Security
These topics are written for administrators that are comfortable securing web applications. Although the topics lay out a comprehensive list of actions to take, security is a very broad subject, and every environment is different; readers are expected to do their own research and complement the information found in these topics.
These topics do not provide guidance on securing specific AM features, such as OAuth 2.0 or SAML v2.0. You will find this information in the topics dedicated to those features.
When you deploy AM, you must ensure that your environment is built and configured with security in mind. This includes:
-
The network infrastructure.
-
The operating system.
-
The container where AM runs.
-
The Java installation and the cryptography settings.
-
The clients and applications that will connect to AM.
-
The CTS store, identity stores, and any other application stores.
-
AM’s own configuration.
ForgeRock® Identity Platform serves as the basis for our simple and comprehensive Identity and Access Management solution. We help our customers deepen their relationships with their customers, and improve the productivity and connectivity of their employees and partners. For more information about ForgeRock and about the platform, see https://www.forgerock.com.
General security considerations
This list does not intend to show you best practices in network and system administration. Rather, it suggests a number of security mechanisms that you can expand upon.
- Keep up to date on patches
-
Security vulnerabilities are the reason why you should keep your operating systems, web and application servers, and any other application in your environment up to date. Knowledge of vulnerabilities spread fast across malicious users, who would not hesitate in trying to exploit them.
ForgeRock maintains a list of security advisories that you should follow. You should also follow similar lists from all your vendors.
- Keep up to date on cryptographic methods and algorithms
-
Different algorithms and methods are discovered and tested over time, and communities of experts decide which are the most secure for different uses. Do not use outdated algorithms such as RSA for generating your keys.
- Turn off unnecessary features
-
The more features you have turned on, the more features you need to secure, patch, and audit. If something is not being used, disable it or uninstall it.
- Limit access to the servers hosting AM
-
A large part of protecting your environment is making sure only authorized people can access your servers and applications through the appropriate network, using the appropriate ports, and presenting strong-enough credentials.
Ensure users connect through SSL / TLS to the systems and audit system access periodically.
For a list of ports used in AM by default, see Ports used.
- Enforce security
-
Do not expect your users to follow security practices on their own; enforce security when possible by requiring secure connections, password resets, and strong authentication methods.
- Audit Access and Changes
-
Audit logs record all events that have happened. Some applications store them with their engine logs, some others use specific files or send the information to a different server for archiving. Operating systems have audit logs as well, to detect unauthorized login attempts and changes to the software.
AM has its own audit logging service that adheres to the log structure common across the ForgeRock Identity Platform.
Secure network communication
It is extremely important to keep your AM instances safe from both internal and external attacks. This can be a challenge when you cannot control who connects to your instances.
For example, a client could send unprotected credentials in an HTTP Authorization header. Even if AM were to reject the request, the credentials would already be leaked to any eavesdroppers.
The best way to protect your environment is to enforce the use of secure HTTPS communication.
The following table summarizes best practices about network security in AM environments:
| Task | Resources |
|---|---|
Enforce secure connections Secure connections between AM and the rest of your platform, whether it is DS servers or your applications. |
|
Use a reverse proxy Configure AM behind a reverse proxy. This will protect AM against DoS attacks and restrict access to AM and its endpoints to networks you trust. |
|
Configure CORS filters Configure a CORS filter such that only your trusted clients and applications can make cross-domain calls to your AM instances. |
|
Adjust AM’s cookie domain Configure AM cookie domain so that AM communicates with the hosts in the required domains and sub-domains. |
|
Learn about the CSRF protection filter for REST endpoints By default, AM protects its |
Secure HTTP and LDAP connections
Both HTTPS and LDAPS secure connections are based on the transport layer security protocol (TLS), which depends on digital certificates (also called public key certificates).
Digital certificates are for sharing public keys used for signing and encryption, and they include information such as the public key, the owner of such key, and a digital signature created by the issuer of the certificate.
In client-server environments, the server provides a certificate that proves that the content it serves is as intended and has not been modified by malicious users. In some environments, however, the client is also required to present its own certificate; this is what is called mutual TLS (or mTLS).
In order to begin the TLS handshake, the actor receiving the certificate must know and trust the issuer of the certificate. This happens by default for certificates issued by a certificate authority (CA), but never for self-signed certificates. This means that, if you decide to have self-signed certificates, you must share them across the servers and applications that need to communicate in your environment.
|
Be mindful of security breaches and vulnerabilities that happen across the world, and ensure your environment is not using outdated insecure protocols, such as SSL 3.0, TLS 1.0, and others. |
Configure the AM container for HTTPS connections
Configure the container where AM runs for HTTPS to prevent communication over insecure HTTP. This includes HTTPS communication between AM and web/Java agents, and AM and your applications, or AM and any other member of the ForgeRock Identity Platform.
Note that configuring AM for HTTPS is the first step; you need to also configure the web/Java agent, your applications, and any other member of the ForgeRock Identity Platform for HTTPS, too.
HTTPS connections happen at container level, encapsulated in the TLS protocol. This means AM itself is not involved in checking or sending certificates. The same is true for web and Java agents.
Some advanced AM features, however, require AM to be able to validate certificates without the mediation of the container. For more information about those features, see AM features that use keys.
To secure communications to AM, configure the container for HTTPS connections
and install AM using the https protocol and the appropriate secure port.
Follow the steps in Installation to prepare your environment and install AM.
You can also reconfigure your instances to use HTTPS. For more information, see How do I enable SSL in AM/OpenAM (All versions) for an existing installation? in the Knowledge Base.
To control the protocols used for outbound HTTPS connections,
configure the -Dhttps.protocols JVM setting in the container where AM runs.
For details, see Security Settings
Secure Directory Server communication
Configure AM and the identity and data stores that connect to it to enforce secure communication, either using LDAPS or StartTLS. This includes communication between AM and the CTS store, between AM and the application stores, and between AM and the identity stores.
Configure AM to trust Directory Server certificates
Secure directory server connections check certificates stored in the truststore of the container where AM runs. This procedure assumes you are using Apache Tomcat and a DS instance. Refer to your container and directory server documentation for more information.
-
Configure your stores to enforce secure communication, if they do not already.
For DS instances, see Require LDAPS in the DS documentation.
DS 7 or later is configured to require secure connections by default; therefore, you might have already configured some of your stores to use secure connections during the AM installation process.
-
Export the DS server certificate:
$ keytool -exportcert \
-keystore /path/to/opendj/config/keystore \
-storepass $(cat /path/to/opendj/config/keystore.pin) \
-alias ssl-key-pair \
-rfc \
-file ds-cert.pem
The default DS server certificate only has the hostname you supplied at setup time, and
localhost, as the value of theSubjectAlternativeNameattribute; however, certificate hostname validation is strict. Ensure that the certificate matches the hostname (or the FQDN) of the DS server before continuing.Copy the
ds-cert.pemfile to an accessible location on the AM host. -
Import the DS certificate into the AM truststore:
$ keytool \
-importcert \
-file ds-cert.pem \
-keystore /path/to/openam/security/keystores/truststore
You are now ready to configure AM to use secure connections to the directory server.
Secure Directory Server communication
-
Make a backup of your environment, as explained in Back up configurations.
-
Ensure your stores are ready for secure connections, and that AM can trust the certificates of the directory servers. Failure to do so may cause several problems, such as the
amAdminuser being unable to log in, or AM being unable to start up.Try the change first in test or development environments.
Certificate hostname validation is strict. AM checks that the hostname in the LDAP server certificate matches the hostname of the directory server, and DS checks that the server it is trying to connect to has a certificate that matches its hostname.
-
Specify the TLS protocol(s) AM will use for outbound LDAPS connections by configuring the
-Dorg.forgerock.openam.ldap.secure.protocol.versionJVM setting in the container where AM runs.For example:
-Dorg.forgerock.openam.ldap.secure.protocol.version=TLSv1.2,TLSv1.3For details, see Security Settings
-
To configure identity stores:
-
In the AM admin UI, go to Realms > Realm Name > Identity Stores > Store Name > Server Settings.
-
In the LDAP Connection Mode drop-down list, choose LDAPS.
-
Click Save Changes.
Perform these steps on every realm as necessary.
-
-
To configure LDAPS for the external CTS store:
-
In the AM admin UI, go to Deployment > Servers > Server Name > CTS > External Store Configuration.
-
Enable the SSL/TLS Enabled option.
-
Click Save Changes.
-
-
To configure the configuration store:
-
Go to Deployment > Servers > Server Name > Directory Configuration > Server.
-
On the Connection type drown-down list, choose SSL.
-
Click Save Changes.
Perform these steps on every server as necessary.
-
-
To configure external policy and application stores:
-
Go to Configure > Global Service > External Data Stores > Secondary Configurations > Store Name.
-
Enable the Use SSL option.
-
Click Save Changes.
Perform these steps for each store on every realm as necessary.
-
-
To configure external UMA stores:
-
Go to Deployment > Servers > Server Name > UMA > External UMA store.
-
Enable the SSL/TLS Enabled option.
-
Click Save Changes.
Perform these steps for each store as necessary.
-
-
When using clients, ensure you make LDAP calls through the LDAPS port and that the client has access to the store certificate.
Otherwise, the LDAP server will not be able to validate the connection.
For DS stores, you should also specify the keystore file containing the store certificate, and its password. For example:
--port 1636 \
--useSsl \
--usePkcs12TrustStore /path/to/opendj/config/keystore \
--trustStorePasswordFile /path/to/opendj/config/keystore.pin \
Different commands may require different options. Different keystore types, too. For more information, see the Directory Services Tools Reference .
Configure AM behind a reverse proxy
Reverse proxies (such as ForgeRock Identity Gateway) are proxy servers that sit between clients and application servers. Their main function is to act on behalf of the application server, forwarding resources to the client as if they were the application server itself.
Modern reverse proxies provide additional functionality such as load balancing, compression, SSL termination, web acceleration, and firewall capabilities.
Configuring a reverse proxy in front of your AM instances provides the following security benefits:
-
Protecting AM servers from denial of service attacks.
A reverse proxy will terminate incoming connections and reopen them against the AM servers, effectively masking the AM IP addresses. This makes it more difficult for attackers to launch DoS attacks against them. A firewall can prevent direct access to the AM servers.
-
SSL termination/SSL offloading.
Since reverse proxies terminate incoming connections to AM, they also decrypt the HTTPS requests and pass them unencrypted to the container where AM runs.
This has several benefits, such as removing the need to install certificates in the containers, which simplifies the management of SSL/TLS.
Depending on your environment, though, you may decide to configure SSL/TLS between AM and the reverse proxy, or configure the proxy to pass-through the SSL traffic to the container where AM runs.
This guide, and the examples in other AM guides default to AM being configured to use HTTPS communication.
-
Unique point of access to AM.
Configuring a reverse proxy in front of AM creates a channel between the public network and the internal network.
Since all communication to AM needs to come from the reverse proxy, you can, for example, restrict access to a set of trusted networks. You can fine-tune the access restrictions for each request and apply rate-limiting and load balancing such that a possible attack does not bring down your whole infrastructure.
-
Protecting endpoints
In the same way that you can restrict access to trusted networks, you can also restrict access to any endpoint AM is exposing.
AM exposes a number of internal administration endpoints, such as the
/sessionserviceendpoint. You must ensure those are not reachable over the Internet.For a list of internal endpoints that you should protect, see Service endpoints.
Regarding feature endpoints, AM makes endpoints accessible the moment an administrator creates a service. For example, the OAuth 2.0 endpoints are not available by default, but configuring an instance of the OAuth 2.0 provider service in a realm will make the endpoints available for that realm.
You must ensure you are exposing the correct endpoints to the Internet.
Recommending how to set up your network infrastructure is beyond the scope of this document. There are too many permutations that are valid use cases; for example, some environments may deploy a reverse proxy for its load balancing capabilities instead of dedicated, hardware-based load balancers. More complex deployments may have multiple layers of firewalls, load balancers, and reverse proxies.
The following figure is an example of a possible configuration:
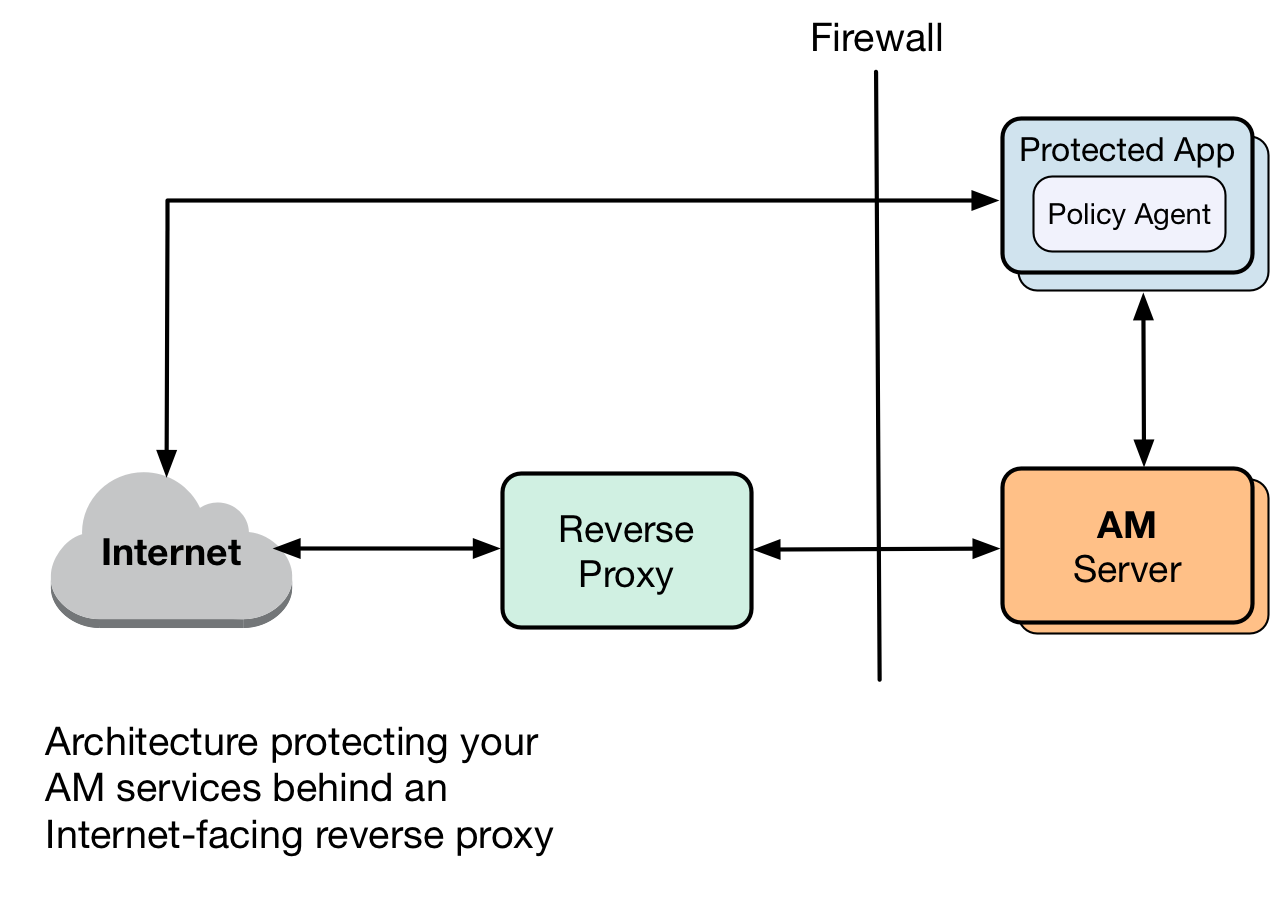
The following table summarizes the high-level tasks required to configure AM when it is behind a proxy:
| Task | Resources |
|---|---|
Configure the proxy’s details Configure AM or the container where it runs to route outbound traffic through the proxy. |
|
Configure the Base URL service Services configure their endpoints based on AM’s URL. The Base URL service remaps the endpoints of the services that require it to the proxy’s URL. |
Configure AM for outbound communication
Clients from different networks connect to AM to use its functionality. These clients initiate communication with AM and the container where it runs. However, when AM acts as a client to a third-party application, it makes outbound calls outside its container to retrieve information or services.
When AM is behind a proxy, you must route AM’s client through the proxy. To do so, provide the proxy’s details to AM and the container where it runs:
-
Set the relevant proxy JVM options in the container where AM runs.
HTTPS options
-Dhttps.proxyHost-
IP address or hostname of the proxy server. For example,
proxy.example.com. -Dhttps.proxyPort-
Port number of the proxy server. For example,
8443. -Dhttp.nonProxyHosts-
A pipe-separated (
|) list of IP addresses or hostnames that should be reached directly, bypassing the proxy configuration. For example,localhost|internal.example.com.Use wildcards (
*) at the beginning or the end of the address or hostname. For example,*.example.comorinternal*.
HTTP options
-Dhttp.proxyHost-
IP address or hostname of the proxy server. For example,
proxy.example.com. -Dhttp.proxyPort-
Port number of the proxy server. For example,
8080. -Dhttp.nonProxyHosts-
A pipe-separated (
|) list of IP addresses or hostnames that should be reached directly, bypassing the proxy configuration. For example,localhost|internal.example.com.Use wildcards (
*) at the beginning or the end of the address or hostname. For example,*.example.comorinternal*.
For example, set the properties in the
JAVA_OPTSvariable of the$CATALINA_BASE/bin/setenv.shApache Tomcat file. -
Check whether your proxy requires authentication:
-
If the proxy requires authentication:
-
In the
org.forgerock.openam.httpclienthandler.system.proxy.uriadvanced server property, configure the URI of the proxy.The URI must be in the format
scheme://hostname:port.For example,
https://myproxy.example.com:443. -
In the
org.forgerock.openam.httpclienthandler.system.proxy.usernameand theorg.forgerock.openam.httpclienthandler.system.proxy.passwordadvanced server properties, configure the proxy’s credentials. -
In the
org.forgerock.openam.httpclienthandler.system.nonProxyHostsadvanced server property, provide one or more target hosts for which resulting HTTP client requests should not be proxied.The list must comma-separated, for example
`localhost,127.,.example.com].Configuring these properties lets features using ForgeRock’s ClientHandler code use the proxy settings defined in the advanced server properties.
-
-
If the proxy does not require authentication:
-
Set the
org.forgerock.openam.httpclienthandler.system.proxy.enabledadvanced server property totrue.Configuring this property lets features using ForgeRock’s ClientHandler code use the JVM proxy settings.
-
-
For more information about the advanced server properties, see Advanced Properties.
How do I configure advanced server properties?
-
To configure advanced server properties for all the instances of the AM environment, in the AM admin UI, go to Configure > Server Defaults > Advanced.
-
To configure advanced server properties for a particular instance, go to Deployment > Servers > Server Name > Advanced.
-
To configure advanced server properties for a particular instance, go to Deployment > Servers > Server Name > Advanced.
If the property you want to add or edit is already configured, click on the pencil () button to edit it. When you are finished, click on the tick () button.
Click Save Changes.
|
You can tune the connection factory behavior of the features that use ForgeRock’s ClientHandler code. For example, the scripting engine, or the social provider authentication nodes. Client connection handler propertiesThe following advanced server properties control different aspects of the connection factory:
They have sensible defaults configured, but if you need to change them, see Advanced Properties. |
Configure the Base URL source service
In many deployments, AM determines the base URL of a provider using the incoming HTTP request. However, there are often cases when the base URL of a provider cannot be determined from the incoming request alone, especially if the provider is behind a proxying application. For example, if an AM instance is part of a site where the external connection is over SSL but the request to the AM instance is over plain HTTP, AM will have difficulty reconstructing the base URL of the provider.
In these cases, AM supports a provider service that lets you configure a realm to obtain the base URL, including the protocol, for components that need to return a URL to the client.
-
In the AM admin UI, go to Realms > Realm Name > Services, and click Add a Service.
-
Click Base URL Source, and click Create. Leave the fields empty.
-
For Base URL Source, choose one of the following options:
Base URL source options Option Description Extension class
Click the Extension class to return a base URL from a provided
HttpServletRequestobject. In the Extension class name field, enter org.forgerock.openam.services.baseurl.BaseURLProvider.Fixed value
Click Fixed value to enter a specific base URL value. In the Fixed value base URL field, enter the base URL.
Forwarded header
Click Forwarded header to retrieve the base URL from the Forwarded header field in the HTTP request. The Forwarded HTTP header field is standardized and specified in RFC 7239.
Host/protocol from incoming request (default)
Click Host/protocol from incoming request to get the hostname, server name, and port from the HTTP request.
X-Forwarded-* headers
Click X-Forwarded-* headers to use non-standard header fields, such as
X-Forwarded-For,X-Forwarded-By, andX-Forwarded-Proto. -
In the Context path, enter the context path for the base URL.
If provided, the base URL includes the deployment context path appended to the calculated URL. For example,
/openam. -
Click Finish to save your configuration.
Configure CORS support
Cross-origin resource sharing (CORS) allows requests to be made across domains from user agents.
To configure CORS support in AM, use the global CORS service UI,
or use the /global-config/services/CorsService REST endpoint.
The configurations you create with either method are combined to form the entire set of rules for resource sharing. The CORS service also collects the values of the JavaScript Origins property in each OAuth 2.0 client configured, and adds them to the list of accepted origins.
|
Ensure that customers allowlist all headers for CORS and OAuth 2.0 client integration with AM. For details, refer to Authentication session allowlisting. |
Any changes you make to CORS configurations, using either the UI or REST, take effect immediately without requiring a restart.
In previous AM releases, you configured CORS filters in the deployment descriptor file (web.xml). This method
of configuring CORS is not supported, from AM version 7 onwards.
|
Configure CORS in the UI
You can use the UI to add multiple CORS configurations to AM, which are combined and used to ensure that only your trusted clients and applications can access your AM instance’s resources.
For example, you could use the REST endpoint to add a base configuration, allowing a broad set of headers, and then add a stricter configuration; for example, for your OAuth 2.0 clients.
Enable the CORS filter
To enable CORS globally, go to Configure > Global Services > CORS Service > Configuration, and enable the Enable the CORS filter property.
If this property is not enabled, no CORS headers are added to any responses from AM, and CORS is disabled.
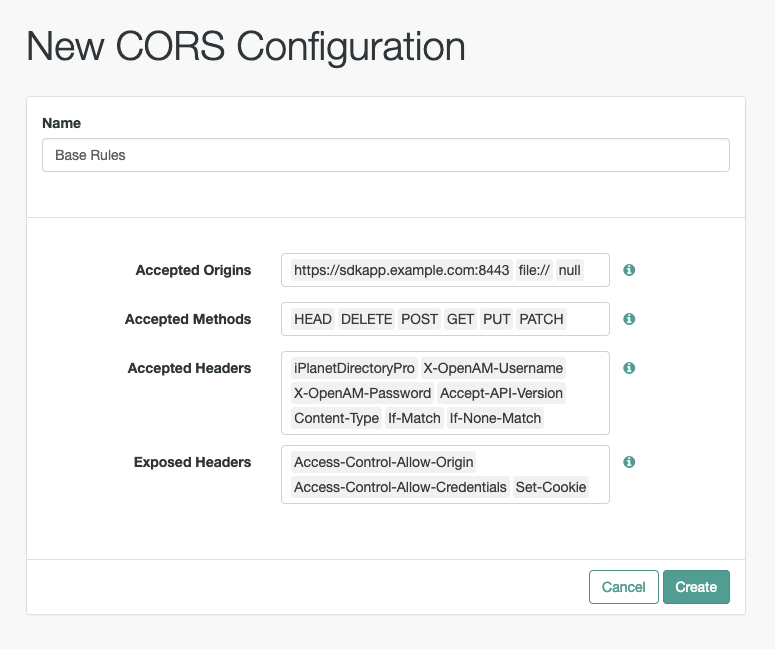
Add a CORS configuration
To add a CORS configuration, go to Configure > Global Services > CORS Service > Secondary Configurations, and click Add a Secondary Configuration.
The initial page contains the following properties:
- Name
-
Provide a descriptive name for the configuration to make management of multiple rules easier.
- Accepted Origins
-
Add the origins allowed when making CORS requests to AM. Wildcards are not supported; each value should be an exact match for the origin of the CORS request.
The CORS service automatically collects the values of the JavaScript Origins property in each OAuth 2.0 client configured, and adds them to an internal list of accepted origins. You do not need to add them manually, unless you plan to use non-standard headers. Refer to JavaScript Origins for details.
During development, you may not be using FQDNs as the origin of a CORS request; for example, when you are using the
file://protocol locally.If so, you can add these non-FQDN origins to the list; for example,
file://andnull. - Accepted Methods
-
Add the HTTP methods allowed when making CORS requests to AM. The list is included in pre-flight responses, in the
Access-Control-Allow-Methodsheader.The method names are case-sensitive, ensure they are entered in all uppercase characters.
- Accepted Headers
-
Add the request header names allowed when making CORS requests to AM. The list is included in pre-flight responses, in the
Access-Control-Allow-Headersheader.The header names are case-insensitive.
By default, the following simple headers are explicitly accepted:
-
Cache-Control -
Content-Language -
Expires -
Last-Modified -
Pragma
If you do not specify values for this element, the presence of any header in the CORS request, other than the simple headers listed above, will cause the request to be rejected.
-
What are the commonly used headers?
Headers commonly used when accessing an AM server include the following:
| Header | Information |
|---|---|
|
Used for session information. |
|
Used to pass credentials in REST calls that use the HTTP POST method. |
|
Used to request a specific AM endpoint version. |
|
Required for cross-origin calls to AM REST API endpoints. |
|
Used to ensure the correct version of a resource will be affected when making a REST call, for example when updating an UMA resource. |
- Exposed Headers
-
Add the response header names that AM returns in the
Access-Control-Expose-Headersheader.The header names are case-insensitive.
User agents can make use of any headers that are listed in this property, as well as the simple response headers, which are as follows:
-
Cache-Control -
Content-Language -
Expires -
Last-Modified -
Pragma -
Content-Type
User agents must filter out all other response headers.
-
Example:
After you have completed the initial form fields, click Create.
The main CORS configuration page has the following additional properties:
- Enable the CORS filter
-
Specifies whether the values specified in this CORS configuration instance will be active.
- Max Age
-
The maximum length of time, in seconds, that the browser is allowed to cache the pre-flight response. The value is included in pre-flight responses, in the
Access-Control-Max-Ageheader. - Allow Credentials
-
Whether to allow requests with credentials in either HTTP cookies or HTTP authentication information.
Enable this property if you send
Authorizationheaders as part of the CORS requests, or need to include information in cookies when making requests.When enabled, AM sets the
Access-Control-Allow-Credentials: trueheader.
Delete a CORS configuration
To delete a CORS configuration, go to Configure > Global Services > CORS Service > Secondary Configurations. Then, find the configuration to delete and click its Delete button.
|
You can disable a CORS configuration, and enable it again later, by choosing the rule and toggling the Enable the CORS filter property. |
Configure CORS over REST
You can use the endpoint to add multiple CORS configurations to AM, which are combined and used to ensure that only your trusted clients and applications can access your AM instance’s resources.
For example, you could use the REST endpoint to add a base configuration, allowing a broad set of headers, and then add a stricter configuration; for example, for your OAuth 2.0 clients.
|
For information about the |
These examples demonstrate managing a CORS configuration by using REST:
Add a CORS configuration
To add a new CORS configuration, send an HTTP POST request, with the create action to the
/global-config/services/CorsService/configuration endpoint.
|
You will require the SSO token of an administrative user; for example, For information on obtaining an SSO token over REST, refer to Authenticate over REST. |
The payload of the request must contain the CORS configuration:
enabled-
Specifies whether the values specified in the CORS configuration instance will be active (
true), or not (false).At least one instance must be enabled for AM to enforce CORS. acceptedOrigins-
A comma-separated list of the origins allowed when making CORS requests to AM. Wildcards are not supported; each value should be an exact match for the origin of the CORS request.
Example:
{
    "acceptedOrigins": [
        "http://example.com",
        "https://example.org:8433"
    ]
}
The CORS service automatically collects the values of the JavaScript Origins property in each OAuth 2.0 client configured, and adds them to an internal list of accepted origins. You do not need to add them manually, unless you plan to use non-standard headers. Refer to JavaScript Origins for details.
During development, you may not be using fully qualified domain names as the origin of a CORS request; for example, you are using the
file://protocol locally.If so, you can add these non-FQDN origins to the list; for example,
http://example.com, https://example.org:8433, file://, null. acceptedMethods-
A list of HTTP methods allowed when making CORS requests to AM. The list is included in pre-flight responses, in the
Access-Control-Allow-Methodsheader.The method names are case-sensitive, ensure they are entered in all uppercase characters.
Example:
{ "acceptedMethods": [ "GET", "POST", "PUT", "PATCH", "OPTIONS", "DELETE" ] } acceptedHeaders-
A list of request header names allowed when making CORS requests to AM. The list is included in pre-flight responses, in the
Access-Control-Allow-Headersheader.The header names are case-insensitive.
Example:
{
    "acceptedHeaders": [
        "iPlanetDirectoryPro",
        "X-OpenAM-Username",
        "X-OpenAM-Password",
        "Accept-API-Version",
        "Content-Type",
        "If-Match",
        "If-None-Match"
    ]
}
By default, the following simple headers are explicitly accepted:
-
Cache-Control -
Content-Language -
Expires -
Last-Modified -
Pragma
If you do not specify values for this element, the presence of any header in the CORS request, other than the simple headers listed above, will cause the request to be rejected.
-
What are the commonly used headers?
Headers commonly used when accessing an AM server include the following:
| Header | Information |
|---|---|
|
Used for session information. |
|
Used to pass credentials in REST calls that use the HTTP POST method. |
|
Used to request a specific endpoint version. |
|
Required for cross-origin calls to AM REST API endpoints. |
|
Used to ensure the correct version of a resource will be affected when making a REST call. For an example, refer to Update an UMA resource over REST. |
exposedHeaders-
A list of response header names that AM returns in the
Access-Control-Expose-Headersheader.The header names are case-insensitive.
User agents can make use of any headers that are listed in this property, as well as the simple response headers, which are as follows:
-
Cache-Control -
Content-Language -
Expires -
Last-Modified -
Pragma -
Content-TypeUser agents must filter out all other response headers.
Example:
{
    "exposedHeaders": [
        "Access-Control-Allow-Origin",
        "Access-Control-Allow-Credentials",
        "Set-Cookie"
    ]
}
-
maxAge-
The maximum length of time, in seconds, that the browser is allowed to cache the pre-flight response. The value is included in pre-flight responses, in the
Access-Control-Max-Ageheader. allowCredentials-
Whether to allow requests with credentials in either HTTP cookies or HTTP authentication information.
Set to
trueif you sendAuthorizationheaders as part of the CORS requests, or need to include information in cookies when making requests.When enabled, AM sets the
Access-Control-Allow-Credentials: trueheader.
The following shows an example of configuring CORS rules by using the /global-config/services/CorsService endpoint:
$ curl \
--request POST \
--header "Content-Type: application/json" \
--header "X-Requested-With: XMLHttpRequest" \
--header 'Accept-API-Version: protocol=1.0,resource=1.0' \
--header "iplanetDirectoryPro: AQIC5w…2NzEz*" \
--data '{
"enabled": true,
"acceptedOrigins": [
"http://localhost:8000",
"null",
"file://",
"https://example.org:8443"
],
"acceptedMethods": [
"POST",
"PUT",
"OPTIONS"
],
"acceptedHeaders": [
"iPlanetDirectoryPro",
"X-OpenAM-Username",
"X-OpenAM-Password",
"X-OpenIDM-Username",
"X-OpenIDM-Password",
"X-OpenIDM-NoSession",
"Accept",
"Accept-API-Version",
"Authorization",
"Cache-Control",
"Content-Type",
"If-Match",
"If-None-Match",
"X-Requested-With"
],
"exposedHeaders": [
"Access-Control-Allow-Origin",
"Access-Control-Allow-Credentials",
"WWW-Authenticate",
"Set-Cookie"
],
"maxAge": 1800,
"allowCredentials": true
}' \
https://openam.example.com:8443/openam/json/global-config/services/CorsService/configuration?_action=create
{
"_id": "ef61e99c-6c83-4044-a1f5-71f472531b71",
"_rev": "-1255664842",
"maxAge": 1800,
"exposedHeaders": [
"Access-Control-Allow-Origin",
"Access-Control-Allow-Credentials",
"WWW-Authenticate",
"Set-Cookie"
],
"acceptedOrigins": [
"null",
"file://",
"https://example.org:8443",
"http://localhost:8000"
],
"acceptedMethods": [
"POST",
"OPTIONS",
"PUT"
],
"acceptedHeaders": [
"iPlanetDirectoryPro",
"X-OpenAM-Username",
"X-OpenAM-Password",
"X-OpenIDM-Username",
"X-OpenIDM-Password",
"X-OpenIDM-NoSession",
"Accept",
"Accept-API-Version",
"Authorization",
"Cache-Control",
"Content-Type",
"If-Match",
"If-None-Match",
"X-Requested-With"
],
"enabled": true,
"allowCredentials": true,
"_type": {
"_id": "CORSService",
"name": "CORS Service",
"collection": true
}
}On success, AM returns an HTTP 201 response code, and a representation of the CORS settings, in JSON format.
AM generates a UUID for the configuration, returned as the value of the _id property.
You can use this ID value to update or delete the configuration with additional REST calls.
The new settings take effect immediately.
Delete a CORS configuration
To delete a CORS configuration,
create an HTTP DELETE request to the /global-config/services/CorsService REST endpoint.
|
You will need the SSO token of an administrative user; for example, For information on obtaining an SSO token by using REST, refer to Authenticate over REST. |
Add the ID of the configuration to delete to the URL.
The following shows an example of deleting CORS rules by using the /global-config/services/CorsService endpoint:
$ curl \
--request DELETE \
--header "X-Requested-With: XMLHttpRequest" \
--header "iplanetDirectoryPro: AQIC5w…2NzEz*" \
https://openam.example.com:8443/openam/json/global-config/services/CorsService/ef61e99c-6c83-4044-a1f5-71f472531b71
{
"_id": "ef61e99c-6c83-4044-a1f5-71f472531b71",
"_rev": "-1255664842",
"maxAge": 1800,
"exposedHeaders": [
"Access-Control-Allow-Origin",
"Access-Control-Allow-Credentials",
"WWW-Authenticate",
"Set-Cookie"
],
"acceptedOrigins": [
"null",
"file://",
"https://example.org:8443",
"http://localhost:8000"
],
"acceptedMethods": [
"POST",
"OPTIONS",
"PUT"
],
"acceptedHeaders": [
"iPlanetDirectoryPro",
"X-OpenAM-Username",
"X-OpenAM-Password",
"X-OpenIDM-Username",
"X-OpenIDM-Password",
"X-OpenIDM-NoSession",
"Accept",
"Accept-API-Version",
"Authorization",
"Cache-Control",
"Content-Type",
"If-Match",
"If-None-Match",
"X-Requested-With"
],
"enabled": true,
"allowCredentials": true,
"_type": {
"_id": "CORSService",
"name": "CORS Service",
"collection": true
}
}On success, AM returns an HTTP 200 response code, and a representation of the CORS settings that were deleted, in JSON format.
The changes to the CORS settings take effect immediately.
Change the cookie domain
Configure AM’s cookie domain to ensure only users and entities from trusted domains can be authenticated.
By default, the AM installer sets the cookie domain based on the fully qualified hostname of the server
on which it installs AM, such as openam.example.com.
After installation, you may want to change the cookie domain to example.com
so AM can communicate with any host in the sub-domain.
-
In the AM admin UI, go to Configure > Global Services > Platform > Cookie Domain.
-
In the Cookie Domain field, set the list of domains into which AM should write cookies. Consider the following points:
-
Configure as many cookie domains as your environment requires. For example, for the realms configured with DNS aliases. (For more information, see Realms.) Browsers ignore any cookies that do not match the current domain to ensure the correct one is used.
-
If you do not specify any cookie domain, AM uses the fully qualified name of the server, which implies that a host cookie is set rather than a domain cookie.
When configuring AM for Cross-Domain Single Sign-On (CDSSO), you must protect your AM deployment against cookie hijacking by setting a host cookie rather than a domain cookie. For more information, see Restrict tokens for CDSSO session cookies.
-
Do not configure a top-level domain as your cookie domain because browsers will reject them. Top-level domains are browser-specific. For example, Firefox considers special domains like Amazon’s web service (for example,
ap-southeast-2.compute.amazonaws.com) to be a top-level domain. (For a list of effective top-level domains, see https://publicsuffix.org/list/effective_tld_names.dat.) -
Do not configure the cookie domain such that it starts with a dot (.) character. For example, configure
example.cominstead of.example.com. -
If you are using Wildfly as the AM web container with multiple cookie domains, you must set the advanced server property,
com.sun.identity.authentication.setCookieToAllDomains, tofalse.Set this property in the AM admin UI, under Configure > Server Defaults > Advanced.
-
-
Save your changes.
-
Restart AM or the container where it runs.
Protect against CSRF attacks
AM includes a global filter to harden protection against cross-site request forgery (CSRF) attacks. The filter
applies to all REST endpoints under json/. It requires that all requests, other than GET, HEAD, or OPTIONS, include at
least one of the following headers:
-
X-Requested-WithThis header is often sent by Javascript frameworks, and the UI already sends it on all requests.
-
Accept-API-VersionThis header specifies which version of the REST API to use. Use this header in your requests to ensure future changes to the API do not affect your clients.
For more information about API versioning, see REST API versions.
Failure to include at least one of the headers causes the REST request to fail with a 403 Forbidden error, even if the
SSO token is valid.
|
The CSRF filter applies only when the request includes the SSO token in the session cookie ( |
To disable the CSRF filter, go to Configure > Global Services > REST APIs and turn off Enable CSRF Protection.
The json/ endpoint is not vulnerable to CSRF attacks when the filter is disabled, because it requires the
Content-Type: application/json header, which currently triggers the same protection in browsers. This might change in
the future, however, so it is advisable to enable the CSRF filter.
Secure administrative access
Some deployments might need only one administrator, for example, deployments whose configuration never changes in production. If your deployment requires more than one administrative user, however, it makes sense to limit what individual administrators can do.
This approach not only reduces the risk of accidental or intentional abuse of power, but also allows you to split the work between different teams and to audit configuration changes.
Securing administration in AM can be summed up as follows:
-
Understanding the
amAdminuser and learning how to delegate realm privileges to groups of users. -
Securing access to the AM admin UI, and to the tools that you can use to configure AM: Amster and the
ssoadmcommand.
The amAdmin user
When you install AM, the amAdmin administrative account is created. This user has unrestricted access to
the AM configuration, including creating new users and augmenting their list of administrative privileges.
The amAdmin account cannot be deleted because it is hard-coded in the source code of several files. The amAdmin user
is defined in AM’s configuration, so it is always available to AM even in the event that the identity stores
become unavailable. Because it is not an identity, defined in an identity store, it cannot use any capabilities that
require a user profile, such as device match or push notifications.
The com.sun.identity.authentication.super.user advanced server property defines the DN of the amAdmin user.
You can change this property to the DN of a regular user that exists in any identity store configured in AM.
Changing the name of the amAdmin user might, however, affect the functionality of those files where the user name is
hard-coded.
Secure the amAdmin user with a strong password and restrict its use as much as possible;
delegate realm administration privileges to regular users instead.
Change the amAdmin password (UI)
This covers how to change the password of the top-level administrator amAdmin, when:
-
AM is configured using an external configuration store.
-
AM is configured for evaluation and is using the embedded DS server as the configuration store.
|
For a different way to change the |
Change the amAdmin password (external configuration store)
If AM is configured to use an external configuration store, follows these steps to change the amAdmin password:
-
In the AM admin UI, click on the user avatar () in the top right corner.
-
Click Change Password.
-
Enter the current password in the Current password field.
-
Enter the new password in the New password and Confirm new password fields.
-
Save your work.
If your deployment has multiple AM servers, the new password replicates across all servers.
Change the amAdmin password (embedded configuration store)
-
Back up your deployment as described in Back up configurations.
-
In the AM admin UI, click on the user avatar () in the top right corner.
-
Click Change Password.
-
Enter the current password in the Current password field.
-
Enter the new password in the New password and Confirm new password fields.
-
Click Save Changes.
When AM is configured to use the embedded DS server for the configuration store, you must change the passwords of the
uid=adminuser to match the newamAdminpassword. -
Change the
uid=adminaccount’s bind password in the AM configuration as follows:-
Change the password for the configuration store binding:
-
Go to Deployment > Servers > Server Name > Directory Configuration.
-
Enter the new bind password, which is the new
amAdminpassword, and click Save Changes.Changing the bind password of the configuration store updates the
configstorepwdalias in the AM keystore file the next time AM starts.
-
-
(Optional) If you use the embedded DS server as a data store, change the following bind passwords:
-
Go to Realms > Realm Name > Identity Stores > embedded:
-
Enter the new bind password, which is the new
amAdminpassword, and click Save Changes.Make this change in every AM realm that uses the embedded DS as an identity store.
-
-
Go to Realms > Realm Name > Services > Policy Configuration:
-
Enter the new bind password, which is the new
amAdminpassword, and click Save Changes.Make this change in every AM realm that uses the embedded DS as a data store.
-
-
Go to Realms > Realm Name > Authentication > Modules, and click LDAP:
-
Enter the new bind password, which is the new
amAdminpassword, and save your changes.Make this change in every AM realm that uses the embedded DS as a data store.
-
-
-
-
To change the
uid=adminand the global administrator passwords in the embedded DS, see Forgotten superuser password in the DS documentation.
Change the amAdmin password (secret store)
Another way to change the password of the amAdmin user is to use a special secret store.
|
You can provide the password of the amAdmin user in different secrets, as shown in the following procedure:
Store the amAdmin password in a secret
-
Salt and hash the new password of the
amAdminuser.You can use a script similar to the following one. Review the comments to understand the salt and hash requirements:
#!/usr/bin/env python3 import getpass import os import sys import struct import hashlib import base64 if os.isatty(0): pwd = getpass.getpass() cnf = getpass.getpass('Confirm: ') else: pwd = sys.stdin.buffer.readline().decode('utf-8').strip() cnf = pwd if pwd != cnf: sys.exit("Password and confirmation don't match") ## Create some random bytes as the salt salt = os.urandom(20) ## Hash the salt and the new password with a SHA-512 function h = hashlib.sha512() h.update(salt) h.update(pwd.encode('utf-8')) hash = h.digest() ## Concatenate the salt length as a single byte, the raw salt, and the hashed password packed = struct.pack("B20s64s", 20, salt, hash) ## Generate the final hashed string outform = "{SSHA-512}" + base64.b64encode(packed).decode('ascii') print(outform) -
Decide whether to encrypt the hashed string, and how to do it:
-
Encrypt with the AM encryption password
-
Log in to the AM admin UI with an administrative user.
For example,
amAdmin. -
Go to
https://openam.example.com/openam/encode.jsp, and paste the final hashed string in the field.Optionally, you can use the
ampasswordcommand to encrypt the password. See Set up administration tools and ampassword. -
Go to Configure > Server Defaults > Advanced.
-
Set the
org.forgerock.openam.secrets.special.user.passwords.formatadvanced server property toENCRYPTED_PLAIN.
-
-
Encrypt with a secret stored in the Google Cloud KMS
Prerequisites
You need a Google Cloud Platform account that has a project. The project must have:
-
A key ring containing the secrets that you will use to encrypt the hash of the password of the
amAdminuser.The key ring can be configured in any Google Cloud location.
-
A service account that AM will use to connect to the project.
Refer to the Google Key Management Service documentation and Google’s Getting Started with Authentication for more information.
To configure AM to connect to the Google Cloud KMS with the service account, see Configure Google service account credentials.
-
Check if you already have a Google Cloud KMS secret for decrypting.
Go to Configure > Server Defaults > Advanced, and check if the
org.forgerock.openam.secrets.googlekms.decryptionkeyadvanced server property is configured.If it is, you do not need to create another key.
If the property is not configured, log in to your Google Cloud dashboard and create a secret of one of the following types in the key ring of your choosing:
-
Symmetric encrypt/decrypt
-
Asymmetric decrypt
-
-
Use the secret you identified or created in the previous step to encrypt the hashed string.
You can use the
gcloudtool included in Google Cloud’s SDK to encrypt it. The tool creates a binary file with the encrypted secret, but AM does not support secrets in binary format. To work around this, base64-encode the encrypted secret. For example:gcloud kms encrypt \ --plaintext-file=./amadmin_password_hashed_string.txt \ --ciphertext-file=- \ --project=my_project_ID \ --location=my_location \ --keyring=my_keyring_for_AM \ --key=my_key_for_decrypting_secrets_in_AM \| base64 > encrypted_hash_of_amadmin_password.enc -
In the AM admin UI, go to Configure > Server Defaults > Advanced.
-
(Optional) If unset, set the
org.forgerock.openam.secrets.googlekms.decryptionkeyadvanced server property to the fully qualified resource ID of the Google Cloud KMS secret that you used to encrypt the hash string. For example:projects/my_project_ID/locations/my_location/keyRings/my_keyring_for_AM/cryptoKeys/my_key_for_decrypting_secrets_in_AMFor information about how to find the key ID, see Object Hierarchy in the Google Cloud KMS documentation.
-
Set the
org.forgerock.openam.secrets.special.user.passwords.formatadvanced server property toGOOGLE_KMS_ENCRYPTED.
-
-
Leave the hashed string unencrypted
Ensure that the password is randomly generated and has high entropy before continuing. -
In the AM admin UI, go to Configure > Server Defaults > Advanced.
-
Set the
org.forgerock.openam.secrets.special.user.passwords.formatadvanced server property toPLAIN.
-
If you cannot access the AM admin UI, you can instead add the required property to the
CATALINA_OPTSvariable. For example, for Apache Tomcat, add the following to the$CATALINA_BASE/bin/setenv.shfile:export CATALINA_OPTS="$CATALINA_OPTS -Dorg.forgerock.openam.secrets.special.user.passwords.format=PLAIN" -
-
Map the encrypted output to the secret ID that you will use. Perform one of the following:
-
Save the encrypted password to a file in the special secret store directory:
$ echo -n amadmin_salted_encrypted_pass > /path/to/openam/security/secrets/userpasswords/password.amadminThe default location of the special secret store is
/path/to/openam/security/secrets/userpasswords. To change it, configure theorg.forgerock.openam.secrets.special.user.passwords.diradvanced server property. -
Store the encrypted password in an operating system variable called
PASSWORD_AMADMIN, and make sure it is available to the user running the container where AM runs. For example, add it to the user’sbash.profilefile. -
Store the encrypted password in a Java system variable called
password.amadmin, and make sure it is available to the container where AM runs.For example, if using Apache Tomcat, add it to
$CATALINA_BASE/bin/setenv.shas follows:export password.amadmin="y3GVzNP5Z3$EXZQHX75aRE!8FjN"
-
Delegate privileges
The amAdmin user can change any setting in AM’s configuration,
but giving that power to each of your administrative users is not ideal.
In AM, you do not create administrative users. You create regular users and delegate realm administration privileges to a group they belong to. For example, you can create a group of users that are only allowed to make REST calls to endpoints in a specific realm, or a group of users that have full administrative privileges for a particular realm.
This approach of splitting responsibilities lowers the risk of accidental or intentional abuse.
Because users with delegated administration privileges are regular users in the identity store, they can use any form of multi-factor authentication.
You can also delegate other kinds of privileges, such as making REST calls to realms for policy evaluation, modifying policies, and more.
Realm privileges available for delegation
The following table describes privileges that you can assign in the AM admin UI
or by using the ssoadm add-privileges command:
| Privilege as it appears in the AM admin UI | Privilege name to use with the ssoadm add-privileges command |
Notes |
|---|---|---|
Read and write access to all realm and policy properties |
|
Assign this privilege to administrators in order to let them modify or read any part of an AM realm. Use this privilege when you do not require granularity in your delegation model. All other AM privileges are included with this privilege. Administrators using the AM admin UI must have this privilege. |
Read and write access to all configured agents |
|
Provides access to centralized agent configuration; subset of the |
Read and write access to all log files |
|
Subset of the |
Read access to all log files |
|
Subset of the |
Write access to all log files |
|
Subset of the |
Read and write access to all federation metadata configurations |
|
Subset of the |
REST calls for reading realms |
|
Subset of the |
Read and write access only for policy properties, including REST calls |
|
Assign this privilege to policy administrators in order to let them modify or read any part of the AM policy configuration. This privilege lets an administrator modify or read all policy components:
policies, applications, subject types, condition types, subject attributes, and decision combiners.
All other AM privileges that affect policy components are included with this privilege.
Subset of the |
REST calls for policy evaluation |
|
Subset of the |
REST calls for reading policies |
|
Subset of the |
REST calls for managing policies |
|
Subset of the |
REST calls for reading policy applications |
|
Subset of the |
REST calls for modifying policy applications |
|
Subset of the |
REST calls for reading policy resource types |
|
Subset of the |
REST calls for modifying policy resource types |
|
Subset of the |
REST calls for reading policy application types |
|
Subset of the |
REST calls for reading environment conditions |
|
Subset of the |
REST calls for reading subject conditions |
|
Subset of the |
REST calls for reading decision combiners |
|
Subset of the |
REST calls for reading subject attributes |
|
Subset of the |
REST calls for modifying session properties |
|
Subset of the |
These steps describe how to create a user and assign administrative privileges using the AM admin UI. You can also delegate privileges over REST. For information about how to do this, see How do I add privileges to identity groups in AM (All versions)? in the ForgeRock Knowledge Base.
-
Go to the realm for which you want to delegate privileges.
For example, go to Realms > Top Level Realm.
Delegating administrative privileges in the Top Level Realm allows members of the group full access to the AM instance. Administration privileges in any other realm allows the group to access administrative functionality only in that realm, and any child realms.
-
Go to Identities > Groups and click the name of the group to which you intend to grant access.
If you do not have a group yet, create one.
The All Authenticated Identities virtual group lets you assign privileges to any identity that has a valid session in AM. Use it with caution, since not every identity authenticates to AM by using strong authentication.
-
Choose the administrative privileges to delegate for the realm:
-
To grant users in the group access to the AM admin UI for the realm, click Realm Admin.
Administrators can use the AM admin UI as follows:
-
Delegated administrators with the
Realm Adminprivilege can access full administration console functionality within the realms they can administer. -
Users with lesser privileges, such as the
Policy Adminprivilege, can not access the AM admin UI, but can use REST to create and manage the functionality for which they have privileges. -
Both the top-level administrator (such as
amAdmin) and delegated administrators in the Top Level Realm with theRealm Adminprivilege have access to full console functionality in all realms and can access AM’s global configuration.
-
-
To grant users in the group access to REST endpoints, choose the required privileges from the list.
For information about the available AM privileges, see Realm privileges available for delegation.
-
-
Click Save Changes.
To enable delegated subrealm administrators to invalidate sessions, you must add an attribute to their entry in the data store, as described in the following procedure:
Let delegated subrealm administrators invalidate sessions
-
Create an LDIF file that modifies the distinguished name entry of the subrealm administrator, adds the
iplanet-am-session-destroy-sessionsattribute, and sets its value to the subrealm’s DN.In the following example, the delegated administrator is named
subRealmAdminand the subrealm is calledmySubRealm:dn: uid=subrealmadmin,ou=people,dc=openam,dc=forgerock,dc=org changetype: modify add: objectClass objectClass: iplanet-am-session-service - add: iplanet-am-session-destroy-sessions iplanet-am-session-destroy-sessions: o=mysubrealm,ou=services,dc=openam,dc=forgerock, dc=orgAll values in the LDIF must be in lowercase, even if the subrealm or administrator name is not. -
Run the
ldapmodifycommand included with DS to apply the LDIF file to the user data store.For example:
$ /path/to/opendj/bin/ldapmodify \
--hostname 'id.example.com' \
--port 1636  \
--useSsl \
--usePkcs12TrustStore /path/to/opendj/config/keystore \
--trustStorePasswordFile /path/to/opendj/config/keystore.pin \
--bindDN uid=admin \
--bindPassword str0ngAdm1nPa55word \
/path/to/ldif.file
# Processing MODIFY request for uid=subrealmadmin,ou=people,dc=openam,dc=forgerock,dc=org
# MODIFY operation successful for DN uid=subrealmadmin,ou=people,dc=openam,dc=forgerock,dc=org
The delegated realm administrator will now be able to invalidate sessions created in the subrealm.
Delegate agent profile creation
If you want to create agent profiles when installing web or Java agents, then you need the credentials of an AM user who can read and write agent profiles.
You can use the AM administrator account when creating agent profiles. If you delegate web or Java agent installation, then you might not want to share AM administrator credentials with everyone who installs agents.
Follow these steps to create agent administrator users for a realm:
-
In the AM admin UI, go to Realms > Realm Name > Identities.
-
On the Groups tab, click Add Group and create a group for agent administrators.
-
On the Privileges tab, choose Realm Admin.
-
Click Save Changes.
-
Go to Realms > Realm Name > Identities.
On the Identities tab, create as many agent administrator users as needed.
-
For each agent administrator user, edit the user profile.
On the Groups tab of the user profile, add the user to agent profile administrator group.
-
Click Save Changes.
-
Provide each system administrator who installs web or Java agents with their agent administrator credentials.
When installing Java agents with the
--custom-installoption, the system administrator can choose the option to create the profile during installation, and then provide the agent administrator user name and the path to a read-only file containing the agent administrator password. For silent installs, you can add the--acceptLicenseoption to auto-accept the software license agreement.
Secure access to the admin UIs
AM provides end-user pages, located at openam/XUI, and an administration UI, located at openam/ui-admin.
Consider the following points to secure the AM admin UI:
-
Limit access to the AM admin UI.
For example, allow access to the console URI only to inbound connections from a specific network, or create a denylist or an allowlist with the endpoints the console uses. For more information and examples, see How do I remove admin UI access in AM (All versions)? in the ForgeRock Knowledge Base.
-
Ensure administrative users present sufficiently strong credentials when logging in to the AM administrative console.
By default, users that log to the console make use of the chain or tree configured in the Organization Authentication Configuration property for the realm. To locate this property, go to Realms > Realm Name > Authentication > Settings > Core.
Ensure that you change the default for all realms, including the Top Level Realm.
|
The API Explorer is enabled by default. For security reasons, it is strongly recommended that you disable it in production environments. To disable the API Explorer, go to Configure > Global Services > REST APIs, and select Disabled in the API Descriptors drop-down list. |
Secure access to the admin tools
AM provides the following administrative tools that you can use
instead of the administrative console to configure AM: Amster and ssoadm.
Do not install the tools on the same server as AM, so that administrators do not require a local system account on that server.
Also, make sure you create a username/password tree specifically for tools, so that you can track it easily in your logs.
Review the following information to secure access to the tools:
-
By default, users logging in through Amster or
ssoadmuse the chain or tree configured in the Administrator Authentication Configuration property for the realm.To locate this property, go to Realms > Realm Name > Authentication > Settings > Core.
-
Amster:
-
If the administrative users connect to AM using interactive login, ensure that they present sufficiently strong credentials.
-
If the administrative users connect to AM using private key connections, make sure that you create your own keys and share them with AM.
For more information, see the Amster User Guide.
-
-
ssoadm
-
Ensure that your administrative users present sufficiently strong credentials.
-
The
ssoadmcommand requires that you provide the password of the administrative user stored in cleartext in a file.Ensure the file is read-only for its owner.
-
Secure realms
The AM installation process creates the Top Level Realm (/), which contains AM default configuration data. This realm cannot be deleted or renamed, since it is the root of the realm hierarchy in AM.
Consider the following list of security best practices related to realms:
- Disable module-based authentication
-
Module-based authentication lets users authenticate using the
module=module-namelogin parameter, therefore bypassing multi-factor authentication if multiple modules are configured in a chain with the sameauthLevel.To disable module-based authentication, go to Realms > Realm Name > Authentication > Settings > Security, and clear the Module Based Authentication check box.
- Create strong authentication trees
-
Ensure your users log in to AM using sensible authentication trees, such as trees that enforce multi-factor authentication.
- Configure sensible default authentication services
-
By default, users that log in to the console make use of the chain or tree configured in the Organization Authentication Configuration property for the realm. To locate this property, go to Realms > Realm Name > Authentication > Settings > Core.
Be extra careful when setting your default authentication tree or chain.
If you leave the default authentication service as the
ldapServicechain, users can still post their username and password to the authentication endpoint to retrieve a session, regardless of the services configured for authentication.For example, consider a deployment where you disable module-based authentication but retain the default authentication chain,
ldapService. If you set up two-factor authentication, your users can still access their accounts without performing the correct two-factor authentication chain login sequence by using the defaultldapServicechain.When you are ready to go to production, set the default authentication tree or chain to your most secure tree or chain. Don’t leave it set to
ldapService.Ensure that you change the default for all realms, including the Top Level Realm.
- Prevent access to the Top Level Realm
-
If most of your privileged accounts reside in the Top Level Realm, consider blocking authentication endpoints that allow access to the Top Level Realm.
For more information, refer to Best practice for blocking the top level realm in a proxy for AM.
The demo user
When you install AM for evaluation, using the embedded DS server, a demo user is created.
This is a regular account with no administrative permissions and is intended for test and demo purposes.
You should remove this user from production environments.
To remove the demo account, go to Realms > Top Level Realm > Identities,
choose the demo account, and click Delete.
Secrets, certificates, and keys
Encryption lets you protect sensitive data, encoding it in such a way that only authorized parties can access it.
Signing allows the receiver of a piece of data to validate the sender’s identity, and ensures that the data has not been tampered with.
AM depends on signing and encryption to protect network communication and to keep data confidential and unalterable. In turn, signing and encryption depend on keys or secrets, which are generated using cryptographic algorithms.
AM uses the following methods to store keys or secrets:
-
The AM keystore. The default AM keystore is used by certain features, and during AM startup.
It can be configured globally, so its configuration is shared by all AM instances in a deployment, or per individual server.
-
AM secret stores. Secret stores are repositories for cryptographic keys and credentials. They can be configured globally, or per realm.
Secret stores can be JVM system properties, key aliases stored in keystores or HSMs, or files stored in filesystems or secret volumes.
Most AM features now use the secrets API (secret stores). Using the traditional AM keystore for these features is not supported. You can, however, define the AM keystore in a secret store, and continue to use the keys inside it.
Default keystores and secret stores
During installation, AM creates a JKS and a JCEKS keystore, with several self-signed certificates that are used for demo and test purposes.
The AM keystore and the default keystore-type secret store use the JCEKS keystore. The JKS keystore is not used by default, and can be safely deleted.
Do not use the default keys, keystores, and secret stores in production environments.
Default JCEKS and JKS keystores
This table lists the contents of the default keystores, generated when AM starts up.
| JCEKS | JKS | |
|---|---|---|
Used by default in AM? |
Yes(1) |
No |
Default path |
|
|
Where is its password stored?(2) |
|
|
Which test aliases does it contain? |
|
|
Which password strings does it contain? |
|
None |
Where is the private key password file?(5) |
|
|
(1) New AM installations use the JCEKS keystore as the default keystore.
(2) The password of the JCEKS and JKS keystores is a random-generated string stored in cleartext.
(3) The value of the configstorepwd is a string.
It is the password of the configuration store, which is accessed during AM startup.
(4) The value of the dsameuserpwd is a string.
It is the password of a reserved service account, which is accessed during AM startup.
(5) The default password for all the key aliases in the JCEKS and JKS keystores is changeit, stored in cleartext.
Default secret stores
-
default-keystore. This keystore-type secret store is mapped to the default JCEKS keystore.It contains secret ID mappings for several of the AM features that use keys.
-
default-password-store. This filesystem-type secret store is mapped to/path/to/openam/security/secrets/encryptedIt provides the passwords to open the
default-keystoresecret store:-
The
storepassfile contains the encrypted password of the keystore. -
The
entrypassfile contains the encrypted password of the keys inside the keystore.
These password files look similar to those of the default JCEKS keystore, but, while the password files for the JCEKS keystore are in cleartext, the password files for the default secret store are encrypted with AM’s encryption key.
Take into account that the keystore file is the same. Therefore, if you change the passwords for the JCEKS keystore, you must also change them in the default secret store.
-
Configure keystores and secret stores
The default keystores and secret stores are sufficient for testing and demonstrating AM features.
For production and pre-production environments, configure the keystores and secret stores that your environment needs, before you configure the AM features that use them.
Keystores and secret stores in production

-
Create a new keystore to use as the AM keystore. Delete the default keystores and the default secret stores.
AM will use the new keystore to start up.
Configure different keys for different features, when possible.
-
Create separate secret stores for each AM feature you are using.
For example, create one for SAML v2.0 secrets, and a different one for OAuth 2.0 secrets.
Use different passwords for keystores and secret stores. This will reduce the risk of compromised keys or secrets, if a malicious user is able to gain access to one of the passwords.
Keystore secret stores need, at least, another secret store to provide the password of the keystore, and the password for the keys. For example, a file system volume secret store.
-
Configure AM features to use your custom key aliases and secrets.
The following table guides you through the tasks you need to perform to configure the keys and secrets AM requires:
| Task | Resources |
|---|---|
Understand AM’s secret needs Review the list of features that use keys in AM, and their possible keystore and secrets configurations. |
|
Create and configure a new AM keystore Create and configure a new AM keystore, that will also serve as the AM bootstrap keystore. Delete the default keystores and secret stores. |
|
Create secrets, as needed Create as many keystores, key aliases, and/or secrets as required in your environment, based on the information you learned when you reviewed the list on the first task. You will configure them in AM in the next steps. Keys and secrets protect the credentials, tokens, and other sensitive information that your environment needs to send and receive. Therefore, ensure that keys and secrets are protected and only shared when required. This may result in configuring multiple keystores and/or secret stores for different features. Do not reuse passwords among keystores or secret stores. This will reduce the risk of compromised keys or secrets, if a malicious user is able to gain access to one of the passwords. |
|
Configure secret stores in AM Create new secret stores to map the new keys you created in previous tasks, for example, those for the OAuth 2.0 providers. |
|
Make keystores and secret stores available to all AM instances |
Keystores and secret stores must be available in the same location across all AM instances. This step might mean mounting a filesystem with the required files across the instances, installing cryptographic cards, and so on. |
Configure key aliases and secrets in AM Change the default key aliases and secrets to the new ones you have created. |
AM features that use keys
Features that require secrets for signing or encryption can use one of the following mechanisms:
-
The AM keystore, configured at Configure > Server Defaults > Security > Key Store.
-
The secrets API (secret stores).
Certain features require secret stores, and some support either secret mechanism. This list outlines which features can use which secret mechanism:
- Features that only use the AM keystore
-
-
Persistent cookie nodes (authentication trees)
Requires a key pair alias for encryption. For more information, see Set Persistent Cookie node.
-
User self-service
Requires a JCEKS keystore with a key pair alias for encryption and a key alias for signing.
For more information, see Create a user self-service service instance.
-
Amster
Requires an
sms.transport.keykey alias to export and import encrypted passwords.For more information, see the Amster documentation.
-
IDM user self-registration
Requires copying signing and encryption keys from IDM into the AM keystore.
For more information, see Delegate user self-registration to IDM.
-
- Features that use secret stores
-
-
Client-side sessions
Require keys or secrets for signing and encrypting client-side sessions and authentication sessions.
For more information, see Client-side session security.
-
Authentication trees
Requires a key alias to encrypt values stored in the authentication tree’s secure state.
For more information, see Store values in a tree’s node states.
-
OAuth 2.0 providers
Require a key alias for signing client-side tokens and OpenID Connect ID tokens. Also require a key alias for encryption of client-side OAuth 2.0 access and refresh tokens.
For more information, see Configure client-side OAuth 2.0 token encryption.
-
Web and Java agents
Web agents and Java agents communicate with AM using a built-in OAuth 2.0 provider, configured globally in AM. This communication requires a key alias for signing tokens.
For more information, see the ForgeRock Web Agents User Guide and the ForgeRock Java Agents User Guide.
-
Remote Consent service
Requires a key alias for signing consent responses, and another key alias for encrypting consent responses.
For more information, see Remote consent.
-
SAML v2.0 federation
Requires key pairs for signing and encrypting messages, responses, and assertions; for example, a key to encrypt the JWT stored in the local storage of supported browsers.
You might also require a key to sign exported metadata.
For more information, see Sign and encrypt messages. For a list of the secret ID mappings, see Secret ID default mappings.
-
Persistent Cookie module (authentication chains)
Requires a key pair alias for encryption.
For more information, see Persistent Cookie module.
-
- Features that support different keystore configurations
-
-
ForgeRock Authenticator (OATH), ForgeRock Authenticator (PUSH) modules, and the WebAuthn Profile Encryption service
Support configuring a different keystore to encrypt device profiles. Also support keystore types that are not available to other features.
For more information, see Multi-factor authentication.
-
AM’s startup (bootstrap) process
Requires two password strings. ForgeRock recommends that you use the AM keystore as the bootstrap keystore, but you can configure a different bootstrap keystore, provided:
-
You keep the password strings updated.
-
You overwrite the
boot.jsonfile before AM starts up.
For more information, see Replace the AM keystore.
-
-
- Features that require different keystore configurations
-
-
Java fedlets
Require a keystore containing a key pair to sign and verify XML assertions and to encrypt and decrypt SAML assertions. Keystore and key information are configurable in the
FederationConfig.propertiesfile. For more information, see Configure Java fedlet properties. -
Security token service
Requires a JKS keystore for encrypting SAML v2.0 and OpenID Connect tokens. Does not require files to store the keystore password or the key aliases' passwords.
For more information, see Configure STS instances.
-
CSV audit logging handler
Requires a keystore for tamper-proofing. Does not require a file to store the keystore password; the password is configured in the AM admin UI. For more information, see Configure CSV audit event handlers.
-
The AM keystore
AM provides a JCEKS keystore by default, containing several test-only key aliases. For production deployments, you should create a new keystore with your own key aliases.
Before you start, note the following points about the AM keystore:
-
Different AM features support different keystore configurations. Some features do not use the default keystore to store their key aliases. For more information, see AM features that use keys.
-
Key aliases are not migrated from one keystore to another. You must prepare a new keystore before you configure it, then migrate the required key aliases manually.
-
If you make any changes to the keystore, such as adding or removing keys or changing key or keystore passwords, you must restart AM.
Replace the AM keystore
The AM keystore provides the secrets required by several features, but it also lets AM start up.
About the bootstrap keystore
The AM startup process checks a file (/path/to/openam/config/boot.json), for the bootstrap settings.
These settings include the path to a keystore file, and the files containing the keystore and key passwords. For example:
{
  "instance" : "http://am.example.com:8080/am",
  "dsameUser" : "cn=dsameuser,ou=DSAME Users,dc=openam,dc=forgerock,dc=org",
  "keystores" : {
    "default" : {
      "keyStorePasswordFile" : "/path/to/am/security/secrets/default/.storepass",
      "keyPasswordFile" : "/path/to/am/security/secrets/default/.keypass",
      "keyStoreType" : "JCEKS",
      "keyStoreFile" : "/path/to/am/security/keystores/keystore.jceks"
    }
  },
  "configStoreList" : [ {
    "baseDN" : "dc=openam,dc=forgerock,dc=org",
    "dirManagerDN" : "cn=Directory Manager",
    "ldapHost" : "am.example.com",
    "ldapPort" : 50636,
    "ldapProtocol" : "ldaps"
  } ]
}
AM looks for the following aliases inside the default keystore, specified in the boot.json file:
- configstorepwd
-
An alias for the password of the AM configuration store. The alias is password-protected, with the password specified by default in the
/path/to/openam/security/secrets/default/.keypassfile.To update the value of this alias, go to Deployment > Servers > Server Name > Directory Configuration, and modify the configuration store bind password. Every time you change the bind alias, AM modifies the content of the key alias in the keystore file.
- dsameuserpwd
-
An alias for the password of a special user required at AM startup time. The alias is password-protected, with the password specified by default in the
/path/to/openam/security/secrets/default/.keypassfile.
These strings cannot be created manually. AM recreates them in a new keystore after a successful start.
To change the bootstrap keystore, you must configure a new AM keystore, and restart AM while the old keystore is still accessible. The startup process does the following:
-
uses the original keystore to boot up
-
writes the password strings in the new keystore
-
rewrites the
boot.jsonfile.
Follow these steps to create a new keystore containing the password strings that AM needs to start up, and configure it as the new AM keystore:
-
Ensure that AM is running, and that you can access the AM admin UI as an administrative user.
-
Create a new keystore in any writable directory. This directory must be the same for all AM instances in the site, for example,
/path/to/openam/security/keystores. -
Obtain a new key from your certificate authority and add it to the new keystore, or generate a new self-signed key in the new keystore.
This example creates a self-signed key alias in a new keystore file,
am_keystore.jceks, with a new asymmetric RSA key alias,newkey.In production environments, you should use the strongest algorithm you can. $ keytool \ -genkeypair \ -alias newkey \ -keyalg RSA \ -keysize 2048 \ -validity 730 \ -storetype JCEKS \ -dname 'CN=newkey' \ -keystore am_keystore.jceks Enter keystore password: Reenter new password: Enter key password for <newkey> (RETURN if same as keystore password): Reenter new password:Take note of the passwords you entered.
-
Store the keystore passwords in cleartext in a writable directory.
This directory should be the same for all AM instances in the site, for example,
/path/to/openam/security/secrets/default.For example:
$ echo -n newstorepassword > .am_keystore_storepass
$ echo -n newkeypassword > .am_keystore_keypass
Use
echo -nto avoid inserting hidden trailing newline characters. Even if thekeytoolcommand is able to use the password in the file, AM might not be able to open the keystore or the key aliases. -
Make sure that the password files have read-only permission for their owner. For example:
$ chmod 400 .am_keystore_storepass $ chmod 400 .am_keystore_keypass -
Configure the new keystore as the AM keystore in the site.
Follow the steps in Change AM keystore properties.
When AM starts successfully, the new keystore contains the password strings that AM uses to start up. You can delete the default JCEKS keystore now. The default secret stores also use the JCEKS keystore. You can also delete them now.
Change AM keystore properties
-
In the AM admin UI, go to Configure > Server Defaults > Security > Key Store.
-
Enter the keystore file name and path in the Keystore File field.
For example,
/path/to/openam/security/keystores/am_keystore.jceks. -
Enter the Keystore Type.
For example
JKS,JCEKS,PKCS11, orPKCS12. -
In the Keystore Password File field, enter the location of the keystore password file.
For example,
/path/to/openam/security/secrets/default/.am_keystore_storepass. -
In the Private Key Password File field, enter the location of the private key password file.
For example,
/path/to/openam/security/secrets/default/.am_keystore_keypass. -
Click Save Changes.
At this point, AM still holds the old keystore configuration in memory, and cannot use key aliases contained in the new keystore.
-
If you need to change key aliases in the AM configuration, decide whether to change them before or after restarting the AM instances in the next step.
If you are using client-side sessions, ensure the signing key exists in the new keystore. You can check the configuration for client-side sessions by going to Realms > Realm Name > Authentication > Settings > Security.
To configure the rest of the features that need key aliases before or after the restart, see Change default key aliases.
-
Make the new keystore files available in the same location to all the instances in the site.
This step may mean mounting a filesystem with the required files across the instances, copying the files across instances, and others.
-
Restart the AM instance or instances.
The new default keystore and its keys are ready to use.
Key aliases and passwords
You might need to create new key aliases because you are using additional AM features, or because you are installing a new environment. In either case, consider these points:
-
First, review the list of AM features to understand which features use the AM keystore and which ones do not.
For more information, see AM features that use keys.
-
Avoid sharing certificates between features when possible, even if this means you need to configure multiple different keystores or secret stores.
-
Make sure keystores, key aliases, and certificates are maintained on every instance; in a site environment, every instance has its own keystore files.
-
Make sure keystores and secret stores are in the same location across all instances in the site.
The following table lists the tasks related to managing key aliases in your environment:
| Task | Resources |
|---|---|
Create a new key alias in an existing keystore or in a new keystore. |
|
Copy key aliases between keystores; for example, when configuring IDM’s provisioning. |
|
Change key alias passwords. |
|
Change keystore passwords. |
Create key aliases
Several AM features require key aliases for signing and encryption. AM provides default key aliases for all features, but you should create new key aliases in production.
You can create key aliases in a new keystore that will be configured later as the AM keystore, or you can create key aliases in the existing AM keystore:
Create a keystore and key aliases for keystore-type secret stores
These instructions are for keystore-type secret stores. To create a new AM keystore, see The AM keystore instead.
-
Obtain a new key from your certificate authority and add it to a new keystore, or generate a self-signed key in a new keystore.
This example creates an assymetric key pair and self-signed certificate, with alias
newkeyin a new keystore file namedkeystoreA.jceks. The RSA algorithm is used to generate the key pair.In production environments you should use the strongest possible algorithm. $ cd /path/to/openam/security/keystores/ $ keytool \ -genkeypair \ -alias newkey \ -keyalg RSA \ -keysize 2048 \ -validity 730 \ -storetype JCEKS \ -dname 'CN=newkey' \ -keystore keystoreA.jceks Enter keystore password: Reenter new password: Enter key password for <newkey> (RETURN if same as keystore password): Reenter new password:Take note of the passwords. You need to make them available within another secret store; for example, by using a file system volume secret store, as shown below:
-
Go to the directory that the filesystem volume secret store will point to.
For example,
/path/to/openam/security/secrets/mydir.You can use different methods to encode the content of the files. Consider creating a directory for each encoding method you plan to use.
-
Create two files, one for the keystore password, and another for the password of the keys inside the keystore.
The files will contain the encoded passwords expected by the file system secret volume store.
For example, if you chose
Base64 encodedas the encoding, you must base64-encode the passwords, and then add them to their respective files.For example:
$ echo -n bmV3c3RvcmVwYXNzd29yZA== > keystoreA_storepass
$ echo -n bmV3a2V5cGFzc3dvcmQ= > keystoreA_keypass
Use
echo -nto avoid inserting hidden trailing newline characters. Even if thekeytoolcommand is able to use the password in the file, AM may not be able to open the keystore or the key aliases. -
Make sure the password files have read-only permission for their owner.
For example:
$ chmod 400 keystoreA_storepass
$ chmod 400 keystoreA_keypass
-
-
Create any other keys and keystores required by your environment by repeating the steps in this procedure and/or following the steps in Create key aliases in an existing keystore.
-
Ensure that password files and keystores are maintained on every instance in your environment. Every AM instance has its own keystores and password files.
-
Configure the keystore in a keystore-type secret store.
To configure the file system secret store too, see File system secret volumes.
Create key aliases in an existing keystore
Perform the following steps to create new key aliases in an existing keystore. For example, the AM keystore:
-
Change directories to the keystore location, for example,
/path/to/openam/security/keystores/. -
Acquire a new key from your certificate authority, or generate a new self-signed key.
When you create or import a new key, the
keytoolcommand adds the new alias to the specified keystore if it exists, or creates a new keystore if it does not exist.This example creates a self-signed key alias in the AM keystore,
am_keystore.jceks, with a new asymmetric RSA key alias calledmynewkey.Note than in production environments you should use the strongest algorithm you can use.
$ cd /path/to/openam/security/keystores/
$ keytool \
-genkeypair \
-alias mynewkey \
-keyalg RSA \
-keysize 2048 \
-validity 730 \
-storetype JCEKS \
-dname 'CN=mynewkey' \
-keystore am_keystore.jceks
Enter keystore password: Enter the password in the .keystore_storepass file.
Enter key password for <mynewkey> (RETURN if same as keystore password): Enter the password in the .keystore_keypass file.
Reenter new password: Enter the password in the .keystore_keypass file.
Remember:
-
The contents of the password files of the AM keystore are in cleartext.
-
The contents of the password files in a file system volume secret store are not in cleartext by default. This means that you need to decode them before you can use them in the
keytoolcommand.
-
-
Ensure that password files and keystores are maintained on every instance in your environment.
Every AM instance has its own keystores and password files.
-
(AM keystore) Restart the AM instances affected by the configuration changes to use the new key aliases.
-
Configure the new key aliases in AM.
For a list of features that use key aliases and links to their relevant sections, see AM features that use keys.
Create self-service key aliases
User self-service requires a key pair for encryption and a signing secret key to be available in the AM keystore before configuring any of its features. Follow the steps in this procedure to create new key aliases for the user self-service features in the AM keystore:
-
Acquire a new key from your certificate authority, or generate new self-signed keys.
The password of the new keys for the user self-service features must match the passwords of those keys already present in the keystore, and configured in the
/path/to/openam/security/secrets/default/.am_keystore_keypassfile.This example generates a self-signed key for encryption and a new signing secret key in the
am_keystore.jcekskeystore, but you could also import CA-provided keys to the keystore.-
Create the new self-signed encryption key alias:
$ cd /path/to/openam/security/keystores/ $ keytool \ -genkeypair \ -alias newenckey \ -keyalg RSA \ -keysize 2048 \ -validity 730 \ -storetype JCEKS \ -dname 'CN=newenckey' \ -keystore am_keystore.jceks Enter keystore password: Enter the password in the .am_keystore_storepass file. Enter key password for <newenckey> (RETURN if same as keystore password): Enter the password in the .am_keystore_keypass file. Reenter new password: Enter the password in the .am_keystore_keypass file. -
Create the new signing secret key alias:
$ cd /path/to/openam/security/keystores/
$ keytool \
-genseckey \
-alias newsigkey \
-keyalg HmacSHA256 \
-keysize 256 \
-storetype JCEKS \
-keystore am_keystore.jceks
Enter keystore password: Enter the password in the .am_keystore_storepass file.
Enter key password for <newsigkey> (RETURN if same as keystore password): Enter the password in the .am_keystore_keypass file.
Reenter new password: Enter the password in the .am_keystore_keypass file.
-
-
Ensure that password files and keystores are maintained on every instance in your environment.
Every AM instance has its own keystores and password files.
-
Restart the AM instances affected by the configuration changes.
-
Configure user self-service to use the new keys.
For instructions, see Create a user self-service instance.
Copy key aliases between keystores
Some AM features require access to the key aliases used by other components of the ForgeRock Identity Platform. For example, the IDM Provisioning feature requires access to the key aliases that IDM uses to sign and encrypt data.
This section covers copying key aliases from the keystore of a ForgeRock Identity Platform component to AM’s default keystore.
-
Use the
keytoolcommand to export the required key from the source keystore into a temporary keystore:$ keytool -importkeystore -srcstoretype jceks -srcalias "myKeyAlias" \ -deststoretype jceks -destalias "myKeyAlias" \ -srckeystore "/path/to/openidm/security/keystore.jceks" \ -destkeystore "/path/to/openidm/security/temp_keystore.jceks" \ -srckeypass "changeit" \ -srcstorepass "changeit" \ -destkeypass "myT3mPK3yP4ssword" \ -deststorepass "myT3mPK3yP4ssword"This command exports the
myKeyAliaskey alias, specified by thesrcaliasargument, to a temporary keystore file/path/to/openidm/security/temp_keystore.jceks. The store and key password is set tomyT3mPK3yP4ssword. You need to use the temporary passwords when importing to the AM instance. -
Move the temporary keystore file created in the previous step, in this example
temp_keystore.jceks, to the filesystem of the target AM server. -
On the target AM server, import the key alias into the AM keystore:
$ keytool -importkeystore -srcstoretype jceks -srcalias "myKeyAlias" \
-deststoretype jceks -destalias "myKeyAlias" \
-srckeystore "/path/to/openam/security/keystores/temp_keystore.jceks" \
-destkeystore "/path/to/openam/security/keystores/am_keystore.jceks" \
-srckeypass "myT3mPK3yP4ssword" \
-srcstorepass "myT3mPK3yP4ssword" \
-destkeypass:file "/path/to/openam/security/secrets/default/.am_keystore_keypass" \
-deststorepass:file "/path/to/openam/security/secrets/default/.am_keystore_storepass"
This command imports the key alias from the temporary
temp_keystore.jcekskeystore file, which was copied from the IDM instance, into the AM keystore. The command also sets the passwords to match those used by the default AM keystore. -
Repeat the previous steps to copy any additional key aliases from the source keystore to the destination keystore.
-
Restart the AM instance for the key change to take effect.
The AM instance will now be able to correctly encrypt, decrypt, sign or verify data and share it with the source ForgeRock Identity Platform component.
Change key alias passwords
Decrypting a key alias in a keystore requires a password. This password is initially specified when you generate the key, or when you import the key into a keystore, but you might need to update the password at a later time.
-
Back up your keystore and password files.
-
Depending on the location of the key alias whose password you are changing, perform one of the following steps:
-
To change the password that opens the AM keystore:
Replace the old password in the
.am_keystore_keypassfile with the new one:$ echo -n newpassword > /path/to/openam/security/secrets/default/.am_keystore_keypassUse
echo -nto avoid inserting hidden trailing newline characters. Even if thekeytoolcommand can use the password in the file, AM may not be able to use the key aliases if there are hidden, trailing, newline characters in the password file. -
To change the password that opens a secret store:
Replace the old password in the secret containing it with the new one. If the secret is a file in a file system volume secret store, ensure that the new password is encoded appropriately.
For example, for base64-encoded passwords, use the following command:
$ echo -n bmV3a2V5cGFzc3dvcmQ= > keystoreA_keypass -
To change a password value used to decrypt a PEM-formatted secret:
Encode the new password using the https://openam.example.com:8443/openam/encode.jsp page, and write the result to a file system secret or environment variable that uses the
am.global.services.secret.pem.decryptionsecret ID:
-
-
Depending on the location of the secret, perform one of the following steps to update the secret’s password to match the value you configured in the previous step:
-
To change the password of key aliases in the AM Keystore:
Use the
keytoolcommand to change the password of each of the key aliases, for example:$ keytool -keypasswd -storetype JCEKS -keystore /path/to/openam/security/keystores/am_keystore.jceks -alias mykey Enter keystore password: Enter the password in the .am_keystore_storepass file New key password for <mykey> Enter the password in the .am_keystore_keypass file Re-enter new key password for <mykey> Enter the password in the .am_keystore_keypass fileRemember to change the passwords of the
configstorepwdand thedsameuserpwdaliases. Failure to do so will render AM unbootable.You can list the keys and password strings contained in the AM keystore using this command:
$ keytool -list -storetype JCEKS -keystore /path/to/openam/security/keystores/am_keystore.jceks -
To change the password of key aliases in a secret store:
Use the
keytoolcommand to change the password of each of the key aliases, for example:$ keytool -keypasswd -storetype JCEKS -keystore /path/to/openam/security/keystores/keystoreA.jceks -alias mykey Enter keystore password: Enter the password in the keystoreA_storepass file New key password for <mykey> Enter the password in the keystoreA_keypass file Re-enter new key password for <mykey> Enter the password in the keystoreA_keypass file RememberSecrets in file system volume secret stores are, by default:
$ `keytool -keypasswd -storetype JCEKS -keystore /path/to/openam/security/keystores/keystoreA.jceks -alias mykey
Enter keystore password: Enter the password in the keystoreA_storepass file
New key password for <mykey> Enter the password in the keystoreA_keypass file
Re-enter new key password for <mykey> Enter the password in the keystoreA_keypass file
Secrets in file system volume secret stores are, by default, not in cleartext. You need to decode them before using them with the
keytoolcommand.You can list the keys and password strings contained in a secret store using this command:
$ keytool -list -storetype JCEKS -keystore /path/to/openam/security/keystores/keystoreA.jceks -
To change the password of a PEM-formatted secret:
Use the
opensslcommand to open, and then export the secret alias with a new password:$ openssl rsa -aes256 -in originalkey.pem -out new_password_key.pem Enter pass phrase for originalkey.pem: Enter the original password writing RSA key Enter PEM pass phrase: Enter the new password Verifying - Enter PEM pass phrase: Re-enter new passwordThe algorithm you specify must match the input PEM file. When completed, overwrite the original PEM file with the replacement, for example:
$ mv new_password_key.pem originalkey.pem
-
-
If you also need to change the keystore password, see Change keystore passwords.
-
Ensure that password files and keystores are maintained on every instance in your environment.
Every AM instance has its own keystores and password files.
-
(AM keystore) Restart the AM instances affected by the configuration changes.
Change keystore passwords
Decrypting and viewing the contents of a keystore requires a password. This password is specified by the user at the time the keystore is created, but you might need to update the password at a later time.
-
(AM keystore) Replace the old password in the
.am_keystore_storepassfile with the new one:$ echo -n newpassword > /path/to/openam/security/secrets/default/.am_keystore_storepassUse
echo -nto avoid inserting hidden trailing newline characters. Even if thekeytoolcommand is able to use the password in the file, AM may not be able to use the key aliases if there are hidden trailing newline characters in the password file. -
(Secret stores) Replace the old password in the secret containing it with the new one.
If the secret is a file in a file system volume secret store, ensure that the new password is encoded appropriately.
For example, base64-encode the password, and add it to the file:
$ echo -n bmV3c3RvcmVwYXNzd29yZA== > keystoreA_storepass -
Change the password of the keystore:
$ keytool -storepasswd -storetype JCEKS -keystore /path/to/openam/security/keystores/am_keystore.jceks
Enter keystore password: Enter the password in the .am_keystore_storepass file.
New keystore password: Enter the new password.
Re-enter new keystore password:
$ keytool -storepasswd -storetype JCEKS -keystore /path/to/openam/security/keystores/keystoreA.jceks Enter keystore password: Enter the password in the keystoreA_storepass file. New keystore password: Enter the new password. Re-enter new keystore password:Secrets in file system volume secret stores are, by default, not in cleartext. You need to decode them before using them with the
keytoolcommand. -
If you also need to change the key aliases' password, see Change keystore passwords.
-
Ensure that password files and keystores are maintained on every instance in your environment.
Each AM instance has its own keystores and password files.
-
(AM keystore only) Restart the AM instance or instances affected by the configuration changes.
Secret stores
Secret stores are repositories for cryptographic keys and credentials. You can configure secret stores globally or per realm. Secrets in a global secret store are visible to realms, unless the realm has its own secret store with the same secrets defined.
Because secrets must be shared by all AM servers in a site,
a good practice is to keep them all under the same directory or mount point, for example, /path/to/openam/security/secrets.
AM supports the following secret store types:
-
You can use a number of different keystore formats, including JCEKS, JKS, PKCS11, and PKCS12.
-
Secrets can be stored as files in defined folders. For example, in a cloud deployment you could mount a secret volume that AM can access.
-
Hardware Security Modules (HSM) secret stores
Secrets can be retrieved from hardware security modules, either locally or over the network.
| A default AM installation includes a keystore-type secret store and a filesystem secret store. These are provided for testing and demonstration purposes only. In production environments, you should create your own secret stores. |
| Task | Resources |
|---|---|
Understand how AM resolves secrets Secrets are first resolved at the realm level, and then globally. |
|
Configure secret stores Configure as many secret stores as your environment needs. |
|
Map secret IDs to secrets A number of AM features require the use of secrets for signing and encryption. For each requirement, AM has a secret ID. You can create active aliases in keystore and HSM secret stores. |
How AM resolves secrets
Most secret stores are configured globally, (at Configure > Secret Stores), or per realm (at Realms > Realm Name > Secret Stores).
Secrets derived from environment or system properties are configured globally, in a special, persistent secret store.
When resolving secrets, AM searches secret stores in the following order:
-
Any secret store configured for the realm, regardless of type.
-
Any secret store configured globally, regardless of type.
If AM cannot find an alias, it logs an error. The operation being attempted (for example, signing a client-side session token) will then fail.
|
Map each secret ID once across the secret stores configured for the realm, or globally.
For example, in a realm with two secret stores configured (a keystore secret store and an HSM secret store)
the |
Environment and system property secret stores
A global instance of the environment and system property secret store is configured by default.
Secrets in the environment and system property secret store are derived from the following:
-
system properties with the same key as the secret value name (for example,
am.services.oauth2.stateless.token.encryption) -
environment variables with keys that have the secret value name in upper case, and separated by underscores (for example,
AM_SERVICES_OAUTH2_STATELESS_TOKEN_ENCRYPTION).
AM configures this secret store each time it starts up. Restart AM, or the container where it runs, if you add or change secret mappings.
Only the secrets format can be configured for the environment and system property secret store. Secrets in this store cannot be rotated, retired (deleted), or removed.
Configure the environment and system property secret store
-
In the AM admin UI, go to Configure > Secret Stores > Environment and System Property Secrets Store.
-
From the Value format drop-down list, choose one of the following:
Secrets supported by the environment and system property secret store
-
Plain Text: the secret is provided in UTF-8 encoded text.
-
Base64 encoded: the secret is provided in Base64 encoded binary values.
-
Encrypted text: the plain text secrets are encrypted using AM’s encryption key, found at Deployment > Servers > Security > Encryption.
-
Encrypted Base64 encoded: the Base64 encoded binary values are encrypted using AM’s encryption key.
-
Encrypted HMAC key: the Base64 encoded binary representation of the HMAC key is encrypted using AM’s encryption key.
-
Base64 encoded HMAC key: the Base64 encoded binary representation of the HMAC key.
-
Encrypted with Google KMS: the secrets are encrypted with a secret stored in the Google Cloud KMS, then base64-encoded.
-
Google KMS-encrypted HMAC key: the HMAC key is encrypted with a secret stored in the Google Cloud KMS, then base64-encoded.
-
PEM encoded certificate or key: the Privacy Enhanced Mail (PEM) formatted certificate or key. Commonly used by tools such as OpenSSL, and a large percentage of certificate authorities.
ForgeRock recommends that you use PEM-formatted secrets.
-
-
Click Save.
Keystore secret stores
A keystore secret store is a secret store that maps to a keystore file, for example, a JKS, JCEKS, PKCS11, or PKCS12 file.
|
During installation or after an upgrade from a version of AM earlier than 6.5, AM creates a number of secret stores. You can use them as an example to configure your own secret stores. For more information, see Secrets, certificates, and keys. |
Create a keystore secret store
Keystore secret stores can be configured at a global or realm level:
-
To create a global secret store, go to Configure > Secret Stores.
To create a realm-specific secret store, go to Realms > Realm Name > Secret Stores.
-
Click Add Secret Store.
-
Enter the Secret Store ID.
-
From the Store Type drop-down list, choose Keystore.
-
Enter the keystore file to use.
This file must be available to all AM instances, for example, by storing it on a shared filesystem, or by copying and maintaining the file across instances.
-
Click Create.
Configure a keystore secret store
-
To configure a global keystore, go to Configure > Secret Stores.
To configure a realm keystore, go to Realms > Realm Name > Secret Stores.
-
Choose the store you want to modify.
-
Enter the keystore file name in the File field.
-
Enter the Keystore Type, for example
JKS,JCEKS,PKCS11, orPKCS12.The specified keystore type must be supported by, and configured in, the local Java runtime environment.
-
Set the Provider name.
If left blank, the JRE default is used.
-
In the Store password secret ID field, enter the secret ID from which AM will resolve the password to the keystore, or none if the password is blank.
For example,
storepass.AM resolves this secret ID using the other secret stores configured; for example, from a file system secret volume mapped to the directory where the file containing the password is stored, or from an HSM secret store.
For more information, see How AM resolves secrets.
-
In the Entry password secret ID field, enter the secret ID from which AM will resolve the password to the keys stored in the keystore, or none if the password is blank.
For example,
entrypass.AM resolves this secret ID using the other secret stores configured; for example, from a file system secret volume mapped to the directory where the file containing the password is stored, or from an HSM secret store.
For more information, see How AM resolves secrets.
-
Set the Key lease expiry time in minutes.
-
Click Save.
File system secret volumes
A file system secret volume maps to a directory storing files that contain secrets—one secret per file. For a given secret value, file system secret volumes will look for a file with the same name as the secret value name, and read its contents using the configured value format.
File system secret volumes can be configured globally, or per realm.
|
During installation or after an upgrade from a version of AM earlier than 6.5, AM deploys a number of secret stores. You can use them as an example to configure your own secret stores. For more information, see Secrets, certificates, and keys. |
Create a file system secret volume
-
To configure a global file system secret volume, go to Configure > Secret Stores.
To configure a realm file system secret volume, go to Realms > Realm Name > Secret Stores.
-
Click Add Secret Store.
-
Enter the Secret Store ID.
-
From the Store Type drop-down list, choose File System Secret Volumes.
-
Enter the name of the directory that contains the secret files.
This directory must be available to all AM instances, for example, by converting it to a shared filesystem, or by creating and maintaining it and its files across instances.
-
Click Create.
Configure a file system secret volume
-
To configure a global file system secret volume, go to Configure > Secret Stores.
To configure a realm-specific file system secret volume, go to Realms > Realm Name > Secret Stores.
-
Choose the store you want to modify.
-
Enter the directory name in the Directory field.
-
Enter a suffix to add to the name of each secret in the File suffix field.
For example,
.txt. -
From the Value format drop-down list, choose one of the following:
Secrets supported by the file system secret volume
-
Plain Text: the secret is provided in UTF-8 encoded text.
-
Base64 encoded: the secret is provided in Base64 encoded binary values.
-
Encrypted text: the plain text secrets are encrypted using AM’s encryption key, found at Deployment > Servers > Security > Encryption.
-
Encrypted Base64 encoded: the Base64 encoded binary values are encrypted using AM’s encryption key.
-
Encrypted HMAC key: the Base64 encoded binary representation of the HMAC key is encrypted using AM’s encryption key.
-
Base64 encoded HMAC key: the Base64 encoded binary representation of the HMAC key.
-
Encrypted with Google KMS: the secrets are encrypted with a secret stored in the Google Cloud KMS, then base64-encoded.
-
Google KMS-encrypted HMAC key: the HMAC key is encrypted with a secret stored in the Google Cloud KMS, then base64-encoded.
-
PEM encoded certificate or key: the Privacy Enhanced Mail (PEM) formatted certificate or key. Commonly used by tools such as OpenSSL, and a large percentage of certificate authorities.
ForgeRock recommends that you use PEM-formatted secrets.
-
-
Click Save.
You can now map secret IDs to files stored in the secret store directory. See Map files in file system secret volumes.
Hardware Security Modules (HSM) secret stores
An HSM secret store maps to a hardware security module.
To configure an HSM secret store, you need a secret ID that can provide the PIN or password for the HSM. Alternatively,
create an extension that provides a Guice binding for a custom PKCS11 java.security.Provider to obtain the keystore.
Create an HSM secret store
HSM secret stores can be configured globally or per realm:
-
To create a global HSM secret store, go to Configure > Secret Stores.
To create a realm-specific HSM secret store, go to Realms > Realm Name > Secret Stores.
-
Click Add Secret Store.
-
Enter the Secret Store ID.
-
From the Store Type drop-down list, choose HSM.
-
Enter the Configuration File containing the initialization configuration for the HSM.
-
In the Provider Guice Key Name field, enter the name of a Guice key that can be used to obtain an initialized provider from which the HSM keystore can be obtained.
-
In the HSM PIN/password secret ID field, enter the secret ID from which HSM’s PIN or password can be obtained.
AM resolves this secret ID using the other secret stores configured.
For example, a file system secret volume secret store mapped to the directory where the file containing the password is stored, or a keystore secret store. For more information, see How AM resolves secrets.
-
Click Create.
Configure an HSM secret store
-
To configure a global HSM secret store store, go to Configure > Secret Stores.
To configure a realm-specific HSM secret store, go to Realms > Realm Name > Secret Stores.
-
Choose the store you want to modify.
-
In the Configuration File field, enter the name of the file containing initialization configuration for the HSM.
-
In the Provider Guice Key Name field, enter the name of a Guice key that can be used to obtain an initialized provider from which the HSM keystore can be obtained.
-
In the HSM PIN/password secret ID field, enter the secret ID from which HSM’s PIN or password can be obtained.
AM resolves this secret ID using the other secret stores configured.
For example, a file system secret volume secret store mapped to the directory where the file containing the password is stored, or a keystore secret store. For more information, see How AM resolves secrets.
-
Set the Key lease expiry time in minutes.
-
Click Save.
Google Cloud Key Management Service (KMS) secret stores
You can configure AM to retrieve secrets from the Google Cloud KMS. Support includes:
-
Mapping Google Cloud KMS secrets to secret IDs used for signing and verification purposes. Using Google Cloud KMS secrets as mappings for encryption and decryption secret IDs is not supported.
For example, mapping a Google Cloud KMS secret to the
am.services.oauth2.oidc.signing.RSAsecret ID is supported because it is a secret ID used for signing OAuth 2.0 tokens. Mapping a Google Cloud KMS secret to theam.services.oauth2.oidc.decryption.RSA1.5secret ID is not supported because it is used for decrypting OpenID Connect parameters.Supported signing algorithms for Google Cloud KMS secrets
SHA256WithRSA (RS256)
SHA512WithRSA (RS512)
SHA256WithRSAAndMGF1 (PS256)
SHA512WithRSAAndMGF1 (PS512)
SHA256WithECDSA (ES256)
SHA384WithECDSA (ES384)Signing tokens with Google Cloud KMS secrets is not a fast operation. For every signature request, AM makes an API call to the Google Cloud KMS to perform the signature operation.
Test the time it would take in your environment to sign tokens under stress conditions to determine if the delay is acceptable. We recommend that you use Google Cloud KMS secrets in environments with a low volume of signatures and high volume of verifications, since AM performs the verification locally.
-
Using a Google Cloud KMS secret to decrypt secrets loaded using other secret stores, or to decrypt the hashed password of the
amAdminuser.
Prerequisites
You need a Google Cloud Platform account that has a project. The project must have:
-
A key ring containing the secrets that AM will use. It can be configured in any Google Cloud location.
-
A service account that AM will use to connect to the project.
For more information, see the Google Key Management Service documentation and Google’s Getting started with authentication.
Configure Google service account credentials
In a Google Cloud environment, AM uses Google’s Java SDK to communicate with the Google Cloud KMS directly. This means that, as long as your Google Cloud environment has a default service account, AM will use it automatically.
If you do not have a default service account or do not want to use it for this purpose, or if you are using Google Cloud KMS secret stores in a non-Google Cloud environment, you must configure the path to the credentials in an environment variable so that AM can use them:
-
Log in to your Google Cloud Platform Account.
-
Download the credentials file for the Google service account that AM will use to connect to the project, and store it in the server where AM runs.
-
Set up the
GOOGLE_APPLICATION_CREDENTIALSenvironment variable to the path of the credentials.Ensure that the variable is available to the container where AM runs.
For example, add the environment variable to the
setenv.shfile of your Apache Tomcat installation:export GOOGLE_APPLICATION_CREDENTIALS="/path/to/Tomcat/Google-service-account-credentials-for-AM.json" -
Restart the container where AM runs.
-
Perform the steps in this procedure on each of the servers where AM runs.
Create KMS Secret Stores
Google KMS secret stores can be configured at a global or realm level:
-
To create on a global level, go to Configure > Secret Stores.
To create on a realm level, go to Realms > Realm Name > Secret Stores.
-
Click Add Secret Store.
-
Enter the Secret Store ID.
-
From the Store Type drop-down list, choose Google KMS.
-
In the Project field, enter the Google Cloud Platform project that contains the key ring with the secrets.
At the time of this writing, you can find your projects by logging in to your Google Cloud Platform dashboard.
-
Configure the following fields related to the key ring.
At the time of this writing, you can find the required information by logging in to the Google Cloud Platform dashboard, choosing your project, and then going to Security > Cryptographic Keys.
-
In the Location field, enter the location of the key ring.
-
In the Key Ring field, enter the name of the key ring containing the secrets that AM should use.
-
-
Click Create.
-
Configure the size of the public key cache and its duration as required in your environment.
Notes about the public key cache
-
When AM signs data with a secret stored in the Google Cloud KMS, it makes an API call to the Google Cloud KMS to perform the signature operation.
-
When AM needs to verify a signature, it retrieves the public key from the Google Cloud KMS and verifies the signature locally. The cache prevents AM from retrieving the public key every time, and therefore, speeds the verification process.
-
The cache lives in AM’s heap, and is created on each of the AM instances for each of the Google Cloud KMS secret stores. You should leave the default settings, unless you have a large number of keys in a key chain.
-
Setting a long cache timeout might be more efficient, because AM does not need to contact the Google Cloud KMS to retrieve public keys very often.
Note, however, that AM will not detect if you have marked a key as expired in the Google Cloud KMS until the cache expires.
-
Use Google Cloud KMS secrets to decrypt AM secrets
You can use a Google Cloud KMS secret to decrypt secrets stored in AM secret stores as they are read from the filesystem, environment variables, or system properties.
You can also use the same secret to decrypt the hashed password of the amAdmin user.
See Change the amAdmin password (secret store).
| You can only configure one Google Cloud KMS secret for decrypting secrets in the AM site. |
This procedure assumes that the encrypted secrets will be stored in a filesystem, and therefore, configured in AM in a file system volume secret store:
-
Check if you already have a Google Cloud KMS secret for decrypting.
Go to Configure > Server Defaults > Advanced, and check if the
org.forgerock.openam.secrets.googlekms.decryptionkeyadvanced server property is configured.If it is, you do not need to create another key.
If the property is not configured, log in to your Google Cloud dashboard and create a secret of one of the following types in the key ring of your choosing:
-
Symmetric encrypt/decrypt
-
Asymmetric decrypt
-
-
Use the secret you identified or created in the previous step to encrypt the secrets that AM will use.
You can use the
gcloudtool included in Google Cloud’s SDK to encrypt the secrets. The tool creates a binary file with the encrypted secret, but AM does not support secrets in binary format. To work around this, base64-encode the encrypted secret. For example:gcloud kms encrypt \ --plaintext-file=./secret.txt \ --ciphertext-file=- \ --project=my_project_ID \ --location=my_location \ --keyring=my_keyring_for_AM \ --key=my_key_for_decrypting_secrets_in_AM | base64 > secret.enc -
Rename the files containing the secrets so that they map to the required secret IDs.
Use the tables in Secret ID default mappings for guidance.
For example, to create a mapping for the Web and Java agents' OAuth 2.0 provider, rename the file containing the relevant secret to a file called
am.global.services.oauth2.oidc.agent.idtoken.signing.Depending on the configuration of the secret store, you may be able to add a suffix to the file name, such as
.enc. -
Share the encrypted secrets with the AM servers.
This may mean, for example, copying the encrypted files to the same directory in every AM server, or mounting a directory in every AM server that is shared across the instances.
-
In the AM admin UI, go to Configure > Server Defaults > Advanced.
-
If unset, set the
org.forgerock.openam.secrets.googlekms.decryptionkeyadvanced server property to the fully qualified resource ID of the Google Cloud KMS secret that you used in the previous step.For example:
projects/my_project_ID/locations/my_location/keyRings/my_keyring_for_AM/cryptoKeys/my_key_for_decrypting_secrets_in_AMFor information about how to find the key ID, see Object hierarchy in the Google Cloud KMS documentation.
-
Configure the file system volume secret store that points to the directory containing the encrypted secrets.
Google Secret Manager (GSM) secret stores
You can configure AM to retrieve secrets from the Google Cloud Secret Manager (GSM).
Prerequisites
You need a Google Cloud Platform account that has a project. The project must have:
-
An instance of Secret Manager that contains the secrets you want AM to use.
Plan ahead how you will name the secrets, and in which format they will be:
-
Each Google GSM secret store can be mapped to one type of secret. ForgeRock recommends that you use PEM-formatted secrets in GSM to make the configuration easier to maintain.
For more information on how to create PEM secrets compatible with AM, see Import PEM-formatted keys.
-
By default, AM let all realms access all the secrets related to a GSM instance. However, you can configure lists of patterns to match the GSM secrets that a realm, or a list of realms, can access.
For example, if you prefix the secrets for the
employeesrealm withemp., you can configure a pattern in AM, such asemp.*, to match them for that realm.This is also useful to separate secrets by type, if you are not using PEM secrets.
-
-
A Google Cloud Compute Engine default service account, (only if AM runs in Google Cloud), or a service account.
You can create different realm and pattern maps with the same account, if needed.
Related Google Documentation
Configure service accounts for GSM
Before configuring the Google GSM secret store, review the configuration of the Google service accounts in AM and make changes as required:
-
Go to Configure > Global Services > Google Cloud Platform Service Accounts.
The Service page displays a secondary configuration named
default. AM is preconfigured to use a Google Cloud Compute Engine default service account.This default account is also configured to let all realms access all the secrets related to a GSM instance.
If you are not using a Google Cloud Compute Engine default service account, you can delete this configuration. Alternatively, you can reconfigure it, or create a new configuration.
Why is it useful to have several secondary configurations?
The Google Cloud Platform Service Accounts service lets you map Google service accounts with realms. It also lets you configure patterns of secrets allowed and disallowed for a particular map of account and realms.
For example, you can create several secondary configurations that use the same Google account, but that map different realms to different secrets.
-
Decide whether you will reconfigure the default secondary configuration, or if you will create a new one to add a new service account.
-
If you decided to create a new secondary configuration to add a new service account, click Add a Secondary Configuration.
Name it, and leave the rest of the fields empty. You will configure them later.
-
If you decided to reconfigure the default secondary configuration, click on it.
-
-
On the secondary Configuration page, determine whether you need to configure the Credentials Secret ID field:
On a Google Cloud environment, AM uses Google’s Java SDK to communicate with Google Secret Manager directly. This means that, as long as your Google Cloud environment has a Cloud Compute Engine default service account, AM will use it automatically. In this case, leave the Credentials Secret ID field blank.
If you do not have a Cloud Compute Engine default service account or do not want to use it for this purpose, or if you are using Google GSM secret stores in a non-Google Cloud environment, you must configure AM to pick up the service account’s credentials.
To do so, configure a file system volume secret store to provide the account’s credentials to AM.
Next, enter the secret ID mapped to the account’s credentials in the Credentials Secret ID field.
Map credentials to a file system secret store
-
Log in to your Google Cloud Platform Account.
-
Download the credentials JSON file for the Google service account that AM will use to connect to the project.
Note that this procedure uses file system secret stores to provide the account’s secret to AM, but you can use any other suitable secret store.
-
Ensure that the file name only contains alphanumeric characters and period (.) characters.
For example,
GSM.123.json.Other characters, such as hyphens (-), are not supported in the file name.
-
Make the JSON file or its contents available across the AM environment.
This may mean, for example, mounting the same directory across different servers, copying the file across to the same location in each server, or configuring it as a Kubernetes secret.
-
Create a file system secret store that points to the directory containing the JSON file.
Ensure that you configure it as follows:
-
Directory = /path/to/JSON/File
-
File Suffix =
.json -
File Format =
Plain text
-
-
Save your changes.
-
In the Credentials Secret ID field, enter the name of the JSON file that contains the secret, without the extension.
For example, for a file named
GSM.123.json, you would enterGSM.123.
-
-
In the Allowed Realms field, configure a list of realms allowed to use this service account.
Enter a list of realms and subrealms, such as
/ /realm1 /realm2/subrealm1 /realm3, or use the wildcard (*) character to allow all realms in the deployment to use the account.Note that you need to press the enter key after each item on the list.
-
In the Allowed Secret Names field, enter a list of patterns to match the GSM secrets that the configured realms can access.
Use the wildcard (*) character to match portions of the secret names.
For example,
alpha*, oralpha*123.Note that you need to press the enter key after each item on the list.
-
In the Disallowed Secret Names field, enter a list of patterns to match the GSM secrets that the configured realms cannot access, if required.
Use the wildcard (*) character to match portions of the secret names.
For example,
development*, orsecure*abc.Note that you need to press the enter key after each item on the list.
For a secret to be accessed, it must match a pattern in the Allowed Secret Names field, and no patterns in the Disallowed Secret Names field.
Create a GSM secret store
GSM Secret Stores can be configured at a global and realm level:
-
To create on a global level, go to Configure > Secret Stores.
To create on a realm level, go to Realms > Realm Name > Secret Stores.
Secrets mapped in a global secret store are available in every realm.
-
Choose Add Secret Store.
-
Enter the Secret Store ID.
-
From the Store Type drop-down list, choose Google Secret Manager.
-
In the Project field, enter the Google Cloud Platform project that contains the Secret Manager instance.
At the time of this writing, you can find your projects by logging in to your Google Cloud Platform dashboard.
Click Create.
-
In the GCP Service Account ID field, enter the name of a Google Cloud Platform Service Accounts service secondary configuration.
For example,
default.For more information, see Configure service accounts for GSM.
-
In the Secret Format field, enter the format of the secrets to extract from Google Secret Manager.
Secrets supported by the GSM secret store
-
Plain Text: the secret is provided in UTF-8 encoded text.
-
Base64 encoded: the secret is provided in Base64 encoded binary values.
-
Encrypted text: the plain text secrets are encrypted using AM’s encryption key, found at Deployment > Servers > Security > Encryption.
-
Encrypted Base64 encoded: the Base64 encoded binary values are encrypted using AM’s encryption key.
-
Encrypted HMAC key: the Base64 encoded binary representation of the HMAC key is encrypted using AM’s encryption key.
-
Base64 encoded HMAC key: the Base64 encoded binary representation of the HMAC key.
-
Encrypted with Google KMS: the secrets are encrypted with a secret stored in the Google Cloud KMS, then base64-encoded.
-
Google KMS-encrypted HMAC key: the HMAC key is encrypted with a secret stored in the Google Cloud KMS, then base64-encoded.
-
PEM encoded certificate or key: the Privacy Enhanced Mail (PEM) formatted certificate or key. Commonly used by tools such as OpenSSL, and a large percentage of certificate authorities.
Configure a Google GSM secret store for each type of secret that you want to map.
ForgeRock recommends that you use PEM secrets to store your secrets.
-
-
In the Expiry Time field, enter the maximum time, in seconds, that AM will cache a value retrieved from Google Secret Manager.
Setting a long cache timeout may be more efficient, since AM does not need to contact Google Secret Manager to retrieve secrets that often, but AM will not detect if you have marked a secret as expired in Google Secret Manager until the cache expires.
-
Save your changes.
Now you are ready to map secret IDs.
Custom secret stores
If you are creating custom components or plugins, you can implement the SecretStore interface to create a custom secret store backend.
Provide the configuration for your secret store type using one of the following subclasses:
Then, pass this class to the installSecretStoreTypes method in your plugin.
Import PEM-formatted keys
AM supports loading certificates, keys, and secrets in PEM format in the following secret stores:
-
Create or obtain PEM-formatted secrets.
Supported PEM formats
Standard PEM-formatted secrets
-
Elliptic Curve and RSA private keys, in OpenSSL and PKCS#8 formats.
-
Elliptic Curve and RSA public keys, in OpenSSL and X.509 formats.
ForgeRock non-standard PEM-formatted secrets
-
AES and HMAC secrets.
-
UTF-8-encoded generic secrets, such as passwords and API keys.
You may obtain standard PEM-formatted secrets from your CA authority, or you can create your own files using, for example, the
opensslutility. Standard PEM-formatted private keys can also be password-encrypted using theopensslutility.To create non-standard PEM-formatted secrets, perform the following steps:
-
To create AES or HMAC secrets, create a string of random bytes to work as cryptographic material, and base64-encode it.
For example:
$ head -c32 /dev/urandom | base64 > myEncodedSecret.txt -
To create generic secrets, base64-encode the secret or key.
For example:
$ base64 myDecodedSecret.txt > myEncodedSecret.txt
-
Open the file with the secret and wrap it in PEM labels, such as the following:
-----BEGIN HMAC SECRET KEY-----
Base64-encoded cryptographic material
-----END HMAC SECRET KEY-----
-----BEGIN AES SECRET KEY----- Base64-encoded cryptographic material -----END AES SECRET KEY----------BEGIN GENERIC SECRET----- Base64-encoded secret -----END GENERIC SECRET----- -
Encrypt the contents of the non-standard PEM-formatted file using the
https://openam.example.com:8443/openam/encode.jsppage, and save it to a file.The encryption process will create a string that is not PEM-formatted: do not add the PEM labels again. When AM reads the secret from the secret store that you will configure in the following step, it will decrypt it automatically and use it as a PEM secret.
-
-
Save the secret in the relevant place:
-
For file system secret volume stores, copy the file with the secret to the location defined as the source of the store.
For information on the file name to use, see Map files in file system secret volumes secret stores.
-
For the environment and system property secrets store, add the contents of the file to an environment variable, or Java system property.
For information on the variable or property name to use, see Environment and system property secret store.
-
For Google GSM secret stores, add the contents of the file to a GSM secret.
For information on the secret name to use, see Google GSM secret stores.
You can concatenate the contents of several related PEM-formatted files in a single GSM secret; for example, a private key and its associated certificate chain. AM will correctly extract the different components.
Example
Concatenate keys and multiple certificates in a PEM file in order, such that the following certificate directly certifies the one preceding it:
-----BEGIN RSA PRIVATE KEY-----
The Private Key: domain_name.key
-----END RSA PRIVATE KEY-----
-----BEGIN CERTIFICATE-----
The Primary SSL certificate: domain_name.crt
-----END CERTIFICATE-----
-----BEGIN CERTIFICATE-----
The Intermediate certificate: CA_cert.crt
-----END CERTIFICATE-----
-----BEGIN CERTIFICATE-----
The Root certificate: Root.crt
-----END CERTIFICATE-----
-
-
If the standard PEM-formatted secret is password-encrypted, make the password available to AM as follows:
-
Encode the password using the
https://openam.example.com:8443/openam/encode.jsppage. -
Write the result to a file system secret, or environment variable, that must use the
am.global.services.secret.pem.decryptionsecret ID: -
Make the password available to AM in either the environment and system property secrets store or a file system secret volumes secret store, depending on how you created the secret in the previous step.
AM only checks global stores for the passwords used to decrypt PEM-formatted files. The PEM-formatted secret can be configured and used in any realm, but the decryption password must be available in a global store.
Configure global stores by navigating to Configure > Secret Stores.
-
-
Configure AM to use the new PEM-formatted certificate or key.
Map and rotate secrets
Several AM features require secrets for signing and encryption. For each requirement, AM has a specific secret ID.
To provide AM with the correct secret, map one or more aliases from the secret stores you configure to each of the secret IDs. These mappings let you specify the active secrets, and rotate them when they expire or become compromised. For a list of secret IDs and their default mappings, see Secret ID default mappings.
Active secrets are used for signature generation and encryption. Non-active secrets are used for signature verification and decryption.
For example, if you mapped several aliases for signing OAuth 2.0 client-side tokens, new tokens are signed with the active secret, and incoming tokens are verified against both the active and the non-active secrets.
A non-active secret can be rotated to become an active secret (while the old secret remains valid). A secret can be retired when it is no longer considered secure.
Map secrets in keystore, HSM, or Google KMS/GSM secret stores
-
To map secrets in a global secret store, go to Configure > Secret Stores.
To map secrets in a realm-specific secret store, go to Realms > Realm Name > Secret Stores.
-
Click the store that contains the secrets you want to map.
-
On the Mappings tab, click Add Mapping.
-
From the Secret ID drop-down list, choose the secret ID that you want to associate with an alias.
For information about the different secret ID mappings, Secret ID default mappings.
-
Enter any Alias and click the add () icon.
You can add as many aliases as necessary. The first alias in the list determines the active secret. Active secrets are used for signature generation and encryption. Non-active secrets are used for signature verification and decryption.
When you configure mappings for a Google KMS or a Google GSM secret store, map only one secret for each secret ID and manage key rotation in the Google Cloud KMS key ring, or in Google Secret Manager.
-
Drag and drop to change the order of aliases, and set the active secret.
-
If a secret is considered no longer secure, retire it by clicking the delete () icon.
-
When you have completed the mappings, click Create.
Map files in file system secret volumes
File system secret volumes do not allow rotating or retiring secrets through mappings like other stores do.
To map secret IDs to files, follow these steps:
-
In the directory configured as the secret store, for example,
/openam/secrets, create the required files to store your secrets. Use the tables in Secret ID default mappings for guidance.For example, to create a mapping for the Web and Java agents' OAuth 2.0 provider, create a file called
am.global.services.oauth2.oidc.agent.idtoken.signing.You can also create mappings for secret store-specific secrets, such as the keystore secret store password, the keystore secret store entry password, or the HSM guice key. These mappings do not require specific secret IDs. For example, you can create a file called
mykeystorepassword, and then configure it in the Store password secret ID field of your keystore secret store.The name of a secret ID—and therefore the file names given to file system secrets—must include only alphanumeric characters and periods (.). The names cannot start or end with periods, or have more than one period in a row.
Depending on the configuration of the secret store, you may be able to add a suffix to the file name, such as
.txt. -
Store the relevant secret value in each file.
The format of the secret value depends on the configuration of the secret store. For example, if you have configured File Format to be
Encrypted text, you must encode the secret value with AM’s encryption key.How do I encode secrets with AM’s encryption key?
Use the https://openam.example.com:8443/openam/encode.jsp page to encode the secret, then add the encoded value to the secret file.
Secrets must not contain trailing newline characters. If you are using the
echocommand to add secrets to a file, append the-noption. For example:$ echo -n AQICmX1ntZv3XETMgDo+0zFynC8UMGJgop+K > am.global.services.oauth2.oidc.agent.idtoken.signing
Secret ID default mappings
The following groups contain the secret IDs used by the AM features, and their default mappings, if any. Expand the categories for additional information about where or how the mappings are used.
General
Secret ID for PEM decryption password
The following table shows the secret ID in which you can store the password used to decrypt password-encrypted PEM files.
Encode the password using the https://openam.example.com:8443/openam/encode.jsp page.
| Secret ID | Default alias | Algorithms |
|---|---|---|
|
Encode using |
Secret ID mappings for encrypting client-side sessions
The following table shows the secret ID mapping to use when encrypting client-side sessions:
| Secret ID | Default alias | Algorithms |
|---|---|---|
|
|
RS256 |
To use AES-based encryption algorithms, configure the secret in the Encryption Symmetric AES Key field in Configure > Global Services > Sessions > Advanced.
Secret ID mappings for signing client-side sessions
The following table shows the secret ID mapping to use when signing client-side sessions:
| Secret ID | Default alias | Algorithms |
|---|---|---|
|
|
RS256 |
To use HMAC-based signing algorithms, configure the secret in the Signing HMAC Shared Secret field in Configure > Global Services > Sessions > Advanced.
OAuth 2.0 and OpenID Connect as provider
Secret ID mappings for JWT authenticity signing
The following table shows the secret ID mapping used to sign several OAuth 2.0 and OpenID Connect-related JWTs:
| Secret ID | Default alias | Algorithms |
|---|---|---|
|
|
HS256 |
|
This key is used to sign the following tokens and requests:
|
Secret ID mappings for encrypting client-side OAuth 2.0 tokens
This table shows the secret ID mapping used to encrypt client-side access tokens:
| Secret ID | Default alias | Algorithms |
|---|---|---|
|
|
A128CBC-HS256 |
Secret ID mappings for signing client-side OAuth 2.0 tokens
This table shows the secret ID mappings used to sign client-side access tokens:
| Secret ID | Default alias | Algorithms |
|---|---|---|
|
|
ES256 |
|
|
ES384 |
|
|
ES512 |
|
|
HS256 |
|
|
PS256 |
Secret ID mappings for signing remote consent requests
The following table shows the secret ID mappings used to sign remote consent requests:
| Secret ID | Default alias | Algorithms(1) |
|---|---|---|
|
|
ES256 |
|
|
ES384 |
|
|
ES512 |
|
|
RS256 |
(1) If you select an HMAC algorithm for signing consent requests (HS256, HS384, or HS512), the value of the Remote Consent Service secret property is used, instead of an entry from the secret stores.
Since the HMAC secret is shared between AM and the remote consent client,
a malicious user compromising the client could potentially create tokens that AM would trust.
Therefore, to protect against misuse, AM also signs the token using a non-shared signing key
configured in the am.services.oauth2.jwt.authenticity.signing secret ID.
Secret ID mappings for decrypting remote consent responses
The following table shows the secret ID mapping used to decrypt remote consent responses:
| Secret ID | Default alias | Algorithms(1) |
|---|---|---|
|
|
RSA-OAEP-256 |
(1) If you select an algorithm other than RSA-OAEP-256 for decrypting consent responses, the value of the Remote Consent Service secret property is used, instead of an entry from the secret stores.
Secret ID mappings for the OAuth 2.0 example Remote Consent service
The following table shows the secret ID mappings used for the example Remote Consent service:
| Secret ID | Default alias | Algorithms |
|---|---|---|
|
|
RS256 |
|
|
RSA-OAEP-256 |
Secret ID mappings for decrypting OpenID Connect request parameters
The following table shows the secret ID mapping used to decrypt OpenID Connect request parameters:
| Secret ID | Default alias | Algorithms(1) |
|---|---|---|
|
|
RSA with PKCS#1 v1.5 padding |
|
|
RSA with OAEP with SHA-1 and MGF-1 |
|
|
RSA with OAEP with SHA-256 and MGF-1 |
(1) The following applies to confidential clients only:
If you select an AES algorithm (A128KW, A192KW, or A256KW) or the direct encryption algorithm (dir), the value of the Client Secret field in the OAuth 2.0 Client is used as the secret instead of an entry from the secret stores.
The following signing and encryption algorithms use the Client Secret field to store the secret:
-
Signing ID tokens with an HMAC algorithm
-
Encrypting ID tokens with AES or direct encryption
-
Encrypting parameters with AES or direct encryption
Store only one secret in the Client Secret field; AM will use different mechanisms to sign and encrypt depending on the algorithm, as explained in the OpenID Connect Core 1.0 errata set 1 specification.
Secret ID mappings for signing OpenID Connect tokens
The following table shows the secret ID mapping used to sign OpenID Connect ID tokens and backchannel logout tokens:
| Secret ID | Default alias | Algorithms(1) |
|---|---|---|
|
|
ES256 |
|
|
ES384 |
|
|
ES512 |
|
|
PS256 |
|
EdDSA with SHA-512 |
(1) The following applies to confidential clients only:
If you select an HMAC algorithm for signing ID tokens (HS256, HS384, or HS512), the Client Secret property value in the OAuth 2.0 Client is used as the HMAC secret instead of an entry from the secret stores.
Since the HMAC secret is shared between AM and the client,
a malicious user compromising the client could potentially create tokens that AM would trust.
Therefore, to protect against misuse, AM also signs the token
using a non-shared signing key configured in the am.services.oauth2.jwt.authenticity.signing secret ID.
Secret ID mappings for CA certificates used in mTLS client authentication
The following table shows the secret ID mapping used to store the CA certificates AM should trust during mTLS client authentication:
| Secret ID | Default alias | Algorithms |
|---|---|---|
|
OAuth 2.0 and OpenID Connect as client/relying party of the Social Identity Provider service
Secret ID mappings for decrypting ID tokens
The following table shows the secret ID mapping to support decryption of ID tokens and userinfo endpoint data
in JWT format when AM is configured as a relying party of the Social Identity Provider Service:
| Secret ID | Default alias | Algorithms |
|---|---|---|
|
|
The public key is exposed in the /oauth2/connect/rp/jwk_uri.
For more information about the algorithms supported, and how to configure this secret ID mapping, see Social authentication.
Secret ID mappings for signing JWTs and objects
The following table shows the secret ID mapping that AM uses to sign JWTs and objects when configured as a relying party of the Social Identity Provider Service:
| Secret ID | Default alias | Algorithms |
|---|---|---|
|
|
The public key is exposed in the /oauth2/connect/rp/jwk_uri.
For more information about the algorithms supported, and how to configure this secret ID mapping, see Social authentication.
Secret ID mappings for CA certificates used in mTLS client authentication
The following table shows the secret ID mapping used to store CA or self-signed certificates AM uses for mTLS client authentication when configured as a relying party of the Social Identity Provider service:
| Secret ID | Default alias | Algorithms |
|---|---|---|
|
The public key is exposed in the /oauth2/connect/rp/jwk_uri.
For more information about the algorithms supported, and how to configure this secret ID mapping, see Social authentication.
Web agents and Java agents
Secret ID mappings for the agents' OAuth 2.0 provider
The following table shows the secret ID mapping used sign the JWTs provided to web and Java agents:
| Secret ID | Default alias | Algorithms |
|---|---|---|
|
|
RS256 |
Authentication
Secret ID mappings for encrypting authentication trees' secure state data
The following table shows the secret ID mapping used to encrypt sensitive data stored in the secure state of an authentication tree:
| Secret ID | Default alias | Algorithms |
|---|---|---|
|
|
AES 256-bit |
SAML v2.0
Secret ID mappings for encrypting SAML v2.0 session storage JWTs
The following table shows the secret ID mapping used to encrypt the JWTs SAML v2.0 creates in session storage:
| Secret ID | Default alias | Algorithms |
|---|---|---|
|
|
A256GCM |
Secret ID mappings for signing SAML v2.0 metadata
The following table shows the secret ID mappings used to sign SAML v2.0 metadata:
| Secret ID | Default alias | Algorithms |
|---|---|---|
|
|
RSA SHA-256 |
Secret ID mappings for SAML v2.0 signing and encryption
The following table shows the secret ID mappings used to sign and encrypt SAML v2.0 elements:
| Secret ID | Default alias | Algorithms |
|---|---|---|
|
|
RSA with PKCS#1 v1.5 padding |
|
|
RSA SHA-1(1) |
|
|
RSA with PKCS#1 v1.5 padding |
|
|
RSA SHA-1(1) |
(1) This algorithm is for compatibility purposes only, and its use should be avoided.
You can specify a custom secret ID identifier for each hosted SAML v2.0 entity provider in a realm, which creates new secret IDs. These secret IDs can be unique to the provider, or shared by multiple providers.
For example, you could add a custom secret ID identifier named mySamlSecrets to a hosted identity provider.
AM dynamically creates the following secret IDs, which the hosted identity provider uses for signing and encryption:
-
am.applications.federation.entity.providers.saml2.mySamlSecrets.signing -
am.applications.federation.entity.providers.saml2.mySamlSecrets.encryption
AM will attempt to look up the secrets with the custom secret ID identifier. If unsuccessful, AM will look up the secrets using the default secret IDs.
IoT
Secret ID mappings for the IoT trusted JWT issuer
The following table shows the secret ID mapping that the IoT service uses when configured as a trusted OAuth 2.0 JWT issuer:
| Secret ID | Default alias | Algorithms |
|---|---|---|
|
|
HS256 |
Secret ID mappings for IoT certificate verification
The following table shows the secret ID mapping for the CA certificate that the Register Thing node uses to verify the X.509 digital certificate included in the proof-of-possession JWT:
| Secret ID | Default alias | Algorithms |
|---|---|---|
|
Change default key aliases
For demo and test purposes, AM includes demo key aliases for several features. You can keep the demo key aliases configured for features you are not using, or you can remove them from your production environment.
When possible, the following list includes the Global Services or Server Default paths where the demo key aliases are configured. If you have already configured any of the features in a realm, ensure that the key alias is replaced in the realm configuration as well.
To replace the default key aliases:
-
Create the required key aliases following the tasks in Key aliases and passwords.
-
Change the default key aliases:
- Web agents and Java agents
-
Refer to the ForgeRock Web Agents User Guide and the ForgeRock Java Agents Installation Guide for more information.
- Persistent Cookie module
-
To change the default mapping for the Persistent Cookie module, go to Realms > Realm Name > Authentication > Settings > Security. Replace the
testkey alias in the Persistent Cookie Encryption Certificate Alias field with the alias you created for persistent cookies in your secret stores.For more information about the secret ID mappings used by this feature, see Secret ID mappings for persistent cookies.
- OAuth 2.0 and OpenID Connect providers
-
See the list of secret IDs and their defaults here and here.
- SAML v2.0 hosted providers
-
See the list of secret IDs and their defaults here.
- Client-side sessions
-
Go to Configure > Global Services > Session > Client-Side Sessions. Replace the
testkey alias in the Signing RSA/ECDSA Certificate Alias field and in the Encryption RSA Certificate Alias field. - User self-service
-
Go to Realms > Realm Name > Services > User Self-Service. Populate the values of the Encryption Key Pair Alias and the Signing Secret Key Alias properties.
Note that the name of the demo keys shows with a gray color; that does not mean the fields are filled in.
- Authentication trees
-
Authentication trees use the secret ID specified in Secret ID mappings for encrypting authentication trees' secure state data.
Ensure that this secret ID is always mapped to an existing, resolvable secret or key alias, or authentication trees may not work as expected.
- IoT
-
The IoT Service uses the secret IDs specified in Secret ID mappings for the IoT trusted JWT issuer.
Secure session cookies
After authenticating an end user, AM stores their session (for client-side sessions), or a pointer to their session (for server-side sessions), in a cookie in the end user’s browser.
HTTPS communication already helps to keep cookies secure since the encrypted communication cannot be eavesdropped. However, there are other ways a malicious user can hijack a cookie. For example, cross-site scripting (XSS) and cross-site tracing (XST) involve injecting HTML or JavaScript on a legitimate website. By using JavaScript code, the malicious user can steal the cookie directly from the browser.
The following table summarizes the tasks you need to perform to protect session cookies:
| Task | Resources |
|---|---|
Configure the This flag ensures that the session cookie is transmitted over an HTTP or HTTPS channel only, protecting your environment against most XSS attacks. |
|
Configure the This flag ensures the session cookie is only transmitted over HTTPS channels such that the session cookie is not carried over insecure HTTP redirections. |
|
Choose a session cookie name Change the name of the session cookie from the default of |
|
Restrict CDSSO tokens to protect them against hijacking By default, AM provides a CDSSO tokens valid for the appropriated realms. Restrict tokens so that AM issues different tokens for different realms. |
|
Use host-only cookies Because host-only cookies are more secure than domain cookies, you should use host-only cookies unless you have a good business case for using domain cookies. |
|
Client-side sessions are more vulnerable to hijacking, since they contain all the session information. To configure additional security measures, see Client-side session security. |
HttpOnly session cookies
Whether you use HTTP or HTTPS, flag your cookies as HttpOnly,
which means they are transmitted only over HTTP or HTTPS protocols.
This setting alone already prevents most XSS attacks, since HttpOnly cookies cannot be transmitted using JavaScript.
|
When a client makes a call to the For example: {
"tokenId":"",
"successUrl":"/openam/console",
"realm":"/alpha"
}
|
Configure the httpOnly flag
-
In the AM admin UI, go to Configure > Server Defaults > Advanced.
-
Set the
com.sun.identity.cookie.httponlyadvanced server property totrue, and save your changes.You must make this change in all the AM instances in the site.
Regardless of the value of the
com.sun.identity.cookie.httponlyproperty, AM upgrades cookies to secure cookies (except theamlbcookiecookie) when requests arrive over a secure channel. -
Restart AM or the container where it runs.
Secure cookies by default
When using HTTPS, mark all your cookies as secure, which means they are only transmitted over HTTPS protocols.
This flag is useful for sites that allow both HTTPS and HTTP traffic, since it protects from HTTP redirection carrying session cookies across unencrypted connections.
-
In the AM admin UI, go to Configure > Server Defaults > Security > Cookie.
-
Enable the Secure Cookie option.
-
Click Save Changes.
-
Restart AM or the container where it runs.
Change the session cookie name
By default, the session cookie name is iPlanetDirectoryPro.
You must change this value to something unique in your environment that does not give away its contents.
Do not use names such as sessionCookie.
|
If you change the name of the cookie on a production system, you are invalidating the sessions of any user that still had a valid cookie. |
-
In the AM admin UI, go to Configure > Server Defaults > Security > Cookie.
-
Change the name in the Cookie Name field.
-
Click Save Changes.
-
Restart AM or the container where it runs.
Note that Web agents need to know the name of the session cookie.
You must change this configuration when you change the name of the session cookie in AM.
For more information, check the com.sun.identity.agents.config.cookie.name property
in the
ForgeRock Web Agents Reference.
Restrict tokens for CDSSO session cookies
When the session cookie is a cross-domain single-sign on (CDSSO) cookie, meaning that it is valid across several domains, the damage a malicious user can cause is increased.
A malicious user who steals a CDSSO cookie can potentially use it to access any realms that session has logged into,
which may span multiple domains.
For example, a token stolen from myapp.example.com could be used to access payroll.internal.com
or any other protected domain in the same realm.
Cookie hijacking protection restricts cookies
to the fully qualified domain name (FQDN) of the host where they are issued,
such as openam-server.example.com and server-with-agent.example.com,
using CDSSO to handle authentication and authorization.
For CDSSO with cookie hijacking protection, when a client successfully authenticates, AM issues the master SSO token cookie for its FQDN. AM issues restricted token cookies for the other FQDNs where the web or Java agents reside. The client ends up with cookies having different session identifiers for different FQDNs, and the AM server stores the correlation between the master SSO token and restricted tokens, such that the client only has one master session internally in AM.
To protect against cookie hijacking, you restrict the AM server domain to the server where AM runs. This sets the domain of the SSO token cookie to the host running the AM server that issued the token. You also enable use of a unique SSO token cookie. For your Java agents, you enable use of the unique SSO token cookie in the agent configuration.
|
Client-side sessions do not support restricted tokens. Therefore, web agents and Java agents in a realm configured for client-side sessions are not protected against cookie hijacking. ForgeRock recommends using web or Java agents with server-side sessions. |
Enable restricted tokens
-
In the AM admin UI, go to Configure > Global Services > Platform.
-
Remove all domains from the Cookies Domains list.
-
Click Save Changes.
-
-
Go to Configure > Server Defaults > Advanced.
-
Set the
com.sun.identity.enableUniqueSSOTokenCookieadvanced property totrue. -
Click Save Changes.
-
Restart AM or the container in which it runs for the configuration changes to take effect.
Additional cookie security
Although the session cookie is the most important cookie to keep track of when securing AM, there are other points you must consider, such as:
-
Which cookie are you using for sticky load balancing?
By default, AM creates the
amlbcookiecookie and sets it to the ID of the instance that first responded to a request. You should change the name of this cookie to something unique in your environment. -
Which other cookies, relevant for your environment, interact with AM or are sent to AM as part of a chain of requests?
The following table summarizes the tasks and information to review to manage cookie security that is not strictly related to the session cookie:
| Task | Resources |
|---|---|
Enable support for Configure AM to apply |
|
Review the secure cookie filter AM provides a filter that upgrades cookies to secure cookies if the conditions are met. |
|
Change the name of the sticky load balancing cookie Name the cookie something relevant and unique for your environment. |
SameSite cookie rules
For additional cookie security, enable support for applying SameSite cookie rules, as described in the internet-draft Cookies: HTTP State Management Mechanism.
You can configure the AM server to apply SameSite cookie rules by navigating to
Configure > Server Defaults > Advanced, and setting the com.sun.identity.cookie.samesite property’s value
to one of the following:
strict-
Requests originating from different sites will not have cookies sent with them.
When this mode is enabled, any AM functionality that relies on requests being redirected back to the AM instance may not operate correctly. For example, OAuth 2.0 flows and SAML federation may not operate correctly if AM cannot access the required cookies.
lax-
Cookies received from different sites cannot be accessed, unless the request is using a top-level request, and uses a "safe" HTTP method, such as GET, HEAD, OPTIONS, or TRACE.
off-
No restrictions on the domain of cookies is applied. This is the default setting.
You must disable
SameSitesupport if any of the following is true:-
You have set
Access-Control-Allow-Credentials=truein your CORS configuration.For more information on configuring CORS in AM, see Configure CORS support.
-
You are using SAML HTTP-POST bindings.
For example, IDP-initiated single logout (SLO) functionality will not operate correctly if SameSite support is enabled, as the
iPlanetDirectoryProcookie would not be accessible in cross-domain POST requests. For more information on SAML single logout, see Implement SSO and SLO.
-
|
Modern browsers only allow disabling |
Secure cookie filter
As part of the support that AM provides for SameSite cookies,
the deployment descriptor file web.xml includes a filter
that flags cookies as secure if any of the following is true:
-
The request comes in through a connection marked as secure.
For example, because you have marked an HTTP connector as secure in Tomcat.
-
The request comes in through an HTTPS connector.
Automatically promoting cookies to secure ensures that the functionality continues to work with the SameSite changes,
because you can only opt out of SameSite if a cookie is marked as secure.
Exclude cookies from the filter
-
To exclude cookies from the filter, edit the
/path/to/tomcat/webapps/openam/WEB-INF/web.xmlfile and search for theSecureCookieFilterfilter. -
Add any cookies you want to exclude to the list.
For example:
...
<param-name>excludes</param-name>
<param-value>
  myCookie1
  myStickyCookie
  myCookie2
</param-value>
...
To ensure that non-secure requests are load-balanced correctly, the
amlbcookiecookie is already excluded by default. If you are using a custom cookie for sticky load balancing, you may want to add it to the list of excluded cookies. -
Restart AM or the container where it runs for the changes to take effect.
Change the sticky load balancing cookie name
By default, the sticky load balancing cookie name is amlbcookie.
Change this value to something that is unique in your environment,
and configure the name of the cookie in your load balancers to achieve session stickiness.
Perform the following steps to change the name of the cookie:
-
Go to Configure > Server Defaults > Advanced.
-
Change the value of the
com.iplanet.am.lbcookie.nameadvanced server property to the new cookie name.By default, AM sets the value of the load balancing cookie to the ID of the instance that first responded to a request. You can change it, but we recommend that you keep this configuration when using web agents.
For more information, see Load balancing.
-
Restart AM or the container where it runs.
Secure sessions
Cookie hijacking is not the only danger to sessions. Consider the following non-exhaustive list of scenarios that can result in a compromised account:
-
End users entering their data in a malicious website thinking it is the authentic one.
-
End users leaving their computers unattended while their session is open.
-
End users logging in from completely different locations or devices than their usual.
The following table summarizes the tasks you need to perform to keep sessions secure:
| Task | Resources |
|---|---|
Settings related to session termination Understand session termination, and configure the session time-to-live and idle timeout. Ensuring sessions expire within a reasonable time helps you protect your environment against impersonation attacks. |
|
Lock accounts after failed login attempts Configure account lockout to protect your environment against brute-force or dictionary attacks. |
|
Limit the number of active user sessions Prevent users from logging in from more than two devices as a time, for example. This helps you mitigate against cases where user accounts have been compromised. |
|
Protect client-side sessions AM offers additional security measures to protect client-side sessions. They are more vulnerable to hijacking than server-side sessions because they contain all the session information in them. |
|
Protect authentication sessions Configure authentication session allowlisting to protect these sessions against replay attacks. |
Session termination
AM manages active sessions, allowing single sign-on when authenticated users attempt to access system resources in AM’s control.
AM ensures that user sessions are terminated when a configured timeout is reached, or when AM users perform actions that cause session termination. Session termination effectively logs the user out of all systems protected by AM.
With server-side sessions, AM terminates sessions in four situations:
-
When a user explicitly logs out.
-
When an administrator monitoring sessions explicitly terminates a session.
-
When a session exceeds the maximum time-to-live.
-
When a user is idle for longer than the maximum session idle time.
Under these circumstances, AM responds by removing server-side sessions from the CTS token store and from AM server memory caches. With the user’s session no longer present in CTS, AM forces the user to reauthenticate during subsequent attempts to access resources protected by AM.
When a user explicitly logs out of AM,
AM also attempts to invalidate the iPlanetDirectoryPro cookie in users' browsers
by sending a Set-Cookie header with an invalid session ID and a cookie expiration time that is in the past.
In the case of administrator session termination and session timeout,
AM cannot invalidate the iPlanetDirectoryPro cookie until the next time the user accesses AM.
Session termination differs for client-side sessions.
Since client-side sessions are not maintained in the CTS token store, administrators cannot monitor or terminate them.
Because AM does not modify the iPlanetDirectoryPro cookie for client-side sessions after authentication,
the session idle time is not maintained in the cookie.
Therefore, AM does not automatically terminate client-side sessions that have exceeded the idle timeout.
As with server-side sessions,
AM attempts to invalidate the iPlanetDirectoryPro cookie from a user’s browser when the user logs out.
When the maximum session time is exceeded,
AM also attempts to invalidate the iPlanetDirectoryPro cookie in the user’s browser
the next time the user accesses AM.
It is important to understand that AM cannot guarantee cookie invalidation.
For example, the HTTP response containing the Set-Cookie header might be lost.
This is not an issue for server-side sessions, because a logged out session no longer exists in the CTS token store,
and a user who attempts to access AM after previously logging out will be forced to reauthenticate.
However, the lack of a guarantee of cookie invalidation is an issue for deployments with client-side sessions.
It could be possible for a logged out user to have an iPlanetDirectoryPro cookie.
AM could not determine that the user previously logged out.
Therefore, AM supports a feature that takes additional action when users log out of client-side sessions.
AM can maintain a list of logged out client-side sessions in a session denylist in the CTS token store.
Whenever users attempt to access AM with client-side sessions,
AM checks the session denylist to validate that the user has not, in fact, logged out.
Since AM does not modify client-side session cookies once they are stored in the end user’s browser, and client-side sessions contain, among others, the session maximum time-to-live, it is imperative to protected them against tampering. See Client-side session security for more information.
Configure maximum session time-to-live
When configuring the maximum session time-to-live, you must balance security and user experience. Depending on your application, it may be acceptable for your users to log in once a month. Financial applications, for example, tend to expire their sessions in less than an hour.
The longer a session is valid, the larger the window during which a malicious user could impersonate a user if they were able to hijack a session cookie.
-
In the AM admin UI, go to Realms > Realm Name > Services > Session > Dynamic Attributes.
Note that you can also change maximum session time settings globally for the AM site at Configure > Sessions > Dynamic Attributes.
-
In the Maximum Session Time field, set a value suitable for your environment.
-
Save your changes.
Configure server-side session idle timeout
Consider a user with a valid session navigating through pages or making changes to the configuration. If for any reason they leave their desk and their computer remains open, a malicious user could take the opportunity to impersonate them.
Session idle timeout can help mitigate those situations, by logging out users after a specified duration of inactivity. Session idle timeout can only be used in realms configured for server-side sessions.
-
In the AM admin UI, go to Realms > Realm Name > Services > Session > Dynamic Attributes.
Note that you can also change idle timeout settings globally for the AM site by navigating to Configure > Sessions > Dynamic Attributes.
-
On the Maximum Time Idle property, configure a value suitable for your environment.
-
Save your changes.
Configure client-side session denylisting
Session denylisting ensures that users who have logged out of client-side sessions cannot achieve single sign-on without reauthenticating to AM. Session denylisting does not apply to authentication sessions.
-
Make sure that you deployed the Core Token Service during AM installation.
The session denylist is stored in the Core Token Service’s token store.
-
Go to Configure > Global Services, click Session, and locate the Client-Side Sessions tab.
-
Select the Enable Session Denylisting option to enable session denylisting for client-side sessions.
When you configure one or more AM realms for client-side sessions, you should enable session denylisting in order to track session logouts across multiple AM servers.
Changing the value of this property takes effect immediately.
-
Configure the Session Denylist Cache Size property.
AM maintains a cache of logged out client-side sessions. The cache size should be around the number of logouts expected in the maximum session time. Change the default value of 10,000 when the expected number of logouts during the maximum session time is an order of magnitude greater than 10,000. An underconfigured session denylist cache causes AM to read denylist entries from the Core Token Service store instead of obtaining them from cache, which results in a small performance degradation.
Changing the value of this property takes effect immediately.
-
Configure the Denylist Poll Interval property.
AM polls the Core Token service for changes to logged out sessions if session denylisting is enabled. By default, the polling interval is 60 seconds. The longer the polling interval, the more time a malicious user has to connect to other AM servers in a cluster and make use of a stolen session cookie. Shortening the polling interval improves the security for logged out sessions, but might incur a minimal decrease in overall AM performance due to increased network activity.
Changing the value of this property does not take effect until you restart AM.
-
Configure the Denylist Purge Delay property.
When session denylisting is enabled, AM tracks each logged out session for the maximum session time plus the denylist purge delay. For example, if a session has a maximum time of 120 minutes and the denylist purge delay is one minute, then AM tracks the session for 121 minutes. Increase the denylist purge delay if you expect system clock skews in a cluster of AM servers to be greater than one minute. There is no need to increase the denylist purge delay for servers running a clock synchronization protocol, such as Network Time Protocol.
Changing the value of this property does not take effect until you restart AM.
-
Click Save Changes.
Enabling or disabling the session denyist, or altering the cache size, takes effect immediately.
Changes to any other session denylist properties do not take effect until you restart AM.
For detailed information about session service configuration attributes, see the entries for Session.
Account lockout
Account lockout is a security mechanism that locks a user account after repeated failed login attempts. It is used to slow down brute-force attacks, and to compensate for weak password policies.
Most deployments use the identity store’s password policy to control account lockout. If this is not an option in your deployment, configure account lockout, as explained in this section.
You can configure account lockout in one of the following ways:
- Persistent lockout
-
Persistent (physical) lockout locks the user’s account indefinitely, until unlocked by an administrator. This is the default type of account lockout.
For persistent lockout, AM sets the user account status to
inactivein the user profile, and tracks failed authentication attempts by writing to the user repository.Persistent lockout works independently of account lockout mechanisms in the underlying directory server that serves as the user data store.
- Duration lockout
-
Duration lockout locks the user account for a specified duration, keeping track of the locked state either in memory or in the data store. Duration lockout is released when AM restarts.
Unlike persistent lockout, the user account status remains
activefor duration lockout.The default configuration is to record invalid authentication attempts in the data store. This avoids the need for sticky load balancing. If you choose to store the count of invalid attempts in memory, the counter applies to the current AM instance only.
|
Failed login attempts during the transactional authorization flow do not increment account lockout counters. If login failures are stored in AM’s memory, this may result in user accounts not being locked out, even after multiple login failures. To avoid this issue, rather implement persistent lockout. |
Configure account lockout
-
Configure account lockout:
-
In the AM admin UI, go to Realms > Realm Name > Authentication > Settings > Account Lockout.
-
Enable lockout by checking Login Failure Lockout Mode, then set the number of attempts and the lockout interval.
You can also opt to warn users after several consecutive failures.
-
To save account login failures to the data store, enable Store Invalid Attempts in Data Store. This setting is necessary when using server-side or client-side authentication sessions. If you do not set this, users might not be locked out, even after multiple login failures.
When you store the count of failed attempts in the data store, other AM servers accessing the user data store can also see that count.
-
If AM is configured to send mail, you can set up email notification of lockouts to an administrator. To configure AM to send mail, go to Configure > Server Defaults > General > Mail Server.
-
-
Configure persistent lockout:
-
For persistent lockout, AM sets the value of the user’s
inetuserstatusprofile attribute toinactive. You can specify an additional attribute to update on lockout. -
You can also define a custom attribute to store the number of failed authentication attempts.
-
-
Configure duration lockout:
-
Set the lockout duration to a positive value to enable duration lockout. Optionally, configure a multipier to increase the lockout duration on each successive lockout.
-
Enable the Store Invalid Attempts in Data Store property so that lockout attempts are not stored in memory, but persisted in the repository, and applied across all AM instances.
-
Set Invalid Attempts Data Attribute Name to the default attribute
sunAMAuthInvalidAttemptsDatato prevent invalid attempts from being stored only in memory.
For more information, see Configure realm authentication properties.
-
|
To unlock a user’s account:
|
For specific information on how authentication trees handle account lockout, see Account lockout for trees.
Customize account lockout messages
To customize the messages shown to end users when their accounts are locked, follow these steps:
-
Locate the
openam-core-7.2.0.jarfile in theWEB-INF/lib/folder where AM is deployed. -
Extract the
amAuth.propertiesfile. -
Change the value of the field that controls the lockout message:
-
If you are using an authentication tree, change the value of the
lockOutfield, for example:lockOut=Your example.com account has been locked. Please contact your support agent.|user_inactive.jsp -
If you are using an authentication chain, change the value of the
112field, for example:112=Your example.com account has been locked. Please contact your support agent.|user_inactive.jsp
-
-
Copy the amended
amAuth.propertiesfile to theWEB-INF/classes/folder where AM is deployed. -
When a user whose account is locked attempts to authenticate, the custom lockout message is displayed:

Session quotas
AM lets you limit the number of active sessions for a user by setting session quotas. Use this feature, for example, to prevent a user from logging in from more than two devices at once, mitigating scenarios where user passwords may have been compromised.
AM’s support for session quotas requires server-side sessions.
Configure session quotas and exhaustion actions
The session quota applies to all sessions opened for the same user (as represented by the user’s universal identifier). To configure session quotas and exhaustion in AM, perform the following steps:
-
In the AM admin UI, go to Configure > Global Services > Sessions > Session Quotas.
-
From the Enable Quota Constraints drop-down menu, choose
ON. -
On the Set Resulting behavior if session quota exhausted property, set one of the following values:
DENY_ACCESS-
Deny access, preventing the user from creating an additional session.
DESTROY_NEXT_EXPIRING-
Remove the next session to expire, and create a new session for the user. The next session to expire is the session with the minimum time left until expiration.
This is the default setting.
DESTROY_OLDEST_SESSION-
Remove the oldest session, and create a new session for the user.
DESTROY_OLD_SESSIONS-
Remove all existing sessions, and create a new session for the user.
If none of these session quota exhaustion actions fit your deployment, you can implement a custom session quota exhaustion action. For an example, see Customize server-side session quota exhaustion actions.
-
Go to Realms > Realm Name > Services > Session.
-
On the Set Active User Sessions property, configure the maximum number of concurrent sessions a user can have.
Note that you can also change this setting globally for the AM site in Configure > Sessions > Dynamic Attributes.
-
Click Save Changes.
Client-side session security
AM can issue server-side sessions, which contain a reference to the real session stored in the CTS store, or client-side sessions, which contain all the information that would be held in the CTS store.
While both types are susceptible to cookie hijacking, client-side sessions are even more vulnerable, since they contain all the information for the session. Therefore, the malicious user could tamper with the session data to their benefit.
When using client-side sessions and client-side authentication sessions, you should configure AM to sign and/or encrypt the JWT containing session information:
Client-side sessions and client-side authentication sessions share the same encryption and signing configuration.
|
To ensure that the client-side session cookie size does not surpass the browser supported size, web agents and Java agents do not support both signing and encrypting the session cookie. For more information, see Client-side session security and agents. |
Configure the JWT signature
Configure a JWT signature to prevent malicious tampering of client-side session and authentication session JWTs.
Perform the following steps to configure the JWT signature:
-
Go to Configure > Global Services > Session > Client-Side Sessions.
-
From the Signing Algorithm Type drop-down menu, choose a suitable algorithm for your environment.
The default value is
HS256.Do not sign the JWT if you plan to encrypt it with the Direct AES Encryption algorithm, because the signature will be redundant. To disable JWT signing, perform the following steps:
-
Go to Configure > Server Defaults > Advanced.
-
Set the
org.forgerock.openam.session.stateless.signing.allownoneproperty totrue.How do I configure advanced server properties?
-
To configure advanced server properties for all instances of the AM environment, go to Configure > Server Defaults > Advanced in the AM admin UI.
-
To configure advanced server properties for a particular instance, go to Deployment > Servers > Server Name > Advanced.
If the property you want to add or edit is already configured, click on the pencil () button to edit it. When you are finished, click on the tick () button.
Click Save Changes.
-
-
Go to Configure > Global Services > Session > Client-Side Sessions.
-
From the Signing Algorithm Type drop-down list, choose
NONE. -
Click Save Changes.
-
-
Configure a secret relevant to the algorithm you chose:
-
If you specified an HMAC signing algorithm, change the value in the Signing HMAC Shared Secret field if you do not want to use the generated default value.
Click Save Changes.
-
If you specified the RS256 signing algorithm, or any of the elliptic curve algorithms, configure a suitable secret in the
am.global.services.session.clientbased.signingsecret ID. You can only configure this secret at a global level.For more information about configuring secrets, see Secret stores.
-
For detailed information about Session Service configuration attributes, see the entries for Session.
Configure JWT encryption
Configure JWT encryption to prevent man-in-the-middle attackers from accessing users' session details, and to prevent end users from examining the content in the JWT.
Perform the following steps to encrypt the JWT:
-
Go to Global Services > Session > Client-Side Sessions.
-
From the Encryption Algorithm drop-down list, choose a suitable algorithm.
-
If you chose the
RSAalgorithm, perform the following steps:-
Configure a suitable secret in the
am.global.services.session.clientbased.encryptionsecret ID.You can only configure this secret at a global level.
For more information about configuring secrets, see Secret stores.
-
Configure one of the following paddings in the
org.forgerock.openam.session.stateless.rsa.paddingadvanced server property:RSA1_5. RSA with PKCS#1 v1.5 padding.
RSA-OAEP. RSA with OAEP and SHA-1.
RSA-OAEP-256. RSA with OAEP padding and SHA-256.The default is
RSA-OAEP-256.
How do I configure advanced server properties?
-
To configure advanced server properties for all instances of the AM environment, go to Configure > Server Defaults > Advanced in the AM admin UI.
-
To configure advanced server properties for a particular instance, go to Deployment > Servers > Server Name > Advanced.
If the property you want to add or edit is already configured, click on the pencil () button to edit it. When you are finished, click on the tick () button.
Click Save Changes.
-
-
If you chose the AES KeyWrapping or Direct AES Encryption algorithms, perform the following steps:
-
If you do not want to use the generated default value, enter a base64-encoded random key in the Encryption Symmetric AES Key field:
-
For direct encryption with AES-GCM, or for AES-KeyWrap with any content encryption method, the secret must be 128, 192, or 256 bits long.
-
For direct encryption with AES-CBC-HMAC, the secret must be 256, 384, or 512 bits long.
-
-
-
Click Save Changes.
-
For the underlying content encryption method, configure one of the following encryption methods in the
org.forgerock.openam.session.stateless.encryption.methodadvanced server property:A128CBC-HS256. AES 128-bit in CBC mode with HMAC-SHA-256-128 hash (HS256 truncated to 128 bits)
A192CBC-HS384. AES 192-bit in CBC mode with HMAC-SHA-384-192 hash (HS384 truncated to 192 bits)
A256CBC-HS512. AES 256-bit in CBC mode with HMAC-SHA-512-256 hash (HS512 truncated to 256 bits)
A128GCM. AES 128-bit in GCM mode
A192GCM. AES 192-bit in GCM mode
A256GCM. AES 256-bit in GCM modeThe default is
A128CBC-HS256.
How do I configure advanced server properties?
-
To configure advanced server properties for all instances of the AM environment, go to Configure > Server Defaults > Advanced in the AM admin UI.
-
To configure advanced server properties for a particular instance, go to Deployment > Servers > Server Name > Advanced.
If the property you want to add or edit is already configured, click on the pencil () button to edit it. When you are finished, click on the tick () button.
Click Save Changes.
-
-
To compress the session state, choose Deflate Compression from the Compression Algorithm drop-down list.
When set to Deflate compression, this option may lead to a possible vulnerability with session state information leakage. Because the session token compression depends on the data in the session, an attacker can vary one part of the session (for example, the username or some other property) and then deduce some secret parts of the session state by examining how the session compresses. You should evaluate this threat depending on your use cases before enabling compression and encryption together.
By default, AM rejects compressed session JWTs that expand to a size larger than 32 KiB (32768 bytes). For more information, see Control the size of compressed JWTs.
For detailed information about Session Service configuration attributes, see the entries for Session.
Client-side session security and agents
To ensure that the client-side session cookie size does not surpass the browser supported size, web agents and Java agents do not support both signing and encrypting the session cookie. To configure agents with client-side sessions, implement one of the following configurations:
-
Configure signing and compression:
-
Enable HS256 signing for the client-side session cookie.
For more information, see Configure the JWT signature.
-
Enable compression. Go to Configure > Global Services > Session > Client-Side Sessions and choose Deflate Compression from the Compression Algorithm drop-down list.
-
-
Configure encryption and compression:
-
Set the
org.forgerock.openam.session.stateless.signing.allownoneadvanced server property totruefor all the instances in the environment.
How do I configure advanced server properties?
-
To configure advanced server properties for all instances of the AM environment, go to Configure > Server Defaults > Advanced in the AM admin UI.
-
To configure advanced server properties for a particular instance, go to Deployment > Servers > Server Name > Advanced.
If the property you want to add or edit is already configured, click on the pencil () button to edit it. When you are finished, click on the tick () button.
Click Save Changes.
-
Disable signing for the client-side session cookie. Go to Configure > Global Services > Session > Client-Side Sessions and choose NONE from the Signing Algorithm Type drop-down list.
-
Enable Direct AES Encryption.
For more information, see Configure JWT encryption.
-
Enable compression. Go to Configure > Global Services > Session > Client-Side Sessions and choose Deflate Compression from the Compression Algorithm drop-down list.
-
Failure to set up client-side sessions correctly may cause unexpected errors when accessing a protected resource, such as blank pages and redirection loops.
Client-side sessions do not support restricted tokens. Therefore, web agents and Java agents configured in a realm configured for client-side sessions are not protected against cookie hijacking. ForgeRock recommends using web or Java agents with server-side sessions.
Authentication session allowlisting
Enable authentication session allowlisting to protect authentication sessions from replay attacks.
When authentication session allowlisting is enabled, AM generates a key-value pair for each authentication session and stores it for the length of the authentication flow in the following ways:
-
For client-side authentication sessions, AM stores the key-value pair in the CTS token store.
-
For server-side authentication sessions, AM creates the key-value pair as a session property in the authentication session.
-
For in-memory sessions, AM creates the key-value pair as a session property in the authentication session.
Each time the authentication flow reaches an authentication node, AM modifies the value of the stored key-value pair and sends it to the user or client that it is authenticating. The next request to AM to continue the authentication flow must contain the key-value pair and must match the value expected by AM.
If the authenticating user or client cannot provide the key-value pair with the values AM expects, AM would not continue the authentication flow, therefore protecting the authentication flow against malicious users wanting to rewind the authentication flow to a previous node.
Perform the following steps to configure authentication session allowlisting:
Secure requests
AM receives requests from multiple sources and for different purposes, such as authentication requests, RESTful requests to the endpoints, and POST requests that might include a lot of data.
Containers usually have settings to mitigate against denial of service (DoS) attacks that POST large amounts of form data to your applications. Refer to your container documentation for more information about their settings, and how they can protect AM.
These settings, however, do not protect AM from receiving large amounts of POST data from other sources.
The following table summarizes the steps AM takes to protect against being overloaded, and how to adjust default values:
| Task | Resources |
|---|---|
Control the maximum size of decompressed JWTs By default, AM rejects JWTs that expand to a size larger than 32 KiB (32768 bytes) when decrypted. |
|
Limit the size of the request body By default, AM rejects incoming requests whose body is larger than 1 MB (1048576 bytes) in size. |
Control the size of compressed JWTs
A number of AM features accept JWTs to receive information. Some examples are:
-
Remote consent, when it receives consent responses.
-
The OAuth 2.0/OpenID Connect authorization service, when:
-
OpenID Connect clients send request parameters as a JWT instead of as HTTP parameters.
-
OpenID Connect clients register dynamically using software statements.
-
-
The Authentication service, when configured to issue client-side sessions.
The JWTs that AM receives can be signed and/or encrypted. Sometimes, larger JWTs are compressed to improve delivery speeds to AM.
Decompressing a JWT makes it expand in size.
By default, AM rejects any JWT that expands to more than 32 KiB (32768 bytes),
and throws an exception with a message similar to JWT payload decompressed to larger than maximum allowed size.
Ensure that the JWTs your clients send to AM are smaller than 32 KiB before compression.
Alteratively, increase the 32 KiB value to a reasonable limit. Take into account that AM performs decryption and decompression operations in its heap, and that you do not want to allow very large JWTs to, potentially, leave AM out of memory.
If you need to change the default value, perform the following steps:
-
Configure the
org.forgerock.json.jose.jwe.compression.max.decompressed.size.bytesJava system property on the container where AM runs.For example, edit the
setenv.shfile of the Apache Tomcat instance, and set the property with the new size in bytes:JAVA_OPTS="$JAVA_OPTS -Dorg.forgerock.json.jose.jwe.compression.max.decompressed.size.bytes=40960" -
Restart the container for the changes to make effect.
Limit the size of the request body
HTTP requests are not limited by the specification. Rather, the method used limits the amount of data that a client can send. The GET and DELETE methods, for example, are limited by the size of the URL. The POST method is not. Instead, browsers and application servers limit the amount of data a request can send to your applications.
Ensure that the amount of data that reaches your applications and AM is not large enough to overwhelm them.
Application servers usually can mitigate against denial of service (DoS) attacks that POST large amounts of form data, but AM endpoints may receive large amounts of POST data in different ways, such as in JSON, JWT, or JWK formats.
By default, AM rejects incoming requests with a body larger than 1 MB (1048576 bytes) in size. It also returns an HTTP 413 error response, and logs a message similar to the following:
-
ERROR: Request Content-Length exceeds maximum allowed, if the content’s length was specified in the request. -
ERROR: Counted request entity size exceeds maximum allowed, if the content’s length was not specified.
To change the default value, perform the following steps:
-
Change the value of the
org.forgerock.openam.request.max.bytes.entity.sizeadvanced server property to the new size, in bytes.The property is hot-swappable. You do not need to restart AM for the changes to take effect.
How do I configure advanced server properties?
-
To configure advanced server properties for all instances of the AM environment, go to Configure > Server Defaults > Advanced in the AM admin UI.
-
To configure advanced server properties for a particular instance, go to Deployment > Servers > Server Name > Advanced.
If the property you want to add or edit is already configured, click on the pencil () button to edit it. When you are finished, click on the tick () button.
Click Save Changes.
Protect applications
AM provides authentication and authorization capabilities, but it requires a policy enforcement point (PEP) intercepting traffic to the applications.
ForgeRock offers Java agents, web agents, and IG as PEPs to enforce what AM decides in a way that is unobtrusive to the user.
Identity Gateway or AM web and Java agents?
ForgeRock Identity Gateway and the AM web and Java agents can both enforce policy, redirecting users to authenticate when necessary, and controlling access to protected resources. IG runs as a self-contained reverse proxy located between the users and the protected applications. Web and Java agents are installed into the servers where applications run, intercepting requests in that context.
Use IG to protect access to applications not suited for a web or Java agent, for example, those applications deployed on operating systems or web servers or containers not supported by the agents.
Web and Java agents have the advantage of sitting within your existing server infrastructure. Once you have agents installed into the servers with web applications or sites to protect, then you can manage their configurations centrally from AM.
For organizations with both servers on which you can install web and Java agents and applications that you must protect without touching the server, you can use agents on the former and IG for the latter.
For more information about agents, see the ForgeRock Web agents documentation, or the ForgeRock Java agents documentation.
For more information about IG, see the ForgeRock Identity Gateway documentation.
Audit logging
AM supports a Common REST-based audit logging service that captures key auditing events, critical for system security, troubleshooting, and regulatory compliance.
Audit logs gather operational information about events that occur within an AM deployment. They track processes and security data, such as authentication mechanisms, system access, user and administrator activity, error messages, and configuration changes.
The audit logging service uses a structured message format that adheres to a consistent log structure across the ForgeRock Identity Platform. This common structure allows correlation between log messages of the different Platform components, if the transaction IDs are trusted. For more information, see Trust transaction headers.
|
Although the ForgeRock Directory Services JSON logger is enabled by default, ForgeRock transaction IDs are not trusted by default.
You must set |
The following topics explain how AM audit logging works, and how to implement it:
| Task | Resources |
|---|---|
Discover AM’s audit logging service AM auditing service provides a rich set of features to help you capture events that are critical for system security, troubleshooting, and regulatory compliance. |
|
Configure AM to log audit events Decide how to implement your audit login service, either globally or by realm, and configure audit login handlers to store audit events into files, databases, or other stores. |
|
Audit log reference Check the format of the files, the names of the events, and more. |
Audit logging service
AM writes log messages generated from audit events triggered by its instances, web or Java agents,
the ssoadm tool, and connected ForgeRock Identity Platform implementations.
AM’s audit logging service provides a versatile and rich feature set as follows:
- Global and realm-based log configuration
-
You can configure audit logging globally, which ensures that all realms inherit your global log settings. You can also configure audit logging by realm, which allows you to set different log settings for each realm.
- Audit event handlers
-
The audit logging service supports a variety of audit event handlers that allow you to write logs to different types of data stores. See Configuring audit event handlers for a list of event handlers available in AM.
- Audit event buffering
-
By default, AM writes each log message separately as they are generated. AM supports message buffering, a type of batch processing, that stores log messages in memory and flushes the buffer after a preconfigured time interval or after a certain number of log messages reaches the configured threshold value.
- Tamper-evident logging
-
For the CSV audit event handler, you can digitally sign audits to enable the detection of tampering.
- Log rotation and retention policies
-
AM rotates JSON and CSV audit logs when it reaches a specified maximum size. You can also configure a time-based rotation policy, which disables the max-size rotation policy and implements log rotation based on a preconfigured time sequence. AM also provides the option to disable log rotation completely for these file types. AM does not support external log rotation for JSON and CSV audit logs.
For Syslog, JDBC, and JMS handlers, AM does not control log rotation and retention as they are handled by each respective service.
- Allowlist and denylist support
-
The audit logging service supports allowlist and denylist-filtering to show or hide sensitive values or fields in logs, such as HTTP headers, query parameters, cookies, profile attributes, or the entire field value.
- Reverse DNS lookup
-
The audit logging service supports a reverse DNS lookup feature for network troubleshooting purposes. Reverse DNS lookup is disabled by default as it enacts a performance hit in operation throughput.
Audit log topics
AM integrates log messages based on four different audit topics. A topic is a category of audit log event that has an associated one-to-one mapping to a schema type. Topics can be broadly categorized as access details, system activity, authentication operations, and configuration changes. The following table shows the basic event topics and associated audit log files for AM’s default audit logging configuration, which uses a JSON audit event handler:
| Event topic | File name | Description |
|---|---|---|
Access |
|
Captures who, what, when, and output for every access request. |
Activity |
|
Captures state changes to objects that have been created, updated, or deleted by end users (that is, non-administrators). Session, user profile, and device profile changes are captured in the logs. |
Authentication |
|
Captures when and how a subject is authenticated and related events. |
Configuration |
|
Captures configuration changes to the product with a timestamp and by whom.
Note that the |
Audit logging in web and Java agents
Web and Java agents log audit events for security, troubleshooting, and regulatory compliance. You can store web or Java agent audit event logs in the following ways:
-
Remotely. Log audit events to the audit event handler configured in the AM realm.
-
Locally. Log audit events to a file in the web or Java agent installation directory.
For more information about audit logs in agents, see the ForgeRock Web Agents User Guide and the ForgeRock Java Agents Maintenance Guide.
Implement audit logging
When you implement the audit logging service, decide whether you require specific audit systems per realm, or if a global configuration suits your deployment. Next, determine which event handlers suit your needs from those supported by AM. Refer to the following sections for more information:
-
Trust transaction headers, to configure the propagation of transaction IDs across the ForgeRock Identity Platform.
Configure audit logging
AM’s default audit event handler is the JSON audit event handler, which comes configured and enabled for the global audit logging service. The global configuration is used to control audit logging in realms that do not have the audit logging service added to them. AM also supports configuring an audit logging service on a per-realm basis.
The JSON audit event handler stores its JSON log files under /path/to/openam/var/audit/.
-
To modify the global audit logging configuration, refer to Global audit logging.
-
To override the global audit logging configuration for a realm, refer to Realm-specific audit logging.
Global audit logging
-
In the AM admin UI, go to Configure > Global Services > Audit Logging.
-
Configure the following options on the Global Attributes tab:
-
Activate Audit logging to start the audit logging feature.
-
In the Field whitelist filters and Field blacklist filters lists, enter any values to include (allowlist) or exclude (denylist) from the audit event logs.
AM has a predefined allowlist that only records values that do not contain sensitive information. Use the filters to override the built-in list, or to hide additional values that you do not want recorded.
The audit logging service lets you suppress the output of certain event types, because logging them can impact performance. These event types are not logged by default, regardless of the configuration of the filter lists.
The filter lists will only apply to these event topics if logging is enabled for them.
For more information, see
org.forgerock.openam.audit.identity.activity.events.blacklistin Advanced properties.For information about the fields that appear in the default allowlist, refer to Audit log default allowlist.
To specify an additional field or value to be allowlisted, or denylisted, add a value using a JSON pointer-like syntax that starts with the event topic (
access,activity,authentication, orconfig), followed by the field name, or the path to the value in the field.The lists allow two types of filtering:
-
Filter fields in events.
You may be interested in capturing, or hiding, HTTP headers, query parameters, or potentially sensitive data like passwords in the access logs.
For example, you might want to filter out surnames by hiding the sn field from activity events. To do so, add the following pointers to the Field blacklist filters list:
/activity/before/sn
/activity/after/sn
-
Filter specific values in fields that store key-value pairs as JSON, such as the HTTP headers, query parameters, and cookies.
For example, to include the
Accept-Languagevalue in the http.request.headers field in access events, add the following pointer to the Field whitelist filters list:/access/http/request/headers/accept-language
-
-
Click Save Changes.
For information on configuring audit logging properties, refer to Audit logging.
-
-
On the Secondary Configurations tab, you can edit the configuration of the Global JSON Handler and create new audit event handlers.
For more information, refer to Configure audit event handlers.
Realm-specific audit logging
You can configure the audit logging service for realms, allowing you to configure realm-specific log locations and handler types.
When the audit logging service is added to a realm, it inherits the configuration defined under Configure > Global Services > Audit Logging > Realm Defaults. Properties configured explicitly in the realm-level service override the realm defaults.
To configure the audit logging service in a realm, perform the following steps:
-
Go to Realms > Realm Name > Services.
-
Click Add a Service.
-
From the Choose a service type drop-down list, choose Audit Logging.
-
Click Create.
On the Audit Logging Service page, configure the Audit Logging Service as follows:
-
Ensure audit logging is Enabled.
In the Field whitelist filters and Field blacklist filters lists, enter any values to include (allowlist) or exclude (denylist) from the audit event logs.
AM has a predefined allowlist that only records values that do not contain sensitive information. Use the filters to override the built-in list, or to hide additional values that you do not want recorded.
The audit logging service lets you suppress the output of certain event types, because logging them can impact performance. These event types are not logged by default, regardless of the configuration of the filter lists.
The filter lists will only apply to these event topics if logging is enabled for them.
For more information, see
org.forgerock.openam.audit.identity.activity.events.blacklistin Advanced properties.For information about the fields that appear in the default allowlist, refer to Audit log default allowlist.
To specify an additional field or value to be allowlisted, or denylisted, add a value using a JSON pointer-like syntax that starts with the event topic (
access,activity,authentication, orconfig), followed by the field name, or the path to the value in the field.The lists allow two types of filtering:
-
Filter fields in events.
You may be interested in capturing, or hiding, HTTP headers, query parameters, or potentially sensitive data like passwords in the access logs.
For example, you might want to filter out surnames by hiding the sn field from activity events. To do so, add the following pointers to the Field blacklist filters list:
/activity/before/sn
/activity/after/sn
-
Filter specific values in fields that store key-value pairs as JSON, such as the HTTP headers, query parameters, and cookies.
For example, to include the
Accept-Languagevalue in the http.request.headers field in access events, add the following pointer to the Field whitelist filters list:/access/http/request/headers/accept-language
-
-
Click Save.
For information on configuring audit logging properties, refer to Audit logging.
-
-
On the Secondary Configurations tab, choose Add a Secondary Configuration.
Choose an event handler from the list.
For more information about supported event handlers and how to configure then, refer to Configure audit event handlers.
Configure audit event handlers
AM supports the following types of audit event handlers:
| Audit Event Handler Type | Publishes to | How to Configure |
|---|---|---|
JSON |
JSON files |
|
CSV |
CSV files |
|
Syslog |
The syslog daemon |
|
JDBC |
A relational database |
|
JMS |
JMS topics |
JSON audit event handler
-
In the AM admin UI, determine whether to create the event handler in a realm or use the default global event handler, then take one of the following actions:
-
To create the event handler in the global configuration, go to Configure > Global Services > Audit Logging.
Note that the JSON audit event handler is already configured in the global configuration. Click it to change its properties.
-
To create the event handler in a realm, go to Realms > Realm Name > Services > Audit Logging.
-
-
On the Secondary Configurations tab, click Global JSON Handler or the Edit icon on the right if present. If no handler is present, click Add a Secondary Configuration, and choose JSON.
-
On the New JSON configuration page, enter a name for the event handler. For example,
JSON Audit Event Handler. -
(Optional) In the Rotation Times field, enter a time duration after midnight to trigger file rotation, in seconds. For example, you can provide a value of
3600to trigger rotation at 1:00 AM. Negative durations are not supported. -
Click Create.
After the JSON audit event handler is created, several configuration tabs appear. To configure the event handler, perform the following steps:
-
On the General Handler Configuration tab, enable the event handler and configure the topics for your audit logs:
-
Choose Enabled to activate the event handler, if disabled.
-
Choose the audit log topics for your audit logs.
-
Click Save Changes.
-
-
On the JSON Configuration tab, configure JSON options:
-
Override the default location of your logs if necessary, and save your changes. The default value is
%BASE_DIR%/%SERVER_URI%/log/.Make sure to configure a different log directory for each JSON audit event handler instance. If two instances are writing to the same file, it can interfere with log rotation and tamper-evident logs.
-
Enable ElasticSearch JSON Format Compatible to direct AM to generate JSON formats that are compatible with the ElasticSearch format.
-
In the File Rotation Retention Check Interval field, edit the time interval (seconds) to check the time-base file rotation policies.
-
Click Save Changes.
-
-
On the File Rotation tab, configure how files are rotated when they reach a specified file size or time interval:
-
Enable Rotation Enabled to activate file rotation. If file rotation is disabled, AM ignores log rotation and appends to the same file.
-
In the Maximum File Size field, enter the maximum size of an audit file before rotation.
-
(Optional). In the File Rotation Prefix field, enter an arbitrary string that will be prefixed to every audit log to identify it. This parameter is used when time-based or size-based rotation is enabled.
-
In the File Rotation Suffix field, enter a timestamp suffix based on the Java SimpleDateFormat that will be added to every audit log. This parameter is used when time-based or size-based log rotation is enabled. The default value is
-yyyy.MM.dd-kk.mm.ss. -
In the Rotation Interval field, enter a time interval to trigger audit log file rotation in seconds. A negative or zero value disables this feature.
-
(Optional) In the Rotation Times field, enter a time duration after midnight to trigger file rotation, in seconds. For example, you can provide a value of
3600to trigger rotation at 1:00 AM. Negative durations are not supported. -
Click Save Changes.
-
-
On the File Retention tab, configure how long log files should be retained in your system:
-
In the Maximum Number of Historical Files field, enter a number for allowed backup audit files. A value of
-1indicates an unlimited number of files and disables the pruning of old history files. -
In the Maximum Disk Space field, enter the maximum amount of disk space that the audit files can use. A negative or zero value indicates that this policy is disabled.
-
In the Minimum Free Space Required field, enter the minimum amount of disk space required to store audit files. A negative or zero value indicates that this policy is disabled.
-
Click Save Changes.
-
-
On the Buffering tab, configure whether log events should be buffered in memory before they are written to the JSON file:
-
In the Batch Size field, enter the maximum number of audit log events that can be buffered.
-
In the Write interval field, enter the time interval in milliseconds at which buffered events are written to a file.
-
Click Save Changes.
-
CSV audit event handler
| Due to the security concerns of opening CSV files with Excel, OpenOffice, and other spreadsheet programs, it is recommended that you open CSV files with alternative software, such as a text editor. |
-
In the AM admin UI, determine whether to create the event handler in a realm or use the default global event handler, then take one of the following actions:
-
To create the event handler in the global configuration, go to Configure > Global Services > Audit Logging.
Note that the CSV audit event handler is already configured in the global configuration. Click its name to change its properties.
-
To create the event handler in a realm, go to Realms > Realm Name > Services > Audit Logging.
-
-
On the Secondary Configurations tab, click Add a Secondary Configuration. Choose CVS from the list.
On the New CVS page, enter the basic configuration for the new handler by performing the following actions:
-
Enter a name for the event handler. For example,
CSV Audit Event Handler. -
(Optional) In the Rotation Times field, enter a time duration after midnight to trigger file rotation, in seconds. For example, you can provide a value of
3600to trigger rotation at 1:00 AM. Negative durations are not supported. -
Enable or disable the Buffering option.
-
Click Create.
After the CSV audit event handler is created, several configuration tabs appear. To configure the event handler, perform the following steps:
-
On the General Handler Configuration tab, enable the event handler and configure the topics for your audit logs:
-
Click Enabled to activate the event handler, if disabled.
-
Choose the audit log topics for your audit logs.
-
Click Save.
-
-
On the CSV Configuration tab, override the default location of your logs if necessary, and click Save Changes. The default value is
%BASE_DIR%/%SERVER_URI%/log/.Configure a different log directory for each CVS audit event handler instance. If two instances are writing to the same file, it can interfere with log rotation and tamper-evident logs.
-
On the File Rotation tab, configure how files are rotated when they reach a specified file size or time interval:
-
Click Rotation Enabled to activate file rotation. If file rotation is disabled, AM ignores log rotation and appends to the same file.
-
In the Maximum File Size field, enter the maximum size of an audit file before rotation.
-
(Optional). In the File Rotation Prefix field, enter an arbitrary string that will be prefixed to every audit log to identify it. This parameter is used when time-based or size-based rotation is enabled.
-
In the File Rotation Suffix field, enter a timestamp suffix based on the Java SimpleDateFormat that will be added to every audit log. This parameter is used when time-based or size-based log rotation is enabled. The default value is
-yyyy.MM.dd-kk.mm.ss. -
In the Rotation Interval field, enter a time interval to trigger audit log file rotation in seconds. A negative or zero value disables this feature.
-
(Optional) In the Rotation Times field, enter a time duration after midnight to trigger file rotation, in seconds. For example, you can provide a value of
3600to trigger rotation at 1:00 AM. Negative durations are not supported. -
Click Save Changes.
-
-
On the File Retention tab, configure how long log files should be retained in your system:
-
In the Maximum Number of Historical Files field, enter a number for allowed backup audit files. A value of
-1indicates an unlimited number of files and disables the pruning of old history files. -
In the Maximum Disk Space field, enter the maximum amount of disk space that the audit files can use. A negative or zero value indicates that this policy is disabled.
-
In the Minimum Free Space Required field, enter the minimum amount of disk space required to store audit files. A negative or zero value indicates that this policy is disabled.
-
Click Save Changes.
-
-
On the Buffering tab, configure whether log events should be buffered in memory before they are written to the CSV file:
-
Click Buffering Enabled to activate buffering.
When buffering is enabled, all audit events are put into an in-memory buffer (one per handled topic), so that the original thread that generated the event can fulfill the requested operation, rather than wait for I/O to complete. A dedicated thread (one per handled topic) constantly pulls events from the buffer in batches and writes them to the CSV file. If the buffer becomes empty, the dedicated thread goes to sleep until a new item gets added. The default buffer size is
5000bytes. -
Enable the Flush Each Event Immediately option to write all buffered events before flushing.
When the dedicated thread accesses the buffer, it copies the contents to an array to reduce contention, and then iterates through the array to write to the CSV file. The bytes written to the file can be buffered again in Java classes and the underlying operating system.
When the Flush Each Event Immediately option is enabled, AM flushes the bytes after each event is written. If the feature is disabled (default), the Java classes and underlying operation system determine when to flush the bytes.
-
Click Save Changes.
-
-
On the Tamper Evident Configuration tab, configure whether to detect audit log tampering:
-
Click Is Enabled to activate the tamper evident feature for CSV logs.
When tamper evident logging is enabled, AM generates an HMAC digest for each audit log event and inserts it into each audit log entry. The digest detects any addition or modification to an entry.
AM also supports another level of tamper evident security by periodically adding a signature entry to a new line in each CSV file. The entry signs the preceding block of events, so that verification can establish if any of these blocks have been added, removed, or edited by some user.
-
In the Certificate Store Location field, enter the location of the keystore AM will use to sign the CSV logs, by default
%BASE_DIR%/%SERVER_URI%/Logger.jks.The recommended approach is to create two keystores:
-
A keystore for AM to use. This keystore is configured in the Certificate Store Location field and must contain a signing key pair called
signatureand an HMAC key calledpassword. -
A keystore for the verification tool. This keystore must contain the HMAC
passwordkey, and the public key of thesignaturekey pair.
-
You can use a simple script to create your keystores, for example: create-keystore.sh.
-
In the Certificate Store Password field, enter the password of the keystore.
-
In the Signature Interval field, enter a value in seconds for AM to generate and add a new signature to the audit log entry.
-
Click Save Changes.
-
To verify that rotated logs have not been tampered with, perform the following steps:
-
Download the AM-SSOAdminTools-5.1.3.18.zip file from the ForgeRock BackStage website.
-
Use the
verifyarchivetool to verify rotated log files as follows:$ /path/to/AM-SSOAdminTools-5.1.3.18/openam/bin/verifyarchive \ --archive /path/to/openam/var/audit/ \ --topic access \ --suffix -yyyy.MM.dd-HH.mm.ss \ --keystore /path/to/keystore-verifier.jks \ --password passwordIn this example, the tool checks files with a suffix of the type
yyyy.MM.dd-HH.mm.ssusing their counterparts with suffix.keystore. For example, the tool checks thetamper-evident-access-csv-2019.01.12-12.04.33file against thetamper-evident-access-csv-2019.01.12-12.04.33.keystorefile. The.keystorefile contains the HMAC digest the tool uses to validate the signature of the logs.The tool returns
PASSorFAILalongside the names of the files that have been tested. For example:PASS tamper-evident-access-csv-2019.01.12-12.04.33 FAIL tamper-evident-access-csv-2019.01.12-12.05.20 The HMac at row 2 is not correct.Run the tool without any parameters to access the online help.
-
-
Syslog audit event handler
AM can publish audit events to a syslog server, which is based on a widely-used logging protocol. You can configure your syslog settings on the AM admin UI.
-
In the AM admin UI, determine whether to create the event handler in a realm or use the default global event handler, then take one of the following actions:
-
To create the event handler in the global configuration, go to Configure > Global Services > Audit Logging.
-
To create the event handler in a realm, go to Realms > Realm Name > Services > Audit Logging.
-
-
On the Secondary Configurations tab, click Add a Secondary Configuration. Choose Syslog from the list.
On the New Syslog page, enter the basic configuration for the new handler by performing the following actions:
-
Enter a name for the event handler. For example,
Syslog Audit Event Handler. -
In the Server hostname field, enter the hostname or IP address of the receiving syslog server.
-
In the Server port field, enter the port of the receiving syslog server.
-
In the Connection timeout field, enter the number of seconds to connect to the syslog server. If the server has not responded in the specified time, a connection timeout occurs.
-
Enable or disable the Buffering option.
-
Click Create.
After the syslog audit event handler is created, several configuration tabs appear. To configure the event handler, perform the following steps:
-
On the General Handler Configuration tab, enable the event handler and configure the topics for your audit logs:
-
Click Enabled to activate the event handler, if disabled.
-
Choose the audit log topics for your audit logs.
-
Click Save Changes.
-
-
On the Audit Event Handler Factory tab, keep the default class name for the audit event handler.
-
On the Syslog Configuration tab, configure the main syslog event handler properties:
-
In the Server hostname field, enter the hostname or IP address of the receiving syslog server.
-
In the Server port field, enter the port of the receiving syslog server.
-
In the Connection timeout field, enter the number of seconds to connect to the syslog server. If the server has not responded in the specified time, a connection timeout occurs.
-
From the Transport Protocol drop-down list, choose TCP or UDP.
-
Choose the facility.
A syslog message includes a PRI field that is calculated from the facility and severity values. All topics set the severity to
INFORMATIONALbut you can choose the facility from the Facility drop-down list:Syslog Facilities Facility Description AUTH
Security or authorization messages
AUTHPRIV
Security or authorization messages
CLOCKD
Clock daemon
CRON
Scheduling daemon
DAEMON
System daemons
FTP
FTP daemon
KERN
Kernel messages
LOCAL0
Local use 0 (local0)
LOCAL1
Local use 1 (local1)
LOCAL2
Local use 2 (local2)
LOCAL3
Local use 3 (local3)
LOCAL4
Local use 4 (local4)
LOCAL5
Local use 5 (local5)
LOCAL6
Local use 6 (local6)
LOCAL7
Local use 7 (local7)
LOGALERT
Log alert
LOGAUDT
Log audit
LPR
Line printer subsystem
MAIL
Mail system
NEWS
Network news subsystem
NTP
Network time protocol
SYSLOG
Internal messages generated by syslogd
USER
User-level messages
UUCP
Unix-to-unix-copy (UUCP) subsystem
-
Click Save Changes.
-
-
On the Buffering tab, configure whether you want buffering or not:
-
Click Buffering Enabled to activate it.
When buffering is enabled, all audit events that get generated are formatted as syslog messages and put into a queue. A dedicated thread constantly pulls events from the queue in batches and transmits them to the syslog server. If the queue becomes empty, the dedicated thread goes to sleep until a new item gets added. The default queue size is
5000. -
Click Save Changes.
-
JDBC Audit Event Handler
You can configure AM to write audit logs to Oracle, MySQL, PostgreSQL, or other JDBC databases.
AM writes audit log records to the following tables:
am_auditaccess, am_auditactivity, am_auditauthentication, and am_auditconfig.
For more information on the JDBC table formats for each of the logs,
refer to JDBC audit log tables.
Before configuring the JDBC audit event handler, you must perform several steps to allow AM to log to the database:
Prepare for JDBC audit logging
-
Create tables in the relational database in which you will write the audit logs. The SQL for Oracle, PostgreSQL, and MySQL table creation is in the
audit.sqlfile under/path/to/tomcat/webapps/openam/WEB-INF/template/sql/db-type.If you are using a different relational database, tailor one of the provided
audit.sqlfiles to conform to your database’s SQL syntax. -
JDBC audit logging requires a database user with read and write privileges for the audit tables. Do one of the following:
-
Identify an existing database user and grant that user privileges for the audit tables.
-
Create a new database user with read and write privileges for the audit tables.
-
-
Obtain the JDBC driver from your database vendor. Place the JDBC driver
.zipor.jarfile in the container’sWEB-INF/libclasspath.For example, place the JDBC driver in
/path/to/tomcat/webapps/openam/WEB-INF/libif you use Apache Tomcat.
The following procedure describes how to configure a JDBC audit event handler. Perform the following steps after you have created audit log tables in your database and installed the JDBC driver in the AM web container:
Configure a JDBC audit event handler
-
In the AM admin UI, determine whether to create the event handler in a realm or use the default global event handler, then take one of the following actions:
-
To create the event handler in the global configuration, go to Configure > Global Services > Audit Logging.
-
To create the event handler in a realm, go to Realms > Realm Name > Services > Audit Logging.
-
-
On the Secondary Configurations tab, click Add a Secondary Configuration. Choose JDBC from the list.
Enter the basic configuration for the new handler by performing the following actions:.
-
Enter a name for the event handler. For example,
JDBC Audit Event Handler. -
In the JDBC Database URL field, enter the URL for your database server. For example,
jdbc:oracle:thin:@//host.example.com:1521/ORCL. -
In the JDBC Driver field, enter the classname of the driver to connect to the database. For example:
-
oracle.jdbc.driver.OracleDriver- for Oracle databases -
com.mysql.jdbc.Driver- for MySQL databases -
org.postgresql.Driver- for PostgreSQL databases
-
-
In the Database Username field, enter the username to authenticate to the database server.
This user must have read and write privileges for the audit tables.
-
In the Database Password field, enter the password used to authenticate to the database server.
-
Enable or disable the Buffering option.
-
Click Create.
After the JDBC audit event handler is created, several configuration tabs appear. To configure the event handler, perform the following steps:
-
On the General Handler Configuration tab, enable the handler and configure the topics for your audit logs:
-
Click Enabled to activate the event handler, if disabled.
-
Choose the audit log topics for your audit logs.
-
Click Save.
-
-
On the Audit Event Handler Factory tab, enter the fully-qualified class name of your custom JDBC audit event handler and save your changes.
-
On the Database Configuration tab, configure the main JDBC event handler properties:
-
From the Database Type drop-down list, choose the audit database type. The default value is
Oracle. -
In the JDBC Database URL field, enter the URL for your database server. For example,
jdbc:oracle:thin:@//host.example.com:1521/ORCL. -
In the JDBC Driver field, enter the classname of the driver to connect to the database. For example:
-
oracle.jdbc.driver.OracleDriver- for Oracle databases -
com.mysql.jdbc.Driver- for MySQL databases -
org.postgresql.Driver- for PostgreSQL databases
-
-
In the Database Username field, enter the username to authenticate to the database server.
This user must have read and write privileges for the audit tables.
-
In the Database Password field, enter the password used to authenticate to the database server.
-
In the Connection Timeout field, enter the maximum wait time before failing the connection.
-
In the Maximum Connection Idle Timeout field, enter the maximum idle time in seconds before the connection is closed.
-
In the Maximum Connection Time field, enter the maximum time in seconds for a connection to stay open.
-
In the Minimum Idle Connections field, enter the minimum number of idle connections allowed in the connection pool.
-
In the Maximum Connections field, enter the maximum number of connections in the connection pools.
-
Click Save.
-
-
On the Buffering tab, configure the buffering settings:
-
Click Buffering Enabled to start audit event buffering.
-
In the Buffer Size field, set the size of the event buffer queue where events should queue up before being written to the database.
If the queue reaches full capacity, the process will block until a write occurs.
-
In the Write Interval field, set the interval in seconds in which buffered events are written to the database.
-
In the Writer Threads field, set the number of threads used to write the buffered events.
-
In the Max Batched Events field, set the maximum number of batched statements the database can support per connection.
-
Click Save Changes.
-
JMS Audit Event Handler
AM supports audit logging to a JMS message broker. JMS is a Java API for sending messages between clients using a publish and subscribe model as follows:
-
AM audit logging to JMS requires that the JMS message broker supports using JNDI to locate a JMS connection factory. Refer to your JMS message broker documentation to verify that you can make connections to your broker by using JNDI before attempting to implement an AM JMS audit handler.
-
AM acts as a JMS publisher client, publishing JMS messages containing audit events to a JMS topic.
AM and JMS use the term topic differently. An AM audit topic is a category of audit log event that has an associated one-to-one mapping to a schema type. A JMS topic is a distribution mechanism for publishing messages delivered to multiple subscribers.
-
A JMS subscriber client, which is not part of the AM software and must be developed and deployed separately from AM, subscribes to the JMS topic to which AM publishes audit events. The client then receives the audit events over JMS and processes them as desired.
Before configuring the JMS audit event handler, you must perform several steps to allow AM to publish audit events as a JMS client:
Prepare for JMS audit logging
-
Obtain JNDI connection properties that AM requires to connect to your JMS message broker. The specific connection properties vary depending on the broker. Refer to your JMS message broker documentation for details.
For example, connecting to an Apache ActiveMQ message broker requires the following properties:
Example Apache ActiveMQ JNDI Connection Properties Property Name Example Value java.naming.factory.initialorg.apache.activemq.jndi.ActiveMQInitialContextFactoryjava.naming.provider.urltcp://localhost:61616topic.auditaudit -
Obtain the JNDI lookup name of the JMS connection factory for your JMS message broker.
For example, for Apache ActiveMQ, the JNDI lookup name is
ConnectionFactory. -
Obtain the JMS client
.jarfile from your JMS message broker vendor. Add the.jarfile to AM’s classpath by placing it in theWEB-INF/libdirectory.For example, place the JMS client
.jarfile in/path/to/tomcat/webapps/openam/WEB-INF/libif you use Apache Tomcat.
The following procedure describes how to configure a JMS audit event handler.
If your JMS message broker requires an SSL connection, you might need to perform additional, broker-dependent configuration tasks. For example, you might need to import a broker certificate into the AM keystore, or provide additional JNDI context properties.
Refer to your JMS message broker documentation for specific requirements for making SSL connections to your broker, and implement them as needed in addition to the steps in the following procedure.
Perform the following steps after you have installed the JMS client .jar file in the AM web container:
Configure a JMS audit event handler
-
In the AM admin UI, determine whether to create the event handler in a realm or use the default global event handler, then take one of the following actions:
-
To create the event handler in the global configuration, go to Configure > Global Services > Audit Logging.
-
To create the event handler in a realm, go to Realms > Realm Name > Services > Audit Logging.
-
-
On the Secondary Configurations tab, click Add a Secondary Configuration. Choose JMS from the list.
-
On the New JMS Configuration page, enter the basic configuration for the new handler by performing the following actions:
-
Enter a name for the event handler. For example,
JMS Audit Event Handler. -
Click Create.
After the JMS audit event handler is created, several configuration tabs appear. To configure the event handler, perform the following steps:
-
On the General Handler Configuration tab, enable the handler and configure the topics for your audit logs:
-
Click Enabled to activate the event handler, if disabled.
-
Choose the audit log topics for your audit logs.
-
Click Save Changes.
-
-
On the Audit Event Handler Factory tab, keep the default class name for the audit event handler.
-
On the JMS Configuration tab, configure the main JMS event handler properties:
-
From the Delivery Mode drop-down list, choose the JMS delivery mode.
With persistent delivery, the JMS provider ensures that messages are not lost in transit in case of a provider failure by logging messages to storage when they are sent. Therefore, persistent delivery mode guarantees JMS message delivery, while non-persistent mode provides better performance.
The default delivery mode is
NON_PERSISTENTdelivery. Therefore, if your deployment requires delivery of every audit event to JMS subscriber clients, be sure to set the configuration toPERSISTENTdelivery. -
From the Session Mode drop-down list, choose the default setting,
AUTO, unless your JMS broker implementation requires otherwise. Refer to your broker documentation for more information. -
Specify properties that AM will use to connect to your JMS message broker as key-value pairs in the JNDI Context Properties field.
AM is configured for the
auditJNDI lookup name and JMS topic, but you can modify or delete this configuration, or add new key-value pairs. To add new key-value pairs, fill the Key and Value fields and click Add. -
In the JMS Topic Name field, enter the name of the JMS topic to which AM will publish messages containing audit events.
Subscriber clients that process AM audit events must subscribe to this topic.
-
In the JMS Connection Factory Name field, specify the JNDI lookup name of the JMS connection factory.
-
Click Save Changes.
-
-
On the Batch Events tab, configure how log events should be batched before they are published to the JMS message broker:
-
In the Capacity field, specify the maximum capacity of the publishing queue. Execution is blocked if the queue size reaches capacity.
-
In the Max Batched field, specify the maximum number of events to be delivered when AM publishes the events to the JMS message broker.
-
In the Writing Interval field, specify the interval (in seconds) between transmissions to JMS.
-
Click Save Changes.
-
Trust transaction headers
AM supports the propagation of the transaction ID across the ForgeRock platform,
such as from DS or IDM to AM, using the HTTP header X-ForgeRock-TransactionId.
The X-ForgeRock-TransactionId header is automatically set in all outgoing HTTP calls
from one ForgeRock product to another.
You can also set this header from your own applications or scripts calling into the ForgeRock platform.
By default, the org.forgerock.http.TrustTransactionHeader system property is set to false, so that a malicious actor
cannot flood the system with requests using the same transaction ID header to hide their tracks. Setting
org.forgerock.http.TrustTransactionHeader to true trusts any incoming X-ForgeRock-TransactionId headers.
-
In the AM admin UI, go to Configure > Server Defaults > Advanced and scroll to the bottom of the list.
-
In the PROPERTY NAME column, add
org.forgerock.http.TrustTransactionHeader. In the corresponding PROPERTY VALUE column, enter true. -
Click + to add the property and save your work.
Your AM instance will now accept incoming
X-ForgeRock-TransactionIdheaders, which can be tracked in the audit logs. -
Repeat this procedure for all servers that require this property.
Legacy logging service (deprecated)
:page-aliases:configuring-legacy-audit-logging-svc
|
This service is deprecated and will be removed in a future AM release. You should use the audit logging service instead. |
To configure the legacy logging service, go to Configure > Global Services > Logging.
For more information on the configuration, refer to the audit logging reference.
Log to flat files
By default, AM audit logs are written to files in the instance’s configuration directory, such as $HOME/openam/log/.
AM sends messages to different log files, each named after the service logging the message,
with two different types log files per service: .access and.error.
Thus, the current log files for the authentication service are named
amAuthentication.access and amAuthentication.error.
For details, see Log files and messages.
Log to a syslog server
AM supports sending audit log messages to a syslog server for collation.
You can enable syslog audit logging by using the AM admin UI, or the ssoadm command.
Syslog logging (UI)
-
In the AM admin UI, go to Configure > Global Services > Logging.
-
On the Syslog tab, configure the following settings as appropriate for your syslog server, and save your changes:
-
Syslog server host -
Syslog server port -
Syslog server protocol -
Syslog facility -
Syslog connection timeout
For information on these settings, see Logging.
-
-
On the General tab, set the Logging Type drop-down list to
Syslog, and save your changes.
Syslog logging (ssoadm)
-
Create a text file, for example,
MySyslogServerSettings.txt, containing the settings used when audit logging to a syslog server:iplanet-am-logging-syslog-port=514 iplanet-am-logging-syslog-protocol=UDP iplanet-am-logging-type=Syslog iplanet-am-logging-syslog-connection-timeout=30 iplanet-am-logging-syslog-host=localhost iplanet-am-logging-syslog-facility=local5 -
Use the following
ssoadmcommand to configure audit logging to a syslog server:$ ssoadm \ set-attr-defs \ --adminid uid=amAdmin,ou=People,dc=openam,dc=forgerock,dc=org \ --password-file /tmp/pwd.txt \ --servicename iPlanetAMLoggingService \ --schematype Global \ --datafile MySyslogServerSettings.txt Schema attribute defaults were set.
Reference
This reference section covers other information relating to securing an AM instance. For the global services reference, see Global services configuration.
| For reference about… | See… |
|---|---|
Audit logging Learn more about the log format of the different files and tables used by the audit logging service. |
|
Session Learn how to customize server-side session quota exhaust actions. |
Audit logging reference
AM writes log messages generated from audit events triggered by its components, instances, and other ForgeRock-based stack products.
Audit log format
This section presents the audit log format for each topic-based file, event names, and audit constants used in its log messages.
Access log format
| Schema property | Description |
|---|---|
|
Specifies a universally unique identifier (UUID) for the message object,
such as |
|
Specifies the timestamp when AM logged the message, in UTC format to millisecond precision:
|
|
Specifies the name of the audit event.
For example, |
|
Specifies the UUID of the transaction, which identifies an external request when it comes into the system boundary.
Any events generated while handling that request will be assigned that transaction ID,
so that you may see the same transaction ID even for different audit event topics.
For example, AM supports a feature where trusted AM deployment with multiple instances, components,
and ForgeRock stack products can propagate the transaction ID through each call across the stack.
AM reads the |
|
Specifies the universal identifier for authenticated users.
For example, |
|
Specifies a unique random string generated as an alias for each AM session ID and OAuth 2.0 token.
In releases prior to OpenAM 13.0.0, the OpenAM 13.0.0 extended this property to handle OAuth 2.0 tokens.
In this case, whenever AM generates an access or grant token,
it also generates unique random value and logs it as an alias.
In this way, it is possible to trace back an access token back to its originating grant token,
trace the grant token back to the session in which it was created, and then trace how the session was authenticated.
An example of a [ "1979edf68543ead001", "8878e51a-f2aa-464f-b1cc-b12fd6daa415", "3df9a5c3-8d1e-4ee3-93d6-b9bbe58163bc" ] |
|
Specifies the IP address of the AM server.
For example, |
|
Specifies the port number used by the AM server.
For example, |
|
Specifies the client hostname. This field is only populated if reverse DNS lookup is enabled. |
|
Specifies the client IP address. |
|
Specifies the client port number. |
|
Specifies the list of roles for the authorized user. |
|
Specifies the component part of the authorized ID, such as |
|
Specifies the protocol associated with the request operation.
Possible values: |
|
Specifies the request operation.
For Common REST operations, possible values are: For PLL operations, possible values are:
|
|
Specifies the detailed information about the request operation. For example:
|
|
Specifies the HTTP method requested by the client.
For example, |
|
Specifies the path of the HTTP request.
For example, |
|
Specifies the HTTP query parameter string. For example:
|
|
Specifies the HTTP header for the request. For example: |
|
Specifies a JSON map of key-value pairs and appears as its own property to allow for denylisting fields or values. |
|
Not used in AM. |
|
Specifies the response status of the request.
For example, |
|
Specifies the response status code, depending on the protocol. For Common REST, HTTP failure codes are displayed but not HTTP success codes. For PLL endpoints, PLL error codes are displayed. |
|
Specifies the message associated with |
|
Specifies the time to execute the access event, usually in millisecond precision. |
|
Specifies the elapsed time units of the response.
For example, |
|
Specifies the AM service utilized.
For example, |
|
Specifies the realm where the operation occurred.
For example, the Top Level Realm ( |
Activity log format
| Property | Description |
|---|---|
|
Specifies a universally unique identifier (UUID) for the message object,
such as |
|
Specifies the timestamp when AM logged the message, in UTC format to millisecond precision:
|
|
Specifies the name of the audit event.
For example, |
|
Specifies the UUID of the transaction, which identifies an external request when it comes into the system boundary.
Any events generated while handling that request will be assigned that transaction ID,
so that you may see the same transaction ID for same even for different audit event topics.
For example, |
|
Specifies the universal identifier for authenticated users.
For example, |
|
Specifies an array containing a random context ID
that identifies the session and a random string generated from an OAuth 2.0/OpenID Connect 1.0 flow
that could track an access token ID or an grant token ID.
For example, |
|
Specifies the user to run the activity as.
May be used in delegated administration.
For example, |
|
Specifies the identifier of an object that has been created, updated, or deleted.
For logging sessions, the session |
|
Specifies the state change operation invoked: |
|
Not used. |
|
Not used. |
|
Not used. |
|
Not used. |
|
Specifies the AM service utilized. For example, |
|
Specifies the realm where the operation occurred.
For example, the Top Level Realm ( |
Authentication log format
| Property | Description |
|---|---|
|
Specifies a universally unique identifier (UUID) for the message object,
such as |
|
Specifies the timestamp when AM logged the message, in UTC format to millisecond precision:
|
|
Specifies the name of the audit event.
For example, |
|
Specifies the UUID of the transaction, which identifies an external request when it comes into the system boundary.
Any events generated while handling that request will be assigned that transaction ID,
so that you may see the same transaction ID for same even for different audit event topics.
For example, |
|
Specifies the universal identifier for authenticated users.
For example, |
|
Specifies an array containing a unique random context ID. For example:
|
|
Depending on the event being logged, specifies the outcome of:
Possible values are |
|
Specifies the array of accounts used to authenticate, such as |
|
Not used |
|
Specifies the JSON representation of the details of an authentication module, chain, tree or node. AM creates an event as each module or node completes and a final event at the end of the chain or tree. Examples: |
|
Specifies the AM service utilized.
For example, |
|
Specifies the realm where the operation occurred.
For example, the Top Level Realm ( |
Config log format
| Property | Description |
|---|---|
|
Specifies a universally unique identifier (UUID) for the message object.
For example, |
|
Specifies the timestamp when AM logged the message, in UTC format to millisecond precision:
|
|
Specifies the name of the audit event.
For example, |
|
Specifies the UUID of the transaction, which identifies an external request when it comes into the system boundary.
Any events generated while handling that request will be assigned that transaction ID,
so that you may see the same transaction ID for different audit event topics.
For example, |
|
Not used. You can determine the value for this field by linking to the access event using the same |
|
Not used. |
|
Specifies the user to run the activity as.
May be used in delegated administration.
For example, |
|
Specifies the identifier of a system object that has been created, modified, or deleted.
For example, |
|
Specifies the state change operation invoked: |
|
Specifies the JSON representation of the object prior to the activity. For example: |
|
Specifies the JSON representation of the object after the activity. For example: |
|
Specifies the fields that were changed.
For example, |
|
Not used. |
|
Not used. |
|
Specifies the realm where the operation occurred.
For example, the Top Level Realm ( |
Audit log events
This table summarizes the predefined events for each topic:
| Topic | Event name | Event description |
|---|---|---|
|
|
When AM starts handling an HTTP request. |
|
|
When AM finishes handling an HTTP request. |
|
|
Event for an OIDC back-channel logout. |
|
|
When the self-service registration process is complete. |
|
|
When the self-service password reset process is complete. |
|
|
When an SSO session is created. |
|
|
When an SSO session is destroyed. |
|
|
When an SSO session has been inactive for longer than configured idle timeout duration. |
|
|
Event for the explicit logout of an SSO session. |
|
|
When an SSO session exceeds the maximum configured lifetime. |
|
|
When an SSO session property changes. |
|
|
|
|
|
|
Event for an OAuth 2.0 token exchange. |
|
|
Event for an authentication process logout. |
|
|
Event for the successful or failed completion of an authentication chain login. |
|
|
Event for the successful or failed completion of an authentication module login. |
|
|
Event for the successful or failed completion of an authentication node login. |
|
|
Event for the successful or failed completion of an authentication tree login. |
|
|
Audit log components
This table lists the predefined audit event components that make up log messages:
| Event component | AM component, service, or feature |
|---|---|
|
Web and Java agents |
|
Auditing service |
|
Authentication service |
|
Batch service |
|
Configuration |
|
Core Token Service |
|
Dashboard service |
|
Trusted devices |
|
Groups component |
|
Mobile authentication |
|
OAuth 2.0, OpenID Connect 1.0, and UMA |
|
Policies |
|
Push Notification service |
|
RADIUS server |
|
Realms and sub-realms |
|
Recording service |
|
SAML v2.0 |
|
Scripting service |
|
User Self-Service service |
|
Server information service |
|
Session service |
|
|
|
Secure Token Service: REST and SOAP |
|
Internet of Things component |
|
Users component |
Audit log failure reasons
This table lists the predefined audit event authentication failure reasons:
| Failure | Description |
|---|---|
|
User account has expired. |
|
Authentication type is denied. |
|
Level-based authentication: Invalid authentication level. |
|
Invalid credentials entered. |
|
Realm does not exist. |
|
Maximum number of failure attempts exceeded. User is locked out. |
|
Incorrect/invalid credentials presented. |
|
Login timed out. |
|
Limit for maximum number of allowed sessions has been reached. |
|
Authentication module is denied. |
|
Authentication chain does not exist. |
|
No user profile found for this user. |
|
Realm is not active. |
|
Cannot create a session. |
|
User is not active. |
|
Role-based authentication: user does not belong to this role. |
|
The user ID was not found. |
Audit log default allowlist
When an object is passed in an audit event, it might contain information that should not be logged. By default, the AM uses an allowlist to specify which fields of the event appear.
The following fields appear on the default allowlist. This lists specifies each field by its JSON path. If an allowlisted field contains an object, then listing the field means the whole object is allowlisted:
Default access log allowlist
-
/_id -
/client -
/eventName -
/http/request/headers/accept -
/http/request/headers/accept-api-version -
/http/request/headers/content-type -
/http/request/headers/host -
/http/request/headers/user-agent -
/http/request/headers/x-forwarded-for -
/http/request/headers/x-forwarded-host -
/http/request/headers/x-forwarded-port -
/http/request/headers/x-forwarded-proto -
/http/request/headers/x-original-uri -
/http/request/headers/x-real-ip -
/http/request/headers/x-request-id -
/http/request/headers/x-requested-with -
/http/request/headers/x-scheme -
/http/request/method -
/http/request/path -
/http/request/queryParameters/authIndexType -
/http/request/queryParameters/authIndexValue -
/http/request/queryParameters/composite_advice -
/http/request/queryParameters/level -
/http/request/queryParameters/module_instance -
/http/request/queryParameters/resource -
/http/request/queryParameters/role -
/http/request/queryParameters/service -
/http/request/queryParameters/user -
/http/request/secure -
/request -
/response -
/server -
/timestamp -
/trackingIds -
/transactionId -
/userId
Default activity log allowlist
-
/_id -
/after/assignedDashboard -
/after/cn -
/after/commonName -
/after/givenName -
/after/inetUserStatus -
/after/iplanet-am-user-alias-list -
/after/iplanet-am-user-login-status -
/after/kbaInfoAttempts -
/after/memberof -
/after/o -
/after/oath2faEnabled -
/after/objectClass -
/after/organizationName -
/after/organizationUnitName -
/after/ou -
/after/push2faEnabled -
/after/sn -
/after/sunAMAuthInvalidAttemptsData -
/after/surname -
/after/uid -
/after/uniqueMember -
/after/userid -
/before/assignedDashboard -
/before/cn -
/before/commonName -
/before/givenName -
/before/inetUserStatus -
/before/iplanet-am-user-alias-list -
/before/iplanet-am-user-login-status -
/before/kbaInfoAttempts -
/before/memberof -
/before/o -
/before/oath2faEnabled -
/before/objectClass -
/before/organizationName -
/before/organizationUnitName -
/before/ou -
/before/push2faEnabled -
/before/sn -
/before/sunAMAuthInvalidAttemptsData -
/before/surname -
/before/uid -
/before/uniqueMember -
/before/userid -
/changedFields -
/component -
/component -
/eventName -
/objectId -
/operation -
/realm -
/realm -
/revision -
/runAs -
/timestamp -
/trackingIds -
/transactionId -
/userId
JDBC audit log tables
AM writes audit events to relational databases using the JDBC audit event handler. This section presents the columns for each audit table.
am_auditaccess
| Column | Datatype | Description |
|---|---|---|
|
|
Specifies a universally unique identifier (UUID) for the message object,
such as |
|
|
Specifies the timestamp when AM logged the message, in UTC format to millisecond precision:
|
|
|
Specifies the UUID of the transaction, which identifies an external request when it comes into the system boundary.
Any events generated while handling that request will be assigned that transaction ID,
so that you may see the same transaction ID for different audit event topics.
For example, AM supports a feature where a trusted AM deployment with multiple instances, components,
and ForgeRock products can propagate a transaction ID through each call across the stack.
AM reads the |
|
|
Specifies the name of the audit event.
For example, |
|
|
Specifies the universal identifier for the authenticated user.
For example, |
|
|
Specifies the tracking IDs of the event, used by all topics. |
|
|
Specifies the IP address of the AM server. |
|
|
Specifies the port number used by the AM server.
For example, |
|
|
Specifies the client hostname. This column is only populated if reverse DNS lookup is enabled. |
|
|
Specifies the client IP address. |
|
|
Specifies the client port number. |
|
|
Specifies the protocol associated with the request operation.
Possible values: |
|
|
Specifies the request operation. For Common REST operations, possible values: For PLL operations, possible values: |
|
|
Specifies the detailed information about the request operation. For example:
|
|
|
Specifies the HTTP method requested by the client.
For example, |
|
|
Specifies the HTTP method requested by the client.
For example, |
|
|
Specifies the path of the HTTP request.
For example, |
|
|
Specifies the HTTP query parameter string. For example:
|
|
|
Specifies the HTTP headers for the request. For example: |
|
|
Specifies a JSON map of key-value pairs and appears as its own property to allow for blacklisting fields or values. For example: Note: line feeds and truncated values in the example are for readability purposes. |
|
|
Captures the headers returned by AM to the client (that is, the inverse of |
|
|
Specifies the response status of the request.
For example, |
|
|
Specifies the response status code, depending on the protocol. For Common REST, HTTP failure codes are displayed but not HTTP success codes. For PLL endpoints, PLL error codes are displayed. |
|
|
Specifies the message associated with the response status code.
For example, a response status code of 401 has a response detail of |
|
|
Specifies the time to execute the access event, usually in millisecond precision. |
|
|
Specifies the elapsed time units of the response.
For example, |
|
|
Specifies the AM service utilized.
For example, |
|
|
Specifies the realm where the operation occurred.
For example, the Top Level Realm ( |
am_auditauthentication
| Column | Datatype | Description |
|---|---|---|
|
|
Specifies a universally unique identifier (UUID) for the message object,
such as |
|
|
Specifies the timestamp when AM logged the message, in UTC format to millisecond precision:
|
|
|
Specifies the UUID of the transaction, which identifies an external request when it comes into the system boundary.
Any events generated while handling that request will be assigned that transaction ID,
so that you may see the same transaction ID for different audit event topics.
For example, AM supports a feature where a trusted AM deployment with multiple instances, components,
and ForgeRock products can propagate a transaction ID through each call across the stack.
AM reads the |
|
|
Specifies the name of the audit event.
For example, ` AM-LOGIN-MODULE-COMPLETED` and |
|
|
Specifies the universal identifier for authenticated users.
For example, |
|
|
Specifies the tracking IDs of the event, used by all topics. |
|
|
Depending on the event being logged, specifies the outcome of:
Possible values are |
|
|
Specifies the array of accounts used to authenticate, such as |
|
|
Not used. |
|
|
Specifies the JSON representation of the details of an authentication module, chain, tree or node. AM creates an event as each module or node completes and a final event at the end of the chain or tree. For example: |
|
|
Specifies the AM service utilized.
For example, |
|
|
Specifies the realm where the operation occurred.
For example, the Top Level Realm ( |
am_auditactivity
| Column | Datatype | Description |
|---|---|---|
|
|
Specifies a universally unique identifier (UUID) for the message object,
such as |
|
|
Specifies the timestamp when AM logged the message, in UTC format to millisecond precision:
|
|
|
Specifies the UUID of the transaction, which identifies an external request when it comes into the system boundary.
Any events generated while handling that request will be assigned that transaction ID,
so that you may see the same transaction ID for different audit event topics.
For example, AM supports a feature where a trusted AM deployment with multiple instances, components,
and ForgeRock products can propagate a transaction ID through each call across the stack.
AM reads the |
|
|
Specifies the name of the audit event.
For example, |
|
|
Specifies the universal identifier for authenticated users.
For example, |
|
|
Specifies the tracking IDs of the event, used by all topics. |
|
|
Specifies the user to run the activity as.
May be used in delegated administration.
For example, |
|
|
Specifies the identifier of a system object that has been created, modified, or deleted.
For example, |
|
|
Specifies the state change operation invoked: |
|
|
Specifies the JSON representation of the object prior to the activity. For example: |
|
|
Specifies the JSON representation of the object after the activity. For example: |
|
|
Specifies the columns that were changed.
For example, |
|
|
Not used. |
|
|
Specifies the AM service utilized.
For example, |
|
|
Specifies the realm where the operation occurred.
For example, the Top Level Realm ( |
am_auditconfig
| Column | Datatype | Description |
|---|---|---|
|
|
Specifies a universally unique identifier (UUID) for the message object,
such as |
|
|
Specifies the timestamp when AM logged the message, in UTC format to millisecond precision:
|
|
|
Specifies the UUID of the transaction, which identifies an external request when it comes into the system boundary.
Any events generated while handling that request will be assigned that transaction ID,
so that you may see the same transaction ID for different audit event topics.
For example, AM supports a feature where a trusted AM deployment with multiple instances, components,
and ForgeRock products can propagate a transaction ID through each call across the stack.
AM reads the |
|
|
Specifies the name of the audit event.
For example, |
|
|
Specifies the universal identifier for authenticated users.
For example, |
|
|
Specifies the tracking IDs of the event, used by all topics. |
|
|
Specifies the user to run the activity as.
May be used in delegated administration.
For example, |
|
|
Specifies the identifier of a system object that has been created, modified, or deleted.
For example, |
|
|
Specifies the state change operation invoked: |
|
|
Specifies the JSON representation of the object prior to the activity. For example: |
|
|
Specifies the JSON representation of the object after the activity. For example: |
|
|
Specifies the columns that were changed.
For example, |
|
|
Not used. |
|
|
Specifies the AM service utilized.
For example, |
|
|
Specifies the realm where the operation occurred.
For example, the Top Level Realm ( |
Customize server-side session quota exhaustion actions
This page demonstrates a custom session quota exhaustion action plugin. AM calls a session quota exhaustion action plugin when a user tries to open more server-side sessions than their quota allows. Note that session quotas are not available for client-side sessions.
You only need a custom session quota exhaustion action plugin if the built-in actions are not flexible enough for your deployment. See Session quotas.
Create and install a custom session quota exhaustion action
You build custom session quota exhaustion actions into a .jar that you then plug in to AM. You must also add your new action to the Session service configuration, and restart AM in order to be able to configure it for your use.
Your custom session quota exhaustion action implements
the com.iplanet.dpro.session.service.QuotaExhaustionAction interface, overriding the action method.
The action method performs the action when the session quota is met,
and returns true only if the request for a new session should not be granted.
The example in this section simply removes the first session it finds as the session quota exhaustion action.
/*
 * The contents of this file are subject to the terms of the Common Development and
 * Distribution License (the License). You may not use this file except in compliance with the
 * License.
 *
 * You can obtain a copy of the License at legal/CDDLv1.0.txt. See the License for the
 * specific language governing permission and limitations under the License.
 *
 * When distributing Covered Software, include this CDDL Header Notice in each file and include
 * the License file at legal/CDDLv1.0.txt. If applicable, add the following below the CDDL
 * Header, with the fields enclosed by brackets [] replaced by your own identifying
 * information: "Portions copyright [year] [name of copyright owner]".
 *
 * Copyright 2012-2019 ForgeRock AS. All Rights Reserved
 */

package org.forgerock.openam.examples.quotaexhaustionaction;

import java.util.Map;

import javax.inject.Inject;

import org.forgerock.guice.core.InjectorHolder;
import org.forgerock.openam.session.Session;
import org.forgerock.openam.session.clientsdk.SessionCache;
import org.slf4j.Logger;
import org.slf4j.LoggerFactory;

import com.iplanet.dpro.session.SessionException;
import com.iplanet.dpro.session.SessionID;
import com.iplanet.dpro.session.service.QuotaExhaustionAction;
import com.iplanet.dpro.session.service.SessionService;

/**
 * This is a sample {@link QuotaExhaustionAction} implementation,
 * which randomly kills the first session it finds.
 */
public class SampleQuotaExhaustionAction implements QuotaExhaustionAction {

    private static Logger debug = LoggerFactory.getLogger(SampleQuotaExhaustionAction.class);

    private final SessionCache sessionCache;
    private final SessionService sessionService;

    public SampleQuotaExhaustionAction() {
        this.sessionCache = InjectorHolder.getInstance(SessionCache.class);
        this.sessionService = InjectorHolder.getInstance(SessionService.class);
    }

    @Inject
    public SampleQuotaExhaustionAction(SessionCache sessionCache, SessionService sessionService) {
        this.sessionCache = sessionCache;
        this.sessionService = sessionService;
    }

    /**
     * Check if the session quota for a given user has been exhausted and
     * if so perform the necessary actions. This implementation randomly
     * destroys the first session it finds.
     *
     * @param is               The InternalSession to be activated.
     * @param existingSessions All existing sessions that belong to the same
     *                         uuid (Map:sid->expiration_time).
     * @return true If the session activation request should be rejected,
     *              otherwise false.
     */
    @Override
    public boolean action(
            Session is,
            Map<String, Long> existingSessions, long excessSessionCount) {
        for (Map.Entry<String, Long> entry : existingSessions.entrySet()) {
            try {
                // Get a Session from the cache based on the session ID, and destroy it.
                SessionID sessionId = new SessionID(entry.getKey());
                Session session = sessionCache.getSession(sessionId);
                sessionService.destroySession(session, sessionId);
                // Only destroy the first session.
                break;
            } catch (SessionException se) {
                if (debug.isDebugEnabled()) {
                    debug.debug("Failed to destroy existing session.", se);
                }
                // In this case, deny the session activation request.
                return true;
            }
        }
        return false;
    }
}
If you have not already done so, download and build the sample code.
For information on downloading and building AM sample source code, see How do I access and build the sample code provided for AM (All versions)? in the Knowledge Base.
In the sources, you find the following files:
pom.xml-
Apache Maven project file for the module
This file specifies how to build the sample plugin, and also specifies its dependencies on AM components and on the Servlet API.
src/main/java/org/forgerock/openam/examples/quotaexhaustionaction/SampleQuotaExhaustionAction.java-
Core class for the sample quota exhaustion action plugin
Once built, copy the .jar to WEB-INF/lib/ where AM is deployed.
$ cp target/*.jar /path/to/tomcat/webapps/openam/WEB-INF/lib/Using the ssoadm command, update the Session Service configuration:
$ ssoadm \
 set-attr-choicevals \
 --adminid uid=amAdmin,ou=People,dc=openam,dc=forgerock,dc=org \
 --password-file /tmp/pwd.txt \
 --servicename iPlanetAMSessionService \
 --schematype Global \
 --attributename iplanet-am-session-constraint-handler \
 --add \
 --choicevalues myKey=\
org.forgerock.openam.examples.quotaexhaustionaction.SampleQuotaExhaustionAction
Choice Values were set.
Extract amSession.properties and if necessary the localized versions of this file
from openam-core-7.2.1.jar to WEB-INF/classes/ where AM is deployed.
For example, if AM is deployed under /path/to/tomcat/webapps/openam,
then you could run the following commands:
$ cd /path/to/tomcat/webapps/openam/WEB-INF/classes/
$ jar -xvf ../lib/openam-core-7.2.1.jar amSession.properties
inflated: amSession.properties
Add the following line to amSession.properties:
myKey=Randomly Destroy SessionRestart AM or the container in which it runs.
You can now use the new session quota exhaustion action. First, in the AM admin UI, go to Configure > Global Services and click Session. Then scroll to Resulting behavior if session quota exhausted, and choose an option.
Before moving to your test and production environments,
be sure to add your .jar file and updates to amSession.properties
into a custom .war file that you can then deploy.
You must still update the Session service configuration in order to use your custom session quota exhaustion action.
List session quota exhaustion actions
List session quota exhaustion actions by using the ssoadm command:
$ ssoadm \
get-attr-choicevals \
--adminid uid=amAdmin,ou=People,dc=openam,dc=forgerock,dc=org \
--password-file /tmp/pwd.txt \
--servicename iPlanetAMSessionService \
--schematype Global \
--attributename iplanet-am-session-constraint-handler
I18n Key Choice Value
------------------------- ---…-----------------------------------------
choiceDestroyOldSession org…session.service.DestroyOldestAction
choiceDenyAccess org…session.service.DenyAccessAction
choiceDestroyNextExpiring org…session.service.DestroyNextExpiringAction
choiceDestroyAll org…session.service.DestroyAllAction
myKey org…examples…SampleQuotaExhaustionActionRemove a session quota exhaustion action
Remove a session quota exhaustion action by using the ssoadm command:
$ ssoadm \
 remove-attr-choicevals \
 --adminid uid=amAdmin,ou=People,dc=openam,dc=forgerock,dc=org \
 --password-file /tmp/pwd.txt \
 --servicename iPlanetAMSessionService \
 --schematype Global \
 --attributename iplanet-am-session-constraint-handler \
 --choicevalues \
 org.forgerock.openam.examples.quotaexhaustionaction.SampleQuotaExhaustionAction
Choice Values were removed.