Administrator Tasks
This chapter is written for administrators who must manage and maintain Autonomous Identity.
ForgeRock® Autonomous Identity is an entitlements and roles analytics system that lets you fully manage your company’s access to your data.
An entitlement refers to the rights or privileges assigned to a user or thing for access to specific resources. A company can have millions of entitlements without a clear picture of what they are, what they do, and who they are assigned to. Autonomous Identity solves this problem by using advanced artificial intelligence (AI) and automation technology to determine the full entitlements landscape for your company. The system also detects potential risks arising from incorrect or over-provisioned entitlements that lead to policy violations. Autonomous Identity eliminates the manual re-certification of entitlements and provides a centralized, transparent, and contextual view of all access points within your company.
For installation instructions, see the Autonomous Identity Installation Guide.
For a description of the Autonomous Identity UI console, see the Autonomous Identity Users Guide.
Self Service
Autonomous Identity provides a self service UI page for administrators to change their profile and password information.
The page also lets administrators create time-based API keys for users to access the Autonomous Identity system. For more information, see Generate an API Key.
Reset Your Password
-
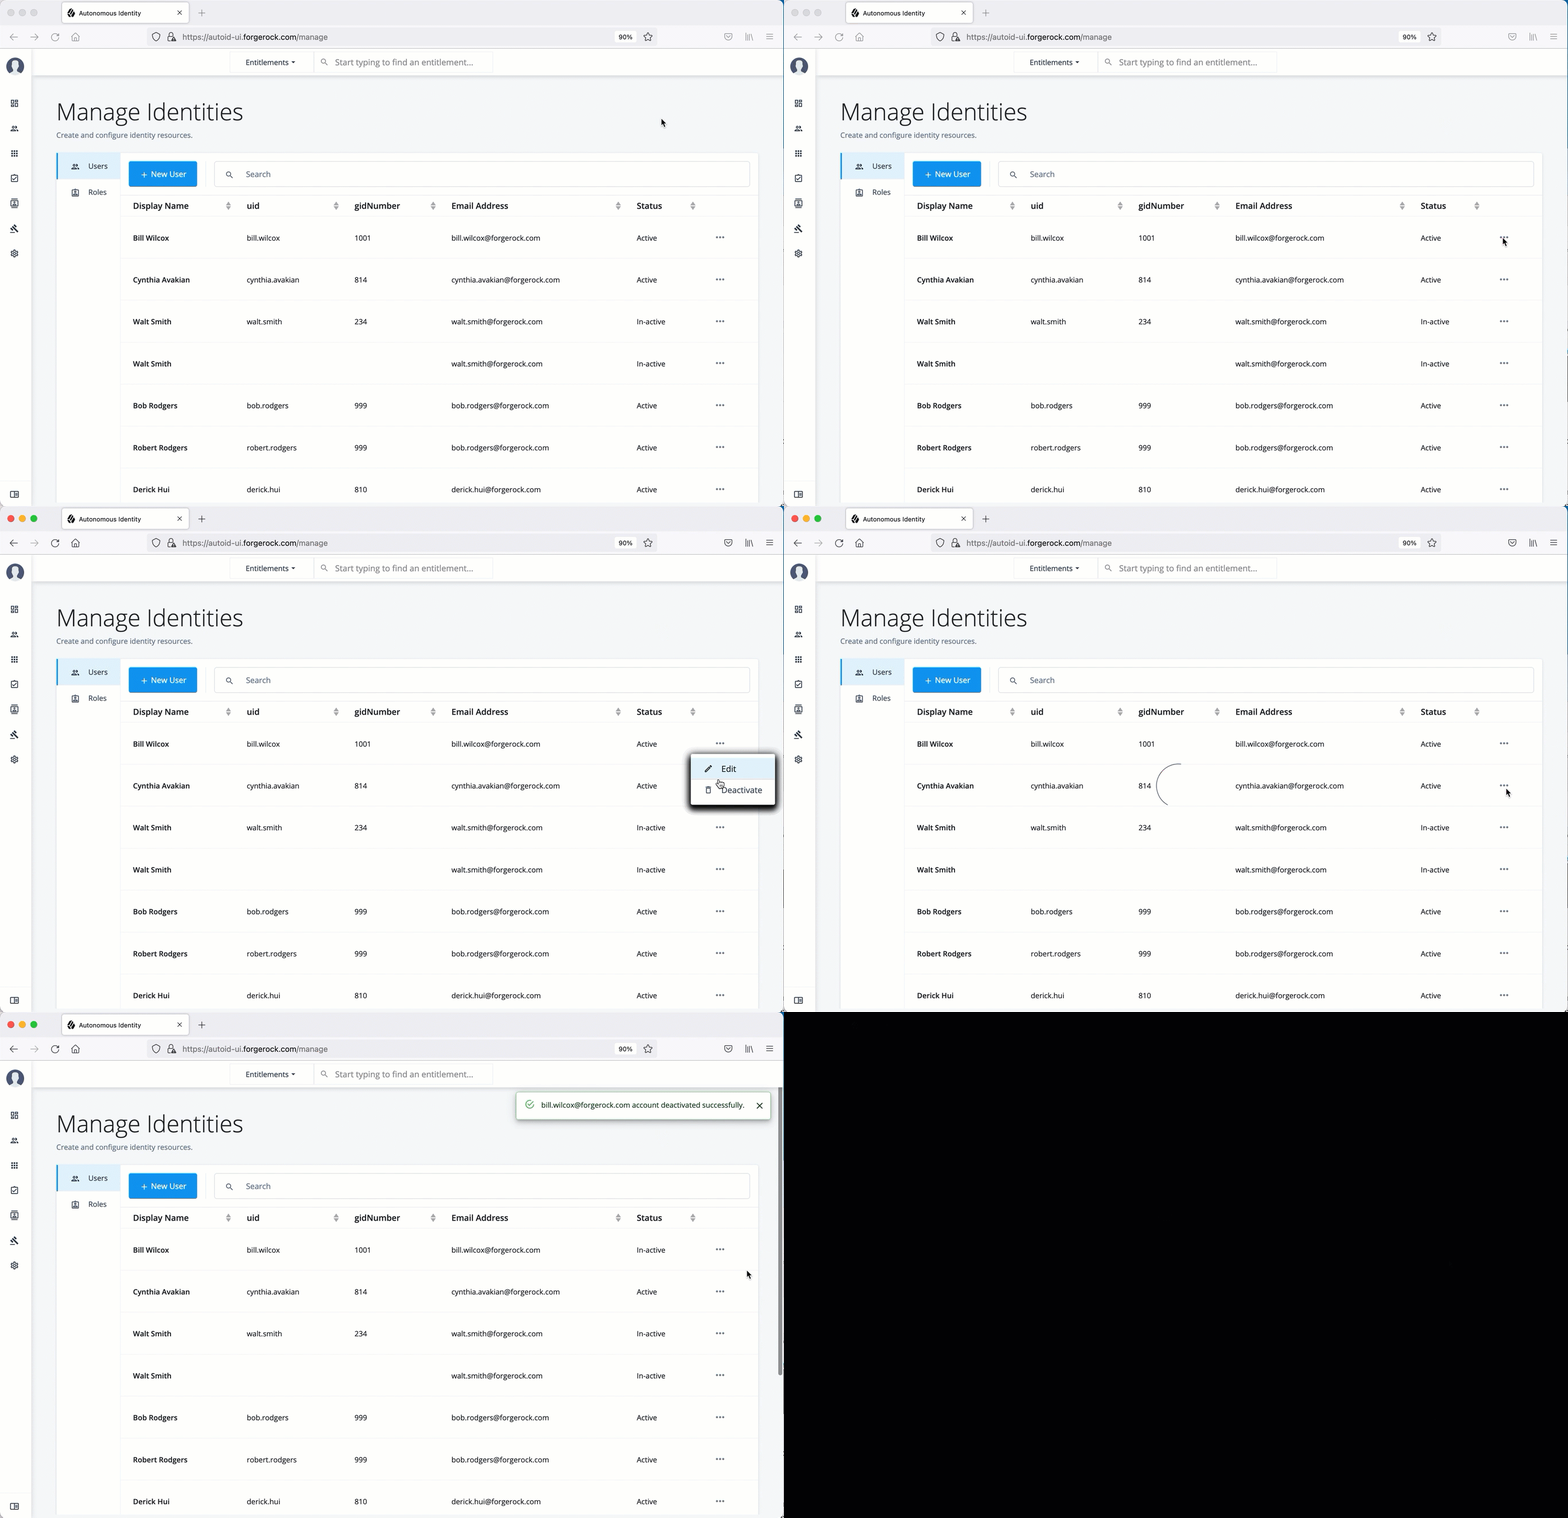
On the Autonomous Identity UI, click the admin drop-down on the top-left of the page.
-
Click Self Service.
-
On the Profile page, enter and re-enter a new password, and then click Save.
See it in action
Update Your Profile
-
On the Autonomous Identity UI, click the admin drop-down on the top-left of the page.
-
Click Self Service.
-
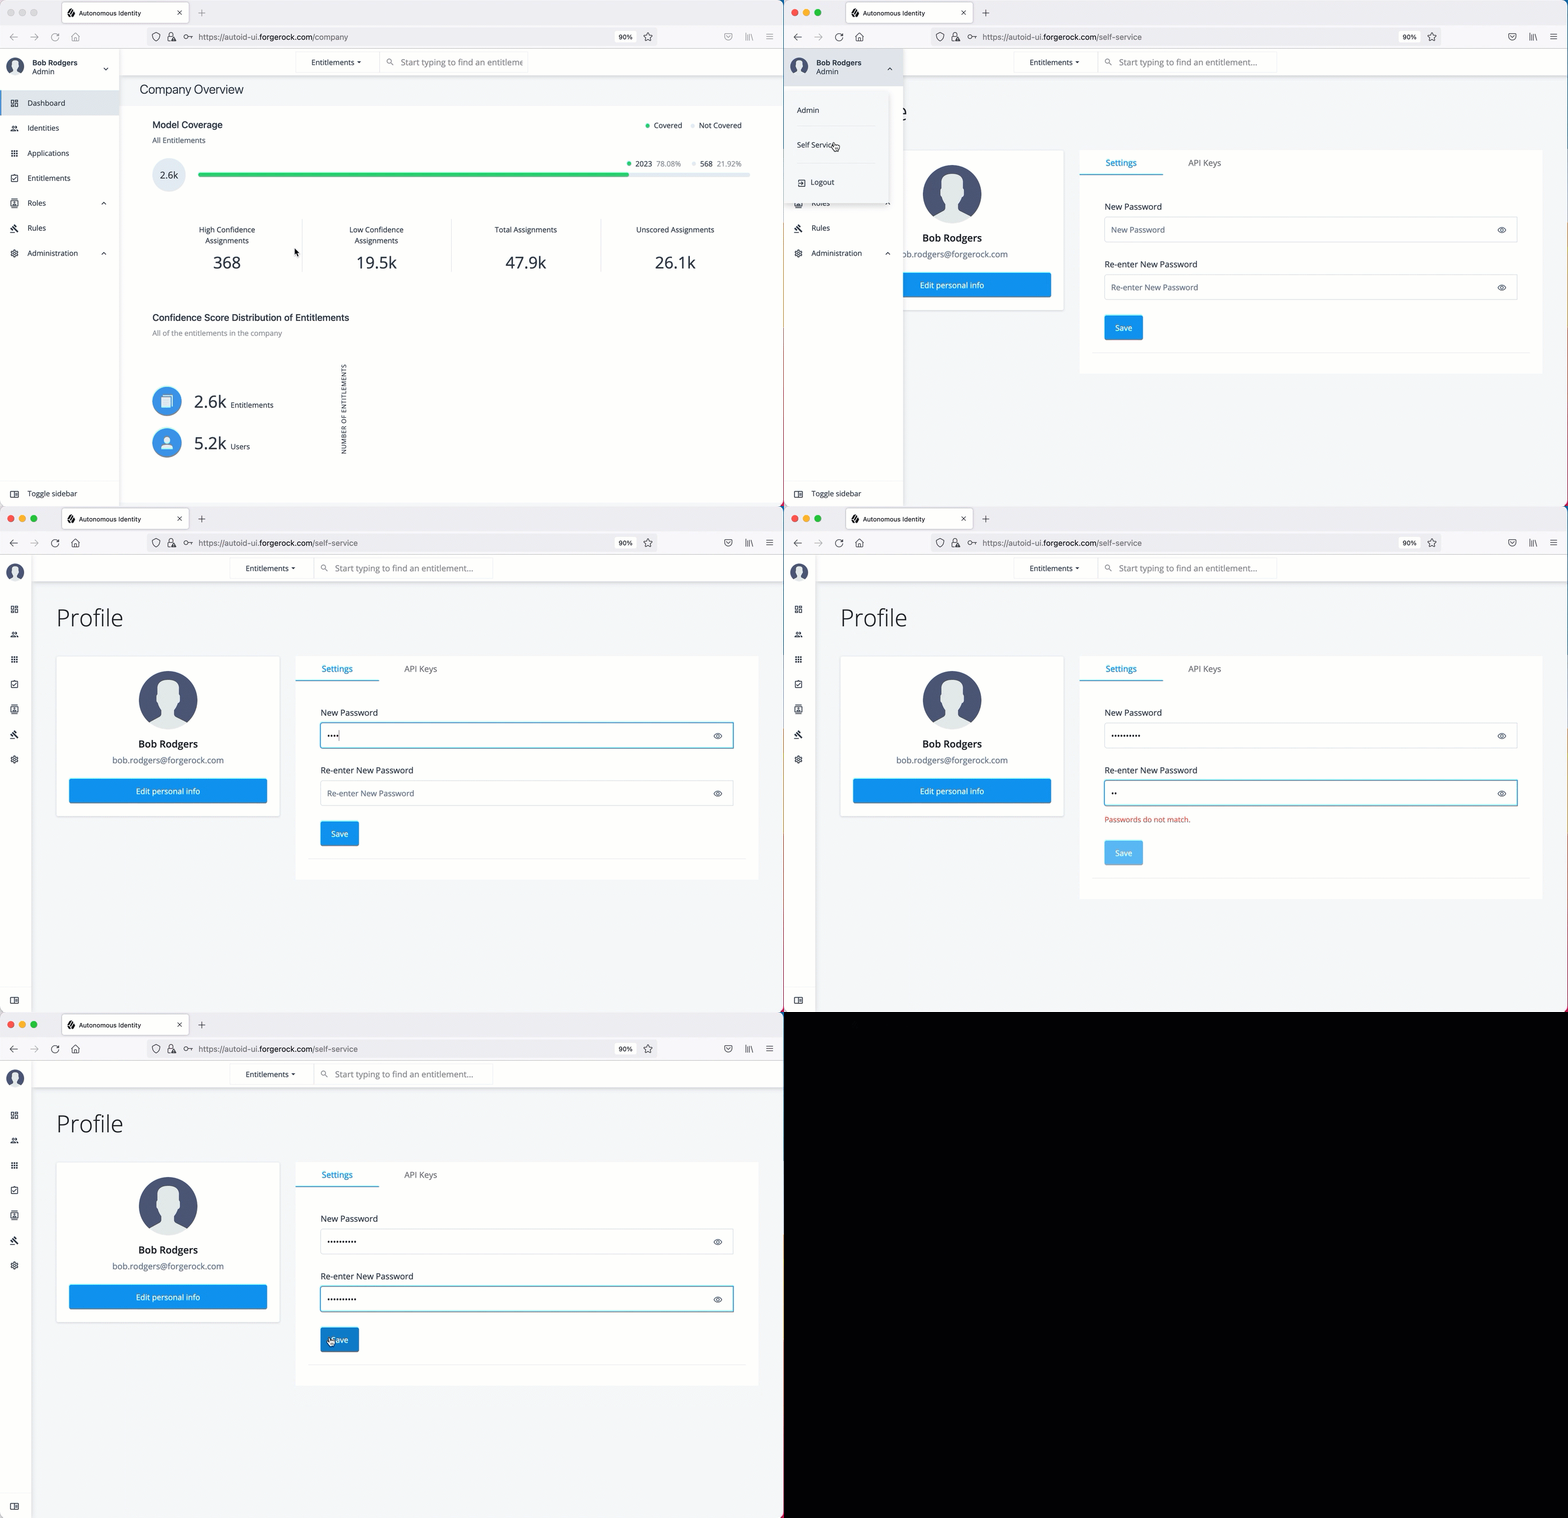
On the Profile page, click Edit personal info to update your profile details:
You cannot change your email address or group ID as these are used to identify each user. -
Update the display name.
-
Update your distinguished name (DN).
-
Update your uid.
-
-
Click Save to apply your changes.
See it in action
Manage Identities
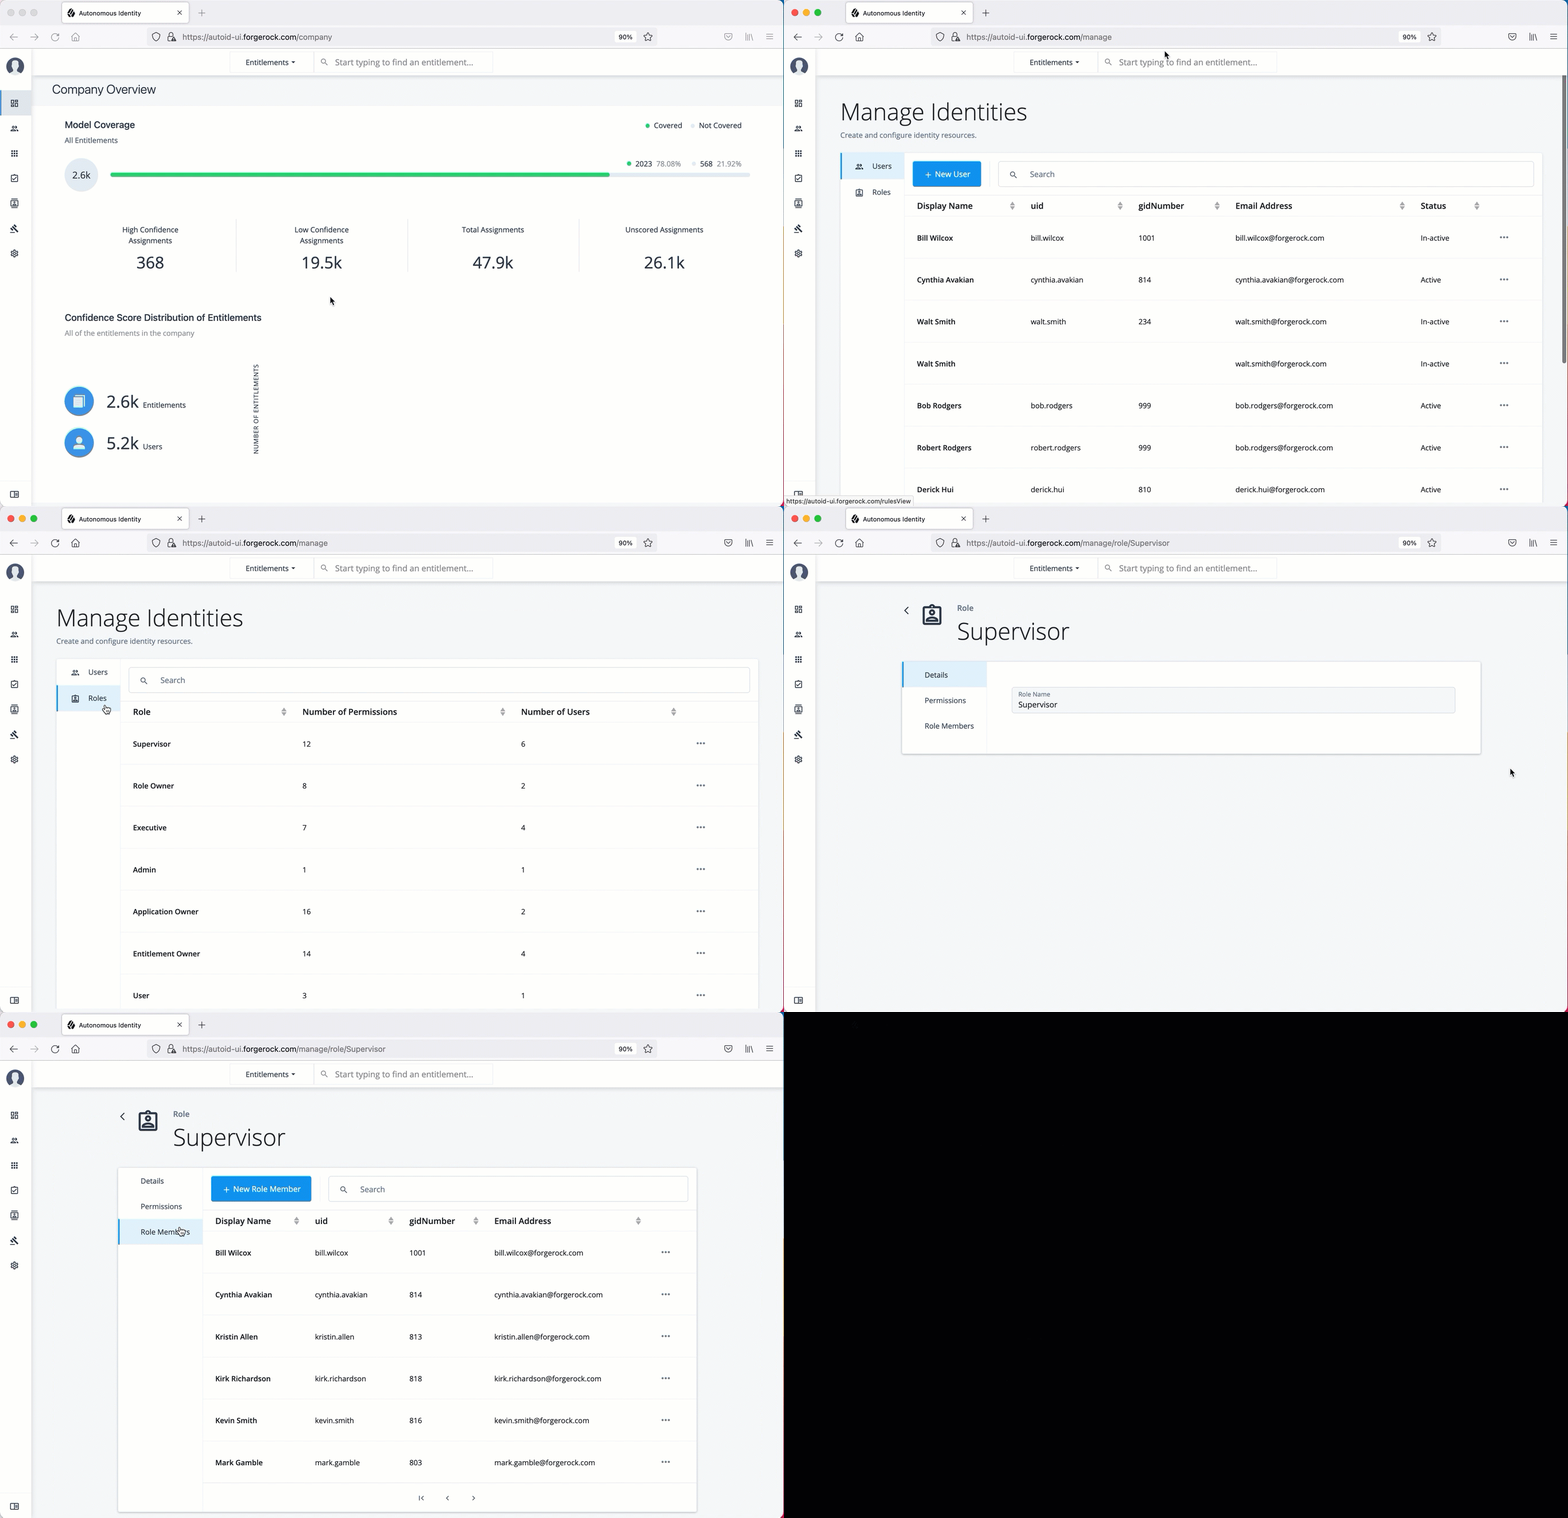
The Manage Identities page lets administrators add or edit, assign roles, and deactivate users to Autonomous Identity.
View the Default Roles
-
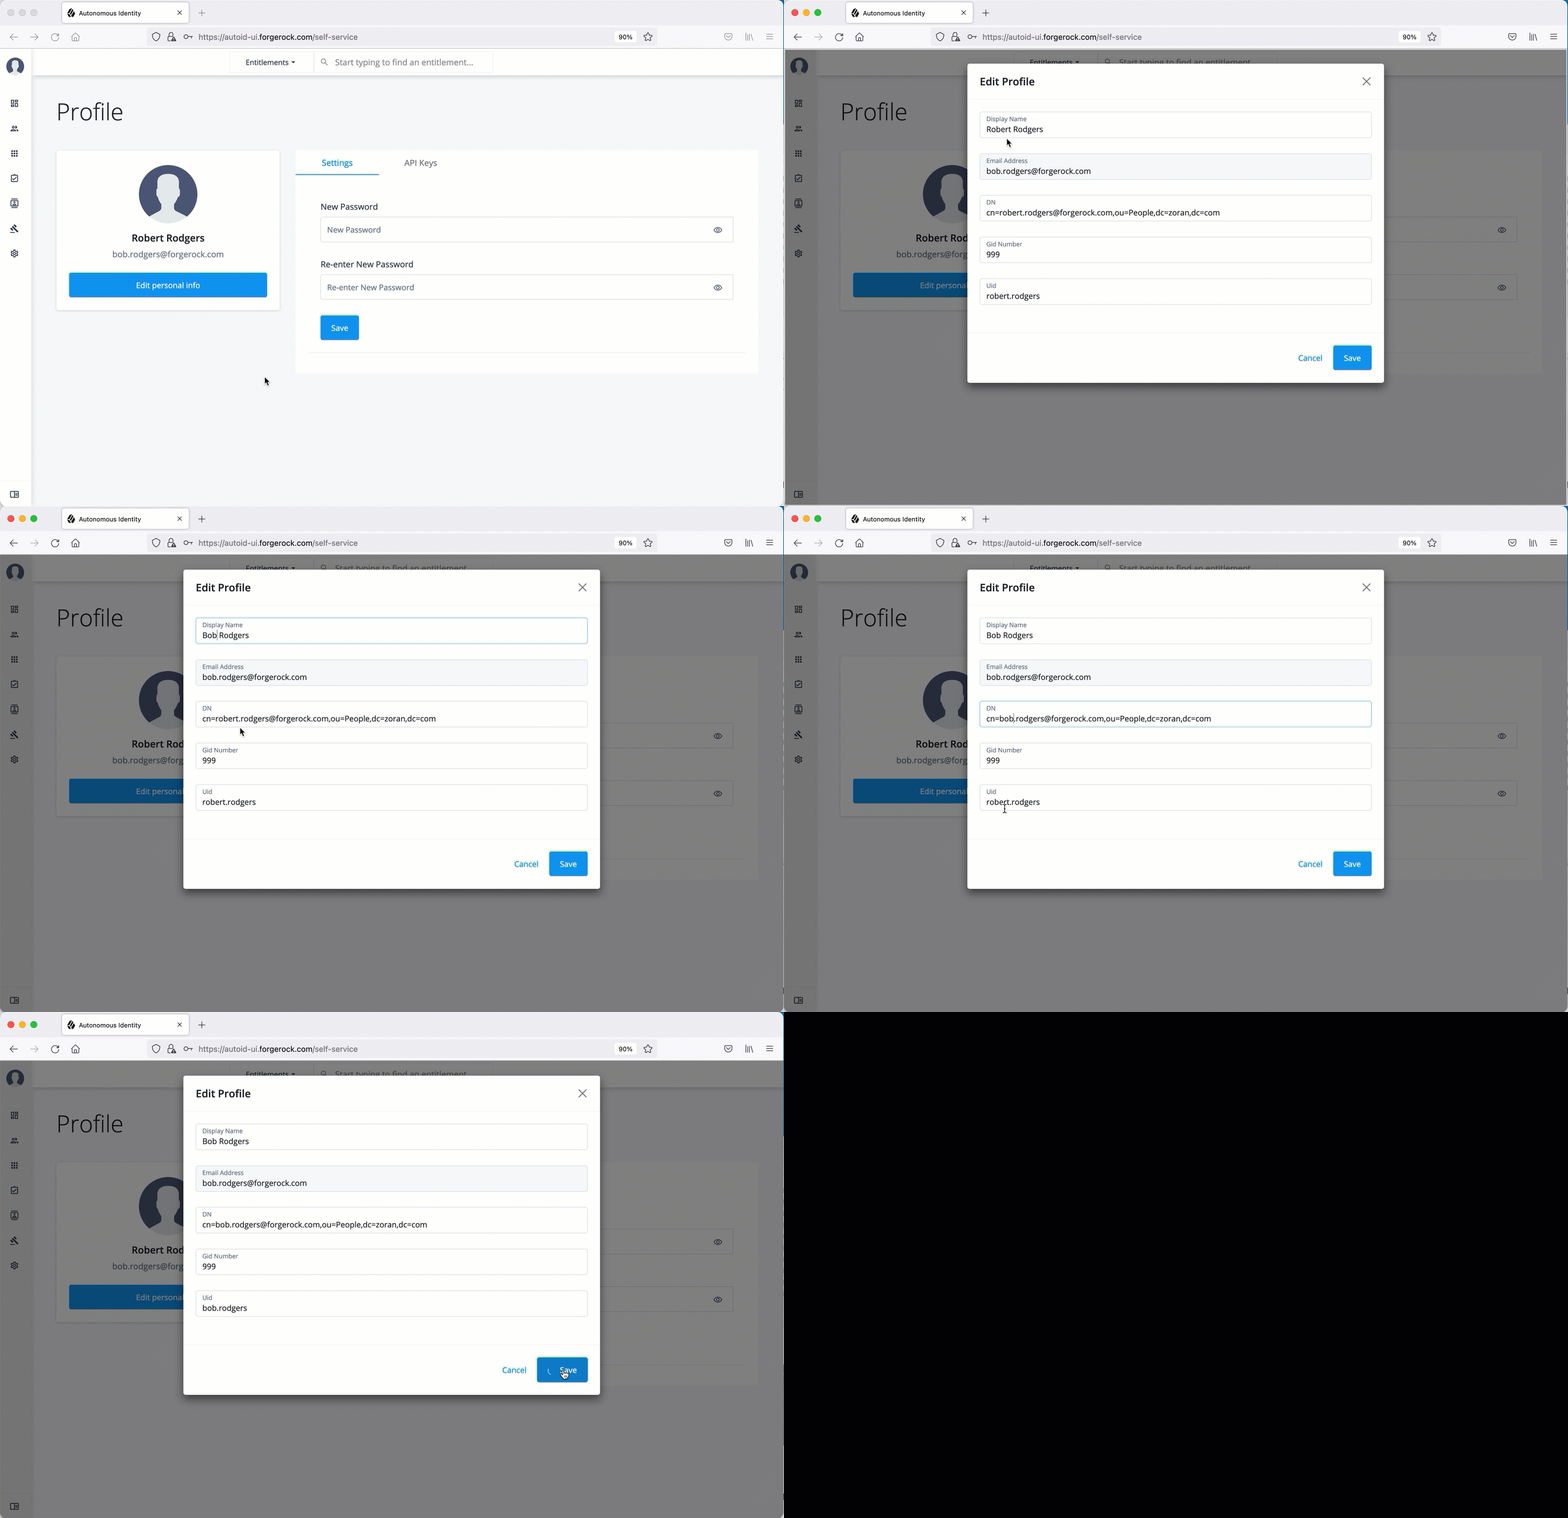
On the Autonomous Identity UI, click the administration icon on the navigation menu, and then click Manage.
-
On the Manage Identities page, click Roles.
-
Select a specific role, and then click Edit to view its details.
-
Click through the Details and Permissions to view its details. You cannot change the permissions in these roles.
-
Click Role Members to see the members associated with this role. If you want to add a user to this Role group, click New Role Member and enter the user’s name. You can enter multiple users. When finished, click Save.
See it in action
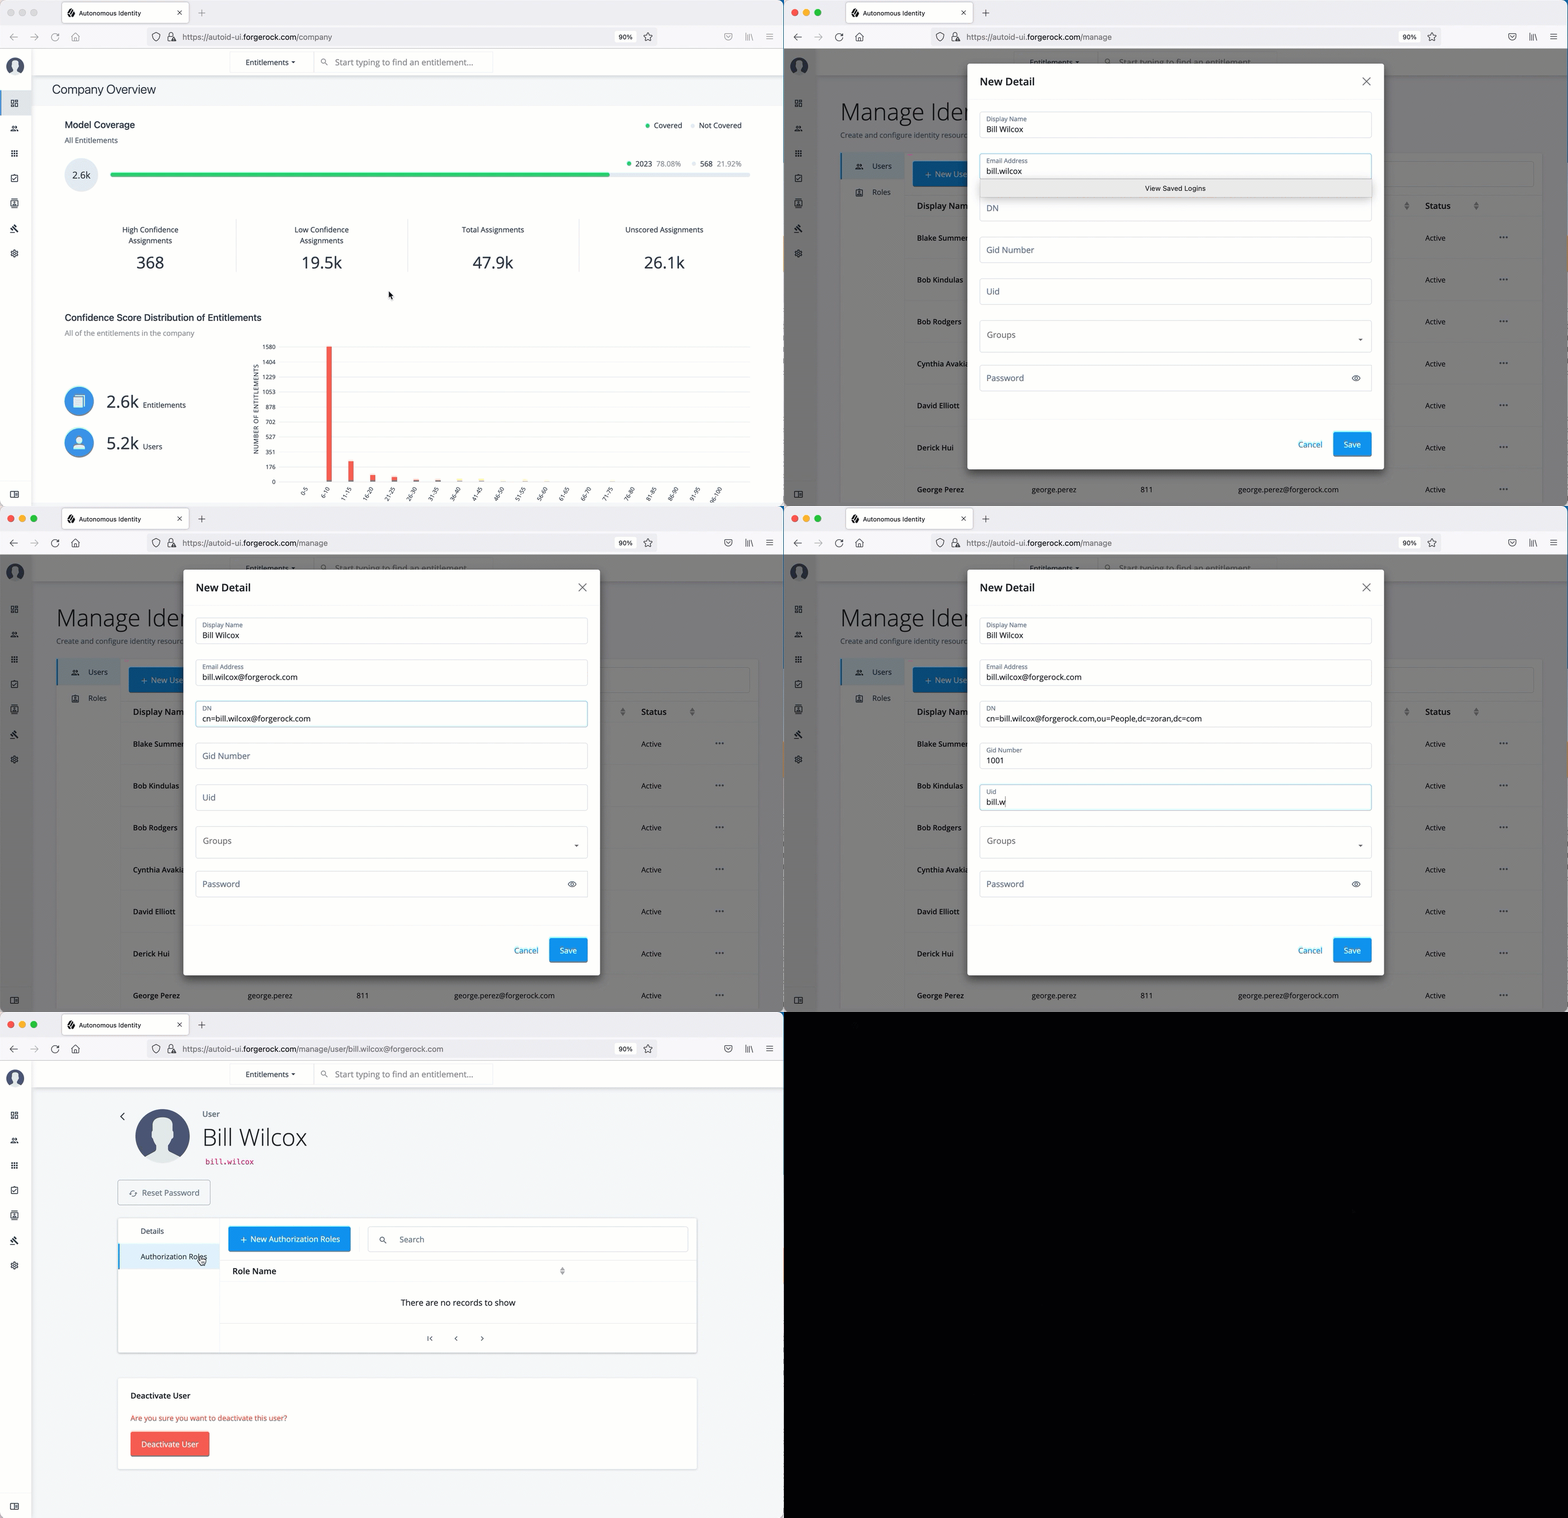
Create a New User
-
On the Autonomous Identity UI, click the administration icon on the navigation menu, and then click Manage.
-
On the Manage Identities page, click New User.
-
Enter the Display Name, Email Address, DN, Gid Number, Uid, and Password for the user.
-
Click Save.
-
Click Authorization Roles, and then click New Authorization Roles. This step is important to assign the proper role to the user.
-
Select a role to assign the user, and then click Save.
See it in action
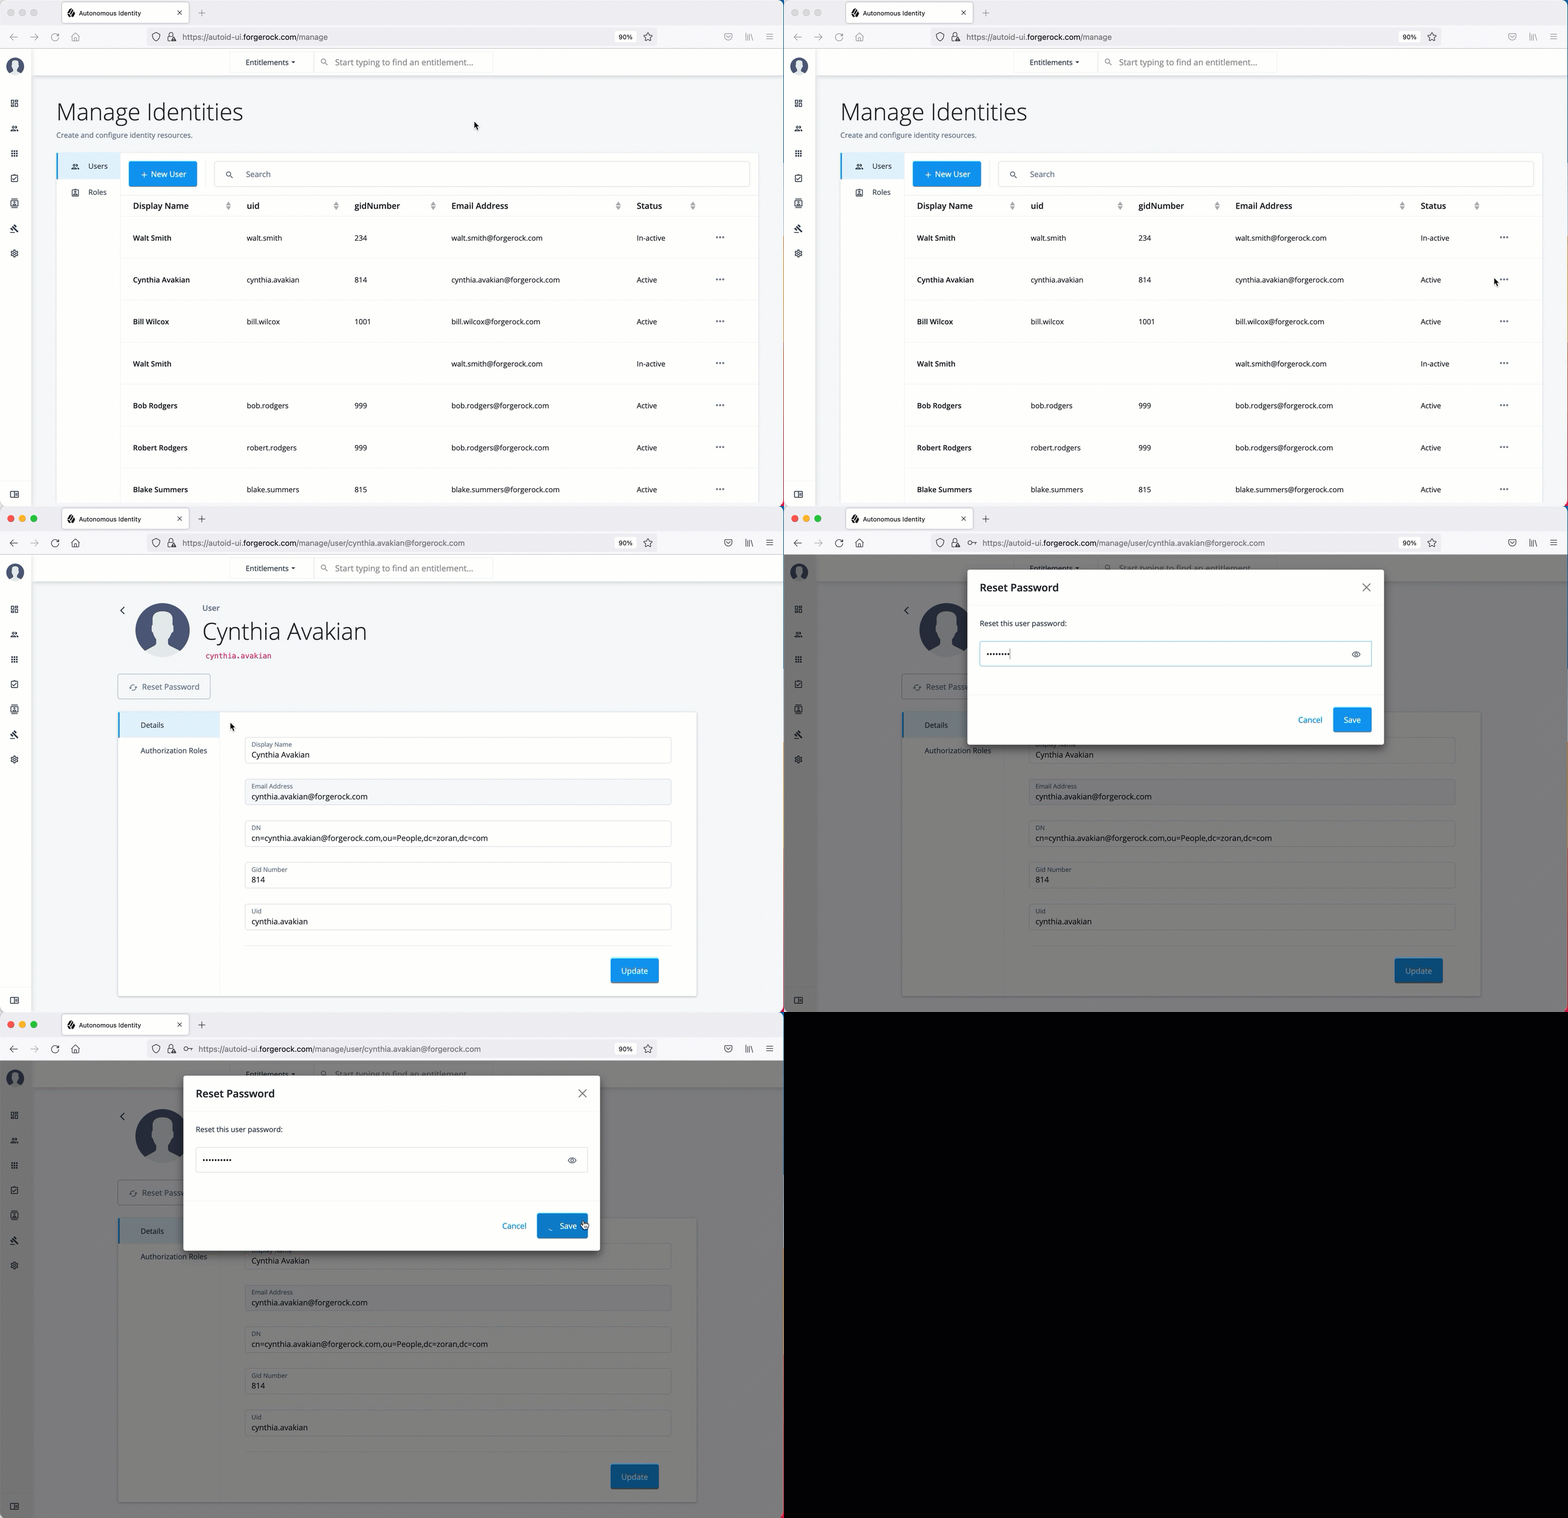
Reset a User’s Password
-
On the Autonomous Identity UI, click the administration icon on the navigation menu, and then click Manage.
-
On the Manage Identities page, search for a user.
-
For a specific user, click Edit.
-
Click Reset Password, enter a temporary password, and then click Save.
See it in action
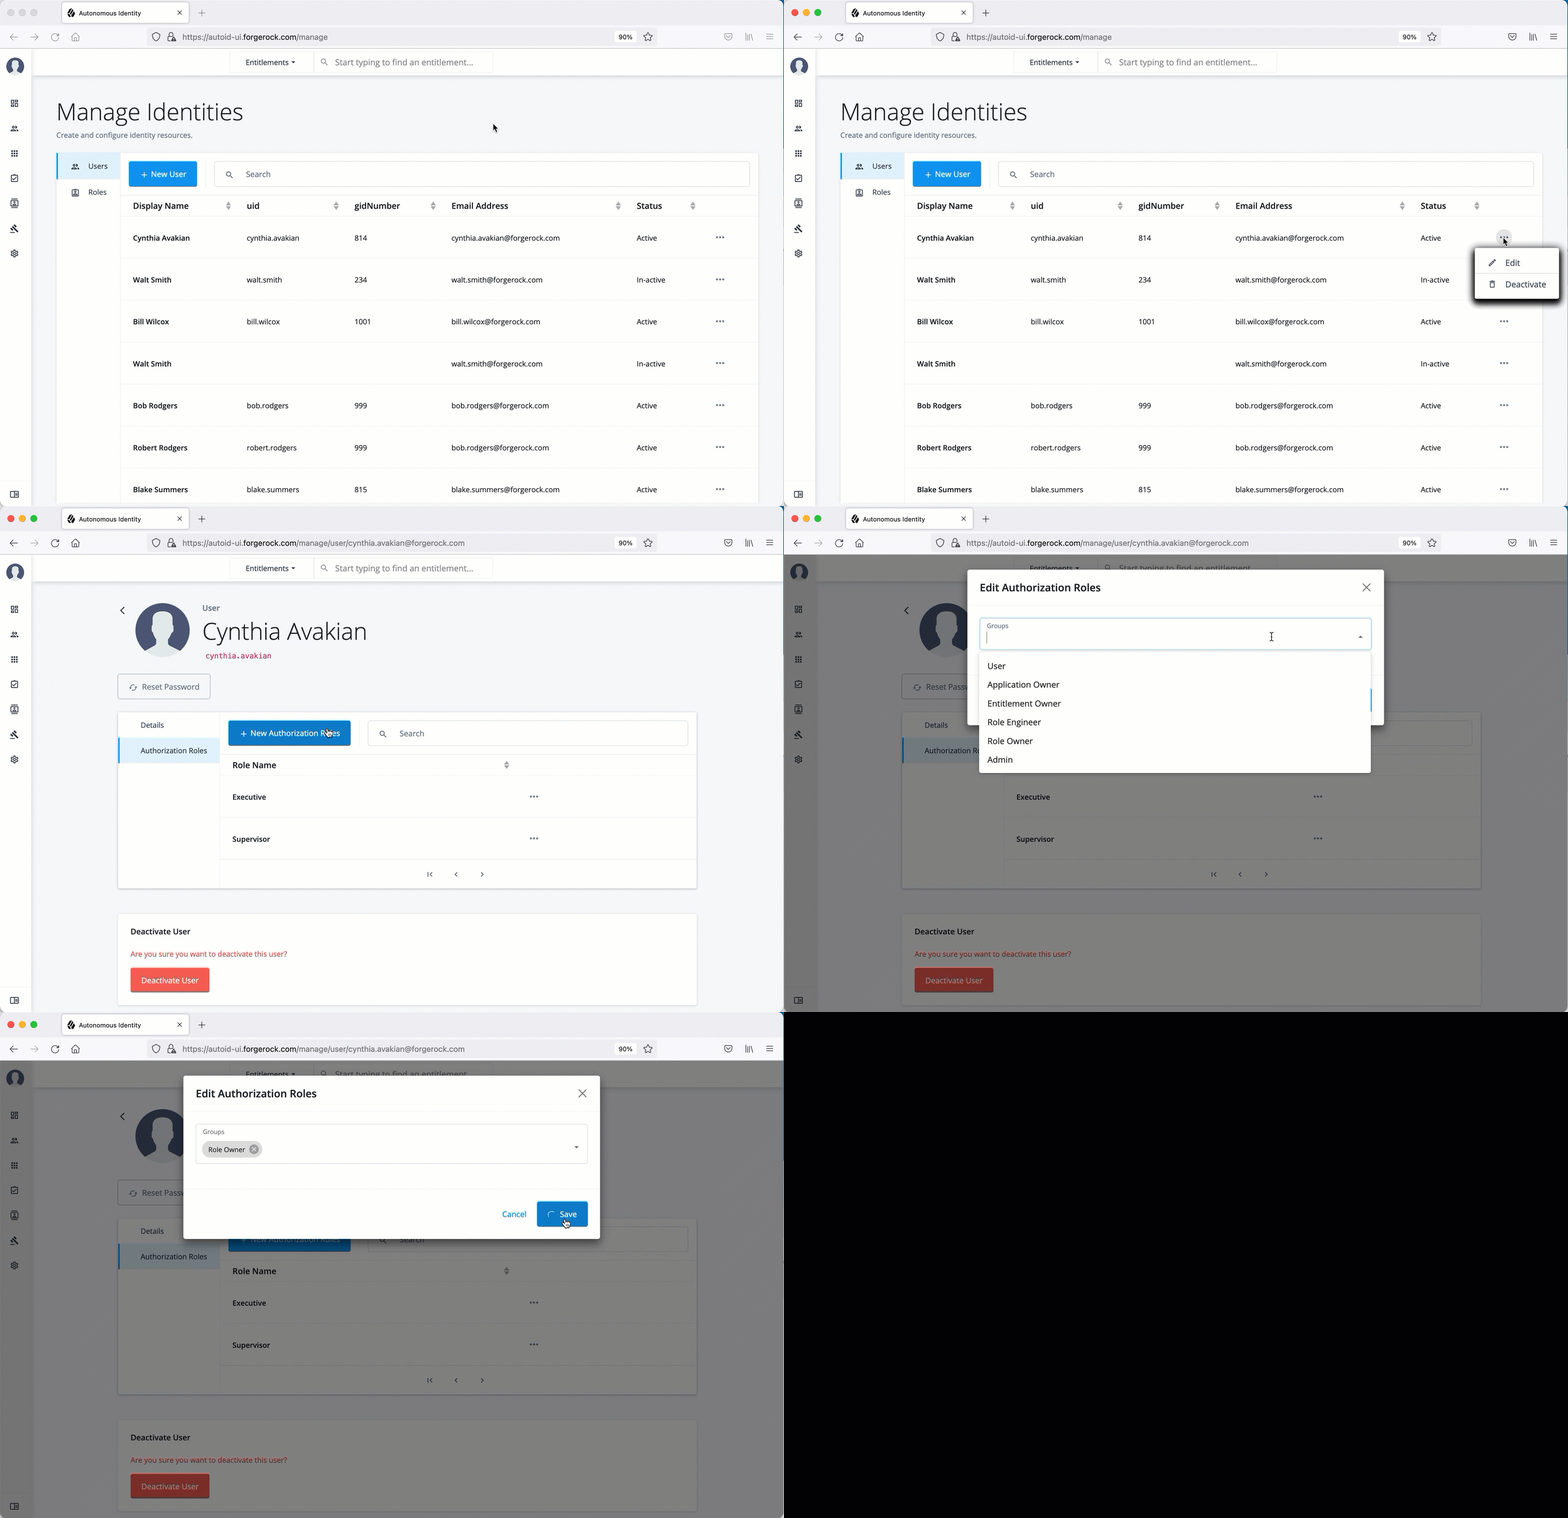
Add a Role to an Existing User
Often administrators need to assign roles to existing members. There are two ways to do this: from the user’s detail page (see below) and through the role’s Role Members page (see View the Default Roles).
-
On the Autonomous Identity UI, click the administration icon on the navigation menu, and then click Manage.
-
On the Manage Identities page, search for a user.
-
For a specific user, click Edit.
-
Click Authorization Roles, and then click New Authorization Roles.
-
Select one or more roles to add, and then click Save.
See it in action
Prepare Data
Autonomous Identity administrators and deployers must set up additional tasks prior to your installment.
The following are some deployments tasks that may occur:
Data Preparation
Once you have deployed Autonomous Identity, you can prepare your dataset into a format that meets the schema.
The initial step is to obtain the data as agreed upon between ForgeRock and your company. The files contain a subset of user attributes from the HR database and entitlement metadata required for the analysis. Only the attributes necessary for analysis are used.
There are a number of steps that must be carried out before your production entitlement data is input into Autonomous Identity. The summary of these steps are outlined below:
Data Collection
Typically, the raw client data is not in a form that meets the Autonomous Identity schema. For example, a unique user identifier can have multiple names, such as user_id, account_id, user_key, or key. Similarly, entitlement columns can have several names, such as access_point, privilege_name, or entitlement.
To get the correct format, here are some general rules:
-
Submit the raw client data in
.csvfile format. The data can be in a single file or multiple files. Data includes application attributes, entitlement assignments, entitlements decriptions, and identities data. -
Duplicate values should be removed.
-
Add optional columns for additional training attributes, for example,
MANAGERS_MANAGERandMANAGER_FLAG. You can add these additional attributes to the schema using the Autonomous Identity UI. For more information, see Set Entity Definitions. -
Make a note of those attributes that differ from the Autonomous Identity schema, which is presented below. This is crucial for setting up your attribute mappings. For more information, see Set Attribute Mappings.
CSV Files and Schema
The required attributes for the schema are as follows:
| Files | Schema |
|---|---|
applications.csv |
This file depends on the attributes that the client wants to include. Here are some required columns:
|
assignments.csv |
|
entitlements.csv |
|
identities.csv |
|
Deployment Tasks
Autonomous Identity administrators and deployers must set up additional tasks during installment.
The following are some deployments tasks that may occur:
Customize the Domain and Namespace
By default, the Autonomous Identity URL and domain for the UI console is set to autoid-ui.forgerock.com, and the URL and domain for the self-service feature is autoid-selfservice.forgerock.com.
-
Customize the domain name and target environment by editing the
/autoid-config/vars.xmlfile. By default, the domain name is set toforgerock.comand the target environment is set toautoid. The default Autonomous Identity URL will be:https://autoid-ui.forgerock.com. For example, we set the domain name toabc.comand the target environment tomyid:domain_name: forgerock.com target_environment: autoid
-
If you set up your domain name and target environment in the previous step, you need to change the certificates to reflect the changes. Autonomous Identity generates self-signed certificates for its default configuration. You must generate new certificates as follows:
-
Generate the private key (that is,
privatekey.pem).$ openssl genrsa 2048 > privatekey.pem
-
Generate the certificate signing request.
$ openssl req -new -key privatekey.pem -out csr.pem
-
Generate the Diffie-Hellman (DH) parameters file (dhparam4096.pem).
$ openssl dhparam -out dhparam4096.pem 4096
-
Create a self-signing certificate.
$ openssl x509 -req -days 365 -in csr.pem -signkey privatekey.pem -out server.crt
-
Use your Certificate Authority (CA) to sign the certificate. The certificate must be
server.crt. -
Copy the files to the
/autoid-config/certsdirectory. -
Make the domain changes on your DNS server or update your
/etc/hosts(Linux/Unix) file orC:\Windows\System32\drivers\etc\hosts(Windows) locally on your machine.
-
Configuring Your Filters
The filters on the Applications pages let you focus your searches based on entitlement and user attributes. In most cases, the default filters should suffice for most environments. However, if you need to customize the filters, you can do so by accessing the configuration service API endpoint as show below.
The default filters for an entitlement are the following:
-
Risk Level
-
Criticality
The default filters for an user attributes are the following:
-
User Department Name
-
Line of Business Subgroup
-
City
-
Jobcode Name
-
User Employee Type
-
Chief Yes No
-
Manager Name
-
Line of Business
-
Cost Center
-
From the deployer node, SSH to the target node.
-
Run the
curlcommand to retrieve the current filters configuration.$ curl -i -k -u configadmin:<configadmin-password> --header "Content-Type: application/json" --request GET https://autoid-configuration-service.forgerock.com/api/configuration/AllowedAttributesForFiltering { "entitlement": [ "risk_level", "criticality", "owner" ], "user": [ "usr_department_name", "line_of_business_subgroup", "city", "jobcode_name", "usr_emp_type", "chief_yes_no", "manager_name", "line_of_business", "cost_center" ] }
-
Update the filters configuration. The syntax is as follows:
$ curl -i -k -u configadmin:<configadmin-password> \
      --request PUT \
      --header "Content-Type: application/json" \
      --data '{<UPDATED_FILTERING_JSON_DATA>}' \
    https://autoid-configuration-service.forgerock.com/api/configuration/AllowedAttributesForFiltering
For example, update the filters list with fewer attributes:
$ curl -i -k -u configadmin:<configadmin-password> \
      --request PUT \
      --header "Content-Type: application/json"
      --data '{ "entitlement":["risk_level","criticality","owner"], \
        "user":["usr_department_name","line_of_business_subgroup","city","jobcode_name"]}' \
    https://autoid-configuration-service.forgerock.com/api/configuration/AllowedAttributesForFiltering

configuration item updated
Change the Vault Passwords
Autonomous Identity uses the ansible vault to store passwords in encrypted files, rather than in plaintext. Autonomous Identity stores the vault file at /autoid-config/vault.yml
saves the encrypted passwords to /config/.autoid_vault_password
. The /config/
mount is internal to the deployer container. The default encryption algorithm used is AES256.
By default, the /autoid-config/vault.yml
file uses the following parameters:
configuration_service_vault:
  basic_auth_password: Welcome123

openldap_vault:
  openldap_password: Welcome123

cassandra_vault:
  cassandra_password: Welcome123
  cassandra_admin_password: Welcome123

mongo_vault:
  mongo_admin_password: Welcome123
  mongo_root_password: Welcome123

elastic_vault:
  elastic_admin_password: Welcome123
  elasticsearch_password: Welcome123
Assume that the vault file is encrypted during the installation. To edit the file:
-
Change to the
/autoid-config/directory.$ cd ~/autoid-config/
-
First, decrypt the vault file.
$ ./deployer.sh decrypt-vault
-
Open a text editor and edit the
vault.ymlfile. -
Encrypt the file again.
$ ./deployer.sh encrypt-vault
Set Up Single Sign-On (SSO)
Autonomous Identity supports single sign-on (SSO) using OpenID Connect (OIDC) JWT tokens. SSO lets you log in once and access multiple applications without the need to re-authenticate yourself. You can use any third-party identity provider (IdP) to connect to Autonomous Identity.
There are two scenarios for SSO configuration:
-
Set up SSO for initial deployments. In this example, we use ForgeRock Access Management (AM) as an OpenID Connect (OIDC) IdP for Autonomous Identity during the original installation of Autonomous Identity. See Set up SSO in initial deployments.
-
Set up SSO for existing deployments. For procedures to set up SSO in an existing Autonomous Identity deployment, see Set up SSO in existing deployments.
|
If you set up SSO-only, be aware that the following services are not deployed with this setting:
If you want to use these services and SSO, set up the authentication as |
Set up SSO in initial deployments
The following procedure requires a running instance of ForgeRock AM. For more information, see ForgeRock Access Management Authentication and Single Sign-On Guide.
-
First, set up your hostnames locally in
/etc/hosts(Linux/Unix) file orC:\Windows\System32\drivers\etc\hosts(Windows):35.189.75.99 autoid-ui.forgerock.com autoid-selfservice.forgerock.com 35.246.65.234 openam.example.com
-
Open a browser and point to
http://openam.example.com:8080/openam. Log in with username:amadmin, password:cangetinam. -
In AM, select Realm > Identities > Groups tab, and add the following groups:
-
AutoIdAdmin
-
AutoIdEntitlementOwner
-
AutoIdExecutive
-
AutoIdSupervisor
-
AutoIdUser
-
-
Add the
demouser to each group. -
Go back to the main AM Admin UI page. Click Configure OAuth Provider.
-
Click Configure OpenID Connect, and then Create.
-
Go to Applications > OAuth 2.0, and then click Add Client. Enter the following properties, specific to your deployment:
Client ID:         <autoid>
Client secret:     <password>
Redirection URIs:  https://<autoid-ui>.<domain>/api/sso/finish
Scope(s):          openid profile
For example:
Client ID:         autoid
Client secret:     Welcome123
Redirection URIs:  https://autoid-ui.forgerock.com/api/sso/finish
Scope(s):          openid profile
-
On the New Client page, go to to the Advanced tab, and enable
Implied Consent. Next, change theToken Endpoint Authentication Methodtoclient_secret_post. -
Edit the OIDC claims script to return
roles (groups), so that AM can match the Autonomous Identity groups. Additionally, add the groups as a claim in the script:"groups": { claim, identity -> [ "groups" : identity.getMemberships(IdType.GROUP).collect { group -> group.name }]}In the
utils.setScopeClaimsMapblock, add:groups: ['groups']
For more information about the OIDC claims script, see the ForgeRock Knowledge Base. The
id_tokenreturns the content that includes the group names.{ "at_hash": "QJRGiQgr1c1sOE4Q8BNyyg", "sub": "demo", "auditTrackingId": "59b6524d-8971-46da-9102-704694cae9bc-48738", "iss": "http://openam.example.com:8080/openam/oauth2", "tokenName": "id_token", "groups": [ "AutoIdAdmin", "AutoIdSupervisor", "AutoIdUser", "AutoIdExecutive", "AutoIdEntitlementOwner", "AutoIdAppOwner", "AutoIdRoleOwner", "AutoIdRoleEngineer" ], "given_name": "demo", "aud": "autoid", "c_hash": "SoLsfc3zjGq9xF5mJG_C9w", "acr": "0", "org.forgerock.openidconnect.ops": "B15A_wXm581fO8INtYHHcwSQtJI", "s_hash": "bOhtX8F73IMjSPeVAqxyTQ", "azp": "autoid", "auth_time": 1592390726, "name": "demo", "realm": "/", "exp": 1592394729, "tokenType": "JWTToken", "family_name": "demo", "iat": 1592391129, "email": "demo@example.com" }For more information on how to retrieve the id_tokenfor observation, see OpenID Connect 1.0 Endpoints.You have successfully configured AM as an OIDC provider.
-
Next, we set up Autonomous Identity. Change to the Autonomous Identity install directory on the deployer machine.
cd ~/autoid-config/
-
Open a text editor, and set the SSO parameters in the
/autoid-config/vars.ymlfile. Make sure to changeLDAPtoSSO.authentication_option: "SSO" oidc_issuer: "http://openam.example.com:8080/openam/oauth2" oidc_auth_url: "http://openam.example.com:8080/openam/oauth2/authorize" oidc_token_url: "http://openam.example.com:8080/openam/oauth2/access_token" oidc_user_info_url: "http://openam.example.com:8080/openam/oauth2/userinfo" oidc_jwks_url: "http://openam.example.com:8080/openam/oauth2/connect/jwk_uri" oidc_callback_url: "https://autoid-ui.forgerock.com/api/sso/finish" oidc_client_scope: 'openid profile' oidc_groups_attribute: groups oidc_uid_attribute: sub oidc_client_id: autoid oidc_client_secret: Welcome1 admin_object_id: AutoIdAdmin entitlement_owner_object_id: AutoIdEntitlementOwner executive_object_id: AutoIdExecutive supervisor_object_id: AutoIdSupervisor user_object_id: AutoIdUser application_owner_object_id: AutoIDAppOwner role_owner_object_id: AutoIDRoleOwner role_engineer_object_id: AutoIDRoleEngineer oidc_end_session_endpoint: "http://openam.example.com:8080/openam/oauth2/logout" oidc_logout_redirect_url: "http://openam.example.com:8088/openman/logout"
-
On the target machine, edit the
/etc/hostsfile or your DNS server, and add an entry foropenam.example.com.35.134.60.234 openam.example.com
-
On the deployer machine, run
deployer.shto push the new configuration.$ deployer.sh run
-
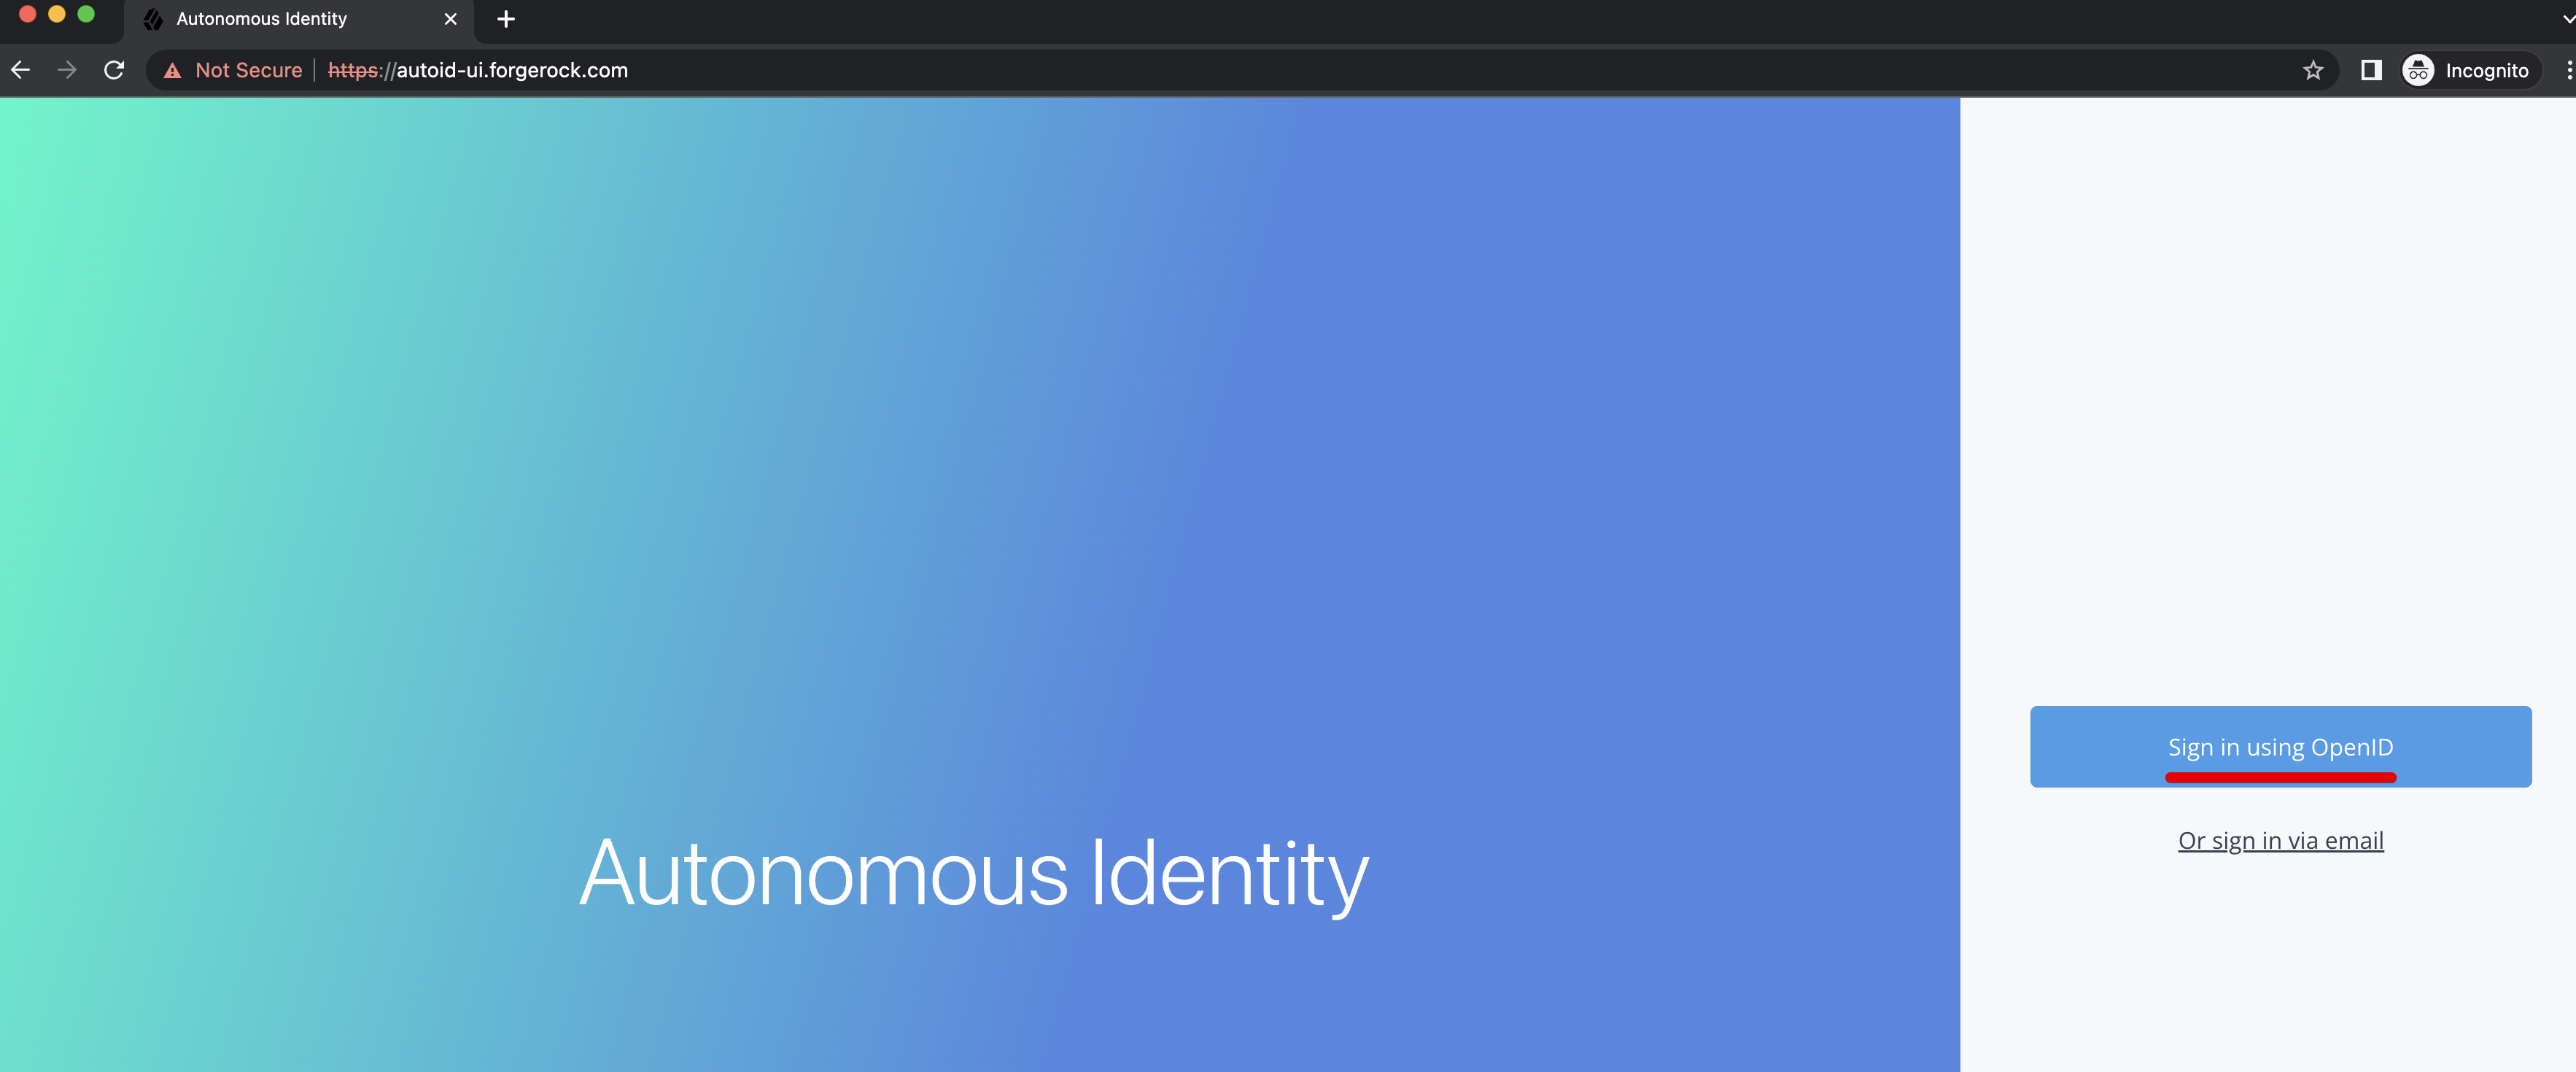
Test the connection now. Access
https://autoid-ui/forgerock.com. The redirect should occur with the following:
Set up SSO in existing deployments
-
First, retrieve and update your
configuration-servicepermissions:-
On the instance where the
configuration-serviceDocker container is running, run the following command to obtain theconfiguration-servicebasic authentication credentials:docker inspect configuration-service_configuration-service
You can find these properties in the output under
Spec > TaskTemplate > Envobject asBASIC_AUTH_PASSWDandBASIC_AUTH_USER: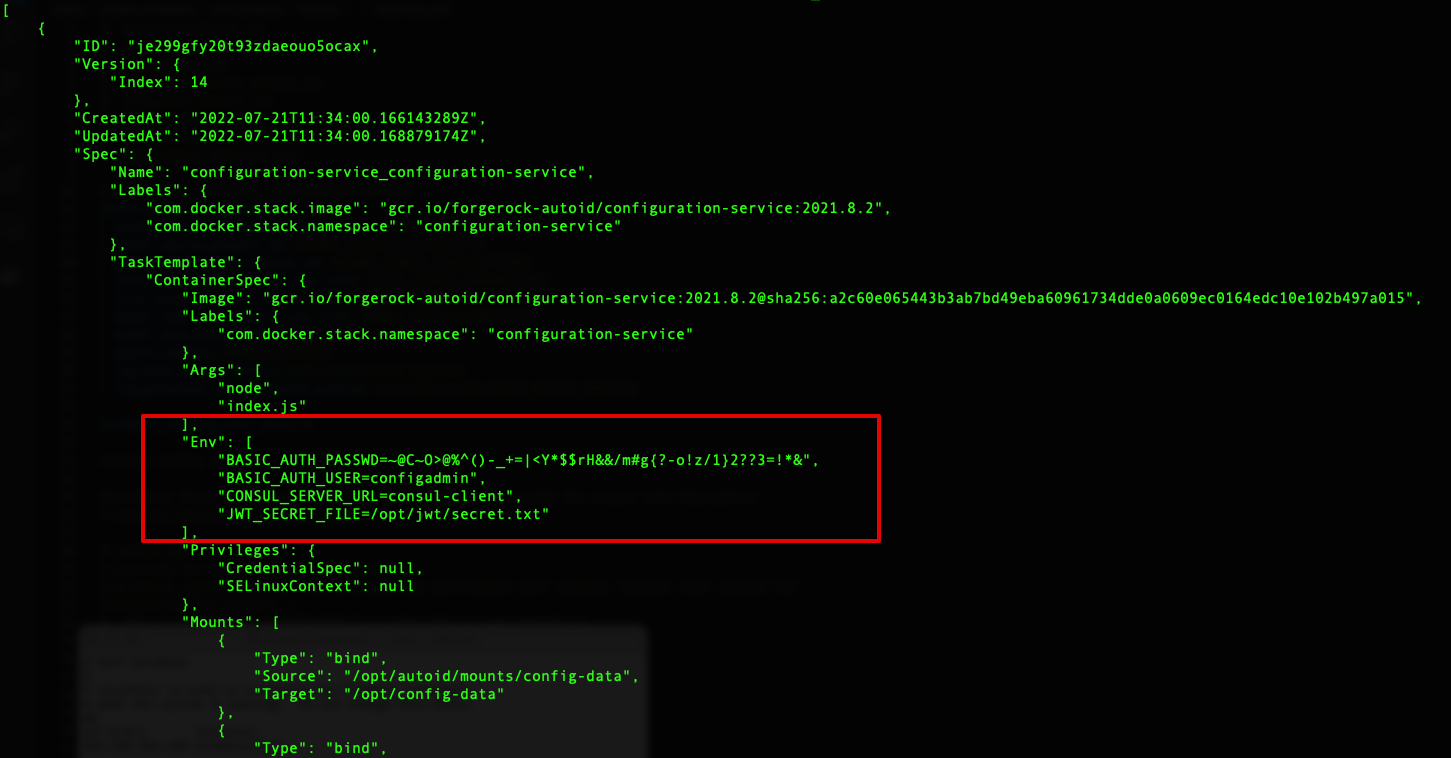
You can also get the password using basic_auth_passwordand opening the~/autoid-config/vault.ymlfile. -
Depending on how you want to configure SSO, use one of the following templates:
localAndSSO template (
LocalAndSSO.json){ "permissions": { "Zoran Admin": { "title": "Admin", "can": "*" }, "###Zoran_Admin_Token###": { "title": "Admin", "can": "*" }, "Zoran Role Engineer": { "title": "Role Engineer", "can": [ "SHOW__ROLE_PAGE", "SEARCH__ALL_ROLES", "CREATE__ROLE", "UPDATE__ROLE", "DELETE__ROLE", "SHOW__ENTITLEMENT", "SHOW__USER", "SHOW__CERTIFICATIONS" ] }, "###Zoran_Role_Engineer_Token###": { "title": "Role Engineer", "can": [ "SHOW__ROLE_PAGE", "SEARCH__ALL_ROLES", "CREATE__ROLE", "UPDATE__ROLE", "DELETE__ROLE", "SHOW__ENTITLEMENT", "SHOW__USER", "SHOW__CERTIFICATIONS" ] }, "Zoran Role Owner": { "title": "Role Owner", "can": [ "SHOW__ROLE_PAGE", "SEARCH__ROLES", "CREATE__ROLE", "UPDATE__ROLE", "DELETE__ROLE", "SHOW__ENTITLEMENT", "SHOW__USER", "SHOW__CERTIFICATIONS" ] }, "###Zoran_Role_Owner_Token###": { "title": "Role Owner", "can": [ "SHOW__ROLE_PAGE", "SEARCH__ROLES", "CREATE__ROLE", "UPDATE__ROLE", "DELETE__ROLE", "SHOW__ENTITLEMENT", "SHOW__USER", "SHOW__CERTIFICATIONS" ] }, "Zoran Application Owner": { "title": "Application Owner", "can": [ "SHOW__APPLICATION_PAGE", "SEARCH__USER", "SEARCH__ENTITLEMENTS_BY_APP_OWNER", "SHOW_OVERVIEW_PAGE", "SHOW__ENTITLEMENT", "SHOW__ENTITLEMENT_USERS", "SHOW__APP_OWNER_FILTER_OPTIONS", "SHOW__ENTT_OWNER_UNSCORED_ENTITLEMENTS", "SHOW__ENTT_OWNER_PAGE", "SHOW__ENTT_OWNER_USER_PAGE", "SHOW__ENTT_OWNER_ENT_PAGE", "SHOW__USER_ENTITLEMENTS", "SHOW__RULES_BY_APP_OWNER", "REVOKE__CERTIFY_ACCESS", "SHOW__USER", "SHOW__CERTIFICATIONS" ] }, "###Zoran_Application_Owner_Token###": { "title": "Application Owner", "can": [ "SHOW__APPLICATION_PAGE", "SEARCH__USER", "SEARCH__ENTITLEMENTS_BY_APP_OWNER", "SHOW_OVERVIEW_PAGE", "SHOW__ENTITLEMENT", "SHOW__ENTITLEMENT_USERS", "SHOW__APP_OWNER_FILTER_OPTIONS", "SHOW__ENTT_OWNER_UNSCORED_ENTITLEMENTS", "SHOW__ENTT_OWNER_PAGE", "SHOW__ENTT_OWNER_USER_PAGE", "SHOW__ENTT_OWNER_ENT_PAGE", "SHOW__USER_ENTITLEMENTS", "SHOW__RULES_BY_APP_OWNER", "REVOKE__CERTIFY_ACCESS", "SHOW__USER", "SHOW__CERTIFICATIONS" ] }, "Zoran Entitlement Owner": { "title": "Entitlement Owner", "can": [ "SEARCH__ENTITLEMENTS_BY_ENTT_OWNER", "SHOW_OVERVIEW_PAGE", "SHOW__ENTITLEMENT", "SHOW__ENTITLEMENT_USERS", "SHOW__ENTT_OWNER_FILTER_OPTIONS", "SHOW__ENTT_OWNER_UNSCORED_ENTITLEMENTS", "SHOW__ENTT_OWNER_PAGE", "SHOW__ENTT_OWNER_USER_PAGE", "SHOW__ENTT_OWNER_ENT_PAGE", "SHOW__USER_ENTITLEMENTS", "SHOW__RULES_BY_ENTT_OWNER", "REVOKE__CERTIFY_ACCESS", "SHOW__USER", "SHOW__CERTIFICATIONS" ] }, "###Zoran_Entitlement_Owner_Token###": { "title": "Entitlement Owner", "can": [ "SEARCH__ENTITLEMENTS_BY_ENTT_OWNER", "SHOW_OVERVIEW_PAGE", "SHOW__ENTITLEMENT", "SHOW__ENTITLEMENT_USERS", "SHOW__ENTT_OWNER_FILTER_OPTIONS", "SHOW__ENTT_OWNER_UNSCORED_ENTITLEMENTS", "SHOW__ENTT_OWNER_PAGE", "SHOW__ENTT_OWNER_USER_PAGE", "SHOW__ENTT_OWNER_ENT_PAGE", "SHOW__USER_ENTITLEMENTS", "SHOW__RULES_BY_ENTT_OWNER", "REVOKE__CERTIFY_ACCESS", "SHOW__USER", "SHOW__CERTIFICATIONS" ] }, "Zoran Executive": { "title": "Executive", "can": [ "SEARCH__USER", "SHOW__ASSIGNMENTS_STATS", "SHOW__COMPANY_PAGE", "SHOW__COMPANY_ENTITLEMENTS_DATA", "SHOW__CRITICAL_ENTITLEMENTS", "SHOW__ENTITLEMENT_AVG_GROUPS", "SHOW__USER_ENTITLEMENTS" ] }, "###Zoran_Executive_Token###": { "title": "Executive", "can": [ "SEARCH__USER", "SHOW__ASSIGNMENTS_STATS", "SHOW__COMPANY_PAGE", "SHOW__COMPANY_ENTITLEMENTS_DATA", "SHOW__CRITICAL_ENTITLEMENTS", "SHOW__ENTITLEMENT_AVG_GROUPS", "SHOW__USER_ENTITLEMENTS" ] }, "Zoran Supervisor": { "title": "Supervisor", "can": [ "SEARCH__USER", "SHOW_OVERVIEW_PAGE", "SHOW__SUPERVISOR_FILTER_OPTIONS", "SHOW__SUPERVISOR_PAGE", "SHOW__SUPERVISOR_ENTITLEMENT_USERS", "SHOW__SUPERVISOR_USER_ENTITLEMENTS", "SHOW__SUPERVISOR_UNSCORED_ENTITLEMENTS", "SEARCH__SUPERVISOR_USER_ENTITLEMENTS", "REVOKE__CERTIFY_ACCESS", "SHOW__ENTITLEMENT", "SHOW__USER", "SHOW__CERTIFICATIONS" ] }, "###Zoran_Supervisor_Token###": { "title": "Supervisor", "can": [ "SEARCH__USER", "SHOW_OVERVIEW_PAGE", "SHOW__SUPERVISOR_FILTER_OPTIONS", "SHOW__SUPERVISOR_PAGE", "SHOW__SUPERVISOR_ENTITLEMENT_USERS", "SHOW__SUPERVISOR_USER_ENTITLEMENTS", "SHOW__SUPERVISOR_UNSCORED_ENTITLEMENTS", "SEARCH__SUPERVISOR_USER_ENTITLEMENTS", "REVOKE__CERTIFY_ACCESS", "SHOW__ENTITLEMENT", "SHOW__USER", "SHOW__CERTIFICATIONS" ] }, "Zoran User": { "title": "User", "can": [ "SHOW__ENTITLEMENT", "SHOW__USER", "SHOW__CERTIFICATIONS" ] }, "###Zoran_User_Token###": { "title": "User", "can": [ "SHOW__ENTITLEMENT", "SHOW__USER", "SHOW__CERTIFICATIONS" ] }, "Zoran Service Connector": { "title": "Service Connector", "can": [ "SERVICE_CONNECTOR", "SHOW__API_KEY_MGMT_PAGE", "SHOW__ENTITLEMENT", "SHOW__USER", "SHOW__CERTIFICATIONS", "SHOW__RULES" ] }, "###Zoran_Service_Connector###": { "title": "Service Connector", "can": [ "SERVICE_CONNECTOR", "SHOW__API_KEY_MGMT_PAGE", "SHOW__ENTITLEMENT", "SHOW__USER", "SHOW__CERTIFICATIONS", "SHOW__RULES" ] } } }SSO template (
SSO.json){ "permissions": { "###Zoran_Admin_Token###": { "title": "Admin", "can": "*" }, "###Zoran_Role_Engineer_Token###": { "title": "Role Engineer", "can": [ "SHOW__ROLE_PAGE", "SEARCH__ALL_ROLES", "CREATE__ROLE", "UPDATE__ROLE", "DELETE__ROLE", "SHOW__ENTITLEMENT", "SHOW__USER", "SHOW__CERTIFICATIONS" ] }, "###Zoran_Role_Owner_Token###": { "title": "Role Owner", "can": [ "SHOW__ROLE_PAGE", "SEARCH__ROLES", "CREATE__ROLE", "UPDATE__ROLE", "DELETE__ROLE", "SHOW__ENTITLEMENT", "SHOW__USER", "SHOW__CERTIFICATIONS" ] }, "###Zoran_Application_Owner_Token###": { "title": "Application Owner", "can": [ "SHOW__APPLICATION_PAGE", "SEARCH__USER", "SEARCH__ENTITLEMENTS_BY_APP_OWNER", "SHOW_OVERVIEW_PAGE", "SHOW__ENTITLEMENT", "SHOW__ENTITLEMENT_USERS", "SHOW__APP_OWNER_FILTER_OPTIONS", "SHOW__ENTT_OWNER_UNSCORED_ENTITLEMENTS", "SHOW__ENTT_OWNER_PAGE", "SHOW__ENTT_OWNER_USER_PAGE", "SHOW__ENTT_OWNER_ENT_PAGE", "SHOW__USER_ENTITLEMENTS", "SHOW__RULES_BY_APP_OWNER", "REVOKE__CERTIFY_ACCESS", "SHOW__USER", "SHOW__CERTIFICATIONS" ] }, "###Zoran_Entitlement_Owner_Token###": { "title": "Entitlement Owner", "can": [ "SEARCH__ENTITLEMENTS_BY_ENTT_OWNER", "SHOW_OVERVIEW_PAGE", "SHOW__ENTITLEMENT", "SHOW__ENTITLEMENT_USERS", "SHOW__ENTT_OWNER_FILTER_OPTIONS", "SHOW__ENTT_OWNER_UNSCORED_ENTITLEMENTS", "SHOW__ENTT_OWNER_PAGE", "SHOW__ENTT_OWNER_USER_PAGE", "SHOW__ENTT_OWNER_ENT_PAGE", "SHOW__USER_ENTITLEMENTS", "SHOW__RULES_BY_ENTT_OWNER", "REVOKE__CERTIFY_ACCESS", "SHOW__USER", "SHOW__CERTIFICATIONS" ] }, "###Zoran_Executive_Token###": { "title": "Executive", "can": [ "SEARCH__USER", "SHOW__ASSIGNMENTS_STATS", "SHOW__COMPANY_PAGE", "SHOW__COMPANY_ENTITLEMENTS_DATA", "SHOW__CRITICAL_ENTITLEMENTS", "SHOW__ENTITLEMENT_AVG_GROUPS", "SHOW__USER_ENTITLEMENTS" ] }, "###Zoran_Supervisor_Token###": { "title": "Supervisor", "can": [ "SEARCH__USER", "SHOW_OVERVIEW_PAGE", "SHOW__SUPERVISOR_FILTER_OPTIONS", "SHOW__SUPERVISOR_PAGE", "SHOW__SUPERVISOR_ENTITLEMENT_USERS", "SHOW__SUPERVISOR_USER_ENTITLEMENTS", "SHOW__SUPERVISOR_UNSCORED_ENTITLEMENTS", "SEARCH__SUPERVISOR_USER_ENTITLEMENTS", "REVOKE__CERTIFY_ACCESS", "SHOW__ENTITLEMENT", "SHOW__USER", "SHOW__CERTIFICATIONS" ] }, "###Zoran_User_Token###": { "title": "User", "can": [ "SHOW__ENTITLEMENT", "SHOW__USER", "SHOW__CERTIFICATIONS" ] }, "###Zoran_Service_Connector###": { "title": "Service Connector", "can": [ "SERVICE_CONNECTOR", "SHOW__API_KEY_MGMT_PAGE", "SHOW__ENTITLEMENT", "SHOW__USER", "SHOW__CERTIFICATIONS", "SHOW__RULES" ] } } } -
Edit the Permissions object in the templates by replacing the
Zoran_…_Tokenfields with the actual SSO group IDs (object_ids):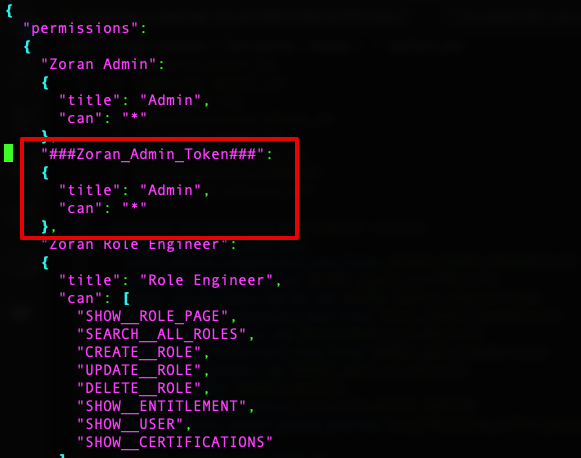
Next, we set up Autonomous Identity.
For SSO only:
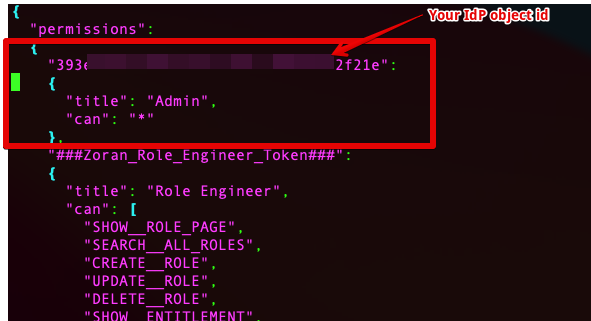
For LocalAndSSO:
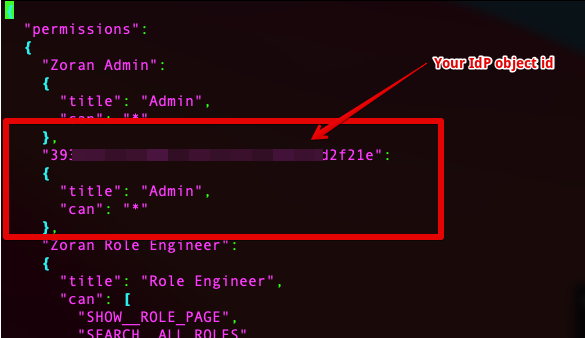
-
Add an entry to your local system’s
/etc/hostsfile or DNS entry for theconfiguration-servicedomain:127.0.0.1 autoid-configuration-service.forgerock.com autoid-ui.forgerock.com
-
Use
curlto update the current permissions configuration object. For example, replace the "<>" placeholders with actual values using the json file and password:curl -k -u configadmin -X PUT -H "Content-Type: application/json" \ -d @LocalAndSSO.json https://autoid-configuration-service.forgerock.com/api/configuration/PermissionsConf
If everything is okay, you should see the following:

-
Use curl to verify the new permissions. You should see a response that includes the configuration changes you made in json:
curl -k -u configadmin -X GET -H "Content-Type: application/json" \
-d @LocalAndSSO.json https://autoid-configuration-service.forgerock.com/api/configuration/PermissionsConf
-
-
Next, update the JAS container environment variables:
-
On the instance where Docker is running, create a backup of the
/opt/autoid/res/jas/docker-compose.ymlfile, and edit the variables in the environment section. For example, change the following variables:From:
- OIDC_ENABLED=False
- GROUPS_ATTRIBUTE=_groups
- OIDC_JWKS_URL=na
To:
- OIDC_ENABLED=True
- GROUPS_ATTRIBUTE=groups
- OIDC_JWKS_URL= <Same value as in the zoran-api. See step 3 below>
The GROUPS_ATTRIBUTEvariable must match theOIDC_GROUPS_ATTRIBUTEvariable used in thedocker-compose.ymlfile. -
Remove the running JAS container and re-deploy:
docker stack rm jas

docker stack deploy --with-registry-auth --compose-file /opt/autoid/res/jas/docker-compose.yml jas
-
-
Next, update the
zoran-apicontainer environment variables:-
On the instance where Docker is running, create a backup of the
/opt/autoid/res/api/docker-compose.ymlfile, and edit the following variables in the file replacing the\$\{…\}placeholders:- OIDC_ISSUER=${OIDC_ISSUER} - OIDC_AUTH_URL=${OIDC_AUTH_URL} - OIDC_TOKEN_URL=${OIDC_TOKEN_URL} - OIDC_USER_INFO_URL=${OIDC_USER_INFO_URL} - OIDC_CLIENT_ID=${OIDC_CLIENT_ID} - OIDC_CLIENT_SECRET=${OIDC_CLIENT_SECRET} - OIDC_CALLBACK_URL=${OIDC_CALLBACK_URL} - OIDC_JWKS_URL=${OIDC_JWKS_URL} - OIDC_CLIENT_SCOPE=${OIDC_CLIENT_SCOPE} - OIDC_GROUPS_ATTRIBUTE=${OIDC_GROUPS_ATTRIBUTE} - OIDC_UID_ATTRIBUTE=${OIDC_UID_ATTRIBUTE} - OIDC_END_SESSION_ENDPOINT=${OIDC_END_SESSION_ENDPOINT} - OIDC_LOGOUT_REDIRECT_URL=${OIDC_LOGOUT_REDIRECT_URL}For example, you should see something similar below (the example uses Asure links and object IDs):
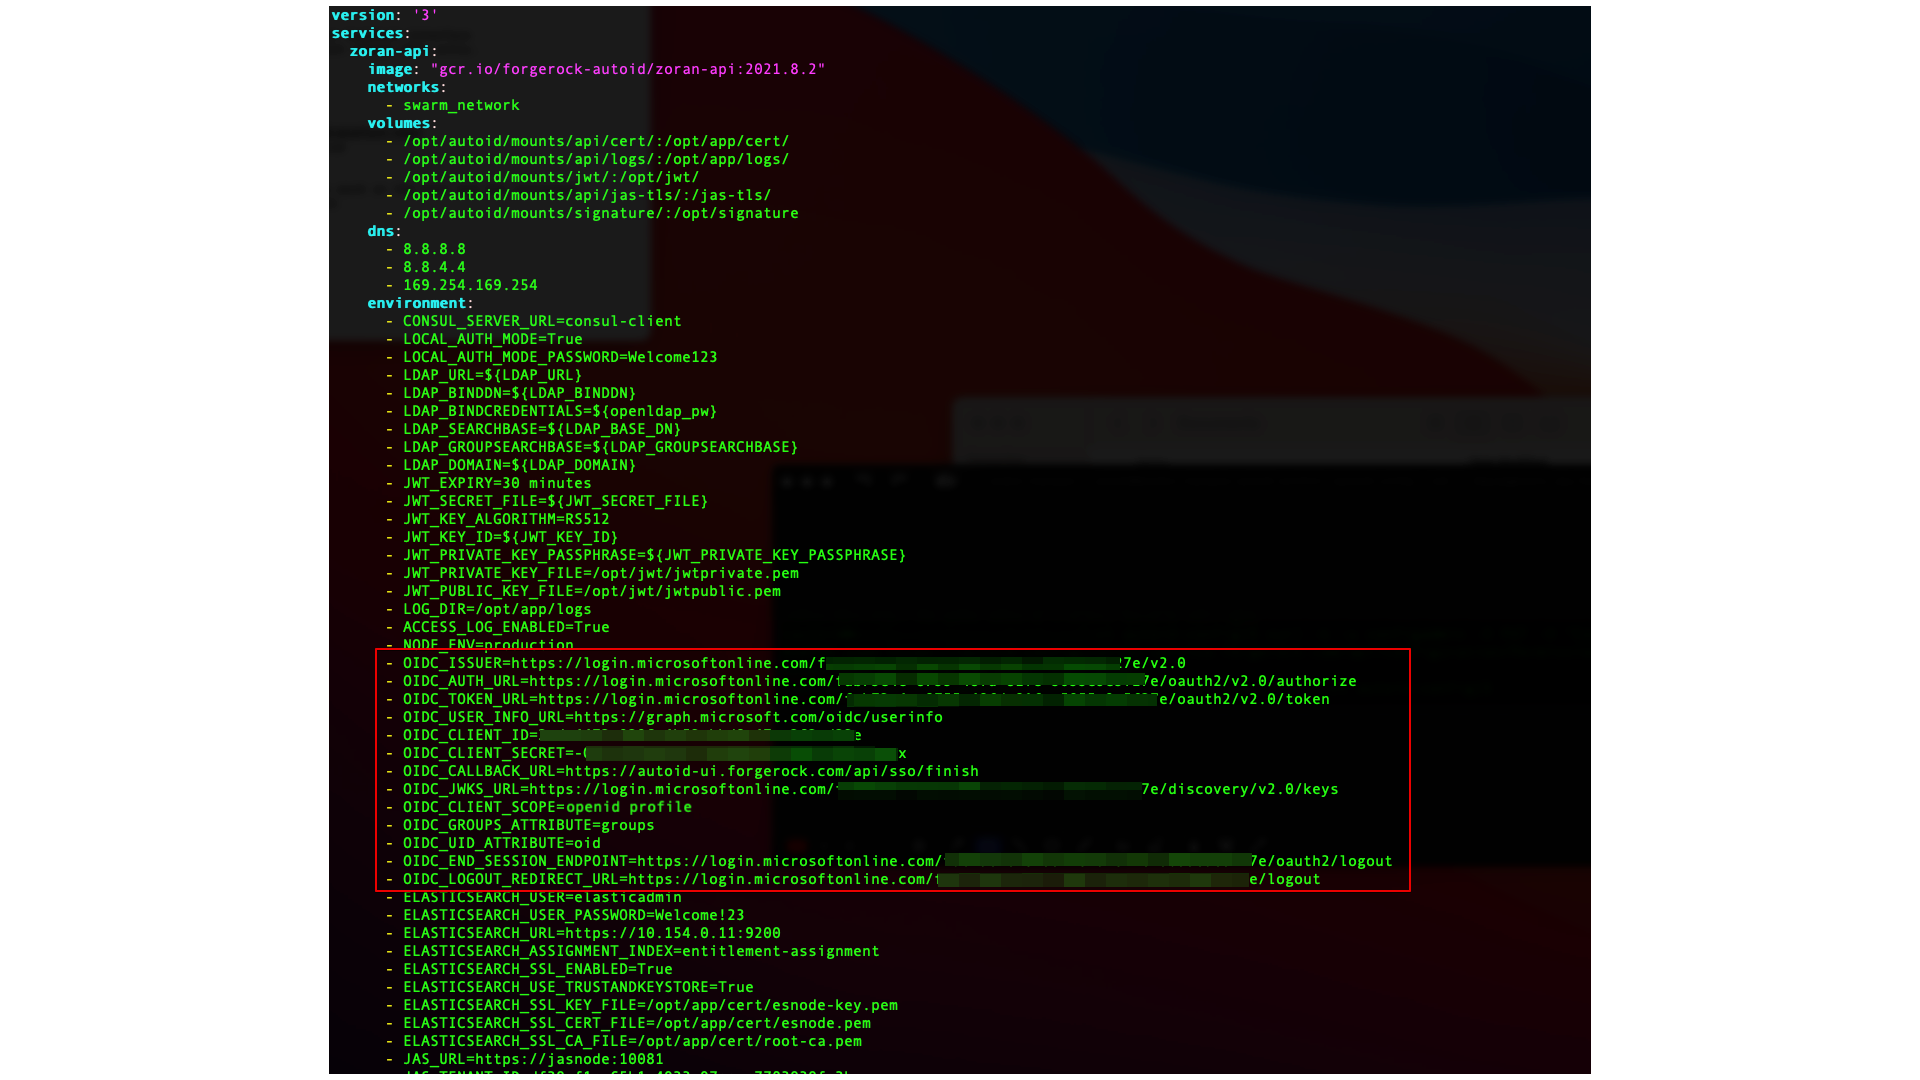
-
Remove the running zoran-api Docker container and re-deploy:
docker stack rm api

docker stack deploy --with-registry-auth --compose-file /opt/autoid/res/api/docker-compose.yml api
-
Restart the UI and Nginx Docker containers:
docker service update --force ui_zoran-ui

docker service update --force nginx_nginx
-
-
Open the Autonomous Identity UI to verify the SSO login.
Setting the Session Duration
By default, the session duration is set to 30 minutes. You can change this value at installation by setting the JWT_EXPIRY property in the /autoid-config/vars.yml
file.
If you did not set the value at installation, you can make the change after installation by setting the JWT_EXPIRY property using the API service.
-
Log in to the Docker manager node.
-
Verify the
JWT_EXPIRYproperty.$ docker inspect api_zoran-api
-
Go to the API folder.
$ cd /opt/autoid/res/api
-
Edit the
docker-compose.ymlfile and update theJWT_EXPIRYproperty. TheJWT_EXPIRYproperty is set to minutes. -
Redeploy the Docker stack API.
$ docker stack deploy --with-registry-auth --compose-file docker-compose.yml api
If the command returns any errors, such as "image could not be accessed by the registry," then try the following command:
$ docker stack deploy --with-registry-auth --resolve-image changed \ --compose-file /opt/autoid/res/api/docker-compose.yml api -
Verify the new
JWT_EXPIRYproperty.$ docker inspect api_zoran-api
-
Log in to the Docker worker node.
-
Stop the worker node.
$ docker stop [container ID]
The Docker manager node re-initiates the worker node. Repeat this step on any other worker node.
Set Entity Definitions
Before you run analytics, you can add new attributes to the schema using the Autonomous Identity UI. Only administrators have access to this functionality.
-
Open a browser. If you set up your own url, use it for your login.
-
Log in as an admin user, specific to your system. For example:
test user: bob.rodgers@forgerock.com
password: Welcome123
-
Click the Administration icon, indicated by the sprocket. Then, click Entity Definitions.
-
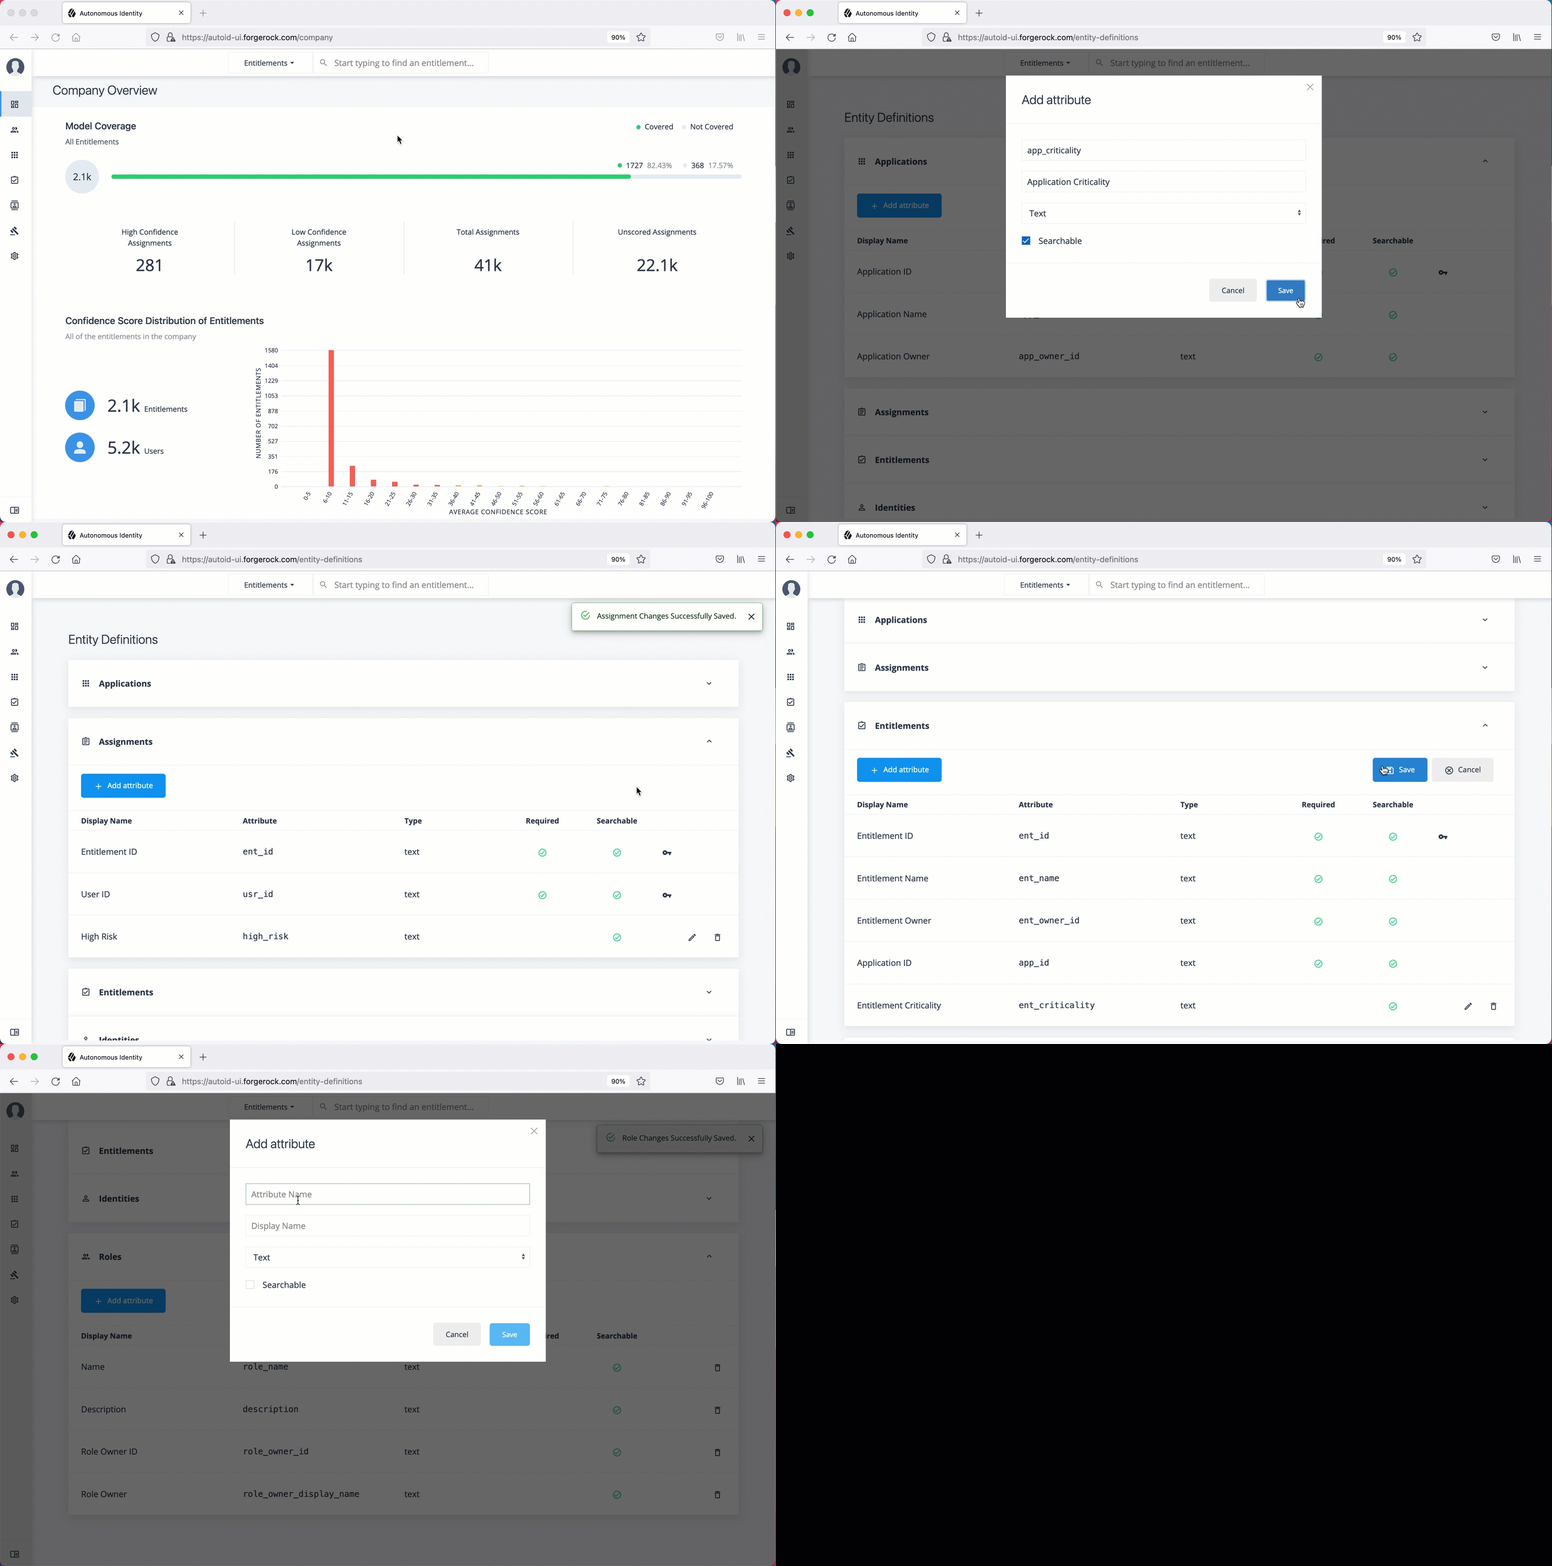
On the Entity Definitions page, click Applications to add any new attributes to the schema.
-
Click the Add attribute button.
-
In the Attribute Name field, enter the name of the new attribute. For example,
app_owner_id. -
In the Display Name field, enter a human-readable name of the attribute.
-
Select the attribute type. The options are:
Text,Boolean,Integer,Float,Date, andNumber. -
Click Searchable if you want the attribute to be indexed.
-
Click Save.
-
Click Save again to apply your attribute.
-
If you need to edit the attribute, click the Edit icon. If you need to remove the attribute, click the Remove icon. Note that attributes marked as
Requiredcannot be removed.
-
-
Click Assignments, and repeat the previous steps.
-
Click Entitlements, and repeat the previous steps.
-
Click Identities, and repeat the previous steps.
See it in action
-
Next, you must set the data sources. See Set Data Sources.
Set Data Sources
After defining any new attributes, you must set your data sources, so that Autonomous Identity can import and ingest your data. Autonomous Identity supports three types of data source files:
-
Comma-separated values (CSV). A comma-separated values (CSV) file is a text file that uses a comma delimiter to separate each field value. Each line of text represents a record, consisting of one or more fields of data.
-
Java Database Connectivity (JDBC). Java Database Connectivity (JDBC) is a Java API that connects to and executes queries on databases, like Oracle, MySQL, PostgreSQL, and others.
-
Generic. Generic data sources are those data types from vendors that have neither CSV nor JDBC-based formats, such as JSON, or others.
Data Source Sync Types
Autonomous Identity supports partial or incremental data ingestion for faster and efficient data uploads. The four types are full, incremental, enrichment, and delete, and are summarized below:
| Sync Type | Data Source | In AutoID | Result |
|---|---|---|---|
Full |
The records from the entity represents the full set of all records that you intend to ingest. For example:
|
An existing table may have the following:
|
After the ingest job runs, all existing records are fully replaced:
|
Incremental |
The records from the entity represents the records that you want to add to AutoID. For example:
|
An existing table may have the following:
|
After the ingest job runs, the records in the data source are added to the existing records:
|
Enrichment |
The records from the entity represents changes to existing data, such as adding a department attribute. No new objects are added, but here you want to edit or "patch" in new attributes to existing records:
|
An existing table may have the following:
|
After the ingest job runs, the attributes in the data source is added to the existing records. If attributes exist, they get updated. If attributes do not exist, they do not get updated, but you can add also attributes using mappings:
|
Delete |
The records from the entity represent records to be deleted, identified by the primary key:
|
An existing table may have the following:
|
After the ingest job completes, the records with the primary key are deleted:
|
CSV Data Sources
-
Log in to the Autonomous Identity UI as an administrator.
-
On the Autonomous Identity UI, click the Administration icon.
-
Click Data Sources.
-
Click the Add data source button.
-
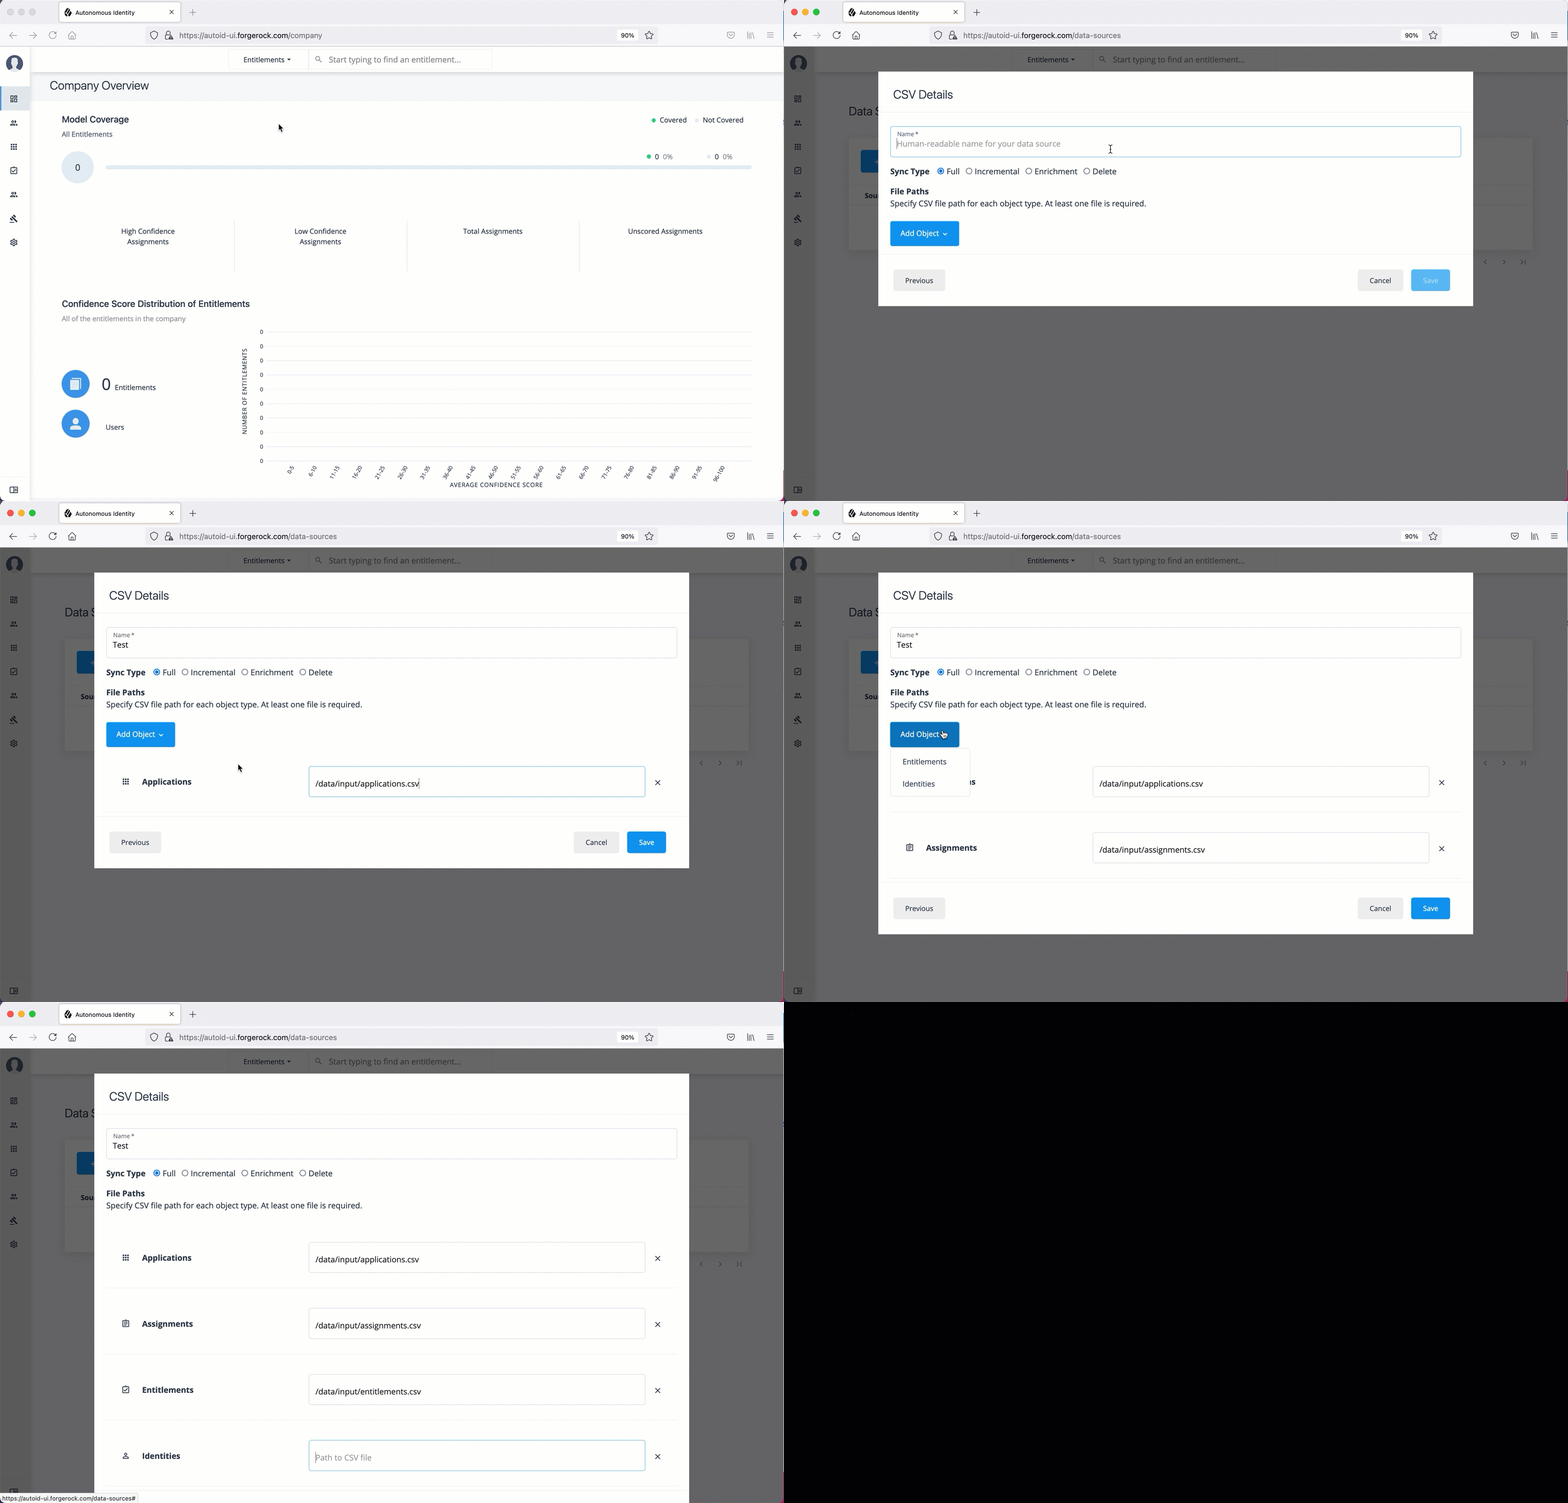
In the Add Data Source dialog box, click CSV, and then click Next.
-
In the CSV Details dialog box, enter a human-readable name for your CSV file.
-
Select the Sync Type. The options are as follows:
-
Full. Runs a full replacement of data if any.
-
Incremental. Adds new records to existing data.
-
Enrichment. Adds new attributes to existing data records.
-
Delete. Delete any existing data objects.
-
-
Click Add Object, and then select the data source file.
-
Click Applications, enter the path to the
application.csvfile. For example,/data/input/applications.csv. -
Click Assignments, enter the path to the
assignments.csvfile. For example,/data/input/assignments.csv. -
Click Entitlements, enter the path to the
entitlements.csvfile. For example,/data/input/entitlements.csv. -
Click Identities, enter the path to the
identities.csvfile. For example,/data/input/identities.csv.
-
-
Click Save.
See it in action
-
Repeat the previous steps to add more CSV data source files if needed.
-
Next, you must set the attribute mappings. This is a critical step to ensure a successful analytics run. See Set Attribute Mappings.
JDBC Data Sources
The following procedure assumes that you have set up Autonomous Identity with connectivity to a database, such as Oracle, MySQL, or PostgreSQL.
-
Log in to the Autonomous Identity UI as an administrator.
-
On the Autonomous Identity UI, click the Administration icon.
-
Click Data Sources.
-
Click the Add data source button.
-
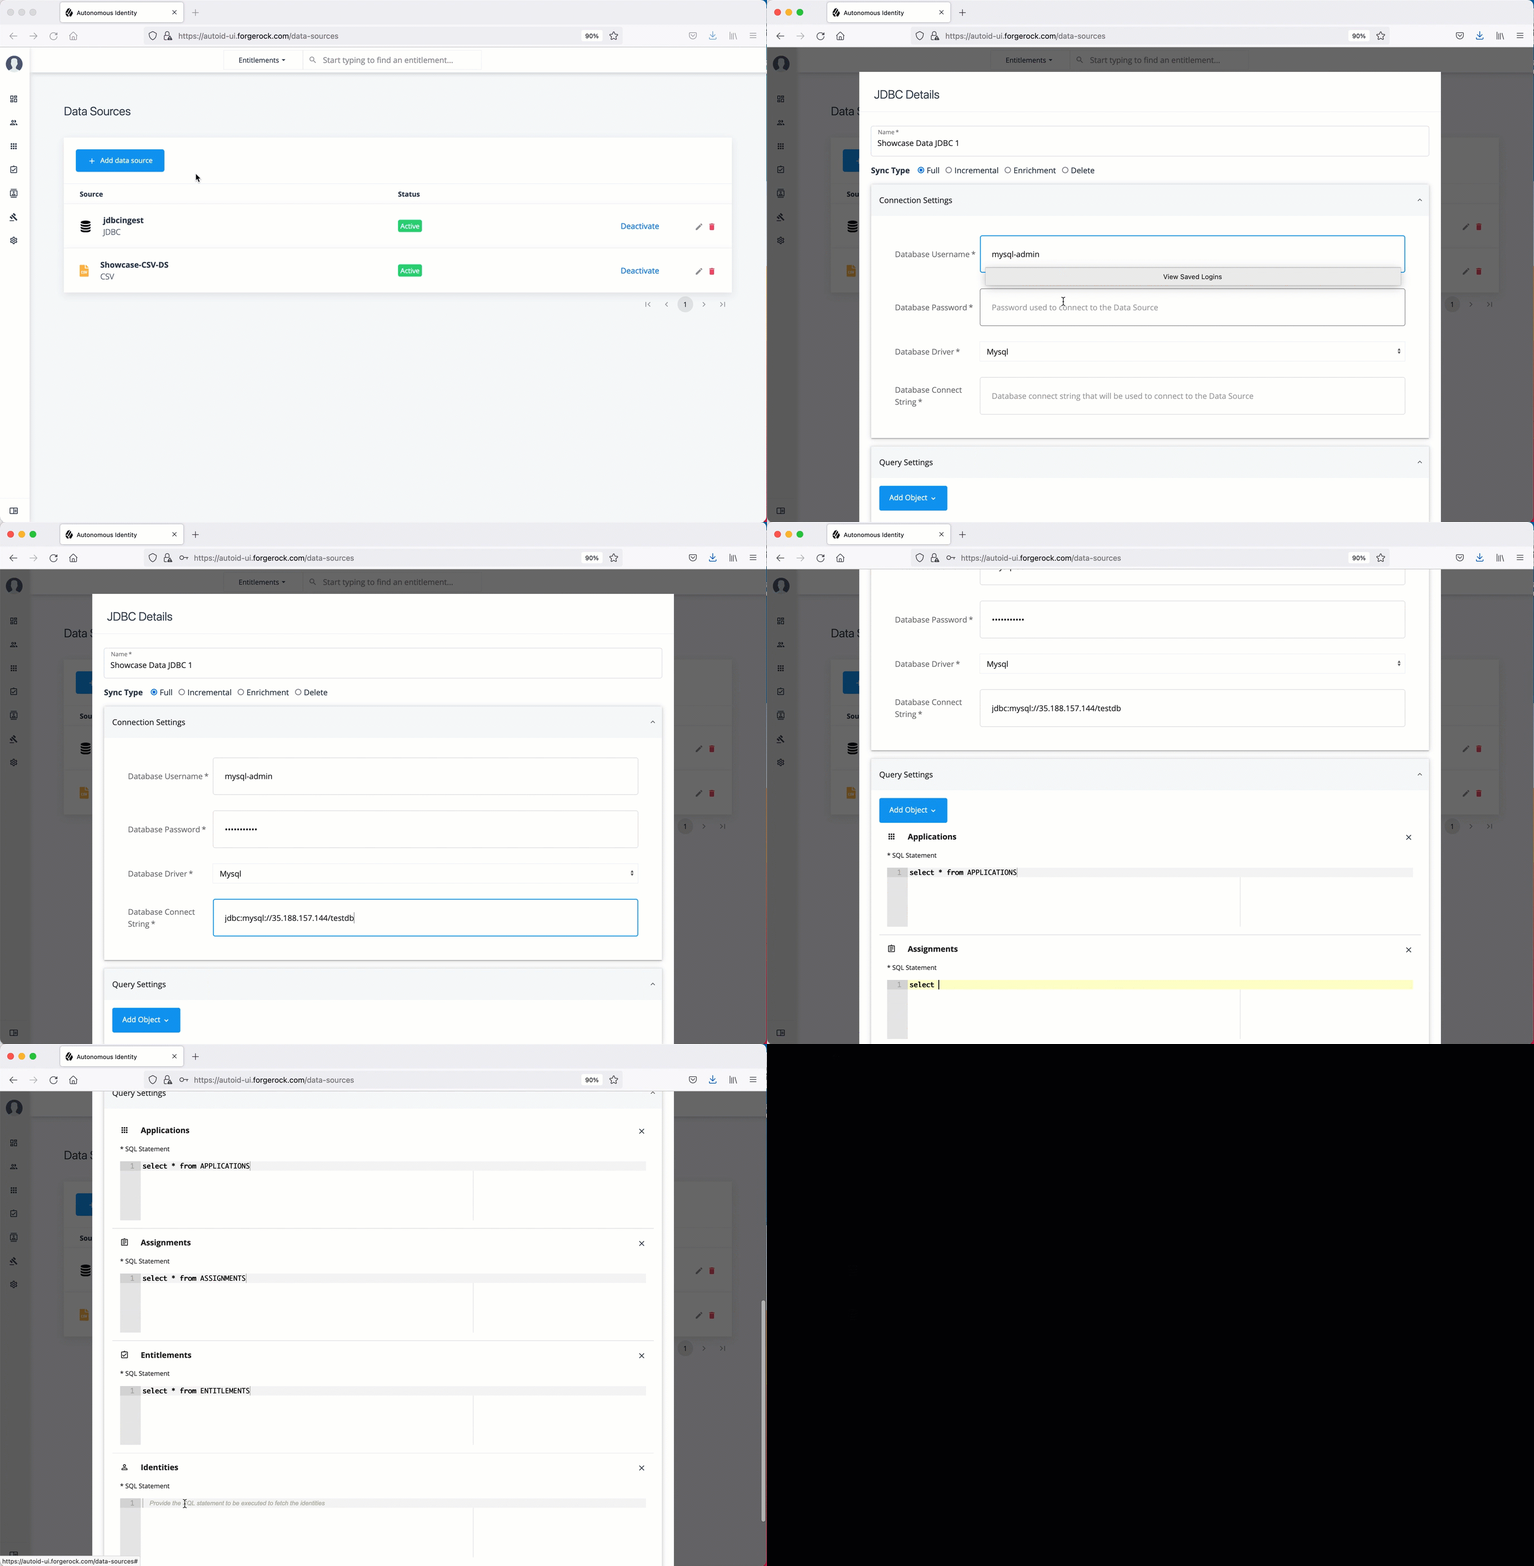
In the Add Data Source dialog box, click JDBC, and then click Next.
-
In the JDBC Details dialog box, enter a human-readable name for your JDBC files.
-
Select the Sync Type. The options are as follows:
-
Full. Runs a full replacement of data if any.
-
Incremental. Adds new records to existing data.
-
Enrichment. Adds new attributes to existing data records.
-
Delete. Delete any existing data objects.
-
-
For Connection Settings, enter the following:
-
Database Username. Enter a user name for the database user that connects to the data source.
-
Database Password. Enter a password for the database user.
-
Database Driver. Select the database driver. Options are: Mysql, Postgresql, and Oracle.
-
Datbase Connect String. Enter the database connect string to the data source.
-
-
Click Add Object, and then select the data source file.
-
Click Applications, enter the path to the
APPLICATIONStable. For example,select * from APPLICATIONS. -
Click Assignments, enter the path to the
ASSIGNMENTStable. For example,select * from ASSIGNMENTS. -
Click Entitlements, enter the path to the
ENTITLEMENTStable. For example,select * from ENTITLEMENTS. -
Click Identities, enter the path to the
IDENTITIEStable. For example,select * from IDENTITIES.
-
-
Click Save.
See it in action
-
Repeat the previous steps to add more JDBC data source files if necessary.
-
Next, you must set the attribute mappings. This is a critical step to ensure a successful analytics run. See Set Attribute Mappings.
Generic Data Sources
-
Log in to the Autonomous Identity UI as an administrator.
-
On the Autonomous Identity UI, click the Administration icon.
-
Click Data Sources.
-
Click the Add data source button.
-
In the Add Data Source dialog box, click Generic, and then click Next.
-
In the Generic Details dialog box, enter a human-readable name for your generic files.
-
Select the Sync Type. The options are as follows:
-
Full. Runs a full replacement of data if any.
-
Incremental. Adds new records to existing data.
-
Enrichment. Adds new attributes to existing data records.
-
Delete. Delete any existing data objects.
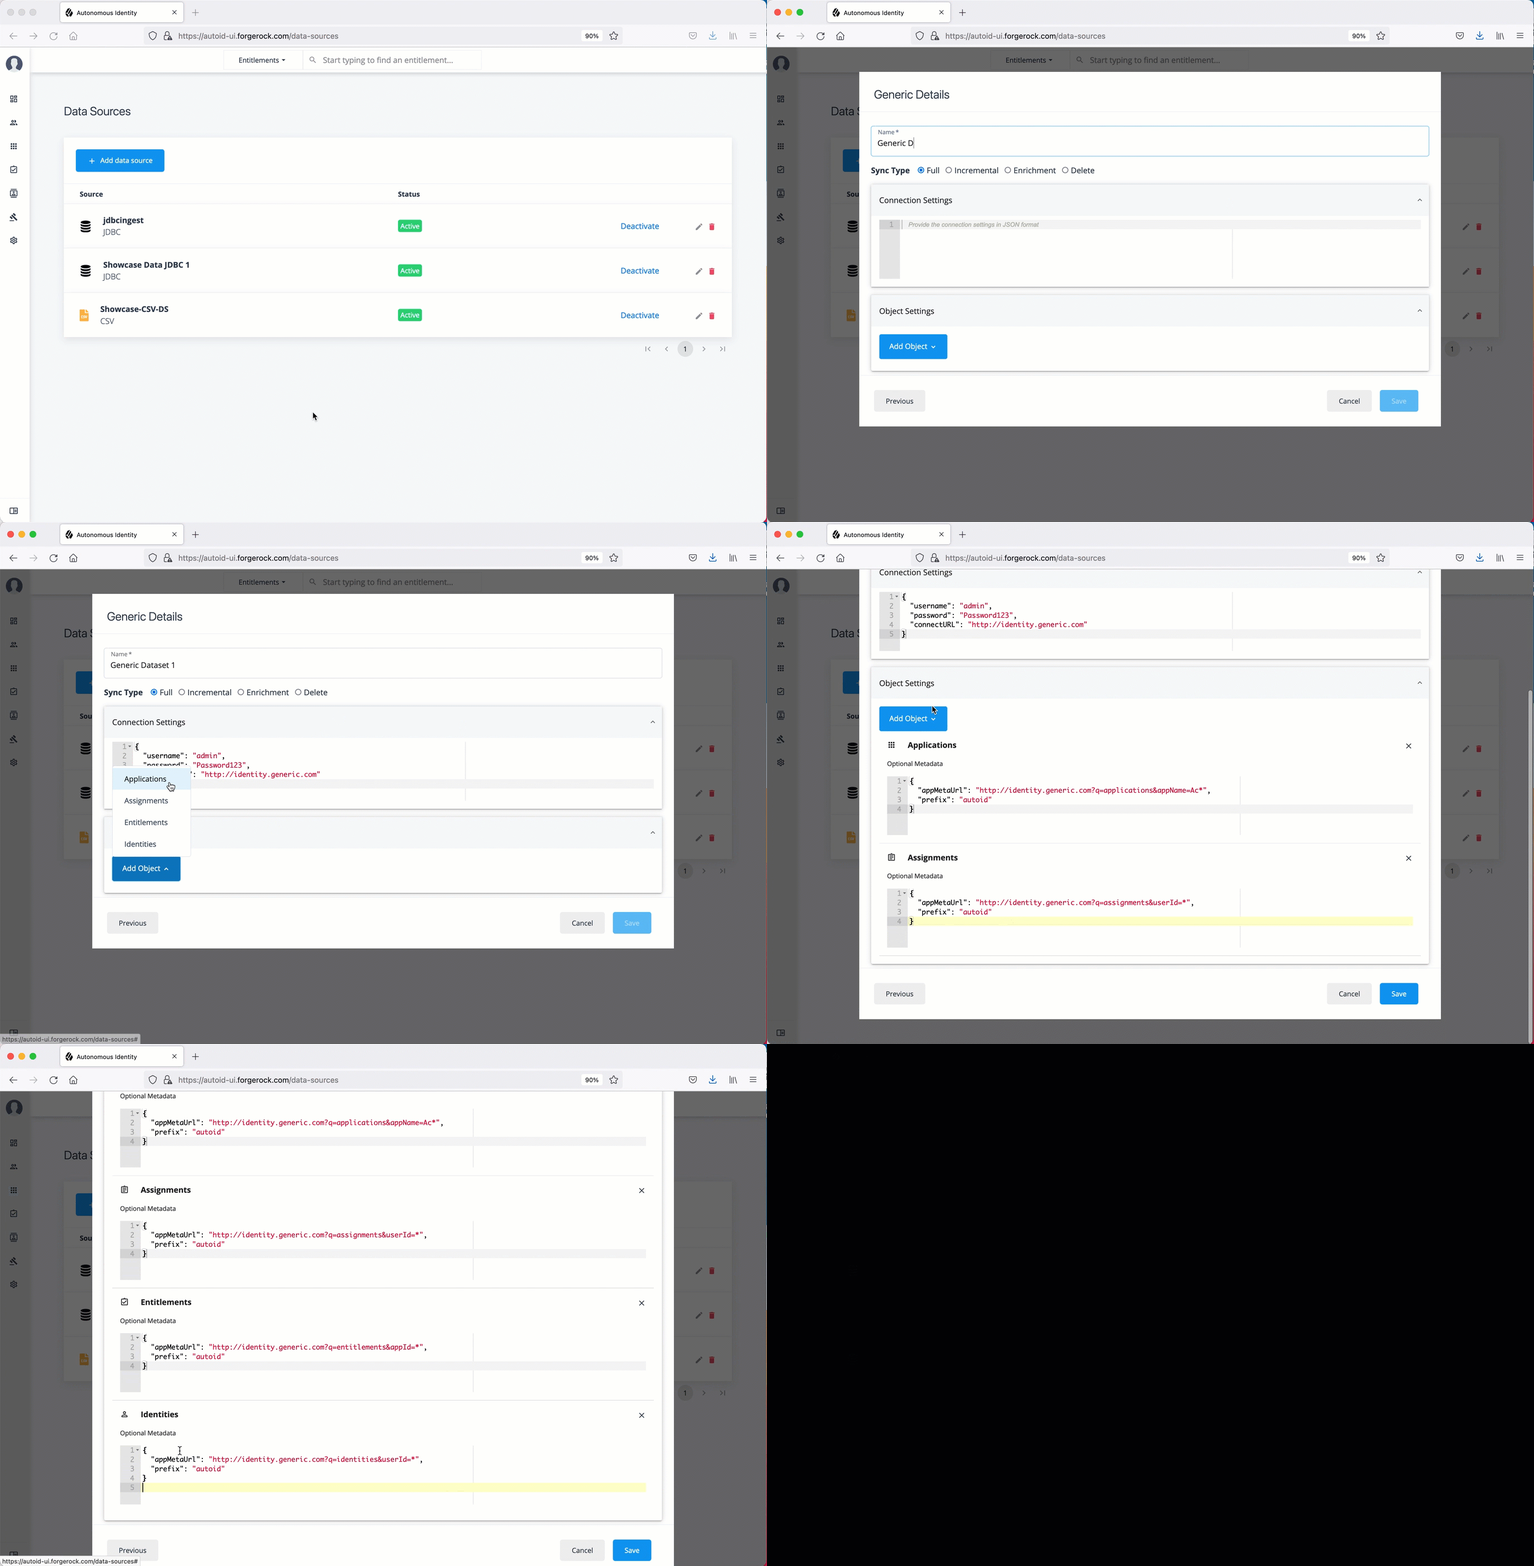
-
-
For Connection Settings, enter the settings to connect to your database server. For example:
{ "username": "admin", "password": "Password123", "connectURL": "http://identity.generic.com" } -
Click Add Object, and then select the data source file:
-
Click Applications, enter the metadata for applications file. For example:
{ "appMetaUrl": "http://identity.generic.com?q=applications&appName=Ac*", "prefix": "autoid" } -
Click Assignments, enter the metadata for the assignments file. For example:
{ "appMetaUrl": "http://identity.generic.com?q=assignments&userId=*", "prefix": "autoid" } -
Click Entitlements, enter the metadata for the entitlements file. For example:
{ "appMetaUrl": "http://identity.generic.com?q=entitlements&appId=*", "prefix": "autoid" } -
Click Identities, enter the metadata for the identities file. For example:
{
  "appMetaUrl": "http://identity.generic.com?q=identities&userId=*",
  "prefix": "autoid"
}
-
-
Click Save.
See it in action
-
Repeat the previous steps to add more JDBC data source files if necessary.
-
Next, you must set the attribute mappings. This is a critical step to ensure a successful analytics run. See Set Attribute Mappings.
Set Attribute Mappings
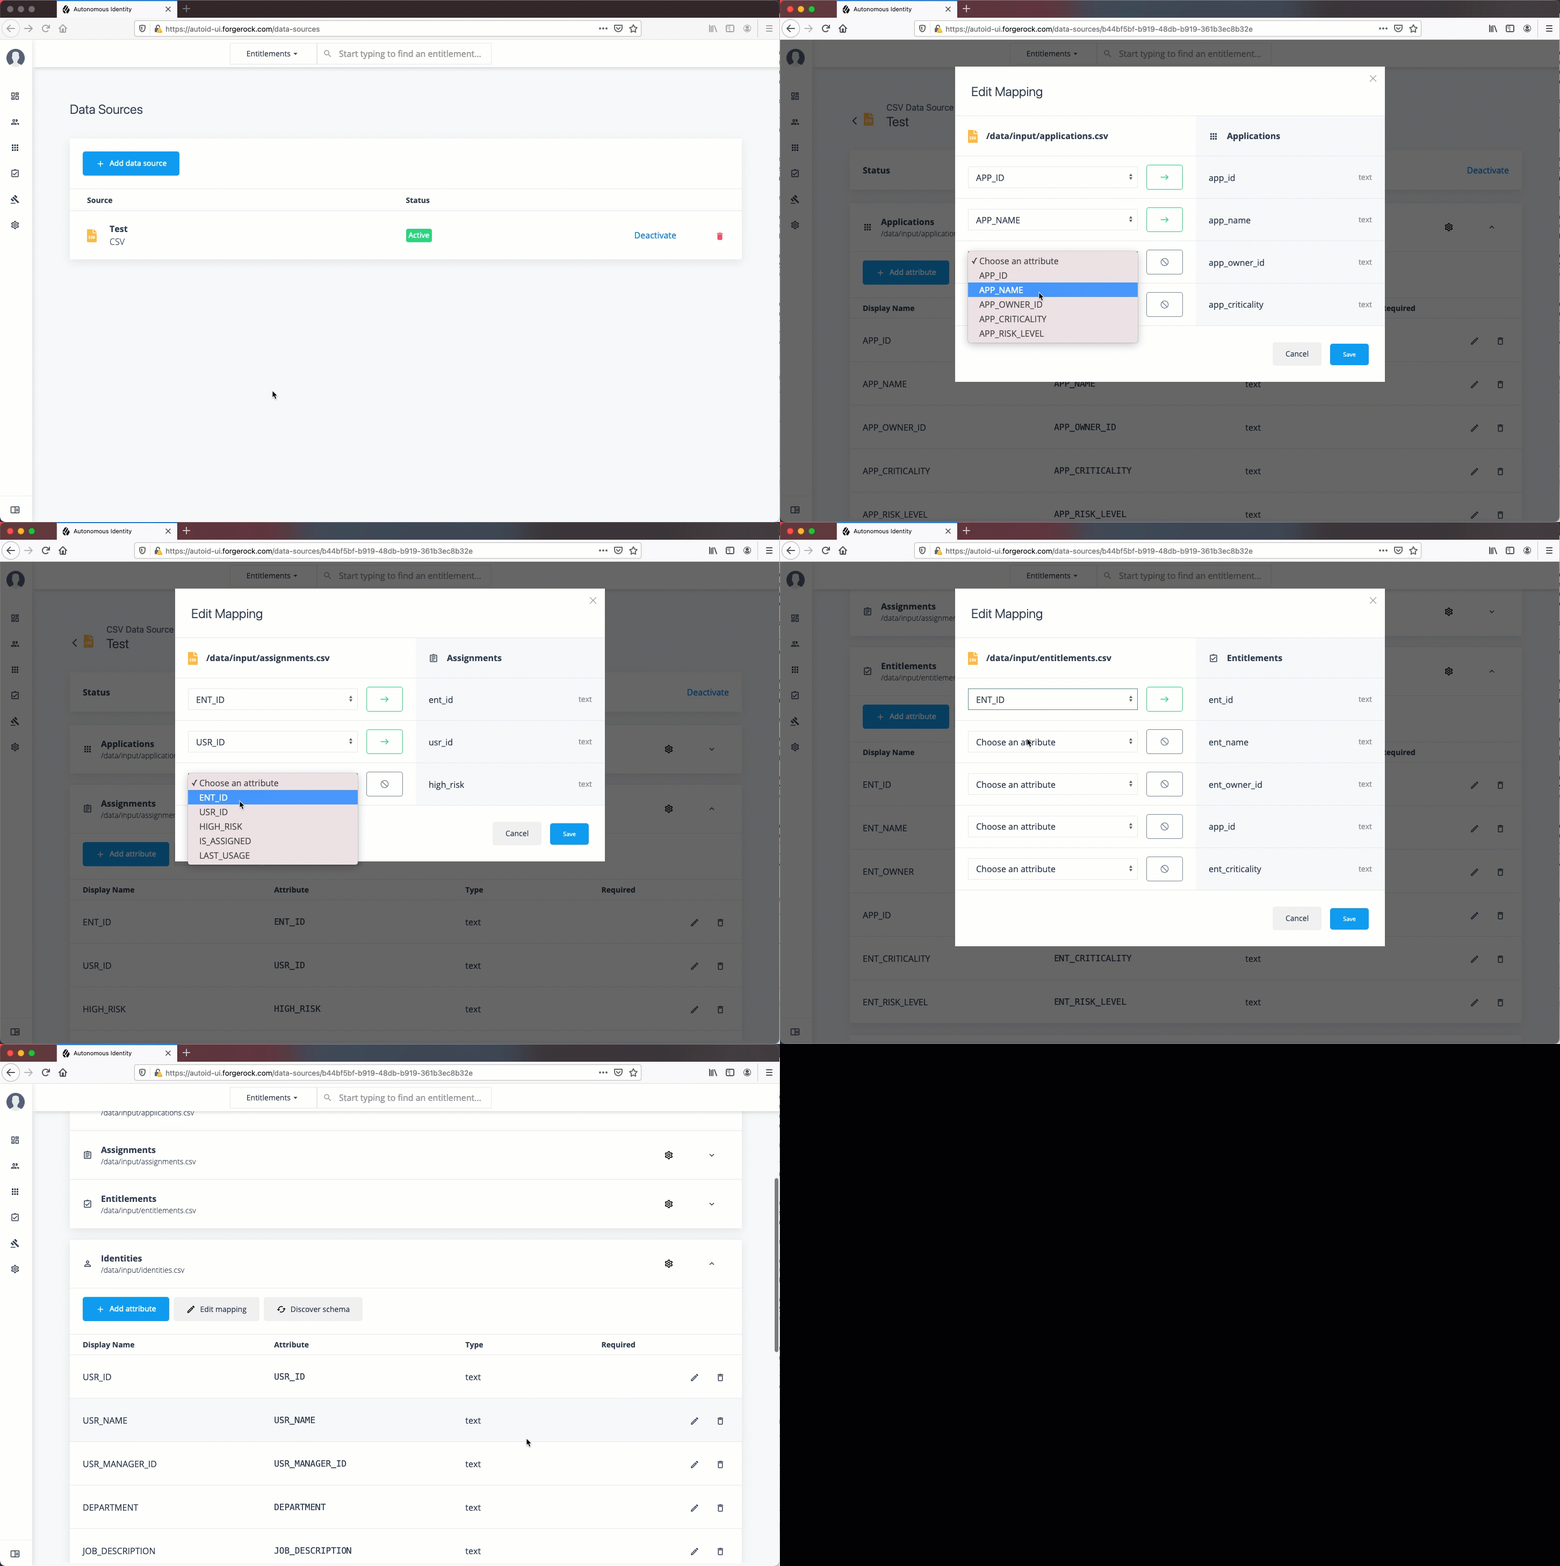
After setting your data sources for your CSV files, you must map any attributes specific to each of your data files to the Autonomous Identity schema.
-
On the Autonomous Identity UI, click the Administration icon.
-
Click a specific csv file. The data files appear below on the page.
-
Click Applications to set up its attribute mappings.
-
Click Discover Schema to view the current attributes in the schema, and then click Save.
-
Click Edit mapping to set up attribute mappings. On the Choose an attribute menu, select the corresponding attribute to map to the required attributes. Repeat for each attribute.
-
Click Save.
-
-
Click Assignments and repeat the previous steps.
-
Click Entitlements and repeat the previous steps.
-
Click Identities and repeat the previous steps.
-
Repeat the procedures for each data source file.
See it in action
-
Optional. Next, adjust the analytics thresholds. See Set Analytic Thresholds.
Set Analytics Thresholds
The Autonomous Identity UI now supports the configuration of the analytics threshold values to calculate confidence scores, predications, and recommendations.
| In general, there is little reason to change the default threshold values. If you do edit these values, be aware that incorrect threshold values could ruin your analytics. |
There are three types of threshold values that you can edit:
-
Confidence Score Threshold. These thresholds are used to identify High, Medium, and Low confidence access. Autonomous Identity computes a confidence score for each access assignment based on its machine learning algorithm. An administrator specifies the thresholds in the UI and API to categorize an assignment as having high, medium, or low confidence.
-
Automation Threshold. Administrators can review access patterns and make a decision on which access pattern to automate for provisioning, approvals, and certifications. The automation threshold controls which access pattern are available for automation.
-
Recommendation Threshold. Approvers and certifiers look to Autonomous Identity to provide a recommendation on whether access should be approved or certified. This recommendation relies on a confidence score threshold. Confidence scores above the threshold result is a positive recommendation, while those below that threshold result are not recommended.
-
Role Discovery Threshold. Administrators can set the thresholds for role discovery in the system. Once set, Autonomous Identity discovers and creates candidates for potential roles into production.
-
Analytics Spark Job Config. Administrators can adjust the Apache Spark job configuration if needed.
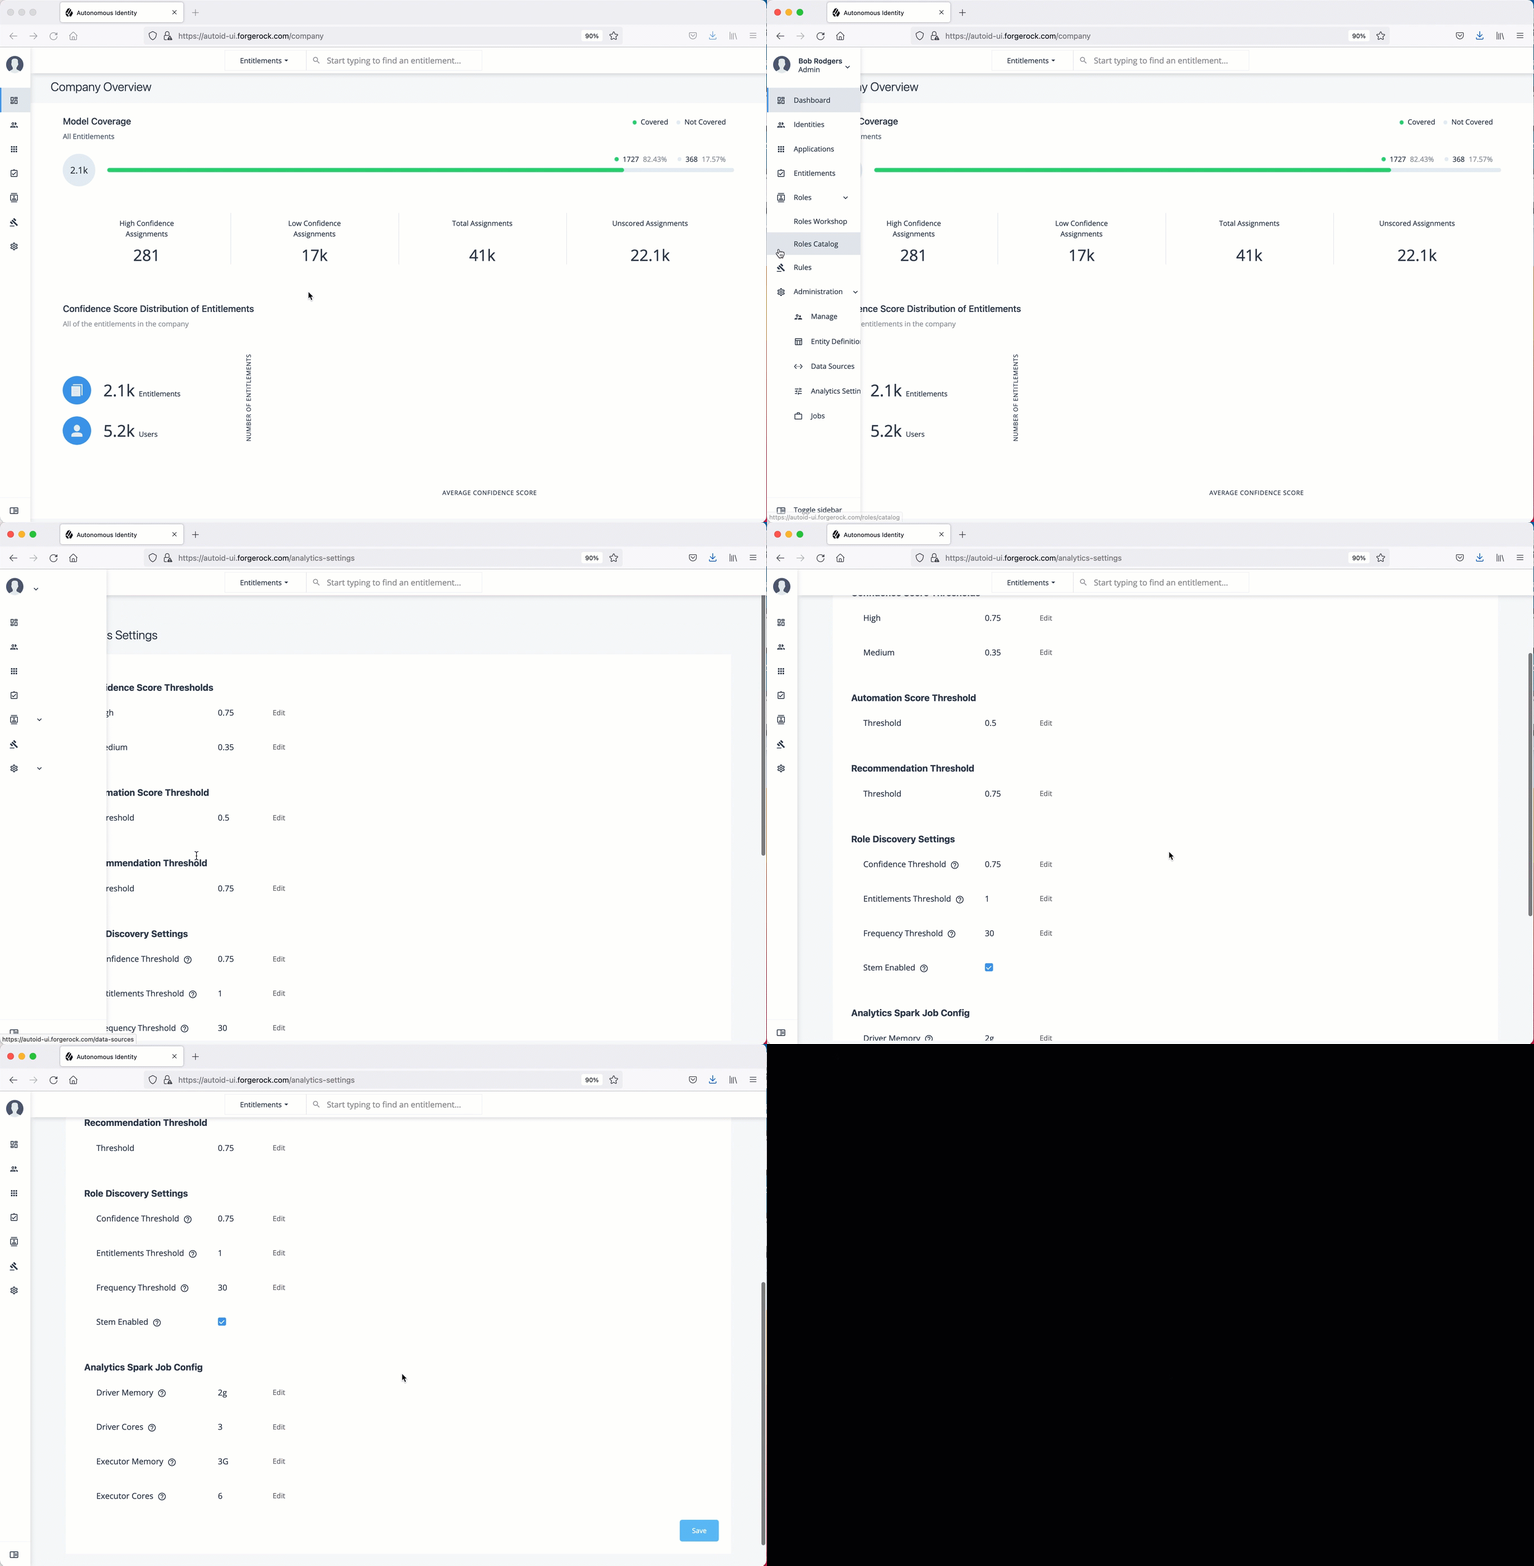
Configure Analytic Settings:
-
Log in to the Autonomous Identity UI as an administrator.
-
On the Autonomous Identity UI, click Administration.
-
Click Analytics Settings.
-
Under Confidence Score Thresholds, click Edit next to the High threshold value, and then enter a new value. Click Save. Repeat for the Medium threshold value.
-
Under Automation Score Threshold, click Edit next to the threshold value, and then enter a new value.
-
Under Recommendation Threshold, click Edit next to the threshold value, and then enter a new value.
-
Under Role Discovery Setting, click [label]## next to the threshold value, and then enter a new value.
-
Under Analytics Spark Job Config, click Edit next to the threshold value, and then enter a new value.
See it in action
-
Next, you can run the analytics. See Run Analytics.
Run Analytics
The Analytics pipeline is the heart of Autonomous Identity. The pipeline analyzes, calculates, and determines the association rules, confidence scores, predictions, and recommendations for assigning entitlements and roles to the users.
The analytics pipeline is an intensive processing operation that can take time depending on your dataset and configuration. To ensure an accurate analysis, the data needs to be as complete as possible with little or no null values. Once you have prepared the data, you must run a series of analytics jobs to ensure an accurate rendering of the entitlements and confidence scores.
Pre-Analytics Tasks
Before running the analytics, you must run the following pre-analytics steps to set up your datasets and schema using the Autonomous Identity UI:
-
Add attributes to the schema. For more information, see Set Entity Definitions.
-
Define your datasources. Autonomous Identity supports different file types for ingestion: CSV, JDBC, and generic. You can enter more than one data source file, specifying the dataset location on your target machine. For more information, see Set Data Sources.
-
Define attribute mappings between your data and the schema. For more information, see Set Attribute Mappings.
-
Configure your analytics threshold values. For more information, see Set Analytics Thresholds.
About the Analytics Process
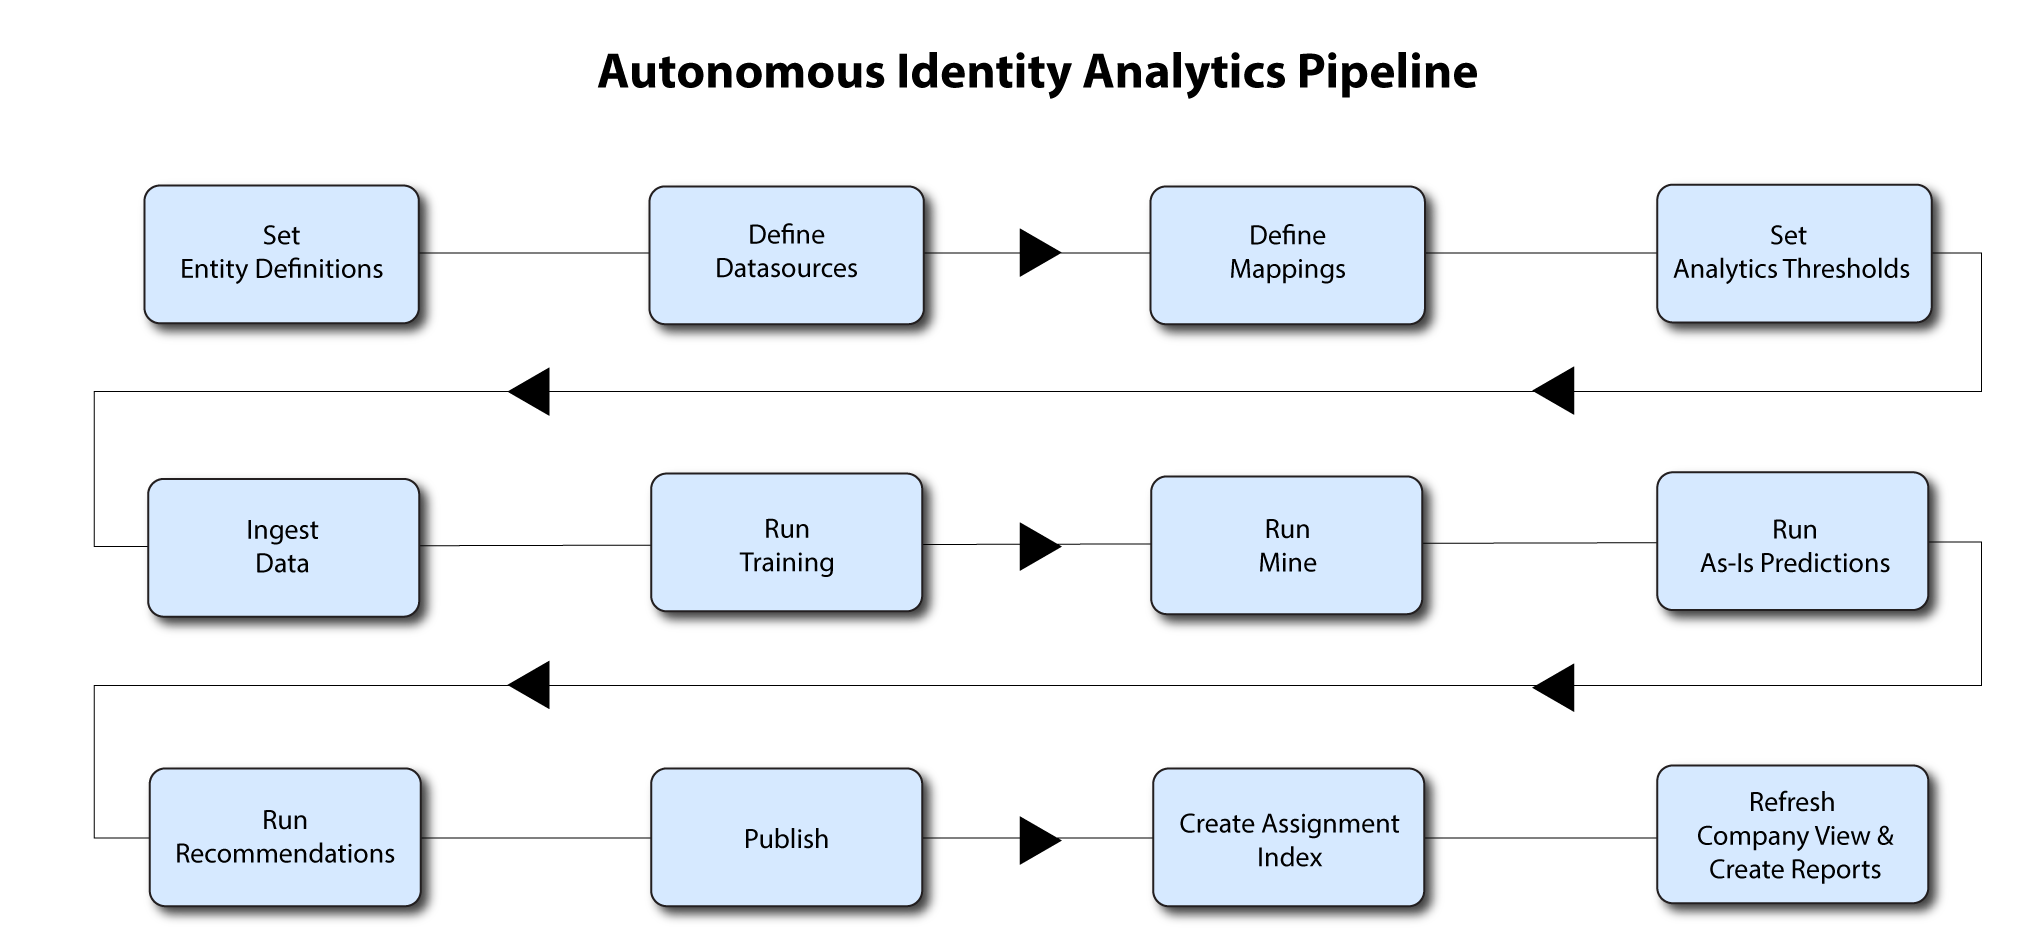
Once you have finished the pre-analytics steps, you can start the analytics. The general analytics process is outlined as follows:
-
Ingest. The ingestion job pulls in data into the system. You can ingest CSV, JDBC, and generic JSON files depending on your system.
-
Training. The training job creates the association rules for each user-assigned entitlement. This is a somewhat intensive operation as the analytics generates a million or more association rules. Once the association rules have been determined, they are applied to user-assigned entitlements.
-
Role Mining. The role mining job analyzes all existing entitlements and analyzes candidate configurations for new roles.
-
Predict As-Is. The predict as-is job determines the current confidence scores for all assigned entitlements.
-
Predict Recommendation. The predict recommendations job looks at all users who do not have a specific entitlement, but are good candidates to receive the entitlement based on their user attribute data.
-
Publish. The publish run publishes the data to the backend Cassandra or MongoDB databases.
-
Create Assignment Index. The create-assignment-index creates the Autonomous Identity index.
-
Refresh Company View. Run refresh-company-view to refresh the indexes and company view display. Currently, you can only run this procedure on the command line.
-
Run Reports. You can run the create-assignment-index-report (report on index creation), anomaly (report on anomalous entitlement assignments), insight (summary of the analytics jobs), and audit (report on change of data).
|
The analytics pipeline requires that DNS properly resolve the hostname before its start. Make sure to set it on your DNS server or locally in your |
The following sections present the steps to run the analytics pipeline using the Jobs UI.
|
You can continue to use the command-line to run each step of the analytics pipeline. For instructions, see see Run Analytics on the Command Line. |
Ingest the Data Files
At this point, you should have set your data sources and configured your attribute mappings. You can now run the initial analytics job to import the data into the Cassandra or MongoDB database.
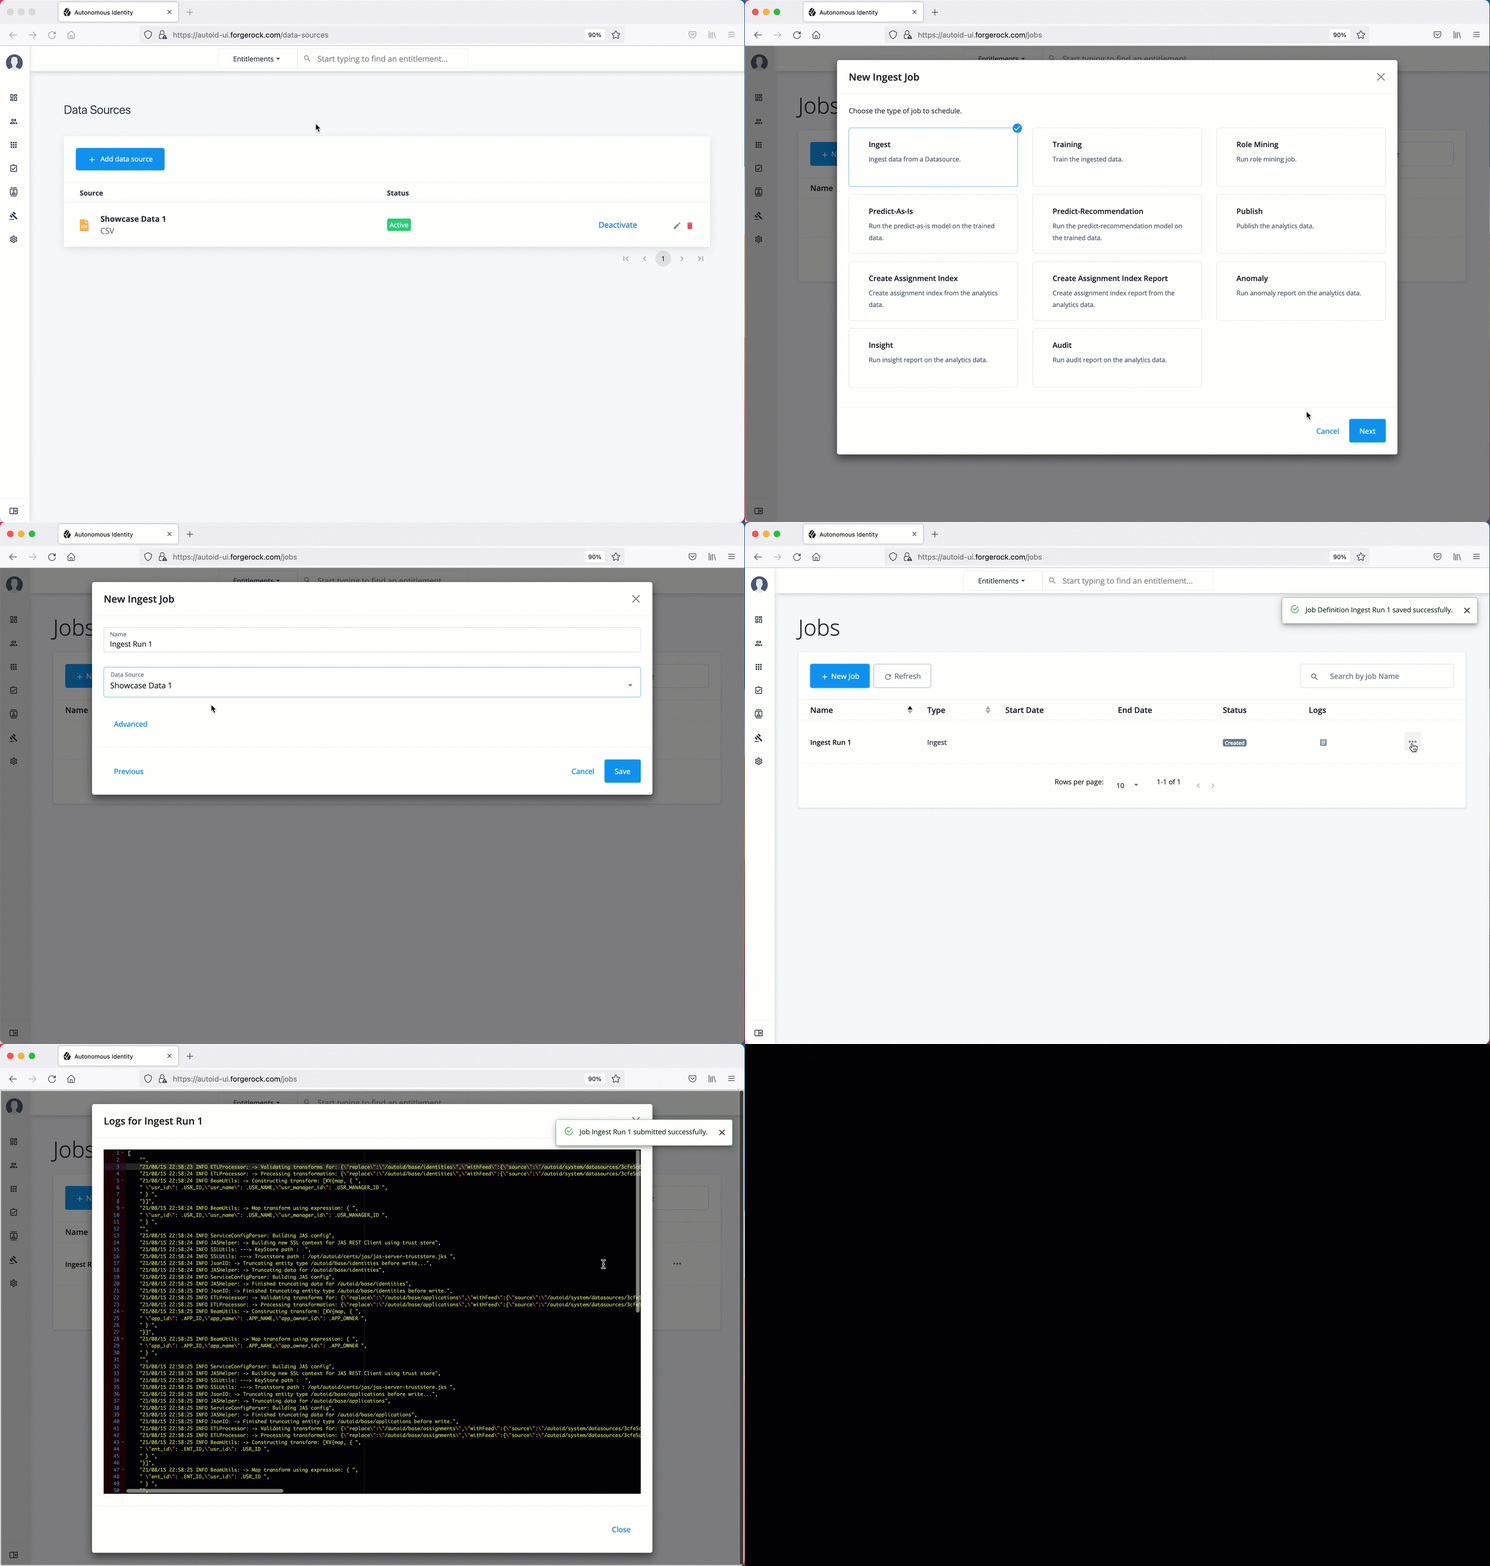
Run ingest using the UI:
-
On the Autonomous Identity UI, click the Administration link, and then click Jobs.
-
On the Jobs page, click New Job. You will see a job schedule with each job in the analytics pipeline.
-
Click Ingest, and then click Next.
-
On the New Ingest Job box, enter the name of the job, and then select the data source file.
-
Click Advanced and adjust any of the Spark properties, if necessary:
-
Driver Memory (GB)
-
Driver Cores
-
Executor Memory (GB)
-
Executor Cores
-
-
Click Save to continue.
-
Click one of the following commands:
-
If you need to edit any of the job settings, click Edit.
-
If you want to remove the job from your Jobs page, click Delete job.
-
-
Click Run Now to start the ingestion run.
-
Next monitor the state of the job by clicking Logs, or click Refresh to update the Jobs page.
-
When the job completes, you can see the change in the status.
See it in action
Run Training
After you have ingested the data into Autonomous Identity, start the training run.
Training involves two steps:
-
Autonomous Identity starts an initial machine learning run where it analyzes the data and produces association rules, which are relationships discovered within your large set of data. In a typical deployment, you can have several million generated rules. The training process can take time depending on the size of your data set.
-
Each of these rules are mapped from the user attributes to the entitlements and assigned a confidence score.
The initial training run may take time as it goes through the analysis process. Once it completes, it saves the results directly to the database.
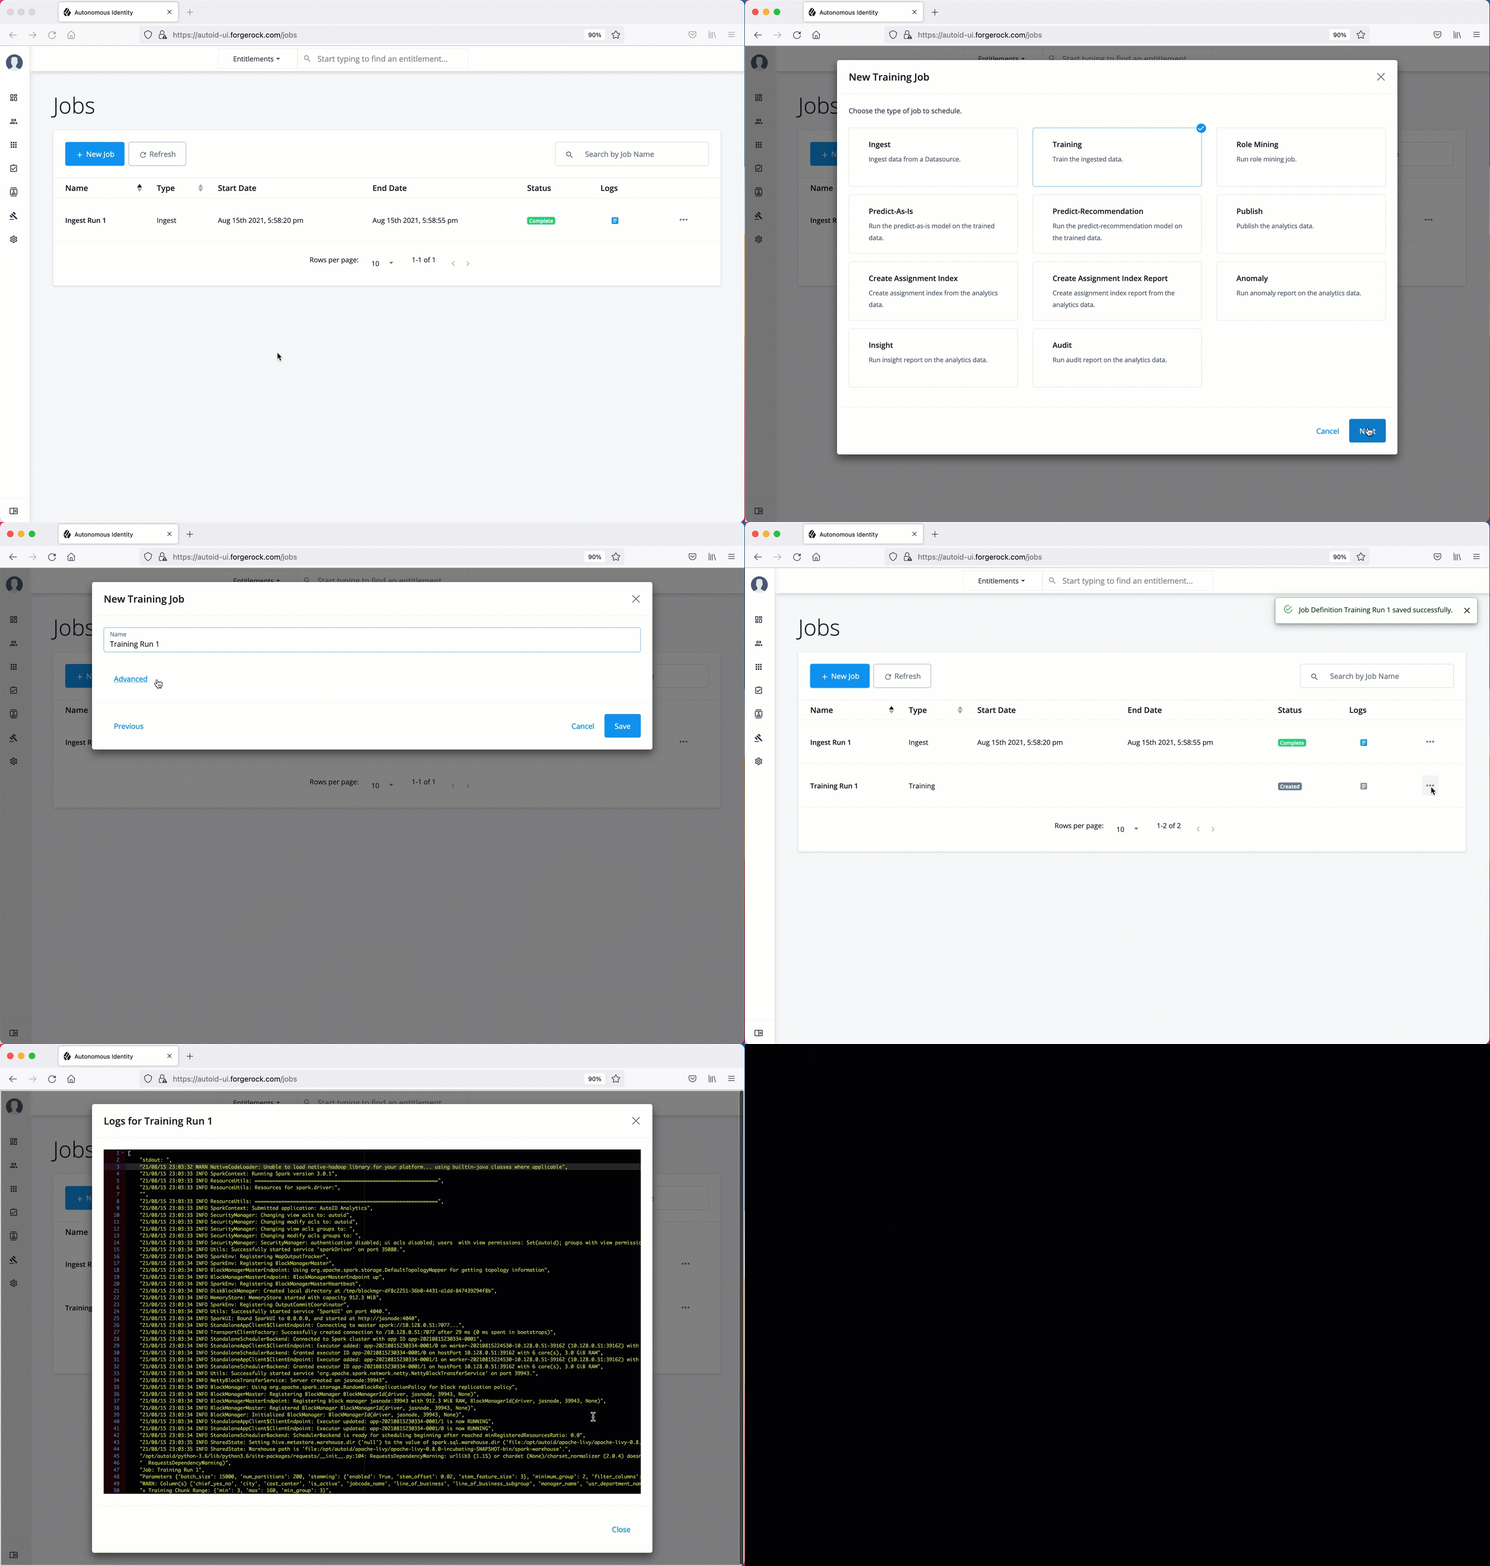
Run training using the UI:
-
On the Autonomous Identity UI, click the Administration link, and then click Jobs.
-
On the Jobs page, click New Job. You will see a job schedule with each job in the analytics pipeline.
-
Click Training, and then click Next.
-
On the New Training Job box, enter the name of the job.
-
Click Advanced and adjust any of the Spark properties, if necessary.
-
Click Save to continue.
-
Click Run Now.
-
Next monitor the state of the job by clicking Logs, or click Refresh to update the Jobs page.
-
When the job completes, you can see the change in the status.
See it in action
Run Role Mining
After you have run training, you can now run the role mining job.
If you want to update your role mining data after an initial analytics job, you can minimally run the ingest, train, and mine analytics jobs.
However, we recommend re-running the full analytics pipeline, so that other pages can pick up changes to your access landscape.
|
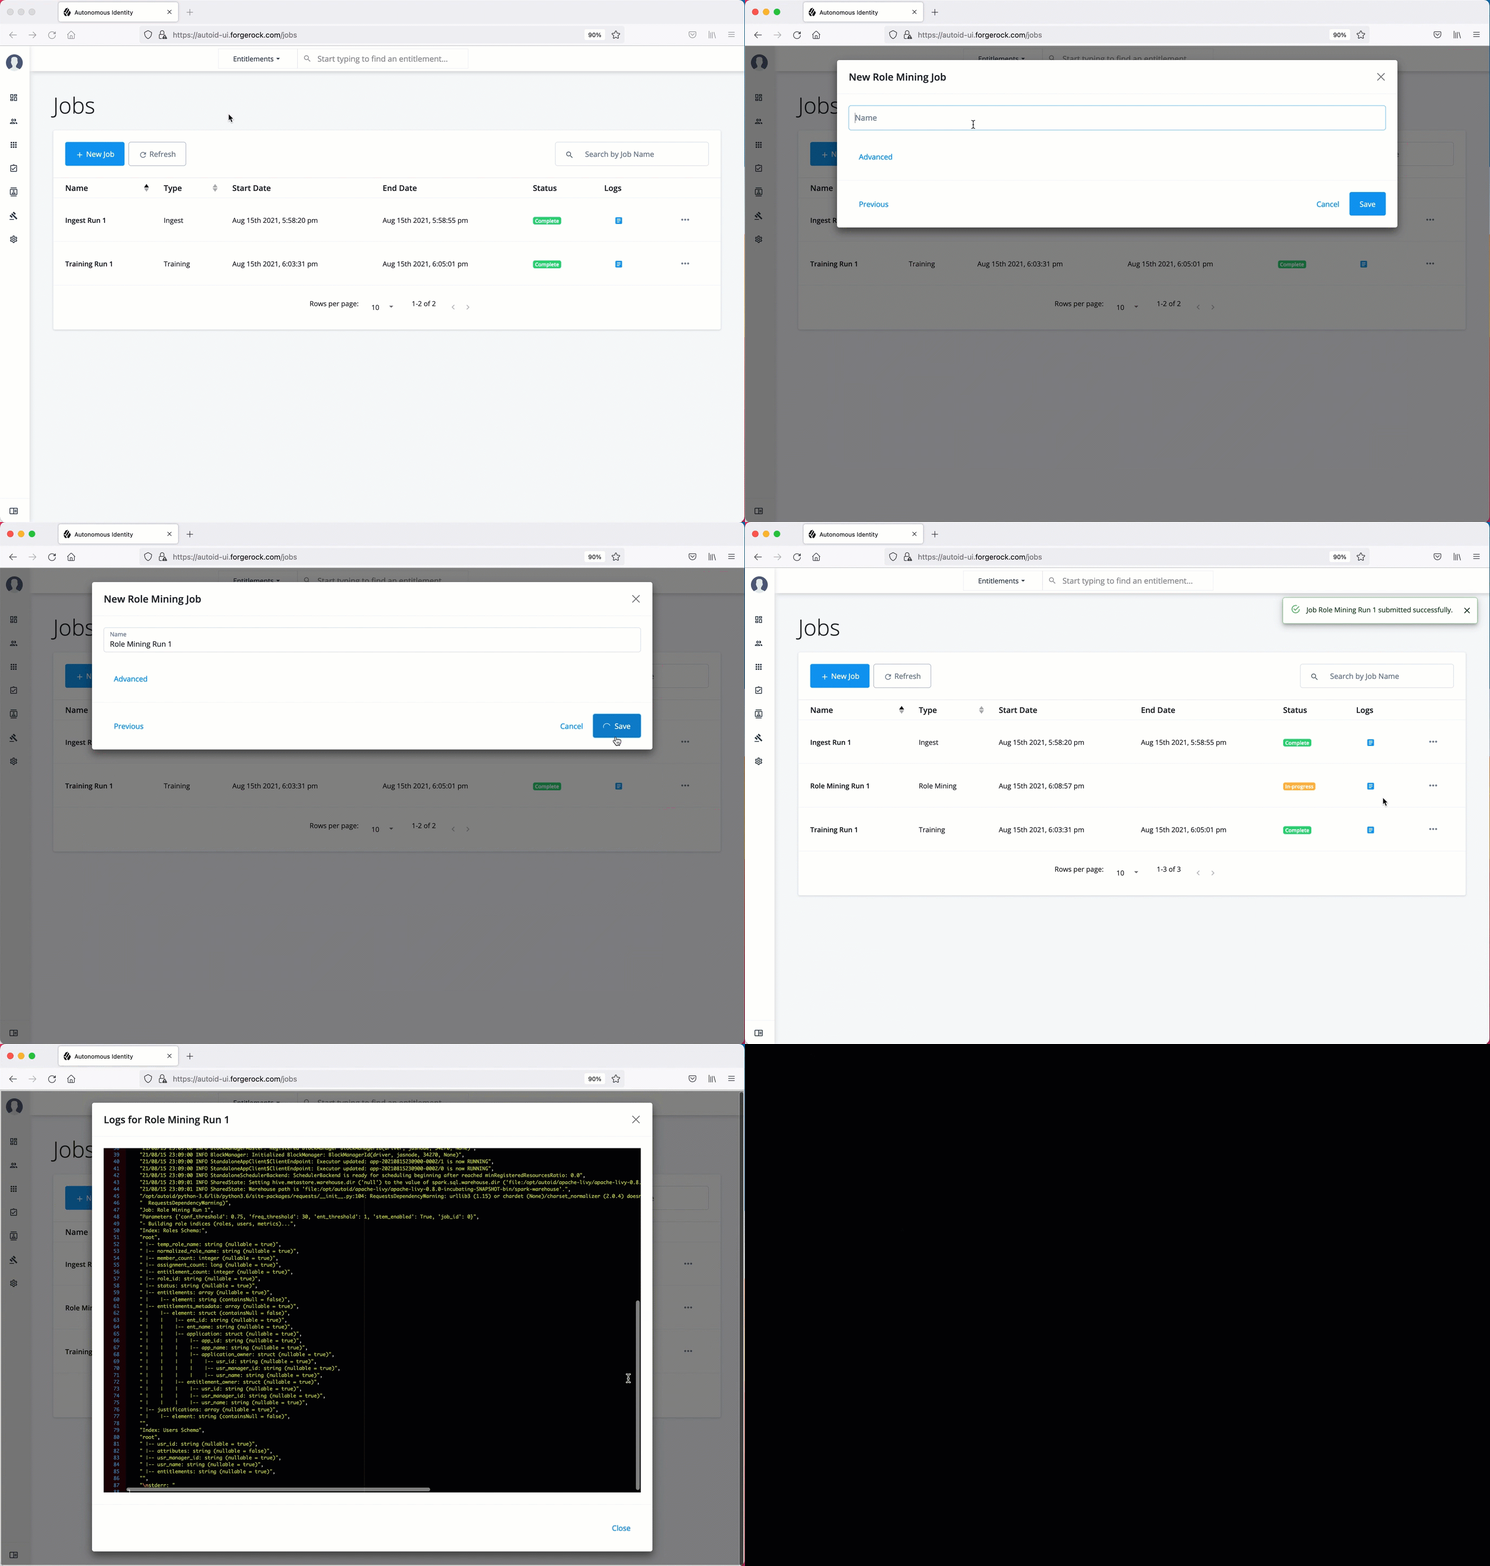
Run role mining using the UI:
-
On the Autonomous Identity UI, click the Administration link, and then click Jobs.
-
On the Jobs page, click New Job. You will see a job schedule with each job in the analytics pipeline.
-
Click Role Mining, and then click Next.
-
On the New Role Mining Job box, enter the name of the job.
-
Click Advanced and adjust any of the Spark properties, if necessary.
-
Click Save to continue.
-
Click Run Now.
-
Next monitor the state of the job by clicking Logs, or click Refresh to update the Jobs page.
-
When the job completes, you can see the change in the status.
See it in action
Run As-Is Predictions
After your initial training run, the association rules are saved to disk. The next phase is to use these rules as a basis for the predictions module.
The predictions module is comprised of two different processes:
-
as-is. During the As-Is Prediction process, confidence scores are assigned to the entitlements that users currently have. The as-is process maps the highest confidence score to the highest
freqUnionrule for each user-entitlement access. These rules will then be displayed in the UI and saved directly to the database. -
Recommendations. See [run-recommendations].
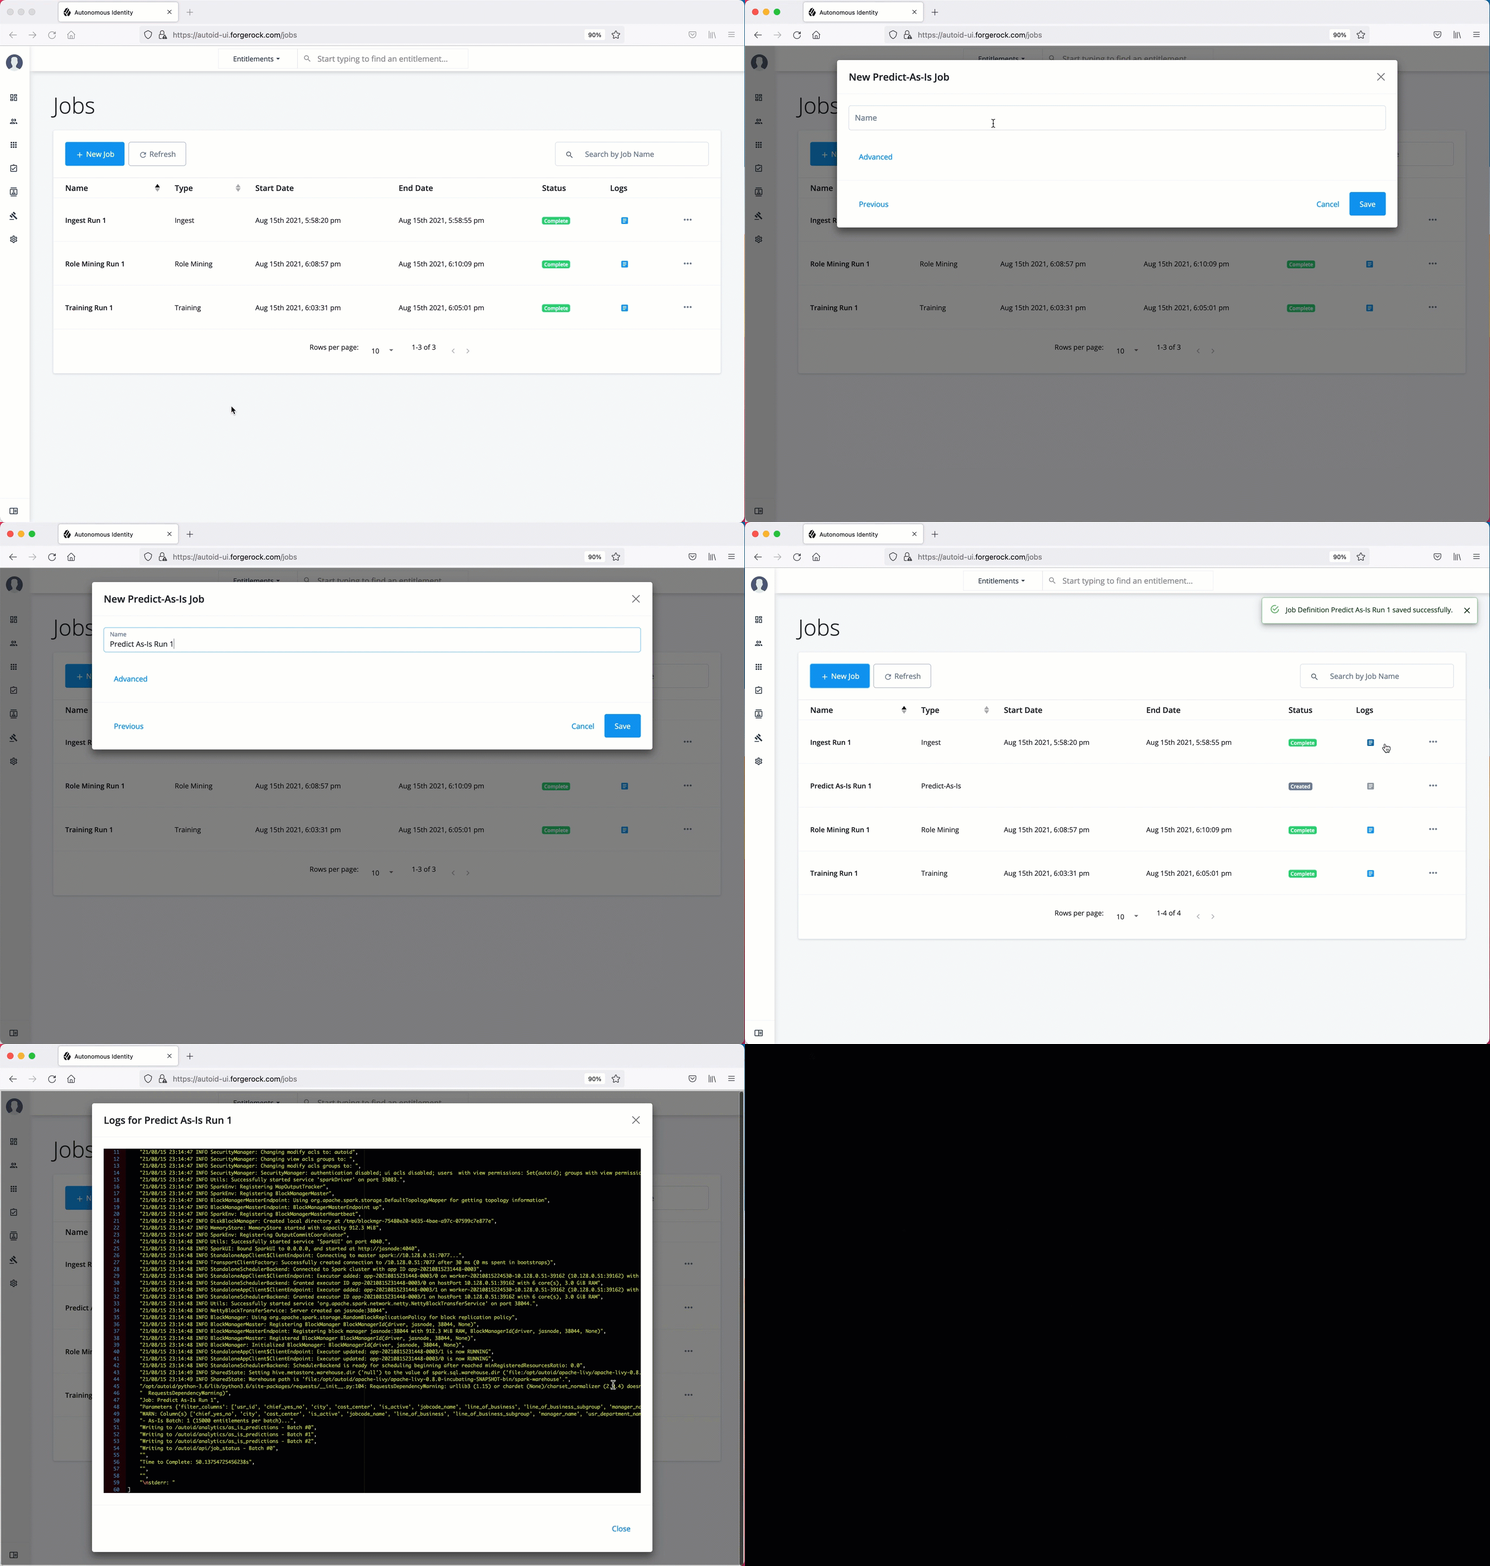
Run predict as-is using the UI:
-
On the Autonomous Identity UI, click the Administration link, and then click Jobs.
-
On the Jobs page, click New Job. You will see a job schedule with each job in the analytics pipeline.
-
Click Predict-As-Is, and then click Next.
-
On the New Predict-As-Is Job box, enter the name of the job.
-
Click Advanced and adjust any of the Spark properties, if necessary.
-
Click Save to continue.
-
Click Run Now.
-
Next monitor the state of the job by clicking Logs, or click Refresh to update the Jobs page.
-
When the job completes, you can see the change in the status.
See it in action
Run Recommendations
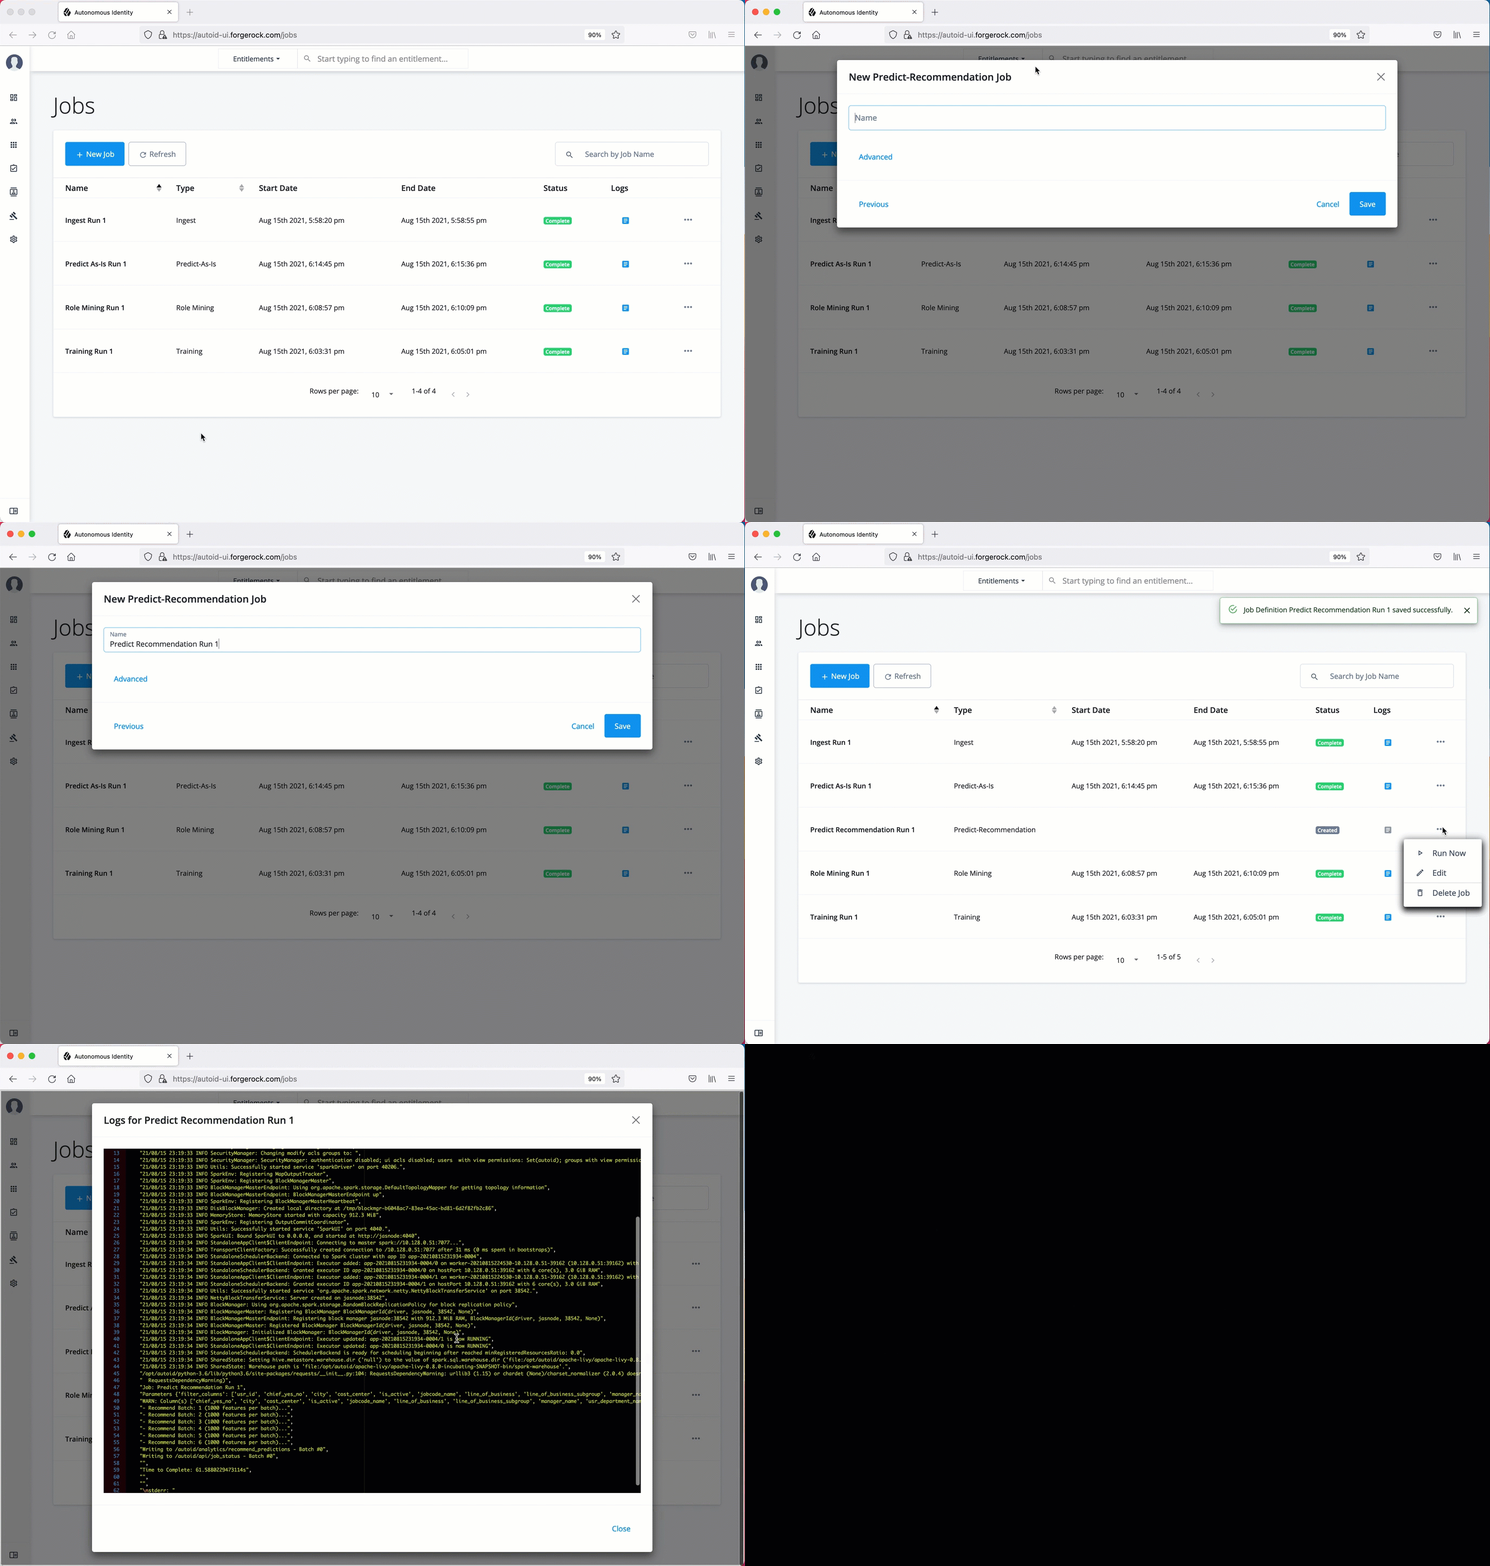
During the second phase of the predictions process, the recommendations process analyzes each employee who may not have a particular entitlement and predicts the access rights that they should have according to their high confidence score justifications. These rules will then be displayed in the UI and saved directly to the database.
Run predict-recommendation using the UI:
-
On the Autonomous Identity UI, click the Administration link, and then click Jobs.
-
On the Jobs page, click New Job. You will see a job schedule with each job in the analytics pipeline.
-
Click Predict-Recommendation, and then click Next.
-
On the New Predict-Recommendation Job box, enter the name of the job.
-
Click Advanced and adjust any of the Spark properties, if necessary.
-
Click Save to continue.
-
Click Run Now.
-
Next monitor the state of the job by clicking Logs, or click Refresh to update the Jobs page.
-
When the job completes, you can see the change in the status.
See it in action
Publish the Analytics Data
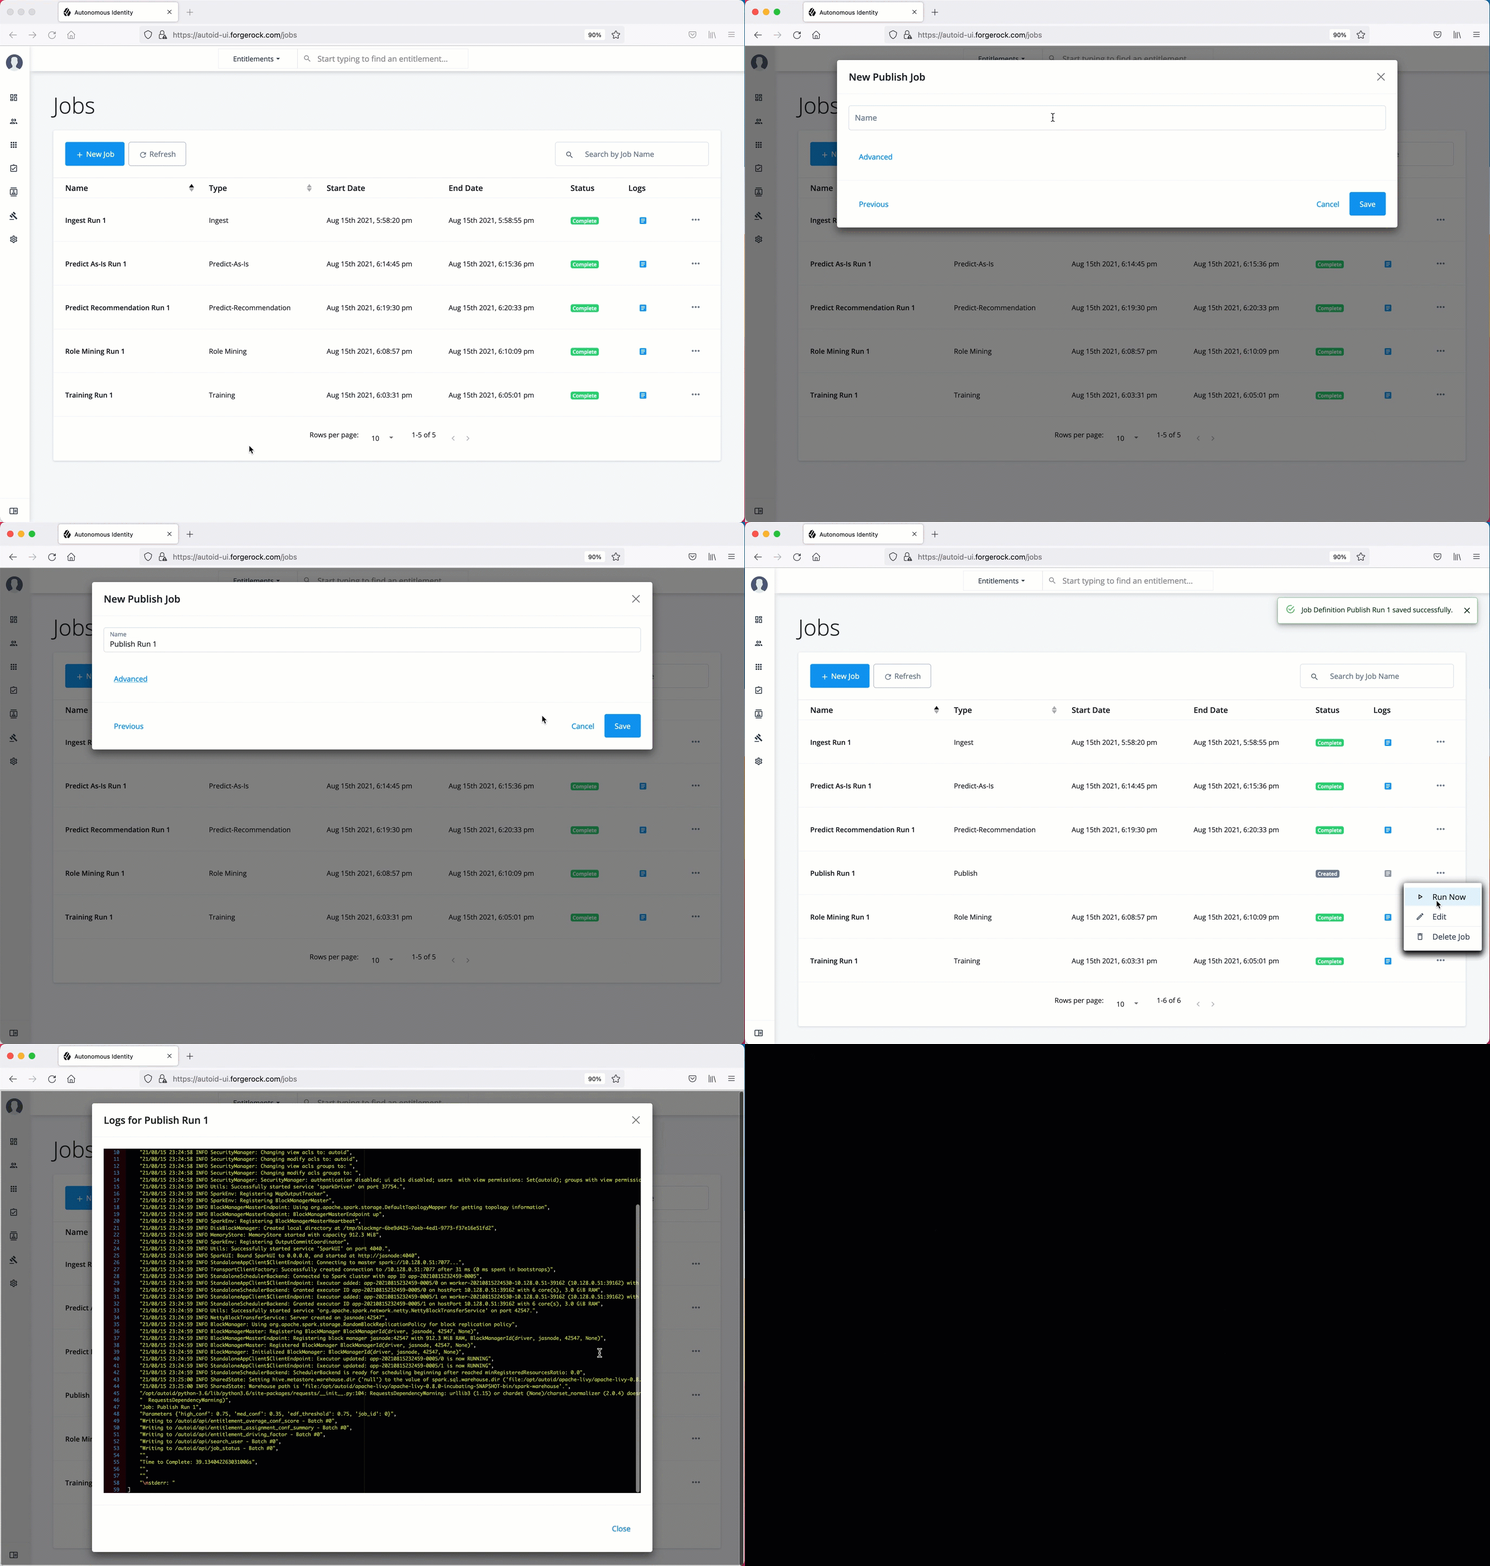
Populate the output of the training, predictions, and recommendation runs to a large table with all assignments and justifications for each assignment. The table data is then pushed to the Cassandra or MongoDB backend.
Run publish using the UI:
-
On the Autonomous Identity UI, click the Administration link, and then click Jobs.
-
On the Jobs page, click New Job. You will see a job schedule with each job in the analytics pipeline.
-
Click Publish, and then click Next.
-
On the New Publish Job box, enter the name of the job.
-
Click Advanced and adjust any of the Spark properties, if necessary.
-
Click Save to continue.
-
Click one of the following commands:
-
Click Run Now.
-
Next monitor the state of the job by clicking Logs, or click Refresh to update the Jobs page.
-
When the job completes, you can see the change in the status.
See it in action
Create Assignment Index
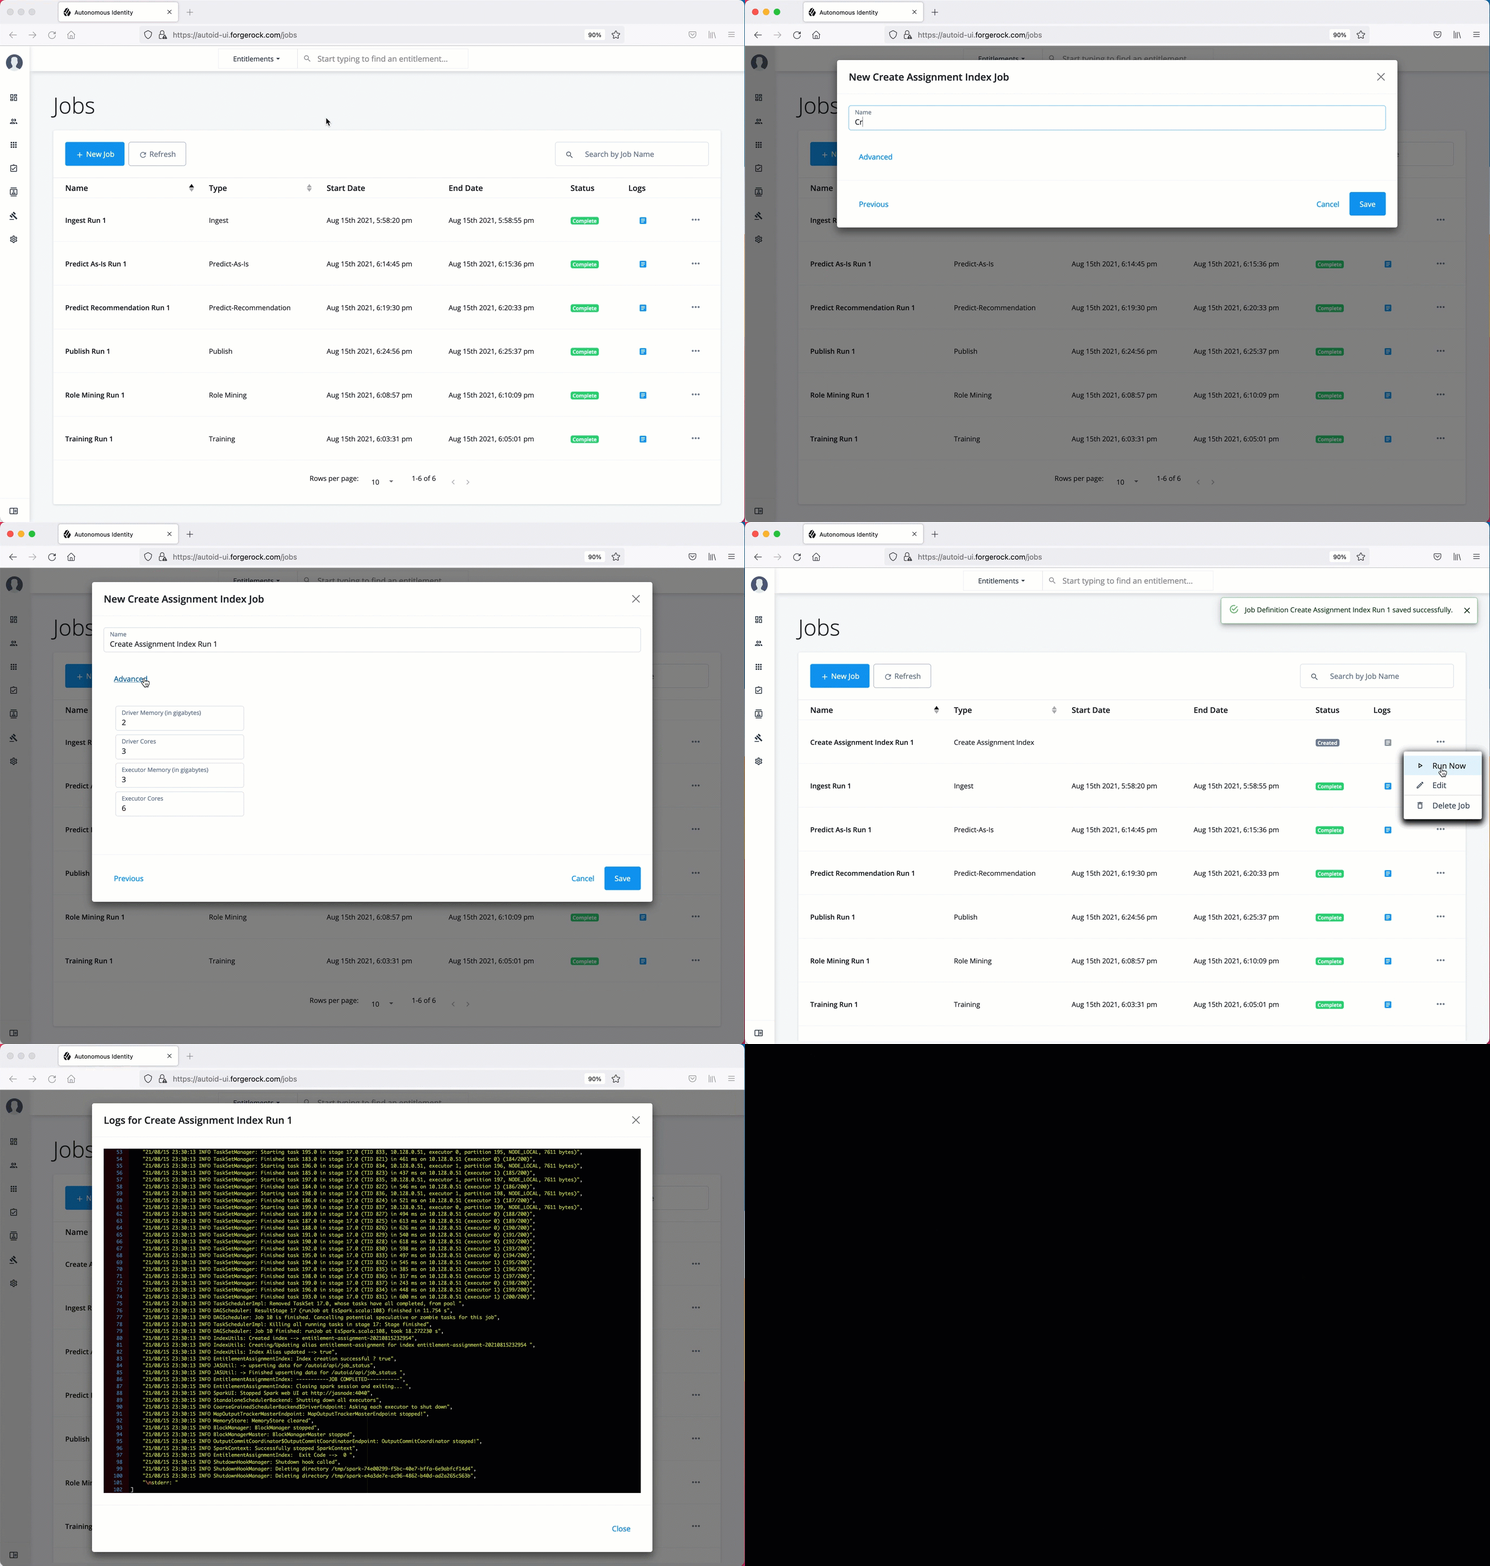
Next, run the create-assignment-index job. This command creates a master index by joining together all database
tables. The combined index becomes a source index for the APIs.
Run create-assignment-index using the UI:
-
On the Autonomous Identity UI, click the Administration link, and then click Jobs.
-
On the Jobs page, click New Job. You will see a job schedule with each job in the analytics pipeline.
-
Click Create Assignment Index, and then click Next.
-
On the New Create Assignment Index Job box, enter the name of the job.
-
Click Advanced and adjust any of the Spark properties, if necessary.
-
Click Save to continue.
-
Click Run Now.
-
Next monitor the state of the job by clicking Logs, or click Refresh to update the Jobs page.
-
When the job completes, you can see the change in the status.
See it in action
The create-assignment-index-report is an export of the assignment index to a csv file. This allows
users to create custom reports from the master table.
|
Refresh Company View
Next, refresh the indexes and company view display with the updated data. ForgeRock has set up an alias to run the command from the target server.
|
Currently, this procedure can only be run on the command line within a terminal window. In a future release, you will be able to run this command from the Jobs UI. |
-
In a terminal window, SSH to the target server.
-
Run the refresh-company-view alias.
$ refresh-company-view
You will see the following output:
021-10-08 19:04:30,043 INFO ServiceConfigParser [main] Building JAS config
2021-10-08 19:04:30,121 INFO SSLUtils [main] --→ KeyStore path :
2021-10-08 19:04:30,130 INFO SSLUtils [main] --→ Truststore path : /opt/autoid/certs/jas/jas-server-truststore.jks
2021-10-08 19:04:30,460 INFO ServiceConfigParser [main] Building JAS config
2021-10-08 19:04:30,624 INFO ServiceConfigParser [main] Building elasticsearch config
2021-10-08 19:04:30,768 INFO SSLUtils [main] --→ KeyStore path : /opt/autoid/certs/elastic/elastic-client-keystore.jks
2021-10-08 19:04:30,770 INFO SSLUtils [main] --→ Truststore path : /opt/autoid/certs/elastic/elastic-server-truststore.jks
2021-10-08 19:04:31,373 INFO RefreshCompanyView [main] → Index Deleted
2021-10-08 19:04:31,373 INFO RefreshCompanyView [main] → Refreshing Company View Cache
2021-10-08 19:04:31,393 INFO ServiceConfigParser [main] Building JAS config
2021-10-08 19:04:33,866 INFO RefreshCompanyView [main] → Refreshing Assignment Stats
2021-10-08 19:04:33,885 INFO ServiceConfigParser [main] Building JAS config
2021-10-08 19:04:38,492 INFO RefreshCompanyView [main] → Refreshing Most Critical Assignments
2021-10-08 19:04:38,510 INFO ServiceConfigParser [main] Building JAS config
2021-10-08 19:04:41,418 INFO RefreshCompanyView [main] → Job finished
Run Anomaly Report
Autonomous Identity provides a report on any anomalous entitlement assignments that have a low confidence score but are for entitlements that have a high average confidence score. The report’s purpose is to identify true anomalies rather than poorly managed entitlements.
The report generates the following points:
-
Identifies potential anomalous assignments.
-
Identifies the number of users who fall below a low confidence score threshold. For example, if 100 people all have low confidence score assignments to the same entitlement, then it is likely not an anomaly. The entitlement is either missing data or the assignment is poorly managed.
Run the anomaly report using the UI:
-
On the Autonomous Identity UI, click the Administration link, and then click Jobs.
-
On the Jobs page, click New Job. You will see a job schedule with each job in the analytics pipeline.
-
Click Anomaly, and then click Next.
-
On the New Anomaly Job box, enter the name of the job.
-
Click Advanced and adjust any of the Spark properties, if necessary.
-
Click Save to continue.
-
Click Run Now to start the ingestion run.
-
Next monitor the state of the job by clicking Logs, or click Refresh to update the Jobs page.
-
When the job completes, you can see the change in the status.
-
Access the anomaly report. The report is available at
/data/output/reports/anomaly_report/<report-id>.csv.
Run Insight Report
Next, run an insight report on the generated rules and predictions that were generated during the training and predictions runs. The analytics command generates insight_report.txt and insight_report.xlsx and writes them to the /data/input/spark_runs/reports
directory.
The report provides the following insights:
-
Number of assignments received, scored, and unscored.
-
Number of entitlements received, scored, and unscored.
-
Number of assignments scored >80% and <5%.
-
Distribution of assignment confidence scores.
-
List of the high volume, high average confidence entitlements.
-
List of the high volume, low average confidence entitlements.
-
Top 25 users with more than 10 entitlements.
-
Top 25 users with more than 10 entitlements and confidence scores greater than 80%.
-
Top 25 users with more than 10 entitlements and confidence scores less than 5%.
-
Breakdown of all applications and confidence scores of their assignments.
-
Supervisors with most employees and confidence scores of their assignments.
-
Top 50 role owners by number of assignments.
-
List of the "Golden Rules," high confidence justifications that apply to a large volume of people.
Run the insight report using the UI:
-
On the Autonomous Identity UI, click the Administration link, and then click Jobs.
-
On the Jobs page, click New Job. You will see a job schedule with each job in the analytics pipeline.
-
Click Insight, and then click Next.
-
On the New Insight Job box, enter the name of the job.
-
Click Advanced and adjust any of the Spark properties, if necessary.
-
Click Save to continue.
-
Click Run Now.
-
Next monitor the state of the job by clicking Logs, or click Refresh to update the Jobs page.
-
When the job completes, you can see the change in the status.
-
Access the insight report. The report is available at
/data/output/reports/insight_report.xlsx.
Run Analytics on the Command Line
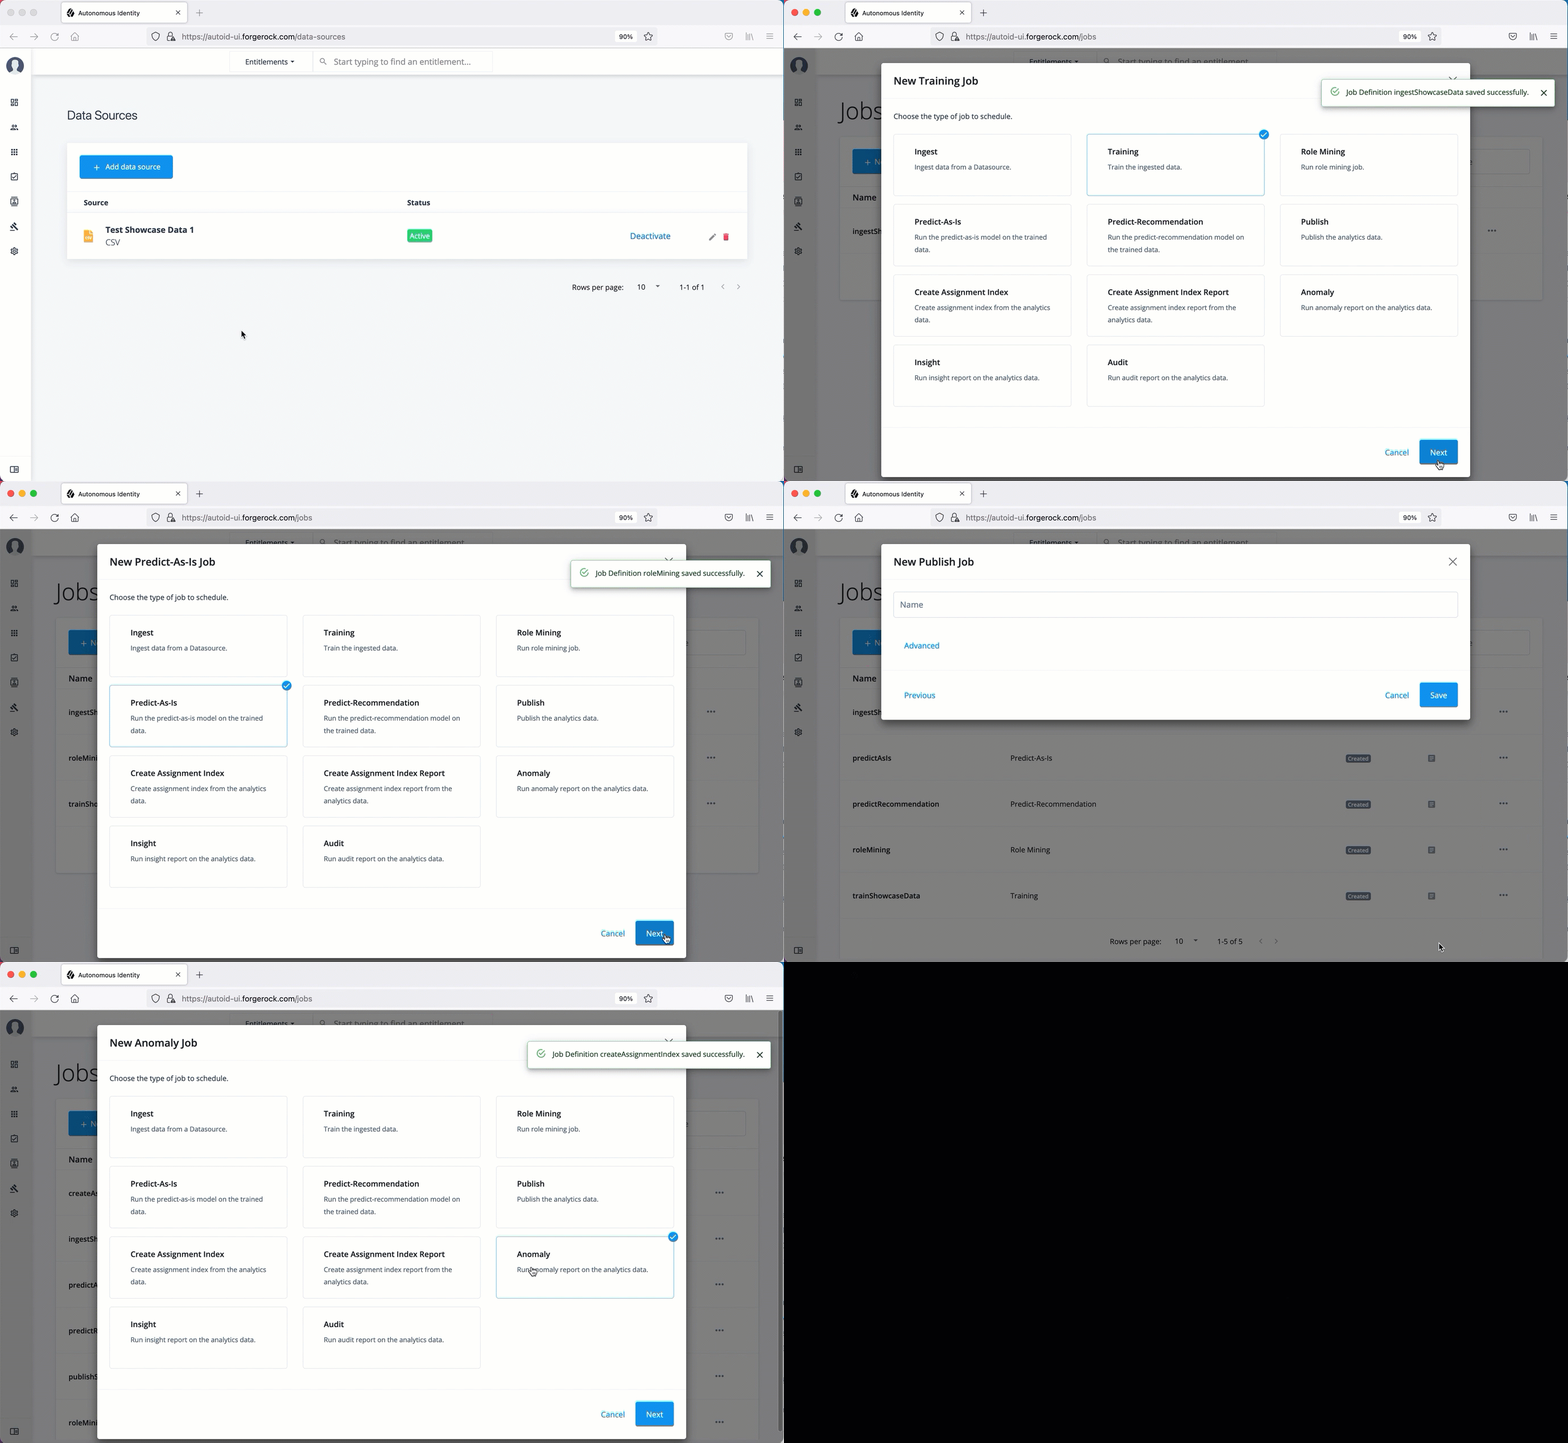
Autonomous Identity supports the ability to run the pipeline from the command-line. Before you run the pipeline commands, you must run the pre-analytic tasks as defined in Pre-Analytics Tasks, and then define the jobs on the Jobs UI.
|
The analytics pipeline CLI commands will be deprecated in a future release. We recommend using the Jobs UI to run the analytics jobs. |
Run the CLI analytics commands:
-
Make sure to run the pre-analytics tasks, such as adding attributes to the schema, define your datasources, set up your attribute mappings, and adjusting your analytics threshold values, if necessary:
-
Add attributes to the schema. For more information, see Set Entity Definitions.
-
Define your datasources. Autonomous Identity supports different file types for ingestion: CSV, JDBC, and generic. You can enter more than one data source file, specifying the dataset location on your target machine. For more information, see Set Data Sources.
-
Define attribute mappings between your data and the schema. For more information, see Set Attribute Mappings.
-
Configure your analytics threshold values. For more information, see Set Analytics Thresholds.
-
-
Define your job definitions on the UI for each of the following:
You can only define your job definitions on the Autonomous Identity UI. There is no command-line equivalent to define the jobs.
-
Ingest
-
Train
-
Role Mine
-
Predict As-Is
-
Predict Recommendation
-
Publish
-
Create Assignment Index
-
Anomaly Report (Optional)
-
Insight Report (Optional)
-
Audit Report (Optional)
See it in action
-
-
In a terminal window, SSH to the target server.
-
Change to the
analyticsdirectory.$ cd /opt/autoid/apache-livy/analytics
-
Run each of the following jobs to completion, and then submit the next job.
-
Run the ingest job.
$ analytics run <ingest-job-definition-name>

For example:
$ analytics run ingestShowcaseData
-
When the ingest job completes, you can run a status command to confirm its completion:
$ analytics status ingestShowcaseData

2021-09-20 23:18:55 INFO  AnalyticsJobsClient:104 - → checking analytic job status for --→  ingestShowcaseData
2021-09-20 23:18:55 INFO  ServiceConfigParser:54 - Building JAS config
2021-09-20 23:18:55 INFO  JASHelper:49 - → Building new SSL context for JAS REST Client using trust store
2021-09-20 23:18:55 INFO  SSLUtils:36 - --→ KeyStore path :
2021-09-20 23:18:55 INFO  SSLUtils:44 - --→ Truststore path : /opt/autoid/certs/jas/jas-server-truststore.jks
2021-09-20 23:18:55 INFO  ServiceConfigParser:54 - Building JAS config
 Job Status result
********************************
Job Status for ingestShowcaseData -→  COMPLETED
********************************
-
Run the training job.
$ analytics run <training-job-definition-name>

For example:
$ analytics run trainShowcaseData
-
Run the role mining job.
$ analytics run <role-mining-job-definition-name>

For example:
$ analytics run roleMining
-
Run the predict-as-is job.
$ analytics run <predict-asis-job-definition-name>

For example:
$ analytics run predictAsIs
-
Run the predict-recommendation job.
$ analytics run <predict-recommendation-job-definition-name>

For example:
$ analytics run predictRecommendation
-
Run the publish job.
$ analytics run <publish-job-definition-name>

For example:
$ analytics run publishShowcaseData
-
Run the create assignment index job.
$ analytics run <create-assignment-index-definition-name>

For example:
$ analytics run createAssignmentIndex
-
Run the refresh-company-view alias. See Refresh Company View for more information.
-
Optional. Run the anomaly report job.
$ analytics run <anomaly-report-definition-name>

For example:
$ analytics run anomalyReport
-
Optional. Run the insight report job.
$ analytics run <insight-report-definition-name>

For example:
$ analytics run insightReport
-
Optional. Run the audit report job.
$ analytics run <audit-report-definition-name>

For example:
$ analytics run auditReport
-
-
Click the Autonomous Identity UI Dashboard. The page reloads with your data.
Admin User Tasks
The Admin user functionality is similar to that of a system administration superuser. Admin users have the access rights to company-wide entitlement data on the Autonomous Identity console. Admin users can approve or revoke a user’s entitlement.
Investigate Most Critical Entitlements
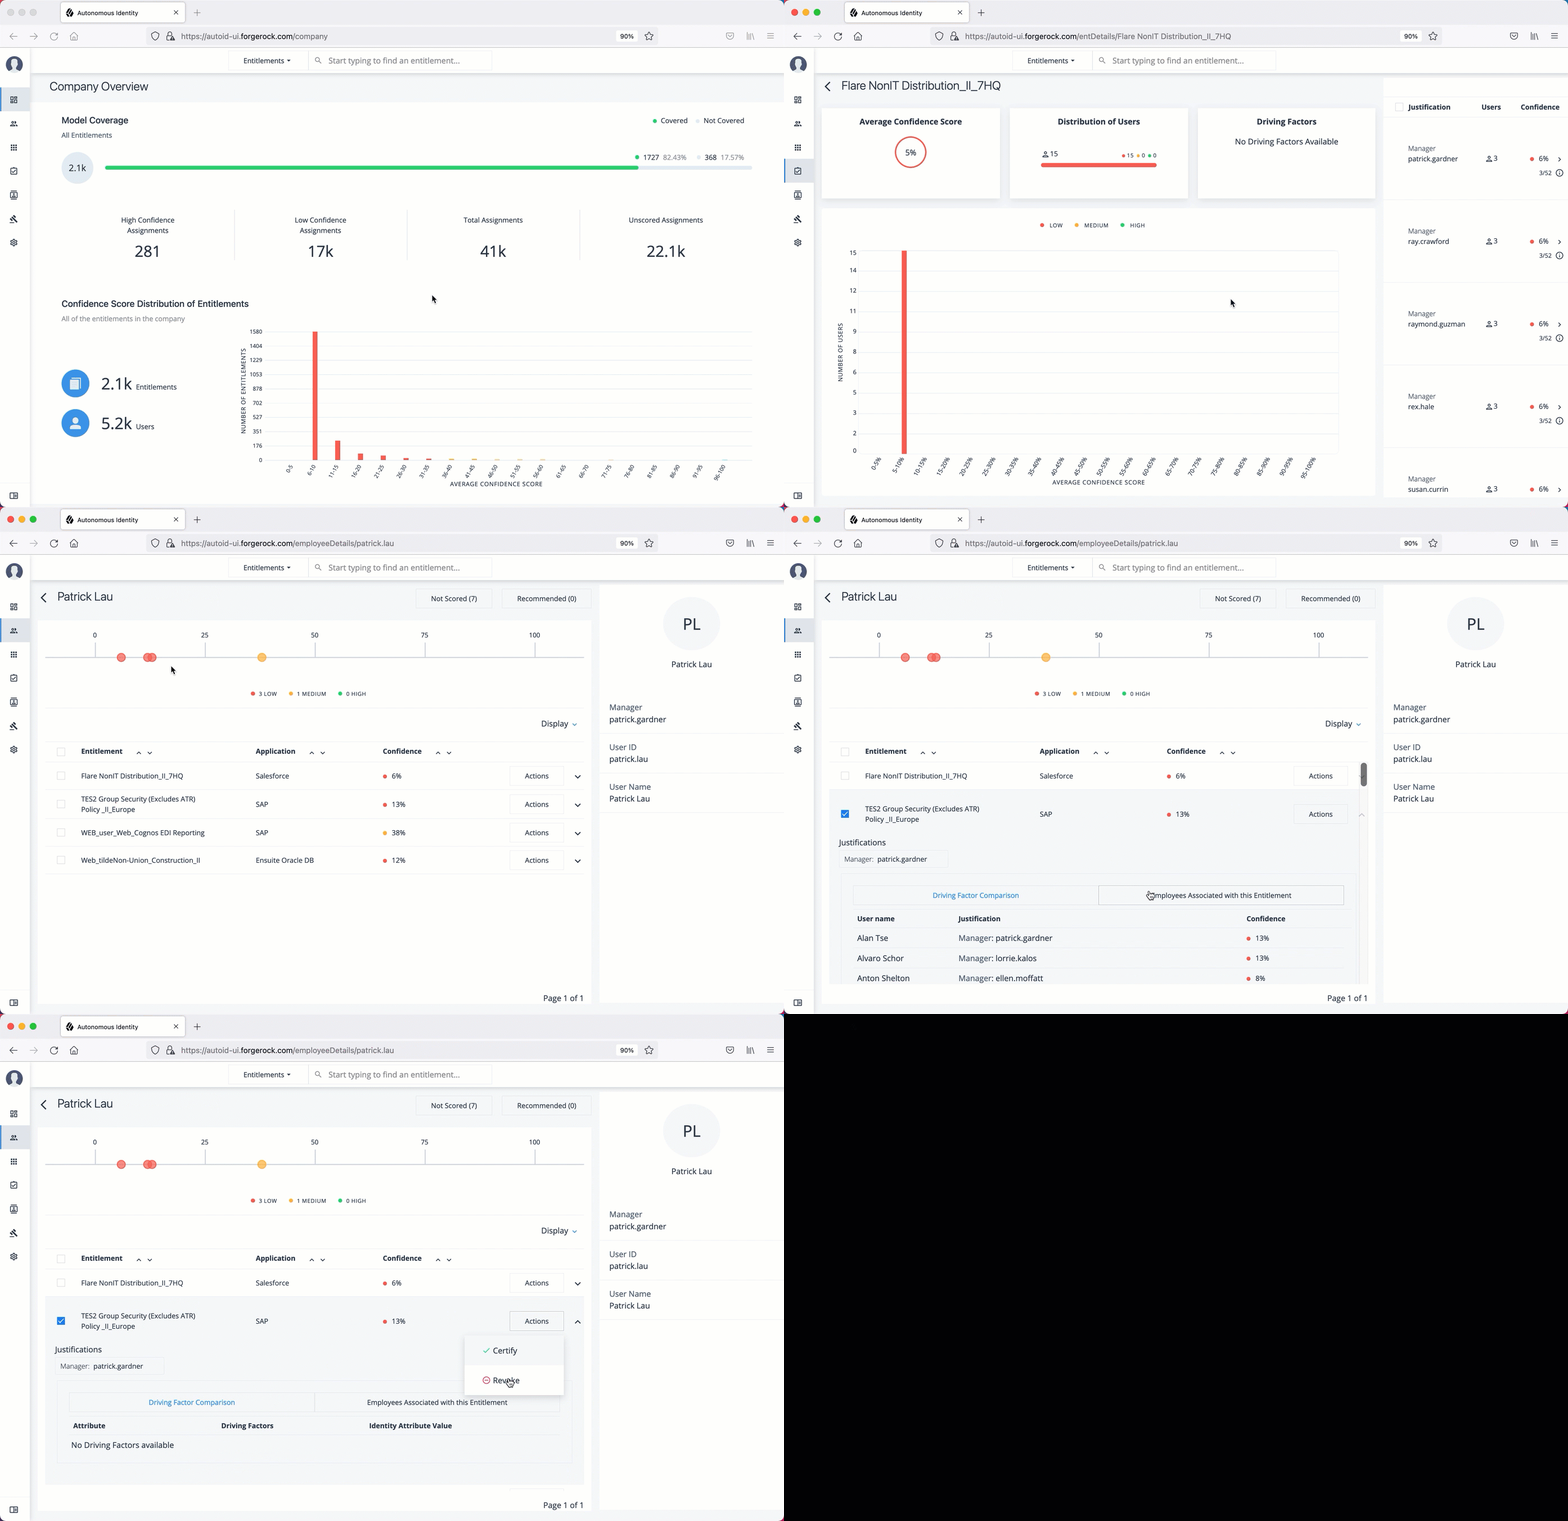
One important task that an administrator must perform is to examine all critical entitlements. Critical entitlements are assigned entitlements that have are highly-assigned but have a low confidence score associated with it. The Autonomous Identity console provides a means to examine these entitlements.
Follow these steps to evaluate the most critical entitlements list:
-
On the Dashboard, scroll down to the Most Critical Entitlements section. This section displays the entitlements that have low confidence scores and a high number of employees who have this entitlement.
-
Click an entitlement to view its details.
-
On the Entitlements detail page, review the key metrics.
-
Click the right arrow in one of the category ranges to view the users, and then click one of the users in the list.
-
On the User’s Entitlements page, scroll down to review the Confidence Score Comparison table to see the differences between the user’s attribute and the driving factor attributes.
-
Click Employees associated with this entitlement to review other uses who have this entitlement.
-
Click Actions, and then click Approve or Revoke for this entitlement. You can also bulk approve more than one entitlement. You can only revoke one entitlement at a time.
See it in action
Approve or Revoke Access an Entitlement for a User
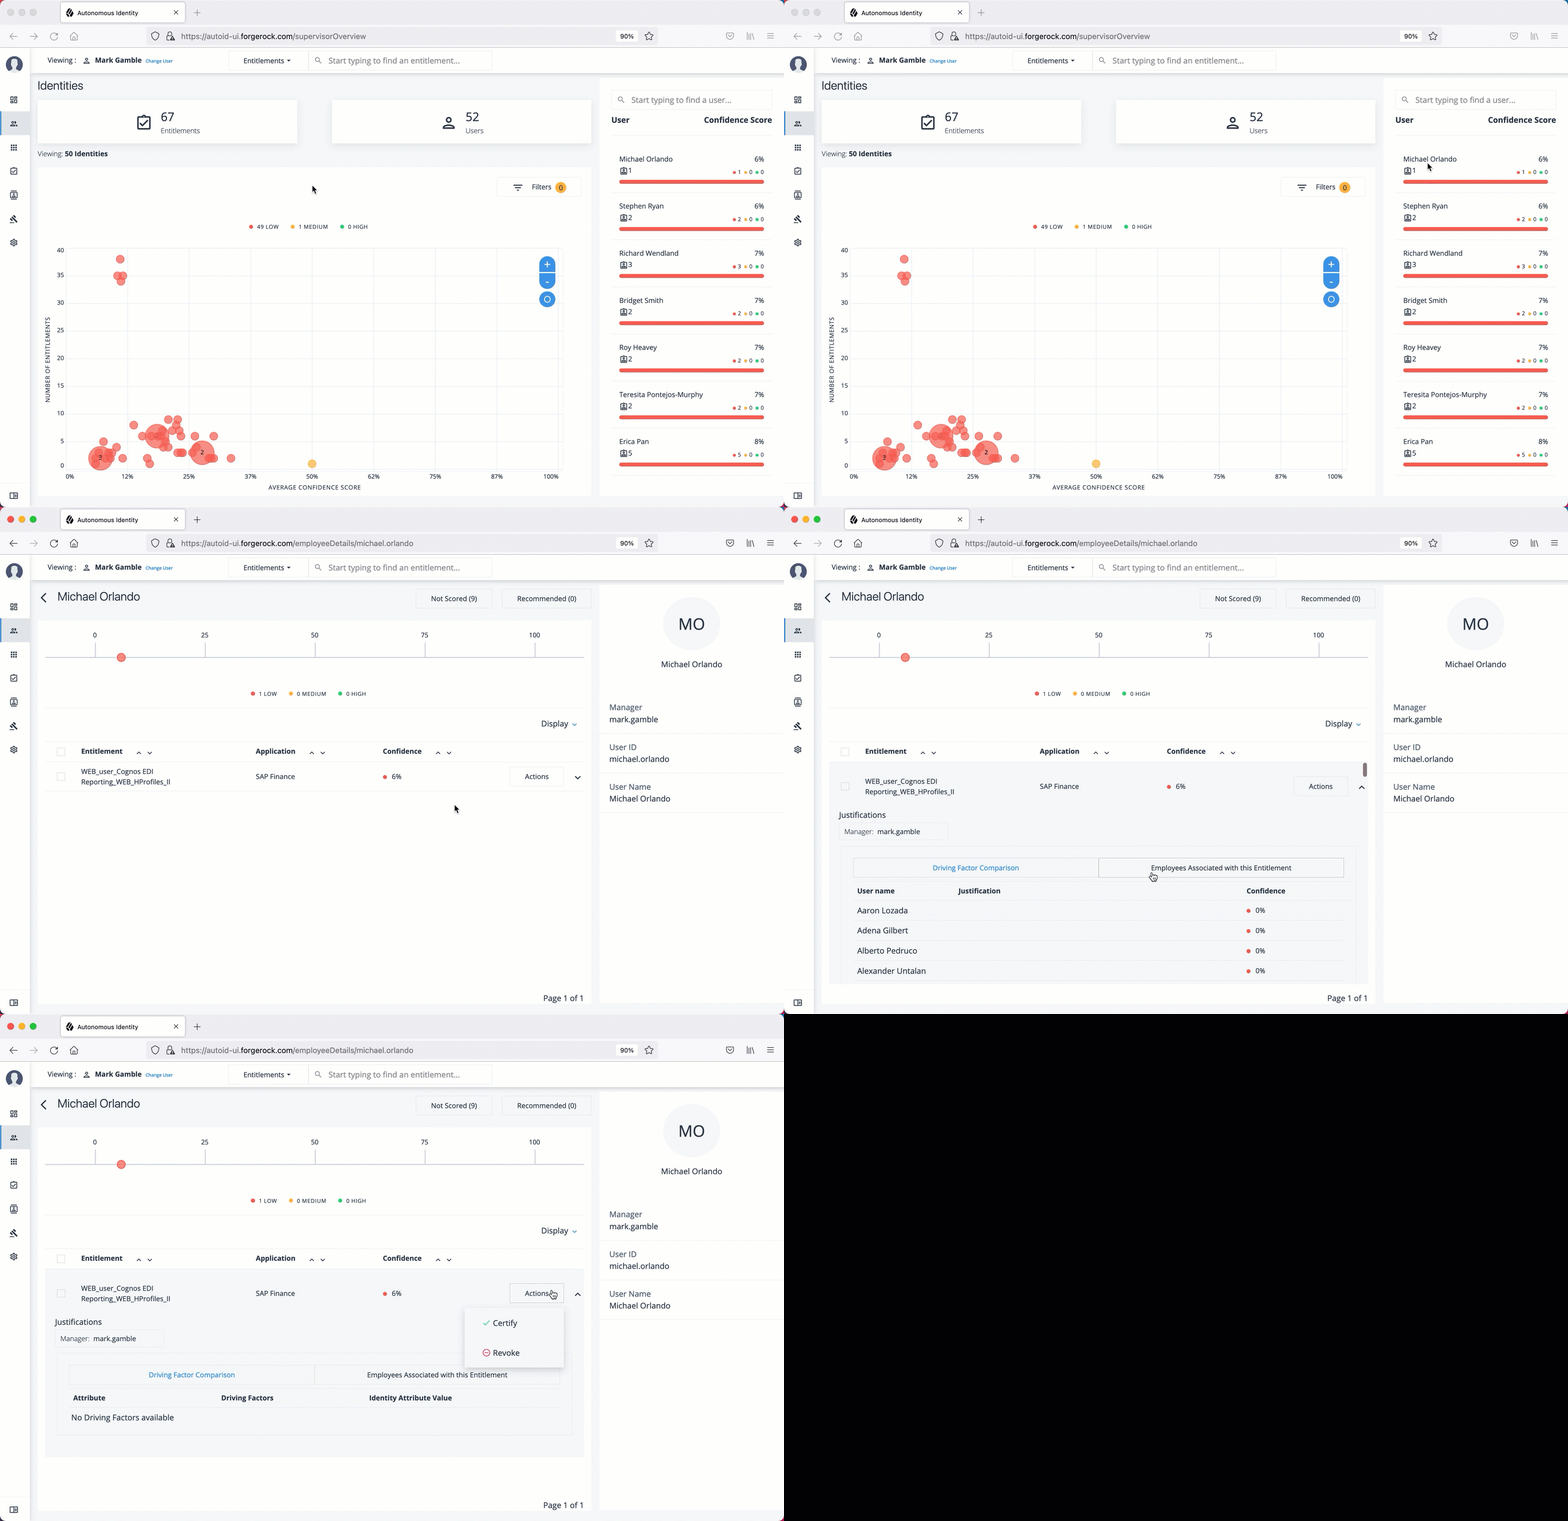
Follow these steps to investigate a confidence score and approve or revoke access an entitlement assigned to a specific user:
-
On Autonomous Identity console, click Identities, and enter a name of a supervisor. The only way to access a user’s entitlements is through the Most Critical Entitlements section or the Identities page.
-
On the Identities page, click a circle, and then click the user in the list on the right.
-
On the User Entitlement page, click a confidence circle on the graph to highlight the entitlement below.
-
For the selected entitlement, click the down arrow on the right to view the Driving Factor Comparison.
-
Click Employees associated with this entitlement to view the justifications for those users with high confidence scores with this entitlement.
-
Click Actions, and then click Approve Access or Revoke access. If you have more than one entitlement that you want to approve, select them all and do a bulk Approval. You can only do one Revoke Access at a time.
See it in action
Check Not-Scored Users
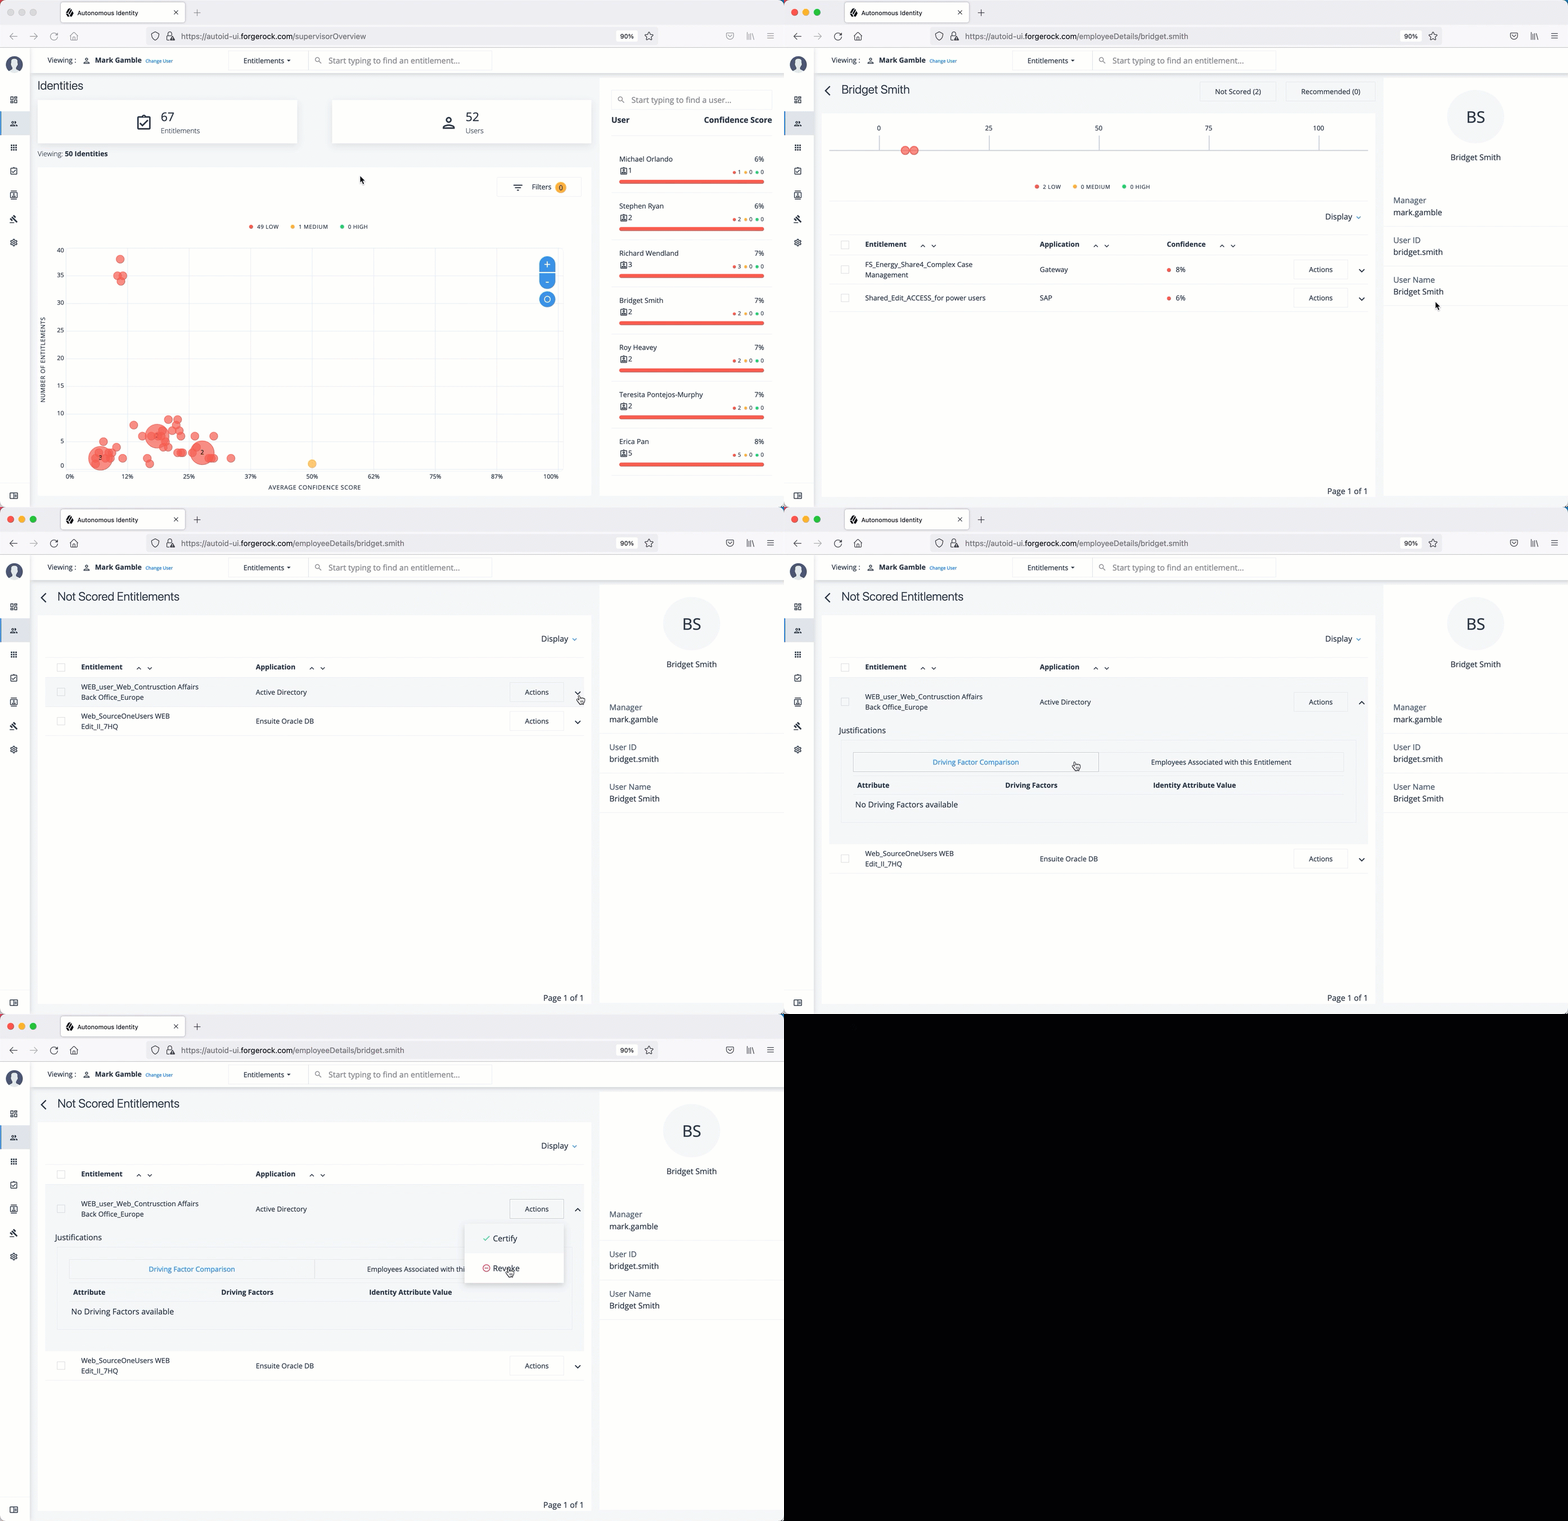
Follow these steps to check Not Scored entitlements. Not-scored indicates that it does not have a justification associated with the entitlement:
-
On Autonomous Identity console, click Identities, and enter a name of a supervisor. The only way to access a user’s entitlements is through the Most Critical Entitlements section or the Identities page.
-
On the Identities page, click a circle, and then click the user in the list on the right.
-
On the User Entitlement page, click Not Scored.
-
On the Not Scored Entitlements page, click the down arrow to view the driving factors comparison.
-
Click Employees associated with this entitlement to view the justifications for those users with high confidence scores with this entitlement.
-
Click Actions, and then click Approve Access or Revoke access. At a later date, you can re-click the Approve or Revoke button to cancel the operation.
See it in action
Apply Filters
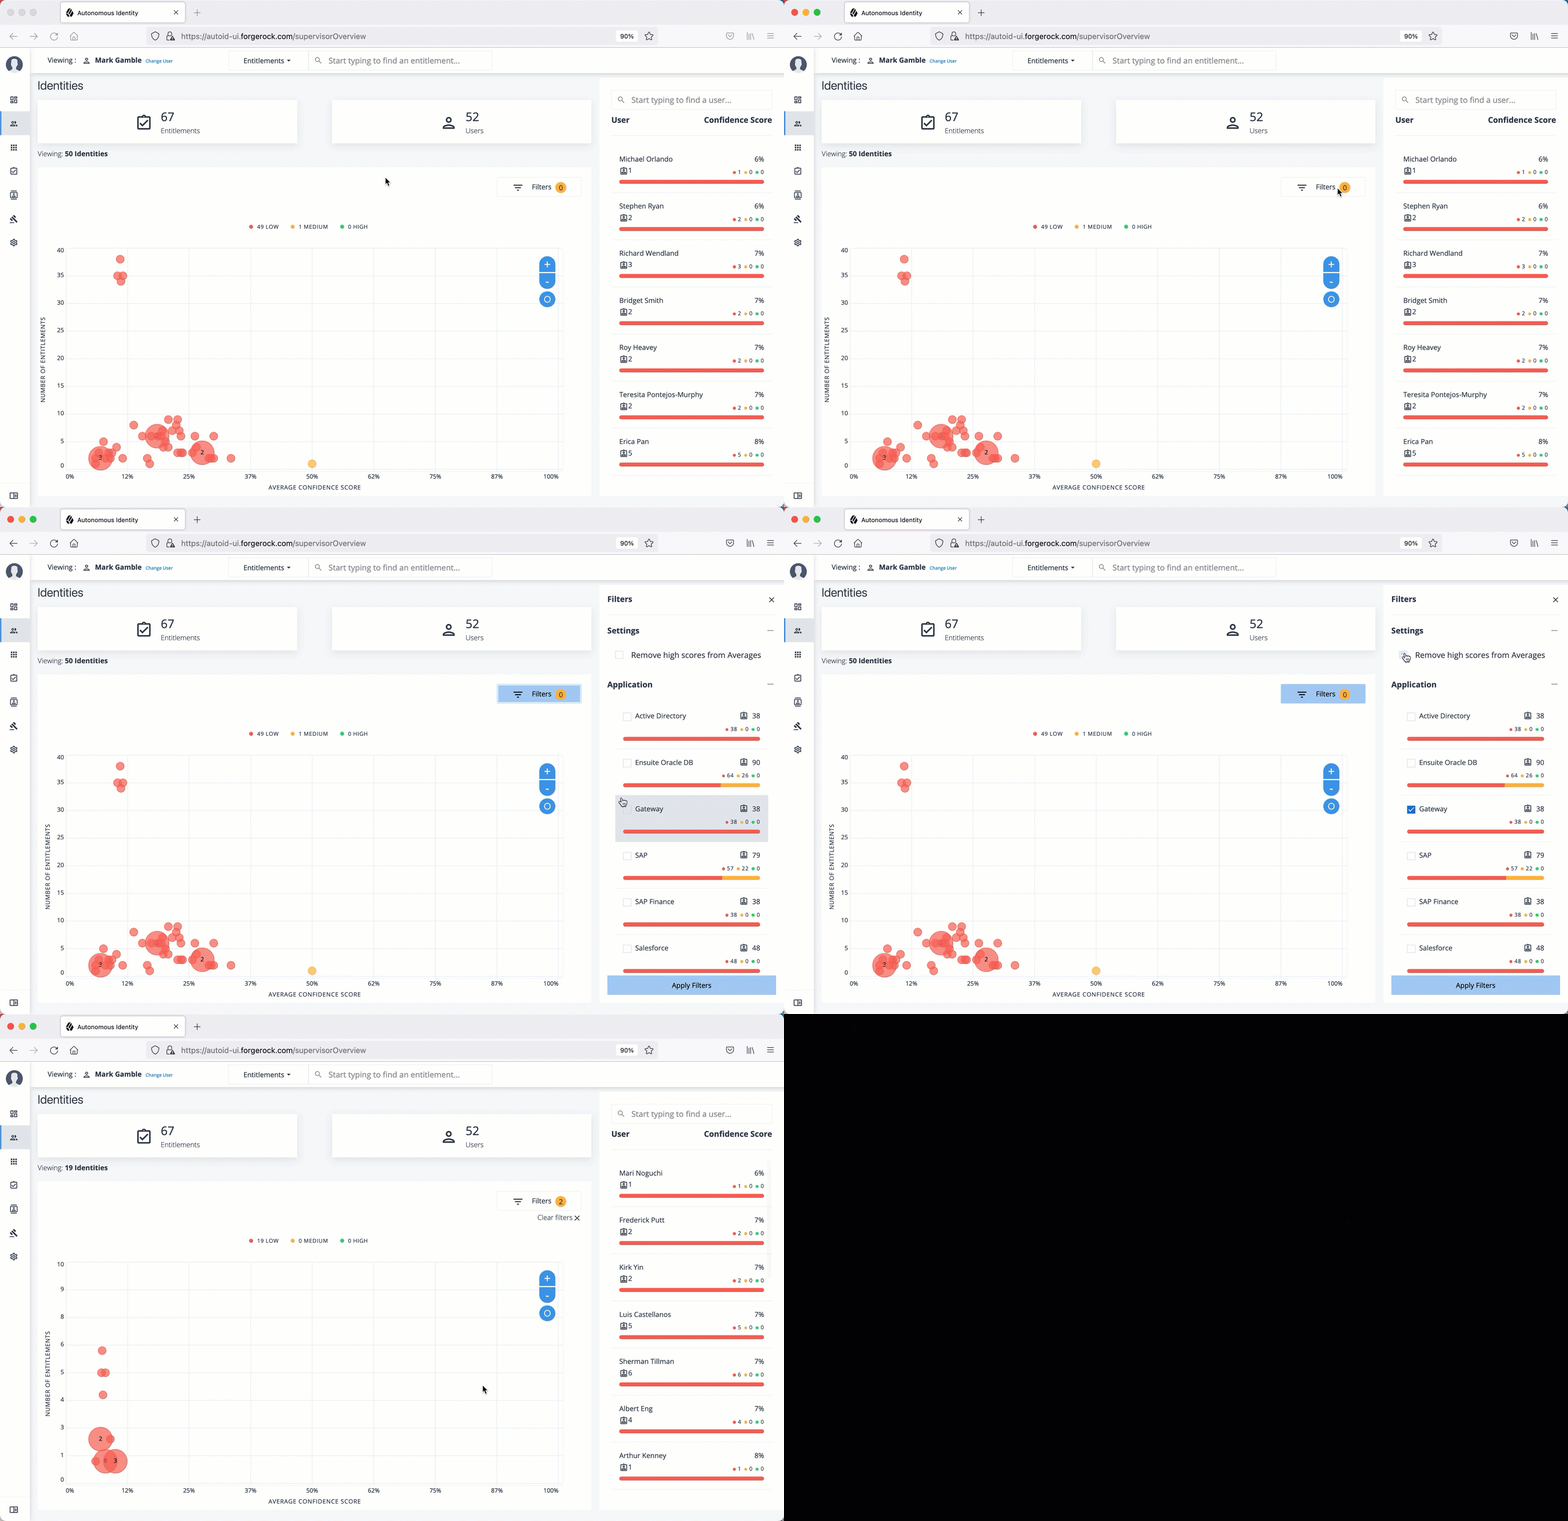
Follow these steps to apply filters to your confidence score graphs on the Identities and Entitlements pages:
| The Filters for the Identities and Entitlements are similar. The filters for the Applications and Rules pages offer different options to filter your searches. |
-
On the Identities or Entitlements page, view the average confidence score graph.
-
On the right, click Filters.
-
Under filters, do one or all of the following:
-
Click Remove High Scores from Average or enable any filter in the Application Filters section.
-
Under Applications, click one or more applications to see the identities or entitlements asssociated with the selected application.
-
Click Add Filters to further see only those identities or entitlements based on a user attribute, such as
city. When ready, click Apply Filters.
-
-
Click Clear Filters to remove your filters.
See it in action
Server Maintenance
Autonomous Identity administrators must conduct various tasks to maintain the service for their users.
The following are basic server maintenance tasks that may occur:
Stopping and Starting
The following commands are for Linux distributions:
Restarting Docker
-
To restart docker, first set the docker to start on boot using the
enablecommand:$ sudo systemctl enable docker
-
To start docker, run the
startcommand:$ sudo systemctl start docker
-
After restarting Docker, restart the JAS service to ensure the service can write to its logs:
$ docker service update --force jas_jasnode
Shutting Down Cassandra
-
On the deployer node, SSH to the target node.
-
Check Cassandra status.
Datacenter: datacenter1
=======================
Status=Up/Down
|/ State=Normal/Leaving/Joining/Moving —  Address      Load       Tokens       Owns (effective)  Host ID                               Rack
UN  10.128.0.38  1.17 MiB   256          100.0%            d134e7f6-408e-43e5-bf8a-7adff055637a  rack1
-
To stop Cassandra, find the process ID and run the kill command.
$ pgrep -u autoid -f cassandra | xargs kill -9
-
Check the status again.
nodetool: Failed to connect to '127.0.0.1:7199' - ConnectException: 'Connection refused (Connection refused)'.
Re-Starting Cassandra
-
On the deployer node, SSH to the target node.
-
Restart Cassandra. When you see the
No gossip backlog; proceedingmessage, hitEnterto continue.$ cassandra … INFO [main] 2020-11-10 17:22:49,306 Gossiper.java:1670 - Waiting for gossip to settle… INFO [main] 2020-11-10 17:22:57,307 Gossiper.java:1701 - No gossip backlog; proceeding
-
Check the status of Cassandra. You should see that it is in
UNstatus ("Up" and "Normal").$ nodetool status
Shutting Down MongoDB
-
Check the status of the MongDB
$ ps -ef | grep mongod
-
Connect to the Mongo shell.
$ mongo --tls --tlsCAFile /opt/autoid/mongo/certs/rootCA.pem --tlsCertificateKeyFile /opt/autoid/mongo/certs/mongodb.pem --tlsAllowInvalidHostnames --host <ip-address> MongoDB shell version v4.2.9 connecting to: mongodb://<ip-address>:27017/?compressors=disabled&gssapiServiceName=mongodb 2020-10-08T18:46:23.285+0000 W NETWORK [js] The server certificate does not match the host name. Hostname: <ip-address> does not match CN: mongonode Implicit session: session { "id" : UUID("22c0123-30e3-4dc9-9d16-5ec310e1ew7b") } MongoDB server version: 4.2.9 -
Switch the admin table.
> use admin

switched to db admin
-
Authenticate using the password set in
vault.ymlfile.> db.auth("root", "Welcome123") 1 -
Start the shutdown process.
> db.shutdownServer() 2020-10-08T18:47:06.396+0000 I NETWORK [js] DBClientConnection failed to receive message from <ip-address>:27017 - SocketException: short read server should be down… 2020-10-08T18:47:06.399+0000 I NETWORK [js] trying reconnect to <ip-address>:27017 failed 2020-10-08T18:47:06.399+0000 I NETWORK [js] reconnect <ip-address>:27017 failed
-
Exit the mongo shell.
$ quit()
or <Ctrl-C>
-
Check the status of the MongDB
$ ps -ef | grep mongod

no instance of mongod found
Re-Starting MongoDB
-
Re-start the MongoDB service.
$ /usr/bin/mongod --config /opt/autoid/mongo/mongo.conf

about to fork child process, waiting until server is ready for connections.
forked process: 31227
child process started successfully, parent exiting
-
Check the status of the MongDB
$ ps -ef | grep mongod

autoid    9245     1  0 18:48 ?        00:00:45 /usr/bin/mongod --config /opt/autoid/mongo/mongo.conf
autoid   22003  6037  0 21:12 pts/1    00:00:00 grep --color=auto mongod
Shutting Down Spark
-
On the deployer node, SSH to the target node.
-
Check Spark status. You should see that it is up-and-running.
$ elinks http://localhost:8080
-
Stop the Spark Master and workers.
$ /opt/autoid/spark/spark-2.4.4-bin-hadoop2.7/sbin/stop-all.sh

localhost: stopping org.apache.spark.deploy.worker.Worker
stopping org.apache.spark.deploy.master.Master
-
Check the Spark status again. You should see:
Unable to retrieve htp://localhost:8080: Connection refused.
Re-Starting Spark
-
On the deployer node, SSH to the target node.
-
Start the Spark Master and workers. Enter the user password on the target node when prompted.
$ /opt/autoid/spark/spark-2.4.4-bin-hadoop2.7/sbin/start-all.sh

starting org.apache.spark.deploy.master.Master, logging to /opt/autoid/spark/spark-2.4.4-bin-hadoop2.7/logs/spark-a
utoid-org.apache.spark.deploy.master.Master-1.out
autoid-2 password:
localhost: starting org.apache.spark.deploy.worker.Worker, logging to /opt/autoid/spark/spark-2.4.4-bin-hadoop2.7/l
ogs/spark-autoid-org.apache.spark.deploy.worker.Worker-1.out
-
Check the Spark status again. You should see that it is up-and-running.
Backing Up and Restoring
Autonomous Identity stores its entitlement analytics results, association rules, predictions, and confidence scores in the Apache Cassandra, MongoDB, and Open Distro for Elasticsearch databases. Cassandra is an open-source, NoSQL database system where data is distributed across multiple nodes in a master-less cluster. MongoDB is a popular schema-free database that uses JSON-like documents. Open Distro for Elasticsearch is a distributed search engine based on Apache Lucene.
For single-node deployments, however, you need to back up Cassandra or MongoDB on a regular basis. If the machine goes down for any reason, you need to restore the database as required.
To simplify the backup process, ForgeRock provides backup and restore scripts in the target directory.
Backing Up Cassandra
-
On the ForgeRock Google Cloud Registry (gcr.io), download the
cassandra-backup.shscript. -
Move the script to the Cassandra home directory on your deployment.
-
Run the backup.
$ ./cassandra-backup.sh \
    -d <Cassandra Database path> \
    -b <Backup folder path> \
    -u <Cassandra Username> \
    -p <Cassandra Password> \
    -s <SSL enable true/false> \
    -k <Keyspace (optional) default value: zoran>
Restore Cassandra
-
On the ForgeRock Google Cloud Registry (gcr.io), download the
cassandra-restore.shscript. -
Move the script to the Cassandra home directory on your deployment.
-
Run the restore.
$ ./cassandra-restore.sh \
    -d <Cassandra Database path> \
    -b <Snapshot Backup tar file> \
    -f <Schema file> \
    -u <Cassandra Username> \
    -p <Cassandra Password> \
    -c <Cassandra commitlog path> \
    -i <Cassandra install path> \
    -s <SSL enable true/false> \
    -k <Keyspace (optional) default value: zoran>
Backing Up Assignment Index Data in Elasticsearch
-
From the deployer node, SSH to the target node.
-
Change to the
/opt/autoid/elasticdirectory. The directory was configured during the./deployer.sh run.$ cd /opt/autoid/elastic
-
Run the backup.
$ ./assignment-index-backup.sh Elastic Host: 10.128.0.52 Elastic Server Status : 200 Elastic server is up and running … assignment index exists status : 200 registerSnapshotStatus 200 backup snapshot name with time stamp : assignment_snapshot_2020_10_07__19_31_53 entitlement-assignment backup status : 200 * entitlement-assignment backup successful *
-
Make note of the snapshot name. For example,
assignment_snapshot_2020_10_07__19_31_53.
Restoring Assignment Index Data in Elasticsearch
-
From the deployer node, SSH to the target node.
-
Change to the
/opt/autoid/elasticdirectory.$ cd /opt/autoid/elastic
-
Run the restore using the snapshot taken from the previous procedure. When prompted if you want to close the existing index, enter
Y. When prompted for the snapshot name, enter the name of the snapshot.$ ./assignment-index-restore.sh [Elastic Host: 10.128.0.55 Elastic Server Status : 200 Elastic server is up and running … assignment index exists status : 200 index with alias name -→ entitlement-assignment exists and is in open state… Do you want to close the existing index -→ entitlement-assignment. (Required for restoring from snapshot ) (Y/N) ? y Restore snapshot ? true registerSnapshotStatus 200 registering assignment_index_backup successful… proceeding with index restore… Enter the snapshot name to restore [snapshot_01]: assignment_snapshot_2020_10_0719_31_53 snapshot to restore -→ assignment_snapshot_2020_10_0719_31_53 entitlement-assignment index restore status -→ 200 * entitlement-assignment restore successful *
Accessing Elasticsearch Index Data using Kibana
During the Autonomous Identity deployment, Open Distro for Elasticsearch (ODFE) is installed to facilitate the efficient searching of entitlement data within the system. A typical deployment may have millions of different entitlements and assignments that require fast search processing. ODFE provides that performance.
ODFE comes bundled with its visualization console, Kibana, that lets you monitor and manage your Elasticsearch data. Once you run the analytics create-assignment-index command that populates the Elasticsearch index, you can configure an SSL tunnel to access Kibana. This is particularly useful when you want to retrieve a list of your backup snapshots.
-
Open a local terminal, and set up an SSL tunnel to your target node. The syntax is as follows:
$ ssh -L < local-port >:<private-ip-remote>:<remote-port> -i <private-key> <user@public-ip-remote>
For example:
$ ssh -L 5601:10.128.0.71:5601 -i ~/.ssh/id_rsa autoid@34.70.190.144

Last login: Fri Oct  9 20:10:59 2020
-
Open a browser and point it to
localhost:5601Login in aselasticadmin. Enter your password that you set in the~/autoid-config/vault.ymlfile on the deployer node during install. -
On the Elasticsearch page, click Explore on my own.
-
On the Elasticsearch Home page, click the menu in the top left corner, and click Dev Tools.
-
On the Dev Tools page, get a total count of indices.
$ GET /entitlement-assignment/_count
-
On the Dev Tools page, search the indices.
$ GET /entitlement-assignment/_search
-
On the Dev Tools page, get the list of snapshot backups.
$ GET /_cat/snapshots/assignment_index_backup
Exporting and Importing Data
Export Your Data
If you are migrating data, for example, from a development server to a QA server, then follow this section to export your data from your current deployment. Autonomous Identity provides a python script to export your data to .csv files and stores them to a folder in your home directory.
-
On the target machine, change to the
dbutilsdirectory.$ cd /opt/autoid/dbutils
-
Export the database.
$ python dbutils.py export ~/backup
Import the Data into the Autonomous Identity Keyspace
If you are moving your data from another server, import your data to the target environment using the following steps.
-
First, create a
zoran_user.cqlfile. This file is used to drop and re-create the Autonomous Identityuseranduser_historytables. The file should go to the same directory as the other .csv files. Make sure to create this file from the source node, for example, the development server, from where we exported the data.Start cqlsh in the source environment, and use the output of these commands to create the
zoran_user.cqlfile:$ describe zoran.user;
$ describe zoran.user_history;
Make sure the
DROP TABLEcql commands precedes theCREATE TABLEcommands as shown in thezoran_user.cqlexample file below:USE zoran ; DROP TABLE IF EXISTS zoran.user_history ; DROP TABLE IF EXISTS zoran.user ; CREATE TABLE zoran.user ( user text PRIMARY KEY, chiefyesno text, city text, costcenter text, isactive text, jobcodename text, lineofbusiness text, lineofbusinesssubgroup text, managername text, usrdepartmentname text, userdisplayname text, usremptype text, usrmanagerkey text ) WITH bloom_filter_fp_chance = 0.01 AND caching = {'keys': 'ALL', 'rows_per_partition': 'NONE'} AND comment = '' AND compaction = {'class': 'org.apache.cassandra.db.compaction.SizeTieredCompactionStrategy', 'max_threshold': '32', 'min_threshold': '4'} AND compression = {'chunk_length_in_kb': '64', 'class': 'org.apache.cassandra.io.compress.LZ4Compressor'} AND crc_check_chance = 1.0 AND dclocal_read_repair_chance = 0.1 AND default_time_to_live = 0 AND gc_grace_seconds = 864000 AND max_index_interval = 2048 AND memtable_flush_period_in_ms = 0 AND min_index_interval = 128 AND read_repair_chance = 0.0 AND speculative_retry = '99PERCENTILE'; CREATE TABLE zoran.user_history ( user text, batch_id int, chiefyesno text, city text, costcenter text, isactive text, jobcodename text, lineofbusiness text, lineofbusinesssubgroup text, managername text, usrdepartmentname text, userdisplayname text, usremptype text, usrmanagerkey text, PRIMARY KEY (user, batch_id) ) WITH CLUSTERING ORDER BY (batch_id ASC) AND bloom_filter_fp_chance = 0.01 AND caching = {'keys': 'ALL', 'rows_per_partition': 'NONE'} AND comment = '' AND compaction = {'class': 'org.apache.cassandra.db.compaction.SizeTieredCompactionStrategy', 'max_threshold': '32', 'min_threshold': '4'} AND compression = {'chunk_length_in_kb': '64', 'class': 'org.apache.cassandra.io.compress.LZ4Compressor'} AND crc_check_chance = 1.0 AND dclocal_read_repair_chance = 0.1 AND default_time_to_live = 0 AND gc_grace_seconds = 864000 AND max_index_interval = 2048 AND memtable_flush_period_in_ms = 0 AND min_index_interval = 128 AND read_repair_chance = 0.0 AND speculative_retry = '99PERCENTILE'; -
Copy the
ui-config.jsonfrom the source environment where you ran an analytics pipeline, usually under/data/config, to the same folder where you have your .csv files. -
On the target machine, change to the
dbutilsdirectory.$ cd /opt/autoid/dbutils
-
Use the
dbutils.py importcommand to populate the Autonomous Identity keyspace with the .csv files, generated from theexportcommand from the source environment using the previous steps. Note that before importing the data, the script truncates the existing tables to remove duplicates. Again, make sure thezoran_user.cqland theui-config.jsonare in the/import-dir.$ python dbutils.py import /import-dir
For example:
$ python dbutils.py import ~/import/AutoID-data
-
Verify that the data is imported in the directory on your server.
Accessing Log Files
Autonomous Identity provides different log files to monitor or troubleshoot your system.
Getting Docker Container Information
-
On the target node, get system wide information about the Docker deployment. The information shows the number of containers running, paused, and stopped containers as well as other information about the deployment.
$ docker info
-
If you want to get debug information, use the
-Doption. The option specifies that all docker commands will output additional debug information.$ docker -D info
-
Get information on all of your containers on your system.
$ docker ps -a
-
Get information on the docker images on your system.
$ docker images
-
Get docker service information on your system.
$ docker service ls
-
Get docker the logs for a service.
$ docker service logs <service-name>
For example, to see the nginx service:
$ docker service logs nginx_nginx
Other useful arguments:
-
--details. Show extra details. -
--follow, -f. Follow log output. The command will stream new output from STDOUT and STDERR. -
--no-trunc. Do not truncate output. -
--tail {n|all}. Show the number of lines from the end of log files, wherenis the number of lines orallfor all lines. -
--timestamps, -t. Show timestamps.
-
Getting Cassandra Logs
The Apache Cassandra output log is kicked off at startup. Autonomous Identity pipes the output to a log file in the directory, /opt/autoid/
.
-
On the target node, get the log file for the Cassandra install.
$ cat /opt/autoid/cassandra/installcassandra.log
-
Get startup information. Cassandra writes to
cassandra.outat startup.$ cat /opt/autoid/cassandra.out
-
Get the general Cassandra log file.
$ cat /opt/autoid/apache-cassandra-3.11.2/logs/system.log
By default, the log level is set to
INFO. You can change the log level by editing the/opt/autoid/apache-cassandra-3.11.2/conf/logback.xmlfile. After any edits, the change will take effect immediately. No restart is necessary. The log levels from most to least verbose are as follows:-
TRACE -
DEBUG -
INFO -
WARN -
ERROR -
FATAL
-
-
Get the JVM garbage collector logs.
$ cat /opt/autoid/apache-cassandra-3.11.2/logs/gc.log.<number>.current
For example:
$ cat /opt/autoid/apache-cassandra-3.11.2/logs/gc.log.0.current
The output is configured in the
/opt/autoid/apache-cassandra-3.11.2/conf/cassandra-env.shfile. Add the following JVM properties to enable them:-
JVM_OPTS="$JVM_OPTS -XX:+PrintGCDetails" -
JVM_OPTS="$JVM_OPTS -XX:+PrintGCDateStamps" -
JVM_OPTS="$JVM_OPTS -XX:+PrintHeapAtGC" -
JVM_OPTS="$JVM_OPTS -XX:+PrintGCApplicationStoppedTime"
-
-
Get the debug log.
$ cat /opt/autoid/apache-cassandra-3.11.2/logs/debug.log
Other Useful Cassandra Monitoring Tools and Files
Apache Cassandra has other useful monitoring tools that you can use to observe or diagnose and issue. To see the complete list of options, see the Apache Cassandra documentation.
-
View statistics for a cluster, such as IP address, load, number of tokens,
$ /opt/autoid/apache-cassandra-3.11.2/bin/nodetool status
-
View statistics for a node, such as uptime, load, key cache hit, rate, and other information.
$ /opt/autoid/apache-cassandra-3.11.2/bin/nodetool info
-
View the Cassandra configuration file to determine how properties are pre-set.
$ cat /opt/autoid/apache-cassandra-3.11.2/conf/cassandra.yaml
Apache Spark Logs
Apache Spark provides several ways to monitor the server after an analytics run.
-
To get an overall status of the Spark server, point your browser to
http://<spark-master-ip>:8080. -
Print the logging message sent to the output file during an analytics run.
$ cat /opt/autoid/spark/spark-2.4.4-bin-hadoop2.7/logs/<file-name>
For example:
$ cat /opt/autoid/spark/spark-2.4.4-bin-hadoop2.7/logs/spark-org.apache.spark.deploy.master.Master-1-autonomous-id-test.out
-
Print the data logs that were written during an analytics run.
$ cat /data/log/files/<filename>
For example:
$ cat /data/log/files/f6c0870e-5782-441e-b145-b0e662f05f79.log
Updating IDP Certificates
When an IDP provider changes their certificates, you can update these certificates in Autonomous Identity.
-
SSH to the target machine.
-
View the current certificate settings in the
docker-compose.ymlfile, and locate theNODE_EXTRA_CA_CERTSproperty$ vi
/opt/autoid/res/api/docker-compose.ymlNODE_EXTRA_CA_CERTS=/opt/app/cert/<customer ID>-sso.pem -
Access your IDP URL, and export the
.cerfile from the browser. -
Convert the
.cerfile into a.pemfile using the following command:$ openssl x509 -in certificatename.cer -outform PEM -out certificatename.pem
-
Open the
docker-compose.ymlfile and update theNODE_EXTRA_CA_CERTSproperty.$ vi
/opt/autoid/res/api/docker-compose.ymlNODE_EXTRA_CA_CERTS=/opt/app/cert/<new-cert>.pem -
Restart the Autonomous Identity services.
$ docker stack rm api
$ docker stack deploy --with-registry-auth --compose-file
$ /opt/autoid/res/api/docker-compose.yml api
$ docker service update --force ui_zoran-ui
$ docker service update --force nginx_nginx
Roles Management Tasks
Autonomous Identity supports a powerful role analysis and management system that examines all roles and their assigned entitlements within your access landscape. The system uses machine learning rules and analytics thresholds to determine the confidence scores and driving factors for each role.
The central hub of the roles management system is the Roles Workshop. The Roles Workshop lets authorized users review, ediit, and test new or existing roles before publishing them to production.
In a typical scenario, an administrator runs a role mining job as part of the analytics pipeline. During a role mining analytics run, Autonomous Identity discovers candidates for any new roles and displays them in the Roles Workshop with confidence scores and driving factors. Authorized users can review these roles, make edits to entitlements, and re-run the role mining analytics until the correct mix of entitlements meets your threshold objectives for given rules.
A month or two later, the administrator can re-run the role mining job to pick up changes in the entitlements landscape. Autonomous Identity re-analyzes each role and recommends updates to existing roles, such as the indication of stale data, or changes in the confidence scores. Based on these recommendations, the authorized user can revoke any active roles, make new configuration changes to a draft, and publish these draft roles to production.
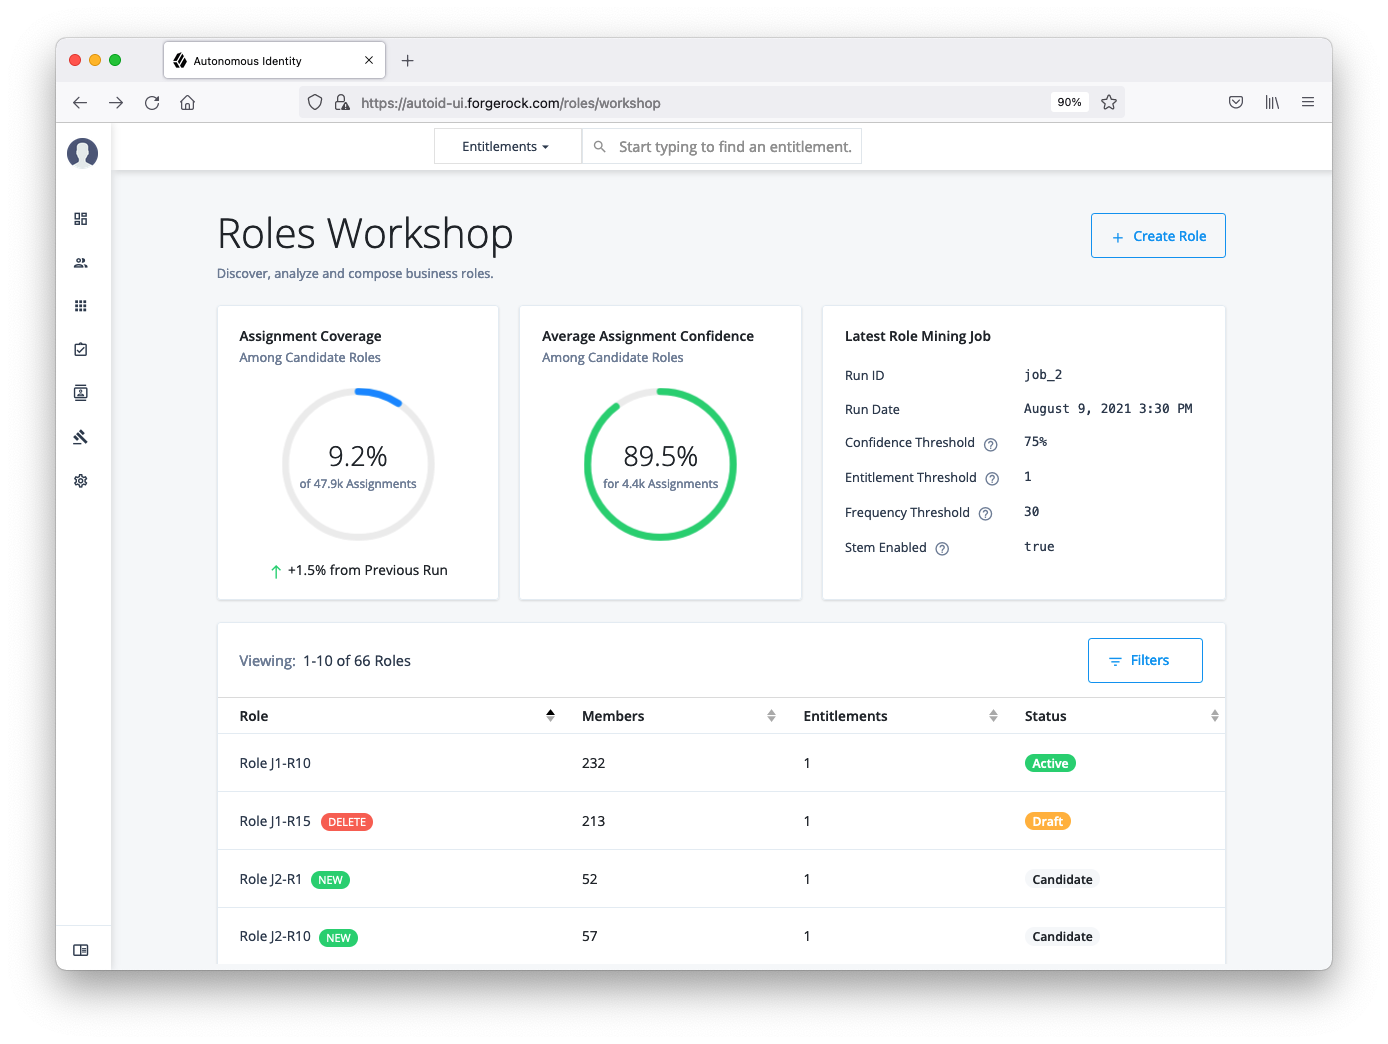
Roles User Types
Autonomous Identity supports two types of user role types to manage roles with the system. You can assign these roles using the Manage Identities [TBD: Add link] function.
| User Type | Description |
|---|---|
Role Engineer |
A user who has the ability to view, edit, delete, and export all roles. Role engineers can create drafts from mined candidates and assign role owners to the draft. They can also create custom roles for further evaluation and testing. Autonomous Identity administrators automatically are assigned this role. |
Role Owner |
A user who has the ability to view, edit, delete, and export active and draft roles assigned to them. |
Roles Workflow
The Roles Workshop displays roles in three different states: candidate, draft, and active.
-
Candidate. A candidate is a template role that is discovered through the latest role mining analytics job. After each role mining job, all newly mined roles are marked as new and as a candidate. Role engineers can review a candidate, assign a role owner to it, and approve the role as a draft. You cannot edit or remove a candidate role as is, but must create a draft from a candidate to change its details. Candidate roles are retained in the system for later adjustments and for the creation of additional new roles until the next role mining job, where all candidates are deleted and a new candidate pool is rebuilt.
See an image.
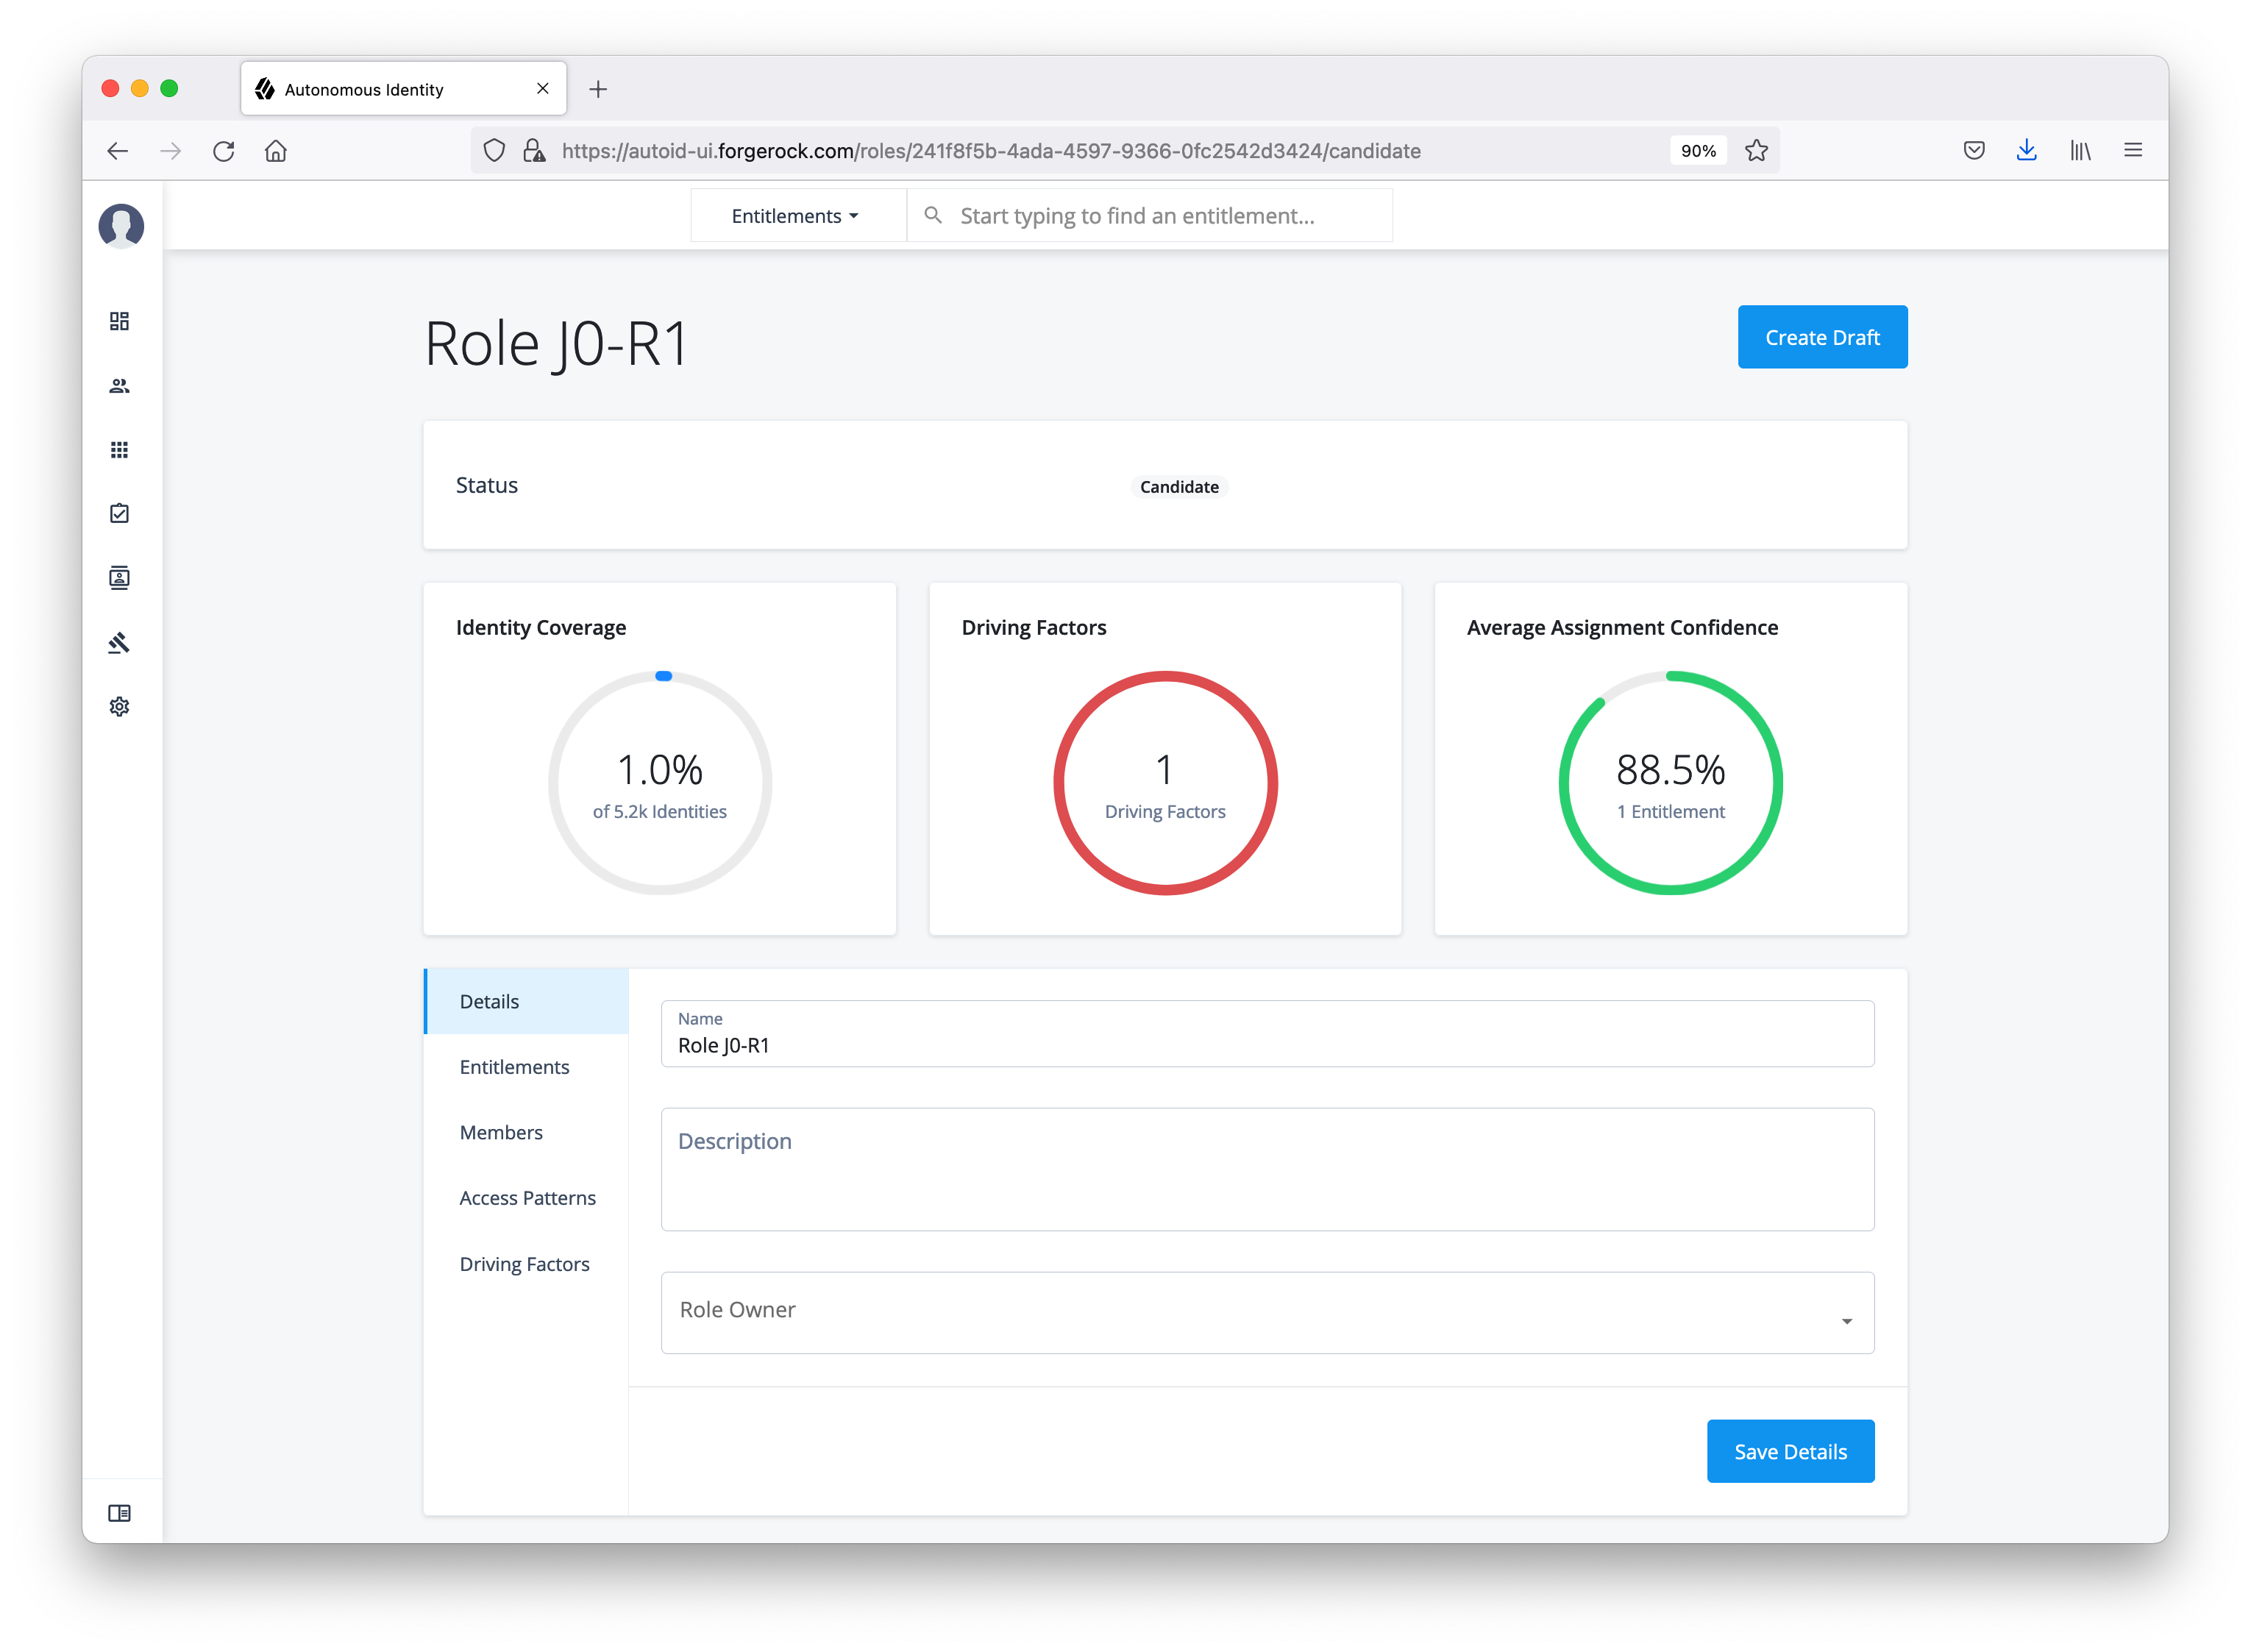
-
Draft. A draft is a role that requires review and approval by an authorized approver to become active. Role engineers can re-run a role mining job to pick up the latest changes in the access landscape. The Roles Workshop displays the latest confidence scores, driving factors, and a Recommended section that shows a suggested course of action for the role. Also, when you create a custom role, Autonomous Identity saves the role in draft status. You can edit the draft, make another custom role from it, publish the role for production, or delete the draft.
See an image.
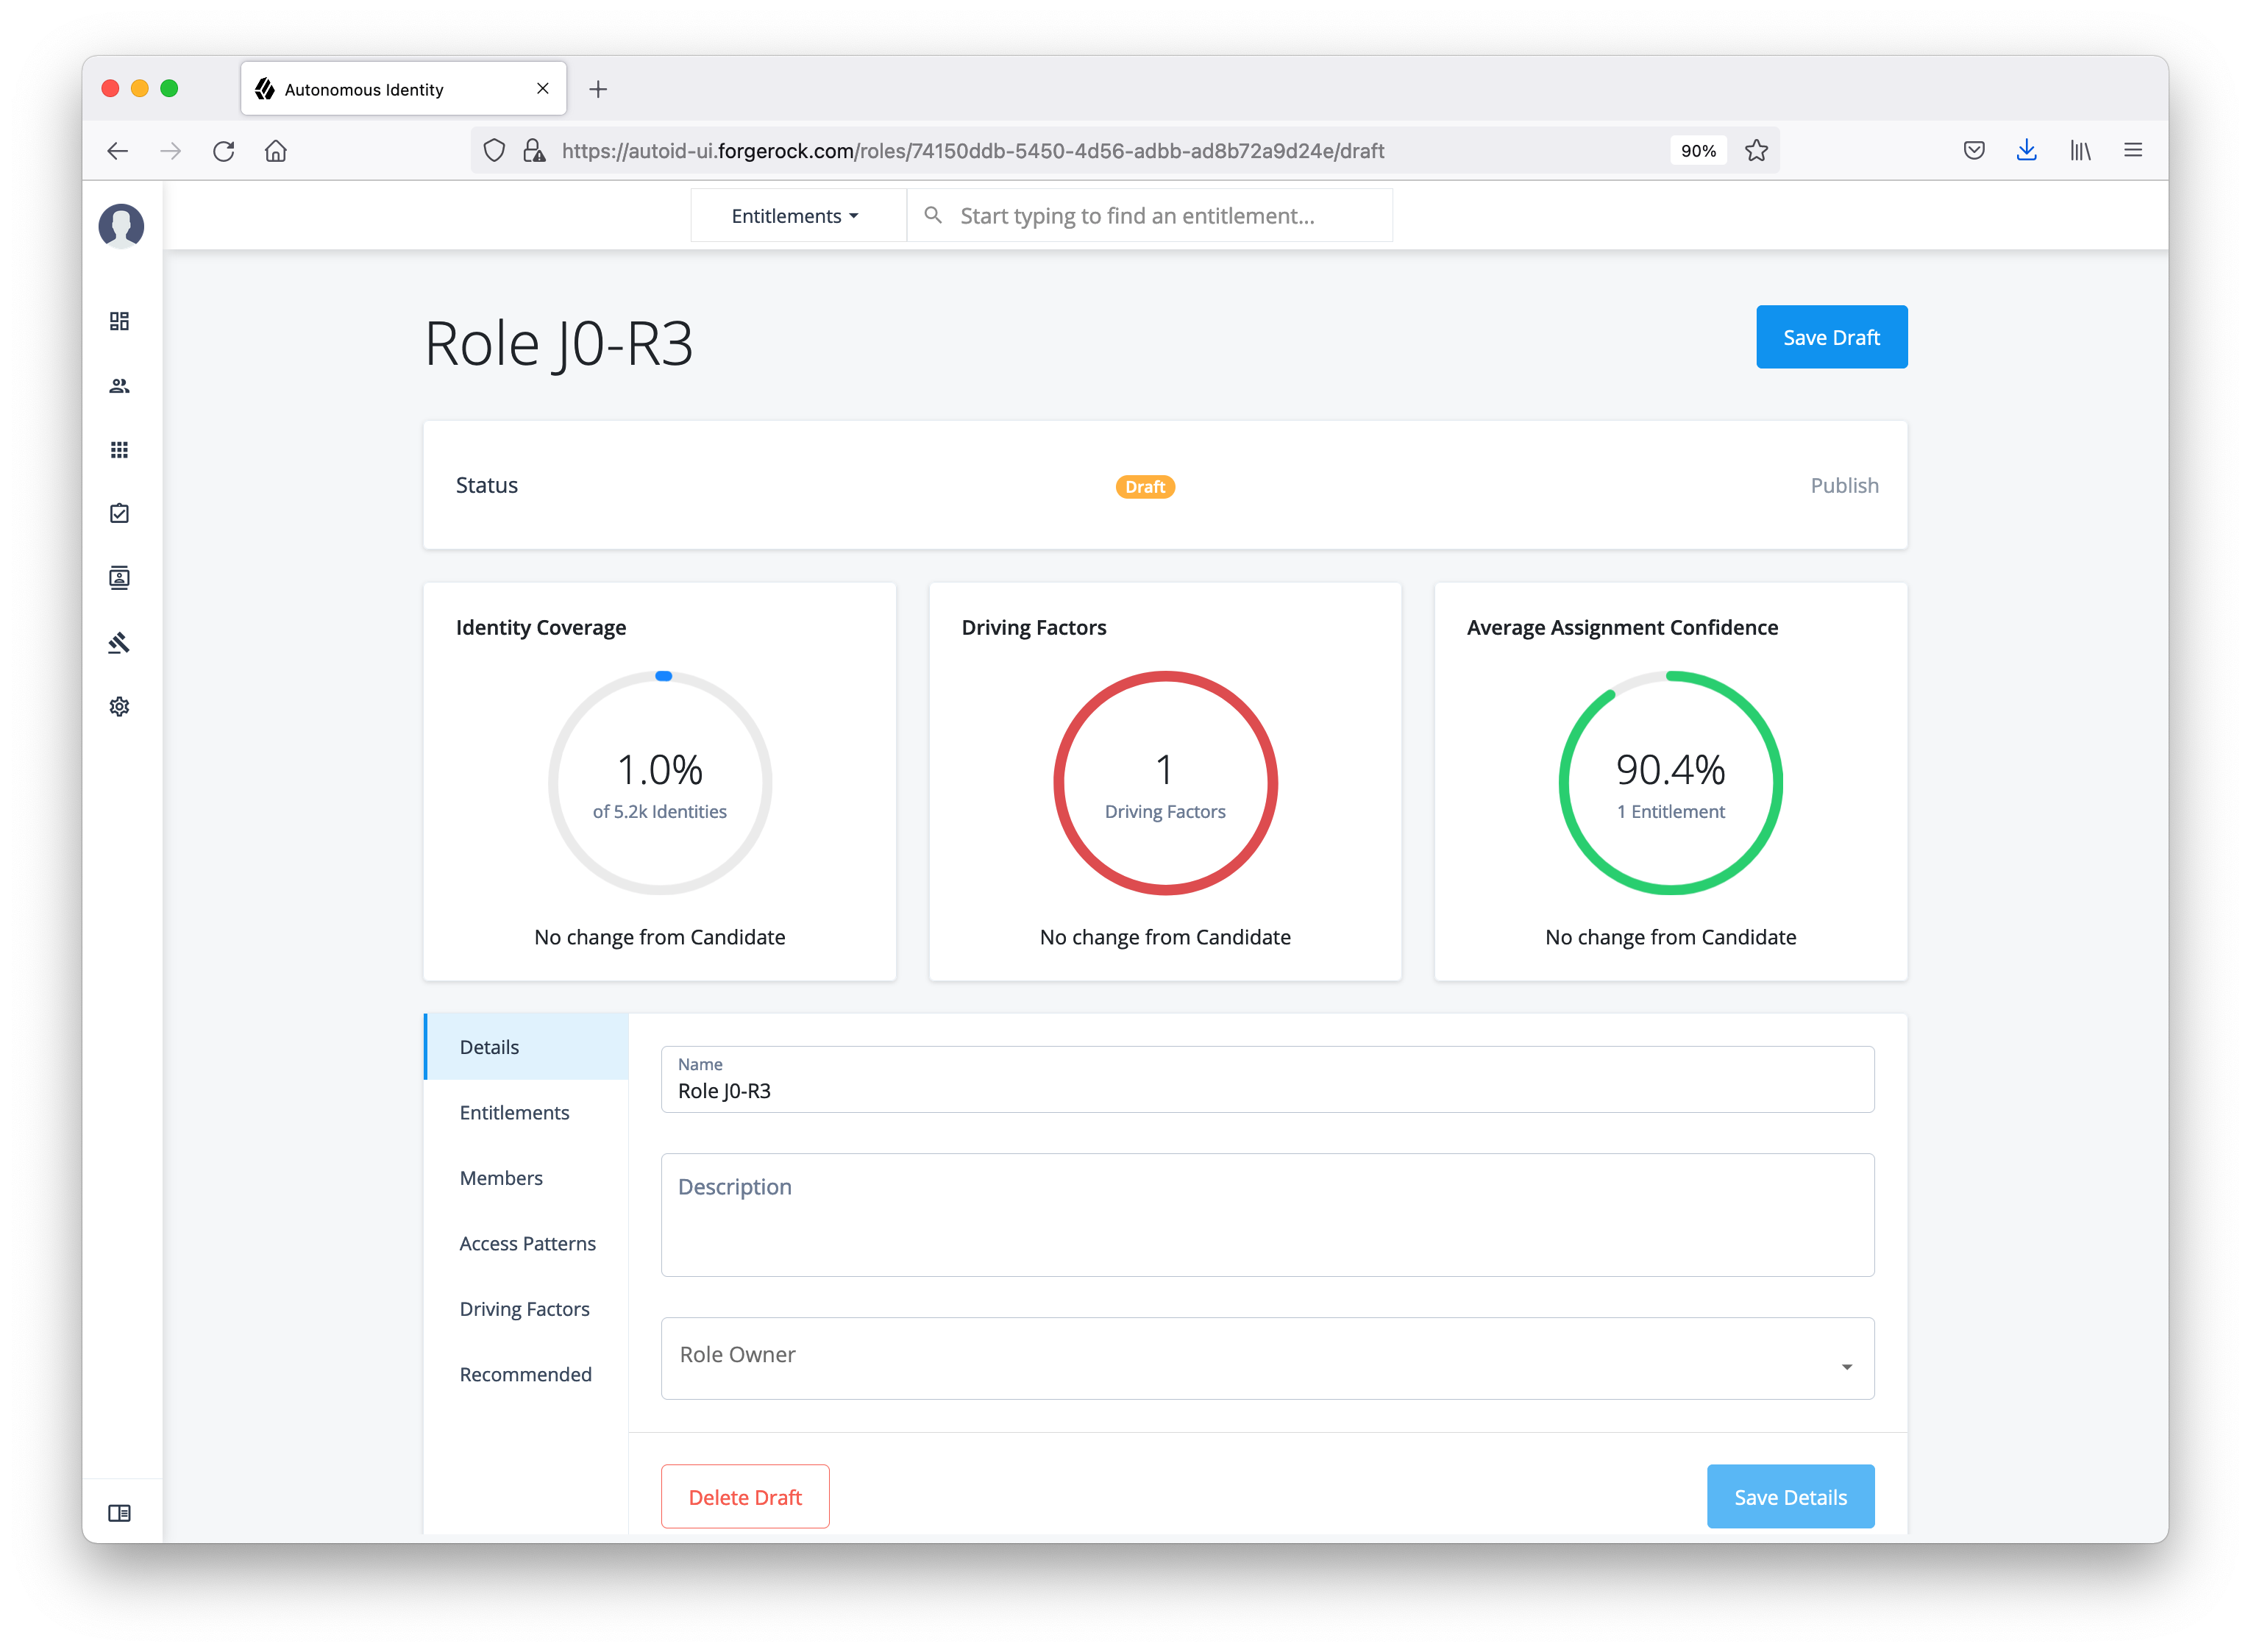
-
Active. Once a draft has been approved, the role is active for production use. The role appears with an Active status and also appears on the Roles Catalog page. The Recommended section presents suggested updates for each role analyzed in the latest mining job. You can create a draft from this active role or unpublish it back to draft status.
See an image.
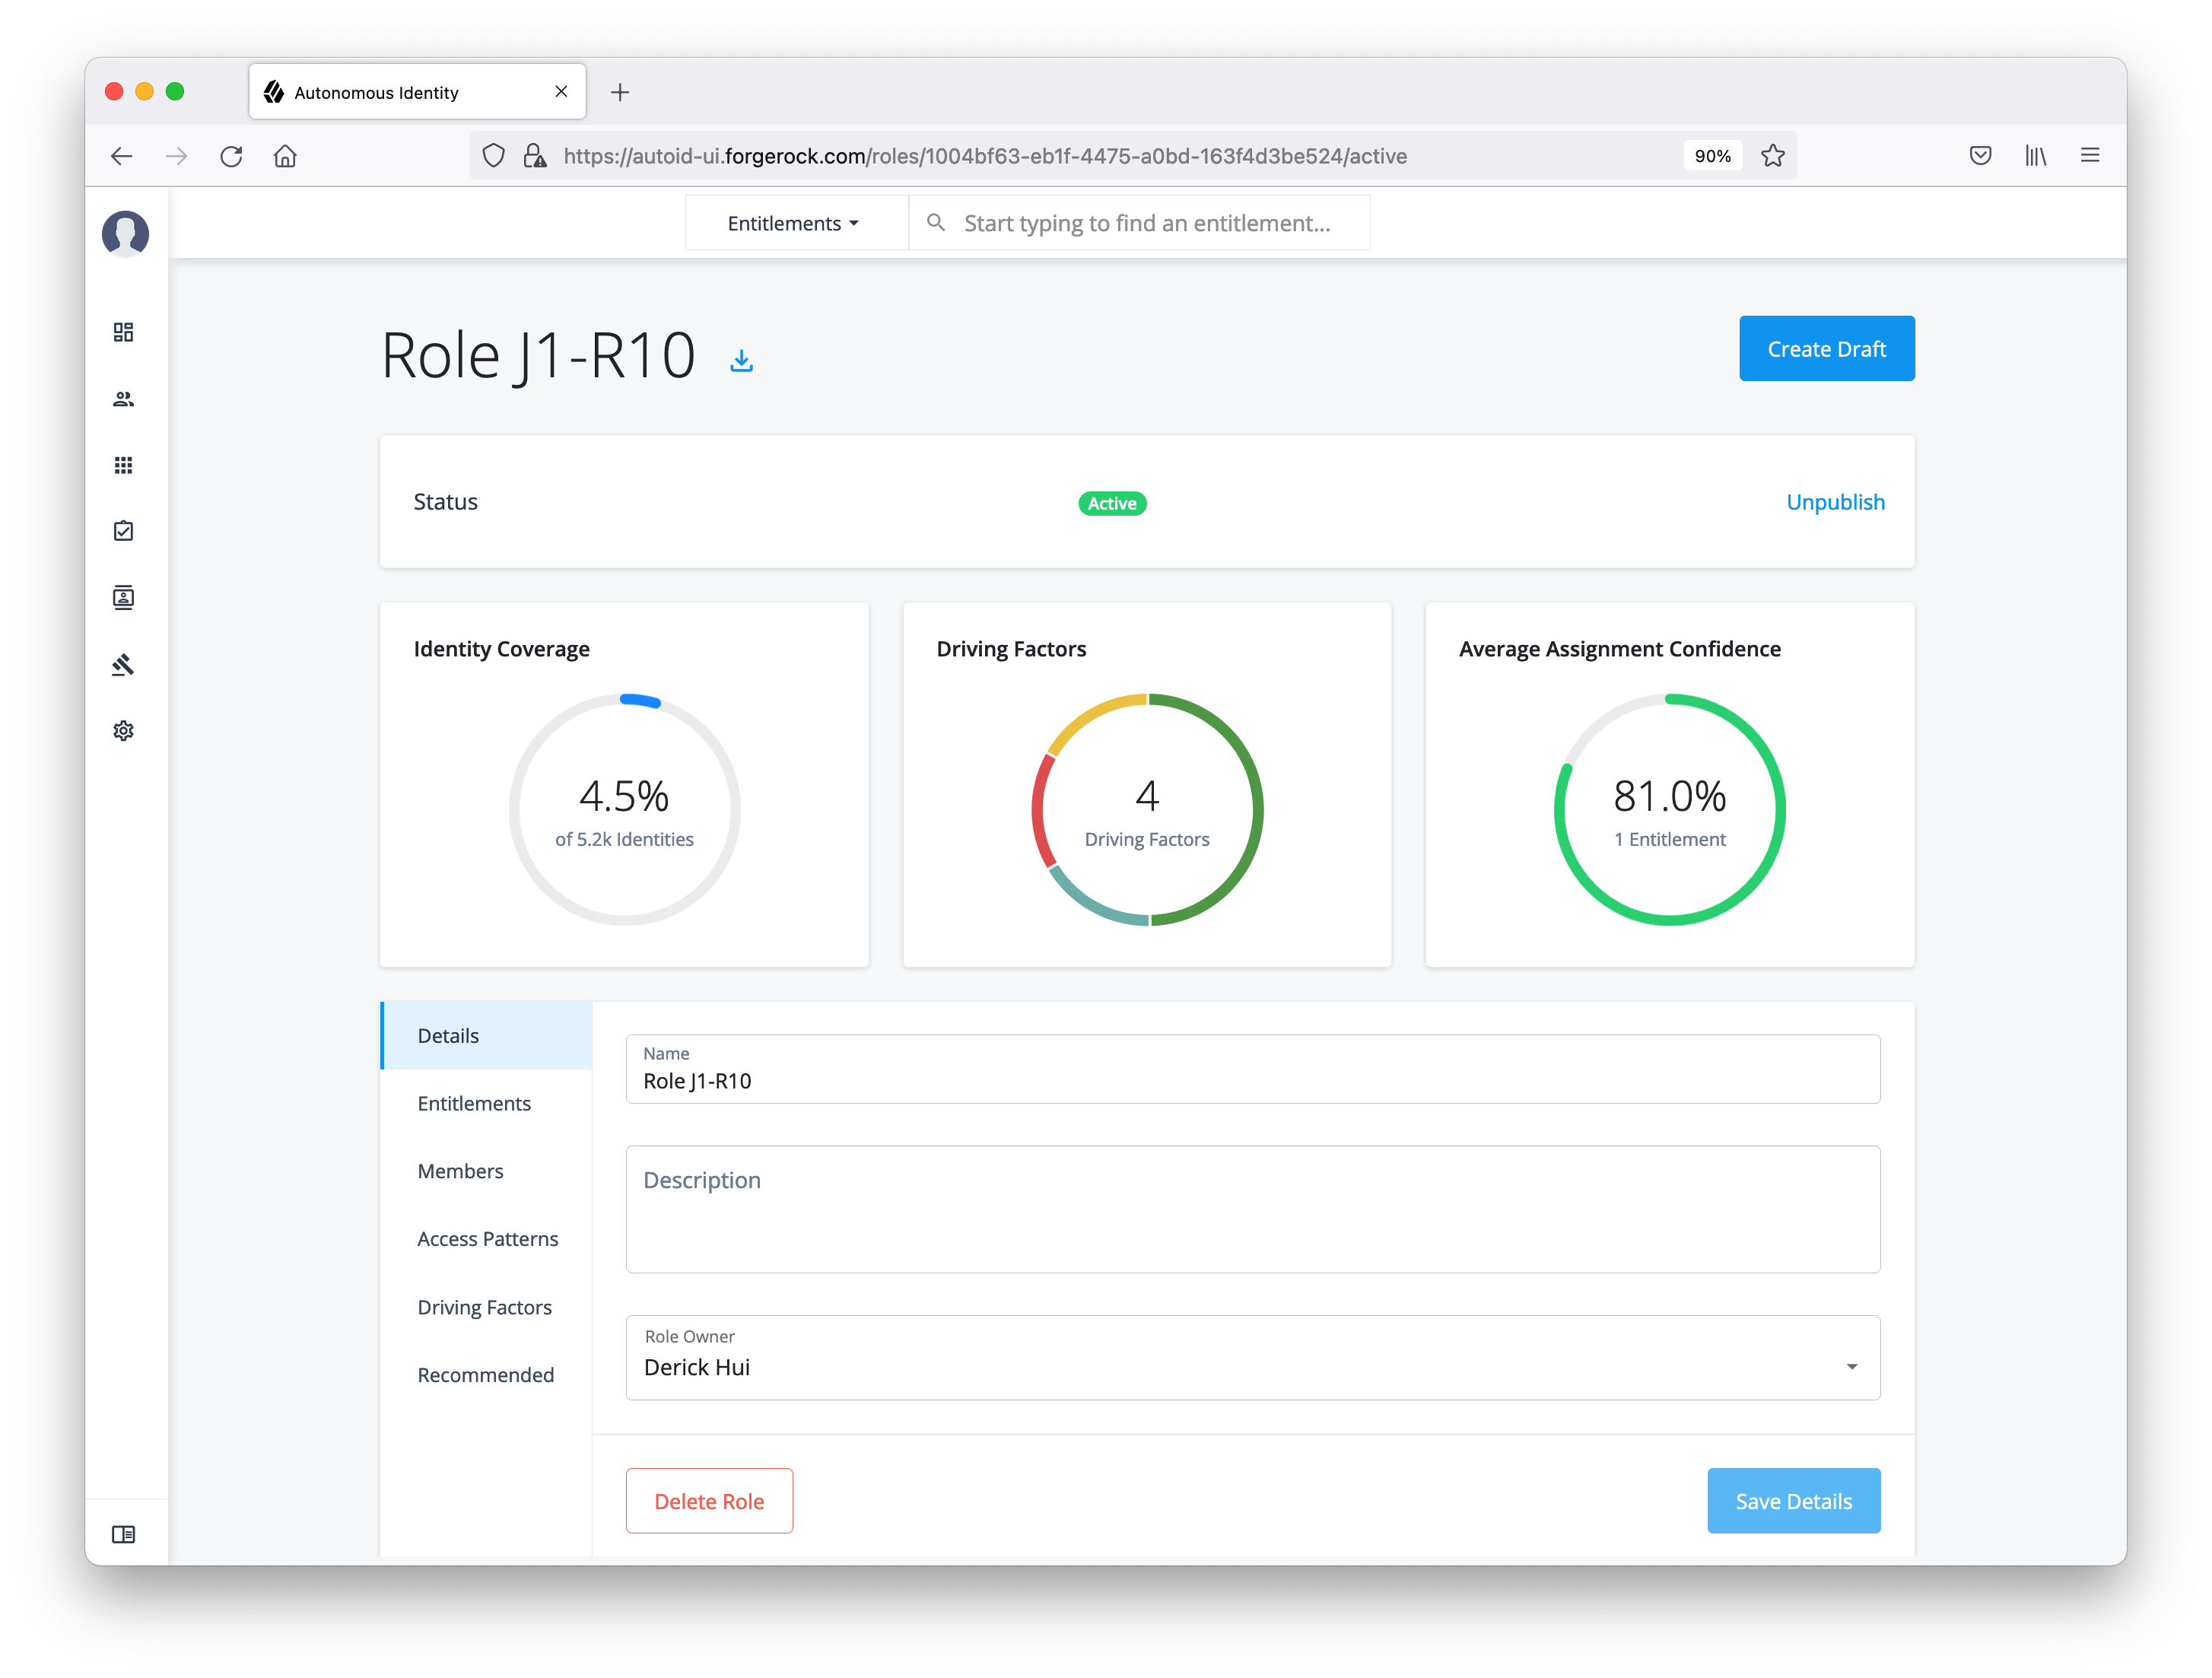
Role-Mined vs Custom Roles
You can originate roles in two different ways: role-mined and custom.
Role-mined roles are discovered through Autonomous Identity’s machine learning process. The result of the role mining run is a generated list of candidates that a role engineer can edit and review on the Roles Workshop page.
Custom roles are created through different workflows:
-
From Scratch. You can create a totally new role on the Roles Workshop using the Create Role function.
-
From Existing. You can create a custom role from an existing draft or active role, which can occur in the following scenarios:
-
When you run a new role-mining job and an existing candidate role is deleted.
-
When you have a draft or an active role that is associated with a deleted candidate, and the recommendation is to delete the draft/active role as role mining determines that it is stale or no longer relevant.
-
| Custom roles do not have recommendations. Recommendations are based on the difference between a mined role and its candidate. |
Create a Custom Role
Autonomous Identity lets authorized users create new custom role drafts on the Roles Workshop.
Create a Custom Role:
-
On the Roles Workshop, click Create Role. Autonomous Identity creates a random label for the role at the top of the page.
-
Click Details. Enter a name, description, and select the Role Owner from the list of authorized users on the drop-down menu.
-
Click Entitlements. On the page, click Add Entitlements. You can search by entitlement name or application.
-
Click Access Patterns. On the page, click Add Access Pattern. Select a User Attribute, and enter an associated value.
-
Review your entries. When ready, click Save Draft.
The role will be saved in the Roles Workshop as a draft. An authorized user must review and approve the role to activate it in production.
See it in action
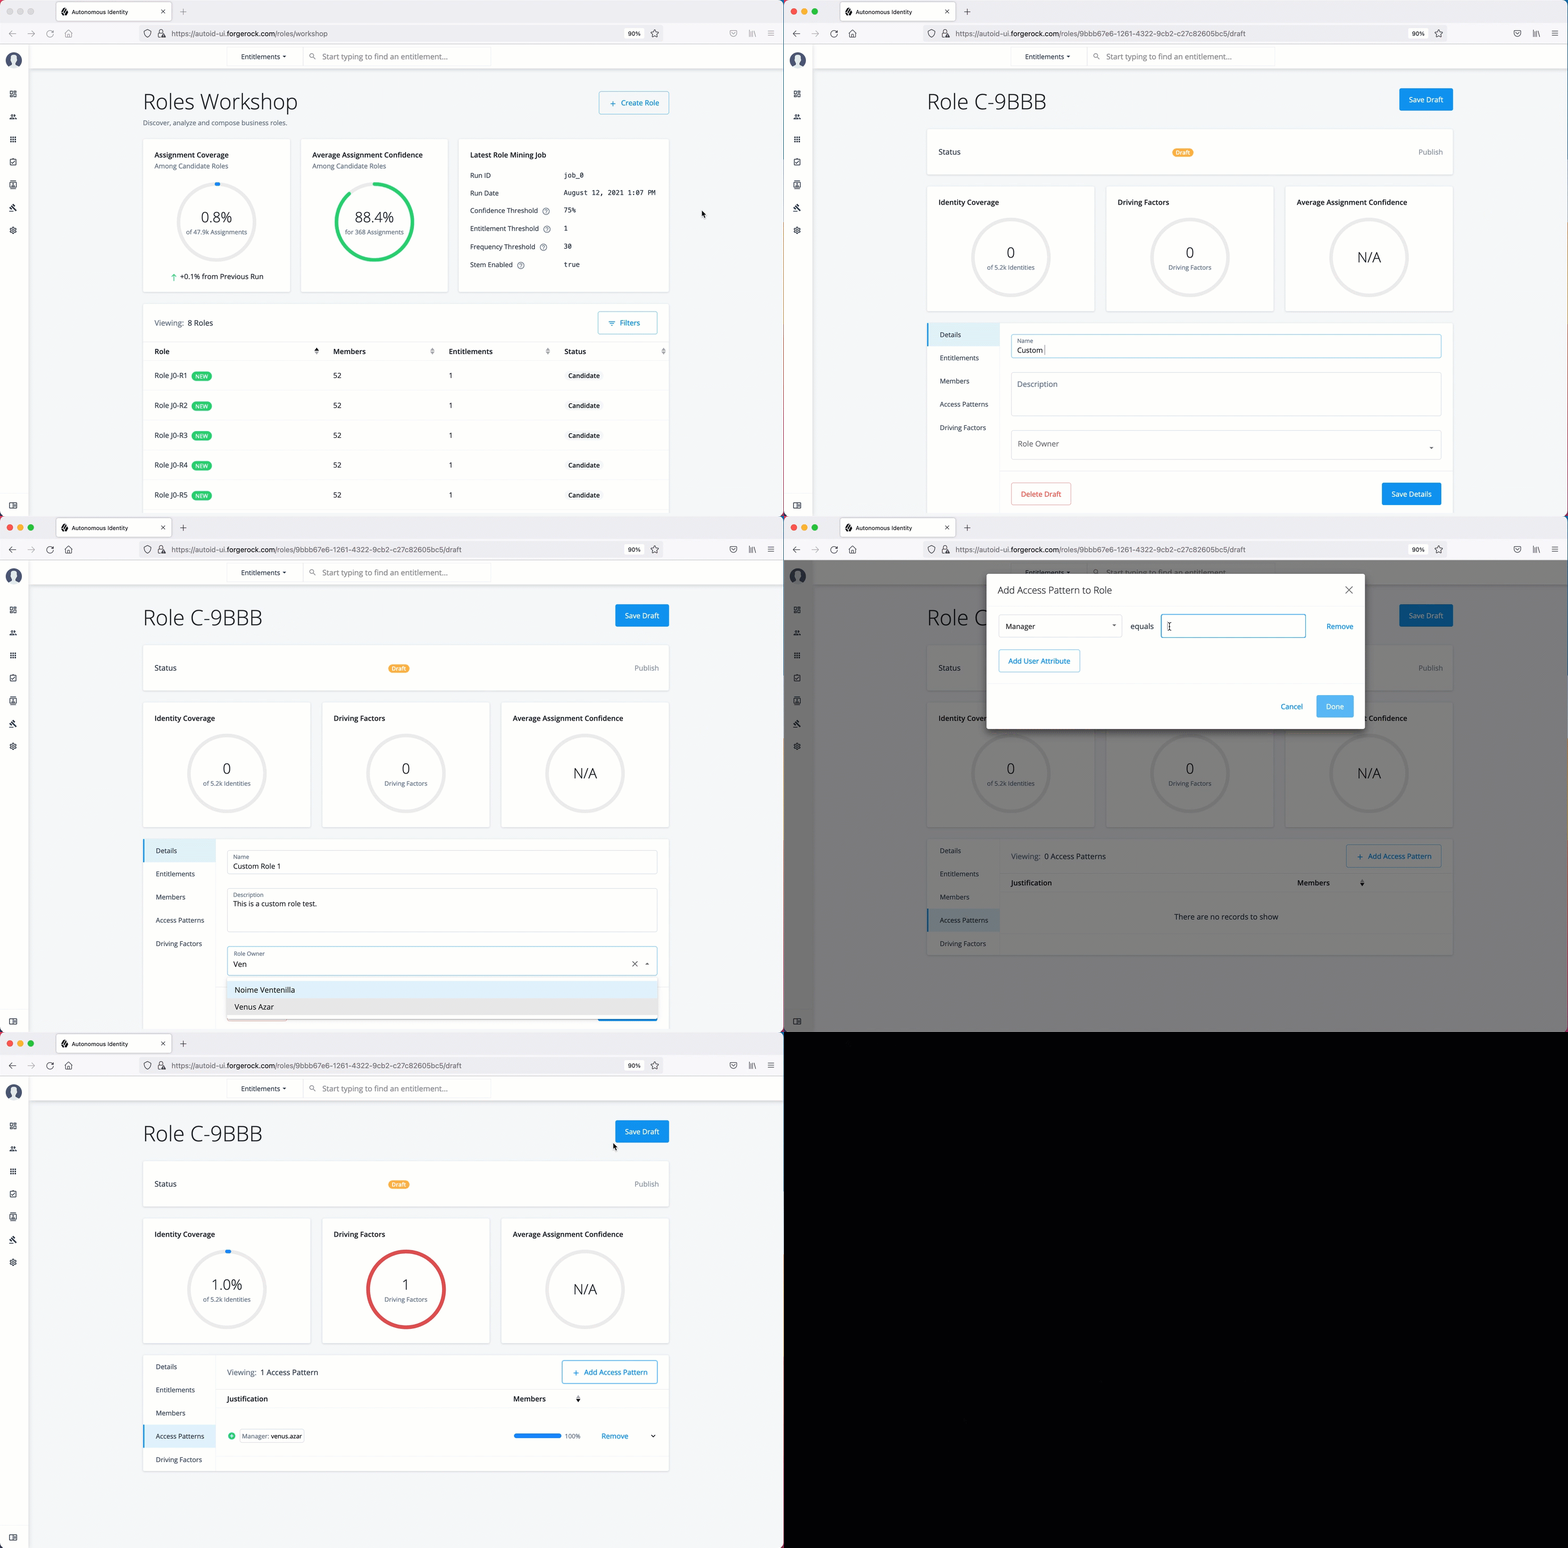
| Do not create a custom role before running an initial analytics pipeline job. Doing so can result in the role mining job failing. |
Search Roles Using the Filter
Many companies have a large number of roles within their system. The Roles Workshop provides a useful filter to locate specific roles.
Search Roles using the filter:
-
On the Roles Workshop, click Filters.
-
Enter any of the following data:
-
Name. Enter a role name.
-
Status. Select
Active,Draft, orCandidate. -
Application. Enter an application with which the role is associated.
-
Role Owner. Enter a role owner.
-
Origin. Select
CustomorRole Mining.
-
-
Click Done.
See it in action
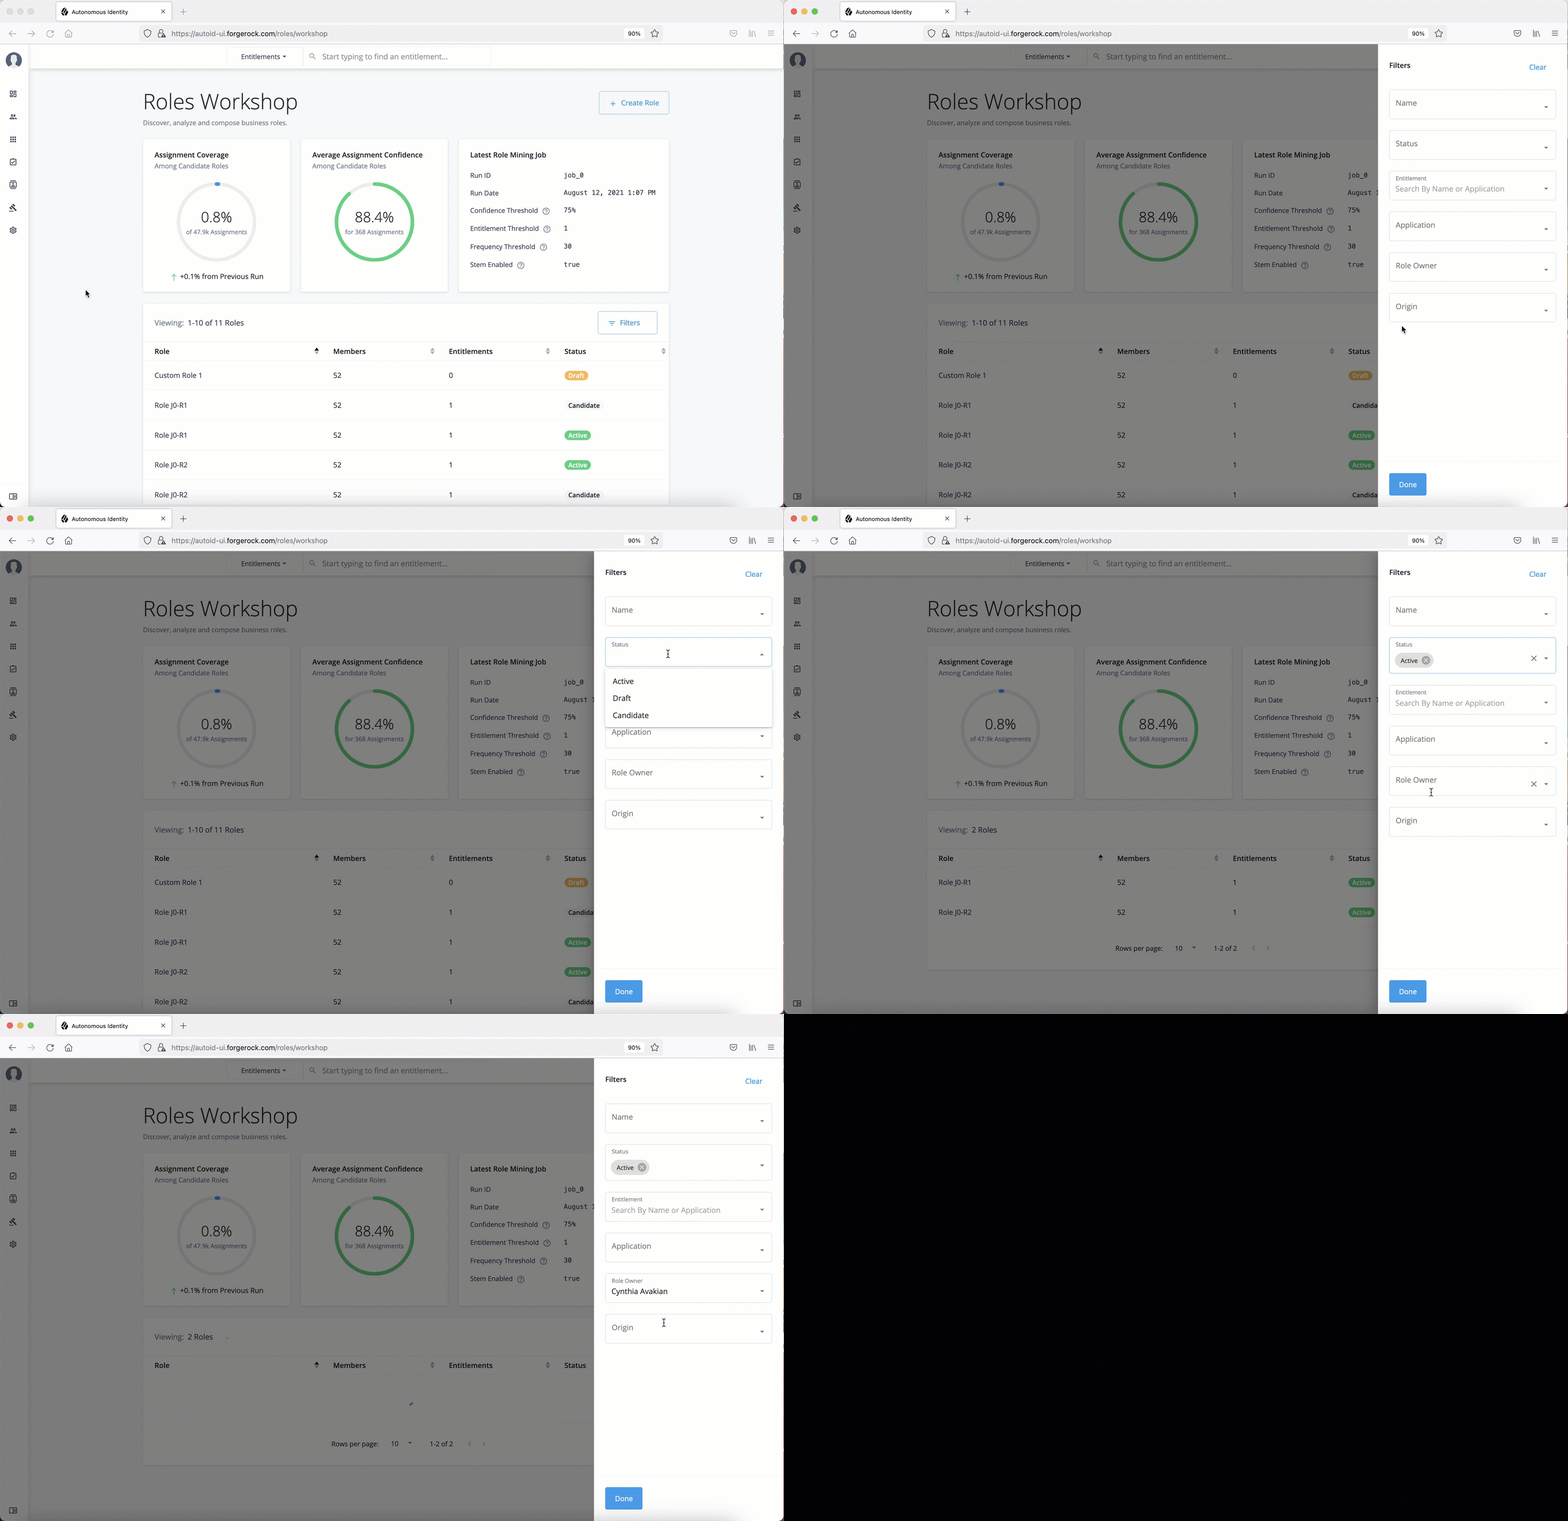
Create a New Draft
Autonomous Identity lets authorized users review role-mined candidates on the Roles Workshop. If the role engineer and role owner approves the candidate, the role goes to draft state.
Create a New Draft:
-
On the Roles Workshop, review the list of candidates. Click a candidate role.
-
Change the role name, and then add a description.
-
Add an authorized user as a role owner. All drafts or active roles must have a role owner assigned to it.
Note: The role owner must have the Role Owner role assigned to them. Administrators can add them on the Manage Identities page, or make a request to your adminstrator.
-
Click Entitlements to review the entitlement name, application if assigned, and the average confidence score.
-
Click Members to review the members or users associated with this role.
-
Click Access Patterns to review the access pattern for this role.
-
Click Driving Factors to review the list of attributes, driving factors, frequency, and percentage of members with the role.
-
Click Recommended to review any suggested action on the role. You must run the role mining job several times to pick up new changes in your access landscape. Initial role mining jobs will not have recommendations other than Create Draft.
-
Click Create Draft when all entries are accepted.
See it in action
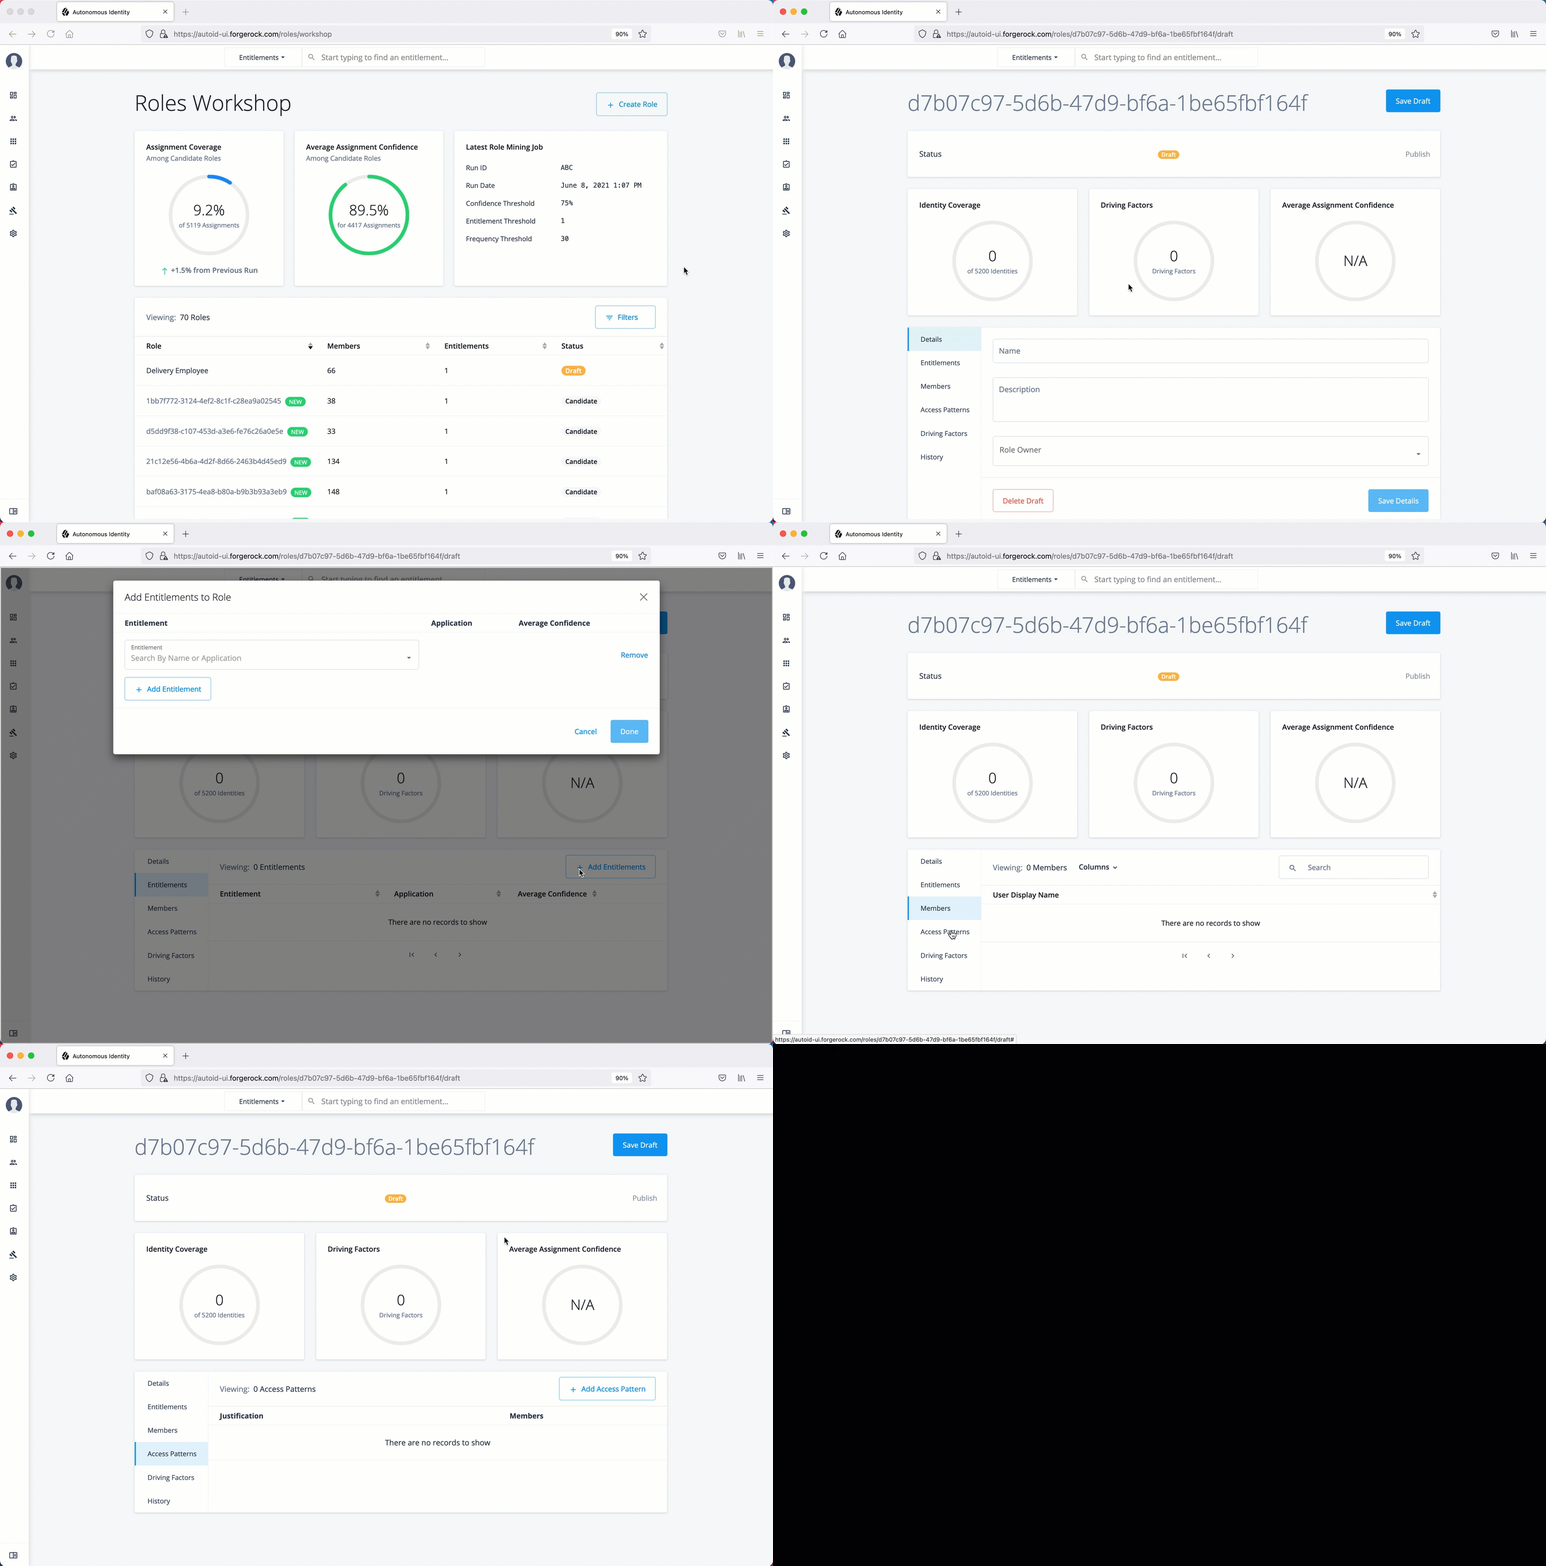
Publish a Role
Autonomous Identity lets role engineers and role owners approves a draft and push it into production. The Roles Workshop displays the role in an active state.
Publish a Draft:
-
On the Roles Workshop, review the list of candidates. Click a draft role.
-
Review the role details.
-
Click Publish.
See it in action
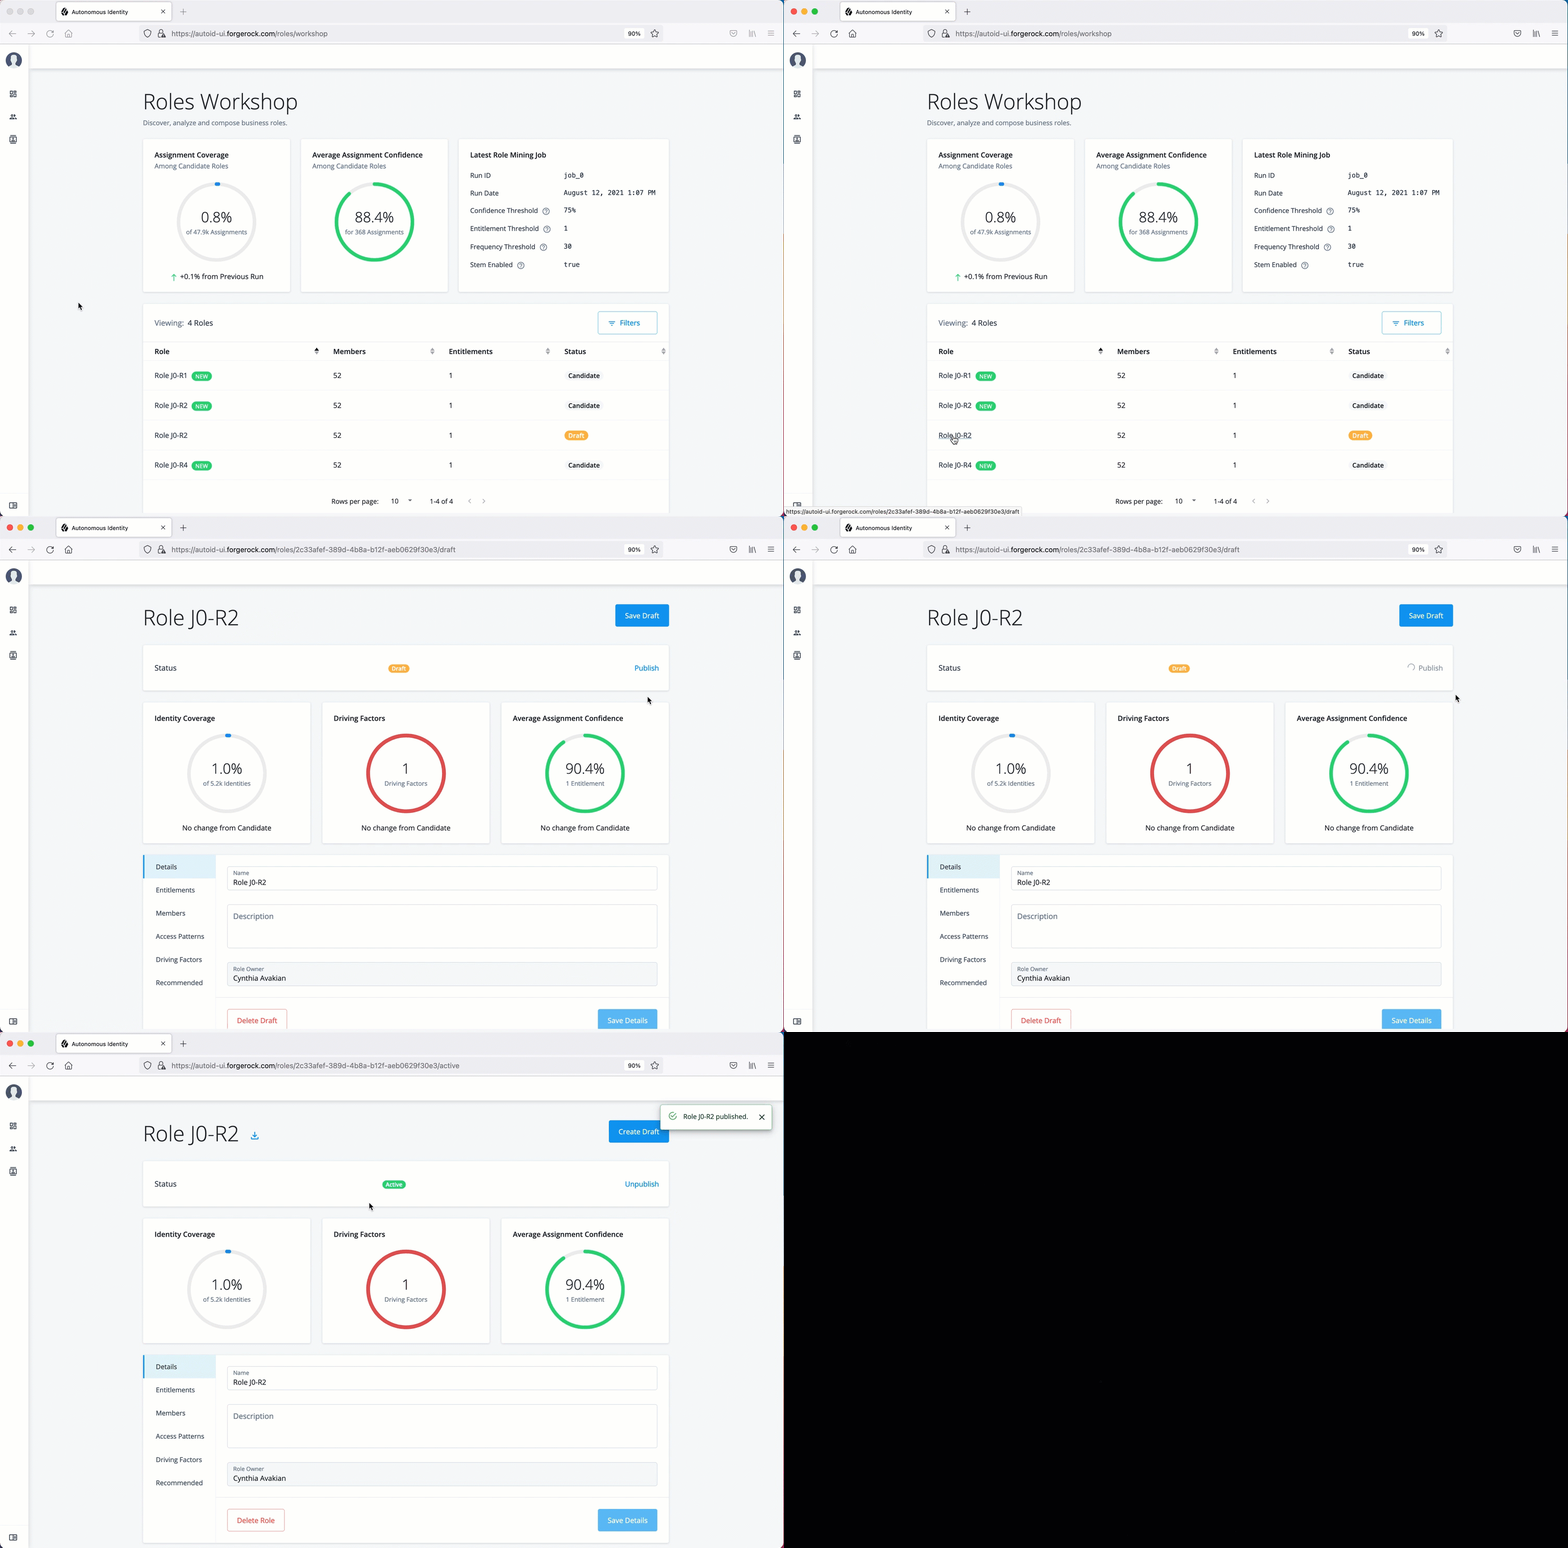
Delete a Role
Autonomous Identity lets role engineers and role owners delete a draft or an active role.
Delete a Role:
-
On the Roles Workshop, review the list of candidates. Click a draft or active role.
-
Review the role details.
-
Click Delete Draft.
See it in action
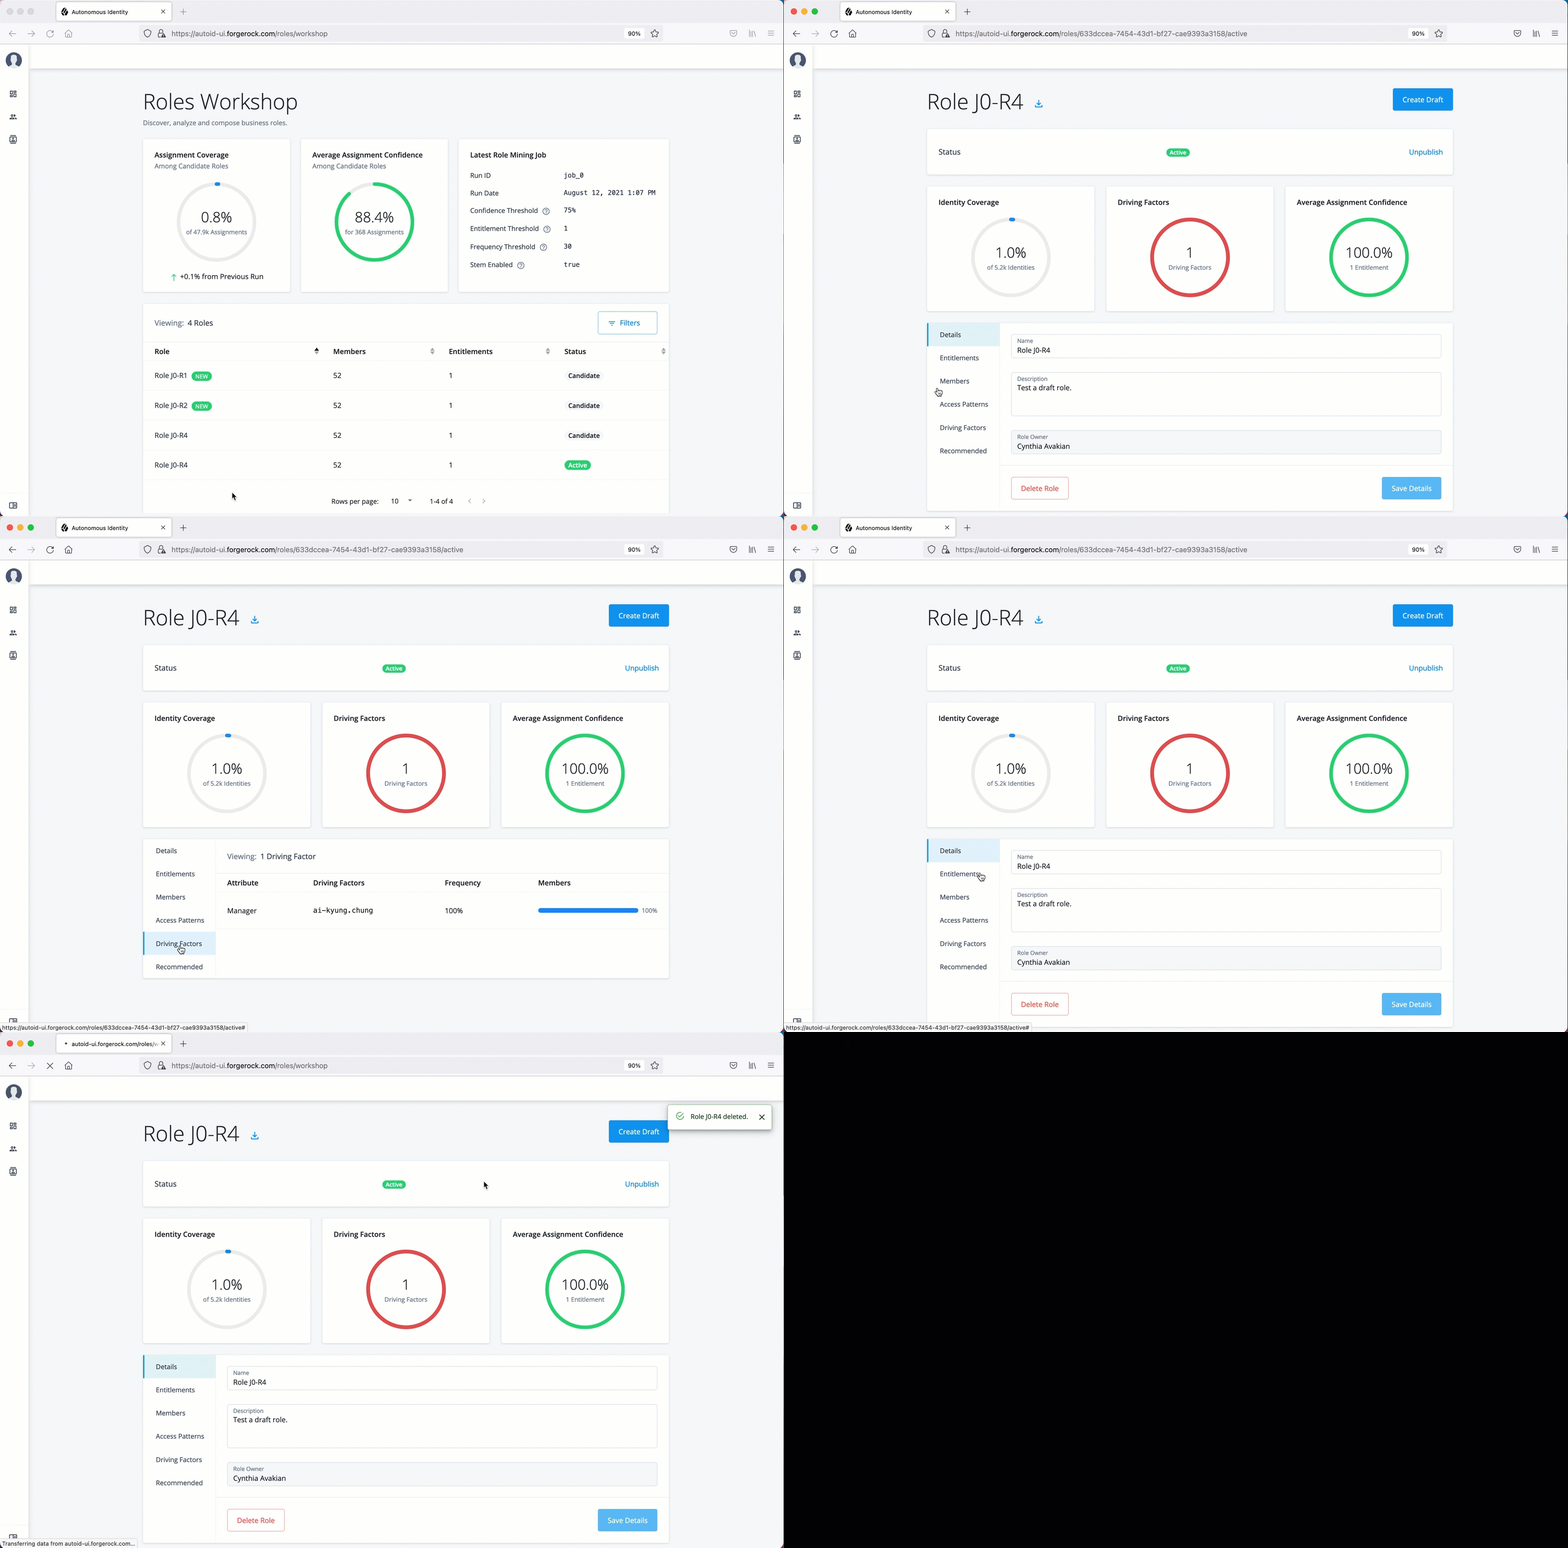
Roles Catalog Tasks
The Roles Catalog lists all active roles within your system. Role engineers can export any role as a json file, edit, unpublish, and delete the roles if necessary. Role owners can carry out the same tasks on only roles assigned to them.
Export a Role
Export a Role to JSON:
-
On the UI Dashboard, click Roles, and then click Roles Catalog.
-
Click the role(s) to export.
-
Click Export Selected. Autonomous Identity sends a JSON file to your local drive.
Filter Roles in the Catalog
Search the Catalog using the filter:
-
On the UI Dashboard, click Roles, and then click Roles Catalog.
-
Click Filters to view specific roles in your catalog.
-
On the Filters menu, enter and select from the following drop-down lists:
-
Name. Enter a role name.
-
Status. Select
Active,Draft, orCandidate. -
Application. Enter an application with which the role is associated.
-
Role Owner. Enter a role owner.
-
Origin. Select
CustomorRole Mining.
-
-
Click Done.
