Sessions
These topics cover concepts and implementation procedures to manage sessions with Identity Cloud.
ForgeRock® Identity Platform serves as the basis for our simple and comprehensive Identity and Access Management solution. We help our customers deepen their relationships with their customers and improve the productivity and connectivity of their employees and partners. For more information about ForgeRock and about the platform, visit https://www.forgerock.com.
Introduction to sessions and cookies
Identity Cloud uses two types of tokens that represent an exchange of information, usually interactive, between Identity Cloud and a user or entity:
-
Authentication sessions, which Identity Cloud uses to manage authentication journeys before a user has authenticated successfully.
-
Sessions, which Identity Cloud creates after a user has authenticated successfully. Sessions let Identity Cloud manage the user’s or entity’s access to resources.
Sessions and cookies
Sessions require the user or client to be able to hold on to cookies.
Identity Cloud issues a cookie to the user or entity at the beginning of an authentication journey. This cookie corresponds to an authentication session.
Identity Cloud issues another cookie to the user or entity after successful authentication. This cookie corresponds to a session.
The content in these cookies differs depending on the session type and location.
Session location
Both authentication sessions and sessions can be stored on the client or on the server.
Sessions stored on the server are called server-side sessions. Server-side sessions are stored in a database internal to Identity Cloud called the Core Token Service (CTS) token store.
Sessions stored on the client are called client-side sessions. Client-side sessions are stored in the session cookie.
Regardless of the session location, Identity Cloud issues a cookie to the user or entity; however, the content in the session cookies differs depending on the session’s location:
-
Server-side sessions contain a reference to the session’s location in the CTS token store and several other pieces of information. The details about server-side sessions are maintained in the CTS token store.
-
Client-side session cookies contain all the details about the session.
Because server-side sessions only contain references to the locations where the session details are stored, while client-side cookies contain all the details about sessions, client-side session cookies are significantly larger than server-side session cookies.
Session location is configurable by realm. The following table illustrates where Identity Cloud can store sessions:
| In the CTS token store | On the client | |
|---|---|---|
Authentication sessions |
✔ |
✔ (Default) |
Sessions |
✔ (Default) |
✔ |
Session storage location can differ per realm, to suit specific realm requirements.
For more information about configuring session locations, refer to:
Session cookie name
Identity Cloud provides a unique, pseudo-random session cookie name for each tenant. It is used in HTTP header values in Identity Cloud API requests; for example, in the OAuth 2.0 authorization grant flow.
You can change the value of your tenant’s cookie name. You might want to do this for these reasons:
-
You want to integrate a legacy system into Identity Cloud, and it expects to ingest a specific cookie name.
-
You want to set the cookie name to a format preferred by your company.
-
In the Identity Cloud admin UI, open the Tenant menu (upper right).
-
Select Tenant Settings.
-
Select Global Settings.
-
(Optional) View or copy the Cookie field value.
-
Click Cookie.
-
In the Cookie page:
-
To change the cookie name, modify the name in the CookieName field. Invalid values for the cookie name are
iPlanetDirectoryProandPrefix__HOST. -
To set the cookie name to its default name, click Reset to Default.
Changing the cookie name will invalidate all user sessions in the tenant. -
-
Click Save.
Throughout this documentation, the tenant session cookie name is
referred to as <session-cookie-name>.
|
Authentication session allowlist
Authentication session allowlisting is an optional feature that maintains a list of in-progress authentication sessions and their progress in the authentication flow to protect against replay attacks.
When authentication session allowlisting is enabled, Identity Cloud generates a key-value pair for each authentication session and stores it for the length of the authentication flow in the following ways:
-
For client-side authentication sessions, Identity Cloud stores the key-value pair in the CTS token store.
-
For server-side authentication sessions, Identity Cloud creates the key-value pair as a session property in the authentication session.
Each time the authentication flow reaches an authentication node, Identity Cloud modifies the value of the stored key-value pair and sends it to the user or client that it is authenticating. The next request to Identity Cloud to continue the authentication flow must contain the key-value pair and must match the value expected by Identity Cloud.
If the authenticating user or client cannot provide the key-value pair with the values Identity Cloud expects, Identity Cloud would not continue the authentication flow, therefore protecting the authentication flow against malicious users wanting to rewind the authentication flow to a previous node.
For more information about the allowlisting setting, refer to Trees.
Client-side sessions
Identity Cloud creates sessions either as client-side sessions or server-side sessions. The session location depends on the session configuration.
For client-side sessions, Identity Cloud returns the entire session state to the client in a session cookie after a request. The cookie is then passed back to Identity Cloud with each subsequent request.
Client-side authentication sessions
Identity Cloud uses authentication sessions to manage authentication journeys before a user has authenticated successfully.
Authentication sessions are configured as client-side sessions by default.
During authentication, the authentication session state is returned to the client
after each call to the authenticate endpoint, and stored in the authId object of the JSON response.
Storing authentication sessions on the client lets Identity Cloud handle the authentication flow at any point in time without load balancing requirements.
For realms configured for server-side sessions, Identity Cloud attempts to invalidate client-side authentication sessions after creating the server-side sessions.
Client-side sessions
Identity Cloud creates sessions after users' authentication flow have completed successfully.
For browser-based clients that use client-side sessions, Identity Cloud sets a cookie in the browser that contains the session state. When the browser returns the cookie, Identity Cloud decodes the session state from the cookie.
For REST-based clients, Identity Cloud sends the cookie in a header.
Session denylisting is an optional feature that maintains a list of logged out client-side sessions in the CTS token store. For more information about session termination and session denylisting, refer to Session termination.
Secure client-side sessions
For improved security, you should configure Identity Cloud to sign and/or encrypt client-side sessions and client-side authentication sessions for security reasons. Because decrypting and verifying the session can be an expensive operation to perform on each request, Identity Cloud caches the decrypt sequence in memory to improve performance.
Configure client-side sessions
Identity Cloud uses two types of tokens that represent an exchange of information, usually interactive, between Identity Cloud and a user or entity:
-
Authentication sessions, which Identity Cloud uses to manage authentication journeys before a user has authenticated successfully.
-
Sessions, which Identity Cloud creates after a user has authenticated successfully. Sessions let Identity Cloud manage the user’s or entity’s access to resources.
You can configure Identity Cloud to use client-side or server-side authentication sessions and sessions.
This page covers how to configure Identity Cloud to use client-side authentication sessions and sessions.
Client-side authentication sessions
-
Under Native Consoles > Access Management, go to Realms > Realm Name > Authentication > Settings.
-
Switch to the Trees tab.
-
From the Authentication session state management scheme drop-down list, select
JWT. -
In the Max duration (minutes) field, adjust the maximum life of the authentication session in minutes.
-
Save your changes.
When Identity Cloud creates tenant environments, it generates signing secrets: unique, secure, random values for signing authentication sessions.
To override the generated signing secret:
-
On the Authentication - Settings page, switch to the Security tab.
-
In the Organization Authentication Signing Secret field, enter a base64-encoded HMAC secret at least 128 bits long.
If you choose to override the generated signing secret, specify different values in your development, staging, and production tenant environments, so development sessions are not valid in your production environment, for example. -
Save your changes.
Client-side sessions
-
Under Native Consoles > Access Management, go to Realms > Realm Name > Authentication > Settings.
-
Switch to the General tab.
-
Select Use Client-Side Sessions.
-
Save your changes.
Verify client-side sessions
The service does not track client-side sessions:
-
Authenticate to the realm configured for client-side sessions as a non-administrative user:
$ curl \ --request POST \ --header 'Content-Type: application/json' \ --header 'X-OpenAM-Username: <non-admin-username>' \ --header 'X-OpenAM-Password: <non-admin-password>' \ --header 'Accept-API-Version: resource=2.0, protocol=1.0' \ 'https://<tenant-env-fqdn>/am/json/realms/root/realms/alpha/authenticate' { "tokenId":"<token-id>", "successUrl": "/enduser/?realm=/alpha", "realm":"/alpha" } -
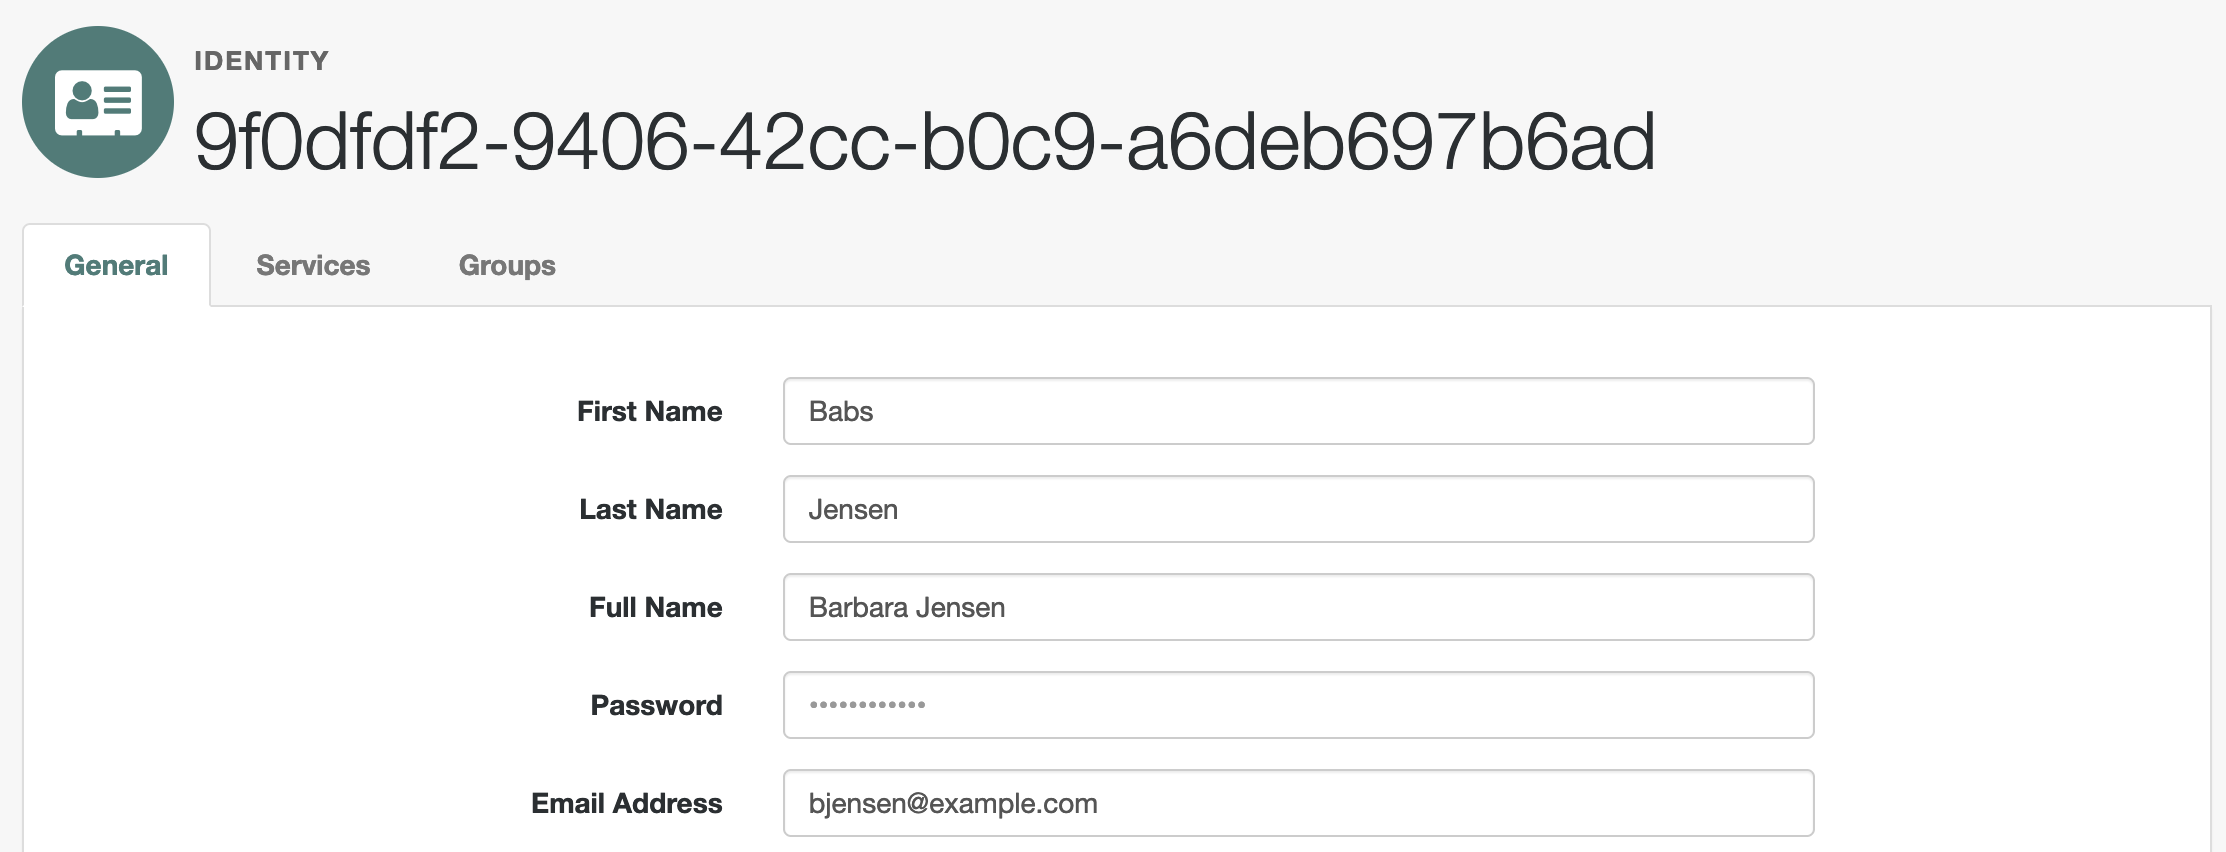
Under Native Consoles > Access Management, go to Realms > Realm Name > Identities > Username to find the user identifier at the top of the profile page; for example:
-
Go to Realms > Realm Name > Sessions.
With the user identifier, search for the session. You should find no sessions for the non-administrative user:
Server-side sessions
Server-side sessions reside in a database internal to Identity Cloud called the Core Token Service (CTS) token store.
When you configure Identity Cloud to use server-side sessions, Identity Cloud sends session references to clients. The references do not contain any of the session state information. Identity Cloud can modify sessions during their lifetime without changing clients' references to the session.
Server-side authentication sessions
Identity Cloud uses authentication sessions to manage authentication journeys before a user has authenticated successfully.
During authentication, the authentication session reference is returned to the
client after each call to the authenticate endpoint and stored in the authId
object of the JSON response.
Identity Cloud maintains the authentication session in the CTS token store. After the authentication flow has completed, if the realm to which the user has authenticated is configured for client-side sessions, Identity Cloud returns the session state to the client and deletes the server-side session.
Server-side session tokens
After the user has successfully authenticated, Identity Cloud returns a session reference, which is known as an SSO token.
For browser clients, Identity Cloud sets a cookie in the browser that contains the session reference.
For REST clients, Identity Cloud returns the session reference in response to calls
to the authentication endpoint.
Server-side sessions and in-memory caching
Server-side sessions can be cached in memory. When a session that is being requested is cached, session retrieval is nearly instantaneous.
Identity Cloud automatically caches server-side sessions after retrieving them from the CTS token store. No configuration is required to enable server-side session caching.
Configure server-side sessions
By default, Identity Cloud realms use server-side sessions.
Identity Cloud uses two types of tokens that represent an exchange of information, usually interactive, between Identity Cloud and a user or entity:
-
Authentication sessions, which Identity Cloud uses to manage authentication journeys before a user has authenticated successfully.
-
Sessions, which Identity Cloud creates after a user has authenticated successfully. Sessions let Identity Cloud manage the user’s or entity’s access to resources.
You can configure Identity Cloud to use client-side or server-side authentication sessions and sessions.
This page covers how to configure Identity Cloud to use server-side authentication sessions and sessions if the default realm settings have changed.
Server-side authentication sessions
-
Under Native Consoles > Access Management, go to Realms > Realm Name > Authentication > Settings.
-
Switch to the Trees tab.
-
From the Authentication session state management scheme drop-down list, select
CTS. -
In the Max duration (minutes) field, adjust the maximum life of the authentication session in minutes.
-
Save your changes.
When Identity Cloud creates tenant environments, it generates signing secrets: unique, secure, random values for signing authentication sessions.
To override the generated signing secret:
-
On the Authentication - Settings page, switch to the Security tab.
-
In the Organization Authentication Signing Secret field, enter a base64-encoded HMAC secret at least 128 bits long.
If you choose to override the generated signing secret, specify different values in your development, staging, and production tenant environments, so development sessions are not valid in your production environment, for example. -
Save your changes.
Server-side sessions
-
Under Native Consoles > Access Management, go to Realms > Realm Name > Authentication > Settings.
-
Switch to the General tab.
-
Clear Use Client-Side Sessions.
-
Save your changes.
Verify server-side sessions
You can find server-side sessions:
-
Authenticate to the realm configured for server-side sessions as a non-administrative user:
$ curl \ --request POST \ --header 'Content-Type: application/json' \ --header 'X-OpenAM-Username: <non-admin-username>' \ --header 'X-OpenAM-Password: <non-admin-password>' \ --header 'Accept-API-Version: resource=2.0, protocol=1.0' \ 'https://<tenant-env-fqdn>/am/json/realms/root/realms/alpha/authenticate' { "tokenId":"<token-id>", "successUrl": "/enduser/?realm=/alpha", "realm":"/alpha" } -
Under Native Consoles > Access Management, go to Realms > Realm Name > Identities > Username to find the user identifier at the top of the profile page; for example:
-
Go to Realms > Realm Name > Sessions.
With the user identifier, search for the session. You should find the session for the non-administrative user:
Session termination
Sessions[1] enable single sign-on, letting authenticated users access system resources in Identity Cloud’s control without re-authenticating.
User sessions are terminated when a configured timeout is reached, or when a user performs actions that cause session termination. Session termination effectively logs the user out of all systems protected by Identity Cloud.
Identity Cloud terminates server-side sessions in four situations:
-
When a user explicitly logs out.
-
When an administrator monitoring sessions explicitly terminates a session.
-
When a session exceeds the maximum time-to-live.
-
When a user is idle for longer than the maximum session idle time.
Under these circumstances, Identity Cloud responds by removing server-side sessions from the CTS token store and from server memory caches. With the user’s session no longer present in CTS, Identity Cloud forces the user to reauthenticate during subsequent attempts to access protected resources.
When a user explicitly logs out of Identity Cloud,
Identity Cloud also attempts to invalidate the tenant session cookie in the user’s browser
by sending a Set-Cookie header with an invalid session ID and a cookie expiration time that is in the past.
In the case of administrator session termination and session timeout,
Identity Cloud cannot invalidate the tenant session cookie until the next time the user accesses Identity Cloud.
Configure session termination settings
Before you can configure the settings for session termination in a given realm, add the Session service configuration to that realm if necessary:
-
Under Native Consoles > Access Management, go to Realms > Realm Name.
-
Select Services.
-
Open the interface that lets you configure session termination:
-
If the Session service appears in the list of services configured for the realm, select Session.
-
If the Session service does not appear in the list of services configured for the realm, add it:
-
Click Add a Service.
-
Select Session from the drop-down list.
-
The Session page appears, showing the Dynamic Attributes tab.
-
Set maximum session time-to-live
When configuring the maximum session time-to-live, balance security and user experience. Depending on your application, it may be acceptable for your users to log in once a month. Financial applications, for example, often terminate their sessions in less than an hour.
The longer a session is valid, the larger the window during which a malicious user could impersonate a user if they were able to hijack a session cookie.
-
Under Native Consoles > Access Management, go to Realms > Realm Name.
-
Select Services.
-
Select Session.
-
On the Maximum Session Time property, configure a value suitable for your environment.
-
Save your changes.
If you update the maximum session time-to-live, you should also set the expiry time for JWT tokens to the same value:
-
Update the JWT token lifetimes for individual OIDC applications:
-
In the Identity Cloud admin UI, select Applications.
-
Select the OIDC application you want to update.
-
On the Sign On tab, scroll down to General Settings, then click Show advanced settings.
-
On the Token Lifetimes tab, specify the following properties in seconds:
-
Access token lifetime (seconds)
-
JWT token lifetime (seconds)
-
-
Click Save.
-
-
Update the JWT token lifetimes for the OAuth2 Provider service:
-
In the Identity Cloud admin UI, select Native Consoles > Access Management.
-
Select Services > OAuth2 Provider.
-
On the Core tab, specify the following property in seconds:
-
Access Token Lifetime (seconds)
-
-
On the OpenID Connect tab, specify the following property in seconds:
-
OpenID Connect JWT Token Lifetime (seconds)
-
-
Click Save Changes.
-
Set maximum session idle timeout
Consider a user with a valid session navigating through pages or making changes to the configuration. If for any reason they leave their desk and their computer remains open, a malicious user could take the opportunity to impersonate them.
Session idle timeout can help mitigate those situations by logging out users after a specified duration of inactivity.
| You can only use session idle timeout in realms configured for server-side sessions. |
-
Under Native Consoles > Access Management, go to Realms > Realm Name.
-
Select Services.
-
Select Session.
-
On the Maximum Time Idle property, configure a value suitable for your environment.
-
Save your changes.
Manage active session quotas
Enabling session quotas allows you to control the maximum number of active sessions a user can have. The quota applies to all active sessions for the same user, and once a user reaches the session limit, the system removes the least recently used session for that user.
You enable session quotas by adding an ESV variable called esv-global-session-quotas-enable-constraints, set to ON. You must add this ESV to each environment (development, staging and production) where you want to enable session quotas.
The default active session limit is 5. This applies to alpha, bravo, and top-level realms, impacting both managed users and admins. If needed, you can adjust the allowed number of active sessions for alpha and/or bravo realms through the Access Management native console.
Enable active session quotas
-
In the Identity Cloud admin UI, go to Tenant Settings > Global Settings > Environment Secrets & Variables.
-
Click the Variables tab, and then click + Add Variable.
-
Enter the following details:
-
Name:
global-session-quotas-enable-constraints -
Type:
string -
Value:
ON
-
-
Click Save.
If you need to disable active session quotas, delete the ESV or change the Value field to OFF.
Adjust the number of allowed active sessions
You can adjust the number of allowed active sessions for alpha and/or bravo realms.
-
In the Identity Cloud admin UI, go to Native Consoles > Access Management > Services.
-
If the session service hasn’t already been added, click Add a Service.
-
Select Session, and then click Create.
-
In the Active User Sessions field, enter the number of allowed active user sessions. The default is
5. -
Click Save Changes.
Identity Cloud deletes the user’s least recently used session when the value in the Active User Sessions field is reached.
View and terminate sessions (UI)
If you have configured Identity Cloud to use server-side sessions[2], you can view and terminate users' sessions under Native Consoles > Access Management.
For advanced functionality that’s not available in the UI, refer to Manage sessions (REST API).
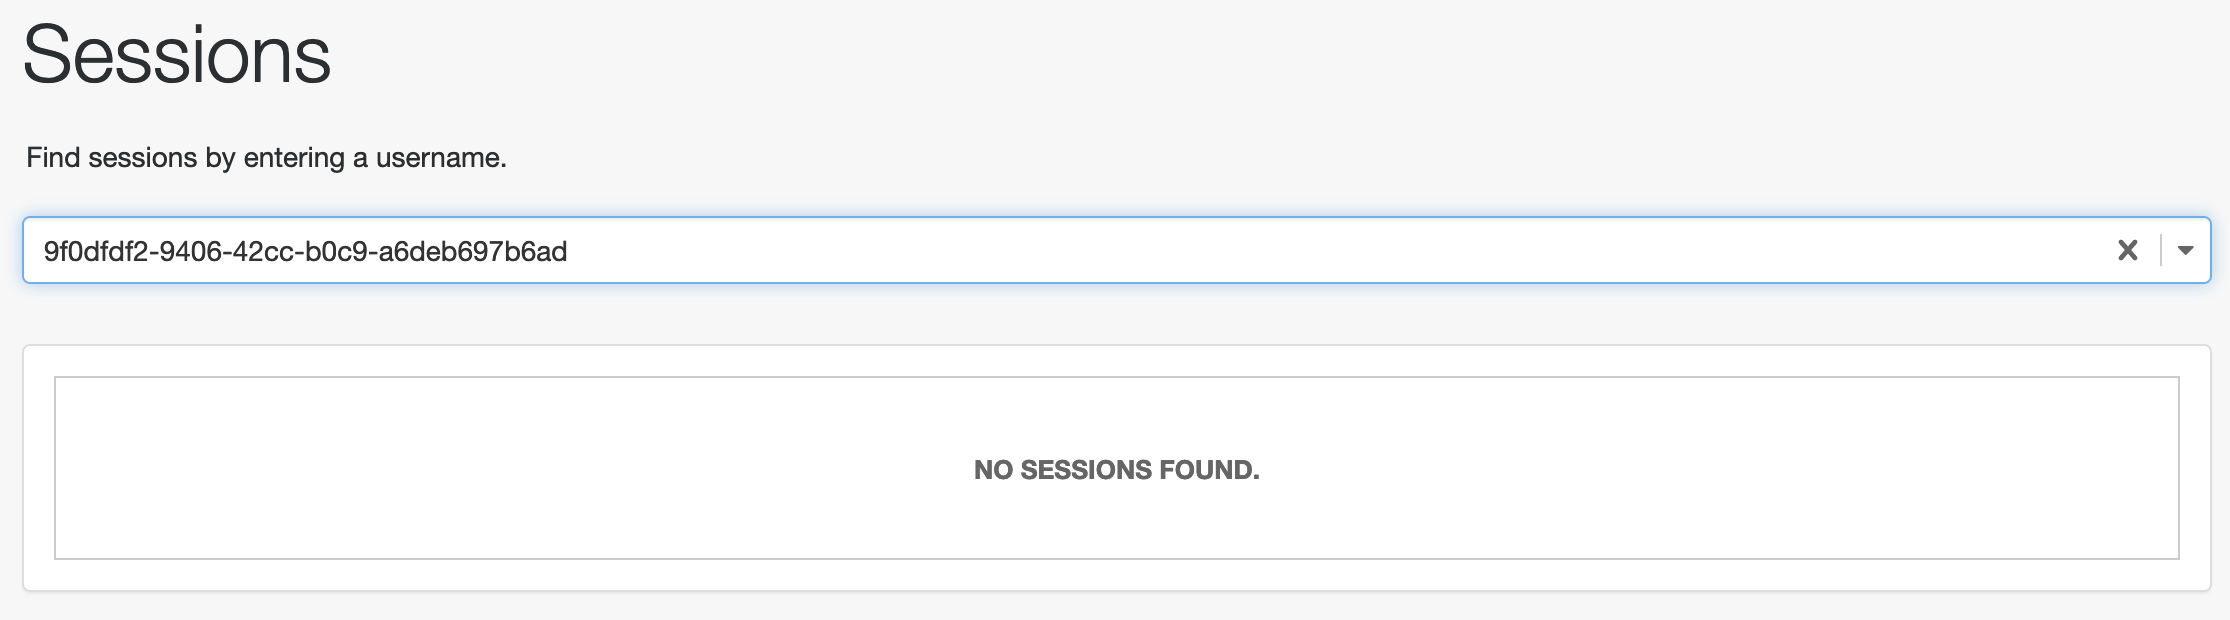
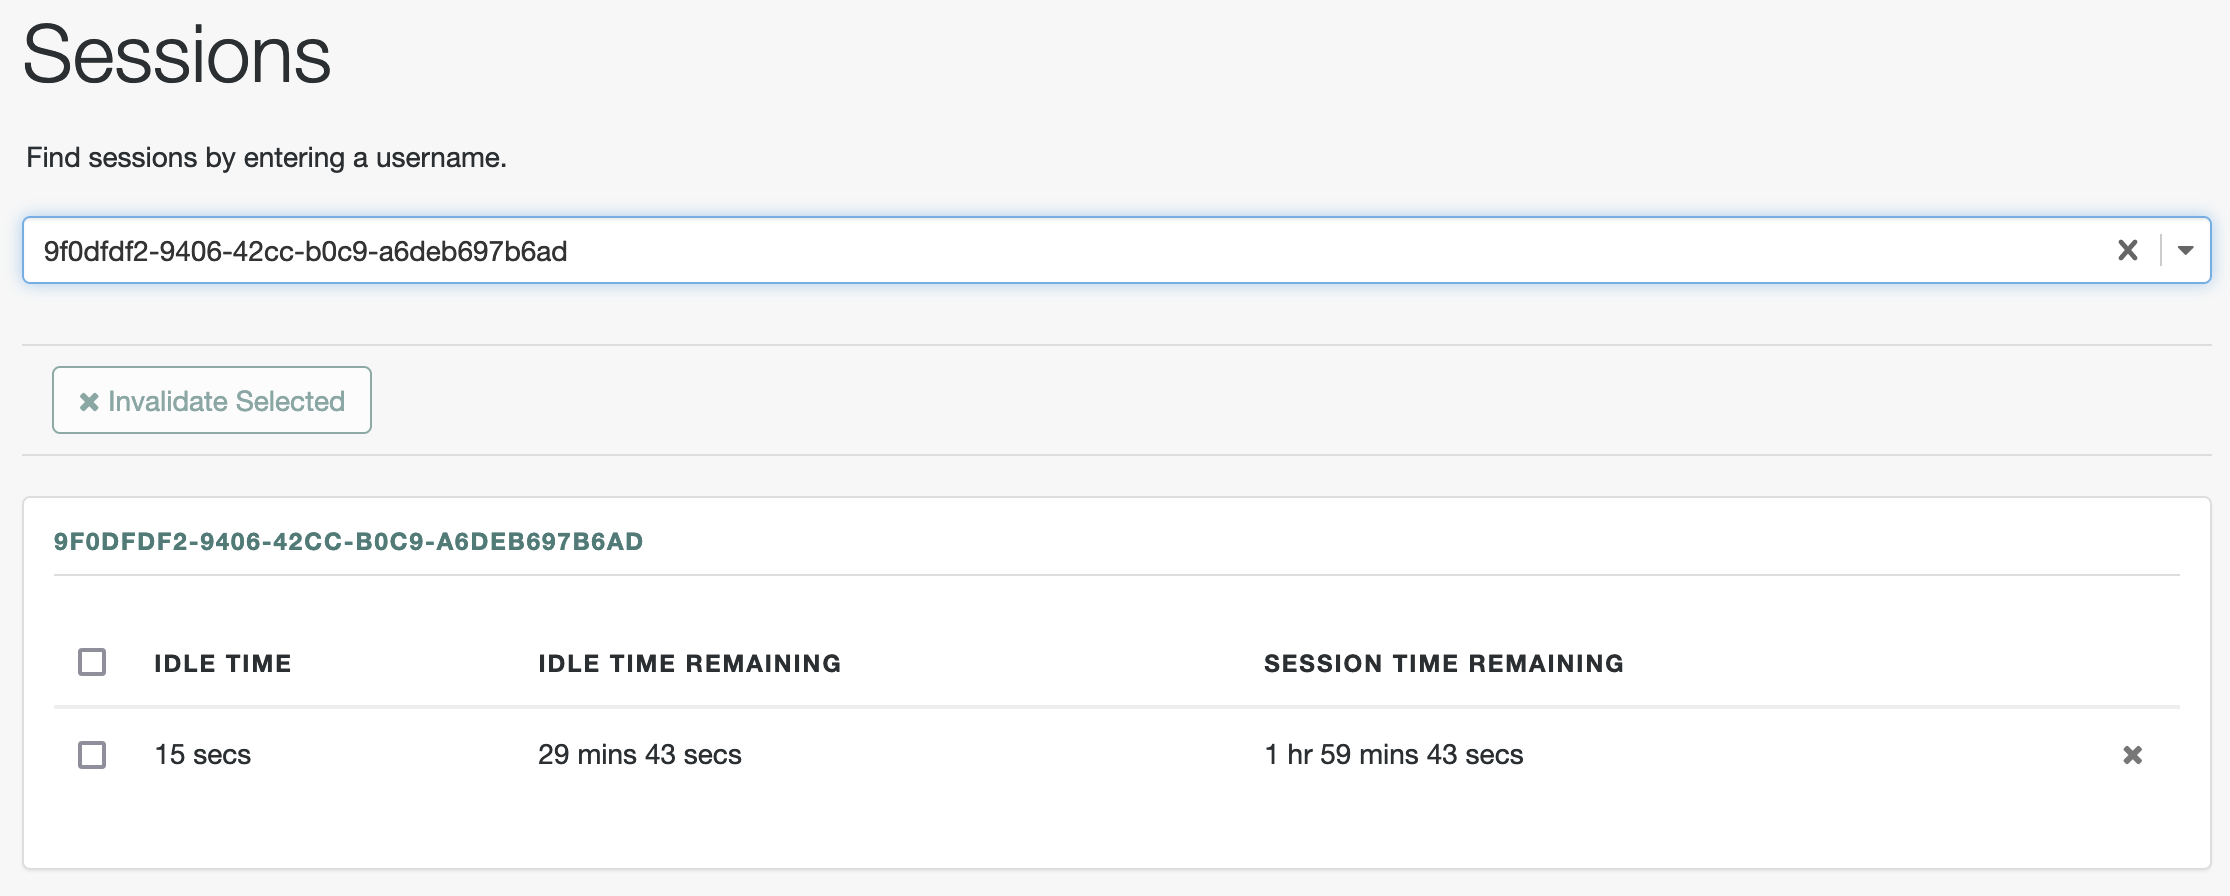
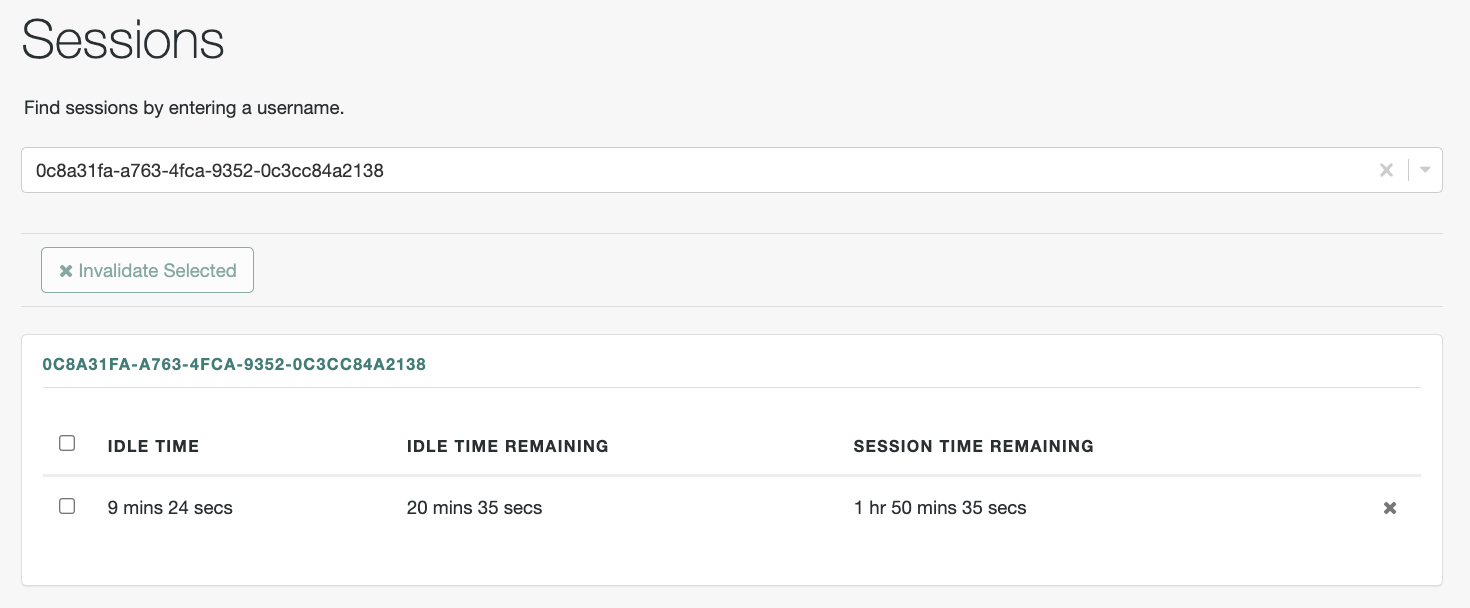
View sessions
-
Under Native Consoles > Access Management, go to Realms > Realm Name.
-
Select Sessions.
-
The Sessions page appears with a single field in which to enter a username.
Identity Cloud uses generated UUIDs for usernames. To get a UUID:
-
In the Identity Cloud admin UI, go to Identities > Manage.
-
From the Realm Name - Users list, click the user for which you want to obtain the UUID.
-
Click Raw JSON from the left-hand menu, and copy the value for
_id. For example,0c8a31fa-a763-4fca-9352-0c3cc84a2138.
-
-
Paste the UUID in the Session page’s username field.
-
Click the entry in the drop-down list to search for the user’s sessions.
If the user has active server-side sessions, Identity Cloud retrieves the sessions for the user and displays them in a table:
Terminate sessions
To terminate a user’s server-side session:
-
Select the session you want to terminate.
-
Clicking the Invalidate Selected button.
After you terminate a user’s session, the user must reauthenticate to access resources protected by Identity Cloud.
Deleting a user doesn’t remove a user’s server-side sessions. After deleting a user, use the preceding steps to check for any sessions for the user and invalidate them.
Manage sessions (REST API)
To manage sessions using REST, send requests to the /json/sessions endpoint.
The following examples assume you have used a service account to obtain an access token with the fr:am:* scope.
The examples also assume you have retrieved the session token for the session you’re managing.
Get information about sessions
To get information about a specific session:
-
Send an HTTP POST request to the
/json/sessions/endpoint, with thegetSessionInfoaction. -
Provide the session token in the POST data as the value of the
tokenId.
$ curl \
--request POST \
--header 'Authorization: Bearer <access-token>' \
--header "Accept-API-Version: resource=4.0" \
--header "Content-type: application/json" \
--data '{ "tokenId": " <session-token> " }' \
'https://<tenant-env-fqdn>/am/json/realms/root/realms/alpha/sessions/?_action=getSessionInfo'
{
  "username": "b0f30dfb-4e01-457e-a567-c258a74e4fe2",
  "universalId": "id=b0f30dfb-4e01-457e-a567-c258a74e4fe2,ou=user,o=alpha,ou=services,ou=am-config",
  "realm": "/alpha",
  "latestAccessTime": "2024-01-12T13:49:25Z",
  "maxIdleExpirationTime": "2024-01-12T14:19:25Z",
  "maxSessionExpirationTime": "2024-01-12T15:49:24Z",
  "properties": {
    "AMCtxId": "b9275f8c-fa83-4455-bdac-d27e8d538a8f-215815",
    "AuthType": ""
  }
}
The getSessionInfo action doesn’t refresh the session idle timeout.
|
To obtain session information about a server-side session and reset the idle timeout,
use the getSessionInfoAndResetIdleTime action as follows:
$ curl \
--request POST \
--header 'Authorization: Bearer <access-token>' \
--header "Accept-API-Version: resource=4.0, protocol=1.0" \
--header "Content-type: application/json" \
--data '{ "tokenId": " <session-token> " }' \
'https://<tenant-env-fqdn>/am/json/realms/root/realms/alpha/sessions/?_action=getSessionInfoAndResetIdleTime'
{
  "username": "b0f30dfb-4e01-457e-a567-c258a74e4fe2",
  "universalId": "id=b0f30dfb-4e01-457e-a567-c258a74e4fe2,ou=user,o=alpha,ou=services,ou=am-config",
  "realm": "/alpha",
  "latestAccessTime": "2024-01-12T14:18:24Z",
  "maxIdleExpirationTime": "2024-01-12T14:48:24Z",
  "maxSessionExpirationTime": "2024-01-12T15:49:23Z",
  "properties": {
    "AMCtxId": "b9275f8c-fa83-4455-bdac-d27e8d538a8f-215815",
    "AuthType": ""
  }
}
|
Validate sessions
To check if a session token is valid, send an HTTP POST request to the /json/sessions/ endpoint with the validate
action. Provide the session token in the POST data as the value of the tokenId.
$ curl \
--request POST \
--header "Content-type: application/json" \
--header 'Authorization: Bearer <access-token>' \
--header "Accept-API-Version: resource=4.0, protocol=1.0" \
--data '{ "tokenId": " <session-token> " }' \
'https://<tenant-env-fqdn>/am/json/realms/root/realms/alpha/sessions/?_action=validate'
If the session token is valid, Identity Cloud returns the user ID and realm:
{
  "valid": true,
  "sessionUid": "b9275f8c-fa83-4455-bdac-d27e8d538a8f-245866",
  "uid": "b0f30dfb-4e01-457e-a567-c258a74e4fe2",
  "realm": "/alpha"
}
By default, validating a session resets the session’s idle time,
which triggers a write operation to the Core Token Service (CTS) token store.
To avoid this, include refresh=false, for example, validate&refresh=false.
Refresh server-side sessions
To reset the idle time of a server-side session, send an HTTP POST request to the /json/sessions/ endpoint, with the
refresh action. Include the session token in the POST body as the value of the tokenId.
$ curl \
--request POST \
--header "Content-type: application/json" \
--header 'Authorization: Bearer <access-token>' \
--header "Accept-API-Version: resource=4.0, protocol=1.0" \
--data '{ "tokenId": " <session-token> " }' \
'https://<tenant-env-fqdn>/am/json/realms/root/realms/alpha/sessions/?_action=refresh'
{
  "uid": "b0f30dfb-4e01-457e-a567-c258a74e4fe2",
  "realm": "/alpha",
  "idletime": 0,
  "maxidletime": 30,
  "maxsessiontime": 120,
  "maxtime": 6826
}
On success, Identity Cloud resets the idle time for the server-side session, and returns timeout details of the session.
|
Invalidate sessions
To invalidate a session, send an HTTP POST request to the /json/sessions/ endpoint with the logout action. Include
the session token in the POST body as the value of the tokenId.
$ curl \
--request POST \
--header "Content-type: application/json" \
--header 'Authorization: Bearer <access-token>' \
--header "Accept-API-Version: resource=4.0, protocol=1.0" \
--data '{ "tokenId": " <session-token> " }' \
'https://<tenant-env-fqdn>/am/json/realms/root/realms/alpha/sessions/?_action=logout'
{
    "result": "Successfully logged out"
}
If the token isn’t valid (and therefore can’t be invalidated), Identity Cloud returns the following error:
{
  "result": "Token has expired"
}
Invalidate specific sessions
To invalidate specific sessions for a user, first obtain a list of the user’s active sessions.
Send an HTTP GET request to the /json/sessions/ endpoint with a queryFilter to specify the UUID of the user and the
realm to search.
For example, to obtain the list of active sessions for bjensen (whose UUID is
b0f30dfb-4e01-457e-a567-c258a74e4fe2) in the alpha realm, the query filter value would be:
username eq "b0f30dfb-4e01-457e-a567-c258a74e4fe2" and realm eq "/alpha"
|
The query filter value must be URL-encoded when sent over HTTP. For more information about query filter parameters, refer to Query. |
In the following example, bjensen has two active sessions. Note the value of the sessionHandle properties.
$ curl \
--request GET \
--header 'Authorization: Bearer <access-token>' \
--header "Accept-API-Version: resource=4.0, protocol=1.0" \
'https://<tenant-env-fqdn>/am/json/realms/root/realms/alpha/sessions?_queryFilter=username%20eq%20%22b0f30dfb-4e01-457e-a567-c258a74e4fe2%22%20and%20realm%20eq%20%22%2Falpha%22'
{
"result": [
{
"_rev": "647523949",
"username": "b0f30dfb-4e01-457e-a567-c258a74e4fe2",
"universalId": "id=b0f30dfb-4e01-457e-a567-c258a74e4fe2,ou=user,o=alpha,ou=services,ou=am-config",
"realm": "/alpha",
"sessionHandle": "shandle:flz3sdj5Ts…",
"latestAccessTime": "2024-01-15T07:42:42.544Z",
"maxIdleExpirationTime": "2024-01-15T08:12:42Z",
"maxSessionExpirationTime": "2024-01-15T09:31:22Z"
},
{
"_rev": "1074537861",
"username": "b0f30dfb-4e01-457e-a567-c258a74e4fe2",
"universalId": "id=b0f30dfb-4e01-457e-a567-c258a74e4fe2,ou=user,o=alpha,ou=services,ou=am-config",
"realm": "/alpha",
"sessionHandle": "shandle:SZtTnGMwnG…",
"latestAccessTime": "2024-01-15T07:44:00.670Z",
"maxIdleExpirationTime": "2024-01-15T08:14:00Z",
"maxSessionExpirationTime": "2024-01-15T09:44:00Z"
}
],
…
}To log out specific sessions, send an HTTP POST request to the /json/sessions/ endpoint, with the logoutByHandle action.
Include an array of the session handles to invalidate as values of the sessionHandles property in the POST body.
This example invalidates the sessions returned by the previous query:
$ curl \
--request POST \
--header "Content-Type: application/json" \
--header 'Authorization: Bearer <access-token>' \
--header "Accept-API-Version: resource=4.0, protocol=1.0" \
--data '{
"sessionHandles": [
"shandle:flz3sdj5Ts…",
"shandle:SZtTnGMwnG…"
]
}' \
'https://<tenant-env-fqdn>/am/json/realms/root/realms/alpha/sessions/?_action=logoutByHandle'
{
"result": {
"shandle:flz3sdj5Ts…": true,
"shandle:SZtTnGMwnG…": true
}
}Invalidate all sessions for a user
To invalidate (log out) all sessions for a user, send an HTTP POST request to the /json/sessions/ endpoint with the
logoutByUser action, specifying the UUID of the user in the request payload.
This example logs out all sessions for user bjensen (whose UUID is b0f30dfb-4e01-457e-a567-c258a74e4fe2):
$ curl \
--request POST \
--header "Content-Type: application/json" \
--header 'Authorization: Bearer <access-token>' \
--header "Accept-API-Version: resource=5.1, protocol=1.0" \
--data '{"username": "b0f30dfb-4e01-457e-a567-c258a74e4fe2"}' \
'https://<tenant-env-fqdn>/am/json/realms/root/realms/alpha/sessions/?_action=logoutByUser'
{
  "result": true
}
Get and set session properties
Use the REST API to read and update properties on users' sessions. Define the properties you want to get and set in the Session Property Whitelist Service configuration.
You can use the REST API to:
-
Get the names of the properties that you can read or update. This is the same set of properties configured in the Session Property Whitelist service.
-
Read and update property values.
|
The ability to set, change and delete session properties is affected by the session state:
|
Differentiate the user who performs the operation from the session affected by the operation as follows:
-
Use an access token for the service account authorized to access these endpoints.
-
Specify the session token of the user whose session you want to read or modify as the
tokenIdparameter in the body of the REST API call.
The following examples assume you configured a property named LoginLocation in the Session Property Whitelist
service.
To retrieve the names and values of the properties you can get or set, send an HTTP POST request to the json/sessions
endpoint, with the getSessionProperties action:
$ curl \
--request POST \
--header 'Authorization: Bearer <access-token>' \
--header "Accept-API-Version: resource=3.1, protocol=1.0" \
--header "Content-type: application/json" \
--data '{ "tokenId": " <session-token> " }' \
'https://<tenant-env-fqdn>/am/json/realms/root/sessions/?_action=getSessionProperties'
{
    "LoginLocation": ""
}
To set the value of a session property, send an HTTP POST request to the /json/sessions/ endpoint,
with the updateSessionProperties action:
$ curl \
--request POST \
--header "Content-Type: application/json" \
--header 'Authorization: Bearer <access-token>' \
--header "Accept-API-Version: resource=3.1, protocol=1.0" \
--data '{ "tokenId": " <session-token> ", "LoginLocation":"40.748440, -73.984559"}' \
'https://<tenant-env-fqdn>/am/json/realms/root/sessions/?_action=updateSessionProperties'
{
    "LoginLocation": "40.748440, -73.984559"
}
To set multiple properties in a single REST API call, specify the list of properties and their values in the JSON payload; for example:
--data '{"property1":"value1", "property2":"value2"}'
If the service account you’re using to modify the session doesn’t have sufficient access privileges, Identity Cloud returns a 403 Forbidden error.
You can’t set properties internal to Identity Cloud sessions. If you try to modify an internal property in a REST API call, Identity Cloud also returns a 403 Forbidden error; for example:
$ curl \
--request POST \
--header "Content-Type: application/json" \
--header 'Authorization: Bearer <access-token>' \
--header "Accept-API-Version: resource=3.1, protocol=1.0" \
--data '{"AuthLevel":"5", "tokenId": " <session-token> "}' \
'https://<tenant-env-fqdn>/am/json/realms/root/sessions/?_action=updateSessionProperties'
{
    "code": 403,
    "reason": "Forbidden",
    "message": "Forbidden"
}
For a list of the default session properties, refer to Session properties.
Session upgrade with MFA
When an authenticated user must present additional credentials to access sensitive resources, Identity Cloud provides session upgrade to perform step-up authentication.
This lets you require credentials only when you really need them. A user signs in quickly to access protected resources like their profile data or their shopping cart. When they are ready to make a purchase, the session upgrade mechanism requires authentication with another factor (MFA).
For single-use step-up authentication, refer to Authorize one-time access with transactional authz instead.
How it works
A client application, an authentication journey, or a policy enforcement point (PEP) initiates session upgrade:
-
A client application triggers session upgrade directly.
The application redirects the authenticated user to the appropriate journey with the
ForceAuth=truequery string parameter in the URL.The following example reauthenticates the user in the
alpharealm with theStrongAuthJourney:https://<tenant-env-fqdn>/am/XUI/?realm=alpha&ForceAuth=true&authIndexType=service&authIndexValue=StrongAuthJourney -
An authentication journey with the Anonymous Session Upgrade node upgrades an anonymous session.
-
Identity Cloud advises a PEP to initiate session upgrade.
In this case, IG, a web agent, a Java agent, or a custom PEP protects sensitive resources.
You configure authorization policies to require basic authentication for protected resources and session upgrade for sensitive protected resources.
Session upgrade proceeds as follows:

-
An authenticated user requests a sensitive resource.
-
The PEP requests a policy decision from Identity Cloud.
-
Identity Cloud returns an authorization decision denying access to the resource with advice to specify a journey for reauthentication.
-
The PEP redirects to Identity Cloud for session upgrade.
-
The user reauthenticates with the specified journey; for example, with an additional factor.
-
Identity Cloud authenticates the user and returns a new session allowing access to the sensitive resource.
-
| Session upgrade | Session type | Outcome |
|---|---|---|
Success |
Client-side |
Issue a new session. |
Server-side |
The outcome depends on what led to session upgrade:
|
|
Failure |
Any |
Retain existing user session. If session upgrade failed because the login page timed out, redirect the user-agent to the success URL from the last successful authentication. |
PEP-based session upgrade
Perform the following tasks to deploy session upgrade with a PEP:
-
Set up a PEP to enforce Identity Cloud authorization policies.
Further reading:
-
Set up authorization policies.
The following example policy grants any authenticated user access to
*://*:*/sample*resources:
-
Set up an authentication journey to use for session upgrade.
For example, configure a journey using a strong authentication mechanism such as MFA.
-
Set up additional authorization policies with conditions to trigger session upgrade.
The following example policy requires reauthentication with the
StrongAuthJourneyto access*://*:*/sensitive*resources: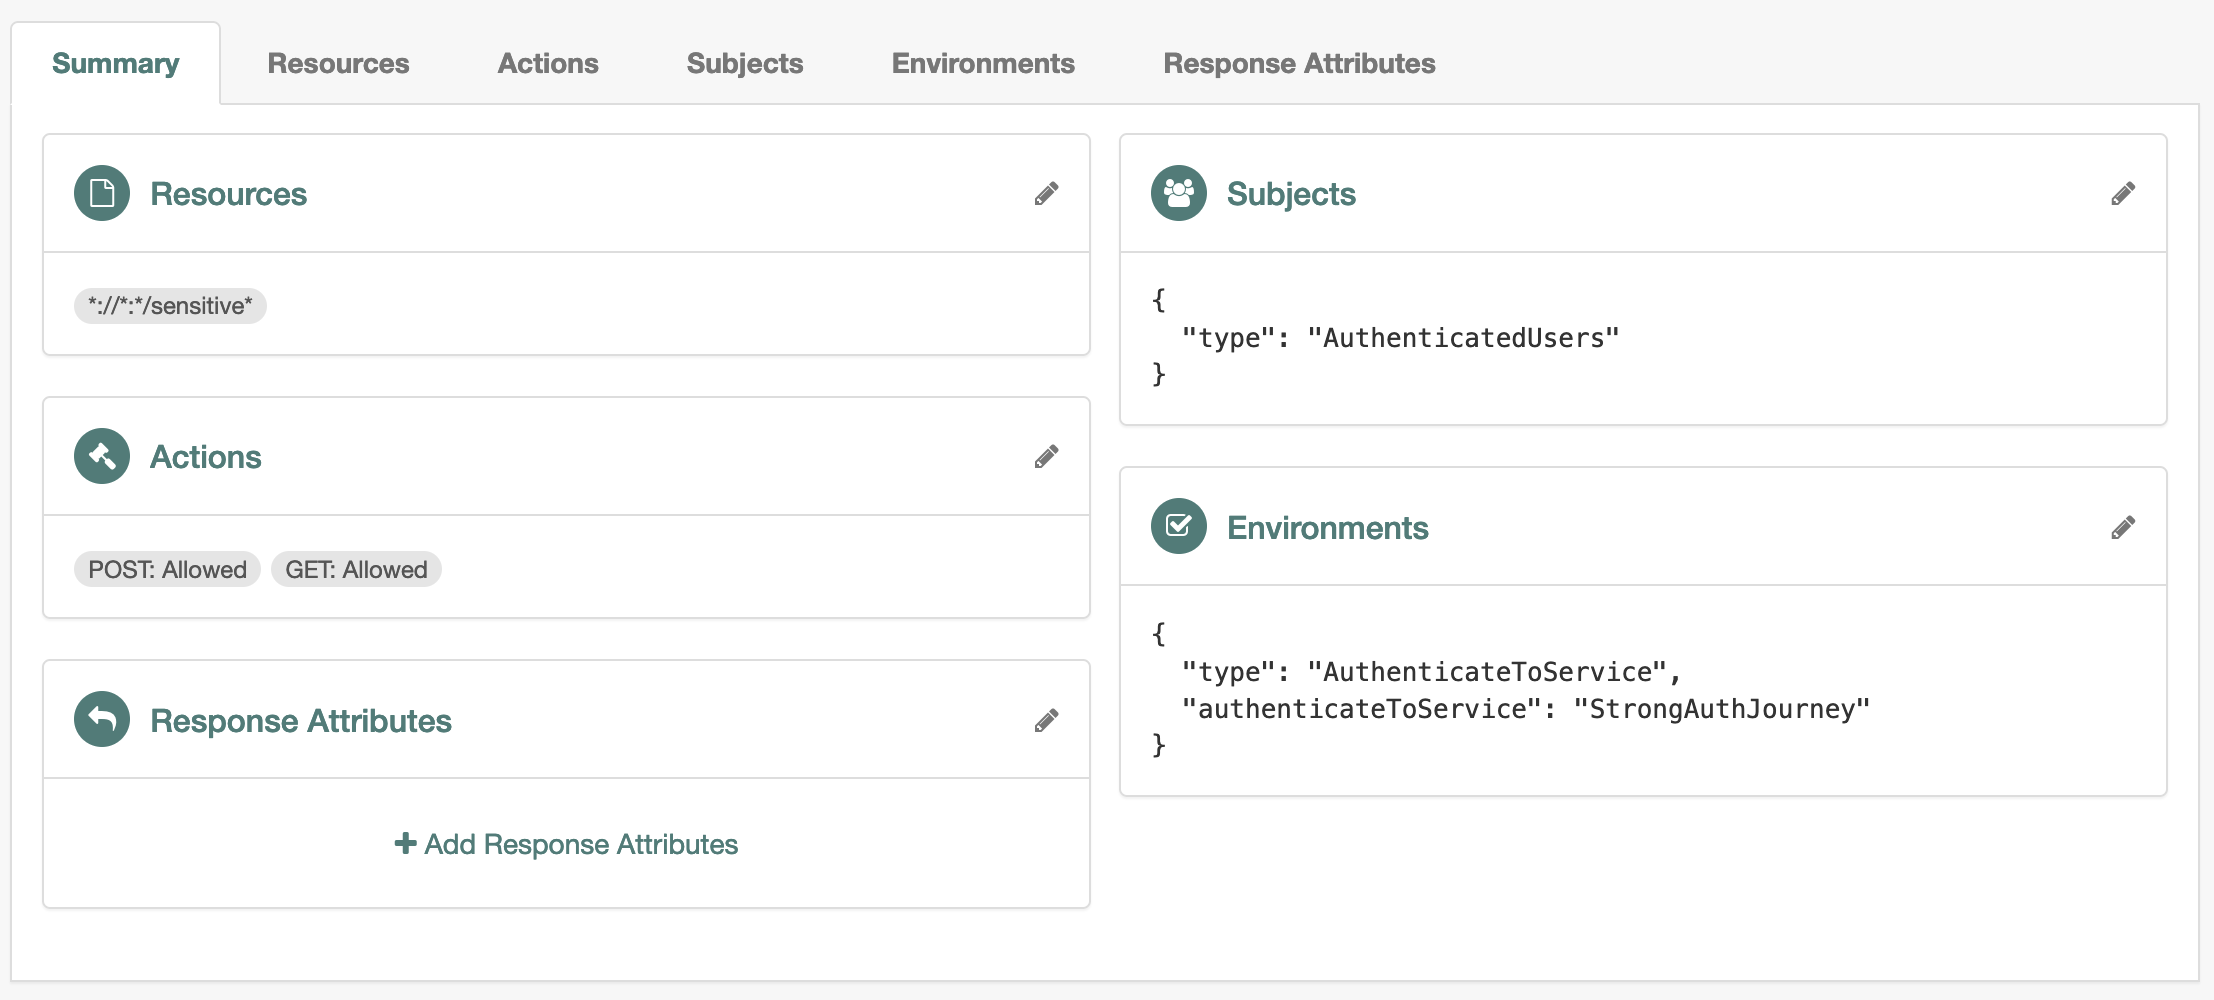
Authentication journey names are case-sensitive.
Working with advice
When you use IG, a Java agent, or a web agent as a PEP, the PEP performs session upgrade when necessary.
If you create your own PEP, it must work with policy advice using the REST API. You can try the following demonstration without installing a PEP or an application to protect:
-
Prepare by configuring the policies and journey described in PEP-based session upgrade.
For the
StrongAuthJourney, duplicate the default journey to keep authentication simple to demonstrate. -
Create a user profile and record the username and password.
-
Grant the user access to evaluate policies.
-
Authenticate as the user you created:
$ curl \ --request POST \ --header 'Content-Type: application/json' \ --header 'X-OpenAM-Username: <username>' \ --header 'X-OpenAM-Password: <password>' \ --header 'Accept-API-Version: resource=2.0, protocol=1.0' \ 'https://<tenant-env-fqdn>/am/json/realms/root/realms/alpha/authenticate' {"tokenId":"<tokenId>","successUrl":"/enduser/?realm=/alpha","realm":"/alpha"} -
Request a policy decision for an authorized resource,
https://www.example.com/sample:$ curl \ --request POST \ --Cookie '<session-cookie-name>=<tokenId>' \ --header 'Content-Type: application/json' \ --header 'Accept-API-Version: resource=2.0, protocol=1.0' \ --data '{ "resources": ["https://www.example.com/sample"], "application": "myPolicySet", "subject": { "ssoToken": "<tokenId>" } }' \ 'https://<tenant-env-fqdn>/am/json/realms/root/realms/alpha/policies?_action=evaluate' [{ "resource": "https://www.example.com/sample", "actions": { "POST": true, "GET": true }, "attributes": {}, "advices": {}, "ttl": <timestamp> }]GET and POST actions are allowed.
-
Request a policy decision for a resource requiring session upgrade,
https://www.example.com/sensitive:$ curl \ --request POST \ --Cookie '<session-cookie-name>=<tokenId>' \ --header 'Content-Type: application/json' \ --header 'Accept-API-Version: resource=2.0, protocol=1.0' \ --data '{ "resources": ["https://www.example.com/sensitive"], "application": "myPolicySet", "subject": { "ssoToken": "<tokenId>" } }' \ 'https://<tenant-env-fqdn>/am/json/realms/root/realms/alpha/policies?_action=evaluate' [{ "resource": "https://www.example.com/sensitive", "actions": {}, "attributes": {}, "advices": { "AuthenticateToServiceConditionAdvice": ["/alpha:StrongAuthJourney"] }, "ttl": <timestamp> }]According to the policy, no actions are allowed. Identity Cloud returns advice instead.
-
Format the advice as XML without spaces or line breaks.
The following formatted example shows the structure of the XML:
<Advices>
  <AttributeValuePair>
    <Attribute name="AuthenticateToServiceConditionAdvice"/>
    <Value>/alpha:StrongAuthJourney</Value>
  </AttributeValuePair>
</Advices>
Advice can include multiple attribute-value pairs.
-
Remember to remove any spaces and blanks around tags and URL-encode the XML advice:
%3CAdvices%3E%3CAttributeValuePair%3E%3CAttribute%20name%3D%22AuthenticateToServiceConditionAdvice%22%2F%3E%3CValue%3E%2Falpha%3AStrongAuthJourney%3C%2FValue%3E%3C%2FAttributeValuePair%3E%3C%2FAdvices%3E -
Use the advice to authenticate again with the existing session:
In the authentication request set the following:
-
authIndexType=composite_advice -
authIndexValue=URL-encoded-XML -
The user’s current SSO token as the cookie
$ curl \
--request POST \
--header 'Content-Type: application/json' \
--Cookie '<session-cookie-name>=<tokenId>' \
--header 'Accept-API-Version: resource=2.1, protocol=1.0' \
'https://<tenant-env-fqdn>/am/json/realms/root/realms/alpha/authenticate?authIndexType=composite_advice&authIndexValue=<URL-encoded-XML>'
{
  "authId": "<auth-id>",
  "callbacks": [{
    "type": "NameCallback",
    "output": [{
      "name": "prompt",
      "value": "User Name"
    }],
    "input": [{
      "name": "IDToken1",
      "value": ""
    }],
    "_id": 0
  }, {
    "type": "PasswordCallback",
    "output": [{
      "name": "prompt",
      "value": "Password"
    }],
    "input": [{
      "name": "IDToken2",
      "value": ""
    }],
    "_id": 1
  }],
  "header": "Sign In",
  "description": "New here? <a href=\"#/service/Registration\">Create an account</a><br><a href=\"#/service/ForgottenUsername\">Forgot username?</a><a href=\"#/service/ResetPassword\"> Forgot password?</a>"
}
Identity Cloud returns an authentication callback as the response body. For details, refer to Authenticate using REST.
-
-
Renew the request with the same parameters and cookie as before, responding to the callback with the details in the request body:
$ curl \
--request POST \
--header 'Content-Type: application/json' \
--Cookie '<session-cookie-name>=<tokenId>' \
--header 'Accept-API-Version: resource=2.1, protocol=1.0' \
--data '{
  "authId": "<auth-id>",
  "callbacks": [{
    "type": "NameCallback",
    "output": [{
      "name": "prompt",
      "value": "User Name"
    }],
    "input": [{
      "name": "IDToken1",
      "value": "<username>"
    }],
    "_id": 0
  }, {
    "type": "PasswordCallback",
    "output": [{
      "name": "prompt",
      "value": "Password"
    }],
    "input": [{
      "name": "IDToken2",
      "value": "<password>"
    }],
    "_id": 1
  }]
}' \
'https://<tenant-env-fqdn>/am/json/realms/root/realms/alpha/authenticate?authIndexType=composite_advice&authIndexValue=<URL-encoded-XML>'
{"tokenId":"<new-tokenId>","successUrl":"/enduser/?realm=/alpha","realm":"/alpha"}
Identity Cloud returns a new SSO token on successful authentication. This represents the upgraded session.
-
Request a policy decision for the resource again using the new SSO token:
$ curl \
--request POST \
--Cookie '<session-cookie-name>=<new-tokenId>' \
--header 'Content-Type: application/json' \
--header 'Accept-API-Version: resource=2.0, protocol=1.0' \
--data '{
  "resources": ["https://www.example.com/sensitive"],
  "application": "myPolicySet",
  "subject": {
    "ssoToken": "<new-tokenId>"
  }
}' \
'https://<tenant-env-fqdn>/am/json/realms/root/realms/alpha/policies?_action=evaluate'
[{
  "resource": "https://www.example.com/sensitive",
  "actions": {
    "POST": true,
    "GET": true
  },
  "attributes": {},
  "advices": {},
  "ttl": <timestamp>
}]
Notice that the user now has access.