Guide to installing and configuring Salesforce Identity Connect.
Preface
This guide shows you how to install, configure, and manage Identity Connect 7.1.6, and how to upgrade to the latest version.
1. Who Should Use this Guide
This guide is written for administrators of Identity Connect and covers the installation, configuration, and removal procedures that you theoretically perform only once per version. This guide also covers the configuration and management of the synchronization mechanism that ensures consistency across disparate data stores.
Identity Connect software is based on the ForgeRock® Identity Management (IDM) product. For a deeper understanding of how Identity Connect works, refer to the IDM documentation on ForgeRock's BackStage site. You do not need this information for basic installation, configuration, and management of Identity Connect.
Chapter 1. Overview of an Identity Connect Deployment
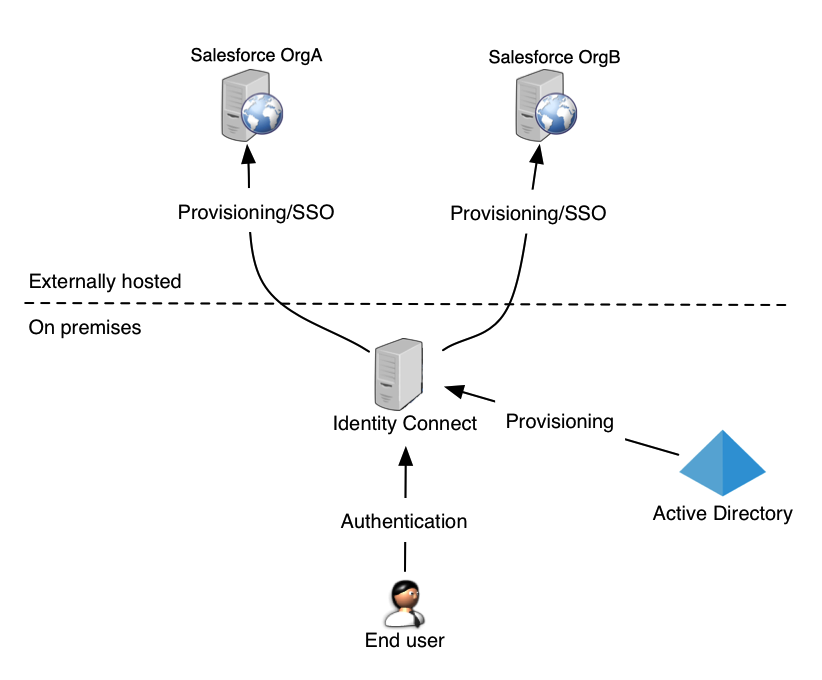
Identity Connect enables you to upload user data from an Active Directory data store to one or more Salesforce organizations, and to synchronize this data automatically when user entries are added, changed, or removed. Identity Connect also enables single sign-on (SSO) to Salesforce, using the Security Assertion Markup Language (SAML).
1.1. Overview of the Identity Connect Architecture
Identity Connect includes a browser-based user interface, and is installed “on premises”, inside your Network. A customizable administration UI enables you to configure data synchronization from your Active Directory server to your Salesforce organization.
You can connect a single Active Directory server to multiple Identity Connect instances, each targeting a separate Salesforce organization. This enables you to synchronize a sandbox organization and a production organization from the same Active Directory server. In addition, you can connect one Identity Connect instance to multiple Salesforce organizations. For example, if two organizations merge, and the user data for both organizations is stored in a single Active Directory server, Identity Connect can synchronize the Active Directory data simultaneously to multiple Salesforce organizations.
When Identity Connect has been installed and configured, any access to the subdomain of your organization on Salesforce (such as example.salesforce.com) can be configured to go through Identity Connect. Attempts to access example.salesforce.com directly are rerouted to Identity Connect, which manages access.
Administrative access to Identity Connect relies on the credentials of administration users in Active Directory.
When administrative users log into Identity Connect (with the URL https://hostname.domain:8443), they are able to configure, manage and monitor data synchronization between Active Directory and Salesforce. If you have configured single sign-on, and an Active Directory user account has been linked to the corresponding Salesforce account, a regular Active Directory user can log into Identity Connect (with the URL https://hostname.domain:8443/#/connect/login), and be routed directly to their Salesforce dashboard, through SAML.
The session for the administration UI is shared with the user UI. Therefore, when an administrator is logged into Identity Connect, and logs into their Salesforce user login page, they do so without entering additional authentication details.
By default, access to Identity Connect is controlled with forms-based authentication. Users of Identity Connect provide the login credentials of their Active Directory account when they log in. You can configure Identity Connect for Integrated Windows Authentication (IWA) in addition to forms-based authentication. For more information, see "Configuring Identity Connect for Integrated Windows Authentication". You can also configure single sign-on (SSO) to Salesforce using the Security Assertion Markup Language (SAML). For more information, see "Configuring Single Sign-On".
The following figure provides a high-level overview of the Identity Connect components, assuming two Salesforce organizations synchronized with a single Active Directory server.
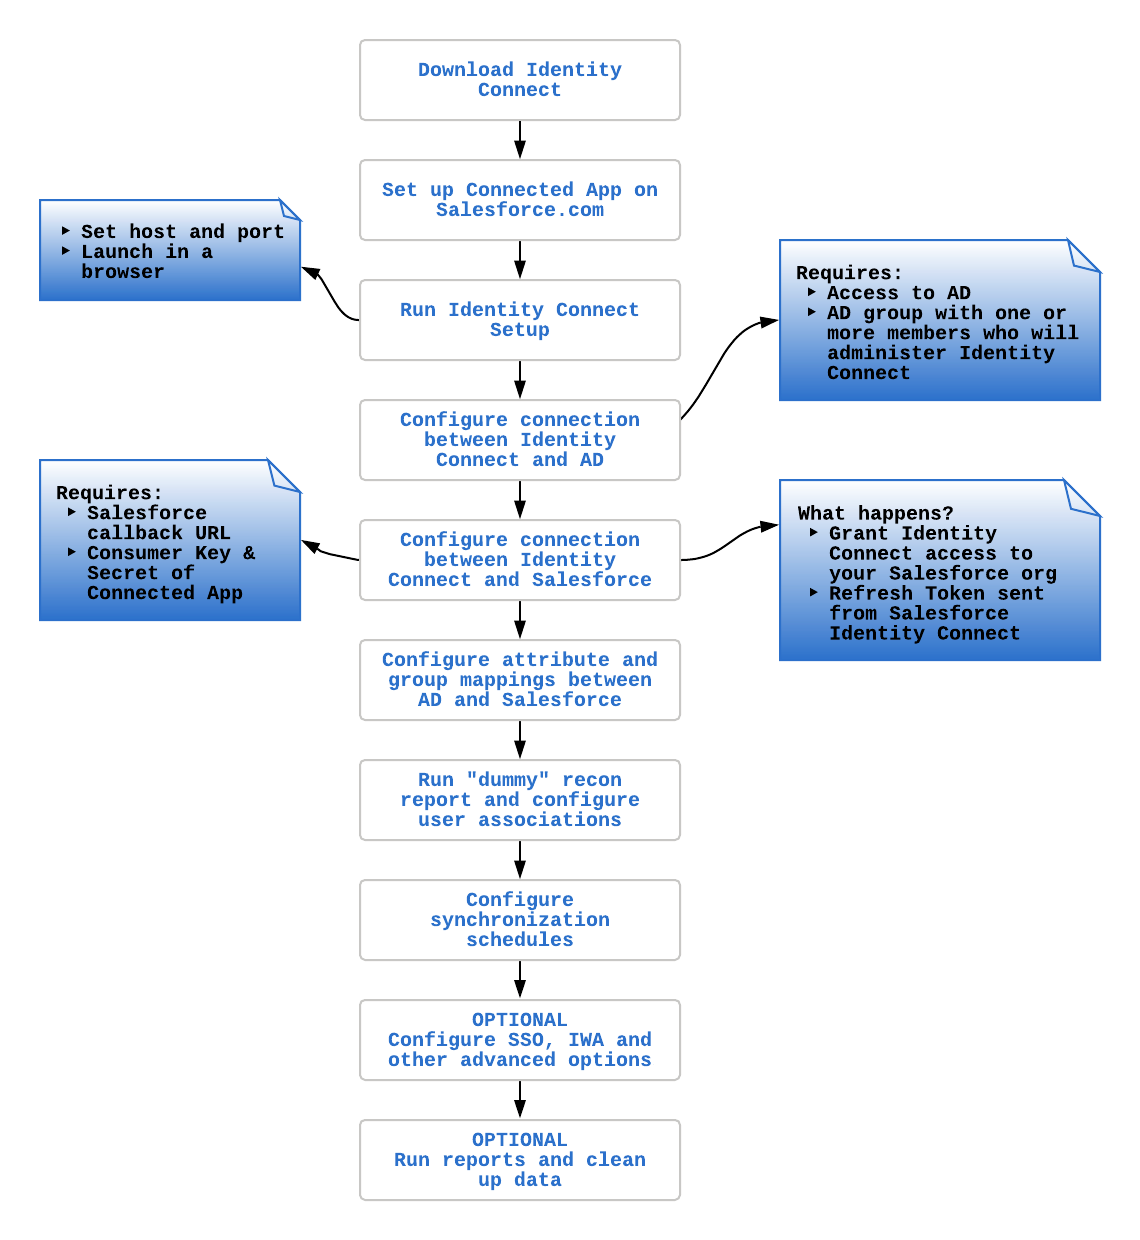
1.2. Outline of the Setup Process
Setting up Identity Connect involves the configuration of multiple systems. The following flowchart provides a high-level overview of what happens between these systems during the setup process. Each step is discussed in more detail in the rest of this guide.
Chapter 2. Getting Identity Connect Up and Running
This chapter describes how to complete the initial configuration of an Identity Connect instance, and how to upgrade an existing instance to the latest Identity Connect version.
2.1. Installation Prerequisites
Before you start an Identity Connect installation, make sure that you have the following information readily available:
- Identity Connect Configuration
The HTTPS port on which Identity Connect should listen. The default port is
8443.The connection details to the PostgreSQL repository that will store Identity Connect data.
Identity Connect installs an embedded PostgreSQL repository on the localhost during the setup. You can use this embedded repository, or an existing external PostgreSQL instance.
If you plan to use an external PostgreSQL instance, first import the Identity Connect schema into your PostgreSQL repository, as described in "Configuring Identity Connect With an External PostgreSQL Repository". You will need to specify the hostname, port number, and repository username and password during the setup.
The URL at which your end users will access Identity Connect in production.
- Active Directory Configuration
When you first set up Identity Connect, you will need the following information about your Active Directory server:
The fully qualified host name, or IP address, of the machine that hosts the Active Directory instance.
The port number on which the Active Directory server listens for LDAP connections. The default LDAP port is
389. The default LDAPS port is636. If you are connecting to a Global Catalog, the default port is3268, or3269if you are using SSL.Whether connections to your Active Directory server are over SSL.
The bind DN of a user that will be used by Identity Connect to access Active Directory.
The bind password for the preceding user.
The Active Directory attribute that is used for login association. This attribute is
sAMAccountNameby default.The base contexts (path to one or more base DNs) that will be synchronized during the data synchronization phase. The user and group entries that will be managed through Identity Connect must be included in these base contexts.
Any LDAP filters that will be used to determine which Active Directory users will be mapped to Salesforce accounts, and which Active Directory groups will be mapped to Salesforce profiles.
This should include a list of:
Which Active Directory groups correlate with which Salesforce Profiles
Which Active Directory groups correlate with which Salesforce Roles
Which Active Directory groups correlate with which Salesforce Permission Sets
Which Active Directory groups correlate with which Salesforce Groups
The Active Directory group that contains the members who will be Identity Connect administrators.
The list of Active Directory attributes that you want to manage through Identity Connect.
- Salesforce Configuration
Connected App
Identity Connect requires a Connected App with OAuth enabled to connect to salesforce.com using the OAuth 2.0 protocol. To set up a Connected App, see the Connected Apps Overview and the supporting API documentation.
When you set up your Connected App:
Select the Enable OAuth Settings checkbox
Specify the Callback URL
This is the URL to which the requested access token will be sent. The default callback URL is
https://hostname.domain:port/#/salesforceReturn, wherehostname.domain:portrefers to the host and port of your Identity Connect installation.The callback URL is specified by the Identity Connect setup wizard on the Configure Salesforce Connected App page.
Include the following scopes, even if you plan to use the "Full access (full)" scope:
Access and manage your data (api)
Access your basic information (id, profile, email, address, phone)
Perform requests on your behalf at any time (refresh_token, offline_access)
You can leave the remaining fields with their default settings
Make a note of the Consumer Key and Consumer Secret. You need these details to configure Identity Connect.
Salesforce subdomain
Identity Connect single sign-on (SSO) requires a subdomain in your Salesforce org. If your org does not already have a subdomain, add one with the Salesforce "My Domain" feature. For more information, see the My Domain documentation.
Managed Package
Identity Connect requires the configuration of specific Apex triggers and custom Salesforce User object Fields. These are configured when you install the Identity Connect managed package. For information on downloading and installing this package, contact your Salesforce implementation partner.
Important
The user that installs Identity Connect must have the Identity Connect 3 Integration permission set assigned to them after the managed package has been installed. The administrator responsible for creating the connected app in Salesforce must manually add the Identity Connect 3 Integration permission set to this user.
2.2. Downloading, Installing, and Starting Identity Connect
Download Identity Connect from the URL provided to you by your Salesforce representative.
If you have the "ADBlock" extension enabled for your browser, disable it. The "ADBlock" extension filters all pages that include "AD" which interferes with several Active Directory pages.
This Guide assumes that Identity Connect is accessed at the URL connect.example.com. Replace connect.example.com in all URLs pertaining to the UI with the FQDN of the host on which you install Identity Connect. Follow these sections to install Identity Connect, depending on your operating system and on the required installation type:
2.2.1. Installing Identity Connect on UNIX-Like Systems
Unpack the contents of the .zip file into the install location.
cd /path/to
unzip ~/Downloads/salesforce_identity_connect_linux.zip
Run the setup script.
cd /path/to/salesforceIdConnect
./setup.sh
Enter the SSL port to listen on for Identity Connect. The default port is
8443.Select whether you will use the embedded PostgreSQL database as the Identity Connect data store.
If you select Yes here, select the port that the embedded PostgreSQL database will use. The default is
5432.Important
The embedded PostgreSQL database assumes a connection from
localhost. This is set in the/path/to/salesforceIdConnect/resolver/boot.propertiesfile with the propertyopenidm.host=localhost. Do not change this value if you are using the embedded repository.To change the default username and password of the database user, see "Protecting the Repository".
If you are using an external PostgreSQL database as the data store, enter the host and port on which PostgreSQL is running, and the username and password that Identity Connect will use to connect to the PostgreSQL database.
Note
The setup script does not verify that it can connect to this PostgreSQL instance. If you are unable to start the configuration wizard after you have run this setup, check the logs for possible failure to connect to the repository.
For more information about running Identity Connect with an external PostgreSQL repository, see "Configuring Identity Connect With an External PostgreSQL Repository".
Enter
yto have the Identity Connect server start immediately after setup, and run in the background.When Identity Connect runs in the background, any log messages are output to the file
/path/to/salesforceIdConnect/logs/console.out.If you select not to have the server start immediately, you must start Identity Connect manually, using the
startup.shscript. In this case, log messages are output to the terminal in which you started Identity Connect. To redirect log messages toconsole.out, follow the instructions in "Stopping and Restarting Identity Connect".Note
Connections over HTTP are disabled by default. On setup, you will see the following warning:
WARNING: HTTP is not enabled in Pax Web configuration - removing
       connector: 0.0.0.0:8080@7c5879a3{HTTP/1.1,[http/1.1]}{0.0.0.0:8080}
You can ignore this warning.
Navigate to
https://hostname.domain:8443, specifying an alternate port if you changed the port during setup.You will receive a warning about the website's security certificate if you have not replaced the default certificate with a trusted certificate. For more information, see "Managing SSL Certificates".
The Identity Connect setup wizard walks you through the remainder of the setup. The setup process is fairly self-explanatory. If you need help with the configuration options, see "Configuring Connections Between Identity Connect, Active Directory, and Salesforce".
2.2.1.1. To Run Identity Connect as a UNIX Service
Identity Connect provides a script that can generate SysV or Systemd service initialization scripts. You can start the script as the root user, or configure it to start during the boot process.
When Identity Connect runs as a service, logs are written to the installation directory.
Run the script to review the script options:
cd /path/to/salesforceIdConnect/bin ./create-openidm-rc.shUsage: ./create-openidm-rc.sh --[systemd|chkconfig|lsb] Outputs Identity Connect init file to stdout for the given system --systemd Generate Systemd init script. This is preferred for all modern distros. --chkconfig Generate SysV init script with chkconfig headers (RedHat/CentOS) --lsb Generate SysV init script with LSB headers (Debian/Ubuntu) ...
If you are running standard versions of Red Hat Enterprise Linux (CentOS Linux) version 7.x, or Ubuntu 16.04 and later, set up a
systemdservice script as described in "To Generate a Systemd Service Script".If you are running standard versions of Red Hat Enterprise Linux (CentOS Linux) version 6.x, set up a
SysVservice script, as described in "To Set up a SysV Service For a Red Hat System".
Run the
setup.shscript to set up Identity Connect before you start the service.From the
/path/to/salesforceIdConnect/bindirectory, run the following command:./create-openidm-rc.sh --systemd > idconnect.service./create-openidm-rc.sh --systemd systemctl enable idconnect systemctl start idconnectAs a user with root privileges, copy the
idconnectscript to the/etc/systemd/systemfolder:sudo cp idconnect.service /etc/systemd/system/You can modify the
idconnect.servicescript to suit your requirements. The following change would run Identity Connect with a startup script in the/home/idconnect/projectdirectory:[Unit] Description=Salesforce Identity Connect After=network.target auditd.target [Service] Type=simple SuccessExitStatus=143 Environment=JAVA_HOME=/usr User=testuser ExecStart=/root/openidm/startup.sh -p /home/idconnect/project ExecStop=/root/openidm/shutdown.sh [Install] WantedBy=multi-user.target
Run the following commands to reload the configuration and start the Identity Connect service script:
systemctl daemon-reload
systemctl start idconnect
To stop the service, run the following command:
systemctl stop idconnect
The SysV service script controls run levels through the chkconfig command. To set up this script:
From the
/path/to/salesforceIdConnect/bindirectory, run the following command:./create-openidm-rc.sh --chkconfigRun the
setup.shscript to set up Identity Connect before you start the service.Start the service on a Linux distribution that uses SysV init scripts, with the following commands:
./create-openidm-rc.sh --chkconfig  > idconnect
sudo cp idconnect /etc/init.d/
sudo chmod u+x /etc/init.d/idconnect
sudo chkconfig --add idconnect
sudo chkconfig idconnect on
sudo service idconnect start
To stop the service, run the following command:
sudo service idconnect stop
2.2.2. Installing Identity Connect on Windows Systems
Important
Identity Connect must run using an unprivileged Local User or Domain User account. Do not attempt to run Identity Connect as an Administrator account.
Do not install Identity Connect on a Windows Domain Controller.
If you are running Windows Server 2012 R2 or 2016, Identity Connect requires the Microsoft Visual C++ Redistributable for Visual Studio 2013. Download and install this redistributable before you start.
Log in to the host on which Identity Connect is to be installed as a Local User or Domain User. Do not use an Administrator account.
Extract the
salesforceIdConnect-IC-7.1.6.zipfile to the required location on the file system.In a Windows Command or PowerShell window, change to the
install-location\salesforceIdConnectdirectory.cd install-location\salesforceIdConnectRun the setup.bat script.
setup.batEnter the SSL port to listen on for Identity Connect. The default port is
8443.If you are running Windows Firewall, make sure that inbound connections to this port are not blocked.
Select whether you will use the embedded PostgreSQL database as the Identity Connect data store.
If you select Yes here, select the port that the embedded PostgreSQL database will use. The default is
5432.If you want to use an external PostgreSQL instance, select the instance host and port, and the username and password that Identity Connect will use to connect to the instance.
Note that the setup script does not verify that it can connect to this PostgreSQL instance. If you are unable to access the configuration wizard after you have run this setup, check the logs for possible failure to connect to the repository.
For more information about running Identity Connect with an external PostgreSQL repository, see "Configuring Identity Connect With an External PostgreSQL Repository".
Enter
yto have the Identity Connect server start immediately after setup, and run in the background.When Identity Connect runs in the background, any log messages are output to the file
/path/to/salesforceIdConnect/logs/console.out.If you select not to have the server start immediately, you must start Identity Connect manually, using the
startup.batscript. In this case, log messages are output to the terminal in which you started Identity Connect. To redirect log messages toconsole.out, follow the instructions in "Stopping and Restarting Identity Connect".Navigate to
https://hostname.domain:8443, specifying an alternate port if you changed the port during setup.You will receive a warning about the website's security certificate if you have not replaced the default certificate with a trusted certificate. For more information, see "Managing SSL Certificates".
The Identity Connect setup wizard walks you through the remainder of the setup. The setup process is fairly self-explanatory. If you need help with the configuration options, see "Configuring Connections Between Identity Connect, Active Directory, and Salesforce".
On a 64-bit Windows server, you must have a 64-bit Java version installed to start the service. If a 32-bit Java version is installed, you will be able to install Identity Connect as a service, but starting the service will fail.
Before you launch the service.bat file, which registers the IdentityConnect service within the Windows registry, make sure that your JAVA_HOME environment variable points to a valid 64-bit version of the JRE or JDK. If you have already installed the service with the JAVA_HOME environment variable pointing to a 32-bit JRE or JDK, delete the service first, by running sc delete IdentityConnect from a Windows command prompt, then re-install the service.
Log in to the host on which Identity Connect is to be installed as either a Local Administrator or a Domain Administrator.
Create a Local User or Domain User with which to run the Identity Connect instance.
Extract the
salesforceIdConnect-IC-7.1.6.zipfile to the required location on the file system.Grant Full control of the
salesforceIdConnectinstallation directory to the Local User that you created previously.In a Windows Command or PowerShell window, change to the
install-location\salesforceIdConnectdirectory.cd install-location\salesforceIdConnectRun the setup.bat script, following the prompts as described in "To Run Identity Connect on Windows Interactively".
When you are prompted to
Start the Identity Connect server, answerN.Navigate to the
salesforceIdConnect\bindirectory and run theservice.batscript to create the Identity Connect Service. For example:service.bat /install identityConnectIdentity Connect Service successfully installed as "IdentityConnect" serviceRun the
services.msccommand to open the Windows Services Manager.Locate and double-click the
identityConnectservice.(Optional) Select the required Startup type.
Select the Log On tab and select This Account.
Enter the Local User account and Password that you created in Step 2 and select Apply.
Select Ok on the Notification that indicates that the User was granted the Log On As A Service right, then select Ok to close the Service Properties dialog.
Use the Windows Services Manager to start the configured Identity Connect service.
Navigate to
https://hostname.domain:8443, specifying an alternate port if you changed the port during setup.You will receive a warning about the website's security certificate if you have not replaced the default certificate with a trusted certificate. For more information, see "Managing SSL Certificates".
The Identity Connect setup wizard walks you through the remainder of the setup. The setup process is fairly self-explanatory. If you need help with the configuration options, see "Configuring Connections Between Identity Connect, Active Directory, and Salesforce".
2.3. Stopping and Restarting Identity Connect
Follow these procedures to check whether an instance of Identity Connect is running, stop, and restart the server:
To check whether Identity Connect is running on UNIX-like systems, run the following command on the system on which you started Identity Connect:
ps -ef | grep openidmIf an instance of Identity Connect is running, you should see output similar to the following:
  501  3994 98786   0  9:42AM ttys001    0:39.45 /usr/bin/java
 -Djava.util.logging.config.file=/path/to/salesforceIdConnect/conf/logging.properties
 -XX:+IgnoreUnrecognizedVMOptions --add-opens=java.base/jdk.internal.loader=ALL-UNNAMED
 -Xmx1024m -Xms1024m -Djava.endorsed.dirs= -classpath ...
 -Dopenidm.system.server.root=/path/to/salesforceIdConnect -Djava.awt.headless=true
 -Djava.security.properties=/path/to/salesforceIdConnect/conf/java.security
 org.forgerock.openidm.launcher.Main -c /path/to/salesforceIdConnect/bin/launcher.json
 -p /path/to/salesforceIdConnect
 501  4015  3994   0  9:42AM ttys001    0:00.06 /path/to/salesforceIdConnect/db/openidm/postgres/pgsql-10.5-1/pgsql/bin/postgres
 -p 5432 -h localhost -D /path/to/salesforceIdConnect/db/openidm/data
To check whether Identity Connect is running on Windows systems, check the running applications in the Windows Task Manager. Identity Connect runs under the application "OpenIDM".
To stop Identity Connect on UNIX-like systems, run the shutdown script, located in the install directory, or type shutdown in the Felix console that opened when you started Identity Connect.
cd /path/to/salesforceIdConnect ./shutdown.sh./shutdown.sh Stopping OpenIDM (91957)To stop Identity Connect on Windows systems, stop the OpenIDM application in the Windows Task Manager, or type
shutdownin the Felix console that opened when you started Identity Connect.
To restart Identity Connect on UNIX-like systems, run the startup script, located in the install directory. Use the
nohupcommand to keep Identity Connect running after you log out, and redirect the console output toconsole.out, as follows.cd /path/to/salesforceIdConnect nohup ./startup.sh > logs/console.out 2>&1&[1] 32548To restart Identity Connect on Windows systems, run the
startup.batscript in the install directory.
2.4. Upgrade From Identity Connect 3.0.x to Identity Connect 7.1
Before you start, note the following:
This process describes how to upgrade from Identity Connect 3.0.x to Identity Connect 7.1. If you are running a version of Identity Connect prior to version 3.0.x, first migrate your data and configuration to version 3.0.x, as described in the documentation for version 3.0.x.
In a clustered environment, you only need to upgrade one of the nodes in the cluster. When one node has been upgraded, set up additional nodes to point to the shared PostgreSQL repository, as described in "Deploying Identity Connect for High Availability".
In this procedure, the version 3.0.x installation is referenced at /path/to/salesforceIdConnect-3 and the version 7.1 installation at /path/to/salesforceIdConnect-7. Adjust the commands to suit the installation paths in your environment.
Download and unzip Identity Connect 7.1.
Stop the Identity Connect 3 instance:
-> shutdownpath/to/salesforceIdConnect-3/shutdown.shNote
On Windows systems, stop the OpenIDM application in the Windows Task Manager, stop the Windows service, or type
shutdownin the Felix console that opened when you started Identity Connect.Migrate your configuration.
Copy the following configuration files from the
confdirectory of the extracted Identity Connect 7.1 installation to theconfdirectory of your existing Identity Connect 3 installation:managed.jsonrepo.jdbc.jsoninternal.jsonrepo.init.json
For example:
cp /path/to/salesforceIdConnect-7/conf/managed.json /path/to/salesforceIdConnect-3/conf/Replace the Identity Connect 7.1
confdirectory with the existing Identity Connect 3confdirectory:cp -r /path/to/salesforceIdConnect-3/conf /path/to/salesforceIdConnect-7/
You now have your existing configuration on the new instance, with the updated versions of the four required configuration files.
In the Identity Connect 7.1
confdirectory, update all the connector configuration (provisioner.openicf-*.json) files to use the updated connector version ranges. The correct version range for this release is[1.5.19.0,1.6.0.0).For example, in
provisioner.openicf-AD.json, replace"bundleVersion" : "[1.4.0.0,1.5.0.0)"with"bundleVersion" : "[1.5.19.0,1.6.0.0)".In the Identity Connect 7.1
confdirectory, remove theendpoint-reconResults.jsonfile:rm /path/to/salesforceIdConnect-7/conf/endpoint-reconResults.jsonCopy the security files from your Identity Connect 3 installation to your Identity Connect 7.1 installation:
cp -r /path/to/salesforceIdConnect-3/security /path/to/salesforceIdConnect-7/Copy the startup configuration from your Identity Connect 3 installation to your Identity Connect 7.1 installation:
cp -r /path/to/salesforceIdConnect-3/resolver /path/to/salesforceIdConnect-7/Copy the data from your Identity Connect 3 installation to your Identity Connect 7.1 installation:
cp -r /path/to/salesforceIdConnect-3/db /path/to/salesforceIdConnect-7/Update your PostgreSQL repository.
These steps assume an embedded PostgreSQL repository. If you are using an external PostgreSQL repository, adjust the steps to match your environment.
Embedded repository only: If your PostgreSQL server is not running, start it with the path to the Identity Connect data files:
cd /path/to/salesforceIdConnect-7/db/openidm/postgres/pgsql-10.5-1/pgsql/bin
./pg_ctl start -D /path/to/salesforceIdConnect-7/db/openidm/data
Connect to the PostgreSQL database as the
openidmuser:psql --username openidm --password openidm --port 5432Run the following commands to update the database schema:
DELETE FROM openidm.schedulerobjects;
DELETE FROM openidm.configobjects;
ALTER TABLE locks ALTER COLUMN objectid TYPE varchar(255);
DELETE FROM openidm.relationships WHERE firstResourceCollection = 'internal/role' AND firstResourceId = 'openidm-authorized' OR secondResourceCollection = 'internal/role' AND secondResourceId = 'openidm-authorized';
Run the following scripts to update the database:
\i \path\to\salesforceIdConnect-7\script\updates\00-relationshipresources.sql
\i \path\to\salesforceIdConnect-7\script\updates\01-syncqueue.sql
\i \path\to\salesforceIdConnect-7\script\updates\02-importobjects.sql
psql -U postgres openidm < /path/to/salesforceIdConnect-7/script/updates/00-relationshipresources.sql psql -U postgres openidm < /path/to/salesforceIdConnect-7/script/updates/01-syncqueue.sql psql -U postgres openidm < /path/to/salesforceIdConnect-7/script/updates/02-importobjects.sqlEmbedded repository only: Stop the PostgreSQL server:
cd /path/to/salesforceIdConnect-7/db/openidm/postgres/pgsql-10.5-1/pgsql/bin
./pg_ctl stop -D /path/to/salesforceIdConnect-7/db/openidm/data
Start up Identity Connect 7.1:
\path\to\salesforceIdConnect-7\startup.bat/path/to/salesforceIdConnect-7/startup.shAlternatively, start Identity Connect as a Windows service.
2.5. Using Identity Connect With the Salesforce1 Mobile App
There are certain specific requirements regarding the use of Identity Connect with the Salesforce1 Mobile App. This section lists these requirements.
- Replace the Default SSL Certificate on the Identity Connect Host
As an Identity Connect administrator, you must deploy an SSL certificate on your Identity Connect host that is trusted by the mobile devices of your users.
Mobile applications will not work with the default self-signed certificate that is provided with Identity Connect. For more information, see "Managing SSL Certificates".
- Provide the Domain Name to the App
Your Salesforce1 Mobile App users must specify the correct domain for Identity Connect within their App.
Click on the gear icon at the top right of the App, and click the plus icon (
+) to specify the connection details. Enter the host that corresponds to your Identity Connect instance, for example,https://connect.example.com:8443. This must be the same URL that you specified during the Identity Connect setup (see "Configuring Connections Between Identity Connect, Active Directory, and Salesforce".
Note
If you have configured IWA, but a user's mobile device does not support Kerberos, the Identity Connect login page on the Salesforce1 App will fall back to their form-based Active Directory login.
Chapter 3. Upgrading Identity Connect
This chapter describes how to upgrade an existing instance to the latest Identity Connect version.
3.1. Upgrade From Identity Connect 7.1 to Identity Connect 7.1.6
Note
In a clustered environment, you only need to upgrade one of the nodes in the cluster. When one node has been upgraded, set up additional nodes to point to the shared PostgreSQL repository, as described in "Deploying Identity Connect for High Availability".
In this procedure, the version 7.1 installation is referenced at /path/to/salesforceIdConnect-71 and the version 7.1.6 installation at /path/to/salesforceIdConnect-716. Adjust the commands to suit the installation paths in your environment.
Download and unzip Identity Connect 7.1.6.
Stop the Identity Connect 7.1 instance:
-> shutdownpath/to/salesforceIdConnect-71/shutdown.shNote
On Windows systems, stop the OpenIDM application in the Windows Task Manager, stop the Windows service, or type
shutdownin the Felix console that opened when you started Identity Connect.Migrate your configuration.
Replace the 7.1.6
confdirectory with the existing 7.1confdirectory:cp -r /path/to/salesforceIdConnect-71/conf /path/to/salesforceIdConnect-716/Copy the security files from your Identity Connect 7.1 installation to your Identity Connect 7.1.6 installation:
cp -r /path/to/salesforceIdConnect-71/security /path/to/salesforceIdConnect-716/Copy the startup configuration from your Identity Connect 7.1 installation to your Identity Connect 7.1.6 installation:
cp -r /path/to/salesforceIdConnect-71/resolver /path/to/salesforceIdConnect-716/Copy the data from your Identity Connect 7.1 installation to your Identity Connect 7.1.6 installation:
cp -r /path/to/salesforceIdConnect-71/db /path/to/salesforceIdConnect-716/Update the
bundleVersionfor all Salesforce connector configuration files (provisioner.openicf-orgID.json) to one of the following:To use a version range for this release,
[1.5.19.0,1.6.0.0).To use the specific version for this release,
1.5.20.19.
Start up Identity Connect 7.1.6:
\path\to\salesforceIdConnect-716\startup.bat/path/to/salesforceIdConnect-716/startup.shAlternatively, start Identity Connect as a Windows service.
3.2. Upgrade From Identity Connect 3.0.x to Identity Connect 7.1 or 7.1.6
This process describes how to upgrade from Identity Connect 3.0.x. If you are running a version of Identity Connect prior to version 3.0.x, follow the migration procedure.
Note
In a clustered environment, you only need to upgrade one of the nodes in the cluster. When one node has been upgraded, set up additional nodes to point to the shared PostgreSQL repository, as described in "Deploying Identity Connect for High Availability".
In this procedure, the version 3.0.x installation is referenced at /path/to/salesforceIdConnect-3 and the version 7.1 installation at /path/to/salesforceIdConnect-7. Adjust the commands to suit the installation paths in your environment.
Download and unzip Identity Connect 7.1.
Stop the Identity Connect 3 instance:
-> shutdownpath/to/salesforceIdConnect-3/shutdown.shNote
On Windows systems, stop the OpenIDM application in the Windows Task Manager, stop the Windows service, or type
shutdownin the Felix console that opened when you started Identity Connect.Migrate your configuration.
Copy the following configuration files from the
confdirectory of the extracted Identity Connect 7.1 installation to theconfdirectory of your existing Identity Connect 3 installation:authentication.jsonmanaged.jsonrepo.jdbc.jsoninternal.jsonrepo.init.jsonjetty.xml
For example:
cp /path/to/salesforceIdConnect-7/conf/managed.json /path/to/salesforceIdConnect-3/conf/Replace the Identity Connect 7.1
confdirectory with the existing Identity Connect 3confdirectory:cp -r /path/to/salesforceIdConnect-3/conf/path/to/salesforceIdConnect-7/
You now have your existing configuration on the new instance, with new versions of the required configuration files.
In the Identity Connect 7.1
confdirectory:Update all the connector configuration (
provisioner.openicf-*.json) files to use the new connector version ranges. The correct version range for this release is[1.5.19.0,1.6.0.0).For example, in
provisioner.openicf-AD.json, replace"bundleVersion" : "[1.4.0.0,1.5.0.0)"with"bundleVersion" : "[1.5.19.0,1.6.0.0)".Remove the
endpoint-reconResults.jsonfile:rm /path/to/salesforceIdConnect-7/conf/endpoint-reconResults.jsonChange the
sync.jsonfile as follows:In the mappings for Salesforce Groups and Permission Sets only (
systemSalesforceGroup_managedAssignment_orgidandsystemSalesforcePermissionSet_managedAssignment_orgid), change the sourceassignmentOperationandunassignmentOperationvalues from:"assignmentOperation": "addToPickList", "unassignmentOperation": "removeFromTarget"to:
"assignmentOperation": "noOp",
       "unassignmentOperation": "noOp"
When you have made this change, click to run a reconciliation for each of these objects—Permission Sets and Groups— to ensure that the new assignments are propagated.
Copy the security files from your Identity Connect 3 installation to your Identity Connect 7.1 installation:
cp -r /path/to/salesforceIdConnect-3/security /path/to/salesforceIdConnect-7/Copy the startup configuration from your Identity Connect 3 installation to your Identity Connect 7.1 installation:
cp -r /path/to/salesforceIdConnect-3/resolver /path/to/salesforceIdConnect-7/Copy the data from your Identity Connect 3 installation to your Identity Connect 7.1 installation:
cp -r /path/to/salesforceIdConnect-3/db /path/to/salesforceIdConnect-7/Update your PostgreSQL repository.
These steps assume an embedded PostgreSQL repository. If you are using an external PostgreSQL repository, adjust the steps to match your environment.
Embedded repository only: If your PostgreSQL server is not running, start it with the path to the Identity Connect data files:
cd /path/to/salesforceIdConnect-7/db/openidm/postgres/pgsql-10.5-1/pgsql/bin
./pg_ctl start -D /path/to/salesforceIdConnect-7/db/openidm/data
Connect to the PostgreSQL database as the
openidmuser:psql --username openidm --password --port 5432Password:openidmRun the following commands to update the database schema:
DELETE FROM openidm.schedulerobjects;
DELETE FROM openidm.configobjects;
ALTER TABLE locks ALTER COLUMN objectid TYPE varchar(255);
DELETE FROM openidm.relationships WHERE firstResourceCollection = 'internal/role' AND firstResourceId = 'openidm-authorized' OR secondResourceCollection = 'internal/role' AND secondResourceId = 'openidm-authorized';
Run the following scripts to update the database:
\path\to\salesforceIdConnect-7\db\openidm\postgres\pgsql-10.5-1\pgsql\bin\psql -U openidm -W -p 5432 < \path\to\salesforceIdConnect-7\script\updates\00-relationshipresources.sql
\path\to\salesforceIdConnect-7\db\openidm\postgres\pgsql-10.5-1\pgsql\bin\psql -U openidm -W -p 5432 < \path\to\salesforceIdConnect-7\script\updates\01-syncqueue.sql
\path\to\salesforceIdConnect-7\db\openidm\postgres\pgsql-10.5-1\pgsql\bin\psql -U openidm -W -p 5432 < \path\to\salesforceIdConnect-7\script\updates\02-importobjects.sql
psql -U openidm -W -p 5432 < /path/to/salesforceIdConnect-7/script/updates/00-relationshipresources.sql psql -U openidm -W -p 5432 < /path/to/salesforceIdConnect-7/script/updates/01-syncqueue.sql psql -U openidm -W -p 5432 < /path/to/salesforceIdConnect-7/script/updates/02-importobjects.sqlEmbedded repository only: Stop the PostgreSQL server:
cd /path/to/salesforceIdConnect-7/db/openidm/postgres/pgsql-10.5-1/pgsql/bin
./pg_ctl stop -D /path/to/salesforceIdConnect-7/db/openidm/data
Start up Identity Connect 7.1:
\path\to\salesforceIdConnect-7\startup.bat/path/to/salesforceIdConnect-7/startup.shAlternatively, start Identity Connect as a Windows service.
3.3. Migrate From Identity Connect 2.1 to Identity Connect 7.1 or 7.1.6
If you are still running Identity Connect 2.1, use the migration mechanism to migrate configuration and data from your version 2.1 deployment.
Note
The migration mechanism migrates only the connection configuration and data. It does not migrate customizations such as themes, session configuration, and SSL configuration.
Before you migrate, note the following requirements:
- Migration From Version 2.1 Only
You can only use this migration process from Identity Connect version 2.1. If you are running an older version of Identity Connect, first upgrade to version 2.1, as described in the upgrade documentation for that version.
If you are running Identity Connect 7.1, see "Upgrade From Identity Connect 7.1 to Identity Connect 7.1.6". If you are running Identity Connect 3.0.x, see "Upgrade From Identity Connect 3.0.x to Identity Connect 7.1 or 7.1.6".
- Credentials to Connect to Active Directory
The migration requires the credentials to connect to your Active Directory instance and the IP address of your Identity Connect 2.1 instance. Make sure that you have these credentials before you start the migration.
- Update your Connected App
Before you migrate from Identity Connect 2.1, you must update the Connected App within your Salesforce Organization to include the Callback URL associated with the new Identity Connect 7.1 instance:
In your Salesforce Org, navigate to the App Manager.
Edit the Identity Connect 2.1 Connected App.
Add a new entry (on a new line) to the Callback Url dialog for the Identity Connect 7.1 instance.
For example,
https://localhost:9443/#/salesforceReturn/. The URL must match the URL that is used to access the Identity Connect 7.1 instance.
- Migrating in a Clustered Environment
In a clustered environment, you only need to migrate one of the nodes in the cluster. When one node has been migrated, you can set up additional nodes to point to the shared PostgreSQL repository, as described in "Deploying Identity Connect for High Availability".
In this procedure, the 2.1 installation is referenced at /path/to/salesforceIdConnect-21 and the version 7.1 installation at /path/to/salesforceIdConnect-7. The procedure assumes that your existing (2.1) Identity Connect is up and running:
Download and unzip Identity Connect 7.1.
Copy the keystore and truststore from your Identity Connect 2.1 instance to your Identity Connect 7.1 installation.
For example:
cd /path/to/salesforceIdConnect-7/cp /path/to/salesforceIdConnect-21/security/keystore.jceks security/cp /path/to/salesforceIdConnect-21/security/truststore security/Import Identity Connect's generated certificate from the keystore into the truststore:
cd /path/to/salesforceIdConnect-7/securitykeytool \ -importkeystore \ -srcalias openidm-localhost \ -srckeystore keystore.jceks \ -destkeystore truststore \ -srcstoretype jceksEnter destination keystore password: changeit Enter source keystore password: changeit Existing entry alias openidm-localhost exists, overwrite? [no]:yesEnter yes at the prompt to overwrite the existing certificate in the truststore.
Change to the Identity Connect 7.1 installation directory and run the setup:
cd /path/to/salesforceIdConnect-7./setup.sh*** Identity Connect basic setup *** SSL port to listen on for Identity Connect (default 8443): 9443 Use embedded Postgres as data source for Identity Connect y/n (default "y")? Postgres port to connect to (default 5432): Setup complete. Start the Identity Connect server y/n (default "y")? Starting Identity Connect. Point a browser at https://hostname.domain.com:9443/Important
If you are installing Identity Connect 7.1 on the same host as the previous version, be sure to specify a different port to the one that you used for Identity Connect 2.1.
Migrate the connection configuration.
This step reads the connection details from your Identity Connect 2.1 instance, and creates the same connection configuration on the new instance.
Run the
configureaction on themigrationendpoint, specifying the hostname and credentials for your instance. You can run this action as useranonymous:curl \ --insecure \ --header "X-OpenIDM-Username: anonymous" \ --header "X-OpenIDM-Password: anonymous" \ --header "Content-Type: application/json" \ --request POST \ --data '{ "instanceUrl" : "https://localhost:8443/openidm/", "userName" : "bjensen", "password" : "Passw0rd", "authType" : "idm_headers" }' \ "https://localhost:9443/openidm/endpoint/migration?_action=configure"You can now connect to the new Identity Connect instance using the authentication details of the Active Directory administrative user that you used to configure the old Identity Connect instance.
Note
The
--insecureoption disables certificate validation. In a production environment, use the--cacertoption to validate your CA certificate.Migrate the data.
To migrate your data, you must authenticate as the administrative user from your Identity Connect 2.1 instance:
curl \
--insecure \
--header "X-OpenIDM-Username: bjensen" \
--header "X-OpenIDM-Password: Passw0rd" \
--header "Content-Type: application/json" \
--request POST \
"https://localhost:9443/openidm/endpoint/migration?_action=migrate"
To check the status of a migration in progress, run the following command either as the anonymous user, or an administrative user:
curl \ --insecure \ --header "X-OpenIDM-Username: bjensen" \ --header "X-OpenIDM-Password: Passw0rd" \ --header "Content-Type: application/json" \ --request POST \ "https://localhost:9443/openidm/endpoint/migration?_action=status"{ "CONFIGURE": { "status": "complete", "description": "Completed successfully", "result": "success" }, "MIGRATE": { "status": "complete", "description": "Completed successfully", "result": [ { "orgId": "00Dq0000000DUfX", "name": "Identity Connect" } ] } }If you are running Identity Connect as a Windows service, uninstall and reinstall the
IdentityConnectservice to apply the appropriate changes to the JVM startup parameters. To uninstall and reinstall the service, run these commands after the upgrade:cd C:\install-location\salesforceIdConnect\binservice.bat /uninstall identityConnectService "IdentityConnect" removed successfullyservice.bat /install identityConnectIdentity Connect Service successfully installed as "IdentityConnect" serviceIf you are using SAML SSO, log into the Identity Connect 7.1 Admin Console and create a new SAML SSO configuration:
Navigate to the SSO tab.
Click Generate SSO Config.
Chapter 4. Configuring Connections Between Identity Connect, Active Directory, and Salesforce
The Identity Connect setup wizard walks you through the configuration of connections between Identity Connect and Active Directory, and between Identity Connect and Salesforce. This chapter provides additional information on the connection configuration. The chapter assumes that you have installed and started Identity Connect and launched the setup wizard by pointing your browser to https://hostname.domain:8443.
4.1. Confirming the Production URL
Before you can start configuring Identity Connect, you must confirm the Identity Connect URL. The setup wizard displays the same URL that you are currently using to access Identity Connect. This must be the same URL at which your end users will access Identity Connect. If it is not the same URL, your SAML configuration will ultimately fail.
For example, if you are configuring Identity Connect using the URL https://localhost.com:8443, but your users will ultimately access Identity Connect at https://connect.example.com:8443, the URL that is configured with SAML will not match the URL your users are using and they will be unable to log in with SAML.
If you realize at this point that this is not the correct production URL, cancel the setup, and launch it again using the correct URL.
4.2. Connecting to Active Directory
This screen configures the connection to your Active Directory instance:
Host name or IP. Enter the fully qualified host name, or IP address, of the machine that hosts the Active Directory instance.
Port. Enter the port number on which the Active Directory server listens for LDAP connections. The default LDAP port is 389. The default LDAPS port is 636. If you are connecting to a Global Catalog, the default port is 3268, or 3269 if you are using SSL.
Make sure that remote LDAP or LDAPS access to the Active Directory server is allowed through the Firewall.
Check Use SSL to connect to the LDAPS port.
If you use SSL and the root CA for your Active Directory certificate is not in the trust store, provide the public SSL certificate for your Active Directory server as follows:
On your Active Directory server, type the following command into a Command Prompt window:
certutil -ca.cert client.crtThis command outputs the certificate (from
-----BEGIN CERTIFICATE-----to-----END CERTIFICATE-----) to the command line.Copy the contents of the certificate and paste them into the SSL Certificate box.
Note
If you enter an invalid certificate the first time, and then attempt to enter the correct certificate, you will need to restart Identity Connect for the correct certificate to take effect.
Account Distinguished Name (DN). Enter the bind DN of the Active Directory user that will be used for the connector, for example,
cn=bjensen,cn=users,dc=example,dc=com. When you specify this user, note the following:The user must have at least read access to all of the base contexts that will be managed by Identity Connect
The user must be included in these base contexts
The user is not filtered out by any user or group filters that you specify under the Advanced item on this screen
If Identity Connect is connecting to a single domain controller (DC), the user that is specified here must either be an administrative user (a member of the
Administratorgroup or theDomain Adminsgroup) or a regular user with the appropriate permissions.A regular user generally does not have permission to access the
cn=Deleted Objectscontainer. As a result synchronization of deletions will cause problems. If you specify a regular user here, you must grant the userList ContentandRead Propertiespermissions on thecn=Deleted Objectscontainer for that domain. To change user permissions, use the dsacls utility, as described in the Microsoft technet article at http://technet.microsoft.com/en-us/library/cc771151.aspx.If Identity Connect is connecting to a Global Catalog (GC), deletions are not synchronized. For more information, see "Limitations When Using Identity Connect With Multiple Active Directory Domains".
Password. Enter the bind password for the user specified in the previous step.
If you change the bind password of this connector user in Active Directory, the connection from Identity Connect to Active Directory will fail because the connection credentials will be invalid. Therefore, you must also make the corresponding password change in the Identity Connect configuration.
To change the connection user password in Identity Connect, select Settings in the Identity Connect UI, then select Active Directory Connection.
Note
Previously, when you configured the connection to Active Directory, the password entered here would be read from the configuration the next time that page was loaded. This password is no longer read from the configuration. You must enter your credentials every time you update the page.
Attribute used for login. Select the attribute with which users will log in to the Identity Connect user interface.
The login attribute is
sAMAccountNameby default but you can select any attribute here. The attribute you select must have a unique value for each user.User Base Contexts. Enter the path to one or more base DNs that contain the users to be synchronized during the data synchronization phase, for example,
cn=users,dc=example,dc=com.Note
All user entries that you want to manage through Identity Connect must be included in the base contexts that you specify here.
Do not specify a root LDAP context and a sub-context here. For example, do not include both
dc=example,dc=comand the sub-contextcn=users,dc=example,dc=comas base contexts. For performance reasons, you should specify the most restrictive context here, as a smaller search tree will have better search performance. Therefore, specifycn=groups,dc=example,dc=comandcn=users,dc=example,dc=com, rather than justdc=example,dc=com.Group Base Contexts. Enter the path to one or more base DNs that contain the groups to be synchronized during the data synchronization phase, for example,
cn=groups,dc=example,dc=com.Note
All group entries that you want to manage through Identity Connect must be included in the base contexts that you specify here.
Do not specify a root LDAP context and a sub-context here. For example, do not include both
dc=example,dc=comand the sub-contextcn=groups,dc=example,dc=comas base contexts. For performance reasons, you should specify the most restrictive context here, as a smaller search tree will have better search performance. Therefore, specifycn=groups,dc=example,dc=comandcn=users,dc=example,dc=com, rather than justdc=example,dc=com.The advanced settings enable you to specify LDAP filters that will be applied to Active Directory to determine which users and groups will be mapped to Salesforce accounts, and to set additional object classes that your directory uses for users and groups.
The default user filter (
(&(!(userAccountControl:1.2.840.113556.1.4.803:=2))(objectClass=User))) retrieves all user account except inactive and locked accounts.The default group filter (
(&(!(cn=Domain Users))(objectClass=group))) retrieves all groups except entries under the organizational unitcn=Domain Users.Domain Usersis a special group that typically includes all user entries in the directory, but is not displayed under a user'smemberOfattribute (so the group displays no members when it is searched). Do not remove this filter from the configuration.For information about LDAP filter syntax, see http://social.technet.microsoft.com/wiki/contents/articles/5392.active-directory-ldap-syntax-filters.aspx.
When you select Next, Identity Connect attempts to connect to your Active Directory instance with the specified credentials.
If the connection to Active Directory is successful, you are prompted to Set Admin Groups. Select the DNs of all groups in your Active Directory that are authorized to administer Identity Connect.
Note
When the Active Directory connector is configured, you are prompted to log into Identity Connect as a user who is a member of one of these groups. Make sure that your own account is included in the group selection.
After setup, you can change the DN of the Identity Connect Admin Group, or add additional groups. Select Settings > Manage Admin Groups.
When you log in, Identity Connect automatically reconciles your Active Directory groups to the Identity Connect repository.
4.3. Connecting to Salesforce
Before you configure the connection to Salesforce, you must have configured a Connected App for Identity Connect, as described in Salesforce Configuration, and have your Consumer Key and Consumer Secret ready.
Before you can proceed with the connector configuration, you must confirm the Callback URL that you specified in your Connected App. Identity Connect prompts you with the Callback URL that it is expecting. If you have not configured the correct Callback URL, return to your Connect App configuration and change it now.
Identity Connect requires the configuration of specific Apex triggers and custom Salesforce User object Fields. These are configured when you install the Identity Connect 3 managed package. The Configure Salesforce Connected App screen of the setup wizard provides a link to the IC3 Package. Note that this link assumes a production URL (starting with https://login.salesforce.com). If you are using the setup wizard in a non-production environment, you must edit the URL to start with https://test.salesforce.com. For more information on downloading and installing this package, contact your Salesforce implementation partner.
Configure the Salesforce connector as follows:
The Salesforce login URL field specifies the OAuth endpoint that will be used to make the OAuth authentication request to Salesforce.
Select Production for a production system. The OAuth endpoint endpoint for a production system is
https://login.salesforce.com/services/oauth2/token.Select Sandbox if you are verifying authentication on a test or sandbox organization. The OAuth endpoint for a sandbox system is
https://test.salesforce.com/services/oauth2/token.Select Custom to provide your own OAuth endpoint.
Enter the consumer key and consumer secret of your Connected App.
(Optional) Select Configure Proxy to set the details of your proxy server.
For more information, see "Connecting to Salesforce Through a Proxy Server".
You are redirected to your Salesforce org. Log in and grant access to Identity Connect to connect to your organization.
Identity Connect then connects to your Salesforce organization and reconciles your Salesforce profiles with the Identity Connect repository.
At this point you are asked to set a default Salesforce profile. All users that are synchronized from Active Directory to Salesforce must have at least one Salesforce profile. You configure how users are assigned profiles as part of the Mapping configuration (see "Mapping Data Between Active Directory and Salesforce"). If an Active Directory user is not a member of any of the groups specified during the mapping, that user receives the default profile that you set here.
The next step is to set up a mapping configuration between Active Directory and Salesforce. See "Mapping Data Between Active Directory and Salesforce" for more information.
To change the Salesforce connection details, select the Connection page for your Salesforce Organization in Identity Connect. You can change the Consumer Key, or Consumer Secret here. You cannot change the Salesforce login URL—if you specified an incorrect login URL during the setup, you will need to start the setup from scratch.
If you have previously configured Identity Connect for your Salesforce organization, and you specified a custom login URL, you are prompted to use that same Identity Connect instance when you use the same custom URL on the Salesforce connector page. If the original Identity Connect instance was removed (and is being replaced) the new installation can result in an infinite loop as the validation attempts to locate the original instance. In this case, either use the production URL or change your Salesforce organization configuration so that it does not use the Identity Provider for login.
When you refresh a Salesforce sandbox instance, your organization ID changes. As a result, the Identity Connect instance that has been configured for that organization then has an incorrect organization ID. Subsequent to the refresh, you will therefore see a connection error as Identity Connect attempts to connect to the old organization ID.
The easiest way to restore functionality, with the correct organization ID, is to delete the Salesforce connection, and recreate it. For information on deleting a connection, see "Deleting a Salesforce Organization Configuration". You can then recreate the connection. Remember that your new sandbox instance must have an active domain configured. When you recreate the Salesforce connection, all previous configuration in the Mappings page, as well as the synchronization reports, are lost.
4.4. Connecting to Salesforce Through a Proxy Server
If your production environment disallows direct communication to external systems, you can configure Identity Connect to use a proxy server.
Configure communication through a proxy in one of the following ways:
- Through the Setup Wizard
On the Connect to Salesforce screen, select Configure Proxy.
Enter the URI (FQDN and port) of the proxy server and, if applicable, the username and password required to connect to the proxy server.
- Through the UI, After Setup
If you have already completed the setup wizard and want to add proxy server details, select the Connection tab for your Salesforce Org, and enter the proxy server details.
Important
Identity Connect currently supports only one proxy server configuration. If you edit the proxy server details on the Connection tab, make sure that the new configuration does not cause problems for connections to your other Salesforce orgs.
- By Editing the Configuration Files
After you have completed the setup, edit the following configuration files:
To
/path/to/salesforceIdConnect/conf/external.rest.json, add aproxyproperty with the proxy connection details. For example:{ "hostnameVerifier" : "&{openidm.external.rest.hostnameVerifier}", "proxy" : { "proxyUri" : "http://proxy.example.com:3128", "proxyUsername" : "proxy-username", "proxyPassword" : "proxy-password" } }To each
/path/to/salesforceIdConnect/conf/provisioner.openicf-orgID.jsonfile, add the proxy connection details to theconfigurationProperties. For example:"configurationProperties" : { "clientId" : "client-id", "clientSecret" : "client-secret", "proxy" : { "proxyUri" : "http://proxy.example.com:3128", "proxyUsername" : "proxy-username", "proxyPassword" : "proxy-password" } }, ...
In both configuration files, the
proxyUrifield is mandatory. If you do not use a username and password to connect to your proxy server, set these fields tonull.
Important
Regardless of how you set up the proxy configuration, you must enable the ForwardedRequestCustomizer class so that Jetty honors X-Forwarded- headers.
To enable the class, uncomment the following excerpt in your /path/to/salesforceIdConnect/conf/jetty.xml file:
    <Call name="addCustomizer">
        <Arg>
            <New class="org.eclipse.jetty.server.ForwardedRequestCustomizer">
                <Set name="forcedHost">
                    <Call class="org.forgerock.openidm.jetty.Param" name="getProperty">
                        <Arg>openidm.host</Arg>
                    </Call>:<Call class="org.forgerock.openidm.jetty.Param" name="getProperty">
                        <Arg>openidm.port.https</Arg>
                    </Call>
                </Set>
            </New>
        </Arg>
    </Call>
For more information, on this class, see the Jetty documentation.
The network latency to the proxy server will directly affect the Identity Connect connection times. Make sure that you have tested your connection to the proxy server outside of Identity Connect before you set up the Identity Connect connection through the proxy server.
4.5. Limitations When Using Identity Connect With Multiple Active Directory Domains
If your directory service has only one domain controller, or if all your Salesforce users are in the same domain, Identity Connect can connect to a single domain controller. If your directory service spans multiple domains, Identity Connect must connect to the Global Catalog (GC) to have a comprehensive view of all the domains. Multiple connections to multiple Domain Controllers from a single Identity Connect instance are not supported.
Using a GC as the authoritative data source has the following limitations:
Only a subset of attributes is replicated from other domains to the GC.
Certain attributes required by Identity Connect might be missing. To avoid this problem, modify the Active Directory schema to ensure that the required attributes are replicated to the GC. For more information, see "Updating the Active Directory Schema for a Global Catalog".
Delete operations are not detected immediately.
Live updates will therefore not update the Salesforce data store with the result of a delete operation. Delete operations are detected by a reconciliation operation, so data stores are only temporarily "out of sync" with regard to deletes.
Not all group types are supported.
Group membership information is replicated to the GC for universal groups only. You must use universal groups if your directory service has more than one domain.
4.6. Updating the Active Directory Schema for a Global Catalog
To ensure that the attributes required by Identity Connect are replicated to the GC, you must update the Active Directory schema to include the required attributes. Before you update the schema, note the following:
Only a member of the Schema Admins group can modify the Active Directory schema.
Modifying the Active Directory schema requires a change to the registry on the Schema Master. For information about how to change the registry, see the Microsoft Knowledge Base article on Registry Modification Required to Allow Writing to Schema.
Modifying the registry incorrectly can severely compromise your system so exercise caution.
If you attempt to change the schema before you change the registry key, Active Directory will reject the change.
Increasing the number of attributes that are replicated to the GC will invariably have an impact on network replication traffic.
Use the Active Directory Schema Microsoft Management Console (MMC) to modify the schema. For more information, see the Microsoft Knowledge Base article on Modifying Attributes That Replicate to the Global Catalog.
4.7. Connecting to More Than One Salesforce Organization
You might want to connect a single Active Directory instance to more than one Salesforce organization. For example, if two organizations merge, and the user data for both organizations is stored in a single Active Directory server, you can use a single Identity Connect instance to synchronize those multiple organizations simultaneously.
Caution
If you are setting up connections in a test or sandbox environment, and in a production environment, do not use this multiple organization feature. Rather set up separate Identity Connect instances for the test organization and the production organization.
Before you start, make sure that you have configured a Connected App for the new organization.
To connect to an additional Salesforce organization, select Settings > Manage Salesforce Organizations.
This page displays any previous organizations that you have connected to this Identity Connect instance.
Select New Organization.
Follow the steps outlined in "Connecting to Salesforce" to complete the Salesforce connector configuration.
Cloning an organization duplicates an existing configuration into a new organization configuration. Cloning a configuration can save time as it avoids having to recreate the mapping rules for profiles and roles. However, you can clone an organization only if it originates from the same production organization as the original organization. For example, if you have configured a sandbox organization, you can clone this configuration for a new sandbox organization that is based on the same production organization, or for the production organization itself. Within the organization configuration, there are several references to ID values, that are valid only for organizations that are part of the same production organization family. Attempting to clone an organization configuration across different production organization families will result in errors.
By default, live updates and scheduled reconciliation are disabled for a newly cloned organization, regardless of the live update setting for the existing organization. Having updates disabled by default allows you to customize any changes to the new organization configuration before updates start to flow to your Salesforce data. You must manually enable live updates for the cloned organization, as described in "Configuring When Changes are Synchronized".
Before you start, make sure that you have a Connected App for the new organization.
Select Settings > Manage Salesforce Organizations.
Select the drop-down arrow next to the organization whose configuration you want to duplicate, then select Clone.
Follow the steps outlined in "Connecting to Salesforce" to complete the Salesforce connector configuration.
4.8. Deleting a Salesforce Organization Configuration
To delete the configuration for an organization:
Select Settings > Manage Salesforce Organizations.
From the dropdown list next to the organization that you want to delete, select Delete.
If you have already run reconciliation or synchronization operations for this organization, you are asked whether you want to delete the audit data that was generated from these operations.
When you delete a Salesforce organization, the following information is removed:
All user association (link) data corresponding to that organization is deleted from the repository.
Any data for that organization related to the mapping of permission sets, permission set assignments, permission set license assignments, profiles, groups, and group memberships is deleted from the repository.
Mappings for that organization are removed from the mapping configuration file (
conf/sync.json).The organization is deleted from the organization configuration file (
conf/salesforce.orgs.json).Any scheduled tasks for that organization are deleted from the configuration directory, and from the repository.
If you have elected to delete audit data, any reconciliation audit data relating to that organization is deleted from the repository.
Chapter 5. Mapping Data Between Active Directory and Salesforce
Identity Connect enables you to specify how attributes and other data are mapped from Active Directory to Salesforce.
Typically, you will have one Active Directory instance mapped to one or more Salesforce organizations. Mappings are therefore configured per Salesforce organization. Data mapping includes the following main aspects:
Attribute Mapping maps all attributes of an Active Directory user to comparable attributes in Salesforce.
Identity Connect presents a default set of mapped attributes. To view a sample mapping with real user data,
Select a user to previewand enter at least three characters of the user's first name or last name. For example, for user Barbara Jensen, enter eitherbarorjen. Select the required user from the list.Note
This is a preview only and does not change any of the corresponding user data in Salesforce.
For more information, see "Mapping Attributes".
Group Mapping maps Active Directory groups to one or more of the grouping mechanisms in Salesforce. Note that Identity Connect supports the mapping of single-level Active Directory groups only. Nested group mappings are not supported.
You can map the following Salesforce grouping mechanisms to Active Directory groups:
Profiles. The AD Group to Profile mapping maps Active Directory groups to Salesforce profiles. Profiles determine how users access objects and data in Salesforce. When you set up Identity Connect, you specify a default Salesforce profile. If an Active Directory user is not a member of any of the groups that are mapped in this section, the user receives the default profile.
For more information, see "Mapping Active Directory Groups to Salesforce Profiles".
User Roles. The AD Group to User Role mapping maps groups in Active Directory to Salesforce user roles. The Salesforce role hierarchy enables you to set levels of access that users have to your organization's data.
For more information, see "Mapping Active Directory Groups to Salesforce Roles".
Permission Sets. The AD Group to Permission Set mapping maps Active Directory groups to Salesforce permission sets. Permissions sets are collections of settings and permissions that give users access to tools and functions in your organization. Permission sets extend a user's access without having to change their profiles. The permission sets displayed here are those that have been configured for your Salesforce organization.
For more information, see "Mapping Active Directory Groups to Salesforce Permission Sets".
Salesforce Groups. The AD Group to SF Group mapping maps Active Directory Groups to the groups defined for your Salesforce organization.
For more information, see "Mapping Active Directory Groups to Salesforce Groups".
After you have set up the initial mapping, you can adjust the configuration at any stage by returning to this Mapping page.
5.1. Mapping Attributes
Attribute mapping enables you to specify how the value of a Salesforce attribute is populated, based on a corresponding Active Directory attribute.
Configure attribute mapping by following these steps:
On the Mapping page, select the Attributes tab.
The list of Active Directory attributes in the left hand column indicates those attributes that have been mapped by default. To change the default mapping, select a different Salesforce attribute in the right hand column.
To map additional Active Directory attributes, select the attributes in the empty fields in the left hand column, and select their corresponding Salesforce attributes in the right hand column.
To map additional Salesforce attributes, select the Add Attribute button and select the required Salesforce attribute. The list of attributes in the Salesforce column is populated directly from the Salesforce data store. You cannot specify your own attributes here, but you can add attributes from the Salesforce list, if the default list does not meet your requirements.
To remove a Salesforce attribute from the mapping, select the drop-down arrow next to the attribute name and select Remove Attribute. Certain attribute mappings are mandatory—these attributes cannot be removed.
Use the
Script Editorto specify that an Active Directory attribute value must be transformed to set the value for the Salesforce attribute. A transformation script is a JavaScript that takes a source (Active Directory) attribute, and does something with its value to provide the Salesforce attribute value.Select the drop-down arrow next to the Active Directory attribute and select View Script Editor.
For example, the following sample transformation script takes the value of the
mailattribute from Active Directory and converts it to lower case to provide the value of the Email attribute in Salesforce. If no value exists for the mail attribute, anullvalue is inserted as the value in Salesforce:source.mail ? source.mail.toLowerCase() : null
By default, the
managerattribute in Active Directory is mapped to themanagerIDattribute in Salesforce, using the following transformation script:require('mappingUtils').getManagerIdForSalesforceUser('00DZ0000009SaxM', source.manager)The transformation script locates the Active Directory user's
managerattribute and looks up the manager'sobjectGUID, based on the value of hisdistinguishedName. The script then locates the corresponding SalesforceID of the manager, in the links table, and uses this ID to populate themanagerIDproperty in Salesforce.Note
Active Directory attributes can be either single-valued or multi-valued. Multi-valued Active Directory attributes are stored as an array in the connector schema. If you are mapping a Salesforce attribute to a multi-valued Active Directory attribute, your transformation script must take this into account.
For more information about single and multi-valued attributes, see the MSDN article on Single vs. Multiple Value Attributes.
Specify
Update Rulesto apply conditions under which an attribute in Salesforce will be updated.To specify a conditional update rule, select Update Rules from the dropdown menu next to the Salesforce attribute.
You can define a conditional update script to prevent an attribute from being updated in Salesforce under certain conditions.
A conditional update script takes the following form:
object.attribute operator valuewhere attribute refers to the source (Active Directory) attribute. The condition is based on the attribute value of the Active Directory entry. The corresponding attribute in Salesforce is updated only if the condition evaluates to true for that entry. The attribute name is case sensitive.
For example, if all users based in Germany worked for a specific department, you might want to prevent any changes to these users'
departmentattribute in Salesforce. In this example, you would apply a conditional update script to thedepartmentattribute in the mapping, which would filter out changes to this attribute for users whose country name (co) attribute wasGermany. The following conditional update script on thedepartmentattribute would achieve this objective:object.co != "Germany"In other words, update this attribute in Salesforce only if the entry's
countryattribute is notGermany.By default, Salesforce attribute values are set when a user is created, and when that user is updated. You can specify that the attribute value should be set only when the user is created, by selecting Only when creating a new user from the dropdown list in this window.
In this case, any updates to a user entry will not reset the Salesforce attribute value for that entry.
Note that, regardless of the situation you select from this list, if you have defined a conditional update script that returns false for an entry, the attribute value will not be set for that entry.
Specify what should happen to the Salesforce attribute in the event that the user does not have the corresponding attribute in their Active Directory user entry. If you enter a value here, the attribute in Salesforce is set to this value if the Active Directory attribute is empty or if the attribute does not exist.
When the attribute mapping configuration is complete, select Save to save the mapping.
5.2. Mapping Active Directory Groups to Salesforce Profiles
A user's Salesforce profile determines what features that user can access in Salesforce. To specify the Salesforce profile that is applied to an Active Directory user, profiles are mapped to Active Directory groups.
Note
In order for synchronization between Active Directory and Salesforce to work correctly, you must map at least one profile to an Active Directory group. To ensure that users whose entries do not include the Active Directory groups that you map here are still assigned a profile ID, set a default profile in the Advanced properties.
Configure profile mapping by following these steps:
On the Mapping page, select AD Group to Profile.
Select one or more Active Directory groups in the left hand column to map to the Salesforce profiles in the right hand column.
The right hand column lists all possible Salesforce profiles. You do not have to map an Active Directory group to every Salesforce profile.
In the event of a user being allocated more than one Salesforce profile, based on the group mapping, you can specify an order of precedence to indicate which profile should be taken into account.
Reorder the profiles by dragging them up and down to list the profiles in their order of precedence.
Select Advanced to specify additional behavior for the group to profile mapping:
By default, Identity Connect uses the
memberOfLDAP attribute to determine membership of an Active Directory group.To change the LDAP group membership attribute, select the Advanced button, then select the attribute to use.
By default, Salesforce profiles are set when a user is created, and when that user is updated. You can specify that the profiles should be set only when the user is created, by selecting Only when creating a new user from the dropdown list in this window.
In this case, any updates to a user entry will not reset the Salesforce profiles for that entry.
Specify what should happen to the Salesforce profile in the event that the user is not a member of any of the Active Directory groups that you have mapped on this page.
If you set a value here, the user obtains this profile ID by default.
When you have completed the profile mapping, select Save to apply the mapping.
5.3. Mapping Active Directory Groups to Salesforce Roles
A Salesforce Role Hierarchy enables you to define how your organization reports on and accesses data. To map Salesforce roles to groups of Active Directory users, select AD Group to User Role on the Mapping page.
User Role Mapping is disabled by default. Select Enable User Role Mapping to enable this mapping type.
When User Role Mapping has been enabled, this tab works in a similar way to the Profiles to Groups mapping tab, described in the previous section. The Salesforce roles that are displayed are those that have been defined in your Salesforce organization.
When you have configured the initial mapping, specify any additional behavior for the group to user role mapping:
By default, Identity Connect uses the
memberOfLDAP attribute to determine membership of an Active Directory group.To change the LDAP group membership attribute, select the Advanced button, then select the attribute to use.
By default, Salesforce role membership is set when a user is created, and when that user is updated. You can specify that the groups should be set only when the user is created, by selecting Only when creating a new user from the dropdown list in this window.
In this case, any updates to a user entry will not reset the Salesforce roles for that entry.
Specify what should happen to the Salesforce role in the event that the user is not a member of any of the Active Directory groups that you have mapped on this page.
If you set a value here, the user obtains this Salesforce role by default.
5.4. Mapping Active Directory Groups to Salesforce Permission Sets
A Salesforce permission set encapsulates a range of settings and permissions that give users access to various areas of a system. You can map Salesforce permission sets to specific Active Directory groups as follows:
On the Mapping page, select AD Group to Permission Set.
No permission sets are displayed by default.
To add a permission set to be mapped, select Add Permission Set and select the permission set from the list.
The permission sets in this list are those that you have defined in your Salesforce organization.
If you add a new permission set in Salesforce, you must Refresh this page for the new permission set to be displayed in the list.
Select an Active Directory group to map to the permission set.
You can select more than one Active Directory group per permission set.
Click Save to save the new mapping.
Repeat this procedure for each Salesforce permission set that you want to map.
5.4.1. Permission Set Licenses
Identity Connect tracks the users that it provisions to Salesforce by maintaining a permission set license agreement record for each user. These records correspond with the number of permission set licenses that your organization has purchased, with one license being "claimed" for each user that is provisioned. If the total number of purchased licenses has been claimed, no additional users can be provisioned.
To see the number of available permission set licenses for your Salesforce organization, see the corresponding Salesforce documentation.
If you have reached the maximum number of permission set licenses available, you must either buy additional licenses, or deactivate any defunct users in Salesforce (or disable them in Active Directory) before you can provision new users.
5.5. Mapping Active Directory Groups to Salesforce Groups
A Salesforce public group is a set of users that can contain individual users, other groups, or the set of users with a specific role.
You can map Salesforce groups to Active Directory groups as follows:
On the Mapping page, select AD Group to Salesforce Group.
No public groups are displayed by default.
To add a group to be mapped, select Add Group and select the group from the list.
The groups in this list are those that you have defined in your Salesforce organization.
If you add a new public group in Salesforce, you must Refresh this page for the new group to be displayed in the list.
Select an Active Directory group to map to the Salesforce group.
You can select more than one Active Directory group per Salesforce group.
Click Save to save the new mapping.
Repeat this procedure for each Salesforce group that you want to map.
Chapter 6. Data Synchronization and User Association Management
The main purpose of Identity Connect is to maintain data consistency between your Active Directory and your Salesforce data store. This consistency is achieved by a process called synchronization, which modifies user data on the target system (Salesforce) to match the data in the source system (Active Directory).
This section provides an overview of the synchronization process and walks you through the synchronization configuration to establish associations between user entries.
6.1. Overview of the Synchronization Process
Synchronization changes user data on a target system so that it matches the data on a source system. When you select the Sync tab, Identity Connect runs a preliminary reconciliation report. Reconciliation is the process by which two data sources are assessed and the consistency of the data across the two systems is analyzed. Part of the reconciliation process involves identifying the user accounts that exist in the two data stores, and assessing their potential for matching.
The preliminary reconciliation run identifies all user and group accounts and categorizes them, based on the extent to which a match is found between the source and the target. User accounts are divided into two main categories:
Valid Active Directory Users are user accounts that exist in Active Directory and are candidates for synchronization. The Identity Connect UI groups these accounts under the label "Will Sync". A valid Active Directory user account can be one of the following:
- 1-1 match
A clear and unique matching account exists in Salesforce, with no ambiguity.
- No match found
No corresponding entry is found in Salesforce, although the Active Directory user is a valid user for synchronization.
In an initial provisioning process (before the Salesforce organization has been populated with entries), this is the most likely situation for Active Directory user entries. Entries are unlikely to be in this state if a scheduled synchronization or live update process has been run.
- Conflicting match
More than one potential match exists in Salesforce. Entries in this category can be manually assigned to the correct Salesforce user.
Other Users includes all entries in either Active Directory or Salesforce that are not candidates for synchronization. This category normally indicates "orphan entries" in either the source or target data stores. Other users can be one of the following:
- Unresolved Active Directory users
User accounts that exist in Active Directory but either have no match in Salesforce or the potential Salesforce match has already been associated with another Active Directory user account.
Generally, an Active Directory entry falls into this category if it was previously linked to a Salesforce entry, that Salesforce entry has been lost, but the link between the entries was not removed. Alternatively, if a manual user association has already been made with the corresponding Salesforce entry, this link can prevent the correct Active Directory entry from being mapped.
- Unresolved Salesforce users
User accounts that exist only in Salesforce and not in Active Directory.
Generally, the corresponding Active Directory entry is missing, either because it never existed, or because it was removed and the change has not yet been picked up by a synchronization process.
- Ignored users
User accounts for which no match exists but which are not cause for concern.
The existence of these users in only one data source (either Active Directory or Salesforce) is expected, and the accounts are ignored in future synchronization reports and reconciliation runs.
For example, certain Salesforce administrative entries might be required only in the context of Salesforce administration and have no use in Active Directory. These known unresolved entries can be flagged so that they appear in a separate list in future synchronization runs. Separating the ignored entries from the unresolved entries ensures that the list of unresolved entries remains a priority for cleanup.
Ignoring a user that was previously synchronized with Salesforce releases the user's Identity Connect license in Salesforce. However, "unignoring" the user does not reestablish that license. You must run a new synchronization operation to reestablish the user's Identity Connect license.
In general, unresolved Active Directory and Salesforce entries are cleaned up during synchronization. Entries that exist only in Active Directory are created in Salesforce. Entries that exist only in Salesforce are deactivated (in the event that they have been deleted in Active Directory) or must be moved manually to the list of Ignored Users (if they never existed in Active Directory and are not candidates for synchronization).
Inactive Salesforce users are filtered out of the reconciliation process. However, they are still visible in Identity Connect and can therefore be manually linked to Active Directory entries and reactivated.
6.2. Managing User Associations
When a reconciliation operation finds a matching target entry, a link is created between the source and the target entry. This link is referred to in Identity Connect as a User Association. User associations serve two purposes—they speed up future reconciliation operations, and they serve as a record of a source or target entry's existence.
For example, a target (Salesforce) entry might be deactivated at some point. If an association to the source entry still exists, there is evidence that the target entry once existed. This functionality is useful for auditing purposes. If there is conflicting data between two matched entries, the reconciliation operation might be unable to associate the entries. In this case, the entries can be associated manually.
When you have configured the mapping between Active Directory and Salesforce, you can preview the user associations. This does not actually change records in Salesforce. The preview enables you to assess the consistency of the entries stored in Active Directory with those stored in Salesforce by automatically associating user entries wherever possible. Based on this preview, you can change either the mapping rules, or the association rules, where necessary.
Association rules specify how Active Directory users are matched to their corresponding entries in Salesforce. By default, users are matched if their email addresses match. Failing this, they are matched if their first and last names match, as well as their phone, mobile phone or title. To change the association rules, select the settings icon () on the Sync page then select Association Rules.
Important
The default mapping applies only until the first real synchronization operation is performed (that is, before any links exist between entries in Active Directory and entries in Salesforce).
Review user associations carefully before running a real synchronization operation for the first time. It is more difficult to isolate or fix inaccurate associations after the data has been synchronized. To rerun the preview operation, select Refresh Associations in the Preview list.
6.2.1. Changing User Associations
After the association rules have been finalized, you can manually associate any entries that could not be associated automatically before you perform a real synchronization operation. Ideally, all entries are either associated, or have been marked as Ignored before you run the first synchronization.
Generally, valid Active Directory Users with a 1-to-1 match require no manual intervention. However, there might be specific entries whose user associations have been made incorrectly by the automatic association mechanism. In this case, you can manually disassociate these user entries and reassociate them with the correct entry.
For valid Active Directory Users for whom no Salesforce match is found, use manual association to link the entry to an existing Salesforce account or move the entry to the list of ignored entries.
Note
If you do not manually associate an unmatched account, that account is created in Salesforce when the data is synchronized.
To create a user association manually, or to change an association that was created automatically:
Select the entry that you want to match in the preview list.
Select Change User Association from the drop down list next to that user's entry.
In the Change User Association window, select an item by which to search for the corresponding user in Salesforce or Active Directory. You can search by Alias, Email, First Name or Last Name.
Type at least three characters to start your search. Select the correct entry to associate, then select Save.
The user is now associated with the account that you have selected, instead of with the account that was identified during automatic association. This manual association will override the automatic association during future synchronization runs.
6.2.2. Ignoring Specific Entries
To move a user to the list of ignored users, follow these steps:
On the Sync page, select the entry or entries that you want to ignore in the preview list.
Select Ignore Users from the drop down list next to the user entry.
Users that have been moved to this category are displayed in the list of Ignored Users in the Preview.
If you have moved a user to the ignored list in error, select that user then select Change User Association. You can then manually associate the user with its matching entry.
After you have changed the automatic user associations and moved any entries to the Ignored Users list, select Refresh Associations to run the reconciliation report again. Verify that all the user associations are correct before you enable synchronization for the entire data store.
6.2.3. Synchronizing Specific Entries
In certain situations, you might want to synchronize a single user entry manually, to test your synchronization configuration. To synchronize a single user entry, follow these steps:
Select the Sync tab, then select the drop-down arrow next to the user that you want to synchronize.
Select Sync Record.
The Sync User screen shows a preview of what the user record in Salesforce will look like, after the synchronization.
Select Sync User to actually perform the synchronization operation.
If the synchronization is unsuccessful, Identity Connect returns an error, indicating the reason for the failure. You can use this information to correct any errors in the mapping, and attempt the synchronization test again.
6.2.4. Performing an Initial Synchronization
When all of your mappings and data associations look correct, and you have tested the synchronization on a single user entry, you run an initial synchronization operation on all user data:
On the Sync tab, select Sync Now.
Depending on the number of entries in your directory, a complete synchronization operation can take some time.
Check the entries in your Salesforce organization to make sure that the synchronization has worked as you expected.
6.3. Configuring When Changes are Synchronized
The synchronization configuration enables you to specify when and how often changes to Active Directory data are pushed to the Salesforce data store. Data can be synchronized immediately, as soon as changes are made in Active Directory, or according to a defined schedule.
To set the synchronization configuration, select Settings () > Sync Settings on the Sync page and set the following options:
- Live Updates
The Live Updates mechanism is intended to react quickly to changes as they happen. Live Updates are, however, a best effort mechanism that can miss changes in certain situations. In addition, if an Identity Connect system is down when an update occurs on Active Directory, that change might not be propagated to Salesforce when the system comes back online.
When you use the Live Updates mechanism, you must configure Identity Connect against a single domain controller. Alternatively, for high availability, configure Identity Connect through a load balancer that is sticky to a specific domain controller. Because Live Updates rely on the
uSNChangedtimestamp (which is not replicated), if you do not configure Identity Connect against a single Domain Controller, updates will be missed.- Scheduled Updates
Scheduled updates perform a complete reconciliation across the source and target, rather than just synchronizing changes. As such, scheduled updates are more thorough. The Scheduled Updates mechanism recognizes system error conditions and catches changes that might be missed by the Live Updates mechanism.
Scheduled Updates consume at least one Salesforce API limit per user per scheduled update run. Live Updates consume API limits only when a change is pushed to Salesforce. Therefore, you should enable both Scheduled Updates and Live Updates in production. Use Live Updates as the primary syncing mechanism, and Scheduled Updates no more than once per day to ensure appropriate change coverage while limiting the API usage against your org.
The Scheduled Update mechanism is referred to internally as
reconciliation.
Note
If you have multiple Salesforce organizations, the Live Update and Scheduled Update configurations apply only to the Salesforce organization for which they are configured. That is, you must explicitly configure Live Updates and Scheduled Updates for each separate organization. This is the case even if you have cloned an organization configuration from an existing organization.
6.3.1. Configuring Scheduled Synchronization
To configure a synchronization schedule, follow these steps:
Select the Sync tab for the Salesforce organization that you are configuring.
Select Schedule Updates then select an update interval from the drop down list.
Selecting
minute,hour,day, and so on, specifies that updates are scheduled once every minute, hour or day. Selecting(n) days,(n) hours, and so on, enables you to specify the precise number of days, hours or minutes between each update.Select Save to save the synchronization configuration.
6.4. Increasing the Number of Connections for Multiple Synchronizations
In high latency environments, running several concurrent synchronization operations can sometimes cause connection errors between Identity Connect and Salesforce. In this situation, you might see an error similar to the following:
Unable to find a connection to send the request
This error can generally be resolved by increasing the number of connections available to Identity Connect. Increase the number of connections as follows:
Change to the Identity Connect configuration directory.
cd /path/to/salesforceIdConnect/confUsing a text editor, edit the configuration file for your Salesforce organization (
provisioner.openicf-org-id.json), and change the value of themaximumConnectionsproperty, for example:{ "enabled" : true, "configurationProperties" : { ... "maximumConnections" : 20, .... } }The
maximumConnectionsproperty specifies the maximum size of the HTTP connection pool that is used to connect to Salesforce, in other words, the maximum number of simultaneous requests that a single Identity Connect browser session can make to each Salesforce site (Token and API).The default size of the connection pool is
10connections. Increase the value of this parameter to make more connections available to Identity Connect. Generally, if you are seeing connection errors, doubling the number of connections will prevent such errors.
Chapter 7. Configuring Single Sign-On
Identity Connect enables you to set up single sign-on (SSO) using the Security Assertion Markup Language (SAML). If SSO is configured, when a user accesses their Salesforce organization URL, they are redirected to the Identity Connect user interface (at https://hostname.domain.com:8443/#/connect/login). When the user logs into this interface, they are routed directly to their Salesforce dashboard.
Salesforce does not validate the user’s password. Identity Connect validates the user's credentials (with a simple username/password check or by using Kerberos) and generates an assertion that is sent back to Salesforce in an HTTP POST request. Salesforce then verifies the assertion and allows single sign-on if the assertion is true. The assertion includes an identifier (in the NameIdentifier element of the Subject statement) which maps to the Federation ID attribute value. This value is populated during a synchronization operation.
Identity Connect can complete the SAML configuration automatically or you can add the SAML configuration to your Salesforce organization manually.
Before you start, make sure that you have registered a subdomain in Salesforce. For more information, see the My Domain documentation.
The easiest way to configure SSO is to allow Identity Connect to create the SAML configuration for you.
To do so, enable SAML for your Salesforce organization, under Security Controls > Single Sign-On Settings. Identity Connect then generates the SSO configuration and populates your Salesforce organization with the required certificate the first time it connects to the organization.
Even if there is no existing SAML configuration entry in your Salesforce organization, Identity Connect populates the entry during configuration.
After Identity Connect has generated the SSO configuration, the configuration is visible in the Identity Connect SSO tab for that organization. You can edit the SSO configuration name on this tab, or in Salesforce under Security Controls > Single Sign-On Settings. The uploaded certificate is visible under Security Controls > Certificate and Key Management.
To regenerate the SSO configuration, select Generate SSO Config on the SSO tab for your Salesforce org in Identity Connect.
Regular users should now be routed to their Salesforce dashboard when they access the Identity Connect user interface.
Important
You must run at least one synchronization operation to populate the Federation ID attribute value for each Active Directory user.
When you perform SSO with SAML login, the following error is displayed in the console:
-> [91] Jun 24, 2019 8:20:05.321 AM com.iplanet.services.util.JCEEncryption pbeDecrypt
SEVERE: JCEEncryption:: Unsupported version: 114
[91] Jun 24, 2019 8:20:05.322 AM com.iplanet.services.util.JCEEncryption pbeDecrypt
SEVERE: JCEEncryption:: Unsupported version: 114
This is a known ForgeRock Access Management error (OPENAM-10480) and does not affect functionality. You can safely ignore this error.
Chapter 8. Customizing the Identity Connect Interface
This chapter describes how to customize various aspects of the Identity Connect User Interface.
8.1. Customizing the UI Theme
You can customize the following aspects of the Identity Connect UI:
The logo that your end users see when they log in, and that appears on the administrative interface
The background color
The primary color of the Admin UI. This includes the color of primary buttons, links and accent colors.
To change the UI theme, follow these steps:
Select Settings at the top right of the Identity Connect administrative interface, then select Customize Theme.
Adjust the following settings:
Background Color sets the background color across the entire UI.
Select the required color from the color chart drop down, or enter the hex value (or any CSS valid color value).
Primary Color sets the color of primary UI buttons, links and accent colors across the Admin UI.
Select the required color from the color chart dropdown or enter the hex value (or any CSS valid color value).
Logo sets a custom logo for the login screen and in the administrative interface.
Either drag and drop an image file onto the existing logo or select Upload File and browse for the image file.
The image is scaled to be 55px in height. All image types, including SVG are supported.
When you have completed the customization, select Save to save the new theme.
8.2. Changing the Session Timeout
By default, an Identity Connect UI session times out after 30 minutes of inactivity, or 120 minutes after the initial login, whichever happens first.
To adjust the login session length:
Select Settings at the top right of the Identity Connect window, then select Session.
In the Maximum session lifetime field, enter the maximum number of minutes that a session can be live, after the initial login.
In the Session idle timeout field, enter the maximum number of minutes that a session can be idle, before the user is logged out automatically.
Note
Changes to the session timeout settings only take effect for a new session, that is, you need to log out and log back in to see the effect of the change.
8.3. Changing the Password Reset Link
If a user forgets their password, you reroute password reset by specifying an external URL to which password reset requests are sent.
To set an external URL to handle password resets:
Select Settings at the top right of the Identity Connect window, then select Password Reset.
In the Reset Password Link field, enter the URL to which password reset requests should be sent.
Chapter 9. Running Reports
This chapter describes how to run reports to track data consistency, changes to user data, and access to the Identity Connect application.
The Reports tab enables you to analyze the following Identity Connect data:
- Overview Report
The overview report analyzes user data to assess the consistency of the data between Salesforce and Active Directory. The report returns a percentage of "Syncable Data", that is, what percentage of the data is consistent across the two resources. To run the report on demand, select Refresh on the Overview Report, or select Refresh Associations on the Sync page. This report is essentially a reconciliation run in report mode, where discrepancies in data are reported rather than fixed.
- Sync Report
The Sync Report provides a lower level view of data inconsistencies, showing the individual user records that have been synchronized, and the reason for any failures.
You can filter the report by data source (Active Directory or Salesforce), or by individual user. To run the report on a specific user, enter the first three letters of the username in the search field and hit Enter or select the search icon. You can also filter the report by synchronization action, or by the success or failure of the synchronization operation. By default, all synchronization actions are shown.
To export the report to a CSV file, select Download CSV.
- User Activity Report
The User Activity Report provides information about successful and failed login attempts to Identity Connect.
You can filter the report output by username, IP address, date range, and successful or failed login attempts.
Select Download CSV to export the report to a CSV file.
Note that logins remain active until they expire, and are based on the validity of the JWT session cookie. Therefore if a specific user logs in, shuts down his browser session, and logs in again, two logins will be active for that user.
Chapter 10. Securing an Identity Connect Deployment
This chapter describes how to manage keys and certificates to establish trust between users and Identity Connect, and provides additional information about securing an Identity Connect deployment.
10.1. Managing SSL Certificates
Identity Connect provides a self-signed certificate for evaluation purposes. In production systems, you should use a certificate that has been signed by a certificate authority to establish trust between users and Identity Connect. A CA-signed certificate will prevent users from seeing the certificate warning when they log on to their Salesforce dashboard via Identity Connect.
The Identity Connect administrative user interface provides a mechanism to generate certificate signing requests, and to import signed certificates into Identity Connect's keystore. You can also use the Java keytool command to manage certificates.
Important
The HTTPS server certificate is also used for LDAPS client authentication when requested by the Active Directory server. If you are connecting to Active Directory over LDAPS on a Microsoft Windows 2012 R2 server, you must import a CA-signed certificate into Identity Connect. Do not use a self-signed certificate in a production environment.
The following sections describe how to manage SSL certificates for Identity Connect:
10.1.1. Managing SSL Certificates Through the UI
The following procedures shows how to generate a certificate signing request (CSR) by using the UI, and to import CA-signed certificates into Identity Connect's keystore.
Log into the Identity Connect administration interface, (for example,
https://connect.example.com:8443).Select Settings in the top right corner, then select SSL Configuration.
Select Generate CSR and enter the CSR details, then click Generate CSR.
For information on the fields required in a CSR, see this article.
The resulting CSR is displayed in a new window. Copy the contents of the CSR and submit it to your Certificate Authority for signing.
When the signed certificate is returned from your certificate authority, select Settings > SSL Configuration, then select Enter Signed Certificate(s).
Copy and paste the contents of the CA-signed certificate (PEM file) into the text box.
If your CA has provided an intermediate or root certificate, select Add Another Certificate and copy and paste the contents of each those certificates.
Select Upload to import the CA certificate and the corresponding certificate chain into the keystore, then select Done.
When you have imported the CA certificate into Identity Connect's keystore, restart Identity Connect for the new certificate to be taken into account.
Restart your browser after you have uploaded the new certificates, because the old self-signed certificate might be cached.
If you already have a CA-signed certificate, and do not need to create a CSR, you can import that certificate directly into Identity Connect's keystore as follows:
Select Settings > SSL Configuration > Enter Signed Certificate(s).
Copy and paste the contents of the CA-signed certificate (PEM file) into the text box.
Select Upload to import the CA certificate and the corresponding certificate chain into the keystore, then select Done.
When you have imported the CA certificate into Identity Connect's keystore, restart Identity Connect for the new certificate to be taken into account.
Restart your browser after you have uploaded the new certificates, because the old self-signed certificate might be cached.
10.1.2. Managing SSL Certificates by Using keytool
The following procedures show how to generate a certificate signing request and how to import an existing CA certificate by using the Java keytool command. These procedures uses the private key that is provided with Identity Connect. You can also use an existing private key, or create a new private key for this certificate.
For more information about the keytool command, see the documentation for your version of Java.
Delete the default keystore alias (
openidm-localhost):keytool \ -delete \ -alias openidm-localhost \ -keystore /path/to/salesforceIdConnect/security/keystore.jceks \ -storetype JCEKSEnter keystore password: changeitCreate a new private key pair that will be used for the certificate signing request (CSR), using the same default alias:
keytool \ -genkey \ -keysize 2048 \ -keyalg RSA \ -sigalg SHA1withRSA \ -alias openidm-localhost \ -keystore /path/to/salesforceIdConnect/security/keystore.jceks \ -storetype JCEKS \ -storepass changeit \ -dname "CN=connect.example.com,O=Example,L=Portland,C=US"Enter key password for <openidm-localhost> (RETURN if same as keystore password):Generate a certificate signing request (CSR) with the private that key you created in the previous step. Save the CSR in a file named
connect.csr.keytool \ -certreq \ -alias openidm-localhost \ -keystore /path/to/salesforceIdConnect/security/keystore.jceks \ -storetype JCEKS \ -file connect.csrEnter keystore password: changeitSubmit the CSR to a certificate authority for signing.
When the signed certificate and the root CA certificate are returned by the CA, import the root CA certificate into the keystore first. Substitute
ca-certificate.pemwith the name of your CA certificate file, and select to trust the certificate when prompted.keytool \ -import \ -trustcacerts \ -alias CARoot \ -file ca-certificate.pem \ -keystore /path/to/salesforceIdConnect/security/keystore.jceks \ -storetype JCEKSEnter keystore password: changeitAfter you have imported the root CA certificate, import the signed certificate into the keystore, as follows:
keytool \ -import \ -trustcacerts \ -alias openidm-localhost \ -file connect.crt \ -keystore /path/to/salesforceIdConnect/security/keystore.jceks \ -storetype JCEKSEnter keystore password: changeit
If you already have a CA-signed certificate, and do not need to create a CSR, you can import that certificate into Identity Connect's keystore by using the keytool command.
This procedure imports an existing PKCS12 wildcard certificate, and its private key, into Identity Connect's keystore. The procedure is the same, whether the certificate you are importing is a wildcard certificate or a more restrictive certificate:
View the contents of the keystore.
After you have connected to your Salesforce Org, the Identity Connect keystore contains seven entries by default. Use the keytool command to view the existing entries in the keystore. The default Identity Connect keystore password is
changeit:cd /path/to/salesforceIdConnect/securitykeytool \ -list \ -keystore keystore.jceks \ -storetype JCEKSEnter keystore password:changeit Keystore type: JCEKS Keystore provider: SunJCE Your keystore contains 7 entries openidm-sym-default, Jun 6, 2019, SecretKeyEntry, openidm-jwtsessionhmac-key, Jun 6, 2019, SecretKeyEntry, selfservice, Jun 6, 2019, PrivateKeyEntry, Certificate fingerprint (SHA1): BE:57:6E:3C:78:...:3D openidm-selfservice-key, Jun 6, 2019, SecretKeyEntry, openidm-localhost, Jun 6, 2019, PrivateKeyEntry, Certificate fingerprint (SHA1): 7E:04:9D:...:F4 identity connect, Jun 6, 2019, PrivateKeyEntry, Certificate fingerprint (SHA1): 9E:80:25:6...:05 server-cert, Jun 6, 2019, PrivateKeyEntry, Certificate fingerprint (SHA1): ED:A8:99:3A:60:...:03To secure SSL connections, Identity Connect uses the certificate with the alias
openidm-localhost, by default.Delete the default certificate alias (
openidm-localhost) from the keystore:keytool \ -delete \ -alias openidm-localhost \ -keystore keystore.jceks \ -storetype JCEKSEnter keystore password: changeitUse the keytool command to import your existing certificate into the keystore.
Substitute the following in this command:
example-cert.p12 with the name of your certificate file
changeit with the password that you set to open your certificate
example-comwith the existing certificate alias
keytool \ -importkeystore \ -srckeystore example-cert.p12 \ -srcstoretype PKCS12 \ -srcstorepass changeit \ -srcalias example-com \ -destkeystore keystore.jceks \ -deststoretype JCEKS \ -destalias openidm-localhostImporting keystore example-cert.p12 to keystore.jceks... Enter destination keystore password: changeitThe certificate will be imported into the keystore with the alias
openidm-localhost. The keytool command creates a trusted certificate entry with the specified alias and associates it with the imported certificate.Change the password of your existing certificate to match your keystore password.
Identity Connect requires that the certificate password and keystore passwords are the same. If the password of your existing certificate, is not the same as the Identity Connect keystore password, change its password to match that of the keystore, as follows:
keytool \
  -keypasswd \
  -alias openidm-localhost \
  -keystore keystore.jceks \
  -storetype JCEKS
 Enter keystore password: changeit
 Enter key password for <openidm-localhost>old-password
 New key password for <openidm-localhost>: changeit
 Re-enter new key password for <openidm-localhost>: changeit
When you have imported the certificate, view the contents of the keystore again, to verify that your certificate (with alias
openidm-localhost) is there:keytool \ -list \ -keystore keystore.jceks \ -storetype JCEKSEnter keystore password:changeit Keystore type: JCEKS Keystore provider: SunJCE Your keystore contains 7 entries openidm-sym-default, Jun 6, 2019, SecretKeyEntry, selfservice, Jun 6, 2019, PrivateKeyEntry, Certificate fingerprint (SHA1): BE:57:6E:3C:78:...:3D openidm-jwtsessionhmac-key, Jun 6, 2019, SecretKeyEntry, openidm-localhost, Jun 6, 2019, PrivateKeyEntry, Certificate fingerprint (SHA1): 0E:B2:55:...:AD openidm-selfservice-key, Jun 6, 2019, SecretKeyEntry, identity connect, Jun 6, 2019, PrivateKeyEntry, Certificate fingerprint (SHA1): 9E:80:25:6...:05 server-cert, Jun 6, 2019, PrivateKeyEntry, Certificate fingerprint (SHA1): ED:A8:99:3A:60:...:03
10.1.3. Changing the Keystore Password
The default keystore password is changeit. You should change this password in a production environment.
Shut down the server if it is running.
Use the keytool command to change the keystore password.
The following command changes the keystore password to
newPassword:keytool \ -storepasswd \ -keystore /path/to/salesforceIdConnect/security/keystore.jceks \ -storetype jceks -storepass changeitNew keystore password: newPassword Re-enter new keystore password: newPasswordChange the passwords of the default encryption keys.
Identity Connect uses a number of encryption keys whose passwords are also
changeitby default. The passwords of each of these keys must match the password of the keystore.To get the list of keys in the keystore, run the following command:
keytool \ -list \ -keystore /path/to/salesforceIdConnect/security/keystore.jceks \ -storetype jceks \ -storepass newPasswordKeystore type: JCEKS Keystore provider: SunJCE Your keystore contains 7 entries openidm-sym-default, May 4, 2021, SecretKeyEntry, selfservice, May 4, 2021, PrivateKeyEntry, Certificate fingerprint (SHA-256): fingerprint openidm-jwtsessionhmac-key, May 4, 2021, SecretKeyEntry, openidm-localhost, May 4, 2021, PrivateKeyEntry, Certificate fingerprint (SHA-256): fingerprint openidm-selfservice-key, May 4, 2021, SecretKeyEntry, identity connect, May 4, 2021, PrivateKeyEntry, Certificate fingerprint (SHA1): fingerprint server-cert, May 4, 2021, PrivateKeyEntry, Certificate fingerprint (SHA1): fingerprintChange the passwords of each default encryption key as follows:
keytool \ -keypasswd \ -alias openidm-localhost \ -keystore /path/to/salesforceIdConnect/security/keystore.jceks \ -storetype jceks \ -storepass newPasswordEnter key password for <openidm-localhost> changeit New key password for <openidm-localhost>: newPassword Re-enter new key password for <openidm-localhost>: newPasswordkeytool \ -keypasswd \ -alias openidm-sym-default \ -keystore /path/to/salesforceIdConnect/security/keystore.jceks \ -storetype jceks \ -storepass newPasswordEnter key password for <openidm-sym-default>changeitNew key password for <openidm-sym-default>: newPassword Re-enter new key password for <openidm-sym-default>: newPasswordkeytool \ -keypasswd \ -alias openidm-selfservice-key \ -keystore /path/to/salesforceIdConnect/security/keystore.jceks \ -storetype jceks \ -storepass newPasswordEnter key password for <openidm-selfservice-key>changeitNew key password for <openidm-selfservice-key>: newPassword Re-enter new key password for <openidm-selfservice-key>: newPasswordkeytool \ -keypasswd \ -alias selfservice \ -keystore /path/to/salesforceIdConnect/security/keystore.jceks \ -storetype jceks \ -storepass newPasswordEnter key password for <selfservice>changeitNew key password for <selfservice>: newPassword Re-enter new key password for <selfservice>: newPasswordkeytool \ -keypasswd \ -alias openidm-jwtsessionhmac-key \ -keystore /path/to/salesforceIdConnect/security/keystore.jceks \ -storetype jceks \ -storepass newPasswordEnter key password for <openidm-jwtsessionhmac-key>changeitNew key password for <openidm-jwtsessionhmac-key>: newPassword Re-enter new key password for <openidm-jwtsessionhmac-key>: newPasswordkeytool \ -keypasswd \ -alias "identity connect" \ -keystore /path/to/salesforceIdConnect/security/keystore.jceks \ -storetype jceks \ -storepass newPasswordEnter key password for <identity connect> changeit New key password for <identity connect>: newPassword Re-enter new key password for <identity connect>: newPasswordkeytool \ -keypasswd \ -alias server-cert \ -keystore /path/to/salesforceIdConnect/security/keystore.jceks \ -storetype jceks \ -storepass newPasswordEnter key password for <server-cert> changeit New key password for <server-cert>: newPassword Re-enter new key password for <server-cert>: newPasswordChange the keystore configuration file to reflect the new password. This file is located at
/path/to/salesforceIdConnect/conf/org.forgerock.identityconnect.keystore.json:{ "type" : "JCEKS", "provider" : "SunJCE", "filename" : "security/keystore.jceks", "password" : "newPassword", "name" : "mainKeyStore" }Important
Ensure that this file is protected on the file system, like any other password file.
Configure a new expression resolver file to store just the keystore password.
Create a new directory in
/path/to/salesforceIdConnect/resolver/that will contain only the properties file for keystore passwords. For example:mkdir /path/to/salesforceIdConnect/resolver/keystoreImportant
Substituted properties are not encrypted by default. You must therefore secure access to this directory, using the appropriate permissions.
Set the
IDM_ENVCONFIG_DIRSenvironment variable to include the new directory:export IDM_ENVCONFIG_DIRS=/path/to/salesforceIdConnect/resolver/,/path/to/salesforceIdConnect/resolver/keystoreCreate a
.jsonor.propertiesfile in that secure directory, that contains the new keystore password as a resolvable property. For example, add one of the following files to that directory:openidm.keystore.password=newPassword
{
    "openidm" : {
        "keystore" : {
            "password" : "newPassword"
        }
    }
}
(Optional) Open your
/path/to/salesforceIdConnect/conf/secrets.jsonfile and change the default keystore password:"storePassword" : "&{openidm.keystore.password|newPassword}",Important
Protect the
secrets.jsonfile as you would any other password file.
10.2. Protecting the Repository
In production deployments, you should consider changing at least the password of the default database user for Identity Connect. The username and password are both openidm by default. These properties are set in the database connection configuration file (/path/to/salesforceIdConnect/conf/datasource.jdbc-default.json).
To change the database username and password before you first set up Identity Connect:
If you are using the embedded PostgreSQL repository, edit the
datasource.jdbc-default.jsonfile. The following change sets the database user toic-adminand the password toPassw0rd:{ "driverClass" : "org.postgresql.Driver", "jdbcUrl" : "jdbc:postgresql://&{openidm.repo.host}:&{openidm.repo.port}/openidm", "databaseName" : "openidm", "username" : "ic-admin", "password" : "Passw0rd", ... }The password is encrypted when the server starts up.
If you are using an external PostgreSQL repository, edit the
path/to/salesforceIdConnect/db/postgresql/scripts/createuser.pgsqlscript, as described in "To Set Up an External PostgreSQL Repository".
To change the database username and password after you have set up Identity Connect with the default values, follow these steps:
Connect to the
openidmdatabase as the default useropenidm:psql -U openidm Password for user openidm: psql (11.2, server 10.5) Type "help" for help.
Change the username of the
openidmuser.The following command changes the username to
ic-admin:ALTER USER openidm RENAME TO ic-admin
Change the password of the new user.
The following command changes the password to
Passw0rd:ALTER USER ic-admin WITH PASSWORD Passw0rd
Change the database connection configuration file (
/path/to/salesforceIdConnect/conf/datasource.jdbc-default.json) to reflect the new username and password:{ "driverClass" : "org.postgresql.Driver", "jdbcUrl" : "jdbc:postgresql://&{openidm.repo.host}:&{openidm.repo.port}/openidm", "databaseName" : "openidm", "username" : "ic-admin", "password" : "Passw0rd", ... }Restart Identity Connect and make sure that you can connect.
10.3. Preventing Configuration Changes
After you have installed, configured, and tested your Identity Connect deployment, it is recommended that you lock down the configuration to prevent accidental or malicious configuration changes. Locking down the configuration involves the following steps:
Restricting update access to the configuration endpoints
Preventing writes to configuration files
Restricting permissions on the configuration directory
10.3.1. Restricting Access to Configuration Endpoints
HTTP access to Identity Connect endpoints is controlled by the /path/to/salesforceIdConnect/script/access.js script. Each entry, or rule, in this script contains a pattern to match against the incoming request ID, and the associated roles, methods, and actions that are allowed for requests on that pattern.
When you have completed and tested your configuration, you should prevent write access to the configuration endpoints by adding the following rules to access.js:
{
    "pattern" : "config/*",
    "roles" : "internal/role/openidm-admin",
    "methods" : "read, query"
},
{
    "pattern" : "config/ui/configuration",
    "roles" : "*",
    "methods" : "read, query"
},
{
    "pattern" : "config/ui/configuration",
    "roles" : "*", "methods" : "read, query"
},
{
    "pattern" : "endpoint/mappingDetails",
    "roles" : "*",
    "methods" : "read"
}
In addition, exclude queries on the config endpoints for the administrative user by changing the rule that begins with the comment // openidm-admin can request nearly anything as follows:
// openidm-admin can request nearly anything
{
    "pattern" : "*",
    "roles" : "internal/role/openidm-admin",
    "methods" : "*", // default to all methods allowed
    "actions" : "*", // default to all actions allowed
    "customAuthz" : "disallowQueryExpression()",
    "excludePatterns": "repo,repo/*,file/iwa/*,*config/*,config,endpoint/**"
}
Note
After you have made these changes, attempts to change the configuration might result in the UI displaying errors until the browser is refreshed.
10.3.2. Prevent Write to Configuration Files
By default, Identity Connect writes configuration changes to the files in its conf directory.
When your configuration is complete, you can disable writes to configuration files by uncommenting the following line in the conf/config.properties file:
felix.fileinstall.enableConfigSave=false
10.3.3. Restricting Permissions on the Configuration Directory
To ensure that nobody can tamper with the Identity Connect configuration files, change the permissions on the conf directory after you have finalised the configuration:
chmod -R /path/to/salesforceIdConnect/confChapter 11. Configuring Identity Connect With an External PostgreSQL Repository
By default, Identity Connect stores user, configuration, and some audit data in an embedded PostgreSQL repository. The embedded repository is supported in production deployments. For larger deployments, and for availability you might want to set up an external PostgreSQL database as the repository of Identity Connect data.
For details of the supported PostgreSQL versions, see Supported Repositories in the Release Notes.
The following steps assume that:
You have downloaded and unzipped Identity Connect but have not configured the server—that is, you have not run the setup process.
PostgreSQL is installed and running, either on the host on which Identity Connect will run, or on a host that is accessible to the Identity Connect instance.
The
path/to/salesforceIdConnect/db/postgresql/scripts/createuser.pgsqlscript sets up anopenidmdatabase and user, with a default password ofopenidm. The script also grants the appropriate permissions.Edit this script if you want to change the password of the
openidmuser, for example:more /path/to/salesforceIdConnect/db/postgresql/scripts/createuser.pgsqlcreate user openidm with password 'mypassword'; create database openidm encoding 'utf8' owner openidm; grant all privileges on database openidm to openidm;Edit the PostgreSQL client authentication configuration file,
pg_hba.conf. Add the following entries for thepostgresandopenidmusers:local all openidm trust local all postgres trust
Note
The location of your
pg_hba.conffile depends on how you have installed PostgreSQL. You can find the file by running the following command in a postgres session:postgres=#
SHOW hba_file;hba_file ------------------------------------- /usr/local/var/postgres/pg_hba.conf (1 row)For more information, see the corresponding PostgreSQL documentation.
As the
postgresuser, execute thecreateuser.pgsqlscript as follows:psql -U postgres < /path/to/salesforceIdConnect/db/postgresql/scripts/createuser.pgsqlCREATE ROLE CREATE DATABASE GRANTExecute the
openidm.pgsqlscript as the newopenidmuser that you created in the previous step:psql -U openidm < /path/to/salesforceIdConnect/db/postgresql/scripts/openidm.pgsqlCREATE SCHEMA CREATE TABLE CREATE TABLE CREATE TABLE CREATE INDEX CREATE INDEX ... START TRANSACTION INSERT 0 1 INSERT 0 1 COMMIT CREATE INDEX CREATE INDEXAlso as the
openidmuser, execute the following scripts:psql -U openidm < /path/to/salesforceIdConnect/db/postgresql/scripts/audit.pgsqlCREATE TABLE CREATE TABLE CREATE TABLE CREATE TABLE CREATE TABLE CREATE INDEX CREATE INDEX CREATE TABLEpsql -U openidm < /path/to/opensalesforceIdConnectidm/db/postgresql/scripts/identityConnect.pgsqlDROP TABLE CREATE TABLE CREATE INDEXRun the
default_schema_optimization.pgsqlscript to create the required indexes. This script must be executed by a user with SUPERUSER privileges, so that the extension can be created. By default, this is thepostgresuser.The file includes extensive comments on the indexes that are being created:
psql -U postgres openidm < /path/to/salesforceIdConnect/db/postgresql/scripts/default_schema_optimization.pgsqlCREATE INDEX CREATE INDEX CREATE INDEX CREATE INDEX CREATE INDEX CREATE INDEXYou can now proceed with the setup, as described in "Getting Identity Connect Up and Running".
Chapter 12. Deploying Identity Connect for High Availability
To ensure availability of the service, you can deploy multiple Identity Connect instances in a cluster. In the event of one Identity Connect instance failing, the remaining instances continue to serve requests. In a clustered environment, each instance must point to the same external PostgreSQL repository. If the database is also clustered, Identity Connect points to the cluster as a single system.
Important
Pass-through authentication to Active Directory cannot function if the connection to the repository is lost. For a truly highly available deployment, you should also configure the backend database for high availability.
Specific configuration changes must be made to configure multiple instances that use a shared repository. These configuration changes are described in this chapter.
12.1. Configuring a Highly Available Deployment
This procedure describes how to configure multiple Identity Connect instances in a cluster, using an external PostgreSQL database.
On each host that will contain an Identity Connect instance, unpack the contents of the .zip file into the install location, but do not set up Identity Connect.
Configure each Identity Connect instance for an external PostgreSQL database, as described in "Configuring Identity Connect With an External PostgreSQL Repository".
You need to execute the schema scripts (those scripts in
/path/to/salesforceIdConnect/db/postgresql/scripts) once only because all the instances will use the same database.When you set up each Identity Connect instance, make sure that you specify the same external PostgreSQL database. If you have already set up an instance and want to point to a different database, edit the
/path/to/salesforceIdConnect/conf/datasource.jdbc-default.jsonfile and set thejdbcUrlproperty. For example:"jdbcUrl" : "jdbc:postgresql://&{openidm.repo.host}:&{openidm.repo.port}/openidm",where &{openidm.repo.host} specifies the host on which the PostgreSQL database is located.
Specify a unique node ID for each instance by setting the value of
openidm.node.idin theresolver/boot.propertiesfile of the instance. For example:openidm.node.id = node1
You can set any value for the
openidm.node.id, as long as the value is unique within the cluster. The cluster manager detects unavailable instances by their node ID.You must set a node ID for each instance, otherwise the instance fails to start. The default
resolver/boot.propertiesfile sets the node ID toopenidm.node.id=node1.Set the cluster configuration.
The cluster configuration is defined in the
conf/cluster.jsonfile of each instance. By default, configuration changes are persisted in the repository so changes that you make in this file apply to all nodes in the cluster.The default version of the
cluster.jsonfile assumes that the cluster management service is disabled:{ "instanceId" : "&{openidm.node.id}", "instanceTimeout" : 30000, "instanceRecoveryTimeout" : 30000, "instanceCheckInInterval" : 5000, "instanceCheckInOffset" : 0, "enabled" : false }The
instanceIdis set to the value of each instance'sopenidm.node.idthat you set in the previous step.The
instanceTimeoutspecifies the length of time (in milliseconds) that a member of the cluster can be "down" before the cluster manager considers that instance to be in recovery mode.Recovery mode indicates that the
instanceTimeoutof an instance has expired, and that another instance in the cluster has detected that event.The scheduler component of the second instance then moves any incomplete jobs into the queue for the cluster.
The
instanceRecoveryTimeoutspecifies the time (in milliseconds) that an instance can be in recovery mode before it is considered to be offline.This property sets a limit after which other members of the cluster stop trying to access an unavailable instance.
The
instanceCheckInIntervalspecifies the frequency (in milliseconds) that instances check in with the cluster manager to indicate that they are still online.The
instanceCheckInOffsetspecifies an offset (in milliseconds) for the check-in timing, when multiple instances in a cluster are started simultaneously.The check-in offset prevents multiple instances from checking in simultaneously, which would strain the cluster manager resource.
The
enabledproperty specifies whether the cluster management service is enabled when you start the server. This property is set tofalseby default.If you have enabled the cluster manager, do not disable it while clustered nodes are running.
On all instances except the first instance, prevent Identity Connect from reading its configuration from the configuration files.
In the
conf/system.propertiesfile on each instance, uncomment the lineopenidm.fileinstall.enabled=false.This forces Identity Connect to read its configuration only from the repository, in this case, the repository of the first instance.
openidm.fileinstall.enabled=false
Start up and configure the first Identity Connect instance.
Make sure that when you initially access this Identity Connect instance, you use the FQDN (
https://host.domain:8443) and notlocalhost.Configure each node in the cluster to use the same keystore and truststore.
After you have started and configured the first instance, copy the initialized keystore (
/path/to/salesforceIdConnect/security/keystore.jceks) and truststore (/path/to/salesforceIdConnect/security/truststore) to all other instances in the cluster.Make sure that all additional instances have access to the shared PostgreSQL database.
Start up the additional instances.
Additional instances read the configuration from the first instance, so requests to
https://host2.example.com:8443/#/connect/loginshould read the existing Identity Connect configuration from the first host.
12.2. Configuring a Load Balancer
After you have configured multiple Identity Connect instances to work together in a cluster, you can configure a load balancer to distribute client connections between the instances.
Identity Connect 7.1.6 was tested with Nginx Version 1.2.9, but any load balancer that supports sticky session configuration should be adequate.
If you configure a load balancer for Identity Connect, you must specify that the logout from Salesforce be directed to the load balancer. To specify the logout from Salesforce:
Log into your Salesforce organization and enter the organization Setup.
Under the Administer section, select Single Sign-On Settings from the Security Controls menu.
Edit the SAML Single Sign-On Settings to indicate the hostname and port number of the load balancer in the Identity Provider Logout URL field.
Note
The load balancer should not send clients to the secondary hosts for administration or configuration of Identity Connect. Configuration should be handled only by the primary host. Therefore, https://host2.example.com:8443, for example, should not be accessible through the load balancer.
If you are configuring IWA for an Identity Connect service behind a load balancer, make sure that the load balanced deployment works with the SAML login first. To do so, configure Identity Connect using the load balancer URL, with the load balancer pointing to the primary server. For more information about configuring IWA for a load balanced deployment, see "Setting Up The Keytab File For a Load Balanced Deployment".
12.3. Configuration Changes in a Clustered Environment
In a clustered environment, any configuration changes must be applied in a specific order. You must change the first node first, then restart all additional nodes so that the configuration change is propagated to the secondary nodes.
Chapter 13. Advanced Configuration
This chapter provides additional information about the Identity Connect setup and instructions on using the advanced Identity Connect features. The information in this chapter is not required for you to be able to get Identity Connect up and running, but might help you to understand some of the lower level configuration. Additional troubleshooting information is provided in "Troubleshooting an Identity Connect Installation".
Important
Configuring these features requires advanced knowledge of Identity Connect and knowledge of the corresponding Active Directory features. Before you implement the features described in this chapter, ensure that you have these expertise internally or engage with an implementation partner.
13.1. Managing the Embedded Repository
By default, Identity Connect uses an embedded PostgreSQL database for its internal repository. This means that you do not need to set up an external database to use the software. This section provides instructions for managing the default embedded repository.
For large deployments or deployments that need to be highly available, you can configure an external PostgreSQL database. For more information, see "Configuring Identity Connect With an External PostgreSQL Repository".
13.1.1. Changing the Repository Configuration
The embedded PostgreSQL database has the following configuration by default:
- Hostname
The same host on which the Identity Connect instance is installed.
- Port
5443
- Database name
openidm- Database user
openidm- Database user password
openidm
Do not change the hostname of the embedded repository (localhost by default). To change the database user or password, see "Protecting the Repository".
13.1.2. Backing Up the Repository
Identity Connect stores user, configuration, and some audit data in an embedded PostgreSQL repository, or in an external PostgreSQL database if you have configured one.
In either case, you should implement regular database backups to avoid data loss.
If you are using an external PostgreSQL database, you will most likely have a backup strategy. Read the PostgreSQL documentation for more information.
If you are using the embedded repository, and do not have an external PostgreSQL database installed, follow these steps for a basic database backup and restore:
Extract the PostgreSQL binaries for your platform from the
/path/to/salesforceIdConnect/db/postgresql/binariesdirectory. For example:tar xvzf /path/to/salesforceIdConnect/db/postgresql/binaries/postgresql-10.5-1-linux-x64-binaries.tar.gzLocate the
pgsql/bin/directory in the extracted archive and run the pg_backup command to dump the database to a script file.The default database is named
openidm, and the database user isopenidmwith passwordopenidm.The following command dumps the repository to a file named
ic-backup:pgsql/bin/pg_dump --username openidm openidm > /path/to/ic-backupThe command dumps a plain-text script file that contains the SQL commands required to reconstruct the PostgreSQL database to the state that it was in at the time it was saved.
For more information on the pg_dump command, see the PostgreSQL documentation.
Use the psql to restore the database from the script file, for example:
pgsql/bin/psql --username openidm -d openidm -f /path/to/ic-backup
13.2. Working With Identity Connect Log Files
When you set up Identity Connect by using the setup.sh script (on UNIX systems), any startup messages that would be output to the OSGi console are output to the file /path/to/salesforceIdConnect/logs/console.out. If you encounter problems while you are configuring Identity Connect, check this file for an indication of what might have gone wrong in the setup process.
On Windows systems, startup messages are output to the Felix shell in the command window in which you launched Identity Connect.
During configuration and authentication, Identity Connect log messages are output to files named /path/to/salesforceIdConnect/logs/openidm0.log.0, with the integers being incremented with each successive Identity Connect startup, and after log rotation, when the file size exceeds the configured limit. Check these log files for additional information if you are experiencing problems with Identity Connect.
Log levels and maximum log file sizes are defined in the file /path/to/salesforceIdConnect/conf/logging.properties. You can adjust the log level in order to provide more or less information. The default configuration rotates log files when the size reaches 5 MB, and retains up to 5 files.
You can adjust the general log level by changing .level=INFO to one of the following, in the logging.properties file.
SEVERE (highest value)
WARNING
INFO
CONFIG
FINE
FINER
You can also set specific log levels for individual components. For example, the following setting will provide the maximum output for log messages from the reconciliation process:
org.forgerock.openidm.recon.level = FINEST
13.3. Using Identity Connect for Delegated Authentication
Identity Connect includes a servlet filter that allows requests from salesforce.com (and any subdomain of salesforce.com) to make AJAX requests to Identity Connect. No specific configuration is required to use this filter. The main purpose of the filter is to provide delegated authentication, which enables you to present a standard login form for a specific customer domain (such as example.salesforce.com). Instead of submitting login credentials to the Salesforce authentication provider, the filter captures these details and makes a request back to Identity Connect, to obtain the SAML assertion. The SAML assertion can then be submitted to the Salesforce authentication provider, and access is allowed based on that evaluation. Such requests to Identity Connect are transparent - end users do not see the fact that they are actually communicating with a service on premise, rather than with Salesforce itself.
13.4. Configuring Identity Connect for Integrated Windows Authentication
You can configure Identity Connect so that clients use Integrated Windows Authentication (IWA), rather than authenticating by providing a username and password.
Caution
This feature requires advanced knowledge of Active Directory and Kerberos-based Authentication. Before you implement this feature, ensure that you have these expertise internally or engage with an implementation partner.
This section describes the steps required to use IWA with Identity Connect. The section assumes that you are familiar with the principles of IWA, Kerberos and the Simple and Protected GSSAPI Negotiation Mechanism (SPNEGO).
The following figure outlines the components involved in configuring Identity Connect for IWA. This setup assumes that the Active Directory server, Identity Connect, and the clients (SPNEGO-enabled browsers) run on different hosts, as indicated in the following diagram. If they run on the same host, the Kerberos ticket cannot be issued to the clients:
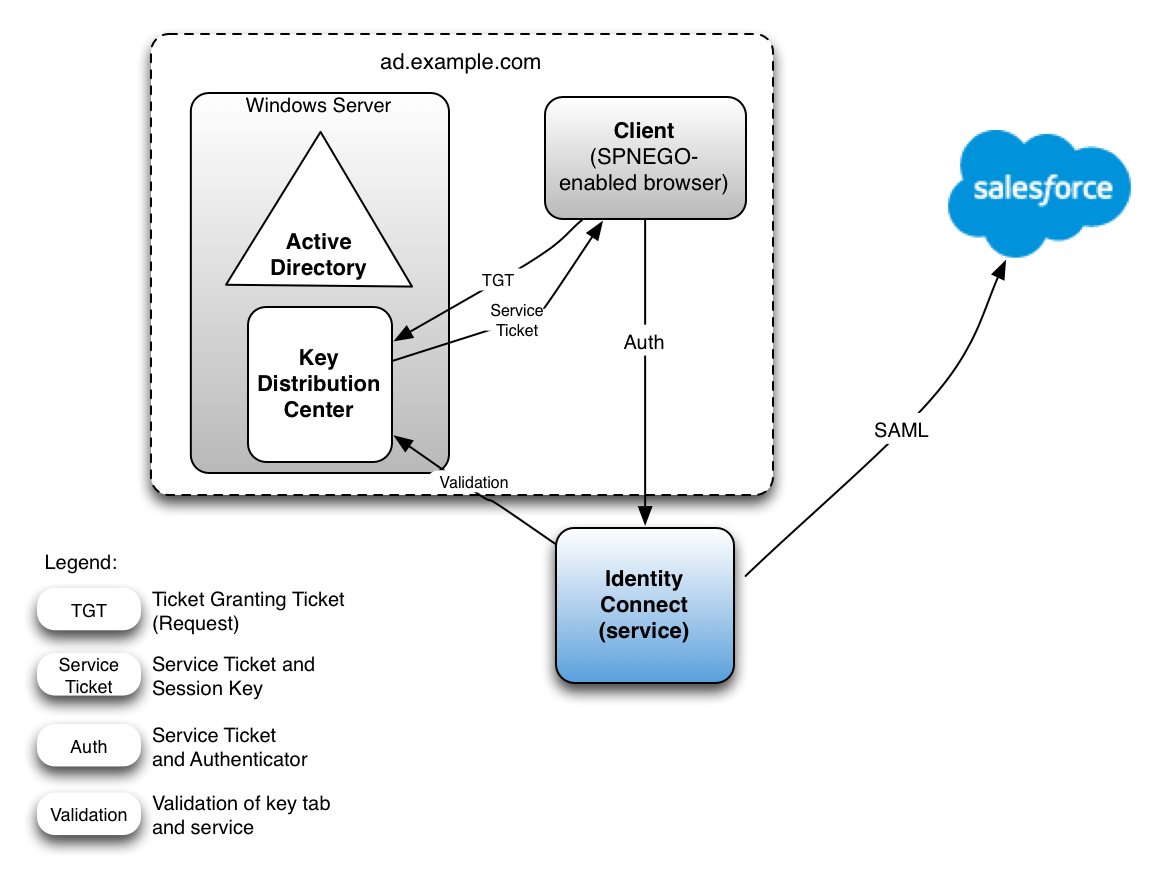
This example assumes that the Kerberos Key Distribution Center and the clients that are requesting tickets are in the same Windows domain. This might not always be the case. The examples at the end of this section illustrate additional scenarios, when the client is not part of the domain.
The following sections describe the process for configuring Identity Connect to use IWA. The process includes three broad steps:
Configure a Kerberos user account and create a keytab file
Perform this step on the machine that hosts the KDC (your Active Directory server host).
Configure the authentication filter in Identity Connect
This step changes the Identity Connect configuration. View the Identity Connect UI in any browser to perform this step.
Configure the client browser to support SPNEGO
Perform this step on every client machine that will access Salesforce through Identity Connect at
https://hostname.domain:8443/#/connect/login.
If you encounter problems during this process, see "Troubleshooting the Integrated Windows Authentication Configuration".
13.4.1. Before You Start
Before you start setting up IWA with Identity Connect, make sure that the following steps are in place:
Identity Connect is installed, configured, and working correctly.
The basic SSO configuration (without IWA) is working correctly. Do not try to set up IWA if basic SSO is not working—first resolve those issues. For more information, see "Configuring Single Sign-On".
13.4.2. Configuring the Kerberos User and Creating the Keytab
Perform these actions on the machine that hosts the KDC (your Active Directory server host).
13.4.2.1. Creating a Specific Kerberos User Account for Identity Connect
To authenticate Identity Connect to the KDC, you must create a specific user entry in Active Directory whose credentials will be used for the authentication. This Kerberos user account must not be used for anything else. It must be a separate user account to the one that Identity Connect uses to connect to Active Directory.
The Kerberos user account is used to generate the Kerberos keytab. If you change the password of this Kerberos user after you have set up IWA, you must update the keytab accordingly.
Create a new user in Active Directory as follows:
Provide a login name for the user that reflects its purpose, for example, identityconnect@ad.example.com.
Enter a password for the user.
Check the Password never expires option and leave all other options unchecked.
If the password of this user account expires, and is reset, you must update the keytab with the new password. It is therefore easier to create an account with a password that does not expire.

Click Finish to create the user.
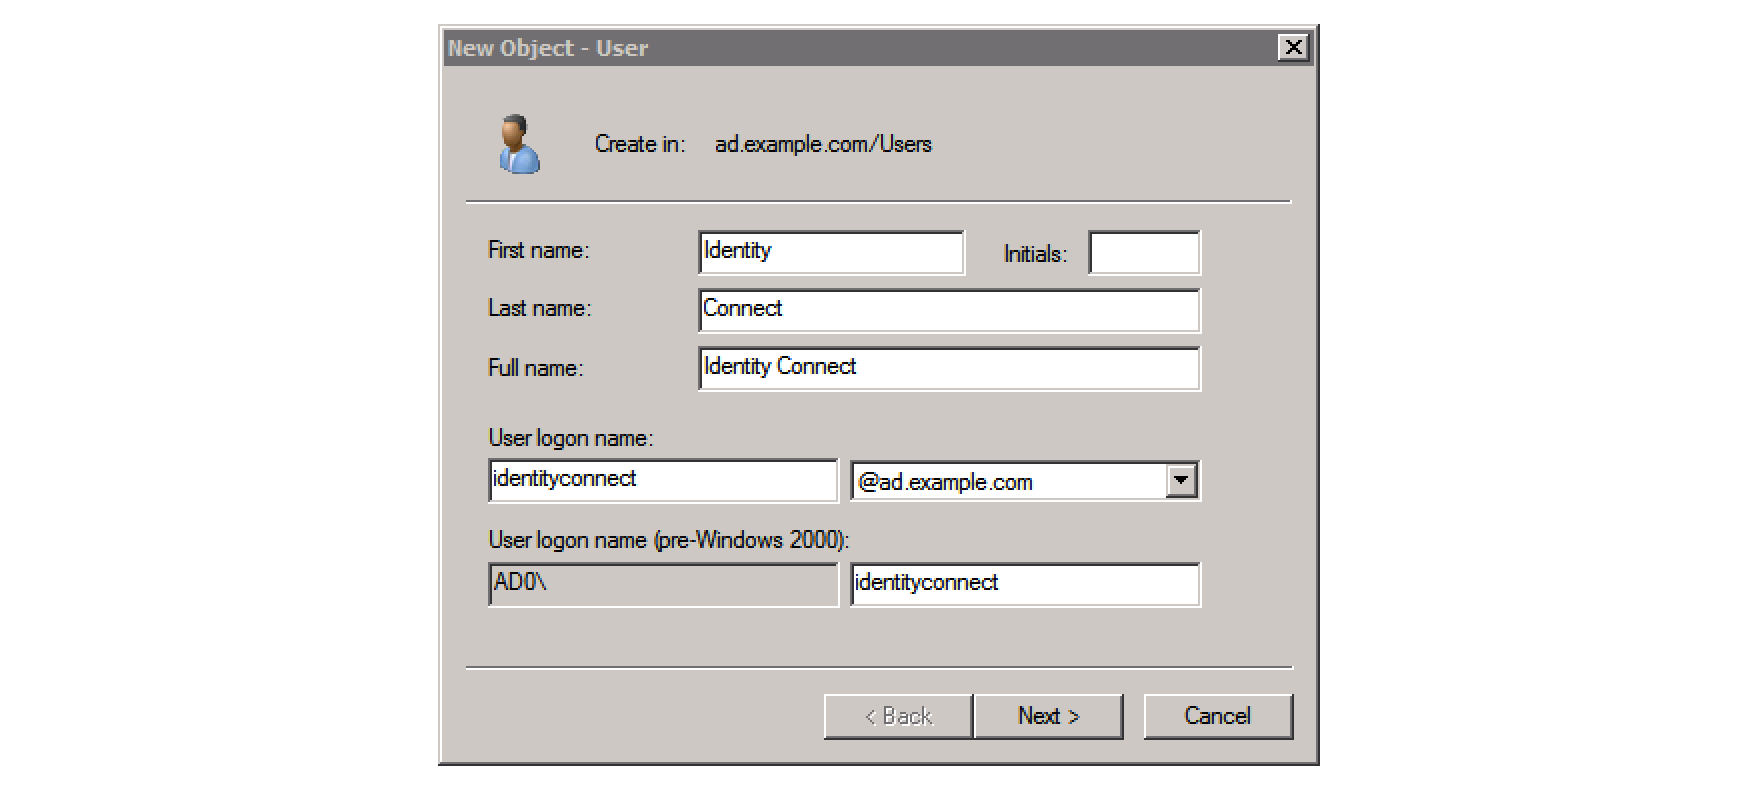
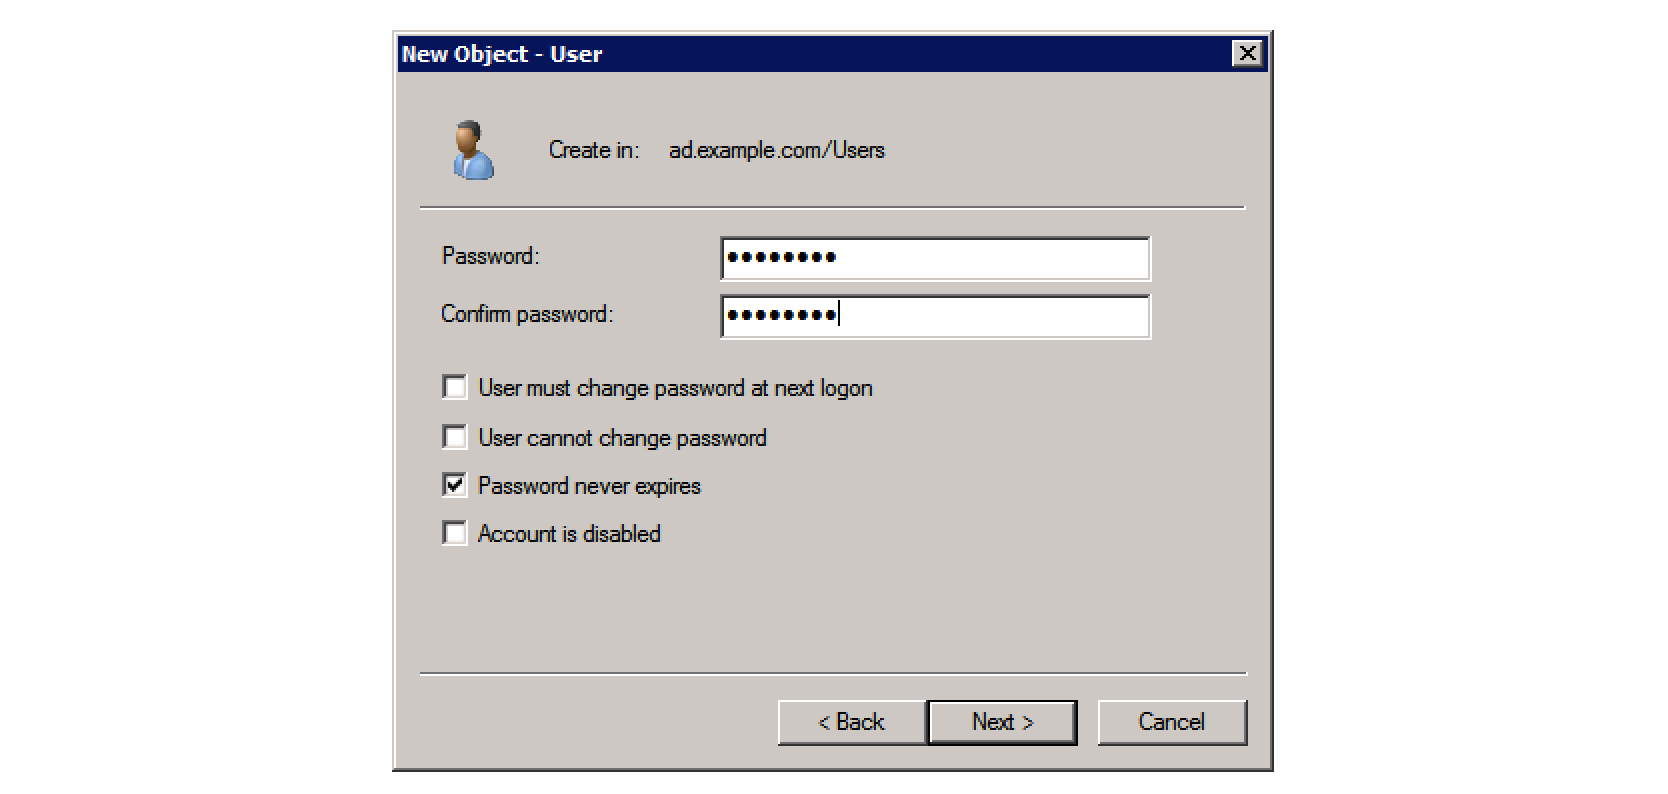
13.4.2.2. Creating the Keytab File
A Kerberos keytab file (krb5.keytab) enables Identity Connect to validate the Kerberos tickets that it receives from client browsers. You must create a Kerberos keytab file for the host on which Identity Connect is running.
This section describes how to use the ktpass command, included in the Windows Server toolkit, to create the keytab file. Run the ktpass command on the Active Directory domain controller. Pay close attention to the use of capitalization in this example because the keytab file is case-sensitive.
The following command creates a keytab file (named identityConnect.HTTP.keytab) for the Identity Connect service located at connect.ad.example.com.
ktpass ` -princ HTTP/connect.ad.example.com@AD.EXAMPLE.COM ` -mapUser AD\identityconnect ` -mapOp set ` -pass Passw0rd1 ` -crypto ALL ` -pType KRB5_NT_PRINCIPAL ` -kvno 0 ` -out identityConnect.HTTP.keytabTargeting domain controller: host.ad.example.com Using legacy password setting method Successfully mapped HTTP/connect.ad.example.com to identityconnect. Key created. Output keytab to identityConnect.HTTP.keytab: Keytab version: 0x502 keysize 79 HTTP/connect.ad.example.com@AD.EXAMPLE.COM ptype 1 (KRB5_NT _PRINCIPAL) vno 0 etype 0x1 (DES-CBC-CRC) keylength 8 (0x73a28fd307ad4f83) keysize 79 HTTP/connect.ad.example.com@AD.EXAMPLE.COM ptype 1 (KRB5_NT _PRINCIPAL) vno 0 etype 0x3 (DES-CBC-MD5) keylength 8 (0x73a28fd307ad4f83) keysize 87 HTTP/connect.ad.example.com@AD.EXAMPLE.COM ptype 1 (KRB5_NT _PRINCIPAL) vno 0 etype 0x17 (RC4-HMAC) keylength 16 (0xa87f3a337d73085c45f9416b e5787d86) keysize 103 HTTP/connect.ad.example.com@AD.EXAMPLE.COM ptype 1 (KRB5_N T_PRINCIPAL) vno 0 etype 0x12 (AES256-SHA1) keylength 32 (0x6df9c282abe3be787553 f23a3d1fcefc6fc4a29c3165a38bae36a8493e866d60) keysize 87 HTTP/connect.ad.example.com@AD.EXAMPLE.COM ptype 1 (KRB5_NT _PRINCIPAL) vno 0 etype 0x11 (AES128-SHA1) keylength 16 (0xf616977f071542cd8ef3f f4e2ebcc09c)
The ktpass command takes the following options:
princSpecifies the principal name, in the format
service/fully-qualified-host-name@realm.In this example (
HTTP/connect.ad.example.com@AD.EXAMPLE.COM), the client browser constructs an SPN based on the following:The service name (HTTP).
The service name for SPNEGO web authentication must be HTTP.
The FQDN of the host on which Identity Connect runs (
connect.ad.example.com).This example assumes that users will access Identity Connect at the URL
https://connect.ad.example.com:8443/#/connect/login.The Kerberos realm name (
AD.EXAMPLE.COM).The realm name must be in upper case. A Kerberos realm defines the area of authority of the Kerberos authentication server.
mapUserSpecifies the name of the Kerberos user account to which the principal should be mapped (the account that you created in "Creating a Specific Kerberos User Account for Identity Connect"). In our example, the Kerberos user name is
identityconnect.mapOpSpecifies how the Kerberos user account is linked. Use
setto set the first user name to be linked. The default (add) adds the value of the specified local user name if a value already exists.passSpecifies a password for the principal user name. Use "*" to prompt for a password.
cryptoSpecifies the cryptographic type of the keys that are generated in the keytab file. Use
ALLto specify all crypto types.This procedure assumes a 128-bit cryptosystem, with a default RC4-HMAC-NT cryptography algorithm. Use the ktpass command to view the crypto algorithm, as follows:
ktpass -in .\identityConnect.HTTP.keytabExisting keytab: Keytab version: 0x502 keysize 79 HTTP/connect.ad.example.com@AD.EXAMPLE.COM ptype 1 (KRB5_NT_PRINCIPAL) vno 0 etype 0x1 (DES-CBC-CRC) keylength 8 (0x73a28fd307ad4f83) keysize 79 HTTP/connect.ad.example.com@AD.EXAMPLE.COM ptype 1 (KRB5_NT_PRINCIPAL) vno 0 etype 0x3 (DES-CBC-MD5) keylength 8 (0x73a28fd307ad4f83) keysize 87 HTTP/connect.ad.example.com@AD.EXAMPLE.COM ptype 1 (KRB5_NT_PRINCIPAL) vno 0 etype 0x17 (RC4-HMAC) keylength 16 (0xa87f3a337d73085c45f9416be5787d86) keysize 103 HTTP/connect.ad.example.com@AD.EXAMPLE.COM ptype 1 (KRB5_NT_PRINCIPAL) vno 0 etype 0x12 (AES256-SHA1) keylength 32 (0x6df9c282abe3be787553f23a3d1fcefc6 fc4a29c3165a38bae36a8493e866d60) keysize 87 HTTP/connect.ad.example.com@AD.EXAMPLE.COM ptype 1 (KRB5_NT_PRINCIPAL) vno 0 etype 0x11 (AES128-SHA1) keylength 16 (0xf616977f071542cd8ef3ff4e2ebcc09c)If your company's Active Directory server requires a higher strength cryptosystem, such as
AES256-SHA1, see Use of a high strength cipher for the keytab.ptypeSpecifies the principal type. Use
KRB5_NT_PRINCIPAL.kvnoSpecifies the key version number. Set the key version number to 0.
outSpecifies the name of the keytab file that will be generated. Use
identityConnect.HTTP.keytab.Important
The keys that are stored in the keytab file are similar to user passwords. You must therefore protect the Kerberos keytab file in the same way that you would protect a file containing passwords.
For more information about the ktpass command, see the ktpass reference in the Windows server documentation.
13.4.2.3. Setting Up The Keytab File For a Load Balanced Deployment
If you are using Identity Connect behind a load balancer, you must create an additional Kerberos user account for the load balancer, and a keytab file for the load balancer host. Create a new user account, as described in "Creating a Specific Kerberos User Account for Identity Connect". The examples in this section assume that the load balancer account is lb-user@ad.example.com.
Map this new account to an SPN, then create a keytab file for the load balancer SPN.
The following command maps the account (lb-user) to an SPN (HTTP/lb.ad.example.com) and creates a keytab file (lb.HTTP.keytab) for the load balancer located at lb.ad.example.com.
ktpass ` -princ HTTP/lb.ad.example.com@AD.EXAMPLE.COM ` -mapUser AD\lb-user ` -mapOp set ` -pass Passw0rd1 ` -crypto ALL ` -pType KRB5_NT_PRINCIPAL ` -kvno 0 ` -out lb.HTTP.keytabTargeting domain controller: host.ad.example.com Using legacy password setting method Successfully mapped HTTP/lb.ad.example.com to lb-user. Key created. Output keytab to lb.HTTP.keytab: Keytab version: 0x502 keysize 79 HTTP/lb.ad.example.com@AD.EXAMPLE.COM ptype 1 (KRB5_NT _PRINCIPAL) vno 0 etype 0x1 (DES-CBC-CRC) keylength 8 (0x73a28fd307ad4f83) keysize 79 HTTP/lb.ad.example.com@AD.EXAMPLE.COM ptype 1 (KRB5_NT _PRINCIPAL) vno 0 etype 0x3 (DES-CBC-MD5) keylength 8 (0x73a28fd307ad4f83) keysize 87 HTTP/lb.ad.example.com@AD.EXAMPLE.COM ptype 1 (KRB5_NT _PRINCIPAL) vno 0 etype 0x17 (RC4-HMAC) keylength 16 (0xa87f3a337d73085c45f9416b e5787d86) keysize 103 HTTP/lb.ad.example.com@AD.EXAMPLE.COM ptype 1 (KRB5_N T_PRINCIPAL) vno 0 etype 0x12 (AES256-SHA1) keylength 32 (0x6df9c282abe3be787553 f23a3d1fcefc6fc4a29c3165a38bae36a8493e866d60) keysize 87 HTTP/lb.ad.example.com@AD.EXAMPLE.COM ptype 1 (KRB5_NT _PRINCIPAL) vno 0 etype 0x11 (AES128-SHA1) keylength 16 (0xf616977f071542cd8ef3f f4e2ebcc09c)
13.4.3. Configuring the Authentication Filter in Identity Connect
IWA is disabled in Identity Connect by default. Follow this procedure to enable IWA and to configure the authentication filter.
Log in to the Identity Connect administrative interface (for example
https://connect.ad.example.com:8443).Select Settings in the top right corner then select Authentication and Session.
Select Enable Integrated Windows Authentication.
Enter the following information:
Kerberos Distribution Center. Enter the FQDN or IP address of the Key Distribution Center (KDC), for example,
host.ad.example.com.For a single domain, this is usually the host machine on which your Active Directory server is installed. For multiple domains, check with your IT administrator for the value of this field.
Name resolution must be valid for the server that you specify here. If this is not the case, Identity Connect will be unable to contact the KDC. In a typical Windows environment, the KDC is part of the DNS record. This might not be the case if Identity Connect is located inside a DMZ.
Kerberos Realm. Enter the name of the Kerberos realm, in upper case, for example,
AD.EXAMPLE.COM.Note that this is the Kerberos realm described in "Creating the Keytab File".
Service Principal Name (SPN). Enter the SPN of the Kerberos user account that you created previously. This value must match the output that was obtained during the keytab creation. In our example, this would be
HTTP/connect.ad.example.com.If your service is behind a load balancer, enter the SPN of the load balancer user account here. In the previous example, this would be
HTTP/lb.ad.example.com.Select Choose Keytab File and locate the keytab file that you created in "Creating the Keytab File".
If your service is behind a load balancer, browse for the keytab file that you created for the load balancer host.
In a clustered environment, you must copy this load balancer keytab file to the
/path/to/salesforceIdConnect/securityfolder on all additional Identity Connect nodes.
Note
When IWA is enabled, the session idle timeout function does not work as expected. When a session times out, clicking on the UI triggers a transparent logout and login. This might make it appear as if the session remains active indefinitely.
If your service is behind a load balancer, perform the following additional steps:
Link the SPN that was created for the Identity Connect host to the user account that you created for the load balancer.
The following command checks which SPNs are registered for the load balancer user account:
setspn -L lb-userRegistered ServicePrincipalNames for CN=lb-user,CN=Users,DC=ad,DC=example,DC=com: HTTP/lb.ad.example.comCurrently, only the load balancer SPN is linked.
The following command links the Identity Connect SPN to the load balancer user account. The
-Soption verifies that there are no duplicate SPNs:setspn -S service name/host name user accountFor example:
setspn -S HTTP/connect.example.com lb-userChecking domain DC=ad,DC=example,DC=com Registering ServicePrincipalNames for CN=lb-user,CN=Users,DC=ad,DC=example,DC=com HTTP/connect.example.com Updated objectVerify that the new SPN has been registered correctly:
setspn -L lb-userRegistered ServicePrincipalNames for CN=lb-user,CN=Users,DC=ad,DC=example,DC=com: HTTP/lb.ad.example.com HTTP/connect.ad.example.comBoth SPNs are now linked to the load balancer user account.
Note
If you see the error KRB_ERR_RESPONSE_TOO_BIG, you might need to force Kerberos to use TCP instead of UDP on your Active Directory server. For more information, see the corresponding Microsoft Knowledge Base article.
Identity Connect is now configured for IWA.
In a load-balanced deployment, users access the server through the load balancer URL (https://lb.ad.example.com:8443/#/connect/login in our example).
13.4.4. Configuring Client Browsers for SPNEGO
Identity Connect uses the Simple and Protected GSSAPI Negotiation Mechanism (SPNEGO), to negotiate authentication mechanisms with the client browser. To access their Salesforce accounts through Identity Connect using IWA, clients must use a browser that supports SPNEGO authentication. Most modern browsers support SPNEGO but require some additional configuration to make it work.
The configuration required varies, depending on the operating system of the client from which you will access Identity Connect.
Note
The client and the host on which Identity Connect is installed must not be the same machine.
Google Chrome requires no additional configuration to support SPNEGO, except on Mac OS clients. For more information, see "To Enable Kerberos Authentication Mac OS".
13.4.4.1. Configuring Browsers for SPNEGO on Windows Clients
For Windows clients, the easiest way to configure browsers for SPNEGO is for the Windows client to join the Active Directory domain (ad.example.com in our example). Generally, this is already the case. If your client is not part of the Active Directory domain, follow these steps:
From the Control Panel, select System Properties > Advanced > Computer Name > Change.
In the Member of panel, select Domain and enter the name of the Active Directory domain.
To join the domain, you will need to provide the administrator's credentials.
After you have joined the domain, reboot your Windows client.
When the Windows client is part of the domain, configure the browser:
13.4.4.1.1. To Configure Internet Explorer for SPNEGO
Launch Internet Explorer and check that the Identity Connect URL is included in the list of "Trusted Sites", as follows:
From the Tools menu, select Internet Options and select the Security tab.
Select Trusted Sites and click the Sites button.
In the list of Websites, check that the URL for Identity Connect appears.
Click the
Custom Level...button.In the Settings pane, scroll down to User Authentication.
Select
Automatic logon with current username and password.
Select the Advanced tab and scroll down to the list of Security settings.
Make sure that Enable Integrated Windows Authentication is selected.
You should now be able to access Identity Connect, seamlessly, through Internet Explorer. No username or password should be required.
Ask your Active Directory administrator to push these changes to all client browsers.
13.4.4.1.2. To Configure Firefox for SPNEGO
Firefox supports SPNEGO, but it is disabled by default. To enable SPNEGO, follow these steps:
Enter the URL
about:configin the address bar.Click past the warnings about your warranty.
At the top of the page, search for
negotiate-authto filter the results.Double-click on
network.negotiate-auth.trusted-uris.In the dialog box, enter the Identity Connect URL and click OK.
You should now be able to access Identity Connect, seamlessly, through your Firefox browser, without providing a username and password.
13.4.4.2. To Enable Kerberos Authentication Mac OS
On a Mac OS client, there are two ways to enable Kerberos authentication.
Join the Mac OS client to the Active Directory domain.
Edit the
krb5.confto generate tickets by using kinit.
13.4.4.2.1. Joining a Mac OS X Client to an Active Directory Domain
Before you attempt to join an Active Directory domain from a Mac OS client, contact your system administrator, as some of these steps might require specific permissions.
Your Mac must have the following basic networking configuration:
An IP address and a subnet mask
A DNS hostname
A connection to a Windows DNS server
When you join the Mac to the domain, use the credentials of the domain administrator, or of a user account with the required privileges.
On your Mac client, follow these steps to join the AD domain. These instructions are for Mac OS X Mojave. You might need to adjust these instructions for your particular Mac OS version:
Select System Preferences > Users and Groups > Login Options
Click the Lock icon to enable you to change these settings.
Click the Join button next to Network Account Server.
Enter the name of the KDC server (
ad.example.comin our example).Enter the credentials of the administration user for the KDC server and click OK.
After you have added the Mac to the domain, configure your browser for SPNEGO:
Safari browsers require no additional configuration.
For Firefox, edit the list of
network.negotiate-auth.trusted-uris, as described in "To Configure Firefox for SPNEGO".Google Chrome requires command line arguments to enable SPNEGO support. To access Identity Connect without a username and password on Chrome, launch Chrome, from a terminal window, as follows:
open '/Applications/Google Chrome.app' \
 --args \
 --auth-server-whitelist="connect.ad.example.com" \
 --auth-negotiate-delegate-whitelist="connect.ad.example.com" \
 --auth-schemes="digest,ntlm,negotiate" \
 https://connect.ad.example.com:8443/#/connect/login
13.4.4.2.2. Using a Kerberos Configuration File to Generate Tickets With kinit
If you are unable to join your Mac OS or Unix system to the Windows domain (or if your company policy prevents you from doing so) you can use the kinit command to generate Kerberos tickets.
The Kerberos configuration file (krb5.conf) contains configuration information that is required by the Kerberos library, including the default Kerberos realm and the location of the Kerberos Key Distribution Center (KDC):
Edit the
/etc/krb5.conffile. (If this file does not exist, create a newkrb5.conffile in the/etcdirectory.)The file contents must include the Kerberos information specific to your site, including the permitted encryption types. The following example shows the Kerberos configuration file for the example described previously:
more /etc/krb5.conf[libdefaults] default_realm = AD.EXAMPLE.COM default_tkt_enctypes = arcfour-hmac aes256-cts default_tgs_enctypes = arcfour-hmac aes256-cts [realms] AD.EXAMPLE.COM = { admin_server = 192.0.2.0 kdc = 192.0.2.0 kpasswd = 192.0.2.0 } [domain_realm] .yourdomain.com = AD.EXAMPLE.COM localhost = AD.EXAMPLE.COMWhen the Kerberos configuration file is in place, generate the initial TGT Kerberos ticket that will be used by Safari, Chrome and Firefox to request additional tickets.
Use kinit to generate the initial ticket:
kinit admin@AD.EXAMPLE.COMadmin@AD.EXAMPLE.COM's Password: ********The format in which the user name is entered depends on how your client machine is configured (so might be simply kinit admin in your case).
Run the klist command to verify that the ticket has been created.
klist -vCredentials cache: API:501:68 Principal: admin@AD.EXAMPLE.COM Cache version: 0 Server: krbtgt/connect.ad.example.com@AD.EXAMPLE.COM Client: admin@AD.EXAMPLE.COM Ticket etype: aes256-cts-hmac-sha1-96, kvno 2 Ticket length: 1051 Auth time: Jun 4 16:10:43 2013 End time: June 5 02:09:01 2013 Ticket flags: pre-authent, initial, proxiable, forwardable Addresses: addressless
After the ticket has been generated, launch your browser and edit the list of network.negotiate-auth.trusted-uris, as described in the previous section. You should now be able to access Identity Connect through your browser.
13.5. Synchronizing Passwords With the Active Directory Password Sync Plugin
Identity Connect can intercept and synchronize passwords that are changed natively in Active Directory and propagate these password changes to Salesforce. To accomplish this synchronization, a filter named the Active Directory Password Sync Plugin is deployed on your Active Directory domain controller. The password sync plugin captures password changes when they are available in clear text, encrypts them, and passes them to Identity Connect. Identity Connect in turn passes the change to Salesforce. A trigger then sets the password in Salesforce. If Identity Connect is unavailable when a password change occurs, the password change is queued for subsequent retry. Note that the passwords themselves are never stored in Identity Connect.
When password synchronization is set up, users can authenticate with the same password in both Active Directory and Salesforce. This enables direct authentication with Salesforce, without having to be redirected to Identity Connect. Direct authentication might be necessary when Identity Connect is behind a firewall or is otherwise inaccessible to a user.
Caution
Although the password synchronization plugin is a useful tool, it is not the easiest mechanism to achieve common credentials. Solutions such as Delegated Authentication or Federation are generally a better approach for achieving common passwords across your resources. Please consult directly with Salesforce before implementing this feature. Additionally, please ensure that you have Active Directory and certificate management expertise internally, or engage with an implementation partner when implementing this feature.
To prevent password updates on Active Directory from being rejected by Salesforce, make sure that the password policy enforcement on Active Directory is identical to the password policy on Salesforce.
The following sections walk you through the steps required to install the password synchronization plugin and to enable password synchronization between Active Directory and Salesforce. These steps assume that you are running at least Microsoft Windows Server 2012 R2.
Setting up password synchronization involves the following steps:
13.5.1. Setting up a Custom Field and Trigger for Password Synchronization
Password synchronization requires that you create a custom user field and an Apex trigger for each Salesforce organization for which you want passwords to be synchronized.
Log in to your Salesforce organization and select Setup.
Under App Setup, select Customize > Users > Fields.
Scroll down to the User Custom Fields item and select New.
On the Data Type page, select Text then select Next.
Provide the following information:
- Field Label
Enter
PWSyncas the name of the new field.- Length
Set the maximum length of the password field to
100.- Field Name
Defaults to the value you set for the
Field Label(PWSync).
Leave the remaining fields blank and select Next to continue.
Under Field-Level Security, limit the field's visibility to System Administrator (uncheck all other items), then select Next.
On the Add to Page Layouts page, deselect Add Field, then select Save.
On your organization's Setup page, under App Setup, select Customize > Users > Triggers.
On the User Triggers page, select New.
On the Apex Trigger tab, paste the following script:
trigger PWSync on User (before insert, before update) {

    for(User u: Trigger.new){
        if (u.PWSync__c != null ) {
            System.setPassword(u.Id, u.PWSync__c);
            u.PWSync__c = null;
        }
    }

}
Select Save to save the new trigger.
13.5.2. Exporting the Encryption Key
The password synchronization plugin encrypts passwords using the Advanced Encryption Standard (AES). The AES key is encrypted using Identity Connect's public key. Identity Connect then uses its private key to decrypt the AES key and then uses the AES key to decrypt the password.
This section describes how to export Identity Connect's public key and certificate to the Active Directory host, so that the password synchronization plugin can use it to encrypt the AES key. The same certificate is used by the password synchronization plugin to trust the SSL certificate provided by Identity Connect over REST.
The certificate that Active Directory uses to authenticate to Identity Connect must be configured with an appropriate encoding, cryptographic hash function, and digital signature. The plugin can read a public or a private key from a PKCS12 archive file. For production purposes, you should use a certificate that has been issued by a Certificate Authority. For testing purposes, you can use the self-signed certificate that is generated by Identity Connect. Whichever certificate you use, you must import that certificate into the Identity Connect trust store, as shown in the following procedure.
The plugin itself will be installed on your Active Directory Domain Controller in the next section.
Important
Encryption of the password over the network relies on a secure (SSL) connection between Identity Connect and the Active Directory host—that is, a connection over HTTPS, using a secure port. If the connection between Identity Connect and Active Directory is over plain HTTP, the password is sent in clear text.
By default, the plugin does not validate the Identity Connect certificate. In a production environment, you should configure certificate validation by setting the following registry key:
netSslVerifyPeer = True
For more information, see "Changing the Password Synchronization Plugin Configuration After Installation".
On the host running Identity Connect, export Identity Connect's public certificate (with alias
openidm-localhost).Use the
-rfcoption to print the certificate in PEM format.The default keystore password is
changeit.cd /path/to/salesforceIdConnect/securitykeytool \ -export \ -alias openidm-localhost \ -file openidm-localhost-cert.crt \ -keystore keystore.jceks \ -storetype jceks \ -rfc \ -storepass changeitCertificate stored in file <openidm-localhost-cert.crt>Export the public key and certificate as a .p12 file, named
ad-pwd-plugin-localhost.p12.The
Export Passwordthat you enter here will be used to open the file. You will need this export password when you set up the password synchronization plugin, in the following section. This example usesPassw0rdfor the export password.openssl pkcs12 \ -export \ -nokeys \ -in openidm-localhost-cert.crt \ -out ad-pwd-plugin-localhost.p12Enter Export Password: <Passw0rd> Verifying - Enter Export Password: <Passw0rd>Copy the p12 certificate file (
ad-pwd-plugin-localhost.p12) that you created in the previous step to your Active Directory Domain Controller.The following procedure assumes that you have copied the file to
C:\Users\Administrator\Desktop\ad-pwd-plugin-localhost.p12.Update your Identity Connect security configuration.
Edit the
conf/secrets.jsonfile in your Identity Connect installation, adding theopenidm-localhostkey alias to theidm.defaultsecret ID.For example:
"mappings": [
    {
        "secretId" : "idm.default",
        "types": [ "ENCRYPT", "DECRYPT" ],
        "aliases": [
            "&{openidm.config.crypto.alias|openidm-sym-default}",
            "openidm-localhost"
        ]
    },
...
For more information on the purpose of this file, and how Identity Connect manages its keystore and truststore, see the corresponding ForgeRock® Identity Management documentation.
13.5.3. Enabling Password Synchronization in the Identity Connect Configuration
Password synchronization is disabled by default. To adjust the Identity Connect configuration to enable password synchronization, send the following REST call to your Identity Connect instance specifying the ID of your Salesforce organization in the JSON payload and in the URL:
curl \ --header "X-OpenIDM-Username: bjensen" \ --header "X-OpenIDM-Password: Passw0rd" \ --header "Content-Type: application/json" \ --header "If-match: *" \ --request PUT \ --data '{ "name": "Identity Connect", "salesforceACSURL": "https://cs36.salesforce.com?so=orgID", "passwordSyncEnabled": true, "enableLiveUpdates": false }' \ "https://localhost:8443/openidm/endpoint/salesforceOrganization/orgID"{ "_id": "orgID", "name": "Identity Connect", "salesforceACSURL": "https://cs11.salesforce.com?so=orgID", "passwordSyncEnabled": true, "enableLiveUpdates": false }
Tip
To obtain the orgID, look at the connector configuration files in your Identity Connect conf directory. These files are named provisioner.openicf-orgID.json. There should be one configuration file for each Salesforce organization you have configured, and one file for the connection to Active Directory. For example:
cd /path/to/salesforceIdConnect/conf/ ls provisioner.openicf-*provisioner.openicf-00DZ0000009SaxM.json provisioner.openicf-AD.json
13.5.4. Installing the Password Sync Plugin
The password sync plugin is provided with the Identity Connect delivery and must be installed on each Active Directory Primary Domain Controller. The plugin intercepts password changes and sends updated password values to Identity Connect over an encrypted channel. You must have Administrator privileges to install the plugin.
After you have extracted the Identity Connect installation, change to the
bindirectory.C:\>
cd salesforceIdConnect\binCopy the plugin setup file (
ad-passwordchange-handler.exe) to a location on your Active Directory Domain Controller.Double-click on the setup file to launch the password sync setup wizard.
Accept the Common Development and Distribution License (CDDL) agreement to proceed with the installation.
On the OpenIDM Information Connection screen, provide the following information:
OpenIDM URL. Enter the URL at which Identity Connect is accessed (including the port) plus the following endpoint and query
/openidm/endpoint/sfpwdplugin?_action=patch-by-query&_uid=${samaccountname}For example:
https://connect.example.com:8443/openidm/endpoint/sfpwdplugin?_action=patch-by-query&_uid=${samaccountname}Note
The Active Directory server must be able to access this URL directly.
OpenIDM User Password attribute. The Identity Connect implementation of the password sync plugin ignores this value, so you can leave the default (
password).
On the Authentication screen, enter the credentials of a user that has administrative privileges in Identity Connect.
Select OpenIDM Header as the authentication type.
On the Password Encryption screen, provide the following information:
Certificate file. Browse to locate the p12 certificate file (
ad-pwd-plugin-localhost.p12) that you copied previously.Private key alias. Specify the name of the p12 certificate file (
openidm-localhostin our example).Password to open certificate file. Enter the export password that you chose when you created the p12 certificate file (
Passw0rdin our example).Select encryption key type. Specify the encryption key type that will be used when encrypting the password value (AES-128, AES-192, or AES-256).
If you select an encryption key type greater than AES-128, you must install the Unlimited JCE Policy for your JRE, on the machine on which Identity Connect is installed. To install the unlimited JCE Policy, follow these steps:
Download the JCE zip file for Java 8 from the Oracle Technetwork site.
Locate the
lib\securityfolder of your JRE, for example,C:\Program Files\Java\jre8\lib\security.Remove the following
.jarfiles from thelib\securityfolder:local_policy.jarUS_export_policy.jarUnzip the JCE zip file and copy the two
_policy.jarfiles to thelib\securityfolder of your JRE.If Identity Connect is already running, you must restart it for the installation of the JCE policy files to take effect.
On the Data Storage screen, provide the following information:
Browse for the folder in which queued password changes will be stored.
If Identity Connect cannot be reached when a password change is made on Active Directory, the change is placed in this queue. All outstanding password changes are propagated when Identity Connect becomes available.
Because this folder contains password information, it is strongly recommended that you restrict access to this folder to administrators.
Specify the interval at which the data storage queue should be polled for changes. The default interval is 60 seconds.
On the Log Storage screen, provide the following information:
Browse for the folder in which log files will be stored.
Specify the level at which messages will be logged. The amount of information that is logged corresponds to the following log levels, from the logging all messages (
debug) to logging only fatal errors (fatal).debuginfowarningerrorfatal
In general, you should set the log level to
debugorinfoin production, to ensure that you capture enough information to help diagnose issues.
Select the directory in which the password synchronization plugin will be installed.
The plugin is installed in
C:\Program Files\OpenIDM Password Syncby default.Select Next, then select Install to complete the installation process.
When the installation is complete, you must restart your Active Directory Domain Controller for the password synchronization plugin to start working.
Select Finish to restart the Domain Controller.
13.5.5. Testing Password Synchronization
After you have installed the password synchronization plugin, test that it is working by changing the password of an Active Directory user. The password change can take some time to be propagated to Salesforce, after which you should be able to log into Salesforce with the new credentials.
If the synchronization is not successful, you should see the change request in the password queue location that you specified when you installed the plugin. You can remove the change request by deleting the file.
The debug logs are located in the password plugin log directory that you specified when you installed the plugin. Additional debugging information is available in the /path/to/salesforceIdConnect/logs/openidm.log file.
13.5.6. Changing the Password Synchronization Plugin Configuration After Installation
If you need to change any settings after installation, access the settings using the Registry Editor under HKEY_LOCAL_MACHINE > SOFTWARE > ForgeRock > OpenIDM > PasswordSync. For information about creating registry keys, see the corresponding Windows documentation.
Tip
For an up-to-date listing of the most current plugin registry key settings, see the corresponding IDM documentation.
13.6. Understanding Scheduled Synchronization Operations
Identity Connect provides CRON-based schedules for specific synchronization operations. By default, these schedules are disabled. You enable them by enabling Live Updates and Scheduled Updates in the Sync Settings on the Sync tab.
You should adjust these schedules on the Sync tab, rather than by manipulating the corresponding schedule files directly. This section describes the configuration files for troubleshooting purposes.
The file-based configuration for these scheduled tasks is in files named schedule* in the /path/to/salesforceIdConnect/conf directory. The following schedules are provided:
schedule-livesyncADAccounts.jsonScheduled operation to propagate changes made to Active Directory user accounts to the corresponding accounts in Identity Connect before synchronizing these changes with Salesforce.
schedule-livesyncADGroups.jsonScheduled operation to propagate changes made to Active Directory groups to the corresponding groups in Identity Connect before synchronizing these changes with Salesforce.
schedule-reconADAccounts.jsonScheduled operation to reconcile all Active Directory user accounts with the Identity Connect repository, before synchronizing these accounts with Salesforce.
schedule-reconADGroups.jsonScheduled operation to reconcile all Active Directory group accounts with the Identity Connect repository, before synchronizing these groups with Salesforce.
schedule-salesforce_DataSyncCron_orgID.jsonThis schedule configuration is created only after you configure the connection to your Salesforce org. The operation reconciles the users and groups in the Identity Connect repository with the corresponding users and groups in your Salesforce org.
The schedule-livesync* and schedule-recon* schedules are not managed through the UI, as they are not intended to be changed. These schedules should always be enabled, after the initial Refresh Associations run, so that they can keep the Active Directory objects mirrored in Identity Connect.
The schedule-livesync* schedules poll Active Directory every five seconds to pick up USNchanged information and replay it immediately to Identity Connect. You disable the schedules, or modify the five second polling, if a delayed propagation of this information, during reconciliation, is acceptable in your deployment.
The schedule-recon* schedules are also intended to mirror Active Directory objects in Identity Connect but are required specifically to deal with objects that have been deleted. Deleted objects do not have a usnChanged attribute, so cannot be picked up by the live update process. You can modify these reconciliation schedules to run less frequently if required.
You should not disable these schedules for any reason other than temporary debugging.
The scheduler service depends on the Quartz Scheduler (bundled with Identity Connect). Schedule configurations have the following structure:
{
 "enabled"             : true,
 "persisted"           : true,
 "type"                : "cron",
 "concurrentExecution" : false,
 "schedule"            : "quartz expression",
 "misfirePolicy"       : "optional, string",
 "invokeService"       : "service identifier",
 "invokeContext"       : "service specific context info",
 "invokeLogLevel"      : "optional, level"
}
The configuration properties are as follows:
- enabled
Set to
trueto enable the schedule. When this property is set tofalse, Identity Connect considers the schedule configuration dormant, and does not allow it to be triggered or executed.If you want to retain a schedule configuration, but do not want it used, set
enabledtofalse, instead of changing the configuration or quartz expression.- persisted (optional)
Specifies whether the schedule state should be persisted or stored in RAM. Boolean (
trueorfalse),falseby default.In a clustered environment, this property must always be set to
trueto have the schedule fire only once across the cluster.- type
Identity Connect supports only
cronschedules.- concurrentExecution
Specifies whether multiple instances of the same schedule can run concurrently. Boolean (
trueorfalse),falseby default. Multiple instances of the same schedule cannot run concurrently by default. This setting prevents a new scheduled task from being launched before the same previously launched task has completed. For example, under normal circumstances you would want a live update operation to complete its execution before the same operation was launched again. To enable concurrent execution of multiple schedules, set this parameter totrue.- schedule
Specifies a Cron Trigger to schedule the operation. For more information about Cron Triggers, see the Quartz documentation.
- misfirePolicy
For persistent schedules, this optional parameter specifies the behavior if the scheduled task is missed, for some reason. Possible values are as follows:
fireAndProceed. The first execution of a missed schedule is immediately executed when Identity Connect is back online. Subsequent executions are discarded. After this, the normal schedule is resumed.doNothing, all missed schedules are discarded and the normal schedule is resumed when Identity Connect is back online.
- invokeService
Defines the type of scheduled event or action. The value of this parameter can be one of the following:
syncfor reconciliationprovisionerfor live updatesscriptto call some other scheduled operation defined in a script
- invokeContext
Specifies contextual information, depending on the type of scheduled event (the value of the
invokeServiceparameter).For example, following excerpt of a schedule configuration triggers the live update from Active Directory:
{ ... "invokeContext" : { "invokeService" : "provisioner", "invokeContext" : { "action" : "liveSync", "source" : "system/AD/__ALL__" } ...invokeLogLevel(optional)Specifies the level at which the invocation will be logged. Scheduled tasks can generate significant output to the log file, particularly for schedules that run very frequently. The default schedule log level is
debug. Adjust the log level to provide only the minimum required log messages for your deployment. You can change the level temporarily if you are troubleshooting synchronization issues.Set the value to one of the SLF4J log levels:
tracedebuginfowarnerrorfatal
13.7. Managing Audit Data
Auditing provides the data for all relevant reports, including those related to orphan accounts. Identity Connect uses audit event handlers to manage audit events, to send audit output to a specified location, and to control the output format.
The Identity Connect audit service logs information related to specific events or topics. The following list describes the default audit event handlers used by Identity Connect, and indicates which audit events are managed by which handlers by default:
- Repository Audit Event Handler
The repository audit event handler sends information to the PostgreSQL repository.
By default, only access events (who logged in to Identity Connect and when) are logged to the repository.
The repository audit event handler is also the default handler for queries on the audit logs.
- JSON Audit Event Handler
The JSON audit event handler logs events as JSON objects to a set of JSON files. The following events are logged to the JSON handler by default:
Activity Events
Activity events include create, update, delete, patch, and action events on internal and external objects. Entries in the activity log contain identifiers, both for the action that triggered the activity, and for the original caller and the relationships between related actions.
Activity events are logged to
/path/to/salesforceIdConnect/audit/activity.audit.jsonby default.Authentication Events
Identity Connect logs the results of authentication operations to the authentication log, including when and how a user authenticated and related events. The activity log contains additional details about each authentication action.
Authentication events are logged to
/path/to/salesforceIdConnect/audit/authentication.audit.jsonby default.Configuration Events
Identity Connect logs changes to the configuration in this log. The configuration log includes the "before" and "after" settings for each configuration item, with timestamps.
Configuration change events are logged to
/path/to/salesforceIdConnect/audit/config.audit.jsonby default.Synchronization Events
Identity Connect logs the results of live updates to this log, including the situations and actions taken on each object, by account. The activity log contains additional detail about each action.
Synchronization events are logged to
/path/to/salesforceIdConnect/audit/sync.audit.jsonby default.
Identity Connect uses the recon/assoc API, rather than the audit service, to store reconciliation run data. Therefore, the results of reconciliation runs are not audited by default. If you need audit logging on reconciliation runs, add recon to the list of topics audited by the JSON audit event handler.
The following example shows the JSON audit event handler configuration, with recon added:
{
    "class" : "org.forgerock.audit.handlers.json.JsonAuditEventHandler",
    "config" : {
        "name" : "json",
        "logDirectory" : "&{idm.data.dir}/audit",
        "buffering" : {
            "maxSize" : 100000,
            "writeInterval" : "100 millis"
        },
        "topics" : [
            "activity",
            "sync",
            "authentication",
            "recon",
            "config"
        ]
    }
}
All audit event handlers have a number of basic configuration properties. Specific audit event handlers have additional configuration properties. For detailed information about how to configure audit event handlers, see the corresponding IDM Audit Event Handler Configuration documentation.
Chapter 14. Troubleshooting an Identity Connect Installation
This chapter describes common problems that might occur during the installation and configuration of Identity Connect, and how these problems can be resolved.
14.1. Troubleshooting the Integrated Windows Authentication Configuration
This section describes problems that might occur during the configuration and use of Integrated Windows Authentication (IWA) with Identity Connect. The IWA configuration process is described in "Configuring Identity Connect for Integrated Windows Authentication".
The IWA setup involves three broad steps:
Configuring a Kerberos user account and creating a keytab file
Configuring the authentication filter in Identity Connect
Configuring the client browser to support SPNEGO
This troubleshooting section is broken down into those steps, to enable you to pinpoint problems in the configuration.
14.1.1. Configuring the Kerberos User account and Creating the Keytab File
The creation of a keytab and the configuration of a dedicated Active Directory user for the service are critical elements of a Kerberos configuration. Before describing potential problems with these elements, it is helpful to have an understanding of the main Kerberos components involved in the authentication process.
Kerberos distinguishes between two types of principals (accounts) - User Principal Name (UPN), and Service Principal Name (SPN). Both of these are essentially unique identifiers for the security identity of a user or of a computer. UPNs are of the format
userID@DNSDomainNamewhile SPNs are of the formatserviceClass/host:port/serviceName.Both UPNs and SPNs are registered in the Active Directory Domain Controller (DC) for the user account that the Identity Connect instance will use.
Kerberos authentication uses SPNs to identify the specific services to which clients have access. The first time a client requests authentication, the client must include the SPN of the Identity Connect service in its request. To do so, the Kerberos user account must be linked to the SPN of the service.
The Key Distribution Center (KDC) comprises two elements - the Authentication Service and the Ticket Granting Service. Identity Connect uses its keytab to authenticate against the Authentication Service (AS) and obtains a ticket from the Ticket Granting Service (TGS) for the specified Service Principal Name (SPN).
The AS uses the SPN to locate the service user entry in Active Directory and to retrieve the account password to establish a session key.
The following scenarios and misconfigurations can cause errors at this point.
- Incorrect UPN
If the user account uses a UPN that does not match the SPN that Identity Connect uses (and the SPN that is defined in the keytab), an error similar to the following is output:
===
Sep 6, 2013 4:33:52 AM org.forgerock.jaspi.modules.iwa.wdsso.WDSSO serviceLogin
SEVERE: IWA WDSSO: Service Login Error: Client not found in Kerberos database (6)
Sep 6, 2013 4:33:52 AM org.forgerock.jaspi.modules.iwa.wdsso.WDSSO serviceLogin
SEVERE: IWA WDSSO: Stack trace:
javax.security.auth.login.LoginException: Client not found in Kerberos database
 (6) at com.sun.security.auth.module.Krb5LoginModule.attemptAuthentication
 (Krb5LoginModule.java:759)
at com.sun.security.auth.module.Krb5LoginModule.login(Krb5LoginModule.java:580)
at sun.reflect.NativeMethodAccessorImpl.invoke0(Native Method)
at sun.reflect.NativeMethodAccessorImpl.invoke(NativeMethodAccessorImpl.java:57)
at sun.reflect.DelegatingMethodAccessorImpl.invoke
 (DelegatingMethodAccessorImpl.java:43)
at java.lang.reflect.Method.invoke(Method.java:606)
at javax.security.auth.login.LoginContext.invoke(LoginContext.java:784)
at javax.security.auth.login.LoginContext.access$000(LoginContext.java:203)
at javax.security.auth.login.LoginContext$4.run(LoginContext.java:698)
at javax.security.auth.login.LoginContext$4.run(LoginContext.java:696)
at java.security.AccessController.doPrivileged(Native Method)
at javax.security.auth.login.LoginContext.invokePriv(LoginContext.java:695)
at javax.security.auth.login.LoginContext.login(LoginContext.java:594)
at org.forgerock.jaspi.modules.iwa.wdsso.WDSSO.serviceLogin(WDSSO.java:601)
...
Caused by: KrbException: Client not found in Kerberos database (6)
at sun.security.krb5.KrbAsRep.<init>(KrbAsRep.java:76)
at sun.security.krb5.KrbAsReqBuilder.send(KrbAsReqBuilder.java:319)
at sun.security.krb5.KrbAsReqBuilder.action(KrbAsReqBuilder.java:364)
at com.sun.security.auth.module.Krb5LoginModule.attemptAuthentication
 (Krb5LoginModule.java:731)
... 61 more
Caused by: KrbException: Identifier doesn't match expected value (906)
at sun.security.krb5.internal.KDCRep.init(KDCRep.java:143)
at sun.security.krb5.internal.ASRep.init(ASRep.java:65)
at sun.security.krb5.internal.ASRep.<init>(ASRep.java:60)
at sun.security.krb5.KrbAsRep.<init>(KrbAsRep.java:60)
... 64 more
===
The message does, in fact, identify the issue, which occurs during the authentication attempt. In this case, the SPN name that is used by Identity Connect was not found in the Kerberos database (Active Directory).
The UPN, or user logon name, is the crucial attribute in this error. The UPN must match the SPN that Identity Connect uses.
After you have run the ktpass to create the keytab file, you can query the Kerberos user account to check the UPN and SPN that were added to the account. You can use the freely available ldapsearch command-line utility, or any other LDAP browser.
The following command uses
ldapsearchto query the Kerberos user account../ldapsearch \ --hostname ad-host \ --port 389 \ --bindDN "cn=administrator,cn=users,dc=ad,dc=example,dc=com" \ --bindPassword Secret12! \ --bindDN "cn=users,dc=ad,dc=example,dc=com" \ "(cn="Identity Connect")"dn: CN=Identity Connect,CN=Users,DC=ad,DC=example,DC=com objectClass: top objectClass: person objectClass: organizationalPerson objectClass: user cn: Identity Connect sn: Connect givenName: Identity distinguishedName: CN=Identity Connect,CN=Users,DC=ad,DC=example,DC=com instanceType: 4 ... sAMAccountName: identityconnect sAMAccountType: 805306368 userPrincipalName: HTTP/connect.ad.example.com@AD.EXAMPLE.COM servicePrincipalName: HTTP/connect.ad.example.com objectCategory: CN=Person,CN=Schema,CN=Configuration,DC=ad,DC=example,DC=comNote the values of the
userPrincipalNameandservicePrincipalNameto this user account.Important
This error might also be output if you have associated multiple Active Directory accounts with a single SPN. For more information, see Single SPN associated with multiple accounts.
- Inconsistent Key Version Number (kvno)
When you create a keytab without specifying a key version number (using the ktpass command without the
kvnooption), themsDS-KeyVersionNumberis automatically incremented in Active Directory. You can obtain the current key version number by using the klist command, for example:klist -ke -t security/identityConnect.HTTP.keytabKeytab name: FILE:security/identityConnect.HTTP.keytab KVNO Timestamp Principal ---- ----------------- -------------------------------------------------------- 5 01/01/70 00:00:00 HTTP/connect.forgerock.com@ad.example.comIf the key version number is incorrect, an error similar to the following is observed:
=== Sep 26, 2013 6:03:49 AM org.forgerock.jaspi.modules.iwa.wdsso.WDSSO process SEVERE: IWA WDSSO: Authentication failed with GSSException. Failure unspecified at GSS-API level (Mechanism level: Specified version of key is not available (44)) ====- Single SPN associated with multiple accounts
If the same SPN is associated with multiple Active Directory accounts, the Kerberos exchange will fail, because the Key Distribution Center is unable to determine which entry to use.
The error message might be confusing but is generally an indication that multiple accounts have been associated with the SPN:
===
Sep 26, 2013 6:21:36 AM org.forgerock.jaspi.modules.iwa.wdsso.WDSSO process
SEVERE: IWA WDSSO: Authentication failed with GSSException. Defective token
 detected (Mechanism level: GSSHeader did not find the right tag)
====
To check whether multiple accounts are linked to the same SPN, search the Active Directory Forest for all accounts linked to that SPN. Execute the following command on the Domain Controller:
setspn -Q {SERVICE_PRINCIPAL_NAME}where
{SERVICE_PRINCIPAL_NAME}is the SPN that you specified when you created the keytab file. This command lists all the Active Directory accounts that are associated with that SPN.- Use of a high strength cipher for the keytab
If you need to use a higher strength cryptosystem, such as
AES256-SHA1, the following additional configuration is required:Download and install the Unlimited JCE Policy for Java 8 from the Oracle Technetwork site.
Unzip the JCE zip file and install the JCE policy jar files in the
/lib/securityfolder of the JRE.When you have installed the Unlimited JCE policy, configure the
identityconnectuser entry to support AES 256-bit encryption.Select the
identityconnectuser entry and select Properties.On the Account tab, select AES 256 under Account Options.

If you do not configure the
identityconnectuser entry to support AES 256-bit encryption, the following error is displayed in the log:Jul 24, 2014 4:26:59 PM org.forgerock.jaspi.modules.iwa.wdsso.WDSSO process SEVERE: IWA WDSSO: Authentication failed with GSSException. Failure unspecified at GSS-API level (Mechanism level: Invalid argument (400) - Cannot find key of appropriate type to decrypt AP REP - RC4 with HMAC)
If the JCE Unlimited Policy files are not installed, an error similar to the following is seen in the logs when a
WWW-Authenticate : Negotiatetakes place:Jul 23, 2014 8:34:19 PM org.forgerock.jaspi.modules.iwa.wdsso.WDSSO serviceLogin SEVERE: IWA WDSSO: Service Login Error: Unable to obtain password from user Jul 23, 2014 8:34:19 PM org.forgerock.jaspi.modules.iwa.wdsso.WDSSO serviceLogin SEVERE: IWA WDSSO: Stack trace: javax.security.auth.login.LoginException: Unable to obtain password from user at com.sun.security.auth.module.Krb5LoginModule.promptForPass(Unknown Source) at com.sun.security.auth.module.Krb5LoginModule.attemptAuthentication(Unknown Source) at com.sun.security.auth.module.Krb5LoginModule.login(Unknown Source) at sun.reflect.NativeMethodAccessorImpl.invoke0(Native Method) at sun.reflect.NativeMethodAccessorImpl.invoke(Unknown Source) at sun.reflect.DelegatingMethodAccessorImpl.invoke(Unknown Source) at java.lang.reflect.Method.invoke(Unknown Source) at javax.security.auth.login.LoginContext.invoke(Unknown Source) at javax.security.auth.login.LoginContext.access$000(Unknown Source) at javax.security.auth.login.LoginContext$4.run(Unknown Source) at javax.security.auth.login.LoginContext$4.run(Unknown Source) at java.security.AccessController.doPrivileged(Native Method) at javax.security.auth.login.LoginContext.invokePriv(Unknown Source) at javax.security.auth.login.LoginContext.login(Unknown Source) at org.forgerock.jaspi.modules.iwa.wdsso.WDSSO.serviceLogin(WDSSO.java:601) at org.forgerock.jaspi.modules.iwa.wdsso.WDSSO.initWindowsDesktopSSOAuth(WDSSO.java:560) at org.forgerock.jaspi.modules.iwa.wdsso.WDSSO.process(WDSSO.java:139) at org.forgerock.jaspi.modules.iwa.IWAModule.validateRequest(IWAModule.java:107) at org.forgerock.openidm.jaspi.modules.IWAModule.validateRequest(IWAModule.java:105) at org.forgerock.openidm.jaspi.modules.IWAPassthroughModule.validateRequest (IWAPassthroughModule.java:114) at org.forgerock.openidm.jaspi.modules.IDMServerAuthModule.validateRequest (IDMServerAuthModule.java:139) at org.forgerock.jaspi.container.ServerAuthContextImpl.validateRequest (ServerAuthContextImpl.java:177) at org.forgerock.jaspi.filter.AuthNFilter.doFilter(AuthNFilter.java:162)This issue is similar to the issue of the SPN in the Identity Connect configuration not matching what is in the keytab file. Essentially, based on the cipher that is used in the keytab, Identity Connect cannot locate a valid key to use (not because the SPN does not match, but because it cannot locate an SPN with a valid cipher in the keytab).

14.1.2. Configuring the Authentication Filter in Identity Connect
This section highlights common errors that occur while configuring IWA in the Identity Connect admin console. These errors might result in some fairly cryptic messages being output. The errors can usually be resolved by updating the IWA configuration in the Identity Connect Administration interface, or by updating the configuration files in the path/to/salesforceIdConnect/security directory.
- Client and Identity Connect on the same node
The client (browser) and Identity Connect must be running on different hosts if you are using IWA. If they are on the same host, no ticket will be available to the client. In this case, the following error is logged:
SEVERE: IWA WDSSO: Authentication failed with GSSException. Defective token
detected (Mechanism level: GSSHeader did not find the right tag)
- Incorrect KDC server name specified in Identity Connect
If the name of the Key Distribution Center (KDC) server is incorrect, an error similar to the following is output to the openidm log files:
===
 org.forgerock.jaspi.modules.iwa.wdsso.WDSSO serviceLogin
 SEVERE: IWA WDSSO: Service Login Error: server-name: Name or service not known
 org.forgerock.jaspi.modules.iwa.wdsso.WDSSO serviceLogin
 SEVERE: IWA WDSSO: Stack trace:
 javax.security.auth.login.LoginException: server-name: Name or service not
 known at com.sun.security.auth.module.Krb5LoginModule.attemptAuthentication
  (Krb5LoginModule.java:763)
 .......
 Caused by: java.net.UnknownHostException: server-name: Name or service not
 known at java.net.Inet6AddressImpl.lookupAllHostAddr(Native Method)
 at java.net.InetAddress$1.lookupAllHostAddr(InetAddress.java:894)
 ===
This error should be resolved when you specify the correct name for the KDC server.
In the Identity Connect administration interface, click Settings and select the Authentication and Session tab. Enter the correct KDC server name in the Windows Domain Controller field.
- Incorrect SPN (Service Principal Name)
If the SPN that is specified in the Identity Connect configuration does not match the SPN that is provided in the keytab, Identity Connect is unable to acquire its login information. The following error is output to the openidm log files:
===
 org.forgerock.jaspi.modules.iwa.wdsso.WDSSO serviceLogin
 SEVERE: IWA WDSSO: Service Login Error: Unable to obtain password from user

 org.forgerock.jaspi.modules.iwa.wdsso.WDSSO serviceLogin
 SEVERE: IWA WDSSO: Stack trace:
 javax.security.auth.login.LoginException: Unable to obtain password from user
 ...
 ===
The message in the stack trace can be confusing. It indicates, however, that during the module initialization, the
promptForPass()method of theKrb5LoginModule.javamodule fails while attempting to validate the principal (SPN), by using the keytab.This error should be resolved when you provide an SPN in the Identity Connect configuration that matches the keytab.
In the Identity Connect administration interface, click Settings and select the Authentication and Session tab. Enter the correct SPN name in the Service Principal Name (SPN) field.
- Case sensitive realm name in the principal
The realm name must be written in upper case. The following is an example of a valid principal name:
HTTP/connect.ad.example.com@AD.EXAMPLE.COM
If the realm name is in lower case, for example:
HTTP/connect.ad.example.com@ad.example.com
errors such as the following are output to the logs:
===
 SEVERE: IWA WDSSO: Stack trace:
 javax.security.auth.login.LoginException: Message stream modified (41)
 at com.sun.security.auth.module.Krb5LoginModule.attemptAuthentication
  (Krb5LoginModule.java:696)
 at com.sun.security.auth.module.Krb5LoginModule.login(Krb5LoginModule.java:542)
 at sun.reflect.NativeMethodAccessorImpl.invoke0(Native Method)
 at sun.reflect.NativeMethodAccessorImpl.invoke(NativeMethodAccessorImpl.java:39)
 at sun.reflect.DelegatingMethodAccessorImpl.invoke
  (DelegatingMethodAccessorImpl.java:25)
 at java.lang.reflect.Method.invoke(Method.java:597)
 at javax.security.auth.login.LoginContext.invoke(LoginContext.java:769)
 at javax.security.auth.login.LoginContext.access$000(LoginContext.java:186)
 at javax.security.auth.login.LoginContext$4.run(LoginContext.java:683)
 at java.security.AccessController.doPrivileged(Native Method)
 at javax.security.auth.login.LoginContext.invokePriv(LoginContext.java:680)
 at javax.security.auth.login.LoginContext.login(LoginContext.java:579)
 at org.forgerock.jaspi.modules.iwa.wdsso.WDSSO.serviceLogin(WDSSO.java:601)
 at org.forgerock.jaspi.modules.iwa.wdsso.WDSSO.initWindowsDesktopSSOAuth
  (WDSSO.java:560)
 at org.forgerock.jaspi.modules.iwa.wdsso.WDSSO.process(WDSSO.java:139)
 at org.forgerock.jaspi.modules.iwa.IWAModule.validateRequest(IWAModule.java:107)
 at org.forgerock.openidm.jaspi.modules.IWAModule.validateRequest
  (IWAModule.java:105)
 at org.forgerock.openidm.jaspi.modules.IWAPassthroughModule.validateRequest
  (IWAPassthroughModule.java:114)
 at org.forgerock.openidm.jaspi.modules.IDMServerAuthModule.validateRequest
  (IDMServerAuthModule.java:139)
 at org.forgerock.jaspi.container.ServerAuthContextImpl.validateRequest
  (ServerAuthContextImpl.java:177)
 at org.forgerock.jaspi.filter.AuthNFilter.doFilter(AuthNFilter.java:162)
 ===
- Missing or incorrectly named keytab file
If the keytab file is absent or does not match the default keytab file name that Identity Connect expects (
identityConnect.HTTP.keytab, an error similar to the following is output to theopenidm0.log.*files:==== org.forgerock.jaspi.modules.iwa.wdsso.WDSSO verifyAttributes SEVERE: IWA WDSSO: Key Tab File does not exist ====
This error should be resolved when you copy the keytab file to the
path/to/salesforceIdConnect/securitydirectory (or when you rename the keytab file with the correct name). The new keytab file will be picked up automatically - there is no need to restart Identity Connect.- DNS issue with the connection URL
Problems with the DNS record of the Identity Connect host can result in an error similar to the following:
SEVERE: IWA WDSSO: Authentication failed with GSSException. Failure unspecified
at GSS-API level (Mechanism level: checksum failed)
To check whether there is a DNS issue, inspect the Kerberos tickets on the windows client from which the authentication was initiated. For example:
PS C:\Users\Administrator>
klist... Cached Tickets: (2) #0> Client: Administrator @ AD.EXAMPLE.COM Server: krbtgt/AD.EXAMPLE.COM @ AD.EXAMPLE.COM KerbTicket Encryption Type: AES-256-CTS-HMAC-SHA1-96 Ticket Flags 0x40e10000 -> forwardable renewable initial pre_authent name_canonicalize Start Time: 9/19/2016 3:10:44 (local) End Time: 9/19/2016 13:10:44 (local) Renew Time: 9/26/2016 3:10:44 (local) Session Key Type: AES-256-CTS-HMAC-SHA1-96 Cache Flags: 0x1 -> PRIMARY Kdc Called: AD #1> Client: Administrator @ AD.EXAMPLE.COM Server: HTTP/myserver001.example.com @ AD.EXAMPLE.COM KerbTicket Encryption Type: RSADSI RC4-HMAC(NT) Ticket Flags 0x40a00000 -> forwardable renewable pre_authent Start Time: 9/19/2016 3:10:44 (local) End Time: 9/19/2016 13:10:44 (local) Renew Time: 9/26/2016 3:10:44 (local) Session Key Type: RSADSI RC4-HMAC(NT)In this sample output, the connection URL for Identity Connect should be
connect.ad.example.comand notmyserver001.example.com. Examining the DNS configuration revealed that the DNS record for Identity Connect was an A record (myserver001.example.com) and not the required CNAME record (connect.ad.example.com). For more information on these record types, see this article.
14.2. Troubleshooting Data Reconciliation
The Settings > Diagnostics page breaks down reconciliation operations per mapping, enabling you to determine the cause of any failed reconciliations.
Mappings are named in the form source_target. For example, systemADGroup_managedRole.
A data source that begins with system is external to Identity Connect, so either Active Directory or Salesforce. A data source that begins with managed refers to data stored internally in the Identity Connect repository.
In order to reconcile Active Directory groups with Salesforce groups, the Active Directory group is mapped to an internal Identity Connect role. That internal (managed) role is then mapped to the corresponding Salesforce group.
If you are seeing reconciliation issues that you cannot resolve with the information on the Sync page, check the Diagnostics page and view the Last Reconciliation Details for specific mappings. You might need to contact your Salesforce support representative for assistance in understanding these diagnostics.
14.3. Debugging Scripts
The script configuration file (/path/to/salesforceIdConnect/conf/script.json) enables you to modify the parameters that are used when compiling, debugging, and running JavaScript and Groovy scripts.
By default, this file includes the following parameters:
- properties
Any custom properties that should be provided to the script engine.
- ECMAScript
Specifies JavaScript debug and compile options. JavaScript is an ECMAScript language.
javascript.debug- the JavaScript debugging configuration. By default this is set to the value of theopenidm.script.javascript.debugproperty in the/path/to/salesforceIdConnect/resolver/boot.propertiesfile.javascript.recompile.minimumInterval- minimum time after which a script can be recompiled.The default value is
60000, or 60 seconds. This means that any changes made to scripts will not get picked up for up to 60 seconds. If you are developing scripts, reduce this parameter to around100(100 milliseconds).If you set the
javascript.recompile.minimumIntervalto-1, or remove this property from thescript.jsonfile, Identity Connect does not poll JavaScript files to check for changes.
- Groovy
Specifies compilation and debugging options related to Groovy scripts. Many of these options are commented out in the default script configuration file. Remove the comments to set these properties:
groovy.warnings- the log level for Groovy scripts. Possible values arenone,likely,possible, andparanoia.groovy.source.encoding- the encoding format for Groovy scripts. Possible values areUTF-8andUS-ASCII.groovy.target.directory- the directory to which compiled Groovy classes will be output. The default directory isinstall-dir/classes.groovy.target.bytecode- the bytecode version that is used to compile Groovy scripts. The default version is1.5.groovy.classpath- the directory in which the compiler should look for compiled classes. The default classpath isinstall-dir/lib.groovy.output.verbose- specifies the verbosity of stack traces. Boolean,trueorfalse.groovy.output.debug- specifies whether debugging messages are output. Boolean,trueorfalse.groovy.errors.tolerance- sets the number of non-fatal errors that can occur before a compilation is aborted. The default is10errors.groovy.script.extension- specifies the file extension for Groovy scripts. The default is.groovy.groovy.script.base- defines the base class for Groovy scripts. By default any class extendsgroovy.lang.Script.groovy.recompile- indicates whether scripts can be recompiled. Boolean,trueorfalse, with defaulttrue.groovy.recompile.minimumInterval- sets the minimum time between which Groovy scripts can be recompiled.The default value is
60000, or 60 seconds. This means that any changes made to scripts will not get picked up for up to 60 seconds. If you are developing scripts, reduce this parameter to around100(100 milliseconds).groovy.target.indy- specifies whether a Groovy indy test can be used. Boolean,trueorfalse, with defaulttrue.groovy.disabled.global.ast.transformations- specifies a list of disabled Abstract Syntax Transformations (ASTs).
Note
By default, debug information (such as file name and line number) is excluded from JavaScript and Groovy exceptions. To troubleshoot script exceptions, you can include debug information by changing the following settings to true in your project's resolver/boot.properties file:
javascript.exception.debug.info=false
groovy.exception.debug.info=false
Including debug information in a production environment is not recommended.