Guide to installing, updating, and uninstalling ForgeRock® Identity Management software. This software offers flexible services for automating management of the identity life cycle.
Preface
ForgeRock Identity Platform™ serves as the basis for our simple and comprehensive Identity and Access Management solution. We help our customers deepen their relationships with their customers, and improve the productivity and connectivity of their employees and partners. For more information about ForgeRock and about the platform, see https://www.forgerock.com.
1. About This Guide
This guide shows you how to install ForgeRock Identity Management services for identity management, provisioning, and compliance. Unless you are planning an evaluation or test installation, read the Release Notes before you get started.
This guide is written for anyone installing ForgeRock Identity Management (IDM) software to manage identities, and to ensure compliance with identity management regulations.
It covers the install and removal (uninstall) procedures that you theoretically perform only once per version. It aims to provide you with at least some idea of what happens behind the scenes when you perform the steps.
You do not need a complete understanding of IDM software to learn something from this guide, though a background in identity management and maintaining web application software can help. You do need some background in managing services on your operating systems and in your application servers. You can nevertheless get started with this guide, and then learn more as you go along.
If you have a previous version of IDM software installed, see "Compatibility" in the Release Notes before you install this version.
2. Accessing Documentation Online
ForgeRock publishes comprehensive documentation online:
The ForgeRock Knowledge Base offers a large and increasing number of up-to-date, practical articles that help you deploy and manage ForgeRock software.
While many articles are visible to community members, ForgeRock customers have access to much more, including advanced information for customers using ForgeRock software in a mission-critical capacity.
ForgeRock product documentation, such as this document, aims to be technically accurate and complete with respect to the software documented. It is visible to everyone and covers all product features and examples of how to use them.
3. Using the ForgeRock.org Site
The ForgeRock.org site has links to source code for ForgeRock open source software, as well as links to the ForgeRock forums and technical blogs.
If you are a ForgeRock customer, raise a support ticket instead of using the forums. ForgeRock support professionals will get in touch to help you.
Chapter 1. Preparing to Install and Run Servers
This chapter covers the tasks required to prepare, install and start IDM.
Note
This documentation set includes a separate Samples Guide. When you have read the first two chapters of this document, use the Samples Guide to test a number of different deployment scenarios.
1.1. Before You Install
This section covers what you need to know before you install IDM.
1.1.1. Java Prerequisites
For details of the supported Java Environment, see "Preparing the Java Environment" in the Release Notes.
On Windows systems, you must set the JAVA_HOME
environment variable to point to the root of a valid Java installation. The
following steps indicate how to set the JAVA_HOME
environment variable on Windows Server 2008 R2. Adjust the steps for your
specific environment:
Locate your JRE Installation Directory. If you have not changed the installation path for the Java Runtime Environment during installation, it will be in a directory under
C:\Program Files\Java\.Select Start > Control Panel > System and Security > System.
Click Advanced System Settings.
Click Environment Variables.
Under System Variables, click New.
Enter the Variable name (
JAVA_HOME) and set the Variable value to the JRE installation directory, for exampleC:\Program Files\Java\jre8.Click OK.
On Linux systems, if startup.sh reports
JAVA_HOME not available, Java is needed to run
     IDM
and you've already installed Java, use the following
steps to set JAVA_HOME:
Open the user shell configuration file found in your home directory.
Add the
JAVA_HOMEvariable to the user shell configuration file, setting the value to/usr. In Bash, this would appear asexport JAVA_HOME="/usr".
1.2. Installing and Running Servers
Follow the procedures in this section to install and run IDM. To set up the server on a read-only volume, read "Installing on a Read-Only Volume".
Follow these steps to install IDM:
Make sure you have an appropriate version of Java installed:
$ java -version
java version "1.8.0_121"
Java(TM) SE Runtime Environment (build 1.8.0_121-b13)
Java HotSpot(TM) 64-Bit Server VM (build 25.121-b13, mixed mode)
For a description of the Java requirements, see "Before You Install" in the Release Notes.
Download IDM from the ForgeRock BackStage site. The ForgeRock BackStage site provides access to ForgeRock releases. These releases are thoroughly validated for ForgeRock customers who run the software in production deployments, and for those who want to try or test a given release.
Unpack the contents of the .zip file into the install directory:
$ unzip ~/Downloads/IDM-6.0.0.7.zip
Archive:  IDM-6.0.0.7.zip
  inflating: openidm/.checksums.csv
   creating: openidm/bundle/
 extracting: openidm/bundle/openidm-audit-6.0.0.7.jar
...
By default, IDM listens for HTTP and HTTPS connections on ports 8080 and 8443, respectively. To change the default port, edit your
resolver/boot.propertiesfile. For more information, see "Host and Port Information" in the Integrator's Guide.The hostname associated with IDM by default is
localhost. To change the default hostname, edit theopenidm.hostproperty in yourresolver/boot.propertiesfile.When you deploy IDM in production, you must set
openidm.hostto the URL of your deployment. If you do not do so, calls to the/adminendpoint are not redirected properly.Before running IDM in production, replace the default embedded DS repository with a supported repository.
For more information, see "Selecting a Repository".
To run IDM as a background process, see "Starting, Stopping, and Running the Server" in the Integrator's Guide.
Follow these steps to run IDM interactively:
Start the Felix container, load all services, and start a command shell to allow you to manage the container:
Start IDM (UNIX):
$ cd /path/to/openidm
$ ./startup.sh

Using OPENIDM_HOME:   /path/to/openidm
Using PROJECT_HOME:   /path/to/openidm
Using OPENIDM_OPTS:   -Xmx1024m -Xms1024m
Using LOGGING_CONFIG: -Djava.util.logging.config.file=/path/to/openidm/conf/logging.properties
-> OpenIDM version "6.0.0.7"
OpenIDM ready
Start IDM (Windows):
C:\> cd \path\to\openidm
C:\> startup.bat

"Using OPENIDM_HOME:   \path\to\openidm"
"Using PROJECT_HOME:   \path\to\openidm"
"Using OPENIDM_OPTS:   -Xmx1024m -Xms1024m -Dfile.encoding=UTF-8"
"Using LOGGING_CONFIG: -Djava.util.logging.config.file=\path\to\openidm\conf\logging.properties"
-> OpenIDM version "6.0.0.7"
OpenIDM ready
->
At the OSGi console
->prompt, you can enter commands such as help for usage, or ps to view the bundles installed. For a list of the core services and their states, run the following command:-> scr list BundleId Component Name Default State Component Id State PIDs (Factory PID) [ 5] org.forgerock.openidm.config.enhanced.starter enabled [ 1] [active ] org.forgerock.openidm.config.enhanced.starter [ 5] org.forgerock.openidm.config.manage enabled [ 0] [active ] org.forgerock.openidm.config.manage [ 10] org.forgerock.openidm.datasource.jdbc enabled [ 10] org.forgerock.openidm.repo.jdbc enabled [ 11] org.forgerock.openidm.repo.ds enabled [ 48] [active ] org.forgerock.openidm.repo.ds ... ->A default startup does not include certain configurable services, which will indicate an
unsatisfiedstate until they are included in the configuration. As you work through the sample configurations described later in this guide, you will notice that these services are active.Startup errors and messages are logged to the console by default. You can also view these messages in the log files at
/path/to/openidm/logs.Alternatively, you can manage the container and services from the Apache Felix Web Console.
Use these hints to connect to the Apache Felix Web Console:
Default URL: https://localhost:8443/system/console
Default user name:
adminDefault password:
admin
Select Main > Components to see core services and their respective states.
You can stop IDM from the -> prompt in the
OSGi console, or through the Apache Felix Web Console. Both of these
options stop the Felix container.
In the OSGi console, enter the shutdown command at the
->prompt:-> shutdown ... $
In the Apache Felix Web Console, select Web Console > System Information to stop the container.
On Unix systems, you can stop IDM by using the shutdown.sh script, located in the
/path/to/openidmdirectory:$ ./shutdown.sh ./shutdown.sh Stopping OpenIDM (31391)
1.3. Installing IDM as a Service
The following sections describe how to install and run IDM as a service, on Windows and Linux systems:
1.3.1. Installing as a Windows Service
You can install IDM to run as a Windows service so that the server starts and stops automatically when Windows starts and stops. You must be logged in as an administrator to install a Windows service.
Note
On a 64-bit Windows server, you must have a 64-bit Java version installed to start the service. If a 32-bit Java version is installed, you will be able to install IDM as a service, but starting the service will fail.
Before you launch the
service.bat file, which registers the
service within the Windows registry, make sure that your
JAVA_HOME environment variable points to a
valid 64-bit version of the JRE or JDK. If you have already installed the
service with the JAVA_HOME environment variable
pointing to a 32-bit JRE or JDK, delete the service first, then reinstall
the service.
Unpack the IDM-6.0.0.7.zip file, as described previously, and navigate to the
install-directory\bindirectory:C:\>cd openidm\bin C:\openidm\bin>
Run the
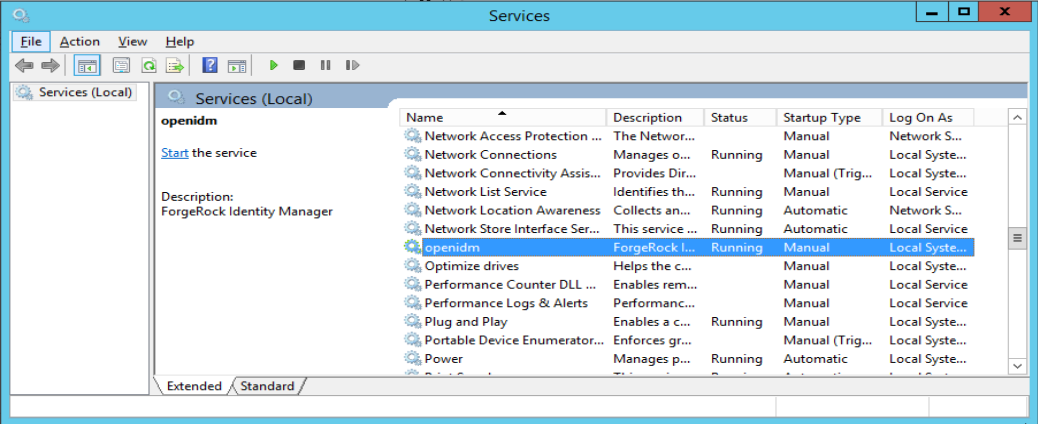
service.batcommand with the/installoption, specifying the name that the service should run as:C:\openidm\bin>service.bat /install openidm ForgeRock Identity Management Server successfully installed as "openidm" service
Use the Windows Service manager to manage the IDM service.
Running as a Windows Service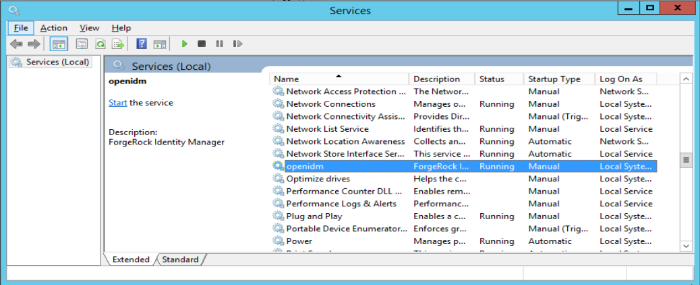
By default, the IDM service is run by
Local System, which is a system-level service account built in to Windows. Before deploying to production, it is recommended you switch to an account with fewer permissions. The account running the IDM service needs to be able to read, write, and execute only the directories related to IDM. For more information about service accounts, see Service Accounts in the Microsoft documentation.Use the Windows Service Manager to start, stop, or restart the service.
If you want to uninstall the IDM service, first use the Windows Service Manager to stop IDM and then run the following command:
C:\install-directory\openidm\bin>service.bat /uninstall openidm
 Service "openidm" removed successfully
If desired, you can then set up IDM with a specific project directory:
C:\install-directory\openidm\bin>service.bat /install openidm -p C:\project-directory
ForgeRock Identity Management Server successfully installed as "openidm" service
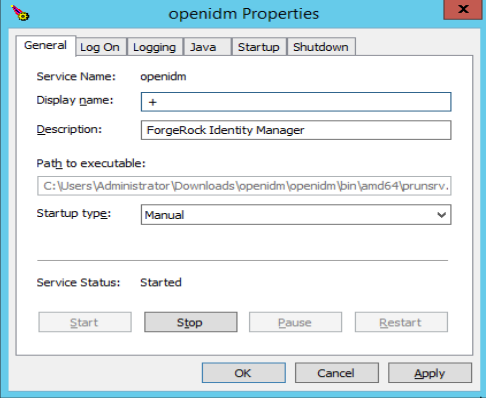
You can also manage configuration details with the Procrun monitor
application. IDM includes the associated
prunmgr.exe executable in the
C:\install-directory\openidm\bin directory.
For example, you can open the Windows service configuration application
for IDM with the following command, where ES
stands for Edit Service Configuration
C:\install-directory\openidm\bin>prunmgr.exe //ES/openidm
The prunmgr.exe executable also includes the monitor
application functionality described in the following Apache Commons
page on the:
Procrun monitor Application. However,
IDM does not include the Procrun service application.
For example, if you've configured IDM as a Windows service, you can start and stop it with the following commands:
C:\install-directory\openidm\bin>prunmgr.exe //MR/openidm
C:\install-directory\openidm\bin>prunmgr.exe //MQ/openidm
In these commands, MR is the option to Monitor
and Run IDM, and MQ stands for
Monitor Quit, which stops the IDM service.
1.3.2. Installing as a Linux Service
IDM provides a script that can generate SysV
or Systemd service initialization scripts. You can start
the script as the root user, or configure it to start during the boot process.
When IDM runs as a service, logs are written to the installation directory.
If you have not yet installed IDM, follow the steps in "To Install IDM".
Review the options by running the following script:
$ cd /path/to/openidm/bin
$ ./create-openidm-rc.sh
Usage: ./create-openidm-rc.sh --[systemd|chkconfig|lsb]
Outputs OpenIDM init file to stdout for the given system

--systemd    Generate Systemd init script. This is preferred for all modern distros.
--chkconfig  Generate SysV init script with chkconfig headers (RedHat/CentOS)
--lsb        Generate SysV init script with LSB headers (Debian/Ubuntu)
...
The following sections describe how you can create each of these scripts:
1.3.2.1. Setting up a Systemd Service
If you're running relatively standard versions of Red Hat Enterprise Linux
(CentOS Linux) version 7.x, or Ubuntu 16.04 and later, you'll want to
set up a systemd service script. To set up such a script, navigate to the
/path/to/openidm/bin directory, and run the following
command:
$ ./create-openidm-rc.sh --systemd
As noted in the output, you can set up the IDM service on a standard systemd-based Linux distribution with the following commands:
$ ./create-openidm-rc.sh --systemd > openidm.service
$ sudo cp openidm.service /etc/systemd/system/
$ systemctl enable openidm
$ systemctl start openidm
To stop the IDM service, run the following command:
$ systemctl stop openidm
You can modify the openidm.service script.
The following excerpt would run IDM with a startup script in the
/home/idm/project directory:
[Unit]
Description=ForgeRock OpenIDM
After=network.target auditd.target

[Service]
Type=simple
SuccessExitStatus=143
Environment=JAVA_HOME=/usr
ExecStart=/root/openidm/startup.sh -p /home/idm/project
ExecStop=/root/openidm/shutdown.sh

[Install]
WantedBy=multi-user.target
Run the following commands to reload the configuration and then start the IDM service script:
$ systemctl daemon-reload
$ systemctl start openidm
1.3.2.2. Setting up a SysV Service (Red Hat)
If you're running relatively standard versions of Red Hat Enterprise Linux
(CentOS Linux) version 6.x, you'll want to set up a SysV service script,
with runlevels controlled through the chkconfig command.
To set up such a script, navigate to the
/path/to/openidm/bin directory, and run the following
command:
$ ./create-openidm-rc.sh --chkconfig
You can then set up and start the IDM service on a Linux distribution that uses SysV init scripts, with the following commands:
$ ./create-openidm-rc.sh --chkconfig  > openidm
$ sudo cp openidm /etc/init.d/
$ sudo chmod u+x /etc/init.d/openidm
$ sudo chkconfig --add openidm
$ sudo chkconfig openidm on
$ sudo service openidm start
To stop the IDM service, run the following command:
$ sudo service openidm stop
You can modify the /etc/init.d/openidm script. The
following excerpt would run IDM with the
startup.sh script in the
/path/to/openidm directory:
START_CMD="PATH=$JAVA_BIN_PATH:$PATH;nohup $OPENIDM_HOME/startup.sh >$OPENIDM_HOME/logs/server.out 2>&1 &"
You can modify this line to point to some
/path/to/production directory:
START_CMD="PATH=$JAVA_BIN_PATH:$PATH;nohup $OPENIDM_HOME/startup.sh -p /path/to/production >$OPENIDM_HOME/logs/server.out 2>&1 &"
Run the following commands to reload the configuration and then start the IDM service script:
$ sudo service openidm start
If you run Linux with SELinux enabled, change the file context of the newly copied script with the following command:
$ sudo restorecon /etc/init.d/openidm
Verify the change to SELinux contexts with the
ls -Z /etc/init.d command. For consistency, change the
user context to match other scripts in the same directory with the
sudo chcon -u system_u /etc/init.d/openidm command.
1.3.2.3. Setting up a SysV Service (Ubuntu)
If you're running relatively standard older versions of Ubuntu Linux,
versions which support SysV services, you'll want to set up a SysV service
script, with runlevels controlled through the update-rc.d
command. To set up such a script, navigate to the
/path/to/openidm/bin directory, and run the following
command:
$ ./create-openidm-rc.sh --lsb
You can then set up and start the IDM service on a Linux distribution that uses SysV init scripts, with the following commands:
$ ./create-openidm-rc.sh --lsb  > openidm
      $ sudo cp openidm /etc/init.d/
      $ sudo chmod u+x /etc/init.d/openidm
      $ sudo update-rc.d openidm defaults
      $ sudo service openidm start
To stop the IDM service, run the following command:
$ sudo service openidm stop
You can modify the /etc/init.d/openidm script. The
following excerpt would run IDM with the
startup.sh script in the
/path/to/openidm directory:
START_CMD="PATH=$JAVA_BIN_PATH:$PATH;nohup $OPENIDM_HOME/startup.sh >$OPENIDM_HOME/logs/server.out 2>&1 &"
You can modify this line to point to some
/path/to/production directory:
START_CMD="PATH=$JAVA_BIN_PATH:$PATH;nohup $OPENIDM_HOME/startup.sh -p /path/to/production >$OPENIDM_HOME/logs/server.out 2>&1 &"
You can then run the following commands to reload the configuration and then start the IDM service script:
$ sudo service openidm restart
1.4. Getting Started With the REST Interface
IDM provides RESTful access to users in its repository. To access the repository over REST, you can use a browser-based REST client, such as the Simple REST Client for Chrome, or RESTClient for Firefox. Alternatively you can use the curl command-line utility that is included with most operating systems. For more information about curl, see https://github.com/bagder/curl.
IDM is accessible over the regular and secure HTTP ports of the Jetty Servlet container, 8080, and 8443. Most of the command-line examples in this documentation set use the regular HTTP port, to avoid you having to use certificates just to test IDM. In a production deployment, install a CA-signed certificate and restrict REST access to a secure (HTTPS) port.
To run curl over the secure port, 8443, you must either
include the --insecure option, or follow the
instructions in "Restricting REST Access to the HTTPS Port" in the Integrator's Guide. You can use those instructions with the
self-signed certificate that is generated when IDM starts, or
with a *.crt file provided by a certificate authority.
Note
Some of the examples in this documentation set use client-assigned IDs when creating resources, as it makes the examples easier to read. In general, immutable server-assigned UUIDs should be used in production.
Access the following URL to obtain the JSON representation of all users in the IDM repository:
$ curl \
 --header "X-OpenIDM-Username: openidm-admin" \
 --header "X-OpenIDM-Password: openidm-admin" \
 --request GET \
 http://localhost:8080/openidm/managed/user/?_queryId=query-all-ids
When you first install IDM with an empty repository, no users exist.
Create a user
joeby sending a RESTful POST.The following curl commands create the user
joein the repository.Create
joe(UNIX):$ curl \ --header "Content-Type: application/json" \ --header "X-OpenIDM-Username: openidm-admin" \ --header "X-OpenIDM-Password: openidm-admin" \ --request POST \ --data '{ "userName":"joe", "givenName":"joe", "sn":"smith", "mail":"joe@example.com", "telephoneNumber":"555-123-1234", "password":"TestPassw0rd", "description":"My first user", "_id":"joe" }' \ http://localhost:8080/openidm/managed/user?_action=create { "_id": "joe", "_rev": "00000000c03fd7aa", "userName": "joe", "givenName": "joe", "sn": "smith", "mail": "joe@example.com", "telephoneNumber": "555-123-1234", "description": "My first user", "accountStatus": "active", "effectiveRoles": [], "effectiveAssignments": [] }Create
joe(Windows):C:\> curl ^ --header "Content-Type: application/json" ^ --header "X-OpenIDM-Username: openidm-admin" ^ --header "X-OpenIDM-Password: openidm-admin" ^ --request POST ^ --data "{ \"userName\":\"joe\", \"givenName\":\"joe\", \"sn\":\"smith\", \"mail\":\"joe@example.com\", \"telephoneNumber\":\"555-123-1234\", \"password\":\"TestPassw0rd\", \"description\":\"My first user\", \"_id\":\"joe\" }" ^ http://localhost:8080/openidm/managed/user?_action=create
Fetch the newly created user from the repository with a RESTful GET:
$ curl \
 --header "X-OpenIDM-Username: openidm-admin" \
 --header "X-OpenIDM-Password: openidm-admin" \
 --request GET \
 http://localhost:8080/openidm/managed/user/joe
{
  "_id": "joe",
  "_rev": "00000000c03fd7aa",
  "userName": "joe",
  "givenName": "joe",
  "sn": "smith",
  "mail": "joe@example.com",
  "telephoneNumber": "555-123-1234",
  "description": "My first user",
  "accountStatus": "active",
  "effectiveRoles": [],
  "effectiveAssignments": []
}
1.4.1. Format REST Output For Readability
By default, curl-based REST calls return the JSON object on one line.
Without a bit of help, the JSON output is formatted all on one line. One example is shown below, and it is difficult to read:
{"mail":"joe@example.com","sn":"smith","passwordAttempts":"0",
"lastPasswordAttempt":"Mon Apr 14 2014 11:13:37 GMT-0800 (GMT-08:00)",
"address2":"","givenName":"joe","effectiveRoles":["openidm-authorized"],
"password":{"$crypto":{"type":"x-simple-encryption","value":{"data":
"OBFVL9cG8uaLoo1N+SMJ3g==","cipher":"AES/CBC/PKCS5Padding","iv":
"7rlV4EwkwdRHkt19F8g22A==","key":"openidm-sym-default"}}},"country":"",
"city":"","_rev": "00000000c03fd7aa","lastPasswordSet":"","postalCode":"",
"_id":"joe3","description":"My first user","accountStatus":"active","telephoneNumber":
"555-123-1234","roles":["openidm-authorized"],"effectiveAssignments":{},
"postalAddress":"","stateProvince":"","userName":"joe3"}
At least two options are available to clean up this output.
The standard way to format JSON output is with a JSON parser such as jq. You can "pipe" the output of a REST call to jq, as follows:
$ curl \
--header "X-OpenIDM-Username: openidm-admin" \
--header "X-OpenIDM-Password: openidm-admin" \
--request GET \
"http://localhost:8080/openidm/managed/user/joe" \
| jq .
The ForgeRock REST API includes an optional _prettyPrint
request parameter. The default value is false. To
use the ForgeRock REST API to format output, add a parameter such as
?_prettyPrint=true or
&_prettyPrint=true, depending on whether it is added
to the end of an existing request parameter. In this case, the following
command would return formatted output:
$ curl \
--header "X-OpenIDM-Username: openidm-admin" \
--header "X-OpenIDM-Password: openidm-admin" \
--request GET \
"http://localhost:8080/openidm/managed/user/joe?_prettyPrint=true"
Note that most command-line examples in this guide do not show this parameter, although the output is formatted for readability.
1.5. IDM User Interfaces
You can manage IDM using Web-based user interfaces, called the UI in this documentation set.
IDM provides UIs at two different endpoints,
/ and /admin. We refer to the
administrative tools available at each endpoint as the Self-Service UI and
the Administrative UI (Admin UI), respectively.
The Self-Service UI allows regular (non-administrative) users to update parts of their profile, such as passwords and addresses. For more information, see "Configuring User Self-Service" in the Integrator's Guide. When these features are enabled, anonymous users can self-register and regular users can reset their own passwords.
In addition, administrative users can configure and manage workflows. For more information, see "Managing User Access to Workflows" in the Integrator's Guide.
In essence, the Self-Service UI supports day-to-day administrative tasks.
In contrast, the Admin UI allows an administrator to define the server configuration. Administrators would access the Admin UI to learn about IDM during initial system setup, and when they identify new requirements.
The Admin UI also enables you to configure connections to external data stores, and to specify the reconciliation and synchronization configuration between data stores.
When IDM is running on the localhost system, you can access
these UIs at https://localhost:8443/ and
https://localhost:8443/admin, respectively.
1.6. About the Repository
By default, IDM installs an embedded ForgeRock Directory Services (DS) instance for use as its repository. This makes it easy to get started. Before you use IDM in production, you must replace the embedded DS repository with a supported repository. For more information, see "Selecting a Repository".
You can query the internal repository directly by using the LDAP command-line utilities provided with DS. For example, the following command returns all the objects in the repository of a default IDM project:
$ ldapsearch \
 --hostname localhost \
 --port 31389 \
 --bindDN "cn=Directory Manager" \
 --bindPassword password \
 --baseDN "dc=openidm,dc=forgerock,dc=com" \
 "(objectclass=*)"

dn: dc=openidm,dc=forgerock,dc=com
objectClass: top
objectClass: domain
dc: openidm

dn: ou=links,dc=openidm,dc=forgerock,dc=com
objectClass: top
objectClass: organizationalUnit
ou: links

dn: ou=internal,dc=openidm,dc=forgerock,dc=com
objectClass: top
objectClass: organizationalUnit
ou: internal

dn: ou=users,ou=internal,dc=openidm,dc=forgerock,dc=com
objectClass: top
objectClass: organizationalUnit
ou: users
...
For more information about the DS command-line utilities, see the DS Tools Reference.
1.7. Starting a New Project
When you extract the IDM .zip file, you have a default project
under /path/to/openidm. You can use this project to test
customizations, but you should not run the default project in production.
Set up a new project as follows:
Create a directory for your new project:
$ mkdir /path/to/my-project
Note that the automated update process does not work for projects that are subdirectories of the default project. You should therefore create your new project directory somewhere outside of
/path/to/openidm/.Set up a minimal configuration:
If your project will be similar to any of the sample configurations (described in the Samples Guide) copy the contents of the sample to your new project.
For example:
$ cp -r /path/to/openidm/samples/sync-with-ldap/* /path/to/my-project/
You can then customize the sample configuration according to your requirements.
If you do not want to start with one of the sample configurations, copy the
conf/andscript/directories from the default project to your new project directory:$ cd /path/to/openidm $ cp -pr conf /path/to/my-project/ $ cp -pr script /path/to/my-project/
You can then customize the basic configuration according to your requirements.
Start your new project as follows:
$ cd /path/to/openidm
$ ./startup.sh -p /path/to/my-project
Chapter 2. Selecting a Repository
By default, IDM uses an embedded ForgeRock Directory Services (DS) instance for its internal repository. This means that you do not need to install a database in order to evaluate the software. Before using IDM in production, however, you must replace the embedded DS repository with a supported repository.
In production environments, the following repositories are supported:
- External DS instance
See "Using an External DS Repository".
Important
Both the default embedded and the external DS repositories do not support storage of audit data. Audit logging to the repository is disabled by default. Do not enable logging to the repository if you are using a DS repository.
- MySQL
- MariaDB
The instructions in "Setting Up a MySQL Repository" work equally well for MariaDB.
- Microsoft SQL
- PostgreSQL
- Oracle Database (Oracle DB)
- IBM DB2 Database
For supported versions, see "Supported Repositories" in the Release Notes.
This chapter describes how to set up IDM to work with each of these supported repositories, and lists the minimum rights required for database installation and operation.
For information about the repository configuration, and how to map IDM objects to database tables or to DS LDAP objects, see "Managing the Repository" in the Integrator's Guide.
2.1. Using the Default DS Repository
By default, IDM uses the conf/repo.ds.json
file to start an embedded DS instance. The embedded DS
repository is not supported in production environments.
The embedded DS server has the following configuration by default:
hostname-localhostldapPort-31389bindDN-cn=Directory ManagerbindPassword-passwordadminPort-34444
To change the administrative port of the embedded DS server, add
an adminPort property to your project's
conf/repo.ds.json file before you start
IDM. To change any of the other default values, add an
ldapConnectionFactories property, as shown in the
following example.
This excerpt of a repo.ds.json sets the
administrative port to 4444. The example changes the bind
password to MyPassw0rd but shows the structure of the
entire ldapConnectionFactories property for reference:
{
  "embedded": true,
  "maxConnectionAttempts" : 5,
  "adminPort": 4444,
  "ldapConnectionFactories": {
    "bind": {
      "primaryLdapServers": [{ "hostname": "localhost", "port": 31389 }]
    },
    "root": {
      "authentication": {
        "simple": { "bindDn": "cn=Directory Manager", "bindPassword": "MyPassw0rd" }
      }
    }
  },
  "queries": {
...
It is not necessary to add the entire ldapConnectionFactories
block to your configuration file but you must respect the JSON structure. For
example, to change only the hostname, you would need to
add at least the following:
{
  ...
  "ldapConnectionFactories": {
    "bind": {
      "primaryLdapServers": [{ "hostname": "my-hostname" }]
    }
  },
  "queries": {
...
If you do not specify a connection property here, IDM assumes the default.
You can also configure an external DS instance as a repository. For more information, see "Using an External DS Repository".
Note
If you are running Red Hat Enterprise Linux 6 or an AWS-based Ubuntu 16.04
system and do not have your own public key certificate, include the hostname
of your system in your /etc/hosts file. Otherwise, an
attempt to start IDM will fail with an
UnknownHostException error.
2.2. Using an External DS Repository
IDM supports the use of a single external DS instance as a repository. You can use a replicated instance for backup purposes, but using multiple replicated instances (in a multimaster DS deployment) is not supported.
To configure a new or existing DS instance as an external repository, follow these steps:
If you have not yet installed DS, download it from ForgeRock's BackStage site and extract the zip archive.
Set up DS with a base DN entry of
dc=openidm,dc=forgerock,dc=com.$ cd /path/to/opendj $ ./setup directory-server \ --rootUserDN "cn=Directory Manager" \ --rootUserPassword password \ --hostname localhost \ --ldapPort 31389 \ --adminConnectorPort 34444 \ --baseDN dc=openidm,dc=forgerock,dc=com \ --acceptLicense Validating parameters..... Done Configuring certificates..... Done Configuring server..... Done To see basic server status and configuration, you can launch /path/to/opendj/bin/status
This command configures DS on the localhost, listening on ports
31389and34444so that it does not conflict with the default ports used in the LDAP samples. You can use any available ports in the setup. If you use a different host and an LDAP port other than31389, change theprimaryLdapServersproperty in yourrepo.ds-external.jsonfile accordingly.Create the matching rules required to set up indexes for the default IDM data:
$ ./bin/dsconfig \
 create-schema-provider \
 --hostname localhost \
 --port 34444 \
 --bindDN "cn=Directory Manager" \
 --bindPassword password \
 --provider-name "IDM managed/user Json Schema" \
 --type json-query-equality-matching-rule \
 --set enabled:true \
 --set case-sensitive-strings:false \
 --set ignore-white-space:true \
 --set matching-rule-name:caseIgnoreJsonQueryMatchManagedUser \
 --set matching-rule-oid:1.3.6.1.4.1.36733.2.3.4.1  \
 --set indexed-field:userName \
 --set indexed-field:givenName \
 --set indexed-field:sn \
 --set indexed-field:mail \
 --set indexed-field:accountStatus \
 --trustAll \
 --no-prompt
The JSON Query Equality Matching Rule was created successfully

$ ./bin/dsconfig \
 create-schema-provider \
 --hostname localhost \
 --port 34444 \
 --bindDN "cn=Directory Manager" \
 --bindPassword password \
 --provider-name "IDM managed/role Json Schema" \
 --type json-query-equality-matching-rule \
 --set enabled:true \
 --set case-sensitive-strings:false \
 --set ignore-white-space:true \
 --set matching-rule-name:caseIgnoreJsonQueryMatchManagedRole \
 --set matching-rule-oid:1.3.6.1.4.1.36733.2.3.4.2  \
 --set indexed-field:"condition/**" \
 --set indexed-field:"temporalConstraints/**" \
 --trustAll \
 --no-prompt
The JSON Query Equality Matching Rule was created successfully

$ ./bin/dsconfig \
 create-schema-provider \
 --hostname localhost \
 --port 34444 \
 --bindDN "cn=Directory Manager" \
 --bindPassword password \
 --provider-name "IDM Relationship Json Schema" \
 --type json-query-equality-matching-rule \
 --set enabled:true \
 --set case-sensitive-strings:false \
 --set ignore-white-space:true \
 --set matching-rule-name:caseIgnoreJsonQueryMatchRelationship \
 --set matching-rule-oid:1.3.6.1.4.1.36733.2.3.4.3  \
 --set indexed-field:firstResourceCollection \
 --set indexed-field:firstResourceId \
 --set indexed-field:firstPropertyName \
 --set indexed-field:secondResourceCollection \
 --set indexed-field:secondResourceId \
 --set indexed-field:secondPropertyName \
 --trustAll \
 --no-prompt
The JSON Query Equality Matching Rule was created successfully

$ ./bin/dsconfig \
 create-schema-provider \
 --hostname localhost \
 --port 34444 \
 --bindDN "cn=Directory Manager" \
 --bindPassword password \
 --provider-name "IDM Cluster Object Json Schema" \
 --type json-query-equality-matching-rule \
 --set enabled:true \
 --set case-sensitive-strings:false \
 --set ignore-white-space:true \
 --set matching-rule-name:caseIgnoreJsonQueryMatchClusterObject \
 --set matching-rule-oid:1.3.6.1.4.1.36733.2.3.4.4  \
 --set indexed-field:"timestamp" \
 --set indexed-field:"state" \
 --trustAll \
 --no-prompt
The JSON Query Equality Matching Rule was created successfully
Copy the IDM LDIF schema to the DS schema folder. To ensure that the schema definitions for IDM load only after all of the DS schema files installed by default, rename the file with a number higher than the default DS schema files. This example renames the file to
99-openidm.ldif:$ cp /path/to/openidm/db/ds/schema/openidm.ldif db/schema/99-openidm.ldif
Restart DS to load the new schema:
$ bin/stop-ds --restart
Stopping Server...
[02/Mar/2018:15:14:53 -0800] category=BACKEND severity=NOTICE msgID=370 msg=The backend userRoot is now taken offline
...
[02/Mar/2018:15:15:12 -0800] category=CORE severity=NOTICE msgID=139 ... The Directory Server has started successfully
Create the required indexes:
$ bin/dsconfig \
 create-backend-index \
 --hostname localhost \
 --port 34444 \
 --bindDN "cn=Directory Manager" \
 --bindPassword password \
 --backend-name userRoot \
 --index-name fr-idm-managed-user-json \
 --set index-type:equality \
 --trustAll \
 --no-prompt
The Backend Index was created successfully

$ bin/dsconfig \
 create-backend-index \
 --hostname localhost \
 --port 34444 \
 --bindDN "cn=Directory Manager" \
 --bindPassword password \
 --backend-name userRoot \
 --index-name fr-idm-managed-role-json \
 --set index-type:equality \
 --trustAll \
 --no-prompt
The Backend Index was created successfully

$ bin/dsconfig \
 create-backend-index \
 --hostname localhost \
 --port 34444 \
 --bindDN "cn=Directory Manager" \
 --bindPassword password \
 --backend-name userRoot \
 --index-name fr-idm-relationship-json \
 --set index-type:equality \
 --trustAll \
 --no-prompt
The Backend Index was created successfully

$ bin/dsconfig \
 create-backend-index \
 --hostname localhost \
 --port 34444 \
 --bindDN "cn=Directory Manager" \
 --bindPassword password \
 --backend-name userRoot \
 --index-name fr-idm-cluster-json \
 --set index-type:equality \
 --trustAll \
 --no-prompt
The Backend Index was created successfully

$ bin/dsconfig \
 create-backend-index \
 --hostname localhost \
 --port 34444 \
 --bindDN "cn=Directory Manager" \
 --bindPassword password \
 --backend-name userRoot \
 --index-name fr-idm-json \
 --set index-type:equality \
 --trustAll \
 --no-prompt
The Backend Index was created successfully

$ bin/dsconfig \
 create-backend-index \
 --hostname localhost \
 --port 34444 \
 --bindDN "cn=Directory Manager" \
 --bindPassword password \
 --backend-name userRoot \
 --index-name fr-idm-link-type \
 --set index-type:equality \
 --trustAll \
 --no-prompt
The Backend Index was created successfully

$ bin/dsconfig \
 create-backend-index \
 --hostname localhost \
 --port 34444 \
 --bindDN "cn=Directory Manager" \
 --bindPassword password \
 --backend-name userRoot \
 --index-name fr-idm-link-firstid \
 --set index-type:equality \
 --trustAll \
 --no-prompt
The Backend Index was created successfully

$ bin/dsconfig \
 create-backend-index \
 --hostname localhost \
 --port 34444 \
 --bindDN "cn=Directory Manager" \
 --bindPassword password \
 --backend-name userRoot \
 --index-name fr-idm-link-secondid \
 --set index-type:equality \
 --trustAll \
 --no-prompt
The Backend Index was created successfully

$ bin/dsconfig \
 create-backend-index \
 --hostname localhost \
 --port 34444 \
 --bindDN "cn=Directory Manager" \
 --bindPassword password \
 --backend-name userRoot \
 --index-name fr-idm-link-qualifier \
 --set index-type:equality \
 --trustAll \
 --no-prompt
The Backend Index was created successfully
Finally, rebuild the indexes:
$ bin/rebuild-index \
 --hostname localhost \
 --port 34444 \
 --bindDN "cn=Directory Manager" \
 --bindPassword password \
 --baseDN dc=openidm,dc=forgerock,dc=com \
 --rebuildAll \
 --start 0 \
 --trustAll
Rebuild Index task 20180302154417277 scheduled to start 02 Mar 2018 3:44:17 PM
Import the
populate_users.ldiffile into DS to set up the default entries required by IDM:$ bin/import-ldif \ --ldifFile /path/to/openidm/db/ds/scripts/populate_users.ldif \ --backendID userRoot \ --hostName localhost \ --port 34444 \ --bindDN "cn=Directory Manager" \ --bindPassword password \ --trustAll \ --noPropertiesFile Import task 20180302154533707 scheduled to start immediately ... Import task 20180302154533707 has been successfully completed
Your DS instance is now ready to be used as an external repository.
In your IDM installation, remove the default DS repository configuration file (
repo.ds.json) from your project'sconf/directory. For example:$ cd /path/to/openidm/my-project/conf/ $ rm repo.ds.json
Copy the external DS repository configuration file (
repo.ds-external.json) to your project'sconfdirectory and rename itrepo.ds.json:$ cd /path/to/openidm/ $ cp db/ds/conf/repo.ds-external.json my-project/conf/repo.ds.json
If your DS instance is not running on the localhost and listening for LDAP connections on port
31389, adjust theprimaryLdapServersproperty in that file to match your DS setup.Start IDM with the configuration for your project. For example:
$ cd /path/to/openidm
 $ ./startup.sh -p my-project
 Executing ./startup.sh...
 Using OPENIDM_HOME:   /path/to/openidm
 Using PROJECT_HOME:   /path/to/my-project
 Using OPENIDM_OPTS:   -Xmx1024m -Xms1024m
 Using LOGGING_CONFIG: -Djava.util.logging.config.file=/path/to/my-project/conf/logging.properties
 -> OpenIDM version "6.0.0.7"
 OpenIDM ready
2.3. Database Access Rights For a JDBC Repository
In general, IDM requires minimal access rights to the JDBC repository for daily operation. This section lists the minimum permissions required, and suggests a strategy for restricting database access in your deployment.
The JDBC repository used by IDM requires only one
relevant user - the service account that is used to
create the tables. Generally, the details of this account are configured in
the repository connection file
(datasource.jdbc-default.json). By default, the username
and password for this account are openidm and
openidm, regardless of the database type.
All other users are created by the
db/database-type/scripts/openidm.sql
script. The openidm user account must have SELECT, UPDATE,
INSERT, and DELETE permissions on all the openidm tables that are created by
this script, by the scripts that create the tables specific to the Activiti
workflow engine, and by the script that sets up the audit tables if you are
using the repository audit event handler.
2.4. Setting Up a MySQL Repository
After you have installed MySQL on the local host and before starting IDM for the first time, configure the server to use the new repository, as described in the following sections.
This procedure assumes that a password has already been set for the MySQL root user:
Download MySQL Connector/J, version 5.1 or later from the MySQL website. Unpack the delivery, and copy the .jar into the
openidm/bundledirectory:$ cp mysql-connector-java-version-bin.jar /path/to/openidm/bundle/
Make sure that IDM is stopped:
$ cd /path/to/openidm/
$ ./shutdown.sh
OpenIDM is not running, not stopping.
Remove the default DS repository configuration file (
repo.ds.json) from your project'sconf/directory. For example:$ cd /path/to/openidm/my-project/conf/ $ rm repo.ds.json
Copy the MySQL database connection configuration file (
datasource.jdbc-default.json) and the database table configuration file (repo.jdbc.json) to your project'sconfdirectory:$ cd /path/to/openidm/ $ cp db/mysql/conf/datasource.jdbc-default.json my-project/conf/ $ cp db/mysql/conf/repo.jdbc.json my-project/conf/
If you have previously set up a MySQL repository for IDM, you must drop the openidm database and users before you continue:
mysql> drop database openidm;
Query OK, 21 rows affected (0.63 sec)
mysql> drop user openidm;
Query OK, 0 rows affected (0.02 sec)
mysql> drop user openidm@localhost;
Query OK, 0 rows affected (0.00 sec)
Import the IDM data definition language script into MySQL:
$ cd /path/to/mysql
$ mysql -u root -p < /path/to/openidm/db/mysql/scripts/openidm.sql
Enter password:
$
Note
If you see errors like
Access denied for user 'root'@'localhost', and are deploying on a new installation of Ubuntu 16.04 and above, the UNIX_SOCKET plugin may be installed, which applies Linuxrootcredentials to MySQL. In that case, substitute sudo mysql -u root for mysql -u root -p in the commands in this section.This step creates an
openidmdatabase for use as the internal repository, and a useropenidmwith passwordopenidmwho has all the required privileges to update the database:$ mysql -u root -p Enter password: Welcome to the MySQL monitor. Commands end with ; or \g. Your MySQL connection id is 18 Server version: 5.5.19 MySQL Community Server (GPL) ... mysql> use openidm; Reading table information for completion of table and column names You can turn off this feature to get a quicker startup with -A Database changed mysql> show tables; +---------------------------+ | Tables_in_openidm | +---------------------------+ | clusteredrecontargetids | | clusterobjectproperties | | clusterobjects | | configobjectproperties | | configobjects | | genericobjectproperties | | genericobjects | | ... | | schedulerobjects | | schedulerobjectproperties | | uinotification | | updateobjectproperties | | updateobjects | +---------------------------+
Exit the mysql console.
mysql> exit
Bye
Create the IDM database user.
If you are running MySQL 5.7 or higher, run the following script:
$ cd /path/to/mysql
$ mysql -u root -p < /path/to/openidm/db/mysql/scripts/createuser.sql
Enter password:
If you are running a MySQL version prior to 5.7, run the following script:
$ cd /path/to/mysql
$ mysql -u root -p < /path/to/openidm/db/mysql/scripts/createuser.mysql56.sql
Enter password:
Run the three scripts that set up the tables required by the Activiti workflow engine.
If you are running MySQL 5.6.4 or higher, run the following scripts:
$ cd /path/to/mysql
$ mysql -D openidm -u root -p < /path/to/openidm/db/mysql/scripts/activiti.mysql.create.engine.sql
Enter password:
$ mysql -D openidm -u root -p < /path/to/openidm/db/mysql/scripts/activiti.mysql.create.history.sql
Enter password:
$ mysql -D openidm -u root -p < /path/to/openidm/db/mysql/scripts/activiti.mysql.create.identity.sql
Enter password:
If you are running a MySQL version prior to 5.6.4, run the following scripts:
$ cd /path/to/mysql
$ mysql -D openidm -u root -p < /path/to/openidm/db/mysql/scripts/activiti.mysql55.create.engine.sql
Enter password:
$ mysql -D openidm -u root -p < /path/to/openidm/db/mysql/scripts/activiti.mysql55.create.history.sql
Enter password:
$ mysql -D openidm -u root -p < /path/to/openidm/db/mysql/scripts/activiti.mysql.create.identity.sql
Enter password:
If you are planning to direct audit logs to this repository, run the script that sets up the audit tables:
$ mysql -D openidm -u root -p < openidm/db/mysql/scripts/audit.sql
Enter password:
Update the connection configuration to reflect your MySQL deployment. The default connection configuration in the
datasource.jdbc-default.jsonfile is as follows:{ "driverClass" : "com.mysql.jdbc.Driver", "jdbcUrl" : "jdbc:mysql://&{openidm.repo.host}:&{openidm.repo.port}/openidm?allowMultiQueries=true&characterEncoding=utf8", "databaseName" : "openidm", "username" : "openidm", "password" : "openidm", "connectionTimeout" : 30000, "connectionPool" : { "type" : "hikari", "minimumIdle" : 20, "maximumPoolSize" : 50 } }Specify the values for
openidm.repo.hostandopenidm.repo.portin one of the following ways:Set the values in
resolver/boot.propertiesor your project'sconf/system.propertiesfile, for example:openidm.repo.host = localhost openidm.repo.port = 3306
Set the properties in the
OPENIDM_OPTSenvironment variable and export that variable before startup. You must include the JVM memory options when you set this variable. For example:$ export OPENIDM_OPTS="-Xmx1024m -Xms1024m -Dopenidm.repo.host=localhost -Dopenidm.repo.port=3306" $ ./startup.sh -p /path/to/openidm/my-project Executing ./startup.sh... Using OPENIDM_HOME: /path/to/openidm Using PROJECT_HOME: /path/to/openidm Using OPENIDM_OPTS: -Xmx1024m -Xms1024m -Dopenidm.repo.host=localhost -Dopenidm.repo.port=3306 Using LOGGING_CONFIG: -Djava.util.logging.config.file=/path/to/openidm/conf/logging.properties Using boot properties at /path/to/openidm/resolver/boot.properties -> OpenIDM version "6.0.0.7" OpenIDM ready
Tip
If you're working in a production environment, set up SSL, as
described in the
MySQL Connector Developer Guide. If you're
using an older version of MySQL, add &useSSL=true
to the end of the jdbcURL.
If you're running a relatively recent version of MySQL (5.5.45+, 5.6.26+,
5.7.6+), the default configuration expects you to set up SSL, unless you add
&useSSL=false to the end of the jdbcUrl.
When you have set up MySQL for use as the internal repository, start the
server to check that the setup has been successful. After startup, you should
see that repo.jdbc is active, whereas
repo.ds is enabled but not
active:
$ cd /path/to/openidm
  $ ./startup.sh -p my-project
Using OPENIDM_HOME:   /path/to/openidm
Using OPENIDM_OPTS:   -Xmx1024m -Xms1024m
Using LOGGING_CONFIG:
-Djava.util.logging.config.file=/path/to/openidm/conf/logging.properties
Using boot properties at /path/to/openidm/resolver/boot.properties
-> scr list
BundleId Component Name Default State
    Component Id State      PIDs (Factory PID)
 [   5]   org.forgerock.openidm.config.enhanced.starter  enabled
    [   1] [active      ] org.forgerock.openidm.config.enhanced.starter
 [   5]   org.forgerock.openidm.config.manage  enabled
    [   0] [active      ] org.forgerock.openidm.config.manage
 [  10]   org.forgerock.openidm.datasource.jdbc  enabled
 [  10]   org.forgerock.openidm.repo.jdbc  enabled
    [  48] [active      ] org.forgerock.openidm.repo.jdbc
 [  11]   org.forgerock.openidm.repo.ds  enabled
...
2.5. Setting Up an MS SQL Repository
These instructions are specific to MS SQL Server 2012 R2 Standard Edition, running on a Windows Server 2012 R2 system. Adapt the instructions for your environment.
When you install Microsoft SQL Server, pay attention to the following specific configuration requirements:
During the Feature Selection installation step, make sure that at least SQL Server Replication, Full Text Search, and Management Tools - Basic are selected.
These instructions require SQL Management Studio so make sure that you include Management Tools in the installation.
During the Database Engine Configuration step, select Mixed Mode (SQL Server authentication and Windows authentication). IDM requires SQL Server authentication.
TCP/IP must be enabled and configured for the correct IP address and port. To configure TCP/IP, follow these steps:
Navigate to SQL Server Configuration Manager.
Expand the SQL Server Network Configuration item and select "Protocols for MSSQLSERVER".
Check that TCP/IP is Enabled.
Select the IP Addresses tab and set the addresses and ports on which the server will listen.
For this sample procedure, scroll down to IPAll and set TCP Dynamic Ports to 1433 (the default port for MS SQL).
Click OK.
Restart MS SQL Server for the configuration changes to take effect.
To restart the server, select SQL Server Services in the left pane, double click SQL Server (MSSQLSERVER) and click Restart.
If you have a firewall enabled, ensure that the port you configured in the previous step is open for IDM to access MS SQL.
After you have installed MS SQL on the local host, install IDM, if you have not already done so, but do not start the instance. Import the data definition and configure IDM to use the MS SQL repository, as described in the following steps:
Use SQL Management Studio to import the IDM data definition language script into MS SQL:
Navigate to SQL Server Management Studio.
On the Connect to Server panel, select Windows Authentication and click Connect.
Select File > Open > File and navigate to the data definition language script (
path\to\openidm\db\mssql\scripts\openidm.sql). Click Open to open the file.Click Execute to run the script.
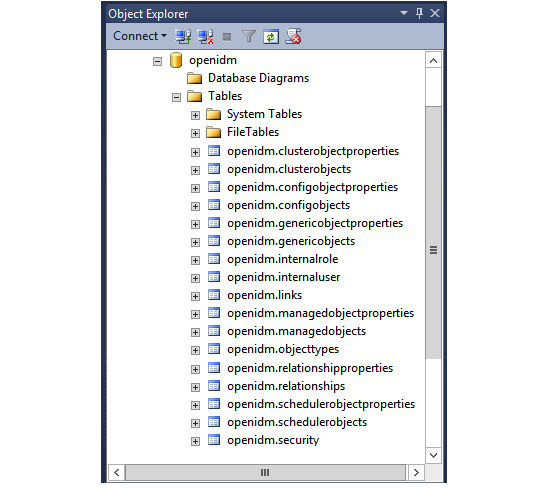
This step creates an
openidmdatabase for use as the internal repository, and a useropenidmwith passwordopenidmwho has all the required privileges to update the database. You might need to refresh the view in SQL Server Management Studio to see theopenidmdatabase in the Object Explorer.Expand Databases > openidm > Tables. You should see the IDM tables in the openidm database, as shown in the following example.
Execute the three scripts that set up the tables required by the Activiti workflow engine:
You can use the
sqlcmdcommand to execute the scripts, for example:PS C:\Users\Administrator> sqlcmd -S localhost -d openidm ^ -i C:\path\to\openidm\db\mssql\scripts\activiti.mssql.create.engine.sql PS C:\Users\Administrator> sqlcmd -S localhost -d openidm ^ -i C:\path\to\openidm\db\mssql\scripts\activiti.mssql.create.history.sql PS C:\Users\Administrator> sqlcmd -S localhost -d openidm ^ -i C:\path\to\openidm\db\mssql\scripts\activiti.mssql.create.identity.sqlNote
When you run the
activiti.mssql.create.engine.sqlscript, you might see the following warning in the log:Warning! The maximum key length is 900 bytes. The index 'ACT_UNIQ_PROCDEF' has maximum length of 1024 bytes. For some combination of large values, the insert/update operation will fail.
It is very unlikely that the key length will be an issue in your deployment, and you can safely ignore this warning.
If you are going to direct audit logs to this repository, run the script that sets up the audit tables:
PS C:\Users\Administrator> sqlcmd -S localhost -d openidm ^
 -i C:\path\to\openidm\db\mssql\scripts\audit.sql
IDM requires an MS SQL driver that must be created from two separate JAR files. Create the driver as follows:
Download the JDBC Driver for SQL Server from Microsoft's download site. IDM requires at least version 4.2 of the driver (
sqljdbc_4.2.8112.100_enu.tar.gz). The precise download URL might vary, depending on your location.Extract the JAR file (
sqljdbc42.jar), using 7-zip or an equivalent file management application and copy the file to theopenidm\db\mssql\scriptsdirectory.Download the
bndJAR file (bnd-2.4.0.jar) that enables you to create OSGi bundles. For more information aboutbnd, see http://bnd.bndtools.org/.Copy this JAR file to
openidm\db\mssql\scripts.Your
openidm\db\mssql\scriptsdirectory should now include the following files:bnd-2.4.0.jar sqljdbc4.bnd sqljdbc42.jar
Create an OSGi bundle from the driver JAR with the following command:
C:\> cd \path\to\openidm\db\mssql\scripts
./> java -jar bnd-2.4.0.jar wrap --properties sqljdbc4.bnd --output sqljdbc42-osgi.jar sqljdbc42.jar
This step creates the OSGi bundle named
sqljdbc42-osgi.jar.Copy the
sqljdbc42-osgi.jarfile to theopenidm\bundledirectory:./> copy sqljdbc42-osgi.jar \path\to\openidm\bundle
Remove the default DS repository configuration file (
repo.ds.json) from your project'sconf/directory. For example:C:\> cd \path\to\openidm\my-project\conf\ .\> del repo.ds.json
Copy the database connection configuration file for MS SQL (
datasource.jdbc-default.json) and the database table configuration file (repo.jdbc.json) to your project's configuration directory. For example:C:\> cd \path\to\openidm .\> copy db\mssql\conf\datasource.jdbc-default.json my-project\conf\ .\> copy db\mssql\conf\repo.jdbc.json my-project\conf\
Update the connection configuration to reflect your MS SQL deployment. The default connection configuration in the
datasource.jdbc-default.jsonfile is as follows:{ "driverClass" : "com.microsoft.sqlserver.jdbc.SQLServerDriver", "jdbcUrl" : "jdbc:sqlserver://&{openidm.repo.host}:&{openidm.repo.port};instanceName=default;databaseName=openidm;applicationName=OpenIDM", "databaseName" : "openidm", "username" : "openidm", "password" : "openidm", "connectionTimeout" : 30000, "connectionPool" : { "type" : "hikari", "minimumIdle" : 20, "maximumPoolSize" : 50 } }Specify the values for
openidm.repo.hostandopenidm.repo.portin one of the following ways:Set the values in
resolver/boot.propertiesor your project'sconf/system.propertiesfile, for example:openidm.repo.host = localhost openidm.repo.port = 1433
Set the properties in the
OPENIDM_OPTSenvironment variable and export that variable before startup. You must include the JVM memory options when you set this variable. For example:$ export OPENIDM_OPTS="-Xmx1024m -Xms1024m -Dopenidm.repo.host=localhost -Dopenidm.repo.port=1433" $ cd /path/to/openidm $ ./startup.sh -p my-project Executing ./startup.sh... Using OPENIDM_HOME: /path/to/openidm Using PROJECT_HOME: /path/to/openidm Using OPENIDM_OPTS: -Xmx1024m -Xms1024m -Dopenidm.repo.host=localhost -Dopenidm.repo.port=1433 Using LOGGING_CONFIG: -Djava.util.logging.config.file=/path/to/openidm/conf/logging.properties Using boot properties at /path/to/openidm/resolver/boot.properties -> OpenIDM version "6.0.0.7" OpenIDM ready

When you have set up MySQL for use as the internal repository, start the
server to check that the setup has been successful. After startup, you should
see that repo.jdbc is active, whereas
repo.ds is enabled but not
active:
C:> cd \path\to\openidm
./> startup.bat -p my-project
"Using OPENIDM_HOME:   \path\to\openidm"
"Using OPENIDM_OPTS:   -Xmx1024m -Xms1024m -Dfile.encoding=UTF-8"
"Using LOGGING_CONFIG:
-Djava.util.logging.config.file=\path\to\openidm\conf\logging.properties"
 Using boot properties at \path\to\openidm\conf\boot\boot.properties
-> scr list
BundleId Component Name Default State
    Component Id State      PIDs (Factory PID)
 [   5]   org.forgerock.openidm.config.enhanced.starter  enabled
    [   1] [active      ] org.forgerock.openidm.config.enhanced.starter
 [   5]   org.forgerock.openidm.config.manage  enabled
    [   0] [active      ] org.forgerock.openidm.config.manage
 [  10]   org.forgerock.openidm.datasource.jdbc  enabled
 [  10]   org.forgerock.openidm.repo.jdbc  enabled
    [  48] [active      ] org.forgerock.openidm.repo.jdbc
 [  11]   org.forgerock.openidm.repo.ds    enabled
...
2.6. Setting Up an Oracle DB Repository
When you set up an Oracle database as the repository, confer with an Oracle DBA when creating the database schema, tables, and users. This section assumes that you have configured an Oracle DB with Local Naming Parameters (tnsnames.ora) and a service user for IDM.
Import the IDM schema using the data definition language script (
/path/to/openidm/db/oracle/scripts/openidm.sql), as the appropriate schema owner user.When you have run the script, you should be able to query the
internalusertable. The query should return two records (openidm-adminandanonymous). The output here has been formatted for legibility:SQL> select * from internaluser; OBJECTID openidm-admin ----------------------------------------------------------------------------- REV 0 ----------------------------------------------------------------------------- PWD openidm-admin ----------------------------------------------------------------------------- ROLES [ { "_ref" : "repo/internal/role/openidm-admin" }, { "_ref" : "repo/internal/role/openidm-authorized" } ] ----------------------------------------------------------------------------- OBJECTID anonymous ----------------------------------------------------------------------------- REV 0 ----------------------------------------------------------------------------- PWD anonymous ----------------------------------------------------------------------------- ROLES [ { "_ref" : "repo/internal/role/openidm-reg" } ] -----------------------------------------------------------------------------Run the three scripts that set up the tables required by the Activiti workflow engine.
You can use the Oracle SQL Developer Data Modeler to run the scripts, as described in the corresponding Oracle documentation.
You must run the following scripts:
/path/to/openidm/db/oracle/scripts/activiti.oracle.create.engine.sql
/path/to/openidm/db/oracle/scripts/activiti.oracle.create.history.sql
/path/to/openidm/db/oracle/scripts/activiti.oracle.create.identity.sql
If you plan to direct audit logs to this repository, run the script that sets up the audit tables:
You can use the Oracle SQL Developer Data Modeler to run the scripts, as described in the previous step.
You must run the following script:
/path/to/openidm/db/oracle/scripts/audit.sql
Create an Oracle DB driver from two separate jar files and set up the repository configuration for Oracle DB, as follows:
Download the Oracle JDBC driver for your Oracle DB version from Oracle Technology Network and place it in the
openidm/db/oracle/scriptsdirectory:$ ls /path/to/openidm/db/oracle/scripts ojdbc7_g.jar openidm.sql
Create a
bndfile and edit it to match the version information for your JDBC driver.You can use the sample
bndfile located inopenidm/db/mssql/scripts. Copy thebndfile to the same location as the JDBC driver:$ cd /path/to/openidm/db $ cp mssql/scripts/sqljdbc4.bnd oracle/scripts $ ls oracle/scripts ojdbc7_g.jar openidm.sql sqljdbc4.bnd
The JDBC driver version information for your driver is located in the
Specification-Versionproperty in the MANIFEST file of the driver:$ cd /path/to/openidm/db/oracle/scripts $ unzip -q -c ojdbc7_g.jar META-INF/MANIFEST.MF ... Specification-Vendor: Sun Microsystems Inc. Specification-Title: JDBC Specification-Version: 4.0 ...
Edit the
bndfile to match the JDBC driver version:$ more sqljdbc4.bnd ... version=4.0 Export-Package: *;version=${version} Bundle-Name: Oracle JDBC Driver 4.0 for SQL Server Bundle-SymbolicName: Oracle JDBC Driver 4.0 for SQL Server Bundle-Version: ${version} Import-Package: *;resolution:=optionalDownload the
bndJAR file (bnd-2.4.0.jar) that enables you to create OSGi bundles. For more information aboutbnd, see http://bnd.bndtools.org/.Place the
bndJAR file in the same directory as the JDBC driver, and thebndfile:$ ls /path/to/openidm/db/oracle/scripts bnd-2.4.0.jar ojdbc7_g.jar openidm.sql sqljdbc4.bnd
Change to the directory in which the script files are located and run the following command to create the OSGi bundle:
$ cd /path/to/openidm/db/oracle/scripts
$ java -jar bnd-2.4.0.jar wrap -properties sqljdbc4.bnd ojdbc7_g.jar
Dec 10, 2013 9:53:28 AM java.util.prefs.FileSystemPreferences$1 run
INFO: Created user preferences directory.
ojdbc7_g.jar 984 0
A new
.barfile has now been created:$ ls bnd-2.4.0.jar ojdbc7_g.bar ojdbc7_g.jar openidm.sql sqljdbc4.bnd
Move the
.barfile to theopenidm/bundledirectory and rename it with a.jarextension. It does not matter what you name the file:$ mv ojdbc7_g.bar /path/to/openidm/bundle/ojdbc7_g-osgi.jar
Remove the default DS repository configuration file (
repo.ds.json) from your project'sconf/directory. For example:$ cd /path/to/openidm/my-project/conf/ $ rm repo.ds.json
Copy the database connection configuration file for Oracle (
datasource.jdbc-default.json) and the database table configuration file (repo.jdbc.json) to your project's configuration directory. For example:$ cd /path/to/openidm/ $ cp db/oracle/conf/datasource.jdbc-default.json my-project/conf/ $ cp db/oracle/conf/repo.jdbc.json my-project/conf/
Update the connection configuration to reflect your Oracle database deployment. The default connection configuration in the
datasource.jdbc-default.jsonfile is as follows:{ "driverClass" : "oracle.jdbc.OracleDriver", "jdbcUrl" : "jdbc:oracle:thin:@//&{openidm.repo.host}:&{openidm.repo.port}/DEFAULTCATALOG", "databaseName" : "openidm", "username" : "openidm", "password" : "openidm", "connectionTimeout" : 30000, "connectionPool" : { "type" : "hikari", "minimumIdle" : 20, "maximumPoolSize" : 50 } }Specify the values for
openidm.repo.hostandopenidm.repo.portin one of the following ways:Set the values in
resolver/boot.propertiesor your project'sconf/system.propertiesfile, for example:openidm.repo.host = localhost openidm.repo.port = 1525
Set the properties in the
OPENIDM_OPTSenvironment variable and export that variable before startup. You must include the JVM memory options when you set this variable. For example:$ export OPENIDM_OPTS="-Xmx1024m -Xms1024m -Dopenidm.repo.host=localhost -Dopenidm.repo.port=1525" $ cd /path/to/openidm $ ./startup.sh -p my-project Executing ./startup.sh... Using OPENIDM_HOME: /path/to/openidm Using PROJECT_HOME: /path/to/openidm Using OPENIDM_OPTS: -Xmx1024m -Xms1024m -Dopenidm.repo.host=localhost -Dopenidm.repo.port=1525 Using LOGGING_CONFIG: -Djava.util.logging.config.file=/path/to/openidm/conf/logging.properties Using boot properties at /path/to/openidm/resolver/boot.properties -> OpenIDM version "6.0.0.7" OpenIDM ready
The
jdbcUrlcorresponds to the URL of the Oracle DB listener, including the service name, based on your configured Local Naming Parameters (tnsnames.ora). It should be whatever is appropriate for your environment.The
DEFAULTCATALOGrefers to the SID (system identifier), for example,orcl.The
usernameandpasswordcorrespond to the credentials of the service user that connects from IDM.
When you have set up an Oracle database for use as the internal repository, start
the server to check that the setup has been successful. After startup, you
should see that repo.jdbc is active,
whereas repo.ds is enabled but not
active:
$ cd /path/to/openidm
$ ./startup.sh -p my-project
Using OPENIDM_HOME:   /path/to/openidm
Using OPENIDM_OPTS:   -Xmx1024m -Xms1024m
Using LOGGING_CONFIG:
-Djava.util.logging.config.file=/path/to/openidm/conf/logging.properties
Using boot properties at /path/to/openidm/resolver/boot.properties
-> scr list
BundleId Component Name Default State
    Component Id State      PIDs (Factory PID)
 [   5]   org.forgerock.openidm.config.enhanced.starter  enabled
    [   1] [active      ] org.forgerock.openidm.config.enhanced.starter
 [   5]   org.forgerock.openidm.config.manage  enabled
    [   0] [active      ] org.forgerock.openidm.config.manage
 [  10]   org.forgerock.openidm.datasource.jdbc  enabled
 [  10]   org.forgerock.openidm.repo.jdbc  enabled
    [  48] [active      ] org.forgerock.openidm.repo.jdbc
 [  11]   org.forgerock.openidm.repo.ds  enabled
...
2.7. Setting Up a PostgreSQL Repository
This procedure assumes that PostgreSQL is installed and running on the local host. For supported versions, see "Supported Repositories" in the Release Notes.
Before starting IDM for the first time, configure the server to use a PostgreSQL repository, as described in the following procedure:
The
path/to/openidm/db/postgresql/scripts/createuser.pgsqlscript sets up anopenidmdatabase and user, with a default password ofopenidm. The script also grants the appropriate permissions.Edit this script if you want to change the password of the
openidmuser, for example:$ more /path/to/openidm/db/postgresql/scripts/createuser.pgsql create user openidm with password 'mypassword'; create database openidm encoding 'utf8' owner openidm; grant all privileges on database openidm to openidm;
Edit the Postgres client authentication configuration file,
pg_hba.conf. Add the following entries for the following users:postgresandopenidm:local all openidm trust local all postgres trust
As the
postgresuser, execute thecreateuser.pgsqlscript as follows:$ psql -U postgres < /path/to/openidm/db/postgresql/scripts/createuser.pgsql CREATE ROLE CREATE DATABASE GRANT
Execute the
openidm.pgsqlscript as the newopenidmuser that you created in the first step:$ psql -U openidm < /path/to/openidm/db/postgresql/scripts/openidm.pgsql CREATE SCHEMA CREATE TABLE CREATE TABLE CREATE TABLE CREATE INDEX CREATE INDEX ... START TRANSACTION INSERT 0 1 INSERT 0 1 COMMIT CREATE INDEX CREATE INDEX
Your database has now been initialized.
Run the three scripts that set up the tables required by the Activiti workflow engine:
$ psql -d openidm -U openidm < /path/to/openidm/db/postgresql/scripts/activiti.postgres.create.engine.sql
$ psql -d openidm -U openidm < /path/to/openidm/db/postgresql/scripts/activiti.postgres.create.history.sql
$ psql -d openidm -U openidm < /path/to/openidm/db/postgresql/scripts/activiti.postgres.create.identity.sql
If you are going to direct audit logs to this repository, run the script that sets up the audit tables:
$ psql -d openidm -U openidm < /path/to/openidm/db/postgresql/scripts/audit.pgsql
Remove the default DS repository configuration file (
repo.ds.json) from your project'sconf/directory. For example:$ cd /path/to/openidm/my-project/conf/ $ rm repo.ds.json
Copy the database connection configuration file for PostgreSQL (
datasource.jdbc-default.json) and the database table file (repo.jdbc.json) to your project's configuration directory. For example:$ cd /path/to/openidm $ cp db/postgresql/conf/datasource.jdbc-default.json my-project/conf/ $ cp db/postgresql/conf/repo.jdbc.json my-project/conf/
Update the connection configuration to reflect your PostgreSQL deployment. The default connection configuration in the
datasource.jdbc-default.jsonfile is as follows:{ "driverClass" : "org.postgresql.Driver", "jdbcUrl" : "jdbc:postgresql://&{openidm.repo.host}:&{openidm.repo.port}/openidm", "databaseName" : "openidm", "username" : "openidm", "password" : "openidm", "connectionTimeout" : 30000, "connectionPool" : { "type" : "hikari", "minimumIdle" : 20, "maximumPoolSize" : 50 } }If you changed the password in step 1 of this procedure, edit the
datasource.jdbc-default.jsonfile to set the value for thepasswordfield to whatever password you set for theopenidmuser.Specify the values for
openidm.repo.hostandopenidm.repo.portin one of the following ways:Set the values in your
resolver/boot.propertiesfile:openidm.repo.host = localhost openidm.repo.port = 5432
Set the properties in the
OPENIDM_OPTSenvironment variable and export that variable before startup. You must include the JVM memory options when you set this variable. For example:$ export OPENIDM_OPTS="-Xmx1024m -Xms1024m -Dopenidm.repo.host=localhost -Dopenidm.repo.port=5432" $ cd /path/to/openidm $ ./startup.sh -p my-project Executing ./startup.sh... Using OPENIDM_HOME: /path/to/openidm Using PROJECT_HOME: /path/to/openidm Using OPENIDM_OPTS: -Xmx1024m -Xms1024m -Dopenidm.repo.host=localhost -Dopenidm.repo.port=5432 Using LOGGING_CONFIG: -Djava.util.logging.config.file=/path/to/openidm/conf/logging.properties Using boot properties at /path/to/openidm/resolver/boot.properties -> OpenIDM version "6.0.0.7" OpenIDM ready
PostgreSQL is now set up for use as the internal repository.
Start IDM with the configuration for your project. Monitor the console for the success of your setup. After startup, run a
scr listcommand. In the output, you should see thatrepo.jdbcisactive, whereasrepo.dsisenabledbut notactive:$ cd /path/to/openidm $ ./startup.sh -p my-project Using OPENIDM_HOME: /path/to/openidm Using OPENIDM_OPTS: -Xmx1024m -Xms1024m Using LOGGING_CONFIG: -Djava.util.logging.config.file=/path/to/openidm/conf/logging.properties Using boot properties at /path/to/openidm/resolver/boot.properties -> scr list BundleId Component Name Default State Component Id State PIDs (Factory PID) [ 5] org.forgerock.openidm.config.enhanced.starter enabled [ 1] [active ] org.forgerock.openidm.config.enhanced.starter [ 5] org.forgerock.openidm.config.manage enabled [ 0] [active ] org.forgerock.openidm.config.manage [ 10] org.forgerock.openidm.datasource.jdbc enabled [ 10] org.forgerock.openidm.repo.jdbc enabled [ 48] [active ] org.forgerock.openidm.repo.jdbc [ 11] org.forgerock.openidm.repo.ds enabled ...Set up indexes to tune the PostgreSQL repository according to your specific deployment.
Important
No indexes are set by default. If you do not tune the repository correctly by creating the required indexes, the performance of your service can be severely impacted. For example, setting too many indexes can have an adverse effect on performance during managed object creation. Conversely, not indexing fields that are searched will severely impact search performance.
IDM includes a
/path/to/openidm/db/postgresql/scripts/default_schema_optimization.pgsqlscript that sets up a number of indexes. This script includes extensive comments on the indexes that are being created. Review the script before you run it to ensure that all the indexes are suitable for your deployment.When you have refined the script for your deployment, execute the script as a user with superuser privileges, so that the required extensions can be created. By default, this is the
postgresuser:$ psql -U postgres openidm < /path/to/openidm/db/postgresql/scripts/default_schema_optimization.pgsql CREATE INDEX CREATE INDEX CREATE INDEX CREATE INDEX CREATE INDEX CREATE INDEX
2.8. Setting Up an IBM DB2 Repository
This section makes the following assumptions about the DB2 environment. If these assumptions do not match your DB2 environment, adapt the subsequent instructions accordingly.
DB2 is running on the localhost, and is listening on the default port (50000).
The user
db2inst1is configured as the DB2 instance owner, and has the passwordPassw0rd1.
This section assumes that you will use basic username/password authentication. For instructions on configuring Kerberos authentication with a DB2 repository, see "Configuring Kerberos Authentication With a DB2 Repository".
Before you start, make sure that the server is stopped.
$ cd /path/to/openidm/ $ ./shutdown.sh OpenIDM is not running, not stopping.
Configure IDM to use the DB2 repository, as described in the following steps:
Create an OSGi bundle for the DB2 JDBC driver, as follows:
Download the DB2 JDBC driver for your database version from the IBM download site and place it in the
openidm/db/db2/scriptsdirectory.Use either the
db2jcc.jarordb2jcc4.jar, depending on your DB2 version. For more information, see the DB2 JDBC Driver Versions.$ ls /path/to/db/db2/scripts/ db2jcc.jar openidm.sql
Create a
bndfile and edit it to match the version information for your JDBC driver.You can use the sample
bndfile located inopenidm/db/mssql/scripts. Copy thebndfile to the same location as the JDBC driver.$ cd /path/to/openidm/db $ cp mssql/scripts/sqljdbc4.bnd db2/scripts/ $ ls db2/scripts db2jcc.jar openidm.sql sqljdbc4.bnd
The JDBC driver version information for your driver is located in the
Specification-Versionproperty in the MANIFEST file of the driver.$ cd /path/to/openidm/db/db2/scripts $ unzip -q -c db2jcc.jar META-INF/MANIFEST.MF Manifest-Version: 1.0 Created-By: 1.4.2 (IBM Corporation)
Edit the
bndfile to match the JDBC driver version.$ more sqljdbc4.bnd ... version=1.0 Export-Package: *;version=${version} Bundle-Name: IBM JDBC DB2 Driver Bundle-SymbolicName: com.ibm.db2.jcc.db2driver Bundle-Version: ${version}Download the
bndJAR file (bnd-2.4.0.jar) that enables you to create OSGi bundles. For more information aboutbnd, see http://bnd.bndtools.org/.Place the
bndJAR file in the same directory as the JDBC driver, and thebndfile.$ ls /path/to/openidm/db/db2/scripts bnd-2.4.0.jar db2jcc.jar openidm.sql sqljdbc4.bnd
Change to the directory in which the script files are located and run the following command to create the OSGi bundle:
$ cd /path/to/openidm/db/db2/scripts
$ java -jar bnd-2.4.0.jar wrap --properties sqljdbc4.bnd --output db2jcc-osgi.jar db2jcc.jar
This command creates an OSGi bundle, as defined by the
--outputoption:db2jcc-osgi.jar:$ ls bnd-2.4.0.jar db2jcc.bar db2jcc.jar openidm.sql sqljdbc4.bnd
Move the OSGi bundle fle to the
openidm/bundledirectory:$ mv db2jcc-osgi.jar /path/to/openidm/bundle/
Remove the default DS repository configuration file (
repo.ds.json) from your project'sconf/directory. For example:$ cd /path/to/openidm/my-project/conf/ $ rm repo.ds.json
Copy the database connection configuration file for DB2 (
datasource.jdbc-default.json) and the database table configuration file (repo.jdbc.json) to your project's configuration directory. For example:$ cd /path/to/openidm/ $ cp db/db2/conf/datasource.jdbc-default.json my-project/conf/ $ cp db/db2/conf/repo.jdbc.json my-project/conf/
Update the connection configuration to reflect your DB2 deployment. The default connection configuration in the
datasource.jdbc-default.jsonfile is as follows:{ "driverClass" : "com.ibm.db2.jcc.DB2Driver", "jdbcUrl" : "jdbc:db2://&{openidm.repo.host}:&{openidm.repo.port}/dopenidm:retrieveMessagesFromServerOnGetMessage=true;", "databaseName" : "sopenidm", "username" : "openidm", "password" : "openidm", "connectionTimeout" : 30000, "connectionPool" : { "type" : "hikari", "minimumIdle" : 20, "maximumPoolSize" : 50 } }Specify the values for
openidm.repo.hostandopenidm.repo.portin one of the following ways:Set the values in
resolver/boot.propertiesor your project'sconf/system.propertiesfile, for example:openidm.repo.host = localhost openidm.repo.port = 50000
Set the properties in the
OPENIDM_OPTSenvironment variable and export that variable before startup. You must include the JVM memory options when you set this variable. For example:$ export OPENIDM_OPTS="-Xmx1024m -Xms1024m -Dopenidm.repo.host=localhost -Dopenidm.repo.port=50000" $ cd /path/to/openidm $ ./startup.sh -p my-project Executing ./startup.sh... Using OPENIDM_HOME: /path/to/openidm Using PROJECT_HOME: /path/to/openidm Using OPENIDM_OPTS: -Xmx1024m -Xms1024m -Dopenidm.repo.host=localhost -Dopenidm.repo.port=50000 Using LOGGING_CONFIG: -Djava.util.logging.config.file=/path/to/openidm/conf/logging.properties Using boot properties at /path/to/openidm/resolver/boot.properties -> OpenIDM version "6.0.0.7" OpenIDM ready
Create a user database for IDM (
dopenidm).$ db2 create database dopenidm
Import the IDM data definition language script into your DB2 instance.
$ cd /path/to/openidm $ db2 -i -tf db/db2/scripts/openidm.sql
The database schema is defined in the
SOPENIDMdatabase.You can show the list of tables in the repository, using the db2 list command, as follows:
$ db2 LIST TABLES for all Table/View Schema Type Creation time ------------------------------- --------------- ----- -------------------------- CLUSTEROBJECTPROPERTIES SOPENIDM T 2015-10-01-11.58.05.968933 CLUSTEROBJECTS SOPENIDM T 2015-10-01-11.58.05.607075 CONFIGOBJECTPROPERTIES SOPENIDM T 2015-10-01-11.58.01.039999 CONFIGOBJECTS SOPENIDM T 2015-10-01-11.58.00.570231 GENERICOBJECTPROPERTIES SOPENIDM T 2015-10-01-11.57.59.583530 GENERICOBJECTS SOPENIDM T 2015-10-01-11.57.59.152221 INTERNALUSER SOPENIDM T 2015-10-01-11.58.04.060990 LINKS SOPENIDM T 2015-10-01-11.58.01.349194 MANAGEDOBJECTPROPERTIES SOPENIDM T 2015-10-01-11.58.00.261556 MANAGEDOBJECTS SOPENIDM T 2015-10-01-11.57.59.890152 ...
Connect to the openidm database, then run the three scripts that set up the tables required by the Activiti workflow engine:
$ db2 connect to dopenidm $ db2 -i -tf /path/to/openidm/db/db2/scripts/activiti.db2.create.engine.sql $ db2 -i -tf /path/to/openidm/db/db2/scripts/activiti.db2.create.history.sql $ db2 -i -tf /path/to/openidm/db/db2/scripts/activiti.db2.create.identity.sql
If you plan to direct audit logs to this repository, run the script that sets up the audit tables:
$ db2 -i -tf /path/to/openidm/db/db2/scripts/audit.sql
When you have set up DB2 for use as the internal repository, start the
server to check that the setup has been successful. After startup, you should
see that repo.jdbc is active, whereas
repo.ds is enabled but not
active:
$ cd /path/to/openidm
$ ./startup.sh -p my-project
Using OPENIDM_HOME:   /path/to/openidm
Using OPENIDM_OPTS:   -Xmx1024m -Xms1024m
Using LOGGING_CONFIG:
-Djava.util.logging.config.file=/path/to/openidm/conf/logging.properties
Using boot properties at /path/to/openidm/resolver/boot.properties
-> scr list
BundleId Component Name Default State
    Component Id State      PIDs (Factory PID)
 [   5]   org.forgerock.openidm.config.enhanced.starter  enabled
    [   1] [active      ] org.forgerock.openidm.config.enhanced.starter
 [   5]   org.forgerock.openidm.config.manage  enabled
    [   0] [active      ] org.forgerock.openidm.config.manage
 [  10]   org.forgerock.openidm.datasource.jdbc  enabled
 [  10]   org.forgerock.openidm.repo.jdbc  enabled
    [  48] [active      ] org.forgerock.openidm.repo.jdbc
 [  11]   org.forgerock.openidm.repo.ds  enabled
...2.8.1. Configuring Kerberos Authentication With a DB2 Repository
By default, IDM uses the username and password configured in the
repository connection configuration file
(conf/datasource.jdbc-default.json) to connect to the
DB2 repository. You can configure IDM to use Kerberos
authentication instead.
In this scenario, IDM acts as a client and requests a Kerberos ticket for a service, which is DB2, through the JDBC driver.
This section assumes that you have configured DB2 for Kerberos authentication. If that is not the case, follow the instructions in the corresponding DB2 documentation before you read this section.
The following diagram shows how the ticket is obtained and how the keytab is
referenced from IDM's jaas.conf file.
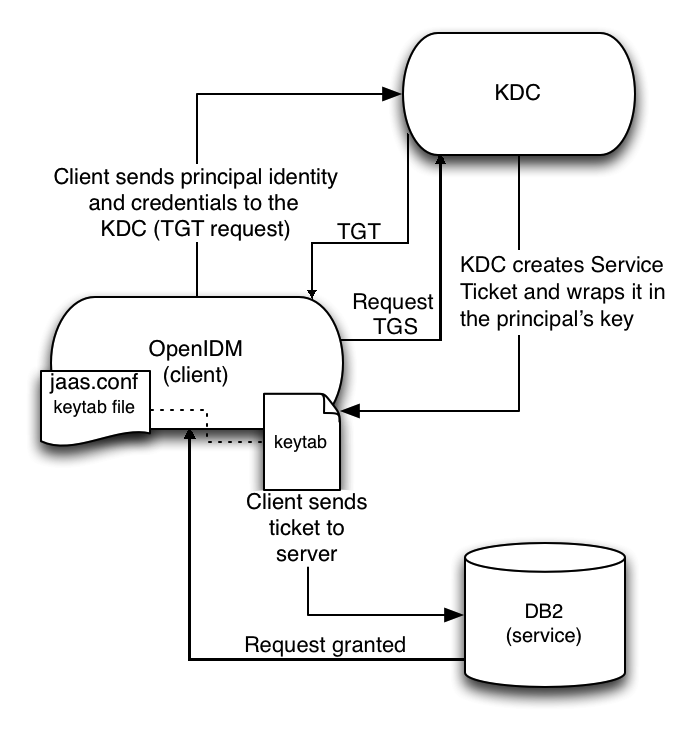
To configure IDM for Kerberos authentication:
Create a keytab file, specifically for use by IDM.
A Kerberos keytab file (
krb5.keytab) is an encrypted copy of the host's key. The keytab enables DB2 to validate the Kerberos ticket that it receives from IDM. You must create a keytab file on the host that IDM runs on. The keytab file must be secured in the same way that you would secure any password file. Specifically, only the user running IDM should have read and write access to this file.Create a keytab for DB2 authentication, in the file
openidm/security/idm.keytab/:$ kadmin -p kadmin/admin -w password $ kadmin: ktadd -k /path/to/openidm/security/idm.keytab db2/idm.example.com
Make sure that the DB2 user has read access to the keytab.
Copy the DB2 Java Authentication and Authorization Service (JAAS) configuration file to the IDM
securitydirectory:$ cd path/to/openidm $ cp db/db2/conf/jaas.conf security/
By default, IDM assumes that the keytab is in the file
openidm/security/idm.keytaband that the principal identity isdb2/idm.example.com@EXAMPLE.COM. Change the following lines in thejaas.conffile if you are using a different keytab:keyTab="security/idm.keytab"
principal="db2/idm.example.com@EXAMPLE.COM"
Adjust the authentication details in your DB2 connection configuration file (
conf/datasource.jdbc-default.json). Edit that file to removepasswordfield and change the username to the instance owner (db2). The following excerpt shows the modified file:{ ... "databaseName" : "sopenidm", "username" : "db2", "connectionTimeout" : 30000, ... }Edit your project's
conf/system.propertiesfile, to add the required Java options for Kerberos authentication.In particular, add the following two lines to that file:
db2.jcc.securityMechanism=11
java.security.auth.login.config=security/jaas.conf
Restart IDM.
Chapter 3. Removing and Moving Server Software
This chapter covers uninstallation and describes how to move an existing installation to a different location.
(Optional) Stop the server if it is running, as described in "To Stop IDM".
Remove the file system directory where you installed the software:
$ rm -rf /path/to/openidm
(Optional) If you use a JDBC database for the repository, you can drop the
openidmdatabase.
To move IDM to a different directory, you do not have to uninstall and reinstall the server. To move an existing instance, follow these steps:
Stop the server, as described in "To Stop IDM".
Remove the
felix-cachedirectory:$ cd path/to/openidm $ rm -rf felix-cache
Move the files:
$ mv path/to/openidm path/to/new-openidm
Start the server in the new location:
$ cd path/to/new-openidm
$ ./startup.sh
Chapter 4. Updating Servers
This chapter describes how to update an existing deployment to the latest IDM release.
The update process is largely dependent on your deployment and on the extent to which you have customized IDM. Engage ForgeRock Support Services for help with updating an existing deployment.
4.1. Limitations of the Automated Update Process
You cannot use the automated update process in all deployments. This section lists the limitations:
- Phased Update From Previous Versions
You cannot update directly from IDM 4, IDM 4.5, or IDM 5 to IDM 6.0.0.7. You must update to each major version successively, for example, from version 4 to 4.5, then from 4.5 to 5, 5 to 5.5, and then to this version.
To update from IDM version 6.0.0.x to IDM 6.0.0.7, make note of the following point:
Important
The update from IDM 6.0.0.x to IDM 6.0.0.7 may require an extra upgrade step depending on the version you are updating from. For example, if you are on versions 6.0.0 to 6.0.0.4, you will need to download and apply a pre-patch file, then run the update. The pre-patch file ensures that the IDM version from which you are updating has the necessary files to successfully complete the update process.
If you are on IDM versions 6.0.0, 6.0.0.1, or 6.0.0.2: download
IDM-6.0.0.5-pre-patch-from-6.0.0-6.0.0.2.zipfrom ForgeRock's BackStage site.If you are on IDM versions 6.0.0.3 or 6.0.0.4: download
IDM-6.0.0.5-pre-patch-from-6.0.0.3-6.0.0.4.zipfrom ForgeRock's BackStage site.If you are on IDM 6.0.0.5 or higher, the update to version 6.0.0.7 does not require a pre-patch file.
For more information, see "Applying the IDM 6.0.0.7 Patch Bundle Release".
To update to version 6.0, follow the instructions shown in "Updating to Version 6.0".
To update from version 5 to version 5.5, follow the instructions shown in Updating To OpenIDM 5.5 in the IDM 5.5 Installation Guide.
To update from version 4.5 to version 5, follow the instructions shown in Updating To OpenIDM 5 in the IDM 5 Installation Guide.
To update from version 4 to version 4.5, follow the instructions shown in Updating From OpenIDM 4.0 to OpenIDM 4.5 in the OpenIDM 4.5 Installation Guide.
If you are updating from a version prior to version 4, you must follow the manual update process first:
To migrate a deployment from 3.1 to 4, see Migrating From OpenIDM 3.1 to OpenIDM 4.0 in the OpenIDM 4 Installation Guide.
To migrate a deployment from 3 to 3.1, see Migrating to OpenIDM 3.1 in the OpenIDM 3.1 Installation Guide.
To migrate a deployment from 2.1 to 3, see Migrating to OpenIDM 3 in the OpenIDM 3 Installation Guide.
- Update on Windows Systems
Automated update is not supported on Microsoft Windows systems. If you are updating on that operating system, follow the manual update process:
To migrate a Windows deployment from version 4 to version 4.5, see Migrating From OpenIDM 4.0 to OpenIDM 4.5 on Windows in the OpenIDM 4.5 Installation Guide.
To migrate a Windows deployment from version 4.5 to 5, see Migrating From OpenIDM 4.5 to OpenIDM 5 on Windows in the OpenIDM 5 Installation Guide.
To migrate a Windows deployment from version 5 to 5.5, see Migrating From IDM 5 to IDM 5.5 on Windows in the OpenIDM 5.5 Installation Guide.
- Updating a Clustered Deployment
Updating nodes in a cluster is not presently supported. As a general practice, do not apply the update process to more than one node in a cluster. If you're updating a cluster, follow these steps:
Redirect client traffic to a different IDM system or cluster.
Shut down every node in the cluster.
Update one node.
Clone the first node to the other nodes in that cluster.
- Supported Project Directories
The automated update process works for a project directory in the following locations:
The default project directory,
/path/to/openidmOutside of the IDM directory tree, such as
/home/projector/other/hard_drive/idm
The update process does not support changes to any project directory when configured as a subdirectory of
/path/to/openidm. That includes the samples listed in the/path/to/openidm/samplesdirectory. For more information on the samples, see "Overview of the Samples" in the Samples Guide.This documentation represents the project directory as
project-dir.As a best practice, copy the default project or sample to an external installation
project-dirdirectory, such as/path/to/project. If needed, this is an opportunity to move theproject-dirto such a location, to facilitate the update process.Apart from the repository update scripts, the update process does not change information related to data and schema.
The update process also generally does not change scripts in your project directories. For a list of files affected during the update process, see "Files Changed During the Update Process".
- Supported Repositories Only
Update is supported only with the JDBC repositories supported on IDM 5.5. As such, repository update scripts are provided only for those JDBC repositories.
Update is not supported for a ForgeRock Directory Services (DS) repository.
For instructions on installing a supported JDBC repository, see "Selecting a Repository".
- Custom Configuration Files
If you customized configuration files for your IDM 5.5 deployment, such as JSON files, or files related to a custom UI, you'll need to reapply what you customized after the update is complete. For more information, see "Before Restarting IDM".
4.2. An Overview of the Update Process
This section provides background information on the update process. If you want to jump to the steps required to update to version 6.0, read "Updating to Version 6.0".
4.2.1. The Update Process in Labels
When you start an update, IDM goes through a process to determine the files to be updated, to facilitate repository updates, to move the server into maintenance mode before implementing an update, and then to restart after the update is complete. Most of these steps happen automatically when you run the update from the UI or CLI. The following basic steps include labels that you might see in log files, if there are problems.
PREVIEW_ARCHIVE: Preview the archive using appropriate checksums, to define the files to be updated.ACCEPT_LICENSE: Present the appropriate license for the update. If the license is not accepted, the update stops, and you retain all files in your current IDM installation.LIST_REPO_UPDATES: Identify and save scripts to update the current repository.PAUSING_SCHEDULER: Pause the scheduler, to prevent new jobs from starting during the update process.WAIT_FOR_JOBS_TO_COMPLETE: Wait for any currently running jobs to complete.ENTER_MAINTENANCE_MODE: Set the server in maintenance mode, which disables non-essential services.INSTALL_ARCHIVE: Install the update archive.WAIT_FOR_INSTALL_DONE: Wait until the installation of the update archive is complete.MARK_REPO_UPDATES_COMPLETE: Note status when repository updates are complete.EXIT_MAINTENANCE_MODE: Exit from maintenance mode.ENABLE_SCHEDULER: Enable the scheduler. Any schedules that were previously in place are re-established.
4.2.2. Files Changed During the Update Process
As of IDM 4, the server includes MD5 checksums for each file. These checksums allow the update process to verify file changes.
The update process compares the current checksum of every file with:
The checksum of the file as originally installed.
The checksum of any file included in the update or patch.
When you run the update process, changes are applied to the
project-dir, either in the
default directory, /path/to/openidm, or outside
of the IDM directory tree, such as /home/project.
If the project-dir is
outside of the IDM directory tree, there is no MD5 checksum for
that file. Based on that information, the update mechanism takes the
following actions:
- Files in
openidm/bundle Because of the nature of Java archives in the
openidm/bundledirectory, IDM updates all files in that directory, even if they have not changed.New files are written to the target directory.
Existing files are saved with a .old-unix_time extension.
- Files in
openidm/binandopenidm/ui/*/default New files are written to the target directory.
If the original file was customized, it is saved with a .old-unix_time extension.
- Files in the
openidm/bin/defaults/script/uidirectory For IDM 6.0, several files have been moved to the
openidm/bin/defaults/scriptdirectory, including:mappingDetails.jsoauthProxy.jsonCreateUser.jsonDelete-user-cleanup.jsonUpdateUser.jsreconResults.jsIf you've called out any of these files in custom scripts, you'll need to update their locations. For example, the IDM update process updates the
onDeletecode block in themanaged.jsonfile to:"onDelete" : { "type" : "text/javascript", "file" : "onDelete-user-cleanup.js" },- Files in the
openidm/bin/defaults/script/infodirectory Files in this directory have been deleted, including:
login.jsping.jsuiconfig.jsversion.jsIf you've called out any of these files in custom scripts, you'll need to find alternatives.
project-dir/script/access.jsThe update process overwrites the existing
access.jsfile. If you've customized this file, such as for a custom endpoint, back upaccess.js. For more information on this file, see "Understanding the Access Configuration Script (access.js)" in the Integrator's Guide.- Files in the
project-dir/confdirectory, outside of the/path/to/openidmdirectory tree Project configuration files (JSON): Files related to your project are patched with the content of the corresponding version 6.0 configuration file, regardless of whether they have been customized.
Warning
If you have customized standard IDM JSON configuration files, be careful. Analyze the corresponding version 6.0 file. It may include new features that you want. As a best practice, apply each customization to the corresponding version 6.0 file and test the change before you put it into production. For more information, see "Before Restarting IDM".
System configuration files: (
system.properties,config.properties,logging.properties, andjetty.xml) are written with a.-new-unix_timeextension in the same directory, regardless of whether they have been customized. You must merge any changes from the latest version of the.newfile into your existing configuration file. For more information, see "Before Restarting IDM".- Files in the default
project-dir/confdirectory, whereproject-diris/path/to/openidm Project configuration files (JSON): Files related to your project are overwritten with the content of the corresponding version 6.0 configuration file, regardless of whether they have been customized.
Warning
If you have customized any standard IDM JSON configuration files, be careful. Analyze the corresponding version 6.0 file. It may include new features that you want. As a best practice, apply and test each custom change to the version 6.0 configuration file. For more information, see "Before Restarting IDM".
System configuration files: (
system.properties,config.properties,logging.properties, andjetty.xml) are not patched if they have been customized. Instead, the update process creates configuration files with a.new-unix_timeextension in the same directory. You must merge any changes from these.new-files into your customized configuration files. For more information, see "Before Restarting IDM". If you have not customized these files, the update process replaces the existing configuration file with the corresponding version 6.0 file.- Files in any other directory
Existing files are overwritten and no backup files are created.
- Configuration in the repository
Configuration information is stored in your repository. The update process overwrites information in that data store.
Note
The unix_time is the number of seconds since the
Unix Epoch of January 1, 1970.
For a list of checksums, review the
openidm/.checksums.csv file. It contains a list of
checksums for every original file in your openidm/
directory.
You need to copy update archives, in zip format, to the
openidm/bin/update directory. IDM creates
that directory during the start process.
Warning
If you've changed defaults in the boot.properties file,
be careful, as this can affect the boot process. After update is
complete, you'll find the 6.0.0.7 version of this file in your
project's resolver/ subdirectory. Pay attention to
changes to this file, especially the new openidm.host
property as described in "Important Changes to Existing Functionality" in the Release Notes.
4.2.3. Files Added During the Update Process
Several new files are added to project-dir/conf
during the update process
4.2.4. The update.json File
The update.json file, in the
/path/to/openidm directory, specifies basic
configuration parameters for the update process:
{
    "update" : {
        "description" : "Full product installation",
        "resource" : "https://backstage.forgerock.com/docs/idm/<current version number>/release-notes",
        "restartRequired" : true
    },
    "origin": {
        "product": "OpenIDM",
        "version": [
            "<current version number>"
        ]
    },
    "destination": {
        "product": "OpenIDM",
        "version": "<update version number>"
    },
    "removeFile" : [
        "<files to be removed>"
    ],
    "removeConfig" : [
        "<configurations to be removed>"
    ],
    "filesToBeIgnored" : [
        "security/keystore.jceks",
        "security/realm.properties",
        "security/truststore"
    ]
}
The version numbers may be either specific, such as
6.0, 6.0.0.1, 6.0.0.2, 6.0.0.3,
or 6.0.0.4.
For a full explanation of how you can specify a range of versions,
see "Setting the Connector Reference Properties" in the Integrator's Guide.
If you want to delete files during the update process, include them in the
removeFile code block. You can include files in the
following formats:
Individual files.
Directories: If you specify a directory, the update process will remove that directory, all files within that directory, and all subdirectories, recursively.
Files and directories with wildcards: If you specify a UNIX-style wildcard,
*or?, the update process will remove all files that meet the requirements of the wildcard.
To remove configurations during the update, include the corresponding
.json files in the removeConfig
array. Do not include the path to these files. During the update,
IDM recognizes these as configuration files and attempts to
remove the corresponding configuration from the repository.
Note
To preserve existing keystore and truststore files,
update.json includes the default versions of these
files in the filesToBeIgnored code block.
If you want to keep the update process from overwriting other files, add them to the same code block.
4.2.4.1. Setting up a Custom Update
You can create your own custom update binary. To do so, you'll need to modify two files:
.checksum.csvAdd an MD5 checksum for each file in your binary to a new
.checksum.csvfile. For guidance, see the same hidden file in the/path/to/openidmdirectory.update.jsonIf you want to try your own update, make sure that the
originanddestinationversion numbers match your current and planned update versions of IDM. For more information, see "Theupdate.jsonFile".
Warning
If you use the IDM update process with your own update binary, this may affect your ability to update IDM to 6.0 and beyond.
4.2.5. Command-Line Update Options
On UNIX/Linux systems, you can update to IDM 6.0 by using the cli.sh update command. For general information on cli.sh and cli.bat, see "Command-Line Interface" in the Integrator's Guide.
The following command updates the local system with the IDM-6.0.0.zip binary:
$ cd /path/to/openidm
$ ./cli.sh update \
--acceptLicense \
--user openidm-admin:openidm-admin \
--url http://localhost:8080/openidm \
IDM-6.0.0.zip
The update subcommand takes the following options:
-uor--userUSER[:PASSWORD]Allows you to specify the server user and password. Specifying a username is mandatory. If you do not specify a username, the following error is shown in the OSGi console:
Remote operation failed: Unauthorized. If you do not specify a password, you are prompted for one. This option is used by all three subcommands.--urlURLThe URL of the REST service. The default URL is
http://localhost:8080/openidm/.-Por--portPORTThe port number associated with the REST service. If specified, this option overrides any port number specified with the --url option. The default port is 8080.
--acceptLicenseAutomatically accept the license shown in
/path/to/openidm/legal-notices/Forgerock_License.txt. If you omit this option, the update process prompts you to accept or decline the license.--skipRepoUpdatePreviewBypasses a preview of repository updates. Suitable if you have already downloaded and approved changes to your repository.
--maxJobsFinishWaitTimeMsTIMEThe maximum time, in milliseconds, that the command should wait for scheduled jobs to finish before proceeding with the update.
Default:
-1, (the process exits immediately if any jobs are running)--maxUpdateWaitTimeMsTIMEThe maximum time, in milliseconds, that the server should wait for the update process to complete.
Default:
30000ms-lor--logLOG_FILEPath to the log file.
Default:
logs/update.log-Qor--quietUse quiet mode to minimize messages at the console; messages are still available in the log file defined by
--log.Note
If you use
--quietmode for updates, include the--acceptLicenseoption.
If you do not run the command in quiet mode, messages similar to the following are displayed in the console window where you launched the command:
Executing ./cli.sh...
Starting shell in /path/to/openidm
Using boot properties at /path/to/openidm/resolver/boot.properties
License was accepted via command line argument.
Pausing the Scheduler
Scheduler has been paused.
Waiting for running jobs to finish.
All running jobs have finished.
Entering into maintenance mode...
Now in maintenance mode.
Installing the update archive IDM-6.0.0.zip
Update procedure is still processing...
Update procedure is still processing...
Update procedure is still processing...
Update procedure is still processing...
Update procedure is still processing...
The update process is complete with a status of COMPLETE
Restarting OpenIDM.
Restart request completed.
4.2.6. Update File States
During the update process, you may see status information for each file, during three stages of an update:
| Status | Description |
|---|---|
| UNEXPECTED | Existing file is not in the list of known files for the original distribution. |
| NONEXISTENT |
A file in the new installation that does not exist in the original
distribution. This is always the status for versioned
files, such as the openidm-*.jar files in the
openidm/bundle/ directory.
|
| DELETED | The file should exist in the current installation but does not; the file is installed during the update. |
| DIFFERS | The file, located in a read-only directory, has changed, since the original deployment. |
| UNCHANGED | The file is not changed from the original distribution. |
| Status | Description |
|---|---|
| REPLACED |
Original file replaced; if the original file was changed by a user,
it is saved with a .old extension.
|
| PRESERVED | Original file saved with changes made by a user. New file
saved with a .new extension. |
| APPLIED | The update changed the file. |
| REMOVED | The update removed the file. |
| FAILED | The attempt to update the file, via a patch, did not work. |
4.3. Updating to Version 6.0
If you are on a version prior to IDM 6.0, for example IDM 5.5, then you must first update to version 6.0.
In the following sections, you'll:
4.3.1. Prepare Your Update
You must take the following steps before you start an automated update:
Update your Java environment.
IDM 6.0 requires a supported Java environment, as described in "Preparing the Java Environment" in the Release Notes.
If your server uses an older version, install a newer Java version before you update and follow the instructions in "Java Prerequisites".
Download the new software.
Download
IDM-6.0.0.zipfrom ForgeRock's BackStage site, and copy it to the/path/to/openidm/bin/updatedirectory.Note
IDM creates the
/path/to/openidm/bin/updatedirectory the first time you start IDM.Back up your deployment.
Before you start the update process, back up your existing deployment by archiving the
openidmdirectory and the contents of your repository. Because there is no "undo" option available during the update process, you can use this backup to restore your deployment or restart the update process if something goes wrong.Save any customized
*.jsonconfiguration files, typically located in your project'sconf/subdirectory. You'll need to make judgements on how to apply these customizations to your version 6.0 deployment after the update is complete.Identify files in custom directories. Save them, and apply them to your updated deployment after all stages of the update process are complete. For more information, see "Before Restarting IDM".
If you have encrypted or obfuscated any properties in configuration files, decrypt them into their plain text values before you start the update. When the update process is complete, you can encrypt or obfuscate the values again.
Save your audit data. If you want to preserve a record of the audit logs collected while IDM 5.5 was running, you will need to save these log files manually before you start the update process. You can find the log files in the
/path/to/openidm/audit/directory. For more information on these files, see "Audit Event Topics" in the Integrator's Guide.Tip
File rotation tip: When you delete files in the
/path/to/openidm/audit/directory, IDM creates new files as needed in the same directory.
Change read-only deployments.
If your project directory is located on a read-only volume, mount that directory in read-write mode before you start the update process.
Disable authentication modules used with AM.
If you have integrated IDM with AM, first disable the authentication module you used. You can re-enable this module when the update is complete.
If you set up the connection as described in "Integrating IDM With the ForgeRock Identity Platform" in the Samples Guide, follow these steps to disable the connection to AM:
In the Admin UI, select Configure > Authentication. If you've configured the connection with AM, the authentication provider should be set to the
ForgeRock Identity Provider. Change it toLocal.Alternatively, edit the
authentication.jsonfile for your project. Delete the code block with your selected authentication module. Depending on your version of IDM and deployment, the module may be namedOAUTH_CLIENT,OPENID_CONNECT, orOPENAM_SESSION.
From the UI, navigate to the URL for IDM. You should now be able to log into IDM normally, without authenticating through AM.
If you need integration with AM, you should also upgrade to AM 6.0. For more information, see the AM Upgrade Guide.
When the update process is complete, you can re-enable the connection to AM. To do so, follow the steps described in "Integrating IDM With the ForgeRock Identity Platform" in the Samples Guide.
Review repository update scripts.
IDM 6.0 includes a number of scripts that you must run to update your repository schema. The update process detects which scripts are required for your particular repository, extracts them from the IDM 6.0 binary, and prompts you to save them in the directory that you specify.
The scripts vary by database. For a list of all the repository update scripts, see "Repository Update Scripts". The path you specify is relative to the
/path/to/openidm/directory.Important
If you are using a managed relational database service such as Amazon RDS, be aware that some update scripts might require root level access to the system tables in the underlying database.
Specifically, certain PostgreSQL update scripts require access to the
pg_attributetable. Because the database service master user is not the same as the PostgreSQL root user, such scripts might fail with a permissions error. In this case, investigate the failing script, and use anALTER TABLEcommand on the specific IDM table instead.Before you run the repository update scripts, review the scripts that correspond to your repository with your Database Administrator (DBA).
Start the server.
IDM must be running when you launch an update using the CLI.
Warning
If you use custom versions of IDM Admin and Self-Service UIs,
the update process may affect you in different ways; for more information,
see "Files Changed During the Update Process". If you followed the procedure
described in "Customizing the Admin UI" in the Integrator's Guide,
you'll have custom files in the openidm/ui/admin/extension
and openidm/ui/selfservice/extension directories.
IDM 6.0 includes significant UI improvements.
The update process does not copy those improvements to the noted
extension/ subdirectories.
When you're ready to run the update process, see "Update to IDM 6.0".
4.3.1.1. Repository Update Scripts
The scripts required for an update from IDM 5.5 to IDM
6.0 are available in the
openidm/db/repo/scripts/updates
directory. The following table lists the scripts that must be run for each
corresponding database.
| Databases | Scripts | ||||
|---|---|---|---|---|---|
|
DB2, MSSQL, MySQL |
| ||||
|
Oracle, PostgreSQL |
|
Update Notes for Database Administrators (DBAs)
Make sure you have a qualified DBA review these scripts.
For a DB2 repository, review the
v12_hybridize_relationships_table.sqlscript with a DBA. ChangeMAX_RELATION_SHIP_ID_COLUMNto an integer that is 1 more than the current maximum of the relationship ID column before you run this update script.For a PostgreSQL repository, you must run the
v16_increase_audit_authentication_method_size.sqlwith Superuser privileges to access thepg_attribute. For example:$ psql -U postgres openidm < /path/to/v16_increase_audit_authentication_method_size.sql
The following script,
v*_increase_audit_authentication_method_size.sql, assumes you've redirected audit logs to the IDM external repository. If you've redirected audit logs elsewhere, make sure your DBA applies the equivalent commands to that repository.If you apply that script without redirecting audit logs to the IDM external repository, you may see the following message:
ERROR 1146 (42S02) at line 1: Table 'openidm.auditauthentication' doesn't exist
If you've redirected audit logs elsewhere, or choose to retain them in the
/path/to/openidm/auditdirectory, you can safely ignore this error.
4.3.2. Update to IDM 6.0
When you have completed the steps in "Prepare Your Update", your instance of IDM is ready for an update to version 6.0.
During the update process to IDM 6.0, you may see around 1000 lines of errors in the console. These errors do not affect the update process, and will disappear after you shut down and restart IDM.
Now start the update process, using the CLI or the Admin UI. This section includes separate procedures for those options.
Note
For IDM 6.0, automatic restart has been removed from the update process. You'll have to:
Shut down IDM after the automated part of the update process is complete.
You must not restart IDM until meeting the requirements described in "Before Restarting IDM".
Start the update process from the command-line, with the following binary, IDM-6.0.0.zip:
$ cd /path/to/openidm
$ ./cli.sh update \
--acceptLicense \
--user openidm-admin:openidm-admin \
--url http://localhost:8080/openidm \
IDM-6.0.0.zip
Note
If you are using a port other than
8080, specify the port number. Include --port number in the ./cli.sh update command.During the update process, you are prompted to save applicable repository update scripts. For a full list, see "Repository Update Scripts". You might see a message similar to the following:
Database repo update files present in archive were found:
vmm_something.sql
vnn_another_update.sql
Please enter the directory to save repository update files:
Enter a directory name, such as
update-scripts. The update process creates this directory, relative to your IDM installation directory, and saves the required scripts to that directory.The update then displays the following message:
Repository scripts are in the following directory: update-scripts.
Please apply the update scripts now. When complete, run the update again with the
--skipRepoUpdatePreview option.
Before applying database repository scripts, review "Repository Update Scripts", especially the following note: Update Notes for Database Administrators (DBAs) for potential pitfalls.
Apply the database repository scripts in numeric order. How you apply these scripts depends on your repository. The following example applies a hypothetical update script required for a MySQL repository:
$ mysql -u root -p < openidm/update-scripts/v999_something_added.sql
After you've run the database repository scripts, run the same cli.sh update command again; add the following option: --skipRepoUpdatePreview:
$ cd /path/to/openidm
$ ./cli.sh update \
--acceptLicense \
--skipRepoUpdatePreview \
--user openidm-admin:openidm-admin \
--url http://localhost:8080/openidm \
IDM-6.0.0.zip
The update continues. The process may take a few minutes. When the update is complete, you'll see the following messages:
The update process is complete.
Exiting maintenance mode...
No longer in maintenance mode.
Resuming the job scheduler.
Scheduler has been resumed.
After update, check if you have multiple versions of the
bundle/openidm-repo-opendj-<version>files, for example,bundle/openidm-repo-opendj-6.0.0.jarorbundle/openidm-repo-opendj-6.0.0.x.jar. Manually remove the oldest version, which should be the file generated from the release before the 6.0.0.4 update.Run the following Groovy script to clear the
reconprogressstatedata in your repository:def result = openidm.query( "repo/reconprogressstate", [ "_queryFilter" : "true", "_fields" : "_id" ]).result; for ( item in result ) { openidm.delete("repo/reconprogressstate/" + item["_id"], null); } return result.size() + " reconprogressstate records deleted";This script will work regardless of the type of repository, and can be sent as a REST call. For example:
curl \
      --header "X-OpenIDM-Username: openidm-admin" \
      --header "X-OpenIDM-Password: openidm-admin" \
      --header "Content-Type: application/json" \
      --request POST \
      --data '{
      "type":"groovy",
      "source":"def result = openidm.query(\"repo/reconprogressstate\", [ \"_queryFilter\" : \"true\", \"_fields\" : \"_id\" ]).result; for ( item in result ) { openidm.delete(\"repo/reconprogressstate/\" + item[\"_id\"], null); }; return result.size() + \" reconprogressstate records deleted\";"
      }' \
      "http://localhost:8080/openidm/script?_action=eval"
      "1 reconprogressstate records deleted"
IDM does not restart automatically. To continue the update process, you must shut down IDM:
-> shutdown
Continue the update process in the following section: "Before Restarting IDM".
Log into the Admin UI at
http://localhost:8080/admin.Select Configure > System Preferences, and choose the Update tab. You should see
IDM-6.0.0.zipin the list of Available Updates.Next to
IDM-6.0.0.zip, select Install to start the initial update process, then Confirm and Install to enable Maintenance Mode.The instructions in the UI are intuitive.
During the update, an Installation Preview screen will show you a list of the files that will be affected by the update, in the categories described in "Preview of File Updates". You'll be asked to confirm the Update and accept the license agreement.
The Repository Update Script Preview shows the scripts that you must run to update your repository.
Download all of the scripts and move them to a local directory (for example
openidm/update-scripts). Then, before you select Continue, open a command line interface and apply the specified scripts, which vary by repository (as shown in "Repository Update Scripts".How you apply these scripts will depend on your repository. The following example applies a hypothetical update script required for a MySQL repository:
$ mysql -u root -p < openidm/update-scripts/v999_something_added.sql
When you have applied all update scripts shown, select Continue.
The update starts again and processes needed files.
When you have applied the scripts, click Mark Complete to continue the update process.
When the update is complete, close the browser.
IDM does not restart automatically. To continue the update process, go to the IDM console and run the following command:
-> shutdown
You'll have to shutdown and restart IDM from the command line, modify configuration files, and more, as discussed in "Before Restarting IDM".
4.3.3. Before Restarting IDM
Read this section after the automated part of the updated process is complete and before restarting IDM.
The IDM update process makes significant changes to a variety of files, as described in the following sections:
You can then proceed with "Restarting IDM After Managing Custom Changes".
4.3.3.1. IDM Labels by Date
If you customized your existing deployment, you may find files with the
following extensions: .old and .new.
For more information, see "An Overview of the Update Process".
On Linux/UNIX systems, you can find some of these files with the following commands:
$ cd /path/to/openidm
$ find . -type f -name "*.old*"
$ find . -type f -name "*.new*"
Files with the
.old-unix_timeextension are saved from the configuration you had when starting this update process.Files with the
.new-unix_timeextension are files from IDM 6.0 that have not been incorporated into your updated installation. For example, if you find asystem.properties.new-unix_timefile in yourproject-dirdirectory, IDM is still using your pre-update version of this file, which would still be namedsystem.properties.To take full advantage of IDM 6.0, analyze the new features shown in files with the
.new-unix_timeextension. If you have files with multiple.new-unix_timeextensions, use the file with the latest unix_time.
4.3.3.2. What You Should Do With Your Properties Files Before Restarting
As suggested in "IDM Labels by Date", if you have a
custom version of a .properties file in your
deployment, you'll see the new version of properties files in your
project directory.
For example, if you set up a custom system.properties file,
you should should see two versions of this file:
$ cd /path/to/project
$ ls
system.properties system.properties.new-<unix_time>
In general, the file with the .new-<unix_time>
extension corresponds to IDM 6.0 version.
There is one exception: boot.properties. After
the update process is complete, you'll find different versions of
this file in two locations:
In your project's
conf/boot/subdirectory, which should contain the version of the file that you used for IDM 5.5.In the
/path/to/openidm/resolver/directory. This is the new location forboot.properties, starting with IDM 6.0.0.7.
Before restarting IDM, you must update all such
.properties files.
Make sure your custom settings are shown in the IDM 6.0 version of each file.
Note
If you did not customize these .properties files,
the IDM update process will overwrite the
config.properties, logging.properties,
and system.properties files.
4.3.3.2.1. Updating logging.properties
Recent security fixes prevent Jetty from logging sensitive data, such as
passwords. Verify that your conf/logging.properties
file includes the following excerpt (and add the excerpt if necessary) to
prevent unnecessary data from being logged:
# Logs the output from Jetty
  # Sets the following Jetty classes to INFO level by default because if logging is set to FINE or higher,
  # sensitive information can be leaked into the logs
  org.eclipse.jetty.server.HttpChannel.level=INFO
  org.eclipse.jetty.server.HttpConnection.level=INFO
  org.eclipse.jetty.server.HttpInput.level=INFO
  org.eclipse.jetty.http.HttpParser.level=INFO
  org.eclipse.jetty.io.ssl.SslConnection.level=INFO
This configuration logs request data at INFO level,
preventing data such as password changes from being logged. In situations
where you need to log all data (for example, if you are
debugging an issue in a test environment) change the settings here to
FINE or FINEST. For example:
org.eclipse.jetty.server.HttpConnection.level=FINE
4.3.3.3. What You Should Do With Your JSON Files Before Restarting
The update process does not account for any changes that you made to
existing standard JSON files such as sync.json and
managed.json. In fact, the update process overwrites
these files with the standard IDM 6.0 versions
of those files.
Do not overwrite the new version 6.0 files. Instead, analyze the custom settings from your original JSON files. Review "What's New" in the Release Notes. Apply each custom setting to the files in your updated deployment and test the results to make sure they still work as intended.
If you've called out UI-related scripts in JSON files, be aware that some of them have been either moved or deleted. For a list, see "Files Changed During the Update Process".
Note
If you've followed the recommendations in
"Configuring the Server for Production" in the Integrator's Guide,
changes you've written directly to JSON files may not be loaded into the
repository. This includes JSON files that may have been removed per the
removeFile code block in "The update.json File".
To address these issues, you have two options:
Write changes directly to the repository, using an HTTP PATCH request.
Temporarily change production settings that may block configuration updates from JSON files, such as those described in "Disabling Automatic Configuration Updates" in the Integrator's Guide.
Pay particular attention to your connector configuration files
(provisioner.openicf-connector-name.json).
The update removes outdated connector versions so you must
make sure that the bundleVersion in your connector
configuration matches the version of the connector in
/path/to/openidm/connectors, or specifies a range
that includes the connector version, for example [1.1.0.0,1.4.0.0].
For more information, see "Setting the Connector Reference Properties" in the Integrator's Guide.
4.3.3.4. Special Update Situation: authentication.json
The IDM update process does not include changes to the
authentication.json file. Before restarting IDM,
you'll have to change that file manually.
Based on the default configurations of IDM 6.0 and
IDM 5.5, make the following changes to
your authentication.json file:
CLIENT_CERTauthentication moduleThe
queryOnResourceentry has been changed fromsecurity/truststoretomanaged/user. For more information, see "Configuring Client Certificate Authentication" in the Integrator's Guide.- Second
STATIC_USERauthentication module IDM 6.0 includes a second
STATIC_USERauthentication module for the Prometheus user for monitoring metrics, as described in "Metrics and Monitoring" in the Integrator's Guide:{ "name" : "STATIC_USER", "properties" : { "queryOnResource" : "repo/internal/user", "username" : "&{openidm.prometheus.username}", "password" : "&{openidm.prometheus.password}", "defaultUserRoles" : [ "openidm-prometheus" ] }, "enabled" : true }
4.3.3.5. Special Update Situation: _meta Data and
managed.json
The IDM update process does not include
_meta-related changes to the managed.json
file. If you're updating IDM and want to take advantage of
Progressive Profile Completion, Terms & Conditions, or Privacy &
Consent as described in
"Configuring User Self-Service" in the Integrator's Guide,
you'll need to add _meta to this file.
If you want to collect _meta data on your users, and
based on the default configurations of IDM 6.0 and IDM 5.5,
you'll have to update managed.json manually. Add the
following code block to the end of the user object in
managed.json:
"meta" : {
  "property" : "_meta",
  "resourceCollection" : "internal/usermeta",
  "trackedProperties" : [
      "createDate",
      "lastChanged"
  ]
}
After completing your configuration updates and restarting IDM,
the repairMetadata script will need to be run to complete
generating the new user metadata. For more information, see "Generating Metadata For Existing Users" in the Integrator's Guide.
4.3.3.6. Special Update Situation: notify* Tags in managed.json
The IDM update process does not include notify
and notifySelf tags for social identity providers in the
managed.json file. You'll need to include those tags
to take advantage of performance improvements for IDM 6.0.
For more information on the notifySelf tag, see
"Configuring Relationship Change Notification" in the Integrator's Guide.
Include the "notifySelf" : true, line, as shown at the
bottom of the following excerpt:
...
"idps" : {
    "title" : "Identity Providers",
    "viewable" : true,
    "searchable" : false,
    "userEditable" : false,
    "returnByDefault" : false,
    "type" : "array",
    "items" : {
        "type" : "relationship",
        "reverseRelationship" : true,
        "reversePropertyName" : "user",
        "notifySelf" : true,
...
Include the "notify" : true, line in the
resourceCollection code block for each social identity
provider:
"resourceCollection" : [
    {
        "path" : "managed/user",
        "notify" : true,
        "label" : "User",
        "query" : {
            "queryFilter" : "true",
            "fields" : [
                "userName"
            ],
            "sortKeys" : [
                "userName"
            ]
        }
    }
]
4.3.3.7. What You Should Do With Your UI Before Restarting
If you have a custom Admin or Self-Service UI, you need to take a few extra steps.
You will need the updated UI files from the
openidm/ui/admin/default and
openidm/ui/selfservice/default directories.
Warning
Make sure you've saved any custom files from the
openidm/ui/admin/extension and
openidm/ui/selfservice/extension subdirectories, as
described in the introduction to "Updating to Version 6.0",
and then follow these steps:
Delete the existing
openidm/ui/admin/extensionandopenidm/ui/selfservice/extensionsubdirectories.Copy files from the
openidm/ui/admin/defaultandopenidm/ui/selfservice/defaultsubdirectories with the following commands:$ cd /path/to/openidm/ui $ cp -r selfservice/default/. selfservice/extension $ cp -r admin/default/. admin/extension
Review your UI custom files. Compare them against the IDM 6.0 version of these files.
Apply your custom changes to each new IDM 6.0 UI file in the
openidm/ui/admin/extensionandopenidm/ui/selfservice/extensionsubdirectories.
4.3.3.8. Restarting IDM After Managing Custom Changes
Now that you've updated the configuration of IDM, you can restart it, for the first time with IDM 6.0 software. When you do so, you should see the following message in the OSGi console:
-> OpenIDM version "6.0" (revision: <someUUIDsubset>)
jenkins-openidm-pipeline-openidm-master-postcommit-<num> master
OpenIDM ready
When you've restarted IDM, you'll need to modify repository relationships, as described in the following section:
4.3.3.8.1. Migrating Repository Relationships
Repository relationships have changed for IDM
6.0, as they separate the managed object container and
ID firstId and secondId into distinct
identifiers for resource containers and IDs.
To update your repository, use the following REST call:
$ curl \
--header "X-OpenIDM-Username: openidm-admin" \
--header "X-OpenIDM-Password: openidm-admin" \
--header "Content-Type: application/json" \
--request POST \
--data '{
"type":"text/javascript",
"file":"bin/defaults/script/update/migrateRepoRelationshipsData.js"
}' \
"http://localhost:8080/openidm/script/?_action=eval"
You can find this script, migrateRepoRelationshipsData.js,
after update is complete, in the following directory:
/path/to/openidm/bin/defaults/script/update
4.3.4. Migrating to IDM 6.0 on Windows
The steps outlined in this section will help you take advantage of the new functionality offered in this version, while preserving your custom configuration where possible. Before you start, read through "Compatibility" in the Release Notes. Some of these changes might affect your existing deployment.
Note
Updates to IDM 6.0 on Microsoft Windows remain a manual process.
To perform a migration from IDM 5.5 to IDM
6.0 on Windows, follow these steps. For
the purposes of this procedure, the path to the existing instance of
IDM 5.5 is defined as
\path\to\openidm-5.5.
In contrast, the path to the IDM 6.0 deployment
is defined as \path\to\openidm-6.0:
Download and extract IDM 6.0 (
IDM-6.0.0.zip).Stop your existing IDM 5.5 server, if it is running. Access the Java console where it is running and enter the shutdown command at the OSGi console:
-> OpenIDM ready
-> shutdown
Backup: Save your current deployment. Archive the
openidmdirectory.Boot properties: On the IDM 6.0 server, edit the
resolver\boot.propertiesfile to match any customizations that you made on your IDM 5.5 server. Specifically, check the following elements:The HTTP, HTTPS, and mutual authentication ports are specified in the
revolver\boot.propertiesfile. If you changed the default ports in your IDM 5.5 deployment, make sure that the corresponding ports are specified in this file.Check that the keystore and truststore passwords match the current passwords for the keystore and truststore of your IDM 5.5 deployment.
Depending on the level of customization you have made in your current deployment, it might be simpler to start with your IDM 5.5
boot.propertiesfile, and copy all customized settings from that file to the corresponding IDM 6.0 file. However, as a best practice, you should keep all configuration customizations (including new properties and changed settings) in a single location. You can then copy and paste these changes as appropriate.Security files: Copy the contents of your IDM 5.5
security\folder to the IDM 6.0 instance.Examine the following excerpt from the
boot.propertiesfile. IDM automatically prepends the locations of thekeystore.jceksandtruststorefiles with the installation directory.... openidm.keystore.type=JCEKS openidm.truststore.type=JKS openidm.keystore.provider=SunJCE openidm.truststore.provider=SUN openidm.keystore.location=security/keystore.jceks openidm.truststore.location=security/truststoreScripts: Migrate any custom scripts or default scripts that you have modified to the scripts directory of your IDM 6.0 instance. In general, custom and customized scripts should be located in the
openidm-5.5\scriptdirectory on the IDM 5.5 deployment:For custom scripts, review "Compatibility" in the Release Notes. If you're confident that the scripts will work as intended on IDM 6.0, then copy these scripts to the new instance. For example:
PS C:\> cd \path\to\openidm-6.0
PS C:\> cp \path\to\openidm-5.5\script\my-custom-script.js .\script
If you modified an existing IDM 5.5 script, compare the default versions of the IDM 5.5 and IDM 6.0 scripts. If you verify that nothing has changed, review what you've customized against "Compatibility" in the Release Notes. If you're confident that your changes will work as intended, then copy the customized scripts to the new
openidm-6.0\scriptdirectory. For example:PS C:\> cd \path\to\openidm-6.0 PS C:\> cp \path\to\openidm-5.5\script\policy.js .\script\
If a default script has changed since the IDM 5.5 release, copy the modified script to the
openidm-6.0\scriptdirectory. For example:PS C:\> cd \path\to\openidm-6.0 PS C:\> cp bin\default\script\linkedView.js .\script
Check that your customizations work as expected, then port the changes to the new script in the
openidm-6.0\scriptdirectory.
Provisioner files: Modify any customized provisioner configurations in your existing project to point to the connectors that are provided with IDM 6.0. Specifically, make sure that the
connectorRefproperties reflect the new connectors, where applicable. For example:"connectorRef" : { "bundleName": "org.forgerock.openicf.connectors.ldap-connector", "bundleVersion": "[1.4.0.0,1.5.0.0)", "connectorName": "org.identityconnectors.ldap.LdapConnector" },Alternatively, copy the connector .jar files from your existing installation into the
openidm\connectors\folder of the new installation.Complete the IDM 6.0 installation, as described in "Preparing to Install and Run Servers".
As there is no automated way to migrate a customized configuration to IDM 6.0, we recommend the following strategy:
Start with the default IDM 5.5 configuration.
For each configuration file that you have customized, use a file comparison tool such as the Windows fc.exe utility to assess the differences between your customized file and the IDM 6.0 file.
Based on the results of the fc.exe review, use either your existing file as a base and port the IDM 6.0 changes to that file, or vice versa. Ultimately, you want to preserve your customizations but ensure that you are up to date with the latest default configuration. All files should end up in the
openidm-6.0/confdirectory.
If you are using the UI, clear your browser cache after the migration. The browser cache contains files from the previous release, that might not be refreshed when you log in to the new UI.
Start IDM 6.0:
PS C:\> cd \path\to\openidm-6.0
PS C:\> .\startup.bat
Test that your existing clients and scripts are working as intended.
4.4. Applying the IDM 6.0.0.7 Patch Bundle Release
You can only run an update to IDM 6.0.0.7 from versions 6.0 and higher.
Note
The process varies, depending on your current IDM version. For versions 6.0 to 6.0.0.4, the update is a two-step process where you must first download and apply a pre-patch file, then run the update.
If you are on IDM 6.0.0.5, you can skip the pre-patch process.
If you are on a version prior to 6.0, you must first update to 6.0. For more information, see "Update to IDM 6.0".
Run the following procedures:
The following procedure depends on the IDM version that you are updating from:
If you are currently on IDM 6.0 - 6.0.0.4, download the pre-patch file from ForgeRock's BackStage site.
For IDM 6.0.0, 6.0.0.1, or 6.0.0.2, download IDM-6.0.0.5-pre-patch-from-6.0.0-6.0.0.2.zip.
For IDM 6.0.0.3 or 6.0.0.4, download IDM-6.0.0.5-pre-patch-from-6.0.0.3-6.0.0.4.zip.
Copy the pre-patch file to
/path/to/openidm/bin/update.Download the
IDM-6.0.0.7.zipfrom ForgeRock's BackStage site.Copy
IDM-6.0.0.7.zipto/path/to/openidm/bin/update.Back up your 6.0.0.x deployment. Save any customized
*.jsonconfiguration files, located in your project's/confdirectory. Save your custom directories.If you have a read-only deployment, mount the directory in read-write mode before starting the update.
If you integrated IDM with AM, disable any authentication modules that are in use.
If you have a custom
resolver/boot.propertiesfile in your IDM 6.0.0.x deployment, you will need to copy the file to your 6.0.0.7 deployment.For example, if you have an IDM 6.0 deployment, extract
IDM-6.0.0.7.zipto a temporary directory. Then, copy the custom IDM 6.0resolver/boot.propertiesfile to your 6.0.0.7resolverdirectory.If you have not customized the default
resolver/boot.propertiesfile in your deployment, you can simply overwrite it with version 6.0.0.7 of this file.Start IDM. IDM must be running when you launch an update.
Note
You must use the CLI to update your system. As of IDM 6.0, the facility to update servers through the Admin UI has been removed.
Disable and re-enable connections to AM.
Go to your IDM installation:
$ cd /path/to/openidm
Run the cli.sh command to apply the pre-patch zip:
$ ./cli.sh update \
  --acceptLicense \
  --user openidm-admin:openidm-admin \
  --url http://localhost:8080/openidm \
  --skipRepoUpdatePreview \
  IDM-6.0.0.5-pre-patch-from-6.0.0.3-6.0.0.4.zip
Note
If you are updating from IDM 6.0.0, 6.0.0.1, or 6.0.0.2, use
IDM-6.0.0.5-pre-patch-from-6.0.0-6.0.0.2.zip.The update process continues and completes with "Scheduler has been resumed."
Executing ./cli.sh...
Starting shell in /openidm
License was accepted via command line argument.
Repository update preview was skipped.
Pausing the Scheduler
Scheduler has been paused.
Waiting for running jobs to finish.
All running jobs have finished.
Entering into maintenance mode...
Now in maintenance mode.
Installing the update archive IDM-6.0.0.5-pre-patch-from-6.0.0.3-6.0.0.4.zip
Update procedure is still processing...
The update process is complete.
Exiting maintenance mode...
No longer in maintenance mode.
Resuming the job scheduler.
Scheduler has been resumed..
Restart IDM.
Run the cli.sh command to apply the IDM-6.0.0.7.zip:
$ ./cli.sh update \
  --acceptLicense \
  --user openidm-admin:openidm-admin \
  --url http://localhost:8080/openidm \
  --skipRepoUpdatePreview \
  IDM-6.0.0.7.zip
The update process continues and completes with "Scheduler has been resumed."
Executing ./cli.sh...
Starting shell in /openidm
License was accepted via command line argument.
Repository update preview was skipped.
Pausing the Scheduler
Scheduler has been paused.
Waiting for running jobs to finish.
All running jobs have finished.
Entering into maintenance mode...
Now in maintenance mode.
Installing the update archive IDM-6.0.0.7.zip
Update procedure is still processing...
Update procedure is still processing...
Update procedure is still processing...
Update procedure is still processing...
Update procedure is still processing...
Update procedure is still processing...
The update process is complete.
Exiting maintenance mode...
No longer in maintenance mode.
Resuming the job scheduler.
Scheduler has been resumed..
Note
You may see the following intermittent error during the update process, which you can ignore:
Error encountered while checking status of install. Retrying 8 more times
The error occurs when attempting to get the update status but does not interrupt the process.
Shutdown IDM.
Manually remove the oldest version of
bundle/openidm-repo-opendj-<version>, which was generated from the release prior to the 6.0.0.5 update.For example,
bundle/openidm-repo-opendj-6.0.0.4.jar.old-1557935520313.If you are updating from versions IDM 6.0.0 through IDM 6.0.0.3 to this release, you must clear the
reconprogressstatedata from your repository by running a Groovy script.Note
This step is not necessary when updating from IDM 6.0.0.4 or 6.0.0.5.
Run the following Groovy script to clear the
reconprogressstatedata in your repository:def result = openidm.query( "repo/reconprogressstate", [ "_queryFilter" : "true", "_fields" : "_id" ]).result; for ( item in result ) { openidm.delete("repo/reconprogressstate/" + item["_id"], null); } return result.size() + " reconprogressstate records deleted";This script will work regardless of the type of repository, and can be sent as a REST call. For example:
curl \
 --header "X-OpenIDM-Username: openidm-admin" \
 --header "X-OpenIDM-Password: openidm-admin" \
 --header "Content-Type: application/json" \
 --request POST \
 --data '{
   "type":"groovy",
   "source":"def result = openidm.query(\"repo/reconprogressstate\", [ \"_queryFilter\" : \"true\", \"_fields\" : \"_id\" ]).result; for ( item in result ) { openidm.delete(\"repo/reconprogressstate/\" + item[\"_id\"], null); }; return result.size() + \" reconprogressstate records deleted\";"
 }' \
 "http://localhost:8080/openidm/script?_action=eval"
"1 reconprogressstate records deleted"
Manually update the
conf/ui-themeconfig.json. Change the Bootstrap version tocss/bootstrap-3.4.1-custom.cssfrom the previous 3.3.7 version.The update does not touch this file, to avoid overwriting possible customization of the UI theme.
Restart your server.
Your update has successfully completed.
Note
There is a known issue that could arise when running your update. When running a pause scheduler job using a REST call (
scheduler/job?_action=pauseJobs), the update can possibly end up in an infinite loop (see OPENIDM-11265: Unable to pause scheduler jobs with REST call).The workaround is to clear out the
schedulerobjectsandschedulerobjectpropertiestables before the update and later recreate all scheduler jobs.Note
During the upgrade to version 6.0.0.7, you may see an exception for
registerFilterfromorg.forgerock.openidm.jetty.LargePayloadServletFilterin the IDM logs. You can ignore this message, as it is a harmless exception.
4.5. Placing a Server in Maintenance Mode
The Maintenance Service disables non-essential services of a running IDM instance, in preparation for an update to a later version. When maintenance mode is enabled, services such as recon, sync, scheduling, and workflow are disabled. The complete list of disabled services is output to the log file.
The router remains functional and requests to the maintenance
endpoint continue to be serviced. Requests to endpoints that are serviced by
a disabled component return the following response:
404 Resource endpoint-name not found
Before you enable maintenance mode, you should temporarily suspend all scheduled tasks. For more information, see "Pausing Scheduled Jobs" in the Integrator's Guide.
You can enable and disable maintenance mode over the REST interface.
To enable maintenance mode, run the following command:
$ curl \
 --header "X-OpenIDM-Username: openidm-admin" \
 --header "X-OpenIDM-Password: openidm-admin" \
 --request POST \
 "http://localhost:8080/openidm/maintenance?_action=enable"
{
  "maintenanceEnabled": true
 }
When the update process starts, maintenance mode is enabled automatically. Before the update process is complete, maintenance mode is disabled. You can disable maintenance mode over REST with the following command:
$ curl \
 --header "X-OpenIDM-Username: openidm-admin" \
 --header "X-OpenIDM-Password: openidm-admin" \
 --request POST \
 "http://localhost:8080/openidm/maintenance?_action=disable"
{
  "maintenanceEnabled": false
}
To check whether a server is in maintenance mode, run the following command:
$ curl \
 --header "X-OpenIDM-Username: openidm-admin" \
 --header "X-OpenIDM-Password: openidm-admin" \
 --request POST \
 "http://localhost:8080/openidm/maintenance?_action=status"
{
  "maintenanceEnabled": false
 }
If the server is in maintenance mode, the command returns
"maintenanceEnabled": true, otherwise it returns
"maintenanceEnabled": false.
4.6. Update Messages
You can review the events of the update process in the IDM log files.
During the update process, you'll find these events in the
openidm0.log.0 file in the
/path/to/openidm/logs directory.
After the IDM update is complete, it moves that information to a
openidm0.log.1 file, and then creates a new
openidm0.log.0 file. You may find error messages in
either file.
When you look through these files, you'll see straightforward INFO messages such as:
Upgrading to: 6.0.0.7INFO: Updating configuration file
If there are problems, you may also see self-explanatory messages such as:
Encrypted zip files are not supported
Update is not currently running
| Error | Explanation (if needed) |
|---|---|
| Cannot instantiate service without OSGiFrameworkService | Problem with the OSGi container; the default is Apache Felix, as described in "Architectural Overview" in the Integrator's Guide |
| Cannot create temporary directory to unzip archive | Suggests a permissions issue with creating directories, possibly due to a read-only installation of IDM, such as described in "Installing on a Read-Only Volume". |
| Messages related to checksums | Without checksums, IDM can't verify files to be updated. For more information, see "Files Changed During the Update Process" |
| Messages related to file state | Review "Update File States" for status messages |
| Messages related to the license file | License file are available in the following directory:
/path/to/openidm/legal-notices |
Appendix A. Installing on a Read-Only Volume
Some enterprises choose to enhance security of their applications by installing them on a dedicated read-only (ro) filesystem volume. This appendix describes how you can set up IDM on such a volume.
This appendix assumes that you have prepared the read-only volume appropriate for your Linux/UNIX installation environment.
A.1. Preparing Your System
Before you continue, read "Preparing to Install and Run Servers", as well as the prerequisites described in "Before You Install" in the Release Notes.
This appendix assumes that you have set up a regular Linux
user named idm and a dedicated volume for the
/idm directory.
Configure the dedicated volume device,
/dev/volume in the
/etc/fstab file, as follows:
/dev/volume /idm ext4 ro,defaults 1,2
When you run the mount -a command, the
/dev/volume volume device gets
mounted on the /idm directory.
You can switch between read-write and read-only mode for the
/idm volume with the following commands:
$ sudo mount -o remount,rw /idm
$ sudo mount -o remount,ro /idm
You can confirm the result with the mount command, which
should show whether the /idm volume is mounted in
read-only or read-write mode:
/dev/volume on /idm type ext4 (ro)
Set up the /idm volume in read-write mode:
$ sudo mount -o remount,rw /idm
With the following commands, you can unpack the IDM binary in the
/idm directory, and give user idm
ownership of all files in that directory:
$ sudo unzip /idm/IDM-6.0.0.7.zip
$ sudo chown -R idm.idm /idm
A.2. Redirect Output Through Configuration Files
In this section, you will modify appropriate configuration files to redirect
data to writable volumes. This procedure assumes that you have a user
idm with Linux administrative (superuser) privileges.
Create an external directory where IDM can send logging, auditing, and internal repository information.
$ sudo mkdir -p /var/log/openidm/audit
$ sudo mkdir /var/log/openidm/logs
$ sudo mkdir -p /var/cache/openidm/felix-cache
$ sudo mkdir /var/run/openidm
Note
You can also route audit data to a remote data store. For an example of how to send audit data to a MySQL repository, see "Directing Audit Information To a MySQL Database" in the Samples Guide.
Give user
idmownership of the newly created directories:$ sudo chown -R idm.idm /var/log/openidm $ sudo chown -R idm.idm /var/cache/openidm $ sudo chown -R idm.idm /var/run/openidm
Open the audit configuration file for your project,
project-dir/conf/audit.json.Make sure
handlerForQueriesis set tojson.Redirect the
logDirectoryproperty to the newly created/var/log/openidm/auditsubdirectory:{ "auditServiceConfig" : { "handlerForQueries" : "json", "availableAuditEventHandlers" : [ "org.forgerock.audit.handlers.csv.CsvAuditEventHandler", "org.forgerock.audit.handlers.elasticsearch.ElasticsearchAuditEventHandler", "org.forgerock.audit.handlers.jms.JmsAuditEventHandler", "org.forgerock.audit.handlers.json.JsonAuditEventHandler", "org.forgerock.openidm.audit.impl.RepositoryAuditEventHandler", "org.forgerock.openidm.audit.impl.RouterAuditEventHandler", "org.forgerock.audit.handlers.splunk.SplunkAuditEventHandler", "org.forgerock.audit.handlers.syslog.SyslogAuditEventHandler" ] ... }, "eventHandlers" : [ { "class" : "org.forgerock.audit.handlers.json.JsonAuditEventHandler", "config" : { "name" : "json", "logDirectory" : "/var/log/openidm/audit", "buffering" : { "maxSize" : 100000, "writeInterval" : "100 millis" }, "topics" : [ "access", "activity", "recon", "sync", "authentication", "config" ] ...Open the logging configuration file for your project:
project-dir/conf/logging.properties.Find the
java.util.logging.FileHandler.patternproperty and redirect it as shown:java.util.logging.FileHandler.pattern = /var/log/openidm/logs/openidm%u.log
Open the configuration properties file for your project:
project-dir/conf/config.properties.Activate the
org.osgi.framework.storageproperty. Activate and redirect thefelix.cache.rootdirproperty and change them as shown:# If this value is not absolute, then the felix.cache.rootdir controls # how the absolute location is calculated. (See buildNext property) org.osgi.framework.storage=${felix.cache.rootdir}/felix-cache # The following property is used to convert a relative bundle cache # location into an absolute one by specifying the root to prepend to # the relative cache path. The default for this property is the # current working directory. felix.cache.rootdir=/var/cache/openidm
Note
You may want to set up additional redirection. Watch for the following configuration details:
Connectors. Depending on the connector, and the read-only volume, you may need to configure connectors to direct output to writable volumes.
Scripts. If you're using Groovy, examine the
conf/script.jsonfile for your project. Make sure that output such as to thegroovy.target.directoryis directed to an appropriate location, such asidm.data.dir
A.3. Additional Details
In a production environment, you must configure a supported repository, as described in "Selecting a Repository".
Disable monitoring of JSON configuration files. To do so, open the
project-dir/conf/system.properties
file, and activate the following option:
openidm.fileinstall.enabled=false
You should address one more detail, the value of the
OPENIDM_PID_FILE in the startup.sh
and shutdown.sh scripts.
For RHEL 6 and Ubuntu 14.04 systems, the default shell is bash.
You can set the value of OPENIDM_PID_FILE for user
idm by adding the following line to
/home/idm/.bashrc:
export OPENIDM_PID_FILE=/var/run/openidm/openidm.pid
If you have set up a different command line shell, adjust your changes accordingly.
When you log in again as user idm, your
OPENIDM_PID_FILE variable should redirect the process
identifier file, openidm.pid to the
/var/run/openidm directory, ready for access by the
shutdown.sh script.
You need to set up security keystore and truststore files, either by importing a signed certificate or by generating a self-signed certificate. For more information, see "Securing and Hardening Servers" in the Integrator's Guide.
While the volume is still mounted in read-write mode, start IDM normally:
$ ./startup.sh -p project-dir
The first startup of IDM either processes the signed certificate that you added, or generates a self-signed certificate.
Stop IDM:
-> shutdown
You can now mount the /idm directory in read-only mode.
The configuration in /etc/fstab ensures that Linux
mounts the /idm directory in read-only mode the next
time that system is booted.
$ sudo mount -o remount,ro /idm
You can now start IDM, configured on a secure read-only volume.
$ ./startup.sh -p project-dir
IDM Glossary
- correlation query
A correlation query specifies an expression that matches existing entries in a source repository to one or more entries on a target repository. While a correlation query may be built with a script, it is not a correlation script.
As noted in "Correlating Source Objects With Existing Target Objects" in the Integrator's Guide, you can set up a query definition, such as
_queryId,_queryFilter, or_queryExpression, possibly with the help of alinkQualifier.- correlation script
A correlation script matches existing entries in a source repository, and returns the IDs of one or more matching entries on a target repository. While it skips the intermediate step associated with a
correlation
    query
, a correlation script can be relatively complex, based on the operations of the script.- entitlement
An entitlement is a collection of attributes that can be added to a user entry via roles. As such, it is a specialized type of
assignment. A user or device with an entitlement gets access rights to specified resources. An entitlement is a property of a managed object.- JSON
JavaScript Object Notation, a lightweight data interchange format based on a subset of JavaScript syntax. For more information, see the JSON site.
- JSON Pointer
A JSON Pointer defines a string syntax for identifying a specific value within a JSON document. For information about JSON Pointer syntax, see the JSON Pointer RFC.
- JWT
JSON Web Token. As noted in the JSON Web Token draft IETF Memo, "JSON Web Token (JWT) is a compact URL-safe means of representing claims to be transferred between two parties." For IDM, the JWT is associated with the
JWT_SESSIONauthentication module.- managed object
An object that represents the identity-related data managed by IDM. Managed objects are configurable, JSON-based data structures that IDM stores in its pluggable repository. The default configuration of a managed object is that of a user, but you can define any kind of managed object, for example, groups or roles.
- mapping
A policy that is defined between a source object and a target object during reconciliation or synchronization. A mapping can also define a trigger for validation, customization, filtering, and transformation of source and target objects.
- OSGi
A module system and service platform for the Java programming language that implements a complete and dynamic component model. For more information, see What is OSGi? Currently, only the Apache Felix container is supported.
- reconciliation
During reconciliation, comparisons are made between managed objects and objects on source or target systems. Reconciliation can result in one or more specified actions, including, but not limited to, synchronization.
- resource
An external system, database, directory server, or other source of identity data to be managed and audited by the identity management system.
- REST
Representational State Transfer. A software architecture style for exposing resources, using the technologies and protocols of the World Wide Web. REST describes how distributed data objects, or resources, can be defined and addressed.
- role
IDM distinguishes between two distinct role types - provisioning roles and authorization roles. For more information, see "Working With Managed Roles" in the Integrator's Guide.
- source object
In the context of reconciliation, a source object is a data object on the source system, that IDM scans before attempting to find a corresponding object on the target system. Depending on the defined mapping, IDM then adjusts the object on the target system (target object).
- synchronization
The synchronization process creates, updates, or deletes objects on a target system, based on the defined mappings from the source system. Synchronization can be scheduled or on demand.
- system object
A pluggable representation of an object on an external system. For example, a user entry that is stored in an external LDAP directory is represented as a system object in IDM for the period during which IDM requires access to that entry. System objects follow the same RESTful resource-based design principles as managed objects.
- target object
In the context of reconciliation, a target object is a data object on the target system, that IDM scans after locating its corresponding object on the source system. Depending on the defined mapping, IDM then adjusts the target object to match the corresponding source object.
Index
A
- Application container
- Requirements, Application Container
R
- Repository database
- Table names, Setting Up an IBM DB2 Repository
U
- Update
- Errors, Update Messages
- File Changes, Update File States
- File Preview, Update File States
- File Status, Update File States