Guide to configuring and integrating ForgeRock® Identity Management software into identity management solutions. This software offers flexible services for automating management of the identity life cycle.
Preface
ForgeRock Identity Platform™ serves as the basis for our simple and comprehensive Identity and Access Management solution. We help our customers deepen their relationships with their customers, and improve the productivity and connectivity of their employees and partners. For more information about ForgeRock and about the platform, see https://www.forgerock.com.
1. About This Guide
In this guide you will learn how to integrate ForgeRock Identity Management (IDM) software as part of a complete identity management solution.
This guide is written for systems integrators building solutions based on IDM services. This guide describes the product functionality, and shows you how to set up and configure IDM software as part of your overall identity management solution.
2. Accessing Documentation Online
ForgeRock publishes comprehensive documentation online:
The ForgeRock Knowledge Base offers a large and increasing number of up-to-date, practical articles that help you deploy and manage ForgeRock software.
While many articles are visible to community members, ForgeRock customers have access to much more, including advanced information for customers using ForgeRock software in a mission-critical capacity.
ForgeRock product documentation, such as this document, aims to be technically accurate and complete with respect to the software documented. It is visible to everyone and covers all product features and examples of how to use them.
3. Using the ForgeRock.org Site
The ForgeRock.org site has links to source code for ForgeRock open source software, as well as links to the ForgeRock forums and technical blogs.
If you are a ForgeRock customer, raise a support ticket instead of using the forums. ForgeRock support professionals will get in touch to help you.
Chapter 1. Architectural Overview
This chapter introduces the IDM architecture, and describes component modules and services.
In this chapter you will learn:
How IDM uses the OSGi framework as a basis for its modular architecture
How the infrastructure modules provide the features required for IDM's core services
What those core services are and how they fit in to the overall architecture
How IDM provides access to the resources it manages
1.1. Modular Framework
IDM implements infrastructure modules that run in an OSGi framework. It exposes core services through RESTful APIs to client applications.
The following figure provides an overview of the architecture. Specific components are described in more detail in subsequent sections of this chapter.

The IDM framework is based on OSGi:
- OSGi
OSGi is a module system and service platform for the Java programming language that implements a complete and dynamic component model. For more information, see What is OSGi? IDM runs in Apache Felix, an implementation of the OSGi Framework and Service Platform.
- Servlet
The Servlet layer provides RESTful HTTP access to the managed objects and services. IDM embeds the Jetty Servlet Container, which can be configured for either HTTP or HTTPS access.
1.2. Infrastructure Modules
The infrastructure modules provide the underlying features needed for core services:
- BPMN 2.0 Workflow Engine
The embedded workflow and business process engine is based on Activiti and the Business Process Model and Notation (BPMN) 2.0 standard.
For more information, see "Integrating Business Processes and Workflows".
- Task Scanner
The task-scanning mechanism performs a batch scan for a specified property, on a scheduled interval. The task scanner executes a task when the value of that property matches a specified value.
For more information, see "Scanning Data to Trigger Tasks".
- Scheduler
The scheduler supports Quartz cron triggers and simple triggers. Use the scheduler to trigger regular reconciliations, liveSync, and scripts, to collect and run reports, to trigger workflows, and to perform custom logging.
For more information, see "Scheduling Tasks and Events".
- Script Engine
The script engine is a pluggable module that provides the triggers and plugin points for IDM. JavaScript and Groovy are supported.
- Policy Service
An extensible policy service applies validation requirements to objects and properties, when they are created or updated.
For more information, see "Using Policies to Validate Data".
- Audit Logging
Auditing logs all relevant system activity to the configured log stores. This includes the data from reconciliation as a basis for reporting, as well as detailed activity logs to capture operations on the internal (managed) and external (system) objects.
For more information, see "Setting Up Audit Logging".
- Repository
The repository provides a common abstraction for a pluggable persistence layer. IDM supports reconciliation and synchronization with several major external data stores in production, including relational databases, LDAP servers, and even flat CSV and XML files.
The repository API uses a JSON-based object model with RESTful principles consistent with the other IDM services. To facilitate testing, IDM includes an embedded instance of ForgeRock Directory Services (DS). In production, you must use a supported repository, as described in "Selecting a Repository" in the Installation Guide.
1.3. Core Services
The core services are the heart of the resource-oriented unified object model and architecture:
- Object Model
Artifacts handled by IDM are Java object representations of the JavaScript object model as defined by JSON. The object model supports interoperability and potential integration with many applications, services, and programming languages.
IDM can serialize and deserialize these structures to and from JSON as required. IDM also exposes a set of triggers and functions that you can define, in either JavaScript or Groovy, which can natively read and modify these JSON-based object model structures.
- Managed Objects
A managed object is an object that represents the identity-related data managed by IDM. Managed objects are configurable, JSON-based data structures that IDM stores in its pluggable repository. The default managed object configuration includes users and roles, but you can define any kind of managed object, for example, groups or devices.
You can access managed objects over the REST interface with a query similar to the following:
$ curl \
 --header "X-OpenIDM-Username: openidm-admin" \
 --header "X-OpenIDM-Password: openidm-admin" \
 --request GET \
 "http://localhost:8080/openidm/managed/..."
- System Objects
System objects are pluggable representations of objects on external systems. For example, a user entry that is stored in an external LDAP directory is represented as a system object in IDM.
System objects follow the same RESTful resource-based design principles as managed objects. They can be accessed over the REST interface with a query similar to the following:
$ curl \
 --header "X-OpenIDM-Username: openidm-admin" \
 --header "X-OpenIDM-Password: openidm-admin" \
 --request GET \
 "http://localhost:8080/openidm/system/..."
There is a default implementation for the OpenICF framework, that allows any connector object to be represented as a system object.
- Mappings
Mappings define policies between source and target objects and their attributes during synchronization and reconciliation. Mappings can also define triggers for validation, customization, filtering, and transformation of source and target objects.
For more information, see "Synchronizing Data Between Resources".
- Synchronization and Reconciliation
Reconciliation enables on-demand and scheduled resource comparisons between the managed object repository and the source or target systems. Comparisons can result in different actions, depending on the mappings defined between the systems.
Synchronization enables creating, updating, and deleting resources from a source to a target system, either on demand or according to a schedule.
For more information, see "Synchronizing Data Between Resources".
1.4. Secure Commons REST Commands
Representational State Transfer (REST) is a software architecture style for exposing resources, using the technologies and protocols of the World Wide Web. For more information on the ForgeRock REST API, see "REST API Reference".
REST interfaces are commonly tested with a curl command. Many of these commands are used in this document. They work with the standard ports associated with Java EE communications, 8080 and 8443.
To run curl over the secure port, 8443, you must include
either the --insecure option, or follow the instructions
shown in "Restricting REST Access to the HTTPS Port". You can use those
instructions with the self-signed certificate generated when IDM
starts, or with a *.crt file provided by a
certificate authority.
1.5. Access Layer
The access layer provides the user interfaces and public APIs for accessing and managing the repository and its functions:
- RESTful Interfaces
IDM provides REST APIs for CRUD operations, for invoking synchronization and reconciliation, and to access several other services.
For more information, see "REST API Reference".
- User Interfaces
User interfaces provide access to most of the functionality available over the REST API.
Chapter 2. Starting, Stopping, and Running the Server
This chapter covers the scripts provided for starting and stopping IDM, and describes how to verify the health of a system, that is, that all requirements are met for a successful system startup.
2.1. To Start and Stop the Server
By default, you start and stop IDM in interactive mode.
To start the server interactively, open a terminal or command window, change
to the openidm directory, and run the startup script:
startup.sh (UNIX)
startup.bat (Windows)
The startup script starts the server, and opens an OSGi console with a
-> prompt where you can issue console commands.
The default hostname and ports for IDM are set in the
resolver/boot.properties file found in the
openidm/ directory. IDM is initially
configured to run on http on port 8080,
https on port 8443, with a hostname
of localhost. For more information about changing ports
and hostnames, see "Host and Port Information".
To stop the server interactively in the OSGi console, run the shutdown command:
-> shutdown
You can also start IDM as a background process on UNIX and Linux systems. Follow these steps, preferable before you start IDM for the first time:
If you have already started the server, shut it down and remove the Felix cache files under
openidm/felix-cache/:-> shutdown ... $ rm -rf felix-cache/*
Start the server in the background. The nohup survives a logout and the 2>&1& redirects standard output and standard error to the noted
console.outfile:$ nohup ./startup.sh > logs/console.out 2>&1& [1] 2343
To stop the server running as a background process, use the shutdown.sh script:
$ ./shutdown.sh
./shutdown.sh
Stopping OpenIDM (2343)
Note
Although installations on OS X systems are not supported in production, you might want to run IDM on OS X in a demo or test environment. To run IDM in the background on an OS X system, take the following additional steps:
Remove the
org.apache.felix.shell.tui-*.jarbundle from theopenidm/bundledirectory.Disable
ConsoleHandlerlogging, as described in "Disabling Logs".
2.2. Specifying the Startup Configuration
By default, IDM starts with the configuration, script, and binary
files in the openidm/conf,
openidm/script, and openidm/bin
directories. You can launch IDM with a different set of
configuration, script, and binary files for test purposes, to manage
different projects, or to run one of the included samples.
The startup.sh script enables you to specify the following elements of a running instance:
-
-p | --project-location {/path/to/project/directory} The project location specifies the directory that contains the configuration and script files that IDM will use.
All configuration objects and any artifacts that are not in the bundled defaults (such as custom scripts) must be included in the project location. These objects include all files otherwise included in the
openidm/confandopenidm/scriptdirectories.For example, the following command starts the server with the configuration of the
sync-with-csvsample (located in/path/to/openidm/samples/sync-with-csv):$ ./startup.sh -p /path/to/openidm/samples/sync-with-csv
If you do not provide an absolute path, the project location path is relative to the system property,
user.dir. IDM setsidm.instance.dirto that relative directory path. Alternatively, if you start the server without the -p option, IDM setsidm.instance.dirto/path/to/openidm.Note
In this documentation, "your project" refers to the value of
idm.instance.dir.-w |--working-location {/path/to/working/directory}The working location specifies the directory in which the embedded DS instance is installed, and the directory to which IDM writes its database cache, audit logs, and felix cache. The working location includes everything that is in the default
db/,audit/, andfelix-cache/subdirectories.The following command specifies that IDM writes its database cache and audit data to
/Users/admin/openidm/storage:$ ./startup.sh -w /Users/admin/openidm/storage
If you do not provide an absolute path, the path is relative to the system property,
user.dir. IDM setsidm.data.dirto that relative directory path. If you do not specify a working location, IDM setsidm.data.dirto/path/to/openidm. This means the default working location data is located in theopenidm/db,openidm/felix-cacheandopenidm/auditdirectories.Note that this property does not affect the location of the IDM system logs. To change the location of these logs, edit the
conf/logging.propertiesfile.You can also change the location of the Felix cache, by editing the
conf/config.propertiesfile, or by starting the server with the-soption, described later in this section.-c | --config {/path/to/config/file}A customizable startup configuration file (named
launcher.json) enables you to specify how the OSGi Framework is started.Unless you are working with a highly customized deployment, you should not modify the default framework configuration. This option is therefore described in more detail in "Advanced Configuration".
-P {property=value}Any properties passed to the startup script with the
-Poption are used when the server loads thelauncher.jsonstartup configuration file.Options specified here have the lowest order of precedence when the configuration is loaded. If the same property is defined in any other configuration source, the value specified here is ignored.
-s | --storage {/path/to/storage/directory}Specifies the OSGi storage location of the cached configuration files.
You can use this option to redirect output if you are installing on a read-only filesystem volume. For more information, see "Installing on a Read-Only Volume" in the Installation Guide. This option is also useful when you are testing different configurations. Sometimes when you start the server with two different sample configurations, one after the other, the cached configurations are merged and cause problems. Specifying a storage location creates a separate
felix-cachedirectory in that location, and the cached configuration files remain completely separate.
Additionally, IDM sets the system property
idm.install.dir to the location IDM is
installed in. For example, if IDM was installed in
/Users/admin/openidm/, that is what
idm.install.dir will be set to.
For information about changing the startup configuration by substituting property values, see "Using Property Value Substitution".
2.3. Monitoring Server Health
Because IDM is highly modular and configurable, it is often difficult to assess whether a system has started up successfully, or whether the system is ready and stable after dynamic configuration changes have been made.
The health check service allows you to monitor the status of internal resources.
To monitor the status of external resources such as LDAP servers and external databases, use the commands described in "Checking the Status of External Systems Over REST".
2.3.1. Basic Health Checks
The health check service reports on the state of the server and outputs this state to the OSGi console and to the log files. The server can be in one of the following states:
STARTING- the server is starting upACTIVE_READY- all of the specified requirements have been met to consider the server readyACTIVE_NOT_READY- one or more of the specified requirements have not been met and the server is not considered readySTOPPING- the server is shutting down
To verify the current server state, use the following REST call:
$ curl \
 --header "X-OpenIDM-Username: openidm-admin" \
 --header "X-OpenIDM-Password: openidm-admin" \
 --request GET \
 "http://localhost:8080/openidm/info/ping"
{
  "_id": "",
  "_rev": "",
  "shortDesc": "OpenIDM ready",
  "state": "ACTIVE_READY"
}
2.3.2. Obtaining Session Information
To obtain information about the current IDM session, beyond basic health checks, use the following REST call:
$ curl \
--header "X-OpenIDM-Username: openidm-admin" \
--header "X-OpenIDM-Password: openidm-admin" \
--request GET \
"http://localhost:8080/openidm/info/login"
{
  "_id": "login",
  "authenticationId": "openidm-admin",
  "authorization": {
    "component": "repo/internal/user",
    "authLogin": false,
    "roles": [
      "openidm-admin",
      "openidm-authorized"
    ],
    "ipAddress": "0:0:0:0:0:0:0:1",
    "id": "openidm-admin",
    "moduleId": "INTERNAL_USER"
  }
}
Note
You can also increment the loginCount with a related
endpoint described in "Authenticating Internal and Managed Users".
2.3.3. Monitoring Tuning and Health Parameters
The openidm/health endpoint provides more detailed
monitoring information on the following areas:
Operating Systemon theopenidm/health/osendpointMemoryon theopenidm/health/memoryendpointReconciliation, on theopenidm/health/reconendpoint.
For information on controlling access to these endpoints, see
"Understanding the Access Configuration Script (access.js)".
2.3.3.1. Operating System Health Check
With the following REST call, you can get basic information about the host operating system:
$ curl \
 --header "X-OpenIDM-Username: openidm-admin" \
 --header "X-OpenIDM-Password: openidm-admin" \
 --request GET \
 "http://localhost:8080/openidm/health/os"
{
    "_id" : "",
    "_rev" : "",
    "availableProcessors" : 1,
    "systemLoadAverage" : 0.06,
    "operatingSystemArchitecture" : "amd64",
    "operatingSystemName" : "Linux",
    "operatingSystemVersion" : "2.6.32-504.30.3.el6.x86_64"
}
From the output, you can see that this particular system has one 64-bit
CPU, with a load average of 6 percent, on a Linux system with the noted
kernel operatingSystemVersion number.
2.3.3.2. Memory Health Check
With the following REST call, you can get basic information about overall JVM memory use:
$ curl \
 --header "X-OpenIDM-Username: openidm-admin" \
 --header "X-OpenIDM-Password: openidm-admin" \
 --request GET \
 "http://localhost:8080/openidm/health/memory"
{
    "_id" : "",
    "_rev" : "",
    "objectPendingFinalization" : 0,
    "heapMemoryUsage" : {
        "init" : 1073741824,
        "used" : 88538392,
        "committed" : 1037959168,
        "max" : 1037959168
    },
    "nonHeapMemoryUsage" : {
        "init" : 24313856,
        "used" : 69255024,
        "committed" : 69664768,
        "max" : 224395264
    }
}
The output includes information on JVM Heap and Non-Heap memory, in bytes. Briefly:
JVM Heap memory is used to store Java objects.
JVM Non-Heap Memory is used by Java to store loaded classes and related meta-data.
2.3.3.3. Reconciliation Health Check
With the following REST call, you can get basic information about the system demands related to reconciliation:
$ curl \
 --header "X-OpenIDM-Username: openidm-admin" \
 --header "X-OpenIDM-Password: openidm-admin" \
 --request GET \
 "http://localhost:8080/openidm/health/recon"
{
    "_id" : "",
    "_rev" : "",
    "activeThreads" : 1,
    "corePoolSize" : 10,
    "largestPoolSize" : 1,
    "maximumPoolSize" : 10,
    "currentPoolSize" : 1
}
From the output, you can review the number of active threads used by the reconciliation, as well as the available thread pool.
2.3.4. Verifying the State of Health Check Service Modules
The configurable health check service verifies the status of the modules and services required for an operational system. During system startup, IDM checks that these modules and services are available and reports on any requirements that have not been met. If dynamic configuration changes are made, IDM rechecks that the required modules and services are functioning, to allow ongoing monitoring of system operation.
IDM checks all required modules. Examples of those modules are shown here:
     "org.forgerock.openicf.framework.connector-framework"
     "org.forgerock.openicf.framework.connector-framework-internal"
     "org.forgerock.openicf.framework.connector-framework-osgi"
     "org.forgerock.openidm.audit"
     "org.forgerock.openidm.core"
     "org.forgerock.openidm.enhanced-config"
     "org.forgerock.openidm.external-email"
     ...
     "org.forgerock.openidm.system"
     "org.forgerock.openidm.ui"
     "org.forgerock.openidm.util"
     "org.forgerock.commons.org.forgerock.json.resource"
     "org.forgerock.commons.org.forgerock.util"
     "org.forgerock.openidm.security-jetty"
     "org.forgerock.openidm.jetty-fragment"
     "org.forgerock.openidm.quartz-fragment"
     "org.ops4j.pax.web.pax-web-extender-whiteboard"
     "org.forgerock.openidm.scheduler"
     "org.ops4j.pax.web.pax-web-jetty-bundle"
     "org.forgerock.openidm.repo-jdbc"
     "org.forgerock.openidm.repo-ds"
     "org.forgerock.openidm.config"
"org.forgerock.openidm.crypto"IDM checks all required services. Examples of those services are shown here:
     "org.forgerock.openidm.config"
     "org.forgerock.openidm.provisioner"
     "org.forgerock.openidm.provisioner.openicf.connectorinfoprovider"
     "org.forgerock.openidm.external.rest"
     "org.forgerock.openidm.audit"
     "org.forgerock.openidm.policy"
     "org.forgerock.openidm.managed"
     "org.forgerock.openidm.script"
     "org.forgerock.openidm.crypto"
     "org.forgerock.openidm.recon"
     "org.forgerock.openidm.info"
     "org.forgerock.openidm.router"
     "org.forgerock.openidm.scheduler"
     "org.forgerock.openidm.scope"
     "org.forgerock.openidm.taskscanner"
You can replace the list of required modules and services, or add to it, by
adding the following lines to your
resolver/boot.properties file. Bundles and services
are specified as a list of symbolic names, separated by commas:
openidm.healthservice.reqbundles- overrides the default required bundles.openidm.healthservice.reqservices- overrides the default required services.openidm.healthservice.additionalreqbundles- specifies required bundles (in addition to the default list).openidm.healthservice.additionalreqservices- specifies required services (in addition to the default list).
By default, the server is given 15 seconds to start up all the required
bundles and services before system readiness is assessed. Note that this
is not the total start time, but the time required to complete the service
startup after the framework has started. You can change this default by
setting the value of the servicestartmax property (in
milliseconds) in your resolver/boot.properties file.
This example sets the startup time to five seconds:
openidm.healthservice.servicestartmax=5000
2.4. Displaying Information About Installed Modules
On a running instance, you can list the installed modules and their states by typing the following command in the OSGi console. (The output will vary by configuration):
-> scr list

 BundleId Component Name Default State
    Component Id State      PIDs (Factory PID)
 [   5]   org.forgerock.openidm.config.enhanced.starter  enabled
    [   1] [active      ] org.forgerock.openidm.config.enhanced.starter
 [   5]   org.forgerock.openidm.config.manage  enabled
    [   0] [active      ] org.forgerock.openidm.config.manage
 [  10]   org.forgerock.openidm.datasource.jdbc  enabled
 [  10]   org.forgerock.openidm.repo.jdbc  enabled
 [  11]   org.forgerock.openidm.repo.ds  enabled
    [  35] [active      ] org.forgerock.openidm.repo.ds
 [  16]   org.forgerock.openidm.cluster  enabled
    [  18] [active      ] org.forgerock.openidm.cluster
 [  17]   org.forgerock.openidm.http.context  enabled
    [   2] [active      ] org.forgerock.openidm.http.context
 [ 123]   org.forgerock.openidm.api-servlet  enabled
    [   5] [active      ] org.forgerock.openidm.api-servlet
 [ 123]   org.forgerock.openidm.error-servlet  enabled
    [   3] [active      ] org.forgerock.openidm.error-servlet
 [ 123]   org.forgerock.openidm.router.servlet  enabled
    [   4] [active      ] org.forgerock.openidm.router.servlet
 [ 124]   org.forgerock.openidm.audit  enabled
    [  24] [active      ] org.forgerock.openidm.audit
 [ 124]   org.forgerock.openidm.audit.filter  enabled
    [   6] [active      ] org.forgerock.openidm.audit.filter
->
To display additional information about a particular module or service, run
the following command, substituting the Component Id from
the preceding list:
-> scr info Id
The following example displays additional information about the router service:
-> scr info 4
*** Bundle: org.forgerock.openidm.api-servlet (123)
Component Description:
  Name: org.forgerock.openidm.router.servlet
  Implementation Class: org.forgerock.openidm.servlet.internal.ServletConnectionFactory
  Default State: enabled
  Activation: immediate
  Configuration Policy: ignore
  Activate Method: activate
  Deactivate Method: deactivate
  Modified Method: -
  Configuration Pid: [org.forgerock.openidm.router.servlet]
  Services:
    org.forgerock.json.resource.ConnectionFactory
    org.forgerock.openidm.router.RouterFilterRegistration
  Service Scope: singleton
  Reference: requestHandler
    Interface Name: org.forgerock.json.resource.RequestHandler
    Target Filter: (org.forgerock.openidm.router=*)
    Cardinality: 1..1
    Policy: static
    Policy option: reluctant
    Reference Scope: bundle
...
->
2.5. Starting in Debug Mode
To debug custom libraries, you can start the server with the option to use the Java Platform Debugger Architecture (JPDA):
Start IDM with the
jpdaoption:$ cd /path/to/openidm $ ./startup.sh jpda Executing ./startup.sh... Using OPENIDM_HOME: /path/to/openidm Using OPENIDM_OPTS: -Xmx1024m -Xms1024m -Djava.compiler=NONE -Xnoagent -Xdebug -Xrunjdwp:transport=dt_socket,address=5005,server=y,suspend=n Using LOGGING_CONFIG: -Djava.util.logging.config.file=/path/to/openidm/conf/logging.properties Listening for transport dt_socket at address: 5005 Using boot properties at /path/to/openidm/resolver/boot.properties -> OpenIDM version "6.0.0.7" (revision: xxxx) OpenIDM ready
The relevant JPDA options are outlined in the startup script (
startup.sh).In your IDE, attach a Java debugger to the JVM via socket, on port 5005.
Caution
This interface is internal and subject to change. If you depend on this interface, contact ForgeRock support.
2.6. Troubleshooting a Server Instance
For information about troubleshooting various issues in IDM, including collecting useful troubleshooting information such as logs, heap dumps and stack traces, see the corresponding Knowledge Base article.
Chapter 3. Command-Line Interface
This chapter describes the basic command-line interface (CLI). The CLI includes a number of utilities for managing an IDM instance.
All of the utilities are subcommands of the cli.sh
(UNIX) or cli.bat (Windows) scripts. To use the utilities,
you can either run them as subcommands, or launch the cli
script first, and then run the utility. For example, to run the
encrypt utility on a UNIX system:
$ cd /path/to/openidm
$ ./cli.sh
Using boot properties at /path/to/openidm/resolver/boot.properties
openidm# encrypt ....
or
$ cd /path/to/openidm
$ ./cli.sh encrypt ...
By default, the command-line utilities run with the properties defined in your
resolver/boot.properties file.
If you run the cli.sh command by itself, it opens an IDM-specific shell prompt:
openidm#
The startup and shutdown scripts are not discussed in this chapter. For information about these scripts, see "Starting, Stopping, and Running the Server".
The following sections describe the subcommands and their use. Examples assume that you are running the commands on a UNIX system. For Windows systems, use cli.bat instead of cli.sh.
For a list of subcommands available from the openidm#
prompt, run the cli.sh help command. The
help and exit options shown below are
self-explanatory. The other subcommands are explained in the subsections
that follow:
local:secureHash   Hash the input string.
local:keytool      Export or import a SecretKeyEntry. The Java Keytool does
                   not allow for exporting or importing SecretKeyEntries.
local:encrypt      Encrypt the input string.
local:validate     Validates all json configuration files in the configuration
                   (default: /conf) folder.
basic:help   Displays available commands.
basic:exit   Exit from the console.
remote:configureconnector   Generate connector configuration.
remote:configexport         Exports all configurations.
remote:update               Update the system with the provided update file.
remote:configimport         Imports the configuration set from local file/directory.
The following options are common to the configexport, configimport, and configureconnector subcommands:
- -u or --user USER[:PASSWORD]
Allows you to specify the server user and password. Specifying a username is mandatory. If you do not specify a username, the following error is output to the OSGi console:
Remote operation failed: Unauthorized. If you do not specify a password, you are prompted for one. This option is used by all three subcommands.- --url URL
The URL of the REST service. The default URL is
http://localhost:8080/openidm/. This can be used to import configuration files from a remote running IDM instance. This option is used by all three subcommands.- -P or --port PORT
The port number associated with the REST service. If specified, this option overrides any port number specified with the --url option. The default port is 8080. This option is used by all three subcommands.
3.1. Using the configexport Subcommand
The configexport subcommand exports all configuration objects to a specified location, enabling you to reuse a system configuration in another environment. For example, you can test a configuration in a development environment, then export it and import it into a production environment. This subcommand also enables you to inspect the active configuration of an IDM instance.
OpenIDM must be running when you execute this command.
Usage is as follows:
$ ./cli.sh configexport --user username:password export-location
For example:
$ ./cli.sh configexport --user openidm-admin:openidm-admin /tmp/conf
On Windows systems, the export-location must be provided in quotation marks, for example:
C:\openidm\cli.bat configexport --user openidm-admin:openidm-admin "C:\temp\openidm"
Configuration objects are exported as .json files to the
specified directory. The command creates the directory if needed.
Configuration files that are present in this directory are renamed as backup
files, with a timestamp, for example,
audit.json.2014-02-19T12-00-28.bkp, and are not
overwritten. The following configuration objects are exported:
The internal repository table configuration (
repo.ds.jsonorrepo.jdbc.json) and the datasource connection configuration, for JDBC repositories (datasource.jdbc-default.json)The script configuration (
script.json)The log configuration (
audit.json)The authentication configuration (
authentication.json)The cluster configuration (
cluster.json)The configuration of a connected SMTP email server (
external.email.json)Custom configuration information (
info-name.json)The managed object configuration (
managed.json)The connector configuration (
provisioner.openicf-*.json)The router service configuration (
router.json)The scheduler service configuration (
scheduler.json)Any configured schedules (
schedule-*.json)Standard security questions (
selfservice.kba.json)The synchronization mapping configuration (
sync.json)If workflows are defined, the configuration of the workflow engine (
workflow.json) and the workflow access configuration (process-access.json)Any configuration files related to the user interface (
ui-*.json)The configuration of any custom endpoints (
endpoint-*.json)The configuration of servlet filters (
servletfilter-*.json)The policy configuration (
policy.json)
3.2. Using the configimport Subcommand
The configimport subcommand imports configuration objects from the specified directory, enabling you to reuse a system configuration from another environment. For example, you can test a configuration in a development environment, then export it and import it into a production environment.
The command updates the existing configuration from the import-location over the REST interface. By default, if configuration objects are present in the import-location and not in the existing configuration, these objects are added. If configuration objects are present in the existing location but not in the import-location, these objects are left untouched in the existing configuration.
The subcommand takes the following options:
-r,--replaceall,--replaceAllReplaces the entire list of configuration files with the files in the specified import location.
Note that this option wipes out the existing configuration and replaces it with the configuration in the import-location. Objects in the existing configuration that are not present in the import-location are deleted.
--retries(integer)This option specifies the number of times the command should attempt to update the configuration if the server is not ready.
Default value : 10
--retryDelay(integer)This option specifies the delay (in milliseconds) between configuration update retries if the server is not ready.
Default value : 500
Usage is as follows:
$ ./cli.sh configimport --user username:password [--replaceAll] [--retries integer] [--retryDelay integer] import-location
For example:
$ ./cli.sh configimport --user openidm-admin:openidm-admin --retries 5 --retryDelay 250 --replaceAll /tmp/conf
On Windows systems, the import-location must be provided in quotation marks, for example:
C:\openidm\cli.bat configimport --user openidm-admin:openidm-admin --replaceAll "C:\temp\openidm"
Configuration objects are imported as .json files from the
specified directory to the conf directory. The
configuration objects that are imported are the same as those for the
export command, described in the previous section.
3.3. Using the configureconnector Subcommand
The configureconnector subcommand generates a configuration for an OpenICF connector.
Usage is as follows:
$ ./cli.sh configureconnector --user username:password --name connector-name
Select the type of connector that you want to configure. The following example configures a new CSV connector:
$ ./cli.sh configureconnector --user openidm-admin:openidm-admin --name myCsvConnector
 Executing ./cli.sh...
Starting shell in /path/to/openidm
Mar 22, 2018 09:50:01 AM org.forgerock.openidm.core.FilePropertyAccessor loadProps
0. Salesforce Connector version 6.0.0
1. Workday Connector version 1.5.20.0
2. SSH Connector version 1.5.20.0
3. ServiceNow Connector version 1.5.20.0
4. Scripted SQL Connector version 1.5.20.0
5. Scripted REST Connector version 1.5.20.0
6. Scim Connector version 1.5.20.0
7. MongoDB Connector version 1.5.20.0
8. Marketo Connector version 1.5.20.0
9. LDAP Connector version 1.5.20.0
10. Kerberos Connector version 1.5.20.0
11. Scripted Poolable Groovy Connector version 1.5.20.0
12. Scripted Groovy Connector version 1.5.20.0
13. GoogleApps Connector version 1.5.20.0
14. Database Table Connector version 1.5.20.0
15. CSV File Connector version 1.5.20.0
16. Adobe Marketing Cloud Connector version 1.5.20.0
17. Exit
Select [0..17]: 15
Edit the configuration file and run the command again. The configuration was saved to
/path/to/openidm/temp/provisioner.openicf-myCsvConnector.json
The basic configuration is saved in a file named
/openidm/temp/provisioner.openicf-connector-name.json.
Edit at least the configurationProperties parameter in
this file to complete the connector configuration. For example, for a CSV
connector:
"configurationProperties" : {
    "headerPassword" : "password",
    "csvFile" : "&{idm.instance.dir}/data/csvConnectorData.csv",
    "newlineString" : "\n",
    "headerUid" : "uid",
    "quoteCharacter" : "\"",
    "fieldDelimiter" : ",",
    "syncFileRetentionCount" : 3
},
For more information about the connector configuration properties, see "Configuring Connectors".
When you have modified the file, run the configureconnector command again so that IDM can pick up the new connector configuration:
$ ./cli.sh configureconnector --user openidm-admin:openidm-admin --name myCsvConnector
Executing ./cli.sh...
Starting shell in /path/to/openidm
Using boot properties at /path/to/openidm/resolver/boot.properties
Configuration was found and read from: /path/to/openidm/temp/provisioner.openicf-myCsvConnector.json
You can now copy the new
provisioner.openicf-myCsvConnector.json file to your
project's conf/ subdirectory.
You can also configure connectors over the REST interface, or through the Admin UI. For more information, see "Configuring Connectors".
3.4. Using the encrypt Subcommand
The encrypt subcommand encrypts an input string, or JSON object, provided at the command line. This subcommand can be used to encrypt passwords, or other sensitive data, to be stored in the repository. The encrypted value is output to standard output and provides details of the cryptography key that is used to encrypt the data.
Usage is as follows:
$ ./cli.sh encrypt [-j] string
If you do not enter the string as part of the command, the command prompts for the string to be encrypted. If you enter the string as part of the command, any special characters, for example quotation marks, must be escaped.
The -j option indicates that the string to be encrypted is
a JSON object, and validates the object. If the object is malformed JSON and
you use the -j option, the command throws an error. It is
easier to input JSON objects in interactive mode. If you input the JSON
object on the command-line, the object must be surrounded by quotes and any
special characters, including curly braces, must be escaped. The rules for
escaping these characters are fairly complex. For more information, see the
OSGi specification.
For example:
$ ./cli.sh encrypt -j '\{\"password\":\"myPassw0rd\"\}'The following example encrypts a normal string value:
$ ./cli.sh encrypt mypassword
Executing ./cli.sh...
Starting shell in /path/to/openidm
Using boot properties at /path/to/openidm/resolver/boot.properties
-----BEGIN ENCRYPTED VALUE-----
{
  "$crypto" : {
    "type" : "x-simple-encryption",
    "value" : {
      "cipher" : "AES/CBC/PKCS5Padding",
      "salt" : "0pRncNLTJ6ZySHfV4DEtgA==",
      "data" : "pIrCCkLPhBt0rbGXiZBHkw==",
      "iv" : "l1Hau6nf2zizQSib8kkW0g==",
      "key" : "openidm-sym-default",
      "mac" : "SoqfhpvhBVuIkux8mztpeQ=="
    }
  }
}
------END ENCRYPTED VALUE------
The following example prompts for a JSON object to be encrypted:
$ ./cli.sh encrypt -j
Using boot properties at /path/to/openidm/resolver/boot.properties
Enter the Json value

> Press ctrl-D to finish input
Start data input:
{"password":"myPassw0rd"}
^D
-----BEGIN ENCRYPTED VALUE-----
{
  "$crypto" : {
    "type" : "x-simple-encryption",
    "value" : {
      "cipher" : "AES/CBC/PKCS5Padding",
      "salt" : "vdz6bUztiT6QsExNrZQAEA==",
      "data" : "RgMLRbX0guxF80nwrtaZkkoFFGqSQdNWF7Ve0zS+N1I=",
      "iv" : "R9w1TcWfbd9FPmOjfvMhZQ==",
      "key" : "openidm-sym-default",
      "mac" : "9pXtSKAt9+dO3Mu0NlrJsQ=="
    }
  }
}
------END ENCRYPTED VALUE------
3.5. Using the secureHash Subcommand
The secureHash subcommand hashes an input string, or JSON object, using the specified hash algorithm. This subcommand can be used to hash password values, or other sensitive data, to be stored in the repository. The hashed value is output to standard output and provides details of the algorithm that was used to hash the data.
Usage is as follows:
$ ./cli.sh secureHash --algorithm [-j] string
The -a or --algorithm option specifies the
hash algorithm to use. For a list of supported hash algorithms, see
"Encoding Attribute Values by Using Salted Hash Algorithms".
If you do not enter the string as part of the command, the command prompts for the string to be hashed. If you enter the string as part of the command, any special characters, for example quotation marks, must be escaped.
The -j option indicates that the string to be hashed is
a JSON object, and validates the object. If the object is malformed JSON and
you use the -j option, the command throws an error. It is
easier to input JSON objects in interactive mode. If you input the JSON
object on the command-line, the object must be surrounded by quotes and any
special characters, including curly braces, must be escaped. The rules for
escaping these characters are fairly complex. For more information, see the
OSGi specification.
For example:
$ ./cli.sh secureHash --algorithm SHA-384 '\{\"password\":\"myPassw0rd\"\}'
The following example hashes a password value (mypassword)
using the SHA-384 algorithm:
$ ./cli.sh secureHash --algorithm SHA-384 mypassword
Executing ./cli.sh...
Starting shell in /path/to/openidm
Nov 14, 2017 1:19:49 PM org.forgerock.openidm.core.FilePropertyAccessor loadProps
INFO: Using properties at /path/to/openidm/resolver/boot.properties
-----BEGIN HASHED VALUE-----
{
  "$crypto" : {
    "value" : {
      "algorithm" : "SHA-384",
      "data" : "1bgOyADyXRFt4lNA80NOM0MeqWyBmAITFnB4742QdSTaLZkCw0kITPOCUhnSaeM8vKMG/W3jRN7slpcrc9jjqg=="
    },
    "type" : "salted-hash"
  }
}
------END HASHED VALUE------
The following example prompts for a JSON object to be hashed:
$ ./cli.sh secureHash --algorithm SHA-384 -j
Executing ./cli.sh...
Executing ./cli.sh...
Starting shell in /path/to/openidm
Nov 14, 2017 1:24:26 PM org.forgerock.openidm.core.FilePropertyAccessor loadProps
INFO: Using properties at /path/to/openidm/resolver/boot.properties
Enter the Json value

> Press ctrl-D to finish input
Start data input:
{"password":"myPassw0rd"}
^D
-----BEGIN HASHED VALUE-----
{
  "$crypto" : {
    "value" : {
      "algorithm" : "SHA-384",
      "data" : "7Caabx7d+vOZ7d3VMwdQObQJdTQ3uGOItsX5AwR4ViygUfARR/XuxRIBQt1LRq58ZOQXFwuw+3rvzK7Kld8pSg=="
    },
    "type" : "salted-hash"
  }
}
------END HASHED VALUE------
3.6. Using the keytool Subcommand
The keytool subcommand exports or imports secret key values.
The Java keytool command enables you to export and import public keys and certificates, but not secret or symmetric keys. The IDM keytool subcommand provides this functionality.
Usage is as follows:
$ ./cli.sh keytool [--export, --import] alias
For example, to export the default IDM symmetric key, run the following command:
$ ./cli.sh keytool --export openidm-sym-default
   Using boot properties at /openidm/resolver/boot.properties
Use KeyStore from: /openidm/security/keystore.jceks
Please enter the password:
[OK] Secret key entry with algorithm AES
AES:606d80ae316be58e94439f91ad8ce1c0
The default keystore password is changeit. For security
reasons, you must change this password in a production
environment. For information about changing the keystore password, see
"Change the Default Keystore Password".
To import a new secret key named my-new-key, run the following command:
$ ./cli.sh keytool --import my-new-key
Using boot properties at /openidm/resolver/boot.properties
Use KeyStore from: /openidm/security/keystore.jceks
Please enter the password:
Enter the key:
AES:606d80ae316be58e94439f91ad8ce1c0
If a secret key with that name already exists, IDM returns the following error:
"KeyStore contains a key with this alias"
3.7. Using the validate Subcommand
The validate subcommand validates all .json configuration
files in your project's conf/ directory.
Usage is as follows:
$ ./cli.sh validate
Executing ./cli.sh
Starting shell in /path/to/openidm
Using boot properties at /path/to/openidm/resolver/boot.properties
...................................................................
[Validating] Load JSON configuration files from:
[Validating] 	/path/to/openidm/conf
[Validating] audit.json .................................. SUCCESS
[Validating] authentication.json ......................... SUCCESS
    ...
[Validating] sync.json ................................... SUCCESS
[Validating] ui-configuration.json ....................... SUCCESS
[Validating] ui-countries.json ........................... SUCCESS
[Validating] workflow.json ............................... SUCCESS
3.8. Using the update Subcommand
The update subcommand supports updates for patches and migrations. For an example of this process, see "Updating Servers" in the Installation Guide.
Chapter 4. Using the Browser-Based UI
IDM provides a customizable, browser-based user interface. The functionality is subdivided into Administrative and Self-Service User Interfaces.
If you are configuring or administering IDM, navigate to the
Administrative User Interface (Admin UI). If IDM is installed on
the local system, you can get to the Admin UI at the following URL:
https://localhost:8443/admin. In the Admin UI, you can
configure connectors, customize managed objects, set up attribute
mappings, manage accounts, and more.
The Self-Service User Interface (Self-Service UI) provides role-based access
to tasks based on BPMN2 workflows, and allows users to manage certain aspects
of their own accounts, including configurable self-service registration. When
IDM starts, you can access the Self-Service UI at
https://localhost:8443/. For more information, see
"Configuring User Self-Service".
All users, including openidm-admin, can change their
password through the Self-Service UI. After you have logged in, click Change
Password.
Warning
The default password for the administrative user,
openidm-admin, is openidm-admin.
To protect your deployment in production, change this password.
4.1. Configuring the Server from the Admin UI
The Admin UI provides a graphical interface for most aspects of the IDM configuration.
Use the Quick Start cards and the Configure and Manage drop-down menus to configure the server.
In the following sections, you will examine the default Admin UI dashboard, and learn how to set up custom Admin UI dashboards.
Caution
If your browser uses an AdBlock extension, it might inadvertently block
some UI functionality, particularly if your configuration includes
strings such as ad. For example, a connection to an
Active Directory server might be configured at the endpoint
system/ad. To avoid problems related to blocked UI
functionality, either remove the AdBlock extension, or set up a suitable
white list to ensure that none of the targeted endpoints are blocked.
4.1.1. Default Admin UI Dashboards
The Admin UI includes multiple default dashboards. You can create additional dashboards, or add and remove widgets from the existing dashboards. For more information, see "Managing Dashboards".
When you log into the Admin UI the Quick Start dashboard loads by default.
The Admin UI includes a fixed top menu bar. As you navigate around the Admin UI, you should see the same menu bar throughout.
To display all configured dashboards, select Dashboards > Manage Dashboards. In addition to the Quick Start dashboard, three dashboards are provided by default: System Monitoring, Resource Report and Business Report. The default dashboards cover the following functionality:
- Quick Start Dashboard
Quick Start cards support one-click access to common administrative tasks. For more information, see "Quick Start Cards".
- System Monitoring Dashboard
Audit Events include information on audit data, segregated by date. For more information on these events, see "Setting Up Audit Logging".
System Health includes data on current CPU and memory usage.
Last Reconciliation includes data from the most recent reconciliation between data stores.
- Resource Report
The Resources Report includes widgets that show the number of active users, configured roles, and active connectors.
The Resources widget shows all configured connectors, mappings, and managed object types.
- Business Report
The Business Report includes widgets related to login and registration activity.
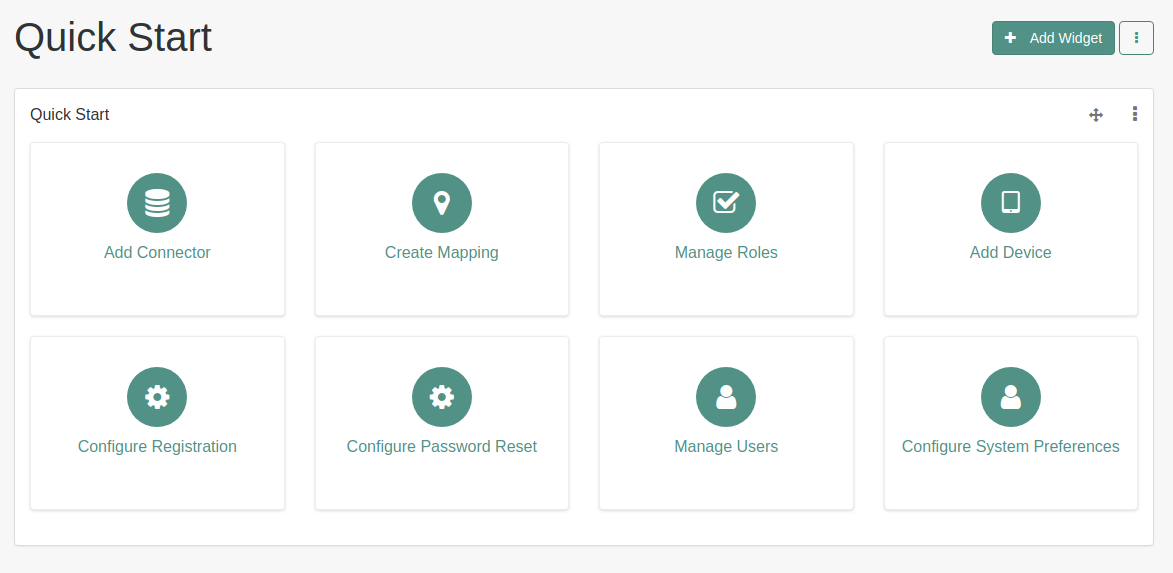
4.1.1.1. Quick Start Cards
The Quick Start cards allow quick access to the
following configuration options:
Add ConnectorUse the Admin UI to connect to external resources. For more information, see "Creating Connector Configurations With the Admin UI".
Create MappingConfigure synchronization mappings to map objects between resources. For more information, see "Mapping Source Objects to Target Objects".
Manage RolesSet up managed provisioning or authorization roles. For more information, see "Working With Managed Roles".
Add DeviceUse the Admin UI to set up managed objects, including users, groups, roles, or even Internet of Things (IoT) devices. For more information, see "Managing Accounts".
Configure RegistrationConfigure user Self-Registration. You can set up the Self-Service UI login screen, with a link that allows new users to start a verified account registration process. For more information, see "Configuring User Self-Service".
Configure Password ResetConfigure user self-service Password Reset. You can configure the ability for users to reset forgotten passwords. For more information, see "Configuring User Self-Service".
Manage UsersAllows management of users in the repository. For more information, see "Working with Managed Users".
Configure System PreferencesConfigure the following aspects of the server:
Audit, as described in "Setting Up Audit Logging".
Self-Service UI, as described in "Changing the UI Path".
Privacy & Consent, as described in "Configuring Privacy & Consent".
Workflows, as described in "Integrating Business Processes and Workflows".
4.1.2. Managing Dashboards
You can set up additional dashboards for customized views of the Admin UI, and you can embed external dashboards such as Kibana or Grafana, or other monitoring boards.
To create a new dashboard, select Dashboards > New Dashboard. Enter a dashboard name and select whether this dashboard should be the default board that is displayed when you load the Admin UI.
For a customized view of the Admin UI, select Widgets as the Dashboard Type, then select Create Dashboard and add the widgets that you want exposed in that view.
You can also customize the view by starting with an existing dashboard. In the upper-right corner of the UI, next to the Add Widget button, click the vertical ellipses () then select Rename or Duplicate.
To embed an external dashboard, select Embedded URL as the Dashboard Type, then enter the URL of the dashboard that you want to embed and select Create Dashboard.
To add a widget to a dashboard, click Add Widget and select the widget type. Widgets are grouped in logical categories, so scroll down to the category that fits the widget you want to add.
To modify the position of a widget in a dashboard, click and drag the move icon for the widget ().
If you add a new Quick Start widget, select the vertical ellipsis () icon in the upper right corner of the widget, and click Settings.
You can configure an Admin UI sub-widget to embed in the Quick Start widget.
If you are linking to a specific page in the Admin UI, the destination URL can be the part of the address after the main page for the Admin UI, such as
https://localhost:8443/<someURI>For example, to create a quick start link to the Audit configuration tab, at
https://localhost:8443/admin/#settings/audit/, enter#settings/auditin the destination URL text box.
IDM writes the changes you make to the
ui-dashboard.json file for your project.
For example, if you add two widgets (Last Reconciliation and System Health)
to a new dashboard named Test, you'll see the following excerpt in your
ui-dashboard.json file:
{
    "name" : "test",
    "isDefault" : false,
    "widgets" : [
        {
            "type" : "lastRecon",
            "size" : "large",
            "barchart" : "false"
        },
        {
            "type" : "systemHealthFull",
            "size" : "large"
        }
    ],
    "embeddedDashboard" : false
}
For more information on each property, see the following table:
ui-dashboard.json| Property | Options | Description |
|---|---|---|
name | User entry | Dashboard name |
isDefault | true or false | Default dashboard; can set one default |
widgets | Different options for type | Code blocks that define a widget |
type | lifeCycleMemoryHeap, lifeCycleMemoryNonHeap,
systemHealthFull, cpuUsage,
lastRecon, resourceList,
quickStart, frame,
userRelationship
| Widget name |
size | x-small, small,
medium, or large | Width of widget, based on a 12-column grid system, where x-small=4, small=6, medium=8, and large=12; for more information, see Bootstrap CSS |
height | Height, in units such as cm, mm,
px, and in | Height; applies only to Embed Web Page widget |
frameUrl | URL | Web page to embed; applies only to Embed Web Page widget |
title | User entry | Label shown in the UI; applies only to Embed Web Page widget |
barchart | true or false | Reconciliation bar chart; applies only to Last Reconciliation widget |
When complete, you can select the name of the new dashboard under the Dashboards menu or from the Manage Dashboards panel.
You can modify the options for each dashboard and widget. Select the vertical ellipsis in the upper right corner of the object, and make desired choices from the pop-up menu.
The following tables display an alphabetical list of the available widgets, by category:
| Name | Description |
|---|---|
| Audit Events | Graphical display of audit events; also see "Viewing Audit Events in the Admin UI". |
| Count Widget | A reporting widget that provides an instant display of the number of specific objects, for example active managed users, enabled social providers, and so on. For more information, see "Reporting and Monitoring". |
| Dropwizard Table With Graph | Does not appear in the list of widgets unless metrics are active, per "Metrics and Monitoring". |
| Graph Widget | Provides a graphical view of a specific managed resource, for example managed users, based on some metric. |
| Last Reconciliation | Shows statistics from the most recent reconciliation, shown in System Monitoring dashboard; also see "Obtaining the Details of a Reconciliation" |
| New Registrations | The number of users that have self-registered that week. To display data using this widget, user self-registration must be enabled (see "User Self-Registration"). |
| Password Resets | The number of password resets that week. To display data using this widget, password reset must be enabled (see "User Password Reset"). |
| Resources | Connectors, mappings, managed objects; shown in Administration dashboard |
| Sign-Ins | The number of managed users that have signed in to the service that week. |
| Name | Description |
|---|---|
| Daily Social Logins | Graphical display of logins via social identity providers; for related information see "Configuring Social Identity Providers" |
| Social Registration (year) | Graphical display of registrations over the past year; for related information, see "Configuring Social Identity Providers" |
| Name | Description |
|---|---|
| Cluster Node Status | Lists the instances in a cluster, with their status. For more information, see "Managing Nodes Through the Admin UI". |
| CPU Usage | Also part of System Health widget |
| Memory Usage (JVM Heap) | Graphs available JVM Heap memory (ref "Memory Health Check" |
| Memory Usage (JVM NonHeap) | Graphs available JVM Non-Heap memory (ref "Memory Health Check" |
| System Health | Shown in System Monitoring dashboard; includes CPU Usage, Memory Usage (JVM Heap), and Memory Usage (JVM NonHeap) |
| Name | Description |
|---|---|
| Embed Web Page | Supports embedding of external content; for more information, see Embed Web Page Widget Requirements |
| Identity Relationships | Graphical display of relationships between identities; also see "Viewing Relationships in Graph Form" |
| Managed Objects Relationship Diagram | Graphical diagram with connections between managed object properties; also see "Viewing the Relationship Configuration in the UI" |
| Quick Start | Links to common tasks; shown in Administration dashboard |
Embed Web Page Widget Requirements
To use the Embed Web Page applet, you'll need a web site that supports
appropriate x-frame-options. For example, Google has a
Maps Embed API for that purpose.
4.2. Managing Accounts
Only administrative users (with the role openidm-admin)
can add, modify, and delete accounts from the Admin UI. Regular users
can modify certain aspects of their own accounts from the Self-Service UI.
4.2.1. Account Configuration
In the Admin UI, you can manage most details associated with an account. Create a user if needed, and then select Manage > User > Username. In the screen that appears, you can configure the following elements of a user account:
- Details
The Details tab includes basic identifying data for each user, based on attributes configured in your project's
managed.jsonfile.- Password
As an administrator, you can create new passwords for users in the managed user repository.
- Provisioning Roles
Used to specify how objects are provisioned to an external system. For more information, see "Working With Managed Roles".
- Authorization Roles
Used to specify the authorization rights of a managed user within IDM. For more information, see "Working With Managed Roles".
- Direct Reports
Users who are listed as managers of others have graphical entries linked to those users under the Direct Reports tab.
- Linked Systems
Used to display account information reconciled from external systems.
4.2.2. Procedures for Managing Accounts
With the following procedures, you can use the Admin UI to add, update, and delete accounts for managed objects such as users. To make these changes using REST, see "Working with Managed Users".
The managed object does not have to be a user. It can be a role, a group, or even a physical item such as an IoT device. The basic process for adding, modifying, deactivating, and deleting other objects is the same as it is with accounts. However, the details may vary; for example, many IoT devices do not have telephone numbers.
Log in to the Admin UI at
https://localhost:8443/admin.Click Manage > User.
Click New User.
Complete the fields on the New User page.
By default, the New User page displays only the
passwordand the fields that are configured asrequiredin the schema, as shown in this excerpt frommanaged.json"required" : [ "userName", "givenName", "sn", "mail" ]To display additional properties on the New User page, add the desired property to this list of required attributes.
The fields on this page are subject to policy validation, as described in "Using Policies to Validate Data". So, for example, the email address must be a valid email address, and the password must comply with the configured password policy.
In a similar way, you can create accounts for other managed objects.
You can review new managed object settings in the managed.json
file of your project-dir/conf
directory.
In the following procedures, you learn how:
Log in to the Admin UI at
https://localhost:8443/adminas an administrative user.Click Manage > User.
Click the Username of the user that you want to update.
On the profile page for the user, modify the fields you want to change and click Update.
The user account is updated in the repository.
Log in to the Admin UI at
https://localhost:8443/adminas an administrative user.Click Manage > User.
Select the checkbox next to the desired Username.
Click the Delete Selected button.
Click OK to confirm the deletion.
The user is deleted from the internal repository.
The Admin UI displays the details of the account in the repository (managed/user). When a mapping has been configured between the repository and one or more external resources, you can view details of that account in any external system to which it is linked. As this view is read-only, you cannot update a user record in a linked system from within the Self-Service UI.
By default, implicit synchronization is enabled for
mappings from the managed/user
repository to any external resource. This means that
when you update a managed object, any mappings defined in the
sync.json file that have the managed object as the
source are automatically executed to update the target system. You can see
these changes in the Linked Systems section of a user's profile.
To view a user's linked accounts:
Log in to the Admin UI at
https://localhost:8443/admin.Click Manage User > Username > Linked Systems.
The Linked Systems panel indicates the external mapped resource or resources.
Select the resource in which you want to view the account, from the Linked Resource list.
The user record in the linked resource is displayed.
4.3. Customizing the Admin UI
You can customize the Admin UI for your specific deployment. When you install
IDM, you will find the default Admin UI configuration files in
the following directory: openidm/ui/admin/default.
In most cases, we recommend that you copy this directory to
openidm/ui/admin/extension with commands such as:
$ cd /path/to/openidm/ui/admin
$ cp -r default/. extension
You can then set up custom files in the extension/
subdirectory.
The Admin UI templates in the
openidm/ui/admin/default/templates directory might help
you get started.
If you want to customize workflows in the UI, see "Managing User Access to Workflows".
4.3.1. Customizing the Admin UI, by Functionality
You may want to customize parts of the Admin UI. You've set up an
openidm/ui/admin/extension directory
as described in "Customizing the Admin UI". In that directory, you
can find a series of subdirectories. The following table is intended to help
you search for the right file(s) to customize:
| Subdirectory | Description |
|---|---|
config | Top-level configuration directory of JavaScript files. Customizable
subdirectories include errorhandlers/ with HTTP
error messages and messages/ with info and error
messages. For actual messages, see the
translation.json file in the
locales/en/ subdirectory. |
css/ and libs/ | If you use a different bootstrap theme, you can replace the files in this and related subdirectories. For more information, see "UI Themes and Bootstrap". |
fonts/ | The font files in this directory are based on the Font Awesome CSS toolkit described in "Changing the UI Theme". |
images/ and img/ | IDM uses the image files in these directories, which you can choose to replace with your own. |
locales/ |
Includes the associated translation.json file, by
default in the en/ subdirectory.
|
org/ | Source files for the Self-Service UI |
partials/ | Includes partial components of HTML pages in the Self-Service UI, for assignments, authentication, connectors, dashboards, email, basic forms, login buttons, etc. |
templates/ |
The files in the templates/ subdirectory are in
actual use. For an example of how you can customize such files in the
Admin UI, see "Customizing the Self-Service UI".
|
To see an example of how this works, review "Customizing the Self-Service UI". It includes examples of how you can customize parts of the Self-Service UI. You can use the same technique to customize parts of the Admin UI.
Tip
The above table is not a complete list. To see a visual representation of customizable Admin UI files, from the Linux command line, run the following commands:
$ cd /path/to/openidm/ui/admin/extension
$ tree
4.4. Changing the UI Theme
You can customize the theme of the user interface. The default UI uses the Bootstrap framework and the Font Awesome CSS toolkit. You can download and customize the UI with the Bootstrap themes of your choice.
Note
If you use Brand Icons from the Font Awesome CSS Toolkit, be aware of the following statement:
All brand icons are trademarks of their respective owners. The use of these trademarks does not indicate endorsement of the trademark holder by ForgeRock, nor vice versa.
4.4.1. UI Themes and Bootstrap
You can configure a few features of the UI in the
ui-themeconfig.json file in your project's
conf/ subdirectory. However, to change most
theme-related features of the UI, you must copy target files to the
appropriate extension subdirectory, and then modify
them as discussed in "Customizing the Admin UI".
The default configuration files for the Admin and Self-Service UIs are identical for theme configuration.
By default the UI reads the stylesheets and images from the respective
openidm/ui/function/default
directories. Do not modify the files in this directory. Your changes may be
overwritten the next time you update or even patch your system.
To customize your UI, first set up matching subdirectories for your system
(openidm/ui/admin/extension and
openidm/ui/selfservice/extension). For example,
assume you want to customize colors, logos, and so on.
You can set up a new theme, primarily through custom Bootstrap CSS
files, in appropriate extension/ subdirectories, such
as openidm/ui/selfservice/extension/libs and
openidm/ui/selfservice/extension/css.
You may also need to update the "stylesheets" listing in
the ui-themeconfig.json file for your project, in the
project-dir/conf directory.
"stylesheets" : [
    "css/bootstrap-3.4.1-custom.css",
    "css/structure.css",
    "css/theme.css"
],
You can find these stylesheets in the
/css subdirectory.
bootstrap-3.4.1-custom.css: Includes custom settings that you can get from various Bootstrap configuration sites, such as the Bootstrap Customize and Download website.You may find the ForgeRock version of this in the
config.jsonfile in theui/admin/default/css/common/structure/directory.structure.css: Supports configuration of structural elements of the UI.theme.css: Includes customizable options for UI themes such as colors, buttons, and navigation bars.
If you want to set up custom versions of these files, copy them to the
extension/css subdirectories.
4.4.2. Changing the Default Logo
For the Admin UI, you can find the default logo in the
openidm/ui/admin/default/images directory. To
change the default logo, copy desired files to the
openidm/ui/admin/extension/images directory.
You should see the changes after refreshing your browser.
To specify a different file name, or to control the size, and other
properties of the image file that is used for the logo, adjust the
logo property in the UI theme configuration file
for your project:
project-dir/conf/ui-themeconfig.json).
The following change to the UI theme configuration file points to an image
file named example-logo.png, in the
openidm/ui/extension/images directory:
...
"loginLogo" : {
     "src" : "images/example-logo.png",
     "title" : "Example.com",
     "alt" : "Example.com",
     "height" : "104px",
     "width" : "210px"
},
...
Refresh your browser window for the new logo to appear.
Note
If you want a different logo for the Self-Service UI, substitute
selfservice for admin in the
cited directories.
4.4.3. Creating a Project-Specific UI Theme
You can create specific UI themes for different projects and then point a particular UI instance to use a defined theme on startup. To create a complete custom theme, follow these steps:
Shut down the IDM instance, if it is running. In the OSGi console, type:
shutdown
->
Copy the entire default Self-Service UI theme to an accessible location. For example:
$ cd /path/to/openidm/ui/selfservice
$ cp -r default /path/to/openidm/new-project-theme
If desired, repeat the process with the Admin UI; just remember to copy files to a different directory:
$ cd /path/to/openidm/ui/admin
$ cp -r default /path/to/openidm/admin-project-theme
In the copied theme, modify the required elements, as described in the previous sections. Note that nothing is copied to the extension folder in this case - changes are made in the copied theme.
In the
conf/ui.context-selfservice.jsonfile, modify the values fordefaultDirandextensionDirto the directory with yournew-project-theme:{ "enabled" : true, "urlContextRoot" : "/", "defaultDir" : "&{idm.install.dir}/ui/selfservice/default", "extensionDir" : "&{idm.install.dir}/ui/selfservice/extension", "responseHeaders" : { "X-Frame-Options" : "DENY" } }If you want to repeat the process for the Admin UI, make parallel changes to the
project-dir/conf/ui.context-admin.jsonfile.Restart the server:
$ cd /path/to/openidm
$ ./startup.sh
Relaunch the UI in your browser. The UI is displayed with the new custom theme.
4.4.4. Custom Response Headers
You can specify custom response headers for your UI by using the
responseHeaders property in UI context configuration
files such as conf/ui.context-selfservice.json. For
example, the X-Frame-Options header is a security
measure used to prevent a web page from being embedded within the frame of
another page. For more information about response headers, see
the MDN page on HTTP Headers.
Since the responseHeaders property is specified in the
configuration file for each UI context, you can set different custom headers
depending on the needs of that part of IDM. For example, you
may want different security headers included for the Admin UI and
Self-Service UIs.
4.5. Resetting User Passwords
When working with end users, administrators frequently have to reset their passwords. You can do so directly, through the Admin UI. Alternatively, you can configure an external system for that purpose, or set up Self-Service for "User Password Reset".
4.5.1. Changing a User Password Through the Admin UI
From the Admin UI, you can change the passwords of accounts in the internal Managed User datastore; to do so, take the following steps in the Admin UI:
Select Manage > User. Choose a specific user from the list that appears.
Select the Password tab for that user; you should be able to change that user's password there.
4.5.2. Using an External System for Password Reset
By default, the Password Reset mechanism is handled within IDM. You can reroute Password Reset in the event that a user has forgotten their password, by specifying an external URL to which Password Reset requests are sent. Note that this URL applies to the Password Reset link on the login page only, not to the security data change facility that is available after a user has logged in.
To set an external URL to handle Password Reset, set the
passwordResetLink parameter in the UI configuration file
(conf/ui-configuration.json) file. The following example
sets the passwordResetLink to
https://accounts.example.com/account/reset-password:
passwordResetLink: "https://accounts.example.com/reset-password"
The passwordResetLink parameter takes either an empty
string as a value (which indicates that no external link is used) or a full
URL to the external system that handles Password Reset requests.
Note
External Password Reset and security questions for internal Password Reset
are mutually exclusive. Therefore, if you set a value for the
passwordResetLink parameter, users will not be prompted
with any security questions, regardless of the setting of the
securityQuestions parameter.
4.6. Providing a Logout URL to External Applications
By default, a UI session is invalidated when a user clicks on the Log out link. In certain situations your external applications might require a distinct logout URL to which users can be routed, to terminate their UI session.
The logout URL is #logout, appended to the UI URL, for
example, https://localhost:8443/#logout/.
The logout URL effectively performs the same action as clicking on the Log out link of the UI.
4.7. Changing the UI Path
By default, the Self-Service UI is registered at the root context and is
accessible at the URL https://localhost:8443. To specify
a different URL, edit the
project-dir/conf/ui.context-selfservice.json
file, setting the urlContextRoot property to the new URL.
For example, to change the URL of the Self-Service UI to
https://localhost:8443/exampleui, edit
the file as follows:
"urlContextRoot" : "/exampleui",
Alternatively, to change the Self-Service UI URL in the Admin UI, follow these steps:
Log in to the Admin UI.
Select Configure > System Preferences, and select the Self-Service UI tab.
Specify the new context route in the Relative URL field.
4.8. API Explorer
IDM includes an API Explorer, an implementation of the OpenAPI Initiative Specification, also known popularly as Swagger.
To access the API Explorer, log into the Admin UI, select the question mark in the upper right corner, and choose API Explorer from the drop-down menu.
Note
If the API Explorer does not appear, you may need to enable it in your
resolver/boot.properties file, specifically with the
openidm.apidescriptor.enabled property. For more
information see, "Disabling the API Explorer".
The API Explorer covers most of the endpoints provided with a default IDM installation.
Each endpoint lists supported HTTP methods such as POST and GET. When custom
actions are available, the API Explorer lists them as
HTTP Method
/path/to/endpoint?_action=something.
To see how this works, navigate to the User
endpoint, select List Operations, and choose the GET option associated
with the /managed/user#_query_id_query-all endpoint.
In this case, the defaults are set, and all you need to do is select
the Try it out! button. The output you see includes:
The REST call, in the form of the curl command.
The request URL, which specifies the endpoint and associated parameters.
The response body, which contains the data that you requested.
The HTTP response code; if everything works, this should be
200.Response headers.
Tip
If you see a 401 Access Denied code
in the response body, your session may have timed out, and you'll have to
log into the Admin UI again.
For details on common ForgeRock REST parameters, see "About ForgeRock Common REST".
You'll see examples of REST calls throughout this documentation set. You can try these calls with the API Explorer.
You can also generate an OpenAPI-compliant descriptor of the REST API to
provide API reference documentation specific to your deployment. The following
command saves the API descriptor of the managed/user endpoint to a file named
my-openidm-api.json:
$ curl \
 --header "X-OpenIDM-Username: openidm-admin" \
 --header "X-OpenIDM-Password: openidm-admin" \
 --request GET \
 --output "my-openidm-api.json" \
 "http://localhost:8080/openidm/managed/user?_api"
For information about publishing reference documentation using the API descriptor, see "To Publish OpenAPI Documentation".
4.9. Disabling the UI
The UI is packaged as a separate bundle that can be disabled in the
configuration before server startup. To disable the registration of the UI
servlet, edit the
project-dir/conf/ui.context-selfservice.json
file, setting the enabled property to false:
"enabled" : false,
Chapter 5. Configuring User Self-Service
ForgeRock Identity Management (IDM) allows you to configure a number of features of user self-service, including user self-registration, password reset, username retrieval, custom email notifications, Privacy & Consent, progressive profile completion, Terms & Conditions, and more, as described in the following sections:
Each of these sections are designed to help you as an IDM deployer, customize the Self-Service UI. To that end, these sections discuss:
Required and supplementary configuration files, along with available functionality for each file.
REST endpoints, sometimes including REST calls to identify and change the configuration of each Self-Service UI function.
When appropriate, this chapter includes the steps that you'd take to verify functionality from an end user point of view.
Note
Some of the options described in this chapter can be used to help support compliance to the General Protection Data Regulation (GDPR).
5.1. User Self-Registration
IDM supports user self-registration. When enabled, users can connect to the IDM Self-Service UI, and create their own accounts on your system, with customizable criteria. Once enabled, administrators no longer need to create user accounts manually.
In the following sections, you'll examine:
5.1.1. Basic Setup: User Self-Registration Configuration Files
To set up basic user self-registration, you'll need at least the following configuration files:
selfservice-registration.jsonYou can find a template version of this file in the following directory:
openidm/samples/example-configurations/self-service.ui-configuration.jsonYou can find this file in the default IDM project configuration directory,
openidm/conf.
Note
Depending on how you configure User Self-Registration, you may need to set up additional configuration files, as discussed in "Configuring the User Self-Registration Form".
To enable self-service registration in the UI, enable the following
boolean in ui-configuration.json:
"selfRegistration" : true,
You can include several features with user self-registration, as shown in
the following excerpts of the selfservice-registration.json
file:
If you've activated Google reCAPTCHA for user self-service registration, you'll see the following code block:
{
     "name" : "captcha",
     "recaptchaSiteKey" : "<siteKey>",
     "recaptchaSecretKey" : "<secretKey>",
     "recaptchaUri" : "https://www.google.com/recaptcha/api/siteverify"
},
As suggested by the code, you'd substitute the actual
siteKeyandsecretKeyassigned by Google for your domain. For more information, see "Configuring Google reCAPTCHA".If you've included email verification, be sure to configure an outgoing email server per "Configuring Outbound Email". For a discussion of the code block to add to
selfservice-registration.json, see "Configuring Emails for Self-Service Registration".If you've configured security questions, users who self-register will have to create them during registration, and as needed, answer them during the password reset process. If so configured, users who've been reconciled from external data stores will also be prompted to add security questions. The relevant code block is shown here, which points IDM to other configuration files as discussed in "Configuring Security Questions".
{
     "name" : "kbaSecurityAnswerDefinitionStage",
     "kbaConfig" : null
},
If you've set up Terms & Conditions, users who self-register will have to accept them, based on criteria you create, as discussed in "Adding Terms & Conditions". If you've included Terms & Conditions with user self-registration, you'll see the following code block:
{
     "name" : "termsAndConditions"
},
If you've configured Privacy & Consent, you'll see a code block with the
consentname. The following code block includes template Privacy & Consent terms in English (en) and French (fr):{ "name" : "consent", "consentTranslations" : { "en" : "Please consent to sharing your data with whomever we like.", "fr" : "Veuillez accepter le partage de vos données avec ceux que nous souhaitons." } },Note
Substitute Privacy & Consent content that meet the requirements of your legal authorities.
New users will have to manually accept these conditions before they complete the self-registration process. For more information, see "Configuring Privacy & Consent".
For audit activity data related to user self-registration, see "Querying the Activity Audit Log".
5.1.2. Managing User Self-Registration Over REST
You can review the current user self-registration configuration over REST:
$ curl \
--header "X-OpenIDM-Username: openidm-admin" \
--header "X-OpenIDM-Password: openidm-admin" \
--request GET \
"http://localhost:8080/openidm/config/selfservice/registration"
Unless you've disabled file writes per
"Disabling Automatic Configuration Updates", the output will match the
contents of your project's selfservice-registration.json file.
If needed, you can update this configuration by including the desired contents of the file:
$ curl \
--header "X-OpenIDM-Username: openidm-admin" \
--header "X-OpenIDM-Password: openidm-admin" \
--header "Content-Type: application/json" \
--request PUT \
--data '{ <Insert file contents here> }' \
"http://localhost:8080/openidm/config/selfservice/registration"
5.1.3. Configuring the User Self-Registration Form
During user self-registration, IDM lists the attributes that
users see in the user registration form, as defined in the
selfservice-registration.json file. You can modify
the properties shown to users in the
registrationProperties code block:
"registrationProperties" : [
    "userName",
    "givenName",
    "sn",
    "mail"
],
If you add a managed user property to the
registrationProperties code block, IDM
includes it in the user self-registration screen.
Alternatively, you can add a managed user property in the Admin UI. Select Configure > User Registration, and add a property under the Registration Form tab. This action also adds a managed user property to the noted code block.
In either case, you can change the order of properties; IDM shows the order you configure in the user self-registration screen. If desired, you can further customize that screen, as described in "Customizing the User Registration Page".
You can also set up user self-registration via configuration files, as described in the following table:
| File Name | Description |
|---|---|
external.email.json | If you want to enable email validation, you'll need to configure this file, as discussed in "Configuring Outbound Email". |
managed.json | You can customize user self-registration based on entries in
this file. To change the labels seen by end users, change the
associated title. |
policy.json | For more information, see "Adding Custom Policies for Self-Registration and Password Reset". |
selfservice.kba.json | See "Configuring Security Questions". |
selfservice-registration.json | See "User Self-Registration". |
ui-configuration.json | See "User Self-Registration". |
consent.json | Specifies whether Privacy & Consent is enabled; however, you'll need to set up additional configuration files, as described in "Configuring Privacy & Consent". |
5.1.4. User Self-Registration: Social
Before you can activate Social Registration under the User Registration, Social tab, you'll need to configure registration with social identity providers. To review the process, see "Configuring Social Identity Providers".
When you've configured one or more social identity providers, you can activate the Social Registration option. This action adds:
The following setting to the
selfservice-registration.jsonconfiguration file:"socialRegistrationEnabled" : true,The following configuration file:
selfservice-socialUserClaim.json, discussed in "Account Claiming: Links Between Accounts and Social Identity Providers".
Under the Social tab, you'll see a list of property mappings as defined
in the selfservice.propertymap.json file.
One or more source properties in this file takes
information from a social identity provider. When a user registers with
their social identity account, that information is reconciled to the
matching target property for IDM. For
example, the email property from a social identity
provider is normally reconciled to the IDM managed user
mail property.
You can also find property mappings in the sync.json
for your project. For details of these synchronization mappings, see
"Mapping Source Objects to Target Objects".
5.1.5. Configuring User Self-Registration From the Admin UI
To configure user self-registration from the Admin UI, select Configure > User Registration and select Enable User Registration in the page that appears.
You'll see a pop-up window that specifies User Registration Settings, including the following:
Identity Resource, typically
managed/userIdentity Email Field, typically
mailoremailSuccess URL for the Self-Service UI; users who successfully log in are redirected to that URL. By default, the success URL is
http://localhost:8080/#dashboard/.Preferences, which set up default marketing preferences for new users. New users can change these preferences during registration, or from the Self-Service UI.
Advanced Options, Snapshot Token, typically a JSON Web Token (JWT)
Advanced Options, Token Lifetime, with a default of 300 seconds
You can also add these settings to the following configuration file:
selfservice-registration.json. When you modify
these settings in the Admin UI, IDM creates the file for you.
Once active, you'll see three tabs under User Registration in the Admin UI:
Registration Form, as described in "Configuring the User Self-Registration Form"
Social, as described in "User Self-Registration: Social"
Options, as described in "Common Steps: User Self-Registration, Password Reset, Forgotten Username"
5.1.6. Verifying Self-Registration in the Self-Service UI
After configuring user self-registration, test the result from the end
user's point of view. Navigate to the Self-Service UI at
http://localhost:8080, and select
Register. You'll see a single-page Register Your
Account screen with configured text boxes and required security questions.
If included in your configuration files, you'll also see marketing
preferences such as "Send me news and updates".
If you've configured Terms & Conditions, you'll see a link to those terms:
By creating an account, you agree to the Terms & Conditions.
Tip
To modify the Terms & Conditions, use the Admin UI or edit the
selfservice.terms.json file, as described in
"Adding Terms & Conditions".
If you've activated the reCAPTCHA option as described in
"Configuring Google reCAPTCHA", you'll need to satisfy the requirements
before you can select the SAVE button to create your
new user account.
If you've activated the Privacy & Consent option, you'll see a
Privacy Notice pop-up. By default, users who try to register aren't allowed
to select the Give Consent button, until they actually
consent to sharing their information.
Tip
To activate and configure the wording for Privacy & Consent, use the
Admin UI or edit the selfservice-registration.json
file, as described in "Configuring Privacy & Consent".
Once the new user is created, you should be able to verify the account in the following ways:
Log into the Self-Service UI as the new user.
Find the
userNameof the new user over REST; one method is shown in "Working with Managed Users".Log into the Admin UI, and select Manage > User. You should see that new user in the list.
5.2. User Password Reset
IDM supports self-service user password reset. When enabled, users who forget their passwords can connect to the IDM Self-Service UI, and can verify their identities with options such as email validation and security questions.
In the following sections, you'll examine:
IDM includes the ability to set up random passwords, as described in "Generating Random Passwords".
5.2.1. Basic Setup: User Password Reset Configuration Files
To set up basic user password reset features, you'll need at least the following configuration files:
selfservice-reset.jsonYou can find a template version of this file in the following directory:
openidm/samples/example-configurations/self-service.ui-configuration.jsonYou can find this file in the default IDM project configuration directory,
openidm/conf.
To set up self-service user password reset registration, enable the
following boolean in ui-configuration.json:
"passwordReset" : true,
You can include several features with user password reset, as shown in
the following excerpts of the selfservice-reset.json
file:
If you've activated Google reCAPTCHA for user self-service registration, you'll see the following code block:
{
     "name" : "captcha",
     "recaptchaSiteKey" : "<siteKey>",
     "recaptchaSecretKey" : "<secretKey>",
     "recaptchaUri" : "https://www.google.com/recaptcha/api/siteverify"
},
As suggested by the code, you'd substitute the actual
siteKeyandsecretKeyassigned by Google for your domain. For more information, see "Configuring Google reCAPTCHA".For password reset, IDM needs to verify user identities. To ensure that password reset links are sent to the right user, include the following code block:
{
    "name" : "userQuery",
    "validQueryFields" : [
        "userName",
        "mail",
        "givenName",
        "sn"
    ],
    "identityIdField" : "_id",
    "identityEmailField" : "mail",
    "identityUsernameField" : "userName",
    "identityServiceUrl" : "managed/user"
},
This code allows IDM to verify user identities by their username, email address, first name (
givenName), or last name (sn, short for surname).If you've included email verification, be sure to configure an outgoing email server per "Configuring Outbound Email". For a discussion of the code block to add to
selfservice-registration.json, see "Configuring Emails for Password Reset".If you've configured security questions, users who self-register will have to create questions and answers during the self-registration process.
If the feature is enabled, users who've been reconciled from external data stores will also be prompted, once, upon their next login, to add security questions and answers. The relevant code block is shown here, which points IDM to other configuration files as discussed in links from this section.
{
     "name" : "kbaSecurityAnswerDefinitionStage",
     "kbaConfig" : null
},
5.2.2. Managing User Password Reset Over REST
You can review the current user password reset configuration over REST:
$ curl \
--header "X-OpenIDM-Username: openidm-admin" \
--header "X-OpenIDM-Password: openidm-admin" \
--request GET \
"http://localhost:8080/openidm/config/selfservice/reset"
Unless you've disabled file writes per
"Disabling Automatic Configuration Updates", the output should match the
contents of your project's selfservice-reset.json file.
If needed, you can update this configuration by including the desired contents of the file:
$ curl \
--header "X-OpenIDM-Username: openidm-admin" \
--header "X-OpenIDM-Password: openidm-admin" \
--header "Content-Type: application/json" \
--request PUT \
--data '{ <Insert file contents here> }' \
"http://localhost:8080/openidm/config/selfservice/reset"
5.2.3. Configuring Password Reset From the Admin UI
To configure Password Reset from the Admin UI, select Configure >
Password Reset. When you select Enable Password Reset, you'll see a
Configure Password Reset Form that allows you to
specify the:
Identity Resource, typically
managed/userAdvanced Options, Snapshot Token, typically a JSON Web Token (JWT)
Advanced Options, Token Lifetime, with a default of 300 seconds
You can also add these settings to the following configuration file:
selfservice-reset.json. When you modify these
settings in the Admin UI, IDM creates the file for you.
5.2.4. Verifying Password Reset in the Self-Service UI
After configuring password reset in "User Password Reset",
you can test the result from the end user's point of view. Navigate to the
Self-Service UI at http://localhost:8080, and select
Reset your password.
You should see a Reset Your Password page with pre-configured queries. After providing an answer, IDM should send a password reset link to the email associated with the target user account.
5.3. Forgotten Username
You can set up IDM to allow users to recover forgotten usernames. You can require that users enter email addresses, or first and last names. Depending on your choices, IDM then will either display that username on the screen, and/or email such information to that user.
In the following sections, you'll examine:
5.3.1. Basic Setup: Forgotten Username Configuration Files
To set up basic forgotten username configuration, you'll need at least the following configuration files:
selfservice-username.jsonYou can find a template version of this file in the following directory:
openidm/samples/example-configurations/self-service.ui-configuration.jsonYou can find this file in the default IDM project configuration directory,
openidm/conf.
To set up forgotten username retrieval, enable the following boolean in
ui-configuration.json:
"forgotUsername" : true,
You can include several features with forgotten username retrieval, as shown
in the following excerpts of the selfservice-reset.json
file:
If you've activated Google reCAPTCHA for forgotten username retrieval, you'll see the following code block:
{
    "name" : "captcha",
    "recaptchaSiteKey" : "<siteKey>",
    "recaptchaSecretKey" : "<secretKey>",
    "recaptchaUri" : "https://www.google.com/recaptcha/api/siteverify"
},
As suggested by the code, you'd substitute actual
siteKeyandsecretKeyassigned by Google for your domain. For more information, see "Configuring Google reCAPTCHA".For forgotten username retrieval, IDM needs to verify user identities. To ensure that usernames are sent to the right user, include the following code block:
{
    "name" : "userQuery",
    "validQueryFields" : [
        "mail",
        "givenName",
        "sn"
    ],
    "identityIdField" : "_id",
    "identityEmailField" : "mail",
    "identityUsernameField" : "userName",
    "identityServiceUrl" : "managed/user"
},
This code allows IDM to verify user identities by their username, email address, first name (
givenName), or last name (sn, short for surname).If you've included email verification, be sure to configure an outgoing email server per "Configuring Outbound Email". For a discussion of the code block to add to
selfservice-username.json, see "Configuring Emails for Forgotten Username".The following code block, after confirming user identity, allows IDM to display the username:
{
     "name" : "retrieveUsername"
}
5.3.2. Managing Forgotten Username Retrieval Over REST
You can review the current forgotten username configuration over REST:
$ curl \
--header "X-OpenIDM-Username: openidm-admin" \
--header "X-OpenIDM-Password: openidm-admin" \
--request GET \
"http://localhost:8080/openidm/config/selfservice/username"
Unless you've disabled file writes per
"Disabling Automatic Configuration Updates", the output will match the
contents of your project's selfservice-username.json
file.
If needed, you can update this configuration by including the desired contents of the file:
$ curl \
--header "X-OpenIDM-Username: openidm-admin" \
--header "X-OpenIDM-Password: openidm-admin" \
--header "Content-Type: application/json" \
--request PUT \
--data '{ <Insert file contents here> }' \
"http://localhost:8080/openidm/config/selfservice/username"
5.3.3. Configuring Forgotten Username Retrieval From the Admin UI
To configure forgotten username retrieval from the Admin UI, select Configure > Forgotten Username. When you select Enable Forgotten Username Retrieval, you'll see a Configure Forgotten Username Form that allows you to specify the:
Identity Resource, typically
managed/userAdvanced Options, Snapshot Token, typically a JSON Web Token (JWT).
Advanced Options, Token Lifetime, with a default of 300 seconds
You can also add these settings to the following configuration file:
selfservice-username.json. When you modify these
settings in the Admin UI, IDM creates the file for you.
5.3.4. Verifying Access to a Forgotten Username in the Self-Service UI
After configuring forgotten username retrieval, you can test the result
from the end user's point of view. Navigate to the Self-Service UI at
http://localhost:8080, and select
Forgot Username?.
You should see a Retrieve Your Username page with pre-configured queries. After providing an answer, IDM should either display your username in the local browser, or send that username to the associated email address.
5.4. Common Steps: User Self-Registration, Password Reset, Forgotten Username
For each of the titled Self-Service features, you can configure several
steps in the main configuration file for each feature:
selfservice-registration.json,
selfservice-reset.json, and
selfservice-username.json. For more information, see
the following sections:
5.4.1. Configuring Google reCAPTCHA
Google reCAPTCHA helps prevent bots from registering users or resetting passwords on your system. For Google documentation on this feature, see Google reCAPTCHA. IDM works with Google reCAPTCHA v2.
To use Google reCAPTCHA, you will need a Google account and your domain
name (RFC 2606-compliant URLs such as localhost and
example.com are acceptable for test purposes). Google
then provides a Site key and a Secret key that you can include in the
self-service function configuration.
For example, you can set up reCAPTCHA by adding the following code
block to the configuration file for user self-registration
selfservice-registration.json, password reset,
selfservice-reset.json and forgotten username
selfservice-username.json functionality.
{
    "name" : "captcha",
    "recaptchaSiteKey" : "< Insert Site Key Here >",
    "recaptchaSecretKey" : "< Insert Secret Key Here >",
    "recaptchaUri" : "https://www.google.com/recaptcha/api/siteverify"
},
You may also add the reCAPTCHA keys through the UI for each of these self-service features.
5.4.2. Configuring Self-Service Email Validation / Username
When a user requests a new account, a password reset, or a reminder of their username, you can configure IDM to confirm the request by sending an email message to that user.
Before you can configure email validation, you must first configure an outgoing email service. To do so, select Configure > Email Settings. For more information, read "Configuring Outbound Email".
To activate Email Validation, you'll need to include an appropriate code block, depending on whether you're setting up self-registration, password reset, or forgotten username functionality, in the corresponding configuration file.
Alternatively, in the Admin UI, select Configure > User Registration or Password Reset or Forgotten Username. Enable the feature. Under the Options tab, enable the Email option.
To configure the email message that informs the user of the new account, see "Configuring Notification Emails".
The following sections include the code blocks that are added to each configuration file:
5.4.2.1. Configuring Emails for Self-Service Registration
To configure emails for self-service registration, you can add the
following code block to the
selfservice-registration.json file:
{
    "name" : "emailValidation",
    "identityEmailField" : "mail",
    "emailServiceUrl" : "external/email",
    "emailServiceParameters" : {
        "waitForCompletion" : false
    },
    "from" : "info@example.com",
    "subject" : "Register new account",
    "mimeType" : "text/html",
    "subjectTranslations" : {
        "en" : "Register new account",
        "fr" : "Créer un nouveau compte"
    },
    "messageTranslations" : {
        "en" : "<h3>This is your registration email.</h3><h4><a href=\"%link%\">Email verification link</a></h4>",
        "fr" : "<h3>Ceci est votre mail d'inscription.</h3><h4><a href=\"%link%\">Lien de vérification email</a></h4>"
    },
    "verificationLinkToken" : "%link%",
    "verificationLink" : "https://localhost:8443/#register/"
},
As suggested by the code block, it includes default registration email
messages in English (en) and French
(fr). The verificationLink sent
with the email takes users to the IDM self-registration URL.
As noted in "Managing User Self-Registration Over REST", you can make
these changes over the following endpoint URI:
/openidm/config/selfservice/registration
If desired, you can also configure self-service registration emails through the Admin UI. Select Configure > User Registration. If needed, activate the Enable User Registration Option. Under the Options tab, in the Email Validation box, select the icon. The Configure Validation Email pop-up should appear.
When you use the Admin UI to customize self-registration emails, you
can review the changes in the
selfservice-registration.json file.
5.4.2.2. Configuring Emails for Password Reset
To configure emails for password reset, you can add the
following code block to the selfservice-reset.json
file:
{
    "name" : "emailValidation",
    "identityEmailField" : "mail",
    "emailServiceUrl" : "external/email",
    "emailServiceParameters" : {
        "waitForCompletion" : false
    },
    "from" : "info@example.com",
    "subject" : "Reset password email",
    "mimeType" : "text/html",
    "subjectTranslations" : {
        "en" : "Reset your password",
        "fr" : "Réinitialisez votre mot de passe"
    },
    "messageTranslations" : {
        "en" : "<h3>Click to reset your password</h3><h4><a href=\"%link%\">Password reset link</a></h4>",
        "fr" : "<h3>Cliquez pour réinitialiser votre mot de passe</h3><h4><a href=\"%link%\">Mot de passe lien de réinitialisation</a></h4>"
    },
    "verificationLinkToken" : "%link%",
    "verificationLink" : "https://localhost:8443/#passwordReset/"
},
As suggested by the code block, it includes default password reset email
messages in English (en) and French
(fr). The verificationLink sent
with the email takes users to the IDM password reset URL.
As noted in "Managing User Password Reset Over REST", you can make
these changes over the following endpoint URI:
/openidm/config/selfservice/reset
If desired, you can also configure self-service password reset emails through the Admin UI. Select Configure > Password Reset. If needed, activate the Enable Password Reset option, and in the Email Validation box, select the icon. The Configure Validation Email pop-up should appear.
When you use the Admin UI to customize password reset emails, you can
review the changes in the
selfservice-reset.json file.
5.4.2.3. Configuring Emails for Forgotten Username
To configure emails for forgotten username functionality, you
can add the following code block to the
selfservice-username.json file:
{
    "name" : "emailUsername",
    "emailServiceUrl" : "external/email",
    "emailServiceParameters" : {
        "waitForCompletion" : false
    },
    "from" : "info@example.com",
    "mimeType" : "text/html",
    "subjectTranslations" : {
        "en" : "Account Information - username"
    },
    "messageTranslations" : {
        "en" : "<h3>Username is:</h3><br />%username%"
    },
    "usernameToken" : "%username%"
},
As suggested by the code block, it includes default email
messages in English (en), with a
usernameToken that includes the actual username in
the message.
As noted in "Managing Forgotten Username Retrieval Over REST", you can make
these changes over the following endpoint URI:
/openidm/config/selfservice/username
If desired, you can also configure forgotten username retrieval emails through the Admin UI. Select Configure > Forgotten Username. If needed, activate the Enable Forgotten Username Retrieval option, and in the Email Username box, select the icon. The Configure Email Username pop-up should appear.
When you use the Admin UI to customize forgotten username
retrieval emails, you can review the changes in the
selfservice-username.json file.
5.4.3. Configuring Security Questions
IDM uses security questions to enable users to verify their
identities. Security questions are sometimes referred to as Knowledge-Based
Authentication (KBA). When an administrator has configured security
questions, self-service users can choose from the questions set in the
selfservice.kba.json file.
The user is prompted to enter answers to pre-configured or custom security questions, during the self-registration process. These questions are used to help verify an identity when a user requests a password reset. These questions do not apply for users who need username retrieval.
The template version of the selfservice.kba.json file
is straightforward; it includes minimumAnswersToDefine,
which requires a user to define at least that many security questions and
answers, along with minimumAnswersToVerify, which
requires a user to answer (in this case) at least one of those questions
when asking for a password reset.
{
     "kbaPropertyName" : "kbaInfo",
     "minimumAnswersToDefine": 2,
     "minimumAnswersToVerify": 1,
     "questions" : {
         "1" : {
             "en" : "What's your favorite color?",
             "en_GB" : "What is your favourite colour?",
             "fr" : "Quelle est votre couleur préférée?"
         },
         "2" : {
             "en" : "Who was your first employer?"
         }
     }
}
To configure account lockout based on the security questions, add the
following lines to your selfservice.kba.json file:
"numberOfAttemptsAllowed" : 2,
"kbaAttemptsPropertyName" : "lockoutproperty"
With this configuration, users who make more than two mistakes in answering
security questions get locked out of their accounts. The number of mistakes
is recorded in whatever property you assign to
kbaAttemptsPropertyName (lockoutproperty
in this example).
If you are using an explicit mapping for managed user objects, you must add
this lockoutproperty to your database schema
and to the objectToColumn mapping
in your repository configuration file.
For example, the previous configuration would require the following
addition to your conf/repo.jdbc.json file:
"explicitMapping" : {
    "managed/user": {
    "table" : "managed_user",
    "objectToColumn": {
        ...
        "lockoutproperty" : "lockoutproperty",
        ...
}
You would also need to create a lockoutproperty
column in the openidm.managed_user table, with datatype
VARCHAR. For example:
mysql> show columns from managed_user;

+----------------------+--------------+------+-----+---------+-------+
| Field                | Type         | Null | Key | Default | Extra |
+----------------------+--------------+------+-----+---------+-------+
| objectid             | varchar(38)  | NO   | PRI | NULL    |       |
| rev                  | varchar(38)  | NO   |     | NULL    |       |
| username             | varchar(255) | YES  | UNI | NULL    |       |
| password             | varchar(511) | YES  |     | NULL    |       |
| accountstatus        | varchar(255) | YES  | MUL | NULL    |       |
| postalcode           | varchar(255) | YES  |     | NULL    |       |
| lockoutproperty      | varchar(255) | YES  |     | NULL    |       |
...
Warning
Once you deploy these IDM self-service features, you should never remove or change existing security questions, as users may have included those questions during the user self-registration process.
You may change or add the questions of your choice, in JSON format. If you're configuring user self-registration, you can also edit these questions through the Admin UI. In fact, the Admin UI allows you to localize these questions in different languages.
In the Admin UI, select Configure > User Registration. Enable User Registration, select Options > Security Questions and select the edit icon to add, edit, or delete these questions.
Any change you make to the security questions under User Registration also applies to Password Reset. To confirm, select Configure > Password Reset. Enable Password Reset, and edit the Security Questions. You'll see the same questions there.
In addition, individual users can configure their own questions and answers, in two ways:
During the user self-registration process
From the Self-Service UI, in the user's My Account section, under Sign-in & Security > Security Questions
Important
A managed user's security questions can only be changed through the
selfservice/userupdate endpoint, or when the user is
created through selfservice/registration and provides
their own questions. You cannot manipulate a user's kbaInfo
property directly through the managed/user endpoint.
When the answers to security questions are hashed, they are converted to
lowercase. If you intend to pre-populate answers with a mapping, the
openidm.hash function or the secureHash
mechanism, you must provide the string in lowercase to match the value of
the answer.
5.4.4. Adding Custom Policies for Self-Registration and Password Reset
IDM has specific policies for usernames and passwords, in
the policy.js file in the
openidm/bin/defaults/script directory. To make sure
these policies are enforced for user self-registration and password reset,
add the following code blocks to that file, under
resources:
{
    "resource" : "selfservice/registration",
    "calculatedProperties" : {
        "type" : "text/javascript",
        "source" : "require('selfServicePolicies').getRegistrationProperties()"
    }
},
{
    "resource" : "selfservice/reset",
    "calculatedProperties" : {
        "type" : "text/javascript",
        "source" : "require('selfServicePolicies').getResetProperties()"
    }
},
For more information on IDM policies, see "Using Policies to Validate Data".
5.5. Configuring Notification Emails
When you configure the outbound email service as described in "Configuring Outbound Email", IDM may use that service to notify users of significant events, primarily related to user self-service. For specifics, see the following table for related notification emails:
| Situation | Configuration File | Details |
|---|---|---|
| When a user is successfully registered | emailTemplate-welcome.json | See "User Self-Registration Email Template" |
| When a user asks for their forgotten username | selfservice-username.json | See "Configuring Emails for Forgotten Username" |
| When a user registers using self-service and needs to verify their email address | selfservice-registration.json | See "Configuring Emails for Self-Service Registration" |
| When a user asks for a password reset | selfservice-reset.json | See "Configuring Emails for Password Reset" |
Each email template can specify an email address to use in the From
field. If this field is left blank, IDM will default to the
address specified in Email Settings.
Note
Some email providers, such as Google, will override the From
address you specify in the templates, and instead use the address used to
authenticate with the SMTP server. The email address specified in the
template may still be present, but in an email header hidden from most users, such as
X-Google-Original-From.
5.5.1. User Self-Registration Email Template
When a new user registers through the IDM self-registration
interface, and if you've configured email per
"Configuring Outbound Email", that user will get a welcome email as
configured in the emailTemplate-welcome.json file:
{
    "enabled" : true,
    "from" : "",
    "subject" : {
        "en" : "Your account has been created"
    },
    "message" : {
        "en" : "<html><body><p>Welcome to OpenIDM. Your username is '{{object.userName}}'.</p></body></html>"
    },
    "defaultLocale" : "en"
}
You may want to make the following changes:
Add an email address to the
fromproperty, perhaps an email address for your organization's systems administrator.Set up appropriate locale(s).
Modify the subject line as needed.
Include a welcome
messageappropriate to your organization.
5.5.2. Managing Email Templates from the Admin UI
The Admin UI includes tools that can help you customize email messages related to two administrative tasks: creating users and resetting passwords.
To configure these messages from the Admin UI, select Configure > Email Settings > Templates, where you'll see the following option:
Welcome: To configure emails that notify a user of a newly created account, as defined in
emailTemplate-welcome.json.Note
IDM sends the same welcome email to users created with a REST call. For an example of user creation over REST, see "Working with Managed Users".
5.6. Configuring Privacy & Consent
IDM supports Privacy & Consent for users who register via IDM directly or via a social identity provider. For more information on the registration process, see "User Self-Registration" and "Configuring Social Identity Providers".
As configured for IDM, if you set up Privacy & Consent, users have to accept sharing their data before they get registered accounts.
To set up Privacy & Consent, edit the following configuration files:
In
selfservice-registration.json, you'll need to specify privacy notices in theconsentTranslationscode block:{ "name" : "consent", "consentTranslations" : { "en" : "<Substitute appropriate Privacy & Consent wording>", "fr" : "<Substitute appropriate Privacy & Consent wording, in French>" } },You can also set this up on the following endpoint:
/openidm/config/selfservice/registrationIn
consent.json, make sure it'senabled:{ "enabled" : true }You can also set this up on the following endpoint:
/openidm/config/consentIn the
sync.jsonfile, for the required mapping, include:"consentRequired" : true,
You can also set this up on the following endpoint:
/openidm/config/sync
Alternatively, you can set up Privacy & Consent in the Admin UI by enabling the following:
In the Admin UI, select Configure > System Preferences. In the Privacy & Consent tab, activate the Enable toggle, and select Save.
Configure Privacy & Consent in the desired mapping. To review available mappings, select Configure > Mappings.
Note
IDM activates Privacy & Consent only for mappings from a Managed Object source. In other words, end users give their consent for transferring some or all of their data only to external systems, such as DS. Then, IDM includes a Privacy & Consent option in the Self-Service UI for regular users.
Conversely, in a mapping to a Managed Object target, the IDM Admin UI seems to allow you to activate Privacy & Consent mappings. As users in your Managed Object store presumably have given their consent to share their information, IDM does not implement those changes in the Self-Service UI.
Select Configure > User Registration. Select Enable User Registration if it isn't already enabled, and then enable Privacy & Consent.
To see how this works for a newly registered user, see "Verifying Self-Registration in the Self-Service UI".
5.8. Customizing the Self-Service UI
You can customize the Self-Service UI. When you install IDM, you
will find the default Self-Service UI configuration files in the following
directory: openidm/ui/selfservice/default.
In most cases, we recommend that you copy this directory to
openidm/ui/selfservice/extension with commands such as:
$ cd /path/to/openidm/ui/selfservice $ cp -r default/. extension
You can then set up custom files in the extension/
subdirectory.
The openidm/ui/selfservice/default/templates directory
includes Self-Service UI templates that might help you get started.
If you want to customize workflows in the UI, see "Managing User Access to Workflows".
If you want to customize tabs under the My Account tab in the Self-Service UI, review the files described in "Privacy: My Account Information in the Self-Service UI".
5.8.1. Customizing a Self-Service UI Template
You may want to customize information included in the Self-Service UI.
These procedures do not address actual data store requirements. If you add text boxes in the UI, it is your responsibility to set up associated properties in your repositories.
To do so, you should copy existing default template files in the
openidm/ui/selfservice/default subdirectory to
associated extension/ subdirectories.
To simplify the process, you can copy some or all of the content from the
openidm/ui/selfservice/default/templates to the
openidm/ui/selfservice/extension/templates directory.
You can use a similar process to modify what is shown in the Self-Service UI.
5.8.1.1. Customizing User Self-Service Screens
In the following procedure, you will customize the screen that users see during the user registration process. You can use a similar process to customize what a user sees during the password reset and forgotten username processes.
For user self-service features, you can customize options in three files.
Navigate to the extension/templates/user/process
subdirectory, and examine the following files:
User Registration:
registration/allInOneRegistration-initial.htmlPassword Reset:
reset/userQuery-initial.htmlForgotten Username:
username/userQuery-initial.html
The following procedure demonstrates the process for user registration.
When you configure user self-service anonymous users who choose to register will see a prompt to
Register Your Account, with text boxes for user account properties such as username, first name, email address, and password.The screen you see comes from the noted User Registration HTML file:
allInOneRegistration-initial.html, in theselfservice/extension/templates/user/process/registrationsubdirectory. Open that file in a text editor.Assume that you want new users to enter an employee ID number when they register.
Create a new
form-groupcode block for that number. For this procedure, the code block appears after the block for Last Name (or surname)sn:<div class="form-group"> <label class="sr-only" for="input-employeeNum">{{t 'common.user.employeeNum'}}</label> <input type="text" placeholder="{{t 'common.user.employeeNum'}}" id="input-employeeNum" name="user.employeeNum" class="form-control input-lg" /> </div>Edit the relevant
translation.jsonfile. As this is the customized file for the Self-Service UI, you will find it in theselfservice/extension/locales/endirectory that you set up in "Customizing the Admin UI".You need to find the right place to enter text associated with the
employeeNumproperty. Look for the other properties in theallInOneRegistration-initial.htmlfile.The following excerpt illustrates the
employeeNumproperty as added to thetranslation.jsonfile.... "givenName" : "First Name", "sn" : "Last Name", "employeeNum" : "Employee ID Number", ...
The next time an anonymous user tries to create an account, that user should see a
Register Your Accountscreen with the Employee ID Number text box.
Tip
Changes to Self-Service UI Templates aren't enough; you must also change the corresponding backend entries for the managed object resource(s). For more information, see "Creating and Modifying Managed Object Types".
If you've added an entry to a UI and have not added corresponding backend configuration files, IDM won't save that information.
Alternatively, if you've deleted an entry that's required
in your managed object schema, the resulting registration will fail
policy requirements. For more information, see
"Using Policies to Validate Data".
5.8.2. Customizing the Self-Service UI, by Functionality
You may want to customize additional parts of the Self-Service UI. You've
set up an openidm/ui/selfservice/extension directory
as described in "Customizing the Self-Service UI". In that
directory, you can find a series of subdirectories. The following table is
intended to help you search for the right file(s) to customize:
| Subdirectory | Description |
|---|---|
config | Top-level configuration directory of JavaScript files. Customizable
subdirectories include errorhandlers/ with HTTP
error messages and messages/ with info and error
messages. For actual messages, see the
translation.json file in the
locales/en/ subdirectory. |
css/ and libs/ | If you use a different bootstrap theme, you can replace the files in this and related subdirectories. For more information, see "UI Themes and Bootstrap". |
images/ and img/ | IDM uses the image files in these directories, which you can choose to replace with your own. |
locales/ |
Includes the associated translation.json file, by
default in the en/ subdirectory.
|
org/ | Source files for the Self-Service UI |
partials/ | Includes partial components of HTML pages in the Self-Service UI, for assignments, authentication, connectors, dashboards, email, basic forms, login buttons, etc. |
templates/ |
The files in the templates/ subdirectory are in
actual use. For an example of how you can customize such files in the
Self-Service UI, see "Customizing the Self-Service UI".
|
Tip
The above table is not a complete list. To see a visual representation of customizable Self-Service UI files, from the Linux command line, run the following commands:
$ cd /path/to/openidm/ui/selfservice/extension $ tree
5.9. Setting Up User-Managed Access (UMA), Trusted Devices, and Privacy
In the following sections, you'll refer to AM documentation to set up User-Managed Access (UMA), Trusted Devices, and Privacy for your end users. These options require IDM working with AM. For a working implementation of both products, see "Integrating IDM With the ForgeRock Identity Platform" in the Samples Guide.
Tip
If you want to configure both UMA and Trusted Devices in AM, configure these features in the following order, as described in the sections that follow:
Set up UMA
Use AM to configure UMA-based resources
Configure Trusted Devices
If you have to reconfigure UMA at a later date, you'll have to first disable Trusted Devices. You can enable Trusted Devices, once again, afterwards.
5.9.1. User Managed Access in IDM
When you integrate IDM with ForgeRock Access Management (AM) you can take advantage of AM's abilities to work with User-Managed Access (UMA) workflows. AM and IDM use a common installation of ForgeRock Directory Services (DS) to store user data.
For instructions on how to set up this integration, see "Integrating IDM With the ForgeRock Identity Platform" in the Samples Guide. Once you've set up integration through that sample, you can configure AM to work with UMA. For more information, see the AM User-Managed Access (UMA) Guide. From that guide, you need to know how to:
Set up AM as an authorization server.
Register resource sets and client agents in AM.
Help users manage access to their protected resources through AM.
Note
IDM provides a read-only configuration of UMA-based sharing only for the resource owner. If you've used AM to share an UMA resource with another user, that user can use only AM to view that resource. Refer to the AM User-Managed Access (UMA) Guide for more information.
After your users have shared UMA resources from the AM Self-Service UI, they can view what they've done and shared in the IDM Self-Service UI, in the My Account section, under the Sharing and Activity tabs.
5.9.2. Configuring Trusted Devices on IDM
You can configure Trusted Devices through AM, using the following sections of the AM Authentication and Single Sign-On Guide: Configuring Authentication Chains and Device ID (Match) Authentication Module. You can use the techniques described in these sections to set up different authentication chains for administrators and regular users.
You can create an AM authentication chain with the following modules and criteria:
| Module | Criteria |
|---|---|
| DataStore | Requisite |
| Device Id (Match) | Sufficient |
| Device Id (Save) | Required |
This is different from the authentication chain described in the following section of the AM Authentication and Single Sign-On Guide: Device ID (Match) Authentication Module, as it does not include the HOTP Authentication Module
When trusted devices are enabled, users are presented with a prompt on a
screen with the following question "Add to Trusted Devices?". If the user
selects Yes, that user is prompted for the name of the
Trusted Device. For more information, see "Trusted Devices".
Note
In default configurations, trusted devices are not saved for the
AM amadmin account. However, you can set up
different AM administrative users as described in the following
section of the AM Setup and Maintenance Guide:
Delegating Realm Administration Privileges.
You can set up different authentication chains for regular and administrative users, as described in the AM Authentication and Single Sign-On Guide.
5.10. Privacy: My Account Information in the Self-Service UI
End users can find account details in the My Account section of the Self-Service UI. The information provided depends on what has been configured in the Admin UI, and potentially through AM as discussed in "Integrating IDM With the ForgeRock Identity Platform" in the Samples Guide.
Some information configured in IDM, such as Personal Info, can be found through appropriate REST calls and audit logs for that particular user. However, some of the information in this section, such as Trusted Devices and UMA-based sharing, may be available from ForgeRock Directory Services (DS) or ForgeRock Access Management (AM).
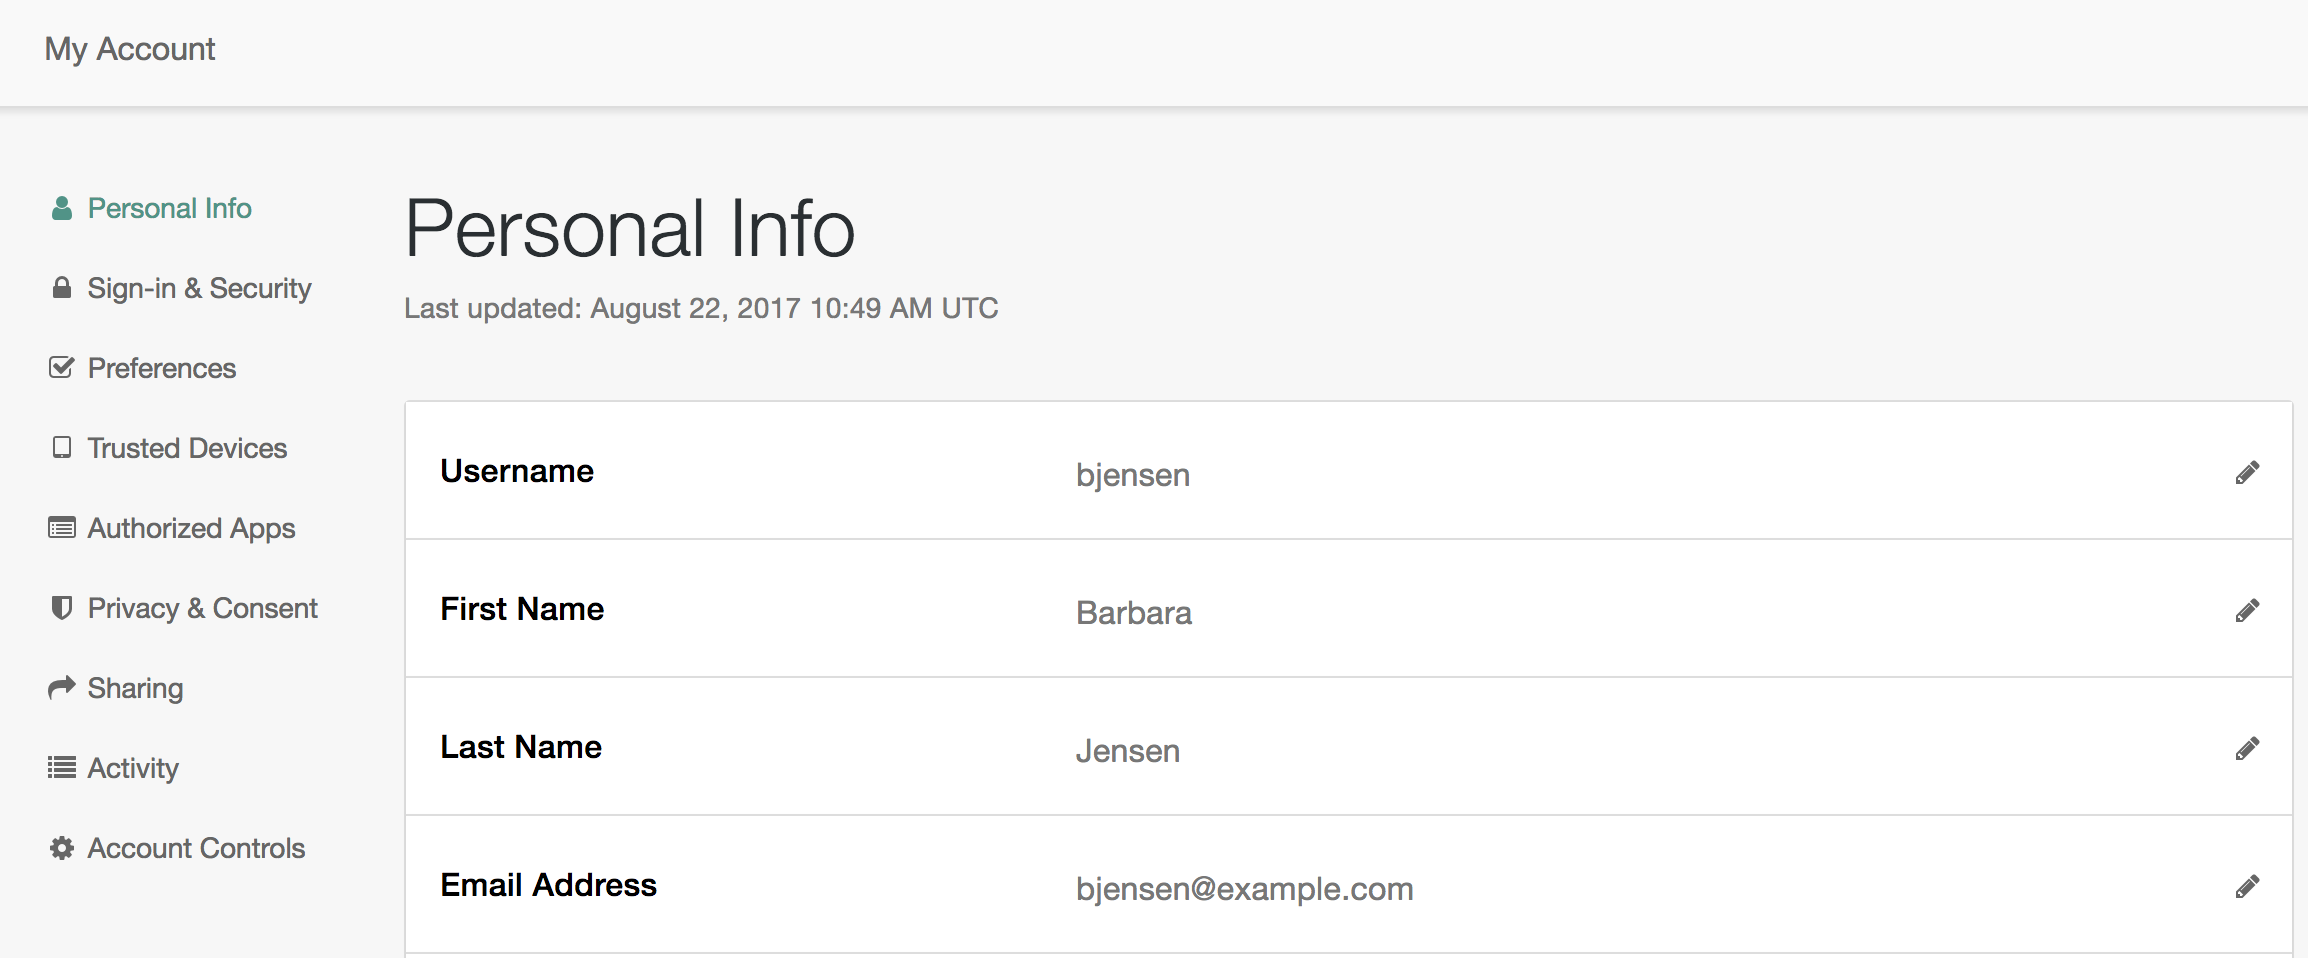
The names in the left-hand column are known as tabs, and
reflect the property shown in the ui-profile.json file
for your project. When you select a tab such as Personal Info in the
Self-Service UI, you'll see related information on your account. Each tab is
described in more detail in the following sections.
5.10.1. Personal Info
The Personal Info tab allows users to manage their information in a centralized location. The last change made to the user account is reflected in the UTC timestamp. You'll see a new timestamp for any change made by a user or an administrator on that account.
For end users, Personal Info information account includes at least the following information: Username, First Name, Last Name, and Email Address. In the Self-Service UI, users can:
Correct errors in their default required information.
Add, delete, or modify information in all other fields.
Review the last time someone made a change to their account.
Each user can modify this information as needed, as long as
"userEditable" : true for the property in the
managed.json file, as described in
"Creating and Modifying Managed Object Types".
5.10.2. Sign-In & Security
Under this tab, end users can change their passwords. They can also add, delete, or modify security questions, and link or unlink supported social identity accounts. For more information, see "Configuring Security Questions" and "Configuring Social Identity Providers".
5.10.3. Preferences
The preferences tab allows end users to modify marketing preferences, as
defined in the managed.json file, and the Managed Object
User property Preferences tab. For more information, see
"Configuring End User Preferences".
End users can toggle marketing preferences. When IDM includes a mapping to a marketing database, these preferences are sent to that database. This can help administrators use IDM to target marketing campaigns and identify potential leads.
5.10.4. Trusted Devices
A trusted device uses AM's Device ID (Match) and Device ID (Save) authentication modules, as described in the AM Authentication and Single Sign-On Guide. When such modules are configured per "Configuring Trusted Devices on IDM", end users get the opportunity to add such devices the first time they log in from a new location.
During the login process, when an end user selects Log In, that user is prompted for a Trusted Device Name.
When added, users see such devices under the noted tab, as shown here:

A trusted device entry is paired with a specific browser on a specific system. The next time the same end user logs in from the same browser and system, in the same location, that user should not be prompted to enter a trusted device again.
End users may remove their trusted devices from the tab, as shown.
5.10.5. Authorized Apps
The Authorized Apps tab is specific to end users as OAuth 2 clients. and reflects the corresponding section of the AM Self-Service dashboard, as described in the following section of the AM OAuth 2.0 Guide on: User Consent Management.
Note
The one exception is when IDM is configured to work with
AM as described in "Integrating IDM With the ForgeRock Identity Platform" in the Samples Guide. You'll see
an "Authorized App" in this case, with a name such as openidm.
While end-users can select Remove, that "Authorized App"
will reappear the next time the user logs into the full stack configuration.
5.10.6. Privacy & Consent
This section assumes that as an administrator, you've followed the instructions in "Configuring Privacy & Consent" to enable Privacy & Consent.
End users who see a Privacy & Consent tab have control of personal data that may be shared with an external database, such as one that might contain marketing leads.
The managed object record for end users who consent to sharing such data is
shown in REST output and the audit activity log as one
consentedMappings:
"consentedMappings" : [ {
"mapping" : "managedUser_systemLdapAccounts",
"consentDate" : "2017-08-25T18:13:08.358Z"
}The profile fields shown in the figure, if authorized by the specific end user, may be shared with the external database.
This tab supports the right to restrict processing of user personal data.
5.10.7. Sharing and Activity
The Sharing and Activity tabs provide a read-only view of personal information that end users may have shared with others. If you as an administrator configured UMA as described in "User Managed Access in IDM", any sharing and activity changes made by end users in the AM Self-Service UI are also shown in the IDM Self-Service UI.
If end users want to share their resources with others, they'll have to use the AM Self-Service UI.
Note how the activity includes a timestamp, which informs end users of the last time their resources were shared (or unshared).
5.10.8. Account Controls
The Account Controls tab allows end users to download their account data (in JSON format), and to delete their accounts from IDM.
Important
When end users delete their accounts, the change is recorded in external repositories upon the next reconciliation. It is then up to the administrator of the external repository to ensure user information is purged from the external system.
To modify the message associated with the Delete Your Account
option, follow the instructions shown in
"Customizing the Self-Service UI", find the
translation.json file, search for the
deleteAccount code block, and edit text information
as desired.
The options shown in this tab can help meet requirements related to data portability, as well as the right to be forgotten.
5.10.9. Notifications related to My Account the Self-Service UI
When end users change their passwords and/or preferences, they receive a
notification in the Self-Service UI. For administrators, you can change these
notification messages in the onUpdateUser.js file, in the
/path/to/openidm/bin/defaults/script directory.
5.10.10. Configuring Additional Tabs for My Account
You'll find a list of available tabs in the ui-profile.json
file, in your project's conf/ subdirectory. For example,
this excerpt sets up the Personal Info tab:
{
"name" : "personalInfoTab",
"view" : "org/forgerock/openidm/ui/user/profile/personalInfo/PersonalInfoTab"
},If you want to configure additional tabs for the My Account section of the Self-Service UI, focus on the following:
The
ui-profile.jsonfile in your project'sconf/subdirectory.JavaScript files in the following directory, which configure details shown in each tab:
/path/to/openidm/ui/selfservice/default/org/forgerock/openidm/ui/user/profileThe Self-Service
translation.jsonfile, ideally in the following directory:openidm/ui/selfservice/extension/locales. In that file, you'll add lines to the following code blocks:templates: You'll see examples of existing templates in this code block.common.user.profileMenu: You'll see examples of existing tabs, with Font Awesome icons and UI text titles.
5.11. Progressive Profile Completion
Progressive profile completion can help you build relationships with end users. Once users have established a history in their accounts, you can collect more information based on customizable criteria. Ideally, you should be able to use that information to create better experiences for those end users.
After activating "User Self-Registration", users need only the following information to register:
User name
First name
Last name
Email address
Progressive profile completion allows you to collect additional information,
limited by the attributes defined in the managed.json
file for your project.
Progressive profile completion introduces a new intermediate authentication
role, known as openidm-authenticated. Upon login,
IDM checks the criteria for existing progressive profile
completion forms. If the user meets the defined criteria, IDM
sends the user to the form(s), with the openidm-authenticated
role. When the user has submitted each of displayed forms with the required
information, IDM assigns the user the
openidm-authorized role, which allows the user to
access the self-service UI. For a description of these roles, see
"Roles and Authentication".
In the following sections, you'll examine how you use progressive profile
completion to ask or require more information from users. You're limited
only by the properties defined in your project's
managed.json file.
For more information, see "Setting Up a Progressive Profile Completion Form With
selfservice-profile.json".
5.11.1. Setting Up a Progressive Profile Completion Form With
selfservice-profile.json
If you're testing progressive profile completion, you can start from the
selfservice-profile.json file in the following
directory:
openidm/samples/example-configurations/self-service/
Copy this file to your project's conf/ subdirectory
and start IDM. After the conditions shown in this
configuration file are met, end users will see a form prompting them to
add a telephone number.
{
"stageConfigs" : [
{
"name" : "conditionaluser",
"identityServiceUrl" : "managed/user",
"condition" : {
"type" : "loginCount",
"interval" : "at",
"amount" : "25"
},
"evaluateConditionOnField" : "user",
"onConditionTrue" : {
"name" : "attributecollection",
"identityServiceUrl" : "managed/user",
"uiConfig" : {
"displayName" : "Add your telephone number",
"purpose" : "Help us verify your identity",
"buttonText" : "Save"
},
"attributes" : [
{
"name" : "telephoneNumber",
"isRequired" : true
}
]
}
}
]
}The following table includes a detailed list of each property shown in this file:
selfservice-profile.json File| Property | Description |
|---|---|
stageConfigs | Progressive profile completion is a stage in the Self-Service UI |
name | conditionaluser sets up conditions for
end users |
identityServiceUrl | managed/user specifies IDM
Managed Users |
condition | Condition when to display the form |
type | Type of condition; for a list of conditions,
see "Standard Progressive Profile Completion Conditions" |
evaluateConditionOnField | IDM evaluates the condition, per
user |
onConditionTrue | Present the form with the following properties |
name | Data that you collect with the form is an
attributeCollection |
uiConfig | Labels to include the in the form seen by the end user |
displayName | Form title |
purpose | Form explanation |
buttonText | Customizable |
attributes | Attribute name from managed.json |
isRequired | If an end user has to enter data to complete a connection to IDM |
For this example configuration, end users are prompted to add their telephone numbers when they log in for the 25th time, as shown in the following form:
5.11.1.1. Standard Progressive Profile Completion Conditions
You can set up a number of different conditions for when users are prompted to add information to their profiles. IDM includes the following pre-defined criteria:
loginCountMay specify
atoreverynumber of logins, as defined by the following value:amount.Note
End users can bypass progressive profile completion screens, when configured with a
loginCount. Every time they see such a request, they can open a new browser window to bypass that request, and log into the Self-Service UI. They won't have to provide the information requested, even if you've set the attribute as Required under the Attributes tab.timeSinceMay specify a time since the user was created, the
createDate, inyears,months,weeks,days,hours, andminutes.profileCompletenessBased on the number of items completed by the user from
managed.json, in percent, as defined bypercentLessThan; for more information, see "Defining Overall Profile Completion".propertyValueBased on the value of a specific user entry, such as
postalAddress, which can be defined by "Presence Expressions".
5.11.1.2. Custom Progressive Profile Conditions
You can also set up custom conditions with query filters and scripts. These criteria may deviate from standard query filters described in "Constructing Queries" and standard scripted conditions described in "Adding Conditional Policy Definitions".
A query filter (
queryFilter), as defined in "Defining and Calling Queries". For example, the following query filter checks user information for users who live in the city of Portland:"condition" : { "type" : "queryFilter", "filter" : "/city eq \"Portland\"" },In addition, you can also reference metadata, as described in "Tracking Metadata For Managed Objects". For example, the following query filter searches for users with:
A
loginCountgreater than or equal to fiveDoes not have a telephone number
"filter" : "(/_meta/loginCount ge 5 and !(/telephoneNumber pr))"Warning
If you include
_metain query filters, the Admin UI will not work for the subject progressive profiling form.While it's technically possible to include a number like
5in the Admin UI with the query filter, IDM would write the number as a string to theselfservice-profile.jsonfile. You'd still have to change that number directly in the noted file.An inline script (
scripted), or a reference to a script file; IDM works with scripts written in either JavaScript or Groovy. For example, you could set up a script here:"condition" : { "type" : "scripted", "script" : { "type" : "text/javascript", "globals" : { }, "source" : "<some script code>" },Alternatively, you could point to some JavaScript or Groovy file:
"condition" : { "type" : "scripted", "script" : { "type" : "text/javascript", "globals" : { }, "file" : "path/to/someScript.js" },For the script code, you'll need to reference fields directly, and not by
object.field. For example, the following code would test for the presence of a telephone number:typeof telephoneNumber === 'undefined' || telephoneNumber === ''While you can also reference metadata for scripts, you can't check for all available fields, as there is no outer
objectfield. However, you can refer to fields that are part of the user object.
5.11.1.3. Defining Overall Profile Completion
A user profile is based on every item in managed.json
where both viewable and userEditable
are set to true. Every qualifying item has equal weight.
So if there are 20 qualifying items in managed.json,
a user who has entries for 10 items has a Profile completion
percentage of 50.
5.11.2. The auth.profile.json File
Progressive profile completion introduces a new role,
openidm-authenticated, which allows regular users
access to related forms, while prohibiting access to other
parts of the Self-Service UI (as well as the rest of IDM).
These roles are defined in the auth.profile.json file:
{
"profileEnhancementProcesses": [
"selfservice/termsAndConditions",
"selfservice/kbaUpdate",
"selfservice/profile"
],
"authenticationRole": "openidm-authenticated",
"authorizationRole": "openidm-authorized"
}
Access for these and other roles is governed by the access.js
script. For more information, see "Understanding the Access Configuration Script (access.js)".
When a user sees a progressive profile completion form, the
openidm-authenticated role is recorded in the access
and authentication log files in the openidm/audit
directory.
5.11.3. Progressive Profile Completion and Metadata
Progressive profile completion requires that you track object metadata, as described in "Tracking Metadata For Managed Objects". Read that section to configure tracking of the following data:
createDate: The date the user was created; used in theonCreateUser.jsscript in theopenidm/bin/defaults/scriptdirectory.loginCount: The number of logins, by user.stagesCompleted: Used to track progressive profile forms, and whether they've been completed, by user.
User acceptance of Terms & Conditions is tracked by default (see "Adding Terms & Conditions").
5.11.4. Configuring Progressive Profile Completion over REST
You can manage the progressive profile completion configuration through the
following endpoint: openidm/config/selfservice/profile. To
review your current configuration, run the following command:
$ curl \ --header "X-OpenIDM-Username: openidm-admin" \ --header "X-OpenIDM-Password: openidm-admin" \ --request GET \ "http://localhost:8080/openidm/config/selfservice/profile"
Unless you've disabled file writes per "Disabling Automatic Configuration Updates",
the output will match the contents of your project's
selfservice-profile.json file.
In a similar fashion, you can update this configuration by including the desired contents of the file:
$ curl \
--header "X-OpenIDM-Username: openidm-admin" \
--header "X-OpenIDM-Password: openidm-admin" \
--header "Content-Type: application/json" \
--request PUT \
--data '{
"stageConfigs" : [
{
"name" : "conditionaluser",
"identityServiceUrl" : "managed/user",
"condition" : {
"type" : "loginCount",
"interval" : "at",
"amount" : "25"
},
"evaluateConditionOnField" : "user",
"onConditionTrue" : {
"name" : "attributecollection",
"identityServiceUrl" : "managed/user",
"uiConfig" : {
"displayName" : "Add your telephone number",
"purpose" : "Help us verify your identity",
"buttonText" : "Save"
},
"attributes" : [
{
"name" : "telephoneNumber",
"isRequired" : true
}
]
}
}
]
}' \
"http://localhost:8080/openidm/config/selfservice/profile"
5.11.5. Configuring Progressive Profile Completion Through the Admin UI
The UI is straightforward; in the Admin UI, when you select Configure > Progressive Profile, you'll add a New Form, with:
Attributes defined in
managed.jsonConditions that may be based on a query filter, a script, or pre-defined criteria such as number of logins.
What you configure in the Admin UI is written to the
selfservice-profile.json file. The information under
the following Admin UI Progressive Profile Completion page tabs is
written to the following code blocks in that file:
Details:
uiConfigDisplay Condition:
conditionAttributes:
attributes
Warning
When you use the UI, you must specify a property
under the Attributes tab. Otherwise, IDM won't display a
Progressive Profile form. To specify a property, select Configure >
Progressive Profile. Select a Progressive Profile form > Attributes tab >
Add a Property. Be sure to select an Attribute Name based on user
properties configured in the managed.json file.
5.12. Adding Terms & Conditions
Many organizations require their users to accept Terms & Conditions. When you activate this option for user self-registration, IDM includes a link to Terms & Conditions as part of the self-registration process.
You can also force existing IDM users to accept new Terms &
Conditions when they log into the Self-Service UI through the
selfservice-termsAndConditions.json file described in
"Terms & Conditions Configuration Files".
5.12.1. Terms & Conditions Configuration Files
If you want to try the IDM implementation of Terms &
Conditions, look at these files from the
openidm/samples/example-configurations/self-service
directory:
selfservice.terms.jsonselfservice-termsAndConditions.json
Copy these files to your project directory and start IDM. To see how these Terms & Conditions appear to end users, create a regular user. Log into the Self-Service UI as that user. You will be prompted to accept default Terms & Conditions.
The Terms & Conditions that you see in the Self-Service UI come from
the selfservice.terms.json file:
{
"versions": [
{
"version": "2.0",
"termsTranslations": {
"en": "Some 2.0 fake terms",
"fr": "More 2.0 fake terms"
},
"createDate": "2017-12-19T03:54:16.865Z"
},
{
"version": "1.5",
"termsTranslations": {
"en": "Some 1.5 fake terms",
"fr": "More 1.5 fake terms"
},
"createDate": "2017-11-20T04:20:11.320Z"
}
],
"active": "1.5",
"uiConfig" : {
"displayName" : "We've updated our terms",
"purpose" : "You must accept the updated terms in order to proceed.",
"buttonText" : "Accept"
}
}Note
IDM does not support <form> elements or <script> tags in Terms & Conditions text.
Substitute Terms & Conditions content that meet the requirements of your legal authorities.
As suggested by this file, you can set up different versions of Terms
& Conditions in multiple languages. What is seen by end users is
driven by the active version.
For details, see the following table:
selfservice.terms.json File| Property | Description |
|---|---|
version | Specifies a version number |
termsTranslations | Supports Terms & Conditions in different languages |
createDate | Creation date |
active | Specifies the version of Terms & Conditions shown to
users; must match an existing version |
displayName | The title of the Terms & Conditions page, as seen by end users |
purpose | Help text shown below the displayName |
buttonText | Button text shown to the end user for acceptance |
The other Terms & Conditions configuration file is
selfservice-termsAndConditions.json. If it exists,
end users must accept the specified Terms & Conditions before logging
into IDM. As shown here, this applies Terms & Conditions
to the managed/user store.
{
"stageConfigs" : [
{
"name" : "conditionaluser",
"identityServiceUrl" : "managed/user",
"condition" : {
"type" : "terms"
},
"evaluateConditionOnField" : "user",
"onConditionTrue" : {
"name" : "termsAndConditions"
}
},
{
"name" : "patchObject",
"identityServiceUrl" : "managed/user"
}
]
}
When a user accepts Terms & Conditions, IDM records relevant
information in the _meta data for that user, as
described in "Identifying When a User Accepts Terms & Conditions".
You can set up user self-registration to require acceptance of Terms & Conditions as described in "User Self-Registration".
Note
If you've set up Terms & Conditions in multiple languages, what your end users see depends on the default language set in the browser, based on ISO-639 language codes:
First, IDM looks for the active version, as defined in the
selfservice.terms.json file.
If the default language in the browser matches one of the Terms & Conditions languages that you've configured, that's what the end user will see.
If the default language in the browser does not match any Terms & Conditions locales, IDM looks for:
The
enlocale.If there is no
enlocale, IDM uses the first locale shown for the active version.
5.12.2. Updating Terms & Conditions over REST
You can manage the configuration for Terms & Conditions over the following endpoints:
openidm/config/selfservice.termsopenidm/config/selfservice/termsAndConditions
For example, the following command would replace the value of
buttonText:
$ curl \
--header "X-OpenIDM-Username: openidm-admin" \
--header "X-OpenIDM-Password: openidm-admin" \
--header "Content-Type: application/json" \
--request PATCH \
--data '[ {
"operation" : "replace",
"field" : "uiConfig/buttonText",
"value" : "OK"
} ]' \
"http://localhost:8080/openidm/config/selfservice.terms"5.12.3. Identifying When a User Accepts Terms & Conditions
You can identify when a user accepts Terms & Conditions, as well as the associated version. To do so, take the following steps:
If needed, find identifying information for all managed users:
$ curl \ --header "X-OpenIDM-Username: openidm-admin" \ --header "X-OpenIDM-Password: openidm-admin" \ --request GET \ "http://localhost:8080/openidm/managed/user?_queryId=query-all"
Pick a desired user, and use REST to get that user's information. This example illustrates how a user with a
userNameofkvaughanhas already accepted a specific version of Terms & Conditions:$ curl \ --header "X-OpenIDM-Username: openidm-admin" \ --header "X-OpenIDM-Password: openidm-admin" \ --request GET \ "http://localhost:8080/openidm/managed/user?_queryFilter=userName+eq+'kvaughan'&_fields=*,/_meta/*" { "result": [ { ... "userName": "kvaughan", ... "termsAccepted": { "acceptDate": "2018-04-12T22:55:33.370Z", "termsVersion": "2.0" }, "createDate": "2018-04-12T22:55:33.395Z", "lastChanged": { "date": "2018-04-12T22:55:33.395Z" }, "loginCount": 1, "_rev": "00000000776f8be1", "_id": "69124007-05ec-46e1-a8a8-ecc3d94db124" } } ], ... }
5.12.4. Configuring Terms & Conditions in the Admin UI
From the Admin UI, select Configure > Terms & Conditions. You can then create a new version, which prompts you to configure the following:
Version number (must be unique).
If there are existing Terms & Conditions, you'll see a Make active switch for the new Terms & Conditions.
Locale, in ISO-639 format.
Terms & Conditions, in the language locales of your choice. You can set up Terms & Conditions in text and/or basic HTML. Make sure your terms and conditions actually work for the end user, especially if you include JavaScript. You may need to include links to appropriate libraries.
Once you've added Terms & Conditions in all desired locales, select
Save to save them in the selfservice.terms.json file.
Note
The Admin UI does not allow you to delete existing Terms & Conditions.
Once you have at least one set of Terms & Conditions, you should see a Settings tab, where you can:
Require acceptance; the next time any end user logs into IDM, that user will see a copy of your Terms & Conditions, with the Header, Description, and Button Text.
To make sure new users have to accept these Terms & Conditions, select Configure > User Registration in the Admin UI. Enable Terms & Conditions under the Options tab. For more information, see "User Self-Registration". Users who self-register will see the following message, with a link to those Terms & Conditions:
By creating an account, you agree to the Terms & Conditions
These changes are recorded in _meta data for each user
and can be retrieved through REST calls described in "Identifying When a User Accepts Terms & Conditions".
5.13. Localizing the Self-Service UI
The Self-Service UI is configured in US English. If you want to change the language shown to end users, focus on the following:
The default language, as described in "Changing the Default Language of the UI".
Configuration files to go with the default language, as described in "Setting Up a Different Locale for the UI".
After you've changed appropriate configuration files, you'll want to test the results, as described in "Testing the Updated Locale".
5.13.1. Changing the Default Language of the UI
To change the default language of the Self-Service UI, you'll have to modify two files:
ui-configuration.jsonin your project'sconf/subdirectory. Modify thelangsetting in that file; for example, to set the default language to French, set:"lang" : "fr",
Note
IDM may not read the change, if you've modified your project's
system.propertiesfile as described in "Disabling Automatic Configuration Updates".To identify the current default language, run the following REST call:
$ curl \ --header "X-OpenIDM-Username: openidm-admin" \ --header "X-OpenIDM-Password: openidm-admin" \ --request GET \ "http://localhost:8080/openidm/info/uiconfig"
Constants.jsin the following directory:openidm/ui/selfservice/default/org/forgerock/openidm/ui/common/util, unless you've created anextensionsdirectory as described in "Customizing the Self-Service UI". Add the following line to the appropriate version of that file:commonConstants.DEFAULT_LANGUAGE = "fr";
Note
This property in
Constants.jsserves as the fallback language, which determines what's shown if the languages that you've configured for IDM don't match what's configured on client browsers.
If you have different languages set in these configuration files, IDM
reviews corresponding localization files in order. For example, assume
you've set French as the default language in the
ui-configuration.json file, and English in the
Constants.js file. If the French version of the
translation.json file doesn't include some required
text property, IDM would look in the English version of the
translation.json file for the same property.
5.13.2. Setting Up a Different Locale for the UI
It's not enough to set a different default language (locale) for the UI. Unless you change the language in associated configuration files, and have a fallback of US English, you'll still see messages in US English. To set up messages in a different language, you'll need to set up:
A different
translation.jsonfile, as described in "Customizing the Translation File".Custom messages configured for licenses, policies, terms, and more, as described in "Customizing Other Messages".
Custom labels for users, as described in "Changing User Labels".
5.13.2.1. Customizing the Translation File
You'll find most Self-Service UI messages and many labels in the
translation.json file. With the following steps, you
can set up a new translation.json file with the
locale of your choice. The following steps assume that you're setting up
messages in French:
Assuming you set up custom
extensionsubdirectories, as described in "Customizing the Admin UI", copy the default (en) locale to a new (fr) subdirectory as follows:$ cd /path/to/openidm/ui/selfservice/extension/locales $ cp -R en fr
The new locale (
fr) now contains the defaulttranslation.jsonfile:$ ls fr/ translation.json
Translate the values of the properties in the
fr/translate.jsonfile. Do not translate the property names. For example:... "UserMessages" : { "changedPassword" : "Mot de passe a été modifié", "profileUpdateFailed" : "Problème lors de la mise à jour du profil", "profileUpdateSuccessful" : "Profil a été mis à jour", "userNameUpdated" : "Nom d'utilisateur a été modifié", ....
5.13.2.2. Customizing Other Messages
You can customize other messages related to IDM User Self-Service, by language locale, as described in the following sections:
Text for these features is generally written to JSON files in your project's
/conf subdirectory.
5.13.2.3. Changing User Labels
You can also change the labels for accounts in the UI. To do so, navigate to
the desired managed object. For example, to change the labels for user
accounts, find the desired property in your project's
managed.json file. For example, the following excerpt
of that file shows the title of the Email Address in
French:
"mail" : {
"title" : "Adresse Électronique",
"description" : "Email Address",
"viewable" : true,
"type" : "string",
"searchable" : true,
...Alternatively, from the Admin UI. Select Configure > Managed Objects > User, and select the Properties tab. Select the edit icon (), and then edit the Readable Title.
If you make changes for the User Managed Object, your users will see the changes in the Self-Service UI in the following locations:
User Personal Info: After logging into the Self-Service UI, select My Account > Personal Info.
User Self-Registration: After you've configured "User Self-Registration", users who self-register will see changes to applicable labels in the shadow text in the Register Your Account screen.
5.13.2.4. Testing the Updated Locale
After you've made these changes, you'll want to review the result from the point of view of the end-user. To review this change on the client browser, take the following steps:
Change the default language.
Make sure the language cookie associated with the IDM domain is cleared.
Refresh your browser to apply the change.
5.14. Tokens and User Self-Service
Many processes within user self-service involve multiple stages, such as user self-registration, password reset, and forgotten username. As the user transitions from one stage to another, IDM uses JWT tokens to represent the current state of the process. As each stage is completed, IDM returns a new token. Each request that follows includes that latest token.
For example, users who use these features to recover their usernames and passwords get two tokens in the following scenario:
The user goes through the forgotten username process, gets a JWT Token with a lifetime (default = 300 seconds) that allows that user to get to the next step in the process.
With username in hand, that user may then start the password reset process. That user gets a second JWT token, with the token lifetime configured for that process.
Note
The default IDM JWT token is encrypted and stateless.
However, if you need a token that can be included in a link that works in
all email clients, change the snapshotToken
type in the appropriate configuration file to
uuid.
Chapter 6. Managing the Repository
IDM stores managed objects, internal users, and configuration objects in a repository. By default, the server uses an embedded ForgeRock Directory Services (DS) instance as its repository. In production, you must replace this embedded instance with an external DS instance, or with a JDBC repository, as described in "Selecting a Repository" in the Installation Guide.
This chapter describes the repository configuration, the use of mappings in the repository, and how to configure a connection to the repository over SSL. It also describes how to interact with the repository over the REST interface.
6.1. Understanding the Repository Configuration Files
IDM provides configuration files for all supported repositories.
These configuration files are located in the
/path/to/openidm/db/database/conf
directory. For JDBC repositories, the configuration is defined in two files:
datasource.jdbc-default.json, which specifies the connection details to the repository.repo.jdbc.json, which specifies the mapping between IDM resources and the tables in the repository, and includes a number of predefined queries.
For a DS repository, the repo.ds.json
file specifies the resource mapping and, in the case of an external
repository, the connection details to the LDAP server.
Copy the configuration files for your specific database type to your
project's conf/ directory.
6.1.1. Understanding the JDBC Connection Configuration File
The default database connection configuration file for a MySQL database follows:
{
"driverClass" : "com.mysql.jdbc.Driver",
"jdbcUrl" : "jdbc:mysql://&{openidm.repo.host}:&{openidm.repo.port}/openidm?allowMultiQueries=true&characterEncoding=utf8",
"databaseName" : "openidm",
"username" : "openidm",
"password" : "openidm",
"connectionTimeout" : 30000,
"connectionPool" : {
"type" : "hikari",
"minimumIdle" : 20,
"maximumPoolSize" : 50
}
}The configuration file includes the following properties:
driverClass,jndiName, orjtaNameDepending on the mechanism you use to acquire the data source, set one of these properties:
"driverClass" : stringTo use the JDBC driver manager to acquire a data source, set this property, as well as
"jdbcUrl","username", and"password". The driver class must be the fully qualified class name of the database driver to use for your database.Using the JDBC driver manager to acquire a data source is the most likely option, and the only one supported "out of the box". The remaining options in the sample repository configuration file assume that you are using a JDBC driver manager.
Example:
"driverClass" : "com.mysql.jdbc.Driver""jndiName" : stringIf you use JNDI to acquire the data source, set this property to the JNDI name of the data source.
This option might be relevant if you want to run IDM inside your own web container.
Example:
"jndiName" : "jdbc/my-datasource""jtaName" : stringIf you use an OSGi service to acquire the data source, set this property to a stringified version of the OsgiName.
This option would only be relevant in a highly customized deployment, for example, if you wanted to develop your own connection pool.
Example:
"jtaName" : "osgi:service/javax.sql.DataSource/(osgi.jndi.service.name=jdbc/openidm)"
jdbcUrlThe connection URL to the JDBC database. The URL should include all of the parameters required by your database. For example, to specify the encoding in MySQL use
'characterEncoding=utf8'.Specify the values for
openidm.repo.hostandopenidm.repo.portin one of the following ways:Set the values in
resolver/boot.propertiesor your project'sconf/system.propertiesfile, for example:openidm.repo.host = localhost openidm.repo.port = 3306
Set the properties in the
OPENIDM_OPTSenvironment variable and export that variable before startup. You must include the JVM memory options when you set this variable. For example:$ export OPENIDM_OPTS="-Xmx1024m -Xms1024m -Dopenidm.repo.host=localhost -Dopenidm.repo.port=3306" $ ./startup.sh Executing ./startup.sh... Using OPENIDM_HOME: /path/to/openidm Using PROJECT_HOME: /path/to/openidm Using OPENIDM_OPTS: -Xmx1024m -Xms1024m -Dopenidm.repo.host=localhost -Dopenidm.repo.port=3306 Using LOGGING_CONFIG: -Djava.util.logging.config.file=/path/to/openidm/conf/logging.properties Using boot properties at /path/to/openidm/resolver/boot.properties -> OpenIDM version "6.0.0.7" OpenIDM ready
databaseNameThe name of the database to which IDM connects. By default, this is
openidm.usernameThe username with which to access the JDBC database.
passwordThe password with which to access the JDBC database. IDM automatically encrypts clear string passwords. To replace an existing encrypted value, replace the whole
crypto-objectvalue, including the brackets, with a string of the new password.connectionTimeoutThe period of time, in milliseconds, after which IDM should consider an attempted connection to the database to have failed. The default period is 30000 milliseconds (30 seconds).
connectionPoolDatabase connection pooling configuration. The default connection pool library is Hikari:
"connectionPool" : { "type" : "hikari" }IDM uses the default Hikari configuration, except for the following parameters. You might need to adjust these parameters, according to your database workload:
minimumIdleThis property controls the minimum number of idle connections that Hikari maintains in the connection pool. If the number of idle connections drops below this value, Hikari attempts to add additional connections.
By default, Hikari runs as a fixed-sized connection pool, that is, this property is not set. The connection configuration files provided with IDM set the minimum number of idle connections to
20.maximumPoolSizeThis property controls the maximum number of connections to the database, including idle connections and connections that are being used.
By default, Hikari sets the maximum number of connections to
10. The connection configuration files provided with IDM set the maximum number of connections to50.
For information about the Hikari configuration parameters, see the Hikari Project Page.
You can also use the BoneCP connection pool library. To use BoneCP, change the configuration as follows:
"connectionPool" : { "type" : "bonecp" }IDM uses the default BoneCP configuration, except for the following parameters. You might need to adjust these parameters, according to your database workload:
partitionCountThe partition count determines the lock segmentation in the connection pool. Each incoming connection request acquires a connection from a pool that has thread-affinity. Threads are dispatched to the appropriate lock by using a value of
threadId % partitionCount. A partition count that is greater than 1 protects the connection pool with more than a single lock, thereby reducing lock contention.By default, BoneCP creates a single partition. The JDBC Connection Configuration Files provided with IDM set the partition count to
4.maxConnectionsPerPartitionThe maximum number of connections to create per partition. The maximum number of database connections is equal to
partitionCount * maxConnectionsPerPartition. BoneCP does not create all these connections at once, but starts off with theminConnectionsPerPartitionand gradually increases connections as required.By default, BoneCP creates a maximum of
20connections per partition. The JDBC Connection Configuration Files provided with IDM set the maximum connections per partition to25.minConnectionsPerPartitionThe number of connections to start off with, per partition. The minimum number of database connections is equal to
partitionCount * minConnectionsPerPartition.By default, BoneCP starts with a minimum of
1connection per partition. The JDBC Connection Configuration Files provided with IDM set the minimum connections per partition to5.
For more information about the BoneCP configuration parameters, see http://www.jolbox.com/configuration.html.
6.1.2. Understanding the JDBC Database Table Configuration
An excerpt of a MySQL database table configuration file follows:
{
"dbType" : "MYSQL",
"useDataSource" : "default",
"maxBatchSize" : 100,
"maxTxRetry" : 5,
"queries" : {...},
"commands" : {...},
"resourceMapping" : {...}
}The configuration file includes the following properties:
dbType: string, optionalThe type of database. The database type might affect the queries used and other optimizations. Supported database types include MYSQL, SQLSERVER, ORACLE, MS SQL, and DB2.
useDataSource: string, optionalThis option refers to the connection details that are defined in the configuration file, described previously. The default configuration file is named
datasource.jdbc-default.json. This is the file that is used by default (and the value of the"useDataSource"is therefore"default"). You might want to specify a different connection configuration file, instead of overwriting the details in the default file. In this case, set your connection configuration filedatasource.jdbc-name.jsonand set the value of"useDataSource"to whatever name you have used.maxBatchSizeThe maximum number of SQL statements that will be batched together. This parameter allows you to optimize the time taken to execute multiple queries. Certain databases do not support batching, or limit how many statements can be batched. A value of
1disables batching.maxTxRetryThe maximum number of times that a specific transaction should be attempted before that transaction is aborted.
queriesPredefined queries that can be referenced from the configuration. For more information about predefined queries, see "Parameterized Queries". The queries are divided between those for
genericTablesand those forexplicitTables.The following sample extract from the default MySQL configuration file shows two credential queries, one for a generic mapping, and one for an explicit mapping. Note that the lines have been broken here for legibility only. In a real configuration file, the query would be all on one line:
"queries" : { "genericTables" : { "credential-query" : "SELECT obj.objectid, obj.rev, obj.fullobject FROM ${_dbSchema}.${_mainTable} obj INNER JOIN ${_dbSchema}.objecttypes objtype ON objtype.id = obj.objecttypes_id AND objtype.objecttype = ${_resource} INNER JOIN ${_dbSchema}.${_propTable} usernameprop ON obj.id = usernameprop.${_mainTable}_id AND usernameprop.propkey='/userName' INNER JOIN ${_dbSchema}.${_propTable} statusprop ON obj.id = statusprop.${_mainTable}_id AND statusprop.propkey='/accountStatus' WHERE usernameprop.propvalue = ${username} AND statusprop.propvalue = 'active'", ... "explicitTables" : { "credential-query" : "SELECT * FROM ${_dbSchema}.${_table} WHERE username = ${username} and accountstatus = 'active'", ... } }Options supported for query parameters include the following:
A default string parameter, for example:
openidm.query("managed/user", { "_queryId": "for-userName", "uid": "jdoe" });For more information about the query function, see "openidm.query(resourceName, params, fields)".
A list parameter (
${list:propName}).Use this parameter to specify a set of indeterminate size as part of your query. For example:
WHERE targetObjectId IN (${list:filteredIds})An integer parameter (
${int:propName}).Use this parameter to query non-string values in the database. This is particularly useful with explicit tables.
commandsSpecific commands configured to manage the database over the REST interface. Currently, the following default commands are included in the configuration:
purge-by-recon-expiredpurge-by-recon-number-ofdelete-mapping-linksdelete-target-ids-for-recon
These commands assist with removing stale reconciliation audit information from the repository, and preventing the repository from growing too large. The commands work by executing a query filter, then performing the specified operation on each result set. Currently the only supported operation is
DELETE, which removes all entries that match the filter. For more information about repository commands, see "Running Queries and Commands on the Repository".resourceMappingDefines the mapping between IDM resource URIs (for example,
managed/user) and JDBC tables. The structure of the resource mapping is as follows:"resourceMapping" : { "default" : { "mainTable" : "genericobjects", "propertiesTable" : "genericobjectproperties", "searchableDefault" : true }, "genericMapping" : {...}, "explicitMapping" : {...} }The default mapping object represents a default generic table in which any resource that does not have a more specific mapping is stored.
The generic and explicit mapping objects are described in the following section.
6.1.3. Understanding the DS Repository Configuration
An excerpt of a DS repository configuration file follows:
{
"embedded" : false,
"maxConnectionAttempts" : 5,
"security" : {...},
"ldapConnectionFactories" : {...},
"queries" : {...},
"commands" : {...},
"rest2LdapOptions": {...},
"indices": {...},
"schemaProviders": {...},
"resourceMapping" : {...}
}The configuration file includes the following properties:
embedded: booleanSpecifies an embedded or external DS instance.
IDM uses an embedded DS instance by default. The embedded instance is not supported in production.
maxConnectionAttempts: integerSpecifies the number of times IDM should attempt to connect to the DS instance. On startup, IDM will attempt to connect to DS indefinitely. The
maxConnectionAttemptsparameter controls the number of reconnection attempts in the event of a failure during normal operation, for example, if an attempt to access the DS repository times out.By default, IDM will attempt to reconnect to the DS instance
5times.securitySpecifies the DS key manager and trust manager provider types, both
jvmby default.ldapConnectionFactoriesConfigures the connection to the DS instance.
queriesPredefined queries that can be referenced from the configuration. For a DS repository, all predefined queries are really filtered queries (using the
_queryFilterparameter), for example:"query-all-ids": { "_queryFilter": "true", "_fields": "_id,_rev" },The queries are divided between those for
genericmappings and those forexplicitmappings, but the queries themselves are the same for both mapping types.commandsSpecific commands configured to manage the repository over the REST interface. Currently, only two commands are included by default:
delete-mapping-linksdelete-target-ids-for-recon
Both of these commands assist with removing stale reconciliation audit information from the repository, and preventing the repository from growing too large. For more information about repository commands, see "Running Queries and Commands on the Repository".
rest2LdapOptionsSpecifies the configuration for accessing the LDAP data stored in DS. For more information, see Gateway REST2LDAP Configuration File in the DS Reference.
indicesFor generic mappings, sets up an LDAP index on an object whose properties are specified in the
schemaProviderproperty. For more information, see "Improving Generic Mapping Search Performance (DS)".schemaProvidersFor generic mappings, lists the objects whose properties should be indexed. For more information, see "Improving Generic Mapping Search Performance (DS)".
resourceMappingDefines the mapping between IDM resource URIs (for example,
managed/user) and the DS directory tree. The structure of the resource mapping object is as follows:{ ... "resourceMapping" : { "defaultMapping": { "dnTemplate": "ou=generic,dc=openidm,dc=forgerock,dc=com" }, "explicitMapping" : {...}, "genericMapping" : {...} }The default mapping object represents a default generic organizational unit (
ou) in which any resource that does not have a more specific mapping is stored.The generic and explicit mapping objects are described in "Using Generic and Explicit Object Mappings" .
6.2. Using Generic and Explicit Object Mappings
There are two ways to map IDM objects to the tables in a JDBC database or to organizational units in DS:
Generic mapping, which allows you to store arbitrary objects without special configuration or administration.
Explicit mapping, which maps specific objects and properties to tables and columns in the JDBC database or to organizational units in DS.
These two mapping strategies are discussed in the following sections, for JDBC repositories and for DS repositories.
6.2.1. Generic and Explicit Mappings With a JDBC Repository
6.2.1.1. Using Generic Mappings With a JDBC Repository
Generic mapping speeds up development, and can make system maintenance more flexible by providing a stable database structure. However, generic mapping can have a performance impact and does not take full advantage of the database facilities (such as validation within the database and flexible indexing). In addition, queries can be more difficult to set up.
In a generic table, the entire object content is stored in a single
large-character field named fullobject in the
mainTable for the object. To search on specific fields,
you can read them by referring to them in the corresponding
properties table for that object. The disadvantage of
generic objects is that, because every property you might like to filter by
is stored in a separate table, you must join to that table each time you
need to filter by anything.
The following diagram shows a pared down database structure for the default generic table, when using a MySQL repository. The diagram indicates the relationship between the main table and the corresponding properties table for each object.

These separate tables can make the query syntax particularly complex. For example, a simple query to return user entries based on a user name would need to be implemented as follows:
SELECT obj.objectid, obj.rev, obj.fullobject FROM ${_dbSchema}.${_mainTable} obj
INNER JOIN ${_dbSchema}.${_propTable} prop ON obj.id = prop.${_mainTable}_id
INNER JOIN ${_dbSchema}.objecttypes objtype ON objtype.id = obj.objecttypes_id
WHERE prop.propkey='/userName' AND prop.propvalue = ${uid} AND objtype.objecttype = ${_resource}",The query can be broken down as follows:
Select the full object, the object ID, and the object revision from the main table:
SELECT obj.objectid, obj.rev, obj.fullobject FROM ${_dbSchema}.${_mainTable} objJoin to the properties table and locate the object with the corresponding ID:
INNER JOIN ${_dbSchema}.${_propTable} prop ON obj.id = prop.${_mainTable}_idJoin to the object types table to restrict returned entries to objects of a specific type. For example, you might want to restrict returned entries to
managed/userobjects, ormanaged/roleobjects:INNER JOIN ${_dbSchema}.objecttypes objtype ON objtype.id = obj.objecttypes_idFilter records by the
userNameproperty, where the userName is equal to the specifieduidand the object type is the specified type (in this case, managed/user objects):WHERE prop.propkey='/userName' AND prop.propvalue = ${uid} AND objtype.objecttype = ${_resource}",The value of the
uidfield is provided as part of the query call, for example:openidm.query("managed/user", { "_queryId": "for-userName", "uid": "jdoe" });
Tables for user definable objects use a generic mapping by default.
The following sample generic mapping object illustrates how
managed/ objects are stored in a generic table:
"genericMapping" : {
"managed/*" : {
"mainTable" : "managedobjects",
"propertiesTable" : "managedobjectproperties",
"searchableDefault" : true,
"properties" : {
"/picture" : {
"searchable" : false
}
}
}
},mainTable(string, mandatory)Indicates the main table in which data is stored for this resource.
The complete object is stored in the
fullobjectcolumn of this table. The table includes anobjecttypesforeign key that is used to distinguish the different objects stored within the table. In addition, the revision of each stored object is tracked, in therevcolumn of the table, enabling multiversion concurrency control (MVCC). For more information, see "Manipulating Managed Objects Programmatically".propertiesTable(string, mandatory)Indicates the properties table, used for searches.
The contents of the properties table is a defined subset of the properties, copied from the character large object (CLOB) that is stored in the
fullobjectcolumn of the main table. The properties are stored in a one-to-many style separate table. The set of properties stored here is determined by the properties that are defined assearchable.The stored set of searchable properties makes these values available as discrete rows that can be accessed with SQL queries, specifically, with
WHEREclauses. It is not otherwise possible to query specific properties of the full object.The properties table includes the following columns:
${_mainTable}_idcorresponds to theidof the full object in the main table, for example,manageobjects_id, orgenericobjects_id.propkeyis the name of the searchable property, stored in JSON pointer format (for example/mail).proptypeis the data type of the property, for examplejava.lang.String. The property type is obtained from the Class associated with the value.propvalueis the value of property, extracted from the full object that is stored in the main table.Regardless of the property data type, this value is stored as a string, so queries against it should treat it as such.
searchableDefault(boolean, optional)Specifies whether all properties of the resource should be searchable by default. Properties that are searchable are stored and indexed. You can override the default for individual properties in the
propertieselement of the mapping. The preceding example indicates that all properties are searchable, with the exception of thepictureproperty.For large, complex objects, having all properties searchable implies a substantial performance impact. In such a case, a separate insert statement is made in the properties table for each element in the object, every time the object is updated. Also, because these are indexed fields, the recreation of these properties incurs a cost in the maintenance of the index. You should therefore enable
searchableonly for those properties that must be used as part of a WHERE clause in a query.propertiesLists any individual properties for which the searchable default should be overridden.
Note that if an object was originally created with a subset of
searchableproperties, changing this subset (by adding a newsearchableproperty in the configuration, for example) will not cause the existing values to be updated in the properties table for that object. To add the new property to the properties table for that object, you must update or recreate the object.
6.2.1.2. Improving Generic Mapping Search Performance (JDBC)
All properties in a generic mapping are searchable by default. In other
words, the value of the searchableDefault property is
true unless you explicitly set it to false. Although
there are no individual indexes in a generic mapping, you can improve search
performance by setting only those properties that you need to search as
searchable. Properties that are searchable are created
within the corresponding properties table. The properties table exists only
for searches or look-ups, and has a composite index, based on the resource,
then the property name.
The sample JDBC repository configuration files
(db/database/conf/repo.jdbc.json)
restrict searches to specific properties by setting the
searchableDefault to false for
managed/user mappings. You must explicitly set
searchable to true for each property that should be
searched. The following sample extract from
repo.jdbc.json indicates searches restricted to the
userName property:
"genericMapping" : {
"managed/user" : {
"mainTable" : "manageduserobjects",
"propertiesTable" : "manageduserobjectproperties",
"searchableDefault" : false,
"properties" : {
"/userName" : {
"searchable" : true
}
}
}
},
With this configuration, IDM creates entries in the properties
table only for userName properties of managed user
objects.
If the global searchableDefault is set to false,
properties that do not have a searchable attribute explicitly set to true
are not written in the properties table.
6.2.1.3. Using Explicit Mappings With a JDBC Repository
Explicit mapping is more difficult to set up and maintain, but can take complete advantage of the native database facilities.
An explicit table offers better performance and simpler queries. There is less work in the reading and writing of data, because the data is all in a single row of a single table. In addition, it is easier to create different types of indexes that apply to only specific fields in an explicit table. The disadvantage of explicit tables is the additional work required in creating the table in the schema. Also, because rows in a table are inherently more simple, it is more difficult to deal with complex objects. Any non-simple key:value pair in an object associated with an explicit table is converted to a JSON string and stored in the cell in that format. This makes the value difficult to use, from the perspective of a query attempting to search within it.
You can have a generic mapping configuration for most managed objects, and an explicit mapping that overrides the default generic mapping in certain cases.
IDM provides a sample configuration, for each JDBC repository,
that sets up an explicit mapping for the managed user
object and a generic mapping for all other managed objects. This
configuration is defined in the files named
/path/to/openidm/db/repository/conf/repo.jdbc-repository-explicit-managed-user.json.
To use this configuration, copy the file that corresponds to your
repository to your project's conf/ directory and
rename it repo.jdbc.json. Run the
sample-explicit-managed-user.sql data definition
script (in the path/to/openidm/db/repository/scripts
directory) to set up the corresponding tables when you configure your JDBC
repository.
IDM uses explicit mapping for internal system tables, such as the tables used for auditing.
Depending on the types of usage your system is supporting, you might find that an explicit mapping performs better than a generic mapping. Operations such as sorting and searching (such as those performed in the default UI) tend to be faster with explicitly-mapped objects, for example.
The following sample explicit mapping object illustrates how
internal/user objects are stored in an explicit table:
"explicitMapping" : {
"internal/user" : {
"table" : "internaluser",
"objectToColumn" : {
"_id" : "objectid",
"_rev" : "rev",
"password" : "pwd",
"roles" : "roles"
}
},
...
} <resource-uri>(string, mandatory)Indicates the URI for the resources to which this mapping applies, for example,
internal/user.table(string, mandatory)The name of the database table in which the object (in this case internal users) is stored.
objectToColumn(string, mandatory)The way in which specific managed object properties are mapped to columns in the table.
The mapping can be a simple one to one mapping, for example
"userName": "userName",or a more complex JSON map or list. When a column is mapped to a JSON map or list, the syntax is as shown in the following examples:"messageDetail" : { "column" : "messagedetail", "type" : "JSON_MAP" }or
"roles": { "column" : "roles", "type" : "JSON_LIST" }
Caution
Support for data types in columns is restricted to String
(VARCHAR in the case of MySQL). If you use a different
data type, such as DATE or TIMESTAMP,
your database must attempt to convert from String to the
other data type. This conversion is not guaranteed to work.
If the conversion does work, the format might not be the same when it is
read from the database as it was when it was saved. For example, your
database might parse a date in the format 12/12/2012
and return the date in the format 2012-12-12 when the
property is read.
Note
Passwords are encrypted before they are stored in the repository. The length of the password column needs to be long enough to store the encrypted password value, which can vary depending on how it is encrypted and whether it is also hashed.
The sample-explicit-managed-user.sql file referenced
in this section sets the password column to a length of 511 characters
(VARCHAR(511) to account for the additional space an
encrypted password requires. For more information about IDM
encryption and an example encrypted password value, see
"Using the encrypt Subcommand" and "Encoding Attribute Values".
6.2.2. Generic and Explicit Mappings With a DS Repository
For both generic and explicit mappings, IDM maps object types
using a dnTemplate property. The
dnTemplate is effectively a pointer to where the object
is stored in DS. For example, the following excerpt of the
default repo.ds.json file shows how configuration
objects are stored under the DN
ou=config,dc=openidm,dc=forgerock,dc=com:
"config": {
"dnTemplate": "ou=config,dc=openidm,dc=forgerock,dc=com"
},6.2.2.1. Using Generic Mappings With a DS Repository
By default, IDM uses a generic mapping for all objects except internal users and roles, links, and clustered reconciliation target IDs. Note that clustered reconciliation is not currently supported with a DS repository.
With a generic mapping, all the properties of an object are stored as a
single JSON blob in the fr-idm-json attribute. To create
a new generic mapping, you need only specify the
dnTemplate, that is, where the object will be stored in
the directory tree.
You can specify a wildcard mapping, that stores all nested URIs under a particular branch of the directory tree, for example:
"managed/*": {
"dnTemplate": "ou=managed,dc=openidm,dc=forgerock,dc=com"
},
With this mapping, all objects under managed/, such as
managed/user and managed/device, will
be stored in the branch
ou=managed,dc=openidm,dc=forgerock,dc=com. You do not
have to specify separate mappings for each of these objects. The mapping
creates a new ou for each object. So, for example,
managed/user objects will be stored under the DN
ou=user,ou=managed,dc=openidm,dc=forgerock,dc=com and
managed/device objects will be stored under the DN
ou=device,ou=managed,dc=openidm,dc=forgerock,dc=com.
6.2.2.1.1. Improving Generic Mapping Search Performance (DS)
By default, all generic objects are instances of the
fr-idm-generic-obj object class and their properties
are stored as a single JSON blob in the fr-idm-json
attribute. The fr-idm-json attribute is indexed by
default, which results in all attributes of a generic
object being indexed. JDBC repositories behave in a similar way, with all
generic objects being searchable by default.
To optimize search performance on specific generic resources, you can set up your own schema providers and indices as described in this section. For a detailed explanation of how indexes improve LDAP search performance, see Indexing Attribute Values in the DS Administration Guide.
For managed user objects, the following properties are indexed by default:
userNamegivenNamesnmailaccountStatus
These indexes are configured as follows in the
repo.ds.json file:
"indices" : {
...
"fr-idm-managed-user-json" : {
"type" : [ "EQUALITY" ]
},
...
},
"schemaProviders" : {
"Managed User Json" : {
"matchingRuleName" : "caseIgnoreJsonQueryMatchManagedUser",
"matchingRuleOid" : "1.3.6.1.4.1.36733.2.3.4.1",
"caseSensitiveStrings" : false,
"fields" : [ "userName", "givenName", "sn", "mail", "accountStatus" ]
},
...
},
The indexed properties are listed in the array of fields
for that managed object. To index additional managed user properties, you
can simply add the property names to this array of
fields.
To set up indexes on generic objects other than the managed user object, you must do the following:
Add the object to the schema file (
/path/to/openidm/db/ds/schema/openidm.ldif).You can use the managed user object schema as an example:
### # Managed User ### attributeTypes: ( 1.3.6.1.4.1.36733.2.3.1.13 NAME 'fr-idm-managed-user-json' SYNTAX 1.3.6.1.4.1.36733.2.1.3.1 EQUALITY caseIgnoreJsonQueryMatchManagedUser ORDERING caseIgnoreOrderingMatch SINGLE-VALUE X-ORIGIN 'OpenIDM DsRepoService') objectClasses: ( 1.3.6.1.4.1.36733.2.3.2.6 NAME 'fr-idm-managed-user' SUP top STRUCTURAL MUST ( fr-idm-managed-user-json ) X-ORIGIN 'OpenIDM DsRepoService' )Add the object to the
indicesproperty in theconf/repo.ds.jsonfile.The following example sets up an equality index for a managed devices object:
"indices" : { ... "fr-idm-managed-devices-json" : { "type" : [ "EQUALITY" ] }, ... },Add the object to the
schemaProvidersproperty in theconf/repo.ds.jsonfile and list the properties that should be indexed.The following example sets up indexes for the
deviceName,brand, andassetNumberproperties of the managed device object:"schemaProviders" : { "Managed Device Json" : { "matchingRuleName" : "caseIgnoreJsonQueryMatchManagedDevice", "matchingRuleOid" : "1.3.6.1.4.1.36733.2.....", "caseSensitiveStrings" : false, "fields" : [ "deviceName", "brand", "assetNumber" ] },
For more information about indexing JSON attributes, see Configuring an Index for a JSON Attribute in the DS Administration Guide.
Note
The OIDs shown in this section are reserved for ForgeRock internal use. If you set up additional objects and attributes, or if you change the default schema, you must specify your own OIDs here.
6.2.2.2. Using Explicit Mappings With a DS Repository
The default configuration uses generic mappings for all objects except internal users and roles, links, and clustered reconciliation target IDs. To use an explicit mapping for managed user objects, follow these steps:
Stop IDM if it is running.
Copy the
repo.ds-explicit-managed-user.jsonfile to your project'sconfdirectory, and rename that filerepo.ds.json:$ cd /path/to/openidm $ cp db/ds/conf/repo.ds-explicit-managed-user.json project-dir/conf/repo.ds.json
Update the DS schema in the
openidm.ldiffile, commenting out thefr-idm-managed-user-jsonobject class and attribute:$ cd /path/to/openidm $ more db/ds/schema/openidm.ldif ### # Managed User ### # attributeTypes: ( 1.3.6.1.4.1.36733.2.3.1.13 NAME 'fr-idm-managed-user-json' # SYNTAX 1.3.6.1.4.1.36733.2.1.3.1 EQUALITY caseIgnoreJsonQueryMatchManagedUser ... # objectClasses: ( 1.3.6.1.4.1.36733.2.3.2.6 NAME 'fr-idm-managed-user' SUP top STRUCTURAL # MUST ( fr-idm-managed-user-json ) # X-ORIGIN 'OpenIDM DsRepoService' )
Restart IDM.
IDM uses the DS REST to LDAP gateway to map JSON
objects to LDAP objects stored in the directory. To create additional
explicit mappings, you must specify the LDAP objectClasses
to which the object is mapped, and how each property maps to its
corresponding LDAP attributes. Specify at least the property
type and the corresponding
ldapAttribute.
The following excerpt of the explicit managed user object mapping provides an example:
"managed/user" : {
"dnTemplate": "ou=user,ou=managed,dc=openidm,dc=forgerock,dc=com",
"objectClasses": [ "person", "organizationalPerson", "inetOrgPerson", "fr-idm-managed-user-explicit" ],
"properties": {
"_id": {
"type": "simple", "ldapAttribute": "uid", "isRequired": true, "writability": "createOnly"
},
"userName": {
"type": "simple", "ldapAttribute": "cn"
},
"password": {
"type": "json", "ldapAttribute": "fr-idm-password"
},
"accountStatus": {
"type": "simple", "ldapAttribute": "fr-idm-accountStatus"
},
"roles": {
"type": "json", "ldapAttribute": "fr-idm-role", "isMultiValued": true
},
"effectiveRoles": {
"type": "json", "ldapAttribute": "fr-idm-effectiveRole", "isMultiValued": true
},
"effectiveAssignments": {
"type": "json", "ldapAttribute": "fr-idm-effectiveAssignment", "isMultiValued": true
},
...
}
},
You do not need to map the _rev (revision) property of
an object as this property is implicit in all objects and maps to the
DS etag operational attribute.
For more information about the REST to LDAP property mappings, see Mapping Configuration File in the DS Reference.
For performance reasons, the DS repository does not apply unique constraints to links. This behavior is different to the JDBC repositories, where uniqueness on link objects is enforced.
Important
DS currently has a default index entry limit of 4000. Therefore, you cannot query more than 4000 records unless you create a Virtual List View (VLV) index. A VLV index is designed to help DS respond to client applications that need to browse through a long list of objects.
You cannot create a VLV index on a JSON attribute. For generic mappings, IDM avoids this restriction by using client-side sorting and searching. However, for explicit mappings you must create a VLV index for any filtered or sorted results, such as results displayed in a UI grid. To configure a VLV index, use the dsconfig command described in Configuring a Virtual List View Index in the DS Administration Guide.
6.2.2.2.1. Specifying How IDM IDs Map to LDAP Entry Names
The DS REST2LDAP configuration enables you to specify a
namingStrategy that determines how LDAP entry names are
mapped to JSON resources. When IDM stores its objects in a
DS repository, this namingStrategy
determines how the IDM _id value maps to the
Relative Distinguished Name (RDN) of the corresponding DS
object.
The namingStrategy is specified as part of the
explicitMapping of an object in the
repo.ds.json file. The following example shows
a naming strategy configuration for an explicit managed user mapping:
"resourceMapping": {
"defaultMapping": {
"dnTemplate": "ou=generic,dc=openidm,dc=forgerock,dc=com"
},
...
"explicitMapping": {
"managed/user" : {
"dnTemplate": "ou=user,ou=managed,dc=openidm,dc=forgerock,dc=com",
"objectClasses": [
"person",
"organizationalPerson",
"inetOrgPerson",
"fr-idm-managed-user-explicit"
],
"namingStrategy" : {
"type" : "clientDnNaming",
"dnAttribute" : "uid"
},
...
}
The namingStrategy can be one of the following:
clientDnNaming- IDM provides an_idto DS and that_idis used to generate the DS RDN. In the following example, the IDM_idmaps to the LDAPuidattribute:{ "namingStrategy": { "type": "clientDnNaming", "dnAttribute": "uid" } }With this default configuration, entries are stored in DS with a DN similar to the following:
"uid=idm-uuid,ou=user,ou=managed,dc=openidm,dc=forgerock,dc=com"
Note
If these default DNs are suitable in your deployment, you do not have to change anything with regard to the naming strategy.
clientNaming- IDM provides an_idto DS but the DS RDN is derived from a different user attribute in the LDAP entry. In the following example, the RDN is thecnattribute. The_idthat IDM provides for the object maps to the LDAPuidattribute:{ "namingStrategy": { "type": "clientNaming", "dnAttribute": "cn", "idAttribute": "uid" } }With this configuration, entries are stored in DS with a DN similar to the following:
"cn=username,ou=user,ou=managed,dc=openidm,dc=forgerock,dc=com"
Specifying a namingStrategy is optional. If you do not
specify a strategy, the default is clientDnNaming with
the following configuration:
{
"namingStrategy" : {
"type" : "clientDnNaming",
"dnAttribute" : "uid"
},
"properties: : {
"_id": {
"type": "simple",
"ldapAttribute": "uid",
"isRequired": true,
"writability": "createOnly"
},
...
}
}Note
If you do not set a dnAttribute as part of the naming
strategy, the value of the dnAttribute is taken from
the value of the ldapAttribute on the
_id property.
6.3. Configuring SSL with a JDBC Repository
To configure SSL with a JDBC repository, import the CA certificate file for
the server into the IDM truststore. The examples in this section
assume a certificate file named ca-cert.pem. If you have
an existing CA or self-signed certificate file, substitute the certificate
name accordingly.
To import the CA certificate file into the IDM truststore, use
the keytool command native to the Java environment,
typically located in the /path/to/jre-version/bin
directory. On some UNIX-based systems, /usr/bin/keytool
may link to that command.
Import the
ca-cert.pemcertificate into the IDM truststore file with the following command:$ keytool \ -importcert \ -trustcacerts \ -file ca-cert.pem \ -alias "DB cert" \ -keystore /path/to/openidm/security/truststore
You are prompted for a keystore password. You must use the same password as is shown in your
resolver/boot.propertiesfile. The default truststore password is:openidm.truststore.password=changeit
After entering a keystore password, you are prompted with the following question. Assuming you have included an appropriate
ca-cert.pemfile, enteryes.Trust this certificate? [no]:
Open the repository connection configuration file,
datasource.jdbc-default.jsonand locate thejdbcUrlproperty.Append
8&useSSL=trueto the end of that URL.The value of the
jdbcUrlproperty depends on your JDBC repository. The following example shows a MySQL repository, configured for SSL:"jdbcUrl" : "jdbc:mysql://&{openidm.repo.host}:&{openidm.repo.port}/openidm?allowMultiQueries=true&characterEncoding=utf8&useSSL=true"Open your project's
conf/config.propertiesfile. Find theorg.osgi.framework.bootdelegationproperty. Make sure that property includes a reference to thejavax.net.ssloption. If you started with the default version ofconfig.propertiesthat line should now read as follows:org.osgi.framework.bootdelegation=sun.*,com.sun.*,apple.*,com.apple.*,javax.net.ssl
Open your project's
conf/system.propertiesfile. Add the following line to that file. If appropriate, substitute the path to your own truststore:# Set the truststore javax.net.ssl.trustStore=&{idm.install.dir}/security/truststoreEven if you are setting up this instance of IDM as part of a cluster, you must still configure this initial truststore. After this instance joins a cluster, the SSL keys in this particular truststore are replaced. For more information on clustering, see "Clustering, Failover, and Availability".
6.4. Interacting With the Repository Over REST
The IDM repository is accessible over the REST interface, at the
openidm/repo endpoint.
In general, you must ensure that external calls to the
openidm/repo endpoint are protected. Native queries and
free-form command actions on this endpoint are disallowed by default because
the endpoint is vulnerable to injection attacks. For more information, see
"Running Queries and Commands on the Repository".
6.4.1. Running Queries and Commands on the Repository
Free-form commands and native queries on the repository are disallowed by default and should remain so in production to reduce the risk of injection attacks.
Common filter expressions, called with the _queryFilter
keyword, enable you to form arbitrary queries on the repository, using a
number of supported filter operations. For more information on these filter
operations, see "Constructing Queries". Parameterized or
predefined queries and commands (using the _queryId and
commandId keywords) can be authorized on the repository
for external calls if necessary. For more information, see
"Parameterized Queries".
Running commands on the repository is supported primarily from scripts. Certain scripts that interact with the repository are provided by default, for example, the scripts that enable you to purge the repository of reconciliation audit records.
You can define your own commands, and specify them in the database table
configuration file (either repo.ds.json or
repo.jdbc.json). In the following simple example, a
command is called to clear out UI notification entries from the repository,
for specific users.
The command is defined in the repository configuration file, as follows:
"commands" : {
"delete-notifications-by-id" : "DELETE FROM ui_notification WHERE receiverId = ${username}"
...
}, The command can be called from a script, as follows:
openidm.action("repo/ui/notification", "command", {},
{ "commandId" : "delete-notifications-by-id", "userName" : "scarter"});
Exercise caution when allowing commands to be run on the repository over the REST interface, as there is an attached risk to the underlying data.
Chapter 7. Configuring the Server
This chapter describes how IDM loads and stores its configuration, how the configuration can be changed, and specific configuration recommendations in a production environment.
The configuration is defined in a combination of
.properties files, container configuration files, and
dynamic configuration objects. Most of the configuration files are stored in
your project's conf/ directory. Note that you might see
files with a .patch extension in the
conf/ and
db/repo/conf/ directories.
These files specify differences relative to the last released version of
IDM and are used by the update mechanism. They do not affect your
current configuration.
When the same configuration object is declared in more than one location, the configuration is loaded with the following order of precedence:
System properties passed in on startup through the
OPENIDM_OPTSenvironment variableProperties declared in the
resolver/boot.propertiesfileProperties declared in the
project-dir/conf/system.propertiesfileProperties set explicitly in the various
project-dir/conf/*.jsonfiles
Properties that are set using the first three options are not stored in the repository. You can therefore use these mechanisms to set different configurations for multiple nodes participating in a cluster.
System properties such as &{idm.install.dir},
&{idm.data.dir}, and
&{idm.instance.dir} can be set through environment
variables, system variables passed during startup, or through
resolver/boot.properties.
idm.envconfig.dirs can be set through environment
variables or system variables passed during startup.
You can access configuration properties in scripts using
identityServer.getProperty(). For more information, see
"The identityServer Variable".
To set the configuration in the OPENIDM_OPTS environment
variable, export that variable before startup. The following example starts
IDM with a different keystore and truststore:
$ export OPENIDM_OPTS="-Xmx1024m -Xms1024m \
-Dopenidm.keystore.location=/path/to/keystore.jceks -Dopenidm.truststore.location=/path/to/truststore"
$ ./startup.sh
Executing ./startup.sh...
Using OPENIDM_HOME: /path/to/openidm
Using PROJECT_HOME: /path/to/openidm
Using OPENIDM_OPTS: -Xmx1024m -Xms1024m -Dopenidm.keystore.location=/path/to/keystore.jceks
-Dopenidm.truststore.location=/path/to/truststore
Using LOGGING_CONFIG: -Djava.util.logging.config.file=/path/to/openidm/conf/logging.properties
Using boot properties at /path/to/openidm/resolver/boot.properties
-> OpenIDM version "6.0.0.7"
OpenIDM ready
Configuration properties that are explicitly set in
project-dir/conf/*.json files are stored in the
repository. You can manage these configuration objects by using the REST
interface or by using the JSON files themselves. Most aspects of the
configuration can also be managed by using the Admin UI, as described in
"Configuring the Server from the Admin UI".
7.1. Configuration Objects
IDM exposes internal configuration objects in JSON format. Configuration elements can be either single instance or multiple instance for an IDM installation.
7.1.1. Single Instance Configuration Objects
Single instance configuration objects correspond to services that have at
most one instance per installation. JSON file views of these configuration
objects are named
object-name.json.
The following list describes the single instance configuration objects:
The
auditconfiguration specifies how audit events are logged.The
authenticationconfiguration controls REST access.The
clusterconfiguration defines how an IDM instance can be configured in a cluster.The
endpointconfiguration controls any custom REST endpoints.The
infoconfiguration points to script files for the customizable information service.The
managedconfiguration defines managed objects and their schemas.The
policyconfiguration defines the policy validation service.The
process accessconfiguration defines access to configured workflows.The
repo.repo-typeconfiguration such asrepo.dsorrepo.jdbcconfigures the IDM repository.The
routerconfiguration specifies filters to apply for specific operations.The
scriptconfiguration defines the parameters that are used when compiling, debugging, and running JavaScript and Groovy scripts.The
syncconfiguration defines the mappings that IDM uses when it synchronizes and reconciles managed objects.The
uiconfiguration defines the configurable aspects of the default user interfaces.The
workflowconfiguration defines the configuration of the workflow engine.
IDM stores managed objects in the repository, and exposes them
under /openidm/managed. System objects on external
resources are exposed under /openidm/system.
7.1.2. Multiple Instance Configuration Objects
Multiple instance configuration objects correspond to services that can have
many instances per installation. Multiple instance configuration objects are
named
objectname/instancename,
for example, provisioner.openicf/csvfile.
JSON file views of these configuration objects
are named
objectname-instancename.json,
for example, provisioner.openicf-csvfile.json.
IDM provides the following multiple instance configuration objects:
Multiple
scheduleconfigurations can run reconciliations and other tasks on different schedules.Multiple
provisioner.openicfconfigurations correspond to connected resources.Multiple
servletfilterconfigurations can be used for different servlet filters such as the Cross Origin and GZip filters.
7.2. Making Configuration Changes
When you change configuration objects, take the following points into account:
IDM's authoritative configuration source is its repository. While JSON files provide a view of the configuration objects, they do not represent the authoritative source.
Unless you've disabled file writes, per "Disabling Automatic Configuration Updates", IDM updates JSON files after making configuration changes via REST. Of course, you can also edit those JSON files directly.
IDM recognizes changes to JSON files when it is running. The server must be running when you delete configuration objects, even if you do so by editing the JSON files.
Avoid editing configuration objects directly in the repository. Rather, edit the configuration over the REST API, or in the configuration JSON files to ensure consistent behavior and that operations are logged.
By default, IDM stores its configuration in the repository. If you remove an IDM instance and do not specifically drop the repository, the configuration remains in effect for a new instance that uses that repository. For testing or evaluation purposes, you can disable this persistent configuration in the
conf/system.propertiesfile by uncommenting the following line:# openidm.config.repo.enabled=false
Disabling persistent configuration means that IDM stores its configuration in memory only. Do not disable persistent configuration in a production environment.
7.3. Changing the Default REST Context
By default, IDM objects are accessible over REST at the context
path /openidm/* where * indicates the
remainder of the context path, for example /openidm/managed/user.
You can change the default REST context (/openidm) by
setting the openidm.servlet.alias property in your
project's resolver/boot.properties file.
The following change to the boot.properties file sets
the REST context to /example:
openidm.servlet.alias=/example
After this change, objects are accessible at the /example
context path, for example:
$ $ curl \
--header "X-OpenIDM-Username: openidm-admin" \
--header "X-OpenIDM-Password: openidm-admin" \
--request GET \
"http://localhost:8080/example/managed/user?_queryId=query-all-ids"
{
"result": [
{
"_id": "bjensen",
"_rev": "0000000042b1dcd2"
},
{
"_id": "scarter",
"_rev": "000000009b54de8a"
}
],
...
}
To ensure that the UI works with the new REST context, also change the
commonConstants.context property in the following files:
/path/to/openidm/ui/selfservice/default/org/forgerock/openidm/ui/common/util/Constants.js |
/path/to/openidm/ui/admin/default/org/forgerock/openidm/ui/common/util/Constants.js |
Note
If you've set up a custom UI per "Customizing the Admin UI" and/or
"Customizing the Self-Service UI", the directory with the
Constants.js file will vary.
For example:
$ more /path/to/openidm/ui/selfservice/default/org/forgerock/openidm/ui/common/util/Constants.js
...
define(["org/forgerock/commons/ui/common/util/Constants"], function (commonConstants) {
commonConstants.context = "/example";
...
Note that changing the REST context impacts the API Explorer, described in
"API Explorer". If you want to use the API Explorer
with the new REST context, change the baseUrl property in the
following file:
/path/to/openidm/ui/api/default/index.html |
Based on the change to the REST context earlier in this section, you'd set the following:
//base URL for accessing the OpenAPI JSON endpoint var baseURL = '/example/';
7.4. Configuring the Server for Production
Out of the box, IDM is configured to make it easy to install and evaluate. Specific configuration changes are required before you deploy IDM in a production environment.
7.4.1. Configuring a Production Repository
By default, IDM installs an embedded ForgeRock Directory Services (DS) instance for use as its repository. This makes it easy to get started. Before you use IDM in production, you must replace the embedded DS repository with a supported repository. For more information, see "Selecting a Repository" in the Installation Guide.
For more information, see "Selecting a Repository" in the Installation Guide.
7.4.2. Disabling Automatic Configuration Updates
By default, IDM polls the JSON files in the conf
directory periodically for any changes to the configuration. In a production
system, it is recommended that you disable automatic polling for updates to
prevent untested configuration changes from disrupting your identity service.
To disable automatic polling for configuration changes, edit the
conf/system.properties file for your project, and
uncomment the following line:
# openidm.fileinstall.enabled=false
This setting also disables the file-based configuration view, which means that IDM reads its configuration only from the repository.
Before you disable automatic polling, you must have started the server at least once to ensure that the configuration has been loaded into the repository. Be aware, if automatic polling is enabled, IDM immediately uses changes to scripts called from a JSON configuration file.
When your configuration is complete, you can disable writes to configuration
files. To do so, add the following line to the
conf/config.properties file for your project:
felix.fileinstall.enableConfigSave=false
7.4.3. Communicating Through a Proxy Server
To set up IDM to communicate through a proxy server, you can use JVM parameters that identify the proxy host system, and the IDM port number.
If you've configured IDM behind a proxy server, include JVM properties from the following table, in the IDM startup script:
| JVM Property | Example Values | Description |
|---|---|---|
-Dhttps.proxyHost | proxy.example.com, 192.168.0.1 | Hostname or IP address of the proxy server |
-Dhttps.proxyPort | 8443, 9443 | Port number used by IDM |
If an insecure port is acceptable, you can also use the
-Dhttp.proxyHost and -Dhttp.proxyPort
options. You can add these JVM proxy properties to the value of
OPENIDM_OPTS in your startup script
(startup.sh or startup.bat):
# Only set OPENIDM_OPTS if not already set [ -z "$OPENIDM_OPTS" ] && OPENIDM_OPTS="-Xmx1024m -Xms1024m -Dhttps.proxyHost=localhost -Dhttps.proxyPort=8443"
7.5. Configuring the Server Over REST
IDM exposes configuration objects under the
/openidm/config context path.
To list the configuration on the local host, perform a GET request on
http://localhost:8080/openidm/config.
The following REST call includes excerpts of the default configuration for
an IDM instance started with the sync-with-csv
sample:
$ curl \
--request GET \
--header "X-OpenIDM-Username: openidm-admin" \
--header "X-OpenIDM-Password: openidm-admin" \
http://localhost:8080/openidm/config
{
"_id": "",
"configurations": [
{
"_id": "router",
"pid": "router",
"factoryPid": null
},
{
"_id": "info/login",
"pid": "info.f01fc3ed-5871-408d-a5f0-bef00ccc4c8f",
"factoryPid": "info"
},
{
"_id": "provisioner.openicf/csvfile",
"pid": "provisioner.openicf.9009f4a1-ea47-4227-94e6-69c345864ba7",
"factoryPid": "provisioner.openicf"
},
{
"_id": "endpoint/usernotifications",
"pid": "endpoint.e2751afc-d169-4a23-a88e-7211d340bccb",
"factoryPid": "endpoint"
},
...
]
}
Single instance configuration objects are located under
openidm/config/object-name.
The following example shows the audit configuration of the
sync-with-csv. The output has been cropped for legibility:
$ curl \
--header "X-OpenIDM-Username: openidm-admin" \
--header "X-OpenIDM-Password: openidm-admin" \
"http://localhost:8080/openidm/config/audit"
{
"_id": "audit",
"auditServiceConfig": {
"handlerForQueries": "json",
"availableAuditEventHandlers": [
"org.forgerock.audit.handlers.csv.CsvAuditEventHandler",
"org.forgerock.audit.handlers.elasticsearch.ElasticsearchAuditEventHandler",
"org.forgerock.audit.handlers.jms.JmsAuditEventHandler",
"org.forgerock.audit.handlers.json.JsonAuditEventHandler",
"org.forgerock.openidm.audit.impl.RepositoryAuditEventHandler",
"org.forgerock.openidm.audit.impl.RouterAuditEventHandler",
"org.forgerock.audit.handlers.splunk.SplunkAuditEventHandler",
"org.forgerock.audit.handlers.syslog.SyslogAuditEventHandler"
],
"filterPolicies": {
"value": {
"excludeIf": [
"/access/http/request/headers/Authorization",
"/access/http/request/headers/X-OpenIDM-Password",
"/access/http/request/cookies/session-jwt",
"/access/http/response/headers/Authorization",
"/access/http/response/headers/X-OpenIDM-Password"
],
"includeIf": []
}
},
"caseInsensitiveFields": [
"/access/http/request/headers",
"/access/http/response/headers"
]
},
"eventHandlers": [
{
"class": "org.forgerock.audit.handlers.json.JsonAuditEventHandler",
"config": {
"name": "json",
"logDirectory": "&{idm.data.dir}/audit",
"buffering": {
"maxSize": 100000,
"writeInterval": "100 millis"
},
"topics": [
"access",
"activity",
"recon",
"sync",
"authentication",
"config"
]
}
}
...
],
"eventTopics": {
...
},
"exceptionFormatter": {
"type": "text/javascript",
"file": "bin/defaults/script/audit/stacktraceFormatter.js"
}
}
Multiple instance configuration objects are found under
openidm/config/object-name/instance-name.
The following example shows the configuration for the CSV connector shown in
the sync-with-csv sample. The output has been cropped for
legibility:
$ curl \
--header "X-OpenIDM-Username: openidm-admin" \
--header "X-OpenIDM-Password: openidm-admin" \
"http://localhost:8080/openidm/config/provisioner.openicf/csvfile"
{
"_id": "provisioner.openicf/csvfile",
"connectorRef": {
"bundleName": "org.forgerock.openicf.connectors.csvfile-connector",
"bundleVersion": "[1.5.1.4,1.6.0.0)",
"connectorName": "org.forgerock.openicf.csvfile.CSVFileConnector"
},
"operationTimeout": {
"CREATE": -1,
"VALIDATE": -1,
"TEST": -1,
"SCRIPT_ON_CONNECTOR": -1,
"SCHEMA": -1,
"DELETE": -1,
"UPDATE": -1,
"SYNC": -1,
"AUTHENTICATE": -1,
"GET": -1,
"SCRIPT_ON_RESOURCE": -1,
"SEARCH": -1
},
"configurationProperties": {
"csvFile": "&{idm.instance.dir}/data/csvConnectorData.csv"
},
"resultsHandlerConfig": {
"enableAttributesToGetSearchResultsHandler": true
},
"syncFailureHandler": {
"maxRetries": 5,
"postRetryAction": "logged-ignore"
},
"objectTypes": {
...
},
"operationOptions": {}
}You can change the configuration over REST by using an HTTP PUT or HTTP PATCH request to modify the required configuration object.
The following example uses a PUT request to modify the configuration of the scheduler service, increasing the maximum number of threads that are available for the concurrent execution of scheduled tasks:
$ curl \
--header "X-OpenIDM-Username: openidm-admin" \
--header "X-OpenIDM-Password: openidm-admin" \
--header "Content-Type: application/json" \
--request PUT \
--data '{
"threadPool": {
"threadCount": "20"
},
"scheduler": {
"executePersistentSchedules": "&{openidm.scheduler.execute.persistent.schedules}"
}
}' \
"http://localhost:8080/openidm/config/scheduler"
{
"_id" : "scheduler",
"threadPool": {
"threadCount": "20"
},
"scheduler": {
"executePersistentSchedules": "&{openidm.scheduler.execute.persistent.schedules}"
}
}The following example uses a PATCH request to reset the number of threads to their original value.
$ curl \
--header "X-OpenIDM-Username: openidm-admin" \
--header "X-OpenIDM-Password: openidm-admin" \
--header "Content-Type: application/json" \
--request PATCH \
--data '[
{
"operation" : "replace",
"field" : "/threadPool/threadCount",
"value" : "10"
}
]' \
"http://localhost:8080/openidm/config/scheduler"
{
"_id": "scheduler",
"threadPool": {
"threadCount": "10"
},
"scheduler": {
"executePersistentSchedules": "&{openidm.scheduler.execute.persistent.schedules}"
}
}Note
Multi-version concurrency control (MVCC) is not supported for configuration objects so you do not need to specify a revision during updates to the configuration, and no revision is returned in the output.
For more information about using the REST API to update objects, see "REST API Reference".
7.6. Using Property Value Substitution
In an environment where you have more than one IDM instance, you might require a configuration that is similar, but not identical, across the different instances.
Property value substitution enables you to achieve the following:
Define a configuration that is specific to a single instance, for example, setting the location of the keystore on a particular host.
Define a configuration whose parameters vary between different environments, for example, the URLs and passwords for test, development, and production environments.
Disable certain capabilities on specific nodes. For example, you might want to disable the workflow engine on specific instances.
Property value substitution uses configuration expressions to introduce variables into the server configuration. You set configuration expressions as the values of configuration properties. The effective property values can be evaluated in a number of ways. For more information about property evaluation, see "Expression Evaluation and Order of Precedence".
Configuration expressions have the following characteristics:
To distinguish them from static values, configuration expressions are preceded by an ampersand and enclosed in braces. For example:
&{openidm.port.http}. The configuration token in the example isopenidm.port.http. The.serves as the separator character.You can use a default value in a configuration expression by including it after a vertical bar following the token.
For example, the following expression sets the default HTTP port value to 8080:
&{openidm.port.http|8080}.With this configuration, the server attempts to substitute
openidm.port.httpwith a defined configuration token. If no token definition is found, the server uses the default,8080.A configuration property can include a mix of static values and expressions.
For example, suppose
hostnameis set tods. Then&{hostname}.example.comevaluates tods.example.com.Configuration token evaluation is recursive.
For example, suppose
portis set to&{port.prefix}389, andport.prefixis set to2. Then&{port}evaluates to2389.
You can define nested properties (that is a property definition within another property definition) and you can combine system properties, boot properties, and environment variables.
7.6.1. Expression Evaluation and Order of Precedence
At server startup, expression resolvers evaluate property values to determine the effective configuration. You must define expression values before you start the IDM server that uses them.
When configuration tokens are resolved, the result is always a string.
However, you can coerce the output type of the
evaluated token to match the type that is required by the property.
Ultimately, the expression must return the appropriate data type for the
configuration property. For example, the port property
takes an integer. If you set it using an expression, the result of the
evaluated expression must be an integer. If the type is wrong, the server
fails to start due to a syntax error. For more information about data type
coercion, see "Transforming Data Types".
Expression resolvers can obtain values from the following sources:
Environment variables
You set an environment variable to hold the property value.
For example:
export OPENIDM_PORT_HTTP=8080The environment variable name must be composed of uppercase characters and underscores. The name maps to the expression token as follows:
Uppercase characters are lower cased.
Underscores,
_, are replaced with.characters.
In other words, the value of
OPENIDM_PORT_HTTPreplaces&{openidm.port.http}in the server configuration.Java system properties
You set a Java system property to hold the value.
Java system property names must match expression tokens exactly. In other words, the value of the
openidm.repo.portsystem property replaces&{openidm.repo.port}in the server configuration.Java system properties can be set in a number of ways. One way of setting system properties for IDM servers is to pass them through the
OPENIDM_OPTSenvironment variable.For example:
export OPENIDM_OPTS="-Dopenidm.repo.port=3306"System properties can also be declared in your project's
conf/system.properties.The following example uses property value substitution with a standard system property. The example modifies the audit configuration, changing the
audit.jsonfile to redirect JSON audit logs to the user's home directory. Theuser.homeproperty is a default Java System property:"eventHandlers" : [ { "class" : "org.forgerock.audit.handlers.json.JsonAuditEventHandler", "config" : { "name" : "json", "logDirectory" : "&{user.home}/audit", ... } }, ...Expression files
You set a key in a
.jsonor.propertiesfile to hold the value. To use an expression file, set theIDM_ENVCONFIG_DIRSenvironment variable, or theidm.envconfig.dirsJava system property as described below. By default, IDM setsidm.envconfig.dirsto&{idm.install.dir}/resolver/.The default property resolver file in IDM is
resolver/boot.propertiesbut you can specify additional files that might hold property values.Keys in
.propertiesfiles must match expression tokens exactly. In other words, the value of theopenidm.repo.portkey replaces&{openidm.repo.port}in the server configuration.The following example expression properties file sets the repository port:
openidm.repo.port=1389
JSON expression files can contain nested objects.
JSON field names map to expression tokens as follows:
The JSON path name matches the expression token.
The
.character serves as the JSON path separator character.
The following example JSON expression file uses property value substitution to set the host in the LDAP connector configuration:
{ "openidm" : { "provisioner" : { "ldap" : { "host" : "ds.example.com" } } } } }To substitute this value in the configuration, the LDAP provisioner file would include the following:
{ ... "configurationProperties" : { "host" : &{openidm.provisioner.ldap.host|localhost}, ... } }If the server does not find a configuration token for the host name, it substitutes the default (
localhost).To use expression files, set the environment variable,
IDM_ENVCONFIG_DIRS, or the Java system property,idm.envconfig.dirs, to a comma-separated list of the directories containing the expression files.When reading these files, the server browses the directories in the order specified. It reads all the files with
.jsonand.propertiesextensions, and attempts to use them to evaluate expression tokens.For example, if you define
idm.envconfig.dirs=/directory1,/directory2and a configuration token is defined in bothdirectory1anddirectory2, the resolved value will be the value defined indirectory1. If the configuration token is defined only indirectory2, the resolved value will be the value defined indirectory2.Note the following constraints when using expression files:
Although IDM scans the directories in a specified order, within a directory IDM scans the files in a nondeterministic order.
IDM does not scan subdirectories.
Do not define the same configuration token more than once in a file.
If you define the same property twice in the same file, one definition will be used and the other will be ignored. The server will not throw an error, but because files are scanned in a nondeterministic order, you have no way of knowing which value will be used.
You cannot define the same configuration token in more than one file in a single directory. The server generates an error in this case.
Important
This constraint implies that you cannot have backup
.propertiesand.jsonfiles, in a single directory if they define the same tokens.If the same token occurs once in several files that are located in different directories, IDM uses the first value that is read.
Framework configuration properties
You can use the
conf/config.propertiesfile to override values used by the OSGI framework.Configuration files
All the properties declared in the
.jsonfiles in your project'sconf/directory.
The preceding list reflects the order of precedence:
Environment variables override system properties, default token settings, and settings in expression files.
System properties override default token settings, and any settings in expression files.
Default token settings.
If
IDM_ENVCONFIG_DIRSoridm.envconfig.dirsis set, the server uses the settings found in expression files.Framework configuration properties
Hardcoded property values
7.6.2. Transforming Data Types
When configuration tokens are resolved, the result is always a string. However, you can transform the output type of the evaluated token to match the type that is required by the property.
The following example JSON expression file sets the value of the port in the LDAP connector configuration:
{
"openidm" : {
"provisioner" : {
"ldap" : {
"port" : 6389
}
}
}
}
When this expression is evaluated, the port would be evaluated as a
string value, which would cause an error. To coerce the
port value to an integer, you would substitute the value in the LDAP
provisioner file as follows:
{
...
"configurationProperties" : {
"port" : {
"$int" : "&{openidm.provisioner.ldap.port|1389}",
...
}
}
With this configuration, the server evaluates the LDAP port property to the
integer 6389. If the server does not find a configuration
token for the port, it substitutes the default (1389).
The following coercion types are supported:
integer (
$int)number (
$number)This type can coerce integers, doubles, longs, and floats.
boolean (
$bool)array (
$array)decodeBase64 (
$base64:decode)Transforms a base64-encoded string into a decoded string.
encodeBase64 (
$base64:encode)Transforms a string into a base64-encoded string.
7.6.3. Limitations of Property Value Substitution
The work you've done to set up property value substitution is limited; different rules apply in the following areas:
7.6.3.1. Property Value Substitution in the Admin UI
Support for property value substitution in the Admin UI is limited to the following categories:
String substitution, where
&{some.property|DefaultValue}Number and integer substitution, including:
"$number" : "&{openidm.port|1234}""$int" : "&{openidm.port|5678}"
Base64 substitution, such as:
"$base64:decode" : "&{openidm.felix.web.console.password|YWRtaW4=}"Cryptographic substitution, where for passwords and client secrets, IDM substitutes
"********"for$crypto
7.6.3.2. Property Value Substitution for Connectors
You cannot use property substitution for connector reference
(connectorRef) properties. For example, the following
configuration would not be valid:
"connectorRef" : {
"connectorName" : "&{connectorName}",
"bundleName" : "org.forgerock.openicf.connectors.ldap-connector",
"bundleVersion" : "&{LDAP.BundleVersion}"
...
The "connectorName" must be the precise string from the
connector configuration. If you need to specify multiple connector version
numbers, use a range of versions, for example:
"connectorRef" : {
"connectorName" : "org.identityconnectors.ldap.LdapConnector",
"bundleName" : "org.forgerock.openicf.connectors.ldap-connector",
"bundleVersion" : "[1.5.0.0,2.0.0.0)",
...7.7. Setting the Script Configuration
The script configuration file (conf/script.json)
enables you to modify the parameters that are used when compiling,
debugging, and running JavaScript and Groovy scripts.
The default script.json file includes the following
parameters:
- properties
Any custom properties that should be provided to the script engine.
- ECMAScript
Specifies JavaScript debug and compile options. JavaScript is an ECMAScript language.
javascript.debug- the JavaScript debugging configuration. By default this is set to the value of theopenidm.script.javascript.debugproperty in IDM'sresolver/boot.propertiesfile.javascript.recompile.minimumInterval- minimum time after which a script can be recompiled.The default value is
60000, or 60 seconds. This means that any changes made to scripts will not get picked up for up to 60 seconds. If you are developing scripts, reduce this parameter to around100(100 milliseconds).If you set the
javascript.recompile.minimumIntervalto-1, or remove this property from thescript.jsonfile, IDM does not poll JavaScript files to check for changes.
- Groovy
Specifies compilation and debugging options related to Groovy scripts. Many of these options are commented out in the default script configuration file. Remove the comments to set these properties:
groovy.warnings- the log level for Groovy scripts. Possible values arenone,likely,possible, andparanoia.groovy.source.encoding- the encoding format for Groovy scripts. Possible values areUTF-8andUS-ASCII.groovy.target.directory- the directory to which compiled Groovy classes will be output. The default directory isinstall-dir/classes.groovy.target.bytecode- the bytecode version that is used to compile Groovy scripts. The default version is1.5.groovy.classpath- the directory in which the compiler should look for compiled classes. The default classpath isinstall-dir/lib.To call an external library from a Groovy script, you must specify the complete path to the .jar file or files, as a value of this property. For example:
"groovy.classpath" : "/&{idm.install.dir}/lib/http-builder-0.7.1.jar: /&{idm.install.dir}/lib/json-lib-2.3-jdk15.jar: /&{idm.install.dir}/lib/xml-resolver-1.2.jar: /&{idm.install.dir}/lib/commons-collections-3.2.1.jar",Note
If you're deploying on Microsoft Windows, use a semicolon (
;) instead of a colon to separate directories in thegroovy.classpath.groovy.output.verbose- specifies the verbosity of stack traces. Boolean,trueorfalse.groovy.output.debug- specifies whether debugging messages are output. Boolean,trueorfalse.groovy.errors.tolerance- sets the number of non-fatal errors that can occur before a compilation is aborted. The default is10errors.groovy.script.extension- specifies the file extension for Groovy scripts. The default is.groovy.groovy.script.base- defines the base class for Groovy scripts. By default any class extendsgroovy.lang.Script.groovy.recompile- indicates whether scripts can be recompiled. Boolean,trueorfalse, with defaulttrue.groovy.recompile.minimumInterval- sets the minimum time between which Groovy scripts can be recompiled.The default value is
60000, or 60 seconds. This means that any changes made to scripts will not get picked up for up to 60 seconds. If you are developing scripts, reduce this parameter to around100(100 milliseconds).groovy.target.indy- specifies whether a Groovy indy test can be used. Boolean,trueorfalse, with defaulttrue.groovy.disabled.global.ast.transformations- specifies a list of disabled Abstract Syntax Transformations (ASTs).
- sources
Specifies the locations in which IDM expects to find JavaScript and Groovy scripts that are referenced in the configuration.
The following excerpt of the
script.jsonfile shows the default locations:... "sources" : { "default" : { "directory" : "&{idm.install.dir}/bin/defaults/script" }, "install" : { "directory" : "&{idm.install.dir}" }, "project" : { "directory" : "&{idm.instance.dir}" }, "project-script" : { "directory" : "&{idm.instance.dir}/script" } ...Note
The order in which locations are listed in the
sourcesproperty is important. Scripts are loaded from the bottom up in this list, that is, scripts found in the last location on the list are loaded first.
Note
By default, debug information (such as file name and line number) is
excluded from JavaScript exceptions. To troubleshoot script exceptions, you
can include debug information by changing the following setting to
true in IDM's
resolver/boot.properties file:
javascript.exception.debug.info=false
Including debug information in a production environment is not recommended.
7.8. Calling a Script From a Configuration File
You can call a script from within a configuration file by providing the script source, or by referencing a file that contains the script source. For example:
{
"type" : "text/javascript",
"source": string
} or
{
"type" : "text/javascript",
"file" : file location
} - type
string, required
Specifies the type of script to be executed. Supported types include
text/javascript, andgroovy.- source
string, required if
fileis not specifiedSpecifies the source code of the script to be executed.
- file
string, required if
sourceis not specifiedSpecifies the file containing the source code of the script to execute.
The file path must be relative to the project-dir. Full file paths are not supported.
The following sample excerpts from configuration files indicate how scripts can be called.
The following example (included in the sync.json file)
returns true if the employeeType is
equal to external, otherwise returns
false. This script can be useful during reconciliation to
establish whether a target object should be included in the reconciliation
process, or should be ignored:
"validTarget": {
"type" : "text/javascript",
"source": "target.employeeType == 'external'"
}
The following example (included in the sync.json file)
sets the __PASSWORD__ attribute to
defaultpwd when IDM creates a target object:
"onCreate" : {
"type" : "text/javascript",
"source": "target.__PASSWORD__ = 'defaultpwd'"
}
The following example (included in the router.json
file) shows a trigger to create Solaris home directories using a script. The
script is located in the file,
project-dir/script/createUnixHomeDir.js:
{
"filters" : [ {
"pattern" : "^system/solaris/account$",
"methods" : [ "create" ],
"onResponse" : {
"type" : "text/javascript",
"file" : "script/createUnixHomeDir.js"
}
} ]
} Often, script files are reused in different contexts. You can pass variables to your scripts to provide these contextual details at runtime. You pass variables to the scripts that are referenced in configuration files by declaring the variable name in the script reference.
The following example of a scheduled task configuration calls a script
named triggerEmailNotification.js. The example sets the
sender and recipient of the email in the schedule configuration, rather
than in the script itself:
{
"enabled" : true,
"type" : "cron",
"schedule" : "0 0/1 * * * ?",
"persisted" : true,
"invokeService" : "script",
"invokeContext" : {
"script": {
"type" : "text/javascript",
"file" : "script/triggerEmailNotification.js",
"fromSender" : "admin@example.com",
"toEmail" : "user@example.com"
}
}
} Tip
In general, you should namespace variables passed into scripts with the
globals map. Passing variables in this way prevents
collisions with the top-level reserved words for script maps, such as
file, source, and
type. The following example uses the
globals map to namespace the variables passed in the
previous example.
"script": {
"type" : "text/javascript",
"file" : "script/triggerEmailNotification.js",
"globals" : {
"fromSender" : "admin@example.com",
"toEmail" : "user@example.com"
}
}
Script variables are not necessarily simple key:value
pairs. A script variable can be any arbitrarily complex JSON object.
7.9. Configuring HTTP Clients
Several IDM modules, such as the external REST service and identity provider service, need to make HTTP(S) requests to external systems.
HTTP client settings can be configured through any expression resolver
(in resolver/boot.properties, environment variables, or
Java system properties). Configuration for specific clients can be set in
that client's JSON configuration file. For example
conf/external.rest.json configures the external REST
service and properties set there override the expression resolvers. For more
information on property resolution, see "Expression Evaluation and Order of Precedence".
You can set the following properties for HTTP clients:
openidm.http.client.sslAlgorithmThe cipher to be used when making SSL/TLS connections, for example,
AES,ECB, orPKCS5Padding. Defaults to the system SSL algorithm.openidm.http.client.socketTimeoutThe TCP socket timeout, in seconds, when waiting for HTTP responses. The default timeout is 10 seconds.
openidm.http.client.connectionTimeoutThe TCP connection timeout for new HTTP connections, in seconds. The default timeout is 10 seconds.
openidm.http.client.reuseConnections(true or false)Specifies whether HTTP connections should be kept alive and reused for additional requests. By default, connections will be reused if possible.
openidm.http.client.retryRequests(true or false)Specifies whether requests should be retried if a failure is detected. By default requests will be retried.
openidm.http.client.maxConnections(integer)The maximum number of connections that should be pooled by the HTTP client. At most
64connections will be pooled by default.openidm.http.client.hostnameVerifier(string)Specifies whether the client should check that the hostname to which it has connected is allowed by the certificate that is presented by the server.
The property can take the following values:
STRICT- hostnames are validatedALLOW_ALL- the external REST service does not attempt to match the URL hostname to the SSL certificate Common Name, as part of its validation process
If you do not set this property, the behavior is to validate hostnames (the equivalent of setting
"hostnameVerifier": "STRICT"). In production environments, you should set this property toSTRICT.openidm.http.client.proxy.uriSpecifies that the client should make its HTTP(S) requests through the specified proxy server.
openidm.http.client.proxy.userNameThe username of the account for the specified proxy.
openidm.http.client.proxy.passwordThe password of the account for the specified proxy.
openidm.http.client.proxy.useSystem(true or false)If
true>, specifies a system-wide proxy with the JVM system properties,http.proxyHost,http.proxyPort, and (optionally)http.nonProxyHosts.If
openidm.http.client.proxy.uriis set, and not empty, that setting overrides the system proxy setting.
Chapter 8. Accessing Data Objects
IDM supports a variety of objects that can be addressed via a URL or URI. You can access data objects by using scripts (through the Resource API) or by using direct HTTP calls (through the REST API).
The following sections describe these two methods of accessing data objects, and provide information on constructing and calling data queries.
8.1. Accessing Data Objects By Using Scripts
IDM's uniform programming model means that all objects are queried and manipulated in the same way, using the Resource API. The URL or URI that is used to identify the target object for an operation depends on the object type. For an explanation of object types, see "Data Models and Objects Reference". For more information about scripts and the objects available to scripts, see "Scripting Reference".
You can use the Resource API to obtain managed, system, configuration, and repository objects, as follows:
val = openidm.read("managed/organization/mysampleorg")
val = openidm.read("system/mysystem/account")
val = openidm.read("config/custom/mylookuptable")
val = openidm.read("repo/custom/mylookuptable")For information about constructing an object ID, see "URI Scheme".
You can update entire objects with the update() function,
as follows:
openidm.update("managed/organization/mysampleorg", rev, object)
openidm.update("system/mysystem/account", rev, object)
You can apply a partial update to a managed or system object by using the
patch() function:
openidm.patch("managed/organization/mysampleorg", rev, value)
The create(), delete(), and
query() functions work the same way.
8.2. Accessing Data Objects By Using the REST API
IDM provides RESTful access to data objects through the ForgeRock Common REST API. To access objects over REST, you can use a browser-based REST client, such as the Simple REST Client for Chrome, or RESTClient for Firefox. Alternatively you can use the curl command-line utility.
For a comprehensive overview of the REST API, see "REST API Reference".
To obtain a managed object through the REST API, depending on your security
settings and authentication configuration, perform an HTTP GET on the
corresponding URL, for example
http://localhost:8080/openidm/managed/organization/mysampleorg.
By default, the HTTP GET returns a JSON representation of the object.
In general, you can map any HTTP request to the corresponding
openidm.method call. The following example shows how the
parameters provided in an openidm.query request correspond
with the key-value pairs that you would include in a similar HTTP GET request:
Reading an object using the Resource API:
openidm.query("managed/user", { "_queryId": "query-all" }, ["userName","sn"])Reading an object using the REST API:
$ curl \ --header "X-OpenIDM-Username: openidm-admin" \ --header "X-OpenIDM-Password: openidm-admin" \ --request GET \ "http://localhost:8080/openidm/managed/user?_queryId=query-all&_fields=userName,sn"
8.3. Defining and Calling Queries
An advanced query model enables you to define queries and to call them over the REST or Resource API. Three types of queries are supported, on both managed, and system objects:
Common filter expressions
Parameterized, or predefined queries
Native query expressions
Each of these mechanisms is discussed in the following sections.
Tip
For limits on queries in progressive profiling, see "Custom Progressive Profile Conditions".
8.3.1. Common Filter Expressions
The ForgeRock REST API defines common filter expressions that enable you to form arbitrary queries using a number of supported filter operations. This query capability is the standard way to query data if no predefined query exists, and is supported for all managed and system objects.
Common filter expressions are useful in that they do not require knowledge of how the object is stored and do not require additions to the repository configuration.
Common filter expressions are called with the
_queryFilter keyword. The following example uses a common
filter expression to retrieve managed user objects whose user name is Smith:
$ curl \ --header "X-OpenIDM-Username: openidm-admin" \ --header "X-OpenIDM-Password: openidm-admin" \ 'http://localhost:8080/openidm/managed/user?_queryFilter=userName+eq+"smith"'
The filter is URL encoded in this example. The corresponding filter using the resource API would be:
openidm.query("managed/user", { "_queryFilter" : '/userName eq "smith"' });Note that, this JavaScript invocation is internal and is not subject to the same URL-encoding requirements that a GET request would be. Also, because JavaScript supports the use of single quotes, it is not necessary to escape the double quotes in this example.
For a list of supported filter operations, see "Constructing Queries".
Note that using common filter expressions to retrieve values from arrays is currently not supported. If you need to search within an array, you should set up a predefined (parameterized) in your repository configuration. For more information, see "Parameterized Queries".
8.3.2. Parameterized Queries
Managed objects in the supported repositories can be accessed using a
parameterized query mechanism. Parameterized queries on repositories are
defined in the repository configuration (repo.*.json)
and are called by their _queryId.
Parameterized queries provide precise control over the query that is executed. Such control might be useful for tuning, or for performing database operations such as aggregation (which is not possible with a common filter expression.)
Parameterized queries provide security and portability for the query call signature, regardless of the backend implementation. Queries that are exposed over the REST interface must be parameterized queries to guard against injection attacks and other misuse. Queries on the officially supported repositories have been reviewed and hardened against injection attacks.
For system objects, support for parameterized queries is restricted to
_queryId=query-all-ids. There is currently no support for
user-defined parameterized queries on system objects. Typically,
parameterized queries on system objects are not called directly over the
REST interface, but are issued from internal calls, such as correlation
queries.
A typical query definition is as follows:
"query-all-ids" : "SELECT objectid FROM ${_dbSchema}.${_table} LIMIT ${int:_pageSize} OFFSET ${int:_pagedResultsOffset}",To call this query, you would reference its ID, as follows:
?_queryId=query-all-ids
The following example calls query-all-ids over the REST
interface:
$ curl \ --header "X-OpenIDM-Username: openidm-admin" \ --header "X-OpenIDM-Password: openidm-admin" \ "http://localhost:8080/openidm/managed/user?_queryId=query-all-ids"
Note
In repo.jdbc.json, the queries
configuration object has a property,
validInRelationshipQuery, which is an array specifying
the query IDs of queries that make use of relationships. If you create
additional queries that you expect to use as part of a relationship
query, be sure to add the query ID to this array. If no query IDs are
specified or the property is missing, relationship information will not
be returned in query results, even if requested. For more information
about relationships, see "Managing Relationships Between Objects".
8.3.3. Native Query Expressions
Native query expressions are supported for all managed objects and system objects, and can be called directly, rather than being defined in the repository configuration.
Native queries are intended specifically for internal callers, such as custom scripts, and should be used only in situations where the common filter or parameterized query facilities are insufficient. For example, native queries are useful if the query needs to be generated dynamically.
The query expression is specific to the target resource. For repositories, queries use the native language of the underlying data store. For system objects that are backed by OpenICF connectors, queries use the applicable query language of the system resource.
Important
Native query expressions are not supported with the default DS repository.
Native queries on the repository are made using the
_queryExpression keyword. For example:
$ curl \ --header "X-OpenIDM-Username: openidm-admin" \ --header "X-OpenIDM-Password: openidm-admin" \ "http://localhost:8080/openidm/managed/user?_queryExpression=select+from+managed_user"
Unless you have specifically enabled native queries over REST, the previous command returns a 403 access denied error message. Native queries are not portable and do not guard against injection attacks. Such query expressions should therefore not be used or made accessible over the REST interface or over HTTP in production environments. They should be used only via the internal Resource API. If you want to enable native queries over REST for development, see "Protecting Sensitive REST Interface URLs".
Alternatively, if you really need to expose native queries over HTTP, in a selective manner, you can design a custom endpoint to wrap such access.
8.3.4. Constructing Queries
The openidm.query function enables you to query managed
and system objects. The query syntax is
openidm.query(id, params), where id
specifies the object on which the query should be performed and
params provides the parameters that are passed to the
query, either _queryFilter or
_queryId. For example:
var params = {
'_queryFilter' : 'givenName co "' + sourceCriteria + '" or ' + 'sn co "' + sourceCriteria + '"'
};
var results = openidm.query("system/ScriptedSQL/account", params)
Over the REST interface, the query filter is specified as
_queryFilter=filter, for
example:
$ curl \ --header "X-OpenIDM-Username: openidm-admin" \ --header "X-OpenIDM-Password: openidm-admin" \ --request GET \ 'http://localhost:8080/openidm/managed/user?_queryFilter=userName+eq+"Smith"'
Note the use of double-quotes around the search term:
Smith. In _queryFilter
expressions, string values must use double-quotes.
Numeric and boolean expressions should not use quotes.
When called over REST, you must URL encode the filter expression. The following examples show the filter expressions using the resource API and the REST API, but do not show the URL encoding, to make them easier to read.
Note that, for generic mappings, any fields that are included in the query
filter (for example userName in the previous query), must
be explicitly defined as searchable, if you have set
the global searchableDefault to false. For more
information, see "Improving Generic Mapping Search Performance (JDBC)".
The filter expression is constructed from the
building blocks shown in this section. In these expressions the simplest
json-pointer is a field of the JSON resource,
such as userName or id. A JSON pointer
can, however, point to nested elements.
Note
You can also use the negation operator (!) in query
construction. For example, a _queryFilter=!(userName+eq+"jdoe")
query would return every userName except for
jdoe.
You can set up query filters with the following expression types:
8.3.4.1. Comparison Expressions
Equal queries (see "Querying Objects That Equal a Specified Value")
Contains queries (see "Querying Objects That Contain a Specified Value")
Starts with queries (see "Querying Objects That Start With a Specified Value")
Less than queries (see "Querying Objects That Are Less Than a Specified Value")
Less than or equal to queries (see "Querying Objects That Are Less Than or Equal to a Specified Value")
Greater than queries (see "Querying Objects That Are Greater Than a Specified Value")
Greater than or equal to queries (see "Querying Objects That Are Greater Than or Equal to a Specified Value")
Note
Certain system endpoints also support EndsWith and
ContainsAllValues queries. However, such queries are
not supported for managed objects and have not been
tested with all supported OpenICF connectors.
8.3.4.1.1. Querying Objects That Equal a Specified Value
This is the associated JSON comparison expression:
json-pointer eq
json-value.
Consider the following example:
"_queryFilter" : '/givenName eq "Dan"'
The following REST call returns the user name and given name of all
managed users whose first name (givenName) is "Dan":
$ curl \
--header "X-OpenIDM-Username: openidm-admin" \
--header "X-OpenIDM-Password: openidm-admin" \
--request GET \
'http://localhost:8080/openidm/managed/user?_queryFilter=givenName+eq+"Dan"&_fields=userName,givenName'
{
"remainingPagedResults": -1,
"pagedResultsCookie": null,
"resultCount": 3,
"result": [
{
"givenName": "Dan",
"userName": "dlangdon"
},
{
"givenName": "Dan",
"userName": "dcope"
},
{
"givenName": "Dan",
"userName": "dlanoway"
}
}8.3.4.1.2. Querying Objects That Contain a Specified Value
This is the associated JSON comparison expression:
json-pointer co
json-value.
Consider the following example:
"_queryFilter" : '/givenName co "Da"'
The following REST call returns the user name and given name of all
managed users whose first name (givenName) contains
"Da":
$ curl \
--header "X-OpenIDM-Username: openidm-admin" \
--header "X-OpenIDM-Password: openidm-admin" \
--request GET \
'http://localhost:8080/openidm/managed/user?_queryFilter=givenName+co+"Da"&_fields=userName,givenName'
{
"remainingPagedResults": -1,
"pagedResultsCookie": null,
"resultCount": 10,
"result": [
{
"givenName": "Dave",
"userName": "djensen"
},
{
"givenName": "David",
"userName": "dakers"
},
{
"givenName": "Dan",
"userName": "dlangdon"
},
{
"givenName": "Dan",
"userName": "dcope"
},
{
"givenName": "Dan",
"userName": "dlanoway"
},
{
"givenName": "Daniel",
"userName": "dsmith"
},
...
}8.3.4.1.3. Querying Objects That Start With a Specified Value
This is the associated JSON comparison expression:
json-pointer sw
json-value.
Consider the following example:
"_queryFilter" : '/sn sw "Jen"'
The following REST call returns the user names of all managed users whose
last name (sn) starts with "Jen":
$ curl \
--header "X-OpenIDM-Username: openidm-admin" \
--header "X-OpenIDM-Password: openidm-admin" \
--request GET \
'http://localhost:8080/openidm/managed/user?_queryFilter=sn+sw+"Jen"&_fields=userName'
{
"remainingPagedResults": -1,
"pagedResultsCookie": null,
"resultCount": 4,
"result": [
{
"userName": "bjensen"
},
{
"userName": "djensen"
},
{
"userName": "cjenkins"
},
{
"userName": "mjennings"
}
]
}8.3.4.1.4. Querying Objects That Are Less Than a Specified Value
This is the associated JSON comparison expression:
json-pointer lt json-value.
Consider the following example:
"_queryFilter" : '/employeeNumber lt 5000'
The following REST call returns the user names of all managed users whose
employeeNumber is lower than 5000:
$ curl \
--header "X-OpenIDM-Username: openidm-admin" \
--header "X-OpenIDM-Password: openidm-admin" \
--request GET \
'http://localhost:8080/openidm/managed/user?_queryFilter=employeeNumber+lt+5000&_fields=userName,employeeNumber'
{
"remainingPagedResults": -1,
"pagedResultsCookie": null,
"resultCount": 4999,
"result": [
{
"employeeNumber": 4907,
"userName": "jnorris"
},
{
"employeeNumber": 4905,
"userName": "afrancis"
},
{
"employeeNumber": 3095,
"userName": "twhite"
},
{
"employeeNumber": 3921,
"userName": "abasson"
},
{
"employeeNumber": 2892,
"userName": "dcarter"
}
...
]
}8.3.4.1.5. Querying Objects That Are Less Than or Equal to a Specified Value
This is the associated JSON comparison expression:
json-pointer le
json-value.
Consider the following example:
"_queryFilter" : '/employeeNumber le 5000'
The following REST call returns the user names of all managed users whose
employeeNumber is 5000 or less:
$ curl \
--header "X-OpenIDM-Username: openidm-admin" \
--header "X-OpenIDM-Password: openidm-admin" \
--request GET \
'http://localhost:8080/openidm/managed/user?_queryFilter=employeeNumber+le+5000&_fields=userName,employeeNumber'
{
"remainingPagedResults": -1,
"pagedResultsCookie": null,
"resultCount": 5000,
"result": [
{
"employeeNumber": 4907,
"userName": "jnorris"
},
{
"employeeNumber": 4905,
"userName": "afrancis"
},
{
"employeeNumber": 3095,
"userName": "twhite"
},
{
"employeeNumber": 3921,
"userName": "abasson"
},
{
"employeeNumber": 2892,
"userName": "dcarter"
}
...
]
}8.3.4.1.6. Querying Objects That Are Greater Than a Specified Value
This is the associated JSON comparison expression:
json-pointer gt
json-value
Consider the following example:
"_queryFilter" : '/employeeNumber gt 5000'
The following REST call returns the user names of all managed users whose
employeeNumber is higher than 5000:
$ curl \
--header "X-OpenIDM-Username: openidm-admin" \
--header "X-OpenIDM-Password: openidm-admin" \
--request GET \
'http://localhost:8080/openidm/managed/user?_queryFilter=employeeNumber+gt+5000&_fields=userName,employeeNumber'
{
"remainingPagedResults": -1,
"pagedResultsCookie": null,
"resultCount": 1458,
"result": [
{
"employeeNumber": 5003,
"userName": "agilder"
},
{
"employeeNumber": 5011,
"userName": "bsmith"
},
{
"employeeNumber": 5034,
"userName": "bjensen"
},
{
"employeeNumber": 5027,
"userName": "cclarke"
},
{
"employeeNumber": 5033,
"userName": "scarter"
}
...
]
}8.3.4.1.7. Querying Objects That Are Greater Than or Equal to a Specified Value
This is the associated JSON comparison expression:
json-pointer ge
json-value.
Consider the following example:
"_queryFilter" : '/employeeNumber ge 5000'
The following REST call returns the user names of all managed users whose
employeeNumber is 5000 or greater:
$ curl \
--header "X-OpenIDM-Username: openidm-admin" \
--header "X-OpenIDM-Password: openidm-admin" \
--request GET \
'http://localhost:8080/openidm/managed/user?_queryFilter=employeeNumber+ge+5000&_fields=userName,employeeNumber'
{
"remainingPagedResults": -1,
"pagedResultsCookie": null,
"resultCount": 1457,
"result": [
{
"employeeNumber": 5000,
"userName": "agilder"
},
{
"employeeNumber": 5011,
"userName": "bsmith"
},
{
"employeeNumber": 5034,
"userName": "bjensen"
},
{
"employeeNumber": 5027,
"userName": "cclarke"
},
{
"employeeNumber": 5033,
"userName": "scarter"
}
...
]
}8.3.4.2. Presence Expressions
The following examples show how you can build filters using a presence
expression, shown as pr. The presence expression is a
filter that returns all records with a given attribute.
A presence expression filter evaluates to true when a
json-pointer pr matches any
object in which the json-pointer is present,
and contains a non-null value. Consider the following expression:
"_queryFilter" : '/mail pr'
The following REST call uses that expression to return the mail addresses
for all managed users with a mail property:
$ curl \
--header "X-OpenIDM-Username: openidm-admin" \
--header "X-OpenIDM-Password: openidm-admin" \
--request GET \
'http://localhost:8080/openidm/managed/user?_queryFilter=mail+pr&_fields=mail'
{
"remainingPagedResults": -1,
"pagedResultsCookie": null,
"resultCount": 2,
"result": [
{
"mail": "jdoe@exampleAD.com"
},
{
"mail": "bjensen@example.com"
}
]
}
Depending on the connector, you can apply the presence filter on system
objects. The following query returns the email address of all users in a
CSV file who have the email attribute in their entries:
$ curl \
--header "X-OpenIDM-Username: openidm-admin" \
--header "X-OpenIDM-Password: openidm-admin" \
--request GET \
'http://localhost:8080/openidm/system/csvfile/account?_queryFilter=email+pr&_fields=email'
{
"result": [
{
"_id": "bjensen",
"email": "bjensen@example.com"
},
{
"_id": "scarter",
"email": "scarter@example.com"
}
],
"resultCount": 2,
"pagedResultsCookie": "MA%3D%3D",
"totalPagedResultsPolicy": "NONE",
"totalPagedResults": -1,
"remainingPagedResults": -1
}
Not all connectors support the presence filter. In most cases, you can
replicate the behavior of the presence filter with an "equals"
(eq) query such as _queryFilter=email+eq"*"
8.3.4.3. Literal Expressions
A literal expression is a boolean:
truematches any object in the resource.falsematches no object in the resource.
For example, you can list the _id of all managed
objects as follows:
$ curl \
--header "X-OpenIDM-Username: openidm-admin" \
--header "X-OpenIDM-Password: openidm-admin" \
--request GET \
'http://localhost:8080/openidm/managed/user?_queryFilter=true&_fields=_id'
{
"remainingPagedResults": -1,
"pagedResultsCookie": null,
"resultCount": 2,
"result": [
{
"_id": "d2e29d5f-0d74-4d04-bcfe-b1daf508ad7c"
},
{
"_id": "709fed03-897b-4ff0-8a59-6faaa34e3af6"
}
]
}
8.3.4.4. Complex Expressions
You can combine expressions using the boolean operators and,
or, and ! (not). The following
example queries managed user objects located in London, with last name Jensen:
$ curl \
--header "X-OpenIDM-Username: openidm-admin" \
--header "X-OpenIDM-Password: openidm-admin" \
--request GET \
'http://localhost:8080/openidm/managed/user/?_queryFilter=city+eq+"London"+and+sn+eq+"Jensen"&_fields=userName,givenName,sn'
{
"remainingPagedResults": -1,
"pagedResultsCookie": null,
"resultCount": 3,
"result": [
{
"sn": "Jensen",
"givenName": "Clive",
"userName": "cjensen"
},
{
"sn": "Jensen",
"givenName": "Dave",
"userName": "djensen"
},
{
"sn": "Jensen",
"givenName": "Margaret",
"userName": "mjensen"
}
]
}8.3.5. Paging Query Results
The common filter query mechanism supports paged query results for managed objects, and for some system objects, depending on the system resource. There are two ways to page objects in a query:
Using a cookie based on the value of a specified sort key.
Using an offset that specifies how many records should be skipped before the first result is returned.
These methods are implemented with the following query parameters:
_pagedResultsCookieOpaque cookie used by the server to keep track of the position in the search results. The format of the cookie is a base-64 encoded version of the value of the unique sort key property. The value of the returned cookie is URL-encoded to prevent values such as
+from being incorrectly translated.You cannot page results without sorting them (using the
_sortKeysparameter). If you do not specify a sort key, the_idof the record is used as the default sort key. At least one of the specified sort key properties must be a unique value property, such as_id.Tip
For paged searches on generic mappings with the default DS repository, you should sort on the
_idproperty, as this is the only property that is stored outside of the JSON blob. If you sort on something other than_id, the search will incur a performance hit because IDM effectively has to pull the entire result set, and then sort it.The server provides the cookie value on the first request. You should then supply the cookie value in subsequent requests until the server returns a null cookie, meaning that the final page of results has been returned.
The
_pagedResultsCookieparameter is supported only for filtered queries, that is, when used with the_queryFilterparameter. You cannot use the_pagedResultsCookiewith a_queryExpressionor a_queryId.The
_pagedResultsCookieand_pagedResultsOffsetparameters are mutually exclusive, and cannot be used together.Paged results are enabled only if the
_pageSizeis a non-zero integer._pagedResultsOffsetSpecifies the index within the result set of the number of records to be skipped before the first result is returned. The format of the
_pagedResultsOffsetis an integer value. When the value of_pagedResultsOffsetis greater than or equal to 1, the server returns pages, starting after the specified index.This request assumes that the
_pageSizeis set, and not equal to zero.For example, if the result set includes 10 records, the
_pageSizeis 2, and the_pagedResultsOffsetis 6, the server skips the first 6 records, then returns 2 records, 7 and 8. The_remainingPagedResultsvalue would be 2, the last two records (9 and 10) that have not yet been returned.If the offset points to a page beyond the last of the search results, the result set returned is empty.
Note that the
totalPagedResultsand_remainingPagedResultsparameters are not supported for all queries. Where they are not supported, their returned value is always-1._pageSizeAn optional parameter indicating that query results should be returned in pages of the specified size. For all paged result requests other than the initial request, a cookie should be provided with the query request.
The default behavior is not to return paged query results. If set, this parameter should be an integer value, greater than zero.
8.3.6. Sorting Query Results
For common filter query expressions, you can sort the results of a query
using the _sortKeys parameter. This parameter takes a
comma-separated list as a value and orders the way in which the JSON result
is returned, based on this list.
The _sortKeys parameter is not supported for predefined
queries.
Note
When using DS as a repo, pagination using
_pageSize is recommended if you intend to use
_sortKeys. If you do not plan to paginate your query,
the data you are querying must at least be indexed in DS.
For more information about how to set up indexes in DS, see
Indexing
Attribute Values in the DS Administration
Guide.
The following query returns all users with the givenName
Dan, and sorts the results alphabetically, according to
surname (sn):
$ curl \
--header "X-OpenIDM-Username: openidm-admin" \
--header "X-OpenIDM-Password: openidm-admin" \
--request GET \
'http://localhost:8080/openidm/system/ldap/account?_queryFilter=givenName+eq+"Dan"&_fields=givenName,sn&_sortKeys=sn'
{
"remainingPagedResults": -1,
"pagedResultsCookie": null,
"resultCount": 3,
"result": [
{
"sn": "Cope",
"givenName": "Dan"
},
{
"sn": "Langdon",
"givenName": "Dan"
},
{
"sn": "Lanoway",
"givenName": "Dan"
}
]
} 8.3.7. Running Scripts on Query Results
For managed objects IDM includes an onRetrieve
script hook that enables you to manipulate properties when an object is
retrieved as the result of a query. To use the onRetrieve
trigger, the query must include the executeOnRetrieve
parameter, which indicates that the query must return the complete object.
For example:
$ curl \ --header "X-OpenIDM-Username: openidm-admin" \ --header "X-OpenIDM-Password: openidm-admin" \ --request GET \ 'http://localhost:8080/openidm/managed/user?_queryFilter=sn+eq+"Jensen"&executeOnRetrieve=true'
For performance reasons, executeOnRetrieve is
false by default.
Chapter 9. Working With Managed Objects
IDM provides a default schema for typical managed object types, such as users and roles, but does not control the structure of objects that you store in the repository. You can modify or extend the schema for the default object types, and you can set up a new managed object type for any item that can be collected in a data set. For example, with the right schema, you can set up any device associated with the Internet of Things (IoT).
This chapter describes how to work with the default managed object types and how to create new object types as required by your deployment. For more information about the IDM object model, see "Data Models and Objects Reference".
9.1. Defining the Managed Object Schema
Managed objects and their properties are defined in your project's
conf/managed.json file. The schema defined in this file
is not a comprehensive list of all the properties that can be stored in the
managed object repository. If you use a generic object mapping, you can
create a managed object with any arbitrary property, and that property will
be stored in the repository. However, if you create an object with properties
that are not defined in conf/managed.json, those
properties will not be visible in the UI. In addition, you will not be able
configure the "sub-properties" that are described in the following section.
For explicit object mappings, the schema must be mapped to tables and columns in the JDBC database or to organizational units in DS.
For more information about explicit and generic object mappings, see "Using Generic and Explicit Object Mappings".
9.2. Creating and Modifying Managed Object Types
If the managed object types provided in the default configuration are not sufficient for your deployment, you can create any number of new managed object types.
The easiest way to create a new managed object type is to use the Admin UI, as follows:
Navigate to the Admin UI URL (
https://localhost:8443/admin) then select Configure > Managed Objects > New Managed Object.Enter a name and readable title for the new managed object. The readable title controls how that object will be referred to in the UI. Optionally, specify an icon that will be displayed for that object type, and a description.
Click Save.
On the Properties tab, specify the schema for the object type, that is, the properties that make up the object.
On the Scripts tab, specify any scripts that should be applied on various events associated with that object type, for example, when an object of that type is created, updated or deleted.
You can also create a new managed object type by adding its configuration,
in JSON, to your project's conf/managed.json
file. The following excerpt of the managed.json file
shows the configuration of a "Phone" object, that was created through the UI.
{
"name": "Phone",
"schema": {
"$schema": "http://forgerock.org/json-schema#",
"type": "object",
"properties": {
"brand": {
"description": "The supplier of the mobile phone",
"title": "Brand",
"viewable": true,
"searchable": true,
"userEditable": false,
"policies": [],
"returnByDefault": false,
"minLength": "",
"pattern": "",
"isVirtual": false,
"type": [
"string",
"null"
]
},
"assetNumber": {
"description": "The asset tag number of the mobile device",
"title": "Asset Number",
"viewable": true,
"searchable": true,
"userEditable": false,
"policies": [],
"returnByDefault": false,
"minLength": "",
"pattern": "",
"isVirtual": false,
"type": "string"
},
"model": {
"description": "The model number of the mobile device, such as 6 plus, Galaxy S4",
"title": "Model",
"viewable": true,
"searchable": false,
"userEditable": false,
"policies": [],
"returnByDefault": false,
"minLength": "",
"pattern": "",
"isVirtual": false,
"type": "string"
}
},
"required": [],
"order": [
"brand",
"assetNumber",
"model"
]
}
}
Every managed object type has a name and a
schema that describes the properties associated with that
object. The managed object name can only include the
characters a-z, A-Z,
0-9, and _ (underscore).
You can add any arbitrary properties to the schema of a managed object type. A property definition typically includes the following fields:
titleThe name of the property, in human-readable language, used to display the property in the UI.
descriptionA brief description of the property.
viewableSpecifies whether this property is viewable in the object's profile in the UI). Boolean,
trueorfalse(trueby default).searchableSpecifies whether this property can be searched in the UI. A searchable property is visible within the Managed Object data grid in the Self-Service UI. Note that for a property to be searchable in the UI, it must be indexed in the repository configuration. For information on indexing properties in a repository, see "Using Generic and Explicit Object Mappings".
Boolean,
trueorfalse(falseby default).userEditableSpecifies whether users can edit the property value in the UI. This property applies in the context of the Self-Service UI, where users are able to edit certain properties of their own accounts. Boolean,
trueorfalse(falseby default).isProtectedSpecifies whether reauthentication is required if the value of this property changes.
For certain properties, such as passwords, changing the value of the property should force an end user to reauthenticate. These properties are referred to as protected properties. Depending on how the user authenticates (which authentication module is used), the list of protected properties is added to the user's security context. For example, if a user logs in with the login and password of their managed user entry (
MANAGED_USERauthentication module), their security context will include this list of protected properties. The list of protected properties is not included in the security context if the user logs in with a module that does not support reauthentication (such as through a social identity provider).minLengthThe minimum number of characters that the value of this property must have.
patternAny specific pattern to which the value of the property must adhere. For example, a property whose value is a date might require a specific date format.
policiesAny policy validation that must be applied to the property. For more information on managed object policies, see "Configuring the Default Policy for Managed Objects".
requiredSpecifies whether the property must be supplied when an object of this type is created. Boolean,
trueorfalse.Important
The
requiredpolicy is assessed only during object creation, not when an object is updated. You can effectively bypass the policy by updating the object and supplying an empty value for that property. To prevent this inconsistency, set bothrequiredandnotEmptytotruefor required properties. This configuration indicates that the property must exist, and must have a value.typeThe data type for the property value; can be
string,array,boolean,integer,number,object,Resource Collection, ornull.Note
If a property (such as a
telephoneNumber) might not exist for a particular user, you must includenullas one of the propertytypes. You can set a null property type in the Admin UI (Configure > Managed Objects > User, select the property, and under the Details tab, Advanced Options, setNullabletotrue).You can also set a null property type directly in your
managed.jsonfile by setting"type" : '[ "string","null" ]'for that property (wherestringcan be any other valid property type. This information is validated by thepolicy.jsscript, as described in "Validation of Managed Object Data Types".If you're configuring a data
typeofarraythrough the Admin UI, you're limited to two values.isVirtualSpecifies whether the property takes a static value, or whether its value is calculated "on the fly" as the result of a script. Boolean,
trueorfalse.returnByDefaultFor non-core attributes (virtual attributes and relationship fields), specifies whether the property will be returned in the results of a query on an object of this type if it is not explicitly requested. Virtual attributes and relationship fields are not returned by default. Boolean,
trueorfalse. When the property is in an array within a relationship, always set tofalse.-
relationshipGrantTemporalConstraintsEnforced For attributes with relationship fields. Specifies whether this relationship should have temporal constraints enforced. Boolean,
trueorfalse. For more information about temporal constraints, see "Using Temporal Constraints to Restrict Effective Roles".
9.3. Working with Managed Users
User objects that are stored in the repository are referred to as
managed users. For a JDBC repository, IDM
stores managed users in the managedobjects table. A second
table, managedobjectproperties, serves as the index table.
IDM provides RESTful access to managed users, at the context path
/openidm/managed/user. For more information, see
"Getting Started With the REST Interface" in the Installation Guide.
You can add, change, and delete managed users by using the Admin UI or over the REST interface. To use the Admin UI, select Manage > User. The UI is intuitive as regards user management.
If you have many managed users, the User List page now supports specialized filtering, with the Advanced Filter option, which allows you to build many of the queries shown in "Defining and Calling Queries".
The following examples show how to add, change and delete users over the REST interface. For a reference of all managed user endpoints and actions, see "Managing Users Over REST". You can also use the API Explorer as a reference to the managed object REST API. For more information, see "API Explorer".
The following example retrieves the JSON representation of all managed users in the repository:
$ curl \ --header "X-OpenIDM-Username: openidm-admin" \ --header "X-OpenIDM-Password: openidm-admin" \ --request GET \ "http://localhost:8080/openidm/managed/user?_queryId=query-all-ids"
The following two examples query all managed users for a user named
scarter:
$ curl \ --header "X-OpenIDM-Username: openidm-admin" \ --header "X-OpenIDM-Password: openidm-admin" \ --request GET \ "http://localhost:8080/openidm/managed/user?_queryFilter=userName+eq+%22scarter%22"
In this second example, note the use of single quotes around the URL, to
avoid conflicts with the double quotes around the user named
smith. Note also that the _queryFilter
requires double quotes (or the URL encoded equivalent %22)
around the search term:
$ curl \ --header "X-OpenIDM-Username: openidm-admin" \ --header "X-OpenIDM-Password: openidm-admin" \ --request GET \ 'http://localhost:8080/openidm/managed/user?_queryFilter=userName+eq+"scarter"'
The following example retrieves the JSON representation of a managed user,
specified by his ID, scarter:
$ curl \ --header "X-OpenIDM-Username: openidm-admin" \ --header "X-OpenIDM-Password: openidm-admin" \ --request GET \ "http://localhost:8080/openidm/managed/user/scarter"
The following example adds a user with a specific user ID,
bjensen:
$ curl \
--header "Content-Type: application/json" \
--header "X-OpenIDM-Username: openidm-admin" \
--header "X-OpenIDM-Password: openidm-admin" \
--header "If-None-Match: *" \
--request PUT \
--data '{
"userName":"bjensen",
"sn":"Jensen",
"givenName":"Barbara",
"mail": "bjensen@example.com",
"telephoneNumber": "082082082",
"password":"Passw0rd"
}' \
"http://localhost:8080/openidm/managed/user/bjensen"The following example adds the same user, but allows IDM to generate an ID. Creating objects with system-generated IDs is recommended in production environments:
$ curl \
--header "Content-Type: application/json" \
--header "X-OpenIDM-Username: openidm-admin" \
--header "X-OpenIDM-Password: openidm-admin" \
--request POST \
--data '{
"userName":"bjensen",
"sn":"Jensen",
"givenName":"Barbara",
"mail": "bjensen@example.com",
"telephoneNumber": "082082082",
"password":"Passw0rd"
}' \
"http://localhost:8080/openidm/managed/user?_action=create"
The following example checks whether user bjensen exists,
then replaces her telephone number with the new data provided in the request
body:
$ curl \
--header "Content-Type: application/json" \
--header "X-OpenIDM-Username: openidm-admin" \
--header "X-OpenIDM-Password: openidm-admin" \
--request POST \
--data '[{
"operation":"replace",
"field":"/telephoneNumber",
"value":"1234567"
}]' \
"http://localhost:8080/openidm/managed/user?_action=patch&_queryId=for-userName&uid=bjensen"
The following example deletes user bjensen:
$ curl \ --header "X-OpenIDM-Username: openidm-admin" \ --header "X-OpenIDM-Password: openidm-admin" \ --request DELETE \ "http://localhost:8080/openidm/managed/user/bjensen"
9.4. Working With Managed Groups
IDM provides support for a managed group
object. For a JDBC repository, IDM stores managed groups with all
other managed objects, in the managedobjects table, and
uses the managedobjectproperties for indexing.
The managed group object is not provided by default. To use managed groups,
add an object similar to the following to your
conf/managed.json file:
{
"name" : "group"
},
With this addition, IDM provides RESTful access to managed
groups, at the context path /openidm/managed/group.
For an example of a deployment that uses managed groups, see "Synchronizing LDAP Groups" in the Samples Guide.
9.5. Tracking Metadata For Managed Objects
Certain self-service features, such as progressive profile completion, privacy and consent, and terms and conditions acceptance, rely on user metadata that tracks information related to a managed object state. Such data might include when the object was created, or the date of the most recent change, for example. This metadata is not stored within the object itself, but in a separate resource location.
Because object metadata is stored outside the managed object, state change situations (such as the time of an update) are separate from object changes (the update itself). This separation reduces unnecessary synchronization to targets when the only data that has changed is metadata. Metadata is not returned in a query unless it is specifically requested. Therefore, the volume of data that is retrieved when metadata is not required, is reduced.
To specify which metadata you want to track for an object, add a
meta stanza to the object definition in your managed
object configuration (managed.json file). The following
default configuration tracks the createDate and
lastChanged date for managed user objects:
{
"objects" : [
{
"name" : "user",
...
"schema" : {
...
},
"meta" : {
"property" : "_meta",
"resourceCollection" : "internal/usermeta",
"trackedProperties" : [
"createDate",
"lastChanged"
]
},
...
},
...
]
} Important
If you are not using the self-service features that require metadata, you
can remove the meta stanza from your user object
definition in managed.json. Preventing the creation and
tracking of metadata where it is not required will improve performance in
that scenario.
If you are upgrading from IDM 5.5 to IDM 6.0, and
want to use the progressive profile completion, terms and conditions, or
privacy and consent features, you must add this
meta stanza to your user object definition in
managed.json manually. You will also need to follow the
process described in "Generating Metadata For Existing Users".
The metadata configuration includes the following properties:
propertyThe property that will be dynamically added to the managed object schema for this object.
resourceCollectionThe resource location in which the metadata will be stored.
Adjust your repository to match the location you specify here. It's recommended that you use an
internalobject path and define the storage in yourrepo.jdbc.jsonorrepo.ds.jsonfile. Use generic objects for metadata storage to avoid creating new schema or table definitions.For a JDBC repository, add the following excerpt to the
genericMappingin yourrepo.jdbc.jsonfile:"internal/usermeta" : { "mainTable" : "genericobjects", "propertiesTable" : "genericobjectproperties", "searchableDefault" : false }For a DS repository, add the following excerpt to the
genericMappingin yourrepo.ds.jsonfile:"internal/usermeta" : { "dnTemplate": "ou=usermeta,ou=internal,dc=openidm,dc=forgerock,dc=com" }User objects stored in a DS repository must include the
ouspecified in the precedingdnTemplateattribute. For example:dn: ou=usermeta,ou=internal,dc=openidm,dc=forgerock,dc=com objectclass: organizationalunit objectclass: top ou: usermetatrackedPropertiesLists the properties that will be tracked as metadata for this object. In the previous example, the
createDate(when the object was created) and thelastChangeddate (when the object was last modified) are tracked.
You cannot search on metadata and it is not returned in the results of a
query unless it is specifically requested. To return all metadata for an
object, include _fields=,_meta/* in your request. The
following example returns a user entry without requesting the metadata:
$ curl \
--header "X-OpenIDM-Username: openidm-admin" \
--header "X-OpenIDM-Password: openidm-admin" \
--request GET \
"http://localhost:8080/openidm/managed/user/bjensen"
{
"_id": "bjensen",
"_rev": "000000000444dd1a",
"mail": "bjensen@example.com",
"givenName": "Barbara",
"sn": "Jensen",
"description": "Created By CSV",
"userName": "bjensen",
"telephoneNumber": "1234567",
"accountStatus": "active",
"effectiveRoles": [],
"effectiveAssignments": []
}The following example returns the same user entry, with their metadata:
$ curl \
--header "X-OpenIDM-Username: openidm-admin" \
--header "X-OpenIDM-Password: openidm-admin" \
--request GET \
"http://localhost:8080/openidm/managed/user/bjensen?_fields=,_meta/*"
{
"_id": "bjensen",
"_rev": "000000000444dd1a",
"mail": "bjensen@example.com",
"givenName": "Barbara",
"sn": "Jensen",
"description": "Created By CSV",
"userName": "bjensen",
"telephoneNumber": "1234567",
"accountStatus": "active",
"effectiveRoles": [],
"effectiveAssignments": []
"_meta": {
"_ref": "internal/usermeta/284273ff-5e50-4fa4-9d30-4a3cf4a5f642",
"_refResourceCollection": "internal/usermeta",
"_refResourceId": "284273ff-5e50-4fa4-9d30-4a3cf4a5f642",
"_refProperties": {
"_id": "30076e2e-8db5-4b4d-ab91-5351d2da4620",
"_rev": "000000001ad09f00"
},
"createDate": "2018-04-12T19:53:19.004Z",
"lastChanged": {
"date": "2018-04-12T19:53:19.004Z"
},
"loginCount": 0,
"_rev": "0000000094605ed9",
"_id": "284273ff-5e50-4fa4-9d30-4a3cf4a5f642"
}
}
Note that apart from the createDate and
lastChanged described previously, the request also returns
the loginCount. This property is stored by default for all
objects, and increments with each login request based on password or social
authentication. If the object for which metadata is tracked is not an object
that "logs in," this field will remain 0.
The request also returns a _meta property that includes
relationship information. IDM uses the relationship model to
store the metadata. When the meta stanza is added to the
user object definition, the attribute specified by the property
("property" : "_meta", in this case) is added to the
schema as a uni-directional relationship to the resource collection specified
by resourceCollection. In this example, the user object's
_meta field is stored as an
internal/usermeta object. The _meta/_ref
property shows the full resource path to the internal object where the
metadata for this user is stored.
9.5.1. Generating Metadata For Existing Users
If managed objects were created prior to IDM 6.0, those objects will not have the metadata required for the self-service processes. After you have updated your deployment to IDM 6.0, you can generate the metadata for these objects as follows:
Add the
metastanza described in the previous section to yourmanaged.jsonfile, for all object types that require metadata.Run the metadata repair script.
This script detects which managed object types have metadata enabled, scans all objects of those object types and determines which objects are missing metadata, then creates the required relationship objects for the affected managed objects.
To launch the metadata repair script, send a GET request to the
repairMetadataendpoint. For example:$ curl \ --header "X-OpenIDM-Username: openidm-admin" \ --header "X-OpenIDM-Password: openidm-admin" \ --request GET \ "http://localhost:8080/openidm/endpoint/repairMetadata" { "_id": "", "result": [ { "totalObjects": 10001, "createdMetadata": 10001, "missingMetadata": 10001, "objectType": "user" } ] }When you update objects with this script, their
createDateis set tonullunless they already have acreationDatefield. This means that thetimeSinceConditionfield for progressive profile completion will never display for those users.To set the
createDateto the currentdateTime, include thesetCreateDate=trueparameter in your request. For example:$ curl \ --header "X-OpenIDM-Username: openidm-admin" \ --header "X-OpenIDM-Password: openidm-admin" \ --request GET \ "http://localhost:8080/openidm/endpoint/repairMetadata?setCreateDate=true"
If you specify
setCreateDate=false, or do not include thesetCreateDateparameter, thecreateDatefor the object defaults tonull.If you know which object types have metadata enabled, you can restrict the scan to just those object types. The following example scans only managed user objects:
$ curl \ --header "X-OpenIDM-Username: openidm-admin" \ --header "X-OpenIDM-Password: openidm-admin" \ --request GET \ "http://localhost:8080/openidm/endpoint/repairMetadata?schemaObjectType=user"
9.6. Running Scripts on Managed Objects
IDM provides a number of hooks that enable
you to manipulate managed objects using scripts. These scripts can be
triggered during various stages of the lifecycle of the managed object, and
are defined in the managed objects configuration file
(managed.json).
The scripts can be triggered when a managed object is created (onCreate), updated (onUpdate), retrieved (onRetrieve), deleted (onDelete), validated (onValidate), or stored in the repository (onStore). A script can also be triggered when a change to a managed object triggers an implicit synchronization operation (onSync).
You can also use post-action scripts for managed objects, including after the creation of an object (postCreate), after the update of an object (postUpdate), and after the deletion of an object (postDelete).
The following sample extract of a managed.json file runs
a script to calculate the effective assignments of a managed object, whenever
that object is retrieved from the repository:
"effectiveAssignments" : {
"type" : "array",
"title" : "Effective Assignments",
"description" : "Effective Assignments",
"viewable" : false,
"returnByDefault" : true,
"isVirtual" : true,
"usageDescription" : "",
"isPersonal" : false,
"onRetrieve" : {
"type" : "text/javascript",
"file" : "roles/effectiveAssignments.js",
"effectiveRolesPropName" : "effectiveRoles"
},
"items" : {
"type" : "object",
"title" : "Effective Assignments Items"
}
},9.7. Encoding Attribute Values
There are two ways to encode attribute values for managed objects - reversible encryption and salted hashing algorithms. Attribute values that might be encoded include passwords, authentication questions, credit card numbers, and social security numbers. If passwords are already encoded on the external resource, they are generally excluded from the synchronization process. For more information, see "Managing Passwords".
You configure attribute value encoding, per schema property, in the managed
object configuration (in your project's conf/managed.json
file). The following sections show how to use reversible encryption and
salted hash algorithms to encode attribute values.
9.7.1. Encoding Attribute Values With Reversible Encryption
The following excerpt of a managed.json file shows a
managed object configuration that encrypts and decrypts the
password attribute using the default symmetric key:
{
"objects" : [
{
"name" : "user",
...
"schema" : {
...
"properties" : {
...
"password" : {
"title" : "Password",
...
"encryption" : {
"key" : "openidm-sym-default"
},
"scope" : "private",
...
}
]
} Tip
To configure encryption of properties by using the Admin UI:
Select Configure > Managed Objects, and select the object type whose property values you want to encrypt (for example User).
On the Properties tab, select the property whose value should be encrypted and select the Encrypt checkbox.
For information about encrypting attribute values from the command-line, see "Using the encrypt Subcommand".
Important
Hashing is a one way operation - property values that are hashed can not be "unhashed" in the way that they can be decrypted. Therefore, if you hash the value of any property, you cannot synchronize that property value to an external resource. For managed object properties with hashed values, you must either exclude those properties from the mapping or set a random default value if the external resource requires the property.
9.7.2. Encoding Attribute Values by Using Salted Hash Algorithms
To encode attribute values with salted hash algorithms, add the
secureHash property to the attribute definition, and
specify the algorithm that should be used to hash the value.
IDM supports the following hash algorithms:
SHA-256
|
SHA-384
|
SHA-512
|
BCrypt
|
SCrypt
|
Password-Based Key Derivation Function 2 (PBKDF2)
|
If you do not specify an algorithm, SHA-256 is used by
default. MD5 and SHA-1 are supported for legacy reasons but you should use a
more secure algorithm in production environments.
The following excerpt of a managed.json file shows a
managed object configuration that hashes the values of the
password attribute using the SHA-256
algorithm:
{
"objects" : [
{
"name" : "user",
...
"schema" : {
...
"properties" : {
...
"password" : {
"title" : "Password",
...
"secureHash" : {
"algorithm" : "SHA-256"
},
"scope" : "private",
...
}
]
} Tip
To configure hashing of properties by using the Admin UI:
Select Configure > Managed Objects, and select the object type whose property values you want to hash (for example User).
On the Properties tab, select the property whose value must be hashed and select the Hash checkbox.
Select the algorithm that should be used to hash the property value.
For information about hashing attribute values from the command-line, see "Using the secureHash Subcommand".
9.8. Privacy & Consent
As an end user, you might want to control what happens to your personal data. For IDM, that means control of how your data is shared with external systems. The example in "Marketo Connector" in the Connector Reference shows how you can generate a marketing leads database, only for those users who have selected a specific preference. Also read "Configuring Privacy & Consent".
IDM allows you to regulate access to two different kinds of personal data:
User information: while marketers want user information such as addresses and telephone numbers, IDM allows you to let individual users decide whether to share that data. For more information, see "Regulating HTTP Access to Personal Data".
Account information: by default, IDM prevents REST-based access to passwords with the
privatescope, as defined in themanaged.jsonfile. You can extend this protection to other properties. For more information, see "Restricting HTTP Access to Sensitive Data".
To configure Privacy & Consent in the Self-Service UI, see "Configuring Privacy & Consent".
9.8.1. Regulating HTTP Access to Personal Data
In some cases, you might want to allow users to choose whether to share their personal data. "Configuring Synchronization Filters With User Preferences" describes how to allow users to select basic preferences for updates and marketing. They can select these preferences when they register and in the Self-Service UI, under My Account > Preferences.
Examine the managed.json file for your project. Every
relevant property should include two settings that determine whether a user
can choose to share or not share that property:
isPersonal: When set totrue, specifies personally identifying information. By default, theisPersonaloption foruserNameandpostalAddressis set totrue.usageDescription: Includes additional information that can help users understand the sensitivity of a specific property such astelephoneNumber.
The consentedMappings property in a managed user object
enables the user to specify an array of mappings (target systems) with which
they consent to sharing their identifying information. The following
sample excerpt of the default managed user object schema shows the
consentedMappings property definition:
"consentedMappings" : {
"title" : "Consented Mappings",
"description" : "Consented Mappings",
"type" : "array",
"viewable" : false,
"searchable" : false,
"userEditable" : true,
"usageDescription" : "",
"isPersonal" : false,
"items" : {
"type" : "array",
"title" : "Consented Mappings Items",
"items" : {
"type" : "object",
"title" : "Consented Mappings Item",
"properties" : {
"mapping" : {
"title" : "Mapping",
"description" : "Mapping",
"type" : "string",
"viewable" : true,
"searchable" : true,
"userEditable" : true
},
"consentDate" : {
"title" : "Consent Date",
"description" : "Consent Date",
"type" : "string",
"viewable" : true,
"searchable" : true,
"userEditable" : true
}
},
"order" : [
"mapping",
"consentDate"
],
"required" : [
"mapping",
"consentDate"
]
}
},
"returnByDefault" : false,
"isVirtual" : false
}9.8.2. Restricting HTTP Access to Sensitive Data
You can protect specific sensitive managed data by marking the corresponding
properties as private. Private data, whether it is
encrypted or not, is not accessible over the REST interface. Properties that
are marked as private are removed from an object when that object is
retrieved over REST.
To mark a property as private, set its scope to
private in the conf/managed.json
file.
The following extract of the managed.json file shows how
HTTP access is prevented on the password and
securityAnswer properties:
{
"objects": [
{
"name": "user",
"schema": {
"id" : "http://jsonschema.net",
"title" : "User",
...
"properties": {
...
{
"name": "securityAnswer",
"encryption": {
"key": "openidm-sym-default"
},
"scope" : "private"
},
{
"name": "password",
"encryption": {
"key": "openidm-sym-default"
}'
"scope" : "private"
}
},
...
}
]
}Tip
To configure private properties by using the Admin UI:
Select Configure > Managed Objects, and select the object type whose property values you want to make private (for example User).
On the Properties tab, select the property that must be private and select the Private checkbox.
A potential caveat relates to private properties. If you use an HTTP
GET request, you won't even see private properties. Even
if you know all relevant private properties, a PUT
request would replace the entire object in the repository. In addition,
that require would effectively remove all private properties from the object.
To work around this limitation, use a POST request to
update only those properties that require change.
For example, to update the givenName of user jdoe, you
could run the following command:
$ curl \
--header "X-OpenIDM-Username: openidm-admin" \
--header "X-OpenIDM-Password: openidm-admin" \
--header "Content-Type: application/json" \
--request POST \
--data '[
{
"operation":"replace",
"field":"/givenName",
"value":"Jon"
}
]' \
"http://localhost:8080/openidm/managed/user?_action=patch&_queryId=for-userName&uid=jdoe"Note
The filtering of private data applies only to direct HTTP read and query calls on managed objects. No automatic filtering is done for internal callers, and the data that these callers choose to expose.
Chapter 10. Managing Relationships Between Objects
Relationships are references between managed objects. Roles (described in "Working With Managed Roles") are implemented using relationships, but you can create relationships between any managed object type.
10.1. Defining a Relationship Type
Relationships are defined in your project's managed object configuration
file (conf/managed.json). The default configuration
includes a relationship named manager that enables you to
configure a management relationship between two managed users. The
manager relationship is a good example from which to
understand how relationships work.
The default manager relationship is configured as
follows:
"manager" : {
"type" : "relationship",
"validate" : true,
"reverseRelationship" : true,
"reversePropertyName" : "reports",
"description" : "Manager",
"title" : "Manager",
"viewable" : true,
"searchable" : false,
"usageDescription" : "",
"isPersonal" : false,
"properties" : {
"_ref" : {
"description" : "References a relationship from a managed object",
"type" : "string"
},
"_refProperties" : {
"description" : "Supports metadata within the relationship",
"type" : "object",
"title" : "Manager _refProperties",
"properties" : {
"_id" : {
"description" : "_refProperties object ID",
"type" : "string"
}
}
}
},
"resourceCollection" : [
{
"path" : "managed/user",
"label" : "User",
"query" : {
"queryFilter" : "true",
"fields" : [
"userName",
"givenName",
"sn"
]
}
}
],
"userEditable" : false
},Most of these properties apply to any managed object type, and are described in "Creating and Modifying Managed Object Types". Relationships have the following specific configurable properties:
type(string)The object type. Must be
relationshipfor a relationship object.returnByDefault(booleantrue, false)Specifies whether the relationship should be returned as part of the response. The
returnByDefaultproperty is not specific to relationships — the flag applies to all managed object types. However, it is important to note that by default relationship properties are not returned, unless explicitly requested.reverseRelationship(booleantrue, false)Specifies whether this is a bidirectional relationship. For more information, see "Working With Bidirectional Relationships".
reversePropertyName(string)Specifies the corresponding property name in the case of a reverse relationship. For example, the
managerproperty has areversePropertyNameofreports. For more information, see "Working With Bidirectional Relationships"._ref(JSON object)Specifies how the relationship between two managed objects is referenced.
In the relationship definition, the value of this property is
{ "type" : "string" }. In a managed user entry, the value of the_refproperty is the reference to the other resource. The_refproperty is described in more detail in "Establishing a Relationship Between Two Objects"._refProperties(JSON object)Specifies any required properties from the relationship that should be included in the managed object. The
_refPropertiesfield includes a unique ID (_id) and the revision (_rev) of the object._refPropertiescan also contain arbitrary fields to support metadata within the relationship.resourceCollection(JSON object)The collection of resources (objects) on which this relationship is based (for example,
managed/userobjects).
10.2. Establishing a Relationship Between Two Objects
When you have defined a relationship type, (such as the
manager relationship, described in the previous section),
you can reference one managed user from another, using
the _ref* relationship properties. Three properties make
up a relationship reference:
_refResourceCollectionspecifies the container of the referenced object (for example,managed/user)._refResourceIdspecifies the ID of the rerenced object. This is generally a system-generated ID. For clarity, we are usingbjensenin our example._refis a derived path that is a combination of_refResourceCollectionand a URL-encoded_refResourceId.
For example, imagine that you are creating a new user, psmith, and that
psmith's manager will be bjensen. You would add psmith's user entry, and
reference bjensen's entry with the
_ref property, as follows:
$ curl \
--header "X-OpenIDM-Username: openidm-admin" \
--header "X-OpenIDM-Password: openidm-admin" \
--header "If-None-Match: *" \
--header "Content-Type: application/json" \
--request PUT \
--data '{
"sn":"Smith",
"userName":"psmith",
"givenName":"Patricia",
"displayName":"Patti Smith",
"description" : "psmith - new user",
"mail" : "psmith@example.com",
"phoneNumber" : "0831245986",
"password" : "Passw0rd",
"manager" : {"_ref" : "managed/user/bjensen"}
}' \
"http://localhost:8080/openidm/managed/user/psmith"
{
"_id": "psmith",
"_rev": "00000000ec41097c",
"sn": "Smith",
"userName": "psmith",
"givenName": "Patricia",
"displayName": "Patti Smith",
"description": "psmith - new user",
"mail": "psmith@example.com",
"phoneNumber": "0831245986",
"accountStatus": "active",
"effectiveRoles": [],
"effectiveAssignments": []
}Note that the relationship information is not returned by default. To show the relationship in psmith's entry, you must explicitly request her manager entry, as follows:
$ curl \
--header "X-OpenIDM-Username: openidm-admin" \
--header "X-OpenIDM-Password: openidm-admin" \
--request GET \
"http://localhost:8080/openidm/managed/user/psmith?_fields=manager"
{
"_id": "psmith",
"_rev": "00000000ec41097c",
"manager": {
"_ref": "managed/user/bjensen",
"_refResourceCollection": "managed/user",
"_refResourceId": "bjensen",
"_refProperties": {
"_id": "ffc6f0f3-93db-4939-b9eb-1f8389a59a52",
"_rev": "0000000081aa991a"
}
}
}
When a relationship changes, the updated relationship state can be queried
when any referenced managed objects are queried. So, after creating user
psmith with manager bjensen, a query on bjensen's user entry will show a
reference to psmith's entry in her reports property
(because the reports property is configured as the
reversePropertyName of the manager
property). The following query shows the updated relationship state for
bjensen:
$ curl \
--header "X-OpenIDM-Username: openidm-admin" \
--header "X-OpenIDM-Password: openidm-admin" \
--request GET \
"http://localhost:8080/openidm/managed/user/bjensen?_fields=reports"
{
"_id": "bjensen",
"_rev": "0000000057b5fe9d",
"reports": [
{
"_ref": "managed/user/psmith",
"_refResourceCollection": "managed/user",
"_refResourceId": "psmith",
"_refProperties": {
"_id": "ffc6f0f3-93db-4939-b9eb-1f8389a59a52",
"_rev": "0000000081aa991a"
}
}
]
}
IDM maintains referential integrity by deleting the relationship
reference, if the object referred to by that relationship is deleted. In our
example, if bjensen's user entry is deleted, the corresponding reference in
psmith's manager property is removed.
10.3. Configuring Relationship Change Notification
A relationship exists between two managed objects. By default, when a relationship changes (when it is created, updated, or deleted), the managed objects on either side of the relationship are not notified of that change. This means that the state of each object with respect to that relationship field is not recalculated until the object is read. This default behavior improves performance, especially in the case where many objects are affected by a single relationship change.
For roles, a special kind of relationship, change
notification is configured by default. The purpose of
this default configuration is to notify managed users when any of the
relationships that link users, roles, and assignments are manipulated. For
more information about relationship change notification in the specific case
of managed roles, see "Roles and Relationship Change Notification".
To change the default configuration, or to set up notification for other
relationship changes, use the notify* properties in the
relationship definition, as described in this section.
A relationship exists between an origin object and a
referenced object. These terms reflect which managed
object is specified in the URL (for example managed/user/psmith),
and which object is referenced by the relationship (_ref*)
properties. For more information about the relationship properties, see
"Establishing a Relationship Between Two Objects".
In the previous example, a PUT on managed/user/psmith with
"manager" : {_ref : "managed/user/bjensen"}, causes
managed/user/psmith to be the origin object, and
managed/user/bjensen to be the referenced object for that
relationship, as shown in the following illustration:

Note that for the reverse relationship (a PUT on managed/user/bjensen
with "reports" : [{_ref = "managed/user/psmith"}])
managed/user/bjensen would be the origin object, and
managed/user/psmith would be the referenced object.
By default, when a relationship changes, neither the origin object nor the
referenced object is notified of the change. So, with
the PUT on managed/user/psmith with
"manager" : {_ref : "managed/user/bjensen"}, neither
psmith's object nor bjensen's object is notified.
Note
Auditing is not tied to relationship change notification and is always
triggered when a relationship changes. Therefore,
relationship changes are audited, regardless of the notify
and notifySelf properties.
To configure relationship change notification, set the following properties
in your managed object schema (conf/managed.json):
The notify and notifySelf properties
specify whether objects that reference relationships are notified of a
relationship change:
notifySelfNotifies the origin object of the relationship change.
In our example, if the
managerdefinition includes"notifySelf" : true, and if the relationship is changed through a URL that references psmith, then psmith's object would be notified of the change. For example, for a CREATE, UPDATE or DELETE request on thepsmith/manager, psmith would be notified, but the managed object referenced by this relationship (bjensen) would not be notified.If the relationship were manipulated through a request to
bjensen/reports, then bjensen would only be notified if thereportsrelationship specified"notifySelf" : true.notifyNotifies the referenced object of the relationship change.
This property must be set on the
resourceCollectionof the relationship property. In our example, assume that themanagerdefinition has aresourceCollectionwith apathofmanaged/user, and that this object specifies"notify" : true. If relationship is changed through a CREATE, UPDATE, or DELETE on the URLpsmith/manager, then the reference object (managed/user/bjensen) would be notified of the change to the relationship.
notifyRelationshipsThis property controls the propagation of notifications out of a managed object when one of its properties changes through an update or patch, or when that object receives a notification through one of these fields.
The
notifyRelationshipsproperty takes an array of relationships as a value, for example"notifyRelationships" : ["relationship1", "relationship2"]. The relationships specified here are fields defined on the managed object type (which might itself be a relationship).Notifications are propagated according to the recipient’s
notifyRelationshipsconfiguration. If a managed object type is notified of a change through one if its relationship fields, the notification is done according to the configuration of the recipient object. To illustrate, look at theattributesproperty in the defaultmanaged/assignmentobject:{ "name" : "assignment", "schema" : { ... "properties" : { ... "attributes" : { "description" : "The attributes operated on by this assignment.", "title" : "Assignment Attributes", .... "notifyRelationships" : ["roles"] }, ...This configuration means that if an assignment is updated or patched and the assignment's
attributeschange in some way, all therolesconnected to that assignment are notified. Because therolemanaged object has"notifyRelationships" : ["members"]defined on itsassignmentsfield, the notification that originated from the change to the assignment attribute is propagated to the connectedroles, and then out to themembersof those roles.So the
roleis notified through itsassignmentsfield because anattributein the assignment changed. This notification is propagated out of themembersfield because the role definition has"notifyRelationships" : ["members"]on itsassignmentsfield.
The default implementation of roles,
assignments and members uses
relationship change notification to ensure that relationship changes are
accurately provisioned.
For example, the default user object includes a
roles property with notifySelf set to
true:
{
"name" : "user",
...
"schema" : {
...
"properties" : {
....
"roles" : {
"description" : "Provisioning Roles",
...
"items" : {
"type" : "relationship",
...
"reverseRelationship" : true,
"reversePropertyName" : "members",
"notifySelf" : true,
...
}
}
In this case, notifySelf indicates the origin or
user object. If any changes are made to a relationship
referencing a role through a URL that includes a user, the user will be
notified of the change. For example, if there is a CREATE on
managed/user/psmith/roles which specifies a set of
references to existing roles, user psmith will be
notified of the change.
Similarly, the role object includes a
members property. That property includes the following
schema definition:
{
"name" : "role",
...
"schema" : {
...
"properties" : {
...
"members" : {
...
"items" : {
"type" : "relationship",
...
"properties" : {
...
"resourceCollection" : [
{
"notify" : true,
"path" : "managed/user",
"label" : "User",
...
}
]
}
...
Notice the "notify" : true setting on the
resourceCollection. This setting indicates that if the
relationship is created, updated, or deleted through a URL that references
that role, all objects in that resource collection (in this case,
managed/user objects) that are identified as
members of that role must be notified of the change.
Important
To notify an object at the end of a relationship that the relationship has changed (using the
notifyproperty), the relationship must be bidirectional ("reverseRelationship" : true). For more information about bidirectional relationships, see "Working With Bidirectional Relationships".When an object is notified of a relationship state change (create, delete, or update), part of that notification process involves calculating the changed object state with respect to the changed relationship field. For example, if a managed user is notified that a role has been created, the user object calculates its base state, and the state of its
rolesfield, before and after the new role was created. This before and after state is then reconciled. An object that is referenced by a forward (unidirectional) relationship does not have a field that references that relationship — the object is "pointed-to", but does not "point-back". Because this object cannot calculate its before and after state with respect to the relationship field, it cannot be notified.Similarly, relationships that are notified of changes to the objects that reference them must be bidirectional relationships.
If you configure relationship change notification on a unidirectional relationship, IDM throws an exception.
You cannot configure relationship change notification in the Admin UI — you must update the managed object schema in the
conf/managed.jsonfile directly.
10.4. Validating Relationships Between Objects
Optionally, you can specify that a relationship between two objects must be validated when the relationship is created. For example, you can indicate that a user cannot reference a role, if that role does not exist.
When you create a new relationship type, validation is disabled by default
as it entails a query to the relationship that can be expensive, if it is
not required. To configure validation of a referenced relationship, set
"validate": true in the object configuration (in
managed.json). The managed.json
files provided with the sample configurations enable validation for the
following relationships:
For user objects ‒ roles, managers, and reports
For role objects ‒ members and assignments
For assignment objects ‒ roles
The following configuration of the manager relationship
enables validation, and prevents a user from referencing a manager that has
not already been created:
"manager" : {
"type" : "relationship",
...
"validate" : true,10.5. Working With Bidirectional Relationships
In most cases, you define a relationship between two objects in both directions. For example, a relationship between a user and his manager might indicate a reverse relationship between the manager and her direct report. Reverse relationships are particularly useful in querying. You might want to query jdoe's user entry to discover who his manager is, or query bjensen's user entry to discover all the users who report to bjensen.
You declare a reverse relationship as part of the relationship definition in
conf/managed.json. Consider the following sample excerpt
of the default managed object configuration:
"reports" : {
"description" : "Direct Reports",
"title" : "Direct Reports",
...
"type" : "array",
"returnByDefault" : false,
"items" : {
"type" : "relationship",
"reverseRelationship" : true,
"reversePropertyName" : "manager",
"validate" : true,
...
}
...
The reports property is a relationship
between users and managers. So, you can refer to a
managed user's reports by referencing the reports.
However, the reports property is also a reverse relationship
("reverseRelationship" : true) which
means that you can list all users that reference that report.
You can list all users whose manager property is set to
the currently queried user.
The reverse relationship includes an optional
resourceCollection that allows you to query a set of
objects, based on specific fields:
"resourceCollection" : [
{
"path" : "managed/user",
"label" : "User",
"query" : {
"queryFilter" : "true",
"fields" : [
"userName",
"givenName",
"sn"
]
}
}
]
The path property of the resourceCollection
points to the set of objects to be queried. If this path is not in the local
repository, the link expansion can incur a significant performance cost.
Although the resourceCollection is optional, the same
performance cost is incurred if the property is absent.
The query property indicates how you will query this
resource collection to configure the relationship. In this case,
"queryFilter" : "true", indicates that you can search on
any of the properties listed in the fields array when you
are assigning a manager to a user or a new report to a manager. To configure
these relationships from the Admin UI, see "Managing Relationships Through the Admin UI".
10.6. Viewing Relationships Over REST
By default, information about relationships is not returned as the result of a GET request on a managed object. You must explicitly include the relationship property in the request, for example:
$ curl \
--header "X-OpenIDM-Username: openidm-admin" \
--header "X-OpenIDM-Password: openidm-admin" \
--request GET \
"http://localhost:8080/openidm/managed/user/psmith?_fields=manager"
{
"_id": "psmith",
"_rev": "000000007e0e0a09",
"manager": {
"_ref": "managed/user/bjensen",
"_refResourceCollection": "managed/user",
"_refResourceId": "bjensen",
"_refProperties": {
"_id": "6714cf83-c32e-45fa-9cba-faecfdb700d1",
"_rev": "000000009e919882"
}
}
}
To obtain more information about the referenced object (psmith's manager, in
this case), you can include additional fields from the referenced object in
the query, using the syntax object/property (for a simple
string value) or object/*/property (for an array of
values).
The following example returns the email address and contact number for psmith's manager:
$ curl \
--header "X-OpenIDM-Username: openidm-admin" \
--header "X-OpenIDM-Password: openidm-admin" \
--request GET \
"http://localhost:8080/openidm/managed/user/psmith?_fields=manager/mail,manager/telephoneNumber"
{
"_id": "psmith",
"_rev": "000000007e0e0a09",
"manager": {
"_ref": "managed/user/bjensen",
"_refResourceCollection": "managed/user",
"_refResourceId": "bjensen",
"_refProperties": {
"_id": "6714cf83-c32e-45fa-9cba-faecfdb700d1",
"_rev": "000000009e919882"
},
"mail": "bjensen@example.com",
"telephoneNumber": "1234567",
"_rev": "000000001ed4ff4f",
"_id": "bjensen"
}
}
To query all the relationships associated with a managed object, query the
reference (*_ref) property of that object. For example,
the following query shows all the objects that are referenced by psmith's
entry:
$ curl \
--header "X-OpenIDM-Username: openidm-admin" \
--header "X-OpenIDM-Password: openidm-admin" \
--request GET \
"http://localhost:8080/openidm/managed/user/psmith?_fields=*_ref"
{
"_id": "psmith",
"_rev": "000000007e0e0a09",
"reports": [],
"manager": {
"_ref": "managed/user/bjensen",
"_refResourceCollection": "managed/user",
"_refResourceId": "bjensen",
"_refProperties": {
"_id": "6714cf83-c32e-45fa-9cba-faecfdb700d1",
"_rev": "000000009e919882"
}
},
"authzRoles": [
{
"_ref": "repo/internal/role/openidm-authorized",
"_refResourceCollection": "repo/internal/role",
"_refResourceId": "openidm-authorized",
"_refProperties": {
"_id": "6e2ddf00-d693-4038-ae63-b56b2447b49e",
"_rev": "000000000508a08f"
}
}
],
"roles": []
}To expand that query to show all fields within each relationship, add a wildcard as follows:
$ curl \
--header "X-OpenIDM-Username: openidm-admin" \
--header "X-OpenIDM-Password: openidm-admin" \
--request GET \
"http://localhost:8080/openidm/managed/user/psmith?_fields=*_ref/*"
{
"_id": "psmith",
"_rev": "000000007e0e0a09",
"reports": [],
"roles": [],
"authzRoles": [
{
"_ref": "repo/internal/role/openidm-authorized",
"_refResourceCollection": "repo/internal/role",
"_refResourceId": "openidm-authorized",
"_refProperties": {
"_id": "6e2ddf00-d693-4038-ae63-b56b2447b49e",
"_rev": "000000000508a08f"
},
"_id": "openidm-authorized",
"description": "Basic minimum user",
"_rev": "0000000068832d1e"
}
],
"manager": {
"_ref": "managed/user/bjensen",
"_refResourceCollection": "managed/user",
"_refResourceId": "bjensen",
"_refProperties": {
"_id": "6714cf83-c32e-45fa-9cba-faecfdb700d1",
"_rev": "000000009e919882"
},
"mail": "bjensen@example.com",
"givenName": "Barbara",
"sn": "Jensen",
"description": "Created By CSV",
"userName": "bjensen",
"telephoneNumber": "1234567",
"accountStatus": "active",
"_meta": {
"_ref": "internal/usermeta/8a4ec527-7a8d-4873-ae5c-7a9bafe43cbd",
"_refResourceCollection": "internal/usermeta",
"_refResourceId": "8a4ec527-7a8d-4873-ae5c-7a9bafe43cbd",
"_refProperties": {
"_id": "a4d045eb-527f-42df-a6d1-6cb136014457",
"_rev": "000000002d5a9e93"
},
"createDate": "2018-04-12T21:50:18.097Z",
"lastChanged": {
"date": "2018-04-12T21:50:18.097Z"
},
"loginCount": 0,
"_rev": "0000000008e85fab",
"_id": "8a4ec527-7a8d-4873-ae5c-7a9bafe43cbd"
}
"effectiveRoles": [],
"effectiveAssignments": [],
"_rev": "000000001ed4ff4f",
"_id": "bjensen"
}
}Note
Metadata is implemented using the relationships mechanism so when you
request all relationships for a user (with _ref/), you
will also get all the metadata for that user, if metadata is being tracked.
For more information, see "Tracking Metadata For Managed Objects".
10.7. Viewing Relationships in Graph Form
The Identity Relationships widget gives a visual display of the relationships between objects.
This widget is not displayed on any dashboard by default. You can add it as follows:
Log into the Admin UI.
Select Dashboards, and choose the dashboard to which you want to add the widget.
For more information about managing dashboards in the UI, see "Managing Dashboards".
Select Add Widget.
In the Add Widget window, scroll down to the Utilities item, select Identity Relationships, then click Settings.
Choose the Widget Size (small, medium, or large).
From the Chart Type list, select Collapsible Tree Layout or Radial Layout.
The Collapsible Tree Layout looks something like this:

The Radial Layout looks something like this:

Select the object for which you want to display relationships, for example,
User.Select the property or properties that will be used to search on that object, and that will be displayed in the widget, for example,
userNameandcity.Optionally, select Preview for an idea of what the data represented by widget will look like. Select Settings to return to the Add Widget window.
Click Add to add the widget to the dashboard.

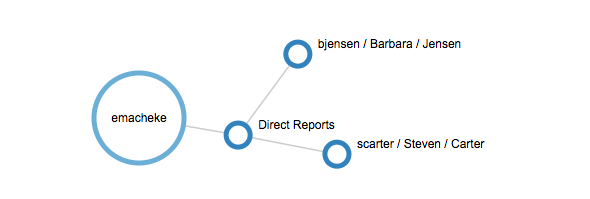
When you have added the Identity Relationships widget, select the user whose relationships you want to search.
The following graph shows all of imartinez's relationships. The graph shows imartinez's manager and her direct reports.
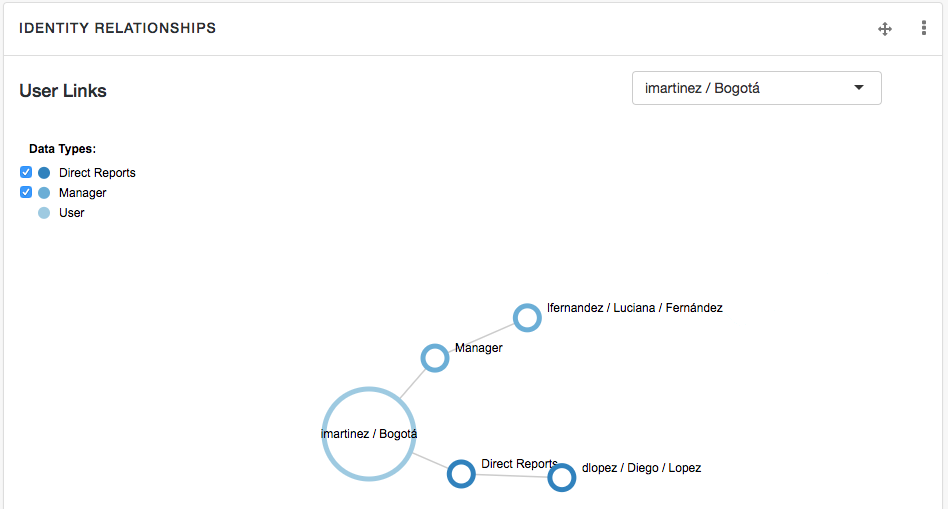
Select or deselect the Data Types on the left of the screen to control how much information is displayed.
Select and move the graph for a better view. Double-click on any user in the graph to view that user's profile.
10.8. Managing Relationships Through the Admin UI
This section describes how to set up relationships between managed objects by using the Admin UI. You can set up a relationship between any object types. The examples in this section demonstrate how to set up a relationship between users and devices, such as IoT devices.
For illustration purposes, these examples assume that you have started IDM and already have some managed users. If this is not the case, start the server with the sample configuration described in "Synchronizing Data From a CSV File to IDM" in the Samples Guide, and run a reconciliation to populate the managed user repository.
In the following procedures, you will:
Create a new managed object type named
Deviceand add a few devices, each with unique serial numbers (see "To Create a New Device Object Type").Set up a bi-directional relationship between the Device object and the managed User object (see "To Configure the Relationship Between a Device and a User").
Demonstrate the relationships, assign devices to users, and show relationship validation (see "To Demonstrate the Relationship").
This procedure illustrates how to set up a new Device managed object type, adding properties to collect information such as model, manufacturer, and serial number for each device. In the next procedure, you will set up the relationship.
Click Configure > Managed Objects > New Managed Object.
Give the object an appropriate name and Readable Title. For this procedure, specify
Devicefor both these fields.Enter a description for the object, select an icon that represents the object, and click Save.
You should now see three tabs: Properties, Details, and Scripts. Select the Properties tab.
Click Add a Property to set up the schema for the device.
For each property, enter a Name, and Label, select the data Type for the property, and specify whether that property is required for an object of this type.
For the purposes of this example, include the properties shown in the following image: model, serialNumber, manufacturer, description, and category.
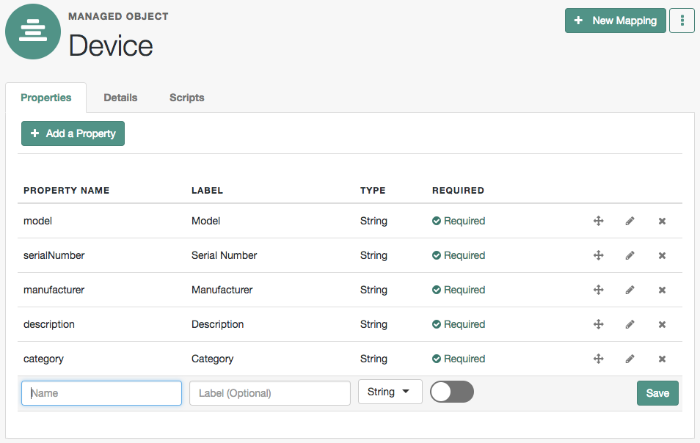
When you save the properties for the new managed object type, IDM saves those entries in your project's
conf/managed.jsonfile.Now select Manage > Device > New Device and add a device as shown in the following image:
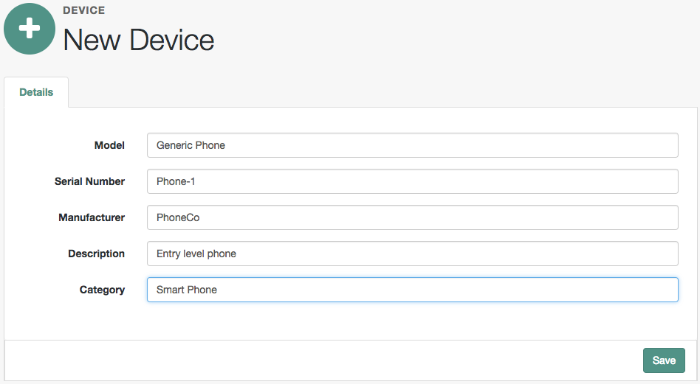
Continue adding new devices to the Device object.
When you have finished, select Manage > Device to view the complete list of Devices.
The remaining procedures in this section assume that you have added devices similar to the following:
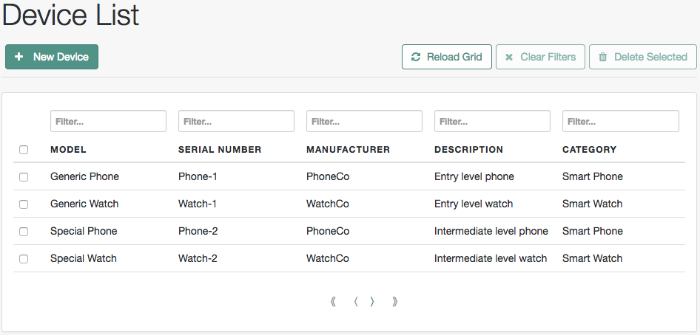
(Optional) To change the order in which properties of the Device managed object are displayed, select Configure > Managed Objects > Device. Select the property that you want to move and drag it up or down the list.
Alternatively, you can make the same changes to this schema (or any managed object schema) in your project's
conf/managed.jsonfile.


To set up a relationship between the Device object type and the User object type, you must identify the specific property on each object that will form the basis of the relationship. For example, a device must have an owner and a user can own one or more devices. The property type for each of these must be relationship.
In this procedure, you will update the managed Device object type to add a
new Relationship type property named owner. You will then
link that property to a new property on the managed User object, named
device. At the end of the procedure, the updated object
types will look as follows:
Create a new relationship property on the Device object:
Select Configure > Managed Objects and select the Device object that you created previously.
On the Properties tab, add a new property named
owner. Select Relationship as the property Type. Select Required, as all device objects must have an owner:
Note
You cannot change the Type of a property after it has been created. If you create the property with an incorrect Type, you must delete the property and recreate it.
When you have saved the Owner property, select it to show the relationship on the Details tab:
Click the + Related Resource item and select
useras the Resource.This sets up a relationship between the new Device object and the managed User object.
Under Display Properties, select all of the properties of the user object that should be visible when you display a user's devices in the UI. For example, you might want to see the user's name, email address and telephone number.
Note that this list of Display Properties also specifies how you can search for user objects when you are assigning a device to a user.
Click Show advanced options. Notice that the Query Filter field is set to
true. This setting allows you to search on any of the Display Properties that you have selected, when you are assigning a device to a user.Click Save to continue.
You now have a one-way relationship between a device and a user.
Click the + Two-way Relationship item to configure the reverse relationship:
Select Has Many to indicate that a single user can have more than one device.
In the Reverse property name field, enter the new property name that will be created in the managed User object type. As shown in "Relationship Properties on User and Device Objects", that property is
devicein this example.Under Display Properties, select all of the properties of the device object that should be visible when you display a user in the UI. For example, you might want to see the model and serial number of each device.
Click Show advanced options. Notice that the Query Filter field is set to
true. This setting allows you to search on any of the Display Properties that you have selected, when you are assigning a device to a user.Select Validate relationship.
This setting ensures that the relationship is valid when a device is assigned to a user. IDM verifies that both the user and device objects exist, and that that specific device has not already been assigned to user.
Click Save to continue.
You should now have the following reverse relationship configured between User objects and Device objects:
Select Configure > Managed Objects > User.
Scroll down to the end of the Properties tab and notice that the
deviceproperty was created automatically when you configured the relationship.
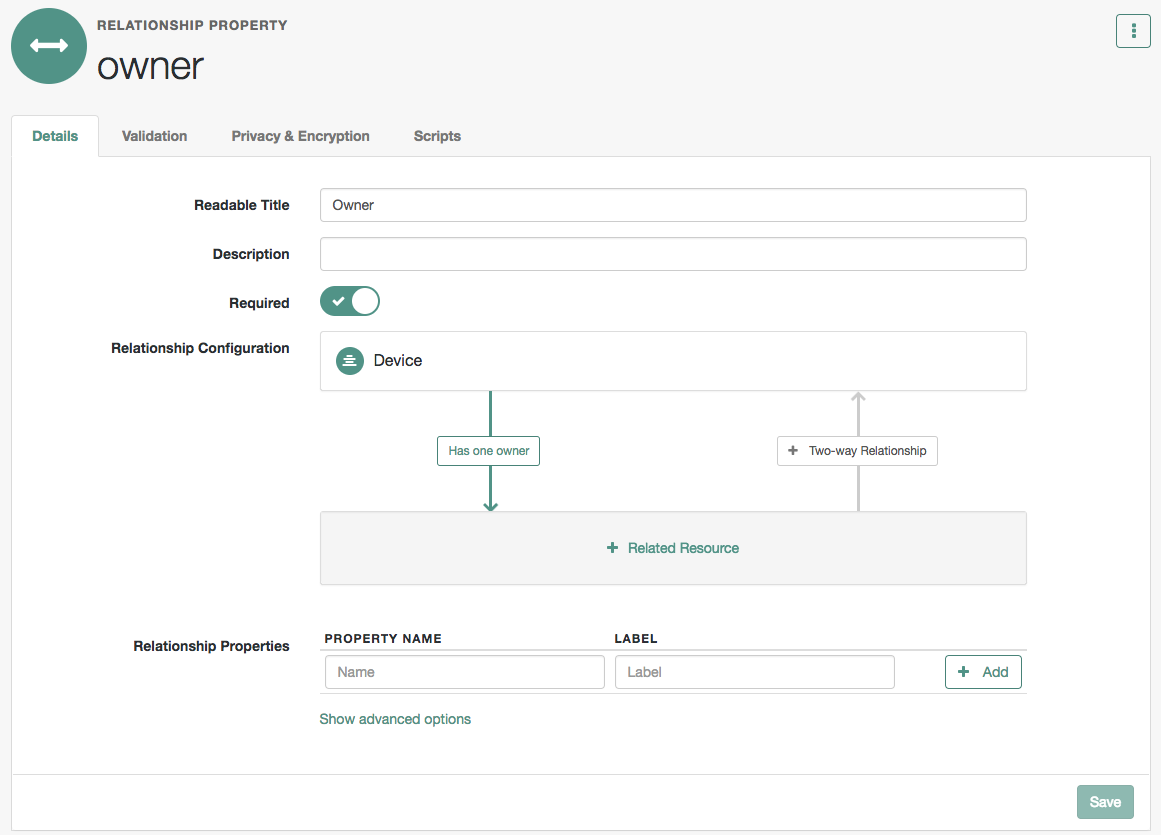

This procedure demonstrates how devices can be assigned to users, based on the relationship configuration that you set up in the previous two procedures.
Select Manage > User, click on a user entry and select the new Device tab.
Click Add Device and click in the Device field to display the list of devices that you added in the previous procedure.
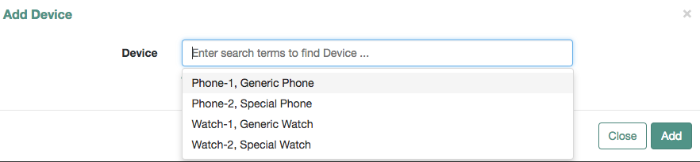
Select two devices and click Add.
On the Device tab, click the Show Chart icon at the top right.
A graphical representation of the relationship between the user and her devices is displayed:

You can also assign an owner to a device.
Select Manage > Device, and select one of the devices that you did not assign in the previous step.
Click Add Owner and search for the user to whom the device should be assigned.
To demonstrate the relationship validation, try to assign a device that has already been assigned to a different user.
The UI displays the error:
Conflict with Existing Relationship.
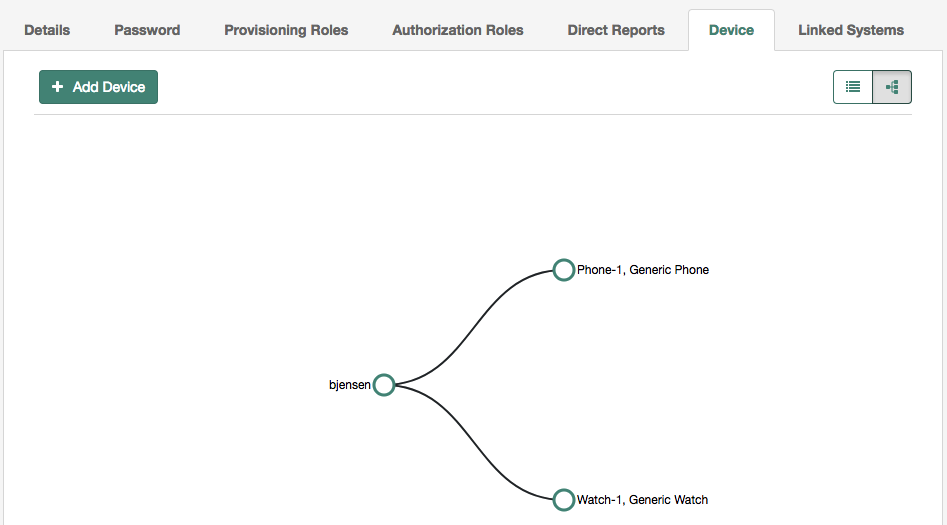
10.9. Viewing the Relationship Configuration in the UI
The Managed Objects Relationship Diagram provides a visual display of the relationship configuration between managed objects. Unlike the Identity Relationships widget, described in "Viewing Relationships in Graph Form", this widget does not show the actual relationship data, but rather shows the configured relationship types.
This widget is not displayed on any dashboard by default. You can add it as follows:
Log into the Admin UI.
Select Dashboards, and choose the dashboard to which you want to add the widget.
For more information about managing dashboards in the UI, see "Managing Dashboards".
Select Add Widget.
In the Add Widget window, scroll down to the Utilities item and select Managed Objects Relationship Diagram.
There are no configurable settings for this widget.
The Preview button shows the current relationship configuration. The following image shows the relationship configuration for a basic IDM installation with no specific configuration:
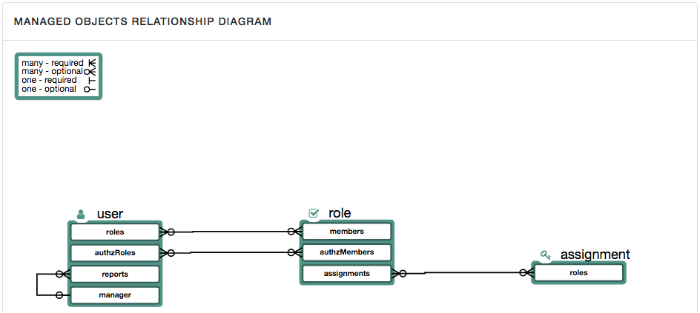
The legend indicates which relationships are required, which are optional, and which are one to one or one to many. In the default relationship configuration shown in the previous image, you can see that a user can have one or more roles and a role can have one or more users. A manager can have one or more reports but a user can have only one manager. There are no mandatory relationships in this default configuration.

Chapter 11. Working With Managed Roles
This chapter describes a specific managed object type — the managed role object. Managed roles use the relationships mechanism, described in "Managing Relationships Between Objects". It is useful to understand how relationships work before you read about roles in IDM.
IDM supports two types of roles:
Provisioning roles - used to specify how objects are provisioned to an external system.
Authorization roles - used to specify the authorization rights of a managed object internally, within IDM.
Provisioning roles are always created as managed roles, at the context path
openidm/managed/role/role-name.
Provisioning roles are granted to managed users as values of the user's
roles property.
Authorization roles can be created either as managed roles (at the context
path
openidm/managed/role/role-name)
or as internal roles (at the context path
openidm/repo/internal/role/role-name).
Authorization roles are granted to managed users as values of the user's
authzRoles property.
Both provisioning roles and authorization roles use the relationships mechanism to link the role to the managed object to which it applies. For more information about relationships between objects, see "Managing Relationships Between Objects".
This section describes how to create and use managed roles, either managed provisioning roles, or managed authorization roles. For more information about internal authorization roles, and how IDM controls authorization to its own endpoints, see "Authorization".
Managed roles are defined like any other managed object, and are granted to users through the relationships mechanism.
A managed role can be granted manually, as a static value of the user's
roles or authzRoles attribute, or
dynamically, as a result of a condition or script. For example, a user might
be granted a role such as sales-role dynamically, if that
user is in the sales organization.
A managed user's roles and authzRoles
attributes take an array of references as a value, where
the references point to the managed roles. For example, if user bjensen has
been granted two provisioning roles (employee and
supervisor), the value of bjensen's
roles attribute would look something like the following:
"roles": [
{
"_ref": "managed/role/employee",
"_refResourceCollection": "managed/role",
"_refResourceId": "employee",
"_refProperties": {
"_grantType": "",
"_id": "bb399428-21a9-4b01-8b74-46a7ac43e0be",
"_rev": "00000000e43e9ba7"
}
},
{
"_ref": "managed/role/supervisor",
"_refResourceCollection": "managed/role",
"_refResourceId": "supervisor",
"_refProperties": {
"_grantType": "",
"_id": "9f7d124b-c7b1-4bcf-9ece-db4900e37c31",
"_rev": "00000000e9c19d26"
}
}
]
the _refResourceCollection is the container that holds
the role and the _refResourceId the ID of the role. The
_ref property is a resource path that is derived from
the _refResourceCollection and the URL-encoded
_refResourceId. The _refProperties
property provides more information about the relationship.
Important
This particular example uses a client-assigned role ID that is the same as the role name, to make the example easier to understand. All other examples in this chapter use system-assigned IDs. In production, you should use system-assigned IDs for role objects.
The following sections describe how to create, read, update, and delete managed roles, and how to grant roles to users. For information about how roles are used to provision users to external systems, see "Working With Role Assignments".
11.1. Creating a Role
The easiest way to create a new role is by using the Admin UI. Select Manage > Role and select New Role on the Role List page. Enter a name and description for the new role and select Save.
Optionally, select Temporal Constraint to restrict the role grant to a set time period or Condition to define a query filter that will allow the role to be granted to members dynamically. For more information on these options, see "Using Temporal Constraints to Restrict Effective Roles" and "Granting Roles Dynamically".
To create a managed role over REST, send a PUT or POST request to the
/openidm/managed/role context path. The following
example creates a managed role named employee:
$ curl \
--header "X-OpenIDM-Username: openidm-admin" \
--header "X-OpenIDM-Password: openidm-admin" \
--header "Content-Type: application/json" \
--request POST \
--data '{
"name" : "employee",
"description" : "Role granted to workers on the company payroll"
}' \
"http://localhost:8080/openidm/managed/role?_action=create"
{
"_id": "5790220a-719b-49ad-96a6-6571e63cbaf1",
"_rev": "0000000079c6644f",
"name": "employee",
"description": "Role granted to workers on the company payroll"
}
At this stage, the employee role has no corresponding
assignments. Assignments are what enables the
provisioning logic to the external system. Assignments are created and
maintained as separate managed objects, and are referred to within role
definitions. For more information about assignments, see
"Working With Role Assignments".
11.2. Listing Existing Roles
You can display a list of all configured managed roles over REST or by using the Admin UI.
To list the managed roles in the Admin UI, select Manage > Role.
If you have many managed roles, the Role List page now supports specialized filtering, with the Advanced Filter option, which allows you to build many of the queries shown in "Defining and Calling Queries".
To list the managed roles over REST, query the
openidm/managed/role endpoint. The following example
shows the employee role that you created in the previous
section:
$ curl \
--header "X-OpenIDM-Username: openidm-admin" \
--header "X-OpenIDM-Password: openidm-admin" \
--request GET \
"http://localhost:8080/openidm/managed/role?_queryFilter=true"
{
"result": [
{
"_id": "5790220a-719b-49ad-96a6-6571e63cbaf1",
"_rev": "0000000079c6644f",
"name": "employee",
"description": "Role granted to workers on the company payroll"
}
],
...
}11.3. Granting a Role to a User
Roles are granted to users through the relationship mechanism. Relationships are essentially references from one managed object to another, in this case from a user object to a role object. For more information about relationships, see "Managing Relationships Between Objects".
Roles can be granted manually or dynamically.
To grant a role manually, you must do one of the following:
Update the value of the user's
rolesproperty (if the role is a provisioning role) orauthzRolesproperty (if the role is an authorization role) to reference the role.Update the value of the role's
membersproperty to reference the user.
Manual role grants are described further in "Granting Roles Manually".
Dynamic role grants use the result of a condition or script to update a user's list of roles. Dynamic role grants are described in detail in "Granting Roles Dynamically".
11.3.1. Granting Roles Manually
To grant a role to a user manually, use the Admin UI or the REST interface as follows:
- Using the Admin UI
Use one of the following UI methods to grant a role to a user:
Update the user entry:
Select Manage > User and select the user to whom you want to grant the role.
Select the Provisioning Roles tab and select Add Provisioning Roles.
Select the role from the dropdown list and select Add.
Update the role entry:
Select Manage > Role and select the role that you want to grant.
Select the Role Members tab and select Add Role Members.
Select the user from the dropdown list and select Add.
- Over the REST interface
Use one of the following methods to grant a role to a user over REST:
Update the user's
rolesproperty to refer to the role.The following sample command grants the
employeerole (with ID5790220a-719b-49ad-96a6-6571e63cbaf1) to user scarter:$ curl \ --header "X-OpenIDM-Username: openidm-admin" \ --header "X-OpenIDM-Password: openidm-admin" \ --header "Content-Type: application/json" \ --request PATCH \ --data '[ { "operation": "add", "field": "/roles/-", "value": {"_ref" : "managed/role/5790220a-719b-49ad-96a6-6571e63cbaf1"} } ]' \ "http://localhost:8080/openidm/managed/user/scarter" { "_id": "scarter", "_rev": "000000003be825ce", "mail": "scarter@example.com", "givenName": "Steven", "sn": "Carter", "description": "Created By CSV", "userName": "scarter", "telephoneNumber": "1234567", "accountStatus": "active", "effectiveRoles": [ { "_ref": "managed/role/5790220a-719b-49ad-96a6-6571e63cbaf1" } ], "effectiveAssignments": [] }Note that scarter's
effectiveRolesattribute has been updated with a reference to the new role. For more information about effective roles and effective assignments, see "Understanding Effective Roles and Effective Assignments".When you update a user's existing roles array, you must use the
-special index to add the new value to the set. For more information, see Set semantic arrays in "Patch Operation: Add".Update the role's
membersproperty to refer to the user.The following sample command makes scarter a member of the
employeerole:$ curl \ --header "X-OpenIDM-Username: openidm-admin" \ --header "X-OpenIDM-Password: openidm-admin" \ --header "Content-Type: application/json" \ --request PATCH \ --data '[ { "operation": "add", "field": "/members/-", "value": {"_ref" : "managed/user/scarter"} } ]' \ "http://localhost:8080/openidm/managed/role/5790220a-719b-49ad-96a6-6571e63cbaf1" { "_id": "5790220a-719b-49ad-96a6-6571e63cbaf1", "_rev": "0000000079c6644f", "name": "employee", "description": "Role granted to workers on the company payroll" }Note that the
membersproperty of a role is not returned by default in the output. To show all members of a role, you must specifically request the relationship properties (*_ref) in your query. The following sample command lists the members of theemployeerole (currently only scarter):$ curl \ --header "X-OpenIDM-Username: openidm-admin" \ --header "X-OpenIDM-Password: openidm-admin" \ --request GET \ "http://localhost:8080/openidm/managed/role/5790220a-719b-49ad-96a6-6571e63cbaf1?_fields=*_ref,name" { "_id": "5790220a-719b-49ad-96a6-6571e63cbaf1", "_rev": "0000000079c6644f", "name": "employee", "authzMembers": [], "assignments": [], "members": [ { "_ref": "managed/user/scarter", "_refResourceCollection": "managed/user", "_refResourceId": "scarter", "_refProperties": { "_id": "7ad15a7b-6806-487b-900d-db569927f56d", "_rev": "0000000075e09cbf" } } ] }You can replace an existing role grant with a new one by using the
replaceoperation in your patch request.The following command replaces scarter's entire
rolesentry (that is, overwrites any existing roles) with a single entry, the reference to theemployeerole (ID5790220a-719b-49ad-96a6-6571e63cbaf1):$ curl \ --header "X-OpenIDM-Username: openidm-admin" \ --header "X-OpenIDM-Password: openidm-admin" \ --header "Content-Type: application/json" \ --request PATCH \ --data '[ { "operation": "replace", "field":"/roles", "value":[ {"_ref":"managed/role/5790220a-719b-49ad-96a6-6571e63cbaf1"} ] } ]' \ "http://localhost:8080/openidm/managed/user/scarter" { "_id": "scarter", "_rev": "00000000da112702", "mail": "scarter@example.com", "givenName": "Steven", "sn": "Carter", "description": "Created By CSV", "userName": "scarter", "telephoneNumber": "1234567", "accountStatus": "active", "effectiveRoles": [ { "_ref": "managed/role/5790220a-719b-49ad-96a6-6571e63cbaf1" } ], "effectiveAssignments": [] }
11.3.2. Granting Roles Dynamically
The previous section showed how to grant roles to a user manually, by
listing a reference to the role as a value of the user's
roles attribute. You can also grant a role
dynamically by using one of the following methods:
Granting a role based on a condition, where that condition is expressed in a query filter in the role definition. If the condition is
truefor a particular member, that member is granted the role.Using a custom script to define a more complex role granting strategy.
11.3.2.1. Granting Roles Based on a Condition
A role that is granted based on a defined condition is called a conditional role. To create a conditional role, include a query filter in the role definition.
Important
Properties that are used as the basis of a conditional role query
must be configured as searchable
and must be indexed in the repository configuration. To configure a
property as searchable, update the schema in your
conf/managed.json file. For more information, see
"Creating and Modifying Managed Object Types".
To create a conditional role by using the Admin UI, select Condition on the role Details page, then define the query filter that will be used to assess the condition.
To create a conditional role over REST, include the query filter as a value
of the condition property in the role definition. The
following command creates a role, fr-employee, that will
be granted only to those users who live in France (whose
country property is set to FR):
$ curl \
--header "X-OpenIDM-Username: openidm-admin" \
--header "X-OpenIDM-Password: openidm-admin" \
--header "Content-Type: application/json" \
--request POST \
--data '{
"name": "fr-employee",
"description": "Role granted to employees resident in France",
"condition": "/country eq \"FR\""
}' \
"http://localhost:8080/openidm/managed/role?_action=create"
{
"_id": "eb18a2e2-ee1e-4cca-83fb-5708a41db94f",
"_rev": "000000004085704c",
"name": "fr-employee",
"description": "Role granted to employees resident in France",
"condition": "/country eq \"FR\""
}
When a conditional role is created or updated, IDM automatically
assesses all managed users, and recalculates the value of their
roles property, if they qualify for that role. When a
condition is removed from a role, that is, when the role becomes an
unconditional role, all conditional grants removed. So, users who were
granted the role based on the condition have that role removed from their
roles property.
Caution
When a conditional role is defined in an existing data set, every user entry (including the mapped entries on remote systems) must be updated with the assignments implied by that conditional role. The time that it takes to create a new conditional role is impacted by the following items:
The number of managed users affected by the condition
The number of assignments related to the conditional role
The average time required to provision updates to all remote systems affected by those assignments
In a data set with a very large number of users, creating a new conditional role can therefore incur a significant performance cost at the time of creation. Ideally, you should set up your conditional roles at the beginning of your deployment to avoid performance issues later.
11.3.2.2. Granting Roles By Using Custom Scripts
The easiest way to grant roles dynamically is to use conditional roles, as described in "Granting Roles Based on a Condition". If your deployment requires complex conditional logic that cannot be achieved with a query filter, you can create a custom script to grant the role, as follows:
Create a
rolesdirectory in your project'sscriptdirectory and copy the default effective roles script to that new directory:$ mkdir project-dir/script/roles/ $ cp /path/to/openidm/bin/defaults/script/roles/effectiveRoles.js \ project-dir/script/roles/
The new script will override the default effective roles script.
Modify the script to reference additional roles that have not been granted manually, or as the result of a conditional grant. The effective roles script calculates the grants that are in effect when the user is retrieved.
For example, the following addition to the
effectiveRoles.jsscript grants the rolesdynamic-role1anddynamic-role2to all active users (managed user objects whoseaccountStatusvalue isactive). This example assumes that you have already created the managed roles,dynamic-role1(with IDd2e29d5f-0d74-4d04-bcfe-b1daf508ad7c) anddynamic-role2(with ID709fed03-897b-4ff0-8a59-6faaa34e3af6, and their corresponding assignments:// This is the location to expand to dynamic roles, // project role script return values can then be added via // effectiveRoles = effectiveRoles.concat(dynamicRolesArray); if (object.accountStatus === 'active') { effectiveRoles = effectiveRoles.concat([ {"_ref": "managed/role/d2e29d5f-0d74-4d04-bcfe-b1daf508ad7c"}, {"_ref": "managed/role/709fed03-897b-4ff0-8a59-6faaa34e3af6"} ]); }
Note
For conditional roles, the user's roles property is
updated if the user meets the condition. For custom scripted roles, the
user's effectiveRoles property is calculated when the
user is retrieved and includes the dynamic roles according to the custom
script.
If you make any of the following changes to a scripted role grant, you must perform a manual reconciliation of all affected users before assignment changes will take effect on an external system:
If you create a new scripted role grant.
If you change the definition of an existing scripted role grant.
If you change any of the assignment rules for a role that is granted by a custom script.
11.4. Using Temporal Constraints to Restrict Effective Roles
To restrict the period during which a role is effective, you can set a temporal constraint on the role itself, or on the role grant. A temporal constraint that is set on a role definition applies to all grants of that role. A temporal constraint that is set on a role grant enables you to specify the period that the role is valid per user.
For example, you might want a role definition such as
contractors-2018 to apply to all contract employees
only for the year 2018. Or you might want a
contractors role to apply to an individual user only
for the period of his contract of employment.
The following sections describe how to set temporal constraints on role definitions, and on individual role grants.
11.4.1. Adding a Temporal Constraint to a Role Definition
When you create a role, you can include a temporal constraint in the role definition that restricts the validity of the entire role, regardless of how that role is granted. Temporal constraints are expressed as a time interval in ISO 8601 date and time format. For more information on this format, see the ISO 8601 standard .
To restrict the period during which a role is valid by using the Admin UI, select Temporal Constraint on the role Details tab, then select a timezone offset relative to GMT and the start and end dates for the required period.
The following example adds a contractor role over the
REST interface. The role is effective from March 1st, 2018 to August 31st,
2018:
$ curl \
--header "X-OpenIDM-Username: openidm-admin" \
--header "X-OpenIDM-Password: openidm-admin" \
--header "Content-Type: application/json" \
--request POST \
--data '{
"name" : "contractor",
"description" : "Role granted to contract workers for 2018",
"temporalConstraints" : [
{
"duration": "2018-03-01T00:00:00.000Z/2018-08-31T00:00:00.000Z"
}
]
}' \
"http://localhost:8080/openidm/managed/role?_action=create"
{
"_id": "6c0afad4-645f-4573-a896-2ad2ae76c29a",
"_rev": "00000000533c7a94",
"name": "contractor",
"description": "Role granted to contract workers for 2018",
"temporalConstraints": [
{
"duration": "2018-03-01T00:00:00.000Z/2018-08-31T00:00:00.000Z"
}
]
}
The preceding example specifies the time zone as Coordinated Universal Time
(UTC) by appending Z to the time. If no time zone
information is provided, the time zone is assumed to be local time. To
specify a different time zone, include an offset (from UTC) in the format
±hh:mm. For example, an interval of
2018-03-01T00:00:00.000-07:00/2018-08-31T00:00:00.000-07:00
specifies a time zone that is seven hours behind UTC.
When the period defined by the constraint has ended, the role object remains in the repository but the effective roles script will not include the role in the list of effective roles for any user.
The following example assumes that user scarter has been granted a role
contractor-february. A temporal constraint has been
included in the contractor-february definition that
specifies that the role should be applicable only during the month of
February 2018. At the end of this period, a query on scarter's entry shows
that his roles property still includes the
contractor-february role (with ID
6c0afad4-645f-4573-a896-2ad2ae76c29a), but his
effectiveRoles property does not:
$ curl \
--header "X-OpenIDM-Username: openidm-admin" \
--header "X-OpenIDM-Password: openidm-admin" \
--request GET \
"http://localhost:8080/openidm/managed/user/scarter?_fields=_id,userName,roles,effectiveRoles"
{
"_id": "scarter",
"_rev": "00000000c1481582",
"userName": "scarter",
"effectiveRoles": [],
"roles": [
{
"_ref": "managed/role/6c0afad4-645f-4573-a896-2ad2ae76c29a",
"_refResourceCollection": "managed/role",
"_refResourceId": "6c0afad4-645f-4573-a896-2ad2ae76c29a",
"_refProperties": {
"_grantType": "",
"_id": "d3e045ea-af80-4699-9aae-120bc2a75cab",
"_rev": "00000000d5a1a32c"
}
}
]
}
The role is still in place but is no longer effective.
11.4.2. Adding a Temporal Constraint to a Role Grant
To restrict the validity of a role for individual users, you can apply a temporal constraint at the grant level, rather than as part of the role definition. In this case, the temporal constraint is taken into account per user, when the user's effective roles are calculated. Temporal constraints that are defined at the grant level can be different for each user who is a member of that role.
To restrict the period during which a role grant is valid by using the Admin UI, set a temporal constraint when you add the member to the role.
For example, to specify that bjensen be added to a Contractor role only for the period of her employment contract, select Manage > Role, select the Contractor role, then select Add Role Members. On the Add Role Members screen, select bjensen from the list, then enable the Temporal Constraint and specify the start and end date of her contract.
To apply a temporal constraint to a grant over the REST interface, include
the constraint as one of the _refProperties of the
relationship between the user and the role. The following example assumes a
contractor role, with ID
6c0afad4-645f-4573-a896-2ad2ae76c29a. The command adds
user bjensen as a member of that role, with a temporal constraint that
specifies that she be a member of the role only for one year, from January
1st, 2018 to January 1st, 2019:
$ curl \
--header "X-OpenIDM-Username: openidm-admin" \
--header "X-OpenIDM-Password: openidm-admin" \
--header "Content-Type: application/json" \
--request PATCH \
--data '[
{
"operation": "add",
"field": "/members/-",
"value": {
"_ref" : "managed/user/bjensen",
"_refProperties": {
"temporalConstraints": [{"duration": "2018-01-01T00:00:00.000Z/2019-01-01T00:00:00.000Z"}]
}
}
}
]' \
"http://localhost:8080/openidm/managed/role/6c0afad4-645f-4573-a896-2ad2ae76c29a"
{
"_id": "6c0afad4-645f-4573-a896-2ad2ae76c29a",
"_rev": "000000007b0475fc",
"name": "contractor",
"description": "Role granted to contract workers"
}A query on bjensen's roles property shows that the temporal constraint has been applied to this grant:
$ curl \
--header "X-OpenIDM-Username: openidm-admin" \
--header "X-OpenIDM-Password: openidm-admin" \
--request GET \
"http://localhost:8080/openidm/managed/user/bjensen/roles?_queryFilter=true"
{
"result": [
{
"_id": "ff9ed5a7-4cb1-461e-a59a-d793b6f35808",
"_rev": "0000000035aab598",
"_ref": "managed/role/6c0afad4-645f-4573-a896-2ad2ae76c29a",
"_refResourceCollection": "managed/role",
"_refResourceId": "6c0afad4-645f-4573-a896-2ad2ae76c29a",
"_refProperties": {
"temporalConstraints": [
{
"duration": "2018-01-01T00:00:00.000Z/2019-01-01T00:00:00.000Z"
}
],
"_id": "ff9ed5a7-4cb1-461e-a59a-d793b6f35808",
"_rev": "0000000035aab598"
}
}
],
...
}11.5. Querying a User's Manual and Conditional Roles
The easiest way to check what roles have been granted to a user, either manually, or as the result of a condition, is to look at the user's entry in the Admin UI. Select Manage > User, select the user whose roles you want to see, and select the Provisioning Roles tab.
If you have many managed roles, use the Advanced Filter option on the Role List page to build a custom query.
To obtain a similar list over the REST interface, query the user's
roles property. The following sample query shows that
scarter has been granted two roles - an employee role
(with ID 5790220a-719b-49ad-96a6-6571e63cbaf1) and an
fr-employee role (with ID
eb18a2e2-ee1e-4cca-83fb-5708a41db94f).
$ curl \
--header "X-OpenIDM-Username: openidm-admin" \
--header "X-OpenIDM-Password: openidm-admin" \
--request GET \
"http://localhost:8080/openidm/managed/user/scarter/roles?_queryFilter=true&_fields=_ref/*,name"
{
"result": [
{
"_id": "053705c1-1759-4776-80de-3af89fe7b107",
"_rev": "000000005e55a064",
"_ref": "managed/role/5790220a-719b-49ad-96a6-6571e63cbaf1",
"_refResourceCollection": "managed/role",
"_refResourceId": "5790220a-719b-49ad-96a6-6571e63cbaf1",
"_refProperties": {
"_grantType": "",
"_id": "053705c1-1759-4776-80de-3af89fe7b107",
"_rev": "000000005e55a064"
}
},
{
"_id": "16e5e25e-eb92-43b1-9013-806289574d44",
"_rev": "00000000a0f6a6d6",
"_ref": "managed/role/eb18a2e2-ee1e-4cca-83fb-5708a41db94f",
"_refResourceCollection": "managed/role",
"_refResourceId": "eb18a2e2-ee1e-4cca-83fb-5708a41db94f",
"_refProperties": {
"_grantType": "conditional",
"_id": "16e5e25e-eb92-43b1-9013-806289574d44",
"_rev": "00000000a0f6a6d6"
}
}
],
...
}
Note that the fr-employee role indicates a
_grantType of conditional. This
property indicates how the role was granted to the
user. If the _grantType is empty, the role was granted
manually.
Querying a user's roles in this way does not return
any roles that would be in effect as a result of a custom script, or of any
temporal constraint applied to the role. To return a complete list of
all the roles in effect at a specific time, you need
to query the user's effectiveRoles property, as follows:
$ curl \ --header "X-OpenIDM-Username: openidm-admin" \ --header "X-OpenIDM-Password: openidm-admin" \ --request GET \ "http://localhost:8080/openidm/managed/user/scarter?_fields=effectiveRoles"
11.6. Deleting a User's Roles
Roles that have been granted manually can be removed from a user's entry in two ways:
Update the value of the user's
rolesproperty (if the role is a provisioning role) orauthzRolesproperty (if the role is an authorization role) to remove the reference to the role.Update the value of the role's
membersproperty to remove the reference to that user.
Both of these actions can be achieved by using the Admin UI, or over REST.
- Using the Admin UI
Use one of the following methods to remove a user's roles:
Select Manage > User and select the user whose role or roles you want to remove.
Select the Provisioning Roles tab, select the role that you want to remove, then select Remove Selected Provisioning Roles.
Select Manage > Role and select on the role whose members you want to remove.
Select the Role Members tab, select the member or members that that you want to remove, then select Remove Selected Role Members.
- Over the REST interface
Use one of the following methods to remove a role grant from a user:
Delete the role from the user's
rolesproperty, including the reference ID (the ID of the relationship between the user and the role) in the delete request:The following sample command removes the
employeerole from user scarter. The role ID is5790220a-719b-49ad-96a6-6571e63cbaf1but the ID required in the DELETE request is the reference ID (053705c1-1759-4776-80de-3af89fe7b107):$ curl \ --header "X-OpenIDM-Username: openidm-admin" \ --header "X-OpenIDM-Password: openidm-admin" \ --request DELETE \ "http://localhost:8080/openidm/managed/user/scarter/roles/053705c1-1759-4776-80de-3af89fe7b107" { "_id": "053705c1-1759-4776-80de-3af89fe7b107", "_rev": "000000005e55a064", "_ref": "managed/role/5790220a-719b-49ad-96a6-6571e63cbaf1", "_refResourceCollection": "managed/role", "_refResourceId": "5790220a-719b-49ad-96a6-6571e63cbaf1", "_refProperties": { "_grantType": "", "_id": "053705c1-1759-4776-80de-3af89fe7b107", "_rev": "000000005e55a064" } }PATCH the user entry to remove the role from the array of roles, specifying the value of the role object in the JSON payload.
Caution
When you remove a role in this way, you must include the entire object in the value, as shown in the following example:
$ curl \ --header "Content-type: application/json" \ --header "X-OpenIDM-Username: openidm-admin" \ --header "X-OpenIDM-Password: openidm-admin" \ --request PATCH \ --data '[ { "operation" : "remove", "field" : "/roles", "value" : { "_ref": "managed/role/5790220a-719b-49ad-96a6-6571e63cbaf1", "_refResourceCollection": "managed/role", "_refResourceId": "5790220a-719b-49ad-96a6-6571e63cbaf1", "_refProperties": { "_grantType": "", "_id": "cec1fabc-894b-4963-ab44-e7dc8ca89927", "_rev": "000000002c5fa279" } } } ]' \ "http://localhost:8080/openidm/managed/user/scarter" { "_id": "scarter", "_rev": "000000009f853b33", "mail": "scarter@example.com", "givenName": "Steven", "sn": "Carter", "description": "Created By CSV", "userName": "scarter", "telephoneNumber": "1234567", "accountStatus": "active", "effectiveRoles": [ { "_ref": "managed/role/eb18a2e2-ee1e-4cca-83fb-5708a41db94f" } ], "effectiveAssignments": [], "preferences": { "updates": false, "marketing": false }, "country": "FR" }Delete the user from the role's
membersproperty, including the reference ID (the ID of the relationship between the user and the role) in the delete request.The following example first queries the members of the
employeerole, to obtain the ID of the relationship, then removes bjensen's membership from that role:$ curl \ --header "X-OpenIDM-Username: openidm-admin" \ --header "X-OpenIDM-Password: openidm-admin" \ --request GET \ "http://localhost:8080/openidm/managed/role/5790220a-719b-49ad-96a6-6571e63cbaf1/members?_queryFilter=true" { "result": [ { "_id": "0d7ded4c-600e-42ae-ac99-3edbd5348d3f", "_rev": "000000002651a299", "_ref": "managed/user/bjensen", "_refResourceCollection": "managed/user", "_refResourceId": "bjensen", "_refProperties": { "_grantType": "", "_id": "0d7ded4c-600e-42ae-ac99-3edbd5348d3f", "_rev": "000000002651a299" } } ], ... } $ curl \ --header "X-OpenIDM-Username: openidm-admin" \ --header "X-OpenIDM-Password: openidm-admin" \ --request DELETE \ "http://localhost:8080/openidm/managed/role/5790220a-719b-49ad-96a6-6571e63cbaf1/members/0d7ded4c-600e-42ae-ac99-3edbd5348d3f" { "_id": "0d7ded4c-600e-42ae-ac99-3edbd5348d3f", "_rev": "000000002651a299", "_ref": "managed/user/bjensen", "_refResourceCollection": "managed/user", "_refResourceId": "bjensen", "_refProperties": { "_grantType": "", "_id": "0d7ded4c-600e-42ae-ac99-3edbd5348d3f", "_rev": "000000002651a299" } }
Note
Roles that have been granted as the result of a condition can only be removed when the condition is changed or removed, or when the role itself is deleted.
11.7. Deleting a Role Definition
You can delete a managed provisioning or authorization role by using the Admin UI, or over the REST interface.
To delete a role by using the Admin UI, select Manage > Role, select the role you want to remove then Delete Selected.
To delete a role over the REST interface, simply delete that managed object.
The following command deletes the employee role created
in the previous section:
$ curl \
--header "X-OpenIDM-Username: openidm-admin" \
--header "X-OpenIDM-Password: openidm-admin" \
--request DELETE \
"http://localhost:8080/openidm/managed/role/5790220a-719b-49ad-96a6-6571e63cbaf1"
{
"_id": "5790220a-719b-49ad-96a6-6571e63cbaf1",
"_rev": "0000000079c6644f",
"name": "employee",
"description": "Role granted to workers on the company payroll"
}Note
You cannot delete a role if it is currently granted to one or more users.
If you attempt to delete a role that is granted to a user (either over the
REST interface, or by using the Admin UI), IDM returns an
error. The following command indicates an attempt to remove the
contractor role while it is still granted to user
scarter:
$ curl \
--header "X-OpenIDM-Username: openidm-admin" \
--header "X-OpenIDM-Password: openidm-admin" \
--request DELETE \
"http://localhost:8080/openidm/managed/role/6c0afad4-645f-4573-a896-2ad2ae76c29a"
{
"code": 409,
"reason": "Conflict",
"message": "Cannot delete a role that is currently granted"
}11.8. Working With Role Assignments
Authorization roles control access to IDM itself. Provisioning roles define rules for how attribute values are updated on external systems. These rules are configured through assignments that are attached to a provisioning role definition. The purpose of an assignment is to provision an attribute or set of attributes, based on an object's role membership.
The synchronization mapping configuration between two resources (defined in
the sync.json file) provides the basic account
provisioning logic (how an account is mapped from a source to a target
system). Role assignments provide additional provisioning logic that is not
covered in the basic mapping configuration. The attributes and values that
are updated by using assignments might include group membership, access to
specific external resources, and so on. A group of assignments can
collectively represent a role.
Assignment objects are created, updated and deleted like any other managed
object, and are attached to a role by using the relationships mechanism, in
much the same way as a role is granted to a user. Assignment are stored in
the repository and are accessible at the context path
/openidm/managed/assignment.
This section describes how to manipulate managed assignments over the REST
interface, and by using the Admin UI. When you have created an assignment,
and attached it to a role definition, all user objects that reference that
role definition will, as a result, reference the corresponding assignment
in their effectiveAssignments attribute.
11.8.1. Creating an Assignment
The easiest way to create an assignment is by using the Admin UI, as follows:
Select Manage > Assignment and select New Assignment on the Assignment List page.
Enter a name and description for the new assignment, and select the mapping to which the assignment should apply. The mapping indicates the target resource, that is, the resource on which the attributes specified in the assignment will be adjusted.
Click Add Assignment.
Select the Attributes tab and select the attribute or attributes whose values will be adjusted by this assignment.
If a regular text field appears, specify what the value of the attribute should be, when this assignment is applied.
If an Item button appears, you can specify a managed object type, such as an object, relationship, or string.
If a Properties button appears, you can specify additional information such as an array of role references.
Select the assignment operation from the dropdown list:
Merge With Target- the attribute value will be added to any existing values for that attribute. This operation merges the existing value of the target object attribute with the value(s) from the assignment. If duplicate values are found (for attributes that take a list as a value), each value is included only once in the resulting target. This assignment operation is used only with complex attribute values like arrays and objects, and does not work with strings or numbers. (Property:mergeWithTarget.)Replace Target- the attribute value will overwrite any existing values for that attribute. The value from the assignment becomes the authoritative source for the attribute. (Property:replaceTarget.)
Select the unassignment operation from the dropdown list. You can set the unassignment operation to one of the following:
Remove From Target- the attribute value is removed from the system object when the user is no longer a member of the role, or when the assignment itself is removed from the role definition. (Property:removeFromTarget.)No Operation- removing the assignment from the user'seffectiveAssignmentshas no effect on the current state of the attribute in the system object. (Property:noOp.)
Optionally, select the Events tab to specify any scriptable events associated with this assignment.
The assignment and unassignment operations described in the previous step operate at the attribute level. That is, you specify what should happen with each attribute affected by the assignment when the assignment is applied to a user, or removed from a user.
The scriptable On assignment and On unassignment events operate at the assignment level, rather than the attribute level. You define scripts here to apply additional logic or operations that should be performed when a user (or other object) receives or loses an entire assignment. This logic can be anything that is not restricted to an operation on a single attribute.
For information about the variables available to these scripts, see "Variables Available to Role Assignment Scripts".
Click the Roles tab to attach this assignment to an existing role definition.
To create a new assignment over REST, send a PUT or POST request to the
/openidm/managed/assignment context path.
The following example creates a new managed assignment named
employee. The JSON payload in this example shows the
following:
The assignment is applied for the mapping
managedUser_systemLdapAccounts, so attributes will be updated on the external LDAP system specified in this mapping.The name of the attribute on the external system whose value will be set is
employeeTypeand its value will be set toEmployee.When the assignment is applied during a sync operation, the attribute value
Employeewill be added to any existing values for that attribute. When the assignment is removed (if the role is deleted, or if the managed user is no longer a member of that role), the attribute valueEmployeewill be removed from the values of that attribute.
$ curl \
--header "X-OpenIDM-Username: openidm-admin" \
--header "X-OpenIDM-Password: openidm-admin" \
--header "Content-Type: application/json" \
--request POST \
--data '{
"name" : "employee",
"description": "Assignment for employees.",
"mapping" : "managedUser_systemLdapAccount",
"attributes": [
{
"name": "employeeType",
"value": [
"Employee"
],
"assignmentOperation" : "mergeWithTarget",
"unassignmentOperation" : "removeFromTarget"
}
]
}' \
"http://localhost:8080/openidm/managed/assignment?_action=create"
{
"_id": "5a145b08-d885-4fba-be21-08f2733ac1c5",
"_rev": "00000000f26f9b5c",
"name": "employee",
"description": "Assignment for employees.",
"mapping": "managedUser_systemLdapAccount",
"attributes": [
{
"name": "employeeType",
"value": [
"Employee"
],
"assignmentOperation": "mergeWithTarget",
"unassignmentOperation": "removeFromTarget"
}
]
}Note that at this stage, the assignment is not linked to any role, so no user can make use of the assignment. You must add the assignment to a role, as described in the following section.
11.8.2. Adding an Assignment to a Role
When you have created a managed role, and a managed assignment, you create a relationship between the assignment and the role, in much the same way as a user references a role.
You can update a role definition to include one or more assignments, either by using the Admin UI, or over the REST interface.
- Using the Admin UI
Select Manage > Role and select the role to which you want to add an assignment.
Select the Managed Assignments tab and select Add Managed Assignments.
Select the assignment that you want to add to the role then select Add.
- Over the REST interface
Update the role definition to include a reference to the ID of the assignment in the
assignmentsproperty of the role. The following sample command adds theemployeeassignment (with ID5a145b08-d885-4fba-be21-08f2733ac1c5) to an existingemployeerole (whose ID isa2e7a145-3d7d-4878-8b41-4d1a224ab53f):$ curl \ --header "X-OpenIDM-Username: openidm-admin" \ --header "X-OpenIDM-Password: openidm-admin" \ --header "Content-Type: application/json" \ --request PATCH \ --data '[ { "operation" : "add", "field" : "/assignments/-", "value" : { "_ref": "managed/assignment/5a145b08-d885-4fba-be21-08f2733ac1c5" } } ]' \ "http://localhost:8080/openidm/managed/role/a2e7a145-3d7d-4878-8b41-4d1a224ab53f" { "_id": "a2e7a145-3d7d-4878-8b41-4d1a224ab53f", "_rev": "00000000fd4060d9", "name": "employee", "description": "Role granted to members on the payroll" }To check that the assignment was added successfully, query the
assignmentsproperty of the role:$ curl \ --header "X-OpenIDM-Username: openidm-admin" \ --header "X-OpenIDM-Password: openidm-admin" \ --request GET \ "http://localhost:8080/openidm/managed/role/a2e7a145-3d7d-4878-8b41-4d1a224ab53f/assignments?_queryFilter=true&_fields=_ref/*,name" { "result": [ { "_id": "ef3ed499-8a66-4020-8cc0-3924054188dc", "_rev": "000000004318a7d5", "_ref": "managed/assignment/5a145b08-d885-4fba-be21-08f2733ac1c5", "_refResourceCollection": "managed/assignment", "_refResourceId": "5a145b08-d885-4fba-be21-08f2733ac1c5", "_refProperties": { "_id": "ef3ed499-8a66-4020-8cc0-3924054188dc", "_rev": "000000004318a7d5" } } ], ... }Note that the role's
assignmentsproperty now references the assignment that you created in the previous step.
To remove an assignment from a role definition, remove the reference to the
assignment from the role's assignments property.
11.8.3. Deleting an Assignment
You can delete an assignment by using the Admin UI, or over the REST interface.
To delete an assignment by using the Admin UI, select Manage > Assignment, select the assignment you want to remove, then select Delete.
To delete an assignment over the REST interface, simply delete that object.
The following command deletes the employee assignment
created in the previous section:
$ curl \
--header "X-OpenIDM-Username: openidm-admin" \
--header "X-OpenIDM-Password: openidm-admin" \
--request DELETE \
"http://localhost:8080/openidm/managed/assignment/5a145b08-d885-4fba-be21-08f2733ac1c5"
{
"_id": "5a145b08-d885-4fba-be21-08f2733ac1c5",
"_rev": "00000000f26f9b5c",
"name": "employee",
"description": "Assignment for employees.",
"mapping": "managedUser_systemLdapAccount",
"attributes": [
{
"name": "employeeType",
"value": [
"Employee"
],
"assignmentOperation": "mergeWithTarget",
"unassignmentOperation": "removeFromTarget"
}
]
}Note
You can delete an assignment, even if it is
referenced by a managed role. When the assignment is removed, any users
to whom the corresponding roles were granted will no longer have that
assignment in their list of effectiveAssignments. For
more information about effective roles and effective assignments, see
"Understanding Effective Roles and Effective Assignments".
11.8.4. Synchronizing Roles and Assignments
If you have mapped roles and assignments to properties on a target system,
and you are preloading the result set into memory, make sure that your
targetQuery returns the mapped property. For example, if
you have mapped a specific role to the ldapGroups
property on the target system, the target query must include the
ldapGroups property when it returns the object.
The following excerpt of a mapping indicates that the target query must
return the _id of the object as well as its
ldapGroups property:
"targetQuery": {
"_queryFilter" : true,
"_fields" : "_id,ldapGroups"
}, For more information about preloading the result set for reconciliation operations, see "Improving Reconciliation Query Performance".
11.9. Understanding Effective Roles and Effective Assignments
Effective roles and
effective assignments are virtual properties of a
user object. Their values are calculated on the fly by
the openidm/bin/defaults/script/roles/effectiveRoles.js
and openidm/bin/defaults/script/roles/effectiveAssignments.js
scripts. These scripts are triggered when a managed user is retrieved and
are referenced in onRetrieve hooks in the managed user
schema.
The effectiveRoles.js and
effectiveAssignments.js scripts must
be executed in a specific order. First the effectiveRoles.js
script determines the role grants for a user, processes any temporal
constraints, and sets the effectiveRoles field in the
user object. Then the effectiveAssignments.js script
calculates the set of effective assignments, based on the value of the user's
effectiveRoles property. The scripts are executed in the
order in which they appear in the managed.json file, so
you must ensure that the effectiveRoles property is
declared first.
The following excerpt of a managed.json file shows how
these two virtual properties are constructed for each managed user object:
"effectiveRoles" : {
"type" : "array",
"title" : "Effective Roles",
"description" : "Effective Roles",
"viewable" : false,
"returnByDefault" : true,
"isVirtual" : true,
"usageDescription" : "",
"isPersonal" : false,
"onRetrieve" : {
"type" : "text/javascript",
"source" : "require('roles/effectiveRoles').calculateEffectiveRoles(object, 'roles');"
},
"items" : {
"type" : "object",
"title" : "Effective Roles Items"
}
},
"effectiveAssignments" : {
"type" : "array",
"title" : "Effective Assignments",
"description" : "Effective Assignments",
"viewable" : false,
"returnByDefault" : true,
"isVirtual" : true,
"usageDescription" : "",
"isPersonal" : false,
"onRetrieve" : {
"type" : "text/javascript",
"file" : "roles/effectiveAssignments.js",
"effectiveRolesPropName" : "effectiveRoles"
},
"items" : {
"type" : "object",
"title" : "Effective Assignments Items"
}
},When a role references an assignment, and a user references the role, that user automatically references the assignment in its list of effective assignments.
The effectiveRoles.js script uses the
roles attribute of a user entry to calculate the grants
(manual or conditional) that are currently in effect at the time of
retrieval, based on temporal constraints or other custom scripted logic.
The effectiveAssignments.js script uses the virtual
effectiveRoles attribute to calculate that user's
effective assignments. The synchronization engine reads the calculated value
of the effectiveAssignments attribute when it processes
the user. The target system is updated according to the configured
assignmentOperation for each assignment.
Do not change the default effectiveRoles.js and
effectiveAssignments.js scripts. If you need to change
the logic that calculates effectiveRoles and
effectiveAssignments, create your own custom script and
include a reference to it in your project's
conf/managed.json file. For more information about
using custom scripts, see "Scripting Reference".
When a user entry is retrieved, IDM calculates the
effectiveRoles and effectiveAssignments
for that user based on the current value of the user's
roles property, and on any roles that might be granted
dynamically through a custom script. The previous set of examples showed the
creation of a role employee that referenced an assignment
employee and was granted to user bjensen. Querying that
user entry would show the following effective roles and effective
assignments:
$ curl \
--header "X-OpenIDM-Username: openidm-admin" \
--header "X-OpenIDM-Password: openidm-admin" \
--request GET \
"http://localhost:8080/openidm/managed/user/bjensen?_fields=userName,roles,effectiveRoles,effectiveAssignments"
{
"_id": "bjensen",
"_rev": "00000000edea91fa",
"userName": "bjensen",
"effectiveRoles": [
{
"_ref": "managed/role/a2e7a145-3d7d-4878-8b41-4d1a224ab53f"
}
],
"effectiveAssignments": [
{
"name": "employee",
"description": "Assignment for employees.",
"mapping": "managedUser_systemLdapAccount",
"attributes": [
{
"assignmentOperation": "mergeWithTarget",
"name": "employeeType",
"unassignmentOperation": "removeFromTarget",
"value": [
"employee"
]
}
],
"_rev": "00000000e2c8b067",
"_id": "4038e228-7477-4b70-b059-542f30c5be19"
}
],
"roles": [
{
"_ref": "managed/role/a2e7a145-3d7d-4878-8b41-4d1a224ab53f",
"_refResourceCollection": "managed/role",
"_refResourceId": "a2e7a145-3d7d-4878-8b41-4d1a224ab53f",
"_refProperties": {
"_grantType": "",
"_id": "71d12cf2-3c33-4ec8-9c66-b78c33012bbf",
"_rev": "00000000f007a17e"
}
}
]
}
In this example, synchronizing the managed/user repository with the
external LDAP system defined in the mapping should populate user bjensen's
employeeType attribute in LDAP with the value
employee.
11.10. Roles and Relationship Change Notification
Before you read this section, see "Configuring Relationship Change Notification"
to understand the notify and notifyRelationships
properties, and how change notification works for relationships in general.
In the case of roles, the change notification configuration exists to ensure
that managed users are notified when any of the relationships that link
users, roles, and assignments are manipulated (that is, created, updated, or
deleted).
Consider the situation where a user has role R. A new
assignment A is created that references role
R. Ultimately, we want to notify all users that have role
R so that their reconciliation state will reflect any
attributes in the new assignment A. We achieve this
notification with the following configuration:
In the managed object schema, the assignment object
definition has a roles property that includes a
resourceCollection. The path of this
resource collection is managed/role and
"notify" : true for the resource collection:
{
"name" : "assignment",
"schema" : {
...
"properties" : {
...
"roles" : {
...
"items" : {
...
"resourceCollection" : [
{
"notify" : true,
"path" : "managed/role",
"label" : "Role",
"query" : {
"queryFilter" : "true",
"fields" : [
"name"
]
}
}
...
}
With this configuration, when assignment A is created,
with a reference to role R, role R is
notified of the change. However, we still need to propagate that
notification to any users who are members
of role R. To do this, we configure the role
object as follows:
{
"name" : "role",
"schema" : {
...
"properties" : {
...
"assignments" : {
...
"notifyRelationships" : ["members"]
}
...
}
When role R is notified of the creation of a new
relationship to assignment A, the notification is
propagated through the assignments property. Because
"notifyRelationships" : ["members"] is set on the
assignments property, the notification is propagated
across role R to all members of role R.
11.11. Managed Role Script Hooks
Like any other managed object, a role has script hooks that enable you to
configure role behavior. The default role definition in
conf/managed.json includes the following script hooks:
{
"name" : "role",
"onDelete" : {
"type" : "text/javascript",
"file" : "roles/onDelete-roles.js"
},
"onCreate" : {
"type" : "text/javascript",
"source" : "require('roles/conditionalRoles').roleCreate(object);"
},
"onUpdate" : {
"type" : "text/javascript",
"source" : "require('roles/conditionalRoles').roleUpdate(oldObject, object);"
},
"postCreate" : {
"type" : "text/javascript",
"source" : "require('roles/postOperation-roles').manageTemporalConstraints(resourceName);"
},
"postUpdate" : {
"type" : "text/javascript",
"source" : "require('roles/postOperation-roles').manageTemporalConstraints(resourceName);"
},
"postDelete" : {
"type" : "text/javascript",
"source" : "require('roles/postOperation-roles').manageTemporalConstraints(resourceName);"
},
...
When a role is deleted, the onDelete script hook calls
the bin/default/script/roles/onDelete-roles.js script.
When a conditional role is created or updated, the
onCreate and onUpdate script hooks
force an update on all managed users affected by the conditional role.
Directly after a role is created, updated or deleted, the
postCreate, postUpdate, and
postDelete hooks call
roles/postOperation-roles, which can be found in
bin/defaults/script/roles/postOperation-roles.js.
Depending on when this script is called, it either creates or removes the
scheduled jobs required to manage temporal constraints on roles.
Chapter 12. Configuring Social Identity Providers
IDM provides a standards-based solution for social authentication requirements, based on the OAuth 2.0 and OpenID Connect 1.0 standards. They are similar, as OpenID Connect 1.0 is an authentication layer built on OAuth 2.0.
This chapter describes how to configure IDM to register and authenticate users with multiple social identity providers.
To configure different social identity providers, you'll take the same general steps:
Set up the provider. You'll need information such as a
Client IDandClient Secretto set up an interface with IDM.Configure the provider on IDM.
Set up User Registration. Activate
Social Registrationin the applicable Admin UI screen or configuration file.After configuration is complete, test the result. For a common basic procedure, see "Testing Social Identity Providers".
You can configure how IDM handles authentication using social identity providers by opening the Admin UI and selecting Configure > Authentication > Modules > Social Providers. The Social Providers authentication module is enabled by default. For more information, see "Configuring the Social Providers Authentication Module".
To understand how data is transmitted between IDM and a social identity provider, read "OpenID Connect Authorization Code Flow".
Note
For all social identity providers, set up a FQDN for IDM, along
with information in a DNS server, or system hosts
files. For test purposes, FQDNs that comply with RFC 2606, such as
localhost and openidm.example.com,
are acceptable.
12.1. OpenID Connect Authorization Code Flow
The OpenID Connect Authorization Code Flow specifies how IDM (Relying Party) interacts with the OpenID Provider (Social ID Provider), based on the use of the OAuth 2.0 authorization grant. The following sequence diagram illustrates successful processing from the authorization request, through grant of the authorization code, access token, ID token, and provisioning from the social identity provider to IDM.

The following list describes details of each item in the authorization flow:
A user navigates to the IDM Self-Service UI, and selects the
Sign Inlink for the desired social identity provider.IDM prepares an authorization request.
IDM sends the request to the Authorization Endpoint that you configured for the social identity provider, with a Client ID.
The social identity provider requests end user authentication and consent.
The end user transmits authentication and consent.
The social identity provider sends a redirect message, with an authorization code, to the end user's browser. The redirect message goes to an
oauthReturnendpoint, configured inui.context-oauth.jsonin your project'sconf/directory.When you configure a social identity provider, you'll find the endpoint in the applicable configuration file with the following property:
redirectUri.The browser transmits the redirect message, with the authorization code, to IDM.
IDM records the authorization code, and sends it to the social identity provider Token Endpoint.
The social identity provider token endpoint returns access and ID tokens.
IDM validates the token, and sends it to the social identity provider User Info Endpoint.
The social identity provider responds with information on the user's account, that IDM can provision as a new Managed User.
You'll configure these credentials and endpoints, in some form, for each social identity provider.
12.2. Many Social Identity Providers, One Schema
Most social identity providers include common properties, such as name, email address, icon configuration, and location.
IDM includes two sets of property maps that translate information from a social identity provider to your managed user objects. These property maps are as follows:
The
identityProviders.jsonfile includes apropertyMapcode block for each supported provider. This file maps properties from the provider to a generic managed user object. You should not customize this file.The
selfservice.propertymap.jsonfile translates the generic managed user properties to the managed user schema that you have defined inmanaged.json. If you have customized the managed user schema, this is the file that you must change, to indicate how your custom schema maps to the generic managed user schema.
Examine the identityProviders.json file in the
conf/ subdirectory for your project. The following
excerpt represents the Facebook propertyMap code block
from that file:
"propertyMap" : [
{
"source" : "id",
"target" : "id"
},
{
"source" : "name",
"target" : "displayName"
},
{
"source" : "first_name",
"target" : "givenName"
},
{
"source" : "last_name",
"target" : "familyName"
},
{
"source" : "email",
"target" : "email"
},
{
"source" : "email",
"target" : "username"
},
{
"source" : "locale",
"target" : "locale"
}
]The source lists the Facebook property, the target lists the corresponding property for a generic managed user.
IDM then processes that information through the
selfservice.propertymap.json file, where the source
corresponds to the generic managed user and the target corresponds to your
customized managed user schema (defined in your project's
managed.json file).
{
"properties" : [
{
"source" : "givenName",
"target" : "givenName"
},
{
"source" : "familyName",
"target" : "sn"
},
{
"source" : "email",
"target" : "mail"
},
{
"source" : "postalAddress",
"target" : "postalAddress",
"condition" : "/object/postalAddress pr"
},
{
"source" : "addressLocality",
"target" : "city",
"condition" : "/object/addressLocality pr"
},
{
"source" : "addressRegion",
"target" : "stateProvince",
"condition" : "/object/addressRegion pr"
},
{
"source" : "postalCode",
"target" : "postalCode",
"condition" : "/object/postalCode pr"
},
{
"source" : "country",
"target" : "country",
"condition" : "/object/country pr"
},
{
"source" : "phone",
"target" : "telephoneNumber",
"condition" : "/object/phone pr"
},
{
"source" : "username",
"target" : "userName"
}
]
}Tip
To take additional information from a social identity provider, make
sure the property is mapped through the identityProviders.json
and selfservice.propertymap.json files.
Several of the property mappings include a pr presence
expression which is a filter that returns all records with the given
attribute. For more information, see "Presence Expressions".
12.3. Setting Up Google as a Social Identity Provider
Take the following basic steps to configure Google as a social identity provider for IDM:
12.3.1. Setting Up Google
To set up Google as a social identity provider, navigate to the Google API Manager. You'll need a Google account. If you have GMail, you already have a Google account. While you could use a personal Google account, it is best to use an organizational account to avoid problems if specific individuals leave your organization. When you set up a Google social identity provider, you'll need to perform the following tasks:
Plan ahead. It may take some time before the Google+
API that you configure for IDM is ready for use.
In the Google API Manager, select and enable the
Google+API. It is one of the Google "social" APIs.Create a project for IDM.
Create OAuth client ID credentials. You'll need to configure an
OAuth consent screenwith at least a product name and email address.When you set up a Web application for the client ID, you'll need to set up a web client with:
Authorized JavaScript originsThe origin URL for IDM, typically a URL such as
https://openidm.example.com:8443Authorized redirect URIsThe redirect URI after users are authenticated, typically,
https://openidm.example.com:8443/oauthReturn/
In the list of credentials, you'll see a unique
Client IDandClient secret. You'll need this information when you configure the Google social identity provider, as described in "Configuring a Google Social Identity Provider".
For Google's procedure, see the Google Identity Platform documentation on Setting Up OAuth 2.0.
12.3.2. Configuring a Google Social Identity Provider
To configure a Google social identity provider, log into the Admin UI and navigate to Configure > Social ID Providers.
Enable the Google social identity provider, and if needed, select the edit icon.
Include the Google values for
Client IDandClient Secretfor your project, as described earlier in this section.Under regular and
Advanced Options, include the options shown in the following appendix: "Google Social Identity Provider Configuration Details".
When you enable a Google social identity provider in the Admin UI,
IDM generates the identityProvider-google.json
file in your project's conf/ subdirectory.
When you review that file, you should see information from what you
configured in the Admin UI, and beyond. The first part of the file includes
the name of the provider, endpoints, as well as the values for
clientId and clientSecret.
{
"enabled" : true,
"authorizationEndpoint" : "https://accounts.google.com/o/oauth2/v2/auth",
"tokenEndpoint" : "https://www.googleapis.com/oauth2/v4/token",
"userInfoEndpoint" : "https://www.googleapis.com/oauth2/v3/userinfo",
"wellKnownEndpoint" : "https://accounts.google.com/.well-known/openid-configuration"
"clientId" : "<someUUID>",
"clientSecret" : {
"$crypto" : {
"type" : "x-simple-encryption",
"value" : {
"cipher" : "AES/CBC/PKCS5Padding",
"salt" : "<hashValue>",
"data" : "<encryptedValue>",
"iv" : "<encryptedValue>",
"key" : "openidm-sym-default",
"mac" : "<hashValue>"
}
}
},
...You should also see UI settings related to the social identity provider icon (badge) and the sign-in button, described in "Social Identity Provider Button and Badge Properties".
You'll see links related to the authenticationIdKey,
redirectUri, scopes, and
configClass; the location may vary.
The file includes schema information,
which includes properties for each social identity account, as collected by
IDM, as well as the order in which it appears in the Admin UI.
When you've registered a user with a Google social identity, you can verify
this by selecting Manage > Google, and then selecting a user.
Another part of the file includes a propertyMap, which
maps user information entries between the source
(social identity provider) and the target (IDM).
If you need more information about the properties in this file, refer to the following appendix: "Google Social Identity Provider Configuration Details".
12.3.3. Configuring User Registration to Link to Google
Once you've configured the Google social identity provider, you can activate it through User Registration. To do so in the Admin UI, select Configure > User Registration, and under the Social tab, enable the option associated with Social Registration. For more information on user self-service features, see "Configuring User Self-Service".
When you enable social registration, you're allowing users to register on IDM through all active social identity providers.
12.4. Setting Up LinkedIn as a Social Identity Provider
As suggested in the introduction to this chapter, you'll need to take the following basic steps to configure LinkedIn as a social identity provider for IDM:
12.4.1. Setting Up LinkedIn
To set up LinkedIn as a social identity provider, navigate to the
LinkedIn
Developers page for My Applications.
You'll need a LinkedIn account. While you could use a personal LinkedIn
account, it is best to use an organizational account to avoid problems if
specific individuals leave your organization. When you set up a LinkedIn
social identity provider, you'll need to perform the following tasks:
In the LinkedIn Developers page for My Applications, select Create Application.
You'll need to include the following information when creating an application:
Company Name
Application Name
Description
Application Logo
Application Use
Website URL
Business Email
Business Phone
When you see Authentication Keys for your LinkedIn application, save the
Client IDandClient Secret.Enable the following default application permissions:
r_basicprofiler_emailaddress
When you set up a Web application for the client ID, you'll need to set up a web client with OAuth 2.0 Authorized Redirect URLs. For example, if your IDM FQDN is
openidm.example.com, add the following URL:http://openidm.example.com:8080/oauthReturn/
You can ignore any LinkedIn URL boxes related to OAuth 1.0a.
For LinkedIn's procedure, see their documentation on Authenticating with OAuth 2.0.
12.4.2. Configuring a LinkedIn Social Identity Provider
To configure a LinkedIn social identity provider, log into the Admin UI and navigate to Configure > Social ID Providers.
Enable the LinkedIn social identity provider.
Include the values that LinkedIn created for
Client IDandClient Secret, as described in "Setting Up LinkedIn".Under regular and
Advanced Options, include the options shown in the following appendix: "LinkedIn Social Identity Provider Configuration Details".
When you enable a LinkedIn social identity provider, IDM
generates the identityProvider-linkedIn.json file in your
project's conf/ subdirectory.
When you review that file, you should see information beyond what you see
in the Admin UI. The first part of the file includes the name of the provider,
endpoints, as well as the values for clientId and
clientSecret.
{
"provider" : "linkedIn",
"authorizationEndpoint" : "https://www.linkedin.com/oauth/v2/authorization",
"tokenEndpoint" : "https://www.linkedin.com/oauth/v2/accessToken",
"userInfoEndpoint" : "https://api.linkedin.com/v1/people/~:(id,formatted-name,first-name,last-name,email-address,location)?format=json"
"provider" : "linkedIn",
"clientId" : "<someUUID>",
"clientSecret" : {
"$crypto" : {
"type" : "x-simple-encryption",
"value" : {
"cipher" : "AES/CBC/PKCS5Padding",
"salt" : "<hashValue>",
"data" : "<encryptedValue>",
"iv" : "<encryptedValue>",
"key" : "openidm-sym-default",
"mac" : "<hashValue>"
}
}
},
"scope" : [
"r_basicprofile",
"r_emailaddress"
],
...You should also see UI settings related to the social identity provider icon (badge) and the sign-in button, described in "Social Identity Provider Button and Badge Properties".
You'll see links related to the authenticationIdKey,
redirectUri, and configClass; the
location may vary.
Another part of the file includes a propertyMap, which
maps user information entries between the source
(social identity provider) and the target (IDM).
The file includes schema information,
which includes properties for each social identity account, as collected by
IDM, as well as the order in which it appears in the Admin UI.
When you've registered a user with a LinkedIn social identity, you can verify
this by selecting Manage > LinkedIn, and then selecting a user.
If you need more information about the properties in this file, refer to the following appendix: "LinkedIn Social Identity Provider Configuration Details".
12.4.3. Configuring User Registration With LinkedIn
Once you've configured the LinkedIn social identity provider, you can activate it through User Registration. To do so in the Admin UI, select Configure > User Registration. Under the Social tab, enable the option associated with Social Registration. For more information about user self-service features, see "Configuring User Self-Service".
When you enable social registration, you're allowing users to register on IDM through all active social identity providers.
12.5. Setting Up Facebook as a Social Identity Provider
As suggested in the introduction to this chapter, you'll need to take the following basic steps to configure Facebook as a social identity provider for IDM:
Note
As of October 2018, Facebook as a social identity provider requires access over secure HTTP (HTTPS).
12.5.1. Setting Up Facebook
To set up Facebook as a social identity provider, navigate to the Facebook for Developers page. You'll need a Facebook account. While you could use a personal Facebook account, it is best to use an organizational account to avoid problems if specific individuals leave your organization. When you set up a Facebook social identity provider, you'll need to perform the following tasks:
In the Facebook for Developers page, select My Apps and Add a New App. For IDM, you'll create a
Websiteapplication.You'll need to include the following information when creating a Facebook website application:
Display Name
Contact Email
IDM URL
When complete, you should see your App. Navigate to Basic Settings.
Make a copy of the
App IDandApp Secretfor when you configure the Facebook social identity provider in IDM.In the settings for your App, you should see an entry for
App Domains, such asexample.com, as well as a Website Site URL, such ashttps://idm.example.com/.
For Facebook's documentation on the subject, see Facebook Login for the Web with the JavaScript SDK.
12.5.2. Configuring a Facebook Social Identity Provider
To configure a Facebook social identity provider, log into the Admin UI and navigate to Configure > Social ID Providers.
Enable the Facebook social identity provider.
Include the values that Facebook created for
App IDandApp Secret, as described in "Setting Up Facebook".Under regular and
Advanced Options, include the options shown in the following appendix: "Facebook Social Identity Provider Configuration Details".
When you enable a Facebook social identity provider in the Admin UI,
IDM generates the identityProvider-facebook.json
file in your project's conf/ subdirectory.
It includes parts of the file that you may have configured through the Admin
UI. While the labels in the UI specify App ID and App Secret, you'll see
them as clientId and clientSecret,
respectively, in the configuration file.
{
"provider" : "facebook",
"authorizationEndpoint" : "https://www.facebook.com/dialog/oauth",
"tokenEndpoint" : "https://graph.facebook.com/v2.7/oauth/access_token",
"userInfoEndpoint" : "https://graph.facebook.com/me?fields=id,name,picture,email,first_name,last_name,locale"
"clientId" : "<someUUID>",
"clientSecret" : {
"$crypto" : {
"type" : "x-simple-encryption",
"value" : {
"cipher" : "AES/CBC/PKCS5Padding",
"salt" : "<hashValue>",
"data" : "<encryptedValue>",
"iv" : "<encryptedValue>",
"key" : "openidm-sym-default",
"mac" : "<hashValue>"
}
}
},
"scope" : [
"email",
"user_birthday"
],
...You should also see UI settings related to the social identity provider icon (badge) and the sign-in button, described in "Social Identity Provider Button and Badge Properties".
You'll see links related to the authenticationIdKey,
redirectUri, and configClass; the
location may vary.
The file includes schema information,
which includes properties for each social identity account, as collected by
IDM, as well as the order in which it appears in the Admin UI.
When you've registered a user with a Facebook social identity, you can verify
this by selecting Manage > Facebook, and then selecting a user.
Another part of the file includes a propertyMap, which
maps user information entries between the source
(social identity provider) and the target (IDM).
If you need more information about the properties in this file, refer to the following appendix: "Facebook Social Identity Provider Configuration Details".
12.5.3. Configuring User Registration to Link to Facebook
Once you've configured the Facebook social identity provider, you can activate it through User Registration. To do so in the Admin UI, select Configure > User Registration, and under the Social tab, enable the option associated with Social Registration. For more information about user self-service features, see "Configuring User Self-Service".
When you enable social registration, you're allowing users to register on IDM through all active social identity providers.
12.6. Setting Up Amazon as an IDM Social Identity Provider
As suggested in the introduction to this chapter, you'll need to take the following basic steps to configure Amazon as a social identity provider for IDM:
Note
Amazon as a social identity provider requires access over secure HTTP (HTTPS).
12.6.1. Setting Up Amazon
To set up Amazon as a social identity provider, first Register for Login With Amazon. You will need an Amazon account.
Then, create a security profile. You will need the following information:
Security Profile Name (The name of your app)
Security Profile Description
Consent Privacy Notice URL
Consent Logo Image (optional)
When complete and saved, you should see a list of security profiles with
OAuth2 credentials. You should be able to find the
Client ID and Client Secret from this
screen.
You still need to configure the web settings for your new Security Profile. From the Amazon Developer Console dashboard, select Apps and Services > Login with Amazon, then select Manage > Web Settings.
In the Web Settings for your app, you'll need to set
either of the following properties:
Allowed Origins, which should match the URL for your registration page, such as
https://openidm.example.com:8443Allowed Return URLs, which should match the redirect URIs described in "Configuring an Amazon Social Identity Provider". You may see URIs such as
https://openidm.example.com:8443/oauthReturn/.
12.6.2. Configuring an Amazon Social Identity Provider
To configure an Amazon social identity provider, log into the Admin UI and navigate to Configure > Social ID Providers.
Enable the Amazon social identity provider.
In the
Amazon Providerpop-up that appears, the values forRedirect URIshould match the values that you've entered for Allowed Return URLs in "Setting Up Amazon".Include the values that Amazon created for
Client IDandClient Secret, as described in "Setting Up Amazon".Under regular and
Advanced Options, include the options shown in the following appendix: "Amazon Social Identity Provider Configuration Details".
When you enable an Amazon social identity provider in the Admin UI,
IDM generates the identityProvider-amazon.json
file in your project's conf/ subdirectory.
When you review that file, you should see information beyond what you see
in the Admin UI. The first part of the file includes the name of the provider,
endpoints, as well as the values for clientId and
clientSecret.
{
"provider" : "amazon",
"authorizationEndpoint" : "https://www.amazon.com/ap/oa",
"tokenEndpoint" : "https://api.amazon.com/auth/o2/token",
"userInfoEndpoint" : "https://api.amazon.com/user/profile"
"enabled" : true,
"clientId" : "<someUUID>",
"clientSecret" : {
"$crypto" : {
"type" : "x-simple-encryption",
"value" : {
"cipher" : "AES/CBC/PKCS5Padding",
"salt" : "<hashValue>",
"data" : "<encryptedValue>",
"iv" : "<encryptedValue>",
"key" : "openidm-sym-default",
"mac" : "<hashValue>"
}
}
},
"scope" : [
"profile"
],
...You should also see UI settings related to the social identity provider icon (badge) and the sign-in button, described in "Social Identity Provider Button and Badge Properties".
You'll see links related to the authenticationIdKey,
redirectUri, and configClass; the
location may vary.
The file includes schema information, which includes
properties for each social identity account, as collected by
IDM, as well as the order in which it appears in the Admin UI.
When you've registered a user with an Amazon social identity, you can verify
this by selecting Manage > Amazon, and then selecting a user.
Another part of the file includes a propertyMap, which
maps user information entries between the source
(social identity provider) and the target (IDM).
If you need more information about the properties in this file, refer to the following appendix: "Amazon Social Identity Provider Configuration Details".
12.6.3. Configuring User Registration to Link to Amazon
Once you've configured the Amazon social identity provider, you can activate it through User Registration. To do so in the Admin UI, select Configure > User Registration, and activate that feature. Under the Social tab that appears, enable Social Registration. For more information on IDM user self-service features, see "Configuring User Self-Service".
When you enable Social Registration, you're allowing users to register on IDM through all active social identity providers.
12.7. Setting Up Microsoft as an IDM Social Identity Provider
As suggested in the introduction to this chapter, you'll need to take the following basic steps to configure Microsoft as a social identity provider for IDM:
Note
Microsoft as a social identity provider requires access over secure
HTTP (HTTPS). This example assumes that you've configured IDM on
https://openidm.example.com:8443. Substitute your URL
for openidm.example.com.
12.7.1. Setting Up Microsoft
For Microsoft documentation on how to set up a social identity provider, navigate to the following article: Sign-in Microsoft Account & Azure AD users in a single app . You'll need a Microsoft account.
To set up Microsoft as a social identity provider:
Navigate to the Microsoft app registration portal at https://apps.dev.microsoft.com/ and sign in with your Microsoft account.
Select Add an App and give your app a name.
The portal will assign your app a unique
Application ID.To find your
Application Secret, select Generate New Password. That password is your Application Secret.Tip
Save your new password. It is the only time you'll see the
Application Secretfor your new app.Select Add Platform. You'll choose a
Webplatform, enableAllow Implicit Flowand set up the following value forRedirect URI:https://openidm.example.com:8443/
If desired, you can also enter the following information:
Logo image
Terms of Service URL
Privacy Statement URL
The OAuth2 credentials for your new Microsoft App include
an Application ID and Application Secret
for your app.
12.7.2. Configuring a Microsoft Social Identity Provider
To configure a Microsoft social identity provider, log into the Admin UI and navigate to Configure > Social ID Providers.
Enable the Microsoft social identity provider.
In the
Microsoft Providerpop-up that appears, the values forRedirect URIshould match the values that you've entered for Allowed Return URLs in "Setting Up Microsoft".Include the values that Microsoft created for
Client IDandClient Secret, as described in "Setting Up Microsoft".Under regular and
Advanced Options, include the options shown in the following appendix: "Microsoft Social Identity Provider Configuration Details".
When you enable a Microsoft social identity provider in the Admin UI,
IDM generates the identityProvider-microsoft.json
file in your project's conf/ subdirectory.
It includes parts of the file that you may have configured through the Admin
UI. While the labels in the UI specify Application ID and Application Secret,
you'll see them as clientId and
clientSecret, respectively, in the configuration file.
"provider" : "microsoft",
"authorizationEndpoint" : "https://login.microsoftonline.com/common/oauth2/v2.0/authorize",
"tokenEndpoint" : "https://login.microsoftonline.com/common/oauth2/v2.0/token",
"userInfoEndpoint" : "https://graph.microsoft.com/v1.0/me"
"clientId" : "<someUUID>",
"clientSecret" : {
"$crypto" : {
"type" : "x-simple-encryption",
"value" : {
"cipher" : "AES/CBC/PKCS5Padding",
"salt" : "<hashValue>",
"data" : "<encryptedValue>",
"iv" : "<encryptedValue>",
"key" : "openidm-sym-default",
"mac" : "<hashValue>"
}
}
},
"scope" : [
"User.Read"
],
...You should also see UI settings related to the social identity provider icon (badge) and the sign-in button, described in "Social Identity Provider Button and Badge Properties".
You'll see links related to the authenticationIdKey,
redirectUri, and configClass; the
location may vary.
The file includes schema information,
which includes properties for each social identity account, as collected by
IDM, as well as the order in which it appears in the Admin UI.
When you've registered a user with a Microsoft social identity, you can
verify this by selecting Manage > Microsoft, and then selecting a user.
Another part of the file includes a propertyMap, which
maps user information entries between the source
(social identity provider) and the target (IDM).
If you need more information about the properties in this file, refer to the following appendix: "Microsoft Social Identity Provider Configuration Details".
12.7.3. Configuring User Registration to Link to Microsoft
Once you've configured the Microsoft social identity provider, you can activate it through User Registration. To do so in the Admin UI, select Configure > User Registration, and activate that feature. Under the Social tab that appears, enable Social Registration. For more information on IDM user self-service features, see "Configuring User Self-Service".
When you enable Social Registration, you're allowing users to register on IDM through all active social identity providers.
12.8. Setting Up WordPress as an IDM Social Identity Provider
As suggested in the introduction to this chapter, you'll need to take the following basic steps to configure WordPress as a social identity provider for IDM:
12.8.1. Setting Up WordPress
To set up WordPress as a social identity provider, navigate to the following WordPress Developers page: Developer Resources . You'll need a WordPress account. You can then navigate to the WordPress My Applications page, where you can create a new web application, with the following information:
Name
Description
Website URL, which becomes your Application URL
Redirect URL(s); for IDM, normally
http://openidm.example.com:8080/oauthReturn/Type, which allows you to select Web clients
When complete and saved, you should see a list of OAuth
Information for your new webapp. That information should you your
Client ID and Client Secret.
12.8.2. Configuring a WordPress Social Identity Provider
To configure a WordPress social identity provider, log into the Admin UI and navigate to Configure > Social ID Providers.
Enable the WordPress social identity provider.
In the
WordPress Providerpop-up that appears, the values forRedirect URIshould match the values that you've entered for Allowed Return URLs in "Setting Up WordPress".Include the values that WordPress created for
Client IDandClient Secret, as described in "Setting Up WordPress".Under regular and
Advanced Options, include the options shown in the following appendix: "WordPress Social Identity Provider Configuration Details".
When you enable a WordPress social identity provider in the Admin UI,
IDM generates the identityProvider-wordpress.json
file in your project's conf/ subdirectory.
When you review that file, you should see information beyond what you see
in the Admin UI. The first part of the file includes the name of the provider,
endpoints, as well as the values for clientId and
clientSecret.
{
"provider" : "wordpress",
"authorizationEndpoint" : "https://public-api.wordpress.com/oauth2/authorize",
"tokenEndpoint" : "https://public-api.wordpress.com/oauth2/token",
"userInfoEndpoint" : "https://public-api.wordpress.com/rest/v1.1/me/",
"enabled" : true,
"clientId" : "<someUUID>",
"clientSecret" : {
"$crypto" : {
"type" : "x-simple-encryption",
"value" : {
"cipher" : "AES/CBC/PKCS5Padding",
"salt" : "<hashValue>",
"data" : "<encryptedValue>",
"iv" : "<encryptedValue>",
"key" : "openidm-sym-default",
"mac" : "<hashValue>"
}
}
},
"scope" : [
"auth"
],
...You should also see UI settings related to the social identity provider icon (badge) and the sign-in button, described in "Social Identity Provider Button and Badge Properties".
You'll see links related to the authenticationIdKey,
redirectUri, and configClass; the
location may vary.
The file includes schema information, which includes
properties for each social identity account, as collected by
IDM, as well as the order in which it appears in the Admin UI.
When you've registered a user with a Wordpress social identity, you can
verify this by selecting Manage > Wordpress, and then selecting a user.
Another part of the file includes a propertyMap, which
maps user information entries between the source
(social identity provider) and the target (IDM).
If you need more information about the properties in this file, refer to the following appendix: "WordPress Social Identity Provider Configuration Details".
12.8.3. Configuring User Registration to Link to WordPress
Once you've configured the WordPress social identity provider, you can activate it through User Registration. To do so in the Admin UI, select Configure > User Registration, and activate that feature. Under the Social tab that appears, enable Social Registration. For more information on IDM user self-service features, see "Configuring User Self-Service".
When you enable Social Registration, you're allowing users to register on IDM through all active social identity providers.
12.9. Setting Up WeChat as an IDM Social Identity Provider
As suggested in the introduction to this chapter, you'll need to take the following basic steps to configure WeChat as a social identity provider for IDM:
These requirements assume that you have a WeChat developer account where you can get access to create WeChat web application credentials. To verify access, you'll need the WeChat app on your mobile phone.
12.9.1. Setting Up WeChat
To set up WeChat as a social identity provider, you'll need to get the following information for your WeChat app. The name may be different in WeChat.
Client ID (WeChat uses
appidas of this writing.)Client Secret (WeChat uses
secretas of this writing.)Scope
Authorization Endpoint URL
Token Endpoint URL
User Info Endpoint URL
Redirect URI, normally something like
http://openidm.example.com/oauthReturn/
WeChat Unique Requirements
Before testing WeChat, be prepared for the following special requirements:
WeChat works only if you deploy IDM on one of the following ports: 80 or 443.
For more information on how to configure IDM to use these ports, see "Host and Port Information".
For registration and sign-in, WeChat requires the use of a mobile device with a Quick Response (QR) code reader.
For sign-in, you'll also need to install the WeChat app on your mobile device.
12.9.2. Configuring a WeChat Social Identity Provider
To configure a WeChat social identity provider, log into the Admin UI and navigate to Configure > Social ID Providers.
Enable the WeChat social identity provider.
In the
WeChat Providerpop-up that appears, the values forRedirect URIshould match the values that you've entered for Allowed Return URLs in "Setting Up WeChat".Include the values that WeChat created for
Client IDandClient Secret, as described in "Setting Up WeChat".Under regular and
Advanced Options, include the options shown in the following appendix: "WeChat Social Identity Provider Configuration Details".
When you enable a WeChat social identity provider in the Admin UI,
IDM generates the identityProvider-wechat.json
file in your project's conf/ subdirectory.
When you review that file, you should see information from what you
configured in the Admin UI, and beyond. The first part of the file includes
the name of the provider, endpoints, scopes, as well as the values for
clientId and clientSecret.
{
"provider" : "wechat",
...
"clientId" : "<someUUID>",
"clientSecret" : {
"$crypto" : {
"type" : "x-simple-encryption",
"value" : {
"cipher" : "AES/CBC/PKCS5Padding",
"salt" : "<hashValue>",
"data" : "<encryptedValue>",
"iv" : "<encryptedValue>",
"key" : "openidm-sym-default",
"mac" : "<hashValue>"
}
}
},
"authorizationEndpoint" : "https://open.weixin.qq.com/connect/qrconnect",
"tokenEndpoint" : "https://api.wechat.com/sns/oauth2/access_token",
"refreshTokenEndpoint" : "https://api.wechat.com/sns/oauth2/refresh_token",
"userInfoEndpoint" : "https://api.wechat.com/sns/userinfo",
"redirectUri" : "http://openidm.example.com:8080/oauthReturn/",
"scope" : [
"snsapi_login"
],
...You should also see UI settings related to the social identity provider icon (badge) and the sign-in button, described in "Social Identity Provider Button and Badge Properties".
You'll see links related to the authenticationIdKey,
redirectUri, and configClass; the
location may vary.
The file includes schema information, which includes
properties for each social identity account, as collected by
IDM, as well as the order in which it appears in the Admin UI.
When you've registered a user with a WeChat social identity, you can verify
this by selecting Manage > WeChat, and then selecting a user.
Another part of the file includes a propertyMap, which
maps user information entries between the source
(social identity provider) and the target (IDM).
If you need more information about the properties in this file, refer to the following appendix: "WeChat Social Identity Provider Configuration Details".
12.9.3. Configuring User Registration to Link to WeChat
Once you've configured the WeChat social identity provider, you can activate it through User Registration. To do so in the Admin UI, select Configure > User Registration, and activate that feature. Under the Social tab that appears, enable Social Registration. For more information on IDM user self-service features, see "Configuring User Self-Service".
When you enable Social Registration, you're allowing users to register on IDM through all active social identity providers.
12.10. Setting Up Instagram as an IDM Social Identity Provider
As suggested in the introduction to this chapter, you'll need to take the following basic steps to configure Instagram as a social identity provider for IDM:
12.10.1. Setting Up Instagram
To set up Instagram as a social identity provider, navigate to the following page: Instagram Developer Documentation . You'll need an Instagram account. You can then navigate to the Manage Clients page, where you can follow the Instagram process to create a new web application. As of this writing, you can do so on their Register a new Client ID page, where you'll need the following information:
Application Name
Description
Website URL for your app, such as
http://openidm.example.com:8080Redirect URL(s); for IDM:
http://openidm.example.com:8080/oauthReturn/
When complete and saved, you should see a list of OAuth
Information for your new webapp. That information should be your
Client ID and Client Secret.
12.10.2. Configuring an Instagram Social Identity Provider
To configure an Instagram social identity provider, log into the Admin UI and navigate to Configure > Social ID Providers.
Enable the Instagram social identity provider.
In the
Instagram Providerpop-up that appears, the values forRedirect URIshould match the values that you've entered for Valid Redirect URIs in "Setting Up Instagram".Include the values that Instagram created for
Client IDandClient Secret, as described in "Setting Up Instagram".Under regular and
Advanced Options, include the options shown in the following appendix: "Instagram Social Identity Provider Configuration Details".
When you enable an Instagram social identity provider in the Admin UI,
IDM generates the identityProvider-instagram.json
file in your project's conf/ subdirectory.
When you review that file, you should see information from what you
configured in the Admin UI, and beyond. The first part of the file includes
the name of the provider, endpoints, scopes, as well as the values for
clientId and clientSecret.
{
"provider" : "instagram",
...
"clientId" : "<Client_ID_Name>",
"clientSecret" : {
"$crypto" : {
"type" : "x-simple-encryption",
"value" : {
"cipher" : "AES/CBC/PKCS5Padding",
"salt" : "<hashValue>",
"data" : "<encryptedValue>",
"iv" : "<encryptedValue>",
"key" : "openidm-sym-default",
"mac" : "<hashValue>"
}
}
},
"authorizationEndpoint" : "https://api.instagram.com/oauth/authorize/",
"tokenEndpoint" : "https://api.instagram.com/oauth/access_token",
"userInfoEndpoint" : "https://api.instagram.com/v1/users/self/",
"redirectUri" : "http://openidm.example.com:8080/oauthReturn/",
"scope" : [
"basic",
"public_content"
],
...
Another part of the file includes a propertyMap, which
maps user information entries between the source
(social identity provider) and the target (IDM).
The file includes schema information,
which includes properties for each social identity account, as collected by
IDM, as well as the order in which it appears in the Admin UI.
When you've registered a user with an Instagram social identity, you can
verify this by selecting Manage > Instagram, and then selecting a user.
If you need more information about the properties in this file, refer to the following appendix: "Instagram Social Identity Provider Configuration Details".
12.10.3. Configuring User Registration to Link to Instagram
Once you've configured the Instagram social identity provider, you can activate it through User Registration. To do so in the Admin UI, select Configure > User Registration, and activate that feature. Under the Social tab that appears, enable Social Registration. For more information on IDM user self-service features, see "Configuring User Self-Service".
When you enable Social Registration, you're allowing users to register on IDM through all active social identity providers.
12.11. Setting Up Vkontakte as an IDM Social Identity Provider
As suggested in the introduction to this chapter, you'll need to take the following basic steps to configure Vkontakte as a social identity provider for IDM:
Note
When you configure a Vkontakte app, look for an Application ID
and a Secure Key. IDM uses this information
as a clientId and clientSecret,
respectively.
12.11.1. Setting Up Vkontakte
To set up Vkontakte as a social identity provider, navigate to the following Vkontakte page: Vkontakte Developers Page . You'll need a Vkontakte account. Find a My Apps link. You can then create an application with the following information:
Title (The name of your app)
Platform (Choose Website)
Site Address (The URL of your IDM deployment, such as
http://openidm.example.com:8080/Base domain (Example:
example.com)Authorized Redirect URI (Example:
http://openidm.example.com:8080/oauthReturn/)API Version; for the current VKontakte API version, see VK Developers Documentation, API Versions section. The default VKontakte API version used for IDM 6 is 5.73.
If you leave and need to return to Vkontakte, navigate to
https://vk.com/dev and select My Apps.
You can then Manage the new apps that you've created.
Navigate to the Settings for your app, where you'll find the Application ID and Secure Key for your app. You'll use that information as shown here:
Vkontakte Application ID = IDM Client ID
Vkontakte Secure Key = IDM Client Secret
12.11.2. Configuring a Vkontakte Social Identity Provider
To configure a Vkontakte social identity provider, log into the Admin UI and navigate to Configure > Social ID Providers.
Enable the Vkontakte social identity provider.
In the
Vkontakte Providerpop-up that appears, the values forRedirect URIshould match the values that you've entered for Authorized Redirect URI in "Setting Up Vkontakte".Include the values that Vkontakte created for
Client IDandClient Secret, as described in "Setting Up Vkontakte".Under regular and
Advanced Options, include the options shown in the following appendix: "Vkontakte Social Identity Provider Configuration Details".
When you enable a Vkontakte social identity provider in the Admin UI,
IDM generates the identityProvider-vkontakte.json
file in your project's conf/ subdirectory.
When you review that file, you should see information beyond what you see
in the Admin UI. The first part of the file includes the name of the provider,
endpoints, as well as information from the Consumer Key
and Consumer Secret, you'll see them as
clientId and clientSecret, respectively,
in the configuration file.
{
"provider" : "vkontakte",
"configClass" : "org.forgerock.oauth.clients.vk.VKClientConfiguration",
"basicAuth" : false,
"clientId" : "<someUUID>",
"clientSecret" : {
"$crypto" : {
"type" : "x-simple-encryption",
"value" : {
"cipher" : "AES/CBC/PKCS5Padding",
"salt" : "<hashValue>",
"data" : "<encryptedValue>",
"iv" : "<encryptedValue>",
"key" : "openidm-sym-default",
"mac" : "<hashValue>"
}
}
},
"authorizationEndpoint" : "https://oauth.vk.com/authorize",
"tokenEndpoint" : "https://oauth.vk.com/access_token",
"userInfoEndpoint" : "https://api.vk.com/method/users.get",
"redirectUri" : "http://openidm.example.com:8080/oauthReturn/",
"apiVersion" : "5.73",
"scope" : [
"email"
],
...You should also see UI settings related to the social identity provider icon (badge) and the sign-in button, described in "Social Identity Provider Button and Badge Properties".
You'll see links related to the authenticationIdKey,
redirectUri, and configClass; the
location may vary.
The file includes schema information, which includes
properties for each social identity account, as collected by
IDM, as well as the order in which it appears in the Admin UI.
When you've registered a user with a Vkontakte social identity, you can verify
this by selecting Manage > Vkontakte, and then selecting a user.
Another part of the file includes a propertyMap, which
maps user information entries between the source
(social identity provider) and the target (IDM).
If you need more information about the properties in this file, refer to the following appendix: "Vkontakte Social Identity Provider Configuration Details".
12.11.3. Configuring User Registration to Link to Vkontakte
Once you've configured the Vkontakte social identity provider, you can activate it through User Registration. To do so in the Admin UI, select Configure > User Registration, and activate that feature. Under the Social tab that appears, enable Social Registration. For more information on IDM user self-service features, see "Configuring User Self-Service".
When you enable Social Registration, you're allowing users to register on IDM through all active social identity providers.
12.12. Setting Up Salesforce as an IDM Social Identity Provider
As suggested in the introduction to this chapter, you'll need to take the following basic steps to configure Salesforce as a social identity provider for IDM:
Note
When you configure a Salesforce app, look for a Consumer Key
and a Consumer Secret. IDM uses this information
as a clientId and clientSecret,
respectively.
For reference, read through the following Salesforce documentation: Connected Apps Overview.
12.12.1. Setting Up Salesforce
To set up Salesforce as a social identity provider, you will need a Salesforce developer account. Log in to the Salesforce Developers Page with your developer account credentials and create a new Connected App.
Note
These instructions were written with the Summer '17 Release of the Salesforce API. The menu items might differ slightly if you are working with a different version of the API.
Select Setup > Apps > App Manager > New Connected App. You will need to add the following information:
Connected App Name
API Name (defaults to the Connected App Name)
Contact Email
Activate the following option: Enable OAuth Settings
Callback URL (also known as the Redirect URI for other providers), for example
https://localhost:8443/admin/oauth.html.The Callback URL must correspond to the URL that you use to log in to the IDM Admin UI.
Add the following OAuth scopes:
Access and Manage your data (api)
Access your basic information (id, profile, email, address, phone)
Perform requests on your behalf at any time (refresh_token, offline_access)
Provide access to your data via the Web (web)
After you have saved the Connected App, it might take a few minutes for the new app to appear under Apps > Connected Apps > Manage Connected Apps.
Select the new Connected App then locate the Consumer Key and Consumer Secret (under the API list). You'll use that information as shown here:
Salesforce Consumer Key = IDM Client ID
Salesforce Consumer Secret = IDM Client Secret
12.12.2. Configuring a Salesforce Social Identity Provider
To configure a Salesforce social identity provider, log into the Admin UI and navigate to Configure > Social ID Providers.
Enable the Salesforce social identity provider.
In the
Salesforce Providerpop-up that appears, the values forRedirect URIshould match the value that you've entered for Callback URL in "Setting Up Salesforce".Include the values that Salesforce created for
Consumer KeyandConsumer Secret, as described in "Setting Up Salesforce".Under regular and
Advanced Options, include the options shown in the following appendix: "Salesforce Social Identity Provider Configuration Details".
When you enable a Salesforce social identity provider in the Admin UI,
IDM generates the identityProvider-salesforce.json
file in your project's conf/ subdirectory.
It includes parts of the file that you may have configured through the Admin
UI. While the labels in the UI specify Consumer Key and Consumer Secret,
you'll see them as clientId and
clientSecret, respectively, in the configuration file.
{
"provider" : "salesforce",
"authorizationEndpoint" : "https://login.salesforce.com/services/oauth2/authorize",
"tokenEndpoint" : "https://login.salesforce.com/services/oauth2/token",
"userInfoEndpoint" : "https://login.salesforce.com/services/oauth2/userinfo",
"clientId" : "<someUUID>",
"clientSecret" : {
"$crypto" : {
"type" : "x-simple-encryption",
"value" : {
"cipher" : "AES/CBC/PKCS5Padding",
"salt" : "<hashValue>",
"data" : "<encryptedValue>",
"iv" : "<encryptedValue>",
"key" : "openidm-sym-default",
"mac" : "<hashValue>"
}
}
},
"scope" : [
"id",
"api",
"web"
],You should also see UI settings related to the social identity provider icon (badge) and the sign-in button, described in "Social Identity Provider Button and Badge Properties".
You'll see links related to the authenticationIdKey,
redirectUri, and configClass; the
location may vary.
The file includes schema information,
which includes properties for each social identity account, as collected by
IDM, as well as the order in which it appears in the Admin UI.
When you've registered a user with a Salesforce social identity, you can
verify this by selecting Manage > Salesforce, and then selecting a user.
Another part of the file includes a propertyMap, which
maps user information entries between the source
(social identity provider) and the target (IDM).
If you need more information about the properties in this file, refer to the following appendix: "Salesforce Social Identity Provider Configuration Details".
12.12.3. Configuring User Registration to Link to Salesforce
Once you've configured the Salesforce social identity provider, you can activate it through User Registration. To do so in the Admin UI, select Configure > User Registration, and activate that feature. Under the Social tab that appears, enable Social Registration. For more information on IDM user self-service features, see "Configuring User Self-Service".
When you enable Social Registration, you're allowing users to register on IDM through all active social identity providers.
12.13. Setting Up Yahoo as an IDM Social Identity Provider
As suggested in the introduction to this chapter, you'll need to take the following basic steps to configure Yahoo as a social identity provider for IDM:
12.13.1. Setting Up Yahoo
To set up Yahoo as a social identity provider, navigate to the following page: Yahoo OAuth 2.0 Guide . You'll need a Yahoo account. You can then navigate to the Create an App page, where you can follow the Yahoo process to create a new web application with the following information:
Application Name
Web Application
Callback Domain, such as
openidm.example.com; required for IDMAPI Permissions; for whatever you select, choose Read/Write. IDM only reads Yahoo user information.
When complete and saved, you should see a Client ID and
Client Secret for your new web app.
Note
Yahoo supports URLs using only HTTPS, only on port 443. For more information on how to configure IDM to use these ports, see "Host and Port Information".
12.13.2. Configuring Yahoo as a Social Identity Provider
To configure Yahoo as a social identity provider, log in to the Admin UI and navigate to Configure > Social ID Providers.
Enable the Yahoo social identity provider.
In the
Yahoo Providerpop-up that appears, the values forRedirect URIshould use the same Callback Domain as shown in "Setting Up Yahoo".Include the values that Yahoo created for
Client IDandClient Secret, as described in "Setting Up Yahoo".Under regular and
Advanced Options, if necessary, include the options shown in the following appendix: "Yahoo Social Identity Provider Configuration Details".
When you enable a Yahoo social identity provider in the Admin UI,
IDM generates the identityProvider-yahoo.json
file in your project's conf/ subdirectory.
When you review that file, you should see information beyond what you see in the Admin UI. The first part of the file includes the name of the provider, the scope, and UI settings related to the social identity provider icon (badge) and the sign-in button. For more information on the icon and button, see "Social Identity Provider Button and Badge Properties".
{
"provider" : "yahoo",
"scope" : [
"openid",
"sdpp-w"
],
"uiConfig" : {
"iconBackground" : "#7B0099",
"iconClass" : "fa-yahoo",
"iconFontColor" : "white",
"buttonClass" : "fa-yahoo",
"buttonDisplayName" : "Yahoo",
"buttonCustomStyle" : "background-color: #7B0099; border-color: #7B0099; color:white;",
"buttonCustomStyleHover" : "background-color: #7B0099; border-color: #7B0099; color:white;"
},
Another part of the file includes a propertyMap, which
maps user information entries between the source
(social identity provider) and the target (IDM).
The next part of the file includes schema information,
which includes properties for each social identity account, as collected by
IDM, as well as the order in which it appears in the Admin UI.
When you've registered a user with a Yahoo social identity, you can
verify this by selecting Manage > Yahoo, and then selecting a user.
Next, there's the part of the file that you may have configured through
the Admin UI, plus additional information on the redirectUri,
the configClass, and the authenticationIdKey:
"authorizationEndpoint" : "https://api.login.yahoo.com/oauth2/request_auth",
"tokenEndpoint" : "https://api.login.yahoo.com/oauth2/get_token",
"wellKnownEndpoint" : "https://login.yahoo.com/.well-known/openid-configuration",
"clientId" : "<Client_ID_Name>",
"clientSecret" : {
"$crypto" : {
"type" : "x-simple-encryption",
"value" : {
"cipher" : "AES/CBC/PKCS5Padding",
"salt" : "<hashValue>",
"data" : "<encryptedValue>",
"iv" : "<encryptedValue>",
"key" : "openidm-sym-default",
"mac" : "<hashValue>"
}
}
},
"authenticationIdKey" : "sub",
"redirectUri" : "https://openidm.example.com/oauthReturn/",
"basicAuth" : false,
"configClass" : "org.forgerock.oauth.clients.oidc.OpenIDConnectClientConfiguration",
"enabled" : true
}If you need more information about the properties in this file, refer to the following appendix: "Yahoo Social Identity Provider Configuration Details".
12.13.3. Configuring User Registration to Link to Yahoo
Once you've configured the Yahoo social identity provider, you can activate it through User Registration. To do so in the Admin UI, select Configure > User Registration, and activate that feature. Under the Social tab that appears, enable Social Registration. For more information on IDM user self-service features, see "Configuring User Self-Service".
When you enable Social Registration, you're allowing users to register on IDM through all active social identity providers.
12.14. Setting Up Twitter as an IDM Social Identity Provider
As suggested in the introduction to this chapter, you'll need to take the following basic steps to configure Twitter as a social identity provider for IDM:
12.14.1. Setting Up Twitter
To set up Twitter as a social identity provider, navigate to the following page: Single-user OAuth with Examples . You'll need a Twitter account. You can then navigate to the Twitter Application Management page, where you can select Create New App and enter at least the following information:
Name
Description
Website, such as
http://openidm.example.com:8080Callback URL, such as
http://openidm.example.com:8080/oauthReturn/; required for IDM; for other providers, known asRedirectURI
When complete and saved, you should see a Consumer Key and
Consumer Secret for your new web app.
Note
Twitter Apps use the OAuth 1.0a protocol. Fortunately, with IDM, you can use the same process used to configure OIDC and OAuth 2 social identity providers.
12.14.2. Configuring Twitter as a Social Identity Provider
To configure Twitter as a social identity provider, log in to the Admin UI and navigate to Configure > Social ID Providers.
Enable the Twitter social identity provider.
In the
Twitter Providerpop-up that appears, the values forCallback URLshould use the same value shown in "Setting Up Twitter".Include the values that Twitter created for
Consumer KeyandConsumer Secret, as described in "Setting Up Twitter".Under regular and
Advanced Options, if necessary, include the options shown in the following appendix: "Twitter Social Identity Provider Configuration Details".
When you enable a Twitter social identity provider in the Admin UI,
IDM generates the identityProvider-twitter.json
file in your project's conf/ subdirectory.
When you review that file, you should see information beyond what you see
in the Admin UI. The first part of the file includes the name of the provider,
endpoints, as well as information from the Consumer Key
and Consumer Secret, you'll see them as
clientId and clientSecret, respectively,
in the configuration file.
{
"provider" : "twitter",
"requestTokenEndpoint" : "https://api.twitter.com/oauth/request_token",
"authorizationEndpoint" : "https://api.twitter.com/oauth/authenticate",
"tokenEndpoint" : "https://api.twitter.com/oauth/access_token",
"userInfoEndpoint" : "https://api.twitter.com/1.1/account/verify_credentials.json",
"clientId" : "<Client_ID_Name>",
"clientSecret" : {
"$crypto" : {
"type" : "x-simple-encryption",
"value" : {
"cipher" : "AES/CBC/PKCS5Padding",
"salt" : "<hashValue>",
"data" : "<encryptedValue>",
"iv" : "<encryptedValue>",
"key" : "openidm-sym-default",
"mac" : "<hashValue>"
}
}
},You should also see UI settings related to the social identity provider icon (badge) and the sign-in button, described in "Social Identity Provider Button and Badge Properties".
You'll see links related to the authenticationIdKey,
redirectUri, and configClass.
The next part of the file includes schema information,
which includes properties for each social identity account, as collected by
IDM, as well as the order in which it appears in the Admin UI.
When you've registered a user with a Twitter social identity, you can
verify this by selecting Manage > Twitter, and then selecting a user.
Another part of the file includes a propertyMap, which
maps user information entries between the source
(social identity provider) and the target (IDM).
If you need more information about the properties in this file, refer to the following appendix: "Twitter Social Identity Provider Configuration Details".
12.14.3. Configuring User Registration to Link to Twitter
Once you've configured the Twitter social identity provider, you can activate it through User Registration. To do so in the Admin UI, select Configure > User Registration, and activate that feature. Under the Social tab that appears, enable Social Registration. For more information on IDM user self-service features, see "Configuring User Self-Service".
When you enable Social Registration, you're allowing users to register on IDM through all active social identity providers.
12.15. Setting Up a Custom Social Identity Provider
As suggested in the introduction to this chapter, you'll need to take four basic steps to configure a custom social identity provider:
Note
These instructions require the social identity provider to be fully compliant with The OAuth 2.0 Authorization Framework or the OpenID Connect standards.
12.15.1. Preparing IDM
While IDM includes provisions to work with OpenID Connect 1.0 and OAuth 2.0 social identity providers, connections to those providers are not supported, other than those specifically listed in this chapter.
To set up another social provider, first add a code block
to the identityProviders.json file, such as:
{
"provider" : "<providerName>",
"authorizationEndpoint" : "",
"tokenEndpoint" : "",
"userInfoEndpoint" : "",
"wellKnownEndpoint" : "",
"clientId" : "",
"clientSecret" : "",
"uiConfig" : {
"iconBackground" : "",
"iconClass" : "",
"iconFontColor" : "",
"buttonImage" : "",
"buttonClass" : "",
"buttonCustomStyle" : "",
"buttonCustomStyleHover" : "",
"buttonDisplayName" : ""
},
"scope" : [ ],
"authenticationIdKey" : "",
"schema" : {
"id" : "urn:jsonschema:org:forgerock:openidm:identityProviders:api:<providerName>",
"viewable" : true,
"type" : "object",
"$schema" : "http://json-schema.org/draft-03/schema",
"properties" : {
"id" : {
"title" : "ID",
"viewable" : true,
"type" : "string",
"searchable" : true
},
"name" : {
"title" : "Name",
"viewable" : true,
"type" : "string",
"searchable" : true
},
"first_name" : {
"title" : "First Name",
"viewable" : true,
"type" : "string",
"searchable" : true
},
"last_name" : {
"title" : "Last Name",
"viewable" : true,
"type" : "string",
"searchable" : true
},
"email" : {
"title" : "Email Address",
"viewable" : true,
"type" : "string",
"searchable" : true
},
"locale" : {
"title" : "Locale Code",
"viewable" : true,
"type" : "string",
"searchable" : true
}
},
"order" : [
"id",
"name",
"first_name",
"last_name",
"email",
"locale"
],
"required" : [ ]
},
"propertyMap" : [
{
"source" : "id",
"target" : "id"
},
{
"source" : "name",
"target" : "displayName"
},
{
"source" : "first_name",
"target" : "givenName"
},
{
"source" : "last_name",
"target" : "familyName"
},
{
"source" : "email",
"target" : "email"
},
{
"source" : "email",
"target" : "username"
},
{
"source" : "locale",
"target" : "locale"
}
],
"redirectUri" : "http://openidm.example.com:8080/oauthReturn/",
"configClass" : "org.forgerock.oauth.clients.oidc.OpenIDConnectClientConfiguration",
"basicAuth" : false,
"enabled" : true
},
Modify this code block for your selected social provider. Some of these
properties may appear under other names. For example, some providers
specify an App ID that you'd include as a
clientId.
Additional changes may be required, especially depending on how the provider implements the OAuth2 or OpenID Connect standards.
In the propertyMap code block, you should substitute the
properties from the selected social identity provider for various values of
source. Make sure to trace the property mapping through
selfservice.propertymap.json to the Managed User
property shown in managed.json. For more information on
this multi-step mapping, see "Many Social Identity Providers, One Schema".
As shown in "OpenID Connect Authorization Code Flow", user provisioning information goes through the User Info Endpoint. Some providers, such as LinkedIn and Facebook, may require a list of properties with the endpoint. Consult the documentation for your provider for details.
For more information on the uiConfig code block, see
"Social Identity Provider Button and Badge Properties".
Both files, identityProviders.json and
identityProvider-custom.json, should include the same
information for the new custom identity provider.
For property details, see "Custom Social Identity Provider Configuration Details".
Once you've included information from your selected social identity provider, proceed with the configuration process. You'll use the same basic steps described for other specified social providers.
12.15.2. Setting Up a Custom Social Identity Provider
Every social identity provider should be able to provide the information you need to specify properties in the code block shown in "Preparing IDM".
In general, you'll need an authorizationEndpoint,
a tokenEndpoint and a userInfoEndpoint.
To link to the custom provider, you'll also have to copy the
clientId and clientSecret that you
created with that provider. In some cases, you'll get this information in
a slightly different format, such as an App ID and
App Secret.
For the propertyMap, check the source
properties. You may need to revise these properties to match those available
from your custom provider.
For examples, refer to the specific social identity providers documented in this chapter.
12.15.3. Configuring a Custom Social Identity Provider
To configure a custom social identity provider, log into the Admin UI and navigate to Configure > Social ID Providers.
Enable the custom social identity provider. The name you see is based on the
nameproperty in the relevant code block in theidentityProviders.jsonfile.If you haven't already done so, include the values provided by your social identity provider for the properties shown. For more information, see the following appendix: "Custom Social Identity Provider Configuration Details".
12.15.4. Configuring User Registration to Link to a Custom Provider
Once you've configured a custom social identity provider, you can activate it through User Registration. To do so in the Admin UI, select Configure > User Registration, and under the Social tab, enable the option associated with Social Registration. For more information about user self-service features, see "Configuring User Self-Service".
When you enable social identity providers, you're allowing users to register on IDM through all active social identity providers.
12.16. Configuring the Social Providers Authentication Module
The SOCIAL_PROVIDERS authentication module incorporates
the requirements from social identity providers who rely on either the OAuth2 or
the OpenID Connect standards. The Social Providers authentication module is
turned on by default. To configure or disable this module in the Admin UI,
select Configure > Authentication, choose the Modules tab, then select Social
Providers from the list of modules.
Authentication settings can be configured from the Admin UI, or by making
changes directly in the authentication.json file for
your project. IDM includes the following code block in the
authentication.json file for your project:
{
"name" : "SOCIAL_PROVIDERS",
"properties" : {
"defaultUserRoles" : [
"openidm-authorized"
],
"augmentSecurityContext" : {
"type" : "text/javascript",
"globals" : { },
"file" : "auth/populateAsManagedUserFromRelationship.js"
},
"propertyMapping" : {
"userRoles" : "authzRoles"
}
},
"enabled" : true
}For more information on these options, see "Common Module Properties".
12.17. Managing Social Identity Providers Over REST
You can identify the current status of configured social identity providers with the following REST call:
$ curl \ --header "X-OpenIDM-Username: openidm-admin" \ --header "X-OpenIDM-Password: openidm-admin" \ --request GET \ http://localhost:8080/openidm/authentication
The output that you see includes JSON information from each configured
social identity provider, as described in the
identityProvider-provider
file in your project's conf/ subdirectory.
One key line from this output specifies whether the social identity provider is enabled:
"enabled" : true
If the SOCIAL_PROVIDERS authentication module is disabled,
you'll see the following output from that REST call:
{
"providers" : [ ]
}For more information, see "Configuring the Social Providers Authentication Module".
If the SOCIAL_PROVIDERS module is disabled, you can still
review the standard configuration of each social provider (enabled or not) by
running the same REST call on a different endpoint (do not forget the
s at the end of identityProviders):
$ curl \ --header "X-OpenIDM-Username: openidm-admin" \ --header "X-OpenIDM-Password: openidm-admin" \ --request GET \ http://localhost:8080/openidm/identityProviders
Note
If you have not configured a social identity provider, you'll see the following
output from the REST call on the openidm/identityProviders
endpoint:
{
"providers" : [ ]
}You can still get information about the available configuration for social identity providers on a slightly different endpoint:
$ curl \ --header "X-OpenIDM-Username: openidm-admin" \ --header "X-OpenIDM-Password: openidm-admin" \ --request GET \ http://localhost:8080/openidm/config/identityProviders
The config in the endpoint refers to the configuration,
starting with the identityProviders.json configuration
file. Note how it matches the corresponding term in the endpoint.
You can review information for a specific provider by including the name with the endpoint. For example, if you've configured LinkedIn as described in "Setting Up LinkedIn as a Social Identity Provider", run the following command:
$ curl \ --header "X-OpenIDM-Username: openidm-admin" \ --header "X-OpenIDM-Password: openidm-admin" \ --request GET \ http://localhost:8080/openidm/config/identityProvider/linkedIn
The above command differs in subtle ways. The config in
the endpoint points to configuration data. The identityProvider
at the end of the endpoint is singular, which matches the corresponding
configuration file, identityProvider-linkedIn.json.
And linkedIn includes a capital I in
the middle of the word.
In a similar fashion, you can delete a specific provider:
$ curl \ --header "X-OpenIDM-Username: openidm-admin" \ --header "X-OpenIDM-Password: openidm-admin" \ --request DELETE \ http://localhost:8080/openidm/config/identityProvider/linkedIn
If you have the information needed to set up a provider, such as the output from the previous two REST calls, you can use the following command to add a provider:
$ curl \
--header "X-OpenIDM-Username: openidm-admin" \
--header "X-OpenIDM-Password: openidm-admin" \
--header "Content-type: application/json" \
--request PUT \
--data '{
<Include content from an identityProvider-linkedIn.json file>
}' \
http://localhost:8080/openidm/config/identityProvider/linkedIn
IDM incorporates the given information in a file named for the
provider, in this case, identityProvider-linkedIn.json.
You can even disable a social identity provider with a PATCH REST
call, as shown:
$ curl \
--header "X-OpenIDM-Username: openidm-admin" \
--header "X-OpenIDM-Password: openidm-admin" \
--header "Content-type: application/json" \
--request PATCH \
--data '[
{
"operation":"replace",
"field" : "enabled",
"value" : false
}
]' \
http://localhost:8080/openidm/config/identityProvider/linkedIn
You can reverse the process by substituting true for
false in the previous PATCH REST call.
You can manage the social identity providers associated with individual users over REST, as described in "Managing Social Identity Providers Over REST".
12.18. Testing Social Identity Providers
In all cases, once configuration is complete, you should test the social identity provider. To do so, go through the steps in the following procedure:
Navigate to the login screen for the Self-Service UI,
https://openidm.example.com:8443.Select the
Registerlink (after the "Don't have an account?" question) on the login page.You should see a link to sign in with your selected social identity provider. Select that link.
Note
If you do not see a link to sign in with any social identity provider, you probably did not enable the option associated with Social Registration. To make sure, access the Admin UI, and select Configure > User Registration.
Warning
If you see a redirect URI error from a social identity provider, check the configuration for your web application in the social identity provider developer console. There may be a mistake in the redirect URI or redirect URL.
Follow the prompts from your social identity provider to log into your account.
Note
If there is a problem with the interface to the social identity provider, you might see a Register Your Account screen with information acquired from that provider.
Because security questions are enabled by default, you must add at least one security question and answer to proceed. For more information, see "Configuring Security Questions".
When the Social ID registration process is complete, you are redirected to the Self-Service UI at
https://openidm.example.com:8443.You should now be able to use the sign in link for your social identity provider to log into IDM.
12.19. Scenarios When Registering With a Social ID
When users connect to IDM with a social identity provider, it could be the first time they're connecting to your system. They could already have an regular IDM account. They could already have registered with a different social identity provider. This section describes what happens during the self-registration process. The process varies depending on whether there's an existing account in the IDM managed user store.

The following list describes each item in the flow shown in the adjacent figure:
From the IDM Self-Service UI, the user selects the
RegisterlinkThe self-registration Interface returns a
Register Your Accountpage athttp://localhost:8080/#registerwith a list of configured providers.The user then selects one configured social identity provider.
IDM connects to the selected social identity provider.
The social identity provider requests end user authentication.
The end user authenticates with the social identity provider.
The social identity provider prompts the user to accept sharing selected account information.
The user accepts the conditions presented by the social identity provider.
The social identity provider notifies IDM of the user registration request.
IDM passes responsibility to the administrative interface.
IDM uses the email address from the social identity provider, and compares it with email addresses of existing managed users.
If the email address is found, IDM links the social identity information to that account (and skips to step 16).
IDM returns to the self-registration (Self-Service) interface.
The self-registration interface prompts the user for additional information, such as security questions, and reCAPTCHA, if configured per "Configuring Google reCAPTCHA".
The user responds appropriately.
IDM creates a new managed user. If the user has already been created, IDM reviews data from the social identity provider, and updates the user data for the managed/provider to conform. In this case, the provider is a social identity provider such as Google.
The user is redirected to the
Success URL.
12.20. Social Identity Widgets
The Admin UI includes widgets that can help you measure the success of your social identity efforts. To add these widgets, take the following steps:
Log into the Admin UI.
Select Dashboards, and choose the dashboard to which you want to add the widget.
For more information about managing dashboards in the UI, see "Managing Dashboards".
Select Add Widget.
In the Add Widget window, scroll down to the Social item which includes the following graphical widgets:
Social Registration (year)
Daily Social Registration
Daily Social Logins
Select the widget you want to add and select Settings to configure the widget.
Optionally, select Preview to see what the widget will look like with the configuration you have applied. Your IDM system must contain some social data to display the preview.
The following example shows daily social registrations, in pie chart form:
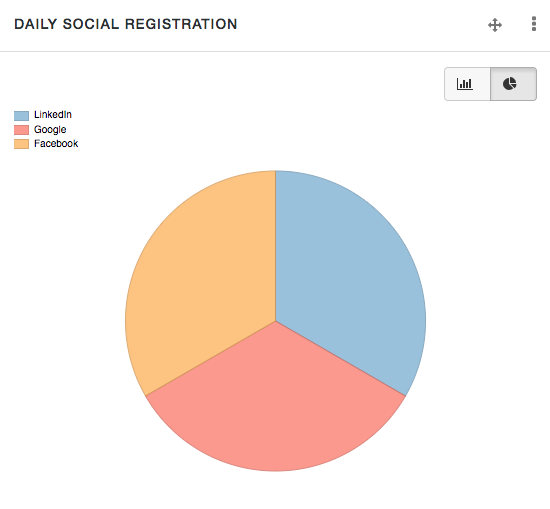
Chapter 13. Using Policies to Validate Data
IDM provides an extensible policy service that enables you to apply specific validation requirements to various components and properties. This chapter describes the policy service, and provides instructions on configuring policies for managed objects.
The policy service provides a REST interface for reading policy requirements and validating the properties of components against configured policies. Objects and properties are validated automatically when they are created, updated, or patched. Policies are generally applied to user passwords, but can also be applied to any managed or system object, and to internal user objects.
The policy service enables you to accomplish the following tasks:
Read the configured policy requirements of a specific component.
Read the configured policy requirements of all components.
Validate a component object against the configured policies.
Validate the properties of a component against the configured policies.
The router service limits policy application to managed, system, and internal
user objects. To apply policies to additional objects, such as the audit
service, you must modify your project's conf/router.json
file. For more information about the router service, see
"Router Service Reference".
A default policy applies to all managed objects. You can configure this default policy to suit your requirements, or you can extend the policy service by supplying your own scripted policies.
13.1. Configuring the Default Policy for Managed Objects
Policies applied to managed objects are configured in two files:
A policy script file (
openidm/bin/defaults/script/policy.js) that defines each policy and specifies how policy validation is performed. For more information, see "Understanding the Policy Script File".A managed object policy configuration element, defined in your project's
conf/managed.jsonfile, that specifies which policies are applicable to each managed resource. For more information, see "Understanding the Policy Configuration Element".Note
The configuration for determining which policies apply to resources other than managed objects is defined in your project's
conf/policy.jsonfile. The defaultpolicy.jsonfile includes policies that are applied to internal user objects, but you can extend the configuration in this file to apply policies to system objects.
13.1.1. Understanding the Policy Script File
The policy script file (openidm/bin/defaults/script/policy.js)
separates policy configuration into two parts:
A policy configuration object, which defines each element of the policy. For more information, see "Policy Configuration Objects".
A policy implementation function, which describes the requirements that are enforced by that policy.
Together, the configuration object and the implementation function determine whether an object is valid in terms of the applied policy. The following excerpt of a policy script file configures a policy that specifies that the value of a property must contain a certain number of capital letters:
...
{ "policyId" : "at-least-X-capitals",
"policyExec" : "atLeastXCapitalLetters",
"clientValidation": true,
"validateOnlyIfPresent":true,
"policyRequirements" : ["AT_LEAST_X_CAPITAL_LETTERS"]
},
...
policyFunctions.atLeastXCapitalLetters = function(fullObject, value, params, property) {
var isRequired = _.find(this.failedPolicyRequirements, function (fpr) {
return fpr.policyRequirement === "REQUIRED";
}),
isNonEmptyString = (typeof(value) === "string" && value.length),
valuePassesRegexp = (function (v) {
var test = isNonEmptyString ? v.match(/[(A-Z)]/g) : null;
return test !== null && test.length >= params.numCaps;
}(value));
if ((isRequired || isNonEmptyString) && !valuePassesRegexp) {
return [ { "policyRequirement" : "AT_LEAST_X_CAPITAL_LETTERS", "params" : {"numCaps": params.numCaps} } ];
}
return [];
}
...
To enforce user passwords that contain at least one capital letter, the
policyId from the preceding example is applied to the
appropriate resource (managed/user/*). The required
number of capital letters is defined in the policy configuration element of
the managed object configuration file (see "Understanding the Policy Configuration Element".
13.1.1.1. Policy Configuration Objects
Each element of the policy is defined in a policy configuration object. The structure of a policy configuration object is as follows:
{
"policyId" : "minimum-length",
"policyExec" : "minLength",
"clientValidation": true,
"validateOnlyIfPresent": true,
"policyRequirements" : ["MIN_LENGTH"]
} policyId- a unique ID that enables the policy to be referenced by component objects.policyExec- the name of the function that contains the policy implementation. For more information, see "Policy Implementation Functions".clientValidation- indicates whether the policy decision can be made on the client. When"clientValidation": true, the source code for the policy decision function is returned when the client requests the requirements for a property.validateOnlyIfPresent- notes that the policy is to be validated only if it exists.policyRequirements- an array containing the policy requirement ID of each requirement that is associated with the policy. Typically, a policy will validate only one requirement, but it can validate more than one.
13.1.1.2. Policy Implementation Functions
Each policy ID has a corresponding policy implementation function that performs the validation. Implementation functions take the following form:
function <name>(fullObject, value, params, propName) {
<implementation_logic>
} fullObjectis the full resource object that is supplied with the request.valueis the value of the property that is being validated.paramsrefers to theparamsarray that is specified in the property's policy configuration.propNameis the name of the property that is being validated.
The following example shows the implementation function for the
required policy:
function required(fullObject, value, params, propName) {
if (value === undefined) {
return [ { "policyRequirement" : "REQUIRED" } ];
}
return [];
} 13.1.2. Understanding the Policy Configuration Element
The configuration of a managed object property (in the
managed.json file) can include a policies
element that specifies how policy validation should be applied to that
property. The following excerpt of the default
managed.json file shows how policy validation is
applied to the password and _id
properties of a managed/user object:
{
"objects" : [
{
"name" : "user",
...
"schema" : {
"id" : "http://jsonschema.net",
...
"properties" : {
"_id" : {
"description" : "User ID",
"type" : "string",
"viewable" : false,
"searchable" : false,
"userEditable" : false,
"usageDescription" : "",
"isPersonal" : false,
"policies" : [
{
"policyId" : "cannot-contain-characters",
"params" : {
"forbiddenChars" : [ "/" ]
}
}
]
},
"password" : {
"title" : "Password",
"description" : "Password",
"type" : "string",
"viewable" : false,
"searchable" : false,
"minLength" : 8,
"userEditable" : true,
"encryption" : {
"key" : "openidm-sym-default"
},
"scope" : "private",
"isProtected": true,
"usageDescription" : "",
"isPersonal" : false,
"policies" : [
{
"policyId" : "at-least-X-capitals",
"params" : {
"numCaps" : 1
}
},
{
"policyId" : "at-least-X-numbers",
"params" : {
"numNums" : 1
}
},
{
"policyId" : "cannot-contain-others",
"params" : {
"disallowedFields" : [
"userName",
"givenName",
"sn"
]
}
}
]
}
...
}
Note that the policy for the _id property references
the function cannot-contain-characters, that is defined
in the policy.js file. The policy for the
password property references the functions
at-least-X-capitals, at-least-X-numbers,
and cannot-contain-others, that are defined in the
policy.js file. The parameters that are passed to these
functions (number of capitals required, and so forth) are specified in the
same element.
13.1.3. Validation of Managed Object Data Types
The type property of a managed object specifies the
data type of that property, for example, array,
boolean, integer,
number, null,
object, or string. For more
information about data types, see the
JSON Schema Primitive Types section of the
JSON Schema standard.
The type property is subject to policy validation when a
managed object is created or updated. Validation fails if data does not
match the specified type, such as when the data is an
array instead of a string.
The valid-type policy in the default
policy.js file enforces the match between property
values and the type defined in the
managed.json file.
IDM supports multiple valid property types. For example, you
might have a scenario where a managed user can have more than one telephone
number, or a null telephone number (when the user
entry is first created and the telephone number is not yet known). In such a
case, you could specify the accepted property type as follows in your
managed.json file:
"telephoneNumber" : {
"description" : "",
"title" : "Telephone Number",
"viewable" : true,
"searchable" : false,
"userEditable" : true,
"policies" : [ ],
"returnByDefault" : false,
"minLength" : null,
"pattern" : "^\\+?([0-9\\- \\(\\)])*$",
"type" : [
"string",
"null"
]
},
In this case, the valid-type policy from the
policy.js file checks the telephone number for an
accepted type and pattern, either
for a real telephone number or a null entry.
13.1.4. Configuring Policy Validation in the UI
The Admin UI provides rudimentary support for applying policy validation to
managed object properties. To configure policy validation for a managed
object type update the configuration of the object type in the UI. For
example, to specify validation policies for specific properties of managed
user objects, select Configure > Managed Objects then click on the User
object. Scroll down to the bottom of the Managed Object configuration, then
update, or add, a validation policy. The Policy field
here refers to a function that has been defined in the policy script file.
For more information, see "Understanding the Policy Script File". You cannot
define additional policy functions by using the UI.
Note
Take care with Validation Policies. If it relates to an array of
relationships, such as between a user and multiple devices, "Return by
Default" should always be set to false. You can verify this in the
managed.json file for your project, with the
"returnByDefault" : false entry for the applicable
managed object, whenever there are items of
"type" : "relationship".
13.2. Extending the Policy Service
You can extend the policy service by adding custom scripted policies, and by adding policies that are applied only under certain conditions.
13.2.1. Adding Custom Scripted Policies
If your deployment requires additional validation functionality that is not
supplied by the default policies, you can add your own policy scripts to
your project's script directory, and reference them
from your project's conf/policy.json file.
Do not modify the default policy script file
(openidm/bin/defaults/script/policy.js) as doing so might
result in interoperability issues in a future release. To reference
additional policy scripts, set the additionalFiles
property conf/policy.json.
The following example creates a custom policy that rejects properties with
null values. The policy is defined in a script named
mypolicy.js:
var policy = { "policyId" : "notNull",
"policyExec" : "notNull",
"policyRequirements" : ["NOT_NULL"]
}
addPolicy(policy);
function notNull(fullObject, value, params, property) {
if (value == null) {
var requireNotNull = [
{"policyRequirement": "NOT_NULL"}
];
return requireNotNull;
}
return [];
}
The mypolicy.js policy is referenced in the
policy.json configuration file as follows:
{
"type" : "text/javascript",
"file" : "bin/defaults/script/policy.js",
"additionalFiles" : ["script/mypolicy.js"],
"resources" : [
{
...
13.2.2. Adding Conditional Policy Definitions
You can extend the policy service to support policies that are applied only
under specific conditions. To apply a conditional policy to managed objects,
add the policy to your project's managed.json file. To
apply a conditional policy to other objects, add it to your project's
policy.json file.
The following excerpt of a managed.json file shows a
sample conditional policy configuration for the "password"
property of managed user objects. The policy indicates that sys-admin users
have a more lenient password policy than regular employees:
{
"objects" : [
{
"name" : "user",
...
"properties" : {
...
"password" : {
"title" : "Password",
"type" : "string",
...
"conditionalPolicies" : [
{
"condition" : {
"type" : "text/javascript",
"source" : "(fullObject.org === 'sys-admin')"
},
"dependencies" : [ "org" ],
"policies" : [
{
"policyId" : "max-age",
"params" : {
"maxDays" : ["90"]
}
}
]
},
{
"condition" : {
"type" : "text/javascript",
"source" : "(fullObject.org === 'employees')"
},
"dependencies" : [ "org" ],
"policies" : [
{
"policyId" : "max-age",
"params" : {
"maxDays" : ["30"]
}
}
]
}
],
"fallbackPolicies" : [
{
"policyId" : "max-age",
"params" : {
"maxDays" : ["7"]
}
}
]
}To understand how a conditional policy is defined, examine the components of this sample policy. For more information on the policy function, see "Policy Implementation Functions".
There are two distinct scripted conditions (defined in the
condition elements). The first condition asserts that
the user object, contained in the fullObject argument, is
a member of the sys-admin org. If that assertion is true,
the max-age policy is applied to the
password attribute of the user object, and the maximum
number of days that a password may remain unchanged is set to 90.
The second condition asserts that the user object is a member of the
employees org. If that assertion is true, the
max-age policy is applied to the
password attribute of the user object, and the maximum
number of days that a password may remain unchanged is set to
30.
In the event that neither condition is met (the user object is not a member
of the sys-admin org or the employees
org), an optional fallback policy can be applied. In this example, the
fallback policy also references the max-age policy and
specifies that for such users, their password must be changed after 7 days.
The dependencies field prevents the condition scripts
from being run at all, if the user object does not include an
org attribute.
Note
This example assumes that a custom max-age policy
validation function has been defined, as described in
"Adding Custom Scripted Policies".
Tip
These scripted conditions do not apply to progressive profiling. For more information, see "Custom Progressive Profile Conditions".
13.3. Disabling Policy Enforcement
Policy enforcement is the automatic validation of data when it is created, updated, or patched. In certain situations you might want to disable policy enforcement temporarily. You might, for example, want to import existing data that does not meet the validation requirements with the intention of cleaning up this data at a later stage.
You can disable policy enforcement by setting
openidm.policy.enforcement.enabled to
false in your
resolver/boot.properties file. This setting disables
policy enforcement in the back-end only, and has no impact on direct policy
validation calls to the Policy Service (which the UI makes to validate input
fields). So, with policy enforcement disabled, data added directly over REST
is not subject to validation, but data added with the UI is still subject to
validation.
You should not disable policy enforcement permanently, in a production environment.
13.4. Managing Policies Over REST
You can manage the policy service over the REST interface, by calling the
REST endpoint https://localhost:8443/openidm/policy, as
shown in the following examples.
13.4.1. Listing the Defined Policies
The following REST call displays a list of all the policies defined in
policy.json (policies for objects other than managed
objects). The policy objects are returned in JSON format, with one object for
each defined policy ID:
$ curl \
--header "X-OpenIDM-Username: openidm-admin" \
--header "X-OpenIDM-Password: openidm-admin" \
--request GET \
"http://localhost:8080/openidm/policy"
{
"_id": "",
"resources": [
...
{
"resource": "repo/internal/user/*",
"properties": [
{
"name": "_id",
"policies": [
{
"policyId": "cannot-contain-characters",
"params": {
"forbiddenChars": [ "/" ]
},
"policyFunction": "\nfunction (fullObject, value, params, property) {\n ...",
"policyRequirements": [
"CANNOT_CONTAIN_CHARACTERS"
]
}
],
"policyRequirements": [
"CANNOT_CONTAIN_CHARACTERS"
]
}
...
]
...
}
]
}To display the policies that apply to a specific resource, include the resource name in the URL. For example, the following REST call displays the policies that apply to managed users:
$ curl \
--header "X-OpenIDM-Username: openidm-admin" \
--header "X-OpenIDM-Password: openidm-admin" \
--request GET \
"http://localhost:8080/openidm/policy/managed/user/*"
{
"_id": "*",
"resource": "managed/user/*",
"properties": [
{
"policyRequirements": [
"VALID_TYPE",
"CANNOT_CONTAIN_CHARACTERS"
],
"fallbackPolicies": null,
"name": "_id",
"policies": [
{
"policyRequirements": [
"VALID_TYPE"
],
"policyId": "valid-type",
"params": {
"types": [
"string"
]
}
},
{
"policyId": "cannot-contain-characters",
"params": {
"forbiddenChars": [ "/" ]
},
"policyFunction": "...",
"policyRequirements": [
"CANNOT_CONTAIN_CHARACTERS"
]
}
],
"conditionalPolicies": null
}
...
]
}13.4.2. Validating Objects and Properties Over REST
To verify that an object adheres to the requirements of all applied policies,
include the validateObject action in the request.
The following example verifies that a new managed user object is acceptable, in terms of the policy requirements:
$ curl \
--header "X-OpenIDM-Username: openidm-admin" \
--header "X-OpenIDM-Password: openidm-admin" \
--header "Content-Type: application/json" \
--request POST \
--data '{
"sn":"Jones",
"givenName":"Bob",
"_id":"bjones",
"telephoneNumber":"0827878921",
"passPhrase":null,
"mail":"bjones@example.com",
"accountStatus":"active",
"userName":"bjones@example.com",
"password":"123"
}' \
"http://localhost:8080/openidm/policy/managed/user/bjones?_action=validateObject"
{
"result": false,
"failedPolicyRequirements": [
{
"policyRequirements": [
{
"policyRequirement": "MIN_LENGTH",
"params": {
"minLength": 8
}
}
],
"property": "password"
},
{
"policyRequirements": [
{
"policyRequirement": "AT_LEAST_X_CAPITAL_LETTERS",
"params": {
"numCaps": 1
}
}
],
"property": "password"
}
]
}
The result (false) indicates that the object is not
valid. The unfulfilled policy requirements are provided as part of the
response - in this case, the user password does not meet the validation
requirements.
Use the validateProperty action to verify that a specific
property adheres to the requirements of a policy.
The following example checks whether Barbara Jensen's new password
(12345) is acceptable:
$ curl \
--header "X-OpenIDM-Username: openidm-admin" \
--header "X-OpenIDM-Password: openidm-admin" \
--header "Content-Type: application/json" \
--request POST \
--data '{ "password" : "12345" }' \
"http://localhost:8080/openidm/policy/managed/user/bjensen?_action=validateProperty"
{
"result": false,
"failedPolicyRequirements": [
{
"policyRequirements": [
{
"policyRequirement": "MIN_LENGTH",
"params": {
"minLength": 8
}
}
],
"property": "password"
},
{
"policyRequirements": [
{
"policyRequirement": "AT_LEAST_X_CAPITAL_LETTERS",
"params": {
"numCaps": 1
}
}
],
"property": "password"
}
]
}
The result (false) indicates that the password is not
valid. The unfulfilled policy requirements are provided as part of the
response - in this case, the minimum length and the minimum number of
capital letters.
Validating a property that does fulfil the policy requirements returns a
true result, for example:
$ curl \
--header "X-OpenIDM-Username: openidm-admin" \
--header "X-OpenIDM-Password: openidm-admin" \
--header "Content-Type: application/json" \
--request POST \
--data '{ "password" : "1NewPassword" }' \
"http://localhost:8080/openidm/policy/managed/user/bjensen?_action=validateProperty"
{
"result": true,
"failedPolicyRequirements": []
}Chapter 14. Configuring Server Logs
In this chapter, you will learn about server logging, that is, the messages that IDM logs related to server activity.
Server logging is separate from auditing. Auditing logs
activity on the IDM system, such as access and synchronization.
For information about audit logging, see "Setting Up Audit Logging". To
configure server logging, edit the logging.properties
file in your project-dir/conf
directory.
Important
When you change the logging settings you must restart the server for those changes to take effect. Alternatively, you can use JMX via jconsole to change the logging settings, in which case changes take effect without restarting the server.
14.1. Log Message Files
By default, IDM writes log messages in simple format to
openidm/logs/openidm*.log files, rotating files when the
size reaches 5 MB, and retaining up to 5 files. All system and custom log
messages are also written to these files.
You can modify these limits in the following properties in the
logging.properties file for your project:
# Limiting size of output file in bytes: java.util.logging.FileHandler.limit = 5242880 # Number of output files to cycle through, by appending an # integer to the base file name: java.util.logging.FileHandler.count = 5
Note
There is currently no logging.properties setting for
time-based rotation of server log files. However, on UNIX systems you can
use the logrotate command to schedule server log rotation
at a regular interval. For more information, see the logrotate
man page.
14.2. Specifying the Logging Level
By default, IDM logs messages at the INFO level.
This logging level is specified with the following global property in
conf/logging.properties:
.level=INFO
You can specify different separate logging levels for individual server features which override the global logging level. Set the log level, per package to one of the following:
SEVERE (highest value) WARNING INFO CONFIG FINE FINER FINEST (lowest value)
For example, the following setting decreases the messages logged by the embedded PostgreSQL database:
# reduce the logging of embedded postgres since it is very verbose ru.yandex.qatools.embed.postgresql.level = SEVERE
Set the log level to OFF to disable logging completely
(see in "Disabling Logs"), or to ALL to
capture all possible log messages.
If you use logger functions in your JavaScript scripts,
set the log level for the scripts as follows:
org.forgerock.openidm.script.javascript.JavaScript.level=level
You can override the log level settings, per script, with the following setting:
org.forgerock.openidm.script.javascript.JavaScript.script-name.level
For more information about using logger functions in
scripts, see "Logging Functions".
Important
It is strongly recommended that you do not log messages
at the FINE or FINEST levels in a
production environment. Although these levels are useful for debugging
issues in a test environment, they can result in accidental exposure of
sensitive data. For example, a password change patch request can expose the
updated password in the Jetty logs.
14.3. Disabling Logs
If required, you can also disable logs. For example, to disable
ConsoleHandler logging, make the following changes in your
project's conf/logging.properties file before you start
IDM.
Set java.util.logging.ConsoleHandler.level = OFF,
and comment out other references to ConsoleHandler,
as shown in the following excerpt:
# ConsoleHandler: A simple handler for writing formatted records to System.err #handlers=java.util.logging.FileHandler, java.util.logging.ConsoleHandler handlers=java.util.logging.FileHandler ... # --- ConsoleHandler --- # Default: java.util.logging.ConsoleHandler.level = INFO java.util.logging.ConsoleHandler.level = OFF #java.util.logging.ConsoleHandler.formatter = ... #java.util.logging.ConsoleHandler.filter=...
Chapter 15. Connecting to External Resources
This chapter describes how to connect to external resources such as LDAP, Active Directory, flat files, and others. Configurations shown here are simplified to show essential aspects. Not all resources support all IDM operations; however, the resources shown here support most of the CRUD operations, and also reconciliation and liveSync.
Resources refer to external systems, databases, directory servers, and other sources of identity data that are managed and audited by the identity management system. To connect to resources, IDM loads the ForgeRock Open Identity Connector Framework (OpenICF). OpenICF avoids the need to install agents to access resources, instead using the resources' native protocols. For example, OpenICF connects to database resources using the database's Java connection libraries or JDBC driver. It connects to directory servers over LDAP. It connects to UNIX systems by using ssh.
IDM provides several connectors by default, in the
path/to/openidm/connectors directory. You can download
additional connectors from ForgeRock's BackStage site.
For details about all connectors supported for use with IDM, see Connector Reference.
15.1. The Open Identity Connector Framework (OpenICF)
OpenICF provides a common interface to allow identity services access to the resources that contain user information. IDM loads the OpenICF API as one of its OSGi modules. OpenICF uses connectors to separate the IDM implementation from the dependencies of the resource to which IDM is connecting. A specific connector is required for each remote resource. Connectors can run locally (on the IDM host) or remotely.
Local connectors are loaded by OpenICF as regular bundles in the OSGi container. Most connectors run locally. Remote connectors must be executed on a remote connector server. If a resource requires access libraries that cannot be included as part of the IDM process, you must use a connector server. For example, OpenICF connects to Microsoft Active Directory through a remote connector server that is implemented as a .NET service.
Connections to remote connector servers are configured in a single
connector info provider configuration file, located in
your project's conf/ directory.
Connectors themselves are configured through
provisioner files. One provisioner file must exist for
each connector. Provisioner files are named
provisioner.openicf-name where
name corresponds to the name of the connector,
and are also located in the conf/ directory.
A number of sample connector configurations are available in the
openidm/samples/example-configurations/provisioners
directory. To use these connectors, edit the configuration files as required,
and copy them to your project's conf/ directory.
The following figure shows how IDM connects to resources by using connectors and remote connector servers. The figure shows one local connector (LDAP) and two remote connectors (Scripted SQL and PowerShell). In this example, the remote Scripted SQL connector uses a remote Java connector server. The remote PowerShell connector always requires a remote .NET connector server.

Tip
Connectors that use the .NET framework must run remotely. Java connectors can be run locally or remotely. You might run a Java connector remotely for security reasons (firewall constraints), for geographical reasons, or if the JVM version that is required by the connector conflicts with the JVM version that is required by IDM.
15.2. Configuring Connectors
Connectors are configured through the OpenICF provisioner service. Each
connector configuration is stored in a file in your project's
conf/ directory, and accessible over REST at the
openidm/conf endpoint. Connector configuration files are
named
project-dir/conf/provisioner.openicf-name
where name corresponds to the name of the
connector.
If you are creating your own connector configuration files, do
not include additional dash characters ( - ) in the
connector name, as this might cause
problems with the OSGi parser. For example, the name
provisioner.openicf-hrdb.json is fine. The name
provisioner.openicf-hr-db.json is not.
You can create a connector configuration in the following ways:
Start with the sample provisioner files in the
/path/to/openidm/samples/example-configurations/provisionersdirectory. For more information, see "Using the Sample Provisioner Files".Set up connectors with the help of the Admin UI. Log in to the Admin UI at
https://localhost:8443/admin, then continue with the process described in "Creating Connector Configurations With the Admin UI".Use the service that IDM exposes through the REST interface to create basic connector configuration files. For more information, see "Creating Connector Configurations Over REST".
Use the cli.sh or cli.bat scripts to generate a basic connector configuration. For more information, see "Using the configureconnector Subcommand".
15.2.1. Using the Sample Provisioner Files
A number of sample connector configurations are available in the
openidm/samples/example-configurations/provisioners
directory. To use these connector configurations, edit the configuration
files as required, and copy them to your project's conf
directory.
The following example shows a high-level connector configuration. The individual configuration objects are described in detail later in this section:
{
"connectorRef" : connector-ref-object,
"producerBufferSize" : integer,
"connectorPoolingSupported" : boolean, true/false,
"poolConfigOption" : pool-config-option-object,
"operationTimeout" : operation-timeout-object,
"configurationProperties" : configuration-properties-object,
"syncFailureHandler" : sync-failure-handler-object,
"resultsHandlerConfig" : results-handler-config-object,
"objectTypes" : object-types-object,
"operationOptions" : operation-options-object
}15.2.2. Creating Connector Configurations With the Admin UI
To configure connectors in the Admin UI, select Configure > Connector. If your project has an existing connector configuration (for example, if you have started IDM with one of the sample configurations) click on that connector to edit it. If you're starting with a new project, click New Connector to configure a new connector.
The connectors displayed on the Connectors page reflect the provisioner
files that are in your project's conf/ directory. To
add a new connector configuration, you can also copy a provisioner file from
the /path/to/openidm/samples/example-configurations/provisioners
directory, then edit it to fit your deployment.
When you add a new connector, the Connector Type dropdown list reflects the
actual connector JARs that are in the /path/to/openidm/connectors
directory. You can have more than one connector configuration for a specific
connector type. For example, you might use the LDAP connector to set up two
connector configurations - one to an Active Directory server and one to a
ForgeRock Directory Services (DS) instance. The Connector Types listed
here do not include all supported connectors - only those that are bundled
with IDM. You can download additional connectors from
ForgeRock's BackStage site and place them in the /path/to/openidm/connectors
directory. For information on all supported connectors and how to configure
them, see the Connector Reference.
The tabs on the connector configuration screens correspond to the objects and properties described in the remaining sections of this chapter.
When a connector configuration is complete, and IDM is able to establish the connection to the remote resource, the Data tab displays the objects in that remote resource. For example, the following image shows the contents of a connected LDAP resource:
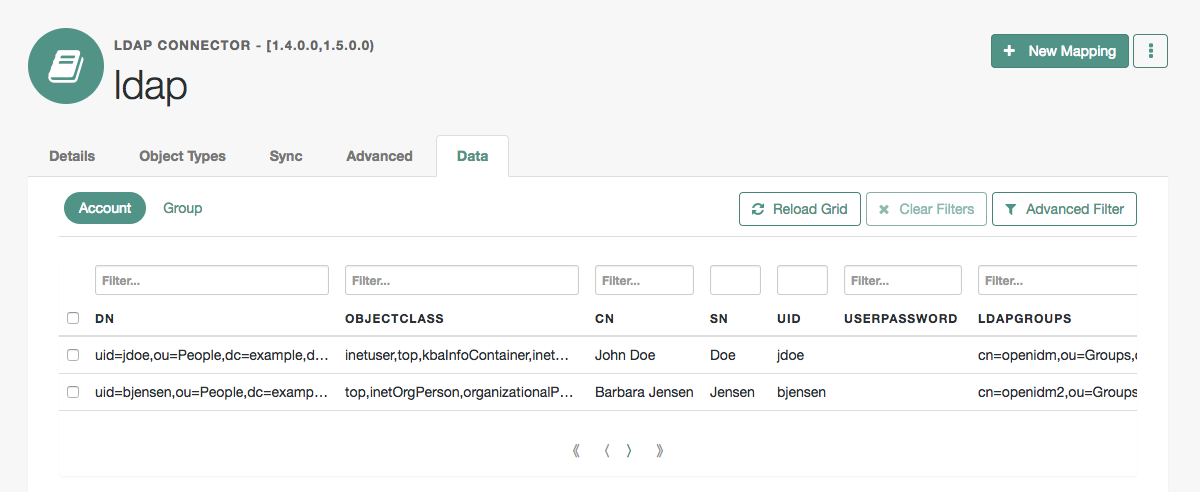
You can search through these objects with either the Basic Filter shown in each column, or the Advanced Filter option, which allows you to build many of the queries shown in "Defining and Calling Queries".
15.2.3. Creating Connector Configurations Over REST
You create a new connector configuration over REST in three stages:
List the available connectors.
Generate the core configuration.
Connect to the target system and generate the final configuration.
List the available connectors by using the following command:
$ curl \ --header "X-OpenIDM-Username: openidm-admin" \ --header "X-OpenIDM-Password: openidm-admin" \ --request POST \ "http://localhost:8080/openidm/system?_action=availableConnectors"
Available connectors are installed in openidm/connectors.
IDM bundles the connectors described in
"Supported Connectors" in the Release Notes.
The preceding command therefore returns the following output:
{
"connectorRef": [
{
"bundleName": "org.forgerock.openidm.provisioner-salesforce",
"bundleVersion": "6.0.0",
"displayName": "Salesforce Connector",
"connectorName": "org.forgerock.openidm.salesforce.Salesforce",
"systemType": "provisioner.salesforce"
},
{
"displayName": "Workday Connector",
"bundleVersion": "1.5.20.0",
"systemType": "provisioner.openicf",
"bundleName": "org.forgerock.openicf.connectors.workday-connector",
"connectorName": "org.forgerock.openicf.connectors.workday.WorkdayConnector"
},
{
"displayName": "SSH Connector",
"bundleVersion": "1.5.20.0",
"systemType": "provisioner.openicf",
"bundleName": "org.forgerock.openicf.connectors.ssh-connector",
"connectorName": "org.forgerock.openicf.connectors.ssh.SSHConnector"
},
{
"displayName": "ServiceNow Connector",
"bundleVersion": "1.5.20.0",
"systemType": "provisioner.openicf",
"bundleName": "org.forgerock.openicf.connectors.servicenow-connector",
"connectorName": "org.forgerock.openicf.connectors.servicenow.ServiceNowConnector"
},
{
"displayName": "Scripted SQL Connector",
"bundleVersion": "1.5.20.0",
"systemType": "provisioner.openicf",
"bundleName": "org.forgerock.openicf.connectors.scriptedsql-connector",
"connectorName": "org.forgerock.openicf.connectors.scriptedsql.ScriptedSQLConnector"
},
{
"displayName": "Scripted REST Connector",
"bundleVersion": "1.5.20.0",
"systemType": "provisioner.openicf",
"bundleName": "org.forgerock.openicf.connectors.scriptedrest-connector",
"connectorName": "org.forgerock.openicf.connectors.scriptedrest.ScriptedRESTConnector"
},
{
"displayName": "Scim Connector",
"bundleVersion": "1.5.20.0",
"systemType": "provisioner.openicf",
"bundleName": "org.forgerock.openicf.connectors.scim-connector",
"connectorName": "org.forgerock.openicf.connectors.scim.ScimConnector"
},
{
"displayName": "MongoDB Connector",
"bundleVersion": "1.5.20.0",
"systemType": "provisioner.openicf",
"bundleName": "org.forgerock.openicf.connectors.mongodb-connector",
"connectorName": "org.forgerock.openicf.connectors.mongodb.MongoDBConnector"
},
{
"displayName": "Marketo Connector",
"bundleVersion": "1.5.20.0",
"systemType": "provisioner.openicf",
"bundleName": "org.forgerock.openicf.connectors.marketo-connector",
"connectorName": "org.forgerock.openicf.connectors.marketo.MarketoConnector"
},
{
"displayName": "LDAP Connector",
"bundleVersion": "1.5.20.0",
"systemType": "provisioner.openicf",
"bundleName": "org.forgerock.openicf.connectors.ldap-connector",
"connectorName": "org.identityconnectors.ldap.LdapConnector"
},
{
"displayName": "Kerberos Connector",
"bundleVersion": "1.5.20.0",
"systemType": "provisioner.openicf",
"bundleName": "org.forgerock.openicf.connectors.kerberos-connector",
"connectorName": "org.forgerock.openicf.connectors.kerberos.KerberosConnector"
},
{
"displayName": "Scripted Poolable Groovy Connector",
"bundleVersion": "1.5.20.0",
"systemType": "provisioner.openicf",
"bundleName": "org.forgerock.openicf.connectors.groovy-connector",
"connectorName": "org.forgerock.openicf.connectors.groovy.ScriptedPoolableConnector"
},
{
"displayName": "Scripted Groovy Connector",
"bundleVersion": "1.5.20.0",
"systemType": "provisioner.openicf",
"bundleName": "org.forgerock.openicf.connectors.groovy-connector",
"connectorName": "org.forgerock.openicf.connectors.groovy.ScriptedConnector"
},
{
"displayName": "GoogleApps Connector",
"bundleVersion": "1.5.20.0",
"systemType": "provisioner.openicf",
"bundleName": "org.forgerock.openicf.connectors.googleapps-connector",
"connectorName": "org.forgerock.openicf.connectors.googleapps.GoogleAppsConnector"
},
{
"displayName": "Database Table Connector",
"bundleVersion": "1.5.20.0",
"systemType": "provisioner.openicf",
"bundleName": "org.forgerock.openicf.connectors.databasetable-connector",
"connectorName": "org.identityconnectors.databasetable.DatabaseTableConnector"
},
{
"displayName": "CSV File Connector",
"bundleVersion": "1.5.20.0",
"systemType": "provisioner.openicf",
"bundleName": "org.forgerock.openicf.connectors.csvfile-connector",
"connectorName": "org.forgerock.openicf.csvfile.CSVFileConnector"
},
{
"displayName": "Adobe Marketing Cloud Connector",
"bundleVersion": "1.5.20.0",
"systemType": "provisioner.openicf",
"bundleName": "org.forgerock.openicf.connectors.adobecm-connector",
"connectorName": "org.forgerock.openicf.acm.ACMConnector"
}
]
}To generate the core configuration, choose one of the available connectors by copying one of the JSON objects from the generated list into the body of the REST command, as shown in the following command for the CSV file connector:
$ curl \
--header "X-OpenIDM-Username: openidm-admin" \
--header "X-OpenIDM-Password: openidm-admin" \
--header "Content-Type: application/json" \
--request POST \
--data '{"connectorRef":
{
"systemType": "provisioner.openicf",
"bundleName": "org.forgerock.openicf.connectors.csvfile-connector",
"connectorName": "org.forgerock.openicf.csvfile.CSVFileConnector",
"displayName": "CSV File Connector",
"bundleVersion": "1.5.20.0"
}
}' \
"http://localhost:8080/openidm/system?_action=createCoreConfig"This command returns a core connector configuration, similar to the following:
{
"connectorRef": {
"systemType": "provisioner.openicf",
"bundleName": "org.forgerock.openicf.connectors.csvfile-connector",
"connectorName": "org.forgerock.openicf.csvfile.CSVFileConnector",
"displayName": "CSV File Connector",
"bundleVersion": "1.5.20.0"
},
"poolConfigOption": {
"maxObjects": 10,
"maxIdle": 10,
"maxWait": 150000,
"minEvictableIdleTimeMillis": 120000,
"minIdle": 1
},
"resultsHandlerConfig": {
"enableNormalizingResultsHandler": true,
"enableFilteredResultsHandler": true,
"enableCaseInsensitiveFilter": false,
"enableAttributesToGetSearchResultsHandler": true
},
"operationTimeout": {
"CREATE": -1,
"UPDATE": -1,
"DELETE": -1,
"TEST": -1,
"SCRIPT_ON_CONNECTOR": -1,
"SCRIPT_ON_RESOURCE": -1,
"GET": -1,
"RESOLVEUSERNAME": -1,
"AUTHENTICATE": -1,
"SEARCH": -1,
"VALIDATE": -1,
"SYNC": -1,
"SCHEMA": -1
},
"configurationProperties": {
"headerPassword": "password",
"csvFile": null,
"newlineString": "\n",
"headerUid": "uid",
"quoteCharacter": "\"",
"fieldDelimiter": ",",
"syncFileRetentionCount": 3
}
}
The configuration that is returned is not yet functional. It does not
contain the required system-specific configurationProperties,
such as the host name and port for an external system, or the
csvFile for the CSV file connector. In addition, the
configuration does not include the complete list of
objectTypes and operationOptions.
To generate the final configuration, add values for the required
configurationProperties to the core configuration, and
use the updated configuration as the body for the next command:
$ curl \
--header "X-OpenIDM-Username: openidm-admin" \
--header "X-OpenIDM-Password: openidm-admin" \
--header "Content-Type: application/json" \
--request POST \
--data '{
"configurationProperties": {
"headerPassword": "password",
"csvFile": "&{idm.instance.dir}/data/csvConnectorData.csv",
"newlineString": "\n",
"headerUid": "uid",
"quoteCharacter": "\"",
"fieldDelimiter": ",",
"syncFileRetentionCount": 3
},
"connectorRef": {
"systemType": "provisioner.openicf",
"bundleName": "org.forgerock.openicf.connectors.csvfile-connector",
"connectorName": "org.forgerock.openicf.csvfile.CSVFileConnector",
"displayName": "CSV File Connector",
"bundleVersion": "1.5.20.0"
},
"poolConfigOption": {
"maxObjects": 10,
"maxIdle": 10,
"maxWait": 150000,
"minEvictableIdleTimeMillis": 120000,
"minIdle": 1
},
"resultsHandlerConfig": {
"enableNormalizingResultsHandler": true,
"enableFilteredResultsHandler": true,
"enableCaseInsensitiveFilter": false,
"enableAttributesToGetSearchResultsHandler": true
},
"operationTimeout": {
"CREATE": -1,
"UPDATE": -1,
"DELETE": -1,
"TEST": -1,
"SCRIPT_ON_CONNECTOR": -1,
"SCRIPT_ON_RESOURCE": -1,
"GET": -1,
"RESOLVEUSERNAME": -1,
"AUTHENTICATE": -1,
"SEARCH": -1,
"VALIDATE": -1,
"SYNC": -1,
"SCHEMA": -1
}
} ' \
"http://localhost:8080/openidm/system?_action=createFullConfig"Note
Notice the single quotes around the argument to the --data
option in the preceding command. For most UNIX shells, single quotes around
a string prevent the shell from executing the command when encountering a
new line in the content. You can therefore pass the
--data '...' option on a single line, or including line
feeds.
IDM attempts to read the schema, if available, from the external
resource in order to generate output. IDM then iterates through
schema objects and attributes, creating JSON representations for
objectTypes and operationOptions for
supported objects and operations.
The output includes the basic --data input, along with
operationOptions and objectTypes.
Because IDM produces a full property set for all attributes and
all object types in the schema from the external resource, the resulting
configuration can be large. For an LDAP server, IDM can generate
a configuration containing several tens of thousands of lines, for example.
You might therefore want to reduce the schema to a minimum on the external
resource before you run the createFullConfig command.
When you have the complete connector configuration, save that configuration
in a file named provisioner.openicf-name.json
(where name corresponds to the name of the connector) and place it in the
conf directory of your project.
15.2.4. Setting the Connector Reference Properties
The following example shows a connector reference object:
"connectorRef" : {
"bundleName" : "org.forgerock.openicf.connectors.csvfile-connector",
"bundleVersion" : "[1.5.1.4,1.6.0.0)",
"connectorName" : "org.forgerock.openicf.csvfile.CSVFileConnector",
"connectorHostRef" : "csv"
},bundleNamestring, required
The
ConnectorBundle-Nameof the OpenICF connector.bundleVersionstring, required
The
ConnectorBundle-Versionof the OpenICF connector. The value can be a single version (such as1.4.0.0) or a range of versions, which enables you to support multiple connector versions in a single project.You can specify a range of versions as follows:
[1.1.0.0,1.4.0.0]indicates that all connector versions from 1.1 to 1.4, inclusive, are supported.[1.1.0.0,1.4.0.0)indicates that all connector versions from 1.1 to 1.4, including 1.1 but excluding 1.4, are supported.(1.1.0.0,1.4.0.0]indicates that all connector versions from 1.1 to 1.4, excluding 1.1 but including 1.4, are supported.(1.1.0.0,1.4.0.0)indicates that all connector versions from 1.1 to 1.4, exclusive, are supported.
When a range of versions is specified, IDM uses the latest connector that is available within that range. If your project requires a specific connector version, you must explicitly state the version in your connector configuration file, or constrain the range to address only the version that you need.
connectorNamestring, required
The connector implementation class name.
connectorHostRefstring, optional
If the connector runs remotely, the value of this field must match the
namefield of theRemoteConnectorServersobject in the connector server configuration file (provisioner.openicf.connectorinfoprovider.json). For example:... "remoteConnectorServers" : [ { "name" : "dotnet", ...If the connector runs locally, the value of this field can be one of the following:
If the connector .jar is installed in
openidm/connectors/, the value must be"#LOCAL". This is currently the default, and recommended location.If the connector .jar is installed in
openidm/bundle/(not recommended), the value must be"osgi:service/org.forgerock.openicf.framework.api.osgi.ConnectorManager".
15.2.5. Setting the Pool Configuration
The poolConfigOption specifies the pool configuration
for poolable connectors only (connectors that have
"connectorPoolingSupported" : true). Non-poolable
connectors ignore this parameter.
The following example shows a pool configuration option object for a poolable connector:
{
"maxObjects" : 10,
"maxIdle" : 10,
"maxWait" : 150000,
"minEvictableIdleTimeMillis" : 120000,
"minIdle" : 1
}maxObjectsThe maximum number of idle and active instances of the connector.
maxIdleThe maximum number of idle instances of the connector.
maxWaitThe maximum time, in milliseconds, that the pool waits for an object before timing out. A value of
0means that there is no timeout.minEvictableIdleTimeMillisThe maximum time, in milliseconds, that an object can be idle before it is removed. A value of
0means that there is no idle timeout.minIdleThe minimum number of idle instances of the connector.
15.2.6. Setting the Operation Timeouts
The operation timeout property enables you to configure timeout values per operation type. By default, no timeout is configured for any operation type. A sample configuration follows:
{
"CREATE" : -1,
"TEST" : -1,
"AUTHENTICATE" : -1,
"SEARCH" : -1,
"VALIDATE" : -1,
"GET" : -1,
"UPDATE" : -1,
"DELETE" : -1,
"SCRIPT_ON_CONNECTOR" : -1,
"SCRIPT_ON_RESOURCE" : -1,
"SYNC" : -1,
"SCHEMA" : -1
}- operation-name
Timeout in milliseconds
A value of
-1disables the timeout.
15.2.7. Setting the Connection Configuration
The configurationProperties object specifies the
configuration for the connection between the connector and the resource,
and is therefore resource-specific.
The following example shows a configuration properties object for the default CSV sample resource connector:
"configurationProperties" : {
"csvFile" : "&{idm.instance.dir}/data/csvConnectorData.csv"
},- property
Individual properties depend on the type of connector.
15.2.8. Setting the Synchronization Failure Configuration
The syncFailureHandler object specifies what should
happen if a liveSync operation reports a failure for an operation. The
following example shows a synchronization failure configuration:
{
"maxRetries" : 5,
"postRetryAction" : "logged-ignore"
} maxRetriespositive integer or
-1, requiredThe number of attempts that IDM should make to process a failed modification. A value of zero indicates that failed modifications should not be reattempted. In this case, the post retry action is executed immediately when a liveSync operation fails. A value of -1 (or omitting the
maxRetriesproperty, or the entiresyncFailureHandlerobject) indicates that failed modifications should be retried an infinite number of times. In this case, no post retry action is executed.postRetryActionstring, required
The action that should be taken if the synchronization operation fails after the specified number of attempts. The post retry action can be one of the following:
logged-ignore- IDM ignores the failed modification, and logs its occurrence.dead-letter-queue- IDM saves the details of the failed modification in a table in the repository (accessible over REST atrepo/synchronisation/deadLetterQueue/provisioner-name).scriptspecifies a custom script that should be executed when the maximum number of retries has been reached.
For more information, see "Configuring the LiveSync Retry Policy".
15.2.9. Configuring How Results Are Handled
The resultsHandlerConfig object specifies how OpenICF
returns results. These configuration properties do not apply to all
connectors and depend on the interfaces that are implemented by each
connector. For information about the interfaces that connectors support, see
the Connector Reference.
The following example shows a results handler configuration object:
"resultsHandlerConfig" : {
"enableNormalizingResultsHandler" : true,
"enableFilteredResultsHandler" : false,
"enableCaseInsensitiveFilter" : false,
"enableAttributesToGetSearchResultsHandler" : false
} enableNormalizingResultsHandlerboolean, false by default
When this property is enabled, OpenICF normalizes returned attributes to ensure that they are filtered consistently. If the connector implements the attribute normalizer interface, enable the interface by setting this property to
true. If the connector does not implement the attribute normalizer interface, the value of this property has no effect.enableFilteredResultsHandlerboolean, false by default
Most connectors use the filtering and search capabilities of the remote connected system. In these cases, you can leave this property set to
false. If the connector does not use the remote system's filtering and search capabilities, you must set this property totrue.All the non-scripted connectors, apart from the CSV connector use the filtering mechanism of the remote system. In the case of the CSV connector, the remote resource has no filtering mechanism, so you must set
enableFilteredResultsHandlertotrue. For the scripted connectors, the setting will depend on how you have implemented the connector.enableCaseInsensitiveFilterboolean, false by default
This property applies only if
enableFilteredResultsHandleris set totrue. The filtered results handler is case-sensitive by default. For example, a search forlastName = "Jensen"will not match a stored user withlastName : jensen. When the filtered results handler is enabled, you can use this property to enable case-insensitive filtering. If you leave this property set tofalse, searches on that resource will be case-sensitive.enableAttributesToGetSearchResultsHandlerboolean, false by default
By default, IDM determines which attributes should be retrieved in a search. If you set this property to
true, the OpenICF framework removes all attributes from the READ/QUERY response, except for those that are specifically requested. For performance reasons, you should set this property tofalsefor local connectors and totruefor remote connectors.
15.2.10. Specifying the Supported Object Types
The objectTypes configuration specifies the object types
(user, group, account, and so on) that are supported by the connector. The
object names that you define here determine how the object is accessed in
the URI. For example:
system/systemName/objectType
This configuration is based on the JSON Schema with the extensions described in the following section.
Attribute names that start or end with __ are regarded as
special attributes by OpenICF. The purpose of the
special attributes in OpenICF is to enable someone who is developing a
new connector to create a contract regarding how
a property can be referenced, regardless of the application that is using
the connector. In this way, the connector can map specific object
information between an arbitrary application and the resource, without
knowing how that information is referenced in the application.
These attributes have no specific meaning in the context of IDM,
although some of the connectors that are bundled with IDM use
these attributes. The generic LDAP connector, for example, can be used with
ForgeRock Directory Services (DS), Active Directory, OpenLDAP, and
other LDAP directories. Each of these directories might use a different
attribute name to represent the same type of information. For example,
Active Directory uses unicodePassword and DS
uses userPassword to represent the same thing, a user's
password. The LDAP connector uses the special OpenICF
__PASSWORD__ attribute to abstract that difference. In
the same way, the LDAP connector maps the __NAME__
attribute to an LDAP dn.
The OpenICF __UID__ is a special case. The
__UID__ must not be included in the
IDM configuration or in any update or create operation. This
attribute denotes the unique identity attribute of an object and
IDM always maps it to the _id of the object.
The following excerpt shows the configuration of an
account object type:
{
"account" :
{
"$schema" : "http://json-schema.org/draft-03/schema",
"id" : "__ACCOUNT__",
"type" : "object",
"nativeType" : "__ACCOUNT__",
"absentIfEmpty" : false,
"absentIfNull" : true,
"properties" :
{
"name" :
{
"type" : "string",
"nativeName" : "__NAME__",
"nativeType" : "JAVA_TYPE_PRIMITIVE_LONG",
"flags" :
[
"NOT_CREATABLE",
"NOT_UPDATEABLE",
"NOT_READABLE",
"NOT_RETURNED_BY_DEFAULT"
]
},
"groups" :
{
"type" : "array",
"items" :
{
"type" : "string",
"nativeType" : "string"
},
"nativeName" : "__GROUPS__",
"nativeType" : "string",
"flags" :
[
"NOT_RETURNED_BY_DEFAULT"
]
},
"givenName" : {
"type" : "string",
"nativeName" : "givenName",
"nativeType" : "string"
},
}
}
}
OpenICF supports an __ALL__ object type that ensures
that objects of every type are included in a synchronization operation. The
primary purpose of this object type is to prevent synchronization errors
when multiple changes affect more than one object type.
For example, imagine a deployment synchronizing two external systems. On
system A, the administrator creates a user, jdoe, then
adds the user to a group, engineers. When these changes
are synchronized to system B, if the __GROUPS__ object
type is synchronized first, the synchronization will fail, because the group
contains a user that does not yet exist on system B. Synchronizing the
__ALL__ object type ensures that user
jdoe is created on the external system before he is added
to the group engineers.
The __ALL__ object type is assumed by default - you do
not need to declare it in your provisioner configuration file. If it is not
declared, the object type is named __ALL__. If you want
to map a different name for this object type, declare it in your provisioner
configuration. The following excerpt from a sample provisioner configuration
uses the name allobjects:
"objectTypes": {
"allobjects": {
"$schema": "http://json-schema.org/draft-03/schema",
"id": "__ALL__",
"type": "object",
"nativeType": "__ALL__"
},
...
A liveSync operation invoked with no object type assumes an object type of
__ALL__. For example, the following call invokes a
liveSync operation on all defined object types in an LDAP system:
$ curl \ --header "X-OpenIDM-Username: openidm-admin" \ --header "X-OpenIDM-Password: openidm-admin" \ --request POST \ "http://localhost:8080/openidm/system/ldap?_action=liveSync"
Note
Using the __ALL__ object type requires a mechanism
to ensure the order in which synchronization changes are processed. Servers
that use the cn=changelog mechanism to order sync
changes, such as ForgeRock Directory Services (DS), Oracle DSEE, and
the legacy Sun Directory Server, cannot use the __ALL__
object type by default. Such servers must be forced to use time stamps to
order their sync changes. For these LDAP server types, set
useTimestampsForSync to true in the
provisioner configuration.
LDAP servers that use timestamps by default (such as Active Directory GCs
and OpenLDAP) can use the __ALL__ object type without
any additional configuration. Active Directory and Active Directory LDS,
which use Update Sequence Numbers, can also use the
__ALL__ object type without additional configuration.
15.2.10.1. Adding Objects and Properties Using the UI
To add object types and properties to a connector configuration by using the Admin UI, select Configure > Connectors. Select the connector that you want to change, then select the Object Types tab.
In the case of the LDAP connector, the connector reads the schema from the remote resource to determine the object types and properties that can be added to its configuration. When you select one of these object types, you can think of it as a template. Edit the basic object type, as required, to suit your deployment.
To add a property to an object type, select the Edit icon next to the object type, then select Add Property.
15.2.10.2. Extending the Object Type Configuration
nativeTypestring, optional
The native OpenICF object type.
The list of supported native object types is dependent on the resource, or on the connector. For example, an LDAP connector might have object types such as
__ACCOUNT__and__GROUP__.
15.2.10.3. Specifying the Behavior For Empty Attributes
The absentIfEmpty and absentIfNull
object class properties enable you to specify how attributes are handled
during synchronization if their values are null (for single-valued
attributes) or empty (for multi-valued attributes). You can set these
properties per object type.
By default, these properties are set as follows:
"absentIfEmpty" : falseMulti-valued attributes whose values are empty are included in the resource response during synchronization.
"absentIfNull" : trueSingle-valued attributes whose values are null are removed from the resource response during synchronization.
15.2.10.4. Extending the Property Type Configuration
nativeTypestring, optional
The native OpenICF attribute type.
The following native types are supported:
JAVA_TYPE_BIGDECIMAL JAVA_TYPE_BIGINTEGER JAVA_TYPE_BYTE JAVA_TYPE_BYTE_ARRAY JAVA_TYPE_CHAR JAVA_TYPE_CHARACTER JAVA_TYPE_DATE JAVA_TYPE_DOUBLE JAVA_TYPE_FILE JAVA_TYPE_FLOAT JAVA_TYPE_GUARDEDBYTEARRAY JAVA_TYPE_GUARDEDSTRING JAVA_TYPE_INT JAVA_TYPE_INTEGER JAVA_TYPE_LONG JAVA_TYPE_OBJECT JAVA_TYPE_PRIMITIVE_BOOLEAN JAVA_TYPE_PRIMITIVE_BYTE JAVA_TYPE_PRIMITIVE_DOUBLE JAVA_TYPE_PRIMITIVE_FLOAT JAVA_TYPE_PRIMITIVE_LONG JAVA_TYPE_STRING
Note
The
JAVA_TYPE_DATEproperty is deprecated. Functionality may be removed in a future release. This property-level extension is an alias forstring. Any dates assigned to this extension should be formatted per ISO 8601.nativeNamestring, optional
The native OpenICF attribute name.
flagsstring, optional
The native OpenICF attribute flags. OpenICF supports the following attribute flags:
MULTIVALUED- specifies that the property can be multivalued.For multi-valued properties, if the property value type is anything other than a
string, you must include anitemsproperty that declares the data type.The following example shows the
entriesproperty of theauthenticationobject in a provisioner file. Theentriesproperty is multi-valued, and its elements are of typeobject:"authentication" : { ... "properties" : { ... "entries" : { "type" : "object", "required" : false, "nativeName" : "entries", "nativeType" : "object", "items" : { "type" : "object" }, "flags" : [ "MULTIVALUED" ] }, ...NOT_CREATABLE,NOT_READABLE,NOT_RETURNED_BY_DEFAULT,NOT_UPDATEABLEIn some cases, the connector might not support manipulating an attribute because the attribute can only be changed directly on the remote system. For example, if the
nameattribute of an account can only be created by Active Directory, and never changed by IDM, you would addNOT_CREATABLEandNOT_UPDATEABLEto the provisioner configuration for that attribute.Certain attributes such as LDAP groups or other calculated attributes might be expensive to read. You might want to avoid returning these attributes in a default read of the object, unless they are explicitly requested. In this case, you would add the
NOT_RETURNED_BY_DEFAULTflag to the provisioner configuration for that attribute.REQUIRED- specifies that the property is required in create operations. This flag sets therequiredproperty of an attribute as follows:"required" : true
You can configure connectors to enable provisioning of any arbitrary
property. For example, the following property definitions would enable you
to provision image files, used as avatars, to account
objects in a system resource. The first definition would work for a single
photo encoded as a base64 string. The second definition would work for
multiple photos encoded in the same way:
"attributeByteArray" : {
"type" : "string",
"nativeName" : "attributeByteArray",
"nativeType" : "JAVA_TYPE_BYTE_ARRAY"
}, "attributeByteArrayMultivalue": {
"type": "array",
"items": {
"type": "string",
"nativeType": "JAVA_TYPE_BYTE_ARRAY"
},
"nativeName": "attributeByteArrayMultivalue"
}, Note
Do not use the dash character ( - ) in property names,
like last-name. Dashes in names make JavaScript syntax
more complex. If you cannot avoid the dash, write
source['last-name'] instead of
source.last-name in your JavaScript scripts.
15.2.11. Configuring the Operation Options
The operationOptions object enables you to deny specific
operations on a resource. For example, you can use this configuration object
to deny CREATE and DELETE operations
on a read-only resource to avoid IDM accidentally updating the
resource during a synchronization operation.
The following example defines the options for the "SYNC"
operation:
"operationOptions" : {
{
"SYNC" :
{
"denied" : true,
"onDeny" : "DO_NOTHING",
"objectFeatures" :
{
"__ACCOUNT__" :
{
"denied" : true,
"onDeny" : "THROW_EXCEPTION",
"operationOptionInfo" :
{
"$schema" : "http://json-schema.org/draft-03/schema",
"type" : "object",
"properties" :
{
"_OperationOption-float" :
{
"type" : "number",
"nativeType" : "JAVA_TYPE_PRIMITIVE_FLOAT"
}
}
}
},
"__GROUP__" :
{
"denied" : false,
"onDeny" : "DO_NOTHING"
}
}
}
}
...The OpenICF Framework supports the following operations:
AUTHENTICATECREATEDELETEGETRESOLVEUSERNAMESCHEMASCRIPT_ON_CONNECTORSCRIPT_ON_RESOURCESEARCHSYNCTESTUPDATEVALIDATE
For detailed information on these operations, see the OpenICF API documentation.
The operationOptions object has the following
configurable properties:
deniedboolean, optional
This property prevents operation execution if the value is
true.onDenystring, optional
If
deniedistrue, then the service uses this value. Default value:DO_NOTHING.DO_NOTHING: On operation the service does nothing.THROW_EXCEPTION: On operation the service throws aForbiddenExceptionexception.
15.3. Accessing Remote Connectors
When you configure a remote connector, you use the connector info
provider service to connect through a remote connector server.
The connector info provider service configuration is stored in the file
project-dir/conf/provisioner.openicf.connectorinfoprovider.json.
A sample configuration file is provided in the
openidm/samples/example-configurations/provisioners/
directory. To use this sample configuration, edit the file as required, and
copy it to your project's conf/ directory.
The sample connector info provider configuration is as follows:
{
"remoteConnectorServers" :
[
{
"name" : "dotnet",
"host" : "127.0.0.1",
"port" : 8759,
"useSSL" : false,
"timeout" : 0,
"protocol" : "websocket",
"key" : "Passw0rd"
}
]
}You can configure the following remote connector server properties:
namestring, required
The name of the remote connector server object. This name is used to identify the remote connector server in the list of connector reference objects.
hoststring, required
The remote host to connect to.
portinteger, optional
The remote port to connect to. The default remote port is 8759.
heartbeatIntervalinteger, optional
The interval, in seconds, at which heartbeat packets are transmitted. If the connector server is unreachable based on this heartbeat interval, all services that use the connector server are made unavailable until the connector server can be reached again. The default interval is 60 seconds.
useSSLboolean, optional
Specifies whether to connect to the connector server over SSL. The default value is
false.timeoutinteger, optional
Specifies the timeout (in milliseconds) to use for the connection. The default value is
0, which means that there is no timeout.protocolstring
Version 1.5.20.2 of the OpenICF framework supports an efficient communication protocol with remote connector servers. This protocol is enabled by default, and its value is
websocketin the default configuration.For compatibility reasons, you might want to enable the legacy protocol for specific remote connectors. For example, if you deploy the connector server on a Java 5 or 6 JVM, you must use the old protocol. In this case, remove the
protocolproperty from the connector server configuration.For the .NET connector server, the service with the default protocol listens on port 8759 and the service with the legacy protocol listens on port 8760 by default. For more information on running the connector server in legacy mode, see "Running the .NET Connector Server in Legacy Mode".
For the Java connector server, the service listens on port 8759 by default, for both protocols. To run the service with the legacy protocol, you must change the main class that is executed in the
ConnectorServer.shorConnectorServer.batfile. The class that starts the websocket protocol isMAIN_CLASS=org.forgerock.openicf.framework.server.Main. The class that starts the legacy protocol isMAIN_CLASS=org.identityconnectors.framework.server.Main. To change the port on which the Java connector server listens, change theconnectorserver.portproperty in theopenicf/conf/ConnectorServer.propertiesfile.keystring, required
The secret key, or password, to use to authenticate to the remote connector server.
15.3.1. Installing and Configuring Remote Connector Servers
Connectors that use the .NET framework must run remotely. Java connectors can run locally or remotely. Connectors that run remotely require a connector server to enable IDM to access the connector.
For a list of supported connector server versions, and compatibility between versions, see "Supported Connectors, Connector Servers, and Plugins" in the Release Notes.
Important
In addition to the connector server, you must copy the connector .jar itself
to the /path/to/openicf/bundles directory and any
connector dependencies to the /path/to/openicf/lib/
directory on the remote machine. For a list of dependencies for each
connector, see "Installing Remote Connector Dependencies".
This section describes the steps to install a .NET connector server and a remote Java Connector Server.
15.3.1.1. Installing and Configuring a .NET Connector Server
A .NET connector server is useful when an application is written in Java, but a connector bundle is written using C#. Because a Java application (for example, a J2EE application) cannot load C# classes, you must deploy the C# bundles under a .NET connector server. The Java application can communicate with the C# connector server over the network, and the C# connector server acts as a proxy to provide access to the C# bundles that are deployed within the C# connector server, to any authenticated application.
By default, the connector server outputs log messages to a file named
connectorserver.log, in the
C:\path\to\openicf directory. To change the location of
the log file set the initializeData parameter in the
configuration file, before you install the connector server. For example,
the following excerpt sets the log directory to
C:\openicf\logs\connectorserver.log:
<add name="file"
type="System.Diagnostics.TextWriterTraceListener"
initializeData="C:\openicf\logs\connectorserver.log"
traceOutputOptions="DateTime">
<filter type="System.Diagnostics.EventTypeFilter" initializeData="Information"/>
</add>Download the OpenICF .NET Connector Server from the ForgeRock BackStage site.
The .NET connector server is distributed in two formats. The
.msifile is a wizard that installs the Connector Server as a Windows Service. The.zipfile is simply a bundle of all the files required to run the Connector Server.If you do not want to run the Connector Server as a Windows service, download and extract the
.zipfile, then move on to "Configuring the .NET Connector Server".If you have deployed the
.zipfile and then decide to run the Connector Server as a service, install the service manually with the following command:.\ConnectorServerService.exe /install /serviceName service-name
Then proceed to "Configuring the .NET Connector Server".
To install the Connector Server as a Windows service automatically, follow the remaining steps in this section.
Run the
openicf-version-dotnet.msiinstallation file and complete the wizard.You must run the wizard as a user who has permissions to start and stop a Windows service, otherwise the service will not start.
When you choose the Setup Type, select Typical unless you require backward compatibility with the 1.4.0.0 connector server. If you need backward compatibility, select Custom, and install the Legacy Connector Service.
When the wizard has completed, the Connector Server is installed as a Windows Service.
Open the Microsoft Services Console and make sure that the Connector Server is listed there.
The name of the service is
OpenICF Connector Server, by default.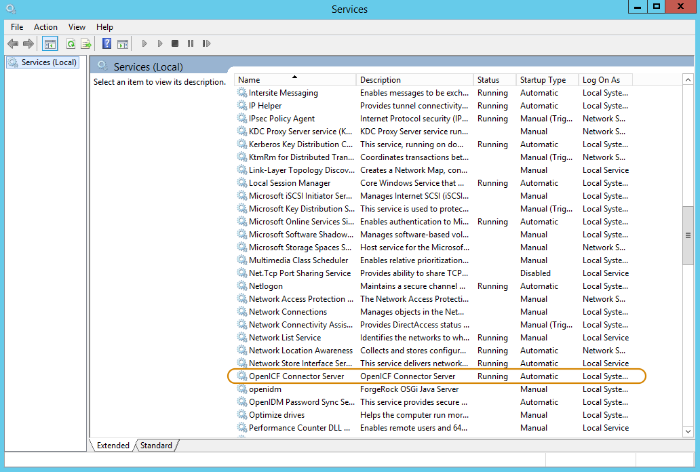
If you are installing the .NET Connector Server from the
.msidistribution, select Custom for the Setup Type, and install the Legacy Connector Service.If you are installing the .NET Connector Server from the
.zipdistribution, launch the Connector Server by running theConnectorServer.execommand, and not theConnectorServerService.execommand.Adjust the
portparameter in your IDM remote connector server configuration file. In legacy mode, the connector server listens on port8760by default.Remove the
"protocol" : "websocket",from your IDM remote connector server configuration file to specify that the connector server should use the legacy protocol.In the commands shown in "Configuring the .NET Connector Server", replace
ConnectorServerService.exewithConnectorServer.exe.
After you have installed the .NET Connector Server, as described in the previous section, follow these steps to configure the Connector Server:
Make sure that the Connector Server is not currently running. If it is running, use the Microsoft Services Console to stop it.
At the command prompt, change to the directory where the Connector Server was installed:
c:\> cd "c:\Program Files (x86)\ForgeRock\OpenICF"
Run the ConnectorServerService /setkey command to set a secret key for the Connector Server. The key can be any string value. This example sets the secret key to
Passw0rd:ConnectorServerService /setkey Passw0rd Key has been successfully updated.
This key is used by clients connecting to the Connector Server. The key that you set here must also be set in the IDM connector info provider configuration file (
conf/provisioner.openicf.connectorinfoprovider.json). For more information, see "Configuring IDM to Connect to the .NET Connector Server".Edit the Connector Server configuration.
The Connector Server configuration is saved in a file named
ConnectorServerService.exe.Config(in the directory in which the Connector Server is installed).Check and edit this file, as necessary, to reflect your installation. Specifically, verify that the
baseAddressreflects the host and port on which the connector server is installed:<system.serviceModel> <services> <service name="Org.ForgeRock.OpenICF.Framework.Service.WcfServiceLibrary.WcfWebsocket"> <host> <baseAddresses> <add baseAddress="http://0.0.0.0:8759/openicf" /> </baseAddresses> <host> </service> </services> </system.serviceModel>The
baseAddressspecifies the host and port on which the Connector Server listens, and is set tohttp://0.0.0.0:8759/openicfby default. If you set a host value other than the default0.0.0.0, connections from all IP addresses other than the one specified are denied.If Windows firewall is enabled, you must create an inbound port rule to open the TCP port for the connector server (8759 by default). If you do not open the TCP port, IDM will be unable to contact the Connector Server. For more information, see the Microsoft documentation on creating an inbound port rule.
Optionally, configure the Connector Server to use SSL:
Open a Powershell terminal as a user with administrator privileges, then change to the OpenICF installation directory:
PS C:\Users\Administrator> cd 'C:\Program Files (x86)\ForgeRock\OpenICF'
Use an existing CA certificate, or use the
New-SelfSignedCertificatecmdlet to create a self-signed certificate:PS ...> New-SelfSignedCertificate -DnsName "dotnet", "dotnet.example.com" -CertStoreLocation "cert:\LocalMachine\My" PSParentPath: Microsoft.PowerShell.Security\Certificate::LocalMachine\My Thumbprint Subject ---------- ------- 770F531F14AF435E963E14AD82B70A47A4BFFBF2 CN=dotnet
Assign the certificate to the Connector Server:
PS ...> .\ConnectorServerService.exe /setCertificate Select certificate you want to use: Index Issued To Thumbprint ----- --------- ------------------------- 0) dotnet 770F531F14AF435E963E14AD82B70A47A4BFFBF2 0 Certificate Thumbprint has been successfully updated to 770F531F14AF435E963E14AD82B70A47A4BFFBF2.
Bind the certificate to the Connector Server port (
8759by default). To bind the certificate:Use
uuidgen.exeto generate a new UUID:PS ...> & 'C:\Program Files (x86)\Windows Kits\10\bin\10.0.15063.0\x64\uuidgen.exe' 058d7a64-8628-49ec-a417-a70c8974046d
Enter the
netshhttp console and add the certificate thumbprint generated in the previous step and the UUID that you have just generated:PS ...> netsh netsh>http netsh http>add sslcert ipport=0.0.0.0:8759 certhash=770F5...FFBF2 appid={058d7...4046d} SSL Certificate successfully added
Change the Connector Server configuration (in the
ConnectorServerService.exe.Configfile) to use HTTPS and not HTTP:<host> <baseAddresses> ... <add baseAddress="https://0.0.0.0:8759/openicf"/> </baseAddresses> </host>Export the certificate:
Launch the certificate management MMC by selecting Run > certlm.msc.
Right-click on the
dotnetcertificate then select All Tasks > Export.The Certificate Export Wizard is launched.
Select Next > No, do not export the private key > DER encoded binary X.509 (.CER) > Next.
Save the file in an accessible location (for example,
C:\Users\Administrator\Desktop\dotnet.cer) then select Finish.
Import the certificate into the IDM truststore:
Transfer the certificate from the Windows machine to the machine that's running IDM.
Change to the
openidm/securitydirectory and use the Javakeytoolcommand to import the certificate:$ cd /path/to/openidm/security $ keytool -import -alias dotnet -file ~/Downloads/dotnet.cer -keystore ./truststore Enter keystore password: changeit Owner: CN=dotnet Issuer: CN=dotnet Serial number: 1e3af7baed05ce834da5cd1bf1241835 Valid from: Tue Aug 08 15:58:32 SAST 2017 until: Wed Aug 08 16:18:32 SAST 2018 Certificate fingerprints: MD5: D1:B7:B7:46:C2:59:1A:3C:94:AA:65:99:B4:43:3B:E8 SHA1: 77:0F:53:1F:14:AF:43:5E:96:3E:14:AD:82:B7:0A:47:A4:BF:FB:F2 SHA256: C0:52:E2:E5:E5:72:9D:69:F8:11:4C:B8:4C:E4:E3:1C:19:95:86:19:70:E5:31:FA:D8:81:4B:F2:AC:30:9C:73 Signature algorithm name: SHA256withRSA Version: 3 ... Trust this certificate? [no]: yes Certificate was added to keystore
Update your project's connector server configuration file (
conf/provisioner.openicf.connectorinfoprovider.json) to use SSL:$ cd /path/to/my-project/conf $ more provisioner.openicf.connectorinfoprovider.json "remoteConnectorServers" : [ { "name" : "dotnet", "host" : "my-windows-host", "port" : 8759, "protocol" : "websocket", "useSSL" : true, "timeout" : 0, "key" : {...} } ]
Check the trace settings, in the same Connector Server configuration file, under the
system.diagnosticsitem:<system.diagnostics> <trace autoflush="true" indentsize="4"> <listeners> <remove name="Default" /> <add name="console" /> <add name="file" /> </listeners> </trace> <sources> <source name="ConnectorServer" switchName="switch1"> <listeners> <remove name="Default" /> <add name="file" /> </listeners> </source> </sources> <switches> <add name="switch1" value="Information" /> </switches> <sharedListeners> <add name="console" type="System.Diagnostics.ConsoleTraceListener" /> <add name="file" type="System.Diagnostics.TextWriterTraceListener" initializeData="logs\ConnectorServerService.log" traceOutputOptions="DateTime"> <filter type="System.Diagnostics.EventTypeFilter" initializeData="Information" /> </add> </sharedListeners> </system.diagnostics>The Connector Server uses the standard .NET trace mechanism. For more information about tracing options, see Microsoft's .NET documentation for
System.Diagnostics.The default trace settings are a good starting point. For less tracing, set the EventTypeFilter's
initializeDatatoWarningorError. For very verbose logging set the value toVerboseorAll. The logging level has a direct effect on the performance of the Connector Servers, so take care when setting this level.
Start the .NET Connector Server in one of the following ways:
Start the server as a Windows service, by using the Microsoft Services Console.
Locate the connector server service (
OpenICF Connector Server), and clickStart the serviceorRestart the service.The service is executed with the credentials of the "run as" user (
System, by default).Start the server as a Windows service, by using the command line.
In the Windows Command Prompt, run the following command:
net start ConnectorServerService
To stop the service in this manner, run the following command:
net stop ConnectorServerService
Start the server without using Windows services.
In the Windows Command Prompt, change directory to the location where the Connector Server was installed. The default location is
c:\> cd "c:\Program Files (x86)\ForgeRock\OpenICF".Start the server with the following command:
ConnectorServerService.exe /run
Note that this command starts the Connector Server with the credentials of the current user. It does not start the server as a Windows service.
The connector info provider service configures one or more remote connector
servers to which IDM can connect. The connector info provider
configuration is stored in a file named
project-dir/conf/provisioner.openicf.connectorinfoprovider.json.
A sample connector info provider configuration file is located in
openidm/samples/example-configurations/provisioners/.
To configure IDM to use the remote .NET connector server, follow these steps:
Start IDM, if it is not already running.
Copy the sample connector info provider configuration file to your project's
conf/directory:$ cd /path/to/openidm $ cp samples/example-configurations/provisioners/provisioner.openicf.connectorinfoprovider.json project-dir/conf/
Edit the connector info provider configuration, specifying the details of the remote connector server:
"remoteConnectorServers" : [ { "name" : "dotnet", "host" : "192.0.2.0", "port" : 8759, "useSSL" : false, "timeout" : 0, "protocol" : "websocket", "key" : "Passw0rd" }Configurable properties are as follows:
nameSpecifies the name of the connection to the .NET connector server. The name can be any string. This name is referenced in the
connectorHostRefproperty of the connector configuration file (provisioner.openicf-ad.json).hostSpecifies the IP address of the host on which the Connector Server is installed.
portSpecifies the port on which the Connector Server listens. This property matches the
connectorserver.portproperty in theConnectorServerService.exe.configfile.For more information, see "Configuring the .NET Connector Server".
useSSLSpecifies whether the connection to the Connector Server should be secured. This property matches the
"connectorserver.usessl"property in theConnectorServerService.exe.configfile.timeoutSpecifies the length of time, in seconds, that IDM should attempt to connect to the Connector Server before abandoning the attempt. To disable the timeout, set the value of this property to
0.protocolVersion 1.5.20.2 of the OpenICF framework supports an efficient communication protocol with remote connector servers. This protocol is enabled by default, and its value is
websocketin the default configuration.keySpecifies the connector server key. This property matches the
keyproperty in theConnectorServerService.exe.configfile. For more information, see "Configuring the .NET Connector Server".The string value that you enter here is encrypted as soon as the file is saved.
15.3.1.2. Installing and Configuring a Remote Java Connector Server
In certain situations, it might be necessary to set up a remote Java Connector Server. This section provides instructions for setting up a remote Java Connector Server on Unix/Linux and Windows.
Download the OpenICF Java Connector Server from ForgeRock's BackStage site.
Change to the appropriate directory and unpack the zip file. The following command unzips the file in the current directory:
$ unzip openicf-zip-1.5.20.0.zip
Change to the
openicfdirectory:$ cd path/to/openicf
The Java Connector Server uses a
keyproperty to authenticate the connection. The default key value ischangeit. To change the value of the secret key, run a command similar to the following. This example sets the key value toPassw0rd:$ cd /path/to/openicf $ bin/ConnectorServer.sh /setkey Passw0rd Key has been successfully updated.
Review the
ConnectorServer.propertiesfile in the/path/to/openicf/confdirectory, and make any required changes. By default, the configuration file has the following properties:connectorserver.port=8759 connectorserver.libDir=lib connectorserver.usessl=false connectorserver.bundleDir=bundles connectorserver.loggerClass=org.forgerock.openicf.common.logging.slf4j.SLF4JLog connectorserver.key=xOS4IeeE6eb/AhMbhxZEC37PgtE\=
The
connectorserver.usesslparameter indicates whether client connections to the connector server should be over SSL. This property is set tofalseby default.To secure connections to the connector server, set this property to
trueand set the following properties before you start the connector server:java -Djavax.net.ssl.keyStore=mySrvKeystore -Djavax.net.ssl.keyStorePassword=Passw0rd
Start the Java Connector Server:
$ bin/ConnectorServer.sh /run
The connector server is now running, and listening on port 8759, by default.
Log files are available in the
/path/to/openicf/logsdirectory.$ ls logs/ Connector.log ConnectorServer.log ConnectorServerTrace.log
If required, stop the Java Connector Server by pressing CTRL-C.
Download the OpenICF Java Connector Server from ForgeRock's BackStage site.
Change to the appropriate directory and unpack the zip file.
In a Command Prompt window, change to the
openicfdirectory:C:\>cd C:\path\to\openicf\bin
If required, secure the communication between IDM and the Java Connector Server. The Java Connector Server uses a
keyproperty to authenticate the connection. The default key value ischangeit.To change the value of the secret key, use the
bin\ConnectorServer.bat /setkeycommand. The following example sets the key toPassw0rd:c:\path\to\openicf>bin\ConnectorServer.bat /setkey Passw0rd lib\framework\connector-framework.jar;lib\framework\connector-framework-internal .jar;lib\framework\groovy-all.jar;lib\framework\icfl-over-slf4j.jar;lib\framework \slf4j-api.jar;lib\framework\logback-core.jar;lib\framework\logback-classic.jar
Review the
ConnectorServer.propertiesfile in thepath\to\openicf\confdirectory, and make any required changes. By default, the configuration file has the following properties:connectorserver.port=8759 connectorserver.libDir=lib connectorserver.usessl=false connectorserver.bundleDir=bundles connectorserver.loggerClass=org.forgerock.openicf.common.logging.slf4j.SLF4JLog connectorserver.key=xOS4IeeE6eb/AhMbhxZEC37PgtE\=
You can either run the Java Connector Server as a Windows service, or start and stop it from the command-line.
To install the Java Connector Server as a Windows service, run the following command:
c:\path\to\openicf>bin\ConnectorServer.bat /install
If you install the connector server as a Windows service you can use the Microsoft Services Console to start, stop and restart the service. The Java Connector Service is named
OpenICFConnectorServerJava.To uninstall the Java Connector Server as a Windows service, run the following command:
c:\path\to\openicf>bin\ConnectorServer.bat /uninstall
To start the Java Connector Server from the command line, enter the following command:
c:\path\to\openicf>bin\ConnectorServer.bat /run
The connector server is now running, and listening on port 8759, by default.
Log files are available in the
\path\to\openicf\logsdirectory.If required, stop the Java Connector Server by pressing
^C.
15.3.2. Installing Remote Connector Dependencies
IDM includes the dependencies needed to run bundled connectors
by default. When you run a connector on a remote machine (using a connector
server), you must copy the connector itself as well as any connector
dependencies to the remote machine. The connector dependencies can be found
in two locations in an IDM installation:
/path/to/openidm/bundles/ and
/path/to/openidm/lib/. To run a connector remotely,
locate its dependencies and copy those files to the
/path/to/openicf/lib/ directory on the remote machine.
| Required dependencies for bundled connectors | |
|---|---|
| Connector | Dependencies |
Adobe Marketing Cloud Connector |
|
CSV File Connector |
|
Database Table Connector |
No external dependencies, though you will need to include the JDBC driver for the database you are targeting. |
GoogleApps Connector |
|
Scripted Groovy Connector |
No external dependencies |
Scripted Poolable Groovy Connector |
No external dependencies |
Kerberos Connector |
|
LDAP Connector |
No external dependencies |
Marketo Connector |
|
MongoDB Connector |
|
SCIM Connector |
|
Scripted REST Connector |
|
Scripted SQL Connector |
|
ServiceNow Connector |
|
SSH Connector |
|
Workday Connector |
|
15.3.2.1. Example: Using the CSV Connector to Reconcile Users in a Remote CSV Data Store
This example demonstrates reconciliation of users stored in a CSV file on a remote machine. The remote Java Connector Server enables IDM to synchronize its repository with the remote CSV repository.
The example assumes that a remote Java Connector Server is installed on a
host named remote-host. For instructions on setting up
the remote Java Connector Server, see
"Installing a Remote Java Connector Server for Unix/Linux" or
"Installing a Remote Java Connector Server for Windows".
This example assumes that the Java Connector Server is running on the
machine named remote-host. The example uses the small
CSV data set provided with the Getting Started
sample (hr.csv). The CSV connector runs as a
remote connector, that is, on the remote host on
which the Java Connector Server is installed. Before you start, copy the
sample data file, and the CSV connector itself over to the remote machine.
Shut down the remote connector server, if it is running. In the connector server terminal window, type
q:q INFO: Stopped listener bound to [0.0.0.0:8759] May 30, 2016 12:33:24 PM INFO o.f.o.f.server.ConnectorServer: Server is shutting down org.forgerock.openicf.framework.server.ConnectorServer@171ba877Copy the CSV data file from the Getting Started sample (
/path/to/openidm/samples/getting-started/data/hr.csv) to an accessible location on the machine that hosts the remote Java Connector Server. For example:$ cd /path/to/openidm/samples/getting-started/data/ $ scp hr.csv testuser@remote-host:/home/testuser/csv-sample/data/ Password:******** hr.csv 100% 651 0.6KB/s 00:00
Copy the CSV connector .jar from the IDM installation to the
openicf/bundlesdirectory on the remote host:$ cd path/to/openidm $ scp connectors/csvfile-connector-1.5.20.0.jar testuser@remote-host:/path/to/openicf/bundles/ Password:******** csvfile-connector-1.5.20.0.jar 100% 40KB 39.8KB/s 00:00
The CSV connector depends on the Super CSV library, that is bundled with IDM. Copy the Super CSV library (
super-csv-2.4.0.jar) from theopenidm/bundledirectory to theopenicf/libdirectory on the remote server:$ cd path/to/openidm $ scp bundle/super-csv-2.4.0.jar testuser@remote-host:/path/to/openicf/lib/ Password:******** super-csv-2.4.0.jar 100% 96KB 95.8KB/s 00:00
On the remote host, restart the Connector Server so that it picks up the new CSV connector and its dependent libraries:
$ cd /path/to/openicf $ bin/ConnectorServer.sh /run ... May 30, 2016 3:58:29 PM INFO o.i.f.i.a.l.LocalConnectorInfoManagerImpl: Add ConnectorInfo ConnectorKey( bundleName=org.forgerock.openicf.connectors.csvfile-connector bundleVersion="[1.5.1.4,1.6.0.0)" connectorName=org.forgerock.openicf.csvfile.CSVFileConnector ) to Local Connector Info Manager from file:/path/to/openicf/bundles/csvfile-connector-1.5.20.0.jar May 30, 2016 3:58:30 PM org.glassfish.grizzly.http.server.NetworkListener start INFO: Started listener bound to [0.0.0.0:8759] May 30, 2016 3:58:30 PM org.glassfish.grizzly.http.server.HttpServer start INFO: [OpenICF Connector Server] Started. May 30, 2016 3:58:30 PM INFO o.f.openicf.framework.server.Main: ConnectorServer listening on: ServerListener[0.0.0.0:8759 - plain]
The connector server logs are noisy by default. You should, however, notice the addition of the CSV connector.
Before you start, copy the following files to your
/path/to/openidm/conf directory:
A customised mapping file required for this example.
/openidm/samples/example-configurations/provisioners/provisioner.openicf.connectorinfoprovider.jsonThe sample connector server configuration file./openidm/samples/example-configurations/provisioners/provisioner.openicf-csvfile.jsonThe sample connector configuration file.
Edit the remote connector server configuration file (
provisioner.openicf.connectorinfoprovider.json) to match your network setup.The following example indicates that the Java connector server is running on the host
remote-host, listening on the default port, and configured with a secret key ofPassw0rd:{ "remoteConnectorServers" : [ { "name" : "csv", "host" : "remote-host", "port" : 8759, "useSSL" : false, "timeout" : 0, "protocol" : "websocket", "key" : "Passw0rd" } ] }The
namethat you set in this file will be referenced in theconnectorHostRefproperty of the connector configuration, in the next step.The
keythat you specify here must match the password that you set when you installed the Java connector server.Edit the CSV connector configuration file (
provisioner.openicf-csvfile.json) as follows:{ "connectorRef" : { "connectorHostRef" : "csv", "bundleName" : "org.forgerock.openicf.connectors.csvfile-connector", "bundleVersion" : "[1.5.1.4,1.6.0.0)", "connectorName" : "org.forgerock.openicf.connectors.csv.CSVFileConnector" }, ... "configurationProperties" : { "csvFile" : "/home/testuser/csv-sample/data/hr.csv" }, }The
connectorHostRefproperty indicates which remote connector server to use, and refers to thenameproperty you specified in theprovisioner.openicf.connectorinfoprovider.jsonfile.The
bundleVersion : "[1.5.1.4,1.6.0.0)",must either be exactly the same as the version of the CSV connector that you are using or, if you specify a range, the CSV connector version must be included in this range.The
csvFileproperty must specify the absolute path to the CSV data file that you copied to the remote host on which the Java Connector Server is running.
Start IDM:
$ cd /path/to/openidm $ ./startup.sh
Verify that IDM can reach the remote connector server and that the CSV connector has been configured correctly:
$ curl \ --header "X-OpenIDM-Username: openidm-admin" \ --header "X-OpenIDM-Password: openidm-admin" \ --request POST \ "http://localhost:8080/openidm/system?_action=test" [ { "name": "csv", "enabled": true, "config": "config/provisioner.openicf/csv", "objectTypes": [ "__ALL__", "account" ], "connectorRef": { "bundleName": "org.forgerock.openicf.connectors.csvfile-connector", "connectorName": "org.forgerock.openicf.csvfile.CSVFileConnector", "bundleVersion": "[1.5.1.4,1.6.0.0)" }, "displayName": "CSV File Connector", "ok": true } ]The connector must return
"ok": true.Alternatively, use the Admin UI to verify that IDM can reach the remote connector server and that the CSV connector is active. Log in to the Admin UI (
https://localhost:8443/openidm/admin) and select Configure > Connectors. The CSV connector should be listed on the Connectors page, and its status should be Active.Connectors Tab Showing an Active CSV Connector
To test that the connector has been configured correctly, run a reconciliation operation as follows:
Select Configure > Mappings and click the systemCsvAccounts_managedUser mapping.
Click Reconcile.
If the reconciliation is successful, the three users from the remote CSV file should have been added to the managed user repository.
To check this, select Manage > User.
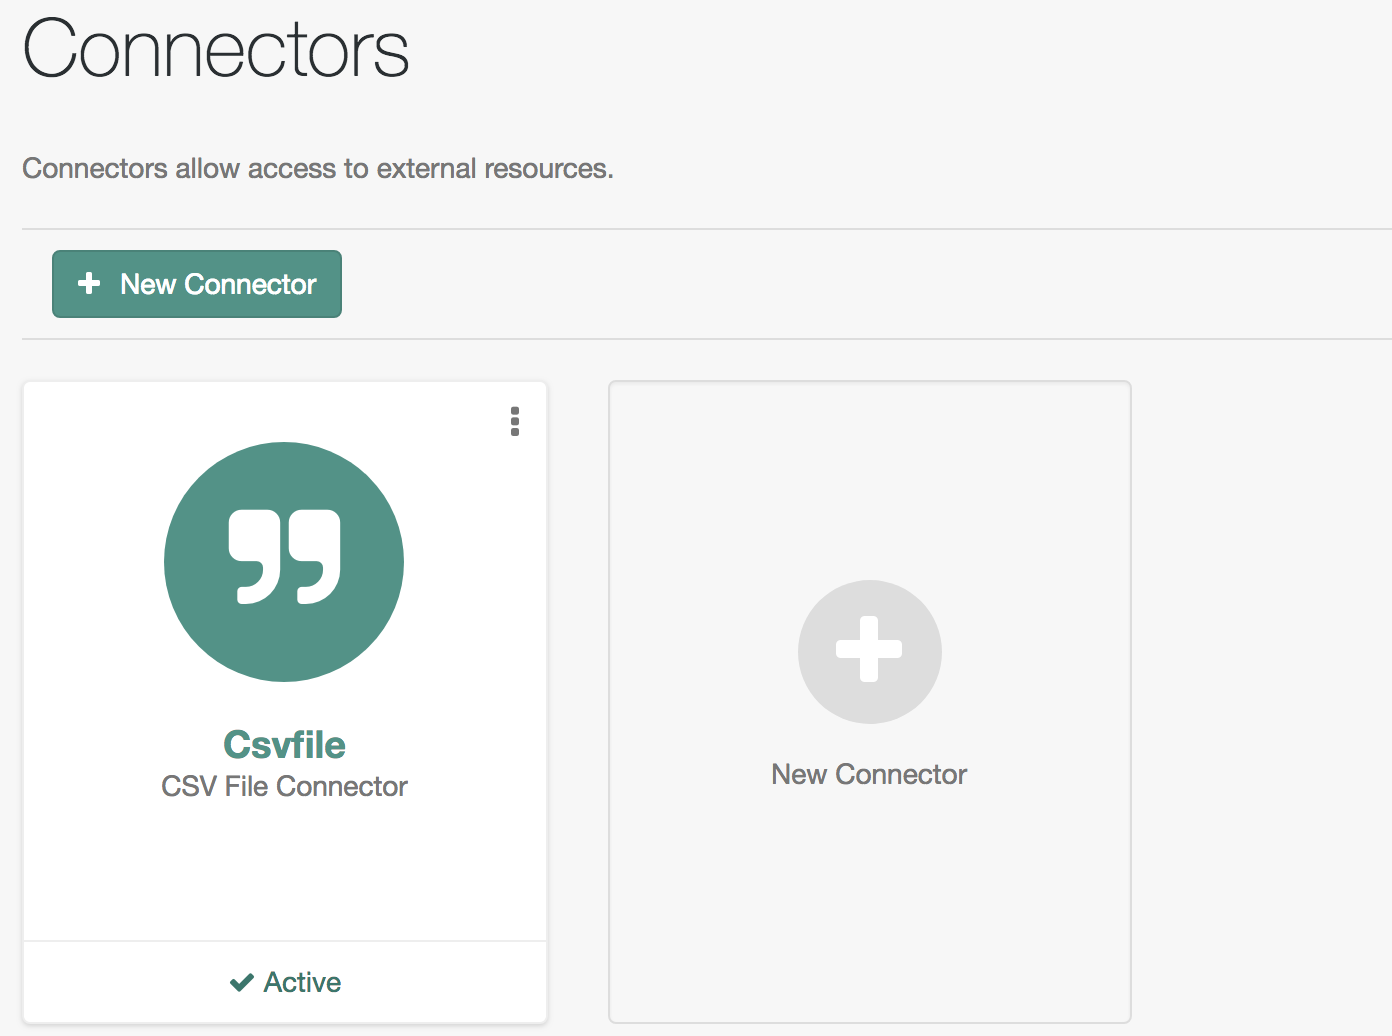
15.3.3. Configuring Failover Between Remote Connector Servers
To prevent the connector server from being a single point of failure, you
can specify a list of remote connector servers that the connector can
target. This failover configuration is included in your project's
conf/provisioner.openicf.connectorinfoprovider.json
file. The connector attempts to contact the first connector server in the
list. If that connector server is down, it proceeds to the next connector
server.
The following sample configuration defines two remote connector servers, on
hosts remote-host-1 and remote-host-2.
These servers are listed, by their name property in a
group, specified in the remoteConnectorServersGroups
property. You can configure multiple servers per group, and multiple groups
in a single remote connector server configuration file.
{
"connectorsLocation" : "connectors",
"remoteConnectorServers" : [
{
"name" : "dotnet1",
"host" : "remote-host-1",
"port" : 8759,
"protocol" : "websocket",
"useSSL" : false,
"timeout" : 0,
"key" : "password"
},
{
"name" : "dotnet2",
"host" : "remote-host-2",
"port" : 8759,
"protocol" : "websocket",
"useSSL" : false,
"timeout" : 0,
"key" : "password"
}
],
"remoteConnectorServersGroups" : [
{
"name" : "dotnet-ha",
"algorithm" : "failover",
"serversList" : [
{"name": "dotnet1"},
{"name": "dotnet2"}
]
}
]
}
The algorithm can be either failover
or roundrobin. If the algorithm is
failover, requests are always sent to the first connector
server in the list, unless it is unavailable, in which case requests are
sent to the next connector server in the list. If the algorithm is
roundrobin, requests are distributed equally between the
connector servers in the list, in the order in which they are received.
Your connector configuration file
(provisioner.openicf-connector-name.json)
references the remote connector server group, rather than a single remote
connector server. For example, the following excerpt of a PowerShell
connector configuration file references the dotnet-ha
connector server group from the previous configuration:
{
"connectorRef" : {
"bundleName" : "MsPowerShell.Connector",
"connectorName" : "Org.ForgeRock.OpenICF.Connectors.MsPowerShell.MsPowerShellConnector",
"connectorHostRef" : "dotnet-ha",
"bundleVersion" : "[1.4.2.0,1.5.0.0)"
},
...Note
Failover is not supported between connector servers that are running in
legacy mode. Therefore, the configuration of each connector server that is
part of the failover group must have the protocol
property set to websocket.
15.4. Checking the Status of External Systems Over REST
After a connection has been configured, external systems are accessible over
the REST interface at the URL
http://localhost:8080/openidm/system/connector-name.
Aside from accessing the data objects within the external systems, you can
test the availability of the systems themselves.
To list the external systems that are connected to an IDM
instance, use the test action on the URL
http://localhost:8080/openidm/system/. The following
example shows an IDM system with two connected LDAP systems:
$ curl \
--header "X-OpenIDM-Username: openidm-admin" \
--header "X-OpenIDM-Password: openidm-admin" \
--request POST \
"http://localhost:8080/openidm/system?_action=test"
[
{
"name": "ldap",
"enabled": true,
"config": "config/provisioner.openicf/ldap",
"connectorRef": {
"bundleVersion": "[1.4.0.0,1.5.0.0)",
"bundleName": "org.forgerock.openicf.connectors.ldap-connector",
"connectorName": "org.identityconnectors.ldap.LdapConnector"
},
"displayName": "LDAP Connector",
"objectTypes": [
"__ALL__",
"account",
"group"
],
"ok": true
},
{
"name": "ldap2",
"enabled": true,
"config": "config/provisioner.openicf/ldap2",
"connectorRef": {
"bundleVersion": "[1.4.0.0,1.5.0.0)",
"bundleName": "org.forgerock.openicf.connectors.ldap-connector",
"connectorName": "org.identityconnectors.ldap.LdapConnector"
},
"displayName": "LDAP Connector",
"objectTypes": [
"__ALL__",
"account",
"group"
],
"ok": true
}
]
The status of the system is provided by the ok parameter.
If the connection is available, the value of this parameter is
true.
To obtain the status for a single system, include the name of the connector in the URL, for example:
$ curl \
--header "X-OpenIDM-Username: openidm-admin" \
--header "X-OpenIDM-Password: openidm-admin" \
--request POST \
"http://localhost:8080/openidm/system/ldap?_action=test"
{
"name": "ldap",
"enabled": true,
"config": "config/provisioner.openicf/ldap",
"connectorRef": {
"bundleVersion": "[1.4.0.0,1.5.0.0)",
"bundleName": "org.forgerock.openicf.connectors.ldap-connector",
"connectorName": "org.identityconnectors.ldap.LdapConnector"
},
"displayName": "LDAP Connector",
"objectTypes": [
"__ALL__",
"account",
"group"
],
"ok": true
}
If there is a problem with the connection, the ok
parameter returns false, with an indication of the error.
In the following example, the LDAP server named
ldap, running on localhost:1389, is
down:
$ curl \
--header "X-OpenIDM-Username: openidm-admin" \
--header "X-OpenIDM-Password: openidm-admin" \
--request POST \
"http://localhost:8080/openidm/system/ldap?_action=test"
{
"name": "ldap",
"enabled": true,
"config": "config/provisioner.openicf/ldap",
"connectorRef": {
"bundleVersion": "[1.4.0.0,1.5.0.0)",
"bundleName": "org.forgerock.openicf.connectors.ldap-connector",
"connectorName": "org.identityconnectors.ldap.LdapConnector"
},
"displayName": "LDAP Connector",
"objectTypes": [
"__ALL__",
"account",
"group"
],
"error": "javax.naming.CommunicationException: localhost:1389 [Root exception
is java.net.ConnectException: Connection refused (Connection refused)]",
"ok": false
}
To test the validity of a connector configuration, use the
testConfig action and include the configuration in the
command. For example:
$ curl \
--header "X-OpenIDM-Username: openidm-admin" \
--header "X-OpenIDM-Password: openidm-admin" \
--header "Content-Type: application/json" \
--request POST \
--data '{
"configurationProperties": {
"headerPassword": "password",
"csvFile": "&{idm.instance.dir}/data/csvConnectorData.csv",
"newlineString": "\n",
"headerUid": "uid",
"quoteCharacter": "\"",
"fieldDelimiter": ",",
"syncFileRetentionCount": 3
},
"connectorRef": {
"systemType": "provisioner.openicf",
"bundleName": "org.forgerock.openicf.connectors.csvfile-connector",
"connectorName": "org.forgerock.openicf.csvfile.CSVFileConnector",
"displayName": "CSV File Connector",
"bundleVersion": "[1.5.0.0,1.6.0.0)"
},
"poolConfigOption": {
"maxObjects": 10,
"maxIdle": 10,
"maxWait": 150000,
"minEvictableIdleTimeMillis": 120000,
"minIdle": 1
},
"resultsHandlerConfig": {
"enableNormalizingResultsHandler": true,
"enableFilteredResultsHandler": true,
"enableCaseInsensitiveFilter": false,
"enableAttributesToGetSearchResultsHandler": true
},
"operationTimeout": {
"CREATE": -1,
"UPDATE": -1,
"DELETE": -1,
"TEST": -1,
"SCRIPT_ON_CONNECTOR": -1,
"SCRIPT_ON_RESOURCE": -1,
"GET": -1,
"RESOLVEUSERNAME": -1,
"AUTHENTICATE": -1,
"SEARCH": -1,
"VALIDATE": -1,
"SYNC": -1,
"SCHEMA": -1
}
}' \
"http://localhost:8080/openidm/system?_action=testConfig"
If the configuration is valid, the command returns
"ok": true, for example:
{
"ok": true
}
If the configuration is not valid, the command returns an error, indicating
the problem with the configuration. For example, the following result is
returned when the LDAP connector configuration is missing a required property
(in this case, the baseContexts to synchronize):
{
"error": "org.identityconnectors.framework.common.exceptions.ConfigurationException:
The list of base contexts cannot be empty",
"name": "ldap",
"ok": false
}
The testConfig action requires a running IDM
instance, as it uses the REST API, but does not require an active connector
instance for the connector whose configuration you want to test.
15.5. Removing a Connector
If you have reason to remove a connector, be careful. If you remove a connector used in a mapping, while it's part of a scheduled task, you may see unintended consequences.
If you're removing a connector, consider the following checklist. Depending on your configuration, this list may not be comprehensive:
Consider the remote resource. Make sure you no longer need data from that resource, and that the resource no longer requires data from IDM.
Open the
sync.jsonfile for your project. Delete the code block associated with the mapping.Review the
schedule-recon.jsonfile. If it contains the schedule for a single operation, delete the file or update it as a schedule for a different mapping.
When these steps are complete, you can delete the connector configuration
file, typically named provisioner-*.json.
You can also delete the connector via the Admin UI. Log in as
openidm-admin and select Configure > Connectors.
Find the target connector, select the vertical ellipsis. In the pop-up
menu that appears, press Delete. The Admin UI will automatically make the
specified changes to the noted configuration files.
Chapter 16. Synchronizing Data Between Resources
One of the core IDM services is synchronizing identity data between resources. In this chapter, you will learn about the different types of synchronization, and how to configure the flexible synchronization mechanism.
16.1. Types of Synchronization
Synchronization happens either when IDM receives a change directly, or when IDM discovers a change on an external resource. An external resource can be any system that holds identity data, such as Active Directory, DS, a CSV file, a JDBC database, and so on. IDM connects to external resources by using connectors. For more information, see "Connecting to External Resources".
For direct changes to managed objects, IDM immediately synchronizes those changes to all mappings configured to use those objects as their source. A direct change can originate not only as a write request through the REST interface, but also as an update resulting from reconciliation with another resource.
IDM discovers and synchronizes changes from external resources by using reconciliation and liveSync.
IDM synchronizes changes made to its internal repository with external resources by using implicit synchronization.
- Reconciliation
Reconciliation is the process of ensuring that the objects in two different data stores are synchronized. Traditionally, reconciliation applies mainly to user objects, but IDM can reconcile any objects, such as groups, roles, and devices.
In any reconciliation operation, there is a source system (the system that contains the changes) and a target system (the system to which the changes will be propagated). The source and target system are defined in a mapping. The IDM repository can be either the source or the target in a mapping. You can configure multiple mappings for one IDM instance, depending on the external resources to which you are connecting.
To perform reconciliation, IDM analyzes both the source system and the target system, to discover the differences that it must reconcile. Reconciliation can therefore be a heavyweight process. When working with large data sets, finding all changes can be more work than processing the changes.
Reconciliation is, however, thorough. It recognizes system error conditions and catches changes that might be missed by liveSync. Reconciliation therefore serves as the basis for compliance and reporting functionality.
- LiveSync
LiveSync captures the changes that occur on a remote system, then pushes those changes to IDM. IDM uses the defined mappings to replay the changes where they are required; either in the repository, or on another remote system, or both. Unlike reconciliation, liveSync uses a polling system, and is intended to react quickly to changes as they happen.
To perform this polling, liveSync relies on a change detection mechanism on the external resource to determine which objects have changed. The change detection mechanism is specific to the external resource, and can be a time stamp, a sequence number, a change vector, or any other method of recording changes that have occurred on the system. For example, ForgeRock Directory Services (DS) implements a change log that provides IDM with a list of objects that have changed since the last request. Active Directory implements a change sequence number, and certain databases might have a
lastChangeattribute.- Implicit synchronization
Implicit synchronization automatically pushes changes that are made in the IDM repository to external systems.
Note that implicit synchronization only synchronizes changed objects to the external data sources. To synchronize a complete data set, you must start with a reconciliation operation. The entire changed object is synchronized. If you want to synchronize only the attributes that have changed, you can modify the
onUpdatescript in your mapping to compare attribute values before pushing changes.
IDM uses mappings, configured in your project's
conf/sync.json file, to determine which data to
synchronize, and how that data must be synchronized. You can schedule
reconciliation operations, and the frequency with which IDM polls
for liveSync changes, as described in "Scheduling Tasks and Events".
IDM logs reconciliation and synchronization operations in the audit logs by default. For information about querying the reconciliation and synchronization logs, see "Querying Audit Logs Over REST".
16.2. Defining Your Data Mapping Model
In general, identity management software implements one of the following data models:
A meta-directory data model, where all data are mirrored in a central repository.
The meta-directory model offers fast access at the risk of getting outdated data.
A virtual data model, where only a minimum set of attributes are stored centrally, and most are loaded on demand from the external resources in which they are stored.
The virtual model guarantees fresh data, but pays for that guarantee in terms of performance.
IDM leaves the data model choice up to you. You determine the right trade offs for a particular deployment. IDM does not hard code any particular schema or set of attributes stored in the repository. Instead, you define how external system objects map onto managed objects, and IDM dynamically updates the repository to store the managed object attributes that you configure.
You can, for example, choose to follow the data model defined in the Simple Cloud Identity Management (SCIM) specification. The following object represents a SCIM user:
{
"userName": "james1",
"familyName": "Berg",
"givenName": "James",
"email": [
"james1@example.com"
],
"description": "Created by OpenIDM REST.",
"password": "asdfkj23",
"displayName": "James Berg",
"phoneNumber": "12345",
"employeeNumber": "12345",
"userType": "Contractor",
"title": "Vice President",
"active": true
}Note
Avoid using the dash character ( - ) in property names,
like last-name, as dashes in names make JavaScript syntax
more complex. If you cannot avoid the dash, then write
source['last-name'] instead of
source.last-name in your JavaScript.
16.3. Configuring Synchronization Between Two Resources
This section describes the high-level steps required to set up synchronization between two resources. A basic synchronization configuration involves the following steps:
Set up the connector configuration.
Connector configurations are defined in
conf/provisioner-*.jsonfiles. One provisioner file must be defined for each external resource to which you are connecting.Map source objects to target objects.
Mappings are defined in your project's
conf/sync.jsonfile. There is only onesync.jsonfile per IDM instance, but multiple mappings can be defined in that file.Mappings are synchronized in the order in which they are specified in the
sync.jsonfile. To change the synchronization order, move the position of the mapping in that file or drag the mapping to a different position in the Admin UI. For information about configuring mappings in the Admin UI, see "Setting Up Mappings in the Admin UI".If you are configuring social identity (see "Configuring Social Identity Providers"), you can also define mappings between the social identity provider and IDM in the
conf/selfservice.propertymap.jsonfile.Configure any scripts that are required to check source and target objects, and to manipulate attributes.
In addition to these configuration elements, IDM stores a
linkstable in its repository. The links table maintains a record of relationships established between source and target objects.
16.3.1. Setting Up the Connector Configuration
Connector configuration files map external resource objects to IDM
objects, and are described in detail in "Connecting to External Resources".
Connector configuration files are stored in the conf/
directory of your project, and are named
provisioner.resource-name.json,
where resource-name reflects the connector
technology and the external resource, for example,
openicf-csv.
You can create and modify connector configurations through the Admin UI or directly in the configuration files, as described in the following sections.
16.3.1.1. Setting up and Modifying Connector Configurations in the Admin UI
The easiest way to set up and modify connector configurations is to use the Admin UI.
To add or modify a connector configuration in the Admin UI:
Log in to the UI (
http://localhost:8080/admin) as an administrative user. The default administrative username and password isopenidm-adminandopenidm-admin.Select Configure > Connectors.
Click on the connector that you want to modify (if there is an existing connector configuration) or click New Connector to set up a new connector configuration.
16.3.1.2. Editing Connector Configuration Files
A number of sample provisioner files are provided in
path/to/openidm/samples/example-configurations/provisioners.
To modify connector configuration files directly, edit one of the sample
provisioner files that corresponds to the resource to which you are
connecting.
The following excerpt of an example LDAP connector configuration shows the
name for the connector and two attributes of an account object type. In the
attribute mapping definitions, the attribute name is mapped from the
nativeName (the attribute name used on the external
resource) to the attribute name that is used in IDM. The
sn attribute in LDAP is mapped to
lastName in IDM. The
homePhone attribute is defined as an array, because it
can have multiple values:
{
"name": "MyLDAP",
"objectTypes": {
"account": {
"lastName": {
"type": "string",
"required": true,
"nativeName": "sn",
"nativeType": "string"
},
"homePhone": {
"type": "array",
"items": {
"type": "string",
"nativeType": "string"
},
"nativeName": "homePhone",
"nativeType": "string"
}
}
}
}For IDM to access external resource objects and attributes, the object and its attributes must match the connector configuration. Note that the connector file only maps external resource objects to IDM objects. To construct attributes and to manipulate their values, you use the synchronization mappings file, described in the following section.
16.3.2. Mapping Source Objects to Target Objects
A synchronization mapping specifies a relationship between objects and their attributes in two data stores. A typical attribute mapping, between objects in an external LDAP directory and an internal Managed User data store, is:
"source": "lastName", "target": "sn"
In this case, the lastName source attribute is mapped
to the sn (surname) attribute on the target.
The core synchronization configuration is defined in your project's
synchronization mappings file (conf/sync.json). The
mappings file contains one or more mappings for every resource that must be
synchronized.
Mappings are always defined from a source resource to a target resource. To configure bidirectional synchronization, you must define two mappings. For example, to configure bidirectional synchronization between an LDAP server and a local repository, you would define the following two mappings:
LDAP Server > Local Repository
Local Repository > LDAP Server
With bidirectional synchronization, IDM includes a
links property that enables you to reuse the links
established between objects, for both mappings. For more information, see
"Reusing Links Between Mappings".
You can update a mapping while the server is running. To avoid inconsistencies between repositories, do not update a mapping while a reconciliation is in progress for that mapping.
16.3.2.1. Specifying the Resource Mapping
Objects in external resources are specified in a mapping as
system/name/object-type,
where name is the name used in the connector
configuration file, and object-type is the
object defined in the connector configuration file list of object types.
Objects in the repository are specified in the mapping as
managed/object-type, where
object-type is defined in your project's
managed objects configuration file (conf/managed.json).
External resources, and IDM managed objects, can be the
source or the target in a
mapping. By convention, the mapping name is a string of the form
source_target,
as shown in the following example:
{
"mappings": [
{
"name": "systemLdapAccounts_managedUser",
"source": "system/ldap/account",
"target": "managed/user",
"properties": [
{
"source": "lastName",
"target": "sn"
},
{
"source": "telephoneNumber",
"target": "telephoneNumber"
},
{
"target": "phoneExtension",
"default": "0047"
},
{
"source": "email",
"target": "mail",
"comment": "Set mail if non-empty.",
"condition": {
"type": "text/javascript",
"source": "(object.email != null)"
}
},
{
"source": "",
"target": "displayName",
"transform": {
"type": "text/javascript",
"source": "source.lastName +', ' + source.firstName;"
}
},
{
"source" : "uid",
"target" : "userName",
"condition" : "/linkQualifier eq \"user\""
}
},
]
}
]
}
In this example, the name of the source is
the external resource (ldap), and the target is
IDM's user repository, specifically managed/user.
The properties defined in the mapping reflect attribute
names that are defined in the IDM configuration. For example,
the source attribute uid is defined in the
ldap connector configuration file, rather than on the
external resource itself.
Note
You can configure mappings between social identity providers and
IDM properties, based on the
selfservice.propertymap.json file, but these
mappings are not reconciled or synchronized.
16.3.2.1.1. Setting Up Mappings in the Admin UI
The Admin UI is a front end to the configuration files. Changes you make
to mappings in the Admin UI are written to your project's
conf/sync.json file
To set up a new synchronization mapping in the Admin UI:
Select Configure > Mappings.
Click New Mapping, then select a source and target resource from the configured resources at the bottom of the window.
You can filter these resources to display only connector configurations or managed objects.
Select Add property on the Attributes Grid to map a target property to its corresponding source property.
The Property list shows all configured properties on the target resource. If the target resource is specified in a connector configuration, the Property list shows all properties configured for this connector. If the target resource is a managed object, the Property list shows the list of properties (defined in
managed.jsonfor that object).Tip
Select Add Missing Required Properties to add all the properties that are configured as required on the target resource. You can then map these required properties individually.
Select Quick Mapping to show all source and target properties simultaneously. Drag a source property onto its corresponding target property, or the inverse.
Select Save to complete the quick mapping.
To test your mapping configuration on a single source entry, select the Behaviors tab and scroll down to Single Record Reconciliation. Search for the entry you want to reconcile. The UI displays a preview of the target entry after a reconciliation. You can then select Reconcile Selected Record to actually perform the reconciliation on that one source entry.
16.3.2.2. Transforming Attributes in a Mapping
Use a mapping to define attribute transformations during synchronization.
In the following sample mapping excerpt, the value of the
displayName attribute on the target is set using a
combination of the lastName and
firstName attribute values from the source:
{
"source": "",
"target": "displayName",
"transform": {
"type": "text/javascript",
"source": "source.lastName +', ' + source.firstName;"
}
},
For transformations, the source property is optional.
However, a source object is only available when you specify the
source property. Therefore, in order to use
source.lastName and source.firstName
to calculate the displayName, the example specifies
"source" : "".
If you set "source" : "" (not specifying an attribute),
the entire object is regarded as the source, and you must include the
attribute name in the transformation script. For example, to transform the
source username to lower case, your script would be
source.mail.toLowerCase();. If you do specify a source
attribute (for example "source" : "mail"), just that
attribute is regarded as the source. In this case, the transformation
script would be source.toLowerCase();.
To set up a transformation script in the Admin UI:
Select Configure > Mappings, and select the Mapping.
Select the line with the target attribute whose value you want to set.
On the Transformation Script tab, select
JavascriptorGroovy, and enter the transformation as anInline Scriptor specify the path to the file containing your transformation script.
When you use the UI to map a property whose value is encrypted, you are
prompted to set up a transformation script to decrypt the value when that
property is synchronized. The resulting mapping in
sync.json looks similar to the following, which shows
the transformation of a user's password property:
{
"target" : "userPassword",
"source" : "password",
"transform" : {
"type" : "text/javascript",
"globals" : { },
"source" : "openidm.decrypt(source);"
},
"condition" : {
"type" : "text/javascript",
"globals" : { },
"source" : "object.password != null"
}
}16.3.2.3. Using Scriptable Conditions in a Mapping
By default, IDM synchronizes all attributes in a mapping. To facilitate more complex relationships between source and target objects, you can define conditions for which IDM maps certain attributes. You can define two types of mapping conditions:
Scriptable conditions, in which an attribute is mapped only if the defined script evaluates to
trueCondition filters, a declarative filter that sets the conditions under which the attribute is mapped. Condition filters can include a link qualifier, that identifies the type of relationship between the source object and multiple target objects. For more information, see "Mapping a Single Source Object to Multiple Target Objects".
Examples of condition filters include:
"condition": "/object/country eq 'France'"- only map the attribute if the object'scountryattribute equalsFrance."condition": "/object/password pr"- only map the attribute if the object'spasswordattribute is present."/linkQualifier eq 'admin'"- only map the attribute if the link between this source and target object is of typeadmin.
To set up mapping conditions in the Admin UI, select Configure > Mappings. Click the mapping for which you want to configure conditions. On the Properties tab, click on the attribute that you want to map, then select the Conditional Updates tab.
Configure the filtered condition on the Condition Filter
tab, or a scriptable condition on the Script tab.
Scriptable conditions create mapping logic, based on the result of the
condition script. If the script does not return true,
IDM does not manipulate the target attribute during a
synchronization operation.
In the following excerpt, the value of the target mail
attribute is set to the value of the source email
attribute only if the source attribute is not empty:
{
"target": "mail",
"comment": "Set mail if non-empty.",
"source": "email",
"condition": {
"type": "text/javascript",
"source": "(object.email != null)"
}
... Tip
You can add comments to JSON files. While this example includes a
property named comment, you can use any unique
property name, as long as it is not used elsewhere in the server.
IDM ignores unknown property names in JSON configuration
files.
16.3.2.4. Creating Default Attributes in a Mapping
You can use a mapping to create attributes on the
target resource. In the preceding example, the mapping creates a
phoneExtension attribute with a default value of
0047 on the target object.
The default property specifies a value to assign to the
attribute on the target object. Before IDM determines the value
of the target attribute, it first evaluates any applicable conditions,
followed by any transformation scripts. If the source
property and the transform script yield a null value, it
then applies the default value, create and update actions. The default
value overrides the target value, if one exists.
To set up attributes with default values in the Admin UI:
Select Configure > Mappings, and click on the Mapping you want to edit.
Click on the Target Property that you want to create (
phoneExtensionin the previous example), select the Default Values tab, and enter a default value for that property mapping.
16.3.2.5. Mapping a Single Source Object to Multiple Target Objects
In certain cases, you might have a single object in a resource that maps to
more than one object in another resource. For example, assume that managed
user, bjensen, has two distinct accounts in an LDAP directory: an
employee account (under
uid=bjensen,ou=employees,dc=example,dc=com) and a
customer account (under
uid=bjensen,ou=customers,dc=example,dc=com). You want to
map both of these LDAP accounts to the same managed user account.
IDM uses link qualifiers to manage this one-to-many scenario. To map a single source object to multiple target objects, you indicate how the source object should be linked to the target object by defining link qualifiers. A link qualifier is essentially a label that identifies the type of link (or relationship) between each object.
In the previous example, you would define two link qualifiers that enable you to link both of bjensen's LDAP accounts to her managed user object, as shown in the following diagram:

Note from this diagram that the link qualifier is a property of the link between the source and target object, and not a property of the source or target object itself.
Link qualifiers are defined as part of the mapping (in your project's
conf/sync.json file). Each link qualifier must be
unique within the mapping. If no link qualifier is specified (when only one
possible matching target object exists), IDM uses a default link
qualifier with the value default.
Link qualifiers can be defined as a static list, or dynamically, using a
script. The following excerpt from a sample mapping shows the two static
link qualifiers, employee and customer,
described in the previous example:
{
"mappings": [
{
"name": "managedUser_systemLdapAccounts",
"source": "managed/user",
"target": "system/MyLDAP/account",
"linkQualifiers" : [ "employee", "customer" ],
...The list of static link qualifiers is evaluated for every source record. That is, every reconciliation processes all synchronization operations, for each link qualifier, in turn.
A dynamic link qualifier script returns a list of link qualifiers applicable for each source record. For example, suppose you have two types of managed users - employees and contractors. For employees, a single managed user (source) account can correlate with three different LDAP (target) accounts - employee, customer, and manager. For contractors, a single managed user account can correlate with only two separate LDAP accounts - contractor, and customer. The possible linking situations for this scenario are shown in the following diagram:
In this scenario, you could write a script to generate a dynamic list of
link qualifiers, based on the managed user type. For employees, the script
would return [employee, customer, manager] in its list of
possible link qualifiers. For contractors, the script would return
[contractor, customer] in its list of possible link
qualifiers. A reconciliation operation would then only process the list of
link qualifiers applicable to each source object.
If your source resource includes a large number of records, you should use a dynamic link qualifier script instead of a static list of link qualifiers. Generating the list of applicable link qualifiers dynamically avoids unnecessary additional processing for those qualifiers that will never apply to specific source records. Synchronization performance is therefore improved for large source data sets.
You can include a dynamic link qualifier script inline (using the
source property), or by referencing a JavaScript or
Groovy script file (using the file property). The
following link qualifier script sets up the dynamic link qualifier lists
described in the previous example.
Note
The source property value has been formatted into
multiple lines to be more clear to readers. If you use this content, it
needs to be formatted as a single line.
{
"mappings": [
{
"name": "managedUser_systemLdapAccounts",
"source": "managed/user",
"target": "system/MyLDAP/account",
"linkQualifiers" : {
"type" : "text/javascript",
"globals" : { },
"source" : "if (returnAll) {
['contractor', 'employee', 'customer', 'manager']
} else {
if(object.type === 'employee') {
['employee', 'customer', 'manager']
} else {
['contractor', 'customer']
}
}"
}
...
To reference an external link qualifier script, provide a link to the file
in the file property:
{
"mappings": [
{
"name": "managedUser_systemLdapAccounts",
"source": "managed/user",
"target": "system/MyLDAP/account",
"linkQualifiers" : {
"type" : "text/javascript",
"file" : "script/linkQualifiers.js"
}
...
Dynamic link qualifier scripts must return all valid link qualifiers when
the returnAll global variable is true. The
returnAll variable is used during the target
reconciliation phase to check whether there are any target records that are
unassigned, for each known link qualifier.
If you configure dynamic link qualifiers through the UI, the complete list
of dynamic link qualifiers is displayed in the Generated Link Qualifiers
item below the script. This list represents the values returned by the
script when the returnAll variable is passed as
true. For a list of the variables available to a dynamic
link qualifier script, see "Script Triggers Defined in sync.json".
On their own, link qualifiers have no functionality. However, they can be referenced by various aspects of reconciliation to manage the situations where a single source object maps to multiple target objects. The following examples show how link qualifiers can be used in reconciliation operations:
Use link qualifiers during object creation, to create multiple target objects per source object.
The following excerpt of a sample mapping defines a transformation script that generates the value of the
dnattribute on an LDAP system. If the link qualifier isemployee, the value of the targetdnis set to"uid=userName,ou=employees,dc=example,dc=com". If the link qualifier iscustomer, the value of the targetdnis set to"uid=userName,ou=customers,dc=example,dc=com". The reconciliation operation iterates through the link qualifiers for each source record. In this case, two LDAP objects, with differentdns would created for each managed user object.{ "target" : "dn", "transform" : { "type" : "text/javascript", "globals" : { }, "source" : "if (linkQualifier === 'employee') { 'uid=' + source.userName + ',ou=employees,dc=example,dc=com'; } else if (linkQualifier === 'customer') { 'uid=' + source.userName + ',ou=customers,dc=example,dc=com'; }" }, "source" : "" }Use link qualifiers in conjunction with a correlation query that assigns a link qualifier based on the values of an existing target object.
During source synchronization, IDM queries the target system for every source record and link qualifier, to check if there are any matching target records. If a match is found, the sourceId, targetId, and linkQualifier are all saved as the link.
The following excerpt of a sample mapping shows the two link qualifiers described previously (
employeeandcustomer). The correlation query first searches the target system for theemployeelink qualifier. If a target object matches the query, based on the value of itsdnattribute, IDM creates a link between the source object and that target object and assigns theemployeelink qualifier to that link. This process is repeated for all source records. Then, the correlation query searches the target system for thecustomerlink qualifier. If a target object matches that query, IDM creates a link between the source object and that target object and assigns thecustomerlink qualifier to that link."linkQualifiers" : ["employee", "customer"], "correlationQuery" : [ { "linkQualifier" : "employee", "type" : "text/javascript", "source" : "var query = {'_queryFilter': 'dn co \"' + uid=source.userName + 'ou=employees\"'}; query;" }, { "linkQualifier" : "customer", "type" : "text/javascript", "source" : "var query = {'_queryFilter': 'dn co \"' + uid=source.userName + 'ou=customers\"'}; query;" } ] ...For more information about correlation queries, see "Correlating Source Objects With Existing Target Objects".
Use link qualifiers during policy validation to apply different policies based on the link type.
The following excerpt of a sample
sync.jsonfile shows two link qualifiers,userandtest. Depending on the link qualifier, different actions are taken when the target record is ABSENT:{ "mappings" : [ { "name" : "systemLdapAccounts_managedUser", "source" : "system/ldap/account", "target" : "managed/user", "linkQualifiers" : [ "user", "test" ], "properties" : [ ... "policies" : [ { "situation" : "CONFIRMED", "action" : "IGNORE" }, { "situation" : "FOUND", "action" : "UPDATE } { "condition" : "/linkQualifier eq \"user\"", "situation" : "ABSENT", "action" : "CREATE", "postAction" : { "type" : "text/javascript", "source" : "java.lang.System.out.println('Created user: \');" } }, { "condition" : "/linkQualifier eq \"test\"", "situation" : "ABSENT", "action" : "IGNORE", "postAction" : { "type" : "text/javascript", "source" : "java.lang.System.out.println('Ignored user: ');" } }, ...With this sample mapping, the synchronization operation creates an object in the target system only if the potential match is assigned a
userlink qualifier. If the match is assigned atestqualifier, no target object is created. In this way, the process avoids creating duplicate test-related accounts in the target system.
Tip
To set up link qualifiers in the Admin UI select Configure > Mappings. Select a mapping, and click Properties > Link Qualifiers.
For an example that uses link qualifiers in conjunction with roles, see "Linking Multiple Accounts to a Single Identity" in the Samples Guide.
16.3.2.6. Correlating Source Objects With Existing Target Objects
When IDM creates an object on a target system during synchronization, it also creates a link between the source and target object. IDM then uses that link to determine the object's synchronization situation during later synchronization operations. For a list of synchronization situations, see "How Synchronization Situations Are Assessed".
With every synchronization operation, IDM can correlate existing source and target objects. Correlation matches source and target objects, based on the results of a query or script, and creates links between matched objects.
Correlation queries and correlation scripts are defined in your project's
mapping (conf/sync.json) file. Each query or script is
specific to the mapping for which it is configured. You can also configure
correlation by using the Admin UI. Select Configure > Mappings, and click
on the mapping for which you want to correlate. On the Association tab,
expand Association Rules, and select Correlation Queries or Correlation
Script from the list.
The following sections describe how to write correlation queries and scripts.
16.3.2.6.1. Writing Correlation Queries
IDM processes a correlation query by constructing a query map. The content of the query is generated dynamically, using values from the source object. For each source object, a new query is sent to the target system, using (possibly transformed) values from the source object for its execution.
Queries are run against target resources, either managed or system objects, depending on the mapping. Correlation queries on system objects access the connector, which executes the query on the external resource.
Correlation queries can be expressed using a query filter
(_queryFilter), a predefined query
(_queryId), or a native query expression
(_queryExpression). For more information on these query
types, see "Defining and Calling Queries". The synchronization process executes
the correlation query to search through the target system for objects that
match the current source object.
The preferred syntax for a correlation query is a filtered query, using the
_queryFilter keyword. Filtered queries should work in the
same way on any backend, whereas other query types are generally specific to
the backend. Predefined queries (using _queryId) and
native queries (using _queryExpression) can also be
used for correlation queries on managed resources. Note that
system resources do not support native queries or
predefined queries other than query-all-ids (which serves
no purpose in a correlation query).
To configure a correlation query, define a script whose source returns a
query that uses the _queryFilter,
_queryId, or _queryExpression keyword.
For example:
For a
_queryId, the value is the named query. Named parameters in the query map are expected by that query.{'_queryId' : 'for-userName', 'uid' : source.name}For a
_queryFilter, the value is the abstract filter string:{ "_queryFilter" : "uid eq \"" + source.userName + "\"" }For a
_queryExpression, the value is the system-specific query expression, such as raw SQL.{'_queryExpression': 'select * from managed_user where givenName = \"' + source.firstname + '\"' }Caution
Using a query expression in this way is not recommended as it exposes your system to SQL injection exploits.
Using Filtered Queries to Correlate Objects
For filtered queries, the script that is defined or referenced in the
correlationQuery property must return an object with the
following elements:
The element that is being compared on the target object, for example,
uid.The element on the target object is not necessarily a single attribute. Your query filter can be simple or complex; valid query filters range from a single operator to an entire boolean expression tree.
If the target object is a system object, this attribute must be referred to by its IDM name rather than its OpenICF
nativeName. For example, given the following provisioner configuration excerpt, the attribute to use in the correlation query would beuidand not__NAME__:"uid" : { "type" : "string", "nativeName" : "__NAME__", "required" : true, "nativeType" : "string" } ...The value to search for in the query.
This value is generally based on one or more values from the source object. However, it does not have to match the value of a single source object property. You can define how your script uses the values from the source object to find a matching record in the target system.
You might use a transformation of a source object property, such as
toUpperCase(). You can concatenate that output with other strings or properties. You can also use this value to call an external REST endpoint, and redirect the response to the final "value" portion of the query.
The following correlation query matches source and target objects if the
value of the uid attribute on the target is the same as
the userName attribute on the source:
"correlationQuery" : {
"type" : "text/javascript",
"source" : "var qry = {'_queryFilter': 'uid eq \"' + source.userName + '\"'}; qry"
}, The query can return zero or more objects. The situation that IDM assigns to the source object depends on the number of target objects that are returned, and on the presence of any link qualifiers in the query. For information about synchronization situations, see "How Synchronization Situations Are Assessed". For information about link qualifiers, see "Mapping a Single Source Object to Multiple Target Objects".
Using Predefined Queries to Correlate Objects
For correlation queries on managed objects, you can
use a query that has been predefined in the database table configuration
file for the repository, either conf/repo.jdbc.json or
conf/repo.ds.json. You reference the query ID in
your project's conf/sync.json file.
The following example shows a query defined in the DS
repository configuration (conf/repo.ds.json) that
can be used as the basis for a correlation query:
"for-userName": {
"_queryFilter": "/userName eq \"${uid}\""
},
You would call this query in the mapping (sync.json) file
as follows:
{
"correlationQuery": {
"type": "text/javascript",
"source":
"var qry = {'_queryId' : 'for-userName', 'uid' : source.name}; qry;"
}
}
In this correlation query, the _queryId property
value (for-userName) matches the name of the query
specified in conf/repo.ds.json. The
source.name value replaces ${uid} in
the query.
Using the Expression Builder to Create Correlation Queries
The expression builder is a declarative correlation mechanism that makes it easier to configure correlation queries.
The easiest way to use the expression builder to create a correlation query is through the Admin UI:
Select Configure > Mappings and select the mapping for which you want to configure a correlation query.
On the Association tab, expand the Association Rules item and select Correlation Queries.
Click Add Correlation query.
In the Correlation Query window, select a link qualifier.
If you do not need to correlate multiple potential target objects per source object, select the
defaultlink qualifier. For more information about linking to multiple target objects, see "Mapping a Single Source Object to Multiple Target Objects".Select Expression Builder, and add or remove the fields whose values in the source and target must match.
The following image shows how you can use the expression builder to build a correlation query for a mapping from
managed/usertosystem/ldap/accountsobjects. The query will create a match between the source (managed) object and the target (LDAP) object if the value of thegivenNameor thetelephoneNumberof those objects is the same.
Click Submit to exit the Correlation Query pop-up then click Save.

The correlation query created in the previous steps displays as follows in
the mapping configuration (sync.json):
"correlationQuery" : [
{
"linkQualifier" : "default",
"expressionTree" : {
"any" : [
"givenName",
"telephoneNumber"
]
},
"mapping" : "managedUser_systemLdapAccounts",
"type" : "text/javascript",
"file" : "ui/correlateTreeToQueryFilter.js"
}
] 16.3.2.6.2. Writing Correlation Scripts
If you need a more powerful correlation mechanism than a simple query can provide, you can write a correlation script with additional logic. Correlation scripts are generally more complex than correlation queries and impose no restrictions on the methods used to find matching objects. A correlation script must execute a query and return the result of that query.
The result of a correlation script is a list of maps, each of which contains
a candidate _id value. If no match is found, the script
returns a zero-length list. If exactly one match is found, the script
returns a single-element list. If there are multiple ambiguous matches, the
script returns a list with multiple elements. There is no assumption that
the matching target record or records can be found by a simple query on the
target system. All of the work necessary to find matching records is left to
the script.
In general, a correlation query should meet the requirements of most deployments. Correlation scripts can be useful, however, if your query needs extra processing, such as fuzzy-logic matching or out-of-band verification with a third-party service over REST.
The following example shows a correlation script that uses link qualifiers.
The script returns resultData.result - a list of maps,
each of which has an _id entry. These entries will be the
values that are used for correlation.
(function () {
var query, resultData;
switch (linkQualifier) {
case "test":
logger.info("linkQualifier = test");
query = {'_queryFilter': 'uid eq \"' + source.userName + '-test\"'};
break;
case "user":
logger.info("linkQualifier = user");
query = {'_queryFilter': 'uid eq \"' + source.userName + '\"'};
break;
case "default":
logger.info("linkQualifier = default");
query = {'_queryFilter': 'uid eq \"' + source.userName + '\"'};
break;
default:
logger.info("No linkQualifier provided.");
break;
}
var resultData = openidm.query("system/ldap/account", query);
logger.info("found " + resultData.result.length + " results for link qualifier " + linkQualifier)
for (i=0;i<resultData.result.length;i++) {
logger.info("found target: " + resultData.result[i]._id);
}
return resultData.result;
} ());To configure a correlation script in the Admin UI, follow these steps:
Select Configure > Mappings and select the mapping for which you want to configure the correlation script.
On the Association tab, expand the Association Rules item and select Correlation Script from the list.
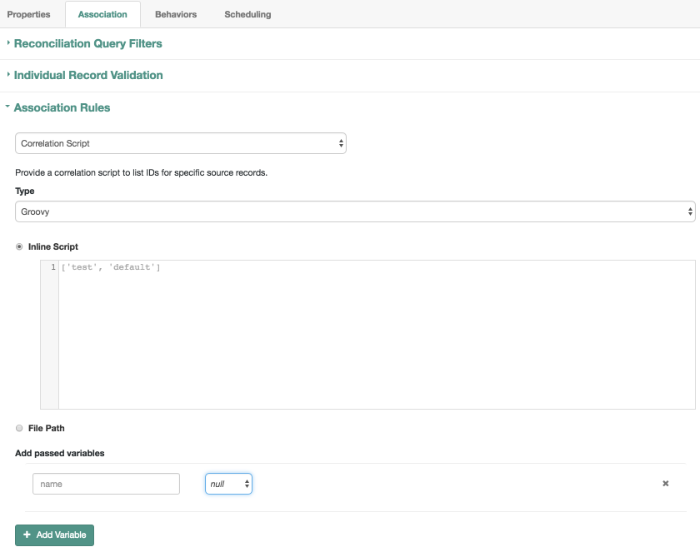
Select a script type (either JavaScript or Groovy) and either enter the script source in the Inline Script box, or specify the path to a file that contains the script.
To create a correlation script, use the details from the source object to find the matching record in the target system. If you are using link qualifiers to match a single source record to multiple target records, you must also use the value of the
linkQualifiervariable within your correlation script to find the target ID that applies for that qualifier.Click Save to save the script as part of the mapping.

16.3.3. Filtering Synchronized Objects
By default, IDM synchronizes all objects that match those
defined in the connector configuration for the resource. Many connectors
allow you to limit the scope of objects that the connector accesses. For
example, the LDAP connector allows you to specify base DNs and LDAP
filters so that you do not need to access every entry in the directory.
You can also filter the source or target objects that are included in a
synchronization operation. To apply these filters, use the
validSource, validTarget, or
sourceCondition properties in your mapping:
validSourceA script that determines if a source object is valid to be mapped. The script yields a boolean value:
trueindicates that the source object is valid;falsecan be used to defer mapping until some condition is met. In the root scope, the source object is provided in the"source"property. If the script is not specified, then all source objects are considered valid:{ "validSource": { "type": "text/javascript", "source": "source.ldapPassword != null" } }validTargetA script used during the second phase of reconciliation that determines if a target object is valid to be mapped. The script yields a boolean value:
trueindicates that the target object is valid;falseindicates that the target object should not be included in reconciliation. In the root scope, the source object is provided in the"target"property. If the script is not specified, then all target objects are considered valid for mapping:{ "validTarget": { "type": "text/javascript", "source": "target.employeeType == 'internal'" } }sourceConditionThe
sourceConditionelement defines an additional filter that must be met for a source object's inclusion in a mapping.This condition works like a
validSourcescript. Its value can be either aqueryFilterstring, or a script configuration.sourceConditionis used principally to specify that a mapping applies only to a particular role or entitlement.The following
sourceConditionrestricts synchronization to those user objects whose account status isactive:{ "mappings": [ { "name": "managedUser_systemLdapAccounts", "source": "managed/user", "sourceCondition": "/source/accountStatus eq \"active\"", ... } ] }
During synchronization, your scripts and filters have access to a
source object and a target object.
Examples already shown in this section use source.attributeName to retrieve attributes from the
source objects. Your scripts can also write to target attributes using
target.attributeName syntax:
{
"onUpdate": {
"type": "text/javascript",
"source": "if (source.email != null) {target.mail = source.email;}"
}
}
In addition, the sourceCondition filter has the
linkQualifier variable in its scope.
For more information about scripting, see "Scripting Reference".
16.3.4. Configuring Synchronization Filters With User Preferences
For all regular users (other than openidm-admin), you
can set up preferences, such as those related to marketing and news updates.
You can then use those preferences as a filter when reconciling users to a
target repository.
IDM includes default user preferences defined for the managed
user object, available in the Admin UI and configured in the
managed.json file.
16.3.4.1. Configuring End User Preferences
In the default project, common marketing preference options are included
for the managed user object. To find these preferences in the Admin UI,
select Configure > Managed Objects and select the User managed object.
Under the Preferences tab, you'll see keys and descriptions. You can also
see these preferences in the managed.json file,
illustrated here:
"preferences" : {
"title" : "Preferences",
"viewable" : true,
"searchable" : false,
"userEditable" : true,
"type" : "object",
"properties" : {
"updates" : {
"description" : "Send me news and updates",
"type" : "boolean"
},
"marketing" : {
"description" : "Send me special offers and services",
"type" : "boolean"
}
},
"order" : [
"updates",
"marketing"
],
"required" : [ ]
},16.3.4.2. Reviewing Preferences as an End User
When regular users log into the Self-Service UI, they'll see the preferences described in "Configuring End User Preferences". To review those preferences, log into the end user UI and select Profile > Preferences.
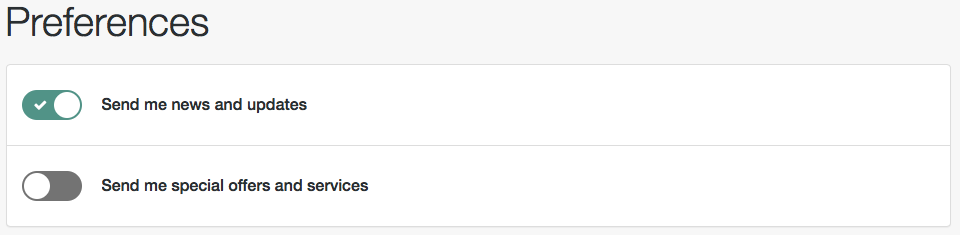
End users who accept these preferences get the following entries in their managed user data:
"preferences" : {
"updates" : true,
"marketing" : true
},You can configure reconciliation to validate users who have chosen to accept the noted preferences.
16.3.4.3. User Preferences and Reconciliation
You can configure user preferences as a filter for reconciliation. For example, if some of your users do not want marketing emails, you can filter those users out of any reconciliation operation.
To configure user preferences as a filter, log into the Admin UI.
Select Configure > Mappings. Choose a mapping.
Under the Association tab, select Individual Record Validation.
Based on the options in the Valid Source drop down text box, you can select
Validate based on user preferences. Users who have selected a preference such asSend me special offerswill then be reconciled from the source to the target repository.Note
What IDM does during this reconciliation depends on the policy associated with the
UNQUALIFIEDsituation for avalidSource. The default action is to delete the target object (user). For more information, see "How Synchronization Situations Are Assessed".
Alternatively, you can edit the sync.json file
directly. The following code block includes
preferences as conditions to define a
validSource on an individual record validation.
IDM applies these conditions at the next reconciliation.
"validSource" : {
"type" : "text/javascript",
"globals" : {
"preferences" : [
"updates",
"marketing"
]
},
"file" : "ui/preferenceCheck.js"
},
"validTarget" : {
"type" : "text/javascript",
"globals" : { },
"source" : ""
}16.3.5. Preventing Accidental Deletion of a Target System
If a source resource is empty, the default behavior is to exit without failure and to log a warning similar to the following:
2015-06-05 10:41:18:918 WARN Cannot reconcile from an empty data
source, unless allowEmptySourceSet is true.The reconciliation summary is also logged in the reconciliation audit log.
This behavior prevents reconciliation operations from accidentally deleting everything in a target resource. In the event that a source system is unavailable but erroneously reports its status as up, the absence of source objects should not result in objects being removed on the target resource.
When you do want reconciliations of an empty source
resource to proceed, override the default behavior by setting the
allowEmptySourceSet property to true
in the mapping. For example:
{
"mappings" : [
{
"name" : "systemCsvfileAccounts_managedUser",
"source" : "system/csvfile/account",
"allowEmptySourceSet" : true,
...When an empty source is reconciled, the target is wiped out.
16.3.5.1. Preventing Accidental Deletion in the Admin UI
To change the allowEmptySourceSet option in the Admin UI,
choose Configure > Mappings. Select the desired mapping. In the Advanced
tab, enable or disable the following option:
Allow Reconciliations From an Empty Source
16.4. Constructing and Manipulating Attributes With Scripts
IDM provides a number of script hooks to
construct and manipulate attributes. These scripts can be triggered during
various stages of the synchronization process, and are defined as part of
the mapping, in the sync.json file.
The scripts can be triggered when a managed or system object is created
(onCreate), updated (onUpdate), or
deleted (onDelete). Scripts can also be triggered when a
link is created (onLink) or removed
(onUnlink).
In the default synchronization mapping, changes are always written to target objects, not to source objects. However, you can explicitly include a call to an action that should be taken on the source object within the script.
Note
The onUpdate script is always
called for an UPDATE situation, even if the synchronization process
determines that there is no difference between the source and target
objects, and that the target object will not be updated.
If, subsequent to the onUpdate script running, the
synchronization process determines that the target value to set is the same
as its existing value, the change is prevented from synchronizing to the
target.
The following sample extract of a sync.json file derives
a DN for an LDAP entry when the entry is created in the internal repository:
{
"onCreate": {
"type": "text/javascript",
"source":
"target.dn = 'uid=' + source.uid + ',ou=people,dc=example,dc=com'"
}
}16.5. Advanced Use of Scripts in Mappings
"Constructing and Manipulating Attributes With Scripts" shows how to manipulate attributes with scripts when objects are created and updated. You might want to trigger scripts in response to other synchronization actions. For example, you might not want IDM to delete a managed user directly when an external account record is deleted, but instead unlink the objects and deactivate the user in another resource. (Alternatively, you might delete the object in IDM but nevertheless execute a script.) The following example shows a more advanced mapping configuration that exposes the script hooks available during synchronization.
{
"mappings": [
{
"name": "systemLdapAccount_managedUser",
"source": "system/ldap/account",
"target": "managed/user",
"validSource": {
"type": "text/javascript",
"file": "script/isValid.js"
},
"correlationQuery" : {
"type" : "text/javascript",
"source" : "var map = {'_queryFilter': 'uid eq \"' +
source.userName + '\"'}; map;"
},
"properties": [
{
"source": "uid",
"transform": {
"type": "text/javascript",
"source": "source.toLowerCase()"
},
"target": "userName"
},
{
"source": "",
"transform": {
"type": "text/javascript",
"source": "if (source.myGivenName)
{source.myGivenName;} else {source.givenName;}"
},
"target": "givenName"
},
{
"source": "",
"transform": {
"type": "text/javascript",
"source": "if (source.mySn)
{source.mySn;} else {source.sn;}"
},
"target": "familyName"
},
{
"source": "cn",
"target": "fullname"
},
{
"comment": "Multi-valued in LDAP, single-valued in AD.
Retrieve first non-empty value.",
"source": "title",
"transform": {
"type": "text/javascript",
"file": "script/getFirstNonEmpty.js"
},
"target": "title"
},
{
"condition": {
"type": "text/javascript",
"source": "var clearObj = openidm.decrypt(object);
((clearObj.password != null) &&
(clearObj.ldapPassword != clearObj.password))"
},
"transform": {
"type": "text/javascript",
"source": "source.password"
},
"target": "__PASSWORD__"
}
],
"onCreate": {
"type": "text/javascript",
"source": "target.ldapPassword = null;
target.adPassword = null;
target.password = null;
target.ldapStatus = 'New Account'"
},
"onUpdate": {
"type": "text/javascript",
"source": "target.ldapStatus = 'OLD'"
},
"onUnlink": {
"type": "text/javascript",
"file": "script/triggerAdDisable.js"
},
"policies": [
{
"situation": "CONFIRMED",
"action": "UPDATE"
},
{
"situation": "FOUND",
"action": "UPDATE"
},
{
"situation": "ABSENT",
"action": "CREATE"
},
{
"situation": "AMBIGUOUS",
"action": "EXCEPTION"
},
{
"situation": "MISSING",
"action": "EXCEPTION"
},
{
"situation": "UNQUALIFIED",
"action": "UNLINK"
},
{
"situation": "UNASSIGNED",
"action": "EXCEPTION"
}
]
}
]
}The following list shows the properties that you can use as hooks in mapping configurations to call scripts:
- Triggered by Situation
onCreate, onUpdate, onDelete, onLink, onUnlink
- Object Filter
validSource, validTarget
- Correlating Objects
correlationQuery
- Triggered on Reconciliation
result
- Scripts Inside Properties
condition, transform
Your scripts can get data from any connected system at any time by using the
openidm.read(id) function, where id is
the identifier of the object to read.
The following example reads a managed user object from the repository:
repoUser = openidm.read("managed/user/ddoe");The following example reads an account from an external LDAP resource:
externalAccount = openidm.read("system/ldap/account/uid=ddoe,ou=People,dc=example,dc=com");Important
For illustration purposes, this query targets a DN rather than a UID as it
did in the previous example. The attribute that is used for the
_id is defined in the connector configuration file and,
in this example, is set to "uidAttribute" : "dn".
Although you can use a DN (or any unique attribute) for
the _id, as a best practice use an attribute that is both
unique and immutable, such as the entryUUID.
IDM provides a logger object with
debug(), error(),
info(), trace(), and
warn() functions that you can use to log messages to the
OSGi console and to the log files from scripts defined within your mapping.
Consider the following mapping excerpt:
{
"mappings" : [
{
"name" : "systemCsvfileAccounts_managedUser",
"source" : "system/csvfile/account",
"target" : "managed/user",
"correlationQuery" : {
"type" : "text/javascript",
"source" : "var query = {'_queryId' : 'for-userName', 'uid' : source.name};query;"
},
"onCreate" : {
"type" : "text/javascript",
"source" : "logger.warn('Case onCreate: the source object contains: = {} ', source); source;"
},
"onUpdate" : {
"type" : "text/javascript",
"source" : "logger.warn('Case onUpdate: the source object contains: = {} ', source); source;"
},
"result" : {
"type" : "text/javascript",
"source" : "logger.warn('Case result: the source object contains: = {} ', source); source;"
},
"properties" : [
{
"transform" : {
"type" : "text/javascript",
"source" : "logger.warn('Case no Source: the source object contains: = {} ', source); source;"
},
"target" : "sourceTest1Nosource"
},
{
"source" : "",
"transform" : {
"type" : "text/javascript",
"source" : "logger.warn('Case emptySource: the source object contains: = {} ', source); source;"
},
"target" : "sourceTestEmptySource"
},
{
"source" : "description",
"transform" : {
"type" : "text/javascript",
"source" : "logger.warn('Case sourceDescription: the source object contains: = {} ', source); source"
},
"target" : "sourceTestDescription"
},
...
]
}
]
}
Notice the scripts that are defined for onCreate,
onUpdate and result. These scripts
log a warning message to the console whenever an object is created or
updated, or when a result is returned. The script result includes the full
source object.
Notice too, the scripts that are defined in the properties
section of the mapping. These scripts log a warning message if the property
in the source object is missing or empty. The last script logs a warning
message that includes the description of the source object.
During a reconciliation operation, these scripts would generate output in the OSGi console, similar to the following:
2017-02... WARN Case no Source: the source object contains: = null [9A00348661C6790E7881A7170F747F...]
2017-02... WARN Case emptySource: the source object contains: = {roles=openidm-..., lastname=Jensen...]
2017-02... WARN Case no Source: the source object contains: = null [9A00348661C6790E7881A7170F747F...]
2017-02... WARN Case emptySource: the source object contains: = {roles=openidm..., lastname=Carter,...]
2017-02... WARN Case sourceDescription: the source object contains: = null [EEE2FF4BCE9748927A1832...]
2017-02... WARN Case sourceDescription: the source object contains: = null [EEE2FF4BCE9748927A1832...]
2017-02... WARN Case onCreate: the source object contains: = {roles=openidm-..., lastname=Carter, ...]
2017-02... WARN Case onCreate: the source object contains: = {roles=openidm-..., lastname=Jensen, ...]
2017-02... WARN Case result: the source object contains: = {SOURCE_IGNORED={count=0, ids=[]}, FOUND_AL...]
You can use similar scripts to inject logging into any aspect of a mapping.
You can also call the logger functions from any
configuration file that has scripts hooks. For more information about the
logger functions, see
"Logging Functions".
16.6. Reusing Links Between Mappings
When two mappings synchronize the same objects bidirectionally, use the
links property in one mapping to have IDM use
the same internally managed link for both mappings. If you do not specify a
links property, IDM maintains a separate link
for each mapping.
The following excerpt shows two mappings, one from MyLDAP accounts to
managed users, and another from managed users to MyLDAP accounts. In the
second mapping, the link property indicates that
IDM should reuse the links created in the first mapping, rather
than create new links:
{
"mappings": [
{
"name": "systemMyLDAPAccounts_managedUser",
"source": "system/MyLDAP/account",
"target": "managed/user"
},
{
"name": "managedUser_systemMyLDAPAccounts",
"source": "managed/user",
"target": "system/MyLDAP/account",
"links": "systemMyLDAPAccounts_managedUser"
}
]
}16.7. Managing Reconciliation
Reconciliation is the synchronization of objects between two data stores. You
can trigger, cancel, and monitor reconciliation operations over REST, using
the REST endpoint http://localhost:8080/openidm/recon. You
can also perform most of these actions through the Admin UI.
16.7.1. Triggering a Reconciliation
The following example triggers a reconciliation operation over REST based
on the systemLdapAccounts_managedUser mapping. The
mapping is defined in the file conf/sync.json:
$ curl \ --header "X-OpenIDM-Username: openidm-admin" \ --header "X-OpenIDM-Password: openidm-admin" \ --request POST \ "http://localhost:8080/openidm/recon?_action=recon&mapping=systemLdapAccounts_managedUser"
By default, a reconciliation run ID is returned immediately when the reconciliation operation is initiated. Clients can make subsequent calls to the reconciliation service, using this reconciliation run ID to query its state and to call operations on it. For an example, see "Obtaining the Details of a Reconciliation".
The reconciliation run initiated previously would return something similar to the following:
{"_id":"9f4260b6-553d-492d-aaa5-ae3c63bd90f0-14","state":"ACTIVE"}
To complete the reconciliation operation before the reconciliation run ID is
returned, set the waitForCompletion property to
true when the reconciliation is initiated:
$ curl \ --header "X-OpenIDM-Username: openidm-admin" \ --header "X-OpenIDM-Password: openidm-admin" \ --request POST \ "http://localhost:8080/openidm/recon?_action=recon&mapping=systemLdapAccounts_managedUser&waitForCompletion=true"
16.7.1.1. Triggering a Reconciliation in the Admin UI
You can also trigger this reconciliation through the Admin UI. Select Configure > Mappings. In the mapping of your choice select Reconcile.
If you're reconciling a large number of items, the Admin UI shares the following message with you, possibly with numbers for entries reconciled and total entries.
In progress: reconciling source entries
Note
In the Admin UI, if you select Cancel Reconciliation
before it is complete, you'll have to start the process again.
16.7.2. Canceling a Reconciliation
You can cancel a reconciliation in progress by specifying the reconciliation run ID. The following REST call cancels the reconciliation run initiated in the previous section:
$ curl \ --header "X-OpenIDM-Username: openidm-admin" \ --header "X-OpenIDM-Password: openidm-admin" \ --request POST \ "http://localhost:8080/openidm/recon/0890ad62-4738-4a3f-8b8e-f3c83bbf212e?_action=cancel"
The output for a reconciliation cancellation request is similar to the following:
{
"status":"INITIATED",
"action":"cancel",
"_id":"0890ad62-4738-4a3f-8b8e-f3c83bbf212e"
}If the reconciliation run is waiting for completion before its ID is returned, obtain the reconciliation run ID from the list of active reconciliations, as described in the following section.
16.7.2.1. Canceling a Reconciliation in the Admin UI
To cancel a reconciliation run in progress through the Admin UI, select
Configure > Mappings, click on the mapping whose reconciliation you want to
cancel and click Cancel Reconciliation.
16.7.3. Listing a History of Reconciliations
Display a list of reconciliation processes that have completed, and
those that are in progress, by running a RESTful GET on
"http://localhost:8080/openidm/recon".
The following example displays all reconciliation runs:
$ curl \ --header "X-OpenIDM-Username: openidm-admin" \ --header "X-OpenIDM-Password: openidm-admin" \ --request GET \ "http://localhost:8080/openidm/recon"
The output is similar to the following, with one item for each reconciliation run:
{
"reconciliations": [
{
"ended": "2014-03-06T06:14:11.845Z",
"_id": "4286510e-986a-4521-bfa4-8cd1e039a7f5",
"mapping": "systemLdapAccounts_managedUser",
"state": "SUCCESS",
"stage": "COMPLETED_SUCCESS",
"stageDescription": "reconciliation completed.",
"progress": {
"links": {
"created": 1,
"existing": {
"total": "0",
"processed": 0
}
},
"target": {
"created": 1,
"existing": {
"total": "2",
"processed": 2
}
},
"source": {
"existing": {
"total": "1",
"processed": 1
}
}
},
"situationSummary": {
"UNASSIGNED": 2,
"TARGET_IGNORED": 0,
"SOURCE_IGNORED": 0,
"MISSING": 0,
"FOUND": 0,
"AMBIGUOUS": 0,
"UNQUALIFIED": 0,
"CONFIRMED": 0,
"SOURCE_MISSING": 0,
"ABSENT": 1
},
"started": "2014-03-06T06:14:04.722Z"
},]
}In contrast, the Admin UI displays the results of only the most recent reconciliation. For more information, see "Obtaining the Details of a Reconciliation in the Admin UI".
Each reconciliation run includes the following properties:
_idThe ID of the reconciliation run.
mappingThe name of the mapping, defined in the
conf/sync.jsonfile.stateThe high level state of the reconciliation run. Values can be as follows:
ACTIVEThe reconciliation run is in progress.
CANCELEDThe reconciliation run was successfully canceled.
FAILEDThe reconciliation run was terminated because of failure.
SUCCESSThe reconciliation run completed successfully.
stageThe current stage of the reconciliation run. Values can be as follows:
ACTIVE_INITIALIZEDThe initial stage, when a reconciliation run is first created.
ACTIVE_QUERY_ENTRIESQuerying the source, target and possibly link sets to reconcile.
ACTIVE_RECONCILING_SOURCEReconciling the set of IDs retrieved from the mapping source.
ACTIVE_RECONCILING_TARGETReconciling any remaining entries from the set of IDs retrieved from the mapping target, that were not matched or processed during the source phase.
ACTIVE_LINK_CLEANUPChecking whether any links are now unused and should be cleaned up.
ACTIVE_PROCESSING_RESULTSPost-processing of reconciliation results.
ACTIVE_CANCELINGAttempting to abort a reconciliation run in progress.
COMPLETED_SUCCESSSuccessfully completed processing the reconciliation run.
COMPLETED_CANCELEDCompleted processing because the reconciliation run was aborted.
COMPLETED_FAILEDCompleted processing because of a failure.
stageDescriptionA description of the stages described previously.
progressThe progress object has the following structure (annotated here with comments):
"progress":{ "source":{ // Progress on set of existing entries in the mapping source "existing":{ "processed":1001, "total":"1001" // Total number of entries in source set, if known, "?" otherwise } }, "target":{ // Progress on set of existing entries in the mapping target "existing":{ "processed":1001, "total":"1001" // Total number of entries in target set, if known, "?" otherwise }, "created":0 // New entries that were created }, "links":{ // Progress on set of existing links between source and target "existing":{ "processed":1001, "total":"1001" // Total number of existing links, if known, "?" otherwise }, "created":0 // Denotes new links that were created } },
16.7.4. Obtaining the Details of a Reconciliation
Display the details of a specific reconciliation over REST, by including the reconciliation run ID in the URL. The following call shows the details of the reconciliation run initiated in "Triggering a Reconciliation".
$ curl \
--header "X-OpenIDM-Username: openidm-admin" \
--header "X-OpenIDM-Password: openidm-admin" \
--request GET \
"http://localhost:8080/openidm/recon/0890ad62-4738-4a3f-8b8e-f3c83bbf212e"
{
"ended": "2014-03-06T07:00:32.094Z",
"_id": "7a07c100-4f11-4d7e-bf8e-fa4594f99d58",
"mapping": "systemLdapAccounts_managedUser",
"state": "SUCCESS",
"stage": "COMPLETED_SUCCESS",
"stageDescription": "reconciliation completed.",
"progress": {
"links": {
"created": 0,
"existing": {
"total": "1",
"processed": 1
}
},
"target": {
"created": 0,
"existing": {
"total": "3",
"processed": 3
}
},
"source": {
"existing": {
"total": "1",
"processed": 1
}
}
},
"situationSummary": {
"UNASSIGNED": 2,
"TARGET_IGNORED": 0,
"SOURCE_IGNORED": 0,
"MISSING": 0,
"FOUND": 0,
"AMBIGUOUS": 0,
"UNQUALIFIED": 0,
"CONFIRMED": 1,
"SOURCE_MISSING": 0,
"ABSENT": 0
},
"started": "2014-03-06T07:00:31.907Z"
}16.7.4.1. Obtaining the Details of a Reconciliation in the Admin UI
You can display the details of the most recent reconciliation in the Admin UI. Select the mapping. In the page that appears, you'll see a message similar to:
Completed: Last reconciled July 29, 2016 14:13
When you select this option, the details of the reconciliation appear. Click Reconciliation Results for additional information on the reconciliation run.
If a reconciliation fails, select the Failure Summary tab to obtain
information about the reasons for the failure. Select the Information
icon () for a breakdown of failure reasons per entry. The following
screen shows that reconciliation failed for a number of user accounts
because they were missing the country property:

You can also view reconciliation audit logs in the Admin UI by adding an Audit widget to your dashboard. For more information, see "Viewing Audit Events in the Admin UI". The reconciliation Audit Widget shows the same information that you can obtain over REST, for example:
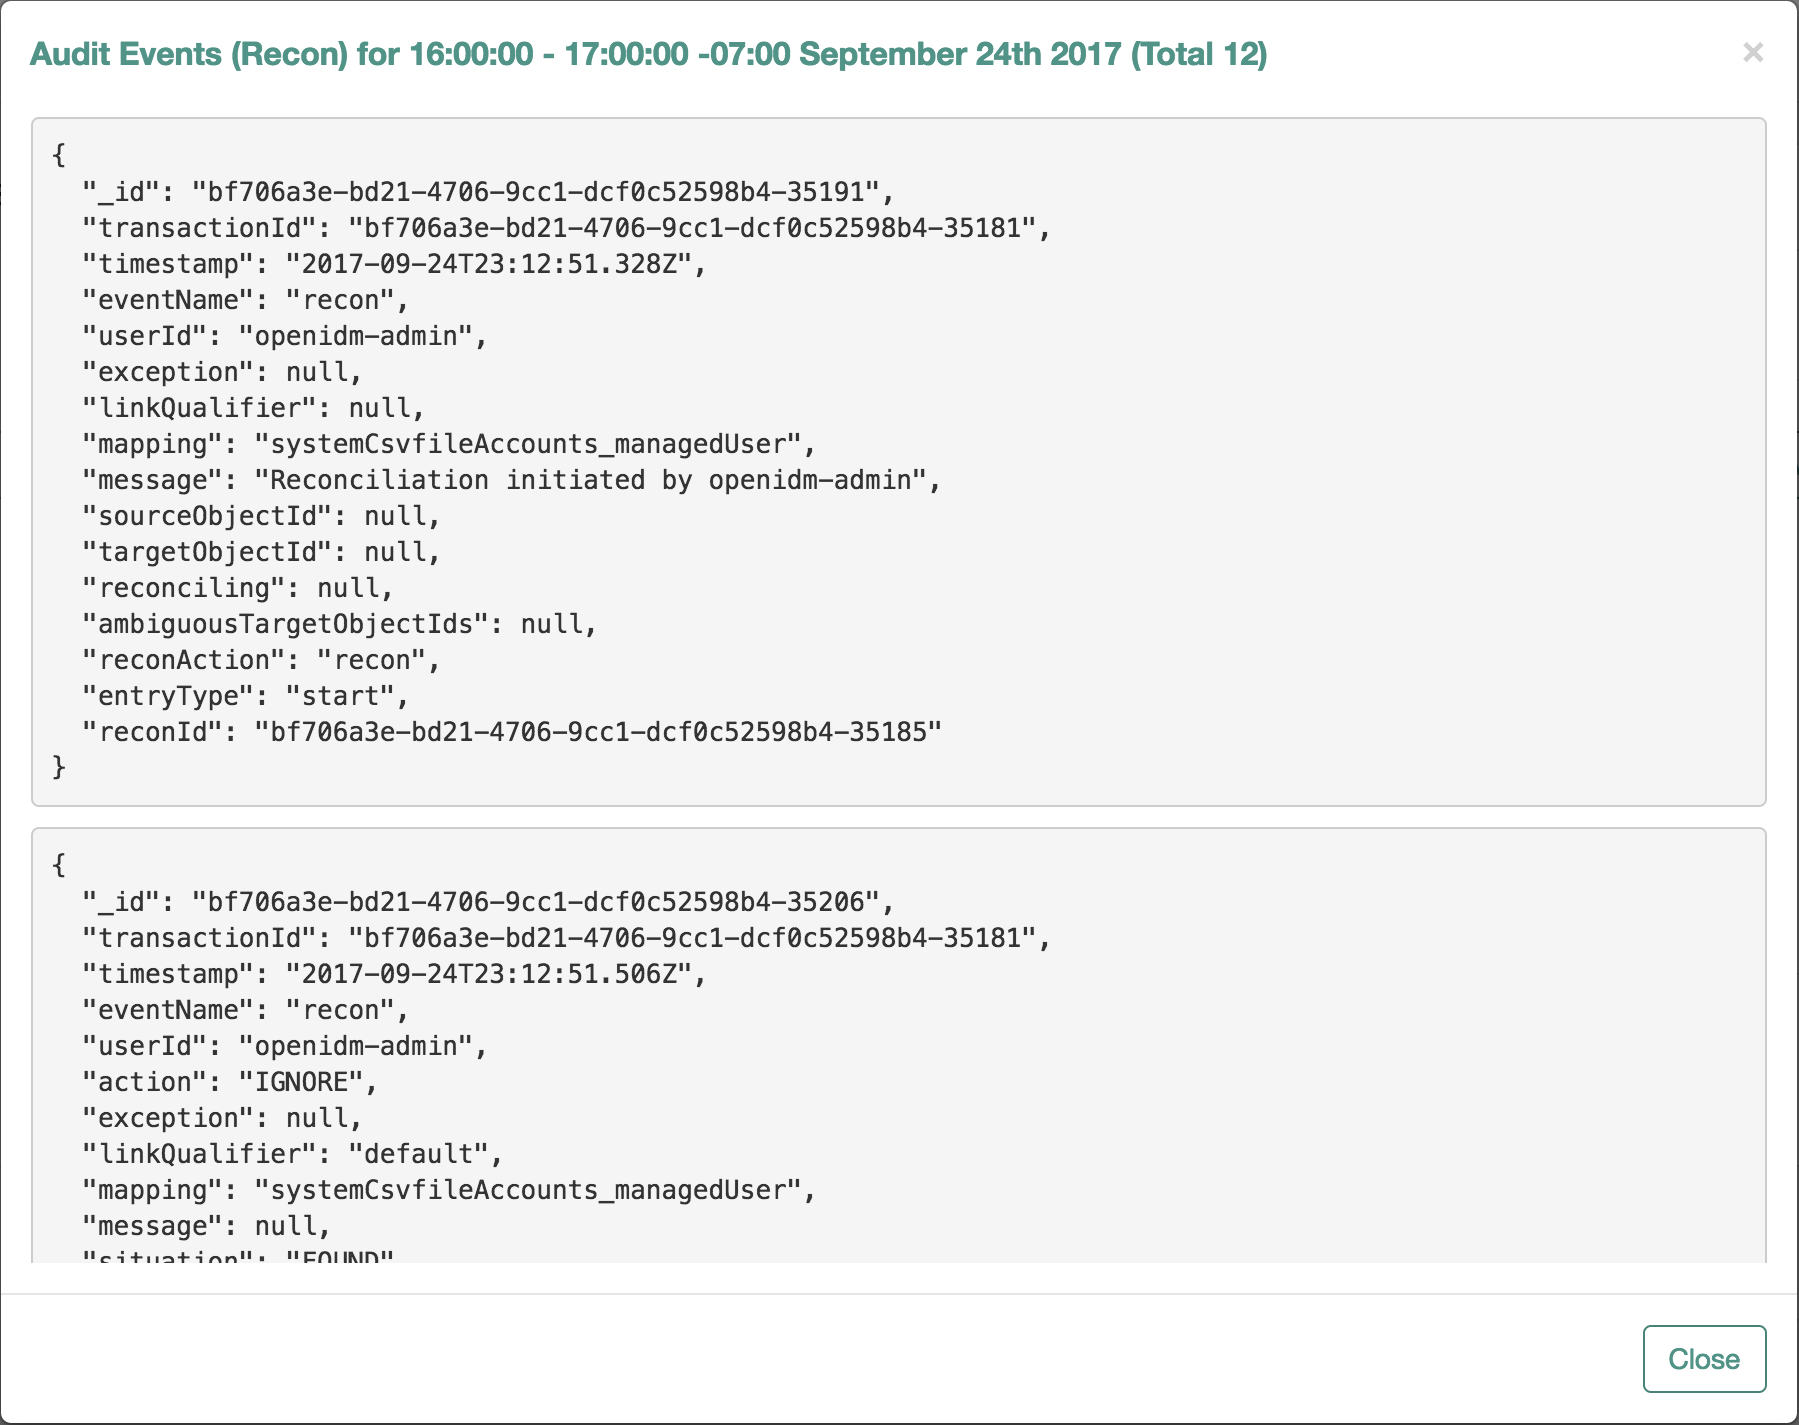
16.7.5. Triggering LiveSync
You can trigger LiveSync over REST or through the Admin UI. But before you do so, you should modify the DS change log.
The DS change log (cn=changelog)
can be read only by cn=directory manager by default.
If you are configuring liveSync with DS, the principal
that is defined in the LDAP connector configuration must have access to
the change log. For information about allowing a regular user to read the
change log, see
To
Allow a User to Read the Change Log in the
Administration Guide for DS.
Note
If you see the following error message, you may have forgotten to set
changelog-read access for a regular user:
Unable to locate the DS replication change log suffix. Please make sure it's enabled, and changelog-read access is granted.
16.7.5.1. Triggering LiveSync Over REST
Because you can trigger liveSync operations over REST (or by using the resource API) you can use an external scheduler to trigger liveSync operations, rather than using the IDM scheduling mechanism.
There are two ways to trigger liveSync over REST:
Use the
_action=liveSyncparameter directly on the resource. This is the recommended method. The following example calls liveSync on the user accounts in an external LDAP system:$ curl \ --header "X-OpenIDM-Username: openidm-admin" \ --header "X-OpenIDM-Password: openidm-admin" \ --request POST \ "http://localhost:8080/openidm/system/ldap/account?_action=liveSync"
Target the
systemendpoint and supply asourceparameter to identify the object that should be synchronized. This method matches the scheduler configuration and can therefore be used to test schedules before they are implemented.The following example calls the same liveSync operation as the previous example:
$ curl \ --header "X-OpenIDM-Username: openidm-admin" \ --header "X-OpenIDM-Password: openidm-admin" \ --request POST \ "http://localhost:8080/openidm/system?_action=liveSync&source=system/ldap/account"
A successful liveSync operation returns the following response:
{
"_rev": "000000001ade755f",
"_id": "SYSTEMLDAPACCOUNT",
"connectorData": {
"nativeType": "integer",
"syncToken": 1
}
}Do not run two identical liveSync operations simultaneously. Rather ensure that the first operation has completed before a second similar operation is launched.
To troubleshoot a liveSync operation that has not succeeded, include an
optional parameter (detailedFailure) to return additional
information. For example:
$ curl \ --header "X-OpenIDM-Username: openidm-admin" \ --header "X-OpenIDM-Password: openidm-admin" \ --request POST \ "http://localhost:8080/openidm/system/ldap/account?_action=liveSync&detailedFailure=true"
Note
The first time liveSync is called, it does not have a synchronization token in the database to establish which changes have already been processed. The default liveSync behavior is to locate the last existing entry in the change log, and to store that entry in the database as the current starting position from which changes should be applied. This behavior prevents liveSync from processing changes that might already have been processed during an initial data load. Subsequent liveSync operations will pick up and process any new changes.
Typically, in setting up liveSync on a new system, you would load the data initially (by using reconciliation, for example) and then enable liveSync, starting from that base point.
16.7.5.2. Triggering LiveSync Through the UI
LiveSync operations are specific to a system object type (such as
system/ldap/account). Apart from scheduling liveSync, as
described in "Configuring LiveSync Through the UI", you can launch a liveSync
operation on demand for a particular system object type as follows:
Select Configure > Connectors > connector-name and select the Object Types tab.
Select the Edit icon () next to the object type that you want to synchronize.
Select the Sync tab and select Sync Now.
The Sync Token field displays the current synchronization token for that object type.
Note
In the case of DS, the change log (cn=changelog)
can be read only by cn=directory manager by default.
If you are configuring liveSync with DS, the principal
that is defined in the LDAP connector configuration must have access to
the change log. For information about allowing a regular user to read the
change log, see
To
Allow a User to Read the Change Log in the
Administration Guide for DS.
If you see the following error message, you may have forgotten to set
changelog-read access for a regular user:
Unable to locate the DS replication change log suffix. Please make sure it's enabled, and changelog-read access is granted.
16.8. Restricting Reconciliation By Using Queries
Every reconciliation operation performs a query on the source and on the
target resource, to determine which records should be reconciled. The default
source and target queries are query-all-ids, which means
that all records in both the source and the target are considered candidates
for that reconciliation operation.
You can restrict reconciliation to specific entries by defining explicit source or target queries in the mapping configuration.
To restrict reconciliation to only those records whose
employeeType on the source resource is
Permanent, you might specify a source query as follows:
"mappings" : [
{
"name" : "managedUser_systemLdapAccounts",
"source" : "managed/user",
"target" : "system/ldap/account",
"sourceQuery" : {
"_queryFilter" : "employeeType eq \"Permanent\""
},
...The format of the query can be any query type that is supported by the resource, and can include additional parameters, if applicable. You can use the following query types.
For queries on managed objects:
_queryIdfor arbitrary predefined, parameterized queries_queryFilterfor arbitrary filters, in common filter notation_queryExpressionfor client-supplied queries, in native query format
For queries on system objects:
_queryId=query-all-ids(the only supported predefined query)_queryFilterfor arbitrary filters, in common filter notation
The source and target queries send the query to the resource that is defined
for that source or target, by default. You can override the resource the
query is to sent by specifying a resourceName in the
query. For example, to query a specific endpoint instead of the source
resource, you might modify the preceding source query as follows:
"mappings" : [
{
"name" : "managedUser_systemLdapAccounts",
"source" : "managed/user",
"target" : "system/ldap/account",
"sourceQuery" : {
"resourceName" : "endpoint/scriptedQuery"
"_queryFilter" : "employeeType eq \"Permanent\""
},
...To override a source or target query that is defined in the mapping, you can specify the query when you call the reconciliation operation. If you wanted to reconcile all employee entries, and not just the permanent employees, you would run the reconciliation operation as follows:
$ curl \
--header "X-OpenIDM-Username: openidm-admin" \
--header "X-OpenIDM-Password: openidm-admin" \
--header "Content-Type: application/json" \
--request POST \
--data '{"sourceQuery": {"_queryId" : "query-all-ids"}}' \
"http://localhost:8080/openidm/recon?_action=recon&mapping=managedUser_systemLdapAccounts"
By default, a reconciliation operation runs both the source and target phase.
To avoid queries on the target resource, set
runTargetPhase to false in the mapping
configuration (conf/sync.json file). To prevent the
target resource from being queried during the reconciliation operation
configured in the previous example, amend the mapping configuration as
follows:
{
"mappings" : [
{
"name" : "systemLdapAccounts_managedUser",
"source" : "system/ldap/account",
"target" : "managed/user",
"sourceQuery" : {
"_queryFilter" : "employeeType eq \"Permanent\""
},
"runTargetPhase" : false,
... 16.8.1. Restricting Reconciliation in the Admin UI, With Queries
You can also restrict reconciliation by using queries through the Admin UI. Select Configure > Mappings, select a Mapping > Association > Reconciliation Query Filters. You can then specify desired source and target queries.
16.9. Restricting Reconciliation to a Specific ID
You can restrict reconciliation to a specific record in much the same way as you restrict reconciliation by using queries.
To restrict reconciliation to a specific ID, use the
reconById action, instead of the recon
action when you call the reconciliation operation. Specify the ID with the
id parameter. Reconciling more than one ID with
the reconById action is not currently supported.
The following command reconciles only the user with ID
b3c2f414-e7b3-46aa-8ce6-f4ab1e89288c, for the mapping
managedUser_systemLdapAccounts. The command synchronizes
this particular user account in LDAP with the data from the managed user
repository. The example assumes that implicit synchronization has been
disabled and that a reconciliation operation is required to copy changes made
in the repository to the LDAP system:
$ curl \ --header "X-OpenIDM-Username: openidm-admin" \ --header "X-OpenIDM-Password: openidm-admin" \ --request POST \ "http://localhost:8080/openidm/recon?_action=reconById&mapping=managedUser_systemLdapAccounts&id=b3c2f414-e7b3-46aa-8ce6-f4ab1e89288c"
Reconciliation by ID takes the default reconciliation options that are specified in the mapping so the source and target queries, and source and target phases described in the previous section apply equally to reconciliation by ID.
16.10. Configuring the LiveSync Retry Policy
You can specify the results when a liveSync operation reports a failure. Configure the liveSync retry policy to specify the number of times a failed modification should be reattempted and what should happen if the modification is unsuccessful after the specified number of attempts. If no retry policy is configured, IDM reattempts the change an infinite number of times until the change is successful. This behavior can increase data consistency in the case of transient failures (for example, when the connection to the database is temporarily lost). However, in situations where the cause of the failure is permanent (for example, if the change does not meet certain policy requirements) the change will never succeed, regardless of the number of attempts. In this case, the infinite retry behavior can effectively block subsequent liveSync operations from starting.
Generally, a scheduled reconciliation operation will eventually force consistency. However, to prevent repeated retries that block liveSync, restrict the number of times that the same modification is attempted. You can then specify what happens to failed liveSync changes. The failed modification can be stored in a dead letter queue, discarded, or reapplied. Alternatively, an administrator can be notified of the failure by email or by some other means. This behavior can be scripted. The default configuration in the samples provided with IDM is to retry a failed modification five times, and then to log and ignore the failure.
The liveSync retry policy is configured in the connector configuration file
(provisioner.openicf-*.json). The sample connector
configuration files have a retry policy defined as follows:
"syncFailureHandler" : {
"maxRetries" : 5,
"postRetryAction" : "logged-ignore"
},
The maxRetries field specifies the number of attempts
that IDM should make to process the failed modification. The
value of this property must be a positive integer, or -1.
A value of zero indicates that failed modifications should not be
reattempted. In this case, the post-retry action is executed immediately
when a liveSync operation fails. A value of -1 (or
omitting the maxRetries property, or the entire
syncFailureHandler from the configuration) indicates that
failed modifications should be retried an infinite number of times. In this
case, no post retry action is executed.
The default retry policy relies on the scheduler, or whatever invokes liveSync. Therefore, if retries are enabled and a liveSync modification fails, IDM will retry the modification the next time that liveSync is invoked.
The postRetryAction field indicates what should happen if
the maximum number of retries has been reached (or if
maxRetries has been set to zero). The post-retry action
can be one of the following:
logged-ignore- IDM should ignore the failed modification, and log its occurrence.dead-letter-queue- IDM should save the details of the failed modification in a table in the repository (accessible over REST atrepo/synchronisation/deadLetterQueue/provisioner-name).scriptspecifies a custom script that should be executed when the maximum number of retries has been reached. For information about using custom scripts in the configuration, see "Scripting Reference".In addition to the regular objects described in "Scripting Reference", the following objects are available in the script scope:
syncFailureProvides details about the failed record. The structure of the
syncFailureobject is as follows:"syncFailure" : { "token" : the ID of the token, "systemIdentifier" : a string identifier that matches the "name" property in provisioner.openicf.json, "objectType" : the object type being synced, one of the keys in the "objectTypes" property in provisioner.openicf.json, "uid" : the UID of the object (for example uid=joe,ou=People,dc=example,dc=com), "failedRecord", the record that failed to synchronize },To access these fields, include
syncFailure.fieldnamein your script.failureCauseProvides the exception that caused the original liveSync failure.
failureHandlersTwo synchronization failure handlers are provided by default:
loggedIgnoreindicates that the failure should be logged, after which no further action should be taken.deadLetterQueueindicates that the failed record should be written to a specific table in the repository, where further action can be taken.
To invoke one of the internal failure handlers from your script, use a call similar to the following (shown here for JavaScript):
failureHandlers.deadLetterQueue.invoke(syncFailure, failureCause);
The following sample provisioner configuration file extract shows a liveSync retry policy that specifies a maximum of four retries before the failed modification is sent to the dead letter queue:
...
"connectorName" : "org.identityconnectors.ldap.LdapConnector"
},
"syncFailureHandler" : {
"maxRetries" : 4,
"postRetryAction" : dead-letter-queue
},
"poolConfigOption" : {
... In the case of a failed modification, a message similar to the following is output to the log file:
INFO: sync retries = 1/4, retrying
IDM reattempts the modification the specified number of times. If the modification is still unsuccessful, a message similar to the following is logged:
INFO: sync retries = 4/4, retries exhausted
Jul 19, 2013 11:59:30 AM
org.forgerock.openidm.provisioner.openicf.syncfailure.DeadLetterQueueHandler invoke
INFO: uid=jdoe,ou=people,dc=example,dc=com saved to dead letter queue
The log message indicates the entry for which the modification failed
(uid=jdoe, in this example).
You can view the failed modification in the dead letter queue, over the REST interface, as follows:
$ curl \
--header "X-OpenIDM-Username: openidm-admin" \
--header "X-OpenIDM-Password: openidm-admin" \
--request GET \
"http://localhost:8080/openidm/repo/synchronisation/deadLetterQueue/ldap?_queryId=query-all-ids"
{
"result":
[
{
"_id": "4",
"_rev": "000000001298f6a6"
}
],
...
}To view the details of a specific failed modification, include its ID in the URL:
$ curl \
--header "X-OpenIDM-Username: openidm-admin" \
--header "X-OpenIDM-Password: openidm-admin" \
--request GET \
"http://localhost:8080/openidm/repo/synchronisation/deadLetterQueue/ldap/4"
{
"objectType": "account",
"systemIdentifier": "ldap",
"failureCause": "org.forgerock.openidm.sync.SynchronizationException:
org.forgerock.openidm.objset.ConflictException:
org.forgerock.openidm.sync.SynchronizationException:
org.forgerock.openidm.script.ScriptException:
ReferenceError: \"bad\" is not defined.
(PropertyMapping/mappings/0/properties/3/condition#1)",
"token": 4,
"failedRecord": "complete record, in xml format"
"uid": "uid=jdoe,ou=people,dc=example,dc=com",
"_rev": "000000001298f6a6",
"_id": "4"
} 16.11. Disabling Automatic Synchronization Operations
By default, all mappings are automatically synchronized. A change to a managed object is automatically synchronized to all resources for which the managed object is configured as a source. Similarly, if liveSync is enabled for a system, changes to an object on that system are automatically propagated to the managed object repository.
To prevent automatic synchronization for a specific mapping, set the
enableSync property of that mapping to false. In the
following example, implicit synchronization is disabled. This means that
changes to objects in the internal repository are not automatically
propagated to the LDAP directory. To propagate changes to the LDAP
directory, reconciliation must be launched manually:
{
"mappings" : [
{
"name" : "managedUser_systemLdapAccounts",
"source" : "managed/user",
"target" : "system/ldap/account",
"enableSync" : false,
....
}
If enableSync is set to false for a
system to managed user mapping (for example
"systemLdapAccounts_managedUser"), liveSync is disabled
for that mapping.
16.12. Configuring Synchronization Failure Compensation
Typically, when a managed/user object is changed, implicit synchronization replays that change to all configured external resources. If synchronization fails for one target resource (for example, due to a policy validation failure on the target, or the target being unavailable), the synchronization operation stops at that point. The effect is that a record might be changed in the repository, and in the targets on which synchronization was successful, but not on the failed target, or any targets that would have been synchronized after the failure. This situation can result in disparate data sets across resources. While a reconciliation operation would eventually bring all targets back in sync, reconciliation can be an expensive operation with large data sets.
For example, if a Human Resources manager adds a large group of new employees in one database, a partial synchronization might mean that some of those employees do not have access to their email or to other systems.
You can configure implicit synchronization to revert a reconciliation operation if it is not completely successful. This mechanism is known as failure compensation.
Failure compensation ensures that either all resources are synchronized
successfully, or that the original change is rolled back. This mechanism uses
an onSync script hook in the managed object configuration
(conf/managed.json file). The onSync
hook references a script (compensate.js) located in the
/path/to/openidm/bin/defaults/script directory. This
script prevents partial synchronization by "reverting" a partial change in
the event that all resources are not synchronized.
The following excerpt of a sample managed.json file
shows the addition of the onSync hook:
...
"onDelete" : {
"type" : "text/javascript",
"file" : "onDelete-user-cleanup.js"
},
"onSync" : {
"type" : "text/javascript",
"file" : "compensate.js"
},
"properties" : [
...
With this configuration, a change to a managed object triggers an implicit
synchronization for each configured mapping, in the order in which the
mappings are specified in sync.json. If synchronization
is successful for all configured mappings, IDM exits from the
script. If synchronization fails for a particular resource, the
onSync hook invokes the compensate.js
script, which attempts to revert the original change by performing another
update to the managed object. This change, in turn, triggers another
implicit synchronization operation to all external resources for which
mappings are configured.
If the synchronization operation fails again, the
compensate.js script is triggered a second time. This
time, however, the script recognizes that the change was originally called
as a result of a compensation and aborts. IDM logs warning
messages related to the sync action
(notifyCreate, notifyUpdate, notifyDelete), along with
the error that caused the sync failure.
If failure compensation is not configured, any issues with connections to an external resource can result in out of sync data stores, as discussed in the earlier Human Resources example.
With the compensate.js script, any such errors will
result in each data store retaining the information it had before implicit
synchronization started. That information is stored, temporarily, in the
oldObject variable.
In the previous Human Resources example, managers should see that new employees are not shown in their database. Administrators can then check log files for errors, address them, and restart the synchronization process with a new REST call.
16.13. Synchronization Situations and Actions
During synchronization IDM assesses source and target objects, and the links between them, and determines the synchronization situation that applies to each object. IDM then performs a specific action, usually on the target object, depending on the assessed situation.
The action that is taken for each situation is defined in the
policies section of your synchronization mapping. The
following excerpt of the sync.json file from the sample
described in "Two Way Synchronization Between LDAP and IDM" in the Samples Guide
shows the defined actions in that sample:
{
"policies": [
{
"situation": "CONFIRMED",
"action": "UPDATE"
},
{
"situation": "FOUND",
"action": "LINK"
},
{
"situation": "ABSENT",
"action": "CREATE"
},
{
"situation": "AMBIGUOUS",
"action": "IGNORE"
},
{
"situation": "MISSING",
"action": "IGNORE"
},
{
"situation": "SOURCE_MISSING",
"action": "DELETE"
{
"situation": "UNQUALIFIED",
"action": "IGNORE"
},
{
"situation": "UNASSIGNED",
"action": "IGNORE"
}
]
}You can also define these actions in the Admin UI. Select Configure > Mappings, click on the required Mapping, then select the Behaviors tab to specify different actions per situation.
If you do not define an action for a particular situation, IDM takes the default action for that situation. The following section describes how situations are assessed, lists all possible situations and describes the default actions taken for each situation.
16.13.1. How Synchronization Situations Are Assessed
Reconciliation is performed in two phases:
Source reconciliation accounts for source objects and associated links based on the configured mapping.
Target reconciliation iterates over the target objects that were not processed in the first phase.
For example, if a source object was deleted, the source reconciliation phase will not identify the target object that was previously linked to that source object. Instead, this orphaned target object is detected during the second phase.
During source reconciliation IDM iterates through the objects in the source resource and evaluates the following conditions:
Is the source object valid?
Valid source objects are categorized
qualifies=1. Invalid source objects are categorizedqualifies=0. Invalid objects include objects that were filtered out by avalidSourcescript orsourceCondition. For more information, see "Filtering Synchronized Objects".Does the source object have a record in the links table?
Source objects that have a corresponding link in the repository's
linkstable are categorizedlink=1. Source objects that do not have a corresponding link are categorizedlink=0.Does the source object have a corresponding valid target object?
Source objects that have a corresponding object in the target resource are categorized
target=1. Source objects that do not have a corresponding object in the target resource are categorizedtarget=0.
The following diagram illustrates the categorization of four sample objects during source reconciliation. In this example, the source is the managed user repository and the target is an LDAP directory.
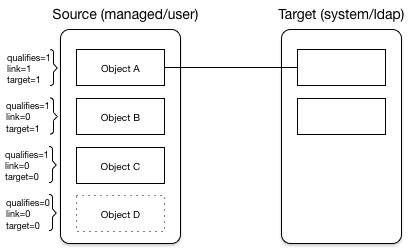
Based on the categorizations of source objects during the source reconciliation phase, IDM assesses a situation for each source object. Not all situations are detected in all synchronization types. The following list describes the set of synchronization situations, when they can be detected, the default action taken for that situation, and valid alternative actions that can be defined for the situation:
- Situations detected during reconciliation and source change events
CONFIRMED(qualifies=1, link=1, target=1)The source object qualifies for a target object, and is linked to an existing target object.
Default action:
UPDATEthe target object.Other valid actions:
IGNORE, REPORT, NOREPORT, ASYNCFOUND(qualifies=1, link=0, target=1)The source object qualifies for a target object and is not linked to an existing target object. There is a single target object that correlates with this source object, according to the logic in the correlation.
Default action:
UPDATEthe target object.Other valid actions:
EXCEPTION, IGNORE, REPORT, NOREPORT, ASYNCFOUND_ALREADY_LINKED(qualifies=1, link=1, target=1)The source object qualifies for a target object and is not linked to an existing target object. There is a single target object that correlates with this source object, according to the logic in the correlation, but that target object is already linked to a different source object.
Default action: throw an
EXCEPTION.Other valid actions:
IGNORE, REPORT, NOREPORT, ASYNCABSENT(qualifies=1, link=0, target=0)The source object qualifies for a target object, is not linked to an existing target object, and no correlated target object is found.
Default action:
CREATEa target object.Other valid actions:
EXCEPTION, IGNORE, REPORT, NOREPORT, ASYNCUNQUALIFIED(qualifies=0, link=0 or 1, target=1 or >1)The source object is unqualified (by the
validSourcescript). One or more target objects are found through the correlation logic.Default action:
DELETEthe target object or objects.Other valid actions:
EXCEPTION, IGNORE, REPORT, NOREPORT, ASYNCAMBIGUOUS(qualifies=1, link=0, target>1)The source object qualifies for a target object, is not linked to an existing target object, but there is more than one correlated target object (that is, more than one possible match on the target system).
Default action: throw an
EXCEPTION.Other valid actions:
IGNORE, REPORT, NOREPORT, ASYNCMISSING(qualifies=1, link=1, target=0)The source object qualifies for a target object, and is linked to a target object, but the target object is missing.
Default action: throw an
EXCEPTION.Other valid actions:
CREATE, UNLINK, DELETE, IGNORE, REPORT, NOREPORT, ASYNCNote
If the action is CREATE for the situation MISSING, the orphaned link associated with the source object is updated to point to the new target object.
When a target object is deleted, the link from the target to the corresponding source object is not deleted automatically. This allows IDM to detect and report items that might have been removed without permission or might need review. If you need to remove the corresponding link when a target object is deleted, change the action to UNLINK to remove the link, or to DELETE to remove the target object and the link.
SOURCE_IGNORED(qualifies=0, link=0, target=0)The source object is unqualified (by the
validSourcescript), no link is found, and no correlated target exists.Default action:
IGNOREthe source object.Other valid actions:
EXCEPTION, REPORT, NOREPORT, ASYNC
- Situations detected only during source change events:
TARGET_IGNORED(qualifies=0, link=0 or 1, target=1)The source object is unqualified (by the
validSourcescript). One or more target objects are found through the correlation logic.This situation differs from the
UNQUALIFIEDsituation, based on the status of the link and the target. If there is a link, the target is not valid. If there is no link and exactly one target, that target is not valid.Default action:
IGNOREthe target object until the next full reconciliation operation.Other valid actions:
DELETE, UNLINK, EXCEPTION, REPORT, NOREPORT, ASYNCLINK_ONLY(qualifies=n/a, link=1, target=0)The source may or may not be qualified. A link is found, but no target object is found.
Default action: throw an
EXCEPTION.Other valid actions:
UNLINK, IGNORE, REPORT, NOREPORT, ASYNCALL_GONE(qualifies=n/a, link=0, cannot-correlate)The source object has been removed. No link is found. Correlation is not possible, for one of the following reasons:
No previous source object can be found.
There is no correlation logic.
A previous source object was found, and correlation logic exists, but no corresponding target was found.
Default action:
IGNOREthe source object.Other valid actions:
EXCEPTION, REPORT, NOREPORT, ASYNC
Based on this list, the following situations would be assigned to the previous diagram:
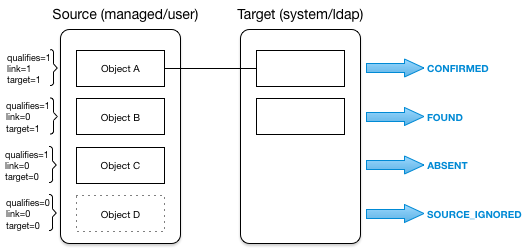
During target reconciliation, IDM iterates through the objects in the target resource that were not accounted for during source reconciliation, and evaluates the following conditions:
Is the target object valid?
Valid target objects are categorized
qualifies=1. Invalid target objects are categorizedqualifies=0. Invalid objects include objects that were filtered out by avalidTargetscript. For more information, see "Filtering Synchronized Objects".Does the target object have a record in the links table?
Target objects that have a corresponding link in the repository's
linkstable are categorizedlink=1. Target objects that do not have a corresponding link are categorizedlink=0.Does the target object have a corresponding valid source object?
Target objects that have a corresponding object in the source resource are categorized
source=1. Target objects that do not have a corresponding object in the source resource are categorizedsource=0.
The following diagram illustrates the categorization of three sample objects during target reconciliation.
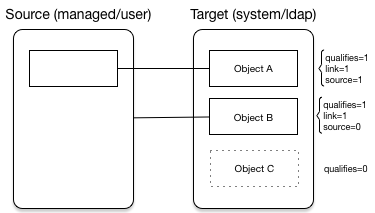
Based on the categorizations of target objects during the target reconciliation phase, a situation is assessed for each remaining target object. Not all situations are detected in all synchronization types. The following list describes the set of synchronization situations, when they can be detected, the default action taken for that situation, and valid alternative actions that can be defined for the situation:
- Situations detected only during reconciliation:
TARGET_IGNORED(qualifies=0)During target reconciliation, the target becomes unqualified by the
validTargetscript.Default action:
IGNOREthe target object.Other valid actions:
DELETE, UNLINK, REPORT, NOREPORT, ASYNCUNASSIGNED(qualifies=1, link=0)A valid target object exists but does not have a link.
Default action: throw an
EXCEPTION.Other valid actions:
IGNORE, REPORT, NOREPORT, ASYNCCONFIRMED(qualifies=1, link=1, source=1)The target object qualifies, and a link to a source object exists.
Default action:
UPDATEthe target object.Other valid actions:
IGNORE, REPORT, NOREPORT
- Situations detected during reconciliation and target change events:
UNQUALIFIED(qualifies=0, link=1, source=1, but source does not qualify)The target object is unqualified (by the
validTargetscript). There is a link to an existing source object, which is also unqualified.Default action:
DELETEthe target object.Other valid actions:
UNLINK, EXCEPTION, IGNORE, REPORT, NOREPORT, ASYNCSOURCE_MISSING(qualifies=1, link=1, source=0)The target object qualifies and a link is found, but the source object is missing.
Default action: throw an
EXCEPTION.Other valid actions:
DELETE, UNLINK, IGNORE, REPORT, NOREPORT, ASYNC
Based on this list, the following situations would be assigned to the previous diagram:
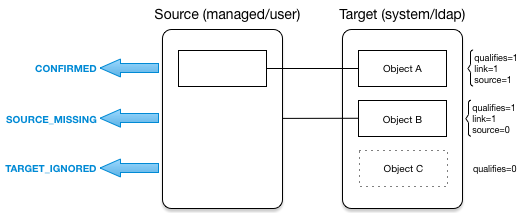
The following sections walk you through how situations are assigned during source and target reconciliation.
16.13.2. Source Reconciliation
Both reconciliation and liveSync start by reading a list of objects from
the resource. For reconciliation, the list includes all objects that are
available through the connector. For liveSync, the list contains only
changed objects. IDM can filter objects from the list by using
the script specified in the validSource property, or the
query specified in the sourceCondition property.
IDM then iterates the list, checking each entry against the
validSource and sourceCondition
filters, and classifying objects according to their situations as described
in "How Synchronization Situations Are Assessed". IDM uses the list of links
for the current mapping to classify objects. Finally, IDM
executes the action that is configured for each situation.
The following table shows how the appropriate situation is assigned during source reconciliation, depending on whether a valid source exists (Source Qualifies), whether a link exists in the repository (Link Exists), and the number of target objects found, based either on links or on the results of the correlation.
| Source Qualifies? | Link Exists? | Target Objects Found[a] | Situation | ||||
|---|---|---|---|---|---|---|---|
| Yes | No | Yes | No | 0 | 1 | > 1 | |
| X | X | X | SOURCE_MISSING | ||||
| X | X | X | UNQUALIFIED | ||||
| X | X | X | UNQUALIFIED | ||||
| X | X | X | TARGET_IGNORED | ||||
| X | X | X | UNQUALIFIED | ||||
| X | X | X | ABSENT | ||||
| X | X | X | FOUND | ||||
| X | X[b] | X | FOUND_ALREADY_LINKED | ||||
| X | X | X | AMBIGUOUS | ||||
| X | X | X | MISSING | ||||
| X | X | X | CONFIRMED | ||||
[a] If no link exists for the source object, then IDM executes correlation logic. If no previous object is available, IDM cannot correlate. [b] A link exists from the target object but it is not for this specific source object. | |||||||
16.13.3. Target Reconciliation
During source reconciliation, IDM cannot detect situations where
no source object exists, such as the UNASSIGNED situation.
When no source object exists, IDM detects the situation during
the second reconciliation phase, target reconciliation. During target
reconciliation, IDM iterates all target objects that do not have
a representation on the source, checking each object against the
validTarget filter, determining the appropriate situation
and executing the action configured for the situation.
The following table shows how IDM assigns the appropriate situation during target reconciliation, depending on whether a valid target exists (Target Qualifies), whether a link with an appropriate type exists in the repository (Link Exists), whether a source object exists (Source Exists), and whether the source object qualifies (Source Qualifies). Not all situations assigned during source reconciliation are assigned during target reconciliation.
| Target Qualifies? | Link Exists? | Source Exists? | Source Qualifies? | Situation | ||||
|---|---|---|---|---|---|---|---|---|
| Yes | No | Yes | No | Yes | No | Yes | No | |
| X | TARGET_IGNORED | |||||||
| X | X | X | UNASSIGNED | |||||
| X | X | X | X | CONFIRMED | ||||
| X | X | X | X | UNQUALIFIED | ||||
| X | X | X | SOURCE_MISSING | |||||
16.13.4. Situations Specific to Implicit Synchronization and LiveSync
Certain situations occur only during implicit synchronization (when changes made in the repository are pushed out to external systems) and liveSync (when IDM polls external system change logs for changes and updates the repository).
The following table shows the situations that pertain only to implicit sync and liveSync, when records are deleted from the source or target resource.
16.13.5. Synchronization Actions
When a situation has been assigned to an object, IDM takes the actions configured in the mapping. If no action is configured, IDM takes the default action for that situation. The following actions can be taken:
CREATECreate and link a target object.
UPDATELink and update a target object.
DELETEDelete and unlink the target object.
LINKLink the correlated target object.
UNLINKUnlink the linked target object.
EXCEPTIONFlag the link situation as an exception.
Do not use this action for liveSync mappings.
IGNOREDo not change the link or target object state.
REPORTDo not perform any action but report what would happen if the default action were performed.
NOREPORTDo not perform any action or generate any report.
ASYNCAn asynchronous process has been started so do not perform any action or generate any report.
16.13.6. Launching a Script As an Action
In addition to the static synchronization actions described in the previous
section, you can provide a script that is run in specific synchronization
situations. The script can be either JavaScript or Groovy, and can be
provided inline (with the "source" property), or
referenced from a file, (with the "file" property).
The following excerpt of a sample sync.json file
specifies that an inline script should be invoked when a synchronization
operation assesses an entry as ABSENT in the target
system. The script checks whether the employeeType
property of the corresponding source entry is contractor.
If so, the entry is ignored. Otherwise, the entry is created on the target
system:
{
"situation" : "ABSENT",
"action" : {
"type" : "text/javascript",
"globals" : { },
"source" : "if (source.employeeType === 'contractor') {action='IGNORE'}
else {action='CREATE'};action;"
},
}
Note that the CREATE action updates the target data set automatically. For
other actions, you must call openidm.update explicitly,
in the script. For example, if you simply want to update the value of the
description attribute on the target object, and then
ignore the object, your script might look as follows:
"var action = 'IGNORE';
target.description='This entry has been deleted';
openidm.update('system/ldap/account/' + target._id, null, target);
action"
The variables available to a script that is called as an action are
source, target,
linkQualifier, and recon (where
recon.actionParam contains information about the current
reconciliation operation). For more information about the variables
available to scripts, see "Variables Available to Scripts".
The result obtained from evaluating this script must be a string whose value is one of the synchronization actions listed in "Synchronization Actions". This resulting action will be shown in the reconciliation log.
To launch a script as a synchronization action in the Admin UI:
Select Configure > Mappings.
Select the mapping that you want to change.
On the Behaviors tab, click the pencil icon next to the situation whose action you want to change.
On the Perform this Action tab, click Script, then enter the script that corresponds to the action.
16.13.7. Launching a Workflow As an Action
The triggerWorkflowFromSync.js script launches a
predefined workflow when a synchronization operation assesses a particular
situation. The mechanism for triggering this script is the same as for any
other script. The script is provided in the
openidm/bin/defaults/script/workflow directory. If you
customize the script, copy it to the script directory of
your project to ensure that your customizations are preserved during an
upgrade.
The parameters for the workflow are passed as properties of the
action parameter.
The following extract of a sample sync.json file
specifies that, when a synchronization operation assesses an entry as
ABSENT, the workflow named
managedUserApproval is invoked:
{
"situation" : "ABSENT",
"action" : {
"workflowName" : "managedUserApproval",
"type" : "text/javascript",
"file" : "workflow/triggerWorkflowFromSync.js"
}
} To launch a workflow as a synchronization action in the Admin UI:
Select Configure > Mappings.
Select the mapping that you want to change.
On the Behaviors tab, click the pencil icon next to the situation whose action you want to change.
On the Perform this Action tab, click Workflow, then enter the details of the workflow you want to launch.
16.14. Asynchronous Reconciliation
Reconciliation can work in tandem with workflows to provide additional business logic to the reconciliation process. You can define scripts to determine the action that should be taken for a particular reconciliation situation. A reconciliation process can launch a workflow after it has assessed a situation, and then perform the reconciliation or some other action.
For example, you might want a reconciliation process to assess new user accounts that need to be created on a target resource. However, new user account creation might require some kind of approval from a manager before the accounts are actually created. The initial reconciliation process can assess the accounts that need to be created, launch a workflow to request management approval for those accounts, and then relaunch the reconciliation process to create the accounts, after the management approval has been received.
In this scenario, the defined script returns IGNORE for
new accounts and the reconciliation engine does not continue processing the
given object. The script then initiates an asynchronous process which calls
back and completes the reconciliation process at a later stage.
A sample configuration for this scenario is available in
openidm/samples/sync-asynchronous, and described in
"Asynchronous Reconciliation Using a Workflow" in the Samples Guide.
Configuring asynchronous reconciliation using a workflow involves the following steps:
Create the workflow definition file (
.xml or .barfile) and place it in theopenidm/workflowdirectory. For more information about creating workflows, see "Integrating Business Processes and Workflows".Modify the
conf/sync.jsonfile for the situation or situations that should call the workflow. Reference the workflow name in the configuration for that situation.For example, the following
sync.jsonextract calls themanagedUserApprovalworkflow if the situation is assessed asABSENT:{ "situation" : "ABSENT", "action" : { "workflowName" : "managedUserApproval", "type" : "text/javascript", "file" : "workflow/triggerWorkflowFromSync.js" } },In the sample configuration, the workflow calls a second, explicit reconciliation process as a final step. This reconciliation process is called on the
synccontext path, with theperformActionaction (openidm.action('sync', 'performAction', params)).
You can also use this kind of explicit reconciliation to perform a specific action on a source or target record, regardless of the assessed situation.
You can call such an operation over the REST interface, specifying the
source, and/or target IDs, the mapping, and the action to be taken. The
action can be any one of the supported reconciliation actions:
CREATE, UPDATE, DELETE, LINK, UNLINK, EXCEPTION, REPORT, NOREPORT,
ASYNC, IGNORE.
The following sample command calls the DELETE action on user
bjensen, whose _id in the LDAP
directory is uid=bjensen,ou=People,dc=example,dc=com.
The user is deleted in the target resource, in this case, the repository.
Note that the _id must be URL-encoded in the REST call:
$ curl \
--header "X-OpenIDM-Username: openidm-admin" \
--header "X-OpenIDM-Password: openidm-admin" \
--request POST \
"http://localhost:8080/openidm/sync?_action=performAction&sourceId=uid%3Dbjensen%2Cou%3DPeople%2Cdc%3Dexample%2Cdc%3Dcom&mapping=
systemLdapAccounts_ManagedUser&action=DELETE"
{
"status": "OK"
}The following example creates a link between a managed object and its corresponding system object. Such a call is useful in the context of manual data association, when correlation logic has linked an incorrect object, or when IDM has been unable to determine the correct target object.
In this example, there are two separate target accounts
(scarter.user and scarter.admin) that
should be mapped to the managed object. This call creates a link to the
user account and specifies a link qualifier that indicates
the type of link that will be created:
$ curl \
--header "X-OpenIDM-Username: openidm-admin" \
--header "X-OpenIDM-Password: openidm-admin" \
--request POST \
"http://localhost:8080/openidm/sync?_action=performAction&action=LINK
&sourceId=4b39f74d-92c1-4346-9322-d86cb2d828a8&targetId=scarter.user
&mapping=managedUser_systemCsvfileAccounts&linkQualifier=user"
{
"status": "OK"
}For more information about linking to multiple accounts, see "Mapping a Single Source Object to Multiple Target Objects".
16.15. Configuring Case Sensitivity For Data Stores
IDM is case-sensitive, which means that an upper case ID is considered different from an otherwise identical lower case ID during reconciliation. In contrast, ForgeRock Directory Services (DS) is case-insensitive. This can be problematic during reconciliation with DS, because the ID of the links created by reconciliation might not match the case of the IDs expected by IDM.
If a mapping inherits links by using the links property,
you do not need to set case-sensitivity, because the mapping uses the
setting of the referred links.
Alternatively, you can address case-sensitivity issues from a datastore in one of the following ways:
Specify a case-insensitive datastore. To do so, set the
sourceIdsCaseSensitiveortargetIdsCaseSensitiveproperties tofalsein the mapping for those links. For example, if the source LDAP data store is case-insensitive, set the mapping from the LDAP store to the managed user repository as follows:"mappings" : [ { "name" : "systemLdapAccounts_managedUser", "source" : "system/ldap/account", "sourceIdsCaseSensitive" : false, "target" : "managed/user", "properties" : [ ...You may also need to modify the OpenICF provisioner to make it case-insensitive. To do so, open your provisioner configuration file, and set the
enableFilteredResultsHandlerproperty tofalse:"resultsHandlerConfig" : { "enableFilteredResultsHandler":false },Caution
Do not disable the filtered results handler for the CSV file connector. The CSV file connector does not perform filtering so if you disable the filtered results handler for this connector, the full CSV file will be returned for every request.
Use a case-insensitive option from your datastore. For example, in MySQL, you can change the collation of
managedobjectproperties.propvaluetoutf8_general_ci.
In general, to address case-sensitivity, focus on database, table, or column level collation settings. Queries performed against repositories configured in this way are subject to the collation, and are used for comparison.
16.16. Optimizing Reconciliation Performance
By default, reconciliation is configured to function optimally, with regard to performance. Some of these optimizations might, however, be unsuitable for your environment. The following sections describe the default optimizations and how they can be configured, as well as additional methods you can use to improve the performance of reconciliation operations.
16.16.1. Correlating Empty Target Sets
To optimize performance, reconciliation does not correlate source objects to
target objects if the set of target objects is empty when the correlation is
started. This considerably speeds up the process the first time
reconciliation is run. You can change this behavior for a specific mapping by
adding the correlateEmptyTargetSet property to the mapping
definition and setting it to true. For example:
{
"mappings": [
{
"name" : "systemMyLDAPAccounts_managedUser",
"source" : "system/MyLDAP/account",
"target" : "managed/user",
"correlateEmptyTargetSet" : true
},
]
}Be aware that this setting will have a performance impact on the reconciliation process.
16.16.1.1. Correlating Empty Target Sets in the Admin UI
To change the correlateEmptyTargetSet option in the
Admin UI, choose Configure > Mappings. Select the desired mapping. In the
Advanced tab, enable or disable the following option:
Correlate Empty Target Objects
16.16.2. Prefetching Links
All links are queried at the start of reconciliation and the results of that
query are used. You can disable the link prefetching so that the
reconciliation process looks up each link in the database as it processes
each source or target object. You can disable the prefetching of links by
adding the prefetchLinks property to the mapping, and
setting it to false, for example:
{
"mappings": [
{
"name": "systemMyLDAPAccounts_managedUser",
"source": "system/MyLDAP/account",
"target": "managed/user"
"prefetchLinks" : false
}
]
}Be aware that this setting will have a performance impact on the reconciliation process.
16.16.2.1. Prefetching Links in the Admin UI
To change the prefetchLinks option in the
Admin UI, choose Configure > Mappings. Select the desired mapping. In the
Advanced tab, enable or disable the following option:
Pre-fetch Links
16.16.3. Parallel Reconciliation Threads
By default, reconciliation is multithreaded; numerous threads are dedicated to the same reconciliation run. Multithreading generally improves reconciliation performance. The default number of threads for a single reconciliation run is 10 (plus the main reconciliation thread). Under normal circumstances, you should not need to change this number; however the default might not be appropriate in the following situations:
The hardware has many cores and supports more concurrent threads. As a rule of thumb for performance tuning, start with setting the thread number to two times the number of cores.
The source or target is an external system with high latency or slow response times. Threads may then spend considerable time waiting for a response from the external system. Increasing the available threads enables the system to prepare or continue with additional objects.
To change the number of threads, set the taskThreads
property in the conf/sync.json file, for example:
"mappings" : [
{
"name" : "systemCsvfileAccounts_managedUser",
"source" : "system/csvfile/account",
"target" : "managed/user",
"taskThreads" : 20
...
}
]
}A zero value runs reconciliation as a serialized process, on the main reconciliation thread.
16.16.3.1. Parallel Reconciliation Threads in the Admin UI
To change the taskThreads option in the
Admin UI, choose Configure > Mappings. Select the desired mapping. In the
Advanced tab, adjust the number of threads in the following text box:
Threads Per Reconciliation
16.16.4. Improving Reconciliation Query Performance
Reconciliation operations are processed in two phases; a source phase and a target phase. In most reconciliation configurations, source and target queries make a read call to every record on the source and target systems to determine candidates for reconciliation. On slow source or target systems, these frequent calls can incur a substantial performance cost.
To improve query performance in these situations, you can preload the entire result set into memory on the source or target system, or on both systems. Subsequent read queries on known IDs are made against the data in memory, rather than the data on the remote system. For this optimization to be effective, the entire result set must fit into the available memory on the system for which it is enabled.
The optimization works by defining a sourceQuery or
targetQuery in the synchronization mapping that returns
not just the ID, but the complete object.
The following example query loads the full result set into memory during the
source phase of the reconciliation. The example uses a common filter
expression, called with the _queryFilter keyword. The
query returns the complete object:
"mappings" : [
{
"name" : "systemLdapAccounts_managedUser",
"source" : "system/ldap/account",
"target" : "managed/user",
"sourceQuery" : {
"_queryFilter" : "true"
},
...
IDM attempts to detect what data has been returned. The
autodetection mechanism assumes that a result set that includes three or
more fields per object (apart from the _id and
rev fields) contains the complete object.
You can explicitly state whether a query is configured to return complete
objects by setting the value of sourceQueryFullEntry or
targetQueryFullEntry in the mapping. The setting of these
properties overrides the autodetection mechanism.
Setting these properties to false indicates that the
returned object is not the complete object. This might be required if a
query returns more than three fields of an object, but not the complete
object. Without this setting, the autodetect logic would assume that the
complete object was being returned. IDM uses only the IDs from
this query result. If the complete object is required, the object is queried
on demand.
Setting these properties to true indicates that the
complete object is returned. This setting is typically required only for
very small objects, for which the number of returned fields does not reach
the threshold required for the auto-detection mechanism to assume that it is
a full object. In this case, the query result includes all the details
required to pre-load the full object.
The following excerpt indicates that the full objects are returned and that IDM should not autodetect the result set:
"mappings" : [
{
"name" : "systemLdapAccounts_managedUser",
"source" : "system/ldap/account",
"target" : "managed/user",
"sourceQueryFullEntry" : true,
"sourceQuery" : {
"_queryFilter" : "true"
},
...
By default, all the attributes that are defined in the connector
configuration file are loaded into memory. If your mapping uses only a small
subset of the attributes in the connector configuration file, you can
restrict your query to return only those attributes required for
synchronization by using the _fields parameter with the
query filter.
The following excerpt loads only a subset of attributes into memory, for all users in an LDAP directory.
"mappings" : [
{
"name" : "systemLdapAccounts_managedUser",
"source" : "system/ldap/account",
"target" : "managed/user",
"sourceQuery" : {
"_queryFilter" : "true",
"_fields" : "cn, sn, dn, uid, employeeType, mail"
},
...Note
The default source query for non-clustered, non-paged reconciliation
operations is query-all-ids. The default source query
for clustered reconciliations and for paged reconciliations is a
queryFilter-based construct that returns the full source
objects, not just their IDs. So, source queries for clustered and paged
reconciliations are optimized for performance by default.
16.16.5. Improving Role-Based Provisioning Performance With an onRecon Script
IDM provides an onRecon script that runs
once, at the beginning of each reconciliation. This script can perform any
setup or initialization operations that are appropriate for the
reconciliation run.
In addition, a reconContext variable is added to a
request's context chain when reconciliation runs. The
reconContext can store pre-loaded data that can be used
by other IDM components (such as the managed object service) to
improve performance.
The default onRecon script
(openidm/bin/default/script/roles/onRecon.groovy)
loads the reconContext with all the roles and
assignments that are required for the current mapping. The
effectiveAssignments script checks the
reconContext first. If a reconContext
is present, the script uses that reconContext to populate
the array of effectiveAssignments. This prevents a read
operation to managed/role or
managed/assignment every time reconciliation runs, and
greatly improves the overall performance for role-based provisioning.
You can customize the onRecon,
effectiveRoles, and effectiveAssignments
scripts to provide additional business logic during reconciliation. If you
customize these scripts, copy the default scripts from
openidm/bin/defaults/scripts into your project's
script directory, and make the changes there.
16.16.6. Paging Reconciliation Query Results
"Improving Reconciliation Query Performance" describes how to improve reconciliation performance by loading all entries into memory to avoid making individual requests to the external system for every ID. However, this optimization depends on the entire result set fitting into the available memory on the system for which it is enabled. For particularly large data sets (for example, data sets of hundreds of millions of users), having the entire data set in memory might not be feasible.
To alleviate this constraint, you can use reconciliation paging, which breaks down extremely large data sets into chunks. It also lets you specify the number of entries that should be reconciled in each chunk or page.
Reconciliation paging is disabled by default, and can be enabled per mapping
(in the sync.json file). To configure reconciliation
paging, set the reconSourceQueryPaging property to
true and set the
reconSourceQueryPageSize in the synchronization mapping,
for example:
{
"mappings" : [
{
"name" : "systemLdapAccounts_managedUser",
"source" : "system/ldap/account",
"target" : "managed/user",
"reconSourceQueryPaging" : true,
"reconSourceQueryPageSize" : 100,
...
}
The value of reconSourceQueryPageSize must be a
positive integer, and specifies the number of entries that will be processed
in each page. If reconciliation paging is enabled but no page size is set, a
default page size of 1000 is used.
Important
If you are reconciling from a JDBC database using the Database Table
connector, you must set the _sortkeys
property in the source query and ensure that the corresponding column is
indexed in the database.
The following excerpt of a sample sync.json file
configures paged reconciliation queries using the Database Table connector:
{
"mappings" : [
{
"name" : "systemHrdb_managedUser",
"source" : "system/db/users",
"target" : "managed/user",
"reconSourceQueryPaging" : true,
"reconSourceQueryPageSize" : 1000,
"sourceQueryFullEntry" : true,
"sourceQuery" : {
"_queryFilter" : "true",
"_sortKeys" : "email"
},
...
]
}16.17. Scheduling Synchronization
You can schedule synchronization operations, such as liveSync and reconciliation, using Quartz triggers. IDM supports simple triggers and cron triggers.
Use the trigger type that suits your scheduling requirements. Because simple triggers are not bound to the local timezone, they are better suited to scenarios such as liveSync where the requirement is to trigger the schedule at regular intervals, regardless of the local time. For more information, see the Quartz documentation on SimpleTriggers and CronTriggers.
This section describes scheduling specifically for reconciliation and liveSync, and shows simple triggers in all the examples. You can use the scheduler service to schedule any other event by supplying a link to a script file in which that event is defined. For information about scheduling other events, see "Scheduling Tasks and Events".
16.17.1. Configuring Scheduled Synchronization
Each scheduled reconciliation and liveSync task requires a schedule
configuration file in your project's conf directory.
By convention, schedule configuration files are named
schedule-schedule-name.json,
where schedule-name is a logical name for the
scheduled synchronization operation, such as
reconcile_systemCsvAccounts_managedUser.
Schedule configuration files have the following format:
{
"enabled" : boolean, true/false
"type" : "string",
"repeatInterval" : long integer,
"repeatCount" : integer,
"persisted" : boolean, true/false
"startTime" : "(optional) time",
"endTime" : "(optional) time",
"schedule" : "cron expression",
"misfirePolicy" : "optional, string",
"invokeService" : "service identifier",
"invokeContext" : "service specific context info"
} These properties are specific to the scheduler service, and are explained in "Scheduling Tasks and Events".
To schedule a reconciliation or liveSync task, set the
invokeService property to either
sync (for reconciliation) or
provisioner for liveSync.
The value of the invokeContext property depends on the
type of scheduled event. For reconciliation, the properties are set as
follows:
{
"invokeService": "sync",
"invokeContext": {
"action": "reconcile",
"mapping": "systemLdapAccount_managedUser"
}
}
The mapping is either referenced by its name in the
conf/sync.json file, or defined inline by using the
mapping property, as shown in the example in
"Specifying the Mapping as Part of the Schedule".
For liveSync, the properties are set as follows:
{
"invokeService": "provisioner",
"invokeContext": {
"action": "liveSync",
"source": "system/ldap/account"
}
}
The source property follows the convention for a pointer
to an external resource object and takes the form
system/resource-name/object-type.
Important
When you schedule a reconciliation operation to run at regular intervals,
do not set "concurrentExecution" : true. This parameter
enables multiple scheduled operations to run concurrently. You cannot
launch multiple reconciliation operations for a single mapping
concurrently.
16.17.1.1. Configuring LiveSync Through the UI
To configure liveSync through the UI, set up a liveSync schedule as follows:
Select Configure > Schedules > Add Schedule.
Complete the schedule configuration. For more information about these fields, see "Configuring Scheduled Synchronization".
Note
The scheduler configuration assumes a
simpletrigger type by default, so theCron-like Triggerfield is disabled. You should use simple triggers for liveSync schedules to avoid problems related to daylight savings time. For more information, see "Schedules and Daylight Savings Time".By default, the UI creates schedules using the scheduler service, rather than the configuration service. To create this schedule in the configuration service, select the Save as Config Object option. If your deployment enables writes to configuration files, this option also creates a corresponding
schedule-schedule-name.jsonfile in your project'sconfdirectory.For more information on the distinction between the scheduler service and the configuration service, see "Managing Schedules Over REST".
16.17.2. Specifying the Mapping as Part of the Schedule
Mappings for synchronization operations are usually stored in your project's
sync.json file. You can, however, provide the mapping
for a scheduled synchronization operation by including it as part of the
invokeContext of the schedule configuration, as shown in
the following example:
{
"enabled": true,
"type": "simple",
"repeatInterval" : 1000,
"persisted": true,
"invokeService": "sync",
"invokeContext": {
"action": "reconcile",
"mapping": {
"name" : "systemLdapAccounts_managedUser",
"source": "system/Ldap/account",
"target": "managed/user",
"properties": [
{
"source": "firstname",
"target": "firstname"
},
...
],
"policies": [...]
}
}
} 16.18. Distributing Reconciliation Operations Across a Cluster
In a clustered deployment, you can configure reconciliation jobs to be distributed across multiple nodes in the cluster. Clustered reconciliation improves reconciliation performance, particularly for very large data sets. Clustered reconciliation uses the paged reconciliation mechanism and the scheduler service to divide the source data set into pages, and then to schedule reconciliation "sub-jobs" per page, distributing these sub-jobs across the nodes in the cluster.
Regular (non-clustered) reconciliation has two phases - a source phase and a target phase. Clustered reconciliation effectively has three phases:
A source page phase.
During this phase, a set of reconciliation sub-jobs are scheduled in succession, page by page. Each source page job does the following:
Executes a source query using the paging cookie from the invocation context.
Schedules the next source page job.
Performs the reconciliation of the source IDs returned by the query.
Writes statistics summary information which is aggregated so that you can obtain the status of the complete reconciliation run by performing a GET on the
reconendpoint.On completion, writes the
repo_id,source_id, andtarget_idto the repository.
A source phase completion check.
This phase is scheduled when the source query returns null. This check runs, and continues to re-schedule itself, as long as source page jobs are running. When the completion check determines that all the source page jobs are complete, it schedules the target phase.
A target phase.
This phase queries the target IDs, then removes all of the IDs that correspond to the
repo_id,source_id, andtarget_idwritten by the source pages. The remaining target IDs are used to run the target phase, taking into account all records on the target system that were not correlated to a source ID during the source phase sub-jobs.
16.18.1. Configuring Clustered Reconciliation for a Mapping
To specify that the reconciliation for a specific mapping should be
distributed across a cluster, add the
clusteredSourceReconEnabled property to the mapping and
set it to true. For example:
{
"mappings" : [
{
"name" : "systemLdapAccounts_managedUser",
"source" : "system/ldap/account",
"target" : "managed/user",
"clusteredSourceReconEnabled" : true,
...
}Note
When clustered reconciliation is enabled, source query paging is enabled
automatically, regardless of the value that you set for the
reconSourceQueryPaging property in the mapping.
By default, the number of records per page is 1000. Increase the page size
for large data sets. For example, a reconciliation of data set of 1,000,000
entries would perform better with a page size of 10,000. To change the page
size, set the reconSourceQueryPageSize property, for
example:
{
"mappings" : [
{
"name" : "systemLdapAccounts_managedUser",
"source" : "system/ldap/account",
"target" : "managed/user",
"clusteredSourceReconEnabled" : true,
"reconSourceQueryPageSize" : 10000
...
}To set these properties in the Admin UI, select Configure > Mappings, click on the mapping that you want to change, and select the Advanced tab.
Important
Be aware of the following limitations when implementing clustered reconciliation:
A complete non-clustered reconciliation run is synchronous with the single reconciliation invocation.
By contrast, a clustered reconciliation is not synchronous. In a clustered reconciliation, the first execution is synchronous only with the reconciliation of the first page. This job also schedules the subsequent pages of the clustered reconciliation to run on other cluster nodes. When you schedule a clustered reconciliation or call the operation over REST, do not set
waitForCompletiontotrue, since you cannot wait for the operation to complete before the next operation starts.Because this first execution does not encompass the entire reconciliation operation for that mapping, you cannot rely on the Quartz
concurrentExecutionproperty to prevent two reconciliation operations from running concurrently. If you use Quartz to schedule clustered reconciliations (as described in "Configuring Scheduled Synchronization"), make sure that the interval between scheduled operations exceeds the known run of the entire clustered reconciliation. The run-length of a specific clustered reconciliation can vary. You should therefore build in appropriate buffer times between schedules, or use a scheduled script that performs a GET on therecon/endpoint, and dispatches the next reconciliation on a mapping only when the previous reconciliation run has completed.If one node in the cluster is down or goes offline during a clustered reconciliation run, the reconciliation is canceled.
16.18.2. Viewing Clustered Reconciliation Progress
The sourceProcessedByNode property indicates how many
records are processed by each node. You can verify the load distribution
per node by running a GET on the recon endpoint, for example:
$ curl \
--header "X-OpenIDM-Username: openidm-admin" \
--header "X-OpenIDM-Password: openidm-admin" \
--request GET \
"http://localhost:8080/openidm/recon"
...
"started": "2017-05-11T10:04:59.563Z",
"ended": "",
"duration": 342237,
"sourceProcessedByNode": {
"node2": 21500,
"node1": 22000
}
}Alternatively, you can display the nodes responsible for each source page in the Admin UI. Click on the relevant mapping and expand the "In Progress" or "Reconciliation Results" item. The following image shows a clustered reconciliation in progress. The details include the number of records that have been processed, the current duration of the reconciliation, and the load distribution, per node:
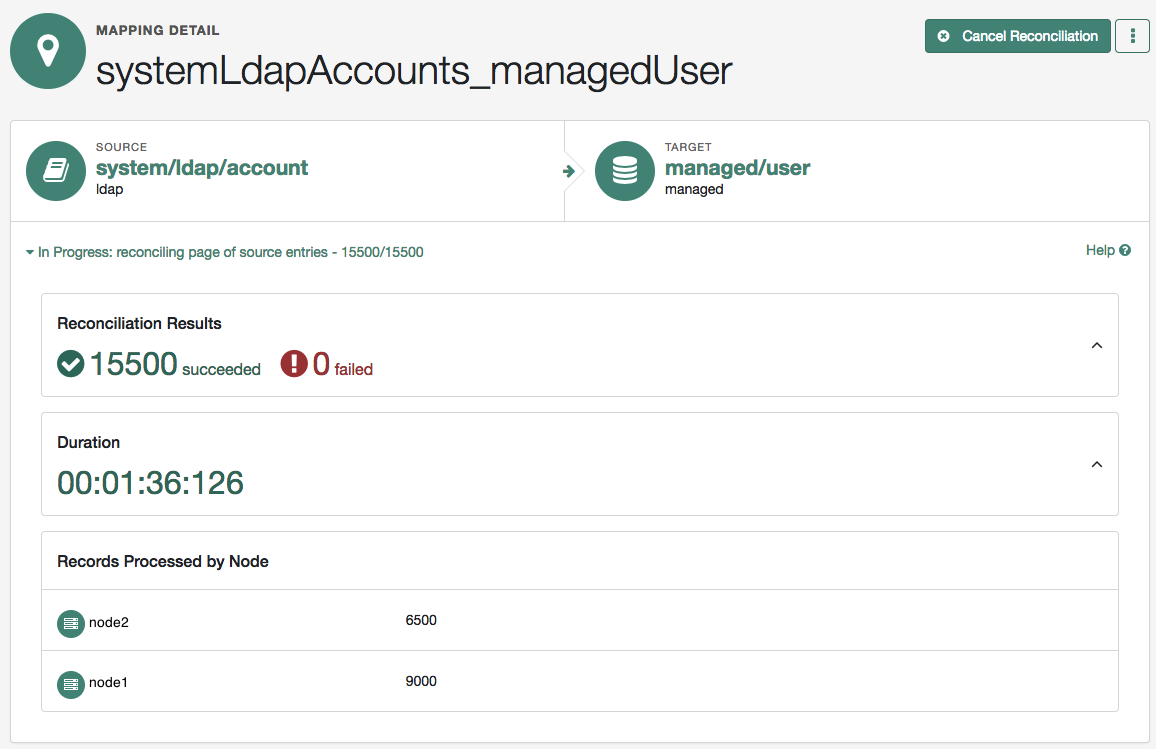
16.18.3. Canceling a Clustered Reconciliation Operation
You cancel a clustered reconciliation in the same way as a non-clustered reconciliation, for example:
$ curl \
--header "X-OpenIDM-Username: openidm-admin" \
--header "X-OpenIDM-Password: openidm-admin" \
--request POST \
"http://localhost:8080/openidm/recon/90892122-5ceb-4bbe-86f7-94272df834ad-406025?_action=cancel"
{
"_id": "90892122-5ceb-4bbe-86f7-94272df834ad-406025",
"action": "cancel",
"status": "INITIATED"
}When the cancellation has completed, a query on that reconciliation ID will show the state and stage of the reconciliation as follows:
{
"_id": "90892122-5ceb-4bbe-86f7-94272df834ad-406025",
"mapping": "systemLdapAccounts_managedUser",
"state": "CANCELED",
"stage": "COMPLETED_CANCELED",
"stageDescription": "reconciliation aborted.",
"progress": {
"source": {
"existing": {
"processed": 23500,
"total": "23500"
}
},
"target": {
"existing": {
"processed": 23498,
"total": "?"
},
...
In a clustered environment, all reconciliation
operations are considered to be "cluster-friendly". This means that even if
a mapping is configured as "clusteredSourceReconEnabled" : false
you can view the in progress operation on any node in
the cluster, even if that node is not currently processing the
reconciliation. You can also cancel a reconciliation in progress from any
node in the cluster.
16.18.4. Purging Reconciliation Statistics From the Repository
By default, the statistics for the last 50 clustered reconciliation runs are
stored in the repository. You can change this default by adding the
openidm.recon.maxcompletedruns property to your
resolver/boot.properties file. The following example
retains the last 100 completed reconciliation runs in the repository:
openidm.recon.maxcompletedruns=100
When the number of reconciliation runs reaches this figure, statistic are purged automatically each time a new reconciliation run is added. Statistics for the oldest reconciliation runs are purged first.
To purge reconciliation statistics from the repository manually, run a DELETE command on the reconciliation run ID. For example:
$ curl \ --header "X-OpenIDM-Username: openidm-admin" \ --header "X-OpenIDM-Password: openidm-admin" \ --request DELETE \ "http://localhost:8080/openidm/recon/0890ad62-4738-4a3f-8b8e-f3c83bbf212e"
16.19. Understanding Reconciliation Duration Metrics
"Obtaining the Details of a Reconciliation" describes how to obtain the details of a
reconciliation run over REST. This section provides more information on the
metrics returned when you query the recon endpoint.
Reconciliation is processed as a series of distinct tasks. The
durationSummary property indicates the period of time
spent on each task. You can use this information to address reconciliation
performance bottlenecks.
The following sample output shows the kind of information returned for each reconciliation run:
{
"_id": "3bc72717-a4bb-4871-b936-3a5a560c1a7c-37",
"duration": 781561,
"durationSummary": {
"auditLog": {
...
},
...
"sourceObjectQuery": {
"count": 100,
"max": 96,
"mean": 14,
"min": 6,
"stdDev": 16,
"sum": 1450
},
"sourcePagePhase": {
"count": 1,
"max": 20944,
"mean": 20944,
"min": 20944,
"stdDev": 0,
"sum": 20944
},
"sourceQuery": {
"count": 1,
"max": 120,
"mean": 120,
"min": 120,
"stdDev": 0,
"sum": 120
},
"targetPhase": {
"count": 1,
"max": 0,
"mean": 0,
"min": 0,
"stdDev": 0,
"sum": 0
},
"targetQuery": {
"count": 1,
"max": 19657,
"mean": 19657,
"min": 19657,
"stdDev": 0,
"sum": 19657
}
},
...
}
The specific reconciliation tasks that are run depend on the configuration
for that mapping. For example, the sourcePagePhase is run
only if paging is enabled. The linkQuery is run only for
non-clustered reconciliation operations because an initial query of all links
does not make sense if a single source page query is being run.
The following list describes all the possible tasks that can be run for a single reconciliation:
sourcePhaseThis phase runs only for non-clustered, non-paged reconciliations. The total duration (
sum) is the time spent processing all records on the source system.sourcePagePhaseQueries and processes individual objects in a page, based on their IDs. This phase is run only for clustered reconciliations or for non-clustered reconciliations that have source paging configured. The total duration (
sum) is the total time spent processing source pages across all cluster nodes. This processing occurs in parallel across all cluster nodes, so it is normal for thesourcePagePhaseduration to exceed the total reconciliation duration.sourceQueryObtains all IDs on the source system, or in a specific source page.
sourceObjectQueryQueries the individual objects on the source system or page, based on their IDs.
validSourceScriptProcesses any scripts that should be run to determine if a source object is valid to be mapped.
linkQueryQueries any existing links between source and target objects.
This phase includes the following tasks:
sourceLinkQueryQueries any existing links from source objects to target objects.
targetLinkQueryQueries any existing links from target objects that were not processed during the
sourceLinkQueryphase.linkQualifiersScriptRuns any link qualifier scripts. For more information, see "Mapping a Single Source Object to Multiple Target Objects".
onLinkScriptProcesses any scripts that should be run when source and target objects are linked.
onUnlinkScriptProcesses any scripts that should be run when source and target objects are unlinked.
deleteLinkObjectDeletes any links that are no longer relevant between source and target objects.
correlationQueryProcesses any configured correlation queries. For more information, see "Writing Correlation Queries".
correlationScriptProcesses any configured correlation scripts. For more information, see "Writing Correlation Scripts".
defaultMappingScriptFor roles, processes the script that applies the effective assignments as part of the mapping.
activePolicyScriptSets the action and active policy based on the current situation.
activePolicyPostActionScriptProcesses any scripts configured to run after policy validation.
targetPhaseThe aggregated result for time spent processing records on the target system.
targetQueryQueries all IDs on the target system. The list of IDs is restricted to IDs that have not already been linked to a source ID during the source phase. The target query generates a list of orphan IDs that must be reconciled if the target phase is not disabled.
targetObjectQueryQueries the individual objects on the target system, based on their IDs.
validTargetScriptProcesses any scripts that should be run to determine if a target object is valid to be mapped.
onCreateScriptProcesses any scripts that should be run when a new target object is created.
updateTargetObjectUpdates existing linked target objects, based on the configured situations and actions.
onUpdateScriptProcesses any scripts that should be run when a target object is updated.
deleteTargetObjectDeletes any objects on the target resource that must be removed in accordance with the defined synchronization actions.
onDeleteScriptProcesses any scripts that should be run when a target object is deleted.
resultScriptProcesses the script that is executed for every mapping event, regardless of the operation.
propertyMappingScriptRuns any scripts configured for when source and target properties are mapped.
postMappingScriptProcesses any scripts that should be run when synchronization has been performed on the managed/user object.
onReconScriptProcesses any scripts that should be run after source and target systems are reconciled.
auditLogWrites reconciliation results to the audit log.
For each phase, the following metrics are collected:
countThe number of objects or records processed during that phase. For the
sourcePageQueryphase, thecountparameter refers to the page size.When the
countstatistic of a particular task refers to the number of records being reconciled, thesumstatistic of that task represents the total time across the total number of threads running in all nodes in the cluster. For example:"updateTargetObject": { "count": 1000000, "max": 1193, "mean": 35, "min": 11, "stdDev": 0, "sum": 35065991 }maxThe maximum time, in milliseconds, spent processing a record during that phase.
meanThe average time, in milliseconds, spent processing a record during that phase.
minThe minimum time, in milliseconds, spent processing a record during that phase.
stdDevThe standard deviation, which measures the variance of the individual values from the mean.
sumThe total amount of time, in milliseconds, spent during that phase.
Chapter 17. Extending IDM Functionality By Using Scripts
Scripting lets you customize various aspects of IDM functionality. For example, you can provide custom logic between source and target mappings, define correlation rules, filters, triggers, and so on. This chapter shows you how to use scripts in IDM and provides reference information on the script engine.
IDM supports scripts written in JavaScript and Groovy. Script
options, and the locations in which IDM expects to find scripts,
are configured in the conf/script.json file for your
project. For more information, see "Setting the Script Configuration".
Several default scripts are included in the directory
/path/to/openidm/bin/defaults/script/.
Do not modify or remove any of the scripts in this directory. IDM
needs these scripts to run specific services. Scripts in this folder are not
guaranteed to remain constant between product releases.
If you develop custom scripts, copy them to the script/
directory for your project, for example,
path/to/openidm/samples/sync-with-ldap/script/.
Caution
IDM uses BouncyCastle 1.67 for signing JWTs. The BouncyCastle .JAR file that is bundled
with IDM includes the org.bouncycastle.asn1.util.Dump command-line
utility. Although this utility is not used directly by IDM, it is possible to reference
the utility in your scripts. Due to a security vulnerability in this utility, you should
not reference it in your scripts. For more information, see the corresponding
BouncyCastle issue.
17.1. Validating Scripts Over REST
IDM exposes a script endpoint over which
scripts can be validated, by specifying the script parameters as part of the
JSON payload. This functionality enables you to test how a script will operate
in your deployment, with complete control over the inputs and outputs.
Testing scripts in this way can be useful in debugging.
In addition, the script registry service supports calls to other scripts. For example, you might have logic written in JavaScript, but also some code available in Groovy. Ordinarily, it would be challenging to interoperate between these two environments, but this script service enables you to call one from the other on the IDM router.
The script endpoint supports two actions -
eval and compile.
The eval action evaluates a script, by taking any actions
referenced in the script, such as router calls to affect the state of an
object. For JavaScript scripts, the last statement that is executed is the
value produced by the script, and the expected result of the REST call.
The following REST call attempts to evaluate the
autoPurgeAuditRecon.js script (provided in
openidm/bin/defaults/script/audit), but provides an
incorrect purge type ("purgeByNumOfRecordsToKeep" instead
of "purgeByNumOfReconsToKeep"). The error is picked up in
the evaluation. The example assumes that the script exists in the directory
reserved for custom scripts (openidm/script).
$ curl \
--header "X-OpenIDM-Username: openidm-admin" \
--header "X-OpenIDM-Password: openidm-admin" \
--header "Content-Type: application/json" \
--request POST \
--data '{
"type": "text/javascript",
"file": "script/autoPurgeAuditRecon.js",
"globals": {
"input": {
"mappings": ["%"],
"purgeType": "purgeByNumOfRecordsToKeep",
"numOfRecons": 1
}
}
}' \
"http://localhost:8080/openidm/script?_action=eval"
"Must choose to either purge by expired or number of recons to keep"Tip
The variables passed into this script are namespaced with the
"globals" map. It is preferable to namespace variables
passed into scripts in this way, to avoid collisions with the top-level
reserved words for script maps, such as file,
source, and type.
The compile action compiles a script, but does not
execute it. This action is used primarily by the UI, to validate scripts that
are entered in the UI. A successful compilation returns
true. An unsuccessful compilation returns the reason for
the failure.
The following REST call tests whether a transformation script will compile.
$ curl \
--header "X-OpenIDM-Username: openidm-admin" \
--header "X-OpenIDM-Password: openidm-admin" \
--header "Content-Type: application/json" \
--request POST \
--data '{
"type":"text/javascript",
"source":"source.mail ? source.mail.toLowerCase() : null"
}' \
"http://localhost:8080/openidm/script?_action=compile"
TrueIf the script is not valid, the action returns an indication of the error, for example:
$ curl \
--header "X-OpenIDM-Username: openidm-admin" \
--header "X-OpenIDM-Password: openidm-admin" \
--header "Content-Type: application/json" \
--request POST \
--data '{
"type":"text/javascript",
"source":"source.mail ? source.mail.toLowerCase()"
}' \
"http://localhost:8080/openidm/script?_action=compile"
{
"code": 400,
"reason": "Bad Request",
"message": "missing : in conditional expression
(3864142CB836831FAB8EAB662F566139CDC22BF2#1)
in 3864142CB836831FAB8EAB662F566139CDC22BF2
at line number 1 at column number 39"
}17.2. Creating Custom Endpoints to Launch Scripts
Custom endpoints enable you to run arbitrary scripts through the REST URI.
Custom endpoints are configured in files named
conf/endpoint-name.json,
where name generally describes the purpose of the
endpoint. The endpoint configuration file includes an inline script or a
reference to a script file, in either JavaScript or Groovy. The referenced
script provides the endpoint functionality.
A sample custom endpoint configuration is provided in the
openidm/samples/example-configurations/custom-endpoint directory. The sample
includes three files:
- conf/endpoint-echo.json
Provides the configuration for the endpoint.
- script/echo.js
Provides the endpoint functionality in JavaScript.
- script/echo.groovy
Provides the endpoint functionality in Groovy.
This sample endpoint is described in detail in "Creating a Custom Endpoint" in the Samples Guide.
Endpoint configuration files and scripts are discussed further in the following sections.
17.2.1. Creating a Custom Endpoint Configuration File
An endpoint configuration file includes the following elements:
{
"context" : "endpoint/linkedView/*",
"type" : "text/javascript",
"source" : "require('linkedView').fetch(request.resourcePath);"
}contextstring, optional
The context path under which the custom endpoint is registered, in other words, the route to the endpoint. An endpoint with the context
endpoint/testis addressable over REST at the URLhttp://localhost:8080/openidm/endpoint/testor by using a script such asopenidm.read("endpoint/test").Endpoint contexts support wild cards, as shown in the preceding example. The
endpoint/linkedview/*route matches the following patterns:endpoint/linkedView/managed/user/bjensen endpoint/linkedView/system/ldap/account/bjensen endpoint/linkedView/ endpoint/linkedView
The
contextparameter is not mandatory in the endpoint configuration file. If you do not include acontext, the route to the endpoint is identified by the name of the file. For example, in the sample endpoint configuration provided inopenidm/samples/example-configurations/custom-endpoint/conf/endpoint-echo.json, the route to the endpoint isendpoint/echo.Note that this
contextpath is not the same as the context chain of the request. For information about the request context chain, see "Understanding the Request Context Chain".typestring, required
The type of script to be executed, either
text/javascriptorgroovy.fileorsourceThe path to the script file, or the script itself, inline.
For example:
"file" : "workflow/gettasksview.js"
or
"source" : "require('linkedView').fetch(request.resourcePath);"
You must set authorization appropriately for any custom endpoints that you add, for example, by restricting the appropriate methods to the appropriate roles. For more information, see "Authorization".
17.2.2. Writing Custom Endpoint Scripts
The custom endpoint script files in the
samples/example-configurations/custom-endpoint/script directory demonstrate
all the HTTP operations that can be called by a script. Each HTTP operation
is associated with a method - create,
read, update, delete,
patch, action or
query. Requests sent to the custom endpoint return a list
of the variables available to each method.
All scripts are invoked with a global request variable in
their scope. This request structure carries all the information about the
request.
Warning
Read requests on custom endpoints must not modify the state of the resource, either on the client or the server, as this can make them susceptible to CSRF exploits.
The standard READ endpoints are safe from Cross Site Request Forgery (CSRF) exploits because they are inherently read-only.
Custom endpoint scripts must return a JSON object. The
structure of the return object depends on the method in
the request.
The following example shows the create method in the
echo.js file:
if (request.method === "create") {
return {
method: "create",
resourceName: request.resourcePath,
newResourceId: request.newResourceId,
parameters: request.additionalParameters,
content: request.content,
context: context.current
};
The following example shows the query method in the
echo.groovy file:
else if (request instanceof QueryRequest) {
// query results must be returned as a list of maps
return [
[
method: "query",
resourceName: request.resourcePath,
pagedResultsCookie: request.pagedResultsCookie,
pagedResultsOffset: request.pagedResultsOffset,
pageSize: request.pageSize,
queryExpression: request.queryExpression,
queryId: request.queryId,
queryFilter: request.queryFilter.toString(),
parameters: request.additionalParameters,
context: context.toJsonValue().getObject()
]
]
}Depending on the method, the variables available to the script can include the following:
resourceNameThe name of the resource, without the
endpoint/prefix, such asecho.newResourceIdThe identifier of the new object, available as the results of a
createrequest.revisionThe revision of the object.
parametersAny additional parameters provided in the request. The sample code returns request parameters from an HTTP GET with
?param=x, as"parameters":{"param":"x"}.contentContent based on the latest revision of the object, using
getObject.contextThe context of the request, including headers and security. For more information, see "Understanding the Request Context Chain".
- Paging parameters
The
pagedResultsCookie,pagedResultsOffsetandpageSizeparameters are specific toquerymethods. For more information see "Paging Query Results".- Query parameters
The
queryExpression,queryIdandqueryFilterparameters are specific toquerymethods. For more information see "Constructing Queries".
17.2.3. Setting Up Exceptions in Scripts
When you create a custom endpoint script, you might need to build exception-handling logic. To return meaningful messages in REST responses and in logs, you must comply with the language-specific method of throwing errors.
A script written in JavaScript should comply with the following exception format:
throw {
"code": 400, // any valid HTTP error code
"message": "custom error message",
"detail" : {
"var": parameter1,
"complexDetailObject" : [
"detail1",
"detail2"
]
}
}
Any exceptions will include the specified HTTP error code, the
corresponding HTTP error message, such as Bad Request,
a custom error message that can help you diagnose the error, and any
additional detail that you think might be helpful.
A script written in Groovy should comply with the following exception format:
import org.forgerock.json.resource.ResourceException
import org.forgerock.json.JsonValue
throw new ResourceException(404, "Your error message").setDetail(new JsonValue([
"var": "parameter1",
"complexDetailObject" : [
"detail1",
"detail2"
]
])) 17.3. Registering Custom Scripted Actions
You can register custom scripts that initiate some arbitrary action on a managed object endpoint. You can declare any number of actions in your managed object schema and associate those actions with a script.
Custom scripted actions have access to the following variables:
context, request,
resourcePath, and object. For more
information, see "Variables Available to Scripts".
Custom scripted actions facilitate arbitrary behavior on managed objects. For example, imagine a scenario where you want your managed users to be able to indicate whether they receive update notifications. You can define an action that toggles the value of a specific property on the user object. You can implement this scenario by following these steps:
Add an
updatesproperty to the managed user schema (in your project'sconf/managed.jsonfile) as follows:"properties": { ... "updates": { "title": "Automatic Updates", "viewable": true, "type": "boolean", "searchable": true, "userEditable": true }, ... }Add an action named
toggleUpdatesto the managed user object definition as follows:{ "objects" : [ { "name" : "user", "onCreate" : { ... }, ... "actions" : { "toggleUpdates" : { "type" : "text/javascript", "source" : "openidm.patch(resourcePath, null, [{ 'operation' : 'replace', 'field' : '/updates', 'value' : !object.updates }])" } }, ...Note that the
toggleUpdatesaction calls a script that changes the value of the user'supdatesproperty.Call the script by specifying the ID of the action in a POST request on the user object, for example:
$ curl \ --header "X-OpenIDM-Username: openidm-admin" \ --header "X-OpenIDM-Password: openidm-admin" \ --request POST \ "http://localhost:8080/openidm/managed/user/ID?_actionId=toggleUpdate"
You can test this functionality as follows:
Create a managed user, bjensen, with an
updatesproperty that is set totrue:$ curl \ --header "X-OpenIDM-Username: openidm-admin" \ --header "X-OpenIDM-Password: openidm-admin" \ --header "Content-Type: application/json" \ --request POST \ --data '{ "_id":"bjensen", "userName":"bjensen", "sn":"Jensen", "givenName":"Barbara", "mail":"bjensen@example.com", "telephoneNumber":"5556787", "description":"Created by OpenIDM REST.", "updates": true, "password":"Passw0rd" }' \ "http://localhost:8080/openidm/managed/user?_action=create" { "_id": "bjensen", "_rev": "0000000050c62938", "userName": "bjensen", "sn": "Jensen", "givenName": "Barbara", "mail": "bjensen@example.com", "telephoneNumber": "5556787", "description": "Created by OpenIDM REST.", "updates": true, "accountStatus": "active", "effectiveRoles": [], "effectiveAssignments": [] }Run the
toggleUpdatesaction on bjensen's entry:$ curl \ --header "X-OpenIDM-Username: openidm-admin" \ --header "X-OpenIDM-Password: openidm-admin" \ --request POST \ "http://localhost:8080/openidm/managed/user/bjensen?_action=toggleUpdates" { "_id": "bjensen", "_rev": "00000000a92657c7", "userName": "bjensen", "sn": "Jensen", "givenName": "Barbara", "mail": "bjensen@example.com", "telephoneNumber": "5556787", "description": "Created by OpenIDM REST.", "updates": false, "accountStatus": "active", "effectiveRoles": [], "effectiveAssignments": [] }Note in the command output that this action has set bjensen's
updatesproperty tofalse.
The return value of a custom scripted action is ignored. The managed object is returned as the response of the scripted action, whether that object has been updated by the script or not.
Chapter 18. Scheduling Tasks and Events
The scheduler service enables you to schedule reconciliation and synchronization tasks, trigger scripts, collect and run reports, trigger workflows, and perform custom logging.
The scheduler service depends on the Quartz Scheduler (bundled with IDM), and supports Quartz simple triggers and cron triggers. Use the trigger type that suits your scheduling requirements. For more information, see the Quartz documentation on SimpleTriggers and CronTriggers.
By default, IDM picks up changes to scheduled tasks and events dynamically, during initialization and also at runtime. For more information, see "Making Configuration Changes".
In addition to the fine-grained scheduling facility, you can perform a scheduled batch scan for a specified date in IDM data, and then automatically run a task when this date is reached. For more information, see "Scanning Data to Trigger Tasks".
18.1. Configuring the Scheduler Service
There is a distinction between the configuration of the scheduler service,
and the configuration of individual scheduled tasks and events. The
scheduler service is configured in your project's
conf/scheduler.json file. This file has the following
format:
{
"threadPool" : {
"threadCount" : "10"
},
"scheduler" : {
"executePersistentSchedules" : "&{openidm.scheduler.execute.persistent.schedules}"
}
}
The properties in the scheduler.json file relate to the
configuration of the Quartz Scheduler:
threadCountspecifies the maximum number of threads that are available for running scheduled tasks concurrently.executePersistentSchedulesallows you to disable persistent schedules for a specific node. If this parameter is set tofalse, the Scheduler Service will support the management of persistent schedules (CRUD operations) but it will not run any persistent schedules. The value of this property can be a string or boolean and istrueby default.You can also control whether schedules are persisted in your
resolver/boot.propertiesfile. For more information, see "Managing Scheduled Tasks Across a Cluster".advancedProperties(optional) enables you to configure additional properties for the Quartz Scheduler.
For details of all the configurable properties for the Quartz Scheduler, see the Quartz Scheduler Configuration Reference.
18.2. Configuring Schedules
You can use the Admin UI or JSON configuration files to schedule tasks and
events. To configure a schedule in the Admin UI, select Configure > Schedules
and then click Add Schedule. If configure your schedules directly in JSON
files, place these files in your project's conf/
directory. By convention, IDM uses file names of the form
schedule-schedule-name.json,
where schedule-name is a logical name for the
scheduled operation, for example,
schedule-reconcile_systemCsvAccounts_managedUser.json.
There are several example schedule configuration files in the
openidm/samples/example-configurations/schedules
directory.
Each schedule configuration file has the following format:
{
"enabled" : boolean,
"persisted" : boolean,
"recoverable" : boolean,
"concurrentExecution" : boolean,
"type" : "simple | cron",
"repeatInterval" : (optional) integer,
"repeatCount" : (optional) integer,
"startTime" : "(optional) time",
"endTime" : "(optional) time",
"schedule" : "cron expression",
"misfirePolicy" : "optional, string",
"invokeService" : "service identifier",
"invokeContext" : "service specific context info",
"invokeLogLevel" : "(optional) level"
}Note
If you create a schedule via the Admin UI, IDM does not create a
schedule-*.json file. It stores the schedule solely in
the IDM internal repository.
The schedule configuration properties are defined as follows:
enabledSet to
trueto enable the schedule. When this property isfalse, IDM considers the schedule configuration dormant, and does not allow it to be triggered or launched.If you want to retain a schedule configuration, but do not want it used, set
enabledtofalsefor task and event schedulers, instead of changing the configuration or cron expressions.persisted(optional)Specifies whether the schedule state should be persisted or stored only in RAM. Boolean (
trueorfalse),falseby default.In a clustered environment, this property must be set to
trueto have the schedule fire only once across the cluster. For more information, see "Configuring Persistent Schedules".Note
If the schedule is stored only in RAM, the schedule will be lost when IDM is restarted.
recoverable(optional)Specifies whether jobs that have failed mid-execution (as a result of a JVM crash or otherwise unexpected termination) should be recovered. Boolean (
trueorfalse),falseby default.concurrentExecutionSpecifies whether multiple instances of the same schedule can run concurrently. Boolean (
trueorfalse),falseby default. Multiple instances of the same schedule cannot run concurrently by default. This setting prevents a new scheduled task from being launched before the same previously launched task has completed. For example, under normal circumstances you would want a liveSync operation to complete before the same operation was launched again. To enable multiple schedules to run concurrently, set this parameter totrue. The behavior of missed scheduled tasks is governed by themisfirePolicy.typeThe trigger type, either
simpleorcron.To decide which trigger type to use, see the Quartz documentation on SimpleTriggers and CronTriggers.
repeatCountUsed only for simple triggers (
"type" : "simple").The number of times the schedule must be repeated. The repeat count can be zero, a positive integer, or -1. A value of -1 indicates that the schedule should repeat indefinitely.
If you do not specify a repeat count, the value defaults to -1.
repeatIntervalUsed only for simple triggers (
"type" : "simple").Specifies the interval, in milliseconds, between trigger firings. The repeat interval must be zero or a positive long value. If you set the repeat interval to zero, the scheduler will trigger
repeatCountfirings concurrently (or as close to concurrently as possible).If you do not specify a repeat interval, the value defaults to 0.
startTime(optional)This parameter starts the schedule at some time in the future. If the parameter is omitted, empty, or set to a time in the past, the task or event is scheduled to start immediately.
Use ISO 8601 format to specify times and dates (
yyyy-MM-dd'T'HH:mm:ss).To specify a time zone, include the time zone at the end of the
startTime, in the format+|-hh:mm, for example2017-10-31T15:53:00+05:00. If you specify both astartTimeand anendTime, they must have the same time zone.endTime(optional)Specifies when the schedule must end, in ISO 8601 format (
yyyy-MM-dd'T'HH:mm:ss+|-hh:mm.scheduleUsed only for cron triggers (
"type" : "cron").Takes cron expression syntax. For more information, see the CronTrigger Tutorial and Lesson 6: CronTrigger.
misfirePolicyFor persistent schedules, this optional parameter specifies the behavior if the scheduled task is missed, for some reason. Possible values are as follows:
fireAndProceed. The first run of a missed schedule is immediately launched when the server is back online. Subsequent runs are discarded. After this, the normal schedule is resumed.doNothing. All missed schedules are discarded and the normal schedule is resumed when the server is back online.
invokeServiceDefines the type of scheduled event or action. The value of this parameter can be one of the following:
syncfor reconciliationprovisionerfor liveSyncscriptto call some other scheduled operation defined in a scripttaskScannerto define a scheduled task that queries a set of objects. For more information, see "Scanning Data to Trigger Tasks".
invokeContextSpecifies contextual information, depending on the type of scheduled event (the value of the
invokeServiceparameter).The following example invokes reconciliation:
{ "invokeService": "sync", "invokeContext": { "action": "reconcile", "mapping": "systemLdapAccounts_managedUser" } }For a scheduled reconciliation task, you can define the mapping in one of two ways:
Reference a mapping by its name in
sync.json, as shown in the previous example. The mapping must exist in your project'sconf/sync.jsonfile.Add the mapping definition inline by using the
mappingproperty, as shown in "Specifying the Mapping as Part of the Schedule".
The following example invokes a liveSync operation:
{ "invokeService": "provisioner", "invokeContext": { "action": "liveSync", "source": "system/ds/__ACCOUNT__" } }For scheduled liveSync tasks, the
sourceproperty follows IDM's convention for a pointer to an external resource object and takes the formsystem/resource-name/object-type.The following example invokes a script, which prints the string
It is working: 26to the console. A similar sample schedule is provided inschedule-script.jsonin the/path/to/openidm/samples/example-configurations/schedulesdirectory.{ "invokeService": "script", "invokeContext": { "script" : { "type" : "text/javascript", "source" : "java.lang.System.out.println('It is working: ' + input.edit);", "input": { "edit": 26} } } }Note that these are sample configurations only. Your own schedule configuration will differ according to your specific requirements.
invokeLogLevel(optional)Specifies the level at which the invocation will be logged. Particularly for schedules that run very frequently, such as liveSync, the scheduled task can generate significant output to the log file, and you should adjust the log level accordingly. The default schedule log level is
info. The value can be set to any one of the SLF4J log levels:tracedebuginfowarnerrorfatal
18.3. Schedules and Daylight Savings Time
The scheduler service supports Quartz cron triggers and simple triggers. Cron triggers schedule jobs to fire at specific times with respect to a calendar (rather than every N milliseconds). This scheduling can cause issues when clocks change for daylight savings time (DST) if the trigger time falls around the clock change time in your specific time zone.
Depending on the trigger schedule, and on the daylight event, the trigger might be skipped or might appear not to fire for a short period. This interruption can be particularly problematic for liveSync where schedules execute continuously. In this case, the time change (for example, from 02:00 back to 01:00) causes an hour break between each liveSync execution.
To prevent DST from having an impact on your schedules, either use simple triggers or set the time zone of the schedule to Coordinated Universal Time (UTC). UTC is never subject to DST, so schedules will continue to fire as normal.
18.4. Configuring Persistent Schedules
By default, scheduling information, such as schedule state and details of the
schedule run, is stored in RAM. This means that such information is lost when
the server is rebooted. The schedule configuration itself (defined in your
project's conf/schedule-schedule-name.json
file) is not lost when the server is shut down, and normal scheduling
continues when the server is restarted. However, there are no details of
missed schedule runs that should have occurred during the period the server
was unavailable.
You can configure schedules to be persistent, which means that the scheduling information is stored in the internal repository rather than in RAM. With persistent schedules, scheduling information is retained when the server is shut down. Any previously scheduled jobs can be rescheduled automatically when the server is restarted.
Persistent schedules also enable you to manage scheduling across a cluster (multiple IDM instances). When scheduling is persistent, a particular schedule will be launched only once across the cluster, rather than once on every instance. For example, if your deployment includes a cluster of nodes for high availability, you can use persistent scheduling to start a reconciliation operation on only one node in the cluster, instead of starting several competing reconciliation operations on each node.
Important
Persistent schedules rely on timestamps. In a deployment where IDM instances run on separate machines, you must synchronize the system clocks of these machines using a time synchronization service that runs regularly. The clocks of all machines involved in persistent scheduling must be within one second of each other. For information on how you can achieve this using the Network Time Protocol (NTP) daemon, see the NTP RFC.
To configure persistent schedules, set persisted to
true in the schedule configuration file
(schedule-schedule-name.json).
If the server is down when a scheduled task was set to occur, one or more
runs of that schedule might be missed. To specify what action should be taken
if schedules are missed, set the misfirePolicy in the
schedule configuration file. The misfirePolicy determines
what IDM should do if scheduled tasks are missed. Possible values
are as follows:
fireAndProceed. The first run of a missed schedule is immediately implemented when the server is back online. Subsequent runs are discarded. After this, the normal schedule is resumed.doNothing. All missed schedules are discarded and the normal schedule is resumed when the server is back online.
18.5. Schedule Examples
The following example shows a schedule for reconciliation that is not
enabled. When the schedule is enabled ("enabled" : true,),
reconciliation runs every 30 minutes (1800000 milliseconds), and repeats
indefinitely:
{
"enabled": false,
"persisted": true,
"type": "simple",
"repeatInterval": 1800000,
"invokeService": "sync",
"invokeContext": {
"action": "reconcile",
"mapping": "systemLdapAccounts_managedUser"
}
}The following example shows a schedule for liveSync enabled to run every 15 seconds, repeating indefinitely. Note that the schedule is persisted, that is, stored in the repository rather than in memory. If one or more liveSync runs are missed, as a result of the server being unavailable, the first run of the liveSync operation is implemented when the server is back online. Subsequent runs are discarded. After this, the normal schedule is resumed:
{
"enabled": true,
"persisted": true,
"misfirePolicy" : "fireAndProceed",
"type": "simple",
"repeatInterval": 15000,
"invokeService": "provisioner",
"invokeContext": {
"action": "liveSync",
"source": "system/ldap/account"
}
}18.6. Managing Schedules Over REST
The scheduler service is exposed under the
/openidm/scheduler context path. Within this context path,
the defined scheduled jobs are accessible at
/openidm/scheduler/job. A job is the actual task that is
run. Each job contains a trigger that starts the job.
The trigger defines the schedule according to which the job is executed. You
can read and query the existing triggers on the
/openidm/scheduler/trigger context path.
The following examples show how schedules are validated, created, read, queried, updated, and deleted, over REST, by using the scheduler service. The examples also show how to pause and resume scheduled jobs, when an instance is placed in maintenance mode. For information about placing a server in maintenance mode, see "Placing a Server in Maintenance Mode" in the Installation Guide.
Note
When you configure schedules over REST, changes made to the schedules are
not pushed back into the configuration service. Managing schedules by
using the /openidm/scheduler/job context path essentially
bypasses the configuration service and sends the request directly to the
scheduler.
If you need to perform an operation on a schedule that was created by using
the configuration service (by placing a schedule file in the
conf/ directory), you must direct your request to the
/openidm/config context path, and not to the
/openidm/scheduler/job context path.
PATCH operations are not supported on the scheduler
context path. To patch a schedule, use the config context
path.
18.6.1. Validating Cron Trigger Expressions
Schedules are defined using Quartz cron or simple triggers. If you use a
cron trigger, you can validate your cron expression by sending the
expression as a JSON object to the scheduler context
path. For example:
$ curl \
--header "X-OpenIDM-Username: openidm-admin" \
--header "X-OpenIDM-Password: openidm-admin" \
--header "Content-Type: application/json" \
--request POST \
--data '{
"cronExpression":"0 0/1 * * * ?"
}' \
"http://localhost:8080/openidm/scheduler?_action=validateQuartzCronExpression"
{
"valid": true
}18.6.2. Defining a Schedule
To define a new schedule, send a PUT or POST request to the
scheduler/job context path with the details of the
schedule in the JSON payload. A PUT request allows you to specify the ID of
the schedule while a POST request assigns an ID automatically.
The following example uses a PUT request to create a schedule that fires a
script (script/testlog.js) every second. The schedule
configuration is as described in
"Configuring the Scheduler Service":
$ curl \
--header "X-OpenIDM-Username: openidm-admin" \
--header "X-OpenIDM-Password: openidm-admin" \
--header "Content-Type: application/json" \
--request PUT \
--data '{
"enabled":true,
"type":"cron",
"schedule":"0/1 * * * * ?",
"persisted":true,
"misfirePolicy":"fireAndProceed",
"invokeService":"script",
"invokeContext": {
"script": {
"type":"text/javascript",
"file":"script/testlog.js"
}
}
}' \
"http://localhost:8080/openidm/scheduler/job/testlog-schedule"
{
"_id": "testlog-schedule",
"enabled": true,
"persisted": true,
"misfirePolicy": "fireAndProceed",
"schedule": "0/1 * * * * ?",
"type": "cron",
"invokeService": "org.forgerock.openidm.script",
"invokeContext": {
"script": {
"type": "text/javascript",
"file": "script/testlog.js"
}
},
"invokeLogLevel": "info",
"timeZone": null,
"startTime": null,
"endTime": null,
"concurrentExecution": false,
"triggers": [
{
"previous_state": 0,
"name": "trigger-testlog-schedule",
"state": 4,
"nodeId": "node1",
"acquired": true,
"serialized": "rO0ABXNyABZvcmcucXVhcnR6L...30HhzcQB+ABx3CAAAAVdwIrfQeA==",
"group": "scheduler-service-group",
"_id": "scheduler-service-group_$x$x$_trigger-testlog-schedule",
"_rev": "00000000034d689d"
}
],
"nextRunDate": "2016-09-28T09:31:47.000Z"
}
Note that the output includes the trigger that was
created as part of the scheduled job, as well as the
nextRunDate for the job. For more information about the
trigger properties, see
"Querying Schedule Triggers".
The following example uses a POST request to create an identical schedule to the one created in the previous example, but with a server-assigned ID:
$ curl \
--header "X-OpenIDM-Username: openidm-admin" \
--header "X-OpenIDM-Password: openidm-admin" \
--header "Content-Type: application/json" \
--request POST \
--data '{
"enabled":true,
"type":"cron",
"schedule":"0/1 * * * * ?",
"persisted":true,
"misfirePolicy":"fireAndProceed",
"invokeService":"script",
"invokeContext": {
"script": {
"type":"text/javascript",
"file":"script/testlog.js"
}
}
}' \
"http://localhost:8080/openidm/scheduler/job?_action=create"
{
"_id": "9858a39d-b1e7-4842-9874-0fb8179b149a",
"enabled": true,
"persisted": true,
"misfirePolicy": "fireAndProceed",
"schedule": "0/1 * * * * ?",
"type": "cron",
"invokeService": "org.forgerock.openidm.script",
"invokeContext": {
"script": {
"type": "text/javascript",
"file": "script/testlog.js"
}
},
"invokeLogLevel": "info",
"timeZone": null,
"startTime": null,
"endTime": null,
"concurrentExecution": false,
"triggers": [
{
"previous_state": 0,
"name": "trigger-9858a39d-b1e7-4842-9874-0fb8179b149a",
"state": 4,
"nodeId": "node1",
"acquired": true,
"serialized": "...+XAeHNxAH4AHHcIAAABV2wX4dh4c3EAfgAcdwgAAAFXbBfh2Hg=...",
"group": "scheduler-service-group",
"_id": "scheduler-service-group_$x$x$_trigger-9858a39d-b1e7-4842-9874-0fb8179b149a",
"_rev": "00000000034d689d"
}
],
"nextRunDate": "2016-09-27T14:41:28.000Z"
}
The output includes the generated _id of the schedule, in
this case "_id": "9858a39d-b1e7-4842-9874-0fb8179b149a".
18.6.3. Obtaining the Details of a Scheduled Job
The following example displays the details of the schedule created in the previous section. Specify the job ID in the URL:
$ curl \
--header "X-OpenIDM-Username: openidm-admin" \
--header "X-OpenIDM-Password: openidm-admin" \
--request GET \
"http://localhost:8080/openidm/scheduler/job/testlog-schedule"
{
"_id": "testlog-schedule",
"enabled": true,
"persisted": true,
"misfirePolicy": "fireAndProceed",
"schedule": "0/1 * * * * ?",
"type": "cron",
"invokeService": "org.forgerock.openidm.script",
"invokeContext": {
"script": {
"type": "text/javascript",
"file": "script/testlog.js"
}
},
"invokeLogLevel": "info",
"timeZone": null,
"startTime": null,
"endTime": null,
"concurrentExecution": false,
"triggers": [
{
"previous_state": -1,
"name": "trigger-testlog-schedule",
"state": 0,
"nodeId": "node1",
"acquired": true,
"serialized": "rO0ABXNyABZvcmcucXVhcnR6L.../AHhzcQB+ABx3CAAAAVdwIrfQeA==",
"group": "scheduler-service-group",
"_id": "scheduler-service-group_$x$x$_trigger-testlog-schedule",
"_rev": "00000000c4c968a0"
}
],
"nextRunDate": "2016-09-28T10:03:13.000Z"
}
18.6.4. Querying Scheduled Jobs
You can query defined and running scheduled jobs using a regular query
filter or a parameterized query. Support for parameterized queries is
restricted to _queryId=query-all-ids. For more
information about query filters, see "Constructing Queries".
The following query returns the IDs of all defined schedules:
$ curl \
--header "X-OpenIDM-Username: openidm-admin" \
--header "X-OpenIDM-Password: openidm-admin" \
--request GET \
"http://localhost:8080/openidm/scheduler/job?_queryId=query-all-ids"
{
"result": [
{
"_id": "reconcile_systemLdapAccounts_managedUser"
},
{
"_id": "testlog-schedule"
}
],
...
}The following query returns the IDs, enabled status, and next run date of all defined schedules:
$ curl \
--header "X-OpenIDM-Username: openidm-admin" \
--header "X-OpenIDM-Password: openidm-admin" \
--request GET \
"http://localhost:8080/openidm/scheduler/job?_queryFilter=true&_fields=_id,enabled,nextRunDate"
{
"result": [
{
"_id": "reconcile_systemLdapAccounts_managedUser",
"enabled": false,
"nextRunDate": null
},
{
"_id": "testlog-schedule",
"enabled": true,
"nextRunDate": "2016-09-28T10:11:06.000Z"
}
],
...
}
18.6.5. Updating a Schedule
To update a schedule definition, use a PUT request and update all the static properties of the object.
The following example disables the testlog schedule created in the previous
section by setting "enabled":false:
$ curl \
--header "X-OpenIDM-Username: openidm-admin" \
--header "X-OpenIDM-Password: openidm-admin" \
--header "Content-Type: application/json" \
--request PUT \
--data '{
"enabled":false,
"type":"cron",
"schedule":"0/1 * * * * ?",
"persisted":true,
"misfirePolicy":"fireAndProceed",
"invokeService":"script",
"invokeContext": {
"script": {
"type":"text/javascript",
"file":"script/testlog.js"
}
}
}' \
"http://localhost:8080/openidm/scheduler/job/testlog-schedule"
{
"_id": "testlog-schedule",
"enabled": false,
"persisted": true,
"misfirePolicy": "fireAndProceed",
"schedule": "0/1 * * * * ?",
"type": "cron",
"invokeService": "org.forgerock.openidm.script",
"invokeContext": {
"script": {
"type": "text/javascript",
"file": "script/testlog.js"
}
},
"invokeLogLevel": "info",
"timeZone": null,
"startTime": null,
"endTime": null,
"concurrentExecution": false,
"triggers": [],
"nextRunDate": null
}
When you disable a schedule, all triggers are removed and the
nextRunDate is set to null. If you
re-enable the schedule, a new trigger is generated, and the
nextRunDate is recalculated.
18.6.6. Deleting a Schedule
To delete a schedule, send a DELETE request to the schedule ID. For example:
$ curl \
--header "X-OpenIDM-Username: openidm-admin" \
--header "X-OpenIDM-Password: openidm-admin" \
--request DELETE \
"http://localhost:8080/openidm/scheduler/job/testlog-schedule"
{
"_id": "testlog-schedule",
"enabled": true,
...
}
The DELETE request returns the entire JSON object.
18.6.7. Obtaining a List of Running Scheduled Jobs
The following command returns a list of the jobs that are currently executing. This list enables you to decide whether to wait for a specific job to complete before you place a server in maintenance mode.
This action does not list the jobs across a cluster, only the jobs currently executing on the node to which the request is routed.
Note that this list is accurate only at the moment the request was issued. The list can change at any time after the response is received.
$ curl \
--header "X-OpenIDM-Username: openidm-admin" \
--header "X-OpenIDM-Password: openidm-admin" \
--request POST \
"http://localhost:8080/openidm/scheduler/job?_action=listCurrentlyExecutingJobs"
[
{
"enabled": true,
"persisted": true,
"misfirePolicy": "fireAndProceed",
"type": "simple",
"repeatInterval": 3600000,
"repeatCount": -1,
"invokeService": "org.forgerock.openidm.sync",
"invokeContext": {
"action": "reconcile",
"mapping": "systemLdapAccounts_managedUser"
},
"invokeLogLevel": "info",
"timeZone": null,
"startTime": null,
"endTime": null,
"concurrentExecution": false
}
]18.6.8. Pausing Scheduled Jobs
In preparation for placing a server in maintenance mode, you can temporarily suspend all scheduled jobs. This action does not cancel or interrupt jobs that are already in progress - it simply prevents any scheduled jobs from being invoked during the suspension period.
The following command suspends all scheduled tasks and returns
true if the tasks could be suspended successfully.
$ curl \
--header "X-OpenIDM-Username: openidm-admin" \
--header "X-OpenIDM-Password: openidm-admin" \
--request POST \
"http://localhost:8080/openidm/scheduler/job?_action=pauseJobs"
{
"success": true
}18.6.9. Resuming All Scheduled Jobs
When an update has been completed, and your instance is no longer in maintenance mode, you can resume scheduled jobs to start them up again. Any jobs that were missed during the downtime will follow their configured misfire policy to determine whether they should be reinvoked.
The following command resumes all scheduled jobs and returns
true if the jobs could be resumed successfully.
$ curl \
--header "X-OpenIDM-Username: openidm-admin" \
--header "X-OpenIDM-Password: openidm-admin" \
--request POST \
"http://localhost:8080/openidm/scheduler/job?_action=resumeJobs"
{
"success": true
}18.6.10. Querying Schedule Triggers
When a scheduled job is created, a trigger for that job is created
automatically and is included in the schedule definition. The trigger is
essentially what causes the job to be started. You can read all the triggers
that have been generated on a system with the following query on the
openidm/scheduler/trigger context path:
$ curl \
--header "X-OpenIDM-Username: openidm-admin" \
--header "X-OpenIDM-Password: openidm-admin" \
--request GET \
"http://localhost:8080/openidm/scheduler/trigger?_queryFilter=true"
{
"result": [
{
"_id": "scheduler-service-group_$x$x$_trigger-testlog-schedule",
"_rev": "00000000f56e6861",
"previous_state": -1,
"name": "trigger-testlog-schedule",
"state": 0,
"nodeId": "node1",
"acquired": true,
"serialized": "rO0ABXNyABZvcmcucXVhcnR6L.../iHhzcQB+ABx3CAAAAVdwXUAweA==",
"group": "scheduler-service-group"
},
{
"_id": "scheduler-service-group_$x$x$_trigger-reconcile_systemLdapAccounts_managedUser",
"_rev": "00000000ea778350",
"previous_state": -1,
"name": "trigger-reconcile_systemLdapAccounts_managedUser",
"state": 0,
"nodeId": null,
"acquired": false,
"serialized": "rO0ABXNyABZvcmcucXVhcnR6L...0gCB4c3EAfgAcdwgAAAFXcF6QIHg=",
"group": "scheduler-service-group"
}
],
...
}
The contents of a trigger object are as follows:
_idThe ID of the trigger. The trigger ID takes the form
group_$x$x$_trigger-schedule-id_revThe revision of the trigger object. This property is reserved for internal use and specifies the revision of the object in the repository. This is the same value that is exposed as the object's ETag through the REST API. The content of this property is not defined. No consumer should make any assumptions of its content beyond equivalence comparison.
previous_stateThe previous state of the trigger, before its current state. For a description of Quartz trigger states, see the Quartz API documentation.
nameThe trigger name, in the form
trigger-schedule-idstateThe current state of the trigger. For a description of Quartz trigger states, see the Quartz API documentation.
nodeIdThe ID of the node that has acquired the trigger, useful in a clustered deployment.
acquiredWhether the trigger has already been acquired by a node. Boolean, true or false.
serializedThe Base64 serialization of the trigger class.
groupThe name of the group that the trigger is in, always
scheduler-service-group.
To read the contents of a specific trigger send a PUT request to the trigger ID, for example:
$ curl \
--header "X-OpenIDM-Username: openidm-admin" \
--header "X-OpenIDM-Password: openidm-admin" \
--request GET \
"http://localhost:8080/openidm/scheduler/trigger/scheduler-service-group_\$x\$x\$_trigger-testlog-schedule"
{
"_id": "scheduler-service-group_$x$x$_trigger-testlog-schedule",
"_rev": "00000000792afa08",
"previous_state": -1,
"name": "trigger-testlog-schedule",
"state": 0,
"nodeId": "node1",
"acquired": true,
"serialized": "rO0ABXNyABZvcmcucXVhcnR6L...2oHhzcQB+ABx3CAAAAVdwXUAweA==",
"group": "scheduler-service-group"
}
Note that you need to escape the $ signs in the URL.
To view the triggers that have been acquired, per node, send a GET request
to the scheduler/acquiredTriggers context path. For
example:
$ curl \
--header "X-OpenIDM-Username: openidm-admin" \
--header "X-OpenIDM-Password: openidm-admin" \
--request GET \
"http://localhost:8080/openidm/scheduler/acquiredTriggers"
{
"_id": "acquiredTriggers",
"_rev": "00000000c7554e13",
"node1": [
"scheduler-service-group_$x$x$_trigger-testlog-schedule"
]
}
To view the triggers that have not yet been acquired by any node, send a GET
request to the scheduler/waitingTriggers context path.
For example:
$ curl \
--header "X-OpenIDM-Username: openidm-admin" \
--header "X-OpenIDM-Password: openidm-admin" \
--request GET \
"http://localhost:8080/openidm/scheduler/waitingTriggers"
{
"_id": "waitingTriggers",
"_rev": "000000004cab60c8",
"names": [
"scheduler-service-group_$x$x$_trigger-0da27688-7ece-4799-bca4-09e185a6b0f4",
"scheduler-service-group_$x$x$_trigger-0eeaf861-604b-4cf4-a044-bbbc78377070",
"scheduler-service-group_$x$x$_trigger-136b7a1a-3aee-4321-8b6a-3e860e7b0292",
"scheduler-service-group_$x$x$_trigger-1f6b116b-aa06-41da-9c19-80314373a20f",
"scheduler-service-group_$x$x$_trigger-659b2bb0-53b8-4a4e-8347-8ed1ed5286af",
"scheduler-service-group_$x$x$_trigger-testlog-schedule",
"scheduler-service-group_$x$x$_trigger-ad9db1c7-a06d-4dc9-83b9-0c2e405dde1f"
]
}18.7. Managing Schedules Through the Admin UI
To manage schedules through the Admin UI, select Configure > Schedules. By default, only persisted schedules are shown in the Schedules list. To show non-persisted (in memory) schedules, select Filter by Type > In Memory.
18.8. Scanning Data to Trigger Tasks
In addition to the fine-grained scheduling facility described previously, IDM provides a task scanning mechanism. The task scanner enables you to scan a set of properties with a complex query filter, at a scheduled interval. The task scanner then launches a script on the objects returned by the query.
For example, the task scanner can scan all managed/user
objects for a "sunset date" and can invoke a script that launches a "sunset
task" on the user object when this date is reached.
18.8.1. Configuring the Task Scanner
The task scanner is essentially a scheduled task that queries a set of
managed users, then launches a script based on the query results. The task
scanner is configured in the same way as a regular scheduled task in a
schedule configuration file named
(schedule-task-name.json),
with the invokeService parameter set to
taskscanner. The invokeContext
parameter defines the details of the scan, and the task that should be
launched when the specified condition is triggered.
The following example defines a scheduled scanning task that triggers a
sunset script. This sample schedule configuration file is provided in
openidm/samples/example-configurations/task-scanner/conf/schedule-taskscan_sunset.json.
To use the sample file, copy it to your project's conf
directory and edit it as required.
{
"enabled" : true,
"type" : "simple",
"repeatInterval" : 3600000,
"persisted": true,
"concurrentExecution" : false,
"invokeService" : "taskscanner",
"invokeContext" : {
"waitForCompletion" : false,
"numberOfThreads" : 5,
"scan" : {
"_queryFilter" : "((/sunset/date lt \"${Time.now}\") AND !(/sunset/task-completed pr))",
"object" : "managed/user",
"taskState" : {
"started" : "/sunset/task-started",
"completed" : "/sunset/task-completed"
},
"recovery" : {
"timeout" : "10m"
}
},
"task" : {
"script" : {
"type" : "text/javascript",
"file" : "script/sunset.js"
}
}
}
}
The schedule configuration calls a script (script/sunset.js).
To test the sample, copy
openidm/samples/example-configurations/task-scanner/script/sunset.js
to your project's script directory. You will also
need to assign a user a sunset date. The task will only execute on users
who have a valid sunset date field. The sunset date field can be added
manually to users, but will need to be added to the managed/user
schema if you want the field to be visible from the Admin UI.
The following example command adds a sunset date field to the user
bjensen using the REST interface:
curl \
--header "Content-Type: application/json" \
--header "X-OpenIDM-Username: openidm-admin" \
--header "X-OpenIDM-Password: openidm-admin" \
--request POST \
--data '[{
"operation" : "add",
"field" : "sunset/date",
"value" : "2017-12-20T12:00:00Z"
}]' \
"http://localhost:8080/openidm/managed/user?_action=patch&_queryId=for-userName&uid=bjensen"The remaining properties in the schedule configuration are as follows:
The invokeContext parameter takes the following
properties:
waitForCompletion(optional)This property specifies whether the task should be performed synchronously. Tasks are performed asynchronously by default (with
waitForCompletionset to false). A task ID (such as{"_id":"354ec41f-c781-4b61-85ac-93c28c180e46"}) is returned immediately. If this property is set to true, tasks are performed synchronously and the ID is not returned until all tasks have completed.maxRecords(optional)The maximum number of records that can be processed. This property is not set by default so the number of records is unlimited. If a maximum number of records is specified, that number will be spread evenly over the number of threads.
numberOfThreads(optional)By default, the task scanner runs in a multi-threaded manner, that is, numerous threads are dedicated to the same scanning task run. Multi-threading generally improves the performance of the task scanner. The default number of threads for a single scanning task is 10. To change this default, set the
numberOfThreadsproperty. The sample configuration sets the default number of threads to 5.scanDefines the details of the scan. The following properties are defined:
_queryFilter,_queryId, or_queryExpressionA query filter, predefined query, or query expression that identifies the entries for which this task should be run. Query filters are recommended but you can also use native query expressions and parameterized, or predefined queries to identify the entries to be scanned.
The query filter provided in the sample schedule configuration (
((/sunset/date lt \"${Time.now}\") AND !(/sunset/task-completed pr))) identifies managed users whosesunset/dateproperty is before the current date and for whom the sunset task has not yet completed.The sample query supports time-based conditions, with the time specified in ISO 8601 format (Zulu time). You can write any query to target the set of entries that you want to scan.
For time-based queries, it's possible to use the
${Time.now}macro object (which fetches the current time). You can also specify any date/time in relation to the current time, using the+or-operator, and a duration modifier. For example: changing the sample query to${Time.now + 1d}would return all user objects whose/sunset/dateis the following day (current time plus one day). Note: you must include space characters around the operator (+or-). The duration modifier supports the following unit specifiers:s- secondm- minuteh- hourd- dayM- monthy- yearobjectDefines the managed object type against which the query should be performed, as defined in the
managed.jsonfile.taskStateIndicates the names of the fields in which the start message and the completed message are stored. These fields are used to track the status of the task.
startedspecifies the field that stores the timestamp for when the task begins.completedspecifies the field that stores the timestamp for when the task completes its operation. Thecompletedfield is present as soon as the task has started, but its value isnulluntil the task has completed.recovery(optional)Specifies a configurable
timeout, after which the task scanner process ends. For clustered IDM instances, there might be more than one task scanner running at a time. A task cannot be launched by two task scanners at the same time. When one task scanner "claims" a task, it indicates that the task has been started. That task is then unavailable to be claimed by another task scanner and remains unavailable until the end of the task is indicated. In the event that the first task scanner does not complete the task by the specified timeout, for whatever reason, a second task scanner can pick up the task.
taskProvides details of the task that is performed. Usually, the task is invoked by a script, whose details are defined in the
scriptproperty:type‒ the type of script, either JavaScript or Groovy.file‒ the path to the script file. The script file takes at least two objects (in addition to the default objects that are provided to all IDM scripts):input‒ the individual object that is retrieved from the query (in the example, this is the individual user object).objectID‒ a string that contains the full identifier of the object. TheobjectIDis useful for performing updates with the script as it allows you to target the object directly. For example:openidm.update(objectID, input['_rev'], input);.
A sample script file is provided in
openidm/samples/example-configurations/task-scanner/script/sunset.js. To use this sample file, copy it to your project'sscript/directory. The sample script marks all user objects that match the specified conditions as inactive. You can use this sample script to trigger a specific workflow, or any other task associated with the sunset process.
For more information about using scripts, see "Scripting Reference".
18.8.2. Managing Scanning Tasks Over REST
You can trigger, cancel, and monitor scanning tasks over the REST interface,
using the REST endpoint
http://localhost:8080/openidm/taskscanner.
18.8.2.1. Creating a Scanning Task
You can define a scanning task in a configuration file or directly over the
REST interface. For an example of a file-based scanning task, see the file
/path/to/openidm/samples/example-configurations/task-scanner/conf/schedule-taskscan_sunset.json.
The following command defines a scanning task named sunsetTask
over REST:
$ curl \
--header "X-OpenIDM-Username: openidm-admin" \
--header "X-OpenIDM-Password: openidm-admin" \
--header "Content-type: application/json" \
--request PUT \
--data '{
"enabled" : true,
"type" : "simple",
"repeatInterval" : 3600000,
"persisted": true,
"concurrentExecution" : false,
"invokeService" : "taskscanner",
"invokeContext" : {
"waitForCompletion" : false,
"numberOfThreads" : 5,
"scan" : {
"_queryFilter" : "((/sunset/date lt \"${Time.now}\") AND !(${taskState.completed} pr))",
"object" : "managed/user",
"taskState" : {
"started" : "/sunset/task-started",
"completed" : "/sunset/task-completed"
},
"recovery" : {
"timeout" : "10m"
}
},
"task" : {
"script" : {
"type" : "text/javascript",
"file" : "script/sunset.js"
}
}
}
}' \
"http://localhost:8080/openidm/scheduler/job/sunsetTask" | jq .
{
"_id": "sunsetTask",
"enabled": true,
"persisted": true,
"misfirePolicy": "fireAndProceed",
"schedule": null,
"repeatInterval": 3600000,
"repeatCount": -1,
"type": "simple",
"invokeService": "org.forgerock.openidm.taskscanner",
"invokeContext": {
"waitForCompletion": false,
"numberOfThreads": 5,
"scan": {
"_queryFilter": "((/sunset/date lt \"${Time.now}\") AND !(${taskState.completed} pr))",
"object": "managed/user",
"taskState": {
"started": "/sunset/task-started",
"completed": "/sunset/task-completed"
},
"recovery": {
"timeout": "10m"
}
},
"task": {
"script": {
"type": "text/javascript",
"file": "script/sunset.js"
}
}
},
"invokeLogLevel": "info",
"startTime": "2018-01-17T11:25:59.382+02:00",
"endTime": null,
"concurrentExecution": false,
"triggers": [
{
"serialized": "rO0ABXNyABZvcmcucXVhcnR6LkNyb25UcmlnZ2VyiAb06o3becICAA...",
"name": "trigger-sunsetTask",
"group": "scheduler-service-group",
"previous_state": -1,
"state": 0,
"acquired": false,
"nodeId": null,
"jobName": "testSchedule",
"_rev": "00000000cde2bd84",
"_id": "scheduler-service-group_$x$x$_trigger-sunsetTask"
}
],
"nextRunDate": "2018-01-17T10:00:00.000Z"
}18.8.2.2. Triggering a Scanning Task
To trigger a scanning task over REST, use the execute
action and specify the name of the task (effectively the
scheduled job name). To obtain a list of task names, you can query the
/openidm/scheduler/job endpoint. Note, however, that not
all jobs are scanning tasks. Only those jobs that have which have the
correct task scanner invokeContext can be triggered in
this way.
The following example triggers the sunsetTask defined in
the previous example:
$ curl \
--header "X-OpenIDM-Username: openidm-admin" \
--header "X-OpenIDM-Password: openidm-admin" \
--request POST \
"http://localhost:8080/openidm/taskscanner?_action=execute&name=sunsetTask"
{
"_id": "9f2564c8-193c-4871-8869-6080f374b1bd-2073"
}
For scanning tasks that are defined in configuration files, you can
determine the task name from the file name, for example,
schedule-task-name.json.
The following example triggers a task named taskscan_sunset
that is defined in a file named
conf/schedule-taskscan_sunset.json:
$ curl \
--header "X-OpenIDM-Username: openidm-admin" \
--header "X-OpenIDM-Password: openidm-admin" \
--request POST \
"http://localhost:8080/openidm/taskscanner?_action=execute&name=taskscan_sunset"
{
"_id": "8d7742f0-5245-41cf-89a5-de32fc50e326-3323"
}By default, a scanning task ID is returned immediately when the task is initiated. Clients can make subsequent calls to the task scanner service, using this task ID to query its state and to call operations on it.
To have the scanning task complete before the ID is returned, set the
waitForCompletion property to true in
the task definition file (schedule-taskscan_sunset.json).
18.8.2.3. Canceling a Scanning Task
To cancel a scanning task that is in progress, send a REST call with the
cancel action, specifying the task ID. For example, the
following call cancels the scanning task initiated in the previous section:
$ curl \
--header "X-OpenIDM-Username: openidm-admin" \
--header "X-OpenIDM-Password: openidm-admin" \
--request POST \
"http://localhost:8080/openidm/taskscanner/9f2564c8-193c-4871-8869-6080f374b1bd-2073?_action=cancel"
{
"_id":"9f2564c8-193c-4871-8869-6080f374b1bd-2073",
"status":"SUCCESS"
}Note
You cannot cancel a scanning task that has already completed.
18.8.2.4. Listing the Scanning Tasks
To retrieve a list of scanning tasks, query the
openidm/taskscanner context path. The following example
displays all scanning tasks, regardless of their state:
$ curl \
--header "X-OpenIDM-Username: openidm-admin" \
--header "X-OpenIDM-Password: openidm-admin" \
--request GET \
"http://localhost:8080/openidm/taskscanner?_queryFilter=true"
{
"result": [
{
"_id": "9f2564c8-193c-4871-8869-6080f374b1bd-2073",
"name": "schedule/taskscan_sunset",
"progress": {
"state": "COMPLETED",
"processed": 0,
"total": 0,
"successes": 0,
"failures": 0
},
"started": "2017-12-19T11:45:53.433Z",
"ended": "2017-12-19T11:45:53.438Z"
},
{
"_id": "b32aafe5-b484-4d00-89ff-83554341f321-9970",
"name": "schedule/taskscan_sunset",
"progress": {
"state": "ACTIVE",
"processed": 80,
"total": 980,
"successes": 80,
"failures": 0
},
"started": "2017-12-19T16:41:04.185Z",
"ended": null
}
...
]
...
]
}Each scanning task has the following properties:
_idThe unique ID of that task instance.
nameThe name of the scanning task, determined by the name of the schedule configuration file or over REST when the task is executed.
startedThe time at which the scanning task started.
endedThe time at which the scanning task ended.
progressThe progress of the scanning task, summarised in the following fields:
failures- the number of records not able to be processedsuccesses- the number of records processed successfullytotal- the total number of recordsprocessed- the number of processed recordsstate- the current state of the task,INITIALIZED,ACTIVE,COMPLETED,CANCELLED, orERROR
The number of processed tasks whose details are retained is governed by the
openidm.taskscanner.maxcompletedruns property in the
conf/system.properties file. By default, the last one
hundred completed tasks are retained.
18.8.3. Managing Scanning Tasks Through the UI
The task scanner queries a set of managed objects, then executes a script on the objects returned in the query result. The scanner then sets a field on a specific managed object property to indicate the state of the task. Before you start, you must set up this object type property on the managed user object.
In the example that follows, the task scanner queries managed user objects
and returns objects whose sunset property holds a date
that is prior to the current date. The scanner then sets the state of the
task in the task-completed field of the user's
sunset property:
To configure this scanning task through the UI, follow these steps:
Select Configure > Schedules and click Add Schedule.
Enable the schedule, and set the times that the task should run, as for any other schedule.
Under Perform Action, select "Execute a script on objects returned by a query (Task Scanner)".
Select the managed object on which the query should be run, in this case,
user.Build the query that will be run against the managed user objects.
The following query (based on the example schedule available in
/path/to/openidm/samples/example-configurations/task-scanner) returns all managed users whosesunsetdate is prior to the current date (${Time.now}) and for whom thesunsettask has not already completed (${taskState.completed} pr):((/sunset/date lt \"${Time.now}\") AND !(${taskState.completed} pr))In the Object Property Field, enter the property whose values will determine the state of the task, in this case
sunset.In the Script field, enter an inline script, or a path to the file containing the script that should be launched on the results of the query.
The sample task scanner runs the following script on the managed users returned by the previous query:
var patch = [{ "operation" : "replace", "field" : "/active", "value" : false },{ "operation" : "replace", "field" : "/accountStatus", "value" : "inactive" }]; openidm.patch(objectID, null, patch);This script essentially deactivates the accounts of users returned by the query by setting the value of their
activeproperty tofalse.(Optional) Configure the advanced properties of the schedule described in "Configuring Schedules".
Chapter 19. Managing Passwords
IDM provides password management features that help you enforce password policies, limit the number of passwords users must remember, and allow users to reset and change their passwords.
19.1. Enforcing Password Policy
A password policy is a set of rules defining what sequence of characters constitutes an acceptable password. Acceptable passwords generally are too complex for users or automated programs to generate or guess.
Password policies set requirements for password length, character sets that passwords must contain, dictionary words and other values that passwords must not contain. Password policies also require that users not reuse old passwords, and that users change their passwords on a regular basis.
IDM enforces password policy rules as part of the general policy service. For more information about the policy service, see "Using Policies to Validate Data". The default password policy applies the following rules to passwords as they are created and updated:
A password property is required for any user object.
The value of a password cannot be empty.
The password must include at least one capital letter.
The password must include at least one number.
The minimum length of a password is 8 characters.
The password cannot contain the user name, given name, or family name.
You can change these validation requirements, or include additional requirements, by configuring the policy for passwords. For more information, see "Configuring the Default Policy for Managed Objects".
The password validation mechanism can apply in many situations:
- Password change and password reset
Password change involves changing a user or account password in accordance with password policy. Password reset involves setting a new user or account password on behalf of a user.
By default, IDM controls password values as they are provisioned.
To change the default administrative user password,
openidm-admin, see "Replacing Default Security Settings".- Password recovery
Password recovery involves recovering a password or setting a new password when the password has been forgotten.
The Self-Service UI allows for password changes, password recovery, and password reset. For more information, see "Configuring User Self-Service".
- Password history
You can add checks to prevent reuse of previous password values. For more information, see "Creating a Password History Policy".
- Password expiration
You can use workflows to ensure that users are able to change expiring passwords or to reset expired passwords.
19.1.1. Creating a Password History Policy
The sample described in "Storing Multiple Passwords For Managed Users" in the Samples Guide shows how to set up a password history policy in a scenario where users have multiple different passwords across resources. You can use the scripts provided in that sample to set up a simple password history policy that prevents managed users from setting the same password that they used previously.
To create a password history policy based on the scripts in the multiple passwords sample, make the following changes to your project:
Copy the
pwpolicy.jsscript from the multiple passwords sample to your project'sscriptdirectory:$ cd /path/to/openidm $ cp samples/multiple-passwords/script/pwpolicy.js /my-project-dir/script/
The
pwpolicy.jsscript contains anis-newpolicy definition that compares a new field value with the list of historical values for that field.The
is-newpolicy takes ahistoryLengthparameter that specifies the number of historical values on which the policy should be enforced. This number must not exceed thehistorySizethat you set inconf/managed.jsonto be passed to theonCreateandonUpdatescripts.Copy the
onCreate-user-custom.js,onUpdate-user-custom.jsscripts to your project'sscriptdirectory:$ cp samples/multiple-passwords/script/onCreate-user-custom.js /my-project-dir/script/
$ cp samples/multiple-passwords/script/onUpdate-user-custom.js /my-project-dir/script/
These scripts validate the password history policy when a managed user is created or updated.
Update your policy configuration (
conf/policy.json) to reference the new policy definition by adding the policy script to theadditionalFilesarray:{ "type" : "text/javascript", "file" : "policy.js", "additionalFiles": [ "script/pwpolicy.js" ], ...Update your project's
conf/managed.jsonfile as follows:Add a
fieldHistoryproperty to the managed user object:"fieldHistory" : { "title" : "Field History", "type" : "object", "viewable" : false, "searchable" : false, "userEditable" : false, "scope" : "private" },The value of this field is a map of field names to a list of historical values for that field. These lists of values are used by the
is-newpolicy to determine if a new value has already been used.Update the managed user object to call the scripts when a user is created, updated:
"name" : "user", "onCreate" : { "type" : "text/javascript", "file" : "script/onCreate-user-custom.js", "historyFields" : [ "password" ], "historySize" : 4 }, "onUpdate" : { "type" : "text/javascript", "file" : "script/onUpdate-user-custom.js", "historyFields" : [ "password" ], "historySize" : 4 }, ...Important
If you have any other script logic that is executed on these events, you must update the scripts to include that logic, or add the password history logic to your current scripts.
Add the
is-newpolicy to the list of policies enforced on thepasswordproperty of a managed user. Specify the number of historical values that the policy should check inhistoryLengthproperty:"password" : { ... "policies" : [ { "policyId" : "at-least-X-capitals", "params" : { "numCaps" : 1 } }, ... { "policyId" : "is-new", "params" : { "historyLength" : 4 } }, ... ] },
You should now be able to test the password history policy by creating a new managed user, and having that user update their password. If the user specifies the same password used within the previous four passwords, the update request is denied with a policy error.
19.2. Storing Separate Passwords Per Linked Resource
You can store multiple passwords in a single managed user entry to enable synchronization of different passwords on different external resources.
To store multiple passwords, extend the managed user schema to include additional properties for each target resource. You can set separate policies on each of these new properties, to ensure that the stored passwords adhere to the password policies of the specific external resources.
The following addition to a sample managed.json
configuration shows an ldapPassword property that has been
added to managed user objects. This property will be mapped to the password
property on an LDAP system:
"ldapPassword" : {
"title" : "Password",
"type" : "string",
"viewable" : false,
"searchable" : false,
"minLength" : 8,
"userEditable" : true,
"scope" : "private",
"secureHash" : {
"algorithm" : "SHA-256"
},
"policies" : [
{
"policyId" : "at-least-X-capitals",
"params" : {
"numCaps" : 2
}
},
{
"policyId" : "at-least-X-numbers",
"params" : {
"numNums" : 1
}
},
{
"policyId" : "cannot-contain-others",
"params" : {
"disallowedFields" : [
"userName",
"givenName",
"sn"
]
}
},
{
"policyId" : "is-new",
"params" : {
"historyLength" : 2
}
}
]
},
This property definition shows that the ldapPassword will
be hashed, with an SHA-256 algorithm, and sets the policy that will be
applied to values of this property.
To use this custom managed object property and its policies to update passwords on an external resource, you must make the corresponding configuration and script changes in your deployment. For a detailed sample that implements multiple passwords, see "Storing Multiple Passwords For Managed Users" in the Samples Guide. That sample can also help you set up password history policies.
19.3. Generating Random Passwords
There are many situations when you might want to generate a random password for one or more user objects.
You can customize your user creation logic to include a randomly generated
password that complies with the default password policy. This functionality
is included in the default crypto script,
bin/defaults/script/crypto.js, but is not invoked by
default. For an example of how this functionality might be used, see the
openidm/bin/defaults/script/onCreateUser.js
script. The following section of that file (commented out by default) means
that users created by using the Admin UI, or directly over the REST interface,
will have a randomly generated, password added to their entry:
if (!object.password) {
// generate random password that aligns with policy requirements
object.password = require("crypto").generateRandomString([
{ "rule": "UPPERCASE", "minimum": 1 },
{ "rule": "LOWERCASE", "minimum": 1 },
{ "rule": "INTEGERS", "minimum": 1 },
{ "rule": "SPECIAL", "minimum": 1 }
], 16);
}
Comment out this section to invoke the random password generation when users
are created. Note that changes made to scripts take effect after the time set
in the recompile.minimumInterval, described in
"Setting the Script Configuration".
The generated password can be encrypted, or hashed, in accordance with the
managed user schema, defined in conf/managed.json. For
more information, see "Encoding Attribute Values".
You can use this random string generation in a number of situations. Any
script handler that is implemented in JavaScript can call the
generateRandomString function.
19.4. Modifying the password Property
If you want to change the password property in
IDM, you'll have to change it in the following files:
policy.jsonThis file is critical. If you want to enforce complexity rules on a different password property, update the
passwordproperty in this file.managed.jsonModify the
passwordcode block in this file, which also includes password complexity policies.sync.jsonIf you change the
passwordproperty, be careful. Make sure to limit the change to the appropriate system, designated assourceortarget.selfservice-reset.jsonIf you're setting up self-service password reset as discussed in "User Password Reset", change the value of
identityPasswordFieldfrompasswordto the desired new property.-
Every UI file which includes
passwordas a property name Whenever there's a way for a user to enter a password, the associated
HTMLpage will include a password entry. For example, theLoginTemplate.htmlfile includes thepasswordproperty. A full list of default files with thepasswordproperty include:_passwordFields.html_resetPassword.htmlConfirmPasswordDialogTemplate.htmlEditPasswordPageView.htmlLoginTemplate.htmlMandatoryPasswordChangeDialogTemplate.htmlresetStage-initial.htmlUserPasswordTab.htmlThis list does not include any custom UI files that you may have created.
Chapter 20. Managing Authentication, Authorization and Role-Based Access Control
IDM provides a flexible authentication and authorization mechanism, based on REST interface URLs and on managed roles. This chapter describes how to configure the supported authentication modules and how roles are used to support authentication, authorization, and access control.
20.1. The Authentication Model
You must authenticate before you can access the
IDM REST interface. User self-registration requires anonymous
access. For this purpose, IDM includes an
anonymous user, with the password
anonymous. For more information, see
"Internal Users".
IDM supports an enhanced authentication mechanism over the REST
interface, that is compatible with the AJAX framework. Although IDM
understands the authorization header of the HTTP basic authorization
contract, it deliberately does not utilize the full contract. IDM
does not cause the browser built in mechanism to prompt for username and
password. However, it does understand utilities such as curl
that can send the username and password in the Authorization header.
In general, the HTTP basic authentication mechanism does not work well with client side web applications, and applications that need to render their own login screens. Because the browser stores and sends the username and password with each request, HTTP basic authentication has significant security vulnerabilities. You can therefore send the username and password via the authorization header, and IDM returns a token for subsequent access.
This document uses the IDM authentication headers in all REST examples, for example:
$ curl \ --header "X-OpenIDM-Username: openidm-admin" \ --header "X-OpenIDM-Password: openidm-admin" \ ...
You can use RFC 5987-encoded characters in the authentication headers
(X-OpenIDM-Username, X-OpenIDM-Password,
and X-OpenIDM-Reauth-Password). This enables you to use
non-ASCII characters in these header values. The RFC 5987-encoding is
automatically detected and decoded when present. As per the RFC 5987
specification, the following character sets are supported:
UTF-8
ISO-8859-1
The following command shows a request for a user (openidm-admin) whose
password is Passw£rd123. The Unicode £
sign (U+00A3) is encoded into the octet sequence C2 A3 using UTF-8 character
encoding, then percent-encoded.
$ curl \ --header "X-OpenIDM-Username: openidm-admin" \ --header "X-OpenIDM-Password: UTF-8''Passw%C2%A3rd123" \ --request GET \ "http://localhost:8080/openidm/managed/user?_queryId=query-all-ids"
For more information, see RFC 5987.
For more information about alternative IDM authentication mechanisms in REST, see "Using Message Level Security".
20.1.1. Authenticating Users
IDM stores two types of users in its repository - internal users
and managed users. The way in which both of these user types are
authenticated is defined in your project's
conf/authentication.json file.
20.1.1.1. Internal Users
IDM creates two internal users by default: anonymous
and openidm-admin. These internal user accounts are
separated from other user accounts to protect them from any reconciliation
or synchronization processes.
IDM stores internal users and their role membership in a table in the repository. The two default internal users have the following functions:
- anonymous
This user enables anonymous access to IDM, for users who do not have their own accounts. The anonymous user has limited rights within IDM. By default, the anonymous user has the
openidm-regrole, and can be used to allow self-registration. For more information about self-registration, see "User Self-Registration".- openidm-admin
This user serves as the top-level administrator. After installation, the
openidm-adminuser has full access, and provides a fallback mechanism in the event that other users are locked out of their accounts. Do not useopenidm-adminfor regular tasks. Under normal circumstances, theopenidm-adminaccount does not represent a regular user, so audit log records for this account do not represent the actions of any real person.The default password for the
openidm-adminuser (alsoopenidm-admin) is not encrypted, and is not secure. In production environments, you must change this password to a more secure one, as described in the following section. The new password will be encoded using a salted hash algorithm, when it is changed.
20.1.1.1.1. Managing Internal Users Over REST
Like any other user in the repository, you can manage internal users over the REST interface.
To list the internal users over REST, query the repo
endpoint as follows:
$ curl \
--header "X-OpenIDM-Username: openidm-admin" \
--header "X-OpenIDM-Password: openidm-admin" \
--request GET \
"http://localhost:8080/openidm/repo/internal/user?_queryId=query-all-ids"
{
"result": [
{
"_id": "openidm-admin",
"_rev": "00000000c7554e13"
},
{
"_id": "anonymous",
"_rev": "000000000cde398e"
}
],
"resultCount": 2,
"pagedResultsCookie": null,
"totalPagedResultsPolicy": "NONE",
"totalPagedResults": -1,
"remainingPagedResults": -1
}To query the details of an internal user, include the user's ID in the request, for example:
$ curl \
--header "X-OpenIDM-Username: openidm-admin" \
--header "X-OpenIDM-Password: openidm-admin" \
--request GET \
"http://localhost:8080/openidm/repo/internal/user/openidm-admin"
{
"_id": "openidm-admin",
"_rev": "00000000c7554e13",
"roles": [
{
"_ref": "repo/internal/role/openidm-admin"
},
{
"_ref": "repo/internal/role/openidm-authorized"
}
],
"password": "openidm-admin"
}
To change the password of the default administrative user, send a PUT
request to the user object. The following example changes the password of
the openidm-admin user to Passw0rd:
$ curl \
--header "Content-Type: application/json" \
--header "X-OpenIDM-Username: openidm-admin" \
--header "X-OpenIDM-Password: openidm-admin" \
--request PUT \
--data '{
"_id": "openidm-admin",
"roles": [
{
"_ref": "repo/internal/role/openidm-admin"
},
{
"_ref": "repo/internal/role/openidm-authorized"
}
],
"password": "Passw0rd"
}' \
"http://localhost:8080/openidm/repo/internal/user/openidm-admin"
{
"_id": "openidm-admin",
"_rev": "00000000744d93dc",
"roles": [
{
"_ref": "repo/internal/role/openidm-admin"
},
{
"_ref": "repo/internal/role/openidm-authorized"
}
],
"password": {
"$crypto": {
"value": {
"algorithm": "SHA-256",
"data": "S5nJJP8jHnLlQJRZC7cXlKdgohHlGaHf8CUCsS1PCJsMGo/4J8QOLNMWVHMNYxvY"
},
"type": "salted-hash"
}
}
}20.1.1.2. Managed Users
External users that are managed by IDM are known as managed users.
The table in which managed users are stored depends on the type of
repository. For JDBC repositories, IDM stores managed users in the
managed objects table, named managedobjects, and indexes
those objects in a table named managedobjectproperties.
IDM provides RESTful access to managed users, at the context path
/openidm/managed/user. For more information, see
"Managing Users Over REST".
20.1.1.3. Authenticating Internal and Managed Users
By default, the attribute names that are used to authenticate managed and
internal users are username and
password, respectively.
You can authenticate internal and managed users by sending a POST to the
openidm/authentication endpoint, with
_action=login
$ curl \ --header "X-OpenIDM-Username: openidm-admin" \ --header "X-OpenIDM-Password: openidm-admin" \ --request POST \ "http://localhost:8080/openidm/authentication?_action=login"
If you apply this REST call to an end user, that action increments the
loginCount property shown in the
activity.audit.json file:
$ curl \ --header "X-OpenIDM-Username: bjensen" \ --header "X-OpenIDM-Password: Passw0rd" \ --request POST \ "http://localhost:8080/openidm/authentication?_action=login"
If you're testing "Progressive Profile Completion", the noted
REST call can help you trigger conditions such as loginCount.
Alternatively, if you only need login information, see
"Obtaining Session Information".
In addition, you can explicitly define the properties that constitute
usernames, passwords, or roles with the propertyMapping
object in the conf/authentication.json file. The
following excerpt of the authentication.json file
shows the default property mapping object:
...
"propertyMapping" : {
"authenticationId" : "username",
"userCredential" : "password",
"userRoles" : "roles"
},
...
If you change the attribute names that are used for authentication, you
must adjust the following authentication queries (defined in the repository
configuration file,
openidm/conf/repo.repo-type.json).
Two queries are defined by default.
credential-internaluser-queryThis query uses the
usernameattribute for login, for internal users. For example, the followingcredential-internaluser-queryis defined in the default repository configuration file for a MySQL repository."credential-internaluser-query" : "SELECT objectid, pwd, roles FROM ${_dbSchema}.${_table} WHERE objectid = ${username}",credential-queryThis query uses the
usernameattribute for login, for managed users. For example, the followingcredential-queryis defined in the default repository configuration file for a MySQL repository."credential-query" : "SELECT * FROM ${_dbSchema}.${_table} WHERE userName = ${username} and accountStatus = 'active'",
The query that is used for a particular resource is specified by the
queryId property in the
authentication.json file. The following sample excerpt
of that file shows that the credential-query is used
when validating managed user credentials.
{
"queryId" : "credential-query",
"queryOnResource" : "managed/user",
...
} 20.1.2. Supported Authentication and Session Modules
The authentication configuration is defined in
conf/authentication.json. This file configures the
methods by which a user request is authenticated. It includes both session
and authentication module configuration.
You can review and configure supported local modules in the Admin UI. To do
so, log into https://localhost:8443/admin, and select
Configure > Authentication. Choose Local when asked to select an
authentication provider, and select the Session and then the Modules tab.
Whenever you modify an authentication module in the Admin UI, that may affect your current session. IDM prompts you with the following message:
Your current session may be invalid. Click here to logout and re-authenticate.
When you select the Click here link, IDM logs you out of any current session and returns you to the login screen.
20.1.2.1. Supported Session Module
At this time, IDM includes one supported session module. The JSON
Web Token session module configuration specifies keystore
information, and details about the session lifespan. The default
JWT_SESSION configuration is as follows:
"sessionModule" : {
"name" : "JWT_SESSION",
"properties" : {
"keyAlias" : "&{openidm.https.keystore.cert.alias}",
"privateKeyPassword" : "&{openidm.keystore.password}",
"keystoreType" : "&{openidm.keystore.type}",
"keystoreFile" : "&{openidm.keystore.location}",
"keystorePassword" : "&{openidm.keystore.password}",
"maxTokenLifeMinutes" : "120",
"tokenIdleTimeMinutes" : "30",
"sessionOnly" : true,
"isHttpOnly" : true
}
},
If you're reviewing the authentication.audit.json file,
in the /path/to/openidm directory, for authenticated
requests, look for the JwtSession
moduleId. For an example on how you can query this log,
see "Querying the Authentication Audit Log".
For more information about this module, see the Class JwtSessionModule JavaDoc.
20.1.2.2. Supported Authentication Modules
IDM evaluates modules in the order shown in the
authentication.json file for your project. When
IDM finds a module to authenticate a user, it does not evaluate
subsequent modules.
You can also configure the order of authentication modules in the Admin UI. After logging in, choose Configure > Authentication, and select the Modules tab. The following figure illustrates how you might include the IWA module in the Admin UI.

You must prioritize the authentication modules that query IDM
resources. Prioritizing the modules that query external resources might
lead to authentication problems for internal users such as
openidm-admin.
- STATIC_USER
STATIC_USERauthentication provides an anonymous authentication mechanism that bypasses any database lookups if the headers in a request indicate that the user isanonymous. The following sample REST call usesSTATIC_USERauthentication in the self-registration process:$ curl \ --header "X-OpenIDM-Password: anonymous" \ --header "X-OpenIDM-Username: anonymous" \ --header "Content-Type: application/json" \ --data '{ "userName":"steve", "givenName":"Steve", "sn":"Carter", "telephoneNumber":"0828290289", "mail":"scarter@example.com", "password":"Passw0rd" }' \ --request POST \ "http://localhost:8080/openidm/managed/user/?_action=create"Note that this is not the same as an anonymous request that is issued without headers.
Authenticating with the
STATIC_USERmodule avoids the performance cost of reading the database for self-registration, certain UI requests, and other actions that can be performed anonymously. Authenticating the anonymous user with theSTATIC_USERmodule is identical to authenticating the anonymous user with theINTERNAL_USERmodule, except that the database is not accessed. So,STATIC_USERauthentication provides an authentication mechanism for the anonymous user that avoids the database lookups incurred when usingINTERNAL_USER.A sample
STATIC_USERauthentication configuration follows:{ "name" : "STATIC_USER", "enabled" : true, "properties" : { "queryOnResource" : "repo/internal/user", "username" : "anonymous", "password" : "anonymous", "defaultUserRoles" : [ "openidm-reg" ] } }- TRUSTED_ATTRIBUTE
The
TRUSTED_ATTRIBUTEauthentication module allows you to configure IDM to trust theHttpServletRequestattribute of your choice. You can configure it by adding theTRUSTED_ATTRIBUTEmodule to yourauthentication.jsonfile, as shown in the following code block:... { "name" : "TRUSTED_ATTRIBUTE", "properties" : { "queryOnResource" : "managed/user", "propertyMapping" : { "authenticationId" : "username", "userRoles" : "authzRoles" }, "defaultUserRoles" : [ ], "authenticationIdAttribute" : "X-ForgeRock-AuthenticationId", "augmentSecurityContext" : { "type" : "text/javascript", "file" : "auth/populateRolesFromRelationship.js" } }, "enabled" : true } ...TRUSTED_ATTRIBUTEauthentication queries themanaged/userrepository, and allows authentication when credentials match, based on theusernameandauthzRolesassigned to that user, specifically theX-ForgeRock-AuthenticationIdattribute.For a sample implementation of a custom servlet filter and the Trusted Request Attribute Authentication Module, see "Authenticating Using a Trusted Servlet Filter" in the Samples Guide.
- MANAGED_USER
MANAGED_USERauthentication queries the repository, specifically themanaged/userobjects, and allows authentication if the credentials match. The default configuration uses theusernameandpasswordof the managed user to authenticate, as shown in the following sample configuration:{ "name" : "MANAGED_USER", "enabled" : true, "properties" : { "augmentSecurityContext": { "type" : "text/javascript", "source" : "require('auth/customAuthz').setProtectedAttributes(security)" }, "queryId" : "credential-query", "queryOnResource" : "managed/user", "propertyMapping" : { "authenticationId" : "username", "userCredential" : "password", "userRoles" : "roles" }, "defaultUserRoles" : [ ] } },The
augmentSecurityContextproperty can be used to add custom properties to the security context of users who authenticate with this module. By default, this property adds a list of protected properties to the user's security context. These protected properties are defined in the managed object schema. For more information, see theisProtectedproperty described in "Creating and Modifying Managed Object Types".- INTERNAL_USER
INTERNAL_USERauthentication queries the repository, specifically therepo/internal/userobjects, and allows authentication if the credentials match. The default configuration uses theusernameandpasswordof the internal user to authenticate, as shown in the following sample configuration:{ "name" : "INTERNAL_USER", "enabled" : true, "properties" : { "queryId" : "credential-internaluser-query", "queryOnResource" : "repo/internal/user", "propertyMapping" : { "authenticationId" : "username", "userCredential" : "password", "userRoles" : "roles" }, "defaultUserRoles" : [ ] } },- CLIENT_CERT
The client certificate module,
CLIENT_CERT, provides authentication by validating a client certificate, transmitted via an HTTP request. IDM compares the subject DN of the request certificate with the subject DN of the truststore.A sample
CLIENT_CERTauthentication configuration follows:{ "name" : "CLIENT_CERT", "properties" : { "augmentSecurityContext" : { "type" : "text/javascript", "globals" : { }, "file" : "auth/mapUserFromClientCert.js" }, "queryOnResource" : "managed/user", "defaultUserRoles" : [ "openidm-cert", "openidm-authorized" ], "allowedAuthenticationIdPatterns" : [".*" ], } "enabled" : true },For more information about certificate-based authentication, see "Configuring Client Certificate Authentication".
The modules that follow point to external systems. In the
authentication.json file, you should generally
include these modules after any modules that query internal IDM
resources.
- PASSTHROUGH
PASSTHROUGHauthentication queries an external system, such as an LDAP server, and allows authentication if the provided credentials match those in the external system. The following sample configuration shows pass-through authentication using the user objects in the system endpointsystem/ldap/account. For more information on pass-through authentication, see "Configuring Pass-Through Authentication".- IWA
The
IWAmodule enables users to authenticate by using Integrated Windows Authentication (IWA), rather than by providing a username and password. For information about configuring the IWA module with IDM, see "Configuring IWA Authentication".- SOCIAL_PROVIDERS
The
SOCIAL_PROVIDERSmodule supports configuration of social identity providers that comply with OAuth 2.0 and OpenID Connect 1.0 standards. For information about configuring this module with social identity providers such as Google, LinkedIn, and Facebook, see "Configuring the Social Providers Authentication Module".In audit logs, namely in the
authentication.audit.jsonfile in the/path/to/openidm/auditdirectory, you'll find the correspondingSOCIAL_AUTHmodule, which is used to handle authentication for each individual social identity provider. For an example of how you can query this log, see "Querying the Authentication Audit Log".- OAUTH_CLIENT
The OAUTH_CLIENT module works only with the OAuth 2.0 standards. For information about configuring this module with IDM, see "Configuring Authentication With OAuth 2.0".
The OAUTH_CLIENT module also supports integration with AM. For an example of this integration, follow the procedure described in "Integrating IDM With the ForgeRock Identity Platform" in the Samples Guide.
20.1.3. Configuring Pass-Through Authentication
With pass-through authentication, the credentials included with the REST request are validated against those stored in a remote system, such as an LDAP server.
The following excerpt of an authentication.json shows a
pass-through authentication configuration for an LDAP system.
"authModules" : [
{
"name" : "PASSTHROUGH",
"enabled" : true,
"properties" : {
"augmentSecurityContext": {
"type" : "text/javascript",
"file" : "auth/populateAsManagedUser.js"
},
"queryOnResource" : "system/ldap/account",
"propertyMapping" : {
"authenticationId" : "uid",
"groupMembership" : "memberOf"
},
"groupRoleMapping" : {
"openidm-admin" : ["cn=admins"]
},
"managedUserLink" : "systemLdapAccounts_managedUser",
"defaultUserRoles" : [
"openidm-authorized"
]
},
},
...
] For more information on authentication module properties, see the following: "Authentication and Session Module Configuration Details".
The IDM samples, described in "Overview of the Samples" in the Samples Guide, include several examples of pass-through
authentication configuration. The sync-with-ldap* samples
use an external LDAP system for authentication. The
scripted-rest-with-dj sample uses a scripted REST
connector to authenticate against a ForgeRock Directory Services (DS)
server.
20.1.4. Configuring Authentication With OAuth 2.0
The OAUTH_CLIENT authentication module complies with
OAuth 2.0 standards.
If you want to enable a social identity provider that fully complies with
OAuth 2.0 standards, IDM includes an authentication module
wrapper known as SOCIAL_PROVIDERS. It is a specialized
facility for sharing a social identity provider configuration with the
authentication service, which you can configure as if it were a separate
authentication module. For more information, see
"Configuring the Social Providers Authentication Module".
The following excerpt of an authentication.json shows
the default configuration associated with the OAUTH
authentication module, as configured for use with ForgeRock Access Management.
{
"name" : "OAUTH_CLIENT",
"properties" : {
"augmentSecurityContext" : {
"type" : "text/javascript",
"globals" : {
"sessionValidationBaseEndpoint" : "http://openam.example.com:8080/openam/json/sessions/"
},
"file" : "auth/amSessionCheck.js"
},
"propertyMapping" : {
"authenticationId" : "uid",
"userRoles" : "authzRoles"
},
"defaultUserRoles" : [
"openidm-authorized"
],
"idpConfig" : {
"provider" : "OPENAM",
"icon" : "<button class=\"btn btn-lg btn-default btn-block btn-social-provider\"><img src=\"images/forgerock_logo.png\">Sign in</button>"
"scope" : [
"openid"
],
"authenticationIdKey" : "sub",
"clientId" : "openidm",
"clientSecret" : {
"$crypto" : {
"type" : "x-simple-encryption",
"value" : {
"cipher" : "AES/CBC/PKCS5Padding",
"salt" : "<someSaltedValue>",
"data" : "<someEncryptedValue>",
"iv" : "<someCipherValue>",
"key" : "openidm-sym-default",
"mac" : "<someCode>"
}
}
},
"authorizationEndpoint" : "http://openam.example.com:8080/openam/oauth2/authorize",
"tokenEndpoint" : "http://openam.example.com:8080/openam/oauth2/access_token",
"endSessionEndpoint" : "http://openam.example.com:8080/openam/oauth2/connect/endSession",
"wellKnownEndpoint" : "http://openam.example.com:8080/openam/oauth2/.well-known/openid-configuration",
"redirectUri" : "http://openidm.example.com:8080/oauthReturn/",
"configClass" : "org.forgerock.oauth.clients.oidc.OpenIDConnectClientConfiguration",
"displayIcon" : "forgerock",
"enabled" : true
},
"queryOnResource" : "system/ldap/account"
},
"enabled" : true
}For more information on authentication module properties, see the following: "Authentication and Session Module Configuration Details".
20.1.5. Configuring IWA Authentication
When IDM is configured for IWA authentication, client browsers can authenticate using a Kerberos ticket.
To enable Kerberos authentication, IDM needs a specific Kerberos user account in Active Directory, and a keytab file that maps the service principal to this user account. When this is set up, the client presents IDM with a Kerberos ticket. If IDM can validate that ticket, the client is granted an encrypted session key for the IDM service. That client can then access IDM without providing a username or password, for the duration of the session.
The complete Kerberos authentication process is shown in the following diagram:

This section assumes that you have an active Kerberos server acting as a Key Distribution Center (KDC). If you are running Active Directory in your deployment, that service includes a Kerberos KDC by default.
The steps required to set up IWA with IDM are described in the following sections:
20.1.5.1. Creating a Specific Kerberos User Account
To authenticate IDM to the Kerberos KDC you must create a specific user entry in Active Directory whose credentials will be used for this authentication. This Kerberos user account must not be used for anything else.
The Kerberos user account is used to generate the Kerberos keytab. If you change the password of this Kerberos user after you have set up IWA authentication, you must update the keytab accordingly.
Create a new user in Active Directory as follows:
Select New > User and provide a login name for the user that reflects its purpose, for example, openidm@example.com.
Enter a password for the user. Check the Password never expires option and leave all other options unchecked.
If the password of this user account expires, and is reset, you must update the keytab with the new password. It is therefore easier to create an account with a password that does not expire.
Click Finish to create the user.
20.1.5.2. Creating a Keytab File
A Kerberos keytab file (krb5.keytab) enables
IDM to validate the Kerberos tickets that it receives from
client browsers. You must create a Kerberos keytab file for the host on
which IDM is running.
This section describes how to use the ktpass command, included in the Windows Server toolkit, to create the keytab file. Run the ktpass command on the Active Directory domain controller. Pay close attention to the use of capitalization in this example because the keytab file is case-sensitive. Note that you must disable UAC or run the ktpass command as a user with administration privileges.
The following command creates a keytab file (named
openidm.HTTP.keytab) for the IDM service
located at openidm.example.com.
C:\Users\Administrator>ktpass ^ -princ HTTP/openidm.example.com@EXAMPLE.COM ^ -mapUser EXAMPLE\openidm ^ -mapOp set ^ -pass Passw0rd1 ^ -crypto ALL -pType KRB5_NT_PRINCIPAL ^ -kvno 0 ^ -out openidm.HTTP.keytab Targeting domain controller: host.example.com Using legacy password setting method Successfully mapped HTTP/openidm.example.com to openidm. Key created. Output keytab to openidm.HTTP.keytab: Keytab version: 0x502 keysize 79 HTTP/openidm.example.com@EXAMPLE.COM ptype 1 (KRB5_NT_PRINCIPAL) vno 0 etype 0x1 (DES-CBC-CRC) keylength 8 (0x73a28fd307ad4f83) keysize 79 HTTP/openidm.example.com@EXAMPLE.COM ptype 1 (KRB5_NT_PRINCIPAL) vno 0 etype 0x3 (DES-CBC-MD5) keylength 8 (0x73a28fd307ad4f83) keysize 87 HTTP/openidm.example.com@EXAMPLE.COM ptype 1 (KRB5_NT_PRINCIPAL) vno 0 etype 0x17 (RC4-HMAC) keylength 16 (0xa87f3a337d73085c45f9416be5787d86) keysize 103 HTTP/openidm.example.com@EXAMPLE.COM ptype 1 (KRB5_NT_PRINCIPAL) vno 0 etype 0x12 (AES256-SHA1) keylength 32 (0x6df9c282abe3be787553f23a3d1fcefc 6fc4a29c3165a38bae36a8493e866d60) keysize 87 HTTP/openidm.example.com@EXAMPLE.COM ptype 1 (KRB5_NT_PRINCIPAL) vno 0 etype 0x11 (AES128-SHA1) keylength 16 (0xf616977f071542cd8ef3ff4e2ebcc09c)
The ktpass command takes the following options:
-princspecifies the service principal name in the formatservice/host-name@realmIn this example (
HTTP/openidm.example.com@EXAMPLE.COM), the client browser constructs an SPN based on the following:The service name (HTTP).
The service name for SPNEGO web authentication must be HTTP.
The FQDN of the host on which IDM runs (
openidm.example.com).This example assumes that users will access IDM at the URL
https://openidm.example.com:8443.The Kerberos realm name (
EXAMPLE.COM).The realm name must be in upper case. A Kerberos realm defines the area of authority of the Kerberos authentication server.
-mapUserspecifies the name of the Kerberos user account to which the principal should be mapped (the account that you created in "Creating a Specific Kerberos User Account"). The username must be specified in down-level logon name format (DOMAIN\UserName). In our example, the Kerberos user name isEXAMPLE\openidm.-mapOpspecifies how the Kerberos user account is linked. Usesetto set the first user name to be linked. The default (add) adds the value of the specified local user name if a value already exists.-passspecifies a password for the principal user name. Use "*" to prompt for a password.-cryptoSpecifies the cryptographic type of the keys that are generated in the keytab file. UseALLto specify all crypto types.This procedure assumes a 128-bit cryptosystem, with a default RC4-HMAC-NT cryptography algorithm. You can use the ktpass command to view the crypto algorithm, as follows:
C:\Users\Administrator> ktpass -in .\openidm.HTTP.keytab Existing keytab: Keytab version: 0x502 keysize 79 HTTP/openidm.example.com@EXAMPLE.COM ptype 1 (KRB5_NT_PRINCIPAL) vno 0 etype 0x1 (DES-CBC-CRC) keylength 8 (0x73a28fd307ad4f83) keysize 79 HTTP/openidm.example.com@EXAMPLE.COM ptype 1 (KRB5_NT_PRINCIPAL) vno 0 etype 0x3 (DES-CBC-MD5) keylength 8 (0x73a28fd307ad4f83) keysize 87 HTTP/openidm.example.com@EXAMPLE.COM ptype 1 (KRB5_NT_PRINCIPAL) vno 0 etype 0x17 (RC4-HMAC) keylength 16 (0xa87f3a337d73085c45f9416be5787d86) keysize 103 HTTP/openidm.example.com@EXAMPLE.COM ptype 1 (KRB5_NT_PRINCIPAL) vno 0 etype 0x12 (AES256-SHA1) keylength 32 (0x6df9c282abe3be787553f23a3d1fcefc6 fc4a29c3165a38bae36a8493e866d60) keysize 87 HTTP/openidm.example.com@EXAMPLE.COM ptype 1 (KRB5_NT_PRINCIPAL) vno 0 etype 0x11 (AES128-SHA1) keylength 16 (0xf616977f071542cd8ef3ff4e2ebcc09c)
-ptypeSpecifies the principal type. UseKRB5_NT_PRINCIPAL.-kvnospecifies the key version number. Set the key version number to 0.-outspecifies the name of the keytab file that will be generated, for example,openidm.HTTP.keytab.Note that the keys that are stored in the keytab file are similar to user passwords. You must therefore protect the Kerberos keytab file in the same way that you would protect a file containing passwords.
For more information about the ktpass command, see the ktpass reference in the Windows server documentation.
20.1.5.3. Configuring IDM for IWA
To configure the IWA authentication module, you must do the following:
Add the
IWAauthentication module to your project'sconf/authentication.jsonfile.Modify your project's
conf/system.propertiesfile to include a pointer to your login configuration for JAAS.
This section assumes that the connection from IDM to the Active
Directory Server is through an LDAP connector, and that the mapping from
managed users to the users in Active Directory (in your project's
conf/sync.json file) identifies the Active Directory
target as system/ad/account. If you have named the
target differently, modify the
"queryOnResource" : "system/ad/account" property
accordingly.
Add the IWA authentication module towards the end of your
conf/authentication.json file. For example:
"authModules" : [
...
{
"name" : "IWA",
"properties": {
"servicePrincipal" : "HTTP/openidm.example.com@EXAMPLE.COM",
"keytabFileName" : "C:\\Users\\Administrator\\openidm\\security\\openidm.HTTP.keytab",
"kerberosRealm" : "EXAMPLE.COM",
"kerberosServerName" : "kdc.example.com",
"queryOnResource" : "system/ad/account",
"maxTokenSize": 48000,
"propertyMapping" : {
"authenticationId" : "sAMAccountName",
"groupMembership" : "memberOf"
},
"groupRoleMapping" : {
"openidm-admin": [ ]
},
"groupComparisonMethod": "ldap",
"defaultUserRoles" : [
"openidm-authorized"
],
"augmentSecurityContext" : {
"type" : "text/javascript",
"file" : "auth/populateAsManagedUser.js"
}
},
"enabled" : true
}The IWA authentication module includes the following configurable properties:
servicePrincipalThe Kerberos principal for authentication, in the following format:
HTTP/host.domain@DC-DOMAIN-NAME
host and domain correspond to the host and domain names of the IDM server. DC-DOMAIN-NAME is the domain name of the Windows Kerberos domain controller server. The DC-DOMAIN-NAME can differ from the domain name for the IDM server.
keytabFileNameThe full path to the keytab file for the Service Principal. On Windows systems, any backslash (
\) characters in the path must be escaped, as shown in the previous example.kerberosRealmThe Kerberos Key Distribution Center realm. For the Windows Kerberos service, this is the domain controller server domain name.
kerberosServerNameThe fully qualified domain name of the Kerberos Key Distribution Center server, such as that of the domain controller server.
queryOnResourceThe IDM resource to check for the authenticating user; for example,
system/ad/account.maxTokenSizeDuring the Kerberos authentication process, the Windows server builds a token to represent the user for authorization. This property sets the maximum size of the token, to prevent DoS attacks, if the SPENGO token in the request being made is amended with extra data. The default maximum token size is
48000bytes.groupRoleMappingEnables you to grant different roles to users who are authenticated through the
IWAmodule.
You can use the IWA module in conjunction with the
PASSTHROUGH authentication module. In this case, a
failure in the IWA module allows users to revert to
forms-based authentication.
To add the PASSTHROUGH module, follow
"Configuring Pass-Through Authentication".
When you have included the IWA module in your
conf/authentication.json file, edit the
conf/system.properties file to include a pointer to
your login configuration file for JAAS. For example:
java.security.auth.login.config=&{idm.instance.dir}/conf/gssapi_jaas.conf
Your gssapi_jaas.conf file must include the following
information related to the LDAP connector:
org.identityconnectors.ldap.LdapConnector {
com.sun.security.auth.module.Krb5LoginModule required
client=TRUE
principal="openidm.example.com@EXAMPLE.COM"
useKeyTab=true
keyTab="C:\\Users\\Administrator\\openidm\\security\\openidm.HTTP.keytab";
};
The value of the principal property must reflect the
username. The value of the keyTab property must match
what you have configured in your authentication.json
file.
20.1.6. Configuring Client Certificate Authentication
The CLIENT_CERT module enables you to authenticate users
by validating their certificates against the truststore.
For this purpose, you can use the authentication.json
file in the following directory:
/path/to/openidm/samples/example-configurations/conf/client-cert.
When the client is a password plugin, such as those described in the Preface in the Password Synchronization Plugin Guide, the client authenticate with IDM using the
CLIENT_CERTmodule. The process is similar to an administrative request to modify passwords of regular users.When users have secure certificates that they install in their browsers for authentication and authorization. You can include those user certificates as described in "Configuring the Client Certificate Authentication Module".
You can set up and use a self-signed certificate for the
CLIENT_CERT module, as described in
"Demonstrating the CLIENT_CERT Module".
With this configuration, a user is authenticated if the following conditions are met:
The user's public certificate is found in the truststore
That public certificate has been issued by a CA whose root certificate is also in the truststore.
When users are authenticated, they receive the roles listed in the
defaultUserRoles attribute. There is no further role
retrieval and population.
To validate users against the truststore, follow these steps:
Import each potential user's public certificate into the IDM truststore, as follows:
$ keytool \ -import \ -alias username \ -file certificate.pem \ -keystore /path/to/openidm/truststore \ -storetype JKS
In this example, username is the username with which the user logs in to IDM and certificate.pem is that user's public certificate.
Each time you add a new user, you must import that user's certificate into the truststore in the same way.
Configure the client certificate module, either in the Admin UI, or in your project's
conf/authentication.jsonfile as follows:{ "name" : "CLIENT_CERT", "properties" : { "augmentSecurityContext" : { "type" : "text/javascript", "globals" : { }, "file" : "auth/mapUserFromClientCert.js" }, "queryOnResource" : "managed/user", "defaultUserRoles" : [ "openidm-cert", "openidm-authorized" ], "allowedAuthenticationIdPatterns" : [ ".*CN=localhost, O=ForgeRock.*" ] }, "enabled" : true }Verify the following properties:
enabledMake sure that this property is set to
true.queryOnResourceSpecifies the resource against which users are validated, in this case
managed/user.defaultUserRolesWhen a user authenticates with this module, the roles listed here are added to the user's security context. By default, the
openidm-certrole is added.allowedAuthenticationIdPatternThis property contains a regular expression (regex) that defines which user distinguished names (DNs) are allowed to authenticate with a certificate.
By default users can authenticate only if their certificates have been issued by a Certification Authority (CA) that is listed in the truststore. The default truststore includes several trusted root CA certificates and any user certificate issued by those CAs will be trusted. Change the value of this property to restrict certificates to those issued to users in your domain, or use some other regular expression to limit who will be trusted.
The value in the example configuration (
"(.*)") means that all certificates will be trusted. If you leave this property empty, no certificates will be trusted.Note
If you are using a private CA to issue user certificates, you should delete the default truststore file and create a new one that only contains your CA's public certificate and the public certificates of the users that you want to trust. For more information, see "Removing Unused CA Digital Certificates".
The following procedure enables you to test this authentication module with a generated self-signed certificate.
In this procedure, you will verify the certificate over port 8444 as
defined in your project's resolver/boot.properties
file:
openidm.auth.clientauthonlyports=8444
Important
OpenSSL software is independent from and not associated with IDM. The examples shown in this chapter might not work with your version of OpenSSL. See the openssl documentation for your version.
Examples in this section were originally written with OpenSSL version 1.0.2.
CLIENT_CERT ModuleGenerate the self-signed certificate with the following command:
$ openssl \ req \ -x509 \ -newkey rsa:1024 \ -keyout key.pem \ -out cert.pem \ -days 3650 \ -nodes
Respond to the questions when prompted. (The default answers vary even on different Linux distributions.):
Country Name (2 letter code) [XX]:US State or Province Name (full name) []:Oregon Locality Name (eg, city) []: Name (eg, company) [Default Company Ltd]:ForgeRock Organizational Unit Name (eg, section) []: Common Name (eg, server FQDN or YOUR name) []:localhost Email Address []:jdoe@example.com
Based on RFC 2049, the entries made to the openssl questions correspond to the following components of a Distinguished Name (DN):
OpenSSL Distinguished Name AttributesDescription Attribute Country Name C State or Province ST Locality Name L Name O Organizational Unit Name OU Common Name CN Email Address EMAILADDRESS Import the certificate
cert.pemfile into the IDM truststore:$ keytool \ -importcert \ -keystore \ /path/to/openidm/security/truststore \ -storetype JKS \ -storepass changeit \ -file cert.pem \ -trustcacerts \ -noprompt \ -alias \ client-cert-example Certificate was added to keystore
Open the
authentication.jsonfile in theproject-dir/confdirectory. Scroll to the code block withCLIENT_CERTand include the information from when you generated the self-signed certificate:...{ "name" : "CLIENT_CERT", "properties" : { "augmentSecurityContext" : { "type" : "text/javascript", "globals" : { }, "file" : "auth/mapUserFromClientCert.js" }, "queryOnResource" : "managed/user", "defaultUserRoles" : [ "openidm-cert", "openidm-authorized" ], "allowedAuthenticationIdPatterns" : [ "C=US,ST=Oregon,CN=localhost,O=ForgeRock,EMAILADDRESS=jdoe@example.com" ] }, "enabled" : true },...Start IDM:
$ cd /path/to/openidm $ ./startup.sh -p project-dir
Create a user named
jdoe, with an email address ofjdoe@example.com. For the purpose of this example, use the following password:Passw0rd.$ curl \ --header "X-OpenIDM-Username: openidm-admin" \ --header "X-OpenIDM-Password: openidm-admin" \ --header "Content-Type: application/json" \ --request PUT \ --data '{ "userName": "jdoe", "givenName": "John", "sn" : "Doe", "displayName" : "John Doe", "mail" : "jdoe@example.com", "password" : "Passw0rd" }' \ "http://localhost:8080/openidm/managed/user/jdoe"Send an HTTP request with your certificate file
cert.pem:$ curl \ --cert-type PEM \ --insecure \ --key key.pem \ --key-type PEM \ --tlsv1.2 \ --cert /path/to/./cert.pem \ --header "X-OpenIDM-Username: jdoe" \ --header "X-OpenIDM-Password: Passw0rd" \ --request GET \ "https://localhost:8444/openidm/info/login" { "_id" : "login", "authenticationId" : "jdoe", "authorization" : { "component" : "managed/user", "authLogin" : false, "roles" : [ "openidm-authorized" ], "ipAddress" : "127.0.0.1", "protectedAttributeList" : [ "password" ], "id" : "d537507e-f05c-495a-b7fd-3bf9f19ffbed", "moduleId" : "MANAGED_USER" } }If you're using a self-signed certificate, such as that created earlier in this procedure, use the
--insecureoption.You can find the
authzroles for a user, by their email address:$ curl \ --header "X-OpenIDM-Username: openidm-admin" \ --header "X-OpenIDM-Password: openidm-admin" \ --request GET \ 'http://localhost:8080/openidm/managed/user/?_queryFilter=/mail+eq+"jdoe@example.com"&_fields=*,authzRoles' ... "authzRoles" : [ { "_ref" : "repo/internal/role/openidm-authorized", "_refResourceCollection" : "repo/internal/role", "_refResourceId" : "openidm-authorized", "_refProperties" : { "_id" : "5df9bc81-41e0-4e27-86a1-742f6f59546e", "_rev" : "00000000b48ea8c1" } } ] ...
20.1.7. Configuring RunAs Authentication
You can set up any of the authentication modules discussed in this
section with a runAs header, which allows you as
openidm-admin to masquerade as a
regular user without needing that user's password. To do so, you'd need a
runAsProperties code block for the module, similar
to the following:
"runAsProperties" : {
"adminRoles" : [
"openidm-admin"
],
"disallowedRunAsRoles" : [
"openidm-admin"
],
"queryId" : "credential-query",
"queryOnResource" : "managed/user",
"propertyMapping" : {
"authenticationId" : "username",
"userRoles" : "authzRoles"
},
"augmentSecurityContext" : {
"type" : "text/javascript",
"source" : "require('auth/customAuthz').setProtectedAttributes(security)"
}
}
For demonstration purposes, you can also find this code block in the
authentication.json file in this directory:
openidm/samples/example-configurations/conf/runas/
This code block allows you to run a REST call as any user except
openidm-admin. The
augmentSecurityContext property, as with
MANAGED_USER, can be used to add custom properties
to the security context of users who authenticate with this module.
By default, this property adds a list of
protected properties to the user's security
context. These protected properties are defined in the managed object
schema. For more information, see the isProtected
property described in
"Creating and Modifying Managed Object Types".
With this code block, linked to the INTERNAL_USER
module, you can now run REST calls like the following, which allows
the openidm-admin user to masquerade as a
selected user:
$ curl \
--header "X-OpenIDM-Username: openidm-admin" \
--header "X-OpenIDM-Password: openidm-admin" \
--header "X-OpenIDM-RunAs: mike" \
--request GET \
"http://localhost:8080/openidm/info/login"
{
"_id" : "login",
"authenticationId" : "mike",
"authorization" : {
"component" : "managed/user",
"authLogin" : false,
"adminUser" : "openidm-admin",
"roles" : [ "openidm-authorized" ],
"ipAddress" : "127.0.0.1",
"protectedAttributeList" : [ "password" ],
"id" : "847fe36b-115b-4769-b74a-d546f0d0ffc8",
"moduleId" : "INTERNAL_USER"
}
}
As noted in the output, the request as user mike
was run with an adminUser of
openidm-admin. This is consistent with the
INTERNAL_USER module, as
openidm-admin is an internal IDM user.
In contrast, if you run this REST call as user mike,
IDM authenticates the user with the
MANAGED_USER authentication module. The output still
shows an authenticationId of mike;
without any reference to openidm-admin:
$ curl \
--header "X-OpenIDM-Username: mike" \
--header "X-OpenIDM-Password: Passw0rd" \
--request GET \
"http://localhost:8080/openidm/info/login"
{
"_id" : "login",
"authenticationId" : "mike",
"authorization" : {
"component" : "managed/user",
"authLogin" : false,
"roles" : [ "openidm-authorized" ],
"ipAddress" : "127.0.0.1",
"protectedAttributeList" : [ "password" ],
"id" : "847fe36b-115b-4769-b74a-d546f0d0ffc8",
"moduleId" : "MANAGED_USER"
}
}20.1.8. Configuring Authentication for Metrics
To support metrics collection, IDM includes a second
STATIC_USER authentication module for access to the
endpoint described in "Prometheus Endpoint". A sample configuration
follows:
{
"name" : "STATIC_USER",
"properties" : {
"queryOnResource" : "repo/internal/user",
"username" : "&{openidm.prometheus.username}",
"password" : "&{openidm.prometheus.password}",
"defaultUserRoles" : [
"openidm-prometheus"
]
},
"enabled" : true
}20.1.9. Interactions Between Modules in the Stack
IDM supports integration with ForgeRock's Access Management product, also known as AM. When you set up IDM modules as described in "Integrating IDM With the ForgeRock Identity Platform" in the Samples Guide, you'll set up interactions as described in OpenID Connect Authorization Code Flow in the AM OpenID Connect 1.0 Guide.
This integration between IDM and AM involves several different factors, described in the following sections:
20.1.9.1. Standards-Based Integration
When you integrate IDM with AM, you're setting up IDM as a Relying Party, fully compliant with the OpenID Connect Discovery specification. The following list depicts each relevant standard associated with the IDM implementation of the OAUTH_CLIENT module, as described in "Configuring Authentication With OAuth 2.0".
Relying Party
As the Relying Party, IDM registers OAuth 2.0 client profiles with AM.
OpenID Provider
AM acts as the OpenID Provider with configuration information.
Scope
Per the Scope Values section of the OpenID Connect specification,
openidis a required scope for OpenID Connect requests.Well-known endpoint
Per Obtaining OpenID Provider Configuration Information, "OpenID Providers supporting Discovery MUST make a JSON document available at the path formed by concatenating the string /.well-known/openid-configuration to the Issuer." ForgeRock complies with this by concatenating the noted string to the end of the related OAuth 2.0 URL; a typical wellKnownEndpoint endpoint URL might be:
http://openam.example.com:8080/openam/oauth2/.well-known/openid-configuration.clientId
A client identifier valid at the authorization server; in this case, IDM is the client and AM is the authorization server.
clientSecret
The client secret, in this case, is the password associated with the
clientId. Clients authenticate with AM (as an authorization server) by including the client credentials in the request body after receiving aclientSecretvalue.authorizationEndpoint
As noted in RFC 6749, the authorization endpoint is used to interact with the resource owner and obtain an authorization grant. For the AM implementation of the authorization endpoint, see OAuth 2.0 Client and Resource Server Endpoints in the AM OAuth 2.0 Guide.
tokenEndpoint
Also known as the Access Token Endpoint, this AM endpoint receives an authorization code and returns an access token to IDM. If you're using the AM top-level realm, the endpoint will resemble
http://openam.example.com:8080/openam/oauth2/access_token.If you're using an AM sub-realm, as described in Setting Up Realms chapter of the AM Setup and Maintenance Guide, you'd include the name of the realm in the URL, such as:
http://openam.example.com:8080/openam/oauth2/access_token?realm=/someRealm.endSessionEndpoint
The End Session Endpoint allows a relying party (IDM) to request logging out an end user at the OpenID Connect Party (AM), at an endpoint such as:
http://openam.example.com:8080/openam/oauth2/connect/endSession. For more information, see the IDM OpenID Connect 1.0 Guide Reference chapter.
20.1.9.2. Using the IDM Session Module
When integrating IDM and AM, both servers have a session module. When you log into IDM in the integrated configuration, the IDM JWT_SESSION module is used solely as a client-side cache.
Without the IDM JWT_SESSION module, the OAUTH_CLIENT authentication module would have to call the AM session module for every request. In contrast, with the IDM JWT_SESSION module, it validates the OAUTH_CLIENT token only after the JWT_SESSION module times out.
While fewer calls ot the AM session module improves performance, that can lead to a problem; if a user logs out of AM (or if that user's AM session has timed out), that user's IDM session may still be active. To minimize that issue, you can reduce the timeout associated with that user's IDM JWT_SESSION, as shown in "Supported Session Module".
20.1.9.3. REST Calls and Integration
When you run a REST call on the integrated IDM/AM system, the application should have an OIDC token obtained from AM. Caching is the responsibility of the REST application.
20.1.9.4. Mapping Admin Users
When you integrate IDM with AM, you're integrating their
administrative accounts, and potentially more. For an example of how this
is done, review the amSessionCheck.js file, as
described in "Understanding the Integrated AM Administrative User" in the Samples Guide.
20.2. Roles and Authentication
IDM includes a number of default roles, and supports the configuration of managed roles, enabling you to customize the roles mechanism as needed.
The following roles are configured by default:
- openidm-reg
Role assigned to users who access IDM with the default anonymous account.
The
openidm-regrole is excluded from the reauthorization required policy definition by default.- openidm-admin
IDM administrator role, excluded from the reauthorization required policy definition by default.
- openidm-authenticated
Temporary role for any user who has authenticated with a user name and password, but is subject to progressive profile completion requirements as described in "Progressive Profile Completion". Unlike other roles, admins cannot assign this internal role to users.
- openidm-authorized
Default role for any user who has authenticated with a user name and password.
- openidm-cert
Default role for any user authenticated with mutual SSL authentication.
This role applies only for mutual authentication. Furthermore, the shared secret (certificate) must be adequately protected. The
openidm-certrole is excluded from the reauthorization required policy definition by default.- openidm-tasks-manager
Role for users who can be assigned to workflow tasks.
When a user authenticates, IDM calculates that user's roles as follows:
If the authentication module with which the user authenticates includes a
defaultUserRolesproperty, IDM assigns those roles to the user on authentication. ThedefaultUserRolesproperty is specified as an array.The
userRolesproperty is a mapping that specifies the attribute or list of attributes in the user entry that contains that specific user's authorization roles. For example, the following excerpt indicates that theuserRolesshould be taken from the user'sauthzRolesproperty on authentication:"userRoles" : "authzRoles"
If the authentication module includes a
groupRoleMapping,groupMembership, orgroupComparisonproperty, IDM can assign additional roles to the user, depending on the user's group membership.
The roles calculated in sequence are cumulative.
For users who have authenticated with mutual SSL authentication, the module
is CLIENT_CERT and the default role for such users is
openidm-cert.
{ "name" : "CLIENT_CERT",
"properties" : {
"queryOnResource": "security/truststore",
"defaultUserRoles": [ "openidm-cert" ],
"allowedAuthenticationPatterns" : [ ]
},
"enabled" : "true"
}
Access control for such users is configured in the
access.js file. For more information, see
"Authorization".
20.3. Authorization
IDM provides role-based authorization that restricts direct HTTP access to REST interface URLs. The default authorization configuration grants access rights to users, based on the following internal roles:
openidm-reg
|
openidm-authenticated
|
openidm-authorized
|
openidm-admin
|
openidm-cert
|
openidm-tasks-manager
|
Note that this access control applies to direct HTTP calls only. Access for internal calls (for example, calls from scripts) is not affected by this mechanism.
Authorization roles are referenced in a user's
authzRoles property, and are implemented using the
relationships mechanism, described in "Managing Relationships Between Objects".
By default, all managed users have the openidm-authorized
role. The following request shows the authorization roles for user
psmith:
$ curl \
--header "X-OpenIDM-Username: openidm-admin" \
--header "X-OpenIDM-Password: openidm-admin" \
--request GET \
"http://localhost:8080/openidm/managed/user/psmith?_fields=authzRoles"
{
"_id": "psmith",
"_rev": "000000004cab60c8",
"authzRoles": [
{
"_ref": "repo/internal/role/openidm-authorized",
"_refProperties": {
"_id": "8e7b2c97-dfa8-4eec-a95b-b40b710d443d",
"_rev": "0000000040b78633"
}
}
]
}The authorization implementation is configured in two script files:
openidm/bin/defaults/script/router-authz.jsproject-dir/script/access.js
IDM calls the router-authz.js script for each
request, through an onRequest hook that is defined in the
router.json file. router-authz.js
calls your project's access configuration script
(access.js) to determine the allowed HTTP requests. If
access is denied, according to the configuration defined in
access.js, the router-authz.js
script throws an exception, and IDM denies the request.
20.3.1. Understanding the Router Authorization Script (router-authz.js)
This file provides the functions that enforce access rules. For example, the following function controls whether users with a certain role can start a specified process.
...
function isAllowedToStartProcess() {
var processDefinitionId = request.content._processDefinitionId;
return isProcessOnUsersList(processDefinitionId);
}
...
There are certain authorization-related functions in
router-authz.js that should not be
altered, as indicated in the comments in the file.
20.3.2. Understanding the Access Configuration Script (access.js)
This file defines the access configuration for HTTP requests and
references the methods defined in router-authz.js. Each
entry in the configuration contains a pattern to match against the incoming
request ID, and the associated roles, methods, and actions that are allowed
for requests on that pattern.
The options shown in the default version of the file do not include all of the actions available at each endpoint.
The following sample configuration entry indicates the configurable parameters and their purpose.
{
"pattern" : "*",
"roles" : "openidm-admin",
"methods" : "*", // default to all methods allowed
"actions" : "*", // default to all actions allowed
"customAuthz" : "disallowQueryExpression()",
"excludePatterns": "system/*"
},
As shown, this entry affects users with the openidm-admin
role. Such users have HTTP access to all but system
endpoints. The parameters are as follows:
patternThe REST endpoint to which access is being controlled.
"*"indicates access to all endpoints."managed/user/*"would indicate access to all managed user objects.rolesA list of the roles to which this access configuration applies.
The
rolesreferenced here align with the details that are read from an object's security context (security.authorization.roles). TheauthzRolesrelationship property of a managed user produces this security context value during authentication.methodsA comma-separated list of the methods to which access is being granted. The method can be one or more of
create, read, update, delete, patch, action, query. A value of"*"indicates that all methods are allowed. A value of""indicates that no methods are allowed.actionsA comma-separated list of the allowed actions. The possible values depend on the service (URL) that is being exposed. The following list indicates the possible actions for each service.
openidm/info/*-(no action parameter applies)openidm/authentication-reauthenticateopenidm/config/ui/*-(no action parameter applies)openidm/endpoint/getprocessforuser-create, completeopenidm/endpoint/gettasksview-create, completeopenidm/external/email-sendopenidm/external/rest-(no action parameter applies)openidm/managed-patch, triggerSyncCheckopenidm/managed/user-validateObject, validatePropertyopenidm/policy-validateObject, validatePropertyopenidm/recon-recon, reconById, cancelopenidm/repo-updateDbCredentialsopenidm/script/*-evalopenidm/sync-notifyCreate, notifyUpdate, notifyDelete, recon, performAction, getLinkedResourcesopenidm/system-test, testConfig, availableConnectors, createCoreConfig, createFullConfig, liveSync, authenticateopenidm/system/<name>-script, test, liveSyncopenidm/system/<name>/{id}-authenticate, liveSyncopenidm/taskscanner-execute, cancelopenidm/workflow/processdefinition-create, completeopenidm/workflow/processinstance-create, completeopenidm/workflow/taskinstance-claim, create, completeA value of
"*"indicates that all actions exposed for that service are allowed. A value of""indicates that no actions are allowed.customAuthzAn optional parameter that enables you to specify a custom function for additional authorization checks. Custom functions are defined in
router-authz.js.excludePatternsAn optional parameter that enables you to specify particular endpoints to which access should not be granted.
20.3.3. Granting Internal Authorization Roles
Internal authorization roles can be granted to users through the Admin UI or over the REST interface, in much the same way as managed roles are granted. For more information about granting managed roles, see "Granting a Role to a User". To grant an internal role to a user through the Admin UI:
Select Manage > User and click the user to whom you want to grant the role.
Select the Authorization Roles tab and click Add Authorization Roles.
Select Internal Role as the Type, click to select from the list of defined Internal Roles, then click Add.
To grant an internal role over REST, add a reference to the internal role to
the user's authzRoles property. The following command
adds the openidm-admin role to user bjensen:
$ curl \
--header "X-OpenIDM-Username: openidm-admin" \
--header "X-OpenIDM-Password: openidm-admin" \
--header "Content-Type: application/json" \
--request PATCH \
--data '[
{
"operation": "add",
"field": "/authzRoles/-",
"value": {"_ref" : "repo/internal/role/openidm-admin"}
}
]' \
"http://localhost:8080/openidm/managed/user/bjensen"
{
"_id": "bjensen",
"_rev": "0000000050c62938",
"mail": "bjensen@example.com",
"givenName": "Barbara",
"sn": "Jensen",
"description": "Created By XML1",
"userName": "bjensen@example.com",
"telephoneNumber": "1234567",
"accountStatus": "active",
"effectiveRoles": [],
"effectiveAssignments": []
}Note
Because internal roles are not managed objects, you cannot manipulate them in the same way as managed roles. Therefore you cannot add a user to an internal role, as you would to a managed role.
20.3.4. Extending the Authorization Mechanism
You can extend the default authorization mechanism by defining additional
functions in router-authz.js and by creating new access
control configuration definitions in access.js.
20.3.5. Managing User Access to Workflows
The Self-Service UI is integrated with the embedded Activiti worfklow
engine, enabling users to interact with workflows. Available workflows are
displayed under the Processes item on the Dashboard. In order for a workflow
to be displayed here, the workflow definition file must be present in the
openidm/workflow directory.
A sample workflow integration with the Self-Service UI is provided in
openidm/samples/provisioning-with-workflow, and
documented in
"Using a Workflow to Provision User Accounts" in the Samples Guide.
Follow the steps in that sample for an understanding of how the workflow
integration works.
General access to workflow-related endpoints is based on the access rules
defined in the script/access.js file. The configuration
defined in the conf/process-access.json file determines
who can invoke workflows. By default all users with the role
openidm-authorized or openidm-admin can
invoke any available workflow. The default
process-access.json file is as follows:
{
"workflowAccess" : [
{
"propertiesCheck" : {
"property" : "_id",
"matches" : ".*",
"requiresRole" : "openidm-authorized"
}
},
{
"propertiesCheck" : {
"property" : "_id",
"matches" : ".*",
"requiresRole" : "openidm-admin"
}
}
]
}"property"Specifies the property used to identify the process definition. By default, process definitions are identified by their
_id."matches"A regular expression match is performed on the process definitions, according to the specified property. The default (
"matches" : ".*") implies that all process definition IDs match."requiresRole"Specifies the IDM role that is required for users to have access to the matched process definition IDs. In the default file, users with the role
openidm-authorizedoropenidm-adminhave access.
To extend the process action definition file, identify the processes to which
users should have access, and specify the qualifying user roles. For example,
if you want to allow access to users with a role of ldap,
add the following code block to the process-access.json
file:
{
"propertiesCheck" : {
"property" : "_id",
"matches" : ".*",
"requiresRole" : "ldap"
}
}20.3.5.1. Adding Another Role to a Workflow
Sometimes, you'll want to configure multiple roles with access to the
same workflow process. For example, if you want users with a role of
doctor and nurse to both have access to certain workflows, you could set
up the following code block within the process-access.json
file:
{
"propertiesCheck" : {
"property" : "_id",
"matches" : ".*",
"requiresRole" : "doctor"
}
},
{
"propertiesCheck" : {
"property" : "_id",
"matches" : ".*",
"requiresRole" : "nurse"
}
}
You could add more requiresRole code blocks, such as:
{
"propertiesCheck" : {
"property" : "_id",
"matches" : ".*",
"requiresRole" : "medic"
}
}20.4. Building Role-Based Access Control (RBAC)
Internal roles can be granted in a number of ways. The roles granted to specific users are cumulative, and are calculated based on the process depicted here:

RBAC incorporates authentication and authorization options from roles configured for clients, for managed / internal users, as well as for group memberships.
The properties listed in this section are described in "Configuring Pass-Through Authentication".
Roles and authentication options can be configured for users in three stages:
- Client Controlled
The
defaultUserRolesmay be added to authentication modules configured in the applicableauthentication.jsonfile. Default roles are listed in "Roles and Authentication".If you see the following entry in
authentication.json, the cited authentication property applies to all authenticated users:"defaultUserRoles" : [ ]
- Managed / Internal
Accumulated roles for users are collected in the
userRolesproperty.For a definition of managed and internal users, see "Authenticating Users".
- Group roles
IDM also uses group roles as input. Options include
groupMembership,groupRoleMapping, andgroupComparison- context.security
Once IDM assigns roles and authentication modules to a user, IDM then evaluates the result based on the
context.securitymap, based on the scripts in thepolicy.jsfile. For more information, see "Roles, Authentication, and the Security Context".
20.4.1. Roles, Authentication, and the Security Context
The Security Context (context.security), consists of a
principal (defined by the authenticationId property) and
an access control element (defined by the authorization
property).
If authentication is successful, the authentication framework sets the
principal. IDM stores that principal as the
authenticationId. For more information, see the
authentication components defined in "Supported Authentication Modules".
The authorization property includes an
id, an array of roles (see
"Roles and Authentication"), and a component, that
specifies the resource against which authorization is validated. For more
information, see "Configuring Pass-Through Authentication".
Chapter 21. Securing and Hardening Servers
This chapter outlines the specific security procedures that you should follow before deploying IDM in a production environment.
Note
In a production environment, avoid the use of communication over insecure HTTP, self-signed certificates, and certificates associated with insecure ciphers.
21.1. Accessing IDM Keys and Certificates
By default, IDM stores keystore and truststore files in the
/path/to/openidm/security directory. These can be managed
using the keytool command, which is included in your
Java installation. For information about using the keytool
command, see
https://docs.oracle.com/javase/8/docs/technotes/tools/unix/keytool.html.
The IDM keystore and truststore are configured in your
resolver/boot.properties file. The default
configuration is as follows:
openidm.keystore.type=JCEKS openidm.truststore.type=JKS openidm.keystore.provider=SunJCE openidm.truststore.provider=SUN openidm.keystore.location=security/keystore.jceks openidm.truststore.location=security/truststore
To use a different keystore and truststore, edit these properties. For an example, see how IDM can be configured to use an HSM provider, in "Configuring IDM to Support an HSM Provider".
You must specify a keystore for IDM to be able to start up. If you do not specify a truststore, IDM uses the keystore configuration as the truststore.
The following sections describe how to manage certificates using the keytool command.
21.1.1. Displaying the Contents of the Keystore
IDM generates a number of encryption keys the first time the server starts up. These can be viewed using the keytool command to get a list of certificates:
$ keytool \ -list \ -keystore /path/to/openidm/security/keystore.jceks \ -storepass changeit -storetype JCEKS openidm-sym-default, Sep 14, 2017, SecretKeyEntry, selfservice, Sep 14, 2017, PrivateKeyEntry, Certificate fingerprint (SHA1): B8:2E:D9:93:39:F5:D2:0C:6F:EB:89:11:0D:57:7B:C7:08:94:4C:73 openidm-jwtsessionhmac-key, Sep 14, 2017, SecretKeyEntry, openidm-localhost, Sep 14, 2017, PrivateKeyEntry, Certificate fingerprint (SHA1): DD:D3:E7:1B:3E:B1:AC:37:AD:3E:CE:04:A0:64:A6:0A:3E:B7:8B:49 openidm-selfservice-key, Sep 14, 2017, SecretKeyEntry
The following aliases are included by default, and are set in the
boot.properties file.
openidm-sym-defaultThe default symmetric key used to encrypt the configuration, managed user passwords, and client secrets. Associated with the
openidm.config.crypto.aliasproperty.openidm-jwtsessionhmac-keyUsed by the JWT session module as the signing key, using HMAC, the hashed-based message authentication code. Associated with the
openidm.config.crypto.jwtsession.hmackey.aliasproperty.selfserviceThe signing key used for the public/private key pair related to the self service module. Used by the delegated authentication and social authentication modules. Not configured in
boot.properties.openidm-localhostThe default alias for an encryption key used by the Jetty web server to service SSL requests. This alias references a private key and a self-signed certificate. You can use the self-signed certificate for testing purposes. When you deploy IDM in a production environment, replace the self-signed certificate with a certificate that has been signed by a certificate authority. Associated with the
openidm.https.keystore.cert.aliasproperty, and configured askeyAliasinauthentication.json.openidm-selfservice-keyUsed by the End User UI to encrypt and sign sensitive data, including information stored in JWT tokens for transferring state between stages. Associated with the
openidm.config.crypto.selfservice.sharedkey.aliaskey.
21.1.2. Importing a Signed Certificate into the Keystore
If you have an existing CA-signed certificate, you can import it into the IDM keystore using the keytool command.
The following process imports a CA-signed certificate, with the alias example-com into the keystore. Replace this with the alias of your certificate.
This procedure assumes that you have the following items, in .PEM format:
A CA-signed certificate
The private key associated with the Certificate Signing Request (CSR) that was used to request the signed certificate
Optionally, any intermediary and root certificates from the Certificate Authority
If there are multiple intermediary CA certificates, you can concatenate them with the root certificate into a single .PEM file.
Stop the server.
Back up your existing
openidm/security/keystoreandopenidm/security/truststorefiles.Generate a new PKCS12 keystore using the existing CA-signed certificate, private key and CA certificate chain:
$ openssl pkcs12 \ -export \ -in cert.pem \ -inkey key.pem \ -certfile chain.pem \ -name example-com \ -out cert.pkcs12 Enter Export Password: changeit Verifying - Enter Export Password: changeit
Important
When you generate the new PKCS12 keystore file, you are prompted to set an export password. This password must be the same as the existing IDM keystore password. If you have not changed the default keystore password, it is
changeit. In a production environment, you should change this password. For more information, see "Change the Default Keystore Password".Import the PKCS12 keystore that you generated in the previous step into the IDM keystore:
$ keytool \ -importkeystore \ -srckeystore cert.pkcs12 \ -srcstoretype pkcs12 \ -destkeystore /path/to/openidm/security/keystore.jceks \ -storetype jceks Enter destination keystore password: changeit Enter source keystore password: changeit Entry for alias example-com successfully imported. Import command completed: 1 entries successfully imported, 0 entries failed or cancelledImport the certificate into the IDM truststore:
$ keytool \ -import \ -file cert.pem \ -keystore /path/to/openidm/security/truststore \ -alias example-com Enter keystore password: changeit Owner: EMAILADDRESS=admin@example.com, CN=example, OU=admin, O=www.example.com, ST=WA, C=US ... Certificate fingerprints: MD5: C2:06:DE:B0:AD:C7:28:14:1D:B6:BE:4A:CC:A1:CA:A0 SHA1: F9:D7:6A:AE:47:99:61:0A:3C:90:4D:F0:73:DC:79:F4:30:B4:08:B1 SHA256: 6C:1A:0F:AF:16:89:8B:EE:1E:AE:A9:19:56:29:D8:6D:C1:4D:82:58:C0:43:66:08:C4:C9:16:1D:BA:C5:D6:5D Signature algorithm name: SHA1withRSA Version: 3 ... Trust this certificate? [no]: yes Certificate was added to keystore
Edit your
resolver/boot.propertiesfile and set theopenidm.https.keystore.cert.aliasto the alias of the signed certificate, for example:openidm.https.keystore.cert.alias=example-com
Restart the server for the new certificate to be taken into account.
Important
If you use a 2048-bit SSL certificate, you must install the Unlimited JCE policy for your JRE to enable IDM to use the certificate.
Download and install the Unlimited JCE Policy for Java 8 from the
Oracle
Technology Network site. Unzip the JCE zip file and install the JCE policy
JAR files in the /lib/security folder of the JRE.
21.1.3. Generating a Self-Signed Certificate
To generate a self-signed certificate, use the
genkeypair action on the keytool
command. The generated certificate is stored in the IDM keystore.
Specify the details of the certificate. For example:
$ keytool \ -genkeypair \ -keyalg RSA \ -sigalg SHA512withRSA \ -keysize 2048 \ -dname "CN=www.example.com, O=Example, OU=None, L=None, ST=None, C=None" \ -startdate "2017/09/01 00:00:01" \ -validity 365 \ -alias "new-alias" \ -keystore /path/to/openidm/security/keystore.jceks \ -storetype JCEKS
You will be prompted to give the keystore password, and (if desired) a separate password for the new certificate.
The following certificate details can be specified:
keyalg(optional)The public key algorithm, for example,
RSA.sigalg(optional)The signature type, for example,
SHA512WithRSA.keysize(optional)The size of the key (in bits) used in the cryptographic algorithm, for example
2048. If no key size is specified, a default of2048is used.dnameThe distinguished name related to the certificate, for example
CN=www.example.com, O=Example, OU=None, L=None, ST=None, C=None. If no distinguished name is specified, the user is prompted to enter the information before the certificate is generated.startdateandvalidity(optional)The validity period of the certificate, starting from a set date. For example
2017/09/01 00:00:01. If no values are specified, the certificate is valid for one year from the current date.aliasThe keystore alias or string that identifies the certificate, for example
openidm-localhost.
21.1.4. Deleting Certificates
If you have a CA-signed certificate, you might want to delete the default certificate from the keystore and the truststore. You can delete certificates from a keystore using the keytool command.
The following example deletes the openidm-localhost
certificate from the keystore:
$ keytool \ -delete \ -alias openidm-localhost \ -keystore /path/to/openidm/security/keystore.jceks \ -storetype JCEKS \ -storepass changeit
The following example deletes the openidm-localhost
certificate from the truststore:
$ keytool \ -delete \ -alias openidm-localhost \ -keystore /path/to/openidm/security/truststore \ -storepass changeit
You can use similar commands to delete custom certificates from the keystore and truststore, specifying the certificate alias in the request.
21.1.5. Rotating Encryption Keys
You can change the key that is used to encrypt managed data in an existing
deployment. By default, IDM encrypts managed object properties
with the default symmetric key (openidm-sym-default).
You can specify that a different key or cipher be used in the managed
object schema (in your project's conf/managed.json
file). You can also specify that different keys be used to encrypt different
properties. For example, the following excerpt of a
managed.json file specifies that user passwords must be
encrypted with a key with alias my-example-key:
"password" : {
"title" : "Password",
"type" : "string",
...
"encryption" : {
"key" : "my-example-key"
},When you change the encryption key in the managed object schema, the affected properties are re-encrypted with the new key the next time the managed object is updated.
Important
If you add a new key to the keystore while IDM is running, you must restart the server before you refer to that key in the configuration. IDM does not reload the keystore during runtime.
One caveat with key rotation is that both the old key and the new key must
remain in the keystore until every object that is encrypted with the old key
has been updated to use the new key. You can force the key rotation on all
managed objects by running the triggerSyncCheck action
on the entire managed object data set. The
triggerSyncCheck action examines the crypto blob of each
object and updates the encrypted property with the correct key. For example,
the following command forces all managed user objects to use the new key:
$ curl \
--header "X-OpenIDM-Username: openidm-admin" \
--header "X-OpenIDM-Password: openidm-admin" \
--header "Content-Type: application/json" \
--request POST \
"http://localhost:8080/openidm/managed/user/?_action=triggerSyncCheck"
{
"status":"OK",
"countTriggered":10
}
Note that the triggerSyncCheck action does not propagate
the key rotation over all the nodes in a cluster. You must run the action on
each successive node.
In a large managed object set, the triggerSyncCheck
action can take a very long time to run on only a single node. You should
therefore avoid using this action if your data set is large. An alternative
to running triggerSyncCheck over the entire data set is
to iterate over the managed data set and call
triggerSyncCheck on each individual managed object. You
can call this action manually or by using a script.
The following example shows the manual commands that must be run to launch
the triggerSyncCheck action on all managed users. The
first command uses a query filter to return all managed user IDs. The second
command iterates over the returned IDs calling
triggerSyncCheck on each ID:
$ curl \
--header "X-OpenIDM-Username: openidm-admin" \
--header "X-OpenIDM-Password: openidm-admin" \
"http://localhost:8080/openidm/managed/user?_queryFilter=true&_fields=_id"
{
"result": [
{
"_id": "bjensen",
"_rev": "00000000792afa08"
},
{
"_id": "scarter",
"_rev": "000000004121fb7e"
},
{
"_id": "jdoe",
"_rev": "000000001298f6a6"
},
...
$ curl \
--header "X-OpenIDM-Username: openidm-admin" \
--header "X-OpenIDM-Password: openidm-admin" \
--header "Content-Type: application/json" \
--request POST \
"http://localhost:8080/openidm/managed/user/bjensen?_action=triggerSyncCheck"
{
"userName": "bjensen",
"givenName": "Babs",
"sn": "Jensen",
"telephoneNumber": "12345678",
"active": "true",
"mail": "bjensen@example.com",
"accountStatus": "active",
"effectiveRoles": [],
"effectiveAssignments": [],
"_id": "bjensen",
"_rev": "00000000792afa08"
}In large data sets, the most efficient way to achieve key rotation is to use the scheduler service to launch these commands. The following example uses the scheduler service for this purpose.
This example uses a script to generate multiple scheduled tasks. Each
scheduled task iterates over a subset of the managed object set (defined
by the pageSize). The generated scheduled task then
calls another script that launches the triggerSyncCheck
action on each managed object in that subset.
You can set up a similar schedule as follows:
Create a schedule configuration named
schedule-triggerSyncCheck.jsonin your project'sconfdirectory. That schedule should look as follows:{ "enabled" : true, "persisted" : true, "type" : "cron", "schedule" : "0 * * * * ? *", "concurrentExecution" : false, "invokeService" : "script", "invokeContext" : { "waitForCompletion" : false, "script": { "type": "text/javascript", "name": "sync/scheduleTriggerSyncCheck.js" }, "input": { "pageSize": 2, "managedObjectPath" : "managed/user", "quartzSchedule" : "0 * * * * ? *" } } }You can change the following parameters of this schedule configuration to suit your deployment:
pageSizeThe number of objects that each generated schedule will handle. This value should be high enough not to create too many schedules. The number of schedules that is generated is equal to the number of objects in the managed object store, divided by the page size.
For example, if there are 500 managed users and a page size of 100, five schedules will be generated (500/100).
managedObjectPathThe managed object set over which the scheduler iterates. For example,
managed/userif you want to iterate over the managed user object set.quartzScheduleThe schedule at which these tasks should run. For example, to run the task every minute, this value would be
`0 * * * * ? *`.
The schedule calls a
scheduleTriggerSyncCheck.jsscript, located in a directory namedproject-dir/script/sync. Create thesyncdirectory, and add that script as follows:var managedObjectPath = object.managedObjectPath; var pageSize = object.pageSize; var quartzSchedule = object.quartzSchedule; var managedObjects = openidm.query(managedObjectPath, { "_queryFilter": "true", "_fields" : "_id" }); var numberOfManagedObjects = managedObjects.result.length; for (var i = 0; i < numberOfManagedObjects; i += pageSize) { var scheduleId = java.util.UUID.randomUUID().toString(); var ids = managedObjects.result.slice(i, i + pageSize).map(function (obj) { return obj._id}); var schedule = newSchedule(scheduleId, ids); openidm.create("/scheduler", scheduleId, schedule); } function newSchedule (scheduleId, ids) { var schedule = { "enabled" : true, "persisted" : true, "type" : "cron", "schedule" : quartzSchedule, "concurrentExecution" : false, "invokeService" : "script", "invokeContext" : { "waitForCompletion" : true, "script": { "type": "text/javascript", "name": "sync/triggerSyncCheck.js" }, "input": { "ids" : ids, "managedObjectPath" : managedObjectPath, "scheduleId" : scheduleId } } }; return schedule; }Each generated scheduled task calls a script named
triggerSyncCheck.js. Create that script in your project'sscript/syncdirectory. The contents of the script are as follows:var ids = object.ids; var scheduleId = object.scheduleId; var managedObjectPath = object.managedObjectPath; for (var i = 0; i < ids.length; i++) { openidm.action(managedObjectPath + "/" + ids[i], "triggerSyncCheck", {}, {}); } openidm.delete("scheduler/" + scheduleId, null);When you have set up the schedule configuration and the two scripts, you can test this key rotation as follows:
Edit your project's
conf/managed.jsonfile to return user passwords by default by setting"scope" : "public"."password" : { ... "encryption" : { "key" : "openidm-sym-default" }, "scope" : "public", ....Because passwords are not returned by default, you will not be able to see the new encryption on the password unless you change the property's
scope.Perform a GET request to return any managed user entry in your data set. For example:
$ curl \ --header "X-OpenIDM-Username: openidm-admin" \ --header "X-OpenIDM-Password: openidm-admin" \ --request GET \ "http://localhost:8080/openidm/managed/user/bjensen" { "_id": "bjensen", "_rev": "000000001298f6a6", "userName": "bjensen", "givenName": "Babs", "sn": "Jensen", "telephoneNumber": "12345678", "active": "true", "mail": "bjensen@example.com", "password": { "$crypto": { "type": "x-simple-encryption", "value": { "cipher": "AES/CBC/PKCS5Padding", "data": "YgTtyHGCPSrPBoJgWq1CYg==", "iv": "24Sgdl1+YL/2Qw0UQUjV8A==", "key": "openidm-sym-default" } } }, "accountStatus": "active", "effectiveRoles": [], "effectiveAssignments": [] }Notice that the user's password is encrypted with the default encryption key (
openidm-sym-default).Create a new encryption key in the IDM keystore:
$ keytool \ -genseckey \ -alias my-new-key \ -keyalg AES \ -keysize 128 \ -keystore /path/to/openidm/security/keystore.jceks \ -storetype JCEKS
Shut down the server for keystore to be reloaded.
Change your project's
conf/managed.jsonfile to change the encryption key for managed user passwords:"password" : { ... "encryption" : { "key" : "my-new-key" }, "scope" : "public", ....Restart the server and wait one minute for the first scheduled task to fire.
Perform a GET request again to return the entry of the managed user that you returned previously:
$ curl \ --header "X-OpenIDM-Username: openidm-admin" \ --header "X-OpenIDM-Password: openidm-admin" \ --request GET \ "http://localhost:8080/openidm/managed/user/bjensen" { "_id": "bjensen", "_rev": "000000004cab60c8", "userName": "bjensen", "givenName": "Babs", "sn": "Jensen", "telephoneNumber": "12345678", "active": "true", "mail": "bjensen@example.com", "password": { "$crypto": { "type": "x-simple-encryption", "value": { "cipher": "AES/CBC/PKCS5Padding", "data": "qWD+lBC8iqXsPbpYkSaVdg==", "iv": "4HTKhHODo8x82tIky/PMIw==", "key": "my-new-key" } } }, "accountStatus": "active", "effectiveRoles": [], "effectiveAssignments": [] }Notice that the user password is now encrypted with
my-new-key.
21.2. Security Precautions for a Production Environment
Out of the box, IDM is set up for ease of development and deployment. When you deploy IDM in production, there are specific precautions you should take to minimize security breaches. After following the guidance in this section, make sure that you test your installation to verify that it behaves as expected before putting it into production.
21.2.1. Using SSL and HTTPS
Disable plain HTTP access, as described in "Restricting REST Access to the HTTPS Port".
Use TLS/SSL to access IDM, ideally with mutual authentication so that only trusted systems can invoke each other. TLS/SSL protects data on the network. Mutual authentication with strong certificates, imported into the trust and keystores of each application, provides a level of confidence for trusting application access.
Augment this protection with message level security where appropriate.
21.2.2. Restricting REST Access to the HTTPS Port
In a production environment, you should restrict REST access to a secure port. To do so, make the following changes to a default installation:
Edit your project's
conf/jetty.xmlconfiguration file.Comment out or delete the
<Call name="addConnector">code block that includes theopenidm.port.httpproperty. Keep the<Call name="addConnector">code blocks that contain theopenidm.port.httpsandopenidm.port.mutualauthproperties. You can set the value for these properties in theresolver/boot.propertiesfile.Edit your project's
conf/config.propertiesfile.Set the
org.osgi.service.http.enabledproperty to false, as shown in the following excerpt:# Enable pax web http/https services to enable jetty org.osgi.service.http.enabled=false org.osgi.service.http.secure.enabled=true
When possible, use a certificate to secure REST access, over HTTPS. For production, that certificate should be signed by a certificate authority.
IDM generates a self-signed certificate when it first starts up.
You can use this certificate to test secure REST access. To do so, create a
self-signed certificate file, self-signed.crt, using the
following procedure:
Note
This procedure works only on a fresh installation of IDM.
Edit the
boot.propertiesfile. Change the following property to the hostname for your IDM deployment. For this procedure, set:openidm.https.keystore.cert.alias=localhost
Extract the certificate that is generated when IDM starts up:
$ openssl s_client -showcerts -connect localhost:8443 </dev/null
This command outputs the entire certificate to the terminal.
Using any text editor, create a file named
self-signed.crt. Copy the portion of the certificate from-----BEGIN CERTIFICATE-----to----END CERTIFICATE-----and paste it into theself-signed.crtfile, which should appear similar to the following:$ more self-signed.crt -----BEGIN CERTIFICATE----- MIIB8zCCAVygAwIBAgIETkvDjjANBgkqhkiG9w0BAQUFADA+MSgwJgYDVQQKEx9P cGVuSURNIFNlbGYtU2lnbmVkIENlcnRpZmljYXRlMRIwEAYDVQQDEwlsb2NhbGhv c3QwHhcNMTEwODE3MTMzNTEwWhcNMjEwODE3MTMzNTEwWjA+MSgwJgYDVQQKEx9P cGVuSURNIFNlbGYtU2lnbmVkIENlcnRpZmljYXRlMRIwEAYDVQQDEwlsb2NhbGhv c3QwgZ8wDQYJKoZIhvcNAQEBBQADgY0AMIGJAoGBAKwMkyvHS5yHAnI7+tXUIbfI nQfhcTChpWNPTHc/cli/+Ta1InTpN8vRScPoBG0BjCaIKnVVl2zZ5ya74UKgwAVe oJQ0xDZvIyeC9PlvGoqsdtH/Ihi+T+zzZ14oVxn74qWoxZcvkG6rWEOd42QzpVhg wMBzX98slxkOZhG9IdRxAgMBAAEwDQYJKoZIhvcNAQEFBQADgYEASo4qMI0axEKZ m0jU4yJejLBHydWoZVZ8fKcHVlD/rTirtVgWsVgvdr3yUr0Idk1rH1nEF47Tzn+V UCq7qJZ75HnIIeVrZqmfTx8169paAKAaNF/KRhTE6ZII8+awst02L86shSSWqWz3 s5xPB2YTaZHWWdzrPVv90gL8JL/N7/Q= -----END CERTIFICATE-----
Test REST access on the HTTPS port, referencing the self-signed certificate in the command. For example:
$ curl \ --header "X-OpenIDM-Username:openidm-admin" \ --header "X-OpenIDM-Password:openidm-admin" \ --cacert self-signed.crt \ --request GET \ "https://localhost:8443/openidm/managed/user/?_queryId=query-all-ids" { "result": [], "resultCount": 0, "pagedResultsCooke": null, "remainingPagedResults": -1 }
21.2.3. Enabling HTTP Strict-Transport-Security
HTTP Strict-Transport-Security (HSTS) is a web security policy that forces browsers to make secure HTTPS connections to specified web applications. HSTS can protect websites against passive eavesdropper and active man-in-the-middle attacks.
IDM provides an HSTS configuration but it is disabled by default. To
enable HSTS, locate the following excerpt in your
conf/jetty.xml file:
<New id="tlsHttpConfig" class="org.eclipse.jetty.server.HttpConfiguration">
...
<Call name="addCustomizer">
<Arg>
<New class="org.eclipse.jetty.server.SecureRequestCustomizer">
<!-- Enable SNI Host Check when true -->
<Arg name="sniHostCheck" type="boolean">true</Arg>
<!-- Enable Strict-Transport-Security header and define max-age when >= 0 seconds -->
<Arg name="stsMaxAgeSeconds" type="long">-1</Arg>
<!-- If enabled, add includeSubDomains to Strict-Transport-Security header when true -->
<Arg name="stsIncludeSubdomains" type="boolean">false</Arg>
</New>
</Arg>
</Call>
... Set the following arguments:
stsMaxAgeSecondsThis parameter sets the length of time, in seconds, that the browser should remember that a site can only be accessed using HTTPS.
For example, the following setting applies the HSTS policy and remains in effect for five minutes:
<Arg name="stsMaxAgeSeconds" type="long">3600</Arg>
stsMaxAgeSecondsIf this parameter is
true>, the HSTS policy is applied to the domain of the issuing host as well as its subdomains:<Arg name="stsIncludeSubdomains" type="boolean">true</Arg>
For more information about HSTS, read this article.
21.2.4. Restricting the HTTP Payload Size
Restricting the size of HTTP payloads can protect the server against large
payload HTTP DDoS attacks. IDM includes a servlet filter that limits
the size of an incoming HTTP request payload, and returns a
413 Request Entity Too Large response when the maximum
payload size is exceeded.
By default, the maximum payload size is 5MB. You can configure the maximum
size in your project's conf/servletfilter-payload.json
file. That file has the following structure by default:
{
"classPathURLs" : [ ],
"systemProperties" : { },
"requestAttributes" : { },
"scriptExtensions" : { },
"initParams" : {
"maxRequestSizeInMegabytes" : "5"
},
"urlPatterns" : [
"/*"
],
"filterClass" : "org.forgerock.openidm.jetty.LargePayloadServletFilter"
}
Change the value of the maxRequestSizeInMegabytes property
to set a different maximum HTTP payload size. The remaining properties in
this file are described in "Registering Additional Servlet Filters".
21.2.5. Encrypting Data Internally and Externally
Beyond relying on end-to-end availability of TLS/SSL to protect data, IDM also supports explicit encryption of data that goes on the network. This can be important if the TLS/SSL termination happens prior to the final endpoint.
IDM also supports encryption of data stored in the repository, using a symmetric key. This protects against some attacks on the data store. Explicit table mapping is supported for encrypted string values.
IDM automatically encrypts sensitive data in configuration files, such as passwords. IDM replaces clear text values when the system first reads the configuration file. Take care with configuration files that contain clear text values that IDM has not yet read and encrypted.
21.2.6. Removing Unused CA Digital Certificates
The Java keystore and IDM truststore files include a number of root CA certificates. While the probability of a compromised root CA is low, best practices in security suggest that you should delete root CA certificates that are not used in your deployment.
To review the current list of root CA certificates in the IDM truststore, run the following command:
$ keytool \ -storepass \ changeit \ -list \ -keystore \ /path/to/openidm/security/truststore
On UNIX/Linux systems, you can find additional lists of root CA certificates
in files named cacerts. They include root CA certificates
associated with your Java environment, such as Oracle JDK or OpenJDK. You
should be able to find that file in the following location:
${JAVA_HOME}/jre/lib/security/cacerts.
Before doing anything with your Java environment keystore files, make sure
the Java-related cacerts files are up to date. Install
the latest supported version, as shown in
"Before You Install" in the Release Notes.
You can remove root CA certificates with the keytool
command. For example, the following command removes the hypothetical
examplecomca2 certificate from the truststore:
$ keytool \ -storepass \ changeit \ -delete \ -keystore \ /path/to/openidm/security/truststore \ -alias \ examplecomca2
Repeat the process for all root CA certificates that are not used in your deployment.
On Windows systems, you can manage certificates with the Microsoft Management Console (MMC) snap-in tool. For more information, see the following Microsoft Documentation on Working With Certificates. With this MMC snap-in, you can add and delete certificates.
21.2.7. Using Message Level Security
Message level security forces authentication before granting access. Authentication works by means of a filter-based mechanism that lets you use either an HTTP Basic like mechanism or IDM-specific headers, setting a cookie in the response that you can use for subsequent authentication. If you attempt to access IDM URLs without the appropriate headers or session cookie, IDM returns HTTP 401 Unauthorized, or HTTP 403 Forbidden, depending on the situation. If you use a session cookie, you must include an additional header that indicates the origin of the request.
21.2.7.1. Message Level Security with Logins
The following examples show successful authentication attempts.
$ curl \
--dump-header /dev/stdout \
--user openidm-admin:openidm-admin \
"http://localhost:8080/openidm/managed/user?_queryId=query-all-ids"
HTTP/1.1 200 OK
Date: Wed, 07 Sep 2016 12:27:39 GMT
Cache-Control: no-cache
Content-Type: application/json; charset=UTF-8
Set-Cookie: session-jwt=eyJ0eXAiOiJKV1QiLCJjd...; Path=/
Vary: Accept-Encoding, User-Agent
Transfer-Encoding: chunked
{
"result" : [ ],
"resultCount" : 0,
"pagedResultsCookie" : null,
"totalPagedResultsPolicy" : "NONE",
"totalPagedResults" : -1,
"remainingPagedResults" : -1
}
$ curl \
--dump-header /dev/stdout \
--header "X-OpenIDM-Username: openidm-admin" \
--header "X-OpenIDM-Password: openidm-admin" \
"http://localhost:8080/openidm/managed/user?_queryId=query-all-ids"
HTTP/1.1 200 OK
Content-Type: application/json; charset=UTF-8
Cache-Control: no-cache
Set-Cookie: session-jwt=2l0zobpuk6st1b2m7gvhg5zas ...;Path=/
Expires: Thu, 01 Jan 1970 00:00:00 GMT
Vary: Accept-Encoding, User-Agent
Content-Length: 82
Server: Jetty(8.y.z-SNAPSHOT)
{"result":[],"resultCount":"0","pagedResultsCookie":null,"remainingPagedResults":-1}
$ curl \
--dump-header /dev/stdout \
--header "Cookie: session-jwt=2l0zobpuk6st1b2m7gvhg5zas ..." \
--header "X-Requested-With: OpenIDM Plugin" \
"http://localhost:8080/openidm/managed/user?_queryId=query-all-ids"
Expires: Thu, 01 Jan 1970 00:00:00 GMT
Content-Type: application/json; charset=UTF-8
Cache-Control: no-cache
Vary: Accept-Encoding, User-Agent
Content-Length: 82
Server: Jetty(8.y.z-SNAPSHOT)
Notice that the last example uses the cookie that IDM set in the
response to the previous request, and includes the
X-Requested-With header to indicate the origin of the
request. The value of the header can be any string, but should be informative
for logging purposes. If you do not include the
X-Requested-With header, IDM returns HTTP
403 Forbidden.
Note
The careful readers among you may notice that the expiration date of the JWT cookie, January 1, 1970, corresponds to the start of UNIX time. Since that time is in the past, browsers will not store that cookie after the browser is closed.
You can also request one-time authentication without a session.
$ curl \
--dump-header /dev/stdout \
--header "X-OpenIDM-NoSession: true" \
--header "X-OpenIDM-Username: openidm-admin" \
--header "X-OpenIDM-Password: openidm-admin" \
"http://localhost:8080/openidm/managed/user?_queryId=query-all-ids"
HTTP/1.1 200 OK
Content-Type: application/json; charset=UTF-8
Cache-Control: no-cache
Vary: Accept-Encoding, User-Agent
Content-Length: 82
Server: Jetty(8.y.z-SNAPSHOT)
{"result":[],"resultCount":"0","pagedResultsCookie":null,"remainingPagedResults":-1}21.2.7.2. Sessions and the JWT Cookie
IDM maintains sessions with a JWT session cookie, stored in a client browser. By default, it deletes the cookie when you log out. Alternatively, if you delete the cookie, that ends your session.
You can modify what happens to the session after a browser restart. Open the
authentication.json file, and change the value of the
sessionOnly property. For more information on
sessionOnly, see "Session Module".
The JWT session cookie is based on the JWT_SESSION module,
described in "Supported Authentication and Session Modules".
21.2.8. Replacing Default Security Settings
The default security settings are adequate for evaluation purposes. In production environments, change at least the following settings:
The password of the default administrative user (
openidm-admin)The default keystore password
To change the password of the default administrative user, first retrieve the complete user object to make sure you have the currently assigned roles:
$ curl \ --header "X-OpenIDM-Username: openidm-admin" \ --header "X-OpenIDM-Password: openidm-admin" \ --request GET \ "http://localhost:8080/openidm/repo/internal/user/openidm-admin" { "_id": "openidm-admin", "_rev": "00000000c7554e13", "password": "openidm-admin", "roles": [ { "_ref": "repo/internal/role/openidm-admin" }, { "_ref": "repo/internal/role/openidm-authorized" } ], "userName": "openidm-admin" }Update the password with a PUT request, including the
rolesproperty that you retrieved in the previous step:The following example changes the password of the
openidm-adminuser toPassw0rd:$ curl \ --header "Content-Type: application/json" \ --header "X-OpenIDM-Username: openidm-admin" \ --header "X-OpenIDM-Password: openidm-admin" \ --request PUT \ --data '{ "password": "Passw0rd", "roles": [ { "_ref": "repo/internal/role/openidm-admin" }, { "_ref": "repo/internal/role/openidm-authorized" } ], "_id": "openidm-admin" }' \ "http://localhost:8080/openidm/repo/internal/user/openidm-admin" { "_id": "openidm-admin", "_rev": "00000000f8b7952c", "roles": [ { "_ref": "repo/internal/role/openidm-admin" }, { "_ref": "repo/internal/role/openidm-authorized" } ], "password": { "$crypto": { "value": { "algorithm": "SHA-256", "data": "6Lp7IABWVNUFqGxHxScJAuerFzEQdWrzjDCcxa6+2yrU5cpie9Qt5ZKlkosu5DHp" }, "type": "salted-hash" } } }Test that the update has been successful by querying IDM with the new credentials:
$ curl \ --header "X-OpenIDM-Username: openidm-admin" \ --header "X-OpenIDM-Password: Passw0rd" \ --request GET \ "http://localhost:8080/openidm/repo/internal/user/openidm-admin" { "_id": "openidm-admin", "_rev": "00000000f8b7952c", ... }
Tip
The administrative user can also reset their own password in the Self-Service UI as follows:
Log into the Self-Service UI (
https://localhost:8443/) with the default username and password (openidm-adminandopenidm-admin).In the upper-right corner, select View Profile.
On the Password tab, enter and confirm the new password, then click Update.
The default keystore password is changeit. You should
change this password in a production environment.
To change the default keystore password, follow these steps.
Shut down the server if it is running:
$ cd /path/to/openidm $ ./shutdown.sh
Use the keytool command to change the keystore password. The following command changes the keystore password to
newPassword:$ keytool \ -storepasswd \ -keystore /path/to/openidm/security/keystore.jceks \ -storetype jceks Enter keystore password: changeit New keystore password: newPassword Re-enter new keystore password: newPassword
IDM uses a number of encryption keys by default. The passwords of these keys must match the password of the keystore.
To obtain a list of the keys in the keystore, run the following command:
$ keytool \ -list \ -keystore /path/to/openidm/security/keystore.jceks \ -storetype jceks\ -storepass newPassword Keystore type: JCEKS Keystore provider: SunJCE Your keystore contains 6 entries openidm-sym-default, 18 May 2018, SecretKeyEntry, selfservice, 18 May 2018, PrivateKeyEntry, Certificate fingerprint (SHA1): F2:CF:3D:76:74:05:DC:90:13:FE:D4:1F:EF:91:E1:89:8A:A0:31:B5 openidm-jwtsessionhmac-key, 18 May 2018, SecretKeyEntry, openidm-selfservice-key, 18 May 2018, SecretKeyEntry, openidm-localhost, 18 May 2018, PrivateKeyEntry, Certificate fingerprint (SHA1): 70:5D:11:CF:42:C1:B4:B5:C3:52:AC:D8:0D:E2:CD:13:3B:58:4D:31 server-cert, 18 May 2018, PrivateKeyEntry, Certificate fingerprint (SHA1): A0:A4:CB:A2:81:6A:25:A6:52:12:C5:30:B0:E6:F2:D5:3D:3A:77:5F
Change the passwords of each of the default encryption keys as follows:
$ keytool \ -keypasswd \ -alias openidm-localhost \ -keystore /path/to/openidm/security/keystore.jceks \ -storetype jceks \ -storepass newPassword Enter key password for <openidm-localhost> changeit New key password for <openidm-localhost>: newPassword Re-enter new key password for <openidm-localhost>: newPassword $ keytool \ -keypasswd \ -alias openidm-sym-default \ -keystore /path/to/openidm/security/keystore.jceks \ -storetype jceks \ -storepass newPassword Enter key password for <openidm-sym-default> changeit New key password for <openidm-sym-default>: newPassword Re-enter new key password for <openidm-sym-default>: newPassword $ keytool \ -keypasswd \ -alias openidm-selfservice-key \ -keystore /path/to/openidm/security/keystore.jceks \ -storetype jceks \ -storepass newPassword Enter key password for <openidm-selfservice-key> changeit New key password for <openidm-selfservice-key>: newPassword Re-enter new key password for <openidm-selfservice-key>: newPassword $ keytool \ -keypasswd \ -alias selfservice \ -keystore /path/to/openidm/security/keystore.jceks \ -storetype jceks \ -storepass newPassword Enter key password for <selfservice> changeit New key password for <selfservice>: newPassword Re-enter new key password for <selfservice>: newPassword $ keytool \ -keypasswd \ -alias openidm-jwtsessionhmac-key \ -keystore /path/to/openidm/security/keystore.jceks \ -storetype jceks \ -storepass newPassword Enter key password for <openidm-jwtsessionhmac-key> changeit New key password for <openidm-jwtsessionhmac-key>: newPassword Re-enter new key password for <openidm-jwtsessionhmac-key>: newPassword $ keytool \ -keypasswd \ -alias server-cert \ -keystore /path/to/openidm/security/keystore.jceks \ -storetype jceks \ -storepass newPassword Enter key password for <server-cert> changeit New key password for <server-cert>: newPassword Re-enter new key password for <server-cert>: newPasswordGenerate an obfuscated and an encrypted version of your new password by using the crypto bundle provided with IDM.
The following example generates an obfuscated and encrypted version of the password
newPassword:$ java -jar /path/to/openidm/bundle/openidm-util-6.0.0.7.jar This utility helps obfuscate passwords to prevent casual observation. It is not securely encrypted and needs further measures to prevent disclosure. Please enter the password:newPassword OBF:1uo91vn61ymf1sgo1v1p1ym71v2p1siu1ylz1vnw1unp CRYPT:dc5aa3ee8f58f7e2c04bbb0d09118199
Open your
resolver/boot.propertiesfile and comment out the default keystore password.Paste the obfuscated or the encrypted password as the value of the
openidm.keystore.passwordproperty. For example, the following excerpt of aboot.propertiesfile removes the default keystore password and sets the keystore password to the obfuscated value ofnewPassword:$ more resolver/boot.properties ... # Keystore password, adjust to match your keystore and protect this file # openidm.keystore.password=changeit openidm.truststore.password=changeit # Optionally use the crypto bundle to obfuscate the password and set one of these: openidm.keystore.password=OBF:1uo91vn61ymf1sgo1v1p1ym71v2p1siu1ylz1vnw1unp #openidm.keystore.password=CRYPT:...
Set either the obfuscated or the encrypted password value here, not both.
Restart the server.
$ ./startup.sh
Important
Repeat this procedure on each node if you run multiple nodes in a cluster to ensure that the new password is present on all nodes.
21.2.9. Protecting Sensitive REST Interface URLs
Anything attached to the router is accessible with the default policy, including the repository. If you do not need such access, deny it in the authorization policy to reduce the attack surface.
In addition, you can deny direct HTTP access to system objects in production,
particularly access to action. As a rule of thumb, do not
expose anything that is not used in production.
For an example that shows how to protect sensitive URLs, see
"Understanding the Access Configuration Script (access.js)".
IDM supports native query expressions on the repository, and you can enable these over HTTP.
Note
Native queries on the default DS are not supported.
By default, direct HTTP access to native queries is disallowed, and should remain so in production systems.
For testing or development purposes, it can be helpful to enable native
queries on the repository over HTTP. To do so, edit the access
control configuration file (access.js). In that file,
remove any instances of "disallowQueryExpression()"
such as the following:
// openidm-admin can request nearly anything (except query expressions on repo endpoints)
{
"pattern" : "*",
"roles" : "openidm-admin",
"methods" : "*", // default to all methods allowed
"actions" : "*", // default to all actions allowed
// "customAuthz" : "disallowQueryExpression()",
"excludePatterns": "repo,repo/*"
},
// additional rules for openidm-admin that selectively enable certain parts of system/
{
"pattern" : "system/*",
"roles" : "openidm-admin",
"methods" : "create,read,update,delete,patch,query", // restrictions on 'action'
"actions" : ""
// "customAuthz" : "disallowQueryExpression()"
},21.2.10. Protecting Sensitive Files and Directories
Protect IDM files from access by unauthorized users. In
particular, prevent other users from reading files in at least the
openidm/resolver/ and
openidm/security/ directories.
The objective is to limit access to the user that is running the service.
Depending on the operating system and configuration, that user might be
root, Administrator,
openidm, or something similar.
Make sure that user and group ownership of the installation and project directories is limited to the user running the IDM service.
Disable access of any sort for
otherusers. One simple command for that purpose, from the/path/to/openidmdirectory, is:# chmod -R o-rwx .
The IDM process in Windows is normally run by the
Local Systemservice account.If you are concerned about the security of this account, you can set up a service account that only has permissions for IDM-related directories, then remove User access to the directories noted above. You should also configure the service account to deny local and remote login. For more information, see the User Rights Assignment article in Microsoft's documentation.
21.2.11. Removing or Protecting Development and Debug Tools
Before you deploy IDM in production, remove or protect
development and debug tools, including the Felix web console that is exposed
under /system/console. Authentication for this console is
not integrated with authentication for IDM.
To remove the Felix web console, remove the web console bundle and all of the plugin bundles related to the web console, as follows:
$ cd /path/to/openidm/bundle $ rm org.apache.felix.webconsole*.jar $ rm openidm-felix-webconsole-6.0.0.7.jar
Also remove the
felix.webconsole.jsonfrom your project'sconfdirectory.$ cd /path/to/project-dir $ rm conf/felix.webconsole.json
Alternatively, protect access to the Felix web console by changing the credentials in your project's
conf/felix.webconsole.jsonfile. This file contains the username and password to access the console, by default:{ "username" : "admin", "password" : "admin" }
21.2.12. Protecting the Repository
You must use a supported repository in production (see "Selecting a Repository" in the Installation Guide).
For JDBC repositories, use a strong password for the connection and change at
least the password of the database user (openidm by default).
When you change the database username and/or password, you must update the
database connection configuration file
(datasource.jdbc-default.json) for your repository type.
For a DS repository, change the bindDN and
bindPassword for the directory server user in the
ldapConnectionFactories property in the
repo.ds.json file.
You can use property substitution to set the database password and place an
obfuscated version of the password in your
resolver/boot.properties file or your project's
conf/system.properties file, or pass it in using the
OPENIDM_OPTS environment variable.
The following excerpt of a MySQL connection configuration file sets the
database password to the value of the openidm.repo.password
property.
{
"driverClass" : "com.mysql.jdbc.Driver",
"jdbcUrl" : "jdbc:mysql://&{openidm.repo.host}:&{openidm.repo.port}/openidm?allowMultiQueries=true&characterEncoding=utf8",
"databaseName" : "openidm",
"username" : "openidm",
"password" : "&{openidm.repo.password}",
"connectionTimeout" : 30000,
"connectionPool" : {
"type" : "hikari",
"minimumIdle" : 20,
"maximumPoolSize" : 50
}
}
In your boot.properties file, you would include the
obfuscated value of that password as follows:
Generate an obfuscated and an encrypted version of your password, by using the crypto bundle provided with IDM:
$ java -jar /path/to/openidm/bundle/openidm-util-6.0.0.7.jar This utility helps obfuscate passwords to prevent casual observation. It is not securely encrypted and needs further measures to prevent disclosure. Please enter the password: newPassword OBF:1uo91vn61ymf1sgo1v1p1ym71v2p1siu1ylz1vnw1unp CRYPT:dc5aa3ee8f58f7e2c04bbb0d09118199
Paste the obfuscated password as the value of the
openidm.repo.passwordproperty, for example:$ more resolver/boot.properties openidm.repo.password=OBF:1uo91vn61ymf1sgo1v1p1ym71v2p1siu1ylz1vnw1unp
Alternatively, you can set the obfuscated password in the
OPENIDM_OPTS environment variable and export that variable
before startup. You must include the JVM memory options when you set the
OPENIDM_OPTS variable. For example:
$ export OPENIDM_OPTS="-Xmx1024m -Xms1024m -Dopenidm.repo.password=OBF:1uo91vn61ymf1sgo1v1p1ym71v2p1siu1ylz1vnw1unp" $ ./startup.sh Executing ./startup.sh... Using OPENIDM_HOME: /path/to/openidm Using PROJECT_HOME: /path/to/openidm Using OPENIDM_OPTS: -Xmx1024m -Xms1024m -Dopenidm.repo.password=OBF:1uo91vn61ymf1sgo1v1p1ym71v2p1siu1ylz1vnw1unp Using LOGGING_CONFIG: -Djava.util.logging.config.file=/path/to/openidm/conf/logging.properties Using boot properties at /path/to/openidm/resolver/boot.properties -> OpenIDM version "6.0.0.7" OpenIDM ready
Use a case sensitive database, particularly if you work with systems with different identifiers that match except for case. Otherwise correlation queries or correlation scripts can pick up identifiers that should not be considered the same.
21.2.13. Adjusting Log Levels
Leave log levels at INFO in production to ensure that you
capture enough information to help diagnose issues. For more information, see
"Configuring Server Logs".
At start up and shut down, INFO can produce many messages.
Yet, during stable operation, INFO generally results in
log messages only when coarse-grain operations such as scheduled
reconciliation start or stop.
21.2.14. Setting Up Restart At System Boot
You can run IDM in the background as a service (daemon), and add startup and shutdown scripts to manage the service at system boot and shutdown. For more information, see "Starting, Stopping, and Running the Server".
See your operating system documentation for information on configuring a service, such as IDM, to be started at boot and shut down at system shutdown.
21.2.15. Disabling the API Explorer
As described in "API Explorer", IDM includes an implementation of the OpenAPI Initiative Specification, also known as Swagger.
The API Explorer can help you identify endpoints, and run REST calls
against those endpoints. To hide that information in production, disable the
following property in your resolver/boot.properties
file:
openidm.apidescriptor.enabled=false
You can also remove this property from boot.properties,
as it is false by default.
21.3. Configuring IDM For a Hardware Security Module (HSM) Device
You can configure an external PKCS #11 (HSM) device to manage the keys that are used to secure IDM transactions.
Note
On Windows systems using the 64-bit JDK, the Sun PKCS #11 provider is available only from JDK version 1.8b49 onwards. If you want to use a PKCS #11 device on Windows, either use the 32-bit version of the JDK, or upgrade your 64-bit JDK to version 1.8b49 or higher.
Currently, you cannot use an HSM device if you are running IDM with an embedded ForgeRock Directory Services (DS) repository (OPENIDM-10132).
21.3.1. Setting Up the HSM Configuration
This section assumes that you have access to an HSM device (or a software emulation of an HSM device, such as SoftHSM) and that the HSM provider has been configured and initialized.
The command-line examples in this section use SoftHSM for testing purposes. Before you start, set the correct environment variable for the SoftHSM configuration, for example:
$ export SOFTHSM2_CONF=/usr/local/Cellar/softhsm/2.0.0/etc/softhsm2.conf
Also initialize slot 0 on the provider, with a command
similar to the following:
$ softhsm2-util --init-token --slot 0 --label "My token 1"
This token initialization requests two PINs—an SO PIN and a user PIN. You can use the SO PIN to reinitialize the token. The user PIN is provided to IDM so that it can interact with the token. Remember the values of these PINs because you will use them later in this section.
The PKCS#11 standard uses a configuration file to interact with the HSM device. The following example shows a basic configuration file for SoftHSM:
name = softHSM
library = /usr/local/Cellar/softhsm/2.0.0/lib/softhsm/libsofthsm2.so
slot = 1
attributes(generate, *, *) = {
CKA_TOKEN = true
}
attributes(generate, CKO_CERTIFICATE, *) = {
CKA_PRIVATE = false
}
attributes(generate, CKO_PUBLIC_KEY, *) = {
CKA_PRIVATE = false
}
attributes(*, CKO_SECRET_KEY, *) = {
CKA_PRIVATE = false
CKA_EXTRACTABLE = true
}Your HSM configuration file must include at least the following settings:
nameA suffix to identify the HSM provider. This example uses the
softHSMprovider.libraryThe path to the PKCS #11 library.
slotThe slot number to use, specified as a string. Make sure that the slot you specify here has been initialized on the HSM device.
The attributes properties specify additional PKCS #11
attributes that are set by the HSM. For a complete list of these attributes,
see the PKCS #11
Reference.
Important
If you are using the JWT Session Module, you must set
CKA_EXTRACTABLE = true for secret keys in your HSM
configuration file. For example:
attributes(*, CKO_SECRET_KEY, *) = {
CKA_PRIVATE = false
CKA_EXTRACTABLE = true
}The HSM provider must allow secret keys to be extractable because the authentication service serializes the JWT Session Module key and passes it to the authentication framework as a base 64-encoded string.
The section that follows assumes that your HSM configuration file is located
at /path/to/hsm/hsm.conf.
21.3.2. Populating the Default Encryption Keys
When IDM first starts up, it generates a number of encryption keys required to encrypt specific data. If you are using an HSM provider, you must generate these keys manually, as follows:
The
openidm-sym-defaultkey is the default symmetric key required to encrypt the configuration. The following command generates that key in the HSM provider. The-providerArgmust point to the HSM configuration file described in "Setting Up the HSM Configuration".$ keytool -genseckey \ -alias openidm-sym-default \ -keyalg HmacSHA256 \ -keysize 2048 \ -keystore NONE \ -storetype PKCS11 \ -providerClass sun.security.pkcs11.SunPKCS11 \ -providerArg /path/to/hsm/hsm.conf Enter keystore password:
Enter the password of your HSM device. If you are using SoftHSM, enter your user PIN as the keystore password. The remaining sample steps use user PIN as the password.
The
openidm-selfservice-keyis used by the End User UI to encrypt and sign sensitive data, including information stored in JWT tokens for transferring state between stages. Generate that key with a command similar to the following:$ keytool -genseckey \ -alias openidm-selfservice-key \ -keyalg HmacSHA256 \ -keysize 2048 \ -keystore NONE \ -storetype PKCS11 \ -providerClass sun.security.pkcs11.SunPKCS11 \ -providerArg /path/to/hsm/hsm.conf Enter keystore password: user PIN
Enter the password of your HSM device. If you are using SoftHSM, enter your user PIN as the keystore password.
The
openidm-jwtsessionhmac-keyis used by the JWT session module to encrypt JWT session cookies. For more information about the JWT session module, see "Supported Session Module". Generate the JWT session module key with a command similar to the following:$ keytool -genseckey \ -alias openidm-jwtsessionhmac-key \ -keyalg HmacSHA256 \ -keysize 2048 \ -keystore NONE \ -storetype PKCS11 \ -providerClass sun.security.pkcs11.SunPKCS11 \ -providerArg /path/to/hsm/hsm.conf Enter keystore password: user PIN
The
openidm-localhostcertificate is used to support SSL/TLS. Generate that certificate with a command similar to the following:$ keytool -genkey \ -alias openidm-localhost \ -keyalg RSA \ -keysize 2048 \ -keystore NONE \ -storetype PKCS11 \ -providerClass sun.security.pkcs11.SunPKCS11 \ -providerArg /path/to/hsm/hsm.conf Enter keystore password: user PIN What is your first and last name? [Unknown]: localhost What is the name of your organizational unit? [Unknown]: What is the name of your organization? [Unknown]: OpenIDM Self-Signed Certificate What is the name of your City or Locality? [Unknown]: What is the name of your State or Province? [Unknown]: What is the two-letter country code for this unit? [Unknown]: Is CN=localhost, OU=Unknown, O=OpenIDM Self-Signed Certificate, L=Unknown, ST=Unknown, C=Unknown correct? [no]: yes
If you are using the default embedded DS repository, the
server-certcertificate is used to support SSL/TLS requests to the repository. Generate that certificate with a command similar to the following:$ keytool -genkey \ -alias server-cert \ -keyalg RSA \ -keysize 2048 \ -keystore NONE \ -storetype PKCS11 \ -providerClass sun.security.pkcs11.SunPKCS11 \ -providerArg /path/to/hsm/hsm.conf Enter keystore password: user PIN What is your first and last name? [Unknown]: localhost What is the name of your organizational unit? [Unknown]: What is the name of your organization? [Unknown]: OpenDJ RSA Self-Signed Certificate What is the name of your City or Locality? [Unknown]: What is the name of your State or Province? [Unknown]: What is the two-letter country code for this unit? [Unknown]: Is CN=localhost, O=OpenDJ RSA Self-Signed Certificate, OU=None, L=None, ST=None, C=None? [no]: yes
The
selfservicecertificate secures requests from the Self-Service UI. Generate that certificate with a command similar to the following:$ keytool -genkey \ -alias selfservice \ -keyalg RSA \ -keysize 2048 \ -keystore NONE \ -storetype PKCS11 \ -providerClass sun.security.pkcs11.SunPKCS11 \ -providerArg /path/to/hsm/hsm.conf Enter keystore password: user PIN What is your first and last name? [Unknown]: localhost What is the name of your organizational unit? [Unknown]: What is the name of your organization? [Unknown]: OpenIDM Self Service Certificate What is the name of your City or Locality? [Unknown]: What is the name of your State or Province? [Unknown]: What is the two-letter country code for this unit? [Unknown]: Is CN=localhost,O=OpenIDM Self Service Certificate,OU=None,L=None,ST=None,C=None? [no]: yes
If you are not using the HSM provider for the truststore, you must add the certificates generated in the previous two steps to the default IDM truststore.
If you are using the HSM provider for the truststore, you can skip this step.
To add the
openidm-localhostcertificate to the IDM truststore, export the certificate from the HSM provider, then import it into the truststore, as follows:$ keytool -export \ -alias openidm-localhost \ -file exportedCert \ -keystore NONE \ -storetype PKCS11 \ -providerClass sun.security.pkcs11.SunPKCS11 \ -providerArg /path/to/hsm/hsm.conf Enter keystore password: user PIN Certificate stored in file exportedCert $ keytool -import \ -alias openidm-localhost \ -file exportedCert \ -keystore /path/to/openidm/security/truststore Enter keystore password: changeit Owner: CN=localhost, OU=Unknown, O=OpenIDM Self-Signed Certificate, L=... Issuer: CN=localhost, OU=Unknown, O=OpenIDM Self-Signed Certificate, L=... Serial number: 5d2554bd Valid from: Fri Aug 19 13:11:54 SAST 2016 until: Thu Nov 17 13:11:54 SAST 2016 Certificate fingerprints: MD5: F1:9B:72:7F:7B:79:58:29:75:85:82:EC:79:D8:F9:8D SHA1: F0:E6:51:75:AA:CB:14:3D:C5:E2:EB:E5:7C:87:C9:15:43:19:AF:36 SHA256: 27:A5:B7:0E:94:9A:32:48:0C:22:0F:BB:7E:3C:22:2A:64:B5:45:24:14:70:... Signature algorithm name: SHA256withRSA Version: 3 Extensions: #1: ObjectId: 2.5.29.14 Criticality=false SubjectKeyIdentifier [ KeyIdentifier [ 0000: 7B 5A 26 53 61 44 C2 5A 76 E4 38 A8 52 6F F2 89 .Z&SaD.Zv.8.Ro.. 0010: 20 04 52 EE .R. ] ] Trust this certificate? [no]: yes Certificate was added to keystore
The default truststore password is changeit.
Follow the same procedure to add the
server-certcertificate to the IDM truststore.
21.3.3. Configuring IDM to Support an HSM Provider
To enable support for an HSM provider, edit your
resolver/boot.properties file. That file already
contains a commented out configuration property that points to the HSM
configuration:
# PKCS#11 configuration file #openidm.security.pkcs11.config=
Uncomment that line and specify the path to your HSM configuration file, described in "Setting Up the HSM Configuration". For example:
# PKCS#11 configuration file openidm.security.pkcs11.config=/path/to/hsm/hsm.conf
To configure an HSM provider for the IDM keystore, add the
following lines to the same section of the boot.properties
file:
openidm.keystore.type=PKCS11 openidm.keystore.provider=SunPKCS11-softHSM openidm.keystore.location=NONE openidm.keystore.password=HSM SO Pin
Note
The value of openidm.keystore.location is case sensitive
and must be NONE.
If you are using the HSM provider for the IDM truststore, add
following lines to the same section of the boot.properties
file:
openidm.truststore.type=PKCS11 openidm.truststore.provider=SunPKCS11-softHSM openidm.truststore.location=NONE openidm.truststore.password=HSM SO Pin
Note
The value of openidm.truststore.location is case
sensitive and must be NONE.
Remove or comment out the other keystore and (optionally) truststore
parameters in the boot.properties file:
# openidm.keystore.type=JCEKS # openidm.truststore.type=JKS # openidm.keystore.provider=SunJCE # openidm.truststore.provider=SUN # openidm.keystore.location=security/keystore.jceks # openidm.truststore.location=security/truststore # Keystore password, adjust to match your keystore and protect this file # openidm.keystore.password=changeit # openidm.truststore.password=changeit
You should now be able to start IDM with the keys in the HSM provider.
Chapter 22. Integrating Business Processes and Workflows
Key to any identity management solution is the ability to provide workflow-driven provisioning activities, whether for self-service actions such as requests for entitlements, roles or resources, running sunrise or sunset processes, handling approvals with escalations, or performing maintenance.
IDM provides an embedded workflow and business process engine based on Activiti and the Business Process Model and Notation (BPMN) 2.0 standard.
More information about Activiti and the Activiti project can be found at http://www.activiti.org.
This chapter describes how to configure the Activiti engine, and how to manage workflow tasks and processes over the REST interface. You can also manage workflows in the Admin UI by selecting Manage > Workflow and then selecting Tasks or Processes.
22.1. BPMN 2.0 and the Activiti Tools
Business Process Model and Notation 2.0 is the result of consensus among Business Process Management (BPM) system vendors. The Object Management Group (OMG) has developed and maintained the BPMN standard since 2004.
The first version of the BPMN specification focused only on graphical notation, and quickly became popular with the business analyst audience. BPMN 1.x defines how constructs such as human tasks, executable scripts, and automated decisions are visualized in a vendor-neutral, standard way. The second version of BPMN extends that focus to include execution semantics, and a common exchange format. Thus, BPMN 2.0 process definition models can be exchanged not only between different graphical editors, but can also be executed as is on any BPMN 2.0-compliant engine, such as the engine embedded in IDM.
Using BPMN 2.0, you can add artifacts describing workflow and business process behavior to IDM for provisioning and other purposes. For example, you can craft the actual artifacts defining business processes and workflow in a text editor, or using a special Eclipse plugin. The Eclipse plugin provides visual design capabilities, simplifying packaging and deployment of the artifact to IDM. For instructions on installing Activiti Eclipse BPMN 2.0 Designer, see the corresponding Alfresco documentation.
Also, read the Activiti User Guide section covering BPMN 2.0 Constructs, which describes in detail the graphical notations and XML representations for events, flows, gateways, tasks, and process constructs.
With the latest version of Activiti, JavaScript tasks can be added to
workflow definitions. However, IDM functions cannot be called
from a JavaScript task in a workflow. Therefore, you can use JavaScript for
non-IDM workflow tasks, but you must use the
activiti:expression construct to call IDM
functions.
22.2. Enabling Workflows
IDM embeds an Activiti Process Engine that is started in the OSGi container. When you have started IDM, run the scr list command in the OSGi console to check that the workflow bundle is enabled:
-> OpenIDM ready
scr list
BundleId Component Name Default State
Component Id State PIDs (Factory PID)
...
[ 174] org.forgerock.openidm.workflow enabled
...Workflows are not active by default. To activate the workflow bundle, IDM requires two configuration files:
workflow.jsonspecifies the configuration of the Activiti engine, including the data source that the Activiti engine will use.datasource.jdbc-default.jsonthe default data source for Activiti.
To enable workflows, log in to the Admin UI and select Configure > System
Preferences > Workflow, then select the Enable switch and click Save.
Enabling workflows through the UI creates the default workflow configuration
files in your project's conf/ directory. To change the
default Activiti configuration, see "Configuring the Activiti Engine".
To change the data store that Activiti uses, see
"Configuring the Activiti Data Source".
22.2.1. Configuring the Activiti Engine
The default workflow.json file that is created by the
UI has the following structure:
{
"useDataSource" : "default",
"workflowDirectory" : "&{idm.instance.dir}/workflow"
}useDataSourceSpecifies the datasource configuration file that points to the repository where Activiti should store its data.
By default, this is the
datasource.jdbc-default.jsonfile. For information about changing the data store that Activiti uses, see "Configuring the Activiti Data Source".workflowDirectorySpecifies the location in which IDM expects to find workflow processes. By default, IDM looks for workflow processes in the
project-dir/workflowdirectory.
In addition to these default properties, you can configure the
history level of the Activiti engine:
{
"history" : "audit"
}The Activiti history level determines how much historical information is retained when workflows are executed. The history level can be one of the following:
none. No history archiving is done. This level results in the best performance for workflow execution, but no historical information is available.activity. Archives all process instances and activity instances. No details are archived.audit. This is the default level. All process instances, activity instances and submitted form properties are archived so that all user interaction through forms is traceable and can be audited.full. This is the highest level of history archiving and has the greatest performance impact. This history level stores all the information that is stored for theauditlevel, as well as any process variable updates.
22.2.2. Configuring the Activiti Data Source
By default, the Activiti engine runs with an embedded H2 database. The
connection details to that H2 database are specified in the
datasource.jdbc-default.json file.The default
datasource.jdbc-default.json file that is
created by the UI has the following structure:
{
"driverClass" : "org.h2.Driver",
"jdbcUrl" : "jdbc:h2:file:&{idm.install.dir}/db/activiti/database;MVCC=FALSE;DB_CLOSE_DELAY=0",
"databaseName" : "activiti",
"connectionTimeout" : 30000,
"connectionPool" : {
"type" : "hikari",
"minimumIdle" : 1,
"maximumPoolSize" : 5
}
}Warning
The embedded H2 database is only for evaluation/demo purposes and is not supported for production use.
Do not configure the H2 WebConsole to listen to external connections via the JDBC URL parameter
-webAllowOthers. Doing so can expose the system to remote attacks.If you require remote connections to the H2 WebConsole for development purposes, set the admin username and password combination within the JDBC URL.
If you are using a JDBC repository for IDM data, you will
already have a datasource.jdbc-default.json file in
your project's conf/ directory. In this case, when you
enable workflows, IDM uses the existing JDBC repository and
creates the required Activiti tables in that JDBC repository.
To specify that Activiti should use a data source that is separate to your
existing IDM JDBC repository, create a new datasource
configuration file in your project's conf/ directory
(for example datasource.jdbc-activiti.json) with the
connection details to the separate data source. Then reference that file in
the useDataSource property of the
workflow.json file (for example,
"useDataSource" : "activiti".
For more information about the fields in this file, see "Understanding the JDBC Connection Configuration File".
22.3. Testing the Workflow Integration
IDM reads workflow definitions from the
/path/to/openidm/workflow directory.
A sample workflow (example.bpmn20.xml) is provided in
the samples/example-configurations/workflow directory.
To test the workflow integration, create a workflow
directory under /path/to/openidm and copy the sample
workflow to that directory:
$ cd /path/to/openidm/ $ mkdir workflow $ cp samples/example-configurations/workflow/example.bpmn20.xml workflow/
Verify the workflow integration by using the REST API. The following REST call lists the defined workflows:
$ curl \ --header "X-OpenIDM-Username: openidm-admin" \ --header "X-OpenIDM-Password: openidm-admin" \ --request GET \ "http://localhost:8080/openidm/workflow/processdefinition?_queryId=query-all-ids"
The sample workflow definition that you copied in the previous step is named
osgiProcess. The result of the preceding REST call
therefore includes output similar to the following:
{
"result": [
{
"_id": "osgiProcess:1:4",
"_rev": "1",
"candidateStarterGroupIdExpressions": [],
"candidateStarterUserIdExpressions": [],
"category": "Examples",
"deploymentId": "1",
"description": null,
"eventSupport": {},
"executionListeners": {},
"graphicalNotationDefined": false,
"hasStartFormKey": false,
"historyLevel": null,
"ioSpecification": null,
"key": "osgiProcess",
"laneSets": [],
"name": "Osgi process",
"participantProcess": null,
"processDiagramResourceName": "OSGI-INF/activiti/example.osgiProcess.png",
"properties": {},
"resourceName": "OSGI-INF/activiti/example.bpmn20.xml",
"revisionNext": 2,
"startFormHandler": null,
"suspended": false,
"suspensionState": 1,
"taskDefinitions": null,
"tenantId": "",
"variables": null,
"version": 1
}
],
...
}
The osgiProcess workflow calls IDM, queries
the available workflow definitions from Activiti, then prints the list of
workflow definitions to the IDM logs. Invoke the
osgiProcess workflow with the following REST call:
$ curl \
--header "X-OpenIDM-Username: openidm-admin" \
--header "X-OpenIDM-Password: openidm-admin" \
--header "Content-Type: application/json" \
--request POST \
--data '{"_key":"osgiProcess"}' \
"http://localhost:8080/openidm/workflow/processinstance?_action=create"
{
"_id": "5",
"processInstanceId": "5",
"processDefinitionId": "osgiProcess:1:4",
"businessKey": null,
"status": "ended"
}The workflow prints the list of workflow definitions to the OSGi console. With the default sample, you should see something like this:
script task using resolver: [
pagedResultsCookie:null,
remainingPagedResults:-1,
result:[
[
tenantId:,
candidateStarterGroupIdExpressions:[],
candidateStarterUserIdExpressions:[],
participantProcess:null,
processDiagramResourceName:null,
historyLevel:null,
hasStartFormKey:false,
laneSets:[],
version:1, _id:osgiProcess:1:3,
description:null,
name:Osgi process,
executionListeners:[:],
key:osgiProcess,
resourceName:OSGI-INF/activiti/example.bpmn20.xml,
ioSpecification:null,
taskDefinitions:null,
suspensionState:1,
deploymentId:1,
properties:[:],
startFormHandler:null,
suspended:false,
variables:null,
_rev:1,
revisionNext:2,
category:Examples,
eventSupport:[:],
graphicalNotationDefined:false
]
]
]
script task using expression resolver: [
pagedResultsCookie:null,
remainingPagedResults:-1,
result:[
[
tenantId:,
candidateStarterGroupIdExpressions:[],
...
]22.4. Defining Activiti Workflows
The following section outlines the process to follow when you create an Activiti workflow for IDM.
Define your workflow in a text file, either using an editor, such as Activiti Eclipse BPMN 2.0 Designer, or a simple text editor.
Save the workflow definition with a
bpmn20.xmlextension.Note that each workflow definition references a script, in the
<scriptTask>element. ThescriptFormatof these scripts is alwaysgroovy. Currently only Groovy script is supported for workflow scripts.Package the workflow definition file as a
.barfile (Business Archive File). If you are using Eclipse to define the workflow, a.barfile is created when you select "Create deployment artifacts". A.barfile is essentially the same as a.zipfile, but with the.barextension.Copy the
.barfile to theopenidm/workflowdirectory.Invoke the workflow using a script (in
openidm/script/) or directly using the REST interface. For more information, see "Invoking Activiti Workflows".You can also schedule the workflow to be invoked repeatedly, or at a future time. For more information, see "Scheduling Tasks and Events".
22.5. Invoking Activiti Workflows
You can invoke workflows and business processes from any trigger point within
IDM, including reacting to situations discovered during
reconciliation. Workflows can be invoked from script files, using the
openidm.create() function, or directly from the REST
interface.
The following sample script extract shows how to invoke a workflow from a script file:
/*
* Calling 'myWorkflow' workflow
*/
var params = {
"_key": "myWorkflow"
};
openidm.create('workflow/processinstance', null, params);
The null in this example indicates that you do not want to
specify an ID as part of the create call. For more information, see
"openidm.create(resourceName, newResourceId, content, params, fields)".
You can invoke the same workflow from the REST interface with the following REST call:
$ curl \
--header "X-OpenIDM-Username: openidm-admin" \
--header "X-OpenIDM-Password: openidm-admin" \
--header "Content-Type: application/json" \
--request POST \
--data '{"_key":"myWorkflow"}' \
"http://localhost:8080/openidm/workflow/processinstance?_action=create"There are two ways in which you can specify the workflow definition that is used when a new workflow instance is started.
_keyspecifies theidattribute of the workflow process definition, for example:<process id="sendNotificationProcess" name="Send Notification Process">
If there is more than one workflow definition with the same
_keyparameter, the latest deployed version of the workflow definition is invoked._processDefinitionIdspecifies the ID that is generated by the Activiti Process Engine when a workflow definition is deployed, for example:"sendNotificationProcess:1:104";
To obtain the
processDefinitionId, query the available workflows, for example:{ "result": [ { "name": "Process Start Auto Generated Task Auto Generated", "_id": "ProcessSAGTAG:1:728" }, { "name": "Process Start Auto Generated Task Empty", "_id": "ProcessSAGTE:1:725" }, ...If you specify a
_keyand a_processDefinitionId, the_processDefinitionIdis used because it is more precise.
Use the optional _businessKey parameter to add specific
business logic information to the workflow when it is invoked. For example,
the following workflow invocation assigns the workflow a business key of
"newOrder". This business key can later be used to query
"newOrder" processes.
$ curl \
--header "X-OpenIDM-Username: openidm-admin" \
--header "X-OpenIDM-Password: openidm-admin" \
--request POST \
--data '{"_key":"myWorkflow", "_businessKey":"newOrder"}' \
"http://localhost:8080/openidm/workflow/processinstance?_action=create"
Access to workflows is based on IDM roles, and is configured in
your project's conf/process-access.json file. For more
information, see "Managing User Access to Workflows".
22.6. Querying Activiti Workflows
The Activiti implementation supports filtered queries that enable you to
query the running process instances and tasks, based on specific query
parameters. To perform a filtered query send a GET request to the
workflow/processinstance context path, including the query
in the URL.
For example, the following query returns all process instances
with the business key "newOrder", as invoked in the
previous example.
$ curl \ --header "X-OpenIDM-Username: openidm-admin" \ --header "X-OpenIDM-Password: openidm-admin" \ --request GET \ "http://localhost:8080/openidm/workflow/processinstance?_queryId=filtered-query&processInstanceBusinessKey=newOrder"
Any Activiti properties can be queried using the same notation, for example,
processDefinitionId=managedUserApproval:1:6405. The query
syntax applies to all queries with _queryId=filtered-query.
The following query returns all process instances that were started by the
user openidm-admin:
$ curl \ --header "X-OpenIDM-Username: openidm-admin" \ --header "X-OpenIDM-Password: openidm-admin" \ --request GET \ "http://localhost:8080/openidm/workflow/processinstance?_queryId=filtered-query&startUserId=openidm-admin"
You can also query process instances based on the value of any process
instance variable, by prefixing the variable name with
var-. For example:
var-processvariablename=processvariablevalue
22.7. Using Custom Templates for Activiti Workflows
The embedded Activiti engine is integrated with the default user interface. For simple workflows, you can use the standard Activiti form properties, and have the UI render the corresponding generic forms automatically. If you require a more complex form template, (including input validation, rich input field types, complex CSS, and so forth) you must define a custom form template.
There are two ways in which you can define custom form templates for your workflows:
Create an HTML template, and refer to that template in the workflow definition.
This is the recommended method of creating custom form templates. To refer to the HTML template in the workflow definition, use the
activiti:formKeyattribute, for exampleactiviti:formKey="nUCStartForm.xhtml".The HTML file must be deployed as part of the workflow definition. Create a .zip file that contains the HTML template and the workflow definition file. Rename the .zip file with a .bar extension.
Use an embedded template within the workflow definition.
This method is not ideal, because the HTML code must be escaped, and is difficult to read, edit, or maintain, as a result. Also, sections of HTML code will most likely need to be duplicated if your workflow includes multiple task stages. However, you might want to use this method if your form is small, not too complex and you do not want to bother with creating a separate HTML file and .bar deployment.
22.8. Managing Workflows Over the REST Interface
In addition to the queries described previously, the following examples show
the context paths that are exposed for managing workflows over the REST
interface. The example output is based on the sample workflow that is
provided in openidm/samples/sync-asynchronous. For a
complete reference of all the context paths related to workflows, see
"Managing Workflows Over REST".
openidm/workflow/processdefinition
List the available workflow definitions:
$ curl \ --header "X-OpenIDM-Username: openidm-admin" \ --header "X-OpenIDM-Password: openidm-admin" \ --request GET \ "http://localhost:8080/openidm/workflow/processdefinition?_queryId=query-all-ids" { "result" : [ { "_id" : "managedUserApproval:1:4", "_rev" : "1", "candidateStarterGroupIdExpressions" : [ ], "candidateStarterUserIdExpressions" : [ ], "category" : "Examples", "deploymentId" : "1", "description" : null, "eventSupport" : { }, "executionListeners" : { }, "graphicalNotationDefined" : false, "hasStartFormKey" : false, "historyLevel" : null, "ioSpecification" : null, "key" : "managedUserApproval", "laneSets" : [ ], "name" : "Managed User Approval Workflow", "participantProcess" : null, "processDiagramResourceName" : "OSGI-INF/activiti/managedUserApproval.managedUserApproval.png", "properties" : { }, "resourceName" : "OSGI-INF/activiti/managedUserApproval.bpmn20.xml", "revisionNext" : 2, "startFormHandler" : null, "suspended" : false, "suspensionState" : 1, "taskDefinitions" : null, "tenantId" : "", "variables" : null, "version" : 1 } ], "resultCount" : 1, "pagedResultsCookie" : null, "totalPagedResultsPolicy" : "NONE", "totalPagedResults" : -1, "remainingPagedResults" : -1 }List the workflow definitions, based on certain filter criteria:
$ curl \ --header "X-OpenIDM-Username: openidm-admin" \ --header "X-OpenIDM-Password: openidm-admin" \ --request GET \ "http://localhost:8080/openidm/workflow/processdefinition?_queryId=filtered-query&category=Examples" { "result" : [ { "_id" : "managedUserApproval:1:4", ... "category" : "Examples", ... "name" : "Managed User Approval Workflow", ... } ], ... }
openidm/workflow/processdefinition/{id}
Obtain detailed information for a process definition, based on the ID. You can determine the ID by querying all the available process definitions, as described in the first example in this section.
$ curl \ --header "X-OpenIDM-Username: openidm-admin" \ --header "X-OpenIDM-Password: openidm-admin" \ --request GET \ "http://localhost:8080/openidm/workflow/processdefinition/managedUserApproval:1:4" { "_id" : "managedUserApproval:1:4", "_rev" : "2", "candidateStarterGroupIdExpressions" : [ ], "candidateStarterUserIdExpressions" : [ ], "category" : "Examples", "deploymentId" : "1", "description" : null, "eventSupport" : { }, "executionListeners" : { "end" : [ { } ] }, "graphicalNotationDefined" : true, "hasStartFormKey" : false, "historyLevel" : null, "ioSpecification" : null, "key" : "managedUserApproval", "laneSets" : [ ], "name" : "Managed User Approval Workflow", "participantProcess" : null, "processDiagramResourceName" : "OSGI-INF/activiti/managedUserApproval.managedUserApproval.png", "properties" : { "documentation" : null }, "resourceName" : "OSGI-INF/activiti/managedUserApproval.bpmn20.xml", "revisionNext" : 3, "startFormHandler" : { "deploymentId" : "1", "formKey" : null, "formPropertyHandlers" : [ ] }, "suspended" : false, "suspensionState" : 1, "taskDefinitions" : { "evaluateRequest" : { "assigneeExpression" : { "expressionText" : "openidm-admin" }, "candidateGroupIdExpressions" : [ ], "candidateUserIdExpressions" : [ ], "categoryExpression" : null, "descriptionExpression" : null, "dueDateExpression" : null, "key" : "evaluateRequest", "nameExpression" : { "expressionText" : "Evaluate request" }, "ownerExpression" : null, "priorityExpression" : null, "taskFormHandler" : { "deploymentId" : "1", "formKey" : null, "formPropertyHandlers" : [ { "defaultExpression" : null, "id" : "requesterName", "name" : "Requester's name", "readable" : true, "required" : false, "type" : null, "variableExpression" : { "expressionText" : "${sourceId}" }, "variableName" : null, "writable" : false }, { "defaultExpression" : null, "id" : "requestApproved", "name" : "Do you approve the request?", "readable" : true, "required" : true, "type" : { "name" : "enum", "values" : { "true" : "Yes", "false" : "No" } }, "variableExpression" : null, "variableName" : null, "writable" : true } ] }, "taskListeners" : { "assignment" : [ { } ], "create" : [ { } ], "complete" : [ { "className" : "org.activiti.engine.impl.bpmn.listener.ScriptTaskListener", "multiInstanceActivityBehavior" : null } ] } } }, "tenantId" : "", "variables" : { }, "version" : 1, "formProperties" : [ ] }Delete a workflow process definition, based on its ID. Note that you cannot delete a process definition if there are currently running instances of that process definition.
IDM picks up workflow definitions from the files located in the
/path/to/openidm/workflowdirectory. If you delete the workflow definition (.xmlfile) from this directory, the OSGI bundle is deleted. However, deleting this file does not remove the workflow definition from the Activiti engine. You must therefore delete the definition over REST, as shown in the following example.Note that, although there is only one representation of a workflow definition in the file system, there might be several versions of the same definition in Activiti. If you want to delete redundant process definitions, delete the definition over REST, making sure that you do not delete the latest version.
$ curl \ --header "X-OpenIDM-Username: openidm-admin" \ --header "X-OpenIDM-Password: openidm-admin" \ --header "If-Match: *" \ --request DELETE \ "http://localhost:8080/openidm/workflow/processdefinition/managedUserApproval:1:3"
The delete request returns the contents of the deleted workflow definition.
openidm/workflow/processinstance
Start a workflow process instance. For example:
$ curl \ --header "Content-Type: application/json" \ --header "X-OpenIDM-Username: openidm-admin" \ --header "X-OpenIDM-Password: openidm-admin" \ --data '{"_key":"managedUserApproval"}' \ --request POST \ "http://localhost:8080/openidm/workflow/processinstance?_action=create" { "_id" : "42", "processInstanceId" : "42", "processDefinitionId" : "managedUserApproval:1:4", "businessKey" : null, "status" : "suspended" }Obtain the list of running workflows (process instances). The query returns a list of IDs. For example:
$ curl \ --header "X-OpenIDM-Username: openidm-admin" \ --header "X-OpenIDM-Password: openidm-admin" \ --request GET \ "http://localhost:8080/openidm/workflow/processinstance?_queryId=query-all-ids" { "result" : [ { "_id" : "42", "businessKey" : null, "deleteReason" : null, "durationInMillis" : null, "endActivityId" : null, "endTime" : null, "processDefinitionId" : "managedUserApproval:1:4", "processInstanceId" : "42", "processVariables" : { }, "queryVariables" : null, "startActivityId" : "start", "startTime" : "2018-01-09T14:15:36.550Z", "startUserId" : "openidm-admin", "superProcessInstanceId" : null, "tenantId" : "", "processDefinitionResourceName" : "Managed User Approval Workflow" } ], "resultCount" : 1, "pagedResultsCookie" : null, "totalPagedResultsPolicy" : "NONE", "totalPagedResults" : -1, "remainingPagedResults" : -1 }Obtain the list of running workflows based on specific filter criteria.
$ curl \ --header "X-OpenIDM-Username: openidm-admin" \ --header "X-OpenIDM-Password: openidm-admin" \ --request GET \ "http://localhost:8080/openidm/workflow/processinstance?_queryId=filtered-query&businessKey=myBusinessKey"
openidm/workflow/processinstance/{id}
Obtain the details of the specified process instance. For example:
$ curl \ --header "X-OpenIDM-Username: openidm-admin" \ --header "X-OpenIDM-Password: openidm-admin" \ --request GET \ "http://localhost:8080/openidm/workflow/processinstance/42" { "_id" : "42", "businessKey" : null, "deleteReason" : null, "durationInMillis" : null, "endActivityId" : null, "endTime" : null, "processDefinitionId" : "managedUserApproval:1:4", "processInstanceId" : "42", "processVariables" : { ... }, "queryVariables" : [ { ... } ], "startActivityId" : "start", "startTime" : "2018-01-09T14:15:36.550Z", "startUserId" : "openidm-admin", "superProcessInstanceId" : null, "tenantId" : "", "openidmObjectId" : "openidm-admin", "processDefinitionResourceName" : "Managed User Approval Workflow", "tasks" : [ { ... } ] }Stop the specified process instance. For example:
$ curl \ --header "X-OpenIDM-Username: openidm-admin" \ --header "X-OpenIDM-Password: openidm-admin" \ --request DELETE \ "http://localhost:8080/openidm/workflow/processinstance/42" { "_id" : "42", "businessKey" : null, "deleteReason" : null, "durationInMillis" : null, "endActivityId" : null, "endTime" : null, "processDefinitionId" : "managedUserApproval:1:4", "processInstanceId" : "42", "processVariables" : { }, "queryVariables" : null, "startActivityId" : "start", "startTime" : "2018-01-09T14:15:36.550Z", "startUserId" : "openidm-admin", "superProcessInstanceId" : null, "tenantId" : "" }The delete request returns the contents of the deleted process instance.
openidm/workflow/processinstance/history
List the running and completed workflows (process instances).
The following query returns two process instances - one that has completed (
"endActivityId": "end") and one that is still running ("endActivityId": null):$ curl \ --header "X-OpenIDM-Username: openidm-admin" \ --header "X-OpenIDM-Password: openidm-admin" \ --request GET \ "http://localhost:8080/openidm/workflow/processinstance/history?_queryId=query-all-ids" { "result" : [ { "_id" : "35", "businessKey" : null, "deleteReason" : "Deleted by Openidm", "durationInMillis" : 310686, "endActivityId" : null, "endTime" : "2018-01-09T14:20:28.342Z", "processDefinitionId" : "managedUserApproval:1:4", "processInstanceId" : "35", "processVariables" : { }, "queryVariables" : null, "startActivityId" : "start", "startTime" : "2018-01-09T14:15:17.656Z", "startUserId" : "openidm-admin", "superProcessInstanceId" : null, "tenantId" : "", "processDefinitionResourceName" : "Managed User Approval Workflow" }, { "_id" : "42", "businessKey" : null, "deleteReason" : null, "durationInMillis" : null, "endActivityId" : null, "endTime" : null, "processDefinitionId" : "managedUserApproval:1:4", "processInstanceId" : "42", "processVariables" : { }, "queryVariables" : null, "startActivityId" : "start", "startTime" : "2018-01-09T14:15:36.550Z", "startUserId" : "openidm-admin", "superProcessInstanceId" : null, "tenantId" : "", "processDefinitionResourceName" : "Managed User Approval Workflow" } ], "resultCount" : 2, "pagedResultsCookie" : null, "totalPagedResultsPolicy" : "NONE", "totalPagedResults" : -1, "remainingPagedResults" : -1 }Obtain the list of running and completed workflows, based on specific filter criteria.
The following command returns the running and completed workflows that were launched by
user.0.$ curl \ --header "X-OpenIDM-Username: openidm-admin" \ --header "X-OpenIDM-Password: openidm-admin" \ --request GET \ "http://localhost:8080/openidm/workflow/processinstance/history?_queryId=filtered-query&startUserId=user.0" { "result" : [ { "_id" : "79", "businessKey" : null, "deleteReason" : null, "durationInMillis" : null, "endActivityId" : null, "endTime" : null, "processDefinitionId" : "managedUserApproval:1:4", "processInstanceId" : "79", "processVariables" : { }, "queryVariables" : null, "startActivityId" : "start", "startTime" : "2018-01-09T14:35:02.514Z", "startUserId" : "user.0", "superProcessInstanceId" : null, "tenantId" : "", "processDefinitionResourceName" : "Managed User Approval Workflow" } ], "resultCount" : 1, "pagedResultsCookie" : null, "totalPagedResultsPolicy" : "NONE", "totalPagedResults" : -1, "remainingPagedResults" : -1 }For large result sets, you can use the
_sortKeysparameter with afiltered-queryto order search results by one or more fields. You can prefix a-character to the field name to specify that results should be returned in descending order, rather than ascending order.The following query orders results according to their
startTime. The-character in this case indicates that results should be sorted in reverse order, that is, with the most recent results returned first.$ curl \ --header "X-OpenIDM-Username: openidm-admin" \ --header "X-OpenIDM-Password: openidm-admin" \ --request GET \ "http://localhost:8080/openidm/workflow/processinstance/history?_queryId=filtered-query&_sortKeys=-startTime" { "result" : [ { "_id" : "79", "businessKey" : null, "deleteReason" : null, "durationInMillis" : null, "endActivityId" : null, "endTime" : null, "processDefinitionId" : "managedUserApproval:1:4", "processInstanceId" : "79", "processVariables" : { }, "queryVariables" : null, "startActivityId" : "start", "startTime" : "2018-01-09T14:35:02.514Z", "startUserId" : "user.0", "superProcessInstanceId" : null, "tenantId" : "", "processDefinitionResourceName" : "Managed User Approval Workflow" }, { "_id" : "42", "businessKey" : null, "deleteReason" : "Deleted by Openidm", "durationInMillis" : 347254, "endActivityId" : null, "endTime" : "2018-01-09T14:21:23.804Z", "processDefinitionId" : "managedUserApproval:1:4", "processInstanceId" : "42", "processVariables" : { }, "queryVariables" : null, "startActivityId" : "start", "startTime" : "2018-01-09T14:15:36.550Z", "startUserId" : "openidm-admin", "superProcessInstanceId" : null, "tenantId" : "", "processDefinitionResourceName" : "Managed User Approval Workflow" }, { "_id" : "6", "businessKey" : "sourceId: bjensen, targetId: undefined, reconId: 89945d65-9a5f-4dc5-b201-ef6e167c2921-703", "deleteReason" : "Deleted by Openidm", "durationInMillis" : 695804, "endActivityId" : null, "endTime" : "2018-01-09T14:20:35.272Z", "processDefinitionId" : "managedUserApproval:1:4", "processInstanceId" : "6", "processVariables" : { }, "queryVariables" : null, "startActivityId" : "start", "startTime" : "2018-01-09T14:08:59.468Z", "startUserId" : "openidm-admin", "superProcessInstanceId" : null, "tenantId" : "", "processDefinitionResourceName" : "Managed User Approval Workflow" } ], "resultCount" : 3, "pagedResultsCookie" : null, "totalPagedResultsPolicy" : "NONE", "totalPagedResults" : -1, "remainingPagedResults" : -1 }Caution
The Activiti engine treats certain property values as strings, regardless of their actual data type. This might result in results being returned in an order that is different to what you might expect. For example, if you wanted to sort the following results by their
_idfield,"88", "45", "101", you would expect them to be returned in the order"45", "88", "101". Because Activiti treats IDs as strings, rather than numbers, they would be returned in the order"101", "45", "88".
openidm/workflow/processdefinition/{id}/taskdefinition
Query the list of tasks defined for a specific process definition. For example:
$ curl \ --header "X-OpenIDM-Username: openidm-admin" \ --header "X-OpenIDM-Password: openidm-admin" \ --request GET \ "http://localhost:8080/openidm/workflow/processdefinition/managedUserApproval:1:4/taskdefinition?_queryId=query-all-ids" { "result" : [ { "_id" : "evaluateRequest", "assignee" : { "expressionText" : "openidm-admin" }, "categoryExpression" : null, "descriptionExpression" : null, "dueDate" : null, "formProperties" : { "deploymentId" : "1", "formKey" : null, "formPropertyHandlers" : [ { "_id" : "requesterName", "defaultExpression" : null, "name" : "Requester's name", "readable" : true, "required" : false, "type" : null, "variableExpression" : { "expressionText" : "${sourceId}" }, "variableName" : null, "writable" : false }, { "_id" : "requestApproved", "defaultExpression" : null, "name" : "Do you approve the request?", "readable" : true, "required" : true, "type" : { "name" : "enum", "values" : { "true" : "Yes", "false" : "No" } }, "variableExpression" : null, "variableName" : null, "writable" : true } ] }, "name" : { "expressionText" : "Evaluate request" }, "ownerExpression" : null, "priority" : null, "taskCandidateGroup" : [ ], "taskCandidateUser" : [ ], "taskListeners" : { "assignment" : [ { } ], "create" : [ { } ], "complete" : [ { "className" : "org.activiti.engine.impl.bpmn.listener.ScriptTaskListener", "multiInstanceActivityBehavior" : null } ] }, "formResourceKey" : null } ], "resultCount" : 1, "pagedResultsCookie" : null, "totalPagedResultsPolicy" : "NONE", "totalPagedResults" : -1, "remainingPagedResults" : -1 }Query a task definition based on the process definition ID and the task name (
taskDefinitionKey). For example:$ curl \ --header "X-OpenIDM-Username: openidm-admin" \ --header "X-OpenIDM-Password: openidm-admin" \ --request GET \ "http://localhost:8080/openidm/workflow/processdefinition/managedUserApproval:1:4/taskdefinition/evaluateRequest" { "_id" : "evaluateRequest", "assignee" : { "expressionText" : "openidm-admin" }, "categoryExpression" : null, "descriptionExpression" : null, "dueDate" : null, "formProperties" : { "deploymentId" : "1", "formKey" : null, "formPropertyHandlers" : [ { "_id" : "requesterName", "defaultExpression" : null, "name" : "Requester's name", "readable" : true, "required" : false, "type" : null, "variableExpression" : { "expressionText" : "${sourceId}" }, "variableName" : null, "writable" : false }, { "_id" : "requestApproved", "defaultExpression" : null, "name" : "Do you approve the request?", "readable" : true, "required" : true, "type" : { "name" : "enum", "values" : { "true" : "Yes", "false" : "No" } }, "variableExpression" : null, "variableName" : null, "writable" : true } ] }, "name" : { "expressionText" : "Evaluate request" }, "ownerExpression" : null, "priority" : null, "taskCandidateGroup" : [ ], "taskCandidateUser" : [ ], "taskListeners" : { "assignment" : [ { } ], "create" : [ { } ], "complete" : [ { "className" : "org.activiti.engine.impl.bpmn.listener.ScriptTaskListener", "multiInstanceActivityBehavior" : null } ] } }
openidm/workflow/taskinstance
Query all running task instances. For example:
$ curl \ --header "X-OpenIDM-Username: openidm-admin" \ --header "X-OpenIDM-Password: openidm-admin" \ --request GET \ "http://localhost:8080/openidm/workflow/taskinstance?_queryId=query-all-ids" { "result" : [ { "_id" : "85", "_rev" : "1", "activityInstanceVariables" : { }, "cachedElContext" : null, "category" : null, "createTime" : "2018-01-09T14:35:02.514Z", "delegationState" : null, "delegationStateString" : null, "deleted" : false, "description" : null, "dueDate" : null, "eventName" : null, "executionId" : "79", "name" : "Evaluate request", "owner" : null, "parentTaskId" : null, "priority" : 50, "processDefinitionId" : "managedUserApproval:1:4", "processInstanceId" : "79", "processVariables" : { }, "queryVariables" : null, "revisionNext" : 2, "suspended" : false, "suspensionState" : 1, "taskDefinitionKey" : "evaluateRequest", "taskLocalVariables" : { }, "tenantId" : "", "assignee" : "openidm-admin" } ], "resultCount" : 1, "pagedResultsCookie" : null, "totalPagedResultsPolicy" : "NONE", "totalPagedResults" : -1, "remainingPagedResults" : -1 }Query task instances based on candidate users or candidate groups. For example:
$ curl \ --header "X-OpenIDM-Username: openidm-admin" \ --header "X-OpenIDM-Password: openidm-admin" \ --request GET \ "http://localhost:8080/openidm/workflow/taskinstance?_queryId=filtered-query&taskCandidateUser=manager1"
or
$ curl \ --header "X-OpenIDM-Username: openidm-admin" \ --header "X-OpenIDM-Password: openidm-admin" \ --request GET \ "http://localhost:8080/openidm/workflow/taskinstance?_queryId=filtered-query&taskCandidateGroup=management"
Note that you can include both users and groups in the same query.
openidm/workflow/taskinstance/{id}
Obtain detailed information for a running task, based on the task ID. For example:
$ curl \ --header "X-OpenIDM-Username: openidm-admin" \ --header "X-OpenIDM-Password: openidm-admin" \ --request GET \ "http://localhost:8080/openidm/workflow/taskinstance/34" { "_id" : "34", "_rev" : "1", "activityInstanceVariables" : { }, "cachedElContext" : null, "category" : null, "createTime" : "2018-01-10T11:19:15.699Z", "delegationState" : null, "delegationStateString" : null, "deleted" : false, "description" : null, "dueDate" : null, "eventName" : null, "executionId" : "5", "name" : "Evaluate request", "owner" : null, "parentTaskId" : null, "priority" : 50, "processDefinitionId" : "managedUserApproval:1:4", "processInstanceId" : "5", "processVariables" : { }, "queryVariables" : null, "revisionNext" : 2, "suspended" : false, "suspensionState" : 1, "taskDefinitionKey" : "evaluateRequest", "taskLocalVariables" : { }, "tenantId" : "", "formProperties" : [ { "requesterName" : "bjensen" }, { "requestApproved" : null } ], "assignee" : "manager", "openidmAssigneeId" : "09bd693a-1c73-45d4-b33b-b0ddfed275be", "variables" : { "sourceId" : "bjensen", "mapping" : "systemCsvfileAccounts_managedUser", "openidmObjectId" : "openidm-admin", "ambiguousTargetIds" : null, "action" : "CREATE", "linkQualifier" : "default", "_action" : "performAction", "reconId" : "bbaa07d5-4d08-4406-80cd-05d7beaa786e-847", "situation" : "ABSENT" }, "candidates" : { "candidateUsers" : [ "manager" ], "candidateGroups" : [ ] } }Update task-related data stored in the Activiti workflow engine. For example:
$ curl \ --header "Content-Type: application/json" \ --header "X-OpenIDM-Username: openidm-admin" \ --header "X-OpenIDM-Password: openidm-admin" \ --header "If-Match : *" \ --request PUT \ --data '{"description":"Evaluate the new managed user request"}' \ "http://localhost:8080/openidm/workflow/taskinstance/34"Complete the specified task. The variables required by the task are provided in the request body. For example:
$ curl \ --header "Content-Type: application/json" \ --header "X-OpenIDM-Username: openidm-admin" \ --header "X-OpenIDM-Password: openidm-admin" \ --request POST \ --data '{"requestApproved":"true"}' \ "http://localhost:8080/openidm/workflow/taskinstance/34?_action=complete"Claim the specified task. A user who claims a task has that task inserted into his list of pending tasks. The ID of the user who claims the task is provided in the request body. For example:
$ curl \ --header "Content-Type: application/json" \ --header "X-OpenIDM-Username: openidm-admin" \ --header "X-OpenIDM-Password: openidm-admin" \ --request POST \ --data '{"userId":"manager1"}' \ "http://localhost:8080/openidm/workflow/taskinstance/34?_action=claim"
Chapter 23. Setting Up Audit Logging
The audit service publishes and logs information to one or more specified targets, including local data files, the repository, and remote systems.
Audit logs help you to record activity by account. With audit data, you can monitor logins, identify problems such as unresponsive devices, and collect information to comply with regulatory requirements.
The audit service logs information related to the following events: system access, system activity, authentication operations, configuration changes, reconciliations, and synchronizations. You can customize what is logged for each event type. Auditing provides the data for all relevant reports, including those related to orphan accounts.
When you first start IDM, you'll see an audit log file for each
configured audit event topic in the /path/to/openidm/audit
directory. Until there's a relevant event, these files will be empty.
Once IDM sends data to these audit logs, you can query them over the REST interface. For more information, see "Querying Audit Logs Over REST".
23.1. Configuring the Audit Service
The audit logging configuration is accessible over REST under the
openidm/config/audit context path and in the file
project-dir/conf/audit.json.
To configure the audit service, edit the audit.json file
or use the Admin UI. Select Configure > System Preferences and click on the
Audit tab. The fields on that form correspond to the configuration parameters
described in this section.
The following list describes the major options that you can configure for the audit service.
IDM provides a number of configurable audit event handlers. These audit event handlers are listed in the
availableAuditEventHandlersproperty in your project'sconf/audit.jsonfile.For details of each audit event handler, see "Choosing Audit Event Handlers".
You must configure one audit event handler to manage queries on the audit logs.
For more information, see "Specifying the Audit Query Handler".
To configure the audit service to log an event, include it in the list of
eventsfor the specified audit event handler.For more information, see "Logging Audit Events".
You can allow a common
transactionIdfor audit data from all ForgeRock products. To do so, edit thesystem.propertiesfile in yourproject-dir/confdirectory and set:org.forgerock.http.TrustTransactionHeader=true
23.2. Specifying the Audit Query Handler
By default, queries on the audit logs are managed by the JSON audit event
handler. You can configure one of the other available event handlers to
handle queries. The audit event handler that you configure to manage queries
must be enabled, either by including its definition in
audit.json, or setting it to Enabled in the Admin UI.
To specify which audit event handler should be used for queries, set the
handlerForQueries property in the
audit.json file, as follows:
{
"auditServiceConfig" : {
"handlerForQueries" : "json",
"availableAuditEventHandlers" : [
"org.forgerock.audit.handlers.csv.CsvAuditEventHandler",
"org.forgerock.audit.handlers.elasticsearch.ElasticsearchAuditEventHandler",
"org.forgerock.audit.handlers.jms.JmsAuditEventHandler",
"org.forgerock.audit.handlers.json.JsonAuditEventHandler",
"org.forgerock.openidm.audit.impl.RepositoryAuditEventHandler",
"org.forgerock.openidm.audit.impl.RouterAuditEventHandler",
"org.forgerock.audit.handlers.splunk.SplunkAuditEventHandler",
"org.forgerock.audit.handlers.syslog.SyslogAuditEventHandler"
],
...
}
In this case, the handlerForQueries is set to
json, which is the name of the
JsonAuditEventHandler.
Important
Do not use a file-based audit event handler, such as CSV or JSON, to handle queries in a clustered environment. Rather use the repo audit event handler or an external database for queries, in conjunction with your file-based audit handler.
In a clustered environment, file-based audit logs are really useful only for offline review and parsing with external tools.
You can use a file-based audit handler for queries in a non-clustered demonstration or evaluation environment. However, be aware that these handlers do not implement paging, and are therefore subject to general query performance limitations.
The JMS, Syslog, and Splunk handlers can not be used as the handler for queries.
Logging via CSV or JSON may lead to errors in one or more mappings in the Admin UI.
23.3. Choosing Audit Event Handlers
An audit event handler manages audit events, sends audit output to a defined location, and controls the output format. Several default audit event handlers are provided, plus audit event handlers for third-party log management tools, as described in "Audit Log Reference".
Each audit event handler has a set of basic configuration properties, listed in "Common Audit Event Handler Property Configuration". Specific audit event handlers have additional configuration properties described, per handler, in "Audit Event Handler Configuration".
The following sections illustrate how you can configure the standard audit event handlers. For additional audit event handlers, see "Audit Log Reference".
23.3.1. JSON Audit Event Handler
The JSON audit event handler logs events as JSON objects to a set of JSON files. This is the default handler for queries on the audit logs.
The following excerpt of an audit.json file shows a
sample JSON audit event handler configuration:
"eventHandlers" : [
{
"class" : "org.forgerock.audit.handlers.json.JsonAuditEventHandler",
"config" : {
"name" : "json",
"logDirectory" : "&{idm.data.dir}/audit",
"buffering" : {
"maxSize" : 100000,
"writeInterval" : "100 millis"
},
"topics" : [
"access",
"activity",
"recon",
"sync",
"authentication",
"config"
]
}
},A JSON audit event handler configuration includes the following mandatory properties:
nameThe audit event handler name (
json).logDirectoryThe name of the directory in which the JSON log files should be written, relative to the working location. For more information on the working location, see "Specifying the Startup Configuration".
You can use property value substitution to direct log files to another location on the file system. For more information, see "Using Property Value Substitution".
buffering-maxSizeThe maximum number of events that can be buffered. The default (and minimum) number of buffered events is 100000.
buffering-writeIntervalThe delay after which the file-writer thread is scheduled to run after encountering an empty event buffer. The default delay is 100 milliseconds.
topicsThe list of topics for which audit events are logged.
One JSON file is created for each audit topic that is included in this list:
access.audit.jsonactivity.audit.jsonauthentication.audit.jsonconfig.audit.jsonrecon.audit.jsonsync.audit.json
For a description of all the configurable properties of the JSON audit event
handler, see "JSON Audit Event Handler config Properties".
The following excerpt of an authentication.audit.json
file shows the log message format for authentication events:
{
"context": {
"ipAddress": "0:0:0:0:0:0:0:1"
},
"entries": [{
"moduleId": "JwtSession",
"result": "FAILED",
"reason": {},
"info": {}
},
...
{
"moduleId": "INTERNAL_USER",
"result": "SUCCESSFUL",
"info": {
"org.forgerock.authentication.principal": "openidm-admin"
}
}],
"principal": ["openidm-admin"],
"result": "SUCCESSFUL",
"userId": "openidm-admin",
"transactionId": "94b9b85f-fbf1-4c4c-8198-ab1ff52ed0c3-24",
"timestamp": "2016-10-11T12:12:03.115Z",
"eventName": "authentication",
"trackingIds": ["5855a363-a1e0-4894-a2dc-fd5270fb99d1"],
"_id": "94b9b85f-fbf1-4c4c-8198-ab1ff52ed0c3-30"
} {
"context": {
"component": "repo/internal/user",
"roles": ["openidm-admin", "openidm-authorized"],
"ipAddress": "0:0:0:0:0:0:0:1",
"id": "openidm-admin",
"moduleId": "INTERNAL_USER"
}...23.3.2. CSV Audit Event Handler
The CSV audit event handler logs events to a comma-separated value (CSV)
file. The following code is an excerpt of the audit.json
file, which depicts a sample CSV audit event handler configuration:
"eventHandlers" : [
{
"class" : "org.forgerock.audit.events.handlers.csv.CSVAuditEventHandler",
"config" : {
"name" : "csv",
"logDirectory" : "&{idm.data.dir}/audit",
"topics" : [ "access", "activity", "recon", "sync", "authentication", "config" ]
}
}
The logDirectory property indicates the name of the
directory in which log files should be written, relative to the
working location. For more information on the working
location, see "Specifying the Startup Configuration".
You can use property value substitution to direct logs to another location on the file system. For more information, see "Using Property Value Substitution".
If you set up a custom CSV Audit Event Handler, you may configure over 20 different properties, as described in "Common Audit Event Handler Property Configuration".
Audit file names are fixed and correspond to the event being audited:
access.csv |
activity.csv |
authentication.csv |
config.csv |
recon.csv |
sync.csv |
23.3.2.1. Minimum Admin UI CSV Audit Handler Configuration Requirements
If you configure the CSV Audit Event Handler in the Admin UI, set at least the following properties:
The
logDirectory, the full path to the directory with audit logs, such as/path/to/openidm/audit. You can substitute &{idm.install.dir} for/path/to/openidm.Differing entries for the quote character,
quoteCharand delimiter character,delimiterChar.After you have set these options, do not change them through the Admin UI. Rather, rotate any CSV audit files and edit the configuration properties directly in the
audit.jsonfile. Changing the properties in the Admin UI generates an error in the console.If you enable the CSV tamper-evident configuration, include the
keystoreHandlerName, or afilenameandpassword. Do not include all three options.Before including tamper-evident features in the audit configuration, set up the keys as described in "Configuring Keys to Protect Audit Logs Against Tampering".
Note
The signatureInterval property supports time settings
in a human-readable format (default = 1 hour). Examples of allowable
signatureInterval settings are:
3 days, 4 m
1 hour, 3 sec
Allowable time units include:
days, day, d
hours, hour, h
minutes, minute, min, m
seconds, second, sec, s
23.3.2.2. Configuring Keys to Protect Audit Logs Against Tampering
If the integrity of your audit files is important, you can configure the CSV Audit Event Handler for tamper detection. Before you do so, you must set the keys required to support tamper detection.
IDM includes a Java Cryptography Extension Keystore (JCEKS),
keystore.jceks, in the
/path/to/openidm/security directory.
You'll need to initialize a key pair using the RSA encryption algorithm, using the SHA256 hashing mechanism.
$ cd /path/to/openidm $ keytool \ -genkeypair \ -alias "Signature" \ -dname CN=openidm \ -keystore security/keystore.jceks \ -storepass changeit \ -storetype JCEKS \ -keypass changeit \ -keyalg RSA \ -sigalg SHA256withRSA
You can now set up a secret key, in Hash-based message authentication code, using the SHA256 hash function (HmacSHA256)
$ keytool \ -genseckey \ -alias "Password" \ -keystore security/keystore.jceks \ -storepass changeit \ -storetype JCEKS \ -keypass changeit \ -keyalg HmacSHA256 \ -keysize 256
To verify your new entries, run the following command:
$ keytool \
-list \
-keystore security/keystore.jceks \
-storepass changeit \
-storetype JCEKS
Keystore type: JCEKS
Keystore provider: SunJCE
Your keystore contains 5 entries
signature, May 10, 2016, PrivateKeyEntry,
Certificate fingerprint (SHA1): 62:2E:E4:36:74:F1:7F:E9:06:08:8D:77:82:1C:F6:D4:05:D1:20:01
openidm-sym-default, May 10, 2016, SecretKeyEntry,
password, May 10, 2016, SecretKeyEntry,
openidm-selfservice-key, May 10, 2016, SecretKeyEntry,
openidm-localhost, May 10, 2016, PrivateKeyEntry,
Certificate fingerprint (SHA1): 31:D2:33:93:E3:63:E8:06:66:CC:C1:4F:7F:DF:0A:F8:C4:D8:0E:BD
23.3.2.3. Configuring Tamper Protection for CSV Audit Logs
Tamper protection can ensure the integrity of audit logs written to CSV
files. You can activate tamper protection in the
audit.json file directly, or by editing the
CSV Audit Event Handler through the Admin UI.
Once configured, the relevant code snippet in your
project-dir/conf/audit.conf
file should appear as follows:
{
"class" : "org.forgerock.audit.handlers.csv.CsvAuditEventHandler",
"config" : {
...
"security" : {
"enabled" : true,
"filename" : "",
"password" : "",
"keyStoreHandlerName" : "openidm",
"signatureInterval" : "10 minutes"
},
...
This particular code snippet reflects a tamper-evident configuration where
a signature is written to a new line in each CSV file, every 10 minutes.
That signature uses the default keystore, configured in the
install-dir/resolver/boot.properties
file. The properties are described in "Common Audit Event Handler Property Configuration".
To import a certificate into the keystore, or create your own self-signed certificate, read "Configuring Keys to Protect Audit Logs Against Tampering".
To make these same changes in the Admin UI, log into
https://localhost:8443/admin, and click
Configure > System Preferences > Audit. You can either edit an existing
CSV audit event handler, or create one of your own, with the options
just described.
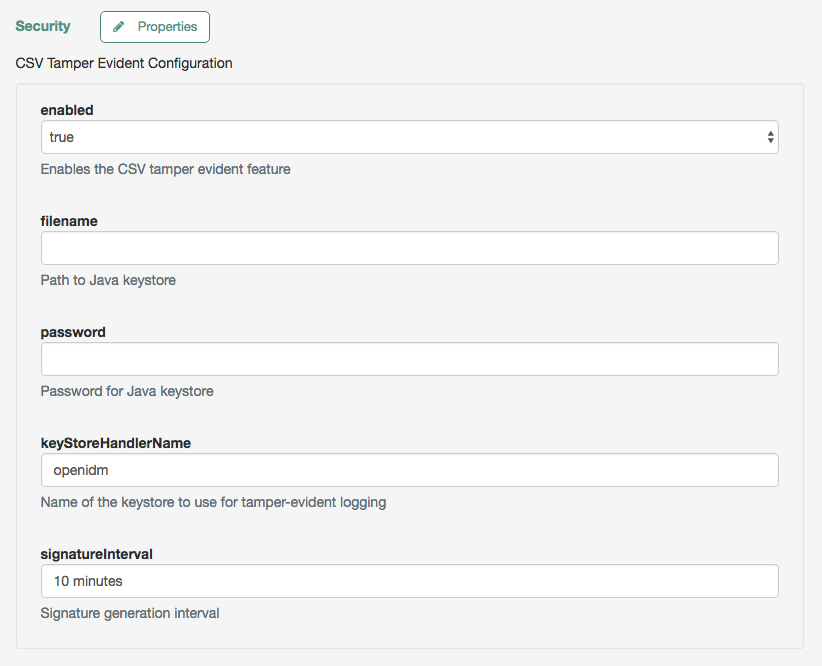
Before saving these tamper-evident changes to your audit configuration, move or delete any current audit CSV files with commands such as:
$ cd /path/to/openidm $ mv audit/*.csv /tmp
Once you've saved tamper-evident configuration changes, you should see the
following files in the /path/to/openidm/audit directory:
tamper-evident-access.csv tamper-evident-access.csv.keystore tamper-evident-activity.csv tamper-evident-activity.csv.keystore tamper-evident-authentication.csv tamper-evident-authentication.csv.keystore tamper-evident-config.csv tamper-evident-config.csv.keystore tamper-evident-recon.csv tamper-evident-recon.csv.keystore tamper-evident-sync.csv tamper-evident-sync.csv.keystore
23.3.2.4. Checking the Integrity of Audit Log Files
Now that you've configured keystore and tamper-evident features, you can periodically check the integrity of your log files.
For example, the following command can verify the CSV files in the
--archive subdirectory (audit/),
which belong to the access --topic, verified with the
keystore.jceks keystore, using the CSV audit handler
bundle,
forgerock-audit-handler-csv-version.jar:
$ java -jar \ bundle/forgerock-audit-handler-csv-version.jar \ --archive audit/ \ --topic access \ --keystore security/keystore.jceks \ --password changeit
If there are changes to your tamper-evident-access.csv
file, you'll see a message similar to:
FAIL tamper-evident-access.csv-2016.05.10-11.05.43 The HMac at row 3 is not correct.
Note
Note the following restrictions on verification of CSV audit files:
You can only verify audit files that have already been rotated. You cannot verify an audit file that is currently being written to.
Verification of tampering is supported only for CSV audit files with the following format:
"formatting" : { "quoteChar" : "\"", "delimiterChar" : ",", "endOfLineSymbols" : "\n" },A tamper-evident audit configuration rotates files automatically and pairs the rotated file with the required keystore file. Files that are rotated manually cannot be verified as the required keystore information is not appended.
23.3.3. Router Audit Event Handler
The router audit event handler logs events to any external or custom
endpoint, such as system/scriptedsql or
custom-endpoint/myhandler. It uses target-assigned
values of _id.
A sample configuration for a router event handler is
provided in the audit.json file in the
openidm/samples/audit-jdbc/conf
directory, and described in "About the Configuration Files" in the Samples Guide. This
sample directs log output to a JDBC repository. The audit configuration file
(conf/audit.json) for the sample shows the following
event handler configuration:
{
"class": "org.forgerock.openidm.audit.impl.RouterAuditEventHandler",
"config": {
"name": "router",
"topics" : [ "access", "activity", "recon", "sync", "authentication", "config" ],
"resourcePath" : "system/auditdb"
}
},
The resourcePath property in the configuration indicates
that logs should be directed to the system/auditdb
endpoint. This endpoint, and the JDBC connection properties, are defined in
the connector configuration file (conf/provisioner.openicf-auditdb.json),
as follows:
{
"configurationProperties" : {
"username" : "root",
"password" : "password",
"driverClassName" : "com.mysql.jdbc.Driver",
"url" : "jdbc:mysql://&{openidm.repo.host}:&{openidm.repo.port}/audit",
"autoCommit" : true,
"reloadScriptOnExecution" : false,
"jdbcDriver" : "com.mysql.jdbc.Driver",
"scriptRoots" : ["&{idm.instance.dir}/tools"],
"createScriptFileName" : "CreateScript.groovy",
"testScriptFileName" : "TestScript.groovy",
"searchScriptFileName" : "SearchScript.groovy"
},
...
Include the correct URL or IP address of your remote JDBC repository in the
boot.properties file for your project.
When JSON information is sent to the router audit event handler, the value
of _id is replaced with eventId.
23.3.4. Repository Audit Event Handler
The repository audit event handler sends information to a JDBC repository. Note that if you are using ForgeRock Directory Services (DS) as the repository, you cannot enable this audit event handler because audit data cannot be stored in DS.
Log entries are stored in the following tables of a JDBC repository:
auditaccessauditactivityauditauthenticationauditconfigauditreconauditsync
You can use the repository audit event handler to generate reports that combine information from multiple tables.
Each of these JDBC tables maps to an object in the database table
configuration file (repo.jdbc.json). The following
excerpt of that file illustrates the mappings for the
auditauthentication table:
"audit/authentication" : {
"table" : "auditauthentication",
"objectToColumn" : {
"_id" : "objectid",
"transactionId" : "transactionid",
"timestamp" : "activitydate",
"userId" : "userid",
"eventName" : "eventname",
"result" : "result",
"principal" : {"column" : "principals", "type" : "JSON_LIST"},
"context" : {"column" : "context", "type" : "JSON_MAP"},
"entries" : {"column" : "entries", "type" : "JSON_LIST"},
"trackingIds" : {"column" : "trackingids", "type" : "JSON_LIST"},
}
},
The tables correspond to the topics listed in the
audit.json file. For example:
{
"class": "org.forgerock.openidm.audit.impl.RepositoryAuditEventHandler",
"config": {
"name": "repo",
"topics" : [ "access", "activity", "recon", "sync", "authentication", "config" ]
}
},23.3.5. JMS Audit Event Handler
When IDM creates auditable information, it can use a Java Message Service (JMS) Audit Event Handler. The Java Message Service (JMS) is a Java API for sending asynchronous messages between clients. The JMS Audit Event Handler can send information to message brokers, which can then forward that information to external log analysis systems.
The JMS Audit Event Handler can work with the following message brokers:
Apache ActiveMQ. For a demonstration, see "Directing Audit Information To a JMS Broker" in the Samples Guide.
TIBCO Enterprise Message Service, as described in this chapter.
This implementation supports the publish/subscribe model. For more information, see Basic JMS API Concepts.
As with other audit event handlers, you can configure it directly through the
conf/audit.json file for your project or through the
Admin UI.
Tip
The JMS audit event handler does not support queries. If you enable JMS,
and want Audit Event query support, you must also enable a second handler
that supports queries. You'll see that handler in the
audit.json file with the
handlerForQueries property, or in the Admin UI with
the Use For Queries option.
The JMS audit event handler supports JMS communication, based on the following components:
A JMS message broker, which provides clients with connectivity, along with message storage and message delivery functionality.
JMS messages, which follow a specific format described in "JMS Message Format".
Destinations are external to IDM and the message broker. IDM, which includes the audit service, is a producer and not a destination. IDM sends messages to a topic in a message broker. Consumers (clients) can subscribe to the message broker.
JMS Topics differ from ForgeRock audit events, which are listed as
topicsin your project'saudit.jsonfile. For more information on JMS topics, see the following link on the publish/subscribe model. In contrast, ForgeRock audit event topics specify categories of events, which may include access, activity, authentication, configuration, reconciliation, and synchronization. These topics can be published via the audit handler(s).
In the following sections, you can configure the JMS audit event handler
in the Admin UI, and through your project's audit.json
file. For detailed configuration options, see
"JMS Audit Event Handler Unique config Properties". But first, you should add several
bundles to your deployment.
23.3.5.1. Adding the Dependencies for JMS Messaging
The JMS audit event handler requires ActiveMQ, and a number of dependencies. This section lists the dependencies, where they can be downloaded, and where they must be installed in the OpenIDM instance.
This sample was tested with the versions of the files mentioned in this list. If you use a different ActiveMQ version, the dependency versions might differ.
Download the ActiveMQ binary from http://activemq.apache.org/download.html. This sample was tested with ActiveMQ 5.14.3.
Download the ActiveMQ Client that corresponds to your ActiveMQ version from https://repository.apache.org/content/repositories/releases/org/apache/activemq/activemq-client/.
Download the JmDNS JAR, version 3.4.1.
Download the bnd tool that allows you to create a JAR with OSGi meta data. This sample was tested with bnd version 2.4.0, downloaded from https://repo1.maven.org/maven2/biz/aQute/bnd/bnd/.
Download the Apache Geronimo J2EE management bundle (
geronimo-j2ee-management_1.1_spec-1.0.1.jar) from https://repo1.maven.org/maven2/org/apache/geronimo/specs/geronimo-j2ee-management_1.1_spec/1.0.1/.Download the hawtbuf Maven-based protocol buffer compiler (hawtbuf-1.11.jar).
Unpack the ActiveMQ binary. For example:
$ tar -zxvf ~/Downloads/apache-activemq-5.14.3-bin.tar.gz
Create a temporary directory, copy the Active MQ Client and
bndJAR files to that directory, then change to that directory:$ mkdir ~/Downloads/tmp $ mv activemq-client-5.14.3.jar ~/Downloads/tmp/ $ mv bnd-2.4.0.jar ~/Downloads/tmp/ $ cd ~/Downloads/tmp/
Create an OSGi bundle as follows:
In a text editor, create a BND file named
activemq.bndwith the following contents:version=5.14.3 Export-Package: *;version=${version} Bundle-Name: ActiveMQ :: Client Bundle-SymbolicName: org.apache.activemq Bundle-Version: ${version}Your
tmp/directory should now contain the following files:$ ls activemq-client-5.14.3.jar activemq.bnd bnd-2.4.0.jar
In that same directory, create the OSGi bundle archive file as follows:
$ java -jar bnd-2.4.0.jar \ wrap --properties activemq.bnd \ --output activemq-client-5.14.3-osgi.jar \ activemq-client-5.14.3.jar
Copy the resulting
activemq-client-5.14.3-osgi.jarfile to theopenidm/bundledirectory:$ cp activemq-client-5.14.3-osgi.jar /path/to/openidm/bundle/
Copy the Apache Geronimo, hawtbuf, and JmDNS JAR files to the
openidm/bundledirectory:$ cp ~/Downloads/geronimo-j2ee-management_1.1_spec-1.0.1.jar /path/to/openidm/bundle/ $ cp ~/Downloads/hawtbuf-1.11.jar /path/to/openidm/bundle/ $ cp ~/Downloads/jmdns-3.4.1.jar /path/to/openidm/bundle
Your OpenIDM instance is now ready for you to configure the JMS audit event handler.
23.3.5.2. Configuring JMS at the Admin UI
To configure JMS at the Admin UI, select Configure > System Preferences >
Audit. Under Event Handlers, select JmsAuditEventHandler
and select Add Event Handler. You can then configure
the JMS audit event handler in the pop-up window that appears. For guidance,
see "JMS Configuration File".
23.3.5.3. JMS Configuration File
You can configure JMS directly in the conf/audit.json
file, or indirectly through the Admin UI. The following code is an excerpt
of the audit.json file, which depicts a sample JMS audit event handler
configuration:
{
"class" : "org.forgerock.audit.handlers.jms.JmsAuditEventHandler",
"config" : {
"name": "jms",
"enabled" : true,
"topics": [ "access", "activity", "config", "authentication", "sync", "recon" ],
"deliveryMode": "NON_PERSISTENT",
"sessionMode": "AUTO",
"batch": {
"batchEnabled": true,
"capacity": 1000,
"threadCount": 3,
"maxBatchedEvents": 100
},
"jndi": {
"contextProperties": {
"java.naming.factory.initial" : "org.apache.activemq.jndi.ActiveMQInitialContextFactory",
"java.naming.provider.url" : "tcp://127.0.0.1:61616?daemon=true",
"topic.forgerock.idm.audit" : "forgerock.idm.audit"
},
"topicName": "forgerock.idm.audit",
"connectionFactoryName": "ConnectionFactory"
}
}
}
As you can see from the properties, in this configuration, the JMS
audit event handler is enabled, with
NON_PERSISTENT delivery of audit events in batches. It
is configured to use the Apache ActiveMQ Java Naming and Directory
Interface (JNDI) message broker, configured on port 61616. For an example
of how to configure Apache ActiveMQ, see
"Directing Audit Information To a JMS Broker" in the Samples Guide.
If you substitute a different JNDI message broker, you'll have to change
the jndi contextProperties. If you
configure the JNDI message broker on a remote system, substitute the
associated IP address.
To set up SSL, change the value of the
java.naming.provider.url to:
ssl://127.0.0.1:61617?daemon=true&socket.enabledCipherSuites=
SSL_RSA_WITH_RC4_128_SHA,SSL_DH_anon_WITH_3DES_EDE_CBC_SHAYou'll also need to set up keystores and truststores, as described in "JMS, ActiveMQ, and SSL".
23.3.5.4. JMS, ActiveMQ, and SSL
If the security of your audit data is important, you can configure SSL for JMS. Take the following steps to generate an ActiveMQ broker certificate keystore, a broker export certificate, a client keystore, and a server truststore. You can then import that client certificate into the IDM security truststore.
Note
This section is based in part on the ActiveMQ documentation on How do I use SSL. As of this writing, it includes the following caution: "In Linux, do not use absolute path to keystore".
But first, you should export two environment variables:
Navigate to the directory where you unpacked the ActiveMQ binary:
$ cd /path/to/apache-activemq-x.y.z
ACTIVEMQ_SSL_OPTS. Set the
ACTIVEMQ_SSL_OPTSvariable to point to the ActiveMQ broker keystore:$ export \ ACTIVEMQ_SSL_OPTS=\ '-Djavax.net.ssl.keyStore=/usr/local/activemq/keystore/broker.ks -Djavax.net.ssl.keyStorePassword=changeit'
MAVEN_OPTS Set the
MAVEN_OPTSvariable, for the sample consumer described in "Configuring and Using a JMS Consumer Application" in the Samples Guide:$ export \ MAVEN_OPTS=\ "-Djavax.net.ssl.keyStore=client.ks -Djavax.net.ssl.keyStorePassword=changeit -Djavax.net.ssl.trustStore=client.ts -Djavax.net.ssl.trustStorePassword=changeit"
Note that these commands use the default keystore changeit
password. The commands which follow assume that you use the same password
when creating ActiveMQ certificates.
Create an ActiveMQ broker certificate (
broker.ks):$ keytool \ -genkey \ -alias broker \ -keyalg RSA \ -keystore broker.ks
Export the certificate to
broker_cert, so you can share it with clients:$ keytool \ -export \ -alias broker \ -keystore broker.ks \ -file broker_cert
Create a client keystore file (
client.ks):$ keytool \ -genkey \ -alias client \ -keyalg RSA \ -keystore client.ks
Create a client truststore file,
client.ts, and import the broker certificate,broker_cert:$ keytool \ -import \ -alias broker \ -keystore client.ts \ -file broker_cert
Export the client keystore,
client.ks, into a client certificate file (client.crt):$ keytool \ -export \ -alias client \ -keystore client.ks \ --file client.crt
Now make this work with IDM. Import the client certificate file into the IDM truststore:
$ keytool \ -import \ -trustcacerts \ -alias client \ -file client.crt \ -keystore /path/to/openidm/security/truststore
With these certificate files, you can now set up SSL in the ActiveMQ
configuration file, activemq.xml, in the
/path/to/apache-activemq-x.y.z/conf directory.
You'll add one line to the <transportConnectors>
code block with <transportConnector name="ssl", as
shown here:
<transportConnectors>
<!-- DOS protection, limit concurrent connections to 1000 and frame size to 100MB -->
<transportConnector name="openwire" uri="tcp://0.0.0.0:61616?
maximumConnections=1000&wireFormat.maxFrameSize=104857600"/>
<transportConnector name="ssl" uri="ssl://0.0.0.0:61617?transport.enabledCipherSuites=
SSL_RSA_WITH_RC4_128_SHA,SSL_DH_anon_WITH_3DES_EDE_CBC_SHA
&maximumConnections=1000&wireFormat.maxFrameSize=104857600&transport.daemon=true"/>
<transportConnector name="amqp" uri="amqp://0.0.0.0:5672?maximumConnections=1000&
wireFormat.maxFrameSize=104857600"/>
<transportConnector name="stomp" uri="stomp://0.0.0.0:61613?maximumConnections=1000&
wireFormat.maxFrameSize=104857600"/>
<transportConnector name="mqtt" uri="mqtt://0.0.0.0:1883?maximumConnections=1000&
wireFormat.maxFrameSize=104857600"/>
<transportConnector name="ws" uri="ws://0.0.0.0:61614?maximumConnections=1000&
wireFormat.maxFrameSize=104857600"/>
</transportConnectors>
Make the corresponding change to your audit configuration file
(audit.json), as described in
"JMS Configuration File".
Start the ActiveMQ event broker and start IDM, as described in "Starting the ActiveMQ Broker and Running the Sample" in the Samples Guide.
23.3.5.5. JMS Message Format
The following JMS message reflects the authentication of the
openidm-admin user, logging into the Admin UI from
a remote location, IP address 172.16.209.49.
{
"event": {
"_id": "134ee773-c081-436b-ae61-a41e8158c712-565",
"trackingIds": [
"4dd1f9de-69ac-4721-b01e-666df388fb17",
"185b9120-406e-47fe-ba8f-e95fd5e0abd8"
],
"context": {
"id": "openidm-admin",
"ipAddress": "172.16.209.49",
"roles": [
"openidm-admin",
"openidm-authorized"
],
"component": "repo/internal/user"
},
"entries": [
{
"info": {
"org.forgerock.authentication.principal": "openidm-admin"
},
"result": "SUCCESSFUL",
"moduleId": "JwtSession"
}
],
"principal": [
"openidm-admin"
],
"result": "SUCCESSFUL",
"userId": "openidm-admin",
"transactionId": "134ee773-c081-436b-ae61-a41e8158c712-562",
"timestamp": "2016-04-15T14:57:53.114Z",
"eventName": "authentication"
},
"auditTopic": "authentication"
}23.3.5.6. JMS, TIBCO, and SSL
You can integrate the JMS audit event handler with the TIBCO Enterprise Message Service.
You'll need to use two bundles from your TIBCO installation:
tibjms.jar, and if you're setting up a secure
connection, tibcrypt.jar. With the following
procedure, you'll process tibjms.jar into an
OSGi bundle:
Download the bnd JAR for working with OSGi bundles, from bnd-1.50.0.jar. If you've previously set up the ActiveMQ server, as described in "Adding the Dependencies for JMS Messaging", you may have already downloaded this JAR archive.
In the same directory, create a file named
tibco.bnd, and add the following lines to that file:version=8.3.0 Export-Package: *;version=${version} Bundle-Name: TIBCO Enterprise Message Service Bundle-SymbolicName: com/tibco/tibjms Bundle-Version: ${version}Add the
tibco.jarfile to the same directory.Run the following command to create the bundle:
$ java \ -jar bnd-1.50.0.jar wrap \ -properties tibco.bnd tibjms.jar
Rename the newly created
tibjms.barfile totibjms-osgi.jar, and copy it to the/path/to/openidm/bundledirectory.If you're configuring SSL, copy the
tibcrypt.jarfile from your TIBCO installation to the/path/to/openidm/bundledirectory.
You also need to configure your project's audit.conf
configuration file. The options are similar to those listed earlier in
"JMS Configuration File", except for the following
jndi code block:
"jndi": {
"contextProperties": {
"java.naming.factory.initial" : "com.tibco.tibjms.naming.TibjmsInitialContextFactory",
"java.naming.provider.url" : "tibjmsnaming://localhost:7222"
},
"topicName": "audit",
"connectionFactoryName": "ConnectionFactory"
}
If your TIBCO server is on a remote system, substitute appropriately for
localhost. If you're configuring a secure TIBCO
installation, you'll want to configure a different code block:
"jndi": {
"contextProperties": {
"java.naming.factory.initial" : "com.tibco.tibjms.naming.TibjmsInitialContextFactory",
"java.naming.provider.url" : "ssl://localhost:7243",
"com.tibco.tibjms.naming.security_protocol" : "ssl",
"com.tibco.tibjms.naming.ssl_trusted_certs" : "/path/to/tibco/server/certificate/cert.pem",
"com.tibco.tibjms.naming.ssl_enable_verify_hostname" : "false"
},
"topicName": "audit",
"connectionFactoryName": "SSLConnectionFactory"
}
Do not add the TIBCO certificate to the IDM
truststore. The formats are not compatible.
When this configuration work is complete, don't forget to start your TIBCO server before starting IDM. For more information, see the TIBCO Enterprise Message Service Users's Guide.
23.3.6. Elasticsearch Audit Event Handler
You can configure third-party audit event handlers, such as Elasticsearch, to log IDM events in file formats compatible with the Elasticsearch search server. Note that ForgeRock does not endorse or support the use of any third-party tools.
The examples in this section assume that the Elasticsearch search server is configured on the same system as your IDM instance. In a production environment, such third-party tools are more likely to be running on a remote system. If you have configured a third-party tool on a remote system, the reliability of audit data may vary, depending on the reliability of your network connection. However, you can limit the risks with appropriate buffer settings, which can mitigate issues related to your network connection, free space on your system, and related resources such as RAM. (This is not an exhaustive list.)
23.3.6.1. Installing and Configuring Elasticsearch
This appendix assumes that you are installing Elasticsearch on the same system as IDM. For Elasticsearch downloads and installation instructions, see the Elasticsearch Getting Started document.
You can set up Elasticsearch Shield with basic authentication to help protect your audit logs. To do so, read the following Elasticsearch document on Getting Started with Shield. Follow up with the following Elasticsearch document on how you can Control Access with Basic Authentication.
You can configure SSL for Elasticsearch Shield. For more information, see the following Elasticsearch document: Setting Up SSL/TLS on a Cluster.
Import the certificate that you use for Elasticsearch into the truststore, with the following command:
$ keytool \ -import \ -trustcacerts \ -alias elasticsearch \ -file /path/to/cacert.pem \ -keystore /path/to/openidm/security/truststore
Once imported, you can activate the useSSL option in
the audit.json file. If you created an Elasticsearch
Shield username and password, you can also associate that information with
the username and password entries
in that same audit.json file.
23.3.6.2. Creating an Audit Index for Elasticsearch
If you want to create an audit index for Elasticsearch, you must set it up before starting IDM, for the audit event topics described in this section: "Audit Event Topics".
To do so, execute the REST call shown in the following
audit index
file. Note the properties that are not_analyzed.
Such fields are not indexed within Elasticsearch.
The REST call in the audit index file includes the following URL:
http://myUsername:myPassword@localhost:9200/audit
That URL assumes that your Elasticsearch deployment is on the localhost
system, accessible on default port 9200, configured with an
indexName of audit.
It also assumes that you have configured basic authentication on
Elasticsearch Shield, with a username of myUsername
and a password of myPassword.
If any part of your Elasticsearch deployment is different, revise the URL accordingly.
Warning
Do not transmit usernames and passwords over an insecure connection.
Enable the useSSL option, as described in
"Configuring the Elasticsearch Audit Event Handler".
23.3.6.3. Configuring the Elasticsearch Audit Event Handler
"Configuring the Elasticsearch Audit Event Handler via the Admin UI" and "Configuring the Elasticsearch Audit Event Handler in
audit.json"
illustrate how you can configure the Elasticsearch Audit Event
Handler.
If you activate the Elasticsearch audit event handler, we recommend that you enable buffering for optimal performance, by setting:
"enabled" : true,
The buffering settings shown are not recommendations for
any specific environment. If performance and audit data integrity are
important in your environment, you may need to adjust these numbers.
If you choose to protect your Elasticsearch deployment with the plugin
known as
Shield, and configure the ability to
Control Access with Basic Authentication,
you can substitute your Elasticsearch Shield admin or
power_user credentials for
myUsername and myPassword.
If you activate the useSSL option, install the
SSL certificate that you use for Elasticsearch into the IDM
keystore. For more information, see
"Accessing IDM Keys and Certificates".
23.3.6.3.1. Configuring the Elasticsearch Audit Event Handler via the Admin UI
To configure this event handler through the Admin UI, click Configure >
System Preferences > Audit. Select
ElasticsearchAuditEventHandler from the drop-down text
box, click Add Event Handler, and configure it in the window that appears.

For a list of properties, see "Common Audit Event Handler Property Configuration".
23.3.6.3.2. Configuring the Elasticsearch Audit Event Handler in
audit.json
Alternatively, you can configure the Elasticsearch audit event handler in
the audit.json file for your project.
The following code is an excerpt from the audit.json
file, with Elasticsearch configured as the handler for audit queries:
{
"auditServiceConfig" : {
"handlerForQueries" : "elasticsearch",
"availableAuditEventHandlers" : [
"org.forgerock.audit.handlers.csv.CsvAuditEventHandler",
"org.forgerock.audit.handlers.elasticsearch.ElasticsearchAuditEventHandler",
"org.forgerock.audit.handlers.jms.JmsAuditEventHandler",
"org.forgerock.audit.handlers.json.JsonAuditEventHandler",
"org.forgerock.openidm.audit.impl.RepositoryAuditEventHandler",
"org.forgerock.openidm.audit.impl.RouterAuditEventHandler",
"org.forgerock.audit.handlers.splunk.SplunkAuditEventHandler",
"org.forgerock.audit.handlers.syslog.SyslogAuditEventHandler"
],You should also set up configuration for the Elasticsearch event handler. The entries shown are defaults, and can be configured. In fact, if you have set up Elasticsearch Shield, with or without SSL/TLS, as described in "Installing and Configuring Elasticsearch", you should change some of these defaults.
"eventHandlers" : [
{
"name" : "elasticsearch"
"class" : "org.forgerock.audit.handlers.elasticsearch.ElasticsearchAuditEventHandler",
"config" : {
"connection" : {
"useSSL" : false,
"host" : "localhost",
"port" : "9200"
},
"indexMapping" : {
"indexName" : "audit"
},
"buffering" : {
"enabled" : false,
"maxSize" : 20000,
"writeInterval" : "1 second",
"maxBatchedEvents" : "500"
}
"topics" : [
"access",
"activity",
"recon",
"sync",
"authentication",
"config"
]
}
}
],
If you set useSSL to true, add the following properties
to the connection code block:
"username" : "myUsername",
"password" : "myPassword",
For more information on the other options shown in
audit.json, see "Common Audit Event Handler Property Configuration".
23.3.6.4. Querying and Reading Elasticsearch Audit Events
By default, Elasticsearch uses pagination. As noted in the following Elasticsearch document on Pagination, queries are limited to the first 10 results.
For example, the following query is limited to the first 10 results:
$ curl \ --header "X-OpenIDM-Username: openidm-admin" \ --header "X-OpenIDM-Password: openidm-admin" \ --header "Content-Type: application/json" \ --request GET \ "http://localhost:8080/openidm/audit/access?_queryFilter=true"
To override the limit of 10 results, follow the guidance shown in
"Paging Query Results" for pageSize.
To set up a queryFilter that uses a "starts with"
sw or "equals" eq comparison
expression, you will need to set it up as a
not_analyzed string field, as described in the following
Elasticsearch document on
Term Query.. You should also review the section on
"Comparison Expressions". If you haven't already done so,
you may need to modify and rerun the REST call described in
"Creating an Audit Index for Elasticsearch".
The queryFilter output should include UUIDs as
id values for each audit event. To read audit data for
that event, include that UUID in the URL. For example, the following REST
call specifies an access event, which includes data on the client:
$ curl \ --header "X-OpenIDM-Username: openidm-admin" \ --header "X-OpenIDM-Password: openidm-admin" \ --header "Content-Type: application/json" \ --request GET "http://localhost:8080/openidm/audit/access/75ca07f5-836c-4e7b-beaa-ae968325a529-622"
23.3.7. Syslog Audit Event Handler
The Syslog audit event handler enables you to log messages to a Syslog server, based on the Syslog Protocol.
You can configure the Syslog audit event handler in the Admin UI, or directly
through the audit.json file for your project. The
following excerpt from this file depicts a possible Syslog configuration
in audit.json:
{
"class" : "org.forgerock.audit.handlers.syslog.SyslogAuditEventHandler",
"config" : {
"protocol" : "UDP",
"host" : "172.16.206.5",
"port" : 514,
"connectTimeout" : 5,
"facility" : "KERN",
"severityFieldMappings" : [
{
"topic" : "recon",
"field" : "exception",
"valueMappings" : {
"SEVERE" : "EMERGENCY",
"INFO" : "INFORMATIONAL"
}
}
],
"buffering" : {
"enabled" : false
},
"name" : "syslog1",
"topics" : [
"config",
"activity",
"authentication",
"access",
"recon",
"sync"
],
"enabled" : true
}
}
The name, topics, and
enabled options in the last part of the excerpt are
common to all audit event handlers. For detailed information on the
remaining properties, see "Syslog Audit Event Handler Unique config Properties".
23.3.8. Splunk Audit Event Handler
The Splunk audit event handler logs IDM events to a Splunk system.
Important
Currently, the Splunk audit event handler can only be used to write events to Splunk. It cannot read or query audit events. You must therefore use the Splunk audit event handler in tandem with another event handler that is configured to handle queries.
Splunk enables you to define the structure of the incoming data. To use the event handler with IDM, create a new data Source Type in Splunk that will be associated with the incoming IDM log data. Because the audit event handler users the HTTP endpoints in Splunk, you must also enable a Splunk HTTP Event Collector. The HTTP Event Collector provides an authorization token that allows IDM to log events to Splunk.
The following procedure assumes a Splunk instance running on the same host as IDM. Adjust the instructions for your Splunk system:
Create a new source type:
In the Splunk UI, select Data > Source Types > New Source Type.
Provide a name for the source type, for example,
openidm.Under Event Breaks, specify how the incoming messages are split.
The Splunk audit event handler supports bulk handing, so it passes multiple audit events to Splunk at a time, as a large JSON payload.
Select Regex and enter
^{to indicate how the bulk messages are separated.Under Timestamp, click Auto to specify that Splunk should generate the timestamp, then click Save.
Create a new HTTP Event Collector.
Select Data Inputs > HTTP Event Collector > New Token.
Enter a Name that will be associated with this token, for example,
openidm.Other fields are optional.
On the Input Settings screen, click Select under Source Type, then select Custom > openidm from the Select Source Type list.
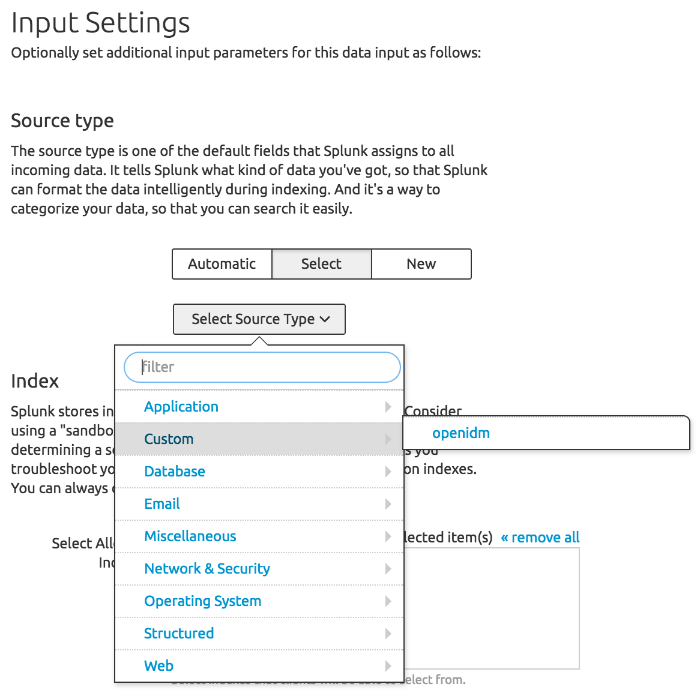
Click Review, then Submit.
Important
Splunk provides the authorization token that you must add as the value of the
authzTokenproperty in the Splunk audit event handler configuration.Make sure that the Global Settings for HTTP Event Collectors do not conflict with the settings you have configured for this IDM HTTP Event Collector.
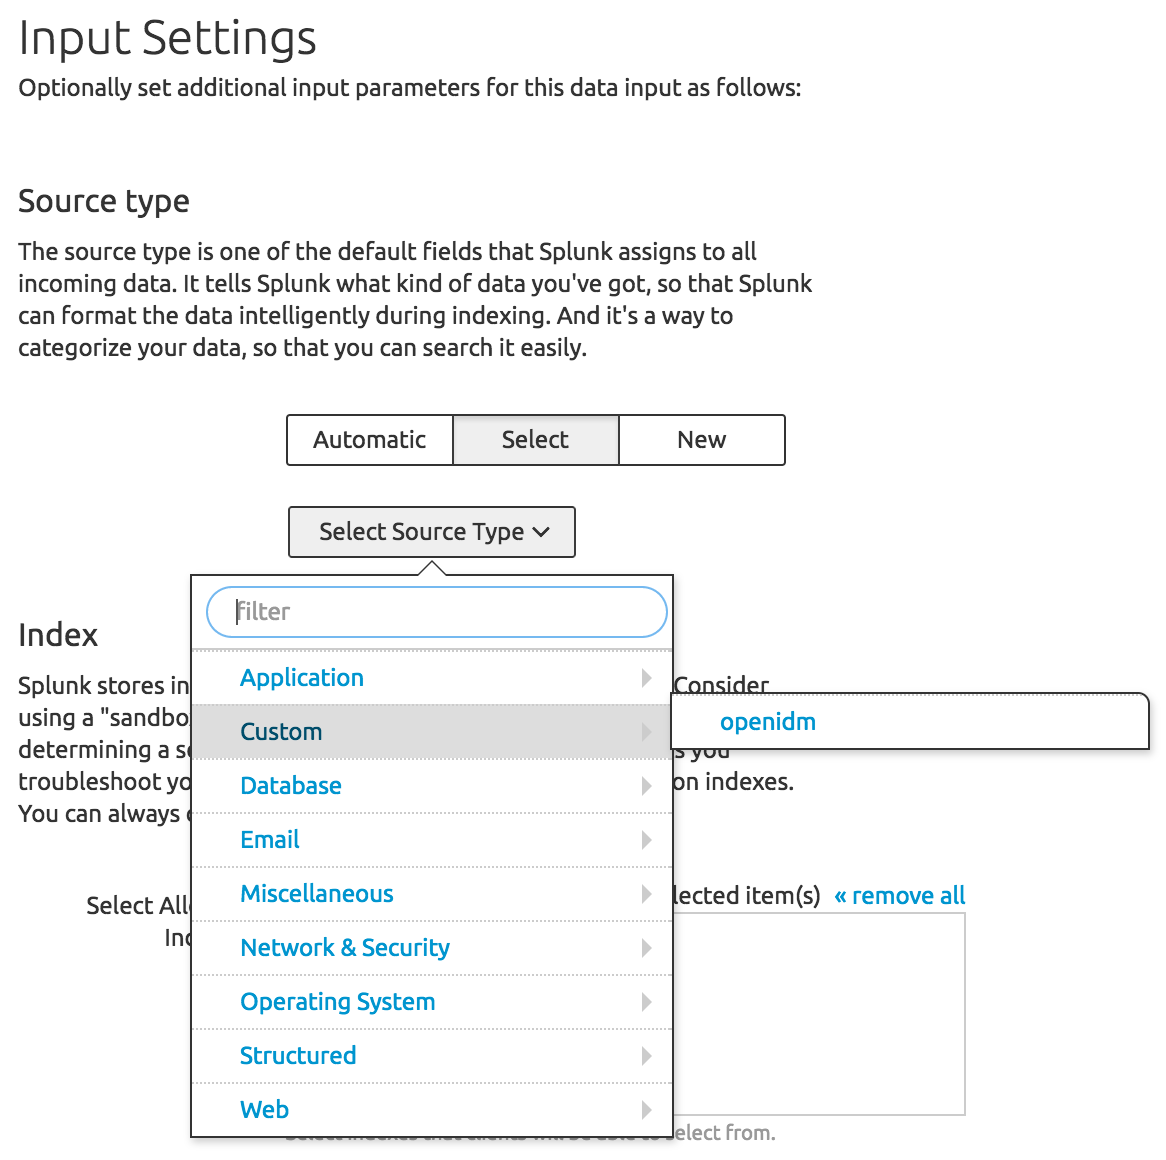
To add the Splunk audit event handler to your IDM configuration,
update your project's audit.json file or select
Configure > System Preferences > Audit in the Admin UI, then select
SplunkAuditEventHandler and click Add Event Handler.
The following excerpt of an audit.json file shows a
sample Splunk audit event handler configuration. Adjust the connection
settings and authzToken to match your Splunk system.
{
"class" : "org.forgerock.audit.handlers.splunk.SplunkAuditEventHandler",
"config" : {
"connection" : {
"useSSL" : false,
"host" : "localhost",
"port" : 8088
},
"buffering" : {
"maxSize" : 10000,
"writeInterval" : "100 ms",
"maxBatchedEvents" : 500
},
"authzToken" : "87E9C00F-F5E6-47CF-B62F-E415A8142355",
"name" : "Splunk",
"topics" : [
"config",
"activity",
"authentication",
"access",
"recon",
"sync"
],
"enabled" : true
}
}
All properties are mandatory. For a complete list of the configurable
properties for this audit event handler, see
"Splunk Audit Event Handler config Properties".
23.3.9. Reviewing Active Audit Event Handlers
To review the available audit event handlers, along with each setting shown
in the audit.json file, use the following command to
POST a request for availableHandlers:
$ curl \ --header "X-OpenIDM-Username: openidm-admin" \ --header "X-OpenIDM-Password: openidm-admin" \ --request POST \ "http://localhost:8080/openidm/audit?_action=availableHandlers"
The output includes a full set of options for each audit event handler, which have been translated in the Admin UI. You can see "human-readable" details when you log into the Admin UI. Click Configure > System Preferences > Audit, and create or customize the event handler of your choice.
Not all audit event handlers support queries. You'll see this in the REST
call output as well as in the Admin UI. In the output for
availableHandlers, you'll see:
"isUsableForQueries" : false
In the Admin UI, when you configure the JMS audit event handler, you
won't be able to enable the Use For Queries option.
23.4. Logging Audit Events
The audit service logs information from six event topics: access, activity, authentication, configuration, reconciliation, and synchronization.
When you start IDM, it creates audit log files in the
openidm/audit directory. The default file-based audit
event handler is the JSON handler, which creates one JSON file for each event
topic.
To configure default and custom audit topics in the Admin UI, select Configure > System Preferences. Click on the Audit tab, and scroll down to Event Topics.
23.4.1. Audit Event Topics
The audit service logs the following event topics by default:
- Access Events
IDM writes messages at system boundaries, that is REST endpoints and the invocation of scheduled tasks in this log. In short, it includes who, what, and output for every access request.
Default file:
openidm/audit/access.audit.json- Activity Events
IDM logs operations on internal (managed) and external (system) objects to this log.
Entries in the activity log contain identifiers, both for the action that triggered the activity, and for the original caller and the relationships between related actions, on internal and external objects.
Default file:
openidm/audit/activity.audit.json- Authentication Events
IDM logs the results of authentication operations to this log, including situations and the actions taken on each object, including when and how a user authenticated and related events. The activity log contains additional detail about each authentication action.
Default file:
openidm/audit/authentication.audit.json- Configuration Events
IDM logs the changes to the configuration in this log. The configuration log includes the "before" and "after" settings for each configuration item, with timestamps.
Default file:
openidm/audit/config.audit.json- Reconciliation Events
IDM logs the results of reconciliation runs to this log (including situations and the resulting actions taken). The activity log contains details about the actions, where log entries display parent activity identifiers,
recon/reconID, links, and policy events by datastore.Default file:
openidm/audit/recon.audit.json- Synchronization Events
IDM logs the results of automatic synchronization operations (liveSync and implicit synchronization) to this log, including situations and the actions taken on each object, by account. The activity log contains additional detail about each action.
Default file:
openidm/audit/sync.audit.json
For detailed information about each audit event topic, see "Audit Log Reference".
23.5. Filtering Audit Data Per Event
The audit configuration, defined in the audit.json
file, includes a filter parameter that enables you to
specify what should be logged, per event topic. The information that is
logged can be filtered in various ways.
The following excerpt of a sample audit.json file shows
the filter element for the activity log:
"eventTopics" : {
"authentication" : { },
"access" : { },
"activity" : {
"filter" : {
"actions" : [
"create",
"update",
"delete",
"patch",
"action"
]
},
...
}To configure audit filtering in the Admin UI, select Configure > System Preferences > Audit. Scroll down to Event Topics, and click the pencil icon next to the event that you want to filter. The four filter tabs, Filter Actions, Filter Fields, Filter Script, and Filter Triggers, correspond to the following for sections. These sections describe the filters that can be applied to each event topic:
23.5.1. Filtering Audit Data by Action
The filter actions list enables you
to specify the actions that are logged, per event type. This filter is
essentially a fields filter (as described in "Filtering Audit Data by Field Value") that filters log entries by the value of
their actions field.
The following configuration specifies that the actions create, update, delete, patch, and action should be included in the log, for the activity audit event topic.
"eventTopics" : {
...
"activity": {
"filter" : {
"actions" : [
"create",
"update",
"delete",
"patch",
"action"
]
},
...
}
}The list of actions that can be filtered into the log depend on the event type. The following table lists the actions that can be filtered, per event type.
| Event Type | Actions | Description |
|---|---|---|
| Activity and Configuration | read |
When an object is read by using its identifier. By default, read actions are not logged.
Note that due to the potential result size in the case of read
operations on openidm.audit.logFullObjects=true |
create |
When an object is created. | |
update |
When an object is updated. | |
delete |
When an object is deleted. | |
patch |
When an object is partially modified. (Activity only.) | |
query |
When a query is performed on an object. By default, query actions are not logged.
Note that, due to the potential result size in the case of query
operations on openidm.audit.logFullObjects=true | |
action |
When an action is performed on an object. (Activity only.) | |
| Reconciliation and Synchronization | create | When a target object is created. |
delete | When a target object is deleted. | |
update | When a target object is updated. | |
link | When a link is created between a source object and an existing target object. | |
unlink | When a link is removed between a source object and a target object. | |
exception | When the synchronization situation results in an exception. For more information, see "Synchronization Situations and Actions". | |
ignore | When the target object is ignored, that is, no action is taken. | |
| Authentication and Access | - | No actions can be specified for the authentication or the access log event type. |
23.5.2. Filtering Audit Data by Field Value
You can add a list of filter fields
to the audit configuration, that enables you to filter log entries by
specific fields. For example, you might want to restrict the reconciliation
or audit log so that only summary information is logged for each
reconciliation operation. The following addition to the
audit.json file specifies that entries are logged in
the reconciliation log only if their entryType is
start or summary.
"eventTopics" : {
...
"activity" : {
"filter" : {
"actions" : [
"create",
"update",
"delete",
"patch",
"action
],
"fields" : [
{
"name" : "entryType",
"values" : [
"start",
"summary"
]
}
]
}
}
...
},
...
To use nested properties, specify the field name as a JSON pointer. For
example, to filter entries according to the value of the
authentication.id, you would specify the field name as
authentication/id.
23.5.3. Using a Script to Filter Audit Data
Apart from the audit filtering options described in the previous sections,
you can use a JavaScript or Groovy script to specify filter what is logged.
Audit filter scripts are referenced in the audit configuration file
(conf/audit.json), and can be configured per
event type. The following sample configuration references a script named
auditfilter.js, which is used to limit what is logged
in the reconciliation audit log:
{
"eventTopics" : {
...
"recon" : {
"filter" : {
"script" : {
"type" : "text/javascript",
"file" : "auditfilter.js"
}
}
},
...
}
The request and context objects are
available to the script. Before writing the audit entry, IDM
can access the entry as a request.content object.
For example, to set up a script to log just the summary entries for mapping
managed users in an LDAP data store, you could include the following in the
auditfilter.js script:
(function() {
return request.content.entryType == 'summary' &&
request.content.mapping == 'systemLdapAccounts_managedUser'
}());
The script must return true to include the log entry;
false to exclude it.
23.5.4. Filtering Audit Data by Trigger
You can add a filter triggers list
to the audit configuration, that specifies the actions that will be logged
for a specific trigger. For example, the following addition to the
audit.json file specifies that only
create and update actions are logged
for in the activity log, for an activity that was triggered by a
recon.
"eventTopics" : {
"activity" : {
"filter" : {
"actions" : [
...
],
"triggers" : {
"recon" : [
"create",
"update"
]
}
...
If a trigger is provided, but no actions are specified, nothing is logged
for that trigger. If a trigger is omitted, all actions are logged for that
trigger. Only the recon trigger is implemented. For a
list of reconciliation actions that can be logged, see
"Synchronization Actions".
23.6. Filtering Audit Logs by Policy
In addition to the event-based filtering described in the previous sections, you can set up policies to exclude specific information from the audit logs.
To configure audit filter policies in the Admin UI, select Configure > System Preferences > Audit and scroll down to Audit Filter Policies. The options shown in that item match the filter configuration described in this section:
By default, the audit.json file includes the following
filterPolicies:
"filterPolicies" : {
"value" : {
"excludeIf" : [
"/access/http/request/headers/Authorization",
"/access/http/request/headers/X-OpenIDM-Password",
"/access/http/request/cookies/session-jwt",
"/access/http/response/headers/Authorization",
"/access/http/response/headers/X-OpenIDM-Password"
],
"includeIf" : [ ]
}
} Use the
excludeIfproperty to list data that the audit service should exclude from the logs. You can exclude an entire field (using thefieldproperty), or a field with a specific value (using thevalueproperty). In the default audit configuration, request and response headers and cookies are excluded from the access log, if their values match those shown in the previous code excerpt.Use the
includeIfproperty to include specific audit data, for custom audit events.This setting has no effect on the default audit event topics - all properties are included by default for these events.
A typical use case for filtering audit data by policy is the removal of
personally identifiable information (PII) from the logs. For example, you
might want to hide information such as user email addresses and telephone
numbers. To exclude specific fields from the audit logs, add the field to the
filterPolicies element, as follows:
"filterPolicies" : {
"value" : {...}
"field" : {
"excludeIf" : [
"/eventTopic/objectURI"
]
}
}Consider the following entry in a sample activity log, showing a change in telephone number for user bjensen:
{
"transactionId": "e14ee7fb-7eb5-47c2-bf72-adbc3a648241-7054",
"timestamp": "2017-11-02T12:19:29.396Z",
"eventName": "activity",
"userId": "openidm-admin",
"runAs": "openidm-admin",
"operation": "PATCH",
"before": {
"mail": "bjensen@example.com",
"givenName": "Barbara",
"sn": "Jensen",
"description": "Created By CSV",
"userName": "bjensen",
"password": {...},
"telephoneNumber": "1234567",
"accountStatus": "active",
...
},
"_rev": "00000000feb030ab",
"_id": "bjensen"
},
"after": {
"mail": "bjensen@example.com",
"givenName": "Barbara",
"sn": "Jensen",
"description": "Created By CSV",
"userName": "bjensen",
"password": {...},
"telephoneNumber": "0828392836",
"accountStatus": "active",
...
},
"_rev": "0000000041a73089",
"_id": "bjensen",
"roles": [],
"authzRoles": null,
"reports": null,
"manager": null
},
"changedFields": [],
"revision": "0000000041a73089",
"message": "",
"objectId": "managed/user/bjensen",
"passwordChanged": false,
"status": "SUCCESS",
"_id": "e14ee7fb-7eb5-47c2-bf72-adbc3a648241-7058"
}To exclude bjensen's telephone number and email address from the activity log, you would add the following filter policies:
"filterPolicies" : {
"field" : {
"excludeIf" : [
"/activity/before/mail",
"/activity/after/mail",
"/activity/before/telephoneNumber",
"/activity/after/telephoneNumber"
],
}
}With this configuration, a similar change in the activity log appears as follows:
{
"transactionId": "e14ee7fb-7eb5-47c2-bf72-adbc3a648241-9836",
"timestamp": "2017-11-02T12:40:43.162Z",
"eventName": "activity",
"userId": "openidm-admin",
"runAs": "openidm-admin",
"operation": "PATCH",
"before": {
"givenName": "Barbara",
"sn": "Jensen",
"description": "Created By CSV",
"userName": "bjensen",
"password": {...},
"accountStatus": "active",
"effectiveRoles": [],
"effectiveAssignments": [],
"preferences": {
"updates": false,
"marketing": false
},
"_rev": "0000000041a73089",
"_id": "bjensen"
},
"after": {
"givenName": "Barbara",
"sn": "Jensen",
"description": "Created By CSV",
"userName": "bjensen",
"password": {...},
"accountStatus": "active",
"effectiveRoles": [],
"effectiveAssignments": [],
"preferences": {
"updates": false,
"marketing": false
},
"_rev": "00000000d6e1312d",
"_id": "bjensen",
"roles": [],
"authzRoles": null,
"reports": null,
"manager": null
},
"changedFields": [],
"revision": "00000000d6e1312d",
"message": "",
"objectId": "managed/user/bjensen",
"passwordChanged": false,
"status": "SUCCESS",
"_id": "e14ee7fb-7eb5-47c2-bf72-adbc3a648241-9840"
}Note
By default, the /access/http/request/headers and
/access/http/response/headers fields are considered
case-insensitive for filtering. All other fields are considered
case-sensitive.
To specify that a value should be filtered, regardless of case, add the
caseInsensitiveFields property to your audit
configuration, including an array of fields that should be considered
case-insensitive. Fields are referenced using JSON pointer syntax and the
array of fields can be empty.
With the following configuration, the audit service excludes cookies named
session-jwt and session-JWT from the
log:
"caseInsensitiveFields" : [
"http.request.cookies"
],23.7. Specifying Fields to Monitor
For the activity log only, you can specify fields whose values are considered particularly important in terms of logging.
The watchedFields parameter, configured in the
audit.json file enables you to define a list of properties
that should be monitored for changes. When the value of one of the properties
in this list changes, the change is logged in the activity log, under the
column changedFields. This parameter enables you to have
quick access to important changes in the log.
Properties to monitor are listed as values of the
watchedFields parameter, separated by commas, for example:
"watchedFields" : [ "email", "address" ]
You can monitor changes to any field in this way.
To configure watched fields in the Admin UI, select Configure > System
Preferences > Audit. Scroll down to Event Topics and click the pencil icon
next to the activity event.
23.8. Specifying Password Fields to Monitor
For the activity log only, you can include a
passwordFields parameter to specify a list of password
properties. This parameter functions much like the
watchedFields parameter in that changes to these property
values are logged in the activity log, under the column
changedFields. In addition, when a password property is
changed, the boolean passwordChanged flag is set to
true in the activity log. Properties that should be
considered as passwords are listed as values of the
passwordFields parameter, separated by commas. For
example:
"passwordFields" : [ "password", "userPassword" ]
To configure password fields in the Admin UI, select Configure > System
Preferences > Audit. Scroll down to Event Topics and click the pencil icon
next to the activity event.
23.9. Configuring an Audit Exception Formatter
The audit service includes an exception formatter,
configured in the following snippet of the audit.json
file:
"exceptionFormatter" : {
"type" : "text/javascript",
"file" : "bin/defaults/script/audit/stacktraceFormatter.js"
},
As shown, you may find the script that defines how the exception formatter
works in the stacktraceFormatter.js file. That file
handles the formatting and display of exceptions written to the audit logger.
23.10. Adjusting Audit Write Behavior
You can buffer audit logging to minimize the writes on your systems. To do
so, you can configure buffering either in the
project-dir/conf/audit.json
file, or through the Admin UI.
You can configure audit buffering through an event handler. To access an event handler in the Admin UI, click Configure > System Preferences and click on the Audit Tab. When you customize or create an event handler, you can configure the following settings:
| Property | UI Text | Description |
|---|---|---|
enabled | True or false | Enables / disables buffering |
autoFlush | True or false; whether the Audit Service automatically flushes events after writing them to disk |
The following sample code illustrates where you would configure these
properties in the audit.json file.
...
"eventHandlers" : [
{
"config" : {
...
"buffering" : {
"autoFlush" : false,
"enabled" : false
}
},
...
You can set up autoFlush when buffering is enabled.
IDM then writes data to audit logs asynchronously, while
autoFlush functionality ensures that the audit service
writes data to logs on a regular basis.
If audit data is important, do activate autoFlush. It
minimizes the risk of data loss in case of a server crash.
23.11. Purging Obsolete Audit Information
If reconciliation audit volumes grow "excessively" large, any subsequent reconciliations, as well as queries to audit tables, can become "sluggish". In a deployment with limited resources, a lack of disk space can affect system performance.
You might already have restricted what is logged in your audit logs by setting up filters, as described in "Filtering Audit Data Per Event". You can also use specific queries to purge reconciliation audit logs, or you can purge reconciliation audit entries older than a specific date, using timestamps.
IDM provides a sample purge script,
autoPurgeRecon.js, in the
bin/defaults/script/audit directory. This script purges
reconciliation audit log entries only from the internal repository. It does
not purge data from the corresponding JSON files or external repositories.
To purge reconciliation audit logs on a regular basis, set up a schedule.
A sample schedule is provided in
openidm/samples/example-configurations/schedules/schedule-autoPurgeAuditRecon.json.
You can change that schedule as required, and copy the file to the
conf/ directory of your project, in order for it to
take effect.
The sample purge schedule file is as follows:
{
"enabled" : false,
"type" : "cron",
"schedule" : "0 0 */12 * * ?",
"persisted" : true,
"misfirePolicy" : "doNothing",
"invokeService" : "script",
"invokeContext" : {
"script" : {
"type" : "text/javascript",
"file" : "audit/autoPurgeAuditRecon.js",
"input" : {
"mappings" : [ "%" ],
"purgeType" : "purgeByNumOfReconsToKeep",
"numOfRecons" : 1,
"intervalUnit" : "minutes",
"intervalValue" : 1
}
}
}
}For information about the schedule-related properties in this file, see "Scheduling Synchronization".
Beyond scheduling, the following parameters are of interest for purging the reconciliation audit logs:
- input
Input information. The parameters below specify different kinds of input.
- mappings
An array of mappings to prune. Each element in the array can be either a string or an object.
Strings must contain the mapping(s) name and can use "%" as a wild card value that will be used in a LIKE condition.
Objects provide the ability to specify mapping(s) to include/exclude and must be of the form:
{ "include" : "mapping1", "exclude" : "mapping2" ... }- purgeType
The type of purge to perform. Can be set to one of the following values:
- purgeByNumOfReconsToKeep
Uses the
deleteFromAuditReconByNumOffunction and thenumOfReconsconfig variable.- purgeByExpired
Uses the
deleteFromAuditReconByExpiredfunction and the config variablesintervalUnitandintervalValue.
- num-of-recons
The number of recon summary entries to keep for a given mapping, including all child entries.
- intervalUnit
The type of time interval when using
purgeByExpired. Acceptable values include:minutes,hours, ordays.- intervalValue
The value of the time interval when using
purgeByExpired. Set to an integer value.
23.11.1. Configuring Audit Log Rotation
The file-based audit event handlers enable you to rotate audit log files, either automatically, based on a set of criteria, or by using a REST call.
To configure automatic log file rotation, set the following properties in
your project's audit.json file:
{
"class" : "org.forgerock.audit.handlers.json.JsonAuditEventHandler",
"config" : {
"fileRotation" : {
"rotationEnabled" : true,
"maxFileSize" : 0,
"rotationFilePrefix" : "",
"rotationTimes" : [ ],
"rotationFileSuffix" : "",
"rotationInterval" : ""
},
The file rotation properties are described in
"JSON Audit Event Handler config Properties".
If you have enabled file rotation ("rotationEnabled" : true),
you can rotate the JSON log files manually for a specific audit event topic,
over REST. The following command saves the current access log file with a
date and time stamp, then starts logging to a new file with the same base
name.
$ curl \
--header "X-OpenIDM-Username: openidm-admin" \
--header "X-OpenIDM-Password: openidm-admin" \
--request POST \
"http://localhost:8080/openidm/audit/access?handler=json&_action=rotate"
{
"status": "OK"
}
If the command is successful, you will see two access.audit.json
files in the openidm/audit directory, for example:
access.audit.json access.audit.json-2016.10.12-17.54.41
The file with the extension (2016.10.12-17.54.41)
indicates that audit logging to this file ended on October 12, 2016, at
5:54:41 pm.
To configure log rotation in the Admin UI, click Configure > System Preferences > Audit, and edit the JSON audit event handler (or the CSV audit event handler if you are logging to CSV). You can set all the log rotation properties on this screen.
23.11.2. Configuring Audit Log File Retention
Log file retention specifies how long audit files remain on disk before they are automatically deleted.
To configure log file retention, set the following properties in your
project's audit.json file:
"fileRetention" : {
"maxNumberOfHistoryFiles" : 100,
"maxDiskSpaceToUse" : 1000,
"minFreeSpaceRequired" : 10
},
The file retention properties are described in
"JSON Audit Event Handler config Properties".
To configure log file retention in the Admin UI, click Configure > System Preferences > Audit, and edit the JSON audit event handler (or the CSV audit event handler if you are logging to CSV). You can set all the log retention properties on this screen.
23.12. Querying Audit Logs Over REST
Regardless of where audit events are stored, they are accessible over REST
on the /audit endpoint. The following sections describe
how to query audit logs over REST.
You can also set up an aggregated analysis of audit logs over REST on the
report/audit endpoint. For more information, see
"Generating Audit Reports".
Note
Queries on the audit endpoint must use queryFilter
syntax. Predefined queries are not supported. For more information, see
"Constructing Queries".
If you get no REST output on the correct endpoint, there might be no audit data in the corresponding audit file or JDBC table.
23.12.1. Querying the Reconciliation Audit Log
With the default audit configuration, reconciliation operations are logged in
the file /path/to/openidm/audit/recon.audit.json, and in
the repository. You can read and query the reconciliation audit logs over the
REST interface, as outlined in the following examples.
To return all reconciliation operations logged in the audit log, query the
audit/recon endpoint, as follows:
$ curl \ --header "X-OpenIDM-Username: openidm-admin" \ --header "X-OpenIDM-Password: openidm-admin" \ --request GET \ "http://localhost:8080/openidm/audit/recon?_queryFilter=true"
The following code extract shows the reconciliation audit log after the
first reconciliation operation in the sync-with-csv sample.
The output has been truncated for legibility.
{
"result": [
{
"_id": "49bdb7cb-79a4-429d-856d-a7154005e41a-182",
"transactionId": "49bdb7cb-79a4-429d-856d-a7154005e41a-177",
"timestamp": "2017-02-28T13:07:20.487Z",
"eventName": "recon",
"userId": "openidm-admin",
"exception": null,
"linkQualifier": null,
"mapping": "systemCsvfileAccounts_managedUser",
"message": "Reconciliation initiated by openidm-admin",
"sourceObjectId": null,
"targetObjectId": null,
"reconciling": null,
"ambiguousTargetObjectIds": null,
"reconAction": "recon",
"entryType": "start",
"reconId": "49bdb7cb-79a4-429d-856d-a7154005e41a-177"
},
{
"_id": "49bdb7cb-79a4-429d-856d-a7154005e41a-192",
"transactionId": "49bdb7cb-79a4-429d-856d-a7154005e41a-177",
"timestamp": "2017-02-28T13:07:20.934Z",
"eventName": "recon",
"userId": "openidm-admin",
"action": "CREATE",
"exception": null,
"linkQualifier": "default",
"mapping": "systemCsvfileAccounts_managedUser",
"message": null,
"situation": "ABSENT",
"sourceObjectId": "system/csvfile/account/scarter",
"status": "SUCCESS",
"targetObjectId": "managed/user/scarter",
"reconciling": "source",
"ambiguousTargetObjectIds": "",
"entryType": "entry",
"reconId": "49bdb7cb-79a4-429d-856d-a7154005e41a-177"
},
...
}
Most of the fields in the reconciliation audit log are self-explanatory. Each
distinct reconciliation operation is identified by its
reconId. Each entry in the log is identified by a unique
_id. The first log entry indicates the status for the
complete reconciliation operation. Successive entries indicate the status for
each entry affected by the reconciliation.
To obtain information about a specific log entry, include its entry
_id in the URL. For example:
$ curl \ --header "X-OpenIDM-Username: openidm-admin" \ --header "X-OpenIDM-Password: openidm-admin" \ --request GET \ "http://localhost:8080/openidm/audit/recon/414a4921-5d9d-4398-bf86-7d5312a9f5d1-146"
The following sample output shows the results of a read operation on a specific reconciliation audit entry. The entry shows the creation of scarter's account in the managed user repository, as the result of a reconciliation operation.
{
"_id": "49bdb7cb-79a4-429d-856d-a7154005e41a-192",
"transactionId": "49bdb7cb-79a4-429d-856d-a7154005e41a-177",
"timestamp": "2017-02-28T13:07:20.934Z",
"eventName": "recon",
"userId": "openidm-admin",
"action": "CREATE",
"exception": null,
"linkQualifier": "default",
"mapping": "systemCsvfileAccounts_managedUser",
"message": null,
"situation": "ABSENT",
"sourceObjectId": "system/csvfile/account/scarter",
"status": "SUCCESS",
"targetObjectId": "managed/user/scarter",
"reconciling": "source",
"ambiguousTargetObjectIds": "",
"entryType": "entry",
"reconId": "49bdb7cb-79a4-429d-856d-a7154005e41a-177"
}
To obtain information for a specific reconciliation operation, include the
reconId in the query. You can filter the log so that the
query returns only the fields you want to see, by adding the
_fields parameter.
The following query returns the mapping,
timestamp, and entryType fields for a
specific reconciliation operation:
$ curl \
--header "X-OpenIDM-Username: openidm-admin" \
--header "X-OpenIDM-Password: openidm-admin" \
--request GET \
'http://localhost:8080/openidm/audit/recon?_queryFilter=/reconId+eq+"4261227f-1d44-4042-ba7e-1dcbc6ac96b8"&_fields=mapping,timestamp,entryType'
{
"result": [
{
"_id": "49bdb7cb-79a4-429d-856d-a7154005e41a-182",
"mapping": "systemCsvfileAccounts_managedUser",
"timestamp": "2017-02-28T13:07:20.487Z",
"entryType": "start"
},
{
"_id": "49bdb7cb-79a4-429d-856d-a7154005e41a-192",
"mapping": "systemCsvfileAccounts_managedUser",
"timestamp": "2017-02-28T13:07:20.934Z",
"entryType": "entry"
},
{
"_id": "49bdb7cb-79a4-429d-856d-a7154005e41a-191",
"mapping": "systemCsvfileAccounts_managedUser",
"timestamp": "2017-02-28T13:07:20.934Z",
"entryType": "entry"
},
{
"_id": "49bdb7cb-79a4-429d-856d-a7154005e41a-193",
"mapping": "systemCsvfileAccounts_managedUser",
"timestamp": "2017-02-28T13:07:20.943Z",
"entryType": "summary"
}
],
...
}
To query the reconciliation audit log for a particular reconciliation
situation, include the reconId and the
situation in the query. For example, the following query
returns all ABSENT entries that were found during the specified
reconciliation operation:
$ curl \
--header "X-OpenIDM-Username: openidm-admin" \
--header "X-OpenIDM-Password: openidm-admin" \
--request GET \
'http://localhost:8080/openidm/audit/recon?_queryFilter=/reconId+eq+"414a4921-5d9d-4398-bf86-7d5312a9f5d1-135"+and+situation+eq+"ABSENT"'
{
"result": [
{
"_id": "49bdb7cb-79a4-429d-856d-a7154005e41a-192",
"situation": "ABSENT",
"reconId": "49bdb7cb-79a4-429d-856d-a7154005e41a-177",
"transactionId": "49bdb7cb-79a4-429d-856d-a7154005e41a-177",
"timestamp": "2017-02-28T13:07:20.934Z",
"eventName": "recon",
"userId": "openidm-admin",
"action": "CREATE",
"exception": null,
"linkQualifier": "default",
"mapping": "systemCsvfileAccounts_managedUser",
"message": null,
"sourceObjectId": "system/csvfile/account/scarter",
"status": "SUCCESS",
"targetObjectId": "managed/user/scarter",
"reconciling": "source",
"ambiguousTargetObjectIds": "",
"entryType": "entry"
},
{
"_id": "49bdb7cb-79a4-429d-856d-a7154005e41a-191",
"situation": "ABSENT",
"reconId": "49bdb7cb-79a4-429d-856d-a7154005e41a-177",
"transactionId": "49bdb7cb-79a4-429d-856d-a7154005e41a-177",
"timestamp": "2017-02-28T13:07:20.934Z",
"eventName": "recon",
"userId": "openidm-admin",
"action": "CREATE",
"exception": null,
"linkQualifier": "default",
"mapping": "systemCsvfileAccounts_managedUser",
"message": null,
"sourceObjectId": "system/csvfile/account/bjensen",
"status": "SUCCESS",
"targetObjectId": "managed/user/bjensen",
"reconciling": "source",
"ambiguousTargetObjectIds": "",
"entryType": "entry"
}
],
...
}23.12.2. Querying the Activity Audit Log
The activity logs track all operations on internal (managed) and external (system) objects. Entries in the activity log contain identifiers for the reconciliation or synchronization action that triggered an activity, and for the original caller and the relationships between related actions.
You can access the activity logs over REST with the following call:
$ curl \ --header "X-OpenIDM-Username: openidm-admin" \ --header "X-OpenIDM-Password: openidm-admin" \ --request GET \ "http://localhost:8080/openidm/audit/activity?_queryFilter=true"
The following excerpt of the activity log shows the entries that created
user scarter:
{
"result": [
{
"_id": "49bdb7cb-79a4-429d-856d-a7154005e41a-190",
"transactionId": "49bdb7cb-79a4-429d-856d-a7154005e41a-177",
"timestamp": "2017-02-28T13:07:20.894Z",
"eventName": "activity",
"userId": "openidm-admin",
"runAs": "openidm-admin",
"operation": "CREATE",
"before": null,
"after": {
"mail": "scarter@example.com",
"givenName": "Steven",
"sn": "Carter",
"description": "Created By CSV",
"userName": "scarter",
"password": {
"$crypto": {
"type": "x-simple-encryption",
"value": {
"cipher": "AES/CBC/PKCS5Padding",
"salt": "tdrE2LZ+nBAnE44QY1UrCA==",
"data": "P/z+OXA1x35aVWMRbOHMUQ==",
"iv": "GACI5q4qZUWZRHzIle57TQ==",
"key": "openidm-sym-default",
"mac": "hqLmhjv67dxcmX8L3xxgZg=="
}
}
},
"telephoneNumber": "1234567",
"accountStatus": "active",
"effectiveRoles": [],
"effectiveAssignments": [],
"_rev": "00000000dc6160c8",
"_id": "scarter"
},
"changedFields": [],
"revision": "00000000bad8e88e",
"message": "create",
"objectId": "managed/user/scarter",
"passwordChanged": true,
"status": "SUCCESS"
},
...
}
For users who self-register with the Self-Service UI, IDM
provides more information. The following activity log excerpt depicts
the information collected for user jsanchez. Note the
following properties:
IDM runs as user
anonymous.Security questions (
kbaInfo) are recorded with a salted hash SHA-256 algorithm.Marketing preferences are included.
termsAcceptedincludes the date of the version of Terms & Conditions was accepted.The
message,context, andstatusproperties indicate that this user was created in theSELFSERVICEcontext, successfully.
{
"_id" : "ddc7f35b-4b97-4586-be31-f5a2599b0764-10781",
"transactionId" : "ddc7f35b-4b97-4586-be31-f5a2599b0764-10779",
"timestamp" : "2017-07-26T17:14:24.137Z",
"eventName" : "activity",
"userId" : "anonymous",
"runAs" : "anonymous",
"operation" : "CREATE",
"before" : null,
"after" : {
"kbaInfo" : [ {
"answer" : {
"$crypto" : {
"value" : {
"algorithm" : "SHA-256",
"data" : "jENrBtzgIHscnOnvqSMYPTJKjZVVSN7XEfTp6VUpdXzNQsbCjmNQWpbfa1k1Zp24"
},
"type" : "salted-hash"
}
},
"questionId" : "1"
}, {
"answer" : {
"$crypto" : {
"value" : {
"algorithm" : "SHA-256",
"data" : "obSQtsW3pgA4Yv4dPiISasvmrq4deoPOX4d9VRg+Bd/gGVDzu6fWPKd30Di3moEe"
},
"type" : "salted-hash"
}
},
"questionId" : "2"
} ],
"userName" : "jsanchez",
"givenName" : "Jane",
"sn" : "Sanchez",
"mail" : "jane.sanchez@example.com",
"password" : {
"$crypto" : {
"type" : "x-simple-encryption",
"value" : {
"cipher" : "AES/CBC/PKCS5Padding",
"salt" : "LsmHAD9D+q4bBFmOqhj5QA==",
"data" : "wX4Sy4NzN2cJ79ULmqRB1Q==",
"iv" : "a/20WYNNjOiOGvZTuBpVAA==",
"key" : "openidm-sym-default",
"mac" : "00wzg26OdL6NezOOSUGFyQ=="
}
}
},
"preferences" : {
"updates" : true,
"marketing" : false
},
"accountStatus" : "active",
"effectiveRoles" : [ ],
"effectiveAssignments" : [ ],
"_rev" : "000000004eb36844",
"_id" : "6e7fb8ce-4a97-42d4-90f1-b5808d51194a"
},
"changedFields" : [ ],
"revision" : "000000004eb36844",
"message" : "create",
"context" : "SELFSERVICE",
"objectId" : "managed/user/6e7fb8ce-4a97-42d4-90f1-b5808d51194a",
"passwordChanged" : true,
"status" : "SUCCESS"
},
...
}
To return the activity information for a specific action, include the
_id of the action in the URL, for example:
$ curl \ --header "X-OpenIDM-Username: openidm-admin" \ --header "X-OpenIDM-Password: openidm-admin" \ --request GET \ 'http://localhost:8080/openidm/audit/activity/414a4921-5d9d-4398-bf86-7d5312a9f5d1-145'
Each action in the activity log has a transactionId that
is the same as the transactionId that was assigned to the
incoming or initiating request. So, for example, if an HTTP request invokes a
script that changes a user's password, the HTTP request is assigned a
transactionId. The action taken by the script is assigned
the same transactionId, which enables you to track the
complete set of changes resulting from a single action. You can query the
activity log for all actions that resulted from a specific transaction, by
including the transactionId in the query.
The following command returns all actions in the activity log that happened
as a result of a reconciliation, with a specific transactionId.
The results of the query are restricted to only the objectId
and the resourceOperation. You can see from the output
that the reconciliation with this transactionId resulted
in two CREATEs and two UPDATEs in the managed repository.
$ curl \ --header "X-OpenIDM-Username: openidm-admin" \ --header "X-OpenIDM-Password: openidm-admin" \ --request GET \ 'http://localhost:8080/openidm/audit/activity?_queryFilter=/transactionId+eq+"414a4921-5d9d-4398-bf86-7d5312a9f5d1-135"&_fields=objectId,operation'
The following sample output shows the result of a query that created users scarter and bjensen.
{
"result" : [ {
"_id" : "414a4921-5d9d-4398-bf86-7d5312a9f5d1-144",
"objectId" : "managed/user/scarter",
"operation" : "CREATE"
}, {
"_id" : "414a4921-5d9d-4398-bf86-7d5312a9f5d1-145",
"objectId" : "managed/user/bjensen",
"operation" : "CREATE"
} ],
"resultCount" : 2,
"pagedResultsCookie" : null,
"totalPagedResultsPolicy" : "NONE",
"totalPagedResults" : -1,
"remainingPagedResults" : -1
}
For users who register through social identity providers, the following
command returns JSON-formatted output for someone who has registered socially
with a LinkedIn account, based on their _id.
$ curl \ --header "X-OpenIDM-Username: openidm-admin" \ --header "X-OpenIDM-Password: openidm-admin" \ --request GET \ 'http://localhost:8080/openidm/audit/activity/b164fcb7-4a45-43b0-876d-083217254962'
The following output illustrates the data collected from a hypothetical LinkedIn user.
{
"_id" : "94001c97-c597-46fa-a6c9-f53b0ddd7ff0-1982",
"transactionId" : "94001c97-c597-46fa-a6c9-f53b0ddd7ff0-1974",
"timestamp" : "2018-02-05T19:55:18.427Z",
"eventName" : "activity",
"userId" : "anonymous",
"runAs" : "anonymous",
"operation" : "CREATE",
"before" : null,
"after" : {
"emailAddress" : "Xie@example.com",
"firstName" : "Xie",
"formattedName" : "Xie Na",
"id" : "MW9FE_KyQH",
"lastName" : "Na",
"location" : {
"country" : {
"code" : "cn"
},
"name" : "Beijing, China"
},
"_meta" : {
"subject" : "MW9FE_KyQH",
"scope" : [ "r_basicprofile", "r_emailaddress" ],
"dateCollected" : "2018-02-05T19:55:18.370"
},
"_rev" : "00000000c29c9f46",
"_id" : "MW9FE_KyQH"
},
"changedFields" : [ ],
"revision" : "00000000c29c9f46",
"message" : "create",
"provider" : "linkedIn",
"context" : "SELFSERVICE",
"objectId" : "managed/linkedIn/MW9FE_KyQH",
"passwordChanged" : false,
"status" : "SUCCESS"
}
Note the SELFSERVICE context, which is included for all
user self-registrations, either directly from the Self-Service UI, or through
registration with a social identity provider.
23.12.3. Querying the Synchronization Audit Log
LiveSync and implicit sync operations are logged in the file
/path/to/openidm/audit/sync.audit.json and in the
repository. You can read the synchronization audit logs over the REST
interface, as outlined in the following examples.
To return all operations logged in the synchronization audit log, query the
audit/sync endpoint, as follows:
$ curl \
--header "X-OpenIDM-Username: openidm-admin" \
--header "X-OpenIDM-Password: openidm-admin" \
--request GET \
"http://localhost:8080/openidm/audit/sync?_queryFilter=true"
{
"result" : [ {
"_id" : "53709f21-5b83-4ea0-ac35-9af39c3090cf-95",
"transactionId" : "53709f21-5b83-4ea0-ac35-9af39c3090cf-85",
"timestamp" : "2015-11-23T05:07:39.376Z",
"eventName" : "sync",
"userId" : "openidm-admin",
"action" : "UPDATE",
"exception" : null,
"linkQualifier" : "default",
"mapping" : "managedUser_systemLdapAccounts",
"message" : null,
"situation" : "CONFIRMED",
"sourceObjectId" : "managed/user/128e0e85-5a07-4e72-bfc8-4d9500a027ce",
"status" : "SUCCESS",
"targetObjectId" : "uid=jdoe,ou=People,dc=example,dc=com"
}, {
...
Most of the fields in the synchronization audit log are self-explanatory.
Each entry in the log synchronization operation is identified by a unique
_id. Each synchronization operation
is identified with a transactionId. The same base
transactionId is assigned to the incoming or initiating
request - so if a modification to a user entry triggers an implicit
synchronization operation, both the sync operation and the original change
operation have the same transactionId. You can query the
sync log for all actions that resulted from a specific transaction, by
including the transactionId in the query.
To obtain information on a specific sync audit log entry, include its entry
_id in the URL. For example:
$ curl \
--header "X-OpenIDM-Username: openidm-admin" \
--header "X-OpenIDM-Password: openidm-admin" \
--request GET \
"http://localhost:8080/openidm/audit/sync/53709f21-5b83-4ea0-ac35-9af39c3090cf-95"
{
"_id" : "53709f21-5b83-4ea0-ac35-9af39c3090cf-95",
"transactionId" : "53709f21-5b83-4ea0-ac35-9af39c3090cf-85",
"timestamp" : "2015-11-23T05:07:39.376Z",
"eventName" : "sync",
"userId" : "openidm-admin",
"action" : "UPDATE",
"exception" : null,
"linkQualifier" : "default",
"mapping" : "managedUser_systemLdapAccounts",
"message" : null,
"situation" : "CONFIRMED",
"sourceObjectId" : "managed/user/128e0e85-5a07-4e72-bfc8-4d9500a027ce",
"status" : "SUCCESS",
"targetObjectId" : "uid=jdoe,ou=People,dc=example,dc=com"
}23.12.4. Querying the Authentication Audit Log
The authentication log includes details of all successful and failed authentication attempts. The output may be long. The output that follows is one excerpt from over 100 entries. To obtain the complete audit log over REST, use the following query:
$ curl \
--header "X-OpenIDM-Username: openidm-admin" \
--header "X-OpenIDM-Password: openidm-admin" \
--request GET \
"http://localhost:8080/openidm/audit/authentication?_queryFilter=true"
...
"principal" : [ "johndoe" ],
"result" : "SUCCESSFUL",
"userId" : "johndoe",
"transactionId" : "cf967c5d-2b95-4cbe-9da0-e8952d726cd0-1016",
"timestamp" : "2017-06-20T20:56:04.112Z",
"eventName" : "LOGIN",
"method" : "SOCIAL_PROVIDERS",
"trackingIds" : [ "55fcec49-9631-4c00-83db-6931d10d04b8" ]
}, {
"_id" : "cf967c5d-2b95-4cbe-9da0-e8952d726cd0-1025",
"provider" : "wordpress",
"context" : {
"component" : "managed/user",
"provider" : "wordpress",
"roles" : [ "openidm-authorized" ],
"ipAddress" : "172.16.201.36",
"id" : "8ead23d1-4f14-4102-a130-c4093237f250",
"moduleId" : "SOCIAL_PROVIDERS"
},
"entries" : [ {
"moduleId" : "JwtSession",
"result" : "SUCCESSFUL",
"info" : {
"org.forgerock.authentication.principal" : "johndoe"
}
} ],
...The output depicts a successful login using Wordpress as a social identity provider. From the information shown, you can derive the following information:
The
userId, also known as the authenticationprincipal, isjohndoe. In the REST call that follows, you'll see how to use this information to filter authentication attempts made by that specific user.The login came from IP address
172.16.201.36.The login used the
SOCIAL_PROVIDERSauthentication and theJwtSessionsession modules. For more information, see "Supported Authentication and Session Modules".
Login failures can also be instructive, as you'll see consecutive
moduleId modules that correspond to the order of
modules shown in your project's authentication.json
file.
You can filter the results to return only those audit entries that you are
interested in. For example, the following query returns all authentication
attempts made by a specific user (johndoe) but displays
only the security context and the result of the authentication attempt.
$ curl \
--header "X-OpenIDM-Username: openidm-admin" \
--header "X-OpenIDM-Password: openidm-admin" \
--request GET \
'http://localhost:8080/openidm/audit/authentication?_queryFilter=/principal+eq+"johndoe"&_fields=context,result'
{
"result" : [ {
"_id" : "cf967c5d-2b95-4cbe-9da0-e8952d726cd0-198",
"provider" : null,
"context" : {
"ipAddress" : "172.16.201.36"
},
"entries" : [ {
"moduleId" : "JwtSession",
"result" : "FAILED",
"reason" : { },
"info" : { }
},
...
}, {
"_id" : "cf967c5d-2b95-4cbe-9da0-e8952d726cd0-922",
"provider" : "wordpress",
"context" : {
"component" : "null",
"provider" : "wordpress",
"roles" : [ "openidm-authorized" ],
"ipAddress" : "172.16.201.36",
"id" : "e2b5bfc7-07a0-455c-a8f3-542089a8cc88",
"moduleId" : "SOCIAL_PROVIDERS"
},
"entries" : [ {
"moduleId" : "JwtSession",
"result" : "FAILED",
"reason" : { },
"info" : { }
},
...
{
"moduleId" : "SOCIAL_PROVIDERS",
"result" : "SUCCESSFUL",
"info" : {
"org.forgerock.authentication.principal" : "johndoe"
}
...
}, {
"_id" : "cf967c5d-2b95-4cbe-9da0-e8952d726cd0-1007",
"provider" : "wordpress",
"context" : {
"component" : "managed/user",
"provider" : "wordpress",
"roles" : [ "openidm-authorized" ],
"ipAddress" : "172.16.201.36",
"id" : "johndoe",
"moduleId" : "SOCIAL_PROVIDERS"
},
"entries" : [ {
"moduleId" : "JwtSession",
"result" : "SUCCESSFUL",
"info" : {
"org.forgerock.authentication.principal" : "johndoe"
}
...
The above excerpt illustrates a FAILED authentication
attempt through a social identity provider, possibly based on a mistaken
password. That is followed by a SUCCESSFUL
authentication through the SOCIAL_PROVIDERS module, with
the user included in the Managed User component.
23.12.5. Querying the Configuration Audit Log
This audit log lists changes made to the configuration in the audited server.
You can read through the changes in the
config.extension file in
the openidm/audit directory.
You can also read the complete audit log over REST with the following query:
$ curl \
--header "X-OpenIDM-Username: openidm-admin" \
--header "X-OpenIDM-Password: openidm-admin" \
--request GET \
"http://localhost:8080/openidm/audit/config?_queryFilter=true"
{
"result" : [ {
"_id" : "414a4921-5d9d-4398-bf86-7d5312a9f5d1-73",
"operation" : "CREATE",
"userId" : "openidm-admin",
"runAs" : "openidm-admin",
"transactionId" : "414a4921-5d9d-4398-bf86-7d5312a9f5d1-58",
"revision" : null,
"timestamp" : "2015-11-23T00:18:17.808Z",
"objectId" : "ui",
"eventName" : "CONFIG",
"before" : "",
"after" : "{ \"icons\":
...
} ],
"resultCount" : 3,
"pagedResultsCookie" : null,
"totalPagedResultsPolicy" : "NONE",
"totalPagedResults" : -1,
"remainingPagedResults" : -1
}
The output includes before and after
entries, which represent the changes made to the configuration files.
23.13. Viewing Audit Events in the Admin UI
The Admin UI includes an audit widget that provides a visual display of audit events.
The audit widget is displayed on the System Monitoring dashboard by default. To show audit events:
Log in to the Admin UI and select Dashboards > System Monitoring.
On the Audit Events widget, select the type of audit event that you want to view. The event types correspond to the audit event topics, described in "Audit Event Topics".
Depending on the event type, you filter the events further. For example, if you select Config as the event type, you can then select to view all configuration audit events, or only Creates, Reads, Updates, and so on.
By default, events are displayed for the current month. Use the arrow keys to scroll backwards and forwards to display the audit data for other months.
The following image shows all access events for the month of February, 2017.


Use the move pointer to reposition the widget on the dashboard, or the vertical ellipses to delete the widget.
Chapter 24. Reporting and Monitoring
IDM provides a basic reporting service that enables you to generate reports on specific sets of data within a resource collection. The reporting service does not intend to replace a comprehensive data analysis platform, such as the Elastic Stack. However, this service can avoid the need for third-party data analysis tools in simple use cases.
The reporting service is accessible with a filtered query on the
openidm/report endpoint.
The query must include an aggregateFields parameter.
This parameter provides a comma-delimited list of name-value pairs of fields
that are aggregated to generate the report. The name
indicates the field type, and the value indicates the
field pointer. The field type can be TIMESTAMP or
VALUE. A TIMESTAMP field specifies a
field name, a time scale and, optionally, a
utcOffset in the format +/-HHmm. A
VALUE field specifies a JSON pointer to any other fields to
be aggregated in the report. For example:
TIMESTAMP=/timestamp;scale:min;utfOffset:-0700,VALUE=/response/status
The following example shows the full query syntax required to generate a report on a particular resource collection:
openidm/report/resourceCollection?_queryFilter=queryFilter&aggregateFields=TIMESTAMP=field;scale:min|hour|day|week|month:utcOffset:offset,VALUE=field
24.1. Generating Audit Reports
Audit reports are intended to count similar records, usually over specified
time periods. To facilitate time-based reports, audit data includes
timestamps in ISO 8601 format
(yyyy-MM-ddTHH:mm:ss). To aggregate the audit data for a
particular time period, include these timestamps in a filtered query on the
report/audit endpoint. You can use a UTC offset to specify
different timezones.
The following example generates a report of recon audit
events. The events are filtered to include only records with a
timestamp value after (gt) October 1,
2017 and before (lt) October 31, 2017, both at midnight.
In effect, this query generates a reconciliation report for the month of
October, 2017.
The aggregateFields parameter determines which fields are
included in the report. In the following example, the report includes the
timestamp and status of each event.
The timestamp shows the number of seconds since the Unix
Epoch and the time in ISO 8601 format, with a utcOffset of
-0700 (which corresponds to US Pacific Daylight Time).
$ curl \
--header "X-OpenIDM-Username: openidm-admin" \
--header "X-OpenIDM-Password: openidm-admin" \
--request GET \
'http://localhost:8080/openidm/report/audit/recon?_queryFilter=timestamp+gt+"2017-10-01T00:00:00.0-0700"+and+timestamp+lt+"2017-10-31T00:00:00.0-0700"&aggregateFields=TIMESTAMP=/timestamp;scale:min;utcOffset:-0700,VALUE=/status'
{
"result": [
{
"timestamp": {
"epochSeconds": 1509361500,
"iso8601": "2017-10-30T11:05:00.000Z"
},
"status": null,
"count": 1
},
{
"timestamp": {
"epochSeconds": 1509361440,
"iso8601": "2017-10-30T11:04:00.000Z"
},
"status": null,
"count": 1
},
{
"timestamp": {
"epochSeconds": 1509361440,
"iso8601": "2017-10-30T11:04:00.000Z"
},
"status": "SUCCESS",
"count": 4
},
{
"timestamp": {
"epochSeconds": 1509361320,
"iso8601": "2017-10-30T11:02:00.000Z"
},
"status": null,
"count": 1
},
{
"timestamp": {
"epochSeconds": 1509361320,
"iso8601": "2017-10-30T11:02:00.000Z"
},
"status": "SUCCESS",
"count": 3
},
{
"timestamp": {
"epochSeconds": 1509361500,
"iso8601": "2017-10-30T11:05:00.000Z"
},
"status": "SUCCESS",
"count": 4
}
],
"resultCount": 6,
"pagedResultsCookie": null,
"totalPagedResultsPolicy": "NONE",
"totalPagedResults": -1,
"remainingPagedResults": -1
}
You can further refine the audit report using an additional filter parameter,
postAggregationFilter, to filter the aggregated audit
results according to additional criteria. The
postAggregationFilter parameter works in the same way as
the queryFilter parameter.
The following example returns the same audit report generated previously
but filters the aggregated results to display only those records whose
count parameter is more than 2:
$ curl \
--header "X-OpenIDM-Username: openidm-admin" \
--header "X-OpenIDM-Password: openidm-admin" \
--request GET \
'http://localhost:8080/openidm/report/audit/recon?_queryFilter=timestamp+gt+"2017-10-01T00:00:00.0-0700"+and+timestamp+lt+"2017-10-31T00:00:00.0-0700"&aggregateFields=TIMESTAMP=/timestamp;scale:min;utcOffset:-0700,VALUE=/status&postAggregationFilter=count+gt+2'
{
"result": [
{
"timestamp": {
"epochSeconds": 1509361440,
"iso8601": "2017-10-30T11:04:00.000Z"
},
"status": "SUCCESS",
"count": 4
},
{
"timestamp": {
"epochSeconds": 1509361320,
"iso8601": "2017-10-30T11:02:00.000Z"
},
"status": "SUCCESS",
"count": 3
},
{
"timestamp": {
"epochSeconds": 1509361500,
"iso8601": "2017-10-30T11:05:00.000Z"
},
"status": "SUCCESS",
"count": 4
}
],
"resultCount": 3,
"pagedResultsCookie": null,
"totalPagedResultsPolicy": "NONE",
"totalPagedResults": -1,
"remainingPagedResults": -1
}
You can sort the audit report using the sortKeys property.
The following example runs the same query as the previous example but sorts
the output according to the value of the iso8601 field
(the precise date and time of the entry):
$ curl \
--header "X-OpenIDM-Username: openidm-admin" \
--header "X-OpenIDM-Password: openidm-admin" \
--request GET \
'http://localhost:8080/openidm/report/audit/recon?_queryFilter=timestamp+gt+"2017-10-01T00:00:00.0-0700"+and+timestamp+lt+"2017-10-31T00:00:00.0-0700"&aggregateFields=TIMESTAMP=/timestamp;scale:min;utcOffset:-0700,VALUE=/status&postAggregationFilter=count+gt+2&_sortKeys=timestamp/iso8601'
{
"result": [
{
"timestamp": {
"epochSeconds": 1509361320,
"iso8601": "2017-10-30T11:02:00.000Z"
},
"status": "SUCCESS",
"count": 3
},
{
"timestamp": {
"epochSeconds": 1509361440,
"iso8601": "2017-10-30T11:04:00.000Z"
},
"status": "SUCCESS",
"count": 4
},
{
"timestamp": {
"epochSeconds": 1509361500,
"iso8601": "2017-10-30T11:05:00.000Z"
},
"status": "SUCCESS",
"count": 4
}
],
"resultCount": 3,
"pagedResultsCookie": null,
"totalPagedResultsPolicy": "NONE",
"totalPagedResults": -1,
"remainingPagedResults": -1
}Tip
The Admin UI includes an Audit Events widget that generates basic time-based reports on audit data. For more information, see "Viewing Audit Events in the Admin UI".
24.2. Generating Reports on Managed Data
To generate a report on managed data, run a filtered query on the
report/managed endpoint. These reports enable data
analysis on areas such as:
Number of active managed users
Number of self-registered managed users
Number of enabled roles
The following example generates a report on the number of managed users born in the year 1999 and aggregates those users by birth month:
$ curl \
--header "X-OpenIDM-Username: openidm-admin" \
--header "X-OpenIDM-Password: openidm-admin" \
--request GET \
'http://localhost:8080/openidm/report/managed/user?_queryFilter=/birthdate+gt+"1998-12-31T23:59:59.999Z"+and+/birthdate+lt+"2000-01-01T00:00:00.000Z"&aggregateFields=TIMESTAMP=/birthdate;scale:month;utcOffset:-0700'
{
"result": [
{
"birthdate": {
"epochSeconds": 933490800,
"iso8601": "1999-08-01T00:00:00.0-0700"
},
"count": 8
},
{
"birthdate": {
"epochSeconds": 915174000,
"iso8601": "1999-01-01T00:00:00.0-0700"
},
"count": 8
},
{
"birthdate": {
"epochSeconds": 917852400,
"iso8601": "1999-02-01T00:00:00.0-0700"
},
"count": 10
},
{
"birthdate": {
"epochSeconds": 920271600,
"iso8601": "1999-03-01T00:00:00.0-0700"
},
"count": 6
},
{
"birthdate": {
"epochSeconds": 928220400,
"iso8601": "1999-06-01T00:00:00.0-0700"
},
"count": 10
},
{
"birthdate": {
"epochSeconds": 930812400,
"iso8601": "1999-07-01T00:00:00.0-0700"
},
"count": 6
},
{
"birthdate": {
"epochSeconds": 936169200,
"iso8601": "1999-09-01T00:00:00.0-0700"
},
"count": 7
},
{
"birthdate": {
"epochSeconds": 922950000,
"iso8601": "1999-04-01T00:00:00.0-0700"
},
"count": 5
},
{
"birthdate": {
"epochSeconds": 925542000,
"iso8601": "1999-05-01T00:00:00.0-0700"
},
"count": 3
}
],
"resultCount": 9,
"pagedResultsCookie": null,
"totalPagedResultsPolicy": "NONE",
"totalPagedResults": -1,
"remainingPagedResults": -1
}The Admin UI provides a number of count widgets that generate reports on the following managed data:
Number of active users (users whose account status is
activeNumber of enabled social providers
Number of enabled roles
Number of configured connectors
Number of manual user registrations
The count widgets are provided by default on the Resource Report and Business Report dashboards. Select Dashboards > Resource Report or Dashboards > Business Report to use these widgets, or add them to any other dashboard. For more information, see "Managing Dashboards".
24.3. Metrics and Monitoring
IDM includes tools for monitoring metrics related to activity in
your IDM installation: a Dropwizard dashboard widget, for viewing
metrics within IDM; and a Prometheus endpoint, for viewing metrics
through external resources such as Prometheus and Grafana. While the same
metrics are available in each tool, the right solution will depend on what
you plan to use the metrics for. By default, metrics are not gathered by
IDM. To enable metrics gathering, open
conf/metrics.json and set the enabled
property to true.
To verify metrics are successfully enabled, run:
$ curl \ --header "X-OpenIDM-Username: openidm-admin" \ --header "X-OpenIDM-Password: openidm-admin" \ --request GET \ 'http://localhost:8080/openidm/metrics/api?_queryFilter=true'
If metrics have been successfully enabled, this will return information about currently collected metrics. Otherwise, a bad request response is returned.
Metrics will only be reported once they have been triggered by activity in IDM, such as a reconciliation described in "Managing Reconciliation".
For a list of available metrics, see "Metrics Reference".
Note
This section discusses the installation of Prometheus and Grafana. These third-party tools are not supported by ForgeRock.
24.3.1. Dropwizard Widget
A Dropwizard widget is provided with IDM, and creates a graph
of metrics based on activity in your IDM installation. This can
be found by navigating to a dashboard on the admin site, selecting Add
Widget, then selecting Dropwizard Table with Graph from
the list of available widgets.
The dashboard widget is useful for lightweight, live monitoring of IDM, but does have a few limitations:
The graphs created by the widget do not persist; they will be restarted if you reload or navigate away from the page.
The widget only works with time-based metrics (other forms of metrics will not be listed in the widget).
24.3.2. Prometheus Endpoint
Prometheus is a third-party tool used for gathering and processing monitoring data. IDM has implemented a metrics endpoint which Prometheus can use to gather information about your IDM installation. For more information about installing and running Prometheus, see the Prometheus documentation.
24.3.2.1. Access to Prometheus
IDM includes a STATIC_USER, prometheus, which
is configured to only have access to the openidm/metrics/prometheus
endpoint. Additionally, the openidm-prometheus authorization
role is available for accounts you wish to have access to this endpoint.
The STATIC_USER module is configured in the
authentication.json file as shown here:
{
"name" : "STATIC_USER",
"properties" : {
"queryOnResource" : "repo/internal/user",
"username" : "&{openidm.prometheus.username}",
"password" : "&{openidm.prometheus.password}",
"defaultUserRoles" : [
"openidm-prometheus"
]
},
"enabled" : true
}
By default, the prometheus user name and password are
stored in
install-dir/resolver/boot.properties.
Note
The name of the prometheus authorization role can be changed in
boot.properties, by altering what
openidm.prometheus.role is set to. If you change
the name of the authorization role, you must also
change it in the openidm.internalrole table of your
IDM repository.
24.3.2.2. Configuring Prometheus
Prometheus will need to be configured to monitor IDM, using a
prometheus.yml configuration file. For more information
on configuring Prometheus, see the
Prometheus
configuration documentation. An example
prometheus.yml file would be:
global:
scrape_interval: 15s
external_labels:
monitor: 'my_prometheus'
# https://prometheus.io/docs/operating/configuration/#scrape_config
scrape_configs:
- job_name: 'openidm'
scrape_interval: 15s
scrape_timeout: 5s
metrics_path: 'openidm/metrics/prometheus'
scheme: http
basic_auth:
username: 'prometheus'
password: 'prometheus'
static_configs:
- targets: ['localhost:8080']
This example configures Prometheus to poll the IDM endpoint
every 5 seconds (scrape_interval: 5s), receiving metrics
in a plain text format (_fields: ['text'] and
_mimeType: ['text/plain;version=0.0.4']). For more
information about reporting formats, see the Prometheus documentation on
Exposition
Formats. You can validate that this configuration returns the
expected results via curl:
$ curl \ --header "X-OpenIDM-Username: prometheus" \ --header "X-OpenIDM-Password: prometheus" \ --request GET \ 'http://localhost:8080/openidm/metrics/prometheus?_fields=text&_mimeType=text%2Fplain%3Bversion%3D0.0.4'
Start Prometheus with your new prometheus.yml
configuration file by running:
$ prometheus --config.file=/path/to/prometheus.yml
You can confirm Prometheus is correctly gathering data from IDM
by navigating to the Prometheus monitoring page (by default,
http://localhost:9090).
24.3.2.3. Configuring Grafana
Prometheus provides monitoring and processing for the information provided by IDM, but deeper analytics may be desired. In this case, you can use tools such as Grafana to create customized charts and graphs based on the information collected by Prometheus. For more information on installing and running Grafana, see the Grafana website.
Tip
The default username and password for Grafana is admin
and admin.
To set up a Grafana dashboard with IDM metrics using Prometheus, your Prometheus installation needs to be added as a data source to Grafana. This can be done by selecting Configuration > Data Sources from the left navigation panel in Grafana, then selecting Add Data Source.
The options suggested in this list match the settings in the
monitoring.dashboard.json file. With that in mind,
proceed to the Add Data Source screen:
Give your data source a name, in this case,
ForgeRockIDM.Select Prometheus for the type.
Set the URL (by default,
http://localhost:9090).Set Access to proxy.
Enable Basic Auth.
Set a username and password of
prometheusandprometheus.Select Save & then Test Connection. If the configuration succeeds, you'll see the following message: "Data source is working."
Once Prometheus has been set up as a data source in Grafana, you can then create a dashboard with IDM metrics. You can create a dashboard in one of the following ways:
Download the Monitoring Dashboard Samples from ForgeRock's BackStage site. Find
monitoring.dashboard.jsonin the downloaded zip file. In the Grafana administrative screen, select Home > Import and import the noted file.Alternatively, select Create > Dashboard.
Select Graph.
Select Panel Title > Edit.
From here, you can enter the metrics you wish to display (which will be available in autocomplete as you type), or you can build more complex queries using the Prometheus query language.
You can display a Grafana chart directly in IDM by creating a
new dashboard in the IDM admin, and configuring the dashboard
to be an Embedded URL, set to the URL of your Grafana installation (by
default, http://localhost:3000).
24.4. Monitoring Usage Trends
The Admin UI provides three widgets that enable you to monitor usage trends regarding new user registrations, sign-ins and password resets.
You can add these widgets to any dashboard, and configure them as required. For more information, see "Managing Dashboards".
The following image shows the usage trend widgets tracking registrations, sign-ins and password resets per week:
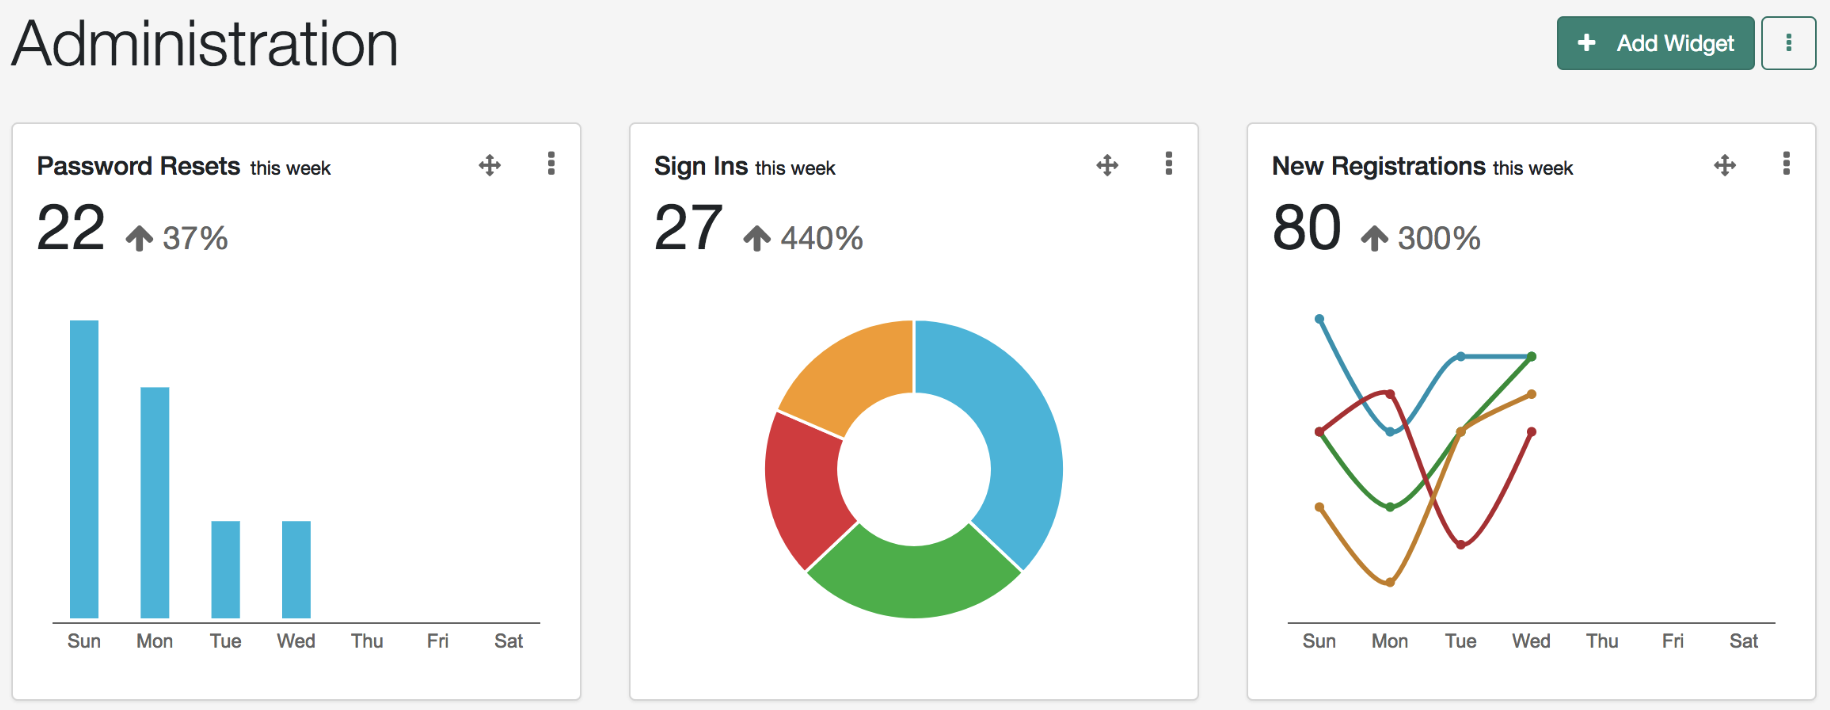
Chapter 25. Clustering, Failover, and Availability
To ensure high availability of the identity management service, you can deploy multiple IDM instances in a cluster. In a clustered environment, each instance must point to the same external repository. If the database is also clustered, IDM points to the cluster as a single system.
If one instance in a cluster shuts down or fails to check in with the cluster
management service, a second instance will detect the failure. For example, if
an instance named instance1 loses connectivity while
executing a scheduled task, the cluster manager notifies the scheduler service
that instance1 is not available. The scheduler service then
attempts to clean up any jobs that instance1 was running at
that time.
Consistency and concurrency across cluster instances is ensured using multi-version concurrency control (MVCC). MVCC provides consistency because each instance updates only the particular revision of the object that was specified in the update.
All instances in a cluster run simultaneously. When a clustered deployment is configured with a load balancer, the deployment works as an active-active high availability cluster.
This chapter describes the changes required to configure multiple IDM instances in a single cluster. However, it does not specify how you might configure a load balancer. When configured with the scheduler service, the different instances claim jobs in a random order. For more information, see "Managing Scheduled Tasks Across a Cluster".
The following diagram depicts a relatively simple cluster configuration.

Important
A clustered deployment relies on system heartbeats to assess the cluster state. For the heartbeat mechanism to work, you must synchronize the system clocks of all the machines in the cluster using a time synchronization service that runs regularly. The system clocks must be within one second of each other. For information on how you can achieve this using the Network Time Protocol (NTP) daemon, see the NTP RFC.
Note that VM guests do not necessarily keep the same time as the host. You should therefore run a time synchronization service such as NTP on every VM.
25.1. Configuring an IDM Instance as Part of a Cluster
To configure an IDM instance as a part of a clustered deployment, follow these steps:
If the server is running, shut it down using the OSGi console:
-> shutdown
If you have not already done so, set up a supported repository, as described in "Selecting a Repository" in the Installation Guide.
Each instance in the cluster must be configured to use the same repository, that is, the database connection configuration file (
datasource.jdbc-default.json) for each instance must point to the same port number and IP address for the database.In "Selecting a Repository" in the Installation Guide, you will see a reference to a data definition language script file. Do not run that script for each instance in the cluster - run it just once to set up the tables required for IDM.
Important
If an instance is not participating in the cluster, it must not share a repository with nodes that are participating in the cluster. Having non-clustered nodes use the same repository as clustered nodes will result in unexpected behavior.
Specify a unique node ID (
openidm.node.id) for each instance.You can specify the node ID in one of the following ways:
Set the value of
openidm.node.idin theresolver/boot.propertiesfile of the instance, for example:openidm.node.id = node1
Set the value in the
OPENIDM_OPTSenvironment variable and export that variable before starting the instance. You must include the JVM memory options when you set this variable. For example:$ export OPENIDM_OPTS="-Xmx1024m -Xms1024m -Dopenidm.node.id=node1" $ ./startup.sh Executing ./startup.sh... Using OPENIDM_HOME: /path/to/openidm Using PROJECT_HOME: /path/to/openidm Using OPENIDM_OPTS: -Xmx1024m -Xms1024m -Dopenidm.node.id=node1 Using LOGGING_CONFIG: -Djava.util.logging.config.file=/path/to/openidm/conf/logging.properties Using boot properties at /path/to/openidm/resolver/boot.properties -> OpenIDM version "6.0.0.7" OpenIDM ready
You can set any value for the
openidm.node.id, as long as the value is unique within the cluster. The cluster manager detects unavailable instances by their node ID.You must set a node ID for each instance, otherwise the instance fails to start. The default
resolver/boot.propertiesfile sets the node ID toopenidm.node.id=node1.Set the cluster configuration.
The cluster configuration is defined in the
conf/cluster.jsonfile of each instance. By default, configuration changes are persisted in the repository so changes that you make in this file apply to all nodes in the cluster.The default version of the
cluster.jsonfile assumes that the cluster management service is enabled:{ "instanceId" : "&{openidm.node.id}", "instanceTimeout" : "30000", "instanceRecoveryTimeout" : "30000", "instanceCheckInInterval" : "5000", "instanceCheckInOffset" : "0", "enabled" : true }The
instanceIdis set to the value of each instance'sopenidm.node.idthat you set in the previous step.The
instanceTimeoutspecifies the length of time (in milliseconds) that a member of the cluster can be "down" before the cluster manager considers that instance to be in recovery mode.Recovery mode indicates that the
instanceTimeoutof an instance has expired, and that another instance in the cluster has detected that event.The scheduler component of the second instance then moves any incomplete jobs into the queue for the cluster.
The
instanceRecoveryTimeoutspecifies the time (in milliseconds) that an instance can be in recovery mode before it is considered to be offline.This property sets a limit after which other members of the cluster stop trying to access an unavailable instance.
The
instanceCheckInIntervalspecifies the frequency (in milliseconds) that instances check in with the cluster manager to indicate that they are still online.The
instanceCheckInOffsetspecifies an offset (in milliseconds) for the checkin timing, when multiple instances in a cluster are started simultaneously.The checkin offset prevents multiple instances from checking in simultaneously, which would strain the cluster manager resource.
The
enabledproperty specifies whether the cluster management service is enabled when you start the server. This property is set totrueby default.
Important
Disabling the cluster manager while clustered nodes are running (by setting the
enabledproperty tofalsein an instance'scluster.jsonfile), has the following consequences:The cluster manager thread that causes instances to check in is not activated.
Nodes in the cluster no longer receive cluster events, which are used to broadcast configuration changes when they occur over the REST interface.
Nodes are unable to detect and attempt to recover failed instances within the cluster.
Persisted schedules associated with failed instances can not be recovered by other nodes.
Optionally, configure your cluster so that each instance reads its configuration only from the files in its
conf/directory and not from the shared repository. For more information, see "Specifying an Authoritative File-Based Configuration".If your deployment uses scheduled tasks, configure persistent schedules so that jobs and tasks are launched only once across the cluster. For more information, see "Configuring Persistent Schedules".
Make sure that each node in the cluster has the same keystore and truststore. You can do this in one of the following ways:
When the first instance has been started, copy the initialized keystore (
/path/to/openidm/security/keystore.jceks) and truststore (/path/to/openidm/security/truststore) to all other instances in the cluster.Use a single keystore that is shared between all the nodes. The shared keystore might be on a mounted filesystem, a Hardware Security Module (HSM) or something similar. If you use this method, set the following properties in the
resolver/boot.propertiesfile of each instance to point to the shared keystore:openidm.keystore.location=path/to/keystore openidm.truststore.location=path/to/truststore
For information on configuring IDM to use an HSM device, see "Configuring IDM For a Hardware Security Module (HSM) Device".
Start each instance in the cluster.
Important
The audit service logs configuration changes only on the modified instance. Although configuration changes are persisted in the repository, and thus replicated on other instances by default, those changes are not logged separately for each instance. For more information on the audit service, see "Setting Up Audit Logging".
Although configuration changes are persisted by default, changes to workflows and scripts, and extensions to the UI are not. Any changes that you make in these areas must be manually copied to each node in the cluster.
25.1.1. Specifying an Authoritative File-Based Configuration
Each IDM instance includes two properties in its
conf/system.properties file that determine how
configuration changes are handled:
openidm.fileinstall.enabledspecifies that IDM reads its configuration from the files in itsconf/directory.This parameter is
trueby default because the following line is commented out:# openidm.fileinstall.enabled=false
If you want the file-based configuration to be authoritative, set this property to
true(or leave the existing line commented out) on every instance in the cluster.For information on changing this setting, see "Disabling Automatic Configuration Updates".
openidm.config.repo.enabledspecifies that IDM reads its configuration from the repository.This parameter is
trueby default because the following line is commented out:# openidm.repo.enabled=false
If you want the file-based configuration to be authoritative, set this property to
falseby removing the comment from the existing line on every instance in the cluster.
With this configuration:
Each node in the cluster does not persist its configuration to the repository.
Each node has its own version of the configuration in memory only.
Any changes made to one node's file configuration must be applied manually across all nodes in the cluster for the configuration to be consistent.
When new nodes are deployed, you must ensure that the configuration is consistent across all nodes.
25.2. Managing Scheduled Tasks Across a Cluster
In a clustered environment, the scheduler service looks for pending jobs and handles them as follows:
Non-persistent (in-memory) jobs execute only on the node that created it.
Persistent scheduled jobs are picked up and executed by any available node in the cluster that has been configured to execute persistent jobs.
Jobs that are configured as persistent but not concurrent run on only one instance in the cluster at a time. That job will not run again at the scheduled time, on any instance in the cluster, until the current job is complete.
For example, a reconciliation operation that runs for longer than the time between scheduled intervals will not trigger a duplicate job while it is still running.
In clustered environments, the scheduler service obtains an
instanceID, and checkin and timeout settings from the
cluster management service (defined in the
project-dir/conf/cluster.json
file).
IDM instances in a cluster claim jobs in a random order. If one instance fails, the cluster manager automatically reassigns unstarted jobs that were claimed by that failed instance.
For example, if instance A claims a job but does not start it, and then loses connectivity, instance B can claim that job.
In contrast, if instance A claims a job, starts it, and then loses
connectivity, other instances in the cluster cannot claim that job. If the
failed instance does not complete the task, the next action depends on the
misfire policy, defined in the scheduler configuration.
For more information, see misfirePolicy.
You can override this behavior with an external load balancer.
If a liveSync operation leads to multiple changes, a single instance processes all changes related to that operation.
Because all nodes in a cluster read their configuration from a single
repository, you must use an instance's
resolver/boot.properties file to define a specific
scheduler configuration for that instance. Settings in the
boot.properties file are not persisted in the
repository, so you can use this file to set different values for a property
across different nodes in the cluster.
For example, if your deployment has a four-node cluster and you want only two
of those nodes to execute persisted schedules, you can disable persisted
schedules in the boot.properties files of the remaining
two nodes. If you set these values directly in the
scheduler.json file, the values are persisted to the
repository and are therefore applied to all nodes in the cluster.
By default, instances in a cluster are able to execute persistent schedules.
The setting in the boot.properties file that governs
this behaviour is:
openidm.scheduler.execute.persistent.schedules=true
To prevent a specific instance from claiming pending jobs, or processing
clustered schedules, set
openidm.scheduler.execute.persistent.schedules=false in
the boot.properties file of that instance.
Caution
Changing the value of the
openidm.scheduler.execute.persistent.schedules property
in the boot.properties file changes the scheduler that
manages scheduled tasks on that node. Because the persistent and in-memory
schedulers are managed separately, a situation can arise where two separate
schedules have the same schedule name.
For more information about persistent schedules, see "Configuring Persistent Schedules".
25.3. Managing Nodes Over REST
You can manage clusters and individual nodes over the REST interface, at the
URL https://localhost:8443/openidm/cluster/. The following
sample REST commands demonstrate the cluster information that is available
over REST.
The following REST request displays the nodes configured in the cluster, and their status.
$ curl \
--header "X-OpenIDM-Username: openidm-admin" \
--header "X-OpenIDM-Password: openidm-admin" \
--request GET \
"http://localhost:8080/openidm/cluster?_queryId=query-cluster-instances"
{
"result": [
{
"_id": "node1",
"state" : "running",
"instanceId" : "node1",
"startup": "2017-09-16T15:37:04.757Z",
"shutdown" : ""
},
{
"_id": "node2",
"state" : "running",
"instanceId" : "node2",
"startup": "2017-09-16T15:45:05.652Z",
"shutdown" : ""
}
]
} To check the status of a specific node, include its node ID in the URL, for example:
$ curl \
--header "X-OpenIDM-Username: openidm-admin" \
--header "X-OpenIDM-Password: openidm-admin" \
--request GET \
"http://localhost:8080/openidm/cluster/node1"
{
"_id": "node1",
"instanceId": "node1",
"startup": "2017-09-16T15:37:04.757Z",
"shutdown": "",
"state": "running"
}25.4. Managing Nodes Through the Admin UI
The Admin UI provides a status widget that enables you to monitor the activity and status of all nodes in a cluster.
To add the widget to a Dashboard, click Add Widget then scroll down to System Status > Cluster Node Status and click Add.
The cluster node status widget shows the current status and number of running jobs of each node.
Select Status to obtain more information on the latest startup and shutdown times of that node. Select Jobs to obtain detailed information on the tasks that the node is running.
The widget can be managed in the same way as any other dashboard widget. For more information, see "Managing Dashboards".
Chapter 26. Configuring Outbound Email
This chapter shows you how to configure the outbound email service, so that you can send email through IDM, either by script or through the REST API.
You can also configure the outbound email service in the Admin UI, by clicking Configure > Email Settings. The fields on that screen correspond to what is described in the following sections.
The outbound email service relies on a configuration object to identify the
email account that is used to send messages. A sample configuration is
provided in
samples/example-configurations/conf/external.email.json.
To set up the external email service, follow these steps. You do not have to
shut down IDM:
If you are setting up outbound email through the UI, start configuring an outbound email server directly from the noted UI screen.
Copy the sample email configuration to the
conf/directory of your project. For example:$ cd /path/to/openidm $ cp samples/example-configurations/conf/external.email.json /path/to/myproject/conf/
Edit
external.email.jsonto reflect the account that is used to send messages, for example:{ "host" : "smtp.gmail.com", "port" : 587, "debug" : false, "auth" : { "enable" : true, "username" : "admin", "password" : "Passw0rd" }, "from" : "admin@example.com", "timeout" : 300000, "writetimeout" : 300000, "connectiontimeout" : 300000, "starttls" : { "enable" : true }, "ssl" : { "enable" : false }, "smtpProperties" : [ "mail.smtp.ssl.protocols=TLSv1.2", "mail.smtps.ssl.protocols=TLSv1.2" ], "threadPoolSize" : 20 }IDM encrypts the password when you restart the server (or if you configure outgoing email through the Admin UI).
You can specify the following outbound email configuration properties:
hostThe host name or IP address of the SMTP server. This can be the
localhost, if the mail server is on the same system as IDM.portSMTP server port number, such as 25, 465, or 587.
Note
Many SMTP servers require the use of a secure port such as 465 or 587. Many ISPs flag email from port 25 as spam.
debugWhen set to
true, this option outputs diagnostic messages from the JavaMail library. Debug mode can be useful if you are having difficulty configuring the external email endpoint with your mail server.authThe authentication details for the mail account from which emails will be sent.
enable—indicates whether you need login credentials to connect to the SMTP server.Note
If
"enable" : false,, you can leave the entries for"username"and"password"empty:"enable" : false, "username" : "", "password" : ""
username—the account used to connect to the SMTP server.password—the password used to connect to the SMTP server.
starttlsIf
"enable" : true, enables the use of the STARTTLS command (if supported by the server) to switch the connection to a TLS-protected connection before issuing any login commands. If the server does not support STARTTLS, the connection continues without the use of TLS.from(Optional) Specifies a default
From:address, that users see when they receive emails from IDM.sslSet
"enable" : trueto use SSL to connect, and to use the SSL port by default.smtpPropertiesSpecifies the SSL protocols that will be enabled for SSL connections. Protocols are specified as a whitespace-separated list. The default protocol is TLSv1.2.
threadPoolSize(Optional) Emails are sent in separate threads managed by a thread pool. This property sets the number of concurrent emails that can be handled at a specific time. The default thread pool size (if none is specified) is
20.connectiontimeout(integer, optional)The socket connection timeout, in milliseconds. The default connection timeout (if none is specified) is
300000milliseconds, or 5 minutes. A setting of 0 disables this timeout.timeout(integer, optional)The socket read timeout, in milliseconds. The default read timeout (if none is specified) is
300000milliseconds, or 5 minutes. A setting of 0 disables this timeout.writetimeout(integer, optional)The socket write timeout, in milliseconds. The default write timeout (if none is specified) is
300000milliseconds, or 5 minutes. A setting of 0 disables this timeout.
Start IDM if it is not running.
Check that the email service is enabled and active:
-> scr list ... [ 130] org.forgerock.openidm.external.email enabled [ 21] [active ] org.forgerock.openidm.external.email ...
26.1. Sending Mail Over REST
Although you are more likely to send mail from a script in production,
you can send email using the REST API by sending an HTTP POST to
/openidm/external/email, to test that your configuration
works. You pass the message parameters as part of the POST payload, URL
encoding the content as necessary.
The following example sends a test email using the REST API:
$ curl \
--header "Content-Type: application/json" \
--header "X-OpenIDM-Username: openidm-admin" \
--header "X-OpenIDM-Password: openidm-admin" \
--request POST \
--data '{
"from":"openidm@example.com",
"to":"your_email@example.com",
"subject":"Test",
"body":"Test"}' \
"http://localhost:8080/openidm/external/email?_action=send"
{
"status": "OK",
"message": "Email sent"
}
By default, a response is returned only when the SMTP relay has completed. To
return a response immediately, without waiting for the SMTP relay to finish,
include the parameter waitForCompletion=false in the REST
call. Use this option only if you do not need to verify that the email was
accepted by the SMTP server. For example:
$ curl \
--header "Content-Type: application/json" \
--header "X-OpenIDM-Username: openidm-admin" \
--header "X-OpenIDM-Password: openidm-admin" \
--request POST \
--data '{
"from":"openidm@example.com",
"to":"your_email@example.com",
"subject":"Test",
"body":"Test"}' \
"http://localhost:8080/openidm/external/email?_action=send&waitForCompletion=false"
{
"status": "OK",
"message": "Email submitted"
}26.2. Sending Mail From a Script
You can send email by using the resource API functions, with the
external/email context. For more information about these
functions, see "Function Reference". In the following example,
params is an object that contains the POST parameters.
var params = new Object();
params.from = "openidm@example.com";
params.to = "your_email@example.com";
params.cc = "bjensen@example.com,scarter@example.com";
params.subject = "OpenIDM recon report";
params.type = "text/html";
params.body = "<html><body><p>Recon report follows...</p></body></html>";
openidm.action("external/email", "send", params);OpenIDM supports the following POST parameters.
fromSender mail address
toComma-separated list of recipient mail addresses
ccOptional comma-separated list of copy recipient mail addresses
bccOptional comma-separated list of blind copy recipient mail addresses
subjectEmail subject
bodyEmail body text
typeOptional MIME type. One of
"text/plain","text/html", or"text/xml".
Chapter 27. Accessing External REST Services
You can access remote REST services at the
openidm/external/rest context path, or by specifying the
external/rest resource in your scripts. Note that this
service is not intended as a full connector to synchronize or reconcile
identity data, but as a way to make dynamic HTTP calls as part of the
IDM logic. For more declarative and encapsulated interaction with
remote REST services, and for synchronization or reconciliation operations,
use the scripted REST implementation of the
Groovy connector in the Connector Reference.
An external REST call via a script might look something like the following:
openidm.action("external/rest", "call", params);
The call parameter specifies the action name to be used
for this invocation, and is the standard method signature for the
openidm.action method.
An external REST call over REST might look something like the following:
$ curl \
--header "Content-Type: application/json" \
--header "X-OpenIDM-Username: openidm-admin" \
--header "X-OpenIDM-Password: openidm-admin" \
--request POST \
--data '{
"url": "http://www.december.com/html/demo/hello.html",
"method": "GET",
"headers": { "custom-header": "custom-header-value" }
}' \
"http://localhost:8080/openidm/external/rest?_action=call"
{
"headers": {
"Accept-Ranges": [
"bytes"
],
"Content-Length": [
"665"
],
"Content-Type": [
"text/html"
],
"Date": [
"Thu, 28 Jul 2016 09:13:38 GMT"
],
"ETag": [
"\"299-4175ff09d1140\""
],
"Last-Modified": [
"Thu, 29 Jun 2006 17:05:33 GMT"
],
"Server": [
"Apache"
]
},
"body": "<!DOCTYPE html PUBLIC \"-//IETF//DTD HTML 2.0//EN\">\r\n
<html>\r\n
<head>\r\n
<title>\r\n Hello World Demonstration Document\r\n </title>\r\n
</head>\r\n
<body>\r\n
<h1>\r\n Hello, World!\r\n </h1>\r\n
<p>\r\n This is a minimal \"hello world\" HTML document. It
demonstrates the\r\n basic structure of an HTML file and anchors.\r\n
</p>\r\n
<p>\r\n For more information, see the HTML Station at:
<a href= \r\n \"http://www.december.com/html/\">http://www.december.com/html/</a>\r\n
</p>\r\n
<hr>\r\n
<address>\r\n ©
<a href=\"http://www.december.com/john/\">John December</a>
(<a\r\n href=\"mailto:john@december.com\">john@december.com</a>) / 2001-04-06\r\n
</address>\r\n </body>\r\n</html>\r\n"}
HTTP 2xx responses are represented as regular, successful responses to the
invocation. All other responses, including redirections, are returned as
exceptions, with the HTTP status code in the exception code,
and the response body in the exception detail, within the
content element.
27.1. Invocation Parameters
The following parameters are passed in the resource API parameters map. These parameters can override the static configuration (if present) on a per-invocation basis.
urlThe target URL to invoke, in string format.
methodThe HTTP action to invoke, in string format.
Possible actions include
POST,GET,PUT,DELETE, andOPTIONS.headers(optional)The HTTP headers to set, in a map format from string (header-name) to string (header-value). For example,
Accept-Language: en-US.contentType(optional)The media type of the data that is sent, for example
"contentType" : "application/json". This parameter is applied only if noContent-Typeheader is included in the request. (If aContent-Typeheader is included, that header takes precedence over thiscontentTypeparameter.) If noContent-Typeis provided (in the header or with this parameter), the default content type isapplication/json; charset=utf-8.body(optional)The body or resource representation to send (for PUT and POST operations), in string format.
base64(boolean, optional)Indicates that the
bodyis base64-encoded, and should be decoded prior to transmission.forceWrap(boolean, optional)Indicates that the response must be wrapped in the headers/body JSON message format, even if the response was JSON and would otherwise have been passed-through unchanged.
authenticateThe authentication type, and the details with which to authenticate.
IDM supports the following authentication types:
basicauthentication with a username and password, for example:"authenticate" : { "type": "basic", "user" : "john", "password" : "Passw0rd" }bearerauthentication, with an OAuth token instead of a username and password, for example:"authenticate" : { "type": "bearer", "token" : "ya29.iQDWKpn8AHy09p....." }
If no
authenticateparameter is specified, no authentication is used.
27.2. Support for Non-JSON Responses
The external REST service supports any arbitrary payload (currently in stringified format). If the response is anything other than JSON, a JSON message object is returned:
For text-compatible (non-JSON) content, IDM returns a JSON object similar to the following:
{ "headers": { "Content-Type": ["..."] }, "body": "..." }Content that is not text-compatible (such as JPEGs) is base64-encoded in the response
bodyand returned as follows:{ "headers": { "Content-Type": ["..."] }, "body": "...", "base64": true }
Note
If the response format is JSON, the raw JSON response is returned. If you
want to inspect the response headers, set forceWrap to
true in your request. This setting returns a JSON message
object with headers and body, similar
to the object returned for text-compatible content.
27.3. Setting the TLS Version
By default, Transport Layer Security (TLS) connections made via the external
REST service use TLS version 1.2. In rare cases, you might need to specify a
different TLS version, for example, if you are connecting to a legacy system
that supports an old version of TLS that is not accommodated by the
backward-compatibility mode of your Java client. If you need to specify that
the external REST service use a different TLS version, uncomment the
openidm.external.rest.tls.version property towards the end
of your project's resolver/boot.properties file and set
its value, for example:
openidm.external.rest.tls.version=TLSv1.1
Valid versions for this parameter include TLSv1.1
and TLSv1.2.
27.4. Configuring the External REST Service
In addition to the TLS version, described in "Setting the TLS Version", you can configure several properties of the external REST service.
A sample configuration file that lists these properties (with their default
values where applicable) is provided in
/path/to/openidm/samples/example-configurations/conf/external.rest.json.
To change any of the default settings, copy this file to your project's
conf directory and edit the values. The sample file
has the following configuration:
{
"socketTimeout" : "10 s",
"connectionTimeout" : "10 s",
"reuseConnections" : "true",
"retryRequests" : "true",
"maxConnections" : "64",
"tlsVersion": "&{openidm.external.rest.tls.version}",
"hostnameVerifier": "&{openidm.external.rest.hostnameVerifier}",
"proxy" : {
"proxyUri" : "",
"userName" : "",
"password" : ""
}
}Note that all these properties must be passed in as strings because the configuration supports property substitution. For information about using property substitution in configuration files, see "Using Property Value Substitution".
socketTimeout(string)The TCP socket timeout, in seconds, when waiting for HTTP responses. The default timeout is 10 seconds.
connectionTimeout(string)The TCP connection timeout for new HTTP connections, in seconds. The default timeout is 10 seconds.
reuseConnections(string)Specifies whether HTTP connections should be kept alive and reused for additional requests. By default, connections will be reused if possible.
retryRequests(string)Specifies whether requests should be retried if a failure is detected. By default requests will be retried.
maxConnections(string)The maximum number of connections that should be pooled by the HTTP client. At most
64connections will be pooled by default.tlsVersion(string)The TLS version that should be used for connections. For more information, see "Setting the TLS Version".
hostnameVerifier(string)Specifies whether the external REST service should check that the hostname to which an SSL client has connected is allowed by the certificate that is presented by the server.
The property can take the following values:
STRICT- hostnames are validatedALLOW_ALL- the external REST service does not attempt to match the URL hostname to the SSL certificate Common Name, as part of its validation process
By default, this property is set in the
resolver/boot.propertiesfile and the value inconf/external.rest.jsonreferences that setting. For testing purposes, the default setting inboot.propertiesis:openidm.external.rest.hostnameVerifier=ALLOW_ALL
If you do not set this property (by removing it from the
boot.propertiesfile or theconf/external.rest.jsonfile), the behavior is to validate hostnames (the equivalent of setting"hostnameVerifier": "STRICT"). In production environments, you should set this property toSTRICT.proxyEnables you to set a proxy server specific to the external REST service. If you set a
proxyUrihere, the system-wide proxy settings described in "Configuring HTTP Clients" are ignored. If you want to configure a system-wide proxy, leave theseproxysettings empty and configure the HTTP Client settings instead.
Chapter 28. Deployment Best Practices
This chapter lists points to check when implementing an identity management solution with IDM.
28.1. Implementation Phases
Any identity management project should follow a set of well defined phases, where each phase defines discrete deliverables. The phases take the project from initiation to finally going live with a tested solution.
28.1.1. Initiation
The project's initiation phase involves identifying and gathering project background, requirements, and goals at a high level. The deliverable for this phase is a statement of work or a mission statement.
28.1.2. Definition
In the definition phase, you gather more detailed information on existing systems, determine how to integrate, describe account schemas, procedures, and other information relevant to the deployment. The deliverable for this phase is one or more documents that define detailed requirements for the project, and that cover project definition, the business case, use cases to solve, and functional specifications.
The definition phase should capture at least the following.
- User Administration and Management
Procedures for managing users and accounts, who manages users, what processes look like for joiners, movers and leavers, and what is required of IDM to manage users.
- Password Management and Password Synchronization
Procedures for managing account passwords, password policies, who manages passwords, and what is required of IDM to manage passwords.
- Security Policy
What security policies define for users, accounts, passwords, and access control.
- Target Systems
Target systems and resources with which IDM must integrate. Information such as schema, attribute mappings and attribute transformation flow, credentials and other integration specific information.
- Entitlement Management
Procedures to manage user access to resources, individual entitlements, grouping provisioning activities into encapsulated concepts such as roles and groups.
- Synchronization and Data Flow
Detailed outlines showing how identity information flows from authoritative sources to target systems, attribute transformations required.
- Interfaces
How to secure the REST, user and file-based interfaces, and to secure the communication protocols involved.
- Auditing and Reporting
Procedures for auditing and reporting, including who takes responsibility for auditing and reporting, and what information is aggregated and reported. Characteristics of reporting engines provided, or definition of the reporting engine to be integrated.
- Technical Requirements
Other technical requirements for the solution such as how to maintain the solution in terms of monitoring, patch management, availability, backup, restore and recovery process. This includes any other components leveraged such as a ConnectorServer and plug-ins for password synchronization with DS or Active Directory.
28.1.3. Design
This phase focuses on solution design including on IDM and other components. The deliverables for this phase are the architecture and design documents, and also success criteria with detailed descriptions and test cases to verify when project goals have been met.
28.1.4. Configure and Test
This phase configures and tests the solution prior to moving the solution into production.
- Configure IDM Properties
Most deployments require customization before going into production. For example, you can modify the ports IDM uses, as described in "Host and Port Information".
- Configure a Connector
Most deployments include a connection to one or more remote data stores. You should first define all the objects and properties for your connector configuration, as described in "Configuring Connectors".
- Test Communication to Remote Data Stores
You can then test communication with each remote data store with appropriate REST calls, such as those described in: "Checking the Status of External Systems Over REST". When your tests succeed, you can have confidence in the way you configured IDM to communicate with your remote data stores.
- Set Up a Mapping
You can now set up a mapping between data stores. "Synchronizing Data Between Resources" includes an extensive discussion of how you can customize a mapping in the
sync.jsonfile.
When you have completed the basic configuration, set up associated custom
configuration files in a directory outside of the
IDM installation directory (outside the
/path/to/openidm directory tree).
28.1.5. Production
This phase deploys the solution into production until an application steady state is reached and maintenance routines and procedures can be applied.
Chapter 29. Advanced Configuration
OpenIDM is a highly customizable, extensible identity management system. For the most part, the customization and configuration required for a "typical" deployment is described earlier in this book. This chapter describes advanced configuration methods that would usually not be required in a deployment, but that might assist in situations that require a high level of customization.
29.1. Advanced Startup Configuration
A customizable startup configuration file (named
launcher.json) enables you to specify how the OSGi
Framework is started.
You specify the startup configuration file with the -c
option of the startup command.
Unless you are working with a highly customized deployment, you should not modify the default framework configuration.
If no configuration file is specified, the default configuration
(defined in /path/to/openidm/bin/launcher.json) is
used. The following command starts IDM with an alternative
startup configuration file:
$ ./startup.sh -c /Users/admin/openidm/bin/launcher.json
You can modify the default startup configuration file to specify a different startup configuration.
The customizable properties of the default startup configuration file are as follows:
"location" : "bundle"- resolves to the install location. You can also load IDM from a specified zip file ("location" : "openidm.zip") or you can install a single jar file ("location" : "openidm-system-2.2.jar")."includes" : "**/openidm-system-*.jar"- the specified folder is scanned for jar files relating to the system startup. If the value of"includes"is*.jar, you must specifically exclude any jars in the bundle that you do not want to install, by setting the"excludes"property."start-level" : 1- specifies a start level for the jar files identified previously."action" : "install.start"- a period-separated list of actions to be taken on the jar files. Values can be one or more of"install.start.update.uninstall"."config.properties"- takes either a path to a configuration file (relative to the project location) or a list of configuration properties and their values. The list must be in the format"string":"string", for example:"config.properties" : { "property" : "value" },"system.properties"- takes either a path to asystem.propertiesfile (relative to the project location) or a list of system properties and their values. The list must be in the format"string":"string", for example:"system.properties" : { "property" : "value" },
Appendix A. Host and Port Information
By default, IDM listens on the following ports (specified in your
resolver/boot.properties file):
8080HTTP access to the REST API, requiring IDM authentication. This port is not secure, exposing clear text passwords and all data that is not encrypted. This port is therefore not suitable for production use.
8443HTTPS access to the REST API, requiring IDM authentication
8444HTTPS access to the REST API, requiring SSL mutual authentication. Clients that present certificates found in the truststore under
openidm/security/are granted access to the system.
If you have another network service that uses any of these ports, change the
port numbers shown in the following excerpt of the
boot.properties file:
openidm.port.http=8080 openidm.port.https=8443 openidm.port.mutualauth=8444 openidm.host=localhost openidm.auth.clientauthonlyports=8444
Note
Some Social Identity providers expect specific ports in their configuration, usually ports 80 and 443. This information is noted in "Configuring Social Identity Providers" and in "Social Identity Provider Configuration Details" when it occurs.
By default, IDM uses localhost as its hostname.
This can be changed through the openidm.host property in
your boot.properties file.
The Jetty configuration (in openidm/conf/jetty.xml)
references the host and ports that are specified in the
boot.properties file.
Appendix B. Data Models and Objects Reference
You can customize a variety of objects that can be addressed via a URL or URI. IDM can perform a common set of functions on these objects, such as CRUDPAQ (create, read, update, delete, patch, action, and query).
Depending on how you intend to use them, different object types are appropriate.
| Object Type | Intended Use | Special Functionality |
|---|---|---|
| Managed objects | Serve as targets and sources for synchronization, and to build virtual identities. | Provide appropriate auditing, script hooks, declarative mappings and so forth in addition to the REST interface. |
| Configuration objects | Ideal for look-up tables or other custom configuration, which can be configured externally like any other system configuration. | Adds file view, REST interface, and so forth |
| Repository objects | The equivalent of arbitrary database table access. Appropriate for managing data purely through the underlying data store or repository API. | Persistence and API access |
| System objects | Representation of target resource objects, such as accounts, but also resource objects such as groups. | |
| Audit objects | Houses audit data in the repository. | |
| Links | Defines a relation between two objects. |
B.1. Managed Objects
A managed object is an object that represents the identity-related data managed by IDM. Managed objects are stored in the IDM repository. All managed objects are JSON-based data structures.
B.1.1. Managed Object Schema
IDM provides a default schema for typical managed object types, such as users and roles, but does not control the structure of objects that you store in the repository. You can modify or extend the schema for the default object types, and you can set up a new managed object type for any item that can be collected in a data set.
The _rev property of a managed object is reserved for
internal use, and is not explicitly part of its schema. This property
specifies the revision of the object in the repository. This is the same
value that is exposed as the object's ETag through the REST API. The content
of this attribute is not defined. No consumer should make any assumptions of
its content beyond equivalence comparison. This attribute may be provided by
the underlying data store.
Schema validation is performed by the policy service and can be configured according to the requirements of your deployment. For more information, see "Using Policies to Validate Data".
Properties can be defined to be strictly derived from other properties within the object. This allows computed and composite values to be created in the object. Such properties are named virtual properties. The value of a virtual property is computed only when that property is retrieved.
B.1.2. Data Consistency
Single-object operations are consistent within the scope of the operation performed, limited by the capabilities of the underlying data store. Bulk operations have no consistency guarantees. IDM does not expose any transactional semantics in the managed object access API.
For information on conditional header access through the REST API, see "Conditional Operations".
B.1.3. Managed Object Triggers
Triggers are user-definable functions that validate or modify object or property state.
B.1.3.1. State Triggers
Managed objects are resource-oriented. A set of triggers is defined to intercept the supported request methods on managed objects. Such triggers are intended to perform authorization, redact, or modify objects before the action is performed. The object being operated on is in scope for each trigger, meaning that the object is retrieved by the data store before the trigger is fired.
If retrieval of the object fails, the failure occurs before any trigger is called. Triggers are executed before any optimistic concurrency mechanisms are invoked. The reason for this is to prevent a potential attacker from getting information about an object (including its presence in the data store) before authorization is applied.
- onCreate
Called upon a request to create a new object. Throwing an exception causes the create to fail.
- postCreate
Called after the creation of a new object is complete.
- onRead
Called upon a request to retrieve a whole object or portion of an object. Throwing an exception causes the object to not be included in the result. This method is also called when lists of objects are retrieved via requests to its container object; in this case, only the requested properties are included in the object. Allows for uniform access control for retrieval of objects, regardless of the method in which they were requested.
- onUpdate
Called upon a request to store an object. The
oldObjectandnewObjectvariables are in-scope for the trigger. TheoldObjectrepresents a complete object, as retrieved from the data store. The trigger can elect to changenewObjectproperties. If, as a result of the trigger, the values of theoldObjectandnewObjectare identical (that is, update is reverted), the update ends prematurely, but successfully. Throwing an exception causes the update to fail.- postUpdate
Called after an update request is complete.
- onDelete
Called upon a request to delete an object. Throwing an exception causes the deletion to fail.
- postDelete
Called after an object is deleted.
- onSync
Called when a managed object is changed, and the change triggers an implicit synchronization operation. The implicit synchronization operation is triggered by calling the sync service, which attempts to to go through all the configured managed-system mappings, defined in
sync.json. The sync service returns either a response or an error. For both the response and the error, script that is referenced by theonSynchook is called.You can use this hook to inject business logic when the sync service either fails or succeeds to synchronize all applicable mappings. For an example of how the
onSynchook is used to revert partial successful synchronization operations, see "Configuring Synchronization Failure Compensation".
B.1.3.2. Object Storage Triggers
An object-scoped trigger applies to an entire object. Unless otherwise specified, the object itself is in scope for the trigger.
- onValidate
Validates an object prior to its storage in the data store. If an exception is thrown, the validation fails and the object is not stored.
- onStore
Called just prior to when an object is stored in the data store. Typically used to transform an object just prior to its storage (for example, encryption).
B.1.3.3. Property Storage Triggers
A property-scoped trigger applies to a specific property within an object. Only the property itself is in scope for the trigger. No other properties in the object should be accessed during execution of the trigger. Unless otherwise specified, the order of execution of property-scoped triggers is intentionally left undefined.
- onValidate
Validates a given property value after its retrieval from and prior to its storage in the data store. If an exception is thrown, the validation fails and the property is not stored.
- onRetrieve
Called in the result of a query request. Executed only when the
executeOnRetrievequery parameter istrue, that is, the query returns the complete managed object.- onStore
Called before an object is stored in the data store. Typically used to transform a given property before its object is stored.
B.1.3.4. Storage Trigger Sequences
Triggers are executed in the following order:
Retrieve the raw object from the data store
The
executeOnRetrieveboolean is used to see if a full managed object is returned. The sequence continues if the boolean is set totrue.Call object
onRetrievetriggerPer-property within the object, call property
onRetrievetrigger
Per-property within the object:
Call property
onValidatetriggerCall object
onValidatetrigger
Per-property trigger within the object:
Call property
onStoretriggerCall object
onStoretriggerStore the object with any resulting changes to the data store
B.1.4. Managed Object Encryption
Sensitive object properties can be encrypted prior to storage,
typically through the property onStore trigger. The
trigger has access to configuration data, which can include arbitrary
attributes that you define, such as a symmetric encryption key. Such
attributes can be decrypted during retrieval from the data store through
the property onRetrieve trigger.
B.1.5. Managed Object Configuration
Configuration of managed objects is provided through an array of managed object configuration objects.
{
"objects": [ managed-object-config object, ... ]
}- objects
array of managed-object-config objects, required
Specifies the objects that the managed object service manages.
Specifies the configuration of each managed object.
{
"name" : string,
"actions" : script object,
"onCreate" : script object,
"onDelete" : script object,
"onRead" : script object,
"onRetrieve": script object,
"onStore" : script object,
"onSync" : script object,
"onUpdate" : script object,
"onValidate": script object,
"postCreate": script object,
"postDelete": script object,
"postUpdate": script object,
"schema" : {
"icon" : string,
"id" : urn,
"order" : [ list of properties],
"properties": { property-configuration objects },
"$schema" : "http://json-schema.org/draft-03/schema",
"title" : "User",
"viewable" : true
}
}- name
string, required
The name of the managed object. Used to identify the managed object in URIs and identifiers.
- actions
script object, optional
A custom script that initiates an action on the managed object. For more information, see "Registering Custom Scripted Actions".
- onCreate
script object, optional
A script object to trigger when the creation of an object is being requested. The object to be created is provided in the root scope as an
objectproperty. The script can change the object. If an exception is thrown, the create aborts with an exception.- onDelete
script object, optional
A script object to trigger when the deletion of an object is being requested. The object being deleted is provided in the root scope as an
objectproperty. If an exception is thrown, the deletion aborts with an exception.- onRead
script object, optional
A script object to trigger when the read of an object is being requested. The object being read is provided in the root scope as an
objectproperty. The script can change the object. If an exception is thrown, the read aborts with an exception.- onRetrieve
script object, optional
A script object to trigger when an object is retrieved from the repository. The object that was retrieved is provided in the root scope as an
objectproperty. The script can change the object. If an exception is thrown, then object retrieval fails.- onStore
script object, optional
A script object to trigger when an object is about to be stored in the repository. The object to be stored is provided in the root scope as an
objectproperty. The script can change the object. If an exception is thrown, then object storage fails.- onSync
script object, optional
A script object to trigger when a change to a managed object triggers an implicit synchronization operation. The script has access to the
syncResultsobject, therequestobject, the state of the object before the change (oldObject) and the state of the object after the change (newObject). The script can change the object.- onUpdate
script object, optional
A script object to trigger when an update to an object is requested. The old value of the object being updated is provided in the root scope as an
oldObjectproperty. The new value of the object being updated is provided in the root scope as anewObjectproperty. The script can change thenewObject. If an exception is thrown, the update aborts with an exception.- onValidate
script object, optional
A script object to trigger when the object requires validation. The object to be validated is provided in the root scope as an
objectproperty. If an exception is thrown, the validation fails.- postCreate
script object, optional
A script object to trigger after an object is created, but before any targets are synchronized.
- postDelete
script object, optional
A script object to trigger after a delete of an object is complete, but before any further synchronization. The value of the deleted object is provided in the root scope as an
oldObjectproperty.- postUpdate
script object, optional
A script object to trigger after an update to an object is complete, but before any targets are synchronized. The value of the object before the update is provided in the root scope as an
oldObjectproperty. The value of the object after the update is provided in the root scope as anewObjectproperty.- schema
json-schema object, optional
The schema to use to validate the structure and content of the managed object, and how the object is displayed in the UI. The schema-object format is defined by the JSON Schema specification.
The
schemaproperty includes the following additional elements:- icon
string, optional
The name of the Font Awesome icon that should be displayed for this object, in the UI.
- id
urn, optional
The URN of the managed object, for example,
urn:jsonschema:org:forgerock:openidm:managed:api:Role.- order
list of properties, optional
The order in which properties of this managed object are displayed in the UI.
- properties
list of property configuration objects, optional
A list of property specifications. For more information, see Property Configuration Properties.
- $schema
url, optional
Link to the JSON schema specification.
- title
string, optional
The title of this managed object in the UI.
- viewable
boolean, optional
Whether this object is visible in the UI.
Each managed object property, identified by its
property-name, can have the
following configurable properties:
"property-name" : {
"description" : string,
"encryption" : property-encryption object,
"isPersonal" : boolean true/false,
"isProtected" : boolean true/false,
"isVirtual" : boolean true/false,
"items" : {
"id" : urn,
"properties" : property-config object,
"resourceCollection" : property-config object,
"reversePropertyName" : string,
"reverseRelationship" : boolean true/false,
"title" : string,
"type" : string,
"validate" : boolean true/false,
},
"minLength" : positive integer,
"onRetrieve" : script object,
"onStore" : script object,
"onValidate" : script object,
"pattern" : string,
"policies" : policy object,
"required" : boolean true/false,
"returnByDefault" : boolean true/false,
"scope" : string,
"searchable" : boolean true/false,
"secureHash" : property-hash object,
"title" : string,
"type" : data type,
"usageDescription": string,
"userEditable" : boolean true/false,
"viewable" : boolean true/false,
}- description
string, optional
A brief description of the property.
- encryption
property-encryption object, optional
Specifies the configuration for encryption of the property in the repository. If omitted or null, the property is not encrypted.
- isPersonal
boolean, true/false
Designed to highlight personally identifying information. By default,
isPersonalis set totrueforuserNameandpostalAddress.- isProtected
boolean, true/false
Specifies whether reauthentication is required if the value of this property changes.
- isVirtual
boolean, true/false
Specifies whether the property takes a static value, or whether its value is calculated dynamically as the result of a script.
The most recently calculated value of a virtual property is persisted by default. The persistence of virtual property values allows IDM to compare the new value of the property against the last calculated value, and therefore to detect change events during synchronization.
Virtual property values are not persisted by default if you are using an explicit mapping.
- items
property-configuration object, optional
For
arraytype properties, defines the elements in the array.itemscan include the following sub-properties:- id
urn, optional
The URN of the property, for example,
urn:jsonschema:org:forgerock:openidm:managed:api:Role:members:items.- properties
property configuration object, optional
A list of properties, and their configuration, that make up this items array. For example, for a relationship type property:
"properties" : { "_ref" : { "description" : "References a relationship from a managed object", "type" : "string" }, "_refProperties" : { "description" : "Supports metadata within the relationship", ... } }- resourceCollection
property configuration object, optional
The collection of resources (objects) on which this relationship is based (for example,
managed/userobjects).- reversePropertyName
string, optional
For
relationshiptype properties, specifies the corresponding property name in the case of a reverse relationship. For example, arolesproperty might have areversePropertyNameofmembers.- reverseRelationship
boolean, true or false.
For
relationshiptype properties, specifies whether the relationship exists in both directions.- title
string, optional
The title of array items, as displayed in the UI, for example
Role Members Items.- type
string, optional
The array type, for example
relationship.- validate
boolean, true/false
For reverse relationships, specifies whether the relationship should be validated.
- minLength
positive integer, optional
The minimum number of characters that the value of this property must have.
- onRetrieve
script object, optional
A script object to trigger once a property is retrieved from the repository. That property may be one of two related variables:
propertyandpropertyName. The property that was retrieved is provided in the root scope as thepropertyNamevariable; its value is provided as thepropertyvariable. If an exception is thrown, then object retrieval fails.- onStore
script object, optional
A script object to trigger when a property is about to be stored in the repository. That property may be one of two related variables:
propertyandpropertyName. The property that was retrieved is provided in the root scope as thepropertyNamevariable; its value is provided as thepropertyvariable. If an exception is thrown, then object storage fails.- onValidate
script object, optional
A script object to trigger when the property requires validation. The value of the property to be validated is provided in the root scope as the
propertyproperty. If an exception is thrown, validation fails.- pattern
string, optional
Any specific pattern to which the value of the property must adhere. For example, a property whose value is a date might require a specific date format. Patterns specified here must follow regular expression syntax.
- policies
policy object, optional
Any policy validation that must be applied to the property.
- required
boolean, true/false
Specifies whether or the property must be supplied when an object of this type is created.
- returnByDefault
boolean, true/false
For virtual properties, specifies whether the property will be returned in the results of a query on an object of this type if it is not explicitly requested. Virtual attributes are not returned by default.
- scope
string, optional
Specifies whether the property should be filtered from HTTP/external calls. The value can be either
"public"or"private"."private"indicates that the property should be filtered,"public"indicates no filtering. If no value is set, the property is assumed to be public and thus not filtered.- searchable
boolean, true/false
Specifies whether this property can be used in a search query on the managed object. A searchable property is visible within the Managed Object data grid in the Self-Service UI. False by default.
- secureHash
property-hash object, optional
Specifies the configuration for hashing of the property value in the repository. If omitted or null, the property is not hashed.
- title
string, required
A human-readable string, used to display the property in the UI.
- type
data type, required
The data type for the property value; can be String, Array, Boolean, Integer, Number, Object, or Resource Collection.
- usageDescription
string, optional
Designed to help end users understand the sensitivity of a property such as a telephone number.
- userEditable
boolean, true/false
Specifies whether users can edit the property value in the UI. This property applies in the context of the Self-Service UI, in which users are able to edit certain properties of their own accounts. False by default.
- viewable
boolean, true/false
Specifies whether this property is viewable in the object's profile in the UI. True by default.
{
"type" : "text/javascript",
"source": string
}- type
string, required
Specifies the type of script to be executed. Supported types include
"text/javascript"and"groovy".- source, file
string, required (only one, source or file is required)
Specifies the source code of the script to be executed (if the keyword is "source"), or a pointer to the file that contains the script (if the keyword is "file").
{
"cipher": string,
"key" : string
}- cipher
string, optional
The cipher transformation used to encrypt the property. If omitted or null, the default cipher of
"AES/CBC/PKCS5Padding"is used.- key
string, required
The alias of the key in the IDM cryptography service keystore used to encrypt the property.
{
"algorithm" : "string",
"type" : "string"
}- algorithm
string, required
The algorithm that should be used to hash the value. For a list of supported hash algorithms, see "Encoding Attribute Values by Using Salted Hash Algorithms".
- type
string, optional
The type of hashing. Currently only salted hash is supported. If this property is omitted or null, the default
"salted-hash"is used.
B.1.6. Custom Managed Objects
Managed objects are inherently fully user definable and customizable. Like all objects, managed objects can maintain relationships to each other in the form of links. Managed objects are intended for use as targets and sources for synchronization operations to represent domain objects, and to build up virtual identities. The name managed objects comes from the intention that IDM stores and manages these objects, as opposed to system objects that are present in external systems.
IDM can synchronize and map directly between external systems (system objects), without storing intermediate managed objects. Managed objects are appropriate, however, as a way to cache the data—for example, when mapping to multiple target systems, or when decoupling the availability of systems—to more fully report and audit on all object changes during reconciliation, and to build up views that are different from the original source, such as transformed and combined or virtual views. Managed objects can also be allowed to act as an authoritative source if no other appropriate source is available.
Other object types exist for other settings that should be available to a script, such as configuration or look-up tables that do not need audit logging.
B.1.6.1. Setting Up a Managed Object Type
To set up a managed object, you declare the object in your project's
conf/managed.json file. The following example adds a
simple foobar object declaration after the user object
type.
{
"objects": [
{
"name": "user"
},
{
"name": "foobar"
}
]
} B.1.6.2. Manipulating Managed Objects Declaratively
By mapping an object to another object, either an external system object or another internal managed object, you automatically tie the object life cycle and property settings to the other object. For more information, see "Synchronizing Data Between Resources".
B.1.6.3. Manipulating Managed Objects Programmatically
You can address managed objects as resources using URLs or URIs with
the managed/ prefix. This works whether you address the
managed object internally as a script running in IDM or
externally through the REST interface.
You can use all resource API functions in script objects for create, read, update, delete operations, and also for arbitrary queries on the object set, but not currently for arbitrary actions. For more information, see "Scripting Reference".
IDM supports concurrency through a multi version concurrency control (MVCC) mechanism. Each time an object changes, IDM assigns it a new revision.
Objects can be arbitrarily complex as long as they use supported types, such as maps, lists, numbers, strings, and booleans as defined in JSON.
B.1.6.3.1. Creating Objects
The following script example creates an object type.
openidm.create("managed/foobar", "myidentifier", mymap)B.1.6.3.2. Updating Objects
The following script example updates an object type.
var expectedRev = origMap._rev
openidm.update("managed/foobar/myidentifier", expectedRev, mymap)
The MVCC mechanism requires that expectedRev be set to
the expected revision of the object to update. You obtain the revision
from the object's _rev property. If something else
changes the object concurrently, IDM rejects the update, and
you must either retry or inspect the concurrent modification.
B.1.6.3.3. Patching Objects
You can partially update a managed or system object using the patch method, which changes only the specified properties of the object.
The following script example updates an object type.
openidm.patch("managed/foobar/myidentifier", rev, value)
The patch method supports a revision of "null",
which effectively disables the MVCC mechanism, that is, changes are
applied, regardless of revision. In the REST interface, this matches the
If-Match: "*" condition supported by patch.
Alternatively, you can omit the "If-Match: *" header.
For managed objects, the API supports patch by query, so the caller does not need to know the identifier of the object to change.
$ curl \
--header "X-OpenIDM-Username: openidm-admin" \
--header "X-OpenIDM-Password: openidm-admin" \
--header "Content-Type: application/json" \
--request POST \
--data '[{
"operation":"replace",
"field":"/password",
"value":"Passw0rd"
}]' \
"http://localhost:8080/openidm/managed/user?_action=patch&_queryId=for-userName&uid=DDOE"For the syntax on how to formulate the query
_queryId=for-userName&uid=DDOE see
"Querying Object Sets".
B.1.6.3.4. Deleting Objects
The following script example deletes an object type.
var expectedRev = origMap._rev
openidm.delete("managed/foobar/myidentifier", expectedRev)
The MVCC mechanism requires that expectedRev be set to
the expected revision of the object to update. You obtain the revision
from the object's _rev property. If something else
changes the object concurrently, IDM rejects deletion, and you
must either retry or inspect the concurrent modification.
B.1.6.3.5. Reading Objects
The following script example reads an object type.
val = openidm.read("managed/foobar/myidentifier")B.1.6.3.6. Querying Object Sets
You can query managed objects using common query filter syntax, or by configuring predefined queries in your repository configuration. The following script example queries managed user objects whose userName is Smith.
var qry = {
"_queryFilter" : "/userName eq \"smith\""
};
val = openidm.query("managed/user", qry);For more information, see "Defining and Calling Queries".
B.1.7. Accessing Managed Objects Through the REST API
IDM exposes all managed object functionality through the REST API unless you configure a policy to prevent such access. In addition to the common REST functionality of create, read, update, delete, patch, and query, the REST API also supports patch by query. For more information, see "REST API Reference".
IDM requires authentication to access the REST API. The
authentication configuration is provided in your project's
conf/authentication.json file. The default
authorization filter script is
openidm/bin/defaults/script/router-authz.js. For more
information, see "The Authentication Model".
B.2. Configuration Objects
IDM provides an extensible configuration to allow you to leverage regular configuration mechanisms.
Unlike native the IDM configuration, which is interpreted automatically and can start new services, IDM stores custom configuration objects and makes them available to your code through the API.
For an introduction to the standard configuration objects, see "Configuring the Server".
B.2.1. When To Use Custom Configuration Objects
Configuration objects are ideal for metadata and settings that need not be included in the data to reconcile. Use configuration objects for data that does not require audit log, and does not serve directly as a target or source for mappings.
Although you can set and manipulate configuration objects programmatically and manually, configuration objects are expected to change slowly, through both manual file updates and programmatic updates. To store temporary values that can change frequently and that you do not expect to be updated by configuration file changes, custom repository objects might be more appropriate.
B.2.2. Custom Configuration Object Naming Conventions
By convention custom configuration objects are added under the
reserved context, config/custom.
You can choose any name under
config/context. Be sure,
however, to choose a value for context that
does not clash with future IDM configuration names.
B.2.3. Mapping Configuration Objects To Configuration Files
If you have not disabled the file based view for configuration, you
can view and edit all configuration including custom configuration in
openidm/conf/*.json files. The configuration maps to a
file named
context-config-name.json,
where context for custom configuration objects
is custom by convention, and
config-name is the configuration object name.
A configuration object named escalation thus maps to a
file named conf/custom-escalation.json.
IDM detects and automatically picks up changes to the file.
IDM also applies changes made through APIs to the file.
By default, IDM stores configuration objects in the repository. The file view is an added convenience aimed to help you in the development phase of your project.
B.2.4. Configuration Objects File and REST Payload Formats
By default, IDM maps configuration objects to JSON representations.
IDM represents objects internally in plain, native types like maps, lists, strings, numbers, booleans, null. The object model is restricted to simple types so that mapping objects to external representations is easy.
The following example shows a representation of a configuration object with a look-up map.
{
"CODE123" : "ALERT",
"CODE889" : "IGNORE"
}In the JSON representation, maps are represented with braces
({ }), and lists are represented with brackets
([ ]). Objects can be arbitrarily complex, as in the
following example.
{
"CODE123" : {
"email" : ["sample@sample.com", "john.doe@somedomain.com"],
"sms" : ["555666777"]
}
"CODE889" : "IGNORE"
}B.2.5. Accessing Configuration Objects Through the REST API
You can list all available configuration objects, including system
and custom configurations, using an HTTP GET on
/openidm/config.
The _id property in the configuration object
provides the link to the configuration details with an HTTP GET on
/openidm/config/id-value.
By convention, the id-value for a custom
configuration object called escalation is
custom/escalation.
IDM supports REST mappings for create, read, update, delete, patch, and query of configuration objects.
B.2.6. Accessing Configuration Objects Programmatically
You can address configuration objects as resources using the URL or
URI config/ prefix both internally and also through
the REST interface. The resource API provides script object functions for
create, read, update, query, and delete operations.
IDM supports concurrency through a multi version concurrency control mechanism. Each time an object changes, IDM assigns it a new revision.
Objects can be arbitrarily complex as long as they use supported types, such as maps, lists, numbers, strings, and booleans.
B.2.7. Creating Objects
The following script example creates an object type.
openidm.create("config/custom", "myconfig", mymap)B.2.8. Updating Objects
The following script example updates a custom configuration object type.
openidm.update("config/custom/myconfig", mymap)B.2.9. Deleting Objects
The following script example deletes a custom configuration object type.
openidm.delete("config/custom/myconfig")B.2.10. Reading Objects
The following script example reads an object type.
val = openidm.read("config/custom/myconfig")B.3. System Objects
System objects are pluggable representations of objects on external systems. They follow the same RESTful resource based design principles as managed objects. There is a default implementation for the OpenICF framework, which allows any connector object to be represented as a system object.
B.4. Audit Objects
Audit objects house audit data selected for local storage in repository. For details, see "Setting Up Audit Logging".
B.5. Links
Link objects define relations between source objects and target
objects, usually relations between managed objects and system objects.
The link relationship is established by provisioning activity that either
results in a new account on a target system, or a reconciliation or
synchronization scenario that takes a LINK action.
Appendix C. Synchronization Reference
The synchronization engine is one of the core IDM services. You
configure the synchronization service through a mappings
property that specifies mappings between objects that are managed by the
synchronization engine.
{
"mappings": [ object-mapping object, ... ]
}C.1. Object-Mapping Objects
An object-mapping object specifies the configuration for a mapping of source
objects to target objects. The name,
source, and target properties are
mandatory. Other properties are optional or implicit (that is, they have a
default value if not set).
{
"correlationQuery" : script object,
"correlationScript" : script object,
"enableSync" : boolean,
"linkQualifiers" : [ list of strings ] or script object
"links" : string,
"name" : string,
"onCreate" : script object,
"onDelete" : script object,
"onLink" : script object,
"onUnlink" : script object,
"onUpdate" : script object,
"policies" : [ policy object, ... ],
"properties" : [ property object, ... ],
"result" : script object,
"runTargetPhase" : boolean,
"source" : string,
"sourceCondition" : script object or queryFilter string,
"target" : string,
"taskThreads" : integer,
"validSource" : script object,
"validTarget" : script object
}- correlationQuery
script object, optional
A script that yields a query object to query the target object set when a source object has no linked target. The syntax for writing the query depends on the target system of the correlation. For examples of correlation queries, see "Correlating Source Objects With Existing Target Objects". The source object is provided in the
sourceproperty in the script scope.- correlationScript
script object, optional
A script that goes beyond a
correlationQueryof a target system. Used when you need another method to determine which records in the target system relate to the given source record. The syntax depends on the target of the correlation. For information about defining correlation scripts, see "Writing Correlation Scripts".- enableSync
boolean, true or false
Specifies whether automatic synchronization (liveSync and implicit synchronization) should be enabled for a specific mapping. For more information, see "Disabling Automatic Synchronization Operations".
Default :
true- linkQualifiers
list of strings or script object, optional
Enables mapping of a single source object to multiple target objects.
Example:
"linkQualifiers" : [ "employee", "customer" ]or"linkQualifiers" : {
"type" : "text/javascript",
"globals" : { },
"source" : "if (returnAll) {
['contractor', 'employee', 'customer', 'manager']
} else {
if(object.type === 'employee') {
['employee', 'customer', 'manager']
} else {
['contractor', 'customer']
}
}"
}If a script object, the script must return a list of strings.
- links
string, optional
Enables reuse of the links created in another mapping. Example:
"systemLdapAccounts_managedUser"reuses the links created by a previous mapping whosenameis"systemLdapAccounts_managedUser".- name
string, required
Uniquely names the object mapping. Used in the link object identifier.
- onCreate
script object, optional
A script to execute when a target object is to be created, after property mappings have been applied. In the root scope, the source object is provided in the
sourceproperty, the projected target object in thetargetproperty, and the link situation that led to the create operation in thesituationproperty. Properties on the target object can be modified by the script. If a property value is not set by the script, IDM falls back on the default property mapping configuration. If the script throws an exception, the target object creation is aborted.- onDelete
script object, optional
A script to execute when a target object is to be deleted, after property mappings have been applied. In the root scope, the source object is provided in the
sourceproperty, the target object in thetargetproperty, and the link situation that led to the delete operation in thesituationproperty. If the script throws an exception, the target object deletion is aborted.- onLink
script object, optional
A script to execute when a source object is to be linked to a target object, after property mappings have been applied. In the root scope, the source object is provided in the
sourceproperty, and the projected target object in thetargetproperty.Note that, although an
onLinkscript has access to a copy of the target object, changes made to that copy will not be saved to the target system automatically. If you want to persist changes made to target objects by anonLinkscript, you must explicitly include a call to the action that should be taken on the target object (for exampleopenidm.create,openidm.updateoropenidm.delete) within the script.In the following example, when an LDAP target object is linked, the
"description"attribute of that object is updated with the value"Active Account". A call toopenidm.updateis made within theonLinkscript, to set the value."onLink" : { "type" : "text/javascript", "source" : "target.description = 'Active Account'; openidm.update('system/ldap/account/' + target._id, null, target);" }If the script throws an exception, target object linking is aborted.
- onUnlink
script object, optional
A script to execute when a source and a target object are to be unlinked, after property mappings have been applied. In the root scope, the source object is provided in the
sourceproperty, and the target object in thetargetproperty.Note that, although an
onUnlinkscript has access to a copy of the target object, changes made to that copy will not be saved to the target system automatically. If you want to persist changes made to target objects by anonUnlinkscript, you must explicitly include a call to the action that should be taken on the target object (for exampleopenidm.create,openidm.updateoropenidm.delete) within the script.In the following example, when an LDAP target object is unlinked, the
descriptionattribute of that object is updated with the valueInactive Account. A call toopenidm.updateis made within theonUnlinkscript, to set the value."onUnlink" : { "type" : "text/javascript", "source" : "target.description = 'Inactive Account'; openidm.update('system/ldap/account/' + target._id, null, target);" }If the script throws an exception, target object unlinking is aborted.
- onUpdate
script object, optional
A script to execute when a target object is to be updated, after property mappings have been applied. In the root scope, the source object is provided in the
sourceproperty, the projected target object in thetargetproperty, and the link situation that led to the update operation in thesituationproperty. Any changes that the script makes to the target object will be persisted when the object is finally saved to the target resource. If the script throws an exception, the target object update is aborted.- policies
array of policy objects, optional
Specifies a set of link conditions and associated actions to take in response.
- properties
array of property-mapping objects, optional
Specifies mappings between source object properties and target object properties, with optional transformation scripts. See Property Object Properties.
- result
script object, optional
A script for each mapping event, executed only after a successful reconciliation.
The variables available to a
resultscript are as follows:source- provides statistics about the source phase of the reconciliationtarget- provides statistics about the target phase of the reconciliationglobal- provides statistics about the entire reconciliation operation
- runTargetPhase
boolean, true or false
Specifies whether reconciliation operations should run both the source and target phase. To avoid queries on the target resource, set to
false.Default :
true- source
string, required
Specifies the path of the source object set. Example:
"managed/user".- sourceCondition
script object or
queryFilterstring, optionalA script or query filter that determines if a source object should be included in the mapping. If no
sourceConditionelement (orvalidSourcescript) is specified, all source objects are included in the mapping.- target
string, required
Specifies the path of the target object set. Example:
"system/ldap/account".- taskThreads
integer, optional
Sets the number of threads dedicated to the same reconciliation run.
Default :
10- validSource
script object, optional
A script that determines if a source object is valid to be mapped. The script yields a boolean value:
trueindicates the source object is valid;falsecan be used to defer mapping until some condition is met. In the root scope, the source object is provided in thesourceproperty. If the script is not specified, then all source objects are considered valid.- validTarget
script object, optional
A script used during the target phase of reconciliation that determines if a target object is valid to be mapped. The script yields a boolean value:
trueindicates that the target object is valid;falseindicates that the target object should not be included in reconciliation. In the root scope, the target object is provided in thetargetproperty. If the script is not specified, then all target objects are considered valid for mapping.
C.1.1. Property Objects
A property object specifies how the value of a target property is determined.
{
"target" : string,
"source" : string,
"transform" : script object,
"condition" : script object,
"default": value
}- target
string, required
Specifies the path of the property in the target object to map to.
- source
string, optional
Specifies the path of the property in the source object to map from. If not specified, then the target property value is derived from the script or default value.
- transform
script object, optional
A script to determine the target property value. The root scope contains the value of the source in the
sourceproperty, if specified. If thesourceproperty has a value of"", the entire source object of the mapping is contained in the root scope. The resulting value yielded by the script is stored in the target property.- condition
script object, optional
A script to determine whether the mapping should be executed or not. The condition has an
"object"property available in root scope, which (if specified) contains the full source object. For example"source": "(object.email != null)". The script is considered to return a boolean value.- default
any value, optional
Specifies the value to assign to the target property if a non-null value is not established by
sourceortransform. If not specified, the default value isnull.
C.1.2. Policy Objects
A policy object specifies a link condition and the associated actions to take in response.
{
"condition" : optional, script object,
"situation" : string,
"action" : string or script object
"postAction" : optional, script object
}- condition
script object or queryFilter condition, optional
Applies a policy, based on the link type, for example
"condition" : "/linkQualifier eq \"user\"".A queryFilter condition can be expressed in two ways—as a string (
"condition" : "/linkQualifier eq \"user\"") or a map, for example:"condition" : { "type" : "queryFilter", "filter" : "/linkQualifier eq \"user\"" }It is generally preferable to express a queryFilter condition as a map.
A
conditionscript has the following variables available in its scope:object, andlinkQualifier.- situation
string, required
Specifies the situation for which an associated action is to be defined.
- action
string or script object, required
Specifies the action to perform. If a script is specified, the script is executed and is expected to yield a string containing the action to perform.
The
actionscript has the following variables available in its scope:source,target,sourceAction,linkQualifier, andrecon.- postAction
script object, optional
Specifies the action to perform after the previously specified action has completed.
The
postActionscript has the following variables available in its scope:source,target,action,sourceAction,linkQualifier, andreconID.sourceActionistrueif the action was performed during the source reconciliation phase, andfalseif the action was performed during the target reconciliation phase. For more information, see "How Synchronization Situations Are Assessed".Note
No
postActionscript is triggered if theactionis eitherIGNOREorASYNC.
C.1.2.1. Script Object
Script objects take the following form.
{
"type" : "text/javascript",
"source": string
}- type
string, required
Specifies the type of script to be executed. Supported types include
"text/javascript"and"groovy".- source
string, required
Specifies the source code of the script to be executed.
C.2. Links
To maintain links between source and target objects in mappings, IDM stores an object set in the repository. The object set identifier follows this scheme:
links/mapping
Here, mapping represents the name of the mapping for which links are managed.
Link entries have the following structure:
{
"_id":string,
"_rev":string,
"linkType":string,
"firstId":string
"secondId":string,
}- _id
string
The identifier of the link object.
- _rev
string, required
The value of link object's revision.
- linkType
string, required
The type of the link. Usually the name of the mapping which created the link.
- firstId
string, required
The identifier of the first of the two linked objects.
- secondId
string
The identifier of the second of the two linked objects.
C.3. Queries
IDM performs the following queries on a link object set:
Find link(s) for a given firstId object identifier.
SELECT * FROM links WHERE linkType = value AND firstId = valueAlthough a single result makes sense, this query is intended to allow multiple results so that this scenario can be handled as an exception.
Select link(s) for a given second object identifier.
SELECT * FROM links WHERE linkType = value AND secondId = valueAlthough a single result makes sense, this query is intended to allow multiple results so that this scenario can be handled as an exception.
C.4. Reconciliation
IDM performs reconciliation on a per-mapping basis. The process of reconciliation for a given mapping includes these stages:
Iterate through all objects for the object set specified as
source. For each source object, carry out the following steps.Look for a link to a target object in the link object set, and perform a correlation query (if defined).
Determine the link condition, as well as whether a target object can be found.
Determine the action to perform based on the policy defined for the condition.
Perform the action.
Keep track of the target objects for which a condition and action has already been determined.
Write the results.
Iterate through all object identifiers for the object set specified as
target. For each identifier, carry out the following steps:Find the target in the link object set.
Determine if the target object was handled in the first phase.
Determine the action to perform based on the policy defined for the condition.
Perform the action.
Write the results.
Iterate through all link objects, carrying out the following steps.
If the
reconIdis"my", then skip the object.If the
reconIdis not recognized, then the source or the target is missing.Determine the action to perform based on the policy.
Perform the action.
Store the
reconIdidentifer in the mapping to indicate that it was processed in this run.
Note
To optimize a reconciliation operation, the reconciliation process does not attempt to correlate source objects to target objects if the set of target objects is empty when the correlation is started. For information on changing this default behaviour, see "Optimizing Reconciliation Performance".
C.5. REST API
External synchronized objects expose an API to request immediate synchronization. This API includes the following requests and responses.
- Request
Example:
POST /openidm/system/csvfile/account/jsmith?_action=liveSync HTTP/1.1
- Response (success)
Example:
HTTP/1.1 204 No Content ...
- Response (synchronization failure)
Example:
HTTP/1.1 409 Conflict ... [JSON representation of error]
Appendix D. REST API Reference
Representational State Transfer (REST) is a software architecture style for exposing resources, using the technologies and protocols of the World Wide Web. REST describes how distributed data objects, or resources, can be defined and addressed. IDM provides a RESTful API for accessing managed objects, system objects, workflows, and some elements of the system configuration.
The following section describes the ForgeRock Common REST API. See "Common REST and IDM" for information specific to the IDM implementation of Common REST.
D.1. About ForgeRock Common REST
ForgeRock® Common REST is a common REST API framework. It works across the ForgeRock platform to provide common ways to access web resources and collections of resources. Adapt the examples in this section to your resources and deployment.
D.1.1. Common REST Resources
Servers generally return JSON-format resources, though resource formats can depend on the implementation.
Resources in collections can be found by their unique identifiers (IDs).
IDs are exposed in the resource URIs.
For example, if a server has a user collection under /users,
then you can access a user at
/users/user-id.
The ID is also the value of the _id field of the resource.
Resources are versioned using revision numbers.
A revision is specified in the resource's _rev field.
Revisions make it possible to figure out whether to apply changes
without resource locking and without distributed transactions.
D.1.2. Common REST Verbs
The Common REST APIs use the following verbs, sometimes referred to collectively as CRUDPAQ. For details and HTTP-based examples of each, follow the links to the sections for each verb.
- Create
Add a new resource.
This verb maps to HTTP PUT or HTTP POST.
For details, see "Create".
- Read
Retrieve a single resource.
This verb maps to HTTP GET.
For details, see "Read".
- Update
Replace an existing resource.
This verb maps to HTTP PUT.
For details, see "Update".
- Delete
Remove an existing resource.
This verb maps to HTTP DELETE.
For details, see "Delete".
- Patch
Modify part of an existing resource.
This verb maps to HTTP PATCH.
For details, see "Patch".
- Action
Perform a predefined action.
This verb maps to HTTP POST.
For details, see "Action".
- Query
Search a collection of resources.
This verb maps to HTTP GET.
For details, see "Query".
D.1.3. Common REST Parameters
Common REST reserved query string parameter names start with an underscore,
_.
Reserved query string parameters include, but are not limited to, the following names:
_action |
_api |
_crestapi |
_fields |
_mimeType |
_pageSize |
_pagedResultsCookie |
_pagedResultsOffset |
_prettyPrint |
_queryExpression |
_queryFilter |
_queryId |
_sortKeys |
_totalPagedResultsPolicy |
Note
Some parameter values are not safe for URLs, so URL-encode parameter values as necessary.
Continue reading for details about how to use each parameter.
D.1.4. Common REST Extension Points
The action verb is the main vehicle for extensions.
For example, to create a new user with HTTP POST rather than HTTP PUT,
you might use /users?_action=create.
A server can define additional actions.
For example, /tasks/1?_action=cancel.
A server can define stored queries to call by ID.
For example, /groups?_queryId=hasDeletedMembers.
Stored queries can call for additional parameters.
The parameters are also passed in the query string.
Which parameters are valid depends on the stored query.
D.1.5. Common REST API Documentation
Common REST APIs often depend at least in part on runtime configuration. Many Common REST endpoints therefore serve API descriptors at runtime. An API descriptor documents the actual API as it is configured.
Use the following query string parameters to retrieve API descriptors:
_apiServes an API descriptor that complies with the OpenAPI specification.
This API descriptor represents the API accessible over HTTP. It is suitable for use with popular tools such as Swagger UI.
_crestapiServes a native Common REST API descriptor.
This API descriptor provides a compact representation that is not dependent on the transport protocol. It requires a client that understands Common REST, as it omits many Common REST defaults.
Note
Consider limiting access to API descriptors in production environments in order to avoid unnecessary traffic.
To provide documentation in production environments, see "To Publish OpenAPI Documentation" instead.
In production systems, developers expect stable, well-documented APIs. Rather than retrieving API descriptors at runtime through Common REST, prepare final versions, and publish them alongside the software in production.
Use the OpenAPI-compliant descriptors to provide API reference documentation for your developers as described in the following steps:
Configure the software to produce production-ready APIs.
In other words, the software should be configured as in production so that the APIs are identical to what developers see in production.
Retrieve the OpenAPI-compliant descriptor.
The following command saves the descriptor to a file,
myapi.json:$ curl -o myapi.json endpoint?_api(Optional) If necessary, edit the descriptor.
For example, you might want to add security definitions to describe how the API is protected.
If you make any changes, then also consider using a source control system to manage your versions of the API descriptor.
Publish the descriptor using a tool such as Swagger UI.
You can customize Swagger UI for your organization as described in the documentation for the tool.
D.1.6. Create
There are two ways to create a resource, either with an HTTP POST or with an HTTP PUT.
To create a resource using POST, perform an HTTP POST
with the query string parameter _action=create
and the JSON resource as a payload.
Accept a JSON response.
The server creates the identifier if not specified:
POST /users?_action=create HTTP/1.1
Host: example.com
Accept: application/json
Content-Length: ...
Content-Type: application/json
{ JSON resource }
To create a resource using PUT, perform an HTTP PUT
including the case-sensitive identifier for the resource in the URL path,
and the JSON resource as a payload.
Use the If-None-Match: * header.
Accept a JSON response:
PUT /users/some-id HTTP/1.1
Host: example.com
Accept: application/json
Content-Length: ...
Content-Type: application/json
If-None-Match: *
{ JSON resource }
The _id and content of the resource depend on the server implementation.
The server is not required to use the _id that the client provides.
The server response to the create request indicates the resource location
as the value of the Location header.
If you include the If-None-Match header, its value must be
*. In this case, the request creates the object if it
does not exist, and fails if the object does exist. If you include the
If-None-Match header with any value other than
*, the server returns an HTTP 400 Bad Request error. For
example, creating an object with
If-None-Match: revision returns
a bad request error. If you do not include If-None-Match: *,
the request creates the object if it does not exist, and
updates the object if it does exist.
You can use the following parameters:
_prettyPrint=trueFormat the body of the response.
_fields=field[,field...]Return only the specified fields in the body of the response.
The
fieldvalues are JSON pointers. For example if the resource is{"parent":{"child":"value"}},parent/childrefers to the"child":"value".If the
fieldis left blank, the server returns all default values.
D.1.7. Read
To retrieve a single resource, perform an HTTP GET on the resource
by its case-sensitive identifier (_id)
and accept a JSON response:
GET /users/some-id HTTP/1.1 Host: example.com Accept: application/json
You can use the following parameters:
_prettyPrint=trueFormat the body of the response.
_fields=field[,field...]Return only the specified fields in the body of the response.
The
fieldvalues are JSON pointers. For example if the resource is{"parent":{"child":"value"}},parent/childrefers to the"child":"value".If the
fieldis left blank, the server returns all default values._mimeType=mime-typeSome resources have fields whose values are multi-media resources such as a profile photo for example.
By specifying both a single field and also the mime-type for the response content, you can read a single field value that is a multi-media resource.
In this case, the content type of the field value returned matches the mime-type that you specify, and the body of the response is the multi-media resource.
The
Acceptheader is not used in this case. For example,Accept: image/pngdoes not work. Use the_mimeTypequery string parameter instead.
D.1.8. Update
To update a resource, perform an HTTP PUT
including the case-sensitive identifier (_id)
as the final element of the path to the resource,
and the JSON resource as the payload.
Use the If-Match: _rev header
to check that you are actually updating the version you modified.
Use If-Match: * if the version does not matter.
Accept a JSON response:
PUT /users/some-id HTTP/1.1
Host: example.com
Accept: application/json
Content-Length: ...
Content-Type: application/json
If-Match: _rev
{ JSON resource }
When updating a resource, include all the attributes to be retained. Omitting an attribute in the resource amounts to deleting the attribute unless it is not under the control of your application. Attributes not under the control of your application include private and read-only attributes. In addition, virtual attributes and relationship references might not be under the control of your application.
You can use the following parameters:
_prettyPrint=trueFormat the body of the response.
_fields=field[,field...]Return only the specified fields in the body of the response.
The
fieldvalues are JSON pointers. For example if the resource is{"parent":{"child":"value"}},parent/childrefers to the"child":"value".If the
fieldis left blank, the server returns all default values.
D.1.9. Delete
To delete a single resource, perform an HTTP DELETE
by its case-sensitive identifier (_id)
and accept a JSON response:
DELETE /users/some-id HTTP/1.1 Host: example.com Accept: application/json
You can use the following parameters:
_prettyPrint=trueFormat the body of the response.
_fields=field[,field...]Return only the specified fields in the body of the response.
The
fieldvalues are JSON pointers. For example if the resource is{"parent":{"child":"value"}},parent/childrefers to the"child":"value".If the
fieldis left blank, the server returns all default values.
D.1.10. Patch
To patch a resource, send an HTTP PATCH request with the following parameters:
operationfieldvaluefrom(optional with copy and move operations)
You can include these parameters in the payload for a PATCH request, or in a JSON PATCH file. If successful, you'll see a JSON response similar to:
PATCH /users/some-id HTTP/1.1
Host: example.com
Accept: application/json
Content-Length: ...
Content-Type: application/json
If-Match: _rev
{ JSON array of patch operations }
PATCH operations apply to three types of targets:
single-valued, such as an object, string, boolean, or number.
list semantics array, where the elements are ordered, and duplicates are allowed.
set semantics array, where the elements are not ordered, and duplicates are not allowed.
ForgeRock PATCH supports several different operations.
The following sections show each of these operations, along with options
for the field and value:
D.1.10.1. Patch Operation: Add
The add operation ensures that the target field contains
the value provided, creating parent fields as necessary.
If the target field is single-valued, then the value you include in the PATCH replaces the value of the target. Examples of a single-valued field include: object, string, boolean, or number.
An add operation has different results on two standard
types of arrays:
List semantic arrays: you can run any of these
addoperations on that type of array:If you
addan array of values, the PATCH operation appends it to the existing list of values.If you
adda single value, specify an ordinal element in the target array, or use the{-}special index to add that value to the end of the list.
Set semantic arrays: The list of values included in a patch are merged with the existing set of values. Any duplicates within the array are removed.
As an example, start with the following list semantic array resource:
{
"fruits" : [ "orange", "apple" ]
}
The following add operation includes the pineapple to the end of the list of
fruits, as indicated by the - at the end of the
fruits array.
{
"operation" : "add",
"field" : "/fruits/-",
"value" : "pineapple"
}The following is the resulting resource:
{
"fruits" : [ "orange", "apple", "pineapple" ]
}D.1.10.2. Patch Operation: Copy
The copy operation takes one or more existing values from the source field.
It then adds those same values on the target field. Once the values are
known, it is equivalent to performing an add operation
on the target field.
The following copy operation takes the value from a field
named mail, and then runs a replace
operation on the target field, another_mail.
[
{
"operation":"copy",
"from":"mail",
"field":"another_mail"
}
]If the source field value and the target field value are configured as arrays, the result depends on whether the array has list semantics or set semantics, as described in "Patch Operation: Add".
D.1.10.3. Patch Operation: Increment
The increment operation changes the value or values of
the target field by the amount you specify. The value that you include
must be one number, and may be positive or negative. The value of the
target field must accept numbers. The following increment
operation adds 1000 to the target value of
/user/payment.
[
{
"operation" : "increment",
"field" : "/user/payment",
"value" : "1000"
}
]
Since the value of the increment is
a single number, arrays do not apply.
D.1.10.4. Patch Operation: Move
The move operation removes existing values on the source field. It
then adds those same values on the target field. It is equivalent to
performing a remove operation on the source, followed
by an add operation with the same values, on the target.
The following move operation is equivalent to a
remove operation on the source field,
surname, followed by a replace
operation on the target field value, lastName. If the
target field does not exist, it is created.
[
{
"operation":"move",
"from":"surname",
"field":"lastName"
}
]
To apply a move operation on an array, you need a
compatible single-value, list semantic array, or set semantic array on
both the source and the target. For details, see the criteria described
in "Patch Operation: Add".
D.1.10.5. Patch Operation: Remove
The remove operation ensures that the target field no
longer contains the value provided. If the remove operation does not include
a value, the operation removes the field. The following
remove deletes the value of the
phoneNumber, along with the field.
[
{
"operation" : "remove",
"field" : "phoneNumber"
}
]
If the object has more than one phoneNumber, those
values are stored as an array.
A remove operation has different results on two standard
types of arrays:
List semantic arrays: A
removeoperation deletes the specified element in the array. For example, the following operation removes the first phone number, based on its array index (zero-based):[ { "operation" : "remove", "field" : "/phoneNumber/0" } ]Set semantic arrays: The list of values included in a patch are removed from the existing array.
D.1.10.6. Patch Operation: Replace
The replace operation removes any existing value(s) of
the targeted field, and replaces them with the provided value(s). It is
essentially equivalent to a remove followed by a
add operation. If the arrays are used, the criteria is
based on "Patch Operation: Add". However, indexed updates are
not allowed, even when the target is an array.
The following replace operation removes the existing
telephoneNumber value for the user, and then adds the
new value of +1 408 555 9999.
[
{
"operation" : "replace",
"field" : "/telephoneNumber",
"value" : "+1 408 555 9999"
}
]A PATCH replace operation on a list semantic array works in the same fashion as a PATCH remove operation. The following example demonstrates how the effect of both operations. Start with the following resource:
{
"fruits" : [ "apple", "orange", "kiwi", "lime" ],
}Apply the following operations on that resource:
[
{
"operation" : "remove",
"field" : "/fruits/0",
"value" : ""
},
{
"operation" : "replace",
"field" : "/fruits/1",
"value" : "pineapple"
}
]
The PATCH operations are applied sequentially. The remove
operation removes the first member of that resource, based on its array
index, (fruits/0), with the following result:
[
{
"fruits" : [ "orange", "kiwi", "lime" ],
}
]
The second PATCH operation, a replace, is applied on the
second member (fruits/1) of the intermediate resource,
with the following result:
[
{
"fruits" : [ "orange", "pineapple", "lime" ],
}
]D.1.10.7. Patch Operation: Transform
The transform operation changes the value of a field
based on a script or some other data transformation command. The following
transform operation takes the value from the field
named /objects, and applies the
something.js script as shown:
[
{
"operation" : "transform",
"field" : "/objects",
"value" : {
"script" : {
"type" : "text/javascript",
"file" : "something.js"
}
}
}
]D.1.10.8. Patch Operation Limitations
Some HTTP client libraries do not support the HTTP PATCH operation. Make sure that the library you use supports HTTP PATCH before using this REST operation.
For example, the Java Development Kit HTTP client does not support
PATCH as a valid HTTP method. Instead, the method
HttpURLConnection.setRequestMethod("PATCH")
throws ProtocolException.
You can use the following parameters. Other parameters might depend on the specific action implementation:
_prettyPrint=trueFormat the body of the response.
_fields=field[,field...]Return only the specified fields in the body of the response.
The
fieldvalues are JSON pointers. For example if the resource is{"parent":{"child":"value"}},parent/childrefers to the"child":"value".If the
fieldis left blank, the server returns all default values.
D.1.11. Action
Actions are a means of extending Common REST APIs and are defined by the resource provider, so the actions you can use depend on the implementation.
The standard action indicated by _action=create
is described in "Create".
You can use the following parameters. Other parameters might depend on the specific action implementation:
_prettyPrint=trueFormat the body of the response.
_fields=field[,field...]Return only the specified fields in the body of the response.
The
fieldvalues are JSON pointers. For example if the resource is{"parent":{"child":"value"}},parent/childrefers to the"child":"value".If the
fieldis left blank, the server returns all default values.
D.1.12. Query
To query a resource collection
(or resource container if you prefer to think of it that way),
perform an HTTP GET and accept a JSON response, including at least
a _queryExpression,
_queryFilter, or _queryId parameter.
These parameters cannot be used together:
GET /users?_queryFilter=true HTTP/1.1 Host: example.com Accept: application/json
The server returns the result as a JSON object including a "results" array and other fields related to the query string parameters that you specify.
You can use the following parameters:
_queryFilter=filter-expressionQuery filters request that the server return entries that match the filter expression. You must URL-escape the filter expression.
The string representation is summarized as follows. Continue reading for additional explanation:
Expr = OrExpr OrExpr = AndExpr ( 'or' AndExpr ) * AndExpr = NotExpr ( 'and' NotExpr ) * NotExpr = '!' PrimaryExpr | PrimaryExpr PrimaryExpr = '(' Expr ')' | ComparisonExpr | PresenceExpr | LiteralExpr ComparisonExpr = Pointer OpName JsonValue PresenceExpr = Pointer 'pr' LiteralExpr = 'true' | 'false' Pointer = JSON pointer OpName = 'eq' | # equal to 'co' | # contains 'sw' | # starts with 'lt' | # less than 'le' | # less than or equal to 'gt' | # greater than 'ge' | # greater than or equal to STRING # extended operator JsonValue = NUMBER | BOOLEAN | '"' UTF8STRING '"' STRING = ASCII string not containing white-space UTF8STRING = UTF-8 string possibly containing white-spaceJsonValue components of filter expressions follow RFC 7159: The JavaScript Object Notation (JSON) Data Interchange Format. In particular, as described in section 7 of the RFC, the escape character in strings is the backslash character. For example, to match the identifier
test\, use_id eq 'test\\'. In the JSON resource, the\is escaped the same way:"_id":"test\\".When using a query filter in a URL, be aware that the filter expression is part of a query string parameter. A query string parameter must be URL encoded as described in RFC 3986: Uniform Resource Identifier (URI): Generic Syntax For example, white space, double quotes (
"), parentheses, and exclamation characters need URL encoding in HTTP query strings. The following rules apply to URL query components:query = *( pchar / "/" / "?" ) pchar = unreserved / pct-encoded / sub-delims / ":" / "@" unreserved = ALPHA / DIGIT / "-" / "." / "_" / "~" pct-encoded = "%" HEXDIG HEXDIG sub-delims = "!" / "$" / "&" / "'" / "(" / ")" / "*" / "+" / "," / ";" / "="ALPHA,DIGIT, andHEXDIGare core rules of RFC 5234: Augmented BNF for Syntax Specifications:ALPHA = %x41-5A / %x61-7A ; A-Z / a-z DIGIT = %x30-39 ; 0-9 HEXDIG = DIGIT / "A" / "B" / "C" / "D" / "E" / "F"As a result, a backslash escape character in a JsonValue component is percent-encoded in the URL query string parameter as
%5C. To encode the query filter expression_id eq 'test\\', use_id+eq+'test%5C%5C', for example.A simple filter expression can represent a comparison, presence, or a literal value.
For comparison expressions use json-pointer comparator json-value, where the comparator is one of the following:
eq(equals)co(contains)sw(starts with)lt(less than)le(less than or equal to)gt(greater than)ge(greater than or equal to)For presence, use json-pointer pr to match resources where:
The JSON pointer is present.
The value it points to is not
null.
Literal values include true (match anything) and false (match nothing).
Complex expressions employ
and,or, and!(not), with parentheses,(expression), to group expressions._queryId=identifierSpecify a query by its identifier.
Specific queries can take their own query string parameter arguments, which depend on the implementation.
_pagedResultsCookie=stringThe string is an opaque cookie used by the server to keep track of the position in the search results. The server returns the cookie in the JSON response as the value of
pagedResultsCookie.In the request
_pageSizemust also be set and non-zero. You receive the cookie value from the provider on the first request, and then supply the cookie value in subsequent requests until the server returns anullcookie, meaning that the final page of results has been returned.The
_pagedResultsCookieparameter is supported when used with the_queryFilterparameter. The_pagedResultsCookieparameter is not guaranteed to work when used with the_queryExpressionand_queryIdparameters.The
_pagedResultsCookieand_pagedResultsOffsetparameters are mutually exclusive, and not to be used together._pagedResultsOffset=integerWhen
_pageSizeis non-zero, use this as an index in the result set indicating the first page to return.The
_pagedResultsCookieand_pagedResultsOffsetparameters are mutually exclusive, and not to be used together._pageSize=integerReturn query results in pages of this size. After the initial request, use
_pagedResultsCookieor_pageResultsOffsetto page through the results._totalPagedResultsPolicy=stringWhen a
_pageSizeis specified, and non-zero, the server calculates the "totalPagedResults", in accordance with thetotalPagedResultsPolicy, and provides the value as part of the response. The "totalPagedResults" is either an estimate of the total number of paged results (_totalPagedResultsPolicy=ESTIMATE), or the exact total result count (_totalPagedResultsPolicy=EXACT). If no count policy is specified in the query, or if_totalPagedResultsPolicy=NONE, result counting is disabled, and the server returns value of -1 for "totalPagedResults"._sortKeys=[+-]field[,[+-]field...]Sort the resources returned based on the specified field(s), either in
+(ascending, default) order, or in-(descending) order.Because ascending order is the default, including the
+character in the query is unnecessary. If you do include the+, it must be URL-encoded as%2B, for example:http://localhost:8080/api/users?_prettyPrint=true&_queryFilter=true&_sortKeys=%2Bname/givenName
The
_sortKeysparameter is not supported for predefined queries (_queryId)._prettyPrint=trueFormat the body of the response.
_fields=field[,field...]Return only the specified fields in each element of the "results" array in the response.
The
fieldvalues are JSON pointers. For example if the resource is{"parent":{"child":"value"}},parent/childrefers to the"child":"value".If the
fieldis left blank, the server returns all default values.
D.1.13. HTTP Status Codes
When working with a Common REST API over HTTP, client applications should expect at least the following HTTP status codes. Not all servers necessarily return all status codes identified here:
- 200 OK
The request was successful and a resource returned, depending on the request.
- 201 Created
The request succeeded and the resource was created.
- 204 No Content
The action request succeeded, and there was no content to return.
- 304 Not Modified
The read request included an
If-None-Matchheader, and the value of the header matched the revision value of the resource.- 400 Bad Request
The request was malformed.
- 401 Unauthorized
The request requires user authentication.
- 403 Forbidden
Access was forbidden during an operation on a resource.
- 404 Not Found
The specified resource could not be found, perhaps because it does not exist.
- 405 Method Not Allowed
The HTTP method is not allowed for the requested resource.
- 406 Not Acceptable
The request contains parameters that are not acceptable, such as a resource or protocol version that is not available.
- 409 Conflict
The request would have resulted in a conflict with the current state of the resource.
- 410 Gone
The requested resource is no longer available, and will not become available again. This can happen when resources expire for example.
- 412 Precondition Failed
The resource's current version does not match the version provided.
- 415 Unsupported Media Type
The request is in a format not supported by the requested resource for the requested method.
- 428 Precondition Required
The resource requires a version, but no version was supplied in the request.
- 500 Internal Server Error
The server encountered an unexpected condition that prevented it from fulfilling the request.
- 501 Not Implemented
The resource does not support the functionality required to fulfill the request.
- 503 Service Unavailable
The requested resource was temporarily unavailable. The service may have been disabled, for example.
D.2. Common REST and IDM
IDM implements the Common REST API as described in the previous section, with the exception of the following elements:
The PATCH
transformaction is supported only on theconfigendpoint. Note that this is an optional action and not implemented everywhere across the ForgeRock Identity Platform.Common REST supports PATCH operations by list element index, as shown in the example in "Patch Operation: Remove". IDM does not support PATCH by list element index. So, for PATCH ADD operations, you cannot use an ordinal when adding items to a list. You can add an item using the special hyphen index, which designates that the element should be added to the end of the list.
If the
fieldis left blank, the server returns all default values. In IDM, this excludes relationships and virtual fields. To include these fields in the output, add"returnByDefault" : truein the applicable schema.
D.3. URI Scheme
The URI scheme for accessing a managed object follows this convention,
assuming the IDM web application was deployed at
/openidm.
/openidm/managed/type/id
Similar schemes exist for URIs associated with all but system objects.
For more information, see "Understanding the Access Configuration Script (access.js)".
The URI scheme for accessing a system object follows this convention:
/openidm/system/resource-name/type/id
An example of a system object in an LDAP directory might be:
/openidm/system/ldap/account/07b46858-56eb-457c-b935-cfe6ddf769c7
Important
For LDAP resources, you should not map the LDAP
dn to the IDM uidAttribute
(_id). The attribute that is used for the
_id should be immutable. You should therefore map the
LDAP entryUUID operational attribute to the
IDM _id, as shown in the following excerpt of
the provisioner configuration file:
... "uidAttribute" : "entryUUID", ...
D.4. Object Identifiers
Every managed and system object has an identifier (expressed as
id in the URI scheme) that is used to address the
object through the REST API. The REST API allows for client-generated and
server-generated identifiers, through PUT and POST methods. The default
server-generated identifier type is a UUID. If you create an object by using
POST, a server-assigned ID is generated in the form of a
UUID. If you create an object by using PUT, the client assigns the ID in
whatever format you specify.
Most of the examples in this guide use client-assigned IDs, as it makes the examples easier to read.
D.5. Content Negotiation
The REST API fully supports negotiation of content representation through the
Accept HTTP header. Currently, the supported content type
is JSON. When you send a JSON payload, you must include the following header:
Accept: application/json
In a REST call (using the curl command, for example), you would include the following option to specify the noted header:
--header "Content-Type: application/json"
You can also specify the default UTF-8 character set as follows:
--header "Content-Type: application/json;charset=utf-8"
The application/json content type is not needed when the
REST call does not send a JSON payload.
D.6. Conditional Operations
The REST API supports conditional operations through the use of the
ETag, If-Match and
If-None-Match HTTP headers. The use of HTTP conditional
operations is the basis of IDM's optimistic concurrency control
system. Clients should make requests conditional in order to prevent
inadvertent modification of the wrong version of an object. For
managed objects, if no conditional header is specified,
a default of If-Match: * is applied.
| HTTP Header | Operation | Description |
|---|---|---|
If-Match: <rev> | PUT | Update the object if the <rev> matches the revision level of the object. |
If-Match: * | PUT | Update the object regardless of revision level |
If-None-Match: <rev> | Bad request | |
If-None-Match: * | PUT | Create; fails if the object already exists |
When the conditional operations If-Match,
If-None-Match are not used | PUT | Upsert; attempts a create, and then an update; if both attempts fail, return an error |
D.7. REST Endpoints and Sample Commands
This section describes the REST endpoints and provides a number of sample commands that show the interaction with the REST interface.
D.7.1. Managing the Server Configuration Over REST
IDM stores configuration objects in the repository, and exposes
them under the context path /openidm/config. Single
instance configuration objects are exposed under
/openidm/config/object-name.
Multiple instance configuration objects are exposed under
/openidm/config/object-name/instance-name.
The following table outlines these configuration objects and how they can be
accessed through the REST interface.
| URI | HTTP Operation | Description |
|---|---|---|
| /openidm/config | GET | Returns a list of configuration objects |
| /openidm/config/audit | GET | Returns the current logging configuration |
| /openidm/config/provisioner.openicf/provisioner-name | GET | Returns the configuration of the specified connector |
| /openidm/config/selfservice/function | GET | Returns the configuration of the specified self-service
feature, registration,
reset, or username |
| /openidm/config/router | PUT | Changes the router configuration. Modifications are provided with
the --data option, in JSON format. |
| /openidm/config/object | PATCH | Changes one or more fields of the specified configuration object. Modifications are provided as a JSON array of patch operations. |
| /openidm/config/object | DELETE | Deletes the specified configuration object. |
| /openidm/config/object?_queryFilter=query | GET |
Queries the specified configuration object. You can use a filtered query
(_queryFilter) or one of two predefined queries
(_queryId=query-all-ids or
_queryId=query-all). You cannot create custom
predefined queries to query the configuration.
|
IDM supports REST operations to create, read, update, query, and delete configuration objects.
For command-line examples of managing the configuration over REST, see "Configuring the Server Over REST".
One entry is returned for each configuration object. To obtain additional
information on the configuration object, include its pid
or _id in the URL. The following example displays
configuration information on the sync object, based on
a deployment using the sync-with-csv sample.
$ curl \
--header "X-OpenIDM-Username: openidm-admin" \
--header "X-OpenIDM-Password: openidm-admin" \
--request GET \
"http://localhost:8080/openidm/config/sync"
{
"_id": "sync",
"mappings": [
{
"name": "systemCsvfileAccounts_managedUser",
"source": "system/csvfile/account",
"target": "managed/user",
"correlationQuery": {
"type": "text/javascript",
"source": "var query = {'_queryId' : 'for-userName', 'uid' : source.name};query;"
},
"properties": [
{
"source": "email",
"target": "mail"
},
{
"source": "firstname",
"target": "givenName"
},
{
"source": "lastname",
"target": "sn"
},
{
"source": "description",
"target": "description"
},
{
"source": "_id",
"target": "_id"
},
{
"source": "name",
"target": "userName"
},
{
"default": "Passw0rd",
"target": "password"
},
{
"source": "mobileTelephoneNumber",
"target": "telephoneNumber"
},
{
"source": "roles",
"transform": {
"type": "text/javascript",
"source": "var _ = require('lib/lodash'); _.map(source.split(','), function(role)
{ return {'_ref': 'repo/internal/role/' + role} });"
},
"target": "authzRoles"
}
],
... D.7.2. Managing Users Over REST
User objects are stored in the repository and are exposed under the context
path /managed/user. Many examples of REST calls related
to this context path exist throughout this document. The following table
lists available functionality associated with the
/managed/user context path.
| URI | HTTP Operation | Description |
|---|---|---|
| /openidm/managed/user?_queryId=query-all-ids | GET | List the IDs of all the managed users in the repository |
| /openidm/managed/user?_queryId=query-all | GET | List all info for the managed users in the repository |
| /openidm/managed/user?_queryFilter=filter | GET | Query the managed user object with the defined filter. |
| /openidm/managed/user/_id | GET | Retrieve the JSON representation of a specific user |
| /openidm/managed/user/_id | PUT | Create a new user |
| /openidm/managed/user/_id | PUT | Update a user entry (replaces the entire entry) |
| /openidm/managed/user?_action=create | POST | Create a new user |
| /openidm/managed/user?_action=patch&_queryId=for-userName&uid= userName | POST | Update a user (can be used to replace the value of one or more existing attributes) |
| /openidm/managed/user/_id | PATCH | Update specified fields of a user entry |
| /openidm/managed/user/_id | DELETE | Delete a user entry |
For a number of sample commands that show how to manage users over REST, see "Working with Managed Users".
D.7.3. Managing System Objects Over REST
System objects, that is, objects that are stored in remote systems, are
exposed under the /openidm/system context. IDM
provides access to system objects over REST, as listed in the following
table.
| URI | HTTP Operation | Description |
|---|---|---|
| /openidm/system?_action=action-name | POST |
|
| /openidm/system/system-name?_action=action-name | POST |
|
| /openidm/system/system-name/system-object?_action=action-name | POST |
|
| /openidm/system/system-name/system-object?_queryId=query-all-ids | GET | Lists all IDs related to the specified system object, such as users, and groups. |
| /openidm/system/system-name/system-object?_queryFilter=filter | GET | Lists the item(s) associated with the query filter. |
| /openidm/system/system-name/system-object/id | PUT | Creates a system object, or updates the system object, if it exists (replaces the entire object). |
| /openidm/system/system-name/system-object/id | PATCH | Updates the specified fields of a system object |
| /openidm/system/system-name/system-object/id | DELETE | Deletes a system object |
Note
When you create a system object with a PUT request (that is, specifying a client-assigned ID), you should specify the ID in the URL only and not in the JSON payload. If you specify a different ID in the URL and in the JSON payload, the request will fail, with an error similar to the following:
{
"code":500,
"reason":"Internal Server Error",
"message":"The uid attribute is not single value attribute."
}
A POST request with a patch action is
not currently supported on system objects. To patch a system object, you
must send a PATCH request.
$ curl \ --header "X-OpenIDM-Username: openidm-admin" \ --header "X-OpenIDM-Password: openidm-admin" \ --request POST \ "http://localhost:8080/openidm/system?_action=availableConnectors"
$ curl \
--header "X-OpenIDM-Username: openidm-admin" \
--header "X-OpenIDM-Password: openidm-admin" \
--request POST \
"http://localhost:8080/openidm/system?_action=test"
[
{
"ok": true,
"displayName": "LDAP Connector",
"connectorRef": {
"bundleVersion": "[1.4.0.0,1.5.0.0)",
"bundleName": "org.forgerock.openicf.connectors.ldap-connector",
"connectorName": "org.identityconnectors.ldap.LdapConnector"
},
"objectTypes": [
"__ALL__",
"group",
"account"
],
"config": "config/provisioner.openicf/ldap",
"enabled": true,
"name": "ldap"
}
]$ curl \
--header "X-OpenIDM-Username: openidm-admin" \
--header "X-OpenIDM-Password: openidm-admin" \
--request POST \
"http://localhost:8080/openidm/system?_action=liveSync&source=system/ldap/account"
{
"connectorData": {
"nativeType": "integer",
"syncToken": 0
},
"_rev": "00000000a92657c7",
"_id": "SYSTEMLDAPACCOUNT"
}$ curl \
--header "X-OpenIDM-Username: openidm-admin" \
--header "X-OpenIDM-Password: openidm-admin" \
--request POST \
"http://localhost:8080/openidm/system/ldap/account?_action=liveSync"
{
"connectorData": {
"nativeType": "integer",
"syncToken": 0
},
"_rev": "00000000a92657c7",
"_id": "SYSTEMLDAPACCOUNT"
}$ curl \ --header "X-OpenIDM-Username: openidm-admin" \ --header "X-OpenIDM-Password: openidm-admin" \ --request POST \ "http://localhost:8080/openidm/system/ldap/account?_action=script&_scriptId=addUser"
$ curl \
--header "X-OpenIDM-Username: openidm-admin" \
--header "X-OpenIDM-Password: openidm-admin" \
--header "Content-Type: application/json" \
--request POST \
--data '{
"username" : "bjensen",
"password" : "Passw0rd"
}' \
"http://localhost:8080/openidm/system/ldap/account?_action=authenticate"
{
"_id": "fc252fd9-b982-3ed6-b42a-c76d2546312c"
}$ curl \
--header "Content-Type: application/json" \
--header "X-OpenIDM-Password: openidm-admin" \
--header "X-OpenIDM-Username: openidm-admin" \
--data '{
"cn":"James Smith",
"dn":"uid=jsmith,ou=people,dc=example,dc=com",
"uid":"jsmith",
"sn":"Smith",
"givenName":"James",
"mail": "jsmith@example.com",
"description":"Created by IDM REST"}' \
--request POST \
"http://localhost:8080/openidm/system/ldap/account?_action=create"
{
"telephoneNumber":null,
"description":"Created by IDM REST",
"mail":"jsmith@example.com",
"givenName":"James",
"cn":"James Smith",
"dn":"uid=jsmith,ou=people,dc=example,dc=com",
"uid":"jsmith",
"ldapGroups":[],
"sn":"Smith",
"_id":"07b46858-56eb-457c-b935-cfe6ddf769c7"
} You can rename a system object simply by supplying a new naming attribute value in a PUT request. The PUT request replaces the entire object. The naming attribute depends on the external resource.
The following example renames an object on an LDAP server, by changing the DN of the LDAP object (effectively performing a modDN operation on that object).
The example renames the user created in the previous example.
$ curl \
--header "Content-Type: application/json" \
--header "X-OpenIDM-Password: openidm-admin" \
--header "X-OpenIDM-Username: openidm-admin" \
--header "If-Match: *" \
--data '{
"cn":"James Smith",
"dn":"uid=jimmysmith,ou=people,dc=example,dc=com",
"uid":"jimmysmith",
"sn":"Smith",
"givenName":"James",
"mail": "jsmith@example.com"}' \
--request PUT \
"http://localhost:8080/openidm/system/ldap/account/07b46858-56eb-457c-b935-cfe6ddf769c7"
{
"mail":"jsmith@example.com",
"cn":"James Smith",
"sn":"Smith",
"dn":"uid=jimmysmith,ou=people,dc=example,dc=com",
"ldapGroups":[],
"telephoneNumber":null,
"description":"Created by IDM REST",
"givenName":"James",
"uid":"jimmysmith",
"_id":"07b46858-56eb-457c-b935-cfe6ddf769c7"
} $ curl \
--header "X-OpenIDM-Password: openidm-admin" \
--header "X-OpenIDM-Username: openidm-admin" \
--request GET \
"http://localhost:8080/openidm/system/ldap/account?_queryId=query-all-ids"
{
"remainingPagedResults": -1,
"pagedResultsCookie": null,
"resultCount": 3,
"result": [
{
"dn": "uid=jdoe,ou=People,dc=example,dc=com",
"_id": "1ff2e78f-4c4c-300c-b8f7-c2ab160061e0"
},
{
"dn": "uid=bjensen,ou=People,dc=example,dc=com",
"_id": "fc252fd9-b982-3ed6-b42a-c76d2546312c"
},
{
"dn": "uid=jimmysmith,ou=people,dc=example,dc=com",
"_id": "07b46858-56eb-457c-b935-cfe6ddf769c7"
}
]
}D.7.4. Managing Workflows Over REST
Workflow objects are exposed under the /openidm/workflow
context path. IDM provides access to the workflow module over
REST, as listed in the following table.
| URI | HTTP Operation | Description |
|---|---|---|
| /openidm/workflow/processdefinition?_queryId=id | GET | Lists workflow definitions based on filtering criteria |
| /openidm/workflow/processdefinition/id | GET | Returns detailed information about the specified process definition |
| /openidm/workflow/processdefinition/id/taskdefinition | GET | Returns detailed information about the task definition, when you
include an id or a query for all IDs,
?_queryId=query-all-ids |
| /openidm/workflow/processinstance?_queryId=query-all-ids | GET | Lists the available running workflows, by their ID |
| /openidm/workflow/processinstance/id | GET | Provides detailed information of a running process instance |
| /openidm/workflow/processinstance?_queryId=filtered-query&filter | GET | Returns a list of workflows, based on the specified query filter.
The parameters on which this list can be filtered include:
businessKey, deleteReason,
durationInMillis, endActivityId,
endTime, processDefinitionId,
processInstanceId, processVariables,
queryVariables, startActivityId,
startTime, startUserId,
superProcessInstanceId, tenantId,
processDefinitionResourceName
|
| /openidm/workflow/processinstance/history?_queryId=query-all-ids | GET | Lists running and completed workflows, by their ID |
| /openidm/workflow/processinstance/history?_queryId=filtered-query&filter | GET | Returns a list of running or completed workflows, based on the
specified query filter. The parameters on which this list can be
filtered include: businessKey, deleteReason,
durationInMillis, endActivityId,
endTime, processDefinitionId,
processInstanceId, processVariables,
queryVariables, startActivityId,
startTime, startUserId,
superProcessInstanceId, tenantId,
processDefinitionResourceName, |
| /openidm/workflow/processinstance?_action=create | POST | Start a new workflow. Parameters are included in the request body. |
| /openidm/workflow/processinstance/id | DELETE | Stops a process instance |
| /openidm/workflow/taskinstance?_queryId=query-all-ids | GET | Lists all active tasks |
| /openidm/workflow/taskinstance?_queryId=filtered-query&filter | GET | Lists the tasks according to the specified filter. The parameters
on which this list can be filtered include: taskId,
activityInstanceVariables, cachedElContext,
category, createTime,
delegationState, delegationStateString,
deleted (boolean), description,
dueDate, eventName,
executionId, name,
owner, parentTaskId,
priority, processDefinitionId,
processInstanceId, processVariables,
queryVariables, suspended (boolean),
suspensionState, taskDefinitionKey,
taskLocalVariables, tenantId,
assignee |
| /openidm/workflow/taskinstance/id | PUT | Update task data |
| /openidm/workflow/taskinstance/id?_action=action | POST |
Perform the specified action on that task. Parameters are included in
the request body. Supported actions include claim,
and complete
|
| /openidm/workflow/taskinstance/history?_queryId=query-all-ids | GET | Lists the running and completed tasks, by their ID |
| /openidm/workflow/taskinstance/history?_queryId=filtered-query&filter | GET | Returns a list of running or completed tasks, based on the
specified query filter. The parameters on which this list can be
filtered include: taskId, assignee,
category, claimTime,
deleteReason, description,
dueDate, durationInMillis,
endTime, executionId,
formKey, name,
owner, parentTaskId,
priority, processDefinitionId,
processInstanceId, processVariables,
queryVariables, startTime,
taskDefinitionKey, taskLocalVariables,
tenantId, time,
workTimeInMillis
|
The following examples list the defined workflows. For a workflow to
appear in this list, the corresponding workflow definition must be in the
openidm/workflow directory.
$ curl \ --header "X-OpenIDM-Username: openidm-admin" \ --header "X-OpenIDM-Password: openidm-admin" \ --request GET \ "http://localhost:8080/openidm/workflow/processdefinition?_queryId=query-all-ids"
Depending on the defined workflows, the output will be something like the following:
{
"result":[ {
"tenantId" : "",
"candidateStarterGroupIdExpressions" : [ ],
"candidateStarterUserIdExpressions" : [ ],
"participantProcess" : null,
...
} ],
"resultCount" : 1,
"pagedResultsCookie" : null,
"remainingPagedResults" : -1
}The following example invokes a workflow named "myWorkflow". The
foo parameter is given the value bar
in the workflow invocation.
$ curl \
--header "Content-Type: application/json" \
--header "X-OpenIDM-Username: openidm-admin" \
--header "X-OpenIDM-Password: openidm-admin" \
--request POST \
--data '{
"_key":"contractorOnboarding",
"foo":"bar"
}' \
"http://localhost:8080/openidm/workflow/processinstance?_action=create"D.7.5. Managing Schedules Over REST
The scheduler service enables you to manage and monitor scheduled jobs. For more information about the scheduler service, see "Scheduling Tasks and Events".
You can access the scheduler service over REST, as indicated in the following table:
| URI | HTTP Operation | Description |
|---|---|---|
| /openidm/scheduler?_action=validateQuartzCronExpression | POST | Validates a cron expression. |
| /openidm/scheduler/job/id | PUT | Creates or updates a schedule with the specified ID. |
| /openidm/scheduler/job/id | GET | Obtains the details of the specified schedule. |
| /openidm/scheduler/job/id | DELETE | Deletes the specified schedule. |
| /openidm/scheduler/job?_action=create | POST | Creates a schedule with a system-generated ID. |
| /openidm/scheduler/job?_queryFilter=query | GET | Queries the existing defined schedules. |
| /openidm/scheduler/job?_action=listCurrentlyExecutingJobs | POST | Returns a list of the jobs that are currently running. |
| /openidm/scheduler/job?_action=pauseJobs | POST | Suspends all scheduled jobs. |
| /openidm/scheduler/job?_action=resumeJobs | POST | Resumes all suspended scheduled jobs. |
| /openidm/scheduler/trigger?_queryFilter=query | GET | Queries the existing triggers. |
| /openidm/scheduler/trigger/id | GET | Obtains the details of the specified trigger. |
| /openidm/scheduler/acquiredTriggers | GET | Returns an array of the triggers that have been acquired, per node. |
| /openidm/scheduler/waitingTriggers | GET | Returns an array of the triggers that have not yet been acquired. |
D.7.6. Managing Scanned Tasks Over REST
The task scanning mechanism enables you to perform a batch scan for a specified date, on a scheduled interval, and then to execute a task when this date is reached. For more information about scanned tasks, see "Scanning Data to Trigger Tasks".
IDM provides REST access to the task scanner, as listed in the following table:
| URI | HTTP Operation | Description |
|---|---|---|
| /openidm/taskscanner | GET | Lists the all scanning tasks, past and present. |
| /openidm/taskscanner/id | GET | Lists details of the given task. |
| /openidm/taskscanner?_action=execute&name=name | POST | Triggers the specified task scan run. |
| /openidm/taskscanner/id?_action=cancel | POST | Cancels the specified task scan run. |
D.7.7. Accessing Log Entries Over REST
You can interact with the audit logs over REST, as shown in the following
table. Queries on the audit endpoint must use queryFilter
syntax. Predefined queries (invoked with the _queryId
parameter) are not supported.
| URI | HTTP Operation | Description |
|---|---|---|
| /openidm/audit/recon?_queryFilter=true | GET | Displays the reconciliation audit log |
| /openidm/audit/recon/id | GET | Reads a specific reconciliation audit log entry |
| /openidm/audit/recon/id | PUT | Creates a reconciliation audit log entry |
| /openidm/audit/recon?_queryFilter=/reconId+eq+"reconId" | GET | Queries the audit log for a particular reconciliation operation |
| /openidm/audit/recon?_queryFilter=/reconId+eq+"reconId"+and+situation+eq+"situation" | GET | Queries the reconciliation audit log for a specific reconciliation situation |
| /openidm/audit/sync?_queryFilter=true | GET | Displays the synchronization audit log |
| /openidm/audit/sync/id | GET | Reads a specific synchronization audit log entry |
| /openidm/audit/sync/id | PUT | Creates a synchronization audit log entry |
| /openidm/audit/activity?_queryFilter=true | GET | Displays the activity log |
| /openidm/audit/activity/id | GET | Returns activity information for a specific action |
| /openidm/audit/activity/id | PUT | Creates an activity audit log entry |
| /openidm/audit/activity?_queryFilter=transactionId=id | GET | Queries the activity log for all actions resulting from a specific transaction |
| /openidm/audit/access?_queryFilter=true | GET | Displays the full list of auditable actions. |
| /openidm/audit/access/id | GET | Displays information on the specific audit item |
| /openidm/audit/access/id | PUT | Creates an access audit log entry |
| /openidm/audit/authentication?_queryFilter=true | GET | Displays a complete list of authentication attempts, successful and unsuccessful |
| /openidm/audit/authentication?_queryFilter=/principal+eq+"principal" | GET | Displays the authentication attempts by a specified user |
| /openidm/audit?_action=availableHandlers | POST | Returns a list of audit event handlers |
| openidm/audit/config?_queryFilter=true | GET | Lists changes made to the configuration |
D.7.8. Managing Reconciliation Operations Over REST
You can interact with the reconciliation engine over REST, as shown in the following table.
| URI | HTTP Operation | Description |
|---|---|---|
| /openidm/recon | GET | Lists all completed reconciliation runs |
| /openidm/recon?_action=recon&mapping=mapping-name | POST | Launches a reconciliation run with the specified mapping |
| /openidm/recon?_action=reconById&mapping=mapping-name&id=id | POST | Restricts the reconciliation run to the specified ID |
| /openidm/recon/id?_action=cancel | POST | Cancels the specified reconciliation run |
The following example runs a reconciliation action, with the mapping
systemHrdb_managedUser, defined in the sync.json
file.
$ curl \ --header "X-OpenIDM-Username: openidm-admin" \ --header "X-OpenIDM-Password: openidm-admin" \ --request POST \ "http://localhost:8080/openidm/recon?_action=recon&mapping=systemHrdb_managedUser"
D.7.9. Managing the Synchronization Service Over REST
You can interact with the synchronization service over REST, as shown in the following table:
| URI | HTTP Operation | Description |
|---|---|---|
| /openidm/sync?_action=getLinkedResources&resourceName=resource | POST | Provides a list of linked resources for the specified resource |
For example:
$ curl \
--header "X-OpenIDM-Username: openidm-admin" \
--header "X-OpenIDM-Password: openidm-admin" \
--header "Content-Type: application/json" \
--request POST \
"http://localhost:8080/openidm/sync?_action=getLinkedResources&resourceName=managed/user/joesmith"
[
{
"resourceName": "system/ldap/account/03496258-1c5e-40a0-8744-badc2500f262",
"content": {
"uid": "joe.smith1",
"mail": "joe.smith@example.com",
"sn": "Smith",
"givenName": "Joe",
"employeeType": [],
"dn": "uid=joe.smith1,ou=People,dc=example,dc=com",
"ldapGroups": [],
"cn": "Joe Smith",
"kbaInfo": [],
"aliasList": [],
"objectClass": [
"top",
"inetOrgPerson",
"organizationalPerson",
"person"
],
"_id": "03496258-1c5e-40a0-8744-badc2500f262"
},
"linkQualifier": "default",
"linkType": "systemLdapAccounts_managedUser"
}
]D.7.10. Managing the Repository Over REST
You can interact with the repository engine over REST, as shown in the following table:
| URI | HTTP Operation | Description |
|---|---|---|
| /openidm/repo/synchronisation/deadLetterQueue/resource?_queryId=query-all-ids | GET | Lists any failed synchronisation records for that resource, that have been placed in the dead letter queue. |
| /openidm/repo/link?_queryId=query-all-ids | GET | Lists entries in the links table |
| /openidm/repo/internal/user?_queryId=query-all-ids | GET | Lists the internal users |
| /openidm/repo/internal/user/username | PUT | Enables you to change the username or password of an internal user |
For examples of queries on the repo/ endpoint, see "Interacting With the Repository Over REST".
D.7.11. Managing Updates Over REST
You can interact with the updates engine over REST, as shown in the following table.
| URI | HTTP Operation | Description |
|---|---|---|
| /openidm/maintenance/update?_action=available | POST | Lists update archives in the
project-dir/openidm/bin/update/
directory
|
| /openidm/maintenance/update?_action=preview&archive=patch.zip | POST | Lists file states of the current installation, relative to the patch.zip archive, using checksums |
| openidm/maintenance/update?_action=listMigrations&archive=patch.zip | POST | Gets a list of repository migrations for a given update type |
| /openidm/maintenance/update?_action=getLicense&archive=patch.zip | POST | Retrieves the license from the patch.zip archive |
| /openidm/maintenance/update?_action=listRepoUpdates&archive=patch.zip | POST | Get a list of repository update archives; use the path in the output for the endpoint with repo files |
| /openidm/maintenance/update/archives/patch.zip/path?_field=contents&_mimeType=text/plain | POST | Get files for the specific repository update, defined in the path. |
| /openidm/maintenance?_action=enable | POST | Activates maintenance mode; you should first run the commands in "Pausing Scheduled Jobs". |
| /openidm/maintenance?_action=disable | POST | Disables maintenance mode; you can then re-enable scheduled tasks as noted in "Resuming All Scheduled Jobs". |
| /openidm/maintenance?_action=status | POST | Returns current maintenance mode information |
| /openidm/maintenance/update?_action=update&archive=patch.zip | POST | Start an update with the patch.zip archive |
| /openidm/maintenance/update?_action=installed | POST | Retrieve a summary of all installed updates |
| /openidm/maintenance/update?_action=restart | POST | Restart IDM |
| /openidm/maintenance/update?_action=lastUpdateId | POST | Returns the _id value of the last successful update |
| /openidm/maintenance/update?_action=markComplete&updateId=id_string | POST | For an update with PENDING_REPO_UPDATES for one or
more repositories, mark as complete. Replace id_string with
the value of _id for the update archive. |
| /openidm/maintenance/update/log/_id | GET | Get information about an update, by _id (status, dates, file action taken) |
| /openidm/maintenance/update/log/?_queryFilter=true | GET | Get information about all past updates, by repository |
| Status | Description |
|---|---|
| IN_PROGRESS | Update has started, not yet complete |
| PENDING_REPO_UPDATES | Update is complete, updates to the repository are pending |
| COMPLETE | Update is complete |
| FAILED | Update failed, not yet reverted |
D.7.12. Accessing Server Information and Health Over REST
You can access information about the current state of the IDM
instance through the info and health
REST calls, as shown in the following table. For more information, see
"Monitoring Server Health".
| URI | HTTP Operation | Description |
|---|---|---|
| /openidm/info/ping | GET |
Lists the current server state. Possible states are STARTING,
ACTIVE_READY, ACTIVE_NOT_READY, and
STOPPING.
|
| /openidm/info/login | GET | Provides authentication and authorization details for the current user. |
| /openidm/info/version | GET | Provides the version of this IDM instance. |
| /openidm/info/uiconfig | GET |
Provides the UI configuration of this IDM instance. The
language parameter returned is the user's preferred language, based on
the Accept-Language header included in the request. If
Accept-Language is not specified in the request, it
returns the language set in conf/ui-configuration.json.
|
| /openidm/health/os | GET | Provides information about the server the IDM instance is running on. |
| /openidm/health/memory | GET | Provides information about JVM memory usage. |
| /openidm/health/recon | GET | Provides reconciliation thread pool statistics. |
D.7.13. Managing Social Identity Providers Over REST
You can manage social identity providers over REST, as shown in the following table. For more information, see "Configuring Social Identity Providers".
| URI | HTTP Operation | Description |
|---|---|---|
| /openidm/identityProviders | GET | Returns JSON details for all configured social identity providers |
| /openidm/authentication | GET | Returns JSON details for all configured social identity providers, if
the SOCIAL_PROVIDERS module is enabled |
| /openidm/managed/social identity provider | multiple | Supports access to social identity provider information |
| /openidm/managed/user/social identity provider | GET | Supports a list of users associated with a specific social identity provider |
| /openidm/managed/user/User UUID/idps | multiple | Supports management of social identity providers by UUID |
Appendix E. Scripting Reference
This appendix lists the functions supported by the script engine, the locations in which scripts can be triggered, and the variables available to scripts. For more information about scripting in IDM, see "Extending IDM Functionality By Using Scripts".
E.1. Function Reference
Functions (access to managed objects, system objects, and configuration
objects) within IDM are accessible to scripts via the
openidm object, which is included in the top-level scope
provided to each script.
The following sections describe the functions supported by the script engine:
E.1.1. openidm.create(resourceName, newResourceId, content, params, fields)
This function creates a new resource object.
- resourceName
string
The container in which the object will be created, for example,
managed/user.- newResourceId
string
The identifier of the object to be created, if the client is supplying the ID. If the server should generate the ID, pass null here.
- content
JSON object
The content of the object to be created.
- params
JSON object (optional)
Additional parameters that are passed to the create request.
- fields
JSON array (optional)
An array of the fields that should be returned in the result. The list of fields can include wild cards, such as
*or*_ref. If no fields are specified, the entire new object is returned.
The created resource object.
An exception is thrown if the object could not be created.
openidm.create("managed/user", bjensen, JSON object);
E.1.2. openidm.patch(resourceName, rev, value, params, fields)
This function performs a partial modification of a managed or system
object. Unlike the update function, only the modified
attributes are provided, not the entire object.
- resourceName
string
The full path to the object being updated, including the ID.
- rev
string
The revision of the object to be updated. Use
nullif the object is not subject to revision control, or if you want to skip the revision check and update the object, regardless of the revision.- value
JSON object
The value of the modifications to be applied to the object. The patch set includes the operation type, the field to be changed, and the new values. A PATCH request can
add,remove,replace, orincrementan attribute value. Areplaceoperation replaces an existing value, or adds a value if no value exists.- params
JSON object (optional)
Additional parameters that are passed to the patch request.
- fields
JSON array (optional)
An array of the fields that should be returned in the result. The list of fields can include wild cards, such as
*or*_ref. If no fields are specified, the entire new object is returned.
The modified resource object.
An exception is thrown if the object could not be updated.
Patching an object to add a value to an array:
openidm.patch("managed/role/" + role._id, null, [{"operation":"add", "field":"/members/-", "value":[ {"_ref":"managed/user/" + user._id} ]}]);Patching an object to remove an existing property:
openidm.patch("managed/user/" + user._id, null, [{"operation":"remove", "field":"marital_status", "value":"single"}]);Patching an object to replace a field value:
openidm.patch("managed/user/" + user._id, null, [{"operation":"replace", "field":"/password", "value":"Passw0rd"}]);Patching an object to increment an integer value:
openidm.patch("managed/user/" + user._id, null, [{"operation":"increment","field":"/age","value":1}]);
E.1.3. openidm.read(resourceName, params, fields)
This function reads and returns a resource object.
- resourceName
string
The full path to the object to be read, including the ID.
- params
JSON object (optional)
The parameters that are passed to the read request. Generally, no additional parameters are passed to a read request, but this might differ, depending on the request. If you need to specify a list of
fieldsas a third parameter, and you have no additionalparamsto pass, you must passnullhere. Otherwise, you simply omit both parameters.- fields
JSON array (optional)
An array of the fields that should be returned in the result. The list of fields can include wild cards, such as
*or*_ref. If no fields are specified, the entire object is returned.
The resource object, or
nullif not found.
openidm.read("managed/user/"+userId, null, ["*", "manager"])
E.1.4. openidm.update(resourceName, rev, value, params, fields)
This function updates an entire resource object.
- id
string
The complete path to the object to be updated, including its ID.
- rev
string
The revision of the object to be updated. Use
nullif the object is not subject to revision control, or if you want to skip the revision check and update the object, regardless of the revision.- value
object
The complete replacement object.
- params
JSON object (optional)
The parameters that are passed to the update request.
- fields
JSON array (optional)
An array of the fields that should be returned in the result. The list of fields can include wild cards, such as
*or*_ref. If no fields are specified, the entire object is returned.
The modified resource object.
An exception is thrown if the object could not be updated.
In this example, the managed user entry is read (with an
openidm.read, the user entry that has been read is updated with a new description, and the entire updated object is replaced with the new value.var user_read = openidm.read('managed/user/' + source._id); user_read['description'] = 'The entry has been updated'; openidm.update('managed/user/' + source._id, null, user_read);
E.1.5. openidm.delete(resourceName, rev, params, fields)
This function deletes a resource object.
- resourceName
string
The complete path to the to be deleted, including its ID.
- rev
string
The revision of the object to be deleted. Use
nullif the object is not subject to revision control, or if you want to skip the revision check and delete the object, regardless of the revision.- params
JSON object (optional)
The parameters that are passed to the delete request.
- fields
JSON array (optional)
An array of the fields that should be returned in the result. The list of fields can include wild cards, such as
*or*_ref. If no fields are specified, the entire object is returned.
Returns the deleted object if successful.
An exception is thrown if the object could not be deleted.
openidm.delete('managed/user/'+ user._id, user._rev)
E.1.6. openidm.query(resourceName, params, fields)
This function performs a query on the specified resource object. For more information, see "Constructing Queries".
- resourceName
string
The resource object on which the query should be performed, for example,
"managed/user", or"system/ldap/account".- params
JSON object
The parameters that are passed to the query,
_queryFilter,_queryId, or_queryExpression. Additional parameters passed to the query will differ, depending on the query.Certain common parameters can be passed to the query to restrict the query results. The following sample query passes paging parameters and sort keys to the query.
reconAudit = openidm.query("audit/recon", { "_queryFilter": queryFilter, "_pageSize": limit, "_pagedResultsOffset": offset, "_pagedResultsCookie": string, "_sortKeys": "-timestamp" });For more information about
_queryFiltersyntax, see "Common Filter Expressions". For more information about paging, see "Paging Query Results".- fields
list
A list of the fields that should be returned in the result. The list of fields can include wild cards, such as
*or*_ref. The following example returns only theuserNameand_idfields:openidm.query("managed/user", { "_queryFilter": "/userName sw \"user.1\""}, ["userName", "_id"])This parameter is particularly useful in enabling you to return the response from a query without including intermediary code to massage it into the right format.
Fields are specified as JSON pointers.
The result of the query. A query result includes the following parameters:
- query-time-ms
(For JDBC repositories only) the time, in milliseconds, that IDM took to process the query.
- result
The list of entries retrieved by the query. The result includes the properties that were requested in the query.
The following example shows the result of a custom query that requests the ID, user name, and email address of all managed users in the repository.
{ "result": [ { "_id": "bjensen", "_rev": "00000000a059dc9f", "userName": "bjensen", "mail": "bjensen@example.com" }, { "_id": "scarter", "_rev": "00000000d84ade1c", "userName": "scarter", "mail": "scarter@example.com" } ], "resultCount": 2, "pagedResultsCookie": null, "totalPagedResultsPolicy": "NONE", "totalPagedResults": -1, "remainingPagedResults": -1 }
An exception is thrown if the given query could not be processed.
The following sample query uses a
_queryFilterto query the managed user repository.openidm.query("managed/user", {'_queryFilter': userIdPropertyName + ' eq "' + security.authenticationId + '"'});The following sample query references the
for-userNamequery, defined in the repository configuration, to query the managed user repository.openidm.query("managed/user", {"_queryId": "for-userName", "uid": request.additionalParameters.uid } );
E.1.7. openidm.action(resource, actionName, content, params, fields)
This function performs an action on the specified resource object. The
resource and actionName are
required. All other parameters are optional.
- resource
string
The resource that the function acts upon, for example,
managed/user.- actionName
string
The action to execute. Actions are used to represent functionality that is not covered by the standard methods for a resource (create, read, update, delete, patch, or query). In general, you should not use the
openidm.actionfunction for create, read, update, patch, delete or query operations. Instead, use the corresponding function specific to the operation (for example,openidm.create).Using the operation-specific functions enables you to benefit from the well-defined REST API, which follows the same pattern as all other standard resources in the system. Using the REST API enhances usability for your own API and enforces the established patterns described in "REST API Reference".
IDM-defined resources support a fixed set of actions. For user-defined resources (scriptable endpoints) you can implement whatever actions you require.
The following list outlines the supported actions, for each resource. The actions listed here are also supported over the REST interface, and are described in detail in "REST API Reference".
-
Actions supported on managed resources
(
managed/*) patch, triggerSyncCheck
-
Actions supported on system resources
(
system/*) availableConnectors, createCoreConfig, createFullConfig, test, testConfig, liveSync, authenticate, script
For example:
openidm.action("system/ldap/account", "authenticate", {"username" : "bjensen", "password" : "Passw0rd"});-
Actions supported on the repository (
repo) command, updateDbCredentials
For example:
var r, command = { "commandId": "purge-by-recon-number-of", "numberOf": numOfRecons, "includeMapping" : includeMapping, "excludeMapping" : excludeMapping }; r = openidm.action("repo/audit/recon", "command", {}, command);-
Actions supported on the synchronization resource (
sync) performAction,
For example:
openidm.action('sync', 'performAction', content, params)-
Actions supported on the reconciliation resource (
recon) recon, cancel
For example:
openidm.action("recon", "cancel", content, params);-
Actions supported on the script resource (
script) eval
For example:
openidm.action("script", "eval", getConfig(scriptConfig), {});-
Actions supported on the policy resource (
policy) validateObject, validateProperty
For example:
openidm.action("policy/" + fullResourcePath, "validateObject", request.content, { "external" : "true" });-
Actions supported on the workflow resource (
workflow/*) On
workflow/processinstancecreateFor example:
var params = { "_key":"contractorOnboarding" }; openidm.action('workflow/processinstance', 'create', params);On
workflow/taskinstanceclaim, completeFor example:
var params = { "userId":"manager1" }; openidm.action('workflow/taskinstance/15', 'claim', params);-
Actions supported on the task scanner resource
(
taskscanner) execute, cancel
-
Actions supported on the external email resource
(
external/email) send
For example:
{ emailParams = { "from" : 'admin@example.com', "to" : user.mail, "subject" : 'Password expiry notification', "type" : 'text/plain', "body" : 'Your password will expire soon. Please change it!' } openidm.action("external/email", "send", emailParams); }
-
Actions supported on managed resources
(
- content
object (optional)
Content given to the action for processing.
- params
object (optional)
Additional parameters passed to the script. The
paramsobject must be a set of simple key:value pairs, and cannot include complex values. The parameters must map directly to URL variables, which take the formname1=val1&name2=val2&....- fields
JSON array (optional)
An array of the fields that should be returned in the result. The list of fields can include wild cards, such as
*or*_ref. If no fields are specified, the entire object is returned.
The result of the action may be
null.
If the action cannot be executed, an exception is thrown.
E.1.8. openidm.encrypt(value, cipher, alias)
This function encrypts a value.
- value
any
The value to be encrypted.
- cipher
string
The cipher with which to encrypt the value, using the form "algorithm/mode/padding" or just "algorithm". Example:
AES/ECB/PKCS5Padding.- alias
string
The key alias in the keystore with which to encrypt the node.
The value, encrypted with the specified cipher and key.
An exception is thrown if the object could not be encrypted for any reason.
E.1.9. openidm.decrypt(value)
This function decrypts a value.
- value
object
The value to be decrypted.
A deep copy of the value, with any encrypted value decrypted.
An exception is thrown if the object could not be decrypted for any reason. An error is thrown if the value is passed in as a string - it must be passed in an object.
E.1.10. openidm.isEncrypted(object)
This function determines if a value is encrypted.
- object to check
any
The object whose value should be checked to determine if it is encrypted.
Boolean,
trueif the value is encrypted, andfalseif it is not encrypted.
An exception is thrown if the server is unable to detect whether the value is encrypted, for any reason.
E.1.11. openidm.hash(value, algorithm)
This function calculates a value using a salted hash algorithm.
- value
any
The value to be hashed.
- algorithm
string (optional)
The algorithm with which to hash the value. Example:
SHA-512. If no algorithm is provided, anullvalue must be passed, and the algorithm defaults to SHA-256. For a list of supported hash algorithms, see "Encoding Attribute Values by Using Salted Hash Algorithms".
The value, calculated with the specified hash algorithm.
An exception is thrown if the object could not be hashed for any reason.
E.1.12. openidm.isHashed(value)
This function detects whether a value has been calculated with a salted hash algorithm.
- value
any
The value to be reviewed.
Boolean,
trueif the value is hashed, andfalseotherwise.
An exception is thrown if the server is unable to detect whether the value is hashed, for any reason.
E.1.13. openidm.matches(string, value)
This function detects whether a string, when hashed, matches an existing hashed value.
- string
any
A string to be hashed.
- value
any
A hashed value to compare to the string.
Boolean,
trueif the hash of the string matches the hashed value, andfalseotherwise.
An exception is thrown if the string could not be hashed.
E.1.14. Logging Functions
IDM also provides a logger object to access
the Simple Logging Facade for Java (SLF4J) facilities. The following code
shows an example of the logger object.
logger.info("Parameters passed in: {} {} {}", param1, param2, param3);
To set the log level for JavaScript scripts, add the following property
to your project's conf/logging.properties file:
org.forgerock.openidm.script.javascript.JavaScript.level
The level can be one of SEVERE (highest value),
WARNING, INFO, CONFIG, FINE, FINER, or
FINEST (lowest value). For example:
org.forgerock.openidm.script.javascript.JavaScript.level=WARNING
In addition, JavaScript has a useful logging function named
console.log(). This function provides an easy way to
dump data to the IDM standard output (usually the same output
as the OSGi console). The function works well with the JavaScript built-in
function JSON.stringify and provides fine-grained
details about any given object. For example, the following line will
print a formatted JSON structure that represents the HTTP request details
to STDOUT.
console.log(JSON.stringify(context.http, null, 4));
Note
These logging functions apply only to JavaScript scripts. To use the logging functions in Groovy scripts, the following lines must be added to the Groovy scripts:
import org.slf4j.*;
logger = LoggerFactory.getLogger('logger');The following sections describe the logging functions available to the script engine.
E.1.14.1. logger.debug(string message, object... params)
Logs a message at DEBUG level.
- message
string
The message format to log. Params replace
{}in your message.- params
object
Arguments to include in the message.
A
nullvalue if successful.
An exception is thrown if the message could not be logged.
E.1.14.2. logger.error(string message, object... params)
Logs a message at ERROR level.
- message
string
The message format to log. Params replace
{}in your message.- params
object
Arguments to include in the message.
A
nullvalue if successful.
An exception is thrown if the message could not be logged.
E.1.14.3. logger.info(string message, object... params)
Logs a message at INFO level.
- message
string
The message format to log. Params replace
{}in your message.- params
object
Arguments to include in the message.
A
nullvalue if successful.
An exception is thrown if the message could not be logged.
E.1.14.4. logger.trace(string message, object... params)
Logs a message at TRACE level.
- message
string
The message format to log. Params replace
{}in your message.- params
object
Arguments to include in the message.
A
nullvalue if successful.
An exception is thrown if the message could not be logged.
E.1.14.5. logger.warn(string message, object... params)
Logs a message at WARN level.
- message
string
The message format to log. Params replace
{}in your message.- params
object
Arguments to include in the message.
A
nullvalue if successful.
An exception is thrown if the message could not be logged.
E.2. Places to Trigger Scripts
Scripts can be triggered in different places, and by different events. The following list indicates the configuration files in which scripts can be referenced, the events upon which the scripts can be triggered and the actual scripts that can be triggered on each of these files.
-
Scripts called in the mapping (
conf/sync.json) file - Triggered by situation
onCreate, onUpdate, onDelete, onLink, onUnlink
- Object filter
validSource, validTarget
- Triggered when correlating objects
correlationQuery, correlationScript
- Triggered on any reconciliation
result
- Scripts inside properties
condition, transform
sync.jsonsupports only one script per hook. If multiple scripts are defined for the same hook, only the last one is kept.- Scripts inside policies
condition
Within a synchronization policy, you can use a
conditionscript to apply different policies based on the link type, for example:"condition" : { "type" : "text/javascript", "source" : "linkQualifier == \"user\"" }
-
Scripts called in the managed object configuration
(
conf/managed.json) file onCreate, onRead, onUpdate, onDelete, onValidate, onRetrieve, onStore, onSync, postCreate, postUpdate, and postDelete
managed.jsonsupports only one script per hook. If multiple scripts are defined for the same hook, only the last one is kept.-
Scripts called in the router configuration
(
conf/router.json) file onRequest, onResponse, onFailure
router.jsonsupports multiple scripts per hook.
E.3. Variables Available to Scripts
The variables available to a script depend on several factors:
The trigger that launches the script
The configuration file in which that trigger is defined
The object type:
For a managed object (defined in
managed.json), the object type is either a managed object configuration object, or a managed object property.For a synchronization object (defined in
sync.json), the object can be an object-mapping object (see "Object-Mapping Objects"), a property object (see "Property Objects"), or a policy object (see "Policy Objects").
The following tables list the variables available to scripts, based on the configuration file in which the trigger is defined.
E.3.1. Script Triggers Defined in managed.json
For information about how managed objects in
managed.json are handled and what script triggers
are available, see "Managed Objects".
| managed object configuration object | |
|---|---|
| Trigger | Variable |
onCreate, postCreate |
|
onUpdate, postUpdate
Returns JSON object |
|
onDelete, onRetrieve,
onRead
Returns JSON object |
|
postDelete
Returns JSON object |
|
onSync
Returns JSON object |
|
onStore, onValidate
Returns JSON object |
|
| property object | |
|---|---|
| Trigger | Variable |
onRetrieve, onStore
Returns JSON object |
|
onValidate
Returns JSON object |
|
E.3.2. Script Triggers Defined in sync.json
For information about how managed objects in sync.json
are handled and what script triggers are available, see
"Object-Mapping Objects".
| object-mapping object | |
|---|---|
| Trigger | Variable |
correlationQuery,
correlationScript
Returns JSON object |
|
linkQualifier
Returns JSON object |
|
onCreate
Returns JSON object |
|
onDelete, onUpdate
Returns JSON object |
|
onLink, onUnlink
Returns JSON object |
|
result
Returns JSON object of reconciliation results |
|
validSource
Returns boolean |
|
validTarget
Returns boolean |
|
| property object | |
|---|---|
| Trigger | Variable |
condition
Returns boolean |
|
transform
Returns JSON object |
|
| policy object | |
|---|---|
| Trigger | Variable |
action
Returns string OR json object |
|
postAction
Returns JSON object |
|
condition
Returns JSON object |
|
E.3.3. Script Triggers Defined in router.json
| Trigger | Variable |
|---|---|
| onFailure | exception |
| onRequest | request |
| onResponse | response |
E.3.4. Variables Available to Scripts in Custom Endpoints
All custom endpoint scripts have a request variable
in their scope, which is a JSON object containing all information about
the request. The parameters found in this object vary depending on the
request method. For more details about writing custom endpoint scripts,
see "Writing Custom Endpoint Scripts".
| Variable | Variable Parameters |
|---|---|
request |
query requests
create requests
|
E.3.5. Variables Available to Role Assignment Scripts
The optional onAssignment and
onUnassignment event scripts specify what should
happen to attributes that are affected by role assignments when those
assignments are applied to a user, or removed from a user. For more
information on role assignments, see "Creating an Assignment".
These scripts have access to the following variables:
sourceObject |
targetObject |
existingTargetObject |
linkQualifier |
The standard assignment scripts, replaceTarget.js,
mergeWithTarget.js, removeFromTarget.js,
and noOp.js have access to all the variables in the
previous list, as well as the following:
attributeName |
attributeValue |
attributesInfo |
Note
Role assignment scripts must always return targetObject,
otherwise other scripts and code that occur downstream of your script
will not work as expected.
E.3.6. The augmentSecurityContext Trigger
The augmentSecurityContext trigger, defined in
authentication.json, can reference a script that is
executed after successful authentication. Such scripts can populate the
security context of the authenticated user. If the authenticated user is
not found in the resource specified by queryOnResource,
the augmentSecurityContext can provide the required
authorization map.
Such scripts have access to the following bindings:
security- includes theauthenticationIdand theauthorizationkey, which includes themoduleId.The main purpose of an
augmentSecurityContextscript is to modify theauthorizationmap that is part of thissecuritybinding. The authentication module determines the value of theauthenticationId, and IDM attempts to populate theauthorizationmap with the details that it finds, related to thatauthenticationIdvalue. These details include the following:security.authorization.component- the resource that contains the account (this will always will be the same as the value ofqueryOnResourceby default).security.authorization.id- the internal_idvalue that is associated with the account.security.authorization.roles- any roles that were determined, either from reading theuserRolesproperty of the account or from calculation.security.authorization.moduleId- the authentication module responsible for performing the original authentication.
You can use the
augmentSecurityContextscript to change any of theseauthorizationvalues. The script can also add new values to theauthorizationmap, which will be available for the lifetime of the session.properties- corresponds to thepropertiesmap of the related authentication modulehttpRequest- a reference to theRequestobject that was responsible for handling the incoming HTTP request.This binding is useful to the augment script because it has access to all of the raw details from the HTTP request, such as the headers. The following code snippet shows how you can access a header using the
httpRequestbinding. This example accesses theauthTokenrequest header:httpRequest.getHeaders().getFirst('authToken').toString()
E.3.7. The identityServer Variable
IDM provides an additional variable, named
identityServer, to scripts. You can use this variable
in several ways. The ScriptRegistryService, described
in "Validating Scripts Over REST", binds this variable to:
getPropertyRetrieves property information from system configuration files. Takes up to three parameters:
The name of the property you are requesting.
(Optional) The default result to return if the property wasn't set.
(Optional) Boolean to determine whether or not to use property substitution when getting the property. For more information about property substitution, see "Using Property Value Substitution".
Returns the first property found following the same order of precedence IDM uses to check for properties: environment variables,
system.properties,boot.properties, then other configuration files. For more information, see "Configuring the Server".For example, you can retrieve the value of the
openidm.config.crypto.aliasproperty with the following code:alias = identityServer.getProperty("openidm.config.crypto.alias", "true", true);getInstallLocationRetrieves the IDM installation path, such as
/path/to/openidm. May be superseded by an absolute path.getProjectLocationRetrieves the directory used when you started IDM. That directory includes configuration and script files for your project.
For more information on the project location, see "Specifying the Startup Configuration".
getWorkingLocationRetrieves the directory associated with database cache and audit logs. You can find
db/andaudit/subdirectories there.For more information on the working location, see "Specifying the Startup Configuration".
Appendix F. Router Service Reference
The router service provides the uniform interface to all IDM objects: managed objects, system objects, configuration objects, and so on.
F.1. Configuration
The router object as shown in conf/router.json
defines an array of filter objects.
{
"filters": [ filter object, ... ]
}The required filters array defines a list of filters to be processed on each router request. Filters are processed in the order in which they are specified in this array.
F.1.1. Filter Objects
Filter objects are defined as follows.
{
"pattern": string,
"methods": [ string, ... ],
"condition": script object,
"onRequest": script object,
"onResponse": script object,
"onFailure": script object
}- pattern
string, optional
Specifies a regular expression pattern matching the JSON pointer of the object to trigger scripts. If not specified, all identifiers (including
null) match. Pattern matching is done on the resource name, rather than on individual objects.- methods
array of strings, optional
One or more methods for which the script(s) should be triggered. Supported methods are:
"create","read","update","delete","patch","query","action". If not specified, all methods are matched.- condition
script object, optional
Specifies a script that is called first to determine if the script should be triggered. If the condition yields
"true", the other script(s) are executed. If no condition is specified, the script(s) are called unconditionally.- onRequest
script object, optional
Specifies a script to execute before the request is dispatched to the resource. If the script throws an exception, the method is not performed, and a client error response is provided.
- onResponse
script object, optional
Specifies a script to execute after the request is successfully dispatched to the resource and a response is returned. Throwing an exception from this script does not undo the method already performed.
- onFailure
script object, optional
Specifies a script to execute if the request resulted in an exception being thrown. Throwing an exception from this script does not undo the method already performed.
F.1.1.1. Pattern Matching in the router.json File
Pattern matching can minimize overhead in the router service. For example,
the default router.json file includes instances
of the pattern filter object, which limits script
requests to specified methods and endpoints.
Based on the following code snippet, the router service would
trigger the policyFilter.js script for
CREATE and UPDATE calls to
managed, system, and internal repository objects.
{
"pattern" : "^(managed|system|repo/internal)($|(/.+))",
"onRequest" : {
"type" : "text/javascript",
"source" : "require('policyFilter').runFilter()"
},
"methods" : [
"create",
"update"
]
},
Without this pattern, IDM would apply the
policy filter to additional objects such as the audit service, which
may affect performance.
F.1.2. Script Execution Sequence
All onRequest and onResponse scripts
are executed in sequence. First, the onRequest scripts
are executed from the top down, then the onResponse
scripts are executed from the bottom up.
client -> filter 1 onRequest -> filter 2 onRequest -> resource
client <- filter 1 onResponse <- filter 2 onResponse <- resource
The following sample router.json file shows the
order in which the scripts would be executed:
{
"filters" : [
{
"onRequest" : {
"type" : "text/javascript",
"file" : "script/router-authz.js"
}
},
{
"pattern" : "^managed/user",
"methods" : [
"read"
],
"onRequest" : {
"type" : "text/javascript",
"source" : "console.log('requestFilter 1');"
}
},
{
"pattern" : "^managed/user",
"methods" : [
"read"
],
"onResponse" : {
"type" : "text/javascript",
"source" : "console.log('responseFilter 1');"
}
},
{
"pattern" : "^managed/user",
"methods" : [
"read"
],
"onRequest" : {
"type" : "text/javascript",
"source" : "console.log('requestFilter 2');"
}
},
{
"pattern" : "^managed/user",
"methods" : [
"read"
],
"onResponse" : {
"type" : "text/javascript",
"source" : "console.log('responseFilter 2');"
}
}
]
}
Will produce a log like:
requestFilter 1 requestFilter 2 responseFilter 2 responseFilter 1
F.1.3. Script Scope
Scripts are provided with the following scope.
{
"openidm": openidm-functions object,
"request": resource-request object,
"response": resource-response object,
"exception": exception object
}- openidm
openidm-functions object (see "Function Reference").
Provides access to IDM resources.
- request
resource-request object
The resource-request context, which has one or more parent contexts. Provided in the scope of all scripts. For more information about the request context, see "Understanding the Request Context Chain".
- response
resource-response object
The response to the resource-request. Only provided in the scope of the
"onResponse"script.- exception
exception object
The exception value that was thrown as a result of processing the request. Only provided in the scope of the
"onFailure"script.
An exception object is defined as follows.
{
"code": integer,
"reason": string,
"message": string,
"detail": string
}- code
integer
The numeric HTTP code of the exception.
- reason
string
The short reason phrase of the exception.
- message
string
A brief message describing the exception.
- detail
(optional), string
A detailed description of the exception, in structured JSON format, suitable for programmatic evaluation.
F.2. Example
The following example executes a script after a managed user object is created or updated.
{
"filters": [
{
"pattern": "^managed/user",
"methods": [
"create",
"update"
],
"onResponse": {
"type": "text/javascript",
"file": "scripts/afterUpdateUser.js"
}
}
]
}F.3. Understanding the Request Context Chain
The context chain of any request is established as follows:
The request starts with a root context, associated with a specific context ID.
The root context is wrapped in the security context that includes the authentication and authorization detail for the request.
The security context is further wrapped by the HTTP context, with the target URI. The HTTP context is associated with the normal parameters of the request, including a user agent, authorization token, and method.
The HTTP context is wrapped by one or more server/router context(s), with an endpoint URI. The request can have several layers of server and router contexts.
Appendix G. Embedded Jetty Configuration
IDM includes an embedded Jetty web server.
To configure the embedded Jetty server, edit
openidm/conf/jetty.xml. IDM delegates most of
the connector configuration to jetty.xml. OSGi and PAX
web specific settings for connector configuration therefore do not have an
effect. This lets you take advantage of all Jetty capabilities, as the web
server is not configured through an abstraction that might limit some of the
options.
The Jetty configuration can reference configuration properties (such as port
numbers and keystore details) from your
resolver/boot.properties file.
G.1. Using IDM Configuration Properties in the Jetty Configuration
IDM exposes a Param class that you can use in
jetty.xml to include IDM-specific
configuration. The Param class exposes Bean properties for
common Jetty settings and generic property access for other, arbitrary
settings.
G.1.1. Accessing Explicit Bean Properties
To retrieve an explicit Bean property, use the following syntax in
jetty.xml.
<Get class="org.forgerock.openidm.jetty.Param" name="<bean property name>"/>
For example, to set a Jetty property for keystore password:
<Set name="password">
<Get class="org.forgerock.openidm.jetty.Param" name="keystorePassword"/>
</Set>Also see the bundled jetty.xml for further
examples.
The following explicit Bean properties are available.
- port
Maps to
openidm.port.http- port
Maps to
openidm.port.https- port
Maps to
openidm.port.mutualauth- keystoreType
Maps to
openidm.keystore.type- keystoreProvider
Maps to
openidm.keystore.provider- keystoreLocation
Maps to
openidm.keystore.location- keystorePassword
Maps to
openidm.keystore.password- keystoreKeyPassword
Maps to
openidm.keystore.key.password, or the keystore password, if not set- truststoreLocation
Maps to
openidm.truststore.location, or the keystore location, if not set- truststorePassword
Maps to
openidm.truststore.password, or the keystore password, if not set
G.1.2. Accessing Generic Properties
<Call class="org.forgerock.openidm.jetty.Param" name="getProperty"> <Arg>org.forgerock.openidm.some.sample.property</Arg> </Call>
G.2. Jetty Default Settings
By default the embedded Jetty server uses the following settings.
The HTTP, SSL, and Mutual Authentication ports defined in IDM
The same keystore and truststore settings as IDM
Trivial sample realm,
openidm/security/realm.propertiesto add users
The default settings are intended for evaluation only. Adjust them according to your production requirements.
G.3. Registering Additional Servlet Filters
You can register generic servlet filters in the embedded Jetty server to
perform additional filtering tasks on requests to or responses from
IDM. For example, you might want to use a servlet filter to
protect access to IDM with an access management product. Servlet
filters are configured in files named
openidm/conf/servletfilter-name.json.
These servlet filter configuration files define the filter class, required
libraries, and other settings.
A sample servlet filter configuration is provided in the
servletfilter-cors.json file in the
/path/to/openidm/conf directory.
The sample servlet filter configuration file is shown below:
{
"classPathURLs" : [ ],
"systemProperties" : { },
"requestAttributes" : { },
"scriptExtensions" : { }.
"initParams" : {
"allowedOrigins" : "https://localhost:&{openidm.port.https}",
"allowedMethods" : "GET,POST,PUT,DELETE,PATCH",
"allowedHeaders" : "accept,x-openidm-password,x-openidm-nosession,
x-openidm-username,content-type,origin,
x-requested-with",
"allowCredentials" : "true",
"chainPreflight" : "false"
},
"urlPatterns" : [
"/*"
],
"filterClass" : "org.eclipse.jetty.servlets.CrossOriginFilter"
}The sample configuration includes the following properties:
classPathURLsThe URLs to any required classes or libraries that should be added to the classpath used by the servlet filter class
systemPropertiesAny additional Java system properties required by the filter
requestAttributesThe HTTP Servlet request attributes that will be set when the filter is invoked. IDM expects certain request attributes to be set by any module that protects access to it, so this helps in setting these expected settings.
scriptExtensionsOptional script extensions to IDM. Currently only
augmentSecurityContextis supported. A script that is defined inaugmentSecurityContextis executed after a successful authentication request. The script helps to populate the expected security context. For example, the login module (servlet filter) might select to supply only the authenticated user name, while the associated roles and user ID can be augmented by the script.Supported script types include
"text/javascript"and"groovy". The script can be provided inline ("source":script source) or in a file ("file":filename). The sample filter extends the filter interface with the functionality in the scriptscript/security/populateContext.js.filterClassThe servlet filter that is being registered
The following additional properties can be configured for the filter:
httpContextIdThe HTTP context under which the filter should be registered. The default is
"openidm".servletNamesA list of servlet names to which the filter should apply. The default is
"OpenIDM REST".urlPatternsA list of URL patterns to which the filter applies. The default is
["/*"].initParamsFilter configuration initialization parameters that are passed to the servlet filter
initmethod. For more information, see http://docs.oracle.com/javaee/5/api/javax/servlet/FilterConfig.html.
G.4. Disabling and Enabling Secure Protocols
Secure communications are important. To that end, the embedded Jetty web server enables a number of different protocols. To review the list of enabled protocols, use a command such as the following:
nmap --script ssl-enum-ciphers -p 8443 localhost
You can modify the list of enabled protocols in the jetty.xml
file in the conf/ subdirectory for your project. Based on
the following excerpt, SSLv3 and TLSv1
are excluded from the list of enabled protocols:
...
<Array id="excludedProtocols" type="java.lang.String">
<Item>SSLv3</Item>
<Item>TLSv1</Item>
</Array>
...Important
Disable TLSv1. Include it in the list of excludedProtocols
in the jetty.xml file for your project.
Note
As noted in the following Security Advisory, "SSL 3.0 [RFC6101] is an obsolete and insecure protocol."
Support for the TLSv1.0 protocol has been removed. For
more information, see the following PDF:
Migrating from SSL and Early TLS from the
PCI Security Standards Council.
To exclude another protocol from the Enabled list, just
add it to the "ExcludeProtocols" XML block. For example,
if you included the following line in that XML block, your instance of
Jetty would also exclude TLSv1.1:
<Item>TLSv1.1</Item>
You can reverse the process by removing the protocol from the
"ExcludeProtocols" block.
G.5. Adjusting Jetty Thread Settings
To change the Jetty thread pool settings, add the following excerpt to your
project's conf/config.properties file:
# Jetty maxThreads (default 200)
org.ops4j.pax.web.server.maxThreads=${org.ops4j.pax.web.server.maxThreads}
# Jetty minThreads (default 8)
org.ops4j.pax.web.server.minThreads=${org.ops4j.pax.web.server.minThreads}
# Jetty idle-thread timeout milliseconds (default 60000)
org.ops4j.pax.web.server.idleTimeout=${org.ops4j.pax.web.server.idleTimeout}
To override these defaults, set a corresponding OPENIDM_OPTS
variable when you start IDM. For example:
$ export OPENIDM_OPTS="-Xmx1024m -Xms1024m -Dorg.ops4j.pax.web.server.maxThreads=768" $ ./startup.sh Executing ./startup.sh... Using OPENIDM_HOME: /path/to/openidm Using PROJECT_HOME: /path/to/openidm Using OPENIDM_OPTS: -Xmx1024m -Xms1024m -Dorg.ops4j.pax.web.server.maxThreads=768 Using LOGGING_CONFIG: -Djava.util.logging.config.file=/path/to/openidm/conf/logging.properties -> OpenIDM version "6.0.0.7" (revision: unknown) OpenIDM ready
Important
You cannot use property substitution to set these properties.
You cannot adjust Jetty's thread settings in the
conf/jetty.xml file. If you uncomment the excerpt of
jetty.xml that starts with
<!--<Arg name="threadpool">..., you'll see errors
in the IDM log.
Appendix H. Authentication and Session Module Configuration Details
This appendix includes configuration details for the supported authentication modules described in "Supported Authentication and Session Modules".
Authentication modules, as configured in the
authentication.json file, include a number of properties.
| Authentication Property | Property as Listed in the Admin UI | Description |
|---|---|---|
keyAlias | (not shown) | Used by the Jetty Web server to service SSL requests. |
privateKeyPassword | (not shown) | Defaults to openidm.keystore.password in
boot.properties. |
keystoreType | (not shown) | Defaults to openidm.keystore.type in
boot.properties. |
keystoreFile | (not shown) | Defaults to openidm.keystore.location in
boot.properties. |
keystorePassword | (not shown) | Defaults to openidm.keystore.password in
boot.properties |
maxTokenLifeMinutes | Max Token Life (in seconds) | Maximum time before a session is cancelled. Note the different units for the property and the UI. |
tokenIdleTimeMinutes | Token Idle Time (in seconds) | Maximum time before an idle session is cancelled. Note the different units for the property and the UI. |
sessionOnly | Session Only | Whether the session continues after browser restarts. |
| Authentication Property | Property as Listed in the Admin UI | Description |
|---|---|---|
enabled | Module Enabled | Does IDM use the module |
queryOnResource | Query on Resource | Endpoint hard coded to user anonymous |
username | Static User Name | Default for the static user, anonymous |
password | Static User Password | Default for the static user, anonymous |
defaultUserRoles | Static User Role | Normally set to openidm-reg for
self-registration |
The following table applies to several authentication modules:
Managed User |
Internal User |
Client Cert |
Passthrough |
IWA |
The IWA module includes several Kerberos-related properties listed at the end of the table.
| Authentication Property | Property as Listed in the Admin UI | Description |
|---|---|---|
enabled | Module Enabled | Does IDM use the module |
queryOnResource | Query on Resource | Endpoint to query |
queryId | Use Query ID | A defined queryId searches against the
queryOnResource endpoint. An undefined
queryId against queryOnResource with
action=reauthenticate |
defaultUserRoles | Default User Roles | Normally blank for managed users |
authenticationId | Authentication ID | Defines how account credentials are derived from a
queryOnResource endpoint |
userCredential | User Credential | Defines how account credentials are derived from a
queryOnResource endpoint; if required, typically
password or userPassword
|
userRoles | User Roles | Defines how account roles are derived from a
queryOnResource endpoint |
groupMembership | Group Membership | Provides more information for calculated roles |
groupRoleMapping | Group Role Mapping | Provides more information for calculated roles |
groupComparisonMethod | Group Comparison Method | Provides more information for calculated roles |
managedUserLink | Managed User Link | Applicable mapping (Passthrough module only) |
augmentSecurityContext | Augment Security Context | Includes a script that is executed only after a successful authentication request. |
servicePrincipal | Kerberos Service Principal | (IWA only) For more information, see "Configuring IWA Authentication" |
keytabFileName | Keytab File Name | (IWA only) For more information, see "Configuring IWA Authentication" |
kerberosRealm | Kerberos Realm | (IWA only) For more information, see "Configuring IWA Authentication" |
kerberosServerName | Kerberos Server Name | (IWA only) For more information, see "Configuring IWA Authentication" |
Appendix I. Social Identity Provider Configuration Details
This appendix includes a list of configuration details for each supported social identity provider.
All social identity providers in IDM include badge and button information in the UI and the associated configuration file. For more information, see "Social Identity Provider Button and Badge Properties".
I.1. Google Social Identity Provider Configuration Details
You can set up the Google social identity provider either through the Admin
UI or in the identityProvider-google.json file in your
project's conf/ subdirectory. The following table
includes the information shown in the Admin UI Google Provider pop-up window,
along with associated information in the
identityProvider-google.json file.
IDM generates the identityProvider-google.json
file only when you configure and enable the Google social identity provider
in the Admin UI.
| Property (UI) | Property (JSON file) | Description |
|---|---|---|
| Client ID | clientId | The client identifier for your Google Identity Platform project |
| Client Secret | clientSecret | Used with the Client ID to access the configured Google API |
| Scope | scope | An array of strings that allows access to user data; see Google's documentation on Authorization Scopes |
| Authorization Endpoint | authorizationEndpoint | Per RFC 6749, "used to interact with the resource owner and obtain an authorization grant". For Google's implementation, see Forming the URL. |
| Token Endpoint | tokenEndpoint | Endpoint that receives a one-time authorization grant, and returns an access and ID token |
| User Info Endpoint | userInfoEndpoint | Endpoint that receives an access token, and returns information about the user |
| Well-Known Endpoint | wellKnownEndpoint | Access URL for Google's Discovery Document |
| Not in the Admin UI | name | Name of the social identity provider |
| Not in the Admin UI | type | Authentication module |
| Not in the Admin UI | authenticationId | Authentication identifier, as returned from the User Info Endpoint for each social identity provider |
| Not in the Admin UI | propertyMap | Mapping between Google and IDM |
For information on social identity provider buttons and badges, see "Social Identity Provider Button and Badge Properties".
I.2. LinkedIn Social Identity Provider Configuration Details
You can set up the LinkedIn social identity provider either through the Admin
UI or in the identityProvider-linkedIn.json file in your
project's conf/ subdirectory. The following table
includes the information shown in the Admin UI LinkedIn Provider pop-up window,
along with associated information in the
identityProvider-linkedIn.json file.
IDM generates the identityProvider-linkedIn.json
file only when you configure and enable the LinkedIn social identity provider
in the Admin UI.
| Property (UI) | Property (JSON file) | Description |
|---|---|---|
| Client ID | clientId | The client identifier for your LinkedIn Application |
| Client Secret | clientSecret | Used with the Client ID to access the applicable LinkedIn API |
| Scope | scope | An array of strings that allows access to user data; see LinkedIn's documentation on Basic Profile Fields. |
| Authorization Endpoint | authorizationEndpoint | Per RFC 6749, "used to interact with the resource owner and obtain an authorization grant". For LinkedIn's implementation, see their documentation on Authenticating with OAuth 2.0. |
| Token Endpoint | tokenEndpoint | Endpoint that receives a one-time authorization code, and returns an access token. For LinkedIn's implementation, see their documentation on Authenticating with OAuth 2.0. |
| User Info Endpoint | userInfoEndpoint | Endpoint that transmits scope-related fields through LinkedIn's API. The default endpoint includes the noted field properties in parentheses, as defined in LinkedIn's documentation on Basic Profile Fields. |
| Well-Known Endpoint | wellKnownEndpoint | Not used for LinkedIn |
| Not in the Admin UI | name | Name of the social identity provider |
| Not in the Admin UI | type | Authentication module |
| Not in the Admin UI | authenticationId | Authentication identifier, as returned from the User Info Endpoint for each social identity provider |
| Not in the Admin UI | propertyMap | Mapping between LinkedIn and IDM |
For information on social identity provider buttons and badges, see "Social Identity Provider Button and Badge Properties".
I.3. Facebook Social Identity Provider Configuration Details
You can set up the Facebook social identity provider either through the Admin
UI or in the identityProvider-facebook.json file in your
project's conf/ subdirectory. The following table
includes the information shown in the Admin UI Facebook Provider pop-up window,
along with associated information in the
identityProvider-facebook.json file.
IDM generates the identityProvider-facebook.json
file only when you configure and enable the Facebook social identity provider
in the Admin UI. Alternatively, you can create that file manually.
| Property (UI) | Property (JSON file) | Description |
|---|---|---|
| App ID | clientId | The client identifier for your Facebook App |
| App Secret | clientSecret | Used with the App ID to access the applicable Facebook API |
| Scope | scope | An array of strings that allows access to user data; see Facebook's Permissions Reference Documentation. |
| Authorization Endpoint | authorizationEndpoint | For Facebook's implementation, see their documentation on how they Manually Build a Login Flow. |
| Token Endpoint | tokenEndpoint | Endpoint that receives a one-time authorization code, and returns an access token. For Facebook's implementation, see their documentation on how they Manually Build a Login Flow. |
| User Info Endpoint | userInfoEndpoint | Endpoint that transmits scope-related fields through Facebook's API. The default endpoint includes the noted field properties as a list, as defined in Facebook's Permissions Reference. |
| Not in the Admin UI | name | Name of the Social ID provider |
| Not in the Admin UI | type | Authentication module |
| Not in the Admin UI | authenticationId | Authentication identifier, as returned from the User Info Endpoint for each social identity provider |
| Not in the Admin UI | propertyMap | Mapping between Facebook and IDM |
For information on social identity provider buttons and badges, see "Social Identity Provider Button and Badge Properties".
I.4. Amazon Social Identity Provider Configuration Details
You can set up the Amazon social identity provider either through the Admin
UI or in the identityProvider-amazon.json file in your
project's conf/ subdirectory. The following table
includes the information shown in the Admin UI Amazon Provider pop-up window,
along with associated information in the
identityProvider-amazon.json file.
IDM generates the identityProvider-amazon.json
file only when you configure and enable the Amazon social identity provider
in the Admin UI. Alternatively, you can create that file manually.
| Property (UI) | Property (JSON file) | Description |
|---|---|---|
| Client ID | clientId | The client identifier for your Amazon App |
| Client Secret | clientSecret | Used with the Client ID to access the applicable Amazon API |
| Scope | scope | An array of strings that allows access to user data; see Amazon's Customer Profile Documentation. |
| Authorization Endpoint | authorizationEndpoint | Typically https://www.amazon.com/ap/oa.
|
| Token Endpoint | tokenEndpoint | Endpoint that receives a one-time authorization code, and returns
an access token; typically https://api.amazon.com/auth/o2/token |
| User Info Endpoint | userInfoEndpoint | Endpoint that transmits scope-related fields; typically
https://api.amazon.com/user/profile |
| Not in the Admin UI | name | Name of the social identity provider |
| Not in the Admin UI | type | Authentication module |
| Not in the Admin UI | authenticationId | Authentication identifier, as returned from the User Info Endpoint for each social identity provider |
| Not in the Admin UI | propertyMap | Mapping between Amazon and IDM |
For information on social identity provider buttons and badges, see "Social Identity Provider Button and Badge Properties".
I.5. Microsoft Social Identity Provider Configuration Details
You can set up the Microsoft social identity provider either through the Admin
UI or in the identityProvider-microsoft.json file in your
project's conf/ subdirectory. The following table
includes the information shown in the Admin UI Microsoft Provider pop-up window,
along with associated information in the
identityProvider-microsoft.json file.
IDM generates the identityProvider-microsoft.json
file only when you configure and enable the Microsoft social identity provider
in the Admin UI. Alternatively, you can create that file manually.
| Property (UI) | Property (JSON file) | Description |
|---|---|---|
| Application ID | clientId | The client identifier for your Microsoft App |
| Application Secret | clientSecret | Used with the Application ID; shown as application password |
| Scope | scope | OAuth 2 scopes; for more information, see Microsoft Graph Permission Scopes. |
| Authorization Endpoint | authorizationEndpoint | Typically https://login.microsoftonline.com/common/oauth2/v2.0/authorize
|
| Token Endpoint | tokenEndpoint | Endpoint that receives a one-time authorization code and returns
an access token; typically https://login.microsoftonline.com/common/oauth2/v2.0/token |
| User Info Endpoint | userInfoEndpoint | Endpoint that transmits scope-related fields; typically
https://graph.microsoft.com/v1.0/me |
| Not in the Admin UI | name | Name of the social identity provider |
| Not in the Admin UI | type | Authentication module |
| Not in the Admin UI | authenticationId | Authentication identifier, as returned from the User Info Endpoint for each social identity provider |
| Not in the Admin UI | propertyMap | Mapping between Microsoft and IDM |
For information on social identity provider buttons and badges, see "Social Identity Provider Button and Badge Properties".
I.6. WordPress Social Identity Provider Configuration Details
You can set up the WordPress social identity provider either through the Admin
UI or in the identityProvider-wordpress.json file in your
project's conf/ subdirectory. The following table
includes the information shown in the Admin UI WordPress Provider pop-up window,
along with associated information in the
identityProvider-wordpress.json file.
IDM generates the identityProvider-wordpress.json
file only when you configure and enable the WordPress social identity provider
in the Admin UI. Alternatively, you can create that file manually.
| Property (UI) | Property (JSON file) | Description |
|---|---|---|
| Client ID | clientId | The client identifier for your WordPress App |
| Client Secret | clientSecret | Used with the Client ID to access the applicable WordPress API |
| Scope | scope | An array of strings that allows access to user data; see WordPress's OAuth2 Authentication Documentation. |
| Authorization Endpoint | authorizationEndpoint | Typically https://public-api.wordpress.com/oauth2/authorize;
known as a WordPress Authorize URL.
|
| Token Endpoint | tokenEndpoint | Endpoint that receives a one-time authorization code, and returns
an access token; typically https://public-api.wordpress.com/oauth2/token;
known as a WordPress Request Token URL.
|
| User Info Endpoint | userInfoEndpoint | Endpoint that transmits scope-related fields; typically
https://public-api.wordpress.com/rest/v1.1/me/ |
| Not in the Admin UI | name | Name of the social identity provider |
| Not in the Admin UI | type | Authentication module |
| Not in the Admin UI | authenticationId | Authentication identifier, as returned from the User Info Endpoint for each social identity provider |
| Not in the Admin UI | propertyMap | Mapping between WordPress and IDM |
For information on social identity provider buttons and badges, see "Social Identity Provider Button and Badge Properties".
I.7. WeChat Social Identity Provider Configuration Details
You can set up the WeChat social identity provider either through the Admin
UI or in the identityProviders.json file in your
project's conf/ subdirectory. The following table
includes the information shown in the Admin UI WeChat Provider pop-up window,
along with associated information from the
identityProviders.json file.
IDM generates the identityProvider-wechat.json
file only when you configure and enable the WeChat social identity provider
in the Admin UI. Alternatively, you can create that file manually.
Note
WeChat supports URLs on one of the following ports: 80 or 443. For more information on how to configure IDM to use these ports, see "Host and Port Information".
| Property (UI) | Property (JSON file) | Description |
|---|---|---|
| Client ID | clientId | The client identifier for your WeChat App |
| Client Secret | clientSecret | Used with the Client ID to access the applicable WeChat API |
| Scope | scope | An array of strings that allows access to user data |
| Authorization Endpoint | authorizationEndpoint | Typically https://open.weixin.qq.com/connect/qrconnect.
|
| Token Endpoint | tokenEndpoint | Endpoint that receives a one-time authorization code, and returns
an access token; typically https://api.wechat.com/sns/oauth2/access_token |
| Refresh Token Endpoint | refreshTokenEndpoint | Endpoint that receives a one-time authorization code, and returns
a refresh token; typically https://api.wechat.com/sns/oauth2/refresh_token |
| User Info Endpoint | userInfoEndpoint | Endpoint that transmits scope-related fields; typically
https://api.wechat.com/user/profile |
| Not in the Admin UI | provider | Name of the social identity provider |
| Not in the Admin UI | configClass | Configuration class for the authentication module |
| Not in the Admin UI | basicAuth | Whether to use basic authentication |
| Not in the Admin UI | propertyMap | Mapping between WeChat and IDM |
For information on social identity provider buttons and badges, see "Social Identity Provider Button and Badge Properties".
I.8. Instagram Social Identity Provider Configuration Details
You can set up the Instagram social identity provider either through the Admin
UI or in the identityProvider-instagram.json file in your
project's conf/ subdirectory. The following table
includes the information shown in the Admin UI Instagram Provider pop-up
window, along with associated information in the
identityProvider-instagram.json file.
IDM generates the identityProvider-instagram.json
file only when you configure and enable the Amazon social identity provider
in the Admin UI. Alternatively, you can create that file manually.
| Property (UI) | Property (JSON file) | Description |
|---|---|---|
| Client ID | clientId | The client identifier for your Instagram App |
| Client Secret | clientSecret | Used with the Client ID to access the applicable Instagram API |
| Scope | scope | An array of strings that allows access to user data |
| Authorization Endpoint | authorizationEndpoint | Typically https://api.instagram.com/oauth/authorize/;
known as an Instagram Authorize URL
|
| Token Endpoint | tokenEndpoint | Endpoint that receives a one-time authorization code, and returns
an access token; typically https://api.instagram.com/oauth/access_token
|
| User Info Endpoint | userInfoEndpoint | Endpoint that transmits scope-related fields; typically
https://api.instagram.com/v1/users/self/ |
| Not in the Admin UI | provider | Name of the social identity provider |
| Not in the Admin UI | configClass | Configuration class for the authentication module |
| Not in the Admin UI | basicAuth | Whether to use basic authentication |
| Not in the Admin UI | propertyMap | Mapping between Instagram and IDM |
For information on social identity provider buttons and badges, see "Social Identity Provider Button and Badge Properties".
I.9. Vkontakte Social Identity Provider Configuration Details
You can set up the Vkontakte social identity provider either through the Admin
UI or in the identityProvider-vkontakte.json file in your
project's conf/ subdirectory. The following table
includes the information shown in the Admin UI Vkontakte Provider pop-up window,
along with associated information in the
identityProvider-vkontakte.json file.
IDM generates the identityProvider-vkontakte.json
file only when you configure and enable the Vkontakte social identity provider
in the Admin UI. Alternatively, you can create that file manually.
| Property (UI) | Property (JSON file) | Description |
|---|---|---|
| Application ID | clientId | The client identifier for your Vkontakte App |
| Secure Key | clientSecret | Used with the Client ID to access the applicable Vkontakte API |
| Scope | scope | An array of strings that allows access to user data. |
| Authorization Endpoint | authorizationEndpoint | Typically https://oauth.vk.com/authorize.
|
| Token Endpoint | tokenEndpoint | Endpoint that receives a one-time authorization code, and returns
an access token; typically "https://oauth.vk.com/access_token |
| User Info Endpoint | userInfoEndpoint | Endpoint that transmits scope-related fields; typically
https://api.vk.com/method/users.get |
| API Version | apiVersion | Version of the applicable VKontakte API, available from VK Developers Documentation, API Versions section. The default VKontakte API version used for IDM 6 is 5.73. |
| Not in the Admin UI | provider | Name of the social identity provider |
| Not in the Admin UI | configClass | Configuration class for the authentication module |
| Not in the Admin UI | basicAuth | Whether to use basic authentication |
| Not in the Admin UI | authenticationIdKey | The user identity property, such as id |
| Not in the Admin UI | propertyMap | Mapping between Vkontakte and IDM |
For information on social identity provider buttons and badges, see "Social Identity Provider Button and Badge Properties".
I.10. Salesforce Social Identity Provider Configuration Details
You can set up the Salesforce social identity provider either through the Admin
UI or in the identityProvider-salesforce.json file in your
project's conf/ subdirectory. The following table
includes the information shown in the Admin UI Salesforce Provider pop-up window,
along with associated information in the
identityProvider-salesforce.json file.
IDM generates the identityProvider-salesforce.json
file only when you configure and enable the Salesforce social identity provider
in the Admin UI. Alternatively, you can create that file manually.
| Property (UI) | Property (JSON file) | Description |
|---|---|---|
| Client ID | clientId | The client identifier for your Salesforce App |
| Client Secret | clientSecret | Used with the Client ID to access the applicable Salesforce API |
| Scope | scope | An array of strings that allows access to user data |
| Authorization Endpoint | authorizationEndpoint | A typical URL: https://login.salesforce.com/services/oauth2/authorize.
|
| Token Endpoint | tokenEndpoint | Endpoint that receives a one-time authorization code, and returns
an access token; such as https://login.salesforce.com/services/oauth2/token |
| User Info Endpoint | userInfoEndpoint | Endpoint that transmits scope-related fields; a typical URL:
https://login.salesforce.com/services/oauth2/userinfo |
| Not in the Admin UI | provider | Name of the social identity provider |
| Not in the Admin UI | configClass | Configuration class for the authentication module |
| Not in the Admin UI | basicAuth | Whether to use basic authentication |
| Not in the Admin UI | propertyMap | Mapping between Salesforce and IDM |
I.11. Yahoo Social Identity Provider Configuration Details
You can set up the Yahoo social identity provider either through the Admin
UI or in the identityProvider-yahoo.json file in your
project's conf/ subdirectory. The following table
includes the information shown in the Admin UI Yahoo Provider pop-up
window, along with associated information in the
identityProvider-yahoo.json file.
IDM generates the identityProvider-yahoo.json
file only when you configure and enable the Yahoo social identity provider
in the Admin UI. Alternatively, you can create that file manually.
Note
Yahoo supports URLs using only HTTPS, only on port 443. For more information on how to configure IDM to use these ports, see "Host and Port Information".
| Property (UI) | Property (JSON file) | Description |
|---|---|---|
| Client ID | clientId | The client identifier for your Yahoo App |
| Client Secret | clientSecret | Used with the Client ID to access the applicable Yahoo API |
| Scope | scope | An array of strings that allows access to user data |
| Authorization Endpoint | authorizationEndpoint | Typically https://api.login.yahoo.com/oauth2/request_auth;
known as a Yahoo Authorize URL
|
| Token Endpoint | tokenEndpoint | Endpoint that receives a one-time authorization code, and returns
an access token; typically https://api.login.yahoo.com/oauth2/get_token
|
| Well-Known Endpoint | wellKnownEndpoint | Access for other URIs; typically
https://login.yahoo.com/.well-known/openid-configuration |
| Not in the Admin UI | provider | Name of the social identity provider |
| Not in the Admin UI | configClass | Configuration class for the authentication module |
| Not in the Admin UI | basicAuth | Whether to use basic authentication |
| Not in the Admin UI | propertyMap | Mapping between Yahoo and IDM |
For information on social identity provider buttons and badges, see "Social Identity Provider Button and Badge Properties".
I.12. Twitter Social Identity Provider Configuration Details
You can set up the Twitter social identity provider either through the Admin
UI or in the identityProvider-twitter.json file in your
project's conf/ subdirectory. The following table
includes the information shown in the Admin UI Twitter Provider pop-up
window, along with associated information in the
identityProvider-twitter.json file.
IDM generates the identityProvider-twitter.json
file only when you configure and enable the Twitter social identity provider
in the Admin UI. Alternatively, you can create that file manually.
| Property (UI) | Property (JSON file) | Description |
|---|---|---|
| Consumer Key | clientId | The client identifier for your Twitter App |
| Consumer Secret | clientSecret | Used with the Client ID to access the applicable Twitter API |
| Authorization Endpoint | authorizationEndpoint | Typically https://api.twitter.com/oauth/authenticate;
known as a Twitter Authorize URL
|
| Access Token Endpoint | tokenEndpoint | Endpoint that receives a one-time authorization code, and returns
an access token; typically https://api.twitter.com/oauth/access_token
|
| User Info Endpoint | userInfoEndpoint | Access for other URIs; typically
https://api.twitter.com/1.1/account/verify_credentials.json |
| Request Token Endpoint | requestTokenEndpoint | Endpoint that receives a one-time authorization code, and returns
an access token; typically https://api.twitter.com/oauth/request_token
|
| Not in the Admin UI | provider | Name of the social identity provider |
| Not in the Admin UI | authenticationIdKey | The user identity property, such as _id |
| Not in the Admin UI | configClass | Configuration class for the authentication module |
| Not in the Admin UI | basicAuth | Whether to use basic authentication |
| Not in the Admin UI | propertyMap | Mapping between Twitter and IDM |
For information on social identity provider buttons and badges, see "Social Identity Provider Button and Badge Properties".
I.13. Custom Social Identity Provider Configuration Details
When you set up a custom social identity provider, starting with
"Preparing IDM", you'll see configuration details in the
identityProviders.json file, in your project's
conf/ subdirectory. The following table includes the
information shown in the relevant Admin UI pop-up window.
IDM generates the identityProvider-custom.json
file only when you configure and enable the custom social identity provider
in the Admin UI. Alternatively, you can create that file manually.
| Property (UI) | Property (JSON file) | Description |
|---|---|---|
| Client ID | clientId | The client identifier for your social identity provider |
| Client Secret | clientSecret | Used with the Client ID |
| Scope | scope | An array of strings that allows access to user data; varies by provider. |
| Authorization Endpoint | authorizationEndpoint | Every social identity provider should have an authorization endpoint to authenticate end users. |
| Token Endpoint | tokenEndpoint | Endpoint that receives a one-time authorization code, and returns an access token. |
| User Info Endpoint | userInfoEndpoint | Endpoint that transmits scope-related fields. |
| Not in the Admin UI | name | Name of the social identity provider |
| Not in the Admin UI | type | Authentication module |
| Not in the Admin UI | authenticationId | Authentication identifier, as returned from the User Info Endpoint for each social identity provider |
| Not in the Admin UI | propertyMap | Mapping between the social identity provider and IDM |
For information on social identity provider buttons and badges, see "Social Identity Provider Button and Badge Properties".
I.14. Social Identity Provider Button and Badge Properties
IDM allows you to configure buttons and badges for each social
identity provider, either through the UI or via the associated
identityProvider-name.json
configuration file.
A badge is a circular icon associated with a social identity provider. It appears in the Admin UI under Configure > Social ID Providers, and in the Self-Service UI under My Account > Sign-in & Security > Social Sign-in. You can modify the badge options as described in the following table.
A button is a rectangular icon associated with a social identity provider. It
appears in the IDM login screens. It also appears when you
select Register from the Self-Service UI login screen.
If you have configured up to three social identity providers, IDM includes long rectangular buttons, with words like Register with Provider.
If you've configured four or more social identity providers, IDM includes smaller rectangular buttons with icons.
If you've configured seven or more social identity providers, you may have to scroll horizontally to log in or register with the provider of your choice.
| Property (UI) | Property (JSON file) | Description |
|---|---|---|
| Badge background color | iconBackground | Color for the social identity provider icon |
| Badge icon classname | iconClass | Name of the icon class; may be a Font Awesome
name like fa-google |
| Badge font color | iconFontColor | Color for the social identity provider icon font |
| Button image path | Looks in openidm/ui/admin/extension and then
openidm/ui/admin/default for an image
file; takes precedence over the Button icon
classname | Unknown |
| Button icon classname | buttonClass | Name for the social identity provider class; may be a Font Awesome
name like fa-yahoo |
| Button styles | buttonCustomStyle | Custom styles, such as background-color: #7B0099;
border-color: #7B0099; color:white; |
| Button hover styles | buttonCustomStyleHover | Custom styles for the hover state of a button, such as
background-color: #7B0099; border-color: #7B0099;
color:white; |
Appendix J. Audit Log Reference
This appendix lists the configuration parameters for the audit event handlers.
J.1. Audit Log Schema
The following tables depict the schema for the six audit event topics. For
the JSON audit event handler, each audit topic is logged to a distinct JSON
file, with the topic in the filename. Files are created in the
openidm/audit directory by default:
access.audit.json: see "Access Event Topic Properties"activity.audit.json: see "Activity Event Topic Properties"authentication.audit.json: see "Authentication Event Topic Properties"config.audit.json: see "Configuration Event Topic Properties"recon.audit.json: see "Reconciliation Event Topic Properties"sync.audit.json: see "Synchronization Event Topic Properties"
You can parse the files in the openidm/audit directory
using a JSON processor, such as jq. For example:
$ tail -f authentication.audit.json | jq .
{
"context": {
"component": "repo/internal/user",
"roles": [
"openidm-admin",
"openidm-authorized"
],
"ipAddress": "0:0:0:0:0:0:0:1",
"id": "openidm-admin",
"moduleId": "INTERNAL_USER"
},
"entries": [
{
"moduleId": "JwtSession",
"result": "SUCCESSFUL",
"info": {
"org.forgerock.authentication.principal": "openidm-admin"
}
}
],
"principal": [
"openidm-admin"
],
...The JSON properties that correspond to each audit topic are described in the following tables:
J.1.1. Audit Event Topics
| Event Property | Description |
|---|---|
_id | UUID for the message object, such as
"0419d364-1b3d-4e4f-b769-555c3ca098b0" |
transactionId | The UUID of the transaction; you may see the same ID in different audit event topics. |
timestamp | The time that the message was logged, in UTC format; for example
"2015-05-18T08:48:00.160Z" |
eventName | The name of the audit event: recon for
this log |
userId | User ID |
trackingIds | A unique value for an object being tracked |
action | Reconciliation action, depicted as a CREST action. For more information, see "Synchronization Actions" |
exception | The stack trace of the exception |
linkQualifier | The link qualifier applied to the action; For more information, see "Mapping a Single Source Object to Multiple Target Objects" |
mapping | The name of the mapping used for the synchronization operation,
defined in conf/sync.json. |
message | Description of the synchronization action |
messageDetail | Details from the synchronization run, shown as CREST output |
situation | The synchronization situation described in "How Synchronization Situations Are Assessed" |
sourceObjectId | The object ID on the source system, such as
managed/user/jdoe |
status | Reconciliation result status, such as SUCCESS or FAILURE |
targetObjectId | The object ID on the target system, such as
system/csvfile/account/bjensen |
reconciling | What is currently being reconciled, source for
the first phase, target for the second phase.
|
ambiguousTargetObjectIds |
When the situation is AMBIGUOUS or UNQUALIFIED, and
IDM cannot distinguish between more than one target object,
the object IDs are logged, to help figure out what was ambiguous.
|
reconAction | The reconciliation action, typically recon or
null |
entryType | The type of reconciliation log entry, such as start,
entry, or summary.
|
reconId | UUID for the reconciliation operation |
| Event Property | Description |
|---|---|
_id | UUID for the message object, such as
"0419d364-1b3d-4e4f-b769-555c3ca098b0" |
transactionId | The UUID of the transaction; you may see the same ID in different audit event topics. |
timestamp | The time that the message was logged, in UTC format; for example
"2015-05-18T08:48:00.160Z" |
eventName | The name of the audit event: sync for
this log |
userId | User ID |
trackingIds | A unique value for an object being tracked |
action | Synchronization action, depicted as a CREST action. For more information, see "Synchronization Actions" |
exception | The stack trace of the exception |
linkQualifier | The link qualifier applied to the action; For more information, see "Mapping a Single Source Object to Multiple Target Objects" |
mapping | The name of the mapping used for the synchronization operation,
defined in conf/sync.json. |
message | Description of the synchronization action |
messageDetail | Details from the reconciliation run, shown as CREST output |
situation | The synchronization situation described in "How Synchronization Situations Are Assessed" |
sourceObjectId | The object ID on the source system, such as
managed/user/jdoe |
status | Reconciliation result status, such as SUCCESS or FAILURE |
targetObjectId | The object ID on the target system, such as
uid=jdoe,ou=People,dc=example,dc=com |
J.1.2. Commons Audit Event Topics
| Event Property | Description |
|---|---|
_id | UUID for the message object, such as
"0419d364-1b3d-4e4f-b769-555c3ca098b0" |
timestamp | The time that OpenIDM logged the message, in UTC format; for example
"2015-05-18T08:48:00.160Z" |
eventName | The name of the audit event: access for
this log |
transactionId | The UUID of the transaction; you may see the same transaction for the same event in different audit event topics |
userId | User ID |
trackingId | A unique value for the object being tracked |
server.ip | IP address of the OpenIDM server |
server.port | Port number used by the OpenIDM server |
client.ip | Client IP address |
client.port | Client port number |
request.protocol | Protocol for request, typically CREST |
request.operation | The CREST operation taken on the object, for example, UPDATE, DELETE, or ACTION |
request.detail | Typically details for an ACTION request |
http.request.secure | Boolean for request security |
http.request.method | HTTP method requested by the client |
http.request.path | Path of the HTTP request |
http.request.queryParameters | Parameters sent in the HTTP request, such as a key/value pair |
http.request.headers | HTTP headers for the request (optional) |
http.request.cookies | HTTP cookies for the request (optional) |
http.response.headers | HTTP response headers (optional) |
response.status | Normally, SUCCESSFUL, FAILED, or null |
response.statusCode | SUCCESS in response.status leads to a null
response.statusCode; FAILURE leads to a 400-level
error |
response.detail | Message associated with response.statusCode, such
as Not Found or Internal Server Error |
response.elapsedTime | Time to execute the access event |
response.elapsedTimeUnits | Units for response time |
roles | OpenIDM roles associated with the request |
| Event Property | Description |
|---|---|
_id | UUID for the message object, such as
"0419d364-1b3d-4e4f-b769-555c3ca098b0" |
timestamp | The time that OpenIDM logged the message, in UTC format; for example
"2015-05-18T08:48:00.160Z" |
eventName | The name of the audit event: activity for
this log |
transactionId | The UUID of the transaction; you may see the same transaction for the same event in different audit event topics. |
userId | User ID |
trackingId | A unique value for the object being tracked |
runAs | User to run the activity as; may be used in delegated administration |
objectId | Object identifier, such as /managed/user/jdoe |
operation | The CREST operation taken on the object, for example, UPDATE, DELETE, or ACTION |
before | JSON representation of the object prior to the activity |
after | JSON representation of the object after the activity |
changedFields | Fields that were changed, based on "Specifying Fields to Monitor" |
revision | Object revision number |
status | Result, such as SUCCESS |
message | Human readable text about the action |
passwordChanged | True/False entry on changes to the password |
context | Flag for self-service logins, such as SELFSERVICE |
provider | Name of the self-service provider, normally a social identity provider |
| Event Property | Description |
|---|---|
_id | UUID for the message object, such as
"0419d364-1b3d-4e4f-b769-555c3ca098b0" |
timestamp | The time that OpenIDM logged the message, in UTC format; for example
"2015-05-18T08:48:00.160Z" |
eventName | The name of the audit event: authentication for
this log |
transactionId | The UUID of the transaction; you may see the same transaction for the same event in different audit event topics. |
userId | User ID |
trackingId | A unique value for the object being tracked |
result | The result of the transaction, either "SUCCESSFUL", or "FAILED" |
principal | An array of the accounts used to authenticate, such as [ "openidm-admin" ] |
context | The complete security context of the authentication operation, including the authenticating ID, targeted endpoint, authentication module, any roles applied, and the IP address from which the authentication request was made. |
entries | The JSON representation of the authentication session |
method | The authentication module, such as JwtSession,
MANAGED_USER and SOCIAL_PROVIDERS |
provider | The social identity provider name |
| Event Property | Description |
|---|---|
_id | UUID for the message object, such as
"0419d364-1b3d-4e4f-b769-555c3ca098b0" |
timestamp | The time that OpenIDM logged the message, in UTC format; for example
"2015-05-18T08:48:00.160Z" |
eventName | The name of the audit event: config for
this log |
transactionId | The UUID of the transaction; you may see the same transaction for the same event in different audit event topics. |
userId | User ID |
trackingId | A unique value for the object being tracked |
runAs | User to run the activity as; may be used in delegated administration |
objectId | Object identifier, such as ui |
operation | The CREST operation taken on the object, for example, UPDATE, DELETE, or ACTION |
before | JSON representation of the object prior to the activity |
after | JSON representation of the object after to the activity |
changedFields | Fields that were changed, based on "Specifying Fields to Monitor" |
revision | Object revision number |
J.2. Audit Event Handler Configuration
To configure an audit event handler, set the config
properties for that handler in your project's
conf/audit.json file.
To configure these properties from the Admin UI, click Configure > System Preferences > Audit, and click the edit icon associated with your event handler.
The tables shown in this section reflect the order in which properties are
shown in the Admin UI. That order differs when you review the properties in
your project's audit.json file.
| UI Label / Text | audit.json File Label | Description |
|---|---|---|
| Name | name | config sub-property. The name of the audit event
handler |
| Audit Events | topics | config sub-property; the list of audit topics
that are logged by this audit event handler, for example,
access, activity, and
config |
| Use for Queries | handlerForQueries | Specifies whether this audit event handler manages the queries on audit logs |
| Enabled | enabled | config sub-property; specifies whether the
audit event handler is enabled. An audit event handler can be configured,
but disabled, in which case it will not log events. |
| n/a | config | The JSON object used to configure the handler; includes several sub-properties |
Shown only in audit.json | class | The class name in the Java file(s) used to build the handler |
The following table lists the configurable properties specific to the JSON audit event handler:
config Properties| Property | Description |
|---|---|
fileRotation | Groups the file rotation configuration parameters. |
rotationEnabled | Specifies whether file rotation is enabled. Boolean, true or false. |
maxFileSize | The maximum size of an audit file, in bytes, before rotation is triggered. |
rotationFilePrefix | The prefix to add to the start of an audit file name when it is rotated. |
rotationTimes |
Specifies a list of times at which file rotation should be triggered. The
times must be provided as durations, offset from midnight. For example,
a list of 10 minutes, 20 minutes, 30 minutes will
cause files to rotate at 10, 20 and 30 minutes after midnight.
|
rotationFileSuffix |
The suffix appended to rotated audit file names. This suffix should take
the form of a timestamp, in simple date format. The default suffix
format, if none is specified, is -yyyy.MM.dd-HH.mm.ss.
|
rotationInterval |
The interval to trigger a file rotation, expressed as a duration. For
example, 5 seconds, 5 minutes,
5 hours. A value of 0 or
disabled disables time-based file rotation. Note that
you can specify a list of rotationTimes and a
rotationInterval. The audit event handler checks all
rotation and retention policies on a periodic basis, and assesses whether
each policy should be triggered at the current time, for a particular
audit file. The first policy to meet the criteria is triggered.
|
fileRetention | Groups the file retention configuration parameters. The retention policy specifies how long audit files remain on disk before they are automatically deleted. |
maxNumberOfHistoryFiles |
The maximum number of historical audit files that can be stored. If the
total number of audit files exceed this maximum, older files are deleted.
A value of -1 disables purging of old log files.
|
maxDiskSpaceToUse | The maximum disk space, in bytes, that can be used for audit files. If the total space occupied by the audit files exceed this maximum, older files are deleted. A negative or zero value indicates that this policy is disabled, that is, that unlimited disk space can be used for historical audit files. |
minFreeSpaceRequired | The minimum free disk space, in bytes, required on the system that houses the audit files. If the free space drops below this minimum, older files are deleted. A negative or zero value indicates that this policy is disabled, that is, that no minimum space requirements apply. |
rotationRetentionCheckInterval |
Interval for periodically checking file rotation and retention policies.
The interval must be a duration, for example, 5 seconds,
5 minutes, or 5 hours.
|
logDirectory | Directory with JSON audit files |
elasticsearchCompatible |
Enable ElasticSearch JSON format compatibility. Boolean, true or
false. Set this property to true, for example, if you
are using Logstash to feed into ElasticSearch. When
elasticsearchCompatible is true,
the handler renames the _id field to
_eventId because _id is reserved by
ElasticSearch. The rename is reversed after JSON serialization, so that
other handlers will see the original field name. For more information,
see the ElasticSearch
documentation. |
buffering | Configuration for event buffering |
maxSize | The maximum number of events that can be buffered (default/minimum: 100000) |
writeInterval | The delay after which the file-writer thread is scheduled to run after encountering an empty event buffer (units of 'ms' are recommended). Default: 100 ms. |
The following table lists the configurable properties specific to the CSV audit event handler:
config Properties| UI Label / Text | audit.json File Label | Description |
|---|---|---|
| File Rotation | fileRotation | Groups the file rotation configuration parameters. |
| rotationEnabled | rotationEnabled | Specifies whether file rotation is enabled. Boolean, true or false. |
| maxFileSize | maxFileSize | The maximum size of an audit file, in bytes, before rotation is triggered. |
| rotationFilePrefix | rotationFilePrefix | The prefix to add to the start of an audit file name when it is rotated. |
| Rotation Times | rotationTimes | Specifies a list of times at which file rotation should be triggered.
The times must be provided as durations, offset from midnight. For example,
a list of 10 minutes, 20 minutes, 30 minutes will cause
files to rotate at 10, 20 and 30 minutes after midnight. |
| File Rotation Suffix | rotationFileSuffix | The suffix appended to rotated audit file names. This suffix should
take the form of a timestamp, in simple date format. The default suffix
format, if none is specified, is -yyyy.MM.dd-HH.mm.ss. |
| Rotation Interval | rotationInterval |
The interval to trigger a file rotation, expressed as a duration. For
example, 5 seconds, 5 minutes,
5 hours. A value of 0 or
disabled disables time-based file rotation. Note that
you can specify a list of rotationTimes and a
rotationInterval. The audit event handler checks all
rotation and retention policies on a periodic basis, and assesses whether
each policy should be triggered at the current time, for a particular
audit file. The first policy to meet the criteria is triggered.
|
| File Retention | fileRetention | Groups the file retention configuration parameters. The retention policy specifies how long audit files remain on disk before they are automatically deleted. |
| Maximum Number of Historical Files | maxNumberOfHistoryFiles |
The maximum number of historical audit files that can be stored. If the
total number of audit files exceed this maximum, older files are deleted.
A value of -1 disables purging of old log files.
|
| Maximum Disk Space | maxDiskSpaceToUse | The maximum disk space, in bytes, that can be used for audit files. If the total space occupied by the audit files exceed this maximum, older files are deleted. A negative or zero value indicates that this policy is disabled, that is, that unlimited disk space can be used for historical audit files. |
| Minimum Free Space Required | minFreeSpaceRequired | The minimum free disk space, in bytes, required on the system that houses the audit files. If the free space drops below this minimum, older files are deleted. A negative or zero value indicates that this policy is disabled, that is, that no minimum space requirements apply. |
| rotationRetentionCheckInterval | rotationRetentionCheckInterval |
Interval for periodically checking file rotation and retention policies.
The interval must be a duration, for example, 5 seconds,
5 minutes, or 5 hours.
|
| Log Directory | logDirectory | Directory with CSV audit files |
| CSV Output Formatting | formatting | |
| quoteChar | quoteChar | Formatting: Character used around a CSV field |
| delimiterChar | delimiterChar | Formatting: Character between CSV fields |
| End of Line Symbols | endOfLineSymbols | Formatting: end of line symbol, such as \n or
\r |
| Security: CSV Tamper Evident Configuration | security | Uses keystore-based signatures |
| Enabled | enabled | CSV Tamper Evident Configuration: true or false |
| Filename | filename | CSV Tamper Evident Configuration: Path to the Java keystore |
| Password | password | CSV Tamper Evident Configuration: Password for the Java keystore |
| Keystore Handler | keystoreHandlerName | CSV Tamper Evident Configuration: Keystore name. The value of this
property must be openidm. This is the name that the
audit service provides to the ForgeRock Common Audit Framework for the
configured IDM keystore. |
| Signature Interval | signatureInterval | CSV Tamper Evident Configuration: Signature generation interval. Default = 1 hour. Units described in "Minimum Admin UI CSV Audit Handler Configuration Requirements". |
| Buffering | buffering | Configuration for optional event buffering |
| enabled | enabled | Buffering: true or false |
| autoFlush | autoFlush | Buffering: avoids flushing after each event |
Except for the common properties shown in "Common Audit Event Handler Property Configuration",
the Repository and Router audit event handlers share one unique property:
resourcePath:
{
"class" : "org.forgerock.openidm.audit.impl.RouterAuditEventHandler",
"config" : {
"name" : "router",
"topics" : [ "access", "activity", "recon", "sync", "authentication", "config" ],
"resourcePath" : "system/auditdb"
}
},config Properties| UI Label / Text | audit.json File Label | Description |
|---|---|---|
| resourcePath | resourcePath | Path to the repository resource |
Note
Take care when reading JMS properties in the audit.json
file. They include the standard ForgeRock audit event topics, along with
JMS-unique topics:
config Properties| UI Label / Text | audit.json File Label | Description |
|---|---|---|
| Delivery Mode | deliveryMode | Required property, for messages from a JMS provider; may be
PERSISTENT or NON_PERSISTENT |
| Session Mode | sessionMode | Acknowledgement mode, in sessions without transactions. May be
AUTO, CLIENT, or
DUPS_OK. |
| Batch Configuration Settings | batchConfiguration | Options when batch messaging is enabled |
| Batch Enabled | batchEnabled | Boolean for batch delivery of audit events |
| Capacity | capacity | Maximum event count in the batch queue; additional events are dropped |
| Thread Count | threadCount | Number of concurrent threads that pull events from the batch queue |
| Maximum Batched Events | maxBatchedEvents | Maximum number of events per batch |
| Insert Timeout (Seconds) | insertTimeoutSec | Waiting period (seconds) for available capacity, when a new event enters the queue |
| Polling Timeout (Seconds) | pollTimeoutSec | Worker thread waiting period (seconds) for the next event, before going idle |
| Shutdown Timeout (Seconds) | shutdownTimeoutSec | Application waiting period (seconds) for worker thread termination |
| JNDI Configuration | jndiConfiguration | Java Naming and Directory Interface (JNDI) Configuration Settings |
| JNDI Context Properties | contextProperties | Settings to populate the JNDI initial context with |
| JNDI Context Factory | java.naming.factory.initial | Initial JNDI context factory, such as
com.tibco.tibjms.naming.TibjmsInitialContextFactory
|
| JNDI Provider URL | java.naming.provider.url | Depends on provider; options include tcp://localhost:61616
and tibjmsnaming://192.168.1.133:7222 |
| JNDI Topic | topic.forgerock.idm.audit | Relevant JNDI topic; default=forgerock.idm.audit |
| JNDI Topic Name | topicName | JNDI lookup name for the JMS topic |
| Connection Factory | connectionFactoryName | JNDI lookup name for the JMS connection factory |
Note
To use the JMS resources provided by your application server, leave the
JNDI Context Properties settings empty. Values for
topicName and connectionFactoryName
will then depend on the configuration of your application server.
The ForgeRock Syslog audit event handler is based on a widely-used logging
protocol. When you configure the Syslog audit event handler, you will see
many of the following properties in the UI and in your project's
audit.json file.
config Properties| UI Label / Text | audit.json File Label | Description |
|---|---|---|
| protocol | protocol | Transport protocol for Syslog messages; may be
TCP or UDP |
| host | host | Host name or IP address of the receiving Syslog server |
| port | port | The TCP/IP port number of the receiving Syslog server |
| connectTimeout | connectTimeout | Timeout for connecting to the Syslog server (seconds) |
| facility | facility | Options shown in the Admin UI, KERN,
USER, MAIL,
DAEMON, AUTH,
SYSLOG, LPR,
NEWS, UUCP,
CRON, AUTPRIV,
FTP, NTP,
LOGAUDIT, LOGALERT,
CLOCKD, LOCAL0,
LOCAL1, LOCAL2,
LOCAL3, LOCAL4,
LOCAL5, LOCAL6,
LOCAL7
correspond directly to facility values shown in RFC 5424,
The
Syslog Protocol. |
| SeverityFieldMappings | severityFieldMappings | Sets the correspondence between audit event fields and Syslog severity values |
| topic | topic | Severity Field Mappings: the audit event topic to which the mapping applies |
| field | field | Severity Field Mappings: the audit event field to which the mapping applies; taken from the JSON schema for the audit event content |
| Value Mappings | valueMappings | Severity Field Mappings: The map of audit event values to Syslog severities. Syslog severities may be: EMERGENCY, ALERT, CRITICAL, ERROR, WARNING, NOTICE, INFORMATIONAL, or DEBUG, in descending order of importance |
| Buffering | buffering | Disabled by default; all messages written immediately to the log |
The Elasticsearch audit event handler is relatively complex, with
config subcategories for connection,
indexMapping, buffering, and
topics.
config Properties| UI Label / Text | audit.json File Label | Description |
|---|---|---|
| Connection | connection | Elasticsearch audit event handler |
| useSSL | useSSL | Connection: Use SSL/TLS to connect to Elasticsearch |
| host | host | Connection: Hostname or IP address of Elasticsearch (default: localhost) |
| port | port | Connection: Port used by Elasticsearch (default: 9200) |
| username | username | Connection: Username when Basic Authentication is enabled via Elasticsearch Shield |
| password | password | Connection: Password when Basic Authentication is enabled via Elasticsearch Shield |
| Index Mapping | indexMapping | Defines how an audit event and its fields are stored and indexed |
| indexName | indexName | Index Mapping: Index Name (default=audit). Change if 'audit' conflicts with an existing Elasticsearch index |
| Buffering | buffering | Configuration for buffering events and batch writes (increases write-throughput) |
| enabled | enabled | Buffering: recommended |
| maxSize | maxSize | Buffering: Fixed maximum number of events that can be buffered (default: 10000) |
| Write Interval | writeInterval | The delay after which the file-writer thread is scheduled to run after encountering an empty event buffer (units of 'ms' are recommended). Default: 100 ms. |
| maxBatchedEvents | maxBatchedEvents | Buffering: Maximum number of events per batch-write to Elasticsearch for each Write Interval (default: 500) |
The following table lists the configurable properties specific to the Splunk audit event handler:
config Properties| Property | Description |
|---|---|
useSSL | Specifies whether IDM should connect to the Splunk instance over SSL. Boolean, true or false. |
host | The hostname or IP address of the Splunk instance. If no hostname
is specified, localhost is assumed. |
port | The dedicated Splunk port for HTTP input. Default: 8088. |
buffering | Configuration for event buffering |
maxSize | The maximum number of events that can be buffered. Default/minimum: 10000. |
writeInterval | The delay after which the file-writer thread is scheduled to run after encountering an empty event buffer (units of 'ms' or 's' are recommended). Default: 100 ms. |
maxBatchedEvents | The maximum number of events per batch-write to Splunk for each Write Interval. Default: 500. |
authzToken | The authorization token associated with the Splunk configured HTTP event collector. |
Appendix K. Metrics Reference
Below is a list of available metrics provided by IDM. There are currently two types of metrics:
Timers provide a histogram of the duration of an event, along with a measure of the rate of occurrences. Timers are available to be monitored using both the Dropwizard dashboard widget and the IDM Prometheus endpoint. Durations in timers are measured in milliseconds, while rates are reported in number of calls per second. Below is an example timer metric:
{ "_id": "sync.source.perform-action", "count": 2, "max": 371.53391, "mean": 370.1752705, "min": 368.816631, "p50": 371.53391, "p75": 371.53391, "p95": 371.53391, "p98": 371.53391, "p99": 371.53391, "p999": 371.53391, "stddev": 1.3586395, "m15_rate": 0.393388581528647, "m1_rate": 0.311520313228562, "m5_rate": 0.3804917698002856, "mean_rate": 0.08572717156016606, "duration_units": "milliseconds", "rate_units": "calls/second", "total": 740.350541, "_type": "timer" }Summaries are similar to Timers in that they measure a distribution of events, but for recording values that aren't units of time, such as user login counts. Summaries are not available to be graphed in the Dropwizard dashboard widget, but are available through the Prometheus endpoint and by querying the
openidm/metrics/apiendpoint directly. Below is an example summary metric:{ "_id": "audit.recon", "m15_rate": 0.786777163057294, "m1_rate": 0.623040626457124, "m5_rate": 0.7609835396005712, "mean_rate": 0.16977218861919927, "units": "events/second", "total": 4, "count": 4, "_type": "summary" }
For more information about monitoring IDM metrics, see "Metrics and Monitoring".
All metrics are currently available through both
openidm/metrics/api and
openidm/metrics/prometheus endpoints, but the names for
these metrics can vary depending on the endpoint used.
K.1. API Metrics available in IDM
Metrics accessed through the API endpoint (such as those consumed by the
Dropwizard dashboard widget) use dot notation for its metric names, for
example, recon.target-phase. Below
is a table of the metrics currently available in IDM:
| API Metric Name | Type | Description |
|---|---|---|
audit.<audit-topic> | Summary | Count of all audit events generated of a given topic type. |
user.login.<user-type> | Summary | Count of all successful logins by user type. |
user.login.<user-type>.<provider> | Summary | Count of all successful logins by user type and provider. |
selfservice.user.registration.<registration-type> | Summary | Count of all successful user self-service registrations by registration type. |
selfservice.user.registration.<registration-type>.<provider> | Summary | Count of all successful user self-service registrations by registration type and provider. |
selfservice.user.password.reset | Summary | Count of all successful user self-service password resets. |
script.<script-name>.<request-type> | Timer | Rate of calls to a script and time taken to complete. |
repo.jdbc.relationship.execute | Timer | Rate of relationship graph query execution times. |
repo.jdbc.relationship.process | Timer | Rate of relationship graph query result processing times. |
repo.<repo-type>get-connection | Timer | Rate of retrievals of a repository connection. |
repo.raw._queryId.<queryId> | Timer | Rate of executions of a query with queryId at a repository level, and time taken to perform this operation. |
repo.raw._queryExpression | Timer | Rate of executions of a query with queryExpression at a repository level, and time taken to perform this operation. |
repo.<repo-type>.<operation>.<resource-mapping> | Timer | Rate of initiations of a CRUDPAQ operation to a repository datasource. |
repo.<repo-type>.<operation>.relationship | Timer | Rate of CRUDPAQ operations to a repository datasource for a generic/explicit/relationship mapped table. |
repo.<repo-type>.<operation>.<action_name>.<command>.<resource-mapping> | Timer | Rate of actions to a repository datasource for a generic/explicit mapped table. |
icf.<system-identifier>.<objectClass>.query._queryId.<queryId> | Timer | Rate of ICF query executions with queryId, and time taken to perform this operation. |
icf.<system-identifier>.<objectClass>.query._queryExpression | Timer | Rate of ICF query executions with queryExpression, and time taken to perform this operation. |
icf.<system-identifier>.<objectClass>.query._queryFilter | Timer | Rate of ICF query executions with queryFilter, and time taken to perform this operation. |
icf.<system-identifier>.<objectClass>.query._UNKNOWN | Timer | Rate of ICF query executions when the query type is UNKNOWN, and time taken to perform this operation. |
router.<path-name>.action.<action-type> | Timer | Rate of actions over the router, and time taken to perform this operation. |
router.<path-name>.create | Timer | Rate of creates over the router, and time taken to perform this operation. |
router.<path-name>.delete | Timer | Rate of deletes over the router, and time taken to perform this operation. |
router.<path-name>.patch | Timer | Rate of patches over the router, and time taken to perform this operation. |
router.<path-name>.query.queryExpression | Timer | Rate of queries with queryExpression completed over the router, and time taken to perform this operation. |
router.<path-name>.query.queryFilter | Timer | Rate of queries with queryFilter completed over the router, and time taken to perform this operation. |
router.<path-name>.read | Timer | Rate of reads over the router, and time taken to perform this operation. |
router.<path-name>.update | Timer | Rate of updates over the router, and time taken to perform this operation. |
managed.<managed-object>.<operation> | Timer | Rate of operations on a managed object. |
managed.<managed-object>.script.<script-name> | Timer | Rate of executions of a script on a managed object. |
managed.<managed-object>.relationship.fetch-relationship-fields | Timer | Rate of fetches of relationship fields of a managed object. |
managed.<managed-object>.relationship.validate-relationship-fields | Timer | Rate of validations of relationship fields of a managed object. |
managed.<managed-object>.relationship.getRelationshipValueForResource | Timer | Rate of queries to get relationship values for a resource on a managed object. |
managed.relationship.validate.read-relationship-endpoint-edges | Timer | Rate of reads on relationship endpoint edges for validation. |
recon | Timer | Rate of executions of a full reconciliation, and time taken to perform this operation. |
recon.target-phase | Timer | Rate of executions of the target phase of a reconciliation, and time taken to perform this operation. |
recon.source-phase | Timer | Rate of executions of the source phase of a reconciliation, and time taken to perform this operation. |
recon.source-phase.page | Timer | Rate of pagination executions of the source phase of a reconciliation, and time taken to perform this operation. |
recon.id-queries-phase | Timer | Rate of executions of the id query phase of a reconciliation, and time taken to perform this operation. |
sync.raw-read-object | Timer | Rate of reads of an object. |
sync.source.correlate-target | Timer | Rate of correlations between a target and a given source, and time taken to perform this operation. |
sync.source.assess-situation | Timer | Rate of assessments of a synchronization situation. |
sync.source.determine-action | Timer | Rate of determinations done on a synchronization action based on its current situation. |
sync.source.perform-action | Timer | Rate of completions of an action performed on a synchronization operation. |
sync.objectmapping.<mapping-name> | Timer | Rate of configurations applied to a mapping. |
sync.create-object | Timer | Rate of requests to create an object on the target, and the time taken to perform this operation. |
sync.delete-target | Timer | Rate of requests to delete an object on the target, and the time taken to perform this operation. |
sync.update-target | Timer | Rate of requests to update an object on the target, and the time taken to perform this operation. |
sync.target.assess-situation | Timer | Rate of assessments of a target situation. |
sync.target.determine-action | Timer | Rate of determinations done on a target action based on its current situation. |
sync.target.perform-action | Timer | Rate of completions of an action performed on a target sync operation. |
K.2. Prometheus Metrics available in IDM
Metrics accessed through the Prometheus endpoint are prepended with
idm_ and use underscores between words, for example
idm_recon_target_phase_seconds. Below is a table of the metrics
currently available in IDM:
| Prometheus Metric Name | Type | Description |
|---|---|---|
idm_audit{audit_topic=<audit-topic>} | Summary | Count of all audit events generated of a given topic type. |
idm_user_login{user_type=<user-type>} | Summary | Count of all successful logins by user type. |
idm_user_login_total{provider=<provider>,user_type=<user-type>} | Summary | Count of all successful logins by user type and provider. |
idm_selfservice_user_registration{reg_type=<registration-type>} | Summary | Count of all successful user self-service registrations by registration type. |
idm_selfservice_user_registration{provider=<registration-type>,reg_type=<provider>} | Summary | Count of all successful user self-service registrations by registration type and provider. |
idm_selfservice_user_password_reset | Summary | Count of all successful user self-service password resets. |
idm_script_<script-name>_<request-type> | Timer | Rate of calls to a script and time taken to complete. |
idm_repo_jdbc_relationship_execute_seconds | Timer | Rate of relationship graph query execution times. |
idm_repo_jdbc_relationship_process_seconds | Timer | Rate of relationship graph query result processing times. |
idm_repo_get_connection_seconds{repo_type=<repo-type>} | Timer | Rate of retrievals of a repository connection. |
idm_repo_raw__queryid_credential_<queryId>_seconds | Timer | Rate of executions of a query with queryId at a repository level, and time taken to perform this operation. |
idm_repo_raw__queryexpression_seconds | Timer | Rate of executions of a query with queryExpression at a repository level, and time taken to perform this operation. |
idm_repo_seconds{operation=<operation>,repo_type=<repo-type>,resource_mapping=<resource-mapping>} | Timer | Rate of initiations of a CRUDPAQ operation to a repository datasource. |
idm_repo_relationship_seconds{operation=<operation>,repo_type=<repo-type>} | Timer | Rate of CRUDPAQ operations to a repository datasource for a generic/explicit/relationship mapped table. |
idm_repo_seconds{action_name=<action-name>,command=<command>,operation=<operation>,repo_type=<repo-type>,resource_mapping=<resource-mapping>} | Timer | Rate of actions to a repository datasource for a generic/explicit mapped table. |
idm_icf_<system-identifier>_<objectClass>_query__queryId_<queryId>_seconds | Timer | Rate of ICF query executions with queryId, and time taken to perform this operation. |
idm_icf_<system-identifier>_<objectClass>_query__queryExpression_seconds | Timer | Rate of ICF query executions with queryExpression, and time taken to perform this operation. |
idm_icf_<system-identifier>_<objectClass>_query__queryFilter_seconds | Timer | Rate of ICF query executions with queryFilter, and time taken to perform this operation. |
idm_icf_<system-identifier>_<objectClass>_query__UNKNOWN_seconds | Timer | Rate of ICF query executions when the query type is UNKNOWN, and time taken to perform this operation. |
idm_router_<path-name>_action_<action-type>_seconds | Timer | Rate of actions over the router, and time taken to perform this operation. |
idm_router_<path-name>_create_seconds | Timer | Rate of creates over the router, and time taken to perform this operation. |
idm_router_<path-name>_delete_seconds | Timer | Rate of deletes over the router, and time taken to perform this operation. |
idm_router_<path-name>_patch_seconds | Timer | Rate of patches over the router, and time taken to perform this operation. |
idm_router_<path-name>_query_queryExpression_seconds | Timer | Rate of queries with queryExpression completed over the router, and time taken to perform this operation. |
idm_router_<path-name>_query_queryFilter_seconds | Timer | Rate of queries with queryFilter completed over the router, and time taken to perform this operation. |
idm_router_<path-name>_read_seconds | Timer | Rate of reads over the router, and time taken to perform this operation. |
idm_router_<path-name>_update_seconds | Timer | Rate of updates over the router, and time taken to perform this operation. |
idm_managed_seconds{managed_object=<managed-object>,operation=<operation>} | Timer | Rate of operations on a managed object. |
idm_managed_<managed-object>_script_<script-name>_seconds | Timer | Rate of executions of a script on a managed object. |
idm_managed_<managed-object>_relationship_fetch_relationship_fields_seconds | Timer | Rate of fetches of relationship fields of a managed object. |
idm_managed_<managed-object>_relationship_validate_relationship_fields_seconds | Timer | Rate of validations of relationship fields of a managed object. |
idm_managed_<managed-object>_relationship_get_relationship_value_for_resource_seconds | Timer | Rate of queries to get relationship values for a resource on a managed object. |
idm_managed_relationship_validate_read_relationship_endpoint_edges_seconds | Timer | Rate of reads on relationship endpoint edges for validation. |
idm_recon_seconds | Timer | Rate of executions of a full reconciliation, and time taken to perform this operation. |
idm_recon_target_phase_seconds | Timer | Rate of executions of the target phase of a reconciliation, and time taken to perform this operation. |
idm_recon_source_phase_seconds | Timer | Rate of executions of the source phase of a reconciliation, and time taken to perform this operation. |
idm_recon_source_phase_page_seconds | Timer | Rate of pagination executions of the source phase of a reconciliation, and time taken to perform this operation. |
idm_recon_id_queries_phase_seconds | Timer | Rate of executions of the id query phase of a reconciliation, and time taken to perform this operation. |
idm_sync_raw_read_object_seconds | Timer | Rate of reads of an object. |
idm_sync_source_correlate_target_seconds | Timer | Rate of correlations between a target and a given source, and time taken to perform this operation. |
idm_sync_source_assess_situation_seconds | Timer | Rate of assessments of a synchronization situation. |
idm_sync_source_determine_action_seconds | Timer | Rate of determinations done on a synchronization action based on its current situation. |
idm_sync_source_perform_action_seconds | Timer | Rate of completions of an action performed on a synchronization operation. |
idm_sync_objectmapping_seconds{mapping_name=<mapping-name>} | Timer | Rate of configurations applied to a mapping. |
idm_sync_create_object_seconds | Timer | Rate of requests to create an object on the target, and the time taken to perform this operation. |
idm_sync_delete_target_seconds | Timer | Rate of requests to delete an object on the target, and the time taken to perform this operation. |
idm_sync_update_target_seconds | Timer | Rate of requests to update an object on the target, and the time taken to perform this operation. |
idm_sync_target_assess_situation_seconds | Timer | Rate of assessments of a target situation. |
idm_sync_target_determine_action_seconds | Timer | Rate of determinations done on a target action based on its current situation. |
idm_sync_target_perform_action_seconds | Timer | Rate of completions of an action performed on a target sync operation. |
IDM Glossary
- correlation query
A correlation query specifies an expression that matches existing entries in a source repository to one or more entries on a target repository. While a correlation query may be built with a script, it is not a correlation script.
As noted in "Correlating Source Objects With Existing Target Objects", you can set up a query definition, such as
_queryId,_queryFilter, or_queryExpression, possibly with the help of alinkQualifier.- correlation script
A correlation script matches existing entries in a source repository, and returns the IDs of one or more matching entries on a target repository. While it skips the intermediate step associated with a
correlation query, a correlation script can be relatively complex, based on the operations of the script.- entitlement
An entitlement is a collection of attributes that can be added to a user entry via roles. As such, it is a specialized type of
assignment. A user or device with an entitlement gets access rights to specified resources. An entitlement is a property of a managed object.- JSON
JavaScript Object Notation, a lightweight data interchange format based on a subset of JavaScript syntax. For more information, see the JSON site.
- JSON Pointer
A JSON Pointer defines a string syntax for identifying a specific value within a JSON document. For information about JSON Pointer syntax, see the JSON Pointer RFC.
- JWT
JSON Web Token. As noted in the JSON Web Token draft IETF Memo, "JSON Web Token (JWT) is a compact URL-safe means of representing claims to be transferred between two parties." For IDM, the JWT is associated with the
JWT_SESSIONauthentication module.- managed object
An object that represents the identity-related data managed by IDM. Managed objects are configurable, JSON-based data structures that IDM stores in its pluggable repository. The default configuration of a managed object is that of a user, but you can define any kind of managed object, for example, groups or roles.
- mapping
A policy that is defined between a source object and a target object during reconciliation or synchronization. A mapping can also define a trigger for validation, customization, filtering, and transformation of source and target objects.
- OSGi
A module system and service platform for the Java programming language that implements a complete and dynamic component model. For more information, see What is OSGi? Currently, only the Apache Felix container is supported.
- reconciliation
During reconciliation, comparisons are made between managed objects and objects on source or target systems. Reconciliation can result in one or more specified actions, including, but not limited to, synchronization.
- resource
An external system, database, directory server, or other source of identity data to be managed and audited by the identity management system.
- REST
Representational State Transfer. A software architecture style for exposing resources, using the technologies and protocols of the World Wide Web. REST describes how distributed data objects, or resources, can be defined and addressed.
- role
IDM distinguishes between two distinct role types - provisioning roles and authorization roles. For more information, see "Working With Managed Roles".
- source object
In the context of reconciliation, a source object is a data object on the source system, that IDM scans before attempting to find a corresponding object on the target system. Depending on the defined mapping, IDM then adjusts the object on the target system (target object).
- synchronization
The synchronization process creates, updates, or deletes objects on a target system, based on the defined mappings from the source system. Synchronization can be scheduled or on demand.
- system object
A pluggable representation of an object on an external system. For example, a user entry that is stored in an external LDAP directory is represented as a system object in IDM for the period during which IDM requires access to that entry. System objects follow the same RESTful resource-based design principles as managed objects.
- target object
In the context of reconciliation, a target object is a data object on the target system, that IDM scans after locating its corresponding object on the source system. Depending on the defined mapping, IDM then adjusts the target object to match the corresponding source object.
Index
A
- Audit
- Event Topic
- Access, Commons Audit Event Topics
- Activity, Commons Audit Event Topics
- Authentication, Commons Audit Event Topics
- Configuration, Commons Audit Event Topics
5.7. Account Claiming: Links Between Accounts and Social Identity Providers
If your users have one or more social identity providers, they can link them to the same IDM user account. This section assumes that you have configured one or more of the social identity providers described in "Configuring Social Identity Providers".
Conversely, you should not be able to link more than one IDM account with a single social identity provider account.
When social accounts are associated with an IDM account, IDM creates a managed record, which uses the name of the social identity provider name as the managed object type, and the subject is used as the
_id. This combination has a unique constraint; if you try to associate a second IDM account with the same social account, IDM detects a conflict, which prevents the association.The default process uses the email address associated with the account. Once you've configured social identity providers, you can see this filter in the
selfservice-socialUserClaim.jsonfile:{ "name" : "socialUserClaim", "identityServiceUrl" : "managed/user", "claimQueryFilter" : "/mail eq \"{{mail}}\"" },You can modify the
claimQueryFilterto a different property such astelephoneNumber. Make sure that property is:Set to "required" in the
managed.jsonfile; the default list for managed users is shown here:"required" : [ "userName", "givenName", "sn", "mail" ]Unique; for example, if multiple users have the same telephone number, IDM responds with error messages shown in "When Multiple Users have the Same Email Address".
Based on the
claimQueryFilter, what IDM does depends on the following scenarios:"When the Email Address is New"
"When One User has the Same Email Address"
"When Multiple Users have the Same Email Address"
5.7.1. When the Email Address is New
When you register with a social identity provider, IDM checks the email address of that account against the managed user datastore.
If that email address doesn't exist for any IDM managed user, IDM takes available identifying information, and pre-populates the self-registration screen. If all required information is included, IDM proceeds to other screens, depending on what you've activated in this section: "Common Steps: User Self-Registration, Password Reset, Forgotten Username".
5.7.2. When One User has the Same Email Address
When you register with a social identity provider, IDM checks the email address of that account against the managed user datastore.
If that email address exists for one IDM managed user, IDM gives you a chance to link to that account, with the following message:
In the text box, users are expected to enter their IDM account password.
5.7.3. When Multiple Users have the Same Email Address
When you register with a social identity provider, IDM checks the email address of that account against the managed user datastore.
If that email address exists for multiple IDM managed users, IDM denies the login attempt, with the following error message:
IDM denies further attempts to login with that account with the following message:
We assume that administrators will want to help end users consolidate such conflicting accounts. To help redirect users, you can customize the first error message. To do so, find the
translation.jsonfile for your deployment.If you've set up custom configuration files per "Customizing the Self-Service UI", you'll find that file in the following directory:
openidm/ui/selfservice/extension/locales/en/. You can then change the message, as it's linked to the following property:socialAuthenticationFailed.5.7.4. The Process for End Users
When your users register with a social identity provider, as defined in "Configuring Social Identity Providers", they create an account in the IDM managed user datastore. As an end user, you can link additional social identity providers to that datastore, from the Self-Service UI, using the following steps:
Navigate to the Self-Service UI, at an URL such as
http://IDM.example.com:8080.Log into the account, either as an IDM user, or with a social identity provider.
Navigate to My Account > Sign-in & Security > Social Sign-in. You should see a list of configured social identity providers.
Enable the social identity providers of your choice. Unless you've already signed in with that social provider, you should be prompted to log into that provider.
If successful, you'll see the following message:
If that provider has already been connected to a different account, you'll see the following error message:
To test the result, log out and log back in, using the link for the newly linked social identity provider.
5.7.5. Reviewing Linked Accounts as an Administrator
You can review social identity accounts linked to an IDM account, from the Admin UI and from the command line. You can disable or delete social identity provider information for a specific user from the command line, as described in "Reviewing Linked Accounts Over REST".
When you activate a social identity provider, IDM creates a new managed object for that provider. You can review that managed object in the
managed.jsonfile, as well as in the Admin UI, by selecting Configure > Managed Objects.The information shown is reflected in the schema in the
identityProvider-providername.jsonfile for the selected provider.Note
Do not edit social identity provider profile information through IDM. Any changes that you make won't be synchronized with that provider.
5.7.5.1. Reviewing Linked Accounts Over REST
To identify linked social identity provider accounts for a user, you must specifically add the
idpsfield to your user query. For example, the following query shows bjensen's linked social identity information:$ curl \ --header "X-OpenIDM-Username:openidm-admin" \ --header "X-OpenIDM-Password:openidm-admin" \ --request GET \ "http://localhost:8080/openidm/managed/user?_queryFilter=userName+eq+'bjensen'&_fields=idps" { "result": [ { "_id": "bjensen", "_rev": "000000003062291c", "idps": [ { "_ref": "managed/google/108246554379618660085", "_refResourceCollection": "managed/google", "_refResourceId": "108246554379618660085", "_refProperties": { "_id": "ba01a4c3-8a7f-468b-8b09-95f5d34f05ea", "_rev": "0000000098619792" } } ] } ], ... }For more information about a specific social identity provider, query the identity relationship using the referred resource ID. The following example shows the information collected from the Google provider for bjensen:
$ curl \
--header "X-OpenIDM-Username:openidm-admin" \
--header "X-OpenIDM-Password:openidm-admin" \
--request GET \
"http://localhost:8080/openidm/managed/google/108246554379618660085"
    {
  "_id": "108246554379618660085",
  "_rev": "00000000e5cace4d",
  "sub": "108246554379618660085",
  "name": "Barbara Jensen",
  "given_name": "Barbara",
  "family_name": "Jensen",
  "picture": "https://lh3.googleusercontent.com/-XdUIqdMkCWA/AAAAAAAAAAI/AAAAAAAAAAA/4252rscbv5M/photo.jpg",
  "email": "babs.jensen@gmail.com",
  "email_verified": true,
  "locale": "en",
  "_meta": {
    "subject": "108246554379618660085",
    "scope": [
      "openid",
      "profile",
      "email"
    ],
    "dateCollected": "2018-03-08T02:07:27.882"
  }
}
When a user disables logins through one specific social identity provider in the self-service UI, that sets
"enabled" : falsein the data for that provider. However, that user's social identity information is preserved.Alternatively, you can use a REST call to disable logins to a specific social identity provider. The following REST call disables bjensen's ability to log in through Google:
In this case, the REST call deletes all Google social identity provider information for that user.
5.7.5.2. Reviewing Linked Accounts From the Admin UI
When you configure a social identity provider, IDM includes two features in the Admin UI.
The ability to review the social identity accounts linked to specific users. To see how this works, log into the Admin UI, and select Manage > User, and select a user. Under the Identity Providers tab, you can review the social identity providers associated with a specific account.
A managed object for each provider. For example, if you've enabled Google as a social identity provider, select Manage > Google. In the screen that appears, you can select the ID for any Google social identity account that has been used or linked to an existing IDM account, and review the profile information shared from that provider.