Guide to installing and evaluating OpenIDM. The OpenIDM project offers flexible, open source services for automating management of the identity life cycle.
Preface
This guide shows you how to install core OpenIDM services for identity management, provisioning, and compliance. Unless you are planning a throwaway evaluation or test installation, read the Release Notes before you get started.
1. Who Should Use this Guide
This guide is written for anyone installing OpenIDM to manage and to provision identities, and to ensure compliance with identity management regulations.
This guide covers the install and removal (uninstall) procedures that you theoretically perform only once per version. This guide aims to provide you with at least some idea of what happens behind the scenes when you perform the steps.
This guide also takes you through all of the samples provided with OpenIDM.
You do not need to be an OpenIDM wizard to learn something from this guide, though a background in identity management and maintaining web application software can help. You do need some background in managing services on your operating systems and in your application servers. You can nevertheless get started with this guide, and then learn more as you go along.
If you have a previous version of OpenIDM installed, see the Compatibility in the Release Notes section of the Release Notes before installing this version.
2. Formatting Conventions
Most examples in the documentation are created in GNU/Linux or Mac OS X
operating environments.
If distinctions are necessary between operating environments,
examples are labeled with the operating environment name in parentheses.
To avoid repetition file system directory names are often given
only in UNIX format as in /path/to/server,
even if the text applies to C:\path\to\server as well.
Absolute path names usually begin with the placeholder
/path/to/.
This path might translate to /opt/,
C:\Program Files\, or somewhere else on your system.
Command-line, terminal sessions are formatted as follows:
$ echo $JAVA_HOME
/path/to/jdk
Command output is sometimes formatted for narrower, more readable output even though formatting parameters are not shown in the command.
Program listings are formatted as follows:
class Test {
    public static void main(String [] args)  {
        System.out.println("This is a program listing.");
    }
}
3. Accessing Documentation Online
ForgeRock publishes comprehensive documentation online:
The ForgeRock Knowledge Base offers a large and increasing number of up-to-date, practical articles that help you deploy and manage ForgeRock software.
While many articles are visible to community members, ForgeRock customers have access to much more, including advanced information for customers using ForgeRock software in a mission-critical capacity.
ForgeRock product documentation, such as this document, aims to be technically accurate and complete with respect to the software documented. It is visible to everyone and covers all product features and examples of how to use them.
4. Using the ForgeRock.org Site
The ForgeRock.org site has links to source code for ForgeRock open source software, as well as links to the ForgeRock forums and technical blogs.
If you are a ForgeRock customer, raise a support ticket instead of using the forums. ForgeRock support professionals will get in touch to help you.
Chapter 1. Installing OpenIDM Services
This chapter covers the tasks required to install and start OpenIDM.
1.1. Before You Run OpenIDM
This section covers what you need to know before running OpenIDM.
1.1.1. Java Environment
This release of OpenIDM requires Java Development Kit 6 or Java Development Kit 7. ForgeRock recommends the most recent update of Java 6 or 7 to ensure that you have the latest security fixes.
The equivalent version of OpenJDK should work for evaluation.
1.1.2. Application Container
OpenIDM services run in an OSGi container with an embedded Servlet container, and an embedded noSQL database. By default the OSGi container is Apache Felix. The default Servlet container is Jetty. For OpenIDM 3.0.0, the only supported configuration is running the services in Apache Felix and Jetty.
1.2. Installing and Running OpenIDM
Follow the procedures in this section to install and run OpenIDM.
Follow these steps to install OpenIDM.
Make sure you have an appropriate version of Java installed.
$ java -version

java version "1.6.0_24"
Java(TM) SE Runtime Environment (build 1.6.0_24-b07-334)
Java HotSpot(TM) 64-Bit Server VM (build 19.1-b02-334, mixed mode)
Check the release notes for Java requirements in the chapter, Before You Install OpenIDM Software in the Release Notes.
Download OpenIDM from one of the following locations:
Enterprise Downloads has the latest stable, supported release of OpenIDM and the other products in the ForgeRock identity stack.
Builds includes the nightly build, the nightly experimental build, and the OpenIDM agents. Note that this is the working version of the trunk and should not be used in a production environment.
Archives includes the stable builds for all previous releases of OpenIDM.
Unpack the contents of the .zip file into the install location.
$ cd /path/to
$ unzip ~/Downloads/openidm-3.0.0.zip


...
inflating: openidm/connectors/scriptedsql-connector-[1.1,1.5].jar
inflating: openidm/bin/felix.jar
inflating: openidm/bin/openidm.jar
(Optional) By default, OpenIDM listens for HTTP and HTTPS connections on ports 8080 and 8443, respectively. To change the default port, edit the
/path/to/openidm/conf/boot/boot.propertiesfile. For more information, see Ports Used in the Integrator's Guide in the Integrator's Guide.Before running OpenIDM in production, replace the default OrientDB repository provided for evaluation with a JDBC repository.
See the chapter on Installing a Repository For Production for details.
Follow these steps to run OpenIDM interactively.
To run OpenIDM as a background process, see Starting and Stopping OpenIDM in the Integrator's Guide in the Integrator's Guide.
Start the Felix container, load all OpenIDM services, and start a command shell to allow you to manage the container.
Start OpenIDM (UNIX).
$ ./startup.sh

Using OPENIDM_HOME:   /path/to/openidm
Using OPENIDM_OPTS:   -Xmx1024m -Xms1024m
Using LOGGING_CONFIG:
 -Djava.util.logging.config.file=/path/to/openidm/conf/logging.properties
Using boot properties at /path/to/openidm/conf/boot/boot.properties
OpenIDM version "3.0.0" (revision: XXXX)
-> OpenIDM ready
Start OpenIDM (Windows).
C:\> cd \path\to\openidm
C:\> startup.bat


"Using OPENIDM_HOME:   \path\to\openidm"
"Using OPENIDM_OPTS:   -Xmx1024m -Xms1024m -Dfile.encoding=UTF-8"
"Using LOGGING_CONFIG:
 -Djava.util.logging.config.file=\path\to\openidm\conf\logging.properties"
Using boot properties at \path\to\openidm\conf\boot\boot.properties
OpenIDM version "3.0.0" (revision: XXXX)
-> OpenIDM ready
->
At the resulting
->prompt, you can enter commands such as help for usage, or ps to view the bundles installed. To see a list of all the OpenIDM core services and their states, enter the following command.-> scr list Id State Name [ 12] [active ] org.forgerock.openidm.endpoint [ 13] [active ] org.forgerock.openidm.endpoint [ 14] [active ] org.forgerock.openidm.endpoint [ 15] [active ] org.forgerock.openidm.endpoint [ 16] [active ] org.forgerock.openidm.endpoint [ 17] [active ] org.forgerock.openidm.endpoint [ 23] [unsatisfied ] org.forgerock.openidm.info [ 27] [active ] org.forgerock.openidm.provisioner.openicf.connectorinfoprovider [ 35] [active ] org.forgerock.openidm.ui.simple [ 29] [active ] org.forgerock.openidm.restlet [ 3] [active ] org.forgerock.openidm.repo.orientdb [ 7] [active ] org.forgerock.openidm.scope [ 5] [active ] org.forgerock.openidm.audit [ 32] [active ] org.forgerock.openidm.schedule [ 2] [unsatisfied ] org.forgerock.openidm.repo.jdbc [ 31] [active ] org.forgerock.openidm.workflow [ 9] [active ] org.forgerock.openidm.managed [ 28] [active ] org.forgerock.openidm.provisioner.openicf [ 22] [active ] org.forgerock.openidm.health [ 26] [active ] org.forgerock.openidm.provisioner [ 0] [active ] org.forgerock.openidm.config.starter [ 34] [active ] org.forgerock.openidm.taskscanner [ 20] [active ] org.forgerock.openidm.external.rest [ 6] [active ] org.forgerock.openidm.router [ 33] [active ] org.forgerock.openidm.scheduler [ 19] [unsatisfied ] org.forgerock.openidm.external.email [ 11] [active ] org.forgerock.openidm.sync [ 25] [active ] org.forgerock.openidm.policy [ 8] [active ] org.forgerock.openidm.script [ 10] [active ] org.forgerock.openidm.recon [ 4] [active ] org.forgerock.openidm.http.contextregistrator [ 1] [active ] org.forgerock.openidm.config [ 18] [active ] org.forgerock.openidm.endpointservice [ 30] [unsatisfied ] org.forgerock.openidm.servletfilter [ 24] [active ] org.forgerock.openidm.infoservice [ 21] [active ] org.forgerock.openidm.authentication ->A default startup does not include certain configurable services, which will indicate an
unsatisfiedstate until they are included in the configuration. As you work through the sample configurations described later in this guide, you will notice that these services are active.Startup errors and messages are logged to the console by default. You can also view these messages in the log files at
/path/to/openidm/logs.Alternatively, you can manage the container and services from the Felix administration console.
Use these hints to connect to the console.
Default Console URL: https://localhost:8443/system/console
Default user name:
adminDefault password:
admin
Some basic hints on using the Felix administration console follow.
Select the Components tab to see OpenIDM core services and their respective states.
Select the Shell tab to access the
->prompt.Select the System Information tab to stop or restart the container.
You can stop OpenIDM Services from the
->prompt, or through the Felix console.Either enter the shutdown command at the
->prompt.-> shutdown ... $
Or click Stop on the System Information tab of the Felix console, by default http://localhost:8080/system/console.
This stops the Servlet container as well, and the console is no longer accessible.
On Unix systems, you can stop OpenIDM by using the shutdown.sh script, located in the
/path/to/openidmdirectory.$ ./shutdown.sh ./shutdown.sh Stopping OpenIDM (31391)
1.3. To Get Started With the OpenIDM REST Interface
OpenIDM provides RESTful access to users in the OpenIDM repository. To access the OpenIDM repository over REST, you can use a browser-based REST client, such as the Simple REST Client for Chrome, or RESTClient for Firefox. Alternatively you can use the curl command-line utility that is included with most operating systems. For more information about curl, see https://github.com/bagder/curl.
OpenIDM is accessible over the regular and secure HTTP ports of the Jetty Servlet container, 8080 and 8443.
If you want to run curl over the secure port, 8443, you
must either include the --insecure option, or follow the
instructions shown in
Restrict
REST Access to the HTTPS Port in the Integrator's Guide. You can use those
instructions with the self-signed certificate that is generated when
OpenIDM starts, or with a *.crt file provided by a
certificate authority.
In numerous cases, curl commands to the secure port
are depicted with a --cacert self-signed.crt option.
Instructions for creating that self-signed.crt file
are shown in the aforementioned section on Restrict
REST Access to the HTTPS Port in the Integrator's Guide.
If you would rather use curl to connect to the regular
HTTP port, omit the --cacert self-signed.crt file and
point to a regular Jetty HTTP URL such as
http://localhost:8080/openidm/....
Note
All RESTful command line examples in this guide, as depicted with
curl, are based on the default configuration of
OpenIDM. If you change configuration files in directories such as
openidm/conf and openidm/script,
you might need to modify the RESTful commands to reflect those changes.
Most of the examples in this guide use client-assigned IDs when creating resources, as it makes the examples easier to read.
In general, server-assigned UUIDs are better in production, as they can be generated easily in clustered environments.
Access the following URL to obtain the JSON representation of all users in the OpenIDM repository.
$ curl \
 --header "X-OpenIDM-Username: openidm-admin" \
 --header "X-OpenIDM-Password: openidm-admin" \
 http://localhost:8080/openidm/managed/user/?_queryId=query-all-ids
When you first install OpenIDM with an empty repository, no users exist.
Create a user
joeby sending a RESTful POST.The following curl commands create the user
joein the repository.Create
joe(UNIX).$ curl \ --cacert self-signed.crt \ --header "Content-Type: application/json" \ --header "X-OpenIDM-Username: openidm-admin" \ --header "X-OpenIDM-Password: openidm-admin" \ --request POST \ --data '{ \ "userName":"joe", \ "givenName":"joe", \ "sn":"smith", \ "mail":"joe@example.com", \ "telephoneNumber":"555-123-1234", \ "password":"TestPassw0rd", \ "description":"My first user", \ "_id":"joe" \ }' \ https://localhost:8443/openidm/managed/user?_action=create { "userName": "joe", "stateProvince": "", "postalAddress": "", "effectiveAssignments": {}, "roles": [ "openidm-authorized" ], "telephoneNumber": "555-123-1234", "password": { "$crypto": { "value": { "key": "openidm-sym-default", "iv": "gTcveNaZdSHE1qeBgcmzRw==", "cipher": "AES/CBC/PKCS5Padding", "data": "X9sCuuvNwSbblxdqS65qxw==" }, "type": "x-simple-encryption", } }, "effectiveRoles": [ "openidm-authorized" ], "givenName": "joe", "address2": "", "lastPasswordAttempt": "Tue Feb 25 2014 18:03:40 GMT-0800 (PST)", "passwordAttempts": "0", "sn": "smith", "mail": "joe@example.com", "country": "", "city": "", "_rev": "1", "lastPasswordSet": "", "postalCode": "", "accountStatus": "active", "description": "My first user", "_id":"joe" }Create
joe(Windows).C:\> curl ^ --cacert self-signed.crt ^ --header "Content-Type: application/json" ^ --header "X-OpenIDM-Username: openidm-admin" ^ --header "X-OpenIDM-Password: openidm-admin" ^ --request POST ^ --data "{ ^ \"userName\":\"joe\", ^ \"givenName\":\"joe\", ^ \"sn\":\"smith\", ^ \"mail\":\"joe@example.com\", ^ \"telephoneNumber\":\"555-123-1234\", ^ \"password\":\"TestPassw0rd\", ^ \"description\":\"My first user\" ^ \"_id\":\"joe\" ^ }" ^ https://localhost:8443/openidm/managed/user?_action=create
Fetch the newly created user from the repository with a RESTful GET.
$ curl \
 --cacert self-signed.crt \
 --header "X-OpenIDM-Username: openidm-admin" \
 --header "X-OpenIDM-Password: openidm-admin" \
 --request GET \
 https://localhost:8443/openidm/managed/user/joe


{
  "effectiveAssignments": {},
  "effectiveRoles": [
    "openidm-authorized"
  ],
  "stateProvince": "",
  "userName": "joe",
  "postalAddress": "",
  "givenName": "joe",
  "address2": "",
  "lastPasswordAttempt": "Tue Feb 25 2014 18:13:03 GMT-0800 (PST)",
  "passwordAttempts": "0",
  "sn": "smith",
  "mail": "joe@example.com",
  "_rev": "1",
  "_id": "joe",
  "country": "",
  "city": "",
  "lastPasswordSet": "",
  "postalCode": "",
  "description": "My first user",
  "accountStatus": "active",
  "telephoneNumber": "555-123-1234",
  "roles": [
    "openidm-authorized"
  ]
}
Notice that more attributes are returned for user
joethan the attributes you added in the previous step. The additional attributes are added by a script namedonCreate-user-set-default-fields.jsthat is triggered when a new user is created. For more information, see Managed Object Configuration in the Integrator's Guide in the Integrator's Guide.When you create a user some attributes might be required by the policy associated with that user. These are listed in the
conf/policy.jsonfile.
1.3.1. Format REST Output for Readability
With all curl-based REST calls, OpenIDM returns the JSON object all on one line.
Without a bit of help, the JSON output is formatted all on one line. One example is shown below, and it is difficult to read:
      {"mail":"joe@example.com","sn":"smith","passwordAttempts":"0",
      "lastPasswordAttempt":"Mon Apr 14 2014 11:13:37 GMT-0800 (GMT-08:00)",
      "address2":"","givenName":"joe","effectiveRoles":["openidm-authorized"],
      "password":{"$crypto":{"type":"x-simple-encryption","value":{"data":
      "OBFVL9cG8uaLoo1N+SMJ3g==","cipher":"AES/CBC/PKCS5Padding","iv":
      "7rlV4EwkwdRHkt19F8g22A==","key":"openidm-sym-default"}}},"country":"",
      "city":"","_rev":"1","lastPasswordSet":"","postalCode":"","_id":"joe3",
      "description":"My first user","accountStatus":"active","telephoneNumber":
      "555-123-1234","roles":["openidm-authorized"],"effectiveAssignments":{},
      "postalAddress":"","stateProvince":"","userName":"joe3"}
At least two options are available to clean up this output.
The standard way to format JSON output is with a JSON parser such as jq. You would "pipe" the output of a REST call to jq, as follows:
$ curl \
--cacert self-signed.crt \
--header "X-OpenIDM-Username: openidm-admin" \
--header "X-OpenIDM-Password: openidm-admin" \
--request GET \
"https://localhost:8443/openidm/managed/user/joe" \
| jq .
The ForgeRock REST API includes an optional _prettyPrint
request parameter. The default value is false. To
use the ForgeRock REST API to format output, add a parameter such as
?_prettyPrint=true or
&_prettyPrint=true, depending on whether it is added
to the end of an existing request parameter. In this case, the following
command would return formatted output:
$ curl \
--cacert self-signed.crt \
--header "X-OpenIDM-Username: openidm-admin" \
--header "X-OpenIDM-Password: openidm-admin" \
--request GET \
"https://localhost:8443/openidm/managed/user/joe?_prettyPrint=true"
Note that most command-line examples in this guide do not show this parameter, although the output is formatted for readability.
Chapter 2. First OpenIDM Sample
This chapter provides an overview of the first sample and how it is
configured. To see a listing and an overview of the rest of the samples
provided, see the README found in openidm/samples and in
the chapter More OpenIDM
Samples.
2.1. Before You Begin
Install OpenIDM as described in the chapter on Installing OpenIDM Services.
OpenIDM comes with an internal noSQL database, OrientDB, for use as the internal repository out of the box. This makes it easy to get started with OpenIDM. OrientDB is not yet supported for production use, however, so use a supported JDBC database when moving to production.
If you want to query the internal noSQL database, you can download
OrientDB (version 1.6.6) from http://www.orientechnologies.com/download/.
You will find the shell console in the bin directory.
Start OrientDB console using either console.sh or
console.bat, and then connect to the running OpenIDM with
the connect command.
$ cd /path/to/orientdb-community-1.6.6/bin
$ ./console.sh
OrientDB console v.1.6.6 (build @BUILD@) www.orientechnologies.com
Type 'help' to display all the commands supported.

Installing extensions for GREMLIN language v.2.5.0-SNAPSHOT

orientdb> connect remote:localhost/openidm admin admin
Connecting to database [remote:localhost/openidm:localhost/openidm] with user 'admin'...OK

orientdb>
When you have connected to the database, you might find the following commands useful.
- info
Shows classes and records
- select * from managed_user
Shows all users in the OpenIDM repository
- select * from audit_activity
Shows all activity audit records
This table is created when there is some activity.
- select * from audit_recon
Shows all reconciliation audit records
This table is created when you run reconciliation.
You can also use OrientDB Studio to query the default OrientDB
repository. After you have installed and started OpenIDM, point your browser
to http://localhost:2480/. The default database
is openidm and the default user and password are
admin and admin. Click Connect to
connect to the repository. For more information about OrientDB Studio, see the
OrientDB Studio documentation.
2.2. About the Sample
OpenIDM connects data objects held in external resources by mapping one object to another. To connect to external resources, OpenIDM uses OpenICF connectors, configured for use with the external resources.
When objects in one external resource change, OpenIDM determines how the changes affect other objects, and can make the changes as necessary. This sample demonstrates how OpenIDM does this by using reconciliation. OpenIDM reconciliation compares the objects in one object set to mapped objects in another object set. Reconciliation can work in write mode, where OpenIDM writes changes to affected objects, or in report mode, where OpenIDM reports on what changes would be written without making the changes. For a complete explanation of reconciliation and synchronization, see the section on Types of Synchronization in the Integrator's Guide in the Integrator's Guide.
This sample connects to an XML file that holds sample user data. The XML file is configured as the authoritative source. In this sample, users are created in the local repository to show you how you can manage local users through the REST APIs as well as through the OpenIDM UI.
You can also use OpenIDM without storing managed objects for users in the local repository, instead reconciling and synchronizing objects directly through connectors to external resources.
Furthermore, this sample involves only one external resource. In practice, you can connect as many resources as needed for your deployment.
You can find configuration files for the sample under the
openidm/samples/sample1/conf directory. As you review
the sample, keep the following in mind.
You must start OpenIDM with the sample configuration ($ ./startup.sh -p samples/sample1). For more information, see Section 2.3, "Running Reconciliation".
OpenIDM regularly scans for any scheduler configuration files in the
confdirectory.OpenIDM's reconciliation service reads the mappings and actions for the source and target users from
conf/sync.json.Reconciliation runs, querying all users in the source, and then creating, deleting, or modifying users in the local OpenIDM repository according to the synchronization mappings.
OpenIDM writes all operations to the audit logs in both the internal database and also the flat files in the
openidm/auditdirectory.In some cases, the
conf/authentication.jsonfile includes aPASSTHROUGHauthentication module that allows newly created users to log into the UI. For more information, see the Integrator's Guide section on Using Delegated Authentication in the Integrator's Guide. For OpenIDM 3.0.0,PASSTHROUGHis an alias forDELEGATED.
When you start OpenIDM with the
./startup.sh -p samples/sample1,
that sets &{launcher.project.location} to a value of
samples/sample1. As seen shortly, the
configuration files use that variable.
The following configuration files play important roles in this sample.
samples/sample1/conf/provisioner.openicf-xml.jsonThis connector configuration file serves as the XML file resource. It is a copy of the file of the same name found in the
samples/provisionersdirectory.In this sample, the connector instance acts as the authoritative source for users. In the configuration file you can see that the
xmlFilePathis set to&{launcher.project.location}/data/xmlConnectorData.xml.The
&{launcher.project.location}, in this case, issample/sample1.For details on the OpenICF connector configuration files see Connecting to External Resources in the Integrator's Guide in the Integrator's Guide.
samples/sample1/conf/schedule-reconcile_systemXmlAccounts_managedUser.jsonThe sample schedule configuration file defines a reconciliation job that, if enabled by setting
"enabled" : true, starts a reconciliation each minute for the mapping namedsystemXmlAccounts_managedUser. The mapping is defined in the configuration file,conf/sync.json.{ "enabled" : false, "type": "cron", "schedule": "30 0/1 * * * ?", "persisted" : true, "misfirePolicy" : "fireAndProceed", "invokeService": "sync", "invokeContext": { "action": "reconcile", "mapping": "systemXmlfileAccounts_managedUser" } }For information about the schedule configuration see Scheduling Tasks and Events in the Integrator's Guide in the Integrator's Guide.
Apart from the scheduled reconciliation run, you can also start the reconciliation run through the REST interface. The call to the REST interface is an HTTP POST such as the following.
$ curl \
 --cacert self-signed.crt \
 --header "X-OpenIDM-Username: openidm-admin" \
 --header "X-OpenIDM-Password: openidm-admin" \
 --header "Content-Type: application/json" \
 --request POST \
 "https://localhost:8443/openidm/recon?_action=recon&mapping=systemXmlfileAccounts_managedUser"
Note
If you do not want to bother with creating a self-signed certificate as noted in Restrict REST Access to the HTTPS Port in the Integrator's Guide, just substitute a -k or --insecure for --cacert self-signed.crt in the REST call (the curl command).
samples/sample1/conf/sync.jsonThis sample configuration file defines the configuration for reconciliation and synchronization. The
systemXmlAccounts_managedUseris the mapping for the reconciliation. This entry inconf/sync.jsondefines the synchronization mappings between the XML file connector (source) and the local repository (target).{ "mappings": [ { "name": "systemXmlfileAccounts_managedUser", "source": "system/xmlfile/account", "target": "managed/user", "correlationQuery": { "type": "text/javascript", "source": "var query = {'_queryId' : 'for-userName', 'uid' : source.name};query;" }, "properties": [ { "source": "_id", "target": "_id" }, { "source": "description", "target": "description" }, { "source": "firstname", "target": "givenName" }, { "source": "email", "target": "mail" }, { "source": "lastname", "target": "sn" }, { "source": "name", "target": "userName" }, { "source": "password", "target": "password" } { "source" : "mobileTelephoneNumber", "target" : "telephoneNumber" }, { "source" : "roles", "transform" : { "type" : "text/javascript", "source" : "source.split(',')" }, "target" : "roles" } ], "policies": [ { "situation": "CONFIRMED", "action": "UPDATE" }, { "situation": "FOUND", "action": "IGNORE" }, { "situation": "ABSENT", "action": "CREATE" }, { "situation": "AMBIGUOUS", "action": "IGNORE" }, { "situation": "MISSING", "action": "IGNORE" }, { "situation": "SOURCE_MISSING", "action": "IGNORE" }, { "situation": "UNQUALIFIED", "action": "IGNORE" }, { "situation": "UNASSIGNED", "action": "IGNORE" } ] } ] }Source and target paths that start with
managed, such asmanaged/user, always refer to objects in the local OpenIDM repository. Paths that start withsystem, such assystem/xmlfile/account, refer to connector objects, in this case the XML file connector.For more information about synchronization, reconciliation, and
sync.json, see Configuring Synchronization in the Integrator's Guide in the Integrator's Guide.For additional examples related to scripting, see the Scripting Reference in the Integrator's Guide appendix in the Integrator's Guide.
2.3. Running Reconciliation
Start OpenIDM with the configuration for sample 1.
$ cd /path/to/openidm
$ ./startup.sh -p samples/sample1
Reconcile the objects in the resources, either by setting
"enabled" : true in the schedule configuration file
(conf/schedule-reconcile_systemXmlAccounts_managedUser.json)
and then waiting until the scheduled reconciliation happens, or by using the
REST interface, as shown in the following example.
$ curl \
 --cacert self-signed.crt \
 --header "X-OpenIDM-Username: openidm-admin" \
 --header "X-OpenIDM-Password: openidm-admin" \
 --header "Content-Type: application/json" \
 --request POST \
 "https://localhost:8443/openidm/recon?_action=recon&mapping=systemXmlfileAccounts_managedUser"
Successful reconciliation returns a reconciliation run ID, similar to the following:
{"_id":"2d87c817-3d00-4776-a705-7de2c65937d8"}To see what happened, you could look at the CSV format log file,
openidm/audit/recon.csv. If that file seems difficult
to decipher, read the guidance shown in the Integrator's Guide
section on
Querying the Reconciliation Audit Log in the Integrator's Guide.
2.4. Viewing Users and Logs
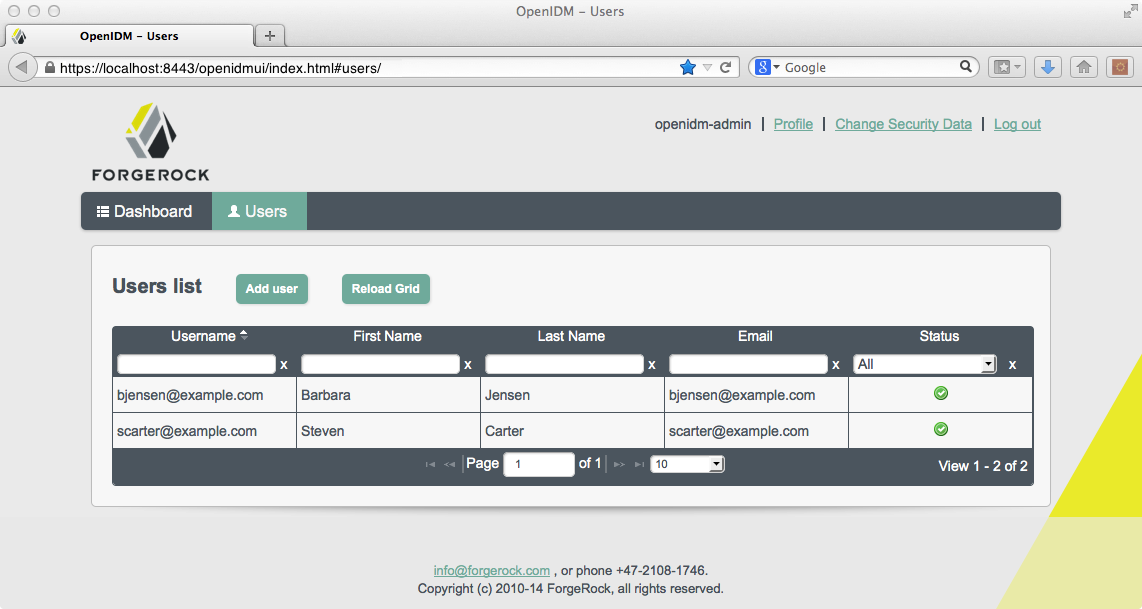
After reconciliation, you can use the UI to review configured users.
Navigate to the URL where OpenIDM is installed. If it is local, navigate to
https://localhost:8443/openidmui. Use the OpenIDM user
credentials noted, where the default administrative username and password
are openidm-admin. When you login with these credentials
and select users, you should see the result of the reconciliation:
Alternatively, you can use the REST interface to display
all users in the local repository. Use a REST client to perform an HTTP
GET on the following URL:
https://localhost:8443/openidm/managed/user?_queryId=query-all-ids
with the headers "X-OpenIDM-Username: openidm-admin" and
"X-OpenIDM-Password: openidm-admin".
OpenIDM returns JSON data. Depending on the browser, you can use a REST client to display the JSON or download it as a file. Alternatively, you can use the following curl command to get the JSON response.
$ curl \
 --cacert self-signed.crt \
 --header "X-OpenIDM-Username: openidm-admin" \
 --header "X-OpenIDM-Password: openidm-admin" \
 --request GET \
 "https://localhost:8443/openidm/managed/user?_queryId=query-all-ids"

   {
  "remainingPagedResults": -1,
  "pagedResultsCookie": null,
  "resultCount": 3,
  "result": [
    {
      "_rev": "0",
      "_id": "scarter"
    },
    {
      "_rev": "0",
      "_id": "bjensen"
    },
    {
      "_rev"  "0",
      "_id"  "joe"
    }
  ]
}
If you created user joe, as described in the procedure
entitled To
Get Started With the OpenIDM REST Interface, you should
see the ID for that user somewhere in this list. If you did not include
"_id:joe" in the command to create user
joe, you would see a system-generated UUID in the list
instead of the specified ID.
Now try a RESTful GET of user
bjensen by appending the user ID to the managed user URL
(https://localhost:8443/openidm/managed/user/).
$ curl \
 --cacert self-signed.crt \
 --header "X-OpenIDM-Username: openidm-admin" \
 --header "X-OpenIDM-Password: openidm-admin" \
 --request GET \
 "https://localhost:8443/openidm/managed/user/bjensen"

{
    "_id" : "bjensen",
    "_rev" : "1",
    "mail" : "bjensen@example.com",
    "sn" : "Jensen",
    "passwordAttempts" : "0",
    "lastPasswordAttempt" : "Tue Apr 15 2014 20:58:46 GMT-0800 (GMT-08:00)",
    "address2" : "",
    "givenName" : "Barbara",
    "country" : "",
    "city" : "",
    "lastPasswordSet" : "",
    "postalCode" : "",
    "description" : "Created By XML1",
    "accountStatus" : "active",
    "telephoneNumber" : "1234567",
    "roles" : [ "openidm-authorized" ],
    "postalAddress" : "",
    "stateProvince" : "",
    "userName" : "bjensen@example.com",
    "effectiveRoles" : [ "openidm-authorized" ],
    "effectiveAssignments" : { }
}
In the OrientDB console, connect to the database, and then query the users and audit logs. The following shows edited excerpts from a console session querying OrientDB.
As defined in the mapping file conf/sync.json, the
sn and mail parameters correspond
to family name (surname) and email address, respectively.
To make it easier to view the records, the first query only requests three specific fields.
> connect remote:localhost/openidm admin admin
Connecting to database [remote:localhost/openidm:localhost/openidm] with user 'admin'...OK

> select sn,mail,description from managed_user

---+---------+--------------------+--------------------+--------------------
  #| RID     |familyName          |email               |description
---+---------+--------------------+--------------------+--------------------
  0|    #-2:1|smith               |joe@example.com     |My first user
  1|    #-2:2|Jensen              |bjensen@example.com |Created By XML1
  2|    #-2:3|Carter              |scarter@example.com |Created By XML1
---+---------+--------------------+--------------------+--------------------

3 item(s) found. Query executed in 0.0040 sec(s).

> select * from audit_activity

---+---------+-------------+----------+...
  #| RID     |rev |action  |status    |...
---+---------+-------------+----------+...
  0|    #-2:1|0   |CREATE  |SUCCESS   |...
  1|    #-2:2|0   |CREATE  |SUCCESS   |...
  2|    #-2:3|0   |CREATE  |SUCCESS   |...
  3|    #-2:4|0   |CREATE  |SUCCESS   |...
  ...
 18 item(s) found. Query executed in 0.0090 sec(s).

> select * from audit_recon

----+------+------+-------+---------+---------+---------+...
#   |@RID  |action|status |exception|entryType|situation|...
----+------+------+-------+---------+---------+---------+...
0   |#19:0 |null  |SUCCESS|         |start    |null     |...
1   |#19:1 |CREATE|SUCCESS|         |         |ABSENT   |...
2   |#19:2 |CREATE|SUCCESS|         |         |ABSENT   |...
3   |#19:3 |IGNORE|SUCCESS|         |         |UNASSI...|...

4 item(s) found. Query executed in 0.0070 sec(s).
This information is also available in the CSV format audit logs located
in the openidm/audit directory.
$ ls /path/to/openidm/audit/

access.csv activity.csv recon.csv
2.5. Adding Users in a Resource
Add a user to the source connector XML data file to see reconciliation
in action. During the next reconciliation, OpenIDM finds the new user in the
source connector, and creates the user in the local repository. To add the
user, copy the following XML into
openidm/samples/sample1/data/xmlConnectorData.xml.
<ri:__ACCOUNT__>
    <icf:__UID__>tmorris</icf:__UID__>
    <icf:__NAME__>tmorris@example.com</icf:__NAME__>
    <ri:password>TestPassw0rd#</ri:password>
    <ri:firstname>Toni</ri:firstname>
    <ri:lastname>Morris</ri:lastname>
    <ri:email>tmorris@example.com</ri:email>
    <ri:mobileTelephoneNumber>1234567</ri:mobileTelephoneNumber>
    <ri:roles>openidm-authorized</ri:roles>
    <icf:__DESCRIPTION__>Created By XML1</icf:__DESCRIPTION__>
 </ri:__ACCOUNT__>
Run reconciliation again, as described in the section on Running
Reconciliation. After reconciliation has run, query the
local repository to see the new user appear in the list of all users under
https://localhost:8443/openidm/managed/user?_queryId=query-all-ids.
$ curl \
 --cacert self-signed.crt \
 --header "X-OpenIDM-Username: openidm-admin" \
 --header "X-OpenIDM-Password: openidm-admin" \
 --request GET \
 "https://localhost:8443/openidm/managed/user?_queryId=query-all-ids"

{
   "result": [ {
      "_id": "bjensen",
      "_rev": "0"
   }, {
      "_id": "scarter",
      "_rev": "0"
   }, {
      "_id": "joe",
      "_rev": "0"
   }, {
      "_id": "tmorris",
      "_rev": "0"
   } ],
   "resultCount": 4,
   "pagedResultsCookie": null,
   "remainingPagedResults": -1
}
Also look at the reconciliation audit log,
openidm/audit/recon.csv to see what took place during
reconciliation. This formatted excerpt from the log covers the two
reconciliation runs done in this sample.
"_id",  "action",...,"reconId","situation","sourceObjectId",                "targetObjectId","timestamp";
"7e...","CREATE",...,"486...", "ABSENT",   "system/xmlfile/account/bjensen","managed/user/bjensen",...;
"1a...","CREATE",...,"486...", "ABSENT",   "system/xmlfile/account/scarter","managed/user/scarter",...;
"47...","IGNORE",...,"486...", "UNQUALIFIED",""            ,...,            "managed/user/joe",...;
"33...","UPDATE",...,"aa9...", "CONFIRMED","system/xmlfile/account/bjensen","managed/user/bjensen",...;
"1d...","UPDATE",...,"aa9...", "CONFIRMED","system/xmlfile/account/scarter","managed/user/scarter",...;
"0e...","CREATE",...,"aa9...", "ABSENT",   "system/xmlfile/account/tmorris","managed/user/tmorris",...;
"23...","IGNORE",...,"aa9...", "UNQUALIFIED","",...,                        "managed/user/joe",...;
The relevant audit log fields in this example are: action, situation,
sourceObjectId, and targetObjectId.
For each object in the source, reconciliation leads to an action on the
target.
In the first reconciliation run (the abbreviated
reconID is shown as 486...), the source
object does not exist in the target, resulting in an ABSENT situation and an
action to CREATE the object in the target. The object created earlier in the
target does not exist in the source, and so is IGNORED.
In the second reconciliation run (the abbreviated
reconID is shown as aa9...), after you
added a user to the source XML, OpenIDM performs an UPDATE on the user objects
bjensen and scarter that already exist
in the target, in this case changing the internal ID. OpenIDM performs a CREATE
on the target for the new user (tmorris).
You configure the action that OpenIDM takes based on an object's
situation in the configuration file, conf/sync.json.
For the list of all possible situations and actions, see the Configuring Synchronization in the Integrator's Guide chapter in the
Integrator's Guide.
For details on auditing, see the Using Audit Logs in the Integrator's Guide chapter in the Integrator's Guide.
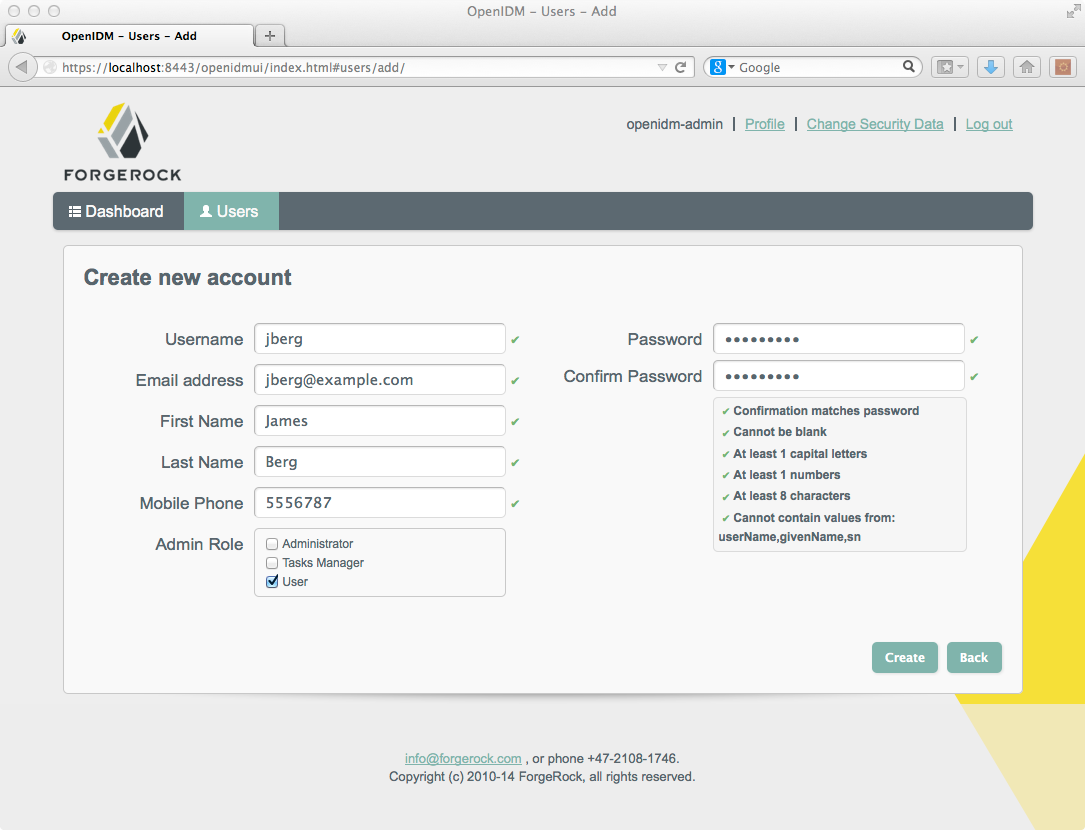
2.6. Adding Users Over REST
You can add users to the local repository over the REST interface. The following example adds a user named James Berg.
Create james (UNIX).
$ curl \
 --cacert self-signed.crt \
 --header "X-OpenIDM-Username: openidm-admin" \
 --header "X-OpenIDM-Password: openidm-admin" \
 --header "Content-Type: application/json" \
 --request POST \
 --data '{
  "_id":"jberg",
  "userName":"jberg",
  "sn":"Berg",
  "givenName":"James",
  "mail":"jberg@example.com",
  "telephoneNumber":"5556787",
  "description":"Created by OpenIDM REST.",
  "password":"MyPassw0rd"
 }' \
 "https://localhost:8443/openidm/managed/user?_action=create"

   {
    "mail" : "jberg@example.com",
    "sn" : "Berg",
    "passwordAttempts" : "0",
    "lastPasswordAttempt" : "Tue Apr 15 2014 21:05:12 GMT-0800 (GMT-08:00)",
    "address2" : "",
    "givenName" : "James",
    "effectiveRoles" : [ "openidm-authorized" ],
    "password" : {
      "$crypto" : {
        "type" : "x-simple-encryption",
        "value" : {
          "data" : "QYRcIS9FbksBEwyd4dNEpg==",
          "cipher" : "AES/CBC/PKCS5Padding",
          "iv" : "R5Kjs6jZZtqCockFCS6BfA==",
          "key" : "openidm-sym-default"
        }
      }
    },
    "country" : "",
    "city" : "",
    "_rev" : "1",
    "lastPasswordSet" : "",
    "postalCode" : "",
    "_id" : "jberg",
    "description" : "Created by OpenIDM REST.",
    "accountStatus" : "active",
    "telephoneNumber" : "5556787",
    "roles" : [ "openidm-authorized" ],
    "effectiveAssignments" : { },
    "postalAddress" : "",
    "stateProvince" : "",
    "userName" : "jberg"
}
Create james (Windows).
C:\> curl
 --cacert self-signed.crt
 --header "X-OpenIDM-Username: openidm-admin"
 --header "X-OpenIDM-Password: openidm-admin"
 --header "Content-Type: application/json"
 --request POST
 --data "{
 \"_id\":\"jberg\",
 \"userName\":\"jberg\",
 \"sn\":\"Berg\",
 \"givenName\":\"James\",
 \"email\":\"jberg@example.com\",
 \"telephoneNumber\":\"5556787\",
 \"description\":\"Created by OpenIDM REST.\",
 \"password\":\"MyPassw0rd\"
 }"
 "https://localhost:8443/openidm/managed/user?_action=create"
The output is essentially identical to that for UNIX.
OpenIDM creates the new user in the repository. If you configure a mapping to apply changes from the local repository to the XML file connector as a target, OpenIDM then updates the XML file to add the new user.
You can also add users through the UI, which uses the OpenIDM REST API. When you have logged into the UI as the OpenIDM administrator, the process is straightforward, as shown in the following figure.
Chapter 3. More OpenIDM Samples
The current distribution of OpenIDM comes with a variety of samples
in openidm/samples/. Sample 1 is described in
First OpenIDM
Sample. This chapter describes the remaining OpenIDM
samples.
3.1. Before You Begin
Install OpenIDM, as described in Installing OpenIDM Services.
OpenIDM comes with an internal noSQL database, OrientDB, for use as the internal repository out of the box. This makes it easy to get started with OpenIDM. OrientDB is not yet supported for production use, however, so use a supported JDBC database when moving to production.
3.1.1. Installing the Samples
Each sample directory in openidm/samples/ contains a
number of subdirectories, such as conf/ and
script/. To start OpenIDM with a sample configuration,
navigate to the /path/to/openidm directory and use the
-p option of the startup command to
point to the sample whose configuration you want to use. Some, but not all
samples require additional software, such as an external LDAP server or
database.
When you move from one sample to the next, bear in mind that you are changing the OpenIDM configuration.
3.1.2. Preparing OpenIDM
Install an instance of OpenIDM specifically to try the samples. That way you can experiment as much as you like, and discard the result if you are not satisfied.
If you are using the same instance of OpenIDM for multiple samples, it is
helpful to clear out the repository created for an earlier sample. To do so,
shut down OpenIDM and delete the openidm/db/openidm
directory.
$ rm -rf /path/to/openidm/db/openidm
OpenIDM should now be ready to start with a new sample. For a number of the following samples, users are created either at the UI or with a commons REST call. Once added, and when reconciliation is complete, such users should be able to log into the UI.
3.2. Sample 1 - XML File
Sample 1 is described in the chapter, First OpenIDM Sample.
3.3. Sample 2 - LDAP One Way
Sample 2 resembles the first sample, but in sample 2 OpenIDM is connected to a local LDAP server. The sample has been tested with OpenDJ , but it should work with any LDAPv3 compliant server.
Sample 2 demonstrates how OpenIDM can pick up new or changed objects from an external resource. The sample contains only one mapping, from the external LDAP server resource to the OpenIDM repository. The sample therefore does not push any changes made to OpenIDM managed user objects out to the LDAP server.
3.3.1. LDAP Server Configuration
Sample 2 expects the following configuration for the external LDAP server:
The LDAP server runs on the local host.
The LDAP server listens on port 1389.
A user with DN
cn=Directory Managerand passwordpasswordhas read access to the LDAP server.Directory data for that server is stored under base DN
dc=example,dc=com.User objects for that server are stored under base DN
ou=People,dc=example,dc=com.User objects have the object class
inetOrgPerson.User objects have the following attributes:
cndescriptiongivenNamemailsntelephoneNumberuiduserPassword
An example user object follows.
dn: uid=jdoe,ou=People,dc=example,dc=com
objectClass: person
objectClass: organizationalPerson
objectClass: inetOrgPerson
objectClass: top
givenName: John
uid: jdoe
cn: John Doe
telephoneNumber: 1-415-523-0772
sn: Doe
mail: jdoe@example.com
description: Created by OpenIDM
userPassword: password
Prepare the LDAP server by creating a base suffix of
dc=example,dc=com, and importing these objects from
samples/sample2/data/Example.ldif.
dn: dc=com
objectClass: domain
objectClass: top
dc: com

dn: dc=example,dc=com
objectClass: domain
objectClass: top
dc: example

dn: ou=People,dc=example,dc=com
ou: people
description: people
objectclass: organizationalunit

dn: uid=jdoe,ou=People,dc=example,dc=com
objectClass: person
objectClass: organizationalPerson
objectClass: inetOrgPerson
objectClass: top
givenName: John
uid: jdoe
cn: John Doe
telephoneNumber: 1-415-523-0772
sn: Doe
mail: jdoe@example.com
description: Created for OpenIDM
userPassword: password
There is an additional user, bjensen in the
sample LDIF file. This user is essentially a "dummy" user, provided for
compliance with RFC 4519, which stipulates that every
groupOfUniqueNames object must contain at least one
uniqueMember.
3.3.2. Install the Sample
Prepare OpenIDM as described in Section 3.1.2, "Preparing OpenIDM", then start OpenIDM with the configuration for sample 2.
$ cd /path/to/openidm
$ ./startup.sh -p samples/sample2
3.3.3. Running the Sample
Run reconciliation over the REST interface.
$ curl \
 --cacert self-signed.crt \
 --header "X-OpenIDM-Username: openidm-admin" \
 --header "X-OpenIDM-Password: openidm-admin" \
 --header "Content-Type: application/json" \
 --request POST \
 "https://localhost:8443/openidm/recon?_action=recon&mapping=systemLdapAccounts_managedUser"
Successful reconciliation returns a reconciliation run ID.
Note
If you want to run a curl command over regular HTTP,
remove the --cacert self-signed.crt option and change
the URL to use protocol HTTP over port 8080. For instructions on how
to set up a self-signed.crt, see the Integrator's
Guide section entitled
Restrict REST Access to the HTTPS Port in the Integrator's Guide.
With the configuration of sample 2, OpenIDM creates user objects from LDAP in OpenIDM, assigning the new objects random unique IDs. To list user objects by ID, run a query over the REST interface.
$ curl \
 --cacert self-signed.crt \
 --header "X-OpenIDM-Username: openidm-admin" \
 --header "X-OpenIDM-Password: openidm-admin" \
 --request GET \
 "https://localhost:8443/openidm/managed/user?_queryId=query-all-ids"
If you want the output to be formatted, include the
_prettyPrint=true request parameter or pipe the output to
a JSON parser such as jq, otherwise the resulting JSON
object appears all on one line.
{
    "result": [
      {
        "_id": "53fbf0c5-aa37-4845-a4b3-92a21810a36d",
        "_rev": "0"
      },
      {
        "_id": "ae0aed26-2a9c-43e3-a6f0-ca707c9c6455",
        "_rev": "0"
      }
    ],
    "resultCount": 2,
    "pagedResultsCookie": null,
    "remainingPagedResults": -1,
 }
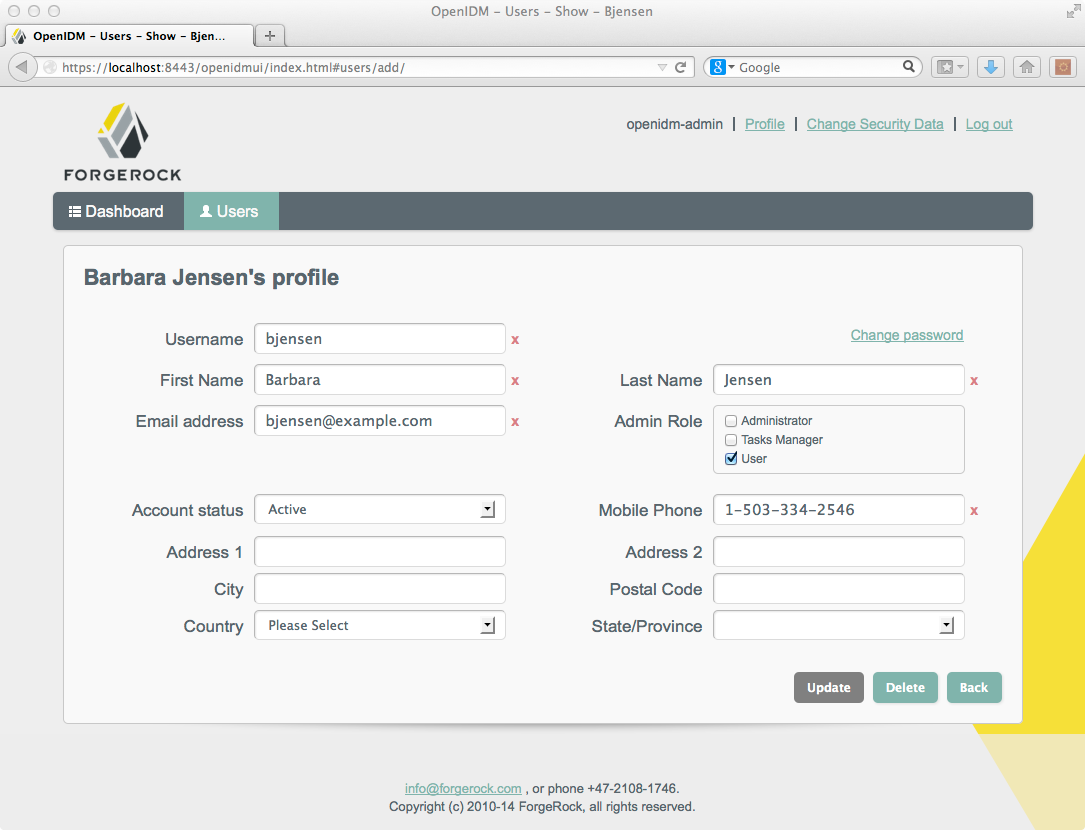
You should now be able to review reconciled users in the UI. Point your
browser to https://localhost:8443/openidmui, log in as
the openidm-admin user (with password
openidm-admin), and navigate to the Users tab. Select the
user whose profile information you want to see.
Alternatively, you can retrieve individual user objects by ID, as shown here.
$ curl \
 --cacert self-signed.crt \
 --header "X-OpenIDM-Username: openidm-admin" \
 --header "X-OpenIDM-Password: openidm-admin" \
 --request GET \
 "https://localhost:8443/openidm/managed/user/53fbf0c5-aa37-4845-a4b3-92a21810a36d"
3.4. Sample 2b - LDAP Two Way
Like sample 2, sample 2b also connects to an external LDAP server.
Unlike sample 2, however, sample 2b has two mappings configured, one from the LDAP server to the OpenIDM repository, and the other from the OpenIDM repository to the LDAP server.
3.4.1. External LDAP Configuration
Configure the LDAP server as for sample 2, Section 3.3.1, "LDAP Server Configuration". The LDAP user must have write access to create users from OpenIDM on the LDAP server.
When configuring the LDAP server, be sure to import the appropriate
LDIF file, in this case,
/path/to/openidm/samples/sample2b/data/Example.ldif
3.4.2. Install the Sample
Prepare OpenIDM as described in Section 3.1.2, "Preparing OpenIDM", then start OpenIDM with the configuration for sample 2b.
$ cd /path/to/openidm
$ ./startup.sh -p samples/sample2b
3.4.3. Running the Sample
Run reconciliation over the REST interface.
$ curl \
 --cacert self-signed.crt \
 --header "X-OpenIDM-Username: openidm-admin" \
 --header "X-OpenIDM-Password: openidm-admin" \
 --header "Content-Type: application/json" \
 --request POST \
 "https://localhost:8443/openidm/recon?_action=recon&mapping=systemLdapAccounts_managedUser"
Successful reconciliation returns a reconciliation run ID.
With the configuration of sample 2b, OpenIDM creates user objects from LDAP in OpenIDM, assigning the new objects random unique IDs. To list user objects by ID, run a query over the REST interface.
$ curl \
 --cacert self-signed.crt \
 --header "X-OpenIDM-Username: openidm-admin" \
 --header "X-OpenIDM-Password: openidm-admin" \
 --request GET \
 "https://localhost:8443/openidm/managed/user?_queryId=query-all-ids"
The resulting JSON object should include content similar to the following.
{
  "result": [
    {
      "_id": "53fbf0c5-aa37-4845-a4b3-92a21810a36d"
      "_rev": "0",
    },
    {
      "_id": "6490489f-bbff-4855-808a-5c1862b09339"
      "_rev": "0",
    }
    "resultCount": 2,
    "pagedResultsCookie": null,
    "remainingPagedResults": -1,
],
 }
To retrieve the user, log into the UI, on an URI such as
https://localhost:8443/openidmui as the administrative
user
Alternatively, you can make a commons REST call to get a specific user object by ID.
$ curl \
 --cacert self-signed.crt \
 --header "X-OpenIDM-Username: openidm-admin" \
 --header "X-OpenIDM-Password: openidm-admin" \
 --request GET \
 "https://localhost:8443/openidm/managed/user/53fbf0c5-aa37-4845-a4b3-92a21810a36d"
Test the second mapping by creating a user in the OpenIDM repository. On UNIX:
$ curl \
 --cacert self-signed.crt \
 --header "X-OpenIDM-Username: openidm-admin" \
 --header "X-OpenIDM-Password: openidm-admin" \
 --header "Content-Type: application/json" \
 --request POST \
 --data '{
    "mail":"fdoe@example.com",
    "sn":"Doe",
    "telephoneNumber":"555-1234",
    "userName":"fdoe",
    "givenName":"Felicitas",
    "description":"Felicitas Doe",
    "displayName":"fdoe"}' \
 "https://localhost:8443/openidm/managed/user?_action=create"
On Windows:
$ curl ^
 --cacert self-signed.crt ^
 --header "X-OpenIDM-Username: openidm-admin" ^
 --header "X-OpenIDM-Password: openidm-admin" ^
 --header "Content-Type: application/json" ^
 --request POST ^
 --data "{
  \"mail\":\"fdoe@example.com\",
  \"sn\":\"Doe\",
  \"telephoneNumber"\:\"555-1234\",
  \"userName\":\"fdoe\",
  \"givenName\":\"Felicitas\",
  \"description\":\"Felicitas Doe\",
  \"displayName\":\"fdoe\"}" ^
 "https://localhost:8443/openidm/managed/user?_action=create"
By default, automatic synchronization is enabled. This means that when you
update a managed object, any mappings defined in the
sync.json file that have the managed object as the
source are automatically executed to update the target system. For more
information, see Synchronization
Mappings File in the Integrator's Guide in the Integrator's
Guide.
Test that the automatic reconciliation has been successful by locating the new user in the LDAP directory.
$ /path/to/OpenDJ/bin/ldapsearch \
 -bindDN "cn=Directory Manager" \
 -bindPassword password \
 -hostname localhost \
 -port 1389 \
 -baseDN "dc=example,dc=com" \
 "uid=fdoe"
dn: uid=fdoe,ou=People,dc=example,dc=com
mail: fdoe@example.com
givenName: Felicitas
objectClass: person
objectClass: organizationalPerson
objectClass: inetOrgPerson
objectClass: top
uid: fdoe
cn: Felicitas Doe
sn: Doe
3.5. Sample 2c - Synchronizing LDAP Group Membership
Like sample 2b, sample 2c also connects to an external LDAP server. The only difference is that in sample 2c, LDAP Group Memberships are synchronized.
3.5.1. External LDAP Configuration
Configure the LDAP server as for sample 2, Section 3.3.1, "LDAP Server Configuration". The LDAP user must have write access to create users from OpenIDM on the LDAP server.
In addition, two LDAP Groups should be created, which can be found in
the LDIF file: openidm/samples/sample2c/data/Example.ldif:
dn: ou=Groups,dc=example,dc=com
ou: Groups
objectClass: organizationalUnit
objectClass: top

dn: cn=openidm,ou=Groups,dc=example,dc=com
uniqueMember: uid=jdoe,ou=People,dc=example,dc=com
cn: openidm
objectClass: groupOfUniqueNames
objectClass: top

dn: cn=openidm2,ou=Groups,dc=example,dc=com
uniqueMember: uid=bjensen,ou=People,dc=example,dc=com
cn: openidm2
objectClass: groupOfUniqueNames
objectClass: top
The users with DNs uid=jdoe,ou=People,dc=example,dc=com
and uid=bjensen,ou=People,dc=example,dc=com are also
imported with the Example.ldif file. (The user
bjensen is essentially a "dummy" user, provided for
compliance with RFC 4519, which stipulates that every
groupOfUniqueNames object must contain at least one
uniqueMember. User bjensen is not
actually used in this sample.)
3.5.2. Install the Sample
Prepare OpenIDM as described in Section 3.1.2, "Preparing OpenIDM", then start OpenIDM with the configuration for sample 2c.
$ cd /path/to/openidm
$ ./startup.sh -p samples/sample2c
3.5.3. Running the Sample
Run reconciliation over the REST interface.
$ curl \
 --cacert self-signed.crt \
 --header "X-OpenIDM-Username: openidm-admin" \
 --header "X-OpenIDM-Password: openidm-admin" \
 --header "Content-Type: application/json" \
 --request POST \
  "https://localhost:8443/openidm/recon?_action=recon&mapping=systemLdapAccounts_managedUser"
Successful reconciliation returns a reconciliation run ID.
With the configuration of sample 2c, OpenIDM creates user objects from LDAP in OpenIDM, assigning the new objects random unique IDs. To list user objects by ID, run a query over the REST interface.
$ curl \
 --cacert self-signed.crt \
 --header "X-OpenIDM-Username: openidm-admin" \
 --header "X-OpenIDM-Password: openidm-admin" \
 --request GET \
 "https://localhost:8443/openidm/managed/user?_queryId=query-all-ids"
The resulting JSON object should appear similar to the following:
{
  "result": [
    {
      "_id": "53fbf0c5-aa37-4845-a4b3-92a21810a36d"
      "_rev": "0",
    }
    {
      "_id": "56f0fb7e-3837-464d-b9ec-9d3b6af665c3",
      "_rev": "0"
    }
    ]
    "resultCount": 2,
    "pagedResultsCookie": null,
    "remainingPagedResults": -1,
 }
You should now be able to retrieve John Doe's user object in the UI,
navigating to the domain for OpenIDM such as
https://localhost:8443/openidmui. Alternatively, you can
retrieve John Doe's user object at the command line by his ID.
$ curl \
 --cacert self-signed.crt \
 --header "X-OpenIDM-Username: openidm-admin" \
 --header "X-OpenIDM-Password: openidm-admin" \
 --request GET \
 "https://localhost:8443/openidm/managed/user/53fbf0c5-aa37-4845-a4b3-92a21810a36d"
The user object should contain a property like:
"ldapGroups":["cn=openidm,ou=Groups,dc=example,dc=com"]
Now change the user on the OpenIDM side with the following REST call (on UNIX):
$ curl \
 --cacert self-signed.crt \
 --header "X-OpenIDM-Username: openidm-admin" \
 --header "X-OpenIDM-Password: openidm-admin" \
 --header "Content-Type: application/json" \
 --request POST \
 --data '[
    {
      "operation":"replace",
      "field":"/ldapGroups",
      "value": ["cn=openidm2,ou=Groups,dc=example,dc=com"]
    }
 ]' \
 "https://localhost:8443/openidm/managed/user?_action=patch&_queryId=for-userName&uid=jdoe"
On Windows, you might need to escape certain characters, so your REST call would look like this:
$ curl ^
 --cacert self-signed.crt ^
 --header "X-OpenIDM-Username: openidm-admin" ^
 --header "X-OpenIDM-Password: openidm-admin" ^
 --header "Content-Type: application/json" ^
 --request POST ^
 --data "[
    {
    \"operation\":\"replace\",
    \"field\":\"\/ldapGroups\",
    \"value\": [\"cn=openidm2,ou=Groups,dc=example,dc=com\"]
    }
 ]" ^
 "https://localhost:8443/openidm/managed/user?_action=patch&_queryId=for-userName&uid=jdoe"
This will change the user's ldapGroups property
in OpenIDM from "cn=openidm,ou=Groups,dc=example,dc=com"
to "cn=openidm2,ou=Groups,dc=example,dc=com" and, as a
result, the user will be removed from the one LDAP group and added to
the other LDAP group on OpenDJ.
Retrieve John Doe's user object again and notice the changed
"ldapGroups" property.
$ curl \
 --cacert self-signed.crt \
 --header "X-OpenIDM-Username: openidm-admin" \
 --header "X-OpenIDM-Password: openidm-admin" \
 --request GET \
 "https://localhost:8443/openidm/managed/user/56f0fb7e-3837-464d-b9ec-9d3b6af665c3"
By default, automatic synchronization is enabled. This means that when you
update a managed object, any mappings defined in the
sync.json file that have the managed object as the
source are automatically executed to update the target system. For more
information, see Synchronization
Mappings File in the Integrator's Guide in the Integrator's
Guide.
3.6. Sample 2d - Synchronizing LDAP Groups
Sample 2d also connects to an external LDAP server. This sample focuses on LDAP Group synchronization.
3.6.1. External LDAP Configuration
Configure the LDAP server as for sample 2, Section 3.3.1, "LDAP Server Configuration". The LDAP user must have write access to create users from OpenIDM on the LDAP server.
In addition, two LDAP Groups should be created, which can be found in
the LDIF file: openidm/samples/sample2d/data/Example.ldif
(if they have not already been added through sample 2c):
dn: ou=Groups,dc=example,dc=com
ou: Groups
objectClass: organizationalUnit
objectClass: top

dn: cn=openidm,ou=Groups,dc=example,dc=com
uniqueMember: uid=jdoe,ou=People,dc=example,dc=com
cn: openidm
objectClass: groupOfUniqueNames
objectClass: top

dn: cn=openidm2,ou=Groups,dc=example,dc=com
uniqueMember: uid=bjensen,ou=People,dc=example,dc=com
uniqueMember: uid=jdoe,ou=People,dc=example,dc=com
cn: openidm2
objectClass: groupOfUniqueNames
objectClass: top
The user with dn uid=jdoe,ou=People,dc=example,dc=com
is also imported with the Example.ldif file.
There is an additional user, bjensen in the
sample LDIF file. This user is essentially a "dummy" user, provided for
compliance with RFC 4519, which stipulates that every
groupOfUniqueNames object must contain at least one
uniqueMember. bjensen is not actually
used in this sample.
3.6.2. Install the Sample
Prepare OpenIDM as described in Section 3.1.2, "Preparing OpenIDM", then start OpenIDM with the configuration for sample 2d.
$ cd /path/to/openidm
$ ./startup.sh -p samples/sample2d
3.6.3. Running the Sample
Run reconciliation for the groups mapping over the REST interface.
$ curl \
 --cacert self-signed.crt \
 --header "X-OpenIDM-Username: openidm-admin" \
 --header "X-OpenIDM-Password: openidm-admin" \
 --header "Content-Type: application/json" \
 --request POST \
 "https://localhost:8443/openidm/recon?_action=recon&mapping=systemLdapGroups_managedGroup"
Successful reconciliation returns a reconciliation run ID.
With the configuration of sample 2d, OpenIDM creates group objects from LDAP in OpenIDM. To list group objects by ID, run a query over the REST interface.
$ curl \
 --cacert self-signed.crt \
 --header "X-OpenIDM-Username: openidm-admin" \
 --header "X-OpenIDM-Password: openidm-admin" \
 --request GET
 "https://localhost:8443/openidm/managed/group?_queryId=query-all-ids"
The resulting JSON object should include content similar to the following.
{
   "result":[
      {
         "_id":"3c704429-aacd-4995-816a-fac33451c642"
         "_rev": "0",
      },
      {
         "_id":"b0982152-5099-4358-bdd1-45a39ebe0d77"
         "_rev": "0",
      }
   ]
    "resultCount": 2,
    "pagedResultsCookie": null,
    "remainingPagedResults": -1,
}
To retrieve a group, get the object by ID.
$ curl \
 --cacert self-signed.crt \
 --header "X-OpenIDM-Username: openidm-admin" \
 --header "X-OpenIDM-Password: openidm-admin" \
 --request GET \
 "https://localhost:8443/openidm/managed/group/b0982152-5099-4358-bdd1-45a39ebe0d77"
Your group's object should be similar to the following:
{
    "name": [
      "openidm"
    ],
    "uniqueMember": [
      "uid=jdoe,ou=People,dc=example,dc=com"
    ],
    "description": [],
    "dn": "cn=openidm,ou=Groups,dc=example,dc=com",
    "_rev": "0",
    "_id": "b0982152-5099-4358-bdd1-45a39ebe0d77"
}
3.7. Sample 3 - Scripted SQL
Sample 3 shows an example configuration for the Scripted SQL connector. The Scripted SQL connector allows OpenIDM to communicate with the database through configurable SQL scripts. Each operation, like create or delete, is represented by its own script.
In this sample, you will see how OpenIDM uses a scripted connection to a MySQL server. Do configure MySQL first, before starting OpenIDM.
After reconciliation with the existing MySQL database, you will be able to review users in the internal repository of OpenIDM.
Sample 3 uses the following file in the conf/ directory
for the Scripted SQL connector:
conf/provisioner.openicf-scriptedsql.json. It cites
customizable Groovy scripts in the
/path/to/openidm/samples/sample3/tools directory.
Prepare a fresh installation of OpenIDM before trying this sample.
3.7.1. External Configuration
In this example OpenIDM communicates with an external MySQL database server.
Make sure MySQL is running.
Note
If you want to test this sample on an existing MySQL database, examine the
configurationProperties section of the
provisioner.openicf-scriptedsql.json file. Change
parameters such as host, database,
password, and jdbcConnectionUrl to
match your configuration.
The remainder of the Sample 3 documentation is based on the database
schema that exists in the openidm/samples/sample3/data
directory.
The sample expects the following configuration for MySQL:
The database is available on the local host.
The database listens on port 3306.
You can connect over the network to the database with user
rootand passwordpassword.MySQL serves a database called
HRDBwith a table calledUsers.The database schema is as described in the data definition language file,
openidm/samples/sample3/data/sample_HR_DB.mysql. Import the file into MySQL before running the sample.$ mysql -u root -p < /path/to/openidm/samples/sample3/data/sample_HR_DB.mysql Enter password: $
Once imported, you can review the contents of the sample in MySQL. The following command accesses the MySQL prompt:
$ mysql -u root -p
From the mysql > prompt, use the following commands
to review the users configured in the sample_HR_DB.mysql
file:
mysql > use HRDB;

Reading table information for completion of table and column names
You can turn off this feature to get a quicker startup with -A

Database changed
mysql > select * from Users;

     +----+--------+--------------+-----------+----------+---------------+------...
     | id | uid    | password     | firstname | lastname | fullname      | email...
     +----+--------+------------------------------------------+-----------+-----...
     |  1 | bob    | e38ad2149... | Bob       | Fleming  | Bob Fleming   | Bob. ...
     |  2 | rowley | 2aa60a8ff... | Rowley    | Birkin   | Rowley Birkin | Rowl ...
     |  3 | louis  | 1119cfd37... | Louis     | Balfour  | Louis Balfour | Loui ...
     |  4 | john   | a1d7584da... | John      | Smith    | John Smith    | John ...
     |  5 | jdoe   | edba955d0... | John      | Doe      | John Doe      | John ...
     +----+--------+------------------------------------------+-----------+---- ...
     5 rows in set (0.01 sec)
You can exit from the MySQL prompt with the quit command.
Note
The passwords in the output shown above are hashed to the SHA-1 standard, as they cannot be read into OpenIDM as cleartext.
The SHA-1 Hash function is used for compatibility reasons. When configuring a database for production, more secure algorithms should be used.
3.7.2. Install the Sample
Prepare OpenIDM as described in Section 3.1.2, "Preparing OpenIDM".
Set up the MySQL driver for OpenIDM. Download MySQL Connector/J, version 5.1 or later. Unpack the download and copy the .jar into the
openidm/bundledirectory.$ cp mysql-connector-java-version-bin.jar /path/to/openidm/bundle/
Once the MySQL driver is in place, start OpenIDM with the configuration for sample 3.
$ cd /path/to/openidm
$ ./startup.sh -p samples/sample3
3.7.3. Run the Sample
The sample 3 sync.json configuration file contains a
mapping to reconcile OpenIDM and the external database. Run the
reconciliation with the following command.
$ curl \
--cacert self-signed.crt \
--header "X-OpenIDM-Username: openidm-admin" \
--header "X-OpenIDM-Password: openidm-admin" \
--header "Content-Type: application/json" \
--request POST \
"https://localhost:8443/openidm/recon?_action=recon&mapping=systemHrdb_managedUser"
Reconciliation creates the five users from the database in the OpenIDM repository. Check the result with the following command.
$ curl \
 --cacert self-signed.crt \
 --header "X-OpenIDM-Username: openidm-admin" \
 --header "X-OpenIDM-Password: openidm-admin" \
 --request GET \
 "https://localhost:8443/openidm/managed/user?_queryId=query-all-ids"
The output includes the identifier _id for each user.
{
    "result": [ {
        "_id": "8366a23d-f6cf-46df-9746-469bf45aafcd",
        "_rev": "0"
    },
    {
        "_id": "3f90933b-9397-4897-84d0-03ed8d99f61e",
        "_rev": "0"
    },
    {
        "_id": "8fbf759d-bebc-42ed-b321-b69487b4470f",
        "_rev": "0"
    },
    {
        "_id": "9592de42-a8ef-4db3-9c6c-7d191e39b084",
        "_rev": "0"
    },
    {
        "_id": "d933441b-684b-446c-a89e-01eca6d21ef3",
        "_rev": "0"
    },
    {
        "_id": "fd962b71-752a-444b-8492-35bff57bec69",
        "_rev": "0"
    } ],
    "resultCount": 6,
    "pagedResultsCookie": null,
    "remainingPagedResults": -1
}
You can get more information about users with any of the following three methods:
You can review the users from the UI, navigating to the domain where OpenIDM
is installed, with a URL similar to
https://localhost:8443/openidmui
Alternatively, to view all fields for a single user, based on its
_id, run the following command:
$ curl \
 --cacert self-signed.crt \
 --header "X-OpenIDM-Username: openidm-admin" \
 --header "X-OpenIDM-Password: openidm-admin" \
 --request GET \
 "https://localhost:8443/openidm/managed/user/8366a23d-f6cf-46df-9746-469bf45aafcd"
You can query specific fields with a REST call. For example, the following
command displays the unique ID and the givenName of all
managed users:
$ curl \
 --cacert self-signed.crt \
 --header "X-OpenIDM-Username: openidm-admin" \
 --header "X-OpenIDM-Password: openidm-admin" \
 --request GET \
 "https://localhost:8443/openidm/managed/user?_queryId=query-all&fields=_openidm_id,givenName"
3.8. Sample 4 - CSV to XML File
Sample 4 works with two databases, a comma-separated value file and an XML file. There is no need to include any external resources.
A correlation query is used to relate the records in these two files.
3.8.1. Install the Sample
No external configuration is required for this sample. Prepare OpenIDM as described in Section 3.1.2, "Preparing OpenIDM", then start up OpenIDM with the configuration of sample 4.
$ cd /path/to/openidm
$ ./startup.sh -p samples/sample4
3.8.2. Check and then Run the Sample
The sample4/data/hr.csv file contains two example
users. The first line of the file sets the attribute names.
Review the current contents of the database in the
sample4/data/xmlConnectorData.xml file. For comparison
purposes, make a copy of the file in a temporary directory with a command
like:
$ cp /path/to/openidm/samples/sample4/data/xmlConnectorData.xml /tmp/
The reconciliation command run here uses the information
from the hr.csv file to update the database in the
sample4/data/xmlConnectorData.xml file.
$ curl \
 --cacert self-signed.crt \
 --header "X-OpenIDM-Username: openidm-admin" \
 --header "X-OpenIDM-Password: openidm-admin" \
 --header "Content-Type: application/json" \
 --request POST \
 "https://localhost:8443/openidm/recon?_action=recon&mapping=csv_xmlfile"
Check the results of reconciliation. Review the updated contents
of the sample4/data/xmlConnectorData.xml file.
If you want to experiment further, try changing the data in the
hr.csv file. Run the noted reconciliation command
again.
These users will not be visible from the OpenIDM UI, since they are mapped directly between the XML and CSV files. The internal OpenIDM repository is not updated in this sample.
3.9. Sample 5 - Synchronization of Two Resources
Sample 5 demonstrates the flow of data from one external resource to
another. The resources are named LDAP and
AD but in the sample, both directory-like resources are
simulated with XML files.
You can optionally configure an outbound email service, if you want to receive emailed reconciliation summaries, as described in the following section.
3.9.1. Configure Email for the Sample
If you do not configure the email service, the functionality of the sample does not change. However, you might see the following message at the OpenIDM console when you run a reconciliation operation:
Email service not configured; report not generated.
To configure an email summary, follow these steps:
Copy the template
external.email.jsonfile from the/path/to/openidm/samples/miscdirectory:$ cd /path/to/openidm $ cp samples/misc/external.email.json samples/sample5/confEdit the
external.email.jsonfile for outbound email, as described in the chapter on Sending Email in the Integrator's Guide.Edit the
reconStats.jsfile from the/path/to/openidm/samples/sample5/scriptdirectory. Near the start of the file, configure the OpenIDM email service to send statistics to the email addresses of your choice:var params = { //UPDATE THESE VALUES from : "openidm@example.com", to : "youremail@example.com", cc : "idmadmin2@example.com,idmadmin3@example.com", subject : "Recon stats for " + global.reconName, type : "text/html" }, template,
3.9.2. Install the Sample
No external configuration is required for this sample. Prepare OpenIDM as described in Section 3.1.2, "Preparing OpenIDM", then start OpenIDM with the configuration of sample 5.
$ cd /path/to/openidm
$ ./startup.sh -p samples/sample5
The XML files that simulate the resources are located in the
openidm/samples/sample5/data/ folder. When you start
OpenIDM with the sample 5 configuration, OpenIDM creates the
xml_AD_Data.xml file, which does not contain users
until you run reconciliation.
3.9.3. Run the Sample
Run a reconciliation operation, to synchronize the contents of the simulated LDAP resource to the OpenIDM repository.
$ curl \
 --cacert self-signed.crt \
 --header "X-OpenIDM-Username: openidm-admin" \
 --header "X-OpenIDM-Password: openidm-admin" \
 --header "Content-Type: application/json" \
 --request POST \
 "https://localhost:8443/openidm/recon?_action=recon&mapping=systemLdapAccounts_managedUser"
This command creates a user in the repository. It is not necessary to run a second reconciliation operation to synchronize the AD resource. Automatic synchronization propagates any change made to managed users in the OpenIDM repository to the simulated AD resource.
Review the contents of xml_AD_Data.xml. It should now
contain information for the same user that was present in the startup
version of the xml_LDAP_Data.xml file.
Alternatively, you can list users in the AD resource with the following command:
$ curl \
 --cacert self-signed.crt \
 --header "X-OpenIDM-Username: openidm-admin" \
 --header "X-OpenIDM-Password: openidm-admin" \
 --request GET \
 "https://localhost:8443/openidm/system/ad/account?_queryId=query-all-ids"

   {
  "result" : [ {
    "name" : "DDOE1",
    "__UID__" : "8dad9df3-820d-41ea-a3ab-a80c241bbc98",
    "_id" : "8dad9df3-820d-41ea-a3ab-a80c241bbc98"
  } ],
    "resultCount" : 1,
    "pagedResultsCookie" : null,
    "remainingPagedResults" : -1
}
You can use the _id of the user to read the user
information from the AD resource, for example:
$ curl \
 --cacert self-signed.crt \
 --header "X-OpenIDM-Username: openidm-admin" \
 --header "X-OpenIDM-Password: openidm-admin" \
 --request GET \
 "https://localhost:8443/openidm/system/ad/account/8dad9df3-820d-41ea-a3ab-a80c241bbc98"

   {
  "email" : [ "mail1@example.com" ],
  "name" : "DDOE1",
  "__UID__" : "8dad9df3-820d-41ea-a3ab-a80c241bbc98",
  "firstname" : "Darth",
  "lastname" : "Doe",
  "_id" : "8dad9df3-820d-41ea-a3ab-a80c241bbc98"
}[
To verify that the sample is working, repeat the process. Set up a second
user in the xml_LDAP_Data.xml file. An example of how
that file might appear with a second user (GDOE1) is
shown here:
<?xml version="1.0" encoding="UTF-8"?>
<icf:OpenICFContainer
    xmlns:icf="http://openidm.forgerock.com/xml/ns/public/resource/openicf/resource-schema-1.xsd"
    xmlns:ri="http://openidm.forgerock.com/xml/ns/public/resource/instances/resource-schema-extension"
    xmlns:xsi="http://www.w3.org/2001/XMLSchema-instance"
    xsi:schemaLocation="http://openidm.forgerock.com/xml/ns/public/resource/instances/resource-schema-extension
    samples/sample5/data/resource-schema-extension.xsd
    http://openidm.forgerock.com/xml/ns/public/resource/openicf/resource-schema-1.xsd
    data/resource-schema-1.xsd">
    <ri:__ACCOUNT__>
       <icf:__UID__>1</icf:__UID__>
       <icf:__PASSWORD__>TestPassw0rd2</icf:__PASSWORD__>
       <ri:firstname>Darth</ri:firstname>
       <icf:__DESCRIPTION__>Created By XML1</icf:__DESCRIPTION__>
       <icf:__NAME__>DDOE1</icf:__NAME__>
       <ri:email>mail1@example.com</ri:email>
       <ri:lastname>Doe</ri:lastname>
    </ri:__ACCOUNT__>
    <ri:__ACCOUNT__>
       <icf:__UID__>2</icf:__UID__>
       <icf:__PASSWORD__>TestPassw0rd2</icf:__PASSWORD__>
       <ri:firstname>Garth</ri:firstname>
       <icf:__DESCRIPTION__>Created By XML1</icf:__DESCRIPTION__>
       <icf:__NAME__>GDOE1</icf:__NAME__>
       <ri:email>mail2@example.com</ri:email>
       <ri:lastname>Doe</ri:lastname>
    </ri:__ACCOUNT__>
</icf:OpenICFContainer>
Rerun the reconciliation and query REST commands shown previously. The reconciliation operation creates the new user from the simulated LDAP resource in the OpenIDM repository. Automatic synchronization then creates that user in the AD resource.
3.10. Sample 5b - Compensated Synchronization with onSync
The compensated synchronization mechanism depicted in this sample can help manage the risks associated with synchronizing data across multiple resources.
Typically, when a managed/user object is changed, automatic synchronization replays that change to all configured external resources. If synchronization fails for one target resource (for example, due to a policy validation failure on the target, or the target being unavailable), the synchronization operation stops at that point. The effect is that a record might be changed in the repository, and in the targets on which synchronization was successful, but not on the failed target, or any targets that would have been synchronized after the failure. This situation can result in disparate data sets across resources. While a reconciliation operation would eventually bring all targets back in sync, reconciliation can be an expensive operation with large data sets.
The compensated synchronization mechanism ensures that either all resources
are synchronized successfully, or that the original change is rolled back.
This mechanism uses an onSync script hook configured with
a compensate.js script that can be used to "revert" the
partial change to managed/user and to the corresponding external resources.
Sample 5b is similar to sample 5 in that it simulates two external resources
with XML files (located in the
/path/to/samples/sample5b/data directory). The
xml_LDAP_Data.xml file simulates an LDAP data source.
OpenIDM creates the xml_AD_Data.xml file when you start
OpenIDM with the sample. Sample 5b adds the onSync script
hook to the process, configured in the
sample5b/conf/managed.json file.
The following excerpt of the managed.json file shows
the onSync hook, which calls the
compensate.js script, provided in the
/path/to/openidm/bin/defaults/script directory.
...
},
"onSync" : {
   "type" : "text/javascript",
   "file" : "compensate.js"
},
You can use the onSync script hook to ensure that changes
made in the repository are synchronized to all external resources, or that
no changes are made. For more information about how automatic synchronization
uses the onSync script hook, see How Automatic
Sync works with onSync in the Integrator's Guide in the Integrator's
Guide.
You can optionally configure an outbound email service for this sample, if you want to receive emailed reconciliation summaries. The email service configuration is identical to that of sample 5 (Section 3.9.1, "Configure Email for the Sample").
3.10.1. Install the Sample
No external configuration is required for this sample. Prepare OpenIDM as described in Section 3.1.2, "Preparing OpenIDM", then start OpenIDM with the configuration of sample 5b.
$ cd /path/to/openidm
$ ./startup.sh -p samples/sample5b
The XML files that simulate an external LDAP and AD resource are now located
in the openidm/samples/sample5b/data/ directory. The
simulated AD data store file, xml_AD_Data.xml, does not
contain users until you run reconciliation.
Run the sample in exactly the same way that you did for Sample 5, following the steps in Section 3.9.3, "Run the Sample".
3.10.2. Demonstrate onSync
To demonstrate integration of the samples with the OpenIDM UI, this sample uses the UI to view and make changes to user objects in the repository. However, you can also use the REST interface to make these changes, as shown in the previous section.
Log into the OpenIDM UI as the administrative user. On a local system,
navigate to https://localhost:8443/openidmui. The default
administrative account and password are both openidm-admin.
Make a change to the data of an existing user (DDOE1).
With automatic synchronization, that change is reflected almost immediately
on the external resources. For sample 5b, you should see the changes in both
XML files in the /path/to/openidm/sample5b/data
directory. Alternatively, you can query the external resources over REST, as
described previously.
The synchronization is successful, across all configured external resources,
so the updated user record can be seen in both the
xml_LDAP_Data.xml and
xml_AD_Data.xml files.
The next step is to simulate a problem connecting to the LDAP resource. One way to do so on the local system is to rename the LDAP data file so that it is unreadable. On a Linux system, the following command, as an administrative user, would serve that purpose:
$ cd /path/to/openidm/samples/sample5b/data
$ sudo mv xml_LDAP_Data.xml xml_LDAP_Data.xml.bak
In the UI, now try another update to user DDOE1. With the
modified filename of the simulated LDAP resource, automatic synchronization
cannot write to this resource. An error similar to the following is
displayed in the log file, openidm0.log.0:
Data file does not exist:
/path/to/openidm/samples/sample5b/data/xml_LDAP_Data.xml
Although the AD resource is available, automatic synchronization will not
reach this resource, because the mapping is specified
after the managed/user to LDAP mapping in the
sync.json file.
When the automatic synchronization fails for the LDAP resource, the
onSync hook invokes the
compensate.js script. This script attempts to revert
the original change by performing another update to DDOE1 in the repository
(managed/user). This change, in turn, triggers another automatic
synchronization to the AD and LDAP resources.
Because the LDAP resource is still unreadable, the synchronization to LDAP
fails again, which triggers the compensate.js script
again. This time, however, the script recognizes that the change was
originally called as a result of a compensation and aborts.
The original synchronization error from the first update is thrown from the script and the UI should display that error. If you refresh the UI, and view that user entry again, you will notice that the change to the entry has been reverted.
Note that if you change the name of the AD resource file (to make it
unavailable), a change to a managed/user entry will be synchronized
successfully with the LDAP resource (because that mapping appears first in
sync.json). The synchronization will fail for the AD
resource. In this case, the change will be reverted on both the managed/user
entry, and the LDAP resource.
3.11. Sample 6 - LiveSync With an AD Server
Sample 6 resembles sample 5, but demonstrates LiveSync from an external
resource. Sample 6 includes configuration files for two scenarios, depending
on whether you have a live Active Directory (AD) service, or whether you
need to simulate an AD service with an OpenDJ server. Each scenario is
associated with a file in the
/path/to/sample6/alternatives directory. The file you
select should be copied to the /path/to/sample6/conf
directory.
- Active AD Deployment
If you have an actual AD deployment available, copy the
provisioner.openicf-realad.jsonfile to theconf/subdirectory. You can then configure synchronization between an OpenDJ Directory Server and an active AD deployment.As this sample demonstrates synchronization from the AD server to OpenDJ, data on the AD server is not changed.
- Simulated AD Deployment
If you need to simulate an AD deployment, copy the
provisioner.openicf-fakead.jsonfile to theconf/subdirectory. You can then configure synchronization between an OpenDJ Directory server and a simulated AD server.This sample simulates an AD server on the same instance of OpenDJ, using a different base DN.
The options shown in the associated configuration files can be easily modified to work with any standard LDAP server.
3.11.1. Sample 6 with an Active AD Deployment
If you have an existing, active instance of AD, set up OpenDJ, as described in the OpenDJ Installation Guide.
During installation, populate OpenDJ with the data in the
Example.ldif file, available in the
/path/to/sample6/data directory.
The actions run in this sample should not change any data on the AD server.
3.11.2. Sample 6 with a Simulated AD Deployment
In this sample, an AD deployment is simulated with a different baseDN
(dc=fakead,dc=com) on the same OpenDJ server instance.
You can also simulate the AD server with a separate OpenDJ instance, running
on the same host, as long as the two instances communicate on different
ports. The data for the simulated AD instance is contained in the file
AD.ldif. The data for the OpenDJ instance is contained
in the file Example.ldif.
3.11.3. External Configuration
3.11.3.1. Prepare OpenDJ For LiveSync
This sample assumes a replicated OpenDJ server. When configured, OpenDJ replication includes an External Change Log (ECL), required to support LiveSync. LiveSync detects changes in OpenDJ by reading the ECL.
To activate the OpenDJ ECL, enable replication as described in the OpenDJ Administration Guide chapter on Managing Data Replication
Once configured, you can proceed with either an active or simulated AD deployment.
3.11.3.2. External Configuration for an Active AD Deployment
To configure an active AD deployment for sample 6, open the
provisioner.openicf-realad.json file in
a text editor. Update it as needed. At minimum, you should check and
if needed update the following parameters in that file, as shown in the
following table:
| Option | Description |
|---|---|
| host | The hostname/IP address of the AD server |
| port | The LDAP port; the default is 389. |
| ssl | By default, SSL is not used. |
| principal | The full DN of the account to bind with, such as "CN=Administrator,CN=Users,DC=example,DC=com" |
| credentials | If a password is used, replace null with that password.
When OpenIDM starts, it encrypts that password in the
provisioner.openicf-realad.conf file. |
| baseContexts | The DNs for account containers, such as ["CN=Users,DC=Example,DC=com"] |
| baseContextsToSynchronize | Set to the same value as baseContexts |
| accountSearchFilter | Default searches for active user (not computer) accounts |
| accountSynchronizationFilter | Default synchronizes with active user (not computer) accounts |
If you do not want to filter out computer and disabled user accounts,
set the accountSearchFilter and
accountSynchronizationFilter to null.
3.11.3.3. External Configuration for a Simulated AD Deployment
Not everyone has a testable instance of AD readily available. For such
administrators, you can use the AD.ldif file from
the data/ subdirectory to simulate an AD deployment.
If you have not already done so, copy the
provisioner.openicf-fakead.json file to the
conf subdirectory.
As previously mentioned, you can use a separate OpenDJ instance to simulate the AD server. However, the following instructions assume that the simulated AD server runs on the same OpenDJ instance.
Open the provisioner.openicf-fakead.json file and
note the following:
OpenDJ directory server uses port 1389 by default for users who cannot use privileged ports, so this is the port that is specified in the provisioner file. Adjust the port if your OpenDJ server is listening on a different port.
The simulated AD server uses the base DN
dc=fakead,dc=com.
To load the data for the simulated AD instance, launch the OpenDJ control
panel, add the simulated AD baseDN (dc=fakead,dc=com),
and then import the /path/to/sample6/data/AD.ldif
file. When you import the AD.ldif file, select
"Append to Existing Data", not "Overwrite Existing Data". Otherwise, the
data in the dc=example,dc=com baseDN will be
overwritten.
3.11.4. Start OpenIDM with Sample 6
Now that OpenDJ and a real or simulated AD database is configured, prepare OpenIDM as described in Section 3.1.2, "Preparing OpenIDM". You can then start OpenIDM with the configuration for sample 6.
$ cd /path/to/openidm
$ ./startup.sh -p samples/sample6
3.11.5. Run the Sample
The following sections show how to run the sample with command-based reconciliation with a REST call, and to configure scheduled reconciliation with LiveSync.
3.11.5.1. Using Reconciliation
Now that OpenIDM is in operation, review the entries in the OpenDJ
data store. When you run reconciliation, any entries that share the same
uid with the AD data store will be updated with the
contents from AD.
If you have set up the simulated AD data store as described in
Section 3.11.3.3, "External Configuration for a Simulated AD Deployment", compare the
entries for uid=jdoe as shown in the
AD.ldif and Example.ldif files.
Note the different values of givenName for
uid=jdoe.
Run reconciliation over the REST interface. If you have followed the
instructions for the simulated AD data store, the following command
takes the information for user jdoe imported from the
AD.ldif file, with a givenName of
Johnny, and synchronizes that information to the LDAP database, overwriting
the givenName of John for that same user
jdoe.
$ curl \
 --cacert self-signed.crt \
 --header "X-OpenIDM-Username: openidm-admin" \
 --header "X-OpenIDM-Password: openidm-admin" \
 --header "Content-Type: application/json" \
 --request POST \
 "https://localhost:8443/openidm/recon?_action=recon&mapping=systemAdAccounts_managedUser"
Successful reconciliation returns a reconciliation run ID.
{"_id":"9ece3807-08c3-4ec6-87fb-a6a2d0c71cee"}The reconciliation operation synchronizes the data in the AD deployment with OpenIDM repository (managed/user). That information is then automatically synchronized to the OpenDJ server, as described in Synchronization Situations and Actions in the Integrator's Guide.
After reconciliation, list all users in the OpenDJ server data store.
$ curl \
 --cacert self-signed.crt \
 --header "X-OpenIDM-Username: openidm-admin" \
 --header "X-OpenIDM-Password: openidm-admin" \
 --request GET \
 "https://localhost:8443/openidm/system/ldap/account?_queryId=query-all-ids"
The result should resemble the following JSON object.
{
  "result": [ {
     "dn" : "uid=jdoe,ou=People,dc=example,dc=com",
     "_id" : "uid=jdoe,ou=People,dc=example,dc=com"
     }, {
     "dn" : "uid=bjensen,ou=People,dc=example,dc=com",
     "_id" : "uid=bjensen,ou=People,dc=example,dc=com"
    } ],
  "resultCount": 2,
  "pagedResultsCookie": null,
  "remainingPagedResults": -1,
}
You see only two entries, as the uid=jdoe entry from
dc=fakead,dc=com overwrites the original LDAP entry for
uid=jdoe in the reconciled LDAP data store.
To read the user object in the OpenDJ server, run the
ldapsearch command. The following example returns the
entry for user uid=jdoe:
$ ./ldapsearch \
 --port 1389 \
 --baseDN dc=example,dc=com \
 "(uid=jdoe)"
3.11.5.2. Using LiveSync
You can start reconciliation by using a scheduled configuration or
by using the REST interface directly. However, to use LiveSync, you must
configure a schedule. When LiveSync is active, the default schedule in the
schedule-activeSynchroniser_systemAdAccount.json
configuration file runs LiveSync every 15 seconds.
LiveSync pushes changes made in the AD data store to the OpenIDM repository, automatically.
LiveSync is disabled by default. To activate LiveSync, change the
value of the "enabled" property
from false to true.
{
    "enabled" : false,
    "type" : "cron",
    "schedule" : "0/15 * * * * ?",
    "invokeService" : "provisioner",
    "invokeContext" : {
        "action" : "liveSync",
        "source" : "system/ad/account"
    },
    "invokeLogLevel" : "debug"
}Now you can test LiveSync. This procedure assumes that you have configured OpenDJ using the parameters and commands described in this section.
Create an LDIF file with a new user entry (
uid=bsmith) that will be added to the simulated AD data store.The following is the contents of a sample
bsmith.ldiffile for demonstration purposes:dn: uid=bsmith,ou=People,dc=fakead,dc=com objectClass: person objectClass: inetOrgPerson objectClass: organizationalPerson objectClass: top givenName: Barry description: Created to see LiveSync work uid: bsmith cn: Barry sn: Smith mail: bsmith@example.com telephoneNumber: 1-415-523-0772 userPassword: passw0rd
Navigate to the
/path/to/opendj/bindirectory.Use the ldapmodify command to add the
bsmith.ldiffile to the directory.$ ./ldapmodify --port 1389 --defaultAdd --bindDN "cn=Directory Manager" --bindPassword password --filename /path/to/bsmith.ldif
Now you can test synchronization by viewing the new user in the OpenIDM repository. The easiest way to do this, is through OpenIDM UI. You should be able to log into the UI with any of the accounts in the AD data store. For this example, log into the UI as user
bsmith, with passwordpassw0rd. The fact that you can log into the UI as this new user indicates that LiveSync has synchronized the user from the AD data store to the managed/user repository.Automatic synchronization pushes this change out to the OpenDJ data store. To test this synchronization operation, search the OpenDJ baseDN for the new user entry.
$ ./ldapsearch \
 --port 1389 \
 --baseDN ou=people,dc=example,dc=com \
 "(uid=bsmith)"
3.12. Sample 7 - Scripting a SCIM-like Schema
Sample 7 demonstrates how you can use OpenIDM to expose user data with a SCIM-like schema. The sample uses the XML file connector to read in attributes from external accounts and construct a JSON object for users stored in the OpenIDM repository. For more information about SCIM schema, see System for Cross-Domain Identity Management: Core Schema 1.1.
3.12.1. Install the Sample
Prepare OpenIDM as described in Section 3.1.2, "Preparing OpenIDM", then start OpenIDM with the configuration for sample 7.
$ cd /path/to/openidm
$ ./startup.sh -p samples/sample7
3.12.2. Running the Sample
Run a reconciliation to pull the user from
samples/sample7/data/xmlConnectorData.xml into the
OpenIDM internal repository.
$ curl \
 --cacert self-signed.crt \
 --header "X-OpenIDM-Username: openidm-admin" \
 --header "X-OpenIDM-Password: openidm-admin" \
 --header "Content-Type: application/json" \
 --request POST \
 "https://localhost:8443/openidm/recon?_action=recon&mapping=systemXmlfileAccounts_managedUser"
Reconciliation creates a user object in the repository. Retrieve the user from the repository.
$ curl \
 --cacert self-signed.crt \
 --header "X-OpenIDM-Username: openidm-admin" \
 --header "X-OpenIDM-Password: openidm-admin" \
 --request GET \
 "https://localhost:8443/openidm/managed/user/DDOE1"
The user object has the following JSON representation.
{
  "_id" : "DDOE1",
  "_rev" : "2",
  "schemas" : "['urn:scim:schemas:core:1.0']",
  "ims" : [ {
    "type" : "aim",
    "value" : "jonyOnAim"
  }, {
    "type" : "skype",
    "value" : "skyperHiasl"
  } ],
  "locale" : null,
  "phoneNumbers" : [ {
    "type" : "work",
    "value" : "1234567"
  }, {
    "type" : "home",
    "value" : "1234568"
  } ],
  "emails" : [ {
    "type" : "work",
    "value" : "hallo@example.com",
    "primary" : true
  }, {
    "type" : "home",
    "value" : "jdoe@forgerock.com"
  } ],
  "externalId" : "DDOE1",
  "preferredLanguage" : "en_US",
  "meta" : {
    "lastModified" : "Thu May 01 2014 12:57:10 GMT-0800 (GMT-08:00)",
    "created" : "Thu May 01 2014 12:56:27 GMT-0800 (GMT-08:00)"
  },
  "userType" : "permanent",
  "photos" : [ {
    "type" : "photo",
    "value" : "https://photos.example.com/profilephoto/72930000000Ccne/F"
  }, {
    "type" : "thumbnail",
    "value" : "https://photos.example.com/profilephoto/72930000000Ccne/T"
  } ],
  "title" : "Mr.Universe",
  "timezone" : "America/Denver",
  "profileUrl" : "https://login.example.com/DDOE1",
  "nickName" : "Jonny",
  "name" : {
    "familyName" : "Doe",
    "middleName" : "Hias",
    "formatted" : "Dr. John H Doe III",
    "givenName" : "John",
    "honorificSuffix" : "III",
    "honorificPrefix" : "Dr."
  },
  "userName" : "DDOE1",
  "displayName" : "John Doe",
  "addresses" : [ {
    "streetAddress" : "100 Universal City Plaza",
    "region" : "CA",
    "formatted" : "100 Universal City Plaza\nHollywood, CA 91608 USA",
    "postalCode" : "91608",
    "primary" : "true",
    "locality" : "Hollywood",
    "type" : "work",
    "country" : "USA"
  }, {
    "streetAddress" : "222 Universal City Plaza",
    "region" : "CA",
    "formatted" : "222 Universal City Plaza\nHollywood, CA 91622 USA",
    "postalCode" : "91622",
    "primary" : "false",
    "locality" : "Hollywood",
    "type" : "home",
    "country" : "USA"
  } ],
  "groups" : [ {
    "value" : "usemploys",
    "display" : "US Employees"
  }, {
    "value" : "euemploys",
    "display" : "EU Employees"
  } ]
}
The sample script file, scim.js in the
/path/to/samples/sample7/script directory,
transforms the user data from the resource into the JSON object layout
required by SCIM schema.
3.13. Sample 8 - Logging in Scripts
OpenIDM provides a logger object with
debug(), error(),
info(), trace(), and
warn() functions that you can use to log messages to
the OpenIDM console from your scripts.
3.13.1. Install the Sample
Prepare OpenIDM as described in Section 3.1.2, "Preparing OpenIDM", then start OpenIDM with the configuration for sample 8.
$ cd /path/to/openidm
$ ./startup.sh -p samples/sample8
The sync.json file in the
/path/to/samples/sample8/conf directory includes
brief examples of log messages.
3.13.2. Running the Sample
Run reconciliation over the REST interface.
$ curl \
 --cacert self-signed.crt \
 --header "X-OpenIDM-Username: openidm-admin" \
 --header "X-OpenIDM-Password: openidm-admin" \
 --header "Content-Type: application/json" \
 --request POST \
 "https://localhost:8443/openidm/recon?_action=recon&mapping=systemXmlfileAccounts_managedUser"
Successful reconciliation returns a reconciliation run ID.
Notice the log messages displayed on the OpenIDM (Felix) console. The following example omits timestamps and so forth to show only the message strings.
->
...Case no Source: the source object contains: = null [5235432-...
...Case emptySource: the source object contains: = {lastname=Carter, mobile...
...Case sourceDescription: the source object contains: = Created By XML1
...Case onCreate: the source object contains: = {lastname=Carter, mobile...
...Case result: the source object contains: = {SOURCE_IGNORED={count=0, ids=[]},...
3.14. Sample 9 - Asynchronous Reconciliation Using Workflows
Sample 9 demonstrates asynchronous reconciliation using workflows.
Reconciliation generates an approval request for each ABSENT user. The
configuration for this action is defined in the conf/sync.json
file, which specifies that an ABSENT condition should
launch the managedUserApproval workflow:
...
    {
        "situation" : "ABSENT",
        "action" : {
            "workflowName" : "managedUserApproval",
            "type" : "text/javascript",
            "file" : "workflow/triggerWorkflowFromSync.js"
        }
    },
 ...
When the request is approved by an administrator, the absent users are created by an asynchronous reconciliation process.
Prepare a fresh installation of OpenIDM before trying this sample.
3.14.1. Install the Sample
Prepare OpenIDM as described in Section 3.1.2, "Preparing OpenIDM", then start OpenIDM with the configuration for sample 9.
$ cd /path/to/openidm
$ ./startup.sh -p samples/sample9
3.14.2. Running the Sample
Run reconciliation over the REST interface.
$ curl \
 --cacert self-signed.crt \
 --header "X-OpenIDM-Username: openidm-admin" \
 --header "X-OpenIDM-Password: openidm-admin" \
 --header "Content-Type: application/json" \
 --request POST \
 "https://localhost:8443/openidm/recon?_action=recon&mapping=systemXmlfileAccounts_managedUser"
Successful reconciliation returns a reconciliation run ID.
The reconciliation starts an approval workflow for each ABSENT user. These approval workflows (named
managedUserApproval) wait for the request to be approved by an administrator.Query the invoked workflow task instances over REST.
$ curl \
 --cacert self-signed.crt \
 --header "X-OpenIDM-Username: openidm-admin" \
 --header "X-OpenIDM-Password: openidm-admin" \
 --request GET \
 "https://localhost:8443/openidm/workflow/taskinstance?_queryId=query-all-ids"
In this case, the request returns two workflow results, each with a process ID (
_id) as well as a process definition ID. You will use the value of the_idshortly.{ "result" : [ { "tenantId" : "", "createTime" : "2014-05-01T13:48:42.980-08:00", "executionId" : "101", "delegationStateString" : null, "processVariables" : { }, "_id" : "123", "processInstanceId" : "101", "description" : null, "priority" : 50, "name" : "Evaluate request", "dueDate" : null, "parentTaskId" : null, "processDefinitionId" : "managedUserApproval:1:3", "taskLocalVariables" : { }, "suspensionState" : 1, "assignee" : "openidm-admin", "cachedElContext" : null, "queryVariables" : null, "activityInstanceVariables" : { }, "deleted" : false, "suspended" : false, "_rev" : 1, "revisionNext" : 2, "category" : null, "taskDefinitionKey" : "evaluateRequest", "owner" : null, "eventName" : null, "delegationState" : null }, { "tenantId" : "", "createTime" : "2014-05-01T13:48:42.980-08:00", "executionId" : "102", "delegationStateString" : null, "processVariables" : { }, "_id" : "124", "processInstanceId" : "102", "description" : null, "priority" : 50, "name" : "Evaluate request", "dueDate" : null, "parentTaskId" : null, "processDefinitionId" : "managedUserApproval:1:3", "taskLocalVariables" : { }, "suspensionState" : 1, "assignee" : "openidm-admin", "cachedElContext" : null, "queryVariables" : null, "activityInstanceVariables" : { }, "deleted" : false, "suspended" : false, "_rev" : 1, "revisionNext" : 2, "category" : null, "taskDefinitionKey" : "evaluateRequest", "owner" : null, "eventName" : null, "delegationState" : null } ], "resultCount" : 2, "pagedResultsCookie" : null, "remainingPagedResults" : -1 }Approve the requests over REST, by setting the
"requestApproved"parameter for the specified task instance to"true". Note the use of one of the values of_idin the REST call, in this case,124.On UNIX:
$ curl \
 --cacert self-signed.crt \
 --header "X-OpenIDM-Username: openidm-admin" \
 --header "X-OpenIDM-Password: openidm-admin" \
 --header "Content-Type: application/json" \
 --request POST \
 --data '{"requestApproved": "true"}' \
 "https://localhost:8443/openidm/workflow/taskinstance/124?_action=complete"
On Windows:
$ curl ^
 --cacert self-signed.crt ^
 --header "X-OpenIDM-Username: openidm-admin" ^
 --header "X-OpenIDM-Password: openidm-admin" ^
 --header "Content-Type: application/json" ^
 --request POST ^
 --data "{\"requestApproved\": \"true\"}" ^
 "https://localhost:8443/openidm/workflow/taskinstance/124?_action=complete"
A successful call returns the following:
{"Task action performed":"complete"}Once the request has been approved, an asynchronous reconciliation operation runs, which creates the users whose accounts were approved in the previous step.
List the users that were created by the asynchronous reconciliation.
$ curl \
 --cacert self-signed.crt \
 --header "X-OpenIDM-Username: openidm-admin" \
 --header "X-OpenIDM-Password: openidm-admin" \
 --request GET \
 "https://localhost:8443/openidm/managed/user?_queryId=query-all-ids"
One user is returned.
{
 "result": [ {
   "_rev": "0",
   "_id": "1"
 } ],
 "resultCount": 1,
 "pagedResultsCookie": null,
 "remainingPagedResults": -1,
}
Chapter 4. Installing a Repository For Production
By default, OpenIDM uses OrientDB for its internal repository so that you do not have to install a database in order to evaluate OpenIDM. Before using OpenIDM in production, however, you must replace OrientDB with a supported JDBC repository.
OpenIDM supports the use of MySQL, MS SQL, and Oracle Database as internal repositories. For details of the supported versions, see Before You Install OpenIDM Software in the Release Notes in the Release Notes.
4.1. To Set Up OpenIDM With MySQL
After you have installed MySQL on the local host and before starting OpenIDM for the first time, set up OpenIDM to use the new repository, as described in the following sections.
This procedure assumes that a password has already been set for the MySQL root user.
Download MySQL Connector/J, version 5.1 or later from the MySQL website. Unpack the delivery, and copy the .jar into the
openidm/bundledirectory.$ cp mysql-connector-java-version-bin.jar /path/to/openidm/bundle/Make sure that OpenIDM is stopped.
$ cd /path/to/openidm/
$ ./shutdown.sh
OpenIDM is not running, not stopping.
Remove
openidm/conf/repo.orientdb.json.$ cd /path/to/openidm/conf/ $ rm repo.orientdb.json
Copy
openidm/samples/misc/repo.jdbc.jsonto theopenidm/confdirectory.$ cd /path/to/openidm/conf $ cp ../samples/misc/repo.jdbc.json .
Import the data definition language script for OpenIDM into MySQL.
$ cd /path/to/mysql
$ ./bin/mysql -u root -p < /path/to/openidm/db/scripts/mysql/openidm.sql
Enter password:
$
This step creates an
openidmdatabase for use as the internal repository, and a useropenidmwith passwordopenidmwho has all the required privileges to update the database.$ ./bin/mysql -u root -p Enter password: Welcome to the MySQL monitor. Commands end with ; or \g. Your MySQL connection id is 18 Server version: 5.5.19 MySQL Community Server (GPL) ... mysql> use openidm; Reading table information for completion of table and column names You can turn off this feature to get a quicker startup with -A Database changed mysql> show tables; +---------------------------+ | Tables_in_openidm | +---------------------------+ | auditaccess | | auditactivity | | auditrecon | | clusterobjectproperties | | clusterobjects | | configobjectproperties | | configobjects | | genericobjectproperties | | genericobjects | | internaluser | | links | | managedobjectproperties | | managedobjects | | objecttypes | | schedulerobjectproperties | | schedulerobjects | | security | | securitykeys | | uinotification | +---------------------------+ 19 rows in set (0.00 sec)
The table names are similar to those used with OrientDB.
Update
openidm/conf/repo.jdbc.jsonas necessary, to reflect your MySQL deployment."connection" : { "dbType" : "MYSQL", "jndiName" : "", "driverClass" : "com.mysql.jdbc.Driver", "jdbcUrl" : "jdbc:mysql://localhost:3306/openidm", "username" : "openidm", "password" : "openidm", "defaultCatalog" : "openidm", "maxBatchSize" : 100, "maxTxRetry" : 5, "enableConnectionPool" : true, "connectionTimeoutInMs" : 30000 },
When you have set up MySQL for use as the OpenIDM internal repository,
start OpenIDM to check that the setup has been successful. After startup,
you should see that repo.jdbc is
active, whereas repo.orientdb is
unsatisfied.
$ cd /path/to/openidm
$ ./startup.sh
Using OPENIDM_HOME:   /path/to/openidm
Using OPENIDM_OPTS:   -Xmx1024m -Xms1024m
Using LOGGING_CONFIG:
-Djava.util.logging.config.file=/path/to/openidm/conf/logging.properties
Using boot properties at /path/to/openidm/conf/boot/boot.properties
-> scr list

Id   State          Name
[  19] [active       ] org.forgerock.openidm.config.starter
[  23] [active       ] org.forgerock.openidm.taskscanner
[   8] [active       ] org.forgerock.openidm.external.rest
[  12] [active       ] org.forgerock.openidm.provisioner.openicf.connectorinfoprovider
[  15] [active       ] org.forgerock.openidm.ui.simple
[   1] [active       ] org.forgerock.openidm.router
[  22] [active       ] org.forgerock.openidm.scheduler
[  14] [active       ] org.forgerock.openidm.restlet
[   7] [unsatisfied  ] org.forgerock.openidm.external.email
[  18] [unsatisfied  ] org.forgerock.openidm.repo.orientdb
[   6] [active       ] org.forgerock.openidm.sync
[   3] [active       ] org.forgerock.openidm.script
[   5] [active       ] org.forgerock.openidm.recon
[   2] [active       ] org.forgerock.openidm.scope
[  10] [active       ] org.forgerock.openidm.http.contextregistrator
[  20] [active       ] org.forgerock.openidm.config
[   0] [active       ] org.forgerock.openidm.audit
[  21] [active       ] org.forgerock.openidm.schedule
[  17] [active       ] org.forgerock.openidm.repo.jdbc
[  16] [active       ] org.forgerock.openidm.workflow
[  13] [active       ] org.forgerock.openidm.provisioner.openicf
[   4] [active       ] org.forgerock.openidm.managed
[   9] [active       ] org.forgerock.openidm.authentication
[  11] [active       ] org.forgerock.openidm.provisioner
4.2. To Set Up OpenIDM With MS SQL
These instructions are specific to MS SQL Server 2008 R2 Express running on a local Windows XP system. Adapt the instructions for your environment.
When you install MS SQL Server, note that OpenIDM has the following specific configuration requirements:
OpenIDM requires SQL Server authentication. During the MS SQL Server installation, make sure that you select SQL Server authentication and not just Windows authentication.
During the Feature Selection installation step, make sure that at least SQL Server Replication, Full Text Search, and Management Tools - Basic are selected.
These instructions require SQL Management Studio so make sure that you include Management Tools in the installation.
TCP/IP must be enabled and configured for the correct IP address and port. To configure TCP/IP, follow these steps:
Click Start > All Programs > MS SQL Server 2008 R2 > Configuration Tools > SQL Server Configuration Manager.
Expand the SQL Server Network Configuration item and select "Protocols for SQLEXPRESS".
Double click TCP/IP and select Enabled > Yes.
Select the IP Addresses tab and set the addresses and ports on which the server will listen.
For this sample procedure, scroll down to IPAll and set TCP Dynamic Ports to 1433 (the default port for MS SQL).
Click Apply, then OK.
Restart MS SQL Server for the configuration changes to take effect. To restart the server, select SQL Server Services in the left pane, double click SQL Server (SQLEXPRESS) and click Restart.
If you have a firewall enabled, ensure that the port you configured in the previous step is open for OpenIDM to access MS SQL.
After you have installed MS SQL on the local host, install OpenIDM, if you have not already done so, but do not start the OpenIDM instance. Import the data definition and set up OpenIDM to use the new repository, as described in the following steps.
Use SQL Management Studio to import the data definition language script for OpenIDM into MS SQL.
Click Start > All Programs > MS SQL Server 2008 R2 > SQL Server Management Studio.
On the Connect to Server panel, select SQL Server Authentication from the Authentication drop down list and log in as the current user (for example, Administrator).
Select File > Open > File and navigate to the OpenIDM data definition language script (
path\to\openidm\db\scripts\mssql\openidm.sql). Click Open to open the file.Click Execute to run the script.
This step creates an
openidmdatabase for use as the internal repository, and a useropenidmwith passwordPassw0rdwho has all the required privileges to update the database. You might need to refresh the view in SQL Server Management Studio to see theopenidmdatabase in the Object Explorer.Expand Databases > openidm > Tables. You should see the OpenIDM tables in the openidm database, as shown in the following example:

The table names are similar to those used with OrientDB.
OpenIDM requires an MS SQL driver that must be created from two separate JAR files. Create the driver as follows.
Download the JDBC Driver 4.0 for SQL Server (
sqljdbc_4.0.2206.100_enu.tar.gz) from Microsoft's download site. The precise URL may vary, depending on your location.Extract the executable Java archive file (
sqljdbc4.jar) from the zip file, using 7-zip or an equivalent file management application.Copy the file to
openidm\db\scripts\mssql.Download the
bndJava archive file (biz.aQute.bnd.jar) that enables you to create OSGi bundles. The file can be downloaded from http://dl.dropbox.com/u/2590603/bnd/biz.aQute.bnd.jar. For more information aboutbnd, see http://www.aqute.biz/Bnd/Bnd.Copy the file to
openidm\db\scripts\mssql.Your
openidm\db\scripts\mssqldirectory should now contain the following files:.\> ls \path\to\openidm\db\scripts\mssql biz.aQute.bnd.jar openidm.sql sqljdbc4.bnd sqljdbc4.jarBundle the two JAR files together with the following command:
C:\> cd \path\to\openidm\db\scripts\mssql
./> java -jar biz.aQute.bnd.jar wrap -properties sqljdbc4.bnd sqljdbc4.jar
This step creates a single
.barfile, namedsqljdbc4.bar.Rename the
sqljdbc4.barfile tosqljdbc4-osgi.jarand copy it to theopenidm\bundledirectory../> mv sqljdbc4.bar sqljdbc4-osgi.jar ./> cp sqljdbc4-osgi.jar \path\to\openidm\bundle
Remove the default OrientDB repository configuration file (
openidm\conf\repo.orientdb.json) from the configuration directory.C:\> cd \path\to\openidm\conf\ .\> del repo.orientdb.jsonCopy the repository configuration file for MS SQL (
openidm\samples\misc\repo.jdbc.json) to the configuration directory.C:\> cd \path\to\openidm\conf\ .\> cp ..\samples\misc\repo.jdbc-mssql.json .Rename the MS SQL repository configuration file to
repo.jdbc.json..\> mv repo.jdbc-mssql.json repo.jdbc.json
Update
openidm\conf\repo.jdbc.jsonas necessary, to reflect your MS SQL deployment.{ "connection" : { "dbType" : "SQLSERVER", "jndiName" : "", "driverClass" : "com.microsoft.sqlserver.jdbc.SQLServerDriver", "jdbcUrl" : "jdbc:sqlserver://localhost:1433;instanceName=default; databaseName=openidm;applicationName=OpenIDM", "username" : "openidm", "password" : "Passw0rd", "defaultCatalog" : "openidm", "maxBatchSize" : 100, "maxTxRetry" : 5, "enableConnectionPool" : true }, ...Specifically, check that the port matches what you have configured in MS SQL.
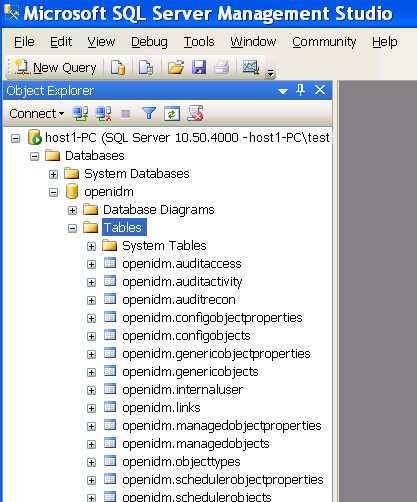
When you have completed the preceding steps, start OpenIDM to check that the
setup has been successful. After startup, you should see that
repo.jdbc is active, whereas
repo.orientdb is unsatisfied.
C:> cd \path\to\openidm
./> startup.bat
   "Using OPENIDM_HOME:   \path\to\openidm"
"Using OPENIDM_OPTS:   -Xmx1024m -Xms1024m"
"Using LOGGING_CONFIG:
-Djava.util.logging.config.file=\path\to\openidm\conf\logging.properties"
Using boot properties at \path\to\openidm\conf\boot\boot.properties
-> scr list
Id   State          Name
[ 19] [active      ] org.forgerock.openidm.config.starter
[ 23] [active      ] org.forgerock.openidm.taskscanner
[  8] [active      ] org.forgerock.openidm.external.rest
[ 12] [active      ] org.forgerock.openidm.provisioner.openicf.connectorinfoprovider
[ 15] [active      ] org.forgerock.openidm.ui.simple
[  1] [active      ] org.forgerock.openidm.router
[ 22] [active      ] org.forgerock.openidm.scheduler
[ 14] [active      ] org.forgerock.openidm.restlet
[  7] [unsatisfied ] org.forgerock.openidm.external.email
[ 18] [unsatisfied ] org.forgerock.openidm.repo.orientdb
[  6] [active      ] org.forgerock.openidm.sync
[  3] [active      ] org.forgerock.openidm.script
[  5] [active      ] org.forgerock.openidm.recon
[  2] [active      ] org.forgerock.openidm.scope
[ 10] [active      ] org.forgerock.openidm.http.contextregistrator
[ 20] [active      ] org.forgerock.openidm.config
[  0] [active      ] org.forgerock.openidm.audit
[ 21] [active      ] org.forgerock.openidm.schedule
[ 17] [active      ] org.forgerock.openidm.repo.jdbc
[ 16] [active      ] org.forgerock.openidm.workflow
[ 13] [active      ] org.forgerock.openidm.provisioner.openicf
[  4] [active      ] org.forgerock.openidm.managed
[  9] [active      ] org.forgerock.openidm.authentication
[ 11] [active      ] org.forgerock.openidm.provisioner
4.3. To Set Up OpenIDM With Oracle Database
This section assumes that you have configured an Oracle Database with Local Naming Parameters (tnsnames.ora), a schema owner, and optionally a service user and its associated credentials for use by OpenIDM.
For more information on connecting to an Oracle database, see Connecting to Oracle Database.
You will need to import the OpenIDM schema using the data definition language
script found in
/path/to/openidm/db/scripts/oracle/openidm.sql using the
appropriate schema owner user.
If you have created OpenIDM tables correctly, you should be able to
query the internaluser table. The query should return two
records (openidm-admin and anonymous).
The output here has been formatted for legibility.
SQL> select * from internaluser;

OBJECTID     openidm-admin
-----------------------------------------------------------------------------
REV          0
-----------------------------------------------------------------------------
PWD          openidm-admin
-----------------------------------------------------------------------------
ROLES        openidm-admin,openidm-authorized
-----------------------------------------------------------------------------

OBJECTID     anonymous
-----------------------------------------------------------------------------
REV          0
-----------------------------------------------------------------------------
PWD          anonymous
-----------------------------------------------------------------------------
ROLES        openidm-reg
-----------------------------------------------------------------------------
Before you start OpenIDM, you should create an Oracle DB driver from two separate jar files and set up the OpenIDM repository file for the Oracle DB. To do so, take the following steps:
Download the Oracle JDBC driver for your Oracle DB version from Oracle Technology Network and place it in the
openidm/db/scripts/oracledirectory.$ ls /path/to/openidm/db/scripts/oracle ojdbc6_g.jar
Create a bind file and edit it to match the version information for your JDBC driver.
You can use the sample bind file located in
openidm/db/scripts/mssql/. Copy the bind file to the same location as the JDBC driver.$ cd /path/to/openidm/db/scripts $ cp mssql/sqljdbc4.bnd oracle/ $ ls oracle/ ojdbc6_g.jar sqljdbc4.bnd
The JDBC driver version information for your driver is located in the
Specification-Versionproperty in the MANIFEST file of the driver.$ cd /path/to/openidm/db/scripts/oracle $ unzip -q -c ojdbc6_g.jar META-INF/MANIFEST.MF ... Specification-Vendor: Sun Microsystems Inc. Specification-Title: JDBC Specification-Version: 4.0 ...
Edit the bind file to match the JDBC driver version.
$ more sqljdbc4.bnd
...
version=4.0
Export-Package: *;version=3.0.0
Bundle-Name: Oracle JDBC Driver 4.0 for SQL Server
Bundle-SymbolicName: Oracle JDBC Driver 4.0 for SQL Server
Bundle-Version: 3.0.0
Download the
bndJava archive file (biz.aQute.bnd.jar) that enables you to create OSGi bundles. The file can be downloaded from http://dl.dropbox.com/u/2590603/bnd/biz.aQute.bnd.jar. For more information aboutbnd, see http://www.aqute.biz/Bnd/Bnd.Place the
bndJava archive file in the same directory as the JDBC driver, and the bind file.$ ls /path/to/openidm/db/scripts/oracle/ biz.aQute.bnd.jar ojdbc6_g.jar sqljdbc4.bnd
Change to the directory in which the three files are located and run the following command to create the OSGi bundle.
$ cd /path/to/openidm/db/scripts/oracle/
$ java -jar biz.aQute.bnd.jar wrap -properties sqljdbc4.bnd ojdbc6_g.jar
Dec 10, 2013 9:53:28 AM java.util.prefs.FileSystemPreferences$1 run
INFO: Created user preferences directory.
ojdbc6_g 984 0
A new
.barfile has now been created.$ ls biz.aQute.bnd.jar ojdbc6_g.bar ojdbc6_g.jar sqljdbc4.bnd
Move the
.barfile to theopenidm/bundledirectory and rename it with a.jarextension. The actual name of the file is unimportant.$ mv ojdbc6_g.bar /path/to/openidm/bundle/ojdbc6_g-osgi.jar
Remove the default OrientDB configuration file (
openidm/conf/repo.orientdb.json) from the configuration directory.$ rm /path/to/openidm/conf/repo.orientdb.json
Copy the OracleDB configuration file (
openidm/samples/misc/repo.jdbc-oracle.json) to the configuration directory and rename the filerepo.jdbc.json.$ cd /path/to/openidm/conf $ cp ../samples/misc/repo.jdbc-oracle.json repo.jdbc.json
Update
openidm/conf/repo.jdbc.jsonas necessary, to reflect your OracleDB deployment. Specifically, edit thejdbcUrl,username, andpasswordproperties. For example:"connection" : { "dbType" : "ORACLE", "jndiName" : "", "driverClass" : "oracle.jdbc.OracleDriver", "jdbcUrl" : "jdbc:oracle:thin:@//localhost:1521/openidm", "username" : "openidm", "password" : "password", "defaultCatalog" : "openidm", "maxBatchSize" : 100, "maxTxRetry" : 5, "connectionTimeoutInMs" : 30000 },
The following parameters relate to the Oracle database:
The
"dbType"is"ORACLE".The
"driverClass"is"oracle.jdbc.OracleDriver".The
"jdbcUrl"corresponds to the URL of the Oracle DB listener, including the service name, based on your configured Local Naming Parameters (tnsnames.ora). It should be whatever is appropriate for your environment. Replace "openidm" with the service name from your TNS description.The
"username"and"password"corresponds to the credentials of the service user that connects from OpenIDM. Use the username of the service user you have created with grants to the OpenIDM tables you created earlier.The
"defaultCatalog"is used to generate queries appropriate to your OpenIDM schema in Oracle. It should match the user who "owns" the tables. If your schema owner was"openidm", then the"defaultCatalog"should also be"openidm". This will cause OpenIDM to generate queries such as"SELECT objectid FROM openidm.internaluser".
When you have set up OracleDB for use as the OpenIDM internal repository, start OpenIDM to check that the setup has been successful. On startup, a number of INFO messages are output, as the predefined queries are processed.
After startup, you should see that repo.jdbc is
active, whereas repo.orientdb is
unsatisfied.
$ cd /path/to/openidm
$ ./startup.sh
Using OPENIDM_HOME:   /path/to/openidm
Using OPENIDM_OPTS:   -Xmx1024m -Xms1024m
Using LOGGING_CONFIG:
-Djava.util.logging.config.file=/path/to/openidm/conf/logging.properties
Using boot properties at /path/to/openidm/conf/boot/boot.properties
....
-> scr list
   Id   State          Name
...
[   2] [unsatisfied  ] org.forgerock.openidm.repo.orientdb
...
[   3] [active       ] org.forgerock.openidm.repo.jdbc
...
4.4. Understanding the JDBC Repository Configuration File
OpenIDM provides a specific configuration file for each supported JDBC
repository, as well as example configurations for other repositories. These
configuration files are located in
/path/to/openidm/samples/misc and are named
repo.jdbc-database.json. Copy
the configuration file for your specific database type to
/path/to/openidm/conf/repo.jdbc.json.
The repository configuration file includes the connection details for the repository, a number of predefined queries, and a mapping between OpenIDM resources and the tables in the repository.
An excerpt from an example repository configuration follows.
{
    "connection" : {
        "dbType" : "MYSQL",
        "jndiName" : "",
        "driverClass" : "com.mysql.jdbc.Driver",
        "jdbcUrl" : "jdbc:mysql://localhost:3306/openidm?characterEncoding=utf8",
        "username" : "openidm",
        "password" : "openidm",
        "defaultCatalog" : "openidm",
        "maxBatchSize" : 100,
        "maxTxRetry" : 5,
        "enableConnectionPool" : true,
        "connectionTimeoutInMs" : 30000
    },
    "queries" : {...},
    "resourceMapping" : {...}
}
"dbType" : string, optionalThe type of database. The database type might affect the queries used and other optimizations. Supported database types include
MYSQL,SQLSERVER, andORACLE."driverClass","jndiName", or"jtaName"Depending on the mechanism you use to acquire the data source, set one of these properties.
"driverClass" : stringTo use the JDBC driver manager to acquire a data source, set this property, as well as
"jdbcUrl","username", and"password". The driver class must be the fully qualified class name of the database driver to use for your database.Using the JDBC driver manager to acquire a data source is the most likely option, and the only one supported "out of the box". The remaining options in the sample repository configuration file assume that you are using a JDBC driver manager.
Example:
"driverClass" : "com.mysql.jdbc.Driver""jndiName" : stringIf you use JNDI to acquire the data source, set this property to the JNDI name of the data source.
This option might be relevant if you want to run OpenIDM inside your own web container.
Example:
"jndiName" : "jdbc/my-datasource""jtaName" : stringIf you use an OSGi service to acquire the data source, set this property to a stringified version of the OsgiName.
This option would only be relevant in a highly customized deployment, for example, if you wanted to develop your own connection pool.
Example:
"jtaName" : "osgi:service/javax.sql.DataSource/(osgi.jndi.service.name=jdbc/openidm)"
"jdbcUrl"The connection URL to the JDBC database. The URL should include all of the parameters required by your database. For example, to specify the encoding in MySQL use
'characterEncoding=utf8'.Example:
"jdbcUrl" : "jdbc:mysql://localhost:3306/openidm?characterEncoding=utf8""username"The username with which to access the JDBC database.
"password"The password with which to access the JDBC database. OpenIDM automatically encrypts clear string passwords. To replace an existing encrypted value, replace the whole
crypto-objectvalue, including the brackets, with a string of the new password."defaultCatalog"The database schema to use for OpenIDM. By default, no schema prefix is used for queries.
"maxBatchSize"The maximum number of SQL statements that will be batched together. This parameter allows you to optimize the time taken to execute multiple queries. Certain databases do not support batching, or limit how many statements can be batched. A value of
1disables batching."queries"Enables you to create pre-defined queries that can be referenced from the configuration. The queries are divided between those for
"genericTables"and those for"explicitTables".The following sample extract from the default MySQL configuration file shows two credential queries, one for a generic mapping, and one for an explicit mapping. Note that the lines have been broken here for legibility only. In a real configuration file, the query would be all on one line.
"queries" : {
    "genericTables" : {
        "credential-query" : "SELECT fullobject FROM ${_dbSchema}.${_mainTable}
          obj INNER JOIN ${_dbSchema}.${_propTable} prop ON
          obj.id = prop.${_mainTable}_id INNER JOIN ${_dbSchema}.objecttypes
          objtype ON objtype.id = obj.objecttypes_id WHERE prop.propkey='/userName'
          AND prop.propvalue = ${username} AND objtype.objecttype = ${_resource}",
        ...
    "explicitTables" : {
        "credential-query" : "SELECT * FROM ${_dbSchema}.${_table}
          WHERE objectid = ${username} and accountStatus = 'active'",
        ...
    }
}
Options supported for query parameters include the following:
A default string parameter, for example:
openidm.query("managed/user", { "_queryId": "for-userName", "uid": "jdoe" });A list parameter (
${list:propName}).Use this parameter to specify a set of indeterminate size as part of your query. For example:
WHERE targetObjectId IN (${list:filteredIds})An integer parameter (
${int:propName}).Use this parameter if you need query for non-string values in the database. This is particularly useful with explicit tables.
"resourceMapping"Defines the mapping between OpenIDM resource URIs (for example,
managed/user) and JDBC tables. The structure of the resource mapping is as follows:"resourceMapping" : { "default" : { "mainTable" : "genericobjects", "propertiesTable" : "genericobjectproperties", "searchableDefault" : true }, "genericMapping" : {...}, "explicitMapping" : {...} }The default mapping object represents a default generic table in which any resource that does not have a more specific mapping is stored.
The generic and explicit mapping objects are described in the following section.
4.5. Using Explicit or Generic Object Mapping With a JDBC Repository
For JDBC repositories, there are two ways of mapping OpenIDM objects to the database tables.
Generic mapping, which allows arbitrary objects to be stored without special configuration or administration.
Explicit mapping, which allows for optimized storage and queries by explicitly mapping objects to tables and columns in the database.
These two mapping strategies are discussed in the following sections.
4.5.1. Using Generic Mappings
Generic mapping speeds up development, and can make system maintenance more flexible by providing a more stable database structure. However, generic mapping can have a performance impact and does not take full advantage of the database facilities (such as validation within the database and flexible indexing). In addition, queries can be more difficult to set up.
In a generic table, the entire object content is stored in a single
large-character field named "fullobject" in the
"mainTable" for the object. To search on specific fields,
you can read them by referring to them in the corresponding
properties table for that object. The disadvantage of
generic objects is that, because every property you might like to filter by
is stored in a separate table, you must join to that table each time you need
to filter by anything.
The following diagram shows a pared down database structure for the default generic table, and indicates the relationship between the main table and the corresponding properties table for each object.
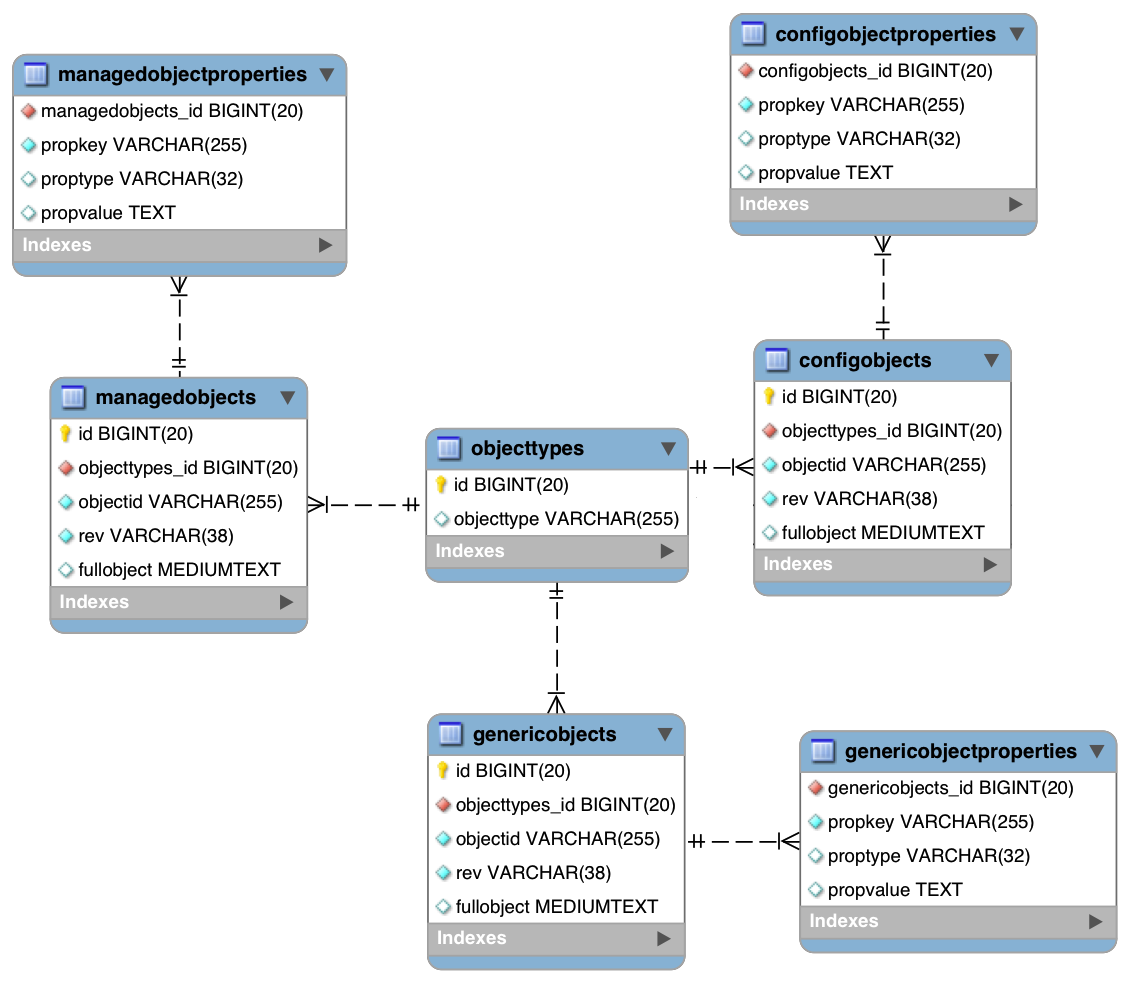
These separate tables can make the query syntax particularly complex. For example, a simple query to return user entries based on a user name would need to be implemented as follows:
SELECT fullobject FROM ${_dbSchema}.${_mainTable} obj INNER JOIN ${_dbSchema}.${_propTable} prop
    ON obj.id = prop.${_mainTable}_id INNER JOIN ${_dbSchema}.objecttypes objtype
    ON objtype.id = obj.objecttypes_id WHERE prop.propkey='/userName' AND prop.propvalue = ${uid}
    AND objtype.objecttype = ${_resource}",
The query can be broken down as follows:
Select the full object from the main table
SELECT fullobject FROM ${_dbSchema}.${_mainTable} objJoin to the properties table and locate the object with the corresponding ID.
INNER JOIN ${_dbSchema}.${_propTable} prop ON obj.id = prop.${_mainTable}_idJoin to the object types table to restrict returned entries to objects of a specific type. For example, you might want to restrict returned entries to
managed/userobjects, ormanaged/roleobjects.INNER JOIN ${_dbSchema}.objecttypes objtype ON objtype.id = obj.objecttypes_idFilter records by the
userNameproperty, where the userName is equal to the specifieduidand the object type is the specified type (in this case, managed/user objects).WHERE prop.propkey='/userName' AND prop.propvalue = ${uid} AND objtype.objecttype = ${_resource}",The value of the
uidfield is provided as part of the query call, for example:openidm.query("managed/user", { "_queryId": "for-userName", "uid": "jdoe" });
Tables for user definable objects use a generic mapping by default.
The following sample generic mapping object illustrates how
managed/ objects are stored in a generic table.
  "genericMapping" : {
      "managed/*" : {
          "mainTable" : "managedobjects",
          "propertiesTable" : "managedobjectproperties",
          "searchableDefault" : true,
          "properties" : {
              "/picture" : {
                  "searchable" : false
              }
          }
      }
  },
"mainTable"(string, mandatory)Indicates the main table in which data is stored for this resource.
The complete object is stored in the
fullobjectcolumn of this table. The table includes anentityTypeforeign key, that is used to distinguish the different objects stored within the table. In addition, the revision of each stored object is tracked, in therevcolumn of the table, enabling multi version concurrency control (MVCC). For more information, see Manipulating Managed Objects Programmatically in the Integrator's Guide in the Integrator's Guide."propertiesTable"(string, mandatory)Indicates the properties table, used for searches.
The contents of the properties table is a defined subset of the properties, copied from the character large object (CLOB) that is stored in the
fullobjectcolumn of the main table. The properties are stored in a one-to-many style separate table. The set of properties stored here is determined by the properties that are defined as"searchable".The stored set of searchable properties makes these values available as discrete rows that can be accessed with SQL queries, specifically, with
WHEREclauses. It is not otherwise possible to query specific properties of the full object.The properties table includes the following columns:
${_mainTable}_idcorresponds to theidof the full object in the main table, for example,manageobjects_id, orgenericobjects_id.propkeyis the name of the searchable property, stored in JSON pointer format (for example/mail. For more information about JSON pointer syntax, see RFC 6901.proptypeis the data type of the property, for examplejava.lang.String. The property type is obtained from the Class associated with the value.propvalueis the value of property, extracted from the full object that is stored in the main table.Regardless of the property data type, this value is stored as a string, so queries against it should treat it as such.
"searchableDefault"(boolean, optional)Specifies whether all properties of the resource should be searchable by default. Properties that are searchable are stored and indexed. You can override the default for individual properties in the
"properties"element of the mapping. The preceding example indicates that all properties are searchable, with the exception of the"picture"property.For large, complex objects, having all properties searchable implies a substantial performance impact. In such a case, a separate insert statement is made in the properties table for each element in the object, every time the object is updated. Also, because these are indexed fields, the recreation of these properties incurs a cost in the maintenance of the index. You should therefore enable
"searchable"only for those properties that must be used as part of a WHERE clause in a query."properties"Lists any individual properties for which the searchable default should be overridden.
Note that if an object was originally created with a subset of
"searchable"properties, changing this subset (by adding a new"searchable"property in the configuration, for example) will not cause the existing values to be updated in the properties table for that object. To add the new property to the properties table for that object, you must update or recreate the object.
4.5.2. Improving Search Performance for Generic Mappings
By default, all properties in a generic mapping are searchable.
Although there are no individual indexes in a generic mapping, you can
improve search performance by setting only those properties that you need to
search as "searchable". Properties that are searchable
are created within the corresponding properties table. The properties table
exists only for searches or look-ups, and has a composite index, based on
the resource, then the property name.
To restrict searches to specific properties, set the
"searchableDefault" to false for the mapping, and then
explicitly set "searchable" to true for each property
that should be searched. The following sample extract from
repo.jdbc.json indicates searches restricted to the
"userName" property.
"genericMapping" : {
    "managed/user" : {
        "mainTable" : "manageduserobjects",
        "propertiesTable" : "manageduserobjectproperties",
        "searchableDefault" : false,
        "properties" : {
            "/userName" : {
            "searchable" : true
            }
        }
    }
},
With this configuration, OpenIDM creates entries in the properties table
only for "userName" properties of managed user objects.
If the global "searchableDefault" is set to false,
properties that do not have a searchable attribute explicitly set to true
are not written in the properties table.
4.5.3. Using Explicit Mappings
Explicit mapping is more difficult to set up and maintain, but can take complete advantage of the native database facilities.
An explicit table offers better performance and simpler queries. There is less work in the reading and writing of data, since the data is all in a single row of a single table. In addition, it is easier to create different types of indexes that apply to only specific fields in an explicit table. The disadvantage of explicit tables is the additional work required in creating the table in the schema. Also, because rows in a table are inherently more simple, it is more difficult to deal with complex objects. Any non-simple key:value pair in an object associated with an explicit table is converted to a JSON string and stored in the cell in that format. This makes the value difficult to use, from the perspective of a query attempting to search within it.
Note that it is possible to have a generic mapping configuration for most
managed objects, and to have an explicit mapping that
overrides the default generic mapping in certain cases. The sample
configuration provided in
/path/to/openidm/samples/misc/repo.jdbc-mysql-explicit-managed-user.json
has a generic mapping for managed objects, but an explicit mapping for
managed user objects.
OpenIDM uses explicit mapping for internal system tables, such as the tables used for auditing.
Depending on the types of usage your system is supporting, you might find that an explicit mapping performs better than a generic mapping. Operations such as sorting and searching (such as those performed in the default UI) tend to be faster with explicitly-mapped objects, for example.
The following sample explicit mapping object illustrates how
internal/user objects are stored in an explicit table.
"explicitMapping" : {
    "internal/user" : {
        "table" : "internaluser",
        "objectToColumn" : {
            "_id" : "objectid",
            "_rev" : "rev",
            "password" : "pwd",
            "roles" : "roles"
        }
    },
    ...
}
"<resource-uri>"(string, mandatory)Indicates the URI for the resources to which this mapping applies, for example,
"internal/user"."table"(string, mandatory)The name of the database table in which the object (in this case internal users) is stored.
"objectToColumn"(string, mandatory)The way in which specific managed object properties are mapped to columns in the table.
The mapping can be a simple one to one mapping, for example
"userName": "userName",or a more complex JSON map or list. When a column is mapped to a JSON map or list, the syntax is as shown in the following examples:"messageDetail" : { "column" : "messagedetail", "type" : "JSON_MAP" }or
"roles": { "column" : "roles", "type" : "JSON_LIST" }
4.6. Configuring SSL with a JDBC Repository
To configure SSL with a JDBC repository, you need to import the CA
certificate file for the server into two locations: the Java truststore
and the OpenIDM truststore. That certificate file could have a name like
ca-cert.pem. If you have a different genuine or
self-signed certificate file, substitute accordingly.
To import the CA certificate file into both truststores, use the
keytool command native to the Java environment, typically
located in the /path/to/jre-version/bin directory. On
some UNIX-based systems, /usr/bin/keytool may link
to that command.
You can find the Java truststore file, cacerts, in the
/path/to/jre-version/jre/lib/security directory. On
some UNIX-based systems, that may be linked to a location such as
/etc/pki/java/cacerts.
Import the
ca-cert.pemcertificate into the Java truststore file with the following command:$ keytool \ -importcert \ -trustcacerts -file ca-cert.pem \ -alias "DB cert" \ -keystore /etc/pki/java/cacertsImport the
ca-cert.pemcertificate into the OpenIDM truststore file with the following command:$ keytool \ -importcert \ -trustcacerts \ -file ca-cert.pem \ -alias "DB cert" \ -keystore /path/to/openidm/security/truststoreOpen the repository configuration file,
repo.jdbc.json.Look for the
"jdbcUrl"properties. You should see ajdbcURL. Add a?characterEncoding=utf8&useSSL=trueto the end of that URL.The
"jdbcUrl"that you configure depends on your JDBC repository. The following entries correspond to appropriate"jdbcURL"properties for MySQL, MSSQL, and Oracle DB, respectively."jdbcUrl" : "jdbc:mysql://localhost:3306/openidm?characterEncoding=utf8&useSSL=true"
"jdbcUrl" : "jdbc:sqlserver://localhost:1433;instanceName=default;
     databaseName=openidm;applicationName=OpenIDM?characterEncoding=utf8&useSSL=true"
"jdbcUrl" : "jdbc:oracle:thin:@//localhost:1521/openidm?characterEncoding=utf8&useSSL=true"
Open the
/path/to/openidm/conf/config.propertiesfile. Find theorg.osgi.framework.bootdelegationproperty. Make sure that property includes a reference to thejavax.net.ssloption. If you started with the default version ofconfig.propertiesthat line should now read as follows:org.osgi.framework.bootdelegation=sun.*,com.sun.*,apple.*,com.apple.*,javax.net.ssl
Chapter 5. Removing and Moving OpenIDM Software
This chapter shows you how to uninstall OpenIDM software and to move an existing install to a different location.
(Optional) Stop OpenIDM services if they are running, by entering
shutdownat the->prompt either on the command line, or on the System Information tab of the Felix console.-> shutdown
Remove the file system directory where you installed OpenIDM software.
$ rm -rf /path/to/openidm
(Optional) If you use a JDBC database for the internal repository, you can drop the
openidmdatabase.
If you want to move OpenIDM to a different directory, you do not have to uninstall and reinstall. To move an existing OpenIDM instance, follow these steps:
Shutdown OpenIDM, as described in To Stop the OpenIDM Services.
Remove the
felix-cachedirectory.$ cd path/to/openidm $ rm -rf felix-cacheMove the files.
$ mv path/to/openidm path/to/new-openidm
Start OpenIDM in the new location.
$ cd path/to/new-openidm
$ ./startup.sh
Chapter 6. Migrating to OpenIDM 3.0.0
The migration process is largely dependent on your particular deployment and on the extent to which you have customized OpenIDM. It is recommended that you engage ForgeRock services for help in migrating an existing deployment.
The steps outlined in this section indicate how to preserve customizations, where possible, and take advantage of the new functionality offered in this release. However, you must be aware of the changes made in OpenIDM 3.0.0 that might affect your existing deployment. Therefore, before starting this process, see the Compatibility chapter in the Release Notes in the Release Notes, and adjust your scripts and clients accordingly.
In particular, for client applications that use the REST API, note that this API has undergone major changes in this release. For information on the new REST API, see the REST API Reference in the Integrator's Guide in the Integrator's Guide.
To perform a basic migration to OpenIDM 3.0.0, follow these
steps. For the purposes of this procedure, the path to the existing 2.1
instance is defined as /path/to/openidm-2.1. The path to
the new instance is defined as /path/to/openidm-3.0.
Download and extract the OpenIDM 3.0.0 server.
Stop your existing OpenIDM 2.1 server, if it is running.
$ cd /path/to/openidm-2.1
$ ./shutdown.sh
Stopping OpenIDM (81491)
Back up your existing deployment by zipping up the entire
openidmdirectory.On the OpenIDM 3.0.0 server, edit the
conf/boot/boot.propertiesfile to match any customizations that you made on your 2.1 server. Specifically, check the following elements:In OpenIDM 2.1, port numbers were specified in the
conf/jetty.xmlfile. In OpenIDM 3.0.0, the HTTP, HTTPS, and mutual authentication ports are specified in theconf/boot/boot.propertiesfile. If you changed the default ports in your 2.x deployment, make sure that the corresponding ports are specified in this file.Check that the keystore and truststore passwords match the current passwords for the keystore and truststore of your 2.x deployment
For clustered deployments, certain cluster properties are also now specified in the
boot.propertiesfile. Therefore, if this migrated OpenIDM instance is going to run in a cluster, set the following properties:openidm.node.id
openidm.instance.type
openidm.scheduler.execute.persistent.schedules
In addition, timeout and checkin settings that were previously defined in the
conf/scheduler.jsonfile are now defined in a new configuration file,conf/cluster.json. Copy any such settings that you had defined in thescheduler.jsonfile to thecluster.jsonfile in the 3.0.0 instance.
Copy the contents of your original
security/folder to the new instance.$ cd /path/to/openidm-3.0 $ cp -r /path/to/openidm-2.1/security .
Migrate any custom scripts or default scripts that you have modified to the new instance. In general, custom and customized scripts should be located in the
openidm/scriptdirectory on your old instance.For custom scripts (that is, scripts that you have written yourself) review the Compatibility chapter in the Release Notes to ensure that the scripts will work as intended with the new version, then copy these scripts to the new instance. For example:
$ cd /path/to/openidm-3.0
$ cp /path/to/openidm-2.1/script/my-custom-script.js script/
For OpenIDM scripts that you have modified, compare the modified script against the corresponding script in the new OpenIDM instance. If nothing has changed in the default script, check that your customizations will work as intended (by reviewing the Compatibility chapter in the Release Notes) then copy the customized scripts to the new
openidm/scriptdirectory. For example:$ cd /path/to/openidm-3.0 $ cp /path/to/openidm-2.1/script/policy.js script/If the default script has changed since the 2.1 release (for example,
access.js, copy the new default script to theopenidm-3.0/scriptdirectory.$ cd /path/to/openidm-3.0 $ cp bin/default/script/access.js script/Check that your customizations will work as expected, then port your customizations to the new script in the
openidm-3.0/scriptdirectory.
Several changes have been made to the default configuration in OpenIDM 3.0.0. Currently, there is no automated way to migrate a customized configuration to the new version. The following strategy is recommended:
Start with the default 3.0.0 configuration.
For each configuration file that you have customized, use a file comparison (
diff) utility to assess the differences between your customized file and the 3.0.0 file.Based on the results of the diff, either use your existing file as a base and port the 3.0.0 changes to that file, or vice versa. Ultimately, you want to preserve your customizations but ensure that you are up to date with the latest default configuration. All files should end up in the
openidm-3.0/confdirectory.Pay particular attention to the
conf/repo.jdbc.jsonfile in your existing deployment. If you have customized this file, make sure that these customizations are ported to the corresponding file in the 3.0.0 deployment. For example, if you have defined any new queries, add these queries to the OpenIDM 3.0repo.jdbc.jsonfile.
Modify any customized provisioner configurations in your existing project to point to the new connectors that are provided with OpenIDM 3.0.0. Specifically, check that the
"connectorRef"properties reflect the new connectors, for example:{ "bundleVersion": "1.1.1.3", "bundleName": "org.forgerock.openicf.connectors.ldap-connector", "displayName": "LDAP Connector", "connectorName": "org.identityconnectors.ldap.LdapConnector" },Alternatively, copy the connector .jars from your existing installation into the
openidm/connectors/folder of the new installation.For more information, see Integration of OpenICF 1.4.0.0 in the Release Notes in the Compatibility chapter of the Release Notes.
Complete the OpenIDM 3.0.0 installation, as described in the Installation chapter.
Migrate your internal user data, managed objects, and reconciliation and audit data, if required.
When you migrate this data, note the following points:
The way in which queries on system objects are constructed has changed. This includes correlation queries on system objects. For more information, see Constructing Queries in the Integrator's Guide in the Integrators Guide.
The database schema has changed slightly in OpenIDM 3.0.0. The following tables have been added:
security,securitykeys,clusterobjects, andclusterobjectproperties. In addition, the following columns have been added to theauditrecontable:actionid,exceptiondetail,mapping,messagedetail, and_rev.Note that the format of system object
_idshas changed in OpenIDM 3.0.0 (they are no longer URL-encoded). Therefore, system object_idsin an existing links table will not be recognized by an OpenIDM 3.0.0 reconciliation process. For more information, see OPENIDM-2091: Migration script for encoded ids in the links table.
Your data migration strategy might vary, depending on your repository. You can either migrate your existing 2.1.0 database, or start with a new 3.0.0 database and import your existing data.
To migrate an existing database:
Using the appropriate schema script from the new OpenIDM 3.0.0 instance (
/path/to/openidm-3.0/db/scripts/repo/openidm.sql), take the changes described above and apply them to your existing database.Use the
--forceoption in MySQL (or an equivalent option for your repository type) to create the new tables, then edit theauditrecontable manually, to add the columns described previously.
To start with a new database:
Set up a clean repository, using the appropriate schema script from the new OpenIDM 3.0.0 instance (
/path/to/openidm-3.0/db/scripts/repo/openidm.sql).Use a schema comparison tool and adjust the tables in your existing repository to match the schema in the new repository.
Export your existing data to the new repository.
If you are using the UI, clear your browser cache after the migration. The browser cache contains files from the previous OpenIDM release, that might not be refreshed when you log into the new UI.
Start up OpenIDM 3.0.0.
$ cd /path/to/openidm-3.0
$ ./startup.sh
Test that your existing clients and scripts are working as intended.
OpenIDM Glossary
- JSON
JavaScript Object Notation, a lightweight data interchange format based on a subset of JavaScript syntax. For more information, see the JSON site.
- JWT
JSON Web Token. As noted in the JSON Web Token draft IETF Memo, "JSON Web Token (JWT) is a compact URL-safe means of representing claims to be transferred between two parties." For OpenIDM, the JWT is associated with the
JWT_SESSIONauthentication module.- managed object
An object that represents the identity-related data managed by OpenIDM. Managed objects are configurable, JSON-based data structures that OpenIDM stores in its pluggable repository. The default configuration of a managed object is that of a user, but you can define any kind of managed object, for example, groups or roles.
- mapping
A policy that is defined between a source object and a target object during reconciliation or synchronization. A mapping can also define a trigger for validation, customization, filtering, and transformation of source and target objects.
- OSGi
A module system and service platform for the Java programming language that implements a complete and dynamic component model. For a good introduction, see the OSGi site. OpenIDM services are designed to run in any OSGi container, but OpenIDM currently runs in Apache Felix.
- reconciliation
During reconciliation, comparisons are made between managed objects and objects on source or target systems. Reconciliation can result in one or more specified actions, including, but not limited to, synchronization.
- resource
An external system, database, directory server, or other source of identity data to be managed and audited by the identity management system.
- REST
Representational State Transfer. A software architecture style for exposing resources, using the technologies and protocols of the World Wide Web. REST describes how distributed data objects, or resources, can be defined and addressed.
- source object
In the context of reconciliation, a source object is a data object on the source system, that OpenIDM scans before attempting to find a corresponding object on the target system. Depending on the defined mapping, OpenIDM then adjusts the object on the target system (target object).
- synchronization
The synchronization process creates, updates, or deletes objects on a target system, based on the defined mappings from the source system. Synchronization can be scheduled or on demand.
- system object
A pluggable representation of an object on an external system. For example, a user entry that is stored in an external LDAP directory is represented as a system object in OpenIDM for the period during which OpenIDM requires access to that entry.System objects follow the same RESTful resource-based design principles as managed objects.
- target object
In the context of reconciliation, a target object is a data object on the target system, that OpenIDM scans after locating its corresponding object on the source system. Depending on the defined mapping, OpenIDM then adjusts the target object to match the corresponding source object.
Index
A
- Application container
- Requirements, Application Container
D
- Downloading, Installing and Running OpenIDM
G
- Getting started, To Get Started With the OpenIDM REST Interface, First OpenIDM Sample
I
- Installing, Installing and Running OpenIDM
- Samples, Installing the Samples
J
- Java
- Requirements, Java Environment
R
- Repository database
- Evaluation version, First OpenIDM Sample
- Production ready, Installing a Repository For Production
- Requirements, Installing and Running OpenIDM
- Table names, To Set Up OpenIDM With MySQL
S
- Samples
- Sample 1 - XML file, First OpenIDM Sample
- Sample 2 - LDAP one way, Sample 2 - LDAP One Way
- Sample 2b - LDAP two way, Sample 2b - LDAP Two Way
- Sample 2c - Synchronizing LDAP Group Membership, Sample 2c - Synchronizing LDAP Group Membership
- Sample 2d - Synchronizing LDAP Groups, Sample 2d - Synchronizing LDAP Groups
- Sample 3 - Scripted SQL, Sample 3 - Scripted SQL
- Sample 4 - CSV file, Sample 4 - CSV to XML File
- Sample 5 - Synchronization of two resources, Sample 5 - Synchronization of Two Resources
- Sample 5b - Synchronization with the onSync script hook, Sample 5b - Compensated Synchronization with onSync
- Sample 6 - LiveSync between two LDAP servers, Sample 6 - LiveSync With an AD Server
- Sample 7 - Scripting a SCIM-like Schema, Sample 7 - Scripting a SCIM-like Schema
- Sample 8 - Logging in Scripts, Sample 8 - Logging in Scripts
- Sample 9 - asynchronous reconciliation, Sample 9 - Asynchronous Reconciliation Using Workflows
- Starting OpenIDM, Installing and Running OpenIDM
- Stopping OpenIDM, Installing and Running OpenIDM
U
- Uninstalling, Removing and Moving OpenIDM Software