Guide to configuring and integrating OpenIDM into identity management solutions. The OpenIDM project offers flexible, open source services for automating management of the identity life cycle.
Preface
This guide shows you how to integrate OpenIDM as part of a complete identity management solution.
1. Who Should Use this Guide
This guide is written for systems integrators building identity management solutions based on OpenIDM services. This guide describes OpenIDM, and shows you how to set up OpenIDM as part of your identity management solution.
You do not need to be an OpenIDM wizard to learn something from this guide, though a background in identity management and building identity management solutions can help.
2. Formatting Conventions
Most examples in the documentation are created in GNU/Linux or Mac OS X
operating environments.
If distinctions are necessary between operating environments,
examples are labeled with the operating environment name in parentheses.
To avoid repetition file system directory names are often given
only in UNIX format as in /path/to/server,
even if the text applies to C:\path\to\server as well.
Absolute path names usually begin with the placeholder
/path/to/.
This path might translate to /opt/,
C:\Program Files\, or somewhere else on your system.
Command-line, terminal sessions are formatted as follows:
$ echo $JAVA_HOME
/path/to/jdk
Command output is sometimes formatted for narrower, more readable output even though formatting parameters are not shown in the command.
Program listings are formatted as follows:
class Test {
    public static void main(String [] args)  {
        System.out.println("This is a program listing.");
    }
}
3. Accessing Documentation Online
ForgeRock publishes comprehensive documentation online:
The ForgeRock Knowledge Base offers a large and increasing number of up-to-date, practical articles that help you deploy and manage ForgeRock software.
While many articles are visible to community members, ForgeRock customers have access to much more, including advanced information for customers using ForgeRock software in a mission-critical capacity.
ForgeRock product documentation, such as this document, aims to be technically accurate and complete with respect to the software documented. It is visible to everyone and covers all product features and examples of how to use them.
4. Using the ForgeRock.org Site
The ForgeRock.org site has links to source code for ForgeRock open source software, as well as links to the ForgeRock forums and technical blogs.
If you are a ForgeRock customer, raise a support ticket instead of using the forums. ForgeRock support professionals will get in touch to help you.
Chapter 1. Architectural Overview
The following figure provides an overview of the OpenIDM architecture, which is covered in more detail in subsequent sections of this chapter.

1.1. OpenIDM Modular Framework
The OpenIDM framework is based on OSGi.
- OSGi
OSGi is a module system and service platform for the Java programming language that implements a complete and dynamic component model. For a good introduction, see the OSGi site. While OpenIDM services are designed to run in any OSGi container, OpenIDM currently runs in Apache Felix.
- Servlet
The optional Servlet layer provides RESTful HTTP access to the managed objects and services. While the Servlet layer can be provided by many different engines, OpenIDM embeds Jetty by default.
1.2. Infrastructure Modules
OpenIDM infrastructure modules provide the underlying features needed for core services.
- BPMN 2.0 Workflow Engine
OpenIDM provides an embedded workflow and business process engine based on Activiti and the Business Process Model and Notation (BPMN) 2.0 standard.
For more information, see Chapter 17, "Integrating Business Processes and Workflows".
- Task Scanner
OpenIDM provides a task scanning mechanism that enables you to perform a batch scan for a specified date in OpenIDM data, on a scheduled interval, and then to execute a task when this date is reached.
For more information, see Section 13.5, "Scanning Data to Trigger Tasks".
- Scheduler
The scheduler provides a cron-like scheduling component implemented using the Quartz library. Use the scheduler, for example, to enable regular synchronizations and reconciliations.
For details, see Chapter 13, "Scheduling Tasks and Events".
- Script Engine
The script engine is a pluggable module that provides the triggers and plugin points for OpenIDM. OpenIDM currently supports JavaScript and Groovy.
- Policy Service
OpenIDM provides an extensible policy service that enables you to apply specific validation requirements to various components and properties.
For more information, see Chapter 9, "Using Policies to Validate Data".
- Audit Logging
Auditing logs all relevant system activity to the configured log stores. This includes the data from reconciliation as a basis for reporting, as well as detailed activity logs to capture operations on the internal (managed) and external (system) objects.
For details, see Chapter 18, "Using Audit Logs".
- Repository
The repository provides a common abstraction for a pluggable persistence layer. OpenIDM 3.1 supports use of MySQL to back the repository. Yet, plugin repositories can include NoSQL and relational databases, LDAP, and even flat files. The repository API operates using a JSON-based object model with RESTful principles consistent with the other OpenIDM services. The default, embedded implementation for the repository is the NoSQL database OrientDB, making it easy to evaluate OpenIDM out of the box before using MySQL in your production environment.
1.3. Core Services
The core services are the heart of the OpenIDM resource oriented unified object model and architecture.
- Object Model
Artifacts handled by OpenIDM are Java object representations of the JavaScript object model as defined by JSON. The object model supports interoperability and potential integration with many applications, services and programming languages. As OpenIDM is a Java-based product, these representations are instances of classes:
Map,List,String,Number,Boolean, andnull.OpenIDM can serialize and deserialize these structures to and from JSON as required. OpenIDM also exposes a set of triggers and functions that system administrators can define, in either JavaScript or Groovy, which can natively read and modify these JSON-based object model structures. OpenIDM is designed to support other scripting and programming languages.
- Managed Objects
A managed object is an object that represents the identity-related data managed by OpenIDM. Managed objects are configurable, JSON-based data structures that OpenIDM stores in its pluggable repository. The default configuration of a managed object is that of a user, but you can define any kind of managed object, for example, groups or roles.
You can access managed objects over the REST interface with a query similar to the following:
$ curl \
 --cacert self-signed.crt \
 --header "X-OpenIDM-Username: openidm-admin" \
 --header "X-OpenIDM-Password: openidm-admin" \
 --request GET \
 "https://localhost:8443/openidm/managed/..."
- System Objects
System objects are pluggable representations of objects on external systems. For example, a user entry that is stored in an external LDAP directory is represented as a system object in OpenIDM.
System objects follow the same RESTful resource-based design principles as managed objects. They can be accessed over the REST interface with a query similar to the following:
$ curl \
 --cacert self-signed.crt \
 --header "X-OpenIDM-Username: openidm-admin" \
 --header "X-OpenIDM-Password: openidm-admin" \
 --request GET \
 "https://localhost:8443/openidm/system/..."
There is a default implementation for the OpenICF framework, that allows any connector object to be represented as a system object.
- Mappings
Mappings define policies between source and target objects and their attributes during synchronization and reconciliation. Mappings can also define triggers for validation, customization, filtering, and transformation of source and target objects.
For details, see Chapter 12, "Configuring Synchronization".
- Synchronization & Reconciliation
Reconciliation enables on-demand and scheduled resource comparisons between the OpenIDM managed object repository and source or target systems. Comparisons can result in different actions, depending on the mappings defined between the systems.
Synchronization enables creating, updating, and deleting resources from a source to a target system, either on demand or according to a schedule.
For details, see Chapter 12, "Configuring Synchronization".
1.4. Secure Commons REST Commands
As noted in Appendix E, "REST API Reference", Representational State Transfer (REST) is a software architecture style for exposing resources, using the technologies and protocols of the World Wide Web.
REST interfaces are commonly tested with a curl command. Many of these commands are used in this document. They work with the standard ports associated with Java EE communications, 8080 and 8443.
To run curl over the secure port, 8443, you must include
either the --insecure option, or follow the instructions
shown in Section 16.2.2, "Restrict REST Access to the HTTPS Port". You can use those
instructions with the self-signed certificate generated when OpenIDM
starts, or with a *.crt file provided by a
certificate authority.
In many cases in this guide, curl commands to the secure
port are depicted with a --cacert self-signed.crt option.
Instructions for creating that self-signed.crt file
are shown in Section 16.2.2, "Restrict REST Access to the HTTPS Port".
1.5. Access Layer
The access layer provides the user interfaces and public APIs for accessing and managing the OpenIDM repository and its functions.
- RESTful Interfaces
OpenIDM provides REST APIs for CRUD operations and invoking synchronization and reconciliation for both HTTP and Java.
For details, see Appendix E, "REST API Reference".
- User Interfaces
User interfaces provide password management, registration, self-service, and workflow services.
Chapter 2. Starting and Stopping OpenIDM
This chapter covers the scripts provided for starting and stopping OpenIDM, and describes how to verify the health of a system, that is, that all requirements are met for a successful system startup.
2.1. To Start and Stop OpenIDM
By default you start and stop OpenIDM in interactive mode.
To start OpenIDM interactively, open a terminal or command window,
change to the openidm directory, and run the startup
script:
startup.sh (UNIX)
startup.bat (Windows)
The startup script starts OpenIDM, and opens an OSGi console with a
-> prompt where you can issue console commands.
To stop OpenIDM interactively in the OSGi console, enter the shutdown command.
-> shutdown
You can also start OpenIDM as a background process on UNIX, Linux, and Mac OS X. Follow these steps before starting OpenIDM for the first time.
If you have already started OpenIDM, then shut down OpenIDM and remove the Felix cache files under
openidm/felix-cache/.-> shutdown ... $ rm -rf felix-cache/*
Start OpenIDM in the background.
$ ./startup.sh &
Alternatively, use the nohup command to keep OpenIDM running after you log out.
$ nohup ./startup.sh &
[2] 394
$ appending output to nohup.out
$
To stop OpenIDM running as a background process, use the shutdown.sh script.
$ ./shutdown.sh
./shutdown.sh
Stopping OpenIDM (454)
If you start OpenIDM in the background, and the job stops immediately after startup, see Section 23.1, "OpenIDM Stopped in Background".
To disable ConsoleHandler logging, see
Chapter 10, "Configuring Server Logs".
2.2. Specifying the OpenIDM Startup Configuration
By default, OpenIDM starts up with the configuration and script files
that are located in the openidm/conf and
openidm/script directories, and with the binaries that
are in the default install location. You can launch OpenIDM with a different
configuration and set of script files, and even with a different set of
binaries, in order to test a new configuration, manage multiple different
OpenIDM projects, or to run one of the included samples.
The startup.sh script enables you to specify the
following elements of a running OpenIDM instance.
project location (
-p)The project location specifies the configuration and default scripts with which OpenIDM will run.
If you specify the project location, OpenIDM does not try to locate configuration objects in the default location. All configuration objects and any artifacts that are not in the bundled defaults (such as custom scripts) must be provided in the project location. This includes everything that is in the default
openidm/confandopenidm/scriptdirectories.The following command starts OpenIDM with the configuration of sample 1:
$ ./startup.sh -p /path/to/openidm/samples/sample1
If an absolute path is not provided, the path is relative to the system property,
user.dir. If no project location is specified, OpenIDM is launched with the default configuration in/path/to/openidm/conf.working location (
-w)The working location specifies the directory to which OpenIDM writes its database cache and audit logs. The working location includes everything that is in the default
dbandauditdirectories.The following command specifies that OpenIDM writes its database cache and audit data to
/Users/admin/openidm/storage:$ ./startup.sh -w /Users/admin/openidm/storage
If an absolute path is not provided, the path is relative to the system property,
user.dir. If no working location is specified, OpenIDM writes this data to theopenidm/dbandopenidm/auditdirectories.Note that this property does not affect the location of the OpenIDM system logs, or the Felix cache. To change the location of the OpenIDM logs, edit the
conf/logging.propertiesfile. To change the location of the Felix cache, edit theconf/config.propertiesfile. Instructions are available in those respective files.startup configuration file (
-c)A customizable startup configuration file (named
launcher.json) enables you to specify how the OSGi Framework is started.Unless you are working with a highly customized deployment, you should not modify the default framework configuration. This option is therefore described in more detail in Chapter 24, "Advanced Configuration".
By default, properties files are loaded in the following order, and property values are resolved in the reverse order:
system.propertiesconfig.propertiesboot.properties
If both system and boot properties define the same attribute, the
property substitution process locates the attribute in
boot.properties and does not attempt to locate the
property in system.properties.
You can use variable substitution in any .json
configuration file with the install, working and project locations
described previously. The following properties can be substituted:
install.location |
install.url |
working.location |
working.url |
project.location |
project.url |
Property substitution takes the following syntax:
&{launcher.property}For example, to specify the location of the OrientDB database, you
can set the dbUrl property in repo.orientdb.json
as follows:
"dbUrl" : "local:&{launcher.working.location}/db/openidm",
The database location is then relative to a working location defined in the startup configuration.
Note that property substitution does not work for connector reference properties. So, for example, the following configuration would not be valid:
"connectorRef" : {
    "connectorName" : "&{connectorName}",
    "bundleName" : "org.forgerock.openicf.connectors.ldap-connector",
    "bundleVersion" : "&{LDAP.BundleVersion}"
    ...
The "connectorName" must be the precise string from the
connector configuration. If you need to specify multiple connector version
numbers, use a range of versions, for example:
"connectorRef" : {
    "connectorName" : "org.identityconnectors.ldap.LdapConnector",
    "bundleName" : "org.forgerock.openicf.connectors.ldap-connector",
    "bundleVersion" : "[1.4.0.0,2.0.0.0)",
    ...
2.3. Obtaining Information About an OpenIDM Instance
OpenIDM includes a customizable information service that provides detailed
information about a running OpenIDM instance. The information can be accessed
over the REST interface, under the context
https://localhost:8443/openidm/info.
By default, OpenIDM provides the following information:
Basic information about the health of the system.
This information can be accessed over REST at
https://localhost:8443/openidm/info/ping. For example:$ curl \ --cacert self-signed.crt \ --header "X-OpenIDM-Username: openidm-admin" \ --header "X-OpenIDM-Password: openidm-admin" \ --request GET \ "https://localhost:8443/openidm/info/ping" {"state":"ACTIVE_READY","shortDesc":"OpenIDM ready"}The information is provided by the script
openidm/bin/defaults/script/info/ping.js.Information about the current OpenIDM session.
This information can be accessed over REST at
https://localhost:8443/openidm/info/login. For example:$ curl \ --cacert self-signed.crt \ --header "X-OpenIDM-Username: openidm-admin" \ --header "X-OpenIDM-Password: openidm-admin" \ --request GET \ "https://localhost:8443/openidm/info/login" { "authenticationId": "openidm-admin", "class": "org.forgerock.json.resource.SecurityContext", "parent": { "class": "org.forgerock.json.resource.RootContext", "parent": null, "id": "6f1709ce-75bd-4f9b-b1ad-d4592be37361" }, "authorizationId": { "roles": [ "openidm-admin", "openidm-authorized" ], "component": "repo/internal/user", "id": "openidm-admin" } }The information is provided by the script
openidm/bin/defaults/script/info/login.js.
You can extend or override the default information that is provided by
creating your own script file and its corresponding configuration file in
openidm/conf/info-name.json.
Custom script files can be located anywhere, although a best practice is to
place them in openidm/script/info. A sample customized
script file for extending the default ping service is provided in
openidm/samples/infoservice/script/info/customping.js.
The corresponding configuration file is provided in
openidm/samples/infoservice/conf/info-customping.json.
The configuration file has the following syntax:
{
    "infocontext" : "ping",
    "type" : "text/javascript",
    "file" : "script/info/customping.js"
}
The parameters in the configuration file are as follows:
"infocontext"specifies the relative name of the info endpoint under the info context. The information can be accessed over REST at this endpoint, for example, setting"infocontext"to"mycontext/myendpoint"would make the information accessible over REST athttps://localhost:8443/openidm/info/mycontext/myendpoint."type"specifies the type of the information source. Javascript ("type" : "text/javascript") and Groovy ("type" : "groovy") are supported."file"specifies the path to the Javascript or Groovy file, if you do not provide a"source"parameter."source"specifies the actual Javascript or Groovy script, if you have not provided a"file"parameter.
Additional properties can be passed to the script as depicted in this
configuration file
(openidm/samples/infoservice/conf/info-name.json).
Script files in openidm/samples/infoservice/script/info/
have access to the following objects:
request- the request details, including the method called and any parameters passed.healthinfo- the current health status of the system.openidm- access to the JSON resource API.Any additional properties that are depicted in the configuration file (
openidm/samples/infoservice/conf/info-name.json.)
2.4. Verifying the Health of an OpenIDM System
Due to the highly modular, configurable nature of OpenIDM, it is often difficult to assess whether a system has started up successfully, or whether the system is ready and stable after dynamic configuration changes have been made.
OpenIDM provides a configurable health check service that verifies that the required modules and services for an operational system are up and running. During system startup, OpenIDM checks that these modules and services are available and reports on whether any requirements for an operational system have not been met. If dynamic configuration changes are made, OpenIDM rechecks that the required modules and services are functioning so that system operation is monitored on an ongoing basis.
The health check service reports on the state of the OpenIDM system and outputs this state to the console and to the log files. The system can be in one of the following states:
STARTING - OpenIDM is starting up |
ACTIVE_READY - all of the specified requirements
have been met to consider the OpenIDM system ready |
ACTIVE_NOT_READY - one or more of the specified
requirements have not been met and the OpenIDM system is not considered ready
|
STOPPING - OpenIDM is shutting down |
OpenIDM checks all required modules and services. Examples of those services are shown here.
Required Modules (examples)
"org.forgerock.openicf.framework.connector-framework"
"org.forgerock.openicf.framework.connector-framework-internal"
"org.forgerock.openicf.framework.connector-framework-osgi"
"org.forgerock.openidm.audit"
"org.forgerock.openidm.core"
"org.forgerock.openidm.enhanced-config"
"org.forgerock.openidm.external-email"

   ...

"org.forgerock.openidm.system"
"org.forgerock.openidm.ui"
"org.forgerock.openidm.util"
"org.forgerock.commons.org.forgerock.json.resource"
"org.forgerock.commons.org.forgerock.json.resource.restlet"
"org.forgerock.commons.org.forgerock.restlet"
"org.forgerock.commons.org.forgerock.util"
"org.forgerock.openidm.security-jetty"
"org.forgerock.openidm.jetty-fragment"
"org.forgerock.openidm.quartz-fragment"
"org.ops4j.pax.web.pax-web-extender-whiteboard"
"org.forgerock.openidm.scheduler"
"org.ops4j.pax.web.pax-web-jetty-bundle"
"org.forgerock.openidm.repo-jdbc"
"org.forgerock.openidm.repo-orientdb"
"org.forgerock.openidm.config"
"org.forgerock.openidm.crypto"
Required Services (examples)
"org.forgerock.openidm.config"
"org.forgerock.openidm.provisioner"
"org.forgerock.openidm.provisioner.openicf.connectorinfoprovider"
"org.forgerock.openidm.external.rest"
"org.forgerock.openidm.audit"
"org.forgerock.openidm.policy"
"org.forgerock.openidm.managed"
"org.forgerock.openidm.script"
"org.forgerock.openidm.crypto"
"org.forgerock.openidm.recon"
"org.forgerock.openidm.info"
"org.forgerock.openidm.router"
"org.forgerock.openidm.scheduler"
"org.forgerock.openidm.scope"
"org.forgerock.openidm.taskscanner"
You can replace this list, or add to it, by adding the following lines
to the openidm/conf/boot/boot.properties file:
"openidm.healthservice.reqbundles" - overrides
the default required bundles. Bundles are specified as a list of symbolic
names, separated by commas. |
"openidm.healthservice.reqservices" - overrides
the default required services. Services are specified as a list of symolic
names, separated by commas. |
"openidm.healthservice.additionalreqbundles" -
specifies required bundles (in addition to the default list). Bundles are
specified as a list of symbolic names, separated by commas. |
"openidm.healthservice.additionalreqservices" -
specifies required services (in addition to the default list). Services are
specified as a list of symbolic names, separated by commas. |
By default, OpenIDM gives the system ten seconds to start up all
the required bundles and services, before the system readiness is assessed.
Note that this is not the total start time, but the time required to complete
the service startup after the framework has started. You can change this
default by setting the value of the servicestartmax
property (in miliseconds) in the
openidm/conf/boot/boot.properties file. This example
sets the startup time to five seconds.
openidm.healthservice.servicestartmax=5000
The health check service works in tandem with the scriptable information service. For more information see Section 2.3, "Obtaining Information About an OpenIDM Instance".
Do not use the health check service to monitor the status of external resources, such as LDAP servers, or external databases. Rather, monitor these resources over the REST interface, as described in Section 11.7, "Checking the Status of External Systems Over REST".
2.5. Displaying Information About Installed Modules
On a running OpenIDM instance, you can list the installed modules and their states by typing the following command in the Felix administration console. (The output will vary by configuration.)
-> scr list

   Id   State          Name
[  12] [active       ] org.forgerock.openidm.endpoint
[  13] [active       ] org.forgerock.openidm.endpoint
[  14] [active       ] org.forgerock.openidm.endpoint
[  15] [active       ] org.forgerock.openidm.endpoint
[  16] [active       ] org.forgerock.openidm.endpoint

      ...

[  34] [active       ] org.forgerock.openidm.taskscanner
[  20] [active       ] org.forgerock.openidm.external.rest
[   6] [active       ] org.forgerock.openidm.router
[  33] [active       ] org.forgerock.openidm.scheduler
[  19] [unsatisfied  ] org.forgerock.openidm.external.email
[  11] [active       ] org.forgerock.openidm.sync
[  25] [active       ] org.forgerock.openidm.policy
[   8] [active       ] org.forgerock.openidm.script
[  10] [active       ] org.forgerock.openidm.recon
[   4] [active       ] org.forgerock.openidm.http.contextregistrator
[   1] [active       ] org.forgerock.openidm.config
[  18] [active       ] org.forgerock.openidm.endpointservice
[  30] [unsatisfied  ] org.forgerock.openidm.servletfilter
[  24] [active       ] org.forgerock.openidm.infoservice
[  21] [active       ] org.forgerock.openidm.authentication
->
To display additional information about a particular module or
service, run the following command, substituting the Id
of that module from the preceding list.
-> scr info Id
The following example displays additional information about the router service:
-> scr info 6

ID: 6
Name: org.forgerock.openidm.router
Bundle: org.forgerock.openidm.core (41)
State: active
Default State: enabled
Activation: immediate
Configuration Policy: optional
Activate Method: activate (declared in the descriptor)
Deactivate Method: deactivate (declared in the descriptor)
Modified Method: modified
Services: org.forgerock.json.resource.JsonResource
Service Type: service
Reference: ref_JsonResourceRouterService_ScopeFactory
    Satisfied: satisfied
    Service Name: org.forgerock.openidm.scope.ScopeFactory
    Multiple: single
    Optional: mandatory
    Policy: dynamic
Properties:
    component.id = 6
    component.name = org.forgerock.openidm.router
    felix.fileinstall.filename = file:/openidm/samples/sample1/conf/router.json
    jsonconfig = {
    "filters" : [
        {
            "onRequest" : {
                "type" : "text/javascript",
                "file" : "bin/defaults/script/router-authz.js"
            }
        },
        {
            "onRequest" : {
                "type" : "text/javascript",
                "file" : "bin/defaults/script/policyFilter.js"
            },
            "methods" : [
                "create",
                "update"
            ]
        }
    ]
}
    openidm.restlet.path = /
    service.description = OpenIDM internal JSON resource router
    service.pid = org.forgerock.openidm.router
    service.vendor = ForgeRock AS
->
2.6. Starting OpenIDM in Debug Mode
To debug custom libraries, you can start OpenIDM with the option to use the Java Platform Debugger Architecture (JPDA).
Start OpenIDM with the
jpdaoption:$ cd /path/to/openidm $ ./startup.sh jpda Executing ./startup.sh... Using OPENIDM_HOME: /path/to/openidm Using OPENIDM_OPTS: -Xmx1024m -Xms1024m -Denvironment=PROD -Djava.compiler=NONE -Xnoagent -Xdebug -Xrunjdwp:transport=dt_socket,address=5005,server=y,suspend=n Using LOGGING_CONFIG: -Djava.util.logging.config.file=/path/to/openidm/conf/logging.properties Listening for transport dt_socket at address: 5005 Using boot properties at /path/to/openidm/conf/boot/boot.properties -> OpenIDM version "3.1.0-6" (revision: xxxx) OpenIDM readyThe relevant JPDA options are outlined in the startup script (
startup.sh).In your IDE, attach a Java debugger to the JVM via socket, on port 5005.
Caution
This interface is internal and subject to change. If you depend on this interface, contact ForgeRock support.
2.7. Running OpenIDM as a Service on Linux Systems
OpenIDM provides a script that generates an initialization script to run OpenIDM as a service on Linux systems. You can start the script as the root user, or configure it to start during the boot process.
When OpenIDM runs as a service, logs are written to the directory in which OpenIDM was installed.
To run OpenIDM as a service, take the following steps:
If you have not already done so, install and set up OpenIDM, as described in Chapter 1, "Installing OpenIDM Services" in the Installation Guide.
Run the RC script.
$ cd /path/to/openidm/bin
$ ./create-openidm-rc.sh
As a user with administrative privileges, copy the
openidmscript to the/etc/init.ddirectory.$ sudo cp openidm /etc/init.d/
If you run Linux with SELinux enabled, change the file context of the newly copied script with the following command:
$ sudo restorecon /etc/init.d/openidmYou can verify the change to SELinux contexts with the
ls -Z /etc/init.dcommand. For consistency, change the user context to match other scripts in the same directory with thesudo chcon -u system_u /etc/init.d/openidmcommand.On Red Hat-based systems, run the following commands to add OpenIDM to the list of RC services, in appropriate runlevels:
$ sudo chkconfig --add openidm
$ sudo chkconfig openidm on
On Debian/Ubuntu systems, run the following command. Note the output, as Debian/Ubuntu adds start and kill scripts to appropriate runlevels.
$ sudo update-rc.d openidm defaults
        Adding system startup for /etc/init.d/openidm ...
        /etc/rc0.d/K20openidm -> ../init.d/openidm
        /etc/rc1.d/K20openidm -> ../init.d/openidm
        /etc/rc6.d/K20openidm -> ../init.d/openidm
        /etc/rc2.d/S20openidm -> ../init.d/openidm
        /etc/rc3.d/S20openidm -> ../init.d/openidm
        /etc/rc4.d/S20openidm -> ../init.d/openidm
        /etc/rc5.d/S20openidm -> ../init.d/openidm
When you run the command, you may get the following warning message:
update-rc.d: warning: /etc/init.d/openidm missing LSB
       information
. You can safely ignore that message.
As an administrative user, start the OpenIDM service.
$ sudo /etc/init.d/openidm start
Alternatively, reboot the system to start the OpenIDM service automatically.
(Optional) The following commands stops and restarts the service:
$ sudo /etc/init.d/openidm stop
$ sudo /etc/init.d/openidm restart
Chapter 3. OpenIDM Command-Line Interface
OpenIDM includes a basic command-line interface that provides a number of utilities for managing the OpenIDM instance.
All of the utilities are subcommands of the cli.sh
(UNIX) or cli.bat (Windows) scripts. To use the utilities,
you can either run them as subcommands, or launch the cli
script first, and then run the utility. For example, to run the
encrypt utility on a UNIX system:
$ cd /path/to/openidm
$ ./cli.sh

Using boot properties at /path/to/openidm/conf/boot/boot.properties
openidm# encrypt ....
or
$ cd /path/to/openidm
$ ./cli.sh encrypt ...
By default, the command-line utilities run with the properties defined
in /path/to/openidm/conf/boot/boot.properties.
If you run the cli.sh command by itself, it opens an OpenIDM-specific shell prompt:
openidm#
The startup and shutdown scripts are not discussed in this chapter. For information about these scripts, see Chapter 2, "Starting and Stopping OpenIDM".
The following sections describe the subcommands and their use. Examples assume that you are running the commands on a UNIX system. For Windows systems, use cli.bat instead of cli.sh.
For a list of subcommands available from the openidm#
prompt, run the cli.sh help command. The
help and exit options shown below are
self-explanatory. The other subcommands are explained in the subsections
that follow.
local:keytool  Export or import a SecretKeyEntry.
	   The Java Keytool does not allow for exporting or importing SecretKeyEntries.
local:encrypt    Encrypt the input string.
local:validate   Validates all json configuration files in the configuration
    (default: /conf) folder.
basic:help   Displays available commands.
basic:exit   Exit from the console.
remote:configureconnector   Generate connector configuration.
remote:configexport         Exports all configurations.
remote:configimport         Imports the configuration set from local file/directory.
The configexport, configimport, and configconnector subcommands support up to four options:
- -u or --user USER[:PASSWORD]
Allows you to specify the server user and password. Specifying a username is mandatory. If you do not specify a username, the following error is output to the console:
Remote operation failed: Unauthorized. If you do not specify a password, you are prompted for one. This option is used by all three subcommands.- --url URL
The URL of the OpenIDM REST service. The default URL is
http://localhost:8080/openidm/. This can be used to import configuration files from a remote running instance of OpenIDM. This option is used by all three subcommands. commands.- -P or --port PORT
The port number associated with the OpenIDM REST service. If specified, this option overrides any port number specified with the --url option. The default port is 8080. This option is used by all three subcommands.
- -r or --replaceall or --replaceAll
Replaces the entire list of configuration files with the files in the specified backup directory. This option is used with only the configimport command.
3.1. configexport
The configexport subcommand exports all configuration objects to a specified location, enabling you to reuse a system configuration in another environment. For example, you can test a configuration in a development environment, then export it and import it into a production environment. This subcommand also enables you to inspect the active configuration of an OpenIDM instance.
OpenIDM must be running when you execute this command.
Usage is as follows:
$ ./cli.sh configexport --user username:passsword export-location
For example:
$ ./cli.sh configexport --user openidm-admin:openidm-admin /tmp/conf
On Windows systems, the export-location must be provided in quotation marks, for example:
C:\openidm\cli.bat configexport --user openidm-admin:openidm-admin "C:\temp\openidm"
Configuration objects are exported, as .json
files, to the specified directory. The command creates the directory if
needed. Configuration files that are present in this directory are renamed as
backup files, with a timestamp, for example,
audit.json.2014-02-19T12-00-28.bkp, and are not
overwritten. The following configuration objects are exported:
The internal repository configuration (
repo.orientdb.jsonorrepo.jdbc.json)Default and custom configuration directories (
script.json)The log configuration (
audit.json)The authentication configuration (
authentication.json)The cluster configuration (
cluster.json)The configuration of a connected SMTP email server (
external.email.json)Custom configuration information (
info-name.json)The managed object configuration (
managed.json)The connector configuration (
provisioner.openicf-*.json)The router service configuration (
router.json)The scheduler service configuration (
scheduler.json)Any configured schedules (
schedule-*.json)The synchronization mapping configuration (
sync.json)If workflows are defined, the configuration of the workflow engine (
workflow.json) and the workflow access configuration (process-access.json)Any configuration files related to the user interface (
ui-*.json)The configuration of any custom endpoints (
endpoint-*.json)The configuration of servlet filters (
servletfilter-*.json)The policy configuration (
policy.json)
3.2. configimport
The configimport subcommand imports configuration objects from the specified directory, enabling you to reuse a system configuration from another environment. For example, you can test a configuration in a development environment, then export it and import it into a production environment.
The command updates the existing configuration from the import-location over the OpenIDM REST interface. By default, if configuration objects are present in the import-location and not in the existing configuration, these objects are added. If configuration objects are present in the existing location but not in the import-location, these objects are left untouched in the existing configuration.
If you include the --replaceAll parameter, the
command wipes out the existing configuration and replaces it with the
configuration in the import-location. Objects in
the existing configuration that are not present in the
import-location are deleted.
Usage is as follows:
$ ./cli.sh configimport --user username:password [--replaceAll] import-location
For example:
$ ./cli.sh configimport --user openidm-admin:openidm-admin --replaceAll /tmp/conf
On Windows systems, the import-location must be provided in quotation marks, for example:
C:\openidm\cli.bat configimport --user openidm-admin:openidm-admin --replaceAll "C:\temp\openidm"
Configuration objects are imported, as .json files,
from the specified directory to the conf directory. The
configuration objects that are imported are outlined in the corresponding
export command, described in the previous section.
3.3. configureconnector
The configureconnector subcommand generates a configuration for an OpenICF connector.
Usage is as follows:
$ ./cli.sh configureconnector --user username:password connector-name
Select the type of connector that you want to configure. The following example configures a new XML connector.
$ ./cli.sh configureconnector --user openidm-admin:openidm-admin myXmlConnector
 Starting shell in /path/to/openidm
Using boot properties at /path/to/openidm/conf/boot/boot.properties
0. CSV File Connector version 1.1.0.2
1. Database Table Connector version 1.1.0.1
2. Scripted Poolable Groovy Connector version 1.4.1.0
3. Scripted Groovy Connector version 1.4.1.0
4. Scripted CREST Connector version 1.4.1.0
5. Scripted SQL Connector version 1.4.1.0
6. Scripted REST Connector version 1.4.1.0
7. LDAP Connector version 1.4.0.1
8. XML Connector version 1.1.0.2
9. Exit
Select [0..9]: 8
Edit the configuration file and run the command again. The configuration was
saved to /openidm/temp/provisioner.openicf-myXmlConnector.json
The basic configuration is saved in a file named
/openidm/temp/provisioner.openicf-connector-name.json.
Edit the configurationProperties parameter in this file to
complete the connector configuration. For an XML connector, you can use the
schema definitions in sample 1 for an example configuration.
  "configurationProperties" : {
    "xmlFilePath" : "samples/sample1/data/resource-schema-1.xsd",
    "createFileIfNotExists" : false,
    "xsdFilePath" : "samples/sample1/data/resource-schema-extension.xsd",
    "xsdIcfFilePath" : "samples/sample1/data/xmlConnectorData.xml"
  },
For more information about the connector configuration properties, see Section 11.3, "Configuring Connectors".
When you have modified the file, run the configureconnector command again so that OpenIDM can pick up the new connector configuration.
$ ./cli.sh configureconnector --user openidm-admin:openidm-admin myXmlConnector
Executing ./cli.sh...
Starting shell in /path/to/openidm
Using boot properties at /path/to/openidm/conf/boot/boot.properties
Configuration was found and read from: /path/to/openidm/temp/provisioner.openicf-myXmlConnector.json
You can now copy the new
provisioner.openicf-myXmlConnector.json file
to the conf/ subdirectory.
You can also configure connectors over the REST interface. For more information, see Section 11.6, "Creating Default Connector Configurations".
3.4. encrypt
The encrypt subcommand encrypts an input string, or JSON object, provided at the command line. This subcommand can be used to encrypt passwords, or other sensitive data, to be stored in the OpenIDM repository. The encrypted value is output to standard output and provides details of the cryptography key that is used to encrypt the data.
Usage is as follows:
$ ./cli.sh encrypt [-j] string
The -j option specifies that the string to be
encrypted is a JSON object. If you do not enter the string as part of the
command, the command prompts for the string to be encrypted. If you enter
the string as part of the command, any special characters, for example
quotation marks, must be escaped.
The following example encrypts a normal string value:
$ ./cli.sh encrypt mypassword

Executing ./cli.sh
Starting shell in /path/to/openidm
Using boot properties at /path/to/openidm/conf/boot/boot.properties
Activating cryptography service of type: JCEKS provider:  location: security/keystore.jceks
Available cryptography key: openidm-sym-default
Available cryptography key: openidm-localhost
CryptoService is initialized with 2 keys.
-----BEGIN ENCRYPTED VALUE-----
{
  "$crypto" : {
    "value" : {
      "iv" : "M2913T5ZADlC2ip2imeOyg==",
      "data" : "DZAAAM1nKjQM1qpLwh3BgA==",
      "cipher" : "AES/CBC/PKCS5Padding",
      "key" : "openidm-sym-default"
    },
    "type" : "x-simple-encryption"
  }
}
------END ENCRYPTED VALUE------
The following example encrypts a JSON object. The input string must be a valid JSON object.
$ ./cli.sh encrypt -j {\"password\":\"myPassw0rd\"}

Starting shell in /path/to/openidm
Using boot properties at /path/to/openidm/conf/boot/boot.properties
Activating cryptography service of type: JCEKS provider:  location: security/keystore.jceks
Available cryptography key: openidm-sym-default
Available cryptography key: openidm-localhost
CryptoService is initialized with 2 keys.
-----BEGIN ENCRYPTED VALUE-----
{
  "$crypto" : {
    "value" : {
      "iv" : "M2913T5ZADlC2ip2imeOyg==",
      "data" : "DZAAAM1nKjQM1qpLwh3BgA==",
      "cipher" : "AES/CBC/PKCS5Padding",
      "key" : "openidm-sym-default"
    },
    "type" : "x-simple-encryption"
  }
}
------END ENCRYPTED VALUE------
The following example prompts for a JSON object to be encrypted. In this case, you need not escape the special characters.
$ ./cli.sh encrypt -j

Using boot properties at /path/to/openidm/conf/boot/boot.properties
Enter the Json value

> Press ctrl-D to finish input
Start data input:
{"password":"myPassw0rd"}
^D

Activating cryptography service of type: JCEKS provider:  location: security/keystore.jceks
Available cryptography key: openidm-sym-default
Available cryptography key: openidm-localhost
CryptoService is initialized with 2 keys.
-----BEGIN ENCRYPTED VALUE-----
{
  "$crypto" : {
    "value" : {
      "iv" : "6e0RK8/4F1EK5FzSZHwNYQ==",
      "data" : "gwHSdDTmzmUXeD6Gtfn6JFC8cAUiksiAGfvzTsdnAqQ=",
      "cipher" : "AES/CBC/PKCS5Padding",
      "key" : "openidm-sym-default"
    },
    "type" : "x-simple-encryption"
  }
}
------END ENCRYPTED VALUE------
3.5. keytool
The keytool subcommand exports or imports secret key values.
The Java keytool command enables you to export and import public keys and certificates, but not secret or symmetric keys. The OpenIDM keytool subcommand provides this functionality.
Usage is as follows:
./cli.sh keytool [--export, --import] alias
For example, to export the default OpenIDM symmetric key, run the following command:
$ ./cli.sh keytool --export openidm-sym-default

Using boot properties at /openidm/conf/boot/boot.properties
Use KeyStore from: /openidm/security/keystore.jceks
Please enter the password:
[OK] Secret key entry with algorithm AES
AES:606d80ae316be58e94439f91ad8ce1c0
The default keystore password is changeit. You
should change this password after installation.
To import a new secret key named my-new-key, run the following command:
$ ./cli.sh keytool --import my-new-key

Using boot properties at /openidm/conf/boot/boot.properties
Use KeyStore from: /openidm/security/keystore.jceks
Please enter the password:
Enter the key:
AES:606d80ae316be58e94439f91ad8ce1c0
If a secret key of that name already exists, OpenIDM returns the following error:
"KeyStore contains a key with this alias"
3.6. validate
The validate subcommand validates all .json
configuration files in the openidm/conf/ directory.
Usage is as follows:
$ ./cli.sh validate

Executing ./cli.sh
Starting shell in /path/to/openidm
Using boot properties at /path/to/openidm/conf/boot/boot.properties
...................................................................
[Validating] Load JSON configuration files from:
[Validating] 	/path/to/openidm/conf
[Validating] audit.json .................................. SUCCESS
[Validating] authentication.json ......................... SUCCESS

    ...

[Validating] sync.json ................................... SUCCESS
[Validating] ui-configuration.json ....................... SUCCESS
[Validating] ui-countries.json ........................... SUCCESS
[Validating] ui-secquestions.json ........................ SUCCESS
[Validating] workflow.json ............................... SUCCESS
Chapter 4. OpenIDM Web-based User Interfaces
OpenIDM provides a customizable, browser-based user interface, known as the
User View UI. To take full advantage of this interface, you can configure
OpenIDM managed objects (see Section C.1, "Managed Objects") under
managed/user. Most of the OpenIDM samples demonstrate how
you can deploy OpenIDM with managed users.
The User View UI interface enables administrative users to create, modify,
and delete user accounts. It provides role-based access to tasks based on
BPMN2 workflows, and allows users to manage certain aspects of their own
accounts, including configurable self-service registration. When OpenIDM
starts, you can access the User View UI at
https://localhost:8443/openidmui.
OpenIDM also provides a configurable administrative user interface (Admin UI)
that allows you to configure connectors, customize managed objects, set up
attribute mappings, and more. When OpenIDM starts, you can access the Admin UI
at https://localhost:8443/admin.
The first time you log into either UI as the openidm-admin
administrative user, the default password is openidm-admin.
As that default password is not secure, we recommend that you change that
password in production. However, you can bypass that window, by clicking the
X in the upper right corner.

4.1. Configuring OpenIDM from the Admin UI
You can set up a basic configuration for OpenIDM with the Administrative User Interface (Admin UI).
Through the Admin UI, you can connect to resources, configure attribute mapping, and set up managed objects, reconciled on a defined schedule.
You can customize the configuration of connectors, managed objects, mapping between resources, and more. You can add and edit properties to be synchronized, configure correlation queries, and enable LiveSync.
To access the initial Admin UI screen, navigate to
https://localhost:8443/admin.
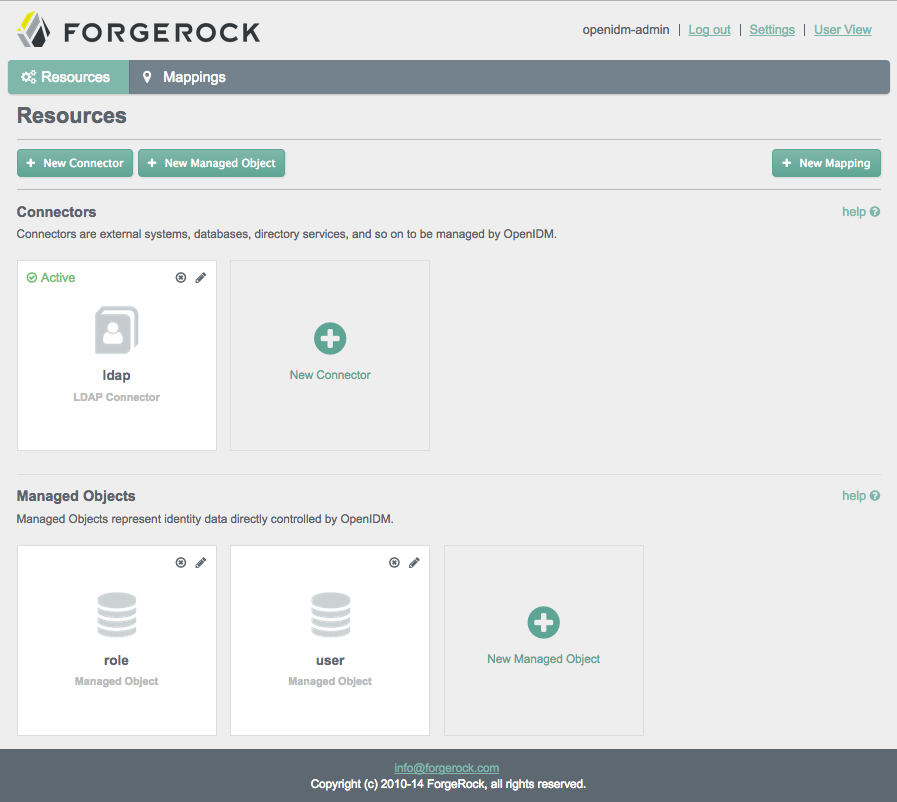
The information that appears in the initial Admin UI screen depends on how you started OpenIDM. For example, if you start OpenIDM with one of the OpenIDM samples (see Chapter 3, "More OpenIDM Samples" in the Installation Guide), your first Resources screen will display connectors and managed objects as configured in the selected sample.
As shown in the initial screen, the Admin UI supports connecting to external resources (see Chapter 11, "Connecting to External Resources") and managing users, groups, and roles (see Chapter 8, "Managing Users, Groups, and Roles").
Scroll up and down the Admin UI screen. Review configured connectors and managed objects. The screenshots in this section assume that you have started OpenIDM with the configuration for Sample 2b (Section 3.4, "Sample 2b - LDAP Two Way" in the Installation Guide).
Note
While a connector is not a resource, it provides a connection to remote resources such as LDAP data stores, XML files, and other databases.
Connectors are used to communicate with remote resources, such as a database, an identity store, or another organized data store.
Once you connect one or more data stores and managed objects, you can create a mapping between two resources. You can then configure property mapping between those resources, for later synchronization.
4.1.1. Administering Connectors from the UI
You can include several different connectors in an OpenIDM configuration. Select the option to create a new connector. Try some of the different connector types in the screen that appears. Observe as the Admin UI changes the configuration options to match the requirements of the connector type.
Remember, every connector serves as a conduit to an external data store.
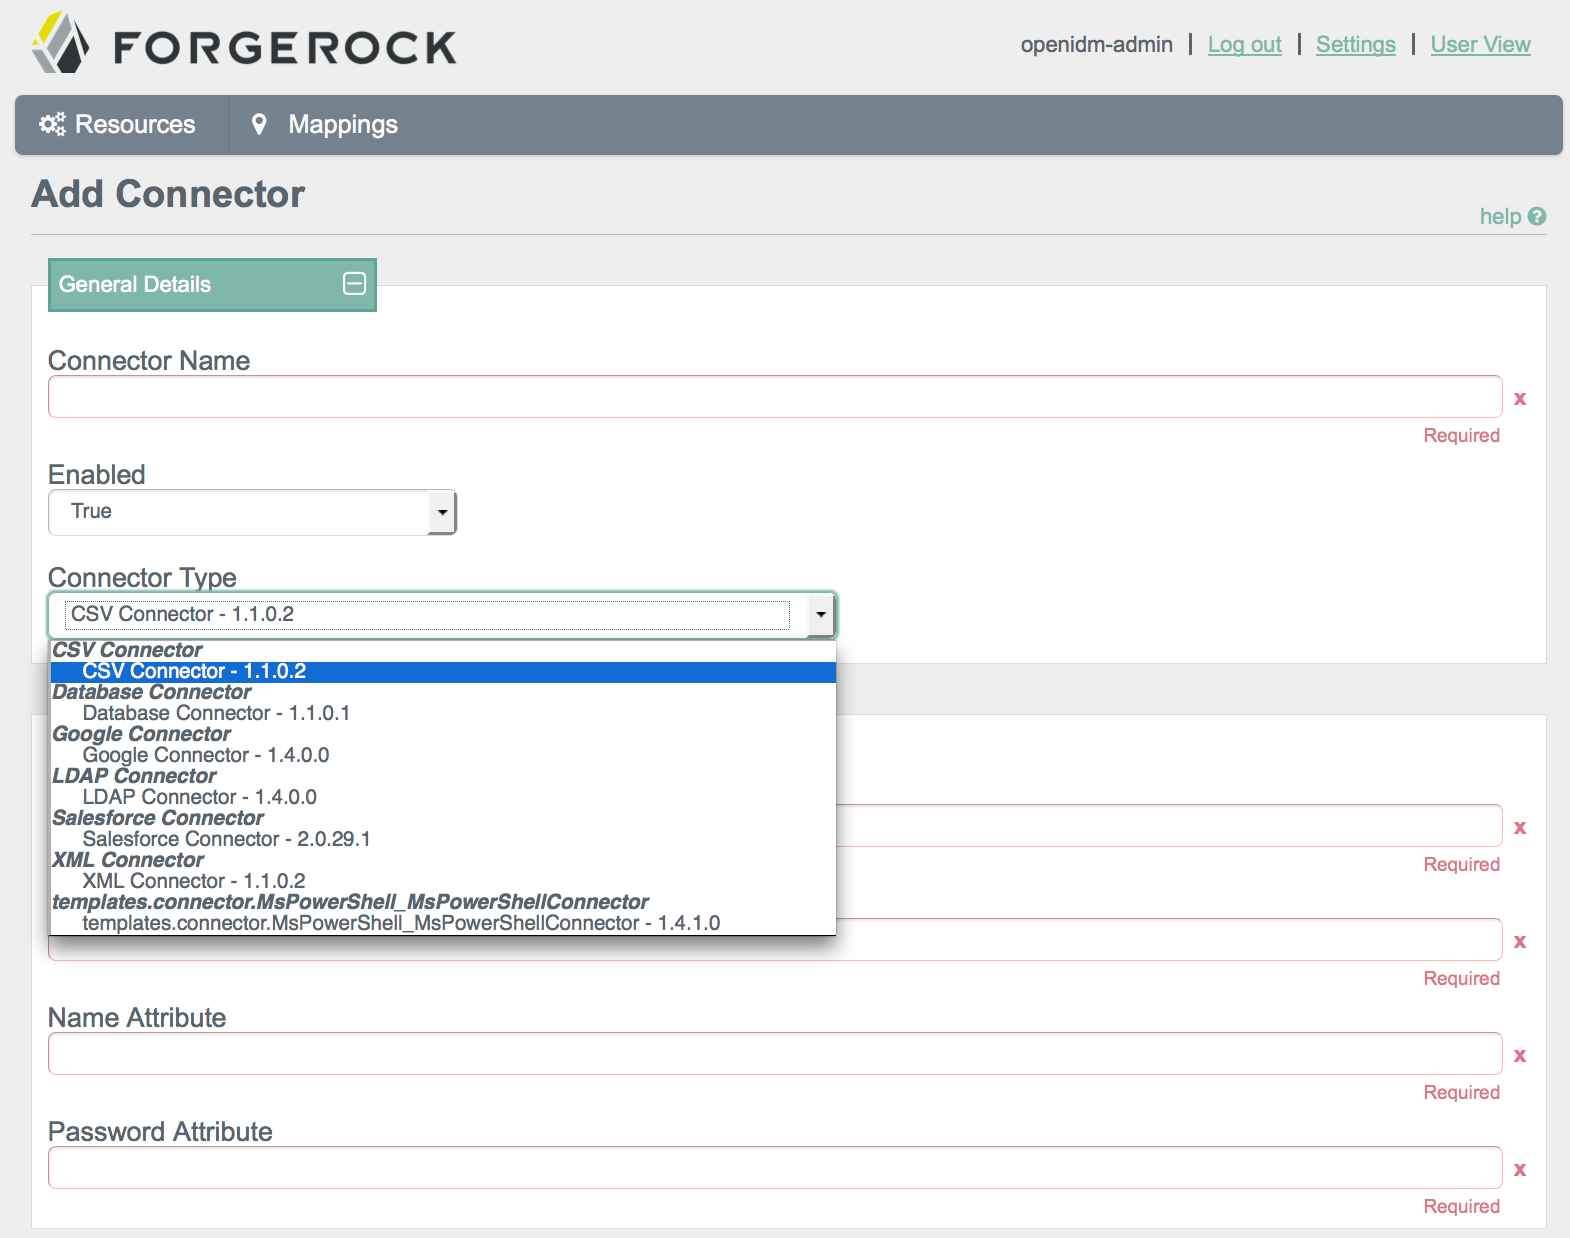
If you are not sure what to enter in a specific Add Connector text box, review the list of connectors supported with OpenIDM (Section 11.5, "Connectors Supported With OpenIDM 3.1"). You should be able to find guidance and or examples on how each supported connector is configured.
For additional guidance, review sample connector files in the
samples/provisioners/ subdirectory.
Once you fill in all required text boxes, the Admin UI allows you to validate the connector configuration.
4.1.2. Administering Managed Objects from the UI
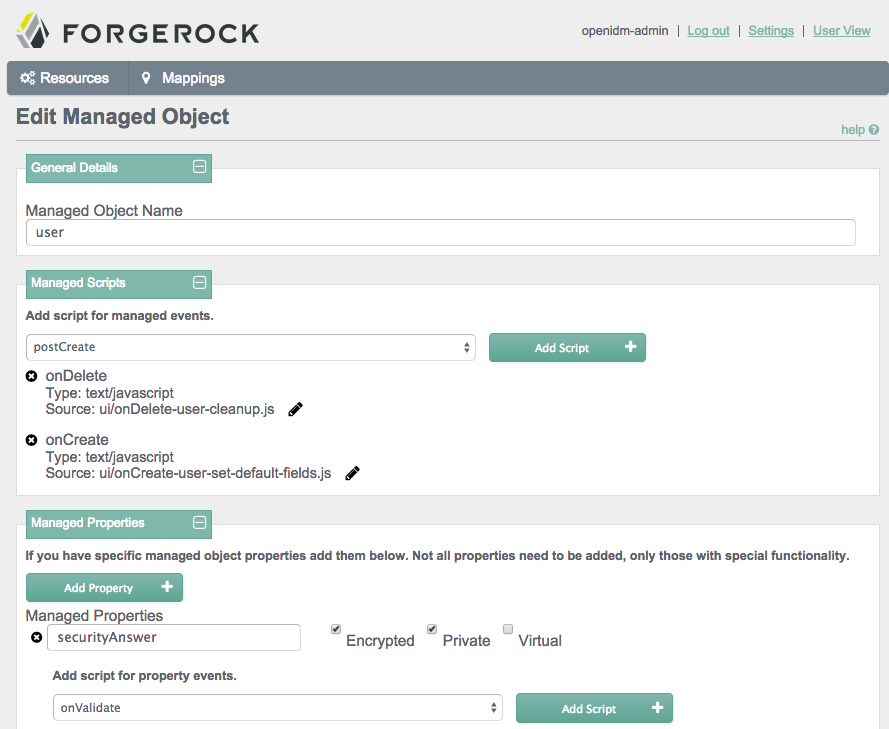
You can set up Managed Objects in a similar way to how you set up connectors. Typically, OpenIDM uses managed objects as described in Chapter 8, "Managing Users, Groups, and Roles".
To access the details of a Managed Object, go to the Resources screen. Select the Edit icon associated with the Managed Object that you want to change, such as user, group, or role.
4.1.3. Configuring a Resource Mapping from the UI
You may have multiple connectors and managed objects. You can configure a mapping between any two of these resources. Connectors represent an external data store, as specified in Section 11.3, "Configuring Connectors". In contrast, managed objects represents a data store internal to OpenIDM.
Resource mapping requires a source and a target. Generally, each resource includes properties such as username, address, surname, and title. Resource mapping can go beyond user information to other types of data.
Once you create a mapping, you can identify properties that you wish to control in the target. With this part of the Admin UI, you can configure how OpenIDM uses matching properties in the source.
The following screenshot illustrates a property mapping between two resources. Every resource includes identifiers for each attribute. For example, different resources may use one of the following identifiers for usernames: un, uid, user, sAMAccountName, and account. For more information on property mappings, see Section 12.3.2, "Synchronization Mappings File".
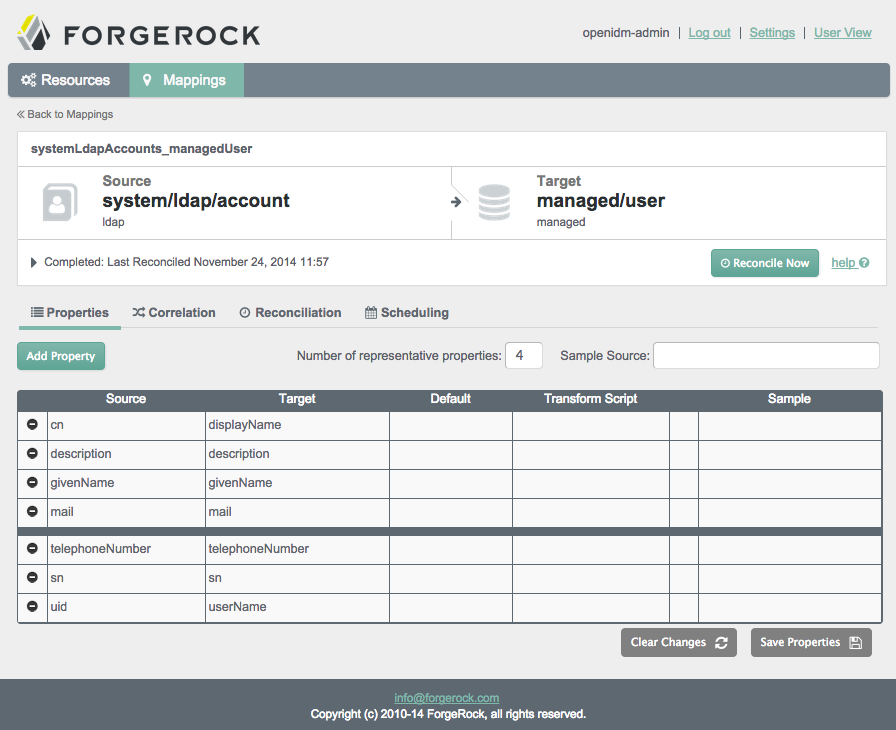
The bold black line is used solely by the UI to determine what data is shown from these data stores. It does not affect reconciliation. In the Admin UI, you can change the location of the line, or move a property above or below the line.
4.1.4. Configuring Reconciliation from the UI
Reconciliation changes data on a target system to match the corresponding data on a source system. You can customize how OpenIDM performs reconciliation in several ways.
4.1.4.1. Correlation Options
OpenIDM can match existing records on the target system to records on the source system. This matching is known as correlation.
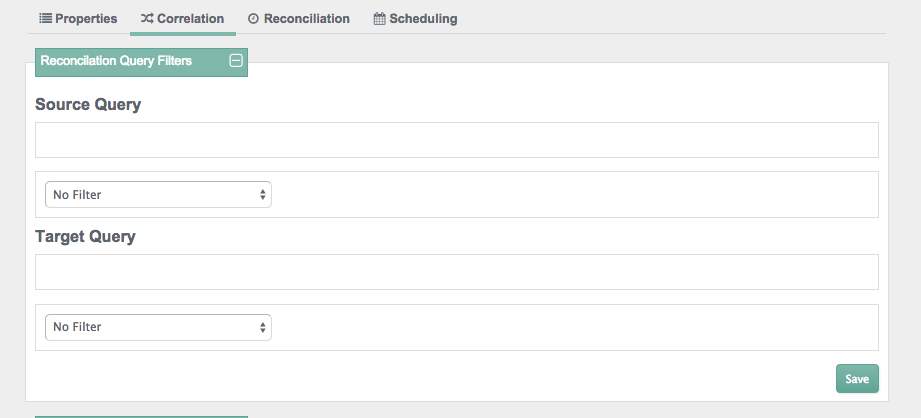
Before activating reconciliation, you may choose to configure various correlation options, including reconciliation query filters, individual record validation, association rules, and data association management.
For more information on correlation, see Section 12.17, "Correlation Queries".
You can add reconciliation query filters, with queries on the source and
target objects. For more information, see Section 7.3.4, "Constructing Queries".
You can set up queries on properties such as userName
and parameters such as Smith.
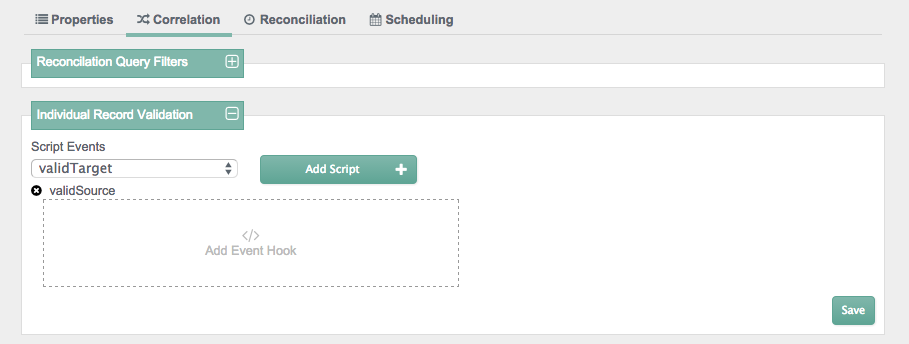
You can add individual record validation scripts, based on the
validSource and validTarget
script objects. For more information on these objects, see
Section D.1, "Object-Mapping Objects". With these scripts, you can set up
criteria for OpenIDM to validate source and target objects for reconciliation.
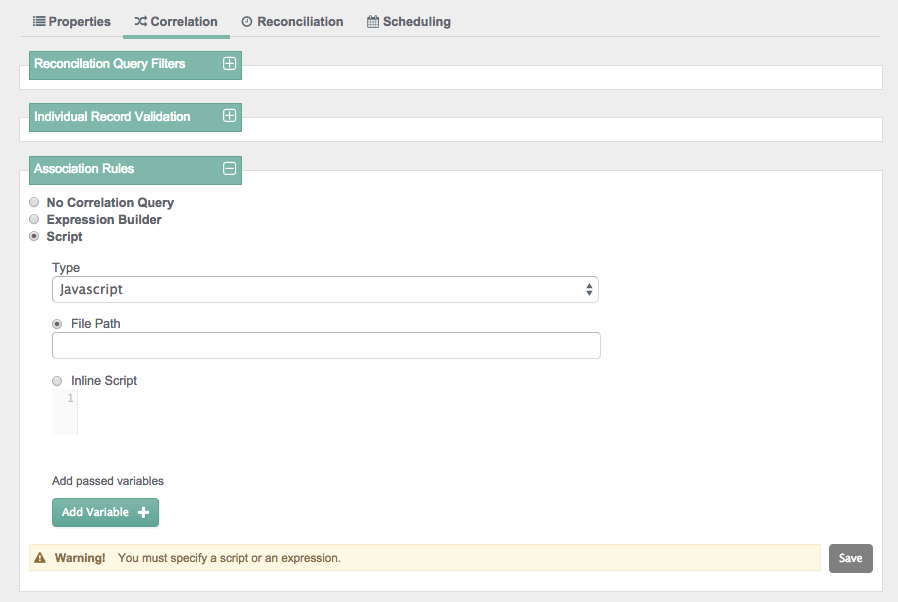
You can set up correlation queries (Section 12.17, "Correlation Queries") with an expression builder or with a JavaScript or Groovy-based script.
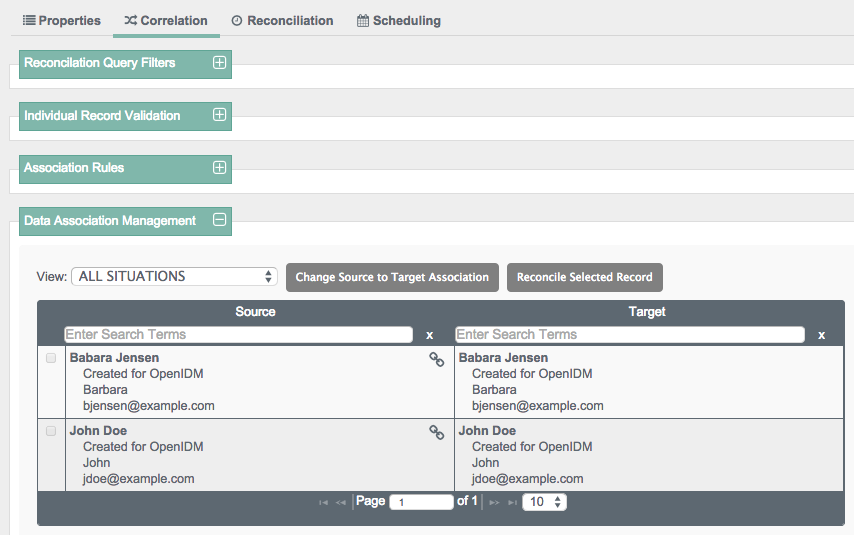
When a reconciliation operation finds a matching target entry, the process creates a link between the source and the target entries. This is also known as a Data Association. Data associations serve two purposes - they speed up future reconciliation operations, and they serve as a record of the relationship between a source and a target entry.
You can set up such data associations for individual entries, as well as different situations shown in Section 12.13.1, "Synchronization Situations".
4.1.4.2. Reconciliation Options
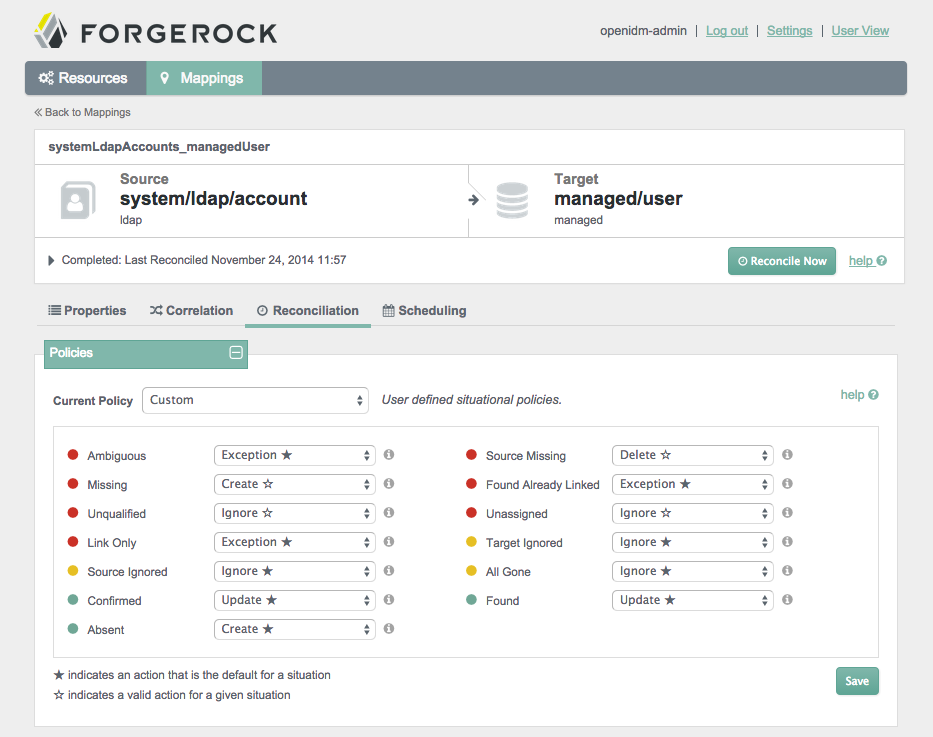
Before activating reconciliation, you may choose to configure situational policies, situational event scripts, and reconciliation scripts.
You may want to configure situational policies. By default, the policies associated with mappings are set to "read-only". As such, OpenIDM does not change anything on the target system, unless you make changes to situational policies.
With situational policies, you can define actions relevant for situations shown in the screenshot below. For a full list of available policies, see Section 12.13, "Synchronization Situations and Actions".
To access the following screen, select the Mapping of your choice and select edit. In the sub-tabs that appear, select Reconciliation.
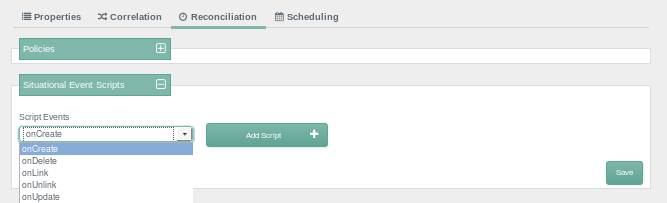
You can configure situational event scripts. Each of the script events
shown onCreate, onDelete,
onLink, onUnlink, and
onUpdate, can help you with constructing attributes. For
more information, see Section 12.3.5, "Constructing and Manipulating Attributes".
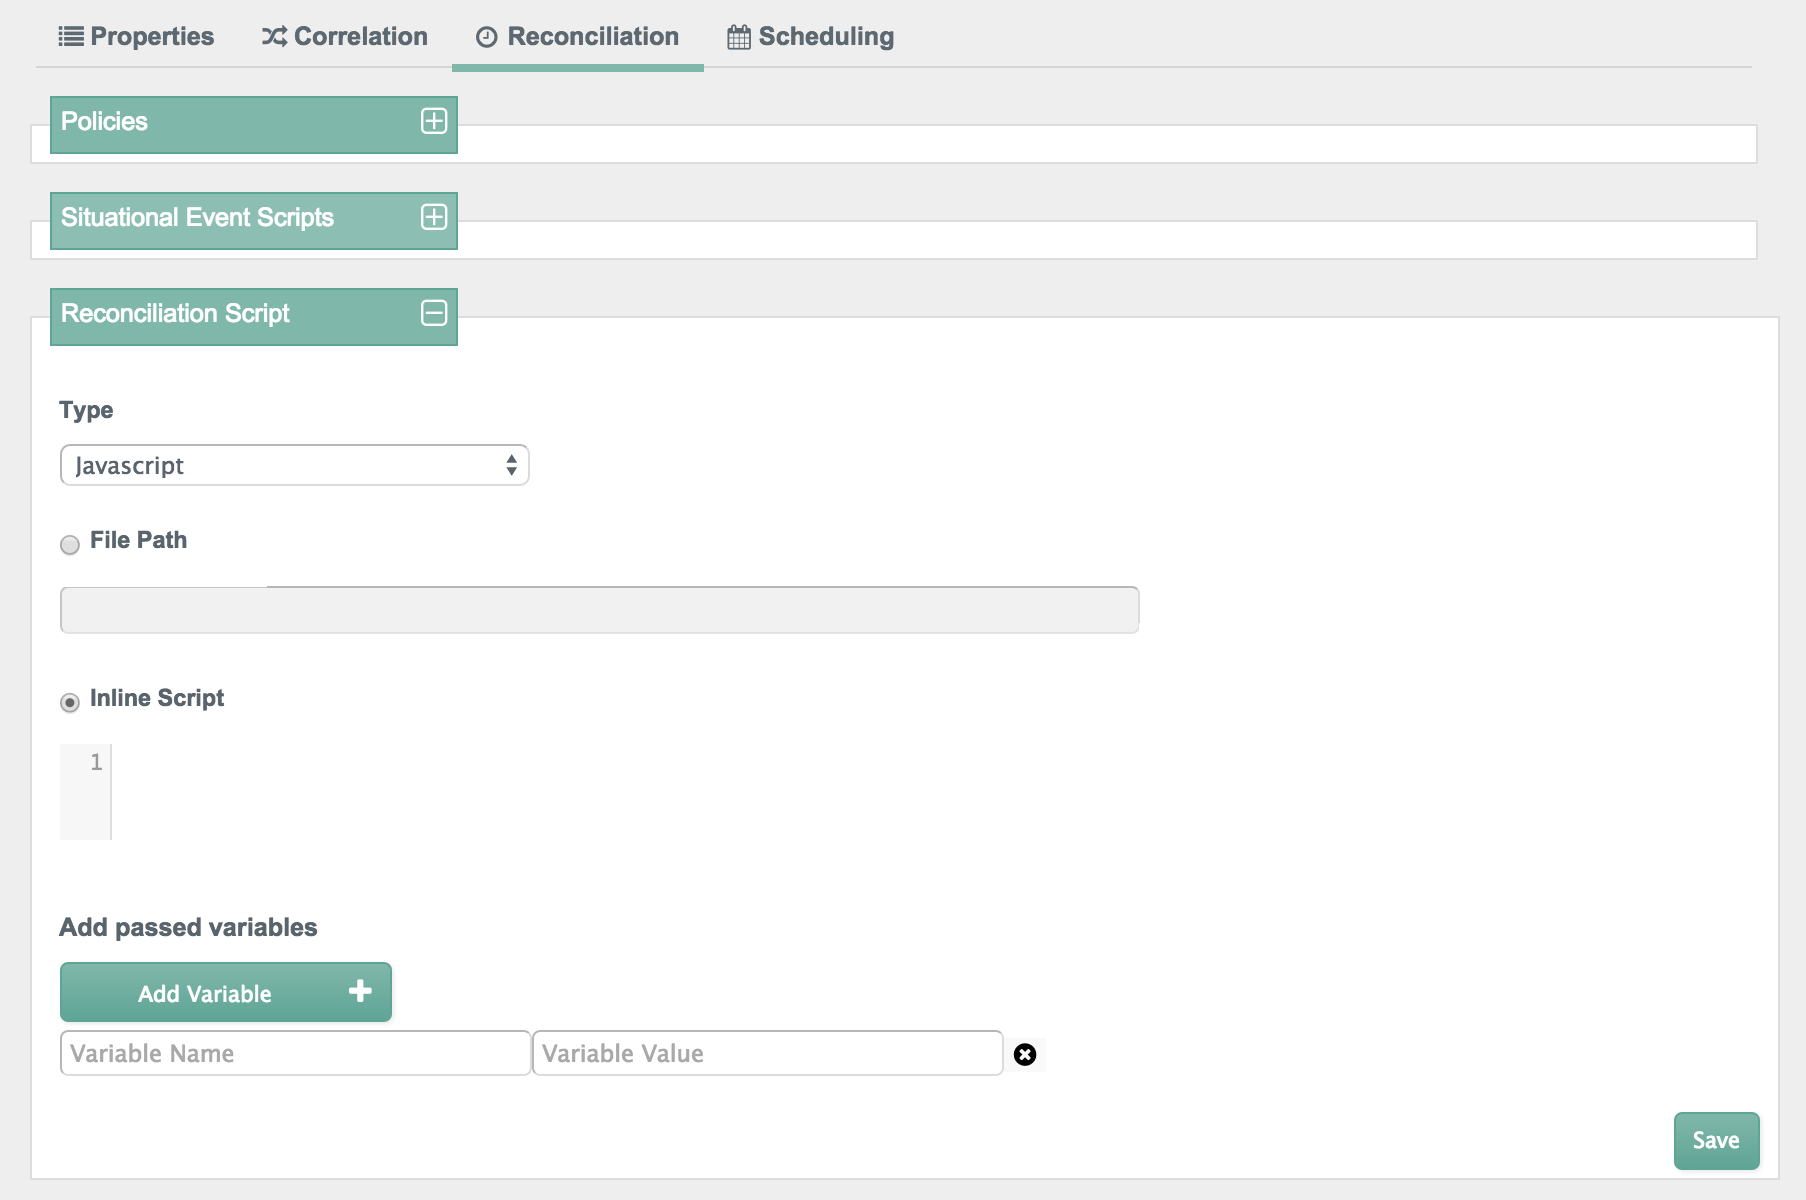
You can configure scripts that are triggered on reconciliation, as part of the dataflow configuration (see Section 12.18, "Advanced Data Flow Configuration".
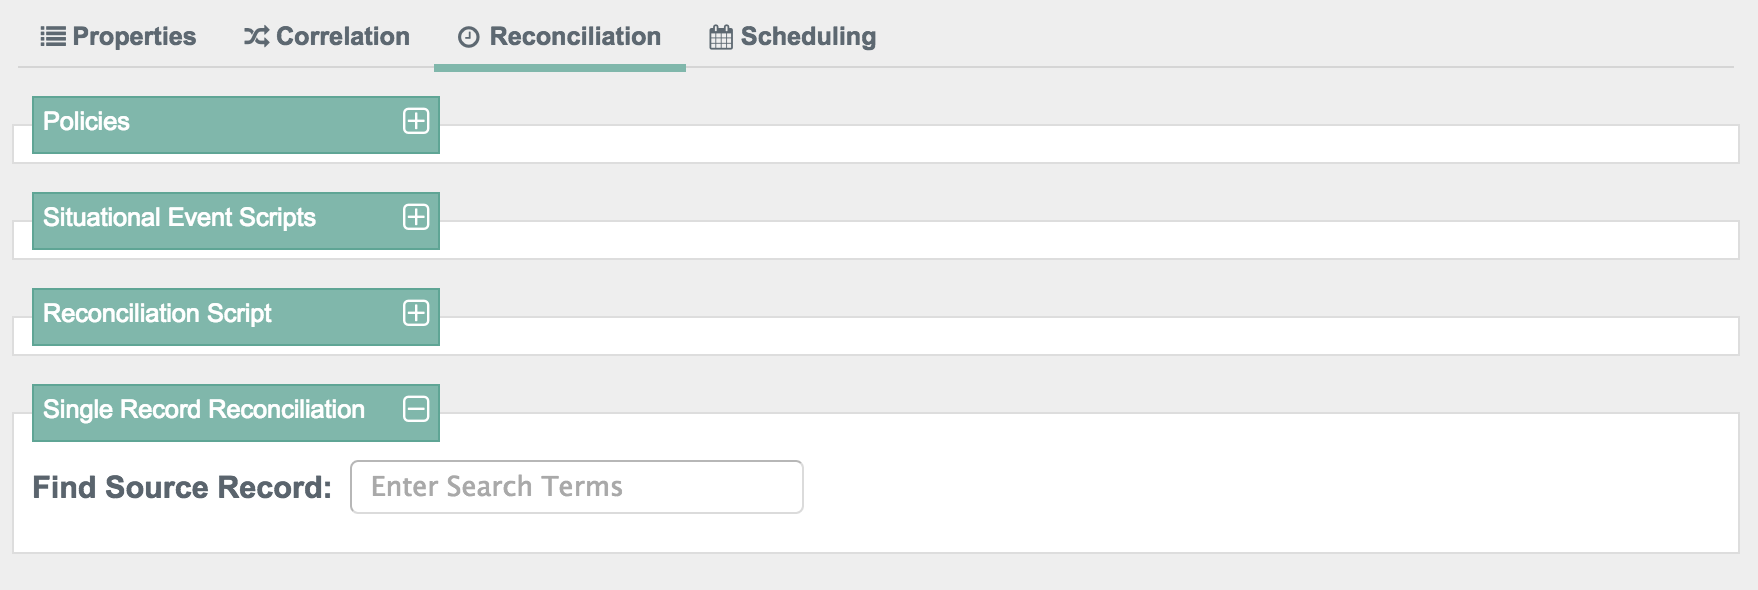
You can choose to test the overall process with a single record reconciliation. In other words, you need not test these policies and scripts against the entire data set. For example, you can restrict reconciliation to a specific ID (see Section 12.6, "Restricting Reconciliation to a Specific ID").
Finally, you should set up a schedule, as described in Section 12.19.1, "Configuring Scheduled Synchronization".
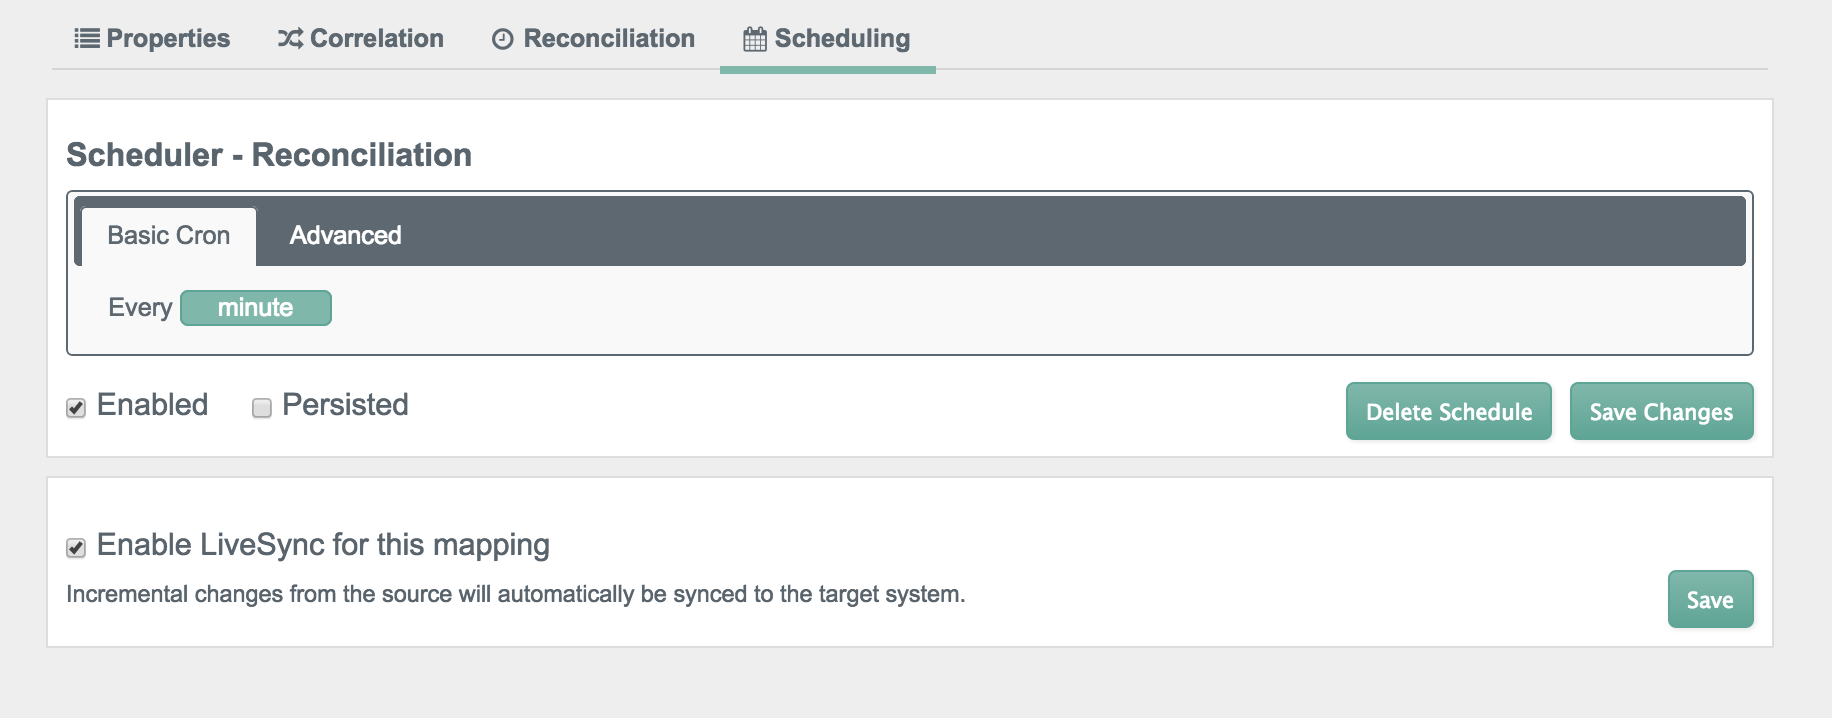
You can also configure LiveSync, which captures the changes that happen on a remote system, and then pushes those changes to OpenIDM.
For more information on Reconciliation and LiveSync, see Section 12.1, "Types of Synchronization".
You can manage reconciliation and liveSync with the embedded Quartz scheduler. For more information, see Chapter 13, "Scheduling Tasks and Events".
Once you've set up Reconciliation based on configured properties, correlation queries, and a synchronization schedule, you can start the synchronization process. Try it out! You'll see the results in the target data store.
Once you have taken the steps required to configure OpenIDM through the Admin UI, you can start the synchronization process from a source to a target. Once a synchronization is complete, you can review the results in this window.
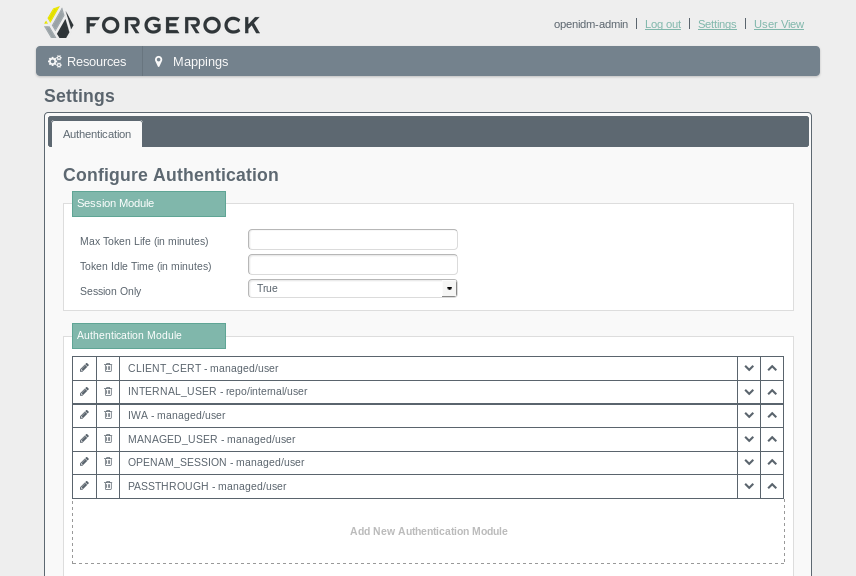
4.1.5. Configuring Authentication Modules from the UI
You can also configure authentication modules from the Admin UI. To access those modules, click Settings.
The page shown here displays several available modules, based on the ForgeRock Common Authentication Framework. For more information on each module, see Section 15.3, "Supported Authentication Modules".
4.2. Overview of the User View UI
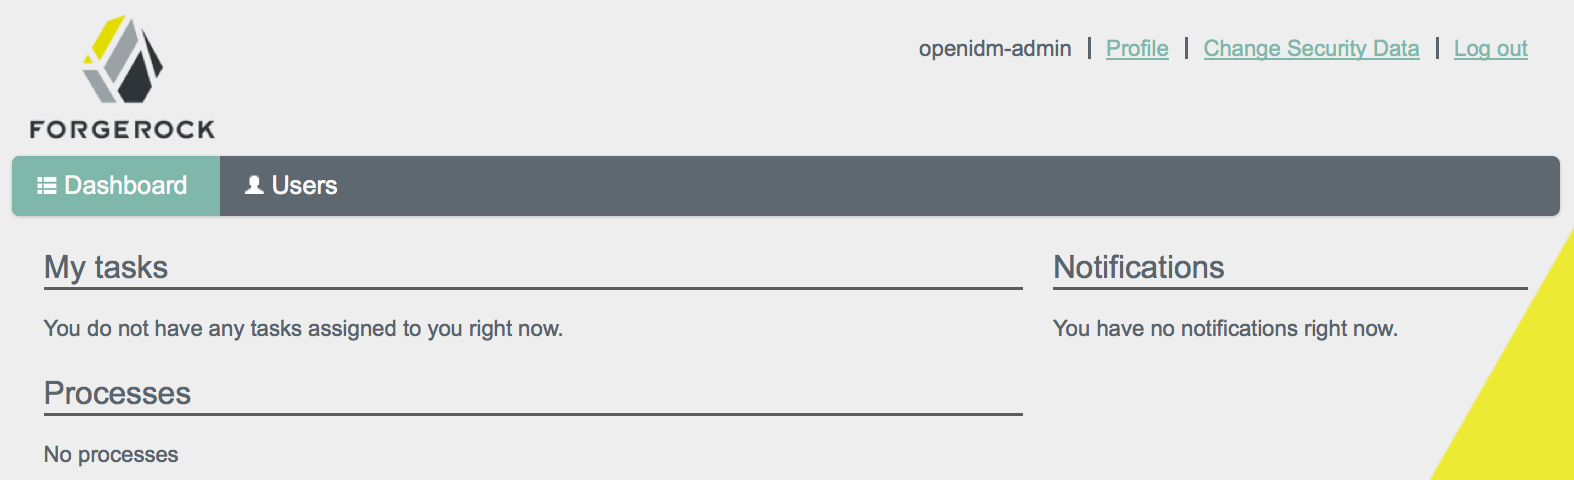
For all users, the User View UI includes a Dashboard tab, which lists any tasks assigned to the user who as logged in, processes available to be invoked, and any notifications for that user.
For the administrative user, (role openidm-admin), the
User View UI also includes a Users tab, which provides an interface for
user entries, if you have configured managed users in the OpenIDM repository.
To access the User View UI, install and start OpenIDM, then point your browser to https://localhost:8443/openidmui. If you have not installed a certificate that is trusted by a certificate authority, you are prompted with an "Untrusted Connection" warning the first time you log in to the UI.
The following image shows the Dashboard tab for the administrative user when no tasks, processes, or notifications are available.
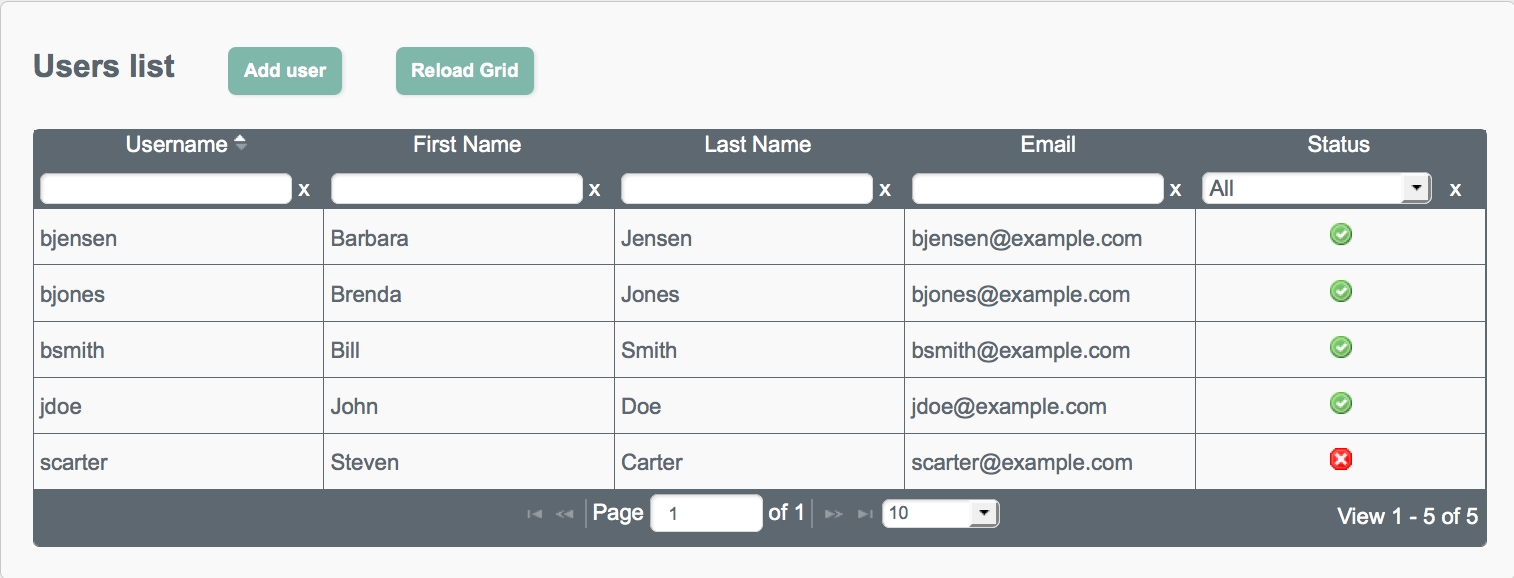
The following image shows the Users tab, populated with two sample users, after a reconciliation associated with Sample 2b.
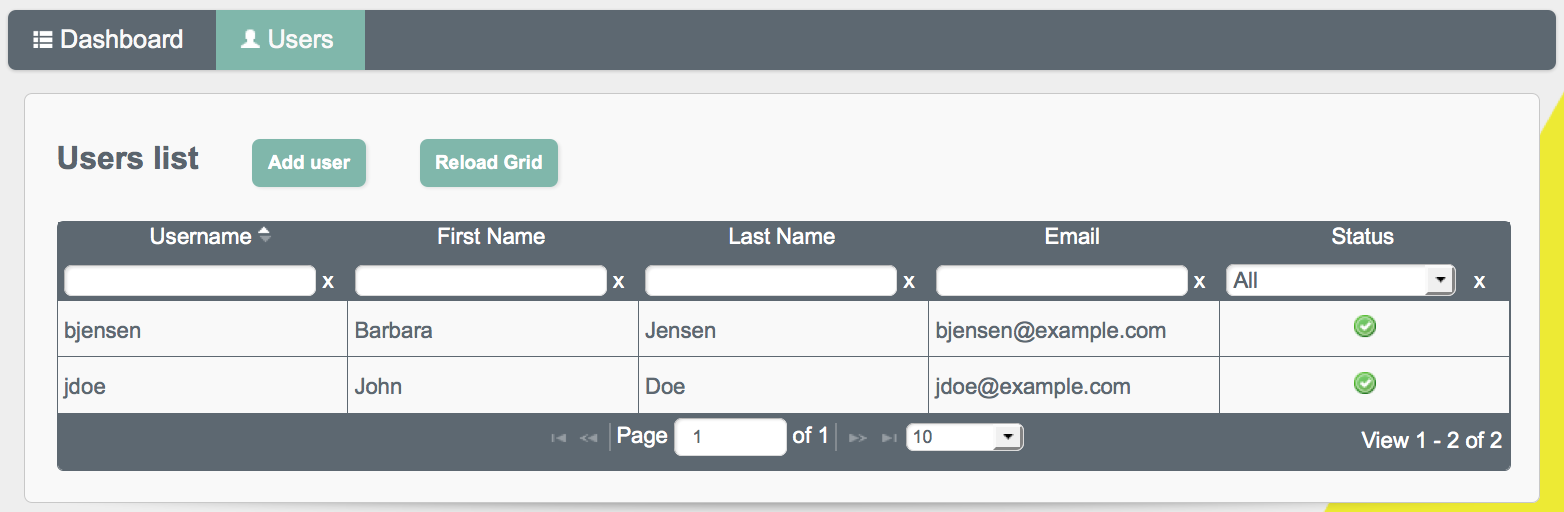
You can sort the list of users alphabetically, by any of the column values. Click on the column title to sort.
The Profile link enables the user to modify his username
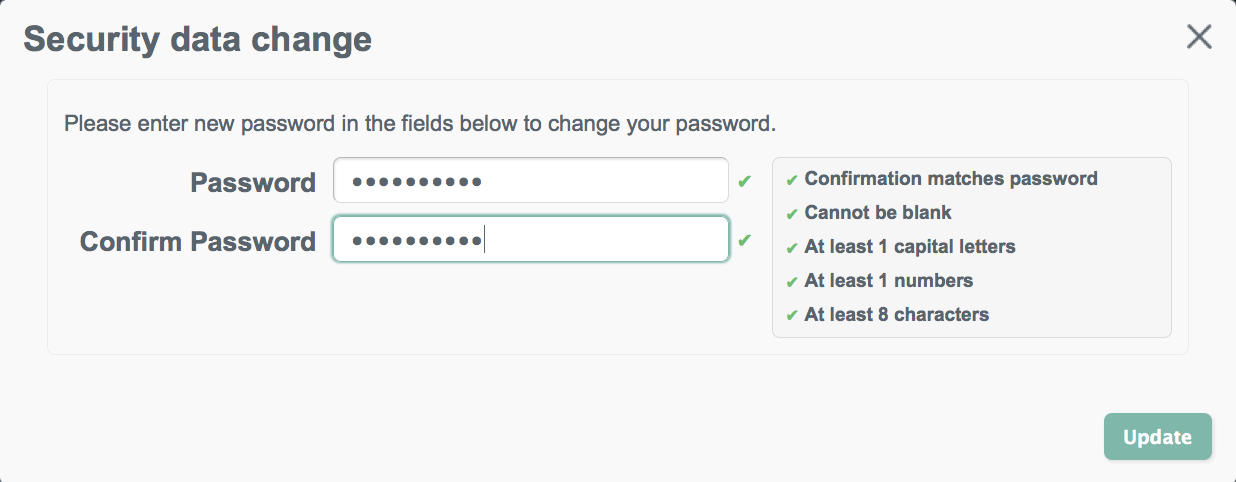
or password. The Change Security Data link, accessed from
the top of the screen, or from the user's Profile page enables the user to
change his password and, if this functionality has been enabled, to select a
new security question.
Password changes are subject to the default password policy, as shown in the following password update screen.
For a regular user (role openidm-authorized), the Users
tab is not displayed. By default, regular users cannot manage user accounts,
except for certain aspects of their own accounts.
4.3. Configuring the User View UI
The following sections outline the configurable aspects of the User View UI.
4.3.1. Enabling Self-Registration
Self-registration (the ability for new users to create their own accounts)
is disabled by default. To enable self-registration, set
"selfRegistration" to true in the UI
configuration file (conf/ui-configuration.json).
{
    "configuration" : {
        "selfRegistration" : true,
...
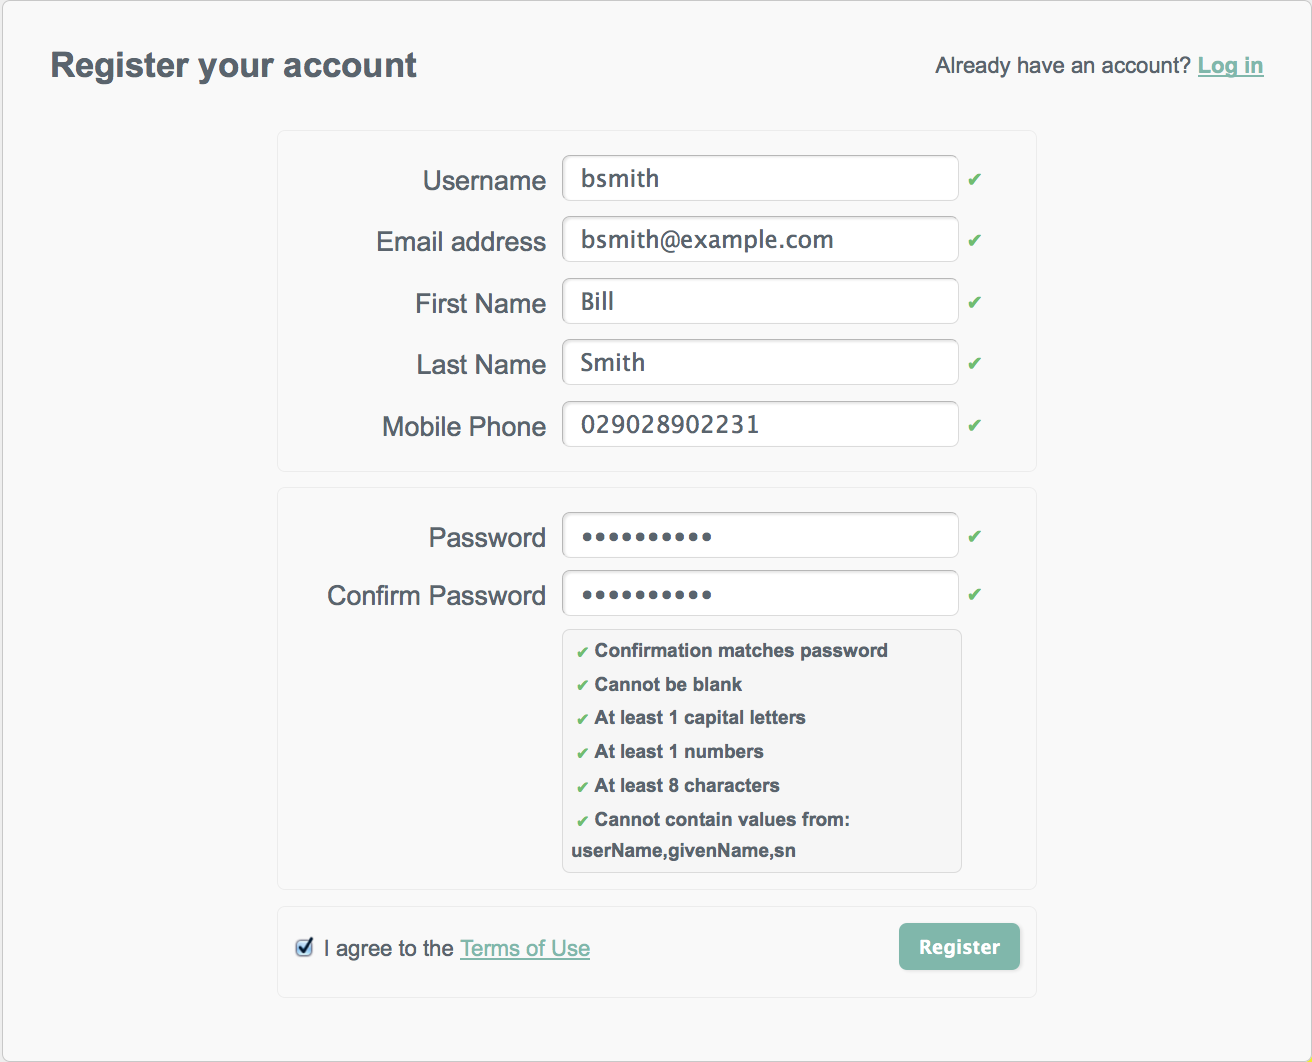
When self-registration is enabled, a "Register your account" link is provided on the login page. When a user creates an account on the account registration page, a managed object is created in the OpenIDM repository. The default policies for managed objects are applied during account creation.
User objects created using self-registration automatically have the role
openidm-authorized.
4.3.2. Configuring Security Questions
In the event that a user forgets his password, a password reset function enables registered users to reset their own passwords. To guard against unauthorized access, you can specify that users be prompted with one or more security questions when they request a password reset.
Security questions are disabled by default. To enable them, set
"securityQuestions" to true in the UI
configuration file (conf/ui-configuration.json).
{
    "configuration" : {
        "securityQuestions" : true,
...
A default set of questions is provided, but you can add to these, or
overwrite them. Specify the list of questions to be asked in the
conf/ui-secquestions.json file.
Refresh your browser after this configuration change for the change to be picked up by the UI.
When security questions are enabled, the following panel is included on the self registration page.
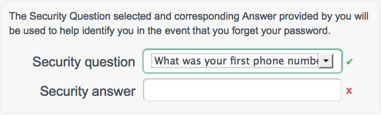
In addition, a "Reset your password" link is provided on the login page. When a user attempts to reset her password, she is prompted for the response to the security question that she set up during registration.

Note
If security questions are enabled after a specific user has registered, that particular user will be unable to use the password reset functionality.
4.3.3. Minimum Length Security Answers
The password, passphrase, and security answer are all associated with
some minimum length. To change that minimum, edit the
conf/policy.json file, setting the
minLength property to the required minimum.
For example, the following excerpt from the
conf/policy.json file shows a default
minLength of 16 associated with the security answer.
{
    "policyId" : "minimum-length",
    "params" : {
        "minLength" : 16
    }
},
4.3.4. Enabling Site Identification
To ensure that users are entering their details onto the correct site, you can enable site identification. Site identification provides a preventative measure against phishing.
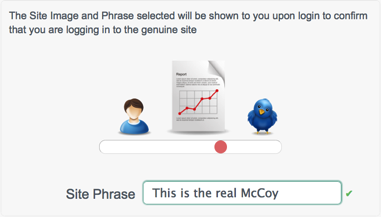
With site identification enabled, a user is presented with a range of images from which he can select when he registers his account, and prompted to specify his own site phrase. The selected site image and phrase are displayed on login, to confirm that the user is logging in to the legitimate site.
To enable site identification, set "siteIdentification"
to true in the UI configuration file
(conf/ui-configuration.json).
{
    "configuration" : {
        "siteIdentification" : true,
...
Refresh your browser after this configuration change for the change to be picked up by the UI.
When site identification is enabled, the following panel is included on the self registration page.
A default list of four images is presented for site identification. The
images are defined in the siteImages property in the
conf/ui-configuration.json file:
"siteImages" : [
"images/passphrase/mail.png",
"images/passphrase/user.png",
"images/passphrase/report.png",
"images/passphrase/twitter.png"
],
...
You can change the default images, and include additional images, by
placing image files in the ui/extension/images folder
and modifying the siteImages property in the
ui-configuration.json file to point to the new images.
Refresh your browser for the change to take effect.
The following example assumes an image file named
my-new-image.jpg, located in
ui/extension/images.
"siteImages" : [
"images/passphrase/mail.png",
"images/passphrase/user.png",
"images/passphrase/report.png",
"images/passphrase/twitter.png",
"images/my-new-image.jpg"
],
...
Note that the default image files are located in
ui/default/enduser/public/images/passphrase.
4.3.5. Configuring the Country List
The default user profile includes the ability to select the user's country
and state or province. To specify the countries, and the associated states
or provinces, that appear in these drop down lists, edit the
conf/ui-countries.json file. For example, to add
Norway to the list of countries, you would add the following to the
conf/ui-countries.json file:
{
    "key" : "norway",
    "value" : "Norway",
    "states" : [
        {
            "key" : "akershus",
            "value" : "Akershus"
        },
        {
            "key" : "aust-agder",
            "value" : "Aust-Agder"
        },
        {
            "key" : "buskerud",
            "value" : "Buskerud"
        },
...
Refresh your browser after this configuration change for the change to be picked up by the UI.
4.4. Managing User Accounts With the User View UI
Only administrative users (with the role openidm-admin)
can add, modify, and delete user accounts. Regular users can modify certain
aspects of their own accounts.
Log into the user interface as an administrative user.
Select the Users tab.
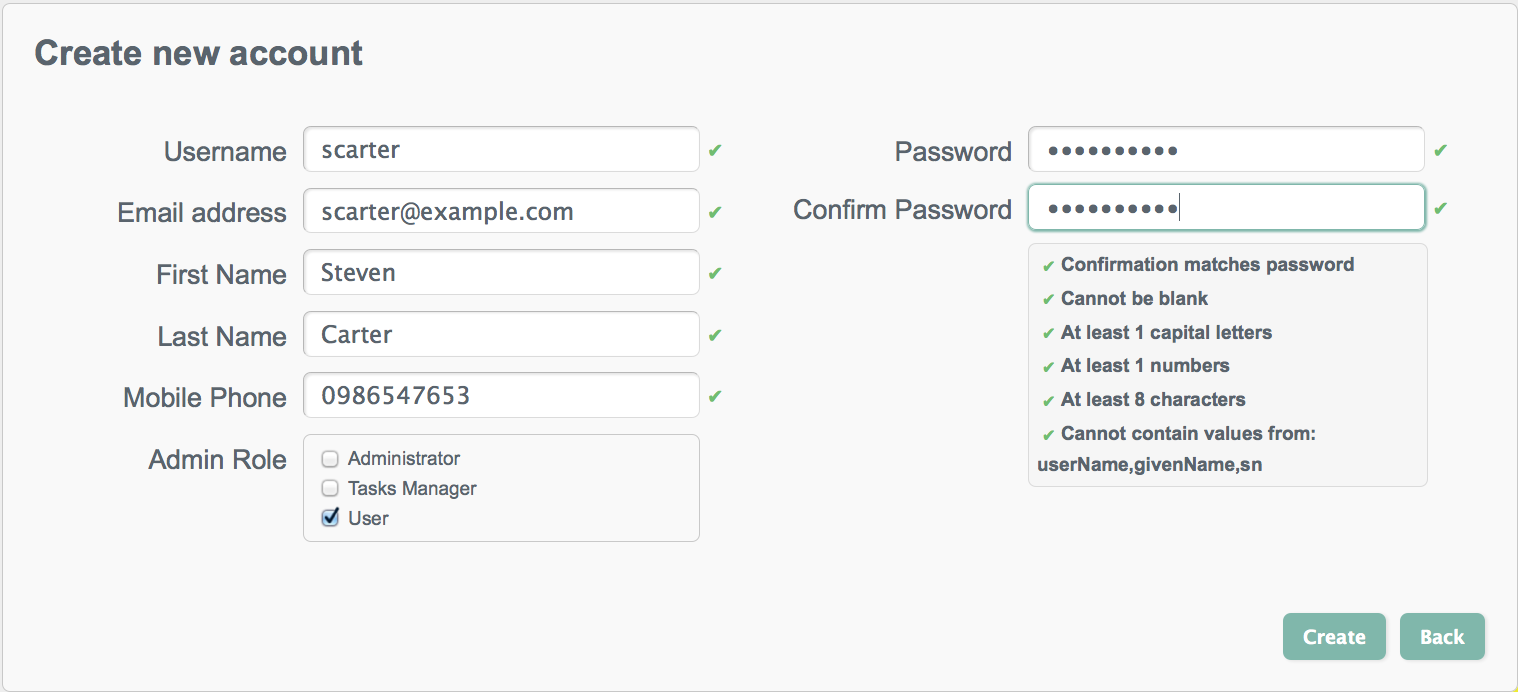
Click Add User.
Complete the fields on the Create new account page.
Most of these fields are self-explanatory. Be aware that the user interface is subject to policy validation, as described in Chapter 9, "Using Policies to Validate Data". So, for example, the Email address must be of valid email address format, and the Password must comply with the password validation settings that are indicated in the panel to the right.
The Admin Role field reflects the roles that are defined in the
ui-configuration.jsonfile, as well as any managed roles that have been added. By default, the roles are mapped as follows:"roles" : { "openidm-admin" : "Administrator", "openidm-authorized" : "User", "openidm-tasks-manager" : "Tasks Manager" },A user can be assigned more than one role. Only users with the
tasks-managerrole can assign tasks to any candidate user for that task.
Log into the User View UI at
https://localhost:8443/openidmuias an administrative user.Select the Users tab.
Click the Username of the user that you want to update.
On the user's profile page, modify the fields you want to change and click Update.
The user account is updated in the OpenIDM repository.
Follow steps 1-3 in Procedure 4.2, "To Update a User Account".
On the user's profile page, select Inactive from the Account status list.
Click Update.
The user account is deactivated and the user can no longer log in to the system.
Inactive users are indicated with a X icon in the Status column of the Users page. The following image shows that Steven Carter's account has been deactivated.
Users can change their own passwords by following the Change Security Data link in their profiles. This process requires that users know their existing passwords.
In a situation where a user forgets his password, an administrator can reset the password of that user without knowing the user's existing password.
Follow steps 1-3 in Procedure 4.2, "To Update a User Account".
On the user's profile page, click Change password.
Enter a new password that conforms to the password policy and click Update.
The user password is updated in the repository.
Log into the user interface as an administrative user.
Select the Users tab.
Click the Username of the user that you want to delete.
On the user's profile page, click Delete.
Click OK to confirm the deletion.
The user is deleted from the internal repository.
The User View UI displays the details of the user account in the OpenIDM repository (managed/user). When a mapping has been configured between the repository and one or more external resources, you can view what that user account looks like in any of the systems to which it is linked. Note that this view is read-only - you cannot update a user record in a linked system from within the User View UI.
By default, implicit synchronization is enabled for
mappings from the managed/user
repository to any external resource. This means that
when you update a managed object, any mappings defined in the
sync.json file that have the managed object as the
source are automatically executed to update the target system. You can see
these changes in the Linked Systems section of a user's profile.
To view a user's linked accounts:
Log into the User View UI as an administrative user.
Select the Users tab.
Click the Username of the user whose accounts you want to view.
At the bottom of the user profile, the Linked Systems panel indicates the external resource or resources to which this user entry is mapped. .
Select the resource in which you want to view the account, from the Linked Resource list.
The user record in the linked resource is displayed.
The following image shows the user account for a user
fdoe, as it exists in the LDAP directory to which the managed user repository is mapped.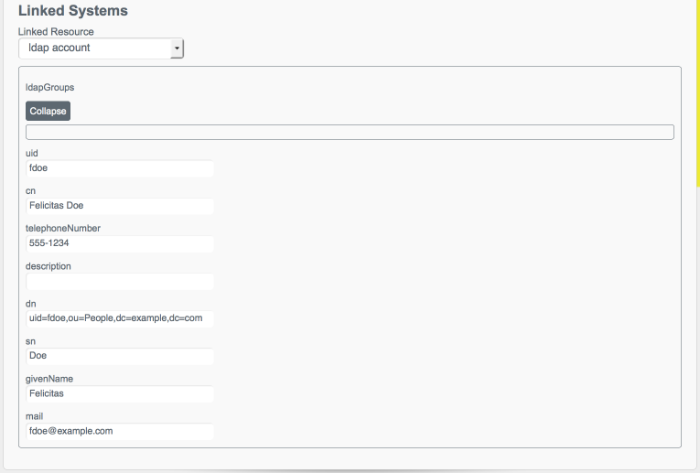

4.5. Managing Workflows From the User View UI
The User View UI is integrated with the embedded Activiti worfklow engine,
enabling users to interact with workflows. Available workflows are displayed
under the Processes item on the Dashboard. In order for a workflow to be
displayed here, the workflow definition file must be present in the
openidm/workflow directory.
A sample workflow integration with the User View UI is provided in
openidm/samples/workflow, and documented in
Section 17.5.2, "Sample Workflow - Provisioning User Accounts". Follow the steps in that
sample for an understanding of how the workflow integration works.
Access to workflows is based on OpenIDM roles, and is configured in the file
conf/process-access.json. By default all users with the
role openidm-authorized or
openidm-admin can invoke any available workflow. The
default process-access.json file is as follows:
{
    "workflowAccess" : [
        {
            "propertiesCheck" : {
                "property" : "_id",
                "matches" : ".*",
                "requiresRole" : "openidm-authorized"
            }
        },
        {
            "propertiesCheck" : {
                "property" : "_id",
                "matches" : ".*",
                "requiresRole" : "openidm-admin"
            }
        }
    ]
}
"property"Specifies the property used to identify the process definition. By default, process definitions are identified by their
_id."matches"A regular expression match is performed on the process definitions, according to the specified property. The default (
"matches" : ".*") implies that all process definition IDs match."requiresRole"Specifies the OpenIDM role that is required for users to have access to the matched process definition IDs. In the default file, users with the role
openidm-authorizedoropenidm-adminhave access.
To extend the process action definition file, identify the processes to which
users should have access, and specify the qualifying user roles. For example,
if you wanted to restrict access to a process definition whose ID was
567, to users with the role ldap you
would add the following to the process-access.json file:
{
    "propertiesCheck" : {
        "property" : "_id",
        "matches" : "567",
        "requiresRole" : "ldap"
    }
}
4.6. Changing the UI Theme
You can customize the theme of the user interface with your own branding. One
way to adjust the UI theme, is to edit the properties in the UI theme
configuration file
(/path/to/openidm/conf/ui-themeconfig.json). This file
stores detailed color values, background image paths, and a number of other
common styling options. Because the UI theme configuration file is part of
the configuration store, it is shared by all nodes in a cluster. Changes made
to this file do not have to be replicated manually across nodes.
To change theme elements that are not included in the UI theme configuration
file, you can create a custom theme in the
openidm/ui/extension directory. By default the user
interface reads the stylesheets and images from the
openidm/ui/default directory. Do not modify the files in
this default directory as there is no guarantee that your changes will not be
overwritten in the next OpenIDM release. Modifications made in the
openidm/ui/extension directory can be maintained across
product upgrades. The UI searches the extension directory
first and applies any styles or images located in this directory. Note that
files added to the extension directory must be manually
copied between every node in a cluster.
If you want to update the view logic of the UI, you cannot simply add files to the extensions folder. It is assumed that if your deployment requires that level of control of the user interface, you are no longer going to want to be automatically upgraded with subsequent releases. As such, you need to take on the task of maintaining a fork of the UI.
4.6.1. Changing the Default Stylesheet
Most changes to the UI stylesheets can be made in the UI theme configuration
file (conf/ui-themeconfig.json).
If you make the following change to that file, that changes the background color of the UI to dark grey.
$ grep "background-color" /path/to/openidm/conf/ui-themeconfig.json
"background-color" : "#ababab",
Refresh your browser window for the change to appear.
The default stylesheets are located in the
openidm/ui/default/enduser/public/css directory. To
customize the stylesheets beyond the properties available in the UI theme
configuration file, copy the default stylesheets to
openidm/ui/extension/css, and edit them according to
your requirements.
4.6.2. Changing the Default Logo
The default logo is located in the
openidm/ui/default/enduser/public/images directory.
Any file named logo.png, added to the directory
openidm/ui/extension/images, will replace the default
logo when the browser is refreshed.
To specify a different file name, or to control the size, and other
properties of the image file that is used for the logo, adjust the
logo property in the UI theme configuration file
(conf/themeconfig.json).
The following change to the UI theme configuration file points to an image
file named example-logo.png, in the
openidm/ui/extension/images directory.
...
   "logo" : {
       "src" : "images/example-logo.png",
       "title" : "Example.com",
       "alt" : "Example.com",
       "height" : "80",
       "width" : "120"
   },
...
Refresh your browser window for the new logo to appear.
4.6.3. Changing the Language of the UI
Currently, the UI is provided only in US English. You can translate the UI and specify that your own locale is used. The following example shows how to translate the UI into French.
Copy the default locale to a new folder in the same location (
openidm/ui/default/enduser/public/locales):$ cd /path/to/openidm/ui/default/enduser/public/locales $ cp -R en/ fr/
The new locale (
fr) now contains the defaulttranslation.jsonfile.$ ls fr/ translation.json
Translate the values of the properties in the
fr/translate.jsonfile. Do not translate the property names. For example:... "UserMessages" : { "changedPassword" : "Mot de passe a été modifié", "profileUpdateFailed" : "Problème lors de la mise à jour du profil", "profileUpdateSuccessful" : "Profil a été mis à jour", "userNameUpdated" : "Nom d'utilisateur a été modifié", ....Change the UI configuration to use the new locale by setting the value of the
langproperty in the/path/to/openidm/conf/ui-configuration.jsonfile, as follows:"lang" : "fr",
Refresh your browser window for the modification to be applied.
4.6.4. Creating a Project-Specific UI Theme
You can create specific UI themes for different projects and then point a particular UI instance to use a defined theme on startup. To create a complete custom theme, follow these steps:
Shut down the OpenIDM instance, if it is running. In the Felix administration console, type:
shutdown
->
Clear the
felix-cachedirectory.$ rm -rf felix-cache
Copy the entire default UI theme to an accessible location. For example:
$ cd /path/to/openidm/ui
$ cp -r default ../new-project-theme
In the copied theme, modify the required elements, as described in the previous sections. Note that nothing is copied to the extension folder in this case - changes are made in the copied theme.
In the
openidm/conf/boot/boot.propertiesfile, add the following line, specifying the location of the new theme. The path is relative to the installation root of the OpenIDM instance.openidm.ui.fileinstall.dir=new-project-theme
Restart OpenIDM.
$ cd /path/to/openidm
$ ./startup.sh
Relaunch the UI in your browser. The UI is displayed with the new custom theme.
4.7. Using an External System for Password Reset
By default, the password reset mechanism is handled internally, in OpenIDM. You can reroute password reset in the event that a user has forgotten his password, by specifying an external URL to which password reset requests are sent. Note that this URL applies to the password reset link on the login page only, not to the security data change facility that is available after a user has logged in.
To set an external URL to handle password reset, set the
passwordResetLink parameter in the UI configuration file
(conf/ui-configuration.json) file. The following example
sets the passwordResetLink to
https://accounts.example.com/account/reset-password.
passwordResetLink: "https://accounts.example.com/reset-password"
The passwordResetLink parameter takes either an empty
string as a value (which indicates that no external link is used) or a full
URL to the external system that handles password reset requests.
Note
External password reset and security questions for internal password reset
are mutually exclusive. Therefore, if you set a value for the
passwordResetLink parameter, users will not be prompted
with any security questions, regardless of the setting of the
securityQuestions parameter.
4.8. Providing a Logout URL to External Applications
By default, a UI session is invalidated when a user clicks on the Log out link. In certain situations your external applications might require a distinct logout URL to which users can be routed, to terminate their UI session.
The logout URL is #logout, appended to the UI URL, for
example, https://localhost:8443/openidmui/index.html#logout/.
The logout URL effectively performs the same action as clicking on the Log out link of the UI.
4.9. Changing the UI Path
By default, the UI is registered at a specific URL
(context-root/openidmui). To
override the default URL and specify your own path, edit the
openidm/conf/ui.context-enduser.json file, setting the
urlContextRoot property to the new URL. For example, to
change the path to
context-root/exampleui, edit
the file as follows:
"urlContextRoot" : "/exampleui",
4.10. Disabling the UI
The UI is packaged as a separate bundle that can be disabled in the
configuration before server startup. To disable the registration of the UI
servlet, edit the openidm/conf/ui.context-enduser.json
file, setting the enabled property to false:
"enabled" : false,
Chapter 5. Managing the OpenIDM Repository
OpenIDM stores managed objects, internal users, and configuration objects in a repository. By default, OpenIDM uses OrientDB for its internal repository. In production, you must replace OrientDB with a supported JDBC repository, as described in Chapter 4, "Installing a Repository For Production" in the Installation Guide.
This chapter describes the JDBC repository configuration, the use of mappings in the repository, and how to configure a connection to the repository over SSL. It also describes how to interact with the OpenIDM repository over the REST interface.
5.1. Understanding the JDBC Repository Configuration File
OpenIDM provides a specific configuration file for each supported JDBC
repository, as well as example configurations for other repositories. These
configuration files are located in
/path/to/openidm/db/database
and are named repo.jdbc.json. Copy the configuration
file for your specific database type to
/path/to/openidm/conf/.
The repository configuration file includes the connection details for the repository, a number of predefined queries, and a mapping between OpenIDM resources and the tables in the repository.
An excerpt from an example repository configuration follows.
{
    "connection" : {
        "dbType" : "MYSQL",
        "jndiName" : "",
        "driverClass" : "com.mysql.jdbc.Driver",
        "jdbcUrl" : "jdbc:mysql://localhost:3306/openidm?characterEncoding=utf8",
        "username" : "openidm",
        "password" : "openidm",
        "defaultCatalog" : "openidm",
        "maxBatchSize" : 100,
        "maxTxRetry" : 5,
        "enableConnectionPool" : true,
        "connectionTimeoutInMs" : 30000
    },
    "queries" : {...},
    "resourceMapping" : {...}
}
"dbType" : string, optionalThe type of database. The database type might affect the queries used and other optimizations. Supported database types include
MYSQL,SQLSERVER, andORACLE."driverClass","jndiName", or"jtaName"Depending on the mechanism you use to acquire the data source, set one of these properties.
"driverClass" : stringTo use the JDBC driver manager to acquire a data source, set this property, as well as
"jdbcUrl","username", and"password". The driver class must be the fully qualified class name of the database driver to use for your database.Using the JDBC driver manager to acquire a data source is the most likely option, and the only one supported "out of the box". The remaining options in the sample repository configuration file assume that you are using a JDBC driver manager.
Example:
"driverClass" : "com.mysql.jdbc.Driver""jndiName" : stringIf you use JNDI to acquire the data source, set this property to the JNDI name of the data source.
This option might be relevant if you want to run OpenIDM inside your own web container.
Example:
"jndiName" : "jdbc/my-datasource""jtaName" : stringIf you use an OSGi service to acquire the data source, set this property to a stringified version of the OsgiName.
This option would only be relevant in a highly customized deployment, for example, if you wanted to develop your own connection pool.
Example:
"jtaName" : "osgi:service/javax.sql.DataSource/(osgi.jndi.service.name=jdbc/openidm)"
"jdbcUrl"The connection URL to the JDBC database. The URL should include all of the parameters required by your database. For example, to specify the encoding in MySQL use
'characterEncoding=utf8'.Example:
"jdbcUrl" : "jdbc:mysql://localhost:3306/openidm?characterEncoding=utf8""username"The username with which to access the JDBC database.
"password"The password with which to access the JDBC database. OpenIDM automatically encrypts clear string passwords. To replace an existing encrypted value, replace the whole
crypto-objectvalue, including the brackets, with a string of the new password."defaultCatalog"The database schema to use for OpenIDM. By default, no schema prefix is used for queries.
"maxBatchSize"The maximum number of SQL statements that will be batched together. This parameter allows you to optimize the time taken to execute multiple queries. Certain databases do not support batching, or limit how many statements can be batched. A value of
1disables batching."queries"Enables you to create pre-defined queries that can be referenced from the configuration. The queries are divided between those for
"genericTables"and those for"explicitTables".The following sample extract from the default MySQL configuration file shows two credential queries, one for a generic mapping, and one for an explicit mapping. Note that the lines have been broken here for legibility only. In a real configuration file, the query would be all on one line.
"queries" : {
    "genericTables" : {
        "credential-query" : "SELECT fullobject FROM ${_dbSchema}.${_mainTable}
          obj INNER JOIN ${_dbSchema}.${_propTable} prop ON
          obj.id = prop.${_mainTable}_id INNER JOIN ${_dbSchema}.objecttypes
          objtype ON objtype.id = obj.objecttypes_id WHERE prop.propkey='/userName'
          AND prop.propvalue = ${username} AND objtype.objecttype = ${_resource}",
        ...
    "explicitTables" : {
        "credential-query" : "SELECT * FROM ${_dbSchema}.${_table}
          WHERE objectid = ${username} and accountStatus = 'active'",
        ...
    }
}
Options supported for query parameters include the following:
A default string parameter, for example:
openidm.query("managed/user", { "_queryId": "for-userName", "uid": "jdoe" });A list parameter (
${list:propName}).Use this parameter to specify a set of indeterminate size as part of your query. For example:
WHERE targetObjectId IN (${list:filteredIds})An integer parameter (
${int:propName}).Use this parameter if you need query for non-string values in the database. This is particularly useful with explicit tables.
"resourceMapping"Defines the mapping between OpenIDM resource URIs (for example,
managed/user) and JDBC tables. The structure of the resource mapping is as follows:"resourceMapping" : { "default" : { "mainTable" : "genericobjects", "propertiesTable" : "genericobjectproperties", "searchableDefault" : true }, "genericMapping" : {...}, "explicitMapping" : {...} }The default mapping object represents a default generic table in which any resource that does not have a more specific mapping is stored.
The generic and explicit mapping objects are described in the following section.
5.2. Using Explicit or Generic Object Mapping With a JDBC Repository
For JDBC repositories, there are two ways of mapping OpenIDM objects to the database tables.
Generic mapping, which allows arbitrary objects to be stored without special configuration or administration.
Explicit mapping, which allows for optimized storage and queries by explicitly mapping objects to tables and columns in the database.
These two mapping strategies are discussed in the following sections.
5.2.1. Using Generic Mappings
Generic mapping speeds up development, and can make system maintenance more flexible by providing a more stable database structure. However, generic mapping can have a performance impact and does not take full advantage of the database facilities (such as validation within the database and flexible indexing). In addition, queries can be more difficult to set up.
In a generic table, the entire object content is stored in a single
large-character field named "fullobject" in the
"mainTable" for the object. To search on specific fields,
you can read them by referring to them in the corresponding
properties table for that object. The disadvantage of
generic objects is that, because every property you might like to filter by
is stored in a separate table, you must join to that table each time you need
to filter by anything.
The following diagram shows a pared down database structure for the default generic table, and indicates the relationship between the main table and the corresponding properties table for each object.
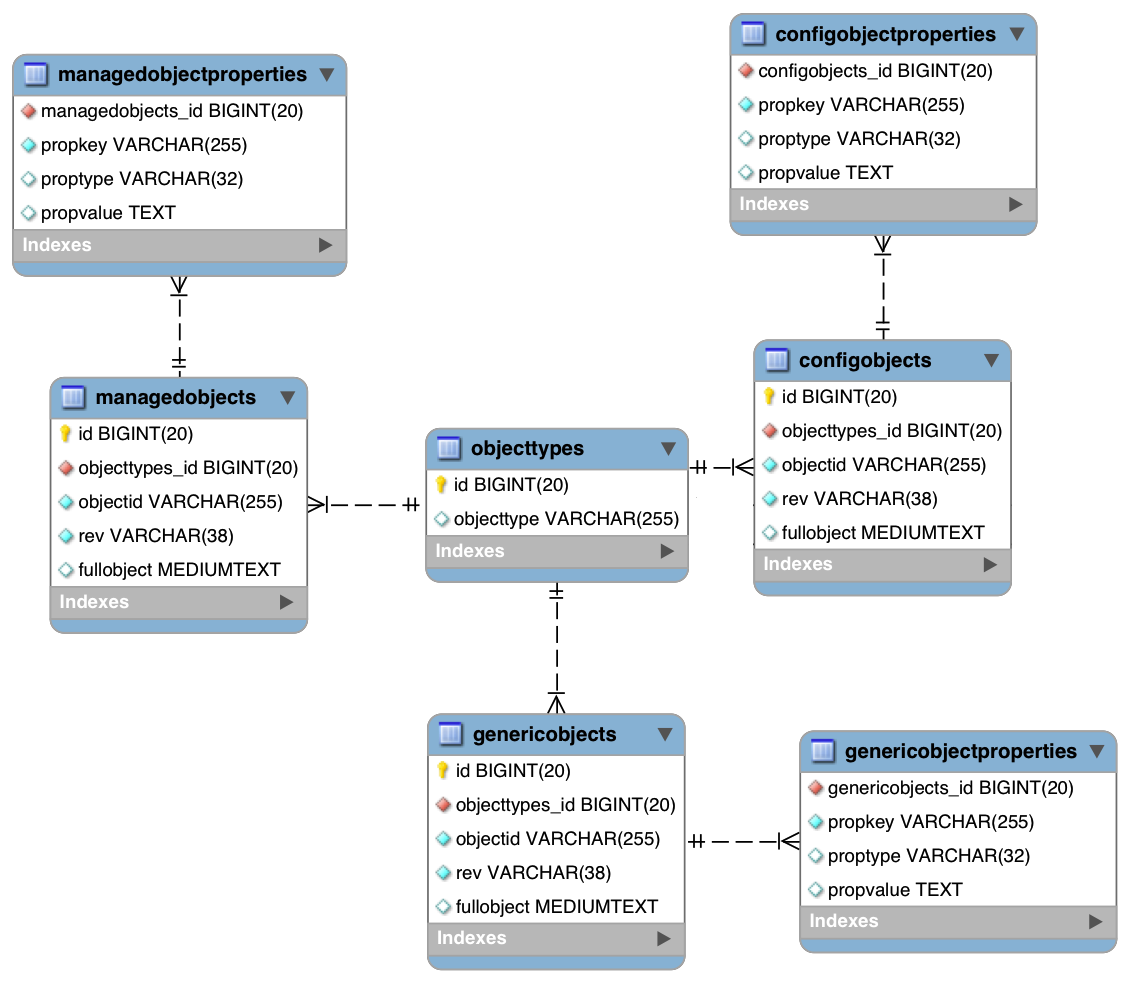
These separate tables can make the query syntax particularly complex. For example, a simple query to return user entries based on a user name would need to be implemented as follows:
SELECT fullobject FROM ${_dbSchema}.${_mainTable} obj INNER JOIN ${_dbSchema}.${_propTable} prop
    ON obj.id = prop.${_mainTable}_id INNER JOIN ${_dbSchema}.objecttypes objtype
    ON objtype.id = obj.objecttypes_id WHERE prop.propkey='/userName' AND prop.propvalue = ${uid}
    AND objtype.objecttype = ${_resource}",
The query can be broken down as follows:
Select the full object from the main table
SELECT fullobject FROM ${_dbSchema}.${_mainTable} objJoin to the properties table and locate the object with the corresponding ID.
INNER JOIN ${_dbSchema}.${_propTable} prop ON obj.id = prop.${_mainTable}_idJoin to the object types table to restrict returned entries to objects of a specific type. For example, you might want to restrict returned entries to
managed/userobjects, ormanaged/roleobjects.INNER JOIN ${_dbSchema}.objecttypes objtype ON objtype.id = obj.objecttypes_idFilter records by the
userNameproperty, where the userName is equal to the specifieduidand the object type is the specified type (in this case, managed/user objects).WHERE prop.propkey='/userName' AND prop.propvalue = ${uid} AND objtype.objecttype = ${_resource}",The value of the
uidfield is provided as part of the query call, for example:openidm.query("managed/user", { "_queryId": "for-userName", "uid": "jdoe" });
Tables for user definable objects use a generic mapping by default.
The following sample generic mapping object illustrates how
managed/ objects are stored in a generic table.
  "genericMapping" : {
      "managed/*" : {
          "mainTable" : "managedobjects",
          "propertiesTable" : "managedobjectproperties",
          "searchableDefault" : true,
          "properties" : {
              "/picture" : {
                  "searchable" : false
              }
          }
      }
  },
"mainTable"(string, mandatory)Indicates the main table in which data is stored for this resource.
The complete object is stored in the
fullobjectcolumn of this table. The table includes anentityTypeforeign key, that is used to distinguish the different objects stored within the table. In addition, the revision of each stored object is tracked, in therevcolumn of the table, enabling multi version concurrency control (MVCC). For more information, see Section C.1.6.3, "Manipulating Managed Objects Programmatically"."propertiesTable"(string, mandatory)Indicates the properties table, used for searches.
The contents of the properties table is a defined subset of the properties, copied from the character large object (CLOB) that is stored in the
fullobjectcolumn of the main table. The properties are stored in a one-to-many style separate table. The set of properties stored here is determined by the properties that are defined as"searchable".The stored set of searchable properties makes these values available as discrete rows that can be accessed with SQL queries, specifically, with
WHEREclauses. It is not otherwise possible to query specific properties of the full object.The properties table includes the following columns:
${_mainTable}_idcorresponds to theidof the full object in the main table, for example,manageobjects_id, orgenericobjects_id.propkeyis the name of the searchable property, stored in JSON pointer format (for example/mail. For more information about JSON pointer syntax, see RFC 6901.proptypeis the data type of the property, for examplejava.lang.String. The property type is obtained from the Class associated with the value.propvalueis the value of property, extracted from the full object that is stored in the main table.Regardless of the property data type, this value is stored as a string, so queries against it should treat it as such.
"searchableDefault"(boolean, optional)Specifies whether all properties of the resource should be searchable by default. Properties that are searchable are stored and indexed. You can override the default for individual properties in the
"properties"element of the mapping. The preceding example indicates that all properties are searchable, with the exception of the"picture"property.For large, complex objects, having all properties searchable implies a substantial performance impact. In such a case, a separate insert statement is made in the properties table for each element in the object, every time the object is updated. Also, because these are indexed fields, the recreation of these properties incurs a cost in the maintenance of the index. You should therefore enable
"searchable"only for those properties that must be used as part of a WHERE clause in a query."properties"Lists any individual properties for which the searchable default should be overridden.
Note that if an object was originally created with a subset of
"searchable"properties, changing this subset (by adding a new"searchable"property in the configuration, for example) will not cause the existing values to be updated in the properties table for that object. To add the new property to the properties table for that object, you must update or recreate the object.
5.2.2. Improving Search Performance for Generic Mappings
By default, all properties in a generic mapping are searchable.
Although there are no individual indexes in a generic mapping, you can
improve search performance by setting only those properties that you need to
search as "searchable". Properties that are searchable
are created within the corresponding properties table. The properties table
exists only for searches or look-ups, and has a composite index, based on
the resource, then the property name.
To restrict searches to specific properties, set the
"searchableDefault" to false for the mapping, and then
explicitly set "searchable" to true for each property
that should be searched. The following sample extract from
repo.jdbc.json indicates searches restricted to the
"userName" property.
"genericMapping" : {
    "managed/user" : {
        "mainTable" : "manageduserobjects",
        "propertiesTable" : "manageduserobjectproperties",
        "searchableDefault" : false,
        "properties" : {
            "/userName" : {
            "searchable" : true
            }
        }
    }
},
With this configuration, OpenIDM creates entries in the properties table
only for "userName" properties of managed user objects.
If the global "searchableDefault" is set to false,
properties that do not have a searchable attribute explicitly set to true
are not written in the properties table.
5.2.3. Using Explicit Mappings
Explicit mapping is more difficult to set up and maintain, but can take complete advantage of the native database facilities.
An explicit table offers better performance and simpler queries. There is less work in the reading and writing of data, since the data is all in a single row of a single table. In addition, it is easier to create different types of indexes that apply to only specific fields in an explicit table. The disadvantage of explicit tables is the additional work required in creating the table in the schema. Also, because rows in a table are inherently more simple, it is more difficult to deal with complex objects. Any non-simple key:value pair in an object associated with an explicit table is converted to a JSON string and stored in the cell in that format. This makes the value difficult to use, from the perspective of a query attempting to search within it.
Note that it is possible to have a generic mapping configuration for most
managed objects, and to have an explicit mapping that
overrides the default generic mapping in certain cases. The sample
configuration provided in
/path/to/openidm/db/mysql/conf/repo.jdbc-mysql-explicit-managed-user.json
has a generic mapping for managed objects, but an explicit mapping for
managed user objects.
OpenIDM uses explicit mapping for internal system tables, such as the tables used for auditing.
Depending on the types of usage your system is supporting, you might find that an explicit mapping performs better than a generic mapping. Operations such as sorting and searching (such as those performed in the default UI) tend to be faster with explicitly-mapped objects, for example.
The following sample explicit mapping object illustrates how
internal/user objects are stored in an explicit table.
"explicitMapping" : {
    "internal/user" : {
        "table" : "internaluser",
        "objectToColumn" : {
            "_id" : "objectid",
            "_rev" : "rev",
            "password" : "pwd",
            "roles" : "roles"
        }
    },
    ...
}
"<resource-uri>"(string, mandatory)Indicates the URI for the resources to which this mapping applies, for example,
"internal/user"."table"(string, mandatory)The name of the database table in which the object (in this case internal users) is stored.
"objectToColumn"(string, mandatory)The way in which specific managed object properties are mapped to columns in the table.
The mapping can be a simple one to one mapping, for example
"userName": "userName",or a more complex JSON map or list. When a column is mapped to a JSON map or list, the syntax is as shown in the following examples:"messageDetail" : { "column" : "messagedetail", "type" : "JSON_MAP" }or
"roles": { "column" : "roles", "type" : "JSON_LIST" }
5.3. Configuring SSL with a JDBC Repository
To configure SSL with a JDBC repository, you need to import the CA
certificate file for the server into the OpenIDM truststore. That certificate
file could have a name like ca-cert.pem. If you have a
different genuine or self-signed certificate file, substitute accordingly.
To import the CA certificate file into the OpenIDM truststore, use the
keytool command native to the Java environment, typically
located in the /path/to/jre-version/bin directory. On
some UNIX-based systems, /usr/bin/keytool may link
to that command.
Import the
ca-cert.pemcertificate into the OpenIDM truststore file with the following command:$ keytool \ -importcert \ -trustcacerts \ -file ca-cert.pem \ -alias "DB cert" \ -keystore /path/to/openidm/security/truststoreOpen the repository configuration file,
repo.jdbc.json.Look for the
"jdbcUrl"properties. You should see ajdbcURL. Add a?characterEncoding=utf8&useSSL=trueto the end of that URL.The
"jdbcUrl"that you configure depends on your JDBC repository. The following entries correspond to appropriate"jdbcURL"properties for MySQL, MSSQL, PostgreSQL, and Oracle DB, respectively."jdbcUrl" : "jdbc:mysql://localhost:3306/openidm?characterEncoding=utf8&useSSL=true"
"jdbcUrl" : "jdbc:sqlserver://localhost:1433;instanceName=default;
     databaseName=openidm;applicationName=OpenIDM?characterEncoding=utf8&useSSL=true"
"jdbcUrl" : "jdbc:postgresql://localhost:5432/openidm"
"jdbcUrl" : "jdbc:oracle:thin:@//localhost:1521/openidm?characterEncoding=utf8&useSSL=true"
Open the
/path/to/openidm/conf/config.propertiesfile. Find theorg.osgi.framework.bootdelegationproperty. Make sure that property includes a reference to thejavax.net.ssloption. If you started with the default version ofconfig.propertiesthat line should now read as follows:org.osgi.framework.bootdelegation=sun.*,com.sun.*,apple.*,com.apple.*,javax.net.sslOpen the
/path/to/openidm/conf/system.propertiesfile. Add the following line to that file. If appropriate, substitute the path to your own truststore:# Set the truststore javax.net.ssl.trustStore=/path/to/openidm/security/truststore
Even if you are setting up this instance of OpenIDM as part of a cluster, you still need to configure this initial truststore. After this instance joins a cluster, the SSL keys in this particular truststore are replaced. For more information on clustering, see Chapter 19, "Configuring OpenIDM to Work in a Cluster".
If you are not using MySQL, you're done!
If you are including MySQL as a repository, you need to take the following additional steps to add the client certificate and key to the OpenIDM keystore:
Create the client certificate file,
client.packet, with the following command:$ openssl \ pkcs12 \ -export \ -inkey client-key.pem \ -in client-cert.pem \ -out client.packetIn this case, the openssl command imports a client key,
client-key.pem, with input data from the same file, exporting output to a client certificate file namedclient.packet, in PKCS12 format.You can then add the client certificate to the OpenIDM keystore with the following command:
$ keytool \ -importkeystore \ -srckeystore client.packet \ -srcstoretype pkcs12 \ -destkeystore /path/to/openidm/security/keystore.jceks \ -storetype JCEKS
5.4. Interacting With the Repository Over REST
The OpenIDM repository is accessible over the REST interface, at the
openidm/repo endpoint.
In general, you must ensure that external calls to the
openidm/repo endpoint are protected. Native queries and
free-form command actions on this endpoint are disallowed by default, as the endpoint
is vulnerable to injection attacks. For more information, see
Section 5.4.2, "Running Queries and Commands on the Repository".
5.4.1. Changing the Repository Password
In the case of an embedded OrientDB repository, the default username and
password are admin and admin. You can
change the default password, by sending the following POST request on the
repo endpoint:
$ curl \ --cacert self-signed.crt \ --header "X-OpenIDM-Username: openidm-admin" \ --header "X-OpenIDM-Password: openidm-admin" \ --header "Content-Type: application/json" \ --request POST \ "https://localhost:8443/openidm/repo?_action=updateDbCredentials&user=admin&password=newPassword"
You must restart OpenIDM for the change to take effect.
5.4.2. Running Queries and Commands on the Repository
Free-form commands and native queries on the repository are disallowed by default and should remain so in production to reduce the risk of injection attacks.
Common filter expressions, called with the _queryFilter
keyword, enable you to form arbitrary queries on the repository, using a
number of supported filter operations. For more information on these filter
operations, see Section 7.3.4, "Constructing Queries". Parameterized or
pre-defined queries and commands (using the _queryId and
_commandId keywords) can be authorized on the repository
for external calls if necessary. For more information, see
Section 7.3.2, "Parameterized Queries".
Running commands on the repository is supported primarily from scripts. Certain scripts that interact with the repository are provided by default, for example, the scripts that enable you to purge the repository of reconciliation audit records.
You can define your own commands, and specify them in the repository
configuration file (either repo.orientdb.json or
repo.jdbc.json). In the following simple example, a
command is called to clear out UI notification entries from the repository,
for specific users.
The command is defined in the repository configuration file, as follows:
"commands" : {
"delete-notifications-by-id" : "DELETE FROM ui_notification WHERE receiverId = ${username}"
...
}, The command can be called from a script, as follows:
openidm.action("repo/ui/notification", "command", {},
{ "commandId" : "delete-notifications-by-id", "userName" : "scarter"});
Exercise caution when allowing commands to be run on the repository over the REST interface, as there is an attached risk to the underlying data.
Chapter 6. Configuring OpenIDM
OpenIDM configuration is split between .properties and container
configuration files, and also dynamic configuration objects. The majority
of OpenIDM configuration files are stored under
openidm/conf/, as described in
Appendix A, "File Layout".
OpenIDM stores configuration objects in its internal repository. You can manage the configuration by using either the REST access to the configuration objects, or by using the JSON file based views.
6.1. OpenIDM Configuration Objects
OpenIDM exposes internal configuration objects in JSON format. Configuration elements can be either single instance or multiple instance for an OpenIDM installation.
Single instance configuration objects correspond to services that have at most one instance per installation.
JSON file views of these configuration objects are named
object-name.json.
The
auditconfiguration specifies how audit events are logged.The
authenticationconfiguration controls REST access.The
clusterconfiguration defines how one OpenIDM instance can be configured in a cluster.The
endpointconfiguration controls any custom REST endpoints.The
infoconfiguration points to script files for the customizable information service.The
managedconfiguration defines managed objects and their schemas.The
policyconfiguration defines the policy validation service.The
process accessconfiguration defines access to any configured workflows.The
repo.repo-typeconfiguration such asrepo.orientdborrepo.jdbcconfigures the internal repository.The
routerconfiguration specifies filters to apply for specific operations.The
scriptconfiguration defines default and custom configuration directories.The
syncconfiguration defines the mappings that OpenIDM uses when synchronizing and reconciling managed objects.The
uiconfiguration defines the configurable aspects of the default user interface.The
workflowconfiguration defines the configuration of the workflow engine.
Multiple instance configuration objects correspond to services that
can have many instances per installation. Configuration objects are named
objectname/instancename,
for example, provisioner.openicf/xml.
JSON file views of these configuration objects
are named objectname-instancename.json, for example,
provisioner.openicf-xml.json.
Multiple
scheduleconfigurations can run reconciliations and other tasks on different schedules.Multiple
provisioner.openicfconfigurations correspond to the resources connected to OpenIDM.Multiple
servletfilterconfigurations can be used for different servlet filters such as the Cross Origin and GZip filters.
6.2. Changing the Default Configuration
When you change OpenIDM's configuration objects, take the following points into account.
OpenIDM's authoritative configuration source is the internal repository. JSON files provide a view of the configuration objects, but do not represent the authoritative source.
OpenIDM updates JSON files after making configuration changes, whether those changes are made through REST access to configuration objects, or through edits to the JSON files.
OpenIDM recognizes changes to JSON files when it is running. OpenIDM must be running when you delete configuration objects, even if you do so by editing the JSON files.
Avoid editing configuration objects directly in the internal repository. Rather edit the configuration over the REST API, or in the configuration JSON files to ensure consistent behavior and that operations are logged.
OpenIDM stores its configuration in the internal database by default. If you remove an OpenIDM instance and do not specifically drop the repository, the configuration remains in effect for a new OpenIDM instance that uses that repository. For testing or evaluation purposes, you can disable this persistent configuration in the
conf/system.propertiesfile by uncommenting the following line:# openidm.config.repo.enabled=falseDisabling persistent configuration means that OpenIDM will store its configuration in memory only. You should not disable persistent configuration in a production environment.
6.3. Configuring an OpenIDM System for Production
Out of the box, OpenIDM is configured to make it easy to install and evaluate. Specific configuration changes are required before you deploy OpenIDM in a production environment.
6.3.1. Configuring a Production Repository
By default, OpenIDM uses OrientDB for its internal repository so that you do not have to install a database in order to evaluate OpenIDM. Before you use OpenIDM in production, you must replace OrientDB with a supported repository.
For more information, see Chapter 4, "Installing a Repository For Production" in the Installation Guide.
6.3.2. Disabling Automatic Configuration Updates
By default, OpenIDM polls the JSON files in the conf
directory periodically for any changes to the configuration. In a production
system, it is recommended that you disable automatic polling for updates to
prevent untested configuration changes from disrupting your identity service.
To disable automatic polling for configuration changes, edit the
conf/system.properties file by uncommenting the
following line:
# openidm.fileinstall.enabled=false
This setting also disables the file-based configuration view, which means that OpenIDM reads its configuration only from the repository.
Before you disable automatic polling, you must have started the OpenIDM instance at least once to ensure that the configuration has been loaded into the repository.
Note if automatic polling is enabled, changes to scripts that are called from a JSON configuration file are taken into account immediately.
6.4. Configuring OpenIDM Over REST
OpenIDM exposes configuration objects under the
/openidm/config context path.
You can list the configuration on the local host by performing a GET
https://localhost:8443/openidm/config. The following
example shows excerpts of the default configuration for an OpenIDM instance
started with Sample 1.
$ curl \
--request GET \
--header "X-OpenIDM-Username: openidm-admin" \
--header "X-OpenIDM-Password: openidm-admin" \
--cacert self-signed.crt \
https://localhost:8443/openidm/config
{
"configurations": [
{
"factoryPid": "servletfilter",
"pid": "servletfilter.ec099f08-bfd4-4ab4-8537-78e5b956c7cc",
"_id": "servletfilter/gzip"
},
{
"factoryPid": null,
"pid": "router",
"_id": "router"
},
...
{
"factoryPid": "endpoint",
"pid": "endpoint.7e9ec068-bb4a-4fa0-ae15-1706bb4a3a07",
"_id": "endpoint/jqgrid"
},
{
"factoryPid": "endpoint",
"pid": "endpoint.47978983-0411-425d-8f53-4022175e146a",
"_id": "endpoint/gettasksview"
},
...
{
"factoryPid": "ui",
"pid": "ui.b10eb4cb-83e3-4a4b-9d29-d91d90eb3053",
"_id": "ui/countries"
},
{
"factoryPid": "process",
"pid": "process.9863529c-60e0-42e3-b5d5-c5c704016e95",
"_id": "process/access"
}
]
}Single instance configuration objects are located under
openidm/config/object-name.
The following example shows the default audit
configuration.
$ curl \
--cacert self-signed.crt \
--header "X-OpenIDM-Username: openidm-admin" \
--header "X-OpenIDM-Password: openidm-admin" \
"https://localhost:8443/openidm/config/audit"
{
"eventTypes": {
"recon": {},
"activity": {
"filter": {
"actions": [
"create",
"update",
"delete",
"patch",
"action"
]
},
"passwordFields": [
"password"
],
"watchedFields": []
}
},
"exceptionFormatter": {
"file": "bin/defaults/script/audit/stacktraceFormatter.js",
"type": "text/javascript"
},
"logTo": [
{
"recordDelimiter": ";",
"logType": "csv",
"location": "audit"
},
{
"useForQueries": true,
"logType": "repository"
}
]
} Multiple instance configuration objects are found under
openidm/config/object-name/instance-name.
The following example shows the configuration for the XML connector provisioner, based on the first IDM sample described in Chapter 2, "First OpenIDM Sample" in the Installation Guide.
$ curl \
--cacert self-signed.crt \
--header "X-OpenIDM-Username: openidm-admin" \
--header "X-OpenIDM-Password: openidm-admin" \
"https://localhost:8443/openidm/config/provisioner.openicf/xml"
{
"operationTimeout": {
"SCRIPT_ON_CONNECTOR": -1,
"VALIDATE": -1,
"SYNC": -1,
"DELETE": -1,
"TEST": -1,
"UPDATE": -1,
"CREATE": -1,
"AUTHENTICATE": -1,
"SEARCH": -1,
"GET": -1,
"SCRIPT_ON_RESOURCE": -1,
"SCHEMA": -1
},
"connectorRef": {
"connectorName": "org.forgerock.openicf.connectors.xml.XMLConnector",
"bundleVersion": "1.1.0.2",
"bundleName": "org.forgerock.openicf.connectors.xml-connector"
},
"connectorPoolingSupported": true,
"syncFailureHandler": {
"maxRetries": 5,
"postRetryAction": "logged-ignore"
},
"configurationProperties": {
"xsdFilePath": "samples/sample1/data/resource-schema-extension.xsd",
"xsdIcfFilePath": "samples/sample1/data/resource-schema-1.xsd",
"xmlFilePath": "samples/sample1/data/xmlConnectorData.xml"
},
"objectTypes": {
"account": {
"nativeType": "__ACCOUNT__",
"$schema": "http://json-schema.org/draft-03/schema",
"type": "object",
"properties": {
"securityAnswer": {
"nativeType": "string",
"nativeName": "securityAnswer",
"required": true,
"type": "string"
},
"securityQuestion": {
"nativeType": "string",
"nativeName": "securityQuestion",
"required": true,
"type": "string"
},
"password": {
"nativeType": "string",
"nativeName": "password",
"type": "string"
},
"mobileTelephoneNumber": {
"nativeType": "string",
"nativeName": "mobileTelephoneNumber",
"required": true,
"type": "string"
},
"_id": {
"nativeName": "__UID__",
"type": "string"
},
"email": {
"nativeType": "string",
"nativeName": "email",
"type": "string"
},
"description": {
"nativeType": "string",
"nativeName": "__DESCRIPTION__",
"type": "string"
},
"name": {
"nativeType": "string",
"nativeName": "__NAME__",
"required": true,
"type": "string"
},
"roles": {
"nativeType": "string",
"nativeName": "roles",
"required": false,
"type": "string"
},
"lastname": {
"nativeType": "string",
"nativeName": "lastname",
"required": true,
"type": "string"
},
"firstname": {
"nativeType": "string",
"nativeName": "firstname",
"type": "string"
}
},
"id": "__ACCOUNT__"
}
},
"operationOptions": {},
"name": "xmlfile",
"producerBufferSize": 100,
"poolConfigOption": {
"maxObjects": 10,
"minEvictableIdleTimeMillis": 120000,
"maxIdle": 10,
"minIdle": 1,
"maxWait": 150000
}
}
You can change the configuration over REST by using an HTTP PUT request to
modify the required configuration object. Note that HTTP PATCH is not
supported on the /config endpoint.
The following example modifies the router.json file to
remove all filters, effectively bypassing any policy validation.
$ curl \
--cacert self-signed.crt \
--header "X-OpenIDM-Username: openidm-admin" \
--header "X-OpenIDM-Password: openidm-admin" \
--header "Content-Type: application/json" \
--request PUT \
--data '{
"filters" : [
{
"onRequest" : {
"type" : "text/javascript",
"file" : "bin/defaults/script/router-authz.js"
}
}
]
}' \
"https://localhost:8443/openidm/config/router"
{
"filters": [
{
"onRequest": {
"file": "bin/defaults/script/router-authz.js",
"type": "text/javascript"
}
}
]
} For more information about using the REST API to update objects, see Appendix E, "REST API Reference".
6.5. Using Property Value Substitution in the Configuration
In an environment where you have more than one OpenIDM instance, you might require a configuration that is similar, but not identical, across the different OpenIDM hosts. OpenIDM supports variable replacement in its configuration which means that you can modify the effective configuration according to the requirements of a specific environment or OpenIDM instance.
Property substitution enables you to achieve the following:
Define a configuration that is specific to a single OpenIDM instance, for example, setting the location of the keystore on a particular host.
Define a configuration whose parameters vary between different environments, for example, the URLs and passwords for test, development, and production environments.
Disable certain capabilities on specific nodes. For example, you might want to disable the workflow engine on specific instances.
When OpenIDM starts up, it combines the system configuration, which might contain specific environment variables, with the defined OpenIDM configuration properties. This combination makes up the effective configuration for that OpenIDM instance. By varying the environment properties, you can change specific configuration items that vary between OpenIDM instances or environments.
Property references are contained within the construct
&{ }. When such references are found, OpenIDM replaces
them with the appropriate property value, defined in the
boot.properties file.
The following example defines two separate OpenIDM environments - a development environment and a production environment. You can specify the environment at startup time and, depending on the environment, the database URL is set accordingly.
The environments are defined by adding the following lines to the
conf/boot.properties file:
PROD.location=production DEV.location=development
The database URL is then specified as follows in the
repo.orientdb.json file:
{
"dbUrl" : "plocal:./db/&{&{environment}.location}-openidm",
...
}
The effective database URL is determined by setting the
OPENIDM_OPTS environment variable when you start OpenIDM.
To use the production environment, start OpenIDM as follows:
$ export OPENIDM_OPTS="-Xmx1024m -Xms1024m -Denvironment=PROD" $ ./startup.sh
To use the development environment, start OpenIDM as follows:
$ export OPENIDM_OPTS="-Xmx1024m -Xms1024m -Denvironment=DEV" $ ./startup.sh
6.5.1. Using Property Value Substitution With System Properties
You can use property value substitution in conjunction with the system properties, to modify the configuration according to the system on which the OpenIDM instance runs.
The following example modifies the audit.json file so
that the log file is written to the user's directory. The
user.home property is a default Java System property.
{
"logTo" : [
{
"logType" : "csv",
"location" : "&{user.home}/audit",
"recordDelimiter" : ";"
}
]
}
You can define nested properties (that is a property definition within another property definition) and you can combine system properties and boot properties.
The following example uses the user.country property, a
default Java System property. The example defines specific LDAP ports,
depending on the country (identified by the country code) in the
boot.properties file. The value of the LDAP port (set in
the provisioner.openicf-ldap.json file) depends on the
value of the user.country System property.
The port numbers are defined in the boot.properties
file as follows:
openidm.NO.ldap.port=2389 openidm.EN.ldap.port=3389 openidm.US.ldap.port=1389
The following extract from the provisioner.openicf-ldap.json
file shows how the value of the LDAP port is eventually determined, based on
the System property:
"configurationProperties" :
{
"credentials" : "Passw0rd",
"port" : "&{openidm.&{user.country}.ldap.port}",
"principal" : "cn=Directory Manager",
"baseContexts" :
[
"dc=example,dc=com"
],
"host" : "localhost"
}6.5.2. Limitations of Property Value Substitution
Note the following limitations when you use property value substitution:
You cannot reference complex objects or properties with syntaxes other than String. Property values are resolved from the
boot.propertiesfile or from the System properties and the value of these properties is always in String format.Property substitution of boolean values is currently only supported in stringified format, that is, resulting in
"true"or"false".Substitution of encrypted property values is currently not supported.
6.6. Adding Custom Endpoints
You can customize OpenIDM to meet the specific requirements of your
deployment by adding your own RESTful endpoints. Endpoints are configured
in files named
conf/endpoint-name.json,
where name generally describes the purpose of the
endpoint.
A sample custom endpoint configuration is provided in the
openidm/samples/customendpoint directory. The use
of this sample is described in
Section 6.6.6, "Custom Endpoint Example". Custom endpoints in
OpenIDM can be written either in JavaScript or Groovy. The sample includes
three files:
- conf/endpoint-echo.json
Provides the configuration for the endpoint.
- script/echo.js
Supports an endpoint script written in JavaScript.
- script/echo.groovy
Supports an endpoint script written in Groovy.
Endpoint configuration files have a certain structure. They may cite scripts written in JavaScript or Groovy.
The cited scripts include defined request and
context global variables.
6.6.1. The Components of an Endpoint Configuration File
The sample custom endpoint configuration
(/path/to/openidm/samples/customendpoint/conf/endpoint-echo.json)
depicts a typical endpoint, configured to use a Groovy script that is
specified in the script/echo.groovy file. The
structure of the sample configuration is as follows:
{
"file" : "echo.groovy",
"type" : "groovy",
"_file" : "echo.js",
"_type" : "text/javascript"
}
The "_file" and "_type" properties
are comments, which you can change to accommodate an endpoint written in
JavaScript.
If appropriate, you can also include a context property
in this file. The following example shows how the
context is used to display routing to an endpoint.
"context" : "endpoint/echo",
The endpoint configuration can specify the route on which the endpoint is
available. For an example, look at the
conf/endpoint-linkedView.json file. The code shown
declares the route on which the endpoint is available.
{
"context": "endpoint/linkedView/*",
"type" : "text/javascript",
"source" : "require('linkedView').fetch(request.resourceName);"
}
The following list describes each property in the custom endpoint configuration file:
"type"string, required
Specifies the type of script to be executed. Supported types include
"text/javascript"and"groovy"."file"or"source"The actual script, inline, or a path to the file that contains the script. The script files associated with this sample,
echo.jsandecho.groovy, support requests using all ForgeRock RESTful CRUD operations (including PATCH, ACTION, and QUERY).contextRequests are dispatched, routed, handled, processed, and more, in a
context.
6.6.2. Context Component Access Methods
For both JavaScript and Groovy, the context consists of a chain of structures that provide different levels of detail. The detail varies depending on the context type:
securityProvides authentication / authorization data.
httpProvides data from the HTTP request.
-
router Provides data on where the information is sent.
JavaScript and Groovy access these context structures in different ways. The term shown is the JavaScript access method; the definition includes the Groovy access method.
context.currentIn Groovy, known simply as
contextThe current context in which the request is handled by a script or a script-hook.
-
context.http In Groovy, known as one of the following:
context.asContext(org.forgerock.json.resource.servlet.HttpContext.class)context.getContext("http")The HTTP context.
context.securityIn Groovy, known as one of the following:
context.asContext(org.forgerock.json.resource.SecurityContext.class)context.getContext("security")The security context.
6.6.3. Custom Endpoints and request Objects
The endpoint configuration file specifies a script (either inline with the
"source" property, or in a referenced file with the
"file" property). The script is invoked with a global
request variable in its scope.
All processes within OpenIDM are initiated with a request. Requests can
come either from the REST API, as shown in Appendix E, "REST API Reference",
or internally, from a script, using the
openidm router object, as described in
Appendix G, "Router Service Reference". Regardless of how the process is
initiated, the details of the request are represented in the same way -
within an object named request.
Most request types include a complex object that stores the details
required for that particular request. For example, when you start an
action process over the REST interface, you might want
to include certain detailed information for that action. You include this
information as a JSON string in the POST body. The HTTP request header
Content-type describes this string as
application/json.
Consider the following REST request:
$ curl \
--cacert self-signed.crt \
--header "Content-Type: application/json" \
--header "X-OpenIDM-Username: openidm-admin" \
--header "X-OpenIDM-Password: openidm-admin" \
--request POST \
--data { "name": "bob"} \
"https://localhost:8443/openidm/endpoint/test?_action=myAction"
This request includes the string '{ "name": "bob"}'
as the HTTP post body. OpenIDM expects this to be a JSON string, and will
deserialize it into an object. The object is accessed using
request.content.
Depending on the type of request,
the associated content may include the following
properties:
methodThe requested operation, which may be
create,read,update,delete,patch,queryoraction.resourceNameThe local identifier, without the
endpoint/prefix, such asecho.newResourceIdAn identifier associated with a new resource, associated with the
createmethod.additionalParametersThe sample code returns request parameters from an HTTP GET with
?param=x, as"params":{"param":"x"}.revisionThe revision level associated with the method used, relative to a
newResourceId.contentContent based on the latest version of the object, using
getObject.contextBased on a JSON object that contains nested attributes. The object with the attributes, defines the request, based on the operations listed in Section E.4, "Supported Operations".
6.6.4. Custom Endpoints, Contexts, and Chains
Custom endpoints include contexts that may be wrapped in various layers, analogous to the way network packets can be wrapped at ascending network levels.
As an example, start with a request such as the following:
GET https://localhost:8443/openidm/endpoint/echo?queryId=query-all-ids&_para=foo
A request at an endpoint starts with a root context, associated with a
specific context ID, and the
org.forgerock.json.resource.RootContext context.
The root context is wrapped in the security context that holds the
authentication and authorization detail for the request. The associated
class is org.forgerock.json.resource.SecurityContext,
with an authenticationId user name such as
openidm-admin, and associated roles such as
openidm-authorized.
That security context is further wrapped by the HTTP context, with the
target URI. The class is
org.forgerock.json.resource.HttpContext, and it is
associated with the normal parameters of a REST call, including a user
agent, authorization token, and method.
The HTTP context is then further wrapped by one or more server / router
context(s). That class is
org.forgerock.json.resource.RouterContext,
with an endpoint URI. You may see several layers of server and router
contexts.
6.6.5. Additional Custom Endpoint Parameters
A couple of additional parameters are shown with the
query request method. You can review how this works
in Section 3.5, "Sample 2c - Synchronizing LDAP Group Membership" in the Installation Guide.
The final statement in the script is the return value. In the following
example, there is no return keyword, and the value of
the last statement (x) is returned.
var x = "Sample return"; functioncall(); x
6.6.6. Custom Endpoint Example
The following example uses the sample provided in the
openidm/samples/customendpoint directory, copied to
the openidm/conf and
openidm/script directories. The output from the query
shows the complete request structure.
$ curl \
--cacert self-signed.crt \
--header "X-OpenIDM-Username: openidm-admin" \
--header "X-OpenIDM-Password: openidm-admin" \
--request GET \
"https://localhost:8443/openidm/endpoint/echo?_queryId=query-all-ids"
{
"result" : [ {
"method" : "query",
"resourceName" : "",
"pagedResultsCookie" : null,
"pagedResultsOffset" : 0,
"pageSize" : 0,
"queryExpression" : null,
"queryId" : "query-all-ids",
"queryFilter" : "null",
"parameters" : { },
"context" : {
"parent" : {
"parent" : {
"parent" : {
"parent" : {
"parent" : {
"parent" : null,
"contextName" : "root",
"rootContext" : true,
"id" : "43576021-fe54-4468-8d10-09b14af2a36d"
},
"contextName" : "security",
"authenticationId" : "openidm-admin",
"authorizationId" : {
"id" : "openidm-admin",
"component" : "repo/internal/user",
"roles" : [ "openidm-admin", "openidm-authorized" ]
},
"rootContext" : false,
"id" : "43576021-fe54-4468-8d10-09b14af2a36d"
},
"headers" : {
"X-OpenIDM-Username" : [ "openidm-admin" ],
"Host" : [ "localhost:8443" ],
"Accept" : [ "*/*" ],
"X-OpenIDM-Password" : [ "openidm-admin" ],
"User-Agent" : [ "curl/7.19.7 (x86_64-redhat-linux-gnu)
libcurl/7.19.7 NSS/3.14.0.0 zlib/1.2.3 libidn/1.18
libssh2/1.4.2" ]
},
"parameters" : {
"_queryId" : [ "query-all-ids" ],
"_prettyPrint" : [ "true" ]
},
"external" : true,
"contextName" : "http",
"method" : "GET",
"path" : "https://localhost:8443/openidm/endpoint/echo",
"rootContext" : false,
"id" : "43576021-fe54-4468-8d10-09b14af2a36d"
},
"contextName" : "apiInfo",
"apiVersion" : "2.3.1-SNAPSHOT",
"apiName" : "org.forgerock.commons.json-resource-servlet",
"rootContext" : false,
"id" : "43576021-fe54-4468-8d10-09b14af2a36d"
},
"contextName" : "server",
"rootContext" : false,
"id" : "43576021-fe54-4468-8d10-09b14af2a36d"
},
"uriTemplateVariables" : { },
"contextName" : "router",
"matchedUri" : "endpoint/echo",
"baseUri" : "endpoint/echo",
"rootContext" : false,
"id" : "43576021-fe54-4468-8d10-09b14af2a36d"
}
} ],
"resultCount" : 1,
"pagedResultsCookie" : null,
"remainingPagedResults" : -1
} You must protect access to any custom endpoints by configuring the appropriate authorization for those contexts. For more information, see Section 15.7, "Authorization" section.
6.7. Default and Custom Configuration Directories
You can set up custom configuration files in directories as
defined in the openidm/conf/script.json file.
The following portion of the script.json file
points to sources in installation and project directories. As described in
Section 2.2, "Specifying the OpenIDM Startup Configuration", the
launcher.project.location is the directory cited if you
start OpenIDM with a specific project directory.
...
"sources" : {
"default" : {
"directory" : "&{launcher.install.location}/bin/defaults/script"
},
"install" : {
"directory" : "&{launcher.install.location}"
},
"project" : {
"directory" : "&{launcher.project.location}"
},
"project-script" : {
"directory" : "&{launcher.project.location}/script"
}
...
For example, if you start OpenIDM from the /path/to/openidm
directory with the following command:
$ ./startup.sh -p /path/to/openidm/customconfig
The launcher.project.location directory would be
/path/to/openidm/customconfig.
The script.json file also refers to a
launcher.install.location directory, which is
/path/to/openidm.
Thus, based on the way the script.json file
is configured for project
and project-script, you can add custom
configuration and script files to the
/path/to/openidm/customconfig and the
/path/to/openidm/customconfig/script directories.
Chapter 7. Accessing Data Objects
OpenIDM supports a variety of objects that can be addressed via a URL or URI. You can access data objects by using scripts (through the Resource API) or by using direct HTTP calls (through the REST API).
The following sections describe these two methods of accessing data objects, and provide information on constructing and calling data queries.
7.1. Accessing Data Objects by Using Scripts
OpenIDM's uniform programming model means that all objects are queried and manipulated in the same way, using the Resource API. The URL or URI that is used to identify the target object for an operation depends on the object type. For an explanation of object types, see Appendix C, "Data Models and Objects Reference". For more information about scripts and the objects available to scripts, see Appendix F, "Scripting Reference".
You can use the Resource API to obtain managed objects, configuration objects, and repository objects, as follows:
val = openidm.read("managed/organization/mysampleorg")
val = openidm.read("config/custom/mylookuptable")
val = openidm.read("repo/custom/mylookuptable")
For information about constructing an object ID, see Section E.1, "URI Scheme".
You can update entire objects with the update() function,
as follows.
openidm.update("managed/organization/mysampleorg", mymap)
openidm.update("config/custom/mylookuptable", mymap)
openidm.update("repo/custom/mylookuptable", mymap)
For managed objects, you can partially update an object with the
patch() function.
openidm.patch("managed/organization/mysampleorg", rev, value)
The create(), delete(), and
query() functions work the same way.
7.2. Accessing Data Objects by Using the REST API
OpenIDM provides RESTful access to data objects via a REST API. To access objects over REST, you can use a browser-based REST client, such as the Simple REST Client for Chrome, or RESTClient for Firefox. Alternatively you can use the curl command-line utility.
For a comprehensive overview of the REST API, see Appendix E, "REST API Reference".
To obtain a managed object through the REST API, depending on your security
settings and authentication configuration, perform an HTTP GET on the
corresponding URL, for example
https://localhost:8443/openidm/managed/organization/mysampleorg.
By default, the HTTP GET returns a JSON representation of the object.
7.3. Defining and Calling Queries
OpenIDM supports an advanced query model that enables you to define queries, and to call them over the REST or Resource API. Three types of queries are supported, on both managed, and system objects:
Common filter expressions
Parameterized, or predefined queries
Native query expressions
Each of these mechanisms is discussed in the following sections.
7.3.1. Common Filter Expressions
The ForgeRock REST API defines common filter expressions, that enable you to form arbitrary queries using a number of supported filter operations. This query capability is the standard way to query data if no predefined query exists, and is supported for all managed and system objects.
Common filter expressions are useful in that they do not require knowledge of how the object is stored and do not require additions to the repository configuration.
Common filter expressions are called with the
_queryFilter keyword. The following example uses a common
filter expression to retrieve managed user objects whose user name is Smith.
$ curl \ --cacert self-signed.crt \ --header "X-OpenIDM-Username: openidm-admin" \ --header "X-OpenIDM-Password: openidm-admin" \ "https://localhost:8443/openidm/managed/user?_queryFilter=userName%20eq%20%22smith%22"
The filter is URL encoded in this example. The corresponding filter using the resource API would be:
openidm.query("managed/user", { "_queryFilter" : '/userName eq "smith"' });Note that, this JavaScript invocation is internal and is not subject to the same URL-encoding requirements that a GET request would be. Also, because JavaScript supports the use of single quotes, it is not necessary to escape the double quotes in this example.
For a list of supported filter operations, see Section 7.3.4, "Constructing Queries".
Note that using common filter expressions to retrieve values from arrays is currently not supported. If you need to search within an array you should set up a predefined (parameterized) in your repository configuration. For more information, see Section 7.3.2, "Parameterized Queries".
7.3.2. Parameterized Queries
Managed objects in the supported OpenIDM repositories can be accessed using
a parameterized query mechanism. Parameterized queries on repositories are
defined in the repository configuration (repo.*.json)
and are called by their _queryId.
Parameterized queries provide precise control over the query that is executed. Such control might be useful for tuning, or for performing database operations such as aggregation (which is not possible with a common filter expression.)
Parameterized queries provide security and portability for the query call signature, regardless of the back-end implementation. Queries that are exposed over the REST interface must be parameterized queries to guard against injection attacks and other misuse. Queries on the officially supported repositories have been reviewed and hardened against injection attacks.
For system objects, support for parameterized queries is restricted to
_queryId=query-all-ids. There is currently no support for
user-defined parameterized queries on system objects. Typically,
parameterized queries on system objects are not called directly over the
REST interface, but are issued from internal calls, such as correlation
queries.
A typical query definition is as follows:
"query-all-ids" : "select _openidm_id from ${unquoted:_resource}"
To call this query, you would reference its ID, as follows:
?_queryId=query-all-ids
The following example calls query-all-ids over the REST
interface:
$ curl \ --cacert self-signed.crt \ --header "X-OpenIDM-Username: openidm-admin" \ --header "X-OpenIDM-Password: openidm-admin" \ "https://localhost:8443/openidm/managed/user?_queryId=query-all-ids"
7.3.3. Native Query Expressions
Native query expressions are supported for all managed objects and system objects, and can be called directly, rather than being defined in the repository configuration.
Native queries are intended specifically for internal callers, such as custom scripts, and should be used only in situations where the common filter or parameterized query facilities are insufficient. For example, native queries are useful if the query needs to be generated dynamically.
The query expression is specific to the target resource. For repositories, queries use the native language of the underlying data store. For system objects that are backed by OpenICF connectors, queries use the applicable query language of the system resource.
Native queries on the repository are made using the
_queryExpression keyword. For example:
$ curl \ --cacert self-signed.crt \ --header "X-OpenIDM-Username: openidm-admin" \ --header "X-OpenIDM-Password: openidm-admin" \ "https://localhost:8443/openidm/managed/user?_queryExpression=select+from+managed_user"
Unless you have specifically enabled native queries, the previous command returns a 403 access denied error message. Native queries should not be enabled in production environments, as they are not portable and do not guard against injection attacks.
Such query expressions should therefore not be used or made accessible over the REST interface or over HTTP, other than for development, and should be used only via the internal Resource API. If you want to enable such native queries for development, see Section 16.2.7, "Protect Sensitive REST Interface URLs".
Alternatively, if you really need to expose native queries over HTTP, in a selective manner, you can design a custom endpoint to wrap such access.
7.3.4. Constructing Queries
The openidm.query function enables you to query OpenIDM
managed and system objects. The query syntax is
openidm.query(id, params), where id
specifies the object on which the query should be performed and
params provides the parameters that are passed to the
query, either _queryFilter or
_queryID. For example:
var params = {
'_queryFilter' : 'givenName co "' + sourceCriteria + '" or ' + 'sn co "'
+ sourceCriteria + '"'
};
var results = openidm.query("system/ScriptedSQL/account", params)
Over the REST interface, the query filter is specified as
_queryFilter=filter, for
example:
$ curl \ --cacert self-signed.crt \ --header "X-OpenIDM-Username: openidm-admin" \ --header "X-OpenIDM-Password: openidm-admin" \ --request GET 'https://localhost:8443/openidm/managed/user?_queryFilter=userName+eq+"Smith"'
When called over REST, you must URL encode the filter expression. The following examples show the filter expressions using the resource API and the REST API, but do not show the URL encoding, to make them easier to read.
Note that, for generic mappings, any fields that are included in the query
filter (for example userName in the previous query), must
be explicitly defined as searchable, if you have set
the global searchableDefault to false. For more
information, see Section 5.2.2, "Improving Search Performance for Generic Mappings".
The filter expression is constructed from the
building blocks shown in this section. In these expressions the simplest
json-pointer is a field of the JSON resource,
such as userName or id. A json-pointer
can, however, point to nested elements as described in the
JSON
Pointer RFC.
- Comparison expressions
The following examples show how you can build filters using comparison expressions.
json-pointer eq json-valueMatches when the pointer equals the value, for example:
"_queryFilter" : '/givenName eq "Dan"'The following REST call returns the user name and given name of all managed users whose first name (
givenName) is "Dan".$ curl \ --cacert self-signed.crt \ --header "X-OpenIDM-Username: openidm-admin" \ --header "X-OpenIDM-Password: openidm-admin" \ --request GET \ 'https://localhost:8443/openidm/managed/user?_queryFilter=givenName+eq+"Dan"&_fields=userName,givenName' { "remainingPagedResults": -1, "pagedResultsCookie": null, "resultCount": 3, "result": [ { "givenName": "Dan", "userName": "dlangdon" }, { "givenName": "Dan", "userName": "dcope" }, { "givenName": "Dan", "userName": "dlanoway" } }json-pointer co json-valueMatches when the pointer contains the value, for example:
"_queryFilter" : '/givenName co "smi"'The following REST call returns the user name and given name of all managed users whose first name (
givenName) contains "Da".$ curl \ --cacert self-signed.crt \ --header "X-OpenIDM-Username: openidm-admin" \ --header "X-OpenIDM-Password: openidm-admin" \ --request GET \ 'https://localhost:8443/openidm/managed/user?_queryFilter=givenName+co+"Da"&_fields=userName,givenName' { "remainingPagedResults": -1, "pagedResultsCookie": null, "resultCount": 10, "result": [ { "givenName": "Dave", "userName": "djensen" }, { "givenName": "David", "userName": "dakers" }, { "givenName": "Dan", "userName": "dlangdon" }, { "givenName": "Dan", "userName": "dcope" }, { "givenName": "Dan", "userName": "dlanoway" }, { "givenName": "Daniel", "userName": "dsmith" }, ... }json-pointer sw json-valueMatches when the pointer starts with the value, for example:
"_queryFilter" : '/sn sw "Jen"'The following REST call returns the user names of all managed users whose last name (
sn) starts with "Jen".$ curl \ --cacert self-signed.crt \ --header "X-OpenIDM-Username: openidm-admin" \ --header "X-OpenIDM-Password: openidm-admin" \ --request GET \ 'http://localhost:8443/openidm/managed/user?_queryFilter=sn+sw+"Jen"&_fields=userName' { "remainingPagedResults": -1, "pagedResultsCookie": null, "resultCount": 4, "result": [ { "userName": "bjensen" }, { "userName": "djensen" }, { "userName": "cjenkins" }, { "userName": "mjennings" } ] }json-pointer lt json-valueMatches when the pointer is less than the value, for example:
"_queryFilter" : '/employeeNumber lt 5000'The following REST call returns the user names of all managed users whose
employeeNumberis lower than 5000.$ curl \ --cacert self-signed.crt \ --header "X-OpenIDM-Username: openidm-admin" \ --header "X-OpenIDM-Password: openidm-admin" \ --request GET \ 'http://localhost:8443/openidm/managed/user?_queryFilter=employeeNumber+lt+5000&_fields=userName,employeeNumber' { "remainingPagedResults": -1, "pagedResultsCookie": null, "resultCount": 4999, "result": [ { "employeeNumber": 4907, "userName": "jnorris" }, { "employeeNumber": 4905, "userName": "afrancis" }, { "employeeNumber": 3095, "userName": "twhite" }, { "employeeNumber": 3921, "userName": "abasson" }, { "employeeNumber": 2892, "userName": "dcarter" } ... ] }json-pointer le json-valueMatches when the pointer is less than or equal to the value, for example:
"_queryFilter" : '/employeeNumber le 5000'The following REST call returns the user names of all managed users whose
employeeNumberis 5000 or lower.$ curl \ --cacert self-signed.crt \ --header "X-OpenIDM-Username: openidm-admin" \ --header "X-OpenIDM-Password: openidm-admin" \ --request GET \ 'http://localhost:8443/openidm/managed/user?_queryFilter=employeeNumber+le+5000&_fields=userName,employeeNumber' { "remainingPagedResults": -1, "pagedResultsCookie": null, "resultCount": 5000, "result": [ { "employeeNumber": 4907, "userName": "jnorris" }, { "employeeNumber": 4905, "userName": "afrancis" }, { "employeeNumber": 3095, "userName": "twhite" }, { "employeeNumber": 3921, "userName": "abasson" }, { "employeeNumber": 2892, "userName": "dcarter" } ... ] }json-pointer gt json-valueMatches when the pointer is greater than the value, for example:
"_queryFilter" : '/employeeNumber gt 5000'The following REST call returns the user names of all managed users whose
employeeNumberis higher than 5000.$ curl \ --cacert self-signed.crt \ --header "X-OpenIDM-Username: openidm-admin" \ --header "X-OpenIDM-Password: openidm-admin" \ --request GET \ 'http://localhost:8443/openidm/managed/user?_queryFilter=employeeNumber+gt+5000&_fields=userName,employeeNumber' { "remainingPagedResults": -1, "pagedResultsCookie": null, "resultCount": 1458, "result": [ { "employeeNumber": 5003, "userName": "agilder" }, { "employeeNumber": 5011, "userName": "bsmith" }, { "employeeNumber": 5034, "userName": "bjensen" }, { "employeeNumber": 5027, "userName": "cclarke" }, { "employeeNumber": 5033, "userName": "scarter" } ... ] }json-pointer ge json-valueMatches when the pointer is greater than or equal to the value for example:
"_queryFilter" : '/employeeNumber ge 5000'The following REST call returns the user names of all managed users whose
employeeNumberis 5000 or higher.$ curl \ --cacert self-signed.crt \ --header "X-OpenIDM-Username: openidm-admin" \ --header "X-OpenIDM-Password: openidm-admin" \ --request GET \ 'http://localhost:8443/openidm/managed/user?_queryFilter=employeeNumber+ge+5000&_fields=userName,employeeNumber' { "remainingPagedResults": -1, "pagedResultsCookie": null, "resultCount": 1457, "result": [ { "employeeNumber": 5000, "userName": "agilder" }, { "employeeNumber": 5011, "userName": "bsmith" }, { "employeeNumber": 5034, "userName": "bjensen" }, { "employeeNumber": 5027, "userName": "cclarke" }, { "employeeNumber": 5033, "userName": "scarter" } ... ] }
- Presence expression
json-pointer prmatches any object in which the json-pointer is present, for example:"_queryFilter" : '/mail pr'The following REST call returns the mail addresses for all managed users who have a
mailproperty in their entry.$ curl \ --cacert self-signed.crt \ --header "X-OpenIDM-Username: openidm-admin" \ --header "X-OpenIDM-Password: openidm-admin" \ --request GET \ 'http://localhost:8443/openidm/managed/user?_queryFilter=mail+pr&_fields=mail' { "remainingPagedResults": -1, "pagedResultsCookie": null, "resultCount": 2, "result": [ { "mail": "jdoe@exampleAD.com" }, { "mail": "bjensen@example.com" } ] }The presence filter is not currently supported for system objects. To query for presence on a system object, specify any attribute that exists for all entries, such as the
uidon an LDAP system, and use the starts with (sw) filter, with an empty value. For example, the following query returns theuidof all users in an LDAP system.$ curl \ --cacert self-signed.crt \ --header "X-OpenIDM-Username: openidm-admin" \ --header "X-OpenIDM-Password: openidm-admin" \ --request GET \ 'http://localhost:8443/openidm/system/ldap/account?_queryFilter=uid+sw+""&_fields=uid' { "remainingPagedResults": -1, "pagedResultsCookie": null, "resultCount": 2, "result": [ { "uid": "jdoe" }, { "uid": "bjensen" } ] }- Literal expressions
truematches any object in the resource.falsematches no object in the resource.For example, you can list the
_idof all managed objects as follows:$ curl \ --cacert self-signed.crt \ --header "X-OpenIDM-Username: openidm-admin" \ --header "X-OpenIDM-Password: openidm-admin" \ --request GET 'https://localhost:8443/openidm/managed/user?_queryFilter=true&_fields=_id' { "remainingPagedResults": -1, "pagedResultsCookie": null, "resultCount": 2, "result": [ { "_id": "d2e29d5f-0d74-4d04-bcfe-b1daf508ad7c" }, { "_id": "709fed03-897b-4ff0-8a59-6faaa34e3af6" } ] }- Complex expressions
You can combine expressions using the boolean operators
and,or, and!(not). The following example queries managed user objects located in London, with last name Jensen.$ curl \ --cacert self-signed.crt \ --header "X-OpenIDM-Username: openidm-admin" \ --header "X-OpenIDM-Password: openidm-admin" \ --request GET \ https://localhost:8443/openidm/managed/user?_queryFilter=city+eq+"London"+and+sn+eq+"Jensen"&_fields=userName,givenName,sn'&_fields=userName' { "remainingPagedResults": -1, "pagedResultsCookie": null, "resultCount": 3, "result": [ { "sn": "Jensen", "givenName": "Clive", "userName": "cjensen" }, { "sn": "Jensen", "givenName": "Dave", "userName": "djensen" }, { "sn": "Jensen", "givenName": "Margaret", "userName": "mjensen" } ] }
7.3.5. Paging Query Results
The common filter query mechanism supports paged query results for managed and system objects.
The following filtered query returns the first two records in an LDAP
repository, whose uid starts with b.
$ curl \
--cacert self-signed.crt \
--header "X-OpenIDM-Username: openidm-admin" \
--header "X-OpenIDM-Password: openidm-admin" \
--request GET \
"https://localhost:8443/openidm/system/ldap/account?_queryFilter=uid%20sw%20%22b%22&_pageSize=2"
{
"remainingPagedResults": -1,
"pagedResultsCookie": null,
"resultCount": 2,
"result": [
{
"_id": "uid=bjensen,ou=People,dc=example,dc=com",
"sn": "Jensen",
"dn": "uid=bjensen,ou=People,dc=example,dc=com",
"givenName": "Barbara",
"description": "Created for OpenIDM",
"cn": "Babara Jensen",
"uid": "bjensen",
"ldapGroups": [
"cn=openidm2,ou=Groups,dc=example,dc=com"
],
"mail": "bjensen@example.com",
"telephoneNumber": "1-360-229-7105"
},
{
"_id": "cn=bsmith,ou=People,dc=example,dc=com",
"sn": "Smith",
"dn": "cn=bsmith,ou=People,dc=example,dc=com",
"givenName": "Bill",
"description": null,
"cn": "bsmith",
"uid": "bsmith",
"ldapGroups": [],
"mail": "bsmith@example.com",
"telephoneNumber": "0987362837"
}
]
} Predefined queries also provide some support for paged results, useful, for example, for UI display purposes. Predefined queries must be configured to support paging, in the repository configuration. For example:
"query-all-ids" : "select _openidm_id from ${unquoted:_resource} SKIP ${unquoted:_pagedResultsOffset} LIMIT ${unquoted:_pageSize}",This query configuration enables the paging parameters to be used, for example, in a query such as the following:
$ curl \
--cacert self-signed.crt \
--header "X-OpenIDM-Username: openidm-admin" \
--header "X-OpenIDM-Password: openidm-admin" \
--header "Content-Type: application/json" \
--request GET \
"https://localhost:8443/openidm/managed/user?_queryId=query-all-ids&_pageSize=2&_pagedResultsOffset=3"
{
"remainingPagedResults": 2,
"pagedResultsCookie": "5",
"resultCount": 2,
"result": [
{
"_rev": "0",
"_id": "b980999e-aa5c-4655-b2a0-08731b64e0ba"
},
{
"_rev": "0",
"_id": "c72b9c00-1e2c-4139-9e7f-fb9fb822db96"
}
]
} The following paging parameters are supported:
_pagedResultsCookieOpaque cookie used by the server to keep track of the position in the search results. The format of the cookie is a string value.
The server provides the cookie value on the first request. You should then supply the cookie value in subsequent requests until the server returns a null cookie, meaning that the final page of results has been returned.
Paged results are enabled only if the
_pageSizeis a non-zero integer._pagedResultsOffsetSpecifies the index within the result set of the number of records to be skipped before the first result is returned. The format of the
_pagedResultsOffsetis an integer value. When the value of_pagedResultsOffsetis greater than or equal to 1, the server returns pages, starting after the specified index.This request assumes that the
_pageSizeis set, and not equal to zero.For example, if the result set includes 10 records, the
_pageSizeis 2, and the_pagedResultsOffsetis 6, the server skips the first 6 records, then returns 2 records, 7 and 8. The_pagedResultsCookievalue would then be 8 (the index of the last returned record) and the_remainingPagedResultsvalue would be 2, the last two records (9 and 10) that have not yet been returned.If the offset points to a page beyond the last of the search results, the result set returned is empty.
Note that the
_remainingPagedResultsparameter is not supported for all queries. Where it is not supported, the returned value is always-1._pageSizeAn optional parameter indicating that query results should be returned in pages of the specified size. For all paged result requests other than the initial request, a cookie should be provided with the query request.
The default behavior is not to return paged query results. If set, this parameter should be an integer value, greater than zero.
7.3.6. Sorting Query Results
For common filter query expressions, you can sort the results of a query,
using the _sortKeys parameter. This parameter takes a
comma-separated list as a value and orders the way in which the JSON result
is returned, based on this list.
The _sortKeys parameter is not supported for predefined
queries.
The following query returns all users with the givenName
Dan, and sorts the results alphabetically, according to
surname (sn).
$
'https://localhost:8443/openidm/system/ldap/account?_queryFilter=givenName+eq+"Dan"&_fields=givenName,sn&_sortKeys=sn'
{
"remainingPagedResults": -1,
"pagedResultsCookie": null,
"resultCount": 3,
"result": [
{
"sn": "Cope",
"givenName": "Dan"
},
{
"sn": "Langdon",
"givenName": "Dan"
},
{
"sn": "Lanoway",
"givenName": "Dan"
}
]
}
Chapter 8. Managing Users, Groups, and Roles
OpenIDM does not control the structure of objects that are stored in its repository. You can define any kind of managed object, but a definition for users, groups and roles is provided by default.
This chapter describes how to work with these default managed objects. More information about the OpenIDM object model is provided in Appendix C, "Data Models and Objects Reference".
8.1. Working with Managed Users
External users that are stored in OpenIDM's repository are referred to as
managed users. For a JDBC repository, OpenIDM stores
managed users in the managedobjects table. A second table,
managedobjectproperties, serves as the index table. For an
OrientDB repository, managed users are stored in the
managed_user table.
OpenIDM provides RESTful access to managed users, at the context path
/openidm/managed/user. For more information, see
Section 1.3, "To Get Started With the OpenIDM REST Interface" in the Installation Guide.
8.2. Working With Managed Groups
OpenIDM provides support for a managed "group" object. For
a JDBC repository, OpenIDM stores managed groups with all other managed
objects, in the managedobjects table, and uses the
managedobjectproperties for indexing. For an OrientDB
repository, managed groups are stored in the managed_group
table.
The managed group object is not provided by default. To use managed groups,
add an object similar to the following to your
conf/managed.json file:
{
"name" : "group"
},
With this addition, OpenIDM provides RESTful access to managed groups, at the
context path /openidm/managed/group.
For an example of a deployment that uses managed groups, see Section 3.6, "Sample 2d - Synchronizing LDAP Groups" in the Installation Guide.
8.3. Configuring Custom Roles
The default managed object model includes a managed role
object that can be manipulated in the same way as any other managed object.
This section refers to two distinct types of roles - direct (static) and
indirect (dynamic) roles. Direct roles refer to roles that are specifically
added to the user's "roles" attribute by an administrator
operation. Indirect roles might be added to the user entry as a result of a
script or rule that assigns the role. For example, a user might acquire a
"sales-role" as a result of being in the
"sales" organization.
A managed user's "roles" attribute takes an array as a
value. Currently, only flat strings are supported in this array.
The "roles" attribute includes any specifically assigned
roles, and any roles assigned internally by OpenIDM. So, the
"roles" attribute of a particular user entry might
appear as follows:
"roles" : [
"name" : "managed/role/sample-role",
"name" : "openidm-authorized"
]
A role value that includes a / character is considered to
be a URL that points to the role details on the router, for example,
managed/role/sample-role.
The following sections describe basic role manipulation - how roles are defined, assigned to users, and deleted. The entitlements or assignments supplied by roles are described in the subsequent section.
8.3.1. Creating, Assigning, and Deleting Roles
Role definitions are stored in the repository and are accessible at the
/openidm/managed/role context path. This section
describes how to manipulate roles over the REST interface.
The examples in this section assume that OpenIDM has been started with the configuration of Sample 2b, and refers to the managed user objects created in that sample. For more information, see Section 3.4, "Sample 2b - LDAP Two Way" in the Installation Guide.
8.3.1.1. To Create a Role Definition
To create a managed role definition, use a PUT request on the
openidm/managed/role context path, specifying the role
ID in the URL. The following request creates a role definition named
newrole. The role effectively assigns the value
"CN=employees,O=corp" to the
ldapGroups attribute on the ldap
system.
$ curl \
--cacert self-signed.crt \
--header "X-OpenIDM-Username: openidm-admin" \
--header "X-OpenIDM-Password: openidm-admin" \
--header "Content-Type: application/json" \
--header "If-None-Match: *" \
--request PUT \
--data '{
"properties": {
"description": "an example role"
},
"assignments": {
"ldap": {
"attributes": [
{
"name": "ldapGroups",
"assignmentOperation": "mergeWithTarget",
"unassignmentOperation": "removeFromTarget",
"value": [
"CN=employees,O=corp"
]
}
],
"onAssignment": {
"file": "roles\/onAssignment_ldap.js",
"type": "text\/javascript"
},
"onUnassignment": {
"file": "roles\/onUnassignment_ldap.js",
"type": "text\/javascript"
}
}
}
}' \
"https://localhost:8443/openidm/managed/role/newrole"
{
"assignments": {
"ldap": {
"attributes": [
{
"name": "ldapGroups",
"unassignmentOperation": "removeFromTarget",
"assignmentOperation": "mergeWithTarget",
"value": [
"CN=employees,O=corp"
]
}
],
"onAssignment": {
"file": "roles/onAssignment_ldap.js",
"type": "text/javascript"
},
"onUnassignment": {
"file": "roles/onUnassignment_ldap.js",
"type": "text/javascript"
}
}
},
"_id": "newrole",
"properties": {
"description": "an example role"
},
"_rev": "1"
}
For information about each of the properties in the role definition, see Section 8.3.2.1, "A Sample Role Definition for Two Remote Systems".
Most of the examples in this guide use PUT to create client-assigned IDs for resources, as it makes the examples easier to read. Your deployment might require you to use server-assigned UUIDs, in which case you should use a POST request. For more information, see Should You Use PUT or POST to Create a Managed Object?.
8.3.1.2. To List the Defined Roles
To obtain a list of all defined managed roles, query the
/openidm/managed/role context path, as follows.
$ curl \
--cacert self-signed.crt \
--header "X-OpenIDM-Username: openidm-admin" \
--header "X-OpenIDM-Password: openidm-admin" \
--request GET \
"https://localhost:8443/openidm/managed/role/?_queryId=query-all-ids"
{
"remainingPagedResults": -1,
"pagedResultsCookie": null,
"resultCount": 1,
"result": [
{
"_rev": "0",
"_id": "newrole"
}
]
}
8.3.1.3. To Assign a Role to a User
To assign a direct role to a user, update the user's entry over REST,
adding managed/role/role ID
to the user's "roles" attribute. The following example
adds the ldap role, created previously, to user
bjensen, whose _id is
2e78fd22-a7cb-4585-9570-5f649e8abd25.
$ curl \
--cacert self-signed.crt \
--header "X-OpenIDM-Username: openidm-admin" \
--header "X-OpenIDM-Password: openidm-admin" \
--header "Content-Type: application/json" \
--header "If-Match: *" \
--request PATCH \
--data '[
{
"operation": "add",
"field": "/roles/-",
"value": "managed/role/newrole"
}
]' \
"https://localhost:8443/openidm/managed/user/2e78fd22-a7cb-4585-9570-5f649e8abd25"
{
"displayName": "Babara Jensen",
"stateProvince": "",
"userName": "bjensen",
"postalAddress": "",
"effectiveAssignments": {
"ldap": {
"attributes": [
{
"name": "ldapGroups",
"unassignmentOperation": "removeFromTarget",
"assignmentOperation": "mergeWithTarget",
"assignedThrough": "managed/role/newrole",
"value": [
"CN=employees,O=corp"
]
}
],
"onAssignment": {
"file": "roles/onAssignment_ldap.js",
"type": "text/javascript"
},
"onUnassignment": {
"file": "roles/onUnassignment_ldap.js",
"type": "text/javascript"
}
}
},
"roles": [
"openidm-authorized",
"managed/role/newrole"
],
"city": "",
"effectiveRoles": [
"openidm-authorized",
"managed/role/newrole"
],
"givenName": "Barbara",
"lastPasswordAttempt": "Tue Oct 21 2014 16:01:22 GMT+0200 (SAST)",
"address2": "",
"passwordAttempts": "0",
"sn": "Jensen",
"mail": "bjensen@example.com",
"country": "",
"_rev": "2",
"lastPasswordSet": "",
"postalCode": "",
"_id": "2e78fd22-a7cb-4585-9570-5f649e8abd25",
"description": "Created for OpenIDM",
"accountStatus": "active",
"telephoneNumber": "1-360-229-7105"
}
Note the dash (-) character that is appended to the
field name in the data that is being sent. This
character specifies that the role should be added to the existing roles for
that user. If you do not include the dash character, the request overwrites
all current values of the user's "roles" attribute.
8.3.1.4. To Query Role Membership
To return a list of all users who have a specific directly assigned role,
use the get-users-of-direct-role query, specifying the
role ID. You cannot query role membership for indirect roles.
The following query returns all members of the "newrole"
role created previously. Currently that role has only one member,
bjensen, whose ID is
2e78fd22-a7cb-4585-9570-5f649e8abd25. The query returns
the complete user object.
$ curl \
--cacert self-signed.crt \
--header "X-OpenIDM-Username: openidm-admin" \
--header "X-OpenIDM-Password: openidm-admin" \
--request GET \
"https://localhost:8443/openidm/managed/user?_queryId=get-users-of-direct-role&role=managed/role/newrole"
{
"remainingPagedResults": -1,
"pagedResultsCookie": null,
"resultCount": 1,
"result": [
{
"effectiveAssignments": {
"ldap": {
"attributes": [
{
"name": "ldapGroups",
...
"_id": "2e78fd22-a7cb-4585-9570-5f649e8abd25",
"_rev": "2",
"description": "Created for OpenIDM",
"accountStatus": "active"
}
]
}
8.3.1.5. To Remove a Role Assignment
To remove a role assignment from a user, simply replace that user's
"roles" attribute with the array of roles that the user
should have. The following example removes the newrole
role from user bjensen by replacing the current value of
her "roles" attribute with its previous value
("openidm-authorized").
$ curl \
--cacert self-signed.crt \
--header "X-OpenIDM-Username: openidm-admin" \
--header "X-OpenIDM-Password: openidm-admin" \
--header "Content-Type: application/json" \
--header "If-Match: *" \
--request PATCH \
--data '[
{
"operation": "replace",
"field": "/roles",
"value": [
"openidm-authorized"
]
}
]' \
"https://localhost:8443/openidm/managed/user/2e78fd22-a7cb-4585-9570-5f649e8abd25"In the role definition, you can specify what should happen when an assignment of that role is removed. For more information, see Section 8.3.2, "Understanding Effective Roles and Effective Assignments".
8.3.1.6. To Delete a Managed Role Definition
To delete a role definition, send a DELETE request, specifying the role ID
in the URL. The following sample command deletes the
newrole role, created previously.
$ curl \
--cacert self-signed.crt \
--header "X-OpenIDM-Username: openidm-admin" \
--header "X-OpenIDM-Password: openidm-admin" \
--header "Content-Type: application/json" \
--request DELETE \
"https://localhost:8443/openidm/managed/role/newrole"
{
"properties": {
"description": "an example role"
},
"assignments": {
"ldap": {
"attributes": [
{
"name": "ldapGroups",
"unassignmentOperation": "removeFromTarget",
"assignmentOperation": "mergeWithTarget",
"value": [
"CN=employees,O=corp"
]
}
],
"onAssignment": {
"file": "roles/onAssignment_ldap.js",
"type": "text/javascript"
},
"onUnassignment": {
"file": "roles/onUnassignment_ldap.js",
"type": "text/javascript"
}
}
},
"_rev": "1",
"_id": "newrole"
}
Note
You cannot delete a role definition if that role is currently assigned to a user. Attempting to delete an assigned role results in the following error:
{
"message": "Cannot delete a role that is currently assigned",
"reason": "Conflict",
"code": 409
}8.3.2. Understanding Effective Roles and Effective Assignments
The primary purpose of roles is the management of user access to system resources. User access is controlled by the assignments or entitlements provided by the role.
The previous section described how to create a basic role definition and to assign that role to a user. This section describes how the assignments that are specified for that role are applied.
8.3.2.1. A Sample Role Definition for Two Remote Systems
The following sample role definition shows how assignments are configured
for two remote systems - an LDAP server (ldap), and an
Active Directory Server (ad).
{
"name": "samplerole",
"_id": "samplerole",
"assignments": {
"ad": {
"attributes": [
{
"name": "adSystems",
"value": [
"CN=fileshare,O=corp",
"CN=desktop,O=corp",
"CN=terminal,O=corp",
"CN=intranet,O=corp"
],
"assignmentOperation": "mergeWithTarget",
"unassignmentOperation": "removeFromTarget"
}
]
},
"ldap": {
"attributes": [
{
"name": "ldapGroups",
"value": [
"CN=employees,O=corp"
],
"assignmentOperation": "mergeWithTarget",
"unassignmentOperation": "removeFromTarget"
},
{
"name": "employeeType",
"value": "employee"
}
],
"onAssignment": {
"file": "roles/onAssignment_ldap.js",
"type": "text/javascript"
},
"onUnassignment": {
"file": "roles/onUnassignment_ldap.js",
"type": "text/javascript"
}
}
}
}The role definition includes the following properties:
"name"is the name of the role, and should be unique. Avoid using special characters in the role name."_id"is the object identifier of the role, by which it is accessed over REST."assignments"specifies the list of assignments (or entitlements) that this role will create on the remote systems.Each assignment includes the name of the external system, such as
adandldap, the attribute or attributes whose values will be generated, on the external system, and the value or values that will be applied to each attribute.OpenIDM uses the
"assignments"property to keep assigned roles up to date."assignmentOperation"and"unassignmentOperation"When you update a role definition by adding, updating, or removing an attribute, the update triggers an
"assignmentOperation"or an"unassignmentOperation".When you assign or unassign a role to a user, that action also triggers an
"assignmentOperation"or an"unassignmentOperation".The
"assignmentOperation"specifies the way in which the attribute value is applied, and can be one of"replaceTarget"(the default) or"mergeWithTarget".The
"replaceTarget"operation replaces the entire target attribute value with whatever is specified in the role definition. When this operation is specified, the value from the role assignments becomes the only authoritative source for the attribute.The
"mergeWithTarget"operation first merges the source value with the existing target value, then adds the value or values from the role assignment. In the event that duplicate values are found (for attributes that take a list as a value), each value is included only once in the resulting target value.The
"unassignmentOperation"specifies the way in which the attribute value is removed, and can only be set to"removeFromTarget".
The
"mergeWithTarget","replaceTarget"and"removeFromTarget"operations are aliases, and are defined in the fileopenidm/bin/defaults/script/roles/defaultMapping.js."onAssignment"and"onUnassignment"These properties refer to customizable scripts, that are specific to each assignment.
By default, OpenIDM addresses any change in role assignments with the assignment operations defined in the
defaultMapping.jsfile. You can modify this behavior by writing customonAssignmentandonUnassignmentscripts. If these custom scripts are specified, OpenIDM triggers the"onAssignment"or"onUnassignment"script whenever you create, assign, or delete a role from a user entry. In addition, every synchronization operation triggers the"onAssignment"script. The"onUnassignment"script is triggered when an assignment is removed from a role, or when a role is unassigned from a user.If you create a custom
"onAssignment"or"onUnassignment"script, the script must return a"targetObject", otherwise, the script operation might fail.
OpenIDM logs any changes to a managed role definition in the audit log.
8.3.2.2. Virtual Role Attributes
Based on the set of role definitions that are assigned to a specific user,
the roles mechanism generates two virtual attributes on the user entry -
effectiveRoles and
effectiveAssignments.
The logic that calculates the effectiveRoles and
effectiveAssignments attribute values is located in two
scripts:
openidm/bin/defaults/script/roles/effectiveRoles.js
and
openidm/bin/defaults/script/roles/effectiveAssignments.js.
Do not alter these scripts. If you need to modify how roles and assignments
are handled, create your own custom script and reference it in the
conf/managed.json file. For information about using
custom scripts, see Appendix F, "Scripting Reference".
The effectiveRoles attribute lists the specific role
definitions that are applied to a user entry. By default, the effective
roles script supports direct role assignments only. Dynamic role assignment
is not provided out of the box, but can be added with a custom script that
overrides the default effectiveRoles.js script. For
more information, see Section 8.3.5, "Adding Support for Dynamic Assignments".
Based on the effective roles, the effectiveAssignments
attribute provides the calculated resource assignments, that is the
amalgamated set of entitlements for a specific user.
The value of the effectiveAssignments attribute provides
the information required for the provisioner to apply the effective
assignments, and provides a reference to the source of the assignment. In
reading this attribute, it is therefore possible to find and change the
root source of an assignment.
Effective assignments can merge attribute operations on the same system from multiple roles. For example, role A might add group A to a user's group membership list, and role B might add group B to the same group membership property on the same assigned system.
The effective roles and effective assignments attributes are configured in
openidm/conf/managed.json as follows:
{
"name" : "effectiveRoles",
"type" : "virtual",
"onRetrieve" : {
"type" : "text/javascript",
"file" : "roles/effectiveRoles.js",
"rolesPropName" : "roles"
}
},
{
"name" : "effectiveAssignments",
"type" : "virtual",
"onRetrieve" : {
"type" : "text/javascript",
"file" : "roles/effectiveAssignments.js",
"effectiveRolesPropName" : "effectiveRoles"
}
}
By default, the effectiveRoles.js script uses the
"roles" attribute of a user entry to determine the
direct roles assigned to the user. The
effectiveAssignments.js script uses the virtual
"effectiveRoles" attribute of the user entry to calculate
the user's effective assignments. If your deployment uses different
attributes to store this information, change the
"rolesPropName" and the
"effectiveRolesPropName" properties of the virtual
attribute definitions accordingly.
When a user entry is assigned a role, the effectiveRoles
and effectiveAssignments of that entry are calculated
according to the role definition. A managed user entry, whose roles have
been generated based on the role definition illustrated previously, might
appear as follows:
{
"_id":"i",
"_rev":"1",
"roles":[
"openidm-authorized",
"managed/role/sample-role"
],
"effectiveRoles":[
"openidm-authorized",
"managed/role/sample-role"
],
"effectiveAssignments":{
"ldap":{
"attributes":[
{
"value":[
"CN=employees,O=corp"
],
"operation":"replaceTarget",
"name":"ldapGroups",
"assignedThrough":"managed/role/sample-role"
},
{
"value":"employee",
"name":"employeeType",
"assignedThrough":"managed/role/sample-role"
}
]
},
"ad":{
"attributes":[
{
"value":[
"CN=fileshare,O=corp",
"CN=desktop,O=corp",
"CN=terminal,O=corp",
"CN=intranet,O=corp"
],
"operation":"replaceTarget",
"name":"adSystems",
"assignedThrough":"managed/role/sample-role"
}
]
}
}
}
Note that the value of the "assignedThrough" property
of the virtual "effectiveAssignments" attribute indicates
how each assignment has been generated.
After you have defined a role, and assigned it to a user, verify that the expected effective roles and effective assignments have been generated for that user. To apply the effective assignments to the target resource, add a default mapping to your synchronization configuration, as described in the following section.
8.3.3. Setting up the Role Mapping
After the role has been defined, and the effective assignments checked, you must set up mapping for the role and, optionally, restrict provisioning based on the effective assignments.
This section describes these two steps.
8.3.3.1. Creating a Mapping For Effective Assignments
After the effective assignments have been calculated, OpenIDM applies these assignments to the target resources.
The following sample extract of a sync.json file
applies the ldap assignment, illustrated in the previous
section, on the target resource (system/ldap/account) for
all entries that have "effectiveAssignments" : "ldap" in
the source.
{
"name" : "managedUser_systemLdapAccounts",
"source" : "managed/user",
"target" : "system/ldap/account",
"links" : "systemLdapAccounts_managedUser",
},
"assignmentsToMap": [
"ldap"
],
...
} 8.3.3.2. Using Roles For Conditional Mapping
The roles mechanism provides the ability to restrict provisioning based on a user's effective assignments. For example, you might want to prevent users from being provisioned to an Active Directory system, if they do not have specific access to that system.
Based on the "effectiveAssignments" virtual attribute,
described in the previous section, you could configure a conditional mapping
for this example, as follows:
Create a role definition that gives the user the Active Directory assignment, for example:
"_id": "ad-role", "assignments": { "ad": { "attributes": [ { "name": "adSystems", "value": [ "CN=fileshare,O=corp", "CN=desktop,O=corp", "CN=terminal,O=corp", "CN=intranet,O=corp" ], "assignmentOperation": "replaceTarget" } ] }Add the role directly as a value of the user's
"roles"attribute."roles" : [ "name" : "managed/role/ad-role", "name" : "openidm-authorized" ]Add a condition in the mapping that restricts provisioning to users who have the
"ad"assignment as an effective assignment. The effective assignments are calculated from the values in the user's"roles"attribute.{ "mappings": [ { "name": "managedUser_systemAdAccounts", "source": "managed/user", "sourceCondition": { "effectiveAssignments": "ad" }, "target": "system/ad/account" ... } ] }
8.3.4. Testing the Roles Mechanism
The following sample procedure creates a new role that includes an
assignment, adds that role to the user entry bjensen and
then shows how bjensen's effective assignments have been generated.
Create the role definition over REST.
This example uses a PUT request to create the role definition, so that we can specify the role
_id. The example adds a role definition with the IDldap-role. The role ID is used to assign the role directly to the user entry.$ curl \ --cacert self-signed.crt \ --header "X-OpenIDM-Username: openidm-admin" \ --header "X-OpenIDM-Password: openidm-admin" \ --header "Content-Type: application/json" \ --header "If-None-Match: *" \ --request PUT \ --data '{ "assignments": { "ldap": { "attributes": [ { "name": "ldapSystems", "value": [ "cn=printers,ou=Groups,dc=example,dc=com", "cn=intranet,ou=Groups,dc=example,dc=com" ], "operation": "replaceTarget" } ] } } }' \ "https://localhost:8443/openidm/managed/role/ldap-role" { "assignments": { "ldap": { "attributes": [ { "name": "ldapSystems", "operation": "replaceTarget", "value": [ "cn=printers,ou=Groups,dc=example,dc=com", "cn=intranet,ou=Groups,dc=example,dc=com" ] } ] } }, "_id": "ldap-role", "_rev": "0" }The
ldap-roleincludes one assignment, namedldap. Add a mapping for the assignment, by adding the following lines to yoursync.jsonfile:"mappings":[ "assignmentsToMap":[ "ldap" ], ]By default, OpenIDM addresses any change in role assignments with the assignment operations defined in the
defaultMapping.jsfile. You can modify this behavior by writing customonAssignmentandonUnassignmentscripts.Assign the role to user
bjensen, whose ID is2e78fd22-a7cb-4585-9570-5f649e8abd25.$ curl \ --cacert self-signed.crt \ --header "X-OpenIDM-Username: openidm-admin" \ --header "X-OpenIDM-Password: openidm-admin" \ --header "Content-Type: application/json" \ --header "If-Match: *" \ --request PATCH \ --data '[ { "operation": "replace", "field": "/roles", "value": [ "openidm-authorized", "managed/role/ldap-role" ] } ]' \ "https://localhost:8443/openidm/managed/user/2e78fd22-a7cb-4585-9570-5f649e8abd25" { "mail": "bjensen@example.com", "sn": "Jensen", "passwordAttempts": "0", "address2": "", "lastPasswordAttempt": "Thu October 23 2014 12:49:32 GMT+0200 (SAST)", "givenName": "Barbara", "city": "", "country": "", "_rev": "2", "lastPasswordSet": "", "postalCode": "", "_id": "2e78fd22-a7cb-4585-9570-5f649e8abd25", "accountStatus": "active", "description": "Created for OpenIDM", "roles": [ "openidm-authorized", "managed/role/ldap-role" ], "telephoneNumber": "1-360-229-7105", "postalAddress": "", "userName": "bjensen", "stateProvince": "", "displayName": "Babara Jensen" }Query
bjensen'suser entry to verify that her effective assignments have been updated.$ curl \ --cacert self-signed.crt \ --header "X-OpenIDM-Username: openidm-admin" \ --header "X-OpenIDM-Password: openidm-admin" \ --request GET \ "https://localhost:8443/openidm/managed/user/2e78fd22-a7cb-4585-9570-5f649e8abd25" ... { "effectiveAssignments": { "ldap": { "attributes": [ { "assignedThrough": "managed/role/ldap-role", "name": "ldapSystems", "operation": "replaceTarget", "value": [ "cn=printers,ou=Groups,dc=example,dc=com", "cn=intranet,ou=Groups,dc=example,dc=com" ] } ] } }, ...Note that bjensen's effective assignments have been updated to include the assignments provided by the
ldap-rolerole.
8.3.5. Adding Support for Dynamic Assignments
Although support for dynamic role assignments is not provided by default, it can easily be added with a custom script, as follows.
Copy the default effective roles script to your project's
script/rolesdirectory.$ cp /path/to/openidm/bin/defaults/script/roles/effectiveRoles.js \ project-dir/script/roles/The new script will override the default effective roles script.
Modify the effective roles script to include the dynamic role assignment logic.
For example, to enable dynamic role assignment for the
exampleorganization, you might add the following extract after the section:// This is the location to expand to dynamic roles, // project role script return values can then be added via // effectiveRoles = effectiveRoles.concat(dynamicRolesArray);if (object.org === 'example') { effectiveRoles = effectiveRoles.concat(['dynamic-role1', 'dynamic-role2']); }(Optional) To apply changes to the dynamic assignment rules to existing users, run a reconciliation operation on those users.
Note that changes to dynamic role assignments for existing users require a manual reconciliation of the affected group of users for those changes to take effect. So, if a new dynamic role definition is created, if an existing dynamic role definition is changed, or if changes are made to the dynamic assignment rule, the group of users affected by that assignment rule must be reconciled manually.
When a user entry is changed or synchronized, however, all dynamic role assignments are reassessed automatically.
8.3.6. Managed Role Object Script Hooks
In addition to the functionality provided by the assignments, a managed
role object has script hooks that enable you to configure role behavior.
The managed role object has the following structure in the managed objects
configuration file (managed.json):
{
"name" : "role",
"postCreate" : {
"type" : "text/javascript",
"file" : "roles/update-users-of-role.js"
},
"postUpdate" : {
"type" : "text/javascript",
"file" : "roles/update-users-of-role.js"
},
"postDelete" : {
"type" : "text/javascript",
"file" : "roles/update-users-of-role.js"
}
}
The "postCreate", "postUpdate", and
"postDelete" properties enable you to specify what
should happen when a role definition is created, updated, or deleted. By
default, the update-users-of-role.js script runs in
each of these cases.
The update-users-of-role.js script includes a
triggerSyncCheck attribute, which reviews the
effectiveRoles and effectiveAssignments
virtual attributes, to determine whether OpenIDM should run a
synchronization operation on these attributes.
This script iterates over all managed users, locates the users who have
been assigned this role, and regenerates their effective assignments on the
target resource. So, for example, if the role "ldap"
gives a user an assignment on the resource "Active Directory", when that
role definition is changed, a reconciliation operation runs to update the
assignment for that user on the "Active Directory" resource.
Chapter 9. Using Policies to Validate Data
OpenIDM provides an extensible policy service that enables you to apply specific validation requirements to various components and properties. The policy service provides a REST interface for reading policy requirements and validating the properties of components against configured policies. Objects and properties are validated automatically when they are created, updated, or patched. Policies can be applied to user passwords, but also to any kind of managed object.
The policy service enables you to do the following:
Read the configured policy requirements of a specific component.
Read the configured policy requirements of all components.
Validate a component object against the configured policies.
Validate the properties of a component against the configured policies.
A default policy applies to all managed objects. You can configure the default policy to suit your requirements, or you can extend the policy service by supplying your own scripted policies.
9.1. Configuring the Default Policy
The default policy is configured in two files:
A policy script file (
openidm/bin/defaults/script/policy.js) which defines each policy and specifies how policy validation is performed.A policy configuration file (
openidm/conf/policy.json) which specifies which policies are applicable to each resource.
9.1.1. Policy Script File
The policy script file defines policy configuration in two parts:
A policy configuration object, which defines each element of the policy.
A policy implementation function, which describes the requirements that are enforced by that policy.
Together, the configuration object and the implementation function determine whether an object is valid in terms of the policy. The following extract from the policy script file configures a policy that specifies that the value of a property must contain a certain number of capital letters.
...
{ "policyId" : "at-least-X-capitals",
"policyExec" : "atLeastXCapitalLetters",
"clientValidation": true,
"validateOnlyIfPresent":true,
"policyRequirements" : ["AT_LEAST_X_CAPITAL_LETTERS"]
},
...
policyFunctions.atLeastXCapitalLetters = function(fullObject, value, params, property) {
var isRequired = _.find(this.failedPolicyRequirements, function (fpr) {
return fpr.policyRequirement === "REQUIRED";
}),
isNonEmptyString = (typeof(value) === "string" && value.length),
valuePassesRegexp = (function (v) {
var test = isNonEmptyString ? v.match(/[(A-Z)]/g) : null;
return test !== null && test.length >= params.numCaps;
}(value));
if ((isRequired || isNonEmptyString) && !valuePassesRegexp) {
return [ { "policyRequirement" : "AT_LEAST_X_CAPITAL_LETTERS", "params" : {"numCaps": params.numCaps} } ];
}
return [];
}
...
To enforce user passwords that contain at least one capital letter, the previous policy ID is applied to the appropriate resource and the required number of capital letters is defined in the policy configuration file, as described in Section 9.1.2, "Policy Configuration File".
9.1.1.1. Policy Configuration Object
Each element of the policy is defined in a policy configuration object. The structure of a policy configuration object is as follows:
{ "policyId" : "minimum-length",
"policyExec" : "propertyMinLength",
"clientValidation": true,
"validateOnlyIfPresent": true,
"policyRequirements" : ["MIN_LENGTH"]
}
"policyId" - a unique ID that enables the
policy to be referenced by component objects. |
"policyExec" - the name of the function that
contains the policy implementation. For more information, see
Section 9.1.1.2, "Policy Implementation Function". |
"clientValidation" - indicates whether the
policy decision can be made on the client. When
"clientValidation": true, the source code for the
policy decision function is returned when the client requests the
requirements for a property. |
"validateOnlyIfPresent" - notes that the
policy is to be validated only if it exists. |
"policyRequirements" - an array containing
the policy requirement ID of each requirement that is associated with
the policy. Typically, a policy will validate only one requirement,
but it can validate more than one. |
9.1.1.2. Policy Implementation Function
Each policy ID has a corresponding policy implementation function that performs the validation. Functions take the following form:
function <name>(fullObject, value, params, propName) {
<implementation_logic>
}
fullObject is the full resource object
that is supplied with the request. |
value is the value of the property that
is being validated. |
params refers to the
"params" array that is specified in the property's
policy configuration. |
propName is the name of the property that
is being validated. |
The following example shows the implementation function for the
"required" policy.
function required(fullObject, value, params, propName) {
if (value === undefined) {
return [ { "policyRequirement" : "REQUIRED" } ];
}
return [];
}
9.1.2. Policy Configuration File
The policy configuration file includes a pointer to the policy
script, and the configured policies for each component resource.
The following includes three sample extracts from the
policy.js file, illustrating policies for
passwords, roles, and mobile telephone numbers.
9.1.2.1. Sample Password Policy Extract
The following extract of the default policy configuration file shows how
the at-least-X-capitals policy is applied to user
passwords. In this case, the configuration file requires users to
include at least one upper case (capital) letter in their passwords.
{
"type" : "text/javascript",
"file" : "bin/defaults/script/policy.js",
"resources" : [
{
"resource" : "managed/user/*",
"properties" : [
...
{
"name" : "password",
"policies" : [
{
"policyId" : "required"
},
{
"policyId" : "not-empty"
},
{
"policyId" : "at-least-X-capitals",
"params" : {
"numCaps" : 1
}
},
...
}
]
}
The configuration file includes the following properties:
"type"- specifies the type of policy service. Supported types include"text/javascript"and"groovy"."file"- provides the path to the policy script file, relative to the OpenIDM installation directory."resources"provides an array of resource objects, in JSON format, that are subject to the policy service. Resource objects are identified by the"resource"parameter, which indicates the URI and supports wildcard syntax. For example,"managed/user/*"indicates that the policy applies to all objects under/managed/user. Each resource has the following properties:"name"- the name of the property to which the policy is applied."policyId"- the ID of the policy that is applied to that property."params"- any specific parameters that apply to that policy ID.
9.1.2.2. Sample Array Policy Extract
Some users may choose to include multiple cellular telephone numbers.
In OpenIDM, multiple values for an object can be organized in an array.
The following excerpt from a sample policy.json file
requires an entry for mobilePhones, and includes two
separate policies.
The first policy suggests that the mobilePhones
policy must be present in the object, and there must be at least one
element within that object (array).
The second policy suggests that for any given element of the
mobilePhones object must not be an empty string.
...
{
"name" : "mobilePhones",
"policies" : [
{
"policyId" : "required"
},
{
"policyId" : "not-empty"
}
]
},
{
"name" : "mobilePhones[*]",
"policies" : [
{
"policyId" : "not-empty"
}
]
}
...
9.2. Extending the Policy Service
You can extend the policy service by adding your own scripted
policies in openidm/script and referencing them in
the policy configuration file (conf/policy.json).
Avoid manipulating the default policy script file (in
bin/defaults/script) as doing so might result in
interoperability issues in a future release. To reference additional
policy scripts, set the "additionalFiles" property in
conf/policy.json.
The following example creates a custom policy that rejects
properties with null values. The policy is defined in a script named
mypolicy.js.
var policy = { "policyId" : "notNull",
"policyExec" : "notNull",
"policyRequirements" : ["NOT_NULL"]
}
addPolicy(policy);
function notNull(fullObject, value, params, property) {
if (value == null) {
return [ {"policyRequirement": "NOT_NULL"}];
}
return [];
}
The mypolicy.js policy is referenced in the
policy.json configuration file as follows:
{
"type" : "text/javascript",
"file" : "bin/defaults/script/policy.js",
"additionalFiles" : ["script/mypolicy.js"],
"resources" : [
{
...
You can also configure policies for managed object properties as
part of the property definition in the conf/managed.json
file. For example, the following extract of a managed.json file shows a
policy configuration for the password property.
...
"properties" : [
{
"name" : "password",
"encryption" : {
"key" : "openidm-sym-default"
},
"scope" : "private"
"policies" : [
{
"policyId" : "required"
},
{
"policyId" : "not-empty"
},
{
"policyId" : "at-least-X-capitals",
"params" : {
"numCaps" : 1
}
}
]
},
...
9.3. Disabling Policy Enforcement
Policy enforcement refers to the automatic validation of data in the repository when it is created, updated, or patched. In certain situations you might want to disable policy enforcement temporarily. You might, for example, want to import existing data that does not meet the validation requirements with the intention of cleaning up this data at a later stage.
You can disable policy enforcement by setting
openidm.policy.enforcement.enabled to
false in the conf/boot/boot.properties
file. This setting disables policy enforcement in the back-end only, and
has no impact on direct policy validation calls to the Policy Service
(which the user interface makes to validate input fields). So, with policy
enforcement disabled, data added directly over REST is not subject to
validation, but data added with the UI is still subject to validation.
Disabling policy enforcement permanently in a production system is not recommended.
9.4. Managing Policies Over REST
You can manage the policy service over the REST interface, by calling
the REST endpoint https://localhost:8443/openidm/policy, as
shown in the following examples.
9.4.1. Listing the Defined Policies
The following REST call displays a list of all the defined policies. The policy objects are returned in JSON format, with one object for each defined policy ID.
$ curl \
--cacert self-signed.crt \
--header "X-OpenIDM-Username: openidm-admin" \
--header "X-OpenIDM-Password: openidm-admin" \
--request GET \
"https://localhost:8443/openidm/policy"
{
"resources": [
{
"properties": [
{
"name": "_id",
"policies": [
{
"policyFunction":
...
To display the policies that apply to a specific component, include the component name in the URL. For example, the following REST call displays the policies that apply to managed users.
$ curl \
--cacert self-signed.crt \
--header "X-OpenIDM-Username: openidm-admin" \
--header "X-OpenIDM-Password: openidm-admin" \
--request GET \
"https://localhost:8443/openidm/policy/managed/user/*"
{
"properties": [
{
"name": "_id",
"policies": [
{
"policyFunction": "
"\n function (fullObject, value, params, property) {
\n var i, join = function (arr, d) {
...
}9.4.2. Validating Objects and Properties Over REST
Use the validateObject action to verify that
an object adheres to the requirements of a policy.
The following example verifies that a new managed user object is acceptable in terms of the policy requirements.
$ curl \
--cacert self-signed.crt \
--header "X-OpenIDM-Username: openidm-admin" \
--header "X-OpenIDM-Password: openidm-admin" \
--header "Content-Type: application/json" \
--request POST \
--data '{
"sn":"Jones",
"givenName":"Bob",
"_id":"bjones",
"telephoneNumber":"0827878921",
"passPhrase":null,
"mail":"bjones@example.com",
"accountStatus":"active",
"roles":"admin",
"userName":"bjones@example.com",
"password":"123"}' \
"https://localhost:8443/openidm/policy/managed/user/bjones?_action=validateObject"
{
"failedPolicyRequirements": [
{
"property": "password",
"policyRequirements": [
{
"params": {
"numCaps": 1
},
"policyRequirement": "AT_LEAST_X_CAPITAL_LETTERS"
}
]
},
{
"property": "password",
"policyRequirements": [
{
"params": {
"minLength": 8
},
"policyRequirement": "MIN_LENGTH"
}
]
},
{
"property": "passPhrase",
"policyRequirements": [
{
"params": {
"minLength": 4
},
"policyRequirement": "MIN_LENGTH"
}
]
}
],
"result": false
}
The result (false) indicates that the object
is not valid. The unfulfilled policy requirements are provided as part
of the response - in this case, the user password does not meet the
validation requirements.
Use the validateProperty action to verify that
a specific property adheres to the requirements of a policy.
The following example checks whether Barbara Jensen's new password
(12345) is acceptable.
$ curl \
--header "X-OpenIDM-Username: openidm-admin" \
--header "X-OpenIDM-Password: openidm-admin" \
--cacert self-signed.crt \
--header "Content-Type: application/json" \
--request POST \
--data '{ "password" : "12345" }' \
"https://localhost:8443/openidm/policy/managed/user/bjensen?_action=validateProperty"
{
"result": false,
"failedPolicyRequirements": [
{
"policyRequirements": [
{
"policyRequirement": "AT_LEAST_X_CAPITAL_LETTERS",
"params": {
"numCaps": 1
}
},
{
"policyRequirement": "MIN_LENGTH",
"params": {
"minLength": 8
}
}
],
"property": "password"
}
]
}
The result (false) indicates that the password
is not valid. The unfulfilled policy requirements are provided as part
of the response - in this case, the minimum length and the minimum
number of capital letters.
Validating a property that does fulfil the policy requirements
returns a true result, for example:
$ curl \
--cacert self-signed.crt \
--header "X-OpenIDM-Username: openidm-admin" \
--header "X-OpenIDM-Password: openidm-admin" \
--header "Content-Type: application/json" \
--request POST \
--data '{ "password" : "1NewPassword" }' \
"https://localhost:8443/openidm/policy/managed/user/bjensen?_action=validateProperty"
{
"failedPolicyRequirements": []
"result": true,
}
Chapter 10. Configuring Server Logs
This chapter briefly describes server logging. For audit information, see Chapter 18, "Using Audit Logs".
To configure logging, edit the
openidm/conf/logging.properties file.
10.1. Log Message Files
The default configuration writes log messages in simple format to
openidm/logs/openidm*.log files, rotating files when the
size reaches 5 MB, and retaining up to 5 files. Also by default, OpenIDM
writes all system and custom log messages to the files.
10.2. Logging Levels
You can update the configuration to attach loggers to individual packages, setting the log level to one of the following values.
SEVERE (highest value) WARNING INFO CONFIG FINE FINER FINEST (lowest value)
If you use logger functions in your JavaScript scripts, you
can set the log level for the scripts as follows:
org.forgerock.script.javascript.JavaScript.level=level
You can override the log level settings per script by using
org.forgerock.script.javascript.JavaScript.script-name.level
10.3. Disabling Logs
You can also disable logs if desired. For example, before starting OpenIDM,
you can disable ConsoleHandler logging in the same
openidm/conf/logging.properties file.
Just set java.util.logging.ConsoleHandler.level = OFF,
and comment out other references to ConsoleHandler,
as shown in the following excerpt.
# ConsoleHandler: A simple handler for writing formatted records to System.err #handlers=java.util.logging.FileHandler, java.util.logging.ConsoleHandler handlers=java.util.logging.FileHandler ... # --- ConsoleHandler --- # Default: java.util.logging.ConsoleHandler.level = INFO java.util.logging.ConsoleHandler.level = OFF #java.util.logging.ConsoleHandler.formatter = ... #java.util.logging.ConsoleHandler.filter=...
Chapter 11. Connecting to External Resources
This chapter describes how to connect to external resources such as LDAP, Active Directory, flat files, and others. Configurations shown here are simplified to show essential aspects. Not all resources support all OpenIDM operations, however the resources shown here support most of the CRUD operations, and also reconciliation and LiveSync.
In OpenIDM, resources are external systems, databases, directory servers, and other sources of identity data to be managed and audited by the identity management system. To connect to resources, OpenIDM loads the Identity Connector Framework, OpenICF. OpenICF aims to avoid the need to install agents to access resources, instead using the resources' native protocols. For example, OpenICF connects to database resources using the database's Java connection libraries or JDBC driver. It connects to directory servers over LDAP. It connects to UNIX systems by using ssh.
11.1. About OpenIDM and OpenICF
OpenICF provides a common interface to allow identity services access to the resources that contain user information. OpenIDM loads the OpenICF API as one of its OSGi modules. OpenICF uses connectors to separate the OpenIDM implementation from the dependencies of the resource to which OpenIDM is connecting. A specific connector is required for each remote resource. Connectors can run either locally or remotely.
Local connectors are loaded by OpenICF as regular bundles in the OSGi container. Remote connectors must be executed on a remote connector server. Most connectors can be run locally. However, a remote connector server is required when access libraries that cannot be included as part of the OpenIDM process are needed. If a resource, such as Microsoft Active Directory, does not provide a connection library that can be included inside the Java Virtual Machine, OpenICF can use the native .dll with a remote .NET connector server. In other words, OpenICF connects to Active Directory through a remote connector server that is implemented as a .NET service.
Connections to remote connector servers are configured in a single
connector info provider configuration file, located in
/path/to/openidm/conf.
Connectors themselves are configured through
provisioner files. One provisioner file must exist for
each connector. Provisioner files are named
provisioner.openicf-name where
name corresponds to the name of the connector,
and are also located in the /path/to/openidm/conf
directory.
A number of sample connector configurations are available in the
openidm/samples/provisioners directory. To use these
connectors, edit the configuration files as required, and copy them to the
openidm/conf directory.
The following figure shows how OpenIDM connects to resources by using connectors and remote connector servers. The figure shows one local connector (LDAP) and two remote connectors (Scripted SQL and PowerShell). In this example, the remote Scripted SQL connector uses a remote Java connector server. The remote PowerShell connector always requires a remote .NET connector server.

Tip
Connectors that use the .NET framework must run remotely. Java connectors can be run locally or remotely. Run them as remote services for scalability, or to have the service run in the cloud.
11.2. Accessing Remote Connectors
When you configure a remote connector, you use the connector info
provider service to connect through a remote connector server.
The connector info provider service configuration is stored in the file
openidm/conf/provisioner.openicf.connectorinfoprovider.json.
A sample configuration file is provided in the
openidm/samples/provisioners/ directory. To use this
sample configuration, edit the file as required, and copy it to the
openidm/conf directory.
The connector info provider service takes the following configuration:
{
"connectorsLocation" : string,
"remoteConnectorServers" : [remoteConnectorServer objects]
}- connectorsLocation
string, optional
Specifies the directory in which the OpenICF connectors are located, relative to the OpenIDM installation directory. The default location is
openidm/connectors.- remoteConnectorServers
array of RemoteConnectorServer objects, optional
An array of remote connector servers that are managed by this service.
The following example shows a remoteConnectorServer object
configuration.
{
"name" : "dotnet",
"host" : "127.0.0.1",
"port" : 8759,
"heartbeatInterval" : 60,
"useSSL" : false,
"timeout" : 0,
"key" : "Passw0rd"
}You can configure the following remote connector server object properties.
- name
string, required
The name of the remote connector server object. This name is used to identify the remote connector server in the list of connector reference objects.
- host
string, required
The remote host to connect to.
- port
string, optional
The remote port to connect to. The default remote port is 8759.
- heartbeatInterval
integer, optional
The interval, in seconds, at which heartbeat packets are transmitted. If the connector server is unreachable, based on this heartbeat interval, all services that use the connector server are made unavailable until the connector server can be reached again. The default interval is 60 seconds.
- useSSL
boolean, optional
Specifies whether to connect to the connector server over SSL. The default value is
false.- timeout
integer, optional
Specifies the timeout (in milliseconds) to use for the connection. The default value is
0, which means that there is no timeout.- key
string, required
The secret key, or password, to use to authenticate to the remote connector server.
To run remotely, the connector .jar itself must be copied to the
openicf/bundles directory, on the remote machine.
11.3. Configuring Connectors
Connectors are configured through the OpenICF provisioner service. Each
connector configuration is stored in a file in the
openidm/conf/ folder, and accessible over REST at the
openidm/conf endpoint. Configuration files are named
openidm/conf/provisioner.openicf-name
where name corresponds to the name of the
connector. A number of sample connectors are available in the
openidm/samples/provisioners directory. To use these
connectors, edit the configuration files as required, and copy them to the
openidm/conf directory.
If you are creating your own connector configuration files, do
not include additional dash characters ( - ) in the
connector name, as this might cause
problems with the OSGi parser. For example, the name
provisioner.openicf-hrdb.json is fine. The name
provisioner.openicf-hr-db.json is not.
The following example shows a connector configuration for an XML file resource.
{
"name" : "xml",
"connectorRef" : connector-ref-object,
"poolConfigOption" : pool-config-option-object,
"operationTimeout" : operation-timeout-object,
"configurationProperties" : configuration-properties-object,
"objectTypes" : object-types-object,
"operationOptions" : operation-options-object
}
The "name" property specifies the name of the system to
which you are connecting. This name must be
alphanumeric.
The following example shows a connector reference object.
{
"bundleName" : "org.forgerock.openicf.connectors.xml-connector",
"bundleVersion" : "1.1.0.2",
"connectorName" : "org.forgerock.openicf.connectors.xml.XMLConnector",
"connectorHostRef" : "host"
}- bundleName
string, required
The ConnectorBundle-Name of the OpenICF connector.
- bundleVersion
string, required
The ConnectorBundle-Version of the OpenICF connector. The value can be a single version (such as
1.4.0.0) or a range of versions, which enables you to support multiple connector versions in a single project.You can specify a range of versions as follows:
[1.1.0.0,1.4.0.0]indicates that all connector versions from 1.1 to 1.4, inclusive, are supported.[1.1.0.0,1.4.0.0)indicates that all connector versions from 1.1 to 1.4, including 1.1 but excluding 1.4, are supported.(1.1.0.0,1.4.0.0]indicates that all connector versions from 1.1 to 1.4, excluding 1.1 but including 1.4, are supported.(1.1.0.0,1.4.0.0)indicates that all connector versions from 1.1 to 1.4, exclusive, are supported.
When a range of versions is specified, OpenIDM uses the latest connector that is available within that range. If your project requires a specific connector version, you must explicitly state the version in your provisioner configuration file, or constrain the range to address only the version that you need.
- connectorName
string, required
The Connector implementation class name.
- connectorHostRef
string, optional
If the connector runs remotely, the value of this field must match the
namefield of theRemoteConnectorServersobject in the connector server configuration file (provisioner.openicf.connectorinfoprovider.json). For example:... "remoteConnectorServers" : [ { "name" : "dotnet", ...If the connector runs locally, the value of this field can be one of the following:
If the connector .jar is installed in
openidm/connectors/, the value must be"#LOCAL". This is currently the default, and recommended location.If the connector .jar is installed in
openidm/bundle/(not recommended), the value must be"osgi:service/org.forgerock.openicf.framework.api.osgi.ConnectorManager".
The Pool Configuration Option ("poolConfigOption")
specifies the pool configuration for poolable connectors only. Non-poolable
connectors ignore this parameter.
The following example shows a pool configuration option object for a poolable connector.
{
"maxObjects" : 10,
"maxIdle" : 10,
"maxWait" : 150000,
"minEvictableIdleTimeMillis" : 120000,
"minIdle" : 1
}- maxObjects
The maximum number of idle and active instances of the connector.
- maxIdle
The maximum number of idle instances of the connector.
- maxWait
The maximum time, in milliseconds, that the pool waits for an object before timing out. A value of
0means that there is no timeout.- minEvictableIdleTimeMillis
The maximum time, in milliseconds, that an object can be idle before it is removed. A value of
0means that there is no idle timeout.- minIdle
The minimum number of idle instances of the connector.
The operation timeout enables you to configure timeout values per operation type. By default, there is no timeout configured for any operation type. A sample configuration follows:
{
"CREATE" : -1,
"TEST" : -1,
"AUTHENTICATE" : -1,
"SEARCH" : -1,
"VALIDATE" : -1,
"GET" : -1,
"UPDATE" : -1,
"DELETE" : -1,
"SCRIPT_ON_CONNECTOR" : -1,
"SCRIPT_ON_RESOURCE" : -1,
"SYNC" : -1,
"SCHEMA" : -1
}- operation-name
Timeout in milliseconds
A value of
-1disables the timeout.
This object contains the configuration for the connection between the connector and the resource, and is therefore resource specific.
The following example shows a configuration properties object for the default XML sample resource connector.
"configurationProperties" : {
"xsdIcfFilePath" : "&{launcher.project.location}/data/resource-schema-1.xsd",
"xsdFilePath" : "&{launcher.project.location}/data/resource-schema-extension.xsd",
"xmlFilePath" : "&{launcher.project.location}/data/xmlConnectorData.xml"
}- property
Individual properties depend on the type of connector.
This configuration object specifies the object types (user, group, and so
on) that are supported by the connector. The property name defines the
objectType, used in the URI:
system/$systemName/$objectType
The configuration is based on the JSON Schema with the extensions described in the following section.
Attribute names that start or end with __ are specific to
the resource type and are used by OpenICF for particular purposes, such as
__NAME__, used as the naming attribute for objects on a
resource.
The following extract shows the configuration of an
account object type.
{
"account" :
{
"$schema" : "http://json-schema.org/draft-03/schema",
"id" : "__ACCOUNT__",
"type" : "object",
"nativeType" : "__ACCOUNT__",
"properties" :
{
"name" :
{
"type" : "string",
"nativeName" : "__NAME__",
"nativeType" : "JAVA_TYPE_PRIMITIVE_LONG",
"flags" :
[
"NOT_CREATABLE",
"NOT_UPDATEABLE",
"NOT_READABLE",
"NOT_RETURNED_BY_DEFAULT"
]
},
"groups" :
{
"type" : "array",
"items" :
{
"type" : "string",
"nativeType" : "string"
},
"nativeName" : "__GROUPS__",
"nativeType" : "string",
"flags" :
[
"NOT_RETURNED_BY_DEFAULT"
]
},
"givenName" : {
"type" : "string",
"nativeName" : "givenName",
"nativeType" : "string"
},
}
}
}
OpenICF 1.4 supports the __ALL__ object type, which
ensures that objects of every type are included in a synchronization
operation. The primary purpose of this object type is to prevent
synchronization errors when multiple changes affect more than one object
type.
For example, imagine a deployment synchronizing two external systems. On
system A, the administrator creates a user, jdoe, then
adds the user to a group, engineers. When these changes
are synchronized to system B, if the __GROUPS__ object
type is synchronized first, the synchronization will fail, because the group
contains a user that does not yet exist on system B. Synchronizing the
__ALL__ object type ensures that user
jdoe is created on the external system before he is added
to the group engineers.
The __ALL__ object type is assumed by default - you do
not need to declare it in your provisioner configuration file. If it is not
declared, the object type is named __ALL__. If you want
to map a different name for this object type, declare it in your provisioner
configuration. The following excerpt from a sample provisioner configuration
uses the name allobjects:
"objectTypes": {
"allobjects": {
"$schema": "http://json-schema.org/draft-03/schema",
"id": "__ALL__",
"type": "object",
"nativeType": "__ALL__"
},
...
A LiveSync operation invoked with no object type assumes an object type of
__ALL__. For example, the following call invokes a
LiveSync operation on all defined object types in an LDAP system:
$ curl \ --cacert self-signed.crt \ --header "X-OpenIDM-Username: openidm-admin" \ --header "X-OpenIDM-Password: openidm-admin" \ --header "Content-Type: application/json" \ --request POST \ "https://localhost:8443/openidm/system/ldap?_action=liveSync"
Note
The use of the __ALL__ object type requires a mechanism
to ensure the order in which synchronization changes are processed. Servers
that use the cn=changelog mechanism to order sync
changes (such as OpenDJ, Oracle DSEE and the legacy Sun Directory Server)
cannot use the __ALL__ object type by default, and must
be forced to use time stamps to order their sync changes. For these LDAP
server types, set useTimestampsForSync to
true in the provisioner configuration.
LDAP servers that use timestamps by default (such as Active Directory GCs
and OpenLDAP) can use the __ALL__ object type without
any additional configuration. Active Directory and Active Directory LDS,
which use Update Sequence Numbers, can also use the
__ALL__ object type without additional configuration.
- Object Level Extensions
- nativeType
string, optional
The native OpenICF object type.
The list of supported native object types is dependent on the resource, or on the connector. For example, an LDAP connector might have object types such as
__ACCOUNT__and__GROUP__.
- Property Level Extensions
- nativeType
string, optional
The native OpenICF attribute type.
The following native types are supported:
JAVA_TYPE_BIGDECIMAL JAVA_TYPE_BIGINTEGER JAVA_TYPE_BYTE JAVA_TYPE_BYTE_ARRAY JAVA_TYPE_CHAR JAVA_TYPE_CHARACTER JAVA_TYPE_DATE JAVA_TYPE_DOUBLE JAVA_TYPE_FILE JAVA_TYPE_FLOAT JAVA_TYPE_GUARDEDBYTEARRAY JAVA_TYPE_GUARDEDSTRING JAVA_TYPE_INT JAVA_TYPE_INTEGER JAVA_TYPE_LONG JAVA_TYPE_OBJECT JAVA_TYPE_PRIMITIVE_BOOLEAN JAVA_TYPE_PRIMITIVE_BYTE JAVA_TYPE_PRIMITIVE_DOUBLE JAVA_TYPE_PRIMITIVE_FLOAT JAVA_TYPE_PRIMITIVE_LONG JAVA_TYPE_STRING
- nativeName
string, optional
The native OpenICF attribute name.
- flags
string, optional
The native OpenICF attribute flags. The required and multivalued flags are defined by the JSON schema.
required =
"required" : truemultivalued =
"type" : "array"If the type is
array, an additional"items"field specifies the supported type for the objects in the array. For example:"groups" : { "type" : "array", "items" : { "type" : "string", "nativeType" : "string" }, ....
Note
Avoid using the dash character ( - ) in property names,
like last-name, as dashes in names make JavaScript syntax
more complex. If you cannot avoid the dash, then write
source['last-name'] instead of
source.last-name in the JavaScripts.
Operation options (specified with the "operationOptions"
property) define how to act on specified operations. You can, for example
deny operations on specific resources to avoid OpenIDM accidentally updating
a read-only resource during a synchronization operation.
The following example defines the options for the "SYNC"
operation.
"operationOptions" : {
{
"SYNC" :
{
"denied" : true,
"onDeny" : "DO_NOTHING",
"objectFeatures" :
{
"__ACCOUNT__" :
{
"denied" : true,
"onDeny" : "THROW_EXCEPTION",
"operationOptionInfo" :
{
"$schema" : "http://json-schema.org/draft-03/schema",
"id" : "FIX_ME",
"type" : "object",
"properties" :
{
"_OperationOption-float" :
{
"type" : "number",
"nativeType" : "JAVA_TYPE_PRIMITIVE_FLOAT"
}
}
}
},
"__GROUP__" :
{
"denied" : false,
"onDeny" : "DO_NOTHING"
}
}
}
}
...The OpenICF Framework supports the following operations:
AUTHENTICATE: AuthenticationApiOpCREATE: CreateApiOpDELETE: DeleteApiOpGET: GetApiOpRESOLVEUSERNAME: ResolveUsernameApiOpSCHEMA: SchemaApiOpSCRIPT_ON_CONNECTOR: ScriptOnConnectorApiOpSCRIPT_ON_RESOURCE: ScriptOnResourceApiOpSEARCH: SearchApiOpSYNC: SyncApiOpTEST: TestApiOpUPDATE: UpdateApiOpVALIDATE: ValidateApiOp
- denied
boolean, optional
This property prevents operation execution if the value is
true.- onDeny
string, optional
If
deniedistrue, then the service uses this value. Default value:DO_NOTHING.DO_NOTHING: On operation the service does nothing.THROW_EXCEPTION: On operation the service throws aForbiddenExceptionexception.
11.4. Installing and Configuring Remote Connector Servers
Connectors that use the .NET framework must run remotely. Java connectors can run locally or remotely. Connectors that run remotely require a connector server to enable OpenIDM to access the connector.
Note
OpenIDM 3.1 supports version 1.4.1.0 of the OpenICF Framework. Therefore, you must use version 1.4.1.0 of the .NET Connector Server, or the Java Connector Server. The 1.4.1.0 Java Connector Server is backward compatible with the version 1.1.x connectors. The 1.4.1.0 .NET Connector Server is compatible only with the 1.4.x connectors.
This section describes the steps to install a .NET connector server and a remote Java Connector Server.
11.4.1. Installing and Configuring a .NET Connector Server
A .NET connector server is useful when an application is written in Java, but a connector bundle is written using C#. Because a Java application (for example, a J2EE application) cannot load C# classes, you must deploy the C# bundles under a .NET connector server. The Java application can communicate with the C# connector server over the network, and the C# connector server acts as a proxy to provide access to the C# bundles that are deployed within the C# connector server, to any authenticated application.
The .NET connector server requires the .NET framework (version 4.0.30319 or later) and is supported on Windows Server 2008 and 2008 R2.
By default, the connector server outputs log messages to a file named
connectorserver.log, in the
C:\path\to\openicf directory. To change the location of
the log file, set the initializeData parameter in the
configuration file, before you install the connector server. For example,
the following excerpt sets the log directory to
C:\openicf\logs\connectorserver.log.
<add name="file"
type="System.Diagnostics.TextWriterTraceListener"
initializeData="C:\openicf\logs\connectorserver.log"
traceOutputOptions="DateTime">
<filter type="System.Diagnostics.EventTypeFilter" initializeData="Information"/>
</add>Download the OpenICF .NET Connector Server from ForgeRock's Backstage site.
The .NET Connector Server is distributed in two formats. The
.msifile is a wizard that installs the Connector Server as a Windows Service. The.zipfile is simply a bundle of all the files required to run the Connector Server.If you do not want to run the Connector Server as a Windows service, download and extract the
.zipfile, and move on to Procedure 11.2, "Configuring the .NET Connector Server". Otherwise, follow the steps in this section.Execute the
openicf-zip-${connectorServerVersion}-dotnet.msiinstallation file and complete the wizard.When the wizard has completed, the Connector Server is installed as a Windows Service.
Open the Services console and make sure that the Connector Server is listed there.
The name of the service is
OpenICF Connector Server, by default.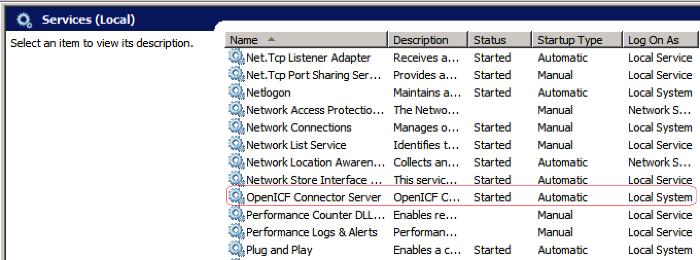

After you have installed the .NET Connector Server, as described in the previous section, follow these steps to configure the Connector Server.
Make sure that the Connector Server is not currently running. If it is running, use the Services console to stop it.
At the command prompt, change to the directory where the Connector Server was installed.
c:\> cd "c:\Program Files (x86)\Identity Connectors\Connector Server"
Run the ConnectorServer /setkey command to set a secret key for the Connector Server. The key can be any string value. This example sets the secret key to
Passw0rd.ConnectorServer /setkey Passw0rd Key Updated.
This key is used by clients connecting to the Connector Server. The key that you set here must also be set in the OpenIDM connector info provider configuration file (
conf/provisioner.openicf.connectorinfoprovider.json). For more information, see Procedure 11.4, "Configuring OpenIDM to Connect to the .NET Connector Server".Edit the Connector Server connection settings.
The Connector Server configuration is saved in a file named
ConnectorServer.exe.Config(in the directory in which the Connector Server is installed).Check and edit this file, as necessary, to reflect your installation. In particular, check the connection properties, under the
<appsettings>item.<add key="connectorserver.port" value="8759" /> <add key="connectorserver.usessl" value="false" /> <add key="connectorserver.certificatestorename" value="ConnectorServerSSLCertificate" /> <add key="connectorserver.ifaddress" value="0.0.0.0" /> <add key="connectorserver.key" value="xOS4IeeE6eb/AhMbhxZEC37PgtE=" />The following connection properties are set by default.
connectorserver.portSpecifies the port on which the Connector Server listens.
Note
If Windows firewall is enabled, you must create an inbound port rule to open the TCP port for the connector server (8759 by default). If you do not open the TCP port, OpenIDM will be unable to contact the Connector Server. For more information, see the Microsoft documentation on creating an inbound port rule.
connectorserver.usesslIndicates whether client connections to the Connector Server should be over SSL. This property is set to
falseby default.To secure connections to the Connector Server, set this property to
trueand store the server certificate in your certificate store, using the following command:ConnectorServer /storeCertificate /storeName <certificate-store-name> /certificateFile <certificate>
connectorserver.certificatestorenameSpecifies the name of the certificate store, into which your server certificate has been installed.
connectorserver.ifaddressSpecifies a single IP address from which connections will be accepted.
If you set a value here (other than the default
0.0.0.0) connections from all IP addresses other than the one specified are denied.
Check the trace settings, in the same configuration file, under the
<system.diagnostics>item.<system.diagnostics> <trace autoflush="true" indentsize="4"> <listeners> <remove name="Default" /> <add name="myListener" type="System.Diagnostics.TextWriterTraceListener" initializeData="c:\connectorserver.log" traceOutputOptions="DateTime"> <filter type="System.Diagnostics.EventTypeFilter" initializeData="Information" /> </add> </listeners> </trace> </system.diagnostics>The Connector Server uses the standard .NET trace mechanism. For more information about tracing options, see Microsoft's .NET documentation for
System.Diagnostics.The default trace settings are a good starting point. For less tracing, you can change the EventTypeFilter's initializeData to "Warning" or "Error". For very verbose logging you can set the value to "Verbose" or "All". The level of logging performed has a direct effect on the performance of the Connector Servers, so take care when setting this level.
Start the .NET Connector Server in one of the following ways.
Start the server as a Windows service, by using the Microsoft Services Console.
Locate the connector server service (
OpenICF Connector Server), and clickStart the serviceorRestart the service.The service is executed with the credentials of the "run as" user (
System, by default).Start the server as a Windows service, by using the command line.
In the Windows Command Prompt, run the following command:
net start ConnectorServerService
To stop the service in this manner, run the following command:
net stop ConnectorServerService
Start the server without using Windows services.
In the Windows Command Prompt, change directory to the location where the Connector Server was installed. The default location is
c:\Program Files (x86)\Identity Connectors\Connector Server.Start the server with the following command:
ConnectorServer.exe /run
Note that this command starts the Connector Server with the credentials of the current user. It does not start the server as a Windows service.
The connector info provider service enables you to configure one or more
remote connector servers to which OpenIDM can connect. The connector info
provider configuration is stored in a file named
openidm/conf/provisioner.openicf.connectorinfoprovider.json.
A sample connector info provider configuration file is located in
openidm/samples/provisioners/.
To configure OpenIDM to use the remote .NET connector server, follow these steps:
Start OpenIDM, if it is not already running.
Copy the sample connector info provider configuration file to the
path/to/openidm/confdirectory.$ cd /path/to/openidm $ cp samples/provisioners/provisioner.openicf.connectorinfoprovider.json conf/
Edit the connector info provider configuration, specifying the details of the remote connector server.
"remoteConnectorServers" : [ { "name" : "dotnet", "host" : "192.0.2.0", "port" : 8759, "useSSL" : false, "timeout" : 0, "key" : "Passw0rd" } ]Configurable properties are as follows:
nameSpecifies the name of the connection to the .NET connector server. The name can be any string. This property is referenced in the connector configuration file (
provisioner.openicf-ad.jsonwith the"connectorHostRef"property.hostSpecifies the IP address of the host on which the Connector Server is installed.
portSpecifies the port on which the Connector Server listens. This property matches the
connectorserver.portproperty in theConnectorServer.exe.configfile.For more information, see Procedure 11.2, "Configuring the .NET Connector Server".
useSSLSpecifies whether the connection to the Connector Server should be secured. This property matches the
"connectorserver.usessl"property in theConnectorServer.exe.configfile.timeoutSpecifies the length of time, in seconds, that OpenIDM should attempt to connect to the Connector Server before abandoning the attempt. To disable the timeout, set the value of this property to
0.keySpecifies the connector server key. This property matches the
keyproperty in theConnectorServer.exe.configfile. For more information, see Procedure 11.2, "Configuring the .NET Connector Server".The string value that you enter here is encrypted as soon as the file is saved.
11.4.2. Installing and Configuring a Remote Java Connector Server
In certain situations, it might be necessary to set up a remote Java Connector Server. This section provides instructions for setting up a remote Java Connector Server on Unix/Linux and Windows.
Download the OpenICF Java Connector Server from ForgeRock's Backstage site.
Change to the appropriate directory and unpack the zip file. The following command unzips the file in the current folder.
$ unzip openicf-zip-${connectorServerVersion}.zipChange to the
openicfdirectory:$ cd path/to/openicf
(Optional) The Java Connector Server uses a
keyproperty to authenticate the connection. The default key value ischangeit. To change the value of the secret key, run a command similar to the following. This example sets the key value toPassw0rd:$ cd /path/to/openicf $ java \ -cp "./lib/framework/*" \ org.identityconnectors.framework.server.Main \ -setKey -key Passw0rd -properties ./conf/ConnectorServer.properties
Review the
ConnectorServer.propertiesfile in the/path/to/openicf/confdirectory, and make any required changes. By default, the configuration file has the following properties:connectorserver.port=8759 connectorserver.libDir=lib connectorserver.usessl=false connectorserver.bundleDir=bundles connectorserver.loggerClass=org.forgerock.openicf.common.logging.slf4j.SLF4JLog connectorserver.key=xOS4IeeE6eb/AhMbhxZEC37PgtE\=
Indicates whether client connections to the connector server should be over SSL. This property is set to
falseby default.To secure connections to the connector server, set this property to
trueand set the following properties before you start the connector server:java -Djavax.net.ssl.keyStore=mySrvKeystore -Djavax.net.ssl.keyStorePassword=Passw0rd
Start the Java Connector Server.
$ java -cp "./lib/framework/*" \ org.identityconnectors.framework.server.Main \ -run \ -properties ./conf/ConnectorServer.properties
The connector server is now running, and listening on port 8759, by default.
Log files are available in the
/path/to/openicf/logsdirectory.$ ls logs/ Connector.log ConnectorServer.log ConnectorServerTrace.log
If required, stop the Java Connector Server by pressing CTRL-C.
Download the OpenICF Java Connector Server from ForgeRock's Backstage site.
Change to the appropriate directory and unpack the zip file.
In a Command Prompt window, change to the
openicfdirectory:C:\>cd C:\path\to\openicf\bin
If required, secure the communication between OpenIDM and the Java Connector Server. The Java Connector Server uses a
keyproperty to authenticate the connection. The default key value ischangeit.To change the value of the secret key, use the
bin\ConnectorServer.bat /setkeycommand. The following example sets the key toPassw0rd:c:\path\to\openicf>bin\ConnectorServer.bat /setkey Passw0rd lib\framework\connector-framework.jar;lib\framework\connector-framework-internal .jar;lib\framework\groovy-all.jar;lib\framework\icfl-over-slf4j.jar;lib\framewor k\slf4j-api.jar;lib\framework\logback-core.jar;lib\framework\logback-classic.jar
Review the
ConnectorServer.propertiesfile in thepath\to\openicf\confdirectory, and make any required changes. By default, the configuration file has the following properties:connectorserver.port=8759 connectorserver.libDir=lib connectorserver.usessl=false connectorserver.bundleDir=bundles connectorserver.loggerClass=org.forgerock.openicf.common.logging.slf4j.SLF4JLog connectorserver.key=xOS4IeeE6eb/AhMbhxZEC37PgtE\=
You can either run the Java Connector Server as a Windows service, or just start and stop it from the command line.
To install the Java Connector Server as a Windows service, run the following command.
c:\path\to\openicf>bin\ConnectorServer.bat /install
If you install the connector server as a Windows service you can use the Microsoft Service Console to start, stop and restart the service. The Java Connector Service is named
OpenICFConnectorServerJava.To uninstall the Java Connector Server as a Windows service, run the following command.
c:\path\to\openicf>bin\ConnectorServer.bat /uninstall
To start the Java Connector Server from the command line, enter the following command:
c:\path\to\openicf>bin\ConnectorServer.bat /run lib\framework\connector-framework.jar;lib\framework\connector-framework-internal .jar;lib\framework\groovy-all.jar;lib\framework\icfl-over-slf4j.jar;lib\framework \slf4j-api.jar;lib\framework\logback-core.jar;lib\framework\logback-classic.jar
The connector server is now running, and listening on port 8759, by default.
Log files are available in the
\path\to\openicf\logsdirectory.If required, stop the Java Connector Server by pressing
^C.
11.5. Connectors Supported With OpenIDM 3.1
OpenIDM 3.1 provides several connectors by default, in
the path/to/openidm/connectors directory. Additional
connectors can be downloaded from ForgeRock's Backstage site.
This section describes the connectors that are supported for use with OpenIDM 3.1, and provides instructions for installing and configuring these connectors. For instructions on building connector configurations interactively, see Section 11.6, "Creating Default Connector Configurations".
11.5.1. XML File Connector
A sample XML connector configuration is provided in
path/to/openidm/samples/provisioners/provisioner.openicf-xml.json.
The following extract of the provisioner configuration shows the main
configurable properties.
{
"connectorRef": {
"connectorHostRef": "#LOCAL",
"bundleName": "org.forgerock.openicf.connectors.xml-connector",
"bundleVersion": "1.1.0.2",
"connectorName": "org.forgerock.openicf.connectors.xml.XMLConnector"
}
}
The connectorHostRef is optional if the connector server
is local.
The configuration properties for the XML file connector set the relative path to the file containing the identity data, and also the paths to the required XML schemas.
{
"configurationProperties": {
"xsdIcfFilePath" : "&{launcher.project.location}/data/resource-schema-1.xsd",
"xsdFilePath" : "&{launcher.project.location}/data/resource-schema-extension.xsd",
"xmlFilePath" : "&{launcher.project.location}/data/xmlConnectorData.xml"
}
}
&{launcher.project.location} refers to the project
directory of your OpenIDM instance. For more information, see
Section 6.7, "Default and Custom Configuration Directories". Note that
relative paths such as these work only if your connector server runs
locally. For remote connector servers, you must specify the absolute path to
the schema and data files.
- xsdIcfFilePath
References the XSD file defining schema common to all XML file resources. Do not change the schema defined in this file.
- xsdFilePath
References custom schema defining attributes specific to your project.
- xmlFilePath
References the XML file containing account entries.
11.5.1.1. Example : Using the XML Connector to Reconcile Users in a Remote XML Data Store
This sample demonstrates reconciliation of users stored in an XML file on a remote machine. The remote Java Connector Server enables OpenIDM to synchronize the internal OpenIDM repository with the remote XML repository.
Before You Start
This sample assumes that a remote Java Connector Server is installed and
running on a host named remote-host. For instructions on
setting up the remote Java Connector Server, see
Procedure 11.5, "Installing a Remote Java Connector Server for Unix/Linux" or
Procedure 11.6, "Installing a Remote Java Connector Server for Windows".
The sample uses the XML data that is provided in the basic XML reconciliation sample (Sample 1). Before you start, copy the XML data from that sample to an accessible location on the machine that hosts the remote Java Connector Server. For example:
$ cd path/to/openidm $ scp -r samples/sample1/data testuser@remote-host:/home/testuser/xml-sample testuser@remote-host's password: resource-schema-1.xsd 100% 4083 4.0KB/s 00:00 resource-schema-extension.xsd 100% 1351 1.3KB/s 00:00 xmlConnectorData.xml 100% 1648 1.6KB/s 00:00
The XML connector runs as a remote connector, that is,
on the remote host on which the Java Connector Server is installed. Copy
the XML connector .jar from the OpenIDM installation to the
openicf/bundles directory on the remote host.
$ cd path/to/openidm $ scp connectors/xml-connector-1.4.0.0.jar testuser@remote-host:/path/to/openicf/bundles testuser@172.16.203.97's password: xml-connector-1.4.0.0.jar 100% 4379KB 4.3MB/s 00:00
This example uses the configuration of Sample 1, which is effectively
your OpenIDM project location. Any configuration changes that you make
must therefore be made in the conf directory of
sample1.
Copy the remote connector configuration file (
provisioner.openicf.connectorinfoprovider.json) from the provisioner samples directory to the configuration directory of your OpenIDM project (sample 1).$ cd path/to/openidm/samples/ $ cp provisioners/provisioner.openicf.connectorinfoprovider.json sample1/conf
Edit the remote connector configuration file (
provisioner.openicf.connectorinfoprovider.json) to match your network setup. Also, change the value of the"connectorsLocation"property to"bundles", as this is where the connector will be installed on the remote host.The following example indicates that the remote Java Connector server is running on the host
remote-host, listening on the default port, and configured with a secret key ofPassw0rd.{ "connectorsLocation" : "bundles", "remoteConnectorServers" : [ { "name" : "xml", "host" : "remote-host", "port" : 8759, "useSSL" : false, "timeout" : 0, "key" : "Passw0rd" } ] }Edit the XML connector configuration file (
provisioner.openicf-xml.json) in thesample1/confdirectory as follows.{ "name" : "xmlfile", "connectorRef" : { "connectorHostRef" : "xml", "bundleName" : "org.forgerock.openicf.connectors.file.openicf-xml-connector", "bundleVersion" : "1.1.0.2", "connectorName" : "org.forgerock.openicf.connectors.xml.XMLConnector" }, "configurationProperties" : { "xsdIcfFilePath" : "/home/testuser/xml-sample/data/resource-schema-1.xsd", "xsdFilePath" : "/home/testuser/xml-sample/data/resource-schema-extension.xsd", "xmlFilePath" : "/home/testuser/xml-sample/data/xmlConnectorData.xml" }, }The
"connectorHostRef"property indicates which remote connector server to use, and refers to the"name"property defined in theprovisioner.openicf.connectorinfoprovider.jsonfile.The
bundleVersion : 1.1.0.2must be exactly the same as the version of the XML connector that you are using. If you specify a range here, the XML connector version must be included in this range.The
"configurationProperties"must specify the absolute path to the data files that you copied to the server on which the Java Connector Server is running.
Start OpenIDM with the configuration for Sample 1.
$ ./startup.sh -p samples/sample1/
In the Felix console, run the following command to show the state of the remote connector:
-> scr list ... [22] [active] org.forgerock.openidm.provisioner.openicf ...
The connector module (
org.forgerock.openidm.provisioner.openicf) should beactive, indicating that the remote connector has been installed correctly. If the connector state is notactive, check the configuration, following the preceding steps.The number of the connector module might differ. Make a note of the number returned.
View the configuration of the remote connector, by running the following command, substituting the number of the provisioner module returned in the previous step:
-> scr info 22
To test that the connector has been configured correctly, run a reconciliation operation as follows:
$ curl \ --cacert self-signed.crt \ --header "X-OpenIDM-Username: openidm-admin" \ --header "X-OpenIDM-Password: openidm-admin" \ --header "Content-Type: application/json" \ --request POST \ "https://localhost:8443/openidm/recon?_action=recon&mapping=systemXmlfileAccounts_managedUser"
If successful, the operation returns a reconciliation ID, similar to the following:
{"_id":"a5346543-db9a-4f8b-ba25-af2a1b576a54","state":"ACTIVE"}To verify that the users from the remote XML files have been created in the OpenIDM repository, run the following command:
$ curl \ --cacert self-signed.crt \ --header "X-OpenIDM-Username: openidm-admin" \ --header "X-OpenIDM-Password: openidm-admin" \ --request GET \ "https://localhost:8443/openidm/managed/user/?_queryId=query-all-ids" { "remainingPagedResults": -1, "pagedResultsCookie": null, "resultCount": 2, "result": [ { "_rev": "0", "_id": "bjensen" }, { "_rev": "0", "_id": "scarter" } ] }
11.5.2. Generic LDAP Connector
A sample LDAP connector configuration is provided in
path/to/openidm/samples/provisioners/provisioner.openicf-ldap.json.
The following extract of the provisioner configuration shows the main
configurable properties.
The following excerpt shows the connectorRef
configuration property for connection to an LDAP server. The
connectorHostRef property is optional, if you use the
connector .jar provided in openidm/connectors, and you
use a local connector server.
{
"connectorRef": {
"connectorHostRef": "#LOCAL",
"connectorName": "org.identityconnectors.ldap.LdapConnector",
"bundleName": "org.forgerock.openicf.connectors.ldap-connector",
"bundleVersion": "[1.4.0.0,2.0.0.0)"
}
}The following excerpt shows the settings for the connector configuration properties in the sample LDAP connector.
"configurationProperties" : {
"host" : "localhost",
"port" : 1389,
"ssl" : false,
"principal" : "cn=Directory Manager",
"credentials" : "password",
"baseContexts" : [
"dc=example,dc=com"
],
"baseContextsToSynchronize" : [
"dc=example,dc=com"
],
"accountSearchFilter" : null,
"accountSynchronizationFilter" : null,
"groupSearchFilter" : null,
"groupSynchronizationFilter" : null,
"passwordAttributeToSynchronize" : null,
"synchronizePasswords" : false,
"removeLogEntryObjectClassFromFilter" : true,
"modifiersNamesToFilterOut" : [ ],
"passwordDecryptionKey" : null,
"changeLogBlockSize" : 100,
"attributesToSynchronize" : [ ],
"changeNumberAttribute" : "changeNumber",
"passwordDecryptionInitializationVector" : null,
"filterWithOrInsteadOfAnd" : false,
"objectClassesToSynchronize" : [
"inetOrgPerson"
],
"vlvSortAttribute" : "uid",
"passwordAttribute" : "userPassword",
"useBlocks" : false,
"maintainPosixGroupMembership" : false,
"failover" : [ ],
"readSchema" : true,
"accountObjectClasses" : [
"top",
"person",
"organizationalPerson",
"inetOrgPerson"
],
"accountUserNameAttributes" : [
"uid"
],
"groupMemberAttribute" : "uniqueMember",
"passwordHashAlgorithm" : null,
"usePagedResultControl" : false,
"blockSize" : 100,
"uidAttribute" : "dn",
"maintainLdapGroupMembership" : false,
"respectResourcePasswordPolicyChangeAfterReset" : false
},- host
The host name or IP address of the server on which the LDAP instance is running.
- port
The port on which the LDAP server listens for LDAP requests. The sample configuration specifies a default port of 1389.
- ssl
If
true, the specified port listens for LDAPS connections.- principal
The bind DN that is used to connect to the LDAP server.
- credentials
The password of the
principalthat is used to connect to the LDAP server.- baseContexts
One or more starting points in the LDAP tree that will be used when searching the tree. Searches are performed when discovering users from the LDAP server or when looking for the groups of which a user is a member.
- baseContextsToSynchronize
One or more starting points in the LDAP tree that will be used to determine if a change should be synchronized. The base contexts attribute will be used to synchronize a change if this property is not set.
- accountSynchronizationFilter
Used during synchronization actions to filter out LDAP accounts
- accountObjectClasses
The object classes used when creating new LDAP user objects. When specifying more than one object class, add each object class as its own property. For object classes that inherit from parents other than
top, such asinetOrgPerson, specify all object classes in the class hierarchy.- accountSearchFilter
Search filter that accounts must match
- accountUserNameAttributes
Attributes holding the account's user name. Used during authentication to find the LDAP entry matching the user name.
- attributesToSynchronize
List of attributes used during object synchronization. OpenIDM ignores change log updates that do not include any of the specified attributes. If empty, OpenIDM considers all changes.
- blockSize
Block size for simple paged results and VLV index searches, reflecting the maximum number of accounts retrieved at any one time
- changeLogBlockSize
Block size used when fetching change log entries
- changeNumberAttribute
Change log attribute containing the last change number
- failover
LDAP URLs specifying alternative LDAP servers to connect to if OpenIDM cannot connect to the primary LDAP server specified in the
hostandportproperties- filterWithOrInsteadOfAnd
In most cases, the filter to fetch change log entries is AND-based. If this property is set, the filter ORs the required change numbers instead.
- groupMemberAttribute
LDAP attribute holding members for non-POSIX static groups
- maintainLdapGroupMembership
If
true, OpenIDM modifies group membership when entries are renamed or deleted.In the sample LDAP connector configuration file provided with OpenIDM, this property is set to
false. This means that LDAP group membership is not modified when entries are renamed or deleted in OpenIDM. To ensure that entries are removed from LDAP groups when the entries are deleted, set this property totrueor enable referential integrity on the LDAP server. For OpenDJ, see Configuring Referential Integrity for more information.- maintainPosixGroupMembership
If
true, OpenIDM modifies POSIX group membership when entries are renamed or deleted.- modifiersNamesToFilterOut
Use to avoid loops caused by OpenIDM's own changes
- objectClassesToSynchronize
OpenIDM synchronizes only entries having these object classes.
- passwordAttribute
Attribute to which OpenIDM writes the predefined PASSWORD attribute
- passwordAttributeToSynchronize
OpenIDM synchronizes password values on this attribute.
- passwordDecryptionInitializationVector
Initialization vector used to decrypt passwords when performing password synchronization
- passwordDecryptionKey
Key used to decrypt passwords when performing password synchronization
- passwordHashAlgorithm
Hash password values with the specified algorithm, if the LDAP server stores them in clear text.
The hash algorithm can be one of the following:
NONE- Clear textWIN-AD- Used for password changes to Active DirectorySHA- Secure Hash AlgorithmSHA-1- A 160-bit hash algorithm that resembles the MD5 algorithmSSHA- Salted SHAMD5- A 128-bit message-digest algorithmSMD5- Salted MD5
- readSchema
If
true, read LDAP schema from the LDAP server.- removeLogEntryObjectClassFromFilter
If
true, the filter to fetch change log entries does not contain thechangeLogEntryobject class, and OpenIDM expects no entries with other object types in the change log. Default:true- respectResourcePasswordPolicyChangeAfterReset
If
true, bind with the Password Expired and Password Policy controls, and throwPasswordExpiredExceptionand other exceptions appropriately.- synchronizePasswords
If
true, synchronize passwords.- uidAttribute
Specifies the LDAP attribute that should be used as the immutable ID (
_UID_) for the entry. For an OpenDJ resource, you should use theentryUUID. You can use theDNas the UID attribute but note that this is not immutable.- useBlocks
If
true, use block-based LDAP controls like simple paged results and virtual list view.- usePagedResultControl
If
true, use simple paged results rather than virtual list view when both are available.- useTimestampsForSync
If
true, use timestamps for LiveSync operations, instead of the change log.By default, the LDAP connector has a change log strategy for LDAP servers that support a change log (such as OpenDJ and Oracle Directory Server Enterprise Edition). If the LDAP server does not support a change log, or if the change log is disabled, LiveSync for create and modify operations can still occur, based on the timestamps of modifications.
- vlvSortAttribute
Attribute used as the sort key for virtual list view
If you use the LDAP connector over SSL, you must set the
ssl property to true in the provisioner
configuration file. You must also specify the path to a truststore in the
system.properties file. A truststore is provided by
default at openidm/security/truststore. Add the
following line to the system.properties file,
substituting the path to your own truststore if you do not want to use the
default.
# Set the truststore
javax.net.ssl.trustStore=/path/to/openidm/security/truststore
11.5.3. Active Directory Connector
Unlike most other connectors, the Active Directory connector is written not in Java, but in C# for the .Net platform. OpenICF should connect to Active Directory over ADSI, the native connection protocol for Active Directory. The connector therefore requires a connector server that has access to the ADSI .dll files.
In general, the generic LDAP connector has better performance than the Active Directory connector. Unfortunately, Active Directory has some limitations when you use the LDAP connector, and the LDAP connector might therefore not be suitable in all Active Directory deployments. However, if your deployment can use the LDAP connector, it is preferable to do so.
Before you configure the Active Directory Connector, make sure that the .NET Connector Server is installed, configured and started, and that OpenIDM has been configured to use the Connector Server. For more information, see Section 11.4.1, "Installing and Configuring a .NET Connector Server".
Download the Active Directory Connector from ForgeRock's Backstage site.
Extract the contents of the AD Connector zip file into the directory in which you installed the Connector Server (by default
c:\Program Files (x86)\Identity Connectors\Connector Server>).Note that the files, specifically the connector itself (
ActiveDirectory.Connector.dll) must be directly under thepath\to\Identity Connectors\Connector Serverfolder, and not in a subfolder.Note
If the account that is used to install the Active Directory connector is different from the account under which the Connector Server runs, you must give the Connector Server runtime account the rights to access the Active Directory connector log files.
A sample Active Directory Connector configuration file is provided in
path/to/opendim/samples/provisioners/provisioner.openicf-ad.json. On the OpenIDM host, copy the sample Active Directory connector configuration file to theopenidm/confdirectory.$ cd /path/to/openidm $ cp samples/provisioners/provisioner.openicf-ad.json conf/
Edit the Active Directory connector configuration to match your Active Directory deployment.
Specifically, check and edit the
"configurationProperties"that define the connection details to the Active Directory server.Also, check that the
bundleVersionof the connector matches the version of theActiveDirectory.Connector.dllin the Connector Server directory. The bundle version can be a range that includes the version of the connector bundle. To check the .dll version:Right click on the
ActiveDirectory.Connector.dllfile and select Properties.Select the Details tab and note the Product Version.
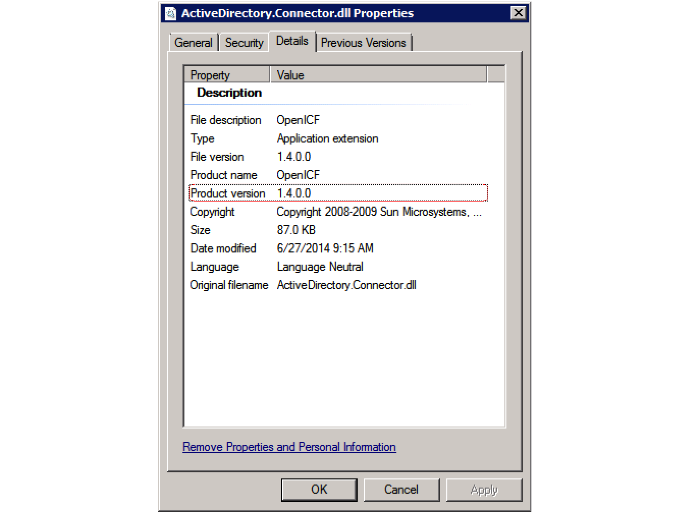
The following configuration extract shows sample values for the
"connectorRef"and"configurationProperties":... "connectorRef" : { "connectorHostRef" : "dotnet", "connectorName" : "Org.IdentityConnectors.ActiveDirectory.ActiveDirectoryConnector", "bundleName" : "ActiveDirectory.Connector", "bundleVersion" : "[1.4.0.0,2.0.0.0)" }, ... "configurationProperties" : { "DirectoryAdminName" : "EXAMPLE\\Administrator", "DirectoryAdminPassword" : "Passw0rd", "ObjectClass" : "User", "Container" : "dc=example,dc=com", "CreateHomeDirectory" : true, "LDAPHostName" : "192.0.2.0", "SearchChildDomains" : false, "DomainName" : "example", "SyncGlobalCatalogServer" : null, "SyncDomainController" : null, "SearchContext" : "" },The main configurable properties are as follows:
"connectorHostRef"Must point to an existing connector info provider configuration in
openidm/conf/provisioner.openicf.connectorinfoprovider.json. The"connectorHostRef"property is required because the Active Directory connector must be installed on a .NET connector server, which is always "remote", relative to OpenIDM."DirectoryAdminName"and"DirectoryAdminPassword"Specify the credentials of an administrator account in Active Directory, that the connector will use to bind to the server.
The
"DirectoryAdminName"can be specified as a bindDN, or in the formatDomainName\\samaccountname."SearchChildDomains"boolean, false by defaultSpecifies if a Global Catalog (GC) should be used. This parameter is used in search and query operations. A Global Catalog is a read-only, partial copy of the entire forest, and is never be used for create, update or delete operations.
"LDAPHostName"Specifies a particular Domain Controller (DC) or Global Catalog (GC), using its hostname. This parameter is used for query, create, update, and delete operations.
If
"SearchChildDomains"is set totrue, this specific GC will be used for search and query operations. If the"LDAPHostName"is null (as it is by default), the connector will allow the ADSI libraries to pick up a valid DC or GC each time it needs to perform a query, create, update, or delete operation."SyncGlobalCatalogServer"Specifies a Global Catalog server name for sync operations. This property is used in combination with the
"SearchChildDomains"property.If a value for
"SyncGlobalCatalogServer"is set (that is, the value is notnull) and"SearchChildDomains"is set totrue, this GC server is used for sync operations. If no value for"SyncGlobalCatalogServer"is set and"SearchChildDomains"is set totrue, the connector allows the ADSI libraries to pick up a valid GC."SyncDomainController"Specifies a particular DC server for sync operations. If no DC is specified, the connector picks up the first available DC and retains this DC in future sync operations.
For a description of all configurable properties for this connector, see the OpenICF Connector Configuration Reference.
The updated configuration is applied immediately.
Check that the connector has been configured correctly by running the following command in the OSGi console:
scr list
This command returns all of the installed modules. The openicf provisioner module should be active, as follows:
[32] [active] org.forgerock.openidm.provisioner.openicf.connectorinfoprovider
The number of the module may differ. Make a note of the module number, as it is referenced in the commands that follow.
Review the contents of the connector by running the following command in the OSGi console (substituting the module number returned in the previous step):
scr info 32
ID: 32
Name: org.forgerock.openidm.provisioner.openicf.connectorinfoprovider
Bundle: org.forgerock.openidm.provisioner-openicf (82)
State: active
Default State: enabled
Activation: immediate
Configuration Policy: optional
Activate Method: activate (declared in the descriptor)
Deactivate Method: deactivate (declared in the descriptor)
Modified Method: -
Services: org.forgerock.openidm.provisioner.openicf.ConnectorInfoProvider
          org.forgerock.openidm.metadata.MetaDataProvider
          org.forgerock.openidm.provisioner.ConnectorConfigurationHelper
Service Type: service
Reference: osgiConnectorEventPublisher
    Satisfied: satisfied
    Service Name: org.identityconnectors.common.event.ConnectorEventPublisher
    Multiple: multiple
    Optional: optional
    Policy: dynamic
Reference: connectorInfoManager
    Satisfied: satisfied
    Service Name: org.identityconnectors.framework.api.ConnectorInfoManager
    Multiple: single
    Optional: optional
    Policy: static
Reference: connectorFacadeFactory
    Satisfied: satisfied
    Service Name: org.identityconnectors.framework.api.ConnectorFacadeFactory
    Multiple: single
    Optional: optional
    Policy: static
Properties:
    component.id = 32
    component.name = org.forgerock.openidm.provisioner.openicf.connectorinfoprovider
    felix.fileinstall.filename = file:/openidm/conf/provisioner.openicf.connectorinfoprovider.json
    jsonconfig = {
    "connectorsLocation" : "connectors",
    "remoteConnectorServers" : [
        {
            "name" : "dotnet",
            "host" : "192.0.2.0",
            "port" : 8759,
            "useSSL" : false,
            "timeout" : 0,
            "key" : {
                "$crypto" : {
                    "value" : {
                        "iv" : "3XpjsLV1YNP034Rt/6BZgg==",
                        "data" : "8JXxpoRJjYGFkRVHvTwGTA==",
                        "cipher" : "AES/CBC/PKCS5Padding",
                        "key" : "openidm-sym-default"
                    },
                    "type" : "x-simple-encryption"
                }
            }
        }
    ]
}
    service.description = OpenICF Connector Info Service
    service.pid = org.forgerock.openidm.provisioner.openicf.connectorinfoprovider
    service.vendor = ForgeRock AS.
The connector is now configured. To verify the configuration, perform a RESTful GET request on the remote system URL, for example:
$ curl \
 --cacert self-signed.crt \
 --header "X-OpenIDM-Username: openidm-admin" \
 --header "X-OpenIDM-Password: openidm-admin" \
 --request GET \
 "https://localhost:8443/openidm/system/ActiveDirectory/account?_queryId=query-all-ids"
This request should return the user accounts in the Active Directory server.
(Optional) To configure reconciliation or liveSync between OpenIDM and Active Directory, create a synchronization configuration file (
sync.json) in theopenidm/confdirectory.The synchronization configuration file defines the attribute mappings and policies that are used during reconciliation.
The following is a simple example of a
sync.jsonfile for Active Directory.{ "mappings" : [ { "name" : "systemADAccounts_managedUser", "source" : "system/ActiveDirectory/account", "target" : "managed/user", "properties" : [ { "source" : "cn", "target" : "displayName" }, { "source" : "description", "target" : "description" }, { "source" : "givenName", "target" : "givenName" }, { "source" : "mail", "target" : "email" }, { "source" : "sn", "target" : "familyName" }, { "source" : "sAMAccountName", "target" : "userName" } ], "policies" : [ { "situation" : "CONFIRMED", "action" : "UPDATE" }, { "situation" : "FOUND", "action" : "UPDATE" }, { "situation" : "ABSENT", "action" : "CREATE" }, { "situation" : "AMBIGUOUS", "action" : "EXCEPTION" }, { "situation" : "MISSING", "action" : "UNLINK" }, { "situation" : "SOURCE_MISSING", "action" : "DELETE" }, { "situation" : "UNQUALIFIED", "action" : "DELETE" }, { "situation" : "UNASSIGNED", "action" : "DELETE" } ] } ] }To test the synchronization, run a reconciliation operation by running the following command.
$ curl \
 --cacert self-signed.crt \
 --header "X-OpenIDM-Username: openidm-admin" \
 --header "X-OpenIDM-Password: openidm-admin" \
 --header "Content-Type: application/json" \
 --request POST \
 "https://localhost:8443/openidm/recon?_action=recon&mapping=systemADAccounts_managedUser"
If reconciliation is successful, the command returns a reconciliation run ID, similar to the following:
{"_id":"0629d920-e29f-4650-889f-4423632481ad","state":"ACTIVE"}Query the internal repository, using either a curl command, or the OpenIDM UI, to make sure that the users in your Active Directory server were provisioned into the repository.
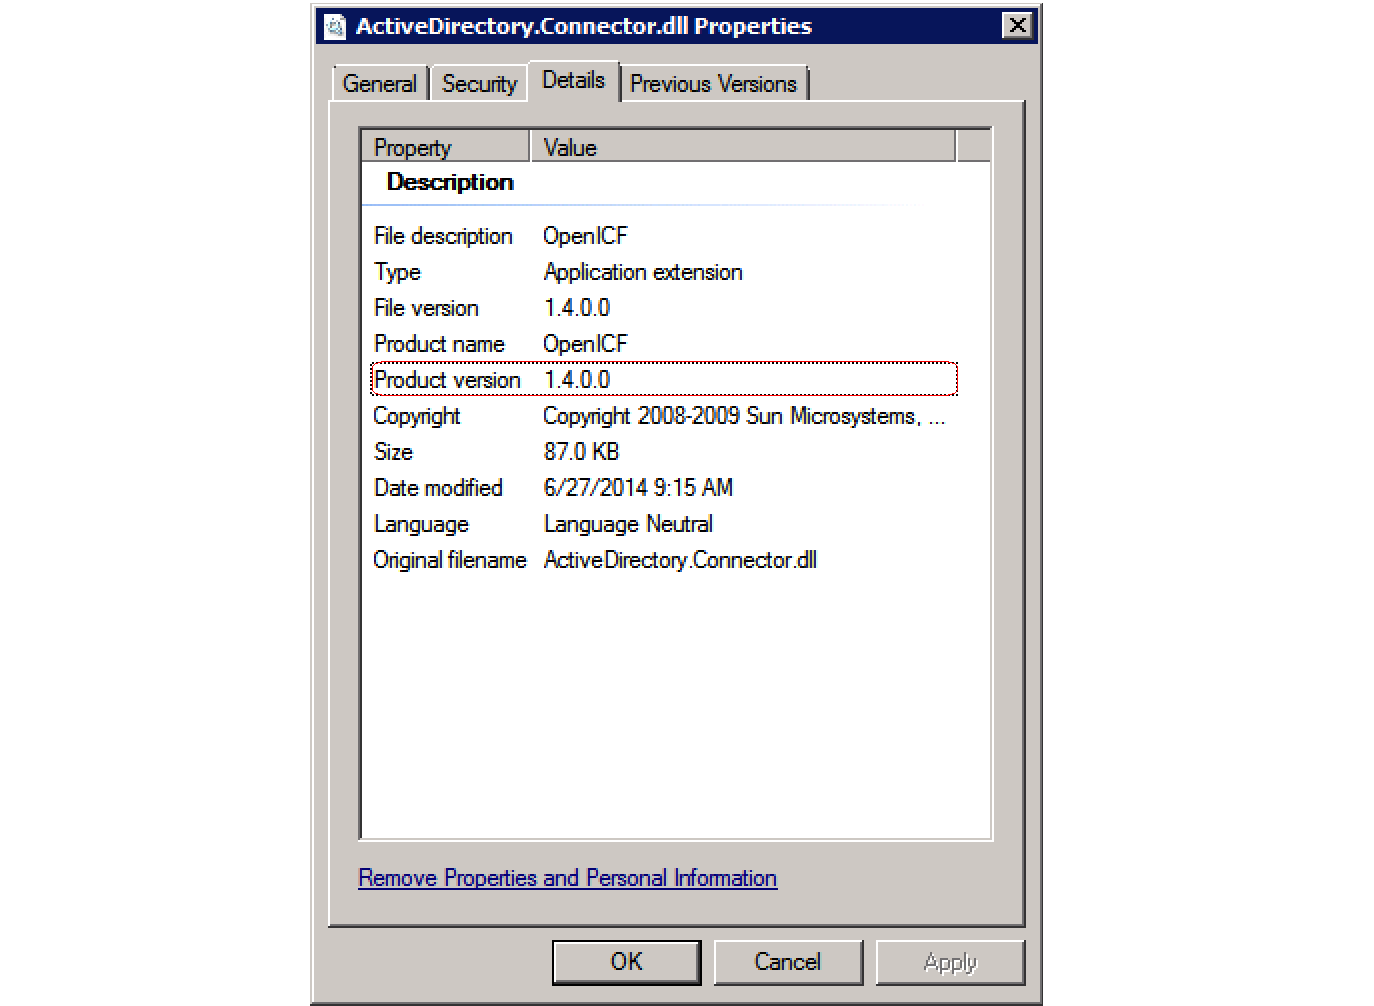
11.5.3.1. Using PowerShell Scripts With the Active Directory Connector
The Active Directory connector supports PowerShell scripting. The following example shows a simple PowerShell script that is referenced in the connector configuration and can be called over the REST interface.
This PowerShell script creates a new MS SQL user with a username that is
specified when the script is called. The script sets the user's password
to Passw0rd and, optionally, gives the user a role.
Save this script as openidm/script/createUser.ps1.
Note
External script execution is disabled on system endpoints by default. For
testing purposes, you can enable script execution over REST, on system
endpoints by adding the script action to the system
object, in the access.js file. For example:
$ more /path/to/openidm/script/access.js
       ...
{
    "pattern"   : "system/ActiveDirectory",
    "roles"     : "openidm-admin",
    "methods" : "action",
    "actions"   : "script"
},
Be aware that scripts passed to clients imply a security risk in production environments. If you need to expose a script for direct external invocation, it might be better to write a custom authorization function to constrain the script ID that is permitted. Alternatively, do not expose the script action for external invocation, and instead, expose a custom endpoint that can make only the desired script calls. For more information on using custom endpoints, see Section 6.6, "Adding Custom Endpoints".
     if ($loginName -ne $NULL) {
  [System.Reflection.Assembly]::LoadWithPartialName('Microsoft.SqlServer.SMO') | Out-Null
  $sqlSrv = New-Object ('Microsoft.SqlServer.Management.Smo.Server') ('WIN-C2MSQ8G1TCA')

  $login = New-Object -TypeName ('Microsoft.SqlServer.Management.Smo.Login') ($sqlSrv, $loginName)
  $login.LoginType = 'SqlLogin'
  $login.PasswordExpirationEnabled = $false
  $login.Create('Passw0rd')
  #  The next two lines are optional, and to give the new login a server role, optional
  $login.AddToRole('sysadmin')
  $login.Alter()
 } else {
  $Error_Message = [string]"Required variables 'loginName' is missing!"
     Write-Error $Error_Message
     throw $Error_Message
 }
Now edit the Active Directory connector configuration to reference the
script. Add the following section to the connector configuration file
(opendim/conf/provisioner.openicf-ad.json).
 "systemActions" : [
     {
         "_scriptId" : "ConnectorScriptName",
         "actions" : [
             {
                 "systemType" : ".*ActiveDirectoryConnector",
                 "actionType" : "Shell",
                 "actionSource" : "@echo off \r\n echo %loginName%\r\n"
             },
             {
                 "systemType" : ".*ActiveDirectoryConnector",
                 "actionType" : "PowerShell",
                 "actionFile" : "script/createUser.ps1"
             }
         ]
     }
 ]
To call the PowerShell script over the REST interface, use the following request, specifying the userName as input:
$ curl \
  --cacert self-signed.crt \
  --header "X-OpenIDM-Username: openidm-admin" \
  --header "X-OpenIDM-Password: openidm-admin" \
  --header "Content-Type: application/json" \
  --request POST \
  "https://localhost:8443/openidm/system/ActiveDirectory/?_action=script&scriptId=ConnectorScriptName&scriptExecuteMode=resource&loginName=myUser"
11.5.4. CSV File Connector
The CSV file connector is often useful when importing users, either for initial provisioning or for ongoing updates. When used continuously in production, a CSV file serves as a change log, often containing only user records that changed.
A sample CSV file connector configuration is provided in
openidm/samples/provisioners/provisioner.openicf-csv.json.
The following example shows an excerpt of the provisioner configuration.
The default location of the connector .jar is
openidm/connectors. Therefore the value of the
connectorHostRef property must be
"#LOCAL".
{
  "connectorRef": {
    "connectorHostRef": "#LOCAL",
    "connectorName": "org.forgerock.openicf.csvfile.CSVFileConnector",
    "bundleName": "org.forgerock.openicf.connectors.csvfile-connector",
    "bundleVersion": "1.1.0.2"
  }
}
The following excerpt shows required configuration properties.
{
    "configurationProperties": {
        "filePath": "data/hr.csv",
        "uniqueAttribute": "uid"
    }
}
The CSV file connector also supports a number of optional configuration properties, in addition to the required properties.
- encoding (optional)
Default:
"utf-8"- fieldDelimiter (optional)
Default:
","- filePath (required)
References the CSV file containing account entries
- multivalueDelimiter (optional)
Used with multi-valued attributes. Default:
";"- passwordAttribute (optional)
Attribute containing the password. Use when password-based authentication is required.
- uniqueAttribute (required)
Primary key used for the CSV file
- usingMultivalue (optional)
Whether attributes can have multiple values. Default:
false
11.5.5. Scripted SQL Connector
The Scripted SQL Connector uses customizable Groovy scripts to interact with the database.
The connector uses one script for each of the following actions on the external database.
Create
Delete
Search
Sync
Test
Update
Example groovy scripts are provided in the
openidm/samples/sample3/tools/ directory.
For a sample configuration that uses the scripted SQL connector, see Section 3.7.1, "Sample 3 - Using the Groovy Connector Toolkit to Connect to MySQL With ScriptedSQL" in the Installation Guide.
The scripted SQL connector runs with autocommit mode enabled by default. As
soon as a statement is executed that modifies a table, the update is stored
on disk and the change cannot be rolled back. This setting applies to all
database actions (search, create, delete, test, synch, and update). You can
disable autocommit in the connector configuration file
(conf/provisioner.openicf-scriptedsql.json) by adding the
autocommit property and setting it to
false, for example:
"configurationProperties" : {
    "host" : "localhost",
    "port" : "3306",
    ...
    "database" : "HRDB",
    "autoCommit" : false,
    "reloadScriptOnExecution" : true,
    "createScriptFileName" : "&{launcher.project.location}/tools/CreateScript.groovy",
    ...
If you require a traditional transaction with a manual commit for a specific script, you can disable autocommit mode in the script or scripts for each action that requires a manual commit. For more information on disabling autocommit, see the corresponding MySQL documentation.
11.5.6. Database Table Connector
The Database Table connector enables provisioning to a single table in a
JDBC database. A sample connector configuration for the Database Table
connector is provided in
samples/provisioners/provisioner.openicf-contractordb.json.
The corresponding data definition language file is provided in
samples/provisioners/provisioner.openicf-contractordb.sql.
The following excerpt shows the settings for the connector configuration properties in the sample Database Table connector:
"configurationProperties" :
    {
       "quoting" : "",
       "host" : "localhost",
       "port" : "3306",
       "user" : "root",
       "password" : "",
       "database" : "contractordb",
       "table" : "people",
       "keyColumn" : "UNIQUE_ID",
       "passwordColumn" : "",
       "jdbcDriver" : "com.mysql.jdbc.Driver",
       "jdbcUrlTemplate" : "jdbc:mysql://%h:%p/%d",
       "enableEmptyString" : false,
       "rethrowAllSQLExceptions" : true,
       "nativeTimestamps" : true,
       "allNative" : false,
       "validConnectionQuery" : null,
       "changeLogColumn" : "CHANGE_TIMESTEMP",
       "datasource" : "",
       "jndiProperties" : null
    },
The mandatory configurable properties are as follows:
- database
The JDBC database that contains the table to which you are provisioning.
- table
The name of the table in the JDBC database that contains the user accounts.
- keyColumn
The column value that is used as the unique identifier for rows in the table.
For a description of all configurable properties for this connector, see the OpenICF Connector Configuration Reference.
11.5.7. Groovy Connector Toolkit
OpenICF 1.4 introduces a generic Groovy Connector Toolkit that enables you to run a Groovy script for any OpenICF operation, such as search, update, create, and so forth, on any external resource.
The Groovy Connector Toolkit is not a complete connector, in the traditional sense. Rather, it is a framework within which you must write your own Groovy scripts to address the requirements of your implementation. Specific scripts are provided within these samples, which demonstrate how the Groovy Connector Toolkit can be used. These scripts cannot be used "as is" in your deployment, but are a good starting point on which to base your customization.
The Groovy Connector Toolkit is bundled with OpenIDM 3.1, in
the JAR openidm/connectors/groovy-connector-1.4.1.0.jar.
Sample implementations are provided in Section 3.7, "Using the Groovy Connector Toolkit to Create Scripted Connectors" in the Installation Guide.
11.5.8. PowerShell Connector Toolkit
The PowerShell Connector Toolkit is not a complete connector, in the traditional sense. Rather, it is a framework within which you must write your own PowerShell scripts to address the requirements of your Microsoft Windows ecosystem. You can use the PowerShell Connector Toolkit to create connectors that can provision any Microsoft system, including, but not limited to, Active Directory, MS SQL, MS Exchange, Sharepoint, Office365, and Azure. Essentially, any task that can be performed with PowerShell can be executed through connectors based on this toolkit.
Connectors created with the PowerShell Connector Toolkit run on the .NET platform and require the installation of a .NET connector server on the Windows system. To install the .NET connector, follow the instructions in Section 11.4.1, "Installing and Configuring a .NET Connector Server". These connectors also require PowerShell V2.
The PowerShell Connector Toolkit is not bundled with OpenIDM, but is
available, with a subscription, from ForgeRock Backstage.
To install the connector, download the archive
(mspowershell-connector-1.4.1.0.zip) and extract the
MsPowerShell.Connector.dll to the same folder in which
the Connector Server(connectorserver.exe) is located.
OpenIDM
Enterprise includes sample connectors and scripts that will
enable you to get started with this toolkit.
11.5.9. Salesforce Connector
OpenIDM Enterprise includes a Salesforce connector, along with a sample connector configuration. The Salesforce connector enables provisioning, reconciliation, and synchronization between Salesforce and the OpenIDM repository.
To use this connector, you need a Salesforce account, and a Connected App that has OAuth enabled, which will allow you to retrieve the required consumer key and consumer secret.
For additional instructions, and a sample Salesforce configuration, see Section 3.19, "Sample - Connecting to Salesforce With the Salesforce Connector" in the Installation Guide.
11.5.10. Google Apps Connector
OpenIDM Enterprise includes a Google Apps connector, along with a sample connector configuration. The Google Apps Connector enables you to interact with Google's web applications.
To use this connector, you need a Google Apps account.
If you have OpenIDM Enterprise, you can view a sample
Google Apps connector configuration file in
samples/provisioners/provisioner.openicf-google.json
The following is an excerpt of the provisioner configuration file. This
example shows an excerpt of the provisioner configuration. The
default location of the connector .jar is
openidm/connectors. Therefore the value of the
connectorHostRef property must be
"#LOCAL".
{
    "connectorHostRef": "#LOCAL",
    "connectorName": "org.forgerock.openicf.connectors.googleapps.GoogleAppsConnector",
    "bundleName": "org.forgerock.openicf.connectors.googleapps-connector",
    "bundleVersion": "[1.4.0.0,2.0.0.0)"
},
The following excerpt shows required configuration properties.
"configurationProperties": {
"domain": "",
"clientId": "",
"clientSecret": null,
"refreshToken": null
}, These configuration properties are fairly straightforward.
domainSet to the domain name for OAuth 2-based authorization.
clientIdA client identifier, as issued by the OAuth 2 authorization server. For more information, see the following section of RFC 6749: Client Identifier.
clientSecretSometimes also known as the client password. OAuth 2 authorization servers can support the use of
clientIdandclientSecretcredentials, as noted in the following section of RFC 6749: Client Password.- refreshToken
A client can use an OAuth 2 refresh token to continue accessing resources. For more information, see the following section of RFC 6749: Refresh Tokens.
Section 3.18, "Sample - Connecting to Google With the Google Apps Connector" in the Installation Guide,
includes a Google Apps configuration, including example OAuth 2-based
entries for configurationProperties.
For a description of all configurable properties for this connector, see the OpenICF Connector Configuration Reference.
11.6. Creating Default Connector Configurations
Rather than creating provisioner files by hand, use the service that OpenIDM exposes through the REST interface to create basic connector configuration files, or use the cli.sh or cli.bat scripts to generate a basic connector configuration.
This section describes how to create connector configurations over the REST interface. For instructions on using the CLI to create connector configurations, see Section 3.3, "configureconnector".
You create a new connector configuration file in three stages:
List the available connectors.
Generate the core configuration.
Connect to the target system and generate the final configuration.
List the available connectors by using the following command.
$ curl \ --cacert self-signed.crt \ --header "X-OpenIDM-Username: openidm-admin" \ --header "X-OpenIDM-Password: openidm-admin" \ --header "Content-Type: application/json" \ --request POST \ "https://localhost:8443/openidm/system?_action=availableConnectors"
Available connectors are installed in openidm/connectors.
OpenIDM 3.1 bundles the following connectors:
CSV File Connector
Database Table Connector
Scripted Groovy Connector Toolkit, which includes the following sample implementations:
Scripted SQL Connector
Scripted CREST Connector
Scripted REST Connector
LDAP Connector
XML Connector
GoogleApps Connector (OpenIDM Enterprise only)
Salesforce Connector (OpenIDM Enterprise only)
The preceding command therefore returns the following output:
{
"connectorRef": [
{
"bundleVersion": "1.1.0.2",
"systemType": "provisioner.openicf",
"bundleName": "org.forgerock.openicf.connectors.csvfile-connector",
"displayName": "CSV File Connector",
"connectorName": "org.forgerock.openicf.csvfile.CSVFileConnector"
},
{
"bundleVersion": "1.1.0.1",
"systemType": "provisioner.openicf",
"bundleName": "org.forgerock.openicf.connectors.databasetable-connector",
"displayName": "Database Table Connector",
"connectorName": "org.identityconnectors.databasetable.DatabaseTableConnector"
},
{
"bundleVersion": "1.4.1.0",
"systemType": "provisioner.openicf",
"bundleName": "org.forgerock.openicf.connectors.googleapps-connector",
"displayName": "GoogleApps Connector",
"connectorName": "org.forgerock.openicf.connectors.googleapps.GoogleAppsConnector"
},
{
"bundleVersion": "1.4.1.0",
"systemType": "provisioner.openicf",
"bundleName": "org.forgerock.openicf.connectors.groovy-connector",
"displayName": "Scripted Poolable Groovy Connector",
"connectorName": "org.forgerock.openicf.connectors.groovy.ScriptedPoolableConnector"
},
{
"bundleVersion": "1.4.1.0",
"systemType": "provisioner.openicf",
"bundleName": "org.forgerock.openicf.connectors.groovy-connector",
"displayName": "Scripted Groovy Connector",
"connectorName": "org.forgerock.openicf.connectors.groovy.ScriptedConnector"
},
{
"bundleVersion": "1.4.1.0",
"systemType": "provisioner.openicf",
"bundleName": "org.forgerock.openicf.connectors.groovy-connector",
"displayName": "Scripted CREST Connector",
"connectorName": "org.forgerock.openicf.connectors.scriptedcrest.ScriptedCRESTConnector"
},
{
"bundleVersion": "1.4.1.0",
"systemType": "provisioner.openicf",
"bundleName": "org.forgerock.openicf.connectors.groovy-connector",
"displayName": "Scripted SQL Connector",
"connectorName": "org.forgerock.openicf.connectors.scriptedsql.ScriptedSQLConnector"
},
{
"bundleVersion": "1.4.1.0",
"systemType": "provisioner.openicf",
"bundleName": "org.forgerock.openicf.connectors.groovy-connector",
"displayName": "Scripted REST Connector",
"connectorName": "org.forgerock.openicf.connectors.scriptedrest.ScriptedRESTConnector"
},
{
"bundleVersion": "1.4.0.1",
"systemType": "provisioner.openicf",
"bundleName": "org.forgerock.openicf.connectors.ldap-connector",
"displayName": "LDAP Connector",
"connectorName": "org.identityconnectors.ldap.LdapConnector"
},
{
"bundleVersion": "1.1.0.2",
"systemType": "provisioner.openicf",
"bundleName": "org.forgerock.openicf.connectors.xml-connector",
"displayName": "XML Connector",
"connectorName": "org.forgerock.openicf.connectors.xml.XMLConnector"
},
{
"bundleVersion": "{provisioner.salesforcemodule.version}",
"systemType": "provisioner.salesforce",
"bundleName": "org.forgerock.openidm.salesforce",
"displayName": "Salesforce Connector",
"connectorName": "org.forgerock.openidm.salesforce.Salesforce"
}
]
}To generate the core configuration, choose one of the available connectors by copying one of the JSON objects from the generated list into the body of the REST command, as shown below for the XML connector.
$ curl \
--cacert self-signed.crt \
--header "X-OpenIDM-Username: openidm-admin" \
--header "X-OpenIDM-Password: openidm-admin" \
--header "Content-Type: application/json" \
--request POST \
--data '{"connectorRef":
{"connectorName": "org.forgerock.openicf.connectors.xml.XMLConnector",
"displayName": "XML Connector",
"bundleName": "org.forgerock.openicf.connectors.xml-connector",
"bundleVersion": "1.1.0.2"}
}' \
"https://localhost:8443/openidm/system?_action=createCoreConfig"This command returns a core connector configuration, similar to the following:
{
"poolConfigOption": {
"minIdle": 1,
"minEvictableIdleTimeMillis": 120000,
"maxWait": 150000,
"maxIdle": 10,
"maxObjects": 10
},
"resultsHandlerConfig": {
"enableAttributesToGetSearchResultsHandler": true,
"enableFilteredResultsHandler": true,
"enableNormalizingResultsHandler": true
},
"operationTimeout": {
"SCHEMA": -1,
"SYNC": -1,
"VALIDATE": -1,
"SEARCH": -1,
"AUTHENTICATE": -1,
"CREATE": -1,
"UPDATE": -1,
"DELETE": -1,
"TEST": -1,
"SCRIPT_ON_CONNECTOR": -1,
"SCRIPT_ON_RESOURCE": -1,
"GET": -1,
"RESOLVEUSERNAME": -1
},
"configurationProperties": {
"xsdIcfFilePath": null,
"xsdFilePath": null,
"createFileIfNotExists": false,
"xmlFilePath": null
},
"connectorRef": {
"bundleVersion": "1.1.0.2",
"bundleName": "org.forgerock.openicf.connectors.xml-connector",
"displayName": "XML Connector",
"connectorName": "org.forgerock.openicf.connectors.xml.XMLConnector"
}
}
The configuration that is returned is not yet functional. Notice that
it does not contain the required system-specific
"configurationProperties", such as the host name and port
for web based connectors, or the "xmlFilePath" for the XML file-based
connector. In addition, the configuration does not include the complete list
of "objectTypes" and
"operationOptions".
To generate the final configuration, add values for the "configurationProperties" to the core configuration, and use the updated configuration as the body for the next command.
$ curl \
--cacert self-signed.crt \
--header "X-OpenIDM-Username: openidm-admin" \
--header "X-OpenIDM-Password: openidm-admin" \
--header "Content-Type: application/json" \
--request POST \
--data '{
"configurationProperties":
{
"xsdIcfFilePath" : "samples/sample1/data/resource-schema-1.xsd",
"xsdFilePath" : "samples/sample1/data/resource-schema-extension.xsd",
"xmlFilePath" : "samples/sample1/data/xmlConnectorData.xml",
"createFileIfNotExists": false
},
"operationTimeout": {
"SCHEMA": -1,
"SYNC": -1,
"VALIDATE": -1,
"SEARCH": -1,
"AUTHENTICATE": -1,
"CREATE": -1,
"UPDATE": -1,
"DELETE": -1,
"TEST": -1,
"SCRIPT_ON_CONNECTOR": -1,
"SCRIPT_ON_RESOURCE": -1,
"GET": -1,
"RESOLVEUSERNAME": -1
},
"resultsHandlerConfig": {
"enableAttributesToGetSearchResultsHandler": true,
"enableFilteredResultsHandler": true,
"enableNormalizingResultsHandler": true
},
"poolConfigOption": {
"minIdle": 1,
"minEvictableIdleTimeMillis": 120000,
"maxWait": 150000,
"maxIdle": 10,
"maxObjects": 10
},
"connectorRef": {
"bundleVersion": "1.1.0.2",
"bundleName": "org.forgerock.openicf.connectors.xml-connector",
"displayName": "XML Connector",
"connectorName": "org.forgerock.openicf.connectors.xml.XMLConnector"
}
}' \
"https://localhost:8443/openidm/system?_action=createFullConfig"Note
Notice the single quotes around the argument to the --data
option in the preceding command. For most UNIX shells, single quotes around
a string prevent the shell from executing the command when encountering a
newline in the content. You can therefore pass the
--data '...' option on a single line, or including line
feeds.
OpenIDM attempts to read the schema, if available, from the external resource in order to generate output. OpenIDM then iterates through schema objects and attributes, creating JSON representations for "objectTypes" and "operationOptions" for supported objects and operations.
The output includes the basic --data input, along with
operationOptions and objectTypes.
Because OpenIDM produces a full property set for all attributes and all
object types in the schema from the external resource, the resulting
configuration can be large. For an LDAP server, OpenIDM can generate a
configuration containing several tens of thousands of lines, for example.
You might therefore want to reduce the schema to a minimum on the external
resource before you run the createFullConfig command.
11.7. Checking the Status of External Systems Over REST
After a connection has been configured, external systems are accessible over
the REST interface at the URL
https://localhost:8443/openidm/system/connector-name.
Aside from accessing the data objects within the external systems, you can
test the availability of the systems themselves.
To list the external systems that are connected to an OpenIDM instance, use
the test action on the URL
https://localhost:8443/openidm/system/. The following
example shows the connector configuration for an external LDAP system.
$ curl \
--cacert self-signed.crt \
--header "X-OpenIDM-Username: openidm-admin" \
--header "X-OpenIDM-Password: openidm-admin" \
--header "Content-Type: application/json" \
--request POST \
"https://localhost:8443/openidm/system?_action=test"
[
{
"ok": true,
"connectorRef": {
"bundleVersion": "[1.4.0.0,2.0.0.0)",
"bundleName": "org.forgerock.openicf.connectors.ldap-connector",
"connectorName": "org.identityconnectors.ldap.LdapConnector"
},
"objectTypes": [
"group",
"account"
],
"config": "config/provisioner.openicf/ldap",
"enabled": true,
"name": "ldap"
}
]
The status of the system is provided by the ok parameter.
If the connection is available, the value of this parameter is
true.
To obtain the status for a single system, include the name of the connector in the URL, for example:
$ curl \
--cacert self-signed.crt \
--header "Content-Type: application/json" \
--header "X-OpenIDM-Username: openidm-admin" \
--header "X-OpenIDM-Password: openidm-admin" \
--request POST \
"https://localhost:8443/openidm/system/ldap?_action=test"
{
"ok": true,
"connectorRef": {
"bundleVersion": "[1.4.0.0,2.0.0.0)",
"bundleName": "org.forgerock.openicf.connectors.ldap-connector",
"connectorName": "org.identityconnectors.ldap.LdapConnector"
},
"objectTypes": [
"group",
"account"
],
"config": "config/provisioner.openicf/ldap",
"enabled": true,
"name": "ldap"
}
If there is a problem with the connection, the "ok"
parameter returns false, with an indication of the error.
In the following example, the LDAP server named
ldap, running on localhost:1389, is
down.
$ curl \
--cacert self-signed.crt \
--header "X-OpenIDM-Username: openidm-admin" \
--header "X-OpenIDM-Password: openidm-admin" \
--header "Content-Type: application/json" \
--request POST \
"https://localhost:8443/openidm/system/ldap?_action=test"
{
"ok": false,
"error": "localhost:1389",
"connectorRef": {
"bundleVersion": "[1.4.0.0,2.0.0.0)",
"bundleName": "org.forgerock.openicf.connectors.ldap-connector",
"connectorName": "org.identityconnectors.ldap.LdapConnector"
},
"objectTypes": [
"group",
"account"
],
"config": "config/provisioner.openicf/ldap",
"enabled": true,
"name": "ldap"
}
To test the validity of a connector configuration, use the
testConfig action and include the configuration in the
command. For example:
$ curl \
--cacert self-signed.crt \
--header "X-OpenIDM-Username: openidm-admin" \
--header "X-OpenIDM-Password: openidm-admin" \
--header "Content-Type: application/json" \
--data '{
"name" : "xmlfile",
"connectorRef" : {
"bundleName" : "org.forgerock.openicf.connectors.xml-connector",
"bundleVersion" : "1.1.0.2",
"connectorName" : "org.forgerock.openicf.connectors.xml.XMLConnector"
},
"producerBufferSize" : 100,
"connectorPoolingSupported" : true,
"poolConfigOption" : {
"maxObjects" : 10,
"maxIdle" : 10,
"maxWait" : 150000,
"minEvictableIdleTimeMillis" : 120000,
"minIdle" : 1
},
"operationTimeout" : {
"CREATE" : -1,
"TEST" : -1,
"AUTHENTICATE" : -1,
"SEARCH" : -1,
"VALIDATE" : -1,
"GET" : -1,
"UPDATE" : -1,
"DELETE" : -1,
"SCRIPT_ON_CONNECTOR" : -1,
"SCRIPT_ON_RESOURCE" : -1,
"SYNC" : -1,
"SCHEMA" : -1
},
"configurationProperties" : {
"xsdIcfFilePath" : "samples/sample1/data/resource-schema-1.xsd",
"xsdFilePath" : "samples/sample1/data/resource-schema-extension.xsd",
"xmlFilePath" : "samples/sample1/data/xmlConnectorData.xml"
},
"syncFailureHandler" : {
"maxRetries" : 5,
"postRetryAction" : "logged-ignore"
},
"objectTypes" : {
"account" : {
"$schema" : "http://json-schema.org/draft-03/schema",
"id" : "__ACCOUNT__",
"type" : "object",
"nativeType" : "__ACCOUNT__",
"properties" : {
"description" : {
"type" : "string",
"nativeName" : "__DESCRIPTION__",
"nativeType" : "string"
},
"firstname" : {
"type" : "string",
"nativeName" : "firstname",
"nativeType" : "string"
},
"email" : {
"type" : "string",
"nativeName" : "email",
"nativeType" : "string"
},
"_id" : {
"type" : "string",
"nativeName" : "__UID__"
},
"password" : {
"type" : "string",
"nativeName" : "password",
"nativeType" : "string"
},
"name" : {
"type" : "string",
"required" : true,
"nativeName" : "__NAME__",
"nativeType" : "string"
},
"lastname" : {
"type" : "string",
"required" : true,
"nativeName" : "lastname",
"nativeType" : "string"
},
"mobileTelephoneNumber" : {
"type" : "string",
"required" : true,
"nativeName" : "mobileTelephoneNumber",
"nativeType" : "string"
},
"securityQuestion" : {
"type" : "string",
"required" : true,
"nativeName" : "securityQuestion",
"nativeType" : "string"
},
"securityAnswer" : {
"type" : "string",
"required" : true,
"nativeName" : "securityAnswer",
"nativeType" : "string"
},
"roles" : {
"type" : "string",
"required" : false,
"nativeName" : "roles",
"nativeType" : "string"
}
}
}
},
"operationOptions" : { }
}' \
--request POST \
"https://localhost:8443/openidm/system?_action=testConfig"
If the configuration is valid, the command returns
"ok": true, for example:
{
"ok": true,
"name": "xmlfile"
}
If the configuration is not valid, the command returns an error, indicating
the problem with the configuration. For example, the following result is
returned when the LDAP connector configuration is missing a required property
(in this case, the baseContexts to synchronize):
{
"error": "org.identityconnectors.framework.common.exceptions.ConfigurationException:
The list of base contexts cannot be empty",
"name": "OpenDJ",
"ok": false
}
The testConfig action requires a running OpenIDM instance,
as it uses the REST API, but does not require an active connector instance
for the connector whose configuration you want to test.
11.8. Adding Attributes to Connectors
You can add the attributes of your choice to a connector configuration file.
Specifically, if you want to set up
Property Level Extensions to one of the
objectTypes such as account, use the
format shown under Object Types.
You can configure connectors to enable provisioning of arbitrary property
level extensions (such as image files) to system resources. For example, if
you want to set up image files such as account avatars, open the appropriate
provisioner file. Look for an account section similar to:
"account" : {
"$schema" : "http://json-schema.org/draft-03/schema",
"id" : "__ACCOUNT__",
"type" : "object",
"nativeType" : "__ACCOUNT__",
"properties" : {
Under "properties", add one of the following code blocks.
The first block works for a single photo encoded as a base64 string. The
second block would address multiple photos encoded in the same way.
"attributeByteArray" : {
"type" : "string",
"nativeName" : "attributeByteArray",
"nativeType" : "JAVA_TYPE_BYTE_ARRAY"
},
"attributeByteArrayMultivalue": {
"type": "array",
"items": {
"type": "string",
"nativeType": "JAVA_TYPE_BYTE_ARRAY"
},
"nativeName": "attributeByteArrayMultivalue"
},
Chapter 12. Configuring Synchronization
One of the core services of OpenIDM is synchronizing identity data from different resources. This chapter explains what you must know to get started configuring OpenIDM's flexible synchronization mechanism, and illustrates the concepts with examples.
12.1. Types of Synchronization
Synchronization happens either when OpenIDM receives a change directly, or when OpenIDM discovers a change on an external resource.
For direct changes to OpenIDM, OpenIDM immediately pushes updates to all external resources configured to receive the updates. A direct change can originate not only as a write request through the REST interface, but also as an update resulting from reconciliation with another resource.
OpenIDM discovers and synchronizes changes from external resources through reconciliation and LiveSync.
In contrast, OpenIDM synchronizes changes from internal resources to external targets using automatic sync.
- Reconciliation
In identity management, reconciliation is the process of bidirectional synchronization of objects between different data stores. Reconciliation applies mainly to user objects, although OpenIDM can reconcile any objects, including groups and roles.
To perform reconciliation, OpenIDM analyzes both source and target systems to uncover the differences that it must reconcile. Reconciliation can therefore be a heavyweight process. When working with large data sets, finding all changes can be more work than processing the changes.
Reconciliation is, however, thorough. It recognizes system error conditions and catches changes that might be missed by the more lightweight LiveSync mechanism. Reconciliation therefore serves as the basis for compliance and reporting functionality.
- LiveSync
LiveSync captures the changes that occur on a remote system, then pushes those changes to OpenIDM. OpenIDM uses the defined mappings to replay the changes where they are required - either in the OpenIDM repository, or on another remote system, or both. Unlike reconciliation, LiveSync uses a polling system, and is intended to react quickly to changes as they happen.
To perform this polling, LiveSync relies on a change detection mechanism on the external resource to determine which objects have changed. The change detection mechanism is specific to the external resource, and can be a time stamp, a sequence number, a change vector or other any method of recording changes that have occurred on the system. For example, OpenDJ implements a change log that provides OpenIDM with a list of objects that have changed since the last request. Active Directory implements a change sequence number, and certain databases might have a
lastChangeattribute.- Implicit synchronization
Implicit synchronization automatically pushes changes made in the OpenIDM internal repository to external systems.
Note that implicit synchronization only pushes changes out to the external data sources. To synchronize a complete data set, you should start with a reconciliation operation.
To disable implicit synchronization, see Section 12.11, "Disabling Automatic Synchronization Operations".
To determine what to synchronize, and how to carry out synchronization,
OpenIDM relies on mappings configured in the
/path/to/conf/sync.json file. LiveSync and implicit sync
rely on the mappings configured once per OpenIDM server.
For reconciliation or LiveSync, you can schedule changes as described in Chapter 13, "Scheduling Tasks and Events".
12.2. Flexible Data Model
Identity management software tends to favor either a meta-directory data model, where all data are mirrored in a central repository, or a virtual data model, where only a minimum set of attributes are stored centrally, and most are loaded on demand from the external resources in which they are stored. The meta-directory model offers fast access at the risk of getting outdated data. The virtual model guarantees fresh data, but pays for that guarantee in terms of performance.
OpenIDM leaves the data model choice up to you. You determine the right trade offs for a particular deployment. OpenIDM does not hard code any particular schema or set of attributes stored in the repository. Instead, you define how external system objects map onto managed objects, and OpenIDM dynamically updates the repository to store the managed object attributes that you configure.
You can, for example, choose to follow the data model defined in the Simple Cloud Identity Management (SCIM) specification. The following object represents a SCIM user.
{
"userName": "james1",
"familyName": "Berg",
"givenName": "James",
"email": [
"james1@example.com"
],
"description": "Created by OpenIDM REST.",
"password": "asdfkj23",
"displayName": "James Berg",
"phoneNumber": "12345",
"employeeNumber": "12345",
"userType": "Contractor",
"title": "Vice President",
"active": true
}Note
Avoid using the dash character ( - ) in property names,
like last-name, as dashes in names make JavaScript syntax
more complex. If you cannot avoid the dash, then write
source['last-name'] instead of
source.last-name in your JavaScript.
12.3. Basic Data Flow Configuration
Data flow for synchronization involves the following elements:
Connector configuration files (
conf/provisioner-*.json), with one file per external resource.Synchronization mappings file (
conf/sync.json), with one file per OpenIDM instance.A links table that OpenIDM maintains in its repository.
The scripts required to check objects and manipulate attributes.
12.3.1. Connector Configuration Files
Connector configuration files map external resource objects to OpenIDM
objects, and are described in detail in Chapter 11, "Connecting to External Resources".
Connector configuration files are named openidm/conf/provisioner.resource-name.json,
where resource-name reflects the connector
technology and external resource, such as
openicf-xml.
An excerpt from an example connector configuration follows. The
example shows the name for the connector and two attributes of an account
object type. In the attribute mapping definitions, the attribute name is
mapped from the nativeName, the attribute name used on
the external resource, to the attribute name used in OpenIDM. Thus the
example shows that the sn attribute in LDAP is mapped to
lastName in OpenIDM. The homePhone
attribute can have multiple values.
{
"name": "MyLDAP",
"objectTypes": {
"account": {
"lastName": {
"type": "string",
"required": true,
"nativeName": "sn",
"nativeType": "string"
},
"homePhone": {
"type": "array",
"items": {
"type": "string",
"nativeType": "string"
},
"nativeName": "homePhone",
"nativeType": "string"
}
}
}
}In order for OpenIDM to access external resource objects and attributes, the object and its attributes must match the connector configuration. Note that the connector file only maps external resource objects to OpenIDM objects. To construct attributes and to manipulate their values, you use the synchronization mappings file.
12.3.2. Synchronization Mappings File
The synchronization mappings file (openidm/conf/sync.json)
represents the core configuration for OpenIDM synchronization.
The sync.json file describes a set of mappings.
Each mapping specifies how attributes from source objects correspond to
attributes on target objects. The source and target indicate the direction
for the data flow, so you must define a separate mapping for each data
flow. For example, if you want data flows from an LDAP server to the
repository and also from the repository to the LDAP server, you must
define two separate mappings.
You identify external resource sources and targets as
system/name/object-type, where
name is the name used in the connector
configuration file, and object-type is the
object defined in the connector configuration file list of object types.
For objects in OpenIDM's internal repository, you use
managed/object-type, where
object-type is defined in
openidm/conf/managed.json. The name for the mapping
by convention is set to a string of the form
source_target, as shown in the following example.
{
"mappings": [
{
"name": "systemLdapAccounts_managedUser",
"source": "system/MyLDAP/account",
"target": "managed/user",
"properties": [
{
"target": "sn",
"source": "lastName"
},
{
"target": "telephoneNumber",
"source": "homePhone"
},
{
"target": "phoneExtension",
"default": "0047"
},
{
"target": "mail",
"comment": "Set mail if non-empty.",
"source": "email",
"condition": {
"type": "text/javascript",
"source": "(object.email != null)"
}
},
{
"target": "displayName",
"source": "",
"transform": {
"type": "text/javascript",
"source": "source.lastName +', ' + source.firstName;"
}
}
]
}
]
}In this example, the source is the external resource,
MyLDAP, and the target is OpenIDM's repository,
specifically the managed user objects. The properties
reflect OpenIDM attribute names. For example, the mapping has the
attribute lastName defined in the
MyLDAP connector configuration file mapped to
sn in the OpenIDM managed user object. Notice
that the attribute names come from the connector configuration, rather
than the external resource itself.
You can create attributes on the target as part of the mapping. In the
preceding example, a phoneExtension attribute with a
default value of 0047 is created on the target.
You can also use the "default" property to specify a
value that should be assigned to the target property. When determining
the value of the target property, any associated conditions are evaluated
first, followed by the transform script, if present. The default value is
applied (for update and create actions) if the "source"
property and the "transform" script yield a null value.
The default value overrides the target value, if one exists.
You can also set up conditions under which OpenIDM maps attributes
as shown for the email attribute in the example. By default, OpenIDM
synchronizes all attributes. In the example, the mail attribute is set
only if the script for the condition returns true.
OpenIDM also enables you to transform attributes. In the example,
the value of the displayName attribute is set using a
combination of the lastName and
firstName attribute values from the source. For
transformations, the source property is optional.
However, the source object is only available when you specify the
source property. Therefore, in order to use
source.lastName and source.firstName
to calculate the displayName, the example specifies
"source" : "".
To add a flow from the repository to MyLDAP,
you would define a mapping with source managed/user
and target system/MyLDAP/account, named for example
managedUser_systemLdapAccounts.
The following image shows the paths to objects in the OpenIDM namespace.

OpenIDM stores managed objects in the repository, and exposes
them under /openidm/managed. System objects on
external resources are exposed under
/openidm/system.
By default, OpenIDM synchronizes all objects that match those defined in
the connector configuration for the resource. Many connectors allow you
to limit the scope of objects that the connector accesses. For example,
the LDAP connector allows you to specify base DNs and LDAP filters so
that you do not need to access every entry in the directory. OpenIDM also
allows you to filter what is considered a valid source or valid target
for synchronization by using scripts. To apply these filters, use the
validSource, and validTarget
properties in your mapping.
- validSource
A script that determines if a source object is valid to be mapped. The script yields a boolean value:
trueindicates that the source object is valid;falsecan be used to defer mapping until some condition is met. In the root scope, the source object is provided in the"source"property. If the script is not specified, then all source objects are considered valid.{ "validSource": { "type": "text/javascript", "source": "source.ldapPassword != null" } }- validTarget
A script, used during reconciliation's second phase, that determines if a target object is valid to be mapped. The script yields a boolean value:
trueindicates that the target object is valid;falseindicates that the target object should not be included in reconciliation. In the root scope, the source object is provided in the"target"property. If the script is not specified, then all target objects are considered valid for mapping.{ "validTarget": { "type": "text/javascript", "source": "target.employeeType == 'internal'" } }
During synchronization, your scripts always have access to a
source object and a target object.
Examples already shown in this section use source.attributeName to retrieve attributes from the
source objects. Your scripts can also write to target attributes using
target.attributeName
syntax.
{
"onUpdate": {
"type": "text/javascript",
"source": "if (source.email != null) {target.mail = source.email;}"
}
}For more information about scripting, see Appendix F, "Scripting Reference".
If a source resource is empty, the default behavior is for a reconciliation operation to exit, without failure, and to log a warning, similar to the following:
2014-03-20 10:41:18:918 WARN Cannot perform reconciliation with an empty source
object set, unless explicitly configured to allow it.
The reconciliation summary is also logged in the reconciliation audit log.
This behavior prevents reconciliation operations from accidentally deleting everything in a target resource. For example, in the event that a source system is unavailable but erroneously reporting its status as "up", the absence of source objects should not result in objects being removed on the target resource.
There might be situations in which you do want reconciliations of an empty
source resource to proceed. In this case, you can override the default
behavior by setting the "allowEmptySourceSet" property to
true in the mapping. For example:
{
"mappings" : [
{
"name" : "systemXmlfileAccounts_managedUser",
"source" : "system/xmlfile/account",
"allowEmptySourceSet" : true,
...
Reconciliation of an empty source effectively wipes out the target.
You can update mappings in the synchronization configuration file
(sync.json) while the server is running, provided you
do not update a mapping that is currently in use by a reconciliation
process.
12.3.3. Using Encrypted Values
OpenIDM supports reversible encryption of attribute values for managed objects. Attribute values to encrypt include passwords, authentication questions, credit card numbers, and social security numbers. If passwords are already encrypted on the external resource, they are generally excluded from the synchronization process. For more information, see Chapter 14, "Managing Passwords".
You configure encryption in the managed object configuration (in the
openidm/conf/managed.json file). The following extract
of that file shows a managed object configuration that encrypts and decrypts
securityAnswer, ssn, and
password attributes using the default symmetric
key, and additional scripts for extra passwords.
{
"objects": [
{
"name": "user",
...
"properties": [
{
"name": "securityAnswer",
"encryption": {
"key": "openidm-sym-default"
}
},
{
"name": "ssn",
"encryption": {
"key": "openidm-sym-default"
}
},
{
"name": "password",
"encryption": {
"key": "openidm-sym-default"
}
}
],
...
}
]
}
Do not use the default symmetric key, openidm-sym-default,
in production. For instructions on adding your own symmetric key, see
Chapter 16, "Securing & Hardening OpenIDM".
12.3.4. Restricting HTTP Access to Sensitive Data
You can protect specific sensitive data stored in the repository by marking the corresponding properties as "private". Private data, whether it is encrypted or not, is not accessible over the REST interface. Properties that are marked as private are removed from an object when that object is retrieved over REST.
To mark a property as private, set its "scope" to
"private" in the conf/managed.json
file.
The following extract of the managed.json file
shows how HTTP access is prevented on the password and
securityAnswer properties.
"properties" : [
{
"name" : "securityAnswer",
"encryption" : {
"key" : "openidm-sym-default"
},
"scope" : "private"
},
{
"name" : "password",
"encryption" : {
"key" : "openidm-sym-default"
},
"scope" : "private"
A potential caveat with using private properties is that such
properties are removed if an object is updated by
using an HTTP PUT request. A PUT
request replaces the entire object in the repository. Because properties
that are marked as private are ignored in HTTP requests, these properties
are effectively removed from the object when the update is done. To work
around this limitation, do not use PUT requests if you
have configured private properties. Instead, use a PATCH
request to update only those properties that need to be changed.
For example, to update the givenName of user jdoe,
you could run the following command:
$ curl \
--cacert self-signed.crt \
--header "X-OpenIDM-Username: openidm-admin" \
--header "X-OpenIDM-Password: openidm-admin" \
--header "Content-Type: application/json" \
--request POST \
--data '[
{
"operation":"replace",
"field":"/givenName",
"value":"Jon"
}
]' \
"https://localhost:8443/openidm/managed/user?_action=patch&_queryId=for-userName&uid=jdoe"
Note
The filtering of private data applies only to direct HTTP read and query calls on managed objects. No automatic filtering is done for internal callers, and the data that these callers choose to expose.
12.3.5. Constructing and Manipulating Attributes
OpenIDM enables you to construct and manipulate attributes using scripts that are triggered when an object is created (onCreate), updated (onUpdate), retrieved (onRetrieve), or deleted (onDelete). Additional scripts are available when a managed object requires validation (onValidate), and when an object is about to be stored in the repository (onStore). Similar scripts are available for when a link is created (onLink) or removed (onUnlink).
The following example derives a DN for an LDAP entry when the entry is created in the internal repository.
{
"onCreate": {
"type": "text/javascript",
"source":
"target.dn = 'uid=' + source.uid + ',ou=people,dc=example,dc=com'"
}
}In addition, OpenIDM supports the use of post-action scripts, including after the creation of an object is complete (postCreate), after the update of an object is complete (postUpdate), and after the deletion of an object (postDelete).
12.3.6. Reusing Links
When two mappings exist to synchronize the same objects bidirectionally,
you can use the links property in one mapping to have
OpenIDM use the same internally managed link for both mappings. Otherwise,
if no links property is specified, OpenIDM maintains a
link for each mapping.
The following excerpt shows two mappings, one from MyLDAP accounts
to managed users, and another from managed users to MyLDAP accounts. In
the second mapping, the link property tells OpenIDM
to reuse the links created in the first mapping, rather than create new
links.
{
"mappings": [
{
"name": "systemMyLDAPAccounts_managedUser",
"source": "system/MyLDAP/account",
"target": "managed/user"
},
{
"name": "managedUser_systemMyLDAPAccounts",
"source": "managed/user",
"target": "system/MyLDAP/account",
"links": "systemMyLDAPAccounts_managedUser"
}
]
}12.4. Managing Reconciliation Over REST
You can trigger, cancel, and monitor reconciliation operations over REST,
using the REST endpoint
https://localhost:8443/openidm/recon.
12.4.1. Triggering a Reconciliation Run
The following example triggers a reconciliation operation based on the
systemLdapAccounts_managedUser mapping. The mapping is
defined in the file conf/sync.json.
$ curl \ --cacert self-signed.crt \ --header "X-OpenIDM-Username: openidm-admin" \ --header "X-OpenIDM-Password: openidm-admin" \ --header "Content-Type: application/json" \ --request POST \ "https://localhost:8443/openidm/recon?_action=recon&mapping=systemLdapAccounts_managedUser"
By default, an assigned reconciliation run ID is returned immediately when the reconciliation operation is initiated. Clients can make subsequent calls to the reconciliation service, using this reconciliation run ID to query its state and to call operations on it.
For example, the reconciliation run initiated previously would return something similar to the following:
{"_id":"0890ad62-4738-4a3f-8b8e-f3c83bbf212e","state":"ACTIVE"}
To have the entire reconciliation run complete before the reconciliation
run ID is returned, set the waitForCompletion property to
true when the reconciliation is initiated. For example:
$ curl \ --cacert self-signed.crt \ --header "X-OpenIDM-Username: openidm-admin" \ --header "X-OpenIDM-Password: openidm-admin" \ --header "Content-Type: application/json" \ --request POST \ "https://localhost:8443/openidm/recon?_action=recon&mapping=systemLdapAccounts_managedUser&waitForCompletion=true"
12.4.2. Obtaining the Details of a Reconciliation Run
You can display the details of a particular reconciliation run over REST by specifying the reconciliation run ID in the URL. For example, the following call shows the details of the reconciliation run initiated in the previous section:
$ curl \
--cacert self-signed.crt \
--header "X-OpenIDM-Username: openidm-admin" \
--header "X-OpenIDM-Password: openidm-admin" \
--request GET \
"https://localhost:8443/openidm/recon/0890ad62-4738-4a3f-8b8e-f3c83bbf212e"
{
"ended": "2014-03-06T07:00:32.094Z",
"_id": "7a07c100-4f11-4d7e-bf8e-fa4594f99d58",
"mapping": "systemLdapAccounts_managedUser",
"state": "SUCCESS",
"stage": "COMPLETED_SUCCESS",
"stageDescription": "reconciliation completed.",
"progress": {
"links": {
"created": 0,
"existing": {
"total": "1",
"processed": 1
}
},
"target": {
"created": 0,
"existing": {
"total": "3",
"processed": 3
}
},
"source": {
"existing": {
"total": "1",
"processed": 1
}
}
},
"situationSummary": {
"UNASSIGNED": 2,
"TARGET_IGNORED": 0,
"SOURCE_IGNORED": 0,
"MISSING": 0,
"FOUND": 0,
"AMBIGUOUS": 0,
"UNQUALIFIED": 0,
"CONFIRMED": 1,
"SOURCE_MISSING": 0,
"ABSENT": 0
},
"started": "2014-03-06T07:00:31.907Z"
}12.4.3. Canceling a Reconciliation Run
You can cancel a reconciliation run by sending a REST call with the
cancel action, specifying the reconciliation run ID. For
example, the following call cancels the reconciliation run initiated in the
previous section:
$ curl \ --cacert self-signed.crt \ --header "X-OpenIDM-Username: openidm-admin" \ --header "X-OpenIDM-Password: openidm-admin" \ --header "Content-Type: application/json" \ --request POST \ "https://localhost:8443/openidm/recon/0890ad62-4738-4a3f-8b8e-f3c83bbf212e?_action=cancel"
The output for a reconciliation cancellation request is similar to the following:
{
"status":"SUCCESS",
"action":"cancel",
"_id":"0890ad62-4738-4a3f-8b8e-f3c83bbf212e"
}If you specified that the call should wait for completion before the ID is returned, you can obtain the reconciliation run ID from the list of active reconciliations, as described in the following section.
12.4.4. Listing Reconciliation Runs
You can display a list of reconciliation processes that have completed, and
those that are in progress, by running a RESTful GET on
"https://localhost:8443/openidm/recon". The following
example displays all reconciliation runs.
$ curl \
--cacert self-signed.crt \
--header "X-OpenIDM-Username: openidm-admin" \
--header "X-OpenIDM-Password: openidm-admin" \
--request GET \
"https://localhost:8443/openidm/recon"
The output of such a request is similar to the following, with one item for each reconciliation run.
{
"reconciliations": [
{
"ended": "2014-03-06T06:14:11.845Z",
"_id": "4286510e-986a-4521-bfa4-8cd1e039a7f5",
"mapping": "systemLdapAccounts_managedUser",
"state": "SUCCESS",
"stage": "COMPLETED_SUCCESS",
"stageDescription": "reconciliation completed.",
"progress": {
"links": {
"created": 1,
"existing": {
"total": "0",
"processed": 0
}
},
"target": {
"created": 1,
"existing": {
"total": "2",
"processed": 2
}
},
"source": {
"existing": {
"total": "1",
"processed": 1
}
}
},
"situationSummary": {
"UNASSIGNED": 2,
"TARGET_IGNORED": 0,
"SOURCE_IGNORED": 0,
"MISSING": 0,
"FOUND": 0,
"AMBIGUOUS": 0,
"UNQUALIFIED": 0,
"CONFIRMED": 0,
"SOURCE_MISSING": 0,
"ABSENT": 1
},
"started": "2014-03-06T06:14:04.722Z"
},
]
}Each reconciliation run has the following properties:
_idThe ID of the reconciliation run.
mappingThe name of the mapping, defined in the
conf/sync.jsonfile.stateThe high level state of the reconciliation run. Values can be as follows:
ACTIVEThe reconciliation run is in progress.
CANCELEDThe reconciliation run was successfully canceled.
FAILEDThe reconciliation run was terminated because of failure.
SUCCESSThe reconciliation run completed successfully.
stageThe current stage of the reconciliation run's progress. Values can be as follows:
ACTIVE_INITIALIZEDThe initial stage, when a reconciliation run is first created.
ACTIVE_QUERY_ENTRIESQuerying the source, target and possibly link sets to reconcile.
ACTIVE_RECONCILING_SOURCEReconciling the set of IDs retrieved from the mapping source.
ACTIVE_RECONCILING_TARGETReconciling any remaining entries from the set of IDs retrieved from the mapping target, that were not matched or processed during the source phase.
ACTIVE_LINK_CLEANUPChecking whether any links are now unused and should be cleaned up.
ACTIVE_PROCESSING_RESULTSPost-processing of reconciliation results.
ACTIVE_CANCELINGAttempting to abort a reconciliation run in progress.
COMPLETED_SUCCESSSuccessfully completed processing the reconciliation run.
COMPLETED_CANCELEDCompleted processing because the reconciliation run was aborted.
COMPLETED_FAILEDCompleted processing because of a failure.
stageDescriptionA description of the stages described previously.
progressThe progress object has the following structure (annotated here with comments):
"progress":{ "source":{ // Progress on set of existing entries in the mapping source "existing":{ "processed":1001, "total":"1001" // Total number of entries in source set, if known, “?” otherwise } }, "target":{ // Progress on set of existing entries in the mapping target "existing":{ "processed":1001, "total":"1001" // Total number of entries in target set, if known, “?” otherwise }, "created":0 // New entries that were created }, "links":{ // Progress on set of existing links between source and target "existing":{ "processed":1001, "total":"1001" // Total number of existing links, if known, “?” otherwise }, "created":0 // Denotes new links that were created } },
12.4.5. Triggering LiveSync Over REST
The ability to trigger LiveSync operations over REST, or by using the resource API, enables you to use an external scheduler to trigger a LiveSync operation, rather than using the OpenIDM scheduling mechanism.
There are two ways in which to trigger a LiveSync operation over REST.
Use the
_action=liveSyncparameter directly on the resource. This is the recommended method. The following example calls a LiveSync operation on the user accounts in an external LDAP system.$ curl \ --cacert self-signed.crt \ --header "X-OpenIDM-Username: openidm-admin" \ --header "X-OpenIDM-Password: openidm-admin" \ --header "Content-Type: application/json" \ --request POST \ "https://localhost:8443/openidm/system/ldap/account?_action=liveSync"
Target the
systemendpoint and supply asourceparameter to identify the object that should be synchronized. This method matches the scheduler configuration and can therefore be used to test schedules before they are implemented.The following example calls the same LiveSync operation as the previous example.
$ curl \ --cacert self-signed.crt \ --header "X-OpenIDM-Username: openidm-admin" \ --header "X-OpenIDM-Password: openidm-admin" \ --header "Content-Type: application/json" \ --request POST \ "https://localhost:8443/openidm/system?_action=liveSync&source=system/ldap/account"
A successful LiveSync operation returns the following response:
{
"_rev": "4",
"_id": "SYSTEMLDAPACCOUNT",
"connectorData": {
"nativeType": "integer",
"syncToken": 1
}
}Do not run two identical LiveSync operations simultaneously - rather, ensure that the first operation has completed before a second similar operation is launched.
To troubleshoot a LiveSync operation that has not succeeded, you can include
an optional parameter (detailedFailure) to return
additional information. For example:
$ curl \ --cacert self-signed.crt \ --header "X-OpenIDM-Username: openidm-admin" \ --header "X-OpenIDM-Password: openidm-admin" \ --header "Content-Type: application/json" \ --request POST \ "https://localhost:8443/openidm/system/ldap/account?_action=liveSync&detailedFailure=true"
Note
The first time that a LiveSync operation is called, no synchronization token exists in the database to establish which changes have already been processed. The default LiveSync behavior is to locate the last existing entry in the change log, and to store that entry in the database as the current starting position from which changes should be applied. This behavior prevents LiveSync from processing changes that might already have been processed during an initial data load. Subsequent LiveSync operations will pick up and process any new changes.
Typically, in setting up LiveSync on a new system, you would load the data initially (by using reconciliation, for example) and then enable LiveSync, starting from that base point.
12.5. Restricting Reconciliation by Using Queries
Every reconciliation operation performs a query on the source, and on the
target resource, to determine which records should be reconciled. The default
source and target queries are query-all-ids, which means
that all records in both the source and the target are considered candidates
for that reconciliation operation.
You can restrict reconciliation to specific entries by defining explicit source or target queries in the mapping configuration.
For example, to restrict reconciliation to only those records whose
employeeType on the source resource is
Permanent, you might specify a source query as follows:
"mappings" : [
{
"name" : "managedUser_systemLdapAccounts",
"source" : "managed/user",
"target" : "system/ldap/account",
"sourceQuery" : : {
"queryFilter" : "employeeType eq \"Permanent\""
},
...The format of the query can be any query type that is supported by the resource, and can include additional parameters, if applicable. OpenIDM 3.1 supports the following query types.
For queries on managed objects:
_queryIdfor arbitrary predefined, parameterized queries_queryFilterfor arbitrary filters, in common filter notation_queryExpressionfor client-supplied queries, in native query format
For queries on system objects:
_queryId=query-all-ids(the only supported predefined query)_queryFilterfor arbitrary filters, in common filter notation
The source and target queries send the query to the resource that is defined
for that source or target, by default. You can override the resource to which
the query is sent by specifying a resourceName in the
query. For example, to query a specific endpoint instead of the source
resource, you might modify the preceding source query as follows:
"mappings" : [
{
"name" : "managedUser_systemLdapAccounts",
"source" : "managed/user",
"target" : "system/ldap/account",
"sourceQuery" : {
"resourceName" : "endpoint/scriptedQuery"
"queryFilter" : "employeeType eq \"Permanent\""
},
...To override a source or target query that is defined in the mapping, you can specify the query when you call the reconciliation operation. For example, if you wanted to reconcile all employee entries, and not just the permanent employees, you would run the reconciliation operation as follows:
$ curl \
--cacert self-signed.crt \
--header "X-OpenIDM-Username: openidm-admin" \
--header "X-OpenIDM-Password: openidm-admin" \
--header "Content-Type: application/json" \
--request POST \
--data '{"sourceQuery": {"_queryId" : "query-all-ids"}}' \
"https://localhost:8443/openidm/recon?_action=recon&mapping=managedUser_systemLdapAccounts"
By default, a reconciliation operation runs both the source and target phase.
To avoid queries on the target resource, set
runTargetPhase to false in the mapping
configuration (conf/sync.json file). For example, to
prevent the target resource from being queried during the reconciliation
operation configured in the previous example, amend the mapping configuration
as follows:
{
"mappings" : [
{
"name" : "systemLdapAccounts_managedUser",
"source" : "system/ldap/account",
"target" : "managed/user",
"sourceQuery" : {
"queryFilter" : "employeeType eq \"Permanent\""
},
"runTargetPhase" : false,
... 12.5.1. Improving Reconciliation Query Performance
In most reconciliation configurations, source and target queries make a read call to every record on the source and target systems, to determine candidates for reconciliation. On slow source or target systems, these frequent calls can incur a substantial performance cost.
To improve query performance in these situations, you can preload the entire result set into memory on the source or target system, or on both systems. Subsequent read queries on known IDs are made against the data in memory, rather than the data on the remote system. For this optimization to be effective, the entire result set must fit into the available memory on the system for which it is enabled.
The optimization works by defining a sourceQuery or
targetQuery in the synchronization mapping that returns
not just the ID, but the complete object.
The following example query loads the full result set into memory during the
source phase of the reconciliation. The example uses a common filter
expression, called with the _queryFilter keyword. The
query returns the complete object for all entries that include a
uid (uid sw "").
"mappings" : [
{
"name" : "systemLdapAccounts_managedUser",
"source" : "system/ldap/account",
"target" : "managed/user",
"sourceQuery" : {
"_queryFilter" : "uid sw \"\""
},
...
OpenIDM automatically attempts to detect what has been returned. The
auto-detection mechanism assumes that a result set that includes three or
more fields per object (apart from the _id and
rev fields) contains the complete object.
You can explicitly state whether a query is configured to return complete
objects by setting the value of sourceQueryFullEntry or
targetQueryFullEntry in the mapping. The setting of these
properties overrides the auto-detection mechanism.
Setting these properties to false, indicates that the
returned object is not the complete object. This might be required if a
query returns more than three fields of an object, but not the complete
object. Without this setting, the auto-detect logic would assume that the
complete object was being returned in this case. OpenIDM uses only the IDs
from this query result. If the complete object is required, the object is
queried on demand.
Setting these properties to true indicates that the
complete object is returned. This setting is typically required only for
very small objects, for which the number of returned fields does not reach
the threshold required for the auto-detection mechanism to assume that it is
a full object. In this case, the query result includes all the details
required to pre-load the full object.
The following excerpt of the synchronization mapping file indicates that the full objects are returned and that OpenIDM should not autodetect the result set.
"mappings" : [
{
"name" : "systemLdapAccounts_managedUser",
"source" : "system/ldap/account",
"target" : "managed/user",
"sourceQueryFullEntry" : true,
"sourceQuery" : {
"_queryFilter" : "uid sw \"\""
},
...12.6. Restricting Reconciliation to a Specific ID
In the same way that you can restrict reconciliation operations to specific records by using queries, you can specify an ID to restrict a reconciliation operation to a particular record.
To restrict reconciliation to a specific ID, use the
reconById action, instead of the recon
action when you call the reconciliation operation. Specify the ID with the
ids parameter. Currently reconciling more than one ID with
the reconById action is not supported.
The following example is based on the data from Sample 2b, which maps an
LDAP server with the OpenIDM repository. The example reconciles only the user
bjensen, using the
managedUser_systemLdapAccounts mapping to update the user
account in LDAP with the data from the OpenIDM repository. The
_id for bjensen in this example is
b3c2f414-e7b3-46aa-8ce6-f4ab1e89288c.
The example assumes that implicit synchronization has been disabled and that
a reconciliation operation is required to copy changes made in the repository
to the LDAP system.
$ curl \ --cacert self-signed.crt \ --header "X-OpenIDM-Username: openidm-admin" \ --header "X-OpenIDM-Password: openidm-admin" \ --header "Content-Type: application/json" \ --request POST \ "https://localhost:8443/openidm/recon?_action=reconById&mapping=managedUser_systemLdapAccounts&ids=b3c2f414-e7b3-46aa-8ce6-f4ab1e89288c"
A reconciliation by ID takes the default reconciliation options that are specified in the mapping, so the source and target queries, and source and target phases described in the previous section apply equally to reconciliation by ID.
12.7. Querying the Reconciliation Audit Log
Reconciliation operations are logged in the file
/path/to/openidm/audit/recon.csv and in the repository.
You can read and query the reconciliation audit logs over the REST interface,
as outlined in the following examples.
By default all audit/recon query responses are formatted
based on the entryType of the entry. Fields that are not
required for the specific entry type are stripped away from the response. For
example, a summary entry would not need to include a null
targetObjectId field, as this would not add information to
a summary. You can specify that this auto-formatting be disabled and return
the full entry for all entry types. To disable entry formatting, include
formatted=false as a query parameter in the request.
To return all reconciliation operations logged in the audit log, run a
RESTful GET on the audit/recon endpoint. For example:
$ curl \ --cacert self-signed.crt \ --header "X-OpenIDM-Username: openidm-admin" \ --header "X-OpenIDM-Password: openidm-admin" \ --request GET \ "https://localhost:8443/openidm/audit/recon"
The following code sample shows an extract of the audit log after the first reconciliation operation in Sample 1.
{
"entries": [
{
"mapping": "systemXmlfileAccounts_managedUser",
"targetObjectId": "managed/user/scarter",
"sourceObjectId": "system/xmlfile/account/scarter",
"situation": "ABSENT",
"reconciling": "source",
"ambiguousTargetObjectIds": "",
"action": "CREATE",
"actionId": "e5f3190d-41d9-4bea-907d-b287a9436a45",
"exception": "",
"_id": "fe250514-d3e1-477a-bb90-88bd4525d70b",
"entryType": "entry",
"timestamp": "2014-09-08T08:57:47.575Z",
"reconId": "e5f3190d-41d9-4bea-907d-b287a9436a45",
"rootActionId": "e5f3190d-41d9-4bea-907d-b287a9436a45",
"status": "SUCCESS",
"message": null,
"messageDetail": null
},
{
"mapping": "systemXmlfileAccounts_managedUser",
"exception": "",
"_id": "10e4195b-7b38-4b99-9916-a6d2de137c11",
"entryType": "start",
"timestamp": "2014-09-08T08:57:47.218Z",
"reconId": "e5f3190d-41d9-4bea-907d-b287a9436a45",
"rootActionId": "e5f3190d-41d9-4bea-907d-b287a9436a45",
"status": "SUCCESS",
"message": "Reconciliation initiated by openidm-admin",
"messageDetail": null
},
{
"mapping": "systemXmlfileAccounts_managedUser",
"exception": "",
"_id": "d8634325-78f6-4504-b9f4-ba7b9103e391",
"entryType": "summary",
"timestamp": "2014-09-08T08:57:47.607Z",
"reconId": "e5f3190d-41d9-4bea-907d-b287a9436a45",
"rootActionId": "e5f3190d-41d9-4bea-907d-b287a9436a45",
"status": "SUCCESS",
"message": "SOURCE_IGNORED: 0 MISSING: 0 FOUND: 0 AMBIGUOUS: 0 UNQUALIFIED: 0 CONFIRMED: 0 SOURCE_MISSING: 0 ABSENT: 2 TARGET_IGNORED: 0 UNASSIGNED: 0 ",
"messageDetail": {
"stage": "COMPLETED_SUCCESS",
"stageDescription": "reconciliation completed.",
"progress": {
"links": {
"created": 2,
"existing": {
"processed": 0,
"total": "0"
}
},
"source": {
"existing": {
"processed": 2,
"total": "2"
}
},
"target": {
"created": 2,
"existing": {
"processed": 0,
"total": "0"
}
}
},
"duration": 388,
"situationSummary": {
"SOURCE_MISSING": 0,
"FOUND": 0,
"SOURCE_IGNORED": 0,
"UNQUALIFIED": 0,
"UNASSIGNED": 0,
"TARGET_IGNORED": 0,
"CONFIRMED": 0,
"AMBIGUOUS": 0,
"ABSENT": 2,
"MISSING": 0
},
"statusSummary": {
"FAILURE": 0,
"SUCCESS": 2
},
"state": "SUCCESS",
"mapping": "systemXmlfileAccounts_managedUser",
"started": "2014-09-08T08:57:47.218Z",
"ended": "2014-09-08T08:57:47.606Z"
}
},
{
"mapping": "systemXmlfileAccounts_managedUser",
"targetObjectId": "managed/user/bjensen",
"sourceObjectId": "system/xmlfile/account/bjensen",
"situation": "ABSENT",
"reconciling": "source",
"ambiguousTargetObjectIds": "",
"action": "CREATE",
"actionId": "e5f3190d-41d9-4bea-907d-b287a9436a45",
"exception": "",
"_id": "939fd113-1158-4f5c-a7f7-6c4b005dce2f",
"entryType": "entry",
"timestamp": "2014-09-08T08:57:47.579Z",
"reconId": "e5f3190d-41d9-4bea-907d-b287a9436a45",
"rootActionId": "e5f3190d-41d9-4bea-907d-b287a9436a45",
"status": "SUCCESS",
"message": null,
"messageDetail": null
}
]
}
Most of the fields in this audit log are self-explanatory. Each distinct
reconciliation operation is identified by its reconId.
Each entry in the log is identified by a unique _id. The
first log entry indicates the status for the complete reconciliation
operation. Successive entries indicate the status for each record affected by
the reconciliation.
To obtain information on a specific audit log entry, include its entry
_id in the URL. For example:
$ curl \ --cacert self-signed.crt \ --header "X-OpenIDM-Username: openidm-admin" \ --header "X-OpenIDM-Password: openidm-admin" \ --request GET \ "https://localhost:8443/openidm/audit/recon/fe250514-d3e1-477a-bb90-88bd4525d70b"
The following sample output shows the results of a read operation on a specific reconciliation audit entry.
{
"mapping": "systemXmlfileAccounts_managedUser",
"targetObjectId": "managed/user/scarter",
"sourceObjectId": "system/xmlfile/account/scarter",
"situation": "ABSENT",
"reconciling": "source",
"ambiguousTargetObjectIds": "",
"action": "CREATE",
"actionId": "e5f3190d-41d9-4bea-907d-b287a9436a45",
"exception": "",
"_id": "fe250514-d3e1-477a-bb90-88bd4525d70b",
"entryType": "entry",
"timestamp": "2014-09-08T08:57:47.575Z",
"reconId": "e5f3190d-41d9-4bea-907d-b287a9436a45",
"rootActionId": "e5f3190d-41d9-4bea-907d-b287a9436a45",
"status": "SUCCESS",
"message": null,
"messageDetail": null
}
To query the audit log for a particular reconciliation operation, use the
audit-by-recon-id keyword, specifying the reconciliation
ID, as follows:
$ curl \ --cacert self-signed.crt \ --header "X-OpenIDM-Username: openidm-admin" \ --header "X-OpenIDM-Password: openidm-admin" \ --request GET \ "https://localhost:8443/openidm/audit/recon?_queryId=audit-by-recon-id&reconId=<reconID>"
Output similar to the following is returned, for the specified reconciliation operation:
{
"remainingPagedResults": -1,
"pagedResultsCookie": null,
"resultCount": 4,
"result": [
{
"mapping": "systemXmlfileAccounts_managedUser",
"exception": "",
"_id": "d8634325-78f6-4504-b9f4-ba7b9103e391",
"entryType": "summary",
"timestamp": "2014-09-08T08:57:47.607Z",
"reconId": "e5f3190d-41d9-4bea-907d-b287a9436a45",
"rootActionId": "e5f3190d-41d9-4bea-907d-b287a9436a45",
"status": "SUCCESS",
"message": "SOURCE_IGNORED: 0 MISSING: 0 FOUND: 0 AMBIGUOUS: 0 UNQUALIFIED: 0
CONFIRMED: 0 SOURCE_MISSING: 0 ABSENT: 2 TARGET_IGNORED: 0 UNASSIGNED: 0 ",
"messageDetail": {
"stage": "COMPLETED_SUCCESS",
"stageDescription": "reconciliation completed.",
"progress": {
"links": {
"created": 2,
"existing": {
"processed": 0,
"total": "0"
}
},
"source": {
"existing": {
"processed": 2,
"total": "2"
}
},
"target": {
"created": 2,
"existing": {
"processed": 0,
"total": "0"
}
}
},
"duration": 388,
"situationSummary": {
"SOURCE_MISSING": 0,
"FOUND": 0,
"SOURCE_IGNORED": 0,
"UNQUALIFIED": 0,
"UNASSIGNED": 0,
"TARGET_IGNORED": 0,
"CONFIRMED": 0,
"AMBIGUOUS": 0,
"ABSENT": 2,
"MISSING": 0
},
"statusSummary": {
"FAILURE": 0,
"SUCCESS": 2
},
"state": "SUCCESS",
"mapping": "systemXmlfileAccounts_managedUser",
"started": "2014-09-08T08:57:47.218Z",
"ended": "2014-09-08T08:57:47.606Z"
}
},
{
"mapping": "systemXmlfileAccounts_managedUser",
"exception": "",
"_id": "10e4195b-7b38-4b99-9916-a6d2de137c11",
"entryType": "start",
"timestamp": "2014-09-08T08:57:47.218Z",
"reconId": "e5f3190d-41d9-4bea-907d-b287a9436a45",
"rootActionId": "e5f3190d-41d9-4bea-907d-b287a9436a45",
"status": "SUCCESS",
"message": "Reconciliation initiated by openidm-admin",
"messageDetail": null
},
{
"mapping": "systemXmlfileAccounts_managedUser",
"targetObjectId": "managed/user/scarter",
"sourceObjectId": "system/xmlfile/account/scarter",
"situation": "ABSENT",
"reconciling": "source",
"ambiguousTargetObjectIds": "",
"action": "CREATE",
"actionId": "e5f3190d-41d9-4bea-907d-b287a9436a45",
"exception": "",
"_id": "fe250514-d3e1-477a-bb90-88bd4525d70b",
"entryType": "entry",
"timestamp": "2014-09-08T08:57:47.575Z",
"reconId": "e5f3190d-41d9-4bea-907d-b287a9436a45",
"rootActionId": "e5f3190d-41d9-4bea-907d-b287a9436a45",
"status": "SUCCESS",
"message": null,
"messageDetail": null
},
{
"mapping": "systemXmlfileAccounts_managedUser",
"targetObjectId": "managed/user/bjensen",
"sourceObjectId": "system/xmlfile/account/bjensen",
"situation": "ABSENT",
"reconciling": "source",
"ambiguousTargetObjectIds": "",
"action": "CREATE",
"actionId": "e5f3190d-41d9-4bea-907d-b287a9436a45",
"exception": "",
"_id": "939fd113-1158-4f5c-a7f7-6c4b005dce2f",
"entryType": "entry",
"timestamp": "2014-09-08T08:57:47.579Z",
"reconId": "e5f3190d-41d9-4bea-907d-b287a9436a45",
"rootActionId": "e5f3190d-41d9-4bea-907d-b287a9436a45",
"status": "SUCCESS",
"message": null,
"messageDetail": null
}
]
}
To query the audit log for a specific reconciliation situation, use the
audit-by-recon-id-situation keyword, specifying the
reconciliation ID and the situation that you want to query. For example, the
following query returns all ABSENT records found during the specified
reconciliation operation:
$ curl \ --cacert self-signed.crt \ --header "X-OpenIDM-Username: openidm-admin" \ --header "X-OpenIDM-Password: openidm-admin" \ --request GET \ "https://localhost:8443/openidm/audit/recon?_queryId=audit-by-recon-id-situation&situation=ABSENT&reconId=e5f3190d-41d9-4bea-907d-b287a9436a45"
Output similar to the following is returned, with one entry for each record that matches the situation queried:
{
"remainingPagedResults": -1,
"pagedResultsCookie": null,
"resultCount": 2,
"result": [
{
"mapping": "systemXmlfileAccounts_managedUser",
"targetObjectId": "managed/user/scarter",
"sourceObjectId": "system/xmlfile/account/scarter",
"situation": "ABSENT",
"reconciling": "source",
"ambiguousTargetObjectIds": "",
"action": "CREATE",
"actionId": "e5f3190d-41d9-4bea-907d-b287a9436a45",
"exception": "",
"_id": "fe250514-d3e1-477a-bb90-88bd4525d70b",
"entryType": "entry",
"timestamp": "2014-09-08T08:57:47.575Z",
"reconId": "e5f3190d-41d9-4bea-907d-b287a9436a45",
"rootActionId": "e5f3190d-41d9-4bea-907d-b287a9436a45",
"status": "SUCCESS",
"message": null,
"messageDetail": null
},
{
"mapping": "systemXmlfileAccounts_managedUser",
"targetObjectId": "managed/user/bjensen",
"sourceObjectId": "system/xmlfile/account/bjensen",
"situation": "ABSENT",
"reconciling": "source",
"ambiguousTargetObjectIds": "",
"action": "CREATE",
"actionId": "e5f3190d-41d9-4bea-907d-b287a9436a45",
"exception": "",
"_id": "939fd113-1158-4f5c-a7f7-6c4b005dce2f",
"entryType": "entry",
"timestamp": "2014-09-08T08:57:47.579Z",
"reconId": "e5f3190d-41d9-4bea-907d-b287a9436a45",
"rootActionId": "e5f3190d-41d9-4bea-907d-b287a9436a45",
"status": "SUCCESS",
"message": null,
"messageDetail": null
}
]
}12.8. Querying the Activity Audit Log
The activity logs track all operations on internal (managed) and external (system) objects. Entries in the activity log contain identifiers for the reconciliation or synchronization action that triggered the activity, and for the original caller and the relationships between related actions.
You can access the activity logs over REST with the following call:
$ curl \ --cacert self-signed.crt \ --header "X-OpenIDM-Username: openidm-admin" \ --header "X-OpenIDM-Password: openidm-admin" \ --request GET \ "https://localhost:8443/openidm/audit/activity"
The following extract of the activity log shows the last entry in the log, which was a password change for user bjensen.
{
"entries": [
...
},
"before": null,
"requester": "openidm-admin",
"parentActionId": "c2c102bc-7b32-4020-b5aa-9a7d63652cb6",
"_id": "bbaff1e0-923b-48f0-b053-b1614cbb3647",
"activityId": "c2c102bc-7b32-4020-b5aa-9a7d63652cb6",
"timestamp": "2014-03-13T16:20:54.811Z",
"action": "CREATE",
"message": "create",
"objectId": "managed/user/4f2f5eea-918a-4ef1-9244-be41dcf128a4",
"rev": "1",
"rootActionId": "c2c102bc-7b32-4020-b5aa-9a7d63652cb6"
},
{
"passwordChanged": true,
"changedFields": [
"/password"
],
"status": "SUCCESS",
"after": {
"securityAnswer": {
"$crypto": {
"value": {
"key": "openidm-sym-default",
"iv": "8CvlA6rWN03MAhLSKJmbvw==",
"cipher": "AES/CBC/PKCS5Padding",
"data": "oJBTrrX+wFAygFZkLuGPrhB/jAIICcdIBuCX1eEbpS0="
},
"type": "x-simple-encryption"
}
},
...
To return activity information for a specific action, include the
_id of the action in the endpoint, for example:
$ curl \ --cacert self-signed.crt \ --header "X-OpenIDM-Username: openidm-admin" \ --header "X-OpenIDM-Password: openidm-admin" \ --request GET \ "https://localhost:8443/openidm/audit/activity/22ef6d20-bd84-4267-9db8-745825a46ad1"
Results similar to the following are returned:
{
"passwordChanged": true,
"changedFields": [
"/password"
],
"status": "SUCCESS",
"after": {
"securityAnswer": {
"$crypto": {
"value": {
"key": "openidm-sym-default",
"iv": "HpsyTtTXc2pfNrXlYbro7Q==",
"cipher": "AES/CBC/PKCS5Padding",
"data": "0M6O7geNjalJ7e0EGSG9B90eaeF8zJuogdL74hcAIRg="
},
"type": "x-simple-encryption"
}
},
"userName": "bjensen@example.com",
"stateProvince": "",
"postalAddress": "",
"effectiveAssignments": {},
"roles": "openidm-authorized",
"telephoneNumber": "1234567",
"accountStatus": "active",
"password": {
"$crypto": {
"value": {
"key": "openidm-sym-default",
"iv": "dkRjURz761HaObBuLl+EkA==",
"cipher": "AES/CBC/PKCS5Padding",
"data": "9chNPUlXotHy195ERj6vlg=="
},
"type": "x-simple-encryption"
}
},
"effectiveRoles": [
"openidm-authorized"
],
"givenName": "Barbara",
"lastPasswordAttempt": "Thu Mar 13 2014 07:23:12 GMT-0800 (GMT-08:00)",
"address2": "",
"passwordAttempts": "0",
"sn": "Jensen",
"mail": "bjensen@example.com",
"securityQuestion": "1",
"city": "",
"country": "",
"_rev": "7",
"lastPasswordSet": "",
"postalCode": "",
"_id": "bjensen",
"description": "Created By XML1"
},
"before": {
"securityAnswer": "Some security answer",
"userName": "bjensen@example.com",
"stateProvince": "",
"postalAddress": "",
"roles": "openidm-authorized",
"telephoneNumber": "1234567",
"password": {
"$crypto": {
"value": {
"key": "openidm-sym-default",
"iv": "bqhRyLW1lI+KZROcpgyukg==",
"cipher": "AES/CBC/PKCS5Padding",
"data": "qO8A76GqNqftVVwOlasyPw=="
},
"type": "x-simple-encryption",
"securityQuestion": "1",
"givenName": "Barbara",
"address2": "",
"lastPasswordAttempt": "Thu Mar 13 2014 07:23:12 GMT-0800 (GMT-08:00)",
"passwordAttempts": "0",
"sn": "Jensen",
"mail": "bjensen@example.com",
"country": "",
"city": "",
"_rev": "7",
"lastPasswordSet": "",
"postalCode": "",
"_id": "bjensen",
"description": "Created By XML1",
"accountStatus": "active"
},
"requester": "openidm-admin",
"parentActionId": "71ddeed8-9006-4578-b869-13e15a3ce6b5",
"_id": "ee88adb8-3329-4f81-a8f2-d9c8e0fbf72b",
"activityId": "71ddeed8-9006-4578-b869-13e15a3ce6b5",
"timestamp": "2014-03-13T16:21:27.086Z",
"action": "UPDATE",
"message": "update",
"objectId": "managed/user/bjensen",
"rev": "7",
"rootActionId": "71ddeed8-9006-4578-b869-13e15a3ce6b5"
}
Each action in the activity log has a rootActionId and a
parentActionId. The rootActionId is the
ID that was assigned to the incoming or initiating request. The
parentActionId is the ID that is associated with the
overall action. So, for example, if an HTTP request invokes a script that
changes a user's password, the HTTP request is assigned the
rootActionId and the action taken by the script is
assigned the parentActionId. You can query the activity
log for the details of a specific action by including the
parentActionId in the query. For example:
$ curl \ --cacert self-signed.crt \ --header "X-OpenIDM-Username: openidm-admin" \ --header "X-OpenIDM-Password: openidm-admin" \ --request GET \ "https://localhost:8443/openidm/audit/activity?_queryId=audit-by-activity-parent-action&parentActionId=0aaba292-1dd3-4e98-a0e2-04bec9ae5209"
The following sample output shows the result of a query that requests details of the password change for bjensen.
{
"remainingPagedResults": -1,
"pagedResultsCookie": null,
"resultCount": 2,
"result": [
{
"rootActionId": "71ddeed8-9006-4578-b869-13e15a3ce6b5",
"changedFields": [
"/password"
],
"action": "UPDATE",
"objectId": "managed/user/bjensen",
"before": {
"securityAnswer": "Some security answer",
"userName": "bjensen@example.com",
"stateProvince": "",
"postalAddress": "",
"roles": "openidm-authorized",
"telephoneNumber": "1234567",
"password": "CAngetin1",
"securityQuestion": "1",
"givenName": "Barbara",
"address2": "",
"lastPasswordAttempt": "Thu Mar 13 2014 07:23:12 GMT-0800 (GMT-08:00)",
"passwordAttempts": "0",
"sn": "Jensen",
"mail": "bjensen@example.com",
"country": "",
"city": "",
"_rev": "7",
"lastPasswordSet": "",
"postalCode": "",
"_id": "bjensen",
"description": "Created By XML1",
"accountStatus": "active"
},
"status": "SUCCESS",
"_rev": "1",
"_id": "ee88adb8-3329-4f81-a8f2-d9c8e0fbf72b",
"parentActionId": "71ddeed8-9006-4578-b869-13e15a3ce6b5",
"timestamp": "2014-03-13T16:21:27.086Z",
"message": "update",
"activityId": "71ddeed8-9006-4578-b869-13e15a3ce6b5",
"after": {
"securityAnswer": {
"$crypto": {
"value": {
"key": "openidm-sym-default",
"iv": "HpsyTtTXc2pfNrXlYbro7Q==",
"cipher": "AES/CBC/PKCS5Padding",
"data": "0M6O7geNjalJ7e0EGSG9B90eaeF8zJuogdL74hcAIRg="
},
"type": "x-simple-encryption"
}
},
"userName": "bjensen@example.com",
"stateProvince": "",
"postalAddress": "",
"effectiveAssignments": {},
"roles": "openidm-authorized",
"telephoneNumber": "1234567",
"accountStatus": "active",
"password": {
"$crypto": {
"value": {
"key": "openidm-sym-default",
"iv": "dkRjURz761HaObBuLl+EkA==",
"cipher": "AES/CBC/PKCS5Padding",
"data": "9chNPUlXotHy195ERj6vlg=="
},
"type": "x-simple-encryption"
}
},
"effectiveRoles": [
"openidm-authorized"
],
"givenName": "Barbara",
"lastPasswordAttempt": "Thu Mar 13 2014 07:23:12 GMT-0800 (GMT-08:00)",
"address2": "",
"passwordAttempts": "0",
"sn": "Jensen",
"mail": "bjensen@example.com",
"securityQuestion": "1",
"city": "",
"country": "",
"_rev": "7",
"lastPasswordSet": "",
"postalCode": "",
"_id": "bjensen",
"description": "Created By XML1"
},
"rev": "7",
"requester": "openidm-admin",
"passwordChanged": true
}
]
} Note
For audit logs in the repository, you can define custom queries using the parameterized query mechanism. For more information, see Section 7.3.2, "Parameterized Queries".
For more information about the entries in these logs, see Chapter 18, "Using Audit Logs".
12.9. Querying the Synchronization Audit Log
LiveSync and implicit sync operations are logged in the file
/path/to/openidm/audit/sync.csv and in the repository.
You can read the synchronization audit logs over the REST interface, as
outlined in the following examples.
To return all synchronization operations logged in the audit log, run a
RESTful GET on the audit/sync endpoint. For example:
$ curl \ --cacert self-signed.crt \ --header "X-OpenIDM-Username: openidm-admin" \ --header "X-OpenIDM-Password: openidm-admin" \ --request GET \ "https://localhost:8443/openidm/audit/sync"
Most of the fields in the synchronization audit log are self-explanatory.
Each distinct synchronization operation is identified by its
actionId. The rootActionId is the ID
that was assigned to the incoming or initiating request - so if a
modification to a user entry triggers an implicit synchronization operation,
the sync operation is assigned an actionId and
rootActionId refers to the
original change operation. Each entry in the log is identified by a unique
_id.
To obtain information on a specific audit log entry, include its entry
_id in the URL. For example:
$ curl \ --cacert self-signed.crt \ --header "X-OpenIDM-Username: openidm-admin" \ --header "X-OpenIDM-Password: openidm-admin" \ --request GET \ "https://localhost:8443/openidm/audit/sync/a311b656-508c-4f56-9df4-f907364184f1"
The following sample output shows the results of a read operation on a specific synchronization audit entry.
{
"entries": [
{
"mapping": "systemAdAccounts_managedUser",
"targetObjectId": "7e5eb90b-f643-4858-803e-a01931f9c12e",
"sourceObjectId": "system/ad/account/rheath",
"situation": "CONFIRMED",
"actionId": "ea6a81e0-a98a-4e72-8c77-50b5756be1f6",
"_id": "b3e3190c-9e9d-4cd1-8fec-01705ad54109",
"timestamp": "2014-10-30T14:48:58.415Z",
"rootActionId": "ea6a81e0-a98a-4e72-8c77-50b5756be1f6",
"status": "SUCCESS",
"message": null,
"messageDetail": null,
"exception": "",
"action": "UPDATE"
},
{
"mapping": "managedUser_systemLdapAccounts",
"targetObjectId": "uid=rheath,ou=People,dc=example,dc=com",
"sourceObjectId": "managed/user/7e5eb90b-f643-4858-803e-a01931f9c12e",
"situation": "CONFIRMED",
"actionId": "ea6a81e0-a98a-4e72-8c77-50b5756be1f6",
"_id": "105a39f7-f071-481a-ae82-e233e556cc5a",
"timestamp": "2014-10-30T14:48:58.402Z",
"rootActionId": "ea6a81e0-a98a-4e72-8c77-50b5756be1f6",
"status": "SUCCESS",
"message": null,
"messageDetail": null,
"exception": "",
"action": "UPDATE"
}
]
}
The output shows two records that originated from the same LiveSync action.
The first record indicates a change on the system/ad
entry, which triggered a LiveSync to update the corresponding
managed/user entry. The second record indicates an
implicit sync from managed/user to the corresponding
entry in system/ldap. Note that the
rootActionId is the same for both these records.
12.10. Configuring the LiveSync Retry Policy
OpenIDM enables you to specify what should happen if a LiveSync operation reports a failure for an operation. By configuring the LiveSync retry policy, you can specify how many times a failed modification should be reattempted and what should happen in the event that the modification is unsuccessful after the specified number of attempts. If no retry policy is configured, OpenIDM reattempts the change an infinite number of times, until the change is successful. This behavior can increase data consistency in the case of transient failures (for example, when the connection to the database is temporarily lost). However, in situations where the cause of the failure is permanent (for example, if the change does not meet certain policy requirements) the change will never succeed, regardless of the number of attempts. In this case, the infinite retry behavior can effectively block subsequent LiveSync operations from starting.
Generally, a scheduled reconciliation operation will eventually force consistency. However, to prevent repeated retries that block the LiveSync mechanism, you should restrict the number of times OpenIDM reattempts the same modification. You can then specify what OpenIDM does with failed LiveSync changes. The failed modification can be stored in a "dead letter queue", discarded, or reapplied. Alternatively, an administrator can be notified of the failure by email or by some other means. This behavior can be scripted. The default configuration, in the samples provided with OpenIDM, is to retry a failed modification five times, and then to log and ignore the failure.
The LiveSync retry policy is configured in the connector configuration file
(provisioner.openicf-*.json). The sample connector
configuration files have a retry policy defined as follows:
"syncFailureHandler" : {
"maxRetries" : 5,
"postRetryAction" : "logged-ignore"
},
The maxRetries field specifies the number of attempts
that OpenIDM should make to process the failed modification. The value of
this property must be a positive integer, or -1. A value
of zero indicates that failed modifications should not be reattempted. In
this case, the post retry action is executed immediately when a LiveSync
operation fails. A value of -1 (or omitting the
maxRetries property, or the entire
syncFailureHandler from the configuration) indicates that
failed modifications should be retried an infinite number of times. In this
case, no post retry action is executed.
The default retry policy relies on the scheduler, or whatever invokes the LiveSync operation. Therefore, if retries are enabled and a LiveSync modification fails, OpenIDM will retry the modification the next time that LiveSync is invoked.
The postRetryAction field indicates what action OpenIDM
should take in the event that the maximum number of retries has been reached
(or if maxRetries has been set to zero). The post retry
action can be one of the following:
logged-ignoreindicates that OpenIDM should ignore the failed modification, and log its occurrence.dead-letter-queueindicates that OpenIDM should save the details of the failed modification in a table in the repository (accessible over REST atrepo/synchronisation/deadLetterQueue/provisioner-name).scriptspecifies a custom script that should be executed when the maximum number of retries has been reached. For information about using custom scripts in the configuration, see Appendix F, "Scripting Reference".In addition to the regular objects described in the Scripting Reference, the following objects are available in the script scope:
syncFailureProvides details about the failed record. The structure of the
syncFailureobject is as follows:"syncFailure" : { "token" : the ID of the token, "systemIdentifier" : a string identifier that matches the "name" property in provisioner.openicf.json, "objectType" : the object type being synced, one of the keys in the "objectTypes" property in provisioner.openicf.json, "uid" : the UID of the object (for example uid=joe,ou=People,dc=example,dc=com), "failedRecord", the record that failed to synchronize },To access these fields, include
syncFailure.fieldnamein your script.failureCauseProvides the exception that caused the original LiveSync failure.
failureHandlersOpenIDM currently provides two synchronization failure handlers "out of the box".
loggedIgnoreindicates that the failure should be logged, after which no further action should be taken.deadLetterQueueindicates that the failed record should be written to a specific table in the repository, where further action can be taken. To invoke one of the internal failure handlers from your script, use a call similar to the following (shown here for JavaScript):failureHandlers.deadLetterQueue.invoke(syncFailure, failureCause);
Two sample scripts are provided in
path/to/openidm/samples/syncfailure/script, one that logs failures, and one that sends them to the dead letter queue in the repository.
The following sample provisioner configuration file extract shows a LiveSync retry policy that specifies a maximum of four retries before the failed modification is sent to the dead letter queue.
...
"connectorName" : "org.identityconnectors.ldap.LdapConnector"
},
"syncFailureHandler" : {
"maxRetries" : 4,
"postRetryAction" : dead-letter-queue
},
"poolConfigOption" : {
...
In the case of a failed modification, a message similar to the following is output to the log file:
INFO: sync retries = 1/4, retrying
OpenIDM reattempts the modification, the specified number of times. If the modification is still unsuccessful, a message similar to the following is logged:
INFO: sync retries = 4/4, retries exhausted
Jul 19, 2013 11:59:30 AM
org.forgerock.openidm.provisioner.openicf.syncfailure.DeadLetterQueueHandler invoke
INFO: uid=jdoe,ou=people,dc=example,dc=com saved to dead letter queue
The log message indicates the entry for which the modification failed
(uid=jdoe, in this example).
You can view the failed modification in the dead letter queue, over the REST interface, as follows:
$ curl \
--cacert self-signed.crt \
--header "X-OpenIDM-Username: openidm-admin" \
--header "X-OpenIDM-Password: openidm-admin" \
--request GET \
"https://localhost:8443/openidm/repo/synchronisation/deadLetterQueue/ldap?_queryId=query-all-ids"
{
"query-time-ms": 2,
"result":
[
{
"_id": "4",
"_rev": "0"
}
],
"conversion-time-ms": 0
}To view the details of a specific failed modification, include its ID in the URL:
$ curl \
--cacert self-signed.crt \
--header "X-OpenIDM-Username: openidm-admin" \
--header "X-OpenIDM-Password: openidm-admin" \
--request GET \
"https://localhost:8443/openidm/repo/synchronisation/deadLetterQueue/ldap/4"
{
"objectType": "account",
"systemIdentifier": "ldap",
"failureCause": "org.forgerock.openidm.sync.SynchronizationException:
org.forgerock.openidm.objset.ConflictException:
org.forgerock.openidm.sync.SynchronizationException:
org.forgerock.openidm.script.ScriptException:
ReferenceError: \"bad\" is not defined.
(PropertyMapping/mappings/0/properties/3/condition#1)",
"token": 4,
"failedRecord": "complete record, in xml format"
"uid": "uid=jdoe,ou=people,dc=example,dc=com",
"_rev": "0",
"_id": "4"
} 12.11. Disabling Automatic Synchronization Operations
By default, all mappings participate in automatic synchronization
operations, that is, a change to a managed object is automatically
synchronized to all resources for which the managed object is configured as
a source. Similarly, if LiveSync is enabled for a system, changes to an
object on that system are automatically propagated to the managed object
repository. You can prevent a specific mapping from participating in this
automatic synchronization by setting the "enableSync"
property of that mapping to false. In the following example, implicit
synchronization is disabled. This means that changes to objects in the
internal repository are not automatically propagated to the LDAP directory.
To propagate changes to the LDAP directory, reconciliation must be launched
manually.
{
"mappings" : [
{
"name" : "managedUser_systemLdapAccounts",
"source" : "managed/user",
"target" : "system/ldap/account",
"enableSync" : false,
....
}
If enableSync is set to false for a
system to managed user mapping (for example
"systemLdapAccounts_managedUser"), LiveSync is disabled
for that mapping.
12.12. Configuring Synchronization Failure Compensation
When implicit synchronization is used to push a large number of changes from the managed object repository to several external repositories, the process can take some time. Problems such as lost connections might happen, resulting in the changes being only partially synchronized.
For example, if a Human Resources manager adds a group of new employees in one database, a partial synchronization might mean that some of those employees do not have access to their email or other systems.
You can configure implicit synchronization such that the system reverts an entire synchronization operation, in the event that it was not completely successful. An example of such a configuration is illustrated in Section 3.11, "Sample 5b - Failure Compensation With Multiple Resources" in the Installation Guide. That sample demonstrates how OpenIDM compensates when synchronization to an external resource fails.
Failure compensation works by using the optional onSync
hook, which can be specified in the conf/managed.json
file. The onSync hook can be used to provide failure
compensation as follows:
...
"onDelete" : {
"type" : "text/javascript",
"file" : "ui/onDelete-user-cleanup.js"
},
"onSync" : {
"type" : "text/javascript",
"file" : "compensate.js"
},
"properties" : [
...
The onSync hook references a script
(compensate.js), that is located in the
/path/to/openidm/bin/defaults/script directory.
When a managed object is changed, an implicit synchronization operation attempts to synchronize the change (and any other pending changes) with any external data store(s) for which a mapping is configured.
The implicit synchronization process proceeds with each mapping, in the
order in which the mappings are specified in sync.json.
The compensate.js script is designed to avoid
partial synchronization. If synchronization is successful, for all
configured mappings, OpenIDM exits from the script.
If an implicit synchronization operation fails for a particular resource,
the onSync hook invokes the
compensate.js script. This script attempts to revert
the original change by performing another update to the managed object. This
change, in turn, triggers another implicit synchronization operation to all
external resources for which mappings are configured.
If the synchronization operation fails again, the
compensate.js script is triggered again. This time,
however, the script recognizes that the change was originally called as a
result of a compensation and aborts. OpenIDM logs warning messages related
to the sync action
(notifyCreate, notifyUpdate, notifyDelete), along with
the error that caused the sync failure.
If failure compensation is not configured, any issues with connections to an external resource can lead to data stores that are out of sync, such as the example cited earlier where some new employees do not have access to their corporate email accounts.
With the compensate.js script, any such errors will
result in each data store using the information it had before the implicit
synchronization operation started. OpenIDM stores that information,
temporarily, in properties such as oldObject and
oldTarget.
In this particular example, human resource managers should see that new employees are not shown in their database. Then, the administrators of the OpenIDM system can check log files for errors, address them, and then restart the implicit synchronization process with a new REST call.
12.13. Synchronization Situations and Actions
During synchronization, OpenIDM categorizes objects according to their
situation. Situations are characterized by whether an
object exists on a source or target system, whether OpenIDM has registered a
link between the source object and the target object, and whether the object
is considered valid, as assessed by the
validSource and validTarget scripts.
OpenIDM then takes a specific action, depending on the situation.
You can define actions for particular situations in the
policies section of a synchronization mapping, as shown in
the following excerpt.
{
"policies": [
{
"situation": "CONFIRMED",
"action": "UPDATE"
},
{
"situation": "FOUND",
"action": "UPDATE"
},
{
"situation": "ABSENT",
"action": "CREATE"
},
{
"situation": "AMBIGUOUS",
"action": "EXCEPTION"
},
{
"situation": "MISSING",
"action": "EXCEPTION"
},
{
"situation": "UNQUALIFIED",
"action": "DELETE"
},
{
"situation": "UNASSIGNED",
"action": "EXCEPTION"
}
]
}If you do not define a policy for a particular situation, OpenIDM takes the default action for the situation.
The following sections describe the possible situations and their default corresponding actions.
12.13.1. Synchronization Situations
OpenIDM performs a reconciliation operation in two phases:
Source reconciliation, where OpenIDM accounts for source objects and associated links, based on the configured mapping.
Target reconciliation, where OpenIDM iterates over the target objects that were not processed in the first phase.
During the source reconciliation phase, OpenIDM builds three lists, assigning values to the objects to reconcile.
All valid objects from the source
OpenIDM assigns valid source objects
qualifies=1. Invalid objects, including those that were not found in the source system, and those that were filtered out by the script specified in thevalidSourceproperty, are assignedqualifies=0.All records from the appropriate links table
Objects that have a corresponding link in the links table of the repository are assigned
link=1. Objects that do not have a corresponding link are assignedlink=0.All valid objects on the target system
Objects that are found in the target system are assigned
target=1. Objects that are not found in the target system are assignedtarget=0.
Based on the values assigned to objects during source reconciliation, OpenIDM assigns situations, listed here with default and appropriate alternative actions.
- "CONFIRMED" (qualifies=1, link=1, target=1)
The source object qualifies for a target object, and a link to an existing target object was found. This situation is detected during change events and during reconciliation.
Default action:
UPDATEthe target object.Other valid actions:
IGNORE, REPORT, NOREPORT, ASYNC- "FOUND" (qualifies=1, link=0, target=1)
The source object qualifies for a target object and there is no link to an existing target object. There is a single target object, that correlates with this source object, according to the logic in the correlation query. This situation is detected during change events and reconciliation.
Default action:
UPDATEthe target object.Other valid actions:
EXCEPTION, IGNORE, REPORT, NOREPORT, ASYNC- "FOUND_ALREADY_LINKED" (qualifies=1, link=1, target=1)
The source object qualifies for a target object and there is no link from that source object to an existing target object. There is a single target object, that correlates with this source object, according to the logic in the correlation query, but that target object is already linked to a different source object. This situation is detected during change events and reconciliation.
Default action: log an
EXCEPTION.Other valid actions:
IGNORE, REPORT, NOREPORT, ASYNC- "ABSENT" (qualifies=1, link=0, target=0)
The source object qualifies for a target object, there is no link to an existing target object, and there is no correlated target object found. This situation is detected during change events and reconciliation.
Default action:
CREATEa target object.Other valid actions:
EXCEPTION, IGNORE, REPORT, NOREPORT, ASYNC- "AMBIGUOUS" (qualifies=1, link=0, target>1)
The source object qualifies for a target object, there is no link to an existing target object, but there is more than one correlated target object (that is, more than one possible match on the target system). This situation is detected during source object changes and reconciliation.
Default action: log an
EXCEPTION.Other valid actions:
IGNORE, REPORT, NOREPORT, ASYNC- "MISSING" (qualifies=1, link=1, target=0)
The source object qualifies for a target object, and there is a link to a target object, but the target object is missing. This situation is detected during reconciliation operations and during source object changes.
Default action: log an
EXCEPTION.Other valid actions:
CREATE, UNLINK, IGNORE, REPORT, NOREPORT. ASYNC- "UNQUALIFIED" (qualifies=0, link=0 or 1, target=1 or >1)
The source object is unqualified (by the "validSource" script). One or more target objects are found through the correlation logic. This situation is detected during change events and reconciliation.
Default action:
DELETEthe target object or objects.Other valid actions:
EXCEPTION, IGNORE, REPORT, NOREPORT, ASYNC- "TARGET_IGNORED" (qualifies=0, link=0 or 1, target=1)
The source object is unqualified (by the "validSource" script). One or more target objects are found through the correlation logic. This situation is detected only during source object changes.
It is different from "UNQUALIFIED", based on the status of the link and target. If there is a link, the target is not valid. If there is no link and exactly one target, that target is not valid.
Default action:
IGNOREthe target object until the next full reconciliation operation.Other valid actions:
DELETE, UNLINK, EXCEPTION, REPORT, NOREPORT, ASYNC- "SOURCE_IGNORED" (qualifies=0, link=0, target=0)
The source object is unqualified (by the "validSource" script), no link is found, and no correlated target exists. This situation is detected during source object changes and reconciliation.
Default action:
IGNOREthe source object.Other valid actions:
EXCEPTION, REPORT, NOREPORT, ASYNC- "LINK_ONLY" (qualifies=n/a, link=1, target=0)
The source may or may not be qualified, a link is found, but no target object is found. This situation is detected only during source object changes.
Default action: Log an
EXCEPTION.Other valid actions:
UNLINK, IGNORE, REPORT, NOREPORT, ASYNC- "ALL_GONE" (qualifies=n/a, link=0, cannot-correlate)
The source object has been removed. No link is found. Correlation is not possible, for one of the following reasons:
No previous source value can be found
There is no correlation query
A previous value was found, and a correlation query exists, but no corresponding target was found
This situation is detected only during source object changes.
Default action: "IGNORE" the source object.
Other valid actions:
EXCEPTION, REPORT, NOREPORT, ASYNC
During the target reconciliation phase, OpenIDM assigns the following values as it iterates through the target objects that were not accounted for during the source reconciliation.
Valid objects from the target
OpenIDM assigns valid target objects
qualifies=1. Invalid objects, including those that are filtered out by the script specified in thevalidTargetproperty, are assignedqualifies=0.All records from the appropriate links table
Objects that have a corresponding link in the links table of the repository are assigned
link=1. Objects that do not have a corresponding link are assignedlink=0.All valid objects on the source system
Objects that are found in the source system are assigned
source=1. Objects that are not found in the source system are assignedsource=0.
Based on the values that are assigned to objects during the target reconciliation phase, OpenIDM assigns situations, listed here with their default actions.
- "TARGET_IGNORED" (qualifies=0)
During target reconciliation, the target becomes unqualified by the "validTarget" script. This situation is detected only during reconciliation operations.
Default action:
IGNOREthe target object.Other valid actions:
DELETE, UNLINK, REPORT, NOREPORT, ASYNC- "UNASSIGNED" (qualifies=1, link=0)
A valid target object exists, for which there is no link. This situation is detected only during reconciliation operations.
Default action: log an
EXCEPTION.Other valid actions:
IGNORE, REPORT, NOREPORT, ASYNC- "CONFIRMED" (qualifies=1, link=1, source=1)
The target object qualifies, and a link to a source object exists. This situation is detected only during reconciliation operations.
Default action:
UPDATEthe target object.Other valid actions:
IGNORE, REPORT, NOREPORT- "UNQUALIFIED" (qualifies=0, link=1, source=1, but source does not qualify)
The target object is unqualified, (by the "validTarget" script), but there is a link to an existing source object, which is also unqualified. This situation is detected during change events and reconciliation.
Default action:
DELETEthe target object.Other valid actions:
UNLINK, EXCEPTION, IGNORE, REPORT, NOREPORT, ASYNC- SOURCE_MISSING (qualifies=1, link=1, source=0)
The target object qualifies and a link is found. But the source object is missing. This situation is detected during change events and reconciliation.
Default action: log an "EXCEPTION".
Other valid actions:
DELETE, UNLINK, IGNORE, REPORT, NOREPORT, ASYNC
The following sections reiterate in detail how OpenIDM assigns situations during each of the two synchronization phases.
12.13.2. Source Reconciliation
OpenIDM starts reconciliation and LiveSync by reading a list of objects from
the resource. For reconciliation, the list includes all objects that are
available through the connector. For LiveSync, the list contains only
changed objects. The connector can filter objects out of the list, too, by
using the script specified in the validSource property.
OpenIDM then iterates over the list, checking each entry against the
validSource filter, and classifying objects according to
their situations as described in Section 12.13.1, "Synchronization Situations". OpenIDM
uses the list of links for the current mapping to classify objects. Finally,
OpenIDM executes the action that is configured for each situation.
The following table shows how OpenIDM assigns the appropriate situation during source reconciliation, depending on whether a valid source exists (Source Qualifies), whether a link exists in the repository (Link Exists), and how many target objects are found, based either on links or on the results of the correlation query.
| Source Qualifies? | Link Exists? | Target Objects Found[a] | Situation | ||||
|---|---|---|---|---|---|---|---|
| Yes | No | Yes | No | 0 | 1 | > 1 | |
| X | X | X | SOURCE_MISSING | ||||
| X | X | X | UNQUALIFIED | ||||
| X | X | X | UNQUALIFIED | ||||
| X | X | X | TARGET_IGNORED | ||||
| X | X | X | UNQUALIFIED | ||||
| X | X | X | ABSENT | ||||
| X | X | X | FOUND | ||||
| X | X[b] | X | FOUND_ALREADY_LINKED | ||||
| X | X | X | AMBIGUOUS | ||||
| X | X | X | MISSING | ||||
| X | X | X | CONFIRMED | ||||
[a] If no link exists for the source object, then OpenIDM executes a correlation query. If no previous object is available, OpenIDM cannot correlate. [b] A link does exist from the target object but it not for this specific source object. | |||||||
12.13.3. Target Reconciliation
During source reconciliation, OpenIDM cannot detect situations where no
source object exists, such as the UNASSIGNED situation. When no source
object exists, OpenIDM detects the situation during the second
reconciliation phase, target reconciliation. During target reconciliation,
OpenIDM iterates over all target objects that do not have a representation
on the source, checking each object against the
validTarget filter, determining the appropriate situation,
and executing the action configured for the situation.
The following table shows how OpenIDM assigns the appropriate situation during target reconciliation, depending on whether a valid target exists (Target Qualifies), whether a link with an appropriate type exists in the repository (Link Exists), whether a source object exists (Source Exists), and whether the source object qualifies (Source Qualifies). Not all situations assigned during source reconciliation are assigned during target reconciliation.
| Target Qualifies? | Link Exists? | Source Exists? | Source Qualifies? | Situation | ||||
|---|---|---|---|---|---|---|---|---|
| Yes | No | Yes | No | Yes | No | Yes | No | |
| X | TARGET_IGNORED | |||||||
| X | X | X | UNASSIGNED | |||||
| X | X | X | X | CONFIRMED | ||||
| X | X | X | X | UNQUALIFIED | ||||
| X | X | X | SOURCE_MISSING | |||||
12.13.4. Situations Specific to Implicit Synchronization and LiveSync
Certain situations occur only during implicit synchronization (when OpenIDM pushes changes made in the repository out to external systems) and LiveSync (when OpenIDM polls external system change logs for changes and updates the repository).
The following table shows the situations that pertain only to implicit sync and LiveSync, when records are deleted from the source or target resource.
12.13.5. Synchronization Actions
Once OpenIDM has assigned a situation to an object, OpenIDM takes the actions configured in the mapping. If no action is configured, then OpenIDM takes the default action for the situation. OpenIDM supports the following actions.
- "CREATE"
Create and link a target object.
- "UPDATE"
Link and update a target object.
- "DELETE"
Delete and unlink the target object.
- "LINK"
Link the correlated target object.
- "UNLINK"
Unlink the linked target object.
- "EXCEPTION"
Flag the link situation as an exception.
You should not use this action for LiveSync mappings.
- "IGNORE"
Do not change the link or target object state.
- "REPORT"
Do not perform any action but report on what would happen if the default action were performed.
- "NOREPORT"
Do not perform any action or generate any report.
- "ASYNC"
An asynchronous process has been started so do not perform any action or generate any report.
12.13.6. Providing a Script as an Action
In addition to the static synchronization actions described in the previous
section, you can provide a script that is run in specific synchronization
situations. The following extract of a sample sync.json
file specifies that when a synchronization operation assesses an entry as
ABSENT, the workflow named
managedUserApproval is invoked. The parameters for the
workflow are passed in as properties of the action
parameter.
{
"situation" : "ABSENT",
"action" : {
"workflowName" : "managedUserApproval",
"type" : "text/javascript",
"file" : "workflow/triggerWorkflowFromSync.js"
}
}
The variables available to these scripts are described in Appendix F, "Scripting Reference".
12.14. Asynchronous Reconciliation
Reconciliation can work in tandem with workflows to provide additional business logic to the reconciliation process. You can define scripts to determine the action that should be taken for a particular reconciliation situation. A reconciliation process can launch a workflow after it has assessed a situation, and then perform the reconciliation, or some other action.
For example, you might want a reconciliation process to assess new user accounts that need to be created on a target resource. However, new user account creation might require some kind of approval from a manager before the accounts are actually created. The initial reconciliation process can assess the accounts that need to be created, launch a workflow to request management approval for those accounts, and then relaunch the reconciliation process to create the accounts, once the management approval has been received.
In this scenario, the defined script returns IGNORE
for new accounts and the reconciliation engine does not continue processing
the given object. The script then initiates an asynchronous process which
calls back and completes the reconciliation process at a later stage.
A sample configuration for this scenario is available in
openidm/samples/sample9, and described in Section 3.15, "Sample 9 - Asynchronous Reconciliation Using Workflows" in the Installation Guide.
Configuring asynchronous reconciliation involves the following steps:
Create the workflow definition file (
.xml or .barfile) and place it in theopenidm/workflowdirectory. For more information about creating workflows, see Chapter 17, "Integrating Business Processes and Workflows".Modify the
conf/sync.jsonfile for the situation or situations that should call the workflow. Reference the workflow name in the configuration for that situation.For example, the following
sync.jsonextract calls themanagedUserApprovalworkflow if the situation is assessed asABSENT:{ "situation" : "ABSENT", "action" : { "workflowName" : "managedUserApproval", "type" : "text/javascript", "file" : "workflow/triggerWorkflowFromSync.js" } },In the sample configuration, the workflow calls a second, explicit reconciliation process as a final step. This reconciliation process is called on the
synccontext path, with theperformActionaction (openidm.action('sync', 'performAction', params)).You can also use this kind of explicit reconciliation to perform a specific action on a source or target record, regardless of the assessed situation.
You can call such an operation over the REST interface, specifying the source, and/or target IDs, the mapping, and the action to be taken. The action can be any one of the supported reconciliation actions, that is,
CREATE, UPDATE, DELETE, LINK, UNLINK, EXCEPTION, REPORT, NOREPORT, ASYNC, IGNORE. In addition, if you specify areconId, the action that is taken is logged in theaudit/reconlog, along with the the other audit data for that reconciliation run.The following sample command calls the DELETE action on user
bjensen, whose_idin the LDAP directory isuid=bjensen,ou=People,dc=example,dc=com. The user is deleted in the target resource, in this case, the OpenIDM repository.Note that the
_idmust be URL-encoded in the REST call.$ curl \ --cacert self-signed.crt \ --header "X-OpenIDM-Username: openidm-admin" \ --header "X-OpenIDM-Password: openidm-admin" \ --header "Content-Type: application/json" \ --request POST \ "https://localhost:8443/openidm/sync?_action=performAction&sourceId=uid%3Dbjensen%2Cou%3DPeople%2Cdc%3Dexample%2Cdc%3Dcom&mapping= systemLdapAccounts_ManagedUser&action=DELETE" {}
12.15. Configuring Case Sensitivity for Data Stores
By default, OpenIDM is case-sensitive, which means that case is taken into account when comparing IDs during reconciliation. For data stores that are case-insensitive, such as OpenDJ, IDs and links that are created by a reconciliation process may be stored with a different case to the way in which they are stored in the OpenIDM repository. Such a situation can cause problems during a reconciliation operation, as the links for these IDs may not match.
For such data stores, you can configure OpenIDM to ignore case during reconciliation operations. With case sensitivity turned off in OpenIDM, for those specific mappings, comparisons are done without regard to case.
To specify that data stores are not case-sensitive, set the
"sourceIdsCaseSensitive" or "targetIdsCaseSensitive"
property to false in the mapping for those links. For
example, if the LDAP data store is case-insensitive, set the mapping from
the LDAP store to the managed user repository as follows:
"mappings" : [
{
"name" : "systemLdapAccounts_managedUser",
"source" : "system/ldap/account",
"sourceIdsCaseSensitive" : false,
"target" : "managed/user",
"properties" : [
...
If a mapping inherits links by using the "links"
property, it is not necessary to set case sensitivity, because the mapping
uses the setting of the referred links.
Note that configuring OpenIDM to be case-insensitive when comparing links
does not make the OpenICF provisioner case-insensitive when it requests
data. For example, if a user entry is stored with the ID
testuser and you make a request for
https://localhost:8443/openidm/managed/TESTuser, most
provisioners will filter out the match because of the difference in case,
and will indicate that the record is not found. To prevent the provisioner
from performing this secondary filtering, set the
enableFilteredResultsHandler property to
false in the provisioner configuration. For example:
"resultsHandlerConfig" :
{
"enableFilteredResultsHandler":false,
}, Caution
Do not disable the filtered results handler for the CSV file connector. The CSV file connector does not perform filtering so if you disable the filtered results handler for this connector, the full CSV file will be returned for every request.
12.16. Reconciliation Optimization
By default, reconciliation is configured to function in an optimized way. Some of these optimizations might, however, be unsuitable for your environment. The following sections describe the optimizations and how they can be configured.
12.16.1. Correlating Empty Target Sets
To optimize a reconciliation operation, the reconciliation process does
not attempt to correlate source objects to target objects if the set of
target objects is empty when the correlation is started. This considerably
speeds up the process the first time the reconciliation is run. You can change
this behavior for a specific mapping by adding the
correlateEmptyTargetSet property to the mapping definition
and setting it to true. For example:
{
"mappings": [
{
"name" : "systemMyLDAPAccounts_managedUser",
"source" : "system/MyLDAP/account",
"target" : "managed/user",
"correlateEmptyTargetSet" : true
},
]
}Be aware that this setting will have a performance impact on the reconciliation process.
12.16.2. Prefetching Links
All links are queried at the start of a correlation and the results of
that query are used. You can disable the prefetching of links, so that the
correlation process looks up each link in the database as it processes each
source or target object. You can disable the prefetching of links by adding
the prefetchLinks property to the mapping, and setting it
to false, for example:
{
"mappings": [
{
"name": "systemMyLDAPAccounts_managedUser",
"source": "system/MyLDAP/account",
"target": "managed/user"
"prefetchLinks" : false
}
]
}Be aware that this setting will have a performance impact on the reconciliation process.
12.16.3. Parallel Reconciliation Threads
By default, reconciliation is executed in a multi-threaded manner, that is, numerous threads are dedicated to the same reconciliation run. Multithreading generally improves reconciliation run performance. The default number of threads for a single reconciliation run is ten (plus the main reconciliation thread). Under normal circumstances, you should not need to change this number, however the default might not be appropriate in the following situations:
The hardware has many cores and supports more concurrent threads. As a rule of thumb for performance tuning, start with setting the thread number to two times the number of cores.
The source or target is an external system with high latency or slow response times. Threads may then spend considerable time waiting for a response from the external system. Increasing the available threads enables the system to prepare or continue with additional objects.
To change the number of threads, set the taskThreads
property in the conf/sync.json file, for example:
"mappings" : [
{
"name" : "systemXmlfileAccounts_managedUser",
"source" : "system/xmlfile/account",
"target" : "managed/user",
"taskThreads" : 20
...
}
]
}A value of 0 specifies that reconciliation is run
on the main reconciliation thread, that is, in a serial manner.
12.17. Correlation Queries
Every time OpenIDM creates an object through synchronization, it creates a link between the source and target objects. OpenIDM then uses the link to determine the object's situation during later synchronization operations.
Initial, full synchronization operations can involve correlating many objects that exist on both source and target systems. In this case, OpenIDM uses correlation queries to find target objects that already exist, and that correspond to source objects. For the target objects that match a correlation query, OpenIDM needs only to create a link, rather than a new target object.
Correlation queries are accomplished by using script to construct the actual query map. The content of the query is generated dynamically, using values from the source object. Each source object results in a new query being sent to the target system, using (possibly transformed) values from the source object for its execution.
Correlation queries are defined as part of the mapping (in
sync.json) and run against
target resources, either managed or system objects,
depending on the mapping. Correlation queries on system objects access the
connector, which executes the query on the external resource.
The preferred syntax for a correlation query is a filtered query, using the
_queryFilter keyword, although predefined queries (using
_queryId) and native queries (using
_queryExpression) are also supported for correlation
queries.
A correlation query must return a map that holds a generic query, with the following elements:
A condition, such as "Equals", "Starts with", or "Greater than".
For examples of query conditions, see Section 7.3.4, "Constructing Queries".
The element that is being compared, on the target object, for example,
uid.Note that this element on the target object is not necessarily a single attribute. Your query filter can be as simple, or as complex, as you need it to be, from a single operator to an entire boolean expression tree.
When the target object is a system object, this attribute must be referred to by its OpenIDM name, rather than its native (OpenICF) name. For example, in the following provisioner configuration excerpt, the name to use would be
uidand not__NAME__:"uid" : { "type" : "string", "nativeName" : "__NAME__", "required" : true, "nativeType" : "string" } ...The value to search for in the query.
This value is generally based on one or more values from the source object, but is not necessarily the value of a single source object property. The way in which your script uses the values from the source object to find a matching record in the target system is up to you. It might be a transformation of a source object property (for example,
toUpperCase()), concatenated with other strings or properties. You can also use this value to call an external REST endpoint, the response from which would be the final "value" portion of the query.
The following query finds objects on the target whose uid
is the same as the userName of a source object.
"correlationQuery" : {
"type" : "text/javascript",
"source" : "var qry = {'_queryFilter': 'uid eq \"' + source.userName + '\"'}; qry"
},
The query can return zero or more objects. The situation that OpenIDM assigns to the source object depends on the number of target objects that are returned.
Correlation queries that do not use common query filter syntax must be
defined in the configuration file for the repository, either
openidm/conf/repo.jdbc.json or
openidm/conf/repo.orientdb.json, and must be referenced
in the mapping (sync.json) file.
The following example shows a query, defined in the OrientDB repository
configuration (openidm/conf/repo.orientdb.json), that
can be used as the basis for a correlation query.
"for-userName" : "SELECT * FROM ${unquoted:_resource} WHERE userName = ${uid}"
By default, a ${value} token replacement is assumed to be
a quoted string. If the value is not a quoted string, use the
unquoted: prefix, as shown above.
You would call this query in the mapping (sync.json) file
as follows:
{
"correlationQuery": {
"type": "text/javascript",
"source":
"var qry = {'_queryId' : 'for-userName', 'uid' : source.name}; qry;"
}
}
The _queryId property
value (for-userName) matches the name of the query
specified in openidm/conf/repo.orientdb.json. The
source.name value replaces ${uid} in
the query. OpenIDM replaces ${unquoted:_resource} in the
query with the name of the table that holds managed objects.
OpenIDM 3.1 offers a new declarative correlation option,
named the expression builder, that makes it easier to configure correlation
queries. The easiest way to use the expression builder to build up a
correlation query is by using the Admin UI. The following image shows how the
expression builder is used to build up a correlation query for a mapping from
system/ldap/accounts to managed/user
objects. The query essentially states that, in order for a match to exist
between the source (LDAP) object and the target (managed) object, both the
userName and telephoneNumber of those
objects must match.
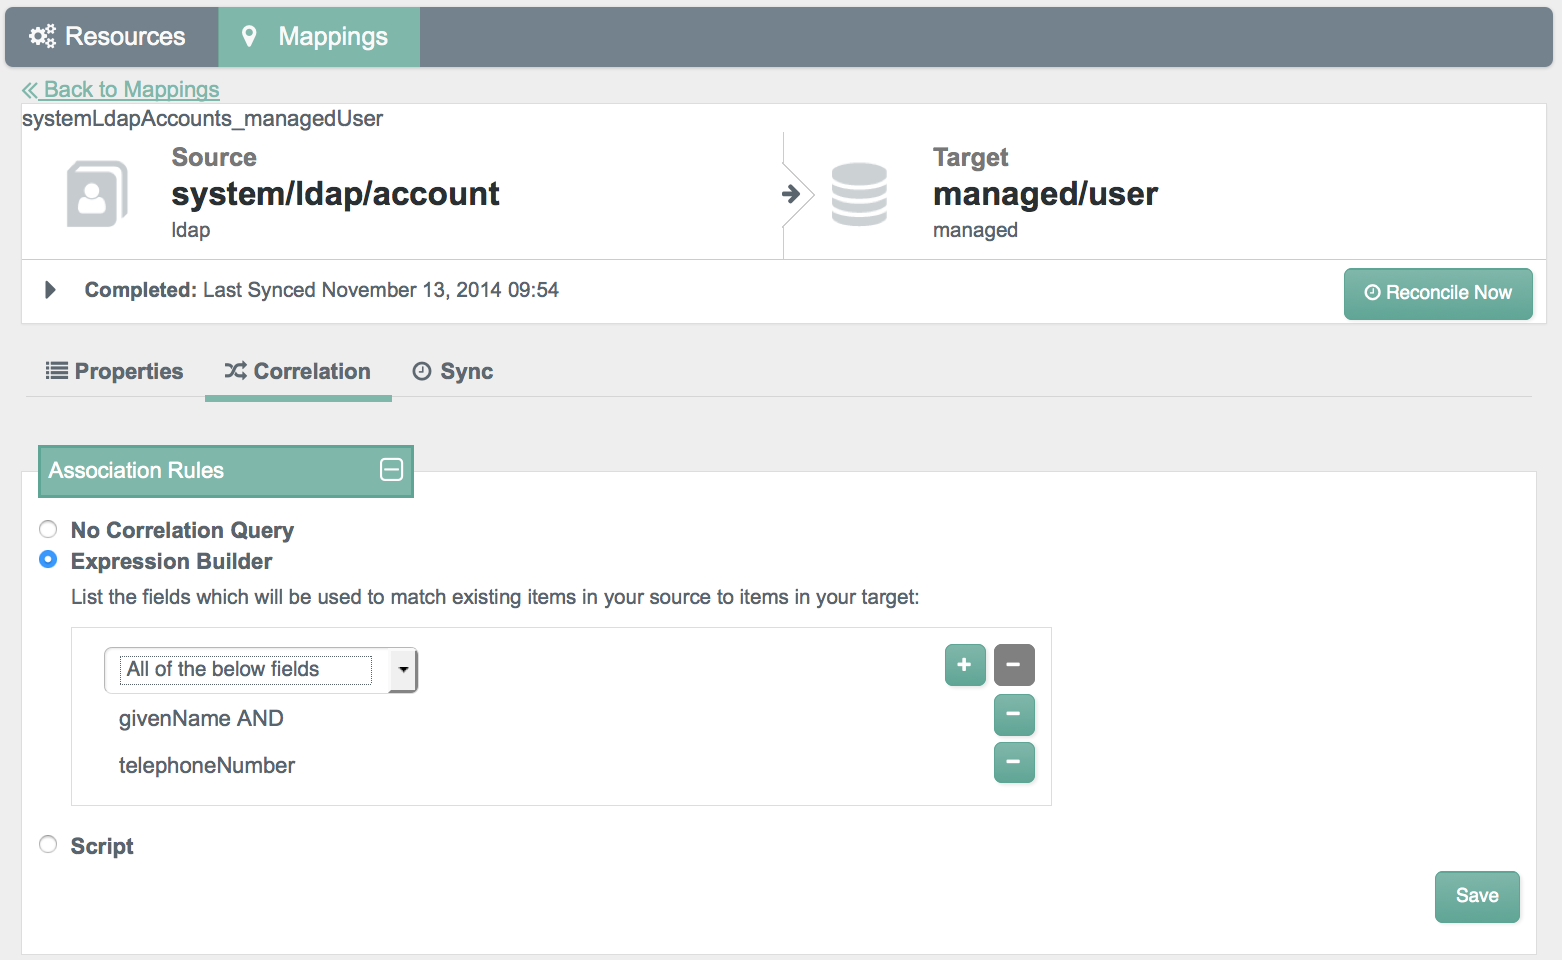
The resulting correlation query, in the mapping configuration
(sync.json) is as follows:
"correlationQuery" : {
"type" : "text/javascript",
"expressionTree" : {
"all" : [
"givenName",
"telephoneNumber"
]
},
"mapping" : "systemLdapAccounts_managedUser",
"file" : "ui/correlateTreeToQueryFilter.js"
},
The logic in the expression builder is in the script
openidm/bin/defaults/script/ui/correlateTreeToQueryFilter.js
which converts the expression into the required query filter.
12.18. Advanced Data Flow Configuration
Section 12.3, "Basic Data Flow Configuration" shows how to trigger scripts when objects are created and updated. Other situations require you to trigger scripts in response to other synchronization actions. For example, you might not want OpenIDM to delete a managed user directly when an external account is deleted, but instead unlink the objects and deactivate the user in another resource. (Alternatively, you might delete the object in OpenIDM but nevertheless execute a script.) The following example shows a more advanced mapping configuration.
{
"mappings": [
{
"name": "systemLdapAccount_managedUser",
"source": "system/ldap/account",
"target": "managed/user",
"validSource": {
"type": "text/javascript",
"file": "script/isValid.js"
},
"correlationQuery" : {
"type" : "text/javascript",
"source" : "var map = {'_queryFilter': 'uid eq \"' +
source.userName + '\"'}; map;"
},
"properties": [
{
"source": "uid",
"transform": {
"type": "text/javascript",
"source": "source.toLowerCase()"
},
"target": "userName"
},
{
"source": "",
"transform": {
"type": "text/javascript",
"source": "if (source.myGivenName)
{source.myGivenName;} else {source.givenName;}"
},
"target": "givenName"
},
{
"source": "",
"transform": {
"type": "text/javascript",
"source": "if (source.mySn)
{source.mySn;} else {source.sn;}"
},
"target": "familyName"
},
{
"source": "cn",
"target": "fullname"
},
{
"comment": "Multi-valued in LDAP, single-valued in AD.
Retrieve first non-empty value.",
"source": "title",
"transform": {
"type": "text/javascript",
"file": "script/getFirstNonEmpty.js"
},
"target": "title"
},
{
"condition": {
"type": "text/javascript",
"source": "var clearObj = openidm.decrypt(object);
((clearObj.password != null) &&
(clearObj.ldapPassword != clearObj.password))"
},
"transform": {
"type": "text/javascript",
"source": "source.password"
},
"target": "__PASSWORD__"
}
],
"onCreate": {
"type": "text/javascript",
"source": "target.ldapPassword = null;
target.adPassword = null;
target.password = null;
target.ldapStatus = 'New Account'"
},
"onUpdate": {
"type": "text/javascript",
"source": "target.ldapStatus = 'OLD'"
},
"onUnlink": {
"type": "text/javascript",
"file": "script/triggerAdDisable.js"
},
"policies": [
{
"situation": "CONFIRMED",
"action": "UPDATE"
},
{
"situation": "FOUND",
"action": "UPDATE"
},
{
"situation": "ABSENT",
"action": "CREATE"
},
{
"situation": "AMBIGUOUS",
"action": "EXCEPTION"
},
{
"situation": "MISSING",
"action": "EXCEPTION"
},
{
"situation": "UNQUALIFIED",
"action": "UNLINK"
},
{
"situation": "UNASSIGNED",
"action": "EXCEPTION"
}
]
}
]
}The following list shows the properties that you can use as hooks in mapping configurations to call scripts.
- Triggered by Situation
onCreate, onUpdate, onDelete, onLink, onUnlink
- Object Filter
vaildSource, validTarget
- Correlating Objects
correlationQuery
- Triggered on Reconciliation
result
- Scripts Inside Properties
condition, transform
Your scripts can get data from any connected system at any time by
using the openidm.read(id) function, where
id is the identifier of the object to read.
The following example reads a managed user object from the repository.
repoUser = openidm.read("managed/user/ddoe");The following example reads an account from an external LDAP resource.
externalAccount = openidm.read("system/ldap/account/uid=ddoe,ou=People,dc=example,dc=com");Note that the query targets a DN rather than a UID, as it did in the
previous example. The attribute that is used for the _id
is defined in the connector configuration file and, in this example, is set
to "uidAttribute" : "dn". Although it is possible to use
a DN (or any unique attribute) for the _id, as a best
practice, you should use an attribute that is both unique and immutable.
12.19. Scheduling Synchronization
You can schedule synchronization operations, such as LiveSync and reconciliation, using cron-like syntax.
This section describes scheduling for reconciliation and LiveSync, however, you can also use OpenIDM's scheduler service to schedule any other event by supplying a link to a script file, in which that event is defined. For information about scheduling other events, and for a deeper understanding of the OpenIDM scheduler service, see Chapter 13, "Scheduling Tasks and Events".
12.19.1. Configuring Scheduled Synchronization
Each scheduled reconciliation and LiveSync task requires a schedule
configuration file in openidm/conf. By convention,
files are named
openidm/conf/schedule-schedule-name
.json, where schedule-name is a
logical name for the scheduled synchronization operation, such as
reconcile_systemXmlAccounts_managedUser.
Schedule configuration files have the following format:
{
"enabled" : true,
"persisted" : false,
"type" : "cron",
"startTime" : "(optional) time",
"endTime" : "(optional) time",
"schedule" : "cron expression",
"misfirePolicy" : "optional, string",
"timeZone" : "(optional) time zone",
"invokeService" : "service identifier",
"invokeContext" : "service specific context info"
}
For an explanation of each of these properties, see Chapter 13, "Scheduling Tasks and Events".
To schedule a reconciliation or LiveSync task, set the
invokeService property to either
"sync" (for reconciliation) or
"provisioner" for LiveSync.
The value of the invokeContext property depends on the
type of scheduled event. For reconciliation, the properties are set as
follows:
{
"invokeService": "sync",
"invokeContext": {
"action": "reconcile",
"mapping": "systemLdapAccount_managedUser"
}
}
The "mapping" is either referenced by its name in the
openidm/conf/sync.json file, or defined inline by using
the "mapping" property, as shown in the example in
Section 12.19.2, "Alternative Mappings".
For LiveSync, the properties are set as follows:
{
"invokeService": "provisioner",
"invokeContext": {
"action": "liveSync",
"source": "system/OpenDJ/__ACCOUNT__"
}
}
The "source" property follows OpenIDM's convention for a
pointer to an external resource object and takes the form
system/resource-name/object-type.
12.19.2. Alternative Mappings
Mappings for synchronization are usually stored in
openidm/conf/sync.json for reconciliation, LiveSync,
and for pushing changes made to managed objects to external resources. You
can, however, provide alternative mappings for scheduled reconciliation by
adding the mapping to the schedule configuration instead of referencing a
mapping in sync.json.
{
"enabled": true,
"type": "cron",
"schedule": "0 08 16 * * ?",
"invokeService": "sync",
"invokeContext": {
"action": "reconcile",
"mapping": {
"name": "CSV_XML",
"source": "system/Ldap/account",
"target": "managed/user",
"properties": [
{
"source": "firstname",
"target": "firstname"
},
...
],
"policies": [...]
}
}
}
Chapter 13. Scheduling Tasks and Events
OpenIDM enables you to schedule reconciliation and synchronization tasks. You can also use scheduling to trigger scripts, collect and run reports, trigger workflows, perform custom logging, and so forth.
OpenIDM supports cron-like syntax to schedule events and tasks, based on expressions supported by the Quartz Scheduler (bundled with OpenIDM).
If you use configuration files to schedule tasks and events, you must
place the schedule files in the openidm/conf directory.
By convention, OpenIDM uses file names of the form
schedule-schedule-name.json,
where schedule-name is a logical name for the
scheduled operation, for example,
schedule-reconcile_systemXmlAccounts_managedUser.json.
There are several example schedule configuration files in the
openidm/samples/schedules directory.
You can configure OpenIDM to pick up changes to scheduled tasks and events dynamically, during initialization and also at runtime. For more information, see Section 6.2, "Changing the Default Configuration".
In addition to the fine-grained scheduling facility, you can perform a scheduled batch scan for a specified date in OpenIDM data, and then automatically execute a task when this date is reached. For more information, see Section 13.5, "Scanning Data to Trigger Tasks".
13.1. Scheduler Configuration
Schedules are configured through JSON objects. The schedule configuration involves three files:
The
openidm/conf/boot/boot.propertiesfile, where you can enable the execution of persistent schedulesThe
openidm/conf/scheduler.jsonfile, that configures the overall scheduler serviceOne
openidm/conf/schedule-schedule-name.jsonfile for each configured schedule
In the boot properties configuration file
(openidm/conf/boot/boot.properties),
the instance type is standalone and persistent schedules are enabled by
default:
# valid instance types for node include standalone, clustered-first, and clustered-additional openidm.instance.type=standalone # enables the execution of persistent schedulers openidm.scheduler.execute.persistent.schedules=true
The scheduler service configuration file
(openidm/conf/scheduler.json) governs the configuration
for a specific scheduler instance, and has the following format:
{
"threadPool" : {
"threadCount" : "10"
},
"scheduler" : {
"executePersistentSchedules" : "&{openidm.scheduler.execute.persistent.schedules}"
}
}
The properties in the scheduler.json file relate
to the configuration of the Quartz Scheduler.
threadCountspecifies the maximum number of threads that are available for the concurrent execution of scheduled tasks.executePersistentSchedulesallows you to disable persistent schedule execution for a specific node. If this parameter is set tofalse, the Scheduler Service will support the management of persistent schedules (CRUD operations) but it will not execute any persistent schedules. The value of this property can be a string or boolean and istrueby default.Note that changing the value of the
openidm.scheduler.execute.persistent.schedulesproperty in theboot.propertiesfile changes the scheduler that manages scheduled tasks on that node. Because the persistent and in-memory schedulers are managed separately, a situation can arise where two separate schedules have the same schedule name.advancedProperties(optional) enables you to configure additional properties for the Quartz Scheduler.
Note
In clustered environments, the scheduler service obtains an
instanceID and checkin and timeout settings from the
cluster management service (defined in the
openidm/conf/cluster.json file). This
behavior differs from OpenIDM 2.1.0 (in which the scheduler service
specified the instance ID and checkin and timeout settings). Therefore, if
you used the scheduler service in OpenIDM 2.1.0, you will need to migrate
any reference to assigned instance IDs, allowing them to be provided by the
cluster management service.
For details of all the configurable properties for the Quartz Scheduler, see the Quartz Scheduler Configuration Reference.
Each schedule configuration file,
openidm/conf/schedule-schedule-name.json,
has the following format:
{
"enabled" : true,
"persisted" : false,
"concurrentExecution" : false,
"type" : "cron",
"startTime" : "(optional) time",
"endTime" : "(optional) time",
"schedule" : "cron expression",
"misfirePolicy" : "optional, string",
"timeZone" : "(optional) time zone",
"invokeService" : "service identifier",
"invokeContext" : "service specific context info",
"invokeLogLevel" : "(optional) level"
}The schedule configuration properties are defined as follows:
- enabled
Set to
trueto enable the schedule. When this property is set tofalse, OpenIDM considers the schedule configuration dormant, and does not allow it to be triggered or executed.If you want to retain a schedule configuration, but do not want it used, set
enabledtofalsefor task and event schedulers, instead of changing the configuration or cron expressions.- persisted (optional)
Specifies whether the schedule state should be persisted or stored in RAM. Boolean (
trueorfalse),falseby default.In a clustered environment, this property must be set to
trueto have the schedule fire only once across the cluster. For more information, see Section 13.2, "Configuring Persistent Schedules".- concurrentExecution
Specifies whether multiple instances of the same schedule can run concurrently. Boolean (
trueorfalse),falseby default. Multiple instances of the same schedule cannot run concurrently by default. This setting prevents a new scheduled task from being launched before the same previously launched task has completed. For example, under normal circumstances you would want a liveSync operation to complete its execution before the same operation was launched again. To enable concurrent execution of multiple schedules, set this parameter totrue. The behavior of "missed" scheduled tasks is governed by the misfirePolicy.- type
Currently OpenIDM supports only
cron.- startTime (optional)
Used to start the schedule at some time in the future. If this parameter is omitted, empty, or set to a time in the past, the task or event is scheduled to start immediately.
Use ISO 8601 format to specify times and dates (
YYYY-MM-DD Thh:mm :ss).- endTime (optional)
Used to plan the end of scheduling.
- schedule
Takes cron expression syntax. For more information, see the CronTrigger Tutorial and Lesson 6: CronTrigger.
- misfirePolicy
For persistent schedules, this optional parameter specifies the behavior if the scheduled task is missed, for some reason. Possible values are as follows:
fireAndProceed. The first execution of a missed schedule is immediately executed when the server is back online. Subsequent executions are discarded. After this, the normal schedule is resumed.doNothing, all missed schedules are discarded and the normal schedule is resumed when the server is back online.
- timeZone (optional)
If not set, OpenIDM uses the system time zone.
- invokeService
Defines the type of scheduled event or action. The value of this parameter can be one of the following:
"sync"for reconciliation"provisioner"for LiveSync"script"to call some other scheduled operation defined in a script
- invokeContext
Specifies contextual information, depending on the type of scheduled event (the value of the
invokeServiceparameter).The following example invokes reconciliation.
{ "invokeService": "sync", "invokeContext": { "action": "reconcile", "mapping": "systemLdapAccount_managedUser" } }For a scheduled reconciliation task, you can define the mapping in one of two ways:
Reference a mapping by its name in
sync.json, as shown in the previous example. The mapping must exist in theopenidm/conf/sync.jsonfile.Add the mapping definition inline by using the
"mapping"property, as shown in the example in Section 12.19.2, "Alternative Mappings".
The following example invokes a LiveSync action.
{ "invokeService": "provisioner", "invokeContext": { "action": "liveSync", "source": "system/OpenDJ/__ACCOUNT__" } }For scheduled LiveSync tasks, the
"source"property follows OpenIDM's convention for a pointer to an external resource object and takes the formsystem/resource-name /object-type.The following example invokes a script, which prints the string
Hello Worldto the OpenIDM log (/openidm/logs/openidm0.log.X).{ "invokeService": "script", "invokeContext": { "script": { "type": "text/javascript", "source": "console.log('Hello World');" } } }Note that these are sample configurations only. Your own schedule configuration will differ according to your specific requirements.
- invokeLogLevel (optional)
Specifies the level at which the invocation will be logged. Particularly for schedules that run very frequently, such as LiveSync, the scheduled task can generate significant output to the log file, and the log level should be adjusted accordingly. The default schedule log level is
info. The value can be set to any one of the SLF4J log levels:"trace""debug""info""warn""error""fatal"
13.2. Configuring Persistent Schedules
By default, scheduling information, such as schedule state and details
of the schedule execution, is stored in RAM. This means that such
information is lost when OpenIDM is rebooted. The schedule configuration
itself (defined in the openidm/conf/schedule-
schedule-name.json file) is not lost
when OpenIDM is shut down, and normal scheduling continues when the server is
restarted. However, there are no details of missed schedule executions that
should have occurred during the period the server was unavailable.
You can configure schedules to be persistent, which means that the scheduling information is stored in the internal repository rather than in RAM. With persistent schedules, scheduling information is retained when OpenIDM is shut down. Any previously scheduled jobs can be rescheduled automatically when OpenIDM is restarted.
Persistent schedules also enable you to manage scheduling across a cluster (multiple OpenIDM instances). When scheduling is persistent, a particular schedule will be executed only once across the cluster, rather than once on every OpenIDM instance. For example, if your deployment includes a cluster of OpenIDM nodes for high availability, you can use persistent scheduling to start a reconciliation action on only one node in the cluster, instead of starting several competing reconciliation actions on each node.
You can use persistent schedules with the default OrientDB repository, or with the MySQL repository (see Chapter 4, "Installing a Repository For Production" in the Installation Guide).
To configure persistent schedules, set the "persisted"
property to true in the schedule configuration file
(schedule-schedule-name.json).
If OpenIDM is down when a scheduled task was set to occur, one or more
executions of that schedule might be missed. To specify what action should be
taken if schedules are missed, set the misfirePolicy in the
schedule configuration file. The misfirePolicy determines
what OpenIDM should do if scheduled tasks are missed. Possible values are as
follows:
fireAndProceed. The first execution of a missed schedule is immediately executed when the server is back online. Subsequent executions are discarded. After this, the normal schedule is resumed.doNothing. All missed schedules are discarded and the normal schedule is resumed when the server is back online.
13.3. Schedule Examples
The following example shows a schedule for reconciliation that
is not enabled. When enabled ("enabled" : true,),
reconciliation runs every 30 minutes, starting on the hour.
{
"enabled": false,
"persisted": false,
"type": "cron",
"schedule": "0 0/30 * * * ?",
"invokeService": "sync",
"invokeContext": {
"action": "reconcile",
"mapping": "systemLdapAccounts_managedUser"
}
}The following example shows a schedule for LiveSync enabled to run every 15 seconds, starting at the beginning of the minute. The schedule is persisted, that is, stored in the internal repository rather than in memory. If one or more LiveSync executions are missed, as a result of OpenIDM being unavailable, the first execution of the LiveSync action is executed when the server is back online. Subsequent executions are discarded. After this, the normal schedule is resumed.
{
"enabled": false,
"persisted": true,
"misfirePolicy" : "fireAndProceed",
"type": "cron",
"schedule": "0/15 * * * * ?",
"invokeService": "provisioner",
"invokeContext": {
"action": "liveSync",
"source": "system/ldap/account"
}
}13.4. Managing Schedules Over REST
OpenIDM exposes the scheduler service under the
/openidm/scheduler context path. The following examples
show how schedules can be created, read, updated, and deleted, over REST,
like any other object.
13.4.1. Creating a Schedule
You can create a schedule with a PUT request, which allows you to specify the ID of the schedule, or with a POST request, in which case the server assigns an ID automatically.
The following example uses a PUT request to create a schedule that fires a
script (script/testlog.js) every second. The schedule
configuration is as described in Section 13.1, "Scheduler Configuration".
$ curl \
--cacert self-signed.crt \
--header "X-OpenIDM-Username: openidm-admin" \
--header "X-OpenIDM-Password: openidm-admin" \
--header "Content-Type: application/json" \
--request PUT \
--data '{
"enabled":true,
"type":"cron",
"schedule":"0/1 * * * * ?",
"persisted":true,
"misfirePolicy":"fireAndProceed",
"invokeService":"script",
"invokeContext": {
"script": {
"type":"text/javascript",
"file":"script/testlog.js"
}
}
}' \
"https://localhost:8443/openidm/scheduler/testlog-schedule"
{
"type": "cron",
"invokeService": "script",
"persisted": true,
"_id": "testlog-schedule",
"schedule": "0/1 * * * * ?",
"misfirePolicy": "fireAndProceed",
"enabled": true,
"invokeContext": {
"script": {
"file": "script/testlog.js",
"type": "text/javascript"
}
}
}The following example uses a POST request to create an identical schedule to the one created in the previous example, but with a server-assigned ID.
$ curl \
--cacert self-signed.crt \
--header "X-OpenIDM-Username: openidm-admin" \
--header "X-OpenIDM-Password: openidm-admin" \
--header "Content-Type: application/json" \
--request POST \
--data '{
"enabled":true,
"type":"cron",
"schedule":"0/1 * * * * ?",
"persisted":true,
"misfirePolicy":"fireAndProceed",
"invokeService":"script",
"invokeContext": {
"script": {
"type":"text/javascript",
"file":"script/testlog.js"
}
}
}' \
"https://localhost:8443/openidm/scheduler?_action=create"
{
"type": "cron",
"invokeService": "script",
"persisted": true,
"_id": "d6d1b256-7e46-486e-af88-169b4b1ad57a",
"schedule": "0/1 * * * * ?",
"misfirePolicy": "fireAndProceed",
"enabled": true,
"invokeContext": {
"script": {
"file": "script/testlog.js",
"type": "text/javascript"
}
}
}
The output includes the _id of the schedule, in this case
"_id": "d6d1b256-7e46-486e-af88-169b4b1ad57a".
13.4.2. Obtaining the Details of a Schedule
The following example displays the details of the schedule created in the previous section. Specify the schedule ID in the URL.
$ curl \
--cacert self-signed.crt \
--header "X-OpenIDM-Username: openidm-admin" \
--header "X-OpenIDM-Password: openidm-admin" \
--request GET \
"https://localhost:8443/openidm/scheduler/d6d1b256-7e46-486e-af88-169b4b1ad57a"
{
"_id": "d6d1b256-7e46-486e-af88-169b4b1ad57a",
"schedule": "0/1 * * * * ?",
"misfirePolicy": "fireAndProceed",
"startTime": null,
"invokeContext": {
"script": {
"file": "script/testlog.js",
"type": "text/javascript"
}
},
"enabled": true,
"concurrentExecution": false,
"persisted": true,
"timeZone": null,
"type": "cron",
"invokeService": "org.forgerock.openidm.script",
"endTime": null,
"invokeLogLevel": "info"
}13.4.3. Updating a Schedule
To update a schedule definition, use a PUT request and update all properties of the object. Note that PATCH requests are currently supported only for managed objects. The following example disables the schedule created in the previous section.
$ curl \
--cacert self-signed.crt \
--header "X-OpenIDM-Username: openidm-admin" \
--header "X-OpenIDM-Password: openidm-admin" \
--header "Content-Type: application/json" \
--request PUT \
--data '{
"enabled":false,
"type":"cron",
"schedule":"0/1 * * * * ?",
"persisted":true,
"misfirePolicy":"fireAndProceed",
"invokeService":"script",
"invokeContext": {
"script": {
"type":"text/javascript",
"file":"script/testlog.js"
}
}
}' \
"https://localhost:8443/openidm/scheduler/d6d1b256-7e46-486e-af88-169b4b1ad57a"
null13.4.4. Listing Configured Schedules
To display a list of all configured schedules, query the
openidm/scheduler context path as shown in the following
example:
$ curl \
--cacert self-signed.crt \
--header "X-OpenIDM-Username: openidm-admin" \
--header "X-OpenIDM-Password: openidm-admin" \
--request GET \
"https://localhost:8443/openidm/scheduler?_queryId=query-all-ids"
{
"remainingPagedResults": -1,
"pagedResultsCookie": null,
"resultCount": 2,
"result": [
{
"_id": "d6d1b256-7e46-486e-af88-169b4b1ad57a"
},
{
"_id": "recon"
}
]
}13.4.5. Deleting a Schedule
To deleted a configured schedule, call a DELETE request on the schedule ID. For example:
$ curl \ --cacert self-signed.crt \ --header "X-OpenIDM-Username: openidm-admin" \ --header "X-OpenIDM-Password: openidm-admin" \ --request DELETE \ "https://localhost:8443/openidm/scheduler/d6d1b256-7e46-486e-af88-169b4b1ad57a" null
13.5. Scanning Data to Trigger Tasks
In addition to the fine-grained scheduling facility described previously, OpenIDM provides a task scanning mechanism. The task scanner enables you to perform a batch scan on a specified property in OpenIDM, at a scheduled interval, and then to execute a task when the value of that property matches a specified value.
When the task scanner identifies a condition that should trigger the task, it can invoke a script created specifically to handle the task.
For example, the task scanner can scan all managed/user
objects for a "sunset date" and can invoke a script that executes a "sunset
task" on the user object when this date is reached.
13.5.1. Configuring the Task Scanner
The task scanner is essentially a scheduled task that queries a set of
managed users. The task scanner is configured in the same way as a regular
scheduled task, in a schedule configuration file named
(schedule-task-name.json),
with the "invokeService" parameter set to
"taskscanner". The "invokeContext"
parameter defines the details of the scan, and the task that should be
executed when the specified condition is triggered.
The following example defines a scheduled scanning task that triggers a
sunset script. The schedule configuration file is provided in
openidm/samples/taskscanner/conf/schedule-taskscan_sunset.json.
To use this sample file, copy it to the openidm/conf
directory.
{
"enabled" : true,
"type" : "cron",
"schedule" : "0 0 * * * ?",
"concurrentExecution" : false,
"invokeService" : "taskscanner",
"invokeContext" : {
"waitForCompletion" : false,
"maxRecords" : 2000,
"numberOfThreads" : 5,
"scan" : {
"_queryId" : "scan-tasks",
"object" : "managed/user",
"property" : "sunset/date",
"condition" : {
"before" : "${Time.now}"
},
"taskState" : {
"started" : "sunset/task-started",
"completed" : "sunset/task-completed"
},
"recovery" : {
"timeout" : "10m"
}
},
"task" : {
"script" : {
"type" : "text/javascript",
"file" : "script/sunset.js"
}
}
}
}
The schedule configuration calls a script (script/sunset.js).
To test the sample, copy this script file from
openidm/samples/taskscanner/script/sunset.js to the
openidm/script directory. The remaining properties in
the schedule configuration are as follows:
The "invokeContext" parameter takes the following
properties:
"waitForCompletion"(optional)This property specifies whether the task should be performed synchronously. Tasks are performed asynchronously by default (with
waitForCompletionset to false). A task ID (such as{"_id":"354ec41f-c781-4b61-85ac-93c28c180e46"}) is returned immediately. If this property is set to true, tasks are performed synchronously and the ID is not returned until all tasks have completed."maxRecords"(optional)The maximum number of records that can be processed. This property is not set by default so the number of records is unlimited. If a maximum number of records is specified, that number will be spread evenly over the number of threads.
"numberOfThreads"(optional)By default, the task scanner runs in a multi-threaded manner, that is, numerous threads are dedicated to the same scanning task run. Multi-threading generally improves the performance of the task scanner. The default number of threads for a single scanning task is ten. To change this default, set the
"numberOfThreads"property."scan"Defines the details of the scan. The following properties are defined:
"_queryId"Specifies the predefined query that is performed to identify the entries for which this task should be run.
The query that is referenced here must be defined in the database configuration file (
conf/repo.orientdb.jsonorconf/repo.jdbc.json). A sample query for a scanned task ("scan-tasks") is defined in the JDBC repository configuration file as follows:"scan-tasks" : "SELECT fullobject FROM ${_dbSchema}.${_mainTable} obj INNER JOIN ${_dbSchema}.${_propTable} prop ON obj.id = prop.${_mainTable}_id LEFT OUTER JOIN ${_dbSchema}.${_propTable} complete ON obj.id = complete.${_mainTable}_id AND complete.propkey=${taskState.completed} INNER JOIN ${_dbSchema}.objecttypes objtype ON objtype.id = obj.objecttypes_id WHERE ( prop.propkey=${property} AND prop.propvalue < ${condition.before} AND objtype.objecttype = ${_resource} ) AND ( complete.propvalue is NULL )",Note that this query identifies records for which the value of the specified
propertyis smaller than the condition. The sample query supports only time-based conditions, with the time specified in ISO 8601 format (Zulu time). You can write any query to target the records that you require."object"Defines the managed object type against which the query should be performed, as defined in the
managed.jsonfile."property"Defines the property of the managed object, against which the query is performed. In the previous example, the
"property" : "sunset/date"indicates a JSON pointer that maps to the object attribute, and can be understood assunset: {"date" : "date"}. For more information about JSON pointer syntax, see RFC 6901.If you are using a JDBC repository, with a generic mapping, you must explicitly set this property as searchable so that it can be queried by the task scanner. For more information, see Section 5.2.1, "Using Generic Mappings".
"condition"(optional)Indicates the conditions that must be matched for the defined property.
In the previous example, the scanner scans for users for whom the property
sunset/dateis prior to the current timestamp (at the time the script is executed).You can use these fields to define any condition. For example, if you wanted to limit the scanned objects to a specified location, say, London, you could formulate a query to compare against object locations and then set the condition to be:
"condition" : { "location" : "London" },For time-based conditions, the
"condition"property supports macro syntax, based on theTime.nowobject (which fetches the current time). You can specify any date/time in relation to the current time, using the+or-operator, and a duration modifier. For example:"${Time.now + 1d}"would return all user objects whosesunset/dateis the following day (current time plus one day). You must include space characters around the operator (+or-). The duration modifier supports the following unit specifiers:s- secondm- minuteh- hourd- dayM- monthy- year"taskState"Indicates the names of the fields in which the start message and the completed message are stored. These fields are used to track the status of the task.
"started"specifies the field that stores the timestamp for when the task begins."completed"specifies the field that stores the timestamp for when the task completes its operation. The"completed"field is present as soon as the task has started, but its value isnulluntil the task has completed."recovery"(optional)Specifies a configurable timeout, after which the task scanner process ends. In a scenario with clustered OpenIDM instances, there might be more than one task scanner running at a time. A task cannot be executed by two task scanners at the same time. When one task scanner "claims" a task, it indicates that the task has been started. That task is then unavailable to be claimed by another task scanner and remains unavailable until the end of the task is indicated. In the event that the first task scanner does not complete the task by the specified timeout, for whatever reason, a second task scanner can pick up the task.
"task"Provides details of the task that is performed. Usually, the task is invoked by a script, whose details are defined in the
"script"property:"type"- the type of script. Currently, only JavaScript is supported."file"- the path to the script file. The script file takes at least two objects (in addition to the default objects that are provided to all OpenIDM scripts):"input"which is the individual object that is retrieved from the query (in the example, this is the individual user object) and"objectID"which is a string that contains the full identifier of the object. The objectID is useful for performing updates with the script as it allows you to target the object directly, for example:openidm.update(objectID, input['_rev'], input);. A sample script file is provided inopenidm/samples/taskscanner/script/sunset.js. To use this sample file, you must copy it to theopenidm/scriptdirectory. The sample script marks all user objects that match the specified conditions as "inactive". You can use this sample script to trigger a specific workflow, or any other task associated with the sunset process. For more information about using scripts in OpenIDM, see Appendix F, "Scripting Reference".
13.5.2. Managing Scanning Tasks Over REST
You can trigger, cancel, and monitor scanning tasks over the REST
interface, using the REST endpoint
https://localhost:8443/openidm/taskscanner.
13.5.2.1. Triggering a Scanning Task
The following REST command executes a task named "taskscan_sunrise".
The task itself is defined in a file named
openidm/conf/schedule-taskscan_sunset.json.
$ curl \ --cacert self-signed.crt \ --header "X-OpenIDM-Username: openidm-admin" \ --header "X-OpenIDM-Password: openidm-admin" \ --header "Content-Type: application/json" \ --request POST \ "https://localhost:8443/openidm/taskscanner?_action=execute&name=schedule/taskscan_sunset"
By default, a scanning task ID is returned immediately when the task is initiated. Clients can make subsequent calls to the task scanner service, using this task ID to query its state and to call operations on it.
For example, the scanning task initiated previously would return something similar to the following, as soon as it was initiated:
{"_id":"edfaf59c-aad1-442a-adf6-3620b24f8385"}To have the scanning task complete before the ID is returned, set the
waitForCompletion property to true
in the task definition file (schedule-taskscan_sunset.json).
You can also set the property directly over the REST interface when the task is
initiated. For example:
$ curl \
--cacert self-signed.crt \
--header "X-OpenIDM-Username: openidm-admin" \
--header "X-OpenIDM-Password: openidm-admin" \
--header "Content-Type: application/json" \
--request POST \
"https://localhost:8443/openidm/taskscanner?_action=execute&name=schedule/taskscan_sunset&waitForCompletion=true"
13.5.2.2. Canceling a Scanning Task
You can cancel a scanning task by sending a REST call with the
cancel action, specifying the task ID. For example, the
following call cancels the scanning task initiated in the previous section.
$ curl \
--cacert self-signed.crt \
--header "X-OpenIDM-Username: openidm-admin" \
--header "X-OpenIDM-Password: openidm-admin" \
--header "Content-Type: application/json" \
--request POST \
"https://localhost:8443/openidm/taskscanner/edfaf59c-aad1-442a-adf6-3620b24f8385?_action=cancel"
The output for a scanning task cancellation request is similar to the following:
{"_id":"edfaf59c-aad1-442a-adf6-3620b24f8385",
"action":"cancel",
"status":"SUCCESS"}
13.5.2.3. Listing Scanning Tasks
You can display a list of scanning tasks that have completed, and
those that are in progress, by running a RESTful GET on the
openidm/taskscanner" context. The following example
displays all scanning tasks.
$ curl \
--cacert self-signed.crt \
--header "X-OpenIDM-Username: openidm-admin" \
--header "X-OpenIDM-Password: openidm-admin" \
--request GET \
"https://localhost:8443/openidm/taskscanner"
The output of such a request is similar to the following, with one item for each scanning task.
{
"tasks": [
{
"ended": 1352455546182
"started": 1352455546149,
"progress": {
"failures": 0
"successes": 2400,
"total": 2400,
"processed": 2400,
"state": "COMPLETED",
},
"_id": "edfaf59c-aad1-442a-adf6-3620b24f8385",
}
]
}
Each scanning task has the following properties:
endedThe time at which the scanning task ended.
startedThe time at which the scanning task started.
progressThe progress of the scanning task, summarised in the following fields:
failures- the number of records not able to be processedsuccesses- the number of records processed successfullytotal- the total number of recordsprocessed- the number of processed recordsstate- the overall state of the task,INITIALIZED,ACTIVE,COMPLETED,CANCELLED, orERROR_idThe ID of the scanning task.
The number of processed tasks whose details are retained is governed
by the "openidm.taskscanner.maxcompletedruns" property
in the conf/system.properties file. By default, the
last one hundred completed tasks are retained.
Chapter 14. Managing Passwords
OpenIDM provides password management features that help you enforce password policies, limit the number of passwords users must remember, and let users reset and change their passwords.
14.1. Enforcing Password Policy
A password policy is a set of rules defining what sequence of characters constitutes an acceptable password. Acceptable passwords generally are too complex for users or automated programs to generate or guess.
Password policies set requirements for password length, character sets that passwords must contain, dictionary words and other values that passwords must not contain. Password policies also require that users not reuse old passwords, and that users change their passwords on a regular basis.
OpenIDM enforces password policy rules as part of the general policy service. For more information about the policy service, see Chapter 9, "Using Policies to Validate Data". The default password policy applies the following rules to passwords when they are created and updated:
A password property is required for any user object.
The value of a password cannot be empty.
The password must include at least one capital letter.
The password must include at least one number.
The minimum length of a password is 8 characters.
The password cannot contain the user name, given name, or family name.
You can remove these validation requirements, or include additional requirements, by configuring the policy for passwords. For more information, see Section 9.1, "Configuring the Default Policy".
The password validation mechanism can apply in many situations.
- Password change and password reset
Password change involves changing a user or account password in accordance with password policy. Password reset involves setting a new user or account password on behalf of a user.
By default, OpenIDM controls password values as they are provisioned.
For instructions on changing the default administrative user password,
openidm-admin, see Procedure 16.2, "To Replace the Default User & Password".- Password recovery
Password recovery involves recovering a password or setting a new password when the password has been forgotten.
OpenIDM provides a self-service end user interface for password changes, password recovery, and password reset. For more information, see Section 4.3.1, "Enabling Self-Registration".
- Password comparisons with dictionary words
You can add dictionary lookups to prevent use of password values that match dictionary words.
- Password history
You can add checks to prevent reuse of previous password values. For more information, see Section 14.1.1, "Creating a Password History Policy".
- Password expiration
You can configure OpenIDM to call a workflow that ensures users are able to change expiring or to reset expired passwords.
14.1.1. Creating a Password History Policy
To minimize password reuse, you can set up a password history policy.
One way to do so is with a custom javascript file for the
onCreate trigger. You can then add a reference
to that javascript file in the conf/managed.json file.
You would then add a scripted policy in a custom javascript file, ready to be called out in appropriate JSON configuration files.
The following procedure retains a record of the last four passwords for each user. Any attempt to reuse one of those passwords is rejected.
This procedure takes advantage of the directories configured in
the conf/script.json file. If you started
OpenIDM with files in some customconfig
subdirectory, you would need to make sure such files exist in
that directory tree. For more information, see
Section 6.7, "Default and Custom Configuration Directories".
Create a custom
onCreatejavascript file. One way to do so is with a copy of theonCreate-user-set-default-files.jsfile in thebin/defaults/script/uidirectory. You can save the custom file in thescriptdirectory. For example, the following commands create anonCreate-user-custom.jsfile in the default script directory defined inconf/script.json:$ cd /path/to/openidm/bin/defaults/script/ui $ cp onCreate-user-set-default-fields.js /path/to/openidm/script/onCreate-user-custom.js
In the newly created custom Javascript file, include the cipher for password encryption:
var cipher = "AES/CBC/PKCS5Padding", alias = identityServer.getProperty("openidm.config.crypto.alias", "true", true);Next, declare a new
lastPassattribute. For example, to prevent reuse of the last four passwords, you would add the following line:object.lastPass = new Array(4);
After the new array is declared, the following lines would increment the previous password:
if (object.password) { object.lastPass.shift(); object.lastPass.push(object.password); }Now create a new file with a script that increments passwords in the array with each new password. This procedure uses the following file name:
onUpdate-user-pwpolicy.js, written to the same directory as theonCreate-user-custom.jsfile, in this case,script.Add the following content to the newly created
onUpdate-user-pwpolicy.jsfile:/*global newObject, oldObject */ var cipher = "AES/CBC/PKCS5Padding", alias = identityServer.getProperty("openidm.config.crypto.alias", "true", true); if (openidm.isEncrypted(newObject.lastPass)) { newObject.lastPass = openidm.decrypt(newObject.lastPass); } if (typeof newObject.lastPass === "undefined") { newObject.lastPass = new Array(4); } if (newObject.password !== oldObject.password) { newObject.lastPass.shift(); newObject.lastPass.push(newObject.password); } newObject.lastPass = openidm.encrypt(newObject.lastPass, cipher, alias); }In the existing
conf/managed.jsonfile, add appropriate lines that point to the files just created in thescriptdirectory. Given the default directories previously described in theconf/script.jsonfile, you do not need to add a directory path to the newly created files. The following is an excerpt of the modifiedconf/managed.jsonfile:{ "objects" : [ "name" : "user" "onCreate" : { "type" : "text/javascript", "file" : "onCreate-user-custom.js" }, "onUpdate" : { "type" : "text/javascript", "file" : "onUpdate-user-pwpolicy.js" }, "onDelete" : { "type" : "text/javascript", "file" : "ui/onDelete-user-cleanup.js" },Now extend the policy service to all users by adding a scripted policy. One way to do so is by adding the following information to a custom javascript file. For this procedure, call that file
pwpolicy.js, also in thescriptsubdirectory.As you can see from the comments to the file, it is designed to ignore new users, users without a password history, and users for whom passwords have not changed.
The last part of the file decrypts encrypted passwords prior to making the comparison, and makes sure the password has a non-zero length.
/*global addPolicy, request, openidm */ addPolicy({ "policyId" : "is-new", "policyExec" : "isNew", "policyRequirements" : ["IS_NEW"] }); function isNew(fullObject, value, params, property) { var currentObject, lastPass, i; // don't do a read if the resource ends with "/*", which indicates that // this is a create with a server-supplied id if (!request.resourceName || request.resourceName.match('/\\*$')) { return []; } currentObject = openidm.read(request.resourceName); // don't try this policy if the resource being evaluated wasn't found. Happens in the // case of a create with a client-supplied id. if (currentObject === null) { return []; } // don't try this policy is there is no history object available if (currentObject.lastPass === null || currentObject.lastPass === undefined) { return []; } if (currentObject[property] !== null && currentObject[property] !== undefined && openidm.isEncrypted(currentObject[property])) { currentObject[property] = openidm.decrypt(currentObject[property]); } // if the password hasn't changed, then we aren't interested in checking the history if (currentObject[property] === value) { return []; } if (openidm.isEncrypted(currentObject.lastPass)) { lastPass = openidm.decrypt(currentObject.lastPass); } else { lastPass = currentObject.lastPass; } for(i=0; i < lastPass.length; i++) { if (lastPass[i] === value) { return [{"policyRequirement": "IS_NEW"}]; } } return []; }Now open the
conf/policy.jsonfile. Add the following lines to call the newly createdpwpolicy.jsscript, right after the existing line that calls thepolicy.jsscript:... "file" : "policy.js", "additionalFiles" : [ "script/pwpolicy.js"], ...Later in the same
conf/policy.jsonfile, in thepasswordconfiguration block, add the newly createdis-newpolicyId:... { "name" : "password", "policies" : [ { "policyId" : "not-empty" }, { "policyId" : "is-new" }, ...Reopen the
conf/managed.jsonfile. Add the following code to thepropertiessection to encrypt the newlastPassattribute, and to prevent REST retrievals of such passwords:... "properties" : [ { "name" : "lastPass", "encryption" : { "key" : "openidm-sym-default" }, "scope" : "private" } ...
14.2. Password Synchronization
Password synchronization intercepts user password changes, and ensures uniform password changes across resources that store the password. Following password synchronization, the user authenticates using the same password on each resource. No centralized directory or authentication server is required for performing authentication. Password synchronization reduces the number of passwords users need to remember, so they can use fewer, stronger passwords.
OpenIDM can propagate passwords to the resources that store a user's password, and can intercept and synchronize passwords that are changed natively in OpenDJ and Active Directory.
When you use password synchronization, set up password policy enforcement on OpenDJ or Active Directory rather than on OpenIDM. Alternatively, ensure that all password policies that are enforced are identical to prevent password updates on one resource from being rejected by OpenIDM or by another resource.
The password synchronization plugins intercept password changes on the resource before the passwords are stored in encrypted form. The plugins then send intercepted password values to OpenIDM over an encrypted channel.
In the event that the OpenIDM instance is unavailable when a password is changed, the plugin intercepts the change, encrypts the password, and stores the encrypted password in a JSON file. The plugin then checks whether the OpenIDM instance is available, at a predefined interval. When OpenIDM becomes available, the plugin performs a PATCH on the user record, to replace the password with the encrypted password stored in the JSON file.
To be able to synchronize the passwords, the plugin requires that the
managed/user object exist in the OpenIDM repository. Users
have typically been created by a reconciliation or liveSync process.
The OpenDJ password sync plugin is supported for OpenDJ versions 2.4.6, 2.5, and 2.6. The Active Directory password sync plugin is supported on Windows 2003, Windows 2008 R2, and Windows 2012 R2.
The procedures in this section assume that you have set up OpenDJ to communicate over the secure LDAP protocol (LDAPS), as described in the OpenDJ documentation. The procedures use the standard ports for regular and LDAP communictions, 389 and 636, or possibly corresponding alternative ports, 1389 and 1636.
The procedures in this section also assume that you have a working instance of Active Directory.
The following instructions describe the steps you should take to prepare OpenIDM to synchronize passwords between an instance of OpenDJ and an instance of Active Directory.
Include the attributes shown in
/path/to/openidm/samples/misc/managed.jsonto enable password synchronization between OpenIDM, OpenDJ, and Active Directory.To do so, include the contents of that
managed.jsonfile in the one you use when starting OpenIDM.For reference, the password attributes for the three systems are as follows:
ldapPasswordfor OpenDJadPasswordfor Active Directorypasswordfor the internal OpenIDM passwordIf you want to incorporate the OpenDJ self-signed certificate into the OpenIDM keystore, add that information to the appropriate
authentication.jsonfile. For example, if you use the version of this file in the/path/to/openidm/confdirectory, you might add"CN=localhost, O=OpenDJ Self-Signed Certificate", as shown in the following excerpt:... { "name" : "CLIENT_CERT", "properties" : { "queryOnResource" : "security/truststore", "defaultUserRoles" : [ "openidm-cert" ], "allowedAuthenticationIdPatterns" : [ "CN=localhost, O=OpenDJ Self-Signed Certificate" ] }, "enabled" : true } ...In production, you should use a certificate that has been issued by a Certificate Authority.
Before you start:
Make sure that OpenDJ is configured to communicate over LDAPS as described in the OpenDJ documentation.
OpenIDM must be running.
The following steps install the plugin on an OpenDJ directory server that is
running on the same host as OpenIDM. If you run OpenDJ on a different host,
use the fully qualified domain name rather than
localhost, and use your certificates rather than the
generated OpenIDM certificate.
OpenIDM generates a self-signed certificate the first time it starts up. You must import this self-signed certificate into OpenDJ's truststore so that the OpenDJ agent can make SSL requests to the OpenIDM endpoints.
Export OpenIDM's generated self-signed certificate to a file, as follows (UNIX):
$ cd /path/to/openidm/security $ keytool \ -export \ -alias openidm-localhost \ -file openidm-localhost.crt \ -keystore keystore.jceks \ -storetype jceks Enter keystore password: <changeit> Certificate stored in file <openidm-localhost.crt>
Import the self-signed certificate into the trust store for OpenDJ (UNIX).
$ cd /path/to/OpenDJ/config $ keytool \ -importcert \ -alias openidm-localhost \ -keystore truststore \ -storepass `cat keystore.pin` \ -file /path/to/openidm/security/openidm-localhost.crt Owner: CN=localhost, O=OpenIDM Self-Signed Certificate, OU=None, L=None, ST=None, C=None Issuer: CN=localhost, O=OpenIDM Self-Signed Certificate, OU=None, L=None, ST=None, C=None Serial number: 149168335c9 Valid from: Mon Sep 15 18:12:18 PDT 2014 until: Tue Oct 15 18:12:18 PDT 2024 Certificate fingerprints: MD5: 0C:BF:08:06:F0:69:E8:E6:6F:39:38:B8:CC:9A:C1:60 SHA1: B0:40:17:0A:6E:3A:3B:BB:82:39:A1:97:04:00:BC:7C:94:63:76:E7 Signature algorithm name: SHA512withRSA Version: 3 Trust this certificate? [no]: yes Certificate was added to keystore
Download the OpenDJ password synchronization plugin from ForgeRock's Backstage site. OpenIDM 3.1 supports version 1.0 of the plugin.
Unzip the module delivery.
$ unzip ~/Downloads/opendj-accountchange-handler-1.0.0.zip creating: opendj/ ...
Copy the files to the directory where OpenDJ is installed.
$ cd opendj $ cp -r * /path/to/OpenDJ/
Restart OpenDJ to load the additional schema from the module.
$ cd /path/to/OpenDJ/bin $ ./stop-ds --restart
Add the plugin configuration to OpenDJ's configuration (UNIX).
$ ./ldapmodify \ --port 1389 \ --hostname `hostname` \ --bindDN "cn=Directory Manager" \ --bindPassword "password" \ --defaultAdd \ --filename ../config/openidm-pwsync-plugin-config.ldif Processing ADD request for cn=OpenIDM Notification Handler, cn=Account Status Notification Handlers,cn=config ADD operation successful for DN cn=OpenIDM Notification Handler, cn=Account Status Notification Handlers,cn=configRestart OpenDJ.
$ ./stop-ds --restart ... [20/Nov/2013:08:55:47 +0100] category=EXTENSIONS severity=INFORMATION msgID=1049147 msg=Loaded extension from file '/path/to/OpenDJ/lib/extensions /opendj-accountchange-handler-1.0.0.jar' (build <unknown>, revision <unknown>) ... [20/Nov/2013:08:55:51 +0100] category=CORE severity=NOTICE msgID=458891 msg=The Directory Server has sent an alert notification generated by class org.opends.server.core.DirectoryServer (alert type org.opends.server.DirectoryServerStarted, alert ID 458887): The Directory Server has started successfully
Enable the plugin for the appropriate password policy.
The following command enables the plugin for the default password policy (UNIX).
$ ./dsconfig \ set-password-policy-prop \ --port 4444 \ --hostname `hostname` \ --bindDN "cn=Directory Manager" \ --bindPassword password \ --policy-name "Default Password Policy" \ --set account-status-notification-handler:"OpenIDM Notification Handler" \ --trustStorePath ../config/admin-truststore \ --no-prompt
If the
passwordattribute does not exist in themanaged/userobject on OpenIDM, the password sync service will return an error when the password is updated in OpenDJ. To prevent this, add the followingonCreatescript to the OpenDJ > Managed Users mapping in thesync.jsonfile:"mappings" : [ { "name" : "systemLdapAccounts_managedUser", "source" : "system/ldap/account", "target" : "managed/user", "properties" : [ { "source" : "uid", "target" : "userName" } ], "onCreate" : { "type" : "text/javascript", "source" : "target.password=''" }, ...The onCreate script creates an empty password in the
managed/userobject, so that the attribute exists and can be patched.
Use the Active Directory password synchronization plugin to synchronize passwords between OpenIDM and Active Directory (on systems running at least Microsoft Windows Server 2003).
Install the plugin on Active Directory domain controllers (DCs) to intercept password changes, and send the password values to OpenIDM over an encrypted channel. You must have Administrator privileges to install the plugin. In a clustered Active Directory environment, you must install the plugin on all DCs.
Download the Active Directory password synchronization plugin from Forgerock's Backstage site.
Double-click the setup file to launch the installation wizard.
Alternatively, from a command line, start the installation wizard with the
setup.execommand. If you want to save the settings in a configuration file, you can use the /saveinf switch as follows.C:\Path\To > setup.exe /saveinf=C:\temp\adsync.inf
If you have a configuration file with installation parameters, you can install the password plugin in silent mode as follows:
C:\Path\To > setup.exe /verysilent /loadinf=C:\temp\adsync.inf
Provide the following information during the installation. You must accept the license agreement shown to proceed with the installation.
- OpenIDM Connection information
OpenIDM URL. Enter the URL where OpenIDM is deployed, including the query that targets each user account. For example:
https://localhost:8443/openidm/managed/user?_action=patch&_queryId=for-userName&uid=${samaccountname}For mutual authentication, the default URL is
https://localhost:8444/openidm/managed/user?_action=patch&_queryId=for-userName&uid=${samaccountname}For this query to work, you must set a mapping from
sAMAccountnametouserNamein the/path/to/openidm/conf/sync.jsonfile, for example:{ "mappings" : [ { "name" : "systemAdAccounts_managedUser", "source" : "system/ad/account", "target" : "managed/user", "properties" : [ ... { "source" : "sAMAccountName", "target" : "userName" }, ... } ] }OpenIDM User Password attribute. The password attribute for the
managed/userobject, such asPassword.If the
passwordattribute does not exist in themanaged/userobject, the password sync service will return an error when the password is updated in Active Directory. To prevent this, add the following script to the Active Directory > Managed Users mapping in thesync.jsonfile:"onCreate" : { "type" : "text/javascript", "source" : "target.password=''; target.adPassword='';" },The onCreate script creates an empty password in the
managed/userobject, so that the attribute exists and can be patched.
- OpenIDM Authentication Parameters
Provide the following information:
User name. Enter the user name that is used to authenticate to OpenIDM, for example,
openidm-admin.Password. Enter the password of the user that authenticates to OpenIDM, for example,
openidm-admin.Select authentication type. Select the type of authentication that Active Directory will use to authenticate to OpenIDM.
For plain HTTP authentication, select
OpenIDM Header. For mutual authentication, selectCertificate.
- Certificate authentication settings
If you selected
Certificateas the authentication type on the previous screen, specify the details of the certificate that will be used for authentication.Select Certificate file. Browse to select the certificate file that Active Directory will use to authenticate to OpenIDM. The certificate file must be configured with an appropriate encoding, cryptographic hash function, and digital signature. The plugin can read a public or a private key from a PKCS12 archive file.
For production purposes, you should use a certificate that has been issued by a Certificate Authority. For testing purposes, you can generate a self-signed certificate. Whichever certificate you use, the certificate must be imported into OpenIDM's trust store.
To generate a self-signed certificate for Active Directory, follow these steps:
On the Active Directory host, generate a private key, which is then used to generate a self-signed certificate with the alias
ad-pwd-plugin-localhost(Windows).> keytool.exe ^ -genkey ^ -alias ad-pwd-plugin-localhost ^ -keyalg rsa ^ -dname "CN=localhost, O=AD-pwd-plugin Self-Signed Certificate" ^ -keystore keystore.jceks ^ -storetype JCEKS Enter keystore password: changeit Re-enter new password: changeit Enter key password for <ad-pwd-plugin-localhost> <RETURN if same as keystore password>Now use the private key, stored in the
keystore.jceksfile, to generate the self-signed certificate (Windows).> keytool.exe ^ -selfcert ^ -alias ad-pwd-plugin-localhost ^ -validity 365 ^ -keystore keystore.jceks ^ -storetype JCEKS ^ -storepass changeitExport the certificate. In this case, the keytool command exports the certificate in a PKCS12 archive file format, used to store a private key with a certificate (Windows).
> keytool.exe ^ -importkeystore ^ -srckeystore keystore.jceks ^ -srcstoretype jceks ^ -srcstorepass changeit ^ -srckeypass changeit ^ -srcalias ad-pwd-plugin-localhost ^ -destkeystore ad-pwd-plugin-localhost.p12 ^ -deststoretype PKCS12 ^ -deststorepass changeit ^ -destkeypass changeit ^ -destalias ad-pwd-plugin-localhost ^ -nopromptThe PKCS12 archive file is named
ad-pwd-plugin-localhost.p12. Import the contents of the keystore contained in this file to the system that hosts OpenIDM. To do so, import the PKCS12 file into the OpenIDM keystore file, namedtruststore, in the/path/to/openidm/securitydirectory (UNIX).$ keytool \ -importkeystore \ -srckeystore /path/to/ad-pwd-plugin-localhost.p12 -srcstoretype PKCS12 -destkeystore truststore -deststoretype JKS
Password to open the archive file with the private key and certificate. Specify the keystore password (
changeit, in the previous example).
- Password Encryption settings
Provide the details of the certificate that will be used to encrypt password values.
Archive file with certificate. Browse to select the archive file that will be used for password encryption. That file is normally set up in PKCS12 format.
For evaluation purposes, you can use a self-signed certificate, as described earlier. For production purposes, you should use a certificate that has been issued by a Certificate Authority.
Whichever certificate you use, the certificate must be imported into OpenIDM's keystore, so that OpenIDM can locate the key with which to decrypt the data. To import the certificate into OpenIDM's keystore,
keystore.jceks, run the following command on the OpenIDM host (UNIX):$ keytool \ -importkeystore \ -srckeystore /path/to/ad-pwd-plugin-localhost.p12 \ -srcstoretype PKCS12 \ -destkeystore /path/to/openidm/security/keystore.jceks \ -deststoretype jceksPrivate key alias. Specify the alias for the certificate, such as
ad-pwd-plugin-localhost.Password to open certificate file. Specify the password to access the PFX keystore file, such as
changeit, from the previous example.Select encryption standard. Specify the encryption standard that will be used when encrypting the password value (AES-128, AES-192, or AES-256).
- Data storage
Provide the details for the storage of encrypted passwords in the event that OpenIDM is not available when a password modification is made.
Select a secure directory in which the JSON files that contain encrypted passwords are queued. The server should prevent access to this folder, except access by the
Password Sync service. The path name cannot include spaces.Directory poll interval (seconds). Enter the number of seconds between calls to check whether OpenIDM is available, for example,
60, to poll OpenIDM every minute.
- Log storage
Provide the details of the messages that should be logged by the plugin.
Select the location to which messages should be logged. The path name cannot include spaces.
Select logging level. Select the severity of messages that should be logged, either
error,info,warning,fatal, ordebug.
- Select Destination Location
Setup installs the plugin in the location you select, by default
C:\Program Files\OpenIDM Password Sync.
After running the installation wizard, restart the computer.
If you need to change any settings after installation, access the settings using the Registry Editor under HKEY_LOCAL_MACHINE > SOFTWARE > ForgeRock > OpenIDM > PasswordSync.
If you have configured SSL access, make sure
authTypeis set toidm.If you selected to authenticate over plain HTTP in the previous step, your setup is now complete.
If you selected to authenticate with mutual authentication, complete this step.
The Password Sync Service uses Windows certificate stores to verify OpenIDM's identity. The certificate that OpenIDM uses must therefore be added to the list of trusted certificates on the Windows machine.
For production purposes, you should use a certificate that has been issued by a certificate authority. For test purposes, you can use the self-signed certificate that is generated by OpenIDM on first startup.
To add the OpenIDM certificate to the list of trusted certificates, use the Microsoft Management Console.
Select Start and type
mmcin the Search field.In the Console window, select File > Add/Remove Snap-in.
From the left hand column, select Certificates and click Add.
Select My user account, and click Finish.
Repeat the previous two steps for Service account and Computer account.
For Service account, select Local computer, then select OpenIDM Password Sync Service.
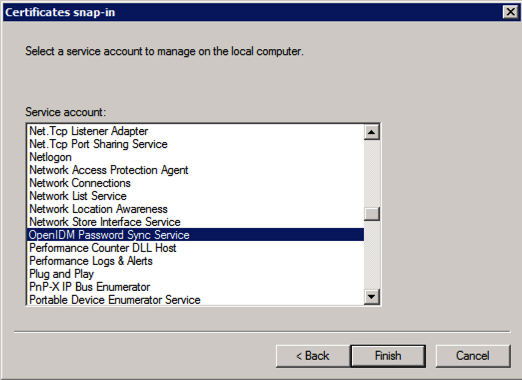
For Computer account, select Local computer.
Click Finish when you have added the three certificate snap-ins.
Still in the mmc Console, expand Certificates - Current User > Personal and select Certificates.
Select Action > All Tasks > Import to open the Certificate Import Wizard.
Browse for the OpenIDM certificate (
openidm-localhost.crtby default, if you use OpenIDM's self-signed certificate).Enter the Password for the certificate (
changeitby default, if you use OpenIDM's self-signed certificate).Accept the default for the Certificate Store.
Click Finish to complete the import.
Repeat the previous six steps to import the certificate for:
Certificates - Current User > Trusted Root Certification AuthoritiesCertificates - Service > OpenIDM Password Sync\PersonalCertificates - Service > OpenIDM Password Sync\Trusted Root Certification AuthoritiesCertificates > Local Computer > PersonalCertificates > Local Computer > Trusted Root Certification Authorities

Follow these steps to configure OpenIDM to access password changes from OpenDJ and Active Directory.
You must add the OpenDJ/Active Directory server certificates that you have used to OpenIDM's trust store so that OpenIDM knows to trust OpenDJ/Active Directory during mutual authentication.
Use the Java keytool command to import the certificate into the OpenIDM trust store. You may have already done so in previous procedures.
Add the configuration to managed objects to handle password synchronization.
An example for synchronization with both OpenDJ and Active Directory is provided in the
samples/misc/managed.jsonfile, JavaScript lines folded for readability:{ "objects": [ { "name": "user", "properties": [ { "name": "ldapPassword", "encryption": { "key": "openidm-sym-default" } }, { "name": "adPassword", "encryption": { "key": "openidm-sym-default" } }, { "name": "password", "encryption": { "key": "openidm-sym-default" } } ], "onUpdate": { "type": "text/javascript", "source": "if (newObject.ldapPassword != oldObject.ldapPassword) { newObject.password = newObject.ldapPassword } else if (newObject.adPassword != oldObject.adPassword) { newObject.password = newObject.adPassword }" } } ] }This sample assumes you define the password as
ldapPasswordfor OpenDJ, andadPasswordfor Active Directory.Update the connector configuration files to add the password property to the
accountobject type.For OpenDJ, update
provisioner.openicf-ldap.json, as follows:"objectTypes" : { "account" : { "$schema" : "http://json-schema.org/draft-03/schema", "id" : "__ACCOUNT__", "type" : "object", "nativeType" : "__ACCOUNT__", "properties" : { "cn" : { "type" : "string", "nativeName" : "cn", "nativeType" : "string" }, ... "ldapPassword" : { "type" : "string", "nativeName" : "userPassword", "nativeType" : "string" }, ...For Active Directory, update
provisioner.openicf-ad.json, as follows:"objectTypes" : { "account" : { "$schema" : "http://json-schema.org/draft-03/schema", "id" : "__ACCOUNT__", "type" : "object", "nativeType" : "__ACCOUNT__", "properties" : { "cn" : { "type" : "string", "nativeName" : "cn", "nativeType" : "string" }, ... "adPassword" : { "type" : "string", "nativeName" : "_PASSWORD_", "nativeType" : "JAVA_TYPE_GUARDEDSTRING" }, ...When you change a password in OpenDJ, you will notice that the value changes in OpenIDM.
$ tail -f openidm/audit/activity.csv | grep bjensen ...userName=bjensen, ... password={$crypto={...data=tEsy7ZXo6nZtEqzW/uVE/A==... ...userName=bjensen, ... password={$crypto={...data=BReT79lnQEPcvfQG3ibLpg==...Be aware that the plugin is patching the password value of the managed user in OpenIDM. The target
passwordproperty must exist for the patch to work.To configure implicit synchronization, that is the password is updated in Active Directory automatically when it is changed in OpenIDM, you must complete the following three steps:
Define a mapping from
managed/usertosystem/ad/accountin your/path/to/openidm/conf/sync.jsonfile.Specify the
{"source" : "password", "target" : "adPassword"}property as part of this mapping.Make sure that implicit synchronization is enabled for that mapping. By default, all mappings participate in implicit synchronization operations so you should not have to enable this operation manually unless you have specifically set the
"enableSync"property of the mapping tofalse.
Chapter 15. Managing Authentication, Authorization and Role-Based Access Control
OpenIDM provides a flexible authentication and authorization mechanism, based on REST interface URLs and on roles which may be stored in the repository.
15.1. OpenIDM Users
While OpenIDM authenticates internal and managed users with the
DELEGATED module, there are differences between these
two types of users.
15.1.1. Internal Users
OpenIDM creates two internal users by default: anonymous
and openidm-admin. These accounts are separated from
other user accounts to protect them from any reconciliation or
synchronization processes.
OpenIDM stores internal users and their role membership in a table in the
repository. For the way internal users are mapped, see the discussion on
the explicitMapping property to
"internal/user described in Section 5.2.3, "Using Explicit Mappings".
For more information on storage mechanisms for managed users in OrientDB and JDBC, see Section 8.1, "Working with Managed Users".
- anonymous
This user enables anonymous access to OpenIDM, for users who do not have their own accounts. The anonymous user, configured by default with the
openidm-regrole, has limited rights within OpenIDM. It can be used to allow self-registration. For more information on the process, see Section 4.3.1, "Enabling Self-Registration".- openidm-admin
This user serves as the top-level administrator. After installation, the
openidm-adminuser has full access, and provides a fallback mechanism in case other users are locked out. Do not useopenidm-adminfor regular tasks. Under normal circumstances, theopenidm-adminaccount does not represent a regular user, so any audit log records for this account do not represent the actions of any real person.OpenIDM encrypts the default administrative password,
openidm-admin. Change the password immediately after installation. For instructions, see Procedure 16.2, "To Replace the Default User & Password".
15.1.1.1. Managing Internal Users Over REST
To list the internal users over REST, query the repo
endpoint as follows:
$ curl \
--cacert self-signed.crt \
--header "X-OpenIDM-Username: openidm-admin" \
--header "X-OpenIDM-Password: openidm-admin" \
--request GET \
"https://localhost:8443/openidm/repo/internal/user?_queryId=query-all-ids"
{
"remainingPagedResults": -1,
"pagedResultsCookie": null,
"resultCount": 2,
"result": [
{
"_rev": "0",
"_id": "openidm-admin"
},
{
"_rev": "0",
"_id": "anonymous"
}
]
}To query the details of an internal user, include the user's ID in the request, for example:
$ curl \
--cacert self-signed.crt \
--header "X-OpenIDM-Username: openidm-admin" \
--header "X-OpenIDM-Password: openidm-admin" \
--request GET \
"https://localhost:8443/openidm/repo/internal/user/openidm-admin"
{
"password": "openidm-admin",
"userName": "openidm-admin",
"roles": "openidm-admin,openidm-authorized",
"_rev": "1",
"_id": "openidm-admin"
}
To change the username or password of the default administrative user,
send a PUT request to the user object. The following example changes the
password of the openidm-admin user to
Passw0rd:
$ curl \
--cacert self-signed.crt \
--header "Content-Type: application/json" \
--header "X-OpenIDM-Username: openidm-admin" \
--header "X-OpenIDM-Password: openidm-admin" \
--request PUT \
--data '{
"password": "Passw0rd",
"userName": "openidm-admin",
"roles": "openidm-admin,openidm-authorized",
"_id": "openidm-admin"
}' \
"https://localhost:8443/openidm/repo/internal/user/openidm-admin"
{
"roles": "openidm-admin,openidm-authorized",
"password": {
"$crypto": {
"value": {
"key": "openidm-sym-default",
"iv": "USfN9kARk4QjoyjGa/r8WA==",
"cipher": "AES/CBC/PKCS5Padding",
"data": "27tDQg49z8nWqvIOEh7VAg=="
},
"type": "x-simple-encryption"
}
},
"_id": "openidm-admin",
"userName": "openidm-admin",
"_rev": "2"
}
15.1.2. Managed Users
External users managed by OpenIDM are known as managed users.
The location of managed users depends on the type of repository. For
JDBC repositories, OpenIDM stores managed users in the managed objects
table, named managedobjects. OpenIDM may access an index
table managedobjectproperties as well.
For the OrientDB repository, managed objects are stored in the table
managed_user.
By default, the attribute names for managed user login and password are
userName and password, respectively.
15.2. Authentication
OpenIDM does not allow access to the REST interface without authentication.
User self-registration requires anonymous access. For that purpose, OpenIDM
includes an anonymous user, with the following password:
anonymous. For more information, see
Section 15.1.1, "Internal Users".
In production, only applications are expected to access the REST interface.
OpenIDM supports an improved authentication mechanism on the REST interface. Unlike basic authentication or form-based authentication, the OpenIDM authentication mechanism is compatible with the AJAX framework. You can configure authentication with standard or OpenIDM-specific header fields, as follows:
- OpenIDM authentication with standard header fields
$ curl --user userName:password
This method uses standard basic authentication. However, it does not prompt for missing credentials.
- OpenIDM authentication with OpenIDM header fields
$ curl --header "X-OpenIDM-Username: openidm-admin" --header "X-OpenIDM-Password: openidm-admin"
Note
This document uses the OpenIDM authentication options for all REST calls. Where no OpenIDM-specific options exist, the "long-form" option such as --data is used. In contrast, the README files that accompany OpenIDM generally use "short-form" options such as -X (instead of --request) and -H (instead of --header).
For more information about the OpenIDM authentication mechanism, see Section 16.2.4, "Use Message Level Security".
You can change the attributes used by OpenIDM to store user login and
password values. Attribute names are shown in a database query listed in
openidm/conf/repo.repo-type.json.
Two queries are defined by default.
credential-internaluser-queryUses the
_openidm_idattribute for logincredential-queryUses the
userNameattribute for login
The openidm/conf/authentication.json file defines
the active query with the queryId property. In the
following example, credential-query is the
queryId identifier used in a queryRequest
to validate credentials.
{
"queryId" : "credential-query",
"queryOnResource" : "managed/user",
...
}
You can explicitly define the properties that constitute passwords or roles
with the propertyMapping object in the
conf/authentication.json file. The default property
mapping is shown here:
...
"propertyMapping" : {
"authenticationId" : "username",
"userCredential" : "password",
"userRoles" : "roles"
},
...
15.3. Supported Authentication Modules
OpenIDM supports a variety of modules, including those available from the
Common Authentication Framework (CAF). The CAF modules available to
OpenIDM include JWT_SESSION,
OPENAM_SESSION, and IWA. OpenIDM also
provides two additional authentication modules: DELEGATED
and CLIENT_CERT.
OpenIDM evaluates authentication modules in the order in which they are
placed in the authentication.json file.
- JWT_SESSION
The JSON Web Token authentication module includes session information. For details on this common authentication module, see the following Javadoc page: Class JwtSessionModule.
- CLIENT_CERT
The client certificate module accommodates users who authenticate with a client certificate.
- DELEGATED
The DELEGATED module validates client requests with the help of one of the following entities:
MANAGED_USER, a managed user objectINTERNAL_USER, an internal user objectPASSTHROUGH, an OpenICF connector.
- OPENAM_SESSION
The OPENAM_SESSION module allows you to protect a deployment of OpenIDM with ForgeRock's OpenAM Access Management product. For an example of how you might use the OPENAM_SESSION module, see Section 3.16, "Sample - Configuring Authentication Management With OpenAM" in the Installation Guide.
- IWA
The IWA module supports Integrated Windows Authentication. In other words, the IWA module supports the use of an LDAP connector for an Active Directory server. For an example of how you can set that up with a Kerberos server, see Section 15.5, "Kerberos Configuration Example".
15.4. Using Delegated Authentication
In addition to the internal and managed user authentication modules, OpenIDM 3.1 supports a delegated authentication mechanism. With delegated authentication, the username and password included with the REST request are validated against those stored in a remote system, such as an LDAP server.
The samples listed in Chapter 3, "More OpenIDM Samples" in the Installation Guide include multiple options for authentication mechanisms.
You can add the delegated authentication module to the
conf/authentication.json file. For example, the
following excerpt illustrates one way to implement the
DELEGATED configuration object. For descriptive purposes,
you can substitute the PASSTHROUGH alias for
DELEGATED.
"authModules" : [
{
"name" : "DELEGATED",
"properties" : {
"augmentSecurityContext": {
"type" : "text/javascript",
"file" : "auth/populateAsManagedUser.js"
},
"queryOnResource" : "system/ldap/account",
"propertyMapping" : {
"authenticationId" : "uid",
"groupMembership" : "memberOf"
},
"groupRoleMapping" : {
"openidm-admin" : ["cn=admins"]
},
"managedUserLink" : "systemLdapAccounts_managedUser",
"defaultUserRoles" : [
"openidm-authorized"
]
},
"enabled" : true
},
...
]
The properties shown from this excerpt are defined in Section 15.7.3, "Properties for Authentication and Roles"
The content of the delegated authentication object varies. Samples
2/2b/2c/2d, 3, 5, and 6 include slightly different versions of the
conf/authentication.json file.
- Samples 2, 2b, 2c, 2d (LDAP)
Samples 2, 2b, 2c, and 2d relate to connections from an LDAP server. Samples 5 and 5b are quite similar, as they uses XML information to masquerade as an LDAP server. The
authentication.jsonfile is identical in each of these samples.In the common
authentication.jsonfile, thequeryOnResourceendpoint issystem/ldap/account. ThemanagedUserLinkissystemLdapAccounts_managedUser.- Sample 3 (Scripted SQL)
Sample 3 relates to a connection to a scripted SQL database. As such, the
queryOnResourceendpoint issystem/scriptedsql/account. ThemanagedUserLinkissystemHrdb_managedUser.- Sample 5, 5b (Synchronization of two resources)
The XML files used in samples 5 and 5b simulate a connection between LDAP servers. For that reason, the
conf/authentication.jsonfile used in these samples are identical to that for sample 2/2b/2c/2d.- Sample 6 (LiveSync)
The
queryOnResourceendpoint issystem/ad/account. TheautheticationIdmatches the AD attribute used for account names. The associatedmanagedUserLinkissystemAdAccounts_managedUser.
15.5. Kerberos Configuration Example
This section assumes that you have an active Kerberos server acting as a Key Distribution Center (KDC). If you're running Active Directory in your deployment, that service includes a Kerberos KDC by default.
To take advantage of a Kerberos KDC, you need to do two things: first
include at least the IWA and possibly the
PASSTHROUGH modules in the
authentication.json file. Second, modify the
system.properties file to take advantage of the
noted modules.
For IWA, based on Integrated Windows Authentication,
this section assumes you have configured an LDAP connector for an Active
Directory server. To confirm, identify the following mapping source in the
sync.json configuration file:
system/ad/account
You could then include the following code block in the
authentication.json file. Include appropriate
values for the kerberosRealm and
kerberosServerName. For a list of definitions, see
Section 15.5.1, "Kerberos Definitions".
"authModules" : [
...
{
"name" : "IWA",
"properties": {
"servicePrincipal" : "",
"keytabFileName" : "security/name.HTTP.keytab",
"kerberosRealm" : "",
"kerberosServerName" : "",
"queryOnResource" : "system/ad/account",
"propertyMapping" : {
"authenticationId" : "sAMAccountName",
"groupMembership" : "memberOf"
},
"groupRoleMapping" : { "openidm-admin": [ ] },
"groupComparisonMethod": "ldap",
"defaultUserRoles" : [
"openidm-authorized"
]
},
"enabled" : true
}
To grant different roles to users who are authenticated through the
IWA module, list them with their
groupRoleMapping.
You could pair the IWA module with the
PASSTHROUGH module. When paired, a failure in the
IWA module allows users to revert to forms-based
authentication.
You could add the PASSTHROUGH module as follows, in the
authentication.json file:
...
{
"name" : "PASSTHROUGH",
"properties": {
"queryOnResource" : "system/AD/account",
"propertyMapping" : {
"authenticationId" : "sAMAccountName",
"groupMembership" : "memberOf" },
"groupRoleMapping" : { "openidm-admin": [ ] },
"groupComparisonMethod": "ldap",
"defaultUserRoles" : [
"openidm-authorized"
]
},
"enabled" : true
}
...
Once you have included at least the IWA module,
edit the system.properties file. Include the following
entry to point to a JAAS configuration file. Substitute if desired for
gssapi_jaas.conf
java.security.auth.login.config=/path/to/openidm/conf/gssapi_jaas.conf
In the gssapi_jaas.conf file, include the following
information related to the LDAP connector:
org.identityconnectors.ldap.LdapConnector {
com.sun.security.auth.module.Krb5LoginModule required client=TRUE
principal="bjensen@EXAMPLE.COM" useKeyTab=true keyTab="/path/to/bjensen.keytab";
};
15.5.1. Kerberos Definitions
The Windows Desktop authentication module uses Kerberos. The user presents a Kerberos token to the ForgeRock product, through the Simple and Protected GSS-API Negotiation Mechanism (SPNEGO) protocol. The Windows Desktop authentication module enables desktop single sign on such that a user who has already authenticated with a Kerberos Key Distribution Center can authenticate without having to provide the login information again. Users might need to set up Integrated Windows Authentication in Internet Explorer to benefit from single sign on when logged on to a Windows desktop.
The Kerberos attributes shown may correspond to a ssoadm attribute for OpenAM or a JSON attribute for OpenIDM.
- Service Principal
Specify the Kerberos principal for authentication in the following format.
HTTP/host.domain@dc-domain-name
Here, host and domain correspond to the host and domain names of the installed ForgeRock product, and dc-domain-name is the domain name of the Windows Kerberos domain controller server. The dc-domain-name can differ from the domain name for the installed ForgeRock product.
You set up the account on the Windows domain controller, creating a computer account for the installed ForgeRock product and associating the new account with a service provider name.
ssoadm attribute:
iplanet-am-auth-windowsdesktopsso-principal-nameJSON attribute:
servicePrincipal- Keytab File Name
Specify the full path of the keytab file for the Service Principal. You generate the keytab file using the Windows ktpass utility.
ssoadm attribute:
iplanet-am-auth-windowsdesktopsso-keytab-fileJSON attribute:
keytabFileName- Kerberos Realm
Specify the Kerberos Key Distribution Center realm. For the Windows Kerberos service this is the domain controller server domain name.
ssoadm attribute:
iplanet-am-auth-windowsdesktopsso-kerberos-realmJSON attribute:
kerberosRealm- Kerberos Server Name
Specify the fully qualified domain name of the Kerberos Key Distribution Center server, such as that of the domain controller server.
ssoadm attribute:
iplanet-am-auth-windowsdesktopsso-kdcJSON attribute:
kerberosServerName- Return Principal with Domain Name
When enabled, OpenAM automatically returns the Kerberos principal with the domain controller's domain name during authentication.
ssoadm attribute:
iplanet-am-auth-windowsdesktopsso-returnRealmJSON attribute:
returnRealm- Authentication Level
Sets the authentication level used to indicate the level of security associated with the module. The value can range from 0 to any positive integer.
ssoadm attribute:
iplanet-am-auth-windowsdesktopsso-auth-levelJSON attribute:
authLevel- Search for the user in the realm
Validates the user against the configured data stores. If the user from the Kerberos token is not found, authentication will fail. If an authentication chain is set, the user will be able to authenticate through another module.
ssoadm attribute:
iplanet-am-auth-windowsdesktopsso-lookupUserInRealmJSON attribute:
lookupUserInRealm
Note
Note: For Windows 7 and later, you will need to disable the "Enable Integrated Windows Authentication" option in Internet Explorer. In addition, you will need to add and activate the DisableNTMLPreAuth key to the Windows Registry. For detailed instructions, see the Microsoft KB article on when You cannot post data to a non-NTLM-authenticated Web site
15.6. Roles and Authentication
OpenIDM includes a number of default roles, and supports the configuration of managed roles, enabling you to customize the roles mechanism as needed.
The following roles are configured by default:
- openidm-reg
Role assigned to users who access OpenIDM with the default anonymous account.
The
openidm-regrole is excluded from the reauthorization required policy definition by default.- openidm-admin
OpenIDM administrator role, excluded from the reauthorization required policy definition by default.
- openidm-authorized
Default role for any user who has authenticated with a user name and password.
- openidm-cert
Default role for any user authenticated with mutual SSL authentication.
This role applies only for mutual authentication. Furthermore, the shared secret (certificate) must be adequately protected. The
openidm-certrole is excluded from the reauthorization required policy definition by default.
OpenIDM begins the process of assigning the roles of a user with the
roles property. OpenIDM then proceeds in the
following sequence to define user roles:
If the
defaultRolesproperty is set, OpenIDM assigns those roles to the given user. ThedefaultRolesproperty must be configured in an array.The
userRolesproperty is a string that defines the attribute. The value of the attribute may be either a comma-delimited string or a list of strings. You can identify the list with a REST call to aqueryOnResourceendpoint such assystem/ldap/accountIf the
groupRoleMappingandgroupMembershipproperties are defined, OpenIDM assigns additional roles to users depending on any existing group membership.
The roles calculated in sequence are cumulative. In other words, if all of
the above properties are defined, OpenIDM would assign roles from
defaultRoles and userRoles. It would
also use a MappingRoleCalculator to define roles from the
groupRoleMapping and groupMembership
properties.
For users who have authenticated with mutual SSL authentication, the module
is CLIENT_CERT and the default role for such users is
openidm-cert.
{ "name" : "CLIENT_CERT",
"properties" : {
"queryOnResource": "managed/user",
"defaultUserRoles": [ "openidm-cert" ],
"allowedAuthenticationPatterns" : [ ]
},
"enabled" : "true"
}
Access control for such users is configured in the
access.js file. For more information, see
Section 15.7, "Authorization".
15.7. Authorization
OpenIDM provides role-based authorization that restricts direct HTTP access
to REST interface URLs. The default authorization configuration grants
different access rights to users that are assigned the roles
"openidm-admin", "openidm-cert",
"openidm-authorized", and "openidm-reg".
Note that this access control applies to direct HTTP calls only. Access for internal calls (for example, calls from scripts) is not affected by this mechanism.
Authorization is configured in two script files:
openidm/bin/defaults/script/router-authz.jsopenidm/script/access.js
OpenIDM calls these scripts for each request, via the
onRequest hook that is defined in the default
router.json file. The scripts either throw the string
Access denied, or nothing. If
Access denied is thrown, OpenIDM denies the request.
15.7.1. router-authz.js
This file provides the functions that enforce access rules. For example, the following function controls whether users with a certain role can start a specified process.
...
function isAllowedToStartProcess() {
var processDefinitionId = request.content._processDefinitionId;
return isProcessOnUsersList(processDefinitionId);
}
...
There are certain authorization-related functions in
router-authz.js that should not be
altered, as described in a comment in the file.
15.7.2. access.js
This file defines the access configuration for HTTP requests and
references the methods defined in router-authz.js. Each
entry in the configuration contains a pattern to match against the incoming
request ID, and the associated roles, methods, and actions that are allowed
for requests on that pattern.
The options shown in the default version of the file do not include all of the actions available at each endpoint.
The following sample configuration entry indicates the configurable parameters and their purpose.
{
"pattern" : "*",
"roles" : "openidm-admin",
"methods" : "*", // default to all methods allowed
"actions" : "*", // default to all actions allowed
"customAuthz" : "disallowQueryExpression()",
"excludePatterns": "system/*"
},
As shown, this entry affects users with the openidm-admin
role. Such users have HTTP access to all but system
endpoints. The parameters are as follows:
"pattern"- the REST endpoint to which access is being controlled."*"indicates access to all endpoints."managed/user/*"would indicate access to all managed user objects."roles"- a list of the roles to which this access configuration applies."methods"- a comma separated list of the methods to which access is being granted. The method can be one or more ofcreate, read, update, delete, patch, action, query. A value of"*"indicates that all methods are allowed. A value of""indicates that no methods are allowed."actions"- a comma separated list of the allowed actions. The possible values depend on the service (URL) that is being exposed. The following list indicates the possible actions for each service.openidm/info/*-(no action parameter applies)openidm/authentication-reauthenticateopenidm/config/ui/*-(no action parameter applies)openidm/endpoint/securityQA-securityQuestionForUserName, checkSecurityAnswerForUserName, setNewPasswordForUserNameopenidm/endpoint/getprocessforuser-create, completeopenidm/endpoint/gettaskview-create, completeopenidm/external/email-sendopenidm/external/rest-(no action parameter applies)openidm/managed-patch, triggerSyncCheckopenidm/managed/user-validateObject, validatePropertyopenidm/policy-validateObject, validatePropertyopenidm/recon-recon, reconByQuery, reconById, cancelopenidm/repo-updateDbCredentialsopenidm/script/*-evalopenidm/security/keystore-generateCert, generateCSRopenidm/security/truststore-generateCert, generateCSRopenidm/sync-notifyCreate, notifyUpdate, notifyDelete, recon, performActionopenidm/system-test, testConfig, availableConnectors, createCoreConfig, createFullConfig, liveSync, authenticateopenidm/system/<name>-script, test, liveSyncopenidm/system/<name>/{id}-authenticate, liveSyncopenidm/taskscanner-execute, cancelopenidm/workflow/processdefinition-create, completeopenidm/workflow/processinstance-create, completeopenidm/workflow/taskinstance-claim, create, completeA value of
"*"indicates that all actions exposed for that service are allowed. A value of""indicates that no actions are allowed."customAuthz"- an optional parameter that enables you to specify a custom function for additional authorization checks. These functions are defined inrouter-authz.js.The
allowedPropertiesForManagedUservariable, declared at the beginning of the file, enables you to create a white list of attributes that users are able to modify on their own accounts."excludePatterns"- an optional parameter that enables you to specify particular endpoints to which access should not be given.
15.7.3. Properties for Authentication and Roles
The properties in this section define how users and groups may be associated
with roles and certain authentication mechanisms. Some of these properties
are included in the excerpt of the authentication.json
file shown in Section 15.4, "Using Delegated Authentication".
Different authentication modules may apply. In files such as
authentication.json, you may assign an authentication
module to the name property. Just be sure to include
enabled=true or enabled=false for
the configured module(s). For a list of available modules, see
Section 15.3, "Supported Authentication Modules".
queryOnResourceThe system endpoint against which the user authenticates, such as
system/ldap/account,system/scriptedsql/account,system/ad/account,managed/user, andrepo/internal/user.augmentSecurityContext(optional)This parameter points to a script, executed only after a successful authentication request to provide additional information, based on the security context.
For delegated (pass-through authentication), OpenIDM uses the
populateAsManagedUser.jsscript. This script uses authentication details returned from the pass-through authentication module. Those details can point to a linked managed user record. If a linked record is found, the script adjusts the details of the security context to match that managed user object. The adjusted security context enables additional operations for the authenticated user, such as the ability to access the default user interface.The script must be either JavaScript (
"type":"text/javascript") or Groovy ("type":"groovy"), and can be provided inline ("source":"script source") or in a file ("file":"filename").propertyMapping(optional)A list that enables you to map the following OpenIDM properties to fields in the system resource used for the authentication.
-
authenticationId Specifies the authentication property, such as
"uid","sAMAccountName", and"username"groupMembershipSpecifies the name of the property in the remote system that contains the list of groups of which the authenticated user is a member, such as
memberOf, orldapGroups.groupRoleMapping(optional)Enables you to assign roles to users, based on their group membership in the system resource. In this example, users who are members of the
"cn=admins"group in the LDAP directory automatically acquire the"openidm-admin"role. Group membership is determined, based on thegroupMembershipproperty, described previously.managedUserLink(optional)Used by the script specified in
"augmentSecurityContext"to switch the context of an authenticated user from their original security context to a context that is based on the relatedmanaged/useraccount. The value is based on thenameof the mapping in the associatedsync.jsonfile.The value of this property is the
"links"entry (usually the mapping name defined insync.json) that was used to relate the remote system users with the managed users.defaultUserRoles(optional)Can be defined for any authentication module. OpenIDM assigns such roles (or an empty set) to the security context of a user.
enabledSpecifies whether the given authentication module is enabled (
true) or disabled (false).
15.7.4. Extending the Authorization Mechanism
You can extend the default authorization mechanism by defining additional
functions in router-authz.js and by creating new access
control configuration definitions in access.js.
15.8. Building Role-Based Access Control (RBAC)
In OpenIDM, role assignments can be configured with different authentication options. Roles can be assigned in a number of ways. The roles assigned to specific users are cumulative.
The roles for each user are calculated based on the process depicted here:

In OpenIDM, RBAC incorporates authentication and authorization options from roles configured for clients, for managed / internal users, as well as for group memberships.
For information on the properties listed in this section, see Section 15.7.3, "Properties for Authentication and Roles".
Roles and authentication options can be configured for users in three stages:
- Client Controlled
The
defaultUserRolesmay be added to authentication modules configured in the applicableauthentication.jsonfile. Default roles are listed in Section 15.6, "Roles and Authentication".If you see the following entry in
authentication.json, the cited authentication property applies to all authenticated users:"defaultUserRoles" : [ ]
- Managed / Internal
Accumulated roles for users are collected in the
userRolesproperty.For a definition of managed and internal users, see Section 15.1, "OpenIDM Users".
- Group roles
OpenIDM also uses group roles as input. Options include
groupMembership,groupRoleMapping, andgroupComparison- context.security
Once OpenIDM assigns roles and authentication modules to a user, OpenIDM then evaluates the result based on the
context.securitymap, based on the scripts in thepolicy.jsfile. Details require an extended discussion in the next section.
15.8.1. Roles, Authentication, and the Security Context
The Security Context, written into the code as
context.security, consists of a principal defined by the
authenticationId, along with access control defined
through the authorizationId.
If authentication is successful, Common Authentication Framework (CAF)
modules set a principal. OpenIDM stores that principal as the
authenticationId. For more information, see the
authentication components defined in Section 15.3, "Supported Authentication Modules".
The authorizationId includes two roles-related components,
generated by OpenIDM:
- roles
Discussed in Section 15.6, "Roles and Authentication"
- component
Resources defined through properties defined in Section 15.7.3, "Properties for Authentication and Roles". The
authorizationIdcomponent is set to the value references in thequeryOnResourceproperty.
Chapter 16. Securing & Hardening OpenIDM
OpenIDM provides a security management service, that manages keystore and truststore files. The security service is accessible over the REST interface, enabling you to read and import SSL certificates, and to generate certificate signing requests.
This chapter describes the security management service and its REST interface.
In addition, the chapter outlines the specific security procedures that you should follow before deploying OpenIDM in a production environment.
Note
In a production environment, we recommend that you avoid the use of: communications over insecure HTTP, self-signed certificates, and certificates associated with insecure ciphers.
16.1. Accessing the Security Management Service
OpenIDM stores keystore and truststore files in a folder named
/path/to/openidm/security. These files can be managed by
using the keytool command, or over the REST interface, at
the URL https://localhost:8443/openidm/security. For
information about using the keytool command, see
http://docs.oracle.com/javase/6/docs/technotes/tools/solaris/keytool.html.
The following sections describe how to manage certificates and keys over REST.
16.1.1. Displaying the Contents of the Keystore
OpenIDM generates a symmetric key and a private key the first time the server is started. After startup, display the contents of the keystore over REST, as follows:
$ curl \
--cacert self-signed.crt \
--header "X-OpenIDM-Username: openidm-admin" \
--header "X-OpenIDM-Password: openidm-admin" \
--request GET \
"https://localhost:8443/openidm/security/keystore"
{
"type" : "JCEKS",
"provider" : {
"Cipher.Blowfish SupportedKeyFormats" : "RAW",
"AlgorithmParameters.DESede" : "com.sun.crypto.provider.DESedeParameters",
"AlgorithmParameters.DES" : "com.sun.crypto.provider.DESParameters",
...
},
"aliases" : [ "openidm-sym-default", "openidm-localhost" ]
}
By default, OpenIDM includes the following aliases:
openidm-sym-default- the default symmetric key that is used, for example, to encrypt the configuration.openidm-localhost- the default alias that is used by the Jetty web server to service SSL requests. This alias references a private key and a self-signed certificate. You can use the self-signed certificate for testing purposes. When you deploy OpenIDM in a production environment, you should replace the self-signed certificate with a certificate that has been signed by a certificate authority.
16.1.2. Generating a Certificate Signing Request Over REST
To request a signed certificate, generate a certificate signing request (CSR) over REST, as described in this section. The details of the CSR are specified in JSON format, for example:
{
"DN" : "www.example.com",
"OU" : "HR",
"L" : "Cupertino",
"C" : "US"
} For information about the complete contents of a CSR, see http://www.sslshopper.com/what-is-a-csr-certificate-signing-request.html.
To generate a CSR over the REST interface, include the private key alias in
the URL. The following example, uses the default alias
(openidm-localhost). If you have created your own private
key for this request, specify its alias instead of
openidm-localhost. Set "returnPrivateKey" : true
to return the private key along with the request.
$ curl \
--cacert self-signed.crt \
--header "X-OpenIDM-Username: openidm-admin" \
--header "X-OpenIDM-Password: openidm-admin" \
--header "Content-Type: application/json" \
--request POST \
--data '{"CN" : "www.example.com",
"OU" : "HR",
"L" : "Cupertino",
"C" : "US",
"returnPrivateKey" : true,
"alias" : "openidm-localhost"}' \
"https://localhost:8443/openidm/security/keystore?_action=generateCSR"
{
"_id": "openidm-localhost",
"csr": "-----BEGIN CERTIFICATE REQUEST-----\n
MIICmzCCAYMCAQAwWDEZMBcGA1UEAwwQd3d3MS5
leGFtcGxlLmNvbTELMAkGA1UE\nCwwCSFIxDTALBgNVBAoMBE5vbmUxEjAQBgNVBAcMCUN1cGVyd
GlubzELMAkGA1UE\nBhMCVVMwggEiMA0GCSqGSIb3DQEBAQUAA4IBDwAwggEKAoIBAQDAjCjTt1b
o0WKH\nP/4PR/Td3A1ElTo4/J/7o7eWflOqs8vW5d76SMcJFKOQ6FhoOcOHRNewch+a0DBK\njKF
aRCE1c0PuXiIlrO7wsF4dFTtTZKAhrpFdM+0hU4LeyCDxQQ5UDga3rmyVIvC8\nL1PvW+sZEcZ9r
T67XOV03cwUpjvG4W58FCUKd6UAI0szfIrFdvJp4q4LkkBNkk9J\nUf+MXsSVuHzZrqvqhX900Is
a19mXD6/P9Cql8KmwEzzbglGFf6uYAK33F71Kx409\nTeS85sjmBbyJwUVwhgQ0R35H3HC6jex4P
jx1rSfPmsi61JBx9kyGu6rnSv5FOQGy\nBQpgQFnJAgMBAAEwDQYJKoZIhvcNAQENBQADggEBAKc
yInfo2d7/12jUrOjL4Bqt\nStuQS/HkO2KAsc/zUnlpJyd3RPI7Gs1C6FxIRVCzi4Via5QzE06n2
F8HHkinqc6m\nBWhIcf5Omk6fSqG0aw7fqn20XWDkRm+I4vtm8P8CuWftUj5qv5kmyUtrcQ3+YPD
O\nL+cK4cfuCkjLQ3h4GIgBJP+gfWX8fTmCHyaHEFjLTMj1hZYEx+3f8awOVFoNmr3/\nB8LIJNH
UiFHO6EED7LDOwa/z32mTRET0nK5DVO60H80JSWxzdWYZQV/IzHzm8ST4\n6j6vuheBZiG5gZR2V
F0x5XoudQrSg7lpVslXBHNeiM85+H08RMQh8Am2bp+Xstw=\n",
-----END CERTIFICATE REQUEST-----\n",
"publicKey": {
"format": "X.509",
"encoded": "-----BEGIN PUBLIC KEY-----\n
MIIBIjANBgkqhkiG9w0BAQEFAAOCAQ8AMIIBCgKCAQEAr
ALtYU662bNbQZG7JZ3M\noOUmVP9cPP3+DhQ5H0V0qB+9YjE4XUtuwUGqaUmuT+mrXHwGpLAqvUm
NsVyXJj9s\nJhX6PCyXzO3RdKBVC8pphMfKXodjBC57ef0OkWjO5ZRAqCRwS3BXkoCfu6/ZXRpk\
ncc/A1RmLZdPmcuKmN5vQl4E3Z6F4YyG7M0g7TE54dhqPvGNS9cO4r0Vom9373MDh\n+8QSfmLCC
94Ro+VUAF9Q6nk2j0PgTi+QZ0i93jbKAWWX57w6S5i7CpEptKyeP9iG\ncFnJddSICPHkbQJ73gu
lyZYkbcBblNUxIhODZV5bJ0oxn9qgYvzlxJupldYsYkBo\ncwIDAQAB\n
-----END PUBLIC KEY-----\n",
"algorithm": "RSA"
},
"privateKey": {
"format": "PKCS#8",
"encoded": "-----BEGIN RSA PRIVATE KEY-----\n
MIIEpAIBAAKCAQEArALtYU662bNbQZG7JZ3MoOU
VP9cPP3+DhQ5H0V0qB+9YjE4\nXUtuwUGqaUmuT+mrXHwGpLAqvUmNsVyXJj9sJhX6PCyXzO3RdK
BVC8pphMfKXodj\nBC57ef0OkWjO5ZRAqCRwS3BXkoCfu6/ZXRpkcc/A1RmLZdPmcuKmN5vQl4E3
Z0i93jbKAWWX57w6S5i7CpEptKyeP9iGcFnJddSICPHkbQJ73gulyZYkbcBb\nlNUxIhODZV5bJ0
Z6F4\nYyG7M0g7TE54dhqPvGNS9cO4r0Vom9373MDh+8QSfmLCC94Ro+VUAF9Q6nk2j0Pg\nTi+Q
oxn9qgYvzlxJupldYsYkBocwIDAQABAoIBAGmfpopRIPWbaBb8\nWNIBcuz9qSsaX1ZolP+qNWVZ
bgfq7Y0FMlo/frQXEYBzqSETGJHC6wVn0+bF6scV\nVw86dLtyVWVr8I77HdoitfZ2hZLuZ/rh4d
BohpPi63YoyJs7DPTy4y2/v1aLuwoy\nMiQ0l6c3bm6sr+eIVgMH4A9Xk5/jzAHVTCBrvfTYZnh6
qD4Qmiuj8pQn79HQV8NK\nLt/5kmV1+uGj78jg7NR06NjNsa4L3mNZSiqsn2haPXZAnBjKfWApxe
GugURgNBCO\ncmYqCDZLvpMy4S/qoRBu+6qdYGprb+tHshBYNywuDkrgszhwgr5yRm8VQ60T9tM/
\nceKM+TECgYEA2Az2DkpC9TjJHPJG7x4boRRVqV5YRgPf5MrU+7PxDMb+EauXXUXg\nsch9Eeon
30yINqSv6FwATLVlkzQpZLkkJ6GJqAxUmPjRslAuosiSJqKaWamDUDbz\nSu/7iANJWvRGayqZsa
GQqFwM0Xpfp/EiBGe757k0D02u8sAv94A75bsCgYEAy9FQ\nMwDU3CaDzgv0qgR1ojXkSW0dCbv0
QPEkKZ2Ik7JbXzwVGzfdv2VUVrzRKBGReYzn\nGg/s4HbZkYy4O+SJo44n/5iO2pgKG5MEDFHSpw
X54Rm+qabT2fQ2lFJ/myWKsPgJ\n4gZ9bUvcemCcLLzsiAphueulQp49eOLnkzPlQKkCgYEAy7A0
jrZuuDjoStUUET5G\neC/urvZWrPPcMx0TfZZhTVWSlWA8HWDS/WnymGA1ZS4HQdU0TxHl6mwerp
C/8ckn\nEAIZAQlW/L2hHcbAoRIN0ET+1kedmJOl/mGQt+O5Vfn1JfYM3s5ezouyPhBsfK43\nDw
Ypvsb6EO+BYDXXQzVvwx8CgYB9o67LcfTFLNzNFCOi9pLJBm2OMbvXt0wPCFch\nbCG34hdfMntU
RvDjvgPqYASSrZm+kvQW5cBAciMWDOe4y91ovAW+En3lFBoO+2Zg\nbcPr/8wUTblxfQxU660Fa4
GL0u2Wv5/f+94vlLb5nTpIfcFU7wllAXTjBwaf0Uet\nPy1P2QKBgQDPoyJqPi2TdN7ZQYcoXAM4
Gl5Yv9oO16RC917XH6SLvj0ePmdLgBXo\nrR6aAmOjLzFp9jiytWZqVR9DbAWd2YNpvQav4Gude3
lteew02UT+GNv/gC71bXCw\ncFTxnmKjP8YYIBBqZXzuk9wEaHN7OdGybUW0dsBCGxTXwDKe8XiA
6w==\n-----END RSA PRIVATE KEY-----\n",
"algorithm": "RSA"
}
This sample request returns the CSR, the private key associated with the request, and the public key. The security management service stores the private key in the repository. When the signed certificate is returned by the certificate authority and you import the certificate into the keystore, you do not need to supply the private key. The security management service locates the private key in the repository, adds the certificate chain, and loads it into the keystore.
If you will be importing the signed certificate into the keystore of an
OpenIDM instance that is not connected to the repository in which this
private key was stored, you must include the private key when you import the
signed certificate. Setting "returnPrivateKey" : true in
the CSR enables you to maintain a copy of the private key for this purpose.
Send the output from
"csr": "-----BEGIN CERTIFICATE REQUEST-----
...
-----END CERTIFICATE REQUEST-----to your certificate authority for signature.
16.1.3. To Import a Signed Certificate into the Keystore
When a signed certificate is returned by the certificate authority, import
it into the keystore by running a RESTful PUT command on
the keystore alias. Include the CA root certificate in the command. If you
are not importing the certificate into the same keystore as the one from
which the CSR was generated, include the private key in the PUT request.
$ curl \
--cacert self-signed.crt \
--header "X-OpenIDM-Username: openidm-admin" \
--header "X-OpenIDM-Password: openidm-admin" \
--header "Content-Type: application/json" \
--request PUT \
--data '{
"alias": "openidm-localhost",
"fromCSR": true,
"certs": [
"-----BEGIN CERTIFICATE-----\n
MIIGcDCCBVigAwIBAgIDC23tMA0GCSqGSIb3DQEBBQUAMIGMMQswCQYDVQQGEwJJ\n
TDEWMBQGA1UEChMNU3RhcnRDb20gTHRkLjErMCkGA1UECxMiU2VjdXJlIERpZ2l0\n
YWwgQ2VydGlmaWNhdGUgU2lnbmluZzE4MDYGA1UEAxMvU3RhcnRDb20gQ2xhc3Mg\n
MSBQcmltYXJ5IEludGVybWVkaWF0ZSBTZXJ2ZXIgQ0EwHhcNMTMwODA3MTMyODAz\n
WhcNMTQwODA4MDY0NTM5WjB2MRkwFwYDVQQNExBwZ3BDaGU4cEJPZnptVE9KMQsw\n
CQYDVQQGEwJHQjEjMCEGA1UEAxMadGVzdC1jb25uZWN0LmZvcmdlcm9jay5jb20x\n
JzAlBgkqhkiG9w0BCQEWGHBvc3RtYXN0ZXJAZm9yZ2Vyb2NrLmNvbTCCASIwDQYJ\n
KoZIhvcNAQEBBQADggEPADCCAQoCggEBAJRWGbnMGs+uGKU6ZrlTaaFdPczLqZnv\n
D37T0FOc/X3XXHxSVH94FDk7N4ansP2o6BsDWttIkM2AXkX3efMRaNpgxg7l4+DL\n
opV6H1RkrRba2Lom6Hp2pgkqvOBfd1ZMOmLbjUHt0jhypnIzu7TVwtTH7Ywsrx9F\n
uR9d4veYdW70IeQ64EhUG3RJBGG++AYJZCOjgEfbCwAYe/NoX/YVu+aMreHMR/+0\n
CV0YXKvHZgytcwZIc5WkQYaSWQA9lDWZzt5XjCErCATfiGEQ0k02QgpEfNTXxwQs\n
kfxh//O/qbfOWmloGwVU/2NY+5z3ZW8/eCksmiL1gGAYQAd+9+WI7BsCAwEAAaOC\n
Au4wggLqMAkGA1UdEwQCMAAwCwYDVR0PBAQDAgOoMBMGA1UdJQQMMAoGCCsGAQUF\n
BwMBMB0GA1UdDgQWBBR2zHzb71ZOHSwDZk28L9It3PvOtzAfBgNVHSMEGDAWgBTr\n
QjTQmLCrn/Qbawj3zGQu7w4sRTA0BgNVHREELTArghp0ZXN0LWNvbm5lY3QuZm9y\n
Z2Vyb2NrLmNvbYINZm9yZ2Vyb2NrLmNvbTCCAVYGA1UdIASCAU0wggFJMAgGBmeB\n
DAECATCCATsGCysGAQQBgbU3AQIDMIIBKjAuBggrBgEFBQcCARYiaHR0cDovL3d3\n
dy5zdGFydHNzbC5jb20vcG9saWN5LnBkZjCB9wYIKwYBBQUHAgIwgeowJxYgU3Rh\n
cnRDb20gQ2VydGlmaWNhdGlvbiBBdXRob3JpdHkwAwIBARqBvlRoaXMgY2VydGlm\n
aWNhdGUgd2FzIGlzc3VlZCBhY2NvcmRpbmcgdG8gdGhlIENsYXNzIDEgVmFsaWRh\n
dGlvbiByZXF1aXJlbWVudHMgb2YgdGhlIFN0YXJ0Q29tIENBIHBvbGljeSwgcmVs\n
aWFuY2Ugb25seSBmb3IgdGhlIGludGVuZGVkIHB1cnBvc2UgaW4gY29tcGxpYW5j\n
ZSBvZiB0aGUgcmVseWluZyBwYXJ0eSBvYmxpZ2F0aW9ucy4wNQYDVR0fBC4wLDAq\n
oCigJoYkaHR0cDovL2NybC5zdGFydHNzbC5jb20vY3J0MS1jcmwuY3JsMIGOBggr\n
BgEFBQcBAQSBgTB/MDkGCCsGAQUFBzABhi1odHRwOi8vb2NzcC5zdGFydHNzbC5j\n
b20vc3ViL2NsYXNzMS9zZXJ2ZXIvY2EwQgYIKwYBBQUHMAKGNmh0dHA6Ly9haWEu\n
c3RhcnRzc2wuY29tL2NlcnRzL3N1Yi5jbGFzczEuc2VydmVyLmNhLmNydDAjBgNV\n
HRIEHDAahhhodHRwOi8vd3d3LnN0YXJ0c3NsLmNvbS8wDQYJKoZIhvcNAQEFBQAD\n
ggEBAKVOAHtXTrgISj7XvE4/lLxAfIP56nlhpoLu8CqVlLK6eK4zCQRyTiFYx3xq\n
VQMSNVgQIdimjEsMz8o5/fDrCrozsT6sqxIPFsdgdskPyz9YyC9Y/AVBuECxabQr\n
B//0STicfdPg8PuDYtI64/INA47d/gtb57RaTFYxKs6bU8vtObinDJCwT33x4tvt\n
ob18DwB3/PeTbWyVUIxB0nvfm89dys0SF2alaA/bLuy0B7rdlppd4dOMpmiD0tnI\n
DORtr5HOD1xGiixZWzA1V2pTmF/hJZbhmEgBUSIyPK5Z9pZPephMf+/KrovbQqKr\n
6SEjgs7dGwpo6fA2mfCH5cCrid0=\n
-----END CERTIFICATE-----",
"-----BEGIN CERTIFICATE-----\n
MIIDdTCCAl2gAwIBAgILBAAAAAABFUtaw5QwDQYJKoZIhvcNAQEFBQAwVzELMAkG\n
A1UEBhMCQkUxGTAXBgNVBAoTEEdsb2JhbFNpZ24gbnYtc2ExEDAOBgNVBAsTB1Jv\n
b3QgQ0ExGzAZBgNVBAMTEkdsb2JhbFNpZ24gUm9vdCBDQTAeFw05ODA5MDExMjAw\n
MDBaFw0yODAxMjgxMjAwMDBaMFcxCzAJBgNVBAYTAkJFMRkwFwYDVQQKExBHbG9i\n
YWxTaWduIG52LXNhMRAwDgYDVQQLEwdSb290IENBMRswGQYDVQQDExJHbG9iYWxT\n
aWduIFJvb3QgQ0EwggEiMA0GCSqGSIb3DQEBAQUAA4IBDwAwggEKAoIBAQDaDuaZ\n
jc6j40+Kfvvxi4Mla+pIH/EqsLmVEQS98GPR4mdmzxzdzxtIK+6NiY6arymAZavp\n
xy0Sy6scTHAHoT0KMM0VjU/43dSMUBUc71DuxC73/OlS8pF94G3VNTCOXkNz8kHp\n
1Wrjsok6Vjk4bwY8iGlbKk3Fp1S4bInMm/k8yuX9ifUSPJJ4ltbcdG6TRGHRjcdG\n
snUOhugZitVtbNV4FpWi6cgKOOvyJBNPc1STE4U6G7weNLWLBYy5d4ux2x8gkasJ\n
U26Qzns3dLlwR5EiUWMWea6xrkEmCMgZK9FGqkjWZCrXgzT/LCrBbBlDSgeF59N8\n
9iFo7+ryUp9/k5DPAgMBAAGjQjBAMA4GA1UdDwEB/wQEAwIBBjAPBgNVHRMBAf8E\n
BTADAQH/MB0GA1UdDgQWBBRge2YaRQ2XyolQL30EzTSo//z9SzANBgkqhkiG9w0B\n
AQUFAAOCAQEA1nPnfE920I2/7LqivjTFKDK1fPxsnCwrvQmeU79rXqoRSLblCKOz\n
yj1hTdNGCbM+w6DjY1Ub8rrvrTnhQ7k4o+YviiY776BQVvnGCv04zcQLcFGUl5gE\n
38NflNUVyRRBnMRddWQVDf9VMOyGj/8N7yy5Y0b2qvzfvGn9LhJIZJrglfCm7ymP\n
AbEVtQwdpf5pLGkkeB6zpxxxYu7KyJesF12KwvhHhm4qxFYxldBniYUr+WymXUad\n
DKqC5JlR3XC321Y9YeRq4VzW9v493kHMB65jUr9TU/Qr6cf9tveCX4XSQRjbgbME\n
HMUfpIBvFSDJ3gyICh3WZlXi/EjJKSZp4A==\n
-----END CERTIFICATE-----"
],
"privateKey": "-----BEGIN RSA PRIVATE KEY-----\n
zDot5q3vP9YjCihMZMkSa0zT2Zt+8S+mC0EVuYuTVhVpqrVNtkP1mlt+CYqmDffY\n
sGuD6SMrT6+SeAzX2uYFgY4+s8yaRWBcr0C5Z7yihilM6BK+IJ4is9kaW5VFr1Ph\n
wRKvSeFHBGh2wLNpjVSNPzLMDZBtkVi9Ny/xD5C3M1Gah0PGmnrPGCP8tr1Lshv4\n
PxYJwzHzouTdQDkLYlCjMN++NmIYfx7zrbEYV4VzXMxgNq7d3+d5dlVfE8xpAjSR\n
Lqlamib+doe1oWOQ2WiS6baBAH+Gw5rgqfwhJbCY/UlbCpuJ6kl7TLvTrFp8YpvB\n
Iv1GD0yuwSued3a+AxMFuIzTBYd2rC6rHq+eF4eHd/Q/Sbm9+9VuW/h8dW3LGvbE\n
5SUUhNw6uSkOZmZ0z/+FLbwoLPCASukY9biSd+12KJf4N42WZxID+9mJTp1j/Bv7\n
n29oGfZ3vav8PqG+F987hSyWEIdGTMfIxwaUrdYe1fmbUCxv0suMcYTRbAs9g3cm\n
eCNxbZBYC/fL+Nlj5NjZ+gxA/tEXV7wWynPZW3mZny6fQpDTDMslqsoFZR+rAUzH\n
ViePuLbCdxIC5heUyqvDBbeOzgQWOu6SZjX+mAQpo0DPKt1KDP4DKv9EW92sIwW3\n
AnFg98sje0DZ+zfsnevGioQMJrG0JSnqTYADxHaauu7NWndkfMZisfNIKA0u+ajU\n
AbP8xFXIP5JU8O4tWmlbxAbMOYfrZHabFNZx4DH1OVOJqdJIVx0KER0GSZd50D6W\n
QBzCfEbwMlJ17OB0AgWzNrbaak3MCmW1mh7OecjQwge1ajy7ho+JtQ==\n
-----END RSA PRIVATE KEY-----"
}' \
"https://localhost:8443/openidm/security/keystore/cert"
{
"_id": "openidm-localhost"
} If the import is successful, the command returns the alias of the keystore to which the signed certificate was added.
16.1.4. Generating a Self-Signed Certificate Over REST
To generate a self-signed X.509 certificate, use the
generateCert action on the keystore
endpoint. This action must be performed as an authenticated administrative
user. The generated certificate is returned in the response to the request,
and stored in the OpenIDM keystore.
Specify the details of the certificate in the JSON payload. For example:
$ curl \
--cacert self-signed.crt \
--header "X-OpenIDM-Username: openidm-admin" \
--header "X-OpenIDM-Password: openidm-admin" \
--header "Content-Type: application/json" \
--request POST \
--data '{
"algorithm" : "RSA",
"signatureAlgorithm" : "SHA512WithRSAEncryption",
"keySize" : 2048,
"domainName" : "www.example.com",
"validFrom" : "2014-08-13T07:59:44.497+02:00",
"validTo" : "2015-08-13T07:59:44.497+02:00",
"returnPrivateKey" : true,
"alias" : "new-alias"
}' \
"https://localhost:8443/openidm/security/keystore?_action=generateCert"
{
"publicKey": {
"algorithm": "RSA",
"encoded": "-----BEGIN PUBLIC KEY-----\nMIIBIjANBgkqhkiG9w0BAQEFAAOCAQ8AMIIB
...
\n-----END PUBLIC KEY-----\n",
"format": "X.509"
},
"cert": "-----BEGIN CERTIFICATE-----\nMIIDSDCCAjCgAwIBAgIGAUfOo3GvMA0GCSqGSIb3
...
\n-----END CERTIFICATE-----\n",
"type": "X.509",
"_id": "new-alias"
}
The following certificate details can be specified:
"algorithm"(optional) - the public key algorithm, for example,RSA. If no algorithm is specified, a default ofRSAis used."signatureAlgorithm"(optional) - the signature type, for example,SHA512WithRSAEncryption. If no algorithm is specified, a default ofSHA512WithRSAEncryptionis used."keySize"(optional) - the size of the key (in bits) used in the cryptographic algorithm, for example2048. If no key size is specified, a default of2048is used."domainName"- the fully qualified domain name (FQDN) of your server, for examplewww.example.com."validFrom"and"validTo"(optional) - the validity period of the certificate, in UTC time format, for example2014-08-13T07:59:44.497+02:00. If no values are specified, the certificate is valid for one year, from the current date."returnPrivateKey"(optional) - set this totrueto return the private key along with the request."alias"- the keystore alias or string that identifies the certificate, for exampleopenidm-localhost.
16.1.5. Security Management Service Endpoints
The OpenIDM security management service includes the following endpoints:
openidm/security/keystoreopenidm/security/truststore
You can use these endpoints to READ the contents on the keystore and truststore.
In addition, you can use these endpoints to perform related actions such as
generateCert and generateCSR.
When you set up an _action request on either endpoint,
you need to include all properties, including alias,
in the request data.
The alias is not provided in the URL; it is available in the data object.
For example, you might include "alias" : "openidm-localhost"
within a --data '{ "alias" : "openidm-localhost" }'
option.
Certificates and private keys are associated with the following endpoints:
openidm/security/keystore/cert,
openidm/security/keystore/privatekey, and
openidm/security/truststore/cert.
All CRUD requests on such certificates and private/public keys use these endpoints.
16.2. Security Precautions for a Production Environment
Out of the box, OpenIDM is set up for ease of development and deployment. When you deploy OpenIDM in production, there are specific precautions you should take to minimize security breaches. After following the guidance in this section, make sure that you test your installation to verify that it behaves as expected before putting it into production.
16.2.1. Use SSL and HTTPS
You should disable plain HTTP access, as described in Section 16.2.6, "Secure Jetty".
Use TLS/SSL to access OpenIDM, ideally with mutual authentication so that only trusted systems can invoke each other. TLS/SSL protects data on the network. Mutual authentication with strong certificates, imported into the trust and keystores of each application, provides a level of confidence for trusting application access.
Augment this protection with message level security where appropriate.
16.2.2. Restrict REST Access to the HTTPS Port
When possible, use a certificate to secure REST access, over HTTPS. For production, that certificate should be signed by a certificate authority.
OpenIDM generates a self-signed certificate when it first starts up. You can use this certificate to test secure REST access.
While not recommended for production, you can test secure REST access using
the default self-signed certificate. To do so, you can create a self-signed
certificate file, self-signed.crt, using the following
procedure:
Extract the certificate that is generated when OpenIDM starts up.
$ openssl s_client -showcerts -connect localhost:8443 </dev/null
This command outputs the entire certificate to the terminal.
Using any text editor, create a file named
self-signed.crt. Copy the portion of the certificate from-----BEGIN CERTIFICATE-----to----END CERTIFICATE-----and paste it into theself-signed.crtfile, which should appear similar to the following:$ more self-signed.crt -----BEGIN CERTIFICATE----- MIIB8zCCAVygAwIBAgIETkvDjjANBgkqhkiG9w0BAQUFADA+MSgwJgYDVQQKEx9P cGVuSURNIFNlbGYtU2lnbmVkIENlcnRpZmljYXRlMRIwEAYDVQQDEwlsb2NhbGhv c3QwHhcNMTEwODE3MTMzNTEwWhcNMjEwODE3MTMzNTEwWjA+MSgwJgYDVQQKEx9P cGVuSURNIFNlbGYtU2lnbmVkIENlcnRpZmljYXRlMRIwEAYDVQQDEwlsb2NhbGhv c3QwgZ8wDQYJKoZIhvcNAQEBBQADgY0AMIGJAoGBAKwMkyvHS5yHAnI7+tXUIbfI nQfhcTChpWNPTHc/cli/+Ta1InTpN8vRScPoBG0BjCaIKnVVl2zZ5ya74UKgwAVe oJQ0xDZvIyeC9PlvGoqsdtH/Ihi+T+zzZ14oVxn74qWoxZcvkG6rWEOd42QzpVhg wMBzX98slxkOZhG9IdRxAgMBAAEwDQYJKoZIhvcNAQEFBQADgYEASo4qMI0axEKZ m0jU4yJejLBHydWoZVZ8fKcHVlD/rTirtVgWsVgvdr3yUr0Idk1rH1nEF47Tzn+V UCq7qJZ75HnIIeVrZqmfTx8169paAKAaNF/KRhTE6ZII8+awst02L86shSSWqWz3 s5xPB2YTaZHWWdzrPVv90gL8JL/N7/Q= -----END CERTIFICATE-----Test REST access on the HTTPS port, referencing the self-signed certificate in the command. For example:
$ curl \ --header "X-OpenIDM-Username:openidm-admin" \ --header "X-OpenIDM-Password:openidm-admin" \ --cacert self-signed.crt \ --request GET \ "https://localhost:8443/openidm/managed/user/?_queryId=query-all-ids" { "result": [], "resultCount": 0, "pagedResultsCooke": null, "remainingPagedResuts": -1 }
16.2.3. Encrypt Data Internally and Externally
Beyond relying on end-to-end availability of TLS/SSL to protect data, OpenIDM also supports explicit encryption of data that goes on the network. This can be important if the TLS/SSL termination happens prior to the final endpoint.
OpenIDM also supports encryption of data stored in the repository, using a symmetric key. This protects against some attacks on the data store. Explicit table mapping is supported for encrypted string values.
OpenIDM automatically encrypts sensitive data in configuration files, such as passwords. OpenIDM replaces clear text values when the system first reads the configuration file. Take care with configuration files having clear text values that OpenIDM has not yet read and updated.
16.2.4. Use Message Level Security
OpenIDM supports message level security, forcing authentication before granting access. Authentication works by means of a filter-based mechanism that lets you use either an HTTP Basic like mechanism or OpenIDM-specific headers, setting a cookie in the response that you can use for subsequent authentication. If you attempt to access OpenIDM URLs without the appropriate headers or session cookie, OpenIDM returns HTTP 401 Unauthorized, or HTTP 403 Forbidden, depending on the situation. If you use a session cookie, you must include an additional header that indicates the origin of the request.
16.2.4.1. Message Level Security with Logins
The following examples show successful authentications.
$ curl \
--cacert self-signed.crt \
--dump-header /dev/stdout \
--user openidm-admin:openidm-admin \
"https://localhost:8443/openidm/managed/user?_queryId=query-all-ids"
HTTP/1.1 200 OK
Content-Type: application/json; charset=UTF-8
Cache-Control: no-cache
Set-Cookie: session-jwt=2l0zobpuk6st1b2m7gvhg5zas ...;Path=/
Expires: Thu, 01 Jan 1970 00:00:00 GMT
Vary: Accept-Encoding, User-Agent
Content-Length: 82
Server: Jetty(8.y.z-SNAPSHOT)
{"result":[],"resultCount":"0","pagedResultsCookie":null,"remainingPagedResults":-1}
$ curl \
--cacert self-signed.crt \
--dump-header /dev/stdout \
--header "X-OpenIDM-Username: openidm-admin" \
--header "X-OpenIDM-Password: openidm-admin" \
"https://localhost:8443/openidm/managed/user?_queryId=query-all-ids"
HTTP/1.1 200 OK
Content-Type: application/json; charset=UTF-8
Cache-Control: no-cache
Set-Cookie: session-jwt=2l0zobpuk6st1b2m7gvhg5zas ...;Path=/
Expires: Thu, 01 Jan 1970 00:00:00 GMT
Vary: Accept-Encoding, User-Agent
Content-Length: 82
Server: Jetty(8.y.z-SNAPSHOT)
{"result":[],"resultCount":"0","pagedResultsCookie":null,"remainingPagedResults":-1}
$ curl \
--dump-header /dev/stdout \
--cacert self-signed.crt \
--header "Cookie: session-jwt=2l0zobpuk6st1b2m7gvhg5zas ..." \
--header "X-Requested-With: OpenIDM Plugin" \
"https://localhost:8443/openidm/managed/user?_queryId=query-all-ids"
Expires: Thu, 01 Jan 1970 00:00:00 GMT
Content-Type: application/json; charset=UTF-8
Cache-Control: no-cache
Vary: Accept-Encoding, User-Agent
Content-Length: 82
Server: Jetty(8.y.z-SNAPSHOT)
Notice that the last example uses the cookie OpenIDM set in the
response to the previous request, and includes the
X-Requested-With header to indicate the origin of the
request. The value of the header can be any string, but should be informative
for logging purposes. If you do not include the
X-Requested-With header, OpenIDM returns HTTP 403
Forbidden.
Note
The careful readers among you may notice that the expiration date of the JWT cookie, January 1, 1970, corresponds to the start of UNIX time. Since that time is in the past, browsers will not store that cookie after the browser is closed.
You can also request one-time authentication without a session.
$ curl \
--dump-header /dev/stdout \
--cacert self-signed.crt \
--header "X-OpenIDM-NoSession: true" \
--header "X-OpenIDM-Username: openidm-admin" \
--header "X-OpenIDM-Password: openidm-admin" \
"https://localhost:8443/openidm/managed/user?_queryId=query-all-ids"
HTTP/1.1 200 OK
Content-Type: application/json; charset=UTF-8
Cache-Control: no-cache
Vary: Accept-Encoding, User-Agent
Content-Length: 82
Server: Jetty(8.y.z-SNAPSHOT)
{"result":[],"resultCount":"0","pagedResultsCookie":null,"remainingPagedResults":-1}
16.2.4.2. Logout By Removing the JWT Cookie
OpenIDM maintains sessions with a JWT session cookie, stored in a client browser. To log out and destroy the session, you would access and remove that cookie from the client browser.
The JWT session cookie is based on the JWT_SESSION module
documented in
Supported Authentication Modules.
16.2.5. Replace Default Security Settings
The default security settings are adequate for evaluation purposes. For production, change the default encryption key, and then replace the default user password.
By default, OpenIDM uses a symmetric encryption key with alias
openidm-sym-default. Change this default key before
deploying OpenIDM in production.
As noted in the section on the
keytool command, the default keystore
password is changeit.
Add the new key to the keystore.
$ cd /path/to/openidm/ $ keytool \ -genseckey \ -alias new-sym-key \ -keyalg AES \ -keysize 128 \ -keystore security/keystore.jceks \ -storetype JCEKS Enter keystore password: Enter key password for <new-sym-key> (RETURN if same as keystore password): Re-enter new password:Additional options associated with the keytool command in OpenIDM are shown in the following file:
openidm/samples/security/keystore_readme.txt.Change the alias used in
openidm/conf/boot/boot.properties.
After changing the default encryption key, change at least the default user password.
Use the encrypt command to obtain the encrypted version of the new password.
$ cd /path/to/openidm/ $ cli.sh encrypt newpwd ... -----BEGIN ENCRYPTED VALUE----- { "$crypto" : { "value" : { "iv" : "TCoC/YrmiRmINw6jCPB5LQ==", "data" : "nCFvBIApIQ7C6k+UPzosaA==", "cipher" : "AES/CBC/PKCS5Padding", "key" : "openidm-sym-default" }, "type" : "x-simple-encryption" } } ------END ENCRYPTED VALUE------Replace the user object in the
openidm/db/database/scripts/openidm.sqlscript before setting up your JDBC repository for OpenIDM.Alternatively, replace the user in the internal user table.
16.2.6. Secure Jetty
If you do not want to use regular HTTP on a production OpenIDM system, you need to make two changes.
First, edit the openidm/conf/jetty.xml configuration
file. Comment out the line that enables regular HTTP.
The following excerpt includes the Java comment code that you would add
around the openidm.port.http argument. The value of this
argument (8080 by default) is taken from the
conf/boot/boot.properties file.
<Call name="addConnector>
<Arg>
<New class="org.eclipse.jetty.server.nio.SelectChannelConnector">
<Set name="host"><Property name="jetty.host" /></Set>
<!-- <Set name="port"><Call class="org.forgerock.openidm.jetty.Param"
name="getProperty"<Arg>openidm.port.http</Arg></Call></Set> -->
<Set name="maxIdleTime">300000</Set>
<Set name="Acceptors">2</Set>
<Set name="statsOn">false</Set>
<Set name="confidentialPort">
<Call class="org.forgerock.openidm.jetty.Param" name="getProperty">
<Arg>openidm.port.https</Arg>
</Call>
</Set>
</New>
</Arg>
</Call>
Second, edit the openidm/conf/config.properties
configuration file. Set the org.osgi.service.http.enabled
property to false, as shown in the following excerpt:
# Enable pax web http/https services to enable jetty org.osgi.service.http.enabled=false org.osgi.service.http.secure.enabled=true
16.2.7. Protect Sensitive REST Interface URLs
Anything attached to the router is accessible with the default policy, including the repository. If you do not need such access, deny it in the authorization policy to reduce the attack surface.
In addition, you can deny direct HTTP access to system objects in production,
particularly access to action. As a rule of thumb, do not
expose anything that is not used in production. The main public interfaces
over HTTP are /openidm/managed/ and
/openidm/config/. Other URIs are triggered indirectly,
or are used for internal consumption.
OpenIDM supports native query expressions on the repository, and it is possible to enable these over HTTP, for example, the following query should identify managed users in an OrientDB repository:
$ curl \ --cacert self-signed.crt \ --header "X-OpenIDM-Username: openidm-admin" \ --header "X-OpenIDM-Password: openidm-admin" \ "https://localhost:8443/openidm/managed/user?_queryExpression=select+*+from+managed_user"
By default, direct HTTP access to native queries is disallowed, and should remain so in production systems.
For testing or development purposes, it can be helpful to enable native
queries on the repository over HTTP. To do so, edit the access
control configuration file (access.js). In that file,
remove any instances of "disallowQueryExpression()"
such as the following:
{
"pattern" : "*",
"roles" : "openidm-admin",
"methods" : "*", // default to all methods allowed
"actions" : "*", // default to all actions allowed
// "customAuthz" : "disallowQueryExpression()",
"excludePatterns": "system/*"
},
...
{
"pattern" : "system/*",
"roles" : "openidm-admin",
"methods" : "create,read,update,delete,patch,query", // restrictions on 'action'
"actions" : ""
// "customAuthz" : "disallowQueryExpression()"
},
...
"customAuthz" : "ownDataOnly() &&
managedUserRestrictedToAllowedProperties('"+allowedPropertiesForManagedUser+"')",
// && disallowQueryExpression()"
See the chapter on Managing Authentication, Authorization & RBAC for an example showing how to protect sensitive URLs.
16.2.8. Protect Sensitive Files & Directories
Protect OpenIDM files from access by unauthorized users.
In particular, prevent other users from reading files in at least the
openidm/conf/boot/ and
openidm/security/ directories.
The objective is to limit access to the user that is running the service.
Depending on the operating system and configuration, that user might be
root, Administrator,
openidm, or something similar.
For the target directory, and the files therein, make sure user and group ownership is limited to the user that is running the OpenIDM service.
Disable access of any sort for
otherusers. One simple command for that purpose, from the/path/to/openidmdirectory, is:# chmod -R o-rwx .
The OpenIDM process in Windows is normally run by the
Administratoruser.If you are concerned about the security of the administrative account, you can
Denypermissions on the noted directories to existing users, or alternatively theUsersgroup.
16.2.9. Obfuscate Bootstrap Information
OpenIDM uses the information in conf/boot/boot.properties,
including the keystore password, to start up. The keystore password is
changeit by default, and is stored in clear text in the
boot.properties file. To set an obfuscated version of
the keystore password in the boot.properties file,
follow these steps.
Generate an obfuscated version of the password, by using the crypto bundle provided with OpenIDM:
$ $ java -jar /path/to/openidm/bundle/openidm-crypto-3.1.0-6.jar This utility helps obfuscate passwords to prevent casual observation. It is not securely encrypted and needs further measures to prevent disclosure. Please enter the password: OBF:1vn21ugu1saj1v9i1v941sar1ugw1vo0 CRYPT:a8b5a01ba48a306f300b62a1541734c7Paste either the obfuscated password (
OBF:xxxxxxx) or the encrypted password (CRYPT:xxxxxxx) into theconf/boot/boot.propertiesfile. Comment out the regular keystore password and remove the comment tag, either from the line that contains the obfuscated password or from the line that contains the encrypted password:$ more conf/boot/boot.properties ... # Keystore password, adjust to match your keystore and protect this file # openidm.keystore.password=changeit openidm.truststore.password=changeit # Optionally use the crypto bundle to obfuscate the password and set one of these: openidm.keystore.password=OBF:1vn21ugu1saj1v9i1v941sar1ugw1vo0 # openidm.keystore.password=CRYPT:a8b5a01ba48a306f300b62a1541734c7 ...Restart OpenIDM.
$ ./startup.sh
16.2.10. Remove or Protect Development & Debug Tools
Before deploying OpenIDM in production, remove or protect development
and debug tools, including the OSGi console exposed under
/system/console. Authentication for this console is not
integrated with authentication for OpenIDM.
To remove the OSGi console, remove the web console bundle,
org.apache.felix.webconsole-version.jar.
If you cannot remove the OSGi console, then protect it by overriding
the default admin:admin credentials. Create a file called
openidm/conf/org.apache.felix.webconsole.internal.servlet.OsgiManager.cfg
containing the user name and password to access the console in Java
properties file format.
username=user-name password=password
16.2.11. Protect the OpenIDM Repository
Use the JDBC or MSSQL repositories. OrientDB is not yet supported for production use.
Use a strong password for the JDBC connection. Do not rely on default passwords.
Use a case sensitive database, particularly if you work with systems with different identifiers that match except for case. Otherwise correlation queries can pick up identifiers that should not be considered the same.
16.2.12. Adjust Log Levels
Leave log levels at INFO in production to ensure
that you capture enough information to help diagnose issues. See the chapter
on Configuring Server
Logs for more information.
At start up and shut down, INFO can produce many
messages. Yet, during stable operation, INFO generally
results in log messages only when coarse-grain operations such as
scheduled reconciliation start or stop.
16.2.13. Set Up Restart At System Boot
You can run OpenIDM in the background as a service (daemon), and add startup and shutdown scripts to manage the service at system boot and shutdown. For more information, see Starting and Stopping OpenIDM.
See your operating system documentation for details on adding a service such as OpenIDM to be started at boot and shut down at system shutdown.
Chapter 17. Integrating Business Processes and Workflows
Key to any identity management solution is the ability to provide workflow-driven provisioning activities, whether for self-service actions such as requests for entitlements, roles or resources, running sunrise or sunset processes, handling approvals with escalations, or performing maintenance.
OpenIDM provides an embedded workflow and business process engine based on Activiti and the Business Process Model and Notation (BPMN) 2.0 standard.
More information about Activiti and the Activiti project can be found at http://www.activiti.org.
17.1. BPMN 2.0 and the Activiti Tools
Business Process Model and Notation 2.0 is the result of consensus among Business Process Management (BPM) system vendors. The Object Management Group (OMG) has developed and maintained the BPMN standard since 2004.
The first version of the BPMN specification focused only on graphical notation, and quickly became popular with the business analyst audience. BPMN 1.x defines how constructs such as human tasks, executable scripts, and automated decisions are visualized in a vendor-neutral, standard way. The second version of BPMN extends that focus to include execution semantics, and a common exchange format. Thus, BPMN 2.0 process definition models can be exchanged not only between different graphical editors, but can also be executed as is on any BPMN 2.0-compliant engine, such as the engine embedded in OpenIDM.
Using BPMN 2.0, you can add artifacts describing workflow and business process behavior to OpenIDM for provisioning and other purposes. For example, you can craft the actual artifacts defining business processes and workflow in a text editor, or using the Activiti Eclipse Designer plugin. Eclipse Designer provides visual design capabilities, simplifying packaging and deployment of the artifact to OpenIDM. For instructions on installing Eclipse Designer, see the Activiti documentation.
Also, read the documentation covering BPMN 2.0 Constructs, which describes in detail the graphical notations and XML representations for events, flows, gateways, tasks, and process constructs.
With the latest version of Activiti, JavaScript tasks can be added to
workflow definitions. However, OpenIDM functions cannot be called from a
JavaScript task in a workflow. Therefore, you can use JavaScript for
non-OpenIDM workflow tasks, but you must use the
activiti:expression construct to call OpenIDM functions.
17.2. Setting Up Activiti Integration With OpenIDM
OpenIDM embeds an Activiti Process Engine that is started in the OpenIDM OSGi container.
After you have installed OpenIDM, as described in Chapter 1, "Installing OpenIDM Services" in the Installation Guide, start OpenIDM, and run the scr list command at the console to check that the workflow bundle is active.
-> OpenIDM ready scr list Id State Name ... [ 39] [active ] org.forgerock.openidm.workflow ...
OpenIDM reads workflow definitions from the
/path/to/openidm/workflow directory. To test workflow
integration, at least one workflow definition must exist in this directory.
A sample workflow (example.bpmn20.xml) is provided in
the /path/to/openidm/samples/misc directory. Copy this
workflow to the /path/to/openidm/workflow directory to
test the workflow integration.
$ cd /path/to/openidm $ cp samples/misc/example.bpmn20.xml workflow/
Verify the workflow integration by using the REST API. The following REST call lists the defined workflows:
$ curl \ --cacert self-signed.crt \ --header "X-OpenIDM-Username: openidm-admin" \ --header "X-OpenIDM-Password: openidm-admin" \ --request GET \ "https://localhost:8443/openidm/workflow/processdefinition?_queryId=query-all-ids"
The sample workflow definition that you copied in the previous step is named
osgiProcess. The result of the preceding REST call
therefore includes output similar to the following:
{
...
"result":[
{
...
"key": "osgiProcess",
...
"name":"Osgi process",
...
"_id":"osgiProcess:1:3",
...
}
]
}
The osgiProcess workflow calls OpenIDM, queries the
available workflow definitions from Activiti, then prints the list of
workflow definitions to the OpenIDM logs. Invoke the osgiProcess
workflow with the following REST call:
$ curl \
--cacert self-signed.crt \
--header "X-OpenIDM-Username: openidm-admin" \
--header "X-OpenIDM-Password: openidm-admin" \
--header "Content-Type: application/json" \
--request POST \
--data '{"_key":"osgiProcess"}' \
"https://localhost:8443/openidm/workflow/processinstance?_action=create"The workflow prints the list of workflow definitions to the OpenIDM console. With the default sample, you should see something like this on the console:
script task using resolver: [
pagedResultsCookie:null,
remainingPagedResults:-1,
result:[
[
tenantId:,
candidateStarterGroupIdExpressions:[],
candidateStarterUserIdExpressions:[],
participantProcess:null,
processDiagramResourceName:null,
historyLevel:null,
hasStartFormKey:false,
laneSets:[],
version:1, _id:osgiProcess:1:3,
description:null,
name:Osgi process,
executionListeners:[:],
key:osgiProcess,
resourceName:OSGI-INF/activiti/example.bpmn20.xml,
ioSpecification:null,
taskDefinitions:null,
suspensionState:1,
deploymentId:1,
properties:[:],
startFormHandler:null,
suspended:false,
variables:null,
_rev:1,
revisionNext:2,
category:Examples,
eventSupport:[:],
graphicalNotationDefined:false
]
]
]
script task using expression resolver: [
pagedResultsCookie:null,
remainingPagedResults:-1,
result:[
[
tenantId:,
candidateStarterGroupIdExpressions:[],
...
]17.2.1. Configuring the Activiti Engine
The OpenIDM Activiti module is configured in a file named
conf/workflow.json. If this file is absent from the
configuration, the workflow module is unavailable for use. In the default
OpenIDM installation, the workflow.json file has the
following basic configuration:
{
"enabled" : true
}
You can disable the workflow module by setting the
"enabled" property to false.
There are several additional configuration properties for the Activiti
module. A sample workflow.json file that includes all
configurable properties, is provided in samples/misc. To
configure an Activiti engine beyond the default configuration, edit this
sample file and copy it to the /path/to/openidm/conf
directory.
The sample workflow.json file contains the following
configuration:
{
"enabled" : true,
"location" : "remote",
"engine" : {
"url" : "http://localhost:9090/openidm-workflow-remote-3.1",
"username" : "youractivitiuser",
"password" : "youractivitipassword"
},
"mail" : {
"host" : "yourserver.smtp.com",
"port" : 587,
"username" : "yourusername",
"password" : "yourpassword",
"starttls" : true
},
"history" : "audit"
}
These fields have the following meaning:
enabled. Indicates whether the Activiti module is enabled for use. Possible values aretrueorfalse. The default value istrue.mail. Specifies the details of the mail server that Activiti will use to send email notifications. By default, Activiti uses the mail serverlocalhost:25. To specify a different mail server, enter the details of the mail server here.host. The host of the mail server.port. The port number of the mail server.username. The user name of the account that connects to the mail server.password. The password for the user specified above.startTLS. Whether startTLS should be used to secure the connection.
history. Determines the history level that should be used for the Activiti engine. For more information, see Section 17.2.1.1, "Configuring the Activiti History Level".
17.2.1.1. Configuring the Activiti History Level
The Activiti history level determines how much historical information is
retained when workflows are executed. You can configure the history level
by setting the history property in the
workflow.json file, for example:
"history" : "audit"
The following history levels can be configured:
none. No history archiving is done. This level results in the best performance for workflow execution, but no historical information is available.activity. Archives all process instances and activity instances. No details are archived.audit. This is the default level. All process instances, activity instances and submitted form properties are archived so that all user interaction through forms is traceable and can be audited.full. This is the highest level of history archiving and has the greatest performance impact. This history level stores all the information that is stored for theauditlevel, as well as any process variable updates.
17.2.2. Defining Activiti Workflows
The following section outlines the process to follow when you create an Activiti workflow for OpenIDM. Before you start creating workflows, you must configure the Activiti engine, as described in Section 17.2.1, "Configuring the Activiti Engine".
Define your workflow in a text file, either using an editor, such as Activiti Eclipse BPMN 2.0 Designer, or a simple text editor.
Package the workflow definition file as a
.barfile (Business Archive File). If you are using Eclipse to define the workflow, a.barfile is created when you select "Create deployment artifacts". A.barfile is essentially the same as a.zipfile, but with the.barextension.Copy the
.barfile to theopenidm/workflowdirectory.Invoke the workflow using a script (in
openidm/script/) or directly using the REST interface. For more information, see Section 17.2.3, "Invoking Activiti Workflows".You can also schedule the workflow to be invoked repeatedly, or at a future time. For more information, see Chapter 13, "Scheduling Tasks and Events".
17.2.3. Invoking Activiti Workflows
You can invoke workflows and business processes from any trigger point within
OpenIDM, including reacting to situations discovered during reconciliation.
Workflows can be invoked from script files, using the
openidm.create() function, or directly from the REST
interface.
The following sample script extract shows how to invoke a workflow from a script file:
/*
* Calling 'myWorkflow' workflow
*/
var params = {
"_key": "myWorkflow"
};
openidm.create('workflow/processinstance', null, params);
The null in this example indicates that you do not want to
specify an ID as part of the create call. For more information, see
Section F.3.1, "openidm.create(container, id, value)".
You can invoke the same workflow from the REST interface by sending the following REST call to OpenIDM:
$ curl \
--cacert self-signed.crt \
--header "X-OpenIDM-Username: openidm-admin" \
--header "X-OpenIDM-Password: openidm-admin" \
--header "Content-Type: application/json" \
--request POST \
--data '{"_key":"myWorkflow"}' \
"https://localhost:8443/openidm/workflow/processinstance?_action=create"
There are two ways in which you can specify the workflow definition that is used when a new workflow instance is started.
_keyspecifies theidattribute of the workflow process definition, for example:<process id="sendNotificationProcess" name="Send Notification Process">If there is more than one workflow definition with the same
_keyparameter, the latest deployed version of the workflow definition is invoked._processDefinitionIdspecifies the ID that is generated by the Activiti Process Engine when a workflow definition is deployed, for example:"sendNotificationProcess:1:104";You can obtain the
processDefinitionIdby querying the available workflows, for example:{ "result": [ { "name": "Process Start Auto Generated Task Auto Generated", "_id": "ProcessSAGTAG:1:728" }, { "name": "Process Start Auto Generated Task Empty", "_id": "ProcessSAGTE:1:725" }, ...If you specify a
_keyand a_processDefinitionId, the_processDefinitionIdis used because it is more precise.
You can use the optional _businessKey parameter to add
specific business logic information to the workflow when it is invoked. For
example, the following workflow invocation assigns the workflow a business
key of "newOrder". This business key can later be used to
query "newOrder" processes.
$ curl \
--cacert self-signed.crt \
--header "X-OpenIDM-Username: openidm-admin" \
--header "X-OpenIDM-Password: openidm-admin" \
--request POST \
--data '{"_key":"myWorkflow", "_businessKey":"newOrder"}' \
"https://localhost:8443/openidm/workflow/processinstance?_action=create"17.2.4. Querying Activiti Workflows
The Activiti implementation supports filtered queries that enable you to
query the running process instances and tasks, based on specific query
parameters. To perform a filtered query send a GET request to the
workflow/processinstance context path, including the query
in the URL.
For example, the following query returns all process instances
with the business key "newOrder", as invoked in the
previous example.
$ curl \ --cacert self-signed.crt \ --header "X-OpenIDM-Username: openidm-admin" \ --header "X-OpenIDM-Password: openidm-admin" \ --request GET \ "https://localhost:8443/openidm/workflow/processinstance?_queryId=filtered-query&processInstanceBusinessKey=newOrder"
Any Activiti properties can be queried using the same notation, for example,
processDefinitionId=managedUserApproval:1:6405. The query
syntax applies to all queries with _queryId=filtered-query.
The following query returns all process instances that were started by the
user openidm-admin:
$ curl \ --cacert self-signed.crt \ --header "X-OpenIDM-Username: openidm-admin" \ --header "X-OpenIDM-Password: openidm-admin" \ --request GET \ "https://localhost:8443/openidm/workflow/processinstance?_queryId=filtered-query&startUserId=openidm-admin"
You can also query process instances based on the value of any process
instance variable, by prefixing the variable name with
var-. For example:
var-processvariablename=processvariablevalue
17.3. Using Custom Templates for Activiti Workflows
The embedded Activiti engine is integrated with the default user interface. For simple workflows, you can use the standard Activiti form properties, and have the UI render the corresponding generic forms automatically. If you require a more complex form template, (including input validation, rich input field types, complex CSS, and so forth) you must define a custom form template.
There are two ways in which you can define custom form templates for your workflows:
Create an HTML template, and refer to that template in the workflow definition.
This is the recommended method of creating custom form templates. To refer to the HTML template in the workflow definition, use the
activiti:formKeyattribute, for exampleactiviti:formKey="nUCStartForm.xhtml".The HTML file must be deployed as part of the workflow definition. Create a .zip file that contains the HTML template and the workflow definition file. Rename the .zip file with a .bar extension.
For a sample workflow that uses external, referenced form templates, see
samples/usecase/workflow/newUserCreate.bpmn20.xml. The HTML templates, and the corresponding .bar file are included in that directory.Use an embedded template within the workflow definition.
This method is not ideal, because the HTML code must be escaped, and is difficult to read, edit, or maintain, as a result. Also, sections of HTML code will most likely need to be duplicated if your workflow includes multiple task stages. However, you might want to use this method if your form is small, not too complex and you do not want to bother with creating a separate HTML file and .bar deployment.
17.4. Managing Workflows Over the REST Interface
In addition to the queries described previously, the following examples show
the context paths that are exposed for managing workflows over the REST
interface. The example output is based on the sample workflow that is
provided in openidm/samples/sample9.
openidm/workflow/processdefinition
List the available workflow definitions:
$ curl \ --cacert self-signed.crt \ --header "X-OpenIDM-Username: openidm-admin" \ --header "X-OpenIDM-Password: openidm-admin" \ --request GET \ "https://localhost:8443/openidm/workflow/processdefinition?_queryId=query-all-ids" { "result" : [ { "tenantId" : "", "candidateStarterGroupIdExpressions" : [ ], "candidateStarterUserIdExpressions" : [ ], "participantProcess" : null, "processDiagramResourceName" : null, "historyLevel" : null, "hasStartFormKey" : false, "laneSets" : [ ], "version" : 1, "_id" : "managedUserApproval:1:3", "description" : null, "name" : "Managed User Approval Workflow", "executionListeners" : { }, "key" : "managedUserApproval", "resourceName" : "OSGI-INF/activiti/managedUserApproval.bpmn20.xml", "ioSpecification" : null, "taskDefinitions" : null, "suspensionState" : 1, "deploymentId" : "1", "properties" : { }, "startFormHandler" : null, "suspended" : false, "variables" : null, "_rev" : 1, "revisionNext" : 2, "category" : "Examples", "eventSupport" : { }, "graphicalNotationDefined" : false } ], "resultCount" : 1, "pagedResultsCookie" : null, "remainingPagedResults" : -1 }List the workflow definitions, based on certain filter criteria:
$ curl \ --cacert self-signed.crt \ --header "X-OpenIDM-Username: openidm-admin" \ --header "X-OpenIDM-Password: openidm-admin" \ --request GET \ "https://localhost:8443/openidm/workflow/processdefinition?_queryId=filtered-query&category=Examples" { "result": [ { ... "name": "Managed User Approval Workflow", "_id": "managedUserApproval:1:3", ... "category" : "Examples", ... } ] }
openidm/workflow/processdefinition/{id}
Obtain detailed information for a process definition, based on the ID. You can determine the ID by querying all the available process definitions, as described in the first example in this section.
$ curl \ --cacert self-signed.crt \ --header "X-OpenIDM-Username: openidm-admin" \ --header "X-OpenIDM-Password: openidm-admin" \ --request GET \ "https://localhost:8443/openidm/workflow/processdefinition/managedUserApproval:1:3" { "tenantId" : "", "candidateStarterGroupIdExpressions" : [ ], "candidateStarterUserIdExpressions" : [ ], "participantProcess" : null, "processDiagramResourceName" : null, "historyLevel" : null, "hasStartFormKey" : false, "laneSets" : [ ], "version" : 1, "formProperties" : [ ], "_id" : "managedUserApproval:1:3", "description" : null, "name" : "Managed User Approval Workflow", "executionListeners" : { "end" : [ { } ] }, "key" : "managedUserApproval", "resourceName" : "OSGI-INF/activiti/managedUserApproval.bpmn20.xml", "ioSpecification" : null, "taskDefinitions" : { "evaluateRequest" : { "assigneeExpression" : { "expressionText" : "openidm-admin" }, "candidateGroupIdExpressions" : [ ], "candidateUserIdExpressions" : [ ], "categoryExpression" : null, "descriptionExpression" : null, "dueDateExpression" : null, "key" : "evaluateRequest", "nameExpression" : { "expressionText" : "Evaluate request" }, "ownerExpression" : null, "priorityExpression" : null, "taskFormHandler" : { "deploymentId" : "1", "formKey" : null, "formPropertyHandlers" : [ { "defaultExpression" : null, "id" : "requesterName", "name" : "Requester's name", "readable" : true, "required" : false, "type" : null, "variableExpression" : { "expressionText" : "${sourceId}" }, "variableName" : null, "writable" : false }, { "defaultExpression" : null, "id" : "requestApproved", "name" : "Do you approve the request?", "readable" : true, "required" : true, "type" : { "name" : "enum", "values" : { "true" : "Yes", "false" : "No" } }, "variableExpression" : null, "variableName" : null, "writable" : true } ] }, "taskListeners" : { "assignment" : [ { } ], "create" : [ { } ] } } }, "suspensionState" : 1, "deploymentId" : "1", "properties" : { "documentation" : null }, "startFormHandler" : { "deploymentId" : "1", "formKey" : null, "formPropertyHandlers" : [ ] }, "suspended" : false, "variables" : { }, "_rev" : 2, "revisionNext" : 3, "category" : "Examples", "eventSupport" : { }, "graphicalNotationDefined" : false }Delete a workflow process definition, based on its ID. Note that you cannot delete a process definition if there are currently running instances of that process definition.
OpenIDM picks up workflow definitions from the files located in the
/path/to/openidm/workflowdirectory. If you delete the workflow definition (.xmlfile) from this directory, the OSGI bundle is deleted. However, deleting this file does not remove the workflow definition from the Activiti engine. You must therefore delete the definition over REST, as shown in the following example.Note that, although there is only one representation of a workflow definition in the file system, there might be several versions of the same definition in Activiti. If you want to delete redundant process definitions, delete the definition over REST, making sure that you do not delete the latest version.
$ curl \ --cacert self-signed.crt \ --header "X-OpenIDM-Username: openidm-admin" \ --header "X-OpenIDM-Password: openidm-admin" \ --header "If-Match: *" \ --request DELETE \ "https://localhost:8443/openidm/workflow/processdefinition/managedUserApproval:1:3"The delete request returns the contents of the deleted workflow definition.
openidm/workflow/processinstance
Start a workflow process instance. For example:
$ curl \ --cacert self-signed.crt \ --header "Content-Type: application/json" \ --header "X-OpenIDM-Username: openidm-admin" \ --header "X-OpenIDM-Password: openidm-admin" \ --data '{"_key":"managedUserApproval"}' \ --request POST \ "https://localhost:8443/openidm/workflow/processinstance?_action=create" { "_id" : "4", "processInstanceId" : "4", "status" : "suspended", "businessKey" : null, "processDefinitionId" : "managedUserApproval:1:3" }Obtain the list of running workflows (process instances). The query returns a list of IDs. For example:
$ curl \ --cacert self-signed.crt \ --header "X-OpenIDM-Username: openidm-admin" \ --header "X-OpenIDM-Password: openidm-admin" \ --request GET \ "https://localhost:8443/openidm/workflow/processinstance?_queryId=query-all-ids" { "result" : [ { "tenantId" : "", "businessKey" : null, "queryVariables" : null, "durationInMillis" : null, "processVariables" : { }, "endTime" : null, "superProcessInstanceId" : null, "startActivityId" : "start", "startTime" : "2014-04-25T09:54:30.035+02:00", "startUserId" : "openidm-admin", "_id" : "4", "endActivityId" : null, "processInstanceId" : "4", "processDefinitionId" : "managedUserApproval:1:3", "deleteReason" : null } ], "resultCount" : 1, "pagedResultsCookie" : null, "remainingPagedResults" : -1 }Obtain the list of running workflows based on specific filter criteria.
$ curl \ --cacert self-signed.crt \ --header "X-OpenIDM-Username: openidm-admin" \ --header "X-OpenIDM-Password: openidm-admin" \ --request GET \ "https://localhost:8443/openidm/workflow/processinstance?_queryId=filtered-query&businessKey=myBusinessKey"
openidm/workflow/processinstance/{id}
Obtain the details of the specified process instance. For example:
$ curl \ --cacert self-signed.crt \ --header "X-OpenIDM-Username: openidm-admin" \ --header "X-OpenIDM-Password: openidm-admin" \ --request GET \ "https://localhost:8443/openidm/workflow/processinstance/4" { "tenantId" : "", "businessKey" : null, "queryVariables" : null, "durationInMillis" : null, "processVariables" : { }, "endTime" : null, "superProcessInstanceId" : null, "startActivityId" : "start", "startTime" : "2014-05-12T20:56:25.415+02:00", "startUserId" : "openidm-admin", "_id" : "4", "endActivityId" : null, "processInstanceId" : "4", "processDefinitionId" : "managedUserApproval:1:3", "deleteReason" : null }Stop the specified process instance. For example:
$ curl \ --cacert self-signed.crt \ --header "X-OpenIDM-Username: openidm-admin" \ --header "X-OpenIDM-Password: openidm-admin" \ --request DELETE \ "https://localhost:8443/openidm/workflow/processinstance/4" { "deleteReason": null, "processDefinitionId": "managedUserApproval:1:3", "processInstanceId": "4", "endActivityId": null, "_id": "4", "startUserId": "openidm-admin", "startTime": "2014-06-18T10:33:40.955+02:00", "tenantId": "", "businessKey": null, "queryVariables": null, "durationInMillis": null, "processVariables": {}, "endTime": null, "superProcessInstanceId": null, "startActivityId": "start" }The delete request returns the contents of the deleted process instance.
openidm/workflow/processdefinition/{id}/taskdefinition
Query the list of tasks defined for a specific process definition. For example:
$ curl \ --cacert self-signed.crt \ --header X-OpenIDM-Username: openidm-admin" \ --header "X-OpenIDM-Password: openidm-admin" \ --request GET \ "https://localhost:8443/openidm/workflow/processdefinition/managedUserApproval:1:3/taskdefinition?_queryId=query-all-ids" { "result" : [ { "taskCandidateGroup" : [ ], "ownerExpression" : null, "assignee" : { "expressionText" : "openidm-admin" }, "categoryExpression" : null, "taskListeners" : { "assignment" : [ { } ], "create" : [ { } ] }, "formProperties" : { "deploymentId" : "1", "formKey" : null, "formPropertyHandlers" : [ { "_id" : "requesterName", "defaultExpression" : null, "name" : "Requester's name", "readable" : true, "required" : false, "type" : null, "variableExpression" : { "expressionText" : "${sourceId}" }, "variableName" : null, "writable" : false }, { "_id" : "requestApproved", "defaultExpression" : null, "name" : "Do you approve the request?", "readable" : true, "required" : true, "type" : { "name" : "enum", "values" : { "true" : "Yes", "false" : "No" } }, "variableExpression" : null, "variableName" : null, "writable" : true } ] }, "taskCandidateUser" : [ ], "formResourceKey" : null, "_id" : "evaluateRequest", "priority" : null, "descriptionExpression" : null, "name" : { "expressionText" : "Evaluate request" }, "dueDate" : null } ], "resultCount" : 1, "pagedResultsCookie" : null, "remainingPagedResults" : -1 }Query a task definition based on the process definition ID and the task name (
taskDefinitionKey). For example:$ curl \ --cacert self-signed.crt \ --header "X-OpenIDM-Username: openidm-admin" \ --header "X-OpenIDM-Password: openidm-admin" \ --request GET \ "https://localhost:8443/openidm/workflow/processdefinition/managedUserApproval:1:3/taskdefinition/evaluateRequest" { "taskCandidateGroup" : [ ], "ownerExpression" : null, "formProperties" : { "deploymentId" : "1", "formKey" : null, "formPropertyHandlers" : [ { "_id" : "requesterName", "defaultExpression" : null, "name" : "Requester's name", "readable" : true, "required" : false, "type" : null, "variableExpression" : { "expressionText" : "${sourceId}" }, "variableName" : null, "writable" : false }, { "_id" : "requestApproved", "defaultExpression" : null, "name" : "Do you approve the request?", "readable" : true, "required" : true, "type" : { "name" : "enum", "values" : { "true" : "Yes", "false" : "No" } }, "variableExpression" : null, "variableName" : null, "writable" : true } ] }, "taskCandidateUser" : [ ], "_id" : "evaluateRequest", "priority" : null, "name" : { "expressionText" : "Evaluate request" }, "descriptionExpression" : null, "categoryExpression" : null, "assignee" : { "expressionText" : "openidm-admin" }, "taskListeners" : { "assignment" : [ { } ], "create" : [ { } ] }, "dueDate" : null }
openidm/workflow/taskinstance
Query all running task instances. For example:
$ curl \ --cacert self-signed.crt \ --header "X-OpenIDM-Username: openidm-admin" \ --header "X-OpenIDM-Password: openidm-admin" \ --request GET \ "https://localhost:8443/openidm/workflow/taskinstance?_queryId=query-all-ids" { "result" : [ { "tenantId" : "", "createTime" : "2014-05-12T21:17:10.054+02:00", "executionId" : "10", "delegationStateString" : null, "processVariables" : { }, "_id" : "15", "processInstanceId" : "10", "description" : null, "priority" : 50, "name" : "Evaluate request", "dueDate" : null, "parentTaskId" : null, "processDefinitionId" : "managedUserApproval:1:3", "taskLocalVariables" : { }, "suspensionState" : 1, "assignee" : "openidm-admin", "cachedElContext" : null, "queryVariables" : null, "activityInstanceVariables" : { }, "deleted" : false, "suspended" : false, "_rev" : 1, "revisionNext" : 2, "category" : null, "taskDefinitionKey" : "evaluateRequest", "owner" : null, "eventName" : null, "delegationState" : null } ], "resultCount" : 1, "pagedResultsCookie" : null, "remainingPagedResults" : -1 }Query task instances based on candidate users or candidate groups. For example:
$ curl \ --cacert self-signed.crt \ --header "X-OpenIDM-Username: openidm-admin" \ --header "X-OpenIDM-Password: openidm-admin" \ --request GET \ "https://localhost:8443/openidm/workflow/taskinstance?_queryId=filtered-query&taskCandidateUser=manager1"or
$ curl \ --cacert self-signed.crt \ --header "X-OpenIDM-Username: openidm-admin" \ --header "X-OpenIDM-Password: openidm-admin" \ --request GET \ "https://localhost:8443/openidm/workflow/taskinstance?_queryId=filtered-query&taskCandidateGroup=management"Note that you can include both users and groups in the same query.
openidm/workflow/taskinstance/{id}
Obtain detailed information for a running task, based on the task ID. For example:
$ curl \ --cacert self-signed.crt \ --header "X-OpenIDM-Username: openidm-admin" \ --header "X-OpenIDM-Password: openidm-admin" \ --request GET \ "https://localhost:8443/openidm/workflow/taskinstance/15" { "dueDate": null, "processDefinitionId": "managedUserApproval:1:3", "owner": null, "taskDefinitionKey": "evaluateRequest", "name": "Evaluate request", ...Update task-related data stored in the Activiti workflow engine. For example:
$ curl \ --cacert self-signed.crt \ --header "Content-Type: application/json" \ --header "X-OpenIDM-Username: openidm-admin" \ --header "X-OpenIDM-Password: openidm-admin" \ --header "If-Match : *" \ --request PUT \ --data '{"description":"Evaluate the new managed user request"}' \ "https://localhost:8443/openidm/workflow/taskinstance/15"Complete the specified task. The variables required by the task are provided in the request body. For example:
$ curl \ --cacert self-signed.crt \ --header "Content-Type: application/json" \ --header "X-OpenIDM-Username: openidm-admin" \ --header "X-OpenIDM-Password: openidm-admin" \ --request POST \ --data '{"requestApproved":"true"}' \ "https://localhost:8443/openidm/workflow/taskinstance/15?_action=complete"Claim the specified task. A user who claims a task has that task inserted into his list of pending tasks. The ID of the user who claims the task is provided in the request body. For example:
$ curl \ --cacert self-signed.crt \ --header "Content-Type: application/json" \ --header "X-OpenIDM-Username: openidm-admin" \ --header "X-OpenIDM-Password: openidm-admin" \ --request POST \ --data '{"userId":"manager1"}' \ "https://localhost:8443/openidm/workflow/taskinstance/15?_action=claim"
17.5. Example Activiti Workflows With OpenIDM
This section describes two example workflows - an email notification workflow, and a workflow that demonstrates provisioning, using the browser-based user interface.
17.5.1. Example Email Notification Workflow
This example uses the Activiti Eclipse BPMN 2.0 Designer to set up an email
notification business process. The example relies on an SMTP server
listening on localhost, port 25.
The example sets up a workflow that can accept parameters used to specify the sender and recipient of the mail.
${fromSender}Specifies the sender
${toEmail}Specifies the recipient
Create a new BPMN2 diagram in Eclipse, then drag and drop components to
create the workflow. This simple example uses a
StartEvent, MailTask, and
EndEvent.

When you have created the workflow definition, edit the generated XML
source code, adding the <extensionElements> to
the <serviceTask> tag, as follows.
<?xml version="1.0" encoding="UTF-8"?>
<definitions
xmlns="http://www.omg.org/spec/BPMN/20100524/MODEL"
xmlns:xsi="http://www.w3.org/2001/XMLSchema-instance"
xmlns:activiti="http://activiti.org/bpmn"
xmlns:bpmndi="http://www.omg.org/spec/BPMN/20100524/DI"
xmlns:omgdc="http://www.omg.org/spec/DD/20100524/DC"
xmlns:omgdi="http://www.omg.org/spec/DD/20100524/DI"
typeLanguage="http://www.w3.org/2001/XMLSchema"
expressionLanguage="http://www.w3.org/1999/XPath"
targetNamespace="http://www.activiti.org/test">
<process id="EmailNotification" name="emailNotification">
<documentation>Simple Email Notification Task</documentation>
<startEvent id="startevent1" name="Start"></startEvent>
<sequenceFlow id="flow1" name="" sourceRef="startevent1"
targetRef="mailtask1"></sequenceFlow>
<endEvent id="endevent1" name="End"></endEvent>
<sequenceFlow id="flow2" name="" sourceRef="mailtask1"
targetRef="endevent1"></sequenceFlow>
<serviceTask id="mailtask1" name="Email Notification"
activiti:type="mail">
<extensionElements>
<activiti:field name="to" expression="${toEmail}"
></activiti:field>
<activiti:field name="from" expression="${fromSender}"
></activiti:field>
<activiti:field name="subject" expression="Simple Email Notification"
></activiti:field>
<activiti:field name="text">
<activiti:expression><![CDATA[Here is a simple Email Notification
from ${fromSender}.]]></activiti:expression>
</activiti:field>
</extensionElements>
</serviceTask>
</process>
<bpmndi:BPMNDiagram id="BPMNDiagram_EmailNotification">
<bpmndi:BPMNPlane bpmnElement="EmailNotification"
id="BPMNPlane_EmailNotification">
<bpmndi:BPMNShape bpmnElement="startevent1" id="BPMNShape_startevent1">
<omgdc:Bounds height="35" width="35" x="170" y="250"></omgdc:Bounds>
</bpmndi:BPMNShape>
<bpmndi:BPMNShape bpmnElement="endevent1" id="BPMNShape_endevent1">
<omgdc:Bounds height="35" width="35" x="410" y="250"></omgdc:Bounds>
</bpmndi:BPMNShape>
<bpmndi:BPMNShape bpmnElement="mailtask1" id="BPMNShape_mailtask1">
<omgdc:Bounds height="55" width="105" x="250" y="240"></omgdc:Bounds>
</bpmndi:BPMNShape>
<bpmndi:BPMNEdge bpmnElement="flow1" id="BPMNEdge_flow1">
<omgdi:waypoint x="205" y="267"></omgdi:waypoint>
<omgdi:waypoint x="250" y="267"></omgdi:waypoint>
</bpmndi:BPMNEdge>
<bpmndi:BPMNEdge bpmnElement="flow2" id="BPMNEdge_flow2">
<omgdi:waypoint x="355" y="267"></omgdi:waypoint>
<omgdi:waypoint x="410" y="267"></omgdi:waypoint>
</bpmndi:BPMNEdge>
</bpmndi:BPMNPlane>
</bpmndi:BPMNDiagram>
</definitions>
Save the workflow definition as a bpmn20.xml file
(email-notification.bpmn20.xml) in the
openidm/workflow directory.
After you have deployed the workflow, create a script named
openidm/script/triggerEmailNotification.js. The script
invokes the workflow.
/*
* Calling 'EmailNotification' workflow
*/
var params = {
"_key" : "EmailNotification",
"fromSender" : "noreply@openidm",
"toEmail" : "jdoe@example.com"
};
openidm.action('workflow/processinstance', {"_action" : "createProcessInstance"}, params);
You can also invoke the workflow over the REST interface with the following REST command:
$ curl \
--cacert self-signed.crt \
--header "Content-Type: application/json" \
--header "X-OpenIDM-Username: openidm-admin" \
--header "X-OpenIDM-Password: openidm-admin" \
--data '{
"_key":"EmailNotification",
"fromSender":"noreply@openidm",
"toEmail":"jdoe@example.com"
}' \
--request POST \
"https://localhost:8443/openidm/workflow/processinstance?_action=create"
To schedule the workflow to be invoked regularly, create a schedule
configuration object named
openidm/conf/schedule-EmailNotification.json. The
following schedule invokes the workflow once per minute.
{
"enabled" : true,
"type" : "cron",
"schedule" : "0 0/1 * * * ?",
"invokeService" : "script",
"invokeContext" : {
"script" : {
"type" : "text/javascript",
"file" : "script/triggerEmailNotification.js"
},
}
}
17.5.2. Sample Workflow - Provisioning User Accounts
This example, provided in openidm/samples/workflow,
uses workflows to provision user accounts. The example demonstrates the use
of the browser-based user interface to manage workflows.
17.5.2.1. Overview of the Sample
The sample starts with a reconciliation process that loads user accounts
from an XML file into the managed users repository. The reconciliation
creates two users, with UIDs user1 and
manager1. Both users have the same password
(Welcome1).
The sample adds two new business roles to the configuration -
employee (assigned to user1) and
manager (assigned to manager1).
As part of the provisioning, employees are required to initiate a "Contract Onboarding" process. This process is a request to add a contractor to the managed users repository, with an option to include the contractor in the original data source (the XML file).
When the employee has completed the required form, the request is sent to
the manager for approval. Any user with the role
"manager" can claim the approval task. If the request is
approved, the user is created in the managed users repository. If a request
was made to add the user to the original data source (the XML file) this is
done in a subsequent step.
The workflow uses embedded templates to build a more sophisticated input form. The form is validated with the server-side policy rules, described in Chapter 9, "Using Policies to Validate Data".
17.5.2.2. Running the Sample
Start OpenIDM with the configuration for the workflow sample.
$ cd /path/to/openidm $ ./startup.sh -p samples/workflow
Run reconciliation over the REST interface.
$ curl \ --cacert self-signed.crt \ --header "Content-Type: application/json" \ --header "X-OpenIDM-Username: openidm-admin" \ --header "X-OpenIDM-Password: openidm-admin" \ --request POST \ "https://localhost:8443/openidm/recon?_action=recon&mapping=systemXmlfileAccounts_managedUser"
Successful reconciliation returns an "_id" object, such as the following:
{"_id":"aea493f5-29ee-423d-b4b1-10449c60886c","state":"ACTIVE"}The two users are added to the repository. You can test this with the following REST query, which shows the two users,
manager1anduser1.$ curl \ --cacert self-signed.crt \ --header "X-OpenIDM-Username: openidm-admin" \ --header "X-OpenIDM-Password: openidm-admin" \ --request GET \ "https://localhost:8443/openidm/managed/user/?_queryId=query-all-ids" { "result" : [ { "_id" : "manager1", "_rev" : "0" }, { "_id" : "user1", "_rev" : "0" } ], "resultCount" : 2, "pagedResultsCookie" : null, "remainingPagedResults" : -1 }Log into the user interface as
user1, with passwordWelcome1. For information about logging in to the user interface, see Section 4.2, "Overview of the User View UI".Under "Processes" click "Contractor onboarding process".
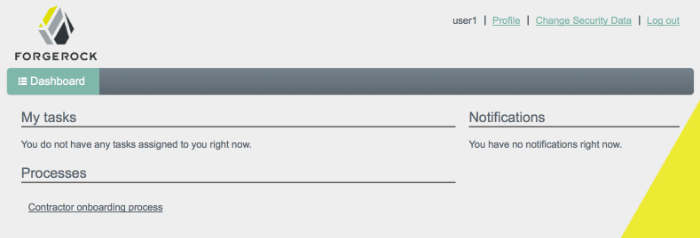
Complete the details of the new user, then click Start.

Log out of the UI.
Log into the UI as
manager1, with passwordWelcome1.Under "Tasks that are in my group's queue" click "Contractor Approval".

From the drop-down list, select "Assign to me".
Note that the "Contractor Approval" task has now moved under "My tasks".
Under "My tasks" click "Contractor Approval".
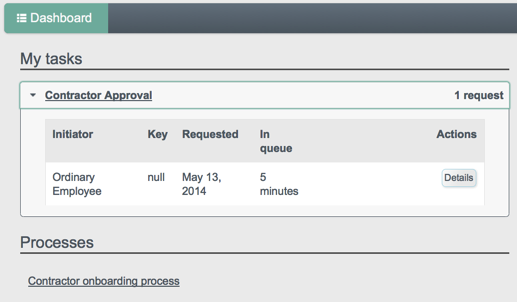
Under Actions, click Details.
The form containing the details of the contractor is displayed.
At the bottom of the form, select a decision from the drop-down list (either "Accept" or "Reject"), then click Complete.
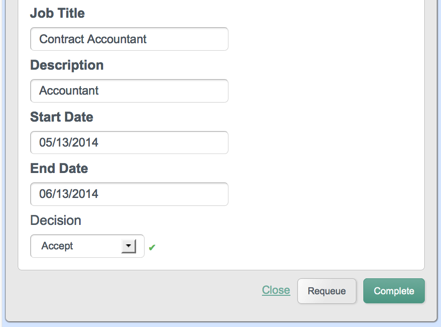
When you Accept the new contractor details, the user account is created in the repository. You can check the new account by running the following REST command:
$ curl \ --cacert self-signed.crt \ --header "X-OpenIDM-Username: openidm-admin" \ --header "X-OpenIDM-Password: openidm-admin" \ --request GET \ "https://localhost:8443/openidm/managed/user/?_queryId=query-all-ids" { "result" : [ { "_id" : "manager1", "_rev" : "0" }, { "_id" : "user1", "_rev" : "0" }, { "_id" : "96a9513b-7896-4d22-83cc-6b35a709f0a8", "_rev" : "0" } ], "resultCount" : 3, "pagedResultsCookie" : null, "remainingPagedResults" : -1 }Display the details of the new user, by running a REST query on the user ID, as follows:
$ curl \ --cacert self-signed.crt \ --header "X-OpenIDM-Username: openidm-admin" \ --header "X-OpenIDM-Password: openidm-admin" \ --request GET \ "https://localhost:8443/openidm/managed/user/96a9513b-7896-4d22-83cc-6b35a709f0a8" { "_id" : "96a9513b-7896-4d22-83cc-6b35a709f0a8", "_rev" : "1", "startDate" : "05/13/2014", "manager" : "user1", "passwordAttempts" : "0", "department" : "Finance", "address2" : "", "endDate" : "06/13/2014", "givenName" : "John", "effectiveRoles" : [ "openidm-authorized" ], "city" : "", "lastPasswordSet" : "", "postalCode" : "", "description" : "Accountant", "accountStatus" : "active", "userName" : "johnb", "stateProvince" : "", "jobTitle" : "Contract Accountant", "mail" : "johnb@example.com", "sn" : "Brand", "provisionToXML" : "1", "lastPasswordAttempt" : "Tue May 13 2014 09:56:49 GMT+0200 (SAST)", "country" : "", "telephoneNumber" : "8934794578", "roles" : [ "openidm-authorized" ], "effectiveAssignments" : { }, "postalAddress" : "" }You can now log into the UI as the new user (with the details that you specified in Step 5). Under "Notifications" you will see a welcome message indicating the working dates of the new user. If you log in as
user1you are notified of the result of the manager's decision.If you specified that the new user should be added to the original data source, you will see that the account was added to the XML file:
$ cd /path/to/openidm $ cat samples/workflow/data/xmlConnectorData.xml ... <ri:__ACCOUNT__> <icf:__DESCRIPTION__>Accountant</icf:__DESCRIPTION__> <ri:roles>openidm-authorized</ri:roles> <ri:mobileTelephoneNumber>8934794578</ri:mobileTelephoneNumber> <ri:firstname>John</ri:firstname> <ri:manager>user1</ri:manager> <ri:startDate>05/13/2014</ri:startDate> <ri:jobTitle>Contract Accountant</ri:jobTitle> <icf:__UID__>67b6bb5f-5457-4ac6-bb49-5d98f2b1f3f8</icf:__UID__> <icf:__NAME__>johnb</icf:__NAME__> <ri:email>johnb@example.com</ri:email> <icf:__PASSWORD__>Welcome1</icf:__PASSWORD__> <ri:department>Finance</ri:department> <ri:endDate>06/13/2014</ri:endDate> <ri:lastname>Brand</ri:lastname> </ri:__ACCOUNT__> ...If you declined the approval request, the user will not be created in either data source.

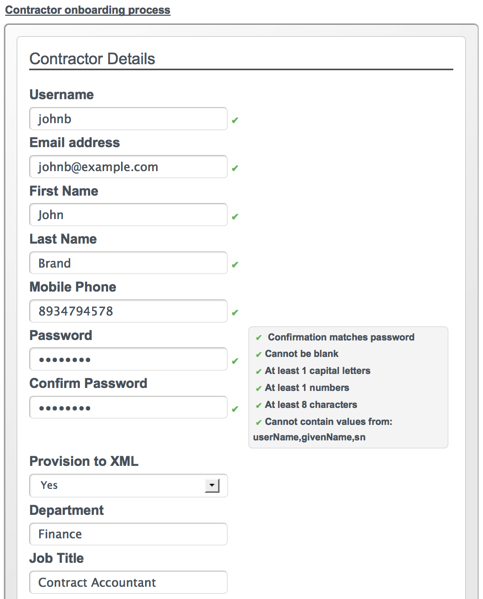
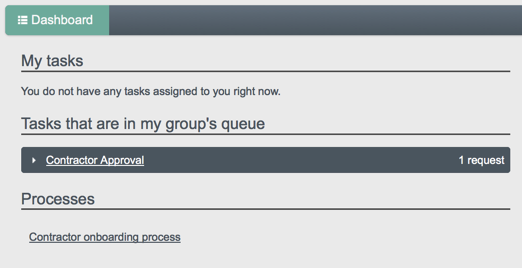


You can see the details of the workflow definition in
samples/workflow/workflow/contractorOnboarding.bpmn20.xml.
17.6. Workflow Use Cases
This section describes a number of sample workflows, that demonstrate typical
use cases for OpenIDM. The use cases, provided in
/path/to/openidm/samples/usecase, work together to
provide a complete business story, with the same set of sample data. Each of
the use cases is integrated with the default UI.
These use cases use OrientDB as a repository by default. Alternative
repository configuration files are provided in
/path/to/openidm/samples/usecase/db. If you want to use
one of these alternative repositories, remove the
repo.orientdb.json file from the conf/
directory of the use case you are testing (for example,
samples/usecase/usecase1/conf/repo.orientdb.json) and
copy the appropriate JDBC repository configuration file
(repo.jdbc.json) into that conf/
directory. For more information on using an alternative repository, see
Chapter 4, "Installing a Repository For Production" in the Installation Guide.
The use cases can be run independently, but rely on the data set that is imported during use case 1 - so you must run use case 1 before running any of the other use cases.
The use cases assume an initial data set of twenty "ordinary" managed users in OpenIDM (user.0 - user.19). The users are divided as follows:
| Users | Department | Manager | Employees | Contractors |
|---|---|---|---|---|
| user.0-user.4 | Human Resources | user.0 | user.0-user.3 | user.4 |
| user.5-user.9 | Production Planning | user.5 | user.5-user.8 | user.9 |
| user.10-user.14 | Sales & Distribution | user.10 | user.10-user.13 | user.14 |
| user.15-user.19 | Treasury & Payments | user.15 | user.15-user.18 | user.19 |
In addition, the following "special" users are defined:
hradmin- represents the human interaction of the HR departmentsystemadmin- represents the human interaction of the populated systems (Business and Project)superadmin- represents the manager of the managers
Note that the curl commands in this section use the secure
port for OpenIDM (8443) and assume a self-signed certificate named
self-signed.crt, located in the directory from which the
command is launched. For instructions on using the self-signed certificate
that is generated when OpenIDM first starts up, see
Section 16.2.2, "Restrict REST Access to the HTTPS Port".
17.6.1. Use Case 1 - Initial Reconciliation
This use case assumes an OpenDJ server and populates the managed user repository with users from OpenDJ.
To prepare the sample:
Download and install OpenDJ, as described in the OpenDJ Install Guide.
This sample assumes that OpenDJ is listening on port 1389, the standard LDAP port for users who cannot use privileged ports.
During the install, import the user data from the LDIF file
/path/to/openidm/samples/usecase/data/hr_data.ldif.The use case assumes a user with DN
cn=Directory Managerand passwordpasswordwho will bind to the directory server.
The OpenDJ server now contains the users required for all the workflow use cases.
Start OpenIDM with the configuration for use case 1.
$ cd /path/to/openidm $ ./startup.sh -p samples/usecase/usecase1Run reconciliation to populate the managed user repository with the users from the OpenDJ server.
$ curl \ --cacert self-signed.crt \ --header "X-OpenIDM-Username: openidm-admin" \ --header "X-OpenIDM-Password: openidm-admin" \ --header "Content-Type: application/json" \ --request POST \ "https://localhost:8443/openidm/recon?_action=recon&mapping=systemHRAccounts_managedUser"Query the managed users that were created by the reconciliation process.
$ curl \ --cacert self-signed.crt \ --header "X-OpenIDM-Username: openidm-admin" \ --header "X-OpenIDM-Password: openidm-admin" \ --request GET \ "https://localhost:8443/openidm/managed/user?_queryId=query-all-ids" { "result" : [ { "_id" : "user.5", "_rev" : "0" }, { "_id" : "user.10", "_rev" : "0" }, { "_id" : "user.1", "_rev" : "0" }, ... { "_id" : "hradmin", "_rev" : "0" }, { "_id" : "systemadmin", "_rev" : "0" }, { "_id" : "superadmin", "_rev" : "0" } ], "resultCount" : 23, "pagedResultsCookie" : null, "remainingPagedResults" : -1 }23 users will have been created by the reconciliation process. The default password of all the newly created users is
Passw0rd.Shut down OpenIDM before you proceed with the next use case.
$ cd /path/to/openidm $ ./shutdown.sh
17.6.2. Use Case 2 - New User Onboarding
This use case demonstrates a new user onboarding process. The process can be
initiated by any of the users created in the previous reconciliation
process. In this example, we use user.1 to initiate the
process. user.1 captures the details of a new user, and
then submits the new user entry for approval by the prospective manager of
that new user.
The use case includes three separate workflows - onboarding (creation of the new user), sunrise (commencement of the new user work period) and sunset (termination of the user contract).
The use case also demonstrates email notification with the optional configuration of an external email service. If you want to use email notification, you must configure the external email service, as described in Procedure 17.2, "Configuring Email Notification", before you start the workflow.
The use case works with the OpenIDM UI, accessible at the following URL by
default: https://localhost:8443/openidmui/.
Start OpenIDM with the configuration for use case 2.
$ cd /path/to/openidm $ ./startup.sh -p samples/usecase/usecase2Log into the UI as
user.1with passwordPassw0rd.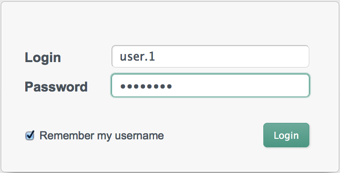
In this use case, the processes associated with the new user onboarding workflow are visible to any user who logs into the UI.
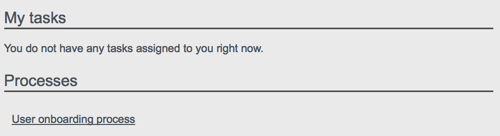
Click on the User Onboarding Process and complete the fields for a sample new user. Complete at least all mandatory fields.
Department. Specifies one of four departments to which the new user will belong (Human Resources, Production Planning, Sales & Distribution, or Treasury & Payments). The value you select here determines the "manager" of the new user, to which the request will be sent for approval. (See the previous table of users for a list of the managers of the various departments.)
User Type. Governs user access to specific accounts. If the User Type is "Employee", the new user will have access to an account named "Business". This access is represented as an attribute of the managed user entry in the OpenIDM repository, as follows:
accounts : ["Business"]. If the User Type is "Contractor", the new user will have no accounts associated with its managed user representation in OpenIDM.Send Email Notification. Indicates whether an email should be sent to alert the manager of the new required approval. The email details used here are defined when you configure email notification, as described in Procedure 17.2, "Configuring Email Notification". If you select not to send an email notification, the notification is simply added to the OpenIDM repository, and appears when the manager logs into the UI.
Click Start to initiate the onboarding workflow.
This action sends the new user request to the corresponding "management" users (the department manager, as well as the
superadminuser, who is an overall manager).Log out of the UI, and log back in as the management user of the department that you selected when you completed the new user form. For example, if you selected "Human Resources", log in as
user.0, which simulates the management user for the HR department. All users have the passwordPassw0rd.Notice that this user now has an Onboarding Approval task in the queue of tasks assigned to his group.
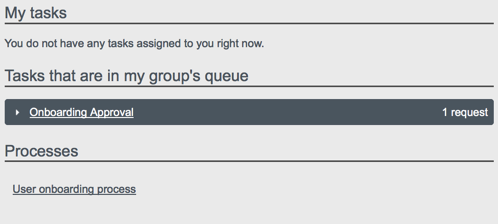
Click on the Onboarding Approval task and select "Assign to Me".
This action "claims" the task for
user.0, removes it from the group queue, and places it in the list of pending tasks foruser.0.Click on the Onboarding Approval task under the My Tasks list and click Details.
The complete new user request is displayed for the manager's approval. As the manager, you can add any information that was missing from the original request.
In addition, you can specify the following information for the new user.
Start Date. Completing this field results in the user being created, with a
"startDate"added to that user's managed user entry. The status of the user isinactive. This field is optional, and is used by the task scanner to trigger the Sunrise workflow.End Date. Completing this field results in the user being created, with an
"endDate"added to that user's managed user entry. The field is optional, and is used by the task scanner to trigger the Sunset workflow.Manager. Selecting "Yes" here adds a
"title"property, with a value of"manager", to the new managed user entry.Decision. Selecting "Reject" here terminates the workflow and sends a notification to the user who initiated the workflow. Selecting "Accept" creates the managed user entry in OpenIDM. The password of the new user is
Passw0rd.Two notifications are created when the request is accepted - one for the user who initiated the workflow, and one for the newly created user. The notifications are visible in the UI after login. If you selected email notification, one email is sent to the user defined when you configured email notification, as described in Procedure 17.2, "Configuring Email Notification".
At the bottom of the form, there is an option either to Requeue the request or to Complete it. Click Complete.
If you click Requeue here, the task is removed from the list of My Tasks for that user, and returned to the list of tasks pending for that group. The task can then be claimed by any member of that group.
When the new user request has been approved, the user is created in the OpenIDM repository. If you did not include a Start Date in the manager approval, you should now be able to log into the UI with the details of the new user. If you included a Start Date, you need to complete the sunrise workflow before the user account is active (which will enable you to log in as this user).


This step is optional, and required only if you want to use email notification with this workflow.
Edit the settings in the file
/path/to/openidm/samples/usecase/usecase2/conf/external.email.jsonto match the settings of your mail server. For example:$ cd /path/to/openidm $ more samples/usecase/usecase2/conf/external.email.json { "host" : "smtp.gmail.com", "port" : "587", "username" : "my-username" "password" : "my-password", "mail.smtp.auth" : "true", "mail.smtp.starttls.enable" : "true" }Change the notification email parameters in the workflow definition file. To edit the workflow definition file:
Copy the workflow archive (
.bar) file (samples/usecase/usecase2/workflow/newUserCreate.bar) to a temporary location.Unzip the temporary workflow
.barfile. This step extracts the workflow definition file (newUserCreate.bpmn20.xml) and two xhtml templates required by the workflow.$ unzip newUserCreate.bar Archive: newUserCreate.bar inflating: nUCDecideApprovalForm.xhtml inflating: nUCStartForm.xhtml inflating: newUserCreate.bpmn20.xml
Edit the extracted workflow definition file (
newUserCreate.bpmn20.xml). The email parameters are towards the end of this file:$ cd /path/to/openidm/samples/usecase/usecase2/workflow $ grep emailParams newUserCreate.bpmn20.xml emailParams = [from : 'usecasetest@forgerock.com', to : 'notification@example.com', ...
Change the
fromandtoparameters to reflect valid email addresses.Zip up the amended workflow definition file, and the xhtml templates into a workflow
.barfile.$ zip newUserCreate.bar newUserCreate.bpmn20.xml nUCDecideApprovalForm.xhtml nUCStartForm.xhtml updating: nUCDecideApprovalForm.xhtml (deflated 82%) updating: nUCStartForm.xhtml (deflated 82%) updating: newUserCreate.bpmn20.xml (deflated 85%)
Copy the new
.barfile to the workflow directory, overwriting the existing.barfile.$ cp /tmp/newUserCreate.bar /path/to/openidm/samples/usecase/usecase2/workflow
If a sunrise date is specified for the new user, the user is created in
the repository, with an inactive account status.
To trigger the sunrise workflow (which activates the account), enable the sunrise task scanning schedule. The schedule is disabled by default.
Modify the schedule configuration file (
samples/usecase/usecase2/conf/schedule-taskscan_sunrise.json), setting the"enabled"property totrue.$ cd /path/to/openidm $ grep "enabled" samples/usecase/usecase2/conf/schedule-taskscan_sunrise.json "enabled" : true,
The scan runs every minute, and checks the repository for users that have a sunrise date that is anything up to one day after the current date. When the scan is triggered, it locates the newly created user and starts the sunrise workflow on this user. The workflow takes the following actions:
Changes the account status of the user to
active.Generates a notification for the new user, which is visible when the user logs into the UI.
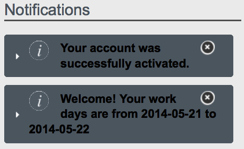

If a sunset date is set for the new user, you can trigger the sunset workflow to deactivate the user account when the end of his work period is reached.
To trigger the sunset workflow, enable the sunset task scanning schedule. The schedule is disabled by default.
Modify the schedule configuration file (
samples/usecase/usecase2/conf/schedule-taskscan_sunset.json), setting the"enabled"property totrue.$ cd /path/to/openidm $ grep "enabled" samples/usecase/usecase2/conf/schedule-taskscan_sunset.json "enabled" : true,The scan runs every minute, and checks the repository for users that have a sunset date that is anything up to one day after the current date. When the scan is triggered, it locates users whose contracts are about to end, and starts the sunset workflow on these users. When the workflow is initiated, it assigns a task to the manager of the affected user. In this example, the task is assigned to
user.0.When the sunset schedule has been enabled, log into OpenIDM UI as
user.0(with passwordPassw0rd). If the user's sunset date is within one day of the current date, a "Contract Termination" task becomes available under the 'My tasks' section for the manager of that user.Select the contract termination task and click Details.
In the Decision field, select either "Accept termination" or "Modify date", then click Complete.
When you accept the termination, the user's account status is set to
inactiveand the HR administrative user receives a notification to that effect, next time that user logs into the UI. The deactivated user is no longer able to log into the UI.If you select to modify the date, the sunset date of that user is changed to the value that you specify in the End Date field on that form. The management user receives a UI notification that the employee's contract has been extended.
Shut down OpenIDM before you proceed with the next use case.
$ cd /path/to/openidm $ ./shutdown.sh
17.6.3. Use Case 3 - User Access Request
This use case simulates a user access request, with two levels of approval for the request.
If you want to use email notification with this workflow, follow the
instructions in Procedure 17.2, "Configuring Email Notification" before you
start the workflow, substituting
usecase3/conf/external.email.json and
usecase3/workflow/accessRequest.bpmn20.xml for the
files described in that procedure.
Start OpenIDM with the configuration for use case 3.
$ cd /path/to/openidm $ ./startup.sh -p samples/usecase/usecase3Log into the UI as
user.1with passwordPassw0rd.user.1belongs to the HR department and, in this workflow, is requesting access to a Project system.Click on the Access Request Process in the list of available processes and click Start to start the workflow.
A User Access Request appears in the list of tasks for
user.1.Select the User Access Request task and click Details.
The resulting form indicates the various systems to which the user may request access.
Access to Business system. This field reflects the current value of the
"accounts"property for that user in the repository. If the value includes"Business"this field is True.Access to Project system. Set this field to True to request Project access for
user.1.Send Email Notification. Indicates whether an email should be sent to alert the manager of the new access request. The email details used here are defined when you configure email notification, as described in Procedure 17.2, "Configuring Email Notification". If you select not to send an email notification, the notification is simply added to the OpenIDM repository, and appears when the manager logs into the UI.
Select either Cancel, to terminate the process, or Request, to start a user task, assigned to the manager of the user requesting access (
user.0in this example).Log out of the UI and log back in as the manager (
user.0with passwordPassw0rd).Under "Tasks that are in my group's queue" click "User Access Request Approval" and select "Assign to me".
Note that the "User Access Request Approval" task has now moved under "My tasks".
Under "My tasks" click "User Access Request Approval" and click Details.
The details of the access request are displayed. The manager is able to modify the access rights. Select Accept or Reject to approve or deny the request.
Rejecting the request results in a notification being sent to the user who made the request. If you have enabled email notification, a single email is sent to the account defined when you configure email notification, as described in Procedure 17.2, "Configuring Email Notification".
Accepting the request initiates a second approval task, assigned to the
systemadminuser.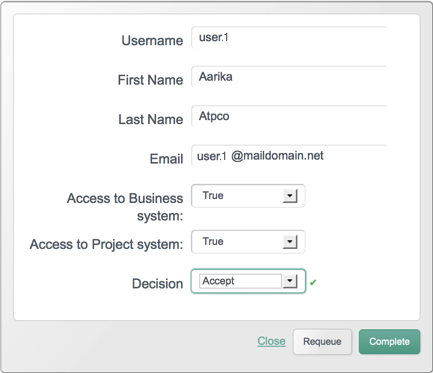
Click Complete to complete the task.
Log out of the UI and log in as the
systemadminuser (with passwordPassw0rd).This user now has one User Access Request Approval task in his queue.
Select the task and click Details.
This task interface is similar to that of the task that was assigned to the manager.
Rejecting the request results in a notification being sent to the user who made the request.
Accepting the request updates the managed/user record in OpenIDM, to reflect the approved access changes.
If you have enabled email notification, a single email is sent to the account defined when you configured the external email service (Procedure 17.2, "Configuring Email Notification"), indicating whether the request has been accepted or rejected.

Note that this sample includes an escalation step that
is attached to the manager approval task. If the manager does not complete
assessment of the user task within ten minutes of its initiation, a new user
task is created and assigned to the superadmin user. This
task has the same interface and functionality as the task assigned to the
manager. Accordingly, when the superadmin user completes
the task, the execution is passed to the systemadmin user
for approval.
Shut down OpenIDM before you proceed with the next use case.
$ cd /path/to/openidm $ ./shutdown.sh
17.6.4. Use Case 4 - Orphan Account Detection
This use case demonstrates two asynchronous tasks, started from a reconciliation process:
Detecting orphan accounts on a target object set
Handling ambiguous results during correlation
This use case relies on a customized synchronization configuration (mapping)
file, named syncManagedBusiness.json, in the
/path/to/openidm/samples/usecase/usecase4/conf
directory.
This file defines a mapping (recon_managedUser_systemBusiness)
between a source (managed users) and a target object set. The target object
set is defined in the file
samples/usecase/usecase4/data/business.csv. The
business.csv file includes all users from the initial
reconciliation (described in Section 17.6.1, "Use Case 1 - Initial Reconciliation"). These users are
categorized as employees, and therefore include the
property "accounts" : ["Business"] in their managed user
entry (see Section 17.6.2, "Use Case 2 - New User Onboarding" for an explanation of the User
Type).
The mapping includes the following "validSource" field:
"validSource" : {
"type" : "text/javascript",
"file" : "script/isSourceValidBusiness.js"
}, This field references a script which specifies that only those users who are employees are taken into account during the reconciliation.
In addition, the business.csv file includes the following
users:
user.50. This user is defined only in the .csv file, and not in the managed/user repository. When a reconciliation operation is run, this user is detected as an orphan account. The orphan account workflow is triggered when an "UNQUALIFIED" or "UNASSIGNED" situation is encountered, as indicated in this section of the mapping:{ "situation" : "UNQUALIFIED", "action" : { "workflowName" : "orphanAccountReport", "type" : "text/javascript", "file" : "workflow/triggerWorkflowFromSync.js" } }, { "situation" : "UNASSIGNED", "action" : { "workflowName" : "orphanAccountReport", "type" : "text/javascript", "file" : "workflow/triggerWorkflowFromSync.js" } }user.33. This user has a"userName"attribute of"user.3"(which is the same as the"userName"attribute of the user,user.3). The correlation query of the reconciliation operation is based on the"userName"attribute. During the correlation query, two candidate users are therefore correlated with the same managed user (user.3), and the result is ambiguous. The manual match workflow is triggered when an "AMBIGUOUS" situation is encountered, as indicated in this section of the mapping:{ "situation" : "AMBIGUOUS", "action" : { "workflowName" : "manualMatch", "type" : "text/javascript", "file" : "workflow/triggerWorkflowFromSync.js" } }
Before you start with this use case, rename the mapping file to
sync.json.$ cd /path/to/openidm/samples/usecase/usecase4/conf $ mv syncManagedBusiness.json sync.json
Start OpenIDM with the configuration for use case 4.
$ cd /path/to/openidm $ ./startup.sh -p samples/usecase/usecase4You will see a warning in the Felix console about a password not being defined in the CSV file (
WARN Password attribute is not defined. [CSVFileConfiguration]). You can ignore this warning.Run a reconciliation operation, according to the mapping defined in
sync.json.$ curl \ --cacert self-signed.crt \ --header "X-OpenIDM-Username: openidm-admin" \ --header "X-OpenIDM-Password: openidm-admin" \ --header "Content-Type: application/json" \ --request POST \ "https://localhost:8443/openidm/recon?_action=recon&mapping=recon_managedUser_systemBusiness"
When the reconciliation operation finds the ambiguous entry (
user.3) and the orphan entry (user.50) in the CSV file, two asynchronous workflows are launched (manualMatchandorphanAccountReport), as indicated in the mapping file, described previously.Log into the UI as the
systemadminuser, with passwordPassw0rd.Select the Manual Linking task from the My tasks list and click Details.
The Possible targets field presents a list of target entries to which the ambiguous record can be linked. In this example,
user.3 - Atrc, Aaronanduser.33 - Atrc, Aaronare the two candidate users found in the target object set by the correlation query. When you select one of these values, the workflow manually links the managed user (user.3) to the selected user.If you select Ignore, here, no action is taken (no link is created), and the workflow terminates.
Select the Orphan Account task from the My tasks list and click Details.
The Link to field enables you to enter an existing managed user ID to which this orphan account should be linked. For the purposes of this example, enter
user.5.The Delete option deletes the user from the target object set (the CSV file in this case) and terminates the workflow.
Shut down OpenIDM before you proceed with the next use case.
$ cd /path/to/openidm $ ./shutdown.sh
17.6.5. Use Case 5 - Certification
This use case includes two scheduled tasks that demonstrate a certification workflow.
The first scheduled task fetches all the managed users and begins a certification workflow for each user. The workflow shows the roles that are assigned to each user and allows you to accept (certify) or change those role assignments. The second scheduled task fetches all the defined managed roles and begins a certification workflow for the roles. The workflow demonstrates managed role assignment.
In this use case, four managed roles are defined, based on the departments
to which the managed users belong. The managed roles are Human
Resources, Production Planning,
Sales and Distribution, and Treasury and
Payments. Every user is assigned a dynamic role by default, which
corresponds to that user's department.
Note
By default the scheduled tasks used in this workflow run every minute, so
you will need to wait a minute before logging into the UI, after enabling
the schedules. You can change the frequency by editing the
"schedule" property in the schedule configuration files
(schedule-certification.json and
schedule-certificationEntitlements.json). This
property takes standard cron syntax. Every minute, a new task is created
for each user or role, so you will see several tasks in the group queue if
you log in to the UI after some time. In a live deployment, this kind of
workflow would probably only run once every few months.
Start OpenIDM with the configuration for use case 5.
$ cd /path/to/openidm $ ./startup.sh -p samples/usecase/usecase5
Define the four managed roles over the REST interface, by sending the following PUT requests to the
managed/roleendpoint.$ curl \ --cacert self-signed.crt \ --header "X-OpenIDM-Username: openidm-admin" \ --header "X-OpenIDM-Password: openidm-admin" \ --header "Content-Type: application/json" \ --header "If-None-Match: *" \ --request PUT \ --data '{ "properties": { "description": "Role for Human Resources department" }, "assignments": { "ad1": { "attributes": [ { "value": [ "CN=cisco_vpn,DC=example,DC=com" ], "assignmentOperation": "mergeWithTarget", "unassignmentOperation": "removeFromTarget", "name": "memberOf" } ] } }, "name": "Human Resources" }' \ "https://localhost:8443/openidm/managed/role/human-resources" $ curl \ --cacert self-signed.crt \ --header "X-OpenIDM-Username: openidm-admin" \ --header "X-OpenIDM-Password: openidm-admin" \ --header "Content-Type: application/json" \ --header "If-None-Match: *" \ --request PUT \ --data '{ "properties": { "description": "Role for Production Planning department" }, "assignments": { "ad1": { "attributes": [ { "value": [ "CN=intranet,DC=example,DC=com", "CN=email,DC=example,DC=com", "CN=radius_dialin,DC=example,DC=com" ], "assignmentOperation": "mergeWithTarget", "unassignmentOperation": "removeFromTarget", "name": "memberOf" } ] } }, "name": "Production Planning" }' \ "https://localhost:8443/openidm/managed/role/production-planning" $ curl \ --cacert self-signed.crt \ --header "X-OpenIDM-Username: openidm-admin" \ --header "X-OpenIDM-Password: openidm-admin" \ --header "Content-Type: application/json" \ --header "If-None-Match: *" \ --request PUT \ --data '{ "properties": { "description": "Role for Sales and Distribution department" }, "assignments": { "ad1": { "attributes": [ { "value": [ "CN=intranet,DC=example,DC=com", "CN=email,DC=example,DC=com" ], "assignmentOperation": "mergeWithTarget", "unassignmentOperation": "removeFromTarget", "name": "memberOf" } ] } }, "name": "Sales and Distribution" }' \ "https://localhost:8443/openidm/managed/role/sales-distribution" $ curl \ --cacert self-signed.crt \ --header "X-OpenIDM-Username: openidm-admin" \ --header "X-OpenIDM-Password: openidm-admin" \ --header "Content-Type: application/json" \ --header "If-None-Match: *" \ --request PUT \ --data '{ "properties": { "description": "Role for Treasury and Payments department" }, "assignments": { "ad1": { "attributes": [ { "value": [ "CN=intranet,DC=example,DC=com" ], "assignmentOperation": "mergeWithTarget", "unassignmentOperation": "removeFromTarget", "name": "memberOf" } ] } }, "name": "Treasury and Payments" }' \ "https://localhost:8443/openidm/managed/role/treasury-payments"To trigger the user certification scheduled task, enable the schedule in the schedule configuration file (
schedule-certification.json).$ cd /path/to/openidm/samples/usecase/usecase5/conf/ $ more schedule-certification.json { "enabled" : true, "type" : "cron", ... }Log into the UI as
user.0with passwordPassw0rd.user.0represents the manager of the users who are being certified.Under "Tasks that are in my group's queue" click "Role Status Check". A scheduled task has been started for each managed user. Choose one of the users, for example, user.1, and select "Assign to me" under the Actions column.
The "Role Status Check" task for that user moves under "My tasks".
Under "My tasks" click "Role Status Check" and click Details.
The Access Status Check window shows the details of the user for whom the certification is being processed, and a list of roles that can be assigned.
An
xin the first column indicates that the role is currently assigned to the user. A value in the second column indicates the roles that will be assigned to the user when the certification process is complete.If the role is dynamic, that is, assigned to the user based on the department to which the user belongs, the value is read-only. user.1 has the
human-resourcesrole assigned dynamically, as a function of the department to which this user belongs.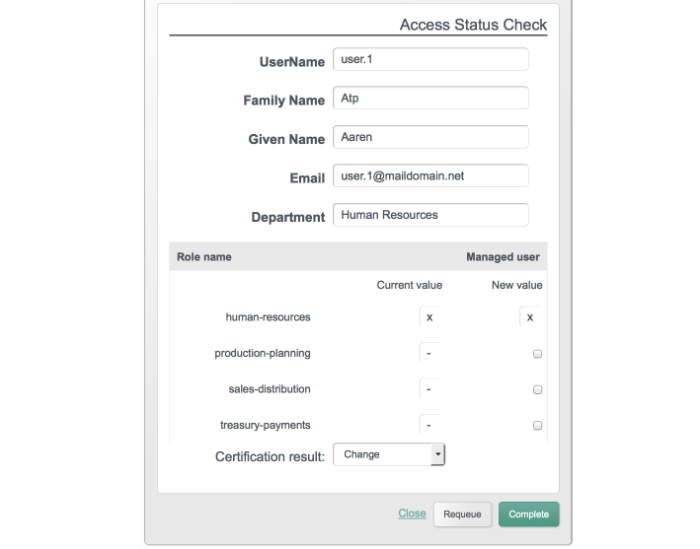
Select the appropriate roles that should be assigned to this user, then select one of the following options from the "Certification result" list:
Change. The user's role assignments are updated, based on the values specified in the second column.
Certify. The user's role assignments are not updated. In other words, the user's current role assignments are certified.
Escalate. The task is reassigned to the superadmin user. To test this, log out, and log in again as the
superadmin. The superadmin can select whether to change or certify the role assignments.
When you have completed the role selection, and the action to be taken, click Complete.
Clicking Requeue here simply returns the task to the list of pending tasks in that group's queue.
Log out of the UI.
This is the end of the first scheduled task.
Trigger the managed role certification by enabling the scheduled task in the schedule configuration file (
schedule-certificationEntitlements.json).$ cd /path/to/openidm/samples/usecase/usecase5/conf/ $ more schedule-certificationEntitlements.json { "enabled" : true, "type" : "cron", ... }Log into the UI as
systemadminwith passwordPassw0rd.Under "My tasks" select "Entitlement Status Check".
Under the "Key" column, you will see the names of the various managed roles whose entitlements are being certified in this workflow.
Select one of the entitlement check tasks (for example, for the
human-resourcesrole) and click Details.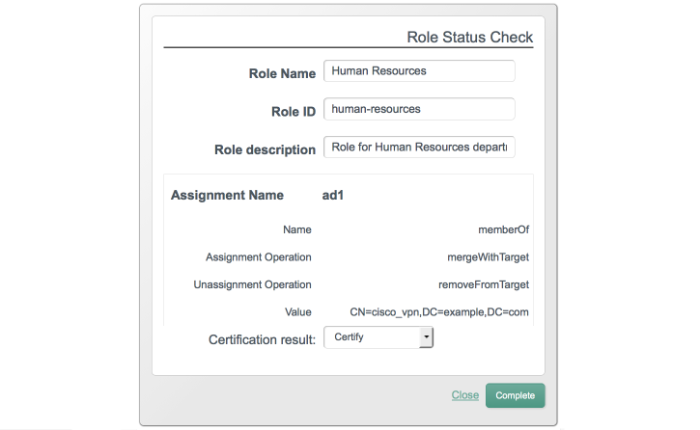
The Role Status Check panel shows the name, ID and description of the role whose assignments or entitlements you are certifying. For each assignment, the name of the attribute whose value is assigned, and the assignment and unassignment operations are indicated.
The only field that can be edited on this panel is the "Value" field, which specifies the value that should be used for the named attribute when this role is assigned to a user. To edit the value, click in the field and either replace the existing value or press Enter at the end of the existing value to add a new value. Because this attribute is multivalued, multiple values are indicated by typing them on separate lines.
For more information about managed roles and assignment and unassignment operations, see Section 8.3, "Configuring Custom Roles".
Enter the values that should be used for this attribute, then select one of the following options from the "Certification result" list:
Update. The role definition is updated to use the attribute value or values that you specified in the "Value" field.
Certify. The role definition is not updated and the current assignment value is certified.
When you have completed the role selection, and the action to be taken, click Complete.
This is the end of the role entitlement workflow.
Shut down OpenIDM before you proceed with the next use case.
$ cd /path/to/openidm $ ./shutdown.sh
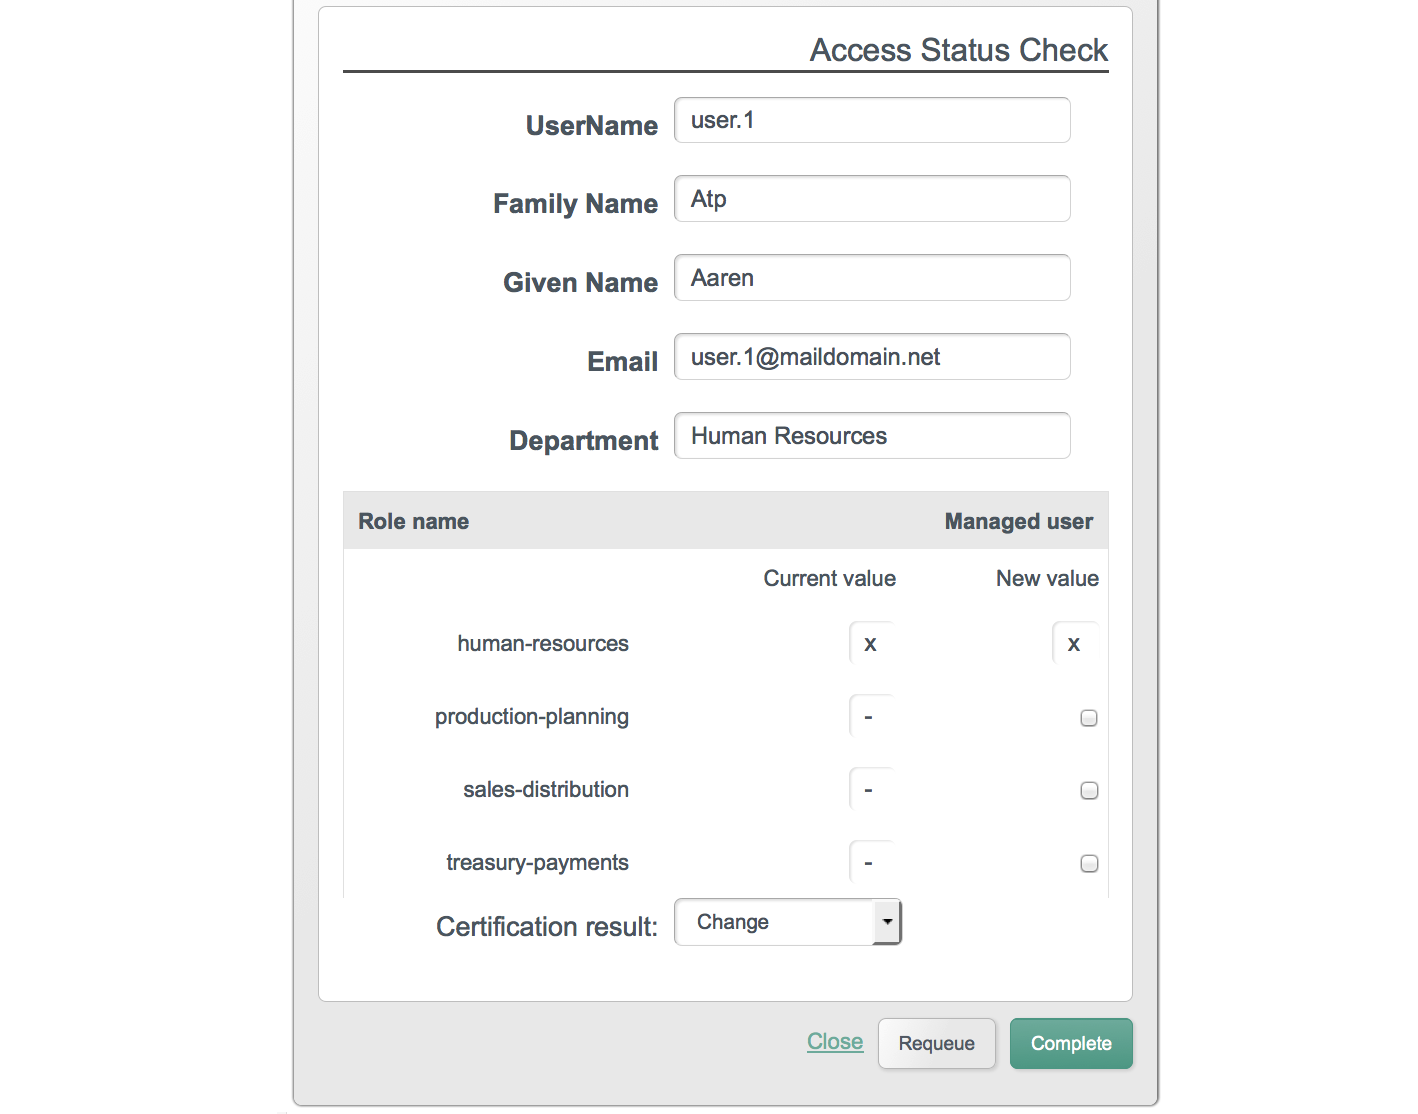
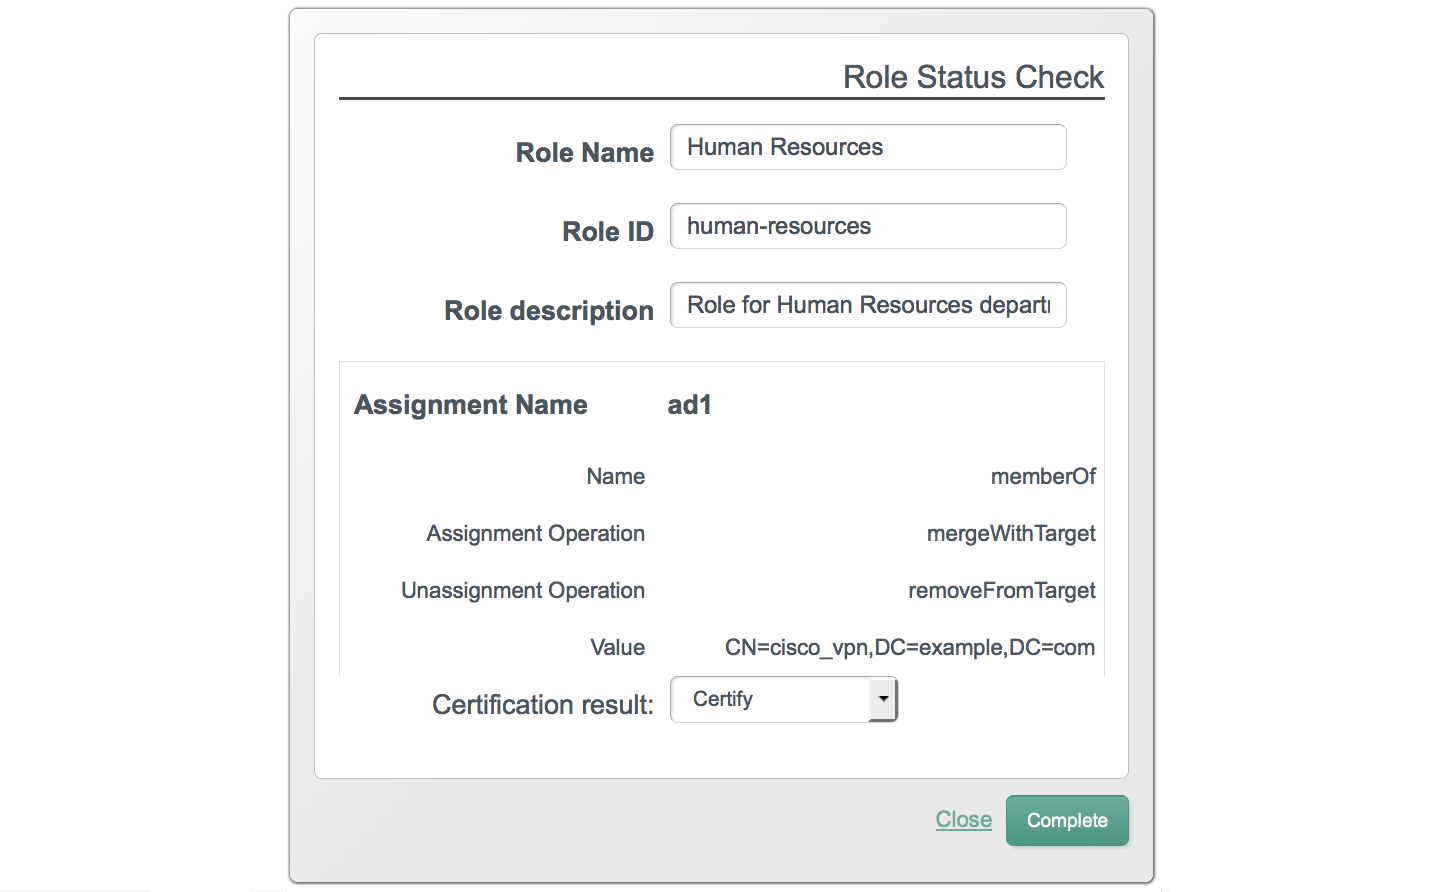
17.6.6. Use Case 6 - Password Change Reminder
This use case demonstrates using the task scanner to trigger a password change reminder workflow for managed users.
In this example, each managed user entry in OpenIDM has a dedicated
attribute, lastPasswordSet, that stores the date on which
the password was last changed. The value of this attribute is updated by an
onStore script, defined in the managed user configuration
file (conf/managed.json), as follows:
"onStore" : {
"type" : "text/javascript",
"file" : "script/onStoreManagedUser.js"
},
When a new password is stored for a user, the script sets the date on which
this change was made. The task scanner periodically scans the
lastPasswordSet attribute, and starts the workflow if the
password was changed more than an hour ago. This condition is configured in
the schedule configuration file
(schedule-taskscan_passwordchange.json):
$ cd /path/to/openidm
$ more samples/usecase/usecase6/conf/schedule-taskscan_passwordchange.json
...
"condition" : {
"before" : "${Time.now - 1h}"
},
....
Obviously, in a real deployment, the period between required password
changes would be longer, and this value would need to be set accordingly.
For the purposes of testing this use case, you might want to set the value
to a shorter period, such as "${Time.now - 1m}", which
will send the notification one minute after a password change.
By default, the workflow sends notifications to the user entry, visible when the user logs into the UI. If you want notifications sent by email, configure the external email service, as follows:
Edit the settings in the file
/path/to/openidm/samples/usecase/usecase6/conf/external.email.jsonto match the settings of your mail server. For example:$ cd /path/to/openidm $ more samples/usecase/usecase6/conf/external.email.json { "host" : "smtp.gmail.com", "port" : "587", "username" : "my-username" "password" : "my-password", "mail.smtp.auth" : "true", "mail.smtp.starttls.enable" : "true" }Enable email notification in the script file that starts the workflow (
samples/usecase/usecase6/script/passwordchange.js). For example:$ cd /path/to/openidm $ more samples/usecase/usecase6/script/passwordchange.js /*global objectID*/ (function () { var params = { "userId" : objectID, "emailEnabled" : "true", "_key": "passwordChangeReminder" };Make sure that all users have a valid email address as the value of their
mailattribute, in the OpenIDM repository.
The task scanning schedule is disabled by default. To test this use case, follow these steps:
Enable the task scanning schedule by setting
enabledtotruein the schedule configuration file (schedule-taskscan_passwordchange.json).$ cd /path/to/openidm $ more samples/usecase/usecase6/conf/schedule-taskscan_passwordchange.json { "enabled" : true, ...Start OpenIDM with the configuration for use case 6.
$ cd /path/to/openidm $ ./startup.sh -p samples/usecase/usecase6
Log into the UI as any of the users listed in the introduction to this section (for example,
user.4, with passwordPassw0rd).The user sees the following notification upon login:
If the password has not been changed after five minutes, a second notification is sent to the user.
If the password has not been changed two minutes after this second notification, the user's account is deactivated and that user is no longer able to log into the UI.
(Optional) To avoid the second notification, or the account deactivation, you can change the user password through the UI, as follows:
Log into the UI as the user whose password you want to change and click Change Security Data at the top right of the page.
Enter the existing password (in this case
Passw0rd).Enter a new password that conforms to the requirements of the password policy.


Chapter 18. Using Audit Logs
OpenIDM auditing can publish and log all relevant system activity to the targets you specify. Auditing can include data from reconciliation as a basis for reporting, access details, and activity logs that capture operations on internal (managed) objects and external (system) objects. Auditing provides the data for all the relevant reports, including orphan account reports.
The auditing interface allows you to push auditing data to local files, to the OpenIDM repository, and to a remote system.
18.1. Audit Log Types
This section describes the types of audit log OpenIDM provides.
- Access Log
OpenIDM writes messages concerning access to the REST API in this log.
Default file:
openidm/audit/access.csv- Activity Log
OpenIDM logs operations on internal (managed) and external (system) objects to this log type.
Entries in the activity log contain identifiers, both for the action that triggered the activity, and also for the original caller and the relationships between related actions.
Default file:
openidm/audit/activity.csv- Reconciliation Log
OpenIDM logs the results of a reconciliation run, including situations and the resulting actions taken to this log type. The activity log contains details about the actions, where log entries display parent activity identifiers,
recon/reconID.Default file:
openidm/audit/recon.csv
Where an action happens related to a higher level business function, the log entry points to a parent activity for that function. The relationships are hierarchical. For example, a synchronization operation could result from scheduled reconciliation for an object type. OpenIDM also logs the top level root activity with each entry, making it possible to query related activities.
18.2. Audit Log Formats
This section describes the audit log formats to help you map these to the reports you generate.
The access log includes the following information:
"_id"UUID for the message object, such as
"0419d364-1b3d-4e4f-b769-555c3ca098b0""action"Action requested, such as
"authenticate""ip"IP address of the client. For access from the local host, this can appear for example as
"0:0:0:0:0:0:0:1%0"."principal"Principal (username) requesting the operation, such as
"openidm-admin""roles"Roles associated with the principal, such as
"[openidm-admin, openidm-authorized]""status"Result of the operation, such as
"SUCCESS""timestamp"The time that OpenIDM logged the message, in UTC format, for example
"2012-11-18T08:48:00.160Z""userid"The ID (
_id) of the user requesting the operation, such asopenidm-admin,jdoeor a UUID that has been generated by the server, such as"0d7532e2-2b45-420e-b10e-c35684c633fd".
The activity log includes the following information for each entry:
"_id"UUID for the message object, such as
"0419d364-1b3d-4e4f-b769-555c3ca098b0""action"Action performed on that entry, such as
"create"."activityId"UUID for the activity corresponding to the UUID of the resource context
"after"JSON representation of the object resulting from the activity
"before"JSON representation of the object prior to the activity
"changedFields"List of the fields that were changed as a result of the activity. This list takes into consideration only those fields that have been configured as
"watchedFields"in theconf/audit.jsonfile."message"Human readable text about the activity
"objectId"Object identifier, such as
"managed/user/jdoe"or"managed/user/38e29216-4b0e-4701-8a6f-ed8bf69692c7"."parentActionId"UUID of the action leading to the activity
"passwordChanged"Boolean (
trueorfalse) indicating whether the action resulted in a password change."requester"Principal requesting the operation
"rev"Object revision number
"rootActionId"UUID of the root cause for the activity. This matches a corresponding
"rootActionId"in a reconciliation message."status"Result of the operation, such as
"SUCCESS""timestamp"Time when OpenIDM logged the message, in UTC format, for example
"2012-11-18T08:48:00.160Z"
Reconciliation messages include the following information:
"_id"UUID for the message object, such as
"0419d364-1b3d-4e4f-b769-555c3ca098b0""action"Synchronization action, such as
"CREATE". For a list of possible actions, see Section 12.13.5, "Synchronization Actions"."actionID"The unique ID assigned to the action.
"ambiguousTargetObjectIds"When the situation is AMBIGUOUS or UNQUALIFIED and OpenIDM cannot distinguish between more than one target object, OpenIDM logs the identifiers of the objects in this field in comma-separated format. This makes it possible to figure out what was ambiguous afterwards.
"entryType"The type of reconciliation log entry, such as
"start", or"summary"."exception"The stack trace of the exception, if any.
"mapping"The name of the mapping used for the reconciliation (defined in
conf/sync.json, for example"systemLdapAccounts_managedUser"."message"Human readable text about the reconciliation action that was taken.
"messageDetail"For the
"summary"entry type, this field contains details about that specific stage of the reconciliation run, such as the stage name and description, start and end time, and so forth.When script exceptions are encountered during a reconciliation run, the error details can also be stored in this property.
For script exception details to be pulled in, the script exception must take the following format:
"throw { 'openidmCode' : HTTP error code, 'message' : error message, 'detail' : { details } };""reconId"UUID for the reconciliation operation, which is the same for all entries pertaining to the reconciliation run.
"reconciling"What OpenIDM is reconciling,
"source"for the first phase,"target"for the second phase"rootActionId"UUID of the root cause for the activity. This matches a corresponding
"rootActionId"in an activity message."situation"The situation encountered. For a list of possible situations, see Section 12.13.1, "Synchronization Situations".
"sourceObjectId"The object identifier on the source system, such as
"system/xmlfile/account/bjensen"or"managed/user/bjensen"(depending on the resource configured as the source in the mapping)."status"Result of the operation, such as
"SUCCESS""targetObjectId"The object identifier on the target system, such as
"system/xmlfile/account/bjensen"or"managed/user/bjensen"(depending on the resource configured as the target in the mapping)."timestamp"Time when OpenIDM logged the message, in UTC format, for example
"2012-11-18T08:48:00.160Z"
18.3. Audit Configuration
OpenIDM exposes the audit logging configuration under
https://localhost:8443/openidm/config/audit for the REST
API, and in the file conf/audit.json where you installed
OpenIDM. A sample conf/audit.json configuration file
follows:
{
"eventTypes" : {
"activity" : {
"filter" : {
"actions" : [
"create",
"update",
"delete",
"patch",
"action"
]
},
"watchedFields" : [ ],
"passwordFields" : [ "password" ]
},
"recon" : { }
},
"logTo" : [
{
"logType" : "csv",
"location" : "audit",
"recordDelimiter" : ";",
"ignoreLoggingFailures" : true
},
{
"logType" : "repository",
"useForQueries" : true,
"ignoreLoggingFailures" : true
}
],
"exceptionFormatter" : {
"type" : "text/javascript",
"file" : "bin/defaults/script/audit/stacktraceFormatter.js"
}
}18.3.1. Event Types
The eventTypes configuration specifies what events
OpenIDM writes to audit logs. OpenIDM supports the following event types:
access, activity, synchronization, and reconciliation. The filter for
actions under activity logging shows the actions on managed or system
objects for which OpenIDM writes to the activity log.
The filter actions list enables
you to configure the conditions that result in actions being written to the
activity log.
readWhen an object is read by using its identifier. By default, read actions are not logged. Add the
"read"action to the list of actions to log all read actions.Note that, due to the potential result size in the case of read operations on
system/endpoints, only the read is logged, and not the resource detail. If you really need to log the complete resource detail, add the following line to yourconf/boot/boot.propertiesfile:openidm.audit.logFullObjects=true
createWhen an object is created.
updateWhen an object is updated.
deleteWhen an object is deleted.
patchWhen an object is partially modified.
queryWhen a query is performed on an object. By default, query actions are not logged. Add the
"query"action to the list of actions to log all query actions.Note that, due to the potential result size in the case of query operations on
system/endpoints, only the query is logged, and not the resource detail. If you really need to log the complete resource detail, add the following line to yourconf/boot/boot.propertiesfile:openidm.audit.logFullObjects=true
actionWhen an action is performed on an object.
You can optionally add a filter
triggers list that specifies the actions that are logged
for a particular trigger. For example, the following addition to the
audit.json file specifies that only
create and update actions are logged
for an activity that was triggered by a recon.
...
"filter" : {
"actions" : [
"create",
"update",
"delete",
"patch",
"action"
],
"triggers" : {
"recon" : [
"create",
"update"
]
}
},
"watchedFields" : [ ],
...
If a trigger is provided, but no actions are specified, nothing is
logged for that trigger. If a trigger is omitted, all actions are logged
for that trigger. In the current OpenIDM release, only the
recon trigger is implemented. For a list of reconciliation
actions that can be logged, see Section 12.13.5, "Synchronization Actions".
The watchedFields parameter enables you to specify
a list of fields that should be "watched" for changes. When the value of one
of the fields in this list changes, the change is logged in the audit log,
under the column "changedFields". Fields are listed in
comma-separated format, for example:
"watchedFields" : [ "email", "address" ]
The passwordFields parameter enables you to specify
a list of fields that are considered passwords. This parameter functions much
like the watchedFields parameter in that changes to these
field values are logged in the audit log, under the column
"changedFields". In addition, when a password field is
changed, the boolean "passwordChanged" flag is set to
true in the audit log. Fields are listed in
comma-separated format, for example:
"passwordFields" : [ "password", "username" ]
18.3.2. Log To List
The logTo list enables you to specify the format of the
log, where it is written, and various parameters for each log type.
logTypeThe format of the audit log. The log type can be one of the following:
csv- write to a comma-separated variable format file.The
"location"property indicates the name of the directory in which the file should be written, relative to the directory in which you installed OpenIDM.Audit file names are fixed,
access.csv,activity.csv, andrecon.csv.The
"recordDelimiter"property enables you to specify the separator between each record.repository- write to the OpenIDM repository.OpenIDM stores entries under the
/openidm/repo/audit/context. Such entries appear asaudit/access/_id,audit/activity/_id, andaudit/recon/_id, where the _id is the UUID of the entry, such as0419d364-1b3d-4e4f-b769-555c3ca098b0.In the OrientDB repository, OpenIDM stores log records in the
audit_access,audit_activity, andaudit_recontables.In a JDBC repository, OpenIDM stores records in the
auditaccess,auditactivity, andauditrecontables.The
"useForQueries"boolean property indicates whether the repository logger should be used to service reads and query requests. The value istrueby default. If"useForQueries"is set tofalse, the CSV file is used to service read and query requests.router- enables log events to be directed to any endpoint in the system, such assystem/scriptedsqlorendpoint/myhandler.As noted with previous instances of
logType, thelocationspecifies the relative directory, anduseForQueriesdefines whether the logger is used to service read and query requests.
ignoreLoggingFailuresIn certain situations, you might want to tolerate the inability to write to an audit log and prevent an exception from being thrown if the logging fails. For example, a request for configuration data might succeed, but fail to write to the activity log. Reasons for logging failures might include full disk (for a CSV logger) or repository unavailable (for a repository logger).
For each log type, you can specify that failure to write to the log should be ignored, and should not prevent the successful execution of the underlying request. To ignore logging failures for a specific log type, add the
"ignoreLoggingFailures"property to the log type configuration, and set its value totrue. This parameter is not included in the defaultaudit.jsonfile, and its value is considered to befalseby default for all log types.
You can specify a logTo location to the directory of your
choice. The example shown in Example 6.2, "Custom Audit Log Location"
shows how you can configure logTo to direct audit logs to
a user home directory.
To review the audit log, see Section 12.7, "Querying the Reconciliation Audit Log". You can review several different ways to run a RESTful GET on audit endpoints in that section.
18.3.2.1. Logging to a Remote System
You can configure logging to a remote system. OpenIDM exposes a useful
logging configuration in the openidm/samples/audit-sample
directory, in the conf/audit.json configuration file.
The logTo location stanza differs slightly from other
versions of that file, in that it includes the following excerpt:
...
"logTo" : [
...
},
{
"logType" : "router",
"location" : "system/auditdb",
"useForQueries" : true
}
...
To connect to an external JDBC database, you can use the
location property, which is configured with the
auditdb system.
You can then set up that connection
in the conf/provisioner.openicf-scriptedsql.json file.
In this particular example, that file starts with:
{
"name" : "auditdb",
You can configure remote access in that file, in the
configurationProperties stanza, in the
host and jdbcConnectionUrl properties.
Substitute the URL or IP address of the running remote MySQL server for
localhost:
...
},
"configurationProperties" : {
"host" : "localhost",
"port" : "3306",
"user" : "root",
"password" : "password",
"database" : "audit",
"autoCommit" : false,
"reloadScriptOnExecution" : false,
"jdbcDriver" : "com.mysql.jdbc.Driver",
"jdbcConnectionUrl" : "jdbc:mysql://localhost:3306/audit",
"jdbcUrlTemplate" : "jdbc:mysql://%h:%p/%d",
"createScriptFileName" : "&{launcher.project.location}/tools/CreateScript.groovy",
"testScriptFileName" : "&{launcher.project.location}/tools/TestScript.groovy",
"searchScriptFileName" : "&{launcher.project.location}/tools/SearchScript.groovy"
},
...
After you change the localhost entries, start OpenIDM
with the configuration associated with your audit configuration. The
following command is based on the
openidm/samples/audit-sample that comes with OpenIDM.
$ ./setup.sh -p samples/audit-sample
18.3.3. Exception Formatter
The exceptionFormatter property specifies the name and
type of file that handles the formatting and display of exceptions thrown by
the audit logger. Supported types include "text/javascript" and
"groovy".
The "file" property provides the path to the script file
that performs the formatting. The default exception formatter is
"bin/defaults/script/audit/stacktraceFormatter.js".
18.4. Generating Reports
When generating reports from audit logs, you can correlate information
from activity and reconciliation logs by matching the
"rootActionId" on entries in both logs.
The following MySQL query shows a join of the audit activity and audit reconciliation tables using root action ID values.
mysql> select distinct auditrecon.activity,auditrecon.sourceobjectid, auditrecon.targetobjectid,auditactivity.activitydate,auditrecon.status from auditactivity inner join auditrecon auditactivity.rootactionid=auditrecon.rootactionid where auditrecon.activity is not null group by auditrecon.sourceobjectid; +----------+--------------------------+----------------------+---------------------+---------+ | activity | sourceobjectid | targetobjectid | activitydate | status | +----------+--------------------------+----------------------+---------------------+---------+ | CREATE | system/xmlfile/account/1 | managed/user/juser | 2012-01-17T07:59:12 | SUCCESS | | CREATE | system/xmlfile/account/2 | managed/user/ajensen | 2012-01-17T07:59:12 | SUCCESS | | CREATE | system/xmlfile/account/3 | managed/user/bjensen | 2012-01-17T07:59:12 | SUCCESS | +----------+--------------------------+----------------------+---------------------+---------+ 3 rows in set (0.00 sec)
18.5. Filtering Data for Audits
With OpenIDM, you can collect large amounts of data on each transaction,
subdivided in several different eventTypes: access,
activity, reconciliation, and synchronization.
In some cases, you may want to minimize the amount of data collected with
one or more filters. As with other Section 18.3, "Audit Configuration"
options, you can do so in the conf/audit.json file,
based on the event type.
For example, the following entry under eventTypes refers
to the auditfilter.js file to script limits to
reconciliation information:
{
"eventTypes" : {
...
"recon" : {
"filter" : {
"script" : {
"type" : "text/javascript",
"file" : "auditfilter.js"
}
}
}
},
...
}
You can create a script for filtering. As it does for other scripts, OpenIDM
makes the create request and the context objects available to the script.
Before the audit record is written, it can be accessed as a
request.content object. For guidance, see
Section F.1, "Scripting Configuration".
For example, if you want to set up a script to log just the summary records
for mapping managed users in an LDAP data store, you could include the
following entry in the auditfilter.js script:
return request.content.entryType == 'summary' && request.content.mapping == 'systemLdapAccounts_managedUser'
The script must return true to include the log entry;
false to exclude it.
18.6. Purging Obsolete Audit Information
If audit records grow "excessively" large, any subsequent reconciliations and queries to audit tables may become "sluggish". In a deployment with limited resources, a lack of disk space may affect system performance.
You may have already run through the process of Section 18.5, "Filtering Data for Audits". If desired, you can also purge audit records with specific queries. Alternatively, you can also purge audit records older than a specific date, using timestamps.
OpenIDM includes a preconfigured purge script,
autoPurgeRecon.js in the
bin/defaults/script/audit directory.
This script purges audit log entries from the repositoyr only, not from the
corresponding CSV files.
You will also want to set up a schedule. For that purpose, you can find a
pre-configured schedule-autoPurgeAuditRecon.json file in
the samples/schedules subdirectory. You can configure
that file as desired and then copy it to the conf/
subdirectory for your deployment.
Examine the contents of the
schedule-autoPurgeAuditRecon.json file:
{
"enabled" : false,
"type" : "cron",
"schedule" : "0 0 */12 * * ?",
"persisted" : true,
"misfirePolicy" : "doNothing",
"invokeService" : "script",
"invokeContext" : {
"script" : {
"type" : "text/javascript",
"file" : "audit/autoPurgeAuditRecon.js",
"input" : {
"mappings" : [ "%" ],
"purgeType" : "purgeByNumOfReconsToKeep",
"numOfRecons" : 1,
"intervalUnit" : "minutes",
"intervalValue" : 1
}
}
}
}For more information on the schedule-related properties in this file, see Section 12.19, "Scheduling Synchronization".
Beyond scheduling, you may also be interested in the following parameters:
- input
Input information; the parameters below specify different kinds of input.
- mappings
An array of mappings to prune. Each element in the array can be either a string or an object.
Strings must contain the mapping(s) name and can use "%" as a wild card value that will be used in a LIKE condition.
Objects provide the ability to specify mapping(s) to include/exclude and must be of the form:
{ "include" : "mapping1", "exclude" : "mapping2"- purgeType
The type of purge to perform, Can be set to one of two values:
- purgeByNumOfReconsToKeep
Uses the
deleteFromAuditReconByNumOffunction and thenumOfReconsconfig variable.- purgeByExpired
Uses the
deleteFromAuditReconByExpiredfunction and the config variablesintervalUnitandintervalValue.
- num-of-recons
The number of recon summary records to keep for a given mapping, including all child records.
- intervalUnit
The type of time interval when using
purgeByExpired. Acceptable values include:minutes,hours, ordays.- intervalValue
The value of the time interval when using
purgeByExpired. Set to an integer value.
Once you have filtered and purged unneeded log information from the database, you can use log rotation services to limit the size of individual log files, and archive them as needed. Some log rotation services also support archiving to remote log servers. Details vary by the service and the operating system.
Chapter 19. Configuring OpenIDM to Work in a Cluster
To ensure availability of the identity management service, you can deploy multiple OpenIDM instances in a cluster. In a clustered environment, all instances point to the same external database. The database itself might or might not be clustered, depending on your particular availability strategy.
In a clustered environment, if one instance of OpenIDM becomes unavailable or does not check in with the cluster management service, another instance of OpenIDM detects this situation. If the unavailable instance did not complete one or more tasks, the available instance attempts to recover and rerun those tasks.
For example, if instance1 goes down while executing a
scheduled task, the cluster manager notifies the scheduler service that
instance1 is not available. The scheduler service then
attempts to clean up any jobs that instance1 was running
when it went down.
This chapter describes what changes you need to make to OpenIDM to configure multiple instances that point to a database.
The following diagram depicts a relatively simple cluster configuration.
You do need to do more than just set a unique value for
openidm.node.id

The default installation of OpenIDM is pre-configured to enable the cluster
service. The conf/cluster.json file includes the
"enabled" : true directive. All you need to do with
multiple instances of OpenIDM on the same subnet is modify each
boot.properties file. Pay attention to the
openidm.node.id and openidm.instance.type
properties in that file.
When you configure a cluster, check the configuration files for each instance
of OpenIDM. Except for boot.properties, the configuration
files should be identical.
19.1. Configuring an OpenIDM Instance as Part of a Cluster
Before you configure an instance of OpenIDM to work in a cluster, make sure
that OpenIDM is stopped. If someone had previously run that instance of
OpenIDM, delete the /path/to/openidm/felix-cache
directory.
All OpenIDM instances that form part of a single cluster must be configured to use the same repository type. Note that OrientDB is not supported in production environments.
To configure an individual OpenIDM instance as a part of a clustered deployment, follow these steps.
Configure OpenIDM for a MySQL repository, as described in Chapter 4, "Installing a Repository For Production" in the Installation Guide.
You need only import the data definition language script for OpenIDM into MySQL once, not repeatedly for each OpenIDM instance.
If you are using scheduled tasks, do configure persistent schedules to ensure that they fire only once across the cluster. For more information, see Section 13.2, "Configuring Persistent Schedules".
19.1.1. Edit the Boot Configuration
Each participating instance in a cluster must have its own unique node or
instance ID, and must be attributed a role in the cluster. Specify these
parameters in the conf/boot/boot.properties file of
each instance.
Specify a unique identifier for the instance, such as:
openidm.node.id=instance1On subsequent instances, the
openidm.node.idcan be set toinstance2,instance3, and so forth. You can choose any value, as long as it is unique within the cluster.In the cluster manager configuration file,
cluster.json, the clustering service is enabled by default with the following setting:"enabled": trueThe cluster manager specifies the OpenIDM instance ID from the
boot.propertiesfile as follows:"instanceId" : "&{openidm.node.id}",The scheduler uses the instance ID to claim and execute pending jobs. If multiple nodes have the same instance ID, problems will arise with multiple nodes attempting to execute the same scheduled jobs.
The cluster manager requires nodes to have unique IDs to ensure that it is able to detect when a node becomes unavailable.
Specify the instance type in the cluster.
On the primary instance, revise the following line in the
boot.propertiesfile as follows:openidm.instance.type=clustered-firstOn subsequent instances, revise the following line in the
boot.propertiesfile as follows:openidm.instance.type=clustered-additionalThe instance type is used during the setup process. When the primary node has been configured, additional nodes are bootstrapped with the security settings (keystore and truststore) of the primary node. After all nodes have been configured, they are all considered equal in the cluster, that is, there is no concept of a "master" node.
If no instance type is specified, the default value for this property is
openidm.instance.type=standalone, which indicates that the instance will not be part of a cluster.
19.1.2. Edit the Cluster Configuration
The cluster configuration file is
/path/to/openidm/conf/cluster.json. To enable a
cluster, you should not have to make changes to this file:
{
"instanceId" : "&{openidm.node.id}",
"instanceTimeout" : "30000",
"instanceRecoveryTimeout" : "30000",
"instanceCheckInInterval" : "5000",
"instanceCheckInOffset" : "0",
"enabled" : true
} The
instanceIdis set to the value ofopenidm.node.id, as configured in theconf/boot/boot.propertiesfile.instanceTimeoutspecifies the length of time (in milliseconds) that an instance can be "down" before the instance is considered to be in recovery mode.Recovery mode implies that the
instanceTimeoutof an instance has expired, and that another instance of OpenIDM in the cluster has detected that event. That second instance of OpenIDM is now attempting to recover the instance. The logic behind the recovery mechanism differs, depending on the component within OpenIDM. The scheduler component has well-defined recovery logic, and attempts to move any jobs that had been acquired by the unavailable instance back into the pool of waiting jobs.instanceRecoveryTimeoutspecifies the length of time (in milliseconds) that an instance can be in recovery mode before that instance is considered to be offline.The purpose of the recovery timeout is to prevent an instance from attempting to recover an unavailable instance indefinitely.
instanceCheckInIntervalspecifies the frequency (in milliseconds) that this instance checks in with the cluster manager to indicate that it is still online.instanceCheckInOffsetspecifies an offset (in milliseconds) for the checkin timing, per instance, when a number of instances in a cluster are started simultaneously.Specifying a checkin offset prevents a situation in which all the instances in a cluster check in at the same time, and place a strain on the cluster manager resource.
enablednotes whether or not the clustering service should be enabled when you start OpenIDM.
If the default cluster configuration is not suitable for your deployment,
edit the cluster.json file for each instance.
19.2. Managing Scheduled Tasks Across a Cluster
In a clustered environment, the scheduler service looks for pending jobs and handles them as follows:
Non-persistent (in-memory) jobs will fire on each node in the cluster.
Persistent scheduled jobs are picked up and executed by a single node in the cluster.
Jobs that are configured as persistent but not concurrent will fire only once across the cluster and will not fire again at the scheduled time, on the same node, or on a different node, until the current job has completed.
For example, a reconciliation operation that runs for longer than the time between scheduled intervals will not trigger a duplicate job while it is still running.
The order in which nodes in a cluster claim jobs is random. If a node goes down, the cluster manager will automatically fail over jobs that have been claimed by that node, but not yet started. For example, if node A claims a job but does not start it, and then goes down, node B can reclaim that job. If node A claims and job, starts it, and then goes down, the job cannot be reclaimed by another node in the cluster. That specific job will never be completed. Instance B can claim the next iteration (or scheduled occurrence) of the job.
Note that this failover behavior is different to the behavior in OpenIDM 2.1.0, in which an unavailable node would need to come up again to free a job that it had already claimed.
If a number of changes are made as a result of a LiveSync action, a single instance will claim the action, and will process all the changes related to that action.
To prevent a specific instance from claiming pending jobs,
"executePersistentSchedules" should be set to
false in the scheduler configuration for that instance.
Because all nodes in a cluster read their configuration from a single
repository you must use token substitution, via the
boot.properties file, to define a specific scheduler
configuration for each node.
So, if you want certain nodes to participate in processing clustered
schedules (such as LiveSync) and other nodes not to participate, you can
specify this information in the conf/boot/boot.properties
file of each node. For example, to prevent a node from participating, add the
following line to the boot.properties file of that node:
execute.clustered.schedules=false
The initial scheduler configuration that is loaded into the repository must
point to the relevant property in boot.properties. So,
the initial scheduler.json file would include a token
such as the following:
{
"executePersistentSchedules" : "&{execute.clustered.schedules}",
}
You do not want to allow changes to a configuration file to overwrite the global configuration in the repository. To prevent this, start each instance of OpenIDM and then disable the file-based configuration view in a clustered deployment. For more information, see Section 6.3.2, "Disabling Automatic Configuration Updates".
19.3. Managing Nodes Over REST
You can manage clusters and individual nodes over the REST interface, at the
URL https://localhost:8443/openidm/cluster/. The following
sample REST commands demonstrate the cluster information that is available
over REST.
The following REST request displays the nodes configured in the cluster, and their status.
$ curl \
--cacert self-signed.crt \
--header "X-OpenIDM-Username: openidm-admin" \
--header "X-OpenIDM-Password: openidm-admin" \
--request GET \
"https://localhost:8443/openidm/cluster"
{
"results": [
{
"shutdown": "",
"startup": "2013-10-28T11:48:29.026+02:00",
"instanceId": "instance1",
"state": "running"
},
{
"shutdown": "",
"startup": "2013-10-28T11:51:31.639+02:00",
"instanceId": "instance2",
"state": "running"
}
]
} To check the status of a specific node, include its instance ID in the URL, for example:
$ curl \
--cacert self-signed.crt \
--header "X-OpenIDM-Username: openidm-admin" \
--header "X-OpenIDM-Password: openidm-admin" \
--request GET \
"https://localhost:8443/openidm/cluster/instance1"
{
"results": {
"shutdown": "",
"startup": "2013-10-28T11:48:29.026+02:00",
"instanceId": "instance1",
"state": "running"
}
} Chapter 20. Sending Email
This chapter shows you how to configure the outbound email service, so that you can send email through OpenIDM either by script or through the REST API.
The outbound email service relies on a configuration object to identify the
email account used to send messages. A sample configuration is provided in
/path/to/openidm/samples/misc/external.email.json. To
set up the external email service, follow these steps.
Shut down OpenIDM.
Copy the sample configuration to the
confdirectory.$ cd /path/to/openidm/ $ cp samples/misc/external.email.json conf/
Edit
external.email.jsonto reflect the account that is used to send messages.{ "host" : "smtp.example.com", "port" : "25", "username" : "openidm", "password" : "secret12", "mail.smtp.auth" : "true", "mail.smtp.starttls.enable" : "true" }OpenIDM encrypts the password you provide.
Follow these hints when editing the configuration.
"host"SMTP server host name or IP address. This can be
"localhost"if the server is on the same system as OpenIDM."port"SMTP server port number such as 25, or 587
"username"Mail account user name needed when
"mail.smtp.auth" : "true""password"Mail account user password needed when
"mail.smtp.auth" : "true""mail.smtp.auth"If
"true", use SMTP authentication"mail.smtp.starttls.enable"If
"true", use TLS"from"Optional default
From:address
Start up OpenIDM.
Check that the email service is active.
-> scr list ... [ 6] [active ] org.forgerock.openidm.external.email ...
Note
The REST call described in the section that follows may use the local SMTP server. For a "quick and dirty" test, you could use the default port, disable authentication, and TLS:
"host" : "localhost", "port" : "25, "username" : "xxxxxx", "password" : "xxxxxx", "mail.smtp.auth" : "false", "mail.smtp.starttls.enable" : "false"
20.1. Sending Mail Over REST
Although you are more likely to send mail from a script in production,
you can send email using the REST API by sending an HTTP POST to
/openidm/external/email in order to test that your
configuration works. You pass the message parameters as POST parameters,
URL encoding the content as necessary.
The following example sends a test email using the REST API.
$ curl \
--cacert self-signed.crt \
--header "Content-Type: application/json" \
--header "X-OpenIDM-Username: openidm-admin" \
--header "X-OpenIDM-Password: openidm-admin" \
--request POST \
--data '{"from":"openidm@example.com",
"to":"admin@example.com",
"subject":"Test",
"body":"Test"}' \
"https://localhost:8443/openidm/external/email?_action=send"20.2. Sending Mail From a Script
You can send email by using the resource API functions with the
external/email context, as in the following example, where
params is an object that contains the POST parameters. For
more information on the resource API functions, see
Section F.3, "Function Reference".
var params = new Object();
params.from = "openidm@example.com";
params.to = "admin@example.com";
params.cc = "wally@example.com,dilbert@example.com";
params.subject = "OpenIDM recon report";
params.type = "text/html";
params.body = "<html><body><p>Recon report follows...</p></body></html>";
openidm.action("external/email", "send", params);OpenIDM supports the following POST parameters.
fromSender mail address
toComma-separated list of recipient mail addresses
ccOptional comma-separated list of copy recipient mail addresses
bccOptional comma-separated list of blind copy recipient mail addresses
subjectEmail subject
bodyEmail body text
typeOptional MIME type. One of
"text/plain","text/html", or"text/xml".
Chapter 21. Accessing External REST Services
You can access remote REST services by using the
openidm/external/rest endpoint, or by specifying the
external/rest resource in your scripts. Note that this
service is not intended as a full connector to synchronize or reconcile
identity data, but as a way to make dynamic HTTP calls as part of the OpenIDM
logic. For more declarative and encapsulated interaction with remote REST
services, and for synchronization or reconciliation operations, you should
rather use the scripted REST connector.
An external REST call via a script might look something like the following:
openidm.action("external/rest", "call", params);
The "call" parameter specifies the action name to be used
for this invocation, and is the standard method signature for the
openidm.action method in OpenIDM 3.1.
An external REST call over REST might look something like the following:
$ curl \
--cacert self-signed.crt \
--header "Content-Type: application/json" \
--header "X-OpenIDM-Username: openidm-admin" \
--header "X-OpenIDM-Password: openidm-admin" \
--request POST \
--data '{
"url": "http://www.december.com/html/demo/hello.html",
"method": "GET",
"detectResultFormat": false,
"headers": { "custom-header": "custom-header-value" }
}' \
"https://localhost:8443/openidm/external/rest?_action=call"
{
"body": "<!DOCTYPE html PUBLIC \"-//IETF//DTD HTML 2.0//EN\">\r\n
<html>\r\n
<head>\r\n
<title>\r\n Hello World Demonstration Document\r\n </title>\r\n
</head>\r\n
<body>\r\n
<h1>\r\n Hello, World!\r\n </h1>
…
</html>\r\n",
"headers": {
"Server": "Apache",
"ETag": "\"299-4175ff09d1140\"",
"Date": "Mon, 28 Jul 2014 08:21:25 GMT",
"Content-Length": "665",
"Last-Modified": "Thu, 29 Jun 2006 17:05:33 GMT",
"Keep-Alive": "timeout=15, max=100",
"Content-Type": "text/html",
"Connection": "Keep-Alive",
"Accept-Ranges": "bytes"
}
}Note that attributes in the POST body do not have underscore prefixes. This is different to the OpenIDM 2.1 implementation, in which underscores were required.
HTTP 2xx responses are represented as regular, successful responses to the
invocation. All other responses, including redirections, are returned as
exceptions, with the HTTP status code in the exception
"code", and the response body in the exception
"detail", within the "content" element.
21.1. Invocation Parameters
The following parameters are passed in the resource API parameters map. These parameters can override the static configuration (if present) on a per-invocation basis.
url. The target URL to invoke, in string format.method. The HTTP action to invoke, in string format.Possible actions include
"POST","GET","PUT","DELETE","HEAD"and"OPTIONS".authenticate. The authentication type, and the details with which to authenticate.OpenIDM 3.1 supports the following authentication types:
basicauthentication, with a username and password, for example:"authenticate" : {"type": "basic", "user" : "john", "password" : "Passw0rd"}bearerauthentication, which takes an OAuthtoken, instead of a username and password, for example:"authenticate" : {"type": "bearer", "token" : "ya29.iQDWKpn8AHy09p....."}
If no
authenticateparameter is specified, no authentication is used.headers. The HTTP headers to set, in a map format from string (header-name) to string (header-value). For example,Accept-Language: en-US.content-type. The media type of the data that is sent, for exampleContent-Type: application/jsonorContent-Type: application/xml.body. The body/resource representation to send (for PUT and POST operations), in string format.detectResultFormat. Specifies whether JSON or non-JSON results are expected. Boolean, defaults totrue.For all responses other than 2xx, the result is returned as an exception, with the HTTP code in the exception
"code". Any details are returned in the exception"detail"under the"content"element. For example:$ curl \ --cacert self-signed.crt \ --header "Content-Type: application/json" \ --header "X-OpenIDM-Username: openidm-admin" \ --header "X-OpenIDM-Password: openidm-admin" \ --request POST \ --data '{ "url":"http://december.com/non_existing_page", "method":"GET", "content-type":"application/xml" }' \ "https://localhost:8443/openidm/external/rest?_action=call" { "detail": { "content": "<html><head><title>December Communications, Inc. Missing Page</title> (...) </html>\n" }, "message": "Error while processing GET request: Not Found", "reason": "Not Found", "code": 404 }For more information about non-JSON results, see Section 21.2, "Support for Non-JSON Responses".
21.2. Support for Non-JSON Responses
The external REST service supports any arbitrary payload (currently in
stringified format). The "detectResultFormat" parameter
specifies whether the server should attempt to detect the response format
and, if the format is known, parse that format.
Currently, the only known response format is JSON. So, if the service that is
requested returns results in JSON format, and
"detectResultFormat" is set to true
(the default), the response from the call to external/rest will be the
identical JSON data that was returned from the remote system. This enables
JSON clients to interact with the external REST service with minimal changes
to account for in the response.
If the service returns results in JSON format and
"detectResultFormat" is set to false,
results are represented as a stringified entry.
If "detectResultFormat" is set to true
and the mime type is not recognized (currently any type other than JSON) the
result is the same as if "detectResultFormat" were set to
false. Set "detectResultFormat" to
false if the remote system returns non-JSON data, or if
you require details in addition to the literal JSON response body (for
example, if you need to access a specific response header, such as a cookie).
The representation as parsed JSON differs from the stringified format as follows:
The parsed JSON representation returns the message payload directly in the body, with no wrapper. Currently, for parsed JSON responses, additional meta-data is not returned in the body. For example:
$ curl \ --cacert self-signed.crt \ --header "Content-Type: application/json" \ --header "X-OpenIDM-Username: openidm-admin" \ --header "X-OpenIDM-Password: openidm-admin" \ --request POST \ --data '{ "url": "http://localhost:8080/openidm/info/ping", "method": "GET", "detectResultFormat": true, "headers": { "X-OpenIDM-Username": "anonymous", "X-OpenIDM-Password": "anonymous" } }' \ "https://localhost:8443/openidm/external/rest?_action=call" { "shortDesc": "OpenIDM ready", "state": "ACTIVE_READY" }The stringified format includes a wrapper that represents other meta-data, such as returned headers. For example:
$ curl \ --cacert self-signed.crt \ --header "Content-Type: application/json" \ --header "X-OpenIDM-Username: openidm-admin" \ --header "X-OpenIDM-Password: openidm-admin" \ --request POST \ --data '{ "url": "http://localhost:8080/openidm/info/ping", "method": "GET", "detectResultFormat": false, "headers": { "X-OpenIDM-Username": "anonymous", "X-OpenIDM-Password": "anonymous" } }' \ "https://localhost:8443/openidm/external/rest?_action=call" { "body": "{\"state\":\"ACTIVE_READY\",\"shortDesc\":\"OpenIDM ready\"}", "headers": { "Cache-Control": "no-cache", "Server": "Jetty(8.y.z-SNAPSHOT)", "Content-Type": "application/json;charset=UTF-8", "Set-Cookie": "session-jwt=eyAiYWxn...-cQ.3QT4zT4ZZTj8LH8Oo_zx3w;Path=/", "Expires": "Thu, 01 Jan 1970 00:00:00 GMT", "Content-Length": "52", "Vary": "Accept-Encoding, User-Agent" } }A sample non-JSON response would be similar:
$ curl \ --cacert self-signed.crt \ --header "Content-Type: application/json" \ --header "X-OpenIDM-Username: openidm-admin" \ --header "X-OpenIDM-Password: openidm-admin" \ --request POST \ --data '{ "url":"http://december.com", "method":"GET", "content-type":"application/xml", "detectResultFormat":false }' \ "https://localhost:8443/openidm/external/rest?_action=call" { "body": "<!DOCTYPE HTML PUBLIC \"-//W3C//DTD HTML 4.01 Transitional//EN\" \"http://www.w3.org/TR/html4/loose.dtd\"> \n <html><head><title>December Communications, Inc. december.com</title>\n <meta http-equiv=\"Content-Type\" content=\"text/html; charset=iso-8859-1\"> ..." "headers": { "Server": "Apache", "ETag": "\"4c3c-4f06c64da3980\"", "Date": "Mon, 28 Jul 2014 19:16:33 GMT", "Content-Length": "19516", "Last-Modified": "Mon, 20 Jan 2014 20:04:06 GMT", "Keep-Alive": "timeout=15, max=100", "Content-Type": "text/html", "Connection": "Keep-Alive", "Accept-Ranges": "bytes" } }
Chapter 22. OpenIDM Project Best Practices
This chapter lists points to check when implementing an identity management solution with OpenIDM.
22.1. Implementation Phases
Any identity management project should follow a set of well defined phases, where each phase defines discrete deliverables. The phases take the project from initiation to finally going live with a tested solution.
22.1.1. Initiation
The project's initiation phase involves identifying and gathering project background, requirements, and goals at a high level. The deliverable for this phase is a statement of work or a mission statement.
22.1.2. Definition
In the definition phase, you gather more detailed information on existing systems, determine how to integrate, describe account schemas, procedures, and other information relevant to the OpenIDM deployment. The deliverable for this phase is one or more documents that define detailed requirements for the project, and that cover project definition, the business case, use cases to solve, and functional specifications.
The definition phase should capture at least the following.
- User Administration and Management
Procedures for managing users and accounts, who manages users, what processes look like for joiners, movers and leavers, and what is required of OpenIDM to manage users
- Password Management and Password Synchronization
Procedures for managing account passwords, password policies, who manages passwords, and what is required of OpenIDM to manage passwords
- Security Policy
What security policies defines for users, accounts, passwords, and access control
- Target Systems
Target systems and resources with which OpenIDM must integrate. Information such as schema, attribute mappings and attribute transformation flow, credentials and other integration specific information.
- Entitlement Management
Procedures to manage user access to resources, individual entitlements, grouping provisioning activities into encapsulated concepts such as roles and groups
- Synchronization and Data Flow
Detailed outlines showing how identity information flows from authoritative sources to target systems, attribute transformations required
- Interfaces
How to secure the REST, user and file-based interfaces, and to secure the communication protocols involved
- Auditing and Reporting
Procedures for auditing and reporting, including who takes responsibility for auditing and reporting, and what information is aggregated and reported. Characteristics of reporting engines provided, or definition of the reporting engine to be integrated.
- Technical Requirements
Other technical requirements for the solution such as how to maintain the solution in terms of monitoring, patch management, availability, backup, restore and recovery process. This includes any other components leveraged such as a ConnectorServer and plug-ins for password synchronization on Active Directory, or OpenDJ.
22.1.3. Design
This phase focuses on solution design including on OpenIDM and other components. The deliverables for this phase are the architecture and design documents, and also success criteria with detailed descriptions and test cases to verify when project goals have been met.
22.1.4. Build
This phase builds and tests the solution prior to moving the solution into production.
22.1.5. Production
This phase deploys the solution into production until an application steady state is reached and maintenance routines and procedures can be applied.
Chapter 23. Troubleshooting
When things are not working check this chapter for tips and answers.
23.1. OpenIDM Stopped in Background
When you start OpenIDM in the background without having disabled the text console, the job can stop immediately after startup.
$ ./startup.sh & [2] 346 $ ./startup.sh Using OPENIDM_HOME: /path/to/openidm Using OPENIDM_OPTS: -Xmx1024m -Xms1024m Using LOGGING_CONFIG: -Djava.util.logging.config.file=/path/to/openidm/conf/logging.properties Using boot properties at /path/to/openidm/conf/boot/boot.properties -> [2]+ Stopped ./startup.sh
To resolve this problem, make sure you remove
openidm/bundle/org.apache.felix.shell.tui-1.4.1.jar
before starting OpenIDM, and also remove Felix cache files in
openidm/felix-cache/.
23.2. Internal Server Error During Reconciliation or Synchronization
You might see an error message such as the following returned from reconciliation or synchronization.
{
"error": "Conflict",
"description": "Internal Server Error:
org.forgerock.openidm.sync.SynchronizationException:
Cowardly refusing to perform reconciliation with an
empty source object set: Cowardly refusing to perform
reconciliation with an empty source object set"
}This error can be misleading. This usually means the connector is not able to communicate with the target source.
Check the settings for your connector. For example, with the XML connector you get this error if the filename for the source is invalid. With the LDAP connector, you can get this error if your connector cannot contact the target LDAP server.
23.3. The scr list Command Shows Sync Service As Unsatisfied
You might encounter this message in the logs.
WARNING: Loading configuration file /path/to/openidm/conf/sync.json failed
org.forgerock.openidm.config.InvalidException:
Configuration for org.forgerock.openidm.sync could not be parsed and may not
be valid JSON : Unexpected character ('}' (code 125)): expected a value
at [Source: java.io.StringReader@3951f910; line: 24, column: 6]
at org.forgerock.openidm.config.crypto.ConfigCrypto.parse...
at org.forgerock.openidm.config.crypto.ConfigCrypto.encrypt...
at org.forgerock.openidm.config.installer.JSONConfigInstaller.setConfig...This indicates a syntax error in
openidm/conf/sync.json. After fixing your configuration,
change to the /path/to/openidm/ directory, and use the
cli.sh validate command to check that your configuration
files are valid.
$ cd /path/to/openidm ; ./cli.sh validate Using boot properties at /path/to/openidm/conf/boot/boot.properties ................................................................... [Validating] Load JSON configuration files from: [Validating] /path/to/openidm/conf [Validating] audit.json .................................. SUCCESS [Validating] authentication.json ......................... SUCCESS [Validating] managed.json ................................ SUCCESS [Validating] provisioner.openicf-xml.json ................ SUCCESS [Validating] repo.orientdb.json .......................... SUCCESS [Validating] router.json ................................. SUCCESS [Validating] scheduler-reconcile_systemXmlAccounts_managedUser.json SUCCESS [Validating] sync.json ................................... SUCCESS
23.4. JSON Parsing Error
You might encounter this error message in the logs.
"Configuration for org.forgerock.openidm.provisioner.openicf could not be
parsed and may not be valid JSON : Unexpected character ('}' (code 125)):
was expecting double-quote to start field name"The error message usually indicates the precise point where the
JSON file has the syntax problem. The error above was caused by an extra
comma in the JSON file, {"attributeName":{},{},}. The
second comma is redundant.
The situation usually results in the service that the specific JSON file
configures being left in the unsatisfied state.
After fixing your configuration, change to the
/path/to/openidm/ directory, and use the cli.sh
validate command to check that your configuration files are
valid.
23.5. System Not Available
OpenIDM throws the following error as a result of a reconciliation where the source systems configuration can not be found.
{
"error": "Conflict",
"description": "Internal Server Error:
org.forgerock.openidm.sync.SynchronizationException:
org.forgerock.openidm.objset.ObjectSetException:
System: system/HR/account is not available.:
org.forgerock.openidm.objset.ObjectSetException:
System: system/HR/account is not available.:
System: system/HR/account is not available."
}This error occurs when the "name" property value
in provisioner.resource.json
is changed from HR to something else.
The same error occurs when a provisioner configuration fails to load due to misconfiguration, or when the path to the data file for a CSV or XML connector is incorrectly set.
23.6. Bad Connector Host Reference in Provisioner Configuration
You might see the following error when a provisioner configuration loads.
Wait for meta data for config org.forgerock.openidm.provisioner.openicf-scriptedsql
In this case the configuration fails to load because information is
missing. One possible cause is an incorrect value for
connectorHostRef in the provisioner configuration
file.
For local Java connector servers, the following rules apply.
If the connector .jar is installed as a bundle under
openidm/bundle, then the value must be"connectorHostRef" : "osgi:service/org.forgerock.openicf.framework.api.osgi.ConnectorManager",.If the connector .jar is installed as a connector under
openidm/connectors, then the value must be"connectorHostRef" : "#LOCAL",.
23.7. Missing Name Attribute
In this case, the situation in the audit recon log shows "NULL".
A missing name attribute error, followed by an
IllegalArgumentException, points to misconfiguration of
the correlation rule, with the correlation query pointing to the external
system. Such queries usually reference the "name" field which, if empty,
leads to the error below.
Jan 20, 2012 1:59:58 PM org.forgerock.openidm.provisioner.openicf.commons.AttributeInfoHelper build SEVERE: Failed to build name attribute out of [null] Jan 20, 2012 1:59:58 PM org.forgerock.openidm.provisioner.openicf.impl.OpenICFProvisionerService query SEVERE: Operation [query, system/ad/account] failed with Exception on system object: java.lang.IllegalArgumentException: Attribute value must be an instance of String. Jan 20, 2012 1:59:58 PM org.forgerock.openidm.router.JsonResourceRouterService handle WARNING: JSON resource exception org.forgerock.json.resource.JsonResourceException: IllegalArgumentException at org.forgerock.openidm.provisioner....OpenICFProvisionerService.query... at org.forgerock.openidm.provisioner.....OpenICFProvisionerService.handle... at org.forgerock.openidm.provisioner.impl.SystemObjectSetService.handle... at org.forgerock.json.resource.JsonResourceRouter.handle...
Check your correlationQuery. Another symptom of a
broken correlation query is that the audit recon log shows a situation
of "NULL", and no onCreate, onUpdate or similar scripts are executed.
Chapter 24. Advanced Configuration
OpenIDM is a highly customizable, extensible identity management system. For the most part, the customization and configuration required for a "typical" deployment is described earlier in this book. This chapter describes advanced configuration methods that would usually not be required in a deployment, but that might assist in situations that require a high level of customization.
24.1. Advanced Startup Configuration
A customizable startup configuration file (named
launcher.json) enables you to specify how the OSGi
Framework is started.
You specify the startup configuration file with the -c
option of the startup command.
Unless you are working with a highly customized deployment, you should not modify the default framework configuration.
If no configuration file is specified, the default configuration
(defined in /path/to/openidm/bin/launcher.json) is
used. The following command starts OpenIDM with an alternative startup
configuration file:
$ ./startup.sh -c /Users/admin/openidm/bin/launcher.json
You can modify the default startup configuration file to specify a different startup configuration.
The customizable properties of the default startup configuration file are as follows:
"location" : "bundle"- resolves to the install location. You can also load OpenIDM from a specified zip file ("location" : "openidm.zip") or you can install a single jar file ("location" : "openidm-system-2.2.jar")."includes" : "**/openidm-system-*.jar"- the specified folder is scanned for jar files relating to the system startup. If the value of"includes"is*.jar, you must specifically exclude any jars in the bundle that you do not want to install, by setting the"excludes"property."start-level" : 1- specifies a start level for the jar files identified previously."action" : "install.start"- a period-separated list of actions to be taken on the jar files. Values can be one or more of"install.start.update.uninstall"."config.properties"- takes either a path to a configuration file (relative to the project location) or a list of configuration properties and their values. The list must be in the format"string":"string", for example:"config.properties" : { "property" : "value" },"system.properties"- takes either a path to asystem.propertiesfile (relative to the project location) or a list of system properties and their values. The list must be in the format"string":"string", for example:"system.properties" : { "property" : "value" },"boot.properties"- takes either a path to aboot.propertiesfile (relative to the project location) or a list of boot properties and their values.The list must be in the format"string":object, for example:"boot.properties" : { "property" : true },
Appendix A. File Layout
When you unpack and start OpenIDM 3.1, you create the following files and directories. Note that the precise paths will depend on the install, project, and working directories that you have selected during startup. For more information, see Section 2.2, "Specifying the OpenIDM Startup Configuration".
-
openidm/audit/ OpenIDM audit log directory default location, created at run time, as configured in
openidm/conf/audit.jsonopenidm/audit/access.csvDefault OpenIDM access audit log
openidm/audit/activity.csvDefault OpenIDM activity audit log
openidm/audit/recon.csvDefault OpenIDM reconciliation audit log
openidm/audit/sync.csvDefault OpenIDM synchronization audit log
openidm/bin/OpenIDM core libraries and scripts
openidm/bin/create-openidm-logrotate.shScript to create an
openidmloglog rotation scheduler for inclusion under/etc/logrotate.d/openidm/bin/create-openidm-rc.shScript to create an
openidmresource definition file for inclusion under/etc/init.d/openidm/bin/defaults/scriptDefault scripts required to run specific services. In general, you should not modify these scripts. Instead, add customized scripts to the
openidm/scriptfolder.openidm/bin/defaults/script/audit/*.jsScripts related to the audit logging service.
openidm/bin/defaults/script/auth/*.jsScripts related to the authentication mechanism, described in the Section 15.2, "Authentication".
openidm/bin/defaults/script/compensate.jsScript that provides the compensation functionality to assure or roll back reconciliation operations. For more information, see Section 12.12, "Configuring Synchronization Failure Compensation".
openidm/bin/defaults/script/info/crypto.jsA wrapper script for the
openidm.encryptfunction.openidm/bin/defaults/script/info/login.jsProvides information about the current OpenIDM session.
openidm/bin/defaults/script/info/ping.jsProvides basic information about the health of an OpenIDM system
openidm/bin/defaults/script/lib/*Internal libraries required by certain OpenIDM javascripts.
openidm/bin/defaults/script/linkedView.jsA script that returns all the records linked to a specific resource, used in reconciliation.
openidm/bin/defaults/script/policy.jsDefines each policy and specifies how policy validation is performed
openidm/bin/defaults/script/policyFilter.jsEnforces policy validation
openidm/bin/defaults/script/roles/*.jsScripts to provide the default roles functionality. For more information, see Section 8.3, "Configuring Custom Roles".
openidm/bin/defaults/script/router-authz.jsProvides the functions that enforce access rules
openidm/bin/defaults/script/ui/*Scripts required by the UI
openidm/bin/defaults/script/workflow/*Default workflow scripts
openidm/bin/felix.jar,openidm/bin/openidm.jar,openidm/bin/org.apache.felix.gogo.runtime-0.10.0.jar,openidm/bin/org.apache.felix.gogo.shell-0.10.0.jarFiles relating to the Apache Felix OSGi framework
openidm/bin/launcher.bat,openidm/bin/launcher.jar,openidm/bin/launcher.jsonFiles relating to the startup configuration
openidm/bin/LICENSE.TXT,openidm/bin/NOTICE.TXTFiles relating to the Apache Software License
openidm/bin/install-service.bat,openidm/bin/MonitorService.bat,openidm/bin/prunmgr.exe,openidm/bin/amd64/prunsrv.exe,openidm/bin/i386/prunsrv.exe,openidm/bin/ia64/prunsrv.exeFiles required by the user interface to monitor and configure installed services
openidm/bin/startup/,openidm/bin/startup/OS X - Run OpenIDM In Background.command,openidm/bin/startup/OS X - Run OpenIDM In Terminal Window.command,openidm/bin/startup/OS X - Stop OpenIDM.commandClickable commands for Mac OS X
openidm/bin/workflow/Files related to the Activiti workflow engine
openidm/bundle/OSGi bundles and modules required by OpenIDM. Upgrade can install new and upgraded bundles here.
openidm/cli.bat,openidm/cli.shManagement commands for operations such as validating configuration files
openidm/conf/OpenIDM configuration files, including .properties files and JSON files. You can also access JSON views through the REST interface.
openidm/conf/audit.jsonAudit event publisher configuration file
openidm/conf/authentication.jsonAuthentication configuration file for access to the REST API
openidm/conf/boot/boot.propertiesOpenIDM bootstrap properties
openidm/conf/cluster.jsonConfiguration file to enable use of this OpenIDM instance in a cluster
openidm/conf/config.propertiesFelix and OSGi bundle configuration properties
openidm/conf/endpoint-*.jsonEndpoint configuration files required by the UI for the default workflows
openidm/conf/info-*.jsonConfiguration files for the info service, described in Section 2.3, "Obtaining Information About an OpenIDM Instance".
openidm/conf/jetty.xmlJetty configuration controlling access to the REST interface
openidm/conf/logging.propertiesOpenIDM log configuration properties
openidm/conf/managed.jsonManaged object configuration file
openidm/conf/policy.jsonDefault policy configuration
openidm/conf/process-access.jsonWorkflow access configuration
openidm/conf/repo.orientdb.jsonOrientDB internal repository configuration file
openidm/conf/router.jsonRouter service configuration file
openidm/conf/scheduler.jsonScheduler service configuration
openidm/conf/script.jsonScript configuration file with default script directories.
openidm/conf/servletfilter-*.jsonSample servlet filter configuration, described in Section H.3, "Registering Additional Servlet Filters".
openidm/conf/system.propertiesSystem configuration properties used when starting OpenIDM services
openidm/conf/ui-configuration.jsonMain configuration file for the browser-based user interface
openidm/conf/ui-countries.jsonConfigurable list of countries available when registering users in the user interface
openidm/conf/ui-secquestions.jsonConfigurable list of security questions available when registering users in the user interface
openidm/conf/ui-themeconfig.jsonCustomizable UI theme configuration file
openidm/conf/ui.context-enduser.jsonConfiguration file that specifies the context root of the UI,
/openidmuiby defaultopenidm/conf/workflow.jsonConfiguration of the Activiti workflow engine
openidm/connectors/OpenICF connector libraries. OSGi enabled connector libraries can also be stored in
openidm/bundle/.openidm/db/Internal repository files, including OrientDB files and sample repository configurations for JDBC-based repositories.
openidm/db/db2Sample repository configuration and data definition language script for DB2 database.
openidm/db/h2Sample repository configuration and data definition language script for H2 database, supported for Activiti engine.
openidm/db/mssqlSample repository configuration, data definition language script, and
bndfile (for creating OSGi bundle) for configuring an MS SQL repository. For more information, see Section 4.2, "To Set Up OpenIDM With MS SQL" in the Installation Guide.openidm/db/mysqlSample repository configuration and data definition language scripts for configuring a MySQL repository. For more information, see Section 4.1, "To Set Up OpenIDM With MySQL" in the Installation Guide.
openidm/db/oracleSample repository configuration and data definition language script for configuring an OracleDB repository. For more information, see Section 4.3, "To Set Up OpenIDM With Oracle Database" in the Installation Guide.
openidm/db/postgresqlSample repository configuration, data definition language script, and schema optimization scripts for configuring a PostgreSQL repository. For more information, see Section 4.4, "To Set Up OpenIDM With PostgreSQL" in the Installation Guide.
openidm/db/utilFiles required for support of OrientDB Studio.
openidm/felix-cache/Bundle cache directory created when the Felix framework is started
openidm/libLocation in which third-party libraries (required, for example, by custom connectors) should be placed.
openidm/logs/OpenIDM service log directory
openidm/logs/openidm0.log.*OpenIDM service log files as configured in
openidm/conf/logging.propertiesopenidm/samples/OpenIDM sample configurations
openidm/samples/audit-sample/Sample demonstrates configuring a MySQL database to receive the audit logs for access, activity, and recon.
openidm/samples/customendpoint/Sample custom endpoint configuration. For more information, see Section 6.6, "Adding Custom Endpoints".
openidm/samples/infoservice/Sample that shows how to use the configurable information service. For more information, see Section 2.3, "Obtaining Information About an OpenIDM Instance".
openidm/samples/misc/Sample configuration files
openidm/samples/provisioners/Sample connector configuration files
openidm/samples/sample1/XML file connector sample
openidm/samples/sample2/One-way reconciliation sample using OpenDJ and LDAP connector
openidm/samples/sample2b/Bi-directional reconciliation sample using OpenDJ and LDAP connector
openidm/samples/sample2c/Sample using LDAP connector to synchronize LDAP group membership
openidm/samples/sample2d/>Sample using LDAP connector to synchronize LDAP groups
openidm/samples/sample3/Scripted SQL connector sample for MySQL
openidm/samples/sample4/Sample demonstrating synchronization between two external resources (CSV and XML) without using the OpenIDM internal repository
openidm/samples/sample5/LDAP to OpenIDM to Active Directory attribute flow sample using XML resources rather than actual directories
openidm/samples/sample5b/Similar to sample 5 but also configures a compensation script that attempts to ensure either all the synchronization or none of the synchronization is performed
openidm/samples/sample6/LiveSync and reconciliation sample for use with two LDAP servers, using Active Directory and OpenDJ
openidm/samples/sample7/Sample exposing identities with a SCIM-line schema
openidm/samples/sample8/Sample demonstrating logging in scripts
openidm/samples/sample9/Sample demonstrating how to perform an asynchronous action from a reconciliation
openidm/samples/schedules/Sample schedule configuration files
openidm/samples/security/Sample keystore, truststore, and certificates
openidm/samples/syncfailure/Sample showing the sync failure handler for liveSync
openidm/samples/taskscanner/Sample sunset scanning task. For more information, see Section 13.5, "Scanning Data to Trigger Tasks".
openidm/samples/workflow/Typical use case of a workflow for provisioning
openidm/samples/usecase/*Several workflow samples to demonstrate common use cases
openidm/script/OpenIDM location for script files referenced in the configuration
openidm/script/access.jsDefault authorization policy script
openidm/security/OpenIDM security configuration, keystore, and truststore
openidm/shutdown.shScript to shutdown OpenIDM services based on the process identifier
openidm/startup.batScript to start OpenIDM services on Windows
openidm/startup.shScript to start OpenIDM services on UNIX
openidm/ui/default/*Default OpenIDM graphical UI files
openidm/ui/extension/*Location for any UI customizations
openidm/workflow/OpenIDM location for BPMN 2.0 workflows and .bar files
Appendix B. Ports Used
By default, OpenIDM 3.1 listens on the following ports
(specified in the file
/path/to/openidm/conf/boot/boot.properties):
8080HTTP access to the REST API, requiring OpenIDM authentication. This port is not secure, exposing clear text passwords and all data that is not encrypted. This port is therefore not suitable for production use.
8443HTTPS access to the REST API, requiring OpenIDM authentication
8444HTTPS access to the REST API, requiring SSL mutual authentication. Clients that present certificates found in the truststore under
openidm/security/are granted access to the system.
The Jetty configuration (in openidm/conf/jetty.xml)
references the ports that are specified in the
boot.properties file.
Appendix C. Data Models and Objects Reference
OpenIDM allows you to customize a variety of objects that can be addressed via a URL or URI, and that have a common set of functions that OpenIDM can perform on them such as CRUD, query, and action.
Depending on how you intend to use them, different objects are appropriate.
| Object Type | Intended Use | Special Functionality |
|---|---|---|
| Managed objects | Serve as targets and sources for synchronization, and to build virtual identities. | Provide appropriate auditing, script hooks, declarative mappings and so forth in addition to the REST interface. |
| Configuration objects | Ideal for look-up tables or other custom configuration, which can be configured externally like any other system configuration. | Adds file view, REST interface, and so forth |
| Repository objects | The equivalent of arbitrary database table access. Appropriate for managing data purely through the underlying data store or repository API. | Persistence and API access |
| System objects | Representation of target resource objects, such as accounts, but also resource objects such as groups. | |
| Audit objects | Houses audit data in the OpenIDM internal repository. | |
| Links | Defines a relation between two objects. |
C.1. Managed Objects
A managed object in OpenIDM is an object which represents the identity-related data managed by OpenIDM. Managed objects are stored by OpenIDM in its data store. All managed objects are JSON-based data structures.
C.1.1. Managed Object Schema
Managed objects have an associated schema to enforce a specific data structure. Schema is specified using the JSON Schema specification. This is currently an Internet-Draft, with implementations in multiple programming languages.
C.1.1.1. Managed Object Reserved Properties
Top-level properties in a managed object that begin with an underscore
( _ ) are reserved by OpenIDM for internal use, and are
not explicitly part of its schema. Internal properties are read-only, and
are ignored when provided by the REST API client.
The following properties exist for all managed objects in OpenIDM.
- _id
string
The unique identifier for the object. This value forms a part of the managed object's URI.
- _rev
string
The revision of the object. This is the same value that is exposed as the object's ETag through the REST API. The content of this attribute is not defined. No consumer should make any assumptions of its content beyond equivalence comparison. This attribute may be provided by the underlying data store.
- _schema_id
string
The a reference to the schema object that the managed object is associated with.
- _schema_rev
string
The revision of the schema that was used for validation when the object was last stored.
C.1.1.2. Managed Object Schema Validation
Schema validation is performed unequivocally whenever an object
is stored, and conditionally whenever an object is retrieved from the
data store and exhibits a _schema_rev value that
differs from the _rev of the schema that the OpenIDM
instance currently has for that managed object type. Whenever schema
validation is performed, the _schema_rev of the object
is updated to contain the _rev value of the current
schema.
C.1.1.3. Managed Object Derived Properties
Properties can be defined to be strictly derived from other properties within the object. This allows computed and composite values to be created in the object. Whenever an object undergoes a change, all derived properties are recomputed. The values of derived properties are stored in the data store, and are not recomputed upon retrieval.
C.1.2. Data Consistency
Single-object operations shall be consistent within the scope of the operation performed, limited by capabilities of the underlying data store. Bulk operations shall not have any consistency guarantees. OpenIDM does not expose any transactional semantics in the managed object access API.
All access through the REST API uses the ETag and associated
conditional headers: If-Match,
If-None-Match. In operations that
modify model objects, conditional headers are mandatory.
C.1.3. Managed Object Triggers
Triggers are user-definable functions that validate or modify object or property state.
C.1.3.1. State Triggers
Managed objects are resource-oriented. A set of triggers is defined to intercept the supported request methods on managed objects. Such triggers are intended to perform authorization, redact, or modify objects before the action is performed. The object being operated on is in scope for each trigger, meaning that the object is retrieved by the data store before the trigger is fired.
If retrieval of the object fails, the failure occurs before any trigger is called. Triggers are executed before any optimistic concurrency mechanisms are invoked. The reason for this is to prevent a potential attacker from getting information about an object (including its presence in the data store) before authorization is applied.
- onCreate
Called upon a request to create a new object. Throwing an exception causes the create to fail.
- postCreate
Called after the creation of a new object is complete.
- onRead
Called upon a request to retrieve a whole object or portion of an object. Throwing an exception causes the object to not be included in the result. This method is also called when lists of objects are retrieved via requests to its container object; in this case, only the requested properties are included in the object. Allows for uniform access control for retrieval of objects, regardless of the method in which they were requested.
- onUpdate
Called upon a request to store an object. The "old" and "new" objects are in-scope for the trigger. The "old" object represents a complete object as retrieved from the data store. The trigger can elect to change "new" object properties. If as a result of the trigger the object's "old" and "new" values are identical (that is, update is reverted), the update ends prematurely, though successfully. Throwing an exception causes the update to fail.
- postUpdate
Called after an update request is complete.
- onDelete
Called upon a request to delete an object. Throwing an exception causes the deletion to fail.
- postDelete
Called after an object is deleted.
C.1.3.2. Object Storage Triggers
An object-scoped trigger applies to an entire object. Unless otherwise specified, the object itself is in scope for the trigger.
- onValidate
Validates an object prior to its storage in the data store. Throws an exception in the event of a validation failure.
- onStore
Called just prior to when an object is stored in the data store. Typically used to transform an object just prior to its storage (for example, encryption).
C.1.3.3. Property Storage Triggers
A property-scoped trigger applies to a specific property within an object. Only the property itself is in scope for the trigger. No other properties in the object should be accessed during execution of the trigger. Unless otherwise specified, the order of execution of property-scoped triggers is intentionally left undefined.
- onValidate
Validates a given property value after its retrieval from and prior to its storage in the data store. Throws an exception in the event of a validation failure.
- onRetrieve
Called in the result of a query request. Executed only when the
executeOnRetrievecondition shows a full managed object.- onStore
Called prior to when an object is stored in the data store. Typically used to transform a given property prior to its object's storage.
C.1.3.4. Storage Trigger Sequences
Triggers are executed in the following order:
Retrieve the raw object from the data store
The
executeOnRetrieveboolean is used to see if a full managed object is returned. The sequence continues if the boolean is set totrue.Call object
onRetrievetriggerPer-property within the object:
Call property
onRetrievetriggerPerform schema validation if
_schema_revdoes not match (see Section C.1.1.2, "Managed Object Schema Validation".
Per-property within the object:
Call property
onValidatetriggerCall object
onValidatetrigger
Per-property trigger within the object:
Call property
onStoretriggerCall object
onStoretriggerStore the object with any resulting changes to the data store
C.1.4. Managed Object Encryption
Sensitive object properties can be encrypted prior to storage,
typically through the property onStore trigger. The
trigger has access to configuration data, which can include arbitrary
attributes that you define, such as a symmetric encryption key. Such
attributes can be decrypted during retrieval from the data store through
the property onRetrieve trigger.
C.1.5. Managed Object Configuration
Configuration of managed objects is provided through an array of managed object configuration objects.
{
"objects": [ managed-object-config object, ... ]
}- objects
array of managed-object-config objects, required
Specifies the objects that the managed object service manages.
Specifies the configuration of each managed object.
{
"name" : string,
"schema" : json-schema object,
"onCreate" : script object,
"postCreate": script object,
"onRead" : script object,
"onUpdate" : script object,
"postUpdate": script object,
"onDelete" : script object,
"postDelete": script object,
"onValidate": script object,
"onRetrieve": script object,
"onStore" : script object,
"properties": [ property-configuration object, ... ]
}- name
string, required
The name of the managed object. Used to identify the managed object in URIs and identifiers.
- schema
json-schema object, optional
The schema to use to validate the structure and content of the managed object. The schema-object format is specified by the JSON Schema specification.
- onCreate
script object, optional
A script object to trigger when the creation of an object is being requested. The object to be created is provided in the root scope as an object property. The script may change the object. If an exception is thrown, the create aborts with an exception.
- postCreate
script object, optional
A script object to trigger after an object is created, but before any targets are synchronized.
- onRead
script object, optional
A script object to trigger when the read of an object is being requested. The object being read is provided in the root scope as an object property. The script may change the object. If an exception is thrown, the read aborts with an exception.
- onUpdate
script object, optional
A script object to trigger when an update to an object is requested. The old value of the object being updated is provided in the root scope as an
oldObjectproperty. The new value of the object being updated is provided in the root scope as anewObjectproperty. The script may change thenewObject. If an exception is thrown, the update aborts with an exception.- postUpdate
script object, optional
A script object to trigger after an update to an object is complete, but before any targets are synchronized.
- onDelete
script object, optional
A script object to trigger when the deletion of an object is being requested. The object being deleted is provided in the root scope as an object property. If an exception is thrown, the deletion aborts with an exception.
- postDelete
script object, optional
A script object to trigger after a delete of an object is complete, but before any further synchronization.
- onValidate
script object, optional
A script object to trigger when the object requires validation. The object to be validated is provided in the root scope as an object property. If an exception is thrown, the validation fails.
- onRetrieve
script object, optional
A script object to trigger once an object is retrieved from the repository. The object that was retrieved is provided in the root scope as an object property. The script may change the object. If an exception is thrown, then object retrieval fails.
- onStore
script object, optional
A script object to trigger when an object is about to be stored in the repository. The object to be stored is provided in the root scope as an object property. The script may change the object. If an exception is thrown, then object storage fails.
- properties
array of property-config objects, optional
A list of property specifications.
{
"type" : "text/javascript",
"source": string
}- type
string, required
Specifies the type of script to be executed. Supported types include
"text/javascript"and"groovy".- source, file
string, required (only one, source or file is required)
Specifies the source code of the script to be executed (if the keyword is "source"), or a pointer to the file that contains the script (if the keyword is "file").
{
"name" : string,
"onValidate": script object,
"onRetrieve": script object,
"onStore" : script object,
"encryption": property-encryption object,
"scope" : string
}- name
string, required
The name of the property being configured.
- onValidate
script object, optional
A script object to trigger when the property requires validation. The property to be validated is provided in the root scope as the
propertyproperty. If an exception is thrown, the validation fails.- onRetrieve
script object, optional
A script object to trigger once a property is retrieved from the repository. The property that was retrieved is provided in the root scope as the
propertyproperty. The script may change the property value. If an exception is thrown, then object retrieval fails.- onStore
script object, optional
A script object to trigger when a property is about to be stored in the repository. The property to be stored is provided in the root scope as the
propertyproperty. The script may change the property value. If an exception is thrown, then object storage fails.- encryption
property-encryption object, optional
Specifies the configuration for encryption of the property in the repository. If omitted or null, the property is not encrypted.
- scope
string, optional
Specifies whether the property should be filtered from HTTP/external calls. The value can be either
"public"or"private"."private"indicates that the property should be filtered,"public"indicates no filtering. If no value is set, the property is assumed to be public and thus not filtered.
{
"cipher": string,
"key" : string
}- cipher
string, optional
The cipher transformation used to encrypt the property. If omitted or null, the default cipher of
"AES/CBC/PKCS5Padding"is used.- key
string, required
The alias of the key in the OpenIDM cryptography service keystore used to encrypt the property.
C.1.6. Custom Managed Objects
Managed objects in OpenIDM are inherently fully user definable and customizable. Like all OpenIDM objects, managed objects can maintain relationships to each other in the form of links. Managed objects are intended for use as targets and sources for synchronization operations to represent domain objects, and to build up virtual identities. The name comes from the intention that OpenIDM stores and manages these objects, as opposed to system objects that are present in external systems.
OpenIDM can synchronize and map directly between external systems (system objects), without storing intermediate managed objects. Managed objects are appropriate, however, as a way to cache the data—for example, when mapping to multiple target systems, or when decoupling the availability of systems—to more fully report and audit on all object changes during reconciliation, and to build up views that are different from the original source, such as transformed and combined or virtual views. Managed objects can also be allowed to act as an authoritative source if no other appropriate source is available.
Other object types exist for other settings that should be available to a script, such as configuration or look-up tables that do not need audit logging.
C.1.6.1. Setting Up a Managed Object Type
To set up a managed object, you declare the object in the
conf/managed.json file where OpenIDM is installed.
The following example adds a simple foobar object
declaration after the user object type.
{
"objects": [
{
"name": "user"
},
{
"name": "foobar"
}
]
}
C.1.6.2. Manipulating Managed Objects Declaratively
By mapping an object to another object, either an external system object or another internal managed object, you automatically tie the object life cycle and property settings to the other object. For more information, see Chapter 12, "Configuring Synchronization".
C.1.6.3. Manipulating Managed Objects Programmatically
You can address managed objects as resources using URLs or URIs with
the managed/ prefix. This works whether you address the
managed object internally as a script running in OpenIDM or externally
through the REST interface.
You can use all resource API functions in script objects for create, read, update, delete operations, and also for arbitrary queries on the object set, but not currently for arbitrary actions. For more information, see Appendix F, "Scripting Reference".
OpenIDM supports concurrency through a multi version concurrency control (MVCC) mechanism. In other words, each time an object changes, OpenIDM assigns it a new revision.
Objects can be arbitrarily complex as long as they use supported types, such as maps, lists, numbers, strings, and booleans as defined in JSON.
C.1.6.3.1. Creating Objects
The following script example creates an object type.
openidm.create("managed/foobar", "myidentifier", mymap)C.1.6.3.2. Updating Objects
The following script example updates an object type.
var expectedRev = origMap._rev
openidm.update("managed/foobar/myidentifier", expectedRev, mymap)The MVCC mechanism requires that expectedRev
be set to the expected revision of the object to update. You obtain the
revision from the object's _rev property. If something
else changes the object concurrently, OpenIDM rejects the update, and you
must either retry or inspect the concurrent modification.
C.1.6.3.3. Patching Objects
You can partially update a managed object using the patch method, which changes only the specified properties of the object. OpenIDM implements the JSON patch media type version 02, described at http://tools.ietf.org/html/rfc6902.
The following script example updates an object type.
openidm.patch("managed/foobar/myidentifier", rev, value)The patch method supports a revision of "null",
which effectively disables the MVCC mechanism, that is, changes are
applied, regardless of revision. In the REST interface, this matches the
If-Match: "*" condition supported by patch.
The API supports patch by query, so the caller does not need to know the identifier of the object to change.
$ curl \
--cacert self-signed.crt \
--header "X-OpenIDM-Username: openidm-admin" \
--header "X-OpenIDM-Password: openidm-admin" \
--header "Content-Type: application/json" \
--request POST \
--data '[{
"operation":"replace",
"field":"/password",
"value":"Passw0rd"
}]' \
"https://localhost:8443/openidm/managed/user?_action=patch&_queryId=for-userName&uid=DDOE"For the syntax on how to formulate the query
_queryId=for-userName&uid=DDOE see
Section C.1.6.3.6, "Querying Object Sets".
C.1.6.3.4. Deleting Objects
The following script example deletes an object type.
var expectedRev = origMap._rev
openidm.delete("managed/foobar/myidentifier", expectedRev)The MVCC mechanism requires that expectedRev
be set to the expected revision of the object to update. You obtain the
revision from the object's _rev property. If something
else changes the object concurrently, OpenIDM rejects deletion, and you
must either retry or inspect the concurrent modification.
C.1.6.3.5. Reading Objects
The following script example reads an object type.
val = openidm.read("managed/foobar/myidentifier")C.1.6.3.6. Querying Object Sets
You can query managed objects using common query filter syntax, or by configuring predefined queries in your repository configuration. The following script example queries managed user objects whose userName is Smith.
var qry = {
"_queryFilter" : "/userName eq \"smith\""
};
val = openidm.query("managed/user", qry);
For more information, see Section 7.3, "Defining and Calling Queries".
C.1.7. Accessing Managed Objects Through the REST API
OpenIDM exposes all managed object functionality through the REST API unless you configure a policy to prevent such access. In addition to the common REST functionality of create, read, update, delete, patch, and query, the REST API also supports patch by query. For more information, see Appendix E, "REST API Reference".
OpenIDM requires authentication to access the REST API. Authentication
configuration is shown in
openidm/conf/authentication.json. The default
authorization filter script is
openidm/script/router-authz.js.
C.2. Configuration Objects
OpenIDM provides an extensible configuration to allow you to leverage regular configuration mechanisms.
Unlike native OpenIDM configuration, which OpenIDM interprets automatically and can start new services, OpenIDM stores custom configuration objects and makes them available to your code through the API.
For an introduction to standard configuration objects, see Chapter 6, "Configuring OpenIDM".
C.2.1. When To Use Custom Configuration Objects
Configuration objects are ideal for metadata and settings that need not be included in the data to reconcile. In other words, use configuration objects for data that does not require audit log, and does not serve directly as a target or source for mappings.
Although you can set and manipulate configuration objects both programmatically and manually, configuration objects are expected to change slowly, perhaps through a mix of both manual file updates and programmatic updates. To store temporary values that can change frequently and that you do not expect to be updated by configuration file changes, custom repository objects might be more appropriate.
C.2.2. Custom Configuration Object Naming Conventions
By convention custom configuration objects are added under the
reserved context, config/custom.
You can choose any name under
config/context. Be sure,
however, to choose a value for context that
does not clash with future OpenIDM configuration names.
C.2.3. Mapping Configuration Objects To Configuration Files
If you have not disabled the file based view for configuration, you
can view and edit all configuration including custom configuration in
openidm/conf/*.json files. The configuration maps to a
file named
context-config-name.json,
where context for custom configuration objects
is custom by convention, and
config-name is the configuration object name.
A configuration object named escalation thus maps to a
file named conf/custom-escalation.json.
OpenIDM detects and automatically picks up changes to the file.
OpenIDM also applies changes made through APIs to the file.
By default, OpenIDM stores configuration objects in the repository. The file view is an added convenience aimed to help you in the development phase of your project.
C.2.4. Configuration Objects File & REST Payload Formats
By default, OpenIDM maps configuration objects to JSON representations.
OpenIDM represents objects internally in plain, native types like maps, lists, strings, numbers, booleans, null. OpenIDM constrains the object model to simple types so that mapping objects to external representations is trivial.
The following example shows a representation of a configuration object with a look-up map.
{
"CODE123" : "ALERT",
"CODE889" : "IGNORE"
}In the JSON representation, maps are represented with braces
({ }), and lists are represented with brackets
([ ]). Objects can be arbitrarily complex, as in the
following example.
{
"CODE123" : {
"email" : ["sample@sample.com", "john.doe@somedomain.com"],
"sms" : ["555666777"]
}
"CODE889" : "IGNORE"
}C.2.5. Accessing Configuration Objects Through the REST API
You can list all available configuration objects, including system
and custom configurations, using an HTTP GET on
/openidm/config.
The _id property in the configuration object
provides the link to the configuration details with an HTTP GET on
/openidm/config/id-value.
By convention, the id-value for a custom
configuration object called escalation is
custom/escalation.
OpenIDM supports REST mappings for create, read, update, query, and delete of configuration objects. Currently OpenIDM does not support patch operations for configuration objects.
C.2.6. Accessing Configuration Objects Programmatically
You can address configuration objects as resources using the URL or
URI config/ prefix both internally and also through
the REST interface. The resource API provides script object functions for
create, read, update, query, and delete operations.
OpenIDM supports concurrency through a multi version concurrency control mechanism. In other words, each time an object changes, OpenIDM assigns it a new revision.
Objects can be arbitrarily complex as long as they use supported types, such as maps, lists, numbers, strings, and booleans.
C.2.7. Creating Objects
The following script example creates an object type.
openidm.create("config/custom", "myconfig", mymap)C.2.8. Updating Objects
The following script example updates a custom configuration object type.
openidm.update("config/custom/myconfig", mymap)C.2.9. Deleting Objects
The following script example deletes a custom configuration object type.
openidm.delete("config/custom/myconfig")C.2.10. Reading Objects
The following script example reads an object type.
val = openidm.read("config/custom/myconfig")C.3. System Objects
System objects are pluggable representations of objects on external systems. They follow the same RESTful resource based design principles as managed objects. There is a default implementation for the OpenICF framework, which allows any connector object to be represented as a system object.
C.4. Audit Objects
Audit objects house audit data selected for local storage in the OpenIDM repository. For details, see Chapter 18, "Using Audit Logs".
C.5. Links
Link objects define relations between source objects and target
objects, usually relations between managed objects and system objects.
The link relationship is established by provisioning activity that either
results in a new account on a target system, or a reconciliation or
synchronization scenario that takes a LINK action.
Appendix D. Synchronization Reference
The synchronization engine is one of the core services of OpenIDM. You
configure the synchronization service through a mappings
property that specifies mappings between objects that are managed by the
synchronization engine.
{
"mappings": [ object-mapping object, ... ]
}D.1. Object-Mapping Objects
An object-mapping object specifies the configuration for a mapping of source objects to target objects.
{
"name" : string,
"source" : string,
"target" : string,
"links" : string,
"validSource" : script object,
"validTarget" : script object,
"correlationQuery": script object,
"properties" : [ property object, ... ],
"policies" : [ policy object, ... ],
"onCreate" : script object,
"onUpdate" : script object,
"onLink" : script object,
"onUnlink" : script object,
"result" : script object
}- name
string, required
Uniquely names the object mapping. Used in the link object identifier.
- source
string, required
Specifies the path of the source object set. Example:
"managed/user".- target
string, required
Specifies the path of the target object set. Example:
"system/ldap/account".- links
string, optional
Enables reuse of the links created in another mapping. Example:
"systemLdapAccounts_managedUser"reuses the links created by a previous mapping whosenameis"systemLdapAccounts_managedUser".- validSource
script object, optional
A script that determines if a source object is valid to be mapped. The script yields a boolean value:
trueindicates the source object is valid;falsecan be used to defer mapping until some condition is met. In the root scope, the source object is provided in the"source"property. If the script is not specified, then all source objects are considered valid.- validTarget
script object, optional
A script used during the target phase of reconciliation that determines if a target object is valid to be mapped. The script yields a boolean value:
trueindicates that the target object is valid;falseindicates that the target object should not be included in reconciliation. In the root scope, the target object is provided in the"target"property. If the script is not specified, then all target objects are considered valid for mapping.- correlationQuery
script object, optional
A script that yields a query object to query the target object set when a source object has no linked target. The syntax for writing the query depends on the target system of the correlation. For examples of some common targets, see Section 12.17, "Correlation Queries". The source object is provided in the
"source"property in the script scope.- properties
array of property-mapping objects, optional
Specifies mappings between source object properties and target object properties, with optional transformation scripts.
- policies
array of policy objects, optional
Specifies a set of link conditions and associated actions to take in response.
- onCreate
script object, optional
A script to execute when a target object is to be created, after property mappings have been applied. In the root scope, the source object is provided in the
"source"property, projected target object in the"target"property and the link situation that led to the create operation in"situation". The_idproperty in the target object can be modified, allowing the mapping to select an identifier; if not set then the identifier is expected to be set by the target object set. If the script throws an exception, then target object creation is aborted.- onUpdate
script object, optional
A script to execute when a target object is to be updated, after property mappings have been applied. In the root scope, the source object is provided in the
"source"property, projected target object in the"target"property, link situation that led to the update operation in"situation". If the script throws an exception, then target object update is aborted.- onLink
script object, optional
A script to execute when a source object is to be linked to a target object, after property mappings have been applied. In the root scope, the source object is provided in the
"source"property, projected target object in the"target"property. If the script throws an exception, then target object linking is aborted.- onUnlink
script object, optional
A script to execute when a source and a target object are to be unlinked, after property mappings have been applied. In the root scope, the source object is provided in the
"source"property, projected target object in the"target"property. If the script throws an exception, then target object unlinking is aborted.- result
script object, optional
A script to execute on each mapping event, independent of the nature of the operation. In the root scope, the source object is provided in the
"source"property, projected target object in the"target"property. If the script throws an exception, then target object unlinking is aborted.The "result" script is executed only during reconciliation operations!
D.1.1. Property Objects
A property object specifies how the value of a target property is determined.
{
"target" : string,
"source" : string,
"transform" : script object,
"condition" : script object,
"default": value
}- target
string, required
Specifies the path of the property in the target object to map to.
- source
string, optional
Specifies the path of the property in the source object to map from. If not specified, then the target property value is derived from the script or default value.
- transform
script object, optional
A script to determine the target property value. The root scope contains the value of the source in the
"source"property, if specified. If the"source"property has a value of"", then the entire source object of the mapping is contained in the root scope. The resulting value yielded by the script is stored in the target property.- condition
script object, optional
A script to determine whether the mapping should be executed or not. The condition has an
"object"property available in root scope, which (if specified) contains the full source object. For example"source": "(object.email != null)". The script is considered to return a boolean value.- default
any value, optional
Specifies the value to assign to the target property if a non-null value is not established by
"source"or"transform". If not specified, the default value isnull.
D.1.2. Policy Objects
A policy object specifies a link condition and the associated actions to take in response.
{
"situation" : string,
"action" : string or script object
"postAction" : optional, script object
}- situation
string, required
Specifies the situation for which an associated action is to be defined.
- action
string or script object, required
Specifies the action to perform. If a script is specified, the script is executed and is expected to yield a string containing the action to perform.
- postAction
script object, optional
Specifies the action to perform after the previously specified action has completed.
Note
No
postActionscript is triggered if theactionis eitherIGNOREorASYNC.
D.1.2.1. Script Object
Script objects take the following form.
{
"type" : "text/javascript",
"source": string
}- type
string, required
Specifies the type of script to be executed. Supported types include
"text/javascript"and"groovy".- source
string, required
Specifies the source code of the script to be executed.
D.2. Links
To maintain links between source and target objects in mappings, OpenIDM stores an object set in the repository. The object set identifier follows this scheme.
links/mapping
Here, mapping represents the name of the mapping for which links are managed.
Link entries have the following structure.
{
"_id":string,
"_rev":string,
"linkType":string,
"firstId":string
"secondId":string,
}- _id
string
The identifier of the link object.
- _rev
string, required
The value of link object's revision.
- linkType
string, required
The type of the link. Usually then name of the mapping which created the link.
- firstId
string, required
The identifier of the first of the two linked objects.
- secondId
string
The identifier of the second of the two linked objects.
D.3. Queries
OpenIDM performs the following queries on a link object set.
Find link(s) for a given firstId object identifier.
SELECT * FROM links WHERE linkType = value AND firstId = valueAlthough a single result makes sense, this query is intended to allow multiple results so that this scenario can be handled as an exception.
Select link(s) for a given second object identifier.
SELECT * FROM links WHERE linkType = value AND secondId = valueAlthough a single result makes sense, this query is intended to allow multiple results so that this scenario can be handled as an exception.
D.4. Reconciliation
OpenIDM performs reconciliation on a per-mapping basis. The process of reconciliation for a given mapping includes these stages.
Iterate through all objects for the object set specified as
"source". For each source object, carry out the following steps.Look for a link to a target object in the link object set, and perform a correlation query (if defined).
Determine the link condition, as well as whether a target object can be found.
Determine the action to perform based on the policy defined for the condition.
Perform the action.
Keep track of the target objects for which a condition and action has already been determined.
Write the results.
Iterate through all object identifiers for the object set specified as
"target". For each identifier, carry out the following steps.Find the target in the link object set.
Determine if the target object was handled in the first phase.
Determine the action to perform based on the policy defined for the condition.
Perform the action.
Write the results.
Iterate through all link objects, carrying out the following steps.
If the
reconIdis"my", then skip the object.If the
reconIdis not recognized, then the source or the target is missing.Determine the action to perform based on the policy.
Perform the action.
Store the
reconIdidentifer in the mapping to indicate that it was processed in this run.
Note
To optimize a reconciliation operation, the reconciliation process does not attempt to correlate source objects to target objects if the set of target objects is empty when the correlation is started. For information on changing this default behaviour, see Section 12.16, "Reconciliation Optimization".
D.5. REST API
External synchronized objects expose an API to request immediate synchronization. This API includes the following requests and responses.
- Request
Example:
POST /openidm/system/xml/account/jsmith?_action=liveSync HTTP/1.1
- Response (success)
Example:
HTTP/1.1 204 No Content ...
- Response (synchronization failure)
Example:
HTTP/1.1 409 Conflict ... [JSON representation of error]
Appendix E. REST API Reference
Representational State Transfer (REST) is a software architecture style for exposing resources, using the technologies and protocols of the World Wide Web. REST describes how distributed data objects, or resources, can be defined and addressed. OpenIDM provides a RESTful API for accessing managed objects, system objects, workflows, and some elements of the system configuration.
The ForgeRock implementation of REST, known as commons REST (CREST), defines an API intended for common use across all ForgeRock products. CREST is a framework used to access various web resources, and for writing to RESTful resource providers (servers).
CREST is intended to support the following types of operations, described in
detail in Section E.4, "Supported Operations":
Create, Read,
Update, Delete,
Action, and Query.
ForgeRock defines a JSON Resource core library, as a common framework to implement RESTful APIs. That core library includes two components:
json-resourceA Maven module that provides core interfaces such as
Connections,Requests, andRequest Handlers.json-resource-servletProvides J2EE servlet integration. Defines a common HTTP-based REST API for interacting with JSON resources.
Note
You can examine the libraries associated with ForgeRock REST at http://commons.forgerock.org/forgerock-rest.
E.1. URI Scheme
The URI scheme for accessing a managed object follows this
convention, assuming the OpenIDM web application was deployed at
/openidm.
/openidm/managed/type/id
Similar schemes exist for URIs associated with all but system objects.
For more information, see Section 15.7.2, "access.js".
The URI scheme for accessing a system object follows this convention:
/openidm/system/resource-name/type/id
An example of a system object in an LDAP repository might be:
/openidm/system/ldap/account/07b46858-56eb-457c-b935-cfe6ddf769c7
Note that for LDAP resources, you should not map the LDAP
dn to the OpenIDM uidAttribute
(_id). The attribute that is used for the
_id should be immutable. You should therefore map the LDAP
entryUUID operational attribute to the OpenIDM
_id, as shown in the following excerpt of the provisioner
configuration file:
... "uidAttribute" : "entryUUID", ...
E.2. Object Identifiers
Every managed and system object has an identifier (expressed as
id in the URI scheme) that is used to address the
object through the REST API. The REST API allows for client-generated and
server-generated identifiers, through PUT and POST methods. The default
server-generated identifier type is a UUID. If you create an object by using
POST, a server-assigned ID is generated in the form of a
UUID. If you create an object by using PUT, the client assigns the ID in
whatever format you specify.
Most of the examples in this guide use client-assigned IDs, as it makes the examples easier to read.
For more information on whether to use PUT or POST to create managed objects, see Should You Use PUT or POST to Create a Managed Object?.
E.3. Content Negotiation
The REST API fully supports negotiation of content representation
through the Accept HTTP header. Currently, the supported
content type is JSON. In most cases, you should include the following
header:
Accept: application/json
In a REST call (using the curl command, for example), you would include the following option to specify the noted header:
--header "Content-Type: application/json"
You can also specify the default UTF-8 character set as follows:
--header "Content-Type: application/json;charset=utf-8"
The application/json content type is not needed when a
REST call is made with the GET and DELETE methods.
E.4. Supported Operations
CREST supports several types of operations for communication with web servers.
The following request parameters can be used in conjunction with the supported operations.
_debug=[true,false]If
_debug=true, theHttpServletdumps theHttpServletRequestto the embedded Jetty Servlet log file._prettyPrint=[true,false]If
_prettyPrint=true, theHttpServletformats the response, in a fashion similar to the JSON parser known as jq.For example, adding
_prettyPrint=trueto the end of aquery-all-idsrequest formats the output in the following manner:$ curl \ --cacert self-signed.crt \ --header "X-OpenIDM-Username: openidm-admin" \ --header "X-OpenIDM-Password: openidm-admin" \ --request GET \ "https://localhost:8443/openidm/managed/user?_queryId=query-all-ids&_prettyPrint=true" { "result" : [ { "_id" : "bjensen", "_rev" : "0" }, { "_id" : "scarter", "_rev" : "0" }, { "_id" : "jberg", "_rev" : "0" } ], "resultCount" : 3, "pagedResultsCookie" : null, "remainingPagedResults" : -1 }Note that most command-line examples in this guide do not show this parameter, although the output in the examples is formatted for readability.
- _fields
The
_fieldsparameter can be used to return multiple common attributes.For example, you can use
GETto read specific attributes for a user as follows:$ curl \ --cacert self-signed.crt \ --header "X-OpenIDM-Username: openidm-admin" \ --header "X-OpenIDM-Password: openidm-admin" \ --request GET "https://localhost:8443/openidm/managed/user/james?_fields=userName,mail" { "mail": "james@example.com", "userName": "james" }
E.4.1. Creating an Object
Objects can be created with two different HTTP operations:
POST and PUT.
To create an object with a server-assigned ID, use the
POST operation with the create action.
For example:
$ curl \
--cacert self-signed.crt \
--header "X-OpenIDM-Username: openidm-admin" \
--header "X-OpenIDM-Password: openidm-admin" \
--header "Content-Type: application/json" \
--request POST \
--data '{
"userName":"mike",
"sn":"Smith",
"givenName":"Mike",
"mail": "mike@example.com",
"telephoneNumber": "082082082",
"password":"Passw0rd"
}'
"https://localhost:8443/openidm/managed/user?_action=create"
{
"userName": "mike",
...
"_rev": "1",
"_id": "a5bed4d7-99d4-41c4-8d64-49493b48a920",
...
}
To create an object with a client-assigned ID, use the
PUT operation, with either of the following headers:
If-None-Match: * |
If-None-Match: "*" |
Specify the ID as part of the URL, for example:
$ curl \
--cacert self-signed.crt \
--header "X-OpenIDM-Username: openidm-admin" \
--header "X-OpenIDM-Password: openidm-admin" \
--header "Content-Type: application/json" \
--header "If-None-Match: *"
--request PUT \
--data '{
"userName":"james",
"sn":"Berg",
"givenName":"James",
"mail": "james@example.com",
"telephoneNumber": "082082082",
"password":"Passw0rd"
}' \
"https://localhost:8443/openidm/managed/user/james"
{
"userName": "james",
...
"_rev": "1",
...
"_id": "james",
...
}
E.4.2. Reading an Object
To read the contents of an object, use the GET
operation, specifying the object ID. For example:
$ curl \
--cacert self-signed.crt \
--header "X-OpenIDM-Username: openidm-admin" \
--header "X-OpenIDM-Password: openidm-admin" \
--request GET \
"https://localhost:8443/openidm/system/ldap/account/fc252fd9-b982-3ed6-b42a-c76d2546312c"
{
"givenName": "Barbara",
"telephoneNumber": "1-360-229-7105",
"dn": "uid=bjensen,ou=People,dc=example,dc=com",
"description": "Created for OpenIDM",
"mail": "bjensen@example.com",
"ldapGroups": [
"cn=openidm2,ou=Groups,dc=example,dc=com"
],
"cn": "Babara Jensen",
"uid": "bjensen",
"sn": "Jensen",
"_id": "fc252fd9-b982-3ed6-b42a-c76d2546312c"
} E.4.3. Updating an Object
An update replaces some or all of the contents of an existing object. Any
object can be updated over REST with a PUT request. Managed
objects can also be updated with a POST request, using the
patch action, or with a PATCH request.
To update an object with a PUT request, use the
If-Match header, for example:
$ curl \
--cacert self-signed.crt \
--header "X-OpenIDM-Username: openidm-admin" \
--header "X-OpenIDM-Password: openidm-admin" \
--header "Content-Type: application/json" \
--header "If-Match : *" \
--request PUT \
--data '{"description":"The new description for Babs Jensen"}'
"https://localhost:8443/openidm/system/ldap/account/fc252fd9-b982-3ed6-b42a-c76d2546312c"
{
"givenName": "Barbara",
"telephoneNumber": "1-360-229-7105",
"dn": "uid=bjensen,ou=People,dc=example,dc=com",
"description": "The new description for Babs Jensen",
"mail": "bjensen@example.com",
"ldapGroups": [
"cn=openidm2,ou=Groups,dc=example,dc=com"
],
"cn": "Babara Jensen",
"uid": "bjensen",
"sn": "Jensen",
"_id": "fc252fd9-b982-3ed6-b42a-c76d2546312c"
}
To update a managed object with a POST request, use the
patch action and specify the updated fields as an array in
the data option. For example:
$ curl \
--cacert self-signed.crt \
--header "X-OpenIDM-Username: openidm-admin" \
--header "X-OpenIDM-Password: openidm-admin" \
--header "Content-Type: application/json" \
--request POST \
--data '[
{
"operation":"replace",
"field":"/description",
"value":"The new description for James"
}
]'
"https://localhost:8443/openidm/managed/user/james?_action=patch"
{
...
"userName": "james",
...
"_id": "james",
"description": "The new description for James",
...
}
To update a managed object with a PATCH request, use the
If-Match header. A PATCH request can add, remove, replace,
or increment an attribute value. A replace operation
replaces an existing value, or adds a value if no value exists.
The following example shows a patch request that updates a multi-valued
attribute by adding a new value. Note the dash - character
appended to the field name, which specifies that the value provided should be
added to the existing values. If the dash character is omitted, the provided
value replaces the existing values of that field.
$ curl \
--cacert self-signed.crt \
--header "X-OpenIDM-Username: openidm-admin" \
--header "X-OpenIDM-Password: openidm-admin" \
--header "Content-Type: application/json" \
--header "If-Match: *" \
--request PATCH \
--data '[
{
"operation": "add",
"field": "/roles/-",
"value": "managed/role/ldap"
}
]' \
"https://localhost:8443/openidm/managed/user/bjensen"
E.4.4. Deleting an Object
A delete request is similar to an update request, and can optionally include
the HTTP If-Match header. To delete an object, specify
its ID in the request, for example:
$ curl \
--cacert self-signed.crt \
--header "X-OpenIDM-Username: openidm-admin" \
--header "X-OpenIDM-Password: openidm-admin" \
--request DELETE \
"https://localhost:8443/openidm/system/ldap/account/e81c7f15-2e6d-4c3c-8005-890101070dd9"
{
"_id": "e81c7f15-2e6d-4c3c-8005-890101070dd9"
} E.4.5. Querying Resources
Resources can be queried using the GET method, with one of
the following query parameters:
For queries on managed objects:
_queryIdfor arbitrary predefined, parameterized queries_queryFilterfor arbitrary filters, in common filter notation_queryExpressionfor client-supplied queries, in native query format
For queries on system objects:
_queryId=query-all-ids(the only supported predefined query)_queryFilterfor arbitrary filters, in common filter notation
For additional information on queries, see Section 7.3.4, "Constructing Queries".
E.5. Conditional Operations
The REST API fully supports conditional operations through the use of
the ETag, If-Match and
If-None-Match HTTP headers. The use of HTTP conditional
operations is the basis of OpenIDM's optimistic concurrency control system.
Clients should make requests conditional in order to prevent inadvertent
modification of the wrong version of an object.
E.6. Supported Methods
The managed object API uses standard HTTP methods to access managed objects.
- GET
Retrieves a managed object in OpenIDM.
Example Request
GET /openidm/managed/user/bdd793f8 ...
Example Response
HTTP/1.1 200 OK Content-Type: application/json;charset=UTF-8 Cache-Control: no-cache Vary: Accept-Encoding, User-Agent Set-Cookie: session-jwt=2sadf... afd5;Path=/ Expires: Thu, 01 Jan 2015 00:00:00 GMT Content-Length: 1230 Server: Jetty(8.y.z-SNAPSHOT) ... [JSON representation of the managed object]
- HEAD
Returns metainformation about a managed object in OpenIDM.
Example Request
HEAD /openidm/managed/user/bdd793f8 ...
Example Response
HTTP/1.1 200 OK Content-Type: application/json Content-Length: 123 ETag: "0"
- PUT
Creates or updates a managed object.
Example Request: Creating a new object
PUT /openidm/managed/user/5752c0fd9509 Content-Type: application/json Content-Length: 123 If-None-Match: * ... [JSON representation of the managed object to create]
Example Response: Creating a new object (success)
HTTP/1.1 201 Created Content-Type: application/json Content-Length: 45 ETag: "0" ... [JSON representation containing metadata (underscore-prefixed) properties]
Example Response: Creating a new object without the
If-None-MatchheaderHTTP/1.1 404 Not Found Content-Type: application/json Content-Length: 83 ... [JSON representation of error]
Example Request: Updating an existing object
PUT /openidm/managed/user/5752c0fd9509 Content-Type: application/json Content-Length: 123 If-Match: "1" ... [JSON representation of managed object to update]
Example Response: Updating an existing object (success)
HTTP/1.1 200 OK Content-Type: application/json Content-Length: 45 ETag: "2" ... [JSON representation of updated object]
Example Response: Updating an existing object when no version is supplied
HTTP/1.1 200 OK Content-Type: application/json Content-Length: 89 ETag: "3" ... [JSON representation of updated object]
Example Response: Updating an existing object when an invalid version is supplied
HTTP/1.1 412 Precondition Required Content-Type: application/json Content-Length: 89 ... [JSON representation of error]
Example Response: Updating an existing object with
If-Match: *HTTP/1.1 200 OK Content-Type: application/json Content-Length: 45 ETag: "0" ... [JSON representation of updated object]
Should You Use PUT or POST to Create a Managed Object?
You can use PUT and POST to create managed objects. To create a managed object with a PUT, you would include the
_idin the request. If you create a managed object with a POST, the server assigns the_idin the form of a UUID.In some cases, you may want to use PUT, as POST is not idempotent. If you can specify the
_idto assign to the object, use PUT.Alternatively, POST generates a server-assigned ID in the form of a UUID. In some cases, you may prefer to use UUIDs in production, as a POST can generate them easily in clustered environments.
- POST
The POST method allows arbitrary actions to be performed on managed objects. The
_actionquery parameter defines the action to be performed.The
createaction is used to create a managed object. Because POST is neither safe nor idempotent, PUT is the preferred method of creating managed objects, and should be used if the client knows what identifier it wants to assign the object. The response contains the server-generated_idof the newly created managed object.The POST method create optionally accepts an
_idquery parameter to specify the identifier to give the newly created object. If an_idis not provided, the server selects its own identifier.The
patchaction is used to update one or more attributes of a managed object, without replacing the entire object.Example Create Request
POST /openidm/managed/user?_action=create Content-Type: application/json;charset=UTF-8 Content-Length: 123 ... [JSON representation of the managed object to create]
Example Response
HTTP/1.1 201 Created Content-Type: application/json;charset=UTF-8 Cache-Control: no-cache Location: https://Some_URI ... [JSON representation containing metadata (underscore-prefixed) properties]
Example Patch Request
POST /openidm/managed/user?_action=patch Content-Type: application/json;charset=UTF-8 Content-Length: 123 ... [JSON representation of the managed object to create]
Example Response (success)
HTTP/1.1 200 OK Content-Type: application/json;charset=UTF-8 Cache-Control: no-cache Set-Cookie: session-jwt=yAiYWxnIjogI;Path=/ ...
- DELETE
Deletes a managed object.
Example Request
DELETE /openidm/managed/user/c3471805b60f If-Match: "0" ...
Example Response (success)
HTTP/1.1 200 OK Content-Length: 405 Content-Type: application/json;charset=UTF-8 Etag: "4" ... [JSON representation of the managed object that was deleted]
Example Response: Deleting an existing object when no version is supplied
HTTP/1.1 200 OK Content-Length: 405 Content-Type: application/json;charset=UTF-8 Etag: "4" ... [JSON representation of the managed object that was deleted]
Example Response: Deleting an existing object when an invalid version is supplied
HTTP/1.1 412 Precondition Required Content-Type: application/json;charset=UTF-8 Content-Length: 89 ... [JSON representation of error]
- PATCH
Performs a partial modification of a managed object.
See the JSON Patch Internet-Draft for details.
Example Request
PATCH /openidm/managed/user/5752c0fd9509 Content-Type: application/patch+json Content-Length: 456 If-Match: "0" ... [JSON representation of patch document to apply]
Example Response (success)
HTTP/1.1 200 OK Set-Cookie: JSESSIONID=1kke440cyv1vivbrid6ljso7b;Path=/ Expires: Thu, 01 Jan 1970 00:00:00 GMT Content-Type: application/json; charset=UTF-8 ETag: "1" ... {"_id":"5752c0fd9509","_rev":"2"}Updating an existing object when no version is supplied (version conflict)
HTTP/1.1 409 Conflict Content-Type: application/json;charset=UTF-8 Content-Length: 89 ... [JSON representation of error]
Example Response: Updating an existing object when an invalid version is supplied (version conflict)
HTTP/1.1 412 Precondition Required Content-Type: application/json;charset=UTF-8 Content-Length: 89 ... [JSON representation of error]
E.7. REST Endpoints and Sample Commands
This section describes the OpenIDM REST endpoints and provides a number of sample commands that show the interaction with the REST interface.
E.7.1. Managing the Server Configuration Over REST
OpenIDM stores configuration objects in the repository, and exposes
them under the context path /openidm/config. Single instance
configuration objects are exposed under
/openidm/config/object-name.
Multiple instance configuration objects are exposed under
/openidm/config/object-name/instance-name.
The following table outlines these configuration objects and how they can
be accessed through the REST interface.
| URI | HTTP Operation | Description |
|---|---|---|
| /openidm/config | GET | Returns a list of configuration objects |
| /openidm/config/audit | GET | Returns the current logging configuration |
| /openidm/config/provisioner.openicf/provisioner-name | GET | Returns the configuration of the specified connector |
| /openidm/config/router | PUT | Changes the router configuration. Modifications
are provided with the -data option,
in JSON format. |
| /openidm/config/object | DELETE | Deletes the specified configuration object. |
OpenIDM supports REST mappings for create, read, update, query, and delete of configuration objects. Currently OpenIDM does not support patch operations for configuration objects.
For an example that displays the current configuration, the current logging configuration, the configuration with an XML connector provisioner, and how the configuration can be modified over the router, see Section 6.4, "Configuring OpenIDM Over REST".
One entry is returned for each configuration object. To obtain
additional information on the configuration object, include its
pid or _id in the URL. The
following example displays configuration information on the
sync object, based on OpenIDM using Sample 1.
$ curl \
--cacert self-signed.crt \
--header "X-OpenIDM-Username: openidm-admin" \
--header "X-OpenIDM-Password: openidm-admin" \
--request GET \
"https://localhost:8443/openidm/config/sync"
{
"mappings": [ {
"target" : "managed/user",
"correlationQuery" : {
"type" : "text/javascript",
"source" : "var query = {'_queryId' : 'for-userName', 'uid' : source.name};query;"
},
"properties" : [ {
"target" : "_id",
"source" : "_id"
}, {
"target" : "description",
"source" : "description"
}, {
"target" : "givenName",
"source" : "firstname"
}, {
"target" : "mail",
"source" : "email"
}, {
... E.7.2. Managing Users Over REST
User objects are stored in the repository and are exposed under the context
path /managed/user. Many examples of REST calls related
to this context path exist throughout this document. The following table
lists available functionality associated with the
/managed/user context path.
| URI | HTTP Operation | Description |
|---|---|---|
| /openidm/managed/user?_queryId=query-all-ids | GET | List all the managed users in the repository |
| /openidm/managed/user?_queryFilter=filter | GET | Query the managed user object with the defined filter. The value of the query filter must be URL encoded. |
| /openidm/managed/user/id | GET | Retrieve the JSON representation of a specific user |
| /openidm/managed/user/userName | PUT | Create a new user |
| /openidm/managed/user/userName | PUT | Update a user entry (replaces the entire entry) |
| /openidm/managed/user?_action=create | POST | Create a new user |
| /openidm/managed/user?_action=patch&_queryId=for-userName&uid= userName | POST | Update a user (can be used to replace the value of one or more existing attributes) |
| /openidm/managed/user/userName | PATCH | Update specified fields of a user entry |
| /openidm/managed/user/userName | DELETE | Delete a user entry |
The following example retrieves the JSON representation of all users stored in the internal repository.
$ curl \ --cacert self-signed.crt \ --header "X-OpenIDM-Username: openidm-admin" \ --header "X-OpenIDM-Password: openidm-admin" \ --request GET \ "https://localhost:8443/openidm/managed/user?_queryId=query-all-ids"
The following example queries the repository for managed users whose user name is Smith.
$ curl \ --cacert self-signed.crt \ --header "X-OpenIDM-Username: openidm-admin" \ --header "X-OpenIDM-Password: openidm-admin" \ --request GET \ "https://localhost:8443/openidm/managed/user?_queryFilter=userName%20eq%20%22smith%22"
The following example retrieves the JSON representation of a specified user.
$ curl \ --cacert self-signed.crt \ --header "X-OpenIDM-Username: openidm-admin" \ --header "X-OpenIDM-Password: openidm-admin" \ --request GET \ "https://localhost:8443/openidm/managed/user/user_id"
To add a user without a specified ID, see Section 2.8, "Adding Users Over REST" in the Installation Guide.
The following example adds a user with a specific user ID.
$ curl \
--cacert self-signed.crt \
--header "Content-Type: application/json" \
--header "X-OpenIDM-Username: openidm-admin" \
--header "X-OpenIDM-Password: openidm-admin" \
--request PUT \
--data '{
"userName":"james",
"sn":"Berg",
"givenName":"James",
"mail": "james@example.com",
"telephoneNumber": "082082082",
"password":"password"
}' \
"https://localhost:8443/openidm/managed/user/james"The following example checks whether a user exists, then updates the user entry. The command replaces the telephone number with the new data provided in the request body.
$ curl \
--cacert self-signed.crt \
--header "Content-Type: application/json" \
--header "X-OpenIDM-Username: openidm-admin" \
--header "X-OpenIDM-Password: openidm-admin" \
--request POST \
--data '[{
"operation":"replace",
"field":"/telephoneNumber",
"value":"1234567"
}]' \
"https://localhost:8443/openidm/managed/user?_action=patch&_queryId=for-userName&uid=id"
E.7.3. Managing System Objects Over REST
System objects, that is, objects that are stored in remote systems, are
exposed under the /openidm/system context. OpenIDM
provides access to system objects over REST, as listed in the following
table.
| URI | HTTP Operation | Description |
|---|---|---|
| /openidm/system?_action=action-name | POST |
|
| /openidm/system/system-name?_action=action-name | POST |
|
| /openidm/system/system-name/system-object?_action=action-name | POST |
|
| /openidm/system/system-name/system-object?_queryId=query-all-ids | GET | Lists all IDs related to the specified system object, such as users, and groups. |
| /openidm/system/system-name/system-object?_queryFilter=filter | GET | Lists the item(s) associated with the query filter. |
| /openidm/system/system-name/system-object/id | PUT | Creates a system object, or updates the system object, if it exists (replaces the entire object). |
| /openidm/system/system-name/system-object/id | DELETE | Deletes a system object. |
Note
When you create a system object with a PUT request (that is, specifying a client-assigned ID), you should specify the ID in the URL only and not in the JSON payload. If you specify a different ID in the URL and in the JSON payload, the request will fail, with an error similar to the following:
{
"code":500,
"reason":"Internal Server Error",
"message":"The uid attribute is not single value attribute."}
The patch action is not supported on system objects.
$ curl \ --cacert self-signed.crt \ --header "Content-Type: application/json" \ --header "X-OpenIDM-Username: openidm-admin" \ --header "X-OpenIDM-Password: openidm-admin" \ --request POST \ "https://localhost:8443/openidm/system?_action=availableConnectors"
$ curl \
--cacert self-signed.crt \
--header "Content-Type: application/json" \
--header "X-OpenIDM-Username: openidm-admin" \
--header "X-OpenIDM-Password: openidm-admin" \
--request POST \
"https://localhost:8443/openidm/system?_action=test"
[
{
"ok": true,
"connectorRef": {
"bundleVersion": "[1.4.0.0,2.0.0.0)",
"bundleName": "org.forgerock.openicf.connectors.ldap-connector",
"connectorName": "org.identityconnectors.ldap.LdapConnector"
},
"objectTypes": [
"group",
"account"
],
"config": "config/provisioner.openicf/ldap",
"enabled": true,
"name": "ldap"
}
]$ curl \
--cacert self-signed.crt \
--header "Content-Type: application/json" \
--header "X-OpenIDM-Username: openidm-admin" \
--header "X-OpenIDM-Password: openidm-admin" \
--request POST \
"https://localhost:8443/openidm/system?_action=liveSync&source=system/ldap/account"
{
"_rev": "1",
"_id": "SYSTEMLDAPACCOUNT",
"connectorData": {
"nativeType": "integer",
"syncToken": 0
}
}$ curl \
--cacert self-signed.crt \
--header "Content-Type: application/json" \
--header "X-OpenIDM-Username: openidm-admin" \
--header "X-OpenIDM-Password: openidm-admin" \
--request POST \
"https://localhost:8443/openidm/system/ldap/account?_action=liveSync"
{
"_rev": "2",
"_id": "SYSTEMLDAPACCOUNT",
"connectorData": {
"nativeType": "integer",
"syncToken": 0
}
} $ curl \ --cacert self-signed.crt \ --header "Content-Type: application/json" \ --header "X-OpenIDM-Username: openidm-admin" \ --header "X-OpenIDM-Password: openidm-admin" \ --request POST \ "https://localhost:8443/openidm/system/ldap/account?_action=script&_scriptId=addUser"
$ curl \
--cacert self-signed.crt \
--header "Content-Type: application/json" \
--header "X-OpenIDM-Username: openidm-admin" \
--header "X-OpenIDM-Password: openidm-admin" \
--request POST \
"https://localhost:8443/openidm/system/ldap/account?_action=authenticate&username=bjensen&password=Passw0rd"
{
"_id": "fc252fd9-b982-3ed6-b42a-c76d2546312c"
}$ curl \
--cacert self-signed.crt \
--header "Content-Type: application/json" \
--header "X-OpenIDM-Password: openidm-admin" \
--header "X-OpenIDM-Username: openidm-admin" \
--data '{
"cn":"James Smith",
"dn":"uid=jsmith,ou=people,dc=example,dc=com",
"uid":"jsmith",
"sn":"Smith",
"givenName":"James",
"mail": "jsmith@example.com",
"description":"Created by OpenIDM REST"}' \
--request POST \
"https://localhost:8443/openidm/system/ldap/account?_action=create"
{
"telephoneNumber":null,
"description":"Created by OpenIDM REST",
"mail":"jsmith@example.com",
"givenName":"James",
"cn":"James Smith",
"dn":"uid=jsmith,ou=people,dc=example,dc=com",
"uid":"jsmith",
"ldapGroups":[],
"sn":"Smith",
"_id":"07b46858-56eb-457c-b935-cfe6ddf769c7"
} You can rename a system object simply by supplying a new naming attribute value in a PUT request. The PUT request replaces the entire object. The naming attribute depends on the external resource.
The following example renames an object on an LDAP server, by changing the DN of the LDAP object (effectively performing a modDN operation on that object).
The example renames the user created in the previous example.
$ curl \
--cacert self-signed.crt \
--header "Content-Type: application/json" \
--header "X-OpenIDM-Password: openidm-admin" \
--header "X-OpenIDM-Username: openidm-admin" \
--header "If-Match: *" \
--data '{
"cn":"James Smith",
"dn":"uid=jimmysmith,ou=people,dc=example,dc=com",
"uid":"jimmysmith",
"sn":"Smith",
"givenName":"James",
"mail": "jsmith@example.com"}' \
--request PUT \
"https://localhost:8443/openidm/system/ldap/account/07b46858-56eb-457c-b935-cfe6ddf769c7"
{
"mail":"jsmith@example.com",
"cn":"James Smith",
"sn":"Smith",
"dn":"uid=jimmysmith,ou=people,dc=example,dc=com",
"ldapGroups":[],
"telephoneNumber":null,
"description":"Created by OpenIDM REST",
"givenName":"James",
"uid":"jimmysmith",
"_id":"07b46858-56eb-457c-b935-cfe6ddf769c7"
} $ curl \
--cacert self-signed.crt \
--header "Content-Type: application/json" \
--header "X-OpenIDM-Password: openidm-admin" \
--header "X-OpenIDM-Username: openidm-admin" \
--request GET \
"https://localhost:8443/openidm/system/ldap/account?_queryId=query-all-ids"
{
"remainingPagedResults": -1,
"pagedResultsCookie": null,
"resultCount": 3,
"result": [
{
"dn": "uid=jdoe,ou=People,dc=example,dc=com",
"_id": "1ff2e78f-4c4c-300c-b8f7-c2ab160061e0"
},
{
"dn": "uid=bjensen,ou=People,dc=example,dc=com",
"_id": "fc252fd9-b982-3ed6-b42a-c76d2546312c"
},
{
"dn": "uid=jimmysmith,ou=people,dc=example,dc=com",
"_id": "07b46858-56eb-457c-b935-cfe6ddf769c7"
}
]
}E.7.4. Managing Workflows Over REST
Workflow objects are exposed under the /openidm/workflow
context. OpenIDM provides access to the workflow module over REST, as listed
in the following table.
| URI | HTTP Operation | Description |
|---|---|---|
| /openidm/workflow/processdefinition?_queryId=id | GET | Lists workflow definitions based on filtering criteria |
| /openidm/workflow/processdefinition/id | GET | Returns detailed information about the specified process definition |
| /openidm/workflow/processinstance?_queryId=query-all-ids | GET | Lists the available running workflows, by IDs |
| /openidm/workflow/processinstance/id | GET | Provides detailed information of a running process instance |
| /openidm/workflow/processdefinition/id/taskdefinition | GET | Returns detailed information about the task definition, when you
include an id or a query for all IDs,
?_queryId=query-all-ids |
| /openidm/workflow/taskinstance?_queryId=query-all-ids | GET | Lists all active tasks |
| /openidm/workflow/taskinstance?_queryId=filteredQuery&filter | GET | Lists the tasks according to the specified filter |
| /openidm/workflow/processinstance?_action=create | POST | Start a new workflow. Parameters are included in the request body. |
| /openidm/workflow/taskinstance/id | PUT | Update task data |
| /openidm/workflow/processinstance/id | DELETE | Stops a process instance |
| /openidm/workflow/taskinstance/id?_action=claim | POST | Claim or complete a task. Parameters are included in the request body. Specifically for user tasks, a user can claim a specific task, which will then be assigned to that user. |
The following examples list the defined workflows. For a workflow to
appear in this list, the corresponding workflow definition must be in the
openidm/workflow directory.
$ curl \ --cacert self-signed.crt \ --header "X-OpenIDM-Username: openidm-admin" \ --header "X-OpenIDM-Password: openidm-admin" \ --request GET \ "https://localhost:8443/openidm/workflow/processdefinition?_queryId=query-all-ids"
Depending on the defined workflows, the output will be something like the following:
{
"result":[ {
"tenantId" : "",
"candidateStarterGroupIdExpressions" : [ ],
"candidateStarterUserIdExpressions" : [ ],
"participantProcess" : null,
...
} ],
"resultCount" : 1,
"pagedResultsCookie" : null,
"remainingPagedResults" : -1
}The following example invokes a workflow named "myWorkflow". The
foo parameter is given the value bar
in the workflow invocation.
$ curl \
--cacert self-signed.crt \
--header "Content-Type: application/json" \
--header "X-OpenIDM-Username: openidm-admin" \
--header "X-OpenIDM-Password: openidm-admin" \
--request POST \
--data '{
"key":"contractorOnboarding",
"foo":"bar"
}' \
"https://localhost:8443/openidm/workflow/processinstance?_action=create"E.7.5. Managing Scanned Tasks Over REST
OpenIDM provides a task scanning mechanism that enables you to perform a batch scan for a specified date in OpenIDM data, on a scheduled interval, and then to execute a task when this date is reached. For more information about scanned tasks, see Section 13.5, "Scanning Data to Trigger Tasks".
OpenIDM provides REST access to the task scanner, as listed in the following table.
| URI | HTTP Operation | Description |
|---|---|---|
| /openidm/taskscanner | GET | Lists the all scanning tasks, past and present. |
| /openidm/taskscanner/id | GET | Lists details of the given task. |
| /openidm/taskscanner?_action=execute&name=name | POST | Triggers the specified task scan run. |
| /openidm/taskscanner/id?_action=cancel | POST | Cancels the specified task scan run. |
E.7.6. Accessing Log Entries Over REST
You can interact with the audit and activity logs over REST, as shown in the following table.
| URI | HTTP Operation | Description |
|---|---|---|
| /openidm/audit/recon | GET | Displays the reconciliation audit log |
| /openidm/audit/recon/id | GET | Reads a specific reconciliation audit log entry |
| /openidm/audit/recon?_queryId=audit-by-recon-id&reconId=id | GET | Queries the audit log for a particular reconciliation operation |
| /openidm/audit/recon?_queryId=audit-by-recon-id-situation&situation= situation&reconId=id | GET | Queries the reconciliation audit log for a specific reconciliation situation |
| /openidm/audit/activity | GET | Displays the activity log |
| /openidm/audit/activity/id | GET | Returns activity information for a specific action |
| /openidm/audit/activity?_queryId=audit-by-activity-parent-action&parentActionId=id | GET | Queries the activity log for the details of an action |
| /openidm/audit/access | GET | Displays the full list of auditable actions. |
| /openidm/audit/access/id | GET | Displays information on the specific audit item. |
E.7.7. Managing Reconciliation Operations Over REST
You can interact with the reconciliation engine over REST, as shown in the following table.
| URI | HTTP Operation | Description |
|---|---|---|
| /openidm/recon | GET | Lists all completed reconciliation runs |
| /openidm/recon?_action=recon&mapping=mapping-name | POST | Launches a reconciliation run with the specified mapping |
| /openidm/recon/id?_action=cancel | POST | Cancels the specified reconciliation run |
| /openidm/system/datastore account?_action=liveSync | POST | Calls a LiveSync operation. |
The following example runs a reconciliation action, with the mapping
systemHrdb_managedUser, defined in the sync.json
file.
$ curl \ --cacert self-signed.crt \ --header "Content-Type: application/json" \ --header "X-OpenIDM-Username: openidm-admin" \ --header "X-OpenIDM-Password: openidm-admin" \ --request POST \ "https://localhost:8443/openidm/recon?_action=recon&mapping=systemHrdb_managedUser"
E.7.8. Managing the Repository over REST
You can interact with the repository engine over REST, as shown in the following table.
| URI | HTTP Operation | Description |
|---|---|---|
| /openidm/repo/synchronisation/deadLetterQueue/resource?_queryId=query-all-ids" | GET | Lists any failed synchronisation records for that resource, that have been placed in the dead letter queue. |
| /openidm/repo/link?_queryId=query-all-ids" | GET | Lists entries in the links table |
| /openidm/repo/internal/user?_queryId=query-all-ids" | GET | Lists the internal users |
| /openidm/repo/internal/user/username" | PUT | Enables you to change the username or password of an internal user |
| /openidm/repo?_action=updateDbCredentials | POST | Enables you to change the database username and password, in the case of an OrientDB repository |
For examples of queries on the repo/ endpoint, see
Section 5.4, "Interacting With the Repository Over REST".
E.8. HTTP Status Codes
The OpenIDM REST API returns the standard HTTP response codes, as described in the following table.
| HTTP Status | Description |
|---|---|
| 200 OK | The request was successfully completed. If this request created a new resource that is addressable with a URI, and a response body is returned containing a representation of the new resource, a 200 status will be returned with a Location header containing the canonical URI for the newly created resource. |
| 201 Created | A request that created a new resource was completed. A representation of the new resource is returned. A Location header containing the canonical URI for the newly created resource should also be returned. |
| 202 Accepted | The request has been accepted for processing, but the processing has not been completed. |
| 204 No Content | The server fulfilled the request, but does not need to return a response message body. |
| 400 Bad Request | The request could not be processed because it contains missing or invalid information. |
| 401 Unauthorized | The authentication credentials included with this request are missing or invalid. |
| 403 Forbidden | The server recognized your credentials, but you do not possess authorization to perform this request. |
| 404 Not Found | The request specified a URI of a resource that does not exist. |
| 405 Method Not Allowed | The HTTP verb specified in the request (DELETE, GET, HEAD, POST, PUT) is not supported for this request URI. |
| 406 Not Acceptable | The resource identified by this request is not capable of generating a representation corresponding to one of the media types in the Accept header of the request. |
| 409 Conflict | A creation or update request could not be completed, because it would cause a conflict in the current state of the resources supported by the server (for example, an attempt to create a new resource with a unique identifier already assigned to some existing resource). |
| 500 Internal Server Error | The server encountered an unexpected condition which prevented it from fulfilling the request. |
| 501 Not Implemented | The server does not (currently) support the functionality required to fulfill the request. |
| 503 Service Unavailable | The server is currently unable to handle the request due to temporary overloading or maintenance of the server. |
Appendix F. Scripting Reference
Scripting allows you to customize various aspects of OpenIDM functionality, for example, by providing custom logic between source and target mappings, defining correlation rules, filters, and triggers, and so on.
OpenIDM 3.1 supports scripts written in JavaScript and
Groovy. Script options are configured in the
conf/script.json file, described in
Section F.1.1, "Script Configuration File" .
F.1. Scripting Configuration
OpenIDM includes several default scripts in the following directory:
path/to/openidm/bin/defaults/script/. Do not modify
or remove any of the scripts in this directory, as OpenIDM needs these
scripts to run specific services. Scripts in this folder are not guaranteed
to remain constant between product releases.
If you develop custom scripts, copy them to the script/
directory for your project, such as
path/to/openidm/script/.
F.1.1. Script Configuration File
OpenIDM 3.1 includes a script configuration file
(/path/to/openidm/conf/script.json) that enables you
to modify the parameters used by your Groovy and Java Scripts. You can
also use this file to change the default project and script directories.
For more information, see Section 6.7, "Default and Custom Configuration Directories".
The properties shown in the default version of the
script.json file are described here:
- properties
Additional custom properties.
- ECMAScript
JavaScript is an ECMAScript language.
- javascript.debug
- javascript.recompile.minimumInterval
Minimum time after which a script can be recompiled.
- groovy.warnings
Specifies a log level for Groovy scripts.
- groovy.source.encoding
Defines the encoding format for Groovy scripts.
- groovy.target.directory
Specifies the output directory.
- groovy.target.bytecode
Specifies the output bytecode.
- groovy.classpath
Defines directories with Groovy class files.
- groovy.output.verbose
Specifies the verbosity of stack traces.
- groovy.output.debug
Sets debugging status.
- groovy.errors.tolerance
Sets number of non-fatal errors before aborting a compilation.
- groovy.script.extension
Defines the file extension for a Groovy script.
- groovy.script.base
Defines the base class for the script.
- groovy.recompile
Allows a script to be recompiled.
- groovy.recompile.minimumInterval
Minimum time between when Groovy scripts can be compiled.
- groovy.target.indy
Defines whether a Groovy indy test can be used.
- groovy.disabled.global.ast.transformations
Notes whether Groovy Abstract Syntax Transformations (AST)s are disabled.
The remaining options in the script.json file are
discussed in Section 6.7, "Default and Custom Configuration Directories".
F.1.2. Calling A Script From Another Configuration File
{
"type" : "text/javascript",
"source": string
} or
{
"type" : "text/javascript",
"file" : file location
} - type
string, required
Specifies the type of script to be executed. Supported types include
"text/javascript"and"groovy".- source
string, required if file is not specified
Specifies the source code of the script to be executed.
- file
string, required if source is not specified
Specifies the file containing the source code of the script to execute.
F.2. Examples
The following example (included in the sync.json file)
returns true if the employeeType is
equal to external, otherwise returns
false. This script can be useful during reconciliation to
establish whether the source object should be a part of the reconciliation,
or ignored.
"validTarget": {
"type" : "text/javascript",
"source": "target.employeeType == 'external'"
}
The following example (included in the sync.json file)
sets the __PASSWORD__ attribute to
defaultpwd when OpenIDM creates a target object.
"onCreate" : {
"type" : "text/javascript",
"source": "target.__PASSWORD__ = 'defaultpwd'"
}
The following example (included in the router.json
file) shows a trigger to create Solaris home directories using a script. The
script is located in a file,
/path/to/openidm/script/createUnixHomeDir.js.
{
"filters" : [ {
"pattern" : "^system/solaris/account$",
"methods" : [ "create" ],
"onResponse" : {
"type" : "text/javascript",
"file" : "script/createUnixHomeDir.js"
}
} ]
} F.3. Function Reference
Functions (access to managed objects, system objects, and configuration
objects) within OpenIDM are accessible to scripts via the
openidm object, which is included in the top-level scope
provided to each script.
OpenIDM also provides a logger object to access SLF4J
facilities. The following code shows an example:
logger.info("Parameters passed in: {} {} {}", param1, param2, param3);
To set the log level, use
org.forgerock.openidm.script.javascript.JavaScript.level
in openidm/conf/logging.properties.
F.3.1. openidm.create(container, id, value)
This function creates a new resource object.
- container
string
The resource container in which the object will be created, for example,
managed/user.- id
string
The identifier of the object to be created, if the client is supplying the ID. If the server should generate an ID, pass null here.
- value
object
The value of the object to be created.
The created OpenIDM resource object.
An exception is thrown if the object could not be created.
F.3.2. openidm.patch(id, rev, value)
This function performs a partial modification of a managed
object. Unlike the update function, only the
modified attributes are provided, not the entire object.
- id
string
The identifier of the object to be updated.
- rev
string
The revision of the object to be updated, or
nullif the object is not subject to revision control.- value
object
The value of the modifications to be applied to the object.
The modified OpenIDM resource object.
An exception is thrown if the object could not be updated.
F.3.3. openidm.read(id)
This function reads and returns an OpenIDM resource object.
- id
string
The identifier of the object to be read.
The read OpenIDM resource object, or
nullif not found.
F.3.4. openidm.update(id, rev, value)
This function updates a resource object.
- id
string
The identifier of the resource object to be updated.
- rev
string
The revision of the object to be updated, or
nullif the object is not subject to revision control.- value
object
The value of the object to be updated.
The modified OpenIDM resource object.
An exception is thrown if the object could not be updated.
F.3.5. openidm.delete(id, rev)
This function deletes a resource object.
- id
string
The identifier of the object to be deleted.
- rev
string
The revision of the object to be deleted, or
nullif the object is not subject to revision control.
A
nullvalue if successful.
An exception is thrown if the object could not be deleted.
Note that delete is a reserved word in JavaScript
and this function can therefore not be called in the usual manner. To call
delete from a JavaScript, you must specify the call as shown in the
following example:
openidm['delete']('managed/user/'+ user._id, user._rev)
Calling openidm.delete() directly from a JavaScript
results in an error similar to the following:
org.forgerock.openidm.script.ScriptException: missing name after . operator
F.3.6. openidm.query(id, params)
This function performs a query on the specified OpenIDM resource object.
- id
string
The identifier of the object to perform the query on.
- params
object
An object containing the query ID and its parameters.
The result of the query. A query result includes the following parameters:
- "query-time-ms"
The time, in milliseconds, that OpenIDM took to process the query.
- "conversion-time-ms"
(For an OrientDB repository only) the time, in milliseconds, taken to convert the data to a JSON object.
- "result"
The list of entries retrieved by the query. The result includes the revision (
"_rev") of the entry and any other properties that were requested in the query.
The following example shows the result of a custom query that requests the ID, user name, and email address of managed users in the repository. For an OrientDB repository, the query would be something like
select _openidm_id, userName, email from managed_user,.{ "conversion-time-ms": 0, "result": [ { "email": "bjensen@example.com", "userName": "bjensen", "_rev": "0", "_id": "36bbb745-517f-4695-93d0-998e1e7065cf" }, { "email": "scarter@example.com", "userName": "scarter", "_rev": "0", "_id": "cc3bf6f0-949e-4699-9b8e-8c78ce04a287" } ], "query-time-ms": 1 }
An exception is thrown if the given query could not be processed.
F.3.7. openidm.action(id, params, value)
This function performs an action on the specified OpenIDM resource object.
- id
string
The identifier of the object on which the action should be performed.
- params
object
An object containing the parameters to pass to the action.
- value
object
A value that can be provided to the action for processing.
The result of the action. May be
nullif no result is provided.
An exception is thrown if the given action could not be executed for any reason.
F.3.8. openidm.encrypt(value, cipher, alias)
This function encrypts a value.
- value
any
The value to be encrypted.
- cipher
string
The cipher with which to encrypt the value, using the form "algorithm/mode/padding" or just "algorithm". Example:
AES/ECB/PKCS5Padding.- alias
string
The key alias in the keystore with which to encrypt the node.
The value, encrypted with the specified cipher and key.
An exception is thrown if the object could not be encrypted for any reason.
F.3.9. openidm.decrypt(value)
This function decrypts a value.
- value
any
The value to be decrypted.
A deep copy of the value, with any encrypted value decrypted.
An exception is thrown if the object could not be decrypted for any reason.
F.3.10. logger.debug(string message, object... params)
Logs a message at DEBUG level.
- message
string
The message format to log. Params replace
{}in your message.- params
object
Arguments to include in the message.
A
nullvalue if successful.
An exception is thrown if the message could not be logged.
F.3.11. logger.error(string message, object... params)
Logs a message at ERROR level.
- message
string
The message format to log. Params replace
{}in your message.- params
object
Arguments to include in the message.
A
nullvalue if successful.
An exception is thrown if the message could not be logged.
F.3.12. logger.info(string message, object... params)
Logs a message at INFO level.
- message
string
The message format to log. Params replace
{}in your message.- params
object
Arguments to include in the message.
A
nullvalue if successful.
An exception is thrown if the message could not be logged.
F.3.13. logger.trace(string message, object... params)
Logs a message at TRACE level.
- message
string
The message format to log. Params replace
{}in your message.- params
object
Arguments to include in the message.
A
nullvalue if successful.
An exception is thrown if the message could not be logged.
F.3.14. logger.warn(string message, object... params)
Logs a message at WARN level.
- message
string
The message format to log. Params replace
{}in your message.- params
object
Arguments to include in the message.
A
nullvalue if successful.
An exception is thrown if the message could not be logged.
F.4. Places to Trigger Scripts
Scripts can be triggered at different places, by different events.
- In
openidm/conf/sync.json - Triggered by situation
onCreate, onUpdate, onDelete, onLink, onUnlink
- Object filter
vaildSource, validTarget
- Correlating objects
correlationQuery
- Triggered on any reconciliation
result
- Scripts inside properties
condition, transform
sync.jsonsupports only one script per hook. If multiple scripts are defined for the same hook, only the last one is kept.
- In
openidm/conf/managed.json onCreate, onRead, onUpdate, onDelete, onValidate, onRetrieve, onStore, postCreate, postUpdate, and postDelete
managed.jsonsupports only one script per hook. If multiple scripts are defined for the same hook, only the last one is kept.- In
openidm/conf/router.json onRequest, onResponse, onFailure
router.jsonsupports multiple scripts per hook.
F.5. Variables Available in Scripts
The variables that are available to scripts depend on the triggers that launch the script. The following section outlines the available variables, per trigger.
- condition
object
- correlationQuery
source
- Custom endpoint scripts
request
- onCreate, postCreate
object, source, target
- onLink
source, target
- onRead, onDelete
object
- onRetrieve
object (when called from either an object or a property storage trigger); property (only when called from a property storage trigger)
As a property, returns the modified property values from the script.
- onStore
object, property
As a property, returns the modified property values from the script.
- onUnlink
source, target
- onUpdate, postUpdate
oldObject, newObject
- onValidate
object, property
- postDelete
oldObject
- propertyName
Name of the property that is changed.
- result
source, target
- synchronization situation scripts
recon.actionParam- the details of the synchronization operation in progress. This variable can be used for asynchronous callbacks to execute the action at a later stage.sourceAction- a boolean that indicates whether the situation was assessed during the source phasesource(if found)target(if found)The properties from the configured script object.
- taskScanner
input, objectID
- transform
source
- validSource
source
- validTarget
target
F.6. Debugging OpenIDM JavaScripts
OpenIDM includes Eclipse JSDT libraries so you can use Eclipse to debug your OpenIDM JavaScripts during development.
Follow these steps to enable debugging using Eclipse.
Install the environment to support JavaScript development in either of the following ways.
Download and install Eclipse IDE for JavaScript Web Developers from the Eclipse download page.
Add the JavaScript Development Tools to your existing Eclipse installation.
Create an empty JavaScript project called
External JavaScript Sourcein Eclipse.Eclipse then uses the
External JavaScript Sourcedirectory in the default workspace location to store sources that it downloads from OpenIDM.Stop OpenIDM.
Edit
openidm/conf/boot/boot.propertiesto enable debugging.Uncomment and edit the following line.
#openidm.script.javascript.debug=transport=socket,suspend=y,address=9888,trace=trueHere
suspend=yprevents OpenIDM from starting until the remote JavaScript debugger has connected. You might therefore choose to set this tosuspend=n.Uncomment and edit the following line.
#openidm.script.javascript.sources=/Eclipse/workspace/External JavaScript Source/Adjust
/Eclipse/workspace/External JavaScript Source/to match the absolute path to this folder including the trailing/character. On Windows, also use forward slashes, such asC:/Eclipse/workspace/External JavaScript Source/.Each time OpenIDM loads a new script, it then creates or overwrites the file in the
External JavaScript Sourcedirectory. Before toggling breakpoints, be sure to refresh the source manually in Eclipse so you have the latest version.
Edit the
openidm/conf/script.jsonfile to enable debugging. Specifically, uncomment and edit the following line:"#javascript.debug": "transport=socket,suspend=y,address=9888,trace=true",Prepare the Eclipse debugger to allow you to set breakpoints.
In the Eclipse Debug perspective, select the Breakpoints tab, and then click the Add Script Load Breakpoint icon to open the list of scripts.
In the Add Script Load Breakpoint window, select your scripts, and then click OK.
Start OpenIDM, and connect the debugger.
To create a new debug, configuration click Run > Debug Configurations... > Remote JavaScript > New button, and then set the port to 9888 as shown above.
F.7. Validating Scripts Over REST
OpenIDM exposes a script endpoint over which scripts can
be validated, by specifying the script parameters as part of the JSON
payload. This functionality enables you to test how a script will operate in
your deployment, with complete control over the inputs and outputs. Testing
scripts in this way can be useful in debugging.
In addition, the script service enables you to call out to other scripts (even scripts written in a different language, such as from JavaScript to Groovy). For example, you might have logic written in Javascript, but also some code available in Groovy. Ordinarily, it would be challenging to interoperate between these two environments, but this script service enables you to call one from the other on the OpenIDM router.
Scripts called over the script endpoint have access to
the "openidm" and "context" objects.
The only supported action on the script endpoint is
eval, so scripts can not be launched from this endpoint,
but merely evaluated. The last statement that is executed is the value
produced by the script, and the expected result of the REST call.
The following REST call attempts to evaluate the
autoPurgeAuditRecon.js script (provided in
openidm/bin/defaults/script/audit), but provides an
incorrect purge type ("purgeByNumOfRecordsToKeep" instead
of "purgeByNumOfReconsToKeep"). The error is picked up in
the evaluation. The example assumes that the script exists in the directory
reserved for custom scripts (openidm/script).
$ curl \
--cacert self-signed.crt \
--header "X-OpenIDM-Username: openidm-admin" \
--header "X-OpenIDM-Password: openidm-admin" \
--header "Content-Type: application/json" \
--request POST \
--data '{
"type": "text/javascript",
"file": "script/autoPurgeAuditRecon.js",
"globals": {
"input": {
"mappings": ["%"],
"purgeType": "purgeByNumOfRecordsToKeep",
"numOfRecons": 1
}
}
}' \
"https://localhost:8443/openidm/script?_action=eval"
"Must choose to either purge by expired or number of recons to keep"
Note that the variables passed into this script are namespaced with the
"globals" map. It is preferable to namespace variables
passed into scripts in this way, to avoid collisions with the top-level
reserved words for script maps, such as file,
source, and type.
Appendix G. Router Service Reference
The OpenIDM router service provides the uniform interface to all objects in OpenIDM: managed objects, system objects, configuration objects, and so on.
G.1. Configuration
The router object as shown in conf/router.json
defines an array of filter objects.
{
"filters": [ filter object, ... ]
}The required filters array defines a list of filters to be processed on each router request. Filters are processed in the order in which they are specified in this array.
G.1.1. Filter Objects
Filter objects are defined as follows.
{
"pattern": string,
"methods": [ string, ... ],
"condition": script object,
"onRequest": script object,
"onResponse": script object,
"onFailure": script object
}- "pattern"
string, optional
Specifies a regular expression pattern matching the JSON pointer of the object to trigger scripts. If not specified, all identifiers (including
null) match. Pattern matching is done on the resource name, rather than on individual objects.- "methods"
array of strings, optional
One or more methods for which the script(s) should be triggered. Supported methods are:
"create","read","update","delete","patch","query","action". If not specified, all methods are matched.- "condition"
script object, optional
Specifies a script that is called first to determine if the script should be triggered. If the condition yields
"true", the other script(s) are executed. If no condition is specified, the script(s) are called unconditionally.- "onRequest"
script object, optional
Specifies a script to execute before the request is dispatched to the resource. If the script throws an exception, the method is not performed, and a client error response is provided.
- "onResponse"
script object, optional
Specifies a script to execute after the request is successfully dispatched to the resource and a response is returned. Throwing an exception from this script does not undo the method already performed.
- "onFailure"
script object, optional
Specifies a script to execute if the request resulted in an exception being thrown. Throwing an exception from this script does not undo the method already performed.
G.1.2. Script Execution Sequence
All "onRequest" and "onResponse" scripts are executed in sequence. First, the "onRequest" scripts are executed from the top down, then the "onResponse" scripts are executed from the bottom up.
client -> filter 1 onRequest -> filter 2 onRequest -> resource
client <- filter 1 onResponse <- filter 2 onResponse <- resource
The following sample router.json file shows the
order in which the scripts would be executed:
{
"filters" : [
{
"onRequest" : {
"type" : "text/javascript",
"file" : "script/router-authz.js"
}
},
{
"pattern" : "^managed/user",
"methods" : [
"read"
],
"onRequest" : {
"type" : "text/javascript",
"source" : "console.log('requestFilter 1');"
}
},
{
"pattern" : "^managed/user",
"methods" : [
"read"
],
"onResponse" : {
"type" : "text/javascript",
"source" : "console.log('responseFilter 1');"
}
},
{
"pattern" : "^managed/user",
"methods" : [
"read"
],
"onRequest" : {
"type" : "text/javascript",
"source" : "console.log('requestFilter 2');"
}
},
{
"pattern" : "^managed/user",
"methods" : [
"read"
],
"onResponse" : {
"type" : "text/javascript",
"source" : "console.log('responseFilter 2');"
}
}
]
}
Will produce a log like:
requestFilter 1
requestFilter 2
responseFilter 2
responseFilter 1
G.1.3. Script Scope
Scripts are provided with the following scope.
{
"openidm": openidm-functions object,
"request": resource-request object,
"response": resource-response object,
"exception": exception object
}- "openidm"
openidm-functionsobject (see Section F.3, "Function Reference").Provides access to OpenIDM resources.
- "request"
resource-request object
The resource-request context, which has one or more parent contexts. Provided in the scope of
"condition","onRequest","onResponse"and"onFailure"scripts.- "response"
openidm-functionsobject (see Section F.3, "Function Reference").The response to the resource-request. Only provided in the scope of the
"onResponse"script.- "exception"
exception object
The exception value that was thrown as a result of processing the request. Only provided in the scope of the
"onFailure"script.
An exception object is defined as follows.
{
"code": integer,
"reason": string,
"message": string,
"detail": string
}- "code"
integer
The numeric HTTP code of the exception.
- "reason"
string
The short reason phrase of the exception.
- "message"
string
A brief message describing the exception.
- "detail"
(optional), string
A detailed description of the exception, in structured JSON format, suitable for programmatic evaluation.
G.2. Example
The following example executes a script after a managed user object is created or updated.
{
"filters": [
{
"pattern": "^managed/user",
"methods": [
"create",
"update"
],
"onResponse": {
"type": "text/javascript",
"file": "scripts/afterUpdateUser.js"
}
}
]
}Appendix H. Embedded Jetty Configuration
OpenIDM 3.1 includes an embedded Jetty web server.
To configure the embedded Jetty server, edit
openidm/conf/jetty.xml. OpenIDM delegates most of the
connector configuration to jetty.xml. OSGi and PAX web specific
settings for connector configuration therefore do not have an effect. This
lets you take advantage of all Jetty capabilities, as the web server is not
configured through an abstraction that might limit some of the options.
The Jetty configuration can reference configuration properties (such as port
numbers and keystore details) from OpenIDM's
boot.properties configuration file.
H.1. Using OpenIDM Configuration Properties in the Jetty Configuration
OpenIDM exposes a Param class that you can use in
jetty.xml to include OpenIDM configuration. The
Param class exposes Bean properties for common Jetty
settings and generic property access for other, arbitrary settings.
H.1.1. Accessing Explicit Bean Properties
To retrieve an explicit Bean property, use the following syntax in
jetty.xml.
<Get class="org.forgerock.openidm.jetty.Param" name="<bean property name>"/>
For example, to set a Jetty property for keystore password:
<Set name="password">
<Get class="org.forgerock.openidm.jetty.Param" name="keystorePassword"/>
</Set>Also see the bundled jetty.xml for further
examples.
The following explicit Bean properties are available.
- port
Maps to
openidm.port.http- port
Maps to
openidm.port.https- port
Maps to
openidm.port.mutualauth- keystoreType
Maps to
openidm.keystore.type- keystoreProvider
Maps to
openidm.keystore.provider- keystoreLocation
Maps to
openidm.keystore.location- keystorePassword
Maps to
openidm.keystore.password- keystoreKeyPassword
Maps to
openidm.keystore.key.password, or the keystore password, if not set- truststoreLocation
Maps to
openidm.truststore.location, or the keystore location, if not set- truststorePassword
Maps to
openidm.truststore.password, or the keystore password, if not set
H.1.2. Accessing Generic Properties
<Call class="org.forgerock.openidm.jetty.Param" name="getProperty">
<Arg>org.forgerock.openidm.some.sample.property</Arg>
</Call>
H.2. Jetty Default Settings
By default the embedded Jetty server uses the following settings.
The HTTP, SSL, and Mutual Authentication ports defined in OpenIDM
The same keystore and truststore settings as OpenIDM
Trivial sample realm,
openidm/security/realm.propertiesto add users
The default settings are intended for evaluation only. Adjust them according to your production requirements.
H.3. Registering Additional Servlet Filters
You can register generic servlet filters in the embedded Jetty server to
perform additional filtering tasks on requests to or responses from OpenIDM.
For example, you might want to use a servlet filter to protect access to
OpenIDM with an access management product. Servlet filters are configured in
files named
openidm/conf/servletfilter-name.json.
These servlet filter configuration files define the filter class, required
libraries, and other settings.
A sample servlet filter configuration is provided in the
servletfilter-cors.json file in the
/path/to/openidm/conf directory.
The sample servlet filter configuration file is shown below:
{
"classPathURLs" : [ ],
"systemProperties" : { },
"requestAttributes" : { },
"scriptExtensions" : { }.
"initParams" : {
"allowedOrigins" : "https://localhost:8443",
"allowedMethods" : "GET,POST,PUT,DELETE,PATCH",
"allowedHeaders" : "accept,x-openidm-password,x-openidm-nosession,
x-openidm-username,content-type,origin,
x-requested-with",
"allowCredentials" : "true",
"chainPreflight" : "false"
},
"urlPatterns" : [
"/*"
],
"filterClass" : "org.eclipse.jetty.servlets.CrossOriginFilter"
}The sample configuration includes the following properties:
"classPathURLs"The URLs to any required classes or libraries that should be added to the classpath used by the servlet filter class
"systemProperties"Any additional Java system properties required by the filter
"requestAttributes"The HTTP Servlet request attributes that will be set by OpenIDM when the filter is invoked. OpenIDM expects certain request attributes to be set by any module that protects access to it, so this helps in setting these expected settings.
"scriptExtensions"Optional script extensions to OpenIDM. Currently only
"augmentSecurityContext"is supported. A script that is defined inaugmentSecurityContextis executed by OpenIDM after a successful authentication request. The script helps to populate the expected security context in OpenIDM. For example, the login module (servlet filter) might select to supply only the authenticated user name, while the associated roles and user ID can be augmented by the script.Supported script types include
"text/javascript"and"groovy". The script can be provided inline ("source":script source) or in a file ("file":filename). The sample filter extends the filter interface with the functionality in the scriptscript/security/populateContext.js."filterClass"The servlet filter that is being registered
The following additional properties can be configured for the filter:
"httpContextId"The HTTP context under which the filter should be registered. The default is
"openidm"."servletNames"A list of servlet names to which the filter should apply. The default is
"OpenIDM REST"."urlPatterns"A list of URL patterns to which the filter applies. The default is
["/openidm/*", "/openidmui/*"]."initParams"Filter configuration initialization parameters that are passed to the servlet filter
initmethod. For more information, see http://docs.oracle.com/javaee/5/api/javax/servlet/FilterConfig.html.
H.4. Disabling and Enabling Secure Protocols
Secure communications are important. To that end, the embedded Jetty web server enables a number of different protocols. To review the list of enabled protocols, run the following commands:
$ cd /path/to/openidm/logs $ grep Enabled openidm0.log.0 openidm0.log.0:INFO: Enabled Protocols [SSLv2Hello, TLSv1, TLSv1.1, TLSv1.2] of [SSLv2Hello, SSLv3, TLSv1, TLSv1.1, TLSv1.2]
Note the difference between enabled and available protocols. Based on this
particular output, SSLv3 is missing from the list of
enabled protocols. To see how this was done, open the
jetty.xml file in the /path/to/openidm/conf directory.
Note the "ExcludeProtocols" code block shown here:
...
<Set name="ExcludeProtocols">
<Array type="java.lang.String">
<Item>SSLv3</Item>
</Array>
</Set>
...Note
As noted in the following Security Advisory, "SSL 3.0 [RFC6101] is an obsolete and insecure protocol."
To exclude another protocol from the Enabled list, just
add it to the "ExcludeProtocols" XML block. For example,
if you included the following line in that XML block, your instance of
Jetty would also exclude TLSv1:
<Item>TLSv1</Item>
You can reverse the process by removing the protocol from the
"ExcludeProtocols" block.
To see if certain protocols should be included in the
"ExcludeProtocols" block, review the current list of
ForgeRock Security Advisories
For more information on Jetty configuration see the following document from the developers of Jetty: The Definitive Reference
Appendix I. Release Levels & Interface Stability
This appendix includes ForgeRock definitions for product release levels and interface stability.
I.1. ForgeRock Product Release Levels
ForgeRock defines Major, Minor, and Maintenance product release levels. The release level is reflected in the version number. The release level tells you what sort of compatibility changes to expect.
| Release Label | Version Numbers | Characteristics |
|---|---|---|
|
Major |
Version: x[.0.0] (trailing 0s are optional) |
|
|
Minor |
Version: x.y[.0] (trailing 0s are optional) |
|
|
Maintenance |
Version: x.y.z |
|
I.2. ForgeRock Product Interface Stability
ForgeRock products support many protocols, APIs, GUIs, and command-line interfaces. Some of these interfaces are standard and very stable. Others offer new functionality that is continuing to evolve.
ForgeRock acknowledges that you invest in these interfaces, and therefore must know when and how ForgeRock expects them to change. For that reason, ForgeRock defines interface stability labels and uses these definitions in ForgeRock products.
| Stability Label | Definition |
|---|---|
|
Stable |
This documented interface is expected to undergo backwards-compatible changes only for major releases. Changes may be announced at least one minor release before they take effect. |
|
Evolving |
This documented interface is continuing to evolve and so is expected to change, potentially in backwards-incompatible ways even in a minor release. Changes are documented at the time of product release. While new protocols and APIs are still in the process of standardization, they are Evolving. This applies for example to recent Internet-Draft implementations, and also to newly developed functionality. |
|
Deprecated |
This interface is deprecated and likely to be removed in a future release. For previously stable interfaces, the change was likely announced in a previous release. Deprecated interfaces will be removed from ForgeRock products. |
|
Removed |
This interface was deprecated in a previous release and has now been removed from the product. |
|
Technology Preview |
Technology previews provide access to new features that are evolving new technology that are not yet supported. Technology preview features may be functionally incomplete and the function as implemented is subject to change without notice. DO NOT DEPLOY A TECHNOLOGY PREVIEW INTO A PRODUCTION ENVIRONMENT. Customers are encouraged to test drive the technology preview features in a non-production environment and are welcome to make comments and suggestions about the features in the associated forums. ForgeRock does not guarantee that a technology preview feature will be present in future releases, the final complete version of the feature is liable to change between preview and the final version. Once a technology preview moves into the completed version, said feature will become part of the ForgeRock platform. Technology previews are provided on an “AS-IS” basis for evaluation purposes only and ForgeRock accepts no liability or obligations for the use thereof. |
|
Internal/Undocumented |
Internal and undocumented interfaces can change without notice. If you depend on one of these interfaces, contact ForgeRock support or email info@forgerock.com to discuss your needs. |
OpenIDM Glossary
- JSON
JavaScript Object Notation, a lightweight data interchange format based on a subset of JavaScript syntax. For more information, see the JSON site.
- JWT
JSON Web Token. As noted in the JSON Web Token draft IETF Memo, "JSON Web Token (JWT) is a compact URL-safe means of representing claims to be transferred between two parties." For OpenIDM, the JWT is associated with the
JWT_SESSIONauthentication module.- managed object
An object that represents the identity-related data managed by OpenIDM. Managed objects are configurable, JSON-based data structures that OpenIDM stores in its pluggable repository. The default configuration of a managed object is that of a user, but you can define any kind of managed object, for example, groups or roles.
- mapping
A policy that is defined between a source object and a target object during reconciliation or synchronization. A mapping can also define a trigger for validation, customization, filtering, and transformation of source and target objects.
- OSGi
A module system and service platform for the Java programming language that implements a complete and dynamic component model. For a good introduction, see the OSGi site. OpenIDM services are designed to run in any OSGi container, but OpenIDM currently runs in Apache Felix.
- reconciliation
During reconciliation, comparisons are made between managed objects and objects on source or target systems. Reconciliation can result in one or more specified actions, including, but not limited to, synchronization.
- resource
An external system, database, directory server, or other source of identity data to be managed and audited by the identity management system.
- REST
Representational State Transfer. A software architecture style for exposing resources, using the technologies and protocols of the World Wide Web. REST describes how distributed data objects, or resources, can be defined and addressed.
- source object
In the context of reconciliation, a source object is a data object on the source system, that OpenIDM scans before attempting to find a corresponding object on the target system. Depending on the defined mapping, OpenIDM then adjusts the object on the target system (target object).
- synchronization
The synchronization process creates, updates, or deletes objects on a target system, based on the defined mappings from the source system. Synchronization can be scheduled or on demand.
- system object
A pluggable representation of an object on an external system. For example, a user entry that is stored in an external LDAP directory is represented as a system object in OpenIDM for the period during which OpenIDM requires access to that entry.System objects follow the same RESTful resource-based design principles as managed objects.
- target object
In the context of reconciliation, a target object is a data object on the target system, that OpenIDM scans after locating its corresponding object on the source system. Depending on the defined mapping, OpenIDM then adjusts the target object to match the corresponding source object.
Index
A
- Architecture, Architectural Overview
- Audit logs, Using Audit Logs
- Authentication, Managing Authentication, Authorization and Role-Based Access Control
- Internal users, OpenIDM Users
- Managed users, OpenIDM Users
- Roles, Roles and Authentication
- Authorization, Managing Authentication, Authorization and Role-Based Access Control, Authorization
B
- Best practices, Securing & Hardening OpenIDM, OpenIDM Project Best Practices
- Business processes, Integrating Business Processes and Workflows
C
- cluster management, Configuring OpenIDM to Work in a Cluster
- Configuration
- Email, Sending Email
- Files, File Layout
- Objects, OpenIDM Configuration Objects
- REST API, Configuring OpenIDM Over REST
- Validating, validate
- Connectors, Connecting to External Resources
- Generating configurations, Creating Default Connector Configurations
- Object types, Configuring Connectors
- Remote, Accessing Remote Connectors
- Correlation queries, Correlation Queries
D
- Data
- accessing, Accessing Data Objects
E
- Encryption, Encrypt Data Internally and Externally, Replace Default Security Settings
- External REST, Accessing External REST Services
F
- failover, Configuring OpenIDM to Work in a Cluster
- File layout, File Layout
H
- healthcheck, Verifying the Health of an OpenIDM System
- high availability, Configuring OpenIDM to Work in a Cluster
K
- Keytool, keytool
L
- LiveSync, Types of Synchronization
- Scheduling, Scheduling Synchronization
M
- Mappings, Core Services, Synchronization Mappings File
- Hooks for scripting, Advanced Data Flow Configuration
- Scheduled reconciliation, Alternative Mappings
O
- Objects
- Audit objects, Audit Objects
- Configuration objects, OpenIDM Configuration Objects
- Links, Links
- Managed objects, Core Services, Flexible Data Model, Managed Users, Managed Objects, REST API Reference
- Customizing, Custom Managed Objects
- Identifiers, Object Identifiers
- Passwords, Enforcing Password Policy
- Object types, Data Models and Objects Reference
- Script access, Accessing Data Objects by Using Scripts, Function Reference
- System objects, Core Services, System Objects
- OpenICF, Connecting to External Resources
P
- Passwords, Managing Passwords, Replace Default Security Settings
- Policies, Using Policies to Validate Data
- Ports
- 8080, Ports Used
- 8443, Ports Used
- 8444, Ports Used
- Disabling, Secure Jetty
R
- Reconciliation, Core Services, Types of Synchronization
- Scheduling, Scheduling Synchronization
- Resources, Connecting to External Resources
- REST API, Configuring OpenIDM Over REST, REST API Reference
- Listing configuration objects, Configuring OpenIDM Over REST
- Roles, Roles and Authentication
- Router service, Router Service Reference
S
- Schedule
- Examples, Schedule Examples
- Scheduler, Scheduling Synchronization, Scheduling Tasks and Events
- Configuration, Scheduler Configuration
- Scheduling tasks, Scheduling Tasks and Events
- Scripting, Scripting Reference
- Functions, Function Reference
- Security, Securing & Hardening OpenIDM
- Authentication, Use Message Level Security
- Encryption, Encrypt Data Internally and Externally, Replace Default Security Settings
- SSL, Use SSL and HTTPS
- Sending mail, Sending Email
- Server logs, Configuring Server Logs
- Starting OpenIDM, To Start and Stop OpenIDM
- Stopping OpenIDM, To Start and Stop OpenIDM
- Synchronization, Core Services, Configuring Synchronization, Synchronization Reference
- Actions, Synchronization Situations and Actions
- Conditions, Synchronization Mappings File
- Connectors, Connector Configuration Files
- Correlation queries, Correlation Queries
- Creating attributes, Synchronization Mappings File, Constructing and Manipulating Attributes
- Direct (push), Types of Synchronization
- Encryption, Using Encrypted Values
- Filtering, Synchronization Mappings File
- Mappings, Synchronization Mappings File
- Passwords, Creating a Password History Policy, Password Synchronization
- Using OpenIDM, Password Synchronization
- With Active Directory, Password Synchronization
- With OpenDJ, Password Synchronization
- Reusing links, Reusing Links
- Scheduling, Scheduling Synchronization
- Situations, Synchronization Situations and Actions
- Transforming attributes, Synchronization Mappings File
T
- Troubleshooting, Troubleshooting