A simple authentication node for ForgeRock's Access Manager 7.0 and above.
Onfido is the new identity standard for the internet. Our AI-based technology assesses whether a user’s government-issued ID is genuine or fraudulent, and then compares it against their facial biometrics. Onfido helps end users bring their Physical Identities to the Digital World providing it's customers with a higher level of assurance of their end users.
Once built and dropped into ForgeRock, 2 nodes will be available.
- Onfido Registration Node
- Onfido Check node
Download the latest version of the Onfido integration jar from here.
Copy the jar file to the WEB-INF/lib/ folder where AM is deployed.
Restart the AM for the new plug-in to become available.
Onfido Registration Node
Collects and sends the document and, optionally, biometrics to the Onfido Back end. This node also uses Onfido's Autofill endpoint to get the User Attributes off the document for possible provisioning later.
Onfido Webhook Node
Retrieves the Identity Verification Report from Onfido and update the users profile accordingly.
The Onfido/ForgeRock integration user journey supports both Registration as a Service and higher level of assurance use cases. For Registration as a Service, end users do not yet have an identity provisioned in the ForgeRock platform.
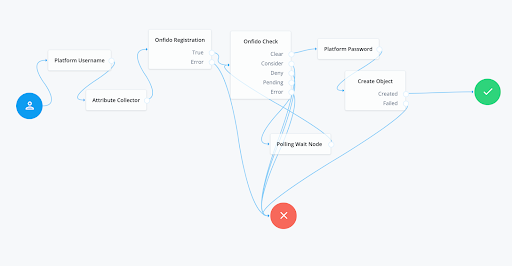
The Tree should be configured as above. The basic flow is as follows.
The Page Node, with its sub-nodes, gathers any required attributes needed to create a new identity such as e-mail, username, and password.
The Onfido Registration Node initiates the JavaScript SDK on the Access Manage Login page. The Onfido Web SDK takes over, guiding the user through the Onfido Identity Verification Flow. (See screenshots at bottom for this flow.)
After running through the Onfido Registration Node, the Create Object will create a resource with the information gathered by the previous nodes. And, the user will be automatically logged in once this flow succeeds.
Note: The Onfido Registration Node will overwrite attributes specified in the Attribute Map with the values read from the document the end user uploads. (See Configuration section below for list of document attributes available for mapping.)

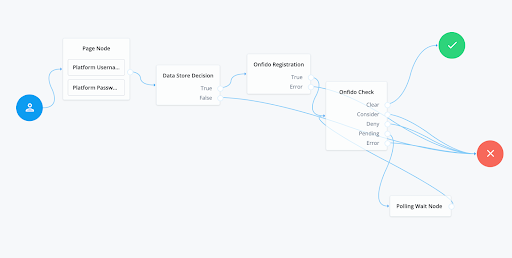
The Tree should be configured as above.
This tree/user journey is built for a user who is already logged in and needs to be redirected through the Onfido Identity Verification. This is used when a user already has an identity in the ForgeRock Platform, but a higher level of assurance is needed on the account. For example, a user who has signed up for a digital identity for a bank to review and track offers, but has now decided to sign up for a checking or savings account. In this case, the user is already known, but no assurance can be attached to the account. Pushing the logged in user through the tree above will start the process of attaching a higher level of assurance to the account.
Collects and sends the document and, optionally, biometrics to the Onfido Back end. This node also uses Onfido's Autofill endpoint to get the User Attributes off the document for possible provisioning later.
| Configuration Name | Explanation |
|---|---|
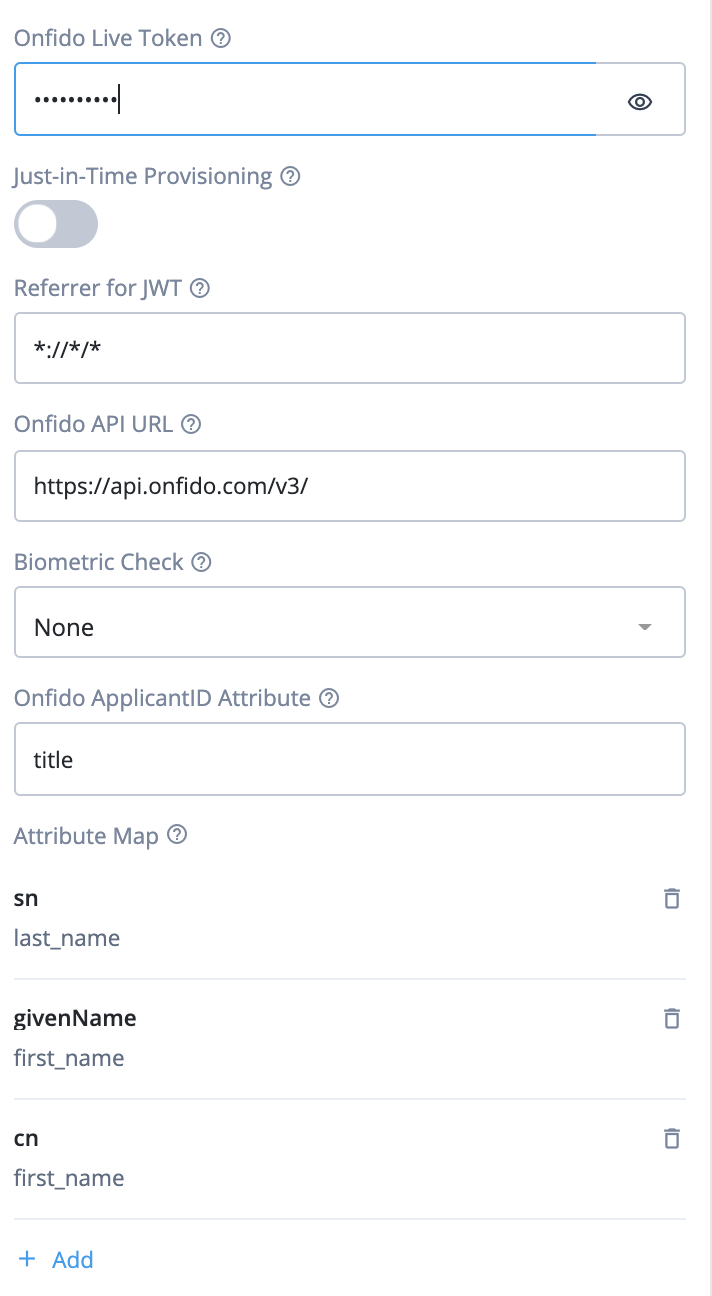
| Live Token | The Onfido Registration Node needs a Live Token Provided by Onfido. To get this Token please go to the Onfido Dashboard at https://onfido.com/dashboard/ and navigate to the Token tab. |
| Just in Time Provisioning | JIT Provisioning should be turned On for the RaaS Use Case. It should be turned Off for the Level of Assurance Use Case. It is used to initiate the creation of the Shared Object used by the Create Object Node, thus is only needed in Registration as a Service use cases. |
| Referrer for JWT | Boolean value; if true, will create JSON object to pass to the Dynamic Provisioning Account Node. |
| Onfido API URL | Regional base URL for performing Onfido API calls. |
| BioMetric Check | This is used to tell the Web SDK which type of check it should initiate: document-only, document-and-face, or document-and-video. |
| Attribute Mapping Configuration | This is used to map the attributes that come from the Onfido AutoFill endpoint to object attributes inside the ForgeRock platform. The key is the ForgeRock IDM attribute, while the value is the Onfido attribute. |
| Onfido ApplicantID Attribute* | The IDM attribute that should be used to store the Onfido Applicant ID for matching up the Identity Verification Report when it comes in. |
| Use Modal Window | Turns the SDK into a modal, which fades the background and puts the SDK into a contained box. The default value is false. |
| Show Welcome Step | Disabling this option will skip the initial Welcome step |
| Messages | Messages on the Onfido user flow that can be customized |
| Document Types | Optional. List of identity types accepted. Examples are national_identity_card, driving_licence, passport, residence_permit |
| Document Country | Optional. Predefine issuing country of accepted document. Use API country codes (ie CAN) |
| Send Date of birth | Optional. Includes a date of birth from the shared state attributes to send with the application for data comparison |
| Date of birth Attribute name | The attribute that contains the date of birth. |
| Date of birth Format | The format of the Date of birth field (Default yyyy-MM-dd) - java.time.format.DateTimeFormatter |
| customUI content | This is additional JSON content that will be injected into the customUI API Initialization options. (JSON Object) See https://documentation.onfido.com/sdk/web/#ui-customization |
| Onfido Check ID Attribute | Attribute to store check ID returned by Onfido |
*Note: In a production system, the Onfido ApplicantID Attribute should be a new string attribute added to the IDM schema for use by the Onfido Registration node. The screenshots in this README show this attribute as title, but any attribute name can be used.
The Attribute Mapping Configuration tells the Registration Node how to map information retrieved from an uploaded document to attributes in ForgeRock IDM. The table here lists the possible Onfido attributes for mapping. Note that not every document will return all attributes listed.
| Onfido Attribute | Description |
|---|---|
| document_number | The official document number |
| first_name | First Name |
| last_name | Last Name |
| middle_name | Middle Name |
| full_name | Full Name |
| spouse_name | Spouse Name (for French Documents) |
| window_name | Widow Name (for French Documents) |
| alias_name | Alias Name (for French Documents) |
| gender | Value will be one of Male or Female |
| date_of_birth | Date of Birth in YYYY-MM-DD format |
| date_of_expiry | Date of Birth in YYYY-MM-DD format |
| nationality | Nationality, given as a 3-letter ISO code |
| mrz_line_1 | Line 1 of MRZ |
| mrz_line_2 | Line 2 of MRZ |
| mrz_line_3 | Line 3 of MRZ |
| address_line_1 | Line 1 of Address (Usually Street in U.S. Address) |
| address_line_2 | Line 2 of Address (Usually Apt or Bldg in U.S. Address) |
| address_line_3 | Line 3 of Address (Usually City in U.S. Address) |
| address_line_4 | Line 4 of Address (Usually Postal Code in U.S. Address) |
| address_line_5 | Line 5 of Address (Usually State/Province in U.S. Address) |
Gets information of an Onfido check to determine if it completed, and the status of that completion.
| Configuration Name | Explanation |
|---|---|
| Live Token | The Onfido Registration Node needs a Live Token Provided by Onfido. To get this Token please go to the Onfido Dashboard at https://onfido.com/dashboard/ and navigate to the Token tab. |
| Onfido API URL | The Onfido API Url to send API requests to |
| Onfido Check ID Attribute | The IDM attribute that should be used to store the Onfido Applicant ID for matching up the Identity Verification Report when it comes in. |
The Onfido Webhook Node/Tree is used to receive the report from Onfido. This is available in the on prem release.
The tree also finds and updates the user inside of ForgeRock that corresponds to the Report. If you are familiar with ForgeRock, normally Trees are used to log users in and provide SSOTokens. But, when called with specific Query Params, you can send information through a tree without returning an SSO Token. This is very important, and the configuration steps below must be followed to make sure that an SSO Token is not created for this flow.

| Configuration Name | Explanation |
|---|---|
| Live Token | The Onfido Registration Node needs A Live Token Provided by Onfido. To get this Token please go to the Onfido Dashboard at https://onfido.com/dashboard/ and navigate to the Token tab. |
| Onfido Webhook Token | Used to check the HMAC signature of the calls coming in from Onfido |
| Lockout User | If a user fails verification, should the user be locked out? If LockOut is turned On, then not only is the user account deactivated, but all current sessions by that user will be deactivated immediately as well. |
| Onfido Pass/Fail Flag Attribute | Used to store if Identity Verification was passed or failed. |
| Onfido ApplicantID Attribute | LDAP Attribute used to store Onfido ApplicantID for matching up the Identity Verification Report when it comes in. |
| Onfido Breakdowns | Allows you to customize which of the Onfido Report Breakdowns are evaluated |
Note:
There is a small disparity between the Onfido Registration Node and the Onfido Webhook Node.
- The Onfido Applicant ID Attribute in the Registration Node is an IDM Attribute
- The Onfido Applicant ID Attribute in the Webhook Node is the related LDAP Attribute
You will need to ensure that your LDAP User Attributes in DS include the attribute used to store the results from the Onfido Webhook Node.
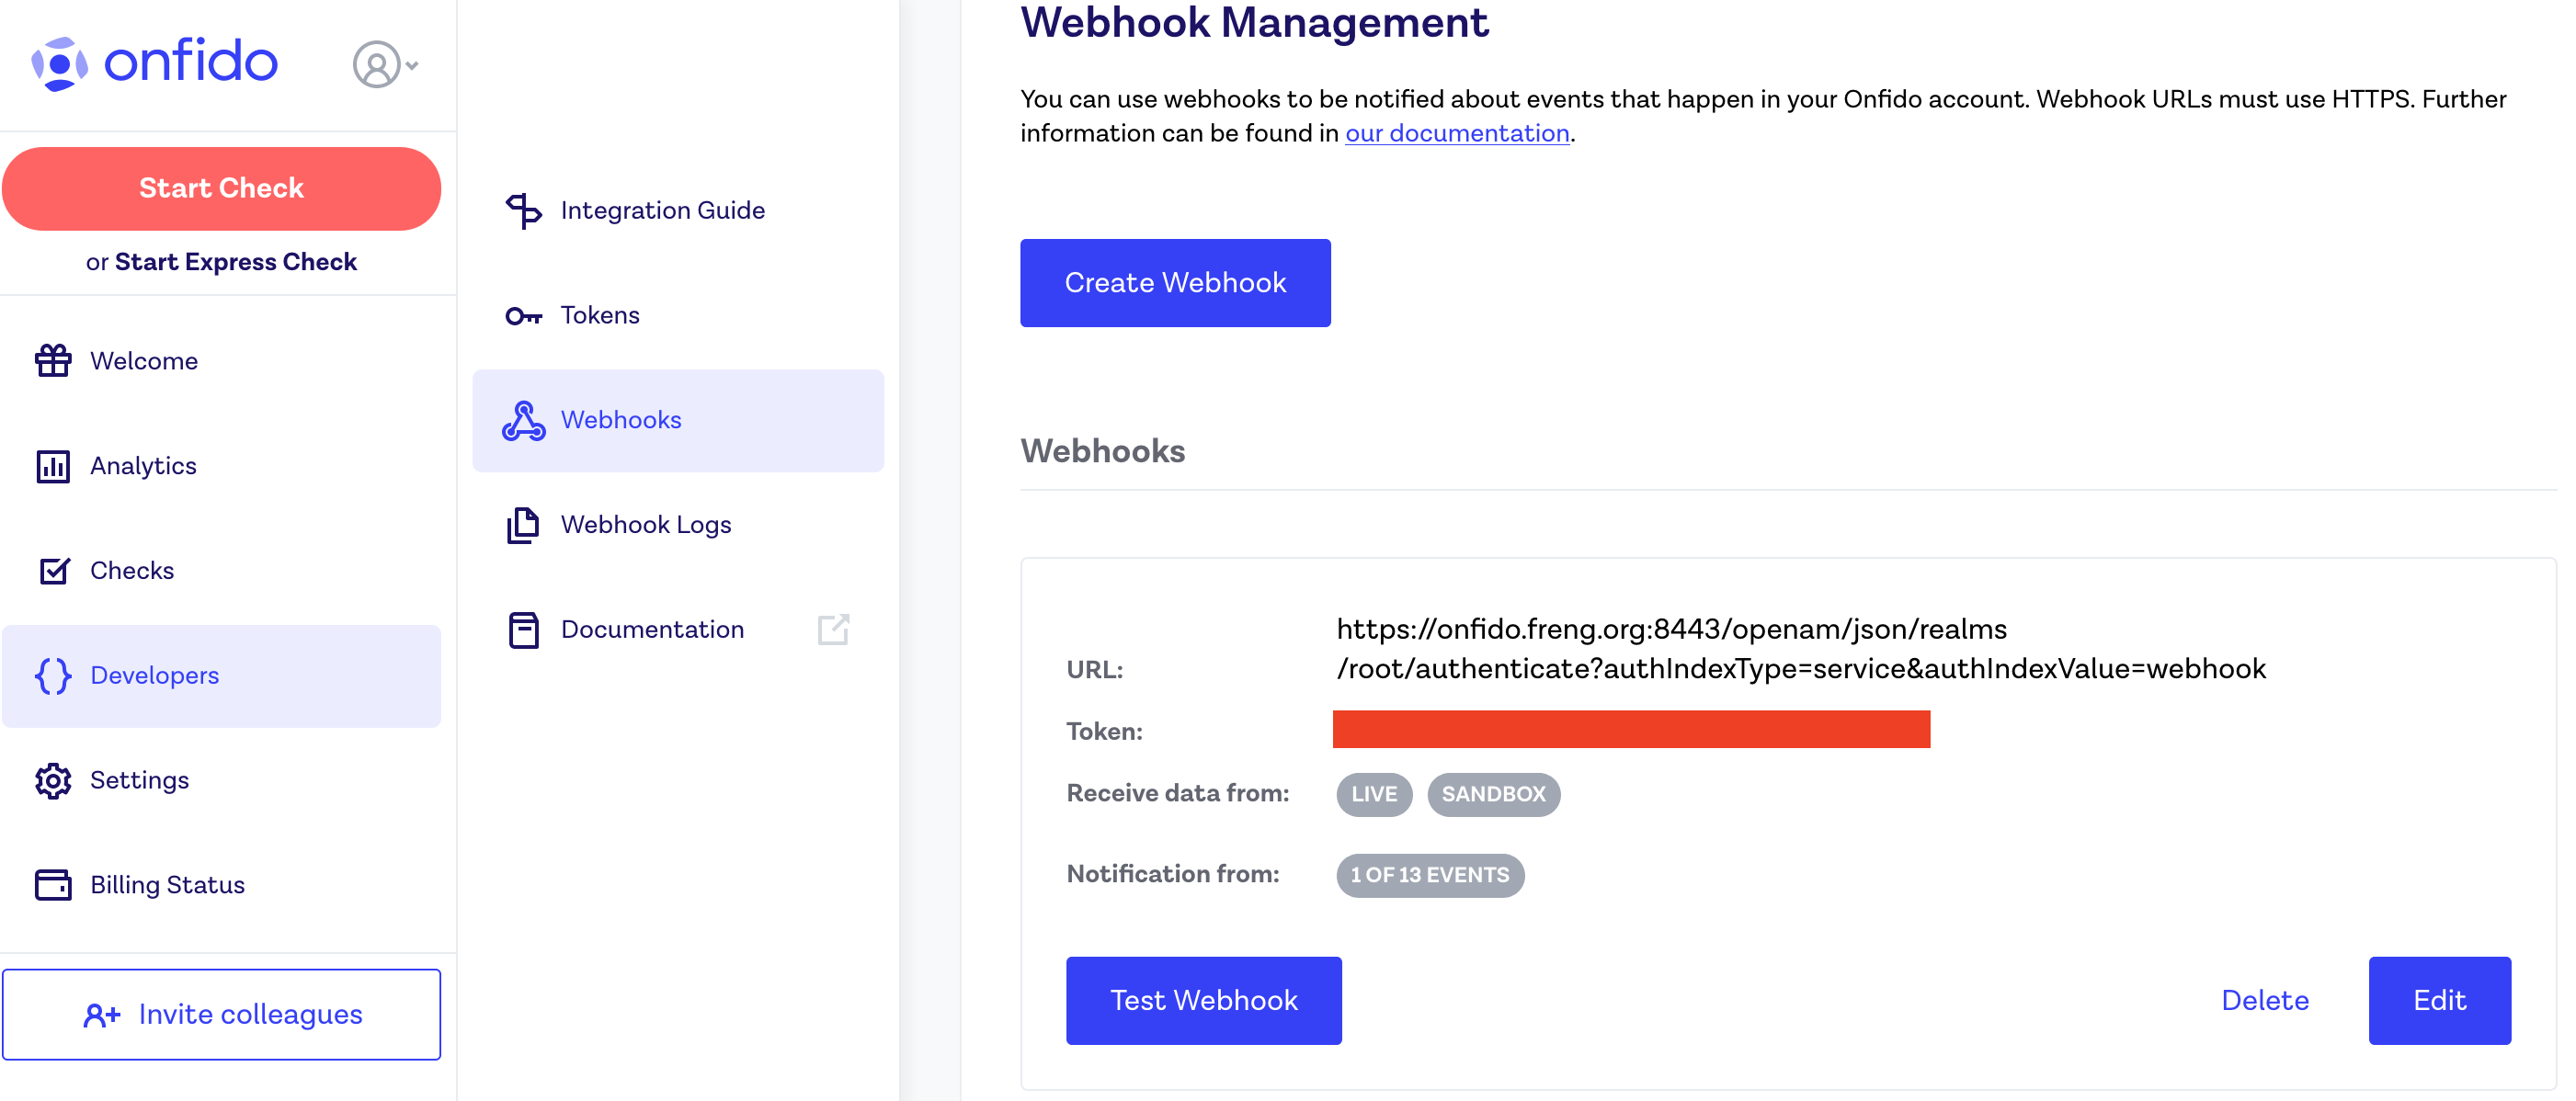
In the Onfido Dashboard:
Go to Developers, then Webhooks to configure a new webhook. The token, which is covered by a red block above, is the webhook token needed by the webhook node. To generate one, click on the button that says Create Webhook. A screen like the one below will pop up.

Fill out the URL like below, using your own url and making sure to have noSession=true in the url. This will ensure that an SSOToken is not created.
https://{{openam_hostname}}/openam/json/realms/root/authenticate?authIndexType=service&authIndexValue={webhookTreeName}&noSession=true
Also make sure to uncheck everything except for the Check Completed option. This is the only notification the webhook tree/node needs.
After clicking save you will be returned to the screen from the first screen shot in this section, and you will be able to use the generated webhook token to configure the webhook node.
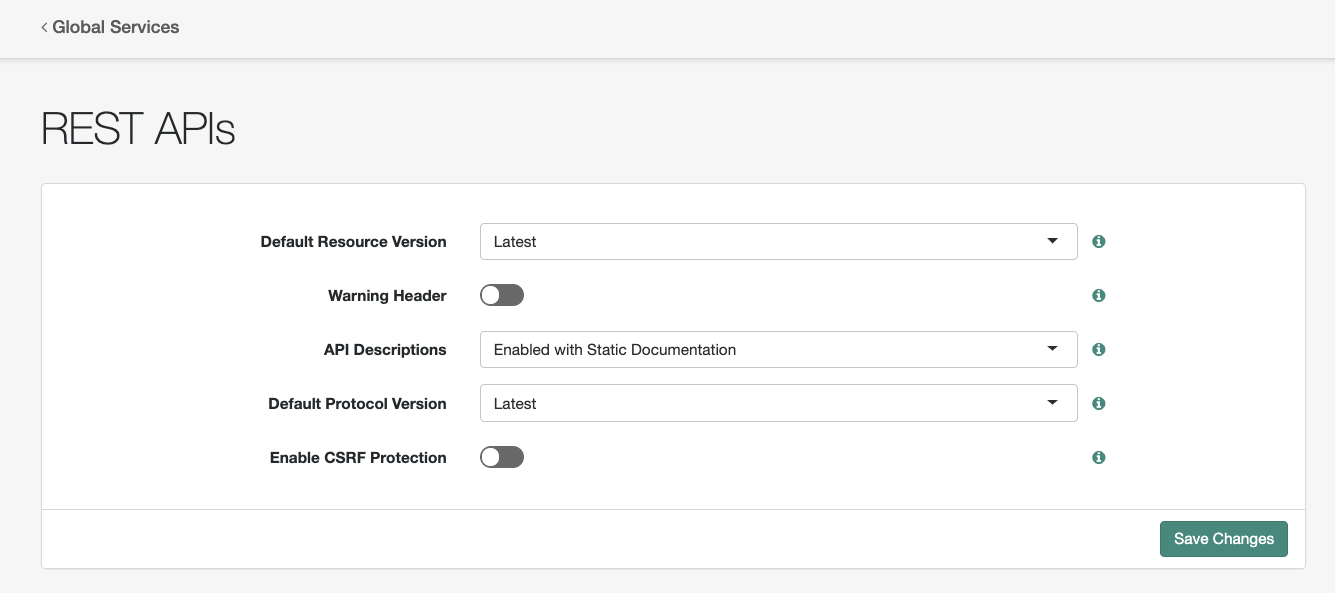
Finally, login to the Access Management Console and navigate to Configure -> Global Services -> REST APIsand disable CSRF Protection
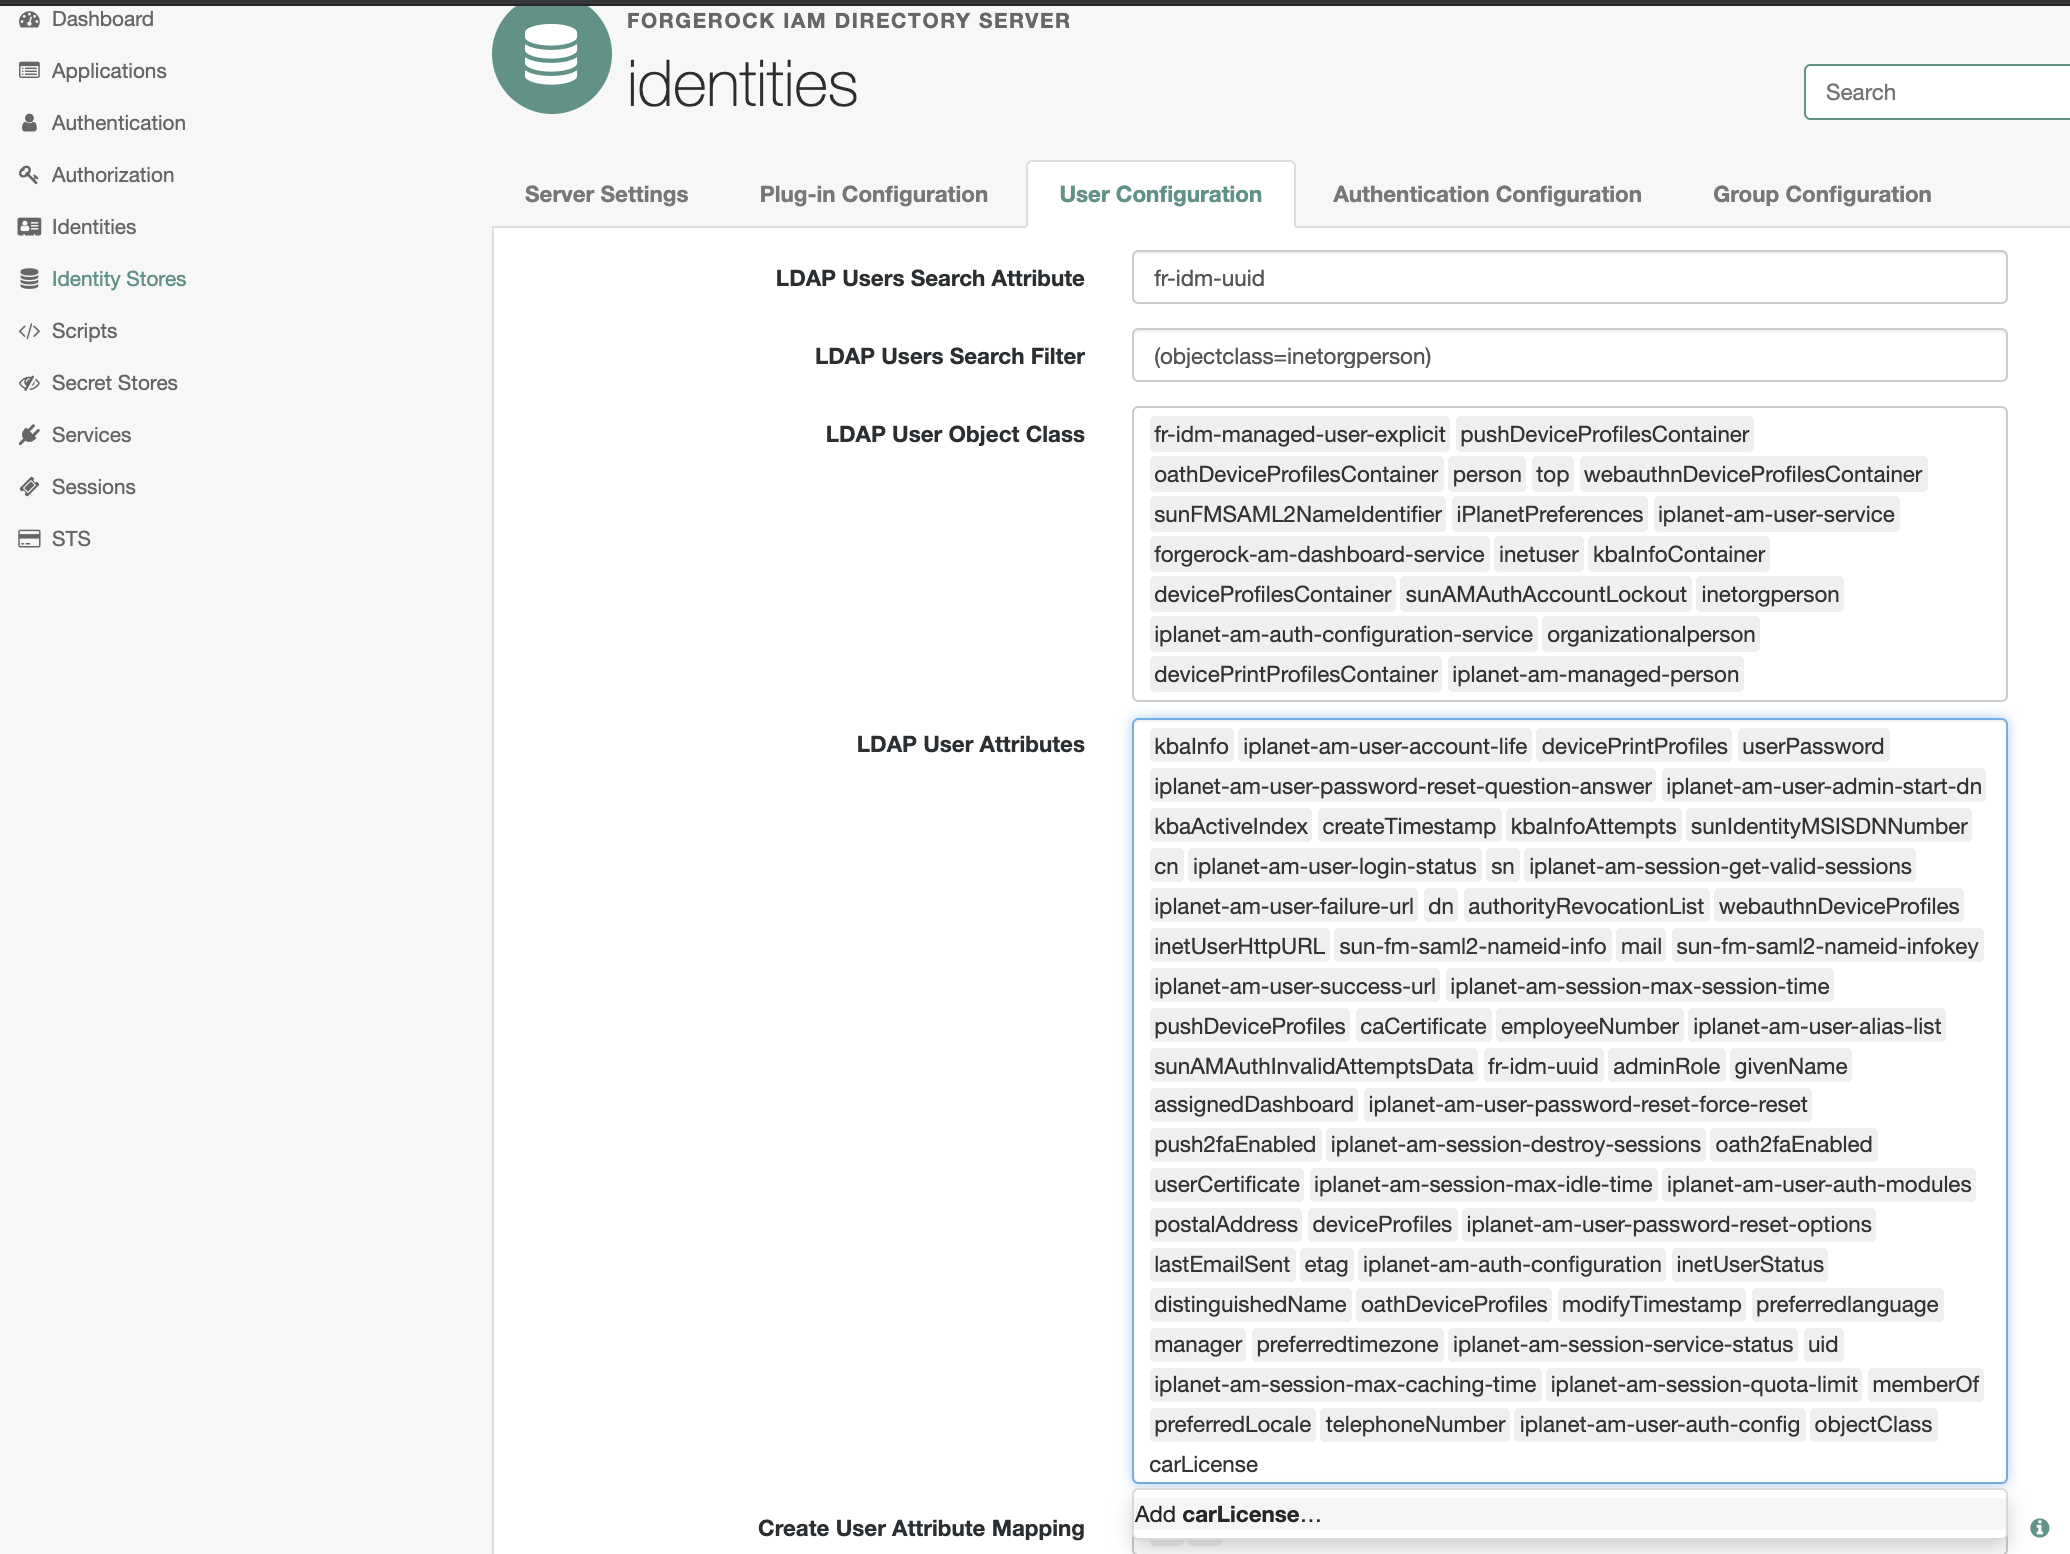
This setup will need to be done in the Access Management Native Console.
In the Access Management Native Console, click on Identity Stores in the left menu.
Select the
identitiesIdentity Store from the Identity Stores listSelect the User Configuration tab
In the LDAP User Attributes section, add the user attribute that will store the result from the Onfido Webhook Node. (In the screenshot below, the new attribute is
carLicense, but any attribute name can be used.)