Octopus Authentication is a high-assurance, passwordless authentication system engineered to address the diverse authentication needs of a real-world, working enterprise. The Secret Double Octopus solution replaces all employee passwords with a strong, password-free authentication mechanism.
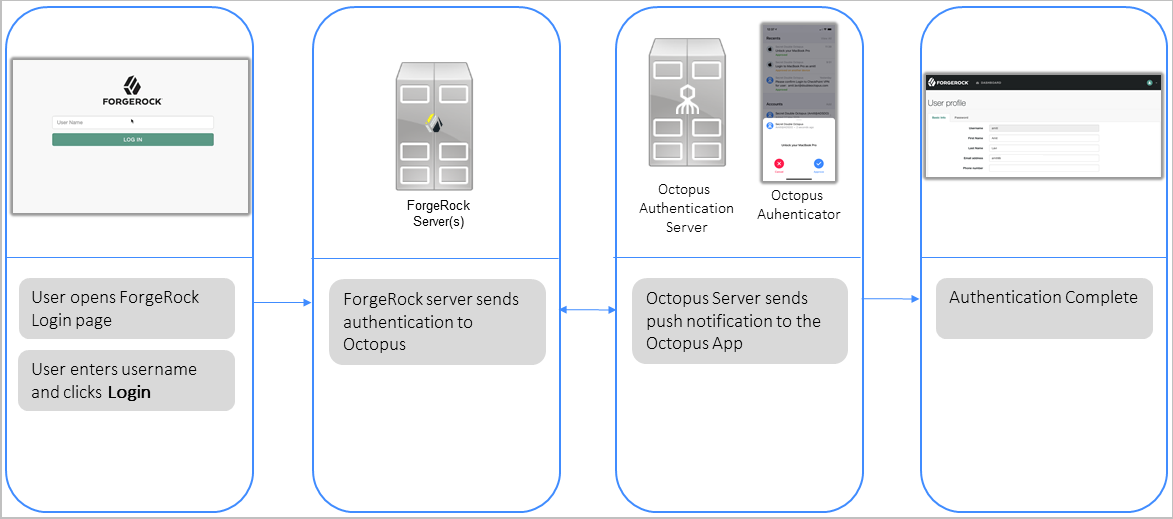
Octopus Authentication Node enhances Forgerock’s authentication capabilities by allowing users to authenticate using the Octopus Authenticator mobile app. The authentication flow is presented in the diagram below.
Octopus Authentication Node can be easily downloaded directly from ForgeRock Marketplace.
ForgeRock Authentication with Octopus Authentication Node
Before you begin, you will need to obtain installation packages for the Octopus Authentication Server and Windows Passwordless Desktop MFA from Secret Double Octopus. Please contact us at sales@doubleoctopus.com for assistance or for more information.
For assistance with technical issues, please contact support@doubleoctopus.com or frank.gasparovic@forgerock.com
Before beginning installation, verify that the following requirements have been met:
Octopus Authentication Server v4.6.4 (or higher) is installed and operating with a valid enterprise certificate (for User Portal and administrator access via HTTPS)
Users are enrolled on the Octopus Authenticator mobile app
ForgeRock is installed and operating
Octopus Authentication Node has been downloaded from ForgeRock Marketplace or directly from https://github.com/ForgeRock/Secret-Double-Octopus-Auth-Tree-Node/releases/latest
The gson.jar file has been downloaded from Google
The high-level architecture of the Octopus Authentication Node and ForgeRock integration is shown in the diagram below. The numbers in the diagram represent the authentication flow:
The user sends a login request to the ForgeRock portal.
The request goes to the ForgeRock server, which operates Octopus Authentication Node.
Octopus Authentication Node sends a REST API call to the Octopus Server.
The user is authenticated with Octopus Authenticator.
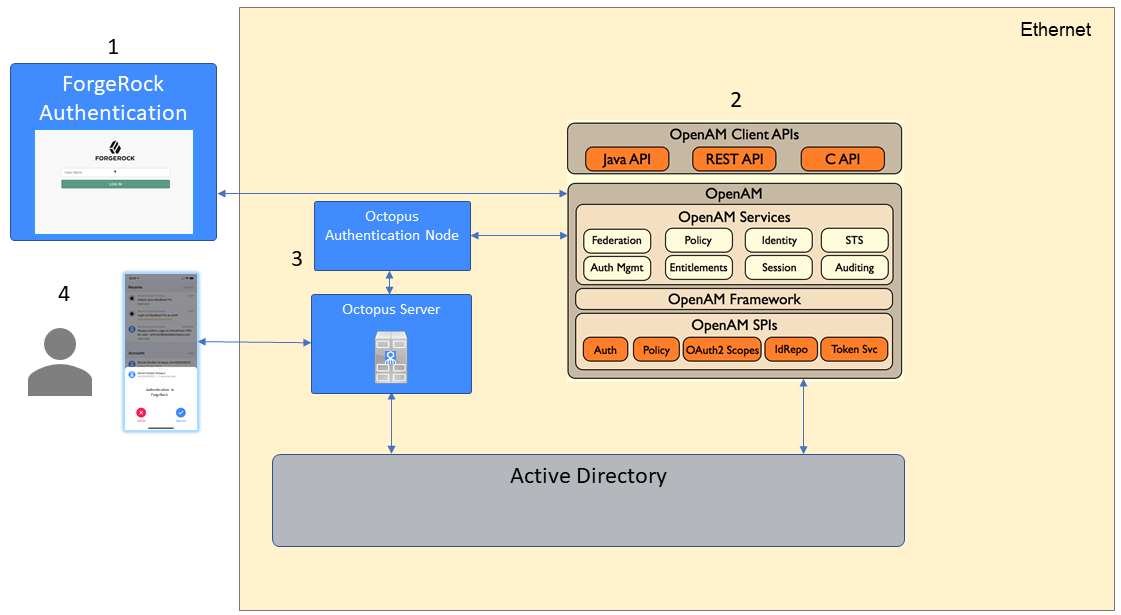
Octopus Authentication Node and ForgeRock Integration: Architecture and Flow
Before installation and configuring Octopus Authentication Node, you need to make the following preparations in the Octopus Management Console:
Integrating Your Corporate Directory
Follow the steps below to integrate your corporate directory with the Octopus Management Console.
You can integrate either an Active Directory type or a ForgeRock directory type.
To integrate your corporate Directory:
From the Octopus Management Console, open the System Settings menu and select Directories.
Click Add Directory to open the Select Directory Type dialog. From the Directory Type dropdown list, select either Active Directory or ForgeRock.

If you want directory users to be synced automatically, enable the Directory Sync toggle button. When Directory Sync is disabled (as in the example below) you will need to import users manually. (For more information, refer to the Octopus Management Console Admin Guide.)

Click Select.
The New Directory page opens.
Configure the following parameters, based on your corporate Directory settings:
Parameter Value / Notes Name Corporate Directory Server name Base DN Directory Distinguished Name; Directory top tree level, from where a server will search for users
(e.g., dc=<AD name>,dc=com)User DN Directory Administrator User DN string (e.g., cn=administrator=users, dc=<AD name>,dc=com) Password Directory Administrator Principal’s password Host Name/URL Corporate Directory URL (LDAP/LDAPS) and port Upload Certificate Directory LDAPS 64-base encoded root CA. If you are using LDAPS, click and upload the certificate file. 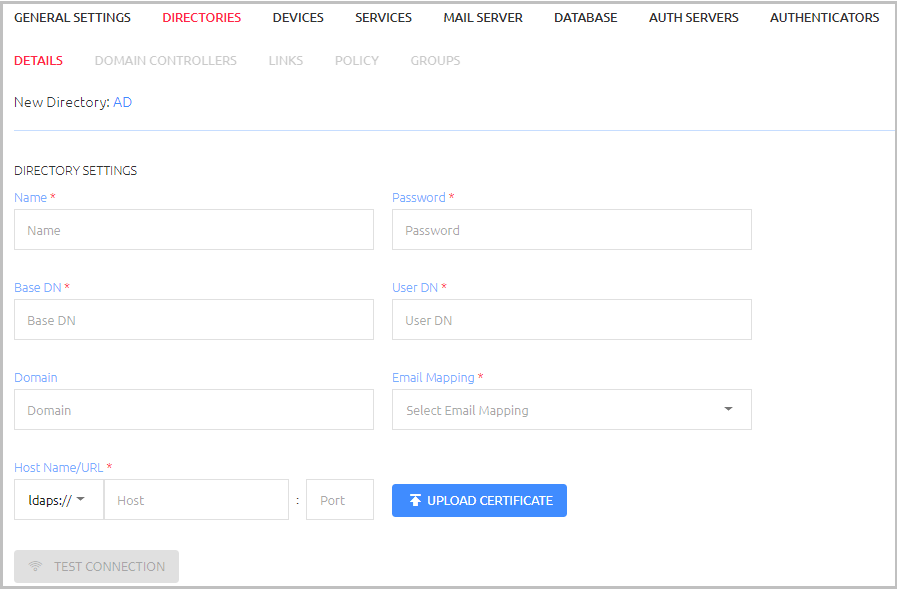
To verify your settings, click Test Connection.
At the bottom of the page, click Save.
Open the directory’s Policy tab. In the Authenticators section, verify that the Octopus Authenticator toggle button is enabled.
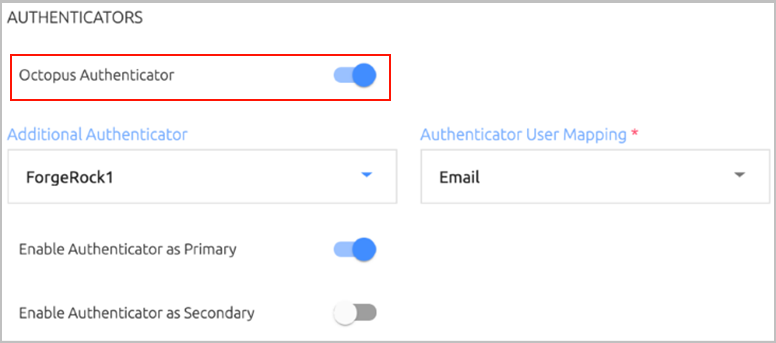
Click Save (if the Save button is enabled) and then publish your changes.
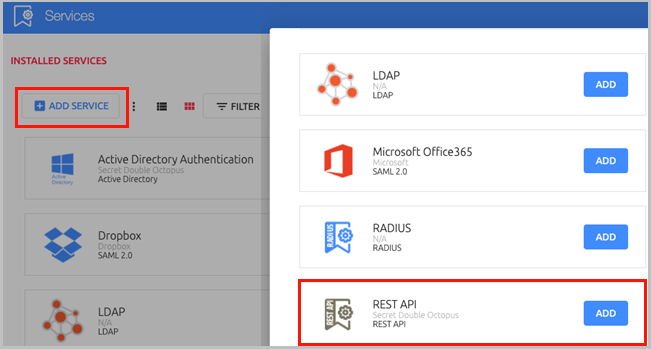
Follow the steps below to create the required REST API service and configure its settings.
To add and configure the REST API service:
From the Octopus Management Console, open the Services menu and click Add Service.
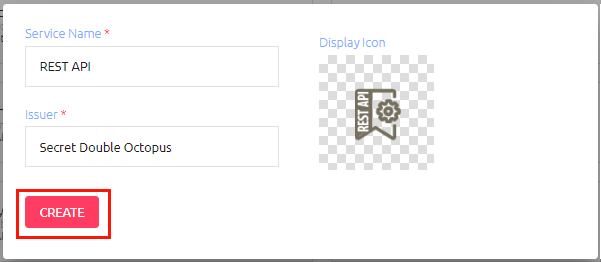
In the REST API tile, click Add.
Then, in the dialog that opens, click Create.
Review the settings in the General Info tab. If you make any changes, click Save.
Setting Value / Notes Service Name / Issuer Change the default value if desired. Description Enter a brief note about the service if desired. Display Icon This icon will be displayed on the Login page for the service. To change the default icon, click and upload the icon of your choice. 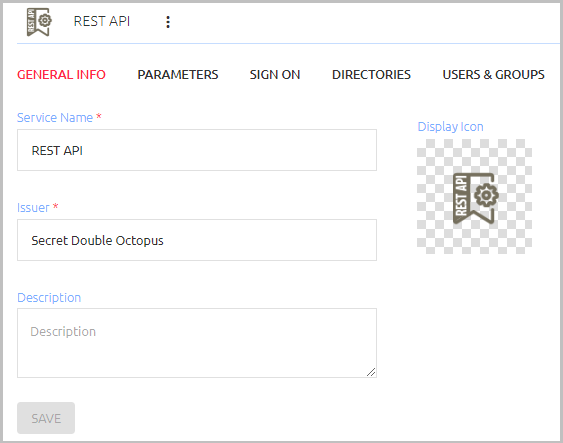
Open the Parameters tab. From the Octopus Authentication Login dropdown list, select the credential type that will be sent by the user for the authentication (usually Email).
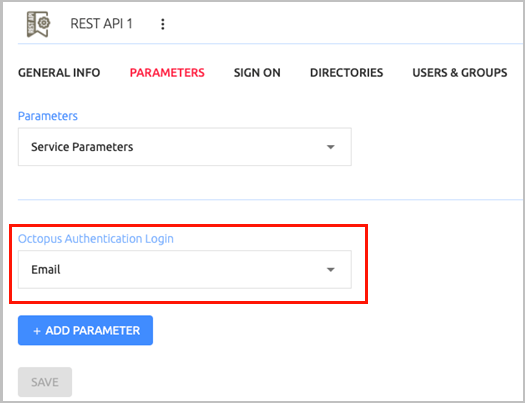
Then, click Save.
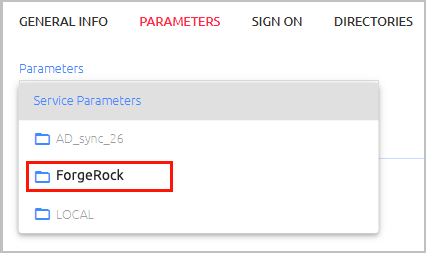
If you have integrated a ForgeRock directory type, and you want to use a ForgeRock-specific identifier for user authentication, follow these steps to override the Octopus Authentication Login parameter selected in Step 4:
a. At the top of the Parameters tab, open the Service Parameters list and select the relevant directory. For example:
Note: If the directory is disabled, enable it by opening the Directories tab, selecting the directory and clicking Save.
b. Select the checkbox next to the Octopus Authentication Login parameter. Then, open the dropdown list and select the value to override the default parameter.
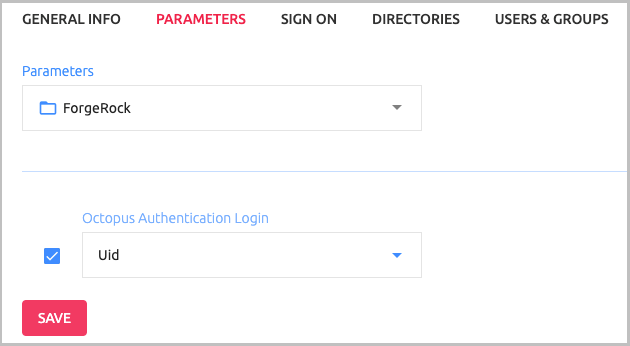
c. At the bottom of the Parameters tab, click Save.
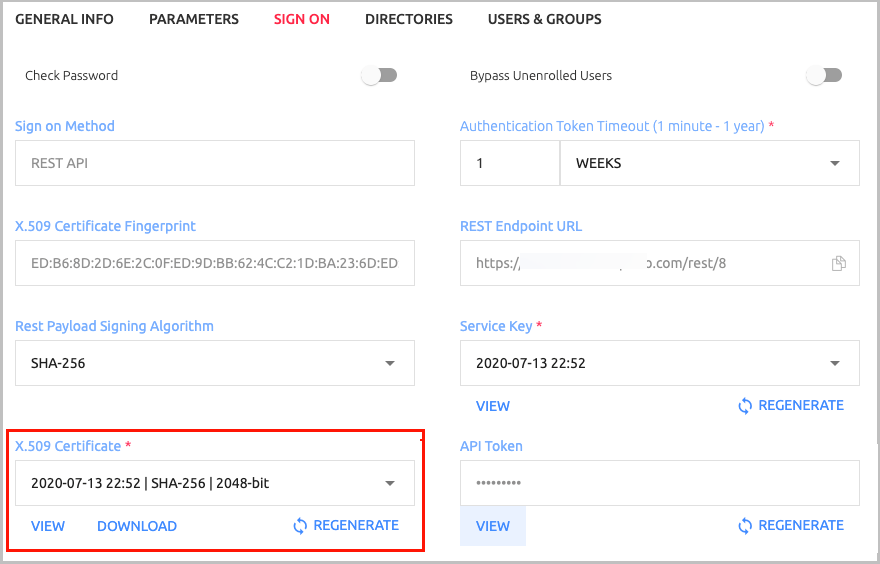
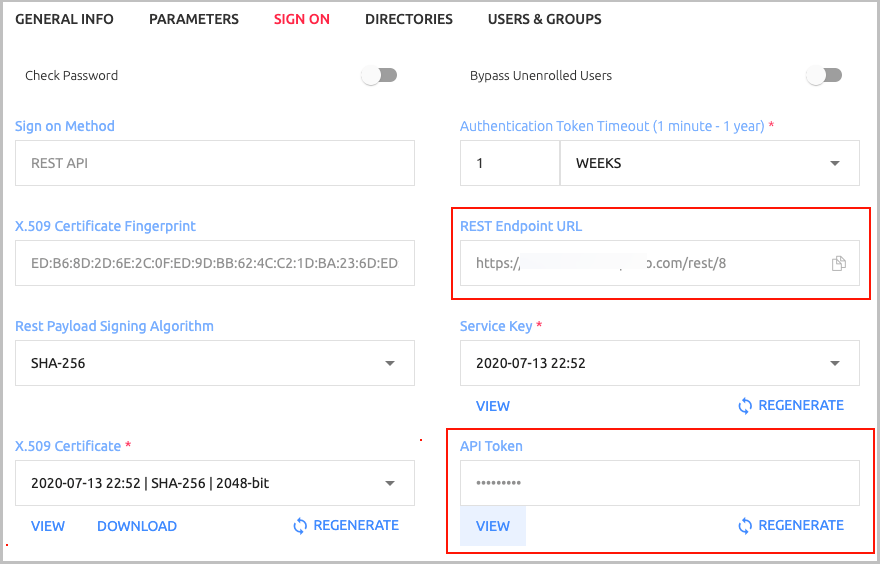
Open the Sign On tab and review the following settings:
Setting Value / Notes Rest Payload Signing Algorithm Method with which the X.509 certificate was generated. X.509 Certificate The service’s certificate file, which will be used as part of the Octopus Return Node settings. Click Download to download the file. Rest Endpoint URL Access URL from Octopus Node to the Octopus Authentication Server. API Token An identifier for the service. This Token is one of the parameters required for Octopus Node to connect to the Octopus Authentication Server. 
At the bottom of the Sign On tab, click Save.
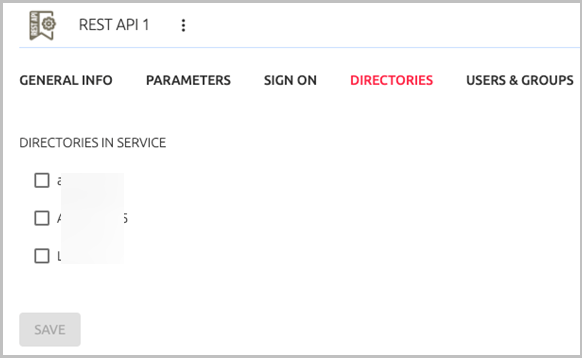
Open the Directories tab and select the directories that will be available for the service. Then, click Save.
Open the Users & Groups tab and click Add.
A popup opens, with a list of directories displayed on the left.
For each directory, select the groups and users to be added to the service.
After making your selections, click Save (in the upper right corner) to close the dialog.
The groups and users you selected are listed in the Users & Groups tab.

Click Save and then publish your changes.
Octopus Authentication Node enables authentication to ForgeRock using Octopus Authenticator. When the node is added to your realm flow, authentication requests are sent to the Octopus Authentication Server, and users then approve the authentication on the Octopus Authenticator Mobile App (see System Architecture diagram).
IMPORTANT: In order to successfully work with Octopus Authentication Node, the Octopus Authentication Server needs to be installed and operational, and the relevant users need to be enrolled with the Octopus Authenticator Mobile App.
To install Octopus Authentication Node:
Download the latest version of the SDO integration (octopusNode-1.0.0.jar) from ForgeRock MarketPlace.
Copy the .jar file into the ../web-container/webapps/openam/WEB-INF/lib directory where your AM console is deployed.
Restart the web container to pick up the new node.
After the restart, the node will appear in the Authentication Trees Components palette.
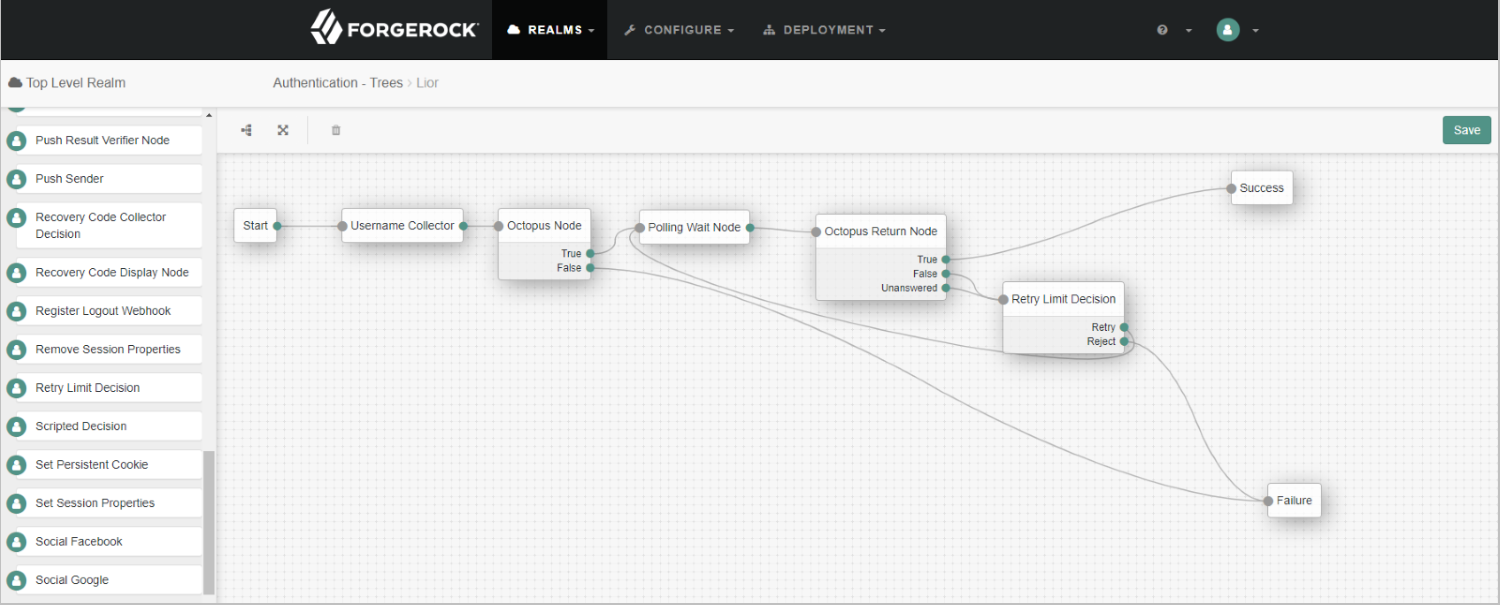
Add Octopus Authentication Node and Octopus Return Node to your environment. For example:
Continue by configuring node parameters, as described below.
The final step of the integration process is configuring the parameters for Octopus Authentication Node and Octopus Return Node.
The following example shows parameters for Octopus Authentication Node:
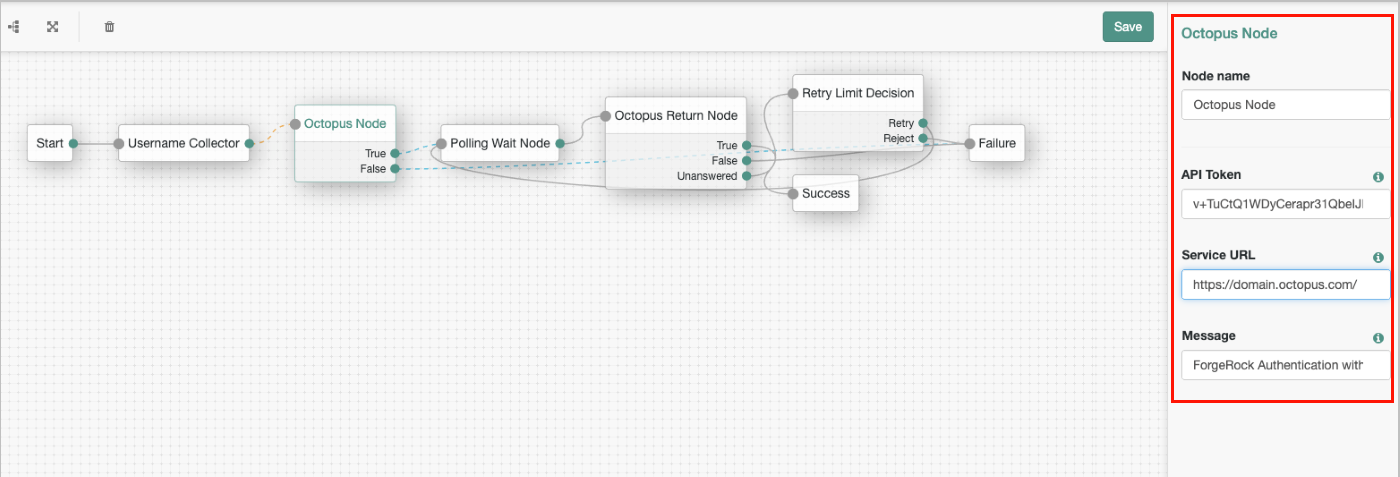
The Message that you manually add here will be displayed to users during Octopus Authentication on the Octopus Mobile App.
The values for the API Token and the Service URL can be copied from the Sign On tab of the REST API service that you created in the Octopus Management Console:
API Token: Click View. Then, in the popup that opens, click Copy to copy the value. Click the Copy icon to copy the value.
Service URL: This corresponds to the REST Endpoint URL. Click the Copy icon to copy the value.
The example below shows parameters for Octopus Return Node:
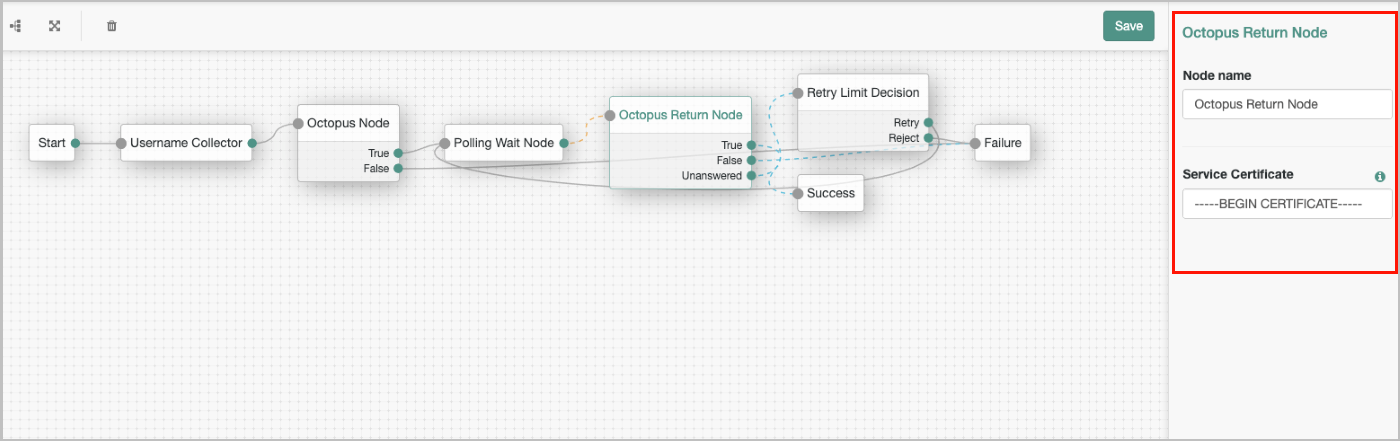
The Service Certificate value can be copied from the Sign On tab of the REST API service that you created in the Octopus Management Console. Under X.509 Certificate, click View. Then, in the popup that opens, click Copy to copy the content.