Guide to configuring and using ForgeRock Access Management User Self Service features.
The User Self Service Guide shows you how to configure, maintain, and troubleshoot the User Self Service feature provided by AM, which automates account registration and account name retrieval, and forgotten password reset.
This guide is written for access management designers, developers, and administrators who build, deploy, and maintain services and features for their organizations.
ForgeRock Identity Platform™ serves as the basis for our simple and comprehensive Identity and Access Management solution. We help our customers deepen their relationships with their customers, and improve the productivity and connectivity of their employees and partners. For more information about ForgeRock and about the platform, see https://www.forgerock.com.
OpenAM provides a user self service feature that enables your customers to self-register to your web site, securely reset forgotten passwords, and retrieve their usernames.
OpenAM's user self service capabilities greatly reduces help desk costs and offers a rich online experience that strengthens customer loyalty.
Note
The Password Reset service, located in the AM console at Configure > Global Services, is deprecated.
OpenAM's user self service feature supports automated account registration for new users, forgotten password reset, and forgotten username retrieval for your existing customer base. The user self service features include the following capabilities:
User Self Registration. Allows non-authenticated users to register to your site on their own. You can add additional security features like email verification, knowledge-based authentication (KBA) security questions, Google reCAPTCHA, and custom plugins to add to your User Self Registration process.
Knowledge-based authentication security questions. Supports the capability to present security questions during the registration process. When enabled, the user is prompted to enter answers to pre-configured or custom security questions. Then, during the forgotten password or forgotten username process, the user is presented with the security questions and must answer them correctly to continue the process.
Forgotten password reset. Allows registered users already in your system to reset their passwords. The default password policy is set in the underlying directory server and requires a minimum password length of eight characters by default. If security questions are enabled, users must also correctly answer their pre-configured security questions before resetting their passwords.
Forgotten username support. Allows users to retrieve their forgotten usernames. If security questions are enabled, users must also correctly answer their pre-configured security questions before retrieving their usernames.
Google reCAPTCHA plugin. Supports the ability to add a Google reCAPTCHA plugin to the registration page. This plug-in protects against any software bots that may be used against your site.
Configurable plugins. Supports the ability to add plugins to customize the user services process flow. You can develop your custom code and drop the
.jarfile into your container.Customizable confirmation emails. Supports the ability to customize or localize confirmation email in plain text or HTML.
Password policy configuration. Supports password policy configuration, which is enforced by the underlying OpenDJ directory server and manually aligned with frontend UI templates. The default password policy requires a password with a minimum length of eight characters.
Self registration user attribute whitelist. Supports attribute whitelisting, which allows you to specify which attributes can be set by the user during account creation.
The user self service feature supports a number of different user flows depending on how you configure your security options. These options include email verification, security questions, Google reCAPTCHA, and any custom plugins that you create.
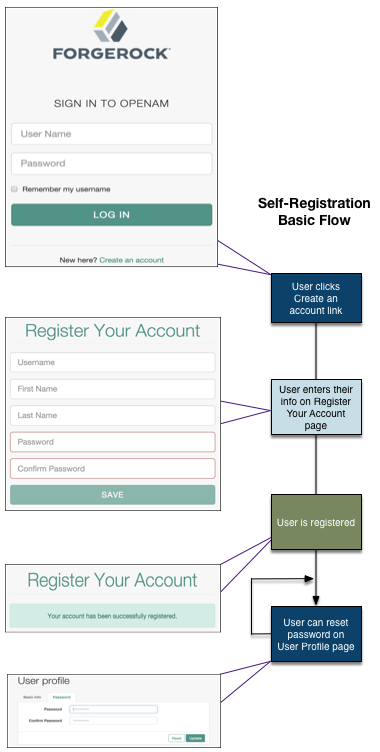
The following diagram shows the basic User Self Registration flow without the optional features:
The following diagrams show the possible flows for User Self Registration flow with the optional features:

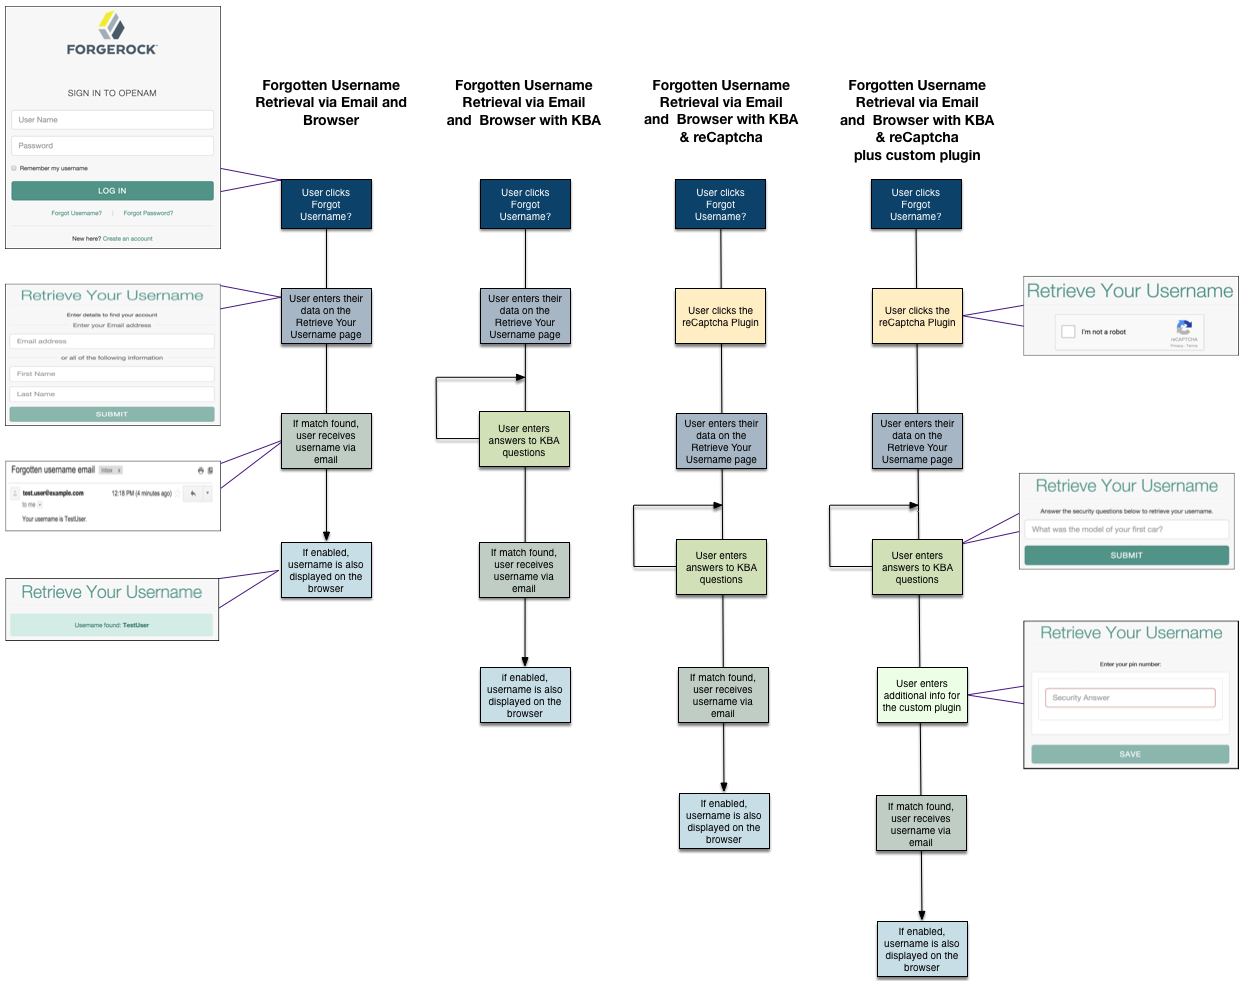
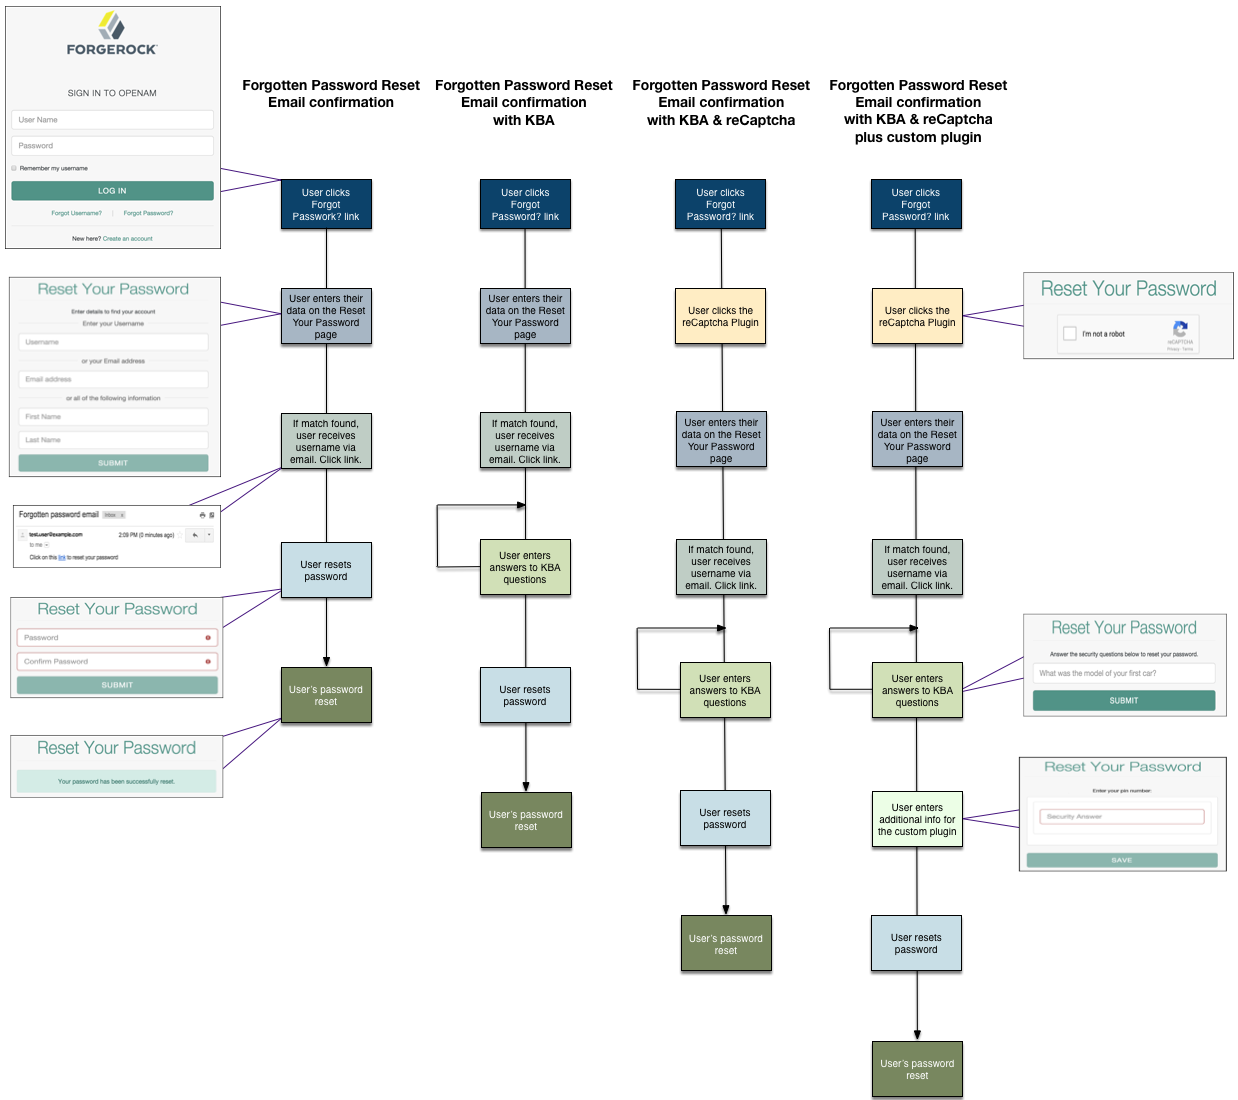
Forgotten username retrieval and forgotten password reset support various user flows depending on how you configure your security options. If you enabled security questions and the user entered responses to each question during self-registration, the security questions are presented to the user in random order.
The following diagram shows the possible flows for forgotten username:
The following diagram shows the possible flows for forgotten password reset:
You can configure the user self service features to use email address verification, which sends an email containing a link for user self-registration and forgotten password reset via OpenAM's email service. You can also send the forgotten username to the user by email if configured.
Follow the sections on this chapter to implement the user self service features using the AM console. For information on how to use the RESTful API functionality, see "RESTful User Self Service".
Important
Each individual user must have a unique email address to use the email features of user self service.
Follow the steps in the sections below:
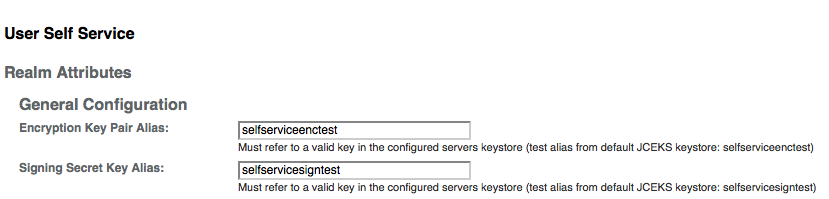
OpenAM's user self service feature requires two key aliases: one secret key alias for signing and one key pair alias for encryption. OpenAM is pre-configured with a JCEKS keystore with three key aliases that you can use for testing purposes. For more information about keystores and key aliases in OpenAM, see "Setting Up Keys and Keystores" in the Setup and Maintenance Guide.
Unlike a JKS keystore that supports asymmetric keys, the JCEKS keystore supports both asymmetric keys for encryption and symmetric keys for signing. In an OpenAM site with multiple OpenAM servers deployed behind a load balancer, the JCEKS keystore allows one server to decrypt and validate a JSON Web Token (JWT) from the other server.
The key aliases must exist in the JCEKS keystore before the user self service feature can be configured, since they need to be specified at configuration time.
To provide user self service features, you must configure suitable key aliases.Perform the following steps to populate the values of the Encryption Key Pair Alias and the Signing Secret Key Alias properties:
Log in to the AM console as an administrator, for example,
amadmin.Navigate to Configure > Global Services > User Self Service.
Populate the values of the Encryption Key Pair Alias and the Signing Secret Key Alias properties with the names of the key pair aliases in your JCEKS keystore. For example, if you are using the demo keys in the default
keystore.jceksfile, set the properties as follows:Encryption Key Pair Alias to
selfserviceenctest.Signing Secret Key Alias to
selfservicesigntest.
Save your changes.
The user self service feature lets you send confirmation emails via OpenAM's SMTP Email Service to users who are registering at your site or resetting forgotten passwords. If you choose to send confirmation emails, you can configure the Email Service globally.
By default, OpenAM expects the SMTP service to listen on
localhost:465. You can change this setting.
Log in to the AM console as the administrator.
On the Realms page, click the realm in which you will install the Email Service, and then click Services.
Click Services, and then click Add a Service.
On the Choose a Service drop-down list, select Email Service, and then enter the following:
Enter the Mail Server Hostname. If you are using the Google SMTP server, you must also configure the Google Mail settings to enable access for less secure applications.
Enter the Mail Server Authentication Username. The default is
amadmin. If you are testing on a Google account, you can enter a known Gmail address.Enter the Mail Server Authentication Password property value.
Enter the Email From Address. The default is
no-reply@example.com.Click Create.
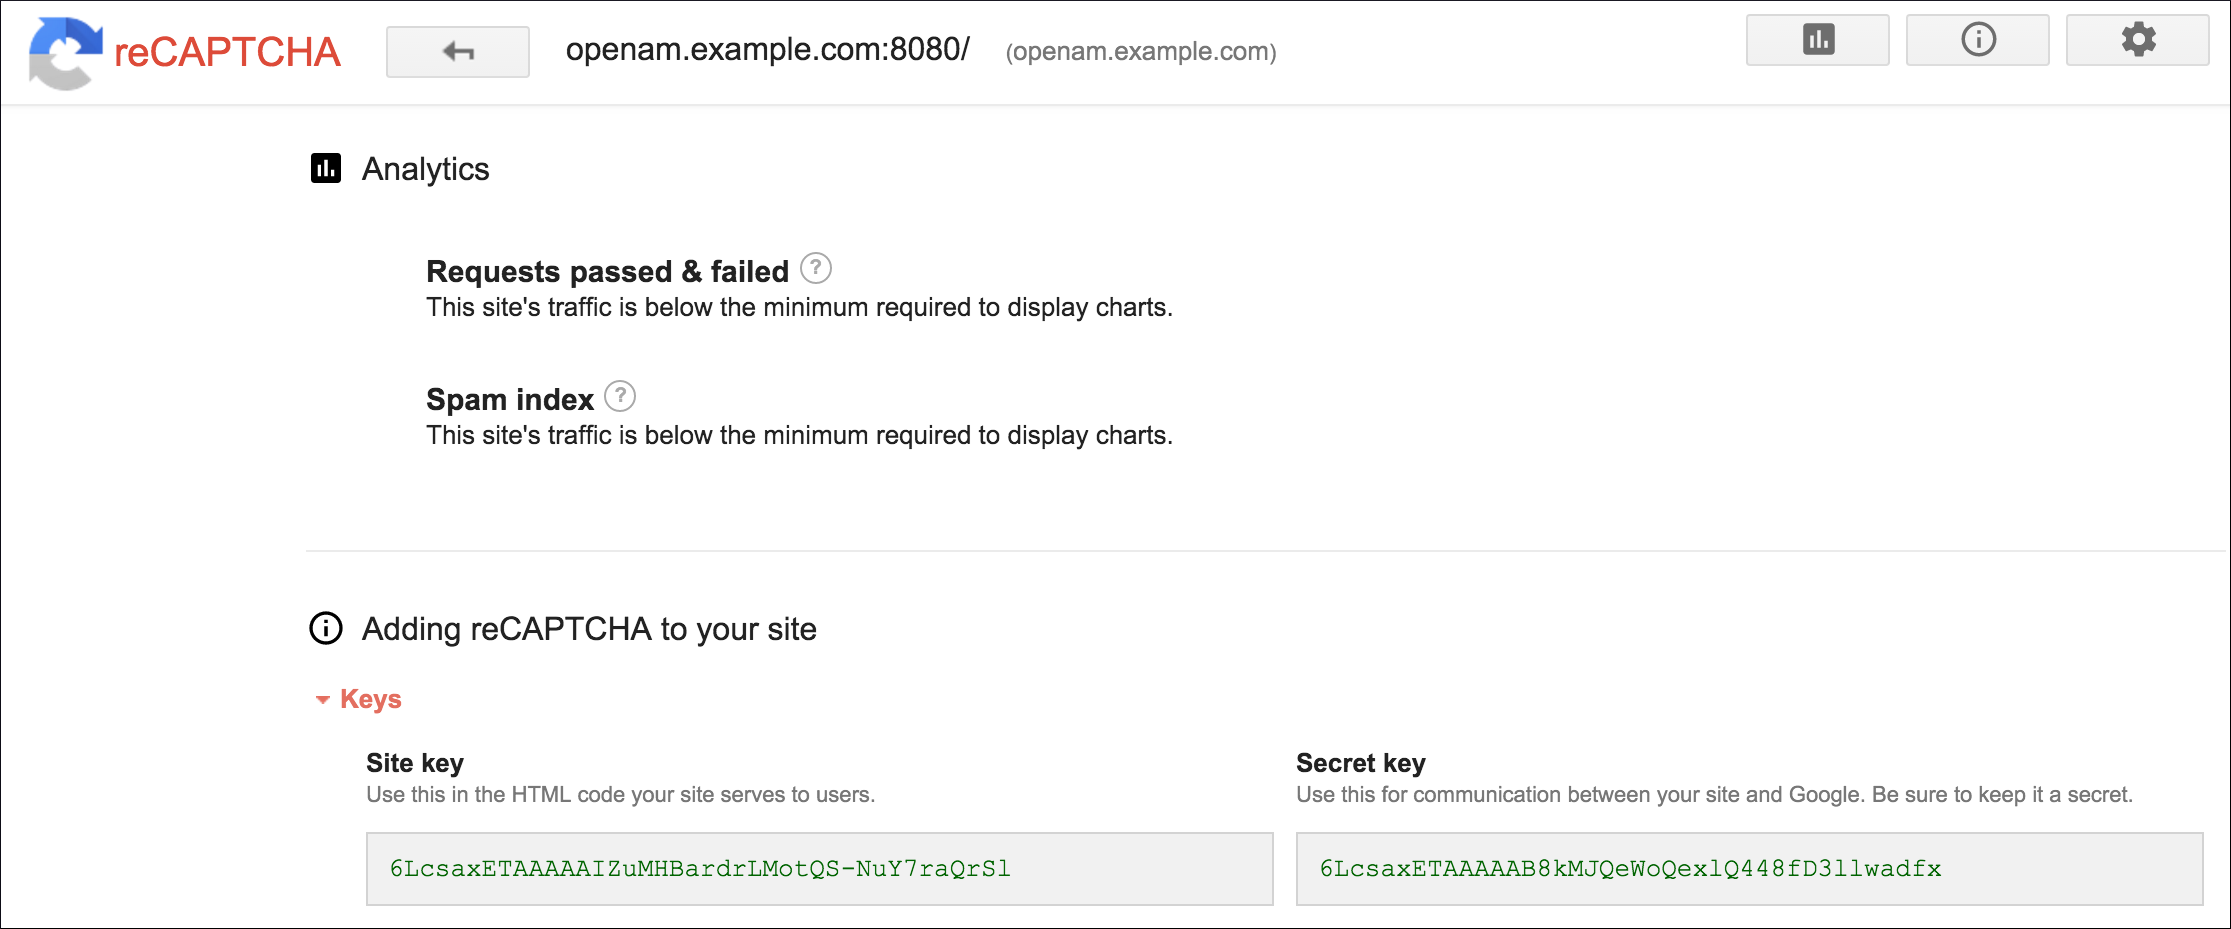
The user self service feature supports the Google reCAPTCHA plugin, which can be placed on the Register Your Account, Reset Your Password, and Retrieve Your Username pages. The Google reCAPTCHA plugin protects your user self service implementation from software bots.
Note
Google reCAPTCHA is the only supported plugin for user self service. Any other Captcha service will require a custom plugin.
Register your web site at a Captcha provider, such as Google reCAPTCHA, to get your site and secret key.
When you register your site for Google reCAPTCHA, you only need to obtain the site and secret key, which you enter in the User Self Service configuration page in the AM console. You do not have to do anything with client-side integration and server-side integration. The Google reCAPTCHA plugin appears automatically on the Register Your Account, Reset Your Password, and Retrieve Your Username pages after you configure it in the AM console.
Log in to the AM console as an administrator.
Click Configure > Global Services > User Self Service.
In the Google Recaptcha Site Key field, enter the site key that you obtained from the Google reCAPTCHA site.
In the Google Recaptcha Secret Key field, enter the secret key that you obtained from the Google reCAPTCHA site.
In the Google Recaptcha Verification URL field, keep the default.
Knowledge-based authentication (KBA) is an authentication mechanism in which the user must correctly answer a number of pre-configured security questions that are set during the initial registration setup. If successful, the user is granted the privilege to carry out an action, such as registering an account, resetting a password, or retrieving a username. The security questions are presented in a random order to the user during the User Self Registration, forgotten password reset, and forgotten username processes.
OpenAM provides a default set of security questions and easily allows OpenAM administrators and users to add their own custom questions.
Log in to the AM console as the administrator.
Click Configure > Global Services > User Self Service.
On the User Self Service page, scroll to the Security Questions section. Enter your own security question in the New Value field, and then click Add. The syntax is:
OrderNum|ISO-3166-2 Country Code|Security Question. For example,5|en|What is your dog's name?. Make sure that order numbers are unique.Warning
You should never remove any security questions as a user may have reference to a given question.
In the Minimum Answers to Define field, enter the number of security questions that will be presented to the user during the registration process.
In the Minimum Answers to Verify field, enter the number of security questions that must be answered during the Forgotten Password and Forgotten Username services.
Click Finish to save your changes.
OpenAM provides a self-registration feature that allows users to create an account to your web site. Although you can configure user self registration without any additional security mechanisms, such as email verification or KBA security questions, we recommend configuring the email verification service with user self registration at a minimum.
Log in to the AM console as the administrator.
Configure the email service presented in "Configuring the Email Service".
Click Configure > Global Services > User Self Service.
On the User Self Service page, click Enabled next to User Registration.
For Captcha, click Enabled to turn on the Google reCAPTCHA plugin. Make sure you configured the plugin as presented in "Configuring the Google reCAPTCHA Plugin".
For Email Verification, clear the Enabled box if you want to turn off the email verification service. We recommend that you keep it selected.
For Security Questions, click Enabled to display security questions to the user during the self registration, after which the user must enter their answers to the questions. During the forgotten password or forgotten username services, the user will be presented with the security questions to be able to reset their passwords or retrieve their usernames if Security Questions is enabled.
In the Token LifeTime field, enter an appropriate number of seconds for the token lifetime. If the token lifetime expires before the user self-registers, then the user will need to restart the registration process over again.
Default: 900 seconds.
To customize the Self Registration outgoing email, run the following steps:
In the Outgoing Email Subject field, enter the Subject line of your email in the New Value field, and then click Add.
The subject line format is
lang|subject-text, wherelangis the ISO-639 language code, such asenfor English,frfor French, and others. For example, the subject line values could be:en|Registration Emailandfr|Inscription E-mail.In the Outgoing Email Body field, enter the text of your email in the New Value field, and then click Add.
The email body text format is
lang|email-text, wherelangis the ISO-639 language code. Note that email body text must be all on one line and can contain any HTML tags within the body of the text.For example, the email body text could be:
en|Thank you for registration to our site!
        Click <a href="%link%">here</a> to register to the site.
In the Valid Creation Attributes field, enter the user attributes the user can set during the User Self Registration. The attributes are based on the OpenAM identity repository.
For Destination After Successful Registration, select one of the following:
User is automatically logged in and sent to the appropriate page within the system.
User is sent to a success page without being logged in. In this case, OpenAM displays a "You have successfully registered" page. The user can then click the Login link to log in to OpenAM. This is the default selection.
User is sent to the login page to authenticate.
Under Advanced Configuration, configure the User Registration Confirmation Email URL for your deployment. The default is:
http://openam.example.com:8080/openam/XUI/?realm=/#register/.Click Finish to apply your changes.
The forgotten password feature allows existing users to reset their passwords when they cannot remember them.
Log in to the AM console as the administrator.
Click Configure > Global Services > User Self Service.
On the User Self Service page, click Enabled next to Forgotten Passwords.
For Captcha, click Enabled to turn on the Google reCAPTCHA plugin. Make sure you configured the plugin as presented in "Configuring the Google reCAPTCHA Plugin".
For Email Verification, clear the Enabled box if you want to turn off the email verification service. We recommend that you keep it selected.
For Security Questions, click Enabled to display security questions to the user during the forgotten password reset process. The user must correctly answer the security questions to be able to reset passwords.
In the Forgotten Password Token LifeTime field, enter an appropriate number of seconds for the token lifetime. If the token lifetime expires before the user resets their password, then the user will need to restart the forgotten password process over again.
Default: 900 seconds.
To customize the Forgotten Password outgoing email, run the following steps:
In the Outgoing Email Subject field, enter the subject line of your email in the New Value field, and then click Add.
The subject line format is
lang|subject-text, wherelangis the ISO-639 language code, such asenfor English,frfor French, and others. For example, the subject line value could be:en|Forgotten Password Email.In the Outgoing Email Body field, enter the text of your email in the New Value field, and then click Add.
The email body text format is
lang|email-text, wherelangis the ISO-639 language code. Note that email body text must be all on one line and can contain any HTML tags within the body of the text.For example, the email body text could be:
en|Thank you for request!
        Click <a href="%link%">here</a> to reset your
        password.
Under Advanced Configuration, change the default Forgotten Password Confirmation Email URL for your deployment. The default is:
http://openam.example.com:8080/openam/XUI/?realm=/#passwordReset/.
The forgotten username feature allows existing users to retrieve their usernames when they cannot remember them.
Log in to the AM console as the administrator.
Click Configure > Global Services > User Self Service.
On the User Self Service page, click Enabled next to Forgotten Username.
For Captcha, click Enabled to turn on the Google reCAPTCHA plugin. Make sure you configured the plugin as presented in "Configuring the Google reCAPTCHA Plugin".
For Security Questions, click Enabled to display security questions to the user during the forgotten username process. The users must correctly answer the security questions to be able to retrieve their usernames.
For Email Username, click Enabled if you want the user to receive the retrieved username by email.
For Show Username, click Enabled if you want the user to see their retrieved username on the browser.
In the Forgotten Username Token LifeTime field, enter an appropriate number of seconds for the token lifetime. If the token lifetime expires before the user retrieves their username, then the user will need to restart the forgotten username process.
Default: 900 seconds.
To customize the Forgotten Username outgoing email, run the following steps:
In the Outgoing Email Subject field, enter the subject line of your email in the New Value field, and then click Add.
The subject Line format is
lang|subject-text, wherelangis the ISO 639 language code, such asenfor English,frfor French, and others. For example, the subject line value could be:en|Forgotten username email.In the Outgoing Email Body field, enter the text of your email in the New Value field, and then click Add.
The email body text format is
lang|email-text, wherelangis the ISO 639 language code. Note that email body text must be all on one line and can contain any HTML tags within the body of the text.For example, the email body text could be:
en|Thank you for your inquiry! Your username is %username%.
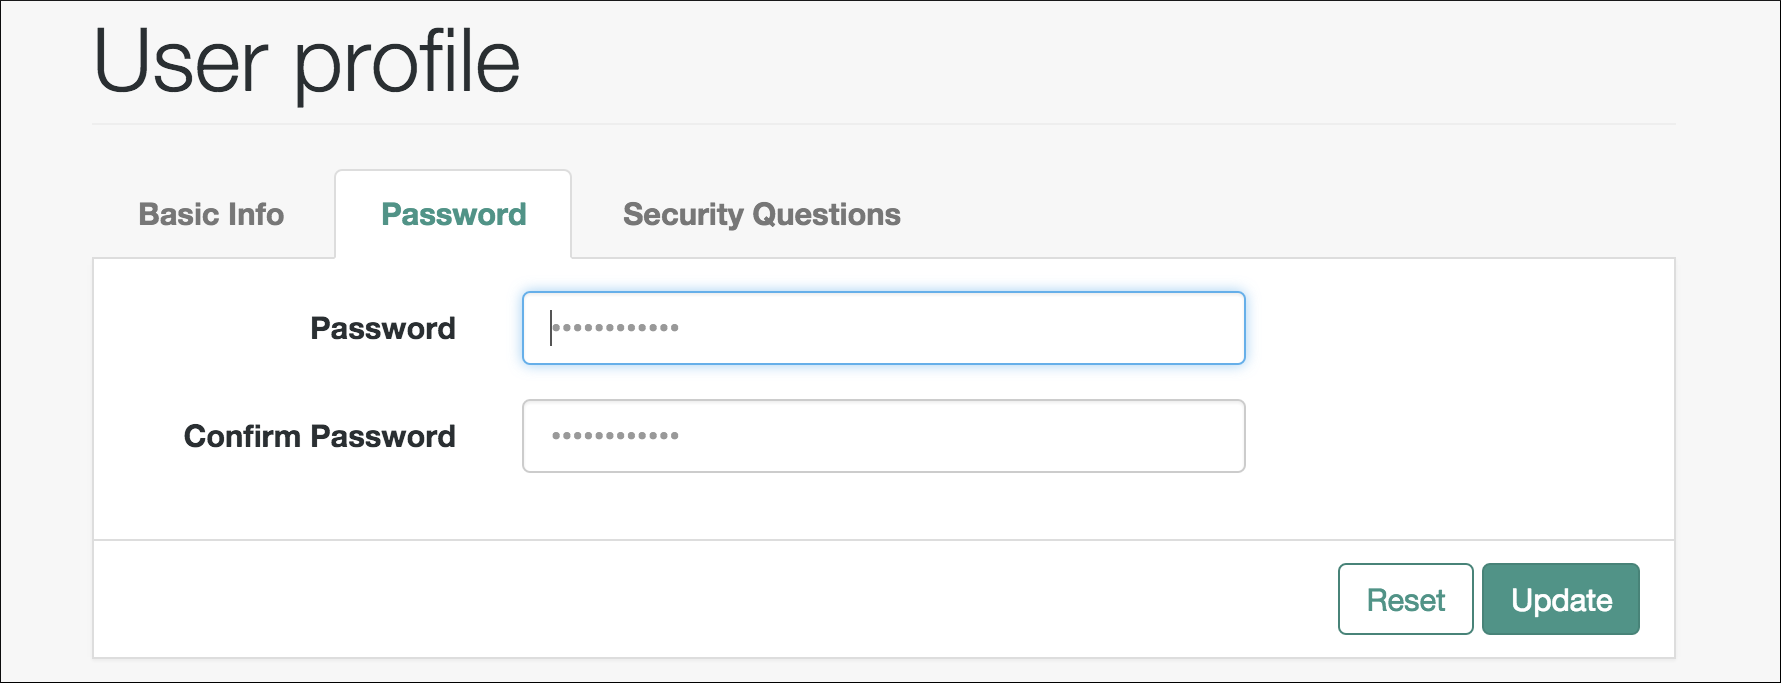
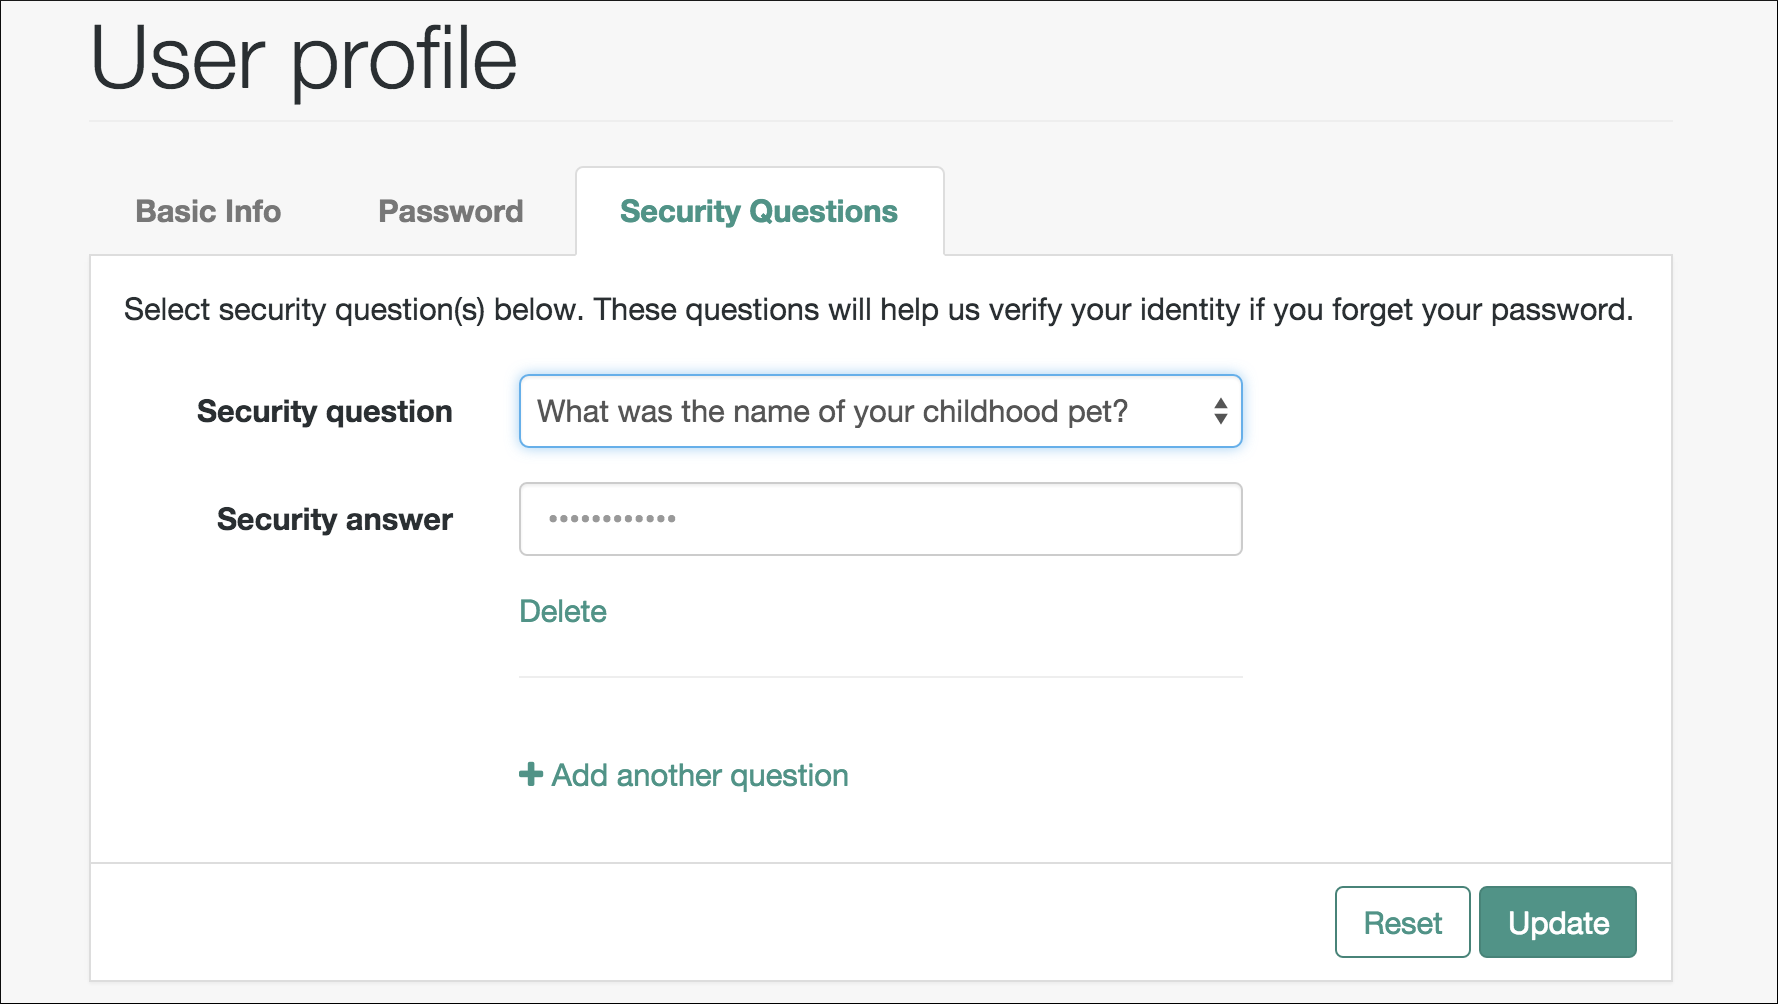
Once the user has self-registered to your system, the user can change their password and security questions at any time on the user profile page. The user profile page provides tabs to carry out these functions.
This chapter covers client interaction with OpenAM using OpenAM APIs over supported protocols for use with the user self service feature.
This section shows how to use the OpenAM RESTful interfaces for user self service functionality: User Self Registration, forgotten password reset, forgotten username retrieval, dashboard configuration, and device profile reset.
The steps to perform user self service via the REST APIs varies depending on the configured User Self Service process flow. For more information, see "User Self Service Process Flows".
When performing user self service functions, you can enable one or more security methods, such as email validation, Google reCAPTCHA, knowledge-based authentication, or custom plugins. Each configured security method requires requests to be sent from OpenAM to the client, and completed responses returned to OpenAM to verify.
Important
At least one security method should be enabled for each user self service feature.
A unique token is provided in the second request to the client that must be used in any subsequent responses, so that OpenAM can maintain the state of the user self service process.
In this section, long URLs are wrapped to fit the printed page, and some of the output is formatted for easier reading.
This section explains how to use the REST APIs for registering a user in OpenAM.
Create a GET request to the
/selfservice/userRegistrationendpoint. Notice that the request does not require any form of authentication.$ curl \ https://openam.example.com:8443/openam/json/realms/root/selfservice/userRegistration { "requirements": { "$schema": "http://json-schema.org/draft-04/schema#", "description": "New user details", "properties": { "user": { "description": "User details", "type": "object" } }, "required": [ "user" ], "type": "object" }, "tag": "initial", "type": "userDetails" }OpenAM sends a request to complete the user details. The
requiredarray defines the data that must be returned to OpenAM to progress past this step of the registration. In the example, the required type is auserobject that contains the user details.Create a POST response back to the
/selfservice/userRegistrationendpoint with a query string containing_action=submitRequirements. In the POST data, include aninputelement in the JSON structure, which should contain values for each element in therequiredarray of the request.In this example, OpenAM requests an object named
user. Ths object should contain values for theusername,givenName,sn,mail,userPassword, andinetUserStatusproperties.$ curl \ --request POST \ --header "Content-Type: application/json" \ --data \ '{ "input": { "user": { "username": "DEMO", "givenName": "Demo User", "sn": "User", "mail":"demo@example.com", "userPassword": "forgerock", "inetUserStatus": "Active" } } }' \ https://openam.example.com:8443/openam/json/realms/root/selfservice/userRegistration?_action=submitRequirements { "requirements": { "$schema": "http://json-schema.org/draft-04/schema#", "description": "Verify emailed code", "properties": { "code": { "description": "Enter code emailed", "type": "string" } }, "required": [ "code" ], "type": "object" }, "tag": "validateCode", "token": "eyJ0eXAiOiJKV.....QiLCJjmqrlqUfQ", "type": "emailValidation" }If the response is accepted, OpenAM continues with the registration process and sends the next request for information.
The value of the
tokenelement should be included in this and any subsequent responses to OpenAM for this registration; AM uses this information to track which stage of the registration process is being completed.Note that the request for information is of the type
emailValidation. Other possible types include:captcha, if the Google reCAPTCHA plugin is enabledkbaSecurityAnswerDefinitionStage, if knowledge-based security questions are required
For an example of Google reCAPTCHA validation, see "Retrieving Forgotten Usernames".
Return the information required by the next step of the registration, along with the
tokenelement.In this example, the user information was accepted and a code was emailed to the email address. AM requires this code in the response in an element named
codebefore continuing:$ curl \ --request POST \ --header "Content-Type: application/json" \ --data \ '{ "input": { "code": "cf53fcb6-3bf2-44eb-a437-885296899699" }, "token": "eyJ0eXAiOiJKV.....QiLCJjmqrlqUfQ" }' https://openam.example.com:8443/openam/json/realms/root/selfservice/userRegistration\ ?_action=submitRequirements { "type": "selfRegistration", "tag": "end", "status": { "success": true }, "additions": {} }When the process is complete, the response from AM has a
tagproperty with value ofend. If thesuccessproperty in thestatusobject has a value oftrue, then self-registration is complete and the user account was created.In the example, AM only required email verification to register a new user. In flows containing Google reCAPTCHA validation or knowledge-based security questions, you would continue returning POST data to AM containing the requested information until the process is complete.
Note
The User Self-Service feature provides options to set the user's destination after a successful self-registration. These options include redirecting the user to a 'successful registration' page, to the login page, or automaticatically logging the user into the system. Use the
Destination After Successful Self-Registrationproperty to set the option (on the console: Realm Name > Services > User Self-Service > User Registration). When you selectUser sent to 'successful registration' pageorUser sent to login page, the JSON response after a successful registration is as follows:{ "type": "selfRegistration", "tag": "end", "status": { "success": true }, "additions": {} }If you select User is automatically logged in, the JSON response is:
{
  "type": "autoLoginStage",
  "tag": "end",
  "status": {
      "success": true
  },
  "additions": {
      "tokenId": "AQIC5...MQAA*",
      "successUrl": "/openam/console"
  }
}
This section explains how to use the REST APIs to retrieve a forgotten username.
Create a GET request to the
/selfservice/forgottenUsernameendpoint. Notice that the request does not require any form of authentication.$ curl \ https://openam.example.com:8443/openam/json/realms/root/selfservice/forgottenUsername { "type": "captcha", "tag": "initial", "requirements": { "$schema": "http://json-schema.org/draft-04/schema#", "description": "Captcha stage", "type": "object", "required": [ "response" ], "properties": { "response": { "recaptchaSiteKey": "6Lfr1...cIqbd", "description": "Captcha response", "type": "string" } } } }In this example, the Google reCAPTCHA plugin is enabled, so the first request is of the
captchatype.Create a POST response back to the
/selfservice/forgottenUsernameendpoint with a query string containing_action=submitRequirements. In the POST data, include aninputelement in the JSON structure, which should contain values for each element in therequiredarray of the request.In this example, a
responsevalue was requested, which should be the user input as provided after completing the Google reCAPTCHA challenge.$ curl \ --request POST \ --header "Content-Type: application/json" \ --data \ '{ "input": { "response": "03AHJ...qiE1x4" } }' https://openam.example.com:8443/openam/json/realms/root/selfservice/forgottenUsername\ ?_action=submitRequirements { "type": "userQuery", "tag": "initial", "requirements": { "$schema": "http://json-schema.org/draft-04/schema#", "description": "Find your account", "type": "object", "required": [ "queryFilter" ], "properties": { "queryFilter": { "description": "filter string to find account", "type": "string" } } }, "token": "eyAicHis...PIF-lN4s" }If the response was accepted, OpenAM continues with the username retrieval process and sends the next request for information. In this example, the Google reCAPTCHA was verified and OpenAM is requesting details about the account name to retrieve, which must be provided in a
queryFilterelement.The value of the
tokenelement should be included in this and all subsequent responses to OpenAM for this retrieval process.Create a POST response to OpenAM with a
queryFiltervalue in the POST data containing the user's email address associated with their account.For more information on query filters, see "Query" in the Development Guide.
$ curl \
--request POST \
--header "Content-Type: application/json" \
--data \
  '{
     "input": {
       "queryFilter": "mail eq \"demo.user@example.com\""
     },
     "token": "eyAicHis...PIF-lN4s"
  }' https://openam.example.com:8443/openam/json/realms/root/selfservice/forgottenUsername\
      ?_action=submitRequirements
  {
    "type": "kbaSecurityAnswerVerificationStage",
    "tag": "initial",
    "requirements": {
      "$schema": "http://json-schema.org/draft-04/schema#",
      "description": "Answer security questions",
      "type": "object",
      "required": [
        "answer1"
      ],
    "properties": {
      "answer1": {
        "systemQuestion": {
          "en": "What was the model of your first car?"
        },
      "type": "string"
      }
    }
  },
  "token": "eyAicHis...PIF-lN4s"
}
If a single subject is located that matches the provided query filter, the retrieval process continues.
If KBA is enabled, OpenAM requests answers to the configured number of KBA questions, as in this example.
If a subject is not found, an HTTP 400 Bad Request status is returned, and an error message in the JSON data:
{
 "code": 400,
 "reason": "Bad Request",
 "message": "Unable to find account"
}
Return a POST response with the answers as values of the elements specified in the
requiredarray, in this exampleanswer1. Ensure the sametokenvalue is sent with each response.$ curl \ --request POST \ --header "Content-Type: application/json" \ --data \ '{ "input": { "answer1": "Mustang" }, "token": "eyAicHis...PIF-lN4s" }' \ https://openam.example.com:8443/openam/json/realms/root/selfservice/forgottenUsername\ ?_action=submitRequirements { "type": "retrieveUsername", "tag": "end", "status": { "success": true }, "additions": { "userName": "demo" } }When the process is complete, the
tagelement has a value ofend. If thesuccesselement in thestatuselement has a value oftrue, then username retrieval is complete and the username is emailed to the registered address.If the Show Username option is enabled for username retrieval, the username retrieved is also returned in the JSON response as the value of the
userNameelement, as in the example above.
This section explains how to use the REST APIs to replace a forgotten password.
Create a GET request to the
/selfservice/forgottenPasswordendpoint. Notice that the request does not require any form of authentication.$ curl \ https://openam.example.com:8443/openam/json/realms/root/selfservice/forgottenPassword { "type": "captcha", "tag": "initial", "requirements": { "$schema": "http://json-schema.org/draft-04/schema#", "description": "Captcha stage", "type": "object", "required": [ "response" ], "properties": { "response": { "recaptchaSiteKey": "6Lfr1...cIqbd", "description": "Captcha response", "type": "string" } } } }In this example the Google reCAPTCHA plugin is enabled, so the first request is of the
captchatype.Create a POST response back to the
/selfservice/forgottenPasswordendpoint with a query string containing_action=submitRequirements. In the POST data, include aninputelement in the JSON structure, which should contain values for each element in therequiredarray of the request.In this example, a
responsevalue was requested, which should be the user input as provided after completing the Google reCAPTCHA challenge.$ curl \ --request POST \ --header "Content-Type: application/json" \ --data \ '{ "input": { "response": "03AHJ...qiE1x4" } }' https://openam.example.com:8443/openam/json/realms/root/selfservice/forgottenPassword\ ?_action=submitRequirements { "type": "userQuery", "tag": "initial", "requirements": { "$schema": "http://json-schema.org/draft-04/schema#", "description": "Find your account", "type": "object", "required": [ "queryFilter" ], "properties": { "queryFilter": { "description": "filter string to find account", "type": "string" } } }, "token": "eyAicHis...PIF-lN4s" }If the response was accepted, OpenAM continues with the password reset process and sends the next request for information. In this example, the Google reCAPTCHA was verified and OpenAM is requesting details about the account with the password to replace, which must be provided in a
queryFilterelement.The value of the
tokenelement should be included in this and all subsequent responses to OpenAM for this reset process.Create a POST response to OpenAM with a
queryFiltervalue in the POST data containing the username of the subject with the password to replace.For more information on query filters, see "Query" in the Development Guide.
$ curl \
--request POST \
--header "Content-Type: application/json" \
--data \
  '{
     "input": {
       "queryFilter": "uid eq \"demo\""
     },
     "token": "eyAicHis...PIF-lN4s"
  }' https://openam.example.com:8443/openam/json/realms/root/selfservice/forgottenPassword\
      ?_action=submitRequirements
{
  "type": "kbaSecurityAnswerVerificationStage",
  "tag": "initial",
  "requirements": {
     "$schema": "http://json-schema.org/draft-04/schema#",
     "description": "Answer security questions",
     "type": "object",
     "required": [
       "answer1"
     ],
     "properties": {
       "answer1": {
         "systemQuestion": {
           "en": "What was the model of your first car?"
         },
         "type": "string"
       }
     }
  },
  "token": "eyAicHis...PIF-lN4s"
}
If a single subject is located that matches the provided query filter, the password reset process continues.
If a subject is not found, an HTTP 400 Bad Request status is returned, and an error message in the JSON data:
{
  "code": 400,
  "reason": "Bad Request",
  "message": "Unable to find account"
}
Continue returning POST data to OpenAM containing the requested information, in the format specified in the request. Also return the
tokenvalue in the POST data, so that OpenAM can track which stage of the password reset process is being completed.$ curl \ --request POST \ --header "Content-Type: application/json" \ --data \ '{ "input": { "answer1": "Mustang" }, "token": "eyAicHis...PIF-lN4s" }' https://openam.example.com:8443/openam/json/realms/root/selfservice/forgottenPassword\ ?_action=submitRequirements { "type": "resetStage", "tag": "initial", "requirements": { "$schema": "http://json-schema.org/draft-04/schema#", "description": "Reset password", "type": "object", "required": [ "password" ], "properties": { "password": { "description": "Password", "type": "string" } } }, "token": "eyAicHis...PIF-lN4s" }When requested—when the
typevalue in the request isresetStage—supply the new password in the POST data.$ curl \ --request POST \ --header "Content-Type: application/json" \ --data \ '{ "input": { "password": "User1234" }, "token": "eyAicHis...PIF-lN4s" }' \ https://openam.example.com:8443/openam/json/realms/root/selfservice/forgottenPassword\ ?_action=submitRequirements { "type": "resetStage", "tag": "end", "status": { "success": true }, "additions": {} }When the process is complete, the
tagelement has a value ofend. If thesuccesselement in thestatuselement has a value oftrue, then password reset is complete and the new password is now active.If the password is not accepted, an HTTP 400 Bad Request status is returned, and an error message in the JSON data:
{
  "code": 400,
  "reason": "Bad Request",
  "message": "Minimum password length is 8."
}
This chapter covers OpenAM configuration properties for the user self service feature, which is accessible through the Configure tab of the AM console, most of which can also be set by using the amster command. The chapter is organized to follow the AM console layout.
amster type ID: selfService
The following settings appear on the General Configuration tab:
- Encryption Key Pair Alias
An encryption key alias in the OpenAM server's JCEKS keystore. Used to encrypt the JWT token that OpenAM uses to track end users during User Self-Service operations.
For example, you might set this property to: selfserviceenctest
amster data attribute:
encryptionKeyPairAlias- Signing Secret Key Alias
A signing secret key alias in the OpenAM server's JCEKS keystore. Used to sign the JWT token that OpenAM uses to track end users during User Self-Service operations.
For example, you might set this property to: selfservicesigntest
amster data attribute:
signingSecretKeyAlias- Google reCAPTCHA Site Key
Google reCAPTCHA plugin site key.
amster data attribute:
captchaSiteKey- Google reCAPTCHA Secret Key
Google reCAPTCHA plugin secret key.
amster data attribute:
captchaSecretKey- Google Re-captcha Verification URL
Google reCAPTCHA plugin verification URL.
Default value:
https://www.google.com/recaptcha/api/siteverifyamster data attribute:
captchaVerificationUrl- Security Questions
Specifies the default set of knowledge-based authentication (KBA) security questions. The security questions can be set for the User Self-Registration, forgotten password reset, and forgotten username services, respectively.
Format is
unique key|locale|question.Default value:
4|en|What is your mother's maiden name?
3|en|What was the name of your childhood pet?
2|en|What was the model of your first car?
1|en|What is the name of your favourite restaurant?amster data attribute:
kbaQuestions- Minimum Answers to Define
Specifies the minimum number of KBA answers that users must define.
Default value:
1amster data attribute:
minimumAnswersToDefine- Minimum Answers to Verify
Specifies the minimum number of KBA questions that users need to answer to be granted the privilege to carry out an action, such as registering for an account, resetting a password, or retrieving a username. Specify a value from
0to50.Default value:
1amster data attribute:
minimumAnswersToVerify- Valid Query Attributes
Specifies the valid query attributes used to search for the user. This is a list of attributes used to identify your account for forgotten password and forgotten username.
Default value:
uid
mail
givenName
snamster data attribute:
validQueryAttributes
The following settings appear on the User Registration tab:
- User Registration
If enabled, new users can sign up for an account.
Default value:
falseamster data attribute:
userRegistrationEnabled- Captcha
If enabled, users must pass a Google reCAPTCHA challenge during user self-registration to mitigate against software bots.
Default value:
falseamster data attribute:
userRegistrationCaptchaEnabled- Email Verification
If enabled, users who self-register must perform email address verification.
Default value:
trueamster data attribute:
userRegistrationEmailVerificationEnabled- Security Questions
If enabled, users must set up their security questions during the self-registration process.
Default value:
falseamster data attribute:
userRegistrationKbaEnabled- Token Lifetime (seconds)
Maximum lifetime of the token allowing User Self-Registration, in seconds.
Default value:
900amster data attribute:
userRegistrationTokenTTL- Outgoing Email Subject
Customize the User Self-Registration verification email subject text. Format is
locale|subject text.Default value:
en|Registration emailamster data attribute:
userRegistrationEmailSubject- Outgoing Email Body
Customize the User Self-Registration verification email body text. Format is:
locale|body text.Default value:
en|<h2>Click on this <a href="%link%">link</a> to register.</h2>amster data attribute:
userRegistrationEmailBody- Valid Creation Attributes
Specifies a whitelist of user attributes that can be set during user creation.
Default value:
userPassword
mail
kbaInfo
givenName
inetUserStatus
sn
usernameamster data attribute:
userRegistrationValidUserAttributes- Destination After Successful Self-Registration
Specifies the action to be taken after a user successfully registers a new account. Choose from:
default. User is sent to a success page without being logged in.login. User is sent to the login page to authenticate.autologin. User is automatically logged in and sent to the appropriate page.
The possible values for this property are:
default
login
auto-loginDefault value:
defaultamster data attribute:
userRegisteredDestination
The following settings appear on the Forgotten Password tab:
- Forgotten Password
If enabled, users can reset their forgotten password.
Default value:
falseamster data attribute:
forgottenPasswordEnabled- Captcha
If enabled, users must pass a Google reCAPTCHA challenge during password reset to mitigate against software bots.
Default value:
falseamster data attribute:
forgottenPasswordCaptchaEnabled- Email Verification
If enabled, users who reset passwords must perform email address verification.
Default value:
trueamster data attribute:
forgottenPasswordEmailVerificationEnabled- Security Questions
If enabled, users must answer their security questions during the forgotten password process.
Default value:
falseamster data attribute:
forgottenPasswordKbaEnabled- Token Lifetime (seconds)
Maximum lifetime for the token allowing forgotten password reset, in seconds.
Specify a value from
0to2147483647.Default value:
900amster data attribute:
forgottenPasswordTokenTTL- Outgoing Email Subject
Customize the forgotten password email subject text. Format is
locale|subject text.Default value:
en|Forgotten password emailamster data attribute:
forgottenPasswordEmailSubject- Outgoing Email Body
Customize the forgotten password email body text. Format is
locale|body text.Default value:
en|<h2>Click on this <a href="%link%">link</a> to reset your password.</h2>amster data attribute:
forgottenPasswordEmailBody
The following settings appear on the Forgotten Username tab:
- Forgotten Username
If enabled, users can retrieve their forgotten username.
Default value:
falseamster data attribute:
forgottenUsernameEnabled- Captcha
If enabled, users must pass a Google reCAPTCHA challenge during the forgotten username retrieval process to mitigate against software bots.
Default value:
falseamster data attribute:
forgottenUsernameCaptchaEnabled- Security Questions
If enabled, users must answer their security questions during the forgotten username process.
Default value:
falseamster data attribute:
forgottenUsernameKbaEnabled- Email Username
If enabled, users receive their forgotten username by email.
Default value:
trueamster data attribute:
forgottenUsernameEmailUsernameEnabled- Show Username
If enabled, users see their forgotten username on the browser page.
Default value:
falseamster data attribute:
forgottenUsernameShowUsernameEnabled- Token LifeTime (seconds)
Maximum lifetime for the token allowing forgotten username, in seconds.
Default value:
900amster data attribute:
forgottenUsernameTokenTTL- Outgoing Email Subject
Customizes the forgotten username email subject text. Format is
locale|subject text.Default value:
en|Forgotten username emailamster data attribute:
forgottenUsernameEmailSubject- Outgoing Email Body
Customizes the forgotten username email body text. Format is
locale|body text.Default value:
en|<h2>Your username is <span style="color:blue">%username%</span>.</h2>amster data attribute:
forgottenUsernameEmailBody
The following settings appear on the Profile Management tab:
- Protected Update Attributes
Specifies a profile's protected user attributes, which causes re-authentication when the user attempts to modify these attributes.
amster data attribute:
profileProtectedUserAttributes
The following settings appear on the Advanced Configuration tab:
- User Registration Confirmation Email URL
Specifies the confirmation URL that the user receives during the self-registration process. The
${realm}string is replaced with the current realm.Default value:
http://openam.example.com:8080/openam/XUI/?realm=${realm}#register/amster data attribute:
userRegistrationConfirmationUrl- Forgotten Password Confirmation Email URL
Specifies the confirmation URL that the user receives after confirming their identity during the forgotten password process. The
${realm}string is replaced with the current realm.Default value:
http://openam.example.com:8080/openam/XUI/?realm=${realm}#passwordReset/amster data attribute:
forgottenPasswordConfirmationUrl- User Registration Service Config Provider Class
Specifies the provider class to configure any custom plugins.
Default value:
org.forgerock.openam.selfservice.config.flows.UserRegistrationConfigProvideramster data attribute:
userRegistrationServiceConfigClass- Forgotten Password Service Config Provider Class
Specifies the provider class to configure any custom plugins.
Default value:
org.forgerock.openam.selfservice.config.flows.ForgottenPasswordConfigProvideramster data attribute:
forgottenPasswordServiceConfigClass- Forgotten Username Service Config Provider Class
Specifies the provider class to configure any custom plugins.
Default value:
org.forgerock.openam.selfservice.config.flows.ForgottenUsernameConfigProvideramster data attribute:
forgottenUsernameServiceConfigClass
amster type ID: security
The following settings appear on the Realm Defaults tab:
- Legacy Self-Service REST Endpoint
Specify whether to enable the legacy self-service endpoint.
OpenAM supports two User Self-Service components: the Legacy User Self-Service, which is based on a Java SDK and is available in OpenAM versions prior to OpenAM 13, and a common REST-based/XUI-based User Self-Service available in OpenAM 13 and later.
The Legacy User Self-Service will be deprecated in a future release.
Default value:
falseamster data attribute:
selfServiceEnabled- Self-Registration for Users
If enabled, new users can sign up using a REST API client.
Default value:
falseamster data attribute:
selfRegistrationEnabled- Self-Registration Token LifeTime (seconds)
Maximum life time for the token allowing User Self-Registration using the REST API.
Default value:
900amster data attribute:
selfRegistrationTokenLifetime- Self-Registration Confirmation Email URL
This page handles the HTTP GET request when the user clicks the link sent by email in the confirmation request.
Default value:
http://openam.example.com:8080/openam/XUI/confirm.htmlamster data attribute:
selfRegistrationConfirmationUrl- Forgot Password for Users
If enabled, users can assign themselves a new password using a REST API client.
Default value:
falseamster data attribute:
forgotPasswordEnabled- Forgot Password Token Lifetime (seconds)
Maximum life time for the token that allows a user to process a forgotten password using the REST API.
Default value:
900amster data attribute:
forgotPasswordTokenLifetime- Forgot Password Confirmation Email URL
This page handles the HTTP GET request when the user clicks the link sent by email in the confirmation request.
Default value:
http://openam.example.com:8080/openam/XUI/confirm.htmlamster data attribute:
forgotPasswordConfirmationUrl- Destination After Successful Self-Registration
Specifies the behavior when self-registration has successfully completed.
The possible values for this property are:
default
login
autologinDefault value:
defaultamster data attribute:
userRegisteredDestination- Protected User Attributes
A list of user profile attributes. Users modifying any of the attributes in this list will be required to enter a password as confirmation before the change is accepted. This option applies to XUI deployments only.
amster data attribute:
protectedUserAttributes
For more information or resources about AM and ForgeRock Support, see the following sections:
ForgeRock publishes comprehensive documentation online:
The ForgeRock Knowledge Base offers a large and increasing number of up-to-date, practical articles that help you deploy and manage ForgeRock software.
While many articles are visible to community members, ForgeRock customers have access to much more, including advanced information for customers using ForgeRock software in a mission-critical capacity.
ForgeRock product documentation, such as this document, aims to be technically accurate and complete with respect to the software documented. It is visible to everyone and covers all product features and examples of how to use them.
The ForgeRock.org site has links to source code for ForgeRock open source software, as well as links to the ForgeRock forums and technical blogs.
If you are a ForgeRock customer, raise a support ticket instead of using the forums. ForgeRock support professionals will get in touch to help you.
ForgeRock provides support services, professional services, training through ForgeRock University, and partner services to assist you in setting up and maintaining your deployments. For a general overview of these services, see https://www.forgerock.com.
ForgeRock has staff members around the globe who support our international customers and partners. For details on ForgeRock's support offering, including support plans and service level agreements (SLAs), visit https://www.forgerock.com/support.
- Access control
Control to grant or to deny access to a resource.
- Account lockout
The act of making an account temporarily or permanently inactive after successive authentication failures.
- Actions
Defined as part of policies, these verbs indicate what authorized subjects can do to resources.
- Advice
In the context of a policy decision denying access, a hint to the policy enforcement point about remedial action to take that could result in a decision allowing access.
- Agent administrator
User having privileges only to read and write policy agent profile configuration information, typically created to delegate policy agent profile creation to the user installing a policy agent.
- Agent authenticator
Entity with read-only access to multiple agent profiles defined in the same realm; allows an agent to read web service profiles.
- Application
In general terms, a service exposing protected resources.
In the context of AM policies, the application is a template that constrains the policies that govern access to protected resources. An application can have zero or more policies.
- Application type
Application types act as templates for creating policy applications.
Application types define a preset list of actions and functional logic, such as policy lookup and resource comparator logic.
Application types also define the internal normalization, indexing logic, and comparator logic for applications.
- Attribute-based access control (ABAC)
Access control that is based on attributes of a user, such as how old a user is or whether the user is a paying customer.
- Authentication
The act of confirming the identity of a principal.
- Authentication chaining
A series of authentication modules configured together which a principal must negotiate as configured in order to authenticate successfully.
- Authentication level
Positive integer associated with an authentication module, usually used to require success with more stringent authentication measures when requesting resources requiring special protection.
- Authentication module
AM authentication unit that handles one way of obtaining and verifying credentials.
- Authorization
The act of determining whether to grant or to deny a principal access to a resource.
- Authorization Server
In OAuth 2.0, issues access tokens to the client after authenticating a resource owner and confirming that the owner authorizes the client to access the protected resource. AM can play this role in the OAuth 2.0 authorization framework.
- Auto-federation
Arrangement to federate a principal's identity automatically based on a common attribute value shared across the principal's profiles at different providers.
- Bulk federation
Batch job permanently federating user profiles between a service provider and an identity provider based on a list of matched user identifiers that exist on both providers.
- Circle of trust
Group of providers, including at least one identity provider, who have agreed to trust each other to participate in a SAML v2.0 provider federation.
- Client
In OAuth 2.0, requests protected web resources on behalf of the resource owner given the owner's authorization. AM can play this role in the OAuth 2.0 authorization framework.
- Conditions
Defined as part of policies, these determine the circumstances under which which a policy applies.
Environmental conditions reflect circumstances like the client IP address, time of day, how the subject authenticated, or the authentication level achieved.
Subject conditions reflect characteristics of the subject like whether the subject authenticated, the identity of the subject, or claims in the subject's JWT.
- Configuration datastore
LDAP directory service holding AM configuration data.
- Cross-domain single sign-on (CDSSO)
AM capability allowing single sign-on across different DNS domains.
- Delegation
Granting users administrative privileges with AM.
- Entitlement
Decision that defines which resource names can and cannot be accessed for a given subject in the context of a particular application, which actions are allowed and which are denied, and any related advice and attributes.
- Extended metadata
Federation configuration information specific to AM.
- Extensible Access Control Markup Language (XACML)
Standard, XML-based access control policy language, including a processing model for making authorization decisions based on policies.
- Federation
Standardized means for aggregating identities, sharing authentication and authorization data information between trusted providers, and allowing principals to access services across different providers without authenticating repeatedly.
- Fedlet
Service provider application capable of participating in a circle of trust and allowing federation without installing all of AM on the service provider side; AM lets you create Java Fedlets.
- Hot swappable
Refers to configuration properties for which changes can take effect without restarting the container where AM runs.
- Identity
Set of data that uniquely describes a person or a thing such as a device or an application.
- Identity federation
Linking of a principal's identity across multiple providers.
- Identity provider (IdP)
Entity that produces assertions about a principal (such as how and when a principal authenticated, or that the principal's profile has a specified attribute value).
- Identity repository
Data store holding user profiles and group information; different identity repositories can be defined for different realms.
- Java EE policy agent
Java web application installed in a web container that acts as a policy agent, filtering requests to other applications in the container with policies based on application resource URLs.
- Metadata
Federation configuration information for a provider.
- Policy
Set of rules that define who is granted access to a protected resource when, how, and under what conditions.
- Policy Agent
Agent that intercepts requests for resources, directs principals to AM for authentication, and enforces policy decisions from AM.
- Policy Administration Point (PAP)
Entity that manages and stores policy definitions.
- Policy Decision Point (PDP)
Entity that evaluates access rights and then issues authorization decisions.
- Policy Enforcement Point (PEP)
Entity that intercepts a request for a resource and then enforces policy decisions from a PDP.
- Policy Information Point (PIP)
Entity that provides extra information, such as user profile attributes that a PDP needs in order to make a decision.
- Principal
Represents an entity that has been authenticated (such as a user, a device, or an application), and thus is distinguished from other entities.
When a Subject successfully authenticates, AM associates the Subject with the Principal.
- Privilege
In the context of delegated administration, a set of administrative tasks that can be performed by specified subjects in a given realm.
- Provider federation
Agreement among providers to participate in a circle of trust.
- Realm
AM unit for organizing configuration and identity information.
Realms can be used for example when different parts of an organization have different applications and user data stores, and when different organizations use the same AM deployment.
Administrators can delegate realm administration. The administrator assigns administrative privileges to users, allowing them to perform administrative tasks within the realm.
- Resource
Something a user can access over the network such as a web page.
Defined as part of policies, these can include wildcards in order to match multiple actual resources.
- Resource owner
In OAuth 2.0, entity who can authorize access to protected web resources, such as an end user.
- Resource server
In OAuth 2.0, server hosting protected web resources, capable of handling access tokens to respond to requests for such resources.
- Response attributes
Defined as part of policies, these allow AM to return additional information in the form of "attributes" with the response to a policy decision.
- Role based access control (RBAC)
Access control that is based on whether a user has been granted a set of permissions (a role).
- Security Assertion Markup Language (SAML)
Standard, XML-based language for exchanging authentication and authorization data between identity providers and service providers.
- Service provider (SP)
Entity that consumes assertions about a principal (and provides a service that the principal is trying to access).
- Session
The interval that starts with the user authenticating through AM and ends when the user logs out, or when their session is terminated. For browser-based clients, AM manages user sessions across one or more applications by setting a session cookie. See also Stateful session and Stateless session.
- Session high availability
Capability that lets any AM server in a clustered deployment access shared, persistent information about users' sessions from the CTS token store. The user does not need to log in again unless the entire deployment goes down.
- Session token
Unique identifier issued by AM after successful authentication. For a Stateful session, the session token is used to track a principal's session.
- Single log out (SLO)
Capability allowing a principal to end a session once, thereby ending her session across multiple applications.
- Single sign-on (SSO)
Capability allowing a principal to authenticate once and gain access to multiple applications without authenticating again.
- Site
Group of AM servers configured the same way, accessed through a load balancer layer.
The load balancer handles failover to provide service-level availability. Use sticky load balancing based on
amlbcookievalues to improve site performance.The load balancer can also be used to protect AM services.
- Standard metadata
Standard federation configuration information that you can share with other access management software.
- Stateful session
An AM session that resides in the Core Token Service's token store. Stateful sessions might also be cached in memory on one or more AM servers. AM tracks stateful sessions in order to handle events like logout and timeout, to permit session constraints, and to notify applications involved in SSO when a session ends.
- Stateless session
An AM session for which state information is encoded in AM and stored on the client. The information from the session is not retained in the CTS token store. For browser-based clients, AM sets a cookie in the browser that contains the session information.
- Subject
Entity that requests access to a resource
When a subject successfully authenticates, AM associates the subject with the Principal that distinguishes it from other subjects. A subject can be associated with multiple principals.
- User data store
Data storage service holding principals' profiles; underlying storage can be an LDAP directory service, a relational database, or a custom
IdRepoimplementation.- Web policy agent
Native library installed in a web server that acts as a policy agent with policies based on web page URLs.