Guide showing you how to use OpenID Connect 1.0 with ForgeRock® Access Management (AM). ForgeRock Access Management provides intelligent authentication, authorization, federation, and single sign-on functionality.
Preface
This guide covers concepts, configuration, and usage procedures for working with OpenID Connect 1.0 and ForgeRock Access Management.
This guide is written for anyone using OpenID Connect 1.0 with Access Management to manage and federate access to web applications and web-based resources.
About ForgeRock Identity Platform™ Software
ForgeRock Identity Platform™ serves as the basis for our simple and comprehensive Identity and Access Management solution. We help our customers deepen their relationships with their customers, and improve the productivity and connectivity of their employees and partners. For more information about ForgeRock and about the platform, see https://www.forgerock.com.
Chapter 1. Introducing OpenID Connect 1.0
OpenID Connect 1.0 is an identity layer built on OAuth 2.0. It enables clients to verify the identity of users based on the authentication performed by OAuth 2.0 authorization servers, as well as to obtain profile information about the user using REST.
Tip
Before configuring OpenID Connect in your environment, ensure you are familiar with the OAuth 2.0 standards and AM's implementation of OAuth 2.0.
For more information about AM and OAuth 2.0, see the OAuth 2.0 Guide.
1.1. OAuth 2.0 or OpenID Connect?
Both standards were created under the premise of users having the need to interact with a third party service, but aim to solve different problems:
| OAuth 2.0 | OpenID Connect | |
|---|---|---|
Purpose | To provide users with a mechanism to authorize a service to access and use a subset of their data in their behalf, in a secure way. Users must agree to provide access under the service's term and conditions (for example, for how long the service has access to their data, and the purpose that data would be used for). | To provide users with a mechanism to authenticate to a service by providing it with a subset of their data in a secure way. Since OpenID Connect builds on top of OAuth 2.0, users authorize a relying party to collect a subset of their data (usually information stored in the end user's profile) from a third party. The service then uses this data to authenticate the user and provide its services. This way, the user can employ the relying party's services even if they have never created an account on it. |
Use Cases | Use-cases are generic and can be tailored to many needs, but an example is a user allowing a photo print service access to a third-party server hosting their pictures, so the photo print service can print them. | The most common scenario is using social media credentials to log in to a third-party service provider. |
Tokens | Access and refresh tokens | ID tokens |
Regarding Scopes | Concept to limit the information to share with service or the actions the service can do with the data. For example, the Scopes are not data, nor are related to user data in any way. | Concept that can be mapped to specific user data. For example, AM maps the Claims are returned as part of the ID token. In some circumstances, additional claims can be requested in a call to the For more information about how AM maps user profile attributes to claims, see "OpenID Connect Scopes and Claims". |
Another difference between the standards is the name of the actors. The names of the actors in OpenID Connect 1.0 relate to those used in OAuth 2.0 as follows:
| OIDC Actor | OAuth 2.0 Actor | Description |
|---|---|---|
| End User | Resource Owner (RO) | The owner of the information the application needs to access. The end user wants to use an application through existing identity provider account without signing up to and creating credentials for yet another web service. |
| Relying Party (RP) | Client | The third-party that needs to know the identity of the end user to provide their services. For example, a delivery company or a shopping site. |
| OpenID Provider (OP) | Authorization Server (AS) Resource Server (RS) | A service that has the end user's consent to provide the RP with access to some of its user information. As OpenID Connect 1.0 defines unique identification for an account (subject identifier + issuer identifier), the RP can use this as a key to its own user profile. In the case of an online mail application, this key could be used to access the mailboxes and related account information. In the case of an online shopping site, this key could be used to access the offerings, account, shopping cart and so forth. The key makes it possible to serve users as if they had local accounts. AM can act as the OpenID Connect provider to authenticate end users and provide RPs with information about the users in the form of an OpenID Connect ID token. |
The following sequence diagram demonstrates the basic OpenID Connect flow:

1.2. AM as the OpenID Provider
In its role as OpenID provider, AM returns ID tokens to relying parties while allowing them to discover its capabilities and register.
Since OpenID Connects builds on top of OAuth 2.0, when AM is configured as an OpenID provider, it can also return access and refresh tokens to the relying parties, if needed.
AM supports the following OpenID Connect grant types and standards:
- Grant Types
Authorization Code
Authorization Code with PKCE
Back Channel Request
Implicit
Hybrid
Hybrid with PKCE
For more information, see "Implementing OpenID Connect Grant Flows".
- Standards
Session Management
OpenID Connect lets the relying party track whether the end user is logged in at the provider, and also initiate end user logout at the provider. The specification has the relying party monitor session state using an invisible iframe and communicate status using the HTML 5 postMessage API.
For more information, see "Managing OpenID Connect User Sessions".
Discovery and Dynamic Client Registration
OpenID Connect defines how a relying party can discover the OpenID Provider and corresponding OpenID Connect configuration for an end user. The discovery mechanism relies on WebFinger to get the information based on the end user's identifier. The server returns the information in JSON Resource Descriptor (JRD) format.
For more information, see "Configuring AM for OpenID Connect Discovery" and "Registering OpenID Connect Relying Parties".
Mobile Connect
Mobile Connect builds on top of OpenID Connect to facilitate the use of mobile phones as authentication devices, offering a way for mobile network operators to act as identity providers.
For more information, see "Configuring for GSMA Mobile Connect".
Tip
For a detailed list of all the supported OpenID Connect standards, see "OpenID Connect 1.0 Standards".
For a detailed list of all the supported OAuth 2.0 standards, see "OAuth 2.0 Standards" in the OAuth 2.0 Guide.
1.3. Security Considerations
AM provides security mechanisms to ensure that OpenID Connect 1.0 ID tokens are properly protected against malicious attackers: TLS, digital signatures, and token encryption.
While designing a security mechanism, you can also take into account the points developed in the section on Security Considerations in the OpenID Connect Core 1.0 incorporating errata set 1 specification.
OpenID Connect 1.0 requires the protection of network messages with Transport Layer Security (TLS). For information about protecting traffic to and from the web container in which AM runs, see "Configuring Secrets, Certificates, and Keys" in the Setup and Maintenance Guide.
For additional security considerations related to the use of OAuth 2.0, see "Security Considerations" in the OAuth 2.0 Guide.
1.4. About Token Storage Location
AM OpenID Connect and OAuth 2.0-related services are stateless unless otherwise indicated; they do not hold any token information local to the AM instances.
Access and refresh tokens can be stored in the CTS token store or presented to the clients as JWTs. However, OpenID Connect tokens and session information are managed in the following way:
ID tokens are always presented as JWTs.
OpenID Connect sessions are always stored in the CTS token store.
For more information about how to configure access and refresh token storage, see "About Token Storage Location" in the OAuth 2.0 Guide.
Chapter 2. Configuring AM for OpenID Connect 1.0
This chapter covers implementing and configuring AM support for OpenID Connect 1.0.
2.1. Configuring AM as an OpenID Connect Provider
You can configure AM's OAuth 2.0 provider service to double as an OpenID Connect provider service.
The following procedure shows how to configure an OAuth 2.0 provider with support for the OpenID Connect specification:
Perform the steps in this procedure to set up the OAuth2 provider service with OpenID Connect defaults by using the Configure OAuth Provider wizard:
In the AM console, navigate to Realms > Realm Name > Dashboard > Configure OAuth Provider > Configure OpenID Connect.
On the Configure OAuth2/OpenID Connect Service page, select the Realm for the provider service.
(Optional) If necessary, adjust the lifetimes for authorization codes (a lifetime of 10 minutes or less is recommended in RFC 6749), access tokens, and refresh tokens.
(Optional) Select Issue Refresh Tokens if you want the provider to supply a refresh token when returning an access token.
(Optional) Select Issue Refresh Tokens on Refreshing Access Tokens if you want the provider to supply a new refresh token when refreshing an access token.
(Optional) Keep the default scope implementation, whereby scopes are taken to be resource owner profile attribute names, unless you have a custom scope validator implementation.
If you have a custom scope validator implementation, copy it to the AM classpath, for example
/path/to/tomcat/webapps/openam/WEB-INF/lib/, and specify the class name in the Scope Implementation Class field. For an example, see "Customizing OAuth 2.0 Scope Handling" in the OAuth 2.0 Guide.Select Create to save your changes. If an OAuth2 provider service already exists, it will be overwritten with the new OpenID Connect parameter values.
AM creates an OAuth2 provider service, with OpenID Connect default parameter values.
This section only covers OpenID Connect-specific configuration. For more information about general OAuth 2.0 configuration, see "OAuth 2.0 Provider Server Additional Configuration" in the OAuth 2.0 Guide.
The OpenID Connect provider is highly configurable:
To access the OAuth 2.0 provider configuration in the AM console, navigate to Realms > Realm Name > Services, and then select OAuth2 Provider.
To adjust global defaults, in the AM console navigate to Configure > Global Services, and then click OAuth2 Provider.
Consider the following configuration options:
To configure the public keys for the provider, see "/oauth2/connect/jwk_uri".
OpenID providers sign ID tokens so that clients can ensure their authenticity. AM exposes the URI where clients can check the signing public keys to verify the ID token signatures.
By default, AM exposes an internal endpoint with keys, but you can configure the URI of your secrets API instead.
To enable the OpenID Connect discovery endpoint, see "Configuring AM for OpenID Connect Discovery".
To configure response type plugins, add or remove lines from the Response Type Plugins field. Response type plugins let the provider issue access tokens, ID tokens, authorization codes, device codes, and others.
The following is a list of the plugins included in AM:
code|org.forgerock.oauth2.core.AuthorizationCodeResponseTypeHandler
id_token|org.forgerock.openidconnect.IdTokenResponseTypeHandler
device_code|org.forgerock.oauth2.core.TokenResponseTypeHandler
token|org.forgerock.oauth2.core.TokenResponseTypeHandler
none|org.forgerock.oauth2.core.NoneResponseTypeHandler
The
id_tokenresponse type is required in OpenID Connect flows. AM uses it to issue ID tokens.The
noneresponse type is required in OpenID Connect flows using theid_token_hintparameter.The
coderesponse type is required in the Authorization Code grant flow.The
device_coderesponse type is required in the Device grant flow.The
tokenresponse type is required in all flows. AM uses it to issue access and refresh tokens.
To configure pairwise subject types as described in the OpenID Connect core specification section concerning Subject Identifier Types, configure the Subject Types supported map.
To configure whether AM must return claims in the ID token and how AM maps scopes to claims, see "OpenID Connect Scopes and Claims".
To configure the provider for OpenID Connect discovery, see "Configuring AM for OpenID Connect Discovery".
To configure the provider to require end users to satisfy different rules when authenticating, see "Adding Authentication Requirements to ID Tokens".
To configure the provider as part of a GSMA Mobile Connect deployment, see "Configuring as an OP for Mobile Connect".
To register clients or configure dynamic client registration, see "Registering OAuth 2.0 Clients With the OAuth 2.0 Provider Service" in the OAuth 2.0 Guide.
To configure the provider to encrypt ID tokens, see "Encrypting OpenID Connect ID Tokens".
To modify the methods and algorithms available for handling signed or encrypted JWTs in authorization request parameters, configure the request parameter signing and encryption fields.
Note that the alias mapped to the encryption algorithms are defined in the secret stores, as shown in the table below:
Secret ID Mappings for Decrypting OpenID Connect Request ParametersSecret ID Default Alias Algorithms [a] am.services.oauth2.oidc.decryption.RSA1.5 test RSA with PKCS#1 v1.5 padding am.services.oauth2.oidc.decryption.RSA.OAEP test RSA with OAEP with SHA-1 and MGF-1 am.services.oauth2.oidc.decryption.RSA.OAEP.256 test RSA with OAEP with SHA-256 and MGF-1 [a] The following applies to confidential clients only:
If you select an AES algorithm (
A128KW,A192KW, orA256KW) or the direct encryption algorithm (dir), the value of the Client Secret field in the OAuth 2.0 Client is used as the secret instead of an entry from the secret stores.The following signing and encryption algorithms use the Client Secret field to store the secret:
Signing ID tokens with an HMAC algorithm
Encrypting ID tokens with AES or direct encryption
Encrypting parameters with AES or direct encryption
Store only one secret in the Client Secret field; AM will use different mechanisms to sign and encrypt depending on the algorithm, as explained in the OpenID Connect Core 1.0 errata set 1 specification.
By default, secret IDs are mapped to demo keys contained in the default keystore provided with AM and mapped to the
default-keystorekeystore secret store. Use these keys for demo and test purposes only. For production environments, replace the secrets as required and create mappings for them in a secret store configured in AM.For more information about managing secret stores and mapping secret IDs to aliases, see "Configuring Secrets, Certificates, and Keys" in the Setup and Maintenance Guide.
For more information about request parameters, see Passing Request Parameters as JWTs in the OpenID Connect Core 1.0 incorporating errata set 1 specification.
2.2. Configuring AM for OpenID Connect Discovery
In order to allow relying parties to discover the OpenID Connect Provider for an end user, AM supports OpenID Connect Discovery 1.0. In addition to discovering the OpenID Provider for an end user, the relying party can also request the OpenID Provider configuration.
AM exposes REST endpoints for discovering information about the provider configuration, and about the provider for a given end user.
The following REST endpoints are available:
/oauth2/.well-known/openid-configurationallows clients to retrieve OpenID Provider configuration by HTTP GET as specified by OpenID Connect Discovery 1.0.When the OpenID Connect provider is configured in a subrealm, relying parties can get the configuration by passing in the full path to the realm in the URL. For example, if the OpenID Connect provider is configured in a subrealm named
subrealm1, which is a child of the top-level realm, the URL would resemble the following:https://openam.example.com:8443/openam/oauth2/realms/root/realms/subrealm1/.well-known/openid-configuration./.well-known/webfingerlets clients determine the provider URL for an end user, as described in the OpenID Connect Discovery 1.0 incorporating errata set 1 specification.The endpoint is disabled by default. To enable it, perform the following steps:
Go to Realms > Realm Name > Services > OAuth2 Provider > OpenID Connect.
Enable OIDC Provider Discovery.
Save your changes.
The discovery endpoint only allows searches for users within the realm where it is enabled. Repeat this procedure in as many realms as necessary.
Note
AM supports a provider service that allows the realm to have a configured option for obtaining the base URL (including protocol) for components that need to return a URL to the client. This service is used to provide the URL base that is used in the .well-known endpoints used in OpenID Connect 1.0 and UMA.
For more information, see "Configuring the Base URL Source Service".
A relying party needs to be able to discover the OpenID Connect provider for an end user. In this case you should consider redirecting requests to URIs at the server root, such as http://www.example.com/.well-known/webfinger and http://www.example.com/.well-known/openid-configuration, to these Well-Known URIs in AM's space.
Discovery relies on WebFinger, a protocol to discover information about people and other entities using standard HTTP methods. WebFinger uses Well-Known URIs, which defines the path prefix /.well-known/ for the URLs defined by OpenID Connect Discovery.
Unless you deploy AM in the root context of a container listening on port 80 on the primary host for your domain, relying parties need to find the right host:port/deployment-uri combination to locate the well-known endpoints. Therefore you must manage the redirection to AM. If you are using WebFinger for something else than OpenID Connect Discovery, then you probably also need proxy logic to route the requests.
OpenID Connect Discovery requires an OAuth 2.0 provider service to be configured within AM. The service must have openid as a supported scope in order to use the /oauth2/.well-known/openid-configuration endpoint. For information on configuring an OAuth 2.0 provider service for OpenID Connect in AM, see "Configuring AM as an OpenID Connect Provider".
To retrieve the OpenID Connect provider for an end user, the relying party needs the following:
realmSpecifies the AM realm that must be queried for user information. Unlike other AM endpoints, the discovery endpoint does not support specifying the realm in the path, because it is always located after the deployment URI. For example,
https://openam.example.com:8443/openam/.well-known/webfinger.Required: No.
resourceIdentifies the URL-encoded subject of the request. This parameter can take the following formats, as defined in the specification:
acct:user_email. For example,acct%3Ademo%40example.com.acct:user_email@host. For example,acct%3Ademo%2540example.com%40server.example.comhttp_or_https://host/username. For example,http%3A%2F%2Fserver.example.com%2Fdemo.http_or_https://host:port. For example,http%3A%2F%2Fserver.example.com%3A8080.
The value of
hostis related to the discovery URL exposed to the clients. In the examples, the exposed discovery endpoint would be something similar tohttp://server.example.com/.well-known/webfinger. For more information about exposing the endpoint through a proxy or load balancer, see "Configuring AM for OpenID Connect Discovery".Wildcard (*) characters are not supported.
Required: Yes.
relSpecifies the URL-encoded URI identifying the type of service whose location is requested. The only valid value is
http://openid.net/specs/connect/1.0/issuer.Required: Yes.
The following command requests information for the demo user in the example.com domain to the OAuth 2.0 provider service in the Engineering realm:
$curl \ --request GET \ "https://openam.example.com:8443/openam/.well-known/webfinger\ ?resource=acct%3Ademo%40example.com\ &realm=Engineering\ &rel=http%3A%2F%2Fopenid.net%2Fspecs%2Fconnect%2F1.0%2Fissuer"{ "subject": "acct:demo@example.com", "links": [ { "rel": "http://openid.net/specs/connect/1.0/issuer", "href": "https://openam.example.com:8443/openam/oauth2" } ] }
This example shows that the OpenID Connect provider for the AM demo user is indeed the AM server.
The relying party can also discover the OpenID Connect provider configuration. If you have not set up the redirection to the root of the domain yet, you can test this with the following curl command:
$curl "https://openam.example.com:8443/openam/oauth2/.well-known/openid-configuration"{ "request_parameter_supported":true, "claims_parameter_supported":false, "introspection_endpoint":"https://openam.example.com:8443/openam/oauth2/introspect", "check_session_iframe":"https://openam.example.com:8443/openam/oauth2/connect/checkSession", "scopes_supported":[ "address", "phone", "openid", "profile", "email" ], "userinfo_endpoint":"https://openam.example.com:8443/openam/oauth2/userinfo", "jwks_uri":"https://openam.example.com:8443/openam/oauth2/connect/jwk_uri", "registration_endpoint":"https://openam.example.com:8443/openam/oauth2/register", .... }
When the OpenID Connect provider is configured in a subrealm, then relying parties can get the configuration by passing in the realm in the URL.
When making a REST API call, specify the realm in the path component of the endpoint. You must specify the entire hierarchy of the realm, starting at the top-level realm. Prefix each realm in the hierarchy with the realms/ keyword. For example /realms/root/realms/customers/realms/europe.
For example, if the OpenID Connect provider is configured in a subrealm named subrealm1 which is a child of the top-level realm, the URL would resemble the following: https://openam.example.com:8443/openam/oauth2/realms/root/realms/subrealm1/.well-known/openid-configuration.
2.3. Configuring the Base URL Source Service
In many deployments, AM determines the base URL of a provider using the incoming HTTP request. However, there are often cases when the base URL of a provider cannot be determined from the incoming request alone, especially if the provider is behind some proxying application. For example, if an AM instance is part of a site where the external connection is over SSL but the request to the AM instance is over plain HTTP, then AM would have difficulty in reconstructing the base URL of the provider.
In these cases, AM supports a provider service that allows a realm to have a configured option for obtaining the base URL including protocol for components that need to return a URL to the client.
Log in to the AM console as an administrative user, such as
amAdmin, and then navigate to Realms > Realm Name > Services.Click Add a Service, select Base URL Source, and then click Create, leaving the fields empty.
For Base URL Source, select one of the following options:
Base URL Source OptionsOption Description Extension class Click the Extension class to return a base URL from a provided
HttpServletRequestobject. In the Extension class name field, enterorg.forgerock.openam.services.baseurl.BaseURLProvider.Fixed value Click Fixed value to enter a specific base URL value. In the Fixed value base URL field, enter the base URL.
Forwarded header Click Forwarded header to retrieve the base URL from the
Forwardedheader field in the HTTP request. The Forwarded HTTP header field is standardized and specified in RFC 7239.Host/protocol from incoming request (default) Click Host/protocol from incoming request to get the hostname, server name, and port from the HTTP request.
X-Forwarded-* headers Click X-Forwarded-* headers to use non-standard header fields, such as
X-Forwarded-For,X-Forwarded-By, andX-Forwarded-Proto.In the Context path, enter the context path for the base URL. If provided, the base URL includes the deployment context path appended to the calculated URL. For example,
/openam.Click Finish to save your configuration.
2.4. Registering OpenID Connect Relying Parties
OpenID Connect relying parties can register with AM both statically through an OAuth 2.0 client profile created with the AM console, and also dynamically using OpenID Connect 1.0 Dynamic Registration.
For information about registering clients with AM and dynamic client registration, see "Registering OAuth 2.0 Clients With the OAuth 2.0 Provider Service" in the OAuth 2.0 Guide.
Tip
For an example OpenID Connect client written in JavaScript, see the OpenID Connect examples.
2.5. Configuring for GSMA Mobile Connect
GSMA Mobile Connect is an application of OpenID Connect (OIDC). Mobile Connect builds on OIDC to facilitate use of mobile phones as authentication devices independently of the service provided and independently of the device used to consume the service. Mobile Connect thus offers a standard way for Mobile Network Operators to act as general-purpose identity providers, providing a range of levels of assurance and profile data to Mobile Connect-compliant Service Providers.
This section includes an overview, as well as the following:
In a Mobile Connect deployment, AM can play the OpenID Provider role, implementing the Mobile Connect Profile as part of the Service Provider - Identity Gateway interface.
AM can also play the Authenticator role as part of the Identity Gateway - Authenticators interface. In this role, AM serves to authenticate users at the appropriate Level of Assurance (LoA). In Mobile Connect, LoAs represent the authentication level achieved. A Service Provider can request LoAs without regard to the implementation, and the Identity Gateway includes a claim in the ID Token that indicates the LoA achieved.
In AM, Mobile Connect LoAs map to an authentication mechanism. Service Providers acting as OpenID Relying Parties (RP) request an LoA by using the acr_values field in an OIDC authentication request. In OIDC, acr_values specifies Authentication Context Class Reference values. The RP sets acr_values as part of the OIDC Authentication Request. AM returns the corresponding acr claim in the Authentication Response as the value of the ID Token acr field.
AM as OP supports LoAs 1 (low - little or no confidence), 2 (medium - some confidence, as in single-factor authentication), and 3 (high - high confidence, as in multi-factor authentication), though out of the box it does not include support for 4, which involves digital signatures.
As Mobile Connect OP, AM supports mandatory request parameters, and a number of optional request parameters:
| Request Parameter | Support | Description |
|---|---|---|
| | Supported | OAuth 2.0 grant type to use. Set this to |
| | Supported | Set this to the client identifier. |
| | Supported | Space delimited OAuth 2.0 scope values. Required: Optional: |
| | Supported | OAuth 2.0 URI where the authorization request callback should go. Must match the |
state | Supported | Value to maintain state between the request and the callback. Required for Mobile Connect. |
nonce | Supported | String value to associate the client session with the ID Token. Optional in OIDC, but required for Mobile Connect. |
display | Supported | String value to specify the user interface display. |
login_hint | Supported | String value that can be set to the ID the user uses to log in. For example, When provided as part of the OIDC Authentication Request, the |
acr_values | Supported | Authentication Context Class Reference values used to communicate acceptable LoAs that users must satisfy when authenticating to the OpenID provider. For more information, see "The Authentication Context Class Reference (acr) Claim". |
dtbs | Not supported | Data To Be Signed At present AM does not support LoA 4. |
As Mobile Connect OP, AM responds to a successful authorization request with a response containing all the required fields, and also the optional expires_in field. AM supports the mandatory ID Token properties, though the relying party is expected to use the expires_in value, rather than specifying max_age as a request parameter:
| Request Parameter | Support | Description |
|---|---|---|
| | Supported | Issuer identifier |
| | Supported | Subject identifier By default AM returns the identifier from the user profile. |
| | Supported | Audience, an array including the token endpoint URL. |
| | Supported | Expiration time in seconds since the epoch. |
| | Supported | Issued at time in seconds since the epoch. |
nonce | Supported | The nonce supplied in the request. |
| | Supported. | Base64url-encoding of the SHA-256 hash of the "access_token" value. |
| | Supported | Authentication Context Class Reference for the LoA achieved. For more information, see "The Authentication Context Class Reference (acr) Claim". |
| | Supported | Authentication Methods Reference to indicate the authentication method. AM maps these to authentication modules. Suggested values include the following: For more information, see "The Authentication Method Reference (amr) Claim". |
| | Supported | Authorized party identifier, which is the |
In addition to the standard OIDC user information returned with userinfo, AM as OP for Mobile Connect returns the updated_at property, representing the time last updated as seconds since the epoch.
You configure AM as an OpenID Connect provider for Mobile Connect by changing the OAuth2 Provider configuration.
Follow the steps in this procedure to set up the OAuth2 provider service with Mobile Connect defaults by using the Configure OAuth Provider wizard.
When you create the OAuth2 provider service with the Configure OAuth Provider wizard, the wizard also creates a standard policy in the Top Level Realm (/) to protect the authorization endpoint. In this configuration, AM serves the resources to protect, and no separate application is involved. AM therefore acts both as the policy decision point and policy enforcement point that protects the OAuth 2.0 authorization endpoint used by OpenID Connect.
There is no requirement to use the wizard or to create the policy in the Top Level Realm. However, if you create the OAuth 2.0 provider service without the wizard, then you must set up the policy independently as well. The policy must appear in a policy set of type iPlanetAMWebAgentService. When configuring the policy, allow all authenticated users to perform HTTP GET and POST requests on the authorization endpoint. The authorization endpoint is described in "OAuth 2.0 Endpoints" in the OAuth 2.0 Guide. For details on creating policies, see "Implementing Authorization" in the Authorization Guide.
In the AM console, select Realms > Realm Name > Dashboard > Configure OAuth Provider > Configure Mobile Connect.
On the Configure Mobile Connect page, select the Realm for the provider service.
(Optional) If necessary, adjust the lifetimes for authorization codes, access tokens, and refresh tokens.
(Optional) Select Issue Refresh Tokens unless you do not want the authorization service to supply a refresh token when returning an access token.
(Optional) Select Issue Refresh Tokens on Refreshing Access Tokens if you want the authorization service to supply a refresh token when refreshing an access token.
(Optional) If you have a custom scope validator implementation, put it on the AM classpath, for example
/path/to/tomcat/webapps/openam/WEB-INF/lib/, and specify the class name in the Scope Implementation Class field. For an example, see "Customizing OAuth 2.0 Scope Handling" in the OAuth 2.0 Guide.Click Create to save your changes.
AM creates an OAuth2 provider service with Mobile Connect default parameter values, as well as a policy to protect the OAuth2 authorization endpoints.
Warning
If an OAuth2 provider service already exists, it will be overwritten with the new Mobile Connect parameter values.
To access the provider service configuration in the AM console, browse to Realms > Realm Name > Services > OAuth2 Provider.
For Mobile Connect providers you may want to configure the following settings:
Configure the following OpenID Connect authentication context settings for AM to return
acrandamrclaims in the ID tokens:OpenID Connect acr_values to Auth Chain Mapping
Default ACR values
OpenID Connect id_token amr Values to Auth Module Mappings
For more information, see "Adding Authentication Requirements to ID Tokens".
Configure the identity Data Store attributes used to return
updated_atvalues in the ID Token.For Mobile Connect clients, the user info endpoint returns
updated_atvalues in the ID Token. If the user profile has never been updatedupdated_atreflects creation time.The
updated_atvalues are read from the profile attributes you specify. When using DS as an identity data store, the value is read from themodifyTimestampattribute, or thecreateTimestampattribute for a profile that has never been modified.In addition, you must also add these attributes to the list of LDAP User Attributes for the identity store. Otherwise, the attributes are not returned when AM reads the user profile. To edit the list in the AM console, browse to Realms > Realm Name > Identity Stores > Identity Store Name > User Configuration > LDAP User Attributes.
Click Save to complete the process.
A simple, non-secure GSMA Mobile Connect relying party example is available online.
2.6. Encrypting OpenID Connect ID Tokens
AM supports encrypting OpenID Connect ID tokens to protect them against tampering attacks, which is outlined in the JSON Web Encryption specification (RFC 7516).
Perform the following steps to enable and configure ID token encryption:
Navigate to Realms > Realm Name > Applications > OAuth 2.0 > Client Name.
On the Signing and Encryption tab, select Enable ID Token Encryption.
In the Id Token Encryption Algorithm field, enter the algorithm AM will use to encrypt ID tokens.
AM supports the following encryption algorithms:
A128KW- AES Key Wrapping with 128-bit key derived from the client secret.A192KW- AES Key Wrapping with 192-bit key derived from the client secret.A256KW- AES Key Wrapping with 256-bit key derived from the client secret.RSA-OAEP- RSA with Optimal Asymmetric Encryption Padding (OAEP) with SHA-1 and MGF-1.RSA-OAEP-256- RSA with OAEP with SHA-256 and MGF-1.RSA1_5- RSA with PKCS#1 v1.5 padding (not recommended).dir- Direct encryption with AES using the hashed client secret.ECDH-ES- Elliptic Curve Diffie-HellmanECDH-ES+A128KW- Elliptic Curve Diffie-Hellman + AES Key Wrapping with 128-bit key.ECDH-ES+A192KW- Elliptic Curve Diffie-Hellman + AES Key Wrapping with 192-bit key.ECDH-ES+A256KW- Elliptic Curve Diffie-Hellman + AES Key Wrapping with 256-bit key.
Only the
P-256,P-384, andP-521curves are supported.In the ID Token Encryption Method field, enter the method AM will use to encrypt ID tokens.
AM supports the following encryption methods:
A128CBC-HS256- AES 128-bit in CBC mode using HMAC-SHA-256-128 hash (HS256 truncated to 128 bits)A192CBC-HS384- AES 192-bit in CBC mode using HMAC-SHA-384-192 hash (HS384 truncated to 192 bits)A256CBC-HS512- AES 256-bit in CBC mode using HMAC-SHA-512-256 hash (HS512 truncated to 256 bits)A128GCM- AES 128-bit in GCM modeA192GCM- AES 192-bit in GCM modeA256GCM- AES 256-bit in GCM mode
(Optional) If you selected an RSA encryption algorithm, perform one of the following actions:
Enter the public key in the Client ID Token Public Encryption Key field.
Enter a JWK set in the Json Web Key field.
Enter a URI containing the public key in the Json Web Key URI field.
(Optional) If you selected an ECDH-ES encryption algorithm, perform one of the following actions:
Enter a JWK set in the Json Web Key field.
Enter a URI containing the public key in the Json Web Key URI field.
(Optional) If you selected an algorithm different from RSA or ECDH-ES, navigate to the Core tab and store the private key/secret in the Client Secret field.
Caution
Several features of OAuth 2.0 use the string stored in the Client Secret field to sign/encrypt tokens or parameters when you configure specific algorithms. For example, signing ID tokens with HMAC algorithms, encrypting ID tokens with AES or direct algorithms, or encrypting OpenID Connect parameters with AES or direct algorithms.
In this case, these features must share the key/secret stored in the Client Secret field and you must ensure that they are configured with the same algorithm.
Chapter 3. OpenID Connect Scopes and Claims
When AM is configured as an OAuth 2.0 provider, a scope is a concept. For example, Facebook has an OAuth 2.0 scope named read_stream. AM returns allowed scopes in the access token, but it does not associate any data with them.
When AM is configured as an OpenID Connect provider, scopes can relate to data in a user profile by making use of one or more claims. Each claim maps directly to an attribute in the user profile. As each claim represents a piece of information from the user profile, AM displays the actual data the relying party will receive if the end user consents to sharing it:

For more information about how AM maps scopes to claims and profile data, see "Scripting OpenID Connect 1.0 Claims".
For more information about how to request claims inside the ID tokens, see "Requesting Claims in ID Tokens".
For more information about scopes and how to configure their appearance in the OAuth 2.0 consent pages, see "AM and OAuth 2.0 Scopes" in the OAuth 2.0 Guide.
Tip
To change how claims appear in the OAuth 2.0 consent pages, configure the Supported Claims field (Realms > Realm Name > Services > OAuth2 Provider > OpenID Connect).
Claims may be entered as simple strings or pipe-separated strings representing the internal claim name, locale, and localized description. For example: name|en|Your full name.
If the description is omitted, the claim is not displayed in the consent page. This may be useful when the client requires claims that are not meaningful for the end user.
3.1. Requesting Claims in ID Tokens
The key-value pairs contained within an ID token are called claims. Section 2 of the OpenID Connect specification lists the required and optional claims used by all OpenID Connect flows.
Alongside those claims, ID tokens can contain claims that are mapped to scopes, as seen in "OpenID Connect Scopes and Claims". By default, AM does not return scope-derived claims in the ID token and clients must retrieve them from the /oauth2/userinfo endpoint.
However, sometimes you may need the provider to return some of those claims in the ID token. For example, claims related to authentication conditions or rules the end user needs to satisfy before being redirected to particular resources.
You can configure AM to either return all scope-derived claims in the ID token, or just the ones specified in the request:
To configure the provider to always return scope-derived claims in the ID token, enable Always Return Claims in ID Tokens (Realms > Realm Name > Services > OAuth2 Provider > Advanced OpenID Connect).
This option is disabled by default because of the security concerns of returning claims that may contain sensitive user information.
To request that the provider only includes certain scope-derived claims in the ID token, enable "claims_parameter_supported" (Realms > Realm Name > Services > OAuth2 Provider > Advanced OpenID Connect) and request said claims in the
claimsparameter.Clients can still retrieve additional claims from the
/oauth2/userinfoendpoint.Claims specified using the
claimsparameter can be voluntary or essential:Essential. The relying party specifies a number of claims that are necessary to ensure a good experience to the end user.
For example, to provide personalized services, the relying party may require the end user's phone number to send them an SMS.
Voluntary. The relying party specifies a number of claims that are useful but not required to provide services to the end user.
For more information, see section 5.5 of the OpenID Connect specification.
For an example on requesting voluntary and essential claims, see "Requesting acr Claims Example".
Note
In section 5.6 of the specification, AM supports Normal Claims. The optional Aggregated Claims and Distributed Claims representations are not supported by AM.
3.2. Scripting OpenID Connect 1.0 Claims
You can configure how AM maps scopes to claims and data by using a script configured in the OAuth 2.0 provider. AM provides a default script that maps the following claims to the profile scope:
| Claim | User profile attribute |
|---|---|
|
|
|
|
|
|
|
|
|
|
Tip
See the script in action by trying any of the OpenID Connect grant flows explained in "Implementing OpenID Connect Grant Flows".
The script is configured in the OAuth 2.0 provider. To configure a different script of the type OIDC Claims, navigate to Realms > Realm Name > Services > OAuth 2.0 Provider > OpenID Connect, and then select it in the OIDC Claims Script drop-down menu.
To examine the contents of the default OIDC claims script, navigate to Realms > Realm Name > Scripts, and then select the OIDC Claims Script.
For general information about scripting in AM, see "About Scripting".
For information about APIs available for use when scripting OpenID Connect 1.0 claims, see the following:
3.2.1. OpenID Connect 1.0 Claims API Functionality
This section covers functionality available when scripting OIDC claim handling using the OIDC claims script context type.
Server-side scripts can access the OpenID Connect request through the following objects:
claimsContains a map of the claims the server provides by default. For example:
{ "sub": "248289761001", "updated_at": "1450368765" }clientPropertiesA map of properties configured in the relevant client profile. Only present if the client was correctly identified.
The keys in the map are as follows:
-
clientId The URI of the client.
allowedGrantTypesThe list of the allowed grant types (
org.forgerock.oauth2.core.GrantType) for the client.allowedResponseTypesThe list of the allowed response types for the client.
allowedScopesThe list of the allowed scopes for the client.
customPropertiesA map of any custom properties added to the client.
Lists or maps are included as sub-maps. For example, a custom property of
customMap[Key1]=Value1is returned ascustomMap>Key1>Value1.To add custom properties to a client, go to OAuth 2.0 > Clients > Client ID > Advanced, and then update the Custom Properties field.
-
identityContains a representation of the identity of the resource owner.
For more details, see the
com.sun.identity.idm.AMIdentityclass in the ForgeRock Access Management Javadoc.requestedClaimsContains requested claims if the
claimsquery parameter is used in the request, and Enable "claims_parameter_supported" is checked in the OAuth 2.0 provider service configuration; otherwise, this property is empty.For more information see "Requesting Claims using the "claims" Request Parameter" in the OpenID Connect Core 1.0 specification.
Example:
{ "given_name": { "essential": true, "values": [ "Demo User", "D User" ] }, "nickname": null, "email": { "essential": true } }requestPropertiesA map of the properties present in the request. Always present.
The keys in the map are as follows:
requestUriThe URI of the request.
realmThe realm to which the request was made.
requestParamsThe request parameters, and/or posted data. Each value in this map is a list of one, or more, properties.
Important
To mitigate the risk of reflection type attacks, use OWASP best practices when handling these properties. For example, see Unsafe use of Reflection.
scopesContains a set of the requested scopes. For example:
[ "profile", "openid" ]scriptNameThe display name of the script. Always present.
sessionContains a representation of the user's session object if the request contained a session cookie.
For more details, see the
com.iplanet.sso.SSOTokenclass in the ForgeRock Access Management Javadoc.
Chapter 4. Implementing OpenID Connect Grant Flows
This chapter describes the OpenID Connect flows that AM supports as per OpenID Connect Core 1.0 incorporating errata set 1, and also provides the information required to implement them. All the examples assume the realm is configured for CTS-based tokens, but the examples also apply to client-based tokens.
You should decide which flow is best for your environment based on the application that would be the relying party. The following table provides an overview of the flows AM supports when they should be used:
| Relying Party | Which Grant to use? | Description |
|---|---|---|
The relying party is a web application running on a server. For example, a .war application. | The OpenID Connect provider uses the user-agent, for example, the end user's browser, to transport a code that is later exchanged for an ID token (and/or an access token). For security purposes, you should use the Authorization Code grant with PKCE when possible. | |
| The relying party is a native application or a single-page application (SPA). For example, a desktop, a mobile application, or a JavaScript application. | Since the relying party does not communicate securely with the OpenID Connect provider, the code may be intercepted by malicious users. The implementation of the Proof Key for Code Exchange (PKCE) standard mitigates against those attacks. | |
| The relying party knows the user's identifier, and wishes to gain consent for an operation from the user by means of a separate authentication device. | The relying party does not require that the user interacts directly with it; instead it can initiate a backchannel request to the user's authentication device, such as a mobile phone with an authenticator app installed, to authenticate the user and consent to the operation. For example, a smart speaker wants to authenticate and gain consent from its registered user after receiving a voice request to transfer money to a third-party. | |
| The relying party is an SPA. For example, a JavaScript application. | The OpenID Connect provider uses the user-agent, for example, the end user's browser, to transport an ID token (and maybe an access token) to the relying party. Therefore, the tokens might be exposed to the end user and other applications. For security purposes, you should use the Authorization Code grant with PKCE when possible. | |
| The relying party is an application that can use the ID token immediately, and then request an access token and/or a refresh token. | AM uses the user-agent, for example, the end user's browser, to transport any combination of ID token, access token, and authorization code to the relying party. The relying party uses the ID token immediately. Later on, it can use either the access token to request a refresh token, or the authorization code to request an access token. For security purposes, you should implement the PKCE specification when using the Hybrid flow when possible. |
4.1. Authorization Code Grant
- Endpoints
/oauth2/authorize in the OAuth 2.0 Guide
/oauth2/access_token in the OAuth 2.0 Guide
The Authorization Code grant is a two-step interactive process used when the client, for example, a Java application running on a server, requires access to protected resources.
The Authorization Code grant is the most secure of all the OAuth 2.0/OpenID Connect grants for the following reasons:
It is a two-step process. The user must authenticate and authorize the client to see the resources and the OpenID provider must validate the code again before issuing the access/ID tokens.
The OpenID provider delivers the tokens directly to the client, usually over HTTPS. The client secret is never exposed publicly, which protects confidential clients.
The following diagram demonstrates the Authorization Code grant flow:

The steps in the diagram are described below:
The end user wants to use the services provided by the relying party. The relying party, usually a web-based service, requires an account to provide those services.
The end user issues a request to the relying party to access their information, which is stored in an OpenID provider.
To access the end user's information in the provider, the relying party requires authorization from the end user. Therefore, the relying party redirects the end user's user-agent...
... to the OpenID provider.
The OpenID provider authenticates the end user, confirms resource access, and gathers consent if not previously saved.
The OpenID provider redirects the end user's user agent to the relying party.
During the redirection process, the OpenID provider appends an authorization code.
The relying party receives the authorization code and authenticates to the OpenID provider to exchange the code for an access token and an ID token (and a refresh token, if applicable).
Note that this example assumes a confidential client. Public clients are not required to authenticate.
If the authorization code is valid, the OpenID provider returns an access token and an ID token (and a refresh token, if applicable) to the relying party.
The relying party validates the ID token and its claims.
Now, the relying party can use the ID token subject ID claim as the end user's identity.
The relying party may require more claims than those included in the ID token. In this case, it makes a request to the OpenID provider's
oauth2/userinfoendpoint with the access token.If the access token is valid, the
oauth2/userinfoendpoint returns additional claims, if any.Now, the relying party can use the subject ID and the additional retrieved claims as the end user's identity.
Perform the steps in the following procedures to obtain an authorization code and exchange it for an ID token and an access token:
This example shows how to obtain an ID token and an access token. It adds notes on how to obtain an ID token only, as well.
This procedure assumes the following configuration:
AM is configured as an OAuth 2.0/OpenID provider in the top-level realm.
The
codeResponse Type Plugins is configured.The
Authorization CodeSupported Grant Type is configured.
A confidential client called
myClientis registered in AM with the following configuration:Client secret:
forgerockScopes:
openid profileResponse Types:
codeGrant Types:
Authorization CodeToken Endpoint Authentication Method:
client_secret_postConfidential OpenID Connect clients can use several methods to authenticate. For more information, see "Authenticating Clients when Using OpenID Connect 1.0" in the OAuth 2.0 Guide.
For more information, see "Registering OpenID Connect Relying Parties".
Perform the steps in this procedure to obtain an authorization code using a browser:
The client redirects the end user's user-agent to the authorization server's authorization endpoint specifying, at least, the following form parameters:
client_id=your_client_id
response_type=code
redirect_uri=your_redirect_uri
scope=openid profile
For information about the parameters supported by the
/oauth2/authorizeendpoint, see "/oauth2/authorize" in the OAuth 2.0 Guide.If the OAuth 2.0/OpenID provider is configured for a subrealm rather than the top-level realm, you must specify it in the endpoint. For example, if the OAuth 2.0/OpenID provider is configured for the
/customersrealm, then use/oauth2/realms/root/realms/customers/authorize.For example:
https://openam.example.com:8443/openam/oauth2/realms/root/authorize \
?client_id=myClient \
&response_type=code \
&scope=openid%20profile \
&state=abc123 \
&nonce=123abc \
&redirect_uri=https://www.example.com:443/callback
Note that the URL is split and spaces have been added for readability purposes. The
stateandnonceparameters have been included to protect against CSRF and replay attacks.The end user authenticates to AM, for example, using the credentials of the
demouser. In this case, they log in using the default chain or tree configured for the realm.After logging in, AM presents its consent screen:
OpenID Connect Consent Screen
Note that requesting the
profilescope translates into requesting access to several claims. For more information about the specialprofilescope, see "OpenID Connect Scopes and Claims".The end user selects the
Allowbutton to grant consent for theprofilescope.AM redirects the end user to the URL specified in the
redirect_uriparameter.Inspect the URL in the browser. It contains a
codeparameter with the authorization code AM has issued. For example:https://www.example.com:443/callback?code=g5B3qZ8rWzKIU2xodV_kkSIk0F4&iss=https://openam.example.com:8443/openam/oauth2&state=abc123&client_id=myClient
The client performs the steps in "To Exchange an Authorization Code for an ID/Access Token in the Authorization Code Grant Flow" to exchange the authorization code for an access token and an ID token.
This example shows how to obtain an ID token and an access token. It adds notes on how to obtain an ID token only, as well.
This procedure assumes the following configuration:
AM is configured as an OAuth 2.0/OpenID provider. Ensure that:
The
codeResponse Type Plugins is configured.The
Authorization CodeSupported Grant Type is configured.
A confidential client called
myClientis registered in AM with the following configuration:Client secret:
forgerockScopes:
openid profileResponse Types:
codeGrant Types:
Authorization CodeToken Endpoint Authentication Method:
client_secret_postConfidential OpenID Connect clients can use several methods to authenticate. For more information, see "Authenticating Clients when Using OpenID Connect 1.0" in the OAuth 2.0 Guide.
For more information, see "Registering OpenID Connect Relying Parties".
Perform the steps in this procedure to obtain an authorization code without using a browser:
The end user logs in to AM, for example, using the credentials of the
demouser. For example:$
curl \ --request POST \ --header "Content-Type: application/json" \ --header "X-OpenAM-Username: demo" \ --header "X-OpenAM-Password: changeit" \ --header "Accept-API-Version: resource=2.0, protocol=1.0" \ 'https://openam.example.com:8443/openam/json/realms/root/authenticate'{ "tokenId":"AQIC5wM...TU3OQ*", "successUrl":"/openam/console", "realm":"/" }The client makes a POST call to AM's authorization endpoint, specifying the SSO token of the
demoin a cookie and, at least, the following parameters:client_id=your_client_id
response_type=code
redirect_uri=your_redirect_uri
scope=openid profile
You can configure the
openidscope as a default scope in the client profile or the OAuth 2.0/OpenID provider to avoid including the scope parameter in your calls, if required.However, since the
openidscope is required in OpenID Connect flows, the example specifies it.decision=allow
csrf=demo_user_SSO_token
For information about the parameters supported by the
/oauth2/authorizeendpoint, see "/oauth2/authorize" in the OAuth 2.0 Guide.If the OAuth 2.0/OpenID provider is configured for a subrealm rather than the top-level realm, you must specify it in the endpoint. For example, if the OAuth 2.0/OpenID provider is configured for the
/customersrealm, then use/oauth2/realms/root/realms/customers/authorize.For example:
$ curl --dump-header - \
--request POST \
--Cookie "iPlanetDirectoryPro=AQIC5wM...TU3OQ*" \
--data "scope=openid profile" \
--data "response_type=code" \
--data "client_id=myClient" \
--data "csrf=AQIC5wM...TU3OQ*" \
--data "redirect_uri=https://www.example.com:443/callback" \
--data "state=abc123" \
--data "nonce=123abc" \
--data "decision=allow" \
"https://openam.example.com:8443/openam/oauth2/realms/root/authorize"
Note that the
stateandnonceparameters have been included to protect against CSRF and replay attacks.If AM is able to authenticate the user and the client, it returns an HTTP 302 response with the authorization code appended to the redirection URL:
HTTP/1.1 302 Found
Server: Apache-Coyote/1.1
X-Frame-Options: SAMEORIGIN
Pragma: no-cache
Cache-Control: no-store
Date: Mon, 30 Jul 2018 11:42:37 GMT
Accept-Ranges: bytes
Location: https://www.example.com:443/callback?code=g5B3qZ8rWzKIU2xodV_kkSIk0F4&iss=https%3A%2F%2Fopenam.example.com%3A8443%2Fopenam%2Foauth2&state=abc123&client_id=myClient
Vary: Accept-Charset, Accept-Encoding, Accept-Language, Accept
Content-Length: 0
Perform the steps in "To Exchange an Authorization Code for an ID/Access Token in the Authorization Code Grant Flow" to exchange the authorization code for an ID/access token.
Perform the steps in the following procedure to exchange an authorization code for an ID/access token:
Ensure the relying party has obtained an authorization code by performing the steps in either "To Obtain an Authorization Code Using a Browser in the Authorization Code Grant Flow" or "To Obtain an Authorization Code Without Using a Browser in the Authorization Code Grant Flow".
The relying party makes an HTTP POST request to the token endpoint in the OpenID provider specifying, at least, the following parameters:
grant_type=authorization_code
code=your_authorization_code
redirect_uri=your_redirect_uri
For information about the parameters supported by the
/oauth2/access_tokenendpoint, see "/oauth2/access_token" in the OAuth 2.0 Guide.Confidential clients can authenticate to the OAuth 2.0 endpoints in several ways. This example uses the following form parameters:
client_id=your_client_id
client_secret=your_client_secret
For more information, see "Authenticating OAuth 2.0 Clients" in the OAuth 2.0 Guide.
If the OAuth 2.0/OpenID provider is configured for a subrealm rather than the top-level realm, you must specify it in the endpoint. For example, if the OAuth 2.0/OpenID provider is configured for the
/customersrealm, then use/oauth2/realms/root/realms/customers/access_token.For example:
$ curl --request POST \
--data "grant_type=authorization_code" \
--data "code=g5B3qZ8rWzKIU2xodV_kkSIk0F4" \
--data "client_id=myClient" \
--data "client_secret=forgerock" \
--data "redirect_uri=https://www.example.com:443/callback" \
"https://openam.example.com:8443/openam/oauth2/realms/root/access_token"
The
client_idand theredirection_uriparameters specified in this call must match those used as part of the authorization code request, or AM will not validate the code.AM returns an ID and an access token. For example:
{
   "access_token":"cnM3nSpF5ckCFZOaDem2vANUdqQ",
   "scope":"openid profile",
   "id_token":"eyJ0eXAiOiJKV1QiLCJra...7r8soMCk8A7QdQpg",
   "token_type":"Bearer",
   "expires_in":3599
}
If the client does not require the access token, revoke it in the OAuth 2.0 Guide.
Tip
AM can also issue refresh tokens at the same time the access tokens are issued. For more information, see "Managing OAuth 2.0 Refresh Tokens" in the OAuth 2.0 Guide.
(Optional) The relying party can request additional claims about the end user from AM.
For more information, see "/oauth2/userinfo".
Tip
A sample JavaScript-based relying party to test the Authorization Code grant flow is available online.
Clone the example project to deploy it in the same web container as AM. Edit the configuration at the outset of the .js files in the project, register a corresponding profile for the example relying party as described in "Registering OpenID Connect Relying Parties", and browse the deployment URL to see the initial page.
The example relying party uses an authorization code to request an access token and an ID token. It shows the response to that request. It also validates the ID token signature using the default (HS256) algorithm, and decodes the ID token to validate its content and show it in the output. Finally, it uses the access token to request information about the end user who authenticated, and displays the result.
4.2. Authorization Code Grant with PKCE
- Endpoints
/oauth2/authorize in the OAuth 2.0 Guide
/oauth2/access_token in the OAuth 2.0 Guide
The Authorization Code grant, when combined with the PKCE standard (RFC 7636), is used when the client, usually a mobile or a JavaScript application, requires access to protected resources.
The flow is similar to the regular Authorization Code grant type, but the client must generate a code that will be part of the communication between the client and the OpenID provider. This code mitigates against interception attacks performed by malicious users.
Since communication between the client and the OpenID provider is not secure, clients are usually public so their secrets do not get compromised. Also, browser-based clients making OAuth 2.0 requests to different domains must implement Cross-Origin Resource Sharing (CORS) calls to access OAuth 2.0 resources in different domains.
The PKCE flow adds three parameters on top of those used for the Authorization code grant:
code_verifier (form parameter). Contains a random string that correlates the authorization request to the token request.
code_challenge (query parameter). Contains a string derived from the code verifier that is sent in the authorization request and that needs to be verified later with the code verifier.
code_challenge_method (query parameter). Contains the method used to derive the code challenge.
The following diagram demonstrates the Authorization Code grant with PKCE flow:

The steps in the diagram are described below:
The end user wants to use the services provided by the relying party. The relying party, usually a web-based service, requires an account to provide those services.
The end user issues a request to the relying party to access their information which is stored in an OpenID provider.
To access the end user's information in the provider, the relying party requires authorization from the end user. When using the PKCE standard, the relying party must generate a unique code and a way to verify it, and append the code to the request for the authorization code.
The relying party redirects the end user's user-agent with
code_challengeandcode_challenge_method...... to the OpenID provider.
The OpenID provider authenticates the end user, confirms resource access, and gathers consent if not previously saved.
If the end user's credentials are valid and they consent to provide their data to the relying party, the OpenID provider stores the code challenge and its method.
The OpenID provider redirects the end user's user agent to the redirection URI (usually the relying party).
During the redirection process, the OpenID provider appends an authorization code.
The relying party receives the authorization code and authenticates to the OpenID provider to exchange the code for an access token and an ID token (and a refresh token, if applicable), appending the verification code to the request.
The OpenID provider verifies the code challenge stored in memory using the validation code. It also verifies the authorization code.
If both codes are valid, the OpenID provider returns an access and an ID token (and arefresh token, if applicable) to the relying party.
The relying party validates the ID token and its claims.
Now, the relying party can use the ID token subject ID claim as the end user's identity.
The relying party may require more claims than those included in the ID token. In this case, it makes a request to AM's
oauth2/userinfoendpoint with the access token.If the access token is valid, the
oauth2/userinfoendpoint returns additional claims, if any.Now, the relying party can use the subject ID and the additional retrieved claims as the end user's identity.
Perform the steps in the following procedures to obtain an authorization code and exchange it for an access token:
The relying party (the client) must be able to generate a code verifier and a code challenge. For details, see the PKCE standard (RFC 7636). The information contained in this procedure is for example purposes only:
The client generates the code challenge and the code verifier. Creating the challenge using a SHA-256 algorithm is mandatory if the client supports it, as per the RFC 7636 standard.
The following is an example of a code verifier and code challenge written in JavaScript:
function base64URLEncode(words) {
   return CryptoJS.enc.Base64.stringify(words)
   .replace(/\+/g, '-')
   .replace(/\//g, '_')
   .replace(/=/g, '');
}
var verifier = base64URLEncode(CryptoJS.lib.WordArray.random(50));
var challenge = base64URLEncode(CryptoJS.SHA256(verifier));
This example generates values such as
ZpJiIM_G0SE9WlxzS69Cq0mQh8uyFaeEbILlW8tHs62SmEE6n7Nke0XJGx_F4OduTI4for the code verifier andj3wKnK2Fa_mc2tgdqa6GtUfCYjdWSA5S23JKTTtPF8Yfor the code challenge. These values will be used in subsequent procedures.The relying party is now ready to request an authorization code.
The relying party performs the steps in one of the following procedures to request an authorization code:
This procedure assumes the following configuration:
AM is configured as an OAuth 2.0/OpenID provider. Ensure that:
The
codeResponse Type Plugins is configured.The
Authorization CodeSupported Grant Type is configured.
The Code Verifier Parameter Required drop-down menu (Realms > Realm Name > Services > OAuth2 Provider > Advanced) specifies whether AM requires clients to include a code verifier in their calls.
However, if a client makes a call to AM with the
code_challengeparameter, AM will honor the code exchange regardless of the configuration of the Code Verifier Parameter Required drop-down menu.A public client called
myClientis registered in AM with the following configuration:Scopes:
openid profileResponse Types:
codeGrant Types:
Authorization CodeToken Endpoint Authentication Method:
noneIf you were using a confidential OpenID Connect client, you must specify a method to authenticate. For more information, see "Authenticating Clients when Using OpenID Connect 1.0" in the OAuth 2.0 Guide.
For more information, see "Registering OpenID Connect Relying Parties".
Perform the steps in this procedure to obtain an authorization code using a browser:
The relying party redirects the end user's user-agent to the AM's authorization endpoint specifying, at least, the following query parameters:
client_id=your_client_id
response_type=code
redirect_uri=your_redirect_uri
code_challenge=your_code_challenge
code_challenge_method=S256
scope=openid profile
For information about the parameters supported by the
/oauth2/authorizeendpoint, see "/oauth2/authorize" in the OAuth 2.0 Guide.If the OAuth 2.0/OpenID provider is configured for a subrealm rather than the top-level realm, you must specify it in the endpoint. For example, if the OAuth 2.0/OpenID provider is configured for the
/customersrealm, then use/oauth2/realms/root/realms/customers/authorize.For example:
https://openam.example.com:8443/openam/oauth2/realms/root/authorize \
?client_id=myClient \
&response_type=code \
&scope=openid%20profile \
&redirect_uri=https://www.example.com:443/callback \
&code_challenge=j3wKnK2Fa_mc2tgdqa6GtUfCYjdWSA5S23JKTTtPF8Y \
&code_challenge_method=S256 \
&nonce=123abc \
&state=abc123
Note that the URL is split and spaces have been added for readability purposes. The
stateandnonceparameters have been included to protect against CSRF and replay attacks.The end user authenticates to AM, for example, using the credentials of the
demouser. In this case, they log in using the default chain or tree configured for the realm.After logging in, AM presents its consent screen:
OpenID Connect Consent ScreenNote that requesting the
profilescope translates into requesting access to several claims. For more information about the specialprofilescope, see "OpenID Connect Scopes and Claims".The end user selects the
Allowbutton to grant consent for theprofilescope.AM redirects the end user to the URL specified in the
redirect_uriparameter.Inspect the URL in the browser. It contains a
codeparameter with the authorization code AM has issued. For example:https://www.example.com:443/callback?code=g5B3qZ8rWzKIU2xodV_kkSIk0F4&iss=https://openam.example.com:8443/openam/oauth2&state=abc123&client_id=myClient
The client performs the steps in "To Exchange an Authorization Code for an ID/Access Token in the Authorization Code Grant with PKCE Flow" to exchange the authorization code for an ID/access token.
This procedure assumes the following configuration:
AM is configured as an OAuth 2.0/OpenID provider. Ensure that:
The
codeResponse Type Plugins is configured.The
Authorization CodeSupported Grant Type is configured.
The Code Verifier Parameter Required drop-down menu (Realms > Realm Name > Services > OAuth2 Provider > Advanced) specifies whether AM require clients to include a code verifier in their calls.
However, if a client makes a call to AM with the
code_challengeparameter, AM will honor the code exchange regardless of the configuration of the Code Verifier Parameter Required drop-down menu.A public client called
myClientis registered in AM with the following configuration:Scopes:
openid profileResponse Types:
codeGrant Types:
Authorization CodeRedirection URIs:
https://www.example.com:443/callbackToken Endpoint Authentication Method:
noneConfidential OpenID Connect clients can use several methods to authenticate. For more information, see "Authenticating Clients when Using OpenID Connect 1.0" in the OAuth 2.0 Guide.
For more information, see "Registering OpenID Connect Relying Parties".
Perform the steps in this procedure to obtain an authorization code:
The end user logs in to AM, for example, using the credentials of the
demouser. For example:$
curl \ --request POST \ --header "Content-Type: application/json" \ --header "X-OpenAM-Username: demo" \ --header "X-OpenAM-Password: changeit" \ --header "Accept-API-Version: resource=2.0, protocol=1.0" \ 'https://openam.example.com:8443/openam/json/realms/root/authenticate'{ "tokenId":"AQIC5wM...TU3OQ*", "successUrl":"/openam/console", "realm":"/" }The client makes an HTTP POST request to AM's authorization endpoint, specifying in a cookie the SSO token of the
demoand, at least, the following parameters:client_id=your_client_id
response_type=code
redirect_uri=your_redirect_uri
decision=allow
csrf=demo_user_SSO_token
code_challenge=your_code_challenge
code_challenge_method=S256
scope=openid profile
You can configure the
openidscope as a default scope in the client profile or the OAuth 2.0/OpenID provider to avoid including the scope parameter in your calls, if required.However, since the
openidscope is required in OpenID Connect flows, the example specifies it.
For information about the parameters supported by the
/oauth2/authorizeendpoint, see "/oauth2/authorize" in the OAuth 2.0 Guide.If the OAuth 2.0/OpenID provider is configured for a subrealm rather than the top-level realm, you must specify it in the endpoint. For example, if the OAuth 2.0/OpenID provider is configured for the
/customersrealm, then use/oauth2/realms/root/realms/customers/authorize.For example:
$ curl --dump-header - \
--request POST \
--Cookie "iPlanetDirectoryPro=AQIC5wM...TU3OQ*" \
--data "redirect_uri=https://www.example.com:443/callback" \
--data "scope=openid profile" \
--data "response_type=code" \
--data "client_id=myClient" \
--data "csrf=AQIC5wM...TU3OQ*" \
--data "state=abc123" \
--data "nonce=123abc" \
--data "decision=allow" \
--data "code_challenge=j3wKnK2Fa_mc2tgdqa6GtUfCYjdWSA5S23JKTTtPF8Y" \
--data "code_challenge_method=S256" \
"https://openam.example.com:8443/openam/oauth2/realms/root/authorize"
Note that the
stateandnonceparameters have been included to protect against CSRF and replay attacks.If AM is able to authenticate the user and the client, it returns an HTTP 302 response with the authorization code appended to the redirection URL:
HTTP/1.1 302 Found
Server: Apache-Coyote/1.1
X-Frame-Options: SAMEORIGIN
Pragma: no-cache
Cache-Control: no-store
Date: Mon, 30 Jul 2018 11:42:37 GMT
Accept-Ranges: bytes
Location: https://www.example.com:443/callback?code=g5B3qZ8rWzKIU2xodV_kkSIk0F4&iss=https%3A%2F%2Fopenam.example.com%3A8443%2Fopenam%2Foauth2&state=abc123&client_id=myClient
Vary: Accept-Charset, Accept-Encoding, Accept-Language, Accept
Content-Length: 0
Perform the steps in "To Exchange an Authorization Code for an ID/Access Token in the Authorization Code Grant with PKCE Flow" to exchange the authorization code for an ID/access token.
Perform the steps in the following procedure to exchange an authorization code for an ID/access token:
Ensure the client has obtained an authorization code by performing the steps in either "To Obtain an Authorization Code Using a Browser in the Authorization Code Grant with PKCE Flow" or "To Obtain an Authorization Code Without Using a Browser in the Authorization Code Grant with PKCE Flow".
The client creates a POST request to the token endpoint in the authorization server specifying, at least, the following parameters:
grant_type=authorization_code
code=your_authorization_code
client_id=your_client_id
redirect_uri=your_redirect_uri
code_verifier=your_code_verifier
For information about the parameters supported by the
/oauth2/access_tokenendpoint, see "/oauth2/access_token" in the OAuth 2.0 Guide.For example:
$ curl --request POST \
--data "grant_type=authorization_code" \
--data "code=g5B3qZ8rWzKIU2xodV_kkSIk0F4" \
--data "client_id=myClient" \
--data "redirect_uri=https://www.example.com:443/callback" \
--data "code_verifier=ZpJiIM_G0SE9WlxzS69Cq0mQh8uyFaeEbILlW8tHs62SmEE6n7Nke0XJGx_F4OduTI4" \
"https://openam.example.com:8443/openam/oauth2/realms/root/access_token"
The
client_idand theredirection_uriparameters specified in this call must match those used as part of the authorization code request, or AM will not validate the code.AM returns an ID and an access token. For example:
{
   "access_token":"cnM3nSpF5ckCFZOaDem2vANUdqQ",
   "scope":"openid profile",
   "id_token":"eyJ0eXAiOiJKV1QiLCJra...7r8soMCk8A7QdQpg",
   "token_type":"Bearer",
   "expires_in":3599
}
If the client does not require the access token, revoke it in the OAuth 2.0 Guide.
Tip
AM can also issue refresh tokens at the same time the access tokens are issued. For more information, see "Managing OAuth 2.0 Refresh Tokens" in the OAuth 2.0 Guide.
(Optional) The relying party can request additional claims about the end user from AM.
For more information, see "/oauth2/userinfo".
4.3. Backchannel Request Grant
- Endpoints
/oauth2/bc-authorize in the OAuth 2.0 Guide
/oauth2/access_token in the OAuth 2.0 Guide
The Backchannel Request grant is used when performing Client Initiated Backchannel Authentication (CIBA).
CIBA allows a client application, known as the consumption device, to obtain authentication and consent from a user, without requiring the user to interact with the client directly.
Instead, the user authenticates and consents to the operation using a separate, "decoupled" device, known as the authentication device. For example, an authenticator application, or a mobile banking application on their mobile phone.
Note
AM applies the guidelines suggested by the OpenID Financial-grade API (FAPI) Working Group to the implementation of CIBA.
For more information, see OpenID Connect 1.0.
The following diagram demonstrates the Backchannel Request grant flow:

The steps in the diagram are described below:
The client has a need to authenticate a user. It has a user identifier, and creates a signed JWT.
The client creates a POST request containing the signed JWT, and sends it to AM.
AM validates the signature using the public key, performs validation checks on the JWT contents, and if verified, returns an
auth_req_id, as well as a polling interval.The client begins polling AM using the
auth_req_idto check if the user has authorized the operation. The client must respect the interval returned each time, otherwise an error message is returned.AM sends the user a push notification message, including the contents of the
binding_message, requesting authorization.The user authorizes the request by performing the required authorization gesture on their authentication device, usually a mobile phone. For example, it may be swiping a slider, or authenticating using facial recognition or a fingerprint sensor.
If the authorization is valid, the OpenID provider returns an access token token (and an ID/refresh token, if applicable) to the client.
Now, the client can use the ID token subject ID claim as the end user's identity.
The client may require more claims than those included in the ID token. In this case, it makes a request to the OpenID provider's
oauth2/userinfoendpoint with the access token.If the access token is valid, the
oauth2/userinfoendpoint returns additional claims, if any.Now, the client can use the subject ID and the additional retrieved claims as the end user's identity.
Perform the steps in the following procedures to obtain an authorization request ID and exchange it for an ID token and an access token:
Perform the following steps to prepare AM for the backchannel request grant flow:
In AM, configure an OAuth 2.0/OpenID provider in the top-level realm.
Associate an authentication tree that performs push authentication with the
acr_valuesproperty contained in the signed JWT.The authentication tree must start with a "Username Collector Node", and contain a "Push Sender Node" and "Push Result Verifier Node", and a "Polling Wait Node".
The following is an example of a suitable authentication tree:

For more information on creating authentication trees for push authentication, see "Creating Authentication Trees for Push Authentication" in the Authentication and Single Sign-On Guide.
To associate a push authentication tree with incoming
acr_values, perform the following steps:In the AM console, navigate to Realms > Realm Name > Services > OAuth2 Provider > Advanced OpenID Connect.
In the OpenID Connect acr_values to Auth Chain Mapping box, enter the value of the
acr_valuesproperty in the Key field, and the name of the push authentication tree to use in the Value field, for exampleCIBA, and then click Add.Save your changes.
For more information, see "The Authentication Context Class Reference (acr) Claim".
For more information, see "Configuring AM as an OpenID Connect Provider".
In AM, create a confidential OAuth 2.0 client with a client ID of
myCIBAClient. The client ID must match the value of theissclaim in the signed JWT prepared above.The client profile should have the following configuration:
Client secret:
forgerockScopes:
openid profileResponse Types:
id_token tokenGrant Types:
Back Channel RequestToken Endpoint Authentication Method:
client_secret_basicConfidential OpenID Connect clients can use several methods to authenticate. For more information, see "Authenticating Clients when Using OpenID Connect 1.0" in the OAuth 2.0 Guide.
The client must be provided with the public key of the keypair that will be used to sign the JWT.
On the Signing and Encryption tab, you must configure either the JWKs URI or the JWK Set fields, as follows:
JWKs URI: specifies a URI that exposes the public keys AM will use to validate the JWT signature.
For example,
http://www.example.com/issuer/jwk_uri.Note
If you configure this field, ensure the following properties are configured with values suitable for your environment:
JWKs URI content cache timeout in ms
JWKs URI content cache miss cache time
JWK set: Specifies a JWK set containing the public keys used to validate JWT signatures.
The following is an example of a public elliptic curve JWK set:
{
  "keys": [
    {
      "kty": "EC",
      "use": "sig",
      "crv": "P-256",
      "kid": "myCIBAKey",
      "x": "m0CkpWpZyGu-FLRLjCGBVGC7Fwm5vGt8Lm3HhYU4ylg",
      "y": "U8NMtO-C2c3yhu2I_ApAELttmaittfPNPQaIJxvTCHk",
      "alg": "ES256"
    }
  ]
}
For more information about the contents of the JWK set, see the JSON Web Key (JWK) specification.
You can store more than one key in the JWK set. However, it is easier to implement key rotation exposing the validation keys on the URI instead.
For more information, see "Registering OpenID Connect Relying Parties".

Perform the steps in this procedure to obtain an authentication request ID, using CIBA:
On the client, prepare a signed JWT. The JWT must contain, at least, the following claims in the payload:
- aud
Specifies a string or an array of strings that is the intended audience of the JWT. Must be set to the authorization server's OAuth 2.0 endpoint, for example:
"aud": "http://openam.example.com:8080/openam/oauth2"
- exp
Specifies the expiration time of the JWT in Unix time.
Providing a JWT with an expiry time greater than 30 minutes causes AM to return a
JWT expiration time is unreasonableerror message.- iss
Specifies the unique identifier of the JWT issuer.
The identifier must match the client ID of the OAuth 2.0 client in AM, for example myCIBAClient.
- login_hint
Specifies the principal who is the subject of the JWT. It should be a string that identifies the resource owner.
Tip
You can provide a previously obtained ID token in a property named id_token_hint as the hint for determining the resource owner, rather than a string.
- scope
Specifies a space-separated list of the requested scopes. Must include the
openidscope.- acr_values
Specifies an identifier that maps to the authentication mechanism AM uses to obtain authorization from the end user.
- binding_message
Specifies a message delivered to the user when obtaining authorization.
Should be a short (100 characters or fewer), description of the operation the end user is authorizing, and should include an identifier to match the authorization request to the client that initiated the request.
Note
If the binding message is sent using push notifications, the following additional limitations apply to the value:
Must begin with a letter, number, or punctuation mark.
Must not include line breaks or control characters.
For example:
Allow ExampleBank to transfer £50 from your 'Main' account to your 'Savings' account? (EB-0246326)
The following is an example of the payload of a basic JWT:
{
  "login_hint": "demo",
  "scope": "openid profile",
  "acr_values": "push",
  "iss": "myCIBAClient",
  "aud": "http://openam.example.com:8080/openam/oauth2",
  "exp": 1559311511,
  "binding_message": "Allow ExampleBank to transfer £50 from your 'Main' account to your 'Savings' account? (EB-0246326)"
}
For more information about JWTs, see the RFC 7523 standard.
The client makes a POST request to the authorization server's backchannel authorization endpoint, including the signed JWT, and the client credentials in the authorization header.
For example:
$
curl --request POST \ --header "authorization: Basic bXlDSUJBQ2xpZW50OmZvcmdlcm9jaw=="
\ --data "request=eyJhbGci...kfPjAfnBg
" \ "https://openam.example.com:8443/openam/oauth2/bc-authorize"The basic authorization header is the base64-encoded value of your client ID, a colon character (:), and the client secret. For example
myCIBAClient:forgerock.For more information about authenticating clients, see "Authenticating OAuth 2.0 Clients" in the OAuth 2.0 Guide.
The "request" field should contain the entire signed JWT.
The value in this example has been truncated for display purposes.
AM returns JSON containing the
auth_req_idvalue:{ "auth_req_id": "35Evy3bJXJEnhll2ebacgROYfbU", "expires_in": 600, "interval": 2 }AM will also send the user a push notification message, containing the contents of the
binding_message, to request authorization for the operation.For more information on interacting with push notifications, see "To Perform Authentication using Push Notifications" in the Authentication and Single Sign-On Guide.
The client performs the steps in "To Exchange an Authorization Request ID for an ID/Access Token in the Backchannel Request Grant Flow" to exchange the authentication request ID for an ID token (and an access/refresh token).
Perform the steps in the following procedure to exchange an authorization request ID for an ID/access token:
The client starts to poll the token endpoint in the OpenID provider with HTTP POST requests, with the client credentials in the authorization header, and specifies the following parameters:
grant_type=urn:openid:params:grant-type:ciba
auth_req_id=your_authorization_request_id
If the OAuth 2.0/OpenID provider is configured for a subrealm rather than the top-level realm, you must specify it in the endpoint. For example, if the OAuth 2.0/OpenID provider is configured for the
/customersrealm, then use/oauth2/realms/root/realms/customers/access_token.For example:
$
curl --request POST \ --header "authorization: Basic bXlDSUJBQ2xpZW50OmZvcmdlcm9jaw=="\ --data "grant_type=urn:openid:params:grant-type:ciba" \ --data "auth_req_id=35Evy3bJXJEnhll2ebacgROYfbU" \ "https://openam.example.com:8443/openam/oauth2/access_token"The basic authorization header is the base64-encoded value of your client ID, a colon character (:), and the client secret. For example
myCIBAClient:forgerock.For more information about authenticating clients, see "Authenticating OAuth 2.0 Clients" in the OAuth 2.0 Guide.
If the user has authenticated and authorized the operation, AM returns an ID token and an access token. For example:
{
  "access_token": "z4mWG0cxqwPwgjj7srJ2Jdxe9ag",
  "id_token": "eyJ0eXAiOi...YA9Hoqwew",
  "token_type": "Bearer",
  "expires_in": 3599
}
Tip
AM can also issue refresh tokens at the same time the access tokens are issued. For more information, see "Managing OAuth 2.0 Refresh Tokens" in the OAuth 2.0 Guide.
If the user has not yet authenticated and authorized the operation, AM returns an HTTP 400 response, as follows:
{
  "error_description": "End user has not yet been authenticated",
  "error": "authorization_pending"
}
The client should wait the number of seconds specified by the
intervalvalue that was returned when requesting theauth_req_id, and then resend the POST request. The default value forintervalis two seconds.If the client does not wait for the interval before resending the request, AM returns an HTTP 400 response, as follows:
{
  "error_description": "The polling interval has not elapsed since the last request",
  "error": "slow_down"
}
(Optional) The relying party can request additional claims about the end user from AM.
For more information, see "/oauth2/userinfo".
4.4. Implicit Grant
- Endpoints
"/oauth2/authorize" in the OAuth 2.0 Guide
The OpenID Connect implicit grant is designed for public clients that run inside the end user's user-agent. For example, JavaScript applications.
This flow allows the relying party to interact directly with the OpenID provider, AM, and receive tokens directly from the authorization endpoint instead of from the token endpoint.
Since applications running in the user-agent are considered less trusted than applications running in servers, the authorization server will never issue refresh tokens in this flow. Also, you must consider the security impact of cross-site scripting (XSS) attacks that could leak the ID and access tokens to other systems, and implement Cross-Origin Resource Sharing (CORS) to make OAuth 2.0/OpenID Connect requests to different domains.
Due to the security implications of this flow, it is recommended to use the Authorization Code grant with PKCE flow whenever possible.
The following diagram demonstrates the Implicit grant flow:

The steps in the diagram are described below:
The relying party, usually a single-page application (SPA), receives a request to access user information stored in an OpenID provider. To access this information, the client requires authorization from the end user.
The relying party redirects the end user's user-agent or opens a new frame to the AM OpenID provider.
As part of the OpenID Connect flow, the request contains the
openidscope and thenonceparameter.The OpenID provider authenticates the end user, confirms resource access, and gathers consent if not previously saved.
If the end user's credentials are valid, the authorization server returns an ID token (and optionally, an access token) to the user-agent as part of the redirection URI.
The user-agent must extract the token(s) from the URI. In this example, the user-agent follows the redirection to the relying party without the token(s)...
... And the relying party returns a web page with an embedded script to extract the token(s) from the URI.
In another possible scenario, the redirection URI is a dummy URI in the application running in the user-agent which already has the logic in itself to extract the tokens.
The user-agent executes the script and retrieves the tokens.
The user-agent returns the tokens to the relying party.
The relying party validates the ID token and its claims.
Now, the relying party can use the ID token subject ID claim as the end user's identity.
The relying party may require more claims than those included in the ID token. In this case, it makes a request to the OpenID provider's
oauth2/userinfoendpoint with the access token.If the access token is valid, the
oauth2/userinfoendpoint returns additional claims, if any.Now, the relying party can use the subject ID and the additional retrieved claims as the end user's identity.
Perform the steps in the following procedures to obtain an ID token and an access token:
This example shows how to obtain an ID token and an access token. It adds notes on how to obtain the ID token only, as well.
The procedure assumes the following configuration:
AM is configured as an OAuth 2.0/OpenID provider in the top-level realm, and it accepts the
openidandprofilescopes.For more information, see "Configuring AM as an OpenID Connect Provider".
A public client called
myClientis registered in AM with the following configuration:Scopes:
openid profileResponse Types:
token id_tokenConfigure
id_tokento receive an ID token only.Grant Types:
ImplicitAuthentication Method:
noneToken Endpoint Authentication Method:
noneIf you were using a confidential OpenID Connect client, you must specify a method to authenticate. For more information, see "Authenticating Clients when Using OpenID Connect 1.0" in the OAuth 2.0 Guide.
For more information, see "Registering OpenID Connect Relying Parties".
Perform the steps in this procedure to obtain an ID token and an access token using the Implicit grant:
The client makes a GET call to AM's authorization endpoint specifying, at least, the following parameters:
client_id=your_client_id
response_type=token id_token
To obtain only an ID token, use
response_type=id_tokeninstead.redirect_uri=your_redirect_uri
nonce=your_nonce
scope=openid profile
For information about the parameters supported by the
/oauth2/authorizeendpoint, see "/oauth2/authorize" in the OAuth 2.0 Guide.If the OAuth 2.0/OpenID provider is configured for a subrealm rather than the top-level realm, you must specify it in the endpoint. For example, if the OAuth 2.0/OpenID provider is configured for the
/customersrealm, then use/oauth2/realms/root/realms/customers/authorize.For example:
https://openam.example.com:8443/openam/oauth2/realms/root/authorize \
?client_id=myClient \
&response_type=token%20id_token \
&scope=openid%20profile \
&redirect_uri=https://www.example.com:443/callback \
&state=abc123 \
&nonce=123abc
Note that the URL is split for readability purposes and that the
stateparameter has been included to protect against CSRF attacks.The end user logs in to AM, for example, using the credentials of the
demouser. In this case, they log in using the default chain or tree configured for the realm.After logging in, AM presents the AM user interface consent screen:
Consent ScreenNote that requesting the
profilescope translates into requesting access to several claims. For more information about the specialprofilescope, see "OpenID Connect Scopes and Claims".The end user selects the
Allowbutton to grant consent for theprofilescope.AM redirects the resource owner to the URL specified in the
redirect_uriparameter.Inspect the URL in the browser. It contains an
access_tokenand anid_tokenparameter with the tokens AM has issued. For example:https://www.example.com:443/callback/#access_token=pRbNamsGPv1T7NfAf5Dbx4AHM2c&id_token=eyJ0eXAiOiJKV1QiLCJra...7r8soMCk8A7QdQpg&state=123&token_type=Bearer&expires_in=3599
If you only request an ID token, the response would not include the
access_tokenparameter.(Optional) The relying party can request additional claims about the end user from AM.
For more information, see "/oauth2/userinfo".
This example shows how to obtain an ID token and an access token. It adds notes on how to obtain the ID token only, as well.
The procedure assumes the following configuration:
AM is configured as an OAuth 2.0/OpenID provider in the top-level realm.
For more information, see "Configuring AM as an OpenID Connect Provider".
A public client called
myClientis registered in AM with the following configuration:Scopes:
openid profileResponse Types:
token id_tokenGrant Types:
ImplicitAuthentication Method:
noneConfidential OpenID Connect clients can use several methods to authenticate. For more information, see "Authenticating Clients when Using OpenID Connect 1.0" in the OAuth 2.0 Guide.
For more information, see "Registering OpenID Connect Relying Parties".
Perform the steps in this procedure to obtain an ID token and an access token using the Implicit grant:
The end user authenticates to AM, for example, using the credentials of the
demouser. For example:$
curl \ --request POST \ --header "Content-Type: application/json" \ --header "X-OpenAM-Username: demo" \ --header "X-OpenAM-Password: changeit" \ --header "Accept-API-Version: resource=2.0, protocol=1.0" \ 'https://openam.example.com:8443/openam/json/realms/root/authenticate'{ "tokenId":"AQIC5wM...TU3OQ*", "successUrl":"/openam/console", "realm":"/" }The client makes a POST call to the AM's authorization endpoint, specifying the SSO token of the
demoin a cookie and, at least, the following parameters:client_id=your_client_id
response_type=token id_token
To obtain only an ID token, use
response_type=id_tokeninstead.redirect_uri=your_redirect_uri
nonce=your_nonce
scope=openid profile
decision=allow
csrf=demo_user_SSO_token
For information about the parameters supported by the
/oauth2/authorizeendpoint, see "/oauth2/authorize" in the OAuth 2.0 Guide.If the OAuth 2.0/OpenID provider is configured for a subrealm rather than the top-level realm, you must specify it in the endpoint. For example, if the OAuth 2.0/OpenID provider is configured for the
/customersrealm, then use/oauth2/realms/root/realms/customers/authorize.For example:
curl --dump-header - \
--Cookie "iPlanetDirectoryPro=AQIC5wM...TU3OQ*" \
--request POST \
--data "client_id=myClient" \
--data "response_type=token id_token" \
--data "scope=openid profile" \
--data "state=123abc" \
--data "nonce=abc123" \
--data "decision=allow" \
--data "csrf=AQIC5wM...TU3OQ*" \
--data "redirect_uri=https://www.example.com:443/callback" \
"https://openam.example.com:8443/openam/oauth2/realms/root/authorize"
Note that the
stateparameter has been included to protect against CSRF attacks.If the authorization server is able to authenticate the user, it returns an HTTP 302 response with the access and ID tokens appended to the redirection URI:
HTTP/1.1 302 Found
Server: Apache-Coyote/1.1
X-Frame-Options: SAMEORIGIN
Pragma: no-cache
Cache-Control: no-store
Date: Mon, 04 Mar 2019 16:56:46 GMT
Accept-Ranges: bytes
Location: https://www.example.com:443/callback#access_token=az91IvnIQ-uP3Eqw5QqaXXY_DCo&id_token=eyJ0eXAiOiJKV1QiLCJra...7r8soMCk8A7QdQpg&state=123abc&token_type=Bearer&expires_in=3599
Vary: Accept-Charset, Accept-Encoding, Accept-Language, Accept
Content-Length: 0
If you only request an ID token, the response would not include the
access_tokenparameter.(Optional) The relying party can request additional claims about the end user from AM.
For more information, see "/oauth2/userinfo".
Tip
A sample JavaScript-based relying party to test the Implicit grant flow is available online.
Clone the example project to deploy it in the same web container as AM. Edit the configuration at the outset of the .js files in the project, register a corresponding profile for the example relying party as described in "Registering OpenID Connect Relying Parties", and browse the deployment URL to see the initial page.
The example relying party validates the ID token signature using the default (HS256) algorithm, decodes de ID token to validate its contents and shows it in the output. Finally, the relying party uses the access token to request information about the end user who authenticated, and displays the result.
4.5. Hybrid Grant
- Endpoints
/oauth2/authorize in the OAuth 2.0 Guide
The OpenID Connect Hybrid grant is designed for clients that require flexibility when requesting ID, access, and refresh tokens.
Similar to the Authorization Code grant flow, the Hybrid grant flow is a two-step process:
The relying party makes a first request for tokens or codes. For example, a request for an ID token and an access code. AM returns them in the redirection fragment, as it does during the Implicit grant flow.
The client relying party usually starts using these tokens immediately.
Some time after the first request has happened, the relying party makes a second request for additional tokens. For example, a request for an access token using the access code, or a request for a refresh token.
Important
Consider the following security tips when implementing this flow:
Requesting an access token during the first step exposes the token in the redirection fragment, just like during the Implicit grant flow.
Also, you must consider the security impact of cross-site scripting (XSS) attacks that could leak the ID and access tokens to other systems, and implement Cross-Origin Resource Sharing (CORS) to make OAuth 2.0/OpenID Connect requests to different domains.
Due to the security implications, ForgeRock recommends not to request access tokens during the first step of this flow.
If the relying party is a public client, you can use the PKCE specification to mitigate against interception attacks performed by malicious users.
A common use case is the relying party requesting an ID token which can be used to, for example, pre-register the end user so they can start shopping. Only later and, if required, the relying party requests an access token to inquire the OpenID provider about additional claims. For example, during the check out, the relying party requests from AM the end user's address details.
The following diagram demonstrates this use case of the Hybrid grant flow:

The steps in the diagram are described below:
The end user wants to use the services provided by the relying party. The relying party, usually a web-based service, requires an account to provide those services.
The end user issues a request to the relying party to access their information, which is stored in an OpenID provider.
To access the end user's information in the provider, the relying party requires authorization from the end user. Therefore, the relaying party redirects the end user's user agent...
... to the OpenID provider.
The OpenID provider authenticates the end user, confirms resource access, and gathers consent if not previously saved.
If the end user's credentials are valid, the OpenID provider redirects the end user to the relying party.
During the redirection process, the OpenID provider appends an authorization code and an ID token to the URL.
Note that AM can return any combination of access token, ID token, and authorization code depending on the request. In this example, the access token is not requested at this time due to security concerns.
The relying party stores the authorization code for future use. It also validates the ID token and gets the subject ID.
With the ID token, the relying party starts providing services to the end user.
Later, but always before the authorization code has expired, the relying party requests an access token from the OpenID provider so it can access more information about the end user.
A use case would be the end user requiring services from the relying party that requires additional (usually more sensitive) information. For example, the end user requests the relying party to compare their electricity usage and supplier information against offers in the market.
If required, the relying party could also request a refresh token.
If the relying party credentials and the authorization code are valid, AM returns an access token.
The relying party makes a request to AM's
/oauth2/userinfoendpoint with the access token to access the end user's additional claims.If the access token is valid, the
/oauth2/userinfoendpoint returns additional claims, if any.The relying party can now use the subject ID in the ID token and the additional claims as the end user's identity to provide them with more services.
Perform the steps in the following procedure to obtain an authorization code and an ID token, and later an access token:
This procedure assumes the following configuration:
AM is configured as an OAuth 2.0/OpenID provider in the top-level realm.
For more information, see "Configuring AM as an OpenID Connect Provider".
A confidential client called
myClientis registered in AM with the following configuration:Client secret:
forgerockScopes:
openid profileResponse Types:
code id_token tokenGrant Types:
Authorization CodeToken Endpoint Authentication Method:
client_secret_postConfidential OpenID Connect clients can use several methods to authenticate. For more information, see "Authenticating Clients when Using OpenID Connect 1.0" in the OAuth 2.0 Guide.
For more information, see "Registering OpenID Connect Relying Parties".
Perform the steps in the following procedure to obtain an ID token and an authorization code that will later be exchanged for an access token:
The client redirects the end user's user-agent to the authorization server's authorization endpoint specifying, at least, the following form parameters:
client_id=your_client_id
response_type=code id_token
As per the specification, you can request the following response types:
code id_tokencode tokencode id_token token
Since AM returns the tokens in the redirection URL, requesting access tokens in this way poses a security risk.
redirect_uri=your_redirect_uri
scope=openid profile
For information about the parameters supported by the
/oauth2/authorizeendpoint, see "/oauth2/authorize" in the OAuth 2.0 Guide.If the OAuth 2.0/OpenID provider is configured for a subrealm rather than the top-level realm, you must specify it in the endpoint. For example, if the OAuth 2.0/OpenID provider is configured for the
/customersrealm, then use/oauth2/realms/root/realms/customers/authorize.For example:
https://openam.example.com:8443/openam/oauth2/realms/root/authorize \
?client_id=myClient \
&response_type=code%20id_token \
&scope=openid%20profile \
&state=abc123 \
&nonce=123abc \
&redirect_uri=https://www.example.com:443/callback
Note that the URL is split and spaces have been added for readability purposes. The
stateandnonceparameters have been included to protect against CSRF and replay attacks.Tip
Implement the PKCE specification to mitigate against interception attacks performed by malicious users.
For more information about the required additional parameters and an example, see "Authorization Code Grant with PKCE".
The end user authenticates to AM, for example, using the credentials of the
demouser. In this case, they log in using the default chain or tree configured for the realm.After logging in, AM presents its consent screen:
OpenID Connect Consent ScreenNote that requesting the
profilescope translates into requesting access to several claims. For more information about the specialprofilescope, see "OpenID Connect Scopes and Claims".The end user selects the
Allowbutton to grant consent for theprofilescope.AM redirects the end user to the URL specified in the
redirect_uriparameter.Inspect the URL in the browser. It contains a
codeparameter with the authorization code and aid_tokenparameter with the ID token AM has issued. For example:https://www.example.com:443/callback?code=bOrAijEerd_YdNCUC1piL5VfNO4&id_token=eyJ0eXAiOiJKV1QiLCJra...7r8soMCk8A7QdQpg&token_type=Bearer&expires_in=3599
The client relying party can now use the ID token as the end user's identity and store the access code for later use.
(Optional) The client exchanges the authorization code for an access token (and maybe, an refresh token). Perform the steps in one of the following procedures:
This procedure assumes the following configuration:
AM is configured as an OAuth 2.0/OpenID provider in the top-level realm.
For more information, see "Configuring AM as an OpenID Connect Provider".
A confidential client called
myClientis registered in AM with the following configuration:Client secret:
forgerockScopes:
openid profileResponse Types:
code id_token tokenGrant Types:
Authorization CodeToken Endpoint Authentication Method:
client_secret_postConfidential OpenID Connect clients can use several methods to authenticate. For more information, see "Authenticating Clients when Using OpenID Connect 1.0" in the OAuth 2.0 Guide.
For more information, see "Registering OpenID Connect Relying Parties".
Perform the steps in the following procedure to obtain an ID token and an authorization code that will later be exchanged for an access token:
The end user logs in to AM, for example, using the credentials of the
demouser. For example:$
curl \ --request POST \ --header "Content-Type: application/json" \ --header "X-OpenAM-Username: demo" \ --header "X-OpenAM-Password: changeit" \ --header "Accept-API-Version: resource=2.0, protocol=1.0" \ 'https://openam.example.com:8443/openam/json/realms/root/authenticate'{ "tokenId":"AQIC5wM...TU3OQ*", "successUrl":"/openam/console", "realm":"/" }The client makes a POST call to AM's authorization endpoint, specifying the SSO token of the
demoin a cookie and, at least, the following parameters:client_id=your_client_id
response_type=code id_token
As per the specification, you can request the following response types:
code id_tokencode tokencode id_token token
Since AM returns the tokens in the redirection URL, requesting access tokens in this way poses a security risk.
redirect_uri=your_redirect_uri
scope=openid profile
decision=allow
csrf=demo_user_SSO_token
For information about the parameters supported by the
/oauth2/authorizeendpoint, see "/oauth2/authorize" in the OAuth 2.0 Guide.If the OAuth 2.0/OpenID provider is configured for a subrealm rather than the top-level realm, you must specify it in the endpoint. For example, if the OAuth 2.0/OpenID provider is configured for the
/customersrealm, then use/oauth2/realms/root/realms/customers/authorize.For example:
$ curl --dump-header - \
--request POST \
--Cookie "iPlanetDirectoryPro=AQIC5wM...TU3OQ*" \
--data "scope=openid profile" \
--data "response_type=code id_token" \
--data "client_id=myClient" \
--data "csrf=AQIC5wM...TU3OQ*" \
--data "redirect_uri=https://www.example.com:443/callback" \
--data "state=abc123" \
--data "nonce=123abc" \
--data "decision=allow" \
"https://openam.example.com:8443/openam/oauth2/realms/root/authorize"
Note that the
stateandnonceparameters have been included to protect against CSRF and replay attacks.Tip
Implement the PKCE specification to mitigate against interception attacks performed by malicious users.
For more information about the required additional parameters and an example, see "Authorization Code Grant with PKCE".
If AM is able to authenticate the user and the client, it returns an HTTP 302 response with the authorization code appended to the redirection URL:
HTTP/1.1 302 Found
Server: Apache-Coyote/1.1
X-Frame-Options: SAMEORIGIN
Pragma: no-cache
Cache-Control: no-store
Date: Mon, 30 Jul 2018 11:42:37 GMT
Accept-Ranges: bytes
Location: https://www.example.com:443/callback?code=bOrAijEerd_YdNCUC1piL5VfNO4&id_token=eyJ0eXAiOiJKV1QiLCJra...7r8soMCk8A7QdQpg&token_type=Bearer&expires_in=3599
Vary: Accept-Charset, Accept-Encoding, Accept-Language, Accept
Content-Length: 0
The client relying party can now use the ID token as the end user's identity and store the access code for later use.
(Optional) The client exchanges the authorization code for an access token (and maybe, a refresh token). Perform the steps in one of the following procedures:
Chapter 5. Managing OpenID Connect User Sessions
Logging in to the OpenID provider and obtaining tokens are well-stabilised processes in the OpenID spec. However, keeping the client relying party informed of the session's validity is not as straightforward. The end user's session in AM is unavailable to the relying party, and therefore the only information the client has is the expiration time of the ID token, which may be undesirable.
OpenID Connect Session Management 1.0 - draft -10 defines a mechanism for relying parties to:
Request AM to confirm if a specific OpenID Connect session is still valid or not.
Terminate end user sessions in AM.
When Session Management is enabled, AM links ID tokens to sessions. This ensures relying parties can track end users' sessions and request that end users log again if their sessions have expired.
To keep the process transparent to the end user, client relying parties use hidden iframes to pass messages between AM and themselves. By embedding iframes in the client relying party, you allow them to periodically request session status from AM.
Session Management is enabled by default, and sessions are always stored in the CTS token store. To disable Session Management, navigate to Realms > Realm Name > Services > OAuth2 Provider > Advanced OpenID Connect, and disable the Store Ops Tokens switch.
Draft 05 of the of the Session Management spec defined two endpoints for managing OpenID sessions. These endpoints have been removed from version 10 of the draft, but AM still supports them:
/oauth2/connect/checkSession. It allows clients to retrieve session state. This endpoint serves thecheck_session_iframeURL that allows the relying party to interact with the endpoint.When checking session state with the check session endpoint, you must configure the Client Session URI field in the client profile as the iframe URL in the relying party.
For an alternative method of checking session state compliant with version 10 of the session management draft, see "Retrieving Session State without the Check Session Endpoint".
/oauth2/connect/endSession. It allows clients to terminate end user sessions and redirect end users to a particular page after logout.
For more information about the endpoints, see "OpenID Connect 1.0 Endpoints".
You can retrieve session state by sending a request to the authorization endpoint that contains the following parameters:
prompt=none. Specifies that the request is a repeated authentication request for a specific end user. AM will not display any user interaction pages to the end user.id_token_hint=your_ID_token. Specifies the ID token associated to an end user. AM validates the ID token against the user's session.response_type=none. Specifies that AM should not issue any token as response.
The simplest strategy to check session state using the authorization endpoint is to create an iframe whose src attribute is AM's /oauth2/authorize endpoint with the required parameters. Note that you must also include any other parameter required in your environment, such as client authentication methods.
For AM to validate an end user session against an ID token, the user-agent must provide the SSO token of the end user's session as the iplanetDirectoryPro cookie. Therefore, the flow would resemble the following:
The relying party obtains an ID token related to an end user. This may have happened at any point in time. For example, when the end user registered with the relying party to use its services.
The end user requests additional services from the relying party.
The relying party, still holding the end user's ID token, requests that AM checks if the user has a valid session.
AM returns session state.
The relying party makes a decision based on AM's response; either provide the services, or request the end user to log in again.
The following is an example of a public client requesting session state:
https://openam.example.com:8443/openam/oauth2/realms/root/authorize \
?client_id=myClient \
&response_type=none \
&id_token_hint=eyJ0eXAiOiJKV1QiLCJra...7r8soMCk8A7QdQpg \
&redirect_uri=https://www.example.com:443/callback \
&prompt=none
Note that the URL is split for readability purposes and the end user's SSO token must be set in a cookie in order to validate the session.
If the session is valid and the request contains a redirection URI, AM redirects to the specified URI with no content. If the request does not contain a redirection URI, AM returns an HTTP 204 no content message.
If the session is invalid and the request contains a redirection URI, AM redirects to the specified URI with no content and appends an error_description parameter to the URL. For example:
https://www.example.com:443/callback?error_description=The%20request%20requires%20login.&error=login_required
If the request does not contain a redirection URI, AM returns an HTTP 400 error message and redirects to an AM console page showing a message, such as login required. The request requires login.
Your iframe, or the redirection page, should be able to retrieve the error messages and act in consequence. For example, redirecting the end user to a login page.
Tip
To retrieve session state using this mechanism, the OAuth 2.0/OpenID provider must be configured for Session Management and the client relying party must have the none value configured as a valid response type.
Chapter 6. Adding Authentication Requirements to ID Tokens
Relying parties may require end users to satisfy different rules or conditions when authenticating to the provider. Consider the case of a financial services provider. While authenticating with username and password may be acceptable to create an account, accessing the end user's bank account details may require multi-factor authentication.
By specifying an authentication context reference (acr) or an authentication module reference (amr) claim in the request, relying parties can require that AM authenticate users using specific chains, modules, or trees.
The following sections show how AM implements both claims, and how to configure AM to honor them:
6.1. The Authentication Context Class Reference (acr) Claim
In the OpenID Connect specification, the acr claim identifies a set of rules the user must satisfy when authenticating to the OpenID provider. For example, a chain or tree configured in AM.
To avoid exposing the name of authentication trees or chains, AM implements a map that consists of a key (the value that is included in the acr claim) and the name of the authentication tree or chain.
The specification indicates that the acr claim is a list of authentication contexts; AM honors the first value in the list for which it has a valid mapping. For example, if the relying party requests a list of acr values such as acr-1 acr-2 acr-3 and only acr-2 and acr-3 are mapped, AM will always choose acr-2 to authenticate the end user.
The acr claim is optional and therefore is not added to ID tokens by default, but you can request AM to include it by specifying it as a voluntary or essential claim:
- Voluntary Claim
Request voluntary
acrclaims when the fact that the user has authenticated to a specific chain or tree would improve the user experience in the OpenID Connect flow, but it is not a requisite.You can request voluntary
acrclaims in the following ways:Specifying the authentication chains or trees in the
acr_valuesparameter when requesting an ID token to the/oauth2/authorizeendpoint.Specifying the authentication chains or trees in JSON format in the
claimsparameter when requesting an ID token to the/oauth2/authorizeendpoint.
If the end user is already authenticated to the first value on the list for which AM has a mapping, AM does not force the user to reauthenticate. If they are not already authenticated, or if they are authenticated to any other tree or chain on the list, AM uses the first value for which it has a valid mapping to authenticate them.
Consider an example where the relying party requests a list of acr values, such as
acr-1 acr-2 acr-3, and AM only hasacr-2andacr-3mapped:AM will not force the end user to reauthenticate if they are already authenticated to
acr-2(which is the first value in the list for which AM has a mapping).AM will force the end user to reauthenticate to
acr-2in the following cases:If the end user has authenticated to
acr-3.If the end user has authenticated to any other tree or chain.
If the end user has not yet authenticated.
If the user reauthenticates to a tree, AM destroys the original session and provides them with a new one that reflects the new authentication journey.
If the user reauthenticates to a chain, AM updates the original session to reflect the new authentication journey.
If the relying party requests authentication chains or trees that are not mapped in AM as valid acr values, AM continues the grant flow. The resulting ID token will contain an
acrclaim with the following values:0 (zero), if the client authenticated to AM using a chain or tree that is not mapped to an acr value.
acr_key_string, if the client authenticated to AM using a chain or tree that is mapped to an acr value.
If the end user authenticated to more than one chain or tree, AM will use the last chain or tree, provided it is mapped to an acr value.
- Essential Claim
Request essential
acrclaims when the user must authenticate to a specific chain or tree to complete an OpenID Connect flow.To request essential
acrclaims, specify the required authentication chains or trees in JSON format in theclaimsparameter when requesting an ID token to the/oauth2/authorizeendpoint.AM will always force the end user to authenticate to the first value in the list for which AM has a mapping, even if the end user already authenticated using the same chain or tree.
Consider an example where the relying party requests a list of acr values, such as
acr-1 acr-2 acr-3, and AM only hasacr-2andacr-3mapped:AM will force the end user to authenticate to
acr-2in the following cases:If the end user has authenticated to either
acr-2oracr-3.If the end user has authenticated to any other chain or tree.
If the end user is not authenticated.
If the user reauthenticates to a tree, AM destroys the original session and provides them with a new one that reflects the new authentication journey.
If the user reauthenticates to a chain, AM updates the original session to reflect the new authentication journey.
This mechanism can be used to perform step-up authentication, but AM does not consider if, for example, the authentication level of the current session is higher than the one achievable with the requested tree or chain.
If the relying party requests authentication chains or trees that are not mapped in AM as valid acr values, AM returns an error and redirects to the
redirect_urivalue, if available.
Perform the steps in the following procedure to configure AM to honor acr claims:
In the AM console, navigate to Realms > Realm Name > Services > OAuth2 Provider > Advanced OpenID Connect.
(Optional) To request
acrclaims using theclaimsparameter, enable "claims_parameter_supported".In the OpenID Connect acr_values to Auth Chain Mapping box, map an identifier (the key in the map) to an authentication chain or tree. For example:
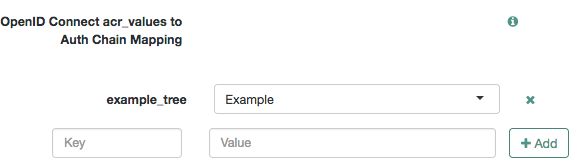
The identifier is the string that AM will add in the
acrclaim.Save your changes.
(Optional) In the Default ACR values field, specify the identifiers of the authentication trees or chains AM should use to authenticate end users when acr values are not specified in the request. AM treats acr values specified in this field as voluntary claims.
Acr values specified in the request will override the default values.
If a request does not specify acr values and the Default ACR values field is empty, AM authenticates the end user with the default authentication chain or tree defined for the realm where the OAuth 2.0 provider is configured.
Tip
Query the
/oauth2/.well-known/openid-configurationendpoint to determine the acr values supported by the OpenID provider. Mapped acr values are returned in theacr_values_supportedobject.Save your changes.
(Optional) Review the "Requesting acr Claims Example".

This example assumes the following configuration:
An authentication tree called
Exampleis configured in AM. For more information, see "Configuring Authentication Trees" in the Authentication and Single Sign-On Guide.The
Exampletree is mapped to theexample_treeidentifier in the acr_value map of the OAuth 2.0 provider. For more information, see "To Configure AM for the acr Claim".A public client called
myClientis registered in AM with the following configuration:Scopes:
openid profileResponse Types:
token id_tokenGrant Types:
Implicit
AM is configured as an OAuth 2.0/OpenID Provider in the top-level realm.
Perform the following steps to request acr claims:
Log in to the AM console, for example, as the
demouser. Ensure you are not using theExampletree to log in, and note the value of theiplanetDirectoryProcookie.In a new tab of the same browser, request an ID token using, for example, the "Implicit Grant" flow. Perform one of the following steps:
Request voluntary claims with the
acr_valuesparameter. For example:https://openam.example.com:8443/openam/oauth2/realms/root/authorize? \ client_id=myClient \ &response_type=id_token \ &scope=openid%20profile \ &redirect_uri=https://www.example.com/callback \ &acr_values=example_chain%20example_tree \ &nonce=abc123 \ &prompt=login \ &state=123abc
Note that the URL is split for readability purposes and that the
prompt=loginparameter has been added. In most cases, this parameter is not required with the current implementation ofacrclaims, but it is recommended to add it for compliance with the specification when you need to force the user to re-authenticate.For information, see the prompt parameter in the OAuth 2.0 Guide.
Request voluntary claims with the
claimsparameter.The
claimsparameter expects a JSON object, such as:{"id_token":{"acr":{"values":["example_chain","example_tree"]}}}For example:
https://openam.example.com:8443/openam/oauth2/realms/root/authorize? \
client_id=myClient \
&response_type=id_token \
&scope=openid%20profile \
&redirect_uri=https://www.example.com/callback \
&nonce=abc123 \
&state=123abc \
&prompt=login \
&claims=%7B%22id_token%22%3A%7B%22acr%22%3A%7B%22values%22%3A%5B%22example_chain%22%2C%22example_tree%22%5D%7D%7D%7D
Note that the URL is split for readability purposes, and that the JSON value of the
claimsparameter is URL encoded.Request essential claims with the
claimsparameter.The
claimsparameter expects a JSON object, such as:{"id_token":{"acr":{"essential":true,"values":["example_chain","example_tree"]}}}If
"essential":trueis not included in the JSON, AM assumes the acr request is voluntary.For example:
https://openam.example.com:8443/openam/oauth2/realms/root/authorize? \
client_id=myClient \
&response_type=id_token \
&scope=openid%20profile \
&redirect_uri=https://www.example.com/callback \
&nonce=abc123 \
&state=123abc \
&prompt=login \
&claims=%7B%22id_token%22%3A%7B%22acr%22%3A%7B%22essential%22%3Atrue%2C%22values%22%3A%5B%22example_chain%22%2C%22example_tree%22%5D%7D%7D%7D
Note that the URL is split for readability purposes, and that the JSON value of the
claimsparameter is URL encoded.
AM redirects to the Example tree. Note that the new URL contains the following parameters:
authIndexValue, the value of which is theExampletree.goto, the value of which is the URL the XUI will use to return to the authorization endpoint once the authentication flow has finished.acr_sig, the value of which is a unique string that identifies this particularacrrequest.
Log in again as the
demouser. Note that the value of theiplanetDirectoryProcookie changes to reflect the new session.AM redirects back to the authorization endpoint, and shows you the OAuth 2.0 consent page. Grant consent by selecting
Allow. AM redirects you now to the URI specified by theredirect_uriparameter with an ID token in the fragment.Decode the ID token. It contains the
acrclaim with the value ofexample_tree, which the identifier mapped to theExampletree in the acr_value map of the OAuth 2.0 provider:{ "at_hash": "3WHa52upb5ihwWVDC8a-Tw", "sub": "demo", "auditTrackingId": "fe330f16-2115-45fe-ae04-f68a9fc2ef92-65191", "iss": "https://openam.example.com:8443/openam/oauth2", "tokenName": "id_token", "nonce": "abc123", "aud": "myClient", "acr": "example_tree", "org.forgerock.openidconnect.ops": "7r1RiXbjWp1QBjJ8Uys4Ob8cwxY", "azp": "myClient", "auth_time": 1554724614, "realm": "/", "exp": 1554728218, "tokenType": "JWTToken", "iat": 1554724618 }
6.2. The Authentication Method Reference (amr) Claim
In the OpenID Connect specification, the amr claim identifies a family of authentication methods, such as a one-time password or multi-factor authentication.
In AM, you can map authentication modules to specific values that the relaying party understands. For example, you could map an amr value called PWD to the LDAP module.
Unlike acr claims, relying parties do not request amr claims. As long as authentication modules are mapped to amr values, and provided that end users log in using one of the mapped modules, AM will return the amr claim in the ID token.
Since authentication nodes are not used on their own but as part of a tree context, you cannot map amr values to specific authentication nodes. However, you can map an AuthType session property to an amr value using the "Set Session Properties Node" in the Authentication and Single Sign-On Guide. AM will add the configured amr claim to the ID token, provided the user's journey on the tree goes through the node.
The following is an example of a decoded ID token that contains both acr and amr claims:
{
   "at_hash": "kP7U-po4xla0OYqJ60p72Q",
   "sub": "demo",
   "auditTrackingId": "ac8ecadc-140f-48a0-b3ec-ccd02d6f9c3d-183361",
   "amr": [
      "PWD"
   ],
   "iss": "https://openam.example.com:8443/openam/oauth2",
   "tokenName": "id_token",
   "nonce": "abc123",
   "aud": "myClient",
   "acr": "0",
   "org.forgerock.openidconnect.ops": "hM7F00xw0kzb7os_S9KdmDphosY",
   "azp": "myClient",
   "auth_time": 1554889732,
   "realm": "/",
   "exp": 1554893403,
   "tokenType": "JWTToken",
   "iat": 1554889803
}
In this example, the end user logged in with an authentication chain or tree that is not mapped to an acr value. Therefore, AM returned "acr": "0". However, the relying party at least knows the user logged in with an authentication method of the family PWD. The relying party can use this knowledge to take additional actions, such as request the end user to reauthenticate using a particular chain or tree.
See the following procedures to map amr values:
In the AM console, navigate to Realms > Realm Name > Services > OAuth2 Provider > Advanced OpenID Connect.
In the OpenID Connect id_token amr Values to Auth Module Mappings box, map an identifier (the key in the map) to any authentication module. The authentication module you use is not important; AM will only use its name to map the amr, and it will not show in the ID token.
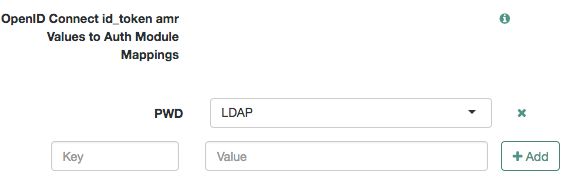
Save your changes.
Create an authentication tree containing the "Set Session Properties Node" in the Authentication and Single Sign-On Guide.
On the Set Session Properties node, configure a key called
AuthType. As its value, set the name of the authentication module you configured with the amr mapping. For example,LDAP.
Tip
To reference multiple authentication modules, separate amr values with
|. For example, if both the LDAP and the DataStore modules are mapped to amr values, set theAuthTypekey to the valueLDAP|DataStore.Go to Realms > Realm Name > Services, and add a Session Property Whitelist service if one is not already available.
On the Whitelisted Session Property Names field, add the
AuthTypekey. This will ensure that the property can be read, edited, or deleted, from a session.Save your changes.
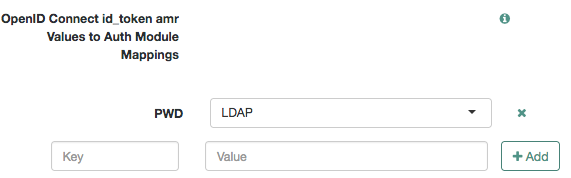
In the AM console, go to Realms > Realm Name > Services > OAuth2 Provider > Advanced OpenID Connect.
In the OpenID Connect id_token amr Values to Auth Module Mappings box, map an identifier (the key in the map) to an authentication module.
Save your changes.
Chapter 7. Additional Use Cases for ID Tokens
In addition to using the ID tokens in OpenID Connect flows, AM supports using ID tokens in place of session tokens when calling REST endpoints and using ID tokens in policy evaluation.
7.1. Using ID Tokens as Session Tokens
You can authorize trusted clients to use ID tokens as the value of the iPlanetDirectoryPro cookie. This is useful when clients need to make calls to AM endpoints, such as the authorization endpoints, without requesting the end user to log in again.
The ID token must be issued using the Authorization Code Grant flow.
Perform the following steps to allow clients to use ID tokens in the place of session tokens:
Navigate to Realms > Realm Name > Services > OAuth2 Provider > Advanced OpenID Connect.
Add the names to the clients that will be able to use ID tokens in place of session tokens in the Authorized OIDC SSO Clients field.
Since these clients will act with the full authority of the end user, grant this permission to trusted clients only.
Ensure that Save Ops Token is enabled.
Save your changes.
The following is an example of a call to the policies endpoint using an ID token instead of a session token:
$ curl \
--request POST
--header "Content-Type: application/json" \
--header "Accept-API-Version: protocol=1.0,resource=2.0" \
--header "iPlanetDirectoryPro: ID_TOKEN_VALUE" \
--data '{
   "resources":[
      https://www.france-site.com:8443/index.html"
   ],
   "subject":{
      "ssoToken": "ID_TOKEN_VALUE"
   },
   "application":"iPlanetAMWebAgentService"
}' \
"https://openam.example.com:8443/openam/json/realms/root/policies?_action=evaluate"
7.2. Using ID Tokens as Subjects in Policy Decision
You can use the ID token as a subject condition during policy evaluation to validate claims within an ID token.
For example, you can validate that the aud claim has a value of myApplication, which identifies a particular application or group of applications within your environment.
Note that policy evaluation does not validate the ID token, but the claims within. Your applications should validate the ID token before requesting policy evaluation from AM.
For more information about configuring policy evaluation using the OpenID Connect/Jwt Claim type, see "To Configure a Policy Using the AM Console" in the Authorization Guide.
Chapter 8. OpenID Connect 1.0 Endpoints
When acting as an OpenID Connect provider, AM exposes the following endpoints:
| Endpoint | Description |
|---|---|
/oauth2/userinfo | Retrieve information about an authenticated user. It requires a valid token issued with, at least, the openid scope (OpenID Connect userinfo endpoint). |
/oauth2/idtokeninfo | Validates unencrypted ID tokens (AM-specific endpoint). |
/oauth2/connect/checkSession | Retrieves OpenID Connect session information (OpenID Connect Session Management endpoint). |
/oauth2/connect/endSession | Invalidates OpenID Connect sessions (OpenID Connect Session Management endpoint). |
/oauth2/connect/jwk_uri | Expose the public keys that clients can use to verify the signature of client-based tokens and to encrypt OpenID Connect requests sent as a JWT. |
Tip
When AM acts as an OpenID Connect provider, the OAuth 2.0 endpoints support OpenID Connect specific parameters, such as prompt and ui_locales.
For a complete list of the endpoints and parameters AM supports as an OAuth 2.0/OpenID Connect provider, see "OAuth 2.0 Endpoints" and "OAuth 2.0 Administration and Supporting REST Endpoints" in the OAuth 2.0 Guide.
8.1. /oauth2/userinfo
Endpoint that returns claims about the authenticated end user, as defined in OpenID Connect Core 1.0 incorporating errata set 1.
When requesting claims, provide an access token granted in an OpenID Connect flow as an authorization bearer header. The endpoint will return the claims associated with the scopes granted when the access token was requested.
You must compose the path to the user information endpoint addressing the specific realm where AM logged in the user. For example, https://openam.example.com:8443/openam/oauth2/realms/root/realms/subrealm1/userinfo.
The following example shows AM returning claims about a user:
$curl \ --request GET \ --header "Authorization: Bearer U-Wjlv-w1jtpuBVWUGFV6PwI_nE" \ "https://openam.example.com:8443/openam/oauth2/realms/root/userinfo"{ "given_name":"Demo First Name", "family_name":"Demo Last Name", "name":"demo", "sub":"demo" }
If the access token validates successfully, the endpoint returns the claims as JSON.
The user information endpoint can return claims as JSON (the default) or as a signed, encrypted, or signed and encrypted JWT. To configure the response type, perform the following steps:
Navigate to Realms > Realm Name > Applications > OAuth 2.0 > Clients > Client Name > Signing and Encryption.
In the User info response format drop-down menu, select the type of response required by the client.
Configure the signing and/or encryption algorithms AM should use when returning claims to this particular client in the following properties:
User info signed response algorithm
User info encrypted response algorithm
User info encrypted response encryption algorithm
For more information about these properties, see "Signing and Encryption".
Note that you can configure the algorithms the OAuth 2.0/OpenID Connect provider service supports by navigating to > Realm Name > Services > OAuth2 Provider > Advanced OpenID Connect.
For more information about the secret IDs mapped to the OAuth 2.0/OpenID Connect provider signing and encrypting algorithms, see "Secret ID Mapping Defaults" in the Setup and Maintenance Guide.
Signed, and signed and encrypted JWT responses will include the iss and the aud objects.
8.2. /oauth2/idtokeninfo
AM-specific endpoint that allows OpenID Connect client relying parties to validate unencrypted ID tokens and to retrieve claims within the token.
AM validates the tokens based on rules 1-10 in section 3.1.3.7 of the OpenID Connect Core. During token validation, AM performs the following steps:
Extracts the first
aud(audience) claim from the ID token. Theclient_id, which is passed in as an authentication of the request, will be used as the client and validated against theaudclaim.Extracts the
realmclaim, if present, defaults to the root realm if the token was not issued by AM.Looks up the client in the given realm, producing an error if it does not exist.
Verifies the signature of the ID token, according to the ID Token Signing Algorithm and Public key selector settings in the client profile.
Verifies the
issuer,audience,expiry,not-before, andissued-atclaims as per the specification.
Tip
By default, the ID token information endpoint requires client authentication. You can configure it by navigating to Realms > Realm Name Services > OAuth2 Provider > Advanced OpenID Connect and disabling the Idtokeninfo Endpoint Requires Client Authentication switch.
The ID token information endpoint supports the following parameters:
- id_token
Specifies the ID token to validate.
Required: Yes.
- client_id
Specifies the client ID unique to the application making the request.
Required: Yes, when client authentication is enabled.
client_assertionSpecifies the signed JWT that the client uses as a credential when using the JWT bearer client authentication method.
Required: A form of password or credentials is required for confidential clients when client authentication is enabled. However, the use of the
client_assertionparameter depends on the client authentication method used. For more information, see "Authenticating OAuth 2.0 Clients" in the OAuth 2.0 Guideclient_assertion_typeSpecifies the type of assertion when the client is authenticating to the authorization server using JWT bearer client authentication.
Set it to
urn%3Aietf%3Aparams%3Aoauth%3Aclient-assertion-type%3Ajwt-bearer.Required: A form of password or credentials is required for confidential clients when client authentication is enabled. However, the use of the
client_assertion_typeparameter depends on the client authentication method used. For more information, see "Authenticating OAuth 2.0 Clients" in the OAuth 2.0 Guideclient_secretSpecifies the secret of the client making the request.
Required: A form of password or credentials is required for confidential clients when client authentication is enabled. However, the use of the
client_secretparameter depends on the client authentication method used. For more information, see "Authenticating OAuth 2.0 Clients" in the OAuth 2.0 Guide- claims
Comma-separated list of claims to return from the ID token.
Required: No.
The endpoint is always accessed from the root realm. For example, https://openam.example.com:8443/openam/oauth2/idtokeninfo.
The following example shows AM returning ID token information:
$curl \ --request POST \ --data "client_id=myClient" \ --data "client_secret=forgerock" \ --data "id_token=eyJ0eXAiOiJKV1QiLCJra...7r8soMCk8A7QdQpg" \ "https://openam.example.com:8443/openam/oauth2/idtokeninfo"{ "at_hash":"AvJ0dXLQgFxHn-qnqP9xmQ", "sub":"demo", "auditTrackingId":"b3f48c69-de7f-4afc-ab78-582733e5f025-156621", "iss":"https://openam.example.com:8443/openam/oauth2", "tokenName":"id_token", "nonce":"123abc", "aud":"myClient", "c_hash":"jMXGi-FCjUad2VQukJRcLQ", "acr":"0", "s_hash":"bKE9UspwyIPg8LsQHkJaiQ", "azp":"myClient", "auth_time":1553077105, "realm":"/myRealm", "exp":1553080707, "tokenType":"JWTToken", "iat":1553077107 }
If the ID token validates successfully, the endpoint unpacks the claims from the ID token and returns them as JSON. You can also use an optional claims parameter in the request to return specific claims.
For example, you can run the following command to retrieve specific claims:
$curl \ --request POST \ --data "client_id=myClient" \ --data "client_secret=forgerock" \ --data "id_token=eyJ0eXAiOiJKV1QiLCJra...7r8soMCk8A7QdQpg" \ --data "claims=sub,exp,realm" \ "https://openam.example.com:8443/openam/oauth2/idtokeninfo"{ "sub":"demo", "exp":1553080707, "realm":"/myRealm" }
If a requested claim does not exist, no error occurs; AM will simply not present it in the response.
Note
The ID token information endpoint does not check if a token has been revoked using the /oauth2/endSession endpoint.
8.3. /oauth2/connect/checkSession
Endpoint to check session state as per OpenID Connect Session Management 1.0 - draft 5.
The relying party client creates an invisible iframe that embeds the URL to the endpoint (by setting it as the src attribute of the iframe tag).
The endpoint accepts postMessage API requests from the iframe, and it postMessages back with the login status of the user in AM.
The endpoint is always accessed from the root realm. For example, https://openam.example.com:8443/openam/oauth2/connect/checkSession.
Tip
Note that this endpoint has been removed in later versions of the OpenID Connect Session Management draft. For an alternative method of checking session state, see "Retrieving Session State without the Check Session Endpoint".
8.4. /oauth2/connect/endSession
Endpoint to terminate authenticated end-user sessions, as per OpenID Connect Session Management 1.0 - draft 5.
Query the well-known configuration endpoint for the realm to determine the URL of the end session endpoint. For example, https://openam.example.com:8443/openam/oauth2/realms/root/realms/subrealm1/.well-known/openid-configuration.
The endpoint supports the following query parameters:
id_token_hintThe ID token corresponding to the identity of the end user the relying party is requesting to be logged out by AM.
Required: Yes
client_idTo support ending sessions when ID tokens are encrypted, AM requires that the request to the end session endpoint includes the client ID to which AM issued the ID token.
Failure to include the client ID will result in error; AM needs the information in the client profile to decrypt the token.
This parameter is
notcompliant with the specification.Required: Yes, if the ID token is encrypted.
post_logout_redirect_uriThe URL AM will redirect after logout.
For security reasons, the value of this parameter must match one of the values configured in the Post Logout Redirect URIs field of the client profile.
If a logout redirection URL is specified, AM redirects the end user to it after they have been logged out.
If a logout redirection URL is not specified, AM returns an HTTP 204 message to indicate the user has been logged out, and does not perform more actions.
Required: No
To log out an end user from AM, perform a call to the end session endpoint and provide the access token granted in an OpenID Connect flow as an authorization bearer header.
The following example shows AM deleting a session when an encrypted ID token is provided:
$curl --dump-header - \ --request GET \ --header "Authorization: Bearer U-Wjlv-w1jtpuBVWUGFV6PwI_nE" \ "https://openam.example.com:8443/openam/oauth2/connect/endSession?id_token_hint=eyJ0eXAiOiJKV1QiLCJra...&post_logout_redirect_uri=https://www.example.com:443/logout_callback&client_id=myClient"HTTP/1.1 204 No Content Server: Apache-Coyote/1.1 X-Frame-Options: SAMEORIGIN Date: Wed, 20 Mar 2019 15:47:13 GMT
8.5. /oauth2/connect/jwk_uri
Each realm configured for OAuth 2.0 exposes a JSON web key (JWK) URI endpoint that contains public keys that clients can use to:
Verify the signature of client-based access tokens and OpenID Connect ID tokens.
Encrypt OpenID Connect ID requests to AM sent as a JWT.
By default, the endpoint exposes an internal URI relative to the AM deployment. For example, openam/oauth2/realms/root/connect/jwk_uri.
The keys in that URI are configured in the AM secret stores. These secrets are configured by default; delete the ones you are not planning to use so that they are not exposed on the endpoint.
In environments where secrets are centralized, you may want AM to share the URI of your secrets API instead of the local AM endpoint. To configure it, go to Realms > Realm name > Services > OAuth2 Provider, and add the new URI to the Remote JSON Web Key URL field.
Note
Web and Java agents use an internal OAuth 2.0 provider to connect to AM. This provider exposes the JWK endpoint so that agents can access the key configured for the am.global.services.oauth2.oidc.agent.idtoken.signing secret ID.
Tip
Configure the base URL source service to change the URL used in the .well-known endpoints used in OpenID Connect 1.0 and UMA.
The following table summarizes the high-level tasks you need to complete to manage the JWK URI endpoint in your environment:
| Task | Resources |
|---|---|
| Learn where to find and how to query the JWK URI endpoint. Clients need to find the endpoint to, for example, validate tokens signed by AM. Note that HMAC-based algorithms, direct encryption, and AES key wrapping encryption algorithms use the client secret instead of a public key. Therefore, clients do not need to check the JWK URI endpoint for those algorithms. | |
| Control which keys are displayed. The JWK URI endpoint returns keys based on the secret mappings configured for the relevant OAuth 2.0/OpenID connect functionality. Therefore, to control which keys are displayed, ensure that you only map the secrets required in your environment. | |
| Learn how to deprecate algorithms and how to rotate public keys. You may need to perform these tasks to replace algorithms with more secure ones. | |
| Customize the key ID ( By default, AM generates a You need to customize AM if any exposed keys in your environment need a specific | |
| Decide if the JWK URI endpoint should display duplicated key IDs By default, each If you have several algorithms and key types associated with one | "Displaying Every Algorithm and Key Type Associated to a Key ID". |
Perform the following steps to access the public keys:
To find the JWK URI that AM exposes, perform an HTTP GET at
/oauth2/realms/root/.well-known/openid-configuration. For example:$
curl https://openam.example.com:8443/openam/oauth2/realms/root/.well-known/openid-configuration{ "request_parameter_supported": true, "claims_parameter_supported": false, "introspection_endpoint": "https://openam.example.com:8443/openam/oauth2/introspect", "check_session_iframe": "https://openam.example.com:8443/openam/oauth2/connect/checkSession", "scopes_supported": [], "issuer": "https://openam.example.com:8443/openam/oauth2", "id_token_encryption_enc_values_supported": [ "A256GCM", "A192GCM", "A128GCM", "A128CBC-HS256", "A192CBC-HS384", "A256CBC-HS512" ], ... "jwks_uri": "https://openam.example.com:8443/openam/oauth2/connect/jwk_uri", "subject_types_supported": [ "public" ], ... }By default, AM exposes the JWK URI as an endpoint relative to the deployment URI. For example,
https://openam.example.com:8443/openam/oauth2/realms/root/connect/jwk_uri.In environments where secrets are centralized, you may want AM to share the URI of your secrets API instead of the local AM endpoint.
To configure it, navigate to Realms > Realm name > Services > OAuth2 Provider, and add the new URI to the Remote JSON Web Key URL field.
Perform an HTTP GET at the JWK URI to get the relevant public keys. For example:
$
curl https://openam.example.com:8443/openam/oauth2/realms/root/connect/jwk_uri{ "keys":[ { "kty":"EC", "kid":"I4x/IijvdDsUZMghwNq2gC/7pYQ=", "use":"sig", "x5t":"GxQ9K-sxpsH487eSkJ7lE_SQodk", "x5c":[ "MIIB/zCCAYYCCQDS7UWmBdQtETAJ0mN0TZL7/MaY..." ], "x":"k5wSvW_6JhOuCj-9PdDWdEA4oH90RSmC2GTliiUHAhXj6rmTdE2S-_zGmMFxufuV", "y":"XfbR-tRoVcZMCoUrkKtuZUIyfCgAy8b0FWnPZqevwpdoTzGQBOXSNi6uItN_o4tH", "crv":"P-384" }, ... ] }
8.5.1. Configuring Digital Signatures
AM supports digital signature algorithms that secure the integrity of its JSON payload, which is outlined in the JSON Web Algorithm specification (RFC 7518).
AM supports the signing algorithms listed in JSON Web Algorithms (JWA): "alg" (Algorithm) Header Parameter Values for JWS.
Tip
For an example on how to generate an ECDSA public and private key pair, see the first step in "Configuring Elliptic Curve Digital Signature Algorithms" in the Authentication and Single Sign-On Guide.
Perform the steps in this procedure to configure the signing algorithm AM should use to sign OpenID Connect tokens:
Navigate to Realms > Realm Name > Services > OAuth2 Provider.
In the OpenID Connect tab, ensure that the ID Token Signing Algorithms supported list has the signing algorithms your environment requires.
Note that the alias mapped to the algorithms are defined in the secret stores, as shown in the table below:
Secret ID Mappings for Signing OpenID Connect TokensSecret ID Default Alias Algorithms [a] am.services.oauth2.oidc.signing.ES256 es256test ES256 am.services.oauth2.oidc.signing.ES384 es384test ES384 am.services.oauth2.oidc.signing.ES512 es512test ES512 am.services.oauth2.oidc.signing.RSA rsajwtsigningkey PS256 PS384 PS512 RS256 RS384 RS512 [a] The following applies to confidential clients only:
If you select an HMAC algorithm for signing ID tokens (
HS256,HS384, orHS512), the Client Secret property value in the OAuth 2.0 Client is used as the HMAC secret instead of an entry from the secret stores.Since the HMAC secret is shared between AM and the client, a malicious user compromising the client could potentially create tokens that AM would trust. Therefore, to protect against misuse, AM also signs the token using a non-shared signing key configured in the
am.services.oauth2.jwt.authenticity.signingsecret ID.By default, secret IDs are mapped to demo keys contained in the default keystore provided with AM and mapped to the
default-keystorekeystore secret store. Use these keys for demo and test purposes only. For production environments, replace the secrets as required and create mappings for them in a secret store configured in AM.For more information about managing secret stores and mapping secret IDs to aliases, see "Configuring Secrets, Certificates, and Keys" in the Setup and Maintenance Guide.
(Optional) If the client is configured in AM, navigate to Realms > Realm Name > Applications > OAuth 2.0 > Client Name.
In the ID Token Signing Algorithm field, enter the signing algorithm that AM will use to sign the ID token for this client.
Note that the OAuth 2.0 provider must support signing with the chosen algorithm.
Save your changes.
AM is ready to sign ID tokens with the algorithm you configured.
Tip
If you chose a non-HMAC-based algorithm, the client will need to make a request to AM's JWK URI endpoint for the realm to recover the signing public key they can use to validate the ID tokens.
For more information, see "/oauth2/connect/jwk_uri".
8.5.2. Deprecating Algorithms and Rotating Public Keys
With signing and encryption methods changing so rapidly, during the lifecycle of your OAuth 2.0 environment you will need to deprecate older, less secure signing and/or encrypting algorithms in favor of new ones.
In the same way, you will rotate the keys AM uses for signing and encryption if you suspect they may have been leaked or just due to security policies, such as deprecating algorithms or because they have reached the end of their lifetime.
The keys you expose in the JWK URI endpoint should reflect the algorithms currently supported by AM as well as the deprecated ones. Otherwise, clients still using tokens signed with deprecated keys would not be able to validate them.
This is why deprecating supported algorithms in the OAuth 2.0/OpenID Connect provider is a two-step process:
Remove the old algorithm from the OAuth 2.0 provider supported algorithm list. This stops new clients from registering with that algorithm.
After a grace period, remove the secret mapping associated to that algorithm. This removes the associated public keys from the JWK URI endpoint.
Perform the steps in this procedure to deprecate an algorithm and its related keys. If you only want to deprecate keys or rotate them as part of your environment's security policies, see "Mapping Secrets" in the Setup and Maintenance Guide instead.
(Optional) Configure the new algorithm, if required.
Navigate to Realms > Realm Name > Services > OAuth2 Provider > OpenID Connect.
(Optional) In the ID Token Signing Algorithm supported field, add the new signing algorithm, if not already present.
(Optional) In the ID Token Encryption Algorithms supported field, add the new encryption algorithm, if not already present.
Save your changes.
(Optional) Configure secret ID mappings for the keys using the new algorithm, if required.
For more information, see "Configuring Secret Stores" in the Setup and Maintenance Guide.
Remove the algorithm to be deprecated from the relevant OAuth 2.0 provider algorithm list:
Navigate to Realms > Realm Name > Services > OAuth2 Provider > OpenID Connect.
(Optional) In the ID Token Signing Algorithm supported field, remove the deprecated signing algorithm.
(Optional) In the ID Token Encryption Algorithms supported field, remove the deprecated encryption algorithm.
Save your changes.
Decide on a grace period. For example, a month. During this period both the deprecated and the new algorithms/keys are supported.
New clients cannot register with the deprecated algorithms and are forced to use a supported algorithm. However, since the deprecated keys are still mapped to secret IDs, existing clients still can use them to validate active tokens and encrypt requests.
Existing clients must change their configuration during the grace period to use one of the supported algorithms.
After the grace period, remove the secret ID mappings relevant to the deprecated algorithm.
For more information about secret mappings, see "Mapping Secrets" in the Setup and Maintenance Guide.
8.5.3. Customizing Public Key IDs
By default, AM generates a key ID (kid) for each public key exposed in the jwk_uri URI when AM is configured as an OAuth 2.0 authorization server.
For keys stored in a keystore or HSM secret store, you can customize how key ID values are determined by writing an implementation of the KeyStoreKeyIdProvider interface and configuring it in AM:
Perform the following steps:
Write your own implementation of the
KeyStoreKeyIdProviderinterface that provides a specific key ID for a provided public key. For more information, see theKeyStoreKeyIdProviderinterface in the AM 6.5.5 Java API Specification.Log in to the AM console on the service provider as a top-level administrative user, such as
amAdmin.Configure AM as an OAuth 2.0/OpenID Connect Provider, if not done already. For more information, see "Configuring AM for OAuth 2.0" in the OAuth 2.0 Guide.
Navigate to Configure > Server Defaults > Advanced.
Add an advanced server property called
org.forgerock.openam.secrets.keystore.keyid.provider, whose value is the fully qualified name of the class you wrote in previous steps. For example:org.forgerock.openam.secrets.keystore.keyid.provider = com.mycompany.am.secrets.CustomKeyStoreKeyIdProvider
Restart the AM instance or the container in which it runs.
Verify that the customized key IDs are displayed by navigating to the OAuth 2.0 authorization server's
jwk_uriURI. For example,https://openam.example.com:8443/openam/oauth2/connect/jwk_uri.
8.5.4. Displaying Every Algorithm and Key Type Associated to a Key ID
By default, each key ID (kid) exposed by the jwk_uri endpoint matches a unique secret, as recommended by the RFC7517 specification. This means that each kid is of a particular key type, and uses a particular algorithm.
If you have several algorithms and key types associated with one kid, configure the JWK URI endpoint to display them as different keys in the JWK. Note that when including all combinations associated with a kid, that kid does not uniquely identify a particular secret.
Go to Realms > Realm Name > Services > OAuth2 Provider > Advanced OpenID Connect.
Enable Include all kty and alg combinations in jwk_uri.
Save your changes.
Verify that you can now see duplicate
kidentries for different combinations of algorithms and key types.For more information, see "To Access the Keys Exposed by the JWK URI Endpoint".
Chapter 9. Reference
This reference section covers settings and other information relating to OpenID Connect 1.0 support in AM.
9.1. OpenID Connect 1.0 Standards
AM implements the following RFCs, Internet-Drafts, and standards relating to OpenID Connect 1.0:
- OpenID Connect 1.0
AM can be configured to play the role of OpenID provider. The OpenID Connect specifications depend on OAuth 2.0, JSON Web Token, Simple Web Discovery and related specifications. The following specifications make up OpenID Connect 1.0.
OpenID Connect Core 1.0 defines core OpenID Connect 1.0 features.
Note
In section 5.6 of the specification, AM supports Normal Claims. The optional Aggregated Claims and Distributed Claims representations are not supported by AM.
OpenID Connect Client Initiated Backchannel Authentication Flow - Core 1.0 draft-02 defines how clients can initiate authentication and gather consent on a decoupled device from the authentication consumer device.
AM applies the guidelines suggested by the OpenID Financial-grade API (FAPI) Working Group to the implementation of CIBA.
As such, the following implementation decisions apply to CIBA support in AM:
AM only supports the CIBA "poll" mode, not the "push" or "ping" modes.
AM requires use of confidential clients for CIBA.
AM requires use of signed JSON-web tokens (JWT) to pass parameters, using one of the following algorithms:
ES256- ECDSA with SHA-256 and NIST standard P-256 elliptic curve.PS256- RSASSA-PSS using SHA-256.
Plain JSON or form parameters for CIBA-related data is not supported.
OpenID Connect Discovery 1.0 defines how clients can dynamically recover information about OpenID providers.
OpenID Connect Dynamic Client Registration 1.0 defines how clients can dynamically register with OpenID providers.
OpenID Connect Session Management 1.0- Draft 05 describes how to manage OpenID Connect sessions, including logout.
OpenID Connect Session Management 1.0- Draft 10 describes how to manage OpenID Connect sessions, including logout.
OAuth 2.0 Multiple Response Type Encoding Practices defines additional OAuth 2.0 response types used in OpenID Connect.
OAuth 2.0 Form Post Response Mode defines how OpenID providers return OAuth 2.0 Authorization Response parameters in auto-submitting forms.
OpenID Connect 1.0 also provides implementer's guides for client developers.
9.2. AM As an Identity Provider to Another AM Example
The following example shows how to set up an AM instance to act as an OAuth2/OpenID Connect provider to another AM instance.
Prerequisites
Two AM instances configured in different cookie domains. For example,
https://server.example.com:8443/openamandhttps://client.example.net:8443/openam.An identity, for example,
test, must exist inhttps://server.example.com:8443/openam.
Perform the steps in the following procedure to configure the AM instances:
On
https://server.example.com:8443/openam, navigate to Realms > Realm Name.On the Common Tasks Dashboard, select Configure OAuth Provider. Then, select Configure OpenID Connect.
On the configuration wizard, keep the default values and select Create.
Navigate to Realms > Realm Name > Applications > OAuth 2.0 and select Add Client.
Configure the client with the following settings:
Client ID: myClient
Client secret: forgerock
Scope(s): openid profile email
On
https://client.example.net:8443/openam, navigate to Realms > Realm Name.On the Common Tasks dashboard, select Configure Social Authentication. Then, select Configure Other Authentication.
Configure the social authentication provider with the following settings:
OpenID Discovery URL: https://server.example.com:8443/openam/oauth2/.well-known/openid-configuration
Provider Name: amServer
Image URL/Path: http://tinyurl.com/openam-logo
Client ID: myClient
Client Secret and Confirm Client Secret: forgerock
Keep the default value of the Redirect URL field, for example,
https://client.example.net:8443/openam/oauth2c/OAuthProxy.jsp, and copy it to the clipboard.On
https://server.example.com:8443/openam, navigate to Realms > Realm Name > Authentication > Modules and selectamServerSocialAuthentication.On the Account Provisioning tab, enable Create account if it does not exist.
Navigate to Realms > Realm Name > Applications > OAuth 2.0 > myClient.
Configure the following settings on the client:
Redirect URIs: Paste the value of the Redirect URL field from the client. For example,
https://client.example.net:8443/openam/oauth2c/OAuthProxy.jsp.Client Name: AM2
Display Name: AM2
Display Description: AM2 Instance Client
Logout from
https://client.example.net:8443/openamand return to the login page.You should be able to log in to
https://client.example.net:8443/openamwith thetestuser by using the AM logo to start the OpenID Connect flow.
9.3. OAuth2 Provider
amster service name: OAuth2Provider
9.3.1. Global Attributes
The following settings appear on the Global Attributes tab:
- Token Blacklist Cache Size
Number of blacklisted tokens to cache in memory to speed up blacklist checks and reduce load on the CTS.
Default value:
10000amster attribute:
blacklistCacheSize- Blacklist Poll Interval (seconds)
How frequently to poll for token blacklist changes from other servers, in seconds.
How often each server will poll the CTS for token blacklist changes from other servers. This is used to maintain a highly compressed view of the overall current token blacklist improving performance. A lower number will reduce the delay for blacklisted tokens to propagate to all servers at the cost of increased CTS load. Set to 0 to disable this feature completely.
Default value:
60amster attribute:
blacklistPollInterval- Blacklist Purge Delay (minutes)
Length of time to blacklist tokens beyond their expiry time.
Allows additional time to account for clock skew to ensure that a token has expired before it is removed from the blacklist.
Default value:
1amster attribute:
blacklistPurgeDelay- Client-Based Grant Token Upgrade Compatibility Mode
Enable AM to consume and create client-based OAuth 2.0 tokens in two different formats simultaneously.
Enable this option when upgrading AM to allow the new instance to create and consume client-based OAuth 2.0 tokens in both the previous format, and the new format. Disable this option once all AM instances in the cluster have been upgraded.
Default value:
falseamster attribute:
statelessGrantTokenUpgradeCompatibilityMode- CTS Storage Scheme
Storage scheme to be used when storing OAuth2 tokens to CTS.
In order to support rolling upgrades, this should be set to the latest storage scheme supported by all AM instances within your cluster. Select the latest storage scheme once all AM instances in the cluster have been upgraded.
One-to-One Storage Scheme
Under this storage scheme, each OAuth2 token maps to an individual CTS entry.
This storage scheme is deprecated.
Grant-Set Storage Scheme
Under this storage scheme, multiple authorization code, access token and refresh token for a given OAuth2 client and resource owner can be stored within a single CTS entry.
The Grant-Set storage scheme is more efficient than the One-to-One storage scheme so should be used once all servers have been upgraded to a version which supports this storage scheme
The possible values for this property are:
CTS_ONE_TO_ONE_MODEL. One-to-One Storage SchemeCTS_GRANT_SET_MODEL. Grant-Set Storage Scheme
Default value:
CTS_ONE_TO_ONE_MODELamster attribute:
storageScheme- Enforce JWT Unreasonable Lifetime
Enable the enforcement of JWT token unreasonable lifetime during validation.
The JSON Web Token (JWT) Profile for OAuth 2.0 Client Authentication and Authorization Grants specification (https://www.rfc-editor.org/rfc/rfc7523.html#section-3) states that an authorization server may reject JWTs with an "exp" claim value that is unreasonably far in the future and an "iat" claim value that is unreasonably far in the past. This enforcement may be disabled, but should only be done if the security implications have been evaluated.
Default value:
trueamster attribute:
jwtTokenLifetimeValidationEnabled- JWT Unreasonable Lifetime (seconds)
Specify the lifetime (in seconds) of a JWT which should be considered unreasonable and rejected by validation.
The JSON Web Token (JWT) Profile for OAuth 2.0 Client Authentication and Authorization Grants specification (https://www.rfc-editor.org/rfc/rfc7523.html#section-3) states that an authorization server may reject JWTs with an "exp" claim value that is unreasonably far in the future and an "iat" claim value that is unreasonably far in the past. During token validation AM enforces that the token must expire within the specified duration and if the "iat" claim value is present, the token must not be older than the specified duration.
Default value:
86400amster attribute:
jwtTokenUnreasonableLifetime
9.3.2. Core
The following settings appear on the Core tab:
- Use Client-Based Access & Refresh Tokens
When enabled, AM issues access and refresh tokens that can be inspected by resource servers.
Default value:
falseamster attribute:
statelessTokensEnabled- Authorization Code Lifetime (seconds)
The time an authorization code is valid for, in seconds.
Default value:
120amster attribute:
codeLifetime- Refresh Token Lifetime (seconds)
The time in seconds a refresh token is valid for. If this field is set to
-1, the refresh token will never expire.Default value:
604800amster attribute:
refreshTokenLifetime- Access Token Lifetime (seconds)
The time an access token is valid for, in seconds. Note that if you set the value to
0, the access token will not be valid. A maximum lifetime of 600 seconds is recommended.Default value:
3600amster attribute:
accessTokenLifetime- Issue Refresh Tokens
Whether to issue a refresh token when returning an access token.
Default value:
trueamster attribute:
issueRefreshToken- Issue Refresh Tokens on Refreshing Access Tokens
Whether to issue a refresh token when refreshing an access token.
Default value:
trueamster attribute:
issueRefreshTokenOnRefreshedToken- Use Policy Engine for Scope decisions
With this setting enabled, the policy engine is consulted for each scope value that is requested.
If a policy returns an action of GRANT=true, the scope is consented automatically, and the user is not consulted in a user-interaction flow. If a policy returns an action of GRANT=false, the scope is not added to any resulting token, and the user will not see it in a user-interaction flow. If no policy returns a value for the GRANT action, then if the grant type is user-facing (i.e. authorization or device code flows), the user is asked for consent (or saved consent is used), and if the grant type is not user-facing (password or client credentials), the scope is not added to any resulting token.
Default value:
falseamster attribute:
usePolicyEngineForScope- OAuth2 Access Token Modification Script
The script that is executed when issuing an access token. The script can change the access token's internal data structure to include or exclude particular fields.
The possible values for this property are:
d22f9a0c-426a-4466-b95e-d0f125b0d5fa. OAuth2 Access Token Modification Script[Empty]. --- Select a script ---
Default value:
d22f9a0c-426a-4466-b95e-d0f125b0d5faamster attribute:
accessTokenModificationScript
9.3.3. Advanced
The following settings appear on the Advanced tab:
- Custom Login URL Template
Custom URL for handling login, to override the default AM login page.
Supports Freemarker syntax, with the following variables:
Variable Description gotoUrlThe URL to redirect to after login. acrValuesThe Authentication Context Class Reference (acr) values for the authorization request. realmThe AM realm the authorization request was made on. moduleThe name of the AM authentication module requested to perform resource owner authentication. serviceThe name of the AM authentication chain requested to perform resource owner authentication. localeA space-separated list of locales, ordered by preference. The following example template redirects users to a non-AM front end to handle login, which will then redirect back to the
/oauth2/authorizeendpoint with any required parameters:http://mylogin.com/login?goto=${goto}<#if acrValues??>&acr_values=${acrValues}</#if><#if realm??>&realm=${realm}</#if><#if module??>&module=${module}</#if><#if service??>&service=${service}</#if><#if locale??>&locale=${locale}</#if>NOTE: Default AM login page is constructed using "Base URL Source" service.
amster attribute:
customLoginUrlTemplate- Scope Implementation Class
The class that contains the required scope implementation, must implement the
org.forgerock.oauth2.core.ScopeValidatorinterface.Default value:
org.forgerock.openam.oauth2.OpenAMScopeValidatoramster attribute:
scopeImplementationClass- Response Type Plugins
List of plugins that handle the valid
response_typevalues.OAuth 2.0 clients pass response types as parameters to the OAuth 2.0 Authorization endpoint (
/oauth2/authorize) to indicate which grant type is requested from the provider. For example, the client passescodewhen requesting an authorization code, andtokenwhen requesting an access token.Values in this list take the form
response-type|plugin-class-name.Default value:
code|org.forgerock.oauth2.core.AuthorizationCodeResponseTypeHandler
device_code|org.forgerock.oauth2.core.TokenResponseTypeHandler
token|org.forgerock.oauth2.core.TokenResponseTypeHandleramster attribute:
responseTypeClasses- User Profile Attribute(s) the Resource Owner is Authenticated On
Names of profile attributes that resource owners use to log in. You can add others to the default, for example
mail.Default value:
uidamster attribute:
authenticationAttributes- User Display Name attribute
The profile attribute that contains the name to be displayed for the user on the consent page.
Default value:
cnamster attribute:
displayNameAttribute- Supported Scopes
The set of supported scopes, with translations.
Scopes may be entered as simple strings or pipe-separated strings representing the internal scope name, locale, and localized description.
For example:
read|en|Permission to view email messages in your accountLocale strings are in the format:
language_country_variant, for exampleen,en_GB, oren_US_WIN.If the locale and pipe is omitted, the description is displayed to all users that have undefined locales.
If the description is also omitted, nothing is displayed on the consent page for the scope. For example specifying
read|would allow the scope read to be used by the client, but would not display it to the user on the consent page when requested.amster attribute:
supportedScopes- Subject Types supported
List of subject types supported. Valid values are:
public- Each client receives the same subject (sub) value.pairwise- Each client receives a different subject (sub) value, to prevent correlation between clients.
Default value:
publicamster attribute:
supportedSubjectTypes- Default Client Scopes
List of scopes a client will be granted if they request registration without specifying which scopes they want. Default scopes are NOT auto-granted to clients created through the AM console.
amster attribute:
defaultScopes- OAuth2 Token Signing Algorithm
Algorithm used to sign client-based OAuth 2.0 tokens in order to detect tampering.
AM supports signing algorithms listed in JSON Web Algorithms (JWA): "alg" (Algorithm) Header Parameter Values for JWS:
HS256- HMAC with SHA-256.HS384- HMAC with SHA-384.HS512- HMAC with SHA-512.ES256- ECDSA with SHA-256 and NIST standard P-256 elliptic curve.ES384- ECDSA with SHA-384 and NIST standard P-384 elliptic curve.ES512- ECDSA with SHA-512 and NIST standard P-521 elliptic curve.RS256- RSASSA-PKCS-v1_5 using SHA-256.
The possible values for this property are:
HS256HS384HS512RS256RS384RS512ES256ES384ES512PS256PS384PS512
Default value:
HS256amster attribute:
tokenSigningAlgorithm- Client-Based Token Compression
Whether client-based access and refresh tokens should be compressed.
amster attribute:
tokenCompressionEnabled- Encrypt Client-Based Tokens
Whether client-based access and refresh tokens should be encrypted.
Enabling token encryption will disable token signing as encryption is performed using direct symmetric encryption.
Default value:
falseamster attribute:
tokenEncryptionEnabled- Subject Identifier Hash Salt
If pairwise subject types are supported, it is STRONGLY RECOMMENDED to change this value. It is used in the salting of hashes for returning specific
subclaims to individuals using the samerequest_uriorsector_identifier_uri.For example, you might set this property to: changeme
amster attribute:
hashSalt- Code Verifier Parameter Required
If enabled, requests using the authorization code grant require a
code_challengeattribute.For more information, read the specification for this feature.
The possible values for this property are:
true. All requestspublic. Requests from all public clientspasswordless. Requests from all passwordless public clientsfalse. No requests
Default value:
falseamster attribute:
codeVerifierEnforced- Modified Timestamp Attribute Name
The identity Data Store attribute used to return modified timestamp values.
This attribute is paired together with the Created Timestamp Attribute Name attribute (
createdTimestampAttribute). You can leave both attributes unset (default) or set them both. If you set only one attribute and leave the other blank, the access token fails with a 500 error.For example, when you configure AM as an OpenID Connect Provider in a Mobile Connect application and use DS as an identity data store, the client accesses the
userinfoendpoint to obtain theupdated_atclaim value in the ID token. Theupdated_atclaim obtains its value from themodifiedTimestampAttributeattribute in the user profile. If the profile has never been modified theupdated_atclaim uses thecreatedTimestampAttributeattribute.amster attribute:
modifiedTimestampAttribute- Created Timestamp Attribute Name
The identity Data Store attribute used to return created timestamp values.
amster attribute:
createdTimestampAttribute- Password Grant Authentication Service
The authentication service (chain or tree) that will be used to authenticate the username and password for the resource owner password credentials grant type.
The possible values for this property are:
[Empty]ldapServiceamsterServiceExampleAgentRetryLimitPersistentCookieHmacOneTimePasswordFacebook-ProvisionIDMAccountGoogle-AnonymousUserGoogle-DynamicAccountCreation
amster attribute:
passwordGrantAuthService- Enable Auth Module Messages for Password Credentials Grant
If enabled, authentication module failure messages are used to create Resource Owner Password Credentials Grant failure messages. If disabled, a standard authentication failed message is used.
The Password Grant Type requires the
grant_type=passwordparameter.Default value:
falseamster attribute:
moduleMessageEnabledInPasswordGrant- Grant Types
The set of Grant Types (OAuth2 Flows) that are permitted to be used by this client.
If no Grant Types (OAuth2 Flows) are configured nothing will be permitted.
Default value:
implicit
urn:ietf:params:oauth:grant-type:saml2-bearer
refresh_token
password
client_credentials
urn:ietf:params:oauth:grant-type:device_code
authorization_code
urn:openid:params:grant-type:ciba
urn:ietf:params:oauth:grant-type:uma-ticket
urn:ietf:params:oauth:grant-type:jwt-beareramster attribute:
grantTypes- Trusted TLS Client Certificate Header
HTTP Header to receive TLS client certificates when TLS is terminated at a proxy.
Leave blank if not terminating TLS at a proxy. Ensure that the proxy is configured to strip this headerfrom incoming requests. Best practice is to use a random string.
amster attribute:
tlsClientCertificateTrustedHeader- Support TLS Certificate-Bound Access Tokens
Whether to bind access tokens to the client certificate when using TLS client certificate authentication.
Default value:
trueamster attribute:
tlsCertificateBoundAccessTokensEnabled
9.3.4. Client Dynamic Registration
The following settings appear on the Client Dynamic Registration tab:
- Require Software Statement for Dynamic Client Registration
When enabled, a software statement JWT containing at least the
iss(issuer) claim must be provided when registering an OAuth 2.0 client dynamically.Default value:
falseamster attribute:
dynamicClientRegistrationSoftwareStatementRequired- Required Software Statement Attested Attributes
The client attributes that are required to be present in the software statement JWT when registering an OAuth 2.0 client dynamically. Only applies if Require Software Statements for Dynamic Client Registration is enabled.
Leave blank to allow any attributes to be present.
Default value:
redirect_urisamster attribute:
requiredSoftwareStatementAttestedAttributes- Allow Open Dynamic Client Registration
Allow clients to register without an access token. If enabled, you should consider adding some form of rate limiting. For more information, see Client Registration in the OpenID Connect specification.
Default value:
falseamster attribute:
allowDynamicRegistration- Generate Registration Access Tokens
Whether to generate Registration Access Tokens for clients that register by using open dynamic client registration. Such tokens allow the client to access the Client Configuration Endpoint as per the OpenID Connect specification. This setting has no effect if Allow Open Dynamic Client Registration is disabled.
Default value:
trueamster attribute:
generateRegistrationAccessTokens- Scope to give access to dynamic client registration
Mandatory scope required when registering a new OAuth2 client.
Default value:
dynamic_client_registrationamster attribute:
dynamicClientRegistrationScope
9.3.5. OpenID Connect
The following settings appear on the OpenID Connect tab:
- OIDC Claims Script
The script that is run when issuing an ID token or making a request to the userinfo endpoint during OpenID requests.
The script gathers the scopes and populates claims, and has access to the access token, the user's identity and, if available, the user's session.
The possible values for this property are:
OIDC Claims Script
Default value:
OIDC Claims Scriptamster attribute:
oidcClaimsScript- ID Token Signing Algorithms supported
Algorithms supported to sign OpenID Connect
id_tokens.AM supports signing algorithms listed in JSON Web Algorithms (JWA): "alg" (Algorithm) Header Parameter Values for JWS:
HS256- HMAC with SHA-256.HS384- HMAC with SHA-384.HS512- HMAC with SHA-512.ES256- ECDSA with SHA-256 and NIST standard P-256 elliptic curve.ES384- ECDSA with SHA-384 and NIST standard P-384 elliptic curve.ES512- ECDSA with SHA-512 and NIST standard P-521 elliptic curve.RS256- RSASSA-PKCS-v1_5 using SHA-256.RS384- RSASSA-PKCS-v1_5 using SHA-384.RS512- RSASSA-PKCS-v1_5 using SHA-512.PS256- RSASSA-PSS using SHA-256.PS384- RSASSA-PSS using SHA-384.PS512- RSASSA-PSS using SHA-512.
Default value:
PS384
ES384
RS384
HS256
HS512
ES256
RS256
HS384
ES512
PS256
PS512
RS512amster attribute:
supportedIDTokenSigningAlgorithms- ID Token Encryption Algorithms supported
Encryption algorithms supported to encrypt OpenID Connect ID tokens in order to hide its contents.
AM supports the following ID token encryption algorithms:
RSA-OAEP- RSA with Optimal Asymmetric Encryption Padding (OAEP) with SHA-1 and MGF-1.RSA-OAEP-256- RSA with OAEP with SHA-256 and MGF-1.A128KW- AES Key Wrapping with 128-bit key derived from the client secret.RSA1_5- RSA with PKCS#1 v1.5 padding.A256KW- AES Key Wrapping with 256-bit key derived from the client secret.dir- Direct encryption with AES using the hashed client secret.A192KW- AES Key Wrapping with 192-bit key derived from the client secret.
Default value:
RSA-OAEP
RSA-OAEP-256
A128KW
A256KW
RSA1_5
dir
A192KWamster attribute:
supportedIDTokenEncryptionAlgorithms- ID Token Encryption Methods supported
Encryption methods supported to encrypt OpenID Connect ID tokens in order to hide its contents.
AM supports the following ID token encryption algorithms:
A128GCM,A192GCM, andA256GCM- AES in Galois Counter Mode (GCM) authenticated encryption mode.A128CBC-HS256,A192CBC-HS384, andA256CBC-HS512- AES encryption in CBC mode, with HMAC-SHA-2 for integrity.
Default value:
A256GCM
A192GCM
A128GCM
A128CBC-HS256
A192CBC-HS384
A256CBC-HS512amster attribute:
supportedIDTokenEncryptionMethods- Supported Claims
Set of claims supported by the OpenID Connect
/oauth2/userinfoendpoint, with translations.Claims may be entered as simple strings or pipe separated strings representing the internal claim name, locale, and localized description.
For example:
name|en|Your full name..Locale strings are in the format:
language + "_" + country + "_" + variant, for exampleen,en_GB, oren_US_WIN. If the locale and pipe is omitted, the description is displayed to all users that have undefined locales.If the description is also omitted, nothing is displayed on the consent page for the claim. For example specifying
family_name|would allow the claimfamily_nameto be used by the client, but would not display it to the user on the consent page when requested.amster attribute:
supportedClaims- OpenID Connect JWT Token Lifetime (seconds)
The amount of time the JWT will be valid for, in seconds.
Default value:
3600amster attribute:
jwtTokenLifetime
9.3.6. Advanced OpenID Connect
The following settings appear on the Advanced OpenID Connect tab:
- Remote JSON Web Key URL
The Remote URL where the providers JSON Web Key can be retrieved.
If this setting is not configured, then AM provides a local URL to access the public key of the private key used to sign ID tokens.
amster attribute:
jkwsURI- Idtokeninfo Endpoint Requires Client Authentication
When enabled, the
/oauth2/idtokeninfoendpoint requires client authentication if the signing algorithm is set toHS256,HS384, orHS512.Default value:
trueamster attribute:
idTokenInfoClientAuthenticationEnabled- Enable "claims_parameter_supported"
If enabled, clients will be able to request individual claims using the
claimsrequest parameter, as per section 5.5 of the OpenID Connect specification.Default value:
falseamster attribute:
claimsParameterSupported- OpenID Connect acr_values to Auth Chain Mapping
Maps OpenID Connect ACR values to authentication chains. For more details, see the acr_values parameter in the OpenID Connect authentication request specification.
amster attribute:
loaMapping- Default ACR values
Default requested Authentication Context Class Reference values.
List of strings that specifies the default acr values that the OP is being requested to use for processing requests from this Client, with the values appearing in order of preference. The Authentication Context Class satisfied by the authentication performed is returned as the acr Claim Value in the issued ID Token. The acr Claim is requested as a Voluntary Claim by this parameter. The acr_values_supported discovery element contains a list of the acr values supported by this server. Values specified in the acr_values request parameter or an individual acr Claim request override these default values.
amster attribute:
defaultACR- OpenID Connect id_token amr Values to Auth Module Mappings
Specify
amrvalues to be returned in the OpenID Connectid_token. Once authentication has completed, the authentication modules that were used from the authentication service will be mapped to theamrvalues. If you do not requireamrvalues, or are not providing OpenID Connect tokens, leave this field blank.amster attribute:
amrMappings- Always Return Claims in ID Tokens
If enabled, include scope-derived claims in the
id_token, even if an access token is also returned that could provide access to get the claims from theuserinfoendpoint.If not enabled, if an access token is requested the client must use it to access the
userinfoendpoint for scope-derived claims, as they will not be included in the ID token.Default value:
falseamster attribute:
alwaysAddClaimsToToken- Store Ops Tokens
Whether AM will store the ops tokens corresponding to OpenID Connect sessions in the CTS store. Note that session management related endpoints will not work when this setting is disabled.
Default value:
trueamster attribute:
storeOpsTokens- Request Parameter Signing Algorithms Supported
Algorithms supported to verify signature of Request parameterAM supports signing algorithms listed in JSON Web Algorithms (JWA): "alg" (Algorithm) Header Parameter Values for JWS:
HS256- HMAC with SHA-256.HS384- HMAC with SHA-384.HS512- HMAC with SHA-512.ES256- ECDSA with SHA-256 and NIST standard P-256 elliptic curve.ES384- ECDSA with SHA-384 and NIST standard P-384 elliptic curve.ES512- ECDSA with SHA-512 and NIST standard P-521 elliptic curve.RS256- RSASSA-PKCS-v1_5 using SHA-256.
Default value:
PS384
ES384
RS384
HS256
HS512
ES256
RS256
HS384
ES512
PS256
PS512
RS512amster attribute:
supportedRequestParameterSigningAlgorithms- Request Parameter Encryption Algorithms Supported
Encryption algorithms supported to decrypt Request parameter.
AM supports the following ID token encryption algorithms:
RSA-OAEP- RSA with Optimal Asymmetric Encryption Padding (OAEP) with SHA-1 and MGF-1.RSA-OAEP-256- RSA with OAEP with SHA-256 and MGF-1.A128KW- AES Key Wrapping with 128-bit key derived from the client secret.RSA1_5- RSA with PKCS#1 v1.5 padding.A256KW- AES Key Wrapping with 256-bit key derived from the client secret.dir- Direct encryption with AES using the hashed client secret.A192KW- AES Key Wrapping with 192-bit key derived from the client secret.
Default value:
RSA-OAEP
RSA-OAEP-256
A128KW
A256KW
RSA1_5
dir
A192KWamster attribute:
supportedRequestParameterEncryptionAlgorithms- Request Parameter Encryption Methods Supported
Encryption methods supported to decrypt Request parameter.
AM supports the following Request parameter encryption algorithms:
A128GCM,A192GCM, andA256GCM- AES in Galois Counter Mode (GCM) authenticated encryption mode.A128CBC-HS256,A192CBC-HS384, andA256CBC-HS512- AES encryption in CBC mode, with HMAC-SHA-2 for integrity.
Default value:
A256GCM
A192GCM
A128GCM
A128CBC-HS256
A192CBC-HS384
A256CBC-HS512amster attribute:
supportedRequestParameterEncryptionEnc- Supported Token Endpoint JWS Signing Algorithms.
Supported JWS Signing Algorithms for 'private_key_jwt' JWT based authentication method.
Default value:
PS384
ES384
RS384
HS256
HS512
ES256
RS256
HS384
ES512
PS256
PS512
RS512amster attribute:
supportedTokenEndpointAuthenticationSigningAlgorithms- Authorized OIDC SSO Clients
Clients authorized to use OpenID Connect ID tokens as SSO Tokens.
Allows clients to act with the full authority of the user. Grant this permission only to trusted clients.
amster attribute:
authorisedOpenIdConnectSSOClients- UserInfo Signing Algorithms Supported
Algorithms supported to verify signature of the UserInfo endpoint. AM supports signing algorithms listed in JSON Web Algorithms (JWA): "alg" (Algorithm) Header Parameter Values for JWS:
HS256- HMAC with SHA-256.HS384- HMAC with SHA-384.HS512- HMAC with SHA-512.ES256- ECDSA with SHA-256 and NIST standard P-256 elliptic curve.ES384- ECDSA with SHA-384 and NIST standard P-384 elliptic curve.ES512- ECDSA with SHA-512 and NIST standard P-521 elliptic curve.RS256- RSASSA-PKCS-v1_5 using SHA-256.
Default value:
ES384
HS256
HS512
ES256
RS256
HS384
ES512amster attribute:
supportedUserInfoSigningAlgorithms- UserInfo Encryption Algorithms Supported
Encryption algorithms supported by the UserInfo endpoint.
AM supports the following UserInfo endpoint encryption algorithms:
RSA-OAEP- RSA with Optimal Asymmetric Encryption Padding (OAEP) with SHA-1 and MGF-1.RSA-OAEP-256- RSA with OAEP with SHA-256 and MGF-1.A128KW- AES Key Wrapping with 128-bit key derived from the client secret.RSA1_5- RSA with PKCS#1 v1.5 padding.A256KW- AES Key Wrapping with 256-bit key derived from the client secret.dir- Direct encryption with AES using the hashed client secret.A192KW- AES Key Wrapping with 192-bit key derived from the client secret.
Default value:
RSA-OAEP
RSA-OAEP-256
A128KW
A256KW
RSA1_5
dir
A192KWamster attribute:
supportedUserInfoEncryptionAlgorithms- UserInfo Encryption Methods Supported
Encryption methods supported by the UserInfo endpoint.
AM supports the following UserInfo endpoint encryption methods:
A128GCM,A192GCM, andA256GCM- AES in Galois Counter Mode (GCM) authenticated encryption mode.A128CBC-HS256,A192CBC-HS384, andA256CBC-HS512- AES encryption in CBC mode, with HMAC-SHA-2 for integrity.
Default value:
A256GCM
A192GCM
A128GCM
A128CBC-HS256
A192CBC-HS384
A256CBC-HS512amster attribute:
supportedUserInfoEncryptionEnc- Use Force Authentication for
prompt=login This setting is applied only when you've implemented modules or chains, and you've specified the
prompt=loginparameter. The default value isfalse.When set to
false, AM forces the end user to authenticate even if they already have a valid session. After re-authentication, AM creates a new session.When set to
true, AM forces the end user to authenticate even if they already have a valid session. But, after re-authentication, AM returns the same session ID. Setting this tofalse, to create new a session, is recommended to increase the level of security.
9.3.7. Device Flow
The following settings appear on the Device Flow tab:
- Verification URL
The URL that the user will be instructed to visit to complete their OAuth 2.0 login and consent when using the device code flow.
amster attribute:
verificationUrl- Device Completion URL
The URL that the user will be sent to on completion of their OAuth 2.0 login and consent when using the device code flow.
amster attribute:
completionUrl- Device Code Lifetime (seconds)
The lifetime of the device code, in seconds.
Default value:
300amster attribute:
deviceCodeLifetime- Device Polling Interval
The polling frequency for devices waiting for tokens when using the device code flow.
Default value:
5amster attribute:
devicePollInterval
9.3.8. Consent
The following settings appear on the Consent tab:
- Saved Consent Attribute Name
Name of a multi-valued attribute on resource owner profiles where AM can save authorization consent decisions.
When the resource owner chooses to save the decision to authorize access for a client application, then AM updates the resource owner's profile to avoid having to prompt the resource owner to grant authorization when the client issues subsequent authorization requests.
amster attribute:
savedConsentAttribute- Allow Clients to Skip Consent
If enabled, clients may be configured so that the resource owner will not be asked for consent during authorization flows.
Default value:
falseamster attribute:
clientsCanSkipConsent- Enable Remote Consent
Default value:
falseamster attribute:
enableRemoteConsent- Remote Consent Service ID
The ID of an existing remote consent service agent.
The possible values for this property are:
[Empty]
amster attribute:
remoteConsentServiceId- Remote Consent Service Request Signing Algorithms Supported
Algorithms supported to sign consent_request JWTs for Remote Consent Services.
AM supports signing algorithms listed in JSON Web Algorithms (JWA): "alg" (Algorithm) Header Parameter Values for JWS:
HS256- HMAC with SHA-256.HS384- HMAC with SHA-384.HS512- HMAC with SHA-512.ES256- ECDSA with SHA-256 and NIST standard P-256 elliptic curve.ES384- ECDSA with SHA-384 and NIST standard P-384 elliptic curve.ES512- ECDSA with SHA-512 and NIST standard P-521 elliptic curve.RS256- RSASSA-PKCS-v1_5 using SHA-256.
Default value:
PS384
ES384
RS384
HS256
HS512
ES256
RS256
HS384
ES512
PS256
PS512
RS512amster attribute:
supportedRcsRequestSigningAlgorithms- Remote Consent Service Request Encryption Algorithms Supported
Encryption algorithms supported to encrypt Remote Consent Service requests.
AM supports the following encryption algorithms:
RSA1_5- RSA with PKCS#1 v1.5 padding.RSA-OAEP- RSA with Optimal Asymmetric Encryption Padding (OAEP) with SHA-1 and MGF-1.RSA-OAEP-256- RSA with OAEP with SHA-256 and MGF-1.A128KW- AES Key Wrapping with 128-bit key derived from the client secret.A192KW- AES Key Wrapping with 192-bit key derived from the client secret.A256KW- AES Key Wrapping with 256-bit key derived from the client secret.dir- Direct encryption with AES using the hashed client secret.
Default value:
RSA-OAEP
RSA-OAEP-256
A128KW
RSA1_5
A256KW
dir
A192KWamster attribute:
supportedRcsRequestEncryptionAlgorithms- Remote Consent Service Request Encryption Methods Supported
Encryption methods supported to encrypt Remote Consent Service requests.
AM supports the following encryption methods:
A128GCM,A192GCM, andA256GCM- AES in Galois Counter Mode (GCM) authenticated encryption mode.A128CBC-HS256,A192CBC-HS384, andA256CBC-HS512- AES encryption in CBC mode, with HMAC-SHA-2 for integrity.
Default value:
A256GCM
A192GCM
A128GCM
A128CBC-HS256
A192CBC-HS384
A256CBC-HS512amster attribute:
supportedRcsRequestEncryptionMethods- Remote Consent Service Response Signing Algorithms Supported
Algorithms supported to verify signed consent_response JWT from Remote Consent Services.
AM supports signing algorithms listed in JSON Web Algorithms (JWA): "alg" (Algorithm) Header Parameter Values for JWS:
HS256- HMAC with SHA-256.HS384- HMAC with SHA-384.HS512- HMAC with SHA-512.ES256- ECDSA with SHA-256 and NIST standard P-256 elliptic curve.ES384- ECDSA with SHA-384 and NIST standard P-384 elliptic curve.ES512- ECDSA with SHA-512 and NIST standard P-521 elliptic curve.RS256- RSASSA-PKCS-v1_5 using SHA-256.
Default value:
PS384
ES384
RS384
HS256
HS512
ES256
RS256
HS384
ES512
PS256
PS512
RS512amster attribute:
supportedRcsResponseSigningAlgorithms- Remote Consent Service Response Encryption Algorithms Supported
Encryption algorithms supported to decrypt Remote Consent Service responses.
AM supports the following encryption algorithms:
RSA1_5- RSA with PKCS#1 v1.5 padding.RSA-OAEP- RSA with Optimal Asymmetric Encryption Padding (OAEP) with SHA-1 and MGF-1.RSA-OAEP-256- RSA with OAEP with SHA-256 and MGF-1.A128KW- AES Key Wrapping with 128-bit key derived from the client secret.A192KW- AES Key Wrapping with 192-bit key derived from the client secret.A256KW- AES Key Wrapping with 256-bit key derived from the client secret.dir- Direct encryption with AES using the hashed client secret.
Default value:
RSA-OAEP
RSA-OAEP-256
A128KW
A256KW
RSA1_5
dir
A192KWamster attribute:
supportedRcsResponseEncryptionAlgorithms- Remote Consent Service Response Encryption Methods Supported
Encryption methods supported to decrypt Remote Consent Service responses.
AM supports the following encryption methods:
A128GCM,A192GCM, andA256GCM- AES in Galois Counter Mode (GCM) authenticated encryption mode.A128CBC-HS256,A192CBC-HS384, andA256CBC-HS512- AES encryption in CBC mode, with HMAC-SHA-2 for integrity.
Default value:
A256GCM
A192GCM
A128GCM
A128CBC-HS256
A192CBC-HS384
A256CBC-HS512amster attribute:
supportedRcsResponseEncryptionMethods
9.3.9. CIBA
The following settings appear on the CIBA tab:
- Back Channel Authentication ID Lifetime (seconds)
The time back channel authentication request id is valid for, in seconds.
Default value:
600amster attribute:
cibaAuthReqIdLifetime- Polling Wait Interval (seconds)
The minimum amount of time in seconds that the Client should wait between polling requests to the token endpoint
Default value:
2amster attribute:
cibaMinimumPollingInterval- Signing Algorithms Supported
Algorithms supported to sign the CIBA request parameter.
AM supports signing algorithms listed in JSON Web Algorithms (JWA): "alg" (Algorithm) Header Parameter Values for JWS:
ES256- ECDSA with SHA-256 and NIST standard P-256 elliptic curve.PS256- RSASSA-PSS using SHA-256.
Default value:
ES256
PS256amster attribute:
supportedCibaSigningAlgorithms
9.4. OAuth 2.0 and OpenID Connect 1.0 Client Settings
To register an OAuth 2.0 client with AM as the OAuth 2.0 authorization server, or register an OpenID Connect 1.0 client through the AM console, then create an OAuth 2.0 client profile. After creating the client profile, you can further configure the properties in the AM console by navigating to Realms > Realm Name > Applications > OAuth 2.0 > Client Name.
9.4.1. Core
The following properties appear on the Core tab:
- Group
Set this field if you have configured an OAuth 2.0 client group.
- Status
Specify whether the client profile is active for use or inactive.
- Client secret
Specify the client secret as described by RFC 6749 in the section, Client Password.
For OAuth 2.0/OpenID Connect 1.0 clients, AM uses the client password as the client shared secret key when signing the contents of the
requestparameter with HMAC-based algorithms, such as HS256.- Client type
Specify the client type.
Confidential clients can maintain the confidentiality of their credentials, such as a web application running on a server where its credentials are protected. Public clients run the risk of exposing their passwords to a host or user agent, such as a JavaScript client running in a browser.
- Redirection URIs
Specify client redirection endpoint URIs as described by RFC 6749 in the section, Redirection Endpoint. AM's OAuth 2.0 authorization service redirects the resource owner's user-agent back to this endpoint during the authorization code grant process. If your client has more than one redirection URI, then it must specify the redirection URI to use in the authorization request. The redirection URI must NOT contain a fragment (#).
OpenID Connect clients require redirection URIs.
- Scope(s)
Specify scopes that are to be presented to the resource owner when the resource owner is asked to authorize client access to protected resources.
The
openidscope is required. It indicates that the client is making an OpenID Connect request to the authorization server.Scopes can be entered as simple strings, such as
openid,read,email,profile, or as a pipe-separated string in the format:scope|locale|localized description. For example,read|en|Permission to view email messages.Locale strings have the format: language_country_variant. For example,
en,en_GB, oren_US_WIN. If thelocaleand pipe is omitted, the localized description is displayed to all users having undefined locales. If the localized description is omitted, nothing is displayed to all users. For example, a scope ofread|would allow the client to use thereadscope but would not display it to the user when requested.AM reserves a special scope,
am-introspect-all-tokens. As administrator, add this scope to the OAuth 2.0 client profile to allow the client to introspect access tokens issued to other clients in the same realm. This scope cannot be added during dynamic client registration.- Default Scope(s)
Specify scopes in
scopeorscope|locale|localized descriptionformat. These scopes are set automatically when tokens are issued.The
openidscope is required. It indicates that the client is making an OpenID Connect request to the authorization server.Scopes can be entered as simple strings, such as
openid,read,email,profile, or as a pipe-separated string in the format:scope|locale|localized description. For example,read|en|Permission to view email messages.Locale strings have the format:language_ country_variant. For example,
en,en_GB, oren_US_WIN. If thelocaleand pipe is omitted, thelocalized description is displayed to all users having undefined locales. If the localized description is omitted, nothing is displayed to all users. For example, a scope ofread|would allow the client to use thereadscope but would not display it to the user when requested.- Client Name
Specify a human-readable name for the client.
- Authorization Code Lifetime (seconds)
Specify the time in seconds for an authorization code to be valid. If this field is set to zero, the authorization code lifetime of the OAuth2 provider is used.
Default:
0- Refresh Token Lifetime (seconds)
Specify the time in seconds for a refresh token to be valid. If this field is set to zero, the refresh token lifetime of the OAuth2 provider is used. If the field is set to
-1, the token will never expire.Default:
0- Access Token Lifetime (seconds)
Specify the time in seconds for an access token to be valid. If this field is set to zero, the access token lifetime of the OAuth2 provider is used.
Default:
0
9.4.2. Advanced
The following properties appear on the Advanced tab:
- Display name
Specify a client name to display to the resource owner when the resource owner is asked to authorize client access to protected resources. Valid formats include
nameorlocale|localized name.The Display name can be entered as a single string or as a pipe-separated string for locale and localized name, for example,
en|My Example Company.Locale strings have the format:language_ country_ variant. For example,
en,en_GB, oren_US_WIN. If thelocaleis omitted, the name is displayed to all users having undefined locales.- Display description
Specify a client description to display to the resource owner when the resource owner is asked to authorize client access to protected resources. Valid formats include
descriptionorlocale|localized description.The Display description can be entered as a single string or as a pipe-separated string for locale and localized name, for example,
en|The company intranet is requesting the following access permission.Locale strings have the format:language_ country_ variant. For example,
en,en_GB, oren_US_WIN. If thelocaleis omitted, the name is displayed to all users having undefined locales.- Request uris
Specify
request_urivalues that a dynamic client would pre-register.URIs must be pre-registered in this field before the client can request them in the
request_uriparameter.- Grant Types
Specify the set of OAuth 2.0 grant flows allowed for this client. The following flows are available:
Authorization CodeBack Channel RequestImplicitResource Owner Password CredentialsClient CredentialsRefresh TokenUMADevice CodeSAML2
When registering clients dynamically, if no grant types are specified in the registration request, then the default
Authorization Codegrant type is assumed, and configured in the client.Any grant types selected in a client must also be enabled in the OAuth 2.0 provider service. See "OAuth2 Provider" in the OAuth 2.0 Guide.
Default:
Authorization Code- Response Types
Specify the response types that the client uses. The response type value specifies the flow that determine how the ID token and access token are returned to the client. For more information, see OAuth 2.0 Multiple Response Type Encoding Practices.
By default, the following response types are available:
code. Specifies that the client application requests an authorization code grant.token. Specifies that the client application requests an implicit grant type and requests a token from the API.id_token. Specifies that the client application requests an ID token.code token. Specifies that the client application requests an access token, access token type, and an authorization code.token id_token. Specifies that the client application requests an access token, access token type, and an ID token.code id_token. Specifies that the client application requests an authorization code and an ID token.code token id_token. Specifies that the client application requests an authorization code, access token, access token type, and an ID token.
- Contacts
Specify the email addresses of users who administer the client.
- Token Endpoint Authentication Method
Specify the authentication method with which a client authenticates to AM (as an authorization server) at the token endpoint. The authentication method applies to OIDC requests with scope
openid.client_secret_basic. Clients authenticate with AM (as an authorization server) using the HTTP Basic authentication scheme after receiving aclient_secretvalue.client_secret_post. Clients authenticate with AM (as an authorization server) by including the client credentials in the request body after receiving aclient_secretvalue.private_key_jwt. Clients sign a JSON web token (JWT) with a registered public key.tls_client_auth. Clients use a CA-signed certificate for mutual TLS authentication.self_signed_tls_client_auth. Clients use a self-signed certificate for mutual TLS authentication.
For more information, see "Authenticating OAuth 2.0 Clients" in the OAuth 2.0 Guide, and Client Authentication in the OpenID Connect Core 1.0 incorporating errata set 1 specification.
- Sector Identifier URI
Specify the host component of this URI, which is used in the computation of pairwise subject identifiers.
- Subject Type
Specify the subject identifier type, which is a locally unique identifier that will be consumed by the client. Select one of two options:
public. Provides the same
sub(subject) value to all clients.pairwise. Provides a different
sub(subject) value to each client.
- Access Token
Specify the
registration_access_tokenvalue that you provide when registering the client, and then subsequently when reading or updating the client profile.- Client URI
Specify the URI containing further information about this client. The URI is displayed as a link in user-facing pages, such as consent pages.
The URI can be made locale-specific by specifying a pipe-separated string in the format: URI|locale. For example,
https://www.example.es:8443/aplicacion/informacion.html|es- Logo URI
Specify the URI of a logo for the client. The logo is displayed in user-facing pages, such as consent pages.
The logo can be made locale-specific by specifying a pipe-separated string in the format: URI|locale. For example,
https://www.example.es:8443/aplicacion/imagen.png|es- Privacy Policy URI
Specify the URI containing the client's privacy policy documentation. The URI is displayed as a link in user-facing pages, such as consent pages.
The URI can be made locale-specific by specifying a pipe-separated string in the format: URI|locale. For example,
https://www.example.es:8443/aplicacion/legal.html|es- Implied Consent
Enable the implied consent feature. When enabled, the resource owner will not be asked for consent during authorization flows. The OAuth2 Provider must also be configured to allow clients to skip consent.
- OAuth 2.0 Mix-Up Mitigation enabled
Enable OAuth 2.0 mix-up mitigation on the authorization server side.
Enable this setting only if this OAuth 2.0 client supports the OAuth 2.0 Mix-Up Mitigation draft, otherwise AM will fail to validate access token requests received from this client.
9.4.3. OpenID Connect
The following properties appear on the OpenID Connect tab:
- Claim(s)
Specify one or more claim name translations that will override those specified for the authentication session. Claims are values that are presented to the user to inform them what data is being made available to the client.
Claims can be in entered as simple strings, such as
name,email,profile, orsub, or as a pipe-separated string in the format:scope|locale|localized description. For example,name|en|Full name of user.Locale strings have the format:language_ country_ variant. For example,
en,en_GB, oren_US_WIN. If thelocaleand pipe is omitted, thelocalized description is displayed to all users having undefined locales. If the localized description is omitted, nothing is displayed to all users. For example, a claim ofname|would allow the client to use thenameclaim but would not display it to the user when requested.If a value is not given, the value is computed from the OAuth2 provider.
- Post Logout Redirect URIs
Specify one or more allowable URIs to which the user-agent can be redirected to after the client logout process.
- Client Session URI
Specify the relying party (client) URI to which the OpenID Connect Provider sends session changed notification messages using the HTML 5
postMessageAPI.- Default Max Age
Specify the maximum time in seconds that a user can be authenticated. If the user last authenticated earlier than this value, then the user must be authenticated again. If specified, the request parameter
max_ageoverrides this setting.Minimum value:
1.Default:
600- Default Max Age Enabled
Enable the default max age feature.
- Default ACR values
Default Authentication Context Class Reference values.
Specify strings that will be requested as Voluntary Claims by default in all incoming requests.
Values specified in the
acr_valuesrequest parameter or an individualacrclaim request override these default values.- OpenID Connect JWT Token Lifetime (seconds)
Specify the time in seconds for a JWT to be valid. If this field is set to zero, the JWT token lifetime of the OAuth2 provider is used.
Default:
0
9.4.4. Signing and Encryption
Note
AM returns an error if the administrator tries to save a client profile configuration containing an unsupported signing or encryption algorithm on a client.
For example, upon saving the configuration, AM will return an error if there is a typo on an algorithm, or a symmetric signing or encryption algorithm is configured on a public client: these algorithms are derived from the client's secret, which public clients do not have.
Clients registering dynamically must also send supported algorithms as part of their configuration, or AM will reject the registration request.
Different features support different algorithms. Refer to the documentation or the UI for more information.
The following properties appear on the Signing and Encryption tab:
- Json Web Key URI
Specify the URI that contains the client's public keys in JSON web key format.
- JWKs URI content cache timeout in ms
Specify the amount of time, in milliseconds, that the content of the JWKs' URI is cached for before being refreshed. Caching the content avoids fetching it for every token encryption or validation.
Default:
3600000- JWKs URI content cache miss cache time
Specify the amount of time, in milliseconds, that AM waits before fetching the URI's content again when a key ID (
kid) is not in the JWKs that are already cached.For example, if a request comes in with a
kidthat is not in the cached JWKs, AM checks the value of JWKs' URI content cache miss cache time. If the amount of time specified in this property has already passed since the last time AM fetched the JWKs, AM fetches them again. Otherwise, the request is rejected.Use this property as a rate limit to prevent denial-of-service attacks against the URI.
Default:
60000- Token Endpoint Authentication Signing Algorithm
Specify the JWS algorithm that must be used for signing JWTs used to authenticate the client at the Token Endpoint.
JWTs that are not signed with the selected algorithm in token requests from the client using the
private_key_jwtauthentication method will be rejected.Default:
RS256- Json Web Key
Raw JSON web key value containing the client's public keys.
- ID Token Signing Algorithm
Specify the signing algorithm that the ID token must be signed with.
- Enable ID Token Encryption
Enable ID token encryption using the specified ID token encryption algorithm.
- ID Token Encryption Algorithm
Specify the algorithm that the ID token must be encrypted with.
Default value:
RSA1_5(RSAES-PKCS1-V1_5).- ID Token Encryption Method
Specify the method that the ID token must be encrypted with.
Default value:
A128CBC-HS256.- Client ID Token Public Encryption Key
Specify the Base64-encoded public key for encrypting ID tokens.
- Client JWT Bearer Public Key Certificate
Specify the base64-encoded X509 certificate in PEM format. The certificate is never used during the signing process, but is used to obtain the client's JWT bearer public key. The client uses the private key to sign client authentication and access token request JWTs, while AM uses the public key for verification.
The following is an example of the certificate:
-----BEGIN CERTIFICATE-----
MIIDETCCAfmgAwIBA...
-----END CERTIFICATE-----
You can generate a new key pair alias by using the Java keytool command. Follow the steps in "To Create Key Aliases in an Existing Keystore" in the Setup and Maintenance Guide.
To export the certificate from the new key pair in PEM format, run a command similar to the following:
$
keytool \ -list \ -alias myAlias \ -rfc \ -storetype JCEKS \ -keystore myKeystore.jceks \ -keypass myKeypass \ -storepass myStorepassAlias name: myAlias Creation date: Oct 27, 2014 Entry type: PrivateKeyEntry Certificate chain length: 1 Certificate[1]: -----BEGIN CERTIFICATE----- MIIDETCCAfmgAwIBA... -----END CERTIFICATE-----For more information, see "Authenticating Clients Using JWT Profiles" in the OAuth 2.0 Guide.
- mTLS Self-Signed Certificate
Specify the base64-encoded X.509 certificate in PEM format that clients can use to authenticate to the
access_tokenendpoint during mutual TLS authentication.Only applies when clients use self-signed certificates to authenticate.
For more information, see "Mutual TLS Using Self-Signed X.509 Certificates" in the OAuth 2.0 Guide
- mTLS Subject DN
Specify the distinguished name that must exactly match the subject field in the client certificate used for mutual TLS authentication, for example
CN=myOauth2Client.Only applies when clients use CA-signed certificates to authenticate.
For more information, see "Mutual TLS Using Public Key Infrastructure" in the OAuth 2.0 Guide
- Use Certificate-Bound Access Tokens
Specify that access tokens issued to this client should be bound to the X.509 certificate it uses to authenticate to the
access_tokenendpoint.If enabled, AM adds a confirmation key labelled
x5t#S256to all access tokens. The confirmation key contains the SHA-256 hash of the client's certificate.For more information, see "Certificate-Bound Proof-of-Possession" in the OAuth 2.0 Guide
- Public key selector
Select the format of the public keys for JWT profile client authentication in the OAuth 2.0 Guide, ID token encryption, and mTLS self-signed certificate authentication in the OAuth 2.0 Guide. Valid formats are:
JWKs_URIConfigure a URI that exposes the client public keys in the Json Web Key URI field, and ensure the following related properties have sensible values for your environment:
JWKs URI content cache timeout in ms
JWKs URI content cache miss cache time
JWKsEnter a JWK Set containing one or more keys in the Json Web Key field. For example:
{ "keys": [ { "kty": "RSA", "n": ... }, ... ] }X509Enter a key object or a single certificate in one of the following fields, depending on the feature you are configuring:
(ID token encryption) Client ID Token Public Encryption Key. Requires an RSA public key object in X.509 PEM format. For example:
-----BEGIN PUBLIC KEY-----
......
-----END PUBLIC KEY-----
(JWT client authentication) Client JWT Bearer Public Key. Requires a X.509 certificate in PEM format. For example:
-----BEGIN CERTIFICATE-----
.....
-----END CERTIFICATE-----
(mTLS client authentication) mTLS Self-Signed Certificate. Requires a X.509 certificate in PEM format. For example:
-----BEGIN CERTIFICATE-----
.....
-----END CERTIFICATE-----
Default:
JWKs_URI
- User info response format.
Specify the output format from the UserInfo endpoint.
The supported output formats are as follows:
User info JSON response format.
User info encrypted JWT response format.
User info signed JWT response format.
User info signed then encrypted response format.
For more information on the output format of the UserInfo Response, see Successful UserInfo Response in the OpenID Connect Core 1.0 incorporating errata set 1 specification.
Default: User info JSON response format.
- User info signed response algorithm
Specify the JSON Web Signature (JWS) algorithm for signing UserInfo Responses. If specified, the response will be JSON Web Token (JWT) serialized, and signed using JWS.
The default, if omitted, is for the UserInfo Response to return the claims as a UTF-8-encoded JSON object using the
application/jsoncontent type.- User info encrypted response algorithm
Specify the JSON Web Encryption (JWE) algorithm for encrypting UserInfo Responses.
If both signing and encryption are requested, the response will be signed then encrypted, with the result being a nested JWT.
The default, if omitted, is that no encryption is performed.
- User info encrypted response encryption algorithm
Specify the JWE encryption method for encrypting UserInfo Responses. If specified, you must also specify an encryption algorithm in the User info encrypted response algorithm property.
AM supports the following encryption methods:
A128GCM,A192GCM, andA256GCM- AES in Galois Counter Mode (GCM) authenticated encryption mode.A128CBC-HS256,A192CBC-HS384, andA256CBC-HS512- AES encryption in CBC mode, with HMAC-SHA-2 for integrity.
Default:
A128CBC-HS256- Request parameter signing algorithm
Specify the JWS algorithm for signing the request parameter.
Must match one of the values configured in the Request parameter Signing Algorithms supported property of the OAuth2 Provider service. See "Advanced OpenID Connect".
- Request parameter encryption algorithm
Specify the algorithm for encrypting the request parameter.
Must match one of the values configured in the Request parameter Encryption Algorithms supported property of the OAuth2 Provider service. See "Advanced OpenID Connect".
- Request parameter encryption method
Specify the method for encrypting the request parameter.
Must match one of the values configured in the Request parameter Encryption Methods supported property of the OAuth2 Provider service. See "Advanced OpenID Connect".
Default:
A128CBC-HS256
9.4.5. UMA
The following properties appear on the UMA tab:
- Client Redirection URIs
Note
This property is for future use, and not currently active.
Specify one or more allowable URIs to which the client can be redirected after the UMA claims collection process. The URIs must not contain a fragment (
#).If multiple URIs are registered, the client MUST specify the redirection URI to be redirected to following approval.
Appendix A. About Scripting
You can use scripts for client-side and server-side authentication, policy conditions, and handling OpenID Connect claims.
A.1. The Scripting Environment
AM supports scripts written in either JavaScript, or Groovy [1], and the same variables and bindings are delivered to scripts of either language.
You can use a script to check the version of the JavaScript engine AM is using. You could temporarily add the following script to a Scripted Decision node, for example, to output the engine version to the debug log:
var rhino = JavaImporter(
  org.mozilla.javascript.Context
)

var currentContext = rhino.Context.getCurrentContext()
var rhinoVersion = currentContext.getImplementationVersion()

logger.error("JS Script Engine: " + rhinoVersion)

outcome = "true"
Note
Ensure the following are listed in the Java class whitelist property of the scripting engine.
org.mozilla.javascript.Contextorg.forgerock.openam.scripting.timeouts.*
To view the Java class whitelist, go to Configure > Global Services > Scripting > Secondary Configurations. Select the script type, and on the Secondary Configurations tab, click engineConfiguration.
For information on the capabilities of the JavaScript engine AM uses, see Mozilla Rhino.
You can use a script to check the version of the Groovy scripting engine AM is using. You could temporarily add the following script to a Scripted Decision node, for example, to output the engine version to the debug log:
logger.error("Groovy Script Engine: " + GroovySystem.version)

outcome = "true"
Note
Ensure the following are listed in the Java class whitelist property of the scripting engine.
groovy.lang.GroovySystem
To view the Java class whitelist, go to Configure > Global Services > Scripting > Secondary Configurations. Select the script type, and on the Secondary Configurations tab, click engineConfiguration.
For information on the capabilities of the Groovy engine AM uses, see Apache Groovy.
To access the functionality AM provides, import the required Java class or package, as follows:
var fr = JavaImporter(
    org.forgerock.openam.auth.node.api,
    javax.security.auth.callback.NameCallback
);
with (fr) {
    ...
}
import org.forgerock.openam.auth.node.api.*; import javax.security.auth.callback.NameCallback;
You may need to whitelist the classes you use in scripts. See "Security".
You can use scripts to modify default AM behavior in the following situations, also known as contexts:
- Client-side Authentication
Scripts that are executed on the client during authentication. Client-side scripts must be in JavaScript.
- Server-side Authentication
Scripts are included in an authentication module within a chain and are executed on the server during authentication.
- Authentication Trees
Scripts are included in an authentication node within a tree and are executed on the server during authentication.
- Policy Condition
Scripts used as conditions within policies.
- OIDC Claims
Scripts that gather and populate the claims in a request when issuing an ID token or making a request to the
userinfoendpoint.
For information on the global API, available to all script types, see "Global Scripting API Functionality".
AM implements a configurable scripting engine for each of the context types that are executed on the server.
The scripting engines in AM have two main components: security settings, and the thread pool.

A.1.1. Security
AM scripting engines provide security features for ensuring that malicious Java classes are not directly called. The engines validate scripts by checking all directly-called Java classes against a configurable blacklist and whitelist, and, optionally, against the JVM SecurityManager, if it is configured.
Whitelists and blacklists contain class names that are allowed or denied execution respectively. Specify classes in whitelists and blacklists by name or by using regular expressions.
Classes called by the script are checked against the whitelist first, and must match at least one pattern in the list. The blacklist is applied after the whitelist, and classes matching any pattern are disallowed.
You can also configure the scripting engine to make an additional call to the JVM security manager for each class that is accessed. The security manager throws an exception if a class being called is not allowed to execute.
For more information on configuring script engine security, see "Scripting".
The following points should be considered when configuring the security settings within each script engine:
- The scripting engine only validates directly accessible classes.
The security settings only apply to classes that the script directly accesses. If the script calls
Foo.a()and then that method callsBar.b(), the scripting engine will be unable to prevent it. You must consider the whole chain of accessible classes.Note
Access includes actions such as:
Importing or loading a class.
Accessing any instance of that class. For example, passed as a parameter to the script.
Calling a static method on that class.
Calling a method on an instance of that class.
Accessing a method or field that returns an instance of that class.
- Potentially dangerous Java classes are blacklisted by default.
All Java reflection classes (
java.lang.Class,java.lang.reflect.*) are blacklisted by default to avoid bypassing the security settings.The
java.security.AccessControllerclass is also blacklisted by default to prevent access to thedoPrivileged()methods.Caution
You should not remove potentially dangerous Java classes from the blacklist.
- The whitelists and blacklists match class or package names only.
The whitelist and blacklist patterns apply only to the exact class or package names involved. The script engine does not know anything about inheritance, so it is best to whitelist known, specific classes.
A.1.2. Thread Pools
Each script is executed in an individual thread. Each scripting engine starts with an initial number of threads available for executing scripts. If no threads are available for execution, AM creates a new thread to execute the script, until the configured maximum number of threads is reached.
If the maximum number of threads is reached, pending script executions are queued in a number of buffer threads, until a thread becomes available for execution. If a created thread has completed script execution and has remained idle for a configured amount of time, AM terminates the thread, shrinking the pool.
For more information on configuring script engine thread pools, see "Scripting".
A.2. Global Scripting API Functionality
This section covers functionality available to each of the server-side script types.
Global API functionality includes:
A.2.1. Accessing HTTP Services
AM passes an HTTP client object, httpClient, to server-side scripts. Server-side scripts can call HTTP services with the httpClient.send method. The method returns an HttpClientResponse object.
Configure the parameters for the HTTP client object by using the org.forgerock.http.protocol package. This package contains the Request class, which has methods for setting the URI and type of request.
The following example, taken from the default server-side Scripted authentication module script, uses these methods to call an online API to determine the longitude and latitude of a user based on their postal address:
function getLongitudeLatitudeFromUserPostalAddress() {

    var request = new org.forgerock.http.protocol.Request();

    request.setUri("http://maps.googleapis.com/maps/api/geocode/json?address=" + encodeURIComponent(userPostalAddress));
    request.setMethod("GET");

    var response = httpClient.send(request).get();
    logResponse(response);

    var geocode = JSON.parse(response.getEntity());
    var i;

    for (i = 0; i < geocode.results.length; i++) {
        var result = geocode.results[i];
        latitude = result.geometry.location.lat;
        longitude = result.geometry.location.lng;

        logger.message("latitude:" + latitude + " longitude:" + longitude);
    }
}
HTTP client requests are synchronous and blocking until they return. You can, however, set a global timeout for server-side scripts. For details, see "Scripted Authentication Module Properties" in the Authentication and Single Sign-On Guide.
Server-side scripts can access response data by using the methods listed in the table below.
| Method | Parameters | Return Type | Description |
|---|---|---|---|
| | | | Get the cookies for the returned response, if any exist. |
| | | | Get the entity of the returned response. |
| | | | Get the headers for the returned response, if any exist. |
| | | | Get the reason phrase of the returned response. |
| | | | Get the status code of the returned response. |
| | | | Indicate whether the returned response had any cookies. |
| | | | Indicate whether the returned response had any headers. |
A.2.2. Debug Logging
Server-side scripts can write messages to AM debug logs by using the logger object.
AM does not log debug messages from scripts by default. You can configure AM to log such messages by setting the debug log level for the amScript service. For details, see "Debug Logging By Service" in the Setup and Maintenance Guide.
The following table lists the logger methods.
| Method | Parameters | Return Type | Description |
|---|---|---|---|
| | | | Write Error Message to AM debug logs if ERROR level logging is enabled. |
| | | | Return |
| | | | Write Message to AM debug logs if MESSAGE level logging is enabled. |
| | | | Return |
| | | | Write Warning Message to AM debug logs if WARNING level logging is enabled. |
| | | | Return |
A.3. Managing Scripts
This section shows you how to manage scripts used for client-side and server-side scripted authentication, custom policy conditions, and handling OpenID Connect claims using the AM console, the ssoadm command, and the REST API.
A.3.1. Managing Scripts With the AM Console
The following procedures describe how to create, modify, and delete scripts using the AM console:
Log in to the AM console as an AM administrator, for example,
amadmin.Navigate to Realms > Realm Name > Scripts.
Click New Script.
The New Script page appears:

Specify a name for the script.
Select the type of script from the Script Type drop-down list.
Click Create.
The Script Name page appears:

Enter values on the Script Name page as follows:
Enter a description of the script.
Choose the script language, either JavaScript or Groovy. Note that not every script type supports both languages.
Enter the source code in the Script field.
On supported browsers, you can click Upload, navigate to the script file, and then click Open to upload the contents to the Script field.
Click Validate to check for compilation errors in the script.
Correct any compilation errors, and revalidate the script until all errors have been fixed.
Save your changes.


Log in to the AM console as an AM administrator, for example,
amadmin.Navigate to Realms > Realm Name > Scripts.
Select the script you want to modify from the list of scripts.
The Script Name page appears.
Modify values on the Script Name page as needed. Note that if you change the Script Type, existing code in the script is replaced.
If you modified the code in the script, click Validate to check for compilation errors.
Correct any compilation errors, and revalidate the script until all errors have been fixed.
Save your changes.
Log in to the AM console as an AM administrator, for example,
amadmin.Navigate to Realms > Realm Name > Scripts.
Choose one or more scripts to delete by activating the checkboxes in the relevant rows. Note that you can only delete user-created scripts—you cannot delete the global sample scripts provided with AM.
Click Delete.
A.3.2. Managing Scripts With the REST API
This section shows you how to manage scripts used for client-side and server-side scripted authentication, custom policy conditions, and handling OpenID Connect claims by using the REST API.
AM provides the scripts REST endpoint for the following:
User-created scripts are realm-specific, hence the URI for the scripts' API can contain a realm component, such as /json{/realm}/scripts. If the realm is not specified in the URI, the top level realm is used.
Tip
AM includes some global example scripts that can be used in any realm.
Scripts are represented in JSON and take the following form. Scripts are built from standard JSON objects and values (strings, numbers, objects, sets, arrays, true, false, and null). Each script has a system-generated universally unique identifier (UUID), which must be used when modifying existing scripts. Renaming a script will not affect the UUID:
{
  "_id": "7e3d7067-d50f-4674-8c76-a3e13a810c33",
  "name": "Scripted Module - Server Side",
  "description": "Default global script for server side Scripted Authentication Module",
  "script": "dmFyIFNUQVJUX1RJ...",
  "language": "JAVASCRIPT",
  "context": "AUTHENTICATION_SERVER_SIDE",
  "createdBy": "id=dsameuser,ou=user,dc=openam,dc=forgerock,dc=org",
  "creationDate": 1433147666269,
  "lastModifiedBy": "id=dsameuser,ou=user,dc=openam,dc=forgerock,dc=org",
  "lastModifiedDate": 1433147666269
}
The values for the fields shown in the example above are explained below:
_idThe UUID that AM generates for the script.
nameThe name provided for the script.
descriptionAn optional text string to help identify the script.
scriptThe source code of the script. The source code is in UTF-8 format and encoded into Base64.
For example, a script such as the following:
var a = 123;
var b = 456;
When encoded into Base64 becomes:
dmFyIGEgPSAxMjM7IA0KdmFyIGIgPSA0NTY7
languageThe language the script is written in -
JAVASCRIPTorGROOVY.Language Support per ContextScript Context Supported Languages POLICY_CONDITIONJAVASCRIPT,GROOVYAUTHENTICATION_SERVER_SIDEJAVASCRIPT,GROOVYAUTHENTICATION_CLIENT_SIDEJAVASCRIPTOIDC_CLAIMSJAVASCRIPT,GROOVYAUTHENTICATION_TREE_DECISION_NODEJAVASCRIPT,GROOVYcontextThe context type of the script.
Supported values are:
POLICY_CONDITIONPolicy Condition
AUTHENTICATION_SERVER_SIDEServer-side Authentication
AUTHENTICATION_CLIENT_SIDEClient-side Authentication
Note
Client-side scripts must be written in JavaScript.
OIDC_CLAIMSOIDC Claims
AUTHENTICATION_TREE_DECISION_NODEAuthentication scripts used by Scripted Tree Decision authentication nodes.
createdByA string containing the universal identifier DN of the subject that created the script.
creationDateAn integer containing the creation date and time, in ISO 8601 format.
lastModifiedByA string containing the universal identifier DN of the subject that most recently updated the resource type.
If the script has not been modified since it was created, this property will have the same value as
createdBy.lastModifiedDateA string containing the last modified date and time, in ISO 8601 format.
If the script has not been modified since it was created, this property will have the same value as
creationDate.
A.3.2.1. Querying Scripts
To list all the scripts in a realm, as well as any global scripts, perform an HTTP GET to the /json{/realm}/scripts endpoint with a _queryFilter parameter set to true.
Note
If the realm is not specified in the URL, AM returns scripts in the top level realm, as well as any global scripts.
The iPlanetDirectoryPro header is required and should contain the SSO token of an administrative user, such as amAdmin, who has access to perform the operation.
$curl \ --header "iPlanetDirectoryPro: AQIC5..." \ --header "Accept-API-Version: resource=1.1" \ https://openam.example.com:8443/openam/json/realms/root/realms/myrealm/scripts?_queryFilter=true{ "result": [ { "_id": "9de3eb62-f131-4fac-a294-7bd170fd4acb", "name": "Scripted Policy Condition", "description": "Default global script for Scripted Policy Conditions", "script": "LyoqCiAqIFRoaXMg...", "language": "JAVASCRIPT", "context": "POLICY_CONDITION", "createdBy": "id=dsameuser,ou=user,dc=openam,dc=forgerock,dc=org", "creationDate": 1433147666269, "lastModifiedBy": "id=dsameuser,ou=user,dc=openam,dc=forgerock,dc=org", "lastModifiedDate": 1433147666269 }, { "_id": "7e3d7067-d50f-4674-8c76-a3e13a810c33", "name": "Scripted Module - Server Side", "description": "Default global script for server side Scripted Authentication Module", "script": "dmFyIFNUQVJUX1RJ...", "language": "JAVASCRIPT", "context": "AUTHENTICATION_SERVER_SIDE", "createdBy": "id=dsameuser,ou=user,dc=openam,dc=forgerock,dc=org", "creationDate": 1433147666269, "lastModifiedBy": "id=dsameuser,ou=user,dc=openam,dc=forgerock,dc=org", "lastModifiedDate": 1433147666269 } ], "resultCount": 2, "pagedResultsCookie": null, "remainingPagedResults": -1 }
| Field | Supported Operators |
|---|---|
_id | Equals (eq), Contains (co), Starts with (sw) |
name | Equals (eq), Contains (co), Starts with (sw) |
description | Equals (eq), Contains (co), Starts with (sw) |
script | Equals (eq), Contains (co), Starts with (sw) |
language | Equals (eq), Contains (co), Starts with (sw) |
context | Equals (eq), Contains (co), Starts with (sw) |
A.3.2.2. Reading a Script
To read an individual script in a realm, perform an HTTP GET using the /json{/realm}/scripts endpoint, specifying the UUID in the URL.
Tip
To read a script in the top-level realm, or to read a built-in global script, do not specify a realm in the URL.
The iPlanetDirectoryPro header is required and should contain the SSO token of an administrative user, such as amAdmin, who has access to perform the operation.
$curl \ --header "iPlanetDirectoryPro: AQIC5..." \ --header "Accept-API-Version: resource=1.1" \ https://openam.example.com:8443/openam/json/realms/root/realms/myrealm/scripts/9de3eb62-f131-4fac-a294-7bd170fd4acb{ "_id": "9de3eb62-f131-4fac-a294-7bd170fd4acb", "name": "Scripted Policy Condition", "description": "Default global script for Scripted Policy Conditions", "script": "LyoqCiAqIFRoaXMg...", "language": "JAVASCRIPT", "context": "POLICY_CONDITION", "createdBy": "id=dsameuser,ou=user,dc=openam,dc=forgerock,dc=org", "creationDate": 1433147666269, "lastModifiedBy": "id=dsameuser,ou=user,dc=openam,dc=forgerock,dc=org", "lastModifiedDate": 1433147666269 }
A.3.2.3. Validating a Script
To validate a script, perform an HTTP POST using the /json{/realm}/scripts endpoint, with an _action parameter set to validate. Include a JSON representation of the script and the script language, JAVASCRIPT or GROOVY, in the POST data.
The value for script must be in UTF-8 format and then encoded into Base64.
The iPlanetDirectoryPro header is required and should contain the SSO token of an administrative user, such as amAdmin, who has access to perform the operation.
$curl \ --request POST \ --header "Content-Type: application/json" \ --header "iPlanetDirectoryPro: AQIC5..." \ --header "Accept-API-Version: resource=1.1" \ --data '{ "script": "dmFyIGEgPSAxMjM7dmFyIGIgPSA0NTY7Cg==", "language": "JAVASCRIPT" }' \ https://openam.example.com:8443/openam/json/realms/root/realms/myrealm/scripts/?_action=validate{ "success": true }
If the script is valid the JSON response contains a success key with a value of true.
If the script is invalid the JSON response contains a success key with a value of false, and an indication of the problem and where it occurs, as shown below:
$curl \ --request POST \ --header "Content-Type: application/json" \ --header "iPlanetDirectoryPro: AQIC5..." \ --header "Accept-API-Version: resource=1.1" \ --data '{ "script": "dmFyIGEgPSAxMjM7dmFyIGIgPSA0NTY7ID1WQUxJREFUSU9OIFNIT1VMRCBGQUlMPQo=", "language": "JAVASCRIPT" }' \ https://openam.example.com:8443/openam/json/realms/root/realms/myrealm/scripts/?_action=validate{ "success": false, "errors": [ { "line": 1, "column": 27, "message": "syntax error" } ] }
A.3.2.4. Creating a Script
To create a script in a realm, perform an HTTP POST using the /json{/realm}/scripts endpoint, with an _action parameter set to create. Include a JSON representation of the script in the POST data.
The value for script must be in UTF-8 format and then encoded into Base64.
Note
If the realm is not specified in the URL, AM creates the script in the top level realm.
The iPlanetDirectoryPro header is required and should contain the SSO token of an administrative user, such as amAdmin, who has access to perform the operation.
$curl \ --request POST \ --header "Content-Type: application/json" \ --header "iPlanetDirectoryPro: AQIC5..." \ --header "Accept-API-Version: resource=1.1" \ --data '{ "name": "MyJavaScript", "script": "dmFyIGEgPSAxMjM7CnZhciBiID0gNDU2Ow==", "language": "JAVASCRIPT", "context": "POLICY_CONDITION", "description": "An example script" }' \ https://openam.example.com:8443/openam/json/realms/root/realms/myrealm/scripts/?_action=create{ "_id": "0168d494-015a-420f-ae5a-6a2a5c1126af", "name": "MyJavaScript", "description": "An example script", "script": "dmFyIGEgPSAxMjM7CnZhciBiID0gNDU2Ow==", "language": "JAVASCRIPT", "context": "POLICY_CONDITION", "createdBy": "id=amadmin,ou=user,dc=openam,dc=forgerock,dc=org", "creationDate": 1436807766258, "lastModifiedBy": "id=amadmin,ou=user,dc=openam,dc=forgerock,dc=org", "lastModifiedDate": 1436807766258 }
A.3.2.5. Updating a Script
To update an individual script in a realm, perform an HTTP PUT using the /json{/realm}/scripts endpoint, specifying the UUID in both the URL and the PUT body. Include a JSON representation of the updated script in the PUT data, alongside the UUID.
Note
If the realm is not specified in the URL, AM uses the top level realm.
The iPlanetDirectoryPro header is required and should contain the SSO token of an administrative user, such as amAdmin, who has access to perform the operation.
$curl \ --header "iPlanetDirectoryPro: AQIC5..." \ --header "Content-Type: application/json" \ --header "Accept-API-Version: resource=1.1" \ --request PUT \ --data '{ "name": "MyUpdatedJavaScript", "script": "dmFyIGEgPSAxMjM7CnZhciBiID0gNDU2Ow==", "language": "JAVASCRIPT", "context": "POLICY_CONDITION", "description": "An updated example script configuration" }' \ https://openam.example.com:8443/openam/json/realms/root/realms/myrealm/scripts/0168d494-015a-420f-ae5a-6a2a5c1126af{ "_id": "0168d494-015a-420f-ae5a-6a2a5c1126af", "name": "MyUpdatedJavaScript", "description": "An updated example script configuration", "script": "dmFyIGEgPSAxMjM7CnZhciBiID0gNDU2Ow==", "language": "JAVASCRIPT", "context": "POLICY_CONDITION", "createdBy": "id=amadmin,ou=user,dc=openam,dc=forgerock,dc=org", "creationDate": 1436807766258, "lastModifiedBy": "id=amadmin,ou=user,dc=openam,dc=forgerock,dc=org", "lastModifiedDate": 1436808364681 }
A.3.2.6. Deleting a Script
To delete an individual script in a realm, perform an HTTP DELETE using the /json{/realm}/scripts endpoint, specifying the UUID in the URL.
Note
If the realm is not specified in the URL, AM uses the top level realm.
The iPlanetDirectoryPro header is required and should contain the SSO token of an administrative user, such as amAdmin, who has access to perform the operation.
$curl \ --request DELETE \ --header "iPlanetDirectoryPro: AQIC5..." \ --header "Accept-API-Version: resource=1.1" \ https://openam.example.com:8443/openam/json/realms/root/realms/myrealm/scripts/0168d494-015a-420f-ae5a-6a2a5c1126af{}
A.3.3. Managing Scripts With the ssoadm Command
Use the ssoadm command's create-sub-cfg, get-sub-cfg, and delete-sub-cfg subcommands to manage AM scripts.
Create an AM script as follows:
Create a script configuration file, for example
/path/to/myScriptConfigurationFile.txt, containing the following:script-file=/path/to/myScriptFile.js language=JAVASCRIPT
name=My New Script
context=AUTHENTICATION_SERVER_SIDE Possible values for the
languageproperty are:JAVASCRIPTGROOVY
Possible values for the
contextproperty are:POLICY_CONDITIONAUTHENTICATION_SERVER_SIDEAUTHENTICATION_CLIENT_SIDEOIDC_CLAIMSAUTHENTICATION_TREE_DECISION_NODE
Run the ssoadm create-sub-cfg command. The
--datafileargument references the script configuration file you created in the previous step:$
ssoadm \ create-sub-cfg \ --realm /myRealm \ --adminid amadmin \ --password-file /tmp/pwd.txt \ --servicename ScriptingService \ --subconfigname scriptConfigurations/scriptConfiguration \ --subconfigid myScriptID \ --datafile /path/to/myScriptConfigurationFile.txtSub Configuration scriptConfigurations/scriptConfiguration was added to realm /myRealm
To list the properties of a script, run the ssoadm get-sub-cfg command:
$ssoadm \ get-sub-cfg \ --realm /myRealm \ --adminid amadmin \ --password-file /tmp/pwd.txt \ --servicename ScriptingService \ --subconfigname scriptConfigurations/myScriptIDcreatedBy= lastModifiedDate= lastModifiedBy= name=My New Script context=AUTHENTICATION_SERVER_SIDE description= language=JAVASCRIPT creationDate= script=...Script output follows...
To delete a script, run the ssoadm delete-sub-cfg command:
$ssoadm \ delete-sub-cfg \ --realm /myRealm \ --adminid amadmin \ --password-file /tmp/pwd.txt \ --servicename ScriptingService \ --subconfigname scriptConfigurations/myScriptIDSub Configuration scriptConfigurations/myScriptID was deleted from realm /myRealm
A.4. Scripting
amster service name: Scripting
A.4.1. Configuration
The following settings appear on the Configuration tab:
- Default Script Type
The default script context type when creating a new script.
The possible values for this property are:
POLICY_CONDITION. Policy ConditionAUTHENTICATION_SERVER_SIDE. Server-side AuthenticationAUTHENTICATION_CLIENT_SIDE. Client-side AuthenticationOIDC_CLAIMS. OIDC ClaimsAUTHENTICATION_TREE_DECISION_NODE. Decision node script for authentication treesOAUTH2_ACCESS_TOKEN_MODIFICATION. OAuth2 Access Token Modification
Default value:
POLICY_CONDITIONamster attribute:
defaultContext
A.4.2. Secondary Configurations
This service has the following Secondary Configurations.
A.4.2.1. Engine Configuration
The following properties are available for Scripting Service secondary configuration instances:
- Engine Configuration
Configure script engine parameters for running a particular script type in AM.
ssoadm attribute:
engineConfigurationTo access a secondary configuration instance using the ssoadm command, use:
--subconfigname [primary configuration]/[secondary configuration]For example:$
ssoadm set-sub-cfg \ --adminid amAdmin \ --password-file admin_pwd_file \ --servicename ScriptingService \ --subconfigname OIDC_CLAIMS/engineConfiguration \ --operation set \ --attributevalues maxThreads=300 queueSize=-1Note
Supports server-side scripts only. AM cannot configure engine settings for client-side scripts.
The configurable engine settings are as follows:
- Server-side Script Timeout
The maximum execution time any individual script should take on the server (in seconds). AM terminates scripts which take longer to run than this value.
ssoadm attribute:
serverTimeout- Core thread pool size
The initial number of threads in the thread pool from which scripts operate. AM will ensure the pool contains at least this many threads.
ssoadm attribute:
coreThreads- Maximum thread pool size
The maximum number of threads in the thread pool from which scripts operate. If no free thread is available in the pool, AM creates new threads in the pool for script execution up to the configured maximum. It is recommended to set the maximum number of threads to 300.
ssoadm attribute:
maxThreads- Thread pool queue size
Specifies the number of threads to use for buffering script execution requests when the maximum thread pool size is reached.
For short, CPU-bound scripts, consider a small pool size and larger queue length. For I/O-bound scripts, for example, REST calls, consider a larger maximum pool size and a smaller queue.
Not hot-swappable: restart server for changes to take effect.
ssoadm attribute:
queueSize- Thread idle timeout (seconds)
Length of time (in seconds) for a thread to be idle before AM terminates created threads. If the current pool size contains the number of threads set in
Core thread pool sizeidle threads will not be terminated, to maintain the initial pool size.ssoadm attribute:
idleTimeout- Java class whitelist
Specifies the list of class-name patterns allowed to be invoked by the script. Every class accessed by the script must match at least one of these patterns.
You can specify the class name as-is or use a regular expression.
ssoadm attribute:
whiteList- Java class blacklist
Specifies the list of class-name patterns that are NOT allowed to be invoked by the script. The blacklist is applied AFTER the whitelist to exclude those classes - access to a class specified in both the whitelist and the blacklist will be denied.
You can specify the class name to exclude as-is or use a regular expression.
ssoadm attribute:
blackList- Use system SecurityManager
If enabled, AM will make a call to
System.getSecurityManager().checkPackageAccess(...)for each class that is accessed. The method throwsSecurityExceptionif the calling thread is not allowed to access the package.Note
This feature only takes effect if the security manager is enabled for the JVM.
ssoadm attribute:
useSecurityManager
- Scripting languages
Select the languages available for scripts on the chosen type. Either
GROOVYorJAVASCRIPT.ssoadm attribute:
languages- Default Script
The source code that is presented as the default when creating a new script of this type.
ssoadm attribute:
defaultScript
Appendix B. Getting Support
ForgeRock provides support services, professional services, training through ForgeRock University, and partner services to assist you in setting up and maintaining your deployments. For a general overview of these services, see https://www.forgerock.com.
ForgeRock has staff members around the globe who support our international customers and partners. For details on ForgeRock's support offering, including support plans and service level agreements (SLAs), visit https://www.forgerock.com/support.
ForgeRock publishes comprehensive documentation online:
The ForgeRock Knowledge Base offers a large and increasing number of up-to-date, practical articles that help you deploy and manage ForgeRock software.
While many articles are visible to community members, ForgeRock customers have access to much more, including advanced information for customers using ForgeRock software in a mission-critical capacity.
ForgeRock product documentation, such as this document, aims to be technically accurate and complete with respect to the software documented. It is visible to everyone and covers all product features and examples of how to use them.
Glossary
- Access control
Control to grant or to deny access to a resource.
- Account lockout
The act of making an account temporarily or permanently inactive after successive authentication failures.
- Actions
Defined as part of policies, these verbs indicate what authorized identities can do to resources.
- Advice
In the context of a policy decision denying access, a hint to the policy enforcement point about remedial action to take that could result in a decision allowing access.
- Agent administrator
User having privileges only to read and write agent profile configuration information, typically created to delegate agent profile creation to the user installing a web or Java agent.
- Agent authenticator
Entity with read-only access to multiple agent profiles defined in the same realm; allows an agent to read web service profiles.
- Application
In general terms, a service exposing protected resources.
In the context of AM policies, the application is a template that constrains the policies that govern access to protected resources. An application can have zero or more policies.
- Application type
Application types act as templates for creating policy applications.
Application types define a preset list of actions and functional logic, such as policy lookup and resource comparator logic.
Application types also define the internal normalization, indexing logic, and comparator logic for applications.
- Attribute-based access control (ABAC)
Access control that is based on attributes of a user, such as how old a user is or whether the user is a paying customer.
- Authentication
The act of confirming the identity of a principal.
- Authentication chaining
A series of authentication modules configured together which a principal must negotiate as configured in order to authenticate successfully.
- Authentication level
Positive integer associated with an authentication module, usually used to require success with more stringent authentication measures when requesting resources requiring special protection.
- Authentication module
AM authentication unit that handles one way of obtaining and verifying credentials.
- Authorization
The act of determining whether to grant or to deny a principal access to a resource.
- Authorization Server
In OAuth 2.0, issues access tokens to the client after authenticating a resource owner and confirming that the owner authorizes the client to access the protected resource. AM can play this role in the OAuth 2.0 authorization framework.
- Auto-federation
Arrangement to federate a principal's identity automatically based on a common attribute value shared across the principal's profiles at different providers.
- Bulk federation
Batch job permanently federating user profiles between a service provider and an identity provider based on a list of matched user identifiers that exist on both providers.
- Circle of trust
Group of providers, including at least one identity provider, who have agreed to trust each other to participate in a SAML v2.0 provider federation.
- Client
In OAuth 2.0, requests protected web resources on behalf of the resource owner given the owner's authorization. AM can play this role in the OAuth 2.0 authorization framework.
- Client-based OAuth 2.0 tokens
After a successful OAuth 2.0 grant flow, AM returns a token to the client. This differs from CTS-based OAuth 2.0 tokens, where AM returns a reference to token to the client.
- Client-based sessions
AM sessions for which AM returns session state to the client after each request, and require it to be passed in with the subsequent request. For browser-based clients, AM sets a cookie in the browser that contains the session information.
For browser-based clients, AM sets a cookie in the browser that contains the session state. When the browser transmits the cookie back to AM, AM decodes the session state from the cookie.
- Conditions
Defined as part of policies, these determine the circumstances under which which a policy applies.
Environmental conditions reflect circumstances like the client IP address, time of day, how the subject authenticated, or the authentication level achieved.
Subject conditions reflect characteristics of the subject like whether the subject authenticated, the identity of the subject, or claims in the subject's JWT.
- Configuration datastore
LDAP directory service holding AM configuration data.
- Cross-domain single sign-on (CDSSO)
AM capability allowing single sign-on across different DNS domains.
- CTS-based OAuth 2.0 tokens
After a successful OAuth 2.0 grant flow, AM returns a reference to the token to the client, rather than the token itself. This differs from client-based OAuth 2.0 tokens, where AM returns the entire token to the client.
- CTS-based sessions
AM sessions that reside in the Core Token Service's token store. CTS-based sessions might also be cached in memory on one or more AM servers. AM tracks these sessions in order to handle events like logout and timeout, to permit session constraints, and to notify applications involved in SSO when a session ends.
- Delegation
Granting users administrative privileges with AM.
- Entitlement
Decision that defines which resource names can and cannot be accessed for a given identity in the context of a particular application, which actions are allowed and which are denied, and any related advice and attributes.
- Extended metadata
Federation configuration information specific to AM.
- Extensible Access Control Markup Language (XACML)
Standard, XML-based access control policy language, including a processing model for making authorization decisions based on policies.
- Federation
Standardized means for aggregating identities, sharing authentication and authorization data information between trusted providers, and allowing principals to access services across different providers without authenticating repeatedly.
- Fedlet
Service provider application capable of participating in a circle of trust and allowing federation without installing all of AM on the service provider side; AM lets you create Java Fedlets.
- Hot swappable
Refers to configuration properties for which changes can take effect without restarting the container where AM runs.
- Identity
Set of data that uniquely describes a person or a thing such as a device or an application.
- Identity federation
Linking of a principal's identity across multiple providers.
- Identity provider (IdP)
Entity that produces assertions about a principal (such as how and when a principal authenticated, or that the principal's profile has a specified attribute value).
- Identity repository
Data store holding user profiles and group information; different identity repositories can be defined for different realms.
- Java agent
Java web application installed in a web container that acts as a policy enforcement point, filtering requests to other applications in the container with policies based on application resource URLs.
- Metadata
Federation configuration information for a provider.
- Policy
Set of rules that define who is granted access to a protected resource when, how, and under what conditions.
- Policy agent
Java, web, or custom agent that intercepts requests for resources, directs principals to AM for authentication, and enforces policy decisions from AM.
- Policy Administration Point (PAP)
Entity that manages and stores policy definitions.
- Policy Decision Point (PDP)
Entity that evaluates access rights and then issues authorization decisions.
- Policy Enforcement Point (PEP)
Entity that intercepts a request for a resource and then enforces policy decisions from a PDP.
- Policy Information Point (PIP)
Entity that provides extra information, such as user profile attributes that a PDP needs in order to make a decision.
- Principal
Represents an entity that has been authenticated (such as a user, a device, or an application), and thus is distinguished from other entities.
When a Subject successfully authenticates, AM associates the Subject with the Principal.
- Privilege
In the context of delegated administration, a set of administrative tasks that can be performed by specified identities in a given realm.
- Provider federation
Agreement among providers to participate in a circle of trust.
- Realm
AM unit for organizing configuration and identity information.
Realms can be used for example when different parts of an organization have different applications and identity stores, and when different organizations use the same AM deployment.
Administrators can delegate realm administration. The administrator assigns administrative privileges to users, allowing them to perform administrative tasks within the realm.
- Resource
Something a user can access over the network such as a web page.
Defined as part of policies, these can include wildcards in order to match multiple actual resources.
- Resource owner
In OAuth 2.0, entity who can authorize access to protected web resources, such as an end user.
- Resource server
In OAuth 2.0, server hosting protected web resources, capable of handling access tokens to respond to requests for such resources.
- Response attributes
Defined as part of policies, these allow AM to return additional information in the form of "attributes" with the response to a policy decision.
- Role based access control (RBAC)
Access control that is based on whether a user has been granted a set of permissions (a role).
- Security Assertion Markup Language (SAML)
Standard, XML-based language for exchanging authentication and authorization data between identity providers and service providers.
- Service provider (SP)
Entity that consumes assertions about a principal (and provides a service that the principal is trying to access).
- Authentication Session
The interval while the user or entity is authenticating to AM.
- Session
The interval that starts after the user has authenticated and ends when the user logs out, or when their session is terminated. For browser-based clients, AM manages user sessions across one or more applications by setting a session cookie. See also CTS-based sessions and Client-based sessions.
- Session high availability
Capability that lets any AM server in a clustered deployment access shared, persistent information about users' sessions from the CTS token store. The user does not need to log in again unless the entire deployment goes down.
- Session token
Unique identifier issued by AM after successful authentication. For a CTS-based sessions, the session token is used to track a principal's session.
- Single log out (SLO)
Capability allowing a principal to end a session once, thereby ending her session across multiple applications.
- Single sign-on (SSO)
Capability allowing a principal to authenticate once and gain access to multiple applications without authenticating again.
- Site
Group of AM servers configured the same way, accessed through a load balancer layer. The load balancer handles failover to provide service-level availability.
The load balancer can also be used to protect AM services.
- Standard metadata
Standard federation configuration information that you can share with other access management software.
- Stateless Service
Stateless services do not store any data locally to the service. When the service requires data to perform any action, it requests it from a data store. For example, a stateless authentication service stores session state for logged-in users in a database. This way, any server in the deployment can recover the session from the database and service requests for any user.
All AM services are stateless unless otherwise specified. See also Client-based sessions and CTS-based sessions.
- Subject
Entity that requests access to a resource
When an identity successfully authenticates, AM associates the identity with the Principal that distinguishes it from other identities. An identity can be associated with multiple principals.
- Identity store
Data storage service holding principals' profiles; underlying storage can be an LDAP directory service or a custom
IdRepoimplementation.- Web Agent
Native library installed in a web server that acts as a policy enforcement point with policies based on web page URLs.