Customizing Identity Stores
Follow this section to create custom attributes to store additional information in your identity stores, or to create identity repository plugins to customize how AM maps users and groups to a realm if your deployment require different functionality than the already built-in AM:
Adding User Profile Attributes
You can extend user profiles by adding custom attributes. This section demonstrates how to add a custom attribute to a user profile when storing user profiles in the LDAP directory.
Adding a custom attribute involves both updating the identity repository schema to hold the new attribute and updating the UI. Furthermore, to give users write permissions to the custom attribute, you must also update the AM configuration store.
This section uses DS 5 or later in the examples and includes the following procedures:
Perform the following steps to update the identity repository schema for the custom attribute, and then update AM to use the custom attribute and object class.
If you intend to use an existing attribute that is already allowed on user profile entries, you can skip this procedure.
Prepare the attribute type object class definitions in LDIF format. For example:
$
cat custom-attr.ldifdn: cn=schema changetype: modify add: attributeTypes attributeTypes: ( temp-custom-attr-oid NAME 'customAttribute' EQUALITY case IgnoreMatch ORDERING caseIgnoreOrderingMatch SUBSTR caseIgnoreSubstrings Match SYNTAX 1.3.6.1.4.1.1466.115.121.1.15 USAGE userApplications ) - add: objectClasses objectClasses: ( temp-custom-oc-oid NAME 'customObjectclass' SUP top AUXILIARY MAY customAttribute )In the example, the attribute type is called
customAttributeand the object class is calledcustomObjectclass.Add the schema definitions to the directory.
$
/path/to/opendj/bin/ldapmodify \ --hostname 'id.example.com' \ --port 1636 \ --useSsl \ --usePkcs12TrustStore /path/to/opendj/config/keystore \ --trustStorePasswordFile /path/to/opendj/config/keystore.pin \ --bindDN uid=admin \ --bindPassword str0ngAdm1nPa55word \ /path/to/custom-attr.ldifProcessing MODIFY request for cn=schema MODIFY operation successful for DN cn=schemaIn the AM console, go to Realms > Realm Name > Identity Stores > Identity Store Name > User Configuration.
Add the object class, for example
customObjectclass, to the LDAP User Object Class list.Add the attribute type, for example
customAttribute, to the LDAP User Attributes list.Save your work.
Add the attribute type to the profile attribute whitelist.
The profile attribute whitelist controls the information returned to non-administrative users when accessing
json/userendpoints. For example, the whitelist controls the attributes shown in the user profile page.Common profile attributes are whitelisted by default, but you need to add any custom attribute you want your non-administrative users to see.
The whitelist can be set by realm, in the user self-service service, or globally. To modify it:
Globally: Navigate to Configure > Global Services > User Self-Service > Profile Management, and edit the Self readable attributes field.
By realm: Navigate to Realms > Realm Name > Services > User Self-Service > Profile Management, and edit the Self readable attributes field.
Note that you need to add the user self-service service to the realm if you have not done so already, but you do not need to configure anything other than the whitelist.
Perform the following steps to update AM configuration store to give users write permission to the custom attribute.
This procedure assumes you use an LDAP browser, for example Apache Directory Studio. Alternatively, you can follow "To Allow Users to Update the New Attribute Using the Command Line" if you use the command line.
Connect to the AM configuration store. You can see the configuration store details by navigating to Deployment > Servers > Directory Configuration > Server.
Search for
ou=SelfWriteAttributes. You should find DNs similar to the following:dn:ou=SelfWriteAttributes,ou=Policies,ou=default,ou=OrganizationConfig,ou=1.0,ou=iPlanetAMPolicyService,ou=services,o=sunamhiddenrealmdelegationservicepermissions,ou=services,dc=openam,dc=forgerock,dc=orgdn:ou=SelfWriteAttributes,ou=default,ou=default,ou=OrganizationConfig,ou=1.0,ou=sunEntitlementIndexes,ou=services,o=sunamhiddenrealmdelegationservicepermissions,ou=services,dc=openam,dc=forgerock,dc=org
In the entry under
iPlanetAMPolicyService, edit thesunKeyValueattribute to add the custom attribute to the list of self-writable attributes. For example,<Value>customAttribute</Value>.In the entry under
sunEntitlementIndexes, edit thesunKeyValueattribute to add the custom attribute to the list of self-writable attributes. The following is an example of the custom attribute as the first element of the list:\"attributes\": [\n \"customAttribute\",\n ....Restart AM or the web container where it runs.
Perform the following steps to update the AM configuration store to give users write permission to the custom attribute.
This procedure assumes you use the command line. Alternatively, you can follow "To Allow Users To Update the New Attribute Using an LDAP Browser" if you use an LDAP browser.
Search for the value of
sunKeyValueinou=SelfWriteAttributesby running the following command:$
/path/to/opendj/bin/ldapsearch --hostname openam.example.com --port 1636 \ --bindDn uid=admin --bindPassword forgerock \ --baseDn "dc=openam,dc=forgerock,dc=org" "(ou=SelfWriteAttributes)" sunKeyValuedn: ou=SelfWriteAttributes,ou=Policies,ou=default,ou=OrganizationConfig,ou=1.0,ou=iPlanetAMPolicyService,ou=services,o=sunamhiddenrealmdelegationservicepermissions,ou=services,dc=openam,dc=forgerock,dc=org sunKeyValue:: eG1scG9saWN5PTw........ dn: ou=SelfWriteAttributes,ou=default,ou=default,ou=OrganizationConfig,ou=1.0,ou=sunEntitlementIndexes,ou=services,o=sunamhiddenrealmdelegationservicepermissions,ou=services,dc=openam,dc=forgerock,dc=org sunKeyValue: serializable={"eCondition":{"className":"com.sun.....Note that the command returns two DNs, and the value of
sunKeyValuein the first one is base64-encoded.Decode the base64 string of the
iPlanetAMPolicyServiceDN. For example:$
./base64 decode --encodedData eG1scG9saWN5PTw........xmlpolicy=<?xml version="1.0" encoding="UTF-8"?> <Policy name="SelfWriteAttributes" createdby="cn=dsameuser,ou=DSAME Users,dc=openam,dc=forgerock,dc=org" lastmodifiedby="cn=dsameuser,ou=DSAME Users,dc=openam,dc=forgerock,dc=org" creationdate="1528296269883" lastmodifieddate="1528296269883" referralPolicy="false" active="true" > <Rule name="user-read-rule"> <ServiceName name="sunAMDelegationService" /> <ResourceName name="sms://*dc=openam,dc=forgerock,dc=org/sunIdentityRepositoryService/1.0/application/*" /> <AttributeValuePair> <Attribute name="MODIFY" /> <Value>allow</Value> </AttributeValuePair> </Rule> <Subjects name="Subjects" description=""> <Subject name="delegation-subject" type="AuthenticatedUsers" includeType="inclusive"> </Subject> </Subjects> <Conditions name="AttrCondition" description=""> <Condition name="condition" type="UserSelfCheckCondition"> <AttributeValuePair><Attribute name="attributes"/><Value>givenname</Value><Value>sn</Value><Value>cn</Value><Value>userpassword</Value><Value>mail</Value><Value>telephonenumber</Value><Value>postaladdress</Value><Value>preferredlocale</Value><Value>iplanet-am-user-password-reset-options</Value><Value>iplanet-am-user-password-reset-question-answer</Value><Value>description</Value><Value>oath2faEnabled</Value><Value>sunIdentityServerDeviceKeyValue</Value><Value>sunIdentityServerDeviceStatus</Value> </AttributeValuePair> </Condition> </Conditions> </Policy>Create a file with the decoded string. Then, add the custom attribute to the
<AttributeValuePair>list. For example:$
vi to-encode.xml ... <Attribute name="attributes"/><Value>customAttribute</Value><Value>givenname</Value>...</AttributeValuePair> ...Base64-encode the content of the file. For example:
$
./base64 encode -f to-encode.xmlEG1scG9saWN5PTw22.....Create an LDIF file, for example,
change.ldif, containing the following:The LDIF properties and rules required to modify the value of the
sunKeyValueattribute for both DNs.The newly base64-encoded string as the value of the
sunKeyValueattribute of theiPlanetAMPolicyServiceDN. The string already contains the custom attribute.The value of the
sunKeyValueattribute of thesunEntitlementIndexesDN. You must add the custom attribute inside theattributeslist.
The following excerpt is an example of LDIF file:
dn: ou=SelfWriteAttributes,ou=Policies,ou=default,ou=OrganizationConfig,ou=1.0,ou=iPlanetAMPolicyService,ou=services,o=sunamhiddenrealmdelegationservicepermissions,ou=services,dc=openam,dc=forgerock,dc=org
changetype: modify
replace: sunKeyValue
sunKeyValue: EG1scG9saWN5PTw22.....

dn: ou=SelfWriteAttributes,ou=default,ou=default,ou=OrganizationConfig,ou=1.0,ou=sunEntitlementIndexes,ou=services,o=sunamhiddenrealmdelegationservicepermissions,ou=services,dc=openam,dc=forgerock,dc=org
changetype: modify
replace: sunKeyValue
sunKeyValue: serializable={"eCondition":{"className": ...  \"properties\": {\"attributes\": [\n    \"customAttribute\",\n    \"givenname\",\n    \"sn\",\n  ... \"values\": []\n}"}}
Apply the changes in the LDIF file to the LDAP configuration store, as follows:
$
/path/to/opendj/bin/ldapmodify \ --hostname 'id.example.com' \ --port 1636 \ --useSsl \ --usePkcs12TrustStore /path/to/opendj/config/keystore \ --trustStorePasswordFile /path/to/opendj/config/keystore.pin \ --bindDn uid=admin \ --bindPassword str0ngAdm1nPa55word \ --filename change.ldif# MODIFY operation successful for DN ou=SelfWriteAttributes,ou=Policies,ou=default,ou=OrganizationConfig,ou=1.0,ou=iPlanetAMPolicyService,ou=services,o=sunamhiddenrealmdelegationservicepermissions,ou=services,dc=openam,dc=forgerock,dc=org # MODIFY operation successful for DN ou=SelfWriteAttributes,ou=default,ou=default,ou=OrganizationConfig,ou=1.0,ou=sunEntitlementIndexes,ou=services,o=sunamhiddenrealmdelegationservicepermissions,ou=services,dc=openam,dc=forgerock,dc=orgRestart AM or the web container where it runs.
To allow the UI to show the new attribute in the user profile, you need to download the UI source, edit it, and then rebuild the UI.
Perform the following steps to configure the UI to show the new attribute:
Download the UI source as explained in Downloading the UI.
Modify the UI as follows:
Edit the
openam-ui-user/src/resources/locales/en/translation.jsonfile and add a new line with the description for the custom attribute. This description will show in the UI user's profile page. For example:... "profile": "Profile", "username" : "Username", "emailAddress" : "Email address", "givenName" : "First Name", "customAttribute" : "My Custom Attribute", "sn" : "Last Name", "changePassword" : "Change password", ...Note that the example adds the custom attribute under the
common.userJSON path.Tip
If you have translated the UI pages, remember to edit all the
translation.jsonfiles in your installation.Edit the
openam-ui-user/src/resources/templates/user/UserProfileTemplate.htmlfile and add a new line for the custom attribute. Consider the following points:propertymust contain the name of the custom attribute created in the LDAP. For example,customAttribute.labelmust contain the path to the label created in thetranslation.jsonfile. In this case,common.user.customAttribute.
For example:
{{#user}}
  {{> form/_basicInput property="username" label="common.user.username" readonly=true}}
  {{> form/_basicInput property="givenName" label="common.user.givenName"}}
  {{> form/_basicInput property="sn" label="common.user.sn" required="true"}}
  {{> form/_basicInput type="email" property="mail" label="common.user.emailAddress"
  extraAttributes='data-validator="validEmailAddressFormat" data-validator-event="keyup"' }}
  {{> form/_basicInput type="tel" property="telephoneNumber" label="common.user.phoneNumber"
  extraAttributes='data-validator="validPhoneFormat" data-validator-event="keyup"'}}
  {{> form/_basicInput property="customAttribute" label="common.user.customAttribute"}}
{{/user}}
Edit the
openam-ui-user/src/js/org/forgerock/openam/ui/user/UserModel.jsfile and add the custom attribute on theServiceInvoker.restCallfunction.Consider the following constraints when modifying this file:
The file does not support tab indentation. You must use space indentation.
The file does not support lines longer than 120 characters. If the line you are modifying exceeds this limit, break it in multiple lines.
For example:
return ServiceInvoker.restCall(_.extend(
{
    type: "PUT",
    data: JSON.stringify(
        _.chain(this.toJSON())
        .pick(["givenName", "sn", "mail", "postalAddress", "telephoneNumber", "customAttribute"])
        .mapValues((val) => {
            ...
}
Rebuild the UI by running the yarn build command.
Test the UI pages by following the steps detailed in "To Test UI Pages in a Development Server".
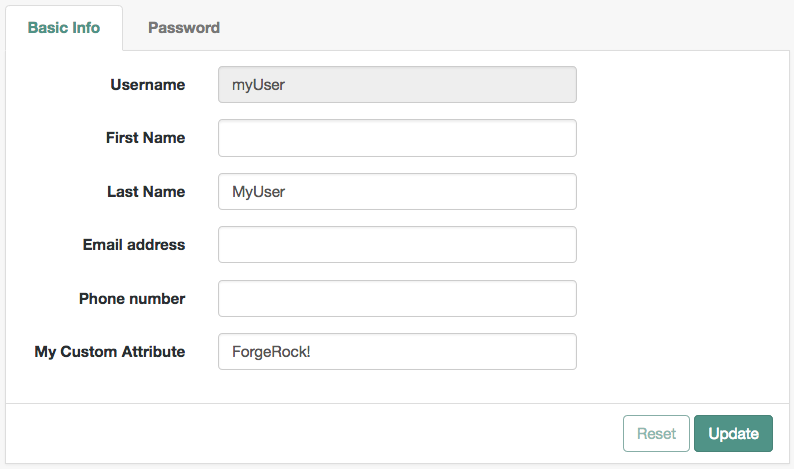
The UI user profile page now shows the custom attribute, and users are able to read and write its values:
Once you are satisfied with the changes, deploy the output in the
builddirectory to the/path/to/tomcat/webapps/openam/XUI/directory of your AM instances.There is no need to restart the AM instance. Subsequent visits to the UI pages will use the rebuilt files.
Customizing Identity Data Storage
AM maps user and group identities into a realm using data stores. An AM data store relies on a Java identity repository (IdRepo) plugin to implement interaction with the identity repository where the users and groups are stored.
About the Identity Repository Plugin
This section describes how to create a custom identity repository plugin. AM includes built-in support for LDAP identity repositories. For most deployments, you therefore do not need to create your own custom identity repository plugin. Only create custom identity repository plugins for deployments with particular requirements not met by built-in AM functionality.
IdRepo Inheritance
Your identity repository plugin class must extend the com.sun.identity.idm.IdRepo abstract class, and must include a constructor method that takes no arguments.
IdRepo Lifecycle
When AM instantiates your IdRepo plugin, it calls the initialize() method.
public void initialize(Map configParams)The configParams are service configuration parameters for the realm where the IdRepo plugin is configured. The configParams normally serve to set up communication with the underlying identity store. AM calls the initialize() method once, and considers the identity repository ready for use.
If you encounter errors or exceptions during initialization, catch and store them in your plugin for use later when AM calls other plugin methods.
After initialization, AM calls the addListener() and removeListener() methods to register listeners that inform AM client code of changes to identities managed by your IdRepo.
public int addListener(SSOToken token, IdRepoListener listener)
public void removeListener()
You must handle listener registration in your IdRepo plugin, and also return events to AM through the IdRepoListener.
When stopping, AM calls your IdRepo plugin shutdown() method.
public void shutdown()You are not required to implement shutdown() unless your IdRepo plugin has shut down work of its own to do, such as close connections to the underlying identity store.
IdRepo Plugin Capabilities
Your IdRepo plugin provides AM with a generic means to manage identities—including users and groups but also special types such as roles, realms, and agents— and to create, read, update, delete, and search identities. In order for AM to determine your plugin's capabilities, it calls the methods described in this section.
public Set getSupportedTypes()The getSupportedTypes() method returns a set of IdType objects, such as IdType.USER and IdType.GROUP. You can either hard-code the supported types into your plugin, or make them configurable through the IdRepo service.
public Set getSupportedOperations(IdType type)The getSupportedOperations() method returns a set of IdOperation objects, such as IdOperation.CREATE and IdOperation.EDIT. You can also either hard-code these, or make them configurable.
public boolean supportsAuthentication()The supportsAuthentication() method returns true if your plugin supports the authenticate() method.
Identity Repository Plugin Implementation
Your IdRepo plugin implements operational methods depending on what you support. These methods perform the operations in your data store.
- Create
AM calls
create()to provision a new identity in the repository, wherenameis the new identity's name, andattrMapholds the attributes names and values.public String create(SSOToken token, IdType type, String name, Map attrMap) throws IdRepoException, SSOException- Read
AM calls the following methods to retrieve identities in the identity repository, and to check account activity. If your data store does not support binary attributes, return an empty
MapforgetBinaryAttributes().public boolean isExists( SSOToken token, IdType type, String name ) throws IdRepoException, SSOException public boolean isActive( SSOToken token, IdType type, String name ) throws IdRepoException, SSOException public Map getAttributes( SSOToken token, IdType type, String name ) throws IdRepoException, SSOException public Map getAttributes( SSOToken token, IdType type, String name, Set attrNames ) throws IdRepoException, SSOException public Map getBinaryAttributes( SSOToken token, IdType type, String name, Set attrNames ) throws IdRepoException, SSOException public RepoSearchResults search( SSOToken token, IdType type, String pattern, Map avPairs, boolean recursive, int maxResults, int maxTime, Set returnAttrs ) throws IdRepoException, SSOException public RepoSearchResults search( SSOToken token, IdType type, String pattern, int maxTime, int maxResults, Set returnAttrs, boolean returnAllAttrs, int filterOp, Map avPairs, boolean recursive ) throws IdRepoException, SSOException- Edit
AM calls the following methods to update a subject in the identity repository.
public void setAttributes( SSOToken token, IdType type, String name, Map attributes, boolean isAdd ) throws IdRepoException, SSOException public void setBinaryAttributes( SSOToken token, IdType type, String name, Map attributes, boolean isAdd ) throws IdRepoException, SSOException public void removeAttributes( SSOToken token, IdType type, String name, Set attrNames ) throws IdRepoException, SSOException public void modifyMemberShip( SSOToken token, IdType type, String name, Set members, IdType membersType, int operation ) throws IdRepoException, SSOException public void setActiveStatus( SSOToken token, IdType type, String name, boolean active )- Authenticate
AM calls
authenticate()with the credentials from theDataStoreauthentication module.public boolean authenticate(Callback[] credentials) throws IdRepoException, AuthLoginException- Delete
The
delete()method removes the subject from the identity repository. Thenamespecifies the subject.public void delete(SSOToken token, IdType type, String name) throws IdRepoException, SSOException- Service
The
IdOperation.SERVICEoperation is rarely used in recent AM deployments.
Identity Repository Plugin Deployment
When you build your IdRepo plugin, include openam-core-7.1.4.jar in the classpath. This file is found under WEB-INF/lib/ where AM is deployed.
You can either package your plugin as a .jar, and then add it to WEB-INF/lib/, or add the classes under WEB-INF/classes/.
The steps in this procedure make use of a number of AM API interfaces and annotations. Click the following links to view the AM Public API JavaDoc:
To register your custom ID repo in AM by using the built-in PluginTools interface, perform the following steps:
Use the
@IdRepoConfigannotation on your configuration interface, as shown below:package com.example.custom; import java.util.Optional; import org.forgerock.openam.annotations.sm.Attribute; import org.forgerock.openam.annotations.sm.IdRepoConfig; /** * Custom IdRepo config. */ @IdRepoConfig(name = "MyIdRepo") public interface CustomIdRepoConfig { /** * The IdRepo implementation fully qualified class name. * * @return The implementation class name. */ @Attribute(order = 10, requiredValue = true) default String idRepoClass() { return CustomIdRepo.class.getCanonicalName(); } /** * Sets the connection pool minimum size. * * @return The connection pool minimum size. */ @Attribute(order = 20) default Optional<Integer> connectionPoolMinSize() { return Optional.of(1); } /** * Sets the connection pool max size. * * @return The connection pool max size. */ @Attribute(order = 30) default Optional<Integer> connectionPoolMaxSize() { return Optional.of(10); } }Create a
.propertiesfile based on the name you provided in the configuration interface; for example,MyIdRepo.properties.The contents of the file might resemble the following:
CustomIdRepoConfig=Custom IdRepo
idRepoClass=LDAPv3 Repository Plug-in Class Name
connectionPoolMinSize=LDAP Connection Pool Minimum Size
connectionPoolMaxSize=LDAP Connection Pool Maximum Size
Create a class that implements
AmPlugin, and uses thepluginToolsinterface to handle the following events:onInstall()Call the
pluginTools.installIdRepofunction with your configuration class as the parameter.onStartup()Call the
pluginTools.startServicefunction with your configuration class as the parameter.upgrade()Call the
pluginTools.upgradeIdRepofunction with your configuration class as the parameter.
You plugin class may resemble the following:
package com.example.custom;

import javax.inject.Inject;

import org.forgerock.openam.plugins.AmPlugin;
import org.forgerock.openam.plugins.PluginException;
import org.forgerock.openam.plugins.PluginTools;
import org.forgerock.openam.plugins.StartupType;

/**
 * A custom identity repository plugin. This uses the plugin framework to install the custom identity repository.
 */
public class CustomIdRepoPlugin implements AmPlugin {

    private static final String CURRENT_VERSION = "1.0.0";
    private PluginTools pluginTools;

    /**
     * The constructor.
     *
     * @param pluginTools The PluginTools instance.
     */
    @Inject
    public CustomIdRepoPlugin(PluginTools pluginTools) {
        this.pluginTools = pluginTools;
    }

    @Override
    public String getPluginVersion() {
        return CustomIdRepoPlugin.CURRENT_VERSION;
    }

    @Override
    public void onInstall() throws PluginException {
        pluginTools.installIdRepo(CustomIdRepoConfig.class);
    }

    @Override
    public void onStartup(StartupType startupType) throws PluginException {
        pluginTools.startService(CustomIdRepoConfig.class);
    }

    @Override
    public void upgrade(String fromVersion) throws PluginException {
        pluginTools.upgradeIdRepo(CustomIdRepoConfig.class);
    }
}
Create a file at the path
META-INF/services/org.forgerock.openam.plugins.AmPluginwith the following contents:com.example.custom.CustomIdRepoPlugin
Note
If you do not create this file, AM will not pick up the custom repository.
To create a custom ID repo plugin for your identity stores and register it with the ssoadm command, perform the following steps:
Create a
SubSchemafor your plugin, and register it to AM:Create the
SubSchemadocument, for examplecustomIdRepo.xml, using the following structure:< SubSchema i18nKey="x4000" inheritance="multiple" maintainPriority="no" name="CustomRepo" supportsApplicableOrganization="no" validate="yes"> <AttributeSchema cosQualifier="default" isSearchable="no" name="RequiredValueValidator" syntax="string" type="validator" > <DefaultValues> <Value>com.sun.identity.sm.RequiredValueValidator</Value> </DefaultValues> </AttributeSchema> <AttributeSchema any="required" cosQualifier="default" i18nKey="x4001" isSearchable="no" name="sunIdRepoClass" syntax="string" type="single" validator="RequiredValueValidator" > <DefaultValues> <Value>org.test.CustomRepo</Value> </DefaultValues> </AttributeSchema> <AttributeSchema cosQualifier="default" i18nKey="x4002" isSearchable="no" name="sunIdRepoAttributeMapping" syntax="string" type="list"> <DefaultValues> <Value></Value> </DefaultValues> </AttributeSchema> </SubSchema>Ensure that you include the
AttributeSchemarequired to configure your IdRepo plugin.Notice the
i18nKeyattributes onSubSchemaelements. Thei18nKeyattribute values correspond to properties in theamIdRepoService.propertiesfile underWEB-INF/classes/where AM is deployed. The AM console displays the label for the configuration user interface that it retrieves from the value of thei18nKeyproperty in theamIdRepoService.propertiesfile.To make changes to the properties, first extract
amIdRepoService.propertiesand, if necessary, the localized versions of this file fromopenam-core-7.1.4.jartoWEB-INF/classes/, where AM is deployed.For example, if AM is deployed under
/path/to/tomcat/webapps/openam, then you could run the following commands:$
cd /path/to/tomcat/webapps/openam/WEB-INF/classes/$jar -xvf ../lib/openam-core-7.1.4.jar amIdRepoService.propertiesinflated: amIdRepoService.properties
Create a properties file for your plugin so it is displayed in the AM console:
To create a custom identity store named
CustomRepo, where the attributes will be displayed under the Plug-in Configuration tab, create a file namedCustomRepo.section.properties, with the following contents:###################################################################################### # Plug-in Configuration ###################################################################################### # LDAPv3 Repository Plug-in Class Name pluginconfig=sunIdRepoClass # Attribute Name Mapping pluginconfig=sunIdRepoAttributeMapping
Tip
Ensure you include any properties you added to the subschema that need to be displayed in the UI. AM includes a number of
section.propertiesin the/path/to/tomcat/WEB-INFfolder that you can use for templates.To get your configuration properties in the UI, place the
CustomRepo.section.propertiesintoWEB-INF/classes/, where AM is deployed.Register your plugin using the ssoadm command after you have copied the files into place.
$ ssoadm \
add-sub-schema \
--adminid uid=amAdmin,ou=People,dc=openam,dc=forgerock,dc=org \
--password-file /tmp/pwd.txt \
--servicename sunIdentityRepositoryService \
--schematype Organization \
--filename customIdRepo.xml
Restart your AM instance.
Configure a new ID repo in AM using your plugin:
In the AM console, go to Realms > Realm Name > Identity Stores.
In the Identity Stores page, select Add Identity Store, enter an ID, and select the type of identity store corresponding to your custom IdRepo plugin. You can now add values to any custom properties you configured to be visible in the UI.
Navigate to Realms > Realm Name > Identities, and create a new identity.
If your plugin supports authentication, then users are now able to authenticate using the
DataStoremodule for the realm, by using a URL similar to the following:https://openam.example.com:8443/openam/XUI/?realm=/alpha&module=DataStore#login