Step 3. Configure AM
Authentication trees provide fine-grained authentication by allowing multiple paths and decision points throughout the authentication flow.
Authentication trees are made up of authentication nodes, which define actions taken during authentication. Authentication nodes are granular, with each node performing a single task, such as collecting a username or making a simple decision. Authentication nodes can have multiple outcomes rather than just success or failure.
Tip
AM provides a number of ready-made sample authentication trees to demonstrate how they can be put together. For more information on setting up authentication trees, see "Configuring Authentication Trees".
Follow these steps to create an authentication tree that you can use to log in to AM.
On the Realms page of the AM console, select the realm in which to create the authentication tree.
On the Realm Overview page, select Authentication in the menu on the left, and then select Trees.
On the Trees page, select Create Tree. Enter a tree name; for example,
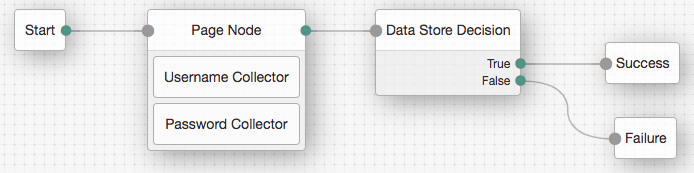
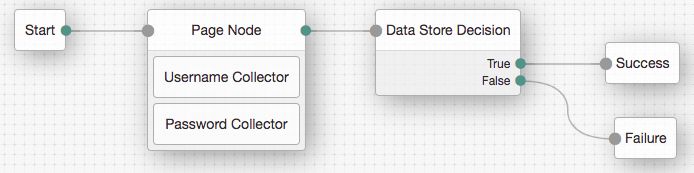
myAuthTree, and then select Create.The authentication tree designer is displayed, with the Start entry point connected to the Failure exit point.
The authentication tree designer provides the following features on the toolbar:
Button Usage 
Lay out and align nodes according to the order they are connected. 
Toggle the designer window between normal and full-screen layout. 
Remove the selected node. Note that the Start entry point cannot be deleted. Drag the following nodes from the Components panel on the left-hand side and drop them into the designer area:
Page Node
Username Collector
Password Collector
Data Store Decision
Success
The Data Store Decision authentication node uses the credentials to authenticate the user against the identity stores configured for the realm. In this example, the username and password are obtained by a combination of the Username Collector and Password Collector nodes.
Drag and drop the Username Collector and Password Collector onto the Page Node, so that they will both appear on the same page when logging in.
Connect the nodes as follows:
Tip
You can configure the node properties by using the panel on the right side of the page. For more information on the available properties for each node, see "Authentication Nodes Configuration Reference".
For more information on setting up more complex authentication trees, see "Configuring Authentication Trees".
You are now ready to authenticate your first user!
Proceed to Step 4. Authenticate to AM.