Deploying the IDP Discovery Service
When your circle of trust includes multiple identity providers, then service providers must discover which identity provider corresponds to a request. You can deploy the identity provider discovery service for this purpose as a separate web application.
Browsers only send cookies for the originating domain. Therefore, when a browser accesses the service provider in the www.sp.example domain, the service provider has no way of knowing whether the user has perhaps already authenticated at www.this-idp.example or at www.that-idp.example. The providers therefore host an identity provider discovery service in a common domain, such as www.disco.example, and use that service to discover where the user logged in. The identity provider discovery service essentially writes and reads cookies from the common domain. The providers configure their circle of trust to use the identity provider discovery service as part of SAML v2.0 federation.
Deploying the identity provider discovery service involves the following stages:
Deploy the
.warfile into your web application container.Configure the discovery service.
Add the identity provider discovery service endpoints for writing cookies to, and reading cookies from, the common domain to the circle of trust configurations for the providers.
Share metadata between identity providers and the service provider.
How you deploy the discovery service .war file depends on your web application container. The procedure in this section shows how to deploy on Apache Tomcat.
Copy the
IDPDiscovery-7.0.2.warfile to thewebapps/directory.$
cp ~/Downloads/openam/IDPDiscovery-7.0.2.war /path/to/tomcat/webapps/disco.warAccess the configuration screen through your browser.
In this example, Apache Tomcat listens for HTTP requests on
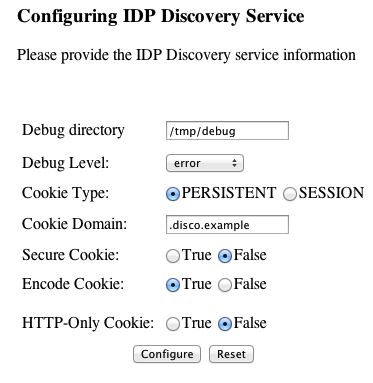
www.disco.example:8080, and Tomcat has unpacked the application under/disco, so the URL ishttp://www.disco.example:8080/disco, which redirects toConfigurator.jsp.Hints for discovery service configuration parameters follow.
- Debug Directory
The discovery service logs to flat files in this directory.
- Debug Level
Default is
error. Other options includeerror,warning,message, andoff.Set this to
messagein order to see the service working when you run your initial tests.- Cookie Type
Set to PERSISTENT if you have configured AM to use persistent cookies, meaning single sign-on cookies that can continue to be valid after the browser is closed.
- Cookie Domain
The cookie domain is the common cookie domain used in your circle of trust for identity provider discovery; in this case,
.disco.example.- Secure Cookie
Set this to true if clients should only return cookies when a secure connection is used.
- Encode Cookie
Leave this true unless your AM installation requires that you do not encode cookies. Normally, cookies are encoded such that cookies remain valid in HTTP.
- HTTP-Only Cookie
Set to true to use HTTPOnly cookies if needed to help prevent third-party programs and scripts from accessing the cookies.
Restrict permissions to the discovery service configuration file in
$HOME/libIDPDiscoveryConfig.properties, where $HOME corresponds to the user who runs the web container where you deployed the service.
Each provider has a circle of trust including itself. You configure each of these circles of trust to use the identity provider discovery service as described in the following steps:
On the service provider console, log in as AM Administrator.
On the service provider console, under Realms > Realm Name > Applications > Federation > Circle of Trust > Circle of Trust Name, add SAML2 Writer and Reader Service URLs for the identity provider discovery service endpoints, and save your work.
In this example, the writer URL is
http://www.disco.example:8080/disco/saml2writer, and the reader URL ishttp://www.disco.example:8080/disco/saml2reader.On each identity provider console, log in as AM Administrator.
On the identity provider console, under Realms > Realm Name > Applications > Federation > Entity Providers > Circle of Trust > Circle of Trust Name, also add SAML2 Writer and Reader Service URLs for the identity provider discovery service endpoints, and save your work.
