Set Data Sources
After defining any new attributes, you must set your data sources, so that Autonomous Identity can import and ingest your data. Autonomous Identity supports three types of data source files:
-
Comma-separated values (CSV). A comma-separated values (CSV) file is a text file that uses a comma delimiter to separate each field value. Each line of text represents a record, consisting of one or more fields of data.
-
Java Database Connectivity (JDBC). Java Database Connectivity (JDBC) is a Java API that connects to and executes queries on databases, like Oracle, MySQL, PostgreSQL, and MSSQL.
-
Generic. Generic data sources are those data types from vendors that have neither CSV nor JDBC-based formats, such as JSON, or others.
Data Source Sync Types
Autonomous Identity supports partial or incremental data ingestion for faster and efficient data uploads. The four types are full, incremental, enrichment, and delete, and are summarized below:
| Sync Type | Data Source | In AutoID | Result |
|---|---|---|---|
Full |
The records from the entity represents the full set of all records that you intend to ingest. For example:
|
An existing table may have the following:
|
After the ingest job runs, all existing records are fully replaced:
|
Incremental |
The records from the entity represents the records that you want to add to AutoID. For example:
|
An existing table may have the following:
|
After the ingest job runs, the records in the data source are added to the existing records:
|
Enrichment |
The records from the entity represents changes to existing data, such as adding a department attribute. No new objects are added, but here you want to edit or "patch" in new attributes to existing records:
|
An existing table may have the following:
|
After the ingest job runs, the attributes in the data source is added to the existing records. If attributes exist, they get updated. If attributes do not exist, they do not get updated, but you can add also attributes using mappings:
|
Delete |
The records from the entity represent records to be deleted, identified by the primary key:
|
An existing table may have the following:
|
After the ingest job completes, the records with the primary key are deleted:
|
CSV Data Sources
The following are general tips for setting up your comma-separated-values (CSV) files:
-
Make sure you have access to your CSV files:
applications.csv,assignments.csv,entitlements.csv, andidentities.csv. -
You can review the Data Preparation chapter for more tips on setting up your files.
-
Log in to the Autonomous Identity UI as an administrator.
-
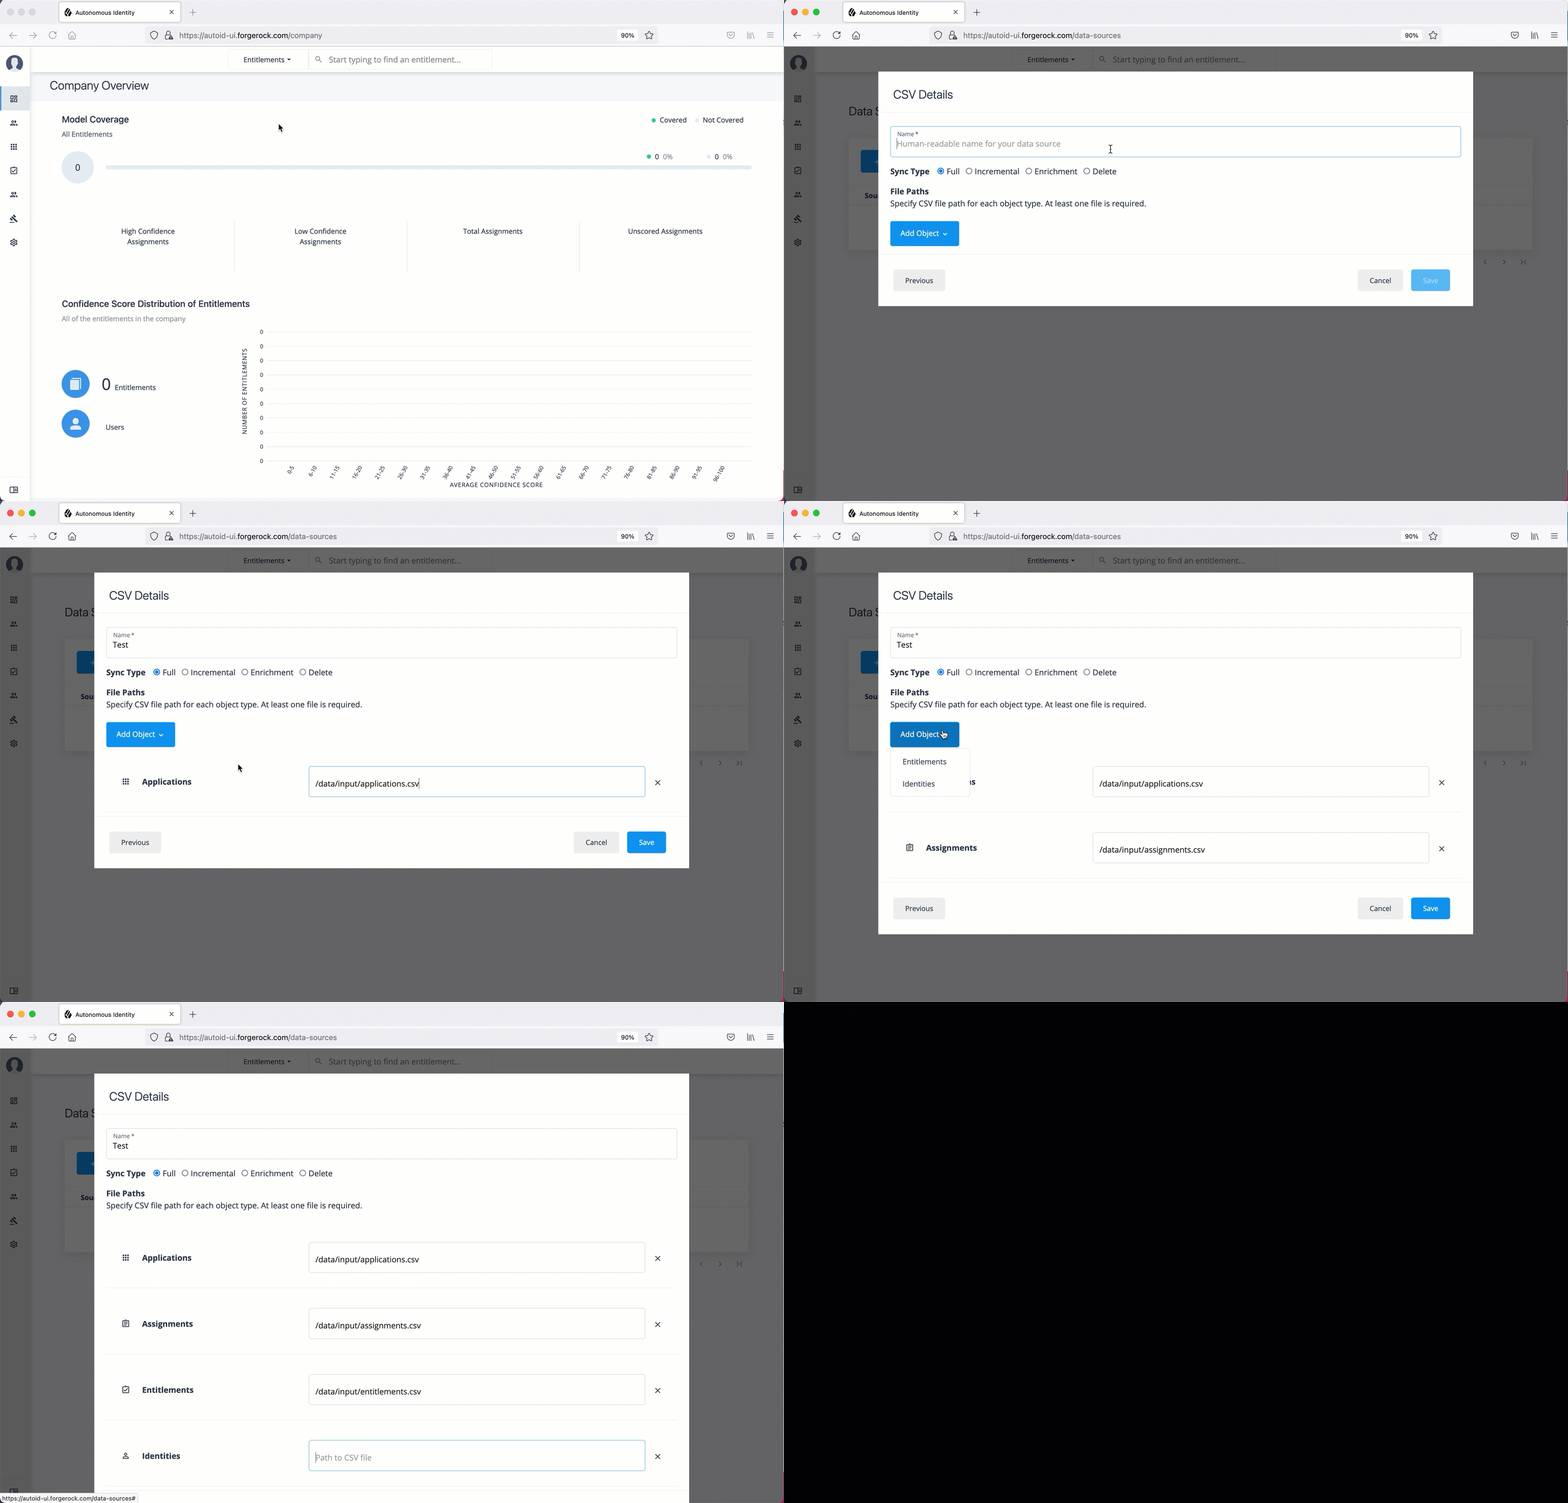
On the Autonomous Identity UI, click the Administration > Data Sources > Add data source > CSV > Next.
-
In the CSV Details dialog box, enter a human-readable name for your CSV file.
-
Select the Sync Type. The options are as follows:
-
Full. Runs a full replacement of data if any.
-
Incremental. Adds new records to existing data.
-
Enrichment. Adds new attributes to existing data records.
-
Delete. Delete any existing data objects.
-
-
Click Add Object, and then select the data source file.
-
Click Applications, enter the path to the
application.csvfile. For example,/data/input/applications.csv. -
Click Assignments, enter the path to the
assignments.csvfile. For example,/data/input/assignments.csv. -
Click Entitlements, enter the path to the
entitlements.csvfile. For example,/data/input/entitlements.csv. -
Click Identities, enter the path to the
identities.csvfile. For example,/data/input/identities.csv.
-
-
Click Save.
See it in action

-
Repeat the previous steps to add more CSV data source files if needed.
-
Next, you must set the attribute mappings. This is a critical step to ensure a successful analytics run. See Set Attribute Mappings.
JDBC Data Sources
The following are general tips for setting up your JDBC data sources (Oracle, MySQL, PostgreSQL, and MSSQL):
-
When configuring your JDBC database, make sure you have properly "whitelisted" the IP addresses that can access the server. For example, you should include your local
autoidinstance and other remote systems, such as a local laptop. -
Make sure you have configured your database tables on your system:
applications,assignments,entitlements, andidentities. -
Make sure to make note of the IP address of your database server.
The following procedure assumes that you have set up Autonomous Identity with connectivity to a database:
-
Log in to the Autonomous Identity UI as an administrator.
-
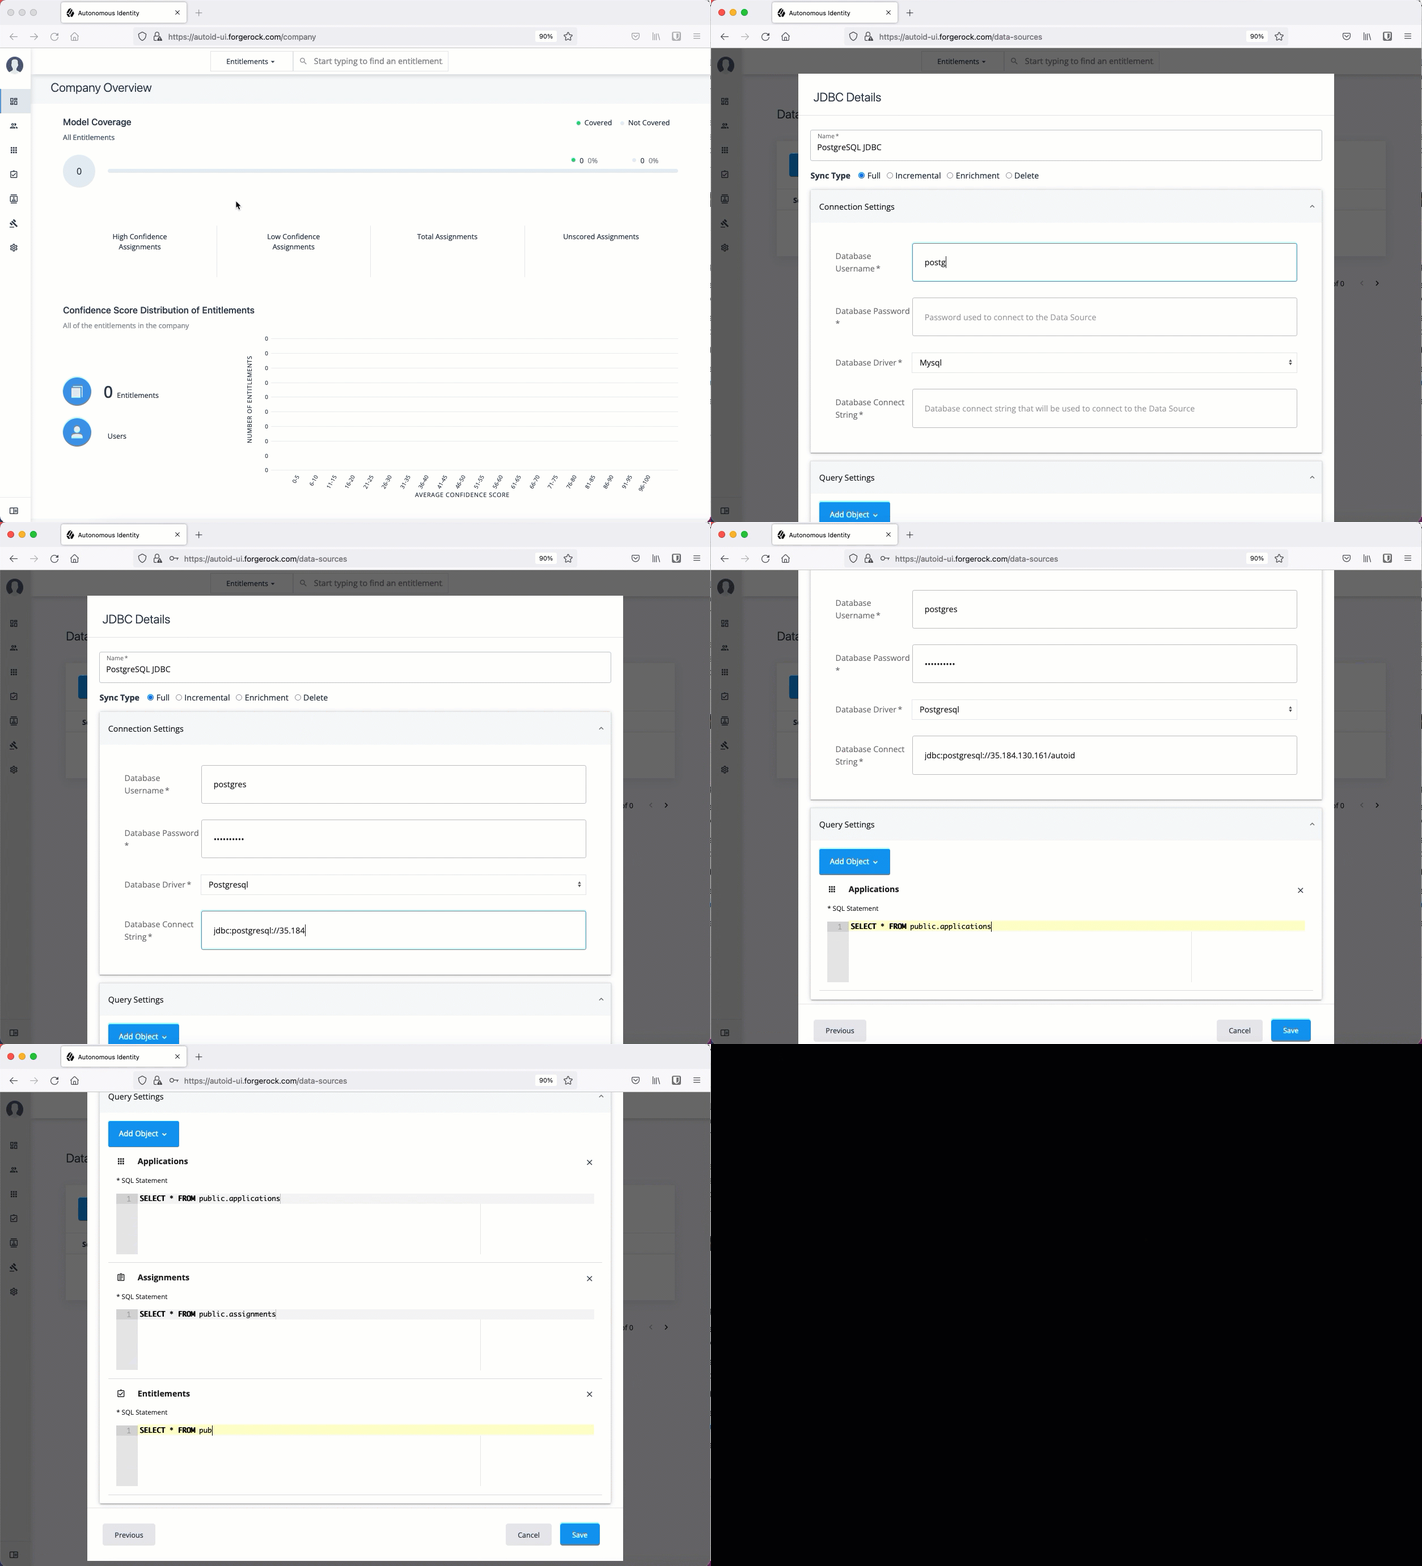
On the Autonomous Identity UI, click the Administration icon > Data Sources > Add data source > JDBC > Next.
-
In the JDBC Details dialog box, enter a human-readable name for your JDBC files.
-
Select the Sync Type. The options are as follows:
-
Full. Runs a full replacement of data if any.
-
Incremental. Adds new records to existing data.
-
Enrichment. Adds new attributes to existing data records.
-
Delete. Delete any existing data objects.
-
-
For Connection Settings, enter the following:
-
Database Username. Enter a user name for the database user that connects to the data source.
-
Database Password. Enter a password for the database user.
-
Database Driver. Select the database driver. Options are:
-
Oracle -
Mysql -
Postgresql -
Mssqlserver
-
-
Database Connect String. Enter the database connection URI to the data source. For example,
jdbc:<Database Type>://<Database IP Address>/<Database Acct Name>, where:-
jdbcis the SQL driver type -
<Database Type>is the database management system type. Options are:oracle,mysql,postgresql, orsqlserver. -
<Database IP Address>is the database IP address -
<Database Acct Name>is the database account name created in the database instance.
-
-
For example:
* Oracle: jdbc:oracle://35.180.130.161/autoid
* MySQL: jdbc:mysql://35.180.130.161/autoid
* PostgreSQL: jdbc:postgresql://35.180.130.161/autoid
* MSSQL: jdbc:sqlserver://35.180.130.161;database=autoid
+ NOTE: There are other properties that you can use for each JDBC connection URI. See the respective documentation for more information.
-
Click Add Object, and then select the data source file:
-
Click Applications, enter the path to the
APPLICATIONStable. For example, using PostgreSQL,SELECT * FROM public.applications, wherepublicis the PostgreSQL schema. Make sure to use your company’s database schema. -
Click Assignments, enter the path to the
ASSIGNMENTStable. For example,SELECT * FROM public.assignments. -
Click Entitlements, enter the path to the
ENTITLEMENTStable. For example,SELECT * FROM public.entitlements. -
Click Identities, enter the path to the
IDENTITIEStable. For example,SELECT * FROM public.identities.
-
-
Click Save.
See it in action

-
If you are having connection issues, check the Java API Service (JAS) logs to verify the connection failure:
$ docker service logs -f jas_jasnode
You may see something like the following entry, which possibly indicates the whitelist was not properly set on the database server:
jas_jasnode.1.5gauc33o1nnn@autonomous-base-dev     | java.lang.RuntiimeException: org.postgresql.util.PSQLException: The connection attempt failed.
. . .
  jas_jasnode.1.5gauc33o1nnn@autonomous-base-dev     | Caused by: org.postgresql.util.PSQLException: The connection attempt failed.
  . . .
  Caused by: java.net.SocketTimeoutExceptiion: connect timed out
-
Next, you must set the attribute mappings. This is a critical step to ensure a successful analytics run. See Set Attribute Mappings.
Generic Data Sources
The following are general tips for setting up your generic data sources:
-
Make sure you have configured data source files:
applications,assignments,entitlements, andidentities. -
Make sure you have the metadata (e.g., URL, prefix) required to access your generic data source files.
-
Log in to the Autonomous Identity UI as an administrator.
-
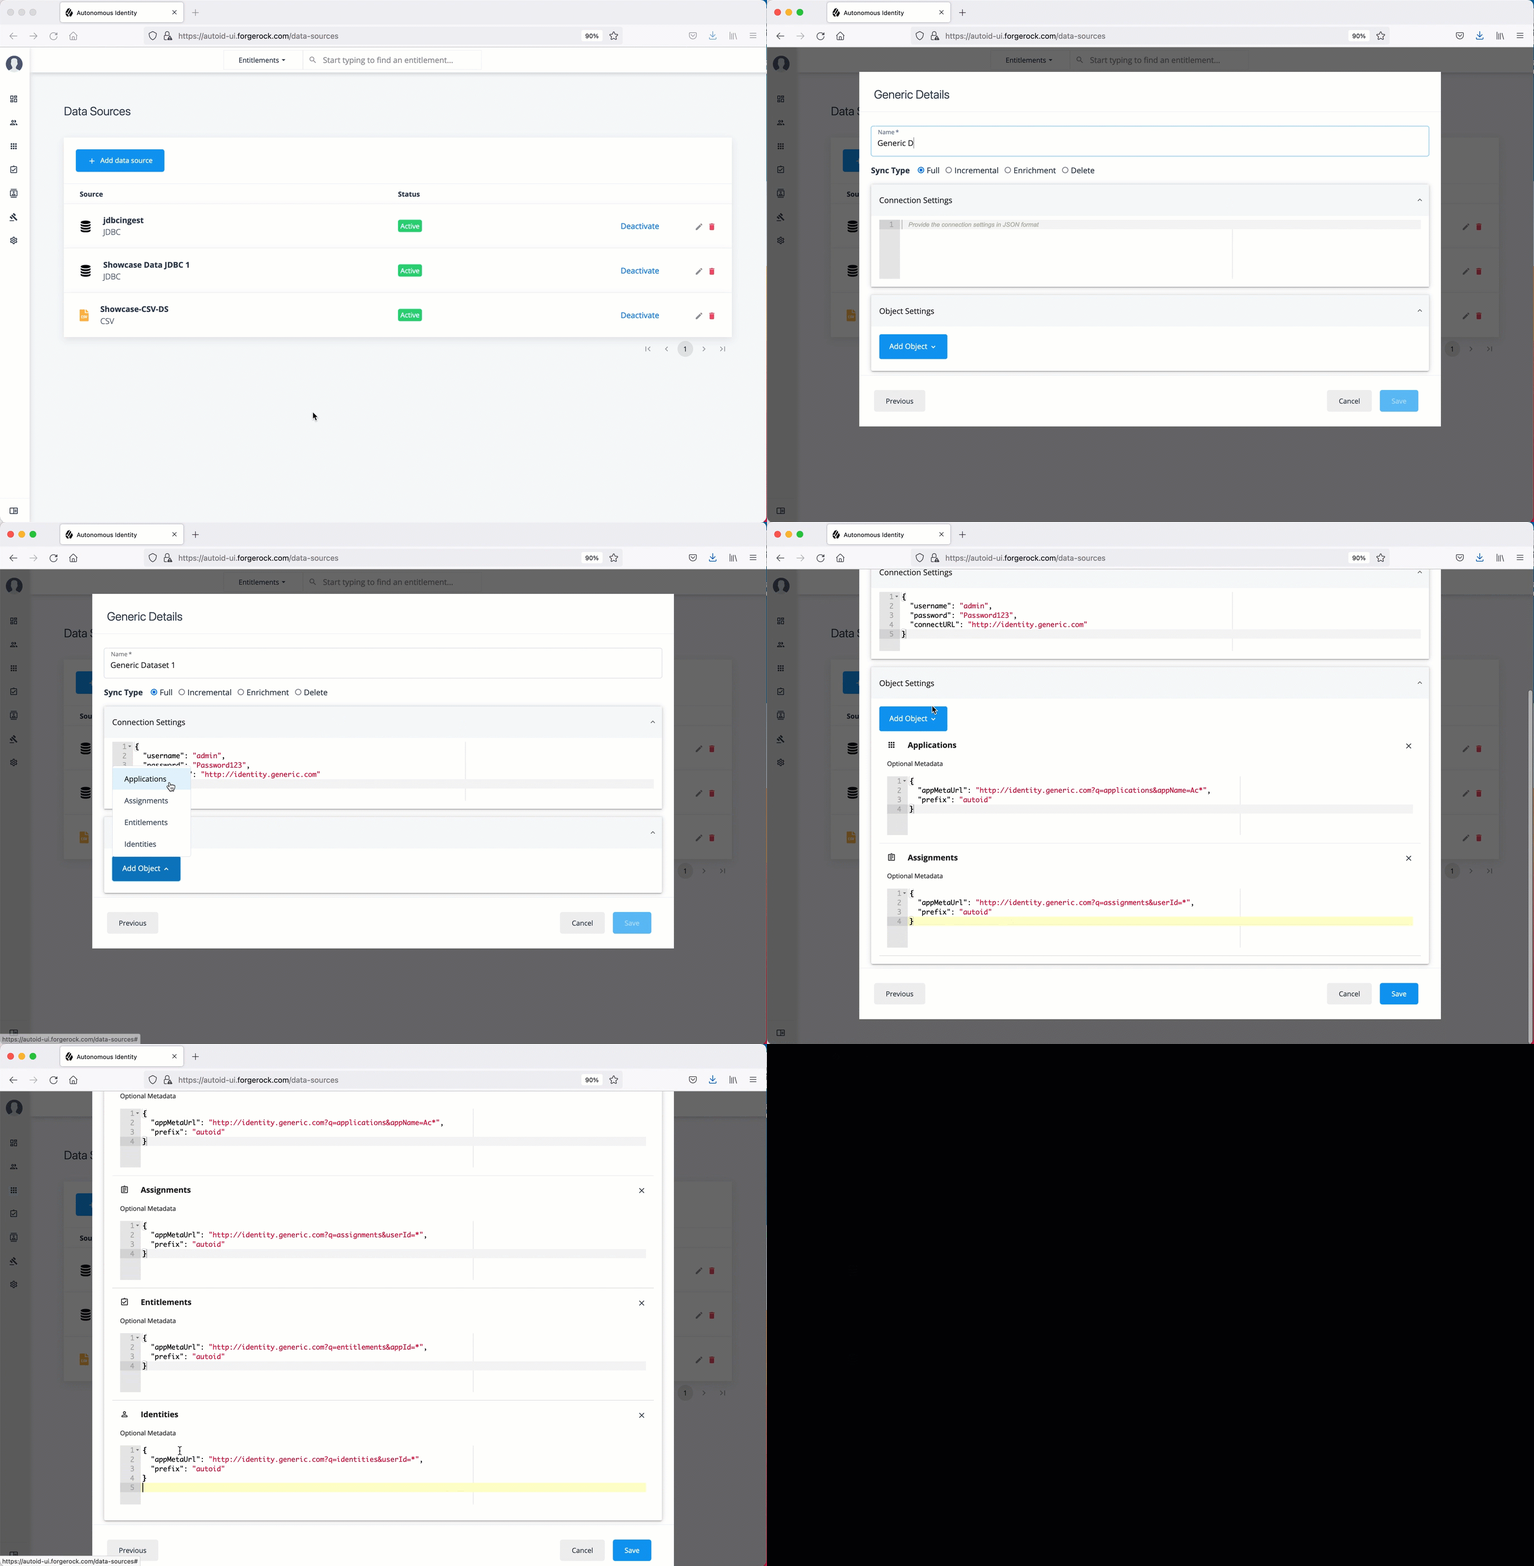
On the Autonomous Identity UI, click the Administration icon > Data Sources > Add data source > Generic > Next.
-
In the Generic Details dialog box, enter a human-readable name for your generic files.
-
Select the Sync Type. The options are as follows:
-
Full. Runs a full replacement of data if any.
-
Incremental. Adds new records to existing data.
-
Enrichment. Adds new attributes to existing data records.
-
Delete. Delete any existing data objects.
-
-
For Connection Settings, enter the settings to connect to your database server. For example:
{ "username": "admin", "password": "Password123", "connectURL": "http://identity.generic.com" } -
Click Add Object, and then select the data source file:
-
Click Applications, enter the metadata for applications file. For example:
{ "appMetaUrl": "http://identity.generic.com?q=applications&appName=Ac*", "prefix": "autoid" } -
Click Assignments, enter the metadata for the assignments file. For example:
{ "appMetaUrl": "http://identity.generic.com?q=assignments&userId=*", "prefix": "autoid" } -
Click Entitlements, enter the metadata for the entitlements file. For example:
{ "appMetaUrl": "http://identity.generic.com?q=entitlements&appId=*", "prefix": "autoid" } -
Click Identities, enter the metadata for the identities file. For example:
{
  "appMetaUrl": "http://identity.generic.com?q=identities&userId=*",
  "prefix": "autoid"
}
-
-
Click Save.
See it in action

-
Repeat the previous steps to add more JDBC data source files if necessary.
-
Next, you must set the attribute mappings. This is a critical step to ensure a successful analytics run. See Set Attribute Mappings.