Prerequisites
These topics cover what you need to do before evaluating ForgeRock IoT.
Get the examples
-
Clone the
iot-edgeGit repository:git clone https://github.com/ForgeRock/iot-edge.git
This command creates a directory named
iot-edge. -
Change to the
iot-edgedirectory:cd /path/to/iot-edge
The examples assume that this is your current working directory.
-
The examples also assume that you are working with version 7.4.0 of the code.
Check out the
release/v7.4.0branch:git checkout release/v7.4.0
Install and configure AM
Before you start, read the Evaluation topics in the AM documentation to set up an AM instance, with a default configuration.
The examples in this guide assume the following:
-
AM is installed with the fully qualified domain name
am.localtest.me, in a Tomcat container, listening on port8080.To configure AM, go to
http://am.localtest.me:8080/openam/. -
AM is configured with the default configuration, with user
amAdminand passwordchangeit.
When you have set up a default AM instance, log into the AM admin UI as user amAdmin with password changeit.
-
Add an IoT service.
The IoT service configures the identity store, adding the required thing attributes to AM users (for all LDAPv3ForOpenDS and LDAPv3ForForgeRockIAM stores in the realm). For more information about this service, see IoT service in the AM Reference:
-
In the Top Level Realm, select Services > Add a Service > IoT Service, and click Create.
-
Enable Create OAuth 2.0 Client.
The IoT service creates an OAuth 2.0 Client with the given name and default configuration required to serve as the client for this service. The client is created without any scope(s), and is used by default for all things that request access tokens.
Advanced use
If a thing (or group of things) needs a client with different configuration to the default, you can create a custom client here, and add its name to the thing’s
thingOAuth2ClientNameprofile attribute. -
Enable Create OAuth 2.0 JWT Issuer.
The service creates a Trusted JWT Issuer with the given name and default configuration required for the IoT Service to act as the Issuer when handling requests for access tokens.
Advanced use
If you configure the client manually, the JWT issuer must have the following settings:
-
JWT Issuer: forgerock-iot-service -
Consented Scopes Claim: scope -
Resource Owner Identity Claim: sub
The signing/verification key used by this issuer is configured in the secrets store under
am.services.iot.jwt.issuer.signing. It must use the HS256 algorithm. -
-
Click Save Changes.
-
-
Add an OAuth 2.0 provider service.
The Top Level Realm includes and OAuth 2.0 provider service by default. If you are using a different realm, select Services > Add a Service > OAuth2 Provider, and click Create.
Advanced use
If your service will use the introspection feature of the SDK, change the following settings:
-
On the Core tab, enable Use Client-Side Access & Refresh Tokens.
-
On the Advanced tab, select an asymmetric key for the OAuth2 Token Signing Algorithm.
-
-
Configure the IoT OAuth 2.0 client:
-
Go to Applications > OAuth 2.0 > Clients and select the
forgerock-iot-oauth2-client. -
In the Scope(s) field, add
publishandsubscribe. -
Save your work.
Advanced use
If you create your own OAUth2 client here, make sure that the client contains the
JWT Bearer,Device CodeandRefresh Tokengrant types, and has a strong generated password. -
-
Create the following authentication trees:
-
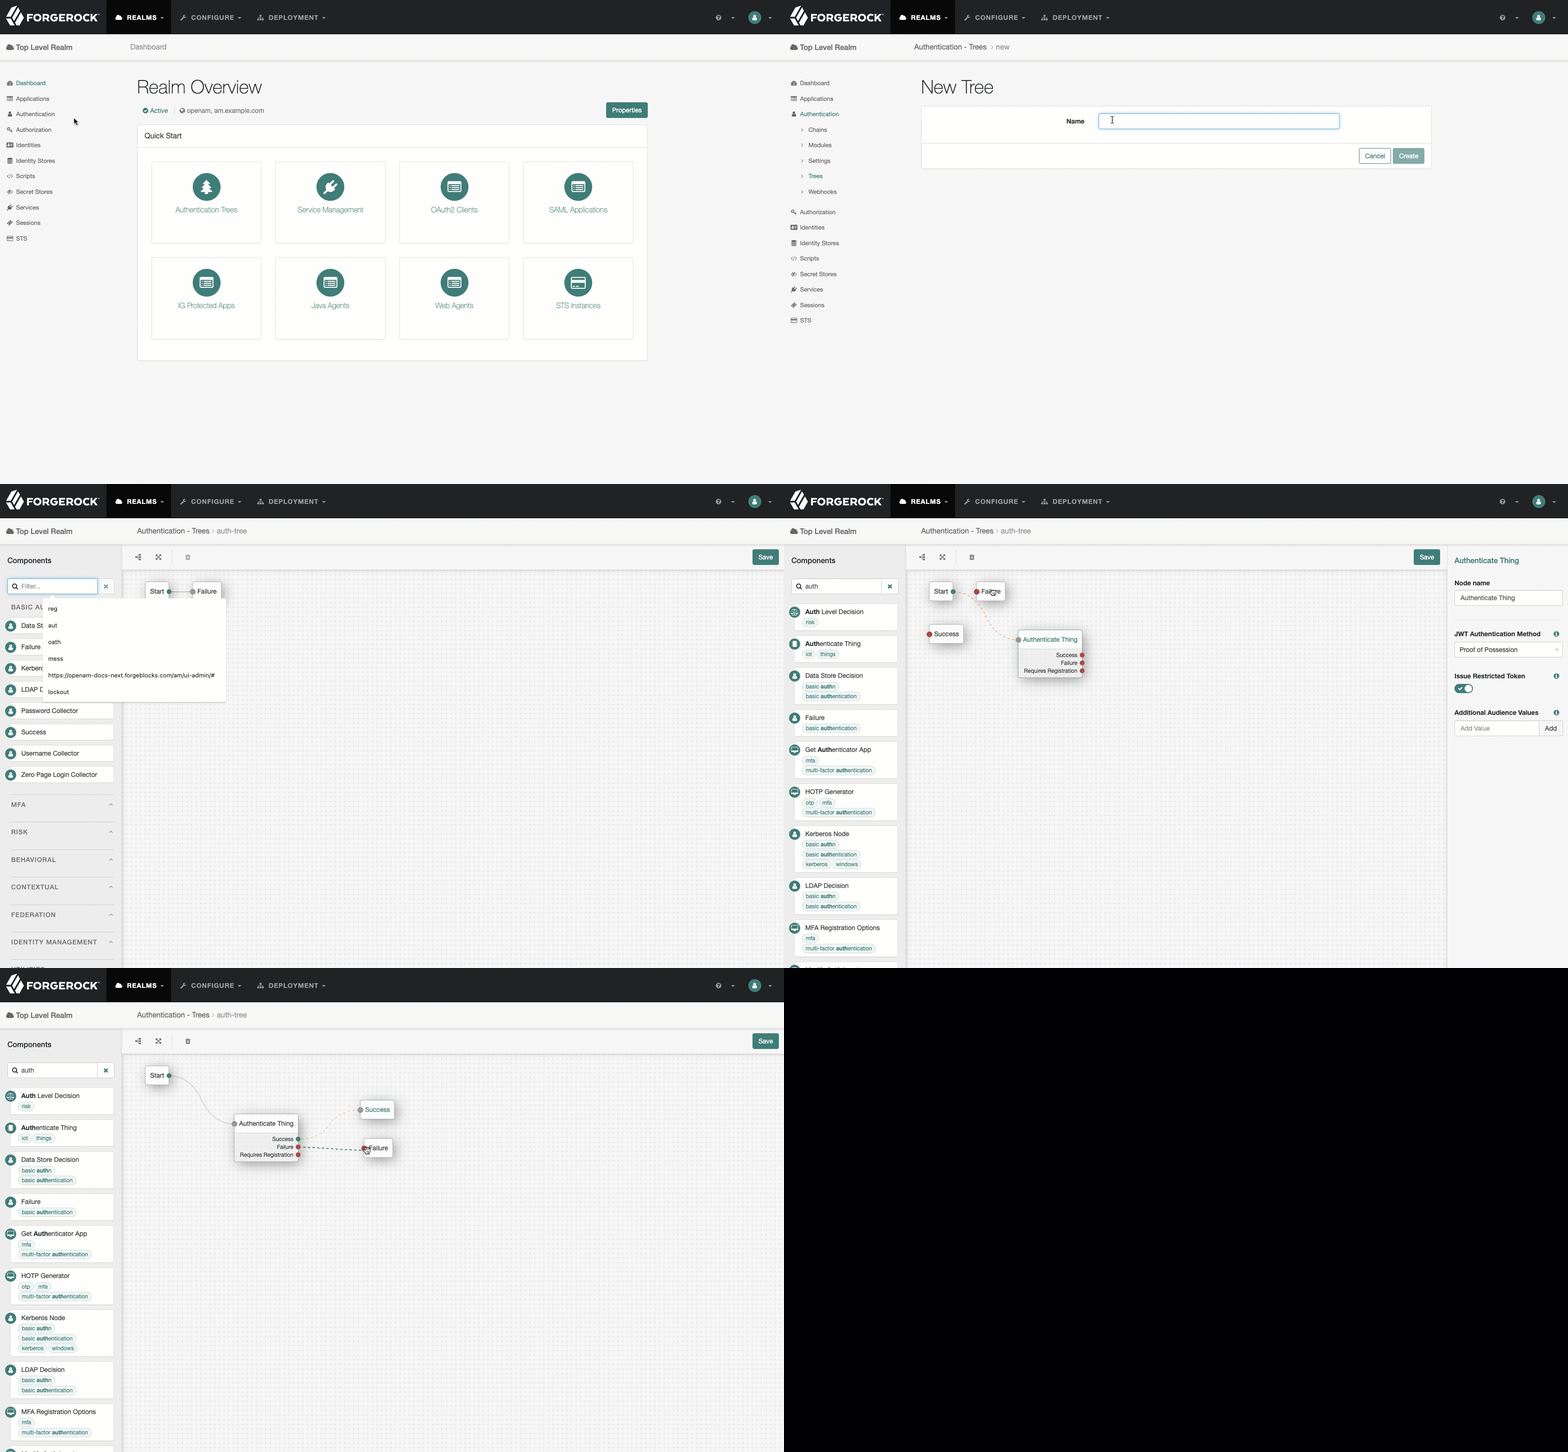
A tree that handles authentication only, named
auth-tree.-
Go to Authentication > Trees and click Create Tree.
-
Type
auth-treein the Name field, and click Create. -
Add an
Authenticate Thingnode, with the default settings, and save your work.Show me

-
-
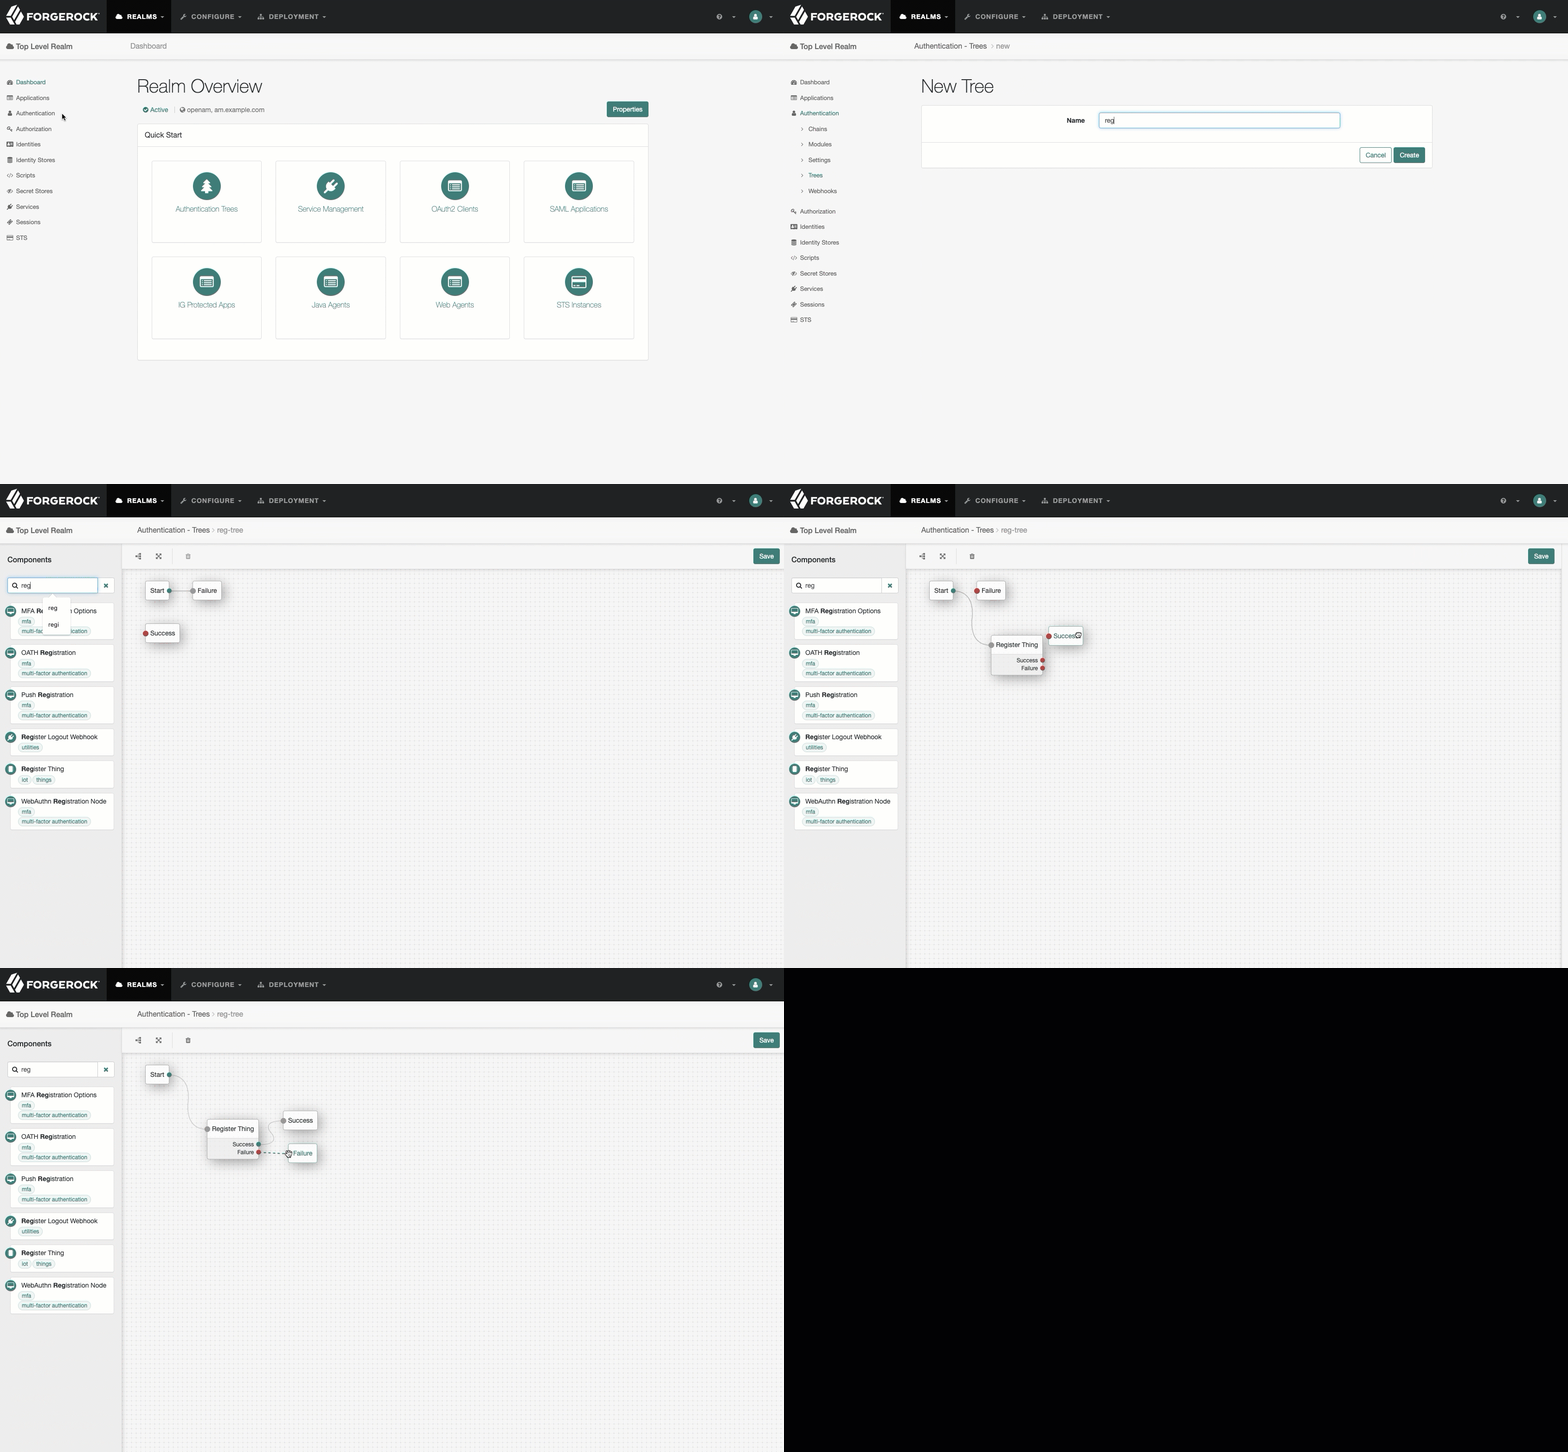
A tree that handles registration only, named
reg-tree:-
Go to Authentication > Trees and click Create Tree.
-
Type
reg-treein the Name field, and click Create. -
Add a
Register Thingnode, and enable Create Identity on that node. -
Save your work.
Show me

-
-
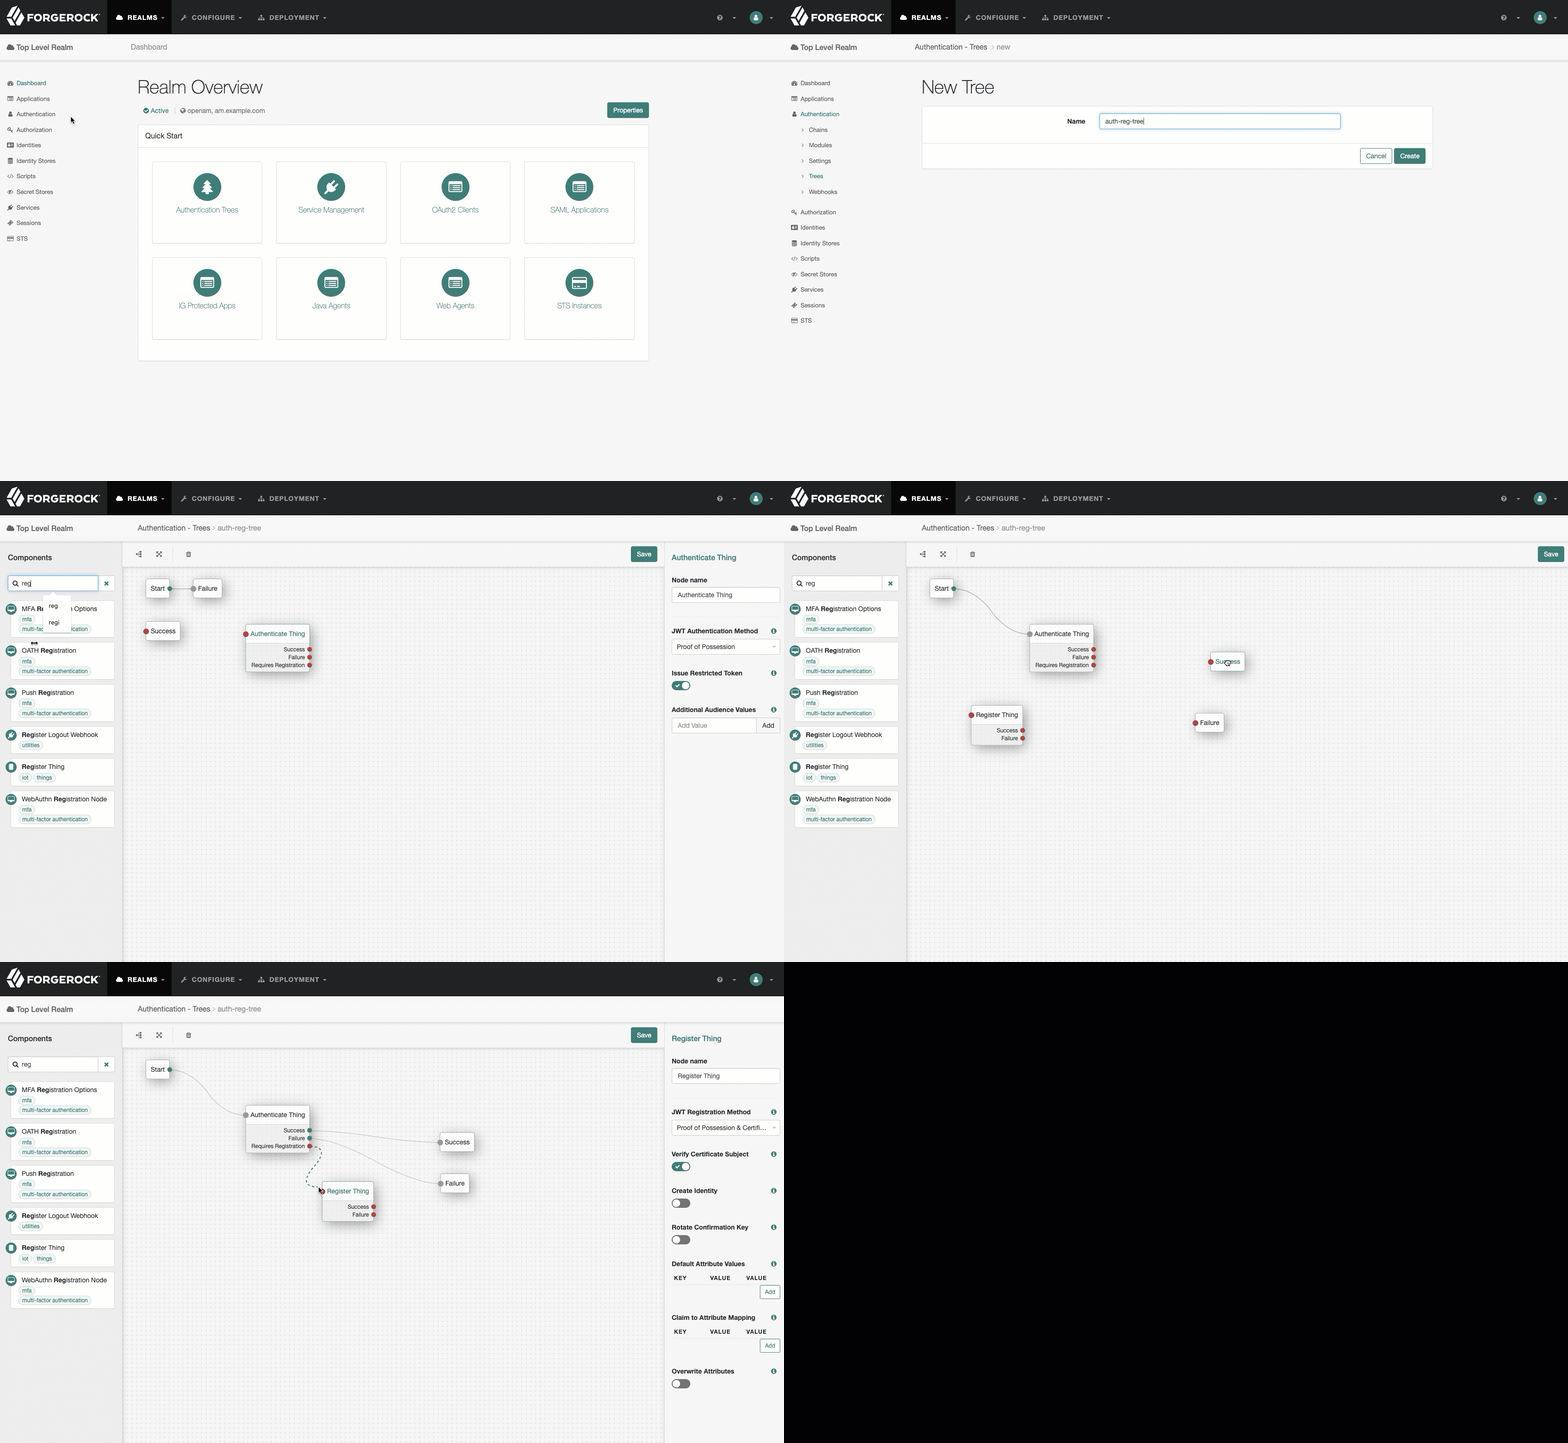
A tree that handles authentication and registration, named
auth-reg-tree:-
Go to Authentication > Trees and click Create Tree.
-
Type
auth-reg-treein the Name field, and click Create. -
Add an
Authenticate Thingnode and aRegister Thingnode. -
On the
Register Thingnode, enable Create Identity. -
Save your work.
Show me

-
-
-
Add a secret ID mapping.
-
Go to Configure > Secret Stores and select the
default-keystore. -
On the Mappings tab, click Add Mapping.
-
In the Secret ID list, select
am.services.iot.cert.verification. -
In the Alias field, type
es256testand click Add.This mapping indicates which key the Register Thing node should use when verifying the registration certificate. The CA certificate in this example (
es256test) is one of the test certificates included by default in AM. -
Click Create to add the mapping.
For more information about mapping secret IDs, see Map and rotate secrets in the AM documentation.
-
-
Create a software publisher agent.
-
Go to Applications > OAuth 2.0 > Software Publisher and click Add Software Publisher Agent.
-
Enter these settings, then click Create:
-
Agent ID:
iot-software-publisher -
Software publisher secret: Leave blank
-
Software publisher issuer:
https://soft-pub.example.com
-
-
Enter these settings, then save your work:
-
Software statement signing Algorithm:
ES256 -
Public key selector:
JWKs -
Json Web Key:
{"keys": [{"use":"sig","kty":"EC","kid":"gLcQhotEZygUuVUrt3Z6azql3dVfqQS7lo3vereyU7Y=","crv":"P-256","alg":"ES256","x":"IUuXjru5zb3ixx23uM-qYsFX47eQNWJ6jTkHudFpVr4","y":"VDSoP-7XBc8KLSeVb2fwzg36458AV3a8MrBx1RZHNho"}]}
-
-