Guide to installing OpenAM Java EE policy agents. OpenAM provides open source Authentication, Authorization, Entitlement and Federation software.
This guide shows you how to install OpenAM Java EE policy agents, as well as how to integrate with other access management software. Read the Release Notes before you get started.
This guide is written for anyone installing OpenAM policy agents to interface with supported Java EE application containers.
This guide covers procedures that you theoretically perform only once per version. This guide aims to provide you with at least some idea of what happens behind the scenes when you perform the steps.
You do not need to be an OpenAM wizard to learn something from this guide, though a background in access management and maintaining web application software can help. You do need some background in managing services on your operating systems and in your application servers. You can nevertheless get started with this guide, and then learn more as you go along.
Most examples in the documentation are created in GNU/Linux or Mac OS X
operating environments.
If distinctions are necessary between operating environments,
examples are labeled with the operating environment name in parentheses.
To avoid repetition file system directory names are often given
only in UNIX format as in /path/to/server,
even if the text applies to C:\path\to\server as well.
Absolute path names usually begin with the placeholder
/path/to/.
This path might translate to /opt/,
C:\Program Files\, or somewhere else on your system.
Command-line, terminal sessions are formatted as follows:
$ echo $JAVA_HOME
/path/to/jdk
Command output is sometimes formatted for narrower, more readable output even though formatting parameters are not shown in the command.
Program listings are formatted as follows:
class Test {
    public static void main(String [] args)  {
        System.out.println("This is a program listing.");
    }
}ForgeRock publishes comprehensive documentation online:
The ForgeRock Knowledge Base offers a large and increasing number of up-to-date, practical articles that help you deploy and manage ForgeRock software.
While many articles are visible to community members, ForgeRock customers have access to much more, including advanced information for customers using ForgeRock software in a mission-critical capacity.
ForgeRock product documentation, such as this document, aims to be technically accurate and complete with respect to the software documented. It is visible to everyone and covers all product features and examples of how to use them.
The ForgeRock.org site has links to source code for ForgeRock open source software, as well as links to the ForgeRock forums and technical blogs.
If you are a ForgeRock customer, raise a support ticket instead of using the forums. ForgeRock support professionals will get in touch to help you.
OpenAM Java EE policy agents provide medium touch integration for web applications running in supported web application containers. Java EE policy agents require some configuration and code changes to deployed web applications. This chapter covers what Java EE policy agents do and how they work.
A policy agent enforces policy for OpenAM. A J2EE policy agent installed in a web application container intercepts requests from users trying to access resources in protected web applications. The agent denies access until the user has authorization from OpenAM to access a particular resource.
Imagine that a user attempts to access a protected resource before having authenticated by pointing her browser to a page in a protected application. Assume that you have configured OpenAM to protect the web application. You have therefore installed the J2EE agent in the web container, and also configured the protected web application to use the agent filter, thus sending requests through the agent. Then the J2EE policy agent intercepting her filtered browser's request finds no session token in the request, and so redirects the user's browser to the OpenAM login page for authentication. After the user has successfully authenticated, OpenAM sets a session token in a browser cookie, and redirects her browser back to the page she tried to access initially.
When the user's browser reiterates the request, the policy agent again checks that the request has a session token, finds a session token this time, and validates the session token with OpenAM. Given the valid session token, the policy agent gets a policy decision from OpenAM concerning whether the user can access the page. If OpenAM's Policy Service determines that the user is allowed to access the page, OpenAM responds to the policy agent that access should be granted. The J2EE policy agent then permits the page to be returned to the user's browser.
You can also configure J2EE agent filters to work in tandem with the J2EE security policies defined alongside the policies for OpenAM. In this case the filter ensures the J2EE security policy grants access to the resource before the agent gets a decision from OpenAM.
The following diagram shows how the pieces fit together when a Java EE client accesses a resource protected by a policy agent. This diagram is simplified to show only the essential principals rather than to describe every possible case.
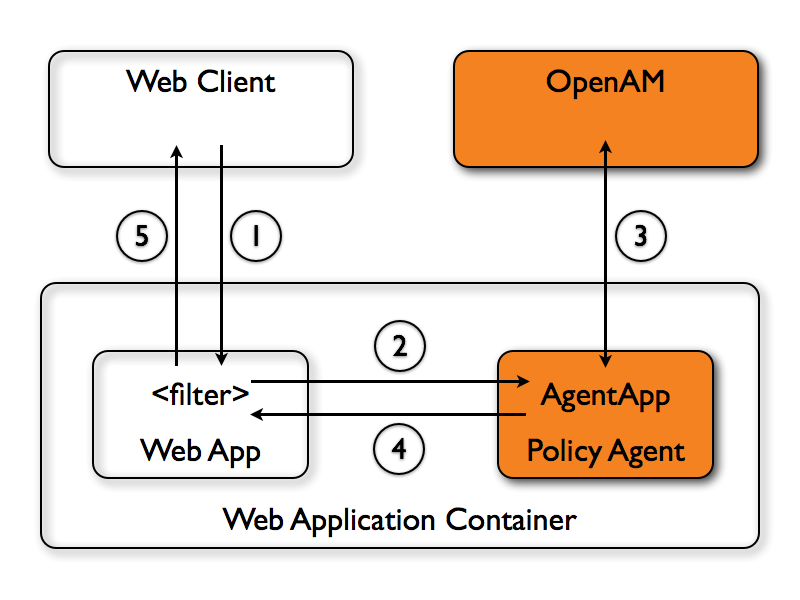
A Java EE policy agent is a web application installed in the web application container. Other applications have filters configured to call the policy agent when a client requests access to a protected resource in the application.
The web client requests access to a protected resource.
The web application filter settings put the request through the policy agent that protects the resource according to OpenAM policy. The policy agent acts to enforce policy, whereas the policy configuration and decisions are handled by OpenAM.
The policy agent communicates with OpenAM to get the policy decision to enforce.
For a resource to which OpenAM approves access, the policy agent allows access.
The web application returns the requested access to the web client.
You install J2EE policy agents in the web application containers serving web applications that you want to protect. J2EE policy agents are themselves web applications running in the container whose applications you configure OpenAM to protect. By default, the J2EE policy agent has only enough configuration at installation time to connect to OpenAM in order to get the rest of its configuration from the OpenAM configuration store. With nearly all configuration stored centrally, you can manage policy agents centrally from the OpenAM console.[1]
For each web application that you protect, you also configure at least
the deployment descriptor to filter requests through the policy agent.
ForgeRock delivers the J2EE policy agents with a sample application under
j2ee_agents/container_agent/sampleapp/
demonstrating the configuration to use to protect your web application.
You configure J2EE policy agents per OpenAM realm. Thus to access centralized configuration, you select Access Control > Realm Name > Agents > J2EE > Agent Name. J2EE policy agent configuration is distinct from policy configuration. The only policy-like configuration that you apply to J2EE policy agents is indicating which URLs in the web server can be ignored (not enforced URLs) and which client IP address are exempt from policy enforcement (not enforced IPs).
For each aspect of J2EE policy agent configuration, you can configure the policy agent through the OpenAM console during testing, and then export the resulting configuration in order to script configuration in your production environment.
This chapter covers installation of the policy agent for Apache Tomcat.
Make sure OpenAM is installed and running, and that you can contact OpenAM from the system running the policy agent. Next, create a profile for your policy agent as described in the Administration Guide section on Creating Agent Profiles. To protect resources with the agent also create at least one policy as described in the section on Configuring Policies. Consider creating a simple policy, such as a policy that allows only authenticated users to access your resources, in order to test your policy agent after installation.
You must install Apache Tomcat before you install the policy agent, and you must stop the server during installation.
All of the Tomcat scripts must be present in
$CATALINA_HOME/bin. The Tomcat Windows executable
installer does not include the scripts, for example. If the scripts
are not present in your installation, copy the contents of the
bin directory from a .zip download of Tomcat of
the same version as the one you installed.
You must install a supported version of the Java runtime environment.
Please review the
Release Notes for the currently supported version
of Java, and set the JAVA_HOME environment
variable accordingly. The policy agent installer requires Java.
$ echo $JAVA_HOME
/path/to/java
$ which java
/usr/bin/java
Go to Obtaining OpenAM Software to determine which version of the agent to download and download the agent. Also verify the checksum of the file you download against the checksum posted on the download page.
Unzip the file in the directory where you plan to install the J2EE policy agent. The agent you install stores its configuration and logs under this directory.
When you unzip the policy agent, you find the following directories
under the j2ee_agents/tomcat_v6_agent directory.
binThe installation and configuration program, agentadmin.
configConfiguration templates used by the agentadmin command during installation
dataNot used
etcConfiguration templates used during installation
installer-logsLocation for log files written during installation
libShared libraries used by the J2EE policy agent
localeProperty files used by the installation program
sampleappSample application that demonstrates key features of the policy agent. Wait until you have installed the agent to deploy this.
Complete the following procedures to install the policy agent.
Regardless of whether you store configurations centrally in OpenAM or locally with your agents, the agent requires a profile so that it can connect to and communicate with OpenAM.
In the OpenAM console, browse to Access Control > Realm Name > Agents > J2EE, and then click the New... button in the Agent table.
Complete the web form using the following hints.
- Name
The name for the agent profile used when you install the agent
- Password
Password the agent uses to authenticate to OpenAM
- Configuration
Centralized configurations are stored in the OpenAM configuration store. You can manage the centralized configuration through the OpenAM console. Local configurations are stored in a file alongside the agent.
- Server URL
The full URL to an OpenAM instance, or if OpenAM is deployed in a site configuration (behind a load balancer) then the site URL
In centralized configuration mode, the Server URL is used to populate the agent profile for services such as Login, Logout, Naming, and Cross Domain SSO.
- Agent URL
The URL to the J2EE application that the agent protects
In centralized configuration mode, the Agent URL is used to populate the Agent Profile for services such as notifications.
Create a text file containing only the password.
$ echo password > /tmp/pwd.txt
Protect the password file you create as appropriate for your operating system.
$ chmod 400 /tmp/pwd.txt
Shut down the Tomcat server where you plan to install the agent.
$ /path/to/tomcat/bin/shutdown.sh
Make sure OpenAM is running.
Run agentadmin --install to install the agent.
$ /path/to/j2ee_agents/tomcat_v6_agent/bin/agentadmin --install
...
-----------------------------------------------
SUMMARY OF YOUR RESPONSES
-----------------------------------------------
Tomcat Server Config Directory : /path/to/tomcat/conf
OpenAM server URL : http://openam.example.com:8080/openam
$CATALINA_HOME environment variable : /path/to/tomcat
Tomcat global web.xml filter install : true
Agent URL : http://www.example.com:8080/agentapp
Agent Profile name : Tomcat Agent
Agent Profile Password file name : /tmp/pwd.txt

...
SUMMARY OF AGENT INSTALLATION
-----------------------------
Agent instance name: Agent_001
Agent Bootstrap file location:
/path/to/j2ee_agents/tomcat_v6_agent/Agent_001/config/
 OpenSSOAgentBootstrap.properties
Agent Configuration file location
/path/to/j2ee_agents/tomcat_v6_agent/Agent_001/config/
 OpenSSOAgentConfiguration.properties
Agent Audit directory location:
/path/to/j2ee_agents/tomcat_v6_agent/Agent_001/logs/audit
Agent Debug directory location:
/path/to/j2ee_agents/tomcat_v6_agent/Agent_001/logs/debug


Install log file location:
/path/to/j2ee_agents/tomcat_v6_agent/installer-logs/audit/install.log
...
Upon successful completion, the installer has added the agent configuration to Tomcat's configuration, and also set up configuration and log directories for the agent.
Note
If the agent is in a different domain than the server, refer to Administration Guide procedure, Configuring Cross-Domain Single Sign On.
Take note of the configuration files and log locations.
Each agent instance that you install on the system has its own numbered configuration and logs directory. The first agent's configuration and logs are thus located under the directory
j2ee_agents/tomcat_v6_agent/Agent_001/.config/OpenSSOAgentBootstrap.propertiesUsed to bootstrap the J2EE policy agent, allowing the agent to connect to OpenAM and download its configuration
config/OpenSSOAgentConfiguration.propertiesOnly used if you configured the J2EE policy agent to use local configuration
logs/audit/Operational audit log directory, only used if remote logging to OpenAM is disabled
logs/debug/Debug directory where the
debug.outdebug file resides. Useful in troubleshooting policy agent issues.
If your policy agent configuration is not in the top-level realm (/), then you must edit config/OpenSSOAgentBootstrap.properties to identify the sub-realm that has your policy agent configuration. Find com.sun.identity.agents.config.organization.name and change the / to the path to your policy agent profile. This allows the policy agent to properly identify itself to the OpenAM server.
(Optional) If you choose not to let the installer install a global filter in Tomcat's
web.xml, then you must add the filter manually for each protected application'sweb.xmlconfiguration, following the opening <web-app> tag. The file for the sample application delivered with the agent is/path/to/j2ee_agents/tomcat_v6_agent/sampleapp/etc/web.xml.<filter> <filter-name>Agent</filter-name> <display-name>Agent</display-name> <description>OpenAM Policy Agent Filter</description> <filter-class>com.sun.identity.agents.filter.AmAgentFilter</filter-class> </filter> <filter-mapping> <filter-name>Agent</filter-name> <url-pattern>/*</url-pattern> <dispatcher>REQUEST</dispatcher> <dispatcher>INCLUDE</dispatcher> <dispatcher>FORWARD</dispatcher> <dispatcher>ERROR</dispatcher> </filter-mapping>Add the agent application web archive to Tomcat's webapps.
$ cp /path/to/j2ee_agents/tomcat_v6_agent/etc/agentapp.war /path/to/tomcat/webapps/
Start the Tomcat server where you installed the agent.
$ /path/to/tomcat/bin/startup.sh
Check the Tomcat server log after you start the server to make sure startup completed successfully.
$ tail -n 1 /path/to/tomcat/logs/catalina.out
INFO: Server startup in 810 ms
Check the
debug.outdebug log to verify that the agent did start up.$ tail -n 7 /path/to/j2ee_agents/tomcat_v6_agent/Agent_001/logs/debug/debug.out ======================================= Version: ... Revision: 3111 Build Date: 20120915 Build Machine: builds.forgerock.org =======================================
(Optional) If you have a policy configured, you can test your policy agent. For example, try to browse to a resource that your policy agent protects. You should be redirected to OpenAM to authenticate, for example as user
demo, passwordchangeit. After you authenticate, OpenAM then redirects you back to the resource you tried to access.
When performing a scripted, silent installation, use agentadmin --install --saveResponse response-file to create a response file for scripted installation. Then install silently using agentadmin --install --useResponse response-file.
Shut down the Tomcat server before you uninstall the policy agent.
$ /path/to/tomcat/bin/shutdown.sh
To remove the J2EE policy agent, use agentadmin --uninstall. You must provide the Tomcat server configuration directory location.
Uninstall does not remove the agent instance directory, but you can do so manually after removing the agent configuration from Tomcat.
This chapter covers installation of the policy agent for GlassFish.
Make sure OpenAM is installed and running, and that you can contact OpenAM from the system running the policy agent. Next, create a profile for your policy agent as described in the Administration Guide section on Creating Agent Profiles. To protect resources with the agent also create at least one policy as described in the section on Configuring Policies. Consider creating a simple policy, such as a policy that allows only authenticated users to access your resources, in order to test your policy agent after installation.
You must install GlassFish before you install the policy agent, and you must stop the domain with applications to protect during installation. Policy agents support GlassFish v2, v3 (at least 3.1).
You must install a supported version of the Java runtime environment.
Please review the
Release Notes for the currently supported version
of Java, and set the JAVA_HOME environment
variable accordingly.
$ echo $JAVA_HOME
/path/to/java
$ which java
/usr/bin/java
Go to Obtaining OpenAM Software to determine which version of the agent to download and download the agent. Also verify the checksum of the file you download against the checksum posted on the download page.
Unzip the file in the directory where you plan to install the J2EE policy agent. The agent you install stores its configuration and logs under this directory.
When you unzip the policy agent, you find the following directories
under the j2ee_agents/appserver_v10_agent directory.
binThe installation and configuration program, agentadmin.
configConfiguration templates used by the agentadmin command during installation
dataNot used
etcAgent web application used during installation
installer-logsLocation for log files written during installation
libShared libraries used by the J2EE policy agent
localeProperty files used by the installation program
sampleappSample application that demonstrates key features of the policy agent. Wait until you have installed the agent to deploy this.
Complete the following procedures to install the policy agent.
Regardless of whether you store configurations centrally in OpenAM or locally with your agents, the agent requires a profile so that it can connect to and communicate with OpenAM.
In the OpenAM console, browse to Access Control > Realm Name > Agents > J2EE, and then click the New... button in the Agent table.
Complete the web form using the following hints.
- Name
The name for the agent profile used when you install the agent
- Password
Password the agent uses to authenticate to OpenAM
- Configuration
Centralized configurations are stored in the OpenAM configuration store. You can manage the centralized configuration through the OpenAM console. Local configurations are stored in a file alongside the agent.
- Server URL
The full URL to an OpenAM instance, or if OpenAM is deployed in a site configuration (behind a load balancer) then the site URL
In centralized configuration mode, the Server URL is used to populate the agent profile for services such as Login, Logout, Naming, and Cross Domain SSO.
- Agent URL
The URL to the J2EE agent application, such as
http://www.example.com:8080/agentappIn centralized configuration mode, the Agent URL is used to populate the Agent Profile for services such as notifications.
Create a text file containing only the password.
$ echo password > /tmp/pwd.txt
Protect the password file you create as appropriate for your operating system.
$ chmod 400 /tmp/pwd.txt
Shut down the GlassFish domain where you plan to install the agent.
$ /path/to/glassfish/bin/asadmin stop-domain domain1
Waiting for the domain to stop ....
Command stop-domain executed successfully.
Make sure OpenAM is running.
Run agentadmin --install to install the agent.
$ /path/to/j2ee_agents/appserver_v10_agent/bin/agentadmin --install
...
-----------------------------------------------
SUMMARY OF YOUR RESPONSES
-----------------------------------------------
Application Server Config Directory :
/path/to/glassfish/glassfish/domains/domain1/config
Application Server Instance name : server
OpenAM server URL : http://openam.example.com:8080/openam
Agent URL : http://www.example.com:8080/agentapp
Agent Profile name : GlassFish Agent
Agent Profile Password file name : /tmp/pwd.txt

...
SUMMARY OF AGENT INSTALLATION
-----------------------------
Agent instance name: Agent_001
Agent Bootstrap file location:
/path/to/j2ee_agents/appserver_v10_agent/Agent_001/config/
 OpenSSOAgentBootstrap.properties
Agent Configuration file location
/path/to/j2ee_agents/appserver_v10_agent/Agent_001/config/
 OpenSSOAgentConfiguration.properties
Agent Audit directory location:
/path/to/j2ee_agents/appserver_v10_agent/Agent_001/logs/audit
Agent Debug directory location:
/path/to/j2ee_agents/appserver_v10_agent/Agent_001/logs/debug


Install log file location:
/path/to/j2ee_agents/appserver_v10_agent/installer-logs/audit/install.log
...
Upon successful completion, the installer has updated the GlassFish configuration, and also set up configuration and log directories for the agent.
Note
If the agent is in a different domain than the server, refer to Administration Guide procedure, Configuring Cross-Domain Single Sign On.
Take note of the configuration files and log locations.
Each agent instance that you install on the system has its own numbered configuration and logs directory. The first agent's configuration and logs are thus located under the directory
j2ee_agents/appserver_v10_agent/Agent_001/.config/OpenSSOAgentBootstrap.propertiesUsed to bootstrap the J2EE policy agent, allowing the agent to connect to OpenAM and download its configuration
config/OpenSSOAgentConfiguration.propertiesOnly used if you configured the J2EE policy agent to use local configuration
logs/audit/Operational audit log directory, only used if remote logging to OpenAM is disabled
logs/debug/Debug directory where the debug file resides. Useful in troubleshooting policy agent issues.
If your policy agent configuration is not in the top-level realm (/), then you must edit config/OpenSSOAgentBootstrap.properties to identify the sub-realm that has your policy agent configuration. Find com.sun.identity.agents.config.organization.name and change the / to the path to your policy agent profile. This allows the policy agent to properly identify itself to the OpenAM server.
To protect a web application, you must add the following filter to the application's
web.xmlconfiguration, following the opening <web-app> tag. The file for the sample application delivered with the agent is/path/to/j2ee_agents/appserver_v10_agent/sampleapp/etc/web.xml.<filter> <filter-name>Agent</filter-name> <display-name>Agent</display-name> <description>OpenAM Policy Agent Filter</description> <filter-class>com.sun.identity.agents.filter.AmAgentFilter</filter-class> </filter> <filter-mapping> <filter-name>Agent</filter-name> <url-pattern>/*</url-pattern> <dispatcher>REQUEST</dispatcher> <dispatcher>INCLUDE</dispatcher> <dispatcher>FORWARD</dispatcher> <dispatcher>ERROR</dispatcher> </filter-mapping>Start the GlassFish domain where you installed the agent.
$ /path/to/glassfish/bin/asadmin start-domain domain1
Waiting for domain1 to start .....
Successfully started the domain : domain1
domain  Location: /path/to/glassfish/glassfish/domains/domain1
Log File: /path/to/glassfish/glassfish/domains/domain1/logs/server.log
Admin Port: 4848
Command start-domain executed successfully.
Deploy the agent web application.
cd /path/to/glassfish/glassfish/bin/asadmin
    $ deploy --name agentapp --contextroot /agentapp
 /path/to/j2ee_agents/appserver_v10_agent/etc/agentapp.war
Check your work by quickly deploying the sample application,
/path/to/j2ee_agents/appserver_v10_agent/sampleapp/dist/agentsample.earthrough the GlassFish administration console, and verifying that the agent redirects to OpenAM for authentication and that access is denied after successful login to OpenAM. (Access is denied because when no policy exists for a protected resource the default decision for OpenAM is to deny all access.)
When performing a scripted, silent installation, use agentadmin --install --saveResponse response-file to create a response file for scripted installation. Then install silently using agentadmin --install --useResponse response-file.
Shut down the GlassFish domain before you uninstall the policy agent.
$ /path/to/glassfish/bin/asadmin stop-domain domain1
    Waiting for the domain to stop ....
    Command stop-domain executed successfully.
To remove the J2EE policy agent, use agentadmin --uninstall. You must provide the GlassFish configuration directory location, and the instance name.
Uninstall does not remove the agent instance directory, but you can do so manually after removing the agent configuration from GlassFish.
This chapter covers installation of the policy agent for JBoss Application Server.
Make sure OpenAM is installed and running, and that you can contact OpenAM from the system running the policy agent. Next, create a profile for your policy agent as described in the Administration Guide section on Creating Agent Profiles. To protect resources with the agent also create at least one policy as described in the section on Configuring Policies. Consider creating a simple policy, such as a policy that allows only authenticated users to access your resources, in order to test your policy agent after installation.
You must install JBoss before you install the policy agent, and you must stop the server during installation.
You must install a supported version of the Java runtime environment.
Please review the
Release Notes for the currently supported version
of Java, and set the JAVA_HOME environment
variable accordingly.
$ echo $JAVA_HOME
/path/to/java
$ which java
/usr/bin/java
>Go to Obtaining OpenAM Software to determine which version of the agent to download and download the agent. Also verify the checksum of the file you download against the checksum posted on the download page.
Unzip the file in the directory where you plan to install the J2EE policy agent. The agent you install stores its configuration and logs under this directory.
When you unzip the policy agent,
you find the following directories under the
j2ee_agents/jboss_version_agent
directory, where version depends
on the version of JBoss that the policy agent supports.
binThe installation and configuration program, agentadmin.
configConfiguration templates used by the agentadmin command during installation
dataNot used
etcAgent web application and configuration templates used during installation
installer-logsLocation for log files written during installation
libShared libraries used by the J2EE policy agent
localeProperty files used by the installation program
sampleappSample application that demonstrates key features of the policy agent. Wait until you have installed the agent to deploy this.
Complete the following procedures to install the policy agent.
Regardless of whether you store configurations centrally in OpenAM or locally with your agents, the agent requires a profile so that it can connect to and communicate with OpenAM.
In the OpenAM console, browse to Access Control > Realm Name > Agents > J2EE, and then click the New... button in the Agent table.
Complete the web form using the following hints.
- Name
The name for the agent profile used when you install the agent
- Password
Password the agent uses to authenticate to OpenAM
- Configuration
Centralized configurations are stored in the OpenAM configuration store. You can manage the centralized configuration through the OpenAM console. Local configurations are stored in a file alongside the agent.
- Server URL
The full URL to an OpenAM instance, or if OpenAM is deployed in a site configuration (behind a load balancer) then the site URL
In centralized configuration mode, the Server URL is used to populate the agent profile for services such as Login, Logout, Naming, and Cross Domain SSO.
- Agent URL
The URL to the J2EE agent application, such as
http://www.example.com:8080/agentappIn centralized configuration mode, the Agent URL is used to populate the Agent Profile for services such as notifications.
Create a text file containing only the password.
$ echo password > /tmp/pwd.txt
Protect the password file you create as appropriate for your operating system.
$ chmod 400 /tmp/pwd.txt
Shut down the JBoss server where you plan to install the agent.
Make sure OpenAM is running.
Run agentadmin --install to install the agent.
The following excerpt shows installation of the JBoss 4 & 5 policy agent.
$ /path/to/j2ee_agents/jboss_v42_agent/bin/agentadmin --install
...
-----------------------------------------------
SUMMARY OF YOUR RESPONSES
-----------------------------------------------
JBoss Server Config Directory : /path/to/jboss/server/default/conf
JBoss Server Home Directory : /path/to/jboss
OpenAM server URL : http://openam.example.com:8080/openam
Agent URL : http://www.example.com:8080/agentapp
Agent Profile name : JBoss Agent
Agent Profile Password file name : /tmp/pwd.txt
Agent permissions gets added to java permissions policy file : false

...
SUMMARY OF AGENT INSTALLATION
-----------------------------
Agent instance name: Agent_001
Agent Bootstrap file location:
/path/to/j2ee_agents/jboss_v42_agent/Agent_001/config/
 OpenSSOAgentBootstrap.properties
Agent Configuration file location
/path/to/j2ee_agents/jboss_v42_agent/Agent_001/config/
 OpenSSOAgentConfiguration.properties
Agent Audit directory location:
/path/to/j2ee_agents/jboss_v42_agent/Agent_001/logs/audit
Agent Debug directory location:
/path/to/j2ee_agents/jboss_v42_agent/Agent_001/logs/debug


Install log file location:
/path/to/j2ee_agents/jboss_v42_agent/installer-logs/audit/install.log
...
Upon successful completion, the installer has updated the JBoss configuration, created a
JBOSS_HOME/bin/setAgentClasspathdefault.shscript, added the agent web application underJBOSS_HOME/server/default/deploy/, and also set up configuration and log directories for the agent.Note
If the agent is in a different domain than the server, refer to Administration Guide procedure, Configuring Cross-Domain Single Sign On.
Take note of the configuration files and log locations.
Each agent instance that you install on the system has its own numbered configuration and logs directory. The first agent's configuration and logs are thus located under the directory
j2ee_agents/jboss_v42_agent/Agent_001/.config/OpenSSOAgentBootstrap.propertiesUsed to bootstrap the J2EE policy agent, allowing the agent to connect to OpenAM and download its configuration
config/OpenSSOAgentConfiguration.propertiesOnly used if you configured the J2EE policy agent to use local configuration
logs/audit/Operational audit log directory, only used if remote logging to OpenAM is disabled
logs/debug/Debug directory where the debug file resides. Useful in troubleshooting policy agent issues.
If your policy agent configuration is not in the top-level realm (/), then you must edit config/OpenSSOAgentBootstrap.properties to identify the sub-realm that has your policy agent configuration. Find com.sun.identity.agents.config.organization.name and change the / to the path to your policy agent profile. This allows the policy agent to properly identify itself to the OpenAM server.
To protect a web application, you must add the following filter to the application's
web.xmlconfiguration, following the opening <web-app> tag. The file for the sample application delivered with the agent is/path/to/j2ee_agents/jboss_v42_agent/sampleapp/etc/web.xml.<filter> <filter-name>Agent</filter-name> <display-name>Agent</display-name> <description>OpenAM Policy Agent Filter</description> <filter-class>com.sun.identity.agents.filter.AmAgentFilter</filter-class> </filter> <filter-mapping> <filter-name>Agent</filter-name> <url-pattern>/*</url-pattern> <dispatcher>REQUEST</dispatcher> <dispatcher>INCLUDE</dispatcher> <dispatcher>FORWARD</dispatcher> <dispatcher>ERROR</dispatcher> </filter-mapping>You must also add the following security domain specification to the application's
jboss.xmlandjboss-web.xmlconfiguration files.<security-domain>java:/jaas/AMRealm</security-domain>
Render the script to set the agent classpath executable.
$ chmod +x $JBOSS_HOME/bin/setAgentClasspathdefault.sh
Open the
JBOSS_HOME/bin/run.shscript for editing, and locate the following code block.if [ "x$JBOSS_CLASSPATH" = "x" ]; then JBOSS_CLASSPATH="$JBOSS_BOOT_CLASSPATH" else JBOSS_CLASSPATH="$JBOSS_CLASSPATH:$JBOSS_BOOT_CLASSPATH" fi if [ "x$JAVAC_JAR_FILE" != "x" ]; then JBOSS_CLASSPATH="$JBOSS_CLASSPATH:$JAVAC_JAR_FILE" fiEdit the
JBOSS_HOME/bin/run.shscript to set the classpath needed for the agent, by adding these lines after the code block you located in the previous step.if [ -r "$JBOSS_HOME/bin/setAgentClasspathdefault.sh" ]; then . $JBOSS_HOME/bin/setAgentClasspathdefault.sh fiStart the JBoss server where you installed the agent.
$ cd $JBOSS_HOME ; ./bin/run.sh -b 0.0.0.0
...
16:30:31,172 INFO  [ServerImpl] JBoss ... Started in 1m:44s:759ms
(Optional) If you have a policy configured, you can test your policy agent. For example, try to browse to a resource that your policy agent protects. You should be redirected to OpenAM to authenticate, for example as user
demo, passwordchangeit. After you authenticate, OpenAM then redirects you back to the resource you tried to access.
When performing a scripted, silent installation, use agentadmin --install --saveResponse response-file to create a response file for scripted installation. Then install silently using agentadmin --install --useResponse response-file.
Shut down the JBoss server before you uninstall the policy agent.
To remove the J2EE policy agent, use agentadmin --uninstall. You must provide the JBoss configuration directory location.
Uninstall does not remove the agent instance directory, but you can do so manually after removing the agent configuration from JBoss.
This chapter covers installation of the policy agent for Jetty.
Make sure OpenAM is installed and running, and that you can contact OpenAM from the system running the policy agent. Next, create a profile for your policy agent as described in the Administration Guide section on Creating Agent Profiles. To protect resources with the agent also create at least one policy as described in the section on Configuring Policies. Consider creating a simple policy, such as a policy that allows only authenticated users to access your resources, in order to test your policy agent after installation.
You must install Jetty before you install the policy agent, and you must stop the server during installation.
You must install a supported version of the Java runtime environment.
Please review the
Release Notes for the currently supported version
of Java, and set the JAVA_HOME environment
variable accordingly.
$ echo $JAVA_HOME
/path/to/java
$ which java
/usr/bin/java
Go to Obtaining OpenAM Software to determine which version of the agent to download and download the agent. Also verify the checksum of the file you download against the checksum posted on the download page.
Note
Command line examples in this chapter show Jetty accessed remotely. If
you are following the examples and have issues accessing Jetty remotely,
you might have to change the test filter settings in
/path/to/jetty/webapps/test/WEB-INF/web.xml.
<filter>
 <filter-name>TestFilter</filter-name>
 <filter-class>com.acme.TestFilter</filter-class>
 <init-param>
  <param-name>remote</param-name>
  <param-value>true</param-value> <!-- default: false -->
 </init-param>
</filter>
Unzip the file in the directory where you plan to install the J2EE policy agent. The agent you install stores its configuration and logs under this directory.
When you unzip the policy agent, you find the following directories
under the j2ee_agents/jetty_v61_agent directory.
binThe installation and configuration program, agentadmin.
configConfiguration templates used by the agentadmin command during installation
dataNot used
etcAgent web application used during installation
installer-logsLocation for log files written during installation
libShared libraries used by the J2EE policy agent
localeProperty files used by the installation program
sampleappSample application that demonstrates key features of the policy agent. Wait until you have installed the agent to deploy this.
Complete the following procedures to install the policy agent.
Regardless of whether you store configurations centrally in OpenAM or locally with your agents, the agent requires a profile so that it can connect to and communicate with OpenAM.
In the OpenAM console, browse to Access Control > Realm Name > Agents > J2EE, and then click the New... button in the Agent table.
Complete the web form using the following hints.
- Name
The name for the agent profile used when you install the agent
- Password
Password the agent uses to authenticate to OpenAM
- Configuration
Centralized configurations are stored in the OpenAM configuration store. You can manage the centralized configuration through the OpenAM console. Local configurations are stored in a file alongside the agent.
- Server URL
The full URL to an OpenAM instance, or if OpenAM is deployed in a site configuration (behind a load balancer) then the site URL
In centralized configuration mode, the Server URL is used to populate the agent profile for services such as Login, Logout, Naming, and Cross Domain SSO.
- Agent URL
The URL to the J2EE agent application, such as
http://www.example.com:8080/agentappIn centralized configuration mode, the Agent URL is used to populate the Agent Profile for services such as notifications.
Create a text file containing only the password.
$ echo password > /tmp/pwd.txt
Protect the password file you create as appropriate for your operating system.
$ chmod 400 /tmp/pwd.txt
Shut down the Jetty server where you plan to install the agent.
Make sure OpenAM is running.
Run agentadmin --install to install the agent.
$ /path/to/j2ee_agents/jetty_v61_agent/bin/agentadmin --install
...
-----------------------------------------------
SUMMARY OF YOUR RESPONSES
-----------------------------------------------
Jetty Server Config Directory : /path/to/jetty/etc
OpenAM server URL : http://openam.example.com:8080/openam
Jetty installation directory. : /path/to/jetty
Agent URL : http://www.example.com:8080/agentapp
Agent Profile name : Jetty Agent
Agent Profile Password file name : /tmp/pwd.txt

...
SUMMARY OF AGENT INSTALLATION
-----------------------------
Agent instance name: Agent_001
Agent Bootstrap file location:
/path/to/j2ee_agents/jetty_v61_agent/Agent_001/config/
 OpenSSOAgentBootstrap.properties
Agent Configuration file location
/path/to/j2ee_agents/jetty_v61_agent/Agent_001/config/
 OpenSSOAgentConfiguration.properties
Agent Audit directory location:
/path/to/j2ee_agents/jetty_v61_agent/Agent_001/logs/audit
Agent Debug directory location:
/path/to/j2ee_agents/jetty_v61_agent/Agent_001/logs/debug


Install log file location:
/path/to/j2ee_agents/jetty_v61_agent/installer-logs/audit/install.log
...
Upon successful completion, the installer has updated Jetty's
start.jarto reference the agent, set up the agent web application, and also set up configuration and log directories for the agent.Note
If the agent is in a different domain than the server, refer to Administration Guide procedure, Configuring Cross-Domain Single Sign On.
Take note of the configuration files and log locations.
Each agent instance that you install on the system has its own numbered configuration and logs directory. The first agent's configuration and logs are thus located under the directory
j2ee_agents/jetty_v61_agent/Agent_001/.config/OpenSSOAgentBootstrap.propertiesUsed to bootstrap the J2EE policy agent, allowing the agent to connect to OpenAM and download its configuration
config/OpenSSOAgentConfiguration.propertiesOnly used if you configured the J2EE policy agent to use local configuration
logs/audit/Operational audit log directory, only used if remote logging to OpenAM is disabled
logs/debug/Debug directory where the
debug.outdebug file resides. Useful in troubleshooting policy agent issues.
If your policy agent configuration is not in the top-level realm (/), then you must edit config/OpenSSOAgentBootstrap.properties to identify the sub-realm that has your policy agent configuration. Find com.sun.identity.agents.config.organization.name and change the / to the path to your policy agent profile. This allows the policy agent to properly identify itself to the OpenAM server.
To protect a web application, you must add the following filter to the application's
web.xmlconfiguration, following the opening <web-app> tag. The file for the sample application delivered with the agent is/path/to/j2ee_agents/jetty_v61_agent/sampleapp/etc/web.xml.<filter> <filter-name>Agent</filter-name> <display-name>Agent</display-name> <description>OpenAM Policy Agent Filter</description> <filter-class>com.sun.identity.agents.filter.AmAgentFilter</filter-class> </filter> <filter-mapping> <filter-name>Agent</filter-name> <url-pattern>/*</url-pattern> <dispatcher>REQUEST</dispatcher> <dispatcher>INCLUDE</dispatcher> <dispatcher>FORWARD</dispatcher> <dispatcher>ERROR</dispatcher> </filter-mapping>Start the Jetty server where you installed the agent.
$ cd /path/to/jetty ; java -jar start.jar
...
2011-09-15 12:49:55.469:INFO::Extract file:/path/to/jetty/webapps/agentapp.war
...
2011-09-15 12:50:14.163:INFO::Started SelectChannelConnector@0.0.0.0:8080
(Optional) If you have a policy configured, you can test your policy agent. For example, try to browse to a resource that your policy agent protects. You should be redirected to OpenAM to authenticate, for example as user
demo, passwordchangeit. After you authenticate, OpenAM then redirects you back to the resource you tried to access.
When performing a scripted, silent installation, use agentadmin --install --saveResponse response-file to create a response file for scripted installation. Then install silently using agentadmin --install --useResponse response-file.
Shut down the Jetty server before you uninstall the policy agent.
To remove the J2EE policy agent, use agentadmin --uninstall. You must provide the Jetty configuration directory location.
Uninstall does not remove the agent instance directory, but you can do so manually after removing the agent configuration from Jetty.
This chapter covers installation of the policy agent for Oracle WebLogic.
Make sure OpenAM is installed and running, and that you can contact OpenAM from the system running the policy agent. Next, create a profile for your policy agent as described in the Administration Guide section on Creating Agent Profiles. To protect resources with the agent also create at least one policy as described in the section on Configuring Policies. Consider creating a simple policy, such as a policy that allows only authenticated users to access your resources, in order to test your policy agent after installation.
You must install WebLogic before you install the policy agent, and you must stop the server during installation.
You must install a supported version of the Java runtime environment.
Please review the
Release Notes for the currently supported version
of Java, and set the JAVA_HOME environment
variable accordingly.
$ echo $JAVA_HOME
/path/to/java
$ which java
/usr/bin/java
Go to Obtaining OpenAM Software to determine which version of the agent to download and download the agent. Also verify the checksum of the file you download against the checksum posted on the download page.
Unzip the file in the directory where you plan to install the J2EE policy agent. The agent you install stores its configuration and logs under this directory.
When you unzip the policy agent, you find the following directories
under the j2ee_agents/weblogic_v10_agent directory.
binThe installation and configuration program, agentadmin.
configConfiguration templates used by the agentadmin command during installation
dataNot used
etcAgent web application and startup configuration
installer-logsLocation for log files written during installation
libShared libraries used by the J2EE policy agent
localeProperty files used by the installation program
sampleappSample application that demonstrates key features of the policy agent. Wait until you have installed the agent to deploy this.
Complete the following procedures to install the policy agent.
Regardless of whether you store configurations centrally in OpenAM or locally with your agents, the agent requires a profile so that it can connect to and communicate with OpenAM.
In the OpenAM console, browse to Access Control > Realm Name > Agents > J2EE, and then click the New... button in the Agent table.
Complete the web form using the following hints.
- Name
The name for the agent profile used when you install the agent
- Password
Password the agent uses to authenticate to OpenAM
- Configuration
Centralized configurations are stored in the OpenAM configuration store. You can manage the centralized configuration through the OpenAM console. Local configurations are stored in a file alongside the agent.
- Server URL
The full URL to an OpenAM instance, or if OpenAM is deployed in a site configuration (behind a load balancer) then the site URL
In centralized configuration mode, the Server URL is used to populate the agent profile for services such as Login, Logout, Naming, and Cross Domain SSO.
- Agent URL
The URL to the J2EE agent application, such as
http://www.example.com:8080/agentappIn centralized configuration mode, the Agent URL is used to populate the Agent Profile for services such as notifications.
Create a text file containing only the password.
$ echo password > /tmp/pwd.txt
Protect the password file you create as appropriate for your operating system.
$ chmod 400 /tmp/pwd.txt
Shut down the WebLogic server where you plan to install the agent.
Make sure OpenAM is running.
Run agentadmin --install to install the agent.
$ /path/to/j2ee_agents/weblogic_v10_agent/bin/agentadmin --install
...
-----------------------------------------------
SUMMARY OF YOUR RESPONSES
-----------------------------------------------
Startup script location :
/path/to/domain/mydomain/bin/startWebLogic.sh
WebLogic Server instance name : AdminServer
WebLogic home directory : /path/to/wlserver
OpenAM server URL : http://openam.example.com:8080/openam
Agent URL : http://www.example.com:7001/agentapp
Agent Profile name : WebLogic Agent
Agent Profile Password file name : /tmp/pwd.txt

...
SUMMARY OF AGENT INSTALLATION
-----------------------------
Agent instance name: Agent_001
Agent Bootstrap file location:
/path/to/j2ee_agents/weblogic_v10_agent/Agent_001/config/
 OpenSSOAgentBootstrap.properties
Agent Configuration file location
/path/to/j2ee_agents/weblogic_v10_agent/Agent_001/config/
 OpenSSOAgentConfiguration.properties
Agent Audit directory location:
/path/to/j2ee_agents/weblogic_v10_agent/Agent_001/logs/audit
Agent Debug directory location:
/path/to/j2ee_agents/weblogic_v10_agent/Agent_001/logs/debug


Install log file location:
/path/to/j2ee_agents/weblogic_v10_agent/installer-logs/audit/install.log
...
Upon successful completion, the installer has updated the WebLogic configuration, copied the agent libraries to WebLogic's library directory, and also set up configuration and log directories for the agent.
Note
If the agent is in a different domain than the server, refer to Administration Guide procedure, Configuring Cross-Domain Single Sign On.
Take note of the configuration files and log locations.
Each agent instance that you install on the system has its own numbered configuration and logs directory. The first agent's configuration and logs are thus located under the directory
j2ee_agents/weblogic_v10_agent/Agent_001/.config/OpenSSOAgentBootstrap.propertiesUsed to bootstrap the J2EE policy agent, allowing the agent to connect to OpenAM and download its configuration
config/OpenSSOAgentConfiguration.propertiesOnly used if you configured the J2EE policy agent to use local configuration
logs/audit/Operational audit log directory, only used if remote logging to OpenAM is disabled
logs/debug/Debug directory where the debug file resides. Useful in troubleshooting policy agent issues.
If your policy agent configuration is not in the top-level realm (/), then you must edit config/OpenSSOAgentBootstrap.properties to identify the sub-realm that has your policy agent configuration. Find com.sun.identity.agents.config.organization.name and change the / to the path to your policy agent profile. This allows the policy agent to properly identify itself to the OpenAM server.
The agent requires sourcing before it will work properly. There are two ways to source.
Manually source the file containing the policy agent environment settings for WebLogic before starting the application server.
. /path/to/setAgentEnv_AdminServer.sh
Or edit the
startWebLogic.shscript to set the sourcing needed for the agent, by adding these lines after the code block shown. Add the setAgentEnv_AdminServer.sh line to the following location in the file. The drawback to this approach is that it could be overwritten, as noted in the file.$ vi /path/to/startWebLogic.sh # Any changes to this script may be lost when adding extensions to this configuration. DOMAIN_HOME="/opt/Oracle/Middleware/user_projects/domains/base_domain" . /path/to/setAgentEnv_AdminServer.sh ${DOMAIN_HOME}/bin/startWebLogic.sh $*
Note
If the sourcing is not properly set, the following message appears.
<Error> <HTTP> <cent.example.com>
 <AdminServer> <[STANDBY] ExecuteThread: '5' for queue: 'weblogic.kernel.Default
 (self-tuning)'> <<WLS Kernel>> <><> <> <1360800613441>
 <BEA-101165> <Could not load user defined filter in web.xml:
 ServletContext@1761850405[app:agentapp module:agentapp.war path:null
 spec-version:null] com.sun.identity.agents.filter.AmAgentFilter.
 java.lang.ClassNotFoundException: com.sun.identity.agents.filter.AmAgentFilter
Start the WebLogic server.
Configure shutdown classes for the environment.
In WebLogic console, browse to Environment > Startup & Shutdown Classes.
Click Lock & Edit.
Click New.
Select the Shutdown Class option, and then click Next.
Provide the Name
Agent, and the Class Nameorg.forgerock.agents.weblogic.v10.lifecycle.ShutdownListener.Select the appropriate targets to call the shutdown class once per Java Virtual Machine, and then click Finish.
Click Activate Changes.
(Optional) Deploy the
/path/to/j2ee_agents/weblogic_v10_agent/etc/agentapp.waragent application in WebLogic.For each web application to protect, add the following filter to the application's
web.xmlconfiguration, following the opening <web-app> tag. The file for the sample application delivered with the agent is/path/to/j2ee_agents/weblogic_v10_agent/sampleapp/etc/web.xml.<filter> <filter-name>Agent</filter-name> <display-name>Agent</display-name> <description>OpenAM Policy Agent Filter</description> <filter-class>com.sun.identity.agents.filter.AmAgentFilter</filter-class> </filter> <filter-mapping> <filter-name>Agent</filter-name> <url-pattern>/*</url-pattern> <dispatcher>REQUEST</dispatcher> <dispatcher>INCLUDE</dispatcher> <dispatcher>FORWARD</dispatcher> <dispatcher>ERROR</dispatcher> </filter-mapping>You might also have to update additional configuration files. See the sample application located under
/path/to/j2ee_agents/weblogic_v10_agent/sampleappfor examples.(Optional) If you have a policy configured, you can test your policy agent. For example, try to browse to a resource that your policy agent protects. You should be redirected to OpenAM to authenticate, for example as user
demo, passwordchangeit. After you authenticate, OpenAM then redirects you back to the resource you tried to access.
When performing a scripted, silent installation, use agentadmin --install --saveResponse response-file to create a response file for scripted installation. Then install silently using agentadmin --install --useResponse response-file.
After installing WebLogic, some configuration is required before the policy agent will work.
WebLogic is unique in that it requires additional configuration after the installation is complete.
Go to the WebLogic Server Administratotion Console and login.
Click
Security realms.Click the name of the realm to use for OpenAM.
Click
Providers>Authentication.Click
Lock & Edit>New.Enter the desired type in
Type as AgentAuthenticator, provide a name, and clickOK.Click on the name of the agent authenticator you just created.
Use
OPTIONALfor the control flag and save.Click on
Providersto display the Authentication Providers Table.Click on
Default Authenticator, useOPTIONALfor the control flag, and save.Activate the changes once the default authenticator is done saving.
You will need to restart the WebLogic Server to implement the changes.
Shut down the WebLogic server before you uninstall the policy agent.
To remove the J2EE policy agent, use agentadmin --uninstall. You must provide the WebLogic configuration directory location.
Uninstall does not remove the agent instance directory, but you can do so manually after removing the agent configuration from WebLogic.
This chapter covers installation of the policy agent for IBM WebSphere.
Make sure OpenAM is installed and running, and that you can contact OpenAM from the system running the policy agent. Next, create a profile for your policy agent as described in the Administration Guide section on Creating Agent Profiles. To protect resources with the agent also create at least one policy as described in the section on Configuring Policies. Consider creating a simple policy, such as a policy that allows only authenticated users to access your resources, in order to test your policy agent after installation.
You must install WebSphere before you install the policy agent, and you must stop the server during installation.
You must install a supported version of the Java runtime environment.
Please review the
Release Notes for the currently supported version
of Java, and set the JAVA_HOME environment
variable accordingly.
$ echo $JAVA_HOME
/path/to/java
$ which java
/usr/bin/java
If you are using IBM Java, see Procedure 7.1, "To Install With IBM Java".
Go to Obtaining OpenAM Software to determine which version of the agent to download and download the agent. Also verify the checksum of the file you download against the checksum posted on the download page.
Unzip the file in the directory where you plan to install the J2EE policy agent. The agent you install stores its configuration and logs under this directory.
When you unzip the policy agent, you find the following directories
under the j2ee_agents/websphere_v61_agent directory.
binThe installation and configuration program, agentadmin.
configConfiguration templates used by the agentadmin command during installation
dataNot used
etcAgent web application that handles notifications and Cross Domain SSO
installer-logsLocation for log files written during installation
libShared libraries used by the J2EE policy agent
localeProperty files used by the installation program
sampleappSample application that demonstrates key features of the policy agent. Wait until you have installed the agent to deploy this.
The WebSphere policy agent runs with IBM Java. In order to install the policy agent using IBM Java on platforms other than AIX, you must first change the agentadmin script to use IBMJCE.
Open the file,
bin/agentadmin(bin/agentadmin.baton Windows), for editing.Edit the line specifying
AGENT_OPTSon platforms other than AIX.AGENT_OPTS="-DamKeyGenDescriptor.provider=IBMJCE \ -DamCryptoDescriptor.provider=IBMJCE -DamRandomGenProvider=IBMJCE"
Edit the last line to include the IBMJCE settings before the classpath is set.
$JAVA_VM \
 -DamCryptoDescriptor.provider=IBMJCE -DamKeyGenDescriptor.provider=IBMJCE \
 -classpath "$AGENT_CLASSPATH" $AGENT_OPTS \
 com.sun.identity.install.tools.launch.AdminToolLauncher $*
Save your work.
You can now install the WebSphere policy agent with IBM Java as described in Section 7.2, "Installing the WebSphere Policy Agent".
Complete the following procedures to install the policy agent.
Regardless of whether you store configurations centrally in OpenAM or locally with your agents, the agent requires a profile so that it can connect to and communicate with OpenAM.
In the OpenAM console, browse to Access Control > Realm Name > Agents > J2EE, and then click the New... button in the Agent table.
Complete the web form using the following hints.
- Name
The name for the agent profile used when you install the agent
- Password
Password the agent uses to authenticate to OpenAM
- Configuration
Centralized configurations are stored in the OpenAM configuration store. You can manage the centralized configuration through the OpenAM console. Local configurations are stored in a file alongside the agent.
- Server URL
The full URL to an OpenAM instance, or if OpenAM is deployed in a site configuration (behind a load balancer) then the site URL
In centralized configuration mode, the Server URL is used to populate the agent profile for services such as Login, Logout, Naming, and Cross Domain SSO.
- Agent URL
The URL to the J2EE agent application, such as
http://www.example.com:8080/agentappIn centralized configuration mode, the Agent URL is used to populate the Agent Profile for services such as notifications.
Create a text file containing only the password.
$ echo password > /tmp/pwd.txt
Protect the password file you create as appropriate for your operating system.
$ chmod 400 /tmp/pwd.txt
Shut down the WebSphere server where you plan to install the agent.
Make sure OpenAM is running.
Run agentadmin --install to install the agent.
$ /path/to/j2ee_agents/websphere_v61_agent/bin/agentadmin --install
...
-----------------------------------------------
SUMMARY OF YOUR RESPONSES
-----------------------------------------------
Instance Config Directory :
/path/to/WebSphere/AppServer/profiles/AppSrv01/config/cells/wwwNode01Cell/
 nodes/wwwNode01/servers/server1

Instance Server name : server1
WebSphere Install Root Directory : /path/to/WebSphere/AppServer
OpenAM server URL : http://openam.example.com:8080/openam
Agent URL : http://www.example.com:9080/agentapp
Agent Profile name : WebSphere Agent
Agent Profile Password file name : /tmp/pwd.txt

...
SUMMARY OF AGENT INSTALLATION
-----------------------------
Agent instance name: Agent_001
Agent Bootstrap file location:
/path/to/j2ee_agents/websphere_v61_agent/Agent_001/config/
 OpenSSOAgentBootstrap.properties
Agent Configuration file location
/path/to/j2ee_agents/websphere_v61_agent/Agent_001/config/
 OpenSSOAgentConfiguration.properties
Agent Audit directory location:
/path/to/j2ee_agents/websphere_v61_agent/Agent_001/logs/audit
Agent Debug directory location:
/path/to/j2ee_agents/websphere_v61_agent/Agent_001/logs/debug


Install log file location:
/path/to/j2ee_agents/websphere_v61_agent/installer-logs/audit/install.log
...
Upon successful completion, the installer has updated the WebSphere configuration, copied the agent libraries to WebSphere's external library directory, and also set up configuration and log directories for the agent.
Note
If the agent is in a different domain than the server, refer to Administration Guide procedure, Configuring Cross-Domain Single Sign On.
Take note of the configuration files and log locations.
Each agent instance that you install on the system has its own numbered configuration and logs directory. The first agent's configuration and logs are thus located under the directory
j2ee_agents/websphere_v61_agent/Agent_001/.config/OpenSSOAgentBootstrap.propertiesUsed to bootstrap the J2EE policy agent, allowing the agent to connect to OpenAM and download its configuration
config/OpenSSOAgentConfiguration.propertiesOnly used if you configured the J2EE policy agent to use local configuration
logs/audit/Operational audit log directory, only used if remote logging to OpenAM is disabled
logs/debug/Debug directory where the debug file resides. Useful in troubleshooting policy agent issues.
If your policy agent configuration is not in the top-level realm (/), then you must edit config/OpenSSOAgentBootstrap.properties to identify the sub-realm that has your policy agent configuration. Find com.sun.identity.agents.config.organization.name and change the / to the path to your policy agent profile. This allows the policy agent to properly identify itself to the OpenAM server.
Restart the WebSphere server.
(Optional) Deploy the
/path/to/j2ee_agents/websphere_v61_agent/etc/agentapp.waragent application in WebSphere.For each web application to protect, add the following filter to the application's
web.xmlconfiguration, following the opening <web-app> tag. The file for the sample application delivered with the agent is/path/to/j2ee_agents/websphere_v61_agent/sampleapp/etc/web.xml.<filter> <filter-name>Agent</filter-name> <display-name>Agent</display-name> <description>OpenAM Policy Agent Filter</description> <filter-class>com.sun.identity.agents.filter.AmAgentFilter</filter-class> </filter> <filter-mapping> <filter-name>Agent</filter-name> <url-pattern>/*</url-pattern> <dispatcher>REQUEST</dispatcher> <dispatcher>INCLUDE</dispatcher> <dispatcher>FORWARD</dispatcher> <dispatcher>ERROR</dispatcher> </filter-mapping>You might also have to update additional configuration files. See the sample application located under
/path/to/j2ee_agents/websphere_v61_agent/sampleappfor examples.(Optional) If you have a policy configured, you can test your policy agent. For example, try to browse to a resource that your policy agent protects. You should be redirected to OpenAM to authenticate, for example as user
demo, passwordchangeit. After you authenticate, OpenAM then redirects you back to the resource you tried to access.
When performing a scripted, silent installation, use agentadmin --install --saveResponse response-file to create a response file for scripted installation. Then install silently using agentadmin --install --useResponse response-file.
Shut down the WebSphere server before you uninstall the policy agent.
To remove the J2EE policy agent, use agentadmin --uninstall. You must provide the WebSphere configuration directory location.
Uninstall does not remove the agent instance directory, but you can do so manually after removing the agent configuration from WebSphere.
When using WebSphere Application Server Network Deployment, you must install policy agents on the Deployment Manager, on each Node Agent, and on each Application Server. Installation requires that you stop and then restart the Deployment Manager, each Node Agent, and each Application Server in the Network Deployment.
Before installation, synchronize each server configuration with the
profile saved by the Deployment Manager using the syncNode
command. After agent installation, copy the server configuration for each
node, stored in server.xml, to the corresponding
Deployment Manager profile. After you have synchronized the configurations,
you must restart the Deployment Manager for the Network Deployment.
This chapter offers solutions to issues during installation of OpenAM policy agents.
Solutions to Common Issues
This section offers solutions to common problems when installing OpenAM policy agents.
Q: | I am trying to install a policy agent, connecting to OpenAM over HTTPS, and seeing the following error. OpenAM server URL: https://openam.example.com:8443/openam WARNING: Unable to connect to OpenAM server URL. Please specify the correct OpenAM server URL by hitting the Back button (<) or if the OpenAM server URL is not started and you want to start it later, please proceed with the installation. If OpenAM server is SSL enabled and the root CA certificate for the OpenAM server certificate has been not imported into installer JVMs key store (see installer-logs/debug/Agent.log for detailed exception), import the root CA certificate and restart the installer; or continue installation without verifying OpenAM server URL. What should I do? |
A: | The Java platform includes certificates from many Certificate Authorities (CAs). If however you run your own CA, or you use self-signed certificates for HTTPS on the container where you run OpenAM, then the agentadmin command cannot trust the certificate presented during connection to OpenAM, and so cannot complete installation correctly. After setting up the container where you run OpenAM to use HTTPS, get the certificate to trust in a certificate file. The certificate you want is the that of the CA who signed the container certificate, or the certificate itself if the container certificate is self-signed. Copy the certificate file to the system where you plan to install the policy agent. Import the certificate into a trust store that you will use during policy agent installation. If you import the certificate into the default trust store for the Java platform, then the agentadmin command can recognize it without additional configuration. Export and import of self-signed certificates is demonstrated in the Administration Guide chapter on Managing Certificates. |
Q: | I am trying to install the WebSphere policy agent on Linux. The system has IBM Java. When I run agentadmin --install, the script fails to encrypt the password from the password file, ending with this message: ERROR: An unknown error has occurred (null). Please try again. What should I do? |
A: | You must edit agentadmin to use IBMJCE, and then try again. |
Q: | After installing a Java EE policy agent on WebSphere AS 7 or 8,
accessing a URL for a folder in a protected application such as
|
A: | Perform the following steps to work around the problem, by setting
the WebSphere custom property
See the IBM documentation on Setting webcontainer custom properties for additional information. |
A
- Apache Tomcat Server, Installing the Apache Tomcat Policy Agent
G
- GlassFish Server, Installing the GlassFish Policy Agent
I
- IBM WebSphere Application Server, Installing the IBM WebSphere Policy Agent
J
- JBoss Application Server, Installing the JBoss Application Server Policy Agent
- Jetty Server, Installing the Jetty Server Policy Agent
O
- Oracle WebLogic Server, Installing the Oracle WebLogic Policy Agent
T
- Troubleshooting, Troubleshooting