Guide to installing and managing OpenAM Java EE policy agents. OpenAM provides open source Authentication, Authorization, Entitlement and Federation software.
This guide shows you how to install OpenAM Java EE policy agents, as well as how to integrate with other access management software. Read the Release Notes before you get started.
This guide is written for anyone installing OpenAM policy agents to interface with supported Java EE application containers.
This guide covers procedures that you theoretically perform only once per version. This guide aims to provide you with at least some idea of what happens behind the scenes when you perform the steps.
You do not need to be an OpenAM wizard to learn something from this guide, though a background in access management and maintaining web application software can help. You do need some background in managing services on your operating systems and in your application servers. You can nevertheless get started with this guide, and then learn more as you go along.
Most examples in the documentation are created in GNU/Linux or Mac OS X
operating environments.
If distinctions are necessary between operating environments,
examples are labeled with the operating environment name in parentheses.
To avoid repetition file system directory names are often given
only in UNIX format as in /path/to/server,
even if the text applies to C:\path\to\server as well.
Absolute path names usually begin with the placeholder
/path/to/.
This path might translate to /opt/,
C:\Program Files\, or somewhere else on your system.
Command-line, terminal sessions are formatted as follows:
$ echo $JAVA_HOME
/path/to/jdk
Command output is sometimes formatted for narrower, more readable output even though formatting parameters are not shown in the command.
Program listings are formatted as follows:
class Test {
    public static void main(String [] args)  {
        System.out.println("This is a program listing.");
    }
}ForgeRock publishes comprehensive documentation online:
The ForgeRock Knowledge Base offers a large and increasing number of up-to-date, practical articles that help you deploy and manage ForgeRock software.
While many articles are visible to community members, ForgeRock customers have access to much more, including advanced information for customers using ForgeRock software in a mission-critical capacity.
ForgeRock product documentation, such as this document, aims to be technically accurate and complete with respect to the software documented. It is visible to everyone and covers all product features and examples of how to use them.
The ForgeRock.org site has links to source code for ForgeRock open source software, as well as links to the ForgeRock forums and technical blogs.
If you are a ForgeRock customer, raise a support ticket instead of using the forums. ForgeRock support professionals will get in touch to help you.
ForgeRock provides support services, professional services, classes through ForgeRock University, and partner services to assist you in setting up and maintaining your deployments. For a general overview of these services, see https://www.forgerock.com.
ForgeRock has staff members around the globe who support our international customers and partners. For details, visit https://www.forgerock.com, or send an email to ForgeRock at info@forgerock.com.
A Java EE policy agent is an OpenAM add-on component that functions as a Policy Enforcement Point (PEP) for applications deployed on a Java EE-based servlet container or application server. The policy agent protects web-based applications and implements single sign-on (SSO) capabilities for the applications deployed in the container.
OpenAM Java EE policy agents provide medium touch integration and run on a wide variety of servlet containers and application servers. The installation process for Java EE policy agents differs slightly for each container type and may require some configuration and code changes to the configuration files. The installation procedures for each container type are presented later in this guide.
This chapter covers what Java EE policy agents do, their key features, and how they work.
Note
A single policy agent can work with multiple applications. You therefore install only one policy agent per application server.
Installing more than one policy agent in an application server is not supported.
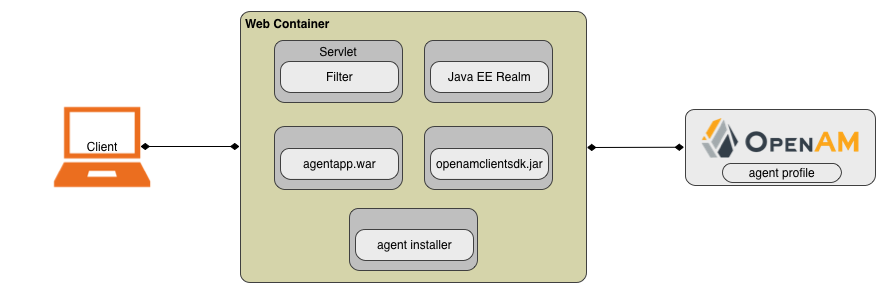
The OpenAM Java EE policy agent is comprised of five main components:
Policy agent filter
Container-specific Java Authentication and Authorization Server (JAAS) realm implementation
Agent application
.warfileAgent installer
Client SDK
The installer integrates the other components within the container, after which the components run transparently, connecting to OpenAM through its client SDK.
Java EE Policy Agent Filter. The Java EE Policy Agent filter is a servlet filter referenced within the deployment descriptor file
web.xml, of each protected application in the container. Applications that do not have their deployment descriptor file updated to use the agent servlet filter will not be protected. The filter's main function is to intercept an inbound client access request for a protected resource and run through a set of task handlers, including determining whether the user has a session ID or token. If the user does not have a session token in the browser cookieiPlanetDirectoryPro, then the policy agent immediately redirects the user to OpenAM for authentication. Once the user has a session token, the agent retrieves the agent profile from OpenAM and continues to process the request based on the property settings defined in the agent profile.Agent Realm. The Agent realm is not strictly a component, but is a container-specific integration to allow support for Java Authentication and Authorization Service (JAAS). The Agent Realm, or more accurately the JAAS Realm, leverages the underlying Java EE container's ability to retrieve the user's identity and populate the principal in the
HTTPServletRequestobject.You can use the Java EE container's declarative and programmatic security settings that define role-based access control over the web resources. You can define the roles in the descriptor files and then define the user's roles within OpenAM, allowing the application to check authorization. JAAS support provides another powerful feature that lets you implement such Java EE permissions-related annotations as
@RolesAllowedand@DeclareRoles, which are specifically designed to secure Enterprise Java Bean (EJB) modules for authenticated users.Agent Application. The Agent application, deployed as
agentapp.war, processes notifications from OpenAM, refreshes the caches, and runs processes for cross-domain single sign-on (CDSSO). Theagentapp.warfile also displays error messages if the cross-site scripting (XSS) detector is enabled. Note that there are some subtle container-dependent configuration differences that may affect the installation ofagentapp.war. For certain containers, the installer installs theagentapp.warfile; for others, you must manually install the file as part of the agent installation.Note
Technically, the
agentapp.waris not a required component if you have no plans to use CDSSO and notifications, but it is strongly recommended that you deploy it as notifications from OpenAM are extremely useful.Agent Installer. The agent installer, invoked by the agentadmin tool, automates the policy agent installation within a container. The agent installer's configuration is set in an XML descriptor file (
config/configure.xml). The descriptor file defines the user interactions when the install, custom-install, migrate, and uninstall subcommands are run. The descriptor file also defines the tasks needed to complete installation process, such as creating the agent directory layout, creating backups for the container's configuration files, and encrypting the agent profile's password and saving it in the agent bootstrap configuration file plus other tasks.openssoclientsdk.jar. Although not technically a part of the Java EE policy agent, the Java EE agent bundles the OpenAM Client SDK for the container. The SDK provides the set of APIs that are designed to work with OpenAM's service and security infrastructure.
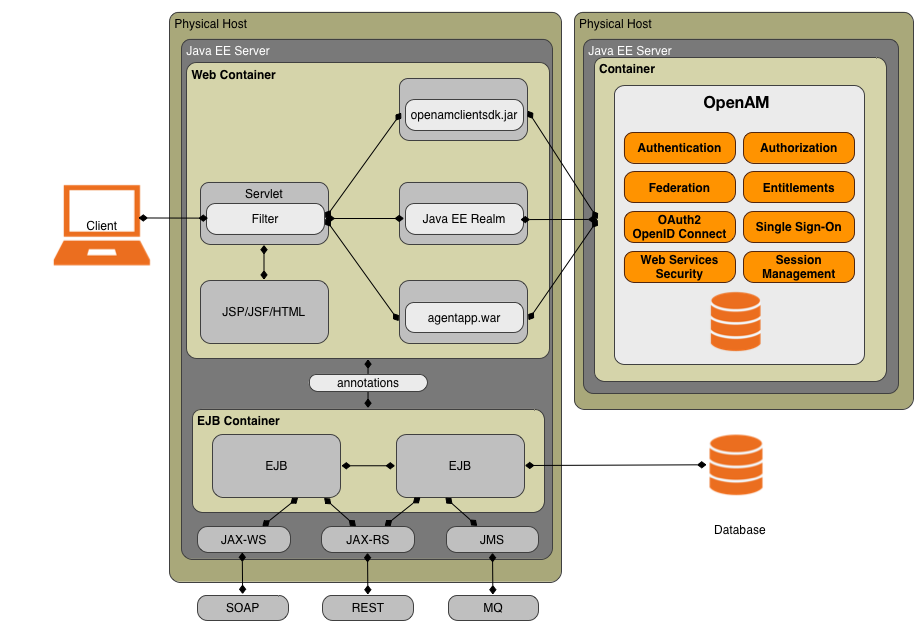
To illustrate how Java EE policy agents work, it is first instructive to understand a simplified and generic web application example with OpenAM. While the specific configuration settings differ depending on the container or application server, the architectural components that make up the OpenAM Java EE policy agent are the same.
Imagine a web application, such as an e-commerce site, deployed in multiple containers: a client application server (not fully displayed), a web container and an EJB container for the business logic. After the user is granted access to a resource through the Java EE policy agent and OpenAM, the servlet instance processes the request and determines which business logic objects or Java bean classes to invoke from the EJB container. The EJB container may have dedicated EJB components that provide specific transactions, such as sales order creation or processing. The EJB processes the transactions and retrieves any data from the database. The servlet constructs a response and then forwards a JavaServer Page (JSP) or JavaServer Face page to the client.
Important
Do not install the Java EE policy agent in the same container as OpenAM. OpenAM must be up and running before the Java EE policy agent starts. This cannot be guaranteed when both run in the same container. ForgeRock does not support configurations where OpenAM and the Java EE policy agent are installed in the same container.
The following sequence diagram shows how the pieces fit together when a Java EE client accesses a resource protected by a policy agent. This diagram is simplified to show only the Java EE policy agent steps rather than to describe every possible case.
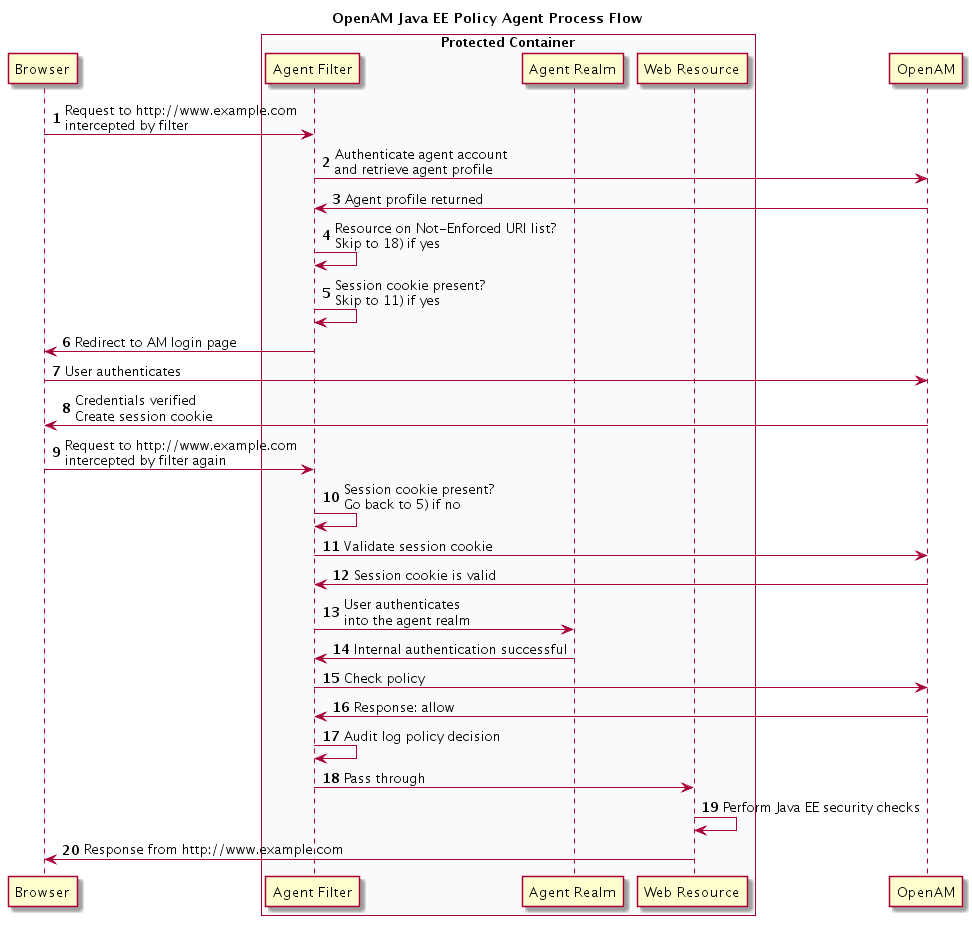
The web client or user attempts to access a protected resource at
www.example.comby pointing her browser to a page in a protected application. The agent filter intercepts the inbound request to the server.The agent filter authenticates the agent account and retrieves the agent profile from OpenAM.
The agent profile is returned. For this example, we assume that the filter mode is set to
ALL.The agent filter checks if the requested resource is on the Not-Enforced URI list. If yes, skip to step 18.
The agent filter checks if the session cookie,
iPlanetDirectoryPro, is present. If yes, skip to step 11.The filter redirects the client browser to the OpenAM Authentication Service, which displays a login page.
The client must input their credentials.
Once the client has been authenticated, create a session ID. Redirect back to the web server with a newly issued session ID, contained in the
iPlanetDirectoryProbrowser cookie.The request is once again intercepted by the servlet filter.
The agent filter checks for the session cookie, which is found.
The session cookie gets validated by OpenAM's Session Service. If it is not valid, go back to step 5.
OpenAM validates the session cookie.
If the agent filter authenticates into the container's security calm and has the correct roles assigned, then the container determines whether the user's role is authorized to access the resource.
Internal authentication is successful.
The agent filter checks the URL_BASED policy in OpenAM.
OpenAM's Policy Service is called to return an authorization decision to allow the client or user access to the protected resource. The Policy Service returns an
ALLOW.The agent filter writes the policy decision to an audit log.
Pass through to the web resource.
The web resource performs the Java EE security checks.
Response returns the resource from
www.example.com
You install Java EE policy agents in the web application containers serving web applications that you want to protect. Java EE policy agents are themselves web applications running in the container whose applications you configure OpenAM to protect. By default, the Java EE policy agent has only enough configuration at installation time to connect to OpenAM in order to get the rest of its configuration from the OpenAM configuration store. With nearly all configuration stored centrally, you can manage policy agents centrally from the OpenAM console.[1]
For each web application that you protect,
you also configure at least the deployment descriptor
to filter requests through the policy agent.
ForgeRock delivers the Java EE policy agents with a sample application
.war file under
j2ee_agents/container_agent/sampleapp/,
which shows the configuration to use to protect your web application.
In the WEB-INF/web.xml deployment descriptor file
for the sample application, you find an example of the filter configuration
that you must add to the deployment descriptors of your applications.
You configure Java EE policy agents per OpenAM realm. Thus, to access centralized configuration, you select Realms > Realm Name > Agents > Java EE > Agent Name. Java EE policy agent configuration is distinct from policy configuration. The only policy-like configuration that you apply to Java EE policy agents is indicating which URLs in the web server can be ignored (not enforced URLs) and which client IP address are exempt from policy enforcement (not enforced IPs).
For each aspect of Java EE policy agent configuration, you can configure the policy agent through the OpenAM console during testing, and then export the resulting configuration in order to script configuration in your production environment.
The Java EE policy agent provides a number of additional features that are useful for your deployment.
The agent filter intercepts all inbound client requests
to access a protected resource and processes the request based on
a global configuration property,
com.sun.identity.agents.config.filter.mode, set in
the policy agent profile on OpenAM.
The configuration setting determines the
filter mode of operation that should be carried out on the intercepted
inbound request.
The filter mode property can be set to one of the following values:
NONE. Specifies that nothing should be done with the inbound request. This mode is primarily used in development or testing environments and should never be used in production. If logging is enabled, the agent filter logs all intercepted requests for auditing purposes.
SSO_ONLY. Specifies that authentication should be enforced to all users who try to access protected web resources. The filter invokes the OpenAM Authentication service to verify the identity of the user. If the user's identity is verified, the user is issued a session token through OpenAM's Session service.
J2EE_POLICY. Specifies that the policy agent should not enforce OpenAM-based URL policies. Instead, authorization should be enforced through the container's Java EE security policies. Container security can be configured declaratively or programmatically, as follows:
Declaratively. Configure elements, such as
auth-constraintandsecurity-constraintin the application'sweb.xmlfile.For more information about container declarative security, see Section 3.9, "Configuring Container Declarative Security".
Programmatically. Configure method calls to security APIs in your environment.
To determine user identity, the filter invokes OpenAM's Authentication service to verify the identity of the user. If OpenAM verifies the user's identity, the following events occur:
OpenAM's Session Service issues a session token to the user.
The policy agent logs the user into the container realm, where the container enforces authorization policies.
Failure to configure container security while the filter is set to the
J2EE_POLICYmode may result in users being requested to authenticate in OpenAM, even for not-enforced resources.URL_POLICY. Specifies that authorization should be enforced only by OpenAM's URL resource-based policies. When the filter mode is
URL_POLICY, no Java EE policies will be enforced. TheURL_POLICYmode is commonly used in production deployments.ALL. Specifies that SSO_ONLY, J2EE_POLICY, and URL_POLICY should be enforced. This setting ensures that the user gets properly authenticated with a valid session token ID, and then authorized through the Java EE container's declarative or programmatic security settings, and OpenAM's URL-based policies to access the web resource.
For more information, see Configuring J2EE Policy Agent Global Properties.
The Java EE policy agent supports properties to bypass authentication and grant immediate access to resources not requiring protection, such as images, stylesheets, or static HTML pages.
You can configure a Not-Enforced URI List using the
com.sun.identity.agents.config.notenforced.uri property
that grants the user access to resources whose URIs match those in the list.
For example, you can set URI patterns with wildcards in the OpenAM console using the following patterns:
/logout.html
   /images/*
   /css/-*-
   /*.jsp?locale=*
For more information on wildcard usage, see Wildcard Usage.
The Java EE policy agent also supports a Not-Enforced Client IP List, which specifies the client IP addresses that can be excluded from authentication and authorization. This property lets administrators access the web site from a certain IP address, or gives a search engine access to the web resources.
For more information on the Not-Enforced URI and Not-Enforced Client IP Lists and other related properties, see Not Enforced URI Processing Properties.
Java EE policy agents provide the capability to fetch and inject user information into HTTP headers, request objects, and cookies and pass them on to the protected client applications. The client applications can then personalize content using these attributes in their web pages or responses.
Specifically, you can configure the type of attributes to be fetched and the associated mappings for the attributes names used on OpenAM to those values used in the containers. The Java EE policy agent securely fetches the user and session data from the authenticated user as well as policy response attributes.
For more details, see Chapter 3, "Configuring Java EE Policy Agents".
When the user-agent does not present a valid SSO token, the agent will redirect the user to the login URL configured in OpenAM. The Java EE policy agent can be configured to limit the login attempts made to the policy agent to mitigate any redirect loops that may result in an error page presented to the end-user.
You can use the com.sun.identity.agents.config.login.attempt.limit
property to specify a non-zero value for the number of login attempts.
For example, if the property is set to 3, then the agent will block the access
request to the protected resource on the fourth login request.
You can also limit the number of redirections the agent can take for a single
browser session by setting the
com.sun.identity.agents.config.redirect.attempt.limit.
For more details, see General Properties.
The Java EE policy agent requires that clients accessing protected resources use valid URLs with fully qualified domain names (FQDNs). If invalid URLs are referenced, policy evaluation can fail as the FQDN will not match the requested URL, leading to blocked access to the resource. Misconfigured URLs can also result in incorrect policy evaluation for subsequent access requests.
There are cases where clients may specify resource URLs that differ from
the FQDNs stored in OpenAM policies; for example, in load
balanced and virtual host environments. To handle these cases,
the Java EE policy agent supports FQDN Checking properties:
FQDN Default
and FQDN Virtual Host Map properties.
The FQDN Default property specifies the default URL
with valid hostname.
The property ensures that the policy agent can redirect to
a URL with a valid hostname should it discover an invalid URL in the client request.
The FQDN Virtual Host Map property stores map keys
and their corresponding values, allowing invalid URLs, load balanced URLs,
and virtual host URLs to be correctly mapped to valid URLs.
Each entry in the Map has precedence over the FQDN Default
setting, so that if no valid URLs exist in the FQDN Virtual Host Map
property, the agent redirects to
the value specified in the FQDN Default property.
If you want the agent to redirect to a URL other than the one specified
in the FQDN Default property, then it is good practice to
include any anticipated invalid URLs in the FQDN Virtual Host Map property
and map it to a valid URL.
For more details, see Fully Qualified Domain Name Checking Properties.
OpenAM provides cookie reset properties that the agent carries out prior to redirecting the client to a login page for authentication.
Cookie reset is typically used when multiple parallel authentication mechanisms are in play with the policy agent and another authentication system. The policy agent can reset the cookies set by the other mechanism before redirecting the client to a login page.
The cookie reset properties include a name list specifying all of the cookies that will reset, a domain map specifying the domains set for each cookie, and a path map specifying the path from which the cookie will be reset.
If you have enabled attribute fetching using cookies to retrieve user data, it is good practice to use cookie reset, which will reset once you want to access an enforced URL without a valid session.
For more details, see Cookie Reset Properties.
Cross domain single sign-on (CDSSO) allows the Java EE policy agent to transfer a validated stateful session ID between an OpenAM domain and an application domain using a proprietary OpenAM mechanism. Normally, single sign-on cannot be implemented across domains as the session cookie from one domain (for example, website.com) is not accessible from another domain (for example, website.net).
OpenAM's CDSSO solves this cross-domain problem and is best implemented in environments where all the domains are managed by the same organization, and where the OpenAM server is configured to use stateful sessions. OpenAM does not support CDSSO for deployments with stateless sessions.
The Java EE policy agent works with an OpenAM component called
a CDCServlet that generates a
self-submitting form containing
the valid session token from one domain.
The form gets auto-submitted to the policy agent endpoint via a POST
operation.
The policy agent processes the request and extracts the session ID, which is
again validated by OpenAM. If validation is successful,
the policy agent sets the cookie in alternate domain. The
client can then access a resource in that domain.
For more details, see Configuring Cross Domain Single Sign-On.
You install policy agents in web servers and web application containers to enforce access policies OpenAM applies to protected web sites and web applications. Policy agents depend on OpenAM for all authentication and authorization decisions. Their primary responsibility consists of enforcing what OpenAM decides in a way that is unobtrusive to the user. In organizations with many servers, you might well install many policy agents.
Policy agents can have local configurations where they are installed, but usually you store all policy agent configuration information in the OpenAM configuration store, defining policy agent profiles for each, and then letting the policy agents access their profiles through OpenAM such that you manage all agent configuration changes centrally. This chapter describes how to set up policy agent profiles in OpenAM for centralized configuration.
Policy agent configuration properties can either be stored centrally in the OpenAM configuration store, or locally as a flat-file installed alongside the policy agent.
Policy agent configuration settings are stored centrally by default in the OpenAM configuration store, which allows you to configure your policy agents on the OpenAM console for easier management and convenience. Any property change made in OpenAM using the console or the ssoadm command-line tool is immediately communicated to the agent by using a notification. Many policy agent properties are hot-swap enabled, allowing the change to take effect immediately without a server restart.
Policy agent configuration settings can also be stored locally in a
Java properties flatfile, such as
Agent_001/config/OpenSSOAgentConfiguration.properties,
which is created when you install the agent.
If you choose to use a local properties file, you must make all
configuration changes by modifying property values in the
OpenSSOAgentConfiguration.properties file.
OpenAM supports both OpenIG and also a variety of policy agents. OpenIG and the policy agents can both enforce policy, redirecting users to authenticate when necessary, and controlling access to protected resources. OpenIG runs as a self-contained reverse proxy located between the users and the protected applications. Policy agents are installed into the servers where applications run, intercepting requests in that context.
Use OpenIG to protect access to applications not suited for a policy agent. Not all web servers and Java EE applications have policy agents. Not all operating systems work with policy agents.
Policy agents have the advantage of sitting within your existing server infrastructure. Once you have agents installed into the servers with web applications or sites to protect, then you can manage their configurations centrally from OpenAM.
For organizations with both servers on which you can install policy agents and also applications that you must protect without touching the server, you can use policy agents on the former and OpenIG for the latter.
You can configure a number of different types of agents.
Each agent type requires an agent profile in OpenAM. The agent profile contains essential configuration for agent operation, such as a password to authenticate the agent, and the URL the agent resides at. For agents that support it, the agent profile can store all agent configuration centrally, rather than locally on the agent server.
Web and J2EE policy agents are the most common, requiring the least integration effort. The available agent types are:
- Web
You install web agents in web servers to protect web sites.
- J2EE
You install J2EE agents in web application containers to protect web applications.
- 2.2 Agents
Version 2.2 web and Java EE policy agents hold their configuration locally, connecting to OpenAM with a username/password combination. This agent type is provided for backwards compatibility.
- OAuth 2.0/OpenID Connect Client
Register OAuth 2.0 and OpenID Connect clients using this type of profile.
- Agent Authenticator
The agent authenticator can read agent profiles by connecting to OpenAM with a user name, password combination, but unlike the agent profile administrator, cannot change agent configuration.
- SOAP STS Agent
Secure requests to the SOAP Security Token Service using this type of agent profile.
This section concerns creating agent profiles, and creating groups that let agents inherit settings when you have many agents with nearly the same profile settings.
To create a new Java EE policy agent profile, you need to create a name and password for the agent. You also need the URLs to OpenAM and the application to protect:
Login to OpenAM Console as an administrative user.
On the Realms menu of the OpenAM console, select the realm in which the agent profile is to be managed.
Click the Agents link, click the tab page for the kind of agent profile you want to create, and then click the New button in the Agent table.
In the Name field, enter a name for the agent profile.
In the Password and Re-Enter Password fields, enter a password for the new agent profile.
Click
LocalorCentralized(Default) to determine where the agent properties are stored. If you selectLocal, the properties are stored on the server on which the agent is running. If you selectCentralized, the properties are stored on the OpenAM server.In the Server URL field, enter the URL to OpenAM. For example,
http://openam.example.com:8080/openam.In the Agent URL field, enter the primary URL of the web or application server protected by the policy agent. For Java EE policy agents, an example URL must include the
agentappcontext:http://shop.example.com:28080/agentapp.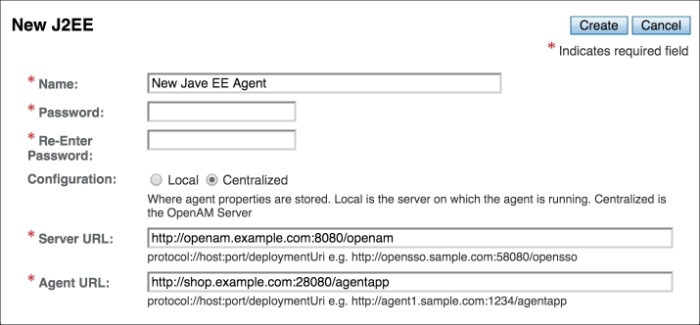
Click Create. After creating the agent profile, you can click the link to the new profile to adjust and export the configuration.

Agent profile groups let you set up multiple agents to inherit settings from the group. To create a new agent profile group, you need a name and the URL to the OpenAM server in which you store the profile:
Login to OpenAM Console as an administrative user.
On the Realms menu of the OpenAM console, Select the realm in which you manage agents.
Click the Agents link, click the tab page for the kind of agent group you want to create, and then in the Group table, click New.
After creating the group profile, you can click the link to the new group profile to fine-tune or export the configuration.
Inherit group settings by selecting your agent profile, and then selecting the group name in the Group drop-down list near the top of the profile page.
You can then adjust inheritance by clicking Inheritance Settings on the agent profile page.
You can create a policy agent profile in OpenAM using the ssoadm command-line tool. You do so by specifying the agent properties either as a list of attributes, or by using an agent properties file as shown below. Export an existing policy agent configuration before you start to see what properties you want to set when creating the agent profile.
The following procedure demonstrates creating a policy agent profile using the ssoadm command:
Make sure the ssoadm command is installed. See "To Set Up Administration Tools" in the OpenAM Installation Guide.
Determine the list of properties to set in the agent profile.
The following properties file shows a minimal configuration for a policy agent profile:
$ cat myAgent.properties
com.sun.identity.agents.config.agenturi.prefix=http://shop.example.com:28080/amagent
com.sun.identity.agents.config.cdsso.cdcservlet.url[0]= \
     https://openam.example.com:8080/openam/cdcservlet
com.sun.identity.agents.config.fqdn.default=www.example.com
com.sun.identity.agents.config.login.url[0]= \
     http://openam.example.com:8080/openam/UI/Login
com.sun.identity.agents.config.logout.url[0]= \
     http://openam.example.com:8080/openam/UI/Logout
com.sun.identity.agents.config.remote.logfile=amAgent_shop_example_com_28080.log
com.sun.identity.agents.config.repository.location=centralized
com.sun.identity.client.notification.url= \
     http://www.example.com:80/UpdateAgentCacheServlet?shortcircuit=false
sunIdentityServerDeviceKeyValue[0]=agentRootURL=http://shop.example.com:28080/
sunIdentityServerDeviceStatus=Active
userpassword=password
Set up a password file used when authenticating to OpenAM. The password file must be read-only for the user who creates the policy agent profile, and must not be accessible to other users:
$ echo password > /tmp/pwd.txt
$ chmod 400 /tmp/pwd.txt
Create the profile in OpenAM:
$ ssoadm create-agent \
  --realm / \
  --agentname myAgent \
  --agenttype J2EE \
  --adminid amadmin
  --password-file /tmp/pwd.txt \
  --datafile myAgent.properties

Agent configuration was created.
At this point you can view the profile in OpenAM Console under Realms > Realm Name > Agents to make sure the configuration is what you expect.
If you want to create policy agent profiles when installing policy agents, then you need the credentials of an OpenAM user who can read and write agent profiles.
You can use the OpenAM administrator account when creating policy agent profiles. If you delegate policy agent installation, then you might not want to share OpenAM administrator credentials with everyone who installs policy agents.
Follow these steps to create agent administrator users for a realm:
In OpenAM console, browse to Realms > Realm Name > Subjects.
Under Group click New... and create a group for agent administrators.
Switch to the Privileges tab for the realm, and click the name of the group you created.
Select Read and write access to all configured agents, and then Save your work.
Return to the Subjects tab, and under User create as many agent administrator users as needed.
For each agent administrator user, edit the user profile.
Under the Group tab of the user profile, add the user to agent profile administrator group, and then Save your work.
Provide each system administrator who installs policy agents with their agent administrator credentials.
When installing the policy agent with the
--custom-installoption, the system administrator can choose the option to create the profile during installation, and then provide the agent administrator user name and the path to a read-only file containing the agent administrator password. For silent installs, you can add the--acceptLicenseoption to auto-accept the software license agreement.
When you create a Java EE policy agent profile and install the agent, you can choose to store the agent configuration centrally and configure the agent through OpenAM console. Alternatively, you can store the agent configuration locally and configure the agent by changing values in the properties file. This section covers centralized configuration, indicating the corresponding properties for use in a local configuration file where applicable. [2]
Tip
To show the agent properties in configuration file format that correspond to what you see in the console, click Export Configuration after editing agent properties.
After changing properties specified as "Hot swap: no", you must restart the agent's container for the changes to take effect.
These properties are set in the
config/OpenSSOAgentBootstrap.properties file.
am.encryption.pwdWhen using an encrypted password, set this to the encryption key used to encrypt the agent profile password.
com.iplanet.am.naming.urlSet this to the naming service URL(s) used for naming lookups in OpenAM. Separate multiple URLs with single space characters.
com.iplanet.am.service.secretWhen using a plain text password, set this to the password for the agent profile, and leave
am.encryption.pwdblank.When using an encrypted password, set this to the encrypted version of the password for the agent profile. Use the command ./agentadmin --encrypt agentInstance passwordFile to get the encrypted version.
com.iplanet.am.services.deploymentDescriptorSet this to the URI under which OpenAM is deployed, such as
/openam.com.iplanet.services.debug.directorySet this to the full path of the agent's debug log directory where the agent writes debug log files.
com.sun.identity.agents.app.usernameSet this to the agent profile name.
com.sun.identity.agents.config.local.logfileSet this to the full path for agent's audit log file.
com.sun.identity.agents.config.lock.enableSet this to
trueto require an agent restart to allow agent configuration changes, even for hot-swappable parameters. Default isfalse.com.sun.identity.agents.config.organization.nameSet this to the realm name where the agent authenticates to OpenAM.
com.sun.identity.agents.config.profilenameSet this to the profile name used to fetch agent configuration data. Unless multiple agents use the same credentials to authenticate, this is the same as
com.sun.identity.agents.app.username.com.sun.identity.agents.config.service.resolverSet this to the class name of the service resolver used by the agent.
com.sun.services.debug.mergeallWhen set to
on, the default, the agent writes all debug messages to a single file undercom.iplanet.services.debug.directory.
This section covers global Java EE agent properties. After creating the agent profile, you access these properties in the OpenAM console under Realms > Realm Name > Agents > J2EE > Agent Name > Global.
This section describes the following property groups:
- Group
For assigning the agent to a previously configured Java EE agent group in order to inherit selected properties from the group.
- Password
Agent password used when creating the password file and when installing the agent.
- Status
Status of the agent configuration.
- Agent Notification URL
URL used by agent to register notification listeners.
Property:
com.sun.identity.client.notification.urlHot swap: no
- Location of Agent Configuration Repository
Whether the agent's configuration is managed centrally through OpenAM (
centralized) or locally in the policy agent configuration file (local).If you change this to a local configuration, you can no longer manage the policy agent configuration through OpenAM console.
Property:
com.sun.identity.agents.config.repository.location- Configuration Reload Interval
Interval in seconds to fetch agent configuration from OpenAM. Used if notifications are disabled. Default: 0
Property:
com.sun.identity.agents.config.load.interval- Agent Configuration Change Notification
Enable agent to receive notification messages from OpenAM server for configuration changes.
Property:
com.sun.identity.agents.config.change.notification.enable- Agent Root URL for CDSSO
The agent root URL for CDSSO. The valid value is in the format
protocol://hostname:port/where protocol represents the protocol used, such ashttporhttps, hostname represents the host name of the system where the agent resides, and port represents the port number on which the agent is installed. The slash following the port number is required.If your agent system also has virtual host names, add URLs with the virtual host names to this list as well. OpenAM checks that
gotoURLs match one of the agent root URLs for CDSSO.
- Agent Filter Mode
Specifies how the agent filters requests to protected web applications. The global value functions as a default, and applies for protected applications that do not have their own filter settings. Valid settings include the following.
ALLEnforce both the Java EE policy defined for the web container where the protected application runs, and also OpenAM policies.
When setting the filter mode to
ALL, set the Map Key, but do not set any Corresponding Map Value.J2EE_POLICYEnforce only the J2EE policy defined for the web container where the protected application runs.
NONEDo not enforce policies to protect resources. In other words, turn off access management. Not for use in production.
SSO_ONLYEnforce only authentication, not policies.
URL_POLICYEnforce only URL resource-based policies defined in OpenAM.
When setting the filter mode to
URL_POLICY, set the Map Key to the application name and the Corresponding Map Value toURL_POLICY.
Property:
com.sun.identity.agents.config.filter.modeHot swap: no
- HTTP Session Binding
When enabled, the agent invalidates the HTTP session upon login failure, when the user has no SSO session, or when the principal user name does not match the SSO user name.
Property:
com.sun.identity.agents.config.httpsession.binding- Login Attempt Limit
When set to a value other than zero, this defines the maximum number of failed login attempts allowed during a single browser session, after which the agent blocks requests from the user.
Property:
com.sun.identity.agents.config.login.attempt.limit- Custom Response Header
Specifies the custom headers the agent sets for the client. The key is the header name. The value is the header value.
Property:
com.sun.identity.agents.config.response.headerFor example,
com.sun.identity.agents.config.response.header[Cache-Control]=no-cache.- Redirect Attempt Limit
When set to a value other than zero, this defines the maximum number of redirects allowed for a single browser session, after which the agent blocks the request.
Property:
com.sun.identity.agents.config.redirect.attempt.limit- Agent Debug Level
Default is
Error. Increase toMessageor evenAllfor fine-grained detail.Property:
com.iplanet.services.debug.level
- User Mapping Mode
Specifies the mechanism used to determine the user ID. This property can take four values:
USER_ID. The agent reads the propertycom.sun.identity.agents.config.user.principal:If
true, the agent sets the principal user name as the user ID.If
false, the user ID is set to the value of the session property specified by thecom.sun.identity.agents.config.user.tokenproperty as the user ID.
PROFILE_ATTRIBUTE. The user ID is set to the value of a named profile attribute, as specified by thecom.sun.identity.agents.config.user.attribute.nameproperty.HTTP_HEADER. The user ID is set to the value of a named HTTP header, as specified by thecom.sun.identity.agents.config.user.attribute.nameproperty.SESSION_PROPERTY. The user ID is set to the value of a named session property, as specified by thecom.sun.identity.agents.config.user.attribute.nameproperty.
If the user ID cannot be set, the user will not be logged in and access requests will be denied.
Property:
com.sun.identity.agents.config.user.mapping.modeDefault:
USER_ID- User Attribute Name
Specifies the data store attribute that contains the user ID.
Property:
com.sun.identity.agents.config.user.attribute.nameDefault:
employeenumber- User Principal Flag
When enabled, OpenAM uses both the principal user name and also the user ID for authentication.
Property:
com.sun.identity.agents.config.user.principal- User Token Name
Specifies the session property name for the authenticated user's ID.
Property:
com.sun.identity.agents.config.user.tokenDefault:
USER_ID
- Audit Access Types
Types of messages to log based on user URL access attempts.
Property:
com.sun.identity.agents.config.audit.accesstypeValid values for the configuration file property include
LOG_NONE,LOG_ALLOW,LOG_DENY, andLOG_BOTH.- Audit Log Location
Specifies where audit messages are logged. By default, audit messages are logged remotely.
Property:
com.sun.identity.agents.config.log.dispositionValid values for the configuration file property include
REMOTE,LOCAL, andALL.- Remote Log File Name
Name of file stored on OpenAM server that contains agent audit messages if log location is remote or all.
Property:
com.sun.identity.agents.config.remote.logfileHot swap: no
- Rotate Local Audit Log
When enabled, audit log files are rotated when reaching the specified size.
Property:
com.sun.identity.agents.config.local.log.rotate- Local Audit Log Rotation Size
When beyond this size limit in bytes, the agent rotates the local audit log file if rotation is enabled.
Property:
com.sun.identity.agents.config.local.log.sizeDefault: 50 MB
- FQDN Check
Enables checking of FQDN default value and FQDN map values.
Property:
com.sun.identity.agents.config.fqdn.check.enable- FQDN Default
FQDN users should use to access resources.
This property ensures that when users access protected resources on the web server without specifying the FQDN, the agent can redirect the users to URLs containing the correct FQDN.
Property:
com.sun.identity.agents.config.fqdn.default- FQDN Virtual Host Map
Maps virtual, invalid, or partial hostnames, and IP addresses to the FQDN to access protected resources. The property allows agents to redirect users to the FQDN and receive cookies belonging to the domain. It also ensures that invalid FQDN values that can cause the application server to become unusable or render resources inaccessible get properly mapped to the FQDN.
The property accepts an invalid_hostname and a validN Map Key value. The invalid_hostname maps an invalid or a partial hostname, or an IP address to a FQDN. The validN (where N = 1, 2, 3 ...) Map Key maps virtual hostnames to a FQDN.
com.sun.identity.agents.config.fqdn.mapping[invalid_hostname] = valid_hostname
      com.sun.identity.agents.config.fqdn.mapping[validN] = valid_hostname
For example, to map the partial hostname
myservertomyserver.mydomain.example, entermyserverin the Map Key field, entermyserver.mydomain.examplein the Corresponding Map Value field and then click Add. This corresponds to:com.sun.identity.agents.config.fqdn.mapping[myserver] = myserver.mydomain.example
To address a server as
xyz.hostname.com, when the actual name of the server isabc.hostname.com, entervalid1in the Map Key field, enterxyz.hostname.examplein the Corresponding Map Value field and then click Add. This corresponds to:com.sun.identity.agents.config.fqdn.mapping[valid1] = xyz.hostname.com
If you have multiple virtual servers
rst.hostname.com,uvw.hostname.com, andxyz.hostname.compointing to the same actual serverabc.hostname.comand each virtual server has its own policies defined, the properties can be defined as:com.sun.identity.agents.config.fqdn.mapping[valid1] = rst.hostname.com com.sun.identity.agents.config.fqdn.mapping[valid2] = uvw.hostname.com com.sun.identity.agents.config.fqdn.mapping[valid3] = xyz.hostname.comProperty:
com.sun.identity.agents.config.fqdn.mapping
This section covers application J2EE agent properties. After creating the agent profile, you access these properties in the OpenAM console under Realms > Realm Name > Agents > J2EE > Agent Name > Application.
This section describes the following property groups:
- Login Form URI
Specifies the list of absolute URIs corresponding to a protected application's
web.xmlform-login-pageelement, such as/myApp/jsp/login.jsp.Property:
com.sun.identity.agents.config.login.form- Login Error URI
Specifies the list of absolute URIs corresponding to a protected application's
web.xmlform-error-pageelement, such as/myApp/jsp/error.jsp.Property:
com.sun.identity.agents.config.login.error.uri- Use Internal Login
When enabled, the agent uses the internal default content file for the login.
Property:
com.sun.identity.agents.config.login.use.internal- Login Content File Name
Full path name to the file containing custom login content when Use Internal Login is enabled.
Property:
com.sun.identity.agents.config.login.content.file
- Application Logout Handler
Specifies how logout handlers map to specific applications. The key is the web application name. The value is the logout handler class.
To set a global logout handler for applications without other logout handlers defined, leave the key empty and set the value to the global logout handler class name,
GlobalApplicationLogoutHandler.To set a logout handler for a specific application, set the key to the name of the application, and the value to the logout handler class name.
Property:
com.sun.identity.agents.config.logout.application.handler- Application Logout URI
Specifies request URIs that indicate logout events. The key is the web application name. The value is the application logout URI.
To set a global logout URI for applications without other logout URIs defined, leave the key empty and set the value to the global logout URI,
/logout.jsp.To set a logout URI for a specific application, set the key to the name of the application, and the value to the application logout page.
Property:
com.sun.identity.agents.config.logout.uri- Logout Request Parameter
Specifies parameters in the HTTP request that indicate logout events. The key is the web application name. The value is the logout request parameter.
To set a global logout request parameter for applications without other logout request parameters defined, leave the key empty and set the value to the global logout request parameter,
logoutparam.To set a logout request parameter for a specific application, set the key to the name of the application, and the value to the application logout request parameter, such as
logoutparam.Property:
com.sun.identity.agents.config.logout.request.param- Logout Introspect Enabled
When enabled, the agent checks the HTTP request body to locate the Logout Request Parameter you set.
Property:
com.sun.identity.agents.config.logout.introspect.enabled- Logout Entry URI
Specifies the URIs to return after successful logout and subsequent authentication. The key is the web application name. The value is the URI to return.
To set a global logout entry URI for applications without other logout entry URIs defined, leave the key empty and set the value to the global logout entry URI,
/welcome.html.To set a logout entry URI for a specific application, set the key to the name of the application, and the value to the application logout entry URI, such as
/myApp/welcome.html.Property:
com.sun.identity.agents.config.logout.entry.uri
- Resource Access Denied URI
Specifies the URIs of custom pages to return when access is denied. The key is the web application name. The value is the custom URI.
To set a global custom access denied URI for applications without other custom access denied URIs defined, leave the key empty and set the value to the global custom access denied URI,
/sample/accessdenied.html.To set a custom access denied URI for a specific application, set the key to the name of the application, and the value to the application access denied URI, such as
/myApp/accessdenied.html.Property:
com.sun.identity.agents.config.access.denied.uri
- Not Enforced URIs
List of URIs for which no authentication is required, and the agent does not protect access. You can use wildcards to define a pattern for a URI.
The
*wildcard matches all characters except question mark (?), cannot be escaped, and spans multiple levels in a URI. Multiple forward slashes do not match a single forward slash, so*matchesmult/iple/dirs, yetmult/*/dirsdoes not matchmult/dirs.The
-*-wildcard matches all characters except forward slash (/) or question mark (?), and cannot be escaped. As it does not match/,-*-does not span multiple levels in a URI.OpenAM does not let you mix
*and-*-in the same URI.Examples include
/logout.html,/images/*,/css/-*-, and/*.jsp?locale=*.Trailing forward slashes are not recognized as part of a resource name. Therefore
/images//and/imagesare equivalent.Property:
com.sun.identity.agents.config.notenforced.uri- Invert Not Enforced URIs
Only enforce not enforced list of URIs. In other words, enforce policy only for those URIs and patterns specified in the list.
Property:
com.sun.identity.agents.config.notenforced.uri.invert- Not Enforced URIs Cache Enabled
When enabled, the agent caches evaluation of the not enforced URI list.
Property:
com.sun.identity.agents.config.notenforced.uri.cache.enable- Not Enforced URIs Cache Size
When caching is enabled, this limits the number of not enforced URIs cached.
Property:
com.sun.identity.agents.config.notenforced.uri.cache.sizeDefault: 1000
- Refresh Session Idle Time
When enabled, the agent resets the stateful session idle time when granting access to a not enforced URI, prolonging the time before the user must authenticate again. This setting has no effect on users with stateless sessions.
Property:
com.sun.identity.agents.config.notenforced.refresh.session.idletime
- Not Enforced Client IP List
No authentication and authorization are required for the requests coming from these client IP addresses.
Property:
com.sun.identity.agents.config.notenforced.ipNote
Loopback addresses are not considered valid IPs on the Not Enforced IP list. If specified, the policy agent ignores the loopback address.
- Not Enforced IP Invert List
Only enforce the not enforced list of IP addresses. In other words, enforce policy only for those client addresses and patterns specified in the list.
Property:
com.sun.identity.agents.config.notenforced.ip.invert- Not Enforced IP Cache Flag
When enabled, the agent caches evaluation of the not enforced IP list.
Property:
com.sun.identity.agents.config.notenforced.ip.cache.enable- Not Enforced IP Cache Size
When caching is enabled, this limits the number of not enforced addresses cached.
Property:
com.sun.identity.agents.config.notenforced.ip.cache.sizeDefault: 1000
- Profile Attribute Fetch Mode
When set to
HTTP_COOKIEorHTTP_HEADER, profile attributes are introduced into the cookie or the headers, respectively. When set toREQUEST_ATTRIBUTE, profile attributes are part of the HTTP request.Property:
com.sun.identity.agents.config.profile.attribute.fetch.mode- Profile Attribute Mapping
Maps the profile attributes to HTTP headers for the currently authenticated user. Map Keys are attribute names, and Map Values are HTTP header names. The user profile can be stored in LDAP or any other arbitrary data store.
To populate the value of profile attribute CN under
CUSTOM-Common-Name: enter CN in the Map Key field, and enterCUSTOM-Common-Namein the Corresponding Map Value field. This corresponds tocom.sun.identity.agents.config.profile.attribute.mapping[cn]=CUSTOM-Common-Name.In most cases, in a destination application where an HTTP header name shows up as a request header, it is prefixed by
HTTP_, lower case letters become upper case, and hyphens (-) become underscores (_). For example,common-namebecomesHTTP_COMMON_NAME.Property:
com.sun.identity.agents.config.profile.attribute.mapping
- Response Attribute Fetch Mode
When set to
HTTP_COOKIEorHTTP_HEADER, response attributes are introduced into the cookie or the headers, respectively. When set toREQUEST_ATTRIBUTE, response attributes are part of the HTTP request.Property:
com.sun.identity.agents.config.response.attribute.fetch.mode- Response Attribute Mapping
Maps the policy response attributes to HTTP headers for the currently authenticated user. The response attribute is the attribute in the policy response to be fetched.
To populate the value of response attribute
uidunderCUSTOM-User-Name: enteruidin the Map Key field, and enterCUSTOM-User-Namein the Corresponding Map Value field. This corresponds tocom.sun.identity.agents.config.response.attribute.mapping[uid]=Custom-User-Name.In most cases, in a destination application where an HTTP header name shows up as a request header, it is prefixed by
HTTP_, lower case letters become upper case, and hyphens (-) become underscores (_). For example,response-attr-onebecomesHTTP_RESPONSE_ATTR_ONE.Property:
com.sun.identity.agents.config.response.attribute.mapping
- Cookie Separator Character
Specifies the separator for multiple values of the same attribute when it is set as a cookie. Default:
|(also known as the vertical bar character).Property:
com.sun.identity.agents.config.attribute.cookie.separator- Fetch Attribute Date Format
Specifies the
java.text.SimpleDateFormatof date attribute values used when an attribute is set in an HTTP header. Default:EEE, d MMM yyyy hh:mm:ss z.Property:
com.sun.identity.agents.config.attribute.date.format- Attribute Cookie Encode
When enabled, attribute values are URL-encoded before being set as a cookie.
Property:
com.sun.identity.agents.config.attribute.cookie.encode
- Session Attribute Fetch Mode
When set to
HTTP_COOKIEorHTTP_HEADER, session attributes are introduced into the cookie or the headers, respectively. When set toREQUEST_ATTRIBUTE, session attributes are part of the HTTP request.Property:
com.sun.identity.agents.config.session.attribute.fetch.mode- Session Attribute Mapping
Maps session attributes to HTTP headers for the currently authenticated user. The session attribute is the attribute in the session to be fetched.
To populate the value of session attribute
UserTokenunderCUSTOM-userid: enterUserTokenin the Map Key field, and enterCUSTOM-useridin the Corresponding Map Value field. This corresponds tocom.sun.identity.agents.config.session.attribute.mapping[UserToken]=CUSTOM-userid.In most cases, in a destination application where an HTTP header name shows up as a request header, it is prefixed by
HTTP_, lower case letters become upper case, and hyphens (-) become underscores (_). For example,success-urlbecomesHTTP_SUCCESS_URL.Property:
com.sun.identity.agents.config.session.attribute.mapping
Privileged attributes are used when the agent is running in
ALL or J2EE_POLICY filter mode.
Privileged attributes contain the list of declarative Java EE roles that the
user can have:
- Default Privileged Attribute
Specifies that every authenticated user with a valid OpenAM session will have the
AUTHENTICATED_USERSrole.Property:
com.sun.identity.agents.config.default.privileged.attribute- Privileged Attribute Type
Specifies the group and role memberships that will be turned into roles for each user.
Property:
com.sun.identity.agents.config.privileged.attribute.type- Privileged Attributes To Lower Case
Specifies how privileged attribute types should be converted to lower case.
Property:
com.sun.identity.agents.config.privileged.attribute.tolowercase- Privileged Session Attribute
Specifies the list of session property names when an authenticated user's roles are store within a session property.
Property:
com.sun.identity.agents.config.privileged.session.attribute- Enable Privileged Attribute Mapping
When enabled, lets you use Privileged Attribute Mapping.
Property:
com.sun.identity.agents.config.privileged.attribute.mapping.enable- Privileged Attribute Mapping
OpenAM allows original attribute values to be mapped to other values. For example, you can map UUIDs to principal names in roles specified in a web application's deployment descriptor. To map the UUID
id=employee,ou=group,o=openamto the principal nameam_employee_rolein the deployment descriptor, set the key toid=employee,ou=group,o=openam, and the value toam_employee_role.Property:
com.sun.identity.agents.config.privileged.attribute.mapping
- Custom Authentication Handler
Specifies custom authentication handler classes for users authenticated with the application server. The key is the web application name and the value is the authentication handler class name.
Property:
com.sun.identity.agents.config.auth.handler- Custom Logout Handler
Specifies custom logout handler classes to log users out of the application server. The key is the web application name and the value is the logout handler class name.
Property:
com.sun.identity.agents.config.logout.handler- Custom Verification Handler
Specifies custom verification classes to validate user credentials with the local user repository. The key is the web application name and the value is the validation handler class name.
Property:
com.sun.identity.agents.config.verification.handler
This section covers SSO J2EE agent properties. After creating the agent profile, you access these properties in the OpenAM console under Realms > Realm Name > Agents > J2EE > Agent Name > SSO.
This section describes the following property groups:
- Cookie Name
Name of the SSO Token cookie used between the OpenAM server and the agent. Default:
iPlanetDirectoryPro.Property:
com.iplanet.am.cookie.nameHot swap: no
- SSO Cache Enable
When enabled, the agent exposes SSO Cache through the agent SDK APIs.
Property:
com.sun.identity.agents.config.amsso.cache.enable
- Cross-Domain SSO
Enables CDSSO.
Property:
com.sun.identity.agents.config.cdsso.enable- CDSSO Redirect URI
Specifies a URI the agent uses to process CDSSO requests.
Property:
com.sun.identity.agents.config.cdsso.redirect.uri- CDSSO Servlet URL
List of URLs of the available CDSSO controllers that the agent can use for CDSSO processing. For example,
http://openam.example.com:8080/openam/cdcservlet.Property:
com.sun.identity.agents.config.cdsso.cdcservlet.url- CDSSO Clock Skew
When set to a value other than zero, specifies the clock skew in seconds that the agent accepts when determining the validity of the CDSSO authentication response assertion.
Property:
com.sun.identity.agents.config.cdsso.clock.skew- CDSSO Trusted ID Provider
Specifies the list of OpenAM servers or identity providers the agent trusts when evaluating CDC Liberty Responses.
Property:
com.sun.identity.agents.config.cdsso.trusted.id.provider- CDSSO Secure Enable
When enabled, the agent marks the SSO Token cookie as secure, thus the cookie is only transmitted over secure connections.
Property:
com.sun.identity.agents.config.cdsso.secure.enable- CDSSO Domain List
List of domains, such as
.example.com, in which cookies have to be set in CDSSO.Property:
com.sun.identity.agents.config.cdsso.domain
- Cookie Reset
When enabled, agent resets cookies in the response before redirecting to authentication.
Property:
com.sun.identity.agents.config.cookie.reset.enable- Cookie Reset Name List
List of cookies to reset if Cookie Reset is enabled.
Property:
com.sun.identity.agents.config.cookie.reset.name- Cookie Reset Domain Map
Specifies how names from the Cookie Reset Name List correspond to cookie domain values when the cookie is reset.
Property:
com.sun.identity.agents.config.cookie.reset.domain- Cookie Reset Path Map
Specifies how names from the Cookie Reset Name List correspond to cookie paths when the cookie is reset.
Property:
com.sun.identity.agents.config.cookie.reset.path
This section covers OpenAM services J2EE agent properties. After creating the agent profile, you access these properties in the OpenAM console under Realms > Realm Name > Agents > J2EE > Agent Name > OpenAM Services.
This section describes the following property groups:
- OpenAM Login URL
OpenAM login page URL, such as
http://openam.example.com:8080/openam/UI/Login, to which the agent redirects incoming users without sufficient credentials so that they can authenticate. If CDSSO is enabled, this property is not used, instead the CDCServlet URL will be used.Property:
com.sun.identity.agents.config.login.url- OpenAM Conditional Login URL (Not yet in OpenAM console)
To conditionally redirect users based on the incoming request URL, set this property.
This takes the incoming request domain to match, a vertical bar (
|), and then a comma-separated list of URLs to which to redirect incoming users.If the domain before the vertical bar matches an incoming request URL, then the policy agent uses the list of URLs to determine how to redirect the user-agent. If the global property FQDN Check (
com.sun.identity.agents.config.fqdn.check.enable) is enabled for the policy agent, then the policy agent iterates through the list until it finds an appropriate redirect URL that matches the FQDN check. Otherwise, the policy agent redirects the user-agent to the first URL in the list.Property:
com.sun.identity.agents.config.conditional.login.urlExamples:
com.sun.identity.agents.config.conditional.login.url[0]= login.example.com|http://openam1.example.com/openam/UI/Login, http://openam2.example.com/openam/UI/Login,com.sun.identity.agents.config.conditional.login.url[1]= signin.example.com|http://openam3.example.com/openam/UI/Login, http://openam4.example.com/openam/UI/LoginIf CDSSO is enabled for the policy agent, then this property takes CDSSO Servlet URLs for its values (
com.sun.identity.agents.config.cdsso.cdcservlet.url), rather than OpenAM login URLs.CDSSO examples:
com.sun.identity.agents.config.conditional.login.url[0]= login.example.com|http://openam1.example.com/openam/cdcservlet, http://openam2.example.com/openam/cdcservlet,com.sun.identity.agents.config.conditional.login.url[1]= signin.example.com|http://openam3.example.com/openam/cdcservlet, http://openam4.example.com/openam/cdcservlet- Login URL Prioritized
When enabled, OpenAM uses the priority defined in the OpenAM Login URL list as the priority for Login and CDSSO URLs when handling failover.
Property:
com.sun.identity.agents.config.login.url.prioritized- Login URL Probe
When enabled, OpenAM checks the availability of OpenAM Login URLs before redirecting to them.
Property:
com.sun.identity.agents.config.login.url.probe.enabled- Login URL Probe Timeout
Timeout period in milliseconds for OpenAM to determine whether to failover between Login URLs when Login URL Probe is enabled.
Property:
com.sun.identity.agents.config.login.url.probe.timeoutDefault: 2000
- OpenAM Logout URL
OpenAM logout page URLs, such as
http://openam.example.com:8080/openam/UI/Logout. The user is logged out of the OpenAM session when accessing these URLs.Property:
com.sun.identity.agents.config.logout.url- OpenAM Conditional Logout URL (Not yet in OpenAM console)
The values take the incoming request URL to match and a comma-separated list of URLs to which to redirect users logging out.
Property:
com.sun.identity.agents.config.conditional.logout.urlExample:
com.sun.identity.agents.config.conditional.logout.url[0]= logout.example.com|http://openam1.example.com/openam/UI/Logout, http://openam2.example.com/openam/UI/Logout- Logout URL Prioritized
When enabled, OpenAM uses the priority defined in the OpenAM Logout URL list as the priority for Logout URLs when handling failover.
Property:
com.sun.identity.agents.config.logout.url.prioritized- Logout URL Probe
When enabled, OpenAM checks the availability of OpenAM Logout URLs before redirecting to them.
Property:
com.sun.identity.agents.config.logout.url.probe.enabled- Logout URL Probe Timeout
Timeout period in milliseconds for OpenAM to determine whether to failover between Logout URLs when Logout URL Probe is enabled.
Property:
com.sun.identity.agents.config.logout.url.probe.timeoutDefault: 2000
- OpenAM Authentication Service Protocol
Specifies the protocol used by the OpenAM authentication service.
Property:
com.iplanet.am.server.protocolHot swap: no
- OpenAM Authentication Service Host Name
Specifies the OpenAM authentication service host name.
Property:
com.iplanet.am.server.hostHot swap: no
- OpenAM Authentication Service Port
Specifies the OpenAM authentication service port number.
Property:
com.iplanet.am.server.portHot swap: no
- Realm
Realm where OpenAM starts policy evaluation for this policy agent.
Default: Top Level Realm (/)
Edit this property when OpenAM should start policy evaluation in a realm other than the Top Level Realm,
/, when handling policy decision requests from this policy agent.This property is recognized by OpenAM, not the policy agent.
Property:
org.forgerock.openam.agents.config.policy.evaluation.realmHot swap: yes
- Application
The name of the policy set where OpenAM looks for policies to evaluate for this policy agent.
Default:
iPlanetAMWebAgentServiceEdit this property when OpenAM should look for policies that belong to a policy set other than
iPlanetAMWebAgentServicewhen handling policy decision requests from this policy agent.This property is recognized by OpenAM, not the policy agent.
Property:
org.forgerock.openam.agents.config.policy.evaluation.applicationHot swap: yes
- Enable Policy Notifications
When enabled, OpenAM sends notification about changes to policy.
Property:
com.sun.identity.agents.notification.enabledHot swap: no
- Policy Client Polling Interval
Specifies the time in minutes after which the policy cache is refreshed.
Property:
com.sun.identity.agents.polling.intervalDefault: 3
Hot swap: no
- Policy Client Cache Mode
Set to cache mode subtree when only a small number of policy rules are defined. For large numbers of policy rules, set to self.
Property:
com.sun.identity.policy.client.cacheModeDefault: self
Hot swap: no
- Policy Client Boolean Action Values
Specifies the values, such as
allowanddeny, that are associated with boolean policy decisions. The string is presented below in multiple lines for readability purposes.Default:
iPlanetAMWebAgentService|GET|allow|deny:
      iPlanetAMWebAgentService|POST|allow|deny:
      iPlanetAMWebAgentService|PUT|allow|deny:
      iPlanetAMWebAgentService|DELETE|allow|deny:
      iPlanetAMWebAgentService|HEAD|allow|deny:
      iPlanetAMWebAgentService|OPTIONS|allow|deny:
      iPlanetAMWebAgentService|PATCH|allow|deny
Property:
com.sun.identity.policy.client.booleanActionValuesHot swap: no
- Policy Client Resource Comparators
Specifies the comparators used for service names in policy.
Default:
serviceType=iPlanetAMWebAgentService|
      class=com.sun.identity.policy.plugins.HttpURLResourceName|wildcard=*|
      delimiter=/|caseSensitive=false
Property:
com.sun.identity.policy.client.resourceComparatorsHot swap: no
- Policy Client Clock Skew
Time in seconds used to adjust time difference between agent system and OpenAM. Clock skew in seconds = AgentTime - OpenAMServerTime.
Default: 10
Property:
com.sun.identity.policy.client.clockSkewHot swap: no
- URL Policy Env GET Parameters
Specifies the list of HTTP GET request parameters whose names and values the agents set in the environment map for URL policy evaluation by the OpenAM server.
Property:
com.sun.identity.agents.config.policy.env.get.param- URL Policy Env POST Parameters
Specifies the list of HTTP POST request parameters whose names and values the agents set in the environment map for URL policy evaluation by the OpenAM server.
Property:
com.sun.identity.agents.config.policy.env.post.param- URL Policy Env jsession Parameters
Specifies the list of HTTP session attributes whose names and values the agents set in the environment map for URL policy evaluation by the OpenAM server.
Property:
com.sun.identity.agents.config.policy.env.jsession.param- Use HTTP-Redirect for composite advice
When enabled, the remote policy client is configured to use HTTP-Redirect instead of HTTP-POST for composite advice.
Property:
com.sun.identity.agents.config.policy.advice.use.redirect
- Enable Notification of User Data Caches
When enabled, receive notification from OpenAM to update user management data caches.
Property:
com.sun.identity.idm.remote.notification.enabledHot swap: no
- User Data Cache Polling Time
If notifications are not enabled and set to a value other than zero, specifies the time in minutes after which the agent polls to update cached user management data.
Property:
com.iplanet.am.sdk.remote.pollingTimeDefault: 1
Hot swap: no
- Enable Notification of Service Data Caches
When enabled, receive notification from OpenAM to update service configuration data caches.
Property:
com.sun.identity.sm.notification.enabledHot swap: no
- Service Data Cache Time
If notifications are not enabled and set to a value other than zero, specifies the time in minutes after which the agent polls to update cached service configuration data.
Property:
com.sun.identity.sm.cacheTimeDefault: 1
Hot swap: no
- Enable Client Polling
When enabled, the session client polls to update the session cache rather than relying on notifications from OpenAM.
Property:
com.iplanet.am.session.client.polling.enableHot swap: no
- Client Polling Period
Specifies the time in seconds after which the session client requests an update from OpenAM for cached session information.
Property:
com.iplanet.am.session.client.polling.periodDefault: 180
Hot swap: no
This section covers miscellaneous J2EE agent properties. After creating the agent profile, you access these properties in the OpenAM console under Realms > Realm Name > Agents > J2EE > Agent Name > Miscellaneous.
This section describes the following property groups:
- Locale Language
The default language for the agent.
Property:
com.sun.identity.agents.config.locale.languageHot swap: no
- Locale Country
The default country for the agent.
Property:
com.sun.identity.agents.config.locale.countryHot swap: no
- Port Check Enable
When enabled, activate port checking, correcting requests on the wrong port.
Property:
com.sun.identity.agents.config.port.check.enable- Port Check File
Specifies the name of the file containing the content to handle requests on the wrong port when port checking is enabled.
Property:
com.sun.identity.agents.config.port.check.file- Port Check Setting
Specifies which ports correspond to which protocols. The agent uses the map when handling requests with invalid port numbers during port checking.
Property:
com.sun.identity.agents.config.port.check.setting
- Bypass Principal List
Specifies a list of principals the agent bypasses for authentication and search purposes, such as
guestortestuser.Property:
com.sun.identity.agents.config.bypass.principal
- Encryption Provider
Specifies the agent's encryption provider class.
Default:
com.iplanet.services.util.JCEEncryptionProperty:
com.iplanet.security.encryptorHot swap: no
- Ignore Path Info in Request URL
When enabled, strip the path information from the request URL while doing the Not Enforced List check, and URL policy evaluation. This is designed to prevent a user from accessing a URI by appending the matching pattern in the policy or not enforced list.
For example, if the not enforced list includes
/*.gif, then stripping path info from the request URL prevents access tohttp://host/index.htmlby usinghttp://host/index.html?hack.gif.Property:
com.sun.identity.agents.config.ignore.path.info
- Goto Parameter Name
Property used only when CDSSO is enabled. Only change the default value,
gotowhen the login URL has a landing page specified, such ascom.sun.identity.agents.config.cdsso.cdcservlet.url = http://openam.example.com:8080/openam/cdcservlet?goto= http://www.example.com/landing.jsp. The agent uses this parameter to append the original request URL to this cdcservlet URL. The landing page consumes this parameter to redirect to the original URL.As an example, if you set this value to
goto2, then the complete URL sent for authentication ishttp://openam.example.com:8080/openam/cdcservlet?goto= http://www.example.com/landing.jsp?goto2=http://www.example.com/original.jsp.Property:
com.sun.identity.agents.config.redirect.param- Legacy User Agent Support Enable
When enabled, provide support for legacy browsers.
Property:
com.sun.identity.agents.config.legacy.support.enable- Legacy User Agent List
List of header values that identify legacy browsers. Entries can use the wildcard character,
*.Property:
com.sun.identity.agents.config.legacy.user.agent- Legacy User Agent Redirect URI
Specifies a URI the agent uses to redirect legacy user agent requests.
Property:
com.sun.identity.agents.config.legacy.redirect.uri
This section covers advanced J2EE agent properties. After creating the agent profile, you access these properties in the OpenAM console under Realms > Realm Name > Agents > J2EE > Agent Name > Advanced.
This section describes the following property groups:
If the agent is behind a proxy or load balancer, then the agent can get client IP and host name values from the proxy or load balancer. For proxies and load balancers that support providing the client IP and host name in HTTP headers, you can use the following properties.
When multiple proxies or load balancers sit in the request path,
the header values can include a comma-separated list of values with the
first value representing the client, as in
client,next-proxy,first-proxy.
- Client IP Address Header
HTTP header name that holds the IP address of the client.
If the agent is behind a proxy or load balancer, then the agent can get client IP address values from the proxy or load balancer. Use this property if the proxy or load balancer supports providing the IP address in an HTTP header.
Property:
com.sun.identity.agents.config.client.ip.header- Client Hostname Header
HTTP header name that holds the hostname of the client.
If the agent is behind a proxy or load balancer, then the agent can get client host name values from the proxy or load balancer. Use this property if the proxy or load balancer supports providing the host name in an HTTP header.
When multiple proxies or load balancers sit in the request path, the header values can include a comma-separated list of values with the first value representing the client, as in
client,next-proxy,first-proxy.Property:
com.sun.identity.agents.config.client.hostname.header
- Web Service Enable
Enable web service processing.
Property:
com.sun.identity.agents.config.webservice.enable- Web Service End Points
Specifies a list of web application end points that represent web services.
Property:
com.sun.identity.agents.config.webservice.endpoint- Web Service Process GET Enable
When enabled, the agent processes HTTP GET requests for web service endpoints.
Property:
com.sun.identity.agents.config.webservice.process.get.enable- Web Service Authenticator
Specifies a class implementing
com.sun.identity.agents.filter.IWebServiceAuthenticator, used to authenticate web service requests.Property:
com.sun.identity.agents.config.webservice.authenticator- Web Service Response Processor
Specifies a class implementing
com.sun.identity.agents.filter.IWebServiceResponseProcessor, used to process web service responses.Property:
com.sun.identity.agents.config.webservice.responseprocessor- Web Service Internal Error Content File
Specifies a file the agent uses to generate an internal error fault for the client application.
Property:
com.sun.identity.agents.config.webservice.internalerror.content- Web Service Authorization Error Content File
Specifies a file the agent uses to generate an authorization error fault for the client application.
Property:
com.sun.identity.agents.config.webservice.autherror.content
- Alternative Agent Host Name
Specifies the host name of the agent protected server to show to client browsers, rather than the actual host name.
Property:
com.sun.identity.agents.config.agent.host- Alternative Agent Port Name
Specifies the port number of the agent protected server to show to client browsers, rather than the actual port number.
Property:
com.sun.identity.agents.config.agent.port- Alternative Agent Protocol
Specifies the protocol used to contact the agent from the browser client browsers, rather than the actual protocol used by the server. Either
httporhttps.Property:
com.sun.identity.agents.config.agent.protocol
- WebAuthentication Available
When enabled, allow programmatic authentication with the JBoss container using the WebAuthentication feature. This feature works only with certain versions of JBoss when the
J2EE_POLICYorALLfilter mode is in use.Property:
com.sun.identity.agents.config.jboss.webauth.availableNote
This setting is not necessary for the JBoss v7 agent.
- Possible XSS code elements
Specifies strings that, when found in the request, cause the agent to redirect the client to an error page.
Property:
com.sun.identity.agents.config.xss.code.elements- XSS detection redirect URI
Maps applications to URIs of customized pages to which to redirect clients upon detection of XSS code elements.
For example, to redirect clients of MyApp to
/myapp/error.html, enter MyApp as the Map Key and/myapp/error.htmlas the Corresponding Map Value.Property:
com.sun.identity.agents.config.xss.redirect.uri
- POST Data Preservation enabled
Enables HTTP POST data preservation, storing POST data before redirecting the browser to the login screen, and then autosubmitting the same POST after successful authentication to the original URL.
Property:
com.sun.identity.agents.config.postdata.preserve.enable- Missing PDP entry URI
Specifies a list of application-specific URIs if the referenced Post Data Preservation entry cannot be found in the local cache because it has exceeded its POST entry TTL. Either the agent redirects to a URI in this list, or it shows an HTTP 403 Forbidden error.
Property:
com.sun.identity.agents.config.postdata.preserve.cache.noentry.url- PDP entry TTL
POST data storage lifetime in milliseconds. Default: 300000.
Property:
com.sun.identity.agents.config.postdata.preserve.cache.entry.ttl- PDP Stickysession mode
Specifies whether to create a cookie, or to append a query string to the URL to assist with sticky load balancing.
Property:
com.sun.identity.agents.config.postdata.preserve.stickysession.mode- PDP Stickysession key-value
Specifies the key-value pair for stickysession mode. For example, a setting of
lb=myservereither sets anlbcookie withmyservervalue, or addslb=myserverto the URL query string.Property:
com.sun.identity.agents.config.postdata.preserve.stickysession.value
- TCP Connection Timeout
Sets the TCP connection timeout for outbound HTTP connections created by the Java EE policy agent. Set the property in the
OpenSSOAgentBootstrap.propertiesfile.Property:
org.forgerock.openam.url.connectTimeout
- Custom Properties
Additional properties to augment the set of properties supported by agent. Such properties take the following forms.
customproperty=custom-value1customlist[0]=customlist-value-0customlist[1]=customlist-value-1custommap[key1]=custommap-value-1custommap[key2]=custommap-value-2
Property:
com.sun.identity.agents.config.freeformproperties
This chapter provides information about configuring policy agents on protected application servers that operate behind network load balancers.
A load balancing layer that stands between clients and protected servers can distribute the client load, and fail client traffic over when a protected server goes offline. In the simplest case, the load balancing layer passes requests from the clients to servers and responses from servers to clients, managing the traffic so the client experience is as smooth as possible.

A load balancing layer can also offload processor-intensive public-key encryption algorithms involved in SSL transactions to a hardware accelerator, reducing the load on the protected servers. The client connects to the load balancer over HTTPS, but the load balancer connects to the servers over HTTP.

Configure your agent to map the agent host name to the load balancer host name, and to set alternate agent URL properties. Follow the steps in Procedure 3.5, "To Map the Agent Host Name to the Load Balancer Host Name" and Procedure 3.6, "To Set Alternate Agent URL Properties".
This procedure explains how to do so for a centralized Java EE policy agent profile configured in OpenAM Console. The steps also mention the properties for Java EE agent profiles that rely on local, file-based configurations:
Login to OpenAM Console as an administrative user with rights to modify the policy agent profile.
Browse to Realms > Realm Name > Agents > J2EE > Agent Name to open the Java EE agent profile for editing.
In the Global tab page section Fully Qualified Domain Name Checking, make sure FQDN checking is selected (the default).
The equivalent property setting is
com.sun.identity.agents.config.fqdn.check.enable=true.Set FQDN Default to the fully qualified domain name of the load balancer, such as
lb.example.com, rather than the protected server FQDN where the policy agent is installed.The equivalent property setting is
com.sun.identity.agents.config.fqdn.default=lb.example.com.Set FQDN Virtual Host Map to map the protected server FQDN to the load balancer FQDN, for example, where the key
agent.example.com(protected server) has valuelb.example.com(load balancer).The equivalent property setting is
com.sun.identity.agents.config.fqdn.mapping[agent.example.com]=lb.example.com.Save your work, and then restart the agent or the protected server.
Use the alternate agent URL properties to show the load balancer protocol, host, and port to show client browsers.
This procedure explains how to do so for a centralized Java EE policy agent profile configured in OpenAM Console. The steps also mention the properties for Java EE agent profiles that rely on local, file-based configurations.
Login to OpenAM Console as an administrative user with rights to modify the policy agent profile.
Browse to Realms > Realm Name > Agents > J2EE > Agent Name to open the Java EE agent profile for editing.
In the Advanced tab page section Alternate Agent URL, set the Alternative Agent Host Name to that of the load balancer. such as
lb.The equivalent property setting is similar to the following:
com.sun.identity.agents.config.agent.host=lb.If the host name is different on the load balancer, in the Advanced tab page section Alternate Agent URL, set the Alternative Agent Port number to that of the load balancer, such as
80.The equivalent property setting is similar to the following:
com.sun.identity.agents.config.agent.port=80.If the protocol is different on the load balancer, in the Advanced tab page section Alternate Agent URL, set the Alternative Agent Protocol to either
httporhttps.The equivalent property setting is similar to the following:
com.sun.identity.agents.config.agent.protocol=https.Save your work, and then restart the agent or the protected server.
An agent authenticator has read-only access to multiple agent profiles defined in the same realm, typically allowing an agent to read web service agent profiles.
After creating the agent profile, you access agent properties in the OpenAM console under Realms > Realm Name > Agents > Agent Authenticator > Agent Name.
- Password
Specifies the password the agent uses to connect to OpenAM.
- Status
Specifies whether the agent profile is active, and so can be used.
- Agent Profiles allowed to Read
Specifies which agent profiles in the realm the agent authenticator can read.
- Agent Root URL for CDSSO
Specifies the list of agent root URLs for CDSSO. The valid value is in the format
protocol://hostname:port/where protocol represents the protocol used, such ashttporhttps, hostname represents the host name of the system where the agent resides, and port represents the port number on which the agent is installed. The slash following the port number is required.If your agent system also has virtual host names, add URLs with the virtual host names to this list as well. OpenAM checks that
gotoURLs match one of the agent root URLs for CDSSO.
In addition to the policy agent's protection, some applications in your
environment may require role-based access control at container level.
For example, you may want to only allow authenticated members of the
manager group defined in the user data store to access certain
servlets and JSP pages.
The Java EE security model is declarative; it describes
roles and permissions in the web.xml file of
each application, isolating the security component from the application code.
An application configured for declarative security contains
<security-constraint> elements in its
web.xml file. Consider the following example:
<security-constraint>
  <web-resource-collection>
     <web-resource-name>Protected Servlet</web-resource-name>
     <url-pattern>/protectedservlet</url-pattern>
  </web-resource-collection>
  <auth-constraint>
     <role-name>id=manager,ou=group,dc=openam,dc=forgerock,dc=org</role-name>
   </auth-constraint>
</security-constraint>
The
<web-resource-collection>element defines the protected resource:/protectedservlet.The
<auth-constraint>element defines the rule that constrains user access: only members of the groupid=manager,ou=group,dc=openam,dc=forgerock,dc=orgcan access the/protectedservletservlet.
When the container gets a request for a resource protected by declarative
security, it prompts the user to log in using the page specified
in the <form-login-page> element of the
web.xml file. For example:
<form-login-config>
  <form-login-page>/authentication/login.html</form-login-page>
  <form-error-page>/authentication/accessdenied.html</form-error-page>
</form-login-config>
If the user does not satisfy the security requirements for the application,
the container redirects the user to the page specified by the
<form-error-page> element.
Tip
For more details on declarative security elements, see the following:
Refer to the documentation of your Java EE version and your container. Some containers may implement security in different ways.
Consider deploying the
agentsample.warsample application contained in the Java EE policy agent distribution. The sample application demonstrates declarative security concepts.Once you deploy the sample application in a container, see the
/j2ee_agents/agent_type/sampleapp/readme.txtfile for instructions.
When configuring an application with declarative security to work alongside
a Java EE policy agent, the agent acts as an additional layer of security between
the user and the protected resource. The following sequence diagram shows
the high-level flow of a request for a resource passing through the policy
agent and the declarative security layer when the policy agent's
filter mode is configured as
ALL.

If the policy agent's filter mode was set to J2EE_POLICY,
the diagram's flow would have ended at step 8), after the check on
declarative security.
To configure the Java EE policy agent to work with the container's declarative security, perform the steps in the following procedure:
This procedure assumes you have already installed a policy agent and that it is configured to protect the application. To configure the agent for declarative security, perform the following steps:
Ensure that the application
<login-config>element is configured, and that its<auth-method>element is set toFORM. For example:<login-config> <auth-method>FORM</auth-method> <form-login-config> <form-login-page>/authentication/login.html</form-login-page> <form-error-page>/authentication/accessdenied.html</form-error-page> </form-login-config> </login-config>Consider the following points:
By default, the policy agent is configured to handle the login process without honoring the value of the
<form-login-page>element. This allows for the configuration of declarative security for applications that are not designed to use theFORMlogin mechanism. Therefore, these applications can define a dummy value for the<form-login-page>element.The
<form-error-page>element is mandatory. It is the page where the container redirects users that do not satisfy OpenAM policies and declarative security rules. If this page does not exist, a 404 error may display.
In the OpenAM console, navigate to Realms > Realm Name > Agents > J2EE > Agent Name, and select the General tab.
Ensure that the Agent Filter Mode property value is either
ALLorJ2EE_POLICY.In the OpenAM console, navigate to Realms > Realm Name > Agents > J2EE > Agent Name, and select the Application tab.
Configure the Login Form URI property using the value of the
<form-login-page>element. For example,/HR/authentication/login.html.Note that the agent requires the URI context to be specified as part of the login form, in this case,
/HR/.Configure the Login Error URI property using the value of the
<form-error-page>element. For example,/HR/authentication/accessdenied.html.Note that the agent requires the URI context to be specified as part of the login form, in this case,
/HR/.Save your changes.
Configure mappings to the roles required for declarative security. For more information, see Privilege Attributes Processing Properties.
Tip
The sample application distributed with the policy agent,
agentsample.war, contains an example about how to configure some of these properties.
[2] The configuration file syntax is that of a standard Java properties file. See java.util.Properties.load() for a description of the format. The value of a property specified multiple times is not defined.
This chapter covers installation of the policy agent for Apache Tomcat.
Make sure OpenAM is installed and running, and that you can contact OpenAM from the system running the policy agent. Next, create a profile for your policy agent as described in Section 3.4, "Creating Agent Profiles". To protect resources with the agent, create at least one policy as described in Configuring Policies in the OpenAM Administration Guide. Consider creating a simple policy, such as a policy that allows only authenticated users to access your resources in order to test your policy agent after installation.
You must install Apache Tomcat before you install the policy agent, and you must stop the server during installation.
All of the Tomcat scripts must be present in
$CATALINA_HOME/bin. The Tomcat Windows executable
installer does not include the scripts, for example. If the scripts
are not present in your installation, copy the contents of the
bin directory from a .zip download of Tomcat of
the same version as the one you installed.
You must install a supported version of the Java runtime environment,
as described in
Section 2.1, "Java Requirements" in the Release Notes.
Set the JAVA_HOME environment variable accordingly.
The policy agent installer requires Java.
$ echo $JAVA_HOME
/path/to/java
See the OpenAM Installation Guide section, Obtaining OpenAM Software to determine which version of the agent to download, and download the agent. Also verify the checksum of the file you download against the checksum posted on the download page.
Unzip the file in the directory where you plan to install the J2EE policy agent. The agent you install stores its configuration and logs under this directory.
When you unzip the policy agent, you find the following directories
under the j2ee_agents/tomcat_v6_agent directory.
Despite the directory name, the policy agent supports multiple container versions. For details, see the Release Notes section, Java EE Agents Platform Requirements in the Release Notes.
binThe installation and configuration program agentadmin. For more details about the available command-line tools, see Command-Line Tool Reference.
configConfiguration templates used by the agentadmin command during installation
dataNot used
etcConfiguration templates used during installation
installer-logsLocation for log files written during installation
legal-noticesContains licensing information including third-party licenses
libShared libraries used by the Java EE policy agent
localeProperty files used by the installation program
READMEREADME file containing platform and install information for the agent
The web application deployment descriptor file, web.xml,
is the basic configuration file for web applications.
As such, the specific content of the web.xml file
depends on the application.
Apache Tomcat also provides a global
/path/to/tomcat/conf/web.xml deployment descriptor,
which sets defaults for all deployed applications.
When you install the Apache Tomcat policy agent,
you should be concerned with /path/to/tomcat/conf/web.xml,
and also with the WEB-INF/web.xml files
in each protected application.
This chapter covers installation of the policy agent for Tomcat.
Regardless of whether you store configurations centrally in OpenAM or locally with your agents, the agent requires a profile so that it can connect to and communicate with OpenAM.
In the OpenAM console, browse to Realms > Realm Name > Agents > J2EE, and then click the New... button in the Agent table.
Complete the web form using the following hints:
- Name
The name for the agent profile used when you install the agent
- Password
Password the agent uses to authenticate to OpenAM
- Configuration
Centralized configurations are stored in the OpenAM configuration store. You can manage the centralized configuration through the OpenAM console. Local configurations are stored in a file alongside the agent.
- Server URL
The full URL to an OpenAM instance, or if OpenAM is deployed in a site configuration (behind a load balancer) then the site URL
In centralized configuration mode, the Server URL is used to populate the agent profile for services, such as Login, Logout, Naming, and Cross Domain SSO.
- Agent URL
The URL to the J2EE agent application, such as
http://www.example.com:8080/agentappIn centralized configuration mode, the Agent URL is used to populate the Agent Profile for services, such as notifications.
Create a text file containing only the password specified when creating the agent profile.
UNIX example:
$ echo password > /tmp/pwd.txt
Windows example:
C:\> echo password > pwd.txt
Protect the password file you create as appropriate for your operating system:
UNIX example:
$ chmod 400 /tmp/pwd.txt
Windows example:
In Windows Explorer, right-click the created password file, for example
pwd.txt, select Read-Only, and then click OK.
The steps required for policy agent installation into Tomcat 6 are subtly
different from those required for Tomcat 7. For Tomcat 6, you have the option
to include a global web.xml file during the installation
process if you plan to project every application within the container.
Shut down the Tomcat server where you plan to install the agent:
$ /path/to/tomcat/bin/shutdown.sh
Make sure OpenAM is running.
Run agentadmin --install to install the agent:
$ /path/to/j2ee_agents/tomcat_v6_agent/bin/agentadmin --install --acceptLicense
When you run the command, you will be prompted to read and accept the software license agreement for the agent installation. You can suppress the license agreement prompt by including the
--acceptLicenceparameter. The inclusion of the option indicates that you have read and accepted the terms stated in the license. To view the license agreement, open<server-root>/legal-notices/license.txt.Enter the path to the Tomcat configuration folder. For example,
/path/to/apache-tomcat/conf.Enter the OpenAM URL. For example,
http://openam.example.com:8080/openam. The installer attempts to connect with the OpenAM server. If OpenAM is not running, you can continue with the installation.Enter the
$CATALINA_HOMEenvironment variable specifying the path to the root of the Tomcat server. For example,/path/to/apache-tomcat/.For Tomcat 6 Installs Only: you will be prompted if you want the installer to deploy the agent filter in the global
web.xml. Press Enter to accept the default value oftrueif you want to protect all applications in the container. If you want to protect only a few applications, enterfalse. For this example, accept the default:Choose yes to deploy the policy agent in the global web.xml file. [ ? : Help, < : Back, ! : Exit ] Install agent filter in global web.xml ? [true]:
Enter the agent URL. For example,
http://openam.example.com:8080/agentapp.Enter the agent profile name that you created in OpenAM. For example,
Tomcat Agent.Enter the path to the password file. For example,
/tmp/pwd.txt.
Next, review a summary of your responses and select an action to continue, go back a step, start over, or exit from the install:
-----------------------------------------------
SUMMARY OF YOUR RESPONSES
-----------------------------------------------
Tomcat Server Config Directory : /path/to/tomcat/conf
OpenAM server URL : http://openam.example.com:8080/openam
$CATALINA_HOME environment variable : /path/to/tomcat

Tomcat global web.xml filter install : true
Agent URL : http://www.example.com:8080/agentapp
Agent Profile name : Tomcat Agent
Agent Profile Password file name : /tmp/pwd.txt

Verify your settings above and decide from the choices below.
1. Continue with Installation
2. Back to the last interaction
3. Start Over
4. Exit
Please make your selection [1]:
...

SUMMARY OF AGENT INSTALLATION
-----------------------------
Agent instance name: Agent_001
Agent Bootstrap file location:
/path/to/j2ee_agents/tomcat_v6_agent/Agent_001/config/
OpenSSOAgentBootstrap.properties
Agent Configuration file location
/path/to/j2ee_agents/tomcat_v6_agent/Agent_001/config/
OpenSSOAgentConfiguration.properties
Agent Audit directory location:
/path/to/j2ee_agents/tomcat_v6_agent/Agent_001/logs/audit
Agent Debug directory location:
/path/to/j2ee_agents/tomcat_v6_agent/Agent_001/logs/debug

Install log file location:
/path/to/j2ee_agents/tomcat_v6_agent/installer-logs/audit/install.log

Thank you for using OpenAM Policy Agent
Upon successful completion, the installer adds the agent configuration to the Tomcat configuration, and set up the configuration and log directories for the agent.
Note
If the agent is in a different domain than the server, refer to the Administration Guide procedure, Configuring Cross-Domain Single Sign On.
Take note of the configuration files and log locations.
Each agent instance that you install on the system has its own numbered configuration and logs directory. The first agent's configuration and logs are thus located under the directory
j2ee_agents/tomcat_v6_agent/Agent_001/:config/OpenSSOAgentBootstrap.propertiesUsed to bootstrap the Java EE policy agent, allowing the agent to connect to OpenAM and download its configuration.
config/OpenSSOAgentConfiguration.propertiesOnly used if you configured the Java EE policy agent to use local configuration.
logs/audit/Operational audit log directory, only used if remote logging to OpenAM is disabled.
logs/debug/Debug directory where the
debug.outdebug file resides. Useful in troubleshooting policy agent issues.
If your policy agent configuration is not in the top-level realm (/), then you must edit config/OpenSSOAgentBootstrap.properties to identify the sub-realm that has your policy agent configuration. Find com.sun.identity.agents.config.organization.name and change the "/" to the path to your policy agent profile. This allows the policy agent to properly identify itself to the OpenAM server.
Start the Tomcat server where you installed the agent:
$ /path/to/tomcat/bin/startup.sh
The steps required for policy agent installation into Tomcat 7 are subtly
different from those required for Tomcat 6. For Tomcat 7, you do not install
the global web.xml file, but configure the
application-specific WEB-INF/web.xml file after basic
installation is complete. The agentapp.war
is automatically copied to the Tomcat webapps folder.
The Tomcat 8 install is identical to the Tomcat 7 installation process:
Shut down the Tomcat server where you plan to install the agent:
$ /path/to/tomcat/bin/shutdown.sh
Make sure OpenAM is running.
Run agentadmin --install to install the agent:
$ /path/to/j2ee_agents/tomcat_v6_agent/bin/agentadmin --install --acceptLicense
When you run the command, you will be prompted to read and accept the software license agreement for the agent installation. You can suppress the license agreement prompt by including the
--acceptLicenceparameter. The inclusion of the option indicates that you have read and accepted the terms stated in the license. To view the license agreement, open<server-root>/legal-notices/license.txt.Enter the path to the Tomcat configuration folder. For example,
/path/to/apache-tomcat/conf.Enter the OpenAM URL. For example,
http://openam.example.com:8080/openam.Enter the
$CATALINA_HOMEenvironment variable specifying the path to the root of the Tomcat server. For example,/path/to/apache-tomcat/.Enter the agent URL. For example,
http://openam.example.com:8080/agentapp.Enter the agent profile name that you created in OpenAM. For example,
Tomcat Agent.Enter the path to the password file. For example,
/tmp/pwd.txt.
Next, review a summary of your responses and select an action to continue, go back a step, start over, or exit from the install:
-----------------------------------------------
SUMMARY OF YOUR RESPONSES
-----------------------------------------------
Tomcat Server Config Directory : /path/to/tomcat/conf
OpenAM server URL : http://openam.example.com:8080/openam
$CATALINA_HOME environment variable : /path/to/tomcat

Tomcat global web.xml filter install : false
Agent URL : http://www.example.com:8080/agentapp
Agent Profile name : Tomcat Agent
Agent Profile Password file name : /tmp/pwd.txt

Verify your settings above and decide from the choices below.
1. Continue with Installation
2. Back to the last interaction
3. Start Over
4. Exit
Please make your selection [1]:
...

SUMMARY OF AGENT INSTALLATION
-----------------------------
Agent instance name: Agent_001
Agent Bootstrap file location:
/path/to/j2ee_agents/tomcat_v6_agent/Agent_001/config/
OpenSSOAgentBootstrap.properties
Agent Configuration file location
/path/to/j2ee_agents/tomcat_v6_agent/Agent_001/config/
OpenSSOAgentConfiguration.properties
Agent Audit directory location:
/path/to/j2ee_agents/tomcat_v6_agent/Agent_001/logs/audit
Agent Debug directory location:
/path/to/j2ee_agents/tomcat_v6_agent/Agent_001/logs/debug

Install log file location:
/path/to/j2ee_agents/tomcat_v6_agent/installer-logs/audit/install.log

Thank you for using OpenAM Policy Agent
Upon successful completion, the installer adds the agent configuration to the Tomcat configuration, and also set up the configuration and log directories for the agent.
Note
If the agent is in a different domain than the server, refer to the Administration Guide procedure, Configuring Cross-Domain Single Sign On.
Take note of the configuration files and log locations.
Each agent instance that you install on the system has its own numbered configuration and logs directory. The first agent's configuration and logs are thus located under the directory
j2ee_agents/tomcat_v6_agent/Agent_001/:config/OpenSSOAgentBootstrap.propertiesUsed to bootstrap the Java EE policy agent, allowing the agent to connect to OpenAM and download its configuration.
config/OpenSSOAgentConfiguration.propertiesOnly used if you configured the Java EE policy agent to use local configuration.
logs/audit/Operational audit log directory, only used if remote logging to OpenAM is disabled.
logs/debug/Debug directory where the
debug.outdebug file resides. Useful in troubleshooting policy agent issues.
If your policy agent configuration is not in the top-level realm (/), then you must edit config/OpenSSOAgentBootstrap.properties to identify the sub-realm that has your policy agent configuration. Find com.sun.identity.agents.config.organization.name and change the "/" to the path to your policy agent profile. This allows the policy agent to properly identify itself to the OpenAM server.
If you want to protect all applications in the container, you must add a filter manually for each protected application's
WEB-INF/web.xmldeployment descriptor file, following the opening <web-app> tag. Make sure that the agent filter is first in the filter chain:<filter> <filter-name>Agent</filter-name> <display-name>Agent</display-name> <description>OpenAM Policy Agent Filter</description> <filter-class>com.sun.identity.agents.filter.AmAgentFilter</filter-class> </filter> <filter-mapping> <filter-name>Agent</filter-name> <url-pattern>/*</url-pattern> <dispatcher>REQUEST</dispatcher> <dispatcher>INCLUDE</dispatcher> <dispatcher>FORWARD</dispatcher> <dispatcher>ERROR</dispatcher> </filter-mapping>Start the Tomcat server where you installed the agent:
$ /path/to/tomcat/bin/startup.sh
Check the Tomcat server log after you start the server to make sure startup completed successfully:
$ tail -n 1 /path/to/tomcat/logs/catalina.out
INFO: Server startup in 810 ms
Check the
debug.outdebug log to verify that the agent did start up:$ tail -n 7 /path/to/j2ee_agents/tomcat_v6_agent/Agent_001/logs/debug/debug.out ======================================= Version: ... Revision: 3111 Build Date: 20120915 Build Machine: builds.forgerock.org =======================================
(Optional) If you have a policy configured, you can test your policy agent. For example, try to browse to a resource that your policy agent protects. You should be redirected to OpenAM to authenticate, for example, as user
demo, passwordchangeit. After you authenticate, OpenAM then redirects you back to the resource you tried to access.
When performing a scripted, silent installation, use agentadmin --install --saveResponse response-file to create a response file for scripted installation. Then install silently using agentadmin --install --acceptLicense --useResponse response-file.
Shut down the Tomcat server before you uninstall the policy agent:
$ /path/to/tomcat/bin/shutdown.sh
To remove the Java EE policy agent, use agentadmin --uninstall. You must provide the Tomcat server configuration directory location.
Uninstall does not remove the agent instance directory, but you can do so manually after removing the agent configuration from Tomcat.
This chapter covers installation of the policy agent for JBoss Application Server.
Make sure OpenAM is installed and running, and that you can contact OpenAM from the system running the policy agent. Next, create a profile for your policy agent as described in Section 3.4, "Creating Agent Profiles". To protect resources with the agent, create at least one policy as described in Configuring Policies in the OpenAM Administration Guide. Consider creating a simple policy, such as a policy that allows only authenticated users to access your resources in order to test your policy agent after installation.
You must install JBoss before installing the policy agent.
You must install a supported version of the Java runtime environment,
as described in
Section 2.1, "Java Requirements" in the Release Notes.
Set the JAVA_HOME environment variable accordingly.
The policy agent installer requires Java.
$ echo $JAVA_HOME
/path/to/java
See the OpenAM Installation Guide section, Obtaining OpenAM Software to determine which version of the agent to download, and download the agent. Also verify the checksum of the file you download against the checksum posted on the download page.
Unzip the file in the directory where you plan to install the J2EE policy agent. The agent you install stores its configuration and logs under this directory.
When you unzip the policy agent, you find the following directories
under the j2ee_agents/jboss_v7_agent directory.
Despite the directory name, the policy agent supports multiple container versions. For details, see the Release Notes section, Java EE Agents Platform Requirements in the Release Notes.
binThe installation and configuration program agentadmin. For more details about the available command-line tools, see Command-Line Tool Reference.
configConfiguration templates used by the agentadmin command during installation
dataNot used
etcConfiguration templates used during installation
installer-logsLocation for log files written during installation
legal-noticesContains licensing information including third-party licenses
libShared libraries used by the Java EE policy agent
localeProperty files used by the installation program
READMEREADME file containing platform and install information for the agent
Complete the following procedures to install the policy agent.
Regardless of whether you store configurations centrally in OpenAM or locally with your agents, the agent requires a profile so that it can connect to and communicate with OpenAM.
In the OpenAM console, browse to Realms > Realm Name > Agents > J2EE, and then click the New... button in the Agent table.
Complete the web form using the following hints:
- Name
The name for the agent profile used when you install the agent
- Password
Password the agent uses to authenticate to OpenAM
- Configuration
Centralized configurations are stored in the OpenAM configuration store. You can manage the centralized configuration through the OpenAM console. Local configurations are stored in a file alongside the agent.
- Server URL
The full URL to an OpenAM instance, or if OpenAM is deployed in a site configuration (behind a load balancer) then the site URL
In centralized configuration mode, the Server URL is used to populate the agent profile for services, such as Login, Logout, Naming, and Cross Domain SSO.
- Agent URL
The URL to the J2EE agent application, such as
http://www.example.com:8080/agentappIn centralized configuration mode, the Agent URL is used to populate the Agent Profile for services, such as notifications.
Create a text file containing only the password specified when creating the agent profile.
UNIX example:
$ echo password > /tmp/pwd.txt
Windows example:
C:\> echo password > pwd.txt
Protect the password file you create as appropriate for your operating system:
UNIX example:
$ chmod 400 /tmp/pwd.txt
Windows example:
In Windows Explorer, right-click the created password file, for example
pwd.txt, select Read-Only, and then click OK.
If you want to include an application-specific module, make sure to
type in false when prompted with the following question:
Install agent as global module? [true]:
Shut down the JBoss server where you plan to install the agent.
Make sure OpenAM is running.
Run agentadmin --install to install the agent.
When you run the command, you will be prompted to read and accept the software license agreement for the agent installation. You can suppress the license agreement prompt by including the
--acceptLicenceparameter. The inclusion of the option indicates that you have read and accepted the terms stated in the license. To view the license agreement, open<server-root>/legal-notices/license.txt.$ /path/to/j2ee_agents/jboss_v7_agent/bin/agentadmin --install --acceptLicense ... ----------------------------------------------- SUMMARY OF YOUR RESPONSES ----------------------------------------------- JBoss home directory : /path/to/jboss/ JBoss deployment mode: standalone Install agent as global module: true OpenAM server URL : http://openam.example.com:8080/openam Agent URL : http://www.example.com:8080/agentapp Agent Profile name : JBossAgent Agent Profile Password file name : /tmp/pwd.txt ... SUMMARY OF AGENT INSTALLATION ----------------------------- Agent instance name: Agent_001 Agent Bootstrap file location: /path/to/j2ee_agents/jboss_v7_agent/Agent_001/config/ OpenSSOAgentBootstrap.properties Agent Configuration file location /path/to/j2ee_agents/jboss_v7_agent/Agent_001/config/ OpenSSOAgentConfiguration.properties Agent Audit directory location: /path/to/j2ee_agents/jboss_v7_agent/Agent_001/logs/audit Agent Debug directory location: /path/to/j2ee_agents/jboss_v7_agent/Agent_001/logs/debug Install log file location: /path/to/j2ee_agents/jboss_v7_agent/installer-logs/audit/install.log ...
Upon successful completion, the installer updates the JBoss configuration, adds the agent web application under
JBOSS_HOME/server/standalone/deployments, and also sets up configuration and log directories for the agent.Note
If the agent is in a different domain than the server, refer to Administration Guide procedure, Configuring Cross-Domain Single Sign On.
Take note of the configuration files and log locations.
Each agent instance that you install on the system has its own numbered configuration and logs directory. The first agent's configuration and logs are thus located under the directory
j2ee_agents/jboss_v7_agent/Agent_001/:config/OpenSSOAgentBootstrap.propertiesUsed to bootstrap the Java EE policy agent, allowing the agent to connect to OpenAM and download its configuration.
config/OpenSSOAgentConfiguration.propertiesOnly used if you configured the Java EE policy agent to use local configuration.
logs/audit/Operational audit log directory, only used if remote logging to OpenAM is disabled.
logs/debug/Debug directory where the debug file resides. Useful in troubleshooting policy agent issues.
If your policy agent configuration is not in the top-level realm (/), then you must edit config/OpenSSOAgentBootstrap.properties to identify the sub-realm that has your policy agent configuration. Find com.sun.identity.agents.config.organization.name and change the / to the realm to your policy agent profile. This allows the policy agent to properly identify itself to the OpenAM server.
To protect a web application, you must add the following filter to the application's
WEB-INF/web.xmldeployment descriptor, following the opening <web-app> tag:<filter> <filter-name>Agent</filter-name> <display-name>Agent</display-name> <description>OpenAM Policy Agent Filter</description> <filter-class>com.sun.identity.agents.filter.AmAgentFilter</filter-class> </filter> <filter-mapping> <filter-name>Agent</filter-name> <url-pattern>/*</url-pattern> <dispatcher>REQUEST</dispatcher> <dispatcher>INCLUDE</dispatcher> <dispatcher>FORWARD</dispatcher> <dispatcher>ERROR</dispatcher> </filter-mapping>You also need to add the following security constraint specification to the application's
WEB-INF/web.xmlfile:<security-constraint> <web-resource-collection> <web-resource-name>All resources</web-resource-name> <description>Protects all resources</description> <url-pattern>*.do</url-pattern> </web-resource-collection> </security-constraint>You must also add the following security domain specification to the
jboss-web.xmlconfiguration file of the application:<security-domain>java:/jaas/AMRealm</security-domain>You can find that file packed in the
agentsample.eararchive in the/path/to/j2ee_agents/jboss_v7_agent/sampleapp/distdirectory. Once unpacked, you can find the file in theWEB-INFsubdirectory.If you typed in
falseto theInstall agent as global modulequestion during the installation process, you will need to add the following line to theMETA-INF/MANIFEST.MFfile of the application:Dependencies: org.forgerock.openam.agent
If you responded
domainto theEnter the name of the deployment modequestion during the installation process, you must manually deploy thej2ee_agents/jboss_v7_agent/etc/agentapp.warfile to JBoss.The reason manual deployment is required when running JBoss in domain mode is that the agent installer uses auto-deployment capabilities provided by the JBoss deployment scanner. The deployment scanner is used only in standalone mode. When running JBoss in standalone mode, it is not necessary to manually deploy the
agentapp.warfile.
Run JBoss.
(Optional) If you have a policy configured, you can test your policy agent. For example, try to browse to a resource that your policy agent protects. You should be redirected to OpenAM to authenticate, for example, as user
demo, passwordchangeit. After you authenticate, OpenAM then redirects you back to the resource you tried to access.
When performing a scripted, silent installation, use agentadmin --install --saveResponse response-file to create a response file for scripted installation. Then install silently using agentadmin --install --acceptLicense --useResponse response-file.
Shut down the JBoss server before you uninstall the policy agent.
To remove the Java EE policy agent, use agentadmin --uninstall. You must provide the JBoss configuration directory location.
Uninstall does not remove the agent instance directory, but you can do so manually after removing the agent configuration from JBoss.
This chapter covers installation of the policy agent for Jetty.
Make sure OpenAM is installed and running, and that you can contact OpenAM from the system running the policy agent. Next, create a profile for your policy agent as described in Section 3.4, "Creating Agent Profiles". To protect resources with the agent, create at least one policy as described in Configuring Policies in the OpenAM Administration Guide. Consider creating a simple policy, such as a policy that allows only authenticated users to access your resources in order to test your policy agent after installation.
You must install Jetty before you install the policy agent, and you must stop the server during installation.
You must install a supported version of the Java runtime environment,
as described in
Section 2.1, "Java Requirements" in the Release Notes.
Set the JAVA_HOME environment variable accordingly.
The policy agent installer requires Java.
$ echo $JAVA_HOME
/path/to/java
See the OpenAM Installation Guide section, Obtaining OpenAM Software to determine which version of the agent to download, and download the agent. Also verify the checksum of the file you download against the checksum posted on the download page.
Note
Command line examples in this chapter show Jetty accessed remotely. If
you are following the examples and have issues accessing Jetty remotely,
you might have to change filter settings in the deployment descriptor file,
such as /path/to/jetty/webapps/test/WEB-INF/web.xml,
as shown in the following example:
<filter>
 <filter-name>TestFilter</filter-name>
 <filter-class>com.acme.TestFilter</filter-class>
 <init-param>
  <param-name>remote</param-name>
  <param-value>true</param-value> <!-- default: false -->
 </init-param>
</filter>
Unzip the file in the directory where you plan to install the J2EE policy agent. The agent you install stores its configuration and logs under this directory.
When you unzip the policy agent, you find the following directories
under the j2ee_agents/jetty_v61_agent directory.
Despite the directory name, the policy agent supports multiple container versions. For details, see the Release Notes section, Java EE Agents Platform Requirements in the Release Notes.
binThe installation and configuration program agentadmin. For more details about the available command-line tools, see Command-Line Tool Reference.
configConfiguration templates used by the agentadmin command during installation
dataNot used
etcConfiguration templates used during installation
installer-logsLocation for log files written during installation
legal-noticesContains licensing information including third-party licenses
libShared libraries used by the Java EE policy agent
localeProperty files used by the installation program
READMEREADME file containing platform and install information for the agent
Complete the following procedures to install the policy agent.
Regardless of whether you store configurations centrally in OpenAM or locally with your agents, the agent requires a profile so that it can connect to and communicate with OpenAM.
In the OpenAM console, browse to Realms > Realm Name > Agents > J2EE, and then click the New... button in the Agent table.
Complete the web form using the following hints:
- Name
The name for the agent profile used when you install the agent
- Password
Password the agent uses to authenticate to OpenAM
- Configuration
Centralized configurations are stored in the OpenAM configuration store. You can manage the centralized configuration through the OpenAM console. Local configurations are stored in a file alongside the agent.
- Server URL
The full URL to an OpenAM instance, or if OpenAM is deployed in a site configuration (behind a load balancer) then the site URL
In centralized configuration mode, the Server URL is used to populate the agent profile for services, such as Login, Logout, Naming, and Cross Domain SSO.
- Agent URL
The URL to the J2EE agent application, such as
http://www.example.com:8080/agentappIn centralized configuration mode, the Agent URL is used to populate the Agent Profile for services, such as notifications.
Create a text file containing only the password specified when creating the agent profile.
UNIX example:
$ echo password > /tmp/pwd.txt
Windows example:
C:\> echo password > pwd.txt
Protect the password file you create as appropriate for your operating system:
UNIX example:
$ chmod 400 /tmp/pwd.txt
Windows example:
In Windows Explorer, right-click the created password file, for example
pwd.txt, select Read-Only, and then click OK.
Shut down the Jetty server where you plan to install the agent.
Make sure OpenAM is running.
Run agentadmin --install to install the agent.
When you run the command, you will be prompted to read and accept the software license agreement for the agent installation. You can suppress the license agreement prompt by including the
--acceptLicenceparameter. The inclusion of the option indicates that you have read and accepted the terms stated in the license. To view the license agreement, open<server-root>/legal-notices/license.txt.$ /path/to/j2ee_agents/jetty_v61_agent/bin/agentadmin --install --acceptLicense ... ----------------------------------------------- SUMMARY OF YOUR RESPONSES ----------------------------------------------- Jetty Server Config Directory : /path/to/jetty/etc OpenAM server URL : http://openam.example.com:8080/openam Jetty installation directory. : /path/to/jetty Agent URL : http://www.example.com:8080/agentapp Agent Profile name : Jetty Agent Agent Profile Password file name : /tmp/pwd.txt ... SUMMARY OF AGENT INSTALLATION ----------------------------- Agent instance name: Agent_001 Agent Bootstrap file location: /path/to/j2ee_agents/jetty_v61_agent/Agent_001/config/ OpenSSOAgentBootstrap.properties Agent Configuration file location /path/to/j2ee_agents/jetty_v61_agent/Agent_001/config/ OpenSSOAgentConfiguration.properties Agent Audit directory location: /path/to/j2ee_agents/jetty_v61_agent/Agent_001/logs/audit Agent Debug directory location: /path/to/j2ee_agents/jetty_v61_agent/Agent_001/logs/debug Install log file location: /path/to/j2ee_agents/jetty_v61_agent/installer-logs/audit/install.log ...
Upon successful completion, the installer updates Jetty's
start.jarto reference the agent, sets up the agent web application, and also sets up configuration and log directories for the agent.Note
If the agent is in a different domain than the server, refer to Administration Guide procedure, Configuring Cross-Domain Single Sign On.
Take note of the configuration files and log locations.
Each agent instance that you install on the system has its own numbered configuration and logs directory. The first agent's configuration and logs are thus located under the directory
j2ee_agents/jetty_v61_agent/Agent_001/:config/OpenSSOAgentBootstrap.propertiesUsed to bootstrap the Java EE policy agent, allowing the agent to connect to OpenAM and download its configuration.
config/OpenSSOAgentConfiguration.propertiesOnly used if you configured the Java EE policy agent to use local configuration.
logs/audit/Operational audit log directory, only used if remote logging to OpenAM is disabled.
logs/debug/Debug directory where the
debug.outdebug file resides. Useful in troubleshooting policy agent issues.
If your policy agent configuration is not in the top-level realm (/), then you must edit config/OpenSSOAgentBootstrap.properties to identify the sub-realm that has your policy agent configuration. Find com.sun.identity.agents.config.organization.name and change the / to the path to your policy agent profile. This allows the policy agent to properly identify itself to the OpenAM server.
To protect a web application, you must add the following filter to the application's
WEB-INF/web.xmldeployment descriptor, following the opening <web-app> tag.<filter> <filter-name>Agent</filter-name> <display-name>Agent</display-name> <description>OpenAM Policy Agent Filter</description> <filter-class>com.sun.identity.agents.filter.AmAgentFilter</filter-class> </filter> <filter-mapping> <filter-name>Agent</filter-name> <url-pattern>/*</url-pattern> <dispatcher>REQUEST</dispatcher> <dispatcher>INCLUDE</dispatcher> <dispatcher>FORWARD</dispatcher> <dispatcher>ERROR</dispatcher> </filter-mapping>Start the Jetty server where you installed the agent:
$ cd /path/to/jetty ; java -jar start.jar
...
2011-09-15 12:49:55.469:INFO::Extract file:/path/to/jetty/webapps/agentapp.war
...
2011-09-15 12:50:14.163:INFO::Started SelectChannelConnector@0.0.0.0:8080
(Optional) If you have a policy configured, you can test your policy agent. For example, try to browse to a resource that your policy agent protects. You should be redirected to OpenAM to authenticate, for example, as user
demo, passwordchangeit. After you authenticate, OpenAM then redirects you back to the resource you tried to access.
When performing a scripted, silent installation, use agentadmin --acceptLicense --saveResponse response-file to create a response file for scripted installation. Then install silently using agentadmin --install --acceptLicense --useResponse response-file.
Shut down the Jetty server before you uninstall the policy agent.
To remove the Java EE policy agent, use agentadmin --uninstall. You must provide the Jetty configuration directory location.
Uninstall does not remove the agent instance directory, but you can do so manually after removing the agent configuration from Jetty.
This chapter covers installation of the policy agent for Oracle WebLogic.
Make sure OpenAM is installed and running, and that you can contact OpenAM from the system running the policy agent. Next, create a profile for your policy agent as described in Section 3.4, "Creating Agent Profiles". To protect resources with the agent, create at least one policy as described in Configuring Policies in the OpenAM Administration Guide. Consider creating a simple policy, such as a policy that allows only authenticated users to access your resources in order to test your policy agent after installation.
You must install WebLogic before you install the policy agent, and you must stop the server during installation.
You must install a supported version of the Java runtime environment,
as described in
Section 2.1, "Java Requirements" in the Release Notes.
Set the JAVA_HOME environment variable accordingly.
The policy agent installer requires Java.
$ echo $JAVA_HOME
/path/to/java
See the OpenAM Installation Guide section, Obtaining OpenAM Software to determine which version of the agent to download, and download the agent. Also verify the checksum of the file you download against the checksum posted on the download page.
Unzip the file in the directory where you plan to install the J2EE policy agent. The agent you install stores its configuration and logs under this directory.
When you unzip the policy agent, you find the following directories
under the j2ee_agents/weblogic_v10_agent directory.
Despite the directory name, the policy agent supports multiple container versions. For details, see the Release Notes section, Java EE Agents Platform Requirements in the Release Notes.
binThe installation and configuration program agentadmin. For more details about the available command-line tools, see Command-Line Tool Reference.
configConfiguration templates used by the agentadmin command during installation
dataNot used
etcConfiguration templates used during installation
installer-logsLocation for log files written during installation
legal-noticesContains licensing information including third-party licenses
libShared libraries used by the Java EE policy agent
localeProperty files used by the installation program
READMEREADME file containing platform and install information for the agent
Complete the following procedures to install the policy agent.
Regardless of whether you store configurations centrally in OpenAM or locally with your agents, the agent requires a profile so that it can connect to and communicate with OpenAM.
In the OpenAM console, browse to Realms > Realm Name > Agents > J2EE, and then click the New... button in the Agent table.
Complete the web form using the following hints:
- Name
The name for the agent profile used when you install the agent
- Password
Password the agent uses to authenticate to OpenAM
- Configuration
Centralized configurations are stored in the OpenAM configuration store. You can manage the centralized configuration through the OpenAM console. Local configurations are stored in a file alongside the agent.
- Server URL
The full URL to an OpenAM instance, or if OpenAM is deployed in a site configuration (behind a load balancer) then the site URL
In centralized configuration mode, the Server URL is used to populate the agent profile for services, such as Login, Logout, Naming, and Cross Domain SSO.
- Agent URL
The URL to the J2EE agent application, such as
http://www.example.com:8080/agentappIn centralized configuration mode, the Agent URL is used to populate the Agent Profile for services, such as notifications.
Create a text file containing only the password specified when creating the agent profile.
UNIX example:
$ echo password > /tmp/pwd.txt
Windows example:
C:\> echo password > pwd.txt
Protect the password file you create as appropriate for your operating system:
UNIX example:
$ chmod 400 /tmp/pwd.txt
Windows example:
In Windows Explorer, right-click the created password file, for example
pwd.txt, select Read-Only, and then click OK.
Shut down the WebLogic server where you plan to install the agent.
Make sure OpenAM is running.
Run agentadmin --install to install the agent.
When you run the command, you will be prompted to read and accept the software license agreement for the agent installation. You can suppress the license agreement prompt by including the
--acceptLicenceparameter. The inclusion of the option indicates that you have read and accepted the terms stated in the license. To view the license agreement, open<server-root>/legal-notices/license.txt.$ /path/to/j2ee_agents/weblogic_v10_agent/bin/agentadmin --install --acceptLicense ... ----------------------------------------------- SUMMARY OF YOUR RESPONSES ----------------------------------------------- Startup script location : /path/to/domain/mydomain/bin/startWebLogic.sh WebLogic Server instance name : AdminServer WebLogic home directory : /path/to/wlserver OpenAM server URL : http://openam.example.com:8080/openam Agent URL : http://www.example.com:7001/agentapp Agent Profile name : WebLogic Agent Agent Profile Password file name : /tmp/pwd.txt ... SUMMARY OF AGENT INSTALLATION ----------------------------- Agent instance name: Agent_001 Agent Bootstrap file location: /path/to/j2ee_agents/weblogic_v10_agent/Agent_001/config/ OpenSSOAgentBootstrap.properties Agent Configuration file location /path/to/j2ee_agents/weblogic_v10_agent/Agent_001/config/ OpenSSOAgentConfiguration.properties Agent Audit directory location: /path/to/j2ee_agents/weblogic_v10_agent/Agent_001/logs/audit Agent Debug directory location: /path/to/j2ee_agents/weblogic_v10_agent/Agent_001/logs/debug Install log file location: /path/to/j2ee_agents/weblogic_v10_agent/installer-logs/audit/install.log ...
Upon successful completion, the installer updates the WebLogic configuration, copies the agent libraries to WebLogic's library directory, and also sets up configuration and log directories for the agent.
Note
If the agent is in a different domain than the server, refer to the Administration Guide procedure, Configuring Cross-Domain Single Sign On.
Take note of the configuration files and log locations.
Each agent instance that you install on the system has its own numbered configuration and logs directory. The first agent's configuration and logs are thus located under the directory
j2ee_agents/weblogic_v10_agent/Agent_001/:config/OpenSSOAgentBootstrap.propertiesUsed to bootstrap the Java EE policy agent, allowing the agent to connect to OpenAM and download its configuration.
config/OpenSSOAgentConfiguration.propertiesOnly used if you configured the Java EE policy agent to use local configuration.
logs/audit/Operational audit log directory, only used if remote logging to OpenAM is disabled.
logs/debug/Debug directory where the debug file resides. Useful in troubleshooting policy agent issues.
If your policy agent configuration is not in the top-level realm (/), then you must edit config/OpenSSOAgentBootstrap.properties to identify the sub-realm that has your policy agent configuration. Find com.sun.identity.agents.config.organization.name and change the / to the path to your policy agent profile. This allows the policy agent to properly identify itself to the OpenAM server.
The agent requires sourcing before it will work properly. There are two ways to source:
Manually source the file containing the policy agent environment settings for WebLogic before starting the application server.
$ . /path/to/setAgentEnv_AdminServer.sh
Or edit the
startWebLogic.shscript to set the sourcing needed for the agent, by adding these lines after the code block shown. Add the setAgentEnv_AdminServer.sh line to the following location in the file. The drawback to this approach is that it could be overwritten, as noted in the file:$ cat /path/to/startWebLogic.sh ... # Any changes to this script may be lost when adding extensions to this # configuration. DOMAIN_HOME="/opt/Oracle/Middleware/user_projects/domains/base_domain" . /path/to/setAgentEnv_AdminServer.sh ${DOMAIN_HOME}/bin/startWebLogic.sh $*
Note
If the sourcing is not set properly, the following message appears:
<Error> <HTTP> <cent.example.com>
<AdminServer> <[STANDBY] ExecuteThread: '5' for queue: 'weblogic.kernel.
Default (self-tuning)'> <<WLS Kernel>> <><> <> <1360800613441>
<BEA-101165> <Could not load user defined filter in web.xml:
ServletContext@1761850405[app:agentapp module:agentapp.war path:null
spec-version:null] com.sun.identity.agents.filter.AmAgentFilter.
java.lang.ClassNotFoundException:
com.sun.identity.agents.filter.AmAgentFilter
Start the WebLogic server.
(Optional) Deploy the
/path/to/j2ee_agents/weblogic_v10_agent/etc/agentapp.waragent application in WebLogic.The
agentapp.warapplication is required to enable notifications. If you decide not to deploy the application, you may want to enable thecom.sun.identity.agents.config.load.intervalproperty to allow the agent to fetch configuration changes from OpenAM.For each web application to protect, add the following filter to the application's
WEB-INF/web.xmldeployment descriptor, following the opening <web-app> tag:<filter> <filter-name>Agent</filter-name> <display-name>Agent</display-name> <description>OpenAM Policy Agent Filter</description> <filter-class>com.sun.identity.agents.filter.AmAgentFilter</filter-class> </filter> <filter-mapping> <filter-name>Agent</filter-name> <url-pattern>/*</url-pattern> <dispatcher>REQUEST</dispatcher> <dispatcher>INCLUDE</dispatcher> <dispatcher>FORWARD</dispatcher> <dispatcher>ERROR</dispatcher> </filter-mapping>You might also have to update additional configuration files. See the sample application located under
/path/to/j2ee_agents/weblogic_v10_agent/sampleappfor examples.(Optional) If you have a policy configured, you can test your policy agent. For example, try to browse to a resource that your policy agent protects. You should be redirected to OpenAM to authenticate, for example, as user
demo, passwordchangeit. After you authenticate, OpenAM then redirects you back to the resource you tried to access.
When performing a scripted, silent installation, use agentadmin --install --saveResponse response-file to create a response file for scripted installation. Then install silently using agentadmin --install --acceptLicense --useResponse response-file.
After installing WebLogic, some configuration is required before the policy agent will work.
WebLogic is unique in that it requires additional configuration after the installation is complete:
Go to the WebLogic Server Administration Console and login.
Click
Security realms.Click the name of the realm to use for OpenAM.
Click
Providers>Authentication.Click
Lock & Edit>New.Enter the desired type in
Type as AgentAuthenticator, provide a name, and clickOK.Click on the name of the agent authenticator you just created.
Use
OPTIONALfor the control flag and save.Click on
Providersto display the Authentication Providers Table.Click on
Default Authenticator, useOPTIONALfor the control flag, and save.Activate the changes once the default authenticator is done saving.
You will need to restart the WebLogic Server to implement the changes.
In many WebLogic domains, the administration server provides a central point for controlling and managing the configuration of the managed servers that host protected applications.
If WebLogic-managed-servers run on different hosts, you must create separate agent profiles and perform separate installations for each so that OpenAM can send notifications to the appropriate addresses.
For multi-server WebLogic domains, install policy agent as follows:
If servers are on different hosts, create agent profiles for each server where you plan to install the policy agent.
The steps are described under Section 7.2, "Installing the WebLogic Policy Agent".
Prepare your protected web applications by adding the policy agent filter configuration as described in Procedure 7.4, "To Protect Applications After Agent Installation".
Use the agentadmin command to install the policy agent either interactively, or silently on each server in the domain.
For interactive installation, prepare password files for the servers as described under Section 7.2, "Installing the WebLogic Policy Agent".
Then install the policy agent on the servers as described in Procedure 7.3, "To Install the Policy Agent into WebLogic".
For silent installation, follow the instructions in Section 7.3, "Silent WebLogic Policy Agent Installation".
Start WebLogic, and then set up an authentication provider as described in Procedure 7.5, "To Configure the WebLogic Policy Agent".
On each server in the domain, deploy the policy agent
agentapp.war.On each managed server in the domain, update the classpath to include policy agent .jar files.
In WebLogic Node Manager console, browse to Environment > Servers > server > Server Start > Class Path, and then edit the classpath as in the following example, but all on a single line:
/path/to/j2ee_agents/weblogic_v10_agent/lib/agent.jar:
/path/to/j2ee_agents/weblogic_v10_agent/lib/openssoclientsdk.jar:
/path/to/j2ee_agents/weblogic_v10_agent/locale:
/path/to/j2ee_agents/weblogic_v10_agent/Agent_001/config:
$CLASSPATH
Replace the paths in the example with the actual paths for your domain.
Restart the managed servers.
Shut down the WebLogic server before you uninstall the policy agent.
To remove the Java EE policy agent, use agentadmin --uninstall. You must provide the WebLogic configuration directory location.
Uninstall does not remove the agent instance directory, but you can do so manually after removing the agent configuration from WebLogic.
This chapter covers installation of the policy agent for IBM WebSphere.
Make sure OpenAM is installed and running, and that you can contact OpenAM from the system running the policy agent. Next, create a profile for your policy agent as described in Section 3.4, "Creating Agent Profiles". To protect resources with the agent, create at least one policy as described in Configuring Policies in the OpenAM Administration Guide. Consider creating a simple policy, such as a policy that allows only authenticated users to access your resources in order to test your policy agent after installation.
You must install WebSphere before you install the policy agent, and you must stop the server during installation.
You must install a supported version of the Java runtime environment,
as described in
Section 2.1, "Java Requirements" in the Release Notes.
Set the JAVA_HOME environment variable accordingly.
The policy agent installer requires Java.
$ echo $JAVA_HOME
/path/to/java
If you are using IBM Java, see Procedure 8.1, "To Install With IBM Java".
See the OpenAM Installation Guide section, Obtaining OpenAM Software to determine which version of the agent to download, and download the agent. Also verify the checksum of the file you download against the checksum posted on the download page.
Unzip the file in the directory where you plan to install the J2EE policy agent. The agent you install stores its configuration and logs under this directory.
When you unzip the policy agent, you find the following directories
under the j2ee_agents/websphere_v61_agent directory.
Despite the directory name, the policy agent supports multiple container versions. For details, see the Release Notes section, Java EE Agents Platform Requirements in the Release Notes.
binThe installation and configuration program agentadmin. For more details about the available command-line tools, see Command-Line Tool Reference.
configConfiguration templates used by the agentadmin command during installation
dataNot used
etcConfiguration templates used during installation
installer-logsLocation for log files written during installation
legal-noticesContains licensing information including third-party licenses
libShared libraries used by the Java EE policy agent
localeProperty files used by the installation program
READMEREADME file containing platform and install information for the agent
The WebSphere policy agent runs with IBM Java. To install the policy agent using IBM Java on platforms other than AIX, you must change the agentadmin script to use the IBM Java Cryptography Extensions (JCE).
Note that line breaks and continuation marker (\) characters have been manually added to the following examples to aid display in the documentation. These are not required when editing the script file.
Open the file,
bin/agentadminfor editing.Remove the
ifstatement surrounding the line defining theAGENT_OPTSenvironment variable for AIX platforms:Before:
if [ "$OS_TYPE" = "AIX" ]; then
    AGENT_OPTS="-DamKeyGenDescriptor.provider=IBMJCE \
                -DamCryptoDescriptor.provider=IBMJCE \
                -DamRandomGenProvider=IBMJCE"
else
    AGENT_OPTS=
fi
After:
AGENT_OPTS="-DamKeyGenDescriptor.provider=IBMJCE \
                -DamCryptoDescriptor.provider=IBMJCE \
                -DamRandomGenProvider=IBMJCE"
Edit the line that calls the AdminToolLauncher to move the
$AGENT_OPTSenvironment variable before the classpath is set:Before:
$JAVA_VM -classpath "$AGENT_CLASSPATH" $AGENT_OPTS \
    com.sun.identity.install.tools.launch.AdminToolLauncher $*
After:
$JAVA_VM $AGENT_OPTS -classpath "$AGENT_CLASSPATH" \
    com.sun.identity.install.tools.launch.AdminToolLauncher $*
Save your work.
You can now install the WebSphere policy agent with IBM Java as described in Section 8.2, "Installing the WebSphere Policy Agent".
Complete the following procedures to install the policy agent.
Regardless of whether you store configurations centrally in OpenAM or locally with your agents, the agent requires a profile so that it can connect to and communicate with OpenAM.
In the OpenAM console, browse to Realms > Realm Name > Agents > J2EE, and then click the New... button in the Agent table.
Complete the web form using the following hints:
- Name
The name for the agent profile used when you install the agent
- Password
Password the agent uses to authenticate to OpenAM
- Configuration
Centralized configurations are stored in the OpenAM configuration store. You can manage the centralized configuration through the OpenAM console. Local configurations are stored in a file alongside the agent.
- Server URL
The full URL to an OpenAM instance, or if OpenAM is deployed in a site configuration (behind a load balancer) then the site URL
In centralized configuration mode, the Server URL is used to populate the agent profile for services, such as Login, Logout, Naming, and Cross Domain SSO.
- Agent URL
The URL to the J2EE agent application, such as
http://www.example.com:8080/agentappIn centralized configuration mode, the Agent URL is used to populate the Agent Profile for services, such as notifications.
Create a text file containing only the password specified when creating the agent profile.
UNIX example:
$ echo password > /tmp/pwd.txt
Windows example:
C:\> echo password > pwd.txt
Protect the password file you create as appropriate for your operating system:
UNIX example:
$ chmod 400 /tmp/pwd.txt
Windows example:
In Windows Explorer, right-click the created password file, for example
pwd.txt, select Read-Only, and then click OK.
Shut down the WebSphere server where you plan to install the agent.
Make sure OpenAM is running.
Run agentadmin --install to install the agent.
When you run the command, you will be prompted to read and accept the software license agreement for the agent installation. You can suppress the license agreement prompt by including the
--acceptLicenceparameter. The inclusion of the option indicates that you have read and accepted the terms stated in the license. To view the license agreement, open<server-root>/legal-notices/license.txt.$ /path/to/j2ee_agents/websphere_v61_agent/bin/agentadmin --install \ --acceptLicense ... ----------------------------------------------- SUMMARY OF YOUR RESPONSES ----------------------------------------------- Instance Config Directory : /path/to/WebSphere/AppServer/profiles/AppSrv01/config/cells/wwwNode01Cell/ nodes/wwwNode01/servers/server1 Instance Server name : server1 WebSphere Install Root Directory : /path/to/WebSphere/AppServer OpenAM server URL : http://openam.example.com:8080/openam Agent URL : http://www.example.com:9080/agentapp Agent Profile name : WebSphere Agent Agent Profile Password file name : /tmp/pwd.txt ... SUMMARY OF AGENT INSTALLATION ----------------------------- Agent instance name: Agent_001 Agent Bootstrap file location: /path/to/j2ee_agents/websphere_v61_agent/Agent_001/config/ OpenSSOAgentBootstrap.properties Agent Configuration file location /path/to/j2ee_agents/websphere_v61_agent/Agent_001/config/ OpenSSOAgentConfiguration.properties Agent Audit directory location: /path/to/j2ee_agents/websphere_v61_agent/Agent_001/logs/audit Agent Debug directory location: /path/to/j2ee_agents/websphere_v61_agent/Agent_001/logs/debug Install log file location: /path/to/j2ee_agents/websphere_v61_agent/installer-logs/audit/install.log ...
Upon successful completion, the installer updates the WebSphere configuration, copies the agent libraries to WebSphere's external library directory, and also sets up configuration and log directories for the agent.
Note
If the agent is in a different domain than the server, refer to the Administration Guide procedure, Configuring Cross-Domain Single Sign On.
Take note of the configuration files and log locations.
Each agent instance that you install on the system has its own numbered configuration and logs directory. The first agent's configuration and logs are thus located under the directory
j2ee_agents/websphere_v61_agent/Agent_001/:config/OpenSSOAgentBootstrap.propertiesUsed to bootstrap the Java EE policy agent, allowing the agent to connect to OpenAM and download its configuration.
config/OpenSSOAgentConfiguration.propertiesOnly used if you configured the Java EE policy agent to use local configuration.
logs/audit/Operational audit log directory, only used if remote logging to OpenAM is disabled.
logs/debug/Debug directory where the debug file resides. Useful in troubleshooting policy agent issues.
If your policy agent configuration is not in the top-level realm (/), then you must edit config/OpenSSOAgentBootstrap.properties to identify the sub-realm that has your policy agent configuration. Find com.sun.identity.agents.config.organization.name and change the / to the path to your policy agent profile. This allows the policy agent to properly identify itself to the OpenAM server.
Restart the WebSphere server.
(Optional) Deploy the
/path/to/j2ee_agents/websphere_v61_agent/etc/agentapp.waragent application in WebSphere.The
agentapp.warapplication is required to enable notifications. If you decide not to deploy the application, you may want to enable thecom.sun.identity.agents.config.load.intervalproperty to allow the agent to fetch configuration changes from OpenAM.For each web application to protect, add the following filter to the application's
WEB-INF/web.xmldeployment descriptor, following the opening <web-app> tag:<filter> <filter-name>Agent</filter-name> <display-name>Agent</display-name> <description>OpenAM Policy Agent Filter</description> <filter-class>com.sun.identity.agents.filter.AmAgentFilter</filter-class> </filter> <filter-mapping> <filter-name>Agent</filter-name> <url-pattern>/*</url-pattern> <dispatcher>REQUEST</dispatcher> <dispatcher>INCLUDE</dispatcher> <dispatcher>FORWARD</dispatcher> <dispatcher>ERROR</dispatcher> </filter-mapping>You might also have to update additional configuration files. See the sample application located under
/path/to/j2ee_agents/websphere_v61_agent/sampleappfor examples.(Optional) If you have a policy configured, you can test your policy agent. For example, try to browse to a resource that your policy agent protects. You should be redirected to OpenAM to authenticate, for example, as user
demo, passwordchangeit. After you authenticate, OpenAM then redirects you back to the resource you tried to access.
When performing a scripted, silent installation, use agentadmin --install --saveResponse response-file to create a response file for scripted installation. Then install silently using agentadmin --install --acceptLicense --useResponse response-file.
Shut down the WebSphere server before you uninstall the policy agent.
To remove the Java EE policy agent, use agentadmin --uninstall. You must provide the WebSphere configuration directory location.
Uninstall does not remove the agent instance directory, but you can do so manually after removing the agent configuration from WebSphere.
When using WebSphere Application Server Network Deployment, you must install policy agents on the Deployment Manager, on each Node Agent, and on each Application Server. Installation requires that you stop and then restart the Deployment Manager, each Node Agent, and each Application Server in the Network Deployment.
Before installation, synchronize each server configuration with the
profile saved by the Deployment Manager using the syncNode
command. After agent installation, copy the server configuration for each
node stored in server.xml to the corresponding
Deployment Manager profile. After you have synchronized the configurations,
you must restart the Deployment Manager for the Network Deployment.
This chapter offers solutions to issues that may occur during installation of OpenAM policy agents.
Solutions to Common Issues
Q: | I am trying to install a policy agent, connecting to OpenAM over HTTPS, and seeing the following error: OpenAM server URL: https://openam.example.com:8443/openam WARNING: Unable to connect to OpenAM server URL. Please specify the correct OpenAM server URL by hitting the Back button (<) or if the OpenAM server URL is not started and you want to start it later, please proceed with the installation. If OpenAM server is SSL enabled and the root CA certificate for the OpenAM server certificate has been not imported into installer JVMs key store (see installer-logs/debug/Agent.log for detailed exception), import the root CA certificate and restart the installer; or continue installation without verifying OpenAM server URL. What should I do? |
A: | The Java platform includes certificates from many Certificate Authorities (CAs). If, however, you run your own CA, or you use self-signed certificates for HTTPS on the container where you run OpenAM, then the agentadmin command cannot trust the certificate presented during connection to OpenAM, and so cannot complete installation correctly. After setting up the container where you run OpenAM to use HTTPS, get the certificate to trust in a certificate file. The certificate you want is that of the CA who signed the container certificate, or the certificate itself if the container certificate is self-signed. Copy the certificate file to the system where you plan to install the policy agent. Import the certificate into a trust store that you will use during policy agent installation. If you import the certificate into the default trust store for the Java platform, then the agentadmin command can recognize it without additional configuration. Export and import of self-signed certificates is demonstrated in the Administration Guide chapter on Managing Certificates. |
Q: | I am trying to install the WebSphere policy agent on Linux. The system has IBM Java. When I run agentadmin --install, the script fails to encrypt the password from the password file, ending with this message: ERROR: An unknown error has occurred (null). Please try again. What should I do? |
A: | You must edit agentadmin to use IBMJCE, and then try again. |
Q: | After installing a Java EE policy agent on WebSphere AS 7 or 8,
accessing a URL for a folder in a protected application such as
|
A: | Perform the following steps to work around the problem, by setting
the WebSphere custom property
See the IBM documentation on Setting webcontainer custom properties for additional information. |
Name
agentadmin — manage OpenAM Java EE policy agent installation
Synopsis
agentadmin {options}
Description
This command manages OpenAM policy agent installations. The agentadmin command requires a Java runtime environment.
Options
The following options are supported.
--installInstalls a new agent instance.
Usage: agentadmin --install [--useResponse | --saveResponse file-name]
--useResponseUse this option to install in silent mode by specifying all the responses in the file-name file. When this option is used, agentadmin runs in non-interactive mode.
--saveResponseUse this option to save all the supplied responses in a response file specified by file-name.
--custom-installInstalls a new agent instance, specifying additional configuration options such as the key used to encrypt passwords.
Usage: agentadmin --custom-install [--useResponse | --saveResponse file-name]
--useResponseUse this option to install in silent mode by specifying all the responses in the file-name file. When this option is used, agentadmin runs in non-interactive mode.
--saveResponseUse this option to save all the supplied responses to the file-name file.
--acceptLicenseAuto-accepts the software license agreement. If this option is present on the command line with the
--installor--custom-installoption, the license agreement prompt is suppressed and the agent installation continues. To view the license agreement, open<server-root>/legal-notices/license.txt.--uninstallUninstalls an existing agent instance.
Usage: agentadmin --uninstall [--useResponse | --saveResponse file-name]
--useResponseUse this option to uninstall in silent mode by specifying all the responses in the file-name file. When this option is used, agentadmin runs in non-interactive mode.
--saveResponseUse this option to save all the supplied responses to the file-name file.
--versionDisplays the version information.
--uninstallAllUninstalls all the agent instances.
--migrateMigrate agent to newer version
--listAgentsDisplays details of all the configured agents.
--agentInfoDisplays details of the agent corresponding to the specified agent-id.
Example: agentadmin --agentInfo agent_001
--encryptEncrypts a given string.
Usage: agentadmin --encrypt agent-instance password-file
- agent-instance
Agent instance identifier. The encryption functionality requires the use of agent instance specific encryption key present in its configuration file.
- password-file
File containing the password to encrypt.
--getEncryptKeyGenerates an agent encryption key.
Examples
The following example installs an Apache HTTP Server 2.2 interactively,
where Apache HTTP Server has been installed under
/path/to/apache22.
$ ./agentadmin --install --acceptLicense
...
-----------------------------------------------
SUMMARY OF YOUR RESPONSES
-----------------------------------------------
Apache Server Config Directory : /path/to/apache22/conf
OpenSSO server URL : http://openam.example.com:8080/openam
Agent URL : http://www.example.com:80
Agent Profile name : Apache Web Agent
Agent Profile Password file name : /tmp/pwd.txt

...
SUMMARY OF AGENT INSTALLATION
-----------------------------
Agent instance name: Agent_001
Agent Bootstrap file location:
/path/to/web_agents/apache22_agent/Agent_001/config/
 OpenSSOAgentBootstrap.properties
Agent Configuration Tag file location
/path/to/web_agents/apache22_agent/Agent_001/config/
 OpenSSOAgentConfiguration.properties
Agent Audit directory location:
/path/to/web_agents/apache22_agent/Agent_001/logs/audit
Agent Debug directory location:
/path/to/web_agents/apache22_agent/Agent_001/logs/debug


Install log file location:
/path/to/web_agents/apache22_agent/installer-logs/audit/install.log
...
A
- Apache Tomcat Server, Installing Java EE Agents in Apache Tomcat
C
- cookie reset, Cookie Reset Properties
- cross domain single sign-on (CDSSO), Cross Domain Single Sign-On
F
- filter modes, Java EE Agent Filter Modes of Operation
- fully-qualified domain checking, FQDN Checking
I
- IBM WebSphere, Installing Java EE Agents in IBM WebSphere
- before you install, Before You Install
- installing into, Installing the WebSphere Policy Agent
- IBM WebSphere agent
- about network deployment, Notes About WebSphere Network Deployment
- installing, Installing the WebSphere Policy Agent
- installing with IBM Java, Before You Install
- protecting applications, Installing the WebSphere Policy Agent
- silent install, Silent WebSphere Policy Agent Installation
J
- Java EE policy agents
- about, About OpenAM Java EE Policy Agents
- components, Java EE Policy Agent Components
- cookie reset, Cookie Reset Properties
- cross domain single sign-on (CDSSO), Cross Domain Single Sign-On
- features, Java EE Policy Agent Features
- filter modes, Java EE Agent Filter Modes of Operation
- fully-qualified domain checking, FQDN Checking
- how agents are configured, How Java EE Policy Agents are Configured
- IBM WebSphere, Before You Install
- JBoss 7, Before You Install
- Jetty, Installing Java EE Agents in Jetty Server
- login attempt limits, Login Attempt Limits
- Not-Enforced Client IP lists, Not-Enforced URI and Client IP Lists
- Not-Enforced URI lists, Not-Enforced URI and Client IP Lists
- process flow, Java EE Process Flow
- Tomcat, Before You Install
- troubleshooting, Troubleshooting
- JBoss 7
- installing into, Installing the JBoss Policy Agent
- JBoss 7 agent
- before you install, Before You Install
- installing, Installing the JBoss Policy Agent
- removing, Removing JBoss Policy Agent Software
- running after install, Installing the JBoss Policy Agent
- silent install, Silent JBoss Policy Agent Installation
- JBoss Application Server, Installing Java EE Agents in JBoss 7
- Jetty, Installing Java EE Agents in Jetty Server
- before you install, Before You Install
- Jetty agent
- installing, Installing the Jetty Policy Agent
- removing, Removing Jetty Policy Agent Software
- silent install, Silent Jetty Policy Agent Installation
L
- load balancers, Configuring Java EE Policy Agents Behind Load Balancers
- configuring agent behind, Configuring the Agent Behind the Load Balancer
- map agent host name to, Configuring the Agent Behind the Load Balancer
- role of, The Role of the Load Balancing Layer
- setting alternate agent URL properties, Configuring the Agent Behind the Load Balancer
- login attempt limits, Login Attempt Limits
N
- Not-Enforced Client IP list, Not-Enforced URI and Client IP Lists
- Not-Enforced URI list, Not-Enforced URI and Client IP Lists
O
- OpenIG, OpenIG or Policy Agent?
- Oracle WebLogic, Installing Java EE Agents in Oracle WebLogic
- Oracle WebLogic agent
- before your install, Before You Install
- installing, Installing the WebLogic Policy Agent
- installing in multi-server domains, Installing WebLogic Policy Agents in Multi-Server Domains
- post-install, Post Installation of WebLogic Policy Agent
- removing, Removing WebLogic Policy Agent Software
- silent install, Silent WebLogic Policy Agent Installation
P
- password file
- policy agent
- profiles, Types of Agent
- types of, Types of Agent
- policy agent profiles
- agent administrators
- creating, Delegating Agent Profile Creation
- creating, Creating Agent Profiles
- delegating creation of, Delegating Agent Profile Creation
- Policy agents, Configuring Java EE Policy Agents
- Configuring, Configuring Java EE Policy Agent Properties, Configuring Agent Authenticators
- Group inheritance, Creating Agent Profiles
- properties, Configuration Location
T
- Tomcat 6
- installing into, Installing the Tomcat Policy Agent
- silent install, Silent Tomcat Policy Agent Installation
- Tomcat 7
- installing into, Installing the Tomcat Policy Agent
- Tomcat agent
- before you install, Before You Install
- checking install, Installing the Tomcat Policy Agent
- removing, Remove Tomcat Policy Agent Software
- troubleshooting, Troubleshooting
- solutions to common issues, Troubleshooting