Guide to installing OpenAM web policy agents. OpenAM provides open source Authentication, Authorization, Entitlement and Federation software.
This guide shows you how to install OpenAM web server policy agents, as well as how to integrate with other access management software. Read the Release Notes before you get started.
This guide is written for anyone installing OpenAM policy agents to interface with supported web servers application containers.
This guide covers procedures that you theoretically perform only once per version. This guide aims to provide you with at least some idea of what happens behind the scenes when you perform the steps.
You do not need to be an OpenAM wizard to learn something from this guide, though a background in access management and maintaining web application software can help. You do need some background in managing services on your operating systems and in your application servers. You can nevertheless get started with this guide, and then learn more as you go along.
Most examples in the documentation are created in GNU/Linux or Mac OS X
operating environments.
If distinctions are necessary between operating environments,
examples are labeled with the operating environment name in parentheses.
To avoid repetition file system directory names are often given
only in UNIX format as in /path/to/server,
even if the text applies to C:\path\to\server as well.
Absolute path names usually begin with the placeholder
/path/to/.
This path might translate to /opt/,
C:\Program Files\, or somewhere else on your system.
Command-line, terminal sessions are formatted as follows:
$ echo $JAVA_HOME
/path/to/jdk
Command output is sometimes formatted for narrower, more readable output even though formatting parameters are not shown in the command.
Program listings are formatted as follows:
class Test {
    public static void main(String [] args)  {
        System.out.println("This is a program listing.");
    }
}ForgeRock publishes comprehensive documentation online:
The ForgeRock Knowledge Base offers a large and increasing number of up-to-date, practical articles that help you deploy and manage ForgeRock software.
While many articles are visible to community members, ForgeRock customers have access to much more, including advanced information for customers using ForgeRock software in a mission-critical capacity.
ForgeRock product documentation, such as this document, aims to be technically accurate and complete with respect to the software documented. It is visible to everyone and covers all product features and examples of how to use them.
The ForgeRock.org site has links to source code for ForgeRock open source software, as well as links to the ForgeRock forums and technical blogs.
If you are a ForgeRock customer, raise a support ticket instead of using the forums. ForgeRock support professionals will get in touch to help you.
OpenAM web policy agents provide light touch integration for web applications running on supported web servers. This chapter covers what web policy agents do and how they work.
A policy agent enforces policy for OpenAM. A web policy agent installed in a web server intercepts requests from users trying to access a protected web resource, and denies access until the user has authorization from OpenAM to access the resource.
Imagine that a user attempts to access a protected resource before having authenticated by pointing her browser to a web page. Assume that you have configured OpenAM to protect the web page. Then the web policy agent intercepting her browser's request finds no session token in the request, and so redirects the user's browser to the OpenAM login page for authentication. After the user has successfully authenticated, OpenAM sets a session token in a browser cookie, and redirects her browser back to the page she tried to access initially.
When the user's browser reiterates the request, the policy agent again checks that the request has a session token, finds a session token this time, and validates the session token with OpenAM. Given the valid session token, the policy agent gets a policy decision from OpenAM concerning whether the user can access the page. If OpenAM's Policy Service determines that the user is allowed to access the page, OpenAM responds to the policy agent that access should be granted. The web policy agent then permits the web page to be returned to the user's browser.
The following diagram shows how the pieces fit together when a web client accesses a web page protected by a policy agent. This diagram is simplified to show only the essential principals rather than to describe every possible case.
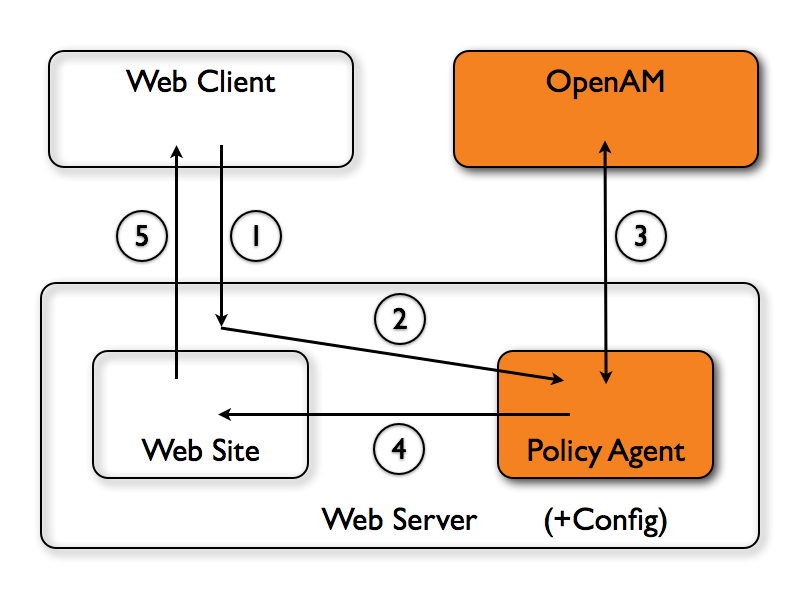
A web policy agent is a library installed in the web server and configured to be called by the web server when a client requests access to a protected resource in a web site.
The web client requests access to a protected resource.
The web server runs the request through the policy agent that protects the resource according to OpenAM policy. The policy agent acts to enforce policy, whereas the policy configuration and decisions are handled by OpenAM.
The policy agent communicates with OpenAM to get the policy decision to enforce.
For a resource to which OpenAM approves access, the policy agent allows access.
The web server returns the requested access to the web client.
You install web policy agents in the web servers holding web resources that you want to protect. By default, the web policy agent has only enough configuration at installation time to connect to OpenAM in order to get the rest of its configuration from the OpenAM configuration store. With nearly all configuration stored centrally, you can manage policy agents centrally from the OpenAM console.
You can opt to store the agent configuration locally if necessary. If you store the configuration locally, then avoid issues with the configuration by making sure you provide valid values for configuration properties ending in the following.
.cookie.name.fqdn.default.agenturi.prefix.naming.url.login.url.instance.name.username.password.connection_timeout.policy_clock_skew
You configure web policy agents per realm. Thus to access centralized configuration, you select Access Control > Realm Name > Agents > Web > Agent Name. Web policy agent configuration is distinct from policy configuration. The only policy-like configuration that you apply to web policy agents is indicating which URLs in the web server can be ignored (not enforced URLs) and which client IP address are exempt from policy enforcement (not enforced IPs).
For each aspect of web policy agent configuration, you can configure the policy agent through the OpenAM console during testing, and then export the resulting configuration in order to script configuration in your production environment.
This chapter covers installation of the policy agent for Apache HTTP Server 2.2.x.
Make sure OpenAM is installed, running, that you can contact OpenAM from the system running the policy agent. Next, create a profile for your policy agent as described in the Administration Guide section on Creating Agent Profiles. To protect resources with the agent also create at least one policy as described in the section on Configuring Policies. Consider creating a simple policy, such as a policy that allows only authenticated users to access your resources, in order to test your policy agent after installation.
You must install Apache HTTP Server before you install the policy agent, and you must stop the server during installation.
You must install a supported version of the Java runtime environment.
Please review the
OpenAM Release Notes for the currently supported version
of Java, and set the JAVA_HOME environment
variable accordingly. The policy agent installer requires Java.
$ echo $JAVA_HOME
/path/to/java
$ which java
/usr/bin/java
Go to Obtaining OpenAM Software to determine which version of the agent to download and download the agent. Also verify the checksum of the file you download against the checksum posted on the download page.
Unzip the file in the directory where you plan to install the web policy agent. The agent you install stores its configuration and logs under this directory.
When you unzip the policy agent .zip download, you find the following
directories under the web_agents/apache22_agent
directory.
binContains the installation and configuration program, agentadmin; the certificate management tool certutil and the password hashing tool crypt_util.
configConfiguration templates used by the agentadmin command during installation
dataNot used
etcApache configuration template used during installation
installer-logsLocation for log files written during installation
libShared libraries used by the web policy agent
localeProperty files used by the installation program
Complete the following procedures to install the policy agent.
Regardless of whether you store configurations centrally in OpenAM or locally with your agents, the agent requires a profile so that it can connect to and communicate with OpenAM.
In the OpenAM console, browse to Access Control > Realm Name> Agents > Web, and then click the New... button in the Agent table.
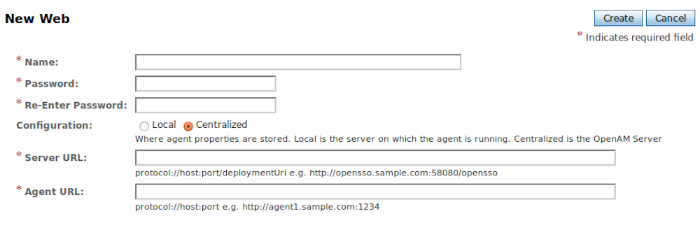
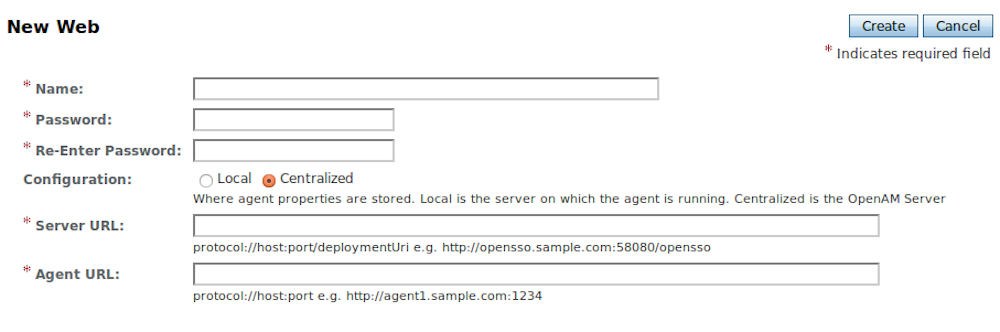
Complete the web form using the following hints.
- Name
The name for the agent profile used when you install the agent
- Password
Password the agent uses to authenticate to OpenAM
- Configuration
Centralized configurations are stored in the OpenAM configuration store. You can manage the centralized configuration through the OpenAM console. Local configurations are stored in a file alongside the agent.
- Server URL
The full URL to an OpenAM instance, or if OpenAM is deployed in a site configuration (behind a load balancer) then the site URL
In centralized configuration mode, the Server URL is used to populate the agent profile for services such as Login, Logout, Naming, and Cross Domain SSO.
- Agent URL
The web server URL that the agent protects
In centralized configuration mode, the Agent URL is used to populate the Agent Profile for services such as notifications.
Create a text file containing only the password.
$ echo password > /tmp/pwd.txt
Protect the password file you create as appropriate for your operating system.
$ chmod 400 /tmp/pwd.txt
Shut down the Apache 2.2 server where you plan to install the agent.
$ /path/to/apache22/bin/apachectl -k stop
Make sure OpenAM is running.
Run ./agentadmin --install to install the agent.
$ cd /path/to/web_agents/apache22_agent/bin/
$ ./agentadmin --install
...
-----------------------------------------------
SUMMARY OF YOUR RESPONSES
-----------------------------------------------
Apache Server Config Directory : /path/to/apache22/conf
OpenAM server URL : http://openam.example.com:8080/openam
Agent URL : http://www.example.com:80
Agent Profile name : Apache Web Agent
Agent Profile Password file name : /tmp/pwd.txt

...
SUMMARY OF AGENT INSTALLATION
-----------------------------
Agent instance name: Agent_001
Agent Bootstrap file location:
/path/to/web_agents/apache22_agent/Agent_001/config/

Agent Configuration Tag file location
/path/to/web_agents/apache22_agent/Agent_001/config/
 agent.conf
Agent Audit directory location:
/path/to/web_agents/apache22_agent/Agent_001/logs/audit
Agent Debug directory location:
/path/to/web_agents/apache22_agent/Agent_001/logs/debug


Install log file location:
/path/to/web_agents/apache22_agent/installer-logs/audit/install.log
...
Upon successful completion, the installer has added the agent as a module to the Apache 2.2 configuration, and also set up configuration and log directories for the agent.
Note
If the agent is in a different domain than the server, refer to Administration Guide procedure, Configuring Cross-Domain Single Sign On.
Take note of the configuration files and log locations.
Each agent instance that you install on the system has its own numbered configuration and logs directory. The first agent's configuration and logs are thus located under the directory
web_agents/apache22_agent/Agent_001/.config/Used to bootstrap the web policy agent, allowing the agent to connect to OpenAM and download its configuration
config/agent.confOnly used if you configured the web policy agent to use local configuration
logs/audit/Operational audit log directory, only used if remote logging to OpenAM is disabled
logs/debug/Debug directory where the
amAgentdebug file resides. Useful in troubleshooting policy agent issues.
If your policy agent configuration is not in the top-level realm (/), then you must edit config/ to identify the sub-realm that has your policy agent configuration. Find com.sun.identity.agents.config.organization.name and change the / to the path to your policy agent profile. This allows the policy agent to properly identify itself to the OpenAM server.
Start the Apache 2.2 server where you installed the agent.
$ /path/to/apache22/bin/apachectl -k start
Check the Apache 2.2 error log after you start the server to make sure startup completed successfully.
$ tail -n 2 /path/to/apache22/logs/error_log
[Sat Sep 03 13:28:16 2011] [notice] Policy web agent shared memory conf...
[Sat Sep 03 13:28:16 2011] [notice] Apache/2.2.19 (Unix) DSAME/3.0 configured
 -- resuming normal operations
Check the
amAgentdebug log to verify that no errors occurred on startup.$ tail /path/to/web_agents/apache22_agent/Agent_001/logs/debug/amAgent 2011-09-03 13:28:16.971 -1 32686:9daae60 all: ==============...===== 2011-09-03 13:28:16.972 -1 32686:9daae60 all: Version: ... 2011-09-03 13:28:16.972 -1 32686:9daae60 all: 2011-09-03 13:28:16.972 -1 32686:9daae60 all: Build Date: ... 2011-09-03 13:28:16.972 -1 32686:9daae60 all: Build Machine: ..forgerock.com 2011-09-03 13:28:16.972 -1 32686:9daae60 all: ==============...=====
(Optional) If you have a policy configured, you can test your policy agent. For example, try to browse to a resource that your policy agent protects. You should be redirected to OpenAM to authenticate, for example as user
demo, passwordchangeit. After you authenticate, OpenAM then redirects you back to the resource you tried to access.
When running multiple Apache 2.2 servers on the same host, use ./agentadmin --custom-install.
When performing a scripted, silent installation, use ./agentadmin --install --saveResponse response-file to create a response file for scripted installation. Then install silently using ./agentadmin --install --useResponse response-file.
With ./agentadmin --custom-install, you can opt to
create the policy agent profile during installation. The OpenAM administrator
must first create an agent administrator user, as described in Delegating Agent
Profile Creation, and provide you with the agent
administrator user name and password. Before running the
./agentadmin --custom-install command, put the password
alone in a read-only file only the user installing can access, as for the
agent password. When the agentadmin command prompts you to
create the profile during installation, enter true, and
then respond to the agentadmin prompts for the agent
administrator user name and password file.
Shut down the Apache 2.2 server before you uninstall the policy agent.
$ /path/to/apache22/bin/apachectl -k stop
To remove the web policy agent, use ./agentadmin --uninstall.
$ ./agentadmin --uninstall
...
-----------------------------------------------
SUMMARY OF YOUR RESPONSES
-----------------------------------------------
Apache Server Config Directory : /path/to/apache22/conf

...
Deleting the config directory
/path/to/web_agents/apache22_agent/Agent_001/config
...DONE.

Removing Agent parameters from /path/to/apache22/conf/httpd.conf file
...DONE.


Uninstall log file location:
/path/to/web_agents/apache22_agent/installer-logs/audit/uninstall.log
...
This chapter covers installation of the policy agent for Apache HTTP Server 2.4.x.
Make sure OpenAM is installed, running, that you can contact OpenAM from the system running the policy agent. Next, create a profile for your policy agent as described in the Administration Guide section on Creating Agent Profiles. To protect resources with the agent also create at least one policy as described in the section on Configuring Policies. Consider creating a simple policy, such as a policy that allows only authenticated users to access your resources, in order to test your policy agent after installation.
You must install Apache HTTP Server before you install the policy agent, and you must stop the server during installation.
You must install a supported version of the Java runtime environment.
Please review the
OpenAM Release Notes for the currently supported version
of Java, and set the JAVA_HOME environment
variable accordingly. The policy agent installer requires Java.
Go to Obtaining OpenAM Software to determine which version of the agent to download and download the agent. Also verify the checksum of the file you download against the checksum posted on the download page.
Unzip the file in the directory where you plan to install the web policy agent. The agent you install stores its configuration and logs under this directory.
When you unzip the policy agent .zip download, you find the following
directories under the web_agents/apache24_agent
directory.
binContains the installation and configuration program, agentadmin; the certificate management tool certutil and the password hashing tool crypt_util.
configConfiguration templates used by the agentadmin command during installation
dataNot used
etcApache configuration template used during installation
installer-logsLocation for log files written during installation
libShared libraries used by the web policy agent
localeProperty files used by the installation program
Complete the following procedures to install the policy agent.
Regardless of whether you store configurations centrally in OpenAM or locally with your agents, the agent requires a profile so that it can connect to and communicate with OpenAM.
In the OpenAM console, browse to Access Control > Realm Name> Agents > Web, and then click the New... button in the Agent table.
Complete the web form using the following hints.
- Name
The name for the agent profile used when you install the agent
- Password
Password the agent uses to authenticate to OpenAM
- Configuration
Centralized configurations are stored in the OpenAM configuration store. You can manage the centralized configuration through the OpenAM console. Local configurations are stored in a file alongside the agent.
- Server URL
The full URL to an OpenAM instance, or if OpenAM is deployed in a site configuration (behind a load balancer) then the site URL
In centralized configuration mode, the Server URL is used to populate the agent profile for services such as Login, Logout, Naming, and Cross Domain SSO.
- Agent URL
The web server URL that the agent protects
In centralized configuration mode, the Agent URL is used to populate the Agent Profile for services such as notifications.
Create a text file containing only the password.
$ echo password > /tmp/pwd.txt
Protect the password file you create as appropriate for your operating system.
$ chmod 400 /tmp/pwd.txt
Shut down the Apache 2.4 server where you plan to install the agent.
$ /path/to/apache24/bin/apachectl -k stop
Make sure OpenAM is running.
Run ./agentadmin --install to install the agent.
$ cd /path/to/web_agents/apache24_agent/bin/
$ ./agentadmin --install
...
-----------------------------------------------
SUMMARY OF YOUR RESPONSES
-----------------------------------------------
Apache Server Config Directory : /path/to/apache24/conf
OpenAM server URL : http://openam.example.com:8080/openam
Agent URL : http://www.example.com:80
Agent Profile name : Apache Web Agent
Agent Profile Password file name : /tmp/pwd.txt

...
SUMMARY OF AGENT INSTALLATION
-----------------------------
Agent instance name: Agent_001
Agent Bootstrap file location:
/path/to/web_agents/apache24_agent/Agent_001/config/
 OpenSSOAgentBootstrap.properties
Agent Configuration Tag file location
/path/to/web_agents/apache24_agent/Agent_001/config/
 OpenSSOAgentConfiguration.properties
Agent Audit directory location:
/path/to/web_agents/apache24_agent/Agent_001/logs/audit
Agent Debug directory location:
/path/to/web_agents/apache24_agent/Agent_001/logs/debug


Install log file location:
/path/to/web_agents/apache24_agent/installer-logs/audit/install.log
...
Upon successful completion, the installer has added the agent as a module to the Apache 2.4 configuration, and also set up configuration and log directories for the agent. You can find a backup Apache HTTPD configuration file,
http.conf-preAmAgent-*, in the Apache HTTPD configuration directory.Note
If the agent is in a different domain than the OpenAM server, refer to the Administration Guide procedure, Configuring Cross-Domain Single Sign On.
Take note of the configuration files and log locations.
Each agent instance that you install on the system has its own numbered configuration and logs directory. The first agent's configuration and logs are thus located under the directory
web_agents/apache24_agent/Agent_001/.config/OpenSSOAgentBootstrap.propertiesUsed to bootstrap the web policy agent, allowing the agent to connect to OpenAM and download its configuration
config/OpenSSOAgentConfiguration.propertiesOnly used if you configured the web policy agent to use local configuration
logs/audit/Operational audit log directory, only used if remote logging to OpenAM is disabled
logs/debug/Debug directory where the
amAgentdebug file resides. Useful in troubleshooting policy agent issues.
If your policy agent configuration is not in the top-level realm (/), then you must edit
config/OpenSSOAgentBootstrap.propertiesto indentify the sub-realm that has your policy agent configuration. Find com.sun.identity.agents.config.organization.name and change the / to the path to your policy agent profile. This allows the policy agent to properly identify itself to the OpenAM server.Start the Apache 2.4 server where you installed the agent.
$ /path/to/apache24/bin/apachectl -k start
Check the Apache 2.4 error log after you start the server to make sure startup completed successfully.
$ tail -n 2 /path/to/apache24/logs/error_log
[Fri Sep 14 12:48:55.765192 2012] [dsame:notice] [pid 18991:tid 3075335872]
 Policy web agent shared memory configuration: notif_shm_size[2099200],
 pdp_shm_size[3213312], max_pid_count[256], max_pdp_count[256]
[Fri Sep 14 12:48:55.774790 2012] [mpm_event:notice] [pid 18991:tid 3075335872]
 AH00489: Apache/2.4.3 (Unix) DSAME/3.0 configured
 -- resuming normal operations
Check the
amAgentdebug log to verify that no errors occurred on startup.$ tail /path/to/web_agents/apache24_agent/Agent_001/logs/debug/amAgent 2012-09-14 12:48:55.613 -1 18991:85fdd48 all: ==============...===== 2012-09-14 12:48:55.614 -1 18991:85fdd48 all: Version: ... 2012-09-14 12:48:55.614 -1 18991:85fdd48 all: Revision: ... 2012-09-14 12:48:55.614 -1 18991:85fdd48 all: Build Date: ... 2012-09-14 12:48:55.614 -1 18991:85fdd48 all: Build Machine: ... 2012-09-14 12:48:55.614 -1 18991:85fdd48 all: ==============...=====
(Optional) If you have a policy configured, you can test your policy agent. For example, try to browse to a resource that your policy agent protects. You should be redirected to OpenAM to authenticate, for example as user
demo, passwordchangeit. After you authenticate, OpenAM then redirects you back to the resource you tried to access.
When running multiple Apache 2.4 servers on the same host, use ./agentadmin --custom-install.
When performing a scripted, silent installation, use ./agentadmin --install --saveResponse response-file to create a response file for scripted installation. Then install silently using ./agentadmin --install --useResponse response-file.
With ./agentadmin --custom-install, you can opt to
create the policy agent profile during installation. The OpenAM administrator
must first create an agent administrator user, as described in Delegating Agent
Profile Creation, and provide you with the agent
administrator user name and password. Before running the
./agentadmin --custom-install command, put the password
alone in a read-only file only the user installing can access, as for the
agent password. When the agentadmin command prompts you to
create the profile during installation, enter true, and
then respond to the agentadmin prompts for the agent
administrator user name and password file.
Shut down the Apache 2.4 server before you uninstall the policy agent.
$ /path/to/apache24/bin/apachectl -k stop
To remove the web policy agent, use ./agentadmin --uninstall.
$ ./agentadmin --uninstall
...
-----------------------------------------------
SUMMARY OF YOUR RESPONSES
-----------------------------------------------
Apache Server Config Directory : /path/to/apache24/conf

...
Deleting the config directory
/path/to/web_agents/apache24_agent/Agent_001/config
...DONE.

Removing Agent parameters from /path/to/apache24/conf/httpd.conf file
...DONE.


Uninstall log file location:
/path/to/web_agents/apache24_agent/installer-logs/audit/uninstall.log
...
This chapter covers installation of the policy agent for Microsoft Internet Information Services 6.
Make sure OpenAM is installed, running, that you can contact OpenAM from the system running the policy agent. Next, create a profile for your policy agent as described in the Administration Guide section on Creating Agent Profiles. To protect resources with the agent also create at least one policy as described in the section on Configuring Policies. Consider creating a simple policy, such as a policy that allows only authenticated users to access your resources, in order to test your policy agent after installation.
You must install Microsoft IIS 6 before you install the policy agent,
and make sure that IIS 6 allows anonymous authentication. Make sure that IIS
6 listens on the URL used during the web policy agent installation, such as
http://win2003.example.com:80/. Furthermore, you
must reset IIS 6 after installing the policy agent.
Go to Obtaining OpenAM Software to determine which version of the agent to download and download the agent. Also verify the checksum of the file you download against the checksum posted on the download page.
Unpack the file in the directory where you plan to install the web policy agent. The agent you install stores its configuration and logs under this directory.
When you unpack the policy agent you download, you find the following
directories under the web_agents\iis6_agent\
directory.
binContains the configuration creation script, IIS6CreateConfig.vbs; the agent administration and installation script, IIS6Admin.vbs; the certificate management tool certutil.exe; the password hashing tool cryptit.exe; additional .dll and support files.
configConfiguration templates used by the scripts during configuration and installation
Complete the following procedures to install the policy agent.
Regardless of whether you store configurations centrally in OpenAM or locally with your agents, the agent requires a profile so that it can connect to and communicate with OpenAM.
In the OpenAM console, browse to Access Control > Realm Name> Agents > Web, and then click the New... button in the Agent table.
Complete the web form using the following hints.
- Name
The name for the agent profile used when you install the agent
- Password
Password the agent uses to authenticate to OpenAM
- Configuration
Centralized configurations are stored in the OpenAM configuration store. You can manage the centralized configuration through the OpenAM console. Local configurations are stored in a file alongside the agent.
- Server URL
The full URL to an OpenAM instance, or if OpenAM is deployed in a site configuration (behind a load balancer) then the site URL
In centralized configuration mode, the Server URL is used to populate the agent profile for services such as Login, Logout, Naming, and Cross Domain SSO.
- Agent URL
The web server URL that the agent protects
In centralized configuration mode, the Agent URL is used to populate the Agent Profile for services such as notifications.
Protect the password file you will create as appropriate.
Create a text file containing only the password.
C:\>notepad C:\Windows\Temp\pwd.txt
Log on as a user with Administrator privileges.
Change to the directory where you unpacked the agent download.
C:\>cd web_agents\iis6_agent\bin
Create a configuration file using the IIS6CreateConfig.vbs script.
Note
The Web Site Identifier is the value of
id, not the site name.C:\web_agents\iis6_agent\bin>cscript IIS6CreateConfig.vbs config.txt ... Enter the Agent Resource File Name [IIS6Resource.en] : Enter the Agent URL (Example: http://agent.example.com:80) : http://windows2003.example.com:80 Displaying the list of Web Sites and its corresponding Identifiers Site Name (Site Id) Default Web Site (1) Web Site Identifier : 1 ... Enter the URL where the OpenAM server is running...: http://openam.example.com:8080/openam Please enter the Agent Profile name : IIS 6 Web Agent Enter the Agent profile password file : C:\Windows\Temp\pwd.txt ----------------------------------------------------- Agent Configuration file created : config.txt -----------------------------------------------------
Log on as a user with Administrator privileges.
Make sure OpenAM is running.
Run IIS6Admin.vbs to install the agent.
C:\web_agents\iis6_agent\bin>cscript IIS6Admin.vbs -config config.txt
...
Enter the Agent Resource File Name [IIS6Resource.en] :

Creating the Agent Config Directory
Creating the  and
 agent.conf File
Updating the Windows Product Registry
Loading the IIS 6.0 Agent
Completed Configuring the IIS 6.0 Agent
Restart IIS 6.
C:\web_agents\iis6_agent\bin>iisreset

Attempting stop...
Internet services successfully stopped
Attempting start...
Internet services successfully restarted
Note
If the agent is in a different domain than the server, refer to Administration Guide procedure, Configuring Cross-Domain Single Sign On.
Take note of the configuration files and log locations.
Each agent instance that you install on the system has its own configuration and logs directory. The agent protecting the Default Web Site (1) shown in the examples above has configuration and logs located under the directory
web_agents\iis6_agent\Identifier_1. The number in the path to the agent configuration reflects the IIS site ID, unlike the other agents for which the number in the path is a counter. The number in the path therefore remains the same when you uninstall and then reinstall an agent to protect the same site.config\Used to bootstrap the web policy agent, allowing the agent to connect to OpenAM and download its configuration
config\agent.confOnly used if you configured the web policy agent to use local configuration
audit\Operational audit log directory, only used if remote logging to OpenAM is disabled
debug\Debug directory where the
amAgentdebug file resides. Useful in troubleshooting policy agent issues.
If your policy agent configuration is not in the top-level realm (/), then you must edit config\ to identify the sub-realm that has your policy agent configuration. Find com.sun.identity.agents.config.organization.name and change the / to the path to your policy agent profile. This allows the policy agent to properly identify itself to the OpenAM server.
If the web policy agent performs naming URL validation, which you can configure by setting the
com.forgerock.agents.ext.url.validation.levelproperty inconfig\OpenSSOAgentBootstrap.properties, then make sure theIUSR_MachineNameuser has read-write access toC:\Windows\Temp\before you start IIS.(Optional) If you have a policy configured, you can test your policy agent. For example, try to browse to a resource that your policy agent protects. You should be redirected to OpenAM to authenticate, for example as user
demo, passwordchangeit. After you authenticate, OpenAM then redirects you back to the resource you tried to access.
When protecting multiple IIS 6 websites on the same host, use different configuration files for each site.
When preparing a scripted, silent installation, notice that the configuration file generated using IIS6CreateConfig.vbs is a text file containing all of the configuration information in clear text plus the encrypted password retrieved originally from the password file. Encrypt passwords using cryptit.exe.
C:\web_agents\iis6_agent\bin>cryptit.exe pwd-file encryption-key
The cryptit.exe command uses its own implementation of the Rivest Cipher 5 (RC5) encryption algorithm.
To remove the web policy agent, log on as a user with Administrator privileges, run cscript IIS6Admin.vbs -unconfig config.txt, and then run iisreset.
This chapter covers installation of the policy agent for Microsoft Internet Information Services 7.
Make sure OpenAM is installed, running, that you can contact OpenAM from the system running the policy agent. Next, create a profile for your policy agent as described in the Administration Guide section on Creating Agent Profiles. To protect resources with the agent also create at least one policy as described in the section on Configuring Policies. Consider creating a simple policy, such as a policy that allows only authenticated users to access your resources, in order to test your policy agent after installation.
You must install Microsoft IIS 7 before you install the policy agent,
and make sure that IIS 7 allows anonymous authentication. Make sure that IIS
7 listens on the URL used during the web policy agent installation, such as
http://windows7.example.com:80/. Furthermore, you
must reset IIS 7 after installing the policy agent.
Go to Obtaining OpenAM Software to determine which version of the agent to download and download the agent. Also verify the checksum of the file you download against the checksum posted on the download page.
Unpack the file in the directory where you plan to install the web policy agent. The agent you install stores its configuration and logs under this directory.
When you unpack the policy agent you download, you find the following
directories under the web_agents\iis7_agent\
directory.
binContains the configuration creation script, IIS7CreateConfig.vbs; the agent administration and installation script, IIS7Admin.vbs; the certificate management tool certutil.exe; the password hashing tool cryptit.exe; additional .dll and support files.
configConfiguration templates used by the scripts during configuration and installation
Complete the following procedures to install the policy agent.
Regardless of whether you store configurations centrally in OpenAM or locally with your agents, the agent requires a profile so that it can connect to and communicate with OpenAM.
In the OpenAM console, browse to Access Control > Realm Name> Agents > Web, and then click the New... button in the Agent table.
Complete the web form using the following hints.
- Name
The name for the agent profile used when you install the agent
- Password
Password the agent uses to authenticate to OpenAM
- Configuration
Centralized configurations are stored in the OpenAM configuration store. You can manage the centralized configuration through the OpenAM console. Local configurations are stored in a file alongside the agent.
- Server URL
The full URL to an OpenAM instance, or if OpenAM is deployed in a site configuration (behind a load balancer) then the site URL
In centralized configuration mode, the Server URL is used to populate the agent profile for services such as Login, Logout, Naming, and Cross Domain SSO.
- Agent URL
The web server URL that the agent protects
In centralized configuration mode, the Agent URL is used to populate the Agent Profile for services such as notifications.
Protect the password file you will create as appropriate.
Create a text file containing only the password.
C:\>notepad C:\Windows\Temp\pwd.txt
Log on as a user with Administrator privileges.
Change to the directory where you unpacked the agent download.
C:\>cd web_agents\iis7_agent\bin
Create a configuration file using the IIS7CreateConfig.vbs script.
Note
The Web Site Identifier is the value of
id, not the site name.C:\web_agents\iis7_agent\bin>cscript IIS7CreateConfig.vbs config.txt ... Enter the Agent Resource File Name [IIS7Resource.en] : Enter the Agent URL (Example: http://agent.example.com:80) : http://windows7.example.com:80 Displaying the list of Web Sites and its corresponding Identifiers (id) SITE "Default Web Site" (id:1,bindings:http/*:80:,state:Started) Web Site Identifier : 1 ... Enter the URL where the OpenAM server is running...: http://openam.example.com:8080/openam Please enter the Agent Profile name : IIS 7 Web Agent Enter the Agent profile password file : C:\Windows\Temp\pwd.txt ----------------------------------------------------- Agent Configuration file created : config.txt -----------------------------------------------------
Log on as a user with Administrator privileges.
Make sure OpenAM is running.
Run IIS7Admin.vbs to install the agent.
C:\web_agents\iis7_agent\bin>cscript IIS7Admin.vbs -config config.txt
...
Enter the Agent Resource File Name [IIS7Resource.en] :

Creating the Agent Config Directory
Creating the  and
 agent.conf File
Updating the Windows Product Registry
Installing policy web agent module in IIS (status: 0)
Adding policy web agent module to "Default Web Site" (status: 0)
Completed Configuring the IIS 7.0 Agent
Make sure the authentication method for IIS 7 is set to anonymous.
Restart IIS 7.
C:\web_agents\iis7_agent\bin>iisreset

Attempting stop...
Internet services successfully stopped
Attempting start...
Internet services successfully restarted
Note
If the agent is in a different domain than the server, refer to Administration Guide procedure, Configuring Cross-Domain Single Sign On.
Take note of the configuration files and log locations.
Each agent instance that you install on the system has its own configuration and logs directory. The agent protecting the Default Web Site (id: 1) shown in the examples above has configuration and logs located under the directory
web_agents\iis7_agent\Identifier_1. The number in the path to the agent configuration reflects the IIS site ID, unlike the other agents for which the number in the path is a counter. The number in the path therefore remains the same when you uninstall and then reinstall an agent to protect the same site.config\Used to bootstrap the web policy agent, allowing the agent to connect to OpenAM and download its configuration
config\agent.confOnly used if you configured the web policy agent to use local configuration
audit\Operational audit log directory, only used if remote logging to OpenAM is disabled
debug\Debug directory where the
amAgentdebug file resides. Useful in troubleshooting policy agent issues.
If your policy agent configuration is not in the top-level realm (/), then you must edit config\ to identify the sub-realm that has your policy agent configuration. Find com.sun.identity.agents.config.organization.name and change the / to the path to your policy agent profile. This allows the policy agent to properly identify itself to the OpenAM server.
(Optional) If you have a policy configured, you can test your policy agent. For example, try to browse to a resource that your policy agent protects. You should be redirected to OpenAM to authenticate, for example as user
demo, passwordchangeit. After you authenticate, OpenAM then redirects you back to the resource you tried to access.
When protecting multiple IIS 7 websites on the same host, use different configuration files for each site.
When preparing a scripted, silent installation, notice that the configuration file generated using IIS7CreateConfig.vbs is a text file containing all of the configuration information in clear text plus the encrypted password retrieved originally from the password file. Encrypt passwords using cryptit.exe.
C:\web_agents\iis7_agent\bin>cryptit.exe pwd-file encryption-key
The IIS 7 web policy agent now supports IIS 7 basic authentication and password replay. You must use the appropriate software versions.
For Microsoft Office integration, you must use Microsoft Office 2007 SP2 or later.
For Microsoft SharePoint integration, you must use Microsoft SharePoint Server 2007 SP2 or later.
You must also apply workarounds as described for the following Microsoft issues.
- Microsoft Support Issue: 841215
Link: http://support.microsoft.com/kb/841215
Description: Error message when you try to connect to a Windows SharePoint document library: "System error 5 has occurred"
Summary: Enable Basic Authentication on the client computer.
- Microsoft Support Issue: 870853
Link: http://support.microsoft.com/kb/870853
Description: Office 2003 and 2007 Office documents open read-only in Internet Explorer
Summary: Add registry keys as described in Microsoft's support document.
- Microsoft Support Issue: 928692
Link: http://support.microsoft.com/kb/928692
Description: Error message when you open a Web site by using Basic authentication in Expression Web on a computer that is running Windows Vista: "The folder name is not valid"
Summary: Edit the registry as described in Microsoft's support document.
- Microsoft Support Issue: 932118
Link: http://support.microsoft.com/kb/932118
Description: Persistent cookies are not shared between Internet Explorer and Office applications
Summary: Add the web site the list of trusted sites.
- Microsoft Support Issue: 943280
Link: http://support.microsoft.com/kb/943280
Description: Prompt for Credentials When Accessing FQDN Sites From a Windows Vista or Windows 7 Computer
Summary: Edit the registry as described in Microsoft's support document.
- Microsoft Support Issue: 968851
Link: http://support.microsoft.com/kb/968851
Description: SharePoint Server 2007 Cumulative Update Server Hotfix Package (MOSS server-package): April 30, 2009
Summary: Apply the fix from Microsoft if you use SharePoint.
- Microsoft Support Issue: 2123563
Link: http://support.microsoft.com/kb/2123563
Description: You cannot open Office file types directly from a server that supports only Basic authentication over a non-SSL connection
Summary: Enable SSL encryption on the web server.
Follow these steps.
Generate and store an encryption key.
Generate the key using
com.sun.identity.common.DESGenKeyusing the .jars where you deployed OpenAM, as in the following example.$ cd /path/to/tomcat/webapps/openam/WEB-INF/lib $ java -cp openam-core-13.jar:openam-shared-13.jar com.sun.identity.common.DESGenKey Key ==> sxVoaDRAN0o=
Store the key in the agent configuration on the property in the OpenAM console under Access Control > realm-name > Agents > Web > agent-name > Advanced > Microsoft IIS Server > Replay Password Key (property name:
com.sun.identity.agents.config.replaypasswd.key), and then Save your work.Store the key in the server configuration in the OpenAM console under Configuration > Servers and Sites > server-name > Advanced > Add... to add the property
com.sun.am.replaypasswd.keywith the key you generated as the value, and then Save your work.
In the OpenAM console under Access Control > realm-name > Authentication > All Core Settings... > Authentication Post Processing Classes, add the class
com.sun.identity.authentication.spi.ReplayPasswd, and then Save your work.If you require Windows logon, or you need to use basic authentication with SharePoint or OWA, then you must configure Active Directory as a user date store, and you must configure the IIS 7 policy agent profile User ID Parameter and User ID Parameter Type so that the policy agent requests OpenAM to provide the appropriate account information from Active Directory in its policy response.
Skip this step if you do not use SharePoint or OWA and no Windows logon is required.
Make sure OpenAM data store is configured to use Active Directory as the user data store.
In the OpenAM console under Access Control > realm-name > Agents > Web > agent-name > OpenAM Services > Policy Client Service, set User ID Parameter and User ID Parameter Type, and then Save your work. For example if the real username for Windows domain logon in Active Directory is stored on the
samaccountnameattribute, then set the User ID Parameter tosamaccountname, and the User ID Parameter Type toLDAP.Setting the User ID Parameter Type to
LDAPcauses the policy agent to request that OpenAM get the value of the User ID Parameter attribute from the data store, in this case Active Directory. Given that information, the policy agent can set the HTTP headersremote_user,auth_user, orlogon_useranduser_passwordwith Active Directory attribute values suitable for Windows logon, setting the remote user, and so forth.To set the encrypted password in the AUTH_PASSWORD header, in the OpenAM console under Access Control > realm-name > Agents > Web > agent-name > Advanced > Custom Properties, add
com.sun.identity.agents.config.iis.password.header=true.To have the agent perform Windows logon (for user token impersonation), in the OpenAM console under Access Control > realm-name > Agents > Web > agent-name > Advanced > Custom Properties, add
com.sun.identity.agents.config.iis.logonuser=true.In the OpenAM console under Access Control > realm-name > Agents > Web > agent-name > Advanced > Microsoft IIS Server, set Authentication Type to basic, and then Save your work.
To use the agent with SharePoint or Microsoft Office, configure OpenAM to support the
iPlanetDirectoryProas a persistent cookie.In the OpenAM console under Access Control > realm-name > Authentication > All Core Settings... > Persistent Cookie Mode, select Enabled, and then Save your work.
To remove the web policy agent, log on as a user with Administrator privileges, run cscript IIS7Admin.vbs -unconfig config.txt, and then run iisreset.
This chapter covers installation of the policy agent for Oracle iPlanet Web Server, formerly known as Sun Web Server.
Make sure OpenAM is installed, running, that you can contact OpenAM from the system running the policy agent. Next, create a profile for your policy agent as described in the Administration Guide section on Creating Agent Profiles. To protect resources with the agent also create at least one policy as described in the section on Configuring Policies. Consider creating a simple policy, such as a policy that allows only authenticated users to access your resources, in order to test your policy agent after installation.
You must install Apache HTTP Server before you install the policy agent, and you must stop the server during installation.
You must install a supported version of the Java runtime environment.
Please review the
OpenAM Release Notes for the currently supported version
of Java, and set the JAVA_HOME environment
variable accordingly. The policy agent installer requires Java.
$ echo $JAVA_HOME
/path/to/java
$ which java
/usr/bin/java
Go to Obtaining OpenAM Software to determine which version of the agent to download and download the agent. Also verify the checksum of the file you download against the checksum posted on the download page.
Unzip the file in the directory where you plan to install the web policy agent. The agent you install stores its configuration and logs under this directory.
When you unzip the policy agent .zip download, you find the following
directories under the web_agents/sjsws_agent
directory.
binContains the installation and configuration program, agentadmin; the certificate management tool certutil and the password hashing tool crypt_util.
configConfiguration templates used by the agentadmin command during installation
dataNot used
etcNot used
installer-logsLocation for log files written during installation
libShared libraries used by the web policy agent
localeProperty files used by the installation program
Complete the following procedures to install the policy agent.
Regardless of whether you store configurations centrally in OpenAM or locally with your agents, the agent requires a profile so that it can connect to and communicate with OpenAM.
In the OpenAM console, browse to Access Control > Realm Name> Agents > Web, and then click the New... button in the Agent table.
Complete the web form using the following hints.
- Name
The name for the agent profile used when you install the agent
- Password
Password the agent uses to authenticate to OpenAM
- Configuration
Centralized configurations are stored in the OpenAM configuration store. You can manage the centralized configuration through the OpenAM console. Local configurations are stored in a file alongside the agent.
- Server URL
The full URL to an OpenAM instance, or if OpenAM is deployed in a site configuration (behind a load balancer) then the site URL
In centralized configuration mode, the Server URL is used to populate the agent profile for services such as Login, Logout, Naming, and Cross Domain SSO.
- Agent URL
The web server URL that the agent protects
In centralized configuration mode, the Agent URL is used to populate the Agent Profile for services such as notifications.
Create a text file containing only the password.
$ echo password > /tmp/pwd.txt
Protect the password file you create as appropriate for your operating system.
$ chmod 400 /tmp/pwd.txt
Shut down Oracle iPlanet Web Server instance where you plan to install the agent.
Make sure OpenAM is running.
Run agentadmin --install to install the agent.
$ /path/to/web_agents/sjsws_agent/bin/agentadmin --install
...
-----------------------------------------------
SUMMARY OF YOUR RESPONSES
-----------------------------------------------
Sun Java System Web Server Config Directory :
/path/to/webserver7/https-www.example.com/config/
OpenAM server URL : http://openam.example.com:8080/openam
Agent URL : http://www.example.com:8080
Agent Profile name : Sun Web Server Agent
Agent Profile Password file name : /tmp/pwd.txt

...
SUMMARY OF AGENT INSTALLATION
-----------------------------
Agent instance name: Agent_001
Agent Bootstrap file location:
/path/to/web_agents/sjsws_agent/Agent_001/config/

Agent Configuration Tag file location
/path/to/web_agents/sjsws_agent/Agent_001/config/
 agent.conf
Agent Audit directory location:
/path/to/web_agents/sjsws_agent/Agent_001/logs/audit
Agent Debug directory location:
/path/to/web_agents/sjsws_agent/Agent_001/logs/debug


Install log file location:
/path/to/web_agents/sjsws_agent/installer-logs/audit/install.log
...
Upon successful completion, the installer has backed up and updated the Oracle iPlanet Web Server instance configuration, and has also set up configuration and log directories for the agent.
Note
If the agent is in a different domain than the server, refer to Administration Guide procedure, Configuring Cross-Domain Single Sign On.
Take note of the configuration files and log locations.
Each agent instance that you install on the system has its own numbered configuration and logs directory. The first agent's configuration and logs are thus located under the directory
web_agents/sjsws_agent/Agent_001/.config/Used to bootstrap the web policy agent, allowing the agent to connect to OpenAM and download its configuration
config/agent.confOnly used if you configured the web policy agent to use local configuration
logs/audit/Operational audit log directory, only used if remote logging to OpenAM is disabled
logs/debug/Debug log directory. Useful in troubleshooting policy agent issues.
If your policy agent configuration is not in the top-level realm (/), then you must edit config/ to identify the sub-realm that has your policy agent configuration. Find com.sun.identity.agents.config.organization.name and change the / to the path to your policy agent profile. This allows the policy agent to properly identify itself to the OpenAM server.
Set up ownership of the log directory. The default is to run as a webservd user instead of root. To post its logs, the agent needs permission to add the files to the directory.
chown -R webservd:webservd /opt/web_agents/sjsws_agent/Agent_number/logs
Restart the Oracle iPlanet Web Server instance where you installed the agent.
Check that the agent protects the web site.
If you have not yet configured any policies to allow access, then you should receive an HTTP 403 Forbidden error. In the above example, when accessing
http://www.example.com:8080/, the content of the page returned appears in the browser as follows.Forbidden
Your client is not allowed to access the requested object.If it appears the protection is inadequate, complete one of the following steps.
Note
A potential cause for the protection failing is updates to the
server.xmlfile for theobject-fileproperty. Aobject-fileproperty refers to theobj.conffile created during the web server installation. Multiple servers create their ownobj.conffiles, which can cause problems with protection. Also, admin changes can update theobj.conffile. For more information, checkout the Syntax and Use of obj.conf.This step removes the
obj.conffile if it is not needed.Open the
server.xmland remove theobject-fileproperty. The web server will use the defaultobj.confconfiguration.Note
Do not change the original file.
$ vi /path/to/webserver7/config/server.xml
 <virtual-server>
  <name>virtual.example.com</name>
  <http-listener-name>http-listener-1</http-listenername>
  <host>virtual.example.com</host>
  -  <object-file>virtual.example.com-obj.conf</object-file>
  <document-root>/path/to/webserver7/htdocs</document-root>
  <name>virtual.example.com</name>
 </virtual-server>
This step updates the
obj.conffile if it is needed.Open the
server.xmland manually update theobject-fileproperty to validate the location of theobj.conffile.Note
Do not change the original file.
$ vi /path/to/webserver7/config/server.xml
 <Object path="*/dummypost/sunpostpreserve*">
 Service type=text/* method=(GET) fn=append_post_data
 </Object>
 <Object path="*/UpdateAgentCacheServlet*">
 Service type=text/* method=(POST) fn=process_notification
 </Object>
Save the file and restart the Oracle iPlanet Web Server.
For alternative installations, use agentadmin --custom-install.
When performing a scripted, silent installation, use agentadmin --install --saveResponse response-file to create a response file for scripted installation. Then install silently using agentadmin --install --useResponse response-file.
With ./agentadmin --custom-install, you can opt to
create the policy agent profile during installation. The OpenAM administrator
must first create an agent administrator user, as described in Delegating Agent
Profile Creation, and provide you with the agent
administrator user name and password. Before running the
./agentadmin --custom-install command, put the password
alone in a read-only file only the user installing can access, as for the
agent password. When the agentadmin command prompts you to
create the profile during installation, enter true, and
then respond to the agentadmin prompts for the agent
administrator user name and password file.
Shut down the Oracle iPlanet Web Server before you uninstall the policy agent.
To remove the web policy agent, use agentadmin --uninstall.
This chapter covers installation of the policy agent for Varnish HTTP Accelerator 3.0.3.
Varnish is unlike the other policy agents supported for OpenAM. It does not require the Java environment necessary for the other policy agents, and it has a unique set of instructions for the agentadmin command. Varnish uses a directory called vmods. This is the location where you will need to handle any required installation or Varnish updates, and it requires the user to have administrative rights to update this directory for changes to take effect. You can also configure your Varnish instance using the Varnish Configuration Language (VCL) file.
You need to setup your container and OpenAM before installing the web agent.
Install the server.
Create and delegating an agent profile.
Download and prepare the policy agent for installation.
Make sure OpenAM is installed and running.
Contact OpenAM from the system running the policy agent.
Install the Varnish HTTP Accelerator.
To create a new web agent profile, you need a name and password, and the URLs to OpenAM and the application to protect. The agent requires a profile so that it can connect to and communicate with OpenAM.
In the OpenAM console, browse to Access Control > Realm Name> Agents > Web, and then click the New... button in the Agent table.
Complete the web form.
Use the following information to help you with the form.
- Name
The name for the agent profile used when you install the agent
- Password
Password the agent uses to authenticate to OpenAM
- Configuration
Centralized configurations are stored in the OpenAM configuration store. You can manage the centralized configuration through the OpenAM console. Local configurations are stored in a file alongside the agent.
- Server URL
The full URL to an OpenAM instance, or if OpenAM is deployed in a site configuration (behind a load balancer) then the site URL
In centralized configuration mode, the Server URL is used to populate the agent profile for services such as Login, Logout, Naming, and Cross Domain SSO.
- Agent URL
The web server URL that the agent protects
In centralized configuration mode, the Agent URL is used to populate the Agent Profile for services such as notifications.
After creating the agent profile, you can click the link to the new profile to adjust and export the configuration.
Create a text file containing only the password.
$ echo password > /tmp/pwd.txt
Protect the password file you create as appropriate for your operating system.
$ chmod 400 /tmp/pwd.txt
Go to Obtaining OpenAM Software to determine which version of the agent to download and download the agent.
Verify the checksum of the file you download against the checksum posted on the download page.
Unzip the file in the directory where you plan to install the policy agent. The agent you install stores its configuration and logs under this directory.
Complete the following procedure to install the policy agent.
Stop Varnish.
$ sudo service varnish stop
Make sure OpenAM is running.
Run ./agentadmin to install the agent.
$ cd /path/to/web_agents/varnish/bin/
$ ./agentadmin
Note
If the agent is in a different domain than the server, refer to the Administration Guide chapter, Configuring Cross-Domain Single Sign On.
Accept the ForgeRock Web Policy Agent License. Select Configure Varnish Web Policy Agent instance from the subsequent window.
Click on Configure Varnish Web Policy Agent instance and enter the following information for each consecutive screen.
Press F3 to move to the next field, or F2 to return to the previous field to make a correction. Be careful as you make your entires, backspace will erase the entire entry, not just the last character.
URL where the OpenAM server runs
Enter URL where the OpenAM server is running:
   http://openam.example.com:8080/openam
Agent URL that protects the web container
Enter URL where Agent is protecting the Web Container:
   http://www.website.example.com:80
Profile ID and password
Enter the Agent profile attributes in the OpenAM server:
   Profile ID: webagent
   Password: cangetin
Path to Varnish modules directory
Enter the path to Varnish modules directory
   /usr/lib/varnish/vmods
Once you have configured your agent, you will get a page displaying the agent configuration results. Verify the information. Click F4 when you are done.
Agent configuration results:
 OpenAM URL: http://openam.example.com:8080/openam
  Agent URL: http://website.example.com
    Profile: webagent
 WebServer configuration:
  /opt/webagent/web_agents/varnish/bin/instances/agent_1/config/am.vcl
Encrypt the password if you want additional security.
Note
The new agent appears as
agent_1. You can return to this screen at any time by running/path/to/web_agents/varnish/bin/agentadminto remove it.Exit the screen.
Take note of the configuration files and log locations.
Each agent instance that you install on the system has its own numbered configuration and logs directory. The first agent's configuration and logs are thus located under the directory
/path/to/web_agents/varnish/instances/agent_1/.config/OpenAMAgentBootstrap.propertiesUsed to bootstrap the web policy agent, allowing the agent to connect to OpenAM and download its configuration
config/OpenAMAgentConfiguration.propertiesOnly used if you configured the web policy agent to use local configuration
logs/audit/Operational audit log directory, only used if remote logging to OpenAM is disabled
logs/debug/Debug directory where the
amAgentdebug file resides. Useful in troubleshooting policy agent issues.
If your policy agent configuration is not in the top-level realm (/), then you must edit config/OpenAMAgentBootstrap.properties to identify the sub-realm that has your policy agent configuration. Find com.sun.identity.agents.config.organization.name and change the / to the path to your policy agent profile. This allows the policy agent to properly identify itself to the OpenAM server.
Setup the backend by updating the following lines in the VLC script. Make sure port and host are set correctly.
$ vi /path/to/web_agents/varnish/instances/agent_1/config/am.vcl
 import am;
 backend default {
 .host = "127.0.0.1";
 .port = "8080";
 }
Start Varnish with the following command. It will also load the VLC script.
varnishd -u root -F -T localhost:8080 -f
  /path/to/web_agents/varnish/instances/agent_1/config/am.vcl -a :80 -s malloc,50M
Check the Varnish error log after you start the server to make sure startup completed successfully.
Check the
amAgentdebug log to verify that no errors occurred on startup.$ tail /path/to/web_agents/varnish/instances/agent_1/logs/debug/amAgent 2011-09-03 13:28:16.971 -1 32686:9daae60 all: ==============...===== 2011-09-03 13:28:16.972 -1 32686:9daae60 all: Version: ... 2011-09-03 13:28:16.972 -1 32686:9daae60 all: Revision: ... 2011-09-03 13:28:16.972 -1 32686:9daae60 all: Build Date: ... 2011-09-03 13:28:16.972 -1 32686:9daae60 all: Build Machine: ..forgerock.com 2011-09-03 13:28:16.972 -1 32686:9daae60 all: ==============...=====
(Optional) If you have a policy configured, you can test your policy agent. For example, try to browse to a resource that your policy agent protects. You should be redirected to OpenAM to authenticate, for example as user
demo, passwordchangeit. After you authenticate, OpenAM then redirects you back to the resource you tried to access.
Varnish is unique because modifications are done in Command Line Mode where you can use it to create a new server configuration template/vcl file, such as instance/agent_1/config. This file is then used to start Varnish to create the file or directory links to the Varnish vmods, where it will be properly loaded when Varnish is started.
You can use the following commands for customizing your Varnish policy agent.
agentadmin -lLists all of the agent instances
agentadmin -r agent_1Removes the agent_1 instance create in the example
agentadmin -e passwordEncrypts the password using an base64 output for the encoded password and encryption key
agentadmin -o openamurl -a agenturl -i agent_profile_id
    -p /path/to/passwordfile -c /usr/lib/varnish/vmods
Creates the agent instance with the configuration parameters. Based on the examples in the procedures, you would get the following:
openamurl for the OpenAM server at
http://openam.example.com:80/openamagenturl of the Agent server url is
http://www.website.example.com:80agent_profile is the agent profile name shown in OpenAM
/path/to/passwordfile is the path where you saved the agent profile password file
/path/to/varnish/vmod is the path to the Varnish vmods directory
/usr/lib/varnish/vmods
agentadmin -vView the version
agentadmin -?Displays a list of all possible options supported by Varnish
Shut down the Varnish server before you uninstall the policy agent.
$ sudo service varnish stop
To remove the web policy agent, use ./agentadmin.
$ cd /path/to/web_agents/varnish/bin/
$ ./agentadmin
Scroll down and select Remove 'agent' instance.
This chapter offers solutions to issues during installation of OpenAM policy agents.
Solutions to Common Issues
This section offers solutions to common problems when installing OpenAM policy agents.
Q: | I am trying to install a policy agent, connecting to OpenAM over HTTPS, and seeing the following error. OpenAM server URL: https://openam.example.com:8443/openam WARNING: Unable to connect to OpenAM server URL. Please specify the correct OpenAM server URL by hitting the Back button (<) or if the OpenAM server URL is not started and you want to start it later, please proceed with the installation. If OpenAM server is SSL enabled and the root CA certificate for the OpenAM server certificate has been not imported into installer JVMs key store (see installer-logs/debug/Agent.log for detailed exception), import the root CA certificate and restart the installer; or continue installation without verifying OpenAM server URL. What should I do? |
A: | The Java platform includes certificates from many Certificate Authorities (CAs). If however you run your own CA, or you use self-signed certificates for HTTPS on the container where you run OpenAM, then the agentadmin command cannot trust the certificate presented during connection to OpenAM, and so cannot complete installation correctly. After setting up the container where you run OpenAM to use HTTPS, get the certificate to trust in a certificate file. The certificate you want is the that of the CA who signed the container certificate, or the certificate itself if the container certificate is self-signed. Copy the certificate file to the system where you plan to install the policy agent. Import the certificate into a trust store that you will use during policy agent installation. If you import the certificate into the default trust store for the Java platform, then the agentadmin command can recognize it without additional configuration. Export and import of self-signed certificates is demonstrated in the Administration Guide chapter on Managing Certificates. |
Q: | I am trying to install the policy agent on SELinux and I am getting error messages after installation. What happened? |
A: | SELinux must be properly configured to connect the web policy agent and OpenAM nodes. Either re-configure SELinux or disable it, then reinstall the policy agent. |
Q: | My Apache HTTPD server is not using port 80. But when I install the web policy agent it defaults to port 80. How do I fix this? |
A: | You probably set Instead you must set both the host name and port number for
<VirtualHost *:8080> ServerName www.localhost.example:8080 |
Q: | My web server and web policy agent are installed as root, and the agent cannot rotate logs. I am seeing this error. Could not rotate log file ... (error: 13) What should I do? |
A: | First, avoid installing the web server (and therefore also the web policy agent) as root, but instead create a web server user and install as that user. If however you cannot avoid installing the web server and policy agent
as root, the you must give all users read and write permissions to the
|
Q: | I have multiple web servers on a single system, and want to protect each of them with a policy agent. |
A: | Once both web policy agents are installed, navigate to the com.forgerock.agents.instance.id= Set that attribute to an appropriate unique value such as |
A
- Apache HTTP Server, Installing the Apache 2.2 Policy Agent, Installing the Apache 2.4 Policy Agent
M
O
- Oracle iPlanet Web Server, Installing the Oracle iPlanet/Sun Web Server Policy Agent
P
- Policy agents
- Creating profiles, Before You Install
S
- Sun Web Server, Installing the Oracle iPlanet/Sun Web Server Policy Agent
T
- Troubleshooting, Troubleshooting
V
- Varnish HTTP Accelerator, Installing the Varnish Policy Agent