Post-installation tasks
Note the location of configuration files and logs
Each agent instance has a numbered configuration and logs directory, starting
with agent_1.
The first agent configuration and logs are located at
web_agents/agent_type/instances/agent_1/.
The following configuration files and logs are created:
-
web_agents/agent_type/instances/agent_1/config/: Bootstrap properties to connect to AM and download the configuration. This directory contains properties that are used only in local configuration mode. -
web_agents/agent_type/instances/agent_1/logs/audit/: Audit log directory. Used only if Audit Log Location isLOCALorALL. -
web_agents/agent_type/instances/agent_1/logs/debug/: The directory where the agent writes debug log files after startup.
During agent startup, the location of the logs can be based on the agent web
server, or defined in the site configuration file for the server.
For example, bootstrap logs for NGINX Plus Web Agent can be written to
/var/log/nginx/error.log.
Validate the agent instance
Validate the agent instance by using the agentadmin --V[i] command.
For information about the options and requirements for this command, see
agentadmin.
-
Linux
-
Windows
$ sudo -u web-server-user
$ cd /web_agents/agent_type/bin/
$ ./agentadmin --Vi agent_name am_identity_name /path/to/am_identity_password
C:\web_agents\agent-type\bin> agentadmin --Vi ^
agent_name am_identity_name C:/path/to/am_identity_password /
A result similar to this is displayed:
Running configuration validation for agent_1:

  Agent instance is configured with 1 naming.url value(s):
  1. https://am.example.com:8443/am is valid
  selected https://am.example.com:8443/am as naming.url value
  validate_bootstrap_configuration: ok
  validate_ssl_libraries: ok
  validate_agent_login: ok
  get_allocator_blockspace_sz(): trying for configured cache size 16777216 bytes
  validate_system_resources: ok
  validate_session_profile: ok
  validate_websocket_connection: ok
  validate_worker_init_shutdown: ok

Result: 7 out of 7 tests passed, 0 skipped.
If validate_websocket_connection is not ok, make sure that the web server and
the network infrastructure between the web server and the AM servers
support WebSockets.
Configure shared runtime resources and memory
By default, agent instances share the Unix Apache and NGINX Plus agent shared
memory, runtime resources, and installation files. For
example, Agent_1 and Agent_2 instances write the same session log and
audit files (even though each one writes to their own file), use the same agent
policy cache, and run a single set of worker processes and background tasks.
Choose whether to share resources
You can choose to configure several related agent instances to share resources, and configure others to be independent.
Despite sharing resources, agent instances can be started and stopped individually and can run as different users as long as the agent resources can be shared by their effective user and groups.
Choosing whether to share runtime resources and shared memory is an important decision that depends on your environment. Consider the information in the following table before configuring your agents:
| Impact | Advantage | Caution |
|---|---|---|
Shared agent policy and session cache |
Potentially reduces overhead of requests to AM for authentication and authorization. |
Cache may fill with irrelevant entries. |
Reduced memory consumption. |
Sharing the cache among different locations or virtual hosts may not be desirable. |
|
- |
Agent instances that are members of the same agent group must be configured in the same Apache or NGINX Plus installation. |
|
Reduced number of background threads. (Single WebSocket connection to AM for notifications) |
Reduced system resource usage. |
Ensure the |
Agent instances share runtime files and semaphores |
Reduced system resource usage. |
Must ensure files and resources can be accessed by all the agent instances. For example, add the users running the instances to the same group and configure
the resources to have |
Configure agent groups
An agent group is a group of agent instances that share runtime resources and
shared memory. Agent groups are defined by adding AmAgentId (Apache agent) and
openam_agent_instance (NGINX Plus agent) directives to Apache and NGINX Plus
configuration files.
Consider these constraints when configuring agent groups:
-
Neither the Apache agent nor the NGINX Plus agent set the directives during installation.
-
When not set, the
AmAgentIddirective defaults to0, and theopenam_agent_instancedirective defaults to1. -
The value of the directives must increase by one for each agent group configured. For example, if the default value of the
AmAgentIddirective is0, the next agent group must be1. -
Agent instances that are members of the same agent group must be part of the same Apache or NGINX Plus installation.
-
By default, the maximum number of agent instances in a single installation is
32. For more information about changing this limit, see AM_MAX_AGENTS in Environment variables.
The following table shows an example of six Apache agent instances split into three different agent groups:
| Agent Instances | Directive Configuration | Description |
|---|---|---|
|
Not Set (defaults to 0) |
The instances share runtime resources and policy cache. |
|
1 |
The instances share runtime resources and policy cache. |
|
2 |
The instance does not share runtime resources and policy cache with any other instance. |
To configure the agent group, set the AmAgentId or openam_agent_instance
directives and their value along with the rest of the agent directives in the
httpd.conf or nginx.conf files:
AmAgentId(Apache only)-
The following is an example of a
httpd.conffile with theAmAgentIddirective configured:<VirtualHost *:80> ServerName www.site1.com DocumentRoot /home/www/site1.com AssignUserID site1 www-data LoadModule amagent_module /web_agents/apache24_agent/lib/mod_openam.so AmAgent On AmAgentConf /web_agents/apache24_agent/bin/../instances/agent_1/config/agent.conf AmAgentId 1 … </VirtualHost> <VirtualHost *:8080> ServerName www.site2.com DocumentRoot /home/www/site3.com AssignUserID site2 www-data LoadModule amagent_module /web_agents/apache24_agent/lib/mod_openam.so AmAgent On AmAgentConf /web_agents/apache24_agent/bin/../instances/agent_2/config/agent.conf AmAgentId 1 … </VirtualHost>
In this example, each virtual host is protected by a different instance of the agent, yet both agent instances belong to the agent group
1. They share runtime resources and shared memory. openam_agent_instance(NGINX Plus only)-
The following is an example of the
nginx.conffile with theopenam_agent_instancedirective configured:server { listen 80 default_server; server_name localhost; openam_agent on; openam_agent_configuration /web_agents/nginx25_agent/bin/../instances/agent_3/config/agent.conf; openam_agent_instance 2 … location /customers { openam_agent on; openam_agent_configuration /web_agents/nginx25_agent/bin/../instances/agent_4/config/agent.conf; openam_agent_instance 2 root /www/customers index index.html } …In this example,
agent_1protects the server context whileagent_2protects a location. Both instances belong to agent group1, and share runtime resources and shared memory.
Secure communication between the agent and AM
| Be mindful of security breaches and vulnerabilities. Ensure your environment isn’t using outdated, insecure protocols, such as SSL 3.0, TLS 1.0, and others. |
To secure communications, configure the agent to validate server certificates installed in the server where AM runs and/or to present a client certificate to AM. Learn more from AM’s Secure HTTP and LDAP connections.
To facilitate integration and test, Web Agent is configured by default to trust any server certificate. Test client certificates aren’t provided or configured.
To send cookies only when the communication channel is secure, set
Enable Cookie Security to
true.
Secure internal communication with OpenSSL
Unix-based agents support only OpenSSL libraries. Windows-based agents can use OpenSSL or Secure communication with the Windows Secure Channel API.
For information about supported versions of OpenSSL, and where to locate related libraries, see Secure communication between Web Agent and AM.
Configure server-side and client-side validation using OpenSSL
Perform the following steps to configure the agent to validate AM’s server certificate chain and to present client certificates if requested:
-
Open the
/web_agents/agent_type/instances/agent_nnn/config/agent.confconfiguration file. -
(For IIS or the Apache for Windows Web Agent) Configure the agent to use OpenSSL.
-
Set the bootstrap property Enable OpenSSL to Secure Internal Communications to
true. -
Ensure that the OpenSSL libraries are in the appropriate place, as specified in OpenSSL library location by operating system.
-
-
(Optional) Configure the agent to validate AM’s server certificate:
-
Create a Privacy-Enhanced Mail (PEM) file that contains the certificates required to validate AM’s server certificate. For example,
ca.pem. -
Set the bootstrap property Server Certificate Trust to
false. -
Set the bootstrap property CA Certificate File Name to the PEM file previously created. For example:
-
Unix
-
Windows
com.forgerock.agents.config.cert.ca.file = /opt/certificates/ca.pem
com.forgerock.agents.config.cert.ca.file = C:\Certificates\ca.pem
-
-
Set the bootstrap property OpenSSL Certificate Verification Depth to the level of certificate validation required in your environment.
-
-
(Optional) To configure the agent to present its client certificate when AM is configured to perform client authentication, perform the following steps:
-
Create a PEM file that contains the certificate chain for the agent. For example,
client-cert.pem. -
Create a PEM file that contains the private key corresponding to the certificate. For example,
client-private-key.pem. -
Set the bootstrap property Public Client Certificate File Name to the file containing the certificate chain. For example:
-
Unix
-
Windows
com.forgerock.agents.config.cert.file = /opt/certificates/client-cert.pem
com.forgerock.agents.config.cert.file = C:\Certificates\client-cert.pem
-
-
Set the bootstrap property Private Client Certificate File Name to the file containing the client certificate private key. For example:
-
Unix
-
Windows
com.forgerock.agents.config.cert.key = /opt/certificates/client-private-key.pem
com.forgerock.agents.config.cert.key = C:\Certificates\client-private-key.pem
-
-
If the private key is password-protected, obfuscate the password by using the
agentadmin --pcommand and configure it in the bootstrap property Private Key Password. For example:-
Unix
-
Windows
$ /path/to/web_agents/agent_type/bin/> agentadmin --p "Encryption Key" “cat certificate_password.file”
Encrypted password value: zck...jtc=com.forgerock.agents.config.cert.key.password = zck...tc=
C:\path\to\web_agents\agent_type\bin> agentadmin.exe --p "Encryption_Key" "Certificate_File_Password" Encrypted password value: zck...jtc=com.forgerock.agents.config.cert.key.password = zck...tc=
Encryption Keyis the value of the bootstrap property Agent Profile Password Encryption Key. -
-
-
Review your configuration. It should look similar to the following:
-
Unix
-
Windows
//Server-side
com.sun.identity.agents.config.trust.server.certs = false
com.forgerock.agents.config.cert.ca.file = /opt/certificates/ca.pem
//Client-side
com.forgerock.agents.config.cert.file = /opt/certificates/client-cert.pem
com.forgerock.agents.config.cert.key = /opt/certificates/client-private-key.pem
com.forgerock.agents.config.cert.key.password = zck+6RKqjtc=
//General
org.forgerock.agents.config.secure.channel.disable=true
//Server-side
com.sun.identity.agents.config.trust.server.certs = false
com.forgerock.agents.config.cert.ca.file = C:\Certificates\ca.pem
//Client-side
com.forgerock.agents.config.cert.file = C:\Certificates\client-cert.pem
com.forgerock.agents.config.cert.key = C:\Certificates\client-private-key.pem
com.forgerock.agents.config.cert.key.password = zck+6RKqjtc=
-
-
Restart the agent.
Secure communication with the Windows Secure Channel API
By default, the IIS and Apache for Windows Web Agent uses the Windows built-in Secure Channel API. To use OpenSSL, see Securing internal communication with OpenSSL.
Configure server-side and client-side validation using the Windows built-in Secure Channel API
Perform the following steps to configure the agent to validate AM’s certificate chain and to present client certificates if requested:
-
Open the
/web_agents/agent_type/instances/agent_nnn/config/agent.confconfiguration file. -
Configure the agent to use the Windows built-in Secure Channel API:
-
If this is a new installation, continue to the next step. Windows-based agents use the Windows built-in Secure Channel API by default.
-
If you ever configured the IIS or Apache for Windows web agent to use OpenSSL libraries, set the bootstrap property Enable OpenSSL to Secure Internal Communications to
false.
-
-
(Optional) To configure the agent to validate AM certificate chain, perform the following steps:
-
Add the certificates required to validate AM’s server certificate to the Windows certificate store. For example, to use PowerShell, add root certificates to the
Cert:\LocalMachine\Rootlocation, and CA certificates to theCert:\LocalMachine\Calocation. -
Set the bootstrap property Server Certificate Trust to
false.
-
-
(Optional) When AM is configured to perform client authentication, configure the agent to present client certificates:
-
Import the client certificate chain and private key into the Windows certificate store. For example, for PowerShell, import them to
Cert:\LocalMachine\My. -
Set the bootstrap property Public Client Certificate File Name to the friendly name of the client certificate chain. For example:
com.forgerock.agents.config.cert.file = agent.example.com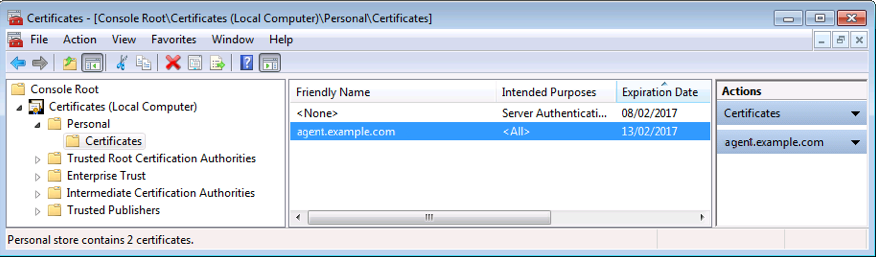
For compatibility, the agent supports an alternative configuration that does not use the Windows certificate store.
-
Create a Personal Information Exchange (PFX) file containing the certificate chain for the agent and its private key. For example,
client.pfx. -
Set the bootstrap property Public Client Certificate File Name to the previously created PFX file. For example:
com.forgerock.agents.config.cert.file = C:\Certificates\client.pfx -
Obfuscate the certificate password by using the
agentadmin --pcommand. For example:C:\path\to\web_agents\agent_type\bin> agentadmin.exe --p "Encryption_Key" "Certificate_File_Password" Encrypted password value: zck+6RKqjtc=
Encryption_Keyis the value of the Agent Profile Password Encryption Key bootstrap property. -
Set the bootstrap property Private Key Password to the value of the encrypted password. For example:
com.forgerock.agents.config.cert.key.password = zck+6RKqjtc= -
Restart the agent.
-
-
-
Review your configuration. It should look similar to the following:
-
Windows Cert Store
-
Windows PFX / PCKS12 File
//Server-side com.sun.identity.agents.config.trust.server.certs = false //Client-side com.forgerock.agents.config.cert.file = agent.example.com//Server-side com.sun.identity.agents.config.trust.server.certs = false //Client-side com.forgerock.agents.config.cert.file = C:\Certificates\client.pfx com.forgerock.agents.config.cert.key.password = zck+6RKqjtc= -
-
Restart the agent.
Support load balancers and reverse proxies between clients and agents
When your environment has reverse proxies or load balancers configured between agents and clients, you must perform additional configuration in the agents to account for the anonymization of both the clients and the agents.
Failure to do so may cause policy evaluation and other agent features to fail.
For more information, see Configure load balancers and reverse proxies.
Configure audit logging
Web Agent supports the logging of audit events for security, troubleshooting, and regulatory compliance. Store agent audit event logs in the following ways:
- Remotely
-
Log audit events to the audit event handler configured in the AM realm. In a site comprised of several AM servers, agents write audit logs to the AM server that satisfies the agent request for client authentication or resource authorization.
Agents cannot log audit events remotely if:
-
AM’s audit logging service is disabled.
-
No audit event handler is configured in the realm where the web agent is configured.
-
All audit event handlers configured in the realm where the web agent is configured are disabled.
For more information about audit logging in AM, see Setting up audit logging in AM’s Security guide.
-
- Locally
-
Log audit events in JSON format to a file in the agent installation directory,
/web_agents/agent_type/logs/audit/. - Locally and remotely
-
Log audit events:
-
To a file in the agent installation directory.
-
To the audit event handler configured in the AM realm in which the agent profile is configured.
-
The example is an agent log record:
{
   "timestamp":"2017-10-30T11:56:57Z",
   "eventName":"AM-ACCESS-OUTCOME",
   "transactionId":"608831c4-7351-4277-8a5f-b1a83fe2277e",
   "userId":"id=demo,ou=user,dc=openam,dc=forgerock,dc=org",
   "trackingIds":[
      "fd5c8ccf-7d97-49ba-a775-76c3c06eb933-82095",
      "fd5c8ccf-7d97-49ba-a775-76c3c06eb933-82177"
   ],
   "component":"Web Policy Agent",
   "realm":"/",
   "server":{
      "ip":"127.0.0.1",
      "port":8020
   },
   "request":{
      "protocol":"HTTP/1.1",
      "operation":"GET"
   },
   "http":{
      "request":{
         "secure":false,
         "method":"GET",
         "path":"http://my.example.com:8020/examples/",
         "cookies":{
            "am-auth-jwt":"eyJ0eXAiOiJKV1QiLCJhbGciOi[...]"
            "i18next":"en",
            "amlbcookie":"01",
            "iPlanetDirectoryPro":"Ts2zDkGUqgtkoxR[...]"
         }
      }
   },
   "response":{
      "status":"DENIED"
   },
   "_id":"fd5c8ccf-7d97-49ba-a775-76c3c06eb933-81703"
}
Local audit logs do not have an _id attribute, which is an internal
AM id.
|
The audit log format adheres to the log structure shared across the ForgeRock Identity Platform. For more information about the audit log format, see Audit log format in AM’s Security guide.
Web Agent supports propagation of the transaction ID across the
ForgeRock Identity Platform using the HTTP header X-ForgeRock-TransactionId. For more information
about configuring the header, see
Configuring the trust transaction header system property
in AM’s Security guide.
By default, Web Agent does not write audit log records. To configure audit logging, perform the following procedure:
This procedure assumes that Web Agent is in centralized configuration mode. Property names are provided for local configuration mode.
-
In the AM console, go to Realms > Realm Name > Applications > Agents > Web > Agent Name > Global > Audit.
-
In Audit Access Types, select the type of messages to log. For example, select
LOG_ALLto log access allowed and access denied events. -
In Audit Log Location, select whether to write the audit logs locally to the agent installation (
LOCAL), remotely to AM (REMOTE), or to both places (ALL). For example, keepREMOTEto log audit events to the AM instances. -
In Local Audit Log Rotation Size, specify the maximum size, in bytes, of the audit log files.
This is a bootstrap property. After changing this property, restart the web server where the agent runs.