Guide showing you how to install OpenAM. OpenAM provides open source Authentication, Authorization, Entitlement and Federation software.
Preface
This guide shows you how to install core OpenAM services for access and federation management. Unless you are planning a throwaway evaluation or test installation, read the Release Notes before you get started.
1. Who Should Use this Guide
This guide is written for anyone installing OpenAM to manage and to federate access to web applications and web based resources.
This guide covers the install, upgrade, and removal (a.k.a. uninstall) procedures that you theoretically perform only once per version. This guide aims to provide you with at least some idea of what happens behind the scenes when you perform the steps.
You do not need to be an OpenAM wizard to learn something from this guide, though a background in access management and maintaining web application software can help. You do need some background in managing services on your operating systems and in your application servers. You can nevertheless get started with this guide, and then learn more as you go along.
2. Formatting Conventions
Most examples in the documentation are created in GNU/Linux or Mac OS X
operating environments.
If distinctions are necessary between operating environments,
examples are labeled with the operating environment name in parentheses.
To avoid repetition file system directory names are often given
only in UNIX format as in /path/to/server,
even if the text applies to C:\path\to\server as well.
Absolute path names usually begin with the placeholder
/path/to/.
This path might translate to /opt/,
C:\Program Files\, or somewhere else on your system.
Command-line, terminal sessions are formatted as follows:
$ echo $JAVA_HOME
/path/to/jdk
Command output is sometimes formatted for narrower, more readable output even though formatting parameters are not shown in the command.
Program listings are formatted as follows:
class Test {
    public static void main(String [] args)  {
        System.out.println("This is a program listing.");
    }
}
3. Accessing Documentation Online
ForgeRock publishes comprehensive documentation online:
The ForgeRock Knowledge Base offers a large and increasing number of up-to-date, practical articles that help you deploy and manage ForgeRock software.
While many articles are visible to community members, ForgeRock customers have access to much more, including advanced information for customers using ForgeRock software in a mission-critical capacity.
ForgeRock product documentation, such as this document, aims to be technically accurate and complete with respect to the software documented. It is visible to everyone and covers all product features and examples of how to use them.
4. Using the ForgeRock.org Site
The ForgeRock.org site has links to source code for ForgeRock open source software, as well as links to the ForgeRock forums and technical blogs.
If you are a ForgeRock customer, raise a support ticket instead of using the forums. ForgeRock support professionals will get in touch to help you.
Chapter 1. Preparing For Installation
This chapter covers prerequisites for installing OpenAM software, including how to prepare your application server to run OpenAM, and how to prepare your identity repository to handle OpenAM identities.
1.1. Preparing a Fully-Qualified Domain Name
OpenAM requires that you provide the fully-qualified domain name (FQDN)
when you configure it. Before you set up OpenAM, be sure that your system
has an FQDN such as openam.example.com. For evaluation
purposes, you can give your system an alias using the
/etc/hosts file on UNIX systems or
%SystemRoot%\system32\drivers\etc\hosts on Windows. For
deployment, make sure the FQDN is properly assigned for example using
DNS.
1.2. Preparing Prerequisite Software
OpenAM core services require that you install a Java runtime environment and an application container before you begin OpenAM installation.
A Java 6 runtime environment
Check the output of java -version to make sure your the version is supported according to the Release Notes section on Java Requirements in the Release Notes.
A supported application server as the deployment container
See the Release Notes in the Release Notes for a list.
If a Java Security Manager is enabled for your deployment container, add permissions before installing OpenAM.
A supported identity repository for user identity data
For evaluation you can use the embedded OpenDJ LDAP directory server, which ships as part of OpenAM and that you can install as part of the OpenAM configuration process. Evaluation does not therefore require a separate user data or configuration store.
When moving to put OpenAM in production use a separate user data store in most cases. Also if you have more than four OpenAM servers in your production deployment, then use a separate LDAP directory server for the configuration store as well. See the Release Notes in the Release Notes for a list of supported external stores.
Examples in the documentation that show a separate user data repository use OpenDJ unless otherwise indicated. In such examples OpenDJ is installed on
openam.example.com, and listens on the following ports.Port 1389 for LDAP requests and StartTLS
Port 1636 for LDAP requests over SSL
Port 4444 for administrative traffic
The script
/etc/init.d/opendj, created with the OpenDJ create-rc-script command, manages the service at system startup and shutdown. This script assumes you run OpenDJ as the useropendj.#!/bin/sh #... # chkconfig: 345 95 5 # description: Control the OpenDJ Directory Server # Set the path to the OpenDJ instance to manage INSTALL_ROOT="/path/to/OpenDJ" export INSTALL_ROOT cd ${INSTALL_ROOT} # Determine what action should be performed on the server case "${1}" in start) /bin/su opendj -c "${INSTALL_ROOT}/bin/start-ds --quiet" exit ${?} ;; stop) /bin/su opendj -c "${INSTALL_ROOT}/bin/stop-ds --quiet" exit ${?} ;; restart) /bin/su opendj -c "${INSTALL_ROOT}/bin/stop-ds --restart --quiet" exit ${?} ;; *) echo "Usage: $0 { start | stop | restart }" exit 1 ;; esacThe Example.com sample data loaded into OpenDJ are taken from the file,
Example.ldif, provided with the server.See the OpenDJ Installation Guide for detailed installation instructions.
1.3. Obtaining OpenAM Software
Download OpenAM and policy agent releases from https://backstage.forgerock.com/downloads/.
For this release of OpenAM core services, you can download the entire package as a .zip archive, only the OpenAM .war file, only administrative tools, or only the configurator tool.
After you download the .zip archive, create a new
openam folder, and unzip the archive to access the
content:
$ cd ~/Downloads
$ mkdir openam ; cd openam
$ unzip ~/Downloads/openam_10.1.0.zip.zip
When you unzip the archive of the entire package, you get ldif, license, and legal directories in addition to the following files. See the File Layout reference in the Reference for details.
openam-clientsdk-10.1.0-Xpress.jarThe OpenAM Java client SDK library
openam-distauth-10.1.0-Xpress.warThe deployable .war file for distributed authentication
openam-distribution-diagnostics-10.1.0-Xpress.zipThe .zip file with the diagnostic tools to help troubleshoot deployment issue.
openam-distribution-fedlet-unconfigured-10.1.0-Xpress.zipThe .zip that contains the lightweight service provider implementations that you can embed in your Java EE or ASP.NET applications to enable it to use federated access management
openam-distribution-ssoadmintools-10.1.0-Xpress.zipThe .zip file that contains tools to manage OpenAM from the command line
openam-distribution-ssoconfiguratortools-10.1.0-Xpress.zipThe .zip file that contains tools to configure OpenAM from the command line
openam-server-10.1.0-Xpress.warThe deployable .war file
openam-server-only-10.1.0-Xpress.warThe deployable .war file when you want to deploy OpenAM server without the OpenAM console
1.4. Preparing Apache Tomcat
OpenAM examples often use Apache Tomcat as the deployment container.
Tomcat is installed on openam.example.com, and listens
on the default ports, with no Java Security Manager enabled. The script
/etc/init.d/tomcat manages the service at system
startup and shutdown. This script assumes you run OpenAM as the user
openam.
OpenAM core services require a minimum JVM heap size of 1 GB, and a permanent generation size of 256 MB.
#!/bin/sh
#
# tomcat
#
# chkconfig: 345 95 5
# description: Manage Tomcat web application container
CATALINA_HOME="/path/to/tomcat"
export CATALINA_HOME
JAVA_HOME=/path/to/jdk1.6
export JAVA_HOME
JAVA_OPTS="-Xmx1024m -XX:MaxPermSize=256m"
export JAVA_OPTS

case "${1}" in
start)
  /bin/su openam -c "${CATALINA_HOME}/bin/startup.sh"
  exit ${?}
  ;;
stop)
  /bin/su openam -c "${CATALINA_HOME}/bin/shutdown.sh"
  exit ${?}
  ;;
*)
  echo "Usage:  $0 { start | stop }"
  exit 1
  ;;
esac
1.5. Preparing GlassFish v2
Before you deploy OpenAM, update these JVM options. These settings are accessible in the administration console under Application Server > JVM Settings > JVM Options.
-serverUse
-serverrather than-client.-XX:MaxPermSize=256mSet the permanent generation size to 256 MB.
-Xmx1024mMake sure OpenAM has at least 1 GB heap.
1.6. Preparing OpenAM & JBoss 4 or 5
OpenAM must be able to store its configuration between restarts. If
you plan to deploy OpenAM as a single archive file, then unpack the .war,
edit WEB-INF/classes/bootstrap.properties to set the
configuration.dir property to the location where OpenAM
has write access to store its configuration.
$ mkdir openam
$ cd openam
$ jar -xf ~/Downloads/openam/openam-server-10.1.0-Xpress.war
$ vi WEB-INF/classes/bootstrap.properties
$ grep ^config WEB-INF/classes/bootstrap.properties
configuration.dir=/home/jboss-user/openam
Also, OpenAM .jar libraries that conflict with JBoss libraries must
be loaded first. Add a WEB-INF/jboss-web.xml to ensure
this happens. (If you deploy the exploded .war, you also need to add this
file.)
$ vi WEB-INF/jboss-web.xml
$ cat WEB-INF/jboss-web.xml
<!DOCTYPE jboss-web PUBLIC
  "-//JBoss//DTD Web Application 5.0//EN"
  "http://www.jboss.org/j2ee/dtd/jboss-web_5_0.dtd">
<jboss-web>
  <class-loading java2ClassLoadingCompliance='true'>
    <loader-repository>
    jbia.loader:loader=opensso
    <loader-repository-config>java2ParentDelegaton=true</loader-repository-config>
    </loader-repository>
  </class-loading>
</jboss-web>
Repack the .war file that you can then deploy.
$ jar -cf ../openam.war *
Before you deploy OpenAM, update these JVM options.
-serverUse
-serverrather than-client.-XX:MaxPermSize=256mSet the permanent generation size to 256 MB.
-Xmx1024mMake sure OpenAM has at least 1 GB heap.
1.7. Preparing OpenAM & JBoss 7
OpenAM must be able to store its configuration between restarts. If
you plan to deploy OpenAM as a single archive file, then unpack the .war,
edit WEB-INF/classes/bootstrap.properties to set the
configuration.dir property to the location where OpenAM
has write access to store its configuration, and then repack the .war.
$ mkdir openam
$ cd openam
$ jar -xf ~/Downloads/openam/openam-server-10.1.0-Xpress.war
$ vi WEB-INF/classes/bootstrap.properties
$ grep ^config WEB-INF/classes/bootstrap.properties
configuration.dir=/home/jboss-user/openam
$ jar -cf ../openam.war *
Stop JBoss.
Add the Sun x509 security module path to the JBoss 7 configuration.
The following example uses JBoss 7.1.1.
$ cp /path/to/jboss7/modules/sun/jdk/main/module.xml
 /path/to/jboss7/modules/sun/jdk/main/module.orig
$ vi /path/to/jboss7/modules/sun/jdk/main/module.xml
$ diff -c /path/to/jboss7/modules/sun/jdk/main/module.orig
 /path/to/jboss7/modules/sun/jdk/main/module.xml
*** /path/to/jboss7/modules/sun/jdk/main/module.orig     ...
--- /path/to/jboss7/modules/sun/jdk/main/module.xml     ...
***************
*** 38,43 ****
--- 38,44 ----
<path name="com/sun/security/auth"/>
<path name="com/sun/security/auth/login"/>
<path name="com/sun/security/auth/module"/>
+                 <path name="sun/security/x509"/>
<path name="sun/misc"/>
<path name="sun/io"/>
<path name="sun/nio"/>
Disable modules that conflict with OpenAM.
The following example uses JBoss 7.1.1 standalone.
$ cp /path/to/jboss7/standalone/configuration/standalone.xml
 /path/to/jboss7/standalone/configuration/standalone.orig
$ vi /path/to/jboss7/standalone/configuration/standalone.xml
$ diff -c /path/to/jboss7/standalone/configuration/standalone.orig
 /path/to/jboss7/standalone/configuration/standalone.xml
*** /path/to/jboss7/standalone/configuration/standalone.orig     ...
--- /path/to/jboss7/standalone/configuration/standalone.xml     ...
***************
*** 9,15 ****
<extension module="org.jboss.as.deployment-scanner"/>
<extension module="org.jboss.as.ee"/>
<extension module="org.jboss.as.ejb3"/>
-         <extension module="org.jboss.as.jaxrs"/>
<extension module="org.jboss.as.jdr"/>
<extension module="org.jboss.as.jmx"/>
<extension module="org.jboss.as.jpa"/>
--- 9,14 ----
***************
*** 24,30 ****
<extension module="org.jboss.as.threads"/>
<extension module="org.jboss.as.transactions"/>
<extension module="org.jboss.as.web"/>
-         <extension module="org.jboss.as.webservices"/>
<extension module="org.jboss.as.weld"/>
</extensions>

--- 23,28 ----
***************
*** 163,169 ****
</local-cache>
</cache-container>
</subsystem>
-         <subsystem xmlns="urn:jboss:domain:jaxrs:1.0"/>
<subsystem xmlns="urn:jboss:domain:jca:1.1">
<archive-validation enabled="true" fail-on-error="true"
  fail-on-warn="false"/>
<bean-validation enabled="true"/>
--- 161,166 ----
***************
*** 262,277 ****
<alias name="example.com"/>
</virtual-server>
</subsystem>
-         <subsystem xmlns="urn:jboss:domain:webservices:1.1">
-             <modify-wsdl-address>true</modify-wsdl-address>
-             <wsdl-host>${jboss.bind.address:127.0.0.1}</wsdl-host>
-             <endpoint-config name="Standard-Endpoint-Config"/>
-             <endpoint-config name="Recording-Endpoint-Config">
-                 <pre-handler-chain name="recording-handlers"
                       protocol-bindings="##SOAP11_HTTP ##SOAP11_HTTP_MTOM
                         ##SOAP12_HTTP ##SOAP12_HTTP_MTOM">
-                     <handler name="RecordingHandler"/>
-                 </pre-handler-chain>
-             </endpoint-config>
-         </subsystem>
<subsystem xmlns="urn:jboss:domain:weld:1.0"/>
</profile>

--- 259,264 ----
The following example uses JBoss 7.1.1 for a managed domain.
$ cp /path/to/jboss7/domain/configuration/domain.xml
 /path/to/jboss7/domain/configuration/domain.orig
$ vi /path/to/jboss7/domain/configuration/domain.xml
$ diff -c /path/to/jboss7/domain/configuration/domain.orig
 /path/to/jboss7/domain/configuration/domain.xml
*** /path/to/jboss7/domain/configuration/domain.orig     ...
--- /path/to/jboss7/domain/configuration/domain.xml     ...
***************
*** 11,17 ****
<extension module="org.jboss.as.ejb3"/>
<extension module="org.jboss.as.jacorb"/>
<extension module="org.jboss.as.jaxr"/>
-         <extension module="org.jboss.as.jaxrs"/>
<extension module="org.jboss.as.jdr"/>
<extension module="org.jboss.as.jmx"/>
<extension module="org.jboss.as.jpa"/>
--- 11,16 ----
***************
*** 29,35 ****
<extension module="org.jboss.as.threads"/>
<extension module="org.jboss.as.transactions"/>
<extension module="org.jboss.as.web"/>
-         <extension module="org.jboss.as.webservices"/>
<extension module="org.jboss.as.weld"/>
</extensions>
<system-properties>
--- 28,33 ----
***************
*** 146,152 ****
</local-cache>
</cache-container>
</subsystem>
-             <subsystem xmlns="urn:jboss:domain:jaxrs:1.0"/>
<subsystem xmlns="urn:jboss:domain:jca:1.1">
<archive-validation enabled="true" fail-on-error="true"
  fail-on-warn="false"/>
<bean-validation enabled="true"/>
--- 144,149 ----
***************
*** 246,261 ****
<alias name="example.com"/>
</virtual-server>
</subsystem>
-             <subsystem xmlns="urn:jboss:domain:webservices:1.1">
-                 <modify-wsdl-address>true</modify-wsdl-address>
-                 <wsdl-host>${jboss.bind.address:127.0.0.1}</wsdl-host>
-                 <endpoint-config name="Standard-Endpoint-Config"/>
-                 <endpoint-config name="Recording-Endpoint-Config">
-                     <pre-handler-chain name="recording-handlers"
                        protocol-bindings="##SOAP11_HTTP ##SOAP11_HTTP_MTOM
                          ##SOAP12_HTTP ##SOAP12_HTTP_MTOM">
-                         <handler name="RecordingHandler"/>
-                     </pre-handler-chain>
-                 </endpoint-config>
-             </subsystem>
<subsystem xmlns="urn:jboss:domain:weld:1.0"/>
</profile>
<profile name="ha">
--- 243,248 ----
***************
*** 544,559 ****
<alias name="example.com"/>
</virtual-server>
</subsystem>
-             <subsystem xmlns="urn:jboss:domain:webservices:1.1">
-                 <modify-wsdl-address>true</modify-wsdl-address>
-                 <wsdl-host>${jboss.bind.address:127.0.0.1}</wsdl-host>
-                 <endpoint-config name="Standard-Endpoint-Config"/>
-                 <endpoint-config name="Recording-Endpoint-Config">
-                     <pre-handler-chain name="recording-handlers"
                        protocol-bindings="##SOAP11_HTTP ##SOAP11_HTTP_MTOM
                          ##SOAP12_HTTP ##SOAP12_HTTP_MTOM">
-                         <handler name="RecordingHandler"/>
-                     </pre-handler-chain>
-                 </endpoint-config>
-             </subsystem>
<subsystem xmlns="urn:jboss:domain:weld:1.0"/>
</profile>
<profile name="full">
--- 531,536 ----
***************
*** 859,874 ****
<alias name="example.com"/>
</virtual-server>
</subsystem>
-             <subsystem xmlns="urn:jboss:domain:webservices:1.1">
-                 <modify-wsdl-address>true</modify-wsdl-address>
-                 <wsdl-host>${jboss.bind.address:127.0.0.1}</wsdl-host>
-                 <endpoint-config name="Standard-Endpoint-Config"/>
-                 <endpoint-config name="Recording-Endpoint-Config">
-                     <pre-handler-chain name="recording-handlers"
                        protocol-bindings="##SOAP11_HTTP ##SOAP11_HTTP_MTOM
                          ##SOAP12_HTTP ##SOAP12_HTTP_MTOM">
-                         <handler name="RecordingHandler"/>
-                     </pre-handler-chain>
-                 </endpoint-config>
-             </subsystem>
<subsystem xmlns="urn:jboss:domain:weld:1.0"/>
</profile>
<profile name="full-ha">
--- 836,841 ----
***************
*** 1275,1290 ****
<alias name="example.com"/>
</virtual-server>
</subsystem>
-             <subsystem xmlns="urn:jboss:domain:webservices:1.1">
-                 <modify-wsdl-address>true</modify-wsdl-address>
-                 <wsdl-host>${jboss.bind.address:127.0.0.1}</wsdl-host>
-                 <endpoint-config name="Standard-Endpoint-Config"/>
-                 <endpoint-config name="Recording-Endpoint-Config">
-                     <pre-handler-chain name="recording-handlers"
                        protocol-bindings="##SOAP11_HTTP ##SOAP11_HTTP_MTOM
                          ##SOAP12_HTTP ##SOAP12_HTTP_MTOM">
-                         <handler name="RecordingHandler"/>
-                     </pre-handler-chain>
-                 </endpoint-config>
-             </subsystem>
<subsystem xmlns="urn:jboss:domain:weld:1.0"/>
</profile>
</profiles>
--- 1242,1247 ----
Before you deploy OpenAM, update these JVM options.
-Dorg.apache.tomcat.util.http.ServerCookie.ALWAYS_ADD_EXPIRES=trueMake sure that headers include the
Expiresattribute rather than onlyMax-Age, as some versions of Internet Explorer do not supportMax-Age.-serverUse
-serverrather than-client.-XX:MaxPermSize=256mSet the permanent generation size to 256 MB.
-Xmx1024mMake sure OpenAM has at least 1 GB heap.
1.8. Preparing Jetty 7
When you deploy OpenAM, make sure you start Jetty with enough memory. OpenAM core services require a minimum JVM heap size of 1 GB, and a permanent generation size of 256 MB.
$ cd /path/to/jetty
$ java -server -Xmx1024m -XX:MaxPermSize=256m -jar start.jar
1.9. Preparing Oracle WebLogic
Before you deploy OpenAM, update these JVM options.
-serverUse
-serverrather than-client.-XX:MaxPermSize=256mSet the permanent generation size to 256 MB.
-Xmx1024mMake sure OpenAM has at least 1 GB heap.
1.10. Preparing IBM® WebSphere®
Before you deploy OpenAM, add these JVM parameters in the Administrator console.
Generic JVM arguments-DamCryptoDescriptor.provider=IBMJCE
-DamKeyGenDescriptor.provider=IBMJCE
Make sure OpenAM has at least 1 GB heap.
Chapter 2. Installing OpenAM Core Services
This chapter covers tasks required for a full install of OpenAM core services including the OpenAM console and installation of only the core services.
To manage access to resources on other servers, you can use either OpenIG or one of the OpenAM policy agents. OpenIG is a high-performance reverse proxy server with specialized session management and credential replay functionality. It can function as a standards-based policy enforcement point. Policy agents provide policy enforcement on supported web servers and Java EE containers, and are tightly integrated with OpenAM. See the Policy Agent Installation Guide for instructions on installing OpenAM agents in supported web servers and Java EE application containers.
The openam.war file contains all
OpenAM server components and samples. How you deploy the .war file depends
on your web application container.
Select the .war file based on the type of
deployment you need, as defined in the following table.
| If you want to... | Use... |
|---|---|
| Install core OpenAM and the console | openam-server-10.1.0-Xpress.war |
| Install OpenAM with distributed authentication | openam-distauth-10.1.0-Xpress.war |
| Install OpenAM with no console | openam-server-only-10.1.0-Xpress.war |
The openam-server-10.1.0-Xpress.war file contains all
OpenAM server components and samples. How you deploy the .war file depends
on your web application container.
Deploy the .war file on your container.
For example, copy the file to deploy on Apache Tomcat.
$ cp openam/openam-server-10.1.0-Xpress.war
    /path/to/tomcat/webapps/openam.war
Note
By adding
openam.warto the end of the path, the name of the.warfile will be changed fromopenam-server-only-10.1.0-Xpress.wartoopenam.warto make deployment easier.Check that you see the initial configuration screen in your browser at
openam.example.com:8080/openam.Note
You should NOT use localhost domain for accessing OpenAM, not even for testing purposes, because OpenAM strongly relies on browser cookies. Also the chosen domain name should contain at least 2 '.' (dot) characters, like
openam.example.com. This gives your instance a domain,example, and a subdomain,openam. Sub-domains provide an extra layer of organization for different department or types of users or clients. It also provides a level of control over your top- level domain that you would not have if you used .com or .org.
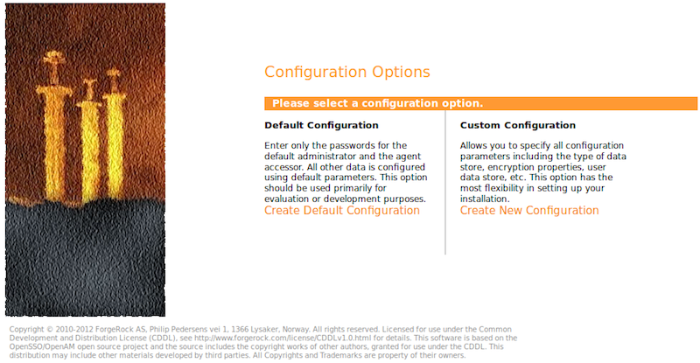
The default configuration option will basically configure the
embedded OpenDJ instance on default ports (if the ports are already in use,
OpenAM will look for a free port) as both configuration store and identity
store. The install will create a standalone OpenAM instance using the
subset of the fully qualified hostname as the cookie domain. In the example
.example.com the cookie domain is set to .example.com.
Note
The configuration settings are saved to the $HOME of
the user running the web application container. If you would like the
configuration files stored somewhere else, such as
/opt/openam, you will need to run the Custom
Configuration.
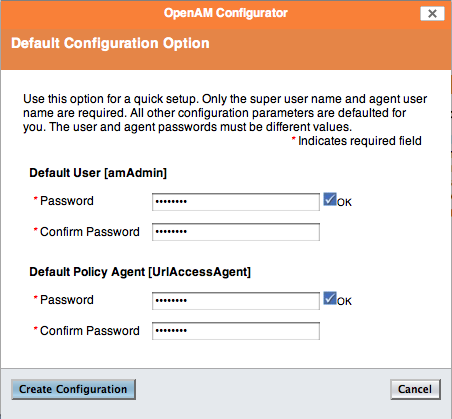
In the initial configuration screen, click Create Default Configuration under Default Configuration.
Provide different passwords for the default OpenAM administrator,
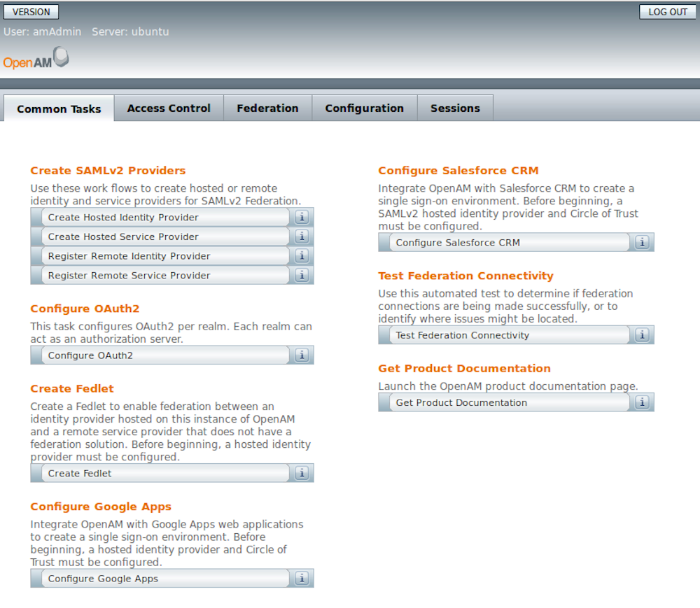
amadmin, and default Policy Agent users.When the configuration completes, click Proceed to Login, and then login as OpenAM administrator with the first of the two passwords you provided.
Stop the OpenAM web application to clear the configuration held in memory.
The following example shuts down Tomcat configured as described above.
$ /etc/init.d/tomcat stop
Password:
Using CATALINA_BASE:   /path/to/tomcat
Using CATALINA_HOME:   /path/to/tomcat
Using CATALINA_TMPDIR: /path/to/tomcat/temp
Using JRE_HOME:        /path/to/jdk1.6/jre
Using CLASSPATH:
       /path/to/tomcat/bin/bootstrap.jar:/path/to/tomcat/bin/tomcat-juli.jar
Delete OpenAM configuration files, by default under the
$HOMEof the user running the web application container.$ rm -rf $HOME/openam $HOME/.openamcfg
Note
When using the internal OpenAM configuration store, this step deletes the embedded directory server and all of its contents. You should always stop the application server before removing the configuration files. In case you're using external configuration store make sure you delete the entries under the configured OpenAM suffix (by default dc=openam,dc=forgerock,dc=org).
Restart the OpenAM web application.
The following example restarts the Tomcat container.
$ /etc/init.d/tomcat start
Password:
Using CATALINA_BASE:   /path/to/tomcat
Using CATALINA_HOME:   /path/to/tomcat
Using CATALINA_TMPDIR: /path/to/tomcat/temp
Using JRE_HOME:        /path/to/jdk1.6/jre
Using CLASSPATH:
       /path/to/tomcat/bin/bootstrap.jar:/path/to/tomcat/bin/tomcat-juli.jar
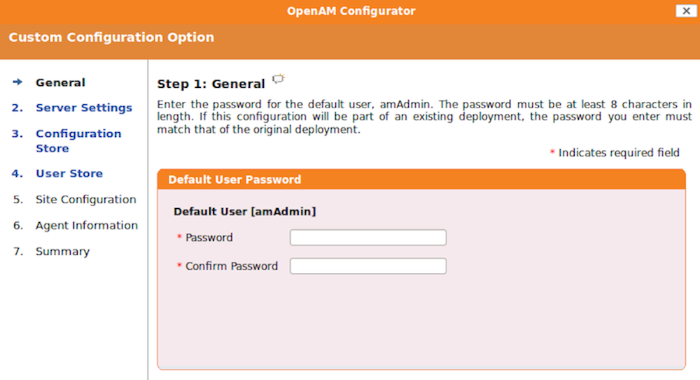
In the initial configuration screen, click Create New Configuration under Custom Configuration.
Provide a password having at least 8 characters for the OpenAM Administrator,
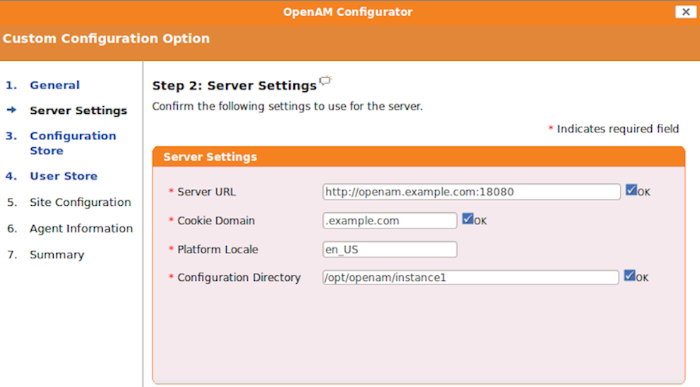
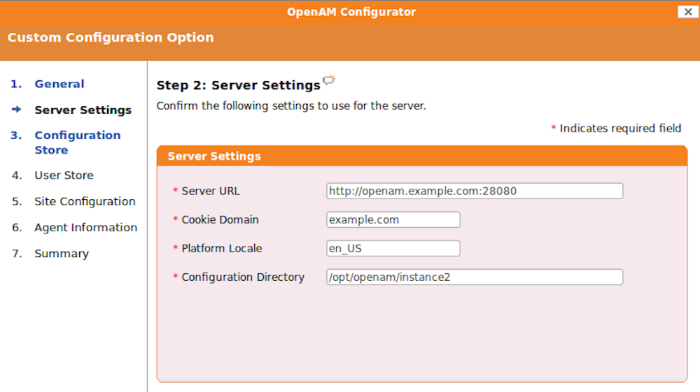
amadmin.Make sure the server settings are valid for your configuration.
- Server URL
Provide a valid URL to the base of your OpenAM web container, including a fully qualified domain name (FQDN).
In a test environment, you can fake the FQDN by adding it to your
/etc/hostsas an alias. The following excerpt shows lines from the/etc/hostsfile on a Linux system where OpenAM is installed.127.0.0.1 localhost.localdomain localhost ::1 localhost6.localdomain6 localhost6 127.0.1.1 openam openam.example.com
- Cookie Domain
Starts with a dot (
.).- Platform Locale
Supported locales include en_US (English), de (German), es (Spanish), fr (French), ja (Japanese), ko (Korean), zh_CN (Simplified Chinese), and zh_TW (Traditional Chinese).
- Configuration Directory
Location on server for OpenAM configuration files. OpenAM must be able to write to this directory.
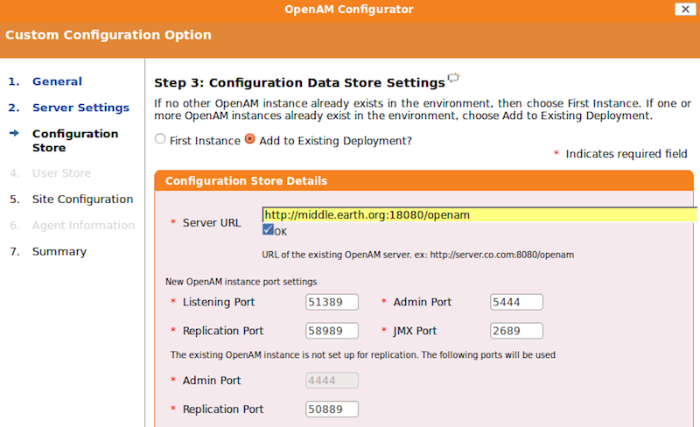
In the Configuration Store screen, you can accept the defaults to allow OpenAM to store configuration data in an embedded directory. The embedded directory can be configured separately to replicate data for high availability if necessary.
You can also add this OpenAM installation to an existing deployment, providing the URL to reach an existing OpenAM instance. Procedure 2.5, "Configuring an Additional Instance" provides information on setting up an additional instance of OpenAM.
Alternatively, if you already manage an OpenDJ or DSEE deployment, you can choose to store OpenAM configuration data in your existing directory service. You must, however, create the suffix to store configuration data on the directory server before you configure OpenAM. OpenAM does not create the suffix when you use an external configuration store.
Note
When you create a new OpenAM custom configuration that uses an external LDAP directory server for the configuration data store, you must use a root suffix DN with at least two domain components, such as
dc=example,dc=com. The root suffix must be dc. You will not be able to move to the next configuration screen if both of these conditions are not met.In the User Store screen, you configure where OpenAM looks for user identities.
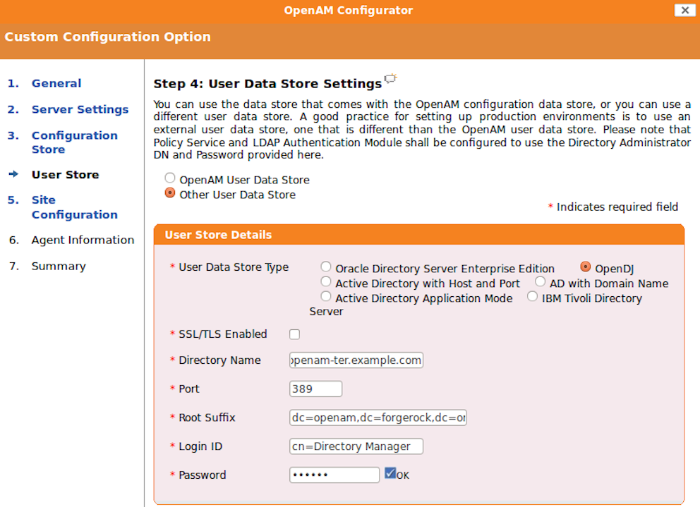
OpenAM must have write access to the directory service you choose, as it adds to the directory schema needed to allow OpenAM to manage access for users in the user store.
- User Data Store Type
If you have a directory service already provisioned with users in a supported user data store, then select that type of directory from the options available.
- SSL/TLS Enabled
To use a secure connection, check this box, then make sure the Port you define corresponds to the port on which the directory listens for StartTLS or SSL connections. When using this option you also need to make sure the trust store used by the JVM running OpenAM has the necessary certificates installed.
- Directory Name
FQDN for the host housing the directory service
- Port
LDAP directory port. The default for LDAP and LDAP with StartTLS to protect the connection is port 389. The default for LDAP over SSL is port 636. Your directory service might use a different port.
- Root Suffix
Base distinguished name (DN) where user data are stored
- Login ID
Directory administrator user DN. The administrator must be capable of updating schema and user data.
- Password
Password for the directory administrator user
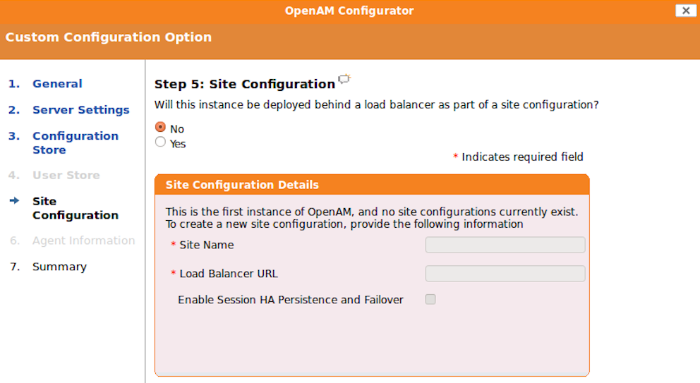
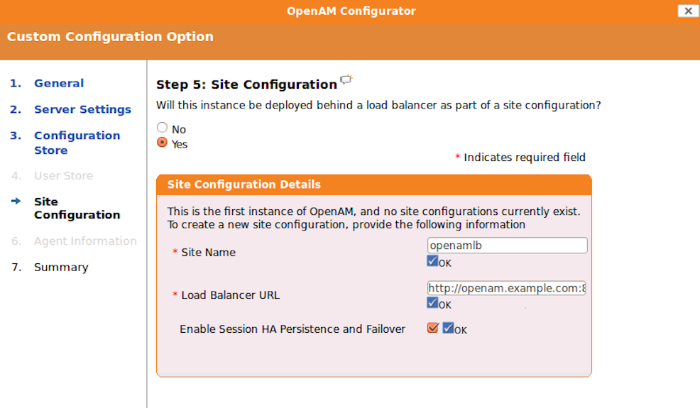
In the Site Configuration screen, you can set up OpenAM as part of a site where the load is balanced across multiple OpenAM servers.
For your first OpenAM installation, you can accept the defaults. If you have a load balancer, you can enable session high availability persistence. This will store sessions in case of a server failure, so that when the server is restored, users will be returned to their sessions without having to login again. If you would like to enable session high availability persistence or if you plan to setup additional instances, enter the Site Name, Load Balancer URL, and click the
Enable Session HA Persistence and Failover.If you plan to set up an additional instance but are not ready yet, you do not have to set it up now. The site configuration can be set up during configuration of your additional instances.
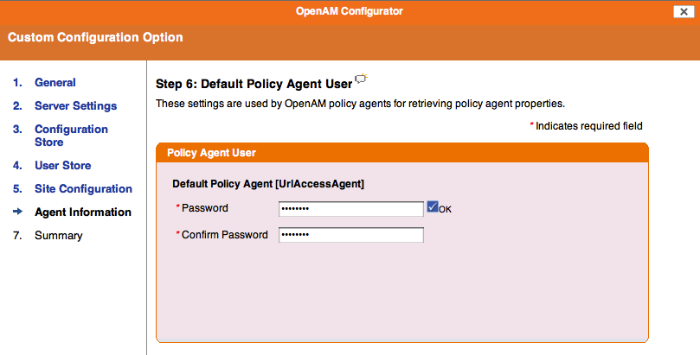
In the Agent Information screen, provide a password having at least 8 characters to be used by policy agents to connect to OpenAM.
When the configuration completes, click Proceed to Login, and then login as OpenAM administrator.
Restrict permissions to the configuration directory (by default
$HOME/openam, where $HOME corresponds to the user who runs the web container).
When an additional OpenAM instance is necessary (usually for Setting Up OpenAM Session Failover [SFO]), it is configured separately from the first instance.
In the initial configuration screen, click Create New Configuration under Custom Configuration.
Enter the same password entered during the first instance configuration for the OpenAM Administrator,
amadmin.Note
If you make a mistake at any time during the configuration, click on the
Previousbutton and the OpenAM Configurator will return to the previous screen. When you clickNext, the original default values will appear.Make sure the server settings are valid for your configuration.
If you make changes to the default values, an x mark or a check mark will indicate if the added value is acceptable. For example, you cannot add additional instances under the same configuration directory as the first instance.
Click on
Add to Existing Deployment?. Enter the Server URL of the first instance, for examplehttp://openam.example.com:18080/openam. You should be able to accept the default settings once your Server URL has been verified.Select
Yesto add the load balancer with each additional instance. It is alright if you did not add the load balancer with the first instance. The SFO chapter describes how to add the load balancer to the first instance.Enter the
Site Name, for exampleopenamlb, and theLoad Balancer URL.Verify the Configurator Summary Details.
When the configuration completes, click
Proceed to Login, and then login as OpenAM administrator.
Now when an end user logs into a server on a load balancer, they will have a persistent session, even if the first server the user logs into fails.
You can deploy OpenAM core services without including the console if you install the console elsewhere, or if you plan to perform all configuration using ssoadm for example.
Deploy the
openam-server-only-10.1.0-Xpress.warfile on your container.For example, copy the file to deploy on Apache Tomcat.
$ cp ~/Downloads/openam/openam-server-only-10.1.0-Xpress.war
    /path/to/tomcat/webapps/coreonly.war
Note
By adding
coreonly.warto the end of the path, the name of the.warfile will be changed fromopenam-server-only-10.1.0-Xpress.wartocoreonly.warso the deployment URI will be/coreonly.Browse to the console application, for example
http://host.example.com:8080/coreonly/, and configure OpenAM core services as if you were deploying with a full version.Restrict permissions to the
$HOME/coreonlyconfiguration directory, where $HOME corresponds to the user who runs the web container.
Chapter 3. Installing OpenAM Tools
OpenAM tools are found in three .zip files inside
the archive of the entire OpenAM zip download package,
openam_10.1.0.zip. When you unpack the full
zip package, you find these files.
openam-distribution-ssoadmintools-10.1.0-Xpress.zipAdministration tools: ampassword, ssoadm and amverifyarchive
This administration tools package can be downloaded separately as
ssoAdminTools_10.1.0.zip.openam-distribution-ssoconfiguratortools-10.1.0-Xpress.zipTool to check for command line installation, upgrade, and initial configuration, as well as serving as a command line alternative to using the GUI configuration wizard
This configurator package can be downloaded separately as
ssoconfiguratortools_10.1.0.zip.openam-distribution-diagnostics-10.1.0-Xpress.zipTool to check for problems with your deployment and configuration
Make sure OpenAM is installed on the system before proceeding.
Make sure the
JAVA_HOMEenvironment variable is properly set.$ echo $JAVA_HOME /path/to/jdk1.6
Unpack the tools from where you unzipped OpenAM.
$ cd /path/to/openam-tools/admin
$ unzip ~/Downloads/openam/
  openam-distribution-ssoadmintools-10.1.0-Xpress.zip
...
  inflating: template/windows/bin/amverifyarchive.bat.template
  inflating: template/windows/bin/ssoadm.bat.template
Run the setup utility (setup.bat on Windows), providing the path to the directory where OpenAM configuration files are located, and where you want debug and log information to be located.
$ ./setup
Path to config files of OpenAM server [/home/mark/openam]:
Debug Directory [/path/to/openam-tools/admin/debug]:
Log Directory [/path/to/openam-tools/admin/log]:
The scripts are properly setup under directory:
 /path/to/openam-tools/admin/openam
Debug directory is /path/to/openam-tools/admin/debug.
Log directory is /path/to/openam-tools/admin/log.
The version of this tools.zip is: 10.1.0-XPRESS (2012-December-09 02:58)
The version of your server instance is: OpenAM 10.1.0-XPRESS
 (2012-December-09 02:48)
After setup, the tools are located under a directory named after the instance of OpenAM.
$ ls openam/bin/
ampassword  amverifyarchive  ssoadm
On Windows, these files are .bat scripts.
Check that ssoadm works properly.
$ umask 366
$ echo password > /tmp/pwd.txt
$ openam/bin/ssoadm list-servers -u amadmin -f /tmp/pwd.txt

http://openam.example.com:8080/openam
The ssoadm commands can also be run from
ssoadm.jspin OpenAM, for example athttp://openam.example.com:8080/openam/ssoadm.jsp, once the page has been enabled as described in the section on OpenAM ssoadm.jsp in the Administration Guide in the Administration Guide.Not all the commands are available on ssoadm.jsp, however this limitation is not present for the command line tool.
(Optional) If you connect to OpenAM over SSL (HTTPS), and the SSL certificate was not signed by a CA whose certificate is found in the Java cacerts truststore (for example, you used a self-signed certificate as described in the Administration Guide procedure, To Set Up OpenAM With HTTPS on Tomcat in the Administration Guide), then edit the ssoadm (ssoadm.bat on Windows) script such that ssoadm recognizes the certificate.
Add two additional options to the java command in the script to identify the proper truststore and truststore password, depending on how you set up SSL.
-D"javax.net.ssl.trustStore=/path/to/tomcat/conf/keystore.jks"
 -D"javax.net.ssl.trustStorePassword=changeit"
(Optional) If you have deployed OpenAM in a site configuration, edit the ssoadm (ssoadm.bat on Windows) script to map the site name to servers.
You add a
com.iplanet.am.naming.map.site.to.serverproperty to the java command in the script.-D"com.iplanet.am.naming.map.site.to.server= lb-url=openam-url[,lb-url=openam-url ...]"
Notice that the mapping is a comma separated list of server URLs, openam-url, in the site with the load balancer URL, lb-url. For example, if your site is behind
https://lb.example.com:443/openam, and the OpenAM servers are athttp://openam1.example.com:8080/openamandhttp://openam2.example.com:8080/openam, then you add the following property to the java command (without line breaks).-D"com.iplanet.am.naming.map.site.to.server= https://lb.example.com:443/openam=http://openam1.example.com:8080/openam, https://lb.example.com:443/openam=http://openam2.example.com:8080/openam"
Make sure the
JAVA_HOMEenvironment variable is properly set.$ echo $JAVA_HOME /path/to/jdk1.6
Unpack the tools from where you unzipped OpenAM.
$ cd /path/to/openam-tools/config
$ unzip ~/Downloads/openam/
  openam-distribution-ssoadmintools-10.1.0-Xpress.zip
Archive:  ~/Downloads/openam/openam-distribution-ssoadmintools-10.1.0-Xpress.zip
  inflating: ssoadm.template
  inflating: ssoadm.bat.template
  inflating: ampassword.template
  inflating: ampassword.bat.template
  inflating: amverifyarchive.template
Set up configuration files based on the
sampleconfigurationexample, and then apply the configuration to a deployed OpenAM .war file using the following command.$ java -jar configurator.jar -f config.file
The config.file is set up by default to use the embedded data store with OpenAM installed on
server1.example.com. You must edit the file before using it, as described in the OpenAM Reference for configurator.jar in the Reference.
The diagnostic tool, ssodtool.sh (ssodtool.bat on Windows), works in both graphical and console mode.
Make sure the
JAVA_HOMEenvironment variable is properly set.$ echo $JAVA_HOME /path/to/jdk1.6
Unpack the tools from where you unzipped OpenAM.
$ cd /path/to/openam-tools/diagnostic
$ unzip ~/Downloads/openam/openam-distribution-ssoadmintools-10.1.0-Xpress.zip
...
  inflating: services/webcontainer/service.xml
  inflating: ssodtool.bat
  inflating: ssodtool.sh
You can start the graphical user interface by using the tools without options, or in console mode using the ssodtool.sh --console command.
Chapter 4. Installing OpenAM Distributed Authentication
When you need to prevent end users from having direct access to the service URLs OpenAM uses to manage access, you can deploy the distributed authentication service (DAS) in your DMZ, leaving OpenAM core services behind the firewall that end users cannot access.
You complete the following stages in deploying the DAS web service.
Make sure the cookie domain for the DAS is configured in OpenAM under Configuration > System > Platform.
Make sure the realms used have a Realm/DNS alias for the DAS configured in OpenAM under Access Control > Realm Name > General.
Deploy the openam-distauth-10.1.0-Xpress.war file into your web application container.
How you deploy the DAS .war file depends on your web application container. The procedure in this section shows how to deploy on Apache Tomcat.
Configure the DAS UI to access OpenAM core services.
Configure your firewall to allow end user access to the DAS.
Firewall configuration is not described here.
Copy the
openam-distauth-10.1.0-Xpress.warfile into thewebapps/directory.cp ~/Downloads/openam/ openam-distauth-10.1.0-Xpress.war /path/to/tomcat/webappsCheck that you see the initial DAS configuration screen in your browser.
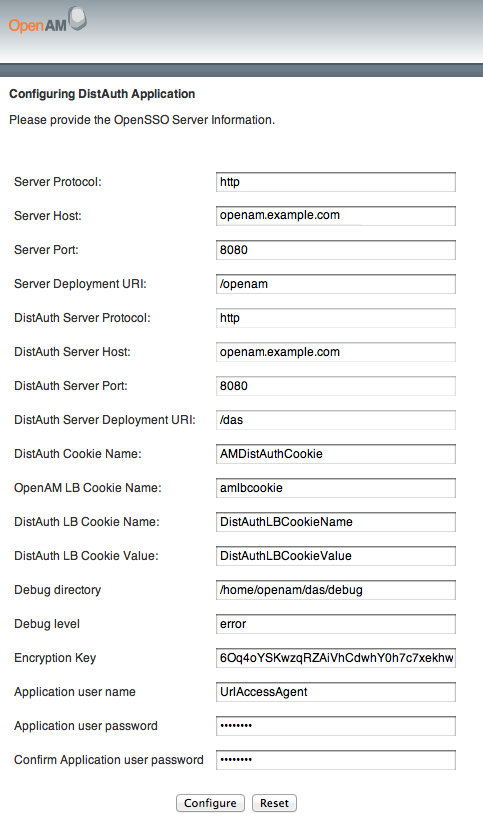
Configure the DAS using the agent profile to connect to OpenAM.
Most DAS configuration choices require no clarification. Hints for equivocal parameters follow.
- Debug Level
Default is
error. Other options includeerror,warning,message, andoff.- Encryption Key
Do not change the password encryption key.
- Application User Name
The DAS uses this identity, such as
UrlAccessAgent, to authenticate to OpenAM.- Application User Password
The DAS uses this password to authenticate to OpenAM.
Login through the DAS to access OpenAM services.
For testing, you can login as user
demo, passwordchangeit.When the
/openam/idm/EndUserpage is inside the firewall, and therefore not visible to users outside, redirect the browser after successful login to a page that exists. One way to do this is to use thegotoparameter in the URL.https://das.example.com/das/UI/Login?goto=absolute-successful-redirect-URL
On successful login, your browser stores an
AMDistAuthConfigcookie that identifies the DAS.Restrict permissions to the configuration for the DAS under the
$HOME/FAMDistAuthdirectory of the user who runs the web container where you deployed the service.The configuration file name ends in
AMDistAuthConfig.properties.If you deploy multiple DAS servers, you can configure them to forward requests to each other based on the
AMDistAuthConfigcookie by setting thecom.sun.identity.distauth.clusterproperty in this file. The following example lines are wrapped to fit on the page, but you put the entire property on a single line in the configuration file.com.sun.identity.distauth.cluster= http://das.example.com:8080/das/UI/Login, http://das2.example.com:8080/das/UI/Login
Chapter 5. Installing OpenAM Client SDK Samples
Important
This samples mentioned in this chapter are not available in the current release.
The full download of OpenAM comes with a Java Client SDK and samples
located in samples/opensso-client.zip where you
unpacked the
openam_version.zip file.
The Developer's
Guide in the Developer's Guide describes how to use the Java SDK, and the OpenAM Java SDK API Specification provides a
reference to the public APIs.
To install the Client SDK, unzip opensso-client.zip
where you want to install the SDK and examples.
$ cd samples/ ; unzip -oq opensso-client.zip
The sample web application deploys in your container to show you the client SDK samples in action.
Deploy the .war in your Java web application container such as Apache Tomcat or JBoss.
$ cp war/opensso-client-jdk15.war /path/to/tomcat/webapps/client.war
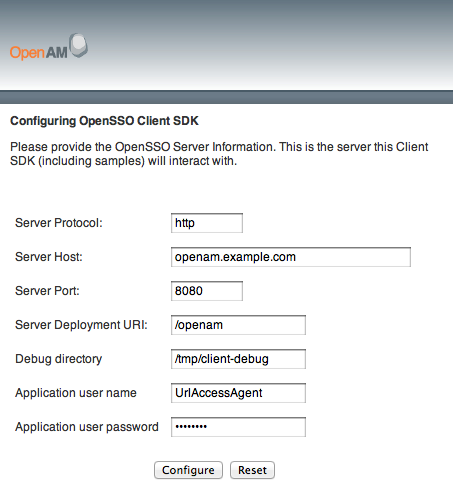
Browse to the location where you deployed the client, and configure the application to access OpenAM using the application user name,
UrlAccessAgent, and password configured when you set up OpenAM.The sample client writes configuration information under
$HOME/OpenSSOClient/, where $HOME is that of the user running the web application container.Verify that you have properly configured the sample web application.
On the Client Samples page, click Access Management Samples.
In another browser tab page of the same browser instance, login to OpenAM as the OpenAM Administrator,
amadmin.This signs you into OpenAM, storing the cookie in your browser.
On the Samples tab page, click the link under Single Sign On Token Verification Servlet.
If the sample web application is properly configured, you should see something like the following text in your browser.
SSOToken host name: 192.168.56.1
SSOToken Principal name: id=amadmin,ou=user,o=openam
Authentication type used: DataStore
IPAddress of the host: 192.168.56.1
SSO Token validation test succeeded
The token id is AQIC5wM2LY4SfcyeA2UgS0dLJIb-xjJClrk_EIXBpdzh7RI.*AAJTSQACMDE.*
Property: Company: Sun Microsystems
Property: Country: USA
User Attributes: {sunIdentityMSISDNNumber=[], mail=[],
 dn=[uid=amAdmin,ou=people,o=openam], givenName=[amAdmin],
 inetUserStatus=[Active], telephoneNumber=[], sn=[amAdmin],
 roles=[Top-level Admin Role], employeeNumber=[], postalAddress=[],
 iplanet-am-user-success-url=[], iplanet-am-user-failure-url=[],
 cn=[amAdmin], iplanet-am-user-alias-list=[]}
Compile the sample applications.
$ cd sdk/
$ sh scripts/compile-samples.sh
Configure the samples to access OpenAM.
$ sh scripts/setup.sh
Debug directory (make sure this directory exists): /tmp
Application user (e.g. URLAccessAgent) password: secret12
Protocol of the server: http
Host name of the server: openam.example.com
Port of the server: 8080
Server's deployment URI: /openam
Naming URL (hit enter to accept default value,
 http://openam.example.com:8080/openam/namingservice):
$
Verify that you have properly configured the samples.
$ sh scripts/Login.sh
Realm (e.g. /): /
Login module name (e.g. DataStore or LDAP): DataStore
Login locale (e.g. en_US or fr_FR): fr_FR
DataStore: Obtained login context
Nom d'utilisateur?:demo
Mot de passe?:changeit
Login succeeded.
Logged Out!!
Chapter 6. Customizing the OpenAM End User Pages
When you deploy OpenAM to protect your web-based applications, users can be redirected to OpenAM pages for login and logout. ForgeRock provides pages localized for English, French, German, Spanish, Japanese, Korean, Simplified Chinese, and Traditional Chinese, but you might require additional language support for your organization.
Also, by default the end user pages have ForgeRock styling and branding. You likely want to change at least the images to reflect your organization. You might want to have different page customizations for different realms as well. This chapter address how to get started customizing OpenAM end user pages for your organizations and supported locales.
First you copy the pages to customize to the proper location, then you customize the files themselves.
Images in this example are located in
/path/to/tomcat/webapps/openam/images/, and CSS in
/path/to/tomcat/webapps/openam/css/. If you choose
to modify images for your deployment, you can maintain the sizes to avoid
having to customize page layout extensively.
Tip
The procedures below describe how to update a deployed version of OpenAM, so that you can see your changes without redeploying the application. This approach works for development as long as your web container does not overwrite changes. When developing with a web container that deploys OpenAM in a temporary location, such as JBoss or Jetty, restarting the container can overwrite your changes with the deployable .war content. For those web containers, you should also prepare a deployable .war containing your changes, and redeploy that file to check your work.
For production deployment you must package your changes in a custom
OpenAM deployable .war file. To create a deployable .war, unpack the
OpenAM .war file from ~/Downloads/openam
into a staging directory, apply your changes in the staging directory, and
use the jar command to prepare the deployable .war.
Rather than changing the default pages, customize your own copy.
Change to the
config/authdirectory where you deployed OpenAM.$ cd /path/to/tomcat/webapps/openam/config/auth
Copy the default files and optionally the localized files to
suffix[_locale]/html, where suffix is the value of the RDN of the configuration suffix, such asopenamif you use the default configuration suffixdc=openam,dc=forgerock,dc=org, and the optional locale is, for example,jpfor Japanese, orzh_CNfor Simplified Chinese.The following example copies the files for the Top-Level Realm (
/) for a custom French locale.$ mkdir -p openam/html $ cp -r default/* openam/html $ mkdir -p openam_fr/html $ cp -r default_fr/* openam_fr/html
See How OpenAM Looks Up UI files for details.
As for the top-level realm, customize your copy rather than the default pages.
Change to the
config/authdirectory where you deployed OpenAM.$ cd /path/to/tomcat/webapps/openam/config/auth
Depending on which locale you want to customize, copy the default files and optionally the localized files to
suffix[_locale]/services/realm/html.The following example copies the files for a custom French locale and a realm named
ventes.$ mkdir -p openam/html/ventes/html $ cp -r default/* openam/services/ventes/html $ mkdir -p openam_fr/services/ventes/html $ cp -r default_fr/* openam_fr/services/ventes/html
The .jsp files from the default/ directory
reference the images used in the OpenAM pages, and retrieve localized text
from the .xml files. Thus you customize appearance through the .jsp files,
being careful not to change the functionality itself. You customize the
localized text through the .xml files.
Modify appearance if you must by editing the .jsp, image, and CSS files without changing any of the JSP tags that govern how the pages work.
Modify the localized text, using UTF-8 without escaped characters, by changing only the original text strings in the .xml files.
For example, to change the text in the default OpenAM login screen in the top-level realm for the French locale, edit
openam_fr/html/DataStore.xml.If necessary, restart OpenAM or the web container to test the changes you have made.
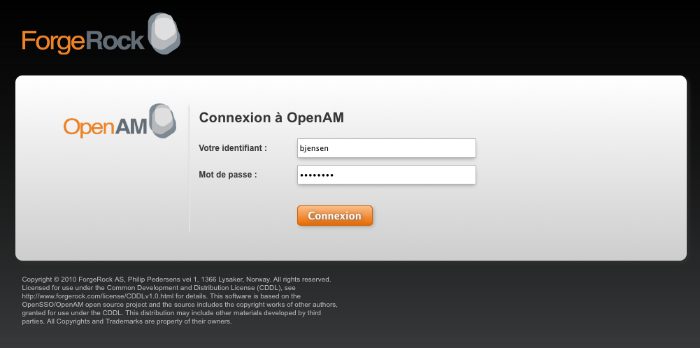
The following screen shot shows a customized French login page where the string
Nom d'utilisateurhas been replaced with the stringVotre identifiant, and the stringMot de passehas been replaced with the stringVotre mot de passeinopenam_fr/html/DataStore.xml.
6.1. How OpenAM Looks Up UI Files
This section provides a more complete description of how OpenAM looks up UI files.
OpenAM uses the following information to look up the UI files.
- Configuration suffix RDN
When you set up the OpenAM to store its configuration in a directory server, you provide the distinguished name of the configuration suffix, by default
dc=openam,dc=forgerock,dc=org, therefore, the relative distinguished name attribute value isopenam.- Client (browser) locale language
The client can specify a locale, which can consist of both a language and a territory, such as
en_GBfor British English. The language in this case isen.- Client (browser) locale territory
If the client local is
en_GB, then the territory in this case isGB.- Platform locale language
The platform locale, defined for the platform where OpenAM runs, can also consist of both a language and a territory, such as
hu_HU. In this example the platform locale language ishufor Hungarian.- Platform locale territory
If the platform locale is
hu_HU, the platform locale territory isHUfor Hungary.- Realm
Realms can be nested. OpenAM uses the nesting as necessary to look for files specific to a sub-realm before looking in the parent realm.
For all realms below the top level realm, OpenAM adds a
servicesdirectory before the realm to the search path.- Client name
Client names identify the type of client. The default,
html, is the only client name used unless client detection mode is enabled. When client detection mode is enabled, the client name can be different for mobile clients, for example.- File name
File names are not themselves localized. Thus
Login.jsphas the same name for all locales, for example.
OpenAM tries first to find the most specific file for the realm and local requested, gradually falling back on less specific alternatives, then on other locales. The first and most specific location as follows.
suffix_client-locale-language_client-locale-territory/services/realm/client-name/file-name
OpenAM looks up Login.jsp in the following order
for a realm named realm, with the browser requesting
en_GB locale, the platform locale being
hu_HU, and the configuration suffix named
o=openam. The client name used in this example is the
generic client name html.
openam_en_GB/services/realm/html/Login.jsp
openam_en_GB/services/realm/Login.jsp
openam_en_GB/services/html/Login.jsp
openam_en_GB/services/Login.jsp
openam_en_GB/html/Login.jsp
openam_en_GB/Login.jsp
openam_en/services/realm/html/Login.jsp
openam_en/services/realm/Login.jsp
openam_en/services/html/Login.jsp
openam_en/services/Login.jsp
openam_en/html/Login.jsp
openam_en/Login.jsp
openam_hu_HU/services/realm/html/Login.jsp
openam_hu_HU/services/realm/Login.jsp
openam_hu_HU/services/html/Login.jsp
openam_hu_HU/services/Login.jsp
openam_hu_HU/html/Login.jsp
openam_hu_HU/Login.jsp
openam_hu/services/realm/html/Login.jsp
openam_hu/services/realm/Login.jsp
openam_hu/services/html/Login.jsp
openam_hu/services/Login.jsp
openam_hu/html/Login.jsp
openam_hu/Login.jsp
openam/services/realm/html/Login.jsp
openam/services/realm/Login.jsp
openam/services/html/Login.jsp
openam/services/Login.jsp
openam/html/Login.jsp
openam/Login.jsp
default_en_GB/services/realm/html/Login.jsp
default_en_GB/services/realm/Login.jsp
default_en_GB/services/html/Login.jsp
default_en_GB/services/Login.jsp
default_en_GB/html/Login.jsp
default_en_GB/Login.jsp
default_en/services/realm/html/Login.jsp
default_en/services/realm/Login.jsp
default_en/services/html/Login.jsp
default_en/services/Login.jsp
default_en/html/Login.jsp
default_en/Login.jsp
default_hu_HU/services/realm/html/Login.jsp
default_hu_HU/services/realm/Login.jsp
default_hu_HU/services/html/Login.jsp
default_hu_HU/services/Login.jsp
default_hu_HU/html/Login.jsp
default_hu_HU/Login.jsp
default_hu/services/realm/html/Login.jsp
default_hu/services/realm/Login.jsp
default_hu/services/html/Login.jsp
default_hu/services/Login.jsp
default_hu/html/Login.jsp
default_hu/Login.jsp
default/services/realm/html/Login.jsp
default/services/realm/Login.jsp
default/services/html/Login.jsp
default/services/Login.jsp
default/html/Login.jsp
default/Login.jsp
Chapter 7. Setting Up OpenAM Session Failover
This chapter covers setting up session failover (SFO) when using multiple
instances of OpenAM in a site configuration for high availability. The basic
idea followed here is that you configure load balancing to be sticky, based
on the value of an OpenAM cookie, amlbcookie, different
for each OpenAM server. Should that server become unavailable, the load
balancer fails client requests over to another OpenAM server. The other OpenAM
server must then fail over the user session associated with the client.
SFO uses a highly available data store for OpenAM session data, shared by OpenAM servers in a site configuration. When the OpenAM server where a user authenticated goes down, other OpenAM servers can read the user session information from the highly available store, so the user does not have to authenticate again. When the original OpenAM server becomes available again, it can also read session information from the store, and carry on serving users with active sessions.
Configuring an Additional Instance provides the steps to configure each instance of OpenAM. The following procedure describes how to configure an OpenAM server to use a load balancer for the first instance if it was not part of the initial configuration.
Note
Following an upgrade to OpenAM 10.1.0 XPress release, all users will need to login again because OpenAM no longer uses Open Message Queue or Berkeley DB Java Edition for SFO.
Note
SFO is supported within a site or data center with a shared local area network. SFO is not supported across sites and data centers linked by wide area networks (WAN).
Before you set up SFO, first configure OpenAM in a site configuration with a load balancer as the entry point to the site. However, you may already have a working instance before realizing that multiple instances are necessary. The following steps walk you through setting up the load balancer for the first instance.
In the OpenAM console for the first instance of the site, select
Configuration > Servers and Sitesand click on the first server underServers.Under site
Siteclick onParent Siteand select the load balancer.Click on
Save.
If you did not set up the site during initial configuration, then follow all the steps below.
In the OpenAM console for one of the servers in the site, select Configuration > Servers and Sites > Sites > New..., and then create a new site.
The site URL is the URL to the load balancer in front of your OpenAM servers in the site. For example, if your load balancer listens on host
lb.example.comand port8080, with OpenAM under/openam, then your site URL ishttp://lb.example.com:8080/openam.For each OpenAM server in the site, select Configuration > Servers and Sites > Servers > Server Name, and then set Parent Site to the site you created before saving your work.
(Optional) If you want to use sticky load balancing, configure your load balancer to inspect the value of the
amlbcookieto determine which OpenAM server should receive the client request.As your load balancer depends on the
amlbcookievalue, on each OpenAM server console in the site, select Configuration > Servers and Sites > Servers > Server Name > Advanced, makes sure thatcom.iplanet.am.lbcookie.valueis unique. By default the value of theamlbcookieis set to the server ID for the OpenAM instance.Note
When using SSL, the approach requires that you either terminate SSL on the load balancer, or that you re-encrypt traffic from the load balancer to the OpenAM servers.
If you must change
amlbcookievalues to make them unique, then your changes take effect after you restart the OpenAM server. (To check, login to the console and check the cookie value in your browser.)Restart each OpenAM server or the web containers where the OpenAM servers run so that all configuration changes take effect.
Chapter 8. Removing OpenAM Software
This chapter shows you how to uninstall OpenAM core software. See the Policy Agent Installation Guide for instructions on removing OpenAM agents.
After you have deployed and configured OpenAM core services, you have at least two, perhaps three or four, locations where OpenAM files are stored on your system.
You remove the internal OpenAM configuration store when you follow the procedure below. If you used an external configuration store, you can remove OpenAM configuration data after removing all the software.
Shut down the web application container in which you deployed OpenAM.
$ /etc/init.d/tomcat stop
Password:
Using CATALINA_BASE:   /path/to/tomcat
Using CATALINA_HOME:   /path/to/tomcat
Using CATALINA_TMPDIR: /path/to/tomcat/temp
Using JRE_HOME:        /path/to/jdk1.6/jre
Using CLASSPATH:       /path/to/tomcat/bin/bootstrap.jar:
 /path/to/tomcat/bin/tomcat-juli.jar
Unconfigure OpenAM by removing configuration files found in the $HOME directory of the user running the web application container.
For a full install of OpenAM core services, configuration files include the following.
The configuration directory, by default
$HOME/openam. If you did not use the default configuration location, then check in the OpenAM console under Configuration > Servers and Sites > Server Name > General > System > Base installation directory.The hidden file that points to the configuration directory.
For example, if you are using Apache Tomcat as the web container, this file could be
$HOME/.openamcfg/AMConfig_path_to_tomcat_webapps_openam_OR$HOME/.openssocfg/AMConfig_path_to_tomcat_webapps_openam_.
$ rm -rf $HOME/openam $HOME/.openamcfg
or
$ rm -rf $HOME/openam $HOME/.openssocfg
Note
At this point, you can restart the web container and configure OpenAM anew if you only want to start over with a clean configuration rather than removing OpenAM completely.
If you used an external configuration store you must also remove the configuration manually from your external directory server. The default base DN for the OpenAM configuration is
dc=openam,dc=forgerock,dc=org.Undeploy the OpenAM web application.
For example, if you are using Apache Tomcat as the web container, remove the .war file and expanded web application from the container.
$ cd /path/to/tomcat/webapps/
$ rm -rf openam.war openam/
If you have stored a download or unpacked version of OpenAM software on your system, you can now remove the files.
If you cannot find the original .zip, search for files named
openam-*.zip.$ find . -name "openam-*.zip" ./Downloads/openam $ rm ./Downloads/openam
Index
C
- Custom end user pages, Customizing the OpenAM End User Pages
D
- Downloading OpenAM, Obtaining OpenAM Software
I
- Installing
- Behind the firewall, Installing OpenAM Distributed Authentication
- Full install, Installing OpenAM Core Services
- Interactive configuration, Installing OpenAM Core Services
- Java SDK samples, Installing OpenAM Client SDK Samples
- Load Balancer, Setting Up OpenAM Session Failover
- No console, Installing OpenAM Core Services
- Session failover, Setting Up OpenAM Session Failover
- Silent configuration, Installing OpenAM Tools
- Starting over, Installing OpenAM Core Services
- Tools (ssoadm, etc.), Installing OpenAM Tools
M
- Memory requirements, Preparing Prerequisite Software
P
- Prerequisites, Preparing For Installation
S
- Software requirements, Preparing Prerequisite Software
U
- Uninstalling, Removing OpenAM Software
