This guide shows you how to install and configure OpenIG, a high-performance reverse proxy server with specialized session management and credential replay functionality.
This guide is written for access management designers and administrators who build, deploy, and maintain identity gateways for their organizations. This guide covers the tasks you might perform once or repeat throughout the life cycle of an OpenIG release used in your organization.
You do not need to be an OpenIG wizard to learn something from this guide, though a background in access management and maintaining web application software can help. You do need some background in managing services on your operating systems and in your application servers. You can nevertheless get started with this guide, and then learn more as you go along.
Most examples in the documentation are created in GNU/Linux or Mac OS X
operating environments.
If distinctions are necessary between operating environments,
examples are labeled with the operating environment name in parentheses.
To avoid repetition file system directory names are often given
only in UNIX format as in /path/to/server,
even if the text applies to C:\path\to\server as well.
Absolute path names usually begin with the placeholder
/path/to/.
This path might translate to /opt/,
C:\Program Files\, or somewhere else on your system.
Command-line, terminal sessions are formatted as follows:
$ echo $JAVA_HOME
/path/to/jdk
Command output is sometimes formatted for narrower, more readable output even though formatting parameters are not shown in the command.
Program listings are formatted as follows:
class Test {
    public static void main(String [] args)  {
        System.out.println("This is a program listing.");
    }
}ForgeRock publishes comprehensive documentation online:
The ForgeRock Knowledge Base offers a large and increasing number of up-to-date, practical articles that help you deploy and manage ForgeRock software.
While many articles are visible to community members, ForgeRock customers have access to much more, including advanced information for customers using ForgeRock software in a mission-critical capacity.
ForgeRock product documentation, such as this document, aims to be technically accurate and complete with respect to the software documented. It is visible to everyone and covers all product features and examples of how to use them.
The ForgeRock.org site has links to source code for ForgeRock open source software, as well as links to the ForgeRock forums and technical blogs.
If you are a ForgeRock customer, raise a support ticket instead of using the forums. ForgeRock support professionals will get in touch to help you.
ForgeRock's Open Identity Gateway (OpenIG) provides the answer to three important challenges.
In today's enterprise, more than 30% of web applications are incompatible with web access management (WAM) software. That is, unlike OpenAM with OpenIG, most web access management products lack the agent to protect the web applications, or the application is a legacy solution that does not follow standard protocols for single sign-on. This limits the return on the enterprise WAM investment and constrains what types of web applications can be protected.
ForgeRock's Open Identity Gateway addresses this problem by extending access management to encompass all web applications. With OpenIG, OpenAM deployments can now be extended to be inclusive of those applications that do not integrate with policy agents alone. In addition, ForgeRock Open Identity Gateway interoperates, out-of-the-box, with all management solutions. Most importantly, your organization can on-board any web application without ever modifying or touching the target application again, significantly reducing the development and quality assurance required to protect web applications.
The expertise and cost required to add SAML2 support to web applications is a problem for many businesses. Those businesses not moving to a standard for exposing their applications to their customers see increased cost and maintenance due to the complexity of one-off proprietary integrations. They may also see a loss of business to those customers requiring a Federation standard for authentication. Sometimes, deploying a full access mangaement solution just to federate a few applications is is too complex and costly, and building out their own solution by modifying their applications is just not possible.
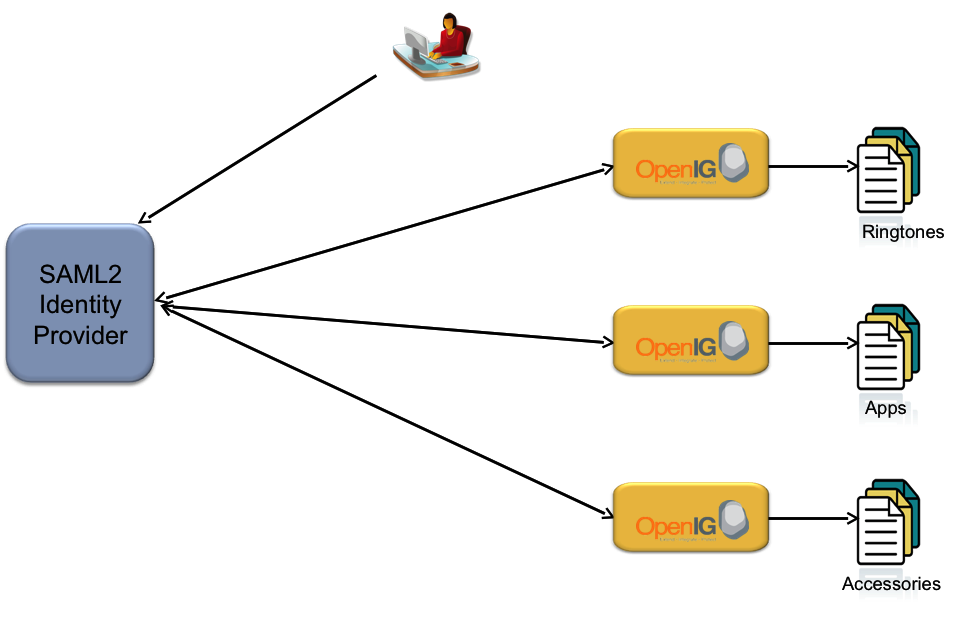
OpenIG Federation Gateway allows businesses to add SAML2 support to their applications with little to no knowledge of the standard. In addition, there is no need to modify the application or install any plugin or agent on the application container.
In order to provide SSO, OpenAM policy enforcement points, the policy agents, have traditionally functioned as plugins for each application. The policy agents however use OpenAM specific APIs and protocols. In contrast, you can roll out OpenIG as an independent policy enforcement point that is built on the SAML2 standard.
OpenIG Federation Gateway can replace policy agents with a standards based SAML2 compliant enforcement point.
This chapter provides a detailed look at OpenIG's components and how they work together.
The underlying core of ForgeRock Open Identity Gateway is based on a reverse proxy architecture. All HTTP traffic to each protected application is routed through OpenIG, enabling close inspection, transformation and filtering of each request. By inspecting the traffic, OpenIG is able to intercept requests that would normally require the user to authenticate, obtain the user's login credentials, and send the necessary HTTP request to the target application, thereby logging in the user without modifying or installing anything on the application. In its simplest form and basic configuration, OpenIG is a Java-based reverse proxy which runs as a web application. Enable the Form-Filter replay module and OpenIG automatically log users in when a timeout or authentication page is detected. Additionally, enable the SAML2 service and OpenIG becomes a SAML2 endpoint. In this mode of operation, OpenIG receives and verifies the SAML2 request and then logs the user directly into the target application.
The following modules make up OpenIG.
OpenIG core is a standard Java EE servlet implementation of a reverse proxy. The main function of OpenIG core is to act as a reverse proxy to the target application. When deployed in its base configuration, OpenIG can be used as a pure reverse proxy. The power of the OpenIG core comes in its ability to search, transform, and process HTTP traffic to and from the target application. This enables OpenIG to recognize login pages, submit login forms, transform or filter content, and even function as a Federation endpoint for the application. All these features are possible without making any changes to the application's deployment container or the application itself.
The Exchange in the Reference is a wrapper around the HTTP request and response objects that pass through OpenIG. Every request or response being processed in OpenIG can be accessed or modified through the Exchange object. In addition, arbitrary data can be set in the Exchange to facilitate the passing of data and state between filters and handlers.
The Dispatcher may be thought of as the internal router of OpenIG. Every request that comes into OpenIG is analyzed and forwarded on to the configured processing chain of filters and handlers. A request may be forwarded based on the target host, URL, URL parameters, headers, cookies, or any other component of the request.
A Chain in the Reference is a
combination of one or more Filters and a handler that process an incoming
request from the Dispatcher. For example, the Dispatcher can process an
incoming request with a URL parameter of action=login
and forward the request to the Login Chain. The Login Chain executes a list
of Filters and then calls a Handler. The Handler sends the request on to
the target application or to another Chain for further processing.
The final processing of every Chain ends in a call to a Handler. A Handler can simply call another Chain or it can send the request on to the target application. The following Handlers are shipped with OpenIG:
ClientHandler in the Reference: Sends the final request to the target application.
StaticResponseHandler in the Reference: Used to send a response, such as a redirect, to a client during request processing.
SequenceHandler in the Reference: Links together multiple handlers or chains during request processing.
Filters are responsible for processing HTTP requests in OpenIG. Filters can be chained together to act on the input stream coming from the browser, or the output stream returned back from the target application. A filter can do something as simple as logging the input and output stream or something more complex, such as processing login pages, fetching user attributes, or transforming content. There are multiple Filters shipped with OpenIG that can be combined in chains to provide very extensible request and response processing features. Custom filters can also be written using the Java SPIs. The following is a list of Filters shipped with OpenIG:
CookieFilter in the Reference: The default behavior of OpenIG is to accept and forward all cookies. Since this is not always the desirable behavior, the CookieFilter, when configured, allows you to suppress, manage, and relay cookies.
CaptureFilter in the Reference: Captures the HTTP requests being processed by OpenIG. Capture can be used for audit purposes and may also be very useful when analyzing an application or troubleshooting a misbehaving OpenIG. Logs are written to a flat file on the OpenIG host.
HeaderFilter in the Reference: The default behavior of OpenIG is to accept and forward all headers. The HeaderFilter can be configured to add additional headers or remove headers on both the HTTP request and the response. It can also be configured to parse and set header values in OpenIG context to allow filters access to the header attributes. This feature is used most commonly when OpenIG is integrated with OpenAM and being fronted by a policy agent.
AssignmentFilter in the Reference: Sets values in the HTTP request and response.
StaticRequestFilter in the Reference: Creates and sends HTTP GET and POST requests. The request can be formed using parameters from previous processing or statically configured values.
EntityExtractFilter in the Reference: Searches for specific content with the body of the requests. For example, it can be used to extract hidden form parameters in a login page, which are needed in the login request.
ExceptionFilter in the Reference: Sends users to configured URLs when errors or exceptions occur during request processing or user interactions.
SwitchFilter in the Reference: Conditionally diverts the exchange to another handler.
HttpBasicAuthFilter in the Reference: Performs HTTP basic authentication to the target application per RFC 2617.
FileAttributesFilter in the Reference: Looks up attributes in a flat file with the specified key. The attributes are added to the exchange to be used by subsequent filters or handlers.
SqlAttributesFilter in the Reference: Executes an SQL prepared statement with configured parameters. The result is added to the exchange to be used by subsequent filters or handlers.
The configuration of OpenIG was designed to be very modular and self-contained. Each module within OpenIG stores its configuration in JSON representation, which is stored in flat files. The features of OpenIG can be configured by directly manipulating the JSON flat files.
Every OpenIG module which has JSON configuration also has a Heaplet associated with it. Each module's Heaplet is responsible for reading the JSON configuration and creating that module's configuration in OpenIG's runtime heap. Each module can then read its configuration from the heap as well as make shared configuration information available to other modules.
The Services model was designed to allow the integration of value added features, such as Federation, without requiring them to be tightly bound to the OpenIG implementation. SAML2 is the add on service shipping with OpenIG today.
When the Federation Service is enabled, OpenIG acts as the Service Provider in a Circle of Trust with a SAML2 compliant Identity Provider. The Federation service supports both IDP and SP initiated SAML2 profiles. The Federation Gateway may be a Service Provider in the classic Federation use case where the IDP and SP are different companies or domains. The OpenIG SP can also be a standards based alternative to an OpenAM policy agent for internal enterprise applications that want to move away from installing agents with web and web application servers.
This chapter provides instructions to get OpenIG up and running on Jetty, configured to execute the WordPress samples at our hosted WordPress deployment. This allows you to quickly see how OpenIG works and provides hands on experience with a few key features. If you are looking for more general installation and configuration instructions for your deployment or would like to use a container other than Jetty, start with the chapter on Installing OpenIG.
For the remainder of this chapter, $HOME is the
location of the home directory of the user running the web application
container, where Jetty, OpenIG and the Samples are unpacked.
Make sure you have the correct Java environment installed. If necessary, download and install Sun Java SE JDK 6 Update 21 or later. At this time these are the only versions of any JDK supported with OpenIG.
Download and if necessary unpack the gateway .war file.
Download and unzip the OpenIG sample configuration files.
Download and unzip Jetty 7.1.6 Hightide.
Copy the OpenIG .war file as
root.warto thewebapps/directory in Jetty.When copied to this location along with the
root.xmlfile below, Jetty automatically deploys OpenIG on startup.$ cp $HOME/gateway-*.war $HOME/jetty-hightide-7.1.6/webapps/root.war
Copy the
WordPressLogin.jsongateway configuration file to$HOME/.ForgeRock/OpenIG/config.json. By default, OpenIG looks forconfig.jsonin the$HOME/.ForgeRock/OpenIG/directory.$ cp $HOME/forgerock-sample-configs/WordPressLogin.json $HOME/.ForgeRock/OpenIG/config.json
Create
$HOME/jetty-hightide-7.1.6/contexts/root.xmlwith the following content. This tells Jetty to deploy OpenIG in the root context:<?xml version="1.0" encoding="ISO-8859-1"?> <!DOCTYPE Configure PUBLIC "-//Jetty//Configure//EN" "http://www.eclipse.org/jetty/configure.dtd"> <Configure class="org.eclipse.jetty.webapp.WebAppContext"> <Set name="contextPath">/</Set> <Set name="war"><SystemProperty name="jetty.home" default="."/>/webapps/root.war</Set> <Set name="extractWAR">true</Set> <Set name="copyWebDir">false</Set> <Set name="defaultsDescriptor"><SystemProperty name="jetty.home" default="."/>/etc/webdefault.xml</Set> </Configure>If you are managing multiple applications in one domain you must turn on domain cookies in Jetty. This can be done by adding the following property to
$JETTY_HOME/contexts/root.xmlor to$JETTY_HOME/etc/jetty.xml. Note that any changes tojetty.xmlimpact all web applications running in the container.<Get name="sessionHandler"> <Get name="sessionManager"> <Set name="sessionDomain">.forgerock.com<Set> <Get> <Get>Start Jetty in the background:
$ $HOME/jetty-hightide-7.1.6/bin/jetty.sh start
Or start Jetty in the foreground:
$ java -jar $HOME/jetty-hightide-7.1.6/start.jar
So far you have deployed the gateway web application in the root
context of Jetty on port 8080. Since the gateway is a reverse proxy you must
make sure all traffic from your browser to
http://demo.forgerock.com:8080/wordpress/ goes through the
gateway. The quickest way to do this is to add an entry to your
/etc/hosts file on UNIX systems or
%SystemRoot%\system32\drivers\etc\hosts on Windows. See
Wikipedia for more information on host files. If you are running
OpenIG and the browser on the same host, add this entry to the hosts file on
the OpenIG host.
127.0.0.1 demo.forgerock.com
If you are running the browser and OpenIG on separate hosts, you must add the IP address of the host running OpenIG. For example, if OpenIG is running on a host with IP Address of 10.0.1.5:
10.0.1.5 demo.forgerock.com
Tip
Some browsers cache IP address resolutions, even after clearing all
browsing data. It might be necessary to restart the browser if you are
changing IP addresses of named hosts. The simplest way to make sure you have
configured your DNS or host settings properly is to stop OpenIG and
make sure you cannot reach the target application. If you can still reach
it, you should double check your host settings. You should also make sure
your name resolution is configured to check your host files before DNS.
This configuration can be found in /etc/nsswitch.conf
for most UNIX systems. Make sure files is listed before
dns.
http://demo.forgerock.com:8080/wordpress should take you to the
WordPress portal hosted at ForgeRock. When you click the login link, you are
automatically logged in by OpenIG with the user name
george.
What's happening behind the scenes?
When your browser goes to
http://demo.forgerock.com:8080/wordpress/, it is actually
connecting to OpenIG deployed on Jetty. OpenIG is configured to proxy all
traffic it receives to the target application at
http://demo.forgerock.com:8080/wordpress/. For this
example, OpenIG is watching for the login page from WordPress. When it sees
the login page, it creates and POSTs the login form for WordPress on behalf
of the user. Since this is just a sample, the credentials for the user are
hard coded in the gateway configuration file. In a real deployment, the
credentials may come from a database, directory, flat file, HTTP headers,
SAML assertion,or an OpenAM policy agent.
Before you install OpenIG, make sure you have the right version of Java, and install and configure the web container.
Make sure you have the correct Java environment installed.
$ java -version java version "1.6.0_24" Java(TM) SE Runtime Environment (build 1.6.0_24-b07-334-9M3326) Java HotSpot(TM) 64-Bit Server VM (build 19.1-b02-334, mixed mode)
Refer to the chapter on Configuring Deployment Containers to ensure you have properly installed and configured your web application container and are running a supported version of Java.
For the remainder of this chapter $HOME refers to
the home directory of the user running the web container where you install
OpenIG.
Download the OpenIG .war file.
Deploy the .war to the root context of the web application container.
Copy the proxy and capture template. You can jump straight to a configuration template that best matches your application, but it is highly recommended you start with the basic proxy template.
Copy the template to
$HOME/.ForgeRock/OpenIG/config.json. Replace theTARGETIPtag inconfig.jsonwith the IP address and port number of your target application.Modify DNS or host file settings so the name of your target application resolves to the IP address of OpenIG. Be sure to restart your browser after making this change.
Start the web container where OpenIG is deployed and browse to the target application. OpenIG should now proxy all traffic to the application.
To ensure the browser is going through OpenIG, stop the OpenIG web container, and verify you cannot reach the application. You can also look in the OpenIG capture log to verify the traffic is going through OpenIG. The location for this log is set in
config.json, by default/tmp/gateway.log.
This section provides installation and configuration tips. The following containers are supported.
Tomcat 6.x and 7.x
Jetty 6.x and 7.x
Glassfish 2.x and 3.x
JBoss 5.x
Weblogic 10.x
Tomcat reference links:
Download and install Sun Java SE JDK 6 Update 21 or later. At this time these are the only versions of any JDK supported with OpenIG.
Download and install Tomcat 6 or Tomcat 7.
$TOMCAT_HOME refers to the location where you have
installed Tomcat.
Configure Tomcat to listen on the same port and protocol of the application you are protecting with OpenIG. If your application listens on both an HTTP and an HTTPS port you must configure Tomcat to do so as well. If you are installing to run the samples you do not have to modify the Tomcat port configuration since both the Tomcat default and the samples use port 8080.
To configure Tomcat to use a port other than 8080 modify the defaults
in $TOMCAT_HOME/conf/server.xml. The quickest way to do
this is to search for the default value of 8080 and replace it with the new
port number.
If OpenIG accesses an SQL database you must configure Tomcat for JNDI. Once you have Tomcat configured you must add the jar for the database, and set up a JNDI data source and a reference to that data source in your web application. The following steps are for the MySQL Connector/J.
Download the
MySQL JDBC Driver
Connector/J. Add it to the class path by copying it to
$TOMCAT_HOME/lib.
Add a JNDI data source for your MySQL server and database in
$TOMCAT_HOME/conf/context.xml.
<Resource name="jdbc/forgerock" auth="Container" type="javax.sql.DataSource"
maxActive="100" maxIdle="30" maxWait="10000"
username="admin" password="11111111" driverClassName="com.mysql.jdbc.Driver"
url="jdbc:mysql://localhost:3306/databasename"/>Add a resource reference to the data source in
$TOMCAT_HOME/conf/web.xml.
<resource-ref>
<description>MySQL Connection<description>
<res-ref-name>jdbc/forgerock<res-ref-name>
<res-type>javax.sql.DataSource<res-type>
<res-auth>Container<res-auth>
<resource-ref>If you use OpenIG for more than a single application and those
applications are on different hosts, you must configure Tomcat to set domain
cookies. To do this add the following to your
$TOMCAT_HOME/conf/Catalina/server/root.xml file.
<Context sessionCookieDomain=".forgerock.com" />To get Tomcat up quickly on an SSL port you can add an entry similar
to the following in $TOMCAT_HOME/conf/server.xml.
<Connector port="443" protocol="HTTP/1.1" SSLEnabled="true"
maxThreads="150" scheme="https" secure="true"
address="10.0.1.6"
clientAuth="false" sslProtocol="TLS" keystorePass="11111111"/>You must also have to make sure you have create a key store along with a self-signed certificate. You can do that with the following UNIX command:
$ keytool -genkey -alias tomcat -keyalg RSA
Jetty reference links:
Download and install Sun Java SE JDK 6 Update 21 or later. At this time these are the only versions of any JDK supported with OpenIG.
Download and install Jetty.
The install directory is referred to as $JETTY_HOME
from now on.
Configure Jetty to listen on the same port and protocol of the application you are protecting with OpenIG. If you are configuring OpenIG for the samples you do not have to modify the Jetty port configuration since the default for Jetty is 8080 and the samples use port 8080.
To configure Jetty to use a port other than 8080 you must modify
the default $JETTY_HOME/etc/jetty.xml. The quickest way
to do that is to search for the default value of 8080 and replace it with the
new port number. The simplest way to get Jetty running on ports below 1024 is
to run the Jetty process as root. This is only appropriate for sample
purposes. Do not run Jetty as root in production.
If the application your are protecting is configured on an HTTPS port, you must configure Jetty for HTTPS as well.
If you are managing multiple applications in one domain you will need
to turn on domain cookies in Jetty. This can be done by adding the following
property to $JETTY_HOME/contexts/root.xml or to
$JETTY_HOME/etc/jetty.xml. Note that any changes to
jetty.xml impact all web applications running in the
container.
<Get name="sessionHandler">
<Get name="sessionManager">
<Set name="sessionDomain">example.com<Set>
<Get>
<Get>If OpenIG accesses an SQL database you must configure Jetty for JNDI or use the Jetty Hightide distribution, which comes pre-configured for JNDI. Once you have Jetty configured you must add the jar for the database, and set up a JNDI data source and a reference to that data source in your web application. The following steps are for the MySQL Connector/J.
Download the MySQL JDBC Driver
Connector/J Add it to the Jetty class path by copying it to
$JETTY_HOME/lib/jndi.
Add a JNDI data source for your MySQL server and database in
$JETTY_HOME/etc/jetty.xml.
<New id="jdbc/forgerock" class="org.eclipse.jetty.plus.jndi.Resource">
<Arg><Arg>
<Arg>jdbc/forgerock<Arg>
<Arg>
<New class="com.mysql.jdbc.jdbc2.optional.MysqlConnectionPoolDataSource">
<Set name="Url">jdbc:mysql://localhost:3306/databasename<Set>
<Set name="User">mysqladmin<Set>
<Set name="Password">11111111<Set>
<New>
<Arg>
<New>Add a resource reference to the data source in
$JETTY_HOME/etc/webdefault.xml.
<resource-ref>
<description>My DataSource Reference<description>
<res-ref-name>jdbc/forgerock<res-ref-name>
<res-type>javax.sql.DataSource<res-type>
<res-auth>Container<res-auth>
<resource-ref>JBoss reference links:
Download and install Sun Java SE JDK 6 Update 21 or later. At this time these are the only versions of any JDK supported with OpenIG.
Download and install the community version of JBoss 5.1. $JBOSS_HOME refers to the location you have installed JBoss. The assumption in this chapter is that you run the default server configuration.
Configure JBoss to listen on the same port and protocol of the application you are protecting with OpenIG. If your application listens on both an HTTP and an HTTPS port you must configure JBoss to do so as well. If you are installing to run the samples you do not have to modify the JBoss port configuration since both the Joss default and the samples use port 8080.
To configure JBoss to use a port other than 8080 modify
server.xml under your server configuration. For example,
if you are using the default server configuration,
server.xml is
$JBOSS_HOME/server/default/deploy/jbossweb.sar/server.xml.
The quickest way to do this is to search for the default value of 8080 and
replace it with the new port number.
If OpenIG accesses an SQL database you must configure JBoss for JNDI. Once you have JBOSS configured you must add the jar for the database, and set up a JNDI data source and a reference to that data source in your web application. The following steps are for the MySQL Connector/J.
Download the MySQL JDBC Driver
Connector/J Add it to the JBoss class path by copying it to
$JBOSS_HOME/server/default/lib.
Add a JNDI data source for your MySQL server and database in
$JBOSS_HOME/server/default/deploy/mysql-ds.xml.
<datasources>
<local-tx-datasource>
<jndi-name>jdbc/forgerock<jndi-name>
<connection-url>jdbc:mysql://localhost:3306/databasename<connection-url>
<driver-class>com.mysql.jdbc.Driver<driver-class>
<user-name>admin<user-name>
<password>11111111<password>
<min-pool-size>5<min-pool-size>
<max-pool-size>20<max-pool-size>
<idle-timeout-minutes>5<idle-timeout-minutes>
<exception-sorter-class-name>
com.mysql.jdbc.integration.jboss.ExtendedMysqlExceptionSorter
<exception-sorter-class-name>
<valid-connection-checker-class-name>
com.mysql.jdbc.integration.jboss.MysqlValidConnectionChecker
<valid-connection-checker-class-name>
<local-tx-datasource>
<datasources>Add a resource reference to the data source in
$JBOSS_HOME/server/default/deployers/jbossweb.deployer/web.xml.
<resource-ref>
<description>MySQL Connection<description>
<res-ref-name>jdbc/forgerock<res-ref-name>
<res-type>javax.sql.DataSource<res-type>
<res-auth>Container<res-auth>
<resource-ref>This chapter diagrams and describes common use case request and response flows.
The figure below illustrates a sample flow with a description of each request from the browser to the back end application. This flow is taken from the Tutorial With WordPress. Try the tutorial yourself to learn how OpenIG works. The Flat-File attribute store contains only one set of credentials. OpenIG makes the assumption this user is logging into the sample application. In a real deployment OpenIG would look up the user credentials using its own session, a SAML2 assertion, or a header from an OpenAM policy agent. Use cases that follow show examples of these types of deployments.

User accesses the Portal.
Gateway intercepts request, finds no login page and passes it through.
Portal finds no local session and redirects to its login page for authentication.
Gateway intercepts the redirect, finds a match for the login page, fetches the credentials from the flat file.
Gateway creates the login form and POSTs it to the Portal login page.
Portal validates the credentials and redirects to the user's home page.
Gateway passes the request through to the browser.
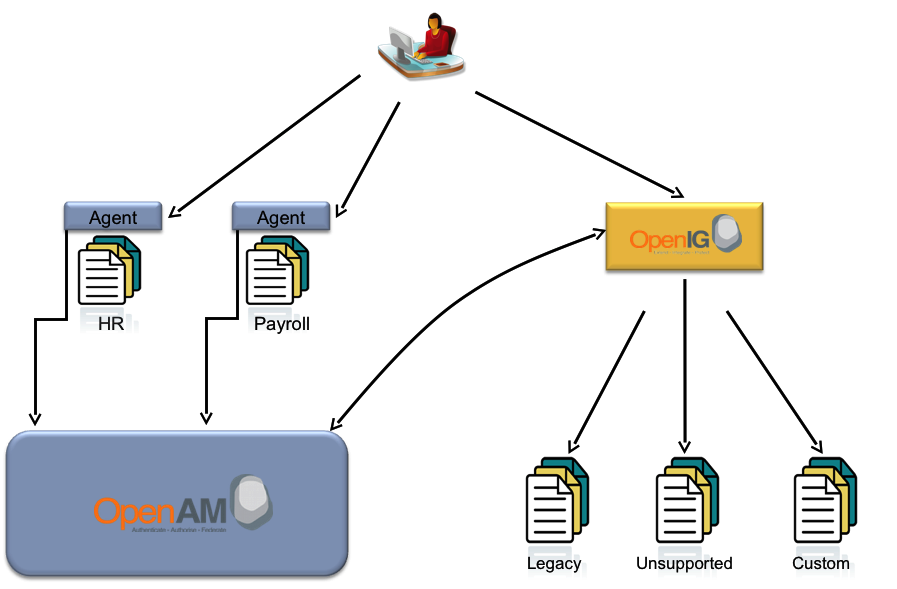
The figure below illustrates OpenIG integrated into an OpenAM deployment. In this deployment OpenIG is running in a container that is protected by an OpenAM policy agent. The agent is configured to forward a header, with the subject (user) of the single sign-on session, to OpenIG. OpenIG then uses the subject as the login credentials, or uses the subject as a reference to look up the login credentials in a database or directory. The HR application is integrated into the SSO deployment without an agent or any modification to the application or its deployment configuration.
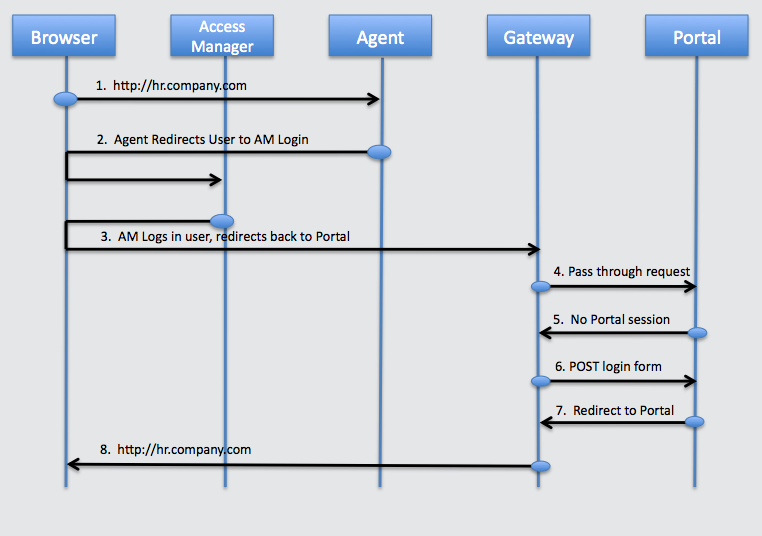
User browses to the Portal.
OpenAM plugin intercepts the request, finds no valid OpenAM session, redirects the user to the OpenAM login pages.
OpenAM logs in the user and redirects back to the Portal.
OpenAM plugin finds a valid session, request goes through, OpenIG passes the request through to the Portal.
Portal finds no local session, redirects to the Portal login page.
OpenIG inspects the redirect, finds a match for the login page, creates the login form, and POSTs it to the Portal.
Portal validates the credentials and redirects to the Portal page.
Gateway passes the request through to the browser.
The figure below illustrates the OpenIG Federation Gateway providing SAML2 endpoint features acting as Service Provider in an SP initiated single sign-on configuration. In this sample, company myHR is an outsourced provider of HR services and has started seeing increased demand for SAML2 support in their core application. The companies to which they outsource are refusing proprietary means of authentication and demanding the widely accepted SAML2 standard. myHR is not in a position to modify their application to support SAML2 nor do they have the time or money to integrate and deploy all of OpenAM. With OpenIG Federation Gateway, myHR deploys OpenIG in front of their HR application, configures it as a SAML2 endpoint for SP initiated SSO, and configures it to log users into the HR application upon successful verification of the SAML2 assertion from their customers.
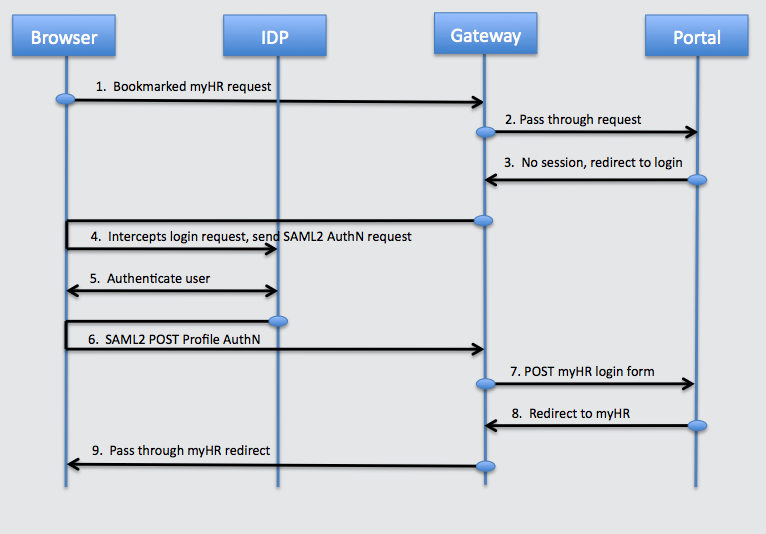
The user accesses the HR application through a bookmark in the browser.
Federation Gateway inspects the request, no match is found for the HR application's login page so the request goes through.
HR application finds no HR session, sends a redirect to its login page.
Federation Gateway intercepts the redirect, finds a match for the login page, issues an SP initiated SSO SAML2 request to Company.com's IDP.
The IDP at Company.com receives the SAML2 AuthN request and authenticates the user.
After authenticating the user the IDP sends a SAML2 POST to OpenIG.
Federation Gateway validates the assertion and makes the assertion attributes available to the OpenIG login chain.
OpenIG login chain gets the user credentials and POSTs the login form to the application.
The HR application verifies the credentials and redirects to its home page.
The figure below illustrates the Federation Gateway providing SAML2 endpoint features acting as a Service Provider in a IDP initiated single sign-on configuration.

User clicks the HR link on the company portal and is redirected to the company IDP for authentication.
IDP sends an AuthN Response to the HR application.
Federation Gateway receives the POST, validates the assertion, and makes the attributes available to the OpenIG login chain.
OpenIG login chain retrieves the user credentials and POSTs the login form to the myHR application.
HR application validates the credentials and redirects to the main page of the application.
The figure below illustrates the Federation Gateway as a standards based replacement for OpenAM policy agents.

The user accesses an internal Payroll application.
Federation Gateway inspects the request, no match is found for the Payroll application's login page so the request goes through.
Payroll application finds no Payroll session, sends a redirect to its login page.
Federation Gateway intercepts the redirect, finds a match for the login page, issues an SP initiated SSO SAML2 request to OpenAM at Company.com.
OpenAM at Company.com receives the SAML2 AuthN and authenticates the user.
After authenticating the user OpenAM sends a SAML2 POST to OpenIG.
Federation Gateway validates the assertion and makes the assertion attributes available to the OpenIG login chain.
OpenIG login chain gets the user credentials and POSTs the login form to the application.
The Payroll application verifies the credentials and redirects to its home page.
This tutorial gives you hands on experience with the basic features of OpenIG. You install the Gateway in your network and point it to an installation of the WordPress Portal hosted at http://demo.forgerock.com:8080/wordpress. The tutorial progresses through the following steps and explains what is happening by walking you through OpenIG configuration.
Pure reverse proxy mode to the Portal
Login with hard coded credentials
Login with credentials from a flat file
Login with credentials from MySQL
Before you begin the tutorial, read the chapter on How OpenIG Works.
The figure and the steps below detail the flow between the browser, OpenIG and the portal for a basic login sequence to the portal. The key concept to understand is all requests to the application are routed through OpenIG by modifying the DNS entry for the target application. OpenIG can then be configured to intercept specific pages, such as login pages, and create requests to log the user in.
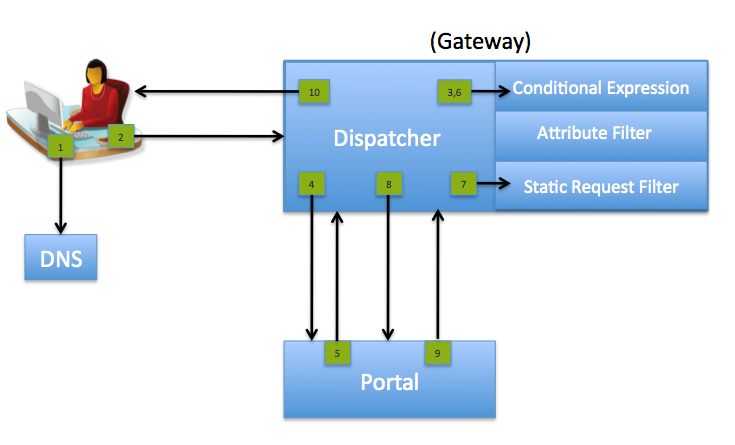
User browses to the Portal, browser host makes a DNS request to get the IP address for
demo.forgerock.com, DNS returns the IP address of OpenIG.Browser sends the request to OpenIG.
OpenIG inspects the request, finds no login page match.
OpenIG forwards the original request to the Portal.
Portal finds no local application session and redirects to the Portal login page.
OpenIG intercepts the redirect, inspects the request, finds a login page match.
OpenIG creates the login form.
OpenIG POSTs the login form to the Portal.
Portal validates the login and redirects to the Portal end user page.
OpenIG receives the final redirect and passes it back to the Browser.
To keep things simple, these instructions assume you are running OpenIG and the Browser on a single host. If they are on separate hosts, make sure the host or DNS changes impact the Browser host. This tutorial also assumes Jetty 7 for the container, but you can use any supported container.
OpenIG IP address 10.0.1.1 (substitute your OpenIG's IP address)
Jetty 7 listening on port 8080
OpenIG deployed under the root context
DNS or
/etc/hostspointingdemo.forgerock.comto 10.0.1.1 (substitute your OpenIG's IP address)
See Getting Started for instructions, and have your container listen on port 8080.
With OpenIG running, configure the browser to go through OpenIG to
get to the Portal. To do this we need to modify DNS or
/etc/hosts so demo.forgerock.com
points to the IP address of the host running OpenIG. If you are using
/etc/hosts be sure to check that the naming services
for your host check checking files before DNS. On UNIX systems this is
configured in /etc/nsswitch.conf. Assuming OpenIG
is running on 10.0.1.1, the /etc/hosts entry should be
the following:
10.0.1.1 demo.forgerock.com
Before continuing please verify your name to IP address changes are
working properly. The simplest way to do this is to ping
demo.forgerock.com. You should see the following if you
have properly configured your name to IP mapping:
$ ping demo.forgerock.com ping demo.forgerock.com PING demo.forgerock.com (10.0.1.1): 56 data bytes 64 bytes from 10.0.1.1: icmp_seq=0 ttl=64 time=0.053 ms
If the ping command returns the actual address of
demo.forgerock.com, you need to recheck your
settings.
For the remainder of this document, $HOME refers to
the location where you unzipped your sample configuration files.
Download and unzip the sample configuration files. If you installed through quick start you already have the configuration files downloaded and installed.
Copy WordPressProxyOnly.json to
$HOME/.ForgeRock/OpenIG/config.json. By default, OpenIG
looks for $HOME/.ForgeRock/OpenIG/config.json for its
configuration. You must restart the OpenIG container when making any change
to the configuration file.
$ cp $HOME/forgerock-sample-configs/WordPressProxyOnly.json $HOME/.ForgeRock/OpenIG/config.json $ jetty.sh restart
To try out the first sample browse to http://demo.forgerock.com:8080/wordpress. You should see the WordPress
Portal home page. If you click on the login link you should be prompted to
login to the application as if you were accessing it directly. To verify you
are actually going through OpenIG, stop the OpenIG container, refresh your
browser and try to access the application again. If you still see the
application, make sure your DNS or host files are configured to point to
OpenIG instead of the Portal. You can login to the Portal with user name
george and password costanza. The next
section shows how to configure OpenIG to intercept the login page and
automatically log you in when it sees that you have clicked the login
link.
To see what is happening behind the scenes, take a look at
$HOME/.ForgeRock/OpenIG/config.json. Look for the
HandlerServlet. This is the servlet entry point to OpenIG. The HandlerServlet
passes the request off to another handler which may be a chain of filters
and handlers. In the pure proxy case there is no special logic to execute so
it hands off to the ClientHandler. The job of the ClientHandler is to send
the request on to the target. Since there are no chains called before the
ClientHandler, the request passes through to the target untouched.
Now that OpenIG can proxy all traffic to and from the application, the next step is to configure OpenIG to intercept the login page, and POST the login form to the Portal.
$ cp $HOME/forgerock-sample-configs/WordPressLogin.json $HOME/.ForgeRock/OpenIG/config.json $ jetty.sh restart
As you changed the OpenIG configuration file, you must restart the OpenIG container. After restarting you should be able to go to http://demo.forgerock.com:8080/wordpress, click on the login link, and be logged in as the user george without entering your credentials. OpenIG has intercepted the request for the login page, created the login form, and POSTed the request to the Portal.
To see what is happening behind the scenes, take a look at
$HOME/.ForgeRock/OpenIG/config.json. This time you
notice the HandlerServlet is calling the DispatchHandler. The DispatchHandler
has a condition which checks for the presence of
wp-login.php (the login page) in the URI path. If the
condition is false (no login page), the ClientHandler is called sending the
request on to the Portal. If the condition is true, OpenIG has found the
login page, and calls the LoginChain for further processing. The LoginChain
calls its filter, the LoginRequestFilter, which creates the login form, and
then calls the ClientHandler to send the form to the Portal. If you look at
the LoginRequestFilter, you notice it defines the method, URI, and form
parameters for the request which is sent by the ClientHandler. In the form
parameters you see the hard coded credentials, which are used to log you in
as the user george.
Hard coding login credentials is great for a sample, but not realistic when it comes to a production deployment. In this next section you see how OpenIG can be configured to fetch the user's credentials from an external source, such as a directory or a database. For this sample, you use a flat file and the FileAttributesFilter. The key to look up the user in the flat file is hard coded, but you can understand how the key could come from something in the incoming request, such as an HTTP header, a session cookie, or even a SAML assertion.
For this sample you must modify the file attribute in the
FileAttributesFilter in the Reference
object in config.json to reflect the location of the
sample flat file. The location of the user file shipped with the samples is
forgerock-sample-configs/userfile.
$ cp $HOME/forgerock-sample-configs/WordPressLoginFile.json
 $HOME/.ForgeRock/OpenIG/config.json
$ jetty.sh restart
After restarting the container, check that you can go to http://demo.forgerock.com:8080/wordpress and be logged in as the user
george without seeing the login page. To verify the login
credentials are being picked up from the flat file, change george's password,
restart OpenIG, and try the login page again. You should get a login failed
page. If you would like to log in as a different user, look for the value
attribute in config.json, replace
george@seinfeld.com with
kramer@seinfeld.com. Both george and
kramer have accounts on the Portal so you can log in with
either.
To see what is happening behind the scenes, take a look at
$HOME/.ForgeRock/OpenIG/config.json. For this sample,
you added one additional filter to the LoginChain and made a slight
modification to the LoginRequestFilter. Take a look at the LoginChain and you
can see the filters attribute now has the value of
["FileAttributesFilter","LoginRequestFilter" ]. When the
LoginChain is executed the FileAttributesFilter will be called prior to the
LoginRequestFilter. The FileAttributesFilter sets the results of its lookup
in the Exchange in the Reference accessible
through the Expressions in the Reference
${exchange.credentials.xxx}
where xxx is the name of any one of the values
from the flat file. Now take a look at the form attribute in the
LoginRequestFilter. The hard coded values for log and password have been
replaced with ["${exchange.credentials.username}"] and
["${exchange.credentials.password}"].
This sample fetches the login credentials from MySQL. You must have access to an instance of MySQL in order to execute this sample. If you do not have access or just want to see how the SqlAttributesFilter works, just read the rest of this section.
For this sample you must configure your container for JNDI and MySQL.
See the chapter on Configuring
Deployment Containers for instructions on configuring
containers for use with JNDI and MySQL. You also must create an entry for a
user and create a query which returns a result with user name and password
attributes. The query in the sample assumes there is a table named
users, with attributes username and
password. The parameter passed into the prepared statement
is email=george@seinfeld.com.
$ cp $HOME/forgerock-sample-configs/WordPressLoginSQL.json
 $HOME/.ForgeRock/OpenIG/config.json
$ jetty.sh restart
To see what is happening behind the scenes, take a look at
$HOME/.ForgeRock/OpenIG/config.json. For this sample,
you replaced the FileAttributesFilter with the SqlAttributesFilter. The only
difference between the filters is how they retrieve the attribute value pairs
to set in the Exchange in the Reference. Once the
values are set in the Exchange, the LoginRequestFilter accesses them in the
exact same way.
This tutorial walks you through an OpenAM integration with OpenAM's password capture and replay feature. This feature of OpenAM is typically used to integrate with Outlook Web Access or Sharepoint by capturing the password during OpenAM authentication, encrypting it, adding to the session, which is later decrypted and used for Basic Authentication to OWA or Sharepoint. This tutorial shows how you can configure OpenIG to use the user name and password from the OpenAM Authentication to log the user into WordPress. This is also how you would achieve OWA or Sharepoint integration.
The figure below illustrates the flow of requests for a user logging into OpenAM and then being logged into WordPress with the user name and password from the OpenAM login session.

User authenticates to OpenAM establishing a session, OpenAM is configured to capture the password, encrypt it, and then store it in the user's session.
User browses to a WordPress page requiring authentication.
OpenAM Agent intercepts the request, validates the user session, and populates HTTP headers with the user name and encrypted password from the session.
Agent passes the original request with populated headers to OpenIG.
OpenIG inspects the request, does not find a match for the WordPress login page, so forwards the request on.
WordPress finds no application session and redirects to its login page.
OpenIG intercepts, sees the login page, creates the login form with the user name and decrypted password from the headers inserted by the Agent.
WordPress validates the login form, returns an application session and the user's home page.
WordPress home page returned to the user.
OpenAM is installed on
http://www.idp.com:8888/openam. WordPress hosted on the
ForgeRock demo site at http://demo.forgerock.com:8080/wordpress, populated with a sample
user george with password costanza.
OpenIG is deployed on an instance of Tomcat protected by an OpenAM J2EE
agent. The J2EE agent is configured for cross domain SSO, and to add the user
name and replay password headers to the HTTP requests.
This section assumes you are familiar with the components involved.
Install and configure OpenAM on
http://www.idp.com:8888/openam with the default
configuration. You can install OpenAM with your configuration, but
be sure to substitute in the tutorial accordingly.
Create a sample user with user name george
and password constanza.
To test, startup OpenAM and make sure you can login with the
user name george and password
constanza.
Create the J2EE agent profile with the following settings:
Server URL http://www.idp.com:8888/openam
Agent URL http://demo.forgerock.com:8080/agentapp
Under Global settings change the Agent filter mode from ALL to SSO_ONLY
Under Application > Session Attributes Processing change the Session Attribute Fetch Mode from none to HTTP_Header
Under Application > Session Attributes Processing > Session Attribute Mappings add UserToken=username and sunIdentityUserPassword=password
Under SSO > Cross Domain SSO select the Enabled checkbox. If you have installed OpenAM in the forgerock.com domain you do not need to enable cross domain SSO.
In the OpenAM console under Access Control > Realm > Authentication click "All Core Settings" and add com.sun.identity.authentication.spi.ReplayPasswd to the Authentication Post Processing Classes.
Run java -classpath amserver.jar:opensso-sharedlib.jar com.sun.identity.common.DESGenKey to generate a shared key for the OpenAM Authentication plugin and OpenIG. As an example, if you have OpenAM installed under $HOME on Tomcat you would run the command java -classpath $HOME/tomcat7/webapps/openam/WEB-INF/lib/amserver.jar:$HOME/tomcat7/webapps/openam/WEB-INF/lib/opensso-sharedlib.jar com.sun.identity.common.DESGenKey.
In the OpenAM console under Configuration > Servers and Sites click on your server name, go to Advanced and add com.sun.am.replaypasswd.key with the value of the key generated in the previous step.
You must restart the OpenAM server after changing Advanced properties.
Install on OpenIG host listening on port 8080.
/etc/hosts or equivalent with a
mapping of demo.forgerock.com to 127.0.0.1. This example
assumes the browser and OpenIG are on the same host. If the
browser is on a different host you must create a mapping so that
all requests to demo.forgerock.com are resolved to the OpenIG
host.
To test, startup Tomcat and make sure you can browse to http://demo.forgerock.com:8080 and get the Tomcat home page. If you get a different page, then you have not modified your host file settings correctly. demo.forgerock.com should resolve to either localhost or the host OpenIG where is running.
Install on the OpenIG host on Tomcat at http://demo.forgerock.com:8080
OpenSSO server URL: http://www.idp.com:8888/openam
Install agent filter in global web.xml true
Agent URL: http://demo.forgerock.com:8080/agentapp
To test, startup Tomcat and browse to the request headers
example at
http://demo.forgerock.com:8080/examples/servlets/servlet/RequestHeaderExample.
You should be redirected to OpenAM for authentication. Once logged in
as user george with password
constanza you should be redirected back to the
examples page and be able to see the user name and replay password
headers. The user name header should be george, the password header
should be encrypted.
See Installing
OpenIG for instructions, and have your
container listen on port 8080. Install OpenIG in the root context by
removing the existing root context directory
$HOME/tomcat/webapps/ROOT/ and then renaming the OpenIG
.war to $HOME/tomcat/webapps/ROOT.war.
Download the WordPressDecryptHeaderLogin.json configuration file, and use it to
replace $HOME/.ForgeRock/OpenIG/config.json.
Search for and replace DESKEY with the key
generated when you enabled the password capture feature in OpenAM.
Restart OpenIG after making changes to
config.json.
Browse to WordPress. If you are not already logged into OpenAM you
should be redirected to the OpenAM login page. You should login with user
name george and password constanza.
After login you should be redirected back to the WordPress portal homepage.
Now click on the login link and OpenIG logs you in as George Costanza.
To see what is happening behind the scenes, take a look at
$HOME/.ForgeRock/OpenIG/config.json. Look for the
HandlerServlet. This is the servlet entry point to OpenIG. Notice it is
calling the DispatchHandler. The DispatchHandler has a condition which
checks for the presence of wp-login.php (the login
page) in the URI path. If the condition is false (no login page), the
ClientHandler is called sending the request on to the WordPress. If the
condition is true, the Gateway has found the login page, and calls the
LoginChain for further processing. The LoginChain calls its filters, the
CryptoFilter, which looks for the replay password header and decrypts it,
the LoginRequestFilter, which creates the login form, and then calls the
ClientHandler to send the form to the WordPress. If you look at the
LoginRequestFilter, you notice it defines the method, URI, and form
parameters for the request which is sent by the ClientHandler. In the
form parameters you see the user name and password retrieved from the user
name and replay password headers in the HTTP request. These headers are
created by the OpenAM agent from the user's OpenAM session and the replay
password header is decrypted by the CryptoFilter prior to the
LoginRequestFilter being executed.
The Federation component of OpenIG is a standards based authentication service used by OpenIG to validate a user and retrieve key attributes of the user in order to log them into the target applications.
There are two ways the Federation Service can be invoked:
IDP initiated SSO, where the remote Identity Provider sends an unsolicited Authentication statement to OpenIG
SP initiated SSO where OpenIG calls the Federation Service to initiate Federated SSO with the Identity provider
In either case, the job of the Federation Service is to validate the user and pass the required attributes to OpenIG to log the user into target applications.
See the Tutorial For the Federation Gateway for hands on experience with the Federation Gateway.
This section is a summary of the steps needed to prepare OpenIG to act as a Federation endpoint for your target application.
Install the OpenIG Federation .war.
Configure OpenIG to log users into the target application. Getting this to work before configuring Federation makes the process much simpler to troubleshoot if anything goes wrong.
Add Federation configuration to the OpenIG configuration file.
Add the assertion and subject mappings, optional redirect URI and optional logout URI to the Federation configuration.
Export the Identity Provider MetaData from the remote Identity Provider or use the meta data from the OpenAM generated fedlet.
Import OpenIG metadata to your Identity Provider.
The Federation service is configured by modifying the OpenIG
config.json and Federation specific XML files located
in the home directory of the effective user running the web application
container housing OpenIG. The home directory of this user is referred to as
$HOME_DIR in this document. By default, the
Federation service looks in $HOME_DIR/.ForgeRock/OpenIG/
for config.json and
$HOME_DIR/.ForgeRock/SAML/ for the Federation XML
configuration.
The following is a description of the files:
$HOME_DIR/.ForgeRock/OpenIG/config.jsonThis is the core configuration file for OpenIG. You must configure both this file and the XML files specific to the Federation Service. The reason there are two sets of configuration files is the Federation Service is based on the openFed library from the OpenAM open source project. The openFed library and the Federation configuration files are taken directly from the OpenFM release. In order to get the Federation Service configured you must tag swap the XML files. If you are familiar with the workflow in the OpenAM console you can generate a Fedlet and directly copy the configuration files into
$HOME_DIR/.ForgeRock/SAML/.$HOME_DIR/.ForgeRock/SAML/FederationConfig.propertiesAdvanced features of the openFed library. The defaults suffice in most deployments.
$HOME_DIR/.ForgeRock/SAML/gateway.cotCircle of trust for OpenIG and the Identity Provider.
$HOME_DIR/.ForgeRock/SAML/idp.xmlThis file is not included with the Federation Service XML. It must be generated by the Identity Provider and copied into the configuration directory.
$HOME_DIR/.ForgeRock/SAML/idp-extended.xmlStandard extensions for the Identity Provider.
$HOME_DIR/.ForgeRock/SAML/sp.xml,$HOME_DIR/.ForgeRock/SAML/sp-extended.xmlThese are the standard metadata and metadata extensions for the OpenIG Federation Service.
The simplest way to configure the OpenIG Federation Gateway is to use
the OpenAM task wizard to generate a Fedlet and then use the Fedlet
configuration files in the Gateway configuration directory. If you use the
Fedlet configuration files, simply unpack Fedlet.war
and copy all the files listed above into
$HOME_DIR/.ForgeRock/SAML/. You do not have to modify
the files to do basic IDP and SP initiated SSO with OpenIG. Note that the
sample Federation Gateway config.json templates uses
/saml as the URI so your Fedlet endpoint should be
specified as protocol://host.domain:port/saml.
If you do not use the Fedlet wizard, then follow the instructions for
the unconfigured Fedlet and then copy the Fedlet configuration files to the
$HOME_DIR/.ForgeRock/SAML/ directory. You must also
export the metadata from the IDP and copy it to idp.xml
in the same directory.
The following sample configuration is from the tutorial on federating WordPress. The sample configuration receives a SAML assertion from OpenAM and then logs the user into WordPress using the user name and password from the assertion.
The following excerpt of the Federation Service JSON is from the OpenIG
config.json file. All fields are mandatory except
logoutURI. The logoutURI is only
necessary if your configuration uses the single logout feature.
{
    "name": "FederationServlet",
    "type": "org.forgerock.openig.saml.FederationServlet",
    "config": {
        "assertionMapping": {
            "userName":"uid",
            "password":"userPassword"
        },
        "subjectMapping":"subjectName",
        "sessionIndexMapping":"sessionIndex",
        "redirectURI":"/login",
        "logoutURI":"/logout"
        "assertionConsumerEndpoint":"fedletapplication",
        "SPinitiatedSSOEndpoint":"SPInitiatedSSO",
        "singleLogoutEndpoint":"fedletSlo"
   }
}- name
Name of the Federation Service within the OpenIG runtime. This value should not be modified.
- type
Classname of the Federation Servlet. This value should not be modified.
- asertionMapping
The
assertionMappingdefines how to transform the attributes from the incoming assertion to attribute value pairs in the session. Each entry in theassertionMappingis of the formattributeName:assertionName. The attributeName represents the name of the attribute set in the session. The assertionName is used to fetch the value from the incoming assertion, which becomes the value in the session. The following statements correspond to the sample shown above.If the incoming assertion contains the statement:
uid = jojo
userPassword = 123456789
Then the following values are set in the session:
userName = jojo
password = 123456789
Notice that you must also modify attributeMap in the
$HOME_DIR/.ForgeRock/SAML/sp-extended.xmlto match the assertion mapping configured in the IDP metadata.- subjectMapping
The value contained in the assertion subject is set as the value of the attribute
subjectNamein the session.- sessionIndexMapping
The IDP's sessionIndex for the user is sent in the assertion. The value contained in the assertion is set as the value of the attribute sessionIndex in the session.
- redirectURI
The
redirectURIshould be set to the page the Form-Filter recognizes as the login page for the target application. This is how OpenIG and the Federation service work together to provide single sign-on. When OpenIG detects the target application's login page, it redirects to the Federation Service. Once the Federation Service validates the SAML exchanges with the IDP and sets the required session attributes, it redirect back to the target application's login page. This allows the Form-Filter to finish the job of logging in the user by retrieving the necessary user data from the session and creating a login form for the application.- logoutURI
The
logoutURIshould be set to the URI which logs the user out of the target application. This attribute is only needed if your application uses the single log-out feature of the Identity Provider.- assertionConsumerEndpoint
The default value of
fedletapplicationis the same as the Fedlet. If you modify this attribute you must change the metadata to match.- SPinitiatedSSOEndpoint
The default value is
SPInitiatedSSO. If you modify this attribute you must change the metadata to match.- singleLogoutEndpoint
The default value of
fedletSLOis the same as the Fedlet. If you modify this attribute you must change the metadata to match.
Application myportal requires a form with userName and password for
login. The userName for myportal is the mail attribute at the user's Identity
Provider. The password for myportal is the mailPassword at the Identity
Provider. The incoming SAML2 assertion sent by the Identity Provider contains
the mail and mailPassword attributes. The Federation Service validates the
incoming assertion, sets the userName and password in the HttpSession to the
values of mail and mailPassword from the assertion, and redirects the user
to /myportal/login. The LoginRequest Filter then retrieves
the login values from the session and creates the form to log the user into
myportal.
{
    "name": "FederationServlet",
    "type": "org.forgerock.openig.saml.FederationServlet",
    "config": {
            "assertionMapping": {
                 "userName":"mail",
                 "password":"mailPassword"
            }
            "redirectURI":"/myportal/login",
            "logoutURI":"/myportal/logout"
    }
}
{
"name": "LoginRequest",
"type": "StaticRequestFilter",
"config": {
"method": "POST",
"uri": "https://10.10.0.5/login",
"form": {
"userName": [${exchange.session.userName}],
"password": [${exchange.session.password}],
}
}
}The Identity Provider metadata must be in
$HOME_DIR/.ForgeRock/SAML/idp.xml directory. See the
documentation for your Identity Provider for instructions on how to get the
metadata.
To export Identity Provider metadata from OpenAM, run a command such as the following.
$ ssoadm
 export-entity
 -u amadmin
 -f /tmp/pass
 -y http://www.idp.com:8080/openam
 -m /tmp/idp.xml
This tutorial expands on the Tutorial With
WordPress by showing you how to configure OpenIG
as a SAML2 Federation endpoint to log the user into WordPress. When you
complete this tutorial you will have configured OpenAM to send a SAML2
assertion to OpenIG and configured OpenIG to validate the assertion and to
use the mail and employeenumber
attribute values from the assertion to log the user into WordPress.
Follow the Tutorial With WordPress, and make sure you can login to WordPress before continuing this tutorial.
For this sample and the test URIs, OpenAM is configured on
http://www.idp.com:8888/openam. You can of course use any
configuration, but be sure to substitute the proper values for the test
URLs.
Use the OpenAM Console task wizard to create a Fedlet with the Name
gateway and the Destination URL
http://demo.forgerock.com:8080/saml. Configure the
Attributes Mapping to contain the mail and
employeenumber attributes.
Create a user with mail attribute
george and
employeenumber costanza.
Download the Federation
to WordPress Sample Config File and copy it to
$HOME/.ForgeRock/OpenIG/config.json, overwriting the
config.json from the WordPress tutorial.
Assuming Fedlet.zip from the previous step is
found in $HOME/openam/myfedlets/Fedlet.zip extract the
Fedlet configuration files using the following commands:
$ cd $HOME/openam/myfedlets
$ unzip Fedlet.zip
$ jar xvf Fedlet.war conf
Create a $HOME/.ForgeRock/SAML/ directory,
and copy the Fedlet configuration to the new directory.
$ mkdir $HOME/.ForgeRock/SAML
$ cp conf/* $HOME/.ForgeRock/SAML
$ ls $HOME/.ForgeRock/SAML
FederationConfig.properties    idp-extended.xml        sp-extended.xml
fedlet.cot                     idp.xml                 sp.xm
For IDP initiated SSO click this link
For SP initiated SSO either browse to http://demo.forgerock.com:8080/wordpress/ and click the login link, or click this link
To understand what is happening behind the scenes, take a look at
$HOME/.ForgeRock/OpenIG/config.json. The HandlerServlet
is no longer the entry point to OpenIG processing. If you look for the
servletObject at the end of the file you see the HandlerServlet has been
replaced by the DispatchServlet. The DispatchServlet provides an internal
routing mechanism based on the incoming URI. The DispatchServlet looks at
the incoming URI and dispatches to the FederationServlet when the SAML URI
is found, otherwise it dispatches to the HandlerServlet as in the previous
sample. This allows the FederationServlet to process the incoming assertion,
set the attributes from the assertion in the HTTPSession, which then allows
the normal chain of filter processing, through the HandlerServlet, to pick up
the credentials and log the user into the target application.
This chapter contains templates of common configurations. Start with one of our templates and then modify to suit your deployment. Read the summary of each template to find the right match for your application. If you are not sure about the characteristics of your application, start with the basic Application Capture template. This template allows you to setup basic proxying and capture the traffic of the login sequence in a flat file, which then allows you to analyze the application and subsequently choose the right template or add your own configuration.
Note
All templates have the CaptureFilter in the Reference enabled by default. Remove the capture filter from the outgoing chain before running the gateway in production. Capturing is typically used only for initial development or debugging and may rapidly fill up your available disk space if left enabled.
Substitute the
TARGETIPtag with the IP address of your application.Modify the
LoginRequestfilter to match the form required for login by your target application.
Proxies all requests and captures them in a flat file. Use this
template if you need to analyze the traffic for your application. Simply
change the baseURI to be that of the target application,
restart OpenIG, and login to the application. The entire sequence is logged
to the flat file.
{
    "heap": {
        "objects": [
            {
                "name": "HandlerServlet",
                "comment": "Transforms Servlet request to handler request.",
                "type": "HandlerServlet",
                "config": {
                    "handler": "DispatchHandler"
                }
            },
            {
                "name": "DispatchHandler",
                "type": "DispatchHandler",
                "config": {
                    "bindings": [
                        {
                            "condition": "${exchange.request.uri.scheme == 'http'}",
                            "handler": "OutgoingChain",
                            "baseURI": "http://TARGETIP"
                        },
                        {
                            "condition": "${exchange.request.uri.path == '/login'}",
                            "handler": "LoginChain",
                            "baseURI": "https://TARGETIP"
                        },
                        {
                            "handler": "OutgoingChain",
                            "baseURI": "https://TARGETIP"
                        }
                    ]
                }
            },
            {
                "name": "LoginChain",
                "type": "Chain",
                "config": {
                    "filters": [],
                    "handler": "OutgoingChain"
                }
            },
            {
                "name": "OutgoingChain",
                "type": "Chain",
                "config": {
                    "filters": [
                        "CaptureFilter"
                    ],
                    "handler": "ClientHandler"
                }
            },
            {
                "name": "CaptureFilter",
                "type": "CaptureFilter",
                "config": {
                    "captureEntity": false,
                    "file": "/tmp/gateway.log"
                }
            },
            {
                "name": "ClientHandler",
                "comment": "Sends all requests to remote servers.",
                "type": "ClientHandler",
                "config": {}
            }
        ]
    },
    "servletObject": "HandlerServlet"
}Logs the user into the target application with hard-coded user name and password. This template intercepts the login page request and replaces it with the login form.
{
  "heap": {
    "objects": [
    {
        "name": "HandlerServlet",
        "comment": "Entry point that transforms Servlet request to handler request.",
        "type": "HandlerServlet",
        "config": {
            "handler": "DispatchHandler",
            "baseURI":"http://TARGETIP"
        }
    },
    {
        "name": "DispatchHandler",
        "type": "DispatchHandler",
        "config": {
            "bindings": [
                {
                    "condition": "${exchange.request.uri.path == '/login'}",
                    "handler": "LoginChain",
                },
                {
                    "handler": "OutgoingChain",
                },
            ]
        }
    },
    {
        "name": "LoginChain",
        "type": "Chain",
        "config": {
            "filters": ["LoginRequest"],
            "handler": "OutgoingChain"
        }
    },
    {
        "name": "LoginRequest",
        "type": "StaticRequestFilter",
        "config": {
            "method": "POST",
            "uri": "https://TARGETIP/login",
            "form": {
                "USER": ["myusername"],
                "PASSWORD": ["mypassword"],
            }
        }
    },
    {
        "name": "OutgoingChain",
        "type": "Chain",
        "config": {
            "filters": ["CaptureFilter"],
            "handler": "ClientHandler"
        }
    },
    {
        "name": "CaptureFilter",
        "type": "CaptureFilter",
        "config": {
            "captureEntity": false,
            "file": "/tmp/gateway.log",
        }
    },
    {
        "name": "ClientHandler",
        "comment": "Responsible for sending all requests to remote servers.",
        "type": "ClientHandler",
        "config": {
            }
        }
    ]
  },
  "servletObject": "HandlerServlet",
}
For applications that expect a cookie from the login page to be sent in the login request form. This templates allows the login page request to go through to the target, intercepts the response, then creates the login form and adds the intercepted cookie to the POST.
{
  "heap": {
    "objects": [
    {
        "name": "HandlerServlet",
        "comment": "Entry point that transforms Servlet request to handler request.",
        "type": "HandlerServlet",
        "config": {
            "handler": "DispatchHandler",
            "baseURI":"http://TARGETIP"
        }
    },
    {
        "name": "DispatchHandler",
        "type": "DispatchHandler",
        "config": {
            "bindings": [
                {
                    "condition": "${exchange.request.uri.path == '/eum/login'}",
                    "handler": "LoginChain",
                },
                {
                    "handler": "OutgoingChain",
                },
            ]
        }
    },
    {
        "name": "LoginChain",
        "type": "Chain",
        "config": {
            "filters": ["SwitchFilter"],
            "handler": "OutgoingChain"
        }
    },
    {
        "name": "SwitchFilter",
        "type": "SwitchFilter",
        "config": {
            "onResponse": [
                {
                    "handler": "LoginRequestHandler"
                }
            ]
        }
    },
    {
        "name": "LoginRequestHandler",
        "type": "Chain",
        "config": {
            "filters": ["LoginRequest"],
            "handler": "OutgoingChain"
        }
    },
    {
        "name": "LoginRequest",
        "type": "StaticRequestFilter",
        "config": {
            "method": "POST",
            "uri": "https://TARGETIP/login",
            "form": {
                "USER": ["myusername"],
                "PASSWORD": ["mypassword"],
            }
            "headers": {
                "cookie": ["${exchange.response.headers['Set-Cookie'][0]}"],
            }
        }
    },
    {
        "name": "OutgoingChain",
        "type": "Chain",
        "config": {
            "filters": ["CaptureFilter"],
            "handler": "ClientHandler"
        }
    },
    {
        "name": "CaptureFilter",
        "type": "CaptureFilter",
        "config": {
            "captureEntity": false,
            "file": "/tmp/gateway.log",
        }
    },
    {
        "name": "ClientHandler",
        "comment": "Responsible for sending all requests to remote servers.",
        "type": "ClientHandler",
        "config": {
            }
        }
    ]
  },
  "servletObject": "HandlerServlet",
}
For applications that return the login page when the user tries to
access a page without a valid session. This template shows how to use the
ExtractFilter to find the login page on the response and
use the CookieFilter to ensure the cookies from the
application are replayed on each request. The sample application in this
template is OpenAM. If you change the TARGETIP:PORT to be
the IP address of OpenAM, the TARGETDN:PORT to be the
fully qualified name and port of OpenAM and modify USERNAME
and PASSWORD in the LoginRequest you
automatically log USERNAME into OpenAM.
Note
Without the CookieFilter in the
OutgoingChain the cookie set in the login page response
would not get set in the browser since that request is intercepted before
it gets to the browser. The simplest way to deal with this situation is to
let OpenIG manage all the cookies by enabling the
CookieFilter. The side effect of OpenIG managing
cookies is none of the cookies are sent to the browser, but are managed
locally by OpenIG.
{
  "heap": {
    "objects": [
    {
        "name": "HandlerServlet",
        "comment": "Entry point that transforms Servlet request to handler request.",
        "type": "HandlerServlet",
        "config": {
            "handler": "FindLoginPageChain",
            "baseURI":"http://TARGETIP:PORT"
        }
    },
    {
        "name": "FindLoginPageChain",
        "type": "Chain",
        "config": {
            "filters": ["IsLoginPage","FindLoginPage"],
            "handler": "OutgoingChain"
        }
    },
    {
        "name": "FindLoginPage",
        "type": "EntityExtractFilter",
        "config": {
            "messageType": "response",
            "target": "${exchange.isLoginPage}",
            "bindings": [
                 {
                     "key": "found",
                     "pattern": "OpenAM\s\(Login\)",
                     "template": "true"
                 }
             ]
          }
    },
    {
        "name": "IsLoginPage",
        "type": "SwitchFilter",
        "config": {
            "onResponse": [
                 {
                    "condition": "${exchange.isLoginPage.found == 'true'}",
                     "handler": "LoginChain"
                 }
             ]
          }
    },
    {
        "name": "LoginChain",
        "type": "Chain",
        "config": {
            "filters": ["LoginRequest"],
            "handler": "OutgoingChain"
        }
    },
    {
        "name": "LoginRequest",
        "type": "StaticRequestFilter",
        "config": {
            "method": "POST",
            "uri": "http://TARGETIP:PORT/openam/UI/Login"
            "form": {
                "IDToken0":[""]
                "IDToken1":["USERNAME"]
                "IDToken2":["PASSWORD"]
                "IDButton":["Log+In"]
                "encoded":["false"]
            },
            "headers": {
                "host":["TARGETFQDN:PORT"]
            }

        }
    },
   {
        "name": "OutgoingChain",
        "type": "Chain",
        "config": {
            "filters": ["CookieFilter","CaptureFilter"],
            "handler": "ClientHandler"
        }
    },
            {
                "name": "CookieFilter",
                "type": "CookieFilter",
                "config": {
                }
         },

    {
        "name": "CaptureFilter",
        "type": "CaptureFilter",
        "config": {
            "captureEntity": true,
            "file": "/tmp/gateway.log",
        }
    },
    {
    "name": "LogSink",
    "comment": "Default sink for logging information.",
    "type": "ConsoleLogSink",
    "config": {
        "level": "DEBUG",
    }
}
    {
        "name": "ClientHandler",
        "comment": "Responsible for sending all requests to remote servers.",
        "type": "ClientHandler",
        "config": {
            }
        }
    ]
  },
  "servletObject": "HandlerServlet",
}
Proxies traffic to an application listening on ports 80 and 443. The
assumption is the application uses HTTPS for authentication and HTTP for the
general application features. Assuming the login will all take place on
port 443, you will need to add the login filters and handlers to the
LoginChain. To get started quickly, modify the
baseURI to be the IPAddress of your
target application. This should allow you to proxy all traffic to the
application. Then add the logic for the LoginChain using
the flow from one of the login templates.
{
  "heap": {
    "objects": [
    {
        "name": "HandlerServlet",
        "comment": "Entry point that transforms Servlet request to handler request.",
        "type": "HandlerServlet",
        "config": {
            "handler": "DispatchHandler",
        }
    },
    {
        "name": "DispatchHandler",
        "type": "DispatchHandler",
        "config": {
            "bindings": [
                {
                    "condition": "${exchange.request.uri.scheme == 'http'}",
                    "handler": "OutgoingChain",
                    "baseURI":"http://TARGETIP"
                },
                {
                    "condition": "${exchange.request.uri.path == '/login'}",
                    "handler": "LoginChain",
                    "baseURI":"https://TARGETIP"
                },
                {
                    "handler": "OutgoingChain",
                    "baseURI":"https://TARGETIP"
                },
            ]
        }
    },
    {
        "name": "LoginChain",
        "type": "Chain",
        "config": {
            "filters": [],
            "handler": "OutgoingChain"
        }
    },
    {
        "name": "OutgoingChain",
        "type": "Chain",
        "config": {
            "filters": ["CaptureFilter"],
            "handler": "ClientHandler"
        }
    },
    {
        "name": "CaptureFilter",
        "type": "CaptureFilter",
        "config": {
            "captureEntity": false,
            "file": "/tmp/gateway.log",
        }
    },
    {
        "name": "ClientHandler",
        "comment": "Responsible for sending all requests to remote servers.",
        "type": "ClientHandler",
        "config": {
            }
        }
    ]
  },
  "servletObject": "HandlerServlet",
}
Shows how a single OpenIG configuration can proxy to multiple
applications on different IPs and ports. This template is setup to proxy to
both the WordPress and MediaWiki hosted samples. OpenIG must be setup to
listen on both ports 8080 and 8181. The DispatchHandler is
used to route each incoming request to either the WordPress chain or the
MediaWiki chain.
{
  "heap": {
    "objects": [
    {
        "name": "HandlerServlet",
        "type": "HandlerServlet",
        "config": {
            "handler": "DispatchHandler"
        }
    },
    {
        "name": "DispatchHandler",
        "type": "DispatchHandler",
        "config": {
            "bindings": [
                {
                    "condition": "${exchange.request.uri.host == 'demo.forgerock.com'}",
                    "handler": "WordPressLoginChain",
                    "baseURI":"http://109.73.67.52:8080",
                },
                {
                    "condition": "${exchange.request.uri.host == 'demo.forgerock.com'}",
                    "handler": "MediaWikiLoginChain",
                    "baseURI":"http://109.73.67.52:8181"
                }
            ]
        }
    },
    {
        "name": "WordPressLoginChain",
        "type": "Chain",
        "config": {
            "filters": [],
            "handler": "OutgoingChain"
        }
    },
    {
        "name": "MediaWikiLoginChain",
        "type": "Chain",
        "config": {
            "filters": [],
            "handler": "OutgoingChain"
        }
    },
    {
        "name": "OutgoingChain",
        "type": "Chain",
        "config": {
            "filters": ["CaptureFilter"],
            "handler": "ClientHandler"
        }
    },
    {
        "name": "CaptureFilter",
        "type": "CaptureFilter",
        "config": {
            "captureEntity": false,
            "file": "/tmp/gateway.log"
        }
    },
    {
        "name": "ClientHandler",
        "comment": "Responsible for sending all requests to remote servers.",
        "type": "ClientHandler",
        "config": {
        }
    }
  ]
},
  "servletObject": "HandlerServlet",
}
Logs the user into the target application using the headers passed down from an OpenAM policy agent. This template assumes the user name and password are passed down by the OpenAM policy agent as headers. If the header passed in contains only a user name or subject and requires a lookup to an external data source, you must add an attribute filter to the chain to retrieve the credentials.
{
  "heap": {
    "objects": [
    {
        "name": "HandlerServlet",
        "comment": "Entry point that transforms Servlet request to handler request.",
        "type": "HandlerServlet",
        "config": {
            "handler": "DispatchHandler",
            "baseURI":"http://TARGETIP"
        }
    },
    {
        "name": "DispatchHandler",
        "type": "DispatchHandler",
        "config": {
            "bindings": [
                {
                    "condition": "${exchange.request.uri.path == '/login'}",
                    "handler": "LoginChain",
                },
                {
                    "handler": "OutgoingChain",
                },
            ]
        }
    },
    {
        "name": "LoginChain",
        "type": "Chain",
        "config": {
            "filters": ["LoginRequest"],
            "handler": "OutgoingChain"
        }
    },
    {
        "name": "LoginRequest",
        "type": "StaticRequestFilter",
        "config": {
            "method": "POST",
            "uri": "https://TARGETIP/login",
            "form": {
                "USER": ["${exchange.request.headers['username'][0]}"],
                "PASSWORD": ["${exchange.request.headers['password'][0]}"],
            }
        }
    },
    {
        "name": "OutgoingChain",
        "type": "Chain",
        "config": {
            "filters": ["CaptureFilter"],
            "handler": "ClientHandler"
        }
    },
    {
        "name": "CaptureFilter",
        "type": "CaptureFilter",
        "config": {
            "captureEntity": false,
            "file": "/tmp/gateway.log",
        }
    },
    {
        "name": "ClientHandler",
        "comment": "Responsible for sending all requests to remote servers.",
        "type": "ClientHandler",
        "config": {
            }
        }
    ]
  },
  "servletObject": "HandlerServlet",
}
A sample template used to log a user into Microsoft Online Outlook Web Access. This template shows how you would use the Gateway and the OpenAM password capture feature to integrate with OWA. You can follow the Tutorial On Password Capture & Replay tutorial and substitute this template.
{
    "heap": {
        "objects": [
            {
                "name": "LogSink",
                "comment": "Default sink for logging information.",
                "type": "ConsoleLogSink",
                "config": {
                    "level": "DEBUG",
                }
            },
            {
                "name": "HandlerServlet",
                "type": "HandlerServlet",
                "config": {
                    "handler": "DispatchHandler",
                    "baseURI":"https://65.55.171.158"
                }
            },
            {
                "name": "DispatchHandler",
                "type": "DispatchHandler",
                "config": {
                    "bindings": [
                        {
                            "condition": "${exchange.request.uri.path == '/owa/auth/logon.aspx'}",
                            "handler": "LoginChain",
                        },
                        {
                            "handler": "OutgoingChain",
                        }
                    ]
                }
            },
            {
                "name": "LoginChain",
                "type": "Chain",
                "config": {
                    "filters": ["CryptoHeaderFilter","LoginRequest"],
                    "handler": "OutgoingChain"
                }
            },
            {
                "name": "CryptoHeaderFilter",
                "type": "CryptoHeaderFilter",
                "config": {
                    "messageType":"REQUEST",
                    "operation":"DECRYPT",
                    "algorithm":"DES/ECB/NoPadding",
                    "key":"DESKEY",
                    "keyType":"DES",
                    "charSet":"utf-8",
                    "headers": ["password"],
                },
            },
            {
                "name": "LoginRequest",
                "type": "StaticRequestFilter",
                "config": {
                    "method": "POST",
                    "uri": "https://65.55.171.158/owa/auth/owaauth.dll",
                    "headers" : {
                        "Host": ["red001.mail.microsoftonline.com"],
                        "Content-Type": ["Content-Type:application/x-www-form-urlencoded"],
                    }
                    "form": {
                        "destination": ["https://red001.mail.microsoftonline.com/owa/"],
                        "forcedownlevel": ["0"],
                        "trusted": ["0"],
                        "username": ["${exchange.request.headers['username'][0]}"],
                        "password": ["${exchange.request.headers['password'][0]}"],
                        "isUtf8": ["1"],
                    }
                }
            },
            {
                "name": "OutgoingChain",
                "type": "Chain",
                "config": {
                    "filters": ["HeaderFilter","CaptureFilter"],
                    "handler": "ClientHandler"
                }
            },
            {
                "name": "HeaderFilter",
                "type": "HeaderFilter",
                "config": {
                    "messageType":"REQUEST",
                    "remove": ["password","username"],
                 }
            },
            {
                "name": "CaptureFilter",
                "type": "CaptureFilter",
                "config": {
                    "captureEntity": false,
                    "file": "/tmp/gateway.log",
                }
            },
            {
                "name": "ClientHandler",
                "type": "ClientHandler",
                "config": {
                }
            },
        ]
    },
    "servletObject": "HandlerServlet",
}
OpenIG includes a complete, stable application programming interface, designed to allow you to customize OpenIG as required. Customizing OpenIG can be necessary if you need to perform complex server interactions or intensive data transformations, and stock handlers, filters and expressions in the Reference provided by the gateway are too basic to meet the task.
The two primary extension points are the interfaces: Filter (for processing a request and/or response en
route) and Handler (for generating responses from requests).
These interfaces are similar to the Java Enterprise Edition
Filter and Servlet interfaces, with
some differences in the semantics of messages. While you can simply implement
these interfaces, there are also included convenience classes: GenericFilter and GenericHandler that you can use if you intend to make
your extensions configurable through the OpenIG configuration
resource.
OpenIG also allows standard Java Enterprise Edition servlets and servlet filters to be embedded in the gateway, with initialization parameters supplied through through the OpenIG configuration resource.
The Filter interface exposes a filter method, which takes an Exchange object and the Chain of remaining filters and handler to dispatch to. Initially,
exchange.request contains the request to be filtered. To pass the
request to the next filter or handler in the chain, the filter calls
chain.handle(exchange). After this call, exchange.response contains the response that can be filtered.
A filter might elect not to pass the request to the next filter or
handler, and instead handle the request itself. It can achieve this by
merely avoiding a call to chain.handle(exchange) and
creating its own response object in the exchange. The filter is also at
liberty to replace a response with another of its own. A filter can exist in
more than one chain, therefore should make no assumptions or correlations
using the chain it is supplied. The only valid use of a chain by a filter
is to call its handle method to dispatch the exchange to
the rest of the chain.
Note
If an existing response exists in the exchange object and the filter intends to replace it with its own, it must first check to see if the existing response has an entity, and if it does, must call its close method in order to signal that the processing of the response from a remote server is complete.
The Handler interface exposes a handle method, which takes an Exchange object. It processes the request in
exchange.request and produces a response in exchange.response. A handler can elect to dispatch the exchange to
another handler or chain.
Note
If an existing response exists in the exchange object and the filter intends to replace it with its own, it must first check to see if the existing response has an entity, and if it does, must call its close method in order to signal that the processing of the response from a remote server is complete.
Objects are added to the heap and supplied with configuration artifacts at initialization time. To be integrated with the configuration, a class must have an accompanying implementation of the Heaplet interface. The easiest and most common way of exposing the heaplet is to extend the NestedHeaplet class in a nested class in the class you want to create and initialize and implementing its create method.
Within the create method, you can access the
object's configuration through the config field.
A servlet or servlet filter can be added as a heap object by including it in the classpath, and identifying it in the OpenIG heap configuration as an javax.servlet.http.HttpServlet in the Reference or javax.servlet.Filter in the Reference type, providing any appropriate initialization parameters. A servlet can be dispatched directly by the gateway servlet, and servlets and filters can be flexibly dispatched to through a DispatchServlet.
The following sample filter sets an arbitrary header in the incoming request and outgoing response.
package com.example.filter;

// Java Standard Edition
import java.io.IOException;

// OpenIG Core Library
import org.forgerock.openig.filter.Chain;
import org.forgerock.openig.filter.GenericFilter;
import org.forgerock.openig.handler.HandlerException;
import org.forgerock.openig.heap.HeapException;
import org.forgerock.openig.heap.NestedHeaplet;
import org.forgerock.openig.http.Exchange;
import org.forgerock.openig.model.ModelException;

public class HelloWorldFilter extends GenericFilter {

    public String name;
    public String value;

    @Override
    public void filter(Exchange exchange, Chain chain)
            throws HandlerException, IOException {
        exchange.request.headers.put(name, value); // set header in request
        chain.handle(exchange); // pass to remaining filters & handler in chain
        exchange.response.headers.put(name, value); // set header in response
    }

    public static class Heaplet extends NestedHeaplet {

        @Override
        public Object create() throws HeapException, ModelException {
            HelloWorldFilter filter = new HelloWorldFilter();
            filter.name = config.get("name").required().asString(); // required
            filter.value = config.get("value").required().asString(); // req'd
            return filter;
        }
    }
}
The corresponding heap object configuration is as follows.
{
     "name": "HelloWorldFilter",
     "type": "com.example.filter.HelloWorldFilter",
     "config": {
         "name": "X-Hello",
         "value": "World"
     }
}This chapter covers common problems and their solutions.
HTTP ERROR 500
org.forgerock.openig.model.NodeException:
 ['file:/Users/george/.ForgeRock/OpenIG/config.json'].heap.objects[2]
  .config.filterObjects[0]: object not found in heap
at org.forgerock.openig.heaplet.HeapUtil.getRequiredObject(HeapUtil.java:54)
at org.forgerock.openig.filter.Chain$Heaplet.create(Chain.java:49)
You have a filter specified in the filterObjects list in the Chain
object that is not in config.json. Make sure you have
added an entry for the Filter and have correctly spelled its name in the
filterObjects list.
HTTP ERROR 500
Problem accessing /. Reason:

 could not find local configuration file at
 /var/root/.ForgeRock/OpenIG/config.json or bootstrap file at
 /var/root/.ForgeRock/OpenIG/_private_var_folders_...webinf.json
OpenIG could not find its configuration file in the home directory of
the user running the container where OpenIG is deployed, in this case
/var/root/.ForgeRock/OpenIG/config.json.
As you can see from the error message, OpenIG looks in a secondary location
determined at runtime by the container. The secondary location is only
necessary if you are running more than one OpenIG on a single host and your
instances do not share a single configuration.
HTTP ERROR 500
Problem accessing /. Reason:

Unexpected character (x) at position 1103
This error usually means a missing double quote or a missing bracket in the configuration file. Use a JSON editor or JSON validation tool such as JSONLint to make sure your JSON is valid.
Ensure the flat file is readable by the user running the container for OpenIG. Values are all characters, including space and tabs, between the separator, so make sure the values are not padded with spaces.
HTTP ERROR 500

Problem accessing /myURL . Reason:

java.lang.String cannot be cast to java.util.List
Caused by:
java.lang.ClassCastException: java.lang.String cannot be cast to java.util.List
at org.forgerock.openig.filter.LoggingFilter.writeHeaders(LoggingFilter.java:132
at org.forgerock.openig.filter.LoggingFilter.logResponse(LoggingFilter.java:119)
at org.forgerock.openig.filter.LoggingFilter.filter(LoggingFilter.java:86)
at org.forgerock.openig.filter.Chain.handle(Chain.java:54)
This error is typically encountered when using the AssignmentFilter in the Reference and
setting a string value for one of the Headers. All headers are stored in
Lists so the header must be addressed with a subscript. For example, if you
try to set exchange.request.headers['Location'] for a
redirect in the response object, you should instead set
exchange.request.headers['Location'][0]. A header without
a subscript leads to the error above.
You must define an entity for the response. For example:
{
    "name": "AccessDeniedHandler",
    "type": "org.forgerock.openig.handler.StaticResponseHandler",
    "config": {
        "status": 403,
        "reason": "Forbidden",
        "entity": "<html><h2>User does not have permission<h2>html>"
    }
}If you are proxying to more than one application in multiple DNS domains, you must make sure your container is enabled for domain cookies. See the chapter on Configuring Deployment Containers for details on your specific container.
A
- Architecture, How OpenIG Works
C
- Configuration
- Federation, Configuration File Overview, Configuring the Federation Service
- HTTP & HTTPS, HTTP & HTTPS Application
- Login with cookie, Login Form With Cookie From Login Page
- Login with filter, Login Form With Extract Filter & Cookie Filter
- Login with hidden value, Login Which Requires a Hidden Value From the Login Page
- Microsoft Online Outlook Web Access, Microsoft Online Outlook Web Access
- Multiple applications, Multiple Applications
- Proxy & capture, Proxy & Capture
- Simple login form, Simple Login Form
- Containers
- JBoss, JBoss
- Jetty, Jetty
- Supported, Configuring Deployment Containers
- Tomcat, Tomcat
- Customizations
- Extension points, Key Extension Points
- Filters, Implementing a Filter
- Handlers, Implementing a Handler
- Heap objects, Heap Object Configuration
- Servlets, Including Servlets and Servlet Filters
I
- Installation, Installing OpenIG
- Federation, Installation Overview
T
- Troubleshooting, Troubleshooting
- Tutorials
- Basic features, Tutorial With WordPress
- Capture & relay passwords, Tutorial On OpenAM Password Capture & Replay
- Federation, Tutorial For the Federation Gateway