Dynamic OAuth 2.0 Authorization
You can configure AM to grant scopes statically or dynamically:
Statically (Default). You configure several OAuth 2.0 clients with different subsets of scopes and resource owners are redirected to a specific client depending on the scopes required. As long as the resource owner can authenticate and the client can deliver the same or a subset of the requested scopes, AM issues the token with the scopes requested. Therefore, two different users requesting scopes A and B to the same client will always receive scopes A and B.
Dynamically. You configure an OAuth 2.0 client with a comprehensive list of scopes and resource owners authenticate against it. When AM receives a request for scopes, AM's Authorization Service grants or denies access scopes dynamically by evaluating authorization policies at runtime. Therefore, two different users requesting scopes A and B to the same client can receive different scopes based on policy conditions.
Consider the case of a company deployment that supports custom OAuth 2.0 clients and internal applications. The use of the internal application is bound by the terms and conditions specified by the company; therefore, the user does not need to consent to provide with their user profile information (for example, the profile scope).
To provide the internal application with the user profile automatically, the administrator creates a policy that grants the profile scope to all requests made by authenticated users using a particular OAuth 2.0 client.

When issuing access tokens, AM deduces consent status based on a policy result: an allow policy result means consent is granted, while a deny result means it is denied.
If AM cannot deduce consent using a policy, for example, because none is defined, it is down to the resource owner to decide whether to grant consent. Note that this is only possible in flows where the resource owner interacts with the consent screen. If the resource owner cannot interact with the consent screen, for example, during the ROPC Grant flow, AM denies the scope.
Just like when granting scopes statically, AM only evaluates default scopes configured in the OAuth 2.0 client profile when no scope is requested. AM follows the same rules to deduce consent for both default and requested scopes.
When issuing refresh tokens, AM issues any scope that was previously consented to either by policy or by the resource owner on the consent screen, unless it is explicitly denied by a policy.
To understand which flows are interactive and which ones are not, see the examples in OAuth 2.0 Grant Flows and OpenID Connect Grant Flows.
OAuth 2.0 authorization is implemented by using the OAuth2 Scope resource type, which must always be configured in the Default OAuth2 Scopes policy set.
Related information:
Writing policies for OAuth 2.0 may not be straightforward if your environment requires complex conditions. The easiest way to test if your OAuth 2.0 policies are granting or denying the scopes you expect before setting them in production is to configure AM as an OAuth 2.0 client and authorization provider and request some tokens.
The following procedures set up an OpenID Connect environment and demonstrate how OAuth 2.0 authorization works:
Configure an instance of the OAuth 2.0 provider. See Authorization Server Configuration.
Ensure that:
Use Policy Engine for Scope Decisions is enabled
Response Type Plugins is configured for
tokenandid_tokenGrant Types is configured for
Resource Owner Password CredentialsandImplicit
Navigate to Realms > Realm Name > Applications > OAuth 2.0 and add a client. Configure the client properties as follows:
Client ID:
myClientClient secret:
forgerockRedirection URIs:
https://www.example.com:443/callbackScope(s):
profileemailopenidGrant Types:
Resource Owner Password Credentials
Navigate to Realms > Realm Name > Authorization > Policy Sets, and select Default OAuth2 Scopes Policy Set.
Create a new policy as follows:
Name:
myOAuth2PolicyResource Type:
OAuth2 ScopeResources: Select the
*resource pattern and replace it withemail.Once the policy is created, you will see the Summary tab.
On the Actions tab, add the
GRANTaction, and set the default state toAllow. Save your changes.On the Subjects tab, specify the subject condition
All of...Authenticated Users. Save your changes.(Optional) If the
demouser is not present in your environment, create it by performing the following step:Navigate to Realms > Realm Name > Identities, and add a new user called
demowith passwordCh4ng31t.
This procedure shows how to test OAuth 2.0 policies with the ROPC Grant flow. In this flow, the resource owner does not interact with the consent screen and cannot therefore grant scopes.
Request an access token from AM by specifying:
The client name,
myClient, and its password,forgerockThe Resource Owner Password Credentials grant type,
passwordThe user and password to authenticate with,
demoandCh4ng31tThe requested scopes,
emailandprofile
$ curl --request POST \
--data "grant_type=password" \
--data "username=demo" \
--data "password=Ch4ng31t" \
--data "scope=profile email" \
--data "client_id=myClient" \
--data "client_secret=forgerock" \
"https://openam.example.com:8443/openam/oauth2/realms/root/realms/alpha/access_token"
Review the JSON response. It should be similar to the following:
{
  "access_token":"B78LPVHaycIrObh12Qps0n9ynYM",
  "scope":"email",
  "token_type":"Bearer",
  "expires_in":3599
}
Note how the requested scopes were
emailandprofile, but the scope granted wasemail, which matches theGRANT=Allowaction defined in the policy.
This procedure shows how to test OAuth 2.0 policies with the OpenID Connect Implicit Grant flow. In this flow, the end user can interact with the consent screen, and can therefore grant scopes.
In a web browser, make a call to the
oauth2/authorizeendpoint with the following parameters:nonce=123state=456scope=openid+email+profileresponse_type=id_tokenclient_id=myClientredirect_uri=https://www.example.com:443/callback
For example:
https://openam.example.com:8443/openam/oauth2/authorize?nonce=123&state=456&scope=openid+email+profile&response_type=id_token&client_id=myClient&redirect_uri=https://www.example.com:443/callback
You will be prompted to log in to AM.
Log in as the
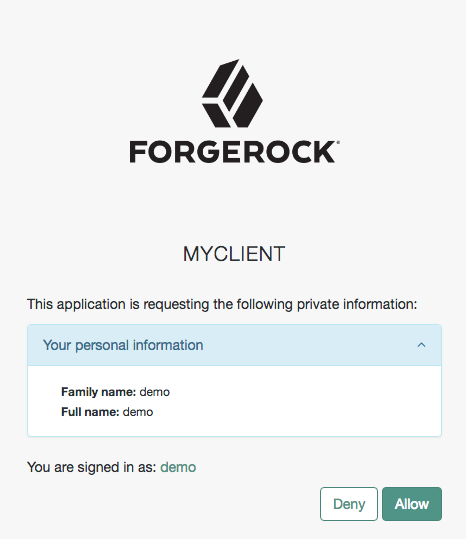
demouser.You will be prompted to provide consent for the
profilescope:Notice that you are not prompted to provide consent for the
emailscope.Allow the flow to continue.
Review the URL of the browser. It should show something similar to:
http://example.com/#scope=openid%20profile%20email&id_token=eyJ0eXJKV1Q...8WK1eg&state=456
Notice that the
emailscope has been granted automatically.If the authorization policy had been configured as
GRANT=Deny, you still would have not seen theemailscope in the consent page, but the scope would not appear in the URL of the browser.