Creating Identities Automatically with Auto-Federation
On occasion, there may not yet be an identity to link with on the SP. For example, if it is the first time a user is attempting to access the service, and they do not have an account in the SP identity store.
You can configure AM to dynamically create an account for the user in the SP identity store, using the values in the assertion as profile properties, as defined in the attribute mappings.
Before attempting to configure auto-federation to create identities based on attribute values, ensure that you have configured AM for SAML v2.0, created the identity and service providers, and configured a circle of trust. You must also have configured AM to support single sign-on. For information on performing those tasks, see Deployment Considerations and Implementing SSO and SLO.
The following steps demonstrate how to dynamically create missing accounts on the SP:
Go to Realms > Realm Name > Applications > Federation > Entity Providers, and click on the name of the hosted provider.
AM only displays the configuration of a single role. Click on the labels to select the role view:

On the hosted IDP:
Go to the Assertion Processing tab.
Review the Attribute Map configuration. If the attributes you want to populate when creating the new user are not in the map already, add them.
The IDP will send these attributes in the assertion, and the SP will then map them using its own attribute map.
The user profile attributes used here must both be allowed in user profiles, and also be specified for the identity repository. See "Adding User Profile Attributes", for instructions on allowing additional attributes in user profiles.
To see the profile attributes available for an LDAP identity repository, log in to the AM console, and go to Realms > Realm Name > Identity Stores > User Configuration. Check the LDAP User Attributes list.
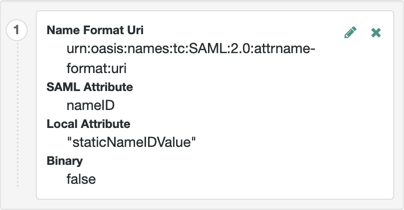
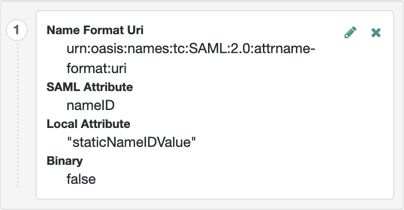
The default IDP mapping implementation allows you to add static values in addition to values taken from the user profile. You add a static value by enclosing the profile attribute name in double quotes ("), as in the following example:
Save your work.
On the hosted SP:
Go to the Assertion Processing tab.
Review the Attribute Map configuration, and ensure that the attribute mappings on the IDP are represented in the map.
The value of Key is a SAML attribute sent in an assertion, and the value of Value is a property in the user's session, or an attribute of the user's profile.
By default, the SP maps the SAML attributes it receives to equivalent-named session properties. However, when the SP is configured to create identities during autofederation and the identity does not exist yet, the SP maps the SAML attributes to their equivalents in the newly-created user profile.
The special mapping
Key: *, Value: *means that the SP maps each attribute it receives in the assertion to equivalent-named properties or attributes. For example, if the SP receivesmailandfirstnamein the assertion, it maps them tomailandfirstnamerespectively.Remove the special mapping and add key pairs to the map if:
(During autofederation) The attributes in the IdP's and the SP's identity stores do not match.
You need control over the names of the session properties.
You need control over which attributes the SP should map, because the IdP adds too many to the assertion.
For example, if the the SAML attribute is
firstnameand you want the SP to map it to a session property/user profile attribute calledcn, create a mapping similar toKey: firstname, Value: cn.Enable Auto Federation. In the Attribute property, enter the SAML attribute name that the SP will use to link accounts, as configured in the Attribute Map.
Tip
The value of the named attribute is used as the username of the created user when auto-federation is enabled.
Save your work.
Navigate to Realms > Realm Name > Authentication > Settings.
On the User Profile tab, in the User Profile field, select Dynamic or Dynamic with User Alias.
For more information the user profile property, see User Profile.
Save your work.
To test your work:
Create a new user on the identity provider, including values for any attributes you mapped in the providers.
Log out of the AM console, and initiate SSO; for example, as described in "IDP-Initiated SSO JSP".
Authenticate as the new user you created in the IDP.
On success, check
https://www.sp.com:8443/openam/XUI/#profile/detailsto see the new user account created on the SP, and the attributes that were copied from the assertion.