Configuring AM Behind a Reverse Proxy
Reverse proxies (such as ForgeRock Identity Gateway) are proxy servers that sit between clients and application servers. Their main function is to act on behalf of the application server, forwarding resources to the client as if they were the application server itself.
Modern reverse proxies also provide additional functionality such as load balancing, compression, SSL termination, web acceleration, and firewall capabilities.
Configuring a reverse proxy in front of your AM instances provides the following security benefits:
Protecting AM servers from denial of service attacks.
A reverse proxy will terminate incoming connections and reopen them against the AM servers, effectively masking the {$am.abbr} IP addresses. This makes it more difficult for attackers to launch DoS attacks against them. A firewall can prevent direct access to the AM servers.
SSL termination/SSL offloading.
Since reverse proxies terminate incoming connections to AM, they also decrypt the HTTPS requests and pass them unencrypted to the container where AM runs.
This has several benefits, such as removing the need to install certificates in the containers, which simplifies the management of SSL/TLS.
Depending on your environment, though, you may decide to configure SSL/TLS between AM and the reverse proxy, or configure the proxy to pass-through the SSL traffic to the container where AM runs.
This guide, and the examples in other AM guides default to AM being configured to use HTTPS communication.
Provide a unique point of access to AM.
Configuring a reverse proxy in front of AM creates a channel between the public network and the internal network.
Since all communication to AM needs to come from the reverse proxy, you can, for example, restrict access to a set of trusted networks. You can fine-tune the access restrictions for each request and apply rate-limiting and load balancing such that a possible attack does not bring down your whole infrastructure.
Protect Endpoints
In the same way that you can restrict access to trusted networks, you can also restrict access to any endpoint AM is exposing.
AM exposes a number of internal administration endpoints, such as the
/sessionserviceendpoint. You must ensure those are not reachable over the Internet.For a list of internal endpoints that you should protect, see Service Endpoints.
Regarding feature endpoints, AM makes endpoints accessible the moment an administrator creates a service. For example, the OAuth 2.0 endpoints are not available by default, but configuring an instance of the OAuth 2.0 provider service in a realm will make the endpoints available for that realm.
You must ensure you are exposing the correct endpoints to the Internet.
Recommending how to set up your network infrastructure is beyond the scope of this guide. There are too many permutations that are valid use cases; for example, some environments may deploy a reverse proxy for its load balancing capabilities instead of dedicated, hardware-based load balancers. More complex deployments may have multiple layers of firewalls, load balancers, and reverse proxies.
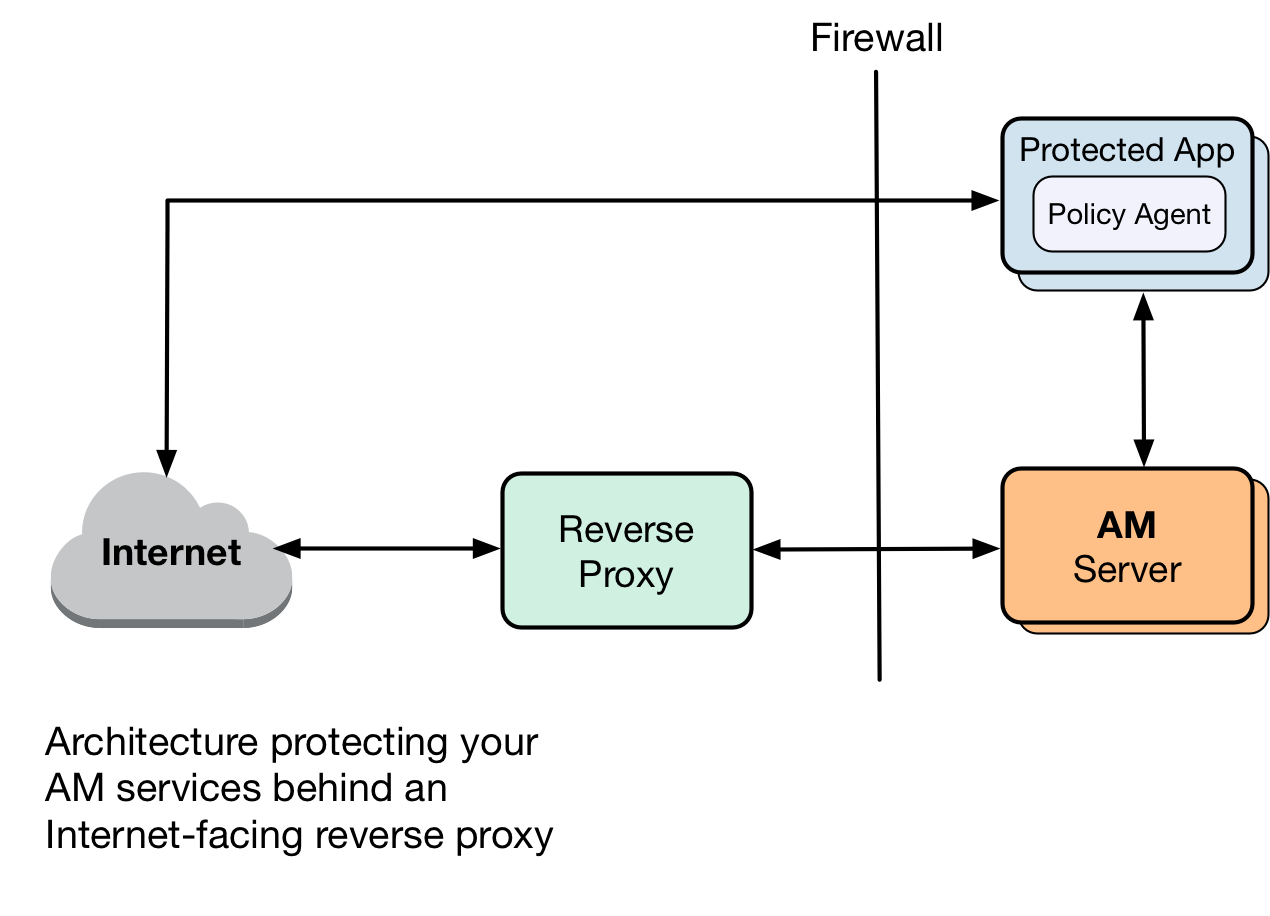
The following figure is an example of a possible configuration:
The following table summarizes the high-level tasks required to configure AM when it is behind a proxy:
| Task | Resources |
|---|---|
| Configure the Proxy's Details Configure AM or the container where it runs to route outbound traffic through the proxy. | "Configuring AM for Outbound Communication" |
| Configure the Base URL Service Services configure their endpoints based on AM's URL. The Base URL Service remaps the endpoints of the services that require it to the proxy's URL. | "Configuring the Base URL Source Service" |
Configuring AM for Outbound Communication
Clients from different networks connect to AM to use its functionality. These clients initiate communication with AM and the container where it runs. However, when AM acts as a client to a third-party application, it makes outbound calls outside its container to retrieve information or services.
When AM is behind a proxy, you must route AM's client through the proxy. To do so, provide the proxy's details to AM and the container where it runs:
Set the relevant proxy JVM options in the container where AM runs.
-Dhttps.proxyHostIP address or hostname of the proxy server. For example,
proxy.example.com.-Dhttps.proxyPortPort number of the proxy server. For example,
8443.-Dhttp.nonProxyHostsA pipe-separated (|) list of IP addresses or hostnames that should be reached directly, bypassing the proxy configuration. For example,
localhost|internal.example.com.Use wildcards (*) at the beginning or the end of the address or hostname. For example,
*.example.comorinternal*.
-Dhttp.proxyHostIP address or hostname of the proxy server. For example,
proxy.example.com.-Dhttp.proxyPortPort number of the proxy server. For example,
8080.-Dhttp.nonProxyHostsA pipe-separated (|) list of IP addresses or hostnames that should be reached directly, bypassing the proxy configuration. For example,
localhost|internal.example.com.Use wildcards (*) at the beginning or the end of the address or hostname. For example,
*.example.comorinternal*.
For example, set the properties in the
JAVA_OPTSvariable of the$CATALINA_BASE/bin/setenv.shApache Tomcat file.Understand whether your proxy requires authentication:
If the proxy requires authentication:
In the
org.forgerock.openam.httpclienthandler.system.proxy.uriadvanced server property, configure the URI of the proxy. The URI must be in the formatscheme://hostname:port. For example,https://myproxy.example.com:443.To configure advanced server properties in the AM Admin UI for all AM instances, go to Configure > Server Defaults > Advanced.
To configure advanced server properties for a particular instance, go to Deployment > Servers > Server Name > Advanced.
If the property you want to add or edit is not already configured, add it with its value, then click on the plus () button.
If the property you want to add or edit is already configured, click on the pencil () button to edit it. When you are finished, click on the tick () button.
Save your changes.
In the
org.forgerock.openam.httpclienthandler.system.proxy.usernameand theorg.forgerock.openam.httpclienthandler.system.proxy.passwordadvanced server properties, configure the proxy's credentials.In the
org.forgerock.openam.httpclienthandler.system.nonProxyHostsadvanced server property, provide one or more target hosts for which resulting HTTP client requests should not be proxied.The list must comma-separated, for example
localhost,127.*,*.example.com.
Configuring these properties lets features using ForgeRock's ClientHandler code use the proxy settings defined in the advanced server properties.
If the proxy does not require authentication:
Set the
org.forgerock.openam.httpclienthandler.system.proxy.enabledadvanced server property totrue.To configure advanced server properties in the AM Admin UI for all AM instances, go to Configure > Server Defaults > Advanced.
To configure advanced server properties for a particular instance, go to Deployment > Servers > Server Name > Advanced.
If the property you want to add or edit is not already configured, add it with its value, then click on the plus () button.
If the property you want to add or edit is already configured, click on the pencil () button to edit it. When you are finished, click on the tick () button.
Save your changes.
Configuring this property lets features using ForgeRock's ClientHandler code use the JVM proxy settings.
For more information about the advanced server properties, see "Advanced Properties".
Tip
You can tune the connection factory behavior of the features that use ForgeRock's ClientHandler code. For example, the scripting engine, or the social provider authentication nodes.
The following advanced server properties control different aspects of the connection factory:
org.forgerock.openam.httpclienthandler.system.clients.connection.timeoutorg.forgerock.openam.httpclienthandler.system.clients.max.connectionsorg.forgerock.openam.httpclienthandler.system.clients.pool.ttlorg.forgerock.openam.httpclienthandler.system.clients.response.timeoutorg.forgerock.openam.httpclienthandler.system.clients.retry.failed.requests.enabledorg.forgerock.openam.httpclienthandler.system.clients.reuse.connections.enabled
They have sensible defaults configured, but if you need to change them, see Advanced Properties.
Configuring the Base URL Source Service
In many deployments, AM determines the base URL of a provider using the incoming HTTP request. However, there are often cases when the base URL of a provider cannot be determined from the incoming request alone, especially if the provider is behind some proxying application. For example, if an AM instance is part of a site where the external connection is over SSL but the request to the AM instance is over plain HTTP, then AM would have difficulty in reconstructing the base URL of the provider.
In these cases, AM supports a provider service that allows a realm to have a configured option for obtaining the base URL including protocol for components that need to return a URL to the client.
Log in to the AM console as an administrative user, such as
amAdmin, and then navigate to Realms > Realm Name > Services.Click Add a Service, select Base URL Source, and then click Create, leaving the fields empty.
For Base URL Source, select one of the following options:
Option Description Extension class Click the Extension class to return a base URL from a provided
HttpServletRequestobject. In the Extension class name field, enterorg.forgerock.openam.services.baseurl.BaseURLProvider.Fixed value Click Fixed value to enter a specific base URL value. In the Fixed value base URL field, enter the base URL.
Forwarded header Click Forwarded header to retrieve the base URL from the
Forwardedheader field in the HTTP request. The Forwarded HTTP header field is standardized and specified in RFC 7239.Host/protocol from incoming request (default) Click Host/protocol from incoming request to get the hostname, server name, and port from the HTTP request.
X-Forwarded-* headers Click X-Forwarded-* headers to use non-standard header fields, such as
X-Forwarded-For,X-Forwarded-By, andX-Forwarded-Proto.In the Context path, enter the context path for the base URL. If provided, the base URL includes the deployment context path appended to the calculated URL. For example,
/openam.Click Finish to save your configuration.