Run Analytics
The Analytics pipeline is the heart of Autonomous Identity. The pipeline analyzes, calculates, and determines the association rules, confidence scores, predictions, and recommendations for assigning entitlements and roles to the users.
The analytics pipeline is an intensive processing operation that can take time depending on your dataset and configuration. To ensure an accurate analysis, the data needs to be as complete as possible with little or no null values. Once you have prepared the data, you must run a series of analytics jobs to ensure an accurate rendering of the entitlements and confidence scores.
Pre-Analytics Tasks
Before running the analytics, you must run the following pre-analytics steps to set up your datasets and schema using the Autonomous Identity UI:
-
Add attributes to the schema. For more information, see Set Entity Definitions.
-
Define your datasources. Autonomous Identity supports different file types for ingestion: CSV, JDBC, and generic. You can enter more than one data source file, specifying the dataset location on your target machine. For more information, see Set Data Sources.
-
Define attribute mappings between your data and the schema. For more information, see Set Attribute Mappings.
-
Configure your analytics threshold values. For more information, see Set Analytics Thresholds.
About the Analytics Process
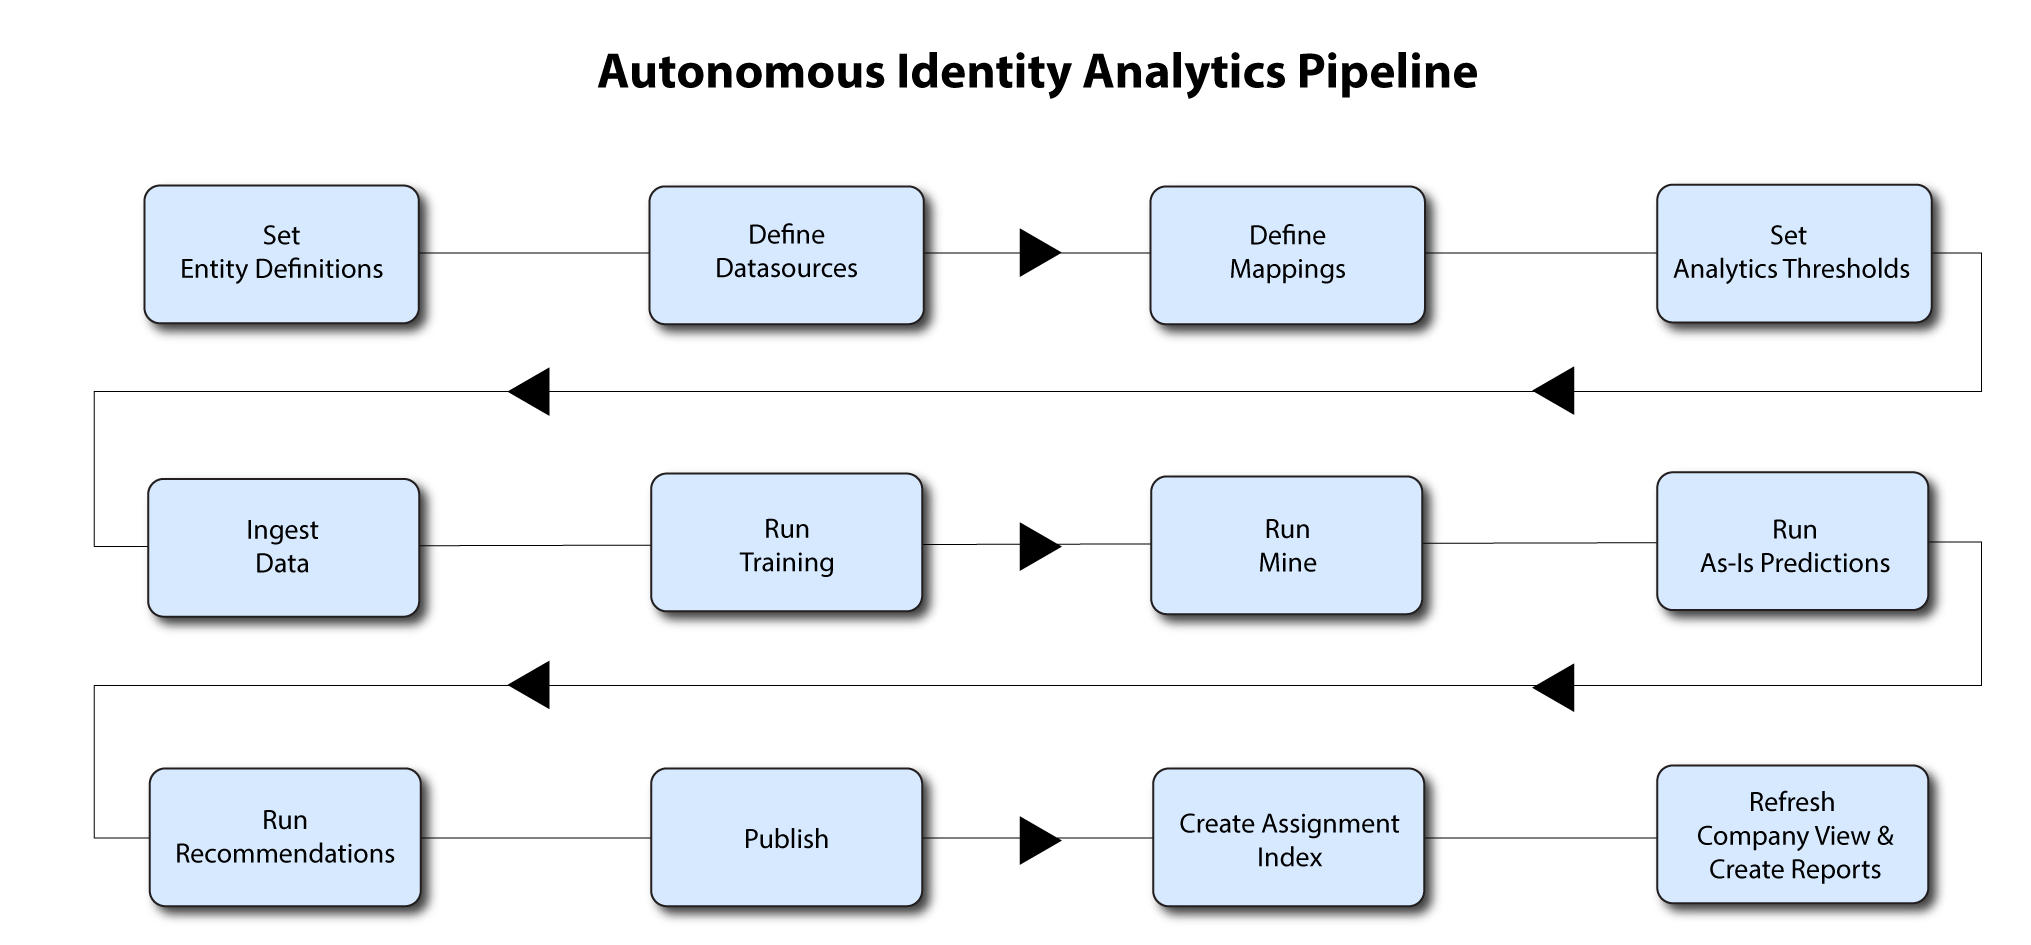
Once you have finished the pre-analytics steps, you can start the analytics. The general analytics process is outlined as follows:
-
Ingest. The ingestion job pulls in data into the system. You can ingest CSV, JDBC, and generic JSON files depending on your system.
-
Training. The training job creates the association rules for each user-assigned entitlement. This is a somewhat intensive operation as the analytics generates a million or more association rules. Once the association rules have been determined, they are applied to user-assigned entitlements.
-
Role Mining. The role mining job analyzes all existing entitlements and analyzes candidate configurations for new roles.
-
Predict As-Is. The predict as-is job determines the current confidence scores for all assigned entitlements.
-
Predict Recommendation. The predict recommendations job looks at all users who do not have a specific entitlement, but are good candidates to receive the entitlement based on their user attribute data.
-
Publish. The publish run publishes the data to the backend Cassandra or MongoDB databases.
-
Create Assignment Index. The create-assignment-index creates the Autonomous Identity index.
-
Refresh Company View. Run refresh-company-view to refresh the indexes and company view display. Currently, you can only run this procedure on the command line.
-
Run Reports. You can run the create-assignment-index-report (report on index creation), anomaly (report on anomalous entitlement assignments), insight (summary of the analytics jobs), and audit (report on change of data).
|
The analytics pipeline requires that DNS properly resolve the hostname before its start. Make sure to set it on your DNS server or locally in your |
The following sections present the steps to run the analytics pipeline using the Jobs UI.
|
You can continue to use the command-line to run each step of the analytics pipeline. For instructions, see see Run Analytics on the Command Line. |
Ingest the Data Files
At this point, you should have set your data sources and configured your attribute mappings. You can now run the initial analytics job to import the data into the Cassandra or MongoDB database.
Run ingest using the UI:
-
On the Autonomous Identity UI, click the Administration link, and then click Jobs.
-
On the Jobs page, click New Job. You will see a job schedule with each job in the analytics pipeline.
-
Click Ingest, and then click Next.
-
On the New Ingest Job box, enter the name of the job, and then select the data source file.
-
Click Advanced and adjust any of the Spark properties, if necessary:
-
Driver Memory (GB)
-
Driver Cores
-
Executor Memory (GB)
-
Executor Cores
-
-
Click Save to continue.
-
Click one of the following commands:
-
If you need to edit any of the job settings, click Edit.
-
If you want to remove the job from your Jobs page, click Delete job.
-
-
Click Run Now to start the ingestion run.
-
Next monitor the state of the job by clicking Logs, or click Refresh to update the Jobs page.
-
When the job completes, you can see the change in the status.
See it in action
Run Training
After you have ingested the data into Autonomous Identity, start the training run.
Training involves two steps:
-
Autonomous Identity starts an initial machine learning run where it analyzes the data and produces association rules, which are relationships discovered within your large set of data. In a typical deployment, you can have several million generated rules. The training process can take time depending on the size of your data set.
-
Each of these rules are mapped from the user attributes to the entitlements and assigned a confidence score.
The initial training run may take time as it goes through the analysis process. Once it completes, it saves the results directly to the database.
Run training using the UI:
-
On the Autonomous Identity UI, click the Administration link, and then click Jobs.
-
On the Jobs page, click New Job. You will see a job schedule with each job in the analytics pipeline.
-
Click Training, and then click Next.
-
On the New Training Job box, enter the name of the job.
-
Click Advanced and adjust any of the Spark properties, if necessary.
-
Click Save to continue.
-
Click Run Now.
-
Next monitor the state of the job by clicking Logs, or click Refresh to update the Jobs page.
-
When the job completes, you can see the change in the status.
See it in action
Run Role Mining
After you have run training, you can now run the role mining job.
If you want to update your role mining data after an initial analytics job, you can minimally run the ingest, train, and mine analytics jobs.
However, we recommend re-running the full analytics pipeline, so that other pages can pick up changes to your access landscape.
|
Run role mining using the UI:
-
On the Autonomous Identity UI, click the Administration link, and then click Jobs.
-
On the Jobs page, click New Job. You will see a job schedule with each job in the analytics pipeline.
-
Click Role Mining, and then click Next.
-
On the New Role Mining Job box, enter the name of the job.
-
Click Advanced and adjust any of the Spark properties, if necessary.
-
Click Save to continue.
-
Click Run Now.
-
Next monitor the state of the job by clicking Logs, or click Refresh to update the Jobs page.
-
When the job completes, you can see the change in the status.
See it in action
Run As-Is Predictions
After your initial training run, the association rules are saved to disk. The next phase is to use these rules as a basis for the predictions module.
The predictions module is comprised of two different processes:
-
as-is. During the As-Is Prediction process, confidence scores are assigned to the entitlements that users currently have. The as-is process maps the highest confidence score to the highest
freqUnionrule for each user-entitlement access. These rules will then be displayed in the UI and saved directly to the database. -
Recommendations. See [run-recommendations].
Run predict as-is using the UI:
-
On the Autonomous Identity UI, click the Administration link, and then click Jobs.
-
On the Jobs page, click New Job. You will see a job schedule with each job in the analytics pipeline.
-
Click Predict-As-Is, and then click Next.
-
On the New Predict-As-Is Job box, enter the name of the job.
-
Click Advanced and adjust any of the Spark properties, if necessary.
-
Click Save to continue.
-
Click Run Now.
-
Next monitor the state of the job by clicking Logs, or click Refresh to update the Jobs page.
-
When the job completes, you can see the change in the status.
See it in action
Run Recommendations
During the second phase of the predictions process, the recommendations process analyzes each employee who may not have a particular entitlement and predicts the access rights that they should have according to their high confidence score justifications. These rules will then be displayed in the UI and saved directly to the database.
Run predict-recommendation using the UI:
-
On the Autonomous Identity UI, click the Administration link, and then click Jobs.
-
On the Jobs page, click New Job. You will see a job schedule with each job in the analytics pipeline.
-
Click Predict-Recommendation, and then click Next.
-
On the New Predict-Recommendation Job box, enter the name of the job.
-
Click Advanced and adjust any of the Spark properties, if necessary.
-
Click Save to continue.
-
Click Run Now.
-
Next monitor the state of the job by clicking Logs, or click Refresh to update the Jobs page.
-
When the job completes, you can see the change in the status.
See it in action
Publish the Analytics Data
Populate the output of the training, predictions, and recommendation runs to a large table with all assignments and justifications for each assignment. The table data is then pushed to the Cassandra or MongoDB backend.
Run publish using the UI:
-
On the Autonomous Identity UI, click the Administration link, and then click Jobs.
-
On the Jobs page, click New Job. You will see a job schedule with each job in the analytics pipeline.
-
Click Publish, and then click Next.
-
On the New Publish Job box, enter the name of the job.
-
Click Advanced and adjust any of the Spark properties, if necessary.
-
Click Save to continue.
-
Click one of the following commands:
-
Click Run Now.
-
Next monitor the state of the job by clicking Logs, or click Refresh to update the Jobs page.
-
When the job completes, you can see the change in the status.
See it in action
Create Assignment Index
Next, run the create-assignment-index job. This command creates a master index by joining together all database
tables. The combined index becomes a source index for the APIs.
Run create-assignment-index using the UI:
-
On the Autonomous Identity UI, click the Administration link, and then click Jobs.
-
On the Jobs page, click New Job. You will see a job schedule with each job in the analytics pipeline.
-
Click Create Assignment Index, and then click Next.
-
On the New Create Assignment Index Job box, enter the name of the job.
-
Click Advanced and adjust any of the Spark properties, if necessary.
-
Click Save to continue.
-
Click Run Now.
-
Next monitor the state of the job by clicking Logs, or click Refresh to update the Jobs page.
-
When the job completes, you can see the change in the status.
See it in action
The create-assignment-index-report is an export of the assignment index to a csv file. This allows
users to create custom reports from the master table.
|
Refresh Company View
Next, refresh the indexes and company view display with the updated data. ForgeRock has set up an alias to run the command from the target server.
|
Currently, this procedure can only be run on the command line within a terminal window. In a future release, you will be able to run this command from the Jobs UI. |
-
In a terminal window, SSH to the target server.
-
Run the refresh-company-view alias.
$ refresh-company-view
You will see the following output:
021-10-08 19:04:30,043 INFO ServiceConfigParser [main] Building JAS config
2021-10-08 19:04:30,121 INFO SSLUtils [main] --→ KeyStore path :
2021-10-08 19:04:30,130 INFO SSLUtils [main] --→ Truststore path : /opt/autoid/certs/jas/jas-server-truststore.jks
2021-10-08 19:04:30,460 INFO ServiceConfigParser [main] Building JAS config
2021-10-08 19:04:30,624 INFO ServiceConfigParser [main] Building elasticsearch config
2021-10-08 19:04:30,768 INFO SSLUtils [main] --→ KeyStore path : /opt/autoid/certs/elastic/elastic-client-keystore.jks
2021-10-08 19:04:30,770 INFO SSLUtils [main] --→ Truststore path : /opt/autoid/certs/elastic/elastic-server-truststore.jks
2021-10-08 19:04:31,373 INFO RefreshCompanyView [main] → Index Deleted
2021-10-08 19:04:31,373 INFO RefreshCompanyView [main] → Refreshing Company View Cache
2021-10-08 19:04:31,393 INFO ServiceConfigParser [main] Building JAS config
2021-10-08 19:04:33,866 INFO RefreshCompanyView [main] → Refreshing Assignment Stats
2021-10-08 19:04:33,885 INFO ServiceConfigParser [main] Building JAS config
2021-10-08 19:04:38,492 INFO RefreshCompanyView [main] → Refreshing Most Critical Assignments
2021-10-08 19:04:38,510 INFO ServiceConfigParser [main] Building JAS config
2021-10-08 19:04:41,418 INFO RefreshCompanyView [main] → Job finished
Run Anomaly Report
Autonomous Identity provides a report on any anomalous entitlement assignments that have a low confidence score but are for entitlements that have a high average confidence score. The report’s purpose is to identify true anomalies rather than poorly managed entitlements.
The report generates the following points:
-
Identifies potential anomalous assignments.
-
Identifies the number of users who fall below a low confidence score threshold. For example, if 100 people all have low confidence score assignments to the same entitlement, then it is likely not an anomaly. The entitlement is either missing data or the assignment is poorly managed.
Run the anomaly report using the UI:
-
On the Autonomous Identity UI, click the Administration link, and then click Jobs.
-
On the Jobs page, click New Job. You will see a job schedule with each job in the analytics pipeline.
-
Click Anomaly, and then click Next.
-
On the New Anomaly Job box, enter the name of the job.
-
Click Advanced and adjust any of the Spark properties, if necessary.
-
Click Save to continue.
-
Click Run Now to start the ingestion run.
-
Next monitor the state of the job by clicking Logs, or click Refresh to update the Jobs page.
-
When the job completes, you can see the change in the status.
-
Access the anomaly report. The report is available at
/data/output/reports/anomaly_report/<report-id>.csv.
Run Insight Report
Next, run an insight report on the generated rules and predictions that were generated during the training and predictions runs. The analytics command generates insight_report.txt and insight_report.xlsx and writes them to the /data/input/spark_runs/reports
directory.
The report provides the following insights:
-
Number of assignments received, scored, and unscored.
-
Number of entitlements received, scored, and unscored.
-
Number of assignments scored >80% and <5%.
-
Distribution of assignment confidence scores.
-
List of the high volume, high average confidence entitlements.
-
List of the high volume, low average confidence entitlements.
-
Top 25 users with more than 10 entitlements.
-
Top 25 users with more than 10 entitlements and confidence scores greater than 80%.
-
Top 25 users with more than 10 entitlements and confidence scores less than 5%.
-
Breakdown of all applications and confidence scores of their assignments.
-
Supervisors with most employees and confidence scores of their assignments.
-
Top 50 role owners by number of assignments.
-
List of the "Golden Rules," high confidence justifications that apply to a large volume of people.
Run the insight report using the UI:
-
On the Autonomous Identity UI, click the Administration link, and then click Jobs.
-
On the Jobs page, click New Job. You will see a job schedule with each job in the analytics pipeline.
-
Click Insight, and then click Next.
-
On the New Insight Job box, enter the name of the job.
-
Click Advanced and adjust any of the Spark properties, if necessary.
-
Click Save to continue.
-
Click Run Now.
-
Next monitor the state of the job by clicking Logs, or click Refresh to update the Jobs page.
-
When the job completes, you can see the change in the status.
-
Access the insight report. The report is available at
/data/output/reports/insight_report.xlsx.
Run Analytics on the Command Line
Autonomous Identity supports the ability to run the pipeline from the command-line. Before you run the pipeline commands, you must run the pre-analytic tasks as defined in Pre-Analytics Tasks, and then define the jobs on the Jobs UI.
|
The analytics pipeline CLI commands will be deprecated in a future release. We recommend using the Jobs UI to run the analytics jobs. |
Run the CLI analytics commands:
-
Make sure to run the pre-analytics tasks, such as adding attributes to the schema, define your datasources, set up your attribute mappings, and adjusting your analytics threshold values, if necessary:
-
Add attributes to the schema. For more information, see Set Entity Definitions.
-
Define your datasources. Autonomous Identity supports different file types for ingestion: CSV, JDBC, and generic. You can enter more than one data source file, specifying the dataset location on your target machine. For more information, see Set Data Sources.
-
Define attribute mappings between your data and the schema. For more information, see Set Attribute Mappings.
-
Configure your analytics threshold values. For more information, see Set Analytics Thresholds.
-
-
Define your job definitions on the UI for each of the following:
You can only define your job definitions on the Autonomous Identity UI. There is no command-line equivalent to define the jobs.
-
Ingest
-
Train
-
Role Mine
-
Predict As-Is
-
Predict Recommendation
-
Publish
-
Create Assignment Index
-
Anomaly Report (Optional)
-
Insight Report (Optional)
-
Audit Report (Optional)
See it in action
-
-
In a terminal window, SSH to the target server.
-
Change to the
analyticsdirectory.$ cd /opt/autoid/apache-livy/analytics
-
Run each of the following jobs to completion, and then submit the next job.
-
Run the ingest job.
$ analytics run <ingest-job-definition-name>

For example:
$ analytics run ingestShowcaseData
-
When the ingest job completes, you can run a status command to confirm its completion:
$ analytics status ingestShowcaseData

2021-09-20 23:18:55 INFO  AnalyticsJobsClient:104 - → checking analytic job status for --→  ingestShowcaseData
2021-09-20 23:18:55 INFO  ServiceConfigParser:54 - Building JAS config
2021-09-20 23:18:55 INFO  JASHelper:49 - → Building new SSL context for JAS REST Client using trust store
2021-09-20 23:18:55 INFO  SSLUtils:36 - --→ KeyStore path :
2021-09-20 23:18:55 INFO  SSLUtils:44 - --→ Truststore path : /opt/autoid/certs/jas/jas-server-truststore.jks
2021-09-20 23:18:55 INFO  ServiceConfigParser:54 - Building JAS config
 Job Status result
********************************
Job Status for ingestShowcaseData -→  COMPLETED
********************************
-
Run the training job.
$ analytics run <training-job-definition-name>

For example:
$ analytics run trainShowcaseData
-
Run the role mining job.
$ analytics run <role-mining-job-definition-name>

For example:
$ analytics run roleMining
-
Run the predict-as-is job.
$ analytics run <predict-asis-job-definition-name>

For example:
$ analytics run predictAsIs
-
Run the predict-recommendation job.
$ analytics run <predict-recommendation-job-definition-name>

For example:
$ analytics run predictRecommendation
-
Run the publish job.
$ analytics run <publish-job-definition-name>

For example:
$ analytics run publishShowcaseData
-
Run the create assignment index job.
$ analytics run <create-assignment-index-definition-name>

For example:
$ analytics run createAssignmentIndex
-
Run the refresh-company-view alias. See Refresh Company View for more information.
-
Optional. Run the anomaly report job.
$ analytics run <anomaly-report-definition-name>

For example:
$ analytics run anomalyReport
-
Optional. Run the insight report job.
$ analytics run <insight-report-definition-name>

For example:
$ analytics run insightReport
-
Optional. Run the audit report job.
$ analytics run <audit-report-definition-name>

For example:
$ analytics run auditReport
-
-
Click the Autonomous Identity UI Dashboard. The page reloads with your data.