Guide to securing ForgeRock® Directory Services deployments.
ForgeRock Identity Platform™ serves as the basis for our simple and comprehensive Identity and Access Management solution. We help our customers deepen their relationships with their customers, and improve the productivity and connectivity of their employees and partners. For more information about ForgeRock and about the platform, see https://www.forgerock.com.
The ForgeRock Common REST API works across the platform to provide common ways to access web resources and collections of resources.
This guide helps you to reduce risk and mitigate threats to directory service security.
A guide to securing directory services can go wrong for many reasons, including at least the following:
The author fails to understand or to properly explain the subject.
The reader fails to understand or to act on what is written.
Bugs exist in the directory's security-related features.
The authors of this guide aim to understand directory security features and issues before attempting to explain how to manage them.
The reader would do well to gain grounding in securing services and systems, and in applying and designing processes that prevent or mitigate threats, before reading the guide with a critical eye and a grain of salt. This is not a guide to getting started with security.
In reading and following the instructions in this guide, you will learn how to:
Identify common threats to directory service security
Understand the features designed to make directory services more secure
Use operating system features to improve security
Use Java features to improve security, and keep Java software up to date
Use web container security features to protect the DSML and REST to LDAP gateways
Make installation of Directory Services software more secure after setup
Manage Directory Services certificates and private keys
Secure connections from client applications to Directory Services
Configure secure authentication mechanisms
Secure directory administration and render administration more subject to audit
Secure access from client applications to directory data
Protect directory data within the server and on disk
Encourage best practices by client application developers
Use Directory Services features to monitor directory security
Test directory services for security before deployment
ForgeRock publishes comprehensive documentation online:
The ForgeRock Knowledge Base offers a large and increasing number of up-to-date, practical articles that help you deploy and manage ForgeRock software.
While many articles are visible to community members, ForgeRock customers have access to much more, including advanced information for customers using ForgeRock software in a mission-critical capacity.
ForgeRock product documentation, such as this document, aims to be technically accurate and complete with respect to the software documented. It is visible to everyone and covers all product features and examples of how to use them.
The ForgeRock.org site has links to source code for ForgeRock open source software, as well as links to the ForgeRock forums and technical blogs.
If you are a ForgeRock customer, raise a support ticket instead of using the forums. ForgeRock support professionals will get in touch to help you.
ForgeRock provides support services, professional services, training through ForgeRock University, and partner services to assist you in setting up and maintaining your deployments. For a general overview of these services, see https://www.forgerock.com.
ForgeRock has staff members around the globe who support our international customers and partners. For details on ForgeRock's support offering, including support plans and service level agreements (SLAs), visit https://www.forgerock.com/support.
In this chapter you will review common threats to secure directory services, which you can mitigate by following the instructions in this guide.
Directory services are well suited as a central, distributed store for identity data and credentials.
Standard access protocols, and delegated access and data management mean you might not know which client applications use your services. Some client applications might not behave securely, however. Be sure to encourage secure client application behavior:
Prevent insecure connections.
Have applications connect with LDAPS and HTTPS, and make sure that you restrict the protocol versions and cipher suites for negotiating secure connections to those with no known vulnerabilities. For details, see "Securing Network Connections".
Accept only secure management of sensitive data.
Nothing in LDAPv3 or HTTP prevents a client application from sending credentials and other sensitive account data in cleartext. You can configure the directory to discourage the practice, however.
As much as possible, require that applications connect with LDAPS and HTTPS.
For public directory server information, such as root DSE attributes and LDAP schema, allow applications to read anonymously over LDAP, and to request a StartTLS extended operation over LDAP, but set ACIs to deny other operations.
Encourage secure authentication.
For details, see "Securing Authentication".
Encourage best practices for client applications, such as those described above and scrubbing input to avoid injection vulnerabilities.
Best practices are described in "Best Practices for Client Applications".
In addition to the threats described in "Insecure Client Applications", client applications can abuse directory services.
Abuse can be innocent, where poorly constructed or incorrectly configured clients waste server resources. In such cases, you might help the owner fix the problem.
Abuse can be intentional, as in a denial-of-service attack. In such cases, you must aim to protect the directory service itself.
Unreasonable requests from client applications include the following:
Unindexed searches that would require the directory to evaluate all entries.
Unindexed searches are not allowed by default for normal accounts, adjustable with the
unindexed-searchprivilege.The access log records attempts to perform unindexed searches.
Excessive use of overly broad persistent searches, particularly by clients that do not process the results quickly.
Review requests before setting ACIs to grant access to use the persistent search control. Client applications might alternatively read the external change log, as described in "Change Notification For Your Applications" in the Administration Guide. See also "To Limit Concurrent Persistent Searches" in the Administration Guide.
Extremely large requests, for example to update directory entries with large values.
By default, requests larger than 5 MB are refused, according to the connection handler setting,
max-request-size.Requests that make excessive demands on server resources.
Set resource limits as described in "Setting Resource Limits".
Requests to read entire large group entries only to check membership.
Encourage client applications to read the
isMemberOfattribute on the account instead.
Despite efforts to improve how people manage passwords, users have more passwords than ever before, and many use weak passwords. In addition to consolidating identity providers, and using modern access management protocols like OAuth 2.0 to avoid password proliferation, you can ensure the safety of passwords that you cannot eliminate.
As a central source of authentication credentials, directory services provide excellent password management capabilities. DS servers have flexible password policy settings, and a wide range of safe password storage options. Be sure that the passwords stored in your directory service are appropriately strong and securely stored.
For details, see "Configuring Password Policy" and "Enforcing Strong Passwords and Strong Password Storage".
Manage passwords for server administration securely as well. Passwords supplied to directory server tools can be provided in files, interactively, through environment variables, or as system property values. Choose the approach that is most appropriate and secure for your deployment.
Also make sure that directory administrators manage their passwords well. To avoid password proliferation for directory administrators, consider assigning administration privileges and granting access to existing accounts for delegated administrative operations. For details, see "Securing Directory Administration" and "Securing Access to Directory Data".
With the power to administer directory services comes the responsibility to make sure the configuration is correct. Misconfiguration can arise from bad or mistaken configuration decisions, and from poor change management.
Bad configuration decisions can result in problems such as the following:
A particular feature stops working.
Depending on the configuration applied, features can stop working in obvious or subtle ways.
For example, if a configuration change prevents the server from making LDAPS connections, many applications will no longer be able to connect, and so the problem will be detected immediately. If the configuration change simply allows insecure TLS protocol versions or cipher suites for LDAPS connections, some applications will negotiate insecure TLS, but they will appear to continue to work properly.
Access policy is not correctly enforced.
Incorrect parameters for secure connections and incorrect ACIs can lead to overly permissive access to directory data, and potentially to a security breach.
The server fails to restart.
Although failure to start a server is not directly a threat to security, it can affect dependent identity and access management systems.
Generally a result of editing the server configuration LDIF incorrectly, this problem can usually be avoided by using configuration tools instead, such as dsconfig and dsreplication. A server that started correctly saves a copy of the configuration in the
var/config.ldif.startokfile. You can compare this with theconfig/config.ldiffile if the server fails to restart.
To guard against bad configuration decisions, implement good change management:
For all enabled features, understand why they are enabled and what your configuration choices mean.
This implies review of configuration settings, including default settings that you accept.
Validate configuration decisions with thorough testing.
For details, see "Testing Secure Deployments".
Maintain a record of your configurations and the changes applied.
For example, use a filtered directory audit log and version control software for any configuration scripts and to record changes to configuration files.
Make sure you also maintain a record of external changes on the system, such as changes to operating system configuration, and updates to software such as the JVM that introduce security changes.
Strongly encourage owners of applications that change ACIs, collective attributes, and similar settings in directory data to also follow good change management practices.
Data theft can occur from outside the directory service when access policies are too permissive, and when the credentials to gain access are too easily cracked. It can occur from inside when the data is not protected, when administrative roles are too permissive, and when administrative credentials are poorly managed.
To protect against unauthorized access over the network, see the suggestions in "Insecure Client Applications", "Weak Passwords and Bad Password Management", and "Securing Access to Directory Data".
To protect against unauthorized access from those inside the organization who might gain access to directory files, see the suggestions in "Protecting Directory Files", and "Securing Directory Administration". Encrypt backup files as described in "Protect DS Server Files".
In addition to the risks associated poor configuration management outlined in "Misconfiguration", threats can arise when plans fail to account for outside risks.
Develop appropriate answers to at least the following questions:
What happens when a server or an entire data center becomes unavailable?
How do you remedy a serious security issue in the service, either in the directory service software or the underlying systems?
How do you validate mitigation plans and remedial actions?
How do client applications deal with the directory service being offline?
If client applications require always-on directory services, how do your operations ensure high availability, even when a server or data center goes offline?
For a critical directory service, you must test both normal, expected operation as described in "Testing Secure Deployments", and procedures to recover from disaster.
An important part of understanding how to make directory services secure is understanding directory server security features. In this short introduction to security features you will learn the basics of how DS software handles the following:
Encryption and digests
Connection management
Cryptographic key management
Authentication
Authorization
Monitoring and logging
When DS servers must store sensitive data, and simply protecting the data on the file system is not sufficient, they can either store encrypted data or a digest:
Encryption turns source data into a reversible code. Good design makes it extremely hard to recover the data from the code without the decryption key.
Encryption in the directory uses keys and cryptographic algorithms to convert source data into encrypted codes and back again. Given the decryption key and the details of the algorithm, converting an encrypted code back to source data is straightforward, though it can be computationally intensive.
DS software does not implement its own versions of all encryption algorithms. Instead, it often relies on cryptographic algorithms provided by the underlying JVM. DS server do manage access to encryption keys, however. An important part of server configuration concerns key management, as described below.
A digest (also called a hash) is a non-reversible code generated from source data using a one-way hash function. (A hash function is one that converts input of arbitrary size into output of fixed size.) Good one-way hash design design makes it impossible to retrieve the source data even if you have access to the hash function.
The hash function does make it easy to check whether a given value matches the original. Convert the value into a digest with the same hash function. If the new digest matches the original digest, then the values are also identical.
In DS software, two types of encryption keys are used:
Symmetric keys, also called secret keys because they must be kept secret.
A single symmetric key is used for both encryption and decryption.
Asymmetric key pairs, consisting of a sharable public key and a secret private key.
Either key can be used for encryption and the other for decryption.
DS servers use encryption in a number of ways. For example, the server can encrypt backend databases and backup files on disk. It can also encrypt password values. Another important use of encryption is to make network connections secure. For details about encryption keys, see "About Certificates, Private Keys, and Secret Keys". For information about symmetric key distribution, see "Cryptographic Key Management", and "How Secret Keys are Distributed".
DS server use digests in a number of ways. For example, the server can store salted password hashes instead of encrypted passwords, making the original passwords extremely hard to recover even given access to the values that are stored. (In this context, salt is random data used as additional input to a hash function to increase the difficulty of cracking the passwords by applying the hash function to common passwords and looking for matches.) It also uses digests for authentication as described in "Authenticating Using Digest MD5".
DS server management of incoming client connections is built on connection handlers. Each connection handler is responsible for accepting client connections, reading requests, and sending responses. Connection handlers are specific to the protocol used. In other words, the connection handlers for LDAP and HTTP are different.
When you configure a connection handler,
you specify whether it secures incoming connections,
and the security protocols and cipher suites
that can be used to negotiate a secure connection.
In practice, separate connection handlers are often set up
for cleartext (LDAP, HTTP) and secure (LDAPS, HTTPS) traffic.
(A cleartext LDAP connection handler can
support the StartTLS LDAP extended operation
to initiate security after the connection is established,
but for security from the moment the connection is established,
you configure a separate LDAPS connection handler
with use-ssl: true in its configuration.)
When you configure a connection handler that secures incoming connections from the network, you specify a key manager provider and a trust manager provider. A key manager provider handles the key material that is used to authenticate a secure connection to its peer. This means providing access to the server certificate when negotiating a secure connection. A trust manager provider determines whether to trust a certificate presented by the peer. This involves determining whether to trust the client certificate issuer. For client certificates signed by a well-known CA, the decision to trust the issuer can be delegated to the JVM, which comes with its own set of trusted CA certificates. If the issuer is not well-known, its trusted certificate must be stored in a truststore, which is a keystore handled by a trust manager provider.
Configuration of outgoing connections depends on the feature, but generally includes a mechanism for securing the connection. Make sure you have a way of securing all connections that carry sensitive information.
For details, see "Securing Network Connections".
DS servers use cryptographic mechanisms for more than setting up secure connections:
Encrypted backup files must be decrypted when restored.
Passwords can be protected by encryption rather than hashing.
Database backends can be encrypted for data confidentiality and integrity.
Servers in a replication topology must authenticate to and trust each other.
For all operations where data is stored in encrypted form, the secret key for encryption must be distributed to all replicas that need to decrypt the data.
Trust between servers for administrative and replication connections depends on a public key infrastructure involving instance key pairs. (This type of infrastructure is explained in more detail in "Public Key Infrastructure (PKI)".) Each server has an asymmetric key pair, its instance key pair, where the public key certificate is self-signed by default.
When you configure replication, which establishes trust between the servers, they exchange and trust each others' instance key certificates. This enables servers to secure subsequent network connections for replication, and also to distribute secret keys. Each secret key is encrypted with each server's public key, stored in the administrative data for the server, and replicated in encrypted form across the topology. When a server needs the private key for decryption or further encryption, it decrypts its copy with its own private instance key. For details about how secret keys are stored in the administrative data, see "How Secret Keys are Distributed".
The component that enables this replication-based secret key distribution mechanism is called the DS Crypto Manager. Beyond its role in secret key distribution, the Crypto Manager provides a common interface for performing compression, decompression, hashing, encryption, and other kinds of cryptographic operations.
You can configure the following Crypto Manager features with the dsconfig command:
How keys are protected (wrapped) when stored in the administrative data.
The alias of the key pair to use for securing administrative and replication connections.
The protocols and cipher suites that can be negotiated for securing administrative and replication connections.
Cipher key lengths, algorithms, and other advanced properties.
Authentication is the act of confirming the identity of a principal, such as a user, application, or device. The main reason for authentication is to control access based on the identity of the principal.
Servers should require authentication before allowing access to any information that is not public.
Authentication mechanisms depend on the access protocol. HTTP has a number of mechanisms, such as HTTP Basic. LDAP has other mechanisms, such as anonymous bind and external SASL. For details on supported mechanisms, see "Securing Authentication".
Authorization is the act of determining whether to grant or to deny a principal access to a resource.
DS servers authorize access based these mechanisms:
Access control instructions (ACI)
Access control instructions apply to directory data, providing fine-grained control over what a user or group member is authorized to do in terms of LDAP operations. Most access control instructions specify scopes (targets) such that an administrative user who has all access to
dc=example,dc=comneed not have any access todc=example,dc=org.Administrative privileges
Privileges control the administrative tasks that users can perform, such as bypassing the access control mechanism, performing backup and restore operations, making changes to the configuration, and other tasks.
By default, privileges restrict administrative access to directory root users, though any user can be assigned a privilege. Privileges apply to DS servers, and do not have a scope.
Global access control policies
Global access control policies provide coarse-grained access control suitable for use on proxy servers, where the lack of local access to directory data makes ACIs a poor fit.
Note
Access control instructions (ACI) and global access control policies rely on different access control handlers, which implement different access control models. ACIs rely on the DSEE-compatible access control handler. (DSEE refers to Sun Java System Directory Server Enterprise Edition.) Global access control policies rely on the policy-based access control handler. A server can only use one handler at a time.
Take the following constraints into consideration:
When the policy-based handler is configured, ACIs have no effect.
When the DSEE-compatible handler is configured, global access control policies have no effect.
When a server is set up as a directory server, it uses the DSEE-compatible access control handler, with ACIs in directory data and global ACIs in the configuration.
When a server is set up as a directory proxy server, it uses the policy-based access control policy handler, and global access control policies.
Once the server has been set up, the choice of access control handler cannot be changed with the dsconfig command.
ACIs are set as attributes on directory entries, either in the user data where they can apply to that data, or in the directory configuration where they can apply for an entire server.
Many ACIs can be defined. Each ACI specifies:
The target the ACI applies to.
The permissions that the ACI grants or denies.
The subjects that specify who the ACI applies to, depending on when, where, and how they connected.
ACI evaluation only allows access that is explicitly granted. Without ACIs, no regular users are allowed any access to directory data. (DS servers have default global settings that allow minimal access.) If access is denied according to an applicable ACI, then the denial takes precedence over any access granted. Only if all applicable ACIs grant access is the access allowed.
Global access control policies are similar to ACIs, but are implemented as entries in the server configuration, rather than attributes on entries. Global access control policies can only allow access, not deny it. This constraint makes them easier to read and to change in isolation.
For details and instructions on using ACIs with directory servers, or global access control policies with proxy servers, see "Securing Access to Directory Data".
Administrative privileges provide access control for server administration independently from ACIs and access control policies. Even if a principal is granted access through applicable ACIs and policies, administrative access is still prevented if the principal does not have the requisite privilege.
Privileges are also stored as attributes on directory entries.
For details and instructions on using privileges, see "Securing Directory Administration".
Once directory services are properly deployed and configured, they must be monitored for evidence of threats and other problems. Interfaces for monitoring include the following:
Remote monitoring facilities that clients applications can access over the network including JMX and SNMP connection handlers, and the
cn=monitordirectory backend that is exposed over LDAP and HTTP.Alerts to notify administrators of significant problems or notable events over JMX or by email.
Account status notifications to send users alerts by email, or to log error messages when an account state changes.
Logging facilities, including local log files for access, debugging, entry change auditing, and errors, and ForgeRock Common Audit event handlers for both local logging and sending access event messages to a variety of remote logging and reporting systems.
For details, see "Monitoring Directory Security".
When you deploy Directory Services software, secure the host system to limit the risk that someone with access to the system can get more access than they should.
This chapter covers basic precautions to take when preparing the operating system where you deploy Directory Services software:
Apply system patches and upgrades in a timely manner
Turn off unnecessary system features, services, and accounts
Limit system and administrative access
Audit system access
This chapter is not meant to be exhaustive. Familiarize yourself with the specific recommendations for and security features of the host operating systems where you deploy Directory Services software.
Over the lifetime of a directory services deployment, vulnerabilities and security issues can be discovered in the host operating systems where DS software is deployed. Some of these issues require upgrades to the host operating system. Others require configuration changes. All updates require proactive planning and careful testing.
For the operating systems used in production, put a plan in place for avoiding and resolving security issues. The plan should answer the following questions:
How does your organization become aware of system security issues early?
This could involve following bug reports, mailing lists, forums, and other sources of information.
How do you test security fixes, including configuration changes, patches, service packs, and system updates?
Validate the changes first in development, then in one or more test environments, then in production in the same way you would validate other changes to the deployment.
How do you roll out solutions for security issues?
In some cases, fixes might involve both changes to the service, and specific actions by those who use the service.
What must you communicate about security issues and how you handle them?
Keep in mind that operating system and software providers typically do not communicate what they know about a vulnerability until they have a way to mitigate or fix the problem. Once they do communicate about security issues, however, the information is likely to become public knowledge quickly. Make sure that you can expedite resolution of security issues.
In order to move resolve security issues quickly, make sure that you are ready to validate any changes that must be made. When you validate a change, check that the fix resolves the security issue, and that the system and DS software continue to function as expected in all the other ways that they are used.
By default, operating systems include many features, accounts, and services that are not required to run and manage DS software. Each optional feature, account, and service on the system brings a risk of additional vulnerabilities. To reduce the surface of attack, you enable only required features, system accounts, and services, and remove those that are not needed for the deployment.
The features needed to run and manage DS software securely include the following:
A Java runtime environment, required to run DS software.
For details, see "Securing the Java Installation".
Software to secure access to service management tools, in particular when administrators access the system remotely.
Software to secure access for remote transfer of software updates, backup files, and log files.
Software to manage system-level authentication, authorization, and accounts.
Firewall software, intrusion-detection/intrusion-prevention software.
Configure the firewall to limit access as much as possible. For example, open the DS administration connector port only to traffic from the loopback address, and require that administrators first connect to the host over SSH before assuming the DS administrator identity.
Software to allow auditing access to the system.
Ideally, the audit system runs in a configuration that prevents an attacker from tampering with audit records.
System update software to allow updates that you have validated previously.
If required for the deployment, system access management software such as SELinux.
If the DS server sends email alerts locally, mail services.
If you use SNMP with DS server software, an SNMP agent.
Any other software that is clearly indispensable to the deployment.
Some server operating system distributions have minimal installation options that allow you to choose most of the system features to enable. Other operating system distributions require you to turn off services that you do not use. In either case, validate DS software and administrative operations with a minimal system.
In addition to limiting what is installed and running on the system, consider configuration options for system hardening to further limit access even to required services.
For each account used to run a necessary service, aim to limit the access granted to the account to what is required to run the service. This reduces the risk that a vulnerability in access to one account affects multiple services across the system.
Make sure that you validate the operating system behavior every time you deploy something that is new or that has changed. When preparing the deployment and when testing changes, maintain a full operating system with DS software that is not used for any publicly available services, but only for troubleshooting problems that might stem from the system being too minimally configured.
In addition to minimizing what the host system does as described in "Enabling Only Required Features, Accounts, and Services", limit access to the system by protecting network ports and reducing access granted to administrative accounts. This further reduces the attack surface and reduces the advantage to be gained from exploiting a vulnerability.
The TCP/IP ports that must be protected are described in "Server Ports". When protecting network ports, notice that some must be open to remote client applications, whereas you can restrict access to administrative ports to the localhost only, assuming administrative access to the host is protected with another protocol such as SSH.
| Protocols | Conventional Ports | Active by Default? | Description |
|---|---|---|---|
LDAP | 389 | No |
Port for cleartext LDAP requests; also used to request StartTLS for a secure connection. The reserved LDAP port number is 389. Interactive setup initially suggests this port number. If the initially suggested port is not free or cannot be used due to lack of privileges, interactive setup adds 1000 to the port number and tries again, repeatedly adding 1000 until a free port is found. If LDAP is used, leave this port open to client applications. |
LDAPS | 636 | No |
Port for secure LDAPS requests. The standard LDAPS port number is 636. Interactive setup initially suggests this port number. If the initially suggested port is not free or cannot be used due to lack of privileges, interactive setup adds 1000 to the port number and tries again, repeatedly adding 1000 until a free port is found. If LDAPS is used, leave this port open to client applications. |
HTTP, HTTPS | 80, 443 | No |
Port for HTTP client requests, such as RESTful API calls. The standard HTTP port number is 80. The standard HTTPS port number is 443. Interactive setup initially suggests 8080 and 8443 instead. If an initially suggested port is not free or cannot be used due to lack of privileges, interactive setup adds 1000 to the port number and tries again, repeatedly adding 1000 until a free port is found. If HTTP or HTTPS is used, leave this port open to client applications. For production deployments, use HTTPS instead of HTTP. |
Server administration | 4444 | Yes |
Port for administrative requests, such as requests from the dsconfig command. Interactive setup initially suggests 4444. If an initially suggested port is not free or cannot be used due to lack of privileges, interactive setup adds 1000 to the port number and tries again, repeatedly adding 1000 until a free port is found. Initial setup secures access to this port. |
Directory data replication | 8989 | No |
Port for replication requests, using the DS-specific replication protocol. Interactive setup initially suggests 8989. If an initially suggested port is not free or cannot be used due to lack of privileges, interactive setup adds 1000 to the port number and tries again, repeatedly adding 1000 until a free port is found. If replication is used, leave this port open to other replicas. For production deployments, secure access to this port. |
JMX | 1689 | No |
Port for Java Management eXtension requests (1689), and JMX RMI requests.
The default setting for the JMX RMI port is If used in production deployments, secure access to this port. |
SNMP | 161, 162 | No |
Reserved ports are 161 for regular SNMP requests and 162 for traps. If used in production deployments, secure access to these ports. |
When setting up system accounts to manage directory services, set up a separate account as described in "Setting Up a System Account for a Server". Prevent other system accounts from accessing DS files as further described in "Protect DS Server Files". Configure the system to prevent users from logging in as the DS system account user, and from performing other operations besides managing directory services when using the DS system account.
DS logs provide a record of directory service events, but they do not record system-level events. Use the auditing features of the host operating system to record access that is not recorded in DS logs.
System audit logs make it possible to uncover system-level security policy violations, such as unauthorized access to DS files, that would not be visible in DS logs and monitoring information.
In addition to configuring system audit logging, consider how you will prevent or at least detect tampering. A malicious user violating security policy is likely to try to remove evidence of how security was compromised.
This chapter describes how to use:
The strongest cryptography provided by the Java runtime environment
The latest Java security updates
Due to export control restrictions, some Java environments, such as the Oracle JRE, ship with a policy that allows only limited strength cryptography. This can prevent DS servers from being able to use some encryption algorithms at full strength.
Assuming your operations are in a location where unlimited strength cryptography is allowed, you can install an unlimited strength policy. For example, Oracle provides an unlimited strength JCE policy extension that unlocks the full cryptographic strength supported by their JVM.
The policy files and download links are specific to the JVM. You can find the appropriate versions online.
Installing the policy generally involves copying a jar file
into the $JAVA_HOME/lib/security/ directory of the JVM.
Read the instructions closely,
taking care to copy the files to the correct directory,
which is different for the JRE and JDK, as the JDK contains the JRE.
Each time you update the Java environment, you must copy the policy file again.
Security updates are regularly released for the Java runtime environment.
Make sure that your operational plans provide for deploying Java security updates to systems where you run DS software.
When you set up DS servers, the path to the Java runtime environment is saved in the configuration. The server continues to use that Java version until you change the configuration as described below.
Follow these steps each time an update to the Java runtime environment changes the Java home path where the runtime environment is installed:
(Optional) If the previous Java update used an unlimited strength cryptography policy, install the policy for the updated Java runtime environment as described in "Using Unlimited Strength Cryptography".
(Optional) If the DS server relies on any CA certificates that were added to the Java runtime environment truststore,
$JAVA_HOME/Home/jre/lib/security/cacerts(Java 8) or$JAVA_HOME/Home/lib/security/cacerts(Java 9), for the previous update, add them to the truststore for the update Java runtime environment.Edit the
default.java-homesetting in the fileconfig/java.propertiesto use the new path.The setting should reflect the updated Java home:
default.java-home=/path/to/updated/java/jre
Restart the DS server to use the updated Java runtime environment:
$ stop-ds --restart
The DS DSML gateway and DS REST to LDAP gateway are web applications that run in application servers such as Apache Tomcat or Jetty. In this chapter you will learn to:
Find application server documentation for configuring TLS and security settings
Review DSML gateway settings to enforce increased security
Review REST to LDAP gateway settings to enforce increased security
This chapter does not address security for DS connection handlers, such as the HTTP connection handler which supports REST to LDAP. Instead, see "Securing Network Connections".
Security settings are covered in the documentation for supported application servers.
The documentation to use depends on the version of the application server. Adapt the following links for the version you use:
- Apache Tomcat documentation
For instructions on setting up HTTPS, see SSL/TLS Configuration HOW-TO.
For other security-related settings, see Security Considerations.
The links above are for Tomcat 8.
- Jetty documentation
For instructions on setting up HTTPS, see Configuring SSL/TLS.
For other security-related settings, see Configuring Security.
The links above are for the current version of Jetty, which at the time of this writing is Jetty 9.
Make sure the application server protects traffic to the gateway with HTTPS.
In addition, review the following settings:
ldap.portUse an LDAP port that supports StartTLS or LDAPS.
Using StartTLS or LDAPS is particularly important if the gateway ever sends credentials over LDAP.
ldap.usesslIf
ldap.usestarttlsis not used, set this totrue.ldap.usestarttlsIf
ldap.usesslis not used, set this totrue.ldap.trustallMake sure this is set to
false.ldap.truststore.pathIf the Java runtime environment's truststore does not include the appropriate trusted certificates to validate the signature on the LDAP server certificates, set this to a truststore with the appropriate trusted certificates.
For details on importing a trusted certificate, see "Managing Certificates and Private Keys".
ldap.truststore.passwordIf
ldap.truststore.pathis set, and the truststore requires a password, set this appropriately.
For details on settings, see "DSML Client Access" in the Administration Guide.
Make sure the application server protects traffic to the gateway with HTTPS.
In addition, review the following settings in the gateway configuration file,
config.json:
security/keyManagerIf the LDAP server expects the gateway to supply its certificate for client authentication when setting up TLS, set this to use a keystore with the gateway's certificate and private key.
Also set related properties as necessary.
For details on working with key pairs and setting up keystores, see "Managing Certificates and Private Keys". The information is focused on DS servers, but you can adapt it for use with the gateway.
security/trustManagerIf the Java runtime environment's truststore does not include the appropriate trusted certificates to validate the signature on the LDAP server certificates, set this to use a truststore with the appropriate trusted certificates.
Also set related properties as necessary.
For details on importing a trusted certificate, see "Managing Certificates and Private Keys".
ldapConnectionFactories/bind/connectionSecurityUse
sslorstartTLS.ldapConnectionFactories/bind/sslCertAliasIf the LDAP server expects the gateway to supply its certificate for client authentication when setting up TLS, set this to the certificate alias used when configuring the keystore for the property
security/keyManager.ldapConnectionFactories/primaryLdapServers/port,ldapConnectionFactories/secondaryLdapServers/portUse an LDAP port that supports StartTLS or LDAPS.
Using StartTLS or LDAPS is particularly important if the gateway ever sends credentials over LDAP.
authorization/resolverCheck the
endpointUrlof the resolver to make sure that OAuth 2.0 tokens are sent over HTTPS.
For details on settings, see "REST to LDAP Configuration" in the Reference.
This chapter explains and demonstrates how to set up DS servers so as to minimize risk. Apply the suggestions in this chapter when you install DS servers for testing or production use.
In this chapter you will learn to:
Set up a special system account for the DS server
Protect access to server files
Enable only directory services that are actually used
Use appropriate log configuration
Use appropriate global access control settings
Use and store passwords appropriately
Do not run DS servers as the system superuser (root). When applications run as superuser, the system effectively does not control their actions. When running the server as superuser, a bug in the server could affect other applications or the system itself.
After setting up a system account for the server, and using that account only to run the server, you can use system controls to limit user access.
The user running the server must have access to use the configured ports. Make sure you configure the system to let the user access privileged ports such as 389 and 636 if necessary. Make sure you configure the firewall to permit access to the server ports.
The user running the server must have access to all server files, including configuration files, data files, log files, keystores, truststores and their password files, and other files. By default, DS software lets users in the same group as the user running the server read server files, though not directory data files.
The user running the server does not, however, need access to login from a remote system or to perform actions unrelated to the directory service.
Set up the user account to prevent other users from reading configuration files.
On UNIX, set an appropriate umask such as 027
to prevent users in other groups from accessing server files.
On Windows, use file access control to do the same.
Do consider letting all users to run command-line tools.
What a user can do with tools depends on server access control mechanisms.
For details,
see "Setting Appropriate File Permissions".
You can create a UNIX service script to start the server at system startup and stop the server at system shutdown by using the create-rc-script command. For details see create-rc-script(1) in the Reference.
You can use the windows-service command to register the DS server as a Windows service. For details, see windows-service(1) in the Reference.
By default, DS servers do not encrypt server files or directory data. The only attribute values stored in encrypted or digest form are passwords. For instructions on encrypting entries and index content, see "Encrypting Directory Data" in the Administration Guide. For instructions on encrypting change log content, see "To Encrypt External Change Log Data" in the Administration Guide.
If you set up an appropriate user account for the server as described in "Setting Up a System Account for a Server", and unpacked the server files as that user, then the system should prevent other users from having overly permissive access to server files.
Included in the files that the server does not encrypt are LDIF exports of directory data. LDIF export files are readable and writable depending on the UNIX umask or Windows file access control settings for the user who runs the command to export the LDIF. The export-ldif command can compress the LDIF, but does not have an option for encrypting LDIF.
Directory backup archives can be encrypted, but are not encrypted by default.
Backup archive file permissions depend on
the UNIX umask or Windows file access control settings.
When using the backup command,
run an online backup and supply the --encrypt option
as shown in the following example:
$ backup \
 --hostname opendj.example.com \
 --port 4444 \
 --bindDN "cn=Directory Manager" \
 --bindPassword - \
 --backupAll \
 --backupDirectory /path/to/opendj/bak \
 --encrypt \
 --start 0
Password for user 'cn=Directory Manager':
Backup task <datestamp> scheduled to start...
The server uses its Crypto Manager configuration
to determine how to encrypt the backup archive data.
The --encrypt option is not available for offline back up.
If you back up server data offline, plan to protect the files separately.
The setup process enables DS server connection handlers,
enabling at least an administration connection handler.
You can choose to disable other connection handlers after setting up the server.
For example, if the setup process enables the (cleartext) LDAP connection handler,
but only LDAPS or HTTPS is used,
then set the LDAP connection handler property to enabled:false
by using the dsconfig set-connection-handler-prop command.
Use the status command to check which connection handlers are enabled.
By default, DS servers write log messages to files when an error is encountered and when a server is accessed. Access logs tend to be much more intensively updated than error logs. You can also configure debug logging, generally too verbose for continuous use in production, and audit logging, which uses the access log mechanism to record changes. Debug and audit logs are not enabled by default. For details, see "Server Logs" in the Administration Guide.
The default DS server error log levels and log rotation and retention policies are set to prevent the logs from harming performance or filling up the disk while still making it possible to perform basic troubleshooting. If you must set a more verbose error log level or if you must activate debug logging on a production system for more advanced troubleshooting, be aware that extra logging can negatively impact performance and generate large files on heavily used servers. When finished troubleshooting, reset the log configuration for more conservative logging.
The audit log for DS servers is not for security audits. Instead it records changes in LDIF. The audit log is intended to help you as server administrator to diagnose problems in the way applications change directory data. For change notification as a service, use the external change log instead. For details about the external change log, see "Change Notification For Your Applications" in the Administration Guide.
Global ACIs or access policies are defined in the server configuration. Global access settings apply together with ACIs in the user data.
You can set up a server to apply the recommendations in this section
by using the setup command option, --productionMode.
When you set up a server without using the --productionMode option,
default global access control settings allow applications to:
Read the root DSE
Read server LDAP schema
Read directory data anonymously
Modify one's own entry
Request extended operations and operations with certain controls
For details, see "Default Global ACIs" in the Administration Guide.
If the default global access control settings do not match your requirements, make sure you change them on each server as the server configuration data is not replicated. Global ACIs have the same syntax as ACIs in the directory data. Global access policies are entries in the server configuration. For details about access control settings, see "Configuring Privileges and Access Control" in the Administration Guide.
Default global access control settings can and often do change between releases. Review the release notes when upgrading to a new release. For details, see "Compatibility" in the Release Notes.
Generally it is appropriate to allow anonymous applications to read the root DSE, and to request the StartTLS extended operation over a cleartext connection, even if read access to most directory data requires authorization. The operational attributes on the root DSE indicate the server capabilities, allowing applications to discover interactively how to use the server. The StartTLS extended operation lets an application initiate a secure session starting on a port that does not require encryption.
Authenticated applications should be allowed to read schema operational attributes. LDAP schema operational attributes describe the data stored in the directory. An application that can read schema attributes and check that changes to directory data respect the LDAP schema before sending an update request.
Follow these steps to minimize global ACIs:
Remove existing global ACIs to prevent all access.
$ dsconfig \
 set-access-control-handler-prop \
 --hostname opendj.example.com \
 --port 4444 \
 --bindDN "cn=Directory Manager" \
 --bindPassword password \
 --reset global-aci \
 --trustAll \
 --no-prompt
Allow limited global access for essential operations.
This example allows the following limited access:
Authenticated users can request the ForgeRock Transaction ID control, which has OID
1.3.6.1.4.1.36733.2.1.5.1.Other components in the ForgeRock platform use this control to share transaction IDs for common access logging.
If you do not use common access logging, you can skip adding the global ACI for
Transaction ID control access.Anonymous users can request the Get Symmetric Key extended operation, which has OID
1.3.6.1.4.1.26027.1.6.3, and the StartTLS extended operation, which has OID1.3.6.1.4.1.1466.20037.DS servers require Get Symmetric Key extended operation access to create and share secret keys for encryption.
Directory client applications must be able to use the StartTLS operation to initiate a secure connection with an LDAP connection handler. This must be available to anonymous users so that applications can initiate a secure connection before sending bind credentials to authenticate, for example.
If the directory deployment does not support StartTLS, then remove
|| 1.3.6.1.4.1.1466.20037from the global ACI forAnonymous extended operation access.Anonymous and authenticated users can read information about the LDAP features that DS servers support according to the global ACI named
User-Visible Root DSE Operational Attributes.This exposes metadata publicly for the following attributes:
namingContextsThe base DNs for user data
supportedAuthPasswordSchemesSupported
authPasswordstorage schemes for pre-encoded passwordssupportedControlSupported LDAP controls by OID
supportedExtensionSupported LDAP extended operations by OID
supportedFeaturesSupported optional LDAP features by OID
supportedLDAPVersionSupported LDAP versions
supportedSASLMechanismsSupported SASL mechanisms
supportedTLSCiphersSupported cipher suites for transport layer security
supportedTLSProtocolsSupported protocols for transport layer security
vendorNameName of the LDAP server implementer
vendorVersionVersion of the LDAP server implementation
$ dsconfig \
 set-access-control-handler-prop \
 --hostname opendj.example.com \
 --port 4444 \
 --bindDN "cn=Directory Manager" \
 --bindPassword password \
 --add global-aci:"(targetcontrol=\"1.3.6.1.4.1.36733.2.1.5.1\")\
 (version 3.0; acl \"Transaction ID control access\"; allow(read)\
 userdn=\"ldap:///all\";)" \
 --add global-aci:"(extop=\"1.3.6.1.4.1.26027.1.6.3 || 1.3.6.1.4.1.1466.20037\") \
 (version 3.0; acl \"Anonymous extended operation access\";\
 allow(read) userdn=\"ldap:///anyone\";)" \
 --add global-aci:"(target=\"ldap:///\")(targetscope=\"base\")\
 (targetattr=\"objectClass||namingContexts||supportedAuthPasswordSchemes\
 ||supportedControl||supportedExtension||supportedFeatures||supportedLDAPVersion\
 ||supportedSASLMechanisms||supportedTLSCiphers||supportedTLSProtocols||\
 vendorName||vendorVersion\")(version 3.0;\
 acl \"User-Visible Root DSE Operational Attributes\";\
 allow (read,search,compare) userdn=\"ldap:///anyone\";)" \
 --add global-aci:"(target=\"ldap:///cn=schema\")(targetscope=\"base\")\
 (targetattr=\"objectClass||attributeTypes||dITContentRules||dITStructureRules\
 ||ldapSyntaxes||matchingRules||matchingRuleUse||nameForms||objectClasses\")\
 (version 3.0; acl \"User-Visible Schema Operational Attributes\";\
 allow (read,search,compare) userdn=\"ldap:///all\";)" \
 --trustAll \
 --no-prompt
Add or update global ACIs as required by known client applications.
Work with your partners and with client application documentation for details.
For example, ForgeRock Access Management servers might require access to update schema definitions under
cn=schema, and to use the Persistent Search control.The following capabilities are useful with the REST to LDAP gateway:
- Access to Read Entry controls
By default, the DS REST to LDAP gateway uses the Pre-Read (OID:
1.3.6.1.1.13.1) and Post-Read (OID:1.3.6.1.1.13.2) controls to read an entry before it is deleted, or to read an entry after it is added or modified.To determine whether access to request the controls is required by the deployment, check the configuration for
readOnUpdatePolicyas described in "Gateway REST2LDAP Configuration File" in the Reference.- Access to the Subtree Delete control
By default, the DS REST to LDAP gateway uses the LDAP Subtree Delete (OID:
1.2.840.113556.1.4.805) control for delete operations.To determine whether access to request the controls is required by the deployment, check the configuration for
useSubtreeDeleteas described in "Gateway REST2LDAP Configuration File" in the Reference.- Access to the Permissive Modify control
By default, the DS REST to LDAP gateway uses the LDAP Permissive Modify (OID:
1.2.840.113556.1.4.1413) control for LDAP modify operations resulting from patch and update operations.To determine whether access to request the controls is required by the deployment, check the configuration for
usePermissiveModifyas described in "Gateway REST2LDAP Configuration File" in the Reference.
The following example adds control access for a REST to LDAP gateway with a default configuration:
$ dsconfig \
 set-access-control-handler-prop \
 --hostname opendj.example.com \
 --port 4444 \
 --bindDN "cn=Directory Manager" \
 --bindPassword password \
 --add global-aci:"(targetcontrol=\"1.3.6.1.1.13.1||1.3.6.1.1.13.2\
 ||1.2.840.113556.1.4.805||1.2.840.113556.1.4.1413\")\
 (version 3.0; acl \"REST to LDAP control access\"; allow(read) userdn=\"ldap:///all\";)" \
 --trustAll \
 --no-prompt
Make sure you keep passwords secret in production. The server configuration includes files that hold passwords. Command-line tools allow users to provide password credentials. Passwords are also stored in directory data. This section looks at how to protect passwords in each situation.
DS servers store passwords in configuration files.
For replicated servers,
the admin-backend.ldif file stores a password hash for the global administrator,
such as cn=admin,cn=Administrators,cn=admin data.
By default the password storage algorithm is Salted SHA512,
a salted form of the 512-bit SHA-2 message digest algorithm.
Permissions on the current copy of the file make it
readable and writable only by the user running the server.
Use a storage scheme that protects the password in the admin-backend.ldif file.
By default, DS servers store passwords for keystores and truststores
in configuration files with .pin extensions.
These files contain the cleartext, randomly generated passwords.
Keep the PIN files readable and writable only by the user running the server.
Alternatively, you can use the dsconfig command
to configure the server to store keystore and truststore passwords
in environment variables or Java properties
if your procedures make these methods more secure in production.
The settings to change are those of
the Key Manager Providers and Trust Manager Providers.
DS commands supply credentials for any operations that are not anonymous.
Password credentials can be supplied as arguments such as the
--bindPassword password option
shown in many of the examples in the documentation.
The passwords for keystores and truststores are handled in the same way.
This is not recommended in production as the password appears in the command.
Passwords can also be supplied interactively by using a -
in the commands, as in --bindPassword -.
The following example demonstrates a password supplied interactively:
$ ldapsearch \
 --hostname opendj.example.com \
 --port 1389 \
 --bindDN "cn=Directory Manager" \
 --bindPassword - \
 --baseDN "cn=Directory Manager" \
 "(&)" \
 userPassword
Password for user 'cn=Directory Manager':
dn: cn=Directory Manager
userPassword: {PBKDF2}10000:<hash>
Notice that the password appears neither in the shell history, nor in the terminal session.
When using scripts where the password cannot be supplied interactively,
passwords can be read from files.
For example,
the --bindPasswordFile file option
takes a file that should be readable only by the user running the command.
It is also possible to set passwords
in the tools.properties file for the user.
This file is located in the user's home directory,
on UNIX ~/.opendj/tools.properties,
and on Windows, typically
C:\Documents and Settings\username\.opendj\tools.properties,
though the location can depend on the Java runtime environment used.
Here as well, make sure that the file is readable only by the user.
Alternatively use other approaches that work with scripts
such as Java properties or environment variables,
depending on what method is most secure in production.
DS servers encode users' passwords before storing them. A variety of built-in password storage schemes are available, using either one-way (hash) or reversible algorithms. The default storage schemes use one-way algorithms to make it computationally difficult to recover the cleartext password values even when given full access to the files containing stored password values.
For details see "Configuring Password Storage".
In DS servers, password policies govern password storage schemes, valid password values, password term duration, account lockout, and others. For example you can configure password policies that prevent users from setting weak passwords and from reusing passwords. DS software provides a wide range of alternatives. For details, see "Configuring Password Policy" in the Administration Guide.
DS server configurations can be hardened for production environments
as part of the installation process.
When installing the server, use the setup command option,
--productionMode.
Setting up a server in hardened production mode leads to the following settings:
The default backend database for directory servers,
userRoot, uses data confidentiality to encrypt potentially sensitive data on disk.As described in "Encrypting Directory Data" in the Administration Guide, if you configure data confidentiality before replication, the destination server's keys disappear when you configure replication. The destination server can no longer decrypt any of its data. (When you initialize replication, a source server initializes a destination server. The dsreplication initialize command references the destination server with its
--hostDestinationand--portDestinationoptions.)When you install multiple directory servers that you will configure as replicas, either import data after installation, or import data for only one replica that you then use to initialize other replicas. In the latter case, leave the database empty for all other replicas.
Global access control allows only the following access:
Anonymous users can request the StartTLS extended operation, and the Get Symmetric Key extended operation. The Get Symmetric Key extended operation is an operation designed for DS for internal use. DS servers require Get Symmetric Key extended operation access to create and share secret keys for encryption.
Anonymous users can read the root DSE operational attributes that describe server capabilities, including among other information, what security protocols and cipher suites the server supports.
Authenticated users can read the LDAP directory schema.
Authenticated users can request the LDAP Password Modify extended operation, the Who am I? extended operation, and the Cancel extended operation.
Authenticated users can request the Pre-Read and Post-Read controls, the Subtree Delete control, and the Permissive Modify control. These controls are used by the REST to LDAP gateway.
Authenticated users can also request the ForgeRock Transaction ID control. This is a ForgeRock-specific control for internal use that permits transmission of transaction IDs through platform components for use as a key to correlation of Common Audit events.
If the setup process creates a monitor user, this user is granted access to read monitoring data.
For a longer explanation of these settings, see "Reconsider Default Global Access Control".
The protocol version and cipher suites for securing connections are restricted to those using strong encryption.
The protocol version is restricted to
TLSv1.2.The cipher suites used when negotiating a secure connection call for a server certificate using an elliptic curve (EC) key algorithm or an RSA key algorithm. If you provide your own keystore when setting up the server in production mode, make sure that the certificate key algorithm is EC or RSA. Otherwise the server will not be able to negotiate secure connections. For details and examples, see "To Restrict Protocols and Cipher Suites".
The Crypto Manager requires encrypted communication between servers.
The Crypto Manager is described in "Cryptographic Key Management".
The anonymous HTTP authorization mechanism for REST access is disabled.
As a result, REST access does not permit anonymous requests.
DS native file-based access loggers and the replication error logger have UNIX/Linux file permissions set to
600(only the server account has read-write access to log files). This setting does not affect Common Audit loggers, such as the JSON file-based audit loggers.Adjust system settings to ensure appropriate access to files. For additional information and recommendations on setting the UNIX/Linux
umaskappropriately and on setting ACLs on Windows systems, see "Setting Appropriate File Permissions".The random password generator generates 10-character alphanumeric passwords.
The default password policy for normal users requires passwords at least 8 characters in length, and prevents use of common passwords.
The password policy for the default directory superuser requires passwords at least 8 characters in length, prevents use of common passwords, and requires that authentication be secure to avoid exposing credentials over the network.
The CRAM-MD5 and DIGEST-MD5 SASL mechanisms are disabled.
Encryption makes it possible to protect sensitive data. Directory Services software depends on encryption to negotiate secure network connections, and to keep directory data confidential. Encryption in turn depends on keys. This chapter covers the DS server features for managing keys.
In this chapter you will learn:
How DS servers use encryption keys
Where keys are stored
How DS servers get access to keys
How DS servers distribute secret keys for data confidentiality
How to prepare keys for secure communications
How to store keys in key store files
How to store keys in cryptographic devices, such as HSMs
How to restrict protocols and cipher suites to enforce better security
Keys can be revoked, and lists of revoked keys can be stored in a directory. The Java runtime environment performs certificate validation as described in "How Keys are Used". For more information about revocation, see "Client Certificate Validation and the Directory".
Once keys are properly stored and managed, you can use them to secure network connections. For details, see "Securing Network Connections".
This section describes how keys are used, stored, accessed, and distributed by DS servers.
This section describes the following:
Types of keys and their uses
Infrastructure for using public/private key pairs, and how public key ownership is verified
How DS software uses public key certificates
DS software uses two kinds of keys:
Symmetric keys (also known as secret keys)
Asymmetric key pairs (public/private key pairs)
These are compared in "Symmetric and Asymmetric Keys".
|
Symmetric (Secret) Keys |
Asymmetric Key Pairs | |
|---|---|---|
|
Content |
Single key, such as a random array of bits |
Pair of keys, one public, the other private |
|
Encryption |
A single key serves to encrypt and to decrypt. |
Data encrypted with a public key can only be decrypted with the private key, and vice versa. |
|
Generation |
Easier to generate, can be a random array of bits |
Harder to generate a matched pair of keys |
|
Speed |
Faster |
Slower |
|
Distribution |
Must be kept secret. Each party must have a copy. Secure channels must be established to exchange secret keys. |
Public key can be shared with any party. Private key must be kept secret by owner. No secure channel is required to distribute public keys. Proving that a public key is valid and belongs to the issuer requires a trust network, such as a public key infrastructure (PKI) as described in "Public Key Infrastructure (PKI)". |
|
Uses |
Encrypting shared data DS servers use secret keys for data confidentiality, and for encrypted backup files. |
DS software uses public/private key pairs to establish secure connections. DS servers can use public keys to authenticate clients. |
A PKI is a set of procedures, roles, and policies required to provide encryption and authentication when using TLS. A PKI makes it possible to trust that a public key belongs to its owner by enabling the following steps:
A party wanting to use public key cryptography generates a key pair with a public key to share with others and a private key to keep secret.
This party is called the public key owner.
The public key owner sends their public key in a certificate signing request to a certificate authority (CA), or self-signs the certificate.
The object of a certificate signing request, a public key certificate, is a digital document that proves ownership of the public key as long as its signer's signature can be trusted. The certificate includes the public key and information about it, such as when it is valid and who the owner is, and the digital signature of the issuer (the CA, or the owner themselves for a self-signed certificate).
In a PKI, a CA is a third party that other parties trust to issued signed certificates to public key owners. As long as the CA can be trusted, the signed certificate proves ownership of the public key. The CA can be trusted because each party has a trusted copy of its signing certificate, or a trusted copy of a certificate used to sign the CA's certificate.
After verifying that the public key does belong to its owner, the issuer digitally signs the owner's certificate, and issues the signed certificate to the owner.
The owner now shares its certificate for public key encryption and signature verification.
Another party wanting to use the certificate must check that the certificate is valid.
Certificate verification can involve checking a number of things:
Whether the current time is in the range of the validity dates.
Whether the owner's identifier in the certificate matches some externally verifiable attribute of the owner's, such as the DNS record of the host FQDN or the owner's email address.
Whether the issuer signature is a valid signature by a trusted party.
The owner's certificate is not necessarily directly signed by a trusted CA. Instead, there can be a certificate chain to verify. For example, a CA issued a signing certificate to an intermediary, and the intermediary signed the owner's certificate. Trust can be established for the certificate chain by verifying the intermediary's signature on the owner's certificate, and verifying the CA's signature on the intermediary's certificate.
Ultimately, the chain of verification must:
End by determining that the issuer's signature is valid and trusted, proving that the certificate does belong to its owner.
Fail at some point, in which case the signature cannot be trusted.
This does not mean that the certificate is invalid. It does mean, however, that the party who wants to use the public key cannot be certain that it belongs to the owner, and so cannot trust the public key.
This can happen when the party trying to use the public key does not have a means to trust the issuer who signed the certificate, perhaps because it has no trusted copy of the issuer's certificate. For example, if the certificate is self-signed, but has not been added to the party's truststore, then the signature cannot be trusted.
Secure connections between the server and client applications are based on TLS. TLS depends on the use of digital certificates. By default, DS servers present their certificates to clients to prove their identities as part of the process of establishing a secure connection.
When presented with a certificate, both the DS server and client applications check that the certificate was signed by a trusted party before accepting it. If either the DS server or the client application cannot trust the peer certificate, then the attempt to set up a secure connection will fail.
By default, DS client tools prompt you if they do not recognize the server certificate. Other clients might not prompt you. DS servers have no one to prompt when a client presents a certificate, so it refuses to set up the connection if it cannot trust the certificate. (Unless you use the Blind Trust Manager Provider, which is recommended only for test purposes.) Because prompting a user to examine and accept a certificate works only for some tools and only in interactive sessions, client applications must be able to verify that DS certificates were signed by a trusted party without user interaction.
By default, DS servers do not expect client applications to present a certificate when negotiating a secure connection. It is possible and recommended for some applications, however, to require mutual authentication, where the client presents its certificate, too. If a client application presents a certificate, but the DS server does not recognize the certificate, it rejects the attempt to establish a secure connection.
In practice, this means that the DS server and client applications must have truststores to verify that they can trust a certificate. The truststores hold trusted certificates. When a peer presents a valid certificate that either matches or was signed by a trusted certificate, then that certificate can be trusted.
Conventionally, certificates are signed by a CA, and the CA certificate is kept in the truststore. The Java runtime environment, for example, has a default truststore holding certificates from many well-known CAs. When an application presents a valid certificate signed by a trusted CA, the application receiving the certificate can verify the certificate locally. If you set up a connection handler with a valid certificate signed by a well-known CA, then many client applications can verify the certificate without further configuration, and proceed to establish a secure connection.
Note
$JAVA_HOME/jre/lib/security/cacerts (Java 8)
or $JAVA_HOME/lib/security/cacerts (Java 9)
holds the CA certificates.
To read the full list, use the following command:
$ keytool -list -cacerts -storepass changeit
In summary, if you need a certificate to be recognized automatically, get the certificate signed by a well-known CA. This is the case in production environments where clients contact the service directly and where the list of clients is not known in advance.
Alternatively, you can choose to sign certificates in other ways:
Set up your own CA.
Use a CA whose signing certificate is not widely distributed.
Use self-signed certificates.
In each case, you must add the signing certificates into the truststore of each peer making secure connections.
DS servers can import CA-signed certificates as part of the installation process, or later using command-line tools as described in "Setting Up Server Certificates". Alternatively, the installation program prepares a self-signed certificate. In addition, you can add a signing certificate to the DS server truststore using the Java keytool command.
DS servers do not store asymmetric keys and symmetric keys in the same way.
DS software stores asymmetric key pairs in keystores, and trusted certificates in truststores. In the DS server configuration, keystores are referenced by key manager providers. (Except for some ForgeRock Common Audit event handlers that manage their own keystores.) Truststores are referenced by trust manager providers. Components that need access to keys reference key manager providers for their certificates and private keys, and trust manager providers for trusted certificates. This enables, but does not require, reuse as shown in "Asymmetric Key Storage".
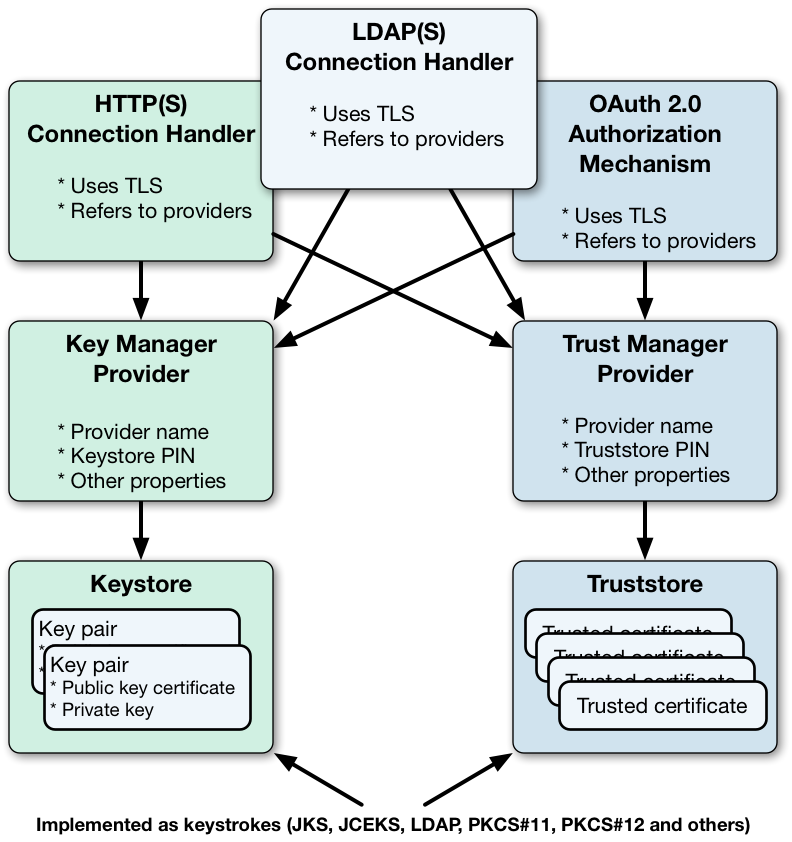
Keys used to communicate with clients and other services
are stored by default in the config/keystore file.
Keys used for directory administration and data replication
are stored by default in other files.
DS servers use one keystore for key pairs to secure adminstration and client connections, and a separate keystore for replication, as shown in "Keystores and Truststores".
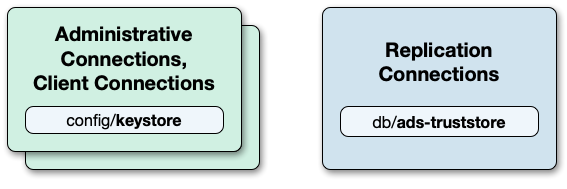
By default, DS servers use file-based keystores,
/path/to/opendj/config/keystore
and /path/to/opendj/db/ads-truststore:
The
keystorefile holds keys for securing administrative and client connections.The key pair for the server has default alias
server-cert.The cleartext password is stored in
keystore.pin. It is also the private key password forserver-cert.This is where you import trusted certificates for external applications.
The
ads-truststorefile holds the server's key pair for securing replication connections, and other replicas' public key certificates.The key pair for the server has default alias
ads-certificate.The cleartext password is stored in
ads-truststore.pin. It is also the private key password forads-certificate.This keystore is synchronized with the certificates under the base DN
cn=admin data. Do not change this keystore directly unless you understand the impact on the server configuration.
Symmetric keys,
used for features such as data confidentiality and encrypted backup,
are managed through the DS Crypto Manager described in
"About Security Features".
The Crypto Manager generates symmetric keys when necessary,
such as the first time data must be encrypted.
It stores symmetric keys under cn=secret keys,cn=admin data,
keeping them secret by encrypting them for each server
using the server's public key.
As mentioned in "How Keys are Stored and Accessed",
the DS Crypto Manager stores symmetric keys
under cn=secret keys,cn=admin data.
As the cn=admin data suffix is replicated,
all replicas in the topology have access to the data.
The following LDIF shows an edited example entry for a secret key:
dn: ds-cfg-key-id=<key-id>,cn=secret keys,cn=admin data
objectClass: top
objectClass: ds-cfg-cipher-key
ds-cfg-symmetric-key: <local-server-key-id>:<metadata>:<base64-encoded-encrypted-key>
ds-cfg-symmetric-key: <remote-server-key-id>:<metadata>:<base64-encoded-encrypted-key>
ds-cfg-key-id: <key-id>
Notice these features of the entry:
The secret key is identified by a key-id.
This secret key ID is the same on different replicas.
The symmetric key is stored encrypted on
ds-cfg-symmetric-key.The attribute has one value for each replica in the topology.
The
ds-cfg-symmetric-keyattribute values have the following parts:- *-server-key-id
This references the public key used to encrypt the value.
The entry referenced is under
cn=instance keys,cn=admin data.Each server has entries for other replicas, and can trust their public keys. Each server of course has only its own private key, and needs to be able to determine which
ds-cfg-symmetric-keyvalue it can decode to obtain the secret key.- metadata
Specifies the mechanism used to encrypt the secret key.
- base64-encoded-encrypted-key
Holds the base64-encoded representation of the secret key that has been encrypted with the public key for the server, identified by the *-server-key-id.
Other attributes, not shown here, define the encryption mechanism.
When a server needs a secret key,
it makes a request to the Crypto Manager.
If the secret key already exists,
the Crypto Manager finds it and returns it.
If not, the Crypto Manager generates a secret key
and stores the information about it under cn=admin data.
Then it returns the secret key.
In this way, data replication distributes the secret key. The Crypto Manager ensures that the distribution is secure.
This section shows how to prepare the server to use a file-based keystore to manage the keys essential to secure communications. For more information about the keys, see "About Certificates, Private Keys, and Secret Keys".
For instructions on importing trusted certificates on PKCS#11 devices, see the documentation for the device.
A client that sets up a secure connection with a server must be able to trust the server certificate. A server that uses mutual authentication (checking the client certificate) must be able to trust the client certificate. In either case, this involves finding the signing certificate in a keystore or a truststore.
In some cases, DS servers act as clients of external services. For example, REST to LDAP can resolve OAuth 2.0 tokens by sending secure requests to an authorization server. The server can also connect to another LDAP server when using pass-through authentication.
The default Java truststore contains signing certificates from well-known CAs. If the CA certificate is not in the default truststore, or the certificate is self-signed, then you can import it into a truststore as described here.
This section includes the following procedures:
The following steps demonstrate using the keytool command to add a client application's binary format, self-signed certificate to a new truststore for the DS server. This procedure enables the DS server to recognize a self-signed client application certificate when negotiating a secure connection. To allow a client application to perform an LDAP bind using its certificate, see "Authenticating Client Applications With a Certificate" in the Developer's Guide instead.
Import the self-signed client certificate:
$ keytool \
 -import \
 -trustcacerts \
 -alias myapp-cert \
 -file myapp-cert.pem \
 -keystore /path/to/opendj/config/truststore \
 -storepass:file /path/to/opendj/config/keystore.pin \
 -storetype PKCS12 \
 -noprompt
Certificate was added to keystore
In this example, the new truststore uses the same PIN as the default keystore.
Add a trust manager provider to access the truststore:
$ dsconfig \
 create-trust-manager-provider \
 --hostname opendj.example.com \
 --port 4444 \
 --bindDN "cn=Directory Manager" \
 --bindPassword password \
 --type file-based \
 --provider-name "PKCS12 Trust Manager" \
 --set enabled:true \
 --set trust-store-file:/path/to/opendj/config/truststore \
 --set trust-store-pin:"&{file:/path/to/opendj/config/keystore.pin}" \
 --trustAll \
 --no-prompt
Configure connection handlers to set the trust manager provider as shown, for example in "LDAP Client Access With Transport Layer Security" in the Administration Guide and in "To Set Up HTTPS Access" in the Administration Guide.
If your client uses a Java truststore, import the DS server signing certificate using the keytool command.
Export the server certificate from the server keystore.
The following example shows the keytool command to export the self-signed server certificate in binary format. Notice that the keystore PIN is stored in a file, which is the default setting:
$ keytool \
 -export \
 -rfc \
 -alias server-cert \
 -file server-cert.pem \
 -keystore /path/to/opendj/config/keystore \
 -storepass:file /path/to/opendj/config/keystore.pin \
 -storetype PKCS12
Certificate stored in file <server-cert.pem>
Import the server certificate into the client truststore:
$ keytool \
 -import \
 -trustcacerts \
 -alias server-cert \
 -file server-cert.pem \
 -keystore my-keystore \
 -storetype PKCS12 \
 -storepass changeit \
 -noprompt
Certificate was added to keystore
If you use self-signed certificates, or if your CA is not well-known, you can nevertheless import the certificate as a CA certificate into a Java file-based truststore using the keytool command. The application that relies on the truststore can then trust the certificate in the same way it trusts well-known CA certificates.
Follow these steps to import the CA certificate into a truststore for the server:
Import the certificate as a CA certificate:
$ keytool \
 -import \
 -trustcacerts \
 -alias ca-cert \
 -file ca.crt \
 -keystore /path/to/opendj/config/truststore \
 -storepass:file /path/to/opendj/config/keystore.pin \
 -storetype PKCS12 \
 -noprompt
Certificate was added to keystore
Make sure the server can use the truststore in one of the following ways:
If no trust manager provider is configured to access the truststore, add one as shown in "To Import a Trusted Client Certificate".
If a trust manager provider is already configured to access the truststore, restart the server to force it to reload the truststore:
$ stop-ds --restart --quiet
If necessary, you can avoid restarting the server by disabling the trust manager provider and then enabling it again.
Configure connection handlers to set the trust manager provider as shown, for example in "LDAP Client Access With Transport Layer Security" in the Administration Guide and in "To Set Up HTTPS Access" in the Administration Guide.
When you install the DS server,
you can choose to configure secure connections
and either generate a key pair with a self-signed certificate,
or import your own keystore.
The default PKCS#12 keystore is
/path/to/opendj/config/keystore,
and the self-signed public key certificate
has the alias server-cert.
The password for the keystore and the private key is stored in cleartext
in the file /path/to/opendj/config/keystore.pin.
If you chose to set up a secure connection as part of the installation process, you can skip this section.
This section includes the following procedures:
This procedure shows how to prepare a new key pair with a CA-signed certificate for use in setting up secure connections.
The high-level steps to perform are the following:
Generate a server private key and public key certificate in your keystore.
Issue a signing request to the CA, who responds with a CA-signed certificate.
Import the CA-signed certificate where appropriate.
Set up a key manager provider to use the keystore.
A detailed example follows:
Prepare the password for the keystore.
By default, DS servers are configured to hold the password in a file,
/path/to/opendj/config/keystore.pin:$ touch /path/to/opendj/config/keystore.pin $ chmod 600 /path/to/opendj/config/keystore.pin # Add keystore and private key password in cleartext on a single line: $ vi /path/to/opendj/config/keystore.pinGenerate the server key pair (private key and public key certificate) using the Java keytool command.
One step in verifying the certificate's validity is checking that the subject's FQDN matches the FQDN obtained from DNS.
The FQDN for the DS server, visible in the status command output, is set both as a
DNSNamein the certificate'sSubjectAlternativeNamelist, and also in the CN of the certificate's subject name DN for backwards compatibility:$ keytool \ -genkeypair \ -alias server-cert \ -ext "san=dns:opendj.example.com" \ -dname "CN=opendj.example.com,O=Example Corp,C=FR" \ -keystore /path/to/opendj/config/keystore \ -storetype PKCS12 \ -storepass:file /path/to/opendj/config/keystore.pin \ -keypass:file /path/to/opendj/config/keystore.pinNote
Notice that the
-storepassand-keypassoptions take identical password arguments. DS servers use the same password to protect the keystore and the private key.If the server can respond on multiple FQDNs, then specify multiple subject alternative names when using the keytool command's
-extoption. In the following example the primary FQDN isopendj.example.comand the alternative isldap.example.com:$ keytool \ -genkeypair \ -alias server-cert \ -ext "san=dns:opendj.example.com,dns:ldap.example.com" \ -dname "CN=opendj.example.com,O=Example Corp,C=FR" \ -keystore /path/to/opendj/config/keystore \ -storetype PKCS12 \ -storepass:file /path/to/opendj/config/keystore.pin \ -keypass:file /path/to/opendj/config/keystore.pinFor an example showing how to use a wildcard certificate, see "To Set Up a Key Pair With a Wildcard Certificate".
Create a certificate signing request file for the generated certificate:
$ keytool \ -certreq \ -alias server-cert \ -file server-cert.csr \ -keystore /path/to/opendj/config/keystore \ -storetype PKCS12 \ -storepass:file /path/to/opendj/config/keystore.pinHave the CA sign the request (
server-cert.csr).See the instructions from your CA on how to provide the request.
The CA returns the signed certificate.
(Optional) If you have set up your own CA and signed the certificate, or are using a CA whose signing certificate is not included in the Java runtime environment, import the CA certificate into the keystore so that it can be trusted.
Otherwise, when you import the signed certificate from an (unknown) CA, the keytool command fails to import the signed certificate with the message
keytool error: java.lang.Exception: Failed to establish chain from reply.For an example command, see "To Import a Trusted CA Certificate".
Import the signed certificate from the CA reply into the keystore where you generated the server certificate.
In this example the certificate from the reply is
server-cert.crt:$ keytool \ -import \ -alias server-cert \ -file server-cert.crt \ -keystore /path/to/opendj/config/keystore \ -storetype PKCS12 \ -storepass:file /path/to/opendj/config/keystore.pin \ -keypass:file /path/to/opendj/config/keystore.pin \ -nopromptConfigure the file-based key manager provider for the keystore that you set up with the keytool command:
$ dsconfig \ set-key-manager-provider-prop \ --hostname opendj.example.com \ --port 4444 \ --bindDN "cn=Directory Manager" \ --bindPassword password \ --provider-name "Default Key Manager" \ --set enabled:true \ --trustAll \ --no-promptIf you stored the keystore password somewhere besides the file,
/path/to/opendj/config/keystore.pin, shown in the examples in this procedure, also adjust thekey-store-*settings accordingly.At this point, the DS server can use the CA-signed certificate.
If you use a CA certificate that is not known to clients, such as a CA that you set up yourself rather than a well-known CA, import the CA certificate into the client application truststore. For an example command, see "To Import a Trusted CA Certificate".
Otherwise the client application cannot trust the signature on the server certificate.
This procedure shows how to prepare a new key pair with a self-signed certificate for use in setting up secure connections.
The high-level steps to perform are the following:
Generate a server private key and public key certificate in your keystore.
Self-sign the certificate.
Set up a key manager provider to use the keystore.
To replace the existing server key pair
with a self-signed certificate and new private key,
first, use keytool -delete -alias server-cert
to delete the existing keys,
then generate a new key pair with the same alias.
Either reuse the existing password in keystore.pin,
or use a new password as shown in the steps below.
Prepare the password for the keystore.
By default, DS servers are configured to hold the password in a file,
/path/to/opendj/config/keystore.pin:$ touch /path/to/opendj/config/keystore.pin $ chmod 600 /path/to/opendj/config/keystore.pin # Add keystore and private key password in cleartext on a single line: $ vi /path/to/opendj/config/keystore.pinGenerate the key pair using the Java keytool command:
$ keytool \ -genkeypair \ -alias server-cert \ -ext "san=dns:opendj.example.com" \ -dname "CN=opendj.example.com,O=Example Corp,C=FR" \ -keystore /path/to/opendj/config/keystore \ -storetype PKCS12 \ -storepass:file /path/to/opendj/config/keystore.pin \ -keypass:file /path/to/opendj/config/keystore.pinIn this example, the DS server runs on a system with FQDN
opendj.example.com. The keystore is created in the serverconfigdirectory.Note
Notice that the
-storepassand-keypassoptions take identical password arguments. DS servers use the same password to protect the keystore and the private key.If the server can respond on multiple FQDNs, then specify multiple subject alternative names when using the keytool command's
-extoption. In the following example the primary FQDN isopendj.example.comand the alternative isldap.example.com:$ keytool \ -genkeypair \ -alias server-cert \ -ext "san=dns:opendj.example.com,dns:ldap.example.com" \ -dname "CN=opendj.example.com,O=Example Corp,C=FR" \ -keystore /path/to/opendj/config/keystore \ -storetype PKCS12 \ -storepass:file /path/to/opendj/config/keystore.pin \ -keypass:file /path/to/opendj/config/keystore.pinFor an example showing how to use a wildcard certificate, see "To Set Up a Key Pair With a Wildcard Certificate".
Self-sign the server certificate:
$ keytool \
 -selfcert \
 -alias server-cert \
 -keystore /path/to/opendj/config/keystore \
 -storetype PKCS12 \
 -storepass:file /path/to/opendj/config/keystore.pin
Configure the file-based key manager provider to access the keystore with keystore/private key password.
In this example, the alias is
server-certand the password is in the file,/path/to/opendj/config/keystore.pin.If you are replacing a key pair with a self-signed certificate, reusing the
server-certalias and password stored inkeystore.pin, then you can skip this step:$ dsconfig \ set-key-manager-provider-prop \ --hostname opendj.example.com \ --port 4444 \ --bindDN "cn=Directory Manager" \ --bindPassword password \ --provider-name "Default Key Manager" \ --set enabled:true \ --trustAll \ --no-promptIf you stored the keystore password somewhere besides the file,
/path/to/opendj/config/keystore.pin, shown in the examples in this procedure, also adjust thekey-store-*settings accordingly.At this point, the DS server can use the self-signed certificate, for example, for StartTLS and LDAPS or HTTPS connection handlers.
To use an alternative keystore implementation, start with a different keystore type when generating the keypair:
Use one of the keystore types supported by the Java runtime environment:
- Java Keystore
The basic Java keystore type is
JKS:$ keytool \ -genkeypair \ -alias server-cert \ -ext "san=dns:opendj.example.com" \ -dname "CN=opendj.example.com,O=Example Corp,C=FR" \ -keystore /path/to/opendj/config/keystore.jks \ -storetype JKS \ -storepass:file /path/to/opendj/config/keystore.pin \ -keypass:file /path/to/opendj/config/keystore.pinThis is the keystore type if you do not specify a
-storetypeoption.- Java Cryptography Extension Keystore
The
JCEKStype lets you take advantage of additional Java cryptography extensions and stronger protection for private keys:$ keytool \ -genkeypair \ -alias server-cert \ -ext "san=dns:opendj.example.com" \ -dname "CN=opendj.example.com,O=Example Corp,C=FR" \ -keystore /path/to/opendj/config/keystore.jceks \ -storetype JCEKS \ -storepass:file /path/to/opendj/config/keystore.pin \ -keypass:file /path/to/opendj/config/keystore.pin- LDAP Keystore
DS servers implement an
OpenDJsecurity provider for LDAP and LDIF-based keystore services. Its keystore type isLDAP.For details, see "Using an LDAP Keystore".
- PKCS#11 device
A PKCS#11 device, such as an HSM, can be used as a keystore.
For details, see "Using a Hardware Security Module".
- PKCS#12 Keystore
The
PKCS12type lets you use a PKCS#12 format file. This is the default for DS servers. It is a standard format and is interoperable with other systems that do not necessarily depend on a Java runtime environment:$ keytool \ -genkeypair \ -alias server-cert \ -ext "san=dns:opendj.example.com" \ -dname "CN=opendj.example.com,O=Example Corp,C=FR" \ -keystore /path/to/opendj/config/keystore \ -storetype PKCS12 \ -storepass:file /path/to/opendj/config/keystore.pin \ -keypass:file /path/to/opendj/config/keystore.pin
After using an alternate keystore type, make sure that you set up:
The key manager provider to open the correct keystore with the correct credentials.
Any components using that key manager provider to use the correct certificate alias.
This section includes procedures for working with test key pairs. The procedures use the openssl command to perform actions that are not necessarily possible with the Java keytool command. OpenSSL software is available from https://www.openssl.org/.
Important
OpenSSL software is independent from and not associated with the DS project. The examples shown in this section might not work with your version of OpenSSL. See the openssl documentation for your version.
Examples in this section were originally written with OpenSSL version 1.0.2.
This section includes the following procedures:
Follow these steps to set up a CA key pair with a signing certificate:
Generate a private key for the CA:
$ openssl \
 genpkey \
 -algorithm RSA \
 -out ca.key \
 -pkeyopt rsa_keygen_bits:4096
Self-sign a corresponding certificate:
$ openssl \
 req \
 -new \
 -x509 \
 -days 7300 \
 -subj "/C=FR/O=Example Corp/CN=example.com" \
 -key ca.key \
 -out ca.crt
The signing certificate is
ca.crt, and it corresponds to the private keyca.key.
Follow these steps to use a CA signing certificate to sign a certificate signing request (CSR):
If you have not already done so, set up a CA key pair as described in "To Set Up a CA Signing Certificate".
Obtain a CSR file for the certificate to sign.
Create a signed certificate from the CSR.
The following example preserves the SAN for a server certificate generated using the keytool command and the
-ext "san=dns:opendj.example.com"option:$ openssl \ x509 \ -req \ -in server-cert.csr \ -CA ca.crt \ -CAkey ca.key \ -CAcreateserial \ -extfile \ <(cat /etc/ssl/openssl.cnf \ <(printf "[SAN]\nsubjectAltName=DNS:opendj.example.com")) \ -extensions SAN \ -out server-cert.crtThe following example preserves the SAN for a wildcard certificate as described in "To Set Up a Key Pair With a Wildcard Certificate":
$ openssl \
 x509 \
 -req \
 -in example.com.csr \
 -CA ca.crt \
 -CAkey ca.key \
 -CAcreateserial \
 -extfile \
  <(cat /etc/ssl/openssl.cnf \
  <(printf "[SAN]\nsubjectAltName=DNS:*.example.com")) \
 -extensions SAN \
 -out example.com.crt
In both examples, the certificates to return to the requestors are the
.crtfiles.
A wildcard certificate uses a *
to replace the top-level subdomain in the subject FQDN,
and can list domains in the subject alternative domain list.
The FQDN for a server,
visible in the status command output,
must also match a DNSName value or pattern
in the certificate's SubjectAlternativeName list.
Follow these steps to set up a key pair with a wildcard certificate:
Generate a private key:
$ openssl \
 genpkey \
 -algorithm RSA \
 -pkeyopt rsa_keygen_bits:2048 \
 -out example.com.key
Generate a certificate signing request for the CA:
$ openssl \
 req \
 -new \
 -sha256 \
 -key example.com.key \
 -subj "/C=FR/O=Example Corp/CN=*.example.com" \
 -reqexts SAN \
 -config \
  <(cat /etc/ssl/openssl.cnf \
  <(printf "[SAN]\nsubjectAltName=DNS:*.example.com")) \
 -out example.com.csr
Get the CA to sign the request and return the certificate.
For an example of how to do this yourself, see "To Sign a Certificate Signing Request".
(Optional) Convert the results into a PKCS#12 format Java keystore file.
$ openssl \
 pkcs12 \
 -export \
 -in example.com.crt \
 -inkey example.com.key \
 -name server-cert \
 -CAfile ca.crt \
 -password file:/path/to/opendj/config/keystore.pin \
 -out /path/to/opendj/config/keystore
This keystore can be used for testing the wildcard certificate with the DS server as in the following example:
$ ldapsearch \
 --port 1636 \
 --hostname opendj.example.com \
 --baseDN dc=example,dc=com \
 --useSSL \
 "(uid=bjensen)" \
 cn
The server is using the following certificate:
    Subject DN:  CN=*.example.com, O=Example Corp, C=FR
    Issuer DN:  CN=example.com, O=Example Corp, C=FR
    Validity:  <validity-dates>
Do you wish to trust this certificate and continue connecting to the server?
Please enter "yes" or "no":yes
dn: uid=bjensen,ou=People,dc=example,dc=com
cn: Barbara Jensen
cn: Babs Jensen
DS servers implement an OpenDJ security provider
for LDAP and LDIF-based keystore services.
Its keystore type is LDAP.
This section demonstrates how to work with an LDAP keystore.
Interface Stability: Evolving
An LDAP keystore can store trusted certificates, private keys, and secret keys. It stores key entries in the directory under a base DN that you specify. It protects private and secret keys by encrypting them with the keystore password.
You can store keys in a database backend or in an LDIF file. By storing keys in a database backend, you can take advantage of data replication to distribute the keys securely to all replicas. LDIF storage can be useful for testing purposes.
You can access an LDAP keystore using the Java keytool command, and using similar tools that work with Java keystores. The tool must have access to the security provider implementation in the server libraries, and to a configuration file for connecting to the LDAP or LDIF storage.
This section includes the following examples:
The following command adds a base DN for an LDAP keystore:
$ cat keystore.ldif
dn: ou=keystore,dc=example,dc=com
objectClass: organizationalUnit
objectClass: top
aci: (target = "ldap:///ou=keystore,dc=example,dc=com")(targetattr = "*")
 (version 3.0;acl "Cleartext LDAP to keystore only on localhost";
 deny(all)(ip != "127.0.0.1" and ssf <= "1");)
description: LDAP keystore
ou: keystore

$ ldapmodify \
 --port 1389 \
 --bindDN "cn=Directory Manager" \
 --bindPassword password \
 keystore.ldif
External tools that access an LDAP keystore require a configuration file.
If the LDAP keystore stores keys in the directory, the tools require a configuration file such as the following:
# Configuration file for LDAP keystore using the directory
org.forgerock.opendj.security.keyStoreBaseDn=ou=keystore,dc=example,dc=com
org.forgerock.opendj.security.host=localhost
org.forgerock.opendj.security.port=1389
org.forgerock.opendj.security.bindDn=cn=Directory Manager
org.forgerock.opendj.security.bindPassword=password
The keyStoreBaseDn must exist before it is used.
See "LDAP Keystore Base DN".
If the LDAP keystore is backed by an LDIF file, the configuration file must specify the file to use:
# Configuration file for LDAP keystore using LDIF
org.forgerock.opendj.security.ldif=/path/to/keystore.ldif
org.forgerock.opendj.security.keyStoreBaseDn=ou=keystore,dc=example,dc=com
The following example sets up a PIN for an LDAP keystore:
$ touch /path/to/opendj/config/ldap.pin
$ chmod 600 /path/to/opendj/config/ldap.pin
# Add a password in cleartext on a single line:
$ vi /path/to/opendj/config/ldap.pin
The following example generates a public-private key pair in the LDAP keystore.
Notice the classpath settings (with -J)
that require access to the server libraries,
the reference to a configuration file as described in
"LDAP Keystore Configuration Files",
and the PIN file created as in "LDAP Keystore PIN".
$ keytool \
 -genkeypair \
 -alias "private-key" \
 -ext "san=dns:opendj.example.com" \
 -dname "CN=opendj.example.com,O=Example Corp,C=FR" \
 -J-cp -J/path/to/opendj/lib/bootstrap-client.jar \
 -providerName OpenDJ \
 -providerClass org.forgerock.opendj.security.OpenDjSecurityProvider \
 -providerArg keystore.conf \
 -storetype LDAP \
 -keystore NONE \
 -storepass:file /path/to/opendj/config/ldap.pin \
 -keypass:file /path/to/opendj/config/ldap.pin
The following example generates a certificate signing request for a private key in the LDAP keystore.
Notice the classpath settings (with -J)
that require access to the server libraries,
the reference to a configuration file as described in
"LDAP Keystore Configuration Files",
and the PIN file created as in "LDAP Keystore PIN".
$ keytool \
 -certreq \
 -alias "private-key" \
 -file private-key.csr \
 -J-cp -J/path/to/opendj/lib/bootstrap-client.jar \
 -providerName OpenDJ \
 -providerClass org.forgerock.opendj.security.OpenDjSecurityProvider \
 -providerArg keystore.conf \
 -storetype LDAP \
 -keystore NONE \
 -storepass:file /path/to/opendj/config/ldap.pin \
 -keypass:file /path/to/opendj/config/ldap.pin
For examples showing how to import a certificate in response from the CA, see "LDAP Keystore: Import Trusted Certificate".
The following example self signs a public key certificate associated with a private key in the LDAP keystore.
Notice the classpath settings (with -J)
that require access to the server libraries,
the reference to a configuration file as described in
"LDAP Keystore Configuration Files",
and the PIN file created as in "LDAP Keystore PIN".
$ keytool \
 -selfcert \
 -alias "private-key" \
 -J-cp -J/path/to/opendj/lib/bootstrap-client.jar \
 -providerName OpenDJ \
 -providerClass org.forgerock.opendj.security.OpenDjSecurityProvider \
 -providerArg keystore.conf \
 -storetype LDAP \
 -keystore NONE \
 -storepass:file /path/to/opendj/config/ldap.pin \
 -keypass:file /path/to/opendj/config/ldap.pin
The following example generates an AES secret key in the LDAP keystore.
Notice the classpath settings (with -J)
that require access to the server libraries,
the reference to a configuration file as described in
"LDAP Keystore Configuration Files",
and the PIN file created as in "LDAP Keystore PIN".
$ keytool \
 -genseckey \
 -alias "secret-key" \
 -keyalg AES \
 -keysize 256 \
 -J-cp -J/path/to/opendj/lib/bootstrap-client.jar \
 -providerName OpenDJ \
 -providerClass org.forgerock.opendj.security.OpenDjSecurityProvider \
 -providerArg keystore.conf \
 -storetype LDAP \
 -keystore NONE \
 -storepass:file /path/to/opendj/config/ldap.pin \
 -keypass:file /path/to/opendj/config/ldap.pin
The following examples import trusted certificates into the LDAP keystore.
Notice the classpath settings (with -J)
that require access to the server libraries,
the reference to a configuration file as described in
"LDAP Keystore Configuration Files",
and the PIN file created as in "LDAP Keystore PIN".
The following example imports a certificate in binary format:
$ keytool \
 -importcert \
 -alias "trusted-cert" \
 -file cert.crt \
 -J-cp -J/path/to/opendj/lib/bootstrap-client.jar \
 -providerName OpenDJ \
 -providerClass org.forgerock.opendj.security.OpenDjSecurityProvider \
 -providerArg keystore.conf \
 -storetype LDAP \
 -keystore NONE \
 -storepass:file /path/to/opendj/config/ldap.pin \
 -keypass:file /path/to/opendj/config/ldap.pin \
 -noprompt
Certificate was added to keystore
The following example imports a certificate in PEM format. The only difference compared to the previous command is the certificate file name:
$ keytool \
 -importcert \
 -alias "trusted-cert" \
 -file cert.pem \
 -J-cp -J/path/to/opendj/lib/bootstrap-client.jar \
 -providerName OpenDJ \
 -providerClass org.forgerock.opendj.security.OpenDjSecurityProvider \
 -providerArg keystore.conf \
 -storetype LDAP \
 -keystore NONE \
 -storepass:file /path/to/opendj/config/ldap.pin \
 -keypass:file /path/to/opendj/config/ldap.pin \
 -noprompt
Certificate was added to keystore
The following example lists the contents of the LDAP keystore.
Notice the classpath settings (with -J)
that require access to the server libraries,
the reference to a configuration file as described in
"LDAP Keystore Configuration Files",
and the PIN file created as in "LDAP Keystore PIN":
$ keytool \
 -list \
 -J-cp -J/path/to/opendj/lib/bootstrap-client.jar \
 -providerName OpenDJ \
 -providerClass org.forgerock.opendj.security.OpenDjSecurityProvider \
 -providerArg keystore.conf \
 -storetype LDAP \
 -keystore NONE \
 -storepass:file /path/to/opendj/config/ldap.pin \
 -keypass:file /path/to/opendj/config/ldap.pin \
 -noprompt
Keystore type: LDAP
Keystore provider: OpenDJ

Your keystore contains 3 entries

private-key, <date>, PrivateKeyEntry,
...
secret-key, <date>, SecretKeyEntry,
trusted-cert, <date>, trustedCertEntry,
...
The following example deletes a key from the LDAP keystore.
Notice the classpath settings (with -J)
that require access to the server libraries,
the reference to a configuration file as described in
"LDAP Keystore Configuration Files",
and the PIN file created as in "LDAP Keystore PIN":
$ keytool \
 -delete \
 -alias "trusted-cert" \
 -J-cp -J/path/to/opendj/lib/bootstrap-client.jar \
 -providerName OpenDJ \
 -providerClass org.forgerock.opendj.security.OpenDjSecurityProvider \
 -providerArg keystore.conf \
 -storetype LDAP \
 -keystore NONE \
 -storepass:file /path/to/opendj/config/ldap.pin \
 -keypass:file /path/to/opendj/config/ldap.pin \
 -noprompt
The following example creates a key manager provider for the LDAP keystore:
$ dsconfig \
 create-key-manager-provider \
 --hostname opendj.example.com \
 --port 4444 \
 --bindDN "cn=Directory Manager" \
 --bindPassword password \
 --provider-name LDAP \
 --type ldap \
 --set enabled:true \
 --set base-dn:ou=keystore,dc=example,dc=com \
 --set key-store-pin:"&{file:/path/to/opendj/config/ldap.pin}" \
 --trustAll \
 --no-prompt
You can reference this key manager provider in connection handler configurations, as shown in the following example:
$ dsconfig \
 set-connection-handler-prop \
 --hostname opendj.example.com \
 --port 4444 \
 --bindDN "cn=Directory Manager" \
 --bindPassword password \
 --handler-name LDAPS \
 --set key-manager-provider:LDAP \
 --set ssl-cert-nickname:private-key \
 --trustAll \
 --no-prompt
The following example creates a trust manager provider for the LDAP keystore:
$ dsconfig \
 create-trust-manager-provider \
 --hostname opendj.example.com \
 --port 4444 \
 --bindDN "cn=Directory Manager" \
 --bindPassword password \
 --provider-name LDAP \
 --type ldap \
 --set enabled:true \
 --set base-dn:ou=keystore,dc=example,dc=com \
 --set trust-store-pin:"&{file:/path/to/opendj/config/ldap.pin}" \
 --trustAll \
 --no-prompt
You can reference this trust manager provider in connection handler configurations, as shown in the following example:
$ dsconfig \
 set-connection-handler-prop \
 --hostname opendj.example.com \
 --port 4444 \
 --bindDN "cn=Directory Manager" \
 --bindPassword password \
 --handler-name LDAPS \
 --set trust-manager-provider:LDAP \
 --trustAll \
 --no-prompt
This section demonstrates how to use a PKCS#11 device, such as a hardware security module (HSM), to store the keys used to secure communications.
DS servers support key management using a PKCS#11 token store. The PKCS#11 standard defines a cryptographic token interface, a platform-independent API for storing keys in an HSM, for example. HSMs logically and physically protect keys. HSMs can perform cryptographic calculations with the keys, potentially offloading the CPU for this purpose, but also preventing the keys from being accessible to other processes on the system.
Note
DS servers use a PKCS#11 keystore to hold PKI key pairs, which are asymmetric keys used to set up secure connections. The DS Crypto Manager, described in "About Security Features", does not store symmetric keys on a PKCS#11 device. In other words, generated symmetric keys used for encryption and decryption of backup data and confidential data cannot be stored in an HSM.
Using a PKCS#11 device for storing DS keys involves:
Storing the keys on the PKCS#11 device.
How you store keys in a device such as an HSM depends on the device. For details, see the documentation for your device.
Creating the DS PKCS11 key manager provider to access the device.
The DS server accesses a PKCS#11 device using a PIN, which can be provided in the server configuration, in a separate file, or as the value of an environment variable or Java system property. The PIN must be stored as a cleartext value, so take care to protect it in production environments.
Configuring other components to use the key manager provider.
For example, DS connection handlers and OAuth 2.0 authorization mechanisms requiring SSL mutual authentication can reference the key manager provider in their configurations.
This section demonstrates how to use the SoftHSM PKCS#11 software device for evaluation, development, and testing.
This section includes the following procedures:
This procedure explains how to prepare the SoftHSM PKCS#11 software device for development and testing.
The sun.security.pkcs11.SunPKCS11 provider implementation
used here is available in the Oracle Java environment.
If you use a different Java implementation, see the documentation
for details on how to use PKCS#11 devices with your JVM.
Follow these steps to set up SoftHSM and add a self-signed key pair:
Install SoftHSM, including setting up the configuration and the
SOFTHSM2_CONFenvironment variable.For details, see the SoftHSM documentation, using the following hints:
Make sure you can write tokens to SoftHSM:
$ cat $SOFTHSM2_CONF
# SoftHSM v2 configuration file

# You must be able to write to the token dir when initializing the device:
directories.tokendir = /path/to/softhsm/tokens
objectstore.backend = file

# ERROR, WARNING, INFO, DEBUG
log.level = INFO
Keep track of the PINs that you enter when initializing the device:
$ softhsm2-util --init-token --slot 0 --label "My token 1"
*** SO PIN (4-255 characters) ***
Please enter SO PIN:
Please reenter SO PIN:
*** User PIN (4-255 characters) ***
Please enter user PIN:
Please reenter user PIN:
The token has been initialized.
The SO PIN is to reinitialize the token.
The user PIN is the one the DS server needs to access the device.
Generate a key pair on the device:
To use the Java keytool command with the device, you must first create a PKCS#11 configuration file that is used by the security provider implementation:
$ cat /path/to/softhsm/hsm.conf
name = SoftHSM
library = /path/to/softhsm/2.0.0/lib/softhsm/libsofthsm2.so
slot = 0
attributes(generate, *, *) = {
   CKA_TOKEN = true
}
attributes(generate, CKO_CERTIFICATE, *) = {
   CKA_PRIVATE = false
}
attributes(generate, CKO_PUBLIC_KEY, *) = {
   CKA_PRIVATE = false
}
attributes(*, CKO_SECRET_KEY, *) = {
   CKA_PRIVATE = false
}
Notes regarding the configuration file:
The format is described in the Java PKCS#11 Reference Guide.
The
librarymust point to thelibsofthsm2.solibrary installed with SoftHSM.The
slotmust be one used when initializing the device.
Using the configuration file, generate the key pair.
The following example generates a key pair with the alias
server-certthat is the default for several DS connection handlers:$ keytool \ -genkeypair \ -alias server-cert \ -keyalg RSA \ -keysize 2048 \ -ext "san=dns:opendj.example.com" \ -dname "CN=opendj.example.com,O=Example Corp,C=FR" \ -keystore NONE \ -storetype PKCS11 \ -providerClass sun.security.pkcs11.SunPKCS11 \ -providerArg /path/to/softhsm/hsm.conf Enter keystore password:The keystore password is the user PIN.
Self-sign the public key certificate:
$ keytool \
 -selfcert \
 -alias server-cert \
 -keystore NONE \
 -storetype PKCS11 \
 -providerClass sun.security.pkcs11.SunPKCS11 \
 -providerArg /path/to/softhsm/hsm.conf
Enter keystore password:
The keystore password is the user PIN.
Using a CA-signed cert is similar, but not shown here.
Follow these steps:
Make sure you have the cleartext PIN available.
With SoftHSM, this is the user PIN set when initializing the slot where you stored the keys.
Make sure that the Java environment can find SoftHSM with its configuration.
For example, add a provider definition by using an extra Java security properties file as in the following example:
# Define the additional security provider in the extra file:
$ cat /path/to/opendj/config/java.security
# Security provider for accessing SoftHSM:
security.provider.11=sun.security.pkcs11.SunPKCS11 /path/to/softhsm/hsm.conf

# Use the extra file when starting the DS server:
$ grep java.security /path/to/opendj/config/java.properties
start-ds.java-args=-server -Djava.security.properties=/path/to/opendj/config/java.security

# Restart the DS server so the changes take effect:
$ stop-ds --restart
Create the PKCS11 key manager provider configuration.
The following example creates a provider for SoftHSM with a protected file holding the cleartext user PIN on the only line in the file:
$ touch /path/to/opendj/config/softhsm.pin
$ chmod 600 /path/to/opendj/config/softhsm.pin
$ vi /path/to/opendj/config/softhsm.pin
# Add the user PIN on the first and only line in the file, and save your work.
$ dsconfig \
 create-key-manager-provider \
 --hostname opendj.example.com \
 --port 4444 \
 --bindDN "cn=Directory Manager" \
 --bindPassword password \
 --provider-name SoftHSM \
 --type pkcs11 \
 --set enabled:true \
 --set key-store-pin:"&{file:/path/to/opendj/config/softhsm.pin}" \
 --trustAll \
 --no-prompt
DS key manager providers also support storing the PIN in the configuration, in an environment variable, or in a Java property.
Follow these steps:
Set a connection handler or authorization mechanism to use the PKCS11 key manager provider.
The following example configures the LDAPS connection handler to use the SoftHSM provider:
$ dsconfig \
 set-connection-handler-prop \
 --hostname opendj.example.com \
 --port 4444 \
 --bindDN "cn=Directory Manager" \
 --bindPassword password \
 --handler-name LDAPS \
 --set listen-port:1636 \
 --set enabled:true \
 --set use-ssl:true \
 --set key-manager-provider:SoftHSM \
 --trustAll \
 --no-prompt
Verify that the secure connection negotiation works with the HSM configured:
$ ldapsearch \
 --port 1636 \
 --hostname opendj.example.com \
 --baseDN dc=example,dc=com \
 --useSSL \
 "(uid=bjensen)" \
 cn
The server is using the following certificate:
    Subject DN:  CN=opendj.example.com, O=Example Corp, C=FR
    Issuer DN:  CN=opendj.example.com, O=Example Corp, C=FR
    Validity:  <validity-period>
Do you wish to trust this certificate and continue connecting to the server?
Please enter "yes" or "no":yes
dn: uid=bjensen,ou=People,dc=example,dc=com
cn: Barbara Jensen
cn: Babs Jensen
When a server and client negotiate a secure connection, they negotiate use of a common protocol and cipher suite. If they cannot negotiate a common protocol and cipher suite, they will fail to set up a secure connection.
Furthermore, researchers continue to find vulnerabilities in protocols and cipher suites. If the server continues to support those protocols and cipher suites, then clients can use them when negotiating connections. Attackers can then exploit the vulnerabilities. It is therefore important to understand how to read and to restrict the list of supported protocols and cipher suites.
DS servers depend on the underlying JVM
to support security protocols and cipher suites.
By default, all supported protocols and cipher suites are available.
For details, see the documentation for the JVM.
For Oracle Java, see the
Java Cryptography Architecture Oracle Providers Documentation
describing the
The SunJSSE Provider.
Bear in mind that support for protocols and cipher suites can be added and removed in Java update releases. The protocols and cipher suites available are also determined by the security policy. For example, see "Using Unlimited Strength Cryptography".
This section includes the following procedures:
To list the protocols and cipher suites that DS servers support, read the
supportedTLSProtocolsandsupportedTLSCiphersattributes of the root DSE:$ ldapsearch \ --port 1389 \ --baseDN "" \ --searchScope base \ "(objectclass=*)" \ supportedTLSCiphers supportedTLSProtocols
A
supportedTLSCiphersname, such asTLS_ECDHE_RSA_WITH_AES_256_GCM_SHA384, identifies the key attributes of the cipher suite:TLSSpecifies the protocol, in this case TLS.
ECDHE_RSASpecifies the key exchange algorithm used to determine how the client and server authenticate during the handshake phase.
In this example, an elliptic curve variant of the Diffie-Hellman key exchange is used, where a random value chosen by the client is encrypted with the server's RSA public key.
WITH_AES_256_GCMSpecifies the bulk encryption algorithm, including the key size or initialization vectors.
This example specifies the Advanced Encryption Standard (AES) with 256-bit key size and Galois/Counter Mode (GCM) block cipher mode.
SHA384Specifies the message authentication code algorithm used to create the message digest, which is a cryptographic hash of each block in the message stream.
In this example, the SHA-2 hash function, SHA-384, is used.
A
supportedTLSProtocolsname identifies the protocol and version, such asTLSv1.2.
Choosing which protocol versions and cipher suites to allow for negotiating secure connections depends on known vulnerabilities, estimations of what is secure, and what peers support.
The default support is backward-compatible with old clients, meaning that if you do nothing it is possible for a client to use a protocol version that is known to have vulnerabilities, or to negotiate an insecure or very weakly secure connection. To avoid this, limit the protocols and cipher suites that you allow.
You can limit supported protocols and cipher suites by setting the properties,
ssl-protocol and ssl-cipher-suite.
These are available on connection handlers,
and on components that connect to remote services
including the global Crypto Manager component used for replication.
This procedure is based on server-side TLS recommendations from the Mozilla Operations Security team taken at the time of this writing. Recommendations evolve. Make sure you use current recommendations when configuring security settings.
The examples in this procedure assume you have installed an unlimited encryption strength policy:
For each cipher suite key algorithm to support, create a key pair using the supported key algorithm.
The following example adds two key pairs to the default PKCS#12 keystore, with one key using RSA and the other key using elliptic curve.
$ keytool \
 -genkeypair \
 -alias server-cert-rsa \
 -keyalg RSA \
 -ext "san=dns:opendj.example.com" \
 -dname "CN=opendj.example.com,O=Example Corp,C=FR" \
 -keystore /path/to/opendj/config/keystore \
 -storetype PKCS12 \
 -storepass:file /path/to/opendj/config/keystore.pin \
 -keypass:file /path/to/opendj/config/keystore.pin
$ keytool \
 -genkeypair \
 -alias server-cert-ec \
 -keyalg EC \
 -ext "san=dns:opendj.example.com" \
 -dname "CN=opendj.example.com,O=Example Corp,C=FR" \
 -keystore /path/to/opendj/config/keystore \
 -storetype PKCS12 \
 -storepass:file /path/to/opendj/config/keystore.pin \
 -keypass:file /path/to/opendj/config/keystore.pin
On the components you use, explicitly set the supported protocols and cipher suites.
The following example adjusts settings for the LDAP and LDAPS connection handlers:
$ dsconfig \
 set-connection-handler-prop \
 --hostname opendj.example.com \
 --port 4444 \
 --bindDN "cn=Directory Manager" \
 --bindPassword password \
 --handler-name LDAP \
 --add ssl-protocol:TLSv1.2 \
 --add ssl-cipher-suite:TLS_ECDHE_ECDSA_WITH_AES_256_GCM_SHA384 \
 --add ssl-cipher-suite:TLS_ECDHE_RSA_WITH_AES_256_GCM_SHA384 \
 --add ssl-cipher-suite:TLS_ECDHE_ECDSA_WITH_AES_128_GCM_SHA256 \
 --add ssl-cipher-suite:TLS_ECDHE_RSA_WITH_AES_128_GCM_SHA256 \
 --add ssl-cipher-suite:TLS_EMPTY_RENEGOTIATION_INFO_SCSV \
 --no-prompt \
 --trustAll
$ dsconfig \
 set-connection-handler-prop \
 --hostname opendj.example.com \
 --port 4444 \
 --bindDN "cn=Directory Manager" \
 --bindPassword password \
 --handler-name LDAPS \
 --add ssl-protocol:TLSv1.2 \
 --add ssl-cipher-suite:TLS_ECDHE_ECDSA_WITH_AES_256_GCM_SHA384 \
 --add ssl-cipher-suite:TLS_ECDHE_RSA_WITH_AES_256_GCM_SHA384 \
 --add ssl-cipher-suite:TLS_ECDHE_ECDSA_WITH_AES_128_GCM_SHA256 \
 --add ssl-cipher-suite:TLS_ECDHE_RSA_WITH_AES_128_GCM_SHA256 \
 --add ssl-cipher-suite:TLS_EMPTY_RENEGOTIATION_INFO_SCSV \
 --no-prompt \
 --trustAll
The
TLS_ECDHE_EC*cipher suites call for a server certificate with an elliptic curve key algorithm. TheTLS_ECDHE_RSA*cipher suites call for a server certificate with an RSA key algorithm.The
TLS_EMPTY_RENEGOTIATION_INFO_SCSVcipher suite is a renegotiation information extension with a special Signaling Cipher Suite Value (SCSV) to help older clients properly complete a handshake.On the components you use, set the multivalued property,
ssl-cert-nickname, to identify each certificate alias:$ dsconfig \ set-connection-handler-prop \ --hostname opendj.example.com \ --port 4444 \ --bindDN "cn=Directory Manager" \ --bindPassword password \ --handler-name LDAP \ --set enabled:true \ --set listen-port:1389 \ --set allow-start-tls:true \ --set ssl-cert-nickname:server-cert-ec \ --set ssl-cert-nickname:server-cert-rsa \ --set key-manager-provider:"Default Key Manager" \ --set trust-manager-provider:"JVM Trust Manager" \ --trustAll \ --no-prompt $ dsconfig \ set-connection-handler-prop \ --hostname opendj.example.com \ --port 4444 \ --bindDN "cn=Directory Manager" \ --bindPassword password \ --handler-name LDAPS \ --set listen-port:1636 \ --set enabled:true \ --set use-ssl:true \ --set ssl-cert-nickname:server-cert-ec \ --set ssl-cert-nickname:server-cert-rsa \ --trustAll \ --no-prompt
When negotiating a secure connection, the server can now use either key.
You can specify which protocol versions to allow when command-line tools negotiate secure connections with LDAP servers.
The command-line tools depend on a system property,
org.opends.ldaps.protocols.
This property takes a comma-separated list of protocols.
The default is constructed from the list of all protocols the JVM supports,
removing protocol names starting with SSL.
For example, if support is enabled in the JVM for
versions 1.0, 1.1, and 1.2 of the TLS protocol,
then the default is "TLSv1,TLSv1.1,TLSv1.2".
Restrict the protocols to use by setting the property in one of the following ways:
Set the property by editing the
java-argsfor the command inconfig/java.properties.For example, to restrict the protocol to TLS v1.2 when the status command negotiates a secure administrative connection, edit the corresponding line in
config/java.properties:status.java-args=-Xms8m -client -Dorg.opends.ldaps.protocols=TLSv1.2
Set the property at runtime when running the command.
The following example restricts the protocol to TLS v1.2 when the status command negotiates a secure administrative connection:
$ export OPENDJ_JAVA_ARGS="-Dorg.opends.ldaps.protocols=TLSv1.2"
$ status \
 --bindDN "cn=Directory Manager" \
 --bindPassword password \
 --trustAll
Directory Services software has incoming and outgoing connections. Depending on the deployment, you might need to secure all of these connections. In this chapter you will learn to:
Understand what connections to allow, and the conditions where connections must be secured
Require HTTPS connections from client applications
Require LDAPS connections from client applications
Understand TLS for all relevant protocols
Understand how DS software handles client certificate validation
Restrict the server resources that client requests are allowed to consume
Securing connections depends on PKI and asymmetric, public/private key pairs. For details, see "Managing Certificates and Private Keys".
This chapter focuses on securing connections. Basic connection handler configuration is covered in "Configuring Connection Handlers" in the Administration Guide.
This section reviews incoming and outgoing connections, and offers recommendations that depend on the deployment.
Incoming connections are those where clients access ForgeRock Directory Services on the host system. See "Recommendations For Incoming Connections" for suggestions.
| Protocol | Recommendations |
|---|---|
Administration |
DS servers use an Administration Connector to handle connections from administration tools. Leave the Administration Connector configured to use SSL/TLS unless you are certain that the connections are already secured by some other means. |
DSML |
DSML support is available through the DS DSML gateway. Use HTTPS to protect client connections. For details, see "Securing Web Applications". |
HTTP |
HTTP connections that are not protected by SSL/TLS use cleartext messages. When you allow a server to establish insecure (cleartext) connections, there is no way to prevent client applications from sending sensitive data. For example, a client could send unprotected credentials in an HTTP Authorization header. Even if the server were to reject the request, the credentials would already be leaked to any eavesdroppers. HTTP could be allowed instead of HTTPS with anonymous connections if only public information is exposed, and no client applications send credentials or other sensitive information. You can configure the HTTP connection handler to use only the default HTTP Anonymous authorization mechanism, described in "To Set Up HTTP Authorization" in the Administration Guide. |
HTTPS |
Prefer HTTPS for secure connections over HTTP. When using an HTTP connection handler, use HTTPS to protect client connections. Some client applications require a higher level of trust than others, such as clients with additional privileges or access. Client application deployers might find it easier to manage public keys as credentials than to manage user name/password credentials. Client applications can use SSL client authentication. When using DS REST to LDAP gateway, use HTTPS to protect client connections. For details, see "Securing Web Applications". |
JMX |
Secure JMX access with the SSL/TLS related properties,
such as |
LDAP |
LDAP connections that are not protected by SSL/TLS use cleartext messages. When you allow a server to establish insecure (cleartext) connections, there is no way to prevent client applications from sending sensitive data. For example, a client could send unprotected credentials in an LDAP simple bind request. Even if the server were to reject the request, the credentials would already be leaked to any eavesdroppers.
If all the LDAP applications are under your control,
you can make sure that the only "insecure" requests
are anonymous binds, SASL binds, or StartTLS requests.
You can also set the global server property
|
LDAPS |
Prefer LDAPS for secure connections, or make sure that applications use StartTLS after establishing a cleartext LDAP connection and before performing other operations. Some client applications require a higher level of trust than others, such as clients with additional privileges or access. Client application deployers might find it easier to manage public keys as credentials than to manage user name/password credentials. Client applications can use SSL client authentication, as described in "Authenticating Client Applications With a Certificate". |
Replication |
Replication is required in all but a few deployments. If any of the following are true, replication is required:
Configure replication to use secure connections unless you are certain that network connections between replicas are already secured by some other means. |
SNMP |
Secure SNMP access with settings for |
SSH |
DS administration tools, such as dsconfig and dsreplication, can connect securely. If the firewall is configured to prevent remote access to the administration connector port, however, then use a secure connection to access the system remotely. ForgeRock Directory Services are separate and independent from tools for accessing the host system remotely. A recommended choice for UNIX and Linux systems is Secure Shell (SSH). The user account for running directory services should not be the same user account for connecting remotely. Instead, connect as a another user who can then assume the role of the directory services account. The following example demonstrates this approach: # Log in to opendj.example.com:
me@my-laptop $ ssh user@opendj.example.com
user@opendj.example.com's password:
# Logged in to opendj.example.com as user.
Last login: ... from ...
# Run dsconfig interactively as opendj:
user@opendj.example.com $ sudo -i -u opendj dsconfig
Secure Copy (SCP) uses SSH to transfer files securely. SCP is an appropriate protocol for copying backup data, for example. |
For a list of default port numbers associated with the protocols, see "Server Ports".
Outgoing connections are those where ForgeRock Directory Services act as clients of remote services. See "Recommendations For Outgoing Connections" for suggestions.
| Client | Recommendations |
|---|---|
Common Audit event handlers |
Configure ForgeRock Common Audit event handlers to use HTTPS or TLS when connecting to external log services. For details, see "Common ForgeRock Access Logs" in the Administration Guide. |
DSML gateway |
The DS DSML gateway connects to remote LDAP directory servers. Use LDAP and StartTLS or LDAPS to protect the connections. For details, see "Securing Web Applications". |
OAuth 2.0-based HTTP authorization mechanisms |
HTTP authorization can be based on OAuth 2.0, where DS servers resolves OAuth 2.0 tokens as described in "To Set Up HTTP Authorization" in the Administration Guide. Use HTTPS to protect the connections to OAuth 2.0 authorization servers. |
Pass-Through Authentication |
When DS servers are configured to perform pass-through authentication as described in "Configuring Pass-Through Authentication" in the Administration Guide, they connect to remote LDAP directory servers for authentication. Use LDAP with StartTLS or LDAPS to protect the connections. |
Proxy Requests |
A directory proxy server uses an LDAP simple bind request to connect to remote directory servers, where the proxy sends its bind DN and bind password. Use LDAP with StartTLS or LDAPS to protect the bind credentials and to protect other requests to remote directory servers. |
Replication |
Configure replication to use secure connections unless you are certain that network connections between replicas are already secured by some other means. |
REST to LDAP gateway |
The DS REST to LDAP gateway connects to remote LDAP directory servers. Use LDAP with StartTLS or LDAPS to protect the connections. For details, see "Securing Web Applications". |
SMTP account notification and alert handlers |
DS servers can send email account notifications and alerts. The current implementation does not provide a means to authenticate or to secure SMTP connections when sending mail. Send messages to a mail server on the local host where authentication is not required. Account notification configuration is described in "Managing Account Status Notification" in the Administration Guide. Alert configuration is described in "Alert Notifications" in the Administration Guide. |
This section shows how to configure DS servers to require HTTPS connections from client applications.
After you make the changes, HTTP clients must connect to the HTTPS port.
For details on configuring the DS DSML gateway or DS REST to LDAP gateway to require HTTPS, see the documentation for the web application container as described in "Securing Web Applications".
The following steps demonstrate how to change the default HTTP connection handler configuration to use only HTTPS:
Make sure a server certificate and associated private key are available:
$ keytool \
 -list \
 -alias server-cert \
 -keystore /path/to/opendj/config/keystore \
 -storepass:file /path/to/opendj/config/keystore.pin \
 -storetype PKCS12
...
server-cert, <date>, PrivateKeyEntry
...
Disable the HTTP connection handler to prevent (cleartext) HTTP access:
$ dsconfig \
 set-connection-handler-prop \
 --hostname opendj.example.com \
 --port 4444 \
 --bindDN "cn=Directory Manager" \
 --bindPassword password \
 --handler-name HTTP \
 --set enabled:false \
 --trustAll \
 --no-prompt
Configure the HTTP connection handler to use HTTPS access.
The following example shows how to set the port to 8443 and perform TLS using the default server certificate:
$ dsconfig \
 set-connection-handler-prop \
 --hostname opendj.example.com \
 --port 4444 \
 --bindDN "cn=Directory Manager" \
 --bindPassword password \
 --handler-name HTTP \
 --set enabled:true \
 --set listen-port:8443 \
 --set use-ssl:true \
 --set key-manager-provider:"Default Key Manager" \
 --set trust-manager-provider:"JVM Trust Manager" \
 --trustAll \
 --no-prompt
(Optional) Enable the HTTP access log.
The following command enables JSON-based HTTP access logging as described in "Configuring JSON Access Logs" in the Administration Guide:
$ dsconfig \
 set-log-publisher-prop \
 --hostname opendj.example.com \
 --port 4444 \
 --bindDN "cn=Directory Manager" \
 --bindPassword password \
 --publisher-name "Json File-Based HTTP Access Logger" \
 --set enabled:true \
 --no-prompt \
 --trustAll
The following command enables HTTP access logging as described in "Standard HTTP Access Logs" in the Administration Guide:
$ dsconfig \
 set-log-publisher-prop \
 --hostname opendj.example.com \
 --port 4444 \
 --bindDN "cn=Directory Manager" \
 --bindPassword password \
 --publisher-name "File-Based HTTP Access Logger" \
 --set enabled:true \
 --no-prompt \
 --trustAll
(Optional) If the deployment requires SSL client authentication, set the properties
ssl-client-auth-policyandtrust-manager-providerappropriately.After you set up the HTTP connection handler, make sure that at least one HTTP endpoint configuration object is enabled.
For details, see "To Set Up REST Access to User Data" in the Administration Guide or "To Set Up REST Access to Administrative Data" in the Administration Guide.
This section shows how to configure DS servers to require LDAPS connections from client applications, preventing potentially insecure, initially cleartext connections over LDAP by following these procedures:
After you make the changes, LDAP clients must connect to the LDAPS port.
Note
The standard port number for LDAPS client access is 636. If you install DS servers as a user who can use port 636 and the port is not yet in use, then 636 is the default port number presented at setup time. If you install as a user who cannot use a port number less than 1024, then the default port number presented at setup time is 1636.
If LDAPS access was not configured at during setup, follow these steps:
Make sure a server certificate and associated private key are available:
$ keytool \
 -list \
 -alias server-cert \
 -keystore /path/to/opendj/config/keystore \
 -storepass:file /path/to/opendj/config/keystore.pin \
 -storetype PKCS12
server-cert, <date>, PrivateKeyEntry
Configure the server to activate LDAPS access:
$ dsconfig \
 set-connection-handler-prop \
 --hostname opendj.example.com \
 --port 4444 \
 --bindDN "cn=Directory Manager" \
 --bindPassword password \
 --handler-name LDAPS \
 --set enabled:true \
 --set listen-port:1636 \
 --set use-ssl:true \
 --trustAll \
 --no-prompt
(Optional) If the deployment requires SSL client authentication, set the properties
ssl-client-auth-policyandtrust-manager-providerappropriately.
Follow these steps to prevent DS servers from allowing (cleartext) LDAP access:
Configure the server to disable LDAP access:
$ dsconfig \
 set-connection-handler-prop \
 --hostname opendj.example.com \
 --port 4444 \
 --bindDN "cn=Directory Manager" \
 --bindPassword password \
 --handler-name LDAP \
 --set enabled:false \
 --trustAll \
 --no-prompt
Verify that LDAP access is disabled:
$ status \
 --bindDN "cn=Directory Manager" \
 --bindPassword password \
 --script-friendly \
 --trustAll
...
Address:Port: 0.0.0.0:1389
Protocol: LDAP
State: Disabled
...
When a client and server set up a secure HTTP (HTTPS) or LDAP (LDAPS) connection, they use a protocol to establish the security, and then encapsulate HTTP or LDAP messages using the secure protocol. This section explains the process, making it clear how client certificates are handled differently in mutual authentication and in an LDAP bind using a certificate.
A connection that uses TLS, a protocol based on the SSL protocol, is a connection that is private and reliable. Communications on the connection are kept private by being encrypted with a symmetric key for the session that only the client and server know. Communications are reliable because their integrity is checked by using a message authentication code (MAC).
The TLS protocol is independent of the application protocol. TLS encapsulates application level protocols like HTTP and LDAP. The client and server negotiate the secure connection before any messages are sent using the application protocol.
When a client and server set up a secure connection, they use the TLS handshake protocol to negotiate a secure session. During the handshake the server and client use asymmetric keys, their public key certificates and associated private keys, to authenticate (prove their identities).
The default configuration for DS servers and most web servers has the server sending its certificate during the handshake. The client is not required to send its certificate. This allows the client to authenticate the server when negotiating security. It does not allow the server to authenticate the client at this stage. It avoids requiring all clients, such as browsers, to manage keys and to get certificates signed by well-known CAs.
For client applications that are part of the software infrastructure rather than end user applications such as browsers, managing keys and getting certificates signed by well-known CAs can be a better choice for authentication than usernames and passwords. Such clients present their certificates during the handshake, allowing the server to authenticate the client. When both the server and client present certificates during the handshake, this is known as mutual authentication.
In TLS v1.2, for example, a successful initial handshake involves the client and server performing the following steps:
Exchanging supported algorithms and random values
Exchanging cryptographic information to agree on an initial secret
Exchanging certificates and cryptographic information to allow authentication (as described above)
Generating a symmetric key for the sessions by using the initial secret and the random values exchanged
Setting the security parameters for the session
Verifying that each are using the same security parameters, and that the handshake was not tampered with
Once again, this handshake completes before any HTTP or LDAP messages are sent over the connection. In other words, HTTP authentications and LDAP binds happen after the secure connection has been established.
DS support for TLS relies on the Java implementation. DS support for LDAP authentication is part of the DS server. This is an important distinction:
When a client application presents its certificate for mutual authentication during negotiation of a TLS connection, the JVM checks the certificate independently of the certificates stored in the client application's directory entry. For details, see "Client Certificate Validation and the Directory".
When securing the transport layer with mutual authentication, the client certificate must match or must be signed by a CA whose certificate matches a trusted certificate held in a Java truststore.
When the client application binds to the DS server with its certificate, the DS server uses a certificate mapper to check that the certificate presented matches the certificate in the client's directory entry.
When using a certificate to authenticate a client in an LDAP bind, the certificate must match a certificate stored in the client's LDAP entry.
This section clarifies the roles that client applications' X.509 digital certificates play in establishing secure connections and in authenticating the client as a directory user. Be aware that establishing a secure connection happens before the server handles the LDAP or HTTP requests that the client sends over the secure connection. Establishing a secure connection is handled separately from authenticating a client as a directory user, even though both processes can involve the client's certificate.
When a client and a server negotiate a secure connection
over LDAPS or HTTPS, or over LDAP using the StartTLS operation,
they can use public key cryptography to authenticate each other.
The server, client, or both present certificates to each other.
By default, DS LDAPS and HTTPS connection handlers
are configured to present the server certificate,
and to consider the client certificate optional.
The connection handler property ssl-client-auth-policy
makes the latter behavior configurable.
For the DSML and REST to LDAP gateways, HTTPS negotiation is handled
by the web application container where the gateway runs.
See the web application container documentation
for details on configuring how the container handles the client certificate.
One step toward establishing a secure connection involves validating the certificate that was presented by the other party. Part of this is trusting the certificate. The certificate identifies the client or server and the CA certificate used to sign the client or server certificate. The validating party checks that the other party corresponds to the one identified by the certificate, and checks that the signature can be trusted. If the signature is valid, and the CA certificate used to sign the certificate can be trusted, then the certificate can be trusted. This part of the validation process is also described briefly in "How Keys are Used".
Certificates can be revoked after they are signed. Therefore, the validation process can involve checking whether the certificate is still valid. Two different methods for performing this validation use the Online Certificate Status Protocol (OCSP) or Certificate Revocation Lists (CRLs). OCSP is a newer solution that provides an online service to handle the revocation check for a specific certificate. CRLs are potentially large lists of user certificates that are no longer valid or that are on hold. A CRL is signed by the CA. The validating party obtains the CRL and checks that the certificate being validated is not listed. For a brief comparison, see OCSP: Comparison to CRLs. A certificate can include links to contact the OCSP responder or to the CRL distribution point. The validating party can use these links to check whether the the certificate is still valid.
In both cases, the CA who signed the certificate acts as the OCSP responder or publishes the CRLs. When establishing a secure connection with a client application, the server relies on the CA for OCSP and CRLs. This is the case even when the DS server is the repository for the CRLs.
DS directory services are logical repositories for certificates and CRLs.
For example, your DS directory service can store CRLs
in a certificateRevocationList attribute
as in the following example entry:
dn: cn=My CA,dc=example,dc=com
objectClass: top
objectClass: applicationProcess
objectClass: certificationAuthority
cn: My CA
authorityRevocationList;binary: Base64-encoded ARL
cACertificate;binary:: Base64-encoded CA certificate
certificateRevocationList;binary:: Base64-encoded CRL
The CRL could then be replicated to other DS directory servers for high availability. (Notice the ARL in this entry. An ARL is like a CRL, but for CA certificates.)
Again, despite being a repository for CRLs,
the DS directory service does not use the CRLs directly
when checking a client certificate.
Instead, when negotiating a secure connection,
the server depends on the JVM security configuration.
The JVM configuration governs whether validation uses OCSP, CRLs, or both.
As described in the Java PKI Programmer's Guide under
Support for the CRL Distribution Points Extension,
and
Appendix C: On-Line Certificate Status Protocol (OCSP) Support,
the JVM relies on system properties that define
whether to use the CRL distribution points defined in certificates,
and how to handle OCSP requests.
These system properties can be set system-wide in
$JAVA_HOME/lib/security/java.security
($JAVA_HOME/jre/lib/security/java.security for JDK 8).
The JVM handles revocation checking without the DS server's involvement.
After a connection is negotiated, the server can authenticate a client application at the LDAP level based on the certificate. For details, see "Authenticating Client Applications With a Certificate".
OCSP and obtaining CRLs depend on network access to the CA. If DS servers or the DSML or REST to LDAP gateways run on a network where the CA is not accessible, and the deployment nevertheless requires OSCP or checking CRLs for client application certificates, then you must provide some alternative means to handle OCSP or CRL requests. The JVM can be configured to use a locally available OCSP responder, for example, and that OCSP responder might depend on DS servers. If the solution depends on CRLs, you could regularly update the CRLs in the directory with copies of the CA CRLs obtained by other means.
When determining the connection configuration for the deployment, also set resource limits to prevent directory clients from using an unfair share of system resources.
This section covers how to:
Limit the resources devoted to directory searches
Limit concurrent client connections
Limit how long connections can remain idle before they are dropped
Limit the size of client requests
Understand how resource limits are set for proxied authorization
In addition, you can further limit what clients can do using the configuration properties described in "Restricting Client Access" in the Administration Guide.
Well-written directory client applications limit the search scope with filters that narrow the number of results returned. This prevents them from performing unindexed searches. By default, DS servers only allow users with appropriate privileges to perform unindexed searches.
In addition to letting the server prevent unindexed searches, you can set limits on search operations, such as the following:
The lookthrough limit defines the maximum number of candidate entries that the DS server considers when processing a search.
The default lookthrough limit of 5000 is set by the global server property
lookthrough-limit.You can override the limit per user with the operational attribute,
ds-rlim-lookthrough-limit.The size limit sets the maximum number of entries returned for a search.
The default size limit of 1000 is set by the global server property
size-limit.You can override the limit per user with the operational attribute,
ds-rlim-size-limit.In addition, search requests themselves can include a size limit setting. The ldapsearch command has an
--sizeLimitoption.The time limit defines the maximum processing time the DS server devotes to a search operation.
The default time limit of 1 minute is set by the global server property
time-limit.You can override the limit on a per user basis with the operational attribute,
ds-rlim-time-limit. Times fords-rlim-time-limitare expressed in seconds.In addition, search requests themselves can include a time limit setting. The ldapsearch command has an
--timeLimitoption.The idle time limit defines how long the DS server allows idle connections to remain open.
No default idle time limit is set. You can set an idle time limit by using the global server property
idle-time-limit.You can override the limit on a per user basis with the operational attribute,
ds-rlim-idle-time-limit. Times fords-rlim-idle-time-limitare expressed in seconds.The maximum number of persistent searches is set by the global server property
max-psearches.
This section includes the following procedures:
Give an administrator access to update the operational attributes related to search limits:
$ cat search-limits.ldif
dn: ou=People,dc=example,dc=com
changetype: modify
add: aci
aci: (targetattr = "ds-rlim-lookthrough-limit||ds-rlim-time-limit||ds-rlim-size-limit")
 (version 3.0;acl "Allow Kirsten Vaughan to manage search limits";
 allow (all) (userdn = "ldap:///uid=kvaughan,ou=People,dc=example,dc=com");)

$ ldapmodify \
 --port 1389 \
 --bindDN "cn=Directory Manager" \
 --bindPassword password \
 search-limits.ldif
Change the user entry to set the limits to override:
$ cat size-limit-bjensen.ldif
dn: uid=bjensen,ou=People,dc=example,dc=com
changetype: modify
add: ds-rlim-size-limit
ds-rlim-size-limit: 10

$ ldapmodify \
 --port 1389 \
 --bindDN uid=kvaughan,ou=people,dc=example,dc=com \
 --bindPassword bribery \
 size-limit-bjensen.ldif
When Babs Jensen performs a search returning more than 10 entries, she sees the following message:
$ ldapsearch \
 --port 1389 \
 --bindDN uid=bjensen,ou=people,dc=example,dc=com \
 --bindPassword hifalutin \
 --baseDN dc=example,dc=com \
 "(&)"
...
# The LDAP search request failed: 4 (Size Limit Exceeded)
# Additional Information:  This search operation has sent the maximum of 10 entries to the client
Give an administrator the privilege to write subentries, such as those used for setting collective attributes:
$ cat subentry-write.ldif
dn: uid=kvaughan,ou=People,dc=example,dc=com
changetype: modify
add: ds-privilege-name
ds-privilege-name: subentry-write

$ ldapmodify \
 --port 1389 \
 --bindDN "cn=Directory Manager" \
 --bindPassword password \
 subentry-write.ldif
Notice here that the directory superuser,
cn=Directory Manager, assigns privileges to Kirsten Vaughan. Any administrator with theprivilege-changeprivilege can assign other privileges. Assuming the administrator can update administrator privileges, they can assign themselves thebypass-aclprivilege. Then they are no longer bound by access control instructions, including both user data ACIs and global ACIs. For this reason, avoid assigning theprivilege-changeprivilege to normal administrator users.Create an LDAP subentry to specify the limits using collective attributes:
$ cat size-limit-collective.ldif
dn: cn=Remove Administrator Search Limits,dc=example,dc=com
objectClass: collectiveAttributeSubentry
objectClass: extensibleObject
objectClass: subentry
objectClass: top
cn: Remove Administrator Search Limits
ds-rlim-lookthrough-limit;collective: 0
ds-rlim-size-limit;collective: 0
ds-rlim-time-limit;collective: 0
subtreeSpecification: {base "ou=people", specificationFilter
  "(isMemberOf=cn=Directory Administrators,ou=Groups,dc=example,dc=com)" }

$ ldapmodify \
 --port 1389 \
 --bindDN uid=kvaughan,ou=people,dc=example,dc=com \
 --bindPassword bribery \
 size-limit-collective.ldif
The
baseentry identifies the branch that holds administrator entries. For details on how subentries apply, see "Understanding Subentry Scope".Check the results:
$ ldapsearch \
 --port 1389 \
 --bindDN uid=kvaughan,ou=people,dc=example,dc=com \
 --bindPassword bribery \
 --baseDN uid=kvaughan,ou=people,dc=example,dc=com \
 --searchScope base \
 "(&)" \
 ds-rlim-lookthrough-limit ds-rlim-time-limit ds-rlim-size-limit
ds-rlim-lookthrough-limit: 0
ds-rlim-time-limit: 0
ds-rlim-size-limit: 0
An LDAP persistent search uses server resources in the following way. Each persistent search opens a connection and keeps it open, though the connection can be idle for long periods of time. When a modification changes data in the search scope, the server returns a search result to the persistent search client. The more concurrent persistent searches, the more work the server has to do for each modification:
Set the global property
max-psearchesto limit the total number of concurrent persistent searches that the hDSserver accepts.The following example sets the limit to 30:
$ dsconfig \
 set-global-configuration-prop \
 --hostname opendj.example.com \
 --port 4444 \
 --bindDN "cn=Directory Manager" \
 --bindPassword password \
 --set max-psearches:30 \
 --trustAll \
 --no-prompt
Each connection uses memory. On UNIX and Linux systems, each connection uses an available file descriptor.
You can use the global setting max-allowed-client-connections
to limit the total number of concurrent client connections
that the DS server accepts.
The following example sets the limit to 64K,
which is the minimum number of file descriptors
that should be available to the DS server:
$ dsconfig \
 set-global-configuration-prop \
 --hostname opendj.example.com \
 --port 4444 \
 --bindDN "cn=Directory Manager" \
 --bindPassword password \
 --set max-allowed-client-connections:65536 \
 --trustAll \
 --no-prompt
If some client applications leave connections idle for long periods, DS servers can end up devoting resources to maintaining connections that are no longer used. If your network does not drop such connections eventually, you can configure the server to drop them by setting the global configuration property idle-time-limit. By default, no idle time limit is set.
If your network load balancer is configured to drop connections that have been idle for some time, set the DS idle time limit to a lower value than the idle time limit for the load balancer. This helps to ensure that idle connections are shut down in orderly fashion. Setting the DS limit lower than the load balancer limit is particularly useful with load balancers that drop idle connections without cleanly closing the connection and notifying the client and server.
Note
DS servers do not enforce idle timeout for persistent searches.
The following example sets the idle-time-limit to 24 hours:
$ dsconfig \
 set-global-configuration-prop \
 --hostname opendj.example.com \
 --port 4444 \
 --bindDN "cn=Directory Manager" \
 --bindPassword password \
 --set idle-time-limit:24h \
 --trustAll \
 --no-prompt
The default maximum request size of 5 MB
is set using the advanced connection handler property
max-request-size.
This is sufficient for most deployments.
In cases where clients add groups with large numbers of members, however,
some add requests can exceed the 5 MB limit.
The following example increases the limit to 20 MB for the LDAP connection handler:
$ dsconfig \
 set-connection-handler-prop \
 --hostname opendj.example.com \
 --port 4444 \
 --bindDN "cn=Directory Manager" \
 --bindPassword password \
 --handler-name LDAP \
 --set max-request-size:20mb \
 --trustAll \
 --no-prompt
Note that this setting affects only the size of requests, not responses.
Proxied authorization uses a standard LDAP control to permit an application to bind as one user and then carry out LDAP operations on behalf of other users.
When using proxied authorization as described in "Configuring Proxied Authorization" in the Developer's Guide, be aware that the resource limits do not change when the user proxies as another user. In other words, resource limits depend on the bind DN, not the proxy authorization identity.
This chapter explains and demonstrates how to use supported authentication mechanisms in secure ways. In this chapter you will learn to:
Determine which authentication mechanisms to allow
Handle anonymous access to directory services appropriately
Protect simple binds (authentication with username and password)
Configure password policies
Enforce strong passwords and appropriate password storage
Authenticate with a public key certificate rather than a password (EXTERNAL SASL mechanism)
Authenticate using digest authentication (DIGEST-MD5 SASL mechanism)
Authenticate using Kerberos v5 (GSSAPI SASL mechanism)
As directory administrator, you must determine the authentication mechanisms that the directory service allows and that you encourage client applications to use.
Authentication is the process of verifying who is requesting access to a resource. The user or application making the request presents credentials, making it possible to prove that the requester is who they claim to be. The goal is to authorize access to directory resources depending on the confirmed identity of the user or application making the request.
LDAP is a stateful protocol, where the client sets up and maintains a connection with the server, potentially performing many operations or long-lived operations before disconnecting from the LDAP server. One of the LDAP operations, a bind, authenticates the client to the server. A bind is generally one of the first operations that a client performs, and clients can bind again on the same connection to reauthenticate.
Below the LDAP protocol at the transport layer, DS servers support SSL and TLS protocols with mutual client authentication based on the client certificate and public key infrastructure. This level of authentication is useful to properly secure connections. For details, see "How Transport Layer Security is Established". The authentication at this level is handled by the underlying JVM, and the client identity verified at this level is not available to the DS server for the purpose of fine-grained authorization. For fine-grained authorization, you need LDAP authentication.
DS servers support multiple authentication mechanisms for LDAP operations:
- Simple bind (name/password) authentication
The client application presents a bind DN/password combination, and the server checks that the password matches the password on the entry with the specified bind DN.
Since this mechanism involves sending the credentials over the network, always use secure connections at the transport layer when you expect simple binds in production systems. You can configure either or both LDAPS and StartTLS, depending on what the client applications support.
For additional information, see "Protecting Simple Binds".
- Anonymous authentication
Simple bind authentication without credentials.
Anonymous authentication allows the server to make authorization decisions when it has been confirmed that the user or application is unknown.
When the directory has publicly readable resources, you can allow anonymous authentication and configure access control to let even anonymous users read them.
For additional information, see "Handling Anonymous Access".
- SASL authentication
Simple Authentication and Security Layer (SASL) is a framework, rather than a single method. DS servers provide handlers for a number of SASL mechanisms, including Digest MD5, and strong authentication choices like the External SASL mechanism handler for certificate-based authentication, and the GSSAPI SASL mechanism handler for use with Kerberos v5 systems.
Certificate-based authentication is well-suited for applications where it is hard to protect name/password combinations. For additional information, see "Authenticating Client Applications With a Certificate".
GSSAPI-based authentication is useful for interoperation with Kerberos. For additional information, see "Authenticating With Kerberos".
- Authentication with proxied authorization
The client application binds with its credentials, and uses proxied authorization to perform operations as another user.
For details, see "Configuring Proxied Authorization" in the Developer's Guide. Client applications can use another means to authenticate the user before requesting proxied authorization.
- Authentication using another LDAP directory
The client application binds with its credentials, and another LDAP directory service handles the authentication. This is known as pass-through authentication.
Pass-through authentication is particularly useful when you use another directory service with DS servers. The DS directory server stores part of the user profile, and the authentication credentials are managed by the remote directory service. For details, see "Configuring Pass-Through Authentication" in the Administration Guide.
DS servers and DS REST to LDAP gateway also support multiple HTTP authentication mechanisms.
The identity from the HTTP request is mapped to an LDAP account for use in authorization decisions, so the mechanisms are known as authorization mechanisms. Their configuration is described in "To Set Up HTTP Authorization" in the Administration Guide. The following authorization mechanisms are available:
- HTTP Basic authorization
The client application sends an HTTP request that uses HTTP Basic authentication.
The client application can alternatively send an HTTP request with username and password headers.
You configure DS software to map the HTTP username to an LDAP DN, and the result is like a simple name/password bind.
Since this method involves sending the credentials over the network, always secure the connections at the transport layer in production systems.
- Anonymous authorization
The client application sends an HTTP request without authenticating.
You configure DS software either to map the HTTP request to anonymous authentication at the LDAP level, or to bind at the LDAP level as a specific user.
- OAuth 2.0 authorization
The client application sends an HTTP request bearing an OAuth 2.0 access token including at least a scope whose value makes it possible to determine the user identity.
You configure DS software to resolve the access token and to map the user identity from the scope to an LDAP account.
Since this method involves sending bearer tokens over the network, always secure connections at the transport layer for OAuth 2.0 authorization in production systems.
Anonymous access means access to the directory where the client making the request provides no credentials. In general, anonymous clients can read public information.
In LDAP, an anonymous bind is a bind operation using simple authentication with an empty DN and an empty password. DS servers apply access controls (ACIs) to allow anonymous clients access only to information that should be fully public, such as information about the directory server in the root DSE, and LDAP schema definitions.
ACIs have a user DN subject, ldap:///anyone,
that matches anonymous and authenticated users.
This is used in some global ACIs as described in
"Default Global ACIs" in the Administration Guide.
It can also be used in ACI in the directory data.
For explanations and examples, see
"Configuring ACIs" in the Administration Guide.
DS servers make it possible to disable anonymous access as shown in "ACI: Disable Anonymous Access" in the Administration Guide.
When a client accesses the directory over HTTP, anonymous operations can be mapped either to a specific user identity or to an anonymous user (default) by using the HTTP Anonymous authorization mechanism for the HTTP endpoint, mentioned in "About Authentication Mechanisms".
As described in "About Authentication Mechanisms", a simple bind in LDAP is name/password authentication, where the client application presents a bind DN/password combination, and the DS server checks that the password matches the password on the entry with the specified bind DN.
The LDAP connection transport layer must be secure for a simple bind. Otherwise, eavesdroppers can read the credentials.
DS servers provide two alternatives to secure the connection for a simple bind, both of which depend on certificates and public key infrastructure:
- LDAPS
To support LDAP over SSL, DS servers have a separate connection handler that listens for traffic on a port dedicated to secure connections.
For detailed configuration instructions, see "LDAP Client Access Over SSL" in the Administration Guide.
- LDAP with StartTLS
DS servers support using the StartTLS extended operation on a normal (cleartext) LDAP connection handler. In this case, the client application initiates the connection at the normal LDAP port, and then negotiates a secure connection.
For detailed configuration instructions, see "LDAP Client Access With Transport Layer Security" in the Administration Guide.
The directory server is often where passwords are stored, so that passwords can be managed safely and that password policy can be defined and managed centrally. This section covers how to configure password policies for DS servers.
DS password policies govern not only passwords, but also account lockout, and how DS servers provide notification about account status.
DS servers support password policies as part of the server configuration, and subentry password policies as part of the (replicated) user data.
You manage server-based password policies in the DS server configuration by using the dsconfig command. As they are part of the server configuration, such password policies are not replicated. You must instead apply password policy configuration updates to each replica in your deployment.
By default, DS directory servers include
two password policy configurations,
one default for all users,
and another for the default directory superuser, cn=Directory Manager.
You can see all the default password policy settings
by using the dsconfig command as follows:
$ dsconfig \
 get-password-policy-prop \
 --hostname opendj.example.com \
 --port 4444 \
 --bindDN "cn=Directory Manager" \
 --bindPassword password \
 --policy-name "Default Password Policy" \
 --advanced \
 --trustAll \
 --no-prompt
Property                                  : Value(s)
------------------------------------------:------------------------------------
account-status-notification-handler       : -
allow-expired-password-changes            : false
allow-multiple-password-values            : false
allow-pre-encoded-passwords               : false
allow-user-password-changes               : true
default-password-storage-scheme           : Salted SHA-512
deprecated-password-storage-scheme        : -
expire-passwords-without-warning          : false
force-change-on-add                       : false
force-change-on-reset                     : false
grace-login-count                         : 0
idle-lockout-interval                     : 0 s
java-class                                : org.opends.server.core.PasswordPoli
                                          : cyFactory
last-login-time-attribute                 : -
last-login-time-format                    : -
lockout-duration                          : 0 s
lockout-failure-count                     : 0
lockout-failure-expiration-interval       : 0 s
max-password-age                          : 0 s
max-password-reset-age                    : 0 s
min-password-age                          : 0 s
password-attribute                        : userPassword
password-change-requires-current-password : false
password-expiration-warning-interval      : 5 d
password-generator                        : Random Password Generator
password-history-count                    : 0
password-history-duration                 : 0 s
password-validator                        : -
previous-last-login-time-format           : -
require-change-by-time                    : -
require-secure-authentication             : false
require-secure-password-changes           : false
skip-validation-for-administrators        : false
state-update-failure-policy               : reactive
For detailed descriptions of each property, see "Password Policy" in the Configuration Reference.
Notice that many capabilities are not set by default: no lockout, no password expiration, no multiple passwords, no password validator to check that passwords contain the appropriate mix of characters. This means that if you decide to use the directory to enforce password policy, you must configure at least the default password policy to meet your needs.
A few basic protections are configured by default.
When you import LDIF with userPassword values,
DS directory servers applies a one-way hash
to the values before storing them.
When a user provides a password value during a bind, for example,
the server hashes the value provided
and compares it with the stored value.
This prevents even the directory manager from recovering
the plain text value of a user's password:
$ ldapsearch \
 --port 1389 \
 --bindDN "cn=Directory Manager" \
 --bindPassword password \
 --baseDN dc=example,dc=com \
 "(uid=bjensen)" \
 userpassword
dn: uid=bjensen,ou=People,dc=example,dc=com
userpassword: {SSHA512}<hash>
In addition, users can change their passwords
provided that you have granted them access to do so.
DS directory servers use the userPassword attribute
to store passwords by default,
rather than the authPassword attribute,
which is designed to store passwords hashed by the client application.
You manage subentry password policies by adding the subentries alongside the user data. DS directory servers can therefore replicate subentry password policies. The advantages are that you only need to add them once, and that administrators of user data can edit subentry password policies without having directory administrator access.
Subentry password policies support the Internet-Draft Password Policy for LDAP Directories (version 09). A subentry password policy effectively overrides settings in the default password policy defined in the DS server configuration. Settings not supported or not included in the subentry password policy are inherited from the default password policy.
"Subentry Policy Attributes vs. Server Properties" lists Internet-Draft password policy attributes that override the default password policy when you set them in the subentry:
| Internet-Draft Policy Attribute | Overrides This Server Policy Property |
|---|---|
pwdAllowUserChange | allow-user-password-changes |
pwdMustChange | force-change-on-reset |
pwdGraceAuthNLimit | grace-login-count |
pwdLockoutDuration | lockout-duration |
pwdMaxFailure | lockout-failure-count |
pwdFailureCountInterval | lockout-failure-expiration-interval |
pwdMaxAge | max-password-age |
pwdMinAge | min-password-age |
pwdAttribute | password-attribute |
pwdSafeModify | password-change-requires-current-password |
pwdExpireWarning | password-expiration-warning-interval |
pwdInHistory | password-history-count |
The following Internet-Draft password policy attributes are not taken into account by DS servers:
pwdCheckQuality, because DS servers have password validators. Set password validators to use in the default password policy, for example.pwdMinLength, because this is handled by the length-based password validator. Configure this validator as part of the default password policy, for example.pwdLockout, because DS servers can deduce whether lockout is configured based on the values of other lockout-related password policy attributes.
Values of the following properties are inherited from the default password policy for Internet-Draft based password policies:
account-status-notification-handlersallow-expired-password-changesallow-multiple-password-valuesallow-pre-encoded-passwordsdefault-password-storage-schemesdeprecated-password-storage-schemesexpire-passwords-without-warningforce-change-on-addidle-lockout-intervallast-login-time-attributelast-login-time-formatmax-password-reset-agepassword-generatorpassword-history-durationpassword-validatorsprevious-last-login-time-formatsrequire-change-by-timerequire-secure-authenticationrequire-secure-password-changesskip-validation-for-administratorsstate-update-failure-policy
If you would rather specify password validators for your policy,
you can configure password validators for a subentry password policy
by adding the auxiliary object class pwdValidatorPolicy
and setting the multi-valued attribute,
ds-cfg-password-validator,
to the DNs of the password validator configuration entries.
The following example shows a subentry password policy that references two password validator configuration entries. The Character Set password validator determines whether a proposed password is acceptable by checking whether it contains a sufficient number of characters from one or more user-defined character sets and ranges. The length-based password validator determines whether a proposed password is acceptable based on whether the number of characters it contains falls within an acceptable range of values. Both are enabled in the default DS server configuration:
dn: cn=Subentry Password Policy with Validators,dc=example,dc=com
objectClass: top
objectClass: subentry
objectClass: pwdPolicy
objectClass: pwdValidatorPolicy
cn: Subentry Password Policy with Validators
pwdAttribute: userPassword
pwdLockout: TRUE
pwdMaxFailure: 3
pwdFailureCountInterval: 300
pwdLockoutDuration: 300
pwdAllowUserChange: TRUE
pwdSafeModify: TRUE
ds-cfg-password-validator: cn=Character Set,cn=Password Validators,cn=config
ds-cfg-password-validator: cn=Length-Based Password Validator,
 cn=Password Validators,cn=config
subtreeSpecification: {base "ou=people", specificationFilter
  "(isMemberOf=cn=Directory Administrators,ou=Groups,dc=example,dc=com)" }
If a referenced password validator cannot be found, then the DS server logs an error message when the password policy is invoked. This can occur, for example, when a subentry password policy is replicated to a directory server where the password validator is not (yet) configured. In that case, when a user attempts to change their password, the server fails to find the referenced password validator.
The password policy that applies to a user is identified
by the operational attribute, pwdPolicySubentry.
The default global access control instructions prevent
this operational attribute from being visible to normal users.
The following example gives access to administrators:
$ cat manage-pwp.ldif
dn: ou=People,dc=example,dc=com
changetype: modify
add: aci
aci: (targetattr = "pwdPolicySubentry||ds-pwp-password-policy-dn")
 (version 3.0;acl "Allow Administrators to manage user's password policy";
 allow (all) (groupdn = "ldap:///cn=Directory Administrators,ou=Groups,dc=example,dc=com");)

$ ldapmodify \
 --port 1389 \
 --bindDN "cn=Directory Manager" \
 --bindPassword password \
 manage-pwp.ldif
$ ldapsearch \
 --port 1389 \
 --bindDN uid=kvaughan,ou=people,dc=example,dc=com \
 --bindPassword bribery \
 --baseDN dc=example,dc=com \
 "(uid=bjensen)" \
 pwdPolicySubentry
dn: uid=bjensen,ou=People,dc=example,dc=com
pwdPolicySubentry: cn=Default Password Policy,cn=Password Policies,cn=config
You configure server-based password policies by using the dsconfig command. Notice that server-based password policies are part of the server configuration, and therefore not replicated. Alternatively, you can configure a subset of password policy features by using subentry-based password policies that are stored with the replicated server data.
This section covers both server-based and subentry-based password policies. It includes the following procedures:
You can reconfigure the default password policy, for example, to check that passwords do not contain complete attribute values, and to prevent password reuse. The default policy is a server-based password policy.
Apply the changes to the default password policy:
$ dsconfig \
 set-password-policy-prop \
 --hostname opendj.example.com \
 --port 4444 \
 --bindDN "cn=Directory Manager" \
 --bindPassword password \
 --policy-name "Default Password Policy" \
 --set password-history-count:7 \
 --set password-validator:Attribute\ Value \
 --trustAll \
 --no-prompt
Check your work:
$ dsconfig \
 get-password-policy-prop \
 --hostname opendj.example.com \
 --port 4444 \
 --bindDN "cn=Directory Manager" \
 --bindPassword password \
 --policy-name "Default Password Policy" \
 --trustAll
Property                                  : Value(s)
------------------------------------------:--------------------------
account-status-notification-handler       : -
allow-expired-password-changes            : false
allow-user-password-changes               : true
default-password-storage-scheme           : Salted SHA-512
deprecated-password-storage-scheme        : -
expire-passwords-without-warning          : false
force-change-on-add                       : false
force-change-on-reset                     : false
grace-login-count                         : 0
idle-lockout-interval                     : 0 s
last-login-time-attribute                 : -
last-login-time-format                    : -
lockout-duration                          : 0 s
lockout-failure-count                     : 0
lockout-failure-expiration-interval       : 0 s
max-password-age                          : 0 s
max-password-reset-age                    : 0 s
min-password-age                          : 0 s
password-attribute                        : userPassword
password-change-requires-current-password : false
password-expiration-warning-interval      : 5 d
password-generator                        : Random Password Generator
password-history-count                    : 7
password-history-duration                 : 0 s
password-validator                        : Attribute Value
previous-last-login-time-format           : -
require-change-by-time                    : -
require-secure-authentication             : false
require-secure-password-changes           : false
Test changes to the default password policy.
For example, the following tests demonstrate how the attribute value password validator works. The attribute value password validator rejects a new password when the password is contained in attribute values on the user's entry.
By default, the attribute value password validator checks all attributes, checks whether portions of the password string match attribute values, where the portions are strings of length 5, and checks the reverse of the password as well:
$ dsconfig \
 get-password-validator-prop \
 --hostname opendj.example.com \
 --port 4444 \
 --bindDN "cn=Directory Manager" \
 --bindPassword password \
 --validator-name Attribute\ Value \
 --trustAll \
 --no-prompt
Property               : Value(s)
-----------------------:--------------------------------------------------
check-substrings       : true
enabled                : true
match-attribute        : All attributes in the user entry will be checked.
min-substring-length   : 5
test-reversed-password : true
Consider the attributes present on Babs Jensen's entry:
$ ldapsearch --port 1389 --baseDN dc=example,dc=com "(uid=bjensen)"
dn: uid=bjensen,ou=People,dc=example,dc=com
objectClass: top
objectClass: inetOrgPerson
objectClass: posixAccount
objectClass: organizationalPerson
objectClass: person
mail: bjensen@example.com
roomNumber: 0209
preferredLanguage: en, ko;q=0.8
manager: uid=trigden, ou=People, dc=example,dc=com
ou: Product Development
ou: People
givenName: Barbara
telephoneNumber: +1 408 555 1862
sn: Jensen
cn: Barbara Jensen
cn: Babs Jensen
homeDirectory: /home/bjensen
facsimileTelephoneNumber: +1 408 555 1992
gidNumber: 1000
uidNumber: 1076
description: Original description
uid: bjensen
l: San Francisco
departmentNumber: 3001
street: 201 Mission Street Suite 2900
Using the attribute value password validator, passwords like
bjensen12andbabsjensenspwdare not valid because substrings of the password match complete attribute values:$ ldappasswordmodify \ --port 1389 \ --authzID "dn:uid=bjensen,ou=people,dc=example,dc=com" \ --currentPassword hifalutin \ --newPassword bjensen12 The LDAP password modify operation failed: 19 (Constraint Violation) Additional Information: The provided new password failed the validation checks defined in the server: The provided password was found in another attribute in the user entry $ ldappasswordmodify \ --port 1389 \ --authzID "dn:uid=bjensen,ou=people,dc=example,dc=com" \ --currentPassword hifalutin \ --newPassword babsjensenspwd The LDAP password modify operation failed: 19 (Constraint Violation) Additional Information: The provided new password failed the validation checks defined in the server: The provided password was found in another attribute in the user entry
The attribute value password validator does not check, however, whether the password contains substrings of attribute values:
$ ldappasswordmodify \
 --port 1389 \
 --authzID "dn:uid=bjensen,ou=people,dc=example,dc=com" \
 --currentPassword hifalutin \
 --newPassword babsp4ssw0rd
The LDAP password modify operation was successful

$ ldappasswordmodify \
 --port 1389 \
 --authzID "dn:uid=bjensen,ou=people,dc=example,dc=com" \
 --currentPassword babsp4ssw0rd \
 --newPassword example.com
The LDAP password modify operation was successful
To avoid the problem of the latter example, you could use a dictionary password validator where the dictionary includes
example.com. For an example using a dictionary password validator, see "To Configure the Default Policy to Meet NIST Requirements".
As described in "To Adjust the Default Password Policy", the default policy is a server-based password policy.
You can change the default password policy to use following rules that are inspired by NIST 800-63 requirements (as of September 2016):
Use a strong password storage scheme.
The example in this procedure uses PBKDF2, which requires more processing time than Salted SHA-512 (the default).
Enforce a minimum password length of 8 characters.
Check for matches in a dictionary of compromised passwords.
Use a file in the same format as
config/wordlist.txt, where each line contains a common password. Lists of common passwords can be found online.Do not use composition rules for password validation.
In other words, do not require a mix of special characters, upper and lower case letters, numbers, or other composition rules.
Do not enforce arbitrary password changes.
In other words, do not set a maximum password age.
Follow these steps to make this the default password policy:
Create a password validator for a minimum length of 8 characters:
$ dsconfig \
 create-password-validator \
 --hostname opendj.example.com \
 --port 4444 \
 --bindDN "cn=Directory Manager" \
 --bindPassword password \
 --validator-name "At least 8 characters" \
 --type length-based \
 --set enabled:true\
 --set min-password-length:8 \
 --trustAll \
 --no-prompt
Create a password validator for checking common compromised passwords:
# Obtain a copy of a dictionary list of common passwords:
$ cp 10k_most_common.txt /path/to/opendj/config/
$ dsconfig \
 create-password-validator \
 --hostname opendj.example.com \
 --port 4444 \
 --bindDN "cn=Directory Manager" \
 --bindPassword password \
 --validator-name "Common passwords" \
 --type dictionary \
 --set enabled:true \
 --set dictionary-file:config/10k_most_common.txt \
 --trustAll \
 --no-prompt
Configure the password policy as the default:
$ dsconfig \
 set-password-policy-prop \
 --hostname opendj.example.com \
 --port 4444 \
 --bindDN "cn=Directory Manager" \
 --bindPassword password \
 --policy-name "Default Password Policy" \
 --set default-password-storage-scheme:PBKDF2 \
 --set password-validator:"At least 8 characters" \
 --set password-validator:"Common passwords" \
 --trustAll \
 --no-prompt
Check that the default password policy works appropriately.
The following example shows a rejected password modification:
$ ldappasswordmodify \
 --port 1389 \
 --authzID "dn:uid=bjensen,ou=people,dc=example,dc=com" \
 --currentPassword hifalutin \
 --newPassword secret12
The LDAP password modify operation failed: 19 (Constraint Violation)
Additional Information:  The provided new password failed the validation
checks defined in the server: The provided password was found in another
attribute in the user entry
The following example shows an accepted password modification:
$ ldappasswordmodify \
 --port 1389 \
 --authzID "dn:uid=bjensen,ou=people,dc=example,dc=com" \
 --currentPassword hifalutin \
 --newPassword aET1OjQeVJECSMgxDPs3U6In
The LDAP password modify operation was successful
You can add a password policy, for example, for new users who have not yet used their credentials to bind.
Create the new password policy:
$ dsconfig \
 create-password-policy \
 --hostname opendj.example.com \
 --port 4444 \
 --bindDN "cn=Directory Manager" \
 --bindPassword password \
 --policy-name "New Account Password Policy" \
 --set default-password-storage-scheme:"Salted SHA-512" \
 --set force-change-on-add:true \
 --set password-attribute:userPassword \
 --type password-policy \
 --trustAll \
 --no-prompt
Check your work:
$ dsconfig \
 get-password-policy-prop \
 --hostname opendj.example.com \
 --port 4444 \
 --bindDN "cn=Directory Manager" \
 --bindPassword password \
 --policy-name "New Account Password Policy" \
 --trustAll
Property                                  : Value(s)
------------------------------------------:---------------
account-status-notification-handler       : -
allow-expired-password-changes            : false
allow-user-password-changes               : true
default-password-storage-scheme           : Salted SHA-512
deprecated-password-storage-scheme        : -
expire-passwords-without-warning          : false
force-change-on-add                       : true
force-change-on-reset                     : false
grace-login-count                         : 0
idle-lockout-interval                     : 0 s
last-login-time-attribute                 : -
last-login-time-format                    : -
lockout-duration                          : 0 s
lockout-failure-count                     : 0
lockout-failure-expiration-interval       : 0 s
max-password-age                          : 0 s
max-password-reset-age                    : 0 s
min-password-age                          : 0 s
password-attribute                        : userPassword
password-change-requires-current-password : false
password-expiration-warning-interval      : 5 d
password-generator                        : -
password-history-count                    : 0
password-history-duration                 : 0 s
password-validator                        : -
previous-last-login-time-format           : -
require-change-by-time                    : -
require-secure-authentication             : false
require-secure-password-changes           : false
If you use a password policy like this, then you will want to change the user's policy again when the new user successfully updates the password. For instructions on assigning a server-based password policy, see "To Assign a Password Policy to a User".
You can add a subentry to configure a password policy that applies to Directory Administrators.
Create the entry that specifies the password policy:
$ cat subentry-password-policy.ldif
dn: cn=Subentry Password Policy with Validators,dc=example,dc=com
objectClass: top
objectClass: subentry
objectClass: pwdPolicy
objectClass: pwdValidatorPolicy
cn: Subentry Password Policy with Validators
pwdAttribute: userPassword
pwdLockout: TRUE
pwdMaxFailure: 3
pwdFailureCountInterval: 300
pwdLockoutDuration: 300
pwdAllowUserChange: TRUE
pwdSafeModify: TRUE
ds-cfg-password-validator: cn=Character Set,cn=Password Validators,cn=config
ds-cfg-password-validator: cn=Length-Based Password Validator,
 cn=Password Validators,cn=config
subtreeSpecification: {base "ou=people", specificationFilter
  "(isMemberOf=cn=Directory Administrators,ou=Groups,dc=example,dc=com)" }
The
baseentry identifies the branch that holds administrator entries. For details on how subentries apply, see "Understanding Subentry Scope".Add the policy to the directory:
$ ldapmodify \
 --hostname opendj.example.com \
 --port 1389 \
 --bindDN "cn=Directory Manager" \
 --bindPassword password \
 subentry-password-policy.ldif
Check that the policy applies as specified.
In this example, the policy should apply to a Directory Administrator, while a normal user has the default password policy. Here, Kirsten Vaughan is a member of the Directory Administrators group, and Babs Jensen is not a member:
$ ldapsearch \
 --port 1389 \
 --bindDN "cn=Directory Manager" \
 --bindPassword password \
 --baseDN dc=example,dc=com \
 "(uid=kvaughan)" \
 pwdPolicySubentry
dn: uid=kvaughan,ou=People,dc=example,dc=com
pwdPolicySubentry: cn=Subentry Password Policy with Validators,dc=example,dc=com

$ ldapsearch \
 --port 1389 \
 --bindDN "cn=Directory Manager" \
 --bindPassword password \
 --baseDN dc=example,dc=com \
 "(uid=bjensen)" \
 pwdPolicySubentry
dn: uid=bjensen,ou=People,dc=example,dc=com
pwdPolicySubentry: cn=Default Password Policy,cn=Password Policies,cn=config
You assign subentry-based password policies for a subtree of the DIT
by adding the policy to an LDAP subentry
whose immediate superior is the root of the subtree.
In other words, you can add the subentry-based password policy
under ou=People,dc=example,dc=com
to have it apply to all entries
under ou=People,dc=example,dc=com.
You can also use the capabilities of
LDAP subentries
to refine the scope of application.
You assign server-based password policies
by using the ds-pwp-password-policy-dn attribute.
"Server-Based and Subentry Password Policies" compares the types of password policy.

Give administrators the right to manage users' password policies:
$ cat manage-pwp.ldif
dn: ou=People,dc=example,dc=com
changetype: modify
add: aci
aci: (targetattr = "pwdPolicySubentry||ds-pwp-password-policy-dn")
 (version 3.0;acl "Allow Administrators to manage user's password policy";
 allow (all) (groupdn = "ldap:///cn=Directory Administrators,ou=Groups,dc=example,dc=com");)

$ ldapmodify \
 --port 1389 \
 --bindDN "cn=Directory Manager" \
 --bindPassword password \
 manage-pwp.ldif
Notice here that the directory superuser,
cn=Directory Manager, assigns privileges to Kirsten Vaughan. Any administrator with theprivilege-changeprivilege can assign other privileges. Assuming the administrator can update administrator privileges, they can assign themselves thebypass-aclprivilege. Then they are no longer bound by access control instructions, including both user data ACIs and global ACIs. For this reason, avoid assigning theprivilege-changeprivilege to normal administrator users.Update the user's
ds-pwp-password-policy-dnattribute:$ cat newuser.ldif dn: uid=newuser,ou=People,dc=example,dc=com uid: newuser objectClass: person objectClass: organizationalPerson objectClass: inetOrgPerson objectClass: top cn: New User sn: User ou: People mail: newuser@example.com userPassword: changeme ds-pwp-password-policy-dn: cn=New Account Password Policy,cn=Password Policies,cn=config $ ldapmodify \ --port 1389 \ --bindDN uid=kvaughan,ou=people,dc=example,dc=com \ --bindPassword bribery \ newuser.ldif
Check your work:
$ ldapsearch \
 --port 1389 \
 --bindDN uid=kvaughan,ou=people,dc=example,dc=com \
 --bindPassword bribery \
 --baseDN dc=example,dc=com \
 "(uid=newuser)" \
 pwdPolicySubentry
dn: uid=newuser,ou=People,dc=example,dc=com
pwdPolicySubentry: cn=New Account Password Policy,cn=Password Policies,cn=config
You can use a collective attribute to assign a password policy. Collective attributes provide a standard mechanism for defining attributes that appear on all the entries in a subtree. For details, see "Collective Attributes" in the Developer's Guide:
Give an administrator the privilege to write subentries, such as those used for setting collective attributes:
$ cat subentry-write.ldif
dn: uid=kvaughan,ou=People,dc=example,dc=com
changetype: modify
add: ds-privilege-name
ds-privilege-name: subentry-write

$ ldapmodify \
 --port 1389 \
 --bindDN "cn=Directory Manager" \
 --bindPassword password \
 subentry-write.ldif
Notice here that the directory superuser,
cn=Directory Manager, assigns privileges to Kirsten Vaughan. Any administrator with theprivilege-changeprivilege can assign other privileges. Assuming the administrator can update administrator privileges, they can assign themselves thebypass-aclprivilege. Then they are no longer bound by access control instructions, including both user data ACIs and global ACIs. For this reason, avoid assigning theprivilege-changeprivilege to normal administrator users.Create a subentry defining the collective attribute that sets the
ds-pwp-password-policy-dnattribute for group members' entries:$ cat pwp-coll.ldif dn: cn=Password Policy for Dir Admins,dc=example,dc=com objectClass: collectiveAttributeSubentry objectClass: extensibleObject objectClass: subentry objectClass: top cn: Password Policy for Dir Admins ds-pwp-password-policy-dn;collective: cn=Root Password Policy,cn=Password Policies,cn=config subtreeSpecification: { base "ou=People", specificationFilter "(isMemberOf=cn=Directory Administrators,ou=Groups,dc=example,dc=com)"} $ ldapmodify \ --port 1389 \ --bindDN uid=kvaughan,ou=people,dc=example,dc=com \ --bindPassword bribery \ pwp-coll.ldifCheck your work:
$ ldapsearch \
 --port 1389 \
 --bindDN uid=kvaughan,ou=people,dc=example,dc=com \
 --bindPassword bribery \
 --baseDN dc=example,dc=com \
 "(uid=kvaughan)" \
 pwdPolicySubentry
dn: uid=kvaughan,ou=People,dc=example,dc=com
pwdPolicySubentry: cn=Root Password Policy,cn=Password Policies,cn=config
A password policy subentry password policy to assign the policy to the entries under a base DN:
Give an administrator the privilege to write subentries, such as those used for setting password policies:
$ cat subentry-write.ldif
dn: uid=kvaughan,ou=People,dc=example,dc=com
changetype: modify
add: ds-privilege-name
ds-privilege-name: subentry-write

$ ldapmodify \
 --port 1389 \
 --bindDN "cn=Directory Manager" \
 --bindPassword password \
 subentry-write.ldif
Notice here that the directory superuser,
cn=Directory Manager, assigns privileges to Kirsten Vaughan. Any administrator with theprivilege-changeprivilege can assign other privileges. Assuming the administrator can update administrator privileges, they can assign themselves thebypass-aclprivilege. Then they are no longer bound by access control instructions, including both user data ACIs and global ACIs. For this reason, avoid assigning theprivilege-changeprivilege to normal administrator users.Create a password policy with a
subtreeSpecificationto assign the policy to all entries under a base DN.The following example creates a password policy for entries under
ou=People,dc=example,dc=com:$ cat people-pwp.ldif dn: cn=People Password Policy,dc=example,dc=com objectClass: top objectClass: subentry objectClass: pwdPolicy cn: People Password Policy pwdAttribute: userPassword pwdLockout: TRUE pwdMaxFailure: 3 pwdFailureCountInterval: 300 pwdLockoutDuration: 300 pwdAllowUserChange: TRUE pwdSafeModify: TRUE subtreeSpecification: { base "ou=people" } $ ldapmodify \ --port 1389 \ --bindDN uid=kvaughan,ou=people,dc=example,dc=com \ --bindPassword bribery \ people-pwp.ldifNotice the subtree specification used to assign the policy,
{ base "ou=people" }. You can relax the subtree specification value to{}to apply the password policy to all sibling entries (all entries underdc=example,dc=com), or further restrict the subtree specification by adding aspecificationFilter. See "Understanding Subentry Scope" for more information.Check your work:
$ ldapsearch \
 --port 1389 \
 --bindDN uid=kvaughan,ou=people,dc=example,dc=com \
 --bindPassword bribery \
 --baseDN dc=example,dc=com \
 "(uid=alutz)" \
 pwdPolicySubentry
dn: uid=alutz,ou=People,dc=example,dc=com
pwdPolicySubentry: cn=People Password Policy,dc=example,dc=com
If everything is correctly configured, then the password policy should be assigned to users whose entries are under
ou=People,dc=example,dc=com.
LDAP subentries
reside with the user data and so are replicated.
Subentries hold operational data.
They are not visible in search results unless explicitly requested.
This section describes how a subentry's subtreeSpecification attribute
defines the scope of the subtree that the subentry applies to.
An LDAP subentry's subtree specification identifies a subset of entries in a branch of the DIT. The subentry scope is these entries. In other words, these are the entries that the subentry affects.
The attribute value for a subtreeSpecification
optionally includes the following parameters:
baseIndicates the entry, relative to the subentry's parent, at the base of the subtree.
By default, the base is the subentry's parent.
specificationFilterIndicates an LDAP filter. Entries matching the filter are in scope.
By default, all entries under the base entry are in scope.
"Subtree Associated With a Subentry" illustrates these characteristics for an example collective attribute subentry.

Notice that the base of ou=People
on the subentry cn=Silver Class of Service,dc=example,dc=com
indicates that the base entry is ou=People,dc=example,dc=com.
The filter "(classOfService=silver)" means that
Kirsten Vaughan and Sam Carter's entries are in scope.
Babs Jensen's entry, with classOfService: bronze
does not match and is therefore not in scope.
The ou=People organizational unit entry
does not have a classOfService attribute,
and so is not in scope, either.
The difficulty with passwords is that they tend to be relatively easy to guess. Despite decades of advice on how to pick strong passwords, people still routinely pick very weak passwords using common words and phrases or simple variations of those. This makes them extremely easy to guess. Attackers with access to even modest hardware can make billions of guesses per second.
DS servers provide flexible password validation to fit your policies about password content and to reject weak passwords when users try to save them. It also provides a variety of one-way and reversible password storage schemes. Password strength is a function both of password minimum length, which you can set as part of password policy described in "Configuring Password Policy", and of password quality, which requires password validation. This section covers password validation for enforcing strong passwords, and protecting stored passwords with password storage schemes.
Password validators, described in "Password Validator" in the Configuration Reference, are responsible for determining whether a proposed password is acceptable for use. Validators can run checks like ensuring that the password meets minimum length requirements, that it has an appropriate range of characters, or that it is not in the history of recently used passwords.
The following example lists password validators, including validators created in earlier examples:
$ dsconfig \
 list-password-validators \
 --hostname opendj.example.com \
 --port 4444 \
 --bindDN "cn=Directory Manager" \
 --bindPassword password \
 --trustAll \
 --no-prompt
Password Validator                  : Type                : enabled
------------------------------------:---------------------:--------
At least 8 characters               : length-based        : true
Attribute Value                     : attribute-value     : true
Character Set                       : character-set       : true
Common passwords                    : dictionary          : true
Dictionary                          : dictionary          : false
Length-Based Password Validator     : length-based        : true
Repeated Characters                 : repeated-characters : true
Similarity-Based Password Validator : similarity-based    : true
Unique Characters                   : unique-characters   : true
The password policy for a user specifies the set of password validators that should be used whenever that user provides a new password. By default, no password validators are configured. You can see an example setting the Default Password Policy to use the Dictionary validator in "To Adjust the Default Password Policy". The following example shows how to set up a custom password validator and assign it to the default password policy.
The custom password validator ensures passwords meet at least three of the following four criteria. Passwords are composed of the following:
English lowercase characters (a through z)
English uppercase characters (A through Z)
Base 10 digits (0 through 9)
Non-alphabetic characters (for example, !, $, #, %)
Notice how the character-set values are constructed.
The initial 0: means the set is optional,
whereas 1: means the set is required:
$ dsconfig \
 create-password-validator \
 --hostname opendj.example.com \
 --port 4444 \
 --bindDN "cn=Directory Manager" \
 --bindPassword password \
 --validator-name "Custom Character Set Password Validator" \
 --set allow-unclassified-characters:true \
 --set enabled:true \
 --set character-set:0:abcdefghijklmnopqrstuvwxyz \
 --set character-set:0:ABCDEFGHIJKLMNOPQRSTUVWXYZ \
 --set character-set:0:0123456789 \
 --set character-set:0:\!\"#\$%\&\'\(\)\*+\,-./:\;\\\<=\>\?@\[\]\^_\`\{\|\}~ \
 --set min-character-sets:3 \
 --type character-set \
 --trustAll \
 --no-prompt
$ dsconfig \
 set-password-policy-prop \
 --hostname opendj.example.com \
 --port 4444 \
 --bindDN "cn=Directory Manager" \
 --bindPassword password \
 --policy-name "Default Password Policy" \
 --set password-validator:"Custom Character Set Password Validator" \
 --trustAll \
 --no-prompt
$ ldappasswordmodify \
 --port 1389 \
 --bindDN "cn=Directory Manager" \
 --bindPassword password \
 --authzID "u:bjensen" \
 --newPassword '!ABcd$%^'
In the preceding example, the character set of ASCII punctuation,
\!\"#\$%\&\'\(\)\*+\,-./:\;\\\<=\>\?@\[\]\^_\`\{\|\}~,
is hard to read because of all of the escape characters.
It is equivalent to !"#$%&'()*+,-./:;\<=>?@[]^_`{|}~.
To enter sequences sequences that are difficult to escape properly,
use the dsconfig in interactive mode,
and let it do the escaping for you.
You can also use the --commandFilePath {path} option
to save the result of your interactive session to a file
for later use in scripts.
An attempt to set an invalid password fails as shown in the following example:
$ ldappasswordmodify \
 --port 1389 \
 --bindDN "cn=Directory Manager" \
 --bindPassword password \
 --authzID "u:bjensen" \
 --newPassword hifalutin
The LDAP password modify operation failed with result code 19
Error Message:  The provided new password failed the validation checks defined
in the server: The provided password did not contain characters from at least
3 of the following character sets or ranges: '0123456789',
'ABCDEFGHIJKLMNOPQRSTUVWXYZ', 'abcdefghijklmnopqrstuvwxyz',
'!"#$%&'()*+,-./:;\<=>?@[]^_`{|}~'
Validation does not affect existing passwords, but only takes effect when the password is updated.
You can reference password validators from subentry password policies. See "Subentry-Based Password Policies" for an example.
Password storage schemes, described in "Password Storage Scheme" in the Configuration Reference, encode new passwords and store the encoded version. When a client application authenticates with the password, the server encodes the cleartext password using the configured storage scheme, and checks whether the result matches the encoded value stored by the server. If the encoded version is appropriately secure, it is difficult to guess the cleartext password from its encoded value.
DS servers offer a variety of reversible and one-way password storage schemes. With a reversible encryption scheme, an attacker who gains access to the server can recover the cleartext passwords. With a one-way hash storage scheme, the attacker who gains access to the server must still crack the password by brute force, encoding passwords over and over to generate guesses until a match is found. If you have a choice, use a one-way password storage scheme.
Some one-way hash functions are not designed specifically for password storage, but also for use in message authentication and digital signatures. Such functions, like those defined in the Secure Hash Algorithm (SHA-1 and SHA-2) standards, are designed for high performance. Because they are fast, they allow the server to perform authentication at high throughput with low response times. However, high-performance algorithms also help attackers use brute force techniques. One estimate in 2017 is that a single GPU can calculate over one billion SHA-512 hashes per second.
Warning
Some one-way hash functions are designed to be computationally expensive. Such functions, like PBKDF2 and Bcrypt, are designed to be relatively slow even on modern hardware. This makes them generally less susceptible to brute force attacks. However, computationally expensive functions reduce authentication throughput and increase response times. With the default number of iterations, the GPU mentioned above might only calculate 100,000 PBKDF2 hashes per second (or 0.01% of the corresponding hashes calculated with SHA-512). If you use these functions, be aware of the potentially dramatic performance impact and plan your deployment accordingly. Do not use functions like Bcrypt for any accounts that are used for frequent, short-lived connections.
Modern hardware and techniques to pre-compute attempts, such as rainbow tables, make it increasingly easy for attackers to crack passwords by brute force. Password storage schemes that use salt make brute force attacks more expensive. In this context, salt is a random value appended to the password before encoding. The salt is then stored with the encoded value and used when comparing an incoming password to the stored password.
Reversible password storage schemes, such as AES and Blowfish, use symmetric keys for encryption. As described in "How Secret Keys are Distributed", DS servers use the Crypto Manager subsystem to safely distribute symmetric keys. In summary, the Crypto Manager relies on replication to distribute symmetric keys to each replica. In order for a directory server to decrypt a password encrypted by another server, it must be a replica of the server that encrypted the password. For information about replication and how to use it, see "Managing Data Replication" in the Administration Guide.
The following example lists available alternatives, further described in "Password Storage Schemes":
$ dsconfig \
 list-password-storage-schemes \
 --hostname opendj.example.com \
 --port 4444 \
 --bindDN "cn=Directory Manager" \
 --bindPassword password \
 --trustAll
Password Storage Scheme : Type          : enabled
------------------------:---------------:--------
3DES                    : triple-des    : true
AES                     : aes           : true
Base64                  : base64        : true
Bcrypt                  : bcrypt        : true
Blowfish                : blowfish      : true
Clear                   : clear         : true
CRYPT                   : crypt         : true
MD5                     : md5           : true
PBKDF2                  : pbkdf2        : true
PKCS5S2                 : pkcs5s2       : true
RC4                     : rc4           : true
Salted MD5              : salted-md5    : true
Salted SHA-1            : salted-sha1   : true
Salted SHA-256          : salted-sha256 : true
Salted SHA-384          : salted-sha384 : true
Salted SHA-512          : salted-sha512 : true
SHA-1                   : sha1          : true
As shown in "To Adjust the Default Password Policy",
the default password storage scheme for users is Salted SHA-512.
When you add users or import user entries
with userPassword values in cleartext,
the DS server hashes them with the default password storage scheme.
The default directory superuser has a different password policy,
shown in "To Assign a Password Policy to a Group".
The Root Password Policy uses PBKDF2 by default.
Tip
The choice of default password storage scheme for normal users can significantly impact server performance. Each time a normal user authenticates using simple bind (username/password) credentials, the directory server encodes the user's password according to the storage scheme in order to compare it with the encoded value in the user's entry.
Schemes such as Salted SHA-512 call for relatively high-performance encoding. Schemes such as PBKDF2, which are designed to make the encoding process computationally expensive, reduce the bind throughput that can be achieved on equivalent hardware.
Take this performance impact into consideration when choosing a password storage scheme. If you opt for a computationally expensive scheme such as PBKDF2, make sure the directory service has enough compute power to absorb the additional load.
| Name | Type of Algorithm | Notes |
|---|---|---|
| 3DES | Reversible encryption |
Triple DES (Data Encryption Standard) in EDE (Encrypt Decrypt Encrypt) mode. Key size: 168 bits. |
| AES | Reversible encryption |
Advanced Encryption Standard, successor to DES, published by the US National Institute of Standards and Technology (NIST). Key size: 128 bits. |
| Base64 | Reversible encoding |
Transfer encoding for representing binary password values in text. Not intended as a secure storage scheme. |
| Bcrypt | One-way hash |
Computationally intensive hashing function, based on the Blowfish cipher. Default cost: 12 (2^12 iterations). |
| Blowfish | Reversible encryption |
Public domain cipher designed by Bruce Schneier as a successor to DES. Key size: 128 bits. |
| Clear | Cleartext, no encoding |
For backwards compatibility and use with certain legacy applications. Not intended as a secure storage scheme. |
| CRYPT | One-way hash |
Based on the UNIX Crypt algorithm. For backwards compatibility and use with certain legacy applications. Not intended as a secure storage scheme.
Default algorithm: |
| MD5 | One-way hash |
Based on the MD5 algorithm defined in RFC 1321. For backwards compatibility and use with certain legacy applications. Not intended as a secure storage scheme. |
| PBKDF2 | One-way hash |
Computationally intensive hashing function, based on PBKDF2 algorithm defined in RFC 2898. Default iterations: 10000. |
| PKCS5S2 | One-way hash |
Computationally intensive hashing function, based on Atlassian's adaptation of the PBKDF2. Number of iterations: 10000. |
| RC4 | Reversible encryption |
Based on the Rivest Cipher 4 algorithm. For backwards compatibility and use with certain legacy applications. Not intended as a secure storage scheme. Key size: 128 bits. |
| Salted MD5 | One-way hash |
Based on MD5, with 64 bits of random salt appended to the cleartext before hashing, and then appended to the hash. |
| Salted SHA-1 | One-way hash |
Based on SHA-1, with 64 bits of random salt appended to the cleartext before hashing, and then appended to the hash. |
| Salted SHA-256 | One-way hash |
Based on the SHA-256 hash function using 32-bit words and producing 256-bit digests. SHA-256 is defined in the SHA-2 (Secure Hash Algorithm 2) standard developed by the US National Security Agency (NSA) and published by NIST. The salt is applied as for Salted SHA-1. |
| Salted SHA-384 | One-way hash |
Based on the SHA-384 hash function that effectively truncates the digest of SHA-512 to 384 bits. SHA-384 is defined in the SHA-2 (Secure Hash Algorithm 2) standard developed by the NSA and published by NIST. The salt is applied as for Salted SHA-1. |
| Salted SHA-512 | One-way hash |
Based on the SHA-512 hash function using 64-bit words and producing 512-bit digests. SHA-512 is defined in the SHA-2 (Secure Hash Algorithm 2) standard developed by the NSA and published by NIST. The salt is applied as for Salted SHA-1. |
| SHA-1 | One-way hash |
SHA-1 (Secure Hash Algorithm 1) standard developed by the NSA and published by NIST. Not intended as a secure storage scheme. |
Password storage schemes listed in the following table have additional configuration settings.
| Scheme | Setting | Description |
|---|---|---|
|
Bcrypt |
|
The cost parameter specifies a key expansion iteration count as a power of two. A default value of 12 (212 iterations) is considered in 2016 as a reasonable balance between responsiveness and security for regular users. |
|
Crypt |
|
Specifies the crypt algorithm to use to encrypt new passwords. The following values are supported:
|
|
PBKDF2 |
|
The number of algorithm iterations. NIST recommends at least 1000. The default is 10000. |
You change the default password policy storage scheme for users by changing the applicable password policy, as shown in the following example:
$ dsconfig \
 set-password-policy-prop \
 --hostname opendj.example.com \
 --port 4444 \
 --bindDN "cn=Directory Manager" \
 --bindPassword password \
 --policy-name "Default Password Policy" \
 --set default-password-storage-scheme:pbkdf2 \
 --trustAll \
 --no-prompt
Notice that the change in default password storage scheme does not cause the DS server to update any stored password values. By default, the server only stores a password with the new storage scheme the next time that the password is changed.
DS servers prefix passwords with the scheme used to encode them, which means it is straightforward to see which password storage scheme is used. After the default password storage scheme is changed to PBKDF2, old user passwords remain encoded with Salted SHA-512:
$ ldapsearch \
 --port 1389 \
 --bindDN uid=bjensen,ou=people,dc=example,dc=com \
 --bindPassword hifalutin \
 --baseDN dc=example,dc=com \
 "(uid=bjensen)" \
 userPassword
dn: uid=bjensen,ou=People,dc=example,dc=com
userPassword: {SSHA512}<hash>
When the password is changed, the new default password storage scheme takes effect, as shown in the following example:
$ ldappasswordmodify \
 --port 1389 \
 --bindDN "cn=Directory Manager" \
 --bindPassword password \
 --authzID "u:bjensen" \
 --newPassword changeit
The LDAP password modify operation was successful
$ ldapsearch \
 --port 1389 \
 --bindDN uid=bjensen,ou=people,dc=example,dc=com \
 --bindPassword changeit \
 --baseDN dc=example,dc=com \
 "(uid=bjensen)" \
 userPassword
dn: uid=bjensen,ou=People,dc=example,dc=com
userPassword: {PBKDF2}10000:<hash>
When you change the password storage scheme for users, realize that the user passwords must change in order for the DS server to encode them with the chosen storage scheme. If you are changing the storage scheme because the old scheme was too weak, then you no doubt want users to change their passwords anyway.
If, however, the storage scheme change is not related to vulnerability,
you can use the deprecated-password-storage-scheme property
of the password policy to have the DS server
store the password in the new format after successful authentication.
This makes it possible to do password migration for active users without
forcing users to change their passwords:
$ ldapsearch \
 --port 1389 \
 --bindDN uid=kvaughan,ou=people,dc=example,dc=com \
 --bindPassword bribery \
 --baseDN dc=example,dc=com \
 "(uid=kvaughan)" \
 userPassword
dn: uid=kvaughan,ou=People,dc=example,dc=com
userPassword: {SSHA512}<hash>
$ dsconfig \
 set-password-policy-prop \
 --hostname opendj.example.com \
 --port 4444 \
 --bindDN "cn=Directory Manager" \
 --bindPassword password \
 --policy-name "Default Password Policy" \
 --set deprecated-password-storage-scheme:"Salted SHA-1" \
 --trustAll \
 --no-prompt
$ ldapsearch \
 --port 1389 \
 --bindDN uid=kvaughan,ou=people,dc=example,dc=com \
 --bindPassword bribery \
 --baseDN dc=example,dc=com \
 "(uid=kvaughan)" \
 userPassword
dn: uid=kvaughan,ou=People,dc=example,dc=com
userPassword: {PBKDF2}10000:<hash>
Notice that with deprecated-password-storage-scheme
set appropriately,
Kirsten Vaughan's password was hashed again
after she authenticated successfully.
One alternative to simple binds with user name/password combinations consists of storing a digital certificate on the user entry, and using the certificate as credentials during the bind. You can use this mechanism, for example, to let applications bind without using passwords.
By setting up a secure connection with a certificate, the client is in effect authenticating to the server. The server must close the connection if it cannot trust the client certificate. However, in the process of establishing a secure connection, it does not identify the client to the DS server, because the secure connection is established by the JVM at the transport layer, independently of the LDAP protocol.
When binding with a certificate, the client must request the SASL External mechanism by which the DS server maps the certificate to the client entry in the directory. When it finds a match, the DS server sets the authorization identity for the connection to that of the client, and the bind is successful.
For the whole process of authenticating with a certificate to work smoothly, the DS server and the client must trust each others' certificates, the client certificate must be stored on the client entry in the directory, and the DS server must be configured to map the certificate to the client entry.
This section includes the following procedures and examples:
Before you try to bind to DS servers using a certificate, create a certificate, and add the certificate attributes to the entry.
Example.ldif
includes an entry for cn=My App,ou=Apps,dc=example,dc=com.
Examples in this section use that entry,
and use the Java keytool command to manage the certificate:
Create a certificate using the DN of the client entry as the
dnamestring:$ keytool \ -genkeypair \ -alias myapp-cert \ -dname "cn=My App,ou=Apps,dc=example,dc=com" \ -keystore /path/to/my-keystore \ -storepass changeit \ -keypass changeit
Get the certificate signed.
If you cannot get the certificate signed by a CA, self-sign the certificate:
$ keytool \
 -selfcert \
 -alias myapp-cert \
 -validity 7300 \
 -keystore /path/to/my-keystore \
 -storepass changeit \
 -keypass changeit
Export the certificate to a file in binary format:
$ keytool \
 -export \
 -alias myapp-cert \
 -keystore /path/to/my-keystore \
 -storepass changeit \
 -keypass changeit \
 -file /path/to/myapp-cert.crt
Certificate stored in file </path/to/myapp-cert.crt>
Make note of the certificate MD5 fingerprint.
Later in this procedure you update the client application entry with the MD5 fingerprint, referred to henceforth as
MD5_FINGERPRINT:$ keytool \ -list \ -v \ -alias myapp-cert \ -keystore /path/to/my-keystore \ -storepass changeit | awk '/MD5/{print $2}' MD5_FINGERPRINTModify the entry to add attributes related to the certificate.
By default, you need the
userCertificatevalue.If you want the server to map the certificate to its fingerprint, use the
ds-certificate-fingerprintattribute. This example uses the MD5 fingerprint, which corresponds to the default setting for the fingerprint certificate mapper.To require that the certificate is issued by a known CA, use the
ds-certificate-issuer-dnattribute. Use this to verify the certificate issuer whenever multiple CAs are trusted in order to prevent impersonation. Different CAs can issue certificates with the same subject DN, but not with the same issuer DN. In the example that follows, a self-signed certificate is used, so the issuer DN and the subject DN are the same. You must also specify the issuer attribute in the certificate mapper configuration, as shown below.If you want to map the certificate subject DN to an attribute of the entry, use the
ds-certificate-subject-dnattribute:$ cat addcert.ldif dn: cn=My App,ou=Apps,dc=example,dc=com changetype: modify add: objectclass objectclass: ds-certificate-user - add: ds-certificate-fingerprint ds-certificate-fingerprint: MD5_FINGERPRINT - add: ds-certificate-issuer-dn ds-certificate-issuer-dn: CN=My App, OU=Apps, DC=example, DC=com - add: ds-certificate-subject-dn ds-certificate-subject-dn: CN=My App, OU=Apps, DC=example, DC=com - add: userCertificate;binary userCertificate;binary:<file:///path/to/myapp-cert.crt $ ldapmodify \ --hostname opendj.example.com \ --port 1389 \ --bindDN uid=kvaughan,ou=People,dc=example,dc=com \ --bindPassword bribery \ addcert.ldif
Check your work:
$ ldapsearch \
 --hostname opendj.example.com \
 --port 1389 \
 --baseDN dc=example,dc=com \
 "(cn=My App)"
dn: cn=My App,ou=Apps,dc=example,dc=com
ds-certificate-fingerprint: MD5_FINGERPRINT
userCertificate;binary:: ENCODED_CERT
objectClass: person
objectClass: inetOrgPerson
objectClass: organizationalPerson
objectClass: ds-certificate-user
objectClass: top
ds-certificate-issuer-dn: CN=My App, OU=Apps, DC=example, DC=com
ds-certificate-subject-dn: CN=My App, OU=Apps, DC=example, DC=com
cn: My App
sn: App
When using a self-signed certificate, import the client certificate into the server truststore.
When the client presents its certificate to the DS server, by default the server must trust the client certificate before it can accept the connection. If the DS server cannot trust the client certificate, it cannot establish a secure connection:
$ keytool \
 -import \
 -alias myapp-cert \
 -file /path/to/myapp-cert.crt \
 -keystore /path/to/opendj/config/keystore \
 -storetype PKCS12 \
 -storepass:file /path/to/opendj/config/keystore.pin \
 -noprompt
Certificate was added to keystore
When using a certificate signed by a CA whose certificate is not delivered with the Java runtime environment, import the CA certificate into the Java runtime environment truststore, or into the server truststore as shown in the following example:
$ keytool \
 -import \
 -alias ca-cert \
 -file ca.crt \
 -keystore /path/to/opendj/config/keystore \
 -storetype PKCS12 \
 -storepass:file /path/to/opendj/config/keystore.pin \
 -noprompt
Certificate was added to keystore
If you updated the truststore to add a certificate, restart the server to make sure that it reads the updated truststore and recognizes the certificate:
$ stop-ds --restart --quiet
DS servers use certificate mappers during binds to establish a mapping between a client certificate and the entry that corresponds to that certificate. The certificate mappers shipped with the DS server include the following:
- Fingerprint Certificate Mapper
Looks for the MD5 (default) or SHA-1 certificate fingerprint in an attribute of the entry (default:
ds-certificate-fingerprint).- Subject Attribute To User Attribute Mapper
Looks for a match between an attribute of the certificate subject and an attribute of the entry (default: match
cnin the certificate tocnon the entry, or matchemailAddressin the certificate tomailon the entry).- Subject DN to User Attribute Certificate Mapper
Looks for the certificate subject DN in an attribute of the entry (default:
ds-certificate-subject-dn).- Subject Equals DN Certificate Mapper
Looks for an entry whose DN matches the certificate subject DN.
If the default configurations for the certificate mappers are acceptable, you do not need to change them. They are enabled by default.
The following steps demonstrate how to change the Fingerprint Mapper default algorithm of MD5 to SHA1:
List the certificate mappers to retrieve the correct name:
$ dsconfig \
 list-certificate-mappers \
 --hostname opendj.example.com \
 --port 4444 \
 --bindDN "cn=Directory Manager" \
 --bindPassword password \
 --trustAll \
 --no-prompt
Certificate Mapper                  : Type                                : enabled
------------------------------------:-------------------------------------:--------
Fingerprint Mapper                  : fingerprint                         : true
Subject Attribute to User Attribute : subject-attribute-to-user-attribute : true
Subject DN to User Attribute        : subject-dn-to-user-attribute        : true
Subject Equals DN                   : subject-equals-dn                   : true
Examine the current configuration:
$ dsconfig \
 get-certificate-mapper-prop \
 --hostname opendj.example.com \
 --port 4444 \
 --bindDN "cn=Directory Manager" \
 --bindPassword password \
 --mapper-name "Fingerprint Mapper" \
 --trustAll \
 --no-prompt
Property              : Value(s)
----------------------:--------------------------------------------------------
enabled               : true
fingerprint-algorithm : md5
fingerprint-attribute : ds-certificate-fingerprint
issuer-attribute      : The certificate issuer DN will not be verified.
user-base-dn          : The server performs the search in all public naming
                      : contexts.
Change the configuration as necessary.
The following command updates the configuration to use SHA1, and to look for the issuer DN in the
ds-certificate-issuer-dnattribute:$ dsconfig \ set-certificate-mapper-prop \ --hostname opendj.example.com \ --port 4444 \ --bindDN "cn=Directory Manager" \ --bindPassword password \ --mapper-name "Fingerprint Mapper" \ --set fingerprint-algorithm:sha1 \ --set issuer-attribute:ds-certificate-issuer-dn \ --trustAll \ --no-prompt
Set the External SASL Mechanism Handler to use the appropriate certificate mapper (default: Subject Equals DN).
Client applications use the SASL External mechanism during the bind to have the DS server set the authorization identifier based on the entry that matches the client certificate:
$ dsconfig \
 set-sasl-mechanism-handler-prop \
 --hostname opendj.example.com \
 --port 4444 \
 --bindDN "cn=Directory Manager" \
 --bindPassword password \
 --handler-name External \
 --set certificate-mapper:"Fingerprint Mapper" \
 --trustAll \
 --no-prompt
Instead of providing a bind DN and password as for simple authentication, use the SASL EXTERNAL authentication mechanism, and provide the certificate. As a test with example data, you can try an anonymous search, then try with certificate-based authentication.
Before you try this example, make sure the DS server is set up to accept StartTLS from clients, and that you have set up the client certificate as described above. Next, create a password PIN file for your client key store:
$ touch /path/to/my-keystore.pin
$ chmod 600 /path/to/my-keystore.pin
# Add the PIN (changeit) in cleartext on first and only line in the file:
$ vi /path/to/my-keystore.pin
Also, if the DS server uses a certificate for StartTLS that was not signed by a well-known CA, import the appropriate certificate into the client keystore, which can then double as a truststore. For example, if the DS server uses a self-signed certificate, import the server certificate into the keystore:
$ keytool \
 -export \
 -alias server-cert \
 -file server-cert.crt \
 -keystore /path/to/opendj/config/keystore \
 -storepass:file /path/to/opendj/config/keystore.pin \
 -storetype PKCS12
$ keytool \
 -import \
 -trustcacerts \
 -alias server-cert \
 -file server-cert.crt \
 -keystore /path/to/my-keystore \
 -storepass:file /path/to/my-keystore.pin \
 -noprompt
If the DS server uses a CA-signed certificate, but the CA is not well-known, import the CA certificate into your keystore:
$ keytool \
 -import \
 -trustcacerts \
 -alias ca-cert \
 -file ca-cert.crt \
 -keystore /path/to/my-keystore \
 -storepass:file /path/to/my-keystore.pin
Now that you can try the example,
notice that the DS server does not return
the userPassword value for an anonymous search:
$ ldapsearch \
 --hostname opendj.example.com \
 --port 1389 \
 --baseDN dc=example,dc=com \
 --useStartTLS \
 --trustStorePath /path/to/my-keystore \
 --trustStorePasswordFile /path/to/my-keystore.pin \
 "(cn=My App)" \
 userPassword
dn: cn=My App,ou=Apps,dc=example,dc=com
DS servers do let users read the values
of their own userPassword attributes
after they bind successfully:
$ ldapsearch \
 --hostname opendj.example.com \
 --port 1389 \
 --baseDN dc=example,dc=com \
 --useStartTLS \
 --saslOption mech="EXTERNAL" \
 --certNickName myapp-cert \
 --keyStorePath /path/to/my-keystore \
 --keyStorePasswordFile /path/to/my-keystore.pin \
 --trustStorePath /path/to/my-keystore \
 --trustStorePasswordFile /path/to/my-keystore.pin \
 "(cn=My App)" \
 userPassword
dn: cn=My App,ou=Apps,dc=example,dc=com
userPassword: {SSHA512}<hash>
You can also try the same test with other certificate mappers.
This example uses the fingerprint mapper:
$ dsconfig \
 set-sasl-mechanism-handler-prop \
 --hostname opendj.example.com \
 --port 4444 \
 --bindDN "cn=Directory Manager" \
 --bindPassword password \
 --handler-name External \
 --set certificate-mapper:"Fingerprint Mapper" \
 --trustAll \
 --no-prompt
$ ldapsearch \
 --hostname opendj.example.com \
 --port 1389 \
 --baseDN dc=example,dc=com \
 --useStartTLS \
 --saslOption mech="EXTERNAL" \
 --certNickName myapp-cert \
 --keyStorePath /path/to/my-keystore \
 --keyStorePasswordFile /path/to/my-keystore.pin \
 --trustStorePath /path/to/my-keystore \
 --trustStorePasswordFile /path/to/my-keystore.pin \
 "(cn=My App)" \
 userPassword
dn: cn=My App,ou=Apps,dc=example,dc=com
userPassword: {SSHA512}<hash>
This example uses the subject attribute to user attribute mapper:
$ dsconfig \
 set-sasl-mechanism-handler-prop \
 --hostname opendj.example.com \
 --port 4444 \
 --bindDN "cn=Directory Manager" \
 --bindPassword password \
 --handler-name External \
 --set certificate-mapper:"Subject Attribute to User Attribute" \
 --trustAll \
 --no-prompt
$ ldapsearch \
 --hostname opendj.example.com \
 --port 1389 \
 --baseDN dc=example,dc=com \
 --useStartTLS \
 --saslOption mech="EXTERNAL" \
 --certNickName myapp-cert \
 --keyStorePath /path/to/my-keystore \
 --keyStorePasswordFile /path/to/my-keystore.pin \
 --trustStorePath /path/to/my-keystore \
 --trustStorePasswordFile /path/to/my-keystore.pin \
 "(cn=My App)" \
 userPassword
dn: cn=My App,ou=Apps,dc=example,dc=com
userPassword: {SSHA512}<hash>
This example uses the subject DN to user attribute mapper:
$ dsconfig \
 set-sasl-mechanism-handler-prop \
 --hostname opendj.example.com \
 --port 4444 \
 --bindDN "cn=Directory Manager" \
 --bindPassword password \
 --handler-name External \
 --set certificate-mapper:"Subject DN to User Attribute" \
 --trustAll \
 --no-prompt
$ ldapsearch \
 --hostname opendj.example.com \
 --port 1389 \
 --baseDN dc=example,dc=com \
 --useStartTLS \
 --saslOption mech="EXTERNAL" \
 --certNickName myapp-cert \
 --keyStorePath /path/to/my-keystore \
 --keyStorePasswordFile /path/to/my-keystore.pin \
 --trustStorePath /path/to/my-keystore \
 --trustStorePasswordFile /path/to/my-keystore.pin \
 "(cn=My App)" \
 userPassword
dn: cn=My App,ou=Apps,dc=example,dc=com
userPassword: {SSHA512}<hash>
Digest MD5 authentication allows password-based authentication without exposing the password on the network in the clear. It does require that both the client application and the DS server have access to the cleartext password, however. Passwords must be stored with a reversible password storage scheme.
Rather than including the password in the bind request, Digest MD5 authentication uses a two-step process where the client needs only to prove that it knows the password. The mechanism uses data that is randomly generated by the DS server to make it resistant to replay attacks. It also includes randomly generated data from the client, which makes it also resistant to problems resulting from weak server-side random number generation.
DS servers support Digest MD5 authentication
through its DIGEST-MD5 SASL authentication mechanism.
This mechanism is enabled by default
unless the server was installed with the setup command option,
--productionMode.
The default password policy prevents Digest MD5 authentication,
as it uses a one-way hash rather than a reversible scheme.
If you plan to use Digest MD5 authentication,
set the password storage scheme for the users involved
to a reversible mechanism before storing the their passwords.
(Once the passwords have been stored with a one-way hash mechanism,
the passwords will not be stored using a new mechanism until they are modified.
Alternatively, DS servers can store the password with the new mechanism when the user authenticates.
To enable this feature,
configure the deprecated-password-storage-scheme property
of the applicable password policy
as described in "Configuring Password Storage".)
For example, the following command sets the default password storage scheme
to use the Advanced Encryption Standard (AES) reversible scheme:
$ dsconfig \
 set-password-policy-prop \
 --hostname opendj.example.com \
 --port 4444 \
 --bindDN "cn=Directory Manager" \
 --bindPassword password \
 --policy-name "Default Password Policy" \
 --set default-password-storage-scheme:aes \
 --trustAll \
 --no-prompt
Once the scheme is defined, you can test Digest MD5 authentication by changing a user's password to ensure that it is stored with the reversible scheme, and then authenticating as the user. When reading the following example it is important to realize that, although the user provides their password to the client application, the password is never sent in the clear over the connection:
# Make sure the password is encoded with a reversible scheme:
$ ldappasswordmodify \
 --port 1389 \
 --authzID "dn:uid=bjensen,ou=people,dc=example,dc=com" \
 --currentPassword hifalutin \
 --newPassword password
The LDAP password modify operation was successful

# Use Digest MD5 authentication:
$ ldapsearch \
 --hostname opendj.example.com \
 --port 1389 \
 --baseDN dc=example,dc=com \
 --saslOption mech=DIGEST-MD5 \
 --saslOption authid=u:bjensen \
 --bindPassword password \
 uid=bjensen \
 userPassword
dn: uid=bjensen,ou=People,dc=example,dc=com
userPassword: {AES}<encrypted>
The preceding example sets only the authentication ID
with the --saslOption authid option.
It is also possible to set the authorization ID separately
by using the --saslOption authzid option.
Windows, UNIX, and Linux systems support Kerberos v5 authentication, which can operate safely on an open, unprotected network. In Kerberos authentication, the client application obtains temporary credentials for a service from an authorization server, in the form of tickets and session keys. The service server must be able to handle its part of the Kerberos mutual authentication process.
DS servers can interoperate with Kerberos systems through their GSSAPI SASL authentication mechanism.
Meet the following constraints when working with Kerberos systems:
The clocks on the host systems where the DS server runs must be kept in sync with other hosts in the system.
For example, you can use Network Time Protocol (NTP) services to keep the clocks in sync.
Each DS server needs its own keytab file, the file which holds its pairs of Kerberos principals and keys.
Depending on the encryption mechanisms Kerberos uses, the Java installation used by each DS server might require unlimited strength Java cryptography policy, which much be installed separately as described in "Using Unlimited Strength Cryptography".
DS server debug logging can display exceptions about unsupported encryption types when a mismatch occurs, but the exceptions are not visible unless you activate debug logging.
Follow these steps when setting up DS servers as Kerberos service servers:
Make sure the clock on the DS server host system is kept in sync with the other hosts' clocks in the Kerberos system.
Make sure that DNS resolves fully qualified domain names correctly on all systems involved.
Make sure the necessary ports are open on the DS server host system.
Make sure the encryption strengths required by the Kerberos system are supported by the JVM that the DS server uses.
Make sure that Kerberos is operating correctly for other services, including Kerberos client services on the DS server host.
This step depends on the implementation, but usually includes adding a Kerberos principal for the host.
Add a Kerberos principal for the DS server, such as
ldap/opendj.example.com.Create a keytab file for the DS server.
This step depends on the Kerberos implementation, but generally consists of extracting the key for the DS server Kerberos principal such as
ldap/opendj.example.comon the host where the DS server runs.Make the keytab file readable only by the DS server, and copy it to the
/path/to/opendj/config/directory.Configure the DS server to handle GSSAPI SASL authentication:
$ dsconfig \
 set-sasl-mechanism-handler-prop \
 --hostname opendj.example.com \
 --port 4444 \
 --bindDN "cn=Directory Manager" \
 --bindPassword password \
 --handler-name GSSAPI \
 --set enabled:true \
 --set keytab:/path/to/opendj/config/opendj.keytab \
 --set server-fqdn:opendj.example.com \
 --trustAll \
 --no-prompt
If your Kerberos principal user identifiers are not of the form
name@realm, configure an appropriateidentity-mapperfor the GSSAPI SASL mechanism handler.By default, the DS server uses the regular expression identity mapper, which expects user identifiers to match the pattern
^([^@])@.$. It maps the string before@to the value of the UID attribute. This works well for identifiers likebjensen@EXAMPLE.COM.Restart the DS server to ensure the configuration changes are taken into account:
$ stop-ds --restart

...GSSAPI SASL mechanism using a server fully qualified domain name of:
 opendj.example.com
...GSSAPI mechanism using a principal name of:
 principal="opendj/opendj.example.com"
...The GSSAPI SASL mechanism handler initialization was successful
Test that the mechanism works, by authenticating as a Kerberos user:
$ ldapsearch \
 --hostname opendj.example.com \
 --port 1389 \
 --baseDN dc=example,dc=com \
 --saslOption mech=GSSAPI \
 --saslOption authid=bjensen@EXAMPLE.COM \
 uid=bjensen \
 cn
dn: uid=bjensen,ou=People,dc=example,dc=com
cn: Barbara Jensen
cn: Babs Jensen
This chapter explains and demonstrates how to manage directory administration in a secure way. In this chapter you will learn to:
Determine which roles different administrators should have
Create and update administrator accounts
Assign appropriate administrative privileges
Constrain and limit administrative access
Manage administrator accounts and roles systematically
When DS servers are first installed,
only one directory administrator account is created.
This administrator, by default cn=Directory Manager,
is a directory superuser administrator
capable of unrestricted changes to the directory service,
including bypassing access control
and augmenting its own list of administrative privileges.
Some deployments require only one administrator. For example, in deployments where the server configuration is never changed in production or where the server is embedded as part of a single application, additional administrators might be unnecessary.
For any directory service with more than one administrator, however, it makes sense to limit what individual administrators can do. When each administrator only has access to perform their individual duties, there is less risk of accidental or intentional abuse. In addition, problems arising from administrative errors or bugs can be easier to characterize when each administrator has a specific role with only necessary administrative privileges and access.
Specifying administrative roles for your deployment is beyond the scope of this guide. It helps to understand what tasks directory administrators can perform, however, and how the roles might be distinguished from one another. The broadest distinction to make is between administrators who manage the directory service, which is a container for user data, and administrators who manage user data.
Administrators who manage the directory service should usually not have all the privileges of default directory manager. The tasks they complete and the privileges required are described in "Directory Service Administration".
| Tasks | Corresponding Access and Privileges |
|---|---|
|
DS server privileges are described in "About Privileges". | |
|
Install and upgrade servers |
Access to file system; capacity to run server commands |
|
Delegate administration |
Access to write administration-related attributes on others' entries;
DS server privileges:
|
|
Manage server processes (start, restart, stop) |
Capacity to run
the start-ds and stop-ds commands;
DS server privileges:
|
|
Manage changes to server configuration, including global and default settings |
Access to read and write to |
|
Manage containers for user data, including backends and indexes |
File system access for backup data and exported LDIF;
access to create entries under |
|
Manage changes to server schemas |
Access to write to |
|
Manage directory server data replication |
File system access to read |
|
Monitor the directory service |
Access to read |
|
Back up and restore directory data |
File system access for backup data and exported LDIF;
access to create entries under |
|
Troubleshoot problems with the directory service |
File system access to read log messages;
write access to create entries under |
Administrators who manage user data usually make changes through remote applications. The tasks they complete and the privileges required are described in "Directory Data Administration".
| Tasks | Corresponding Access and Privileges |
|---|---|
|
Manage changes to users, groups, and other accounts for their organizations |
Access to read and write to others' entries |
|
Delegate administration within their organizations |
Access to write administration-related attributes on others' entries;
DS server privileges:
|
|
Update administrative user data such as subentry-based password policies and access controls |
Access to write administration-related attributes on others' entries;
DS server privileges:
|
|
Help users who are locked out, or have forgotten or lost their password |
Access to use the manage-account command;
access to request a password modify extended operation;
access to update passwords on user entries;
DS server privileges:
|
|
Assist users and application developers who access the directory service |
Access to read (and potentially write to) others' entries
If performing operations on behalf of other users,
access to request proxied authorization;
DS server privileges:
|
Depending on the complexity of the directory service and the number of different administrators, it could make sense to subdivide administrative roles and limit the specific tasks each administrator can perform.
DS servers make it possible to limit administrative capabilities to specific tasks and data. They use the following server features to achieve this:
Server resource limits broadly constrain what users can do.
Resource limits are covered in "Setting Resource Limits" in the Administration Guide.
Server administrative privileges govern the administrative tasks that users can perform.
Privileges are covered in "Assigning Administrative Privileges".
Access control settings provide fine-grained control over what a user is authorized to do in terms of LDAP operations, including the conditions for connecting to the directory.
Access control is covered in "Securing Access to Directory Data".
Many operations require both privileges and also ACIs.
For example, in order to reset user's passwords,
an administrator needs the password-reset privilege
and access control to write userPassword values
on the user entries.
By combining ACIs with privileges,
the administrator can effectively restrict the scope of a privilege.
The rest of this chapter covers how to manage administrator accounts, set privileges, and limit administrative access.
DS server administrators can either have a directory superuser account, or a regular user account with privileges and access to perform administrative tasks.
In addition to the default directory superuser account,
cn=Directory Manager,
you can create additional superuser accounts.
This makes it possible to add administrators with a different bind DN than the default, making it more difficult for attackers to guess the directory manager bind DN. Alternatively, you could add an administrator with limited rights.
The following steps create an account that is identical to the default directory superuser account, but with a different bind DN than the default. They then remove the default account:
Create the administrator account like the default directory superuser account.
The default administrator account is
cn=Directory Manager. It is stored in its own backend,rootUser. TherootUseris backed by an LDIF file,db/rootUser.ldif.The following example shows the LDIF for an alternative directory superuser:
$ cat alt-root.ldif
dn: cn=Alternate DM
objectClass: top
objectClass: person
objectClass: organizationalPerson
objectClass: inetOrgPerson
givenName: Directory
sn: Manager
ds-rlim-size-limit: 0
ds-rlim-time-limit: 0
ds-rlim-idle-time-limit: 0
ds-rlim-lookthrough-limit: 0
ds-rlim-cursor-entry-limit: 100000
ds-pwp-password-policy-dn: cn=Root Password Policy,cn=Password Policies,cn=config
ds-privilege-name: bypass-lockdown
ds-privilege-name: bypass-acl
ds-privilege-name: modify-acl
ds-privilege-name: config-read
ds-privilege-name: config-write
ds-privilege-name: ldif-import
ds-privilege-name: ldif-export
ds-privilege-name: backend-backup
ds-privilege-name: backend-restore
ds-privilege-name: server-lockdown
ds-privilege-name: server-shutdown
ds-privilege-name: server-restart
ds-privilege-name: disconnect-client
ds-privilege-name: cancel-request
ds-privilege-name: password-reset
ds-privilege-name: update-schema
ds-privilege-name: privilege-change
ds-privilege-name: unindexed-search
ds-privilege-name: subentry-write
ds-privilege-name: changelog-read
ds-privilege-name: monitor-read
cn: Alternate DM
userPassword: password
Tip
Avoid using
Alternate DMsince it shows up here in the documentation.Choose a name that is specific to your deployment.
Create a private backend to store the new directory superuser account.
The following example creates an LDIF backend to store the entry. Before creating the backend, create a separate directory to hold the backend files:
$ mkdir /path/to/opendj/db/altRootUser
$ dsconfig \
 create-backend \
 --hostname opendj.example.com \
 --port 4444 \
 --bindDN "cn=Directory Manager" \
 --bindPassword password \
 --backend-name altRootUser \
 --type ldif \
 --set enabled:true \
 --set base-dn:cn=Alternate\ DM \
 --set ldif-file:db/altRootUser/altRootUser.ldif \
 --set is-private-backend:true \
 --trustAll \
 --no-prompt
If you choose to create a database backend instead of an LDIF backend, also set a low value for
db-cache-percentordb-cache-size.Import the new directory superuser entry into the new backend:
$ import-ldif \
 --hostname opendj.example.com \
 --port 4444 \
 --bindDN "cn=Directory Manager" \
 --bindPassword password \
 --backendID altRootUser \
 --ldifFile alt-root.ldif \
 --trustAll
(Optional) Remove the backend database and the unused LDIF files for the default superuser account,
cn=Directory Manager.$ dsconfig \ delete-backend \ --hostname opendj.example.com \ --port 4444 \ --bindDN "cn=Directory Manager" \ --bindPassword password \ --backend-name altRootUser \ --trustAll \ --no-prompt $ rm -rf /path/to/opendj/db/rootUserIn this example,
cn=Alternate DMnow has the same rights as the original superuser.(Optional) Repeat these steps for other DS servers.
The account is not replicated by default.
For replicated directory server topologies, a global administrator account exists on all servers in the replication topology. This provides an account to administer replication with the same credentials on every server in the topology.
When configuring replication as described in "Configuring Replication Settings" in the Administration Guide, create the global account with a name other than
admin, which is the example used in the documentation.Choose a name that is specific to your deployment.
Any user in the directory can have administrative privileges,
ACIs to perform administrative operations,
and resource limits to perform expensive operations.
In the sample data found in
Example.ldif,
see how members of the Directory Administrators group
have specific ACIs to allow them more access than normal users.
Also see how the application with CN My App
has the privilege to request proxied authorization
and perform operations on behalf of other users.
When following these high-level steps, only allow the minimum required capabilities initially. Grant additional capabilities as they prove to be required:
(Optional) Adjust the resource limits to as needed.
This can be done for an individual user or for a group of administrators as described in "Setting Resource Limits" in the Administration Guide.
(Optional) Assign any necessary DS server privileges.
As explained in "About the Roles Directory Administrators Play", the required privileges depend on the adminstration tasks performed.
For details, see "Assigning Administrative Privileges".
Add the necessary ACIs as described in "Securing Access to Directory Data".
As described in "About the Roles Directory Administrators Play", DS server administrative privileges govern the administrative tasks that users can perform.
Privileges provide access control for server administration independently from ACIs.
The default directory superuser, cn=Directory Manager,
is granted the privileges marked with an asterisk (*).
Other administrator users can be assigned these privileges, too:
backend-backup*Request a task to back up data
backend-restore*Request a task to restore data from backup
bypass-acl*Perform operations without regard to ACIs
bypass-lockdown*Perform operations without regard to lockdown mode
cancel-request*Cancel any client request
changelog-read*Read the changelog (under
cn=changelog)config-read*Read the server configuration
config-write*Change the server configuration
data-syncPerform data synchronization
disconnect-client*Close any client connection
jmx-notifySubscribe to JMX notifications
jmx-readRead JMX attribute values
jmx-writeWrite JMX attribute values
ldif-export*Export data to LDIF
ldif-import*Import data from LDIF
modify-acl*Change ACIs
monitor-read*Read metrics under
cn=monitor,/metrics/api,/metrics/prometheus, and over JMXpassword-reset*Reset other users' passwords
privilege-change*Change the privileges assigned to users
Take great care when assigning this privilege, as it allows the user to assign themselves all other administrative privileges.
proxied-authUse the Proxied Authorization control
server-lockdown*Put the server into and take the server out of lockdown mode
server-restart*Request a task to restart the server
server-shutdown*Request a task to stop the server
subentry-write*Perform LDAP subentry write operations
unindexed-search*Search using a filter with no corresponding index
update-schema*Change LDAP schema definitions
For all directory administrators, you can change privileges with the ldapmodify command as shown in the following procedures:
Privileges are specified using
the ds-privilege-name operational attribute,
which you can change using the ldapmodify command.
Determine the privileges to add:
$ cat privileges.ldif
dn: uid=kvaughan,ou=People,dc=example,dc=com
changetype: modify
add: ds-privilege-name
ds-privilege-name: config-read
ds-privilege-name: password-reset
This example lets the user read the server configuration, and reset user passwords. In order for the user to be able to change a user password, you must also allow the modification using ACIs.
For this example, Kirsten Vaughan is a member of the Directory Administrators group for Example.com, and already has access to modify user entries.
Prior to having the privileges, Kirsten gets messages about insufficient access when trying to read the server configuration, or trying to reset a user password:
$ ldapsearch \
 --port 1389 \
 --bindDN "uid=kvaughan,ou=people,dc=example,dc=com" \
 --bindPassword bribery \
 --baseDN cn=config \
 "(objectclass=*)"
# The LDAP search request failed: 50 (Insufficient Access Rights)
# Additional Information:  You do not have sufficient privileges to perform search operations in the Directory Server configuration
$ ldappasswordmodify \
 --port 1389 \
 --bindDN "uid=kvaughan,ou=people,dc=example,dc=com" \
 --bindPassword bribery \
 --authzID "dn:uid=scarter,ou=People,dc=example,dc=com" \
 --newPassword changeit
The LDAP password modify operation failed: 50 (Insufficient Access Rights)
Additional Information:  You do not have sufficient privileges to perform
password reset operations
Apply the change as a user with the
privilege-changeprivilege:$ ldapmodify \ --port 1389 \ --bindDN "cn=Directory Manager" \ --bindPassword password \ privileges.ldif
At this point, Kirsten can perform the operations requiring privileges:
$ ldapsearch \
 --port 1389 \
 --bindDN "uid=kvaughan,ou=people,dc=example,dc=com" \
 --bindPassword bribery \
 --baseDN cn=config \
 "(objectclass=*)"
dn: cn=config
…
$ ldappasswordmodify \
 --port 1389 \
 --bindDN "uid=kvaughan,ou=people,dc=example,dc=com" \
 --bindPassword bribery \
 --authzID "dn:uid=scarter,ou=People,dc=example,dc=com" \
 --newPassword changeit
The LDAP password modify operation was successful
For deployments with more than one administrator, use groups to define administrative rights.
You can use a collective attribute subentry to specify privileges for the administrator group.
Collective attributes provide a standard mechanism for defining attributes
that appear on all the entries in a particular subtree.
For details, see "Collective Attributes" in the Developer's Guide.
DS servers extend collective attributes
to give you fine-grained control over which entries are in scope.
In addition, DS servers let you use virtual attributes,
such as isMemberOf
to construct the filter for targeting entries in scope.
This allows you, for example, to define administrative privileges
that apply to all users who belong to an administrator group:
Create an LDAP subentry that specifies the collective attributes:
$ cat collective.ldif
dn: cn=Administrator Privileges,dc=example,dc=com
objectClass: collectiveAttributeSubentry
objectClass: extensibleObject
objectClass: subentry
objectClass: top
cn: Administrator Privileges
ds-privilege-name;collective: config-read
ds-privilege-name;collective: config-write
ds-privilege-name;collective: ldif-export
ds-privilege-name;collective: modify-acl
ds-privilege-name;collective: password-reset
ds-privilege-name;collective: proxied-auth
subtreeSpecification: {base "ou=people", specificationFilter
  "(isMemberOf=cn=Directory Administrators,ou=Groups,dc=example,dc=com)" }

$ ldapmodify \
 --port 1389 \
 --bindDN "cn=Directory Manager" \
 --bindPassword password \
 collective.ldif
The Directory Administrators group for Example.com includes members like Harry Miller.
The
baseentry identifies the branch that holds administrator entries. For details on how subentries apply, see "Understanding Subentry Scope".Observe that the change takes effect immediately:
$ ldappasswordmodify \
 --port 1389 \
 --bindDN "uid=hmiller,ou=people,dc=example,dc=com" \
 --bindPassword hillock \
 --authzID "dn:uid=scarter,ou=People,dc=example,dc=com"
The LDAP password modify operation was successful
Generated Password:  <password>
When privileges are set as described in "To Add Privileges for a Group of Administrators", the same list of privileges is applied to every target account.
In some cases, the list of inherited privileges can be too broad.
DS servers have a mechanism to limit effective privileges
by preceding the privilege attribute value with a -.
The following steps show how to prevent Kirsten Vaughan from resetting passwords when the privilege is assigned as described in "To Add Privileges for a Group of Administrators":
Check the privilege settings for the account:
$ ldapsearch \
 --port 1389 \
 --bindDN "cn=Directory Manager" \
 --bindPassword password \
 --baseDN dc=example,dc=com \
 "(uid=kvaughan)" \
 ds-privilege-name
dn: uid=kvaughan,ou=People,dc=example,dc=com
ds-privilege-name: config-read
ds-privilege-name: password-reset
Set the privilege attribute for the account to deny the privilege:
$ cat restrict-privileges.ldif
dn: uid=kvaughan,ou=people,dc=example,dc=com
changetype: modify
add: ds-privilege-name
ds-privilege-name: -password-reset

$ ldapmodify \
 --port 1389 \
 --bindDN "cn=Directory Manager" \
 --bindPassword password \
 restrict-privileges.ldif
Observe that the privilege is no longer in effect:
$ ldappasswordmodify \
 --port 1389 \
 --bindDN "uid=kvaughan,ou=people,dc=example,dc=com" \
 --bindPassword bribery \
 --authzID "dn:uid=scarter,ou=People,dc=example,dc=com"
The LDAP password modify operation failed: 50 (Insufficient Access Rights)
Additional Information:  You do not have sufficient privileges to perform
password reset operations
DS software provides the tools and features needed to manage user and administrator accounts individually or in groups. If the deployment calls for provisioning and workflow capabilities, or custom tools for day-to-day administration, then other tools are available to help manage groups and users systematically, including administrator accounts.
Some deployments require automation of provisioning and workflow operations, and management of many different user roles. In such cases, identity management software can help. ForgeRock Identity Management software, based on the OpenIDM project, offers user self-service, provisioning, data synchronization, workflow, and other capabilities to deal with constant changes to directory data in a centrally-managed, automated, systematic way.
Simple or local deployments might require a GUI for generic or system-specific administrative operations. In such cases, DS software's adherence to standards like LDAP v3 makes it interoperable with many third-party tools.
This chapter explains and demonstrates how to secure access to directory data. In this chapter you will learn to:
Authorize access only as needed
Use ACIs or global access policies to control access to directory data
Prevent access temporarily by putting the server in lockdown mode
DS servers are designed to protect unauthorized access to directory data:
Data confidentiality with encryption on disk prevents other users with file system access or access to backup files from reading directory data.
Secure connections prevent eavesdropping on communications between clients and servers.
Administrative privileges control access to server administration operations.
Authentication mechanisms and fine-grained authorization controls constrain who has access to what data under what conditions.
When you set up DS servers for evaluation, the settings can allow all client applications to read most user data. This makes it easier to become familiar with DS server features before you fully understand how the server works.
When deploying DS servers for use in production, it is much safer to grant access only as needed:
Use data confidentiality to protect directory data files.
For details, see "Encrypting Directory Data" in the Administration Guide.
Require secure connections to the directory as much as possible.
For details, see "Securing Network Connections".
Require authentication for most operations.
For details, see "Securing Authentication".
Grant privileges only to administrators who need them.
For details, see "Securing Directory Administration".
Keep global ACIs or global access policies to a minimum.
For details, see "Securing the Server Installation".
Add ACIs to directory data only as needed.
For details, see "Using ACIs or Global Access Policies".
Do not use the default directory superuser,
cn=Directory Manager, for all administrative actions and client operations. Use one or more accounts with restricted authorizations and privileges instead.
ACIs apply to directory data, providing fine-grained control
over what a user or group member is authorized to do
in terms of LDAP operations.
Most access control instructions specify scopes (targets)
so that an even an administrative user with full access
to all data in dc=example,dc=com
might have not access at all to data in dc=example,dc=org.
ACIs are implemented as attributes on DS server entries. This means they can be updated over protocol while the server is running. ACI attribute values are written in a special domain-specific language that is described in this section.
Global access control policies are similar to ACIs. They are configured as entries in the server configuration, and apply to DS servers. They provide coarse-grained access control suitable for use on proxy servers, where the lack of local access to directory data makes ACIs a poor fit.
Note
Access control instructions (ACI) and global access control policies rely on different access control handlers, which implement different access control models. ACIs rely on the DSEE-compatible access control handler. (DSEE refers to Sun Java System Directory Server Enterprise Edition.) Global access control policies rely on the policy-based access control handler. A server can only use one handler at a time.
Take the following constraints into consideration:
When the policy-based handler is configured, ACIs have no effect.
When the DSEE-compatible handler is configured, global access control policies have no effect.
When a server is set up as a directory server, it uses the DSEE-compatible access control handler, with ACIs in directory data and global ACIs in the configuration.
When a server is set up as a directory proxy server, it uses the policy-based access control policy handler, and global access control policies.
Once the server has been set up, the choice of access control handler cannot be changed with the dsconfig command.
Some operations require both privileges and access control.
For example, in order to reset user's passwords, an administrator needs
the password-reset privilege
and access to write userPassword values on user entries.
By combining access control and privileges,
you can effectively restrict scope of privileges
to a particular branch of the Directory Information Tree.
Privileges are described in "Securing Directory Administration".
DS server ACIs exist
as operational aci attribute values on directory entries,
and as global ACI attributes stored in the configuration.
ACIs apply to a scope defined in the instruction.
They set permissions that depend on what operation is requested,
who requested the operation, and how the client connected to the server.
For example, the ACIs on the following entry
allow anonymous read access to all attributes except passwords,
and allow read-write access for directory administrators
under dc=example,dc=com:
dn: dc=example,dc=com
objectClass: domain
objectClass: top
dc: example
aci: (target ="ldap:///dc=example,dc=com")
 (targetattr != "userPassword")(version 3.0;acl "Anonymous read-search access";
 allow(read, search, compare)(userdn = "ldap:///anyone");)
aci: (target="ldap:///dc=example,dc=com")
 (targetattr = "*")(version 3.0; acl "allow all Admin group";
 allow(all) groupdn = "ldap:///cn=Directory Administrators,ou=Groups,dc=example,dc=com";)
The DS server default behavior is
that no access is allowed unless it is specifically granted by an ACI.
(The bypass-acl privilege,
assigned to certain users such as cn=Directory Manager,
can allow users to bypass access control checks.)
DS servers provide default global ACIs to facilitate evaluation while maintaining a reasonable security policy. By default, users are granted access to:
Read the root DSE
Read the LDAP schema
Use certain LDAP controls and extended operations
Modify their own entries
Read public data and operational attributes
Global ACIs are defined on the access control handler, and apply to the entire server. You must adjust the default global ACIs to match the security policies for your organization, for example, to restrict anonymous access.
ACI attribute values use a specific language described in this section. Although ACI attribute values can become difficult to read in LDIF, the basic syntax is simple:
targets(version 3.0;acl "name";permissions subjects;)
The following list briefly explains the variables in the syntax above:
- targets
The targets specifies entries, attributes, controls, and extended operations to which the ACI applies.
To include multiple targets, enclose each individual target in parentheses,
(). When you specify multiple targets, all targets must match for the ACI to apply (AND).- name
Supplies a human-readable description of what the ACI does.
- permissions
Defines which actions to allow, and which to deny. Paired with subjects.
- subjects
Identifies clients to which the ACI applies depending on who connected, and when, where, and how they connected. Paired with permissions.
Separate multiple pairs of
permissions-subjects
definitions with semicolons, ;.
When you specify multiple permissions-subjects pairs,
at least one must match (OR).
The seven types of ACI targets identify the objects to which the ACI applies.
Most expressions allow you to use
either = to specify that the target should match the value
or != to specify that the target should not match the value:
(target [!]= "ldap:///DN")Sets the scope to the entry with distinguished name DN, and to child entries.
You can use asterisks,
*, to replace attribute types, attribute values, and entire DN components.In other words, the following specification targets both
uid=bjensen,ou=People,dc=example,dc=comandcn=My App,ou=Apps,dc=example,dc=com:(target = "ldap:///*=*,*,dc=example,dc=com")The DN must be in the subtree of the entry where the ACI is defined.
If you do not specify
target, then the entry holding this ACI is affected. Iftargetscopeis also omitted, then this entry and all subordinates are affected.(targetattr [!]= "attr-list")Replace attr-list with a list of attribute type names, such as
userPassword, separating multiple attribute type names with||.This specification affects the entry where the ACI is located, or the entries specified by other targets in the ACI.
You can use an asterisk,
*, to specify all user attributes, although you will see better performance when explicitly including or excluding attribute types as needed. You can use a plus sign,+, to specify all operational attributes.A negated attr-list of operational attributes will only match other operational attributes and never any user attributes, and vice-versa.
If you do not include this target specification, then by default no attributes are affected by the ACI.
(targetfilter [!]= "ldap-filter")Sets the scope to match the ldap-filter dynamically, as in an LDAP search. The ldap-filter can be any valid LDAP filter.
(targattrfilters = "expression")Use this target specification when managing changes made to particular attributes.
The expression takes one of the following forms. Separate expressions with semicolons (
;):op=attr1:filter1[&& attr2:filter2 …][;op=attr3:filter3[&& attr4:filter4 …] …]
The op can be either
addfor operations creating attributes, ordelfor operations removing them.Replace attr with an attribute type. Replace filter with an LDAP filter that corresponds to the attr attribute type.
(targetscope = "base|onelevel|subtree|subordinate")baserefers to the entry with the ACI.onelevelrefers to immediate children.subtreerefers to the base entry and all children.subordinaterefers to all children only.
If you do not specify
targetscope, the default issubtree.(targetcontrol [!]= "OID")Replace OID with the object identifier for the LDAP control to target. Separate multiple OIDs with
||.To use an LDAP control, the bind DN user must have
allow(read)permissions.This target cannot be restricted to a specific subtree by combining it with another target.
(extop [!]= "OID")Replace OID with the object identifier for the extended operation to target. Separate multiple OIDs with
||.To use an LDAP extended operation, the bind DN user must have
allow(read)permissions.This target cannot be restricted to a specific subtree by combining it with another target.
ACI permission definitions take one of the following forms:
allow(action[, action …])
deny(action[, action …])
Tip
Although deny is supported,
avoid restricting permissions by using deny.
Instead, explicitly allow access only as needed.
What looks harmless and simple in tests and examples
can grow difficult to maintain in a real-world deployment with nested ACIs.
Replace action with one of the following:
addEntry creation, as for an LDAP add operation.
allAll permissions, except
export,import,proxy.compareAttribute value comparison, as for an LDAP compare operation.
deleteEntry deletion, as for an LDAP delete operation.
exportEntry export during a modify DN operation.
Despite the name, this action is unrelated to LDIF export operations.
importEntry import during a modify DN operation.
Despite the name, this action is unrelated to LDIF import operations.
proxyAccess the ACI target using the rights of another user.
readRead entries and attributes, or use an LDAP control or extended operation.
searchSearch the ACI targets.
Combine with
readto read the search results.selfwriteAdd or delete own DN from a group.
writeModify attributes on ACI target entries.
ACI subjects match characteristics of the client connection to the server.
Use subjects to restrict whether the ACI applies
depending on who connected, and when, where, and how they connected.
Most expressions allow you to use either
= to specify that the condition should match the value
or != to specify that the condition should not match the value:
authmethod [!]= "none|simple|ssl|sasl mech"nonemeans do not check.simplemeans simple authentication.sslrefers to certificate-based authentication over LDAPS.sasl mechrefers to SASL, where mech is DIGEST-MD5, EXTERNAL, or GSSAPI.
dayofweek [!]= "day[, day …]"Replace day with one of:
sunmontuewedthufrisatdns [!]= "hostname"Use asterisks,
*, to replace name components, such asdns = "*.example.com".groupdn [!]= "ldap:///DN[|| ldap:///DN …]"Replace DN with the distinguished name of a group to permit or restrict access for members.
ip [!]= "addresses"The addresses can be specified for IPv4 or IPv6.
IPv6 addresses are specified in brackets as
ldap://[address]/subnet-prefixwhere /subnet-prefix is optional.You can specify:
Individual IPv4 addresses
Addresses with asterisks (
*) to replace subnets and host numbersCIDR notation
Forms such as
192.168.0.*+255.255.255.0to specify subnet masks
ssf = "strength",ssf != "strength",ssf > "strength",ssf >= "strength",ssf < "strength",ssf <= "strength"The security strength factor (
ssf) pertains to the cipher key strength for connections using DIGEST-MD5, GSSAPI, SSL, or TLS.For example, to require that the connection must have a cipher strength of at least 256 bits, specify
ssf >= "256".timeofday = "hhmm",timeofday != "hhmm",timeofday > "hhmm",timeofday >= "hhmm",timeofday < "hhmm",timeofday <= "hhmm"The hhmm is expressed as on a 24-hour clock.
For example, 1:15 PM is written
1315.userattr [!]= "attr#value",userattr [!]= ldap-url#LDAPURL",userattr [!]= "[parent[child-level]. ]attr#GROUPDN|USERDN"The
userattrsubject specifies an attribute that must match on both the bind entry and the target of the ACI.To match when the user attribute on the bind DN entry corresponds directly to the attribute on the target entry, replace attr with the user attribute type, and value with the attribute value. DS servers perform an internal search to get the attributes of the bind entry. Therefore, this ACI subject does not work with operational attributes.
To match when the target entry is identified by an LDAP URL, and the bind DN is in the subtree of the DN of the LDAP URL, use
ldap-url#LDAPURL.To match when the bind DN corresponds to a member of the group identified by the attr value on the target entry, use
attr#GROUPDN.To match when the bind DN corresponds to the attr value on the target entry, use
attr#USERDN.The optional inheritance specification,
parent[child-level]., lets you specify how many levels below the target entry inherit the ACI. The child-level is a number from 0 to 9, with 0 indicating the target entry only. Separate multiple child-level digits with commas (,).userdn [!]= "ldap-url++[|| ldap-url++ …]"To match the bind DN, replace ldap-url++ with either a valid LDAP URL, such as
ldap:///uid=bjensen,ou=People,dc=example,dc=com, orldap:///dc=example,dc=com??sub?(uid=bjensen), or a special LDAP URL-like keyword from the following list:ldap:///allMatch authenticated users.
ldap:///anyoneMatch anonymous and authenticated users.
ldap:///parentMatch when the bind DN is a parent of the ACI target.
ldap:///selfMatch when the bind DN entry corresponds to ACI target.
Understanding how DS servers evaluate the aci values
is critical when implementing an access control policy.
The rules the server follows are simple:
To determine whether an operation is allowed or denied, DS servers look in the directory for the target of the operation. A server collects any ACI values from that entry, and then walks up the directory tree to the suffix, collecting all ACI values en route. Global ACI values are then collected.
It then separates the ACI values into two lists; one list contains all the ACI values that match the target and deny the required access, and the other list contains all the ACI values that match the target and allow the required access.
If the deny list contains any ACI values after this procedure, access is immediately denied.
If the deny list is empty, then the allow list is processed. If the allow list contains any ACI values, access is allowed.
If both lists are empty, access is denied.
Note
Some operations require multiple permissions and involve multiple targets.
Evaluation will therefore take place multiple times.
For example, a search operation requires
the search permission for each attribute in the search filter.
If all those are allowed, the read permission
is used to decide what attributes and values can be returned.
The minimal access control information required for specific LDAP operations is described here:
- Add
The ACI must allow the
addpermission to entries in the target. This implicitly allows the attributes and values to be set.Use
targattrfiltersto explicitly deny access to any values if required.For example, the ACI required to allow
uid=bjensen,ou=People,dc=example,dc=comto add an entry is:aci: (version 3.0;acl "Add entry"; allow (add) (userdn = "ldap:///uid=bjensen,ou=People,dc=example,dc=com");)- Bind
Because this is used to establish the user's identity and derived authorizations, ACI is irrelevant for this operation and is not checked.
To prevent authentication, disable the account instead. For details, see "Managing Accounts Manually" in the Administration Guide.
- Compare
The ACI must allow the
comparepermission to the attribute in the target entry.For example, the ACI required to allow
uid=bjensen,ou=People,dc=example,dc=comto compare values against thesnattribute is:aci: (targetattr = "sn")(version 3.0;acl "Compare surname"; allow (compare) (userdn = "ldap:///uid=bjensen,ou=People,dc=example,dc=com");)- Delete
The ACI must allow the
deletepermission to the target entry. This implicitly allows the attributes and values in the target to be deleted.Use
targattrfiltersto explicitly deny access to the values if required.For example, the ACI required to allow
uid=bjensen,ou=People,dc=example,dc=comto delete an entry is:aci: (version 3.0;acl "Delete entry"; allow (delete) (userdn = "ldap:///uid=bjensen,ou=People,dc=example,dc=com");)- Modify
The ACI must allow the
writepermission to attributes in the target entries. This implicitly allows all values in the target attribute to be modified.Use
targattrfiltersto explicitly deny access to specific values if required.For example, the ACI required to allow
uid=bjensen,ou=People,dc=example,dc=comto modify thedescriptionattribute in an entry is:aci: (targetattr = "description")(version 3.0; acl "Modify description"; allow (write) (userdn = "ldap:///uid=bjensen,ou=People,dc=example,dc=com");)- ModifyDN
If the entry is being moved to a
newSuperior, theexportpermission must be allowed on the target, and theimportpermission must be allowed on thenewSuperiorentry.The ACI must allow
writepermission to the attributes in the old RDN and the new RDN. All values of the old RDN and new RDN can be written implicitly; usetargattrfiltersto explicitly deny access to values used if required.For example, the ACI required to allow
uid=bjensen,ou=People,dc=example,dc=comto rename entries named with theuidattribute to new locations:aci: (targetattr = "uid")(version 3.0;acl "Rename uid= entries"; allow (write, import, export) (userdn = "ldap:///uid=bjensen,ou=People,dc=example,dc=com");)- Search
ACI is required to process the search filter, and to determine what attributes and values may be returned in the results. The
searchpermission is used to allow particular attributes in the search filter. Thereadpermission is used to allow particular attributes to be returned.If
readpermission is allowed to any attribute, the server automatically allows theobjectClassattribute to also be read.For example, the ACI required to allow
uid=bjensen,ou=People,dc=example,dc=comto search foruidattributes, and also to read that attribute in matching entries is:aci: (targetattr = "uid")(version 3.0;acl "Search and read uid"; allow (search, read) (userdn = "ldap:///uid=bjensen,ou=People,dc=example,dc=com");)- Use Control or Extended Operation
The ACI must allow the
readpermission to thetargetcontrolorextopOIDs.For example, the ACI required to allow
uid=bjensen,ou=People,dc=example,dc=comto use the Persistent Search request control with OID2.16.840.1.113730.3.4.3is:aci: (targetcontrol = "2.16.840.1.113730.3.4.3") (version 3.0;acl "Request Persistent Search"; allow (read) (userdn = "ldap:///uid=bjensen,ou=People,dc=example,dc=com");)
ACIs are defined in the data on aci attributes.
They can be imported in LDIF and modified over LDAP.
In order to make changes to ACIs, however,
users first need the modify-acl privilege.
By default, only the directory superuser has
the modify-acl privilege.
Global ACIs on cn=Access Control Handler,cn=config
can be set using the dsconfig command.
Global ACIs have attribute type ds-cfg-global-aci.
Modifying and removing global ACIs can have deleterious effects. Generally the impact depends on your deployment requirements. Modifications to global ACIs fall into the following categories:
Modification or removal is permitted.
You must test client applications when deleting the specified ACI.
Modification or removal may affect applications.
You must test client applications when modifying or deleting the specified ACI.
Modification or removal may affect applications, but is not recommended.
You must test client applications when modifying or deleting the specified ACI.
Do not modify or delete.
For details, see "Default Global ACIs".
| Name | Description | ACI Definition |
|---|---|---|
|
Anonymous control access |
Anonymous and authenticated users can use the LDAP controls that are specified by OID. Modification or removal may affect applications. |
|
|
Anonymous extended operation access |
Anonymous and authenticated users can request the LDAP extended operations that are specified by OID. Modification or removal may affect applications. |
|
|
Anonymous read access |
Anonymous and authenticated users can read the user data attributes that are specified by their names. Modification or removal is permitted. |
|
|
Authenticated users control access |
Authenticated users can use the LDAP controls that are specified by OID. Modification or removal may affect applications. |
|
|
Self entry modification |
Authenticated users can modify the specified attributes on their own entries. Modification or removal is permitted. |
|
|
Self entry read |
Authenticated users can read the password values on their own entries. By default, the server applies a one-way hash algorithm to the password value before writing it to the entry, so it is computationally difficult to recover the cleartext version of the password from the stored value. Modification or removal is permitted. |
|
|
User-Visible Operational Attributes |
Anonymous and authenticated users can read attributes that identify entries and that contain information about modifications to entries. Modification or removal may affect applications. |
|
|
User-Visible Root DSE Operational Attributes |
Anonymous and authenticated users can read attributes that describe what the server supports. Modification or removal may affect applications. |
|
|
User-Visible Schema Operational Attributes |
Anonymous and authenticated users can read LDAP schema definitions. Modification or removal may affect applications. |
|
Users with write access to add ACIs
and with the modify-acl privilege
can use the ldapmodify command
to change ACIs located in user data.
This section focuses on ACI examples, rather than demonstrating how to update the directory for each example. To update ACIs, use the ldapmodify command.
For hints on updating directory entries
with the ldapmodify command,
see "Modifying Entry Attributes" in the Developer's Guide.
Keep in mind that the name of the ACI attribute is aci
as shown in the examples that follow.
This section includes the following examples:
This ACI makes all user attributes world-readable except password attributes:
aci: (target ="ldap:///dc=example,dc=com")
 (targetattr != "authPassword || userPassword")
 (version 3.0;acl "Anonymous read-search access";
 allow (read, search, compare)(userdn = "ldap:///anyone");)
By default, DS servers deny access
unless an ACI explicitly allows access.
(This does not apply to the default directory superuser,
cn=Directory Manager,
who has the bypass-acl privilege.)
DS servers allow anonymous users
to read public data and request certain controls and extended operations.
These default capabilities are defined in global ACIs, which you can read by using the following command:
$ dsconfig \
 get-access-control-handler-prop \
 --hostname opendj.example.com \
 --port 4444 \
 --bindDN "cn=Directory Manager" \
 --bindPassword password \
 --property global-aci \
 --trustAll
You can disable anonymous access either
by editing relevant global-aci properties,
or by using the global server configuration property,
reject-unauthenticated-requests.
Editing relevant global-aci properties
lets you take a fine-grained approach to limit anonymous access.
Setting reject-unauthenticated-requests:true
causes the DS server to reject all requests
from clients who are not authenticated
except bind requests and StartTLS requests.
To take a fine-grained approach,
use the dsconfig command
to edit global-aci properties.
One of the most expedient ways to do this is to use the command interactively
on one DS server,
capturing the output to a script with the
--commandFilePath script option,
and then editing the script for use on other servers.
With this approach, you can
allow anonymous read access to the root DSE and to directory schemas
so that clients do not have to authenticate to discover server capabilities,
and also allow anonymous users access
to request certain controls and extended operations:
#
# Edit Access Control Handler global-aci attributes, replacing
# userdn="ldap:///anyone" (anonymous) with userdn="ldap:///all" (authenticated)
# in "Anonymous read access" and "User-Visible Operational Attributes" ACIs.
#
# To make this change, you remove existing values, and add edited values:
#
$ dsconfig \
 set-access-control-handler-prop \
 --hostname opendj.example.com \
 --port 4444 \
 --bindDN "cn=Directory Manager" \
 --bindPassword password \
 --remove global-aci:\(targetattr!=\"userPassword\|\|authPassword\|\|debugsearchindex\|\|changes\|\|changeNumber\|\|changeType\|\|changeTime\|\|targetDN\|\|newRDN\|\|newSuperior\|\|deleteOldRDN\"\)\(version\ 3.0\;\ acl\ \"Anonymous\ read\ access\"\;\ allow\ \(read,search,compare\)\ userdn=\"ldap:///anyone\"\;\) \
 --remove global-aci:\(targetattr=\"createTimestamp\|\|creatorsName\|\|modifiersName\|\|modifyTimestamp\|\|entryDN\|\|entryUUID\|\|subschemaSubentry\|\|etag\|\|governingStructureRule\|\|structuralObjectClass\|\|hasSubordinates\|\|numSubordinates\|\|isMemberOf\"\)\(version\ 3.0\;\ acl\ \"User-Visible\ Operational\ Attributes\"\;\ allow\ \(read,search,compare\)\ userdn=\"ldap:///anyone\"\;\) \
 --add global-aci:\(targetattr!=\"userPassword\|\|authPassword\|\|debugsearchindex\|\|changes\|\|changeNumber\|\|changeType\|\|changeTime\|\|targetDN\|\|newRDN\|\|newSuperior\|\|deleteOldRDN\"\)\(version\ 3.0\;\ acl\ \"Anonymous\ read\ access\"\;\ allow\ \(read,search,compare\)\ userdn=\"ldap:///all\"\;\) \
 --add global-aci:\(targetattr=\"createTimestamp\|\|creatorsName\|\|modifiersName\|\|modifyTimestamp\|\|entryDN\|\|entryUUID\|\|subschemaSubentry\|\|etag\|\|governingStructureRule\|\|structuralObjectClass\|\|hasSubordinates\|\|numSubordinates\|\|isMemberOf\"\)\(version\ 3.0\;\ acl\ \"User-Visible\ Operational\ Attributes\"\;\ allow\ \(read,search,compare\)\ userdn=\"ldap:///all\"\;\) \
 --trustAll \
 --no-prompt
Make sure that you also set appropriate ACIs on any data that you import. The following commands prevent anonymous reads of Example.com data:
$ cat remove-anon.ldif
dn: dc=example,dc=com
changetype: modify
delete: aci
aci: (target ="ldap:///dc=example,dc=com")(targetattr != "userPassword")(version 3.0;acl "Anonymous read-search access";allow (read, search, compare)(userdn = "ldap:///anyone");)
-
add: aci
aci: (target ="ldap:///dc=example,dc=com")(targetattr != "userPassword")(version 3.0;acl "Anonymous read-search access";allow (read, search, compare)(userdn = "ldap:///all");)

$ ldapmodify \
 --port 1389 \
 --bindDN "cn=Directory Manager" \
 --bindPassword password \
 remove-anon.ldif
At this point, clients must authenticate to view search results:
$ ldapsearch --port 1389 --baseDN dc=example,dc=com "(uid=bjensen)"
$ ldapsearch  \
 --port 1389 \
 --bindDN uid=bjensen,ou=people,dc=example,dc=com \
 --bindPassword hifalutin \
 --baseDN dc=example,dc=com \
 "(uid=bjensen)" cn uid
dn: uid=bjensen,ou=People,dc=example,dc=com
cn: Barbara Jensen
cn: Babs Jensen
uid: bjensen
To reject anonymous access except bind and StartTLS requests,
set reject-unauthenticated-requests:true:
$ dsconfig \
 set-global-configuration-prop \
 --hostname opendj.example.com \
 --port 4444 \
 --bindDN "cn=Directory Manager" \
 --bindPassword password \
 --set reject-unauthenticated-requests:true \
 --trustAll \
 --no-prompt
Once you set the property, anonymous clients trying to search, for example,
get an Unwilling to Perform response
from the DS server:
$ ldapsearch --port 1389 --baseDN dc=example,dc=com "(uid=bjensen)"
# The LDAP search request failed: 53 (Unwilling to Perform)
# Additional Information:  Rejecting the requested operation because the connection has not been authenticated
In both cases, notice that the changes apply to a single DS server configuration, and so are never replicated to other servers. You must apply the changes separately to each replicated server.
The following ACI gives a group of Directory Administrators full access. Some administrative operations will also require privileges not shown in this example:
aci: (target="ldap:///dc=example,dc=com")
 (targetattr = "* || +")
 (version 3.0;acl "Admins can run amok";
  allow(all, proxy, import, export)
  groupdn = "ldap:///cn=Directory Administrators,ou=Groups,dc=example,dc=com";)
targetattr = "* || +" permits access
to all user attributes and all operational attributes.
allow(all, proxy, import, export) permits
all user operations, proxy authorization, and modify DN operations.
By default, the right to change one's own password is set in a global ACI. This ACI reproduces the same effect:
aci: (target ="ldap:///ou=People,dc=example,dc=com")
 (targetattr = "authPassword || userPassword")
 (version 3.0;acl "Allow users to change pass words";
   allow (write)(userdn = "ldap:///self");)
For some static groups, such as carpoolers and social club members, you might choose to let users manage their own memberships. The following ACI lets members of self-service groups manage their own membership:
aci: (target ="ldap:///ou=Self Service,ou=Groups,dc=example,dc=com")
 (targetattr = "member")
 (version 3.0;acl "Self registration"; allow(selfwrite)
 (userdn = "ldap:///uid=*,ou=People,dc=example,dc=com");)
This ACI lets users create and delete self-managed groups:
aci: (target ="ldap:///ou=Self Service,ou=Groups,dc=example,dc=com")
 (targattrfilters="add=objectClass:(objectClass=groupOfNames)")
 (version 3.0; acl "All can create self service groups";
   allow (add)(userdn= "ldap:///uid=*,ou=People,dc=example,dc=com");)
aci: (target ="ldap:///ou=Self Service,ou=Groups,dc=example,dc=com")
 (version 3.0; acl "Owner can delete self service groups";
   allow (delete)(userattr= "owner#USERDN");)
This ACI uses IP address and Security Strength Factor subjects:
aci: (target = "ldap:///dc=example,dc=com")
 (targetattr = "*")
 (version 3.0;acl "Use loopback only for LDAP in the clear";
   deny (all)(ip != "127.0.0.1" and ssf <= "1");)
When you use TLS but have not configured a cipher,
ssf is one.
Packets are checksummed for integrity checking,
but all content is sent in cleartext.
In order to update ACIs in directory data,
a user must have both the modify-acl privilege
and access to modify the aci operational attribute.
This ACI lets Directory Administrators manage aci values:
aci: (target = "ldap:///dc=example,dc=com")
 (targetattr = "aci") (version 3.0;acl "Modify ACIs"; allow (all)
 (groupdn = "ldap:///cn=Directory Administrators,ou=Groups,dc=example,dc=com";)
Global access control policies are similar to ACIs, but are implemented as entries in the server configuration, rather than attributes on entries. They are managed using the dsconfig command.
Unlike ACIs, policies can only allow access, not deny it. This constraint makes them easier to read and to change in isolation. Policies are, however, applied in addition to ACIs and privileges. It is still possible that an ACI could deny something allowed by a policy.
By default, no access is allowed until permitted by a policy or other access control. By default, a policy matches all entries, all types of connection, and all users. You set the properties of the policy to restrict its scope of application. Policies can have the settings to allow the following:
Requests for specified LDAP controls and extended operations
Access to specific attributes, with support for wildcards, @objectclass notation, and exceptions to simplify settings
Read access (for read, search, and compare operations)
Write access (for add, delete, modify, and modify DN operations)
Making authentication required or not before requesting an operation
Requests targeting a particular scope, with wildcards to simplify settings
Requests originating or not from specific client addresses or domains
Requests using a specified protocol
Requests using a specified port
Requests using a minimum security strength factor
Requests from a user whose DN does or does not match a DN pattern
For details, see "Global Access Control Policy" in the Configuration Reference.
You manage global access control policies with the dsconfig command. As the policies are part of the server configuration, they are not replicated, and must be configured on each server.
This section includes the following examples:
The following example replaces the default policies that allow anonymous access and authenticated access with a single policy for authenticated access. This example then adds a policy to allow anonymous access to use the StartTLS and Get Symmetric Key extended operations. It does not change the default policy that allows anonymous access to read root DSE operational attributes, as that information should remain publicly readable in most deployments:
$ dsconfig \
 delete-global-access-control-policy \
 --hostname opendj.example.com \
 --port 4444 \
 --bindDN "cn=Directory Manager" \
 --bindPassword password \
 --policy-name "Anonymous access all entries" \
 --trustAll \
 --no-prompt
$ dsconfig \
 delete-global-access-control-policy \
 --hostname opendj.example.com \
 --port 4444 \
 --bindDN "cn=Directory Manager" \
 --bindPassword password \
 --policy-name "Authenticated access all entries" \
 --trustAll \
 --no-prompt
$ dsconfig \
 create-global-access-control-policy \
 --hostname opendj.example.com \
 --port 4444 \
 --bindDN "cn=Directory Manager" \
 --bindPassword password \
 --policy-name "Authenticated access all entries" \
 --set authentication-required:true \
 --set request-target-dn-not-equal-to:"**,cn=changelog" \
 --set permission:read \
 --set allowed-attribute:"*" \
 --set allowed-attribute:createTimestamp \
 --set allowed-attribute:creatorsName \
 --set allowed-attribute:entryDN \
 --set allowed-attribute:entryUUID \
 --set allowed-attribute:etag \
 --set allowed-attribute:governingStructureRule \
 --set allowed-attribute:hasSubordinates \
 --set allowed-attribute:isMemberOf \
 --set allowed-attribute:modifiersName \
 --set allowed-attribute:modifyTimestamp \
 --set allowed-attribute:numSubordinates \
 --set allowed-attribute:structuralObjectClass \
 --set allowed-attribute:subschemaSubentry \
 --set allowed-attribute-exception:authPassword \
 --set allowed-attribute-exception:userPassword \
 --set allowed-attribute-exception:debugSearchIndex \
 --set allowed-attribute-exception:@changeLogEntry \
 --set allowed-control:Assertion \
 --set allowed-control:AuthorizationIdentity \
 --set allowed-control:Csn \
 --set allowed-control:ManageDsaIt \
 --set allowed-control:MatchedValues \
 --set allowed-control:Noop \
 --set allowed-control:PasswordPolicy \
 --set allowed-control:PermissiveModify \
 --set allowed-control:PostRead \
 --set allowed-control:PreRead \
 --set allowed-control:ProxiedAuthV2 \
 --set allowed-control:RealAttributesOnly \
 --set allowed-control:ServerSideSort \
 --set allowed-control:SimplePagedResults \
 --set allowed-control:TransactionId \
 --set allowed-control:VirtualAttributesOnly \
 --set allowed-control:Vlv \
 --set allowed-extended-operation:GetSymmetricKey \
 --set allowed-extended-operation:PasswordModify \
 --set allowed-extended-operation:PasswordPolicyState \
 --set allowed-extended-operation:StartTls \
 --set allowed-extended-operation:WhoAmI \
 --trustAll \
 --no-prompt
$ dsconfig \
 create-global-access-control-policy \
 --hostname opendj.example.com \
 --port 4444 \
 --bindDN "cn=Directory Manager" \
 --bindPassword password \
 --policy-name "Anonymous extended operation access" \
 --set authentication-required:false \
 --set allowed-extended-operation:GetSymmetricKey \
 --set allowed-extended-operation:StartTls \
 --trustAll \
 --no-prompt
The following example creates a policy with a minimum security strength factor of 128,
effectively allowing only secure connections
for requests targeting data in dc=example,dc=com.
A security strength factor defines the key strength
for DIGEST-MD5, GSSAPI, SSL, and TLS:
$ dsconfig \
 create-global-access-control-policy \
 --hostname opendj.example.com \
 --port 4444 \
 --bindDN "cn=Directory Manager" \
 --bindPassword password \
 --policy-name "Require secure connections for example.com data" \
 --set request-target-dn-equal-to:"**,dc=example,dc=com" \
 --set request-target-dn-equal-to:dc=example,dc=com \
 --set connection-minimum-ssf:128 \
 --trustAll \
 --no-prompt
The following example updates policies that allow anonymous requests
so they are scoped to apply to clients in the example.com domain:
$ dsconfig \
 set-global-access-control-policy-prop \
 --hostname opendj.example.com \
 --port 4444 \
 --bindDN "cn=Directory Manager" \
 --bindPassword password \
 --policy-name "Anonymous extended operation access" \
 --set connection-client-address-equal-to:.example.com \
 --trustAll \
 --no-prompt
$ dsconfig \
 set-global-access-control-policy-prop \
 --hostname opendj.example.com \
 --port 4444 \
 --bindDN "cn=Directory Manager" \
 --bindPassword password \
 --policy-name "Root DSE access" \
 --set connection-client-address-equal-to:.example.com \
 --trustAll \
 --no-prompt
With the connection-client-address-not-equal-to property,
it is also possible to reject requests
from a particular host, domain, address, or address mask.
For additional details, see "Global Access Control Policy" in the Configuration Reference.
Misconfiguration can potentially put the DS server in a state where you must intervene, and where you need to prevent users and applications from accessing the directory until you are done fixing the problem.
DS servers provide a lockdown mode
that allows connections only on the loopback address,
and allows only operations requested by superusers,
such as cn=Directory Manager.
You can use lockdown mode to prevent all but administrative access
while you repair a server.
To put the DS server into lockdown mode, the server must be running. You cause the server to enter lockdown mode by using a task. Notice that the modify operation is performed over the loopback address (accessing the DS server on the local host):
$ cat enter-lockdown.ldif
dn: ds-task-id=Enter Lockdown Mode,cn=Scheduled Tasks,cn=tasks
objectClass: top
objectClass: ds-task
ds-task-id: Enter Lockdown Mode
ds-task-class-name: org.opends.server.tasks.EnterLockdownModeTask

$ ldapmodify \
 --hostname localhost \
 --port 1389 \
 --bindDN "cn=Directory Manager" \
 --bindPassword password \
 enter-lockdown.ldif
The DS server logs a notice message
in logs/errors when lockdown mode takes effect:
...msg=Lockdown task Enter Lockdown Mode finished execution
Client applications that request operations get a message concerning lockdown mode:
$ ldapsearch --port 1389 --baseDN "" --searchScope base "(objectclass=*)" +
The LDAP search request failed: 53 (Unwilling to Perform)
Additional Information:  Rejecting the requested operation because the server
is in lockdown mode and will only accept requests from root users over
loopback connections
You also leave lockdown mode by using a task:
$ cat leave-lockdown.ldif
dn: ds-task-id=Leave Lockdown Mode,cn=Scheduled Tasks,cn=tasks
objectClass: top
objectClass: ds-task
ds-task-id: Leave Lockdown Mode
ds-task-class-name: org.opends.server.tasks.LeaveLockdownModeTask

$ ldapmodify \
 --hostname localhost \
 --port 1389 \
 --bindDN "cn=Directory Manager" \
 --bindPassword password \
 leave-lockdown.ldif
The DS server logs a notice message when leaving lockdown mode:
...msg=Leave Lockdown task Leave Lockdown Mode finished execution
This chapter describes ways to secure sensitive data that is stored in files. In this chapter you will learn to:
Use data confidentiality to protect backend database files
Use appropriate file system permissions
In addition to the mechanisms described in this chapter, help prevent unauthorized access to keystore PIN codes, passwords used to authenticate to DS servers, and passwords in backend database files by handling them securely. For details, see "Use Appropriate Password Storage and Password Policies".
DS directory servers can encrypt directory data before storing it in a database backend on disk, keeping the data confidential until it is accessed by a directory client.
Data encryption is useful for at least the following cases:
- Ensuring Confidentiality and Integrity
Encrypted directory data is confidential, remaining private until decrypted with a proper key.
Encryption ensures data integrity at the moment it is accessed. The DS directory service cannot decrypt corrupted data.
- Protection on a Shared Infrastructure
When you deploy directory services on a shared infrastructure you relinquish full and sole control of directory data.
For example, if the DS directory server runs in the cloud, or in a data center with shared disks, the file system and disk management are not under your control.
Data confidentiality and encryption come with the following trade-offs:
- Equality Indexes Limited to Equality Matching
When an equality index is configured without confidentiality, the values can be maintained in sorted order. A non-confidential, cleartext equality index can therefore be used for searches that require ordering and searches that match an initial substring.
An example of a search that requires ordering is a search with a filter
"(cn<=App)". The filter matches entries withcommonNameup to those starting withApp(case-insensitive) in alphabetical order.An example of a search that matches an initial substring is a search with a filter
"(cn=A*)". The filter matches entries having acommonNamethat starts witha(case-insensitive).In an equality index with confidentiality enabled, the DS directory server no longer sorts cleartext values. As a result, you must accept that ordering and initial substring searches are unindexed.
- Performance Impact
Encryption and decryption requires more processing than handling cleartext values.
Encrypted values also take up more space than cleartext values.
- Replication Configuration Before Encryption
A directory server provides data confidentiality without requiring you to supply a key for encryption and decryption. It encrypts the data using a symmetric key stored under
cn=admin datain the admin-backend. The symmetric key is encrypted in turn with the server's public key also stored there. When multiple servers are configured to replicate data as described in "Managing Data Replication" in the Administration Guide, the servers replicate the keys as well, allowing any server replica to decrypt any other replica's encrypted data.The directory server generates a secret key the first time it must encrypt data. That key is then shared across the replication topology as described above, or until it is marked as compromised. (For details regarding compromised keys, see "Handling Compromised Keys" in the Administration Guide.)
When you configure replication, the source server overwrites
cn=admin datain the destination server. This data includes any secret keys stored there by the destination server.Therefore, if you configure data confidentiality before replication, the destination server's keys disappear when you configure replication. The destination server can no longer decrypt any of its data.
To prevent this problem, always configure replication before configuring data confidentiality.
As explained in "Protect DS Server Files", DS directory servers do not encrypt directory data by default. This means that any user with system access to read directory files can potentially access directory data in cleartext.
You can verify what a system user could see with read access to backend database files by using the backendstat dump-raw-db command. The backendstat subcommands list-raw-dbs and dump-raw-db help you list and view the low-level databases within a backend. Unlike the output of other subcommands, the output of the dump-raw-db subcommand is neither decrypted nor formatted for readability. Instead, you can see values as they are stored in the backend file.
In a backend database, the id2entry index holds
LDIF representations of directory entries.
For a database that is not encrypted,
the corresponding low-level database shows the cleartext strings,
as is evident in the following example:
$ stop-ds --quiet
$ backendstat list-raw-dbs --backendId userRoot
...
/dc=com,dc=example/id2entry...
...
$ backendstat \
 dump-raw-db \
 --backendId userRoot \
 --dbName /dc=com,dc=example/id2entry
...
Key (len 8):
 00 00 00 00 00 00 00 1E                          ........
 Value (len 437):
 02 00 81 B1 03 01 06 27 75 69 64 3D 62 6A 65 6E  .......'uid=bjen
 73 65 6E 2C 6F 75 3D 50 65 6F 70 6C 65 2C 64 63  sen,ou=People,dc
 3D 65 78 61 6D 70 6C 65 2C 64 63 3D 63 6F 6D 01  =example,dc=com.
 06 11 01 08 01 13 62 6A 65 6E 73 65 6E 40 65 78  ......bjensen@ex
 61 6D 70 6C 65 2E 63 6F 6D 01 09 01 04 30 32 30  ample.com....020
 39 01 16 01 0C 65 6E 2C 20 6B 6F 3B 71 3D 30 2E  9....en, ko;q=0.
 38 01 10 01 29 75 69 64 3D 74 72 69 67 64 65 6E  8...)uid=trigden
 2C 20 6F 75 3D 50 65 6F 70 6C 65 2C 20 64 63 3D  , ou=People, dc=
 65 78 61 6D 70 6C 65 2C 64 63 3D 63 6F 6D 01 04  example,dc=com..
 02 13 50 72 6F 64 75 63 74 20 44 65 76 65 6C 6F  ..Product Develo
 70 6D 65 6E 74 06 50 65 6F 70 6C 65 01 0B 01 07  pment.People....
 42 61 72 62 61 72 61 01 0C 01 0F 2B 31 20 34 30  Barbara....+1 40
 38 20 35 35 35 20 31 38 36 32 01 0D 01 06 4A 65  8 555 1862....Je
 6E 73 65 6E 01 07 02 0E 42 61 72 62 61 72 61 20  nsen....Barbara
 4A 65 6E 73 65 6E 0B 42 61 62 73 20 4A 65 6E 73  Jensen.Babs Jens
 65 6E 01 0E 01 0D 2F 68 6F 6D 65 2F 62 6A 65 6E  en..../home/bjen
 73 65 6E 01 0F 01 0F 2B 31 20 34 30 38 20 35 35  sen....+1 408 55
 35 20 31 39 39 32 01 11 01 04 31 30 30 30 01 12  5 1992....1000..
 01 2E 7B 53 53 48 41 7D 33 45 66 54 62 33 70 37  ..{SSHA}3EfTb3p7
 71 75 6F 75 73 4B 35 34 2B 41 4F 34 71 44 57 6C  quousK54+AO4qDWl
 56 33 4F 39 54 58 48 57 49 4A 49 32 4E 41 3D 3D  V3O9TXHWIJI2NA==
 01 13 01 04 31 30 37 36 01 05 01 14 4F 72 69 67  ....1076....Orig
 69 6E 61 6C 20 64 65 73 63 72 69 70 74 69 6F 6E  inal description
 01 14 01 07 62 6A 65 6E 73 65 6E 01 15 01 0D 53  ....bjensen....S
 61 6E 20 46 72 61 6E 63 69 73 63 6F 01 01 02 01  an Francisco....
 24 38 38 37 37 33 32 65 38 2D 33 64 62 32 2D 33  $887732e8-3db2-3
 31 62 62 2D 62 33 32 39 2D 32 30 63 64 36 66 63  1bb-b329-20cd6fc
 65 63 63 30 35                                   ecc05
...
To maintain data confidentiality on disk, you must configure it explicitly. In addition to preventing read access by other users as described in "Setting Up a System Account for a Server", you can configure confidentiality for database backends. When confidentiality is enabled for a backend, the directory server encrypts entries before storing them in the backend.
Important
Encrypting stored directory data does not prevent it from being sent over the network in the clear.
Apply the suggestions in "Securing Network Connections" to protect data sent over the network.
Enable backend confidentiality with the default encryption settings
as shown in the following example
that applies to the userRoot backend:
$ dsconfig \
 set-backend-prop \
 --hostname opendj.example.com \
 --port 4444 \
 --bindDN "cn=Directory Manager" \
 --bindPassword password \
 --backend-name userRoot \
 --set confidentiality-enabled:true \
 --no-prompt \
 --trustAll
After confidentiality is enabled, entries are encrypted when next written. That is, the DS directory server does not automatically rewrite all entries in encrypted form. Instead, it encrypts each entry on update, for example, when a user updates their entry or when you import data.
If you import the data again after enabling confidentiality,
you can see with the backendstat dump-raw-db command
that the low-level database for id2index
no longer contains cleartext:
$ stop-ds --quiet
$ import-ldif \
 --offline \
 --backendID userRoot \
 --includeBranch dc=example,dc=com \
 --ldifFile Example.ldif
$ backendstat \
 dump-raw-db \
 --backendId userRoot \
 --dbName /dc=com,dc=example/id2entry
...
Key (len 8):
 00 00 00 00 00 00 00 C2                          ........
 Value (len 437):
 02 02 81 82 01 C4 95 87 5B A5 2E 47 97 80 23 F4  ........[..G..#.
 CE 5D 93 25 97 D4 13 F9 0A A3 A8 31 9A D9 7A 70  .].%.......1..zp
 FE 3E AC 9D 64 41 EB 7B D5 7F 7E B8 B7 74 52 B8  .>..dA.{.^?~..tR.
 C7 7F C8 79 19 46 7D C5 5D 5B 83 9C 5B 9F 85 28  .^?.y.F}.][..[..(
 83 A2 5F A0 C1 B1 09 FC 2F E3 D8 82 4A AA 8B D9  .._...../...J...
 78 43 34 50 AE A1 52 88 5B 70 97 D2 E1 EA 87 CA  xC4P..R.[p......
 3B 4D 07 DC F9 F8 30 BB D2 76 51 C8 75 FF FA 80  ;M....0..vQ.u...
 77 E1 6A 8B 5B 8F DA A4 F4 0B B5 20 56 B3 19 19  w.j.[...... V...
 22 D8 9D 38 04 E3 4D 94 A7 99 4B 81 16 AD 88 46  "..8..M...K....F
 FC 3F 7E 78 66 B8 D1 E9 86 A0 F3 AC B6 68 0D A9  .?~xf........h..
 9A A7 3C 30 40 37 97 4E 90 DD 63 16 8E 11 0F 5E  ..<0@7.N..c....^
 9D 5B 86 90 AF 4E E2 1F 9E 70 73 14 0A 11 5C DB  .[...N...ps...\.
 B7 BC B8 A9 31 3F 74 8D 0A 9F F4 6C E1 B0 36 78  ....1?t....l..6x
 F0 5A 5E CD 7C B3 A2 36 66 8E 88 86 A0 8B 9A 77  .Z^.|..6f......w
 D5 CD 7E 9C 4E 62 20 0E D0 DB AD E7 7E 99 46 4F  ..~.Nb .....~.FO
 67 C7 A6 7E 2C 24 82 50 51 9F A7 B2 02 44 5B 30  g..~,$.PQ....D[0
 74 41 99 D9 83 69 EF AE 2E C0 FF C4 E6 4F F2 2F  tA...i.......O./
 95 FB 93 65 30 2A 2D 8D 20 88 83 B5 DE 35 B6 20  ...e0*-. ....5.
 47 17 30 25 60 FD E3 43 B9 D6 A4 F7 47 B6 6C 9F  G.0%`..C....G.l.
 47 FD 63 8E 7F A5 00 CE 6C 3E BC 95 23 69 ED D0  G.c.^?...l>..#i..
 69 4F BE 61 BD 30 C2 40 66 F6 F9 C3 3E C1 D7 8C  iO.a.0.@f...>...
 B0 C8 4A 2E 27 BE 13 6C 40 88 B0 13 A3 12 F4 50  ..J.'..l@......P
 CA 92 D8 EB 4A E5 3F E2 64 A3 76 C7 5C 2B D8 89  ....J.?.d.v.\+..
 A3 6E C1 F7 0A C2 37 7A BD AF 14 4B 52 04 6B F2  .n....7z...KR.k.
 8F 4F C3 F8 00 90 BA 0F EC 6D B1 2D A8 18 0C A6  .O.......m.-....
 29 96 82 3B 5C BC D0 F4 2B BE 9C C5 8B 18 7A DE  )..;\...+.....z.
 C7 B5 10 2D 45 50 4F 77 ED F7 23 34 95 AF C3 2E  ...-EPOw..#4....
 B0 9B FA E9 DF                                   .....
...
Similar checks can be run on other low-level databases if you enable confidentiality by backend indexes as described below.
The settings for data confidentiality depend on the encryption capabilities of the JVM. For example, for details about the Sun/Oracle Java implementation, see the explanations in javax.crypto.Cipher. You can accept the default settings, or choose to specify the following:
The cipher algorithm defining how the cleartext is encrypted and decrypted.
The cipher mode of operation defining how a block cipher algorithm should transform data larger than a single block.
The cipher padding defining how to pad the cleartext to reach appropriate size for the algorithm.
The cipher key length, where longer key lengths strengthen encryption at the cost of more performance impact.
The default settings for confidentiality are
cipher-transformation: AES/CBC/PKCS5Padding
and cipher-key-length: 128.
This means the algorithm is the Advanced Encryption Standard (AES),
the cipher mode is Cipher Block Chaining (CBC),
and the padding is PKCS#5 padding as described in
RFC 2898: PKCS #5: Password-Based Cryptography Specification.
The syntax for the cipher-transformation is
algorithm/mode/padding,
and all three must be specified.
When the algorithm does not require a mode, use NONE.
When the algorithm does not require padding, use NoPadding.
Use of larger cipher-key-length values can require
that you install JCE policy files such as those for unlimited strength,
as described in
"Using Unlimited Strength Cryptography".
DS servers encrypt data using a symmetric key that is stored with the server configuration. The symmetric key is encrypted in turn with the server's public key that is also stored with the server configuration. When multiple servers are configured to replicate data as described in "Configuring Replication Settings" in the Administration Guide, the servers replicate the keys as well, allowing any server replica to decrypt the data.
In addition to entry encryption,
you can enable confidentiality by backend index,
as long as confidentiality is enabled for the backend itself.
Confidentiality hashes keys for equality type indexes using SHA-1,
and encrypts the list of entries matching a substring key
for substring indexes.
The following example shows how to enable confidentiality
for the mail index:
$ dsconfig \
 set-backend-index-prop \
 --hostname opendj.example.com \
 --port 4444 \
 --bindDN "cn=Directory Manager" \
 --bindPassword password \
 --backend-name userRoot \
 --index-name mail \
 --set confidentiality-enabled:true \
 --no-prompt \
 --trustAll
After changing the index configuration, you can rebuild the index to enforce confidentiality immediately. For details, see "Configuring and Rebuilding Indexes" in the Administration Guide.
Avoid using sensitive attributes in VLV indexes. Confidentiality cannot be enabled for VLV indexes.
When reading files for an encrypted backend database, be aware that although user data is kept confidential, the following are not encrypted on disk:
As described above, the server encrypts backend database content the next time it is written.
If you configure data confidentiality after initial import, and you must make sure that all relevant data are encrypted, export the data to LDIF and then import the data again. For details, see "Managing Directory Data" in the Administration Guide.
With the exception of the items identified below, backend database file content is encrypted. Yet, the files themselves are not encrypted.
The
dn2idindex and its keys are not encrypted.Substring index keys are not encrypted.
As described above, the values are encrypted, however.
Encrypting and decrypting data comes with costs
in terms of cryptographic processing that reduces throughput
and of extra space for larger encrypted values.
In general, tests with default settings show
that the cost of enabling confidentiality can be quite modest,
but your results can vary based on your systems and on the settings used for
cipher-transformation
and cipher-key-length.
Make sure you test your deployment to qualify the impact of confidentiality
before enabling it in production.
Appropriate file permissions grant access to authorized users and deny access by unauthorized users. For example, all users on the system might have access to run the ldapsearch command, but only a few users should be able to read the log files, and only the user running the DS server should be able to read a file containing a keystore PIN code.
When installing and setting up DS servers, you should use system accounts specific to the server, as described in "Setting Up a System Account for a Server". Having a specific account makes it possible to set appropriate file permissions.
Many DS server file permissions depend on the software distribution, and not the UNIX file mode creation mask. For example, the server commands are generally executable by all users, and the PIN code files are read-write only for the server user. You can affect the file permissions for several types of server files. "File Permission Settings" indicates the impact of recommended permissions settings on these files.
| Setting | Impact |
|---|---|
umask of |
The UNIX umask setting defines the permissions applied when creating a file or a directory. See your system documentation for instructions on changing this setting.
A setting of Members of the server user's group can still read the files. This setting can be useful when other processes read these files to process them independently. For example, other processes might copy backup files to a remote system, or parse the logs to look for particular patterns. |
umask of |
On UNIX systems,
a setting of This setting can be useful when no other processes need access to those files. Other users can still run commands delivered with the server. |
|
This setting applies to DS-native file-based log publishers on UNIX systems. It does not apply to Common Audit file-based log publishers. Its value is a UNIX mode string. The impact of the setting is independent of the server user's umask setting.
The default for file-based log publishers is
To prevent other members of the group from reading the logs
produced by a publisher, set the property to |
Windows NTFS ACLs |
On Windows systems, set folder ACLs on the NTFS volume where the server files are installed. Apply suitably restrictive permissions to folders such that they are inherited by all old and new files. Consider setting ACLs on at least the following folders:
|
In many cases, you can influence or even control how client applications are configured to improve security. This chapter provides suggestions for such cases. In this chapter you will learn to:
Handle input securely
Use secure connections
Authenticate appropriately
Use OAuth 2.0 authorization where appropriate
Use proxied authorization where appropriate
Apply client-side resource limits
For general best practices for LDAP client applications, see "Best Practices For Application Developers" in the Developer's Guide.
When taking input directly from a user or another program, handle the input securely by using appropriate methods to sanitize the data.
When writing command-line or HTTP clients, make sure you sanitize the input.
Failure to sanitize the input data can leave your application vulnerable to injection attacks.
Use secure connections except when reading public information anonymously. Always use secure connections when sending credentials for authentication, and when reading or writing any data that is not public.
For LDAP applications, either connect to the directory server's LDAPS port, or if possible, begin each session with the StartTLS extended operation on the (cleartext) LDAP port.
For HTTP clients, use HTTPS.
Unless your application only reads public information, authenticate to the directory server.
Use an account that is specific to your application when authenticating. This helps avoid risks involved in sharing credentials between accounts. Furthermore, it makes debugging easier by associating traces of your application's actions with its specific account.
LDAP applications can avoid username/password credentials by authenticating using digital certificates as described in "Authenticating Client Applications With a Certificate".
DS servers support OAuth 2.0 for HTTP authorization, where the directory acts as an OAuth 2.0 resource server as described in "To Set Up HTTP Authorization" in the Administration Guide.
An OAuth 2.0 client application gets authorization from the resource owner, such as the user, device, or thing whose account it needs to access, and presents the OAuth 2.0 bearer access token to get access to the account. This allows the HTTP application to access directory data through REST calls without having to have its own account.
Access tokens give the bearer access, regardless of the bearer's identity. Send access tokens only over secure HTTPS connections to prevent eavesdroppers from stealing the token.
DS servers support the use of proxied authorization as described in "Configuring Proxied Authorization" in the Developer's Guide. With proxied authorization, an LDAP application binds to the directory using its own account, and sends requests on behalf of applications users by attaching the user authorization ID in a request control.
When the user is already safely authenticated by other means, proxied authorization makes it easy to reuse a connection that is dedicated and bound to the application.
LDAP client applications can set time limits and size limits on search requests to avoid overuse of server resources. Setting limits is appropriate when the searches your application performs are not fixed, but instead partially or fully determined by user input.
The Directory Services ldapsearch command has
--sizeLimit and --timeLimit options.
This chapter covers monitoring capabilities. In this chapter you will learn to:
Access monitoring information remotely using HTTP, LDAP, SNMP, or JMX.
Monitor server status, including task status.
Configure logs and interpret the messages they contain.
Configure email settings for administrative alert notifications.
Watching for security issues is only one of the reasons to monitor your directory service. Other reasons to monitor the directory service include:
Noticing availability problems as they occur.
If a server becomes unresponsive, goes offline, or crashes, you can discover the problem quickly, and take corrective action.
Identifying how client applications use the directory service.
You can parse directory access logs to determine what client applications do. This information helps you understand what is most important, and make decisions about indexing, for example.
Access log messages can also provide evidence of security threats, and traces of insecure client application behavior.
Spotting performance problems, where the directory service does not meet habitual, expected, or formally defined functional, throughput, or response time characteristics.
For example, if it suddenly becomes impossible to perform updates, the directory service has a performance problem. Alternatively, if a search that regularly completes in 500 milliseconds now takes 15 seconds, the directory service has a performance problem.
A performance problem could also be evidence of a security threat.
Monitoring directory security is thus part of an overall monitoring strategy. Aim to answer at least the following questions when monitoring specifically for security problems:
What insecure client behaviors do you observe?
Examples:
Attempts to send simple bind credentials over cleartext connections
Attempts to change passwords over cleartext connections
Attempts to change configuration over cleartext connections
What unusual or unexpected usage patterns do you observe?
Examples:
Search requests that perform unindexed searches
Requests that hit resource limits
Unusually large numbers of bind requests that fail
Unusual large numbers of password change requests that fail
Unusual large numbers of account lockout events
Are you observing any sudden or hard-to-explain performance problems?
Examples:
Unusual increases in throughput
Unusual increases in response times for typical requests
Servers suddenly starved for system resources
Keep in mind when you see evidence of what looks like a security problem that it might be explained by a mistake made by an administrator or an application developer. Whether the problem is due to malice or user error, you can nevertheless use monitoring information to guide corrective actions.
DS servers publish monitoring information over LDAP under the entry cn=monitor.
The LDAP Schema Reference describes attributes and object classes used.
Many different types of information are exposed. For details, see "Monitoring Metrics" in the Reference.
The following example assigns the required privilege to Kirsten Vaughan's entry to read monitoring data,
and shows monitoring information for the userRoot backend holding Example.com data:
$ cat monitor-read.ldif
dn: uid=kvaughan,ou=People,dc=example,dc=com
changetype: modify
add: ds-privilege-name
ds-privilege-name: monitor-read

$ ldapmodify \
 --port 1389 \
 --bindDN "cn=Directory Manager" \
 --bindPassword password \
 monitor-read.ldif
$ ldapsearch \
 --port 1389 \
 --bindDN uid=kvaughan,ou=People,dc=example,dc=com \
 --bindPassword bribery \
 --baseDN cn=monitor \
 "(cn=userRoot backend)"
dn: cn=userRoot backend,cn=Disk Space Monitor,cn=monitor
objectClass: top
objectClass: ds-monitor-entry
objectClass: extensibleObject
disk-dir: /path/to/opendj/db/userRoot
disk-free: <bytes>
disk-state: normal
cn: userRoot backend

dn: cn=userRoot Backend,cn=monitor
objectClass: top
objectClass: ds-monitor-entry
objectClass: ds-backend-monitor-entry
ds-backend-id: userRoot
ds-backend-base-dn: dc=example,dc=com
ds-backend-is-private: false
ds-backend-entry-count: <count>
ds-base-dn-entry-count: <count> dc=example,dc=com
ds-backend-writability-mode: enabled
cn: userRoot Backend
Notice that users must have the monitor-read privilege to read monitoring data.
As an alternative, you can add a monitoring account when setting up the server. For an example, see "To Set Up a Directory Server" in the Installation Guide.
The following example uses the default monitor user account to check the delay in replication:
$ ldapsearch \
 --port 1389 \
 --bindDN uid=monitor \
 --bindPassword password \
 --baseDN cn=monitor \
 "(ds-mon-current-delay=*)" \
 ds-mon-current-delay
dn: ds-mon-domain-name=cn=admin data,cn=replicas,cn=replication,cn=monitor
ds-mon-current-delay: <delay>

dn: ds-mon-domain-name=cn=schema,cn=replicas,cn=replication,cn=monitor
ds-mon-current-delay: <delay>

dn: ds-mon-domain-name=dc=example\,dc=com,cn=replicas,cn=replication,cn=monitor
ds-mon-current-delay: <delay>

dn: ds-mon-server-id=<id>,cn=remote replicas,ds-mon-domain-name=dc=example\,dc=com,cn=replicas,cn=replication,cn=monitor
ds-mon-current-delay: <delay>
The delay reflects the time between the latest update that the replica has received and the latest update that the replica has replayed. This metric is accurate only when the replica receives updates quickly. In the event of a network partition, the delay cannot accurately reflect updates happening on the other side of the partition.
DS servers support SNMP, including the Management Information Base described in RFC 2605: Directory Server Monitoring MIB.
SNMP is not enabled by default.
SNMP-based monitoring depends on an OpenDMK library.
The OpenDMK binary bundle containing this library
ships with DS servers as snmp/opendmk.jar.
Installation requires that you accept the OpenDMK Binary License,
and so OpenDMK installation is a separate step that you must perform
before you can use SNMP.
To run the OpenDMK installer and accept the license, use the self-extracting .jar:
$ java -jar /path/to/opendj/snmp/opendmk.jar
Install OpenDMK, and then copy the libraries to the /path/to/opendj/extlib directory.
For example, if you install OpenDMK in the /path/to directory,
copy the libraries from the /path/to/OpenDMK-bin/lib directory:
$ cp /path/to/OpenDMK-bin/lib/* /path/to/opendj/extlib/
After installing OpenDMK, set up an SNMP connection handler:
$ dsconfig \
 set-connection-handler-prop \
 --hostname opendj.example.com \
 --port 4444 \
 --bindDN "cn=Directory Manager" \
 --bindPassword password \
 --handler-name SNMP \
 --set enabled:true \
 --trustAll \
 --no-prompt
By default, the SNMP connection handler listens on port 161 and uses port 162 for traps. On UNIX and Linux systems, only root can normally open these ports. To install as a normal user, change the listen and trap ports:
$ dsconfig \
 set-connection-handler-prop \
 --hostname opendj.example.com \
 --port 4444 \
 --bindDN "cn=Directory Manager" \
 --bindPassword password \
 --handler-name SNMP \
 --set listen-port:11161 \
 --set trap-port:11162 \
 --trustAll \
 --no-prompt
Restart the SNMP connection handler to take the changes into account:
$ dsconfig \
 set-connection-handler-prop \
 --hostname opendj.example.com \
 --port 4444 \
 --bindDN "cn=Directory Manager" \
 --bindPassword password \
 --handler-name SNMP \
 --set enabled:false \
 --trustAll \
 --no-prompt

$ dsconfig \
 set-connection-handler-prop \
 --hostname opendj.example.com \
 --port 4444 \
 --bindDN "cn=Directory Manager" \
 --bindPassword password \
 --handler-name SNMP \
 --set enabled:true \
 --trustAll \
 --no-prompt
To check that connection handler works as expected, use a command such as snmpwalk to read the response on the SNMP listen port:
$ snmpwalk -v 2c -c OpenDJ@OpenDJ localhost:11161
iso.3.6.1.2.1.66.1.1.1.1 = STRING: "ForgeRock Directory Services version"
iso.3.6.1.2.1.66.1.1.2.1 = STRING: "/path/to/opendj"
...
DS servers support JMX-based monitoring. A number of tools support JMX, including the jconsole and jvisualvm commands bundled with the Sun/Oracle Java platform. JMX is not configured by default. Use the dsconfig command to configure the JMX connection handler:
Interface stability: Evolving (See "ForgeRock Product Interface Stability" in the Release Notes)
$ dsconfig \
 create-connection-handler \
 --hostname opendj.example.com \
 --port 4444 \
 --bindDN "cn=Directory Manager" \
 --bindPassword password \
 --handler-name JMX \
 --type jmx \
 --set enabled:true \
 --set listen-port:1689 \
 --trustAll \
 --no-prompt
By default, no users have privileges to access the JMX connection. The following commands add JMX privileges for Directory Manager:
$ cat jmx-privileges.ldif
dn: cn=Directory Manager
changetype: modify
add: ds-privilege-name
ds-privilege-name: jmx-notify
ds-privilege-name: jmx-read
ds-privilege-name: jmx-write

$ ldapmodify \
 --port 1389 \
 --bindDN "cn=Directory Manager" \
 --bindPassword password \
 jmx-privileges.ldif
Also configure security to login remotely. See the section on Using SSL in Monitoring and Management Using JMX for hints.
Alternatively, connect to a local server process using the process ID:
$ jvisualvm --openpid $(</path/to/opendj/logs/server.pid)
DS servers have commands for monitoring server processes and tasks. The status command, described in status(1) in the Reference, displays basic information about the local server. The manage-tasks command, described in manage-tasks(1) in the Reference, lets you manage tasks scheduled on a server, such as nightly backup.
The status command takes administrative credentials to read the configuration:
$ status \
 --bindDN "cn=Directory Manager" \
 --bindPassword password \
 --script-friendly \
 --trustAll
Server Run Status: Started
Open Connections: 1
Host Name: opendj.example.com
Administrative Users: cn=Directory Manager
Installation Path: /path/to/opendj
Version: OpenDJ Server 6.0.0
Java Version: <version>
Administration Connector: Port 4444 (LDAPS)
-
Address:Port: --
Protocol: LDIF
State: Disabled
-
Address:Port: 0.0.0.0:161
Protocol: SNMP
State: Disabled
-
Address:Port: 0.0.0.0:8080
Protocol: HTTP
State: Disabled
-
Address:Port: 0.0.0.0:1389
Protocol: LDAP
State: Enabled
-
Address:Port: 0.0.0.0:1636
Protocol: LDAPS
State: Enabled
-
Address:Port: 0.0.0.0:1689
Protocol: JMX
State: Enabled
-
Base DN:     dc=example,dc=com
Backend ID:  userRoot
Entries:     <count>
Replication:
The manage-tasks command connects to the administration port, and so can connect to both local and remote servers:
$ manage-tasks \
 --hostname opendj.example.com \
 --port 4444 \
 --bindDN "cn=Directory Manager" \
 --bindPassword password \
 --trustAll \
 --no-prompt
The Graphite application stores numeric time-series data of the sort produced by monitoring metrics, and allows you to render graphs of that data.
Your applications, in this case DS servers, push data into Graphite.
You do this by configuring the
"Graphite Monitor Reporter Plugin"
with the host and port number of the Graphite service,
and with a prefix for your server, such as its FQDN.
By default, the plugin pushes all metrics it produces to the Graphite service.
You can opt to limit this by setting
the excluded-metric-pattern or included-metric-pattern properties.
The following example configures the plugin to push metrics to Graphite at
graphite.example.com:2004 every 10 seconds (default):
$ dsconfig \ create-plugin \ --hostname opendj.example.com \ --port 4444 \ --bindDN "cn=Directory Manager" \ --bindPassword password \ --plugin-name Graphite \ --type graphite-monitor-reporter \ --set enabled:true \ --set graphite-server:graphite.example.com:2004 \ --set metric-name-prefix:opendj.example.com \ --trustAll \ --no-prompt
To view metrics stored in Graphite, you can use the Graphite render API or Grafana, for example. See the Graphite and Grafana documentation for details.
By default, the server stores the following files
under the logs/ directory:
Access logs for messages about clients accessing the server.
One form of access log is a directory audit log. An audit log records changes to directory data in LDIF.
Debug logs for messages tracing internal server events.
Error logs for messages tracing server events.
Replication logs for messages used to help repair problems in data replication.
A
server.outlog for messages about server events since startup.Messages in this file have the same format as error log messages.
A
server.pidprocess ID file when the server is running.
Logs are handled by log publishers. Log publishers determine which messages to publish, where to publish them, and what output format to use.
The server's logging system supports extensibility through the ForgeRock Common Audit event framework. (Common Audit deals with any event you can audit, not only the directory data changes recorded in a directory audit log.) The ForgeRock Common Audit event framework provides log handlers for publishing to local files or to remote systems, as described in "Common ForgeRock Access Logs".
You configure logging using the dsconfig command. In addition to configuring how messages are published, you can configure policies for log file rotation and retention.
An access log traces client requests that the server processes. Each message includes a datestamp, information about the connection, and information about the operation processed.
Tip
It is possible to configure multiple access logs at the same time. This makes it possible to have a primary unfiltered access logger to record information about all client requests, and also additional filtered access logs as described below in "Access Log Filtering".
Do not enable multiple unfiltered access loggers, however.
An unfiltered access logger can put significant write load on the disk subsystem where access logs are stored. Every client request results in at least one new log message.
By default, the JSON file-based access logger is enabled. For details about this log publisher, see "Configuring JSON Access Logs".
DS servers support the ForgeRock Common Audit event framework, and uses the JSON file handler as the default logger. The log message formats are compatible for all products using the framework. The framework uses transaction IDs to correlate requests as they traverse the platform. This makes it easier to monitor activity and to enrich reports.
Interface stability: Evolving
The ForgeRock Common Audit event framework is built on audit event handlers. Audit event handlers can encapsulate their own configurations. Audit event handlers are the same in each product in the ForgeRock platform. You can plug in custom handlers that comply with the framework without having to upgrade the server.
Note
The ForgeRock Common Audit event framework includes handlers for logging audit event messages to local files and facilities, as well as to remote systems.
Although the ForgeRock Common Audit event framework supports multiple topics,
DS software currently supports handling only access events.
DS software divides access events into
ldap-access events and http-access events.
Common Audit transaction IDs are not recorded by default. In order to record transaction IDs in the access logs, you must configure the DS server to trust them as described in the sections below.
Common Audit LDAP events have the following format:
{
"eventName": "DJ-LDAP",
"client": {
"ip": string, // Client IP address
"port": number // Client port number
},
"server": {
"ip": string, // Server IP address
"port": number // Server port number
},
"request": { // LDAP request
"attrs": [ string ], // Requested attributes
"authType": string, // Bind type such as "SIMPLE"
"connId": number, // Connection ID
"controls": string, // Request controls
"deleteOldRDN": boolean, // For a modify DN request
"dn": string, // Bind DN
"filter": string, // Search filter
"idToAbandon": number, // ID to use to abandon operation
"message": string, // Localized request message
"msgId": number, // Message ID
"name": string, // Operation name
"newRDN": string, // For a modify DN request
"newSup": string, // For a modify DN request
"oid": string, // Operation name or OID
"operation": string, // Examples: "CONNECT", "BIND", "SEARCH"
"opType": "sync", // Replication operation
"protocol": "LDAP",
"runAs": string, // Authorization ID
"scope": string, // Search scope such as "sub"
"version": string // Version "2", "3"
},
"response": {
"additionalItems": string // Additional information
"controls": string, // Response controls
"elapsedTime": number, // Number of time units
"elapsedTimeUnits": string, // Time unit such as "MILLISECONDS"
"failureReason": string, // Human-readable information
"maskedMessage": string, // Real, masked result message
"maskedResult": string, // Real, masked result code
"nentries": number, // Number of entries returned
"reason": string, // Reason for disconnect
"status": string, // "SUCCESSFUL", "FAILED"
"statusCode": string // For example, "0" for success
},
"timestamp": string, // UTC date
"transactionId": string, // Unique ID for the transaction
"userId": string, // User who requested the operation
"_id": string // Unique ID for the operation
}
Common Audit HTTP events have the following format:
{
"eventName": "DJ-HTTP",
"client": {
"ip": string, // Client IP address
"port": number // Client port number
},
"server": {
"ip": string, // Server IP address
"port": number // Server port number
},
"http": { // HTTP request and response
"request": {
"secure": boolean, // HTTP: false; HTTPS: true
"method": string, // Examples: "GET", "POST", "PUT"
"path": string, // URL
"queryParameters": map, // map: { key-string: [ value-string ] }
"cookies": map // map: { key-string: [ value-string ] }
},
"response": {
"headers": map // map: { key-string: [ value-string ] }
}
},
"response": {
"detail": string, // Human-readable information
"elapsedTime": number, // Number of time units
"elapsedTimeUnits": string, // Time unit such as "MILLISECONDS"
"status": string, // "SUCCESSFUL", "FAILED"
"statusCode": string // For example, "0" for success
},
"timestamp": string, // UTC date
"transactionId": string, // Unique ID for the transaction
"trackingIds": [ string ], // Unique IDs from the transaction context
"userId": string, // User who requested the operation
"_id": string // Unique ID for the operation
}
A JSON handler sends messages to a JSON format file.
This section includes the following procedures:
The default JSON-based LDAP access log file is
logs/ldap-access.audit.json.
Follow these steps to change the configuration:
Decide whether to trust transaction IDs sent by client applications, used to correlate requests as they traverse multiple servers.
Client applications using the ForgeRock Common Audit event framework send transaction IDs with their requests. The transaction IDs are used to correlate audit events for monitoring and reporting that trace the request through multiple applications.
Transaction IDs are sent over LDAP using an internal DS request control. They are sent over HTTP in an HTTP header.
By default, DS servers are configured not to trust transaction IDs sent with client application requests.
If you configure the server or gateway to trust transaction IDs in client application requests, then outgoing requests reuse the incoming transaction ID. For each outgoing request in the transaction, the request's transaction ID has the form
original-transaction-id/sequence-number, where sequence-number reflects the position of the request in the series of requests for this transaction. For example, if the original-transaction-id isabc123, the first outgoing request has transaction IDabc123/0, the secondabc123/1, the thirdabc123/2, and so on. This helps you to distinguish specific requests within a transaction when correlating audit events from multiple services.To trust transactions, set the advanced global server property,
trust-transaction-ids, totrue:$ dsconfig \ set-global-configuration-prop \ --advanced \ --hostname opendj.example.com \ --port 4444 \ --bindDN "cn=Directory Manager" \ --bindPassword password \ --set trust-transaction-ids:true \ --trustAll \ --no-prompt
(Optional) Edit the default access log publisher if necessary.
The following example applies the default settings:
$ dsconfig \ set-log-publisher-prop \ --hostname opendj.example.com \ --port 4444 \ --bindDN "cn=Directory Manager" \ --bindPassword password \ --publisher-name "Json File-Based Access Logger" \ --set enabled:true \ --add "rotation-policy:24 Hours Time Limit Rotation Policy" \ --add "rotation-policy:Size Limit Rotation Policy" \ --set "retention-policy:File Count Retention Policy" \ --trustAll \ --no-prompt
When setting the JSON file LDAP access log publisher properties, you can set the log directory, but you cannot change the log file name, which contains
ldap-access.
When you enable the HTTP connection handler as described in "To Set Up REST Access to User Data" in the Administration Guide, also consider enabling JSON-based HTTP access logs.
The default JSON-based HTTP access log file is
logs/http-access.audit.json:
Decide whether to trust transaction IDs sent by client applications, used to correlate requests as they traverse multiple servers.
Client applications using the ForgeRock Common Audit event framework send transaction IDs with their requests. The transaction IDs are used to correlate audit events for monitoring and reporting that trace the request through multiple applications.
Transaction IDs are sent over LDAP using an internal DS request control. They are sent over HTTP in an HTTP header.
By default, DS servers are configured not to trust transaction IDs sent with client application requests.
If you configure the server or gateway to trust transaction IDs in client application requests, then outgoing requests reuse the incoming transaction ID. For each outgoing request in the transaction, the request's transaction ID has the form
original-transaction-id/sequence-number, where sequence-number reflects the position of the request in the series of requests for this transaction. For example, if the original-transaction-id isabc123, the first outgoing request has transaction IDabc123/0, the secondabc123/1, the thirdabc123/2, and so on. This helps you to distinguish specific requests within a transaction when correlating audit events from multiple services.To trust transactions, set the advanced global server property,
trust-transaction-ids, totrue:$ dsconfig \ set-global-configuration-prop \ --advanced \ --hostname opendj.example.com \ --port 4444 \ --bindDN "cn=Directory Manager" \ --bindPassword password \ --set trust-transaction-ids:true \ --trustAll \ --no-prompt
Enable the log publisher:
$ dsconfig \ set-log-publisher-prop \ --hostname opendj.example.com \ --port 4444 \ --bindDN "cn=Directory Manager" \ --bindPassword password \ --publisher-name "Json File-Based HTTP Access Logger" \ --set enabled:true \ --trustAll \ --no-prompt
When setting the JSON file HTTP access log publisher properties, you can set the log directory, but you cannot change the log file name, which contains
http-access.
A CSV handler sends messages to a comma-separated variable (CSV) file.
This section includes the following procedures:
The default CSV LDAP access log file is
logs/ldap-access.csv:
Decide whether to trust transaction IDs sent by client applications, used to correlate requests as they traverse multiple servers.
Client applications using the ForgeRock Common Audit event framework send transaction IDs with their requests. The transaction IDs are used to correlate audit events for monitoring and reporting that trace the request through multiple applications.
Transaction IDs are sent over LDAP using an internal DS request control. They are sent over HTTP in an HTTP header.
By default, DS servers are configured not to trust transaction IDs sent with client application requests.
If you configure the server or gateway to trust transaction IDs in client application requests, then outgoing requests reuse the incoming transaction ID. For each outgoing request in the transaction, the request's transaction ID has the form
original-transaction-id/sequence-number, where sequence-number reflects the position of the request in the series of requests for this transaction. For example, if the original-transaction-id isabc123, the first outgoing request has transaction IDabc123/0, the secondabc123/1, the thirdabc123/2, and so on. This helps you to distinguish specific requests within a transaction when correlating audit events from multiple services.To trust transactions, set the advanced global server property,
trust-transaction-ids, totrue:$ dsconfig \ set-global-configuration-prop \ --advanced \ --hostname opendj.example.com \ --port 4444 \ --bindDN "cn=Directory Manager" \ --bindPassword password \ --set trust-transaction-ids:true \ --trustAll \ --no-prompt
Create an enabled CSV file access logger with optional rotation and retention policies as in the following example:
$ dsconfig \ create-log-publisher \ --hostname opendj.example.com \ --port 4444 \ --bindDN "cn=Directory Manager" \ --bindPassword password \ --publisher-name "Common Audit Csv File Access Logger" \ --type csv-file-access \ --set enabled:true \ --set "rotation-policy:24 Hours Time Limit Rotation Policy" \ --set "rotation-policy:Size Limit Rotation Policy" \ --set "retention-policy:File Count Retention Policy" \ --trustAll \ --no-prompt
When setting the CSV file access log publisher properties, you can set the log directory, but you cannot change the log file name, which contains
ldap-access.(Optional) If you require tamper-evident logs, prepare a keystore as described in "To Prepare a Keystore for Tamper-Evident Logs". Then enable tamper-evident capability as in the following example:
$ dsconfig \ set-log-publisher-prop \ --hostname opendj.example.com \ --port 4444 \ --bindDN "cn=Directory Manager" \ --bindPassword password \ --publisher-name "Common Audit Csv File Access Logger" \ --set tamper-evident:true \ --set key-store-file:config/audit-keystore \ --set key-store-pin:"&{file:config/audit-keystore.pin}" \ --trustAll \ --no-promptTamper-evident logging relies on digital signatures and regularly flushing messages to the log system. In high-volume directory deployments with heavy access patterns, signing log messages has a severe negative impact on server performance, reducing throughput by orders of magnitude.
Be certain to test the performance impact of tamper-evident logging with realistic access patterns for your deployment before enabling the feature in production.
If you have enabled the HTTP connection handler as described in "To Set Up REST Access to User Data" in the Administration Guide, you might want to enable CSV-format HTTP access logs.
The default CSV HTTP access log file is
logs/http-access.csv:
Decide whether to trust transaction IDs sent by client applications, used to correlate requests as they traverse multiple servers.
Client applications using the ForgeRock Common Audit event framework send transaction IDs with their requests. The transaction IDs are used to correlate audit events for monitoring and reporting that trace the request through multiple applications.
Transaction IDs are sent over LDAP using an internal DS request control. They are sent over HTTP in an HTTP header.
By default, DS servers are configured not to trust transaction IDs sent with client application requests.
If you configure the server or gateway to trust transaction IDs in client application requests, then outgoing requests reuse the incoming transaction ID. For each outgoing request in the transaction, the request's transaction ID has the form
original-transaction-id/sequence-number, where sequence-number reflects the position of the request in the series of requests for this transaction. For example, if the original-transaction-id isabc123, the first outgoing request has transaction IDabc123/0, the secondabc123/1, the thirdabc123/2, and so on. This helps you to distinguish specific requests within a transaction when correlating audit events from multiple services.To trust transactions, set the advanced global server property,
trust-transaction-ids, totrue:$ dsconfig \ set-global-configuration-prop \ --advanced \ --hostname opendj.example.com \ --port 4444 \ --bindDN "cn=Directory Manager" \ --bindPassword password \ --set trust-transaction-ids:true \ --trustAll \ --no-prompt
Create an enabled CSV file HTTP access logger with optional rotation and retention policies as in the following example:
$ dsconfig \ create-log-publisher \ --hostname opendj.example.com \ --port 4444 \ --bindDN "cn=Directory Manager" \ --bindPassword password \ --publisher-name "Common Audit Csv File HTTP Access Logger" \ --type csv-file-http-access \ --set enabled:true \ --set "rotation-policy:24 Hours Time Limit Rotation Policy" \ --set "rotation-policy:Size Limit Rotation Policy" \ --set "retention-policy:File Count Retention Policy" \ --trustAll \ --no-prompt
When setting the CSV file HTTP access log publisher properties, you can set the log directory, but you cannot change the log file name, which contains
http-access.(Optional) If you require tamper-evident logs, prepare a keystore as described in "To Prepare a Keystore for Tamper-Evident Logs". Then enable tamper-evident capability as in the following example:
$ dsconfig \ set-log-publisher-prop \ --hostname opendj.example.com \ --port 4444 \ --bindDN "cn=Directory Manager" \ --bindPassword password \ --publisher-name "Common Audit Csv File HTTP Access Logger" \ --set tamper-evident:true \ --set key-store-file:config/audit-keystore \ --set key-store-pin:"&{file:config/audit-keystore.pin}" \ --trustAll \ --no-promptTamper-evident logging relies on digital signatures and regularly flushing messages to the log system. In high-volume directory deployments with heavy access patterns, signing log messages has a severe negative impact on server performance, reducing throughput by orders of magnitude.
Be certain to test the performance impact of tamper-evident logging with realistic access patterns for your deployment before enabling the feature in production.
An Elasticsearch audit event handler sends messages to an Elasticsearch server.
Before you enable the Elasticsearch handler,
create a mapping in the Elasticsearch server index for the messages.
For a sample index definition, see
/path/to/opendj/config/audit-handlers/elasticsearch-index-setup-example.json.
To enable the Elasticsearch handler, see "To Enable an Access Logger With an External Configuration". The JSON configuration file for the Elasticsearch handler has the following format:
{
"class": "org.forgerock.audit.handlers.elasticsearch.ElasticsearchAuditEventHandler",
"config": {
"name": string, // Handler name, such as "elasticsearch".
"topics": [ string, ...], // LDAP: "ldap-access"; HTTP: "http-access".
"enabled": boolean, // Is the handler enabled?
"connection": { // (Optional) Connect using default settings.
"host": string, // Elasticsearch host. Default: localhost.
"port": number, // Elasticsearch host. Default: 9200.
"useSSL": boolean, // Connect to Elasticsearch over HTTPS? Default: false.
"username": string, // (Optional) User name for HTTP Basic auth.
"password": string // (Optional) Password for HTTP Basic auth.
},
"indexMapping": { // (Optional) No mapping specified.
"indexName": string // Name of the Elasticsearch index.
},
"buffering": { // (Optional) Default: write each message separately, no buffering.
"enabled": boolean, // Buffer messages to be sent? Default: false.
"maxSize": number, // Maximum number of buffered events.
"writeInterval": duration, // Interval between sending batch of events.
"maxBatchedEvents": number // Number of events to send per interval.
}
}
}
For a sample configuration, see
/path/to/opendj/config/audit-handlers/elasticsearch-config.json-example.
The writeInterval takes a duration.
A duration is a lapse of time expressed in English,
such as 23 hours 59 minutes and 59 seconds.
Durations are not case sensitive.
Negative durations are not supported.
The following units can be used in durations:
indefinite,infinity,undefined,unlimited: unlimited durationzero,disabled: zero-length durationdays,day,d: dayshours,hour,h: hoursminutes,minute,min,m: minutesseconds,second,sec,s: secondsmilliseconds,millisecond,millisec,millis,milli,ms: millisecondsmicroseconds,microsecond,microsec,micros,micro,us: microsecondsnanoseconds,nanosecond,nanosec,nanos,nano,ns: nanoseconds
This example demonstrates logging HTTP access messages to a local Elasticsearch server.
To prepare the example, complete these steps:
Install and run an Elasticsearch server on
localhost:9200.Create an
auditindex in the Elasticsearch server for HTTP audit event messages.The following command uses the example index configuration file:
$ curl \ --request POST \ --header "Content-Type: application/json" \ --data @/path/to/opendj/config/audit-handlers/elasticsearch-index-setup-example.json \ http://localhost:9200/audit {"acknowledged":true}Configure DS servers to enable HTTP access as described in "To Set Up REST Access to User Data" in the Administration Guide.
Add a JSON configuration file under for the handler:
$ cat /path/to/opendj/config/audit-handlers/elasticsearch-handler.json { "class": "org.forgerock.audit.handlers.elasticsearch.ElasticsearchAuditEventHandler", "config": { "name": "elasticsearch", "topics": ["http-access"], "connection": { "useSSL": false, "host": "localhost", "port": 9200 }, "indexMapping": { "indexName": "audit" }, "buffering": { "enabled": true, "maxSize": 10000, "writeInterval": "100 ms", "maxBatchedEvents": 500 } } }Configure the server to use the Elasticsearch audit handler:
$ dsconfig \ create-log-publisher \ --hostname opendj.example.com \ --port 4444 \ --bindDN "cn=Directory Manager" \ --bindPassword password \ --publisher-name "Elasticsearch HTTP Access Log Publisher" \ --type external-http-access \ --set enabled:true \ --set config-file:config/audit-handlers/elasticsearch-handler.json \ --trustAll \ --no-prompt
With Elasticsearch and the DS server running, audit event messages for HTTP requests to the DS server are sent to Elasticsearch.
The following example requests Babs Jensen's entry:
$ curl --user bjensen:hifalutin http://opendj.example.com:8080/api/users/bjensen
A search request to Elasticsearch shows the resulting audit event content:
$ curl 'localhost:9200/audit/_search?q=*&pretty'
See the Elasticsearch documentation for details on searching and search results.
A JDBC handler sends messages to an appropriately configured relational database table.
Before you enable the JDBC handler,
create the necessary schema and tables in the target database.
See the examples,
/path/to/opendj/config/audit-handlers/mysql_tables-example.sql,
and /path/to/opendj/config/audit-handlers/oracle_tables-example.sql.
In addition, the JDBC handler depends on the JDBC driver for the database, and
HirakiCP.
Copy the JDBC driver .jar file for your database,
the HirakiCP .jar file for your Java version,
and any other dependent libraries required
to the /path/to/opendj/extlib/ directory.
To enable the JDBC handler, see "To Enable an Access Logger With an External Configuration". The JSON configuration file for the JDBC handler has the following format:
{
"class": "org.forgerock.audit.handlers.jdbc.JdbcAuditEventHandler",
"config": {
"name": string, // Handler name, such as "jdbc".
"topics": array, // LDAP: "ldap-access"; HTTP: "http-access".
"databaseType": string, // Supported by default: "oracle", "mysql", "h2".
"enabled": boolean, // Is the handler enabled?
"buffering": { // (Optional) Default: write each message separately, no buffering.
"enabled": boolean, // Buffer messages to be sent? Default: false.
"writeInterval": duration, // Duration; must be > 0 if buffering is enabled.
"autoFlush": boolean, // Flush messages automatically? Default: true.
"maxBatchedEvents": number, // Maximum messages in prepared statement. Default: 100.
"maxSize": number, // Maximum number of buffered messages. Default: 5000.
"writerThreads": number // Threads to write buffered messages: Default: 1.
},
"connectionPool": {
"dataSourceClassName": string, // Either set this to the class name of the data source...
"jdbcUrl": string, // ...or set this to the JDBC URL to connect to the database.
"username": string, // Username to connect to the database.
"password": string, // Password to connect to the database.
"autoCommit": boolean, // (Optional) Commit transactions automatically? Default: true.
"connectionTimeout": number, // (Optional) Milliseconds to wait before timing out. Default: 30,000.
"idleTimeout": number, // (Optional) Milliseconds to wait before timing out. Default: 600,000.
"maxLifetime": number, // (Optional) Milliseconds thread remains in pool. Default: 1,800,000.
"minIdle": number, // (Optional) Minimum connections in pool. Default: 10.
"maxPoolSize": number, // (Optional) Maximum number of connections in pool. Default: 10.
"poolName": string, // (Optional) Name of connection pool. Default: audit.
"driverClassName": string // (Optional) Class name of database driver. Default: null.
},
"tableMappings": [ // Correspondence of message fields to database columns.
{
"event": string, // LDAP: "ldap-access"; HTTP: "http-access".
"table": string, // LDAP: "ldapaccess"; HTTP: "httpaccess".
"fieldToColumn": { // Map of field names to database column names.
"event-field": "database-column" // Event-field takes JSON pointer.
}
}
]
}
}
For a sample configuration, see
/path/to/opendj/config/audit-handlers/jdbc-config.json-example.
The writeInterval takes a duration.
A duration is a lapse of time expressed in English,
such as 23 hours 59 minutes and 59 seconds.
Durations are not case sensitive.
Negative durations are not supported.
The following units can be used in durations:
indefinite,infinity,undefined,unlimited: unlimited durationzero,disabled: zero-length durationdays,day,d: dayshours,hour,h: hoursminutes,minute,min,m: minutesseconds,second,sec,s: secondsmilliseconds,millisecond,millisec,millis,milli,ms: millisecondsmicroseconds,microsecond,microsec,micros,micro,us: microsecondsnanoseconds,nanosecond,nanosec,nanos,nano,ns: nanoseconds
A JMS handler is a JMS producer that publishes messages to an appropriately configured Java Message Service.
To enable the JMS handler, see "To Enable an Access Logger With an External Configuration". The JSON configuration file for the JMS handler has the following format:
{
"class": "org.forgerock.audit.handlers.jms.JmsAuditEventHandler",
"config": {
"name": string, // Handler name, such as "jms".
"enabled": boolean, // Is the handler enabled?
"topics": array, // LDAP: "ldap-access"; HTTP: "http-access".
"deliveryMode": string, // One of "NON_PERSISTENT", "PERSISTENT".
"sessionMode": string, // One of "AUTO", "CLIENT", "DUPS_OK".
"batch": { // (Optional) Default: no batching.
"batchEnabled": boolean, // Batch messages to publish? Default: false.
"capacity": number, // Maximum capacity of publishing queue. Default: 1.
"maxBatchedEvents": number, // Maximum events to deliver in single publishing call. Default: 1.
"threadCount": number, // Worker threads to process publishing queue. Default: 1.
"insertTimeoutSec": number, // Seconds queue can block before adding new item. Default: 60.
"pollTimeoutSec": number, // Seconds worker threads wait for new item. Default: 10.
"shutdownTimeoutSec": number // Seconds publisher waits for threads at shutdown. Default: 60.
},
"jndi": { // (Optional) Default: Use default settings.
"connectionFactoryName": string, // JNDI name for JMS connection factory. Default: "ConnectionFactory".
"topicName": string // (Optional) Match the value in the context. Default: "audit".
"contextProperties": { // JNDI InitialContext properties.
// These depend on the JNDI provider. See the provider documentation for details.
}
}
}
}
For a sample configuration, see
/path/to/opendj/config/audit-handlers/jms-config.json-example.
A Splunk handler sends messages to an appropriately configured Splunk service.
To enable the Splunk handler, see "To Enable an Access Logger With an External Configuration". The JSON configuration file for the Splunk handler has the following format:
{
"class": "org.forgerock.audit.handlers.splunk.SplunkAuditEventHandler",
"config": {
"name": string, // Handler name, such as "splunk".
"enabled": boolean, // Is the handler enabled?
"topics": array, // LDAP: "ldap-access"; HTTP: "http-access".
"authzToken": string, // Splunk authorization token for HTTP requests.
"buffering": { // Required message buffering configuration.
"maxBatchedEvents": number, // Maximum messages in prepared statement.
"maxSize": number, // Maximum number of buffered messages.
"writeInterval": duration // Duration as described below.
},
"connection": { // (Optional) Default: Use default settings.
"host": string, // Splunk host name. Default: "localhost".
"port": number, // Splunk port number. Default: "8088".
"useSSL": boolean // Use secure connection to Splunk? Default: false.
}
}
}
For a sample configuration, see
/path/to/opendj/config/audit-handlers/splunk-config.json-example.
The writeInterval takes a duration.
A duration is a lapse of time expressed in English,
such as 23 hours 59 minutes and 59 seconds.
Durations are not case sensitive.
Negative durations are not supported.
The following units can be used in durations:
indefinite,infinity,undefined,unlimited: unlimited durationzero,disabled: zero-length durationdays,day,d: dayshours,hour,h: hoursminutes,minute,min,m: minutesseconds,second,sec,s: secondsmilliseconds,millisecond,millisec,millis,milli,ms: millisecondsmicroseconds,microsecond,microsec,micros,micro,us: microsecondsnanoseconds,nanosecond,nanosec,nanos,nano,ns: nanoseconds
A Syslog handler sends messages to the UNIX system log as governed by RFC 5424, The Syslog Protocol.
Note
The implementation currently only supports writing access messages to Syslog, rather than error messages. As a result, this feature is of limited use in most deployments.
To enable a Syslog handler, see "To Enable an Access Logger With an External Configuration". The JSON configuration file for the Syslog handler has the following format:
{
"class": "org.forgerock.audit.handlers.syslog.SyslogAuditEventHandler",
"config": {
"name": string, // Handler name, such as "syslog".
"enabled": boolean, // Default: false.
"topics": array, // LDAP: "ldap-access"; HTTP: "http-access".
"protocol": string, // "TCP" or "UDP".
"host": string, // Syslog daemon host, such as localhost; must resolve to IP address.
"port": number, // Syslog daemon port number, such as 514; range: 0 to 65535.
"connectTimeout": number, // If using TCP, milliseconds to wait before timing out.
"facility": string, // Syslog facility to use for event messages.
"buffering": { // (Optional) Default: write each message separately, no buffering.
"enabled": boolean, // Buffer messages to be sent? Default: false.
"maxSize": number // Maximum number of buffered messages. Default: 5000.
}
}
}
For a sample configuration, see
/path/to/opendj/config/audit-handlers/syslog-config.json-example.
For additional details, see "Syslog Facility Values".
| Value | Description |
|---|---|
|
|
Kernel messages. |
|
|
User-level messages. |
|
|
Mail system. |
|
|
System daemons. |
|
|
Security/authorization messages. |
|
|
Messages generated internally by |
|
|
Line printer subsystem. |
|
|
Network news subsystem. |
|
|
UUCP subsystem. |
|
|
Clock daemon. |
|
|
Security/authorization messages. |
|
|
FTP daemon. |
|
|
NTP subsystem. |
|
|
Log audit. |
|
|
Log alert. |
|
|
Clock daemon. |
|
|
Local use 0. |
|
|
Local use 1. |
|
|
Local use 2. |
|
|
Local use 3. |
|
|
Local use 4. |
|
|
Local use 5. |
|
|
Local use 6. |
|
|
Local use 7. |
This section includes the following procedures:
Tamper-evident logging depends on a public key/private key pair and on a secret key that are stored together in a JCEKS keystore. Follow these steps to prepare the keystore:
Create a password for the keystore.
The following example uses the default file name. If you use a different filename, then you must edit the
key-store-pinproperty when configuring the log publisher:$ touch /path/to/opendj/config/audit-keystore.pin $ chmod 600 /path/to/opendj/config/audit-keystore.pin # Add password in cleartext on the only line in the file: $ vi /path/to/opendj/config/audit-keystore.pin
Generate a key pair in the keystore.
The CSV event handler expects a JCEKS-type keystore with a key alias of
Signaturefor the signing key, where the key is generated with theRSAkey algorithm and theSHA256withRSAsignature algorithm.The following example uses the default file name. If you use a different filename, then you must edit
key-store-fileproperty when configuring the log publisher:$ keytool \ -genkeypair \ -keyalg RSA \ -sigalg SHA256withRSA \ -alias "Signature" \ -dname "CN=opendj.example.com,O=Example Corp,C=FR" \ -keystore /path/to/opendj/config/audit-keystore \ -storetype JCEKS \ -storepass:file /path/to/opendj/config/audit-keystore.pin \ -keypass:file /path/to/opendj/config/audit-keystore.pin
Generate a secret key in the keystore.
The CSV event handler expects a JCEKS-type keystore with a key alias of
Passwordfor the symmetric key, where the key is generated with theHmacSHA256key algorithm and 256-bit key size.The following example uses the default file name. If you use a different filename, then you must edit
key-store-fileproperty when configuring the log publisher:$ keytool \ -genseckey \ -keyalg HmacSHA256 \ -keysize 256 \ -alias "Password" \ -keystore /path/to/opendj/config/audit-keystore \ -storetype JCEKS \ -storepass:file /path/to/opendj/config/audit-keystore.pin \ -keypass:file /path/to/opendj/config/audit-keystore.pin
Verify that the keystore contains signature and password keys:
$ keytool \ -list \ -keystore /path/to/opendj/config/audit-keystore \ -storetype JCEKS \ -storepass:file /path/to/opendj/config/audit-keystore.pin ... signature, <date>, PrivateKeyEntry, <fingerprint> password, <date>, SecretKeyEntry, <fingerprint>
An access logger configuration that relies on a JSON configuration lets you use any Common Audit event handler, including customer handlers. The content of the configuration file depends on the audit event handler.
Follow these steps:
Decide whether to trust transaction IDs sent by client applications, used to correlate requests as they traverse multiple servers.
Client applications using the ForgeRock Common Audit event framework send transaction IDs with their requests. The transaction IDs are used to correlate audit events for monitoring and reporting that trace the request through multiple applications.
Transaction IDs are sent over LDAP using an internal DS request control. They are sent over HTTP in an HTTP header.
By default, DS servers are configured not to trust transaction IDs sent with client application requests.
If you configure the server or gateway to trust transaction IDs in client application requests, then outgoing requests reuse the incoming transaction ID. For each outgoing request in the transaction, the request's transaction ID has the form
original-transaction-id/sequence-number, where sequence-number reflects the position of the request in the series of requests for this transaction. For example, if the original-transaction-id isabc123, the first outgoing request has transaction IDabc123/0, the secondabc123/1, the thirdabc123/2, and so on. This helps you to distinguish specific requests within a transaction when correlating audit events from multiple services.To trust transactions, set the advanced global server property,
trust-transaction-ids, totrue:$ dsconfig \ set-global-configuration-prop \ --advanced \ --hostname opendj.example.com \ --port 4444 \ --bindDN "cn=Directory Manager" \ --bindPassword password \ --set trust-transaction-ids:true \ --trustAll \ --no-prompt
Create the external JSON configuration file for the handler.
Base your work on the appropriate template in the
config/audit-handlersdirectory.(Optional) If this is a custom access logger provided separately, copy the custom handler .jar file to
/path/to/opendj/lib/extensions.Create a log publisher configuration for the access log, where the
typedefines whether the log contains messages about LDAP or HTTP requests:For LDAP access logging, create an external access log publisher:
$ dsconfig \ create-log-publisher \ --hostname opendj.example.com \ --port 4444 \ --bindDN "cn=Directory Manager" \ --bindPassword password \ --publisher-name "My External LDAP Access Log Publisher" \ --type external-access \ --set enabled:true \ --set config-file:config/audit-handlers/handler-conf.json \ --trustAll \ --no-promptFor HTTP access logging, create an external HTTP access log publisher:
$ dsconfig \ create-log-publisher \ --hostname opendj.example.com \ --port 4444 \ --bindDN "cn=Directory Manager" \ --bindPassword password \ --publisher-name "My External HTTP Access Log Publisher" \ --type external-http-access \ --set enabled:true \ --set config-file:config/audit-handlers/handler-conf.json \ --trustAll \ --no-prompt
For LDAP connection handlers, you can configure a native format access log.
Tip
This format was previously the default for DS servers. This log format can be useful, for example, if you already have software configured to consume the messages.
This access log uses the File Based Access Log Publisher
The default log file is logs/access.
The following command enables this LDAP access logger:
$ dsconfig \ set-log-publisher-prop \ --hostname opendj.example.com \ --port 4444 \ --bindDN "cn=Directory Manager" \ --bindPassword password \ --publisher-name "File-Based Access Logger" \ --set enabled:true \ --trustAll \ --no-prompt
By default, this access log contains a message for each request,
and a message for each response,
as well as messages for connection and disconnection.
You can configure the access log to write messages only on responses
by setting the property log-format:combined.
The setting is useful when filtering messages based on response criteria.
It causes the server to log one message per operation,
rather than one message for the request and another for the response.
An audit log is a type of access log that records changes to directory data in LDIF format.
Tip
When using replicated directory servers, another way of accessing changes is to use the external change log. The external change log includes changes for all servers in a replication topology, and identifies the user requesting each change.
For details, see "Change Notification For Your Applications" in the Administration Guide.
This audit log uses the File Based Audit Log Publisher.
The default log file is logs/audit.
The following command enables the default file-based audit logger:
$ dsconfig \ set-log-publisher-prop \ --hostname opendj.example.com \ --port 4444 \ --bindDN "cn=Directory Manager" \ --bindPassword password \ --publisher-name "File-Based Audit Logger" \ --set enabled:true \ --trustAll \ --no-prompt
To see audit log output, make a change to directory data. The following example changes a description:
$ cat bjensen-new-description.ldif dn: uid=bjensen,ou=People,dc=example,dc=com changetype: modify replace: description description: New description $ ldapmodify \ --hostname opendj.example.com \ --port 1389 \ --bindDN "uid=bjensen,ou=People,dc=example,dc=com" \ --bindPassword hifalutin \ bjensen-new-description.ldif
The audit log records the changes as shown in the following excerpt:
$ # <datestamp>; conn=<number>; op=<number> dn: cn=File-Based Audit Logger,cn=Loggers,cn=config changetype: modify replace: ds-cfg-enabled ds-cfg-enabled: true - # <datestamp>; conn=<number>; op=<number> dn: uid=bjensen,ou=people,dc=example,dc=com changetype: modify add: description description: New description -
As stated above, audit logs record changes in LDIF format. This means that when an LDAP entry is deleted, the audit log records only its DN.
For HTTP requests, you can configure an access logger that uses the Extended Log File Format, which is a W3C working draft.
This access log uses the File Based HTTP Access Log Publisher.
The default log file is logs/http-access.
The following command enables this HTTP access logger:
$ dsconfig \ set-log-publisher-prop \ --hostname opendj.example.com \ --port 4444 \ --bindDN "cn=Directory Manager" \ --bindPassword password \ --publisher-name "File-Based HTTP Access Logger" \ --set enabled:true \ --trustAll \ --no-prompt
The following default fields are shown here in the order they occur in the log file:
cs-hostClient host name
c-ipClient IP address
cs-usernameUsername used to authenticate
x-datetimeCompletion timestamp for the HTTP request, which you can configure using the
log-record-time-formatpropertycs-methodHTTP method requested by the client
cs-uriURI requested by the client
cs-uri-stemURL-encoded path requested by the client
cs-uri-queryURL-encoded query parameter string requested by the client
cs-versionHTTP version requested by the client
sc-statusHTTP status code for the operation
cs(User-Agent)User-Agent identifier
x-connection-idConnection ID used for DS internal operations
When using this field to match HTTP requests with internal operations in the LDAP access log, first set the access log advanced property,
suppress-internal-operations, tofalse. By default, internal operations do not appear in the LDAP access log.x-etimeExecution time in milliseconds needed by DS to service the HTTP request
x-transaction-idForgeRock Common Audit event framework transaction ID for the request
This defaults to
0unless you configure the server to trust transaction IDs.
Missing values are replaced with -.
Tabs separate the fields, and if a field contains a tab character,
then the field is surrounded with double quotes.
DS software doubles double quotes in the field to escape them.
The following example shows an excerpt of an HTTP access log with space reformatted:
- <client-ip> bjensen <datestamp> GET /users/bjensen HTTP/1.1 200 <user-agent> 3 40
- <client-ip> bjensen <datestamp> GET /users/scarter HTTP/1.1 200 <user-agent> 4 9
- <client-ip> - <datestamp> GET /users/missing HTTP/1.1 401 <user-agent> 5 0
- <client-ip> kvaughan <datestamp> POST /users HTTP/1.1 200 <user-agent> 6 120
You can configure the log-format for the access log
using the dsconfig command.
In addition to the default fields, the following standard fields are supported:
c-portClient port number
s-computernameServer name where the access log was written
s-ipServer IP address
s-portServer port number
With the default access log configuration (no filtering), for every client application request, the server writes at least one message to its access log. This volume of logging gives you the information to analyze overall access patterns, or to audit access when you do not know in advance what you are looking for.
When you do know what you are looking for, log filtering lets you throttle logging to focus on what you want to see. You specify the criteria for a filtering policy, and apply the policy to a log publisher.
Log filtering policies use the following criteria:
Client IP address, bind DN, group membership
Operation type (abandon, add, bind, compare, connect, delete, disconnect, extended operation, modify, rename, search, and unbind)
Port number
Protocol used
Response time
Result codes (only log error results, for example)
Search response criteria (number of entries returned, unindexed search, and others)
Target DN
User DN and group membership
A log publisher's filtering policy determines whether to include or exclude log messages that match the criteria.
A common development troubleshooting technique consists of sending client requests while tailing the access log:
$ tail -f /path/to/opendj/logs/ldap-access.audit.json
When the dsconfig command accesses the configuration, access log messages are written for administrative operations. These messages can prevent you from seeing the messages of interest from client applications.
This example demonstrates how to filter access log messages for administrative connections over LDAPS on port 4444.
Configure access log filtering criteria:
$ dsconfig \ create-access-log-filtering-criteria \ --hostname opendj.example.com \ --port 4444 \ --bindDN "cn=Directory Manager" \ --bindPassword password \ --publisher-name "Json File-Based Access Logger" \ --criteria-name "Exclude LDAPS on 4444" \ --type generic \ --set connection-port-equal-to:4444 \ --set connection-protocol-equal-to:ldaps \ --trustAll \ --no-prompt
Activate filtering to exclude administrative messages:
$ dsconfig \ set-log-publisher-prop \ --hostname opendj.example.com \ --port 4444 \ --bindDN "cn=Directory Manager" \ --bindPassword password \ --publisher-name "Json File-Based Access Logger" \ --set filtering-policy:exclusive \ --trustAll \ --no-prompt
The publisher filters messages about administrative requests to port 4444.
This example demonstrates how to set up an audit log file
to track changes to the server configuration.
The LDAP representation of the configuration is found
under the base DN cn=config.
As described in "Server Logs" in the Administration Guide, an audit log is a type of access log that records changes to directory data in LDIF. The change records have timestamped comments with connection and operation IDs, so that you can correlate the changes with messages in access logs.
Create an audit log publisher:
$ dsconfig \ create-log-publisher \ --hostname opendj.example.com \ --port 4444 \ --bindDN "cn=Directory Manager" \ --bindPassword password \ --publisher-name "File-Based Server Configuration Audit Log" \ --type file-based-audit \ --set enabled:true \ --set filtering-policy:inclusive \ --set log-file:logs/config-audit \ --set rotation-policy:"24 Hours Time Limit Rotation Policy" \ --set rotation-policy:"Size Limit Rotation Policy" \ --set retention-policy:"File Count Retention Policy" \ --trustAll \ --no-prompt
Create log filtering criteria for the logger
that matches operations targeting cn=config:
$ dsconfig \ create-log-publisher \ --hostname opendj.example.com \ --port 4444 \ --bindDN "cn=Directory Manager" \ --bindPassword password \ --publisher-name "File-Based Server Configuration Audit Log" \ --type file-based-audit \ --set enabled:true \ --set filtering-policy:inclusive \ --set log-file:logs/config-audit \ --set rotation-policy:"24 Hours Time Limit Rotation Policy" \ --set rotation-policy:"Size Limit Rotation Policy" \ --set retention-policy:"File Count Retention Policy" \ --trustAll \ --no-prompt
The server now writes to the current audit log file,
/path/to/opendj/logs/config-audit,
whenever an administrator changes the server configuration.
The following example output show the resulting LDIF
that defines the log filtering criteria:
# <datestamp>; conn=<id>; op=<id>
dn: cn=Record changes to cn=config,cn=Filtering Criteria,cn=File-Based Server Configuration Audit Log,cn=Loggers,cn=config
changetype: add
objectClass: top
objectClass: ds-cfg-access-log-filtering-criteria
cn: Record changes to cn=config
ds-cfg-request-target-dn-equal-to: **,cn=config
ds-cfg-request-target-dn-equal-to: cn=config
createTimestamp: <timestamp>
creatorsName: cn=Directory Manager
entryUUID: <uuid>A debug log traces internal server information needed to troubleshoot a problem. Debug logs can grow large quickly, and therefore no debug logs are enabled by default.
For debug logging, you must set a debug target to control what gets logged. For details, see "Enabling Debug Logging" in the Administration Guide.
The errors log traces server events, error conditions, and warnings, categorized and identified by severity.
Messages in the logs/errors file have the following format:
[datestamp] category=category severity=severity msgID=ID number msg=message string
For lists of severe and fatal error messages by category, see the Log Message Reference.
The replication repair log traces replication events, with entries having the same format as the errors log:
[datestamp] category=SYNC severity=severity msgID=ID number msg=message string
The replication log does not trace replication operations. Use the external change log instead to get notifications about changes to directory data over protocol, as described in "Change Notification For Your Applications" in the Administration Guide.
Each file-based log can be associated with a log rotation policy, and a log retention policy. The rotation policy specifies when to rotate a log file based on a time, log file age, or log file size. The retention policy specifies whether to retain logs based on the number of logs, their size, or how much free space should be left on the disk.
Rotated logs have a rotation timestamp appended to their name.
You list existing log rotation policies with the dsconfig list-log-rotation-policies command, and retention policies with the dsconfig list-log-retention-policies:
$ dsconfig \ list-log-rotation-policies \ --hostname opendj.example.com \ --port 4444 \ --bindDN "cn=Directory Manager" \ --bindPassword password \ --trustAll \ --no-prompt Log Rotation Policy : Type : file-size-limit : rotation-interval : time-of-day ------------------------------------:------------:-----------------:-------------------:------------ 24 Hours Time Limit Rotation Policy : time-limit : - : 1 d : - 7 Days Time Limit Rotation Policy : time-limit : - : 1 w : - Fixed Time Rotation Policy : fixed-time : - : - : 2359 Size Limit Rotation Policy : size-limit : 100 mb : - : - $ dsconfig \ list-log-retention-policies \ --hostname opendj.example.com \ --port 4444 \ --bindDN "cn=Directory Manager" \ --bindPassword password \ --trustAll \ --no-prompt Log Retention Policy : Type : disk-space-used : free-disk-space : number-of-files ---------------------------------:-----------------:-----------------:-----------------:---------------- File Count Retention Policy : file-count : - : - : 10 Free Disk Space Retention Policy : free-disk-space : - : 500 mb : - Size Limit Retention Policy : size-limit : 500 mb : - : -
View the policies that apply for a given log with the dsconfig get-log-publisher-prop command. The following example shows that the server keeps 10 access log files, rotating either each day or when the log size reaches 100 MB:
$ dsconfig \
get-log-publisher-prop \
--hostname opendj.example.com \
--port 4444 \
--bindDN "cn=Directory Manager" \
--bindPassword password \
--publisher-name "Json File-Based Access Logger" \
--property retention-policy \
--property rotation-policy \
--trustAll \
--no-prompt
Property : Value(s)
-----------------:-------------------------------------------------------------
retention-policy : File Count Retention Policy
rotation-policy : 24 Hours Time Limit Rotation Policy, Size Limit Rotation
: Policy
Use the dsconfig command to create, update, delete, and assign log rotation and retention policies. Set the policy that applies to a logger with the dsconfig set-log-publisher-prop command.
Note
When using access logs based on the ForgeRock Common Audit event framework, such as the CSV file based or JSON file based access log publishers, you can only configure one of each type of retention or rotation policy.
In other words, you can configure one file count, free disk space, and size limit log retention policy, but not more than one of each. Also, you can configure one fixed time, size limit, and time limit log rotation policy, but not more than one of each.
DS servers can send notifications of significant server events. Alert notifications are not enabled by default.
The following example enables JMX alert notifications:
$ dsconfig \ set-alert-handler-prop \ --hostname opendj.example.com \ --port 4444 \ --bindDN "cn=Directory Manager" \ --bindPassword password \ --handler-name "JMX Alert Handler" \ --set enabled:true \ --trustAll \ --no-prompt
DS servers can send mail over SMTP instead of JMX notifications. Before you set up the SMTP-based alert handler, specify an SMTP server:
$ dsconfig \ set-global-configuration-prop \ --hostname opendj.example.com \ --port 4444 \ --bindDN "cn=Directory Manager" \ --bindPassword password \ --set smtp-server:opendj.example.com \ --trustAll \ --no-prompt $ dsconfig \ create-alert-handler \ --hostname opendj.example.com \ --port 4444 \ --bindDN "cn=Directory Manager" \ --bindPassword password \ --handler-name "SMTP Alert Handler" \ --type smtp \ --set enabled:true \ --set message-subject:"DS Alert, Type: %%alert-type%%, ID: %%alert-id%%" \ --set message-body:"%%alert-message%%" \ --set recipient-address:kvaughan@example.com \ --set sender-address:opendj@example.com \ --trustAll \ --no-prompt
DS servers use the following alert types.
For alert types that indicate server problems,
check logs/errors for details:
org.opends.server.AccessControlDisabledThe access control handler has been disabled.
org.opends.server.AccessControlEnabledThe access control handler has been enabled.
org.opends.server.authentiation.dseecompat.ACIParseFailedThe dseecompat access control subsystem failed to correctly parse one or more ACI rules when the server first started.
org.opends.server.BackendRunRecoveryThe pluggable backend has thrown a
RunRecoveryException. The server needs to be restarted.org.opends.server.CannotCopySchemaFilesA problem has occurred while attempting to create copies of the existing schema configuration files before making a schema update, and the schema configuration has been left in a potentially inconsistent state.
org.opends.server.CannotRenameCurrentTaskFileThe server is unable to rename the current tasks backing file in the process of trying to write an updated version.
org.opends.server.CannotRenameNewTaskFileThe server is unable to rename the new tasks backing file into place.
org.opends.server.CannotScheduleRecurringIterationThe server is unable to schedule an iteration of a recurring task.
org.opends.server.CannotWriteConfigThe server is unable to write its updated configuration for some reason and therefore the server may not exhibit the new configuration if it is restarted.
org.opends.server.CannotWriteNewSchemaFilesA problem has occurred while attempting to write new versions of the server schema configuration files, and the schema configuration has been left in a potentially inconsistent state.
org.opends.server.CannotWriteTaskFileThe server is unable to write an updated tasks backing file for some reason.
org.opends.server.DirectoryServerShutdownThe server has begun the process of shutting down.
org.opends.server.DirectoryServerStartedThe server has completed its startup process.
org.opends.server.DiskFullFree disk space has reached the full threshold.
Default is 6% of the size of the file system.
org.opends.server.DiskSpaceLowFree disk space has reached the low threshold.
Default is 10% of the size of the file system.
org.opends.server.EnteringLockdownModeThe server is entering lockdown mode, wherein only root users are allowed to perform operations and only over the loopback address.
org.opends.server.LDAPHandlerDisabledByConsecutiveFailuresConsecutive failures have occurred in the LDAP connection handler and have caused it to become disabled.
org.opends.server.LDAPHandlerUncaughtErrorUncaught errors in the LDAP connection handler have caused it to become disabled.
org.opends.server.LDIFBackendCannotWriteUpdateAn LDIF backend was unable to store an updated copy of the LDIF file after processing a write operation.
org.opends.server.LDIFConnectionHandlerIOErrorThe LDIF connection handler encountered an I/O error that prevented it from completing its processing.
org.opends.server.LDIFConnectionHandlerParseErrorThe LDIF connection handler encountered an unrecoverable error while attempting to parse an LDIF file.
org.opends.server.LeavingLockdownModeThe server is leaving lockdown mode.
org.opends.server.ManualConfigEditHandledThe server detects that its configuration has been manually edited with the server online and those changes were overwritten by another change made through the server. The manually edited configuration will be copied to another location.
org.opends.server.ManualConfigEditLostThe server detects that its configuration has been manually edited with the server online and those changes were overwritten by another change made through the server. The manually edited configuration could not be preserved due to an unexpected error.
org.opends.server.replication.UnresolvedConflictMultimaster replication cannot resolve a conflict automatically.
org.opends.server.UncaughtExceptionA server thread has encountered an uncaught exception that caused that thread to terminate abnormally. The impact that this problem has on the server depends on which thread was impacted and the nature of the exception.
org.opends.server.UniqueAttributeSynchronizationConflictA unique attribute conflict has been detected during synchronization processing.
org.opends.server.UniqueAttributeSynchronizationErrorAn error occurred while attempting to perform unique attribute conflict detection during synchronization processing.
This chapter covers a general approach to testing to make sure that the directory services you deploy work as planned. In this chapter you will learn how to:
Validate that security requirements corresponds to what users require
Prepare and test the directory service in a lab environment
Validate and verify the directory service in a pre-production environment
Monitor the deployed directory service for continuous verification
In this context, validation means checking that you are building the right thing, whereas verification means checking that you are building it in the right way.
Before you begin to write specific tests, step back to review the big picture. Do the security requirements make sense for the directory service, and also for the users of the service?
On the directory service side, you aim to prevent problems such as those described in "Threats to Directory Services". The directory service is only accessible in secure ways, requires strong credentials when authenticating, and grants access to data on a need-to-know basis.
On the users' side, you want directory access from any device or application using standard protocols and tools. The directory should protect your sensitive information, but not to the extent that it requires you to explicitly trust unfamiliar public key certificates, and to struggle to come up with yet another strong password that you must remember forever or be locked out of your account for good.
In refining the security requirements for the directory service, make sure there is an appropriate balance between security and user needs. An ultimately secure directory service is one that denies all user access. An ultimately flexible directory service is one that relinquishes all control. The appropriate balance is somewhere in the middle.
Be aware that directory service security is only part of an overall strategy, one that aims to help users and application developers make appropriately secure choices. In validating the requirements, understand how the directory service fits into the overall identity and access management strategy.
Long before you roll out the directory service, when you start to prepare server configurations in a lab environment, begin by testing the directory's functional capabilities. As you understand your users' requirements, reproduce what their client applications will do in your tests. In most cases, it is not feasible to exhaustively reproduce everything that every directory client will do. Instead, choose a representative sample of actions. Test your expectations, both for normal and for insecure client application and user behavior.
The goals for your functional testing are to verify compliance, to uncover problems, and to begin automating tests early in the project. Test automation should drive you to use version control software, and continuous integration software as well. Be ready to roll back any change you make if a test fails, and make sure that every change is reviewed and tested before it is pushed further along in the process.
Aim to keep the automated tests both representative and short. As you build out the deployment and complexity grows, automated tests let you build the service with confidence, by repeatedly iterating with small changes to fix problems, and to better match users' expectations.
Before you apply a change to a production environment, you want to verify the impact under conditions as close as possible to those of the production environment.
In the test environment, the directory service should mirror production in terms of configuration, client application configuration and load, and directory data including access policies. This is the environment where end-to-end testing first takes place.
Although you might not test at a scale that is identical to production, the test environment must remain representative. For example, when using replicas in production, also use replicas in the pre-production test environment. When using secure connections everywhere in production, also use them in the test environment. If you expect many client applications accessing the production directory, and particular client usage patterns, also simulate those in the test environment.
Automate your testing in the pre-production environment as well. Each change for the production environment should first pass the pre-production tests. You will need to iterate through the tests for each change.
In deployments where updates to new servers would not harm production data, you might also use canary servers. Canary servers fulfill a similar function to canaries in coal mines. You deploy a small group of servers in production that have the change. You then test and monitor these servers to compare with unchanged servers. If the change looks good after enough testing and monitoring, you roll out more servers with the change. If something goes wrong, you have only exposed a small, perhaps less risky proportion of production clients to the change. Only use this when you are sure that replication from a canary server would not corrupt any production data.
Directory services integrate with many monitoring solutions as described in "Monitoring Directory Security". You can choose to access monitoring information over HTTP, LDAP, SNMP, and JMX, and by sending Common Audit events to local log files and remote systems for further processing.
In addition to using the monitoring capabilities in the software, adapt some of your tests to verify operation of the service in production. For example, a few end-to-end tests in production can alert you to problems early before they impact many users.
- Abandon operation
LDAP operation to stop processing of a request in progress, after which the server drops the connection without a reply to the client application.
- Access control
Control to grant or to deny access to a resource.
- Access control instruction (ACI)
Instruction added as a directory entry attribute for fine-grained control over what a given user or group member is authorized to do in terms of LDAP operations and access to user data.
ACIs are implemented independently from privileges, which apply to administrative operations.
See also Privilege.
- Access control list (ACL)
An access control list connects a user or group of users to one or more security entitlements. For example, users in group sales are granted the entitlement read-only to some financial data.
accesslogServer log tracing the operations the server processes including timestamps, connection information, and information about the operation itself.
- Account lockout
The act of making an account temporarily or permanently inactive after successive authentication failures.
- Active user
A user that has the ability to authenticate and use the services, having valid credentials.
- Add operation
LDAP operation to add a new entry or entries to the directory.
- Anonymous
A user that does not need to authenticate, and is unknown to the system.
- Anonymous bind
A bind operation using simple authentication with an empty DN and an empty password, allowing anonymous access such as reading public information.
- Approximate index
Index is used to match values that "sound like" those provided in the filter.
- Attribute
Properties of a directory entry, stored as one or more key-value pairs. Typical examples include the common name (
cn) to store the user's full name and variations of the name, user ID (uid) to store a unique identifier for the entry, andmailto store email addresses.auditlogType of access log that dumps changes in LDIF.
- Authentication
The process of verifying who is requesting access to a resource; the act of confirming the identity of a principal.
- Authorization
The process of determining whether access should be granted to an individual based on information about that individual; the act of determining whether to grant or to deny a principal access to a resource.
- Backend
Repository that stores directory data. Different implementations with different capabilities exist.
- Binary copy
Binary backup archive of one directory server that can be restored on another directory server.
- Bind operation
LDAP authentication operation to determine the client's identity in LDAP terms, the identity which is later used by the server to authorize (or not) access to directory data that the client wants to lookup or change.
- Branch
The distinguished name (DN) of a non-leaf entry in the Directory Information Tree (DIT), and also that entry and all its subordinates taken together.
Some administrative operations allow you to include or exclude branches by specifying the DN of the branch.
See also Suffix.
- Collective attribute
A standard mechanism for defining attributes that appear on all the entries in a particular subtree.
- Compare operation
LDAP operation to compare a specified attribute value with the value stored on an entry in the directory.
- Control
Information added to an LDAP message to further specify how an LDAP operation should be processed. DS supports many LDAP controls.
- Database cache
Memory space set aside to hold database content.
debuglogServer log tracing details needed to troubleshoot a problem in the server.
- Delete operation
LDAP operation to remove an existing entry or entries from the directory.
- Directory
A directory is a network service which lists participants in the network such as users, computers, printers, and groups. The directory provides a convenient, centralized, and robust mechanism for publishing and consuming information about network participants.
- Directory hierarchy
A directory can be organized into a hierarchy in order to make it easier to browse or manage. Directory hierarchies normally represent something in the physical world, such as organizational hierarchies or physical locations. For example, the top level of a directory may represent a company, the next level down divisions, the next level down departments, and down the hierarchy. Alternately, the top level may represent the world, the next level down countries, next states or provinces, and next cities.
- Directory Information Tree (DIT)
A set of directory entries organized hierarchically in a tree structure, where the vertices are the entries and the arcs between vertices define relationships between entries
- Directory manager
Default directory superuser who has privileges to do full administration of the DS server, including bypassing access control evaluation, changing access controls, and changing administrative privileges.
See also Superuser.
- Directory object
A directory object is an item in a directory. Example objects include users, user groups, computers, and more. Objects may be organized into a hierarchy and contain identifying attributes.
See also Entry.
- Directory proxy server
Server that forwards LDAP requests to remote directory servers. A standalone directory proxy server does not store user data.
See also Directory server.
- Directory server
Server application for centralizing information about network participants. A highly available directory service consists of multiple directory servers configured to replicate directory data.
See also Directory, Replication.
- Directory Services Markup Language (DSML)
Standard language to access directory services using XML. DMSL v1 defined an XML mapping of LDAP objects, while DSMLv2 maps the LDAP Protocol and data model to XML.
- Distinguished name (DN)
Fully qualified name for a directory entry, such as
uid=bjensen,ou=People,dc=example,dc=com, built by concatenating the entry RDN (uid=bjensen) with the DN of the parent entry (ou=People,dc=example,dc=com).- Domain
A replication domain consists of several directory servers sharing the same synchronized set of data.
The base DN of a replication domain specifies the base DN of the replicated data.
- DSML gateway
Standalone web application that translates DSML requests from client applications to LDAP requests to a directory service, and LDAP responses from a directory service to DSML responses to client applications.
- Dynamic group
Group that specifies members using LDAP URLs.
- Entry
As generic and hierarchical data stores, directories always contain different kinds of entries, either nodes (or containers) or leaf entries. An entry is an object in the directory, defined by one of more object classes and their related attributes. At startup, DS servers report the number of entries contained in each suffix.
- Entry cache
Memory space set aside to hold frequently accessed, large entries, such as static groups.
- Equality index
Index used to match values that correspond exactly (though generally without case sensitivity) to the value provided in the search filter.
errorslogServer log tracing server events, error conditions, and warnings, categorized and identified by severity.
- Export
Save directory data in an LDIF file.
- Extended operation
Additional LDAP operation not included in the original standards. DS servers support several standard LDAP extended operations.
- Extensible match index
Index for a matching rule other than approximate, equality, ordering, presence, substring or VLV, such as an index for generalized time.
- External user
An individual that accesses company resources or services but is not working for the company. Typically a customer or partner.
- Filter
An LDAP search filter is an expression that the server uses to find entries that match a search request, such as
(mail=*@example.com)to match all entries having an email address in the example.com domain.- Group
Entry identifying a set of members whose entries are also in the directory.
- Idle time limit
Defines how long DS allows idle connections to remain open.
- Import
Read in and index directory data from an LDIF file.
- Inactive user
An entry in the directory that once represented a user but which is now no longer able to be authenticated.
- Index
Directory server backend feature to allow quick lookup of entries based on their attribute values.
See also Approximate index, Equality index, Extensible match index, Ordering index, Presence index, Substring index, Virtual list view (VLV) index, Index entry limit.
- Index entry limit
When the number of entries that an index key points to exceeds the index entry limit, DS stops maintaining the list of entries for that index key.
- Internal user
An individual who works within the company either as an employee or as a contractor.
- LDAP Data Interchange Format (LDIF)
Standard, portable, text-based representation of directory content. See RFC 2849.
- LDAP URL
LDAP Uniform Resource Locator such as
ldap://directory.example.com:389/dc=example,dc=com??sub?(uid=bjensen). See RFC 2255.- LDAPS
LDAP over SSL.
- Lightweight Directory Access Protocol (LDAP)
A simple and standardized network protocol used by applications to connect to a directory, search for objects and add, edit or remove objects. See RFC 4510.
- Lookthrough limit
Defines the maximum number of candidate entries DS considers when processing a search.
- Matching rule
Defines rules for performing matching operations against assertion values. Matching rules are frequently associated with an attribute syntax and are used to compare values according to that syntax. For example, the
distinguishedNameEqualityMatchmatching rule can be used to determine whether two DNs are equal and can ignore unnecessary spaces around commas and equal signs, differences in capitalization in attribute names, and other discrepancies.- Modify DN operation
LDAP modification operation to request that the server change the distinguished name of an entry.
- Modify operation
LDAP modification operation to request that the server change one or more attributes of an entry.
- Naming context
Base DN under which client applications can look for user data.
- Object class
Identifies entries that share certain characteristics. Most commonly, an entry's object classes define the attributes that must and may be present on the entry. Object classes are stored on entries as values of the
objectClassattribute. Object classes are defined in the directory schema, and can be abstract (defining characteristics for other object classes to inherit), structural (defining the basic structure of an entry, one structural inheritance per entry), or auxiliary (for decorating entries already having a structural object class with other required and optional attributes).- Object identifier (OID)
String that uniquely identifies an object, such as
0.9.2342.19200300.100.1.1for the user ID attribute or1.3.6.1.4.1.1466.115.121.1.15forDirectoryStringsyntax.- Operational attribute
An attribute that has a special (operational) meaning for the server, such as
pwdPolicySubentryormodifyTimestamp.- Ordering index
Index used to match values for a filter that specifies a range.
- Password policy
A set of rules regarding what sequence of characters constitutes an acceptable password. Acceptable passwords are generally those that would be too difficult for another user or an automated program to guess and thereby defeat the password mechanism. Password policies may require a minimum length, a mixture of different types of characters (lowercase, uppercase, digits, punctuation marks, and other characters), avoiding dictionary words or passwords based on the user's name, and other attributes. Password policies may also require that users not reuse old passwords and that users change their passwords regularly.
- Password reset
Password change performed by a user other than the user who owns the entry.
- Password storage scheme
Mechanism for encoding user passwords stored on directory entries. DS implements a number of password storage schemes.
- Password validator
Mechanism for determining whether a proposed password is acceptable for use. DS implements a number of password validators.
- Plugin
Java library with accompanying configuration that implements a feature through processing that is not essential to the core operation of DS servers.
As the name indicates, plugins can be plugged in to an installed server for immediate configuration and use without recompiling the server.
DS servers invoke plugins at specific points in the lifecycle of a client request. The DS configuration framework lets directory administrators manage plugins with the same tools used to manage the server.
- Presence index
Index used to match the fact that an attribute is present on the entry, regardless of the value.
- Principal
Entity that can be authenticated, such as a user, a device, or an application.
- Privilege
Server configuration settings controlling access to administrative operations such as exporting and importing data, restarting the server, performing password reset, and changing the server configuration.
Privileges are implemented independently from access control instructions (ACI), which apply to LDAP operations and user data.
See also Access control instruction (ACI).
- Referential integrity
Ensuring that group membership remains consistent following changes to member entries.
referintlogServer log tracing referential integrity events, with entries similar to the errors log.
- Referral
Reference to another directory location, which can be another directory server running elsewhere or another container on the same server, where the current operation can be processed.
- Relative distinguished name (RDN)
Initial portion of a DN that distinguishes the entry from all other entries at the same level, such as
uid=bjenseninuid=bjensen,ou=People,dc=example,dc=com.- Replica
Directory server this is configured to use replication.
- Replication
Data synchronization that ensures all directory servers participating eventually share a consistent set of directory data.
replicationlogServer log tracing replication events, with entries similar to the errors log.
- Replication server
Server dedicated to transmitting replication messages. A standalone replication server does not store user data.
- REST to LDAP gateway
Standalone web application that translates RESTful HTTP requests from client applications to LDAP requests to directory services, and LDAP responses from directory services to HTTP responses to client applications.
- Root DSE
The directory entry with distinguished name "" (empty string), where DSE is an acronym for DSA-Specific Entry. DSA is an acronym for Directory Server Agent, a single directory server. The root DSE serves to expose information over LDAP about what the directory server supports in terms of LDAP controls, auth password schemes, SASL mechanisms, LDAP protocol versions, naming contexts, features, LDAP extended operations, and other information.
- Schema
LDAP schema defines the object classes, attributes types, attribute value syntaxes, matching rules and other constrains on entries held by the directory server.
- Search filter
See Filter.
- Search operation
LDAP lookup operation where a client requests that the server return entries based on an LDAP filter and a base DN under which to search.
- Simple authentication
Bind operation performed with a user's entry DN and user's password. Use simple authentication only if the network connection is secure.
- Size limit
Sets the maximum number of entries returned for a search.
- Static group
Group that enumerates member entries.
- Subentry
An entry, such as a password policy entry, that resides with the user data but holds operational data, and is not visible in search results unless explicitly requested.
- Substring index
Index used to match values specified with wildcards in the filter.
- Suffix
The distinguished name (DN) of a root entry in the Directory Information Tree (DIT), and also that entry and all its subordinates taken together as a single object of administrative tasks such as export, import, indexing, and replication.
- Superuser
User with privileges to perform unconstrained administrative actions on DS server. This account is analogous to the UNIX
rootand WindowsAdministratoraccounts.Superuser privileges include the following:
bypass-acl: The holder is not subject to access control.privilege-change: The holder can edit administrative privileges.proxied-auth: The holder can make requests on behalf of another user, including directory superusers.
The default superuser is
cn=Directory Manager. You can create additional superuser accounts, each with different administrative privileges.See also Directory manager, Privilege.
- Task
Mechanism to provide remote access to server administrative functions. DS software supports tasks to back up and restore backends, to import and export LDIF files, and to stop and restart the server.
- Time limit
Defines the maximum processing time DS devotes to a search operation.
- Unbind operation
LDAP operation to release resources at the end of a session.
- Unindexed search
Search operation for which no matching index is available. If no indexes are applicable, then the directory server potentially has to go through all entries to look for candidate matches. For this reason, the
unindexed-searchprivilege, which allows users to request searches for which no applicable index exists, is reserved for the directory manager by default.- User
An entry that represents an individual that can be authenticated through credentials contained or referenced by its attributes. A user may represent an internal user or an external user, and may be an active user or an inactive user.
- User attribute
An attribute for storing user data on a directory entry such as
mailorgivenname.- Virtual attribute
An attribute with dynamically generated values that appear in entries but are not persistently stored in the backend.
- Virtual directory
An application that exposes a consolidated view of multiple physical directories over an LDAP interface. Consumers of the directory information connect to the virtual directory's LDAP service. Behind the scenes, requests for information and updates to the directory are sent to one or more physical directories where the actual information resides. Virtual directories enable organizations to create a consolidated view of information that for legal or technical reasons cannot be consolidated into a single physical copy.
- Virtual list view (VLV) index
Browsing index designed to help the directory server respond to client applications that need, for example, to browse through a long list of results a page at a time in a GUI.
- Virtual static group
DS group that lets applications see dynamic groups as what appear to be static groups.
- X.500
A family of standardized protocols for accessing, browsing and maintaining a directory. X.500 is functionally similar to LDAP, but is generally considered to be more complex, and has consequently not been widely adopted.