Installing the Active Directory Password Synchronization Plugin
The following steps install the password synchronization on an Active directory server:
Download the Active Directory password synchronization plugin.
Install the plugin using one of the following methods:
Double-click the setup file to launch the installation wizard.
Alternatively, from a command-line, start the installation wizard with the
idm-setup.execommand. To save the settings in a configuration file, use the/saveinfswitch as follows:PS C:\path\to\dir> idm-setup.exe /saveinf=C:\temp\adsync.inf
If you have a configuration file with installation parameters, you can install the password plugin in silent mode as follows:
PS C:\path\to\dir> idm-setup.exe /verysilent /loadinf=C:\temp\adsync.inf
Provide the following information during the installation. You must accept the license agreement shown to proceed with the installation:
- OpenIDM Connection information
OpenIDM URL
Enter the URL where IDM is deployed, including the query that targets each user account. For example:
https://localhost:8444/openidm/managed/user?_action=patch&_queryFilter=userName+eq+'${samaccountname}'OpenIDM User Password attribute
The password attribute for the
managed/userobject, such aspassword.If the
passwordattribute does not exist in the IDMmanaged/userobject, the password sync service will return an error when it attempts to replay a password update that has been made in Active Directory. If your managed user objects do not include passwords, you can add anonCreatescript to the Active Directory > Managed Users mapping that sets an empty password when managed user accounts are created. The following excerpt of a samplesync.jsonfile shows such a script in the mapping:"mappings" : [ { "name" : "systemAdAccounts_managedUser", "source" : "system/ad/account", "target" : "managed/user", "properties" : [ { "source" : "sAMAccountName", "target" : "userName" } ], "onCreate" : { "type" : "text/javascript", "source" : "target.password=''" }, ...The onCreate script creates an empty password in the
managed/userobject, so that the password attribute exists and can be patched.
- OpenIDM Authentication Parameters
Provide the following information:
User name
Enter the name of an administrative user that can authenticate to IDM, for example,
openidm-admin.Password
Enter the password of the user that authenticates to IDM; for example,
openidm-admin.OAuth2 Access Token URL
If you are using the authentication type
OAuth2 Access Token, enter the token URL; for example:https://am.example.com/am/oauth2/realms/root/access_token
OAuth2 Scope
If you are using the authentication type
OAuth2 Access Token, enter the OAuth2 token scope; for examplefr:idm:*.Select authentication type
Select the authentication type that Active Directory will use to authenticate to IDM:
To use plain HTTP authentication, select OpenIDM Header.
To use SSL mutual authentication, select Certificate.
To use AM bearer tokens, select OAuth2 Access Token.
- Certificate authentication settings
If you selected
Certificateas the authentication type on the previous screen, specify the details of the certificate that will be used for authentication.Select Certificate file
Browse to select the certificate file that Active Directory will use to authenticate to IDM. The certificate file must be configured with an appropriate encoding, cryptographic hash function, and digital signature. The plugin can read a public or a private key from a PKCS #12 archive file.
For production purposes, you should use a certificate that has been issued by a Certificate Authority. For testing purposes, you can generate a self-signed certificate. Whichever certificate you use, you must import that certificate into the IDM truststore.
To generate a self-signed certificate for Active Directory, follow these steps:
On the Active Directory host, generate a private key, which will be used to generate a self-signed certificate with the alias
ad-pwd-plugin-localhost:> keytool.exe ^ -genkey ^ -alias ad-pwd-plugin-localhost ^ -keyalg rsa ^ -dname "CN=localhost, O=AD-pwd-plugin Self-Signed Certificate" ^ -keystore keystore.jceks ^ -storetype JCEKS Enter keystore password: changeit Re-enter new password: changeit Enter key password for <ad-pwd-plugin-localhost> <RETURN if same as keystore password>Now use the private key, stored in the
keystore.jceksfile, to generate the self-signed certificate:> keytool.exe ^ -selfcert ^ -alias ad-pwd-plugin-localhost ^ -validity 365 ^ -keystore keystore.jceks ^ -storetype JCEKS ^ -storepass changeit
Export the certificate. In this case, the keytool command exports the certificate in a PKCS #12 archive file format, used to store a private key with a certificate:
> keytool.exe ^
 -importkeystore ^
 -srckeystore keystore.jceks ^
 -srcstoretype jceks ^
 -srcstorepass changeit ^
 -srckeypass changeit ^
 -srcalias ad-pwd-plugin-localhost ^
 -destkeystore ad-pwd-plugin-localhost.p12 ^
 -deststoretype PKCS12 ^
 -deststorepass changeit ^
 -destkeypass changeit ^
 -destalias ad-pwd-plugin-localhost ^
 -noprompt
The PKCS #12 archive file is named
ad-pwd-plugin-localhost.p12. Import the contents of the keystore contained in this file to the system that hosts IDM. To do so, import the PKCS #12 file into the IDM keystore file, namedtruststore, in the/path/to/openidm/securitydirectory.On the machine that is running IDM, enter the following command:
keytool \
 -importkeystore \
 -srckeystore /path/to/ad-pwd-plugin-localhost.p12 \
 -srcstoretype PKCS12 \
 -destkeystore truststore \
 -deststoretype JKS
Password to open the archive file with the private key and certificate
Specify the keystore password (
changeit, in the previous example).
- Password Encryption settings
Provide the details of the certificate that will be used to encrypt password values.
Select certificate file
Browse to select the certificate that will be used for password encryption. The certificate format must be PKCS #12.
For evaluation purposes, you can use a self-signed certificate, as described earlier. For production purposes, you should use a certificate that has been issued by a Certificate Authority.
Whichever certificate you use, the certificate must be imported into the IDM keystore, so that IDM can locate the key with which to decrypt the data. To import the certificate into the IDM keystore,
keystore.jceks, run the following command on the IDM host (UNIX):keytool \ -importkeystore \ -srckeystore /path/to/ad-pwd-plugin-localhost.p12 \ -srcstoretype PKCS12 \ -destkeystore /path/to/openidm/security/keystore.jceks \ -deststoretype jceks
Private key alias
Specify the alias for the certificate, such as
ad-pwd-plugin-localhost. The password sync plugin sends the alias when communicating with IDM, which uses the alias to retrieve the corresponding private key in IDM's keystore.Update the IDM secret store (
conf/secrets.json) to add this certificate alias to theidm.defaultsecretId:"mappings": [ { "secretId": "idm.default", "types": [ "ENCRYPT", "DECRYPT" ], "aliases": [ "&{openidm.config.crypto.alias|openidm-sym-default}","ad-pwd-plugin-localhost" ] }, ... } ]For more information about secret stores, see "Configuring Secret Stores".
Password to open certificate file
Specify the password to access the PFX keystore file, such as
changeit, from the previous example.Select encryption standard
Specify the encryption standard that will be used when encrypting the password value (AES-128, AES-192, or AES-256).
- Data storage
Provide the details for the storage of encrypted passwords in the event that IDM is not available when a password modification is made.
Select the folder in which Service will store its output data files
The server should prevent access to this folder, except access by the
Password Sync service. The path name cannot include spaces.Directory poll interval (seconds)
Enter the number of seconds between calls to check whether IDM is available, for example,
60, to poll IDM every minute.
- Log storage
Provide the details of the messages that should be logged by the plugin.
Select the folder in which Service will store its log files
The path name cannot include spaces.
Select logging level
Select the severity of messages that should be logged, either
error,info,warning,fatal, ordebug.
- Select Destination Location
Setup installs the plugin in the location you select, by default
C:\Program Files\OpenIDM Password Sync.
After running the installation wizard, restart the computer.
If you selected
Certificateas the authentication type during setup, complete the following sub-steps; otherwise, your setup is now complete.The Password Sync Service uses Windows certificate stores to verify IDM's identity. The certificate that IDM uses must therefore be added to the list of trusted certificates on the Windows machine.
In a production environment, use a certificate that has been issued by a certificate authority. For test purposes, you can use the self-signed certificate that is generated by IDM on first startup.
To add the IDM certificate to the list of trusted certificates, use the Microsoft Management Console.
Select Start and type
mmcin the Search field.In the Console window, select File > Add/Remove Snap-in.
From the left hand column, select Certificates and click Add.
Select My user account, and click Finish.
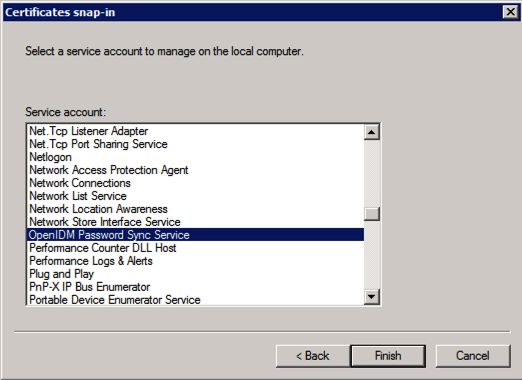
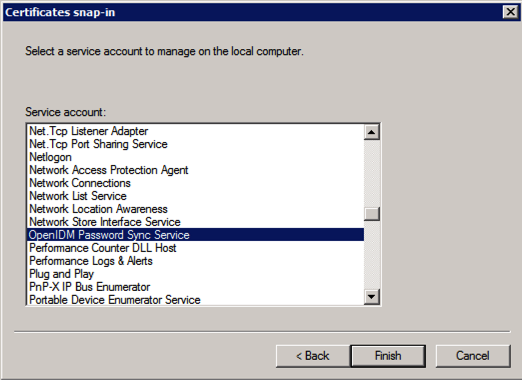
Repeat the previous two steps for Service account and Computer account.
For Service account, select Local computer, then select OpenIDM Password Sync Service.
For Computer account, select Local computer.
Click Finish when you have added the three certificate snap-ins.
Still in the Microsoft Management Console, expand Certificates - Current User > Personal and select Certificates.
Select Action > All Tasks > Import to open the Certificate Import Wizard.
Browse for the IDM certificate. If you have exported IDM's self-signed certificate, the certificate is
openidm-localhost.crt.Enter the Password for the certificate (
changeitby default, if you use the IDM self-signed certificate).Accept the default for the Certificate Store.
Click Finish to complete the import.
Repeat the previous six steps to import the certificate for:
Certificates - Current User > Trusted Root Certification AuthoritiesCertificates - Service > OpenIDM Password Sync\PersonalCertificates - Service > OpenIDM Password Sync\Trusted Root Certification AuthoritiesCertificates > Local Computer > PersonalCertificates > Local Computer > Trusted Root Certification Authorities
Password synchronization should now be configured and working. To test that the setup was successful, change a user password in Active Directory. That password should be synchronized to the corresponding IDM managed user account, and you should be able to query the user's own entry in IDM using the new password.