Gateway guide
This guide shows you how to set up examples that use IG. It is for access management designers and administrators who develop, build, deploy, and maintain IG for their organizations.
This guide assumes familiarity with the following topics:
-
Hypertext Transfer Protocol (HTTP), including how clients and servers exchange messages, and the role that a reverse proxy (gateway) plays
-
JavaScript Object Notation (JSON), which is the format for IG configuration files
-
Managing services on operating systems and application servers
-
Configuring network connections on operating systems
-
Managing Public Key Infrastructure (PKI) used to establish HTTPS connections
-
Access management for web applications
Depending on the features you use, you should also have basic familiarity with the following topics:
-
Structured Query Language (SQL) if you use IG with relational databases
-
Configuring AM if you use password capture and replay, or if you plan to follow the OAuth 2.0 or SAML 2.0 tutorials
-
The Groovy programming language if you plan to extend IG with scripts
-
The Java programming language if you plan to extend IG with plugins, and Apache Maven for building plugins
Example installation for this guide
Unless otherwise stated, the examples in this guide assume the following installation:
-
IG accessible on
http://ig.example.com:8080andhttps://ig.example.com:8443, as described in Quick install. -
Sample application installed on http://app.example.com:8081, as described in Use the sample application.
-
AM installed on http://am.example.com:8088/openam, with the default configuration.
If you use a different configuration, substitute in the procedures accordingly.
Set up AM
This documentation contains procedures for setting up items in AM that you can use with IG. For more information about setting up AM, refer to the Access Management docs.
Authenticate an IG agent to AM
|
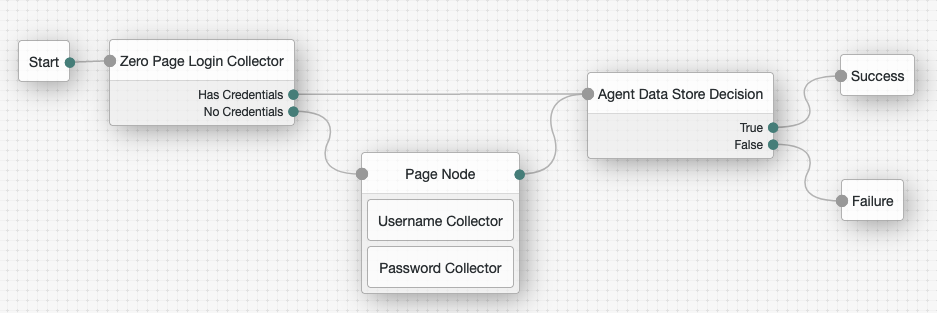
This section describes how to create an authentication tree to authenticate an IG agent to AM. The tree has the following requirements:
-
It must be called
Agent -
Its nodes must pass the agent credentials to the Agent Data Store Decision node.
When you define a tree in AM, that same tree is used for all instances of IG, Java agent, and Web agent. Consider this point if you change the tree configuration.
-
On the Realms page of the AM admin UI, choose the realm in which to create the authentication tree.
-
On the Realm Overview page, click Authentication > Trees > Create tree.
-
Create a tree named
Agent.The authentication tree designer is displayed, with the
Startentry point connected to theFailureexit point, and aSuccessnode.The authentication tree designer provides the following features on the toolbar:
Button Usage 
Lay out and align nodes according to the order they are connected.

Toggle the designer window between normal and full-screen layout.

Remove the selected node. Note that the
Startentry point cannot be deleted. -
Using the Filter bar, find and then drag the following nodes from the Components panel into the designer area:
-
Zero Page Login Collector node to check whether the agent credentials are provided in the incoming authentication request, and use their values in the following nodes.
This node is required for compatibility with Java agent and Web agent.
-
Page node to collect the agent credentials if they are not provided in the incoming authentication request, and use their values in the following nodes.
-
Agent Data Store Decision node to verify the agent credentials match the registered IG agent profile.
Many nodes can be configured in the panel on the right side of the page. Unless otherwise stated, do not configure the nodes and use only the default values. -
-
Drag the following nodes from the Components panel into the Page node:
-
Username Collector node to prompt the user to enter their username.
-
Password Collector node to prompt the user to enter their password.
-
-
Connect the nodes as follows and save the tree:
Register an IG agent in AM
In AM 7 and later versions, follow these steps to register an agent that acts on behalf of IG.
-
In the AM admin UI, select the top-level realm, and then select Applications > Agents > Identity Gateway.
-
Add an agent with the following configuration, leaving other options blank or with the default value:
-
For SSO
-
For CDSSO
-
Agent ID :
ig_agent -
Password :
password
-
Agent ID :
ig_agent -
Password :
password -
Redirect URL for CDSSO :
https://ig.ext.com:8443/home/cdsso/redirect -
Login URL Template for CDSSO: Configure this property to direct login to a custom URL instead of the default AM login page.
-
-
(Optional - From AM 7.5) Use AM’s secret service to manage the agent profile password. If AM finds a matching secret in a secret store, it uses that secret instead of the agent password configured in Step 2.
-
In the agent profile page, set a label for the agent password in Secret Label Identifier.
AM uses the identifier to generate a secret label for the agent.
The secret label has the format
am.application.agents.identifier.secret, where identifier is the Secret Label Identifier.The Secret Label Identifier can only contain characters
a-z,A-Z,0-9, and periods (.). It can’t start or end with a period. -
Select Secret Stores and configure a secret store.
-
Map the label to the secret. Learn more from AM’s mapping.
Note the following points for using AM’s secret service:
-
Set a Secret Label Identifier that clearly identifies the agent.
-
If you update or delete the Secret Label Identifier, AM updates or deletes the corresponding mapping for the previous identifier provided no other agent shares the mapping.
-
When you rotate a secret, update the corresponding mapping.
-
Set up a demo user in AM
AM is provided with a demo user in the top-level realm, with the following credentials:
-
ID/username:
demo -
Last name:
user -
Password:
Ch4ng31t -
Email address:
demo@example.com -
Employee number:
123
For information about how to manage identities in AM, refer to AM’s Identity stores.
Find the AM session cookie name
In routes that use AmService, IG retrieves AM’s SSO
cookie name from the ssoTokenHeader property or from AM’s
/serverinfo/* endpoint.
In other circumstances where you need to find the SSO cookie name, access
http://am-base-url/serverinfo/*. For example, access the
AM endpoint with curl:
$ curl http://am.example.com:8088/openam/json/serverinfo/*Set up PingOne
This documentation contains procedures for setting up items in PingOne that you can use with IG.
Create a PingOne test environment
Learn more from PingOne’s Adding an environment.
In the PingOne console, create a test environment with the following values:
-
Select a solution for your Environment: Build your own solution
-
Select solution(s) for your Environment:
PingOne SSO -
ENVIRONMENT NAME:
Test environment -
DESCRIPTION: OIDC
Test environment -
ENVIRONMENT TYPE:
Sandbox
Add a PingOne test user
Learn more from PingOne’s Adding a user.
In the PingOne test environment, select Directory > Users and add a user with the following values:
-
Given Name:
demo -
Family Name:
user -
Username:
demo -
Email:
demo@example.com -
Password:
Ch4ng31t.
You are required to change the password on first login.