Cryptographic Keys
DS servers use cryptographic keys for encryption, signing, and securing network connections.
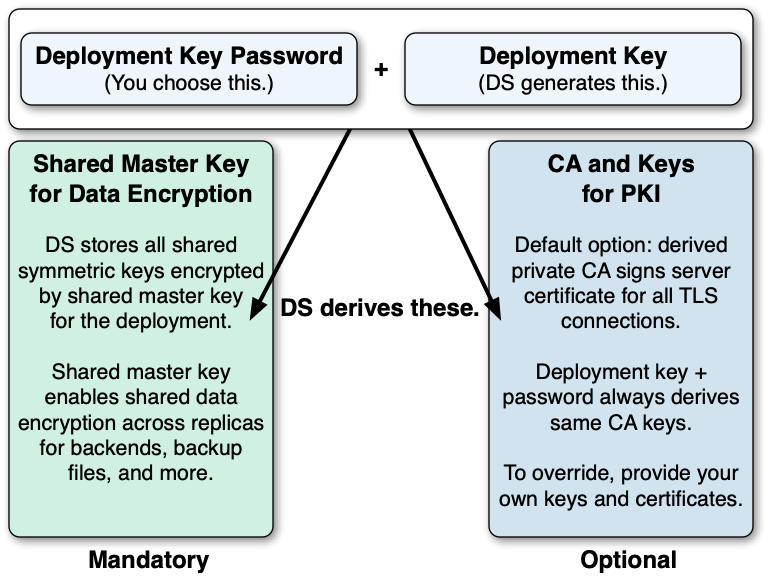
Deployment Keys
A deployment key is a random string generated by DS software. A deployment key password is a secret string at least 8 characters long that you choose. The two are a pair. You must have a deployment key's password to use the key.
Deployment keys enable the following:
A shared master key for the deployment.
DS replicas share secret keys for data encryption and decryption. When DS servers encrypt backend data, backup files, or passwords, each replica must be able to decrypt data encrypted on another peer replica.
To avoid exposing secret keys, DS servers encrypt secret keys with a shared master key. DS software uses a deployment key and its password to derive the master key.
A private PKI for trusted, secure connections.
A PKI serves to secure network connections from clients and other DS servers. The PKI is a trust network, requiring trust in the CA that signs public key certificates.
Building a PKI can be complex. You can use self-signed certificates, but you must distribute each certificate to each server and client application. You can pay an existing CA to sign certificates, but that has a cost, and leaves control of trust with a third party. You can set up a CA or certificate management software, but that can be a significant effort and cost. As a shortcut to setting up a private CA, DS software uses deployment keys and passwords.
DS software uses the deployment key and its password to generate key pairs without storing the CA private key.
Initially, you start without a deployment key.
To generate a new deployment key, either:
Use the dskeymgr create-deployment-key command to create a new key prior to installation.
Run the setup command for the first time without specifying a deployment key. The command displays a deployment key in its output.
You provide the deployment key password when generating the deployment key or setting up the server.
DS software uses the deployment key and password together to generate a CA key pair.
Every time you use the same deployment key and password, you get the same CA key.
Protect the deployment key password with the same care you would use to protect the CA private key.
DS software generates a server key pair used for secure communications in a new PKCS#12 keystore.
DS software signs the server certificate with the CA key.
DS software derives the shared master key for protecting secret keys, storing the master key in the PKCS#12 keystore.
DS software writes the CA certificate to the PKCS#12 keystore.
DS software discards the CA private key temporarily held in memory.
You can use the dskeymgr command with an existing deployment key and password to add the CA certificate to a truststore or export it in PEM file format. You can also use the command to generate a new server key pair with the certificate signed by the CA key. Furthermore, you can export the shared master key to another keystore if necessary.
This private CA alternative, using a deployment key and password instead, is not appropriate for signing server certificates in some situations:
External applications you do not control must be able to trust the server certificates.
In this case, use server certificates signed by a well-known CA.
Your deployment requires high security around CA private keys.
If the CA private key needs to be stored in an HSM that it never leaves, you cannot achieve the same level of security with a deployment key and password. The deployment key and password must be provided to sign a certificate, and cannot remain secure in an HSM. Furthermore, the CA private key used to sign the certificate is present in memory during the operation.
Secret Keys and Key Pairs
DS software uses two types of cryptographic keys:
Symmetric keys (also known as secret keys)
Asymmetric key pairs (public/private key pairs)
| Symmetric (Secret) Keys | Asymmetric Key Pairs | |
|---|---|---|
| Content | Single key, such as a random array of bits. | Pair of keys, one public, the other private. |
| Encryption | A single key serves to encrypt and to decrypt. | Data encrypted with a public key can only be decrypted with the private key, and vice versa. |
| Generation | Easier to generate, can be a random array of bits. | Harder to generate a matched pair of keys. |
| Speed | Faster. | Slower. |
| Distribution | Must be kept secret. Each party must have a copy. Secure channels must be established to exchange secret keys. | Public key can be shared with any party. Private key must be kept secret by owner. No secure channel is required to distribute public keys. Proving that a public key is valid and belongs to the issuer requires a trust network, such as a public key infrastructure (PKI). |
| Uses | Encrypting shared data. DS servers use secret keys for data confidentiality, and for encrypted backup files. |
DS software uses public/private key pairs to establish secure connections. DS servers can use public keys to authenticate clients. |
Asymmetric Keys
DS software stores asymmetric key pairs and trusted certificates in keystores. In the DS server configuration, key manager providers reference Java keystores. (Except for some ForgeRock Common Audit event handlers that manage their own keystores.) Trust manager providers also reference Java keystores. Components that access keys reference key manager providers for their certificates and private keys, and trust manager providers for trusted certificates. This enables, but does not require, reuse:
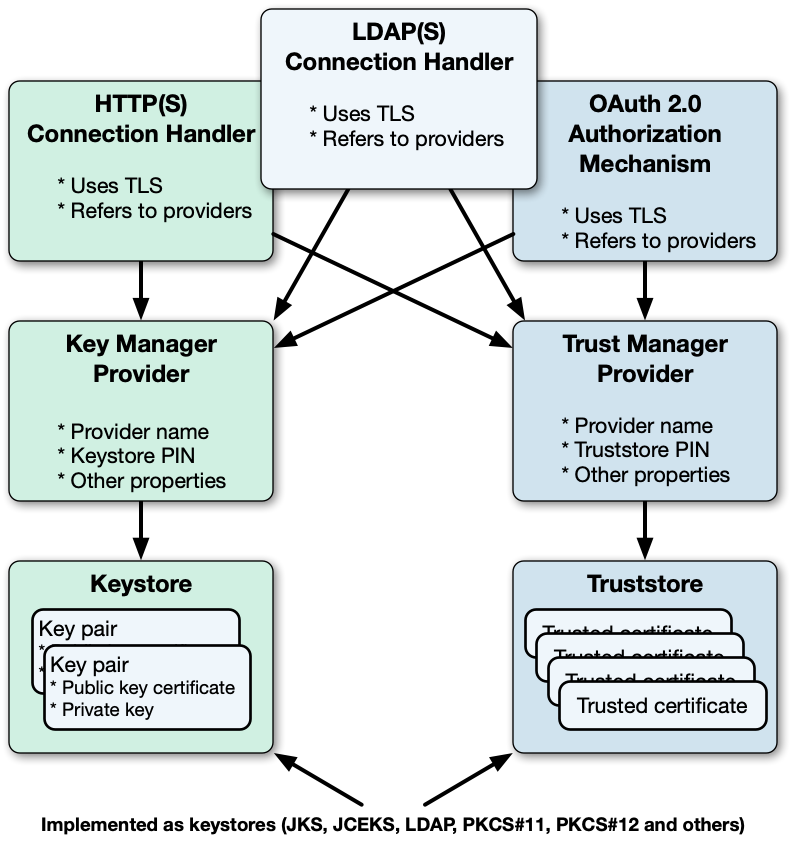
DS servers use keystores for server keys and trusted certificates. By default, each server stores keys in a file-based keystore, /path/to/opendj/config/keystore. The cleartext password is stored in a keystore.pin file next to the keystore file. This password serves as the password for the keystore and each private key.
The password for the keystore and for private keys must be the same. DS servers do not support using different passwords for the keystore and private keys.
By default, the keystore file holds these keys based on the deployment key and password:
The CA certificate
The shared master key
A key pair for secure communications
Symmetric Keys
DS servers encrypt data using symmetric keys. Servers store symmetric keys, encrypted with the shared master key, with the data they encrypt. As long as servers have the same shared master key, any server can recover symmetric keys needed to decrypt data.
Public Key Infrastructure
A public key infrastructure (PKI) is a set of procedures, roles, and policies required to enable parties to trust each other. A PKI makes it possible to trust that a public key belongs to its owner by enabling the following steps:
Each party in the PKI trusts one or more certificate authorities (CAs).
Trusting a CA means trusting that it owns its public key, that it maintains its private key secret, and that it only signs another party's certificate according to standard operating procedures.
The decision to trust a CA is a prerequisite for other operations, such as negotiating secure connections.
Trusting a CA equates to storing a trusted copy of the CA's certificate. The trusted copy is used to verify CA signatures.
Other trusted parties get their keys certified in one of the following ways:
A party wanting to use public key cryptography requests a CA-signed certificate for its key pair:
The owner generates a key pair with a public key to share and a private key to keep secret.
This key pair is generated for the public key subject (or owner).
The owner makes a certificate signing request to a trusted CA. The request includes the public key.
The CA verifies that the party making the request is indeed the party making the request. If so, the CA signs the certificate request, resulting in the signed public key certificate. The CA responds to the owner with the signed certificate as the response to the request.
Notice that the certificate is a digital document that certifies ownership of the public key. The certificate includes the public key and other information, such as the validity period, who the subject (owner) is, and the digital signature of the issuer CA who signed the certificate.
A party registers for an account with a service provider that uses certificate-based authentication.
The service provider, acting as a CA, issues a key pair including a certificate to the account owner over a secure channel. The service provider stores a copy of the certificate with the owner's account.
The owner stores the signed certificate, and shares it when necessary with other parties for public key encryption and signature verification.
It stores the private key in a safe manner and never shares it.
Another party wanting to trust the certificate must verify that the certificate is valid.
Certificate verification involves checking certificate information such as the following:
Whether the current time is in the range of the validity dates.
Whether the owner's subject identifier in the certificate matches some externally verifiable attribute of the owner, such as the DNS record of the host FQDN or the owner's email address.
Whether the certificate has been signed by a trusted party.
A public CA does not sign certificates with its root certificate directly. Instead, the CA issues signing certificates to itself, and uses them to sign other certificates. Trust is verified for the certificate chain, whereby the root certificate signature on the signing certificate makes it possible to trust the signing certificate. The signing certificate signature on the owner's certificate makes it possible to trust the owner's certificate.
Whether the party providing the certificate with the public key can prove that is has the corresponding private key.
For example, the verifier supplies a nonce for the party to sign with the private key, and verifies the signature with the public key in the certificate.
Ultimately, the chain of verification must:
End by determining that the issuer's signature is valid and trusted, and that the party providing the certificate is authenticated.
Fail at some point, in which case, the signature cannot be trusted.
This does not mean that the certificate is invalid. It does mean, however, that the party that wants to use the public key cannot be certain that it belongs to the owner, and so, cannot trust the public key.
This can happen when the party trying to use the public key does not have a means to trust the issuer who signed the certificate. For example, it has no trusted copy of the issuer's certificate.
Trusted Certificates
Secure connections between server and client applications are based on TLS. TLS depends on the use of digital certificates. By default, DS servers present their certificates when establishing a secure connection. This process fails if the client cannot trust the server certificate.
By default, DS client tools prompt you if they do not recognize the server certificate. DS servers have no one to prompt, so they refuse to accept a connection with an untrusted certificate. For ease of use, your deployment should enable secure connections without user interaction.
Automating trust is based on configuring applications to trust the CAs who sign the certificates. To achieve this, operating systems, JVMs, and web browsers ship with many trusted public CA certificates. On one hand, this prevents end users from having to understand PKI before using secure connections. On the other hand, it also introduces some risk. When public CAs are installed by default, the user must trust:
The software distribution mechanism used to obtain the original software and subsequent updates.
The software distributor to vet each CA and make sure the CA remains worthy of trust.
The CAs to perform their CA duties correctly.
The whole process to be safe from serious bugs.
Stronger security requires that you take more control. You can do this by using a private CA to distribute keys used for private communications.
| Use | Private CA | Public CA | Rationale |
|---|---|---|---|
| Private connections | | You control both parties making the connection. | |
| Public connections | | Your service publishes information over HTTPS or LDAPS to unknown end user clients. Your service connects as a client to public HTTPS or LDAPS services. | |
| Mutual TLS | | When your private CA signs the client certificate, store certificate information for authentication on the client's entry in the directory. | |
| Replication | | Replication messages are private to your service. | |
| Service administration | | Service administration is private to your service. |
Key Management
Choose the appropriate method to renew an expiring certificate:
If you set up the server with a deployment key, renew with the dskeymgr command:
$ dskeymgr \
 create-tls-key-pair \
 --deploymentKey $DEPLOYMENT_KEY \
 --deploymentKeyPassword password \
 --keyStoreFile /path/to/opendj/config/keystore \
 --keyStorePasswordFile /path/to/opendj/config/keystore.pin \
 --hostname localhost \
 --hostname ds.example.com \
 --subjectDn CN=DS,O=ForgeRock
If you use a CA, renew the CA signature:
Create a certificate signing request.
Have the request signed by the CA you use.
Import the signed certificate from the CA reply.
If you used a self-signed certificate, sign it again, and distribute the new certificate as appropriate.
Have each server and client application that trusted the old certificate import the renewed certificate.
For details, see "Trust a Server Certificate".
Choose the appropriate method to replace or rotate a key pair used for secure communications:
If you set up the server with a deployment key, use the dskeymgr command:
$ dskeymgr \
 create-tls-key-pair \
 --deploymentKey $DEPLOYMENT_KEY \
 --deploymentKeyPassword password \
 --keyStoreFile /path/to/opendj/config/keystore \
 --keyStorePasswordFile /path/to/opendj/config/keystore.pin \
 --hostname localhost \
 --hostname ds.example.com \
 --subjectDn CN=DS,O=ForgeRock
If you provided your own keys in the server keystore, do the following:
Generate a new key pair in the server keystore with a new alias.
If you use a CA, get the certificate signed by the CA.
If you use a self-signed certificate, distribute the certificate for import by all servers and clients that trust your server.
(Optional) Once the old key pair is no longer used anywhere, delete the keys using the keytool -delete command with the old alias.
You do not need to retire secret keys for the following, because encryption is only performed once per key:
Backup uses a new secret key for each file.
Confidential replication changelog backends use a new secret key for each file.
You can retire secret keys for confidential database backends:
Change the cipher-key-length property for the backend.
Each time you change the setting, the server generates a new secret key. After you retire the key, DS servers will only use that key for decryption, not for encryption.
Follow these steps if you must:
Renew an expiring deployment key-based CA.
The default validity period is 10 years.
Replace a lost or compromised deployment key password.
Generate a new deployment key with a new password:
$ dskeymgr \
 create-deployment-key \
 --outputFile new.deployment.key \
 --deploymentKeyPassword password
On each server, add the new shared master key:
$ dskeymgr \
 export-master-key-pair \
 --alias new-master-key \
 --deploymentKey "$(<new.deployment.key)" \
 --deploymentKeyPassword password \
 --keyStoreFile /path/to/opendj/config/keystore \
 --keyStorePasswordFile /path/to/opendj/config/keystore.pin
Servers continue to use the existing shared master key to decrypt existing symmetric keys. Do not overwrite a shared master key that is already in use.
On each server that uses the deployment key for PKI, add the new CA certificate:
$ dskeymgr \
 export-ca-cert \
 --alias new-ca-cert \
 --deploymentKey "$(<new.deployment.key)" \
 --deploymentKeyPassword password \
 --keyStoreFile /path/to/opendj/config/keystore \
 --keyStorePasswordFile /path/to/opendj/config/keystore.pin
Also distribute the new CA certificate to any client applications that rely on the old CA certificate.
On each server that uses the deployment key for PKI, renew the key pair used for secure communications.
Before completing this step, make sure you have added the new CA certificate on all servers. Any peer servers missing the new CA certificate will not trust the new keys:
$ dskeymgr \
 create-tls-key-pair \
 --deploymentKey "$(<new.deployment.key)" \
 --deploymentKeyPassword password \
 --keyStoreFile /path/to/opendj/config/keystore \
 --keyStorePasswordFile /path/to/opendj/config/keystore.pin \
 --hostname localhost \
 --hostname ds.example.com \
 --subjectDn CN=DS,O=ForgeRock
Also renew any client application key pairs that were generated using the old deployment key and password.
On each server, update the master key alias to use the new key:
$ dsconfig \
 set-crypto-manager-prop \
 --set master-key-alias:new-master-key \
 --hostname localhost \
 --port 4444 \
 --bindDN uid=admin \
 --bindPassword password \
 --usePkcs12TrustStore /path/to/opendj/config/keystore \
 --trustStorePasswordFile /path/to/opendj/config/keystore.pin \
 --no-prompt
Stop trusting the old CA certificate by removing all references to it.
For example, remove the old CA certificate from all client and server truststores.
When installing a new server after replacing deployment keys:
Use the new deployment key to set up the server, and do not start the server at setup time.
Copy the keystore and PIN from an existing server, overwriting the existing keystore and PIN.
This adds the older shared master key to the new server's keystore.
Renew the local key pair used for secure communications using the new deployment key.
Start the server.
These steps let the DS server trust a self-signed client application certificate:
Note
If you control the application, issue the client a certificate from a private CA instead.
For an example, see "Certificate-Based Authentication".
Import the self-signed client certificate.
The following example imports the client certificate into the default truststore:
$
keytool \ -import \ -trustcacerts \ -alias myapp-cert \ -file myapp-cert.pem \ -keystore /path/to/opendj/config/keystore \ -storepass:file /path/to/opendj/config/keystore.pin \ -storetype PKCS12 \ -nopromptCertificate was added to keystoreIf the truststore was provided during the setup process, specify the truststore and password.
These steps let a client trust the DS server.
If the server certificate was signed by a well-known CA, the client may not have to configure any further trust.
To trust a certificate signed using a deployment key and password, get the CA certificate. Either:
Copy the server's truststore file and PIN.
Export the CA certificate as a PEM format file, as described in "Export a Deployment Key CA Certificate".
For an unknown CA or a self-signed server certificate follow these steps:
Export the CA certificate from its truststore or the server certificate from the server keystore.
You can export the certificate in PEM format using the keytool -exportcert -rfc command.
Some client applications can use the PEM format directly.
If the client uses a Java truststore, import the certificate into the client truststore.
You can import the server certificate using the keytool -import -trustcacerts command.
These steps let the DS server trust a CA. If the CA's certificate is included with Java, you can let the server use the JVM truststore.
If the CA is not well-known, you can import the trusted CA certificate into a truststore:
Import the certificate as a CA certificate.
The following example imports the CA certificate into the default truststore.
$
keytool \ -import \ -trustcacerts \ -alias my-ca-cert \ -file ca.pem \ -keystore /path/to/opendj/config/keystore \ -storepass:file /path/to/opendj/config/keystore.pin \ -storetype PKCS12 \ -nopromptCertificate was added to keystoreIf the truststore was provided during the setup process, specify the truststore and password.
If no trust manager provider is configured to access the truststore, create one.
For reference, see "create-trust-manager-provider".
Also, configure connection handlers to use the new trust manager provider.
A wildcard certificate uses a * to replace the top-level subdomain in the subject FQDN. It can list domains in the subject alternative domain list:
Generate a key pair with a wildcard certificate:
$ dskeymgr \
 create-tls-key-pair \
 --deploymentKey $DEPLOYMENT_KEY \
 --deploymentKeyPassword password \
 --hostname localhost \
 --hostname "*.example.com" \
 --subjectDn CN=DS,CN=Example,CN=com \
 --keyStoreFile /path/to/opendj/config/keystore \
 --keyStorePasswordFile /path/to/opendj/config/keystore.pin
Generate a server key pair in the existing server keystore.
Many client applications will check that the server's DNS name in the certificate matches the server hostname.
Find the hostname for the server in the status command output. When creating the key pair, set it as a
DNSNamein the certificate'sSubjectAlternativeNamelist. If the server can respond on multiple FQDNs, use multiple subject alternative names.Create a certificate signing request
.csrfile for the generated certificate.Have the CA sign the request in the
.csrfile.See the instructions from your CA on how to provide the request.
The CA returns the signed certificate, for example, in a
.crtfile.(Optional) If you have set up your own CA and signed the certificate, or are using a CA whose certificate is not included in the Java runtime environment, import the CA certificate into the DS keystore and truststore so that it can be trusted.
For an example command, see "Trust a CA Certificate".
Import the signed certificate, such as the
.crtfile, from the CA reply into the keystore where you generated the key pair.If you use a CA certificate that is not known to clients, such as a CA that you set up yourself rather than a well-known CA, import the CA certificate into the client application truststore. For an example command, see "Trust a CA Certificate".
Otherwise the client application cannot trust the signature on the server certificate.
Generate a server key pair in the existing server keystore.
The certificate is considered self-signed, because the issuer DN and subject DN are the same.
Many client applications will check that the server's DNS name in the certificate matches the server hostname.
Find the hostname for the server in the status command output. When creating the key pair, set it as a
DNSNamein the certificate'sSubjectAlternativeNamelist.
To use an alternative keystore implementation, start with a different keystore type when generating the keypair.
Important
When generating a key pair for TLS with the keytool command, set the -keyalg option to EC or RSA for compatibility with TLSv1.3.
The -keyalg DSA option is not compatible with TLSv1.3.
Use one of the keystore types supported by the Java runtime environment:
- Java Keystore
The basic Java keystore type is
JKS:$
keytool \ -genkeypair \ -keyalg EC \ -alias new-keys \ -ext "san=dns:ds.example.com" \ -dname "CN=ds.example.com,O=Example Corp,C=FR" \ -keystore /path/to/new-keystore.jks \ -storetype JKS \ -storepass:env KEYSTORE_PASSWORD \ -keypass:env KEYSTORE_PASSWORDThis is the keystore type if you do not specify a
-storetypeoption.- Java Cryptography Extension Keystore
The
JCEKStype implements additional Java cryptography extensions and stronger protection for private keys:$
keytool \ -genkeypair \ -keyalg EC \ -alias new-keys \ -ext "san=dns:ds.example.com" \ -dname "CN=ds.example.com,O=Example Corp,C=FR" \ -keystore /path/to/new-keystore.jceks \ -storetype JCEKS \ -storepass:env KEYSTORE_PASSWORD \ -keypass:env KEYSTORE_PASSWORD- PKCS#11 device
A PKCS#11 device, such as an HSM, can be used as a keystore.
For details, see "PKCS#11 Hardware Security Module".
- PKCS#12 Keystore
The
PKCS12type lets you use a PKCS#12 format file. This is the default for DS servers. It is a standard format and is interoperable with other systems that do not use Java:$
keytool \ -genkeypair \ -keyalg EC \ -alias new-keys \ -ext "san=dns:ds.example.com" \ -dname "CN=ds.example.com,O=Example Corp,C=FR" \ -keystore /path/to/new-keystore \ -storetype PKCS12 \ -storepass:env KEYSTORE_PASSWORD \ -keypass:env KEYSTORE_PASSWORD
After using an alternate keystore type, make sure that you set up:
The key manager provider to open the correct keystore with the correct credentials.
Any components using that key manager provider to use the correct certificate alias.
Use the dskeymgr command to generate a deployment key for testing.
This example records the deployment key in a file:
$ dskeymgr \
 create-deployment-key \
 --deploymentKeyPassword password \
 --outputFile test.deployment.key
If you do not specify the deployment key password or file containing the password, the tool prompts you for the password interactively.
Use this deployment key when setting up test servers. The test servers trust each others' certificates.
Applications like DS servers that can use a PKCS#12 truststore can use the config/keystore and config/keystore.pin from a test server set up with the deployment key.
For applications that require a PEM format certificate, use the dskeymgr command:
$ dskeymgr \
 export-ca-cert \
 --deploymentKey $DEPLOYMENT_KEY \
 --deploymentKeyPassword password \
 --outputFile ca-cert.pem
PKCS#11 Hardware Security Module
DS servers support key management using a PKCS#11 token store. The PKCS#11 standard defines a cryptographic token interface, a platform-independent API for storing keys in an HSM, for example.
Important
DS servers use a PKCS#11 keystore only to hold asymmetric key pairs and, optionally, CA certificates. (DS servers and client tools can store CA certificates in separate truststores. Client tools and client applications are not required to use the PKCS#11 keystore at all.) The asymmetric key pairs include TLS keys, and the shared master key for the deployment.
DS servers do not store symmetric (secret) encryption keys in the keystore. They store symmetric keys, encrypted with the shared master key, with the data they encrypt.
The symmetric keys cannot be stored in an HSM, but the shared master key potentially can. The HSM must be able to share the master key with all DS servers in the deployment, so that each server can decrypt symmetric keys that were encrypted with the master key.
Using a PKCS#11 device for storing DS keys involves:
Storing the keys on the PKCS#11 device.
How you store keys in a device such as an HSM depends on the device. For details, see the documentation for your device.
Creating the DS PKCS11 key manager provider to access the device.
The DS server accesses a PKCS#11 device using a PIN. The PIN can be provided in the server configuration, in a separate file, or as the value of an environment variable or Java system property. The PIN must be stored as a cleartext value, so take care to protect it in production environments.
Configuring other components to use the key manager provider.
For example, DS connection handlers and OAuth 2.0 authorization mechanisms requiring mutual TLS can reference the key manager provider in their configurations.
The following procedures demonstrate how to use the SoftHSM PKCS#11 software device for evaluation, development, and testing:
The procedures uses the sun.security.pkcs11.SunPKCS11 provider implementation with SoftHSM. If you use a different Java implementation, see the documentation for details on how to use PKCS#11 devices with your JVM:
Install SoftHSM, including the configuration and the
SOFTHSM2_CONFenvironment variable.For details, see the SoftHSM documentation, using the following hints:
Make sure you can write tokens to SoftHSM:
$
cat $SOFTHSM2_CONF# SoftHSM v2 configuration file # You must be able to write to the token dir when initializing the device: directories.tokendir = /path/to/softhsm/tokens objectstore.backend = file # ERROR, WARNING, INFO, DEBUG log.level = INFOKeep track of the PINs that you enter when initializing the device:
$
softhsm2-util --init-token --slot 0 --label "My token 1"*** SO PIN (4-255 characters) *** Please enter SO PIN: Please reenter SO PIN: *** User PIN (4-255 characters) *** Please enter user PIN: Please reenter user PIN: The token has been initialized.The SO PIN is to reinitialize the token.
The user PIN is the one the DS server needs to access the device.
Generate a key pair on the device:
To use the Java keytool command with the device, create a PKCS#11 configuration file that is used by the security provider implementation:
$
cat /path/to/softhsm/hsm.confname = SoftHSM library = /path/to/softhsm/2.0.0/lib/softhsm/libsofthsm2.so slot = 0 attributes(generate, *, *) = { CKA_TOKEN = true } attributes(generate, CKO_CERTIFICATE, *) = { CKA_PRIVATE = false } attributes(generate, CKO_PUBLIC_KEY, *) = { CKA_PRIVATE = false } attributes(*, CKO_SECRET_KEY, *) = { CKA_PRIVATE = false }Notes regarding the configuration file:
The format is described in the Java PKCS#11 Reference Guide.
The
librarymust point to the SoftHSMlibsofthsm2.solibrary.The
slotmust be one used when initializing the device.
Using the configuration file, generate the key pair.
The following example generates a key pair with the alias
server-cert:$
keytool \ -genkeypair \ -alias server-cert \ -keyalg EC \ -keysize 2048 \ -ext "san=dns:ds.example.com" \ -dname "CN=ds.example.com,O=Example Corp,C=FR" \ -keystore NONE \ -storetype PKCS11 \ -providerClass sun.security.pkcs11.SunPKCS11 \ -providerArg /path/to/softhsm/hsm.confEnter keystore password:The keystore password is the user PIN.
Self-sign the public key certificate:
$
keytool \ -selfcert \ -alias server-cert \ -keystore NONE \ -storetype PKCS11 \ -providerClass sun.security.pkcs11.SunPKCS11 \ -providerArg /path/to/softhsm/hsm.confEnter keystore password:The keystore password is the user PIN.
Using a CA-signed cert is similar, but not shown here.
Make sure you have the plain text PIN.
With SoftHSM, this is the user PIN set when initializing the slot where you stored the keys.
Make sure that the Java environment can find SoftHSM with its configuration.
For example, add a provider definition by using an extra Java security properties file as in the following example. In this example, 10 security providers are already defined in the system
java.securityfile. The configuration must use the next available key, which issecurity.provider.11:# Define the additional security provider in the extra file: $
cat /path/to/opendj/config/java.security# Security provider for accessing SoftHSM: security.provider.11=sun.security.pkcs11.SunPKCS11 /path/to/softhsm/hsm.conf# Use the extra file when starting the DS server: $grep java.security /path/to/opendj/config/java.propertiesstart-ds.java-args=-server -Djava.security.properties=/path/to/opendj/config/java.security# Restart the DS server so the changes take effect: $stop-ds --restartCreate the PKCS#11 key manager provider configuration.
The following example creates a provider for SoftHSM with a protected PIN file:
$
touch /path/to/opendj/config/softhsm.pin$chmod 600 /path/to/opendj/config/softhsm.pin$vi /path/to/opendj/config/softhsm.pin# Add the user PIN on the first and only line in the file, and save your work. $dsconfig \ create-key-manager-provider \ --hostname localhost \ --port 4444 \ --bindDN uid=admin \ --bindPassword password \ --provider-name SoftHSM \ --type pkcs11 \ --set enabled:true \ --set key-store-pin:"&{file:/path/to/opendj/config/softhsm.pin}" \ --usePkcs12TrustStore /path/to/opendj/config/keystore \ --trustStorePasswordFile /path/to/opendj/config/keystore.pin \ --no-promptDS key manager providers also support storing the PIN in the configuration, in an environment variable, or in a Java property.
Set a connection handler or authorization mechanism to use the PKCS#11 key manager provider.
The following example configures the LDAPS connection handler to use the SoftHSM provider:
$ dsconfig \
 set-connection-handler-prop \
 --hostname localhost \
 --port 4444 \
 --bindDN uid=admin \
 --bindPassword password \
 --handler-name LDAPS \
 --set listen-port:1636 \
 --set enabled:true \
 --set use-ssl:true \
 --set key-manager-provider:SoftHSM \
 --usePkcs12TrustStore /path/to/opendj/config/keystore \
 --trustStorePasswordFile /path/to/opendj/config/keystore.pin \
 --no-prompt
Verify that the secure connection negotiation works with the HSM configured:
$
ldapsearch \ --hostname ds.example.com \ --port 1636 \ --useSSL \ --baseDN dc=example,dc=com \ "(uid=bjensen)" \ cnThe server is using the following certificate: Subject DN: CN=ds.example.com, O=Example Corp, C=FR Issuer DN: CN=ds.example.com, O=Example Corp, C=FR Validity: <validity-period> Do you wish to trust this certificate and continue connecting to the server? Please enter "yes" or "no":yesdn: uid=bjensen,ou=People,dc=example,dc=com cn: Barbara Jensen cn: Babs Jensen