Guide to installing and evaluating ForgeRock® Identity Management software. This software offers flexible services for automating management of the identity life cycle.
ForgeRock Identity Platform™ serves as the basis for our simple and comprehensive Identity and Access Management solution. We help our customers deepen their relationships with their customers, and improve the productivity and connectivity of their employees and partners. For more information about ForgeRock and about the platform, see https://www.forgerock.com.
This guide shows you how to install and get started with ForgeRock Identity Management software.
This guide is written for identity management developers and administrators who build, deploy, and maintain ForgeRock Identity Management services for their organizations. This guide covers the tasks you need to quickly get ForgeRock Identity Management software running on your system.
As you read this guide, you will see how ForgeRock Identity Management software reconciles customer identity data to ensure accurate information across disparate resources within an organization.
You will also read about what ForgeRock Identity Management software can do in the areas of provisioning, self-service workflows, and password management. You will see how ForgeRock Identity Management software can connect to a variety of remote data stores, with links to detailed documentation.
For example, engineers might access their systems through Active Directory accounts. Those same engineers might need to update their information in a Human Resources database, stored in a separate LDAP directory. With ForgeRock Identity Management software, you can keep those user identities synchronized, so each engineer only has to update their data once.
ForgeRock publishes comprehensive documentation online:
The ForgeRock Knowledge Base offers a large and increasing number of up-to-date, practical articles that help you deploy and manage ForgeRock software.
While many articles are visible to community members, ForgeRock customers have access to much more, including advanced information for customers using ForgeRock software in a mission-critical capacity.
ForgeRock product documentation, such as this document, aims to be technically accurate and complete with respect to the software documented. It is visible to everyone and covers all product features and examples of how to use them.
The ForgeRock.org site has links to source code for ForgeRock open source software, as well as links to the ForgeRock forums and technical blogs.
If you are a ForgeRock customer, raise a support ticket instead of using the forums. ForgeRock support professionals will get in touch to help you.
Whenever you need access to important information, administrators need to know who you are. They need to know your identity, which may be distributed in multiple accounts.
As a user, you might have several accounts even within your own company, for functions such as:
Email
Human Resources
Payroll
Engineering, Support, Accounting, and other functions
Each of these accounts may be stored in different resources, such as DS, Active Directory, OpenLDAP, and more. Keeping track of user identities in each of these resources (also known as data stores) can get complex. IDM simplifies the process, as it reconciles differences between resources.
With situational policies, IDM can handle discrepancies such as a missing or updated address for a specific user. The server includes default but configurable policies to handle such conditions. In this way, consistency and predictability is ensured, in an otherwise chaotic resource environment.
IDM can make it easier to track user identities across these resources. IDM has a highly scalable, modular, readily deployable architecture that can help you manage workflows and user information.
This software allows you to simplify the management of identity, as it can help you synchronize data across multiple resources. Each organization can maintain control of accounts within their respective domains.
IDM works equally well with user, group, and device identities.
You can also configure workflows to help users manage how they sign up for accounts, as part of how IDM manages the life cycle of users and their accounts.
You can manage employee identities as they move from job to job. You will make their lives easier as their user accounts can be registered on different systems automatically. Later, IDM can increase productivity when it reconciles information from different accounts, saving users the hassle of entering the same information on different systems.
In this guide, you will see how IDM reconciles user data between two data stores. We will look at a department that is adding a third engineer, Jane Sanchez.
Your Human Resources department has updated their data store with Jane Sanchez's information. You want to use IDM to update the internal Engineering data store. But first, you have to start IDM.
This section covers what you need to have on your system before running IDM:
Operating System: Windows or UNIX/Linux.
Java: Java Runtime Environment (JRE) Standard Edition (Java SE) version 8 or 11. Alternatively, you can use the same version of the Java Development Kit (JDK). On Linux, you can also install the OpenJDK package native to your updated Linux distribution.
At least 10 GB of free disk space.
At least 1 GB of free RAM.
If your operating system includes a firewall, make sure that it allows traffic through (default) ports 8080 and 8443.
Note that this Getting Started document is provided for demonstration purposes only.
The aim of this document is to make it as easy as possible to set up a demonstration of IDM software. To that end, the document has been written for installations on a desktop operating system not supported by ForgeRock, Microsoft Windows 7.
For a list of software that ForgeRock supports in production, see "Before You Install" in the Release Notes. The details in the Release Notes supersede any information shown in this guide.
On Windows systems, after installing Java, set the
JAVA_HOME environment variable. To do so on Windows 7,
take the following steps:
Locate your JRE or JDK installation directory. For a default Java installation on Windows 7, you should find the directory here:
C:\Program Files\Java\jre-version.Select Start > Control Panel > System and Security > Advanced System Settings to open a System Properties window.
Select Advanced > Environment Variables.
Set the value of
JAVA_HOMEto match the JRE or JDK installation directory.These changes are applied the next time you log in or open a new command line console such as PowerShell.
This procedure assumes that you are starting IDM as a regular
(not administrative) user named user.
Download IDM from the ForgeRock BackStage download site. Releases on the ForgeRock BackStage download site are thoroughly validated for ForgeRock customers who run the software in production deployments, and for those who want to try or test a given release.
Extract the contents of the IDM binary file to your user's
Downloadsdirectory. The process should unpack the contents to theDownloads/openidmsubdirectory.Navigate to the
Downloads/openidmsubdirectory:In Microsoft Windows, use Windows Explorer to navigate to the
C:\Users\user\Downloads\openidmdirectory.Double-click the
getting-started(.bat)file. Do not select thegetting-started.shfile, as that is intended for use on UNIX/Linux systems.In Linux/UNIX, open a command-line interface and run the following commands:
$ cd /home/user/Downloads/openidm
$ ./getting-started.sh
You should see the following message:
-> OpenIDM ready
When the server is ready, you can administer it from a web browser. To do so,
navigate to http://localhost:8080/admin or
https://localhost:8443/admin. If you have
installed the server on a remote system, substitute that hostname or IP
address for localhost.
Note
In production, you should connect to IDM via the default secure port, 8443, and import a signed certificate into the truststore, as discussed in "Accessing IDM Keys and Certificates" in the Integrator's Guide.
Until you install that certificate, you will see a warning in your browser at least the first time you access IDM over a secure port.
The default username and password for the IDM Administrator is
openidm-admin and openidm-admin.
When you log into IDM at a URL with the
/admin endpoint, you are logging into the Administrative
User Interface, also known as the Admin UI.
Warning
The default password for the administrative user,
openidm-admin, is openidm-admin.
To protect your deployment in production, change this password.
All users, including openidm-admin, can change their
password through the End User UI, at http://localhost:8080/ or
https://localhost:8443/.
In a production deployment, you can have any number of external data stores, such as Active Directory and ForgeRock Directory Services (DS). For illustration purposes, this guide uses two simple static files as external data stores:
hr.csvrepresents the Human Resources data store. It is in CSV format, commonly used to share data between spreadsheet applications.engineering.csvrepresents the Engineering data store. It is also in CSV format.
You can find these files in the binary package that you downloaded earlier,
in the following subdirectory:
openidm/samples/getting-started/data.
Now that you have installed IDM with a "Getting Started" configuration, you will learn how information is reconciled between two data stores.
While the reconciliation demonstrated in this guide uses two simplified data files, you can set up the same operations at an enterprise level on a variety of resources.
Return to the situation described earlier, where you have Jane Sanchez joining the engineering department. The following illustration depicts what must be done to reconcile the differences.
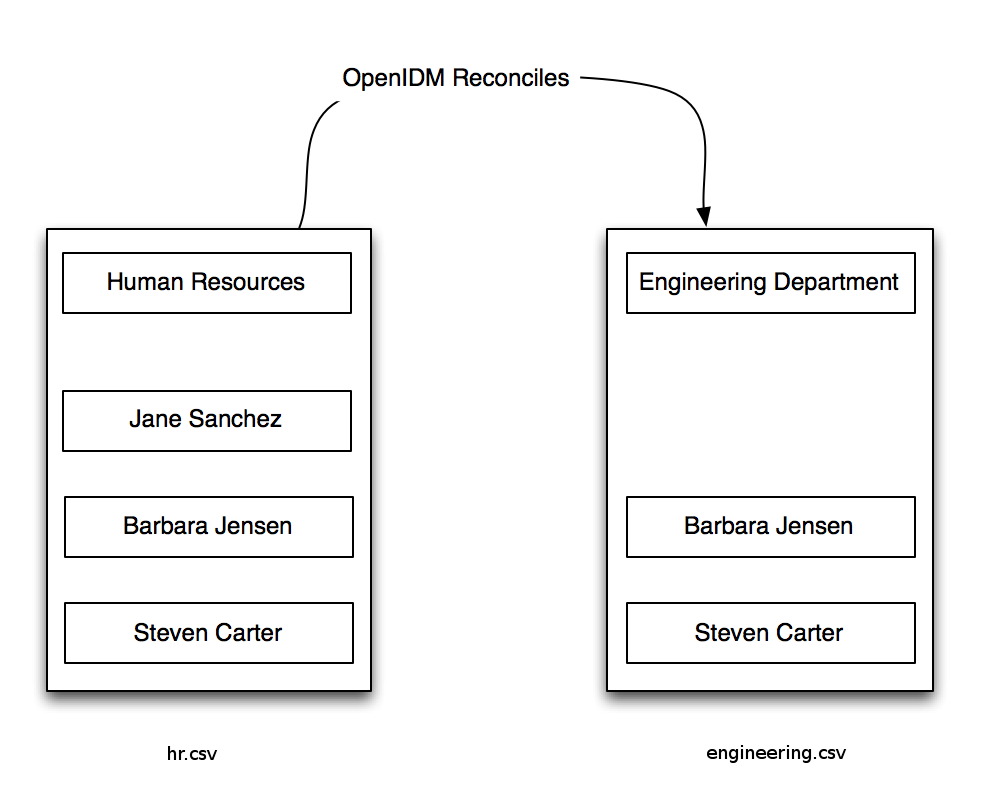
A central feature of IDM is reconciliation - comparing the contents of two data stores and deciding what to do, depending on the differences.
This scenario is based on two data files:
hr.csv, which represents the Human Resources data storeengineering.csv, which represents the Engineering data store
Reconciliation modifies the Engineering data store by adding the newly hired Jane Sanchez. As suggested by the following illustration, it will also address detailed differences between Jane's Human Resources account and the Engineering data store.

This sample includes configuration files that map detailed information from
the Human Resources data store to the Engineering data store. For example,
the configuration maps the firstName entry in Human
Resources to the firstname entry in Engineering.
Note
Mapping between data stores may require additional configuration. You should
find two provisioner.openicf-*.json files in the
/path/to/openidm/samples/getting-started/conf
subdirectory. The provisioner files configure connections to external
resources, such as Active Directory, ForgeRock Directory Services (DS)
or even the engineering.csv and hr.csv
files used in this guide. For more information, see "Connecting to External Resources" in the Integrator's Guide.
In the Admin UI, you can see how the different categories are reconciled for
user Jane Sanchez. Log in to the Admin UI at
https://localhost:8443/admin. The default username is
openidm-admin and default password is
openidm-admin.
Select Configure > Mappings >
HumanResources_Engineering > Edit.
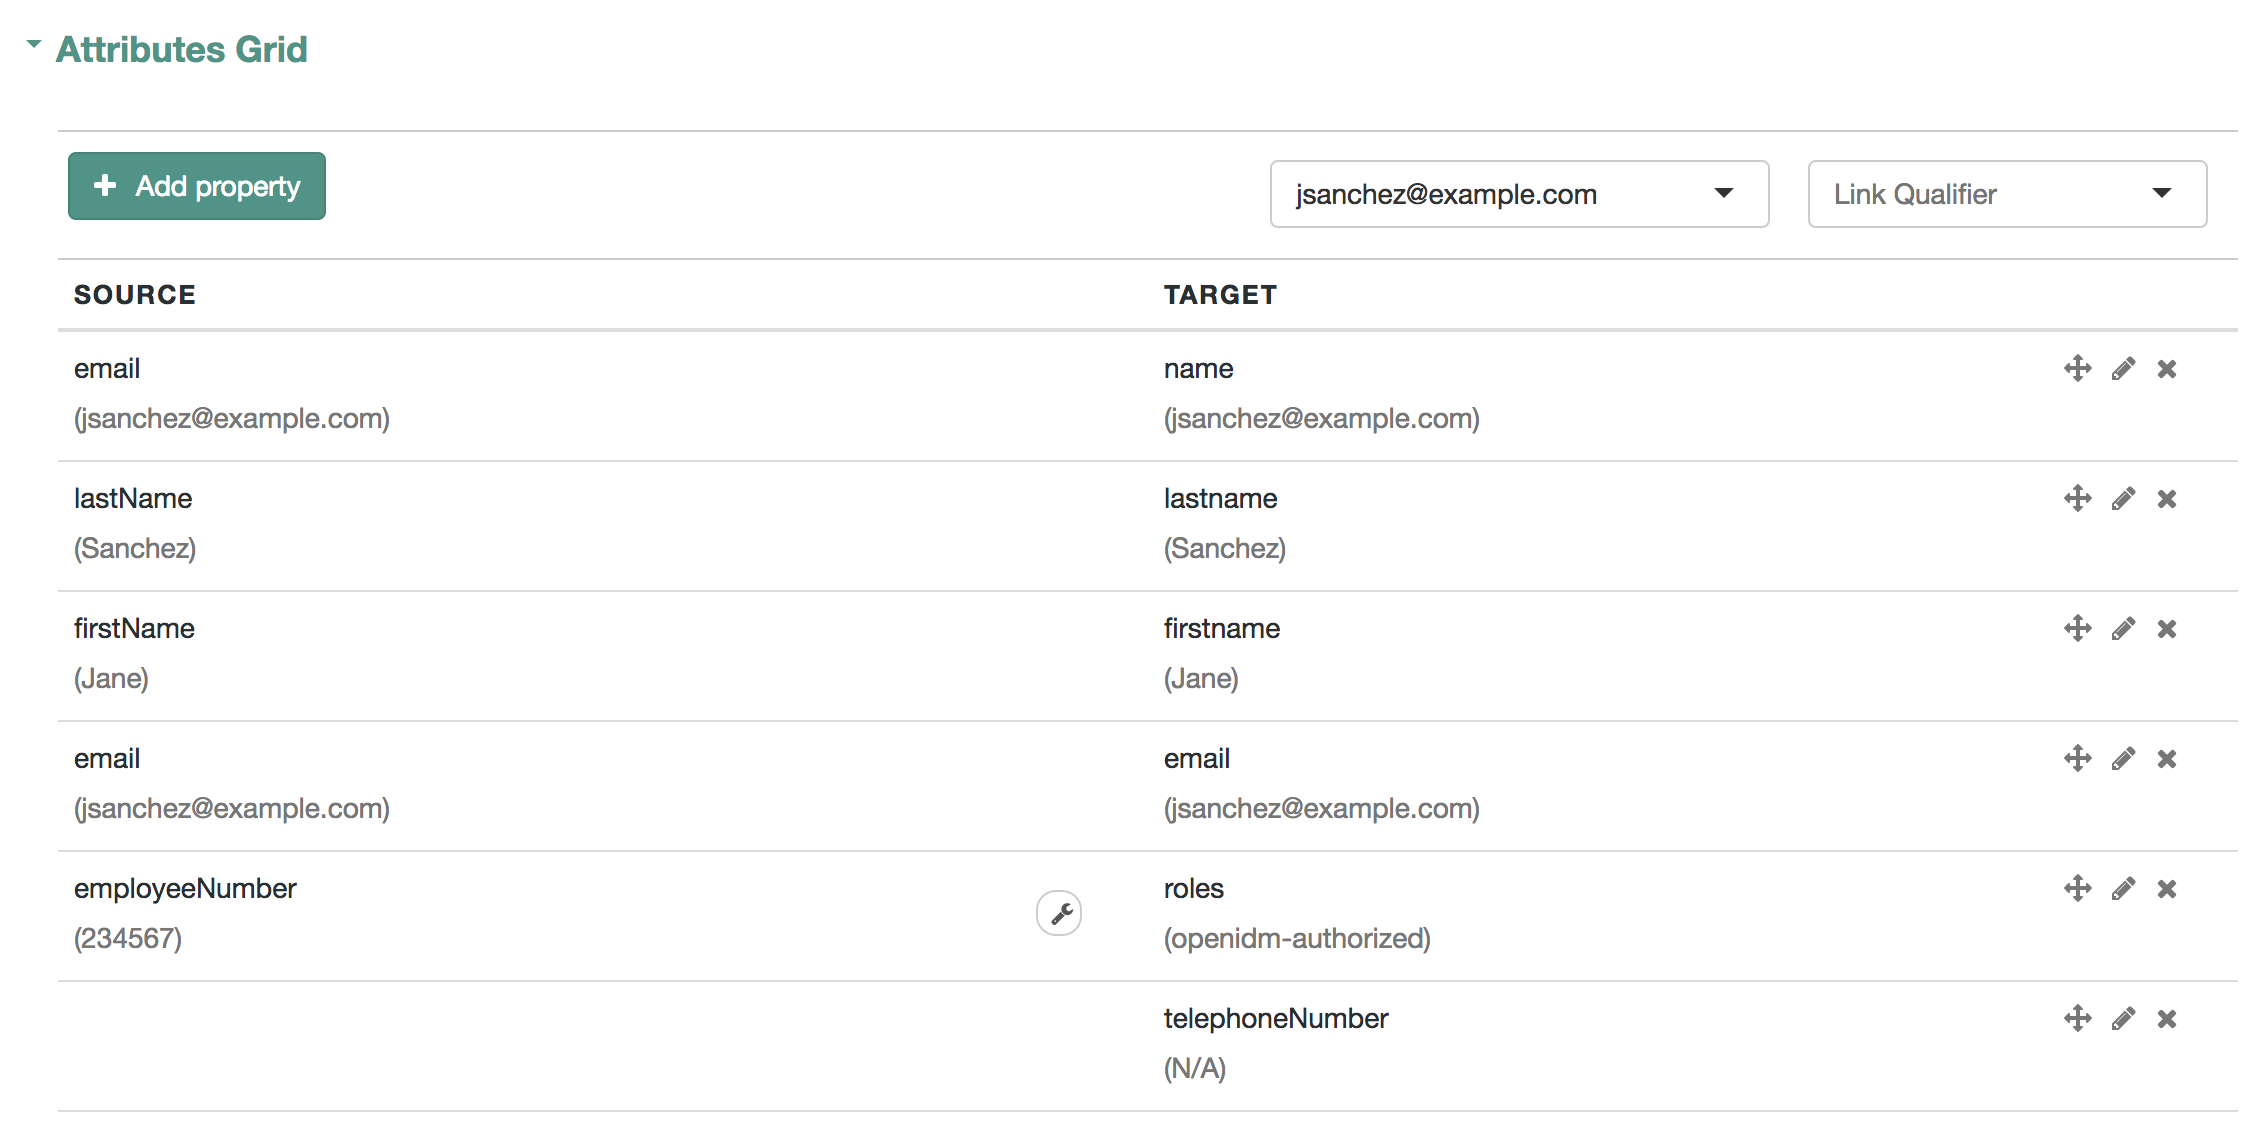
In the Sample source preview text box, enter
Sanchez. You should see a drop-down entry for Jane Sanchez
that you can select. You should now see how IDM would reconcile
Jane Sanchez's entry from the (source) Human Resources data store into the
(target) Engineering data store.
Scroll back up the same page. Select Reconcile.
When you reconcile the two data stores, IDM makes the change to the Engineering data store.
For those of you who prefer the command-line interface, you can see how
the mapping works in the sync.json file, in the
/path/to/openidm/samples/getting-started/conf directory.
Now that you have used IDM to reconcile two data stores, try something else. Assume the Engineering organization wants to overwrite all user telephone numbers in its employee data store with one central telephone number.
For this purpose, you can set up a default telephone number for the next reconciliation:
On the HumanResources_Engineering mapping page, select the Properties tab and expand the Attributes Grid.
In the TARGET column, select the row that contains the
telephoneNumberattribute.Select the Default Values tab and enter a default number:
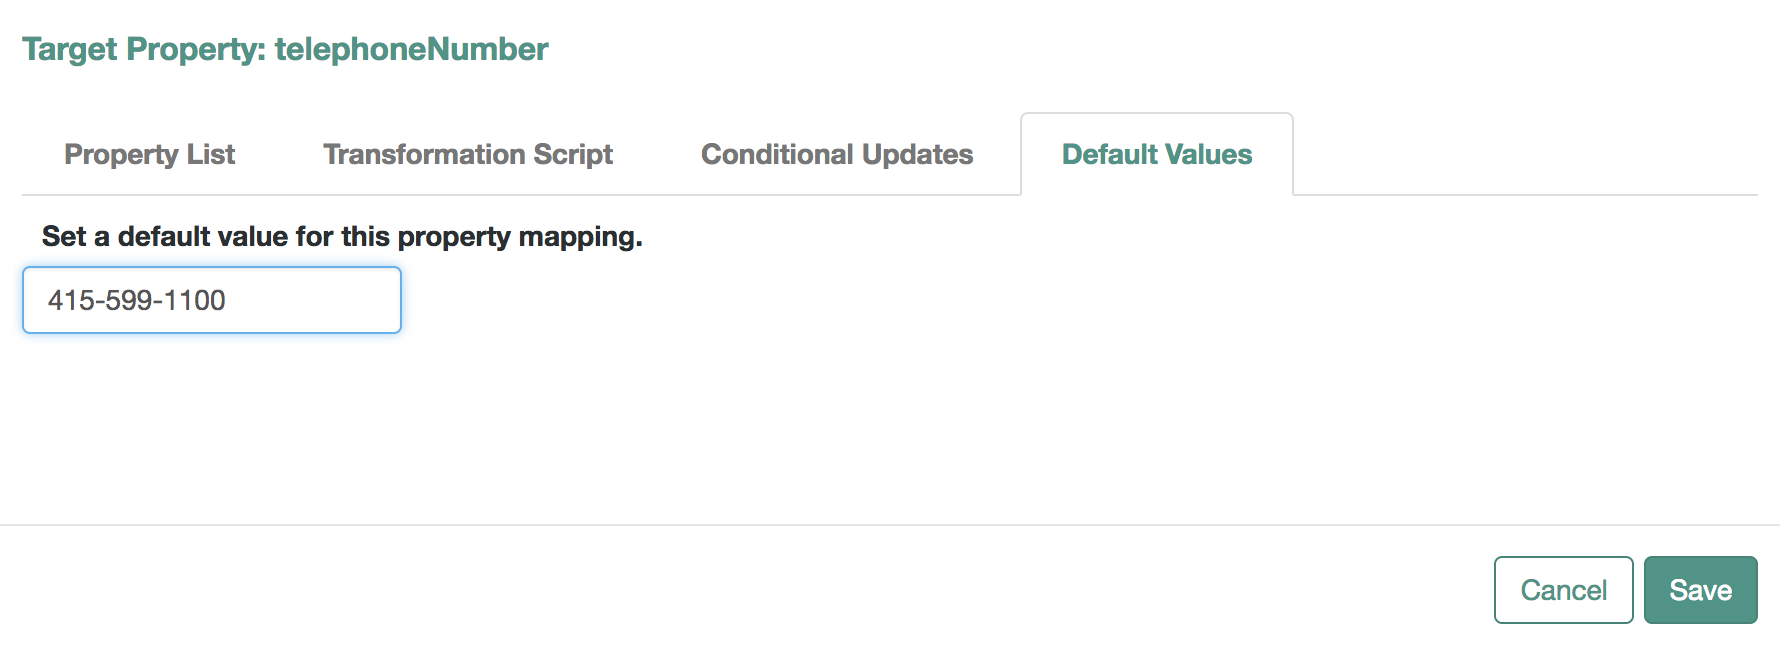
When you select Update, and Save, IDM changes the
sync.json configuration file. The next time you run a
reconciliation from Human Resources to Engineering, the default telephone
number will be included for all employees in the Engineering group.
IDM can do much more than reconcile data between two different sources. In this chapter, you will read about the key product features, with links to additional information about each feature.
A business process begins with an objective and includes a well-defined sequence of tasks to meet that objective. IDM allows you to configure many of these tasks as self-service workflows, such as self-registration, new user onboarding, and account certification.
You can also automate many of these tasks as a workflow.
Once you configure the right workflows, a newly hired engineer can log into IDM and request access to manufacturing information.
That request is sent to the appropriate manager for approval. Once approved, IDM provisions the new engineer with access to manufacturing.
IDM supports workflow-driven provisioning activities, based on the embedded Activiti Process Engine, which complies with the Business Process Model and Notation 2.0 (BPMN 2.0) standard.
You can manage passwords from the End User UI. From the Admin UI, select the icon in the upper-right corner. In the menu that appears, choose Self-Service:
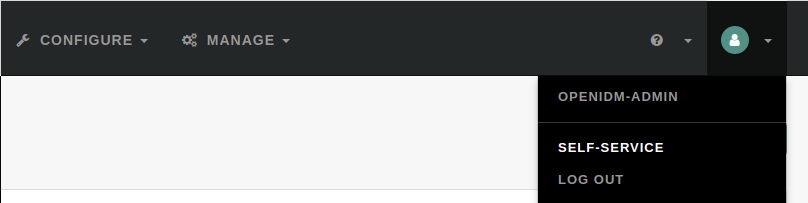
You should now be in the End User UI. In the Dashboard, select Change Password. You can now change your password, subject to the following minimum number of characters:
Length ≥ 8
Capital letters ≥ 1
Numbers ≥ 1
IDM supports robust password policies. You can modify policies such as the following:
Elements that should not be a part of a password, such as a family name
Password expiration dates
Password histories, to prevent password reuse
For more information, including details on how you can configure these policies, see "Managing Passwords" in the Integrator's Guide.
Some users need accounts on multiple systems. For example, insurance agents may also have insurance policies with the company that they work for. In that situation, the insurance agent is also a customer of the company.
Alternatively, a salesperson may also test customer engineering scenarios. That salesperson may also need access to engineering systems.
Each of these user scenarios is known as a role. You can set up a consolidated set of attributes associated with each role. To do so, you would configure custom roles to assign to selected users. For example, you may assign both insured and agent roles to an agent, while assigning the insured role to all customers.
In a similar fashion, you can assign both sales and engineering roles to the sales engineer.
You can then synchronize users with those roles into appropriate data stores.
For more information, see "Working With Managed Roles" in the Integrator's Guide. For a sample of how you can configure external roles, see "Provisioning With Roles" in the Samples Guide.
IDM can connect to a substantial variety of user and device data stores, on premise and in the cloud. A number of specific connectors are provided, allowing you to connect to those dedicated data stores. In addition, you can connect to many more data stores using a scripted connector framework.
Connectors are provided for a number of external resources, including:
Google Web Applications (see "Google Apps Connector" in the Connector Reference).
Salesforce (see "Salesforce Connector" in the Connector Reference).
Any LDAPv3-compliant directory, including DS and Active Directory (see "Generic LDAP Connector" in the Connector Reference).
CSV Files (see "CSV File Connector" in the Connector Reference).
Database Tables (see "Database Table Connector" in the Connector Reference).
For a full list, see "Connector Overview" in the Connector Reference.
If the resource that you need is not on the list, you should be able to use one of the scripted connector frameworks to connect to that resource:
For connectors associated with Microsoft Windows, IDM includes a PowerShell Connector Toolkit that you can use to provision a variety of Microsoft services, including but not limited to Active Directory, SQL Server, Microsoft Exchange, SharePoint, Azure Active Directory, and Office 365. For more information, see "PowerShell Connector Toolkit" in the Connector Reference. IDM includes a sample PowerShell Connector configuration, described in "Connecting to Active Directory With the PowerShell Connector" in the Samples Guide.
For other external resources, IDM includes a Groovy Connector Toolkit that lets you run Groovy scripts to interact with any external resource. For more information, see "Groovy Connector Toolkit" in the Connector Reference.
For a sample implementation of the scripted Groovy connector, see "Connecting to DS With ScriptedREST" in the Samples Guide.
IDM supports reconciliation between two data stores, as a source and a target.
In identity management, reconciliation compares the contents of objects in different data stores, and makes decisions based on configurable policies.
For example, if you have an application that maintains its own user store, IDM can ensure your canonical directory attributes are kept up to date by reconciling their values as they are changed.
For more information, see "Synchronizing Data Between Resources" in the Integrator's Guide.
Several different authentication modules are supplied to help you protect your systems. For more information, see "Supported Authentication and Session Modules" in the Integrator's Guide.
IDM is a lightweight and highly customizable identity management product.
The documentation includes a number of additional use cases. Most of these are known as Samples, and are described in "Overview of the Samples" in the Samples Guide.
These samples include step-by-step instructions on how you can connect to different data stores, customize product behavior using JavaScript and Groovy, and administer IDM with ForgeRock's common REST API commands.
Now that you have seen how IDM can help you manage users, review the features that IDM can bring to your organization:
Web-Based Administrative User Interface
Configure IDM with the Web-Based Administrative User Interface. You can configure many major server components without ever touching a text configuration file.
Self-Service Functionality
User self-service features can streamline onboarding, account certification, new user registration, username recovery, and password reset. The self-service features are built upon a BPMN 2.0-compliant workflow engine.
Registration With Social Identities
Users can now register new accounts using information from social identity providers, including Google, Facebook, and LinkedIn. If you configure access through more than one social identity provider, users can select and manage the providers they use. You can also synchronize user information with marketing databases.
For more information, see "Configuring Social Identity Providers" in the Integrator's Guide.
Role-Based Provisioning
Create and manage users based on attributes such as organizational need, job function, and geographic location.
Backend Flexibility
Choose the desired backend database for your deployment. IDM supports MySQL, Microsoft SQL Server, Oracle Database, IBM DB2, and PostgreSQL. For the supported versions of each database, see "Before You Install" in the Release Notes.
Password Management
Set up fine-grained control of passwords to ensure consistent password policies across all applications and data stores. Supports separate passwords per external resource.
Logging, Auditing, and Reporting
IDM logs all activity, internally and within connected systems. With such logs, you can track information for access, activity, authentication, configuration, reconciliation, and synchronization.
Access to External Resources
IDM can access a generic scripted connector that allows you to set up communications with many external data stores.
Follow these steps to stop and remove IDM.
To stop IDM, return to the console window where you saw the following message:
-> OpenIDM ready
Press Return, and enter the following command:
-> shutdown
IDM is self-contained. After you shut down the server, you can choose to delete the files in the
/path/to/openidmdirectory. There are no artifacts in system registries or elsewhere.
We hope that you want to continue exploring IDM.
To do so, review the rest of the IDM documentation.