Example routes created with Freeform Designer
The following sections give examples of how to use the templates provided by the freeform designer:
In this release, routes generated in Studio do not use the Commons Secrets API. Documentation examples generated with Studio use deprecated properties.
Using a basic template in FreeForm Designer
This section describes how to use a basic template in freeform designer to set up SSO. For more information about setting up and testing SSO, refer to Authentication.
-
In IG Studio, create a route:
-
Go to http://ig.example.com:8080/openig/studio, and select Create a route.
-
Select
 Freeform to use the freeform designer.
-
-
Select Basic to create a route from a blank template.
-
Select Advanced options on the right, and create a route with the following options:
-
Base URI:
http://app.example.com:8081 -
Condition: Path:
/home/sso-ff -
Name:
sso-ffThe route is displayed on the
Flow tab of the canvas. Select the
All Objects tab to view a list of objects in the route.Double-click on any object to review or edit it. After double-clicking on an object, select the Decorations tab to decorate it.
-
-
Configure authentication with a SingleSignOnFilter:
-
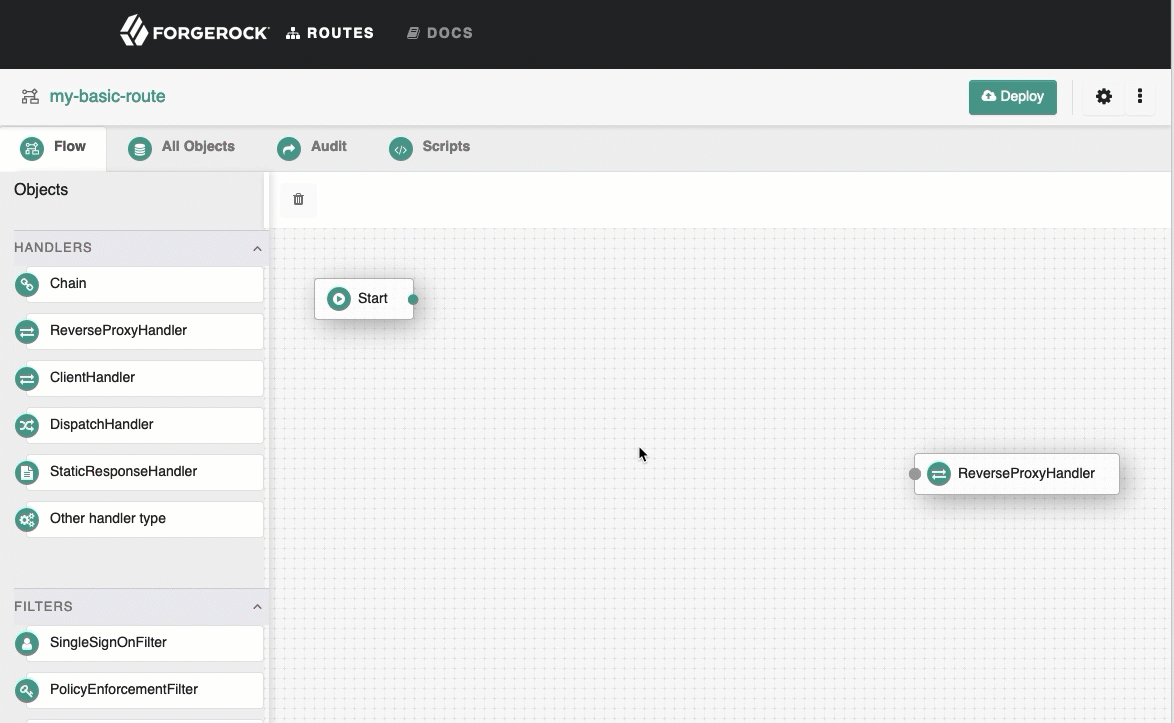
Select the
Flow tab, and delete the connector between Start and
ReverseProxyHandler. -
From the side bar, drag a Chain onto the canvas, and then drag a SingleSignOnFilter into the chain.
See how to add objects to the canvas.
-
In the Edit SingleSignOnFilter page, click , and create an AM service, with the following values:
-
URI:
http://am.example.com:8088/openam -
Agent:
-
Username:
ig_agent -
Password:
passwordUse secure passwords in a production environment. Consider using a password manager to generate secure passwords.
-
-
-
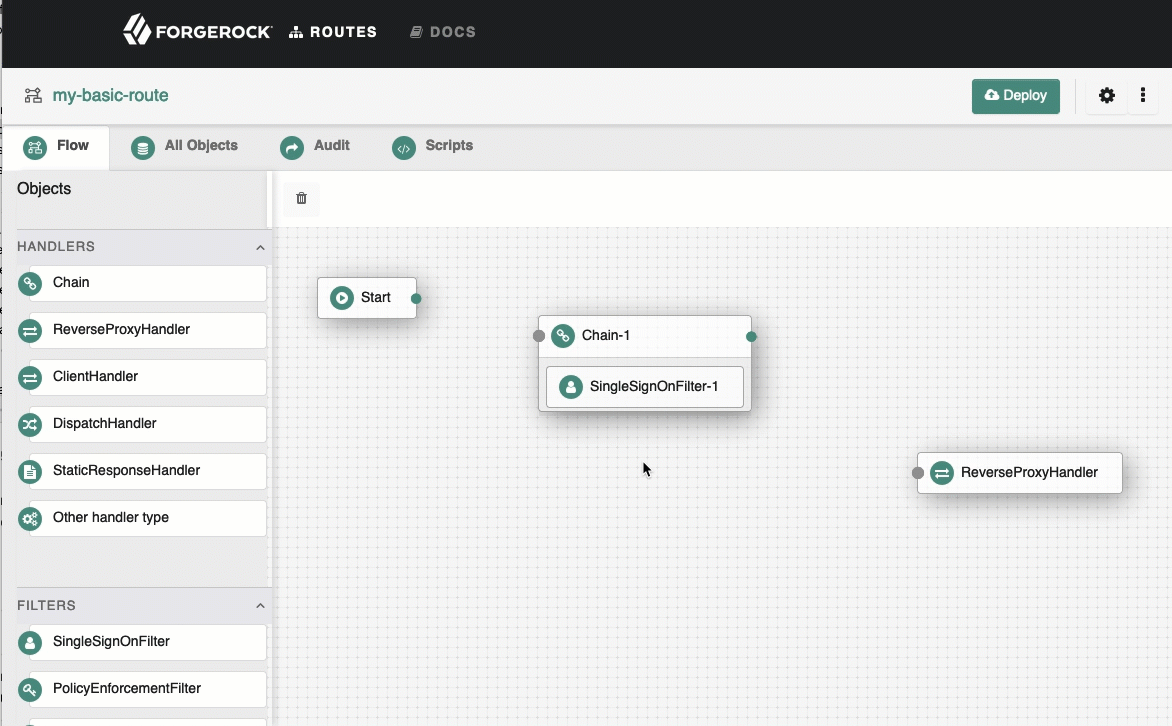
Connect Start to Chain-1, and Chain-1 to ReverseProxyHandler.
See how to connect components.
-
-
On the top-right of the screen, select and Display to review the route.
{ "name": "sso-ff", "baseURI": "http://app.example.com:8081", "condition": "${find(request.uri.path, '^/home/sso-ff')}", "handler": "Chain-1", "heap": [ { "name": "ReverseProxyHandler", "type": "ReverseProxyHandler" }, { "type": "BaseUriDecorator", "name": "baseUri" }, { "type": "TimerDecorator", "name": "timer", "config": { "timeUnit": "ms" } }, { "type": "CaptureDecorator", "name": "capture", "config": { "captureEntity": false, "captureContext": false, "maxEntityLength": 524288 } }, { "name": "Chain-1", "type": "Chain", "config": { "handler": "ReverseProxyHandler", "filters": [ "SingleSignOnFilter-1" ] } }, { "name": "AmService-1", "type": "AmService", "config": { "url": "http://am.example.com:8088/openam", "realm": "/", "agent": { "username": "ig_agent", "password": "password" }, "sessionCache": { "enabled": false } } }, { "name": "SingleSignOnFilter-1", "type": "SingleSignOnFilter", "config": { "amService": "AmService-1" } } ] } -
Select Deploy to push the route to the IG configuration.
You can check the
$HOME/.openig/config/routesfolder to see that the route is there.
Protecting a web app with Freeform Designer
This section describes how to use freeform designer to protect a web app, using AM for single sign-on and policy enforcement.
The generated route contains a chain of objects to authenticate the user, enforce an AM authorization policy, retrieve the user’s profile, insert it into the request, and, finally, forward the request to the web app.
Before you start, set up AM as described in Enforce policy decisions from AM.
-
In IG Studio, create a route:
-
Go to http://ig.example.com:8080/openig/studio, and select Create a route.
-
Select
Freeform to use the freeform designer.
-
-
Select Web SSO to use the template for protecting web apps.
-
Select Advanced options on the right, and create a route with the following options:
-
Base URI :
http://app.example.com:8081 -
Condition: Path :
/home/pep-sso-ff -
Name :
pep-sso-ff -
AM Configuration :
-
URI :
http://am.example.com:8088/openam -
Username :
ig_agent -
Password :
passwordThe route is displayed on the
Flow tab of the canvas. Select the
All Objects tab to view a list of objects in the route.Double-click on any object to review or edit it. After double-clicking on an object, select the Decorations tab to decorate it.
-
-
-
On the
Flow tab, double-click the Policy Enforcement object, and add a
policy set with the following values:-
Policy set :
PEP-SSO -
AM SSO token :
${contexts.ssoToken.value}Leave all other values as default.
-
-
On the top-right of the screen, select and Display to review the route.
{ "name": "pep-sso-ff", "baseURI": "http://app.example.com:8081", "condition": "${find(request.uri.path, '^/home/pep-sso-ff')}", "handler": "Chain", "heap": [ { "name": "Chain", "type": "Chain", "config": { "handler": "ReverseProxyHandler", "filters": [ "SSO", "PolicyEnforcement", "GetEmail", "InjectEmail" ] } }, { "name": "SSO", "type": "SingleSignOnFilter", "config": { "amService": "AmService" } }, { "name": "ReverseProxyHandler", "type": "ReverseProxyHandler" }, { "name": "AmService", "type": "AmService", "config": { "url": "http://am.example.com:8088/openam", "realm": "/", "agent": { "username": "ig_agent", "password": "password" }, "sessionCache": { "enabled": false } } }, { "name": "PolicyEnforcement", "type": "PolicyEnforcementFilter", "config": { "amService": "AmService", "ssoTokenSubject": "${contexts.ssoToken.value}", "cache": { "enabled": false }, "application": "PEP-SSO" } }, { "name": "GetEmail", "type": "UserProfileFilter", "config": { "username": "${contexts.ssoToken.info.uid}", "userProfileService": { "type": "UserProfileService", "config": { "amService": "AmService" } } } }, { "name": "InjectEmail", "type": "HeaderFilter", "config": { "messageType": "REQUEST", "add": { "Email": [ "${contexts.userProfile.username}" ] } } }, { "type": "BaseUriDecorator", "name": "baseUri" }, { "type": "TimerDecorator", "name": "timer", "config": { "timeUnit": "ms" } }, { "type": "CaptureDecorator", "name": "capture", "config": { "captureEntity": false, "captureContext": false, "maxEntityLength": 524288 } } ] } -
Select Deploy to push the route to the IG configuration.
You can check the
$HOME/.openig/config/routesfolder to see that the route is there.
-
If you are logged in to AM, log out and clear any cookies.
-
Log in to AM as user
demo, passwordCh4ng31t.AM returns a policy decision that grants access to the sample application.
Protect an API with Freeform Designer
This section describes how to use freeform designer to protect APIs, using AM as an OAuth 2.0 authorization server.
The generated route contains a chain of objects to authenticate the user, throttle the rate of requests to the API, and, finally, forward the request to the sample app.
Before you start, set up AM as described in Validate access tokens through the introspection endpoint. In addition, create an OAuth 2.0 Client authorized to introspect tokens, with the following values:
-
Client ID :
resource-server -
Client secret :
password -
Scope(s) :
am-introspect-all-tokens
-
In IG Studio, create a route:
-
Go to http://ig.example.com:8080/openig/studio, and select Create a route.
-
Select
Freeform to use the freeform designer.
-
-
Select Applications > Agents > Identity Gateway, add an agent with the following values:
-
Agent ID :
ig_agent -
Password :
password -
Token Introspection :
Realm Only
-
-
Select Advanced options on the right, and create a route with the following options:
-
Base URI :
http://app.example.com:8081 -
Condition: Path :
/home/rs-introspect-ff -
Name :
rs-introspect-ff -
AM Configuration :
-
URI :
http://am.example.com:8088/openam -
Username :
ig_agent -
Password :
password -
Scopes :
mail,employeenumberThe route is displayed on the
Flow tab of the canvas.Notice that the Start, Chain, and ReverseProxyHandler objects are connected by solid lines, but other objects, such as Authenticate to Am Chain, are connected by a fading line. Objects connected by a fading line are used by other objects in the route.
Select the All Objects tab to view a list of objects in the route. Double-click on any object to review or edit it. After double-clicking on an object, select the Decorations tab to decorate it.
-
-
-
On the
Flow tab, double-click the OAuth2RS object, and edit it as follows:-
Require HTTPS : Deselect this option
-
Realm :
OpenIGLeave the other values as they are.
-
-
On the top-right of the screen, select and Display to review the route.
{ "name": "rs-introspect-ff", "baseURI": "http://app.example.com:8081", "condition": "${find(request.uri.path, '^/home/rs-introspect-ff')}", "handler": "Chain", "properties": { "amUsername": "ig_agent", "amPassword": "password" }, "heap": [ { "name": "ClientHandler", "type": "ClientHandler" }, { "name": "Chain", "type": "Chain", "config": { "handler": "ReverseProxyHandler", "filters": [ "OAuth2RS", "Throttling" ] } }, { "type": "OAuth2ResourceServerFilter", "name": "OAuth2RS", "config": { "requireHttps": false, "realm": "OpenIG", "scopes": [ "mail", "employeenumber" ], "accessTokenResolver": "TokenIntrospectionAccessTokenResolver" } }, { "type": "TokenIntrospectionAccessTokenResolver", "name": "TokenIntrospectionAccessTokenResolver", "config": { "amService": "AmService", "providerHandler": "Authenticate to AM Chain" } }, { "name": "ReverseProxyHandler", "type": "ReverseProxyHandler" }, { "name": "AmService", "type": "AmService", "config": { "url": "http://am.example.com:8088/openam", "realm": "/", "agent": { "username": "${amUsername}", "password": "${amPassword}" }, "sessionCache": { "enabled": false } } }, { "name": "Authenticate to AM Chain", "type": "Chain", "config": { "handler": "ClientHandler", "filters": [ "Authenticate to AM Filter" ] } }, { "name": "Authenticate to AM Filter", "type": "HeaderFilter", "config": { "messageType": "REQUEST", "add": { "Authorization": [ "Basic ${encodeBase64(join(array(amUsername, amPassword), ':'))}" ] } } }, { "name": "Throttling", "type": "ThrottlingFilter", "config": { "requestGroupPolicy": "${contexts.oauth2.info.sub}", "rate": { "numberOfRequests": 60, "duration": "60 s" } } }, { "type": "BaseUriDecorator", "name": "baseUri" }, { "type": "TimerDecorator", "name": "timer", "config": { "timeUnit": "ms" } }, { "type": "CaptureDecorator", "name": "capture", "config": { "captureEntity": false, "captureContext": false, "maxEntityLength": 524288 } } ] } -
Select Deploy to push the route to the IG configuration.
You can check the
$HOME/.openig/config/routesfolder to see that the route is there. -
Test the setup:
-
In a terminal window, use a
curlcommand similar to the following to retrieve an access token:$ mytoken=$(curl -s \ --user "client-application:password" \ --data "grant_type=password&username=demo&password=Ch4ng31t&scope=mail%20employeenumber" \ http://am.example.com:8088/openam/oauth2/access_token | jq -r ".access_token") -
Validate the access token returned in the previous step:
$ curl -v http://ig.example.com:8080/home/rs-introspect-ff --header "Authorization: Bearer ${mytoken}"The HTML of the sample application is returned.
-