Gateway guide
ForgeRock® Identity Platform serves as the basis for our simple and comprehensive Identity and Access Management solution. We help our customers deepen their relationships with their customers, and improve the productivity and connectivity of their employees and partners. For more information about ForgeRock and about the platform, see https://www.forgerock.com.
IG integrates web applications, APIs, and microservices with the ForgeRock Identity Platform. Based on reverse proxy architecture, IG enforces security and access control in conjunction with Access Management modules.
This guide is for access management designers and administrators who develop, build, deploy, and maintain IG for their organizations. It helps you to get started quickly, and learn more as you progress through the guide.
This guide assumes basic familiarity with the following topics:
-
Hypertext Transfer Protocol (HTTP), including how clients and servers exchange messages, and the role that a reverse proxy (gateway) plays
-
JavaScript Object Notation (JSON), which is the format for IG configuration files
-
Managing services on operating systems and application servers
-
Configuring network connections on operating systems
-
Managing Public Key Infrastructure (PKI) used to establish HTTPS connections
-
Access management for web applications
Depending on the features you use, you should also have basic familiarity with the following topics:
-
Lightweight Directory Access Protocol (LDAP) if you use IG with LDAP directory services
-
Structured Query Language (SQL) if you use IG with relational databases
-
Configuring AM if you use password capture and replay, or if you plan to follow the OAuth 2.0 or SAML 2.0 tutorials
-
The Groovy programming language if you plan to extend IG with scripts
-
The Java programming language if you plan to extend IG with plugins, and Apache Maven for building plugins
Example installation for this guide
Unless otherwise stated, the examples in this guide assume the following installation:
-
IG accessible on
http://ig.example.com:8080andhttps://ig.example.com:8443, as described in Downloading, starting, and stopping IG. -
Sample application installed on http://app.example.com:8081, as described in Using the sample application.
-
AM installed on http://am.example.com:8088/openam, with the default configuration.
If you use a different configuration, substitute in the procedures accordingly.
Set up Identity Cloud and AM for use with IG
This section contains procedures for setting up items in ForgeRock Identity Cloud and AM that you can use with IG. For more information about setting up Identity Cloud, refer to the ForgeRock Identity Cloud docs. For more information about setting up AM, refer to the Access Management docs.
Authenticate an IG agent to Identity Cloud
|
IG agents are automatically authenticated to Identity Cloud by a non-configurable authentication module. Authentication chains and modules are deprecated in Identity Cloud and replaced by journeys. You can now authenticate IG agents to Identity Cloud with a journey. The procedure is currently optional, but will be required when authentication chains and modules are removed in a future release of Identity Cloud. For more information, refer to Identity Cloud’s Journeys. |
This section describes how to create a journey to authenticate an IG agent to Identity Cloud. The journey has the following requirements:
-
It must be called
Agent -
Its nodes must pass the agent credentials to the Agent Data Store Decision node.
When you define a journey in Identity Cloud, that same journey is used for all instances of IG, Java agent, and Web agent. Consider this point if you change the journey configuration.
-
Log in to the Identity Cloud admin UI as an administrator.
-
Click Journeys > New Journey.
-
Add a journey with the following information and click Create journey:
-
Name:
Agent -
Identity Object: The user or device to authenticate.
-
(Optional) Description: Authenticate an IG agent to Identity Cloud
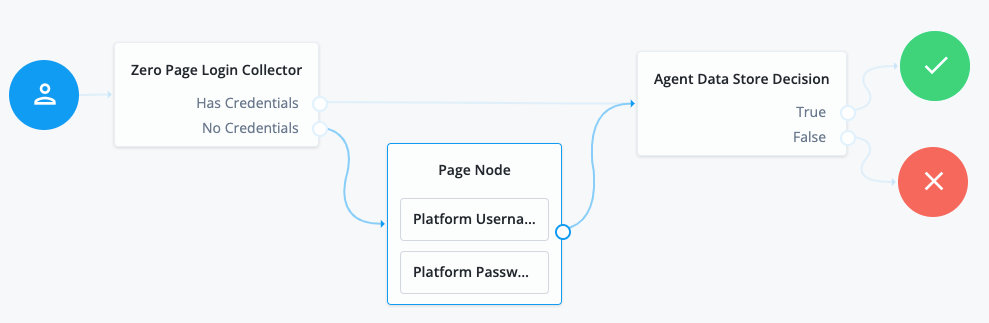
The journey designer is displayed, with the
Startentry point connected to theFailureexit point, and aSuccessnode. -
-
Using the Filter nodes bar, find and then drag the following nodes from the Components panel into the designer area:
-
Zero Page Login Collector node to check whether the agent credentials are provided in the incoming authentication request, and use their values in the following nodes.
This node is required for compatibility with Java agent and Web agent.
-
Page node to collect the agent credentials if they are not provided in the incoming authentication request, and use their values in the following nodes.
-
Agent Data Store Decision node to verify the agent credentials match the registered IG agent profile.
Many nodes can be configured in the panel on the right side of the page. Unless otherwise stated, do not configure the nodes, and use only the default values. -
-
Drag the following nodes from the Components panel into the Page node:
-
Platform Username node to prompt the user to enter their username.
-
Platform Password node to prompt the user to enter their password.
-
-
Connect the nodes as follows and save the journey:
Authenticate an IG agent to AM
|
IG agents are automatically authenticated to AM by a non-configurable authentication module in AM. Authentication chains and modules were deprecated in AM 7 and are replaced by authentication nodes and trees. From AM 7.3 you can authenticate IG agents to AM by using authentication nodes and trees. The procedure is currently optional, but will be required when authentication chains and modules are removed in a future release of AM. For more information, refer to AM’s Authentication Nodes and Trees. |
This section describes how to create an authentication tree to authenticate an IG agent to AM. The tree has the following requirements:
-
It must be called
Agent -
Its nodes must pass the agent credentials to the Agent Data Store Decision node.
When you define a tree in AM, that same tree is used for all instances of IG, Java agent, and Web agent. Consider this point if you change the tree configuration.
-
On the Realms page of the AM admin UI, choose the realm in which to create the authentication tree.
-
On the Realm Overview page, click Authentication > Trees > Create tree.
-
Create a tree named
Agent.The authentication tree designer is displayed, with the
Startentry point connected to theFailureexit point, and aSuccessnode.The authentication tree designer provides the following features on the toolbar:
Button Usage 
Lay out and align nodes according to the order they are connected.

Toggle the designer window between normal and full-screen layout.

Remove the selected node. Note that the
Startentry point cannot be deleted. -
Using the Filter bar, find and then drag the following nodes from the Components panel into the designer area:
-
Zero Page Login Collector node to check whether the agent credentials are provided in the incoming authentication request, and use their values in the following nodes.
This node is required for compatibility with Java agent and Web agent.
-
Page node to collect the agent credentials if they are not provided in the incoming authentication request, and use their values in the following nodes.
-
Agent Data Store Decision node to verify the agent credentials match the registered IG agent profile.
Many nodes can be configured in the panel on the right side of the page. Unless otherwise stated, do not configure the nodes and use only the default values. -
-
Drag the following nodes from the Components panel into the Page node:
-
Username Collector node to prompt the user to enter their username.
-
Password Collector node to prompt the user to enter their password.
-
-
Connect the nodes as follows and save the tree:

Register an IG agent in Identity Cloud
This procedure registers an agent that acts on behalf of IG.
-
Log in to the Identity Cloud admin UI as an administrator.
-
Click verified_user Gateways & Agents > New Gateway/Agent > Identity Gateway > Next, and add an agent profile:
-
ID: agent-name
-
Password: agent-password
Use secure passwords in a production environment. Consider using a password manager to generate secure passwords.
-
-
Click Save Profile > Done. The agent profile page is displayed.
-
To add a redirect URL for CDSSO, go to the agent profile page and add the URL.
-
To change the introspection scope, click open_in_new Native Consoles > Access Management, and update the agent in the AM admin UI. By default, the agent can introspect OAuth 2.0 tokens issued to any client, in the realm and subrealm where it is created.
Register an IG agent in AM 7 and later
In AM 7 and later versions, follow these steps to register an agent that acts on behalf of IG.
-
In the AM admin UI, select the top-level realm, and then select Applications > Agents > Identity Gateway.
-
Add an agent with the following values:
-
Agent ID :
ig_agent -
Password :
password
-
Agent ID :
ig_agent -
Password :
password -
Redirect URL for CDSSO :
https://ig.ext.com:8443/home/cdsso/redirect
-
Register an IG agent in AM 6.5 and earlier
In AM 6.5 and earlier versions, follow these steps to register an agent that acts on behalf of IG.
-
In the AM admin UI, select the top-level realm, and then select Applications > Agents > Java (or J2EE ).
-
Add an agent with the following values:
-
On the Global tab, deselect Agent Configuration Change Notification.
This option stops IG from being notified about agent configuration changes in AM. IG doesn’t need these notifications.
-
(For CDSSO) On the SSO tab, select the following values:
-
Cross Domain SSO : Deselect this option
-
CDSSO Redirect URI :
/home/cdsso/redirect
-
-
(For CDSSO and policy enforcement) On the SSO tab, select the following values:
-
Cross Domain SSO : Deselect this option
-
CDSSO Redirect URI :
/home/pep-cdsso/redirect
-
Set up a demo user in Identity Cloud
This procedure sets up a demo user in the alpha realm.
-
Log in to the Identity Cloud admin UI as an administrator.
-
Go to group Identities > Manage > settings_system_daydream Alpha realm - Users, and add a user with the following values:
-
Username:
demo -
First name:
demo -
Last name:
user -
Email Address:
demo@example.com -
Password:
Ch4ng3!t
-
Set up a demo user in AM
AM is provided with a demo user in the top-level realm, with the following credentials:
-
ID/username:
demo -
Last name:
user -
Password:
Ch4ng31t -
Email address:
demo@example.com -
Employee number:
123
For information about how to manage identities in AM, refer to AM’s Identity stores.