Prepare for installation
Before you install
Consider the following points before you install:
-
Install AM and Web Agent in different servers.
-
Make sure AM is running, so that you can contact AM from the agent web server.
-
Install the web server before you install the agent.
-
Install only one Web Agent for each web server, and configure as many agent instances as necessary.
-
For environments with load balancers or reverse proxies, consider the communication between the agent and the AM servers, and between the agent and the client. Configure both AM and the environment before you install the agent. For more information, refer to Configure load balancers and reverse proxies.
Download and unzip Web Agent
Go to the ForgeRock BackStage download site and download an agent based on your architecture, and operating system requirements. Verify the checksum of the downloaded file against the checksum posted on the download page.
Unzip the file in the directory where you plan to store the agent configuration and log files. The following directories are extracted:
| Directory | Description | ||
|---|---|---|---|
|
The installation and configuration program |
||
|
Configuration templates used by the |
||
|
Configuration files, and audit and debug logs for individual instances of the agents. The directory is empty when first extracted.
|
||
|
Licensing information including third-party licenses. |
||
|
Shared libraries used by the agent. |
||
|
Log files written during installation. The directory is empty when first extracted. When the agent is running, the directory can contain the following files:
|
||
|
POST data preservation cache. The agent stores POST data preservation files temporarily. To change the directory, configure POST Data Storage Directory. |
Pre-installation tasks
-
In AM, add an agent profile, as described in Create an agent profile in AM using the console:
The example in this guide uses an agent profile in the top-level realm, with the following values:
-
Agent ID:
web-agent -
Agent URL:
http://www.example.com:80 -
Server URL:
http://am.example.com:8080/am -
Password:
password
-
-
In AM, add a policy set and policy, to protect resources with the agent, as described in Policies in AM’s Authorization guide.
The example in this guide uses a policy set and policy in the top-level realm, with the following values:
-
Policy set:
-
Name:
PEP -
Resource Types:
URL
-
-
Policy:
-
Name:
PEP-policy -
Resource Type:
URL -
Resource pattern:
*://*:*/* -
Resource value:
*://*:*/* -
Actions tab: Allow HTTP
GETandPOST -
Subjects tab: All Authenticated Users.
-
When you use your own policy set instead of the default policy set,
iPlanetAMWebAgentService, update the following properties in the agent profile: -
-
Configure AM to protect the CDSSO cookie from hijacking. For more information, refer to Enabling restricted tokens for CDSSO session cookies in AM’s Security guide.
-
Create a text file for the agent password, and protect it. For example, use commands similar to these, but use a strong password and store it in a secure place:
$ cat > /secure-directory/pwd.txt
password
CTRL+D

$ chmod 400 /secure-directory/pwd.txt
'password' | Out-File -Encoding ascii pwd.txt
In Windows Explorer, right-click the password file, for example
pwd.txt, select Read-Only, and then click OK.Although the agent accepts any password length and content, you are strongly encouraged to generate secure passwords. This can be achieved in various ways, for example, by using a password manager. -
If either of the following are true, set up the required environment variables :
-
AM is configured to perform client authentication
-
The agent web server is to configured to validate AM’s server certificate
For more information, refer to Environment variables.
-
Configure AM to sign authentication information
AM communicates all authentication and authorization information to Web Agent, using OpenID Connect ID tokens. For security, configure AM and the agent to use signed tokens. For more information, refer to RFC 7518: JSON Web Algorithms (JWA).
AM also uses an HMAC signing key to protect requested ACR claims values
between sending the user to the authentication endpoint, and returning from
successful authentication.
By default, AM uses a demo key and an autogenerated secret for these purposes. For production environments, perform one of the following procedures to create new key aliases and configure them in AM.
Configure AM secret IDs for the agents' OAuth 2.0 provider
By default, AM 6.5 and later versions are configured to:
-
Sign the session ID tokens with the secret mapped to the
am.global.services.oauth2.oidc.agent.idtoken.signingsecret ID. This secret ID defaults to thersajwtsigningkeykey alias provided in AM’s JCEKS keystore. -
Sign the claims with the secret mapped to the
am.services.oauth2.jwt.authenticity.signingsecret ID. This secret ID defaults to thehmacsigningtestkey alias available in AM’s JCEKS keystore.-
Create the following aliases in one of the secret stores configured in AM, for example, the default JCEKS keystore:
-
Create an RSA key pair.
-
Create an HMAC secret.
-
-
In the AM admin UI, go to Configure > Secret Stores > Keystore Secret Store Name > Mappings.
-
Configure the following secret IDs:
-
Configure the new RSA key alias in the
am.global.services.oauth2.oidc.agent.idtoken.signingsecret ID. -
Configure the new HMAC secret in the
am.services.oauth2.jwt.authenticity.signingsecret ID.Note that you may already have a secret configured for this secret ID, because it is also used for signing certain OpenID Connect ID tokens and remote consent requests. For more information, refer to Secret ID default mappings in AM’s Security guide.
-
Save your changes.
For more information about secret stores, refer to Secret stores in AM’s Security guide.
-
No further configuration is required in the agents.
-
Create agent profiles
Use Web Agent profiles to connect to and communicate with AM.
Create an agent profile for a single agent instance
This section describes how to create an agent profile in the AM admin UI.
Alternatively, create agent profiles by using the
/realm-config/agents/WebAgent/{id} endpoint in the REST API.
For more information, refer to
REST API explorer in AM’s
Getting started with REST.
-
In the AM admin UI, select REALMS > Realm Name > Applications > Agents > Web, and add an agent using the following hints:
- Agent ID
-
The ID of the agent profile. This ID resembles a username in AM and is used during the agent installation. For example,
MyAgent.When AM is not available, the related error message contains the agent profile name. Consider this in your choice of agent profile name. - Agent URL
-
The URL where the agent resides. For more information, refer to Example installation for this guide.
In centralized configuration mode, the Agent URL populates the agent profile for services, such as notifications.
- Server URL
-
The full URL to an authorization server, such as Identity Cloud or AM. For more information, refer to Example installation for this guide.
If the authorization server is deployed in a site configuration (behind a load balancer), enter the site URL.
In centralized configuration mode, the Server URL populates the agent profile for use with login, logout, naming, and cross-domain SSO.
- Password
-
The password the agent uses to authenticate to an authorization server, such as Identity Cloud or AM. Use this password when installing an agent.
Although the agent accepts any password length and content, you are strongly encouraged to generate secure passwords. This can be achieved in various ways, for example, by using a password manager.
Create an agent profile for multiple agent instances when post data preservation is enabled
By default, the POST data preservation load balancer cookie name and value is set by the agent profile. Therefore, each agent instance behind a load balancer requires its own agent profile.
In scalable environments, such as deployments with load balancing, or environments that run Kubernetes, resources are dynamically created and destroyed.
To facilitate the rapid creation and destruction of agent instances when post
data preservation is enabled, set the POST data preservation configuration
in agent.conf to map one agent profile to multiple agent
instances.
The configuration in agent.conf overrides the
configuration in AM for the following properties:
For an example, refer to Map one agent profile to multiple agent instances when POST data preservation is enabled.
Create an agent profile group
Use agent profile groups when you set up multiple agents, and want to inherit settings from the group.
-
In the AM admin UI, go to REALMS > Realm Name > Applications > Agents > Web.
-
Select the Groups tab, and add a group with the following settings:
-
Group ID: A name for the profile group.
-
Server URL: The URL of the AM server in which to store the profile.
-
Inherit properties from an agent profile group
-
Set up an agent profile and agent profile group, as described in Create an agent profile for a single agent instance and Create an agent profile group.
-
In the AM admin UI, select your agent profile.
-
On the Global tab, select Group, and select a group from the drop-down menu. The agent profile is added to the group.
-
For each setting in the Global tab, select or deselect the icon:
-
: Inherit this setting from the group
-
: Do not inherit this setting from the group
-
Authenticate agents to the identity provider
Authenticate agents to Identity Cloud
|
Web Agent is automatically authenticated to Identity Cloud by a non-configurable authentication module. Authentication chains and modules are deprecated in Identity Cloud and replaced by journeys. You can now authenticate Web Agent to Identity Cloud with a journey. The procedure is currently optional, but will be required when authentication chains and modules are removed in a future release of Identity Cloud. For more information, refer to Identity Cloud’s Journeys. |
This section describes how to create a journey to authenticate Web Agent to Identity Cloud. The journey has the following requirements:
-
It must be called
Agent -
Its nodes must pass the agent credentials to the Agent Data Store Decision node.
When you define a journey in Identity Cloud, that same journey is used for all instances of Identity Gateway, Java Agent, and Web Agent. Consider this point if you change the journey configuration.
-
Log in to the Identity Cloud admin UI as an administrator.
-
Click Journeys > New Journey.
-
Add a journey with the following information and click Create journey:
-
Name:
Agent -
Identity Object: The user or device to authenticate.
-
(Optional) Description: Authenticate an agent to Identity Cloud
The journey designer is displayed, with the
Startentry point connected to theFailureexit point, and aSuccessnode. -
-
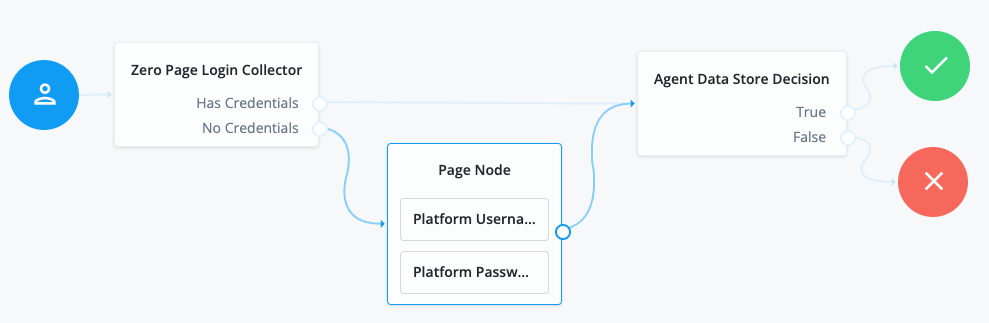
Using the Filter nodes bar, find and then drag the following nodes from the Components panel into the designer area:
-
Zero Page Login Collector node to check whether the agent credentials are provided in the incoming authentication request and use their values in the following nodes.
This node is required for compatibility with Java agent and Web agent.
-
Page node to collect the agent credentials if they are not provided in the incoming authentication request and use their values in the following nodes.
-
Agent Data Store Decision node to verify that the agent credentials match the registered Web Agent agent profile.
Many nodes can be configured in the panel on the right side of the page. Unless otherwise stated, do not configure the nodes and use only the default values. -
-
Drag the following nodes from the Components panel into the Page node:
-
Platform Username node
-
Platform Password node
-
-
Connect the nodes as follows and save the journey:
Authenticate agents to AM
For more information, refer to AM’s Authentication Nodes and Trees. |
This section describes how to create an authentication tree to authenticate Web Agent to AM. The tree has the following requirements:
-
It must be called
Agent -
Its nodes must pass the agent credentials to the Agent Data Store Decision node.
When you define a tree in AM, that same tree is used for all instances of Identity Gateway, Java Agent, and Web Agent. Consider this point if you change the tree configuration.
-
On the Realms page of the AM admin UI, choose the realm in which to create the authentication tree.
-
On the Realm Overview page, click Authentication > Trees > Create tree.
-
Create a tree named
Agent.The authentication tree designer is displayed, with the
Startentry point connected to theFailureexit point, and aSuccessnode.The authentication tree designer provides the following features on the toolbar:
Button Usage 
Lay out and align nodes according to the order they are connected.

Toggle the designer window between normal and full-screen layout.

Remove the selected node. Note that the
Startentry point cannot be deleted. -
Using the Filter bar, find and then drag the following nodes from the Components panel into the designer area:
-
Zero Page Login Collector node to check whether the agent credentials are provided in the incoming authentication request and use their values in the following nodes.
This node is required for compatibility with Java agent and Web agent.
-
Page node to collect the agent credentials if they are not provided in the incoming authentication request and use their values in the following nodes.
-
Agent Data Store Decision node to verify that the agent credentials match the registered Web Agent profile.
Many nodes can be configured in the panel on the right side of the page. Unless otherwise stated, do not configure the nodes and use only the default values. -
-
Drag the following nodes from the Components panel into the Page node:
-
Username Collector node, to prompt the user to enter their username
-
Password Collector node,to prompt the user to enter their password
-
-
Connect the nodes as follows and save the tree:

Secure communication between Web Agent and AM
Web Agent requires OpenSSL or the Windows built-in Secure Channel API to be available at install time. Unix agents support only OpenSSL. Windows agents support OpenSSL and the Windows Secure Channel API.
For information about supported OpenSSL versions, refer to OpenSSL requirements.
Before installing, make sure the OpenSSL libraries are located or referenced as shown in the following table:
| Operating System | OpenSSL Library | Location or Variable |
|---|---|---|
Windows 32-bit |
|
|
Windows 64-bit |
|
|
Linux |
|
|
AIX |
|
|
(1)OpenSSL 1.1.0+ only
| Windows 64-bit servers require both 32-bit and 64-bit OpenSSL libraries. |