This guide provides instructions for installing and configuring OpenIG, a high-performance reverse proxy server with specialized session management and credential replay functionality.
As a reverse proxy server (also referred to as a gateway in HTTP RFCs), OpenIG filters all traffic to and from a server application, adapting requests to protect the service and adapting responses to filter outgoing content. The credential replay functionality effectively enables single sign-on (SSO) with applications that do not integrate easily into a traditional SSO service.
In reading and following the instructions in this guide, you will learn how to:
Install OpenIG and evaluate all OpenIG features
Protect server applications and integrate them with SSO solutions
Use OpenIG to allow an existing application to act as an OAuth 2.0 resource server
Use OpenIG to allow an existing application to act as an OAuth 2.0 client or OpenID Connect 1.0 Relying Party
Use OpenIG to allow an existing application to act as a SAML 2.0 Service Provider
Configure OpenIG to handle authentication in common use cases
Monitor and audit traffic flowing through OpenIG
Extend OpenIG with Groovy scripts and Java plugins
Troubleshoot typical problems
This guide is intended for access management designers and administrators who develop, build, deploy, and maintain OpenIG for their organizations.
This guide is written so you can get started with OpenIG quickly, and learn more as you progress through the guide.
This guide is also written with the assumption that you already have basic familiarity with the following topics:
Hypertext Transfer Protocol (HTTP), including how clients and servers exchange messages, and the role that a reverse proxy (gateway) plays
JavaScript Object Notation (JSON), which is the format for OpenIG configuration files
Managing services on operating systems and application servers
Configuring network connections on operating systems
Managing Public Key Infrastructure (PKI) used to establish HTTPS connections
Access management for web applications
Depending on the features you use, you should also have basic familiarity with the following topics:
Lightweight Directory Access Protocol (LDAP) if you use OpenIG with LDAP directory services
Structured Query Language (SQL) if you use OpenIG with relational databases
Configuring OpenAM if you use password capture and replay, or if you plan to follow the OAuth 2.0 or SAML 2.0 tutorials
The Groovy programming language if you plan to extend OpenIG with scripts
The Java programming language if you plan to extend OpenIG with plugins, and Apache Maven for building plugins
Most examples in the documentation are created in GNU/Linux or Mac OS X
operating environments.
If distinctions are necessary between operating environments,
examples are labeled with the operating environment name in parentheses.
To avoid repetition file system directory names are often given
only in UNIX format as in /path/to/server,
even if the text applies to C:\path\to\server as well.
Absolute path names usually begin with the placeholder
/path/to/.
This path might translate to /opt/,
C:\Program Files\, or somewhere else on your system.
Command-line, terminal sessions are formatted as follows:
$ echo $JAVA_HOME
/path/to/jdk
Command output is sometimes formatted for narrower, more readable output even though formatting parameters are not shown in the command.
Program listings are formatted as follows:
class Test {
    public static void main(String [] args)  {
        System.out.println("This is a program listing.");
    }
}ForgeRock publishes comprehensive documentation online:
The ForgeRock Knowledge Base offers a large and increasing number of up-to-date, practical articles that help you deploy and manage ForgeRock software.
While many articles are visible to community members, ForgeRock customers have access to much more, including advanced information for customers using ForgeRock software in a mission-critical capacity.
ForgeRock product documentation, such as this document, aims to be technically accurate and complete with respect to the software documented. It is visible to everyone and covers all product features and examples of how to use them.
The ForgeRock.org site has links to source code for ForgeRock open source software, as well as links to the ForgeRock forums and technical blogs.
If you are a ForgeRock customer, raise a support ticket instead of using the forums. ForgeRock support professionals will get in touch to help you.
This chapter introduces OpenIG. In this chapter, you will learn the essentials of using OpenIG including:
What problems OpenIG solves and where it fits in your deployment
How OpenIG acts on HTTP requests and responses
How the configuration files for OpenIG are organized
The roles played by routes, filters, handlers, and chains, which are the building blocks of an OpenIG configuration
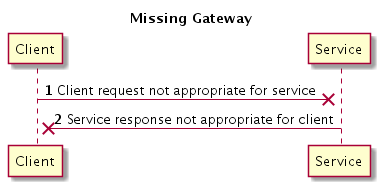
Most organizations have valuable existing services that are not easily integrated into newer architectures. These existing services cannot often be changed. Many client applications cannot communicate as they lack a gateway to bridge the gap. Figure 1.1, "Missing Gateway" illustrates one example of a missing gateway.
OpenIG works as an HTTP gateway, also known as a reverse proxy. OpenIG is deployed on a network so it can intercept both client requests and server responses. Figure 1.2, "OpenIG Deployed" illustrates a OpenIG deployment.
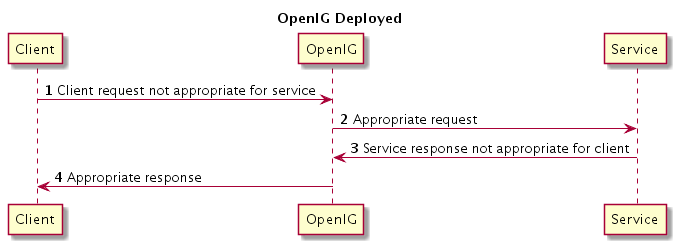
Clients interact with protected servers through OpenIG. OpenIG can be configured to add new capabilities to existing services without affecting current clients or servers.
The list that follows features you can add to your solution by using OpenIG:
Access management integration
Application and API security
Credential replay
OAuth 2.0 support
OpenID Connect 1.0 support
Network traffic control
Proxy with request and response capture
Request and response rewriting
SAML 2.0 federation support
Single sign-on (SSO)
OpenIG supports these capabilities as out of the box configuration options. Once you understand the essential concepts covered in this chapter, try the additional instructions in this guide to use OpenIG to add other features.
OpenIG handles HTTP requests and responses in user-defined chains, making it possible to manage and to monitor processing at any point in a chain. The OpenIG object model provides both access to the requests and responses that pass through each chain, and also context information associated with each request.
Contexts provide information about the client making the request, the session, the authentication or authorization identity of the principal, and any other state information associated with the request. Contexts provide a means to access state information throughout the duration of the HTTP session between the client and protected application, including when this involves interaction with additional services.
The configuration for OpenIG is stored in flat files, which are mainly in JavaScript Object Notation (JSON) format.[1] Configure OpenIG by editing the JSON files.
When installation is complete, add at least one configuration file. Each configuration file holds a JSON object, which specifies a handler to process the request. A handler is an object responsible for producing a response to a request. Every route must call a handler.
The following very simple configuration routes requests to be handled according to separate route configurations:
{
    "handler": {
        "type": "Router"
    }
}
Notice in this case that the handler field takes an object as its value. This is an inline declaration. If you only use the object once where it is declared, then it makes sense to use an inline declaration.
To change the definition of an object defined by default or when you need to declare an object once and use it multiple times, declare the object in the heap. The heap is a collection of named configuration objects that can be referenced by their names from elsewhere in the configuration.
The following example declares a reusable router object and references it by its name, as follows:
{
    "handler": "My Router",
    "heap": [
        {
            "name": "My Router",
            "type": "Router"
        }
    ]
}
Notice that the heap takes an array. Because the heap holds configuration objects all at the same level, you can impose any hierarchy or order that you like when referencing objects. Note that when you declare all objects in the heap and reference them by name, neither hierarchy nor ordering are obvious from the structure of the configuration file alone.
Each configuration object has a type, a name, and an optional config. For example:
The type must be the type name of the configuration object. OpenIG defines many types for different purposes.
The name takes a string that is unique in the list of objects.
You can omit this field when declaring objects inline.
The contents of the config object depend on the type.
When all the configuration settings for the type are optional, the config field is also optional, as in the router example. If all configuration settings are optional, then omitting the config field, setting the config field to an empty object,
"config": {}, or setting"config": nullall signify that the object uses default settings.
The configuration can specify additional objects as well. For example, you can configure a ClientHandler object that OpenIG uses to connect to servers. The following ClientHandler configuration uses defaults for all settings, except hostnameVerifier, which it configures to verify host names in SSL certificates:
{
    "name": "ClientHandler",
    "type": "ClientHandler",
    "config": {
        "hostnameVerifier": "STRICT"
    }
}
Decorators are additional heap objects
that let you extend what another object can do.
For example, a CaptureDecorator
extends the capability of filters and handlers to log requests and responses.
A TimerDecorator logs processing times.
Decorate configuration objects with decorator names as field names.
By default OpenIG defines both
a CaptureDecorator named capture
and also a TimerDecorator named timer.
Log requests, responses, and processing times
by adding decorations as shown in the following example:
{
    "handler": {
        "type": "Router",
        "capture": [ "request", "response" ],
        "timer": true
    }
}
OpenIG also creates additional utility objects with default settings, including ClientHandler, LogSink, and TemporaryStorage. These objects can be referenced by name and do not need to be configured unless they are needed to override the default configurations.
Routes are configuration objects whose behavior is triggered when their conditions are matched. Routes inherit settings from their parent configurations. This means that you can configure global objects in the heap of the base configuration for example, and then reference the objects by name in any other OpenIG configuration.
OpenIG routing lets you use multiple configuration files. Routing also lets OpenIG reload configurations that you change at runtime without restarting OpenIG.
Use routing where OpenIG protects multiple services or multiple and different endpoints of the same service. Routing is also used when processing a request involves multiple steps, because the client must be redirected to authenticate with an identity provider before accessing the service.
As illustrated in Section 1.3, "The Configuration" a router manages the routes in its file system directory, periodically reloading changed routes unless it is configured to load them only at startup.
A router does not explicitly specify any routes. Instead the router specifies a directory where route configuration files are found, or uses the default directory. Routes specify their own condition, which is an expression that evaluates to true, false, or null. If a route condition is true, then the route handles the request.
The following example specifies a condition
that is true when the request path is /login:
"condition": "${matches(request.uri.path, '^/login')}"
If the route has no condition, or if the value of the condition is null, then the route matches any request. Furthermore, OpenIG orders routes lexicographically by file name.
You can use these features to have both optional and default routes.
For example, you could name your routes to check conditions in order:
01-login.json,
02-protected.json,
99-default.json.
Alternatively, you can name routes by using the name property on the route.
A router configuration can specify where to look for route files. As a router is a kind of handler, routes can have routers, too.
Routing only delegates request handling. It does not actually modify the request, the response, or the context. To modify these, chain together filters and handlers:
A handler either delegates to another handler, or it produces a response.
One way to produce a response is to send a request to and receive a response from an external service. In this case, OpenIG acts as a client of the service, often on behalf of the client whose request initiated the request.
Another way to produce a response is to build a response either statically or based on something in the context. In this case, OpenIG plays the role of server, generating a response to return to the client.
A filter either transforms data in the request, response, or context, or performs an action when the request or response passes through the filter.
A filter can leave the request, response, and contexts unchanged. For example, it can log the context as it passes through the filter. Alternatively, it can change request or response. For example, it can generate a static request to replace the client request, add a header to the request, or remove a header from a response.
A chain is a type of handler that dispatches processing to a list of filters in order, and then to the handler.
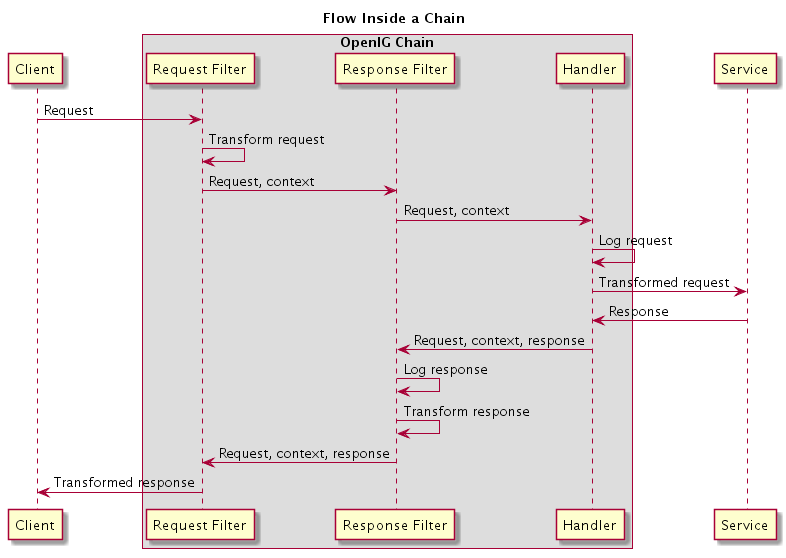
A chain can be placed anywhere in a configuration that a handler can be placed. Filters process the incoming request and pass it on to the next filter and the handler. After the handler produces a response, the filters process the outgoing response as it makes its way to the client. Note that the same filter can process both the incoming request and the outgoing response but most filters do one or the other.
Figure 1.3, "Flow Inside a Chain" shows the flow inside a chain with a request filter transforming the request, a response filter transforming the response, and a handler sending a request to a service to get a response. Notice how the flow traverses the filters in reverse order when the outgoing response comes back from the handler.
The route configuration in Example 1.1, "Chain Without an External Service" demonstrates the flow through a chain that does not call an external service.
{
    "handler": {
        "type": "Chain",
        "comment": "Base configuration defines the capture decorator",
        "config": {
            "filters": [
                {
                    "type": "HeaderFilter",
                    "comment": "Same header on all requests",
                    "config": {
                        "messageType": "REQUEST",
                        "add": {
                            "X-MyHeaderFilter": [
                                "Added by HeaderFilter to request"
                            ]
                        }
                    }
                },
                {
                    "type": "HeaderFilter",
                    "comment": "Remove X-Powered-By from response",
                    "capture": "response",
                    "config": {
                        "messageType": "RESPONSE",
                        "remove": [
                            "X-Powered-By"
                        ]
                    }
                }
            ],
            "handler": {
                "type": "StaticResponseHandler",
                "comment": "Same response to all requests",
                "capture": "request",
                "config": {
                    "status": 200,
                    "reason": "OK",
                    "headers": {
                        "X-Powered-By": [
                            "OpenIG"
                        ]
                    },
                    "entity": "<html><p>Hello, World!</p></html>"
                }
            }
        }
    }
}
The chain receives the request and context and process it as follows:
The first
HeaderFilteradds a header to the incoming request.The second
HeaderFilteris configured to manage responses, not requests, so it simply passes the request and context to the handler.The
StaticResponseHandlercaptures (logs) the request.The
StaticResponseHandlerproduces a response with an entity body and a header.The second
HeaderFiltercaptures (logs) the response.The second
HeaderFilterremoves the header added to the response.The first
HeaderFilteris configured to manage requests, not responses, so it simply passes the outgoing response back to OpenIG.
Example 1.1, "Chain Without an External Service" explained how a chain processes a request and its context. Example 1.2, "Requests and Responses in a Chain" illustrates the HTTP requests and responses captured as they flow through the chain.
### Original request from user-agent
GET / HTTP/1.1
Host: www.example.com:8080
Accept: */*

### Captured incoming request (inside OpenIG)
GET / HTTP/1.1
X-MyHeaderFilter: Added by HeaderFilter to request
Accept: */*
Host: www.example.com:8080

### Captured outgoing response (inside OpenIG)
HTTP/1.1 200 OK
Content-Length: 33
X-Powered-By: OpenIG

<html><p>Hello, World!</p></html>

### Final response to user-agent
HTTP/1.1 200 OK
Content-Length: 33

<html><p>Hello, World!</p></html>
The JSON format does not specify a notation for comments. If OpenIG does not recognize a JSON field name, it ignores the field. As a result, it is possible to use comments in configuration files.
Use the following conventions when commenting to ensure your configuration files are easier to read:
Use
commentfields to add text comments. Figure 1.4, "Using a Comment Field" illustrates a CaptureDecorator configuration that includes a text comment.{ "name": "capture", "type": "CaptureDecorator", "comment": "Write request and response information to the LogSink", "config": { "captureEntity": true } }Use an underscore (
_) to comment a field temporarily. Figure 1.5, "Using an Underscore" illustrates aCaptureDecoratorthat has"captureEntity": truecommented out. As a result, it uses the default setting ("captureEntity": false).{ "name": "capture", "type": "CaptureDecorator", "config": { "_captureEntity": true } }
Now that you understand the essential concepts, start using OpenIG with the help of the following chapters:
- Chapter 2, "Getting Started"
This chapter shows you how to get OpenIG up and running quickly.
- Chapter 3, "Installation in Detail"
This chapter covers more advanced installation procedures.
- Chapter 4, "Getting Login Credentials From Data Sources"
This chapter shows you how to configure OpenIG to look up credentials in external sources, such as a file or a database.
- Chapter 5, "Getting Login Credentials From OpenAM"
This chapter walks you through an OpenAM integration with OpenAM's password capture and replay feature.
- Chapter 7, "OpenIG As a SAML 2.0 Service Provider"
This chapter shows how to configure OpenIG as a SAML 2.0 Identity Provider.
- Chapter 8, "OpenIG As an OAuth 2.0 Resource Server"
This chapter explains how OpenIG acts as an OAuth 2.0 Resource Server, and follows with a tutorial that shows you how to use OpenIG as a resource server.
- Chapter 9, "OpenIG As an OAuth 2.0 Client or OpenID Connect Relying Party"
This chapter explains how OpenIG acts as an OAuth 2.0 client or OpenID Connect 1.0 relying party, and follows with a tutorial that shows you how to use OpenIG as an OpenID Connect 1.0 relying party.
- Chapter 11, "Configuring Routes"
This chapter shows how to configure OpenIG to allow dynamic configuration changes and route to multiple applications.
- Chapter 12, "Configuration Templates"
This chapter provides sample OpenIG configuration files for common use cases.
In this chapter, you will learn to:
Quickly set up OpenIG on Jetty
Configure OpenIG to protect a sample application
Prepare OpenIG so that you can follow all subsequent tutorials in the documentation
This chapter allows you to quickly see how OpenIG works, and provides hands-on experience with a few key features. For more general installation and configuration instructions, start with Chapter 3, "Installation in Detail".
Make sure you have a supported Java Development Kit installed. For details, see Section 2.1, "JDK Version" in the Release Notes.
You install OpenIG in the root context of a web application container. In this chapter, you use Jetty server as the web application container.
To perform initial installation, follow these steps:
Download and unzip a supported version of Jetty server.
Supported versions are listed in Section 2.2, "Web Application Containers" in the Release Notes.
Download the OpenIG .war file.
Deploy OpenIG in the root context.
Copy the OpenIG .war file as
root.warto the/path/to/jetty/webapps/:$ cp OpenIG-4.0.0.war /path/to/jetty/webapps/root.warJetty automatically deploys OpenIG in the root context on startup.
Start Jetty in the background:
$ /path/to/jetty/bin/jetty.sh startOr start Jetty in the foreground:
$ cd /path/to/jetty/
$ java -jar start.jar
Verify that you can see the OpenIG welcome page at http://localhost:8080.
When you start OpenIG without a configuration, requests to OpenIG default to a welcome page with a link to the documentation.
Stop Jetty in the background:
$ /path/to/jetty/bin/jetty.sh stopOr stop Jetty in the foreground by entering Ctrl+C in the terminal where Jetty is running.
Now that OpenIG is installed, set up a sample application to protect.
Follow these steps:
Download and run the minimal HTTP server .jar to use as the application to protect:
$ java -jar openig-doc-4.0.0-jar-with-dependencies.jar
Preparing to listen for HTTP on port 8081.
Preparing to listen for HTTPS on port 8444.
The server will use a self-signed certificate not known to browsers.
When using HTTPS with curl for example, try --insecure.
Using OpenAM URL: http://openam.example.com:8088/openam/oauth2.
Starting server...
Sep 09, 2015 9:52:56 AM org.glassfish.grizzly.http.server.NetworkListener start
INFO: Started listener bound to [0.0.0.0:8444]
Sep 09, 2015 9:52:56 AM org.glassfish.grizzly.http.server.NetworkListener start
INFO: Started listener bound to [0.0.0.0:8081]
Sep 09, 2015 9:52:56 AM org.glassfish.grizzly.http.server.HttpServer start
INFO: [HttpServer] Started.
Press Ctrl+C to stop the server.
By default, this server listens for HTTP on port 8081, and for HTTPS on port 8444. If one or both of those ports are not free, specify other ports:
$ java -jar openig-doc-4.0.0-jar-with-dependencies.jar 8888 8889
Preparing to listen for HTTP on port 8888.
Preparing to listen for HTTPS on port 8889.
The server will use a self-signed certificate not known to browsers.
When using HTTPS with curl for example, try --insecure.
Using OpenAM URL: http://openam.example.com:8088/openam/oauth2.
Starting server...
Sep 09, 2015 9:55:57 AM org.glassfish.grizzly.http.server.NetworkListener start
INFO: Started listener bound to [0.0.0.0:8889]
Sep 09, 2015 9:55:57 AM org.glassfish.grizzly.http.server.NetworkListener start
INFO: Started listener bound to [0.0.0.0:8888]
Sep 09, 2015 9:55:57 AM org.glassfish.grizzly.http.server.HttpServer start
INFO: [HttpServer] Started.
Press Ctrl+C to stop the server.
If you change the port numbers when starting the server, also account for the differences when using the examples.
Now access the minimal HTTP server through a browser on the appropriate port, such as http://localhost:8081.
Log in with username
demo, passwordchangeit. You should see a page that includes the username,demo, and some information about your browser request.
Now that you have installed both OpenIG and a sample application to protect, it is time to configure OpenIG.
Follow these steps to configure OpenIG to proxy traffic to the sample application:
Prepare the OpenIG configuration.
Add the following base configuration file as
$HOME/.openig/config/config.json. By default, OpenIG looks forconfig.jsonin the$HOME/.openig/configdirectory:{ "handler": { "type": "Router", "audit": "global", "baseURI": "http://www.example.com:8081", "capture": "all" }, "heap": [ { "name": "LogSink", "type": "ConsoleLogSink", "config": { "level": "DEBUG" } }, { "name": "JwtSession", "type": "JwtSession" }, { "name": "capture", "type": "CaptureDecorator", "config": { "captureEntity": true, "_captureContext": true } } ] }$ mkdir -p $HOME/.openig/config $ vi $HOME/.openig/config/config.jsonOn Windows, the configuration files belong in
%appdata%\OpenIG\config. To locate the%appdata%folder for your version of Windows, open Windows Explorer, type%appdata%as the file path, and press Enter. You must create the%appdata%\OpenIG\configfolder, and then copy the configuration files.If you adapt this base configuration for production use, make sure to adjust the log level, and to deactivate the CaptureDecorator that generates several log message lines for each request and response. Also consider editing the router based on recommendations described in Section 11.3, "Locking Down Route Configurations".
Add the following default route configuration file as
$HOME/.openig/config/routes/99-default.json. By default, the Router defined in the base configuration file looks for routes in the$HOME/.openig/config/routesdirectory:{ "handler": "ClientHandler" }$ mkdir $HOME/.openig/config/routes $ vi $HOME/.openig/config/routes/99-default.jsonOn Windows, the file name should be
%appdata%\OpenIG\config\routes\99-default.json.Start Jetty in the background:
$ /path/to/jetty/bin/jetty.sh startOr start Jetty in the foreground:
$ cd /path/to/jetty/ $ java -jar start.jar
So far you have deployed OpenIG in the root context of Jetty on port 8080. Since OpenIG is a reverse proxy you must make sure that all traffic from your browser to the protected application goes through OpenIG. In other words, the network must be configured so that the browser goes to OpenIG instead of going directly to the protected application.
If you followed the installation steps,
you are running both OpenIG and the minimal HTTP server
on the same host as your browser (probably your laptop or desktop).
Keep in mind that network configuration is an important deployment step.
To encourage you to keep this in mind,
the sample configuration for this chapter expects the minimal HTTP server
to be running on www.example.com,
rather than localhost.
The quickest way to configure the network locally is to add an entry to your
/etc/hosts file on UNIX systems
or %SystemRoot%\system32\drivers\etc\hosts on Windows.
See the Wikipedia entry,
Hosts (file),
for more information on host files.
If you are indeed running all servers in this chapter on the same host,
add the following entry to the hosts file:
127.0.0.1 www.example.com
If you are running the browser and OpenIG on separate hosts, add the IP address of the host running OpenIG to the hosts file on the system running the browser, where the host name matches that of protected application. For example, if OpenIG is running on a host with IP address 192.168.0.15:
192.168.0.15 www.example.com
If OpenIG is on a different host from the protected application, also make sure that the host name of the protected application resolves correctly for requests from OpenIG to the application.
Restart Jetty to take the configuration changes into account.
Tip
Some browsers cache IP address resolutions, even after clearing all browsing data. Restart the browser after changing the IP addresses of named hosts.
The simplest way to make sure you have configured your DNS or host settings properly for remote systems is to stop OpenIG and then to make sure you cannot reach the target application with the host name and port number of OpenIG. If you can still reach it, double check your host settings.
Also make sure name resolution is configured to check host files before DNS.
This configuration can be found in /etc/nsswitch.conf
for most UNIX systems.
Make sure files is listed before dns.
http://www.example.com:8080/ should take you to the home page of the minimal HTTP server.
What just happened?
When your browser goes to http://www.example.com:8080/,
it is actually connecting to OpenIG deployed in Jetty.
OpenIG proxies all traffic it receives to the protected application at
http://www.example.com:8081/,
and returns responses from the application to your browser.
It does this based on the configuration that you set up.
Consider the base configuration file first, config.json.
The base configuration file specifies a router handler named Router.
OpenIG calls this handler when it receives an incoming request.
In addition, it uses the LogSink to log debug messages to the console.
Alternatively, to send log messages to a file you can use a FileLogSink
as described in FileLogSink(5) in the Configuration Reference,
rather than a ConsoleLogSink.
The baseURI decoration in turn changes the request URI to point the request to the sample application to protect. The Router captures the request on the way in, and captures the response on the way out.
The Router routes processing to separate route configurations.
For now the only route available is the the default route you added,
99-default.json.
The default route calls a ClientHandler with the default configuration.
This ClientHandler simply proxies the request to and the response from
the sample application to protect
without changing either the request or the response.
Therefore, the browser request is sent unchanged to the sample application
and the response from the sample application
is returned unchanged to your browser.
Now change the OpenIG configuration to log you in automatically with hard-coded credentials:
Add a route to automatically log you in as username
demo, passwordchangeit.Add the following route configuration file as
$HOME/.openig/config/routes/01-static.json:{ "handler": { "type": "Chain", "config": { "filters": [ { "type": "StaticRequestFilter", "config": { "method": "POST", "uri": "http://www.example.com:8081", "form": { "username": [ "demo" ], "password": [ "changeit" ] } } } ], "handler": "ClientHandler" } }, "condition": "${matches(request.uri.path, '^/static')}" }On Windows, the file name should be
%appdata%\OpenIG\config\routes\01-static.json.Access the new route, http://www.example.com:8080/static.
This time, OpenIG logs you in automatically.
Also view the information logged about requests and responses, which shows up in the Jetty log.
What's happening behind the scenes?
With the original configuration, OpenIG does not change requests or responses, but only proxies requests and responses, and captures request and response information.
After you change the configuration,
OpenIG continues to capture request and response data.
When your request does not go to the default route,
but instead goes to /static,
then the condition on the new route you added matches the request.
OpenIG therefore uses the new route you added.
Using the route configuration in 01-static.json,
OpenIG replaces your browser's original HTTP GET request
with an HTTP POST login request containing credentials to authenticate.
As a result, instead of the home page with a login form,
OpenIG logs you in directly,
and the application responds with the page you see after logging in.
OpenIG then returns this response to your browser.
Figure 2.1, "Log in With Hard-Coded Credentials" shows the steps.

The browser host makes a DNS request for the IP address of the HTTP server host,
www.example.com.DNS responds with the address for OpenIG.
Browser sends a request to the HTTP server.
OpenIG replaces the request with an HTTP POST request, including the login form with hard-coded credentials.
HTTP server validates the credentials, and responds with the profile page.
OpenIG passes the response back to the browser.
In this chapter, you will learn to:
Configure deployment containers for use with OpenIG
Configure the network so that traffic passes through OpenIG
Install OpenIG with custom configuration file locations
Use load balancing with OpenIG
Secure connections to and from OpenIG
Use OpenIG JSON Web Token (JWT) Session cookies across multiple servers
Make sure you have a supported Java version installed.
For details about supported Java versions, see Section 2.1, "JDK Version" in the Release Notes.
Prepare a deployment container.
For details, see Section 3.1, "Configuring Deployment Containers".
Prepare the network to use OpenIG as a reverse proxy.
For details, see Section 3.2, "Preparing the Network".
Download, deploy, and configure OpenIG.
For details, see Section 3.3, "Installing OpenIG".
This section provides installation and configuration tips that you need to run OpenIG in supported containers.
For the full list of supported containers see Section 2.2, "Web Application Containers" in the Release Notes.
For further information on advanced configuration for a particular container, see the container documentation.
OpenIG is often deployed to replay credentials or other security information. In a real world deployment, that information must be communicated over a secure connection using HTTPS, meaning in effect HTTP over encrypted Transport Layer Security (TLS). Never send real credentials, bearer tokens, or other security information unprotected over HTTP.
When OpenIG is acting as a server, the web application container where OpenIG runs is responsible for setting up TLS connections with client applications that connect to OpenIG. For details, see Section 3.1.3.2, "Configuring Jetty For HTTPS (Server-Side)" or Section 3.1.2.2, "Configuring Tomcat For HTTPS (Server-Side)".
When OpenIG is acting as a client, the ClientHandler configuration governs TLS connections from OpenIG to other servers. For details, see Section 3.5, "Configuring OpenIG For HTTPS (Client-Side)" and ClientHandler(5) in the Configuration Reference.
TLS depends on the use of digital certificates (public keys). In typical use of TLS, the client authenticates the server by its X.509 digital certificate as the first step to establishing communication. Once trust is established, then the client and server can set up a symmetric key to encrypt communications.
In order for the client to trust the server certificate, the client needs first to trust the certificate of the party who signed the server's certificate. This means that either the client has a trusted copy of the signer's certificate, or the client has a trusted copy of the certificate of the party who signed the signer's certificate.
Certificate Authorities (CAs) are trusted signers with well-known certificates. Browsers generally ship with many well-known CA certificates. Java distributions also ship with many well-known CA certificates. Getting a certificate signed by a well-known CA is often expensive.
It is also possible for you to self-sign certificates. The trade-off is that although there is no monetary expense, the certificate is not trusted by any clients until they have a copy. Whereas it is often enough to install a certificate signed by a well-known CA in the server keystore as the basis of trust for HTTPS connections, self-signed certificates must also be installed in all clients.
Like self-signed certificates, the signing certificates of less well-known CAs are also unlikely to be found in the default truststore. You might therefore need to install those signing certificates on the client side as well.
This guide describes how to install self-signed certificates, which are certainly fine for trying out the software and okay for deployments where you manage all clients that access OpenIG. If you need a well-known CA-signed certificate instead, see the documentation for your container for details on requesting a CA signature and installing the CA-signed certificate.
Once certificates are properly installed to allow client-server trust, also consider the cipher suites configured for use. The cipher suite used determines the security settings for the communication. Initial TLS negotiations bring the client and server to agreement on which cipher suite to use. Basically the client and server share their preferred cipher suites to compare and to choose. If you therefore have a preference concerning the cipher suites to use, you must set up your container to use only your preferred cipher suites. Otherwise the container is likely to inherit the list of cipher suites from the underlying Java environment.
The Java Secure Socket Extension (JSSE), part of the Java environment, provides security services that OpenIG uses to secure connections. You can set security and system properties to configure the JSSE. For a list of properties you can use to customize the JSSE in Oracle Java, see the Customization section of the JSSE Reference Guide.
This section describes essential Tomcat configuration that you need in order to run OpenIG.
Download and install a supported version of Tomcat from http://tomcat.apache.org/.
Configure Tomcat to use the same protocol as the application you are protecting with OpenIG. If the protected application is on a remote system, configure Tomcat to use the same port as well. If your application listens on both an HTTP and an HTTPS port, then you must configure Tomcat to do so, too.
To configure Tomcat to use an HTTP port other than 8080,
modify the defaults in /path/to/tomcat/conf/server.xml.
Search for the default value of 8080 and replace it with the new port number.
If you use OpenIG for more than a single protected application
and the protected applications are on different hosts,
then you must configure Tomcat to set domain cookies.
To do this, add a session cookie domain context element
that specifies the domain to
/path/to/conf/Catalina/server/root.xml,
as in the following example:
<Context sessionCookieDomain=".example.com" />
Restart Tomcat to read the configuration changes.
To get Tomcat up quickly on an SSL port,
add an entry similar to the following in
/path/to/tomcat/conf/server.xml:
<Connector
port="8443"
protocol="HTTP/1.1"
SSLEnabled="true"
maxThreads="150"
scheme="https"
secure="true"
address="127.0.0.1"
clientAuth="false"
sslProtocol="TLS"
keystoreFile="/path/to/tomcat/conf/keystore"
keystorePass="password"
/>
Also create a keystore holding a self-signed certificate:
$ keytool \
-genkey \
-alias tomcat \
-keyalg RSA \
-keystore /path/to/tomcat/conf/keystore \
-storepass password \
-keypass password \
-dname "CN=openig.example.com,O=Example Corp,C=FR"
Notice the keystore file location and the keystore password
both match the configuration.
By default, Tomcat looks for a certificate with alias tomcat.
Restart Tomcat to read the configuration changes.
Browsers generally do not trust self-signed certificates. To work with a certificate signed instead by a trusted CA, see the Tomcat documentation on configuring HTTPS.
If OpenIG accesses an SQL database, then you must configure Tomcat to access the database using Java Naming and Directory Interface (JNDI). To do so, you must add the driver .jar for the database, set up a JNDI data source, and set up a reference to that data source.
The following steps are for MySQL Connector/J:
Download the MySQL JDBC Driver Connector/J from http://dev.mysql.com/downloads/connector/j.
Copy the driver .jar to
/path/to/tomcat/lib/so that it is on Tomcat's class path.Add a JNDI data source for your MySQL server and database in
/path/to/tomcat/conf/context.xml:<Resource name="jdbc/forgerock" auth="Container" type="javax.sql.DataSource" maxActive="100" maxIdle="30" maxWait="10000" username="mysqladmin" password="password" driverClassName="com.mysql.jdbc.Driver" url="jdbc:mysql://localhost:3306/databasename" />Add a resource reference to the data source in
/path/to/tomcat/conf/web.xml:<resource-ref> <description>MySQL Connection</description> <res-ref-name>jdbc/forgerock</res-ref-name> <res-type>javax.sql.DataSource</res-type> <res-auth>Container</res-auth> </resource-ref>Restart Tomcat to read the configuration changes.
This section describes essential Jetty configuration that you need in order to run OpenIG.
Download and install a supported version of Jetty from http://download.eclipse.org/jetty/.
Configure Jetty to use the same protocol as the application you are protecting with OpenIG. If the protected application is on a remote system, configure Jetty to use the same port as well. If your application listens on both an HTTP and an HTTPS port, then you must configure Jetty to do so as well.
To configure Jetty to use an HTTP port other than 8080,
modify the defaults in /path/to/jetty/etc/jetty.xml.
Search for the default value of 8080 and replace it with the new port number.
If you use OpenIG for more than a single protected application
and the protected applications are on different hosts,
then you must configure Jetty to set domain cookies.
To do this, add a session domain handler element
that specifies the domain to
/path/to/jetty/etc/webdefault.xml,
as in the following example:
<context-param>
<param-name>org.eclipse.jetty.servlet.SessionDomain</param-name>
<param-value>.example.com</param-value>
</context-param>
Restart Jetty to read the configuration changes.
To get Jetty up quickly on an SSL port, follow the steps in this section.
These steps involve replacing the built-in keystore with your own:
If you have not done so already, remove the built-in keystore:
$ rm /path/to/jetty/etc/keystoreGenerate a new key pair with self-signed certificate in the keystore:
$ keytool \ -genkey \ -alias jetty \ -keyalg RSA \ -keystore /path/to/jetty/etc/keystore \ -storepass password \ -keypass password \ -dname "CN=openig.example.com,O=Example Corp,C=FR"Find the obfuscated form of the password:
$ java \ -cp /path/to/jetty/lib/jetty-util-*.jar \ org.eclipse.jetty.util.security.Password \ password password OBF:1v2j1uum1xtv1zej1zer1xtn1uvk1v1v MD5:5f4dcc3b5aa765d61d8327deb882cf99Edit the SSL Context Factory entry in the Jetty configuration file,
/path/to/jetty/etc/jetty-ssl.xml:<New id="sslContextFactory" class="org.eclipse.jetty.http.ssl.SslContextFactory"> <Set name="KeyStore"><Property name="jetty.home" default="." />/etc/keystore</Set> <Set name="KeyStorePassword">OBF:1v2j1uum1xtv1zej1zer1xtn1uvk1v1v</Set> <Set name="KeyManagerPassword">OBF:1v2j1uum1xtv1zej1zer1xtn1uvk1v1v</Set> <Set name="TrustStore"><Property name="jetty.home" default="." />/etc/keystore</Set> <Set name="TrustStorePassword">OBF:1v2j1uum1xtv1zej1zer1xtn1uvk1v1v</Set> </New>Uncomment the line specifying that configuration file in
/path/to/jetty/start.ini:etc/jetty-ssl.xmlRestart Jetty.
Browse https://www.example.com:8443.
You should see a warning in the browser that the (self-signed) certificate is not recognized.
If OpenIG accesses an SQL database, then you must configure Jetty to access the database over JNDI. To do so, you must add the driver .jar for the database, set up a JNDI data source, and set up a reference to that data source.
The following steps are for MySQL Connector/J:
Download the MySQL JDBC Driver Connector/J from http://dev.mysql.com/downloads/connector/j.
Copy the driver .jar to
/path/to/jetty/lib/jndi/so that it is on Jetty's class path.Add a JNDI data source for your MySQL server and database in
/path/to/jetty/etc/jetty.xml:<New id="jdbc/forgerock" class="org.eclipse.jetty.plus.jndi.Resource"> <Arg></Arg> <Arg>jdbc/forgerock</Arg> <Arg> <New class="com.mysql.jdbc.jdbc2.optional.MysqlConnectionPoolDataSource"> <Set name="Url">jdbc:mysql://localhost:3306/databasename</Set> <Set name="User">mysqladmin</Set> <Set name="Password">password</Set> </New> </Arg> </New>Add a resource reference to the data source in
/path/to/jetty/etc/webdefault.xml:<resource-ref> <description>MySQL Connection</description> <res-ref-name>jdbc/forgerock</res-ref-name> <res-type>javax.sql.DataSource</res-type> <res-auth>Container</res-auth> </resource-ref>Restart Jetty to read the configuration changes.
In order for OpenIG to function as a reverse proxy, browsers attempting to access the protected application must go through OpenIG instead.
Modify DNS or host file settings so that the host name of the protected application resolves to the IP address of OpenIG on the system where the browser runs.
Restart the browser after making this change.
Follow these steps to install OpenIG:
Get OpenIG software.
Enterprise software releases are available through the ForgeRock BackStage site. Enterprise releases are thoroughly validated builds for ForgeRock customers who run OpenIG in production deployments, and for those who want to try or test with release builds. Make sure you review and agree with the Software License and Subscription Agreement in order to use the software.
Deploy the OpenIG .war file to the root context of the web application container.
OpenIG must be deployed to the root context, not below.
The name of the root context .war file depends on the container:
Jetty expects a root context .war file named
root.war.Tomcat expects a root context .war file named
ROOT.war.
Prepare your OpenIG configuration files.
By default, OpenIG files are located under
$HOME/.openigon Linux, Mac OS X, and UNIX systems, and%appdata%\OpenIGon Windows systems. OpenIG uses the following file system directories:$HOME/.openig/config,%appdata%\OpenIG\configOpenIG configuration files, where the main configuration file is
config.json.$HOME/.openig/config/routes,%appdata%\OpenIG\config\routesOpenIG route configuration files.
For more information see Chapter 11, "Configuring Routes".
$HOME/.openig/SAML,%appdata%\OpenIG\SAMLOpenIG SAML 2.0 configuration files.
For more information see Chapter 7, "OpenIG As a SAML 2.0 Service Provider".
$HOME/.openig/scripts/groovy,%appdata%\OpenIG\scripts\groovyOpenIG script files, for Groovy scripted filters and handlers.
For more information see Chapter 13, "Extending OpenIG's Functionality".
$HOME/.openig/tmp,%appdata%\OpenIG\tmpOpenIG temporary files.
This location can be used for temporary storage.
You can change
$HOME/.openig(or%appdata%\OpenIG) from the default location in the following ways:Set the
OPENIG_BASEenvironment variable to the full path to the base location for OpenIG files:# On Linux, Mac OS X, and UNIX using Bash $ export OPENIG_BASE=/path/to/openig # On Windows C:>set OPENIG_BASE=c:\path\to\openigSet the
openig.baseJava system property to the full path to the base location for OpenIG files when starting the web application container where OpenIG runs, as in the following example that starts Jetty server in the foreground:$ java -Dopenig.base=/path/to/openig -jar start.jar
If you have not yet prepared configuration files, then start with the configuration described in Section 2.4, "Configure OpenIG".
Copy the template to
$HOME/.openig/config/config.json. Replace the baseURI of the DispatchHandler with that of the protected application.On Windows, copy the template to
%appdata%\OpenIG\config\config.json. To locate the%appdata%folder for your version of Windows, open Windows Explorer, type%appdata%as the file path, and press Enter. You must create the%appdata%\OpenIG\configfolder, and then add the configuration file.Start the web container where OpenIG is deployed.
Browse to the protected application.
OpenIG should now proxy all traffic to the application.
Make sure the browser is going through OpenIG.
Verify this in one of the following ways:
Follow these steps:
Stop the OpenIG web container.
Verify that you cannot browse to the protected application.
Start the OpenIG web container.
Verify that you can now browse to the protected application again.
Check the LogSink to see that traffic is going through OpenIG.
The default ConsoleLogSink is the deployment container log.
For a high scale or highly available deployment, you can prepare a pool of OpenIG servers with nearly identical configurations, and then load balance requests across the pool, routing around any servers that become unavailable. Load balancing allows the service to handle more load.
Before you spread requests across multiple servers, however, you must determine what to do with state information that OpenIG saves in the context, or retrieves locally from the OpenIG server system. If information is retrieved locally, then consider setting up failover. If one server becomes unavailable, another server in the pool can take its place. The benefit of failover is that a server failure can be invisible to client applications.
OpenIG can save state information in several ways:
Handlers including a
SamlFederationHandleror a customScriptableHandlercan store information in the context. Most handlers depend on information in the context, some of which is first stored by OpenIG.Some filters, such as
AssignmentFilters,HeaderFilters,OAuth2ClientFilters,OAuth2ResourceServerFilters,ScriptableFilters,SqlAttributesFilters, andStaticRequestFilters, can store information in the context. Most filters depend on information in the request, response, or context, some of which is first stored by OpenIG.
OpenIG can also retrieve information locally in several ways:
Some filters and handlers, such as
FileAttributesFilters,ScriptableFilters,ScriptableHandlers, andSqlAttributesFilters, can depend on local system files or container configuration.
By default the context data resides in memory in the container
where OpenIG runs.
This includes the default session implementation,
which is backed by the HttpSession that the container handles.
You can opt to store session data on the user-agent instead, however.
For details and to consider whether your data fits, see
JwtSession(5) in the Configuration Reference.
When you use the JwtSession implementation,
be sure to share the encryption keys across all servers,
so that any server can read session cookies from any other.
If your data does not fit in an HTTP cookie,
for example, because when encrypted it is larger than 4 KB,
consider storing a reference in the cookie,
and then retrieve the data by using another filter.
OpenIG logs warning messages
if the JwtSession cookie is too large.
Using a reference can also work when a server becomes unavailable,
and the load balancer must fail requests over to another server in the pool.
If some data attached to a context must be stored on the server side, then you have additional configuration steps to perform for session stickiness and for session replication. Session stickiness means that the load balancer sends all requests from the same client session to the same server. Session stickiness helps to ensure that a client request goes to the server holding the original session data. Session replication involves writing session data either to other servers or to a data store, so that if one server goes down, other servers can read the session data and continue processing. Session replication helps when one server fails, allowing another server to take its place without having to start the session over again. If you set up session stickiness but not session replication, when a server crashes, the client session information for that server is lost, and the client must start again with a new session.
How you configure session stickiness and session replication depends on your load balancer and on your container.
Tomcat can help with session stickiness, and a Tomcat cluster can handle session replication:
If you choose to use the Tomcat connector (mod_jk) on your web server to perform load balancing, then see the LoadBalancer HowTo for details.
In the HowTo, you configure the
jvmRouteattribute in the Tomcat server configuration,/path/to/tomcat/conf/server.xml, to identify the server. The connector can use this identifier to achieve session stickiness.A Tomcat cluster configuration can handle session replication. When setting up a cluster configuration, the ClusterManager defines the session replication implementation.
Jetty has provisions for session stickiness, and also for session replication through clustering:
Jetty's persistent session mechanism appends a node ID to the session ID in the same way Tomcat appends the
jvmRoutevalue to the session cookie. This can be useful for session stickiness if your load balancer examines the session ID.Session Clustering with a Database describes how to configure Jetty to persist sessions over JDBC, allowing session replication.
Unless it is set up to be highly available, the database can be a single point of failure in this case.
Session Clustering with MongoDB describes how to configure Jetty to persist sessions in MongoDB, allowing session replication.
The Jetty documentation recommends this implementation when session data is seldom written but often read.
For OpenIG to connect to a server securely over HTTPS, OpenIG must be able to trust the server. The default settings rely on the Java environment truststore to trust server certificates. The Java environment default truststore includes public key signing certificates from many well-known Certificate Authorities (CAs). If all servers present certificates signed by these CAs, then you have nothing to configure.
If, however, the server certificates are self-signed or signed by a CA whose certificate is not trusted out of the box, then you can configure a KeyStore and a TrustManager, and optionally, a KeyManager to reference when configuring an ClientHandler to enable OpenIG to trust servers when acting as a client.
For details, see:
ClientHandler(5) in the Configuration Reference
KeyManager(5) in the Configuration Reference
KeyStore(5) in the Configuration Reference
TrustManager(5) in the Configuration Reference
The KeyStore holds the servers' certificates or the CA's signing certificate. The TrustManager allows OpenIG to handle the certificates in the KeyStore when deciding whether to trust a server certificate. The optional KeyManager allows OpenIG to present its certificate from the keystore when the server must authenticate OpenIG as client. The ClientHandler references whatever TrustManager and KeyManager you configure.
You can configure each of these either globally, for the OpenIG server, or locally, for a particular ClientHandler configuration.
The Java KeyStore holds the peer servers' public key certificates
(and optionally, the OpenIG certificate and private key).
For example, suppose you have a certificate file, ca.crt,
that holds the trusted signer's certificate
of the CA who signed the server certificates
of the servers in your deployment.
In that case, you could import the certificate into a Java Keystore file,
/path/to/keystore.jks:
$ keytool \ -import \ -trustcacerts \ -keystore /path/to/keystore \ -file ca.crt \ -alias ca-cert \ -storepass changeit
You could then configure the following KeyStore for OpenIG
that holds the trusted certificate.
Notice that the url field takes an expression that evaluates to a URL,
starting with a scheme such as file://:
{
"name": "MyKeyStore",
"type": "KeyStore",
"config": {
"url": "file:///path/to/keystore",
"password": "changeit"
}
}
The TrustManager handles the certificates in the KeyStore when deciding whether to trust the server certificate. The TrustManager references your KeyStore:
{
"name": "MyTrustManager",
"type": "TrustManager",
"config": {
"keystore": "MyKeyStore"
}
}
The ClientHandler configuration has
the following security settings:
- "trustManager"
This references the
TrustManager.Recall that you must configure this when your server certificates are not trusted out of the box.
- "hostnameVerifier"
This defines how the
ClientHandlerverifies host names in server certificates.By default, host name verification is turned off.
- "keyManager"
This references the optional
KeyManager.Configure this if servers request that OpenIG present its certificate as part of mutual authentication.
In that case, generate a key pair for OpenIG, and have the certificate signed by a well-known CA. For instructions, see the documentation for the Java keytool command. You can use a different keystore for the
KeyManagerthan you use for theTrustManager.
The following ClientHandler configuration
references MyTrustManager
and sets strict host name verification:
{
"name": "ClientHandler",
"type": "ClientHandler",
"config": {
"hostnameVerifier": "STRICT",
"trustManager": "MyTrustManager"
}
}
You can use a JSON Web Token (JWT) session, JwtSession,
to configure OpenIG
as described in JwtSession(5) in the Configuration Reference.
A JwtSession stores session information
in JWT cookies on the user-agent,
rather than storing the information
in the container where OpenIG runs.
In order to encrypt the JWTs, OpenIG needs cryptographic keys. OpenIG can generate its own key pair in memory, but that key pair disappears on restart and cannot be shared across OpenIG servers.
Alternatively, OpenIG can use keys from a keystore. The following steps describe how to prepare the keystore for JWT encryption:
Generate the key pair in a new keystore file by using the Java keytool command.
The following command generates a Java Keystore format file,
/path/to/keystore.jks, holding a key pair with aliasjwe-key. Notice that both the keystore and the private key have the same password:$ keytool \ -genkey \ -alias jwe-key \ -keyalg rsa \ -keystore /path/to/keystore.jks \ -storepass changeit \ -keypass changeit \ -dname "CN=www.example.com,O=Example Corp"Add a KeyStore to your configuration that references the keystore file:
{ "name": "MyKeyStore", "type": "KeyStore", "config": { "url": "file:///path/to/keystore.jks", "password": "changeit" } }For details, see KeyStore(5) in the Configuration Reference.
Add a JwtSession to your configuration that references your KeyStore:
{ "name": "MyJwtSession", "type": "JwtSession", "config": { "keystore": "MyKeyStore", "alias": "jwe-key", "password": "changeit", "cookieName": "OpenIG" } }Specify your JwtSession object in the top-level configuration, or in the route configuration:
"session": "MyJwtSession"
In Chapter 2, "Getting Started" you learned how to configure OpenIG to proxy traffic and capture request and response data. You also learned how to configure OpenIG to use a static request to log in with hard-coded credentials. In this chapter, you will learn to:
Configure OpenIG to look up credentials in a file
Configure OpenIG to look up credentials in a relational database
Before you start this tutorial, prepare OpenIG and the minimal HTTP server as shown in Chapter 2, "Getting Started".
OpenIG should be running in Jetty, configured to access the minimal HTTP server as described in that chapter.
This sample shows you how to configure OpenIG to get credentials from a file.
The sample uses a comma-separated value file, userfile:
username,password,fullname,email
george,costanza,George Costanza,george@example.com
kramer,newman,Kramer,kramer@example.com
bjensen,hifalutin,Babs Jensen,bjensen@example.com
demo,changeit,Demo User,demo@example.com
kvaughan,bribery,Kirsten Vaughan,kvaughan@example.com
scarter,sprain,Sam Carter,scarter@example.com
OpenIG looks up the user credentials based on the user's email address.
OpenIG uses a FileAttributesFilter
to look up the credentials.
Follow these steps to set up log in with credentials from a file:
Add the user file on your system:
$ vi /tmp/userfile $ cat /tmp/userfile username,password,fullname,email george,costanza,George Costanza,george@example.com kramer,newman,Kramer,kramer@example.com bjensen,hifalutin,Babs Jensen,bjensen@example.com demo,changeit,Demo User,demo@example.com kvaughan,bribery,Kirsten Vaughan,kvaughan@example.com scarter,sprain,Sam Carter,scarter@example.comOn Windows systems, use an appropriate path such as
C:\Temp\userfile.Add a new route to the OpenIG configuration to obtain the credentials from the file.
To add the route, add the following route configuration file as
$HOME/.openig/config/routes/02-file.json:{ "handler": { "type": "Chain", "config": { "filters": [ { "type": "PasswordReplayFilter", "config": { "loginPage": "${true}", "credentials": { "type": "FileAttributesFilter", "config": { "file": "/tmp/userfile", "key": "email", "value": "george@example.com", "target": "${attributes.credentials}" } }, "request": { "method": "POST", "uri": "http://www.example.com:8081", "form": { "username": [ "${attributes.credentials.username}" ], "password": [ "${attributes.credentials.password}" ] } } } } ], "handler": "ClientHandler" } }, "condition": "${matches(request.uri.path, '^/file')}" }On Windows, the file name should be
%appdata%\OpenIG\config\routes\02-file.json.Notice the following features of the new route:
The
FileAttributesFilterspecifies the file to access, the key and value to look up to retrieve the user's record, and where to store the results in the request context attributes map.The
PasswordReplayFiltercreates a request by retrieving the username and password from the attributes map and replacing your browser's original HTTP GET request with an HTTP POST login request that contains the credentials to authenticate.The route matches requests to
/file.
On Windows systems, edit the path name to the user file.
Now browse to http://www.example.com:8080/file.
If everything is configured correctly, OpenIG logs you in as George.
What's happening behind the scenes?

OpenIG intercepts your browser's HTTP GET request.
The request matches the new route configuration.
The PasswordReplayFilter's FileAttributesFilter
looks up credentials in a file,
and stores the credentials it finds in the request context attributes map.
The PasswordReplayFilter's request
pulls the credentials out of the attributes map,
builds the login form, and performs the HTTP POST request to the HTTP server.
The HTTP server validates the credentials, and responds with a profile page.
OpenIG then passes the response from the HTTP server to your browser.
This sample shows you how to configure OpenIG to get credentials from H2. This sample was developed with Jetty and with H2 1.4.178.
Although this sample uses H2, OpenIG also works with other database software. OpenIG relies on the application server where it runs to connect to the database. Configuring OpenIG to retrieve data from a database is therefore a question of configuring the application server to connect to the database, and configuring OpenIG to choose the appropriate data source, and to send the appropriate SQL request to the database. As a result, the OpenIG configuration depends more on the data structure than on any particular database drivers or connection configuration.
Follow these steps to prepare the database:
On the system where OpenIG runs, download and unpack H2 database.
Start H2:
$ sh /path/to/h2/bin/h2.shH2 starts, listening on port 8082, and opens a browser console page.
In the browser console page, select Generic H2 (Server) under Saved Settings. This sets the Driver Class,
org.h2.Driver, the JDBC URL,jdbc:h2:tcp://localhost/~/test, the User Name,sa.In the Password field, type
password.Then click Connect to access the console.
Run a statement to create a users table based on the user file from Section 4.2, "Log in With Credentials From a File".
If you have not created the user file on your system, put the following content in
/tmp/userfile:username,password,fullname,email george,costanza,George Costanza,george@example.com kramer,newman,Kramer,kramer@example.com bjensen,hifalutin,Babs Jensen,bjensen@example.com demo,changeit,Demo User,demo@example.com kvaughan,bribery,Kirsten Vaughan,kvaughan@example.com scarter,sprain,Sam Carter,scarter@example.comThen create the users table through the H2 console:
DROP TABLE IF EXISTS USERS; CREATE TABLE USERS AS SELECT * FROM CSVREAD('/tmp/userfile');On success, the table should contain the same users as the file. You can check this by running
SELECT * FROM users;in the H2 console.
Follow these steps to enable Jetty to connect to the database:
Configure Jetty for JNDI.
For the version of Jetty used in this sample, stop Jetty and add the following lines to
/path/to/jetty/start.ini:# =========================================================== # Enable JNDI # ----------------------------------------------------------- OPTIONS=jndi # =========================================================== # Enable additional webapp environment configurators # ----------------------------------------------------------- OPTIONS=plus etc/jetty-plus.xmlFor more information, see the Jetty documentation on Configuring JNDI.
Copy the H2 library to the classpath for Jetty:
$ cp /path/to/h2/bin/h2-*.jar /path/to/jetty/lib/ext/Define a JNDI resource for H2 in
/path/to/jetty/etc/jetty.xml:<New id="jdbc/forgerock" class="org.eclipse.jetty.plus.jndi.Resource"> <Arg></Arg> <Arg>jdbc/forgerock</Arg> <Arg> <New class="org.h2.jdbcx.JdbcDataSource"> <Set name="Url">jdbc:h2:tcp://localhost/~/test</Set> <Set name="User">sa</Set> <Set name="Password">password</Set> </New> </Arg> </New>Add a resource reference to the data source in
/path/to/jetty/etc/webdefault.xml:<resource-ref> <res-ref-name>jdbc/forgerock</res-ref-name> <res-type>javax.sql.DataSource</res-type> <res-auth>Container</res-auth> </resource-ref>Restart Jetty to take the configuration changes into account.
Add a new route to the OpenIG configuration to look up credentials in the database:
To add the route, add the following route configuration file as
$HOME/.openig/config/routes/03-sql.json:{ "handler": { "type": "Chain", "config": { "filters": [ { "type": "PasswordReplayFilter", "config": { "loginPage": "${true}", "credentials": { "type": "SqlAttributesFilter", "config": { "dataSource": "java:comp/env/jdbc/forgerock", "preparedStatement": "SELECT username, password FROM users WHERE email = ?;", "parameters": [ "george@example.com" ], "target": "${attributes.sql}" } }, "request": { "method": "POST", "uri": "http://www.example.com:8081", "form": { "username": [ "${attributes.sql.USERNAME}" ], "password": [ "${attributes.sql.PASSWORD}" ] } } } } ], "handler": "ClientHandler" } }, "condition": "${matches(request.uri.path, '^/sql')}" }On Windows, the file name should be
%appdata%\OpenIG\config\routes\03-sql.json.Notice the following features of the new route:
The
SqlAttributesFilterspecifies the data source to access, a prepared statement to look up the user's record, a parameter to pass into the statement, and where to store the search results in the request context attributes map.The
PasswordReplayFilter's request retrieves the username and password from the attributes map and replaces your browser's original HTTP GET request with an HTTP POST login request that contains the credentials to authenticate.Notice that the request is for
username, password, and that H2 returns the fields asUSERNAMEandPASSWORD. The configuration reflects this difference.The route matches requests to
/sql.
With H2, Jetty, and OpenIG correctly configured, you can try it out:
Access the new route, http://www.example.com:8080/sql.
OpenIG logs you in automatically as George.
What's happening behind the scenes?
OpenIG intercepts your browser's HTTP GET request.
The request matches the new route configuration.
The PasswordReplayFilter's SqlAttributesFilter
looks up credentials in H2,
and stores the credentials it finds in the request context attributes map.
The PasswordReplayFilter's request pulls the credentials
out of the attributes map,
builds the login form, and performs the HTTP POST request to the HTTP server.
The HTTP server validates the credentials, and responds with a profile page.
OpenIG then passes the response from the HTTP server to your browser.
OpenIG helps integrate applications with OpenAM's password capture and replay feature. This feature of OpenAM is typically used to integrate with Microsoft Outlook Web Access (OWA) or SharePoint by capturing the password during OpenAM authentication, encrypting it, and adding to the session, which is later decrypted and used for Basic Authentication to OWA or SharePoint. In this chapter, you will learn:
How OpenAM password capture and replay works
To configure OpenIG to obtain credentials from OpenAM authentication
To use the credentials to log the user in to a protected application
The figure below illustrates the flow of requests for a user who is not yet logged into OpenAM accessing a protected application. After successful authentication, the user is logged into the application with the username and password from the OpenAM login session.
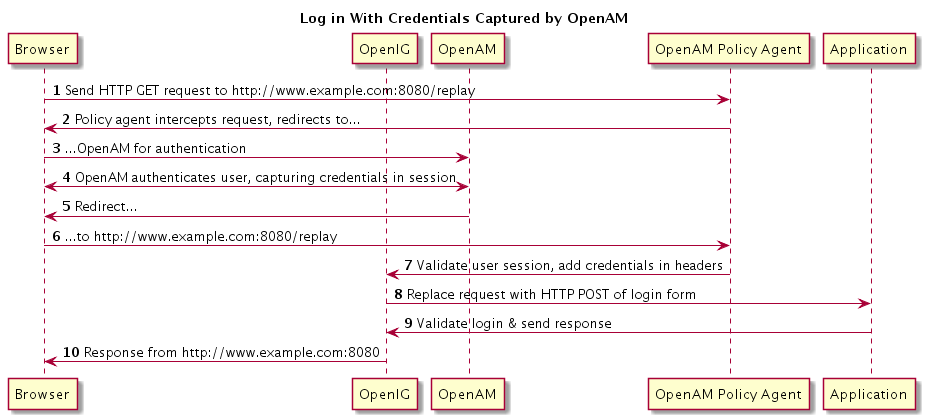
The user sends a browser request to access a protected application.
The OpenAM policy agent protecting OpenIG intercepts the request.
The policy agent redirects the browser to OpenAM.
OpenAM authenticates the user, capturing the login credentials, storing the password in encrypted form in the user's session.
After authentication, OpenAM redirects the browser...
...back to the protected application.
The OpenAM policy agent protecting OpenIG intercepts the request, validates the user session with OpenAM (not shown here), adds the username and encrypted password to headers in the request, and passes the request to OpenIG.
OpenIG retrieves the credentials from the headers, and uses the username and decrypted password to replace the request with an HTTP POST of the login form.
The application validates the login credentials, and sends a response back to OpenIG.
OpenIG passes the response from the application back to the user's browser.
This tutorial calls for you to set up several different software components:
OpenAM is installed on
http://openam.example.com:8088/openam.Download and run the minimal HTTP server .jar to use as the application to protect:
The openig-doc-4.0.0-jar-with-dependencies.jar application listens at
http://www.example.com:8081. The minimal HTTP server is run with the java -jar openig-doc-4.0.0-jar-with-dependencies.jar command, as described in Chapter 2, "Getting Started".OpenIG is deployed in Jetty as described in Chapter 2, "Getting Started". OpenIG listens at
http://www.example.com:8080.OpenIG is protected by an OpenAM Java EE policy agent also deployed in Jetty. The policy agent is configured to add username and encrypted password headers to the HTTP requests.
In this section, it is assumed that you are familiar with the components involved. For OpenAM and OpenAM policy agent documentation, see https://backstage.forgerock.com/docs/am.
Install and configure OpenAM on
http://openam.example.com:8088/openamwith the default configuration. If you use a different configuration, make sure you substitute in the tutorial accordingly.Create a sample user Subject in the top-level realm with username
georgeand passwordcostanza.Test that you can log in to OpenAM with this username and password.
Create the Java EE agent profile in the top-level realm with the following settings:
Server URL:
http://openam.example.com:8088/openamAgent URL:
http://www.example.com:8080/agentapp
Edit the policy agent profile to add these settings, making sure to save your work when you finish:
On the Global settings tab page under General, change the Agent Filter Mode from
ALLtoSSO_ONLY.On the Application tab page under Session Attributes Processing, change the Session Attribute Fetch Mode from
NONEtoHTTP_HEADER.Also on the Application tab page under Session Attributes Processing, add
UserToken=usernameandsunIdentityUserPassword=passwordto the Session Attribute Mapping list.
Configure password capture in OpenAM as follows:
Update Authentication Post Processing Classes for password replay:
In the console for OpenAM 12 and earlier, under Access Control > / (Top Level Realm) > Authentication, click All Core Settings, and then add
com.sun.identity.authentication.spi.ReplayPasswdto the Authentication Post Processing Classes.In the console for OpenAM 13 and later, select the top-level Realm, browse to Authentication > Settings, and then add
com.sun.identity.authentication.spi.ReplayPasswdto the Authentication Post Processing Classes.
Generate a DES shared key for the OpenAM Authentication plugin and for OpenIG.
When you configure password capture and replay, an OpenAM policy agent shares captured passwords with OpenIG. Before communicating the passwords to OpenIG however, OpenAM encrypts them with a shared key. OpenIG then uses the shared key to decrypt the shared passwords. You supply the shared key to OpenIG and to OpenAM as part of the password capture configuration.
To generate a DES shared key, you can use a
DesKeyGenHandleras described in DesKeyGenHandler(5) in the Configuration Reference. Add the route for the handler while you generate the key. For example, add the following route configuration file as$HOME/.openig/config/routes/04-keygen.json:{ "handler": { "type": "DesKeyGenHandler" }, "condition": "${matches(request.uri.path, '^/keygen') and (matches(contexts.client.remoteAddress, ':1') or matches(contexts.client.remoteAddress, '127.0.0.1'))}" }On Windows, the file name should be
%appdata%\OpenIG\config\routes\04-keygen.json.Call the route to generate a key as in the following example:
$ curl http://localhost:8080/keygen {"key":"1U+YFlIcDjQ="}The shared key is sensitive information. If it is possible for others to inspect the response, make sure you use HTTPS to protect the communication.
In the OpenAM console under Configuration > Servers and Sites, click on the server name link, go to the Advanced tab and add
com.sun.am.replaypasswd.keywith the value of the key generated in the previous step.Restart the OpenAM server after adding the Advanced property for the change to take effect.
Install OpenIG in Jetty and run the minimal HTTP server as described in Chapter 2, "Getting Started".
When you finish, OpenIG should be running in Jetty, configured to access the minimal HTTP server as described in that chapter.
The initial OpenIG configuration file should look like the one used to proxy requests through to the HTTP server and to capture request and response data, as described in Section 2.4, "Configure OpenIG".
To test your setup, access the HTTP server home page through OpenIG at http://www.example.com:8080.
Login as username
george, passwordcostanza.You should see a page showing the username and some information about the request.
Install the OpenAM Java EE policy agent alongside OpenIG in Jetty, listening at
http://www.example.com:8080, using the following hints:Jetty Server Config Directory :
/path/to/jetty/etcJetty installation directory. :
/path/to/jettyOpenAM server URL :
http://openam.example.com:8088/openamAgent URL :
http://www.example.com:8080/agentapp
After copying
agentapp.warinto/path/to/jetty/webapps/, also add the following filter configuration to/path/to/jetty/etc/webdefault.xml:<filter> <filter-name>Agent</filter-name> <display-name>Agent</display-name> <description>OpenAM Policy Agent Filter</description> <filter-class>com.sun.identity.agents.filter.AmAgentFilter</filter-class> </filter> <filter-mapping> <filter-name>Agent</filter-name> <url-pattern>/replay</url-pattern> <dispatcher>REQUEST</dispatcher> <dispatcher>INCLUDE</dispatcher> <dispatcher>FORWARD</dispatcher> <dispatcher>ERROR</dispatcher> </filter-mapping>To test the configuration, start Jetty, and then browse to http://www.example.com:8080/replay. You should be redirected to OpenAM for authentication.
Do not log in, however. You have not yet configured a route to handle requests to
/replay.
Add a new route to the OpenIG configuration to handle OpenAM password capture and replay.
To add the route, add the following route configuration file as
$HOME/.openig/config/routes/04-replay.json:{ "handler": { "type": "Chain", "config": { "filters": [ { "type": "PasswordReplayFilter", "config": { "loginPage": "${true}", "headerDecryption": { "algorithm": "DES/ECB/NoPadding", "key": "DESKEY", "keyType": "DES", "charSet": "utf-8", "headers": [ "password" ] }, "request": { "method": "POST", "uri": "http://www.example.com:8081", "form": { "username": [ "${request.headers['username'][0]}" ], "password": [ "${request.headers['password'][0]}" ] } } } }, { "type": "HeaderFilter", "config": { "messageType": "REQUEST", "remove": [ "password", "username" ] } } ], "handler": "ClientHandler" } }, "condition": "${matches(request.uri.path, '^/replay')}" }On Windows, the file name should be
%appdata%\OpenIG\config\routes\04-replay.json.Change
DESKEYto the actual key value that you generated in Section 5.3.3, "Configuring Password Capture".Notice the following features of the new route:
The
PasswordReplayFilteruses theheaderDecryptioninformation to decrypt the password that OpenAM captured and encrypted, and that the OpenAM policy agent included in the headers for the request.The resulting
headerDecryptionobject should look something like this, but using the key value that you generated:{ "algorithm": "DES/ECB/NoPadding", "key": "ipvvZF2Mj0k", "keyType": "DES", "charSet": "utf-8", "headers": [ "password" ] }The
PasswordReplayFilterretrieves the username and password from the context and replaces your browser's original HTTP GET request with an HTTP POST login request that contains the credentials to authenticate.The
HeaderFilterremoves the username and password headers before continuing to process the request.The route matches requests to
/replay.
Log out of OpenAM if you are logged in already.
Access the new route, http://www.example.com:8080/replay.
If you are not already logged into OpenAM, you should be redirected to the OpenAM login page.
Log in with username
george, passwordcostanza. After login you should be redirected back to the application.
OpenIG can function as a policy enforcement point (PEP) with OpenAM as the policy decision point (PDP). In this chapter, you will learn how to configure OpenIG to:
Enforce policy decisions from OpenAM
Skip policy enforcement for resources that do not require policy protection
In access management, a policy enforcement point (PEP) intercepts requests for a resource, provides information about the request to a policy decision point (PDP), and then grants or denies access to the resource based on the policy decision. The policy decision point determines whether to allow a request based on the information that puts the request in context. The policy decision is made based on authorization policies that apply depending on the context for the request.
OpenAM allows the administrator to maintain centralized, fine-grained, declarative policies describing who can access what resources, and under what conditions access is authorized. OpenAM evaluates access decisions based on applicable policies, which can be managed by OpenAM realm, and by OpenAM application.
OpenAM provides a REST API for authorized users to request policy decisions. OpenIG provides a PolicyEnforcementFilter that uses the REST API.
You configure OpenIG to use a PolicyEnforcementFilter to protect resources based on OpenAM policies. For reference information about the filter, see PolicyEnforcementFilter(5) in the Configuration Reference.
This tutorial shows you how OpenIG can act as a PEP, requesting policy decisions from OpenAM as a PDP. You add an OpenIG route that does the following:
When a user requests access to resources that do not require protection, the route allows the request to pass through.
When a user requests access to protected resources:
If the request is missing the expected OpenAM SSO token cookie, then the route redirects the user to OpenAM for authentication.
Otherwise, the route requests a policy decision from OpenAM.
If the decision indicates that the request is allowed, processing continues. If the decision indicates that request is denied, OpenIG returns HTTP 403 Unauthorized.
Before you start this tutorial, prepare OpenIG and the minimal HTTP server as described in Chapter 2, "Getting Started".
OpenIG should be running in Jetty, configured to access the minimal HTTP server as described in that chapter.
Now proceed to Section 6.3, "Setting Up OpenAM As a PDP".
OpenAM must have at least one policy that applies to requests to make policy decisions allowing access to resources. For OpenIG to request policy decisions, it must use the credentials of a user with the privilege to do so. This section describes what policy to create, and how to prepare a user who can request policy decisions.
Follow these steps:
Log in to OpenAM console as administrator (
amadmin).In the top-level realm, create an authorization policy in the
iPlanetAMWebAgentServicepolicy set calledPolicy for OpenIG as PEP.Configure the policy with the following characteristics:
- Resources
Protect a URL resource of the form
http://www.example.com:*/*.This policy applies to resources served by the minimal HTTP server as they are accessed through OpenIG.
- Actions
Allow HTTP
GET.- Subjects
Add a subject condition of type
Authenticated Users.
Make sure all the changes are saved.
Follow these steps:
In the top-level realm, create a subject with ID
policyAdminand passwordpassword.Create a
policyAdminsgroup and add the user you created.In the privileges configuration, add the
REST calls for policy evaluationprivilege for thepolicyAdminsgroup.This allows the user to request policy decisions.
Make sure all the changes are saved.
Now proceed to Section 6.4, "Setting Up OpenIG As a PEP".
To configure OpenIG as a PEP,
use a PolicyEnforcementFilter as described in
PolicyEnforcementFilter(5) in the Configuration Reference.
Include the following route configuration file
as $HOME/.openig/config/routes/04-pep.json:
{
"handler": {
"type": "DispatchHandler",
"config": {
"bindings": [
{
"condition": "${request.cookies['iPlanetDirectoryPro'] == null}",
"handler": {
"type": "StaticResponseHandler",
"config": {
"status": 302,
"reason": "Found",
"headers": {
"Location": [
"http://openam.example.com:8088/openam/XUI/#login/&goto=${urlEncode(contexts.router.originalUri)}"
]
},
"entity": "Redirecting to OpenAM..."
}
}
},
{
"comment": "This condition is optional, but included for clarity.",
"condition": "${request.cookies['iPlanetDirectoryPro'] != null}",
"handler": {
"type": "Chain",
"config": {
"filters": [
{
"type": "PolicyEnforcementFilter",
"config": {
"openamUrl": "http://openam.example.com:8088/openam/",
"pepUsername": "policyAdmin",
"pepPassword": "password",
"ssoTokenSubject": "${request.cookies['iPlanetDirectoryPro'][0].value}"
}
}
],
"handler": "ClientHandler"
}
}
}
]
}
},
"condition": "${matches(request.uri.path, '^/pep') and not contains(request.uri.path, 'not-enforced')}"
}
On Windows, the file name should be
%appdata%\OpenIG\config\routes\04-pep.json.
Notice the following features of the new route:
If the request path contains
not-enforced, the route is skipped.This is similar to the not-enforced URL behavior of OpenAM policy agents.
The main
DispatchHandlerhas the following bindings:If the request is missing an
iPlanetDirectoryProSSO cookie, theStaticResponseHandlerredirects to OpenAM for authentication, with agotoparameter to have OpenAM redirect back to the request URL on successful authentication.When redirecting to OpenAM, OpenIG uses the XUI URL. If you use the classic UI, adjust the location accordingly.
Adding other parameters is left as an exercise for the reader. See the OpenAM documentation for details.
Otherwise, the
PolicyEnforcementFilteruses the SSO cookie value to identify the subject making the request, and calls to OpenAM for a policy decision.On success, the
PolicyEnforcementFilterlets processing continue, and the resource is returned in response to the request.
The route matches requests to
/pep.
Now proceed to Section 6.5, "Test the Setup".
To try your configuration, first log out of OpenAM. Then try the following:
Browse to http://www.example.com:8080/pep/not-enforced/.
The condition does not match the new route, because as intended access control is not enforced for this resource.
The default OpenIG route lets the request through to the minimal HTTP server that returns its home page.
Browse to http://www.example.com:8080/pep/.
OpenIG redirects you to OpenAM for authentication, where you can log in as user
demo, passwordchangeit.On successful authentication, OpenAM redirects you back to the request URL, and OpenIG requests a policy decision with the SSO cookie value.
OpenAM returns a policy decision granting access to the resource, and OpenIG allows the minimal HTTP server to return its home page.
OpenIG helps integrate applications into SAML 2.0 deployments. In this chapter, you will learn:
How OpenIG works as a SAML 2.0 service provider, and what the feature requires in terms of setup and configuration
To configure OpenIG as a SAML 2.0 federation service provider, logging users in to a protected application with information from a SAML assertion
The federation component of OpenIG is a standards-based authentication service used by OpenIG to validate a user and retrieve key attributes of the user in order to log them in to applications that OpenIG protects. The federation component implements Security Assertion Markup Language 2.0.
Security Assertion Markup Language (SAML) 2.0 is a standard for exchanging security information across organizational boundaries. SAML 2.0 enables web single sign-on (SSO), for example, where the service managing the user's identity does not necessarily belong to the same organization and does not necessarily use the same software as the service that the user wants to access.
In SAML 2.0, the service managing the user's identity is called the Identity Provider (IDP). The service that the user wants to access is called the Service Provider (SP). Provider organizations agree on the security information they want to exchange, and then they mutually configure access to each others' services so that the SAML 2.0 federation capability is ready for use. The group of providers sets up a circle of trust, which is a list of services participating in the federation. In order to be able to configure access to services in the circle of trust, the providers share SAML 2.0 metadata describing their services in an XML format defined by the SAML 2.0 standard.
OpenIG plays the role of SAML 2.0 SP. You must therefore configure OpenIG as SP to access IDP services in order for the federation component to be operational.
For SAML 2.0 web SSO, the user authenticates with the IDP. This can start either with the user visiting the IDP site and logging in, or with the user visiting the SP site and being directed to the IDP to log in. On successful authentication, the IDP sends an assertion statement about the authentication to the SP. This assertion statement attests which user the IDP authenticated, when the authentication succeeded, how long the assertion is valid, and so forth. It can optionally contain attribute values for the user who authenticated. (OpenIG can then, for example, use the attribute values to log a user into a protected application.) The assertion can optionally be signed and encrypted.
There are two ways that the OpenIG federation component can be invoked:
IDP initiated SSO, where the remote Identity Provider sends an unsolicited authentication statement to OpenIG
SP initiated SSO, where OpenIG calls the federation component to initiate federated SSO with the Identity Provider
In both cases, the job of the federation component is to validate the user and to pass the required attributes to OpenIG so that it can log the user into protected applications.
This section summarizes the stages needed to prepare OpenIG to act as a SAML 2.0 SP for your target application:
Install the OpenIG .war file.
Configure OpenIG to proxy successfully, and even log a user in to the target application.
Getting this to work before configuring federation makes the process much simpler to troubleshoot if anything goes wrong.
Add federation configuration to the OpenIG configuration.
Include the assertion mapping, redirect URI, and any optional configuration settings you choose in the federation configuration.
Export the Identity Provider metadata from the remote IDP, or use the metadata from an OpenAM-generated Fedlet. (An OpenAM Fedlet is a small web application that can act as SP.)
Import OpenIG metadata to your Identity Provider.
If you intend to protect multiple service provider applications first read this chapter and work through the samples. Then consider the explanation in Appendix A, "SAML 2.0 and Multiple Applications".
You configure the federation component by modifying
both the OpenIG config.json file
and also by including federation-specific XML files with the configuration.
The location of configuration information depends on the operating system where OpenIG runs, and on the user who runs the application server where OpenIG runs:
On UNIX, Linux, and similar systems where this user's home directory is referred to as
$HOME, by default the federation component looks in$HOME/.openig/configforconfig.jsonand in$HOME/.openig/SAMLfor the federation XML configuration.On Windows, by default the federation component looks in
%appdata%\OpenIG\config, and in%appdata%\OpenIG\SAML. To locate the%appdata%folder for your version of Windows, open Windows Explorer, type%appdata%as the file path, and press Enter. You must create the%appdata%\OpenIG\configand%appdata%\OpenIG\SAMLfolders, and then copy the configuration files into the folders.
The following is a description of the files:
$HOME/.openig/config/config.jsonThis is the core configuration file for OpenIG, where you configure a
SamlFederationHandleras described in SamlFederationHandler(5) in the Configuration Reference. If this file uses aRouteras described in Router(5) in the Configuration Reference, you can configure the handler in a route file.You must configure both the OpenIG core configuration, and also the XML files specific to the federation component. The reason there are two sets of configuration files is that the federation component includes a federation library from OpenAM.
In order to configure the federation component, you must tag swap the XML files. If you are familiar with the workflow in the OpenAM console you can instead generate a Fedlet and directly copy the configuration files into
$HOME/.openig/SAML.$HOME/.openig/SAML/FederationConfig.propertiesAdvanced features of the federation library from OpenAM. The defaults suffice in most deployments.
$HOME/.openig/SAML/fedlet.cotCircle of trust for OpenIG and the Identity Provider.
$HOME/.openig/SAML/idp.xmlThis metadata file is generated by the Identity Provider. You must copy the generated metadata file into the configuration directory.
$HOME/.openig/SAML/idp-extended.xmlStandard metadata extensions generated by the Identity Provider.
$HOME/.openig/SAML/sp.xml,$HOME/.openig/SAML/sp-extended.xmlThese are the standard metadata and metadata extensions for the OpenIG federation component.
The simplest way to configure the federation component is to use the OpenAM wizard to generate a Fedlet, and then copy the Fedlet configuration files to the correct locations. The wizard is accessible from the Common Tasks page in the console for OpenAM 12 and earlier, and from the Dashboard for the realm in OpenAM 13 and later.
If you use the Fedlet configuration files,
simply unpack Fedlet.war
and copy all the files listed above into $HOME/.openig/SAML.
You do not have to modify the files
to do basic IDP and SP initiated SSO with OpenIG.
When generating a Fedlet,
know that the sample config.json templates
uses /saml as the URI
so your Fedlet end point should be specified as
protocol://host.domain:port/saml.
If you do not use the Fedlet wizard,
edit the configuration files for the unconfigured Fedlet,
and then copy the Fedlet configuration files
to the $HOME/.openig/SAML directory.
You must still nevertheless get the metadata from the IDP,
and then copy it to idp.xml in the same directory.
Once you have the Fedlet configuration files set up,
add a SamlFederationHandler as described in
SamlFederationHandler(5) in the Configuration Reference
to the OpenIG configuration.
Application myportal requires a form
with username and password for login.
The username for myportal
is the mail attribute at the user's Identity Provider.
The password for myportal
is the mailPassword attribute at the Identity Provider.
The incoming SAML2 assertion sent by the Identity Provider contains
the mail and mailPassword attributes.
The federation component validates the incoming assertion,
sets the session attributes
username and password
to the values of
mail and mailPassword
from the assertion attributes,
and redirects the user to /myportal/login.
A LoginRequest filter then retrieves the credentials
and creates the form to log the user in to myportal.
The SamlFederationHandler configuration object
looks like this:
{
"name": "SamlFederationHandler",
"type": "SamlFederationHandler",
"config": {
"assertionMapping": {
"username": "mail",
"password": "mailPassword"
},
"redirectURI": "/myportal/login",
"logoutURI": "/myportal/logout"
}
}
The LoginRequest configuration object looks like this:
{
"name": "LoginRequest",
"type": "StaticRequestFilter",
"config": {
"method": "POST",
"uri": "https://www.myportal.com/myportal/login",
"form": {
"username": [
"${session.username}"
],
"password": [
"${session.password}"
]
}
}
}
The Identity Provider metadata must be copied to
the $HOME/.openig/SAML/idp.xml directory.
See the documentation for your Identity Provider
for instructions on how to get the metadata.
To export Identity Provider metadata from OpenAM,
either save the response from the appropriate end point,
such as http://openam.example.com:8088/openam/saml2/jsp/exportmetadata.jsp,
or run an ssoadm command such as the following:
$ ssoadm \ export-entity \ --adminid amadmin \ --password-file /tmp/pwd.txt \ --entityid http://openam.example.com:8088/openam \ --meta-data-file /tmp/idp.xml
The following sections in this chapter are a tutorial on setting up OpenAM to send a SAML 2.0 assertion to OpenIG containing user credentials, and OpenIG to validate the assertion and use the credentials to log the user in to the protected application.
Before you start this tutorial, prepare OpenIG and the minimal HTTP server as described in Chapter 2, "Getting Started".
OpenIG should be running in Jetty, configured to access the minimal HTTP server as described in that chapter.
The initial OpenIG configuration file should look like the one used to proxy requests through to the HTTP server and to capture request and response data, as described in Chapter 2, "Getting Started".
To test your setup, access the HTTP server home page through OpenIG at
http://www.example.com:8080.
Log in as username george, password costanza.
You should see a page showing the username and some information about the request.
In this tutorial, it is assumed that you are familiar with SAML 2.0 federation and with the components involved, including OpenAM. For details, read the documentation for your version of OpenAM.
Install and configure OpenAM on
http://openam.example.com:8088/openamwith the default configuration.If you use a different configuration, make sure you substitute in the tutorial accordingly.
Log in to the OpenAM console as administrator, and create a hosted Identity Provider.
In the console for OpenAM 12 and earlier, use the common task wizard. In the console for OpenAM 13 and later, access the wizard for the realm from Dashboard > Create SAMLv2 Providers > Create Hosted Identity Provider.
This tutorial does not address PKI configuration for validation and encryption, though OpenIG is capable of handling both when properly configured, just as any OpenAM Fedlet can handle both.
Configure the Attribute Mapping to map the the
mailattribute tomailand theemployeenumberattribute toemployeenumber.You can use the
testcertificate in the Identity Provider configuration for signing in this example.Create a Fedlet.
In the console for OpenAM 12 and earlier, use the common task wizard. In the console for OpenAM 13 and later, access the wizard for the realm from Dashboard > Create Fedlet. Set the Name to
OpenIG. Set the Destination URL tohttp://www.example.com:8080/saml.Also configure the Attribute Mapping for the Fedlet to map the the
mailattribute tomailand theemployeenumberattribute toemployeenumber.Why map these attributes?
The SAML 2.0 attribute mapping indicates that the SP, OpenIG, wants the IDP, OpenAM in this case, to get the values of these attributes from the user profile and then send them to the SP, OpenIG. OpenIG can then use the values of the attributes, in this case
mailandemployeenumber, to log the user in to the application it protects.This tutorial uses
mailandemployeenumberfor the sake of simplicity. Both of those attributes are part of a user's profile out of the box with the default OpenAM configuration. Neither of the attributes are needed for anything else in this tutorial.So, this tutorial uses
mailto hold the username, andemployeenumberto hold the password. In a real deployment, you would no doubt use other attributes that depend on how the real user profiles are configured.Use the OpenAM console to create a user subject in the top-level realm with Email Address
georgeand Employee Numbercostanza.
Unpack the configuration files from the Fedlet you created in Section 7.8, "Configuring OpenAM".
The Fedlet is packaged as a .zip file that contains a .war file that in turn contains the configuration files to unpack. OpenAM displays the location of the .zip file upon successful creation of the Fedlet. If you followed the instructions above, the .zip is
$HOME/openam/myfedlets/OpenIG/Fedlet.zipon the system where OpenAM runs:$ cd $HOME/openam/myfedlets/OpenIG $ unzip Fedlet.zip fedlet.war $ unzip fedlet.war conf/* $ mkdir $HOME/.openig/SAML $ cp conf/* $HOME/.openig/SAML $ ls -1 $HOME/.openig/SAML FederationConfig.properties fedlet.cot idp-extended.xml idp.xml sp-extended.xml sp.xmlOn Windows, the SAML configuration files belong in
%appdata%\OpenIG\SAML. To locate the%appdata%folder for your version of Windows, open Windows Explorer, type%appdata%as the file path, and press Enter.Restart Jetty after preparing the SAML configuration files:
Add two new routes to the OpenIG configuration:
Add a route that injects credentials into the context based on attribute values from the SAML assertion returned on successful authentication.
The configuration file to add in this case is
$HOME/.openig/config/routes/05-saml.json:{ "handler": { "type": "SamlFederationHandler", "config": { "assertionMapping": { "username": "mail", "password": "employeenumber" }, "subjectMapping": "subjectName", "redirectURI": "/federate" } }, "condition": "${matches(request.uri.path, '^/saml')}", "session": "JwtSession" }On Windows, the file name should be
%appdata%\OpenIG\config\routes\05-saml.json.Notice the following features of the new route:
The
SamlFederationHandlerextracts credentials from the attributes returned in the SAML 2.0 assertion. It then redirects to the/federateroute.The route matches requests to
/saml.The route uses the
JwtSessionimplementation, meaning it stores encrypted session information in a browser cookie. The name is a reference to theJwtSessionobject defined inconfig.json. For details, see JwtSession(5) in the Configuration Reference.
Add a route that handles requests to perform SAML federation.
The configuration file to add in this case is
$HOME/.openig/config/routes/05-federate.json:{ "handler": { "type": "DispatchHandler", "config": { "bindings": [ { "condition": "${empty session.username}", "handler": { "type": "StaticResponseHandler", "config": { "status": 302, "reason": "Found", "headers": { "Location": [ "http://www.example.com:8080/saml/SPInitiatedSSO" ] } } }, "baseURI": "http://www.example.com:8081" }, { "handler": { "type": "Chain", "config": { "filters": [ { "type": "StaticRequestFilter", "config": { "method": "POST", "uri": "http://www.example.com:8081", "form": { "username": [ "${session.username}" ], "password": [ "${session.password}" ] } } } ], "handler": "ClientHandler" } }, "baseURI": "http://www.example.com:8081" } ] } }, "condition": "${matches(request.uri.path, '^/federate')}", "session": "JwtSession" }On Windows, the file name should be
%appdata%\OpenIG\config\routes\05-federate.json.Notice the following features of the new route:
The
DispatchHandlerdispatches requests to theStaticResponseHandlerif the username has not yet been populated in the context, meaning the user has not yet authenticated with the IDP. Otherwise, if the credentials have been inserted into the context, theDispatchHandlerdispatches requests to theChainto log the user in to the protected application.The
StaticResponseHandlerredirects to the Service Provider initiated SSO end point to initiate SAML 2.0 web browser SSO. After authentication is successful and theSamlFederationHandlerhas injected credentials into the request context, the user-agent ends up redirected to this same route.If more dynamic control is needed for the URL where the user agent is redirected, then use the
RelayStatequery string parameter in the URL of the redirectLocationheader. TheRelayStatequery string parameter specifies where to redirect the user when the SAML 2.0 web browser SSO process is complete. TheRelayStateoverrides the redirectURI set in theSamlFederationHandler. TheRelayStatevalue must be URL-encoded. When using an expression, use theurlEncode()function to encode the value. For example:${urlEncode(contexts.router.originalUri)}. In the following example, the user is finally redirected to the original URI from the request:"headers": { "Location": [ "http://www.example.com:8080/saml/SPInitiatedSSO?RelayState=${urlEncode(contexts.router.originalUri)}" ] }The
StaticRequestFilterretrieves the username and password from the context and replaces your browser's original HTTP GET request with an HTTP POST login request that contains the credentials to authenticate.The route matches requests to
/federate. This is the route you use to test the configuration.The route also uses the
JwtSessionsession implementation.
Log out of OpenAM console, and then test whether everything is properly configured:
For IDP-initiated SSO, click this IDP-initiated SSO link, and then login to OpenAM with username
george, passwordcostanza.For SP-initiated SSO, either browse to the URL for the new route, at http://www.example.com:8080/federate, or click this SP-initiated SSO link, and then log in to OpenAM with username
george, passwordcostanza.
However you initiate SSO, you should wind up viewing the page you normally see after logging in.
What is happening behind the scenes?
The initial incoming requests matches the /federate route.
As the user is not yet authenticated,
the SPInitiatedSSORedirectHandler sends a redirect to initiate SSO.
The user authenticates with the IDP for SAML 2.0 SSO.
After authentication, the IDP redirects the user-agent back to
the SAML URI on the SP (OpenIG),
which you configured for the Fedlet as /saml.
The SamlFederationHandler gets the request to this route.
The request holds the SAML 2.0 assertion whose attributes contain credentials.
The SamlFederationHandler processes an incoming SAML 2.0 assertion,
injecting credentials values from the assertion into the session context.
The SamlFederationHandler then redirects
to the /federate route.
On the /federate route,
once the attributes from the assertion are set in the session,
OpenIG dispatches the request to the chain.
The StaticRequestFilter in the Chain
uses the attribute values to replace the request
with an HTTP POST of login form data
to log the user in to the protected application.
OpenIG returns the response page showing that the user has logged in.
OpenIG helps integrate applications into OAuth 2.0 deployments. In this chapter, you will learn to use OpenIG as an OAuth 2.0 Resource Server.
This chapter explains how OpenIG acts as an OAuth 2.0 Resource Server, and follows with a tutorial that shows you how to use OpenIG as a resource server.
The OAuth 2.0 Authorization Framework describes a way of allowing a third-party application to access a user's resources without having the user's credentials. When resources are protected with OAuth 2.0, users can use their credentials with an OAuth 2.0-compliant identity provider, such as OpenAM, Facebook, Google and others to access the resources, rather than setting up an account with yet another third-party application.
In OAuth 2.0, there are four entities involved:
The resource owner is the user who owns protected resources on a resource server.
For example, a resource owner has photos stored in a web service.
The resource server provides the user's protected resources to authorized client applications.
In OAuth 2.0, an authorization server grants the client application authorization based on the resource owner's consent.
For example, a web service holds user's photos.
The client is the application that needs access to the protected resources.
For example, a photo printing service needs access to the user's photos.
The authorization server is the service responsible for authenticating resource owners and obtaining their consent to allow client applications to access their resources.
For example, OpenAM can act as the OAuth 2.0 authorization server to authenticate resource owners and obtain their consent. Other services can play this role as well. Google and Facebook, for example, provide OAuth 2.0 authorization services.
In OAuth 2.0, there are different grant mechanisms whereby the client can obtain authorization. One grant mechanism involves the client redirecting the resource owner's browser to the authorization server to complete authentication and authorization. You might have experienced this grant mechanism yourself when logging in with your identity provider account to access a web service, rather than creating a new account directly with the web service. Whatever the grant mechanism, the client's aim is to get an OAuth 2.0 access token from the authorization server.
Access tokens are the credentials used to access protected resources. An access token is just a string that represents the authorization to access protected resources given by the authorization server. An access token, like cash, is a bearer token. This means that anyone who has the access token can use it to get the resources. Access tokens therefore must be protected, so requests involving them must go over HTTPS. The advantage of access tokens over passwords or other credentials is that access tokens can be granted and revoked without exposing the user's credentials.
When the client requests access to protected resources, it supplies the access token to the resource server housing the resources. The resource server must then validate the access token. If the access token is found to be valid, then the resource server can let the client have access to the resources.
When OpenIG acts therefore as an OAuth 2.0 resource server, its role is to validate access tokens. How an access token is validated is technically not covered in the specifications for OAuth 2.0. Typically the resource server validates an access token by submitting the token to a token information endpoint. The token information endpoint typically returns the access token when it expires, and the OAuth 2.0 scopes associated with the token, potentially with other information. In OAuth 2.0, the token scopes are strings that can identify the scope of access authorized to the client, but can also be used for other purposes. For example, OpenAM maps them to user profile attribute values by default, and also allows custom scope handling plugins.
In the tutorial that follows, you configure OpenIG as a resource server, and use OpenAM as the OAuth 2.0 authorization server.
Chapter 2, "Getting Started" describes how to configure OpenIG to proxy traffic and capture request and response data. You also learned how to configure OpenIG to use a static request to log in with hard-coded credentials.
You will learn how OpenIG can act as an OAuth 2.0 resource server, validating OAuth 2.0 access tokens and including token info in the context.
This tutorial relies on OpenAM as an OAuth 2.0 authorization server. As an OAuth 2.0 client of OpenAM, you get an access token. You then submit the access token to OpenIG, and OpenIG acts as the resource server.
Before you start this tutorial, prepare OpenIG and the minimal HTTP server as described in Chapter 2, "Getting Started".
OpenIG should be running in Jetty, configured to access the minimal HTTP server as described in that chapter.
Edit config.json to make sure
that the CaptureDecorator also captures the context.
After you make the changes, the object declaration appears as follows:
{
"name": "capture",
"type": "CaptureDecorator",
"config": {
"captureEntity": true,
"captureContext": true
}
}
Restart Jetty for the changes to take effect. This allows you to view the token information that OpenAM returns.
Install and configure OpenAM on
http://openam.example.com:8088/openamwith the default configuration.If you use a different configuration, make sure you substitute in the tutorial accordingly. Although this tutorial does not use HTTPS, you must use HTTPS to protect access tokens in production environments.
Login to the OpenAM console as administrator, and configure an OAuth 2.0 authorization server in the top-level realm.
In the console for OpenAM 12 and earlier, use the common task wizard. In the console for OpenAM 13 and later, access the wizard for the realm from Dashboard > Configure OAuth Provider > Configure OAuth 2.0.
Create an OAuth 2.0 Client profile in the top-level realm.
This allows you to request an OAuth 2.0 access token on behalf of the client.
In the console for OpenAM 12 and earlier, browse to Access Control > / (Top Level Realm) > Agents > OAuth 2.0 Client. In the console for OpenAM 13 and later, select the top-level realm and browse to Agents > OAuth 2.0/OpenID Connect Client Then click New in the Agent table.
Give th new OAuth 2.0 client profile the name
OpenIGand passwordpassword.The name is the OAuth 2.0
client_id, and the password is theclient_secret.Edit the
OpenIGclient profile to addmailandemployeenumberscopes to the Scope(s) list, and then save your work.Here, you overload these profile settings to pass credentials to OpenIG. This tutorial uses
mailandemployeenumberfor the sake of simplicity. Both of those attributes are part of a user's profile out of the box with the default OpenAM configuration. Neither of the attributes are needed for anything else in this tutorial.So, this tutorial uses
mailto hold the username, andemployeenumberto hold the password. In a real deployment, you would no doubt use other attributes that depend on how the real user profiles are configured.Create a user whose additional credentials you set in the Email Address and Employee Number fields if you have not already done so for another tutorial:
In the console for OpenAM 12 and earlier, under Access Control > / (Top Level Realm) > Subjects > User, click New to create the user profile. In the console for OpenAM 13 and later, select Subjects in for the top level realm and create a new subject.
Set the ID to
george, the password tocostanza, and fill the other required fields as you like before clicking OK.Click the user name to edit the profile again, setting Email Address to
georgeand Employee Number tocostanzabefore clicking Save.When finished, log out of OpenAM console.
To configure OpenIG as an OAuth 2.0 resource server, you use an
OAuth2ResourceServerFilter as described in
OAuth2ResourceServerFilter(5) in the Configuration Reference.
The filter expects an OAuth 2.0 access token
in an incoming Authorization request header,
such as the following:
Authorization: Bearer 7af41ddd-47a4-40dc-b530-a9aa9f7ceda9
The filter then uses the access token to validate the token and to retrieve token information from the authorization server. On successful validation, the filter injects the response from the authorization server into the location set by the target in the configuration.
If no access token is present in the request, or token validation does not complete successfully, the filter returns an HTTP error status to the user-agent, and OpenIG does not continue processing the request. This is done as specified in the RFC, OAuth 2.0 Bearer Token Usage.
You can add additional filters and handlers to the chain
directly after the OAuth2ResourceServerFilter,
and expect to have the access token if the filter completes successfully.
To configure OpenIG as an OAuth 2.0 resource server,
add a new route to the OpenIG configuration,
by including the following route configuration file
as $HOME/.openig/config/routes/06-rs.json:
{
"handler": {
"type": "Chain",
"config": {
"filters": [
{
"type": "OAuth2ResourceServerFilter",
"config": {
"providerHandler": "ClientHandler",
"scopes": [
"mail",
"employeenumber"
],
"tokenInfoEndpoint":
"http://openam.example.com:8088/openam/oauth2/tokeninfo",
"requireHttps": false,
"target": "${attributes.token}"
},
"capture": "filtered_request",
"timer": true
},
{
"type": "AssignmentFilter",
"config": {
"onRequest": [
{
"target": "${session.username}",
"value": "${attributes.token.info.mail}"
},
{
"target": "${session.password}",
"value": "${attributes.token.info.employeenumber}"
}
]
},
"timer": true
},
{
"type": "StaticRequestFilter",
"config": {
"method": "POST",
"uri": "http://www.example.com:8081",
"form": {
"username": [
"${session.username}"
],
"password": [
"${session.password}"
]
}
},
"timer": true
}
],
"handler": "ClientHandler"
}
},
"condition": "${matches(request.uri.path, '^/rs')}",
"timer": true
}
On Windows, the file name should be
%appdata%\OpenIG\config\routes\06-rs.json.
Notice the following features of the new route:
The
OAuth2ResourceServerFilterincludes a client handler to send access token validation requests, the list of required scopes that the filter expects to find in access tokens, the OpenAM token info endpoint used to validate access tokens, and"requireHttps": falseto allow testing without having to set up keys and certificates. (In production environments, do use HTTPS to protect access tokens.)After successfully using the token info endpoint to validate an access token, the
OAuth2ResourceServerFilterinjects data from the response intoattributes.token.After the
OAuth2ResourceServerFilterhas injected information for a valid access token intoattributes.token, theAssignmentFilterinjects the credentials from the user profile in OpenAM intosession.The
StaticRequestFilterretrieves the username and password fromsession, and replaces the original HTTP GET request with an HTTP POST login request that contains the credentials to authenticate.The route matches requests to
/rs.
To try your configuration, you need an access token. Get an access token from OpenAM and use it to access OpenIG as in the following example, which uses the OAuth 2.0 resource owner password credentials authorization grant:
$ curl \
--user "OpenIG:password" \
--data "grant_type=password&username=george&password=costanza&scope=mail%20employeenumber" \
http://openam.example.com:8088/openam/oauth2/access_token
{
"scope": "mail employeenumber",
"expires_in": 3599,
"token_type": "Bearer",
"refresh_token": "80963b0e-8283-434b-ba11-ce01ef0e93b6",
"access_token": "ddf31dac-e23a-446c-bd21-db60cf19b9f3"
}
$ curl \
--header "Authorization: Bearer ddf31dac-e23a-446c-bd21-db60cf19b9f3" \
http://www.example.com:8080/rs
...
<h1>User Information</h1>
<dl>
<dt>Username</dt>
<dd>george</dd>
</dl>
<h1>Request Information</h1>
<dl>
<dt>Method</dt>
<dd>POST</dd>
<dt>URI</dt>
<dd>/</dd>
<dt>Headers</dt>
<dd style="font-family: monospace; font-size: small;">...</dd>
</dl>
Also look in the Jetty server output to see the token information
injected into attributes.token.
The token information looks something like the following:
{
"token": {
"token": "ddf31dac-e23a-446c-bd21-db60cf19b9f3",
"info": {
"access_token": "ddf31dac-e23a-446c-bd21-db60cf19b9f3",
"employeenumber": "costanza",
"mail": "george",
"grant_type": "password",
"scope": [
"employeenumber",
"mail"
],
"realm": "/",
"token_type": "Bearer",
"expires_in": 3585
},
"scopes": [
"employeenumber",
"mail"
],
"expiresAt": 1449663614998
}
}
What is happening behind the scenes?
After OpenIG gets the curl request, the resource server filter validates the access token with OpenAM, and injects the token information into the context. (If the access token was missing or invalid, then the resource server filter would have returned an error status to the user-agent. The OAuth 2.0 client would then have had to deal with the error.)
OpenIG captures the token information into the log,
and the AssignmentFilter injects the credentials
into the session context.
Finally, the StaticRequestFilter uses the credentials
to log the user in to the minimal HTTP server,
which responds with the user information page.
OpenIG helps integrate applications into OAuth 2.0 and OpenID Connect deployments. In this chapter, you will learn to:
Configure OpenIG as an OAuth 2.0 client
Configure OpenIG as an OpenID Connect 1.0 relying party
Configure OpenIG to use OpenID Connect discovery and dynamic client registration
As described in Chapter 8, "OpenIG As an OAuth 2.0 Resource Server", an OAuth 2.0 client is the third-party application that needs access to a user's protected resources. The client application therefore has the user (the OAuth 2.0 resource owner) delegate authorization by authenticating with an identity provider (the OAuth 2.0 authorization server) using an existing account, and then consenting to authorize access to protected resources (on an OAuth 2.0 resource server).
OpenIG can act as an OAuth 2.0 client when you configure an OAuth2ClientFilter as described in OAuth2ClientFilter(5) in the Configuration Reference. The filter handles the process of allowing the user to select a provider, and redirecting the user through the authentication and authorization steps of an OAuth 2.0 authorization code grant, which results in the authorization server returning an access token to the filter. At the outcome of a successful authorization grant, the filter injects the access token data into a configurable target in the context so that subsequent filters and handlers have access to the access token. Subsequent requests can use the access token without reauthentication.
If the protected application is an OAuth 2.0 resource server, then OpenIG can send the access token with the resource request.
The specifications available through the OpenID Connect site describe an authentication layer built on OAuth 2.0, which is OpenID Connect 1.0.
OpenID Connect 1.0 is a specific implementation of OAuth 2.0 where the identity provider holds the protected resource that the third-party application aims to access. This resource is the UserInfo, information about the authenticated end-user expressed in a standard format.
In OpenID Connect 1.0, the key entities are the following:
The end user (OAuth 2.0 resource owner) whose user information the application needs to access.
The end user wants to use an application through existing identity provider account without signing up and creating credentials for yet another web service.
The Relying Party (RP) (OAuth 2.0 client) needs access to the end user's protected user information.
For example, an online mail application needs to know which end user is accessing the application in order to present the correct inbox.
As another example, an online shopping site needs to know which end user is accessing the site in order to present the right offerings, account, and shopping cart.
The OpenID Provider (OP) (OAuth 2.0 authorization server and also resource server) that holds the user information and grants access.
The OP effectively has the end user consent to providing the RP with access to some of its user information. As OpenID Connect 1.0 defines unique identification for an account (subject identifier + issuer identifier), the RP can use this as a key to its own user profile.
In the case of the online mail application, this key could be used to access the mailboxes and related account information. In the case of the online shopping site, this key could be used to access the offerings, account, shopping cart and others. The key makes it possible to serve users as if they had local accounts.
When OpenIG acts therefore as an OpenID Connect 1.0 relying party, its ultimate role is to retrieve user information from the OpenID provider, and then to inject that information into the context for use by subsequent filters and handlers.
In the tutorial that follows, you configure OpenIG as a relying party, and use OpenAM as the OpenID Provider.
Chapter 2, "Getting Started" describes how to configure OpenIG to proxy traffic and capture request and response data. You also learned how to configure OpenIG to use a static request to log in with hard-coded credentials.
This tutorial shows you how OpenIG can act as an OpenID Connect 1.0 relying party.
This tutorial relies on OpenAM as an OpenID Provider. As a relying party, OpenIG takes the end user to OpenAM for authorization and an access token. It then uses the access token to get end user information from OpenAM.
Before you start this tutorial, prepare OpenIG and the minimal HTTP server as described in Chapter 2, "Getting Started".
OpenIG should be running in Jetty, configured to access the minimal HTTP server as described in that chapter.
Install and configure OpenAM on
http://openam.example.com:8088/openamwith the default configuration.If you use a different configuration, make sure you substitute in the tutorial accordingly. Although this tutorial does not use HTTPS, you must use HTTPS to protect access tokens and user information in production environments.
Login to the OpenAM console as administrator.
In the console for OpenAM 12 and earlier, use the common task to configure OAuth 2.0/OpenID Connect in the top-level realm. In the console for OpenAM 13 and later, use the wizard under Dashboard > Configure OAuth Provider > Configure OpenID Connect for the top-level realm. This configures OpenAM as an OAuth 2.0 authorization server and OpenID Provider.
Create an OAuth 2.0 Client profile in the top-level realm.
This allows OpenIG to communicate with OpenAM as an OAuth 2.0 client.
In the console for OpenAM 12 and earlier, browse to Access Control > / (Top Level Realm) > Agents > OAuth 2.0 Client. In the console for OpenAM 13 and later, select the top-level realm and browse to Agents > OAuth 2.0/OpenID Connect Client Then click New in the Agent table.
Give the OAuth 2.0 client profile the name
OpenIGand passwordpassword.The name is the
clientIdvalue, and the password is theclientSecretvalue that you use in the provider configuration in OpenIG.Edit the
OpenIGclient profile to add the Redirection URIhttp://www.example.com:8080/openid/callback.Add
openidandprofilescopes to the Scope(s) list, and then save your work.Overload the profile settings to pass credentials to OpenIG.
This tutorial uses Full Name and Last Name for the sake of simplicity. Both of those attributes are part of a user's profile out of the box with the default OpenAM configuration. Neither of the attributes are needed for anything else in this tutorial.
So, this tutorial uses Last Name to hold the username, and Full Name to hold the password. In a real deployment, you would no doubt use other attributes, depending upon the user profiles and on your requirements.
To overload the profile, create a user whose additional credentials you set in the Full Name and Last Name fields, or edit the existing user
georgeif you have already created the profile for another tutorial:In the console for OpenAM 12 and earlier, browse to Access Control > / (Top Level Realm) > Subjects > User. In the console for OpenAM 13 and later, browse to Subjects > User for the top-level realm. Click New and create the user profile.
If the profile already exists in the table, then click the link to open the profile for editing.
Set the ID to
george, the password tocostanza, the Last Name togeorge, and the Full Name tocostanzabefore saving your work.When finished, log out of OpenAM console by clicking the log out button. It is not enough simply to close the browser tab, as the OpenAM session remains active until you log out or quit the browser.
To configure OpenIG as an OpenID Connect 1.0 relying party,
add a new route to the OpenIG configuration,
by including the following route configuration file
as $HOME/.openig/config/routes/07-openid.json:
{
"heap": [
{
"comment": "To reuse issuers, configure them in the parent route",
"name": "openam",
"type": "Issuer",
"config": {
"wellKnownEndpoint":
"http://openam.example.com:8088/openam/oauth2/.well-known/openid-configuration"
}
},
{
"comment": "To reuse client registrations, configure them in the parent route",
"name": "OidcRelyingParty",
"type": "ClientRegistration",
"config": {
"clientId": "OpenIG",
"clientSecret": "password",
"issuer": "openam",
"redirect_uris": [
"http://www.example.com:8080/openid/callback"
],
"scopes": [
"openid",
"profile"
]
}
}
],
"handler": {
"type": "Chain",
"config": {
"filters": [
{
"type": "OAuth2ClientFilter",
"config": {
"clientEndpoint": "/openid",
"requireHttps": false,
"requireLogin": true,
"target": "${attributes.openid}",
"failureHandler": {
"type": "StaticResponseHandler",
"config": {
"comment": "Trivial failure handler for debugging only",
"status": 500,
"reason": "Error",
"entity": "${attributes.openid}"
}
},
"registration": "OidcRelyingParty"
}
}
],
"handler": {
"type": "Chain",
"config": {
"filters": [
{
"type": "StaticRequestFilter",
"config": {
"method": "POST",
"uri": "http://www.example.com:8081",
"form": {
"username": [
"${attributes.openid.user_info.family_name}"
],
"password": [
"${attributes.openid.user_info.name}"
]
}
}
}
],
"handler": "ClientHandler"
}
}
}
},
"condition": "${matches(request.uri.path, '^/openid')}",
"baseURI": "http://www.example.com:8080"
}
On Windows, the file name should be
%appdata%\OpenIG\config\routes\07-openid.json.
Notice the following features of the new route:
The heap defines an issuer, in this case, an OpenID Provider, and a client registration with the issuer. To reuse the definitions in multiple routes, define them in the heap of the parent route.
An issuer describes an OAuth 2.0 authorization server or OpenID Provider. A client registration holds the information provided when the OAuth 2.0 client was manually registered with the issuer. Multiple client registrations can exist with the same issuer. As an OAuth 2.0 client or OpenID Connect relying party, OpenIG uses these configurations to connect with the OAuth 2.0 authorization server or OpenID Provider. For details, see Issuer(5) in the Configuration Reference and ClientRegistration(5) in the Configuration Reference.
If the issuer is an OpenID Provider that supports dynamic registration, it is possible to avoid explicitly configuring the client registration. For details, see the example in Section 9.7, "Using OpenID Connect Discovery and Dynamic Client Registration".
At the global level the route changes the base URI for requests to ensure that the initial interaction happens between OpenIG and OpenAM, which is the OpenID Provider. This route sends only the final request to the protected application.
The first filter in the outermost chain has the
OAuth2ClientFiltertype, which is described in OAuth2ClientFilter(5) in the Configuration Reference. This is the filter that enables OpenIG to act as a relying party.The filter is configured to work only with a single client registration, the OpenAM server you configured in Section 9.4, "Setting Up OpenAM As an OpenID Provider". If you have more than one issuer, use a loginHandler that helps the end user select the client registration to use instead of a single
ClientRegistration.The
OAuth2ClientFilterhas a base client endpoint of/openid. Incoming requests to/openid/loginstart the delegated authorization process. Incoming requests to/openid/callbackare expected as redirects from the OP (as authorization server), so this is why you set the redirect URI in the client profile in OpenAM tohttp://www.example.com:8080/openid/callback.The
OAuth2ClientFilterhas"requireHttps": falseas a convenience for testing. In production environments, require HTTPS.The filter has
"requireLogin": trueto ensure you see the delegated authorization process when you make your request.In the
OAuth2ClientFilter, the target for storing authorization state information is${attributes.openid}, so this is where subsequent filters and handlers can find access token and user information.Notice that on failure the filter dumps the current information in the context into a web page response to the end user. While this is helpful to you for debugging purposes, it is not helpful to an end user. In production environments, return a more user-friendly failure page.
After the filter injects the access token and user information into
attributes.openid, OpenIG invokes a chain. The chain uses the credentials to log the user in to the minimal HTTP server.With this configuration, all successful requests result in login attempts against the minimal HTTP server.
The
StaticRequestFilterretrieves the username and password from the context and replaces the original HTTP GET request with an HTTP POST login request that contains the credentials to authenticate.The route matches requests to
/openid.
To try your configuration, browse to OpenIG at http://www.example.com:8080/openid.
When redirected to the OpenAM login page,
login as user george, password costanza,
and then allow the application access to user information.
If successful, OpenIG logs you into the minimal HTTP server as George Costanza, and the minimal HTTP server returns George's page.
What is happening behind the scenes?
After OpenIG gets the browser request,
the OAuth2ClientFilter
redirects you to authenticate with OpenAM
and consent to authorize access to user information.
After you authorize access, OpenAM returns an access token to the filter.
The filter then uses that access token to get the user information.
The filter injects the authorization state information into
attributes.openid.
The outermost chain then calls its handler, which as another Chain.
This inner chain uses the credentials to log the user in to the minimal HTTP server, which responds with its user information page.
OpenID Connect defines mechanisms for discovering and dynamically registering with an identity provider that is not known in advance. These mechanisms are specified in OpenID Connect Discovery and OpenID Connect Dynamic Client Registration. OpenIG supports discovery and dynamic registration. In this section you will learn how to configure OpenIG to try these features with OpenAM.
Although this tutorial focuses on OpenID Connect dynamic registration, OpenIG also supports dynamic registration as described in RFC 7591, OAuth 2.0 Dynamic Client Registration Protocol.
This short tutorial builds on the previous tutorial in this chapter. If you have not already done so, start by performing the steps described in Section 9.3, "Preparing the Tutorial". This tutorial requires a recent minimal HTTP server, as the newer versions include a small WebFinger service that is used here.
When ready, complete preparations for OpenID Connect discovery and dynamic client registration:
By default, OpenAM does not allow dynamic registration without an access token.
After carrying out the steps described in Section 9.4, "Setting Up OpenAM As an OpenID Provider", also perform these steps:
Log in to OpenAM console as administrator.
In the top-level realm, browse to the Services configuration and display the OAuth2 Provider configuration.
Select Allow Open Dynamic Client Registration.
Save your work, and log out of OpenAM console.
Follow these steps to add a route demonstrating OpenID Connect discovery and dynamic client registration:
Add a new route to the OpenIG configuration, by including the following route configuration file as
$HOME/.openig/config/routes/07-discovery.json:{ "heap": [ { "name": "DiscoveryPage", "type": "StaticResponseHandler", "config": { "status": 200, "reason": "OK", "entity": "<!doctype html> <html> <head> <title>OpenID Connect Discovery</title> <meta charset='UTF-8'> </head> <body> <form id='form' action='/discovery/login?'> Enter your user ID or email address: <input type='text' id='discovery' name='discovery' placeholder='george or george@example.com' /> <input type='hidden' name='goto' value='${urlEncode(contexts.router.originalUri)}' /> </form> <script> // The sample application handles the WebFinger request, // so make sure the request is sent to the sample app. window.onload = function() { document.getElementById('form').onsubmit = function() { // Fix the URL if not using the default settings. var sampleAppUrl = 'http://www.example.com:8081/'; var discovery = document.getElementById('discovery'); discovery.value = sampleAppUrl + discovery.value.split('@', 1)[0]; }; }; </script> </body> </html>" } } ], "handler": { "type": "Chain", "config": { "filters": [ { "name": "DynamicallyRegisteredClient", "type": "OAuth2ClientFilter", "config": { "clientEndpoint": "/discovery", "requireHttps": false, "requireLogin": true, "target": "${attributes.openid}", "failureHandler": { "type": "StaticResponseHandler", "config": { "comment": "Trivial failure handler for debugging only", "status": 500, "reason": "Error", "entity": "${attributes.openid}" } }, "loginHandler": "DiscoveryPage", "metadata": { "client_name": "My Dynamically Registered Client", "redirect_uris": [ "http://www.example.com:8080/discovery/callback" ], "scopes": [ "openid", "profile" ] } } } ], "handler": { "type": "Chain", "config": { "filters": [ { "type": "StaticRequestFilter", "config": { "method": "POST", "uri": "http://www.example.com:8081", "form": { "username": [ "${attributes.openid.user_info.family_name}" ], "password": [ "${attributes.openid.user_info.name}" ] } } } ], "handler": "ClientHandler" } } } }, "condition": "${matches(request.uri.path, '^/discovery')}", "baseURI": "http://www.example.com:8080" }On Windows, the file name should be
%appdata%\OpenIG\config\routes\07-discovery.json.Consider the differences with
07-openid.json:For discovery and dynamic client registration, no issuer or client registration is defined. Instead a
StaticResponseHandleris used as a login handler for the client filter.The static response handler serves an HTML page that provides important pieces of information to OpenIG:
The value of a
discoveryparameter.OpenIG uses the value to perform OpenID Connect discovery. Examples from the specification include
acct:joe@example.com,https://example.com:8080/, andhttps://example.com/joe. First, OpenIG extracts the domain host and port from the value, and attempts to find a match in thesupportedDomainslists for any issuers that are already configured for the route. If it finds a match, then it can potentially use the issuer's registration end point and avoid an additional request to look up the user's issuer using the WebFinger protocol. If there is no match in the supported domains lists, OpenIG uses thediscoveryvalue as theresourcefor a WebFinger request according to the OpenID Connect Discovery protocol.On success, OpenIG has either found an appropriate issuer in the configuration, or found the issuer using the WebFinger protocol. OpenIG can thus proceed to dynamic client registration.
The small JavaScript function in the HTML page transforms user input into a useful
discoveryvalue for OpenIG. This is not a requirement for deployment, only a convenience for the purposes of this example. Alternatives are described in the discovery protocol specification.The value of a
gotoparameter.The
gotoparameter takes a URI that tells OpenIG where to redirect the end user's browser once the process is complete and OpenIG has injected the OpenID Connect user information into the context. In this case, the user is redirected back to this route so that the innermost chain of the configuration can log the user in to the protected application.
The OAuth 2.0 client filter specifies a login handler, and dynamic client registration metadata, including a client name, redirection URIs, and scopes.
The login handler points to the login page described above.
OpenIG uses the metadata to prepare the dynamic registration request.
OpenIG needs redirection URIs that invariably reflect the
redirect_uri, which according to OAuth 2.0 must be an absolute URI. OpenIG can easily generate the path of the redirection URI, but cannot determine the scheme and host name once and for all, as those might depend on how the user-agent accessed OpenIG. Redirection URIs take the formhttp[s]://host:port known to user-agent/clientEndpoint/callbackwhere:The scheme is the scheme used by the user-agent, either
httporhttps.host:port known to user-agent is the host name with optional port number resolvable by the user-agent such as
www.example.com:8080.The default port numbers are 80 for HTTP, 443 for HTTPS.
clientEndpoint is taken from the value of the
clientEndpointfield, such asdiscovery.
OpenIG also needs the scopes that are required for your application.
07-discovery.jsonuses the path/discovery, whereas07-openid.jsonuses/openid.This distinction makes it easy to keep traffic separate on the two routes with a simple condition as in the following:
"condition": "${matches(request.uri.path, '^/discovery')}"
After following the steps described in Section 9.7.1, "Preparing to Try Discovery and Dynamic Client Registration", test your configuration by browsing to OpenIG at http://www.example.com:8080/discovery.
When redirected to the OpenAM login page,
log in as user george, password costanza,
and then allow the application access to user information.
If successful, OpenIG logs you in to the minimal HTTP server as George Costanza, and the minimal HTTP server returns George's page.
What is happening behind the scenes?
After OpenIG gets the browser request,
it returns the example page for discovery.
You provide a user ID or email address,
and the page transforms that into a discovery value.
The value is tailored to let OpenIG use the minimal HTTP server
as a WebFinger server.
(In the real world the WebFinger server is more likely a service
on the issuer's domain, not part of the protected application.
For the purposes of this tutorial the WebFinger service
has been embedded in the minimal HTTP server
to avoid leaving you with another server to manage during the tutorial.)
OpenIG learns from the WebFinger service that OpenAM is the issuer for the user. OpenIG retrieves the OpenID Provider configuration from OpenAM, and registers itself dynamically with OpenAM, using the redirection URIs and scopes specified in the OAuth 2.0 client filter configuration.
Once the issuer and client registration are properly configured, the OAuth 2.0 client filter redirects the browser to OpenAM for authentication and authorization to access to the user information. The rest is the same as the previous tutorial in this chapter. For details, see Section 9.6, "Test the Configuration".
OpenIG reuses issuer and client registration configurations that it builds after discovery and dynamic registration. These dynamically generated configuration objects are held in memory, and do not persist when OpenIG is restarted.
OpenIG provides experimental support for building a User-Managed Access (UMA) resource server. In this chapter, you will learn:
Where OpenIG fits in the UMA picture
How to configure OpenIG to allow a resource owner to register UMA resource sets
How to configure OpenIG to protect access to resources using UMA
This section covers the role OpenIG plays as UMA resource server.
User-Managed Access (UMA) Profile of OAuth 2.0 defines a workflow that allows resource owners to share their protected resources with requesting parties. Figure 10.1, "UMA Workflow" illustrates the relationships where OpenIG protects the resource server.

The actions that form the UMA workflow are as follows:
- 1. Manage
The resource owner manages their resources on the resource server.
When using OpenIG to protect the resources, OpenIG creates the resource sets that describe what the resource owner shares. Resource set registration is covered in OAuth 2.0 Resource Set Registration.
- 2. Protect
The resource owner links their resource server and chosen authorization server, such as OpenAM.
The authorization server provides a protection API so that the resource server can register sets of resources. Use of the protection API requires a protection API token (PAT), an OAuth 2.0 token with scope
uma_protection.- 3. Control
The resource owner controls who has access to their registered resources by creating policies on the authorization server.
Only a resource owner can create policies for their registered resources.
- 4. Authorize
The client, acting on behalf of the requesting party, uses the authorization server's authorization API to acquire a requesting party token (RPT). The requesting party or client may need further interaction with the authorization server at this point, for example, to supply identity claims. Use of the authorization API requires an authorization API token (AAT), an OAuth 2.0 token with scope
uma_authorization.- 5. Access
The client presents the RPT to the resource server, which verifies its validity with the authorization server and, if both valid and containing sufficient permissions, returns the protected resource to the requesting party.
When acting as an UMA resource server, OpenIG helps the resource owner register resource sets with the authorization server. The resource owner then interacts with the authorization server to authorize access to registered resources.
This process of sharing protected resources includes the following steps:
The OpenIG administrator configures a route with the following:
An
UmaServicethat describes OpenIG registration as an OAuth 2.0 client of the authorization server and the resource sets to share, including resource path patterns and scopes.The
UmaServiceexposes a REST API to use when managing resource sets.For details, see UmaService(5) in the Configuration Reference.
An
UmaFilterthat acts as a policy enforcement point, protecting access to resources on the route.For details, see UmaFilter(5) in the Configuration Reference.
The resource owner obtains a PAT from the authorization server.
The resource owner provides the PAT and a resource path to OpenIG, which registers a corresponding resource set with the authorization server.
OpenIG responds with the resource set identifier and a link where the resource owner can set up access permissions.
The resource owner creates policies on the authorization server to authorize requesting parties to access protected resources.
When acting as an UMA resource server, OpenIG interacts with the UMA client and the authorization server. OpenIG challenges the UMA client to gain authorization with the authorization server, and enforces policy for protected resources according to policy decisions by the authorization server.
The process of accessing protected resources can start after the process of sharing resources is successfully completed. The process of accessing a protected resource includes the following steps:
The requesting party attempts to access the resource without an RPT.
OpenIG responds with an UMA
WWW-Authenticateheader, and a ticket that the requesting party can use to get an RPT.The requesting party gets an AAT from the authorization server.
This step lets the authorization server authenticate the requesting party.
The requesting party uses AAT from the authorization server, and the ticket from OpenIG to obtain an RPT from the authorization server.
The requesting party uses the RPT to access the resource as originally intended.
Keep the following points in mind when using OpenIG as an UMA resource server:
OpenIG depends on the resource owner for the PAT.
When a PAT expires, no refresh token is available to OpenIG. The resource owner must perform the entire share process again with a new PAT in order to authorize access to protected resources. The resource owner should delete the old resource and create a new one.
Data about PATs and shared resources is held in memory.
OpenIG has no mechanism for persisting the data across restarts. When OpenIG stops and starts again, the resource owner must perform the entire share process again.
UMA client applications for sharing and accessing protected resources must deal with UMA error conditions and OpenIG error conditions.
OpenIG exposes a REST API to manage share objects that is not protected by default.
When matching protected resource paths with share patterns, OpenIG takes the longest match.
For example, if resource owner Alice shares
/photos/.*with Bob, and/photos/vacation.pngwith Charlie, and then Bob attempts to access/photos/vacation.png, OpenIG applies the sharing permissions for Charlie, not Bob. As a result, Bob can be denied access.
This section covers preparation to complete before configuring OpenIG as an UMA resource server.
This tutorial relies on OpenAM as an authorization server for OAuth 2.0 and for UMA, and the minimal HTTP server for resources to protect, and for files that serve as a basic UMA client. OpenAM 13 and later can function as an UMA authorization server.
Before you start this tutorial, prepare OpenIG and the minimal HTTP server as described in Chapter 2, "Getting Started".
OpenIG should be running in Jetty, configured to access the minimal HTTP server as described in that chapter.
This tutorial uses api.example.com as the domain.
Add api.example.com as an alias
for the OpenIG network address.
For example, if traffic to OpenIG goes through the loopback address,
edit the line in your hosts file to add the additional domain:
127.0.0.1 www.example.com api.example.com
Edit config.json to comment the baseURI decoration
in the top-level handler for OpenIG configuration.
After you make the changes, the handler declaration appears as follows:
{
"handler": {
"type": "Router",
"audit": "global",
"_baseURI": "http://www.example.com:8081",
"capture": "all"
}
}
Restart Jetty for the changes to take effect. This allows you to view the token information that OpenAM returns.
Now proceed to Section 10.3, "Setting Up OpenAM As an Authorization Server".
This section covers the following:
Enabling cross-origin resource sharing (CORS) support in OpenAM
Configuring OpenAM as an authorization server
Registering UMA client profiles with OpenAM
Setting up a resource owner (Alice) and requesting party (Bob)
Follow these steps to configure OpenAM as an authorization server:
Enable CORS support for OpenAM.
See the OpenAM product documentation for details. The following settings are suggestions for this tutorial. This is not intended as documentation for setting up OpenAM CORS support on a server in production.
Make sure that the filter mapping for the
CORSFilterin theWEB-INF/web.xmlfile applies to all the endpoints you use a URL pattern that matches all endpoints:<filter-mapping> <filter-name>CORSFilter</filter-name> <url-pattern>/*</url-pattern> </filter-mapping>Make sure the filter configuration in the
WEB-INF/web.xmlfile authorizes cross-site access for origins, hosts, and headers that are shown in the following excerpt:<filter> <filter-name>CORSFilter</filter-name> <filter-class>org.forgerock.openam.cors.CORSFilter</filter-class> <init-param> <description> Accepted Methods (Required): A comma separated list of HTTP methods for which to accept CORS requests. </description> <param-name>methods</param-name> <param-value>POST,GET,PUT,DELETE,PATCH,OPTIONS</param-value> </init-param> <init-param> <description> Accepted Origins (Required): A comma separated list of origins from which to accept CORS requests. </description> <param-name>origins</param-name> <param-value>http://api.example.com:8081,http://api.example.com:8080</param-value> </init-param> <init-param> <description> Allow Credentials (Optional): Whether to include the Vary (Origin) and Access-Control-Allow-Credentials headers in the response. Default: false </description> <param-name>allowCredentials</param-name> <param-value>true</param-value> </init-param> <init-param> <description> Allowed Headers (Optional): A comma separated list of HTTP headers which can be included in the requests. </description> <param-name>headers</param-name> <param-value> Authorization,Content-Type,iPlanetDirectoryPro,X-OpenAM-Username,X-OpenAM-Password </param-value> </init-param> <init-param> <description> Expected Hostname (Optional): The name of the host expected in the request Host header. </description> <param-name>expectedHostname</param-name> <param-value>openam.example.com:8088</param-value> </init-param> <init-param> <description> Exposed Headers (Optional): The comma separated list of headers which the user-agent can expose to its CORS client. </description> <param-name>exposeHeaders</param-name> <param-value>WWW-Authenticate</param-value> </init-param> <init-param> <description> Maximum Cache Age (Optional): The maximum time that the CORS client can cache the pre-flight response, in seconds. Default: 600 </description> <param-name>maxAge</param-name> <param-value>600</param-value> </init-param> </filter>Install and configure OpenAM on
http://openam.example.com:8088/openamwith the default configuration.If you use a different configuration, make sure you substitute in the tutorial accordingly.
Although this tutorial does not use HTTPS, you must use HTTPS to protect credentials and access tokens in production environments.
Log in to the OpenAM console as administrator and access the configuration for the top-level realm.
Configure OpenAM as an OAuth 2.0 authorization server, and as an UMA authorization server.
The PAT and AAT are obtained through the OAuth 2.0 access token endpoint, whereas the RPT is obtained through the UMA endpoint.
Consider extending the default token lifetimes to 3600 seconds. Longer token lifetimes are particularly helpful if you plan to build your own examples or modify the sample clients.
For the purposes of this tutorial, disable Require Trust Elevation for the UMA Provider.
Browse to Services > UMA Provider for the top-level realm to edit the UMA Provider configuration through OpenAM console.
Follow these steps to register client profiles with OpenAM in the top-level realm:
Create an OAuth 2.0/UMA client profile for use when sharing resources that has the following properties:
- Name (
client_id) OpenIG- Password (
client_secret) password- Scope
uma_protection
- Name (
Create an OAuth 2.0/UMA client profile for use when accessing resources that has the following properties:
- Name (
client_id) UmaClient- Password (
client_secret) password- Scope
uma_authorization
- Name (
Follow these steps to create subjects in the top-level realm:
Create a resource owner subject named Alice with the following properties:
- ID
alice- First Name
Alice- Last Name
User- Full Name
Alice User- Password
password- User Status
Active
Create a requesting party subject named Bob with the following properties:
- ID
bob- First Name
Bob- Last Name
User- Full Name
Bob User- Password
password- User Status
Active
When finished, log out of OpenAM and proceed to Section 10.4, "Setting Up OpenIG As an UMA Resource Server".
This section covers configuring OpenIG as an UMA resource server.
Add a new route to the OpenIG configuration, by including the following route configuration file as
$HOME/.openig/config/routes/00-uma.json:{ "heap": [ { "name": "UmaService", "type": "UmaService", "config": { "protectionApiHandler": "ClientHandler", "authorizationServerUri": "http://openam.example.com:8088/openam/", "clientId": "OpenIG", "clientSecret": "password", "resources": [ { "comment": "Protects all resources matching the following pattern.", "pattern": ".*", "actions": [ { "scopes": [ "#read" ], "condition": "${request.method == 'GET'}" }, { "scopes": [ "#create" ], "condition": "${request.method == 'POST'}" } ] } ] } } ], "handler": { "type": "Chain", "config": { "filters": [ { "type": "ScriptableFilter", "config": { "type": "application/x-groovy", "file": "CorsFilter.groovy" } }, { "type": "UmaFilter", "config": { "protectionApiHandler": "ClientHandler", "umaService": "UmaService" } } ], "handler": "ClientHandler" } }, "baseURI": "http://api.example.com:8081", "condition": "${request.uri.host == 'api.example.com'}" }On Windows, the file name should be
%appdata%\OpenIG\config\routes\00-uma.json.Notice the following features of the new route:
The
UmaServiceis coupled with OpenAM as authorization server, relying on one of the client profiles you created (client_id: OpenIG). This service describes the resources that a resource owner can share.The
UmaServicealso provides a REST API to manage sharing of resource sets.The tutorial involves JavaScript clients that are served by the minimal HTTP server, and so not from the same origin as OpenAM or OpenIG. The route uses a CORS filter to include appropriate response headers for cross-origin requests.
The CORS filter handles pre-flight (HTTP OPTIONS) requests, and responses for all HTTP operations. The logic for the filter is provided through a script. Add the script to your configuration by including the following Groovy script file as
$HOME/.openig/scripts/groovy/CorsFilter.groovy:import org.forgerock.http.protocol.Response import org.forgerock.http.protocol.Status if (request.method == 'OPTIONS') { /** * Supplies a response to a CORS preflight request. * * Example response: * * HTTP/1.1 200 OK * Access-Control-Allow-Origin: http://www.example.com:8081 * Access-Control-Allow-Methods: POST * Access-Control-Allow-Headers: Authorization * Access-Control-Allow-Credentials: true * Access-Control-Max-Age: 3600 */ def origin = request.headers['Origin']?.firstValue def response = new Response(Status.OK) // Browsers sending a cross-origin request from a file might have Origin: null. response.headers.put("Access-Control-Allow-Origin", origin) request.headers['Access-Control-Request-Method']?.values.each() { response.headers.add("Access-Control-Allow-Methods", it) } request.headers['Access-Control-Request-Headers']?.values.each() { response.headers.add("Access-Control-Allow-Headers", it) } response.headers.put("Access-Control-Allow-Credentials", "true") response.headers.put("Access-Control-Max-Age", "3600") return response } return next.handle(context, request) /** * Adds headers to a CORS response. */ .thenOnResult({ response -> if (response.status.isServerError()) { // Skip headers if the response is a server error. } else { def headers = [ "Access-Control-Allow-Origin": request.headers['Origin']?.firstValue, "Access-Control-Allow-Credentials": "true", "Access-Control-Expose-Headers": "WWW-Authenticate" ] response.headers.addAll(headers) } })On Windows, the file name should be
%appdata%\OpenIG\scripts\groovy\CorsFilter.groovy.The filter adds the appropriate headers to CORS requests. Pre-flight requests are diverted to a dedicated handler, which returns the response directly to the user agent. For all other requests, the headers are added to the response.
For details on scripting filters and handlers, see Chapter 13, "Extending OpenIG's Functionality".
The handler for the route chains together the CORS filter, the
UmaFilter, and the default handler.The
UmaFiltermanages requesting party access to protected resources, using theUmaService. Protected resources are on the minimal HTTP server, which responds to requests on port 8081.The route matches requests to
api.example.com.
Overload the default
ApiProtectionFilterthat protects the reserved routes for paths under/openigso that the UMA share API has CORS support.You can reuse the CORS filter for this purpose.
Add the following declaration to the heap array in
config.json:{ "name": "ApiProtectionFilter", "type": "ScriptableFilter", "config": { "type": "application/x-groovy", "file": "CorsFilter.groovy" } }After editing
config.json, restart Jetty to reload the configuration.
This section demonstrates OpenIG acting as an UMA resource server.
Follow these steps to run the demonstration:
Browse to http://api.example.com:8081/uma/, and check that the configuration displayed in the page matches your settings.
The settings match if you are using the defaults described in this chapter. If not, unpack UMA sample client files from the minimal HTTP server described in Section 2.3, "Install an Application to Protect" to a web server document location for your web server:
$ cd /path/to/web/server/files/ $ jar -xvf /path/to/openig-doc-4.0.0-jar-with-dependencies.jar uma created: uma/ inflated: uma/alice.html inflated: uma/bob.html inflated: uma/common.js inflated: uma/index.html inflated: uma/style.css
(Optional) If you had to unpack the files to your own web server, edit the configuration in
common.js,alice.html, andbob.htmlto match your settings.Also adjust CORS settings for OpenAM as necessary.
Click the first link to demonstrate Alice sharing resources.
When you click the button, you simulate Alice sharing resources as described in Section 10.1.2, "Sharing Protected Resources".
In the initial page, click the second link to demonstrate Bob accessing resources.
When you click the button, you simulate Bob accessing one of Alice's resources as described in Section 10.1.3, "Accessing Protected Resources".
What is happening behind the scenes?
The first page is the client that simulates Alice sharing resources.
The output shown in the page lets you see the PAT Alice gets,
the metadata for the resource set Alice registers through OpenIG,
the result of Alice authenticating with OpenAM in order to create a policy,
and the successful result {} when Alice creates the policy.
The second page is the client that simulates Bob accessing a resource. The output shown on the page lets you see the ticket returned initially, the AAT that Bob gets to obtain the RPT, the RPT Bob gets in order to request the resource again, and the final response containing the body of the resource.
Other tutorials in this guide demonstrate how to use routes
so that you can change the configuration without restarting OpenIG.
This chapter takes a closer look
at Router and Route configurations,
further described in Router(5) in the Configuration Reference
and Route(5) in the Configuration Reference.
In this chapter, you will learn to:
Protect multiple routes with the same OpenIG server
Lock down OpenIG configurations for deployment
When you set up the first tutorial, you configured a Router.
The Router is a handler
that you can configure in the top-level config.json file
for OpenIG,
and in fact wherever you can configure a Handler.
For the first tutorial, you added a Router
as part of the base configuration,
which is shown here again in the following listing:
{
    "handler": {
        "type": "Router",
        "audit": "global",
        "baseURI": "http://www.example.com:8081",
        "capture": "all"
    },
    "heap": [
        {
            "name": "LogSink",
            "type": "ConsoleLogSink",
            "config": {
                "level": "DEBUG"
            }
        },
        {
            "name": "JwtSession",
            "type": "JwtSession"
        },
        {
            "name": "capture",
            "type": "CaptureDecorator",
            "config": {
                "captureEntity": true,
                "_captureContext": true
            }
        }
    ]
}
The Router's job is to pass the request and context
to a route that matches a condition,
and to periodically reload changed route configurations.
As routes define the conditions on which they accept any given request,
the Router does not have
to know about specific Routes in advance.
In other words, you can configure the Router first
and then add routes while OpenIG is running,
as you have done in the tutorials.
The configuration shown above passes all requests
to the Router
using the default settings, meaning that the Router
monitors $HOME/.openig/config/routes for Routes.
When OpenIG receives a request,
if more time has passed than the default scan interval of 10 seconds,
then OpenIG rescans the routes directory for changes
and reloads any routes changes it finds.
Routes are configurations to handle a request that meets a specified condition.
The condition is defined using an OpenIG expression
as described in Expressions(5) in the Configuration Reference.
It can be based on almost any characteristic of the request, context,
or even of the OpenIG runtime environment.
Another way to think of the Route
is like an independent DispatchHandler
as described in DispatchHandler(5) in the Configuration Reference.
The following example shows a condition setting.
With this condition on a route, the route matches all requests
that have api.example.com as the host portion of the URI:
"condition": "${request.uri.host == 'api.example.com'}"
Routes can also have their own names, used to order them lexicographically.
If no name is specified, the route file name is used.
Route file names have the extension .json.
In other words, a router only scans for files
with the .json extension,
and ignores files with other extensions.
Routes can have a base URI to change the scheme, host, and port of the request.
Routes wrap a heap of configuration objects, and hand off any request they accept to a handler. In this way each route is much like its own server-wide configuration file.
If no condition is specified for the route, the route accepts any request. The following is a basic default route that accepts any request and forwards it on without changes:
{
"name": "default",
"handler": {
"type": "ClientHandler"
}
}
Having the Route configurations automatically reloaded
is great in the lab,
but is perhaps not what you want in production.
In that case, stop the server,
edit the Router scanInterval,
and restart.
When scanInterval is set to -1,
the Router only loads routes at startup:
{
"name": "Router",
"type": "Router",
"config": {
"scanInterval": -1
}
}
You can also change the file system location to look for routes:
{
"name": "Router",
"type": "Router",
"config": {
"directory": "/path/to/safe/routes",
"scanInterval": -1
}
}
This chapter contains template routes for common configurations.
Before you use one of the templates here, install and configure OpenIG with a router and default route as described in Chapter 2, "Getting Started".
Next, take one of the templates and then modify it to suit your deployment. Read the summary of each template to find the right match for your application.
When you move to use OpenIG in production,
be sure to turn off DEBUG level logging,
and to deactivate CaptureDecorator use
to avoid filling up disk space.
Also consider locking down the Router configuration.
If you installed and configured OpenIG with a router and default route as described in Chapter 2, "Getting Started", then you already proxy and capture both the application requests coming in and the server responses going out.
The route shown in Example 12.1, "Proxy and Capture"
uses a DispatchHandler
to change the scheme to HTTPS on login.
To use this template change the baseURI settings
to match those of the target application.
When connecting to the protected application over HTTPS,
the ClientHandler must be configured to
trust the application's public key server certificate.
If the certificate was signed by a well-known Certificate Authority,
then there should be no further configuration to do.
Otherwise, use a ClientHandler that references a truststore
holding the certificate.
{
"handler": {
"type": "DispatchHandler",
"config": {
"bindings": [
{
"condition": "${request.uri.path == '/login'}",
"handler": "ClientHandler",
"comment": "Must be able to trust the server cert for HTTPS",
"baseURI": "https://www.example.com:8444"
},
{
"condition": "${request.uri.scheme == 'http'}",
"handler": "ClientHandler",
"baseURI": "http://www.example.com:8081"
},
{
"handler": "ClientHandler",
"baseURI": "https://www.example.com:8444"
}
]
}
},
"capture": "all",
"condition": "${matches(request.uri.query, 'demo=capture')}"
}
To try this example with the sample application,
save the file as $HOME/.openig/config/routes/20-capture.json,
and browse to
http://www.example.com:8080/login?demo=capture.
To use this as a default route with a real application,
remove the route-level condition on the handler
that specifies a demo query string parameter.
The route in Example 12.2, "Simple Login Form"
logs the user into the target application
with hard-coded user name and password.
The route intercepts the login page request
and replaces it with the login form.
Adapt the uri, form,
and baseURI settings as necessary.
{
"heap": [
{
"name": "ClientHandler",
"type": "ClientHandler",
"comment": "Testing only: blindly trust the server cert for HTTPS.",
"config": {
"trustManager": {
"type": "TrustAllManager"
}
}
}
],
"handler": {
"type": "Chain",
"config": {
"filters": [
{
"type": "PasswordReplayFilter",
"config": {
"loginPage": "${request.uri.path == '/login'}",
"request": {
"method": "POST",
"uri": "https://www.example.com:8444/login",
"form": {
"username": [
"MY_USERNAME"
],
"password": [
"MY_PASSWORD"
]
}
}
}
}
],
"handler": "ClientHandler"
}
},
"condition": "${matches(request.uri.query, 'demo=simple')}"
}
The parameters in the PasswordReplayFilter form,
MY_USERNAME and MY_PASSWORD,
can use strings or expressions.
When connecting to the protected application over HTTPS,
the ClientHandler must be configured
to trust the application's public key server certificate.
To try this example with the sample application,
save the file as $HOME/.openig/config/routes/21-simple.json,
replace MY_USERNAME with demo
and MY_PASSWORD with changeit,
and browse to
http://www.example.com:8080/login?demo=simple.
To use this as a default route with a real application,
use a ClientHandler
that does not blindly trust the server certificate,
and remove the route-level condition on the handler
that specifies a demo query string parameter.
Some applications expect a cookie from the login page to be sent in the login request form. OpenIG can manage the cookies. The route in Example 12.3, "Login Form With Cookie From Login Page" allows the login page request to go through to the target, and manages the cookies set in the response rather than passing the cookie through to the browser.
{
"handler": {
"type": "Chain",
"config": {
"filters": [
{
"type": "PasswordReplayFilter",
"config": {
"loginPage": "${request.uri.path == '/login'}",
"request": {
"method": "POST",
"uri": "https://www.example.com:8444/login",
"form": {
"username": [
"MY_USERNAME"
],
"password": [
"MY_PASSWORD"
]
}
}
}
},
{
"type": "CookieFilter"
}
],
"handler": "ClientHandler"
}
},
"condition": "${matches(request.uri.query, 'demo=cookie')}"
}
The parameters in the PasswordReplayFilter form,
MY_USERNAME and MY_PASSWORD,
can use strings or expressions.
A CookieFilter with no specified configuration
manages all cookies that are set by the protected application.
When connecting to the protected application over HTTPS,
the ClientHandler must be configured to
trust the application's public key server certificate.
To try this example with the sample application,
save the file as $HOME/.openig/config/routes/22-cookie.json,
replace MY_USERNAME with kramer
and MY_PASSWORD with newman,
and browse to
http://www.example.com:8080/login?demo=cookie.
To use this as a default route with a real application,
remove the route-level condition on the handler
that specifies a demo query string parameter.
The route in Example 12.4, "Login Form With Password Replay and Cookie Filters"
works with an application that returns the login page
when the user tries to access a page without a valid session.
This route shows how to use a PasswordReplayFilter
to find the login page with a pattern
that matches a mock OpenAM Classic UI page.
Note
The route uses a CookieFilter to manage cookies,
ensuring that cookies from the protected application
are included with the appropriate requests.
The side effect of OpenIG managing cookies is
none of the cookies are sent to the browser,
but are managed locally by OpenIG.
{
"handler": {
"type": "Chain",
"config": {
"filters": [
{
"type": "PasswordReplayFilter",
"config": {
"loginPageContentMarker": "OpenAM\\s\\(Login\\)",
"request": {
"comments": [
"An example based on OpenAM classic UI: ",
"uri is for the OpenAM login page; ",
"IDToken1 is the username field; ",
"IDToken2 is the password field; ",
"host takes the OpenAM FQDN:port.",
"The sample app simulates OpenAM."
],
"method": "POST",
"uri": "http://www.example.com:8081/openam/UI/Login",
"form": {
"IDToken0": [
""
],
"IDToken1": [
"demo"
],
"IDToken2": [
"changeit"
],
"IDButton": [
"Log+In"
],
"encoded": [
"false"
]
},
"headers": {
"host": [
"www.example.com:8081"
]
}
}
}
},
{
"type": "CookieFilter"
}
],
"handler": "ClientHandler"
}
},
"condition": "${matches(request.uri.query, 'demo=classic')}"
}
The parameters in the PasswordReplayFilter form
can use strings or expressions.
To try this example with the sample application,
save the file as $HOME/.openig/config/routes/23-classic.json,
and use the curl command to check that it works
as in the following example,
which shows that the CookieFilter
has removed cookies from the response
except for the session cookie added by the container:
$ curl -D- http://www.example.com:8080/login?demo=classic HTTP/1.1 200 OK ... Set-Cookie: JSESSIONID=1gwp5h0ugkciv1g200c9hid4sp;Path=/ Content-Length: 15 Content-Type: text/plain;charset=ISO-8859-1 ... Welcome, demo!
To use this as a default route with a real application,
remove the route-level condition on the handler
that specifies a demo query string parameter,
and adjust the PasswordReplayFilter as necessary.
The route in Example 12.6, "HTTP and HTTPS Application" proxies traffic to an application with both HTTP and HTTPS ports. The application uses HTTPS for authentication and HTTP for the general application features. Assuming all login requests are made over HTTPS, you must add the login filters and handlers to the chain.
{
"handler": {
"type": "DispatchHandler",
"config": {
"bindings": [
{
"condition": "${request.uri.scheme == 'http'}",
"handler": "ClientHandler",
"baseURI": "http://www.example.com:8081"
},
{
"condition": "${request.uri.path == '/login'}",
"handler": {
"type": "Chain",
"config": {
"comment": "Add one or more filters to handle login.",
"filters": [],
"handler": "ClientHandler"
}
},
"baseURI": "https://www.example.com:8444"
},
{
"handler": "ClientHandler",
"baseURI": "https://www.example.com:8444"
}
]
}
},
"condition": "${matches(request.uri.query, 'demo=https')}"
}
When connecting to the protected application over HTTPS,
the ClientHandler must be configured
to trust the application's public key server certificate.
To try this example with the sample application,
save the file as $HOME/.openig/config/routes/25-https.json,
and browse to
http://www.example.com:8080/login?demo=https.
To use this as a default route with a real application,
remove the route-level condition on the handler
that specifies a demo query string parameter.
The route in Example 12.7, "OpenAM Integration With Headers" logs the user into the target application using the headers such as those passed in from an OpenAM policy agent. If the header passed in contains only a user name or subject and requires a lookup to an external data source, you must add an attribute filter to the chain to retrieve the credentials.
{
"heap": [
{
"name": "ClientHandler",
"type": "ClientHandler",
"comment": "Testing only: blindly trust the server cert for HTTPS.",
"config": {
"trustManager": {
"type": "TrustAllManager"
}
}
}
],
"handler": {
"type": "Chain",
"config": {
"filters": [
{
"type": "PasswordReplayFilter",
"config": {
"loginPage": "${request.uri.path == '/login'}",
"request": {
"method": "POST",
"uri": "https://www.example.com:8444/login",
"form": {
"username": [
"${request.headers['username'][0]}"
],
"password": [
"${request.headers['password'][0]}"
]
}
}
}
}
],
"handler": "ClientHandler"
}
},
"condition": "${matches(request.uri.query, 'demo=headers')}"
}
When connecting to the protected application over HTTPS,
the ClientHandler must be configured
to trust the application's public key server certificate.
To try this example with the sample application,
save the file as $HOME/.openig/config/routes/26-headers.json,
and use the curl command
to simulate the headers being passed in from an OpenAM policy agent
as in the following example:
$ curl \
--header "username: kvaughan" \
--header "password: bribery" \
http://www.example.com:8080/login?demo=headers
...
<title id="welcome">Howdy, kvaughan</title>
...
To use this as a default route with a real application,
use a ClientHandler
that does not blindly trust the server certificate,
and remove the route-level condition on the handler
that specifies a demo query string parameter.
The route in Example 12.8, "Microsoft Online Outlook Web Access" logs the user into Microsoft Online Outlook Web Access (OWA). The example shows how you would use OpenIG and the OpenAM password capture feature to integrate with OWA. Follow the example in Chapter 5, "Getting Login Credentials From OpenAM", and substitute this template as a replacement for the default route.
{
"handler": {
"type": "Chain",
"config": {
"filters": [
{
"type": "PasswordReplayFilter",
"config": {
"loginPage": "${request.uri.path == '/owa/auth/logon.aspx'}",
"headerDecryption": {
"algorithm": "DES/ECB/NoPadding",
"key": "DESKEY",
"keyType": "DES",
"charSet": "utf-8",
"headers": [
"password"
]
},
"request": {
"method": "POST",
"uri": "https://login.microsoftonline.com",
"headers": {
"Host": [
"login.microsoftonline.com"
],
"Content-Type": [
"Content-Type:application/x-www-form-urlencoded"
]
},
"form": {
"destination": [
"https://login.microsoftonline.com/owa/"
],
"forcedownlevel": [
"0"
],
"trusted": [
"0"
],
"username": [
"${request.headers['username'][0]}"
],
"passwd": [
"${request.headers['password'][0]}"
],
"isUtf8": [
"1"
]
}
}
}
}
],
"handler": {
"type": "Chain",
"config": {
"filters": [
{
"type": "HeaderFilter",
"config": {
"messageType": "REQUEST",
"remove": [
"password",
"username"
]
}
}
],
"handler": {
"type": "ClientHandler"
},
"baseURI": "https://login.microsoftonline.com"
}
}
}
},
"condition": "${matches(request.uri.query, 'demo=headers')}"
}
To try this example, save the file as
$HOME/.openig/config/routes/27-owa.json.
Change DESKEY to the actual key value
that you generated when following the instructions in
Section 5.3.3, "Configuring Password Capture".
To use this as a default route with a real application,
remove the route-level condition on the handler
that specifies a demo query string parameter.
This chapter covers extending what OpenIG can do. In this chapter, you will learn to:
Write scripts to create custom filters and handlers
Plug additional Java libraries into OpenIG for further customization
To extend filter and handler functionality,
OpenIG supports the Groovy dynamic scripting language
through the use of ScriptableFilter
and ScriptableHandler objects.
In addition to scriptable filters and handlers, it is possible to customize OpenIG itself. Customizing OpenIG can be used to perform complex server interactions or intensive data transformations that you cannot achieve with scripts or existing handlers, filters and expressions described in Expressions(5) in the Configuration Reference.
Scriptable filters and handlers are added to the configuration in the same way as standard filters and handlers. Each takes as its configuration the script's Internet media type and either a source script included in the JSON configuration, or a file script that OpenIG reads from a file. The configuration can optionally supply arguments to the script.
The following example defines a ScriptableFilter,
written in the Groovy language,
and stored in a file named
$HOME/.openig/scripts/groovy/SimpleFormLogin.groovy
(%appdata%\OpenIG\scripts\groovy\SimpleFormLogin.groovy on Windows):
{
"name": "SimpleFormLogin",
"type": "ScriptableFilter",
"config": {
"type": "application/x-groovy",
"file": "SimpleFormLogin.groovy"
}
}
Relative paths in the file field depend on how OpenIG is installed.
If OpenIG is installed in an application server,
then paths for Groovy scripts are relative to
$HOME/.openig/scripts/groovy.
This base location $HOME/.openig/scripts/groovy
is on the classpath when the scripts are executed.
If therefore some Groovy scripts are not in the default package,
but instead have their own package names,
they belong in the directory corresponding to their package name.
For example, a script in package com.example.groovy
belongs under $HOME/.openig/scripts/groovy/com/example/groovy/.
OpenIG provides scripts with several global variables at run time, enabling them to access the request and the context, to store variables across executions, to write messages to the logs, and to make requests to a web service or to an LDAP directory service, in addition to Groovy's built-in functionality. Scripts can also access responses returned in promise callback methods. For details, see ScriptableFilter(5) in the Configuration Reference and ScriptableHandler(5) in the Configuration Reference.
Before trying the scripts shown in this chapter, first install and configure OpenIG as described in Chapter 2, "Getting Started".
When developing and debugging your scripts, consider configuring a capture decorator to log requests, responses, and context data in JSON form. You can then turn off capturing when you move to production.
For details, see CaptureDecorator(5) in the Configuration Reference.
In order to route requests, especially when the conditions are complicated,
you can use a ScriptableHandler instead of a
DispatchHandler as described in
DispatchHandler(5) in the Configuration Reference.
The following script demonstrates a simple dispatch handler:
import org.forgerock.http.protocol.Response
import org.forgerock.http.protocol.Status
/*
* This simplistic dispatcher matches the path part of the HTTP request.
* If the path is /mylogin, it checks Username and Password headers,
* accepting bjensen:hifalutin, and returning HTTP 403 Forbidden to others.
* Otherwise it returns HTTP 401 Unauthorized.
*/
// Rather than return a Promise of a response from an external source,
// this script returns the response itself.
response = new Response();
switch (request.uri.path) {
case "/mylogin":
if (request.headers.Username.values[0] == "bjensen" &&
request.headers.Password.values[0] == "hifalutin") {
response.status = Status.OK
response.entity = "<html><p>Welcome back, Babs!</p></html>"
} else {
response.status = Status.FORBIDDEN
response.entity = "<html><p>Authorization required</p></html>"
}
break
default:
response.status = Status.UNAUTHORIZED
response.entity = "<html><p>Please <a href='./mylogin'>log in</a>.</p></html>"
break
}
// Return the locally created response, no need to wrap it into a Promise
return response
To try this handler, save the script
as $HOME/.openig/scripts/groovy/DispatchHandler.groovy
(%appdata%\OpenIG\scripts\groovy\DispatchHandler.groovy on Windows).
Next, add the following route to your configuration
as $HOME/.openig/config/routes/98-dispatch.json
(%appdata%\OpenIG\config\routes\98-dispatch.json on Windows):
{
"heap": [
{
"name": "DispatchHandler",
"type": "DispatchHandler",
"config": {
"bindings": [
{
"condition":
"${matches(request.uri.path, '/mylogin')}",
"handler": {
"type": "Chain",
"config": {
"filters": [
{
"type": "HeaderFilter",
"config": {
"messageType": "REQUEST",
"add": {
"Username": [
"bjensen"
],
"Password": [
"hifalutin"
]
}
}
}
],
"handler": "Dispatcher"
}
}
},
{
"handler": "Dispatcher"
}
]
}
},
{
"name": "Dispatcher",
"type": "ScriptableHandler",
"config": {
"type": "application/x-groovy",
"file": "DispatchHandler.groovy"
}
}
],
"handler": "DispatchHandler"
}
The route sets up the headers required by the script when the user logs in.
To try it out, browse to http://www.example.com:8080.
The response from the script says, "Please log in."
When you click the log in link,
the HeaderFilter sets
Username and Password headers
in the request,
and passes the request to the script.
The script then responds, Welcome back, Babs!
HTTP Basic authentication calls for the user agent such as a browser
to send a user name and password to the server
in an Authorization header.
HTTP Basic authentication relies on an encrypted connection
to protect the user name and password credentials,
which are base64-encoded in the Authorization header,
not encrypted.
The following script, for use in a ScriptableFilter,
adds an Authorization header
based on a username and password combination:
/*
* Perform basic authentication with the user name and password
* that are supplied using a configuration like the following:
*
* {
* "name": "BasicAuth",
* "type": "ScriptableFilter",
* "config": {
* "type": "application/x-groovy",
* "file": "BasicAuthFilter.groovy",
* "args": {
* "username": "bjensen",
* "password": "hifalutin"
* }
* }
* }
*/
def userPass = username + ":" + password
def base64UserPass = userPass.getBytes().encodeBase64()
request.headers.add("Authorization", "Basic ${base64UserPass}" as String)
// Credentials are only base64-encoded, not encrypted: Set scheme to HTTPS.
/*
* When connecting over HTTPS, by default the client tries to trust the server.
* If the server has no certificate
* or has a self-signed certificate unknown to the client,
* then the most likely result is an SSLPeerUnverifiedException.
*
* To avoid an SSLPeerUnverifiedException,
* set up HTTPS correctly on the server.
* Either use a server certificate signed by a well-known CA,
* or set up the gateway to trust the server certificate.
*/
request.uri.scheme = "https"
// Calls the next Handler and returns a Promise of the Response.
// The Response can be handled with asynchronous Promise callbacks.
next.handle(context, request)
To try this filter, save the script
as $HOME/.openig/scripts/groovy/BasicAuthFilter.groovy
(%appdata%\OpenIG\scripts\groovy\BasicAuthFilter.groovy on Windows).
Next, add the following route to your configuration
as $HOME/.openig/config/routes/09-basic.json
(%appdata%\OpenIG\config\routes\09-basic.json on Windows):
{
"handler": {
"type": "Chain",
"config": {
"filters": [
{
"type": "ScriptableFilter",
"config": {
"type": "application/x-groovy",
"file": "BasicAuthFilter.groovy",
"args": {
"username": "bjensen",
"password": "hifalutin"
}
},
"capture": "filtered_request"
}
],
"handler": {
"type": "StaticResponseHandler",
"config": {
"status": 200,
"reason": "OK",
"entity": "Hello, Babs!"
}
}
}
},
"condition": "${matches(request.uri.path, '^/basic')}"
}
When the request path matches /basic
the route calls the Chain,
which runs the ScriptableFilter.
The capture setting captures the request
as updated by the ScriptableFilter.
Finally, OpenIG returns a static page.
To try it out, browse to http://www.example.com:8080/basic.
The captured request in the console log
shows that the scheme is now HTTPS,
and that the Authorization header is set for HTTP Basic:
GET https://www.example.com:8080/basic HTTP/1.1
Authorization: Basic YmplbnNlbjpoaWZhbHV0aW4=
Many organizations use an LDAP directory service to store user profiles including authentication credentials. The LDAP directory service securely stores user passwords in a highly-available, central service capable of handling thousands of authentications per second.
The following script, for use in a ScriptableFilter,
performs simple authentication against an LDAP server
based on request form fields
username and password:
import org.forgerock.opendj.ldap.*
import org.forgerock.http.protocol.Response
import org.forgerock.http.protocol.Status
/*
* Perform LDAP authentication based on user credentials from a form.
*
* If LDAP authentication succeeds, then return a promise to handle the response.
* If there is a failure, produce an error response and return it.
*/
username = request.form?.username[0]
password = request.form?.password[0]
// For testing purposes, the LDAP host and port are provided in the context's attributes.
// Edit as needed to match your directory service.
host = attributes.ldapHost ?: "localhost"
port = attributes.ldapPort ?: 1389
client = ldap.connect(host, port as Integer)
try {
// Assume the username is an exact match of either
// the user ID, the email address, or the user's full name.
filter = "(|(uid=%s)(mail=%s)(cn=%s))"
user = client.searchSingleEntry(
"ou=people,dc=example,dc=com",
ldap.scope.sub,
ldap.filter(filter, username, username, username))
client.bind(user.name as String, password?.toCharArray())
// Authentication succeeded.
// Set a header (or whatever else you want to do here).
request.headers.add("Ldap-User-Dn", user.name.toString())
// Most LDAP attributes are multi-valued.
// When you read multi-valued attributes, use the parse() method,
// with an AttributeParser method
// that specifies the type of object to return.
attributes.cn = user.cn?.parse().asSetOfString()
// When you write attribute values, set them directly.
user.description = "New description set by my script"
// Here is how you might read a single value of a multi-valued attribute:
attributes.description = user.description?.parse().asString()
// Call the next handler. This returns when the request has been handled.
return next.handle(context, request)
} catch (AuthenticationException e) {
// LDAP authentication failed, so fail the response with
// HTTP status code 403 Forbidden.
response = new Response()
response.status = Status.FORBIDDEN
response.entity = "<html><p>Authentication failed: " + e.message + "</p></html>"
} catch (Exception e) {
// Something other than authentication failed on the server side,
// so fail the response with HTTP 500 Internal Server Error.
response = new Response()
response.status = Status.INTERNAL_SERVER_ERROR
response.entity = "<html><p>Server error: " + e.message + "</p></html>"
} finally {
client.close()
}
// Return the locally created response, no need to wrap it into a Promise
return response
For the list of methods to specify which type of objects to return,
see the OpenDJ LDAP SDK Javadoc for AttributeParser.
To try the LDAP authentication script, follow these steps:
Install an LDAP directory server such as ForgeRock Directory Services or OpenDJ directory server.
Either import some sample users who can authenticate over LDAP, or generate sample users at installation time.
Save the script as
$HOME/.openig/scripts/groovy/LdapAuthFilter.groovy(%appdata%\OpenIG\scripts\groovy\LdapAuthFilter.groovyon Windows).If the directory server installation does not match the assumptions made in the script, adjust the script to use the correct settings for your installation.
Add the following route to your configuration as
$HOME/.openig/config/routes/10-ldap.json(%appdata%\OpenIG\config\routes\10-ldap.jsonon Windows):{ "handler": { "type": "Chain", "config": { "filters": [ { "type": "ScriptableFilter", "config": { "type": "application/x-groovy", "file": "LdapAuthFilter.groovy" } } ], "handler": { "type": "ScriptableHandler", "config": { "type": "application/x-groovy", "source": "import org.forgerock.http.protocol.Response; import org.forgerock.http.protocol.Status; dn = request.headers['Ldap-User-Dn'].values[0]; entity = '<html><p>Ldap-User-Dn: ' + dn + '</p></html>'; response = new Response(Status.OK); response.entity = entity; return response" } } } }, "condition": "${matches(request.uri.path, '^/ldap')}" }
The route calls the LdapAuthFilter.groovy script
to authenticate the user over LDAP.
On successful authentication, it responds with the the bind DN.
To test the configuration, browse to a URL where query string parameters specify a valid username and password, such as http://www.example.com:8080/ldap?username=user.0&password=password.
The response from the script shows the DN:
Ldap-User-Dn: uid=user.0,ou=People,dc=example,dc=com.
You can use a ScriptableFilter
to look up information in a relational database
and include the results in the request context.
The following filter looks up user credentials in a database given the user's email address, which is found in the form data of the request. The script then sets the credentials in headers, making sure the scheme is HTTPS to protect the request when it leaves OpenIG:
/*
* Look up user credentials in a relational database
* based on the user's email address provided in the request form data,
* and set the credentials in the request headers for the next handler.
*/
def client = new SqlClient()
def credentials = client.getCredentials(request.form?.mail[0])
request.headers.add("Username", credentials.Username)
request.headers.add("Password", credentials.Password)
// The credentials are not protected in the headers, so use HTTPS.
request.uri.scheme = "https"
// Calls the next Handler and returns a Promise of the Response.
// The Response can be handled with asynchronous Promise callbacks.
next.handle(context, request)
The previous script demonstrates a ScriptableFilter
that uses a SqlClient class defined in another script.
The following code listing shows the SqlClient class:
import groovy.sql.Sql
import javax.naming.InitialContext
import javax.sql.DataSource
/**
* Access a database with a well-known structure,
* in particular to get credentials given an email address.
*/
class SqlClient {
// Get a DataSource from the container.
InitialContext context = new InitialContext()
DataSource dataSource = context.lookup("jdbc/forgerock") as DataSource
def sql = new Sql(dataSource)
// The expected table is laid out like the following.
// Table USERS
// ----------------------------------------
// | USERNAME | PASSWORD | EMAIL |...|
// ----------------------------------------
// | <username>| <passwd> | <mail@...>|...|
// ----------------------------------------
String tableName = "USERS"
String usernameColumn = "USERNAME"
String passwordColumn = "PASSWORD"
String mailColumn = "EMAIL"
/**
* Get the Username and Password given an email address.
*
* @param mail Email address used to look up the credentials
* @return Username and Password from the database
*/
def getCredentials(mail) {
def credentials = [:]
def query = "SELECT " + usernameColumn + ", " + passwordColumn +
" FROM " + tableName + " WHERE " + mailColumn + "='$mail';"
sql.eachRow(query) {
credentials.put("Username", it."$usernameColumn")
credentials.put("Password", it."$passwordColumn")
}
return credentials
}
}
To try the script, follow these steps:
Follow the tutorial in Section 4.3, "Log in With Credentials From a Database".
When everything in that tutorial works, you know that OpenIG can connect to the database, look up users by email address, and successfully authenticate to the sample application.
Save the scripts as
$HOME/.openig/scripts/groovy/SqlAccessFilter.groovy(%appdata%\OpenIG\scripts\groovy\SqlAccessFilter.groovyon Windows), and as$HOME/.openig/scripts/groovy/SqlClient.groovy(%appdata%\OpenIG\scripts\groovy\SqlClient.groovyon Windows).Add the following route to your configuration as
$HOME/.openig/config/routes/11-db.json(%appdata%\OpenIG\config\routes\11-db.jsonon Windows):{ "handler": { "type": "Chain", "config": { "filters": [ { "type": "ScriptableFilter", "config": { "type": "application/x-groovy", "file": "SqlAccessFilter.groovy" } }, { "type": "StaticRequestFilter", "config": { "method": "POST", "uri": "http://www.example.com:8081", "form": { "username": [ "${request.headers['Username'][0]}" ], "password": [ "${request.headers['Password'][0]}" ] } } } ], "handler": "ClientHandler" } }, "condition": "${matches(request.uri.path, '^/db')}" }
The route calls the ScriptableFilter
to look up credentials over SQL.
It then uses calls a StaticRequestFilter
to build a login request.
Although the script sets the scheme to HTTPS,
the StaticRequestFilter ignores that and resets the URI.
This makes it easier to try the script without additional steps to set up HTTPS.
To try the configuration, browse to a URL where a query string parameter specifies a valid email address, such as http://www.example.com:8080/db?mail=george@example.com.
If the lookup and authentication are successful, you see the profile page of the sample application.
If addition to scripting scripting, OpenIG includes a complete Java application programming interface, designed to allow you to customize OpenIG as required. You can customize OpenIG to perform complex server interactions or intensive data transformations that you cannot achieve with scripts or existing handlers, filters and expressions described in Expressions(5) in the Configuration Reference.
Interface Stability: Evolving (For details, see Section A.2, "ForgeRock Product Interface Stability" in the Configuration Reference.)
Primary extension points include these interfaces:
- Decorator
A
Decoratoradds new behavior to another object without changing the base type of the object.When suggesting custom
Decoratornames, know that OpenIG reserves all field names that use only alphanumeric characters. To avoid clashes, use dots or dashes in your field names, such asmy-decorator.- ExpressionPlugin
An
ExpressionPluginadds a node to theExpressioncontext tree, alongsideenv(for environment variables), andsystem(for system properties). For example, the expression${system['user.home']}yields the home directory of the user running the application server for OpenIG.In your
ExpressionPlugin, thegetKey()method returns the name of the node, and thegetObject()method returns the unified expression language context object that contains the values needed to resolve the expression. The plugins forenvandsystemreturn Map objects, for example.When you add your own
ExpressionPlugin, you must make it discoverable within your custom library. You do this by adding a services file named after the plugin interface, where the file contains the fully qualified class name of your plugin, underMETA-INF/services/org.forgerock.openig.el.ExpressionPluginin the .jar file for your customizations. When you have more than one plugin, add one fully qualified class name per line. For details, see the reference documentation for the Java class ServiceLoader. If you build your project using Maven, then you can add this under thesrc/main/resourcesdirectory. As described in Section 13.13, "Embedding Customizations in OpenIG", you must add your custom libraries to theWEB-INF/lib/directory of the OpenIG .war file that you deploy.Be sure to provide some documentation for OpenIG administrators on how your plugin extends expressions.
- Filter
A
Filterserves to process the request and/or the response.- Handler
A
Handlergenerates a response for a request.
These Filter and Handler interfaces are similar to Java Enterprise Edition
Filter and Servlet interfaces,
with some differences in the semantics of messages.
OpenIG also provides the convenience class,
GenericHeapObject,
to help with configuration.
The Filter interface exposes a filter() method,
which takes a
Context, a
Request, and the
Handler, which is the next filter or handler to dispatch to.
The filter() method returns a
Promise that provides access to the
Response
with methods for dealing with both success and failure conditions.
A filter might elect not to pass the request to the next filter or handler,
and instead handle the request itself.
It can achieve this by merely avoiding a call
to next.handle(context, request),
creating its own response object and returning that in the promise.
The filter is also at liberty to replace a response with another of its own.
A filter can exist in more than one chain,
therefore should make no assumptions or correlations
using the chain it is supplied.
The only valid use of a chain by a filter is to call its
handle() method to dispatch the request
to the rest of the chain.
The Handler interface exposes a handle() method,
which takes a
Context, and a
Request.
It processes the request and returns a
Promise that provides access to the
Response
with methods for dealing with both success and failure conditions.
A handler can elect to dispatch the request to another handler or chain.
Objects are added to the heap and supplied with configuration artifacts at initialization time. To be integrated with the configuration, a class must have an accompanying implementation of the Heaplet interface. The easiest and most common way of exposing the heaplet is to extend the GenericHeaplet class in a nested class of the class you want to create and initialize, overriding the heaplet's create() method.
Within the create() method,
you can access the object's configuration through the
config field.
The following sample filter sets an arbitrary header in the incoming request and outgoing response:
package org.forgerock.openig.doc;
import org.forgerock.services.context.Context;
import org.forgerock.http.Filter;
import org.forgerock.http.Handler;
import org.forgerock.http.protocol.Request;
import org.forgerock.http.protocol.Response;
import org.forgerock.openig.heap.GenericHeapObject;
import org.forgerock.openig.heap.GenericHeaplet;
import org.forgerock.openig.heap.HeapException;
import org.forgerock.util.promise.NeverThrowsException;
import org.forgerock.util.promise.Promise;
import org.forgerock.util.promise.ResultHandler;
/**
* Filter to set a header in the incoming request and in the outgoing response.
*/
public class SampleFilter extends GenericHeapObject implements Filter {
/** Header name. */
String name;
/** Header value. */
String value;
/**
* Set a header in the incoming request and in the outgoing response.
* A configuration example looks something like the following.
*
* <pre>
* {
* "name": "SampleFilter",
* "type": "SampleFilter",
* "config": {
* "name": "X-Greeting",
* "value": "Hello world"
* }
* }
* </pre>
*
* @param context Execution context.
* @param request HTTP Request.
* @param next Next filter or handler in the chain.
* @return A {@code Promise} representing the response to be returned to the client.
*/
@Override
public Promise<Response, NeverThrowsException> filter(final Context context,
final Request request,
final Handler next) {
// Set header in the request.
request.getHeaders().put(name, value);
// Pass to the next filter or handler in the chain.
return next.handle(context, request)
// When it has been successfully executed, execute the following callback
.thenOnResult(new ResultHandler<Response>() {
@Override
public void handleResult(final Response response) {
// Set header in the response.
response.getHeaders().put(name, value);
}
});
}
/**
* Create and initialize the filter, based on the configuration.
* The filter object is stored in the heap.
*/
public static class Heaplet extends GenericHeaplet {
/**
* Create the filter object in the heap,
* setting the header name and value for the filter,
* based on the configuration.
*
* @return The filter object.
* @throws HeapException Failed to create the object.
*/
@Override
public Object create() throws HeapException {
SampleFilter filter = new SampleFilter();
filter.name = config.get("name").required().asString();
filter.value = config.get("value").required().asString();
return filter;
}
}
}
When you set the sample filter type in the configuration,
you need to provide the fully qualified class name,
as in "type": "org.forgerock.openig.doc.SampleFilter".
You can however implement a class alias resolver
to make it possible to use a short name instead,
as in "type": "SampleFilter":
package org.forgerock.openig.doc;
import org.forgerock.openig.alias.ClassAliasResolver;
import java.util.HashMap;
import java.util.Map;
/**
* Allow use of short name aliases in configuration object types.
*
* This allows a configuration with {@code "type": "SampleFilter"}
* instead of {@code "type": "org.forgerock.openig.doc.SampleFilter"}.
*/
public class SampleClassAliasResolver implements ClassAliasResolver {
private static final Map<String, Class<?>> ALIASES =
new HashMap<>();
static {
ALIASES.put("SampleFilter", SampleFilter.class);
}
/**
* Get the class for a short name alias.
*
* @param alias Short name alias.
* @return The class, or null if the alias is not defined.
*/
@Override
public Class<?> resolve(String alias) {
return ALIASES.get(alias);
}
}
When you add your own resolver,
you must make it discoverable within your custom library.
You do this by adding a services file named after the class resolver interface,
where the file contains the fully qualified class name of your resolver, under
META-INF/services/org.forgerock.openig.alias.ClassAliasResolver
in the .jar file for your customizations.
When you have more than one resolver,
add one fully qualified class name per line.
If you build your project using Maven, then you can add this
under the src/main/resources directory.
The content of the file in this example is one line:
org.forgerock.openig.doc.SampleClassAliasResolver
The corresponding heap object configuration then looks as follows:
{
"name": "SampleFilter",
"type": "SampleFilter",
"config": {
"name": "X-Greeting",
"value": "Hello world"
}
}
You can use Apache Maven to manage dependencies on OpenIG. The dependencies are found in the ForgeRock Maven repository.
The following listing shows the Maven POM configuration for the ForgeRock Maven repository and the dependency to build the sample filter:
<repositories>
<repository>
<id>forgerock-staging-repository</id>
<name>ForgeRock Release Repository</name>
<url>http://maven.forgerock.org/repo/releases</url>
<snapshots>
<enabled>false</enabled>
</snapshots>
</repository>
<repository>
<id>forgerock-snapshots-repository</id>
<name>ForgeRock Snapshot Repository</name>
<url>http://maven.forgerock.org/repo/snapshots</url>
<releases>
<enabled>false</enabled>
</releases>
</repository>
</repositories>
<dependencies>
<dependency>
<groupId>org.forgerock.openig</groupId>
<artifactId>openig-core</artifactId>
<version>4.0.0</version>
</dependency>
</dependencies>
You can then build your customizations into a .jar file and install them in your local Maven repository by using the mvn install command:
$ mvn install ... [INFO] --- maven-jar-plugin:2.4:jar (default-jar) @ sample-filter --- [INFO] Building jar: .../sample-filter/target/sample-filter-1.0.0-SNAPSHOT.jar [INFO] ------------------------------------------------------------------------ [INFO] BUILD SUCCESS [INFO] ------------------------------------------------------------------------ [INFO] Total time: 1.478s [INFO] Finished at: Fri Nov 07 16:57:18 CET 2014 [INFO] Final Memory: 18M/309M [INFO] ------------------------------------------------------------------------
After building your customizations into a .jar file,
you can include them in the OpenIG .war file for deployment.
You do this by unpacking OpenIG-4.0.0.war,
including your .jar library in WEB-INF/lib,
and then creating a new .war file.
For example, if your .jar file is in a project named sample-filter,
and the development version is 1.0.0-SNAPSHOT,
you might include the file as in the following example:
$ mkdir root && cd root $ jar -xf ~/Downloads/OpenIG-4.0.0.war $ cp ~/Documents/sample-filter/target/sample-filter-1.0.0-SNAPSHOT.jar WEB-INF/lib $ jar -cf ../custom.war *
In this example, the resulting custom.war
contains the custom sample filter.
You can deploy the custom .war file
as you would deploy OpenIG-4.0.0.war.
OpenIG provides a filter to limit access rates by throttling requests.
Routes have a monitor boolean attribute
that you can use to have OpenIG collect statistics for the route.
The statistics are then exposed as a JSON resource
that you can access over HTTP.
In addition, OpenIG supports the common ForgeRock audit framework.
You can add an audit service to a route,
and the service can then publish messages to a consumer
such as a CSV file, a relational database, or the Syslog facility.
In this chapter, you will learn to:
Limit access rates using a throttling filter
Enable monitoring for a route
Read monitoring statistics for a route as a JSON resource
Add an audit service to a route to integrate with the ForgeRock common audit event framework, sometimes referred to as Common Audit
To limit access rates by throttling requests, use a throttling filter. This section demonstrates how a throttling filter works. For details, see ThrottlingFilter(5) in the Configuration Reference.
The following example route uses a throttling filter to limit the number of requests to 60 requests per minute from clients at the same network address:
{
"handler": {
"type": "Chain",
"config": {
"filters": [
{
"type": "ThrottlingFilter",
"config": {
"rate": {
"numberOfRequests": 60,
"duration": "1 minute"
},
"partitionKey": "${contexts.client.remoteAddress}"
}
}
],
"handler": {
"type": "StaticResponseHandler",
"config": {
"status": 200,
"reason": "OK",
"entity": "Success!"
}
}
}
},
"condition": "${matches(request.uri.path, '^/limited')}"
}
Before you try this route, prepare OpenIG and the minimal HTTP server as shown in Chapter 2, "Getting Started".
Add the route file to the OpenIG configuration
as $HOME/.openig/config/routes/00-throttle.json
(on Windows, %appdata%\OpenIG\config\routes\00-throttle.json).
With the route in place and OpenIG running, access the route in a loop until you reach the limit. The URL for the route is http://www.example.com:8080/limited. You can use a command-line tool such as curl to access the route multiple times, as in the following example:
$ curl -v http://www.example.com:8080/limited/\[001-100\] > /tmp/curl.txt 2>&1
$ grep "< HTTP/1.1" /tmp/curl.txt | sort | uniq -c
60 < HTTP/1.1 200 OK
40 < HTTP/1.1 429 429
Notice that the initial requests receive a success response. Once the limit is reached, OpenIG throttles further requests from the same client address, which is the loopback address in this case. The result is HTTP status code 429 Too Many Requests.
Replace the handler in the chain with a client handler to limit requests through OpenIG to the protected application.
To monitor a route, you set "monitor": true
in the top-level attributes on the route.
The value of the attribute can be an expression that evaluates to a boolean,
such as "monitor": "${true}",
or an object that indicates the percentile thresholds.
By using an appropriate boolean expression, for example,
you can enable or disable monitoring
with an environment variable or system property.
For details, see Expressions(5) in the Configuration Reference
and Route(5) in the Configuration Reference.
The following example route has monitoring enabled:
{
"handler": {
"type": "StaticResponseHandler",
"config": {
"status": 200,
"reason": "OK",
"entity": "Hello, world!"
}
},
"monitor": "${true}",
"condition": "${matches(request.uri.path, '^/monitor')}"
}
Before you try this route, prepare OpenIG and the minimal HTTP server as shown in Chapter 2, "Getting Started".
Add the route file to the OpenIG configuration
as $HOME/.openig/config/routes/00-monitor.json
(on Windows, %appdata%\OpenIG\config\routes\00-monitor.json).
With the route in place and OpenIG running, access the route a few times at http://www.example.com:8080/monitor.
Your access causes OpenIG to collect monitoring statistics for the route. After generating statistics by accessing the route a few times, read the JSON monitoring resource for the route at http://www.example.com:8080/openig/api/system/objects/router-handler/routes/00-monitor/monitoring. The monitoring resource provides statistics on requests and responses as in the following example:
{
"requests": {
"total": 100,
"active": 0
},
"responses": {
"total": 100,
"info": 0,
"success": 100,
"redirect": 0,
"clientError": 0,
"serverError": 0,
"other": 0,
"errors": 0,
"null": 0
},
"throughput": {
"mean": 15.6,
"lastMinute": 20.0,
"last5Minutes": 20.0,
"last15Minutes": 20.0
},
"responseTime": {
"mean": 0.093,
"median": 0.046,
"standardDeviation": 0.371,
"total": 9,
"percentiles": {
"0.999": 3.762,
"0.9999": 3.762,
"0.99999": 3.762
}
}
}
For details about the content of the monitoring resource, see "The REST API for Monitoring" in the Configuration Reference.
By default, monitoring statistics are accessible from the local host.
OpenIG uses an ApiProtectionFilter
that protects the reserved routes for paths under /openig.
By default, the filter allows access to reserved routes only from the local host.
You can override this behavior by declaring
a custom ApiProtectionFilter in the top-level heap.
For an example, see the CORS filter described
in Section 10.4, "Setting Up OpenIG As an UMA Resource Server".
This section covers adding an audit service to a route to integrate with the ForgeRock common audit event framework and to log audit event messages.
The ForgeRock common audit event framework provides common infrastructure across ForgeRock products to handle audit events using common audit event handlers.
Out of the box, OpenIG provides handlers for writing messages to:
CSV files, with support for retention, rotation, and tamper-evident logs
Relational database using JDBC
The UNIX system log (Syslog) facility
To enable the audit framework for a route, you specify an audit service.
The following example route, 30-audit.json,
adds a route with an audit service configuration
for publishing log messages to a CSV file,
/tmp/logs/access.csv:
{
"handler": "ForgeRockClientHandler",
"baseURI": "http://www.example.com:8081",
"condition": "${matches(request.uri.path, '^/audit')}",
"auditService": {
"type": "AuditService",
"config": {
"config": {},
"event-handlers": [
{
"class": "org.forgerock.audit.handlers.csv.CsvAuditEventHandler",
"config": {
"name": "csv",
"logDirectory": "/tmp/logs",
"buffering": {
"enabled": "true",
"autoFlush": "true"
},
"topics": [
"access"
]
}
}
]
}
}
}
Notice that this route is triggered
when the request path starts with /audit.
The audit framework uses transaction IDs that make it easy to correlate requests as they traverse the platform. This makes it easier to monitor activity and to enrich reports.
Transaction IDs from other services in the ForgeRock platform
are sent as X-ForgeRock-TransactionId header values.
The example route shown in this section
uses the ForgeRockClientHandler as its handler.
The ForgeRockClientHandler sends
the X-ForgeRock-TransactionId header
with its requests to external services.
By default, OpenIG does not trust transaction ID headers from client applications.
(Optional) If you trust transaction IDs sent by client applications, and want monitoring and reporting systems consuming the logs to allow correlation of requests as they traverse multiple servers, then set the boolean system property
org.forgerock.http.TrustTransactionHeadertotruein the Java command to start the container where OpenIG runs.
For additional information on the audit service, see Audit Logging Framework in the Configuration Reference.
This chapter covers common problems and their solutions.
org.forgerock.json.fluent.JsonValueException: /handler:
object Router2 not found in heap
at org.forgerock.openig.heap.HeapImpl.resolve(HeapImpl.java:351)
at org.forgerock.openig.heap.HeapImpl.resolve(HeapImpl.java:334)
at org.forgerock.openig.heap.HeapImpl.getHandler(HeapImpl.java:538)
You have specified "handler": "Router2"
in config.json,
but no handler configuration object named Router2 exists.
Make sure you have added an entry for the handler
and that you have correctly spelled its name.
When the JSON for a route is not valid, OpenIG does not load the route. Instead, a description of the error appears in the log:
MON NOV 30 16:12:56 CET 2015 (ERROR) {Router}/handler
The route defined in file '/Users/me/.openig/config/routes/99-default.json'
cannot be modified
------------------------------
MON NOV 30 16:12:56 CET 2015 (ERROR) {Router}/handler
Cannot read/parse content of /Users/me/.openig/config/routes/99-default.json
[ HeapException] > Cannot read/parse content of
/Users/me/.openig/config/routes/99-default.json
[ JsonParseException] > Unexpected character (',' (code 44)):
was expecting double-quote to start field name
at [Source: java.io.InputStreamReader@195ed7f6; line: 8, column: 33]
In this case, extra comma is spotted at line 8, column 33.
Use a JSON editor or JSON validation tool such as JSONLint to make sure your JSON is valid.
Ensure the flat file is readable by the user running the container for OpenIG. Values are all characters including space and tabs between the separator, so make sure the values are not padded with spaces.
HTTP ERROR 500
Problem accessing /myURL . Reason:
java.lang.String cannot be cast to java.util.List
Caused by:
java.lang.ClassCastException: java.lang.String cannot be cast to java.util.List
This error is typically encountered
when using an AssignmentFilter
as described in AssignmentFilter(5) in the Configuration Reference
and setting a string value for one of the headers.
All headers are stored in lists
so the header must be addressed with a subscript.
For example, rather than trying to set
request.headers['Location']
for a redirect in the response object, you should instead set
request.headers['Location'][0].
A header without a subscript leads to the error above.
You must define an entity for the response as in the following example:
{
"name": "AccessDeniedHandler",
"type": "StaticResponseHandler",
"config": {
"status": 403,
"reason": "Forbidden",
"entity": "<html><p>User does not have permission</p></html>"
}
}
If you are proxying to more than one application in multiple DNS domains, you must make sure your container is enabled for domain cookies. For details on your specific container, see Section 3.1, "Configuring Deployment Containers".
If a baseURI configuration setting causes a request to come back to OpenIG, OpenIG never produces a response to the request. You then observe the following behavior.
You send a request and OpenIG seems to hang.
Then you see a failure message,
HTTP Status 500 - Read timed out,
accompanied by OpenIG throwing an exception,
java.net.SocketTimeoutException: Read timed out.
To fix this issue, make sure
that baseURI configuration settings
use a different host and port than the host and port for OpenIG.
OpenIG loads all configuration at startup. By default, it then periodically reloads changed route configurations.
If you make changes to a route that result in an invalid configuration, OpenIG logs errors, but it keeps the previous, correct configuration, and continues to use the old route.
OpenIG only uses the new configuration after you save a valid version or when you restart OpenIG.
Of course, if you restart OpenIG with an invalid route configuration,
then OpenIG tries to load the invalid route at startup
and logs an error.
In that case, if there is no default handler to accept any incoming request
for the invalid route, then you see an error,
No handler to dispatch to.
If you have copied routes from another OpenIG server, those routes might depend on environment or container configuration that you have not yet configured locally.
You can work around this problem by changing the route file extension.
A router ignores route files
that do not have the .json extension.
For example, suppose you copy route all sample route configurations from the documentation, and then start OpenIG without first configuring your container. This can result in an error such as the following:
/handler/config/filters/0/config/dataSource: javax.naming.NameNotFoundException;
remaining name 'jdbc/forgerock'
[ JsonValueException] > /handler/config/filters/0/config/dataSource:
javax.naming.NameNotFoundException; remaining name 'jdbc/forgerock'
[ NameNotFoundException] > null
org.forgerock.json.fluent.JsonValueException:
/handler/config/filters/0/config/dataSource:
javax.naming.NameNotFoundException; remaining name 'jdbc/forgerock'
at org.forgerock.openig.filter.SqlAttributesFilter$Heaplet.create(
SqlAttributesFilter.java:211)
at org.forgerock.openig.heap.GenericHeaplet.create(GenericHeaplet.java:81)
at org.forgerock.openig.heap.HeapImpl.extract(HeapImpl.java:316)
at org.forgerock.openig.heap.HeapImpl.get(HeapImpl.java:281)
...
This arises from the route in 03-sql.json,
which defines an SqlAttributesFilter
that depends on a JNDI data source configured in the container:
{
"type": "SqlAttributesFilter",
"config": {
"dataSource": "java:comp/env/jdbc/forgerock",
"preparedStatement":
"SELECT username, password FROM users WHERE email = ?;",
"parameters": [
"george@example.com"
],
"target": "${attributes.sql}"
}
}
To prevent OpenIG from loading the route configuration until you have had time to configure the container, change the file extension to render the route inactive:
$ mv ~/.openig/config/routes/03-sql.json ~/.openig/config/routes/03-sql.inactive
If necessary, restart the container to force OpenIG to reload the configuration.
When you have configured the data source in the container,
change the file extension back to .json
to render the route active again:
$ mv ~/.openig/config/routes/03-sql.inactive ~/.openig/config/routes/03-sql.json
You can use a single OpenIG server as SAML 2.0 Service Provider for multiple protected applications. In this appendix, you will learn to:
Set up network access to protect multiple applications
Edit the SAML configuration files to handle multiple service providers
Import SAML service provider configurations into OpenAM
Configure OpenIG routes for multiple service providers
Before you try the samples described here, familiarize yourself with OpenIG SAML 2.0 support by reading Chapter 7, "OpenIG As a SAML 2.0 Service Provider" and working through the tutorial in that chapter.
Also make sure you understand the principles for configuring SAML 2.0 entities in OpenAM. The preparation for handling multiple applications involves editing the SAML 2.0 service provider configurations based on the original Fedlet configuration, and then importing the new configurations as SAML 2.0 entities in OpenAM.
At this point, you should have OpenIG protecting the sample application as SAML 2.0 service provider, with OpenAM working as identity provider configured as described in the tutorial.
You must configure the network so that browser traffic to the application hosts is proxied through OpenIG.
Modify DNS or host file settings so that the hosts name of the protected applications resolve to the IP address of OpenIG on the system where the browser runs. Restart the browser as necessary to take the changes into account.
The examples that follow use host names
sp.one.example and sp.two.example.
To try the examples on your computer,
you can edit the host file settings to add these to the loopback address:
127.0.0.1 localhost www.example.com sp.one.example sp.two.example
Based on the original Fedlet configuration, add a configuration for each new protected application.
In the following examples,
the first application runs on host sp.one.example.
The examples assign the entity ID One to this application,
and use the metaAlias /sp1 in the SAML configuration.
The second application runs on sp.two.example
with entity ID Two and metaAlias /sp2.
Edit the SAML/fedlet.cot file
to include the entity IDs as in the following example:
cot-name=Circle of Trust
sun-fm-cot-status=Active
sun-fm-trusted-providers=http://openam.example.com:8088/openam,One,Two
sun-fm-saml2-readerservice-url=
sun-fm-saml2-writerservice-url=
For each application, make copies of the SAML configuration files
sp.xml and sp-extended.xml.
Edit the copy of sp.xml for the application so that
the entity ID matches the application,
the Location
and ResponseLocation attributes
reflect those of the application,
and the AssertionConsumerService
and Location attributes
include the metaAlias.
<!--
Set the entityID and edit *Location attributes to match the service provider.
Note that AssertionConsumerService Location attributes include the metaAlias.
-->
<EntityDescriptor
entityID="One"
xmlns="urn:oasis:names:tc:SAML:2.0:metadata">
<SPSSODescriptor
AuthnRequestsSigned="false"
WantAssertionsSigned="false"
protocolSupportEnumeration="urn:oasis:names:tc:SAML:2.0:protocol">
<SingleLogoutService
Binding="urn:oasis:names:tc:SAML:2.0:bindings:HTTP-Redirect"
Location="http://sp.one.example:8080/saml/fedletSloRedirect"
ResponseLocation="http://sp.one.example:8080/saml/fedletSloRedirect"/>
<SingleLogoutService
Binding="urn:oasis:names:tc:SAML:2.0:bindings:HTTP-POST"
Location="http://sp.one.example:8080/saml/fedletSloPOST"
ResponseLocation="http://sp.one.example:8080/saml/fedletSloPOST"/>
<SingleLogoutService
Binding="urn:oasis:names:tc:SAML:2.0:bindings:SOAP"
Location="http://sp.one.example:8080/saml/fedletSloSoap"/>
<NameIDFormat>urn:oasis:names:tc:SAML:2.0:nameid-format:transient</NameIDFormat>
<AssertionConsumerService
isDefault="true"
index="0"
Binding="urn:oasis:names:tc:SAML:2.0:bindings:HTTP-POST"
Location="http://sp.one.example:8080/saml/fedletapplication/metaAlias/sp1"/>
<AssertionConsumerService
index="1"
Binding="urn:oasis:names:tc:SAML:2.0:bindings:HTTP-Artifact"
Location="http://sp.one.example:8080/saml/fedletapplication/metaAlias/sp1"/>
</SPSSODescriptor>
<RoleDescriptor
xmlns:xsi="http://www.w3.org/2001/XMLSchema-instance"
xmlns:query="urn:oasis:names:tc:SAML:metadata:ext:query"
xsi:type="query:AttributeQueryDescriptorType"
protocolSupportEnumeration="urn:oasis:names:tc:SAML:2.0:protocol">
</RoleDescriptor>
<XACMLAuthzDecisionQueryDescriptor
WantAssertionsSigned="false"
protocolSupportEnumeration="urn:oasis:names:tc:SAML:2.0:protocol">
</XACMLAuthzDecisionQueryDescriptor>
</EntityDescriptor>
<!--
Set the entityID and edit *Location attributes to match the service provider.
Note that AssertionConsumerService Location attributes include the metaAlias.
-->
<EntityDescriptor
entityID="Two"
xmlns="urn:oasis:names:tc:SAML:2.0:metadata">
<SPSSODescriptor
AuthnRequestsSigned="false"
WantAssertionsSigned="false"
protocolSupportEnumeration="urn:oasis:names:tc:SAML:2.0:protocol">
<SingleLogoutService
Binding="urn:oasis:names:tc:SAML:2.0:bindings:HTTP-Redirect"
Location="http://sp.two.example:8080/saml/fedletSloRedirect"
ResponseLocation="http://sp.two.example:8080/saml/fedletSloRedirect"/>
<SingleLogoutService
Binding="urn:oasis:names:tc:SAML:2.0:bindings:HTTP-POST"
Location="http://sp.two.example:8080/saml/fedletSloPOST"
ResponseLocation="http://sp.two.example:8080/saml/fedletSloPOST"/>
<SingleLogoutService
Binding="urn:oasis:names:tc:SAML:2.0:bindings:SOAP"
Location="http://sp.two.example:8080/saml/fedletSloSoap"/>
<NameIDFormat>urn:oasis:names:tc:SAML:2.0:nameid-format:transient</NameIDFormat>
<AssertionConsumerService
isDefault="true"
index="0"
Binding="urn:oasis:names:tc:SAML:2.0:bindings:HTTP-POST"
Location="http://sp.two.example:8080/saml/fedletapplication/metaAlias/sp2"/>
<AssertionConsumerService
index="1"
Binding="urn:oasis:names:tc:SAML:2.0:bindings:HTTP-Artifact"
Location="http://sp.two.example:8080/saml/fedletapplication/metaAlias/sp2"/>
</SPSSODescriptor>
<RoleDescriptor
xmlns:xsi="http://www.w3.org/2001/XMLSchema-instance"
xmlns:query="urn:oasis:names:tc:SAML:metadata:ext:query"
xsi:type="query:AttributeQueryDescriptorType"
protocolSupportEnumeration="urn:oasis:names:tc:SAML:2.0:protocol">
</RoleDescriptor>
<XACMLAuthzDecisionQueryDescriptor
WantAssertionsSigned="false"
protocolSupportEnumeration="urn:oasis:names:tc:SAML:2.0:protocol">
</XACMLAuthzDecisionQueryDescriptor>
</EntityDescriptor>
Edit the copy of sp-extended.xml for the application
so that the entity ID matches the application,
and the metaAlias and appLogoutUrl are correctly set.
<!--
Set the entityID and edit the SPSSOConfig metaAlias attribute.
Also set the value of appLogoutUrl.
-->
<EntityConfig xmlns="urn:sun:fm:SAML:2.0:entityconfig"
xmlns:fm="urn:sun:fm:SAML:2.0:entityconfig"
hosted="1"
entityID="One">
<SPSSOConfig metaAlias="/sp1">
<Attribute name="description">
<Value></Value>
</Attribute>
<Attribute name="signingCertAlias">
<Value></Value>
</Attribute>
<Attribute name="encryptionCertAlias">
<Value></Value>
</Attribute>
<Attribute name="basicAuthOn">
<Value>false</Value>
</Attribute>
<Attribute name="basicAuthUser">
<Value></Value>
</Attribute>
<Attribute name="basicAuthPassword">
<Value></Value>
</Attribute>
<Attribute name="autofedEnabled">
<Value>false</Value>
</Attribute>
<Attribute name="autofedAttribute">
<Value></Value>
</Attribute>
<Attribute name="transientUser">
<Value>anonymous</Value>
</Attribute>
<Attribute name="spAdapter">
<Value></Value>
</Attribute>
<Attribute name="spAdapterEnv">
<Value></Value>
</Attribute>
<Attribute name="fedletAdapter">
<Value>com.sun.identity.saml2.plugins.DefaultFedletAdapter</Value>
</Attribute>
<Attribute name="fedletAdapterEnv">
<Value></Value>
</Attribute>
<Attribute name="spAccountMapper">
<Value>com.sun.identity.saml2.plugins.DefaultLibrarySPAccountMapper</Value>
</Attribute>
<Attribute name="useNameIDAsSPUserID">
<Value>false</Value>
</Attribute>
<Attribute name="spAttributeMapper">
<Value>com.sun.identity.saml2.plugins.DefaultSPAttributeMapper</Value>
</Attribute>
<Attribute name="spAuthncontextMapper">
<Value>com.sun.identity.saml2.plugins.DefaultSPAuthnContextMapper</Value>
</Attribute>
<Attribute name="spAuthncontextClassrefMapping">
<Value>
urn:oasis:names:tc:SAML:2.0:ac:classes:PasswordProtectedTransport|0|default
</Value>
</Attribute>
<Attribute name="spAuthncontextComparisonType">
<Value>exact</Value>
</Attribute>
<Attribute name="attributeMap">
<Value>employeenumber=employeenumber</Value>
<Value>mail=mail</Value>
</Attribute>
<Attribute name="saml2AuthModuleName">
<Value></Value>
</Attribute>
<Attribute name="localAuthURL">
<Value></Value>
</Attribute>
<Attribute name="intermediateUrl">
<Value></Value>
</Attribute>
<Attribute name="defaultRelayState">
<Value></Value>
</Attribute>
<Attribute name="appLogoutUrl">
<Value>http://sp.one.example:8080/saml/logout</Value>
</Attribute>
<Attribute name="assertionTimeSkew">
<Value>300</Value>
</Attribute>
<Attribute name="wantAttributeEncrypted">
<Value></Value>
</Attribute>
<Attribute name="wantAssertionEncrypted">
<Value></Value>
</Attribute>
<Attribute name="wantNameIDEncrypted">
<Value></Value>
</Attribute>
<Attribute name="wantPOSTResponseSigned">
<Value></Value>
</Attribute>
<Attribute name="wantArtifactResponseSigned">
<Value></Value>
</Attribute>
<Attribute name="wantLogoutRequestSigned">
<Value></Value>
</Attribute>
<Attribute name="wantLogoutResponseSigned">
<Value></Value>
</Attribute>
<Attribute name="wantMNIRequestSigned">
<Value></Value>
</Attribute>
<Attribute name="wantMNIResponseSigned">
<Value></Value>
</Attribute>
<Attribute name="responseArtifactMessageEncoding">
<Value>URI</Value>
</Attribute>
<Attribute name="cotlist">
<Value>Circle of Trust</Value></Attribute>
<Attribute name="saeAppSecretList">
</Attribute>
<Attribute name="saeSPUrl">
<Value></Value>
</Attribute>
<Attribute name="saeSPLogoutUrl">
</Attribute>
<Attribute name="ECPRequestIDPListFinderImpl">
<Value>com.sun.identity.saml2.plugins.ECPIDPFinder</Value>
</Attribute>
<Attribute name="ECPRequestIDPList">
<Value></Value>
</Attribute>
<Attribute name="ECPRequestIDPListGetComplete">
<Value></Value>
</Attribute>
<Attribute name="enableIDPProxy">
<Value>false</Value>
</Attribute>
<Attribute name="idpProxyList">
<Value></Value>
</Attribute>
<Attribute name="idpProxyCount">
<Value>0</Value>
</Attribute>
<Attribute name="useIntroductionForIDPProxy">
<Value>false</Value>
</Attribute>
<Attribute name="spSessionSyncEnabled">
<Value>false</Value>
</Attribute>
<Attribute name="relayStateUrlList">
</Attribute>
</SPSSOConfig>
<AttributeQueryConfig metaAlias="/attrQuery">
<Attribute name="signingCertAlias">
<Value></Value>
</Attribute>
<Attribute name="encryptionCertAlias">
<Value></Value>
</Attribute>
<Attribute name="wantNameIDEncrypted">
<Value></Value>
</Attribute>
<Attribute name="cotlist">
<Value>Circle of Trust</Value>
</Attribute>
</AttributeQueryConfig>
<XACMLAuthzDecisionQueryConfig metaAlias="/pep">
<Attribute name="signingCertAlias">
<Value></Value>
</Attribute>
<Attribute name="encryptionCertAlias">
<Value></Value>
</Attribute>
<Attribute name="basicAuthOn">
<Value>false</Value>
</Attribute>
<Attribute name="basicAuthUser">
<Value></Value>
</Attribute>
<Attribute name="basicAuthPassword">
<Value></Value>
</Attribute>
<Attribute name="wantXACMLAuthzDecisionResponseSigned">
<Value>false</Value>
</Attribute>
<Attribute name="wantAssertionEncrypted">
<Value>false</Value>
</Attribute>
<Attribute name="cotlist">
<Value>Circle of Trust</Value>
</Attribute>
</XACMLAuthzDecisionQueryConfig>
</EntityConfig>
<!--
Set the entityID and edit the SPSSOConfig metaAlias attribute.
Also set the value of appLogoutUrl.
-->
<EntityConfig xmlns="urn:sun:fm:SAML:2.0:entityconfig"
xmlns:fm="urn:sun:fm:SAML:2.0:entityconfig"
hosted="1"
entityID="Two">
<SPSSOConfig metaAlias="/sp2">
<Attribute name="description">
<Value></Value>
</Attribute>
<Attribute name="signingCertAlias">
<Value></Value>
</Attribute>
<Attribute name="encryptionCertAlias">
<Value></Value>
</Attribute>
<Attribute name="basicAuthOn">
<Value>false</Value>
</Attribute>
<Attribute name="basicAuthUser">
<Value></Value>
</Attribute>
<Attribute name="basicAuthPassword">
<Value></Value>
</Attribute>
<Attribute name="autofedEnabled">
<Value>false</Value>
</Attribute>
<Attribute name="autofedAttribute">
<Value></Value>
</Attribute>
<Attribute name="transientUser">
<Value>anonymous</Value>
</Attribute>
<Attribute name="spAdapter">
<Value></Value>
</Attribute>
<Attribute name="spAdapterEnv">
<Value></Value>
</Attribute>
<Attribute name="fedletAdapter">
<Value>com.sun.identity.saml2.plugins.DefaultFedletAdapter</Value>
</Attribute>
<Attribute name="fedletAdapterEnv">
<Value></Value>
</Attribute>
<Attribute name="spAccountMapper">
<Value>com.sun.identity.saml2.plugins.DefaultLibrarySPAccountMapper</Value>
</Attribute>
<Attribute name="useNameIDAsSPUserID">
<Value>false</Value>
</Attribute>
<Attribute name="spAttributeMapper">
<Value>com.sun.identity.saml2.plugins.DefaultSPAttributeMapper</Value>
</Attribute>
<Attribute name="spAuthncontextMapper">
<Value>com.sun.identity.saml2.plugins.DefaultSPAuthnContextMapper</Value>
</Attribute>
<Attribute name="spAuthncontextClassrefMapping">
<Value>
urn:oasis:names:tc:SAML:2.0:ac:classes:PasswordProtectedTransport|0|default
</Value>
</Attribute>
<Attribute name="spAuthncontextComparisonType">
<Value>exact</Value>
</Attribute>
<Attribute name="attributeMap">
<Value>employeenumber=employeenumber</Value>
<Value>mail=mail</Value>
</Attribute>
<Attribute name="saml2AuthModuleName">
<Value></Value>
</Attribute>
<Attribute name="localAuthURL">
<Value></Value>
</Attribute>
<Attribute name="intermediateUrl">
<Value></Value>
</Attribute>
<Attribute name="defaultRelayState">
<Value></Value>
</Attribute>
<Attribute name="appLogoutUrl">
<Value>http://sp.two.example:8080/saml/logout</Value>
</Attribute>
<Attribute name="assertionTimeSkew">
<Value>300</Value>
</Attribute>
<Attribute name="wantAttributeEncrypted">
<Value></Value>
</Attribute>
<Attribute name="wantAssertionEncrypted">
<Value></Value>
</Attribute>
<Attribute name="wantNameIDEncrypted">
<Value></Value>
</Attribute>
<Attribute name="wantPOSTResponseSigned">
<Value></Value>
</Attribute>
<Attribute name="wantArtifactResponseSigned">
<Value></Value>
</Attribute>
<Attribute name="wantLogoutRequestSigned">
<Value></Value>
</Attribute>
<Attribute name="wantLogoutResponseSigned">
<Value></Value>
</Attribute>
<Attribute name="wantMNIRequestSigned">
<Value></Value>
</Attribute>
<Attribute name="wantMNIResponseSigned">
<Value></Value>
</Attribute>
<Attribute name="responseArtifactMessageEncoding">
<Value>URI</Value>
</Attribute>
<Attribute name="cotlist">
<Value>Circle of Trust</Value></Attribute>
<Attribute name="saeAppSecretList">
</Attribute>
<Attribute name="saeSPUrl">
<Value></Value>
</Attribute>
<Attribute name="saeSPLogoutUrl">
</Attribute>
<Attribute name="ECPRequestIDPListFinderImpl">
<Value>com.sun.identity.saml2.plugins.ECPIDPFinder</Value>
</Attribute>
<Attribute name="ECPRequestIDPList">
<Value></Value>
</Attribute>
<Attribute name="ECPRequestIDPListGetComplete">
<Value></Value>
</Attribute>
<Attribute name="enableIDPProxy">
<Value>false</Value>
</Attribute>
<Attribute name="idpProxyList">
<Value></Value>
</Attribute>
<Attribute name="idpProxyCount">
<Value>0</Value>
</Attribute>
<Attribute name="useIntroductionForIDPProxy">
<Value>false</Value>
</Attribute>
<Attribute name="spSessionSyncEnabled">
<Value>false</Value>
</Attribute>
<Attribute name="relayStateUrlList">
</Attribute>
</SPSSOConfig>
<AttributeQueryConfig metaAlias="/attrQuery">
<Attribute name="signingCertAlias">
<Value></Value>
</Attribute>
<Attribute name="encryptionCertAlias">
<Value></Value>
</Attribute>
<Attribute name="wantNameIDEncrypted">
<Value></Value>
</Attribute>
<Attribute name="cotlist">
<Value>Circle of Trust</Value>
</Attribute>
</AttributeQueryConfig>
<XACMLAuthzDecisionQueryConfig metaAlias="/pep">
<Attribute name="signingCertAlias">
<Value></Value>
</Attribute>
<Attribute name="encryptionCertAlias">
<Value></Value>
</Attribute>
<Attribute name="basicAuthOn">
<Value>false</Value>
</Attribute>
<Attribute name="basicAuthUser">
<Value></Value>
</Attribute>
<Attribute name="basicAuthPassword">
<Value></Value>
</Attribute>
<Attribute name="wantXACMLAuthzDecisionResponseSigned">
<Value>false</Value>
</Attribute>
<Attribute name="wantAssertionEncrypted">
<Value>false</Value>
</Attribute>
<Attribute name="cotlist">
<Value>Circle of Trust</Value>
</Attribute>
</XACMLAuthzDecisionQueryConfig>
</EntityConfig>
For each of the service provider extended configuration files,
prepare a copy for use when importing the configuration into OpenAM.
The only change to make in each copy is to set hosted="0",
so that when you import the configuration into OpenAM,
OpenAM considers it that of a remote service provider.
For each new protected application, import a SAML 2.0 entity into OpenAM:
Log in to OpenAM console as global administrator (
amadmin).On the Federation tab > Entity Providers table, click Import Entity.
Import the entity using the metadata from the edited copies of
sp.xmlandsp-extended.xml, where the copy ofsp-extended.xmlhashosted="0".The service provider configurations should have Location
Remotein the Entity Providers table.Log out of OpenAM console.
For each new protected application, prepare a OpenIG configuration. The configurations in this section follow the example in Chapter 7, "OpenIG As a SAML 2.0 Service Provider".
Before editing route configurations for the protected applications,
configure a top-level router that does not rebase the incoming URLs,
such as the following config.json.
This differs from the example used in earlier tutorials:
{
"handler": {
"type": "Router"
},
"heap": [
{
"name": "LogSink",
"type": "ConsoleLogSink",
"config": {
"level": "DEBUG"
}
},
{
    "name": "capture",
    "type": "CaptureDecorator",
    "config": {
        "captureEntity": true,
        "captureContext": true
    }
}
]
}
Also, restart OpenIG to put all configuration changes into effect.
For each application set up a pair of routes, one to handle redirection for SAML authentication and log in to the application, the other to act as the SAML 2.0 assertion consumer that maps attributes from the SAML assertion into the context and redirects back to the first route.
The following examples show the routes for application one.
{
    "handler": {
        "type": "DispatchHandler",
        "config": {
            "bindings": [
                {
                    "condition": "${empty session.sp1Username}",
                    "handler": {
                        "type": "StaticResponseHandler",
                        "config": {
                            "status": 302,
                            "reason": "Found",
                            "headers": {
                                "Location": [
                                    "http://sp.one.example:8080/saml/SPInitiatedSSO?metaAlias=/sp1"
                                ]
                            }
                        }
                    },
                    "baseURI": "http://sp.one.example:8081"
                },
                {
                    "handler": {
                        "type": "Chain",
                        "config": {
                            "filters": [
                                {
                                    "type": "StaticRequestFilter",
                                    "config": {
                                        "method": "POST",
                                        "uri": "http://sp.one.example:8081",
                                        "form": {
                                            "username": [
                                                "${session.sp1Username}"
                                            ],
                                            "password": [
                                                "${session.sp1Password}"
                                            ]
                                        }
                                    }
                                }
                            ],
                            "handler": "ClientHandler"
                        }
                    },
                    "baseURI": "http://sp.one.example:8081"
                }
            ]
        }
    },
    "condition": "${matches(request.uri.host, 'sp.one.example')}"
}
{
    "handler": {
        "type": "SamlFederationHandler",
        "config": {
            "comment": "Use unique session properties for this SP.",
            "assertionMapping": {
                "sp1Username": "mail",
                "sp1Password": "employeenumber"
            },
            "authnContext": "sp1AuthnContext",
            "sessionIndexMapping": "sp1SessionIndex",
            "subjectMapping": "sp1SubjectName",
            "redirectURI": "/sp1"
        }
    },
    "condition": "${matches(request.uri.host, 'sp.one.example')
                    and matches(request.uri.path, '^/saml')}"
}
The following examples show the routes for application two.
{
    "handler": {
        "type": "DispatchHandler",
        "config": {
            "bindings": [
                {
                    "condition": "${empty session.sp2Username}",
                    "handler": {
                        "type": "StaticResponseHandler",
                        "config": {
                            "status": 302,
                            "reason": "Found",
                            "headers": {
                                "Location": [
                                    "http://sp.two.example:8080/saml/SPInitiatedSSO?metaAlias=/sp2"
                                ]
                            }
                        }
                    },
                    "baseURI": "http://sp.two.example:8081"
                },
                {
                    "handler": {
                        "type": "Chain",
                        "config": {
                            "filters": [
                                {
                                    "type": "StaticRequestFilter",
                                    "config": {
                                        "method": "POST",
                                        "uri": "http://sp.two.example:8081",
                                        "form": {
                                            "username": [
                                                "${session.sp2Username}"
                                            ],
                                            "password": [
                                                "${session.sp2Password}"
                                            ]
                                        }
                                    }
                                }
                            ],
                            "handler": "ClientHandler"
                        }
                    },
                    "baseURI": "http://sp.two.example:8081"
                }
            ]
        }
    },
    "condition": "${matches(request.uri.host, 'sp.two.example')}"
}
{
    "handler": {
        "type": "SamlFederationHandler",
        "config": {
            "comment": "Use unique session properties for this SP.",
            "assertionMapping": {
                "sp2Username": "mail",
                "sp2Password": "employeenumber"
            },
            "authnContext": "sp2AuthnContext",
            "sessionIndexMapping": "sp2SessionIndex",
            "subjectMapping": "sp2SubjectName",
            "redirectURI": "/sp2"
        }
    },
    "condition": "${matches(request.uri.host, 'sp.two.example')
                    and matches(request.uri.path, '^/saml')}"
}
Try the configuration for multiple protected applications,
logging in to OpenAM as for the single SP federation example
with username george, password costanza.
If you use the example configurations described here with all services running on your computer protecting the sample application, then you can try the SAML 2.0 web single sign-on profile with application one by using either of the following links:
The link for SP-initiated SSO.
The link for IDP-initiated SSO.
Similarly you can try the SAML 2.0 web single sign-on profile with application two by using either of the following links:
The link for SP-initiated SSO.
The link for IDP-initiated SSO.
If you have not configured the examples exactly as shown in this guide, then adapt the SSO links accordingly.
C
- Configuration
- Federation, Configuration File Overview, Configuring the Federation Handler
- HTTP and HTTPS, HTTP and HTTPS Application
- Log in with cookie, Login Form With Cookie From Login Page
- Log in with filter, Login Form With Password Replay and Cookie Filters
- Log in with hidden value, Login Which Requires a Hidden Value From the Login Page
- Microsoft Online Outlook Web Access, Microsoft Online Outlook Web Access
- OAuth 2.0, OpenIG As an OAuth 2.0 Resource Server, OpenIG As an OAuth 2.0 Client or OpenID Connect Relying Party
- OpenID Connect 1.0, OpenIG As an OAuth 2.0 Client or OpenID Connect Relying Party
- Policy enforcement point, OpenIG As an OpenAM Policy Enforcement Point
- Proxy and capture, Proxy and Capture
- Run time changes, Configuring Routes
- SAML 2.0, OpenIG As a SAML 2.0 Service Provider, SAML 2.0 and Multiple Applications
- Simple login form, Simple Login Form
- UMA, OpenIG As an UMA Resource Server
- Containers
- CORS
- Example filter, Setting Up OpenIG As an UMA Resource Server
- Customizations
- Extension points, Key Extension Points
- Filters, Implementing a Filter
- Handlers, Implementing a Handler
- Heap objects, Heap Object Configuration
I
- Installation, Installation in Detail
- Federation, Installation Overview
M
- Monitoring, Monitoring a Route
O
- OAuth 2.0
- Client, OpenIG As an OAuth 2.0 Client or OpenID Connect Relying Party
- Resource server, OpenIG As an OAuth 2.0 Resource Server
- OpenID Connect 1.0
R
- Routing, Configuring Routes
T
- Throttling, Limiting Access With a Throttling Filter
- Troubleshooting, Troubleshooting
- Tutorials
- Capture and relay passwords, Getting Login Credentials From OpenAM
- Credentials from a file, Getting Login Credentials From Data Sources
- Credentials from a relational database, Getting Login Credentials From Data Sources
- Getting started, Getting Started
- Monitoring, Monitoring a Route
- OAuth 2.0, OpenIG As an OAuth 2.0 Resource Server, OpenIG As an OAuth 2.0 Client or OpenID Connect Relying Party
- OpenID Connect 1.0, OpenIG As an OAuth 2.0 Client or OpenID Connect Relying Party
- Policy enforcement, OpenIG As an OpenAM Policy Enforcement Point
- SAML 2.0, OpenIG As a SAML 2.0 Service Provider
- Throttling, Limiting Access With a Throttling Filter
- UMA, OpenIG As an UMA Resource Server