Upgrading Autonomous Identity
Autonomous Identity provides an upgrade command to update your core software to the latest version while migrating your data.
The upgrade assumes the following:
-
Database Systems are the Same. If your current database is Apache Cassandra, you cannot upgrade to a MongoDB-based system. You will need to run a clean installation with the new version.
-
Host IPs should be the Same. Host IP addresses must be the same for existing components. You must update the
~/autoid-config/hostsfile by adding the IP addresses for the Elasticsearch entries. See the instructions below. -
Registry Key Required. To download the deployment images for the upgrade, you still need a registry key to log into the ForgeRock Google Cloud Registry (gcr.io). The registry key is only available to ForgeRock Autonomous Identity customers. For specific instructions on obtaining the registry key, see How To Configure Service Credentials (Push Auth, Docker) in Backstage.
Upgrade to Autonomous Identity 2021.3.1
The following instruction is for upgrade from Autonomous Identity 2021.3.0 to version 2021.3.0.
Upgrade to version 2021.3.0:
-
On the deployer machine, back up the 2021.3.0
~/autoid-configdirectory or move it to another location.$ mv ~/autoid-config ~/backup-2021.3
-
Create a new
~/autoid-configdirectory.$ mkdir ~/autoid-config
-
Copy your
autoid_registry_key.jsonfrom your backup directory to~/autoid-config. -
Remove your
known_files.$ rm ~/.ssh/known_hosts
-
Copy your original SSH key into the new directory.
$ cp ~/.ssh/id_rsa ~/autoid-config
-
Change the permission on the SSH key.
$ chmod 400 ~/autoid-config/id_rsa
-
Check if you can successfully SSH to the target server.
$ ssh -i ~/autoid-config/id_rsa autoid@<Target-IP-Address>

Last login: Tue May 23 18:19:14 2021
-
Stop the stack.
$ docker stack rm configuration-service consul-server consul-client nginx jas openldap selfservice swagger-ui ui api
You should see:
Removing service configuration-service_configuration-service
Removing service consul-server_consul-server
Removing service consul-client_consul-client
Removing service nginx_nginx
Removing service jas_jasnode
Removing service openldap_openldap
Removing service openldap_phpldapadmin
Removing service selfservice_selfservice
Removing service swagger-ui_swagger-ui
Removing service ui_zoran-ui
Removing service api_zoran-api
-
Remove the contents of the consul data for Docker Manager and Swarm:
$ sudo rm -r /opt/autoid/mounts/consul-data/*
-
Remove the analytics container of the analytics node:
$ docker rm -f analytics
-
Enter
exitto end your SSH session. -
Repeat the restart Docker command:
$ sudo systemctl restart docker
-
On the deployer node, change to the
~/autoid-configdirectory.$ cd ~/autoid-config
-
Log in to the ForgeRock Google Cloud Registry (gcr.io) using the registry key. The registry key is only available to ForgeRock Autonomous Identity customers. For specific instructions on obtaining the registry key, see How To Configure Service Credentials (Push Auth, Docker) in Backstage.
$ docker login -u _json_key -p "$(cat autoid_registry_key.json)" https://gcr.io/forgerock-autoid
You should see:
Login Succeeded
-
Run the
create-templatecommand to generate thedeployer.shscript wrapper and configuration files. Note that the command sets the configuration directory on the target node to/config. The--userparameter eliminates the need to usesudowhile editing the hosts file and other configuration files.$ docker run --user=$(id -u) -v ~/autoid-config:/config -it gcr.io/forgerock-autoid/deployer:2021.3.0 create-template … d6c7c6f3303e: Pull complete Digest: sha256:15225be65417f8bfb111adea37c83eb5e0d87140ed498bfb624a358f43fbbf Status: Downloaded newer image for gcr.io/forgerock-autoid/autoid/dev-compact/deployer@sha256:15225be65417f8bfb111a dea37c83eb5e0d87140ed498bfb624a358f43fbbf Config template is copied to host machine directory mapped to /config
-
Configure your upgraded system by editing the
~/autoid-config/vars.yml,~/autoid-config/hosts, and~/autoid-config/vault.ymlfiles on the deployer machine.The key here is to keep your configuration settings consistent from one system to another.
-
Download the images. This step downloads software dependencies needed for the deployment and places them in the
autoid-packagesdirectory. Make sure you are in the~/autoid-configdirectory.$ ./deployer.sh download-images
You should see:
PLAY RECAP
*localhost : ok=19 changed=17 unreachable=0 failed=0 skipped=0 rescued=0 ignored=0 -
SSH to the target node.
-
Stop the Spark master and workers.
$ /opt/autoid/spark/spark-2.4.4-bin-hadoop2.7/sbin/stop-all.sh
You should see:
localhost: stopping org.apache.spark.deploy.worker.Worker
stopping org.apache.spark.deploy.master.Master
-
Exit your SSH session.
-
Run the upgrade.
$ ./deployer.sh upgrade
You should see:
PLAY RECAP
*<Target-IP-Addr> : ok=407 changed=177 unreachable=0 failed=0 skipped=134 rescued=0 ignored=0 localhost : ok=65 changed=22 unreachable=0 failed=0 skipped=7 rescued=0 ignored=0 -
Add a reference to Autonomous Identity JAS to your
/etc/hostsor DNS server.<Public IP Address> autoid-ui.forgerock.com autoid-selfservice.forgerock.com autoid-jas.forgerock.com
-
At this point, you must import the entity definitions for assignments into Autonomous Identity, which will require several steps. You can use Postman or curl to access and post the definitions. For example, use Postman in the following steps:
-
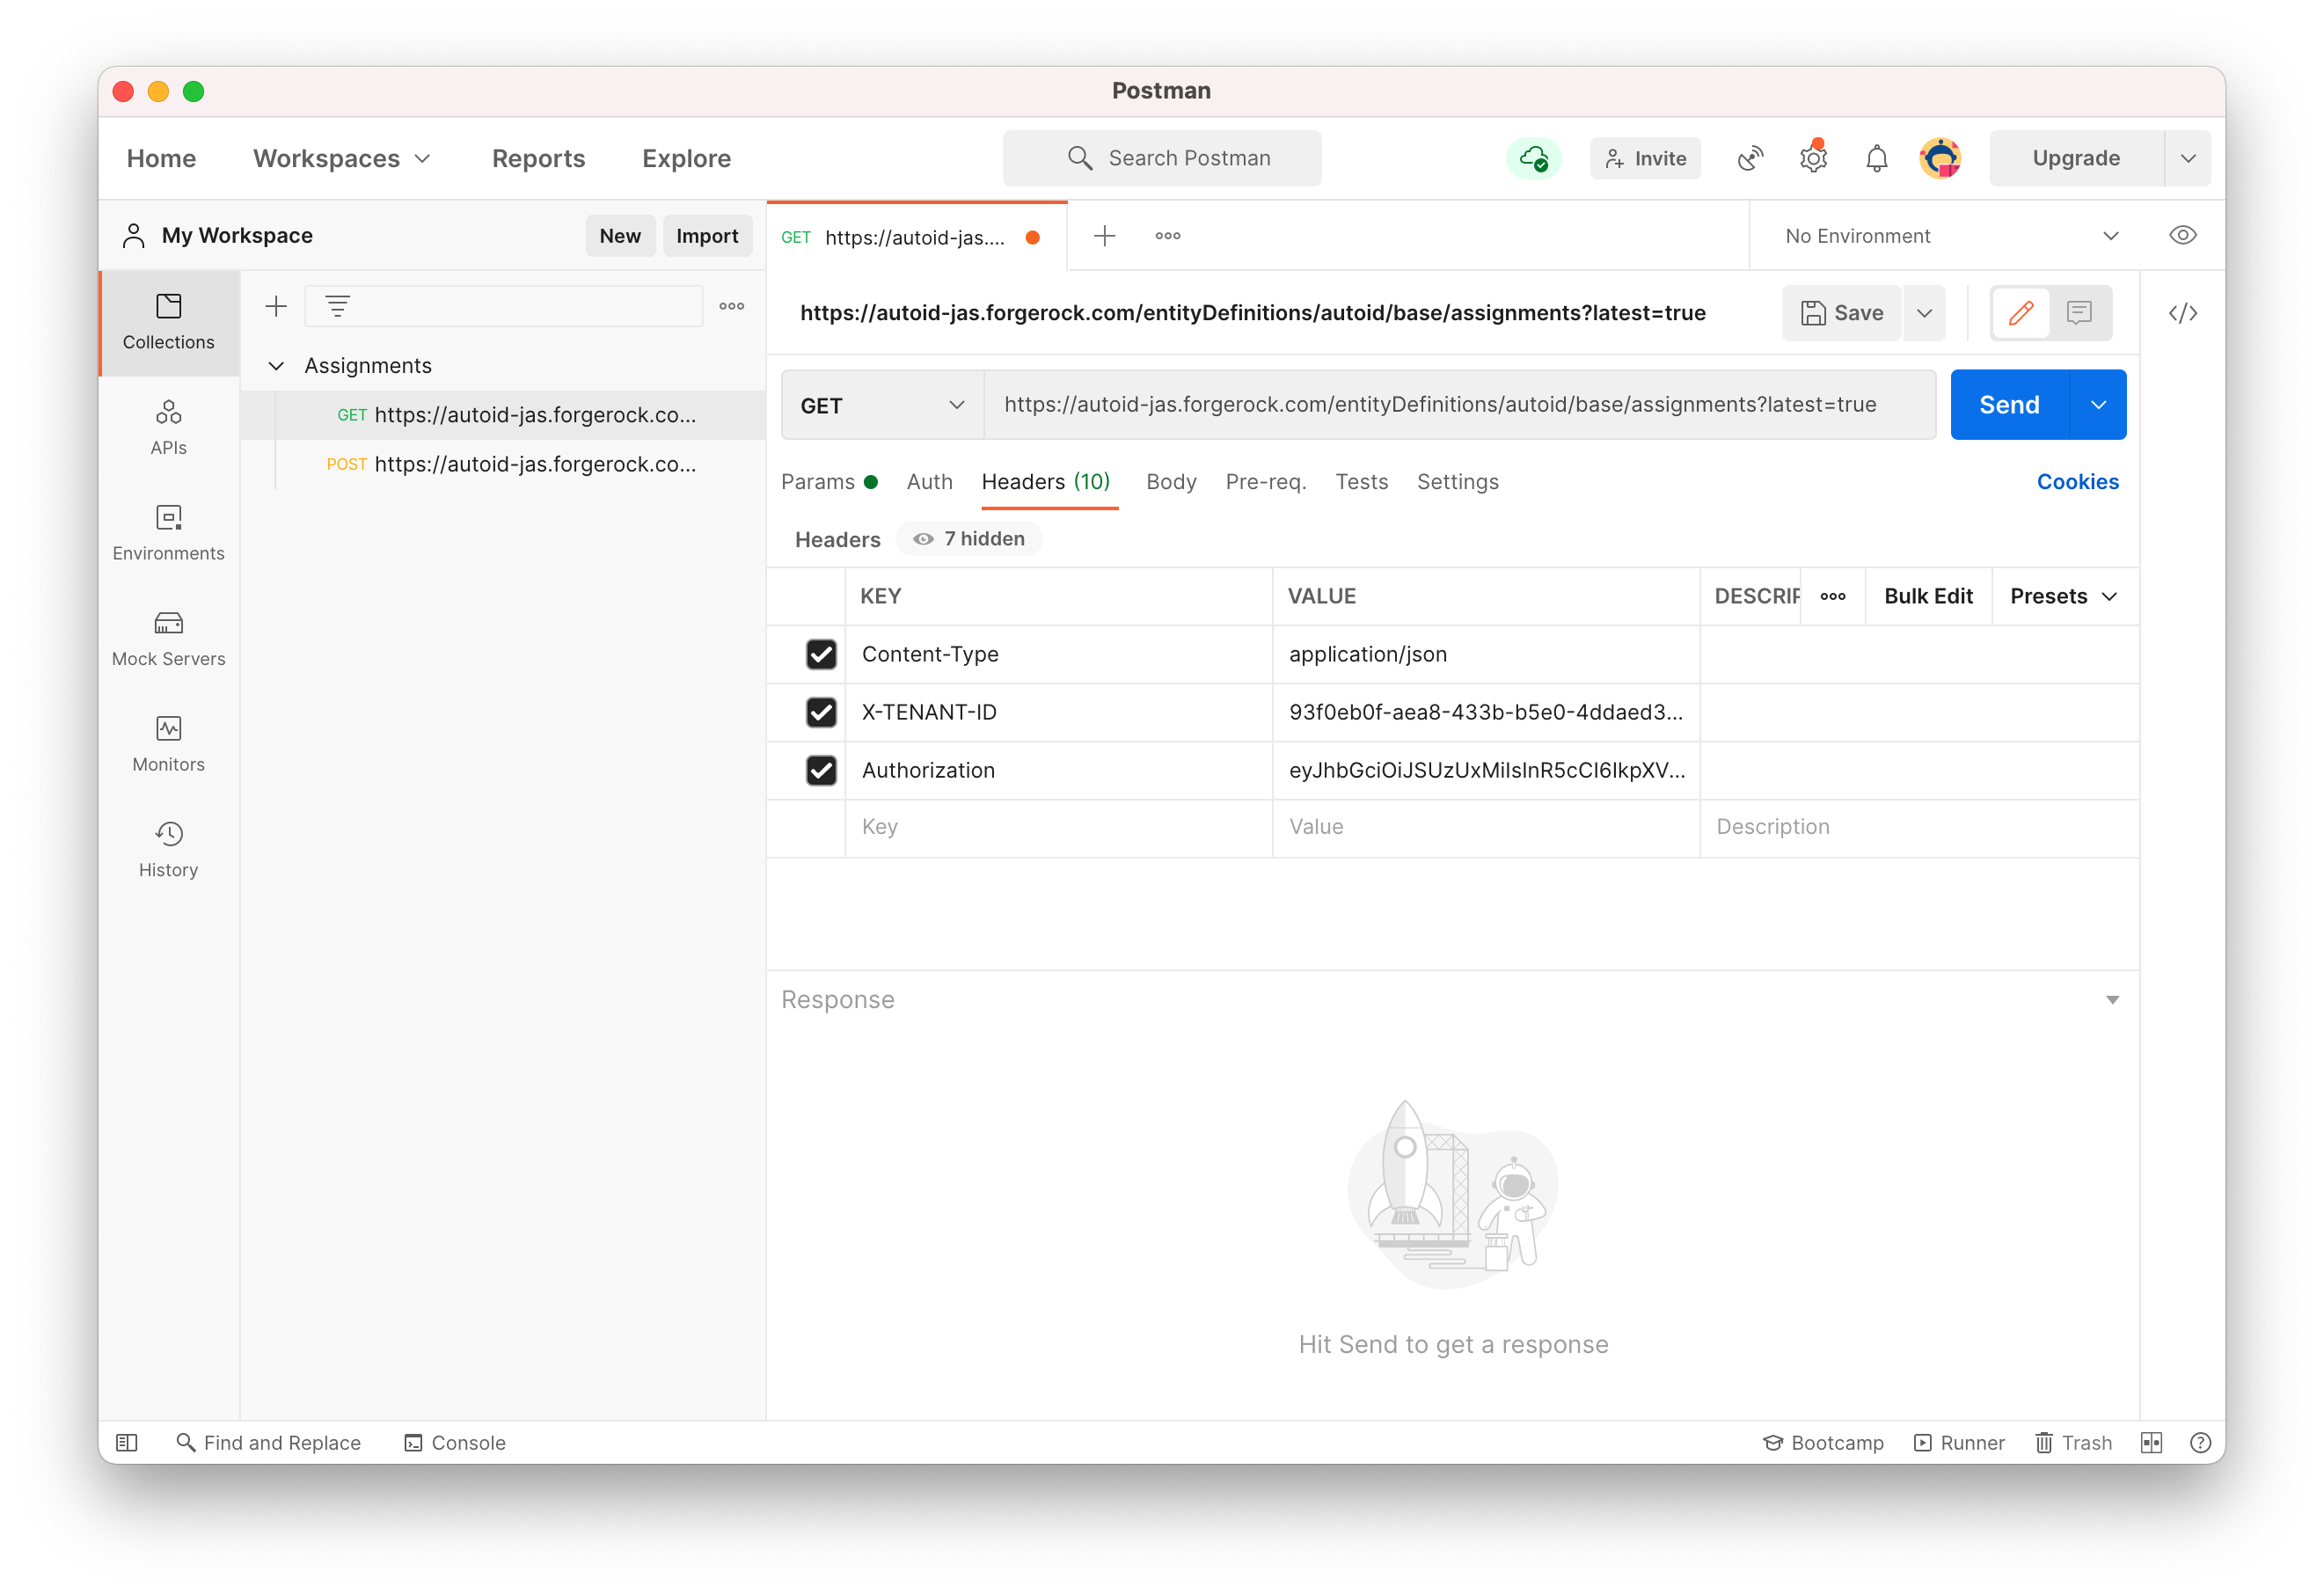
Open Postman, enter a request to get the latest index value:
https://autoid-jas.forgerock.com/entityDefinitions/autoid/base/assignments?latest=true. Enter the following headers:Content-type application/json X-TENANT-ID <tenant ID> Authorization <Bearer>
To get the Tenant ID and Authorization token:
-
Open the Autonomous Identity UI and log in as an administrator.
-
On the Autonomous Identity Dashboard, right-click the browser page and open the DevTools by clicking
Inspect. -
Click the Network tab and reload the page.
-
Click
tenants, and thenResponse. You will see the tenant ID. -
Click
6, and then clickHeaders. Scroll down to get the Authorization Bearer token.See it in action.
If you get a 502 Bad Gateway nginx error:
-
SSH to the target server.
-
Restart nginx:
$ docker service scale nginx_nginx=0
$ docker service scale nginx_nginx=1
-
-
-
On Postman, enter the Tenant ID and Authorization Bearer token, and then click Send to get the assignments entity definition in the response.
See an image.
-
Next, on Postman, enter another request to POST the assignments entity definition to Autonomous Identity. Use the following URL:
https://autoid-jas.forgerock.com/entityDefinitions/autoid/base/3. Use the same headers as the previous GET example. In the Body, paste in the Assignments entity definition, and then click Send.See an image.

-
-
Go back to the Autonomous Identity UI, click Administration > Entity Definitions. You should see the
Assignmentsentity definitions. -
Redo the attribute mappings. See Set Attribute Mappings.
-
Then, rerun the analytics pipeline.
$ analytics ingest
$ analytics train
$ analytics predict-as-is
$ analytics predict-recommendation
$ analytics publish
$ analytics create-assignment-index
You have successfully upgraded your Autonomous Identity server to 2021.3.0.
Upgrade to Autonomous Identity 2021.3.0
The following instruction is for upgrade from Autonomous Identity 2021.10.x to version 2021.3.0.
Upgrade to version 2021.3.0:
-
On the deployer machine, back up the 2020.10.x
~/autoid-configdirectory or move it to another location.$ mv ~/autoid-config ~/backup-2020.10
-
Create a new
~/autoid-configdirectory.$ mkdir ~/autoid-config
-
Remove your
known_files.$ rm ~/.ssh/known_hosts
-
Copy your original SSH key into the new directory.
$ cp ~/.ssh/id_rsa ~/autoid-config
-
Change the permission on the SSH key.
$ chmod 400 ~/autoid-config/id_rsa
-
Check if you can successfully SSH to the target server.
$ ssh -i ~/autoid-config/id_rsa autoid@<Target-IP-Address>

Last login: Tue Mar 23 18:19:14 2020
-
Stop the stack.
$ docker stack rm configuration-service consul-server consul-client nginx openldap selfservice swagger-ui ui api
You should see:
Removing service configuration-service_configuration-service
Removing service consul-server_consul-server
Removing service nginx_nginx
Removing service openldap_openldap
Removing service openldap_phpldapadmin
Removing service selfservice_selfservice
Removing service swagger-ui_swagger-ui
Removing service ui_zoran-ui
Removing service ui_zoran-api
Removing service consul-client_consul-client
-
Remove the contents of the consul data:
$ sudo rm -r /opt/autoid/mounts/consul-data/*
-
Enter
exitto end your SSH session. -
From the deployer, restart Docker:
$ sudo systemctl restart docker
-
On the deployer node, change to the
~/autoid-configdirectory.$ cd ~/autoid-config
-
Log in to the ForgeRock Google Cloud Registry (gcr.io) using the registry key. The registry key is only available to ForgeRock Autonomous Identity customers. For specific instructions on obtaining the registry key, see How To Configure Service Credentials (Push Auth, Docker) in Backstage.
$ docker login -u _json_key -p "$(cat autoid_registry_key.json)" https://gcr.io/forgerock-autoid
You should see:
Login Succeeded
-
Run the
create-templatecommand to generate thedeployer.shscript wrapper and configuration files. Note that the command sets the configuration directory on the target node to/config. The--userparameter eliminates the need to usesudowhile editing the hosts file and other configuration files.$ docker run --user=$(id -u) -v ~/autoid-config:/config -it gcr.io/forgerock-autoid/deployer:2021.3.0 create-template … d6c7c6f3303e: Pull complete Digest: sha256:15225be65417f8bfb111adea37c83eb5e0d87140ed498bfb624a358f43fbbf Status: Downloaded newer image for gcr.io/forgerock-autoid/autoid/dev-compact/deployer@sha256:15225be65417f8bfb111a dea37c83eb5e0d87140ed498bfb624a358f43fbbf Config template is copied to host machine directory mapped to /config
-
Configure your upgraded system by editing the
~/autoid-config/vars.yml,~/autoid-config/hosts, and~/autoid-config/vault.ymlfiles on the deployer machine.The key here is to keep your configuration settings consistent from one system to another. For example, if your hosts file from your 2020.10.x system is as follows:
See an example hosts file from a 2020.10.x Deployment
[docker-managers]
34.70.190.144

[docker-workers]
34.70.190.144

[docker:children]
docker-managers
docker-workers

[cassandra-seeds]
34.70.190.144

[cassandra-workers]
34.70.190.144

[spark-master]
34.70.190.144

[spark-workers]
34.70.190.144

[analytics]
34.70.190.144

[mongo_master]
#ip#  mongodb_master=True

[mongo_replicas]
#ip-1#
##ip-2#
##...

[mongo:children]
mongo_replicas
mongo_master

# ELastic Nodes
[odfe-master-node]
34.70.190.144

[odfe-data-nodes]
34.70.190.144

[kibana-node]
34.70.190.144
An example 2021.3.0 hosts file would be as follows (single-node example):
See an example hosts file from a 2021.3.0 Deployment
[docker-managers]
34.70.190.144

[docker-workers]
34.70.190.144

[docker:children]
docker-managers
docker-workers

[cassandra-seeds]
34.70.190.144

[cassandra-workers]
34.70.190.144

[spark-master]
34.70.190.144

[spark-workers]
34.70.190.144

[mongo_master]
#ip#  mongodb_master=True

[mongo_replicas]
#ip-1#
##ip-2#
##...

[mongo:children]
mongo_replicas
mongo_master

# ELastic Nodes
[odfe-master-node]
34.70.190.144

[odfe-data-nodes]
34.70.190.144

[kibana-node]
34.70.190.144

[noteboook]
#ip#
-
Download the images. This step downloads software dependencies needed for the deployment and places them in the
autoid-packagesdirectory. Make sure you are in the~/autoid-configdirectory.$ ./deployer.sh download-images
You should see:
PLAY RECAP *
localhost          : ok=24   changed=17   unreachable=0    failed=0    skipped=0    rescued=0    ignored=0
-
SSH to the target node.
-
Stop Apache Spark so that the deployer can upgrade the version to 3.0.1.
-
Stop the Spark master and workers.
$ /opt/autoid/spark/spark-2.4.4-bin-hadoop2.7/sbin/stop-all.sh
You should see:
localhost: stopping org.apache.spark.deploy.worker.Worker
stopping org.apache.spark.deploy.master.Master
-
-
Exit your SSH session.
-
On the deployer node, run the upgrade.
$ ./deployer.sh upgrade
You should see:
PLAY RECAP **
<Target-IP-Addr>   : ok=313  changed=153  unreachable=0    failed=0    skipped=15   rescued=0    ignored=0
localhost          : ok=11   changed=5    unreachable=0    failed=0    skipped=6    rescued=0    ignored=0
-
On the target node, take a backup of the
/data/confdirectory. This directory holds the configuration files used in 2020.10.x.$ cp -r /data/conf <backup_directory>
-
Change to the upgrade directory:
$ cd /opt/autoid/apache-livy/analytics-artifacts/upgrade
-
Edit the
upgrade.ymlfile. Assuming a Cassandra database (MongoDB will have analogous properties), add the following values in thecassandrasection:-
Add the IP addresses of the Cassandra machines where the 2020.10.x data is stored next to the
hostspropert. -
Add the password for the Cassandra account.
-
Add the keystore password for
spark.cassandra.connection.ssl.keyStore.password. -
And the truststore passwords for
spark.cassandra.connection.ssl.trustStore.password.upgrade: old_base: 'autoid_base' old_analytics: 'autoid_analytics' old_ui: 'autoid' steps: ['base', 'analytics', 'ui'] ui_steps: ['ui_tables', 'ui_tables_with_batch_history', 'ui_tables_with_date_history', 'ui_tables_with_history_only'] tracker_file: /tmp/upgrade_tracker_file.yaml batch_restart: False spark: logging_level: FATAL config: spark.scheduler.mode: FAIR spark.executor.memory: 10G spark.driver.memory: 20G spark.driver.maxResultSize: 5G cassandra: hosts: [] port: 9042 username: zoran_dba password: ssl: enabled: true python: keyfile: /opt/autoid/certs/zoran-cassandra-client-key.pem certfile: /opt/autoid/certs/zoran-cassandra-client-cer.pem spark: spark.cassandra.connection.ssl.enabled: true spark.cassandra.connection.ssl.clientAuth.enabled: true spark.cassandra.connection.ssl.keyStore.password: spark.cassandra.connection.ssl.trustStore.password: spark.cassandra.connection.ssl.keyStore.path: /opt/autoid/certs/zoran-cassandra-client-keystore.jks spark.cassandra.connection.ssl.trustStore.path: /opt/autoid/certs/zoran-cassandra-server-truststore.jks eps: tenant: autonomous-iam batch_size: 10000
-
-
Change to the analytics directory.
$ cd /opt/autoid/apache-livy/analytics
-
Upgrade the analytics:
$ analytics upgrade
-
Open the 2020.10.1
/data/conf/analytics_init_config.ymlfile. You will need to get some properties from that file later. -
Log in to the 2021.3.0 Autonomous Identity as an Admin account. Navigate to
Administration>Entity Definitions. -
Open the Identities definition, this page contains the definition for the User attribute entity used by Autonomous Identity.
-
Open the 2020.10.1
/data/conf/analytics_init_config.ymlfile and take the list of properties stored asui_config>user_column_descriptions. -
On the 2021.3.0 UI, click the Add attribute button, and the add each attribute to the list. Note: You will see that
usr_id(replacesusr_key),usr_name, andusr_manager(replacesusr_manager_key) are already present. -
The Add attribute requires five pieces of information that you must add. You will add attributes listed under
ui_config>user_column_descriptions:-
Attribute Name. This field corresponds to the value before the colon in your
user_column_descriptionslist. For example, if you have'JOBCODE_NAME':'Job Code Name', use'JOBCODE_NAME'. -
Display Name. This field corresponds to the value after the colon in your
user_column_descriptions. For example, if you have'JOBCODE_NAME':'Job Code Name', use'JOBCODE_NAME'. -
Dropdown. The dropdown shows the data type. Note that only attributes marked as 'Text' can be used in machine learning.
-
Use in machine learning. This indicates whether this attribute should be used in training. If the attribute you are adding appears in
assoc_rules>features_filterfrom the/data/conf/analytics_init_config.ymlfile, then click this box. -
Searchable. This indicates whether this attribute can be used as a filter in the UI. if the attribute appears in
ui_config>usr_filtering_columns, then click this box. -
Once you have added all the attributes, click Save at the top of the
Identitiestable.
-
-
Repeat steps 27-28 for the Applications entities. In this case, you will add the attributes listed under
ui_config>app_filter_columns:-
Attribute Name. This field corresponds to the value before the colon in your
app_filter_columnslist. For example, if you have'APP_CRITICALITY':'Application Criticality', use'APP_CRITICALITY'. -
Display Name. This field corresponds to the value after the colon in your
app_filter_columns. For example, if you have'APP_CRITICALITY':'Application Criticality', use'APP_CRITICALITY'. -
Dropdown. The dropdown shows the data type.
-
Searchable. This indicates whether you want the attribute to be filterable in the UI.
-
-
Repeat steps 27-28 for the Entitlements entities. In this case, you will add the attributes listed under
ui_config>ent_filter_columns:-
Attribute Name. This field corresponds to the value before the colon in your
ent_filter_columnslist. For example, if you have'ENT_RISK_LEVEL':'Entitlement Risk', use'ENT_RISK_LEVEL'. -
Display Name. This field corresponds to the value after the colon in your
ent_filter_columns. For example, if you have'ENT_RISK_LEVEL':'Entitlement Risk', use'ENT_RISK_LEVEL'. -
Dropdown. The dropdown shows the data type.
-
Searchable. This indicates whether you want the attribute to be filterable in the UI.
-
-
Navigate to
Administration>Analytics Settings. Compare the values in the 2020.10.1analytics_config.ymland modify if required. Make sure to save your settings. The mappings are shown below:
2020.10.1 analytics_config.yml |
2021.3 UI Administration > Analytics Settings |
etl > med_conf |
Confidence Score Thresholds > Medium |
etl > high_conf |
Confidence Score Thresholds > High |
prediction > recommend |
Recommendation Threshold > Threshold |
-
Run
create-assignment-indexto generate a new index using the migrated data:$ analytics create-assignment-index
You have successfully upgraded your Autonomous Identity server to 2021.3.0.