About Upgrades
DS 7 is a major, cloud-friendly release that is different in significant ways from earlier releases.
To upgrade successfully, make sure you understand the key differences beforehand. With these in mind, plan the upgrade, how you will test the upgraded version, and how you will recover if the upgrade process does not go as expected:
- Fully Compatible Replication
Some things never change. The replication protocol remains fully compatible with earlier versions back to OpenDJ 3.
This means you can still upgrade servers while the directory service is online, but the process has changed.
In 6.5 and earlier, you set up DS servers that did not yet replicate. Then, when enough of them were online, you configured replication.
In 7, you configure replication at setup time before you start the server. For servers that will have a changelog, you use the setup --replicationPort option for the replication server port. For all servers, you use the setup --bootstrapReplicationServer option to specify the replication servers that the server will contact when it starts up.
The bootstrap replication servers maintain information about the servers in the deployment. The servers learn about the other servers in the deployment by reading the information that the bootstrap replication server maintains. Replicas initiate replication when they contact the first bootstrap replication server.
As a directory administrator, you no longer have to configure and initiate replication for a pure DS 7 deployment. DS 7 servers can start in any order as long as they initiate replication before taking updates from client applications.
Furthermore, you no longer have to actively purge replicas you removed from other servers' configurations. The other servers "forget" a replica that disappears for longer than the replication purge delay, meaning they eventually purge its state from memory and from their changelogs. (DS servers do not "forget" bootstrap replication servers, because each server's configuration explicitly references its bootstrap replication servers.) With earlier DS versions, you had to purge replicas from other servers' configurations after they were removed. DS servers do this automatically now. No administrative action is required.
These new capabilities bring you more deployment flexibility than ever before. As a trade off, you must now think about configuring replication at setup time, and you must migrate scripts and procedures that used older commands to the new dsrepl command.
- Unique String-Based Server IDs
By default, DS 7 servers use unique string-based server IDs.
In prior releases, servers had multiple numeric server IDs. Before you add a new DS 7 server to a deployment of older servers, you must assign it a "numeric" server ID.
- Secure by Default
The setup --production-mode option is gone. All setup options and profiles are secure by default.
DS 7 servers require:
Secure connections.
Authentication for nearly all operations, denying most anonymous access by default.
Additional access policies when you choose to grant access beyond what setup profiles define.
Stronger passwords.
New passwords must not match known compromised passwords from the default password dictionary. Also in 7, only secure password storage schemes are enabled by default, and reversible password storage schemes are deprecated.
Permission to read log files.
Furthermore, DS 7 encrypts backup data by default. As a result of these changes, all deployments now require cryptographic keys.
- Deployment Key Required
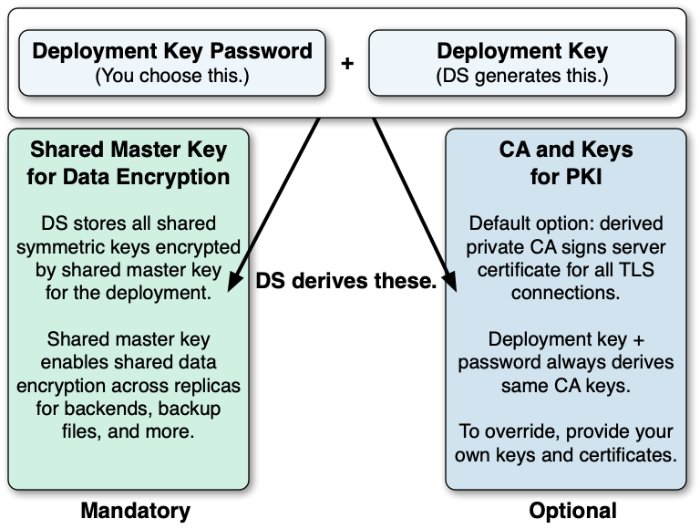
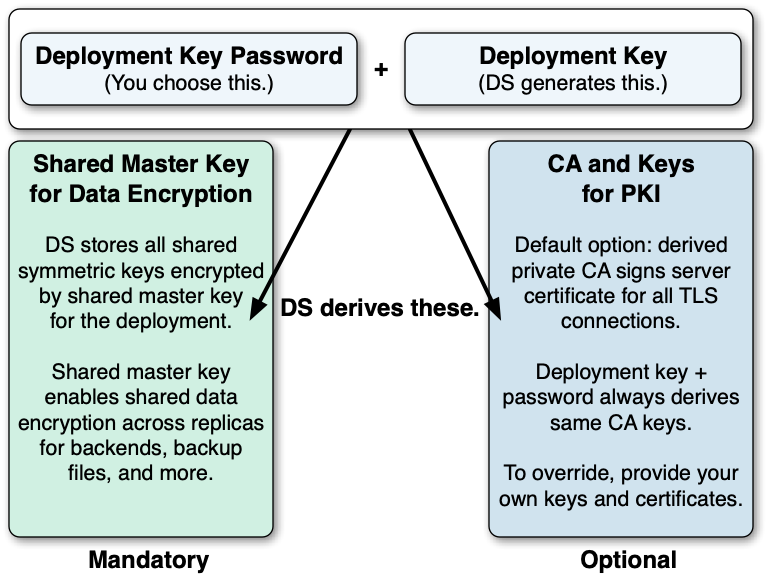
DS 7 deployments require cryptographic keys. Secure connections require asymmetric keys (public key certificates and associated private keys). Encryption requires symmetric (secret) keys that each replica shares.
To simplify key management and distribution, and especially to simplify disaster recovery, DS 7 uses a shared master key to protect secret keys. DS 7 stores the encrypted secret keys with the replicated and backed up data. This is new in DS 7, and replaces
cn=admin dataand the keys for that backend.A deployment key is a random string generated by DS software. A deployment key password is a secret string at least 8 characters long that you choose. The two are a pair. You must have a deployment key’s password to use the key.
You generate a shared master key, and optionally, asymmetric key pairs, with the dskeymgr command using your deployment key and password. Even if you provide your own asymmetric keys for securing connections, you must use the deployment key and password to generate the shared master key.
When you upgrade, or add a DS 7 server to a deployment of pre-7 servers, you must intervene to move from the old model to the new, and unlock all the capabilities of DS 7.
- New Backup
As before, backups are not guaranteed to be compatible across major and minor server releases. If you must roll back from an unsuccessful upgrade, roll back the data as well as the software.
When you back up DS 7 data, the backup format is different. The new format always encrypts backup data. The new format lets you back up and restore data directly in cloud storage if you choose.
Backup operations are now incremental by design. The initial backup operation copies all the data, incrementing from nothing to the current state. All subsequent operations back up data that has changed.
Restoring a backup no longer involves restoring files from the full backup archive, and then restoring files from each incremental backup archive. You restore any backup as a single operation.
The previous backup and restore tools are gone. In their place is a single dsbackup command for managing backup and restore operations, for verifying backup archives, and for purging outdated backup files.
For additional details, see the rest of the DS 7 documentation.
Important
To the extent possible, separate the upgrade process from the process of adopting new features. The DS upgrade command encourages this by maintaining compatibility where possible.
Once you have validated that the upgrade has completed successfully, take advantage of the new features available. Be sure to review the suggestions in After You Upgrade.
Supported Upgrades
| From... | To... | Important Notes |
|---|---|---|
| Official ForgeRock release, version 3.0 or later | Official ForgeRock release, same edition of directory server or replication server | Supported. |
| Official ForgeRock release, OEM edition, version 3.0 or later | Official ForgeRock release, directory server or replication server | Supported. The OEM edition did not include Berkeley DB Java Edition, and did not support JE backends. Instead, the OEM edition uses PDB backends for local data. This release removes support for PDB backend databases. The upgrade process only converts PDB backend configuration entries to JE backend configuration entries. It renames the PDB backend database directories, appending a For instructions on exporting and importing LDIF, see "Import and Export". After upgrading, configure backup tasks for the new JE backend databases as you had done previously for PDB backend databases. |
| Official ForgeRock release, version 2.6 | Official ForgeRock release, directory server or replication server | Not supported. Workaround: First, upgrade all servers in the deployment to 6.5 before upgrading further. For details on upgrading to 6.5, see the DS 6.5 Installation Guide. |
| Official ForgeRock release, version 2.4 or 2.5 | Official ForgeRock release, directory server or replication server | Not supported. Workaround: Upgrade all servers in the deployment to use at least 2.6.0 before upgrading further. For details on upgrading to that version, see Upgrading to OpenDJ 2.6.0. |
| Evaluation release, version 5.0 or later | Official ForgeRock release | Not supported. The evaluation version includes an additional server plugin and configuration. Official releases do not have an upgrade task to remove the plugin and its configuration. |
| Unofficial build, version 2.6.0 or later | Official ForgeRock release | Not supported. |
Upgrade Strategies
When you upgrade to a new DS version, you choose between an in-place upgrade, unpacking the new software over old, then running the upgrade command, or upgrade by adding new servers and retiring old ones.
DS software provides an upgrade command to simplify the process of upgrading a server in place.
Important
For some scenarios, like upgrading Docker images in a Kubernetes deployment, in-place upgrade is the only kind that works.
Upgrade in Place
The most straightforward option when upgrading DS servers is to upgrade in place. One by one, you stop, upgrade, and restart each server individually, leaving the service running during upgrade:
| Advantages | Disadvantages |
|---|---|
| No additional systems to manage. | During upgrade, the host system must meet the requirements for both the older version and the new release. For example, you might need to have more than one Java environment installed. The operating system must also be supported for both releases. |
| Simpler to understand. | Slower to roll back. Rollback involves restoring each server to its pre-upgrade state. Once a replica's databases have been upgraded, they cannot be rolled back. |
| Easier to maintain compatibility. To the extent possible, the upgrade command leaves the configuration as is. | You must manually enable new features after upgrade. |
On Upgrading Replicas
Important
The directory server upgrade process is designed to support a rolling (sequential) upgrade of replicated servers.
Do not upgrade all replicated servers at once in parallel, as this removes all replication changelog data simultaneously, breaking replication.
Follow these steps for each replica:
Direct client application traffic away from the server to upgrade.
Upgrade the server.
Direct client application traffic back to the upgraded server.
Add New Servers
Adding new servers and then retiring old ones is an alternative to upgrading in place. You replicate data between old and new systems, leaving the service running during upgrade:
| Advantages | Disadvantages |
|---|---|
| Smoothly phase out old host systems. After successfully completing the upgrade, you gradually retire the old systems. | New host systems to manage. |
| Faster to roll back. Old servers remain in operation until upgrade completes successfully. | Harder to maintain compatibility. You must manually configure new servers to be fully compatible with existing servers, rather than relying on the upgrade command. This requires an in-depth understanding of both your existing configuration and the new configuration. Some of the new default settings may be incompatible with the old default settings, for example. |
| Requires initializing the new replicas. Depending on the volume of data to synchronize, you can initialize at least the first new replica online. For deployments with medium to large data sets, initialize from exported LDIF, or from backup files created using an upgraded DS server. In either case, you must plan the operation. | |
|
| You must manually enable new features after upgrade. |