Report Schedules
Report Schedules are used to define schedules for re-occurring reports or reports that need to be run on a future date. Each schedule will also contain a list of email recipients to which the report will be forwarded. The Report Schedules tab of the dashboard is used for managing these schedules. There must be at least one report definition before a report schedule can be created.
Creating New Report Schedules
-
Navigate to the Report Schedules tab of the main dashboard.
-
Click Create Schedule.
-
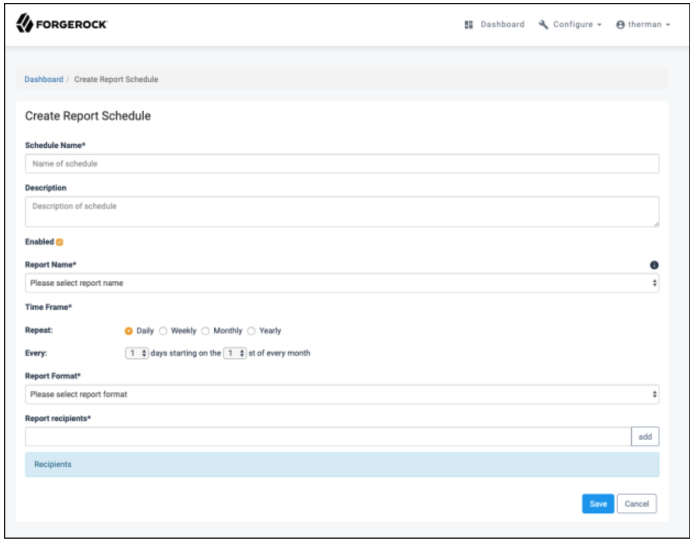
On the Create Report Schedule page, fill in each of the required fields. Additional details on the available fields are given below:
-
Schedule Name. (Required) Name of the report schedule that appears in the table.
-
Description. Provides additional information about the report schedule and its purpose.
-
Enabled. Determines whether the schedule should run at the designated intervals. While the checkbox remains empty, the schedule will not generate a report or any corresponding notifications.
-
Report Name. (Required) Name of report definition that will be run on a scheduled basis. After a report definition has been successfully created, it appears in this list for selection.
-
Time Frame. (Required) Interval at which the schedule should run to generate a report. The options available use CRON standard settings:
-
Daily. Allows the administrator to generate a report every specified number of days, starting on a specified day of the month.

-
Weekly. Allows the administrator to generate a report on specified days of the week.

-
Monthly. Allows the administrator to generate a report every specified number of months starting on a specified month. Day of the month for the report generation can also be specified, with
Last day of the monthas an option.
-
Yearly. Allows the administrator to generate a report every year on the specified day of the specified month. The day of the month for report generation can also be specified, with
Last day of the monthas an option.
-
-
Report Format. (Required) File format of the report that will be attached in the email notification.
-
Report Recipients. (Required) List of emails that will receive a notification containing the report when the schedule runs.
-
Modifying Report Schedules
-
Navigate to the Report Schedules tab of the main dashboard.
-
In the table, select the report scheduled to be modified.
-
Update the fields as necessary.
-
Click Save.
Deleting Report Schedules
Report Schedules can be deleted individually or in bulk.
Delete Individual Report Schedules:
-
Navigate to the Report Schedules tab of the main dashboard.
-
In the table, select the report scheduled to be deleted.
-
Click Delete.
-
Select Yes to confirm the deletion.
Bulk Deletion is done directly from the Report Schedules table in the dashboard.
Delete Bulk Report Schedules:
-
Navigate to the Report Schedules tab of the main dashboard.
-
In the table, locate and select, via the checkboxes on the left, the report schedules to be deleted.
-
Click Delete Selected.
-
Select Yes to confirm the deletion.