Backchannel Request Grant
The Backchannel Request grant is used when performing Client Initiated Backchannel Authentication (CIBA).
CIBA allows a client application, known as the consumption device, to obtain authentication and consent from a user, without requiring the user to interact with the client directly.
Instead, the user authenticates and consents to the operation using a separate, "decoupled" device, known as the authentication device. For example, an authenticator application, or a mobile banking application on their mobile phone.
Note
AM applies the guidelines suggested by the OpenID Financial-grade API (FAPI) Working Group to the implementation of CIBA.
For more information, see OpenID Connect 1.0.

The steps in the diagram are described below:
The client has a need to authenticate a user. It has a user identifier, and creates a signed JWT.
The client creates a POST request containing the signed JWT, and sends it to AM.
AM validates the signature using the public key, performs validation checks on the JWT contents, and if verified, returns an
auth_req_id, as well as a polling interval.The client begins polling AM using the
auth_req_idto check if the user has authorized the operation. The client must respect the interval returned each time, otherwise an error message is returned.AM sends the user a push notification message, including the contents of the
binding_message, requesting authorization.The user authorizes the request by performing the required authorization gesture on their authentication device, usually a mobile phone. For example, it may be swiping a slider, or authenticating using facial recognition or a fingerprint sensor.
If the authorization is valid, the OpenID provider returns an access token token (and an ID/refresh token, if applicable) to the client.
Now, the client can use the ID token subject ID claim as the end user's identity.
The client may require more claims than those included in the ID token. In this case, it makes a request to the OpenID provider's
oauth2/userinfoendpoint with the access token.If the access token is valid, the
oauth2/userinfoendpoint returns additional claims, if any.Now, the client can use the subject ID and the additional retrieved claims as the end user's identity.
Perform the steps in the following procedures to obtain an authorization request ID and exchange it for an ID token and an access token:
Perform the following steps to prepare AM for the backchannel request grant flow:
In AM, configure an OAuth 2.0/OpenID provider. Ensure that:
The
tokenand theid_tokenplugins are configured in the Response Type Plugins field.The
Back Channel Requestgrant type is configured in the Grant Types field.
Associate an authentication tree that performs push authentication with the
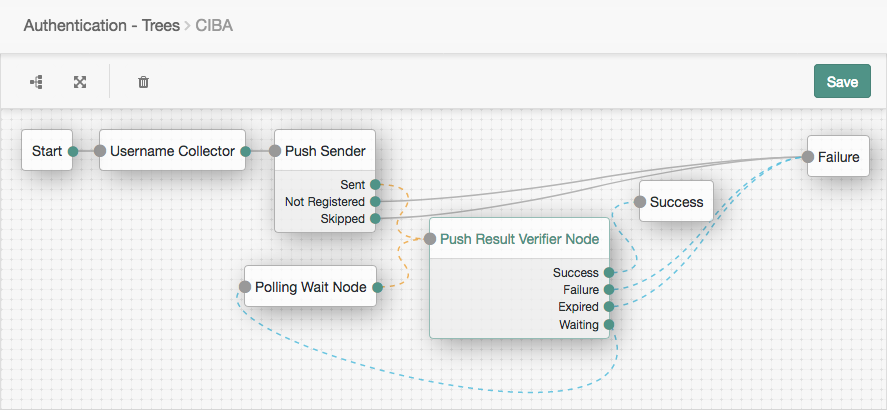
acr_valuesproperty contained in the signed JWT.The authentication tree must start with a "Username Collector Node", and contain a "Push Sender Node" and "Push Result Verifier Node", and a "Polling Wait Node".
The following is an example of a suitable authentication tree:

For more information on creating authentication trees for push authentication, see "Creating Trees for Push Authentication".
To associate a push authentication tree with incoming
acr_values, perform the following steps:In the AM console, go to Realms > Realm Name > Services > OAuth2 Provider > Advanced OpenID Connect.
In the OpenID Connect acr_values to Auth Chain Mapping box, enter the value of the
acr_valuesproperty in the Key field, and the name of the push authentication tree to use in the Value field, for exampleCIBA, and then click Add.Save your changes.
For more information, see "The Authentication Context Class Reference (acr) Claim".
For more information, see OpenID Provider Configuration.
In AM, create a confidential OAuth 2.0 client with a client ID of
myCIBAClient. The client ID must match the value of theissclaim in the signed JWT prepared above.The client profile should have the following configuration:
Client secret:
forgerockScopes:
openid profileResponse Types:
id_token tokenGrant Types:
Back Channel RequestToken Endpoint Authentication Method:
client_secret_basicConfidential OpenID Connect clients can use several methods to authenticate. For more information, see OpenID Connect Client Authentication.
The client must be provided with the public key of the keypair that will be used to sign the JWT.
On the Signing and Encryption tab, you must configure either the JWKs URI or the JWK Set fields, as follows:
JWKs URI: specifies a URI that exposes the public keys AM will use to validate the JWT signature.
For example,
http://www.example.com/issuer/jwk_uri.Note
If you configure this field, ensure the following properties are configured with values suitable for your environment:
JWKs URI content cache timeout in ms
JWKs URI content cache miss cache time
JWK set: Specifies a JWK set containing the public keys used to validate JWT signatures.
The following is an example of a public elliptic curve JWK set:
{
  "keys": [
    {
      "kty": "EC",
      "use": "sig",
      "crv": "P-256",
      "kid": "myCIBAKey",
      "x": "m0CkpWpZyGu-FLRLjCGBVGC7Fwm5vGt8Lm3HhYU4ylg",
      "y": "U8NMtO-C2c3yhu2I_ApAELttmaittfPNPQaIJxvTCHk",
      "alg": "ES256"
    }
  ]
}
For more information about the contents of the JWK set, see the JSON Web Key (JWK) specification.
You can store more than one key in the JWK set. However, it is easier to implement key rotation exposing the validation keys on the URI instead.
For more information, see Dynamic Client Registration.
Perform the steps in this procedure to obtain an authentication request ID, using CIBA:
On the client, prepare a signed JWT. The JWT must contain, at least, the following claims in the payload:
- aud
Specifies a string or an array of strings that is the intended audience of the JWT. Must be set to the authorization server's OAuth 2.0 endpoint, for example:
"aud": "http://openam.example.com:8080/openam/oauth2"
- exp
Specifies the expiration time of the JWT in Unix time.
Providing a JWT with an expiry time greater than 30 minutes causes AM to return a
JWT expiration time is unreasonableerror message.- iss
Specifies the unique identifier of the JWT issuer.
The identifier must match the client ID of the OAuth 2.0 client in AM, for example myCIBAClient.
- login_hint
Specifies the principal who is the subject of the JWT. It should be a string that identifies the resource owner.
Tip
You can provide a previously obtained ID token in a property named id_token_hint as the hint for determining the resource owner, rather than a string.
- scope
Specifies a space-separated list of the requested scopes. Must include the
openidscope.- acr_values
Specifies an identifier that maps to the authentication mechanism AM uses to obtain authorization from the end user.
- binding_message
Specifies a message delivered to the user when obtaining authorization.
Should be a short (100 characters or fewer), description of the operation the end user is authorizing, and should include an identifier to match the authorization request to the client that initiated the request.
Note
If the binding message is sent using push notifications, the following additional limitations apply to the value:
Must begin with a letter, number, or punctuation mark.
Must not include line breaks or control characters.
For example:
Allow ExampleBank to transfer £50 from your 'Main' account to your 'Savings' account? (EB-0246326)
The following is an example of the payload of a basic JWT:
{
  "login_hint": "demo",
  "scope": "openid profile",
  "acr_values": "push",
  "iss": "myCIBAClient",
  "aud": "http://openam.example.com:8080/openam/oauth2",
  "exp": 1559311511,
  "binding_message": "Allow ExampleBank to transfer £50 from your 'Main' account to your 'Savings' account? (EB-0246326)"
}
For more information about JWTs, see the RFC 7523 standard.
AM ignores keys specified in JWT headers, such as
jkuandjwe, and will use the configuration in the client profile to verify the JWT's signature.The client makes a POST request to the authorization server's backchannel authorization endpoint, including the signed JWT, and the client credentials in the authorization header.
For example:
$
curl --request POST \ --header "authorization: Basic bXlDSUJBQ2xpZW50OmZvcmdlcm9jaw=="
\ --data "request=eyJhbGci...kfPjAfnBg
" \ "https://openam.example.com:8443/openam/oauth2/bc-authorize"The basic authorization header is the base64-encoded value of your client ID, a colon character (:), and the client secret. For example
myCIBAClient:forgerock.For more information about authenticating clients, see OAuth 2.0 Client Authentication.
The "request" field should contain the entire signed JWT.
The value in this example has been truncated for display purposes.
AM returns JSON containing the
auth_req_idvalue:{ "auth_req_id": "35Evy3bJXJEnhll2ebacgROYfbU", "expires_in": 600, "interval": 2 }AM will also send the user a push notification message, containing the contents of the
binding_message, to request authorization for the operation.For more information on interacting with push notifications, see MFA: Push Authentication.
The client performs the steps in "To Exchange an Authorization Request ID for an ID/Access Token in the Backchannel Request Grant Flow" to exchange the authentication request ID for an ID token (and an access/refresh token).
Perform the steps in the following procedure to exchange an authorization request ID for an ID/access token:
The client starts to poll the token endpoint in the OpenID provider with HTTP POST requests, with the client credentials in the authorization header, and specifies the following parameters:
grant_type=urn:openid:params:grant-type:ciba
auth_req_id=your_authorization_request_id
If the OAuth 2.0/OpenID provider is configured for a subrealm rather than the Top Level Realm, you must specify it in the endpoint. For example, if the OAuth 2.0/OpenID provider is configured for the
/customersrealm, then use/oauth2/realms/root/realms/customers/access_token.For example:
$
curl --request POST \ --header "authorization: Basic bXlDSUJBQ2xpZW50OmZvcmdlcm9jaw=="\ --data "grant_type=urn:openid:params:grant-type:ciba" \ --data "auth_req_id=35Evy3bJXJEnhll2ebacgROYfbU" \ "https://openam.example.com:8443/openam/oauth2/access_token"The basic authorization header is the base64-encoded value of your client ID, a colon character (:), and the client secret. For example
myCIBAClient:forgerock.For more information about authenticating clients, see OAuth 2.0 Client Authentication.
If the user has authenticated and authorized the operation, AM returns an ID token and an access token. For example:
{
  "access_token": "z4mWG0cxqwPwgjj7srJ2Jdxe9ag",
  "id_token": "eyJ0eXAiOi...YA9Hoqwew",
  "token_type": "Bearer",
  "expires_in": 3599
}
Tip
AM can also issue refresh tokens at the same time the access tokens are issued. For more information, see Refresh Tokens.
If the user has not yet authenticated and authorized the operation, AM returns an HTTP 400 response, as follows:
{
  "error_description": "End user has not yet been authenticated",
  "error": "authorization_pending"
}
The client should wait the number of seconds specified by the
intervalvalue that was returned when requesting theauth_req_id, and then resend the POST request. The default value forintervalis two seconds.If the client does not wait for the interval before resending the request, AM returns an HTTP 400 response, as follows:
{
  "error_description": "The polling interval has not elapsed since the last request",
  "error": "slow_down"
}
(Optional) The relying party can request additional claims about the end user from AM.
For more information, see "/oauth2/userinfo".