Install a Multi-Node Air-Gapped Deployment
This chapter presents instructions on deploying Autonomous Identity in a multi-node air-gapped or offline target machine that has no external Internet connectivity. ForgeRock provides a deployer script that pulls a Docker container image from ForgeRock’s Google Cloud Registry (gcr.io) repository. The image contains the microservices, analytics, and backend databases needed for the system.
The air-gap installation is similar to that of the multi-node deployment with Internet connectivity, except that the image and deployer script must be stored on a portable media, such as USB drive or drive, and copied to the air-gapped target environment.
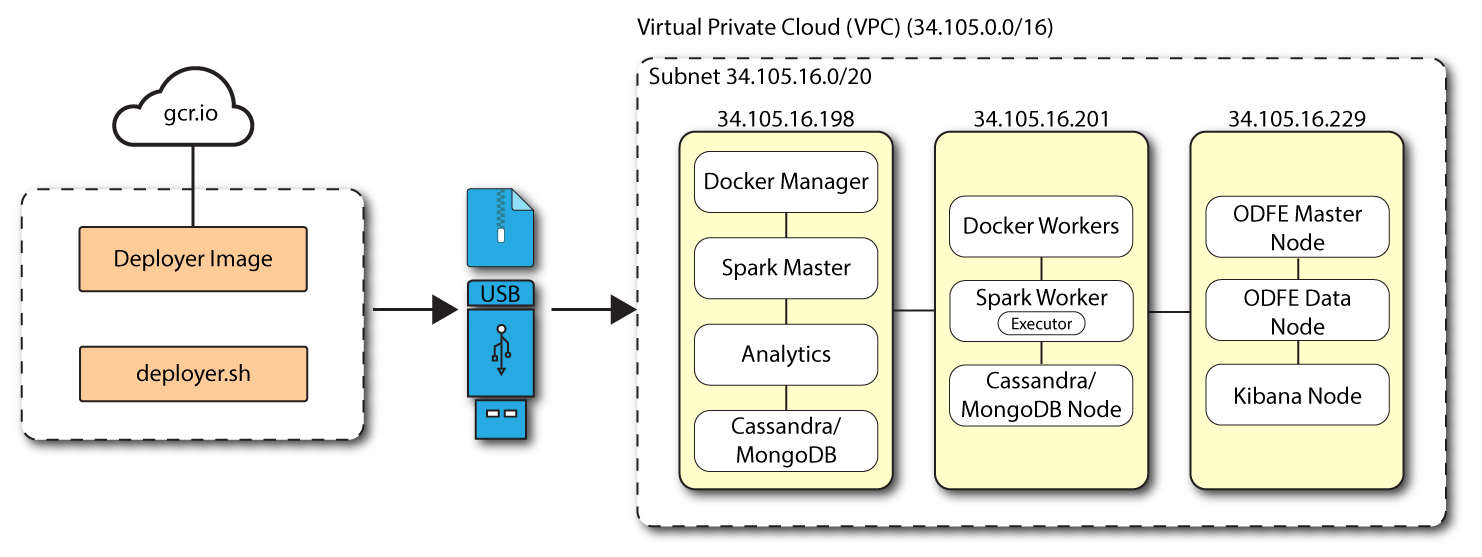
The deployment depends on how the network is configured. You could have a Docker cluster with multiple Spark nodes and Cassandra or MongoDB nodes. The key is to determine the IP addresses of each node.
Figure 9: A multi-node air-gap deployment.
Prerequisites
Let’s deploy Autonomous Identity on a single-node target on CentOS 7. The following are prerequisites:
-
Operating System. The target machine requires CentOS 7. The deployer machine can use any operating system as long as Docker is installed. For this guide, we use CentOS 7 as its base operating system.
-
Memory Requirements. Make sure you have enough free disk space on the deployer machine before running the
deployer.shcommands. We recommend at least a 500GB. -
Default Shell. The default shell for the
autoiduser must be bash. -
Subnet Requirements. We recommend deploying your multinode instances within the same subnet. Ports must be open for the installation to succeed. Each instance should be able to communicate to the other instances.
If any hosts used for the Docker cluster (docker-managers, docker-workers) have an IP address in the range of 10.0.x.x/16, they will conflict with the Swarm network. As a result, the services in the cluster will connect to the Cassandra database or Elasticsearch backend.
The Docker cluster hosts must be in a subnet that provides IP addresses 10.10.1.x or higher.
-
Deployment Requirements. Autonomous Identity provides a Docker image that creates a
deployer.shscript. The script downloads additional images necessary for the installation. To download the deployment images, you must first obtain a registry key to log into the ForgeRock Google Cloud Registry (gcr.io). The registry key is only available to ForgeRock Autonomous Identity customers. For specific instructions on obtaining the registry key, see How To Configure Service Credentials (Push Auth, Docker) in Backstage. -
Filesystem Requirements. Autonomous Identity requires a shared filesystem accessible from the Spark master, Spark worker, analytics hosts, and application layer. The shared filesystem should be mounted at the same mount directory on all of those hosts. If the mount directory for the shared filesystem is different from the default,
/data, update the/autoid-config/vars.ymlfile to point to the correct directories:analytics_data_dir: /data analytics_conf_dif: /data/conf
-
Architecture Requirements. Make sure that the analytics server is on the same node as the Spark master.
-
Database Requirements. Decide which database you are using: Apache Cassandra or MongoDB.
-
IPv4 Forwarding. Many high-security environments run their CentOS-based systems with IPv4 forwarding disabled. However, Docker Swarm does not work with a disabled IPv4 forward setting. In such environments, make sure to enable IPv4 forwarding in the file
/etc/sysctl.conf:net.ipv4.ip_forward=1
Set Up the Target Nodes
Make sure you have sufficient storage for your particular deployment. For more information on sizing considerations, see Deployment Planning Guide.
For each target node, run the following commands.
-
The install assumes that you have CentOS 7 as your operating system. Check your CentOS 7 version.
$ sudo cat /etc/centos-release
-
Set the user for the target machine to a username of your choice. For example,
autoid.$ sudo adduser autoid
-
Set the password for the user you created in the previous step.
$ sudo passwd autoid
-
Configure the user for passwordless sudo.
$ echo "autoid ALL=(ALL) NOPASSWD:ALL" | sudo tee /etc/sudoers.d/autoid
-
Add administrator privileges to the user.
$ sudo usermod -aG wheel autoid
-
Change to the user account.
$ su - autoid
-
Set up a shared directory on your target servers. The method depends on your machine configuration. Make sure the deployer can write to the shared directory.
Set Up the Deployer Machine
Set up the deployer on an Internet-connect machine.
-
The install assumes that you have CentOS 7 as your operating system. Check your CentOS 7 version.
$ sudo cat /etc/centos-release
-
Set the user for the target machine to a username of your choice. For example,
autoid.$ sudo adduser autoid
-
Set the password for the user you created in the previous step.
$ sudo passwd autoid
-
Configure the user for passwordless sudo.
$ echo "autoid ALL=(ALL) NOPASSWD:ALL" | sudo tee /etc/sudoers.d/autoid
-
Add administrator privileges to the user.
$ sudo usermod -aG wheel autoid
-
Change to the user account.
$ su - autoid
-
Install yum-utils package on the deployer machine. yum-utils is a utilities manager for the Yum RPM package repository. The repository compresses software packages for Linux distributions.
$ sudo yum install -y yum-utils
-
Create the installation directory. Note that you can use any install directory for your system as long as your run the
deployer.shscript from there. Also, the disk volume where you have the install directory must have at least 8GB free space for the installation.$ mkdir ~/autoid-config
Install Docker on the Deployer Machine
-
On the target machine, set up the Docker-CE repository.
$ sudo yum-config-manager \ --add-repo https://download.docker.com/linux/centos/docker-ce.repo -
Install the latest version of the Docker CE, the command-line interface, and containerd.io, a containerized website.
$ sudo yum install -y docker-ce docker-ce-cli containerd.io
Set Up SSH on the Deployer
While SSH is not necessary to connect the deployer to the target node as the machines are isolated from one another. You still need SSH on the deployer so that it can communicate with itself.
-
On the deployer machine, run
ssh-keygento generate an RSA keypair, and then click Enter. You can use the default filename. Enter a password for protecting your private key.$ ssh-keygen -t rsa -C "autoid"
The public and private rsa key pair is stored in
home-directory/.ssh/id_rsaandhome-directory/.ssh/id_rsa.pub. -
Copy the SSH key to the
autoid-configdirectory.$ cp ~/.ssh/id_rsa ~/autoid-config
-
Change the privileges to the file.
$ chmod 400 ~/autoid-config/id_rsa
Prepare the Tar File
Run the following steps on an Internet-connect host machine:
-
On the deployer machine, change to the installation directory.
$ cd ~/autoid-config/
-
Log in to the ForgeRock Google Cloud Registry (gcr.io) using the registry key. The registry key is only available to ForgeRock Autonomous Identity customers. For specific instructions on obtaining the registry key, see How To Configure Service Credentials (Push Auth, Docker) in Backstage.
$ docker login -u _json_key -p "$(cat autoid_registry_key.json)" https://gcr.io/forgerock-autoid
You should see:
Login Succeeded
-
Run the
create-templatecommand to generate thedeployer.shscript wrapper. Note that the command sets the configuration directory on the target node to/config. Note that the--userparameter eliminates the need to usesudowhile editing the hosts file and other configuration files.$ docker run --user=$(id -u) -v ~/autoid-config:/config -it gcr.io/forgerock-autoid/deployer:2021.3.1 create-template
-
Open the
~/autoid-config/vars.ymlfile, set theoffline_modeproperty totrue, and then save the file.offline_mode: true
-
Download the Docker images. This step downloads software dependencies needed for the deployment and places them in the
autoid-packagesdirectory.$ sudo ./deployer.sh download-images
-
Create a tar file containing all of the Autonomous Identity binaries.
$ tar czf autoid-packages.tgz deployer.sh autoid-packages/*
-
Copy the
autoid-packages.tgzto a USB drive or portable hard drive.
Install from the Air-Gap Target
Before you begin, make sure you have CentOS 7 installed on your air-gapped target machine.
-
Create the
~/autoid-configdirectory if you haven’t already.$ mkdir ~/autoid-config
-
Unpack the tar file.
$ tar xf autoid-packages.tgz -C ~/autoid-config
-
On the air-gap host node, copy the SSH key to the
~/autoid-configdirectory.$ cp ~/.ssh/id_rsa ~/autoid-config
-
Change the privileges to the file.
$ chmod 400 ~/autoid-config/id_rsa
-
Change to the configuration directory.
$ cd ~/autoid-config
-
Install Docker.
$ sudo ./deployer.sh install-docker
-
Log out and back in.
-
Change to the configuration directory.
$ cd ~/autoid-config
-
Import the deployer image.
$ ./deployer.sh import-deployer
-
Create the configuration template using he
create-templatecommand. This command creates a configuration file,ansible.cfg.$ ./deployer.sh create-template
-
Make the script executable.
$ chmod +x deployer.sh
-
To see the list of commands, enter
deployer.sh.$ ./deployer.sh Usage: deployer <command> Commands: create-template download-images import-deployer encrypt-vault decrypt-vault run create-tar install-docker install-dbutils upgrade
Configure Autonomous Identity
The create-template command from the previous section creates a number of configuration files, required for the deployment: ansible.cfg, vars.yml, hosts, and vault.yml.
If you are running a deployment for evaluation, you can minimally set the private IP address mapping in the vars.yml file in step 2, edit the hosts file in step 3, jump to step 6 to download the images and then run the deployer in step 7.
|
For air-gapped deployments, you must set the offline_mode property to true in the ~/autoid-config/vars.yml file in step 2 below. This is a new change in 2021.3.1 from prior releases.
|
-
Open a text editor and edit the
~/autoid-config/ansible.cfgto set up the remote user and SSH private key file location on the target node. Make sure that the remote_user exists on the target node and that the deployer machine can ssh to the target node as the user specified in theid_rsafile.[defaults] host_key_checking = False remote_user = autoid private_key_file = id_rsa
-
On the deployer machine, open a text editor and edit the
~/autoid-config/vars.ymlfile to configure specific settings for your deployment:-
Domain and Target Environment. Set the domain name and target environment specific to your deployment by editing the
/autoid-config/vars.xmlfile. By default, the domain name is set toforgerock.comand the target environment is set toautoid. The default Autonomous Identity URL will be:https://autoid-ui.forgerock.com. For this example, we use the default values.domain_name: forgerock.com target_environment: autoid
If you change the domain name and target environment, you need to also change the certificates to reflect the new changes. For more information, see Customize Domains.
-
Analytics Data Directory and Analytics Configuration Direction. For a multi-node Spark deployment, Autonomous Identity requires a shared filesystem accessible from Spark Master, Spark Worker(s), and Analytics hosts. The shared filesystem should be mounted at same mount directory on all of the above hosts. If the mount directory for shared filesystem is different than
/data, update the following properties in thevars.yamlfile to point to the correct location:analytics_data_dir: /data analytics_conf_dif: /data/conf
-
Dark Theme Mode. Optional. By default, the Autonomous Identity UI displays its pages with a light background. You can set a dark theme mode by setting the
enable_dark_themeproperty totrue. -
Offline Mode. Set the
offline_modetotruefor air-gapped deployments.offline_mode: true
-
Database Type. By default, Apache Cassandra is set as the default database for Autonomous Identity. For MongoDB, set the
db_driver_type:tomongo.db_driver_type: mongo
-
Private IP Address Mapping. An air-gap deployment has no external IP addresses, but you may still need to define a mapping if your internal IP address differs from an external IP, say in a virtual air-gapped configuration.
If the IP addresses are the same, you can skip this step.
On the target machine, add the
private_ip_address_mappingproperty in the/inventory/vars.ymlfile. Make sure the values are within double quotes. The key should not be in double quotes and should have two spaces preceding the IP address.private_ip_address_mapping: external_ip: "internal_ip"
For example:
private_ip_address_mapping:
  34.105.16.198:  "10.128.0.51"
  34.105.16.201:  "10.128.0.54"
  34.105.16.229:  "10.128.0.71"
-
Authentication Option. Autonomous Identity provides a single sign-on (SSO) feature that you can configure with an OIDC identity provider.
-
Access Log. By default, the access log is enabled. If you want to disable the access log, set the
access_log_enabledvariable to "false". -
JWT Expiry and Secret File. Optional. By default, the session JWT is set at 30 minutes. To change this value, set the
jwt_expiryproperty to a different value.jwt_expiry: "30 minutes" jwt_secret_file: "{{install path}}"/jwt/secret.txt" jwt_audience: "http://my.service" oidc_jwks_url: "na" -
MongoDB Configuration. For MongoDB clusters, enable replication by uncommenting the
mongodb_replication_replsetproperty.# uncomment below for mongo with replication enabled. Not needed for single node deployments mongodb_replication_replset: mongors
Also, enable a custom key for inter-machine authentication in the clustered nodes.
# custom key
# password for inter-process authentication
# please regenerate this file on production environment with
# command 'openssl rand -base64 741'
mongodb_keyfile_content: |
  8pYcxvCqoe89kcp33KuTtKVf5MoHGEFjTnudrq5BosvWRoIxLowmdjrmUpVfAivh
  CHjqM6w0zVBytAxH1lW+7teMYe6eDn2S/O/1YlRRiW57bWU3zjliW3VdguJar5i
  Z+1a8lI+0S9pWynbv9+Ao0aXFjSJYVxAm/w7DJbVRGcPhsPmExiSBDw8szfQ8PAU
  2hwRl7nqPZZMMR+uQThg/zV9rOzHJmkqZtsO4UJSilG9euLCYrzW2hdoPuCrEDhu
  Vsi5+nwAgYR9dP2oWkmGN1dwRe0ixSIM2UzFgpaXZaMOG6VztmFrlVXh8oFDRGM0
  cGrFHcnGF7oUGfWnI2Cekngk64dHA2qD7WxXPbQ/svn9EfTY5aPw5lXzKA87Ds8p
  KHVFUYvmA6wVsxb/riGLwc+XZlb6M9gqHn1XSpsnYRjF6UzfRcRR2WyCxLZELaqu
  iKxLKB5FYqMBH7Sqg3qBCtE53vZ7T1nefq5RFzmykviYP63Uhu/A2EQatrMnaFPl
  TTG5CaPjob45CBSyMrheYRWKqxdWN93BTgiTW7p0U6RB0/OCUbsVX6IG3I9N8Uqt
  l8Kc+7aOmtUqFkwo8w30prIOjStMrokxNsuK9KTUiPu2cj7gwYQ574vV3hQvQPAr
  hhb9ohKr0zoPQt31iTj0FDkJzPepeuzqeq8F51HB56RZKpXdRTfY8G6OaOT68cV5
  vP1O6T/okFKrl41FQ3CyYN5eRHyRTK99zTytrjoP2EbtIZ18z+bg/angRHYNzbgk
  lc3jpiGzs1ZWHD0nxOmHCMhU4usEcFbV6FlOxzlwrsEhHkeiununlCsNHatiDgzp
  ZWLnP/mXKV992/Jhu0Z577DHlh+3JIYx0PceB9yzACJ8MNARHF7QpBkhtuGMGZpF
  T+c73exupZFxItXs1Bnhe3djgE3MKKyYvxNUIbcTJoe7nhVMrwO/7lBSpVLvC4p3
  wR700U0LDaGGQpslGtiE56SemgoP
On production deployments, you can regenerate this file by running the following command:
$ openssl rand -base64 741
-
Elasticsearch Heap Size. Optional. The default heap size for Elasticsearch is 1GB, which may be small for production. For production deployments, uncomment the option and specify
2Gor3G.#elastic_heap_size: 1g # sets the heap size (1g|2g|3g) for the Elastic Servers
-
Java API Service. Optional. Set the Java API Service (JAS) properties for the deployment: authentication, maximum memory, directory for attribute mappings data source entities:
jas:
  auth_enabled: true
  max_memory: 2048M
  mapping_entity_type: /common/mappings
  datasource_entity_type: /common/datasources
-
-
Open a text editor and enter the public IP addresses of the target machines in the
~/autoid-config/hostsfile. Make sure the target host IP addresses are accessible from the deployer machine. The following is an example of the~/autoid-config/hostsfile:Click to See a Host File for Cassandra Deployments
If you configured Cassandra as your database, the
~/autoid-config/hostsfile is as follows for single-node target deployments:[docker-managers] 34.105.16.198 [docker-workers] 34.105.16.201 [docker:children] docker-managers docker-workers [cassandra-seeds] 34.105.16.198 [cassandra-workers] 34.105.16.201 [spark-master] 34.105.16.198 [spark-workers] 34.105.16.201 [mongo_master] [mongo_replicas] [mongo:children] mongo_replicas mongo_master # ELastic Nodes [odfe-master-node] 34.105.16.229 [odfe-data-nodes] 34.105.16.229 [kibana-node] 34.105.16.229 [notebook] #ip#
Click to See a Host File for MongoDB Deployments
If you configured MongoDB as your database, the
~/autoid-config/hostsfile is as follows for single-node target deployments:[docker-managers] 34.105.16.198 [docker-workers] 34.105.16.201 [docker:children] docker-managers docker-workers [cassandra-seeds] [cassandra-workers] [spark-master] 34.105.16.198 [spark-workers] 34.105.16.201 [mongo_master] 34.105.16.198 mongodb_master=True [mongo_replicas] 34.105.16.201 [mongo:children] mongo_replicas mongo_master # ELastic Nodes [odfe-master-node] 34.105.16.229 [odfe-data-nodes] 34.105.16.229 [kibana-node] 34.105.16.229 [notebook] #ip#
-
Set the Autonomous Identity passwords, located at
~/autoid-config/vault.yml.Do not include special characters &or$invault.ymlpasswords as it will result in a failed deployer process.configuration_service_vault: basic_auth_password: Welcome123 openldap_vault: openldap_password: Welcome123 cassandra_vault: cassandra_password: Welcome123 cassandra_admin_password: Welcome123 mongo_vault: mongo_admin_password: Welcome123 mongo_root_password: Welcome123 elastic_vault: elastic_admin_password: Welcome123 elasticsearch_password: Welcome123
-
Encrypt the vault file that stores the Autonomous Identity passwords, located at
~/autoid-config/vault.yml. The encrypted passwords will be saved to/config/.autoid_vault_password. The/config/mount is internal to the deployer container.$ ./deployer.sh encrypt-vault
-
Run the deployment.
$ ./deployer.sh run
Access the Dashboard
Access the Autonomous Identity console UI:
-
Open a browser. If you set up your own url, use it for your login.
-
Log in as a test user.
test user: bob.rodgers@forgerock.com
password: Welcome123
Check Apache Cassandra
Check Cassandra:
-
On the target node, check the status of Apache Cassandra.
$ /opt/autoid/apache-cassandra-3.11.2/bin/nodetool status
-
An example output is as follows:
Datacenter: datacenter1
=======================
Status=Up/Down
|/ State=Normal/Leaving/Joining/Moving
++--++  Address       Load       Tokens       Owns (effective)  Host ID                               Rack
UN  34.70.190.144 1.33 MiB   256          100.0%            a10a91a4-96e83dd-85a2-4f90d19224d9  rack1
++--++
Check MongoDB
Check the status of MongoDB:
-
On the target node, check the status of MongoDB.
$ mongo --tls \
--host <Host IP> \
--tlsCAFile /opt/autoid/mongo/certs/rootCA.pem  \
--tlsAllowInvalidCertificates  \
--tlsCertificateKeyFile /opt/autoid/mongo/certs/mongodb.pem
Check Apache Spark
Check Spark:
-
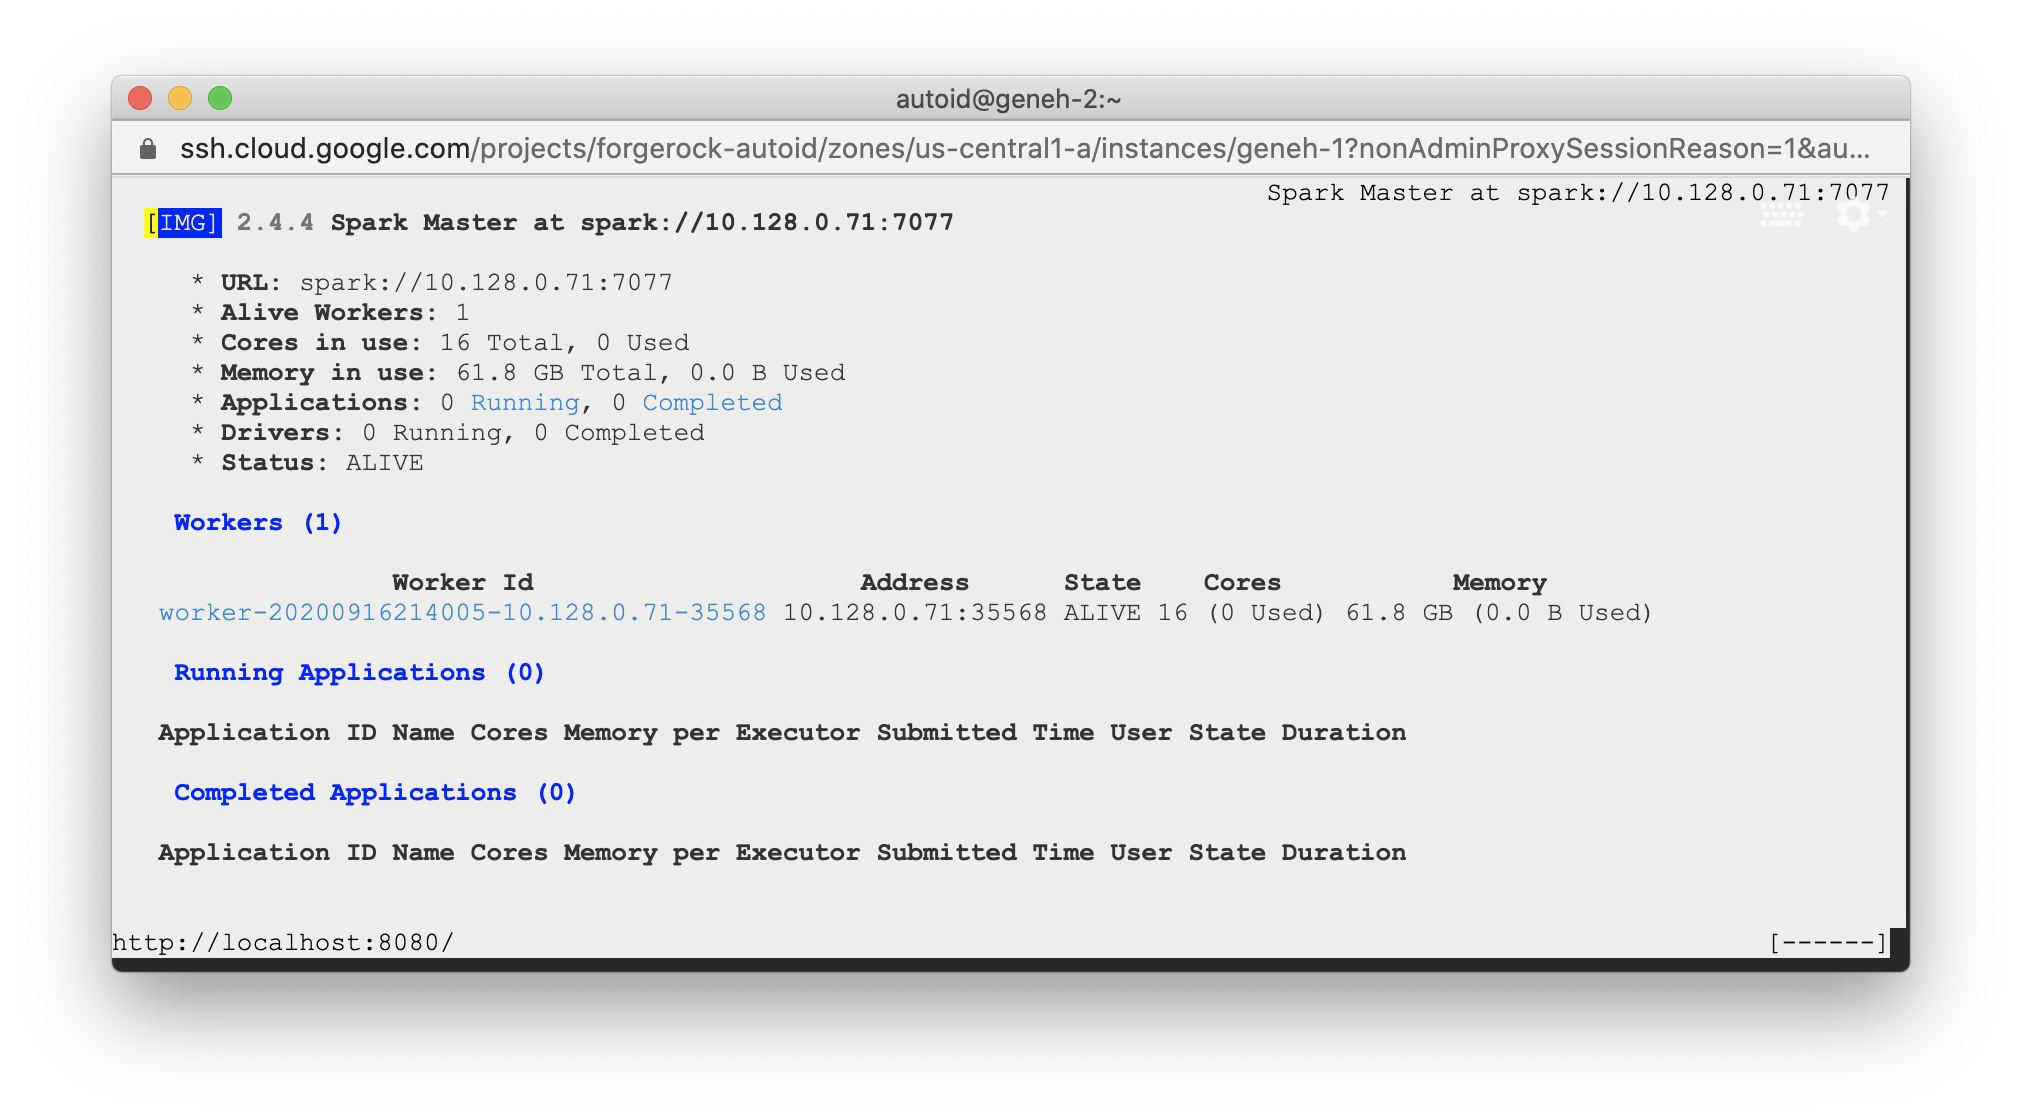
SSH to the target node and open Spark dashboard using the bundled text-mode web browser
$ elinks http://localhost:8080
You should see Spark Master status as ALIVE and worker(s) with State ALIVE.
Click to See an Example of the Spark Dashboard
Start the Analytics
If the previous installation steps all succeeded, you must now prepare your data’s entity definitions, data sources, and attribute mappings prior to running your analytics jobs. These step are required and are critical for a successful analytics process.
For more information, see Set Entity Definitions.