Installation guide
ForgeRock® Identity Platform serves as the basis for our simple and comprehensive Identity and Access Management solution. We help our customers deepen their relationships with their customers, and improve the productivity and connectivity of their employees and partners. For more information about ForgeRock and about the platform, see https://www.forgerock.com.
This guide describes options for installing IG for customized or secure environments. For information about how to install and configure IG for evaluation, refer to the Getting started.
Migrate from web container mode to standalone mode
Consider these points to migrate from IG in web container mode to IG in standalone mode.
Streaming asynchronous responses and events
In ClientHandler and
ReverseProxyHandler,
use only the default mode of asyncBehavior:non_streaming; responses are
processed when the entity content is entirely available.
If the property is set to streaming, the setting is
ignored.
Connection reuse when client certificates are used for authentication
In ClientHandler and
ReverseProxyHandler,
use only the default mode of
stateTrackingEnabled:true; when a client certificate is used for
authentication, connections cannot be reused.
If the property is set to false, the setting is ignored.
Tomcat configuration
| Feature | Standalone | Tomcat |
|---|---|---|
Port number |
Configure the |
Configure in the xml |
HTTPS server-side configuration |
Create a keystore, set up secrets, and configure secrets stores, ports, and ServerTlsOptions in admin.json. For information, refer to Configure IG for HTTPS (server-side). |
Create a keystore, and set up the SSL port in the For information, refer to Configure IG for HTTPS (server-side) in Tomcat. |
Session cookie name |
Configure the |
Configure |
Access logs |
Configure in the Audit framework. For information, refer to Auditing your deployment and Audit framework. |
Configure with |
JDBC datasource |
Configure with the JdbcDataSource object. For information, refer to JdbcDataSource. For an example, refer to Password replay from a database. |
Configure in the |
Environment variables |
Configure in |
Configure in |
Jar files |
Add to |
Add to to web container classpath; for example
|
Upgrade
For information about upgrade between supported versions of IG, see migrate.adoc#supported-upgrades.
This section describes how to upgrade a single IG instance. The most straightforward option when upgrading sites with multiple IG instances is to upgrade in place. One by one, stop, upgrade, and then restart each server individually, leaving the service running during the upgrade.
IG supports the following types of upgrade:
- Drop-in software update
-
Usually, an update from a version of IG to a newer minor version. For example, the update from 2023.2 to 2023.4.
Drop-in software updates can introduce additional functionality and fix bugs or security issues. Consider the following restrictions for drop-in software updates:
-
Do not require any update to the configuration
-
Cannot cause feature regression
-
Can change default or previously configured behavior only for bug fixes and security issues
-
Can deprecate but not remove existing functionality
-
- Major upgrade
-
Usually, an upgrade from a version of IG to a newer major version. For example, the upgrade from 7.2 to 2023.2.
Major upgrades can introduce additional functionality and fix bugs or security issues. Major upgrades do not have the restrictions of drop-in software update. Consider the following features of major upgrades:
-
Can require code or configuration changes
-
Can cause feature regression
-
Can change default or previously configured behavior
-
Can deprecate and remove existing functionality
-
Supported upgrade paths
The following table lists supported upgrade paths to IG 2023.4:
| Version | Upgrade type |
|---|---|
IG 2023.2 |
|
IG 7.x |
|
IG 6.x |
For more information, refer to Checking your product versions are supported in the ForgeRock Knowledge Base.
For unsupported, legacy deployments, ForgeRock can assist you in the upgrade process.
Plan the upgrade
Do these planning tasks before you start an upgrade:
| Planning task | Description |
|---|---|
Find the upgrade path |
Refer to migrate.adoc#supported-upgrades to see if you need a drop-in upgrade or a major upgrade. |
Find out what changed |
Read the release notes for all releases between the current version and the new version. Understand the new features and changes in the new version compared to the current version. |
Check the requirements |
Make sure you meet all of the requirements in the release notes for the new version. In particular, make sure you have a recent, supported Java version. |
Plan for server downtime |
At least one of your IG servers will be down during upgrade. Plan to route client applications to another server until the upgrade process is complete and you have validated the result. Make sure the owners of client application are aware of the change, and let them know what to expect. If you have a single IG server, make sure the downtime happens in a low-usage window, and make sure you let client application owners plan accordingly. |
Back up |
The IG configuration is a set of files, including Back up any tools scripts you have edited for your deployment and any trust stores used to connect securely. |
Plan for rollback |
Sometimes even a well-planned upgrade fails to go smoothly. In such cases, you need a plan to roll back smoothly to the pre-upgrade version. For IG servers, roll back by restoring a backed-up configuration. |
Prepare a test environment |
Before applying the upgrade in your production environment, always try to upgrade IG in a test environment. This will help you gauge the amount of work required, without affecting your production environment, and will help smooth out unforeseen problems. The test environment should resemble your production environment as closely as possible. |
Drop-in software update with binaries
-
Read and act on Plan the upgrade.
-
Back up the IG configuration and store it in version control so that you can roll back if something goes wrong.
-
Make the new configuration available on the file system.
By default, IG configuration files are located under
$HOME/.openig(on Windowsappdata\OpenIG). For information about how to use a different location, refer to Change the base location of the IG configuration. -
By default, IG configuration files are located under
$HOME/.openig(on Windowsappdata\OpenIG). For information about how to use a different location, refer to Change the base location of the IG configuration. -
In a test environment that simulates your production environment, validate that the upgraded service performs as expected with the new configuration. Check the logs for new or unexpected notifications or errors.
-
Allow client application traffic to flow to the upgraded site.
Drop-in software update with Docker files
-
Read and act on Plan the upgrade.
-
Back up the IG configuration and store it in version control so that you can roll back if something goes wrong.
-
In a test environment that simulates your production environment, validate that the upgraded service performs as expected with the new configuration. Check the logs for new or unexpected notifications or errors.
-
Allow client application traffic to flow to the upgraded site.
Major upgrade with binaries
-
Read and act on Plan the upgrade.
-
Use the release notes for all releases between the version you currently use and the new version, and create a new configuration as follows:
-
Review all incompatible changes and removed functionality, and adjust your configuration as necessary.
-
Switch to the replacement settings for deprecated functionality. Although deprecated objects continue to work, they add to the notifications in the logs and are eventually removed.
-
Check the lists of fixes, limitations, and known issues to find out if they impact your deployment.
-
Recompile your Java extensions. The method signature or imports for supported and evolving APIs can change in each version.
-
Read the documentation updates for new examples and information that can help with your configuration.
-
-
Back up the IG configuration and store it in version control so that you can roll back if something goes wrong.
-
Make the new configuration available on the file system.
By default, IG configuration files are located under
$HOME/.openig(on Windowsappdata\OpenIG). For information about how to use a different location, refer to Change the base location of the IG configuration. -
By default, IG configuration files are located under
$HOME/.openig(on Windowsappdata\OpenIG). For information about how to use a different location, refer to Change the base location of the IG configuration. -
In a test environment that simulates your production environment, validate that the upgraded service performs as expected with the new configuration. Check the logs for new or unexpected notifications or errors.
-
Allow client application traffic to flow to the upgraded site.
Major upgrade with Docker files
-
Read and act on Plan the upgrade.
-
Use the release notes for all releases between the version you currently use and the new version, and create a new configuration as follows:
-
Review all incompatible changes and removed functionality, and adjust your configuration as necessary.
-
Switch to the replacement settings for deprecated functionality. Although deprecated objects continue to work, they add to the notifications in the logs and are eventually removed.
-
Check the lists of fixes, limitations, and known issues to find out if they impact your deployment.
-
Recompile your Java extensions. The method signature or imports for supported and evolving APIs can change in each version.
-
Read the documentation updates for new examples and information that can help with your configuration.
-
-
Back up the IG configuration and store it in version control so that you can roll back if something goes wrong.
-
In a test environment that simulates your production environment, validate that the upgraded service performs as expected with the new configuration. Check the logs for new or unexpected notifications or errors.
-
Allow client application traffic to flow to the upgraded site.
Post upgrade tasks
After upgrade, review the what’s new section in the release notes and consider activating new features and functionality.
Rollback
| Before you roll back to a previous version of IG, consider whether any change to the the configuration during or since upgrade could be incompatible with the previous version. |
-
Plan for server downtime
Plan to route client applications to another server until the rollback process is complete and you have validated the result. Make sure the owners of client application are aware of the change, and let them know what to expect.
-
Make the new configuration available on the file system.
By default, IG configuration files are located under
$HOME/.openig(on Windowsappdata\OpenIG). For information about how to use a different location, refer to Change the base location of the IG configuration.
-
Plan for server downtime
Plan to route client applications to another server until the rollback process is complete and you have validated the result. Make sure the owners of client application are aware of the change, and let them know what to expect.
Prepare to install
Requirements
Make sure your installation meets the requirements in the release notes.
Create an IG service account
To limit the impact of a security breach, install and run IG from a dedicated service account. This is optional when you are evaluating IG, but essential in production installations.
A hacker is constrained by the rights granted to the user account where IG runs; therefore, never run IG as root user.
-
In a terminal window, use a command similar to the following to create a service account:
-
Apply the principle of least privilege to the account, for example:
-
Read/write permissions on the installation directory,
/path/to/identity-gateway. -
Execute permissions on the scripts in the installation
bindirectory,/path/to/identity-gateway/bin.
-
Prepare the network
Configure the network to include the hosts.
-
Add the following additional entry to your host file:
127.0.0.1 localhost ig.example.com app.example.com am.example.combashFor more information about host files, refer to the Wikipedia entry, Hosts (file).
Set up Identity Cloud and AM for use with IG
This section contains procedures for setting up items in ForgeRock Identity Cloud and AM that you can use with IG. For more information about setting up Identity Cloud, refer to the ForgeRock Identity Cloud docs. For more information about setting up AM, refer to the Access Management docs.
Authenticate an IG agent to Identity Cloud
|
IG agents are automatically authenticated to Identity Cloud by a non-configurable authentication module. Authentication chains and modules are deprecated in Identity Cloud and replaced by journeys. You can now authenticate IG agents to Identity Cloud with a journey. The procedure is currently optional, but will be required when authentication chains and modules are removed in a future release of Identity Cloud. For more information, refer to Identity Cloud’s Journeys. |
This section describes how to create a journey to authenticate an IG agent to Identity Cloud. The journey has the following requirements:
-
It must be called
Agent -
Its nodes must pass the agent credentials to the Agent Data Store Decision node.
When you define a journey in Identity Cloud, that same journey is used for all instances of IG, Java agent, and Web agent. Consider this point if you change the journey configuration.
-
Log in to the Identity Cloud admin UI as an administrator.
-
Click Journeys > New Journey.
-
Add a journey with the following information and click Create journey:
-
Name:
Agent -
Identity Object: The user or device to authenticate.
-
(Optional) Description: Authenticate an IG agent to Identity Cloud
The journey designer is displayed, with the
Startentry point connected to theFailureexit point, and aSuccessnode. -
-
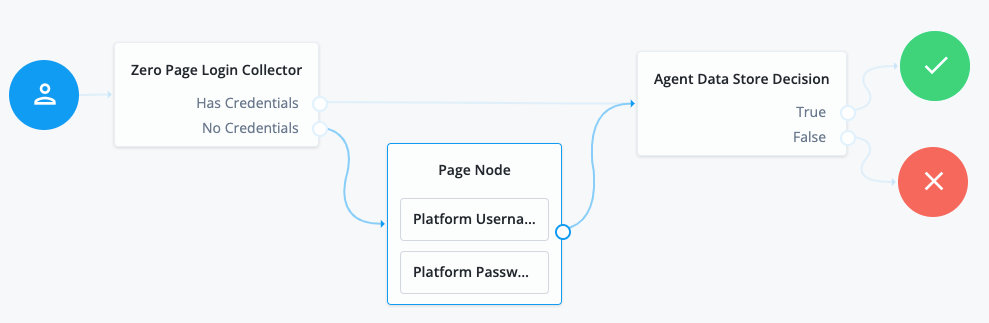
Using the Filter nodes bar, find and then drag the following nodes from the Components panel into the designer area:
-
Zero Page Login Collector node to check whether the agent credentials are provided in the incoming authentication request, and use their values in the following nodes.
This node is required for compatibility with Java agent and Web agent.
-
Page node to collect the agent credentials if they are not provided in the incoming authentication request, and use their values in the following nodes.
-
Agent Data Store Decision node to verify the agent credentials match the registered IG agent profile.
Many nodes can be configured in the panel on the right side of the page. Unless otherwise stated, do not configure the nodes, and use only the default values. -
-
Drag the following nodes from the Components panel into the Page node:
-
Platform Username node to prompt the user to enter their username.
-
Platform Password node to prompt the user to enter their password.
-
-
Connect the nodes as follows and save the journey:
Authenticate an IG agent to AM
|
IG agents are automatically authenticated to AM by a non-configurable authentication module in AM. Authentication chains and modules were deprecated in AM 7 and are replaced by authentication nodes and trees. From AM 7.3 you can authenticate IG agents to AM by using authentication nodes and trees. The procedure is currently optional, but will be required when authentication chains and modules are removed in a future release of AM. For more information, refer to AM’s Authentication Nodes and Trees. |
This section describes how to create an authentication tree to authenticate an IG agent to AM. The tree has the following requirements:
-
It must be called
Agent -
Its nodes must pass the agent credentials to the Agent Data Store Decision node.
When you define a tree in AM, that same tree is used for all instances of IG, Java agent, and Web agent. Consider this point if you change the tree configuration.
-
On the Realms page of the AM admin UI, choose the realm in which to create the authentication tree.
-
On the Realm Overview page, click Authentication > Trees > Create tree.
-
Create a tree named
Agent.The authentication tree designer is displayed, with the
Startentry point connected to theFailureexit point, and aSuccessnode.The authentication tree designer provides the following features on the toolbar:
Button Usage 
Lay out and align nodes according to the order they are connected.

Toggle the designer window between normal and full-screen layout.

Remove the selected node. Note that the
Startentry point cannot be deleted. -
Using the Filter bar, find and then drag the following nodes from the Components panel into the designer area:
-
Zero Page Login Collector node to check whether the agent credentials are provided in the incoming authentication request, and use their values in the following nodes.
This node is required for compatibility with Java agent and Web agent.
-
Page node to collect the agent credentials if they are not provided in the incoming authentication request, and use their values in the following nodes.
-
Agent Data Store Decision node to verify the agent credentials match the registered IG agent profile.
Many nodes can be configured in the panel on the right side of the page. Unless otherwise stated, do not configure the nodes and use only the default values. -
-
Drag the following nodes from the Components panel into the Page node:
-
Username Collector node to prompt the user to enter their username.
-
Password Collector node to prompt the user to enter their password.
-
-
Connect the nodes as follows and save the tree:

Register an IG agent in Identity Cloud
This procedure registers an agent that acts on behalf of IG.
-
Log in to the Identity Cloud admin UI as an administrator.
-
Click verified_user Gateways & Agents > New Gateway/Agent > Identity Gateway > Next, and add an agent profile:
-
ID: agent-name
-
Password: agent-password
Use secure passwords in a production environment. Consider using a password manager to generate secure passwords.
-
-
Click Save Profile > Done. The agent profile page is displayed.
-
To add a redirect URL for CDSSO, go to the agent profile page and add the URL.
-
To change the introspection scope, click open_in_new Native Consoles > Access Management, and update the agent in the AM admin UI. By default, the agent can introspect OAuth 2.0 tokens issued to any client, in the realm and subrealm where it is created.
Register an IG agent in AM 7 and later
In AM 7 and later versions, follow these steps to register an agent that acts on behalf of IG.
-
In the AM admin UI, select the top-level realm, and then select Applications > Agents > Identity Gateway.
-
Add an agent with the following values:
-
Agent ID :
ig_agent -
Password :
password
-
Agent ID :
ig_agent -
Password :
password -
Redirect URL for CDSSO :
https://ig.ext.com:8443/home/cdsso/redirect
-
Register an IG agent in AM 6.5 and earlier
In AM 6.5 and earlier versions, follow these steps to register an agent that acts on behalf of IG.
-
In the AM admin UI, select the top-level realm, and then select Applications > Agents > Java (or J2EE ).
-
Add an agent with the following values:
-
On the Global tab, deselect Agent Configuration Change Notification.
This option stops IG from being notified about agent configuration changes in AM. IG doesn’t need these notifications.
-
(For CDSSO) On the SSO tab, select the following values:
-
Cross Domain SSO : Deselect this option
-
CDSSO Redirect URI :
/home/cdsso/redirect
-
-
(For CDSSO and policy enforcement) On the SSO tab, select the following values:
-
Cross Domain SSO : Deselect this option
-
CDSSO Redirect URI :
/home/pep-cdsso/redirect
-
Set up a demo user in Identity Cloud
This procedure sets up a demo user in the alpha realm.
-
Log in to the Identity Cloud admin UI as an administrator.
-
Go to group Identities > Manage > settings_system_daydream Alpha realm - Users, and add a user with the following values:
-
Username:
demo -
First name:
demo -
Last name:
user -
Email Address:
demo@example.com -
Password:
Ch4ng3!t
-
Set up a demo user in AM
AM is provided with a demo user in the top-level realm, with the following credentials:
-
ID/username:
demo -
Last name:
user -
Password:
Ch4ng31t -
Email address:
demo@example.com -
Employee number:
123
For information about how to manage identities in AM, refer to AM’s Identity stores.
Install IG
Download and start IG
Download the IG .zip file
The .zip file unpacks into a /path/to/identity-gateway directory with the following content:
-
bin: Start and stop executables -
classes: Initially empty; used to install patches from ForgeRock support -
docker/Dockerfile: Dockerfile and README to build an IG Docker image -
legal-notices: Licenses and copyrights -
lib: IG and third-party libraries
-
Create a local installation directory for IG. The examples in this section use
/path/to. -
Download
IG-2023.4.0.zipfrom the ForgeRock BackStage download site, and copy the .zip file to the installation directory:$ cp IG-2023.4.0.zip /path/to/IG-2023.4.0.zipbash -
Unzip the file:
$ unzip IG-2023.4.0.zipbashThe directory
/path/to/identity-gatewayis created.
Start IG
Start IG with default settings
Use the following step to start the instance of IG, specifying the configuration directory where IG looks for configuration files.
-
Start IG:
$ /path/to/identity-gateway/bin/start.sh ... ... started in 1234ms on ports : [8080 8443]bashC:\path\to\identity-gateway\bin\start.batwindowsBy default, IG configuration files are located under
$HOME/.openig(on Windowsappdata\OpenIG). For information about how to use a different location, refer to Change the base location of the IG configuration. -
Check that IG is running in one of the following ways:
-
Ping IG at
http://ig.example.com:8080/openig/ping, and make sure anHTTP 200is returned. -
Access the IG welcome page at
http://ig.example.com:8080. -
When IG is running in development mode, display the product version and build information at
http://ig.example.com:8080/openig/api/info.
-
Start IG with custom settings
By default, IG runs on HTTP, on port 8080, from the instance
directory $HOME/.openig.
To start IG with custom settings, add the configuration file
admin.json with the following properties, and restart IG:
-
vertx: Finely tune Vert.x instances. -
connectors: Customize server port, TLS, and Vert.x-specific configurations. Eachconnectorsobject represents the configuration of an individual port. -
prefix: Set the instance directory, and therefore, the base of the route for administration requests.
The following example starts IG on non-default ports, and configures Vert.x-specific options for the connection on port 9091:
{
  "connectors": [{
    "port": 9090
  },
  {
    "port": 9091,
    "vertx": {
      "maxWebSocketFrameSize": 128000,
      "maxWebSocketMessageSize": 256000,
      "compressionLevel": 4
    }
  }]
}For more information, refer to AdminHttpApplication (admin.json).
Configure IG for HTTPS (server-side)
When IG is server-side, applications send requests to IG or request services from IG. IG is acting as a server of the application, and the application is acting as a client.
To run IG as a server over HTTPS, you must configure connections to TLS-protected endpoints, based on ServerTlsOptions.
Using keys and certificates
The examples in this doc set use self-signed certificates, but your deployment is likely to use certificates issued by a certificate authority (CA certificates).
The way to obtain CA certificates depends on the certificate authority that you are using, and is not described in this document. As an example, refer to Let’s Encrypt.
Integrate CA certificates by using secret stores:
-
For PEM files, use a FileSystemSecretStore and PemPropertyFormat
-
For PKCS12 keystores, use a KeyStoreSecretStore
For examples, refer to Serve the same certificate for TLS connections to all server names.
Note the following points about using secrets:
-
When IG starts up, it listens for HTTPS connections, using the ServerTlsOptions configuration in
admin.json. The keys and certificates are fetched at startup. -
Keys and certificates must be present at startup.
-
If keys or certificates change, you must to restart IG.
-
When the
autoRefreshproperty of FileSystemSecretStore or KeyStoreSecretStore is enabled, the secret store is automatically reloaded when the filesystem or keystore is changed.
For information about secret stores provided in IG, refer to Secrets object and secret stores.
Serve the same certificate for TLS connections to all server names
This example uses PEM files and a PKCS#12 keystore for self-signed certificates, but you can adapt it to use official (non self-signed) keys and certificates.
Before you start, install IG, as described in Download and start IG.
-
Locate a directory for the secrets, for example,
/path/to/secrets. -
Create self-signed keys in one of the following ways. If you have your own keys, use them and skip this step.
Use your own keys
If you have your own keys, use them and skip this step.
Set up a self-signed certificate in a (PKCS#12) keystore
-
Create the keystore, replacing
/path/to/secretswith your path:$ keytool \ -genkey \ -alias https-connector-key \ -keyalg RSA \ -keystore /path/to/secrets/IG-keystore \ -storepass password \ -keypass password \ -dname "CN=ig.example.com,O=Example Corp,C=FR"bashBecause keytool converts all characters in its key aliases to lowercase, use only lowercase in alias definitions of a keystore. -
In the secrets directory, add a file called
keystore.pass, containing the keystore passwordpassword:$ cd /path/to/secrets/ $ echo -n 'password' > keystore.passbashMake sure the password file contains only the password, with no trailing spaces or carriage returns.
Set up self-signed certificate stored in PEM file
-
Locate a directory for secrets, and go to it:
$ cd /path/to/secretsbash -
Create the following secret key and certificate pair as PEM files:
$ openssl req \ -newkey rsa:2048 \ -new \ -nodes \ -x509 \ -days 3650 \ -subj "/CN=ig.example.com/OU=example/O=com/L=fr/ST=fr/C=fr" \ -keyout ig.example.com-key.pem \ -out ig.example.com-certificate.pembashTwo PEM files are created, one for the secret key, and another for the associated certificate.
-
Map the key and certificate to the same secret ID in IG:
$ cat ig.example.com-key.pem ig.example.com-certificate.pem > key.manager.secret.id.pembash
-
-
Set up TLS on IG in one of the following ways:
Keys stored in a (PKCS#12) keystore
Add the following file to IG, replacing
/path/to/secretswith your path:{ "connectors": [ { "port": 8080 }, { "port": 8443, "tls": "ServerTlsOptions-1" } ], "heap": [ { "name": "ServerTlsOptions-1", "type": "ServerTlsOptions", "config": { "keyManager": { "type": "SecretsKeyManager", "config": { "signingSecretId": "key.manager.secret.id", "secretsProvider": "ServerIdentityStore" } } } }, { "type": "FileSystemSecretStore", "name": "SecretsPasswords", "config": { "directory": "/path/to/secrets", "format": "PLAIN" } }, { "name": "ServerIdentityStore", "type": "KeyStoreSecretStore", "config": { "file": "/path/to/secrets/IG-keystore", "storePasswordSecretId": "keystore.pass", "secretsProvider": "SecretsPasswords", "mappings": [ { "secretId": "key.manager.secret.id", "aliases": ["https-connector-key"] } ] } } ] }jsonNotice the following features of the file:
-
IG starts on port
8080, and on8443over TLS. -
IG’s private keys for TLS are managed by the SecretsKeyManager, whose ServerIdentityStore references a KeyStoreSecretStore.
-
The KeyStoreSecretStore maps the keystore alias to the secret ID for retrieving the server keys (private key + certificate).
-
The password of the KeyStoreSecretStore is provided by the FileSystemSecretStore.
Keys stored in PEM file
Add the following file to IG, replacing
/path/to/secretswith your path:{ "connectors": [ { "port": 8080 }, { "port": 8443, "tls": "ServerTlsOptions-1" } ], "heap": [ { "name": "ServerTlsOptions-1", "type": "ServerTlsOptions", "config": { "keyManager": { "type": "SecretsKeyManager", "config": { "signingSecretId": "key.manager.secret.id", "secretsProvider": "ServerIdentityStore" } } } }, { "name": "ServerIdentityStore", "type": "FileSystemSecretStore", "config": { "format": "PLAIN", "directory": "/path/to/secrets", "suffix": ".pem", "mappings": [{ "secretId": "key.manager.secret.id", "format": { "type": "PemPropertyFormat" } }] } } ] }jsonNotice how this file differs to that for the keystore-based approach:
-
The ServerIdentityStore is a FileSystemSecretStore.
-
The FileSystemSecretStore reads the keys that are stored as file in the PEM standard format.
-
-
Start IG:
$ /path/to/identity-gateway/bin/start.sh ... ... started in 1234ms on ports : [8080 8443]bashC:\path\to\identity-gateway\bin\start.batwindowsBy default, IG configuration files are located under
$HOME/.openig(on Windowsappdata\OpenIG). For information about how to use a different location, refer to Change the base location of the IG configuration.
Serve different certificates for TLS connections to different server names
This example uses PEM files for self-signed certificates, but you can adapt it to use official (non self-signed) keys and certificates.
Before you start, install IG, as described in Download and start IG.
-
Locate a directory for secrets, for example,
/path/to/secrets, and go to it.$ cd /path/to/secretsbash -
Create the following secret key and certificate pair as PEM files:
-
For
ig.example.com:-
Create a key and certificate:
$ openssl req \ -newkey rsa:2048 \ -new \ -nodes \ -x509 \ -days 3650 \ -subj "/CN=ig.example.com/OU=example/O=com/L=fr/ST=fr/C=fr" \ -keyout ig.example.com-key.pem \ -out ig.example.com-certificate.pembashTwo PEM files are created, one for the secret key, and another for the associated certificate.
-
Map the key and certificate to the same secret ID in IG:
$ cat ig.example.com-key.pem ig.example.com-certificate.pem > key.manager.secret.id.pembash
-
-
For servers grouped by a wildcard:
-
Create a key and certificate:
$ openssl req \
-newkey rsa:2048 \
-new \
-nodes \
-x509 \
-days 3650 \
-subj "/CN=*.example.com/OU=example/O=com/L=fr/ST=fr/C=fr" \
-keyout wildcard.example.com-key.pem \
-out wildcard.example.com-certificate.pem
bash -
Map the key and certificate to the same secret ID in IG:
$ cat wildcard.example.com-key.pem wildcard.example.com-certificate.pem > wildcard.secret.id.pembash
-
-
For other, unmapped servers
-
Create a key and certificate:
$ openssl req \
-newkey rsa:2048 \
-new \
-nodes \
-x509 \
-days 3650 \
-subj "/CN=un.mapped.com/OU=example/O=com/L=fr/ST=fr/C=fr" \
-keyout default.example.com-key.pem \
-out default.example.com-certificate.pem
bash -
Map the key and certificate to the same secret ID in IG:
$ cat default.example.com-key.pem default.example.com-certificate.pem > default.secret.id.pembash
-
-
-
Add the following file to IG, replacing
/path/to/secretswith your path, and then restart IG:{ "connectors": [ { "port": 8080 }, { "port": 8443, "tls": "ServerTlsOptions-1" } ], "heap": [ { "name": "ServerTlsOptions-1", "type": "ServerTlsOptions", "config": { "sni": { "serverNames": { "ig.example.com": "key.manager.secret.id", "*.example.com": "wildcard.secret.id" }, "defaultSecretId" : "default.secret.id", "secretsProvider": "ServerIdentityStore" } } }, { "name": "ServerIdentityStore", "type": "FileSystemSecretStore", "config": { "format": "PLAIN", "directory": "path/to/secrets", "suffix": ".pem", "mappings": [ { "secretId": "key.manager.secret.id", "format": { "type": "PemPropertyFormat" } }, { "secretId": "wildcard.secret.id", "format": { "type": "PemPropertyFormat" } }, { "secretId": "default.secret.id", "format": { "type": "PemPropertyFormat" } } ] } } ] }jsonNotice the following features of the file:
-
The ServerTlsOptions object maps two servers to secret IDs, and includes a default secret ID
-
The secret IDs correspond to the secret IDs in the FileSystemSecretStore, and the PEM files generated in an earlier step.
-
-
Run the following commands to request TLS connections to different servers, using different certificates:
-
Connect to
ig.example.com, and note that the certificate subject corresponds to the certificate created forig.example.com:$ openssl s_client -connect localhost:8443 -servername ig.example.com ... Server certificate -----BEGIN CERTIFICATE----- MII...dZC -----END CERTIFICATE----- subject=/CN=ig.example.com/OU=example/O=com/L=fr/ST=fr/C=fr issuer=/CN=ig.example.com/OU=example/O=com/L=fr/ST=fr/C=frbash -
Connect to
other.example.com, and note that the certificate subject corresponds to the certificate created with the wildcard,*.example.com:$ openssl s_client -connect localhost:8443 -servername other.example.com ... Server certificate -----BEGIN CERTIFICATE----- MII...fY= -----END CERTIFICATE----- subject=/CN=*.example.com/OU=example/O=com/L=fr/ST=fr/C=fr issuer=/CN=*.example.com/OU=example/O=com/L=fr/ST=fr/C=frbash -
Connect to
unmapped.site.com, and note that the certificate subject corresponds to the certificate created for the default secret ID:$ openssl s_client -connect localhost:8443 -servername unmapped.site.com ... Server certificate -----BEGIN CERTIFICATE----- MII..rON -----END CERTIFICATE----- subject=/CN=un.mapped.com/OU=example/O=com/L=fr/ST=fr/C=fr issuer=/CN=un.mapped.com/OU=example/O=com/L=fr/ST=fr/C=frbash
-
Configure environment variables and system properties
Configure environment variables and system properties as follows:
-
By adding environment variables on the command line when you start IG.
-
By adding environment variables in
$HOME/.openig/bin/env.sh, where$HOME/.openigis the instance directory. After changingenv.sh, restart IG to load the new configuration.
Start IG with a customized router scan interval
By default, IG scans every 10 seconds for changes to the route configuration files. Any changes to the files are automatically loaded into the configuration without restarting IG. For more information about the router scan interval, refer to Router.
The following example overwrites the default value of the Router scan interval to two seconds when you start up IG:
Define environment variables for startup, runtime, and stop
IG provides the following environment variables for Java runtime options:
- IG_OPTS
-
(Optional) Java runtime options for IG and its startup process, such as JVM memory sizing options.
Include all options that are not shared with the
stopscript.The following example specifies environment variables in the
env.shfile to customize JVM options and keys:# Specify JVM options JVM_OPTS="-Xms256m -Xmx2048m" # Specify the DH key size for stronger ephemeral DH keys, and to protect against weak keys JSSE_OPTS="-Djdk.tls.ephemeralDHKeySize=2048" # Wrap them up into the IG_OPTS environment variable export IG_OPTS="${IG_OPTS} ${JVM_OPTS} ${JSSE_OPTS}"bashC:\set "JVM_OPTS=-Xms256m -Xmx2048m" C:\set "JSSE_OPTS=-Djdk.tls.ephemeralDHKeySize=2048" C:\set "IG_OPTS=%IG_OPTS% %JVM_OPTS% %JSSE_OPTS%"
- JAVA_OPTS
-
(Optional) Java runtime options for IG include all options that are shared by the
startandstopscript.
Add .jar files for IG extensions
IG includes a complete Java application programming interface for extending your deployment with customizations. For more information, refer to Extend IG through the Java API
Create a directory to hold .jar files for IG extensions:
When IG starts up, the JVM loads .jar files in the
extra directory.
Set up logs and configuration files
The following table summarizes the default location of the IG configuration and logs.
| Purpose | Default location on Linux | Default location on Windows |
|---|---|---|
Log messages from IG and third-party dependencies |
|
|
Administration (admin.json) Gateway (config.json) |
|
|
Routes (Route) |
|
|
SAML 2.0 |
|
|
Groovy scripts for scripted filters and handlers, and other objects |
|
|
Temporary directory To change the directory, configure |
|
|
JSON schema for custom audit To change the directory, configure |
|
|
Secure the configuration and logs
For the /logs, /tmp, and all configuration directories, allow the following
access:
-
Highest privilege the IG system account.
-
Least priviledge for specific accounts, on a case-by-case basis
-
No priviledge for all other accounts, by default
Change the base location of the IG configuration
By default, the base location for IG configuration files is in the following directory:
To change the location use an argument with the startup command. The following
example reads the configuration from the config directory under
/path/to/config-dir:
+
Configure IG For HTTPS (client-side)
When IG sends requests over HTTP to a proxied application, or requests services from a third-party application, IG is acting as a client of the application, and the application is acting as a server. IG is client-side.
When IG sends requests securely over HTTPS, IG must be able to trust the server. By default, IG uses the Java environment truststore to trust server certificates. The Java environment truststore includes public key signing certificates from many well-known Certificate Authorities (CAs).
When servers present certificates signed by trusted CAs, then IG can send requests over HTTPS to those servers, without any configuration to set up the HTTPS client connection. When server certificates are self-signed or signed by a CA whose certificate is not automatically trusted, the following objects can be required to configure the connection:
-
KeyStoreSecretStore, to manage a secret store for cryptographic keys and certificates, based on a standard Java keystore.
-
SecretsTrustManager, to manage trust material that verifies the credentials presented by a peer.
-
(Optional) SecretsKeyManager, to manage keys that authenticate a TLS connection to a peer.
-
ClientHandler and ReverseProxyHandler reference to ClientTlsOptions, for connecting to TLS-protected endpoints.
The following procedure describes how to set up IG for HTTPS (client-side), when server certificates are self-signed or signed by untrusted CAs.
-
Locate or set up the following directories:
-
Directory containing the sample application .jar: sampleapp_install_dir
-
Directory to store the sample application certificate and IG keystore: /path/to/secrets
-
-
Extract the public certificate from the sample application:
$ cd /path/to/secretsbash$ jar --verbose --extract \ --file sampleapp_install_dir/IG-sample-application-2023.4.0-SNAPSHOT.jar tls/sampleapp-cert.pem inflated: tls/sampleapp-cert.pembashThe file
/path/to/secrets/tls/sampleapp-cert.pemis created. -
From the same directory, import the certificate into the IG keystore, and answer
yesto trust the certificate:$ keytool -importcert \ -alias ig-sampleapp \ -file tls/sampleapp-cert.pem \ -keystore reverseproxy-truststore.p12 \ -storetype pkcs12 \ -storepass password ... Trust this certificate? [no]: yes Certificate was added to keystorebashBecause keytool converts all characters in its key aliases to lowercase, use only lowercase in alias definitions of a keystore. -
List the keys in the IG keystore to make sure that a key with the alias
ig-sampleappis present:$ keytool -list \ -v \ -keystore /path/to/secrets/reverseproxy-truststore.p12 \ -storetype pkcs12 \ -storepass password Keystore type: PKCS12 Keystore provider: SUN Your keystore contains 1 entry Alias name: ig-sampleapp ...bash -
In the terminal where you run IG, create an environment variable for the value of the keystore password:
$ export KEYSTORE_SECRET_ID='cGFzc3dvcmQ='bashThe password is retrieved by the SystemAndEnvSecretStore, and must be base64-encoded.
-
Add the following route to serve static resources, such as .css, for the sample application:
$HOME/.openig/config/routes/static-resources.json
appdata\OpenIG\config\routes\static-resources.json
{
  "name" : "sampleapp-resources",
  "baseURI" : "http://app.example.com:8081",
  "condition": "${find(request.uri.path,'^/css')}",
  "handler": "ReverseProxyHandler"
}
json -
Add the following route to IG:
$HOME/.openig/config/routes/client-side-https.json
appdata\OpenIG\config\routes\client-side-https.json
{ "name": "client-side-https", "condition": "${find(request.uri.path, '/home/client-side-https')}", "baseURI": "https://app.example.com:8444", "heap": [ { "name": "Base64EncodedSecretStore-1", "type": "Base64EncodedSecretStore", "config": { "secrets": { "keystore.secret.id": "cGFzc3dvcmQ=" } } }, { "name": "KeyStoreSecretStore-1", "type": "KeyStoreSecretStore", "config": { "file": "/path/to/secrets/reverseproxy-truststore.p12", "storeType": "PKCS12", "storePasswordSecretId": "keystore.secret.id", "secretsProvider": "Base64EncodedSecretStore-1", "mappings": [ { "secretId": "trust.manager.secret.id", "aliases": [ "ig-sampleapp" ] } ] } }, { "name": "SecretsTrustManager-1", "type": "SecretsTrustManager", "config": { "verificationSecretId": "trust.manager.secret.id", "secretsProvider":"KeyStoreSecretStore-1" } }, { "name": "ReverseProxyHandler-1", "type": "ReverseProxyHandler", "config": { "tls": { "type": "ClientTlsOptions", "config": { "trustManager": "SecretsTrustManager-1" } }, "hostnameVerifier": "ALLOW_ALL" }, "capture": "all" } ], "handler": "ReverseProxyHandler-1" }jsonNotice the following features of the route:
-
The route matches requests to
/home/client-side-https. -
The
baseURIchanges the request URI to point to the HTTPS port for the sample application. -
The Base64EncodedSecretStore provides the keystore password.
-
The SecretsTrustManager uses a KeyStoreSecretStore to manage the trust material.
-
The KeyStoreSecretStore points to the sample application certificate. The password to access the keystore is provided by the SystemAndEnvSecretStore.
-
The ReverseProxyHandler uses the SecretsTrustManager for the connection to TLS-protected endpoints. All hostnames are allowed.
-
-
Test the setup:
-
Start the sample application
$ java -jar sampleapp_install_dir/IG-sample-application-2023.4.0-SNAPSHOT.jarbash -
Go to http://ig.example.com:8080/home/client-side-https.
The request is proxied transparently to the sample application, on the TLS port
8444. -
Check the route log for a line like this:
GET https://app.example.com:8444/home/client-side-https
-
Encrypt and share JWT sessions
JwtSession objects store session information in JWT cookies on the user agent. The following sections describe how to set authenticated encryption for JwtSession, using symmetric keys.
Authenticated encryption encrypts data and then signs it with HMAC, in a single step. For more information, refer to Authenticated Encryption. For information about JwtSession, refer to JwtSession.
Encrypt JWT sessions
This section describes how to set up a keystore with a symmetric key for authenticated encryption of a JWT session.
-
Set up a keystore to contain the encryption key, where the keystore and the key have the password
password:-
Locate a directory for secrets, and go to it:
$ cd /path/to/secretsbash -
Generate the key:
$ keytool \ -genseckey \ -alias symmetric-key \ -keystore jwtsessionkeystore.pkcs12 \ -storepass password \ -storetype pkcs12 \ -keyalg HmacSHA512 \ -keysize 512bashBecause keytool converts all characters in its key aliases to lowercase, use only lowercase in alias definitions of a keystore.
-
-
Add the following route to IG:
$HOME/.openig/config/routes/jwt-session-encrypt.json
appdata\OpenIG\config\routes\jwt-session-encrypt.json
{ "name": "jwt-session-encrypt", "heap": [{ "name": "KeyStoreSecretStore-1", "type": "KeyStoreSecretStore", "config": { "file": "/path/to/secrets/jwtsessionkeystore.pkcs12", "storeType": "PKCS12", "storePasswordSecretId": "keystore.secret.id", "secretsProvider": ["SystemAndEnvSecretStore-1"], "mappings": [{ "secretId": "jwtsession.symmetric.secret.id", "aliases": ["symmetric-key"] }] } }, { "name": "SystemAndEnvSecretStore-1", "type": "SystemAndEnvSecretStore" } ], "session": { "type": "JwtSession", "config": { "authenticatedEncryptionSecretId": "jwtsession.symmetric.secret.id", "encryptionMethod": "A256CBC-HS512", "secretsProvider": ["KeyStoreSecretStore-1"], "cookie": { "name": "IG", "domain": ".example.com" } } }, "handler": { "type": "StaticResponseHandler", "config": { "status": 200, "headers": { "Content-Type": [ "text/plain; charset=UTF-8" ] }, "entity": "Hello world!" } }, "condition": "${request.uri.path == '/jwt-session-encrypt'}" }jsonNotice the following features of the route:
-
The route matches requests to
/jwt-session-encrypt. -
The KeyStoreSecretStore uses the SystemAndEnvSecretStore in the heap to manage the store password.
-
The JwtSession uses the KeyStoreSecretStore in the heap to manage the session encryption secret.
-
-
In the terminal where you will run the IG instance, create an environment variable for the value of the keystore password:
$ export KEYSTORE_SECRET_ID='cGFzc3dvcmQ='bashThe password is retrieved by the SystemAndEnvSecretStore, and must be base64-encoded.
Share JWT sessions between multiple instances of IG
When a session is shared between multiple instances of IG, the instances are able to share the session information for load balancing and failover.
This section gives an example of how to set up a deployment with three instances of IG that share a JwtSession.

Prepare for load balancing and failover
For a high scale or highly available deployment, you can prepare a pool of IG servers with nearly identical configurations, and then load balance requests across the pool, routing around any servers that become unavailable. Load balancing allows the service to handle more load.
Before you spread requests across multiple servers, however, you must determine what to do with state information that IG saves in the context, or retrieves locally from the IG server system. If information is retrieved locally, then consider setting up failover. If one server becomes unavailable, another server in the pool can take its place. The benefit of failover is that a server failure can be invisible to client applications.
IG saves state information in the following ways:
-
By using a handler, such as a custom ScriptableHandler, that can store information in the context. Most handlers depend on information in the context, some of which is first stored by IG.
-
By using filters, such as AssignmentFilters, HeaderFilters, AuthorizationCodeOAuth2ClientFilters, OAuth2ResourceServerFilters, ScriptableFilters, SqlAttributesFilters, and StaticRequestFilters, that can store information in the context. Most filters depend on information in the request, response, or context, some of which is first stored by IG.
IG retrieves information locally in the following ways:
-
By using filters and handlers, such as FileAttributesFilters, ScriptableFilters, ScriptableHandlers, and SqlAttributesFilters, that depend on local system files or container configuration.
By default, the context data, including storage of the default session implementation, resides in memory. For information about whether to store session data on the user agent instead, refer to JwtSession.
When using JwtSession with a cookie domain, share the encryption keys and the signature symmetric secret across all IG configurations so that any server can read or update JWT cookies from any other server in the same cookie domain.
If your data does not fit in an HTTP cookie, for example, because when encrypted it is larger than 4 KB, consider storing a reference in the cookie, and then retrieve the data by using another filter. IG logs warning messages if the JwtSession cookie is too large. Using a reference can also work when a server becomes unavailable, and the load balancer must fail requests over to another server in the pool.
If some data attached to a context must be stored on the server-side, then you have additional configuration steps to perform for session stickiness and for session replication. Session stickiness means that the load balancer sends all requests from the same client session to the same server. Session stickiness helps to ensure that a client request goes to the server holding the original session data. Session replication involves writing session data either to other servers or to a data store, so that if one server goes down, other servers can read the session data and continue processing. Session replication helps when one server fails, allowing another server to take its place without having to start the session over again. If you set up session stickiness but not session replication, when a server crashes, the client session information for that server is lost, and the client must start again with a new session.
Secure connections
IG is often deployed to replay credentials or other security information. In a real world deployment, that information must be communicated over a secure connection using HTTPS, meaning in effect HTTP over encrypted Transport Layer Security (TLS). Never send real credentials, bearer tokens, or other security information unprotected over HTTP.
When IG is
acting as a server, the TLS connection is configured in admin.json.
When IG is acting as a client, the TLS connection is configured in the ReverseProxyHandler. For information, refer to Configure IG For HTTPS (client-side) and ReverseProxyHandler.
TLS depends on the use of digital certificates (public keys). In typical use of TLS, the client authenticates the server by its X.509 digital certificate as the first step to establishing communication. Once trust is established, then the client and server can set up a symmetric key to encrypt communications.
In order for the client to trust the server certificate, the client needs first to trust the certificate of the party who signed the server’s certificate. This means that either the client has a trusted copy of the signer’s certificate, or the client has a trusted copy of the certificate of the party who signed the signer’s certificate.
Certificate Authorities (CAs) are trusted signers with well-known certificates. Browsers generally ship with many well-known CA certificates. Java distributions also ship with many well-known CA certificates. Getting a certificate signed by a well-known CA is often expensive.
It is also possible for you to self-sign certificates. The trade-off is that although there is no monetary expense, the certificate is not trusted by any clients until they have a copy. Whereas it is often enough to install a certificate signed by a well-known CA in the server keystore as the basis of trust for HTTPS connections, self-signed certificates must also be installed in all clients.
Like self-signed certificates, the signing certificates of less well-known CAs are also unlikely to be found in the default truststore. You might therefore need to install those signing certificates on the client-side as well.
This guide describes how to install self-signed certificates, that are suitable for trying out the software, or for deployments where you manage all clients that access IG. For information about how to use well-known CA-signed certificates, refer to the documentation for the Java Virtual Machine (JVM).
After certificates are properly installed to allow client-server trust, consider the cipher suites configured for use. The cipher suite determines the security settings for the communication. Initial TLS negotiations bring the client and server to agreement on which cipher suite to use. Basically the client and server share their preferred cipher suites to compare and to choose. If you therefore have a preference concerning the cipher suites to use, you must set up your deployment to use only your preferred cipher suites. IG inherits the list of cipher suites from the underlying Java environment.
The Java Secure Socket Extension (JSSE), part of the Java environment, provides security services that IG uses to secure connections. You can set security and system properties to configure the JSSE. For a list of properties you can use to customize the JSSE in Oracle Java, refer to the Customization section of the JSSE Reference guide.