Identity Cloud guide
ForgeRock® Identity Platform serves as the basis for our simple and comprehensive Identity and Access Management solution. We help our customers deepen their relationships with their customers, and improve the productivity and connectivity of their employees and partners. For more information about ForgeRock and about the platform, see https://www.forgerock.com.
This guide is for ForgeRock Identity Cloud evaluators, administrators, and architects. It provides examples of how to integrate your business application and APIs with Identity Cloud for Single Sign-On and API Security, with ForgeRock Identity Gateway.
Example installation for this guide
Unless otherwise stated, the examples in this guide assume the following installation:
-
Identity Gateway installed in standalone mode, on
http://ig.example.com:8080, as described in Download and start IG in standalone mode. -
Sample application installed on
http://app.example.com:8081, as described in Using the sample application. -
The ForgeRock Identity Cloud, with the default configuration, as described in the ForgeRock Identity Cloud Docs.
When you are using the ForgeRock Identity Cloud, you need to know the value of the following properties:
-
The root URL of your ForgeRock Identity Cloud. For example,
https://myTenant.forgeblocks.com.The URL of the Access Management component of the ForgeRock Identity Cloud is the root URL of your Identity Cloud followed by
/am. For example,https://myTenant.forgeblocks.com/am. -
The realm where you work. The examples in this document use
alpha.Prefix each realm in the hierarchy with the
realmskeyword. For example,/realms/root/realms/alpha.
If you use a different configuration, substitute in the procedures accordingly.
About Identity Gateway and the ForgeRock Identity Cloud
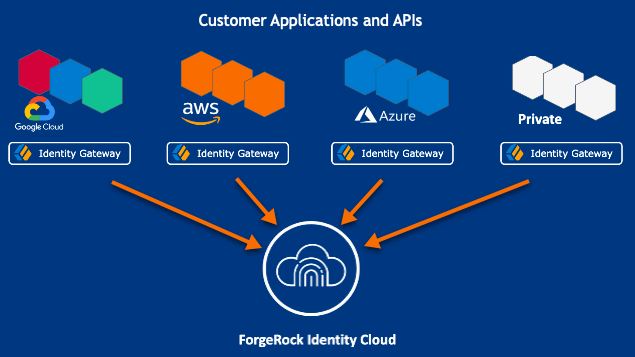
ForgeRock Identity Cloud simplifies the consumption of ForgeRock as an Identity Platform. However, many organizations have business web applications and APIs deployed across multiple clouds, or on-premise.
Identity Gateway facilitates non-intrusive integration of your web applications and APIs with the Identity Cloud, for SSO and API Security. The following image illustrates how Identity Gateway bridges your business to the ForgeRock Identity Cloud:
For information about the ForgeRock Identity Cloud, see the ForgeRock Identity Cloud Docs.
API security with OAuth 2.0 and the ForgeRock Identity Cloud
This example sets up OAuth 2.0, using the standard introspection endpoint, where ForgeRock Identity Cloud is the authorization server, and Identity Gateway is the resource server.
For more information about Identity Gateway as an OAuth 2.0 resource server, see Validate access tokens through the introspection endpoint.
| This procedure uses the Resource Owner Password Credentials grant type. According to information in the The OAuth 2.0 Authorization Framework, minimize use of this grant type and utilize other grant types whenever possible. |
Before you start, prepare Identity Cloud, IG, and the sample application as described in Example installation for this guide.
-
Set up Identity Cloud:
-
Log in to Identity Cloud as an administrator.
-
Go to Identities > Manage > Alpha realm - Users, and add a user with the following values:
-
Username:
demo -
First name:
demo -
Last name:
user -
Email Address:
demo@example.com -
Password:
Ch4ng3!t
-
-
Make sure that you are managing the
alpharealm. If not, click the current realm at the top of the screen, and switch realm. -
Add a web application:
-
In the platform console, click Applications > Add Application > Web, and add a web application with the following values:
-
Client ID:
oauth2-client -
Client Secret:
password
-
-
On the application page, add the following general settings:
-
Grant Types:
Resource Owner Password Credentials -
Scopes:
mail
-
-
-
Click Gateways & Agents, and add an agent profile with the following values:
-
ID:
ig_agent -
Password:
passwordBy default, the agent can introspect OAuth 2.0 tokens issued to any client, in the realm and subrealm where it is created. To change the introspection, select Native Consoles > Access Management, and update the agent in the AM console.
-
-
-
Set up Identity Gateway:
-
Set an environment variable for the IG agent password, and then restart IG:
$ export AGENT_SECRET_ID='cGFzc3dvcmQ='bashThe password is retrieved by a SystemAndEnvSecretStore, and must be base64-encoded.
-
Add the following route to Identity Gateway, replacing the value for the property
amInstanceUrl:-
Linux
-
Windows
$HOME/.openig/config/routes/oauth2rs-idc.json
%appdata%\OpenIG\config\routes\oauth2rs-idc.json
{ "name": "oauth2rs-idc", "baseURI": "http://app.example.com:8081", "condition": "${find(request.uri.path, '^/oauth2rs-idc')}", "properties": { "amInstanceUrl": "https://myTenant.forgeblocks.com/am" }, "heap": [ { "name": "SystemAndEnvSecretStore-1", "type": "SystemAndEnvSecretStore" }, { "name": "AmService-1", "type": "AmService", "config": { "url": "&{amInstanceUrl}", "realm": "/alpha", "version": "7.2", "agent": { "username": "ig_agent", "passwordSecretId": "agent.secret.id" }, "secretsProvider": "SystemAndEnvSecretStore-1" } } ], "handler": { "type": "Chain", "config": { "filters": [ { "name": "OAuth2ResourceServerFilter-1", "type": "OAuth2ResourceServerFilter", "config": { "scopes": [ "mail" ], "requireHttps": false, "realm": "OpenIG", "accessTokenResolver": { "name": "TokenIntrospectionAccessTokenResolver-1", "type": "TokenIntrospectionAccessTokenResolver", "config": { "amService": "AmService-1", "providerHandler": { "type": "Chain", "config": { "filters": [ { "type": "HttpBasicAuthenticationClientFilter", "config": { "username": "ig_agent", "passwordSecretId": "agent.secret.id", "secretsProvider": "SystemAndEnvSecretStore-1" } } ], "handler": "ForgeRockClientHandler" } } } } } } ], "handler": { "type": "StaticResponseHandler", "config": { "status": 200, "headers": { "Content-Type": [ "text/html; charset=UTF-8" ] }, "entity": "<html><body><h2>Decoded access_token: ${contexts.oauth2.accessToken.info}</h2></body></html>" } } } } }jsonNotice the following features of the route compared to
rs-introspect.jsonin Validate access tokens through the introspection endpoint, where a local Access Management instance is the authorization server:-
The AmService
URLpoints to Access Management in the Identity Cloud. -
The AmService
realmpoints to the realm where you have configured your web application and the IG agent.
-
-
-
Test the setup:
-
In a terminal, export an environment variable for URL of Access Management in the Identity Cloud:
$ export amInstanceUrl='myAmInstanceUrl'bash -
Use a
curlcommand similar to the following to retrieve an access token:$ mytoken=$(curl -s \ --user "oauth2-client:password" \ --data 'grant_type=password&username=demo&password=Ch4ng3!t&scope=mail' \ $amInstanceUrl/oauth2/realms/alpha/access_token | jq -r ".access_token")bash -
Validate the access token returned in the previous step:
$ curl -v http://ig.example.com:8080/oauth2rs-idc --header "Authorization: Bearer ${mytoken}"

{
  active = true,
  scope = mail,
  realm = /alpha,
  client_id = oauth2-client,
  ...
}
bash
-
Single sign-on with OpenID Connect and the ForgeRock Identity Cloud
This example sets up ForgeRock Identity Cloud as an OpenID Connect identity provider, and Identity Gateway as a relying party.
For more information about Identity Gateway and OpenID Connect, see Act as an OpenID Connect relying party.
| This procedure uses the Resource Owner Password Credentials grant type. According to information in the The OAuth 2.0 Authorization Framework, minimize use of this grant type and utilize other grant types whenever possible. |
Before you start, prepare Identity Cloud, IG, and the sample application as described in Example installation for this guide.
-
Set up Identity Cloud:
-
Log in to Identity Cloud as an administrator.
-
Go to Identities > Manage > Alpha realm - Users, and add a user with the following values:
-
Username:
demo -
First name:
demo -
Last name:
user -
Email Address:
demo@example.com -
Password:
Ch4ng3!t
-
-
Make sure that you are managing the
alpharealm. If not, click the current realm at the top of the screen, and switch realm. -
Add a web application:
-
In the platform console, click Applications > Add Application > Web, and add a web application with the following values:
-
Client ID:
oidc-client -
Client Secret:
password
-
-
In General Settings on the application page, add the following values:
-
Sign-in URLs:
http://ig.example.com:8080/home/id_token/callback -
Grant Types:
Authorization Code,Resource owner Password Credentials -
Scopes:
openid,profile,mail
-
-
Click Show advanced settings > Authentication, and click Implied Consent:
The resource owner is not asked for consent during authorization flows.
-
-
-
Set up Identity Gateway:
-
Set an environment variable for the
oidc-clientpassword, and then restart IG:$ export CLIENT_SECRET_ID='cGFzc3dvcmQ='bash
-
Add the following route to IG, to serve .css and other static resources for the sample application:
-
Linux
-
Windows
$HOME/.openig/config/routes/static-resources.json
%appdata%\OpenIG\config\routes\static-resources.json
{
  "name" : "sampleapp-resources",
  "baseURI" : "http://app.example.com:8081",
  "condition": "${find(request.uri.path,'^/css')}",
  "handler": "ReverseProxyHandler"
}
json -
-
Add the following route to Identity Gateway, replacing the value for the property
amInstanceUrl:-
Linux
-
Windows
$HOME/.openig/config/routes/oidc-idc.json
%appdata%\OpenIG\config\routes\oidc-idc.json
{ "name": "oidc-idc", "baseURI": "http://app.example.com:8081", "condition": "${find(request.uri.path, '^/home/id_token')}", "properties": { "amInstanceUrl": "https://myTenant.forgeblocks.com/am" }, "heap": [ { "name": "SystemAndEnvSecretStore-1", "type": "SystemAndEnvSecretStore" } ], "handler": { "type": "Chain", "config": { "filters": [ { "name": "AuthorizationCodeOAuth2ClientFilter-1", "type": "AuthorizationCodeOAuth2ClientFilter", "config": { "clientEndpoint": "/home/id_token", "failureHandler": { "type": "StaticResponseHandler", "config": { "status": 500, "headers": { "Content-Type": [ "text/plain" ] }, "entity": "Error in OAuth 2.0 setup." } }, "registrations": [ { "name": "oauth2-client", "type": "ClientRegistration", "config": { "clientId": "oidc-client", "clientSecretId": "client.secret.id", "issuer": { "name": "Issuer", "type": "Issuer", "config": { "wellKnownEndpoint": "&{amInstanceUrl}/oauth2/realms/alpha/.well-known/openid-configuration" } }, "scopes": [ "openid", "profile", "mail" ], "secretsProvider": "SystemAndEnvSecretStore-1", "tokenEndpointAuthMethod": "client_secret_basic" } } ], "requireHttps": false, "cacheExpiration": "disabled" } } ], "handler": "ReverseProxyHandler" } } }jsonNotice the following features of the route compared to
07-openid.jsonin Use AM As a Single OpenID Connect Provider, where Access Management is running locally:-
The ClientRegistration
wellKnownEndpointpoints to the Identity Cloud.
-
-
-
Test the setup:
-
Go to http://ig.example.com:8080/home/id_token. The Identity Cloud login page is displayed.
-
Log in to Identity Cloud as user
demo, passwordCh4ng3!t. The home page of the sample application is displayed.
-
Cross-domain single sign-on with the ForgeRock Identity Cloud
For organizations relying on AM’s session and policy services with SSO, consider cross-Domain Single Sign-On (CDSSO) as an alternative to SSO through OpenID Connect.
This example sets up ForgeRock Identity Cloud as an SSO authentication server for requests processed by Identity Gateway. For more information about about Identity Gateway and CDSSO, see Authenticate With CDSSO.
Before you start, prepare Identity Cloud, IG, and the sample application as described in Example installation for this guide.
-
Set up Identity Cloud:
-
Log in to Identity Cloud as an administrator.
-
Make sure that you are managing the
alpharealm. If not, click the current realm at the top of the screen, and switch realm. -
Go to Identities > Manage > Alpha realm - Users, and add a user with the following values:
-
Username:
demo -
First name:
demo -
Last name:
user -
Email Address:
demo@example.com -
Password:
Ch4ng3!t
-
-
Click Gateways & Agents, and add an IG agent with the following values:
-
ID:
ig_agent_cdsso -
Password:
password -
Redirect URLs:
https://ig.ext.com:8443/home/cdsso/redirect
-
-
Select Services > Add a Service, and add a Validation Service with the following Valid goto URL Resources:
-
https://ig.ext.com:8443/* -
https://ig.ext.com:8443/*?*
-
-
-
Set up Identity Gateway:
-
Set up IG for HTTPS, as described in Configure IG for HTTPS (server-side) in standalone mode.
-
Add the following
sessionconfiguration toadmin.json, to ensure that the browser passes the session cookie in the form-POST to the redirect endpoint (step 6 of Information Flow During CDSSO):{ "connectors": […], "session": { "cookie": { "sameSite": "none", "secure": true } }, "heap": […] }This step is required for the following reasons:
-
When
sameSiteisstrictorlax, the browser does not send the session cookie, which contains the nonce used in validation. If IG doesn’t find the nonce, it assumes that the authentication failed. -
When
secureisfalse, the browser is likely to reject the session cookie.For more information, see admin.json.
-
-
Set an environment variable for the IG agent password, and then restart IG:
$ export AGENT_SECRET_ID='cGFzc3dvcmQ='bashThe password is retrieved by a SystemAndEnvSecretStore, and must be base64-encoded.
-
Add the following route to IG, to serve .css and other static resources for the sample application:
-
Linux
-
Windows
$HOME/.openig/config/routes/static-resources.json
%appdata%\OpenIG\config\routes\static-resources.json
{
  "name" : "sampleapp-resources",
  "baseURI" : "http://app.example.com:8081",
  "condition": "${find(request.uri.path,'^/css')}",
  "handler": "ReverseProxyHandler"
}
json -
-
Add the following route to Identity Gateway, replacing the value for the property
amInstanceUrl:-
Linux
-
Windows
$HOME/.openig/config/routes/cdsso-idc.json
%appdata%\OpenIG\config\routes\cdsso-idc.json
{ "name": "cdsso-idc", "baseURI": "http://app.example.com:8081", "condition": "${find(request.uri.path, '^/home/cdsso')}", "properties": { "amInstanceUrl": "https://myTenant.forgeblocks.com/am" }, "heap": [ { "name": "SystemAndEnvSecretStore-1", "type": "SystemAndEnvSecretStore" }, { "name": "AmService-1", "type": "AmService", "config": { "url": "&{amInstanceUrl}", "realm": "/alpha", "version": "7.2", "agent": { "username": "ig_agent_cdsso", "passwordSecretId": "agent.secret.id" }, "secretsProvider": "SystemAndEnvSecretStore-1", "sessionCache": { "enabled": false } } } ], "handler": { "type": "Chain", "config": { "filters": [ { "name": "CrossDomainSingleSignOnFilter-1", "type": "CrossDomainSingleSignOnFilter", "config": { "redirectEndpoint": "/home/cdsso/redirect", "authCookie": { "path": "/home", "name": "ig-token-cookie" }, "amService": "AmService-1", "verificationSecretId": "verify", "secretsProvider": { "type": "JwkSetSecretStore", "config": { "jwkUrl": "&{amInstanceUrl}/oauth2/realms/alpha/connect/jwk_uri" } } } } ], "handler": "ReverseProxyHandler" } } }jsonNotice the following features of the route compared to
cdsso.jsonin CDSSO for IG in standalone mode, where Access Management is running locally:-
The AmService
URLpoints to Access Management in the Identity Cloud. -
The AmService
realmpoints to the realm where you configure your IG agent.
-
-
-
Test the setup:
-
Go to https://ig.ext.com:8443/home/cdsso.
If you see warnings that the site is not secure, respond to the warnings to access the site.
The Identity Cloud login page is displayed.
-
Log in to Identity Cloud as user
demo, passwordCh4ng3!t.Access Management calls
/home/cdsso/redirect, and includes the CDSSO token. The CrossDomainSingleSignOnFilter passes the request to sample app.
-
Pass runtime data downstream in a JWT
This example sets up Identity Cloud as an identity provider, to pass identity or other runtime information downstream, in a JWT signed with a PEM.
For more information about using runtime data, see
Pass runtime data downstream in a JWT. To help with development, the sample
application includes a /jwt endpoint to display the JWT, verify its signature,
and decrypt it.
Before you start, prepare Identity Cloud, IG, and the sample application as described in Example installation for this guide.
-
Set up secrets:
-
Locate a directory for secrets, and go to it:
$ cd /path/to/secretsbash -
Create the following secret key and certificate pair as PEM files:
$ openssl req \ -newkey rsa:2048 \ -new \ -nodes \ -x509 \ -days 3650 \ -subj "/CN=ig.example.com/OU=example/O=com/L=fr/ST=fr/C=fr" \ -keyout ig.example.com-key.pem \ -out ig.example.com-certificate.pembashTwo PEM files are created, one for the secret key, and another for the associated certificate.
-
Map the key and certificate to the same secret ID in IG:
$ cat ig.example.com-key.pem ig.example.com-certificate.pem > key.manager.secret.id.pembash -
Generate PEM files to sign and verify the JWT:
$ openssl req \
-newkey rsa:2048 \
-new \
-nodes \
-x509 \
-days 3650 \
-subj "/CN=ig.example.com/OU=example/O=com/L=fr/ST=fr/C=fr" \
-keyout id.key.for.signing.jwt.pem \
-out id.key.for.verifying.jwt.pem
bash -
Make sure the following files have been added to your secrets directory:
-
id.key.for.signing.jwt.pem -
id.key.for.verifying.jwt.pem -
key.manager.secret.id.pem -
ig.example.com-certificate.pem -
ig.example.com-key.pem
-
-
-
Set up Identity Cloud:
-
Log in to Identity Cloud as an administrator.
-
Go to Identities > Manage > Alpha realm - Users, and add a user with the following values:
-
Username:
demo -
First name:
demo -
Last name:
user -
Email Address:
demo@example.com -
Password:
Ch4ng3!t
-
-
Click Gateways & Agents, and add an IG agent with the following values:
-
ID:
ig_agent_jwt -
Password:
password -
Redirect URLs:
https://ig.example.com:8443/jwt/redirect
-
-
Add a Validation Service:
-
In Identity Cloud, select Native Consoles > Access Management. The Access Management console is displayed.
-
Select Services, and add a Validation Service with the following Valid goto URL Resources:
-
https://ig.example.com:8443/* -
https://ig.example.com:8443/*?*
-
-
-
-
Set up IG:
-
Set up TLS by adding the following file to IG, replacing the value for the property
secretsDir:-
Linux
-
Windows
$HOME/.openig/config/admin.json
%appdata%\OpenIG\config\admin.json
{
  "mode": "DEVELOPMENT",
  "properties": {
    "secretsDir": "/path/to/secrets"
  },
  "connectors": [
    {
      "port": 8080
    },
    {
      "port": 8443,
      "tls": "ServerTlsOptions-1"
    }
  ],
  "session": {
    "cookie": {
      "sameSite": "none",
      "secure": true
    }
  },
  "heap": [
    {
      "name": "ServerTlsOptions-1",
      "type": "ServerTlsOptions",
      "config": {
        "keyManager": {
          "type": "SecretsKeyManager",
          "config": {
            "signingSecretId": "key.manager.secret.id",
            "secretsProvider": "ServerIdentityStore"
          }
        }
      }
    },
    {
      "name": "ServerIdentityStore",
      "type": "FileSystemSecretStore",
      "config": {
        "format": "PLAIN",
        "directory": "&{secretsDir}",
        "suffix": ".pem",
        "mappings": [{
          "secretId": "key.manager.secret.id",
          "format": {
            "type": "PemPropertyFormat"
          }
        }]
      }
    }
  ]
}
json -
-
Set an environment variable for the IG agent password, and then restart IG:
$ export AGENT_SECRET_ID='cGFzc3dvcmQ='bashThe password is retrieved by a SystemAndEnvSecretStore, and must be base64-encoded.
-
Add the following route to IG, to serve .css and other static resources for the sample application:
-
Linux
-
Windows
$HOME/.openig/config/routes/static-resources.json
%appdata%\OpenIG\config\routes\static-resources.json
{
  "name" : "sampleapp-resources",
  "baseURI" : "http://app.example.com:8081",
  "condition": "${find(request.uri.path,'^/css')}",
  "handler": "ReverseProxyHandler"
}
json -
-
Add the following route to IG, replacing the value for the properties
secretsDirandamInstanceUrl:-
Linux
-
Windows
$HOME/.openig/config/routes/jwt-idc.json
%appdata%\OpenIG\config\routes\jwt-idc.json
{
  "name": "jwt-idc",
  "condition": "${find(request.uri.path, '/jwt')}",
  "baseURI": "http://app.example.com:8081",
  "properties": {
    "secretsDir": "/path/to/secrets",
    "amInstanceUrl": "https://myTenant.forgeblocks.com/am"
  },
  "heap": [
    {
      "name": "SystemAndEnvSecretStore-1",
      "type": "SystemAndEnvSecretStore"
    },
    {
      "name": "AmService-1",
      "type": "AmService",
      "config": {
        "url": "&{amInstanceUrl}",
        "realm": "/alpha",
        "version": "7.2",
        "agent": {
          "username": "ig_agent_jwt",
          "passwordSecretId": "agent.secret.id"
        },
        "secretsProvider": "SystemAndEnvSecretStore-1",
        "sessionCache": {
          "enabled": false
        }
      }
    },
    {
      "name": "pemPropertyFormat",
      "type": "PemPropertyFormat"
    },
    {
      "name": "FileSystemSecretStore-1",
      "type": "FileSystemSecretStore",
      "config": {
        "format": "PLAIN",
        "directory": "&{secretsDir}",
        "suffix": ".pem",
        "mappings": [{
          "secretId": "id.key.for.signing.jwt",
          "format": "pemPropertyFormat"
        }]
      }
    }
  ],
  "handler": {
    "type": "Chain",
    "config": {
      "filters": [
        {
          "name": "CrossDomainSingleSignOnFilter-1",
          "type": "CrossDomainSingleSignOnFilter",
          "config": {
            "redirectEndpoint": "/jwt/redirect",
            "authCookie": {
              "path": "/jwt",
              "name": "ig-token-cookie"
            },
            "amService": "AmService-1",
            "verificationSecretId": "verify",
            "secretsProvider": {
              "type": "JwkSetSecretStore",
              "config": {
                "jwkUrl": "&{amInstanceUrl}/oauth2/realms/alpha/connect/jwk_uri"
              }
            }
          }
        },
        {
          "name": "UserProfileFilter",
          "type": "UserProfileFilter",
          "config": {
            "username": "${contexts.ssoToken.info.uid}",
            "userProfileService": {
              "type": "UserProfileService",
              "config": {
                "amService": "AmService-1"
              }
            }
          }
        },
        {
          "name": "JwtBuilderFilter-1",
          "type": "JwtBuilderFilter",
          "config": {
            "template": {
              "name": "${contexts.userProfile.commonName}",
              "email": "${contexts.userProfile.rawInfo.mail[0]}"
            },
            "secretsProvider": "FileSystemSecretStore-1",
            "signature": {
              "secretId": "id.key.for.signing.jwt",
              "algorithm": "RS512"
            }
          }
        },
        {
          "name": "HeaderFilter-1",
          "type": "HeaderFilter",
          "config": {
            "messageType": "REQUEST",
            "add": {
              "x-openig-user": ["${contexts.jwtBuilder.value}"]
            }
          }
        }
      ],
      "handler": "ReverseProxyHandler"
    }
  }
}
json -
-
-
Test the setup:
-
Go to https://ig.example.com:8443/jwt.
If you see warnings that the site is not secure, respond to the warnings to access the site. The Identity Cloud login page is displayed.
-
Log in to Identity Cloud as user
demo, passwordCh4ng3!t. The sample app displays the signed JWT along with its header and payload. -
In
USE PEM FILE, enter the absolute path toid.key.for.verifying.jwt.pemto verify the JWT signature.
-