Authentication Nodes and Trees
Authentication trees (also referred to as Intelligent Authentication) provide fine-grained authentication by allowing multiple paths and decision points throughout the authentication flow. Use them to build complex authorization scenarios, while offering a streamlined login experience to users.
Authentication trees are made up of authentication nodes, which define actions taken during authentication. Each node performs a single task during authentication, for example, collecting a username or making a simple decision based on a cookie.
Nodes can have multiple outcomes rather than just success or failure; this allows you to create complex yet customer-friendly authentication experiences by linking nodes together, creating loops, branching the tree for different authentication scenarios, and nesting nodes within a tree:
To further control the authentication process, you can assign authentication levels to branches on a tree, with higher levels being used typically to allow access to more restricted resources.
Authentication trees differ in the following ways to traditional authentication chains:
Authentication nodes are not yet available for all the functionality provided by authentication modules.
Authentication trees cannot mix with authentication chains. Each authentication to AM can use either a tree or a chain, but not both together.
The functionality derived from post-authentication plugins, used traditionally with authentication chains, is handled differently when using trees. For example:
Session property management is handled by individual nodes. See "Set Session Properties Node".
Calling out to third-party systems is handled by scripted nodes. See "Scripted Decision Node".
Registering events to make HTTP POST calls to a server is handled by webhooks. See "Configuring Authentication Webhooks". Note that post-authentication plugins do not get triggered when authenticating to a tree, only to a chain.
About Authentication Levels for Trees
When a user successfully authenticates, AM creates a session, which allows AM to manage the user's access to resources. The session is assigned an authentication level. The authentication level is often used as a measure of the strength of the authentication performed. For example, simple username and password may be assigned a low authentication level, whereas multi-factor with Push and webAuthn, a high one.
Authorization policies may require a particular authentication level to access protected resources. When an authenticated user tries to access a protected resource without satisfying the authentication level requirement, AM denies access to the resource and returns an advice indicating that the user needs to reauthenticate at the required authentication level to access the resource.
The web or Java agent or policy enforcement point can then send the user back to AM for session upgrade. For more information, refer to Session Upgrade
AM provides the following nodes to manage authentication levels:
The
Authentication Level Decisionnode, that checks that the current authentication level is equal or greater than the one specified in the node.The
Modify Authentication Levelnode, that can raise or lower the authentication level.
Position these nodes to alter the authentication level depending on the route take through the authentication tree.
About Account Lockout for Trees
It is recommended to limit the number of attempts a user can make at authenticating with credentials. Limiting the number of attempts helps to prevent password-guessing and brute-force attacks.
Authentication trees in AM have built-in support for account lockout, and provide nodes for checking the status of a user, and changing their status:
- "Account Active Decision Node"
Use this node to determine if an account is marked as active, or inactive (locked).
- "Account lockout Node"
Use this node to alter the user's status, to either active, or inactive (locked).
Note
When setting an account to active, the node will also reset the failed attempts and lockout duration counters.
In addition to the lockout-specific nodes above, the Success and Failure nodes include account lockout functionality, when lockout is enabled in a realm, as follows:
- Success node:
Checks the User Status property of the user profile, when reached, and fails the authentication with an error message, if the account is marked as
Inactive:
The error message is returned in the JSON response if authenticating to the tree by using REST:
{
    "code":401,
    "reason":"Unauthorized",
    "message":"User Locked Out."
}
Resets the failure count in the user profile, when reached, if the User Status property is set to
Active.
- Failure node:
Checks the invalid attempts property of the user profile, and returns a warning message if the number of failed attempts is equal to or greater than the configured Warn User After N Failures value in the realm:

The error message is returned in the JSON response if authenticating to the tree by using REST:
{
    "code":401,
    "reason":"Unauthorized",
    "message":"Warning: You will be locked out after 1 more failure(s)."
}
Increments the failure count in the user profile, when reached.
Returns an error message if the account is marked as
Inactive:The error message is returned in the JSON response if authenticating to the tree by using REST:
{
    "code":401,
    "reason":"Unauthorized",
    "message":"User Locked Out."
}


For information on configuring account lockout in a realm, refer to "Configuring Account Lockout".
Specifying IDM Identity Resources in Trees
When running AM as part of an integrated platform with IDM, trees configured to use the platform must identify the type of identity resource or object the tree is working with. To do this, use the identityResource configuration property. If the property is not included in the tree configuration, it defaults to managed/user.
To update identityResource on a tree, use the REST API to update the tree:
curl \
 --request PUT \
 --header 'Accept-API-Version: protocol=2.1,resource=1.0' \
 --header 'Accept: application/json' \
 --header 'If-None-Match: *' \
 --header 'Content-Type: application/json' \
 --header 'Cookie: <omitted for length>' \
 --data '{
   "entryNodeId":"e301438c-0bd0-429c-ab0c-66126501069a",
   "nodes":{},
   "staticNodes":{},
   "description":"Example tree description",
   "identityResource":"managed/newObjectType"
 }' \
 "https://default.iam.example.com/am/json/realms/root/realm-config/authentication/authenticationtrees/trees/ExampleTree"
In the above example, the tree ExampleTree has no nodes added to it yet. It includes the identityResourceproperty, set to use a managed object in IDM called newObjectType.
Because this is a PUT request, you must include the entire tree as part of the request. For more information about the REST API, refer to Introducing REST in AM.
Configuring Authentication Trees
The following table summarizes the high-level tasks required to configure authentication trees:
| Task | Resources |
|---|---|
| Design the Authentication Journey of your Users Authentication trees are very flexible. For example, the same tree can branch for different use cases, or users can be forced to loop though branches until they are able to present the required credentials. It is easy to create a massive tree that is difficult to understand, read, and maintain in the UI. For this reason, AM allows you to nest trees within trees. The best way to tackle the design decision is to write down a list of required steps users would need to take to log in to your environment, and then check the list of nodes available in AM. TipEvaluation installs of AM that use the embedded data store provide ready-made sample authentication trees to demonstrate how they can be put together. These sample trees are not installed by default in instances of AM that use an external configuration store, or if you are upgrading an existing instance of AM. To obtain a copy of the sample trees that you can import into your instance, see How do I access and build the sample code provided for AM (All versions)? in the ForgeRock Knowledge Base. For information on importing the sample tree JSON files by using Amster, see Importing Configuration Data in the Amster 7.1 User Guide. |
|
| Decide if you Need Custom Authentication Nodes and Webhooks If the nodes available in AM or in the ForgeRock Marketplace do not suit your needs, you can build your own nodes. In the same way, you can create custom webhooks for nodes that need them. | |
| Configure your Authentication Trees Use the authentication tree designer to put together your trees quickly. | |
| Configure Webhooks, if Required If you have configured the |
On the Realms page of the AM console, select the realm in which to create the authentication tree.
On the Realm Overview page, select Authentication in the left-hand menu, and then select Trees.
On the Trees page, select Create Tree. Enter a tree name, for example
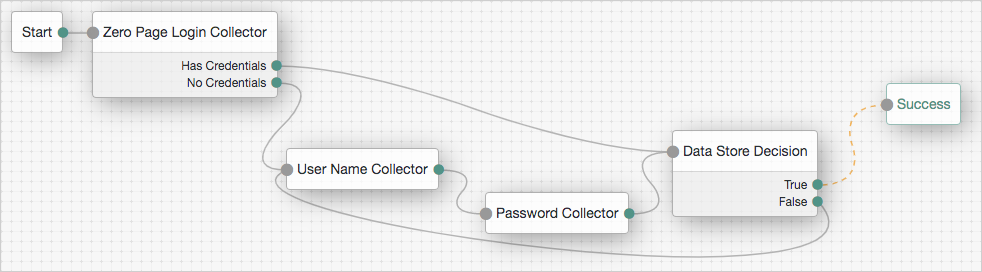
myAuthTree, and then select Create.The authentication tree designer is displayed, with the Start entry point connected to the Failure exit point.
The authentication tree designer provides the following features on the toolbar:
Button Usage 
Lay out and align nodes according to the order they are connected. 
Toggle the designer window between normal and full screen layout. 
Remove the selected node. Note that the Start entry point cannot be deleted. Add a node to the tree by dragging the node from the Components panel on the left-hand side and dropping it into the designer area.
The list of authentication nodes is split into a number of categories, which you can expand and collapse by clicking the category title.
You can use the filter text field to restrict the list of authentication nodes, which will match on the nodes' name, and any tags applied to the node:

(Optional) Configure the node properties by using the right-hand panel. For more information on the available properties for each node, see "Authentication Nodes Configuration Reference".
Connect the node to the tree as follows:
Select and drag the output connector from an existing node and drop it onto the new node.
Select and drag the output connector from the new node and drop it onto an existing node.
Nodes have one or more connectors, displayed as dots on the node. Unconnected connectors are colored red and must be connected to other nodes in the tree.
Tip
Input connectors appear on the left of the node, output connectors appear on the right.
A line is drawn between the connectors of connected nodes, and the connectors will no longer be red.
(Optional) Alter a connection by selecting and dragging the green connector in the connection and dropping it onto the new location.
Continue adding, connecting and removing nodes until the tree is complete, and then select Save.
Test your authentication tree by navigating to a URL similar to the following:
https://openam.example.com:8443/openam/XUI/?realm=/alpha&service=myAuthTree#login

Configuring Authentication Webhooks
This section covers creating webhooks, which are used to send HTTP POST calls to a server with contextual information about an authentication session when a predefined event occurs, for example, logging out.
Webhooks are used from within authentication trees, by the following nodes:
Perform the following steps to create an authentication webhook for use within an authentication tree:
In the AM console, go to Realms > Realm Name > Authentication > Webhooks.
To create a new webhook, select Create Webhook, specify a Webhook Name, and then select Create.
To edit an existing webhook, select the name of the webhook.
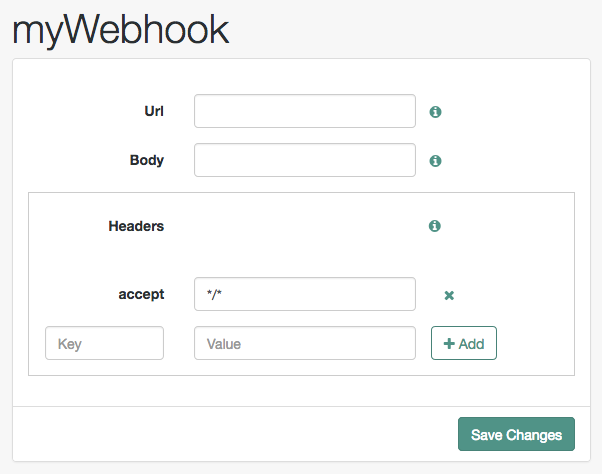
A screen similar to the following appears:

Complete the fields as required:
- Url
Specifies the URL to which the HTTP POST is sent when the event occurs.
- Body
Specifies the body of the HTTP POST. You can send different formats by also setting the correct Content-Type header in the
Headerproperty, for example:Form Data. Enter the body value in the format
parameter=value¶meter2=value2, and set aContent-Typeheader ofapplication/x-www-form-urlencoded.JSON Data. Enter the body value in the format
{"parameter":"value","parameter2":"value2"}, and set aContent-Typeheader ofapplication/json.
- Headers
Specifies any HTTP headers to add to the POST.
To add a header, enter the name of the header in the
Keyfield, and the value, and then click the Add button ().To remove a header, select the Delete button ().
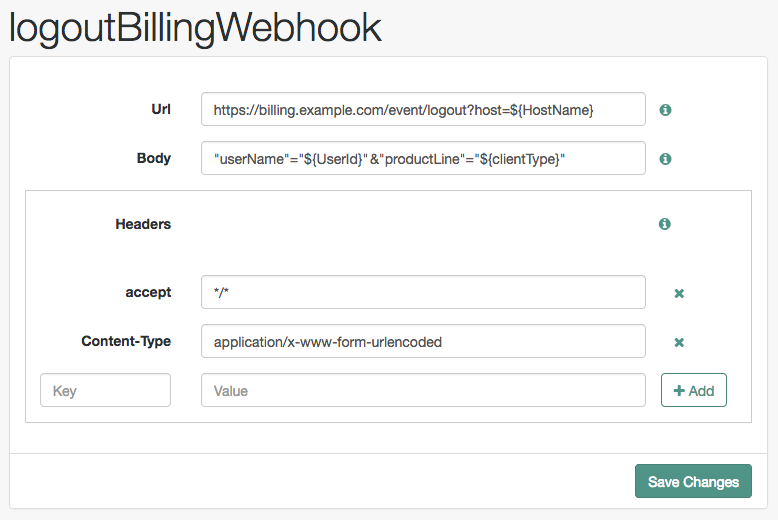
The fields in a webhook support variables for retrieving values from the user's session after successfully authenticating. Specify a variable in the following format:
${variable_name}To access the type of webhook event, use the `WebhookEventType` parameter key to return one of the following possible values:
LOGOUTUPGRADEDESTROYMAX_TIMEOUTIDLE_TIMEOUTFor example, to retrieve the event type as a query parameter:
&event=${WebhookEventType}You can use a variable to access custom properties added to the session by the Set Session Properties Node as well as the following session properties:
AMCtxIdamlbcookieauthInstantAuthLevelCharSetclientTypeFullLoginURLHostHostNameIndexTypeLocaleOrganizationPrincipalPrincipalsServicesuccessURLsun.am.UniversalIdentifierUserIdUserProfileUserTokenwebhooksThe following figure shows an example webhook, using variable substitutions:
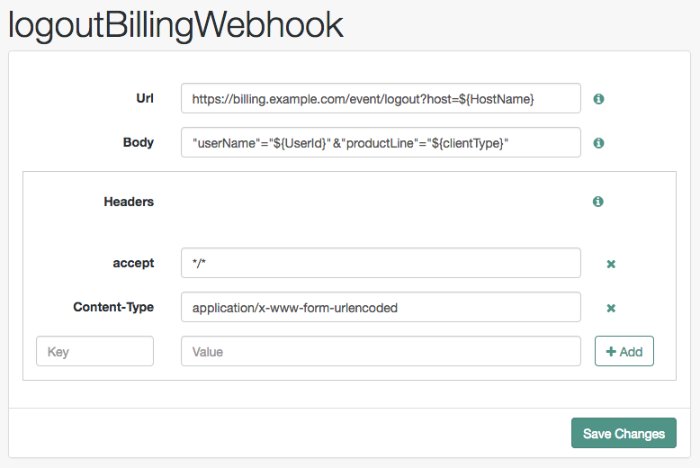
Warning
Specifying a variable that is not present in the user's session places the literal variable text in to the HTTP POST, for example
user=${UserId}, rather thanuser=demo.
Customizing Authentication Trees
Your deployment might require customizing standard authentication tree features.
For information on customizing authentication nodes, see Authentication Node Development Guide.
Creating Post-Authentication Hooks for Trees
This section explains how to create a hook used by a node within an authentication tree. These tree hooks can perform custom processing after an authentication tree has successfully completed and a session created.
AM includes the following authentication tree hooks:
-
CreatePersistentCookieJwt Used by the
SetPersistentCookieNodeauthentication node.-
UpdatePersistentCookieJwt Used by the
PersistentCookieDecisionNodeauthentication node.
The Core Class of an Authentication Tree Hook
The following example shows the UpdatePersistentCookieTreehook class, as used by the Persistent Cookie Decision node:
/*
* CCPL HEADER START
*
* This work is licensed under the Creative Commons
* Attribution-NonCommercial-NoDerivs 3.0 Unported License.
* To view a copy of this license, visit
* https://creativecommons.org/licenses/by-nc-nd/3.0/
* or send a letter to Creative Commons, 444 Castro Street,
* Suite 900, Mountain View, California, 94041, USA.
*
* You can also obtain a copy of the license at legal-notices/CC-BY-NC-ND.txt.
* See the License for the specific language governing permissions
* and limitations under the License.
*
* If applicable, add the following below this CCPL HEADER, with the fields
* enclosed by brackets "[]" replaced with your own identifying information:
* Portions Copyright [yyyy] [name of copyright owner]
*
* CCPL HEADER END
*
* Copyright 2018 ForgeRock AS.
*
*/
package org.forgerock.openam.auth.nodes.treehook;
import java.util.List;
import java.util.concurrent.TimeUnit;
import javax.inject.Inject;
import org.forgerock.guice.core.InjectorHolder;
import org.forgerock.http.protocol.Cookie;
import org.forgerock.http.protocol.Request;
import org.forgerock.http.protocol.Response;
import org.forgerock.openam.auth.node.api.TreeHook;
import org.forgerock.openam.auth.node.api.TreeHookException;
import org.forgerock.openam.auth.nodes.PersistentCookieDecisionNode;
import org.forgerock.openam.auth.nodes.jwt.InvalidPersistentJwtException;
import org.forgerock.openam.auth.nodes.jwt.PersistentJwtStringSupplier;
import org.slf4j.Logger;
import org.slf4j.LoggerFactory;
import com.google.inject.assistedinject.Assisted;
/**
* A TreeHook for updating a persistent cookie.
*/
@TreeHook.Metadata(configClass = PersistentCookieDecisionNode.Config.class)  public class UpdatePersistentCookieTreeHook implements TreeHook {
  private final Request request;
private final Response response;
private final PersistentCookieDecisionNode.Config config;
private final PersistentJwtStringSupplier persistentJwtStringSupplier;
private final PersistentCookieResponseHandler persistentCookieResponseHandler;
private final Logger logger = LoggerFactory.getLogger("amAuth");
/**
* The UpdatePersistentCookieTreeHook Constructor.
*
* @param request The request.
* @param response The response.
* @param config the config for updating the cookie.
*/
@Inject
private final Request request;
private final Response response;
private final PersistentCookieDecisionNode.Config config;
private final PersistentJwtStringSupplier persistentJwtStringSupplier;
private final PersistentCookieResponseHandler persistentCookieResponseHandler;
private final Logger logger = LoggerFactory.getLogger("amAuth");
/**
* The UpdatePersistentCookieTreeHook Constructor.
*
* @param request The request.
* @param response The response.
* @param config the config for updating the cookie.
*/
@Inject  public UpdatePersistentCookieTreeHook(@Assisted Request request, @Assisted Response response,
@Assisted PersistentCookieDecisionNode.Config config) {
this.request = request;
this.response = response;
this.config = config;
this.persistentJwtStringSupplier = InjectorHolder.getInstance(PersistentJwtStringSupplier.class);
this.persistentCookieResponseHandler = InjectorHolder.getInstance(PersistentCookieResponseHandler.class);
}
@Override
public void accept() throws TreeHookException {
public UpdatePersistentCookieTreeHook(@Assisted Request request, @Assisted Response response,
@Assisted PersistentCookieDecisionNode.Config config) {
this.request = request;
this.response = response;
this.config = config;
this.persistentJwtStringSupplier = InjectorHolder.getInstance(PersistentJwtStringSupplier.class);
this.persistentCookieResponseHandler = InjectorHolder.getInstance(PersistentCookieResponseHandler.class);
}
@Override
public void accept() throws TreeHookException {  logger.debug("UpdatePersistentCookieTreeHook.accept");
String orgName = PersistentCookieResponseHandler.getOrgName(response);
Cookie originalJwt = getJwtCookie(request, config.persistentCookieName());
if (originalJwt != null) {
String jwtString;
try {
jwtString = persistentJwtStringSupplier.getUpdatedJwt(originalJwt.getValue(), orgName,
String.valueOf(config.hmacSigningKey()), config.idleTimeout().to(TimeUnit.HOURS));
} catch (InvalidPersistentJwtException e) {
logger.error("Invalid jwt", e);
throw new TreeHookException(e);
}
if (jwtString != null && !jwtString.isEmpty()) {
persistentCookieResponseHandler.setCookieOnResponse(response, request, config.persistentCookieName(),
jwtString, originalJwt.getExpires(), config.useSecureCookie(), config.useHttpOnlyCookie());
}
}
}
private Cookie getJwtCookie(Request request, String cookieName) {
if (request.getCookies().containsKey(cookieName)) {
List<Cookie> cookies = request.getCookies().get(cookieName);
for (Cookie cookie : cookies) {
if (cookie.getName().equals(cookieName)) {
return cookie;
}
}
}
return null;
}
}
logger.debug("UpdatePersistentCookieTreeHook.accept");
String orgName = PersistentCookieResponseHandler.getOrgName(response);
Cookie originalJwt = getJwtCookie(request, config.persistentCookieName());
if (originalJwt != null) {
String jwtString;
try {
jwtString = persistentJwtStringSupplier.getUpdatedJwt(originalJwt.getValue(), orgName,
String.valueOf(config.hmacSigningKey()), config.idleTimeout().to(TimeUnit.HOURS));
} catch (InvalidPersistentJwtException e) {
logger.error("Invalid jwt", e);
throw new TreeHookException(e);
}
if (jwtString != null && !jwtString.isEmpty()) {
persistentCookieResponseHandler.setCookieOnResponse(response, request, config.persistentCookieName(),
jwtString, originalJwt.getExpires(), config.useSecureCookie(), config.useHttpOnlyCookie());
}
}
}
private Cookie getJwtCookie(Request request, String cookieName) {
if (request.getCookies().containsKey(cookieName)) {
List<Cookie> cookies = request.getCookies().get(cookieName);
for (Cookie cookie : cookies) {
if (cookie.getName().equals(cookieName)) {
return cookie;
}
}
}
return null;
}
}
| The Before defining the core class, use a Java NoteThe node class must invoke ActionBuilder's For example, in the @Override
public Action process(TreeContext context) throws NodeProcessException {
...
actionBuilder = actionBuilder
.addSessionHook(UpdatePersistentCookieTreeHook.class, nodeId, getClass().getSimpleName());
}
|
| The core class must implement the |
| AM uses Google's Guice dependency injection framework for authentication nodes and tree hooks. Use the For more information, see the Inject annotation type and the Assisted annotation type in the Google Guice Javadoc. |
| Creating an |