Testing Push Authentication
AM presents you with a page for entering only your user ID, or user ID and password. After you provide those credentials, AM verifies them. If your credentials are valid and the account has a device registered for push notifications, AM sends a push notification to the registered device.
If the user does not yet have a device registered for push authentication, see "Registering".
Note
The device needs access to the Internet to receive push notifications, and the AM server must be able to receive responses from the device.
On your registered device, you will receive a push notification from AM. Depending on the state of the phone and the ForgeRock Authenticator app, respond to the notification as follows:
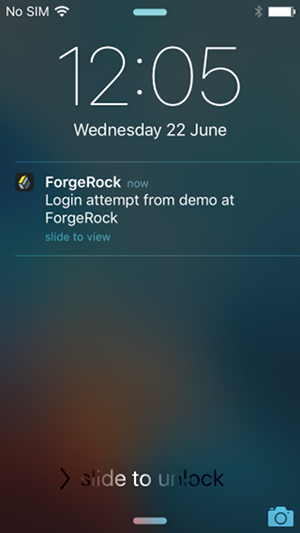
If the phone is locked, the notification may appear similar to the following:

Slide the notification across the screen, then unlock the phone. The ForgeRock Authenticator app will automatically open and display the push notification authentication screen.
If the phone is not locked, and the ForgeRock Authenticator app is not open, the notification may appear similar to the following:
Tap the notification. The ForgeRock Authenticator app will automatically open and display the push notification authentication screen.
If the phone is not locked, and the ForgeRock Authenticator app is open, the app will open the push notification authentication screen automatically.

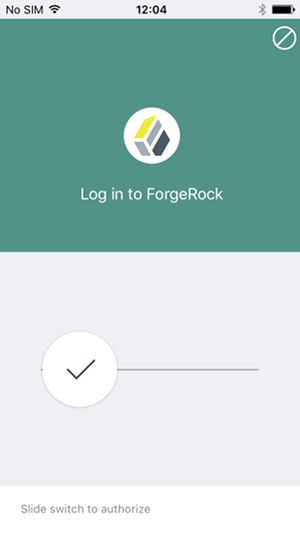
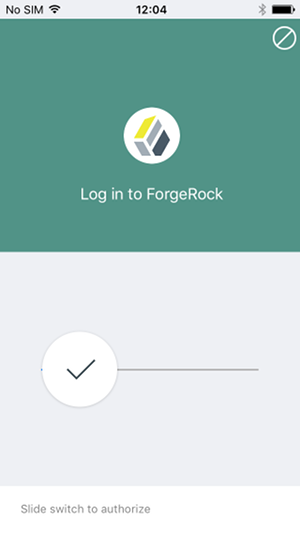
On the push notification authentication screen, approve the request using one of the following methods:
Slide the switch with a checkmark on horizontally to the right.
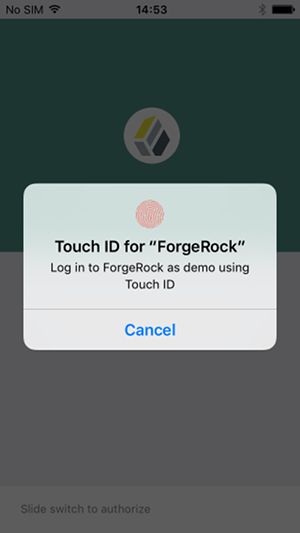
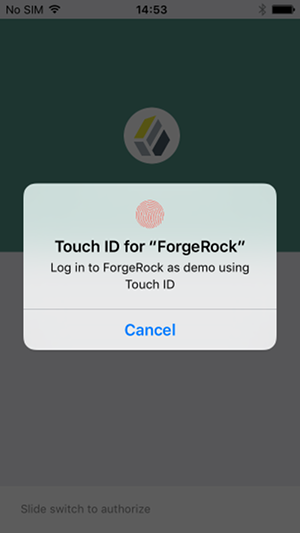
If the registered device supports Touch ID, and fingerprints have been provided, you can approve the request by using a registered fingerprint.
Tip
If the registered device supports face recognition and you have set up facial recognition, you can approve the request by glancing at your device.
AM will display the user's profile page.
Deny the request by tapping the cancel icon in the top-right of the screen or, if Touch ID or face recognition are enabled, tap the Cancel button.
After a timeout has passed, AM will report that authentication has failed.
Note
If you do not approve or deny the request on the registered device, the AM Push Authentication page will timeout and the authentication will fail. The timeout can be configured in the ForgeRock Authenticator (Push) authentication module settings or in the Push Sender node.
If your credentials are valid but the account does not have a device registered for push notifications, AM presents the MFA Registration Options screen:
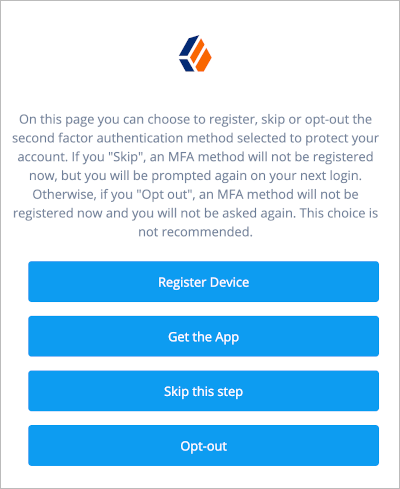
- Register Device
The journey continues to the Push Registration Node, which displays the QR code that should be scanned with a suitable authenticator app.
For information on how to register the ForgeRock Authenticator for use with push authentication, follow the steps in "Registering the ForgeRock Authenticator for Multi-Factor Authentication".
- Get the App
The journey continues to the Get Authenticator App Node, which displays the links needed to obtain a suitable app; for example, the ForgeRock Authenticator.
- Skip this step
Displayed only if the node configuration allows the user to skip. In this example tree, skipping is linked to the Success node.
- Opt-out
Displayed only if the node configuration allows the user to skip or opt out. The journey continues to the Opt-out Multi-Factor Authentication Node, which updates the users' profile to skip MFA with push in the future. In this example, after updating the profile, the journey continues to the Success node.
Once the registration is complete, the path returns to the Push Sender Node, which starts the actual push notification stage of the journey. See "Receiving Push Notifications".