MFA: Web Authentication (WebAuthn)
Web Authentication allows users to authenticate by using an authenticator device, for example the fingerprint scanner on their laptop or phone.
Communication with the authentication devices is handled by the user's browser. AM requests that the browser activates authenticators with certain criteria; for example it must be built-in to the platform rather than a roaming USB device, and/or that it must verify the identity of the user, rather than simply that a user is present.
To use WebAuthn with AM, users must first register their authenticators. If recovery codes are enabled, users must also make a copy of their codes.
Registration involves the selected authenticator creating, or minting, a key pair. The public key of the pair is returned to AM and stored in the user's profile. The private key is stored securely, either in the authenticator itself, or in the platform managing the authenticators. The private key does not leave the client at any time.
When authenticating by using WebAuthn, the authenticator locks some data using the stored private key, which is sent to AM to verify using the public key stored in the user's profile. If the data is verified as being from the correct device, and passes any attestation checks, the authentication is considered successful.
AM supports web authentication in the following user agents and platform minimum versions:
| User Agent | Platform | Version | Supported? |
|---|---|---|---|
| Google Chrome | Desktop | 70 | |
| Android | 70 | | |
| Microsoft Edge | Desktop | 18 | |
| Mozilla Firefox | Desktop | 60 | |
Creating Trees for Web Authentication (WebAuthn)
This section explains how to create an authentication tree to authenticate users by using a WebAuthn device, and allow them to register a device if they have not already done so.
If the user has already registered a WebAuthn device, they only need to enter their username, and then perform the authorization gesture with their registered device to access their profile.
If the user does not have a registered device, they are prompted for their password, and must be verified by the Data Store Decision Node before registering a new WebAuthn device. Once completed, they must authenticate with the new device before gaining access to their profile page.
This procedure assumes the following:
The WebAuthn Profile Encryption Service is configured.
This service specifies the attribute in which to store information about registered WebAuthn devices, and whether to encrypt that information.
For detailed information about the available properties, see "WebAuthn Profile Encryption Service".
To create a multi-factor authentication tree for WebAuthn authentication, and registration if required, perform the following steps:
Note
The tree created in this procedure is an example, and does not provide user-friendly features, such as allowing retries of the users' password.
In the AM console, go to Realms > Realm Name > Authentication > Trees.
Create the authentication tree as follows:
Click Create Tree.
The New Tree page appears.
Specify a name of your choosing, for example,
myWebAuthnTree, and then click Create.The authentication tree designer is displayed, with the Start entry point connected to the Failure exit point.
You can add nodes to the authentication tree by dragging the node from the Components panel on the left-hand side and dropping it into the designer area.
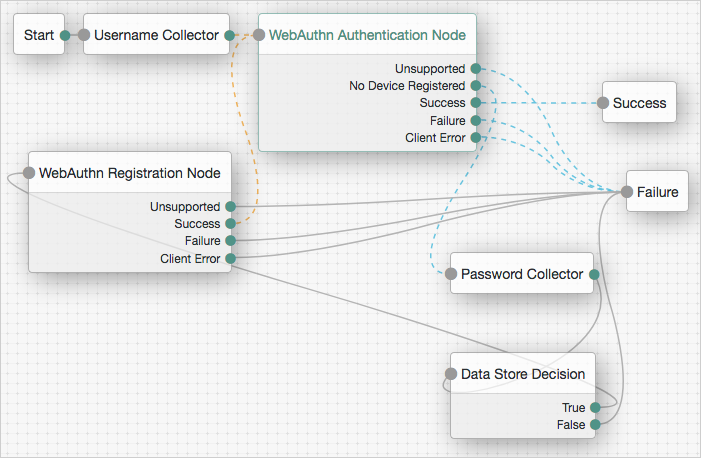
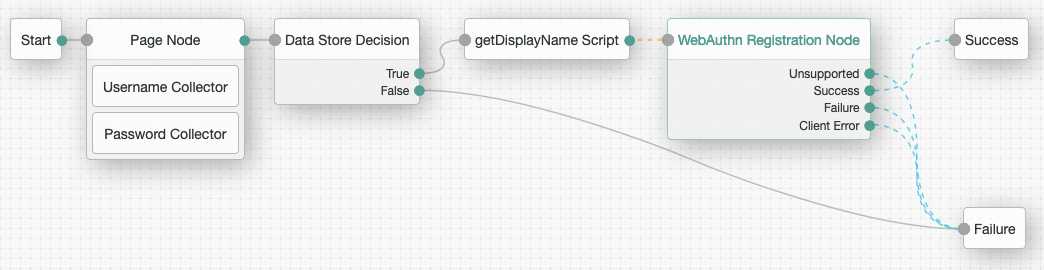
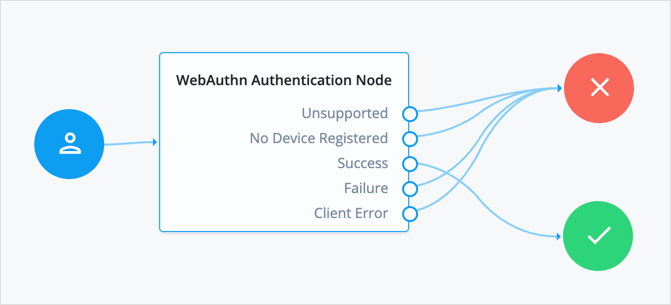
Add the following nodes to the authentication tree:
Connect the nodes as demonstrated in the following figure:
Save your changes.
Test your WebAuthn authentication and registration tree as follows:
Log out of AM, and then go to a URL similar to the following:
https://openam.example.com:8443/openam/XUI/?realm=/alpha&service=myWebAuthnTree#loginImportant
You must connect over HTTPS in order to use Web Authentication.
A login screen prompting you to enter your user ID appears.
Enter the username of an existing account in the specified realm. For example, enter
demo.(Optional) If the
demouser does not have a registered device:When asked for the user's password, enter the default
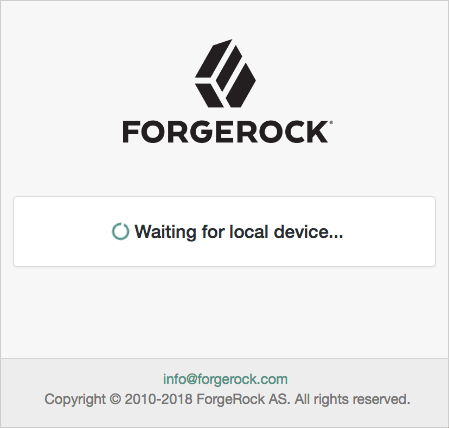
Ch4ng31t.At the following screen, register a WebAuthn authenticator by performing an authorization gesture, for example press the button on a connected Yubikey.
Note
The user's browser may present a consent pop-up to allow access to the authenticators available on the client. When consent has been granted, the browser activates the relevant authenticators, ready for registration.
If the device registration is successful, the user is redirected to the new node in the tree in order to authenticate with the newly registered device.
When prompted, authenticate to AM by performing an authorization gesture with a registered device.
If the authorization is verified, the user's profile page is displayed.
Click the Dashboard link to see a list of the registered WebAuthn authenticators, and to rename or delete them. The default name for a new device is
New Security Key.

Configuring Usernameless Authentication with ForgeRock Go
With ForgeRock Go, you can create a secure and seamless login experience by authenticating with any credential on the user’s device that supports FIDO2 WebAuthn.
You can also extend passwordless authentication to include usernameless authentication with popular authenticators that support resident keys; for example, Windows Hello (biometric authenticators).
To use usernameless authentication, you must register an authenticator that supports resident keys to the user's profile, and enable the option to associate a certificate on the device with the user's username.
Once registered, that device can be used to authenticate the user without them having to provide their credentials; they just have to select the appropriate entry to use from the list their device provides.
To Configure Usernameless Authentication with ForgeRock Go, create a Web Authentication registration tree to associate a device that supports resident keys with a user. The registration tree is similar to that described in "Creating Trees for Web Authentication (WebAuthn)".
Create a second tree that lets users authenticate to AM without entering their username or password, by using Forgerock Go.
Note
The trees in this procedure are examples, and do not provide user-friendly features, such as allowing retries, or redirecting to further help on failures.
In the AM console, select the realm that will contain the ForgeRock Go registration tree.
Create the registration tree as follows:
Select Authentication > Trees, and then click Create Tree.
The New Tree page appears.
Specify a name of your choosing, for example,
fr-go-reg, and then click Create.The authentication tree designer is displayed, with the Start entry point connected to the Failure exit point.
You can add nodes to the authentication tree by dragging the node from the Components panel on the left side and dropping it into the designer area.
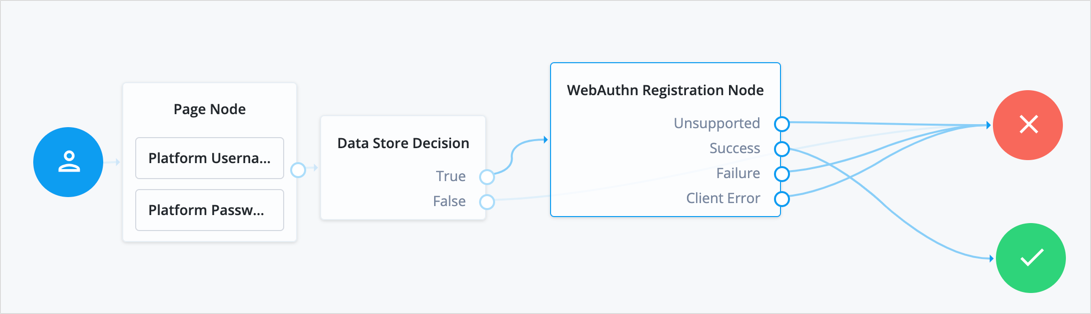
Add the following nodes to the authentication tree:
(OPTIONAL) Scripted Decision Node
When configured for ForgeRock Go, the WebAuthn Registration node will store the value of the
usernameauthentication tree shared state variable in the device by default. This value will later be used to identify the user during authentication.Use a Scripted Decision Node to customize the display name or string to be saved in the shared state. You will later configure the variable containing the data in the the WebAuthn Registration node.
var username = sharedState.get("username"); var displayName = ''; var fullName = idRepository.getAttribute(username, "CN").iterator().next(); var email = idRepository.getAttribute(username, "mail").iterator().next(); if(fullName){ displayName += fullName; } if(email){ displayName += ' (' + email + ')'; } sharedState.put("displayName", displayName.toString()); outcome = "continue";(OPTIONAL) Page Node
Connect the nodes as demonstrated in the following figure:
In the WebAuthn Registration node properties, ensure Username to device is enabled.
(Optional) If you are using a Scripted Decision node to create the display name, enter the shared state variable name into the Shared state attribute for display name property in the WebAuthn Registration node.
(Optional) (ForgeRock Identity Platform deployments) If you are not using the Scripted Decision node to create the display name, enter
userNameinto the Shared state attribute for display name property in the WebAuthn Registration node.Save your changes.
Create an authentication tree for ForgeRock Go, and specify a name of your choosing; for example,
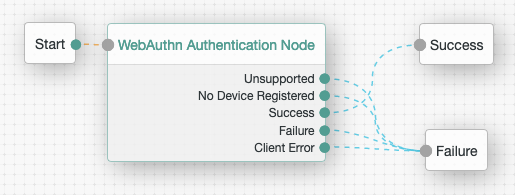
fr-go-auth.Add a WebAuthn Authentication Node to the authentication tree.
Connect the nodes as demonstrated in the following figure:
In the WebAuthn Authentication node properties, ensure Username from device is enabled.
Save your changes.
You are now ready to register a device, and authenticate by using ForgeRock Go.
Proceed to "Registering and Authenticating with ForgeRock Go".
Follow these steps to register a device for use with usernameless authentication, and then authenticate without having to provide your username or password.
To register a device for use with ForgeRock Go:
Log out of AM, and then go to your ForgeRock Go registration tree, with a URL similar to the following:
https://openam.example.com:8443/openam/XUI/?realm=/alpha&service=fr-go-reg#loginImportant
You must connect over HTTPS in order to use Web Authentication.
A login screen prompting you to enter your credentials appears.
Enter the username and password of an existing account in the specified realm. For example, enter
demo, and the passwordCh4ng31t, and then click .If you are authenticating from a FIDO2-enabled device, a dialog will display asking you to choose the method to verify your identity; for example, a USB security key, or built-in biometric sensor.
Select the option you want to associate with the user.
Perform the authorization gesture of the chosen option when asked to do so. For example, scan your fingerprint with TouchID, or press the button on your USB security key.
If successful, you are taken to the profile page for the user.
(Optional) The new device appears on the Dashboard page, as New Security Key.
Give a suitable name to the device; for example, Apple Mac TouchID, by clicking the context icon ( ), and selecting Settings.
To use a device to authenticate without username or password by using ForgeRock Go:
Log out of AM, and then go to your ForgeRock Go authentication tree, with a URL similar to the following:
https://openam.example.com:8443/openam/XUI/?realm=/alpha&service=fr-go-auth#loginImportant
You must connect over HTTPS in order to use Web Authentication.
Perform the authorization gesture of the chosen option when asked to do so. For example, scan your fingerprint with TouchID, or press the button on your USB security key.
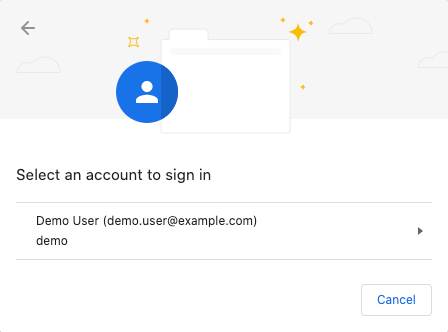
If successful, a list of the accounts associated with the authentication device displays:

Note that in this example the user's full name and email address appear, which were gathered by the Scripted Decision node from the user's profile during registration.
Select the account that you want to sign in.
If successful, you are taken to the profile page for the user, without having to enter username or password credentials!
Configuring WebAuthn Trust Anchors
AM 7 added support for a new CA attestation type, whereby the attestation data received from a device can be verified as authentic by using the relevant CA certificates.
If the trust chains defined by the CA certificates have CRL or OCSP entries, AM is also able to check for revocation.
To configure trust anchors in AM, you should obtain the CA-issued certificate chains for the devices you intend to verify, and make them available to AM in a secret store.
When the relevant certificate chains are in place, configure the "WebAuthn Registration Node" with the alias of the secret store, and set Preferred mode of attestation to either DIRECT or INDIRECT.
Perform the following steps to enable trust anchors and achieve CA attestation for trusted devices:
Obtain the CA-issued certificate chains for the devices you want to verify.
You may need to consult the device manufacturer to obtain the certificate chains.
Import the certificate chains into a keystore:
$ keytool -import \
  -file /Downloads/vendor-a-ca.crt \
  -alias "vendor-a-devices" \
  -storetype JCEKS \
  -storepass changeit \
  -keystore /path/to/openam/security/keystores/webauthnTrustStore.jceks
The command above imports a hypothetical trust chain from "Vendor A" into a secret store named
webauthnTrustStore.jceks, located in the default AM path for keystores,/path/to/openam/security/keystoresIf they keystore does not exist, the command creates it and sets the store password to
changeit; otherwise it adds the specified certificate to the secret store.Repeat the previous step until the
webauthnTrustStore.jcekssecret store contains all of the CA-issued certificate chains for the devices you want to verify.Ensure that the password to access the new
webauthnTrustStore.jcekssecret store is available to your AM instance; for example, by encrypting the password and adding the result to a new file namedwebauthnStorepass, in/path/to/openam/security/secrets/encrypted.For more information, see "File System Secret Volumes Secret Stores".
In the AM console, go to the realm containing the web authentication registration tree that will attempt CA-level attestation, navigate to Authentication > Trees, and click your registration tree.
Select the WebAuthn Registration Node, and in the properties pane:
Set the property to
DIRECTorINDIRECT.Set the Trust Store alias property to a string that will identify both the name of the trust store, and will be the suffix of the secret ID used for mappings; for example,
webauthnTrustStore.(Optional) If you want to act upon the attestation type achieved when registering a device; for example, using a script, then you should enable the Store data in transient state property.
When this is enabled, the WebAuthn Registration Node stores the level of attestation achieved in a variable named
webauthnAttestationType, in the transient state of the tree.Tip
Use code similar to the following JavaScript to read the value of
webauthnAttestationType:var attestationLevel = transientState.get("webauthnAttestationType");Save your changes.
For more information on the available properties, see "WebAuthn Registration Node".
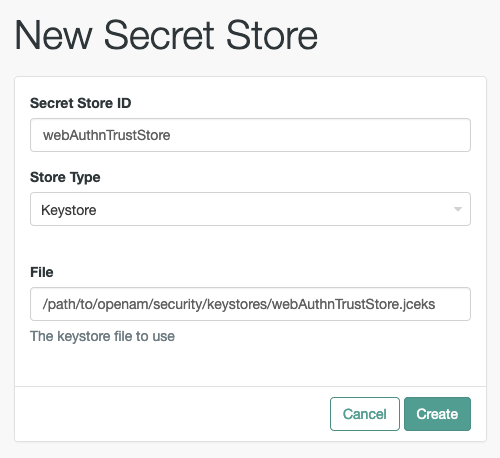
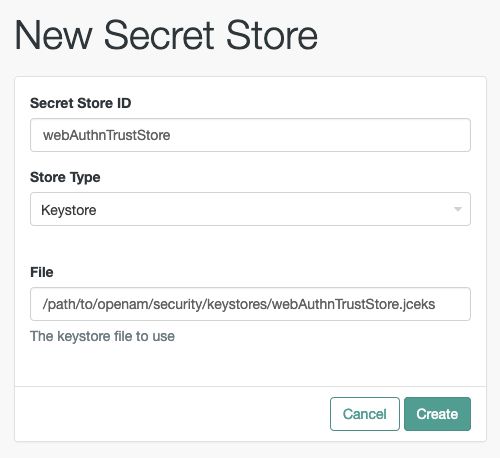
Navigate back to the realm page, select Secret Stores, and then click .
In Secret Store ID, enter the alias you specified in the registration node earlier; for example,
webauthnTrustStore.Select the store type, specify the path to the store, and then click .
Set the Store password secret ID to the name of the file you created earlier with the encrypted value of the store password in; for example,
webauthnStorepass.Save your changes.
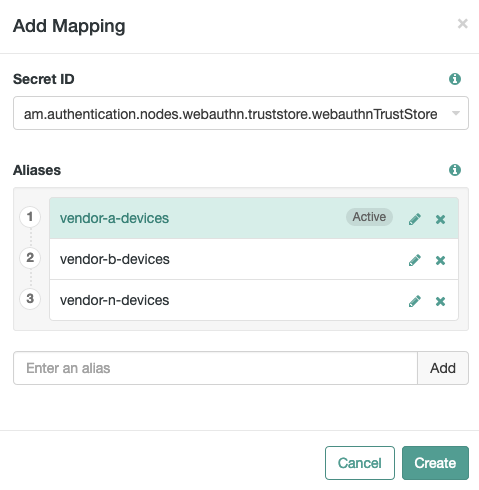
On the Mappings tab, click .
In , select the ID that begins with
am.authentication.nodes.webauthn.truststore, and has the alias you specified earlier as the suffix. For example,am.authentication.nodes.webauthn.truststore.webauthnTrustStore.Enter the alias of the certificate chains you want to use for verification, and then click .
Repeat this step to add all the aliases of certificate chains you want to use for CA-level attestation:

Save your changes.
Your registration tree is now ready to verify the attestation data against the list of configured certificate chains.