Authentication Modules Configuration Reference
The AM console provides two places where you can configure authentication modules:
Under Configure > Authentication, you configure default properties for global authentication modules.
Under Realms > Realm Name > Authentication > Modules, you configure modules for your realm.
The configuration of individual modules depend on its function. The configuration of an Active Directory instead of the LDAP authentication module requires connection information and details about where to search for users. In contrast, the configuration of the HOTP module for OTP authentication requires data about the password length and the mail server or SMS gateway to send the password during authentication.
Account Active Check Module
Lets you determine whether an account is marked as active, or locked.
By default, AM checks if a user account is active or locked after processing an entire authentication chain. This means users with locked accounts may be asked to perform unnecessary authentication steps, such as providing a one-time password, before authentication fails.
Use the Account Active Check module to check for active or locked status immediately after determining the user account; for example, after a DataStore or LDAP module. If the account is locked, the chain will fail early, without processing modules that appear after the Account Active Check module.
For more information, see "Configuring Account Lockout".
Active Directory Authentication Module
AM connects to Active Directory over Lightweight Directory Access Protocol (LDAP). AM provides separate Active Directory and LDAP modules to support the use of both Active Directory and another directory service in an authentication chain.
For detailed information about this module's configuration properties, see "Active Directory Module Properties".
Adaptive Risk Authentication Module
The Adaptive Risk module is designed to assess risk during authentication, so that AM can determine whether to require the user to complete further authentication steps. After configuring the Adaptive Risk module, insert it in your authentication chain with criteria set to Sufficient as shown in the following example:

In the example authentication chain shown, AM has users authenticate first using the LDAP module providing a user ID and password combination. Upon success, AM calls the Adaptive Risk module. The Adaptive Risk module assesses the risk based on your configured parameters. If the Adaptive Risk module calculates a total score below the threshold you set, the module returns success, and AM finishes authentication processing without requiring further credentials. Otherwise, the Adaptive Risk module evaluates the score to be above the risk threshold, and returns failure. AM then calls the HOTP module, requiring the user to authenticate with a one-time password delivered to her by email or by SMS to her mobile phone.
When you configure the Adaptive Risk module to save cookies and profile attributes after successful authentication, AM performs the save as post-authentication processing, only after the entire authentication chain returns success. You must set up AM to save the data as part of post-authentication processing by editing the authentication chain to add org.forgerock.openam.authentication.modules.adaptive.AdaptivePostAuthenticationPlugin to the list of post-authentication plugins.
When the Adaptive Risk module relies on the client IP address, and AM lies behind a load balancer or proxy layer, configure the load balancer or proxy to send the address by using the X-Forwarded-For header, and configure AM to consume and forward the header as necessary. For details, see "Handling HTTP Request Headers".
For detailed information about this module's configuration properties, see "Adaptive Risk Authentication Module Properties".
Amster Authentication Module
This module lets Amster clients authenticate using established SSH keys.
The Amster client signs a JWT (containing subject and expiration claims) using a local private key. The subject claim is interpreted as the username of the principal. AM verifies the signature, using the list of public keys in its authorized keys file, and finding a key that matches the JWT's key identifier claim. If the entry in the authorized keys file contains a from> parameter, only connections that originate from the qualifying host are permitted.
For detailed information about this module's configuration properties, see "Amster Authentication Module Properties".
Anonymous Authentication Module
This module lets you configure and track anonymous users, who can log in to your application or web site without login credentials. Typically, you would provide such users with very limited access, for example, an anonymous user may have access to public downloads on your site. When the user attempts to access resources that require more protection, the module can force further authentication for those resources.
For detailed information about this module's configuration properties, see "Anonymous Authentication Module Properties".
Certificate Authentication Module
X.509 digital certificates can enable secure authentication without the need for user names and passwords or other credentials. Certificate authentication can be used to manage authentication by applications. If all certificates are signed by a recognized Certificate Authority (CA), then you might not need additional configuration. If you need to look up public keys of AM clients, this module can also look up public keys in an LDAP directory server.
When you store certificates and certificate revocation lists (CRL) in an LDAP directory service, you must configure:
How to access the directory service.
How to look up the certificates and CRLs, based on the fields in the certificates that AM clients present to authenticate.
Access to the LDAP server and how to search for users is similar to LDAP module configuration as in "LDAP Authentication Module". The primary difference is that, unlike for LDAP configuration, AM retrieves the user identifier from a field in the certificate that the client application presents, then uses that identifier to search for the LDAP directory entry that holds the certificate, which should match the certificate presented. For example, if the Subject field of a typical certificate has a DN C=FR, O=Example Corp, CN=Barbara Jensen, and Barbara Jensen's entry in the directory has cn=Barbara Jensen, then you can use CN=Barbara Jensen from the Subject DN to search for the entry with cn=Barbara Jensen in the directory.
For information about how to configure certificate authentication, refer to "How do I configure certificate-based authentication in AM/OpenAM (All versions)?" and "How do I troubleshoot certificate-based authentication issues in AM/OpenAM (All versions)?" in the ForgeRock Knowledge Base.
For detailed information about this module's configuration properties, see "Certificate Authentication Module Properties".
Data Store Authentication Module
The Data Store authentication module allows a login using the identity repository of the realm to authenticate users. The Data Store module removes the requirement to write an authentication plugin module, load, and then configure the authentication module if you need to authenticate against the same data store repository. Additionally, you do not need to write a custom authentication module where flatfile authentication is needed for the corresponding repository in that realm.
The Data Store module is generic. It does not implement data store-specific capabilities, such as the password policy and password reset features provided by LDAP modules. Therefore, the Data Store module returns failure when such capabilities are invoked.
For detailed information about this module's configuration properties, see "Data Store Authentication Module Properties".
Device ID (Match) Authentication Module
The Device ID (Match) module provides device fingerprinting functionality for risk-based authentication. The Device ID (Match) module collects the unique characteristics of a remote user's computing device and compares them to characteristics on a saved device profile. The module computes any variances between the collected characteristics to those stored on the saved device profile and assigns penalty points for each difference.
For detailed information about this module's configuration properties, see "Device ID (Match) Authentication Module Properties".
In general, you can configure and gather the following device characteristics:
User agents associated with the configuration of a web browser
Installed fonts
Plugins installed for the web browser
Resolution and color depth associated with a display
Timezone or geolocation of a device
For example, when a user who typically authenticates to AM using Firefox and then logs on using Chrome, the Device ID (Match) module notes the difference and assigns penalty points to this change in behavior. If the module detects additional differences in behavior, such as browser fonts, geolocation, and so forth, then additional points are assessed and calculated.
If the total number of penalty points exceeds a pre-configured threshold value, the Device ID (Match) module fails and control is determined by how you configured your authentication chain. If you include the HOTP module in your authentication chain, and if the Device ID (Match) module fails after the maximum number of penalty points have been exceeded, then the authentication chain issues a HOTP request to the user, requiring the user to identify themselves using two-factor authentication.
Important
By default, the maximum penalty points is set to 0, which you can adjust in the server-side script.
The Device ID (Match) module comes pre-configured with default client-side and server-side JavaScript code, supplying the logic necessary to fingerprint the user agent and computer. Scripting allows you to customize the code, providing more control over the device fingerprint elements that you would like to collect. While AM scripting supports both the JavaScript (default) and Groovy languages, only server-side scripts can be written in either language. The client-side scripts must be written in the JavaScript language.
Caution
The Device ID (Match) module's default JavaScript client-side and server-side scripts are fully functional. If you change the client-side script, you must also make a corresponding change to the server-side script. For a safer option, if you want to change the behavior of the module, you can make a copy of the scripts, customize the behavior, and update the Device ID (Match) modules to use the new scripts.
The Device ID (Match) module does not stand on its own within an authentication chain and requires additional modules. For example, you can have any module that identifies the user (for example, DataStore, Active Directory or others), Device ID (Match), any module that provides two-factor authentication, for example the ForgeRock Authenticator (OATH) or ForgeRock Authenticator (Push) authentication modules, and Device ID (Save) within your authentication chain.
As an example, you can configure the following modules with the specified criteria:
DataStore - Requisite. The Device ID (Match) module requires user authentication information to validate the username. You can also use other modules that identify the username, such as LDAP, Active Directory, or RADIUS.
Device ID (Match) - Sufficient. The Device ID (Match) runs the client-side script, which invokes the device fingerprint collectors, captures the data, and converts it into a JSON string. It then auto-submits the data in a JSP page to the server-side scripting engine.
The server-side script calculates the penalty points based on differences between the client device and stored device profile, and whether the client device successfully "matches" the stored profile. If a match is successful, AM determines that the client's device has the required attributes for a successful authentication.
If the device does not have a match, then the module fails and falls through to the HOTP module for further processing.
HOTP - Requisite. If the user's device does not match a stored profile, AM presents the user with a HMAC One-Time Password (HOTP) screen either by SMS or email, prompting the user to enter a password.
You can also use any other module that provides two-factor authentication.
After the HOTP has successfully validated the user, the Device ID (Save) module gathers additional data from the user. For specific information about the HOTP module, see "HOTP Authentication Module".
Device ID (Save) - Required. The Device ID (Save) module provides configuration options to enable an auto-save feature on the device profile as well as set a maximum number of stored device profiles on the user entry or record. Once the maximum number of stored device profiles is reached, AM deletes the old data from the user record as new ones are added. User records could thus contain both old and new device profiles.
If the auto-save feature is not enabled, AM presents the user with a screen to save the new device profile.
The module also takes the device print and creates a JSON object that includes the ID, name, last selected date, selection counter, and device print. For specific information about the Device ID (Save) module, see "Device ID (Save) Module".
Note
If a user has multiple device profiles, the profile that is the closest match to the current client details is used for the comparison result.
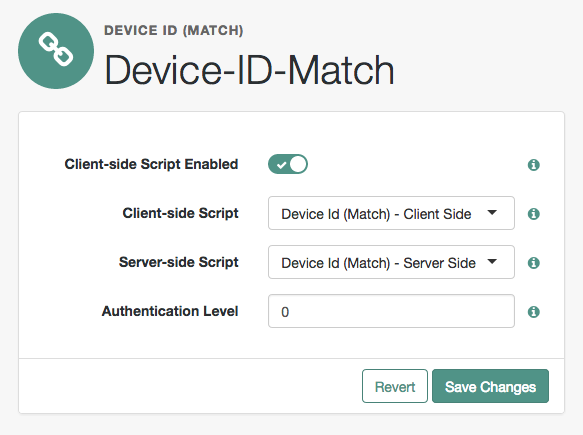
In the AM console, go to Realms > Realm Name > Authentication > Modules.
To add the Device ID (Match) module, do the following substeps:
Click Add Module.
In the Module Name box, enter
Device-ID-Match.In the Type box, select
Device Id (Match), and then click Create.Click Save Changes.
To make adjustments to the default scripts, click Scripts drop-down list, and then click
Device Id (Match) - Client Side.To make corresponding changes to the server-side script, click Scripts drop-down list, and then click
Device Id (Match) - Server Side. For more information, see Managing Scripts (UI).
In the AM console, go to Realms > Realm Name > Authentication > Chains.
On the Authentication Chains page, do the following steps:
Click Add Chain. In the Chain Name box, enter a descriptive label for your authentication chain, and then click Create.
Click Add Module.
On the New Module dialog, select the authentication module, select the criteria, and then click Ok to save your changes. Repeat the last two steps to enter each module to your chain.
For example, you can enter the following modules and criteria:
Module Criteria DataStore REQUISITE Device-ID-Match SUFFICIENT HOTP REQUISITE Device-ID-Save REQUIRED It is assumed that you have added the Device Id (Match) and Device Id (Save) modules. If you have not added these modules, see "To Configure the Device ID (Match) Authentication Module" and "To Configure the Device ID (Save) Authentication Module".
Review your authentication chain, and then click Save Changes.
What the User Sees During Authentication
When the user logs on to the AM console, AM determines if the user's device differs from that of the stored profile. If the differences exceed the maximum number of penalty points or a device profile has not yet been stored, AM sends an "Enter OTP" page, requiring the user to enter a one-time password, which is sent to the user via email or SMS. The user also has the option to request a one-time password.
Next, because the Device ID (Save) module is present, AM presents the user with a "Add to Trusted Devices?" page, asking if the user wants to add the device to the list of trusted device profiles. If the user clicks "Yes", AM prompts the user to enter a descriptive name for the trusted device.
Next, AM presents the user with the User Profile page, where the user can click the Dashboard link at top to access the My Applications and Authentication Devices page. Once on the Dashboard, the user can view the list of trusted devices or remove the device by clicking the Delete Device link.
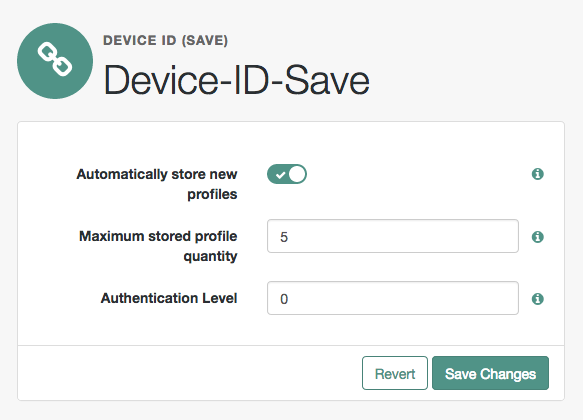
Device ID (Save) Module
The Device ID (Save) module saves a user's device profile. The module can either save the profile upon request, requiring the user to provide a name for the device and explicitly save it, or it can save the profile automatically. If a user has multiple device profiles, the profile that is the closest match to the current client details is used for the comparison result.
For detailed information about this module's configuration properties, see "Device ID (Save) Authentication Module Properties".
Within its configured authentication chain, the Device ID (Save) module also takes the device print and creates a JSON object that consists of the ID, name, last selected date, selection counter, and device print itself.
In the AM console, go to Realms > Realm Name, > Authentication > Modules.
To add the Device ID (Save) module, click Add Module.
In the Module Name box, enter
Device-ID-Save.In the Type box, select
Device Id (Save), and then click Create.To configure the Device-Id (Save) module, do the following:
Click the Automatically store new profiles checkbox. If this box is left unchecked, the user will be prompted to give consent to store new profiles.
In the Maximum stored profile quantity box, enter the max number of stored profiles. Any profile that exceeds this number will not be stored.
In the Authentication Level box, enter a number corresponding to the authentication level of the module.
Click Save Changes.
Federation Authentication Module
The Federation authentication module is used by a service provider to create a user session after validating single sign-on protocol messages. This authentication module is used by the SAML, SAMLv2, ID-FF, and WS-Federation protocols.
For detailed information about this module's configuration properties, see "Federation Authentication Module Properties".
Note
When configuring AM to use WS-Federation, add the hosted and remote entity SP/RP token issuer endpoint URLs to the hosted IDP's Valid WReply List parameter to ensure successful validation of the wreply URL.
For information about implementing WS-Federation, refer to "How do I configure AM (All versions) as an Identity Provider for Microsoft Office 365 and Azure using WS-Federation?" in the ForgeRock Knowledge Base.
ForgeRock Authenticator (OATH) Authentication Module
The ForgeRock Authenticator (OATH) module provides a more secure method for users to access their accounts with the help of a device such as a mobile phone.
For detailed information about this module's configuration properties, see "OATH Authentication Module Properties".
Note
AM provides two authentication modules that support OATH:
The ForgeRock Authenticator (OATH) authentication module, which is optimized for use with the ForgeRock Authenticator app and provides device profile encryption.
The OATH authentication module, which is a raw OATH implementation requiring more configuration for users and the AM administrator.
We recommend using the ForgeRock Authenticator (OATH) authentication module when possible.
Also, the ForgeRock Authenticator (OATH), HOTP, and OATH authentication modules all support HOTP passwords, but the way that users obtain passwords differs. See "Comparing the ForgeRock Authenticator (OATH) to the HOTP Authentication Module" for more information.
ForgeRock Authenticator (Push) Authentication Module
The ForgeRock Authenticator (Push) module provides a way to send push notification messages to a device such as a mobile phone, enabling multi-factor authentication. For detailed information about multi-factor authentication with the ForgeRock Authenticator (Push) module in AM, see "About Multi-Factor Authentication".
For detailed information about this module's configuration properties, see "ForgeRock Authenticator (Push) Authentication Module Properties".
ForgeRock Authenticator (Push) Registration Authentication Module
The ForgeRock Authenticator (Push) Registration module provides a way to register a device such as a mobile phone for multi-factor authentication. For detailed information about multi-factor authentication with the ForgeRock Authenticator (Push) module in AM, see Managing Devices for MFA.
For detailed information about this module's configuration properties, see "ForgeRock Authenticator (Push) Registration Authentication Module Properties".
HOTP Authentication Module
The HOTP authentication module works with an authentication chain with any module that stores the username attribute. The module uses the username from the sharedState set by the previous module in the chain and retrieves the user's email address or telephone number to send a one-time password to the user. The user then enters the password on a Login page and completes the authentication process if successful.
For example, to set up HOTP in an authentication chain, you can configure the Data Store module (or any module that stores the user's username) as the requisite first module, and the HOTP module as the second requisite module. When authentication succeeds against the Data Store module, the HOTP module retrieves the Email Address and Telephone Number attributes from the data store based on the username value. For the HOTP module to use either attribute, the Email Address must contain a valid email address, or the Telephone Number must contain a valid SMS telephone number.
You can set the HOTP module to automatically generate a password when users begin logging into the system. You can also set up mobile phone, mobile carrier, and email attributes for tighter controls over where the messages are generated and what provider the messages go through to reach the user.
For detailed information about this module's configuration properties, see "HOTP Authentication Module Properties".
Note
The ForgeRock Authenticator (OATH), HOTP, and OATH authentication modules all support HOTP passwords, but the way that users obtain passwords differs. See "Comparing the ForgeRock Authenticator (OATH) to the HOTP Authentication Module" for more information.
HTTP Basic Authentication Module
HTTP basic authentication takes a user name and password from HTTP authentication and tries authentication against the backend module in AM, depending on what you configure as the Backend Module Name.
For detailed information about this module's configuration properties, see "HTTP Basic Authentication Module Properties".
JDBC Authentication Module
The Java Database Connectivity (JDBC) module lets AM connect to a database, such as MySQL or Oracle DB to authenticate users.
For detailed information about this module's configuration properties, see "JDBC Authentication Module Properties".
LDAP Authentication Module
AM connects to directory servers using Lightweight Directory Access Protocol (LDAP). To build an easy-to-manage, high-performance, pure Java directory service, try ForgeRock Directory Services.
For detailed information about this module's configuration properties, see "LDAP Authentication Module Properties".
Legacy OAuth 2.0/OpenID Connect Authentication Module
Note
This authentication module is labeled as legacy. Use the replacements instead, as described in "Social Authentication Modules"
The Legacy OAuth 2.0/OpenID Connect authentication module lets AM authenticate clients of OAuth resource servers. References in this section are to RFC 6749, The OAuth 2.0 Authorization Framework.
If the module is configured to create an account if none exists, then you must provide valid SMTP settings. As part of account creation, the OAuth 2.0/OpenID Connect client authentication module sends the resource owner an email with an account activation code. To send email, AM uses the SMTP settings from the configuration for the OAuth 2.0/OpenID Connect authentication module.
For detailed information about this module's configuration properties, see "Legacy OAuth 2.0/OpenID Connect Authentication Module Properties".
MSISDN Authentication Module
The Mobile Station Integrated Services Digital Network (MSISDN) authentication module enables non-interactive authentication using a mobile subscriber ISDN associated with a terminal, such as a mobile phone. The module checks the subscriber ISDN against the value found on a user's entry in an LDAP directory service.
For detailed information about this module's configuration properties, see "MSISDN Authentication Module Properties".
OATH Authentication Module
The Open Authentication (OATH) module provides a more secure method for users to access their accounts with the help of a device, such as their mobile phone or Yubikey. Users can log into AM and update their information more securely from a one-time password (OTP) displayed on their device. The OATH module includes the OATH standard protocols (RFC 4226 and RFC 6238). The OATH module has several enhancements to the HMAC One-Time Password (HOTP) Authentication Module, but does not replace the original module for those already using HOTP prior to the 10.1.0 release. The OATH module includes HOTP authentication and Time-Based One-Time Password (TOTP) authentication. Both types of authentication require an OATH compliant device that can provide the OTP.
HOTP authentication generates the OTP every time the user requests a new OTP on their device. The device tracks the number of times the user requests a new OTP, called the counter. The OTP displays for a period of time you designate in the setup, so the user may be further in the counter on their device than on their account. AM will resynchronize the counter when the user finally logs in. To accommodate this, you set the number of passwords a user can generate before their device cannot be resynchronized. For example, if you set the number of HOTP Window Size to 50 and someone presses the button 30 on the user's device to generate a new OTP, the counter in AM will review the OTPs until it reaches the OTP entered by the user. If someone presses the button 51 times, you will need to reset the counter to match the number on the device's counter before the user can login to AM. HOTP authentication does not check earlier passwords, so if the user attempts to reset the counter on their device, they will not be able to login until you reset the counter in AM to match their device. See "Resetting Registered Devices by using REST" for more information.
TOTP authentication constantly generates a new OTP based on a time interval you specify. The device tracks the last two passwords generated and the current password. The Last Login Time monitors the time when a user logs in to make sure that user is not logged in several times within the present time period. Once a user logs into AM, they must wait for the time it takes TOTP to generate the next two passwords and display them. This prevents others from being able to access the users account using the OTP they entered. The user's account can be accessed again after the generation of the third new OTP is generated and displayed on their device. For this reason, the TOTP Time-Step Interval should not be so long as to lock users out, with a recommended time of 30 seconds.
An authentication chain can be created to generate an OTP from either HOTP or TOTP.
For detailed information about this module's configuration properties, see "OATH Authentication Module Properties".
Note
AM provides two authentication modules that support OATH:
The ForgeRock Authenticator (OATH) authentication module, which is optimized for use with the ForgeRock Authenticator app and provides device profile encryption.
The OATH authentication module, which is a raw OATH implementation requiring more configuration for users and the AM administrator.
We recommend using the ForgeRock Authenticator (OATH) authentication module when possible.
Also, the ForgeRock Authenticator (OATH), HOTP, and OATH authentication modules all support HOTP passwords, but the way that users obtain passwords differs. See "Comparing the ForgeRock Authenticator (OATH) to the HOTP Authentication Module" for more information.
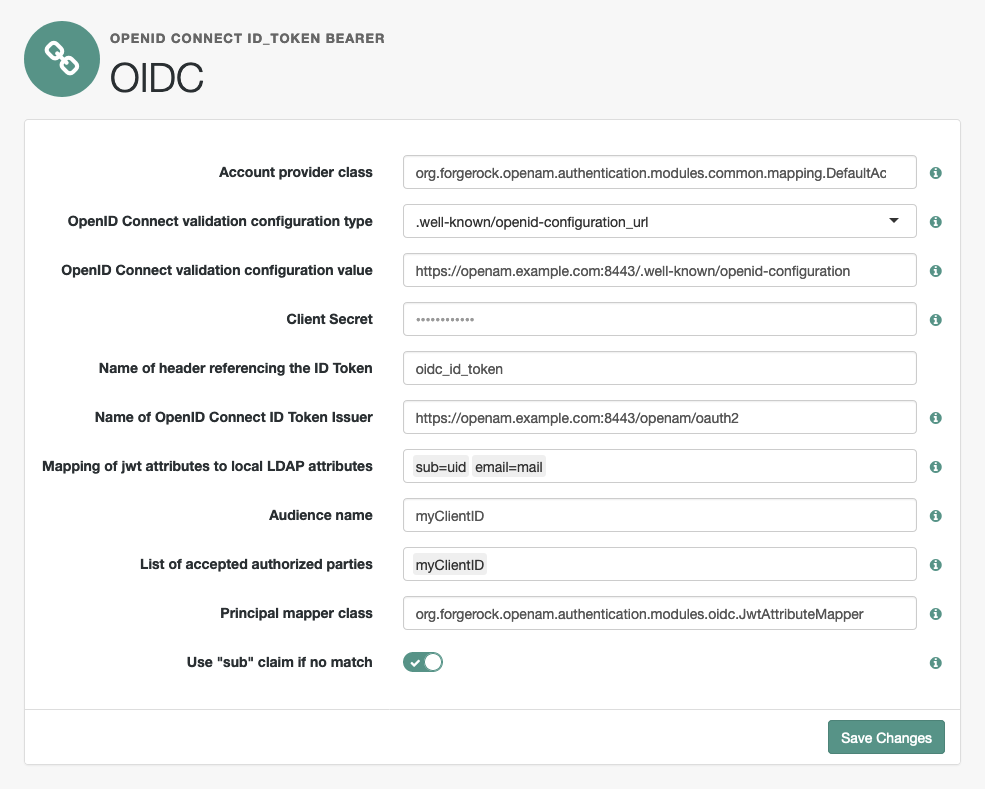
OpenID Connect id_token bearer Module
The OpenID Connect id_token bearer module lets AM rely on an OpenID Connect 1.0 provider's ID Token to authenticate an end user.
Note
This module validates an OpenID Connect ID token and matches it with a user profile. You should not use this module if you want AM to act as a client in the full OpenID Connect authentication flow.
To provision AM as an OpenID Connect client, you should instead configure an OAuth 2.0 or OpenID Connect social auth module. For more information, see Social Authentication.
The OpenID Connect id_token bearer module expects an OpenID Connect ID Token in an HTTP request header. It validates the ID Token, and if successful, looks up the AM user profile corresponding to the end user for whom the ID Token was issued. Assuming the ID Token is valid and the profile is found, the module authenticates the AM user.
You configure the OpenID Connect id_token bearer module to specify how AM gets the information needed to validate the ID Token, which request header contains the ID Token, the issuer identifier for the provider who issued the ID Token, and how to map the ID Token claims to an AM user profile.
The OpenID Connect id_token bearer module configuration must match the claims returned in the id_token JWT used to authenticate.
Before configuring the module, use an OpenID Connect client to obtain an id_token. Decode the id_token value to see the claims in the middle portion of the JWT. The claims in the decoded id_token look something like the following example:
{
    "at_hash":"GZofHqaewBJ2hRjkKiT8Ew"
    "sub":"demo"
    "auditTrackingId":"0d836a8d-af4c-4b33-a3a2-bf06cd590b91-3937"
    "iss":"https://openam.example.com:8443/openam/oauth2"
    "tokenName":"id_token"
    "aud":"myClientID"
    "azp":"myClientID"
    "auth_time":1538675226
    "name":"demo"
    "realm":"/"
    "exp":1538733152
    "tokenType":"JWTToken"
    "family_name":"demo"
    "iat":1538675226
    "jti":"bb18a404-f08c-446e-8e01-8b70c8d48192"
}
The azp, aud, and iss values are literally reused in the module configuration. The following figure shows an example configuration for this id_token format.
The following example command demonstrates a REST call that authenticates the user using the module:
$curl \ --request POST \ --header "Content-Type: application/json" \ --header "Accept-API-Version: resource=2.0, protocol=1.0" \ --header "oidc_id_token: eyJ...ifQ.eyJ...In0.BT1...iZA" \ 'https://openam.example.com:8443/openam/json/realms/root/realms/alpha/authenticate?authIndexType=module&authIndexValue=OIDC'{ "tokenId": "nIq...AA*", "successUrl": "/openam/console", "realm": "/" }
Notice that the id_token value, abbreviated as eyJ...ifQ.eyJ...In0.BT1...iZA, is the value of the oidc_id_token header as seen in the configuration. The request targets a module named OIDC as specified by the authIndexType and authIndexValue parameters. For detailed information about the authentication REST API, see Authenticating (REST).
For detailed information about this module's configuration properties, see "OpenID Connect id_token bearer Authentication Module Properties".
Persistent Cookie Module
The Persistent Cookie module supports the configuration of cookie lifetimes based on requests and a maximum time. Note that by default, the persistent cookie is called session-jwt.
Important
If Secure Cookie is enabled (Deployment > Servers > Server Name > Security > Cookie), the Persistent Cookie module only works over HTTPS.
The module signs and encrypts the JSON Web Token (JWT) that is inserted as the value of the persistent cookie. The relevant secret IDs and the default public key and HMAC key aliases are shown in the table below:
The following table shows the secret ID mappings used to encrypt and then sign persistent cookies:
| Secret ID | Default Alias | Algorithms | |
|---|---|---|---|
| am.default.authentication.modules.persistentcookie.encryption | test | RSA (at least 2048 bits) | |
| am.default.authentication.modules.persistentcookie.signing | hmacsigningtest |
|
For each instance of a persistent cookie module available in a realm, there is a dynamic secret ID associated with that module configuration instance.
For example, in a single realm you can have a Persistent Cookie module instance with the name helloworld, and a separate Persistent Cookie module instance with the name hellomars.
The following secret ID mappings could be used to encrypt and then sign persistent cookies:
| Secret ID | Default Alias |
|---|---|
| am.authentication.modules.persistentcookie.helloworld.encryption | helloworld |
| am.authentication.modules.persistentcookie.helloworld.signing | hmacsigninghelloworld |
| am.authentication.modules.persistentcookie.hellomars.encryption | hellomars |
| am.authentication.modules.persistentcookie.hellomars.signing | hmacsigninghellomars |
AM will attempt to look up the secrets with the Persistent Cookie module instance name. If unsuccessful, AM will look up the secrets using the default secret ID.
For information on mapping certificate aliases to secret IDs in secret stores, see "Mapping and Rotating Secrets".
When the Persistent Cookie module enforces the client IP address, and AM lies behind a load balancer or proxy layer, configure the load balancer or proxy to send the address by using the X-Forwarded-For header, and configure AM to consume and forward the header as necessary. For details, see "Handling HTTP Request Headers".
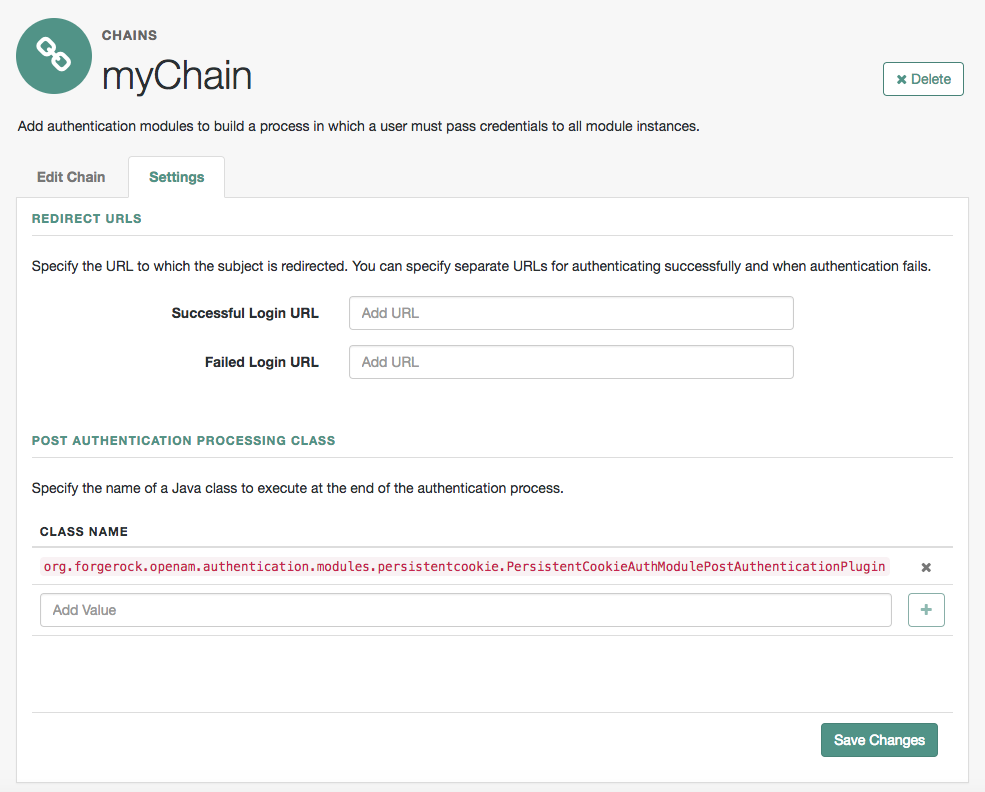
The Persistent Cookie module belongs with a second module in an authentication chain. To see how this works, go to Realms > Realm Name > Authentication > Chains. Create a new chain and add modules as shown in the figure. The following example shows how a Persistent Cookie module is sufficient. If the persistent cookie does not yet exist, authentication relies on LDAP:

Select the Settings tab and locate settings for the post-authentication processing class. Set the Class Name to org.forgerock.openam.authentication.modules.persistentcookie.PersistentCookieAuthModulePostAuthenticationPlugin, as shown in the following figure:
You should now be able to authenticate automatically, as long as the cookie exists for the associated domain.
Tip
To configure the Persistent Cookie module globally in the AM console, go to Configure > Authentication, and then click Persistent Cookie.
For detailed information about this module's configuration properties, see "Persistent Cookie Authentication Module Properties".
RADIUS Authentication Module
The Remote Authentication Dial-In User Service (RADIUS) module lets AM authenticate users against RADIUS servers.
For detailed information about this module's configuration properties, see "RADIUS Authentication Module Properties".
SAE Authentication Module
The Secure Attribute Exchange (SAE) module lets AM authenticate a user who has already authenticated with an entity that can vouch for the user to AM, so that AM creates a session for the user. This module is useful in virtual federation, where an existing entity instructs the local AM instance to use federation protocols to transfer authentication and attribute information to a partner application.
For detailed information about this module's configuration properties, see "SAE Authentication Module Properties".
SAML2 Authentication Module
The SAML2 authentication module lets administrators integrate SAML v2.0 single sign-on and single logout into an AM authentication chain.
You use the SAML2 authentication module when deploying SAML v2.0 single sign-on in integrated mode. In addition to configuring SAML2 authentication module properties, integrated mode deployment requires that you make several changes to service provider configurations. Before attempting to configure a SAML2 authentication module instance, review "Implementing SSO in Integrated Mode (Chains)" and make sure that you have made any required changes to your service provider configuration.
For detailed information about this module's configuration properties, see "SAML2 Authentication Module Properties".
Scripted Authentication Module
A scripted authentication module runs scripts to authenticate a user. The configuration for the module can hold two scripts, one to include in the web page run on the client user-agent, another to run in AM on the server side.
The client-side script is intended to retrieve data from the user-agent. This must be in a language the user-agent can run, such as JavaScript, even if the server-side script is written in Groovy.
The server-side script is intended to handle authentication.
Scripts are stored not as files, but instead as AM configuration data. This makes it easy to update a script on one AM server, and then to allow replication to copy it to other servers. You can manage the scripts through the AM console, where you can write them in the text boxes provided or upload them from files.
You can also upload scripts and associate them with a scripted authentication module by using the ssoadm command.
The following example shows how to upload a server-side script from a file, create a scripted authentication module, and then associate the uploaded script with the new module.
   #
   # Upload a server-side script from a script file, myscript.groovy.
   #

   ssoadm create-sub-cfg \
   --realm / \
   --adminid uid=amAdmin,ou=People,dc=openam,dc=forgerock,dc=org \
   --password-file /tmp/pwd.txt \
   --servicename ScriptingService \
   --subconfigname scriptConfigurations/scriptConfiguration \
   --subconfigid myScriptId \
   --attributevalues \
   "name=My Scripted Auth Module Script" \
   "script-file=myscript.groovy" \
   "context=AUTHENTICATION_SERVER_SIDE" \
   "language=GROOVY"
   #
   # Create a scripted authentication module, myScriptedAuthModule.
   #

   ssoadm create-auth-instance \
   --realm / \
   --adminid uid=amAdmin,ou=People,dc=openam,dc=forgerock,dc=org \
   --password-file /tmp/pwd.txt \
   --authtype Scripted \
   --name myScriptedAuthModule

   #
   # Associate the script with the auth module, and disable client-side scripts.
   #

   ssoadm update-auth-instance \
   --realm / \
   --adminid uid=amAdmin,ou=People,dc=openam,dc=forgerock,dc=org \
   --password-file /tmp/pwd.txt \
   --name myScriptedAuthModule \
   --attributevalues \
   "iplanet-am-auth-scripted-server-script=myScriptId" \
   "iplanet-am-auth-scripted-client-script-enabled=false"
If you have multiple separate sets of client-side and server-side scripts, then configure multiple modules, one for each set of scripts.
For details on writing authentication module scripts, see "Using Server-side Authentication Scripts in Authentication Modules".
For detailed information about this module's configuration properties, see "Scripted Authentication Module Properties".
SecurID Authentication Module
The SecurID module lets AM authenticate users with RSA Authentication Manager software and RSA SecurID authenticators.
Important
To use the SecurID authentication module, you must first build an AM .war file that includes the supporting library. For more information, see "Enabling RSA SecurID Support".
For detailed information about this module's configuration properties, see "SecurID Authentication Module Properties".
Windows Desktop SSO Authentication Module
The Windows Desktop SSO module uses Kerberos authentication. The user presents a Kerberos token to AM through the Simple and Protected GSS-API Negotiation Mechanism (SPNEGO) protocol. The Windows Desktop SSO authentication module enables desktop single sign on such that a user who has already authenticated with a Kerberos Key Distribution Center can authenticate to AM without having to provide the login information again. Users might need to set up Integrated Windows Authentication in Internet Explorer or Microsoft Edge to benefit from single sign on when logged on to a Windows desktop.
For detailed information about this module's configuration properties, see "Windows Desktop SSO Authentication Module Properties".
Warning
If you are using the Windows Desktop SSO module as part of an authentication chain and Windows Desktop SSO fails, you may no longer be able to POST data to non-NTLM-authenticated web sites. For information on a possible workaround, see Microsoft knowledge base article KB251404.
Social Authentication Modules
The social authentication modules let AM authenticate clients of OAuth 2.0 or OpenID Connect 1.0 resource servers. References in this section are to RFC 6749, The OAuth 2.0 Authorization Framework.
AM provides pre-configured authentication modules for the following social identity providers:
Instagram
VKontakte
WeChat
AM provides two authentication modules for the WeChat social identity provider. The Social Auth WeChat authentication module implements a login flow that requires the user to scan an on-screen QR code with the WeChat app. The Social Auth WeChat Mobile authentication module implements an alternative login flow for users authenticating on their mobile device, who would not be able to scan a QR code displayed on the mobile device's screen.
AM provides two generic authentication modules, one for OAuth 2.0, and another for OpenID Connect 1.0, for authenticating users of standards-compliant social identity providers, for example Facebook and Google.
If the social authentication module is configured to create an account when none exists, then you must provide valid SMTP settings in the Email tab. The social identity provider must also provide the user's email address. As part of account creation, the social authentication module sends the resource owner an email with an account activation code. To send email, AM uses the SMTP settings from the Email tab of the configuration of the social authentication module.
For detailed information about the social authentication module's configuration properties, see the following sections:
"Social Authentication Module Properties - OAuth 2.0"
"Social Authentication Module Properties - OpenID Connect 1.0"
"Social Authentication Module Properties - Instagram"
"Social Authentication Module Properties - VKontakte"
"Social Authentication Module Properties - WeChat"
"Social Authentication Module Properties - WeChat Mobile"