Authentication Modules and Chains
AM uses authentication modules to handle different ways of authenticating. Basically, each authentication module handles one way of obtaining and verifying credentials. You can chain different authentication modules together. In AM, this is called authentication chaining. Each authentication module can be configured to specify the continuation and failure semantics with one of the following four criteria: requisite, sufficient, required, or optional.
Authentication modules in a chain can assign a pass or fail flag to the authorization request. To successfully complete an authentication chain at least one pass flag must have been achieved, and there must be no fail flags.
Flags are assigned when completing a module as shown in the table below:
| Criteria | Fail | Pass | Example |
|---|---|---|---|
| Requisite | Assigns fail flag. Exits chain. | Assigns pass flag. Continues chain. | Active Directory, Data Store, and LDAP authentication modules are often set as requisite because of a subsequent requirement in the chain to identify the user. For example, the Device ID (Match) authentication module needs a user's ID before it can retrieve information about the user's devices. |
| Sufficient | Assigns no flag. Continues chain. | Assigns pass flag. Exits chain. | You could set Windows Desktop SSO as sufficient, so authenticated Windows users are let through, whereas web users must traverse another authentication module, such as one requiring a username and password. One exception is that if you pass a sufficient module after having failed a required module, you will continue through the chain and will not exit at that point. Consider using a requisite module instead of a required module in this situation. |
| Required | Assigns fail flag.
Continues chain. | Assigns pass flag. Continues chain. | You could use a required module for login with email and password, so that it can fail through to another module to handle new users who have not yet signed up. |
| Optional | Assigns no flag. Continues chain. | Assigns pass flag.
Continues chain. | You could use an optional module to assign a higher authentication level if it passes. Consider a chain with a requisite Data Store module and an optional Certificate module. Users who only passed the Data Store module could be assigned a lower authentication level than users who passed both the Data Store and Certificate modules. The users with the higher authentication level could be granted access to more highly-secured resources. |
Tip
In authentication chains with a single module, requisite and required are equivalent. For authentication chains with multiple modules, use required only when you want the authentication chain to continue evaluating modules even after the required criterion fails.
The AM authentication chain editor displays the flags that could be assigned by each module in the chain, and whether execution of the chain continues downwards through the chain or exits out, as shown below:
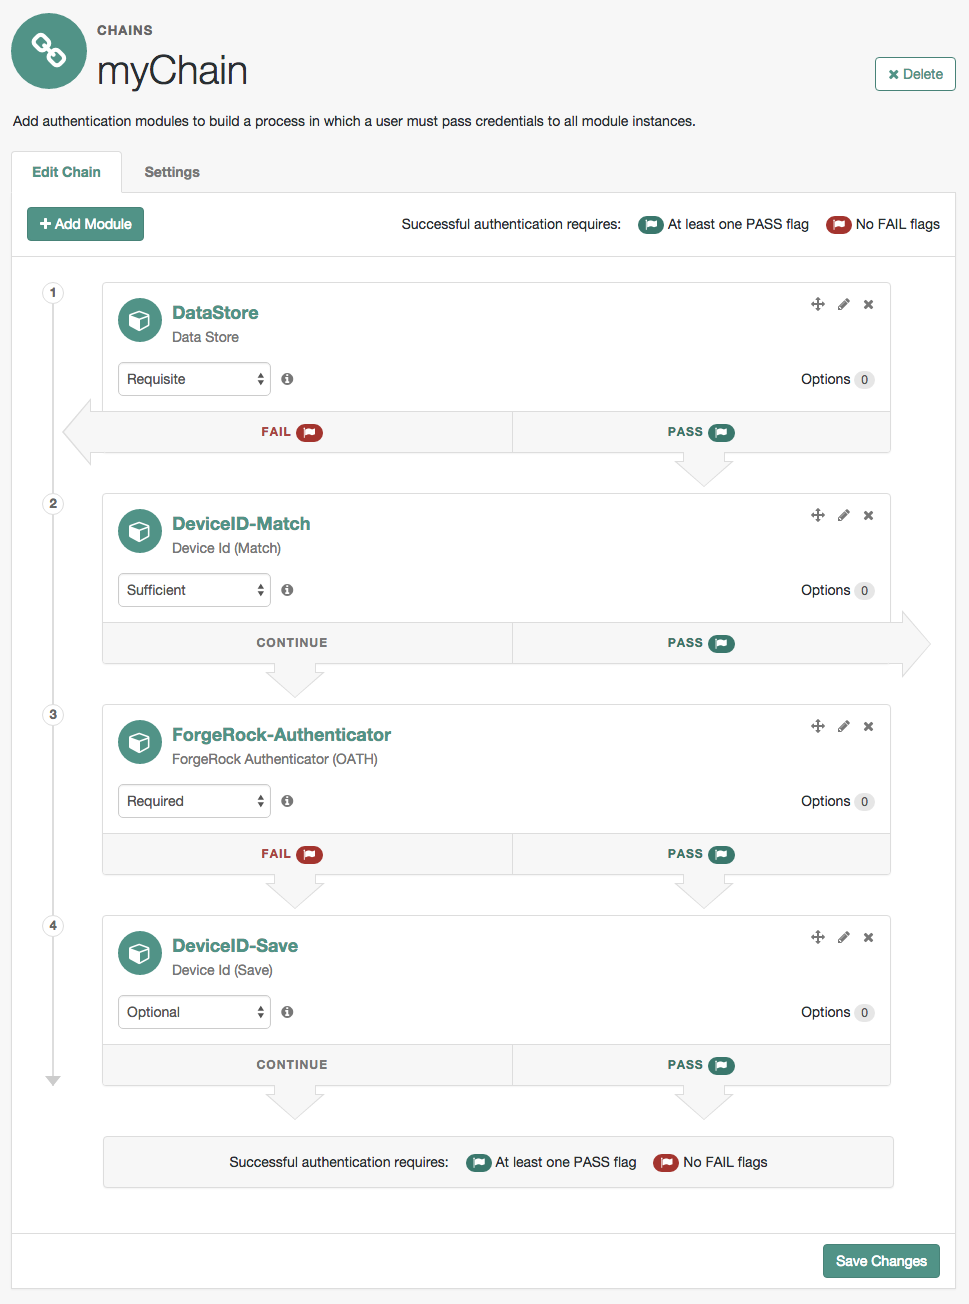
With AM, you can further set authentication levels per module, with higher levels being used typically to allow access to more restricted resources. The AM SPIs also let you develop your own authentication modules, and post authentication plugins. Client applications can specify the authentication level, module, user, and authentication service to use among those you have configured. As described later in this guide, you can use realms to organize which authentication process applies for different applications or different domains, perhaps managed by different people.
About Authentication Levels for Chains
When a user successfully authenticates, AM creates a session, which allows AM to manage the user's access to resources. The session is assigned an authentication level, which is calculated to be the highest authentication level of any authentication module that passed. If the user's session does not have the appropriate authentication level, then the user may need to reauthenticate again at a higher authentication level to access the requested resource.
The authentication level sets the level of security associated with a module. Typically, the strongest form of authentication is assigned the highest authentication level.
If an authentication chain contains requisite or required modules that were not executed due to the presence of a passing sufficient module in front of them, the session's authentication level is calculated to be whichever is greater: the highest authentication level of any authentication module that passed, or the highest authentication level of requisite or required modules that were not executed.
You can modify AM's default behavior, so that a session's authentication level is always the highest authentication level of any authentication module that passed, even if there are requisite or required modules in the authentication chain that were not executed.
To modify the default behavior, set the org.forgerock.openam.authLevel.excludeRequiredOrRequisite property to true under Deployment > Servers > Server Name > Advanced and restart the AM server.
Authorization policies may also require a particular authentication level to access protected resources. When an authenticated user tries to access a protected resource without satisfying the authentication level requirement, AM denies access to the resource and returns an advice indicating that the user needs to reauthenticate at the required authentication level to access the resource.
The web or Java agent or policy enforcement point can then send the user back to AM for session upgrade. For more information, see Session Upgrade
Configuring Authentication Chains
The following table summarizes the high-level tasks required to configure authentication chains:
| Task | Resources |
|---|---|
| Design the Authentication Journey of your Users The best way to tackle the design decision is to write down a list of required steps users would need to take to log in to your environment, and then check the list of nodes available in AM. |
|
| Decide if you Need Custom Authentication Modules, Server-Side Scripts, or Post-Authentication Plugins If the default authentication modules and plugins do not suit your needs, consider coding your own. | |
| Configure your Authentication Modules Before setting up your chains, configure the authentication modules you need. | |
| Configure your Authentication Chains Use the chain designer to put together your chains quickly. | |
| Configure Post-Authentication Plugins Post-authentication plugins allow you to manage session properties and run scripts after authentication, or after the user has logged out. |
The AM console provides two places where you can configure authentication modules:
Under Configure > Authentication, you configure default properties for global authentication modules.
Under Realms > Realm Name > Authentication v Modules, you configure modules for your realm.
Configure the authentication modules required by your environment. The configuration of individual modules depend on its function. See the following links:
For module reference information, see "Authentication Modules Configuration Reference".
Once you have configured authentication modules and added the modules to the list of module instances, you can configure authentication chains. Authentication chains let you handle cases where alternate modules or credentials are needed. If you need modules in the chain to share user credentials, then set options for the module.
In the AM console, go to Realms > Realm Name > Authentication > Chains.
On the Authentication Chains page, click Add Chain. Enter new chain name, and then click Create.
The Edit Chain dialog appears. Click on Add a Module.
Select the authentication module in the drop-down list, and then assign appropriate criteria (Optional, Required, Requisite, Sufficient), as described in "Authentication Modules and Chains".
Add as many modules as required.
(Optional) If you need modules in the chain to share user credentials, consider the following available options:
iplanet-am-auth-store-shared-state-enabledSet
iplanet-am-auth-store-shared-state-enabled=trueto store the credentials captured by this module in shared state. This enables subsequent modules in the chain to access the credentials captured by this module. The shared state is cleared when the user successfully authenticates, quits the chain, or logs out.Default:
trueNote
OATH and OTP codes are never added to the shared state, and cannot be shared between other modules in the chain.
iplanet-am-auth-shared-state-enabledSet
iplanet-am-auth-shared-state-enabled=trueto allow this module to access the credentials, such as user name and password, that have been stored in shared state by previous modules in the authentication chain.Default:
falseiplanet-am-auth-shared-state-behavior-patternSet
iplanet-am-auth-shared-state-behavior-pattern=tryFirstPassto try authenticating with the username and password stored in shared state. If authentication fails, AM displays the login screen of this module for the user to re-enter their credentials.Set
iplanet-am-auth-shared-state-behavior-pattern=useFirstPassto prevent the user from entering the username and password twice during authentication. Typically, you set the property touseFirstPassfor all modules in the chain except the first module. If authentication fails, then the module fails.Default:
tryFirstPass
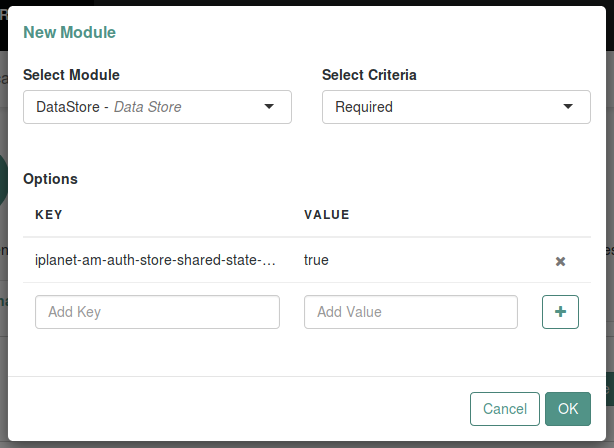
Enter the key and its value, and then click Plus (+). When you finish entering the options, click OK.
For example, consider a chain with two modules sharing credentials according to the following settings: the first module in the chain has the option
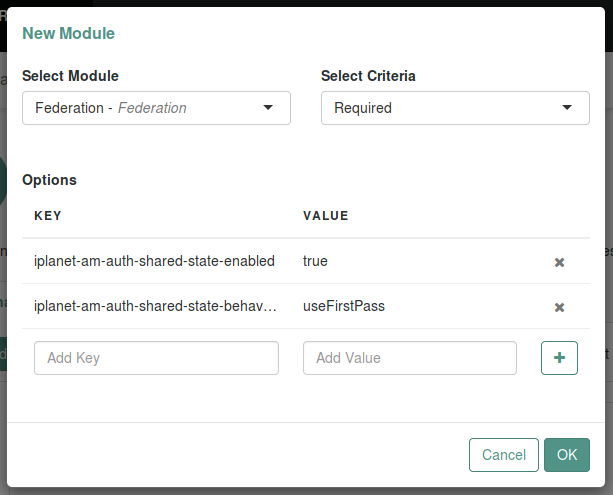
iplanet-am-auth-store-shared-state-enabled=true, and criteriaREQUIRED.The second module in the chain has options
iplanet-am-auth-shared-state-enabled=true,iplanet-am-auth-shared-state-behavior-pattern=useFirstPasswith criteriaREQUIRED.On the Settings tab, configure where AM redirects the user upon successful and failed authentication, and plug in your post-authentication processing classes as necessary.
If you configure absolute URLs that are not in the same scheme, FQDN, and port as AM, you must also configure the Validation Service.
Click Save Changes.
The following authentication sequence would occur: the user enters their credentials for the first module and successfully authenticates. The first module shares the credentials with the second module, successfully authenticating the user without prompting again for their credentials, unless the credentials for the first module do not successfully authenticate the user to the second module.
Login Session Timeouts for Chains
Login pages have a session timeout that specifies the number of minutes before the session times out, if the user has not logged in. The login session timeout has two components:
The timeout of the specific authentication module.
The default session timeout for an authentication module is two minutes.
The overall session timeout, set in Configure > Server Defaults > Session > Session Limits > Invalidate Session Max Time.
The default overall session timeout is three minutes.
You must set the overall session timeout to a value greater than the complete authentication process (including any multi-page authentication processes). If you have chained authentication modules, with different timeouts, you must set the overall session timeout to a value greater than the sum of these timeouts.
For more information, see How do I configure login page session timeouts in AM when using authentication modules? in the ForgeRock Knowledge Base.
Implementing Post-Authentication Plugins
Post-authentication plugins (PAP) let you include custom processing at the end of the authentication process and when users log out of AM.
In the AM console, you add post-authentication plugins to an authentication chain. Navigate to Realms > Realm Name > Authentication > Chains > Auth Chain Name > Settings > Post Authentication Processing Class > Class Name.
See "Creating Post-Authentication Plugins for Chains" for more information about post authentication plugins.
AM provides some post-authentication plugins as part of the standard product delivery.
- Class name:
org.forgerock.openam.authentication.modules.adaptive.AdaptivePostAuthenticationPlugin The adaptive authentication plugin serves to save cookies and profile attributes after successful authentication.
Add it to your authentication chains that use the adaptive authentication module configured to save cookies and profile attributes.
- Class name:
org.forgerock.openam.authentication.modules.common.JaspiAuthLoginModulePostAuthenticationPlugin The Java Authentication Service Provider Interface (JASPI) post authentication plugin initializes the underlying JASPI
ServerAuthmodule.JASPI defines a standard service provider interface (SPI) where developers can write message level authentication agents for Java containers on either the client side or the server side.
- Class name:
org.forgerock.openam.authentication.modules.oauth2.OAuth2PostAuthnPlugin The OAuth 2.0 post-authentication plugin builds a global logout URL used by
/oauth2c/OAuthLogout.jspafter successful OAuth 2.0 client authentication. This logs the resource owner out with the OAuth 2.0 provider when logging out of AM.Before using this plugin, configure the OAuth 2.0 authentication module with the correct OAuth 2.0 Provider logout service URL, and set the Logout options to Log out or Prompt. This plugin cannot succeed unless those parameters are correctly set.
Sometimes OAuth 2.0 providers change their endpoints, including their logout URLs. When using a provider like Facebook, Google, or MSN, make sure you are aware when they change their endpoint locations so that you can change your client configuration accordingly.
- Class name:
org.forgerock.openam.authentication.modules.saml2.SAML2PostAuthenticationPlugin The SAML v2.0 post-authentication plugin that gets activated for single logout. Supports HTTP-Redirect for logout-sending messages only.
Set the post-authentication processing class for the authentication chain that contains the SAML v2.0 authentication module.
- Class name:
org.forgerock.openam.authentication.modules.persistentcookie.PersistentCookieAuthModule The Persistent Cookie Authentication Module provides logic for persistent cookie authentication in AM. It makes use of the JASPI
JwtSessionmodule to create and verify the persistent cookie.- Class name:
com.sun.identity.authentication.spi.ReplayPasswd[1] Password replay post-authentication plugin class that uses a DES/ECB/NoPadding encryption algorithm. This class is deprecated in favor of the
com.sun.identity.authentication.spi.JwtReplayPasswordclass.The plugin encrypts the password captured by AM during the authentication process and stores it in a session property. IG or a web agent looks up the property, decrypts it, and replays the password into legacy applications.
To configure password replay for AM and IG, see the ForgeRock Identity Gateway Gateway Guide.
- Class name:
com.sun.identity.authentication.spi.JwtReplayPassword[1] Password replay post-authentication plugin class that uses a JWT-based AES A128CBC-HS256 encryption algorithm.
The plugin encrypts the password captured by AM during the authentication process and stores it in a session property. IG looks up the property, decrypts it, and replays the password into legacy applications.
Only IG 6 or later is supported.
To configure password replay for AM and IG, see the ForgeRock Identity Gateway Gateway Guide.
If necessary, you can also write your own custom post-authentication plugin as described in "Creating Post-Authentication Plugins for Chains".
[1] Only one password replay post-authentication plugin class can be active for a given AM deployment.
Customizing Authentication Chains
Your deployment might require customizing standard authentication chain features. See the following sections for customization examples:
Creating a Custom Authentication Module
This section shows how to customize authentication with a sample custom authentication module. For deployments with particular requirements not met by existing AM authentication modules, determine whether you can adapt one of the built-in or extension modules for your needs. If not, build the functionality into a custom authentication module.
About the Sample Custom Authentication Module
The sample custom authentication module prompts for a user name and password to authenticate the user, and handles error conditions. The sample shows how you integrate an authentication module into AM such that you can configure the module through the AM console, and also localize the user interface.
For information on downloading and building AM sample source code, see How do I access and build the sample code provided for AM (All versions)? in the Knowledge Base.
Get a local clone so that you can try the sample on your system. In the sources, you find the following files under the /path/to/openam-samples-external/custom-authentication-module directory:
pom.xmlApache Maven project file for the module
This file specifies how to build the sample authentication module, and also specifies its dependencies on AM components and on the Java Servlet API.
src/main/java/org/forgerock/openam/examples/SampleAuth.javaCore class for the sample authentication module
This class is called by AM to initialize the module and to process authentication. See "The Sample Authentication Logic" for details.
src/main/java/org/forgerock/openam/examples/SampleAuthPrincipal.javaClass implementing
java.security.Principalinterface that defines how to map credentials to identitiesThis class is used to process authentication. See "The Sample Auth Principal" for details.
src/main/resources/amAuthSampleAuth.propertiesProperties file mapping UI strings to property values
This file makes it easier to localize the UI. See "Sample Auth Properties" for details.
src/main/resources/amAuthSampleAuth.xmlConfiguration file for the sample authentication service
This file is used when registering the authentication module with AM. See "The Sample Auth Service Configuration" for details.
src/main/resources/config/auth/default/SampleAuth.xmlCallback file for deprecated AM classic UI authentication pages
The sample authentication module does not include localized versions of this file. See "Sample Auth Callbacks" for details.
src/main/java/org/forgerock/openam/examples/SampleAuthPlugin.java,src/main/resources/META-INF/services/org.forgerock.openam.plugins.AmPluginThese files serve to register the plugin with AM.
The Java class,
SampleAuthPlugin, implements theorg.forgerock.openam.plugins.AmPlugininterface. In the sample, this class registers theSampleAuthimplementation, and theamAuthSampleAuthservice schema for configuration.The services file,
org.forgerock.openam.plugins.AmPlugin, holds the fully qualified class name of theAmPluginthat registers the custom implementations. In this case,org.forgerock.openam.examples.SampleAuthPlugin.For an explanation of service loading, see the
ServiceLoaderAPI specification.
Sample Auth Properties
AM uses a Java properties file per locale to retrieve the appropriate, localized strings for the authentication module.
The following is the Sample Authentication Module properties file, amAuthSampleAuth.properties.
[/home/jenkins/workspace/ipelines_product-docs-qa-release/src/main/docbkx/resources/amAuthSampleAuth.properties]
Sample Auth Callbacks
AM callbacks XML files are used to build the deprecated classic UI to prompt the user for identity information needed to process the authentication. The document type for a callback XML file is described in WEB-INF/Auth_Module_Properties.dtd where AM is deployed.
The value of the moduleName property in the callbacks file must match your custom authentication module's class name. Observe that the module name SampleAuth, shown in the example below, matches the class name in SampleAuth.java.
[/home/jenkins/workspace/ipelines_product-docs-qa-release/src/main/docbkx/resources/SampleAuth.xml]
This file specifies three states.
The initial state (order="1") is used dynamically to replace the dummy strings shown between hashes (for example,
#USERNAME#) by thesubstituteUIStrings()method inSampleAuth.java.The next state (order="2") handles prompting the user for authentication information.
The last state (order="3") has the attribute
error="true". If the authentication module state machine reaches this order then the authentication has failed. TheNameCallbackis not used and not displayed to user. AM requires that the callbacks array have at least one element. Otherwise AM does not permit header substitution.
The Sample Authentication Logic
An AM authentication module must extend the com.sun.identity.authentication.spi.AMLoginModule abstract class, and must implement the methods shown below.
Tip
The account lockout functionality in AM is triggered by counting invalid password exceptions, rather than invalid login exceptions.
To trigger account lockouts after repeated failed attempts, ensure your modules throw InvalidPasswordException exceptions instead of AuthLoginException exceptions when appropriate, as per the code below.
See the ForgeRock Access Management Java SDK API Specification for reference.
public void init(Subject subject, Map sharedState, Map options)

// OpenAM calls the process() method when the user submits authentication
// information. The process() method determines what happens next:
// success, failure, or the next state specified by the order
// attribute in the callbacks XML file.
public int process(Callback[] callbacks, int state) throws LoginException

// OpenAM expects the getPrincipal() method to return an implementation of
// the java.security.Principal interface.
public Principal getPrincipal()
AM does not reuse authentication module instances. This means that you can store information specific to the authentication process in the instance.
The implementation, SampleAuth.java, is shown below:
[/home/jenkins/workspace/ipelines_product-docs-qa-release/src/main/docbkx/resources/SampleAuth.java]
The Sample Auth Principal
The implementation, SampleAuthPrincipal.java, is shown below:
[/home/jenkins/workspace/ipelines_product-docs-qa-release/src/main/docbkx/resources/SampleAuthPrincipal.java]
The Sample Auth Service Configuration
AM requires that all authentication modules be configured by means of an AM service. At minimum, the service must include an authentication level attribute. Your module can access these configuration attributes in the options parameter passed to the init() method.
Some observations about the service configuration file follow in the list below.
The document type for a service configuration file is described in
WEB-INF/sms.dtdwhere AM is deployed.The service name is derived from the module name. The service name must have the following format:
It must start with either
iPlanetAMAuthorsunAMAuth.The module name must follow. The case of the module name must match the case of the class that implements the custom authentication module.
It must end with
Service.
In the Sample Auth service configuration, the module name is
SampleAuthand the service name isiPlanetAMAuthSampleAuthService.The service must have a localized description, retrieved from a properties file.
The
i18nFileNameattribute in the service configuration holds the default (non-localized) base name of the Java properties file. Thei18nKeyattributes indicate properties keys to string values in the Java properties file.The authentication level attribute name must have the following format:
It must start with
iplanet-am-auth-,sun-am-auth-, orforgerock-am-auth-.The module name must follow, and must appear in lower case if the attribute name starts with
iplanet-am-auth-orforgerock-am-auth-. If the attribute name starts withsun-am-auth-, it must exactly match the case of the module name as it appears in the service name.It must end with
-auth-level.
In the Sample Auth service configuration, the authentication level attribute name is
iplanet-am-auth-sampleauth-auth-level.The Sample Auth service configuration includes an example
sampleauth-service-specific-attribute, which can be configured through the AM console.
The service configuration file, amAuthSampleAuth.xml, is shown below. Save a local copy of this file, which you use when registering the module.
[/home/jenkins/workspace/ipelines_product-docs-qa-release/src/main/docbkx/resources/amAuthSampleAuth.xml]
Building and Installing the Sample Custom Auth Module
Build the module with Apache Maven, and install the module in AM.
For information on downloading and building AM sample source code, see How do I access and build the sample code provided for AM (All versions)? in the Knowledge Base.
Installing the Module
Installing the sample authentication module consists of copying the .jar file to AM's WEB-INF/lib/ directory, registering the module with AM, and then restarting AM or the web application container where it runs.
Copy the sample authentication module
.jarfile toWEB-INF/lib/where AM is deployed.$
cp target/custom*.jar /path/to/tomcat/webapps/openam/WEB-INF/lib/Restart AM or the container in which it runs.
For example if you deployed AM in Apache Tomcat, then you shut down Tomcat and start it again.
$
/path/to/tomcat/bin/shutdown.sh$/path/to/tomcat/bin/startup.sh$tail -1 /path/to/tomcat/logs/catalina.outINFO: Server startup in 14736 ms
Configuring & Testing the Sample Custom Auth Module
Authentication modules are registered as services with AM globally, and then set up for use in a particular realm. In this example, you set up the sample authentication module for use in the realm / (Top Level Realm).
In the AM console, go to Realms > Top Level Realm > Authentication > Modules. Click Add Module to create an instance of the Sample Authentication Module. Name the module Sample.
Click Create, and then configure the authentication module as appropriate.
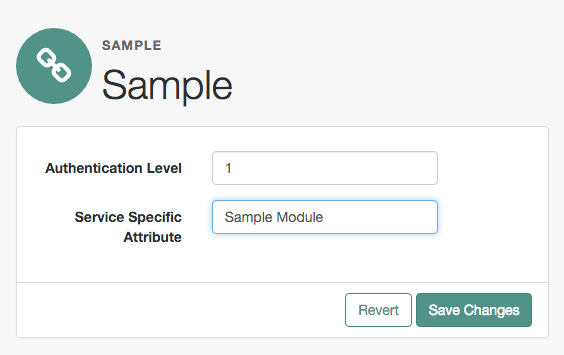
Now that the module is configured, log out of the AM console.
Finally, try the module by specifying the Sample module. Browse to the login URL such as https://openam.example.com:8443/openam/XUI/?realm=/&module=Sample#login, and then authenticate with user name demo and password Ch4ng31t.
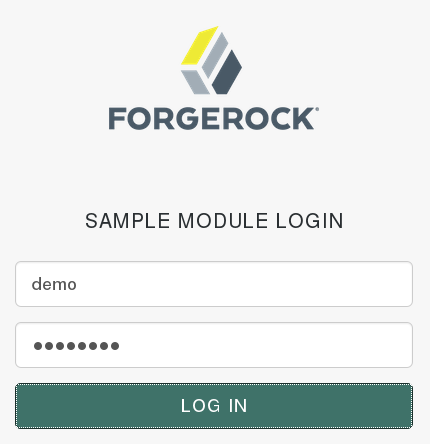
After authentication you are redirected to the end user page for the demo user. You can logout of the AM console, and then try to authenticate as the non-existent user test123 to see what the error handling looks like to the user.
Using Server-side Authentication Scripts in Authentication Modules
This section demonstrates how to use the default server-side authentication script. An authentication script can be called from a Scripted authentication module.
The default server-side authentication script only authenticates a subject when the current time on the AM server is between 09:00 and 17:00. The script also uses the logger and httpClient functionality provided in the scripting API.
To examine the contents of the default server-side authentication script in the AM console, go to Realms > Top Level Realm > Scripts, and then click Scripted Module - Server Side.
For general information about scripting in AM, see Getting Started with Scripting.
For information about APIs available for use when scripting authentication, see the following sections:
Preparing AM To Use Server-side Authentication Scripts
AM requires a small amount of configuration before trying the example server-side authentication script. You must create an authentication module of the Scripted type, and then include it in an authentication chain, which can then be used when logging in to AM. You must also ensure the demo user has an associated postal address.
The procedures in this section are:
In this procedure, create a Scripted Authentication module, and link it to the default server-side authentication script.
Log in as an AM administrator, for example
amAdmin.Navigate to Realms > Top Level Realm > Authentication > Modules.
On the Authentication Modules page, click Add Module.
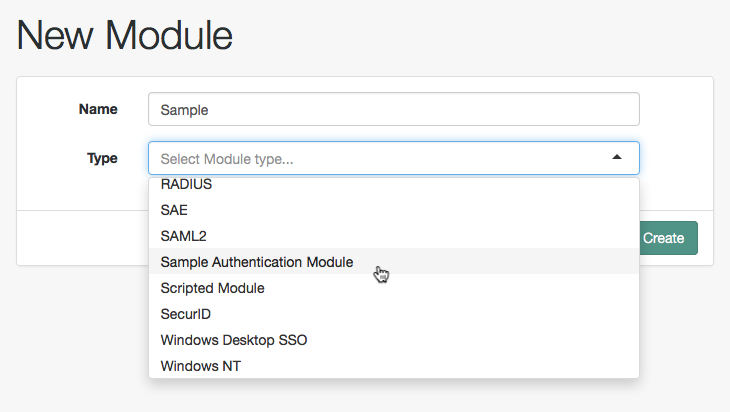
On the New Module page, enter a module name, such as
myScriptedAuthModule, from the Type drop-down list, selectScripted Module, and then click Create.On the module configuration page:
Uncheck the Client-side Script Enabled checkbox.
From the Server-side Script drop-down list, select
Scripted Module - Server Side.Click Save Changes.
In this procedure, create an authentication chain that uses a Data Store authentication module and the Scripted authentication module created in the previous procedure.
Log in as an AM administrator, for example
amAdmin.Navigate to Realms > Top Level Realm > Authentication > Chains.
On the Authentication Chains page, click Add Chain.
On the Add Chain page, enter a name, such as
myScriptedChain, and then click Create.On the Edit Chain tab, click Add a Module.
In the New Module dialog box:
From the Select Module drop-down list, select
DataStore.From the Select Criteria drop-down list, select
Required.Click OK.
Note
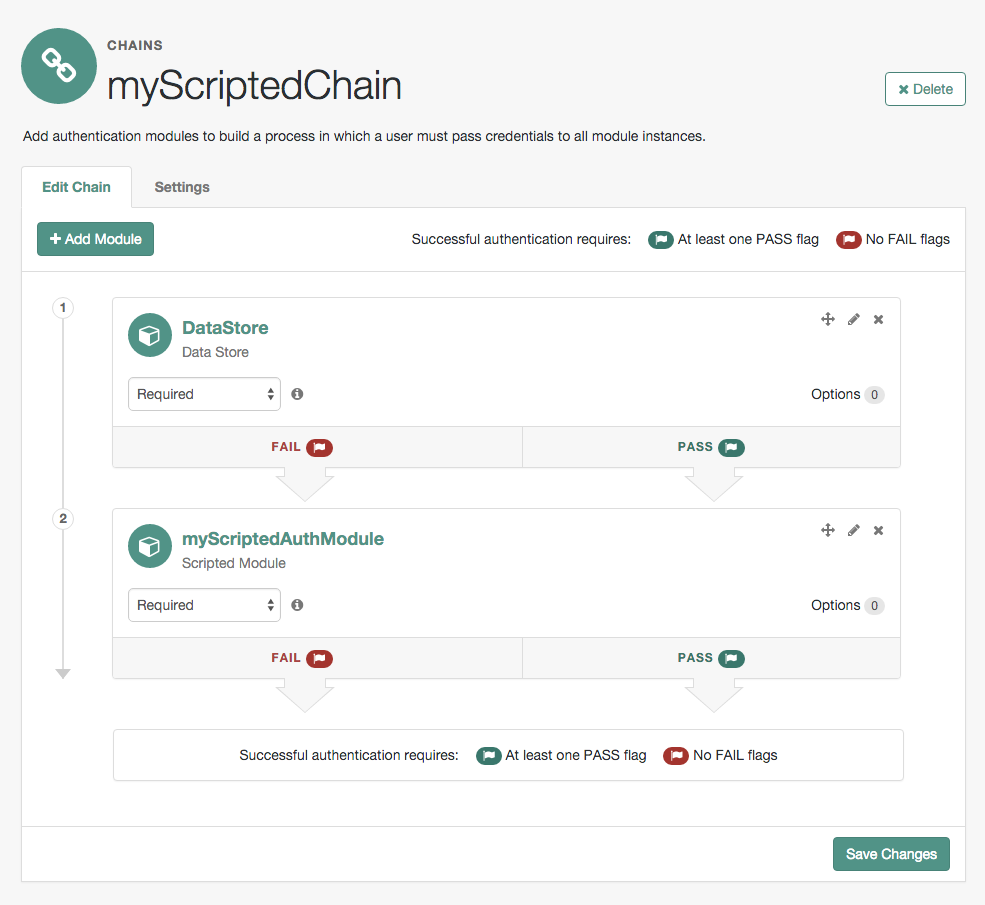
The Data Store authentication module checks the user credentials, whereas the Scripted authentication module does not check credentials, but instead only checks that the authentication request is processed during working hours. Without the Data Store module, the username in the Scripted authentication module cannot be determined. Therefore, do not configure the Scripted authentication module (server-side script) as the first module in an authentication chain, because it needs a username.
On the Edit Chain tab, click Add Module.
In the New Module dialog box:
From the Select Module drop-down list, select the Scripted Module from the previous procedure, for example
myScriptedAuthModule.From the Select Criteria drop-down list, select
Required.Click OK.
The resulting chain resembles the following:
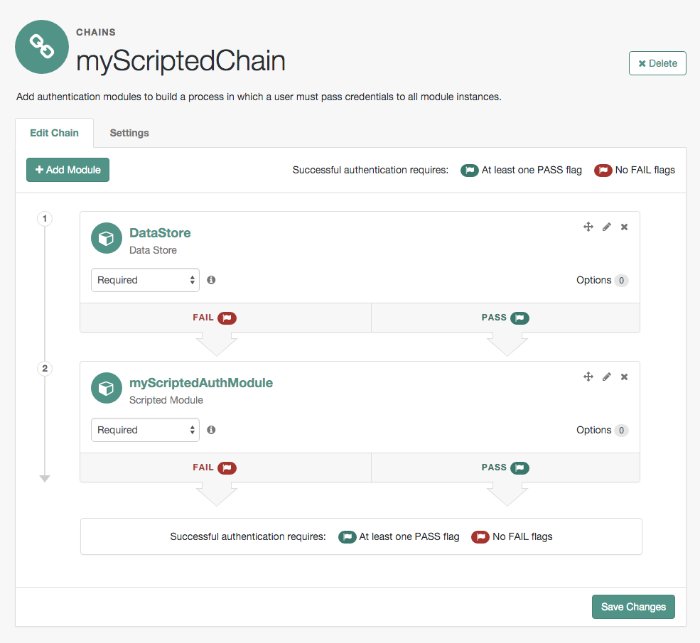
On the Edit Chain tab, click Save Changes.
Log in as an AM administrator, for example
amAdmin.Navigate to Realms > Top Level Realm > Identities.
On the Identities tab, click the
demouser.In the Home Address field, enter a valid postal address, with lines separated by commas.
For example:
ForgeRock Inc., 201 Mission St #2900, San Francisco, CA 94105, USASave your changes.
Trying the Default Server-side Authentication Script
This section shows how to log in using an authentication chain that contains a Scripted authentication module, which in turn uses the default server-side authentication script.
The default server-side authentication script gets the postal address of a user after they authenticate using a Data Store authentication module, and then makes an HTTP call to an external web service to determine the longitude and latitude of the address. Using these details, a second HTTP call is performed to get the local time at those coordinates. If that time is between two preset limits, authentication is allowed, and the user is given a session and redirected to the profile page.
Log out of AM.
In a browser, go to the AM login URL, and specify the authentication chain created in the previous procedure as the value of the
serviceparameter.For example:
https://openam.example.com:8443/openam/XUI/?service=myScriptedChain#login
Log in as user
demowith passwordCh4ng31t.If login is successful, the user profile page appears. The script will also output messages, such as the following in the
debug/Authenticationlog file:Starting scripted authentication amScript:02/27/2017 03:22:42:881 PM GMT: Thread[ScriptEvaluator-5,5,main]: TransactionId[7635cd7c-ea97-4be6-8694-9e2be8642d56-8581] User: demo amScript:02/27/2017 03:22:42:882 PM GMT: Thread[ScriptEvaluator-5,5,main]: TransactionId[7635cd7c-ea97-4be6-8694-9e2be8642d56-8581] User address: ForgeRock Inc., 201 Mission St #2900, San Francisco, CA 94105, USA amScript:02/27/2017 03:22:42:929 PM GMT: Thread[ScriptEvaluator-5,5,main]: TransactionId[7635cd7c-ea97-4be6-8694-9e2be8642d56-8581] User REST Call. Status: [Status: 200 OK] amScript:02/27/2017 03:27:31:646 PM GMT: Thread[ScriptEvaluator-7,5,main]: TransactionId[7635cd7c-ea97-4be6-8694-9e2be8642d56-8581] latitude:37.7914374 longitude:-122.3950694 amScript:02/27/2017 03:27:31:676 PM GMT: Thread[ScriptEvaluator-7,5,main]: TransactionId[7635cd7c-ea97-4be6-8694-9e2be8642d56-8581] User REST Call. Status: [Status: 200 OK] amScript:02/27/2017 03:27:31:676 PM GMT: Thread[ScriptEvaluator-7,5,main]: TransactionId[7635cd7c-ea97-4be6-8694-9e2be8642d56-8581] Current time at the users location: 10 amScript:02/27/2017 03:27:31:676 PM GMT: Thread[ScriptEvaluator-7,5,main]: TransactionId[7635cd7c-ea97-4be6-8694-9e2be8642d56-8581] Authentication allowed! amLoginModule:02/27/2017 03:27:31:676 PM GMT: Thread[http-nio-8080-exec-4,5,main]: TransactionId[7635cd7c-ea97-4be6-8694-9e2be8642d56-8581] Login NEXT State : -1 amLoginModule:02/27/2017 03:27:31:676 PM GMT: Thread[http-nio-8080-exec-4,5,main]: TransactionId[7635cd7c-ea97-4be6-8694-9e2be8642d56-8581] SETTING Module name.... :myScriptedAuthModule amAuth:02/27/2017 03:27:31:676 PM GMT: Thread[http-nio-8080-exec-4,5,main]: TransactionId[7635cd7c-ea97-4be6-8694-9e2be8642d56-8581] Module name is .. myScriptedAuthModule amAuth:02/27/2017 03:27:31:676 PM GMT: Thread[http-nio-8080-exec-4,5,main]: TransactionId[7635cd7c-ea97-4be6-8694-9e2be8642d56-8581] successModuleSet is : [DataStore, myScriptedAuthModule] amJAAS:02/27/2017 03:27:31:676 PM GMT: Thread[http-nio-8080-exec-4,5,main]: TransactionId[7635cd7c-ea97-4be6-8694-9e2be8642d56-8581] login success
Tip
The default server-side authentication script outputs log messages at the
messageanderrorlevel.AM does not log debug messages from scripts by default. You can configure AM to log such messages by setting the debug log level for the
amScriptservice. For details, see Debug Logging.(Optional) To test that the script is being used as part of the login process, edit the script to alter the times when authentication is allowed:
Log out the
demouser.Log in as an AM administrator, for example
amAdmin.Navigate to Realms > Top Level Realm > Scripts > Scripted Module - Server Side.
In the script, swap the values for
START_TIMEandEND_TIME, for example:var START_TIME = 17; var END_TIME = 9; //
Click Save.
Repeat steps 1, 2, and 3 above, logging into the module as the
demouser as before. The authentication result will be the opposite of the previous result, as the allowed times have inverted.
Creating Post-Authentication Plugins for Chains
Post-authentication plugins (PAP) let you include custom processing at the following places in the authentication cycle:
At the end of the authentication process, immediately before a user is authenticated
When a user logs out of an AM session
A common use of post-authentication plugins is to set state information in the session object in conjunction with web or Java agents. The post-authentication plugin sets custom session properties, and then the web or Java agent injects the custom properties into the header sent to the protected application.
Two issues should be considered when writing a post-authentication plugin for an AM deployment that uses client-based sessions:
- Cookie size
You can set an unlimited number of session properties in a post authentication plugin. When AM creates a client-based session, it writes the session properties into the session cookie, increasing the size of the cookie. Very large session cookies can exceed browser limitations. Therefore, when implementing a post-authentication plugin in a deployment with client-based sessions, be sure to monitor the session cookie size and verify that you have not exceeded browser cookie size limits.
For more information about client-based session cookies, see Session Cookies and Session Security.
- Cookie security
The AM administrator secures custom session properties in sessions residing in the CTS token store by using firewalls and other typical security techniques.
However, when using client-based sessions, custom session properties are written in cookies and reside on end users' systems. Cookies can be long-lasting and might represent a security issue if any session properties are of a sensitive nature. When developing a post authentication plugin for a deployment that uses client-based sessions, be sure that you are aware of the measures securing the session contained within the cookie.
For more information about client-based session cookie security, see "Configuring Client-Based Session Security".
This section explains how to create a post-authentication plugin.
Designing Your Post-Authentication Plugin
Your post-authentication plugin class implements the AMPostAuthProcessInterface interface, and in particular the following three methods.
public void onLoginSuccess(
  Map requestParamsMap,
  HttpServletRequest request,
  HttpServletResponse response,
  SSOToken token
) throws AuthenticationException

public void onLoginFailure(
  Map requestParamsMap,
  HttpServletRequest request,
  HttpServletResponse response
) throws AuthenticationException

public void onLogout(
  HttpServletRequest request,
  HttpServletResponse response,
  SSOToken token
) throws AuthenticationException
AM calls the onLoginSuccess() and onLoginFailure() methods immediately before informing the user of login success or failure, respectively. AM calls the onLogout() method only when the user actively logs out, not when a user's session times out. See the ForgeRock Access Management Java SDK API Specification for reference.
These methods can perform whatever processing you require. Yet, know that AM calls your methods synchronously as part of the authentication process. Therefore, if your methods take a long time to complete, you will keep users waiting. Minimize the processing done in your post-authentication methods.
Important
Implementing a post-authentication processing plugin in the top level realm can have unexpected effects. AM invokes a post-authentication plugin when the plugin is configured in the top level realm, which will then run for all types of authentication during startup, including user logins and internal administrative logins. The best practice first and foremost is to configure end-users to only log into subrealms, while administrators only log into the top level realm. If you need to execute the post-authentication plugin for administrative logins, make sure that the plugin can also handle internal authentications.
An alternate solution is to configure the post-authentication plugin on a per authentication chain basis, which can be configured separately for user logins or internal administrative logins.
Post-authentication plugins must be stateless: they do not maintain state between login and logout. Store any information that you want to save between login and logout in a session property. AM stores session properties in the CTS token store after login, and retrieves them from the token store as part of the logout process.
Building Your Sample Post-Authentication Plugin
The following example post-authentication plugin sets a session property during successful login, writing to its debug log if the operation fails.
[/home/jenkins/workspace/ipelines_product-docs-qa-release/src/main/docbkx/resources/SamplePAP.java]
If you have not already done so, download and build the sample code.
For information on downloading and building AM sample source code, see How do I access and build the sample code provided for AM (All versions)? in the Knowledge Base.
In the sources, you find the following files:
pom.xmlApache Maven project file for the module
This file specifies how to build the sample post-authentication plugin, and also specifies its dependencies on AM components and on the Servlet API.
src/main/java/com/forgerock/openam/examples/SamplePAP.javaCore class for the sample post-authentication plugin
Once built, copy the .jar to the WEB-INF/lib directory where you deployed AM.
$ cp target/*.jar /path/to/tomcat/webapps/openam/WEB-INF/lib/Restart AM or the container in which it runs.
Configuring Your Post-Authentication Plugin
You can associate post-authentication plugins with realms or services (authentication chains). Where you configure the plugin depends on the scope to which the plugin should apply:
Plugins configured at the realm level are executed when authenticating to any authentication chain in the realm, provided the authentication chain does not have an associated plugin.
Plugins configured at the service level are executed if that authentication chain is used for authentication. Any plugins configured at the realm level will not execute.
In the AM console, go to Realms > Realm Name > Authentication > Settings > Post Authentication Processing. In the Authentication Post Processing Classes list, add the sample plugin class, com.forgerock.openam.examples.SamplePAP, and then click Save.
Alternatively, you can configure sample plugin for the realm by using the ssoadm command.
$ssoadm set-svc-attrs \ --adminid uid=amAdmin,ou=People,dc=openam,dc=forgerock,dc=org \ --password-file /tmp/pwd.txt \ --servicename iPlanetAMAuthService \ --realm /myRealm \ --attributevalues iplanet-am-auth-post-login-process-class= com.forgerock.openam.examples.SamplePAPiPlanetAMAuthService under /myRealm was modified.
Testing Your Post-Authentication Plugin
To test the sample post-authentication plugin, login successfully to AM in the scope where the plugin is configured. For example, if you configured your plugin for the realm, /myRealm, specify the realm in the login URL.
https://openam.example.com:8443/openam/XUI/?realm=/myRealm#login
Although you will not notice anywhere in the user interface that AM calls your plugin, a web or Java agent or custom client code could retrieve the session property that your plugin added to the user session.
[1] Only one password replay post-authentication plugin class can be active for a given AM deployment.