Replication
Always-on directory services use replication to let applications continue reading and writing data, even when individual servers crash, and network connections are interrupted. DS replication is designed to make building highly available directory services straightforward.
About replication
Replication is the process of copying updates between DS servers so all directory servers eventually converge on identical copies of directory data. DS servers that replicate their data are replicas. Since replication is eventually convergent, different replicas can be momentarily out of sync. If you lose an individual replica, or even an entire data center, the remaining replicas continue to provide service. Applications can still write changes to the directory data. Replication brings the replicas back in sync when the problem is repaired.
Replication uses a DS-specific protocol that works only between DS replicas. It replays update operations quickly, storing historical change data to resolve most conflicts automatically. For example, if two client applications separately update a user entry to change the phone number, replication can identify the latest change, and apply it on all replicas without human intervention. To prevent the historical change data from growing forever, DS replicas purge historical data that is older than a configurable interval (default: three days).
DS software supports replication over LAN and WAN networks. If you have multiple sites with many replicas communicating over the WAN, consider standalone replication servers. For details, see Install standalone servers.
Replication is resilient to host clock anomalies.
You should, however, aim to keep server clocks synchronized using ntpd, for example.
Keeping replica clocks synchronized helps prevent issues when validating certificates for secure connections,
and makes it easier to compare timestamps from multiple replicas.
Replication is designed to overcome the following issues:
-
Clock skew between different replicas.
Replication adjusts for skew automatically, and using
ntpdfurther mitigates this.Very large skew, such as replicating with a system whose clock was started at 0 (January 1, 1970), has been seen to cause problems.
-
Forward and backward clock adjustments on a single replica.
Replication adjusts for these automatically.
Very large changes, such as abruptly setting the clock back an entire day, have been seen to cause problems.
-
Timezone differences and adjustments.
Replication uses UTC time.
Very large host clock anomalies can result in the following symptoms:
-
SSL certificate validation errors, when the clocks are far enough apart that the validity dates cannot be correctly compared.
-
Problems with time-based settings in access control instruction subjects, and with features that depend on timestamps, such as password age and last login attributes.
-
Misleading changelog timestamps and replication-related monitoring data.
-
Incorrect replication conflict resolution.
-
Incorrect replication purge delay calculation.
Ready to replicate
When you set up a server, you can specify the following:
-
The replication port.
If specified, the setup process configures the server as a replication server.
-
The bootstrap replication servers' host:port combinations.
When the server starts, it contacts the bootstrap replication servers to discover other replicas and replication servers.
Setup profiles that create backends for schema and directory data configure replication domains for their base DNs. The server is ready to replicate that directory data when it starts up.
Replication initialization depends on the state of the data in the replicas.
DS replication shares changes, not data. When a replica applies an update, it sends a message to its replication server. The replication server forwards the update to all other replication servers, and to its replicas. The other replication servers do the same, so the update is eventually propagated to all replicas.
Each replica eventually converges on the same data by applying each update and resolving conflicts in the same way. As long as each replica starts from the same initial state, each replica eventually converges on the same state. It is crucial, therefore, for each replica to begin in the same initial state. Replicas cannot converge by following exactly the same steps from different initial states.
Internally, DS replicas store a shorthand form of the initial state called a generation ID. The generation ID is a hash of the first 1000 entries in a backend. If the replicas' generation IDs match, the servers can replicate data without user intervention. If the replicas' generation IDs do not match for a given backend, you must manually initialize replication between them to force the same initial state on all replicas.
If necessary, and before starting the servers, further restrict TLS protocols and cipher suites on all servers. This forces the server to use only the restricted set of protocols and cipher suites. For details, see TLS Settings.
Replication per base DN
The primary unit of replication is the replication domain.
A replication domain has a base DN, such as dc=example,dc=com.
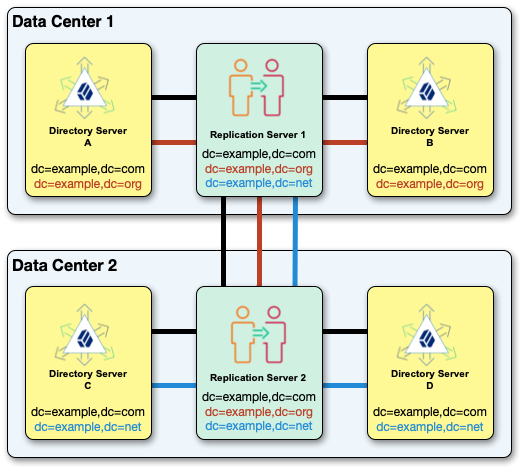
The set of DS replicas and replication servers sharing one or more replication domains is a replication topology. Replication among these servers applies to all the data under the domain’s base DN.
The following example topology replicates dc=example,dc=com, dc=example,dc=org, and dc=example,dc=net.
All the replication servers in a topology are fully connected, replicating the same data under each base DN:
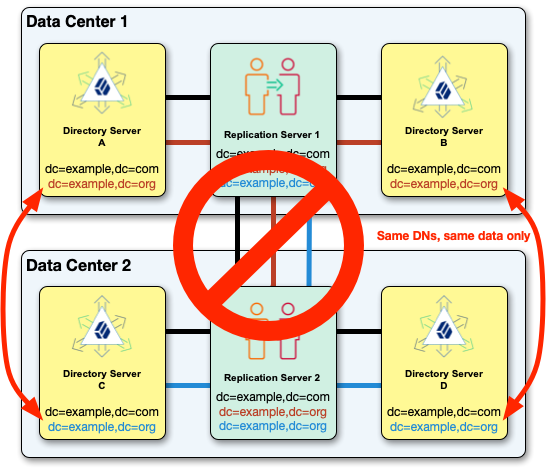
Replication doesn’t support separate, independent domains for the same base DN in the same topology.
For example, you can’t replicate two dc=example,dc=org domains with different data in the same topology:
When you set up a replication domain, replicate the data under the base DN among all the servers in the topology. If the data under a base DN is different on different servers, configure the servers appropriately:
| Difference | Use this |
|---|---|
Different data under the same base DN. |
Separate replication topologies. In other words, put the replicas and replication servers in independent deployments unless the data matches. |
Some replicas have only part of the data under a base DN. |
|
Some replicas have only a subset of LDAP attributes. |
Replication depends on the directory schema under cn=schema.
If applications require specific, non-standard schema definitions or can update the LDAP schema online,
replicate cn=schema with the other base DNs.
Port use and operations
DS servers listen on dedicated ports for administrative requests and for replication requests. These dedicated ports must remain open to remote requests from configuration tools and from other servers. Make sure that firewall software allows connections to the administration and replication ports from all connecting servers.
DS server configuration tools securely connect to administration ports. Administrative connections are short-lived.
DS replicas connect to DS replication ports for replication requests. A server listening on a replication port is called a replication server, whether it is running inside the same process as a directory server, or on a separate host system. Replication connections are long-lived. Each DS replica connects to a replication server upon initialization and then at startup time. The replica keeps the connection open to push and receive updates, although it can connect to another replication server.
The command to initialize replication uses the administrative port, and initialization uses the replication port:

DS replicas push updates to and receive updates from replication servers over replication connections. When processing an update, a replica (DS) pushes it to the replication server (RS) it is connected to. The replication server pushes the update to connected replicas and to other replication servers. Replicas always connect through replication servers.
A replica with a replication port and a changelog plays both roles (DS/RS), normally connecting to its own replication server. A standalone replica (DS) connects to a remote replication server (RS). The replication servers connect to each other. The following figure shows the flow of messages between standalone replicas and replication servers.

The command to monitor replication status uses the administration ports on multiple servers to connect and read monitoring information, as shown in the following sequence diagram:

Replication connection selection
DS servers can provide both directory services and replication services. The two services are not the same, even if they can run alongside each other in the same DS server in the same JVM.
Replication relies on the replication service provided by DS replication servers. DS directory servers (replicas) publish changes made to their data, and subscribe to changes published by other replicas. The replication service manages replication data only, sending and receiving replication messages. A replication server receives, sends, and stores only changes to directory data, not the data itself.
The directory service manages directory data.
It responds to requests, and stores directory data and historical information.
For each replicated base DN, such as dc=example,dc=com or cn=schema,
the directory service publishes changes to and subscribes to changes from a replication service.
The directory service resolves any conflicts that arise when reconciling changes from other replicas,
using the historical information about changes to resolve the conflicts.
(Conflict resolution is the responsibility of the directory server rather than the replication server.)
After a directory server connects to a replication topology, it connects to one replication server at a time for a given domain. The replication server provides the directory server with the list of all replication servers for that base DN. Given this list, the directory server selects its preferred replication server when starting up, when it loses the current connection, or when the connection becomes unresponsive.
For each replicated base DN, a directory server prefers to connect to a replication server:
-
In the same JVM as the directory server.
-
In the same group as the directory server.
By default, if no replication server in the same group is available, the directory server chooses a replication server from any available group.
To define the order of failover across replication groups, set the global configuration property, group-id-failover-order. When this property is set and no replication server is available in the directory server’s group, the directory server chooses a replication server from the next group in the list.
-
With the same initial data under the base DN as the directory server.
-
If initial data was the same, a replication server with all the latest changes from the directory server.
-
With the most available capacity relative to other eligible replication servers.
Available capacity depends on how many replicas in the topology are already connected to the replication server, and what proportion of all replicas ought to be connected to the replication server.
To determine what proportion ought to be connected, a directory server uses replication server weight. When configuring a replication server, you can assign it a weight (default: 1). The weight property takes an integer that indicates capacity relative to other replication servers. For example, a weight of 2 indicates a replication server that can handle twice as many connected replicas as one with weight 1.
The proportion that ought to be connected is
(replication server weight)/(sum of replication server weights). If there are four replication servers with weight 1, the proportion for each is 1/4.
Consider a dc=example,dc=com topology with five directory servers connected to replication servers A, B, and C, where:
-
Two directory servers are connected to replication server A.
-
Two directory servers are connected to replication server B.
-
One directory server is connected to replication server C.
Replication server C is the server with the most available capacity. All other criteria being equal, replication server C is the server to connect to when another directory server joins the topology.
The directory server regularly updates the list of replication servers in case it must reconnect. As available capacity can change dynamically, a directory server can reconnect to another replication server to balance the replication load in the topology. For this reason, the server can also end up connected to different replication servers for different base DNs.
Manual initialization
Manual initialization is not always required. Replication can proceed automatically when replicas start from the same initial data.
If this is not the case, manually initialize replication. How you initialize replication depends on your situation:
| Use Cases | Recommendations |
|---|---|
Replicas installed with same data |
Nothing to do (no manual initialization required) |
Evaluating DS software Developing a directory solution |
Limitations:
|
New directory service, medium to large data set (> 500,000 entries) |
Limitations:
|
Existing directory service, medium to large data set (> 500,000 entries) |
Limitations:
|
New backend |
Create a backend, then one of:
Limitations:
|
Broken data set |
Limitations:
|
Initialize over the network
Review Initialization Options before following these steps:
-
Manually initialize replication using the replication protocol’s total update capability in one of these ways:
-
Overwrite the data in all replicas with the data from the replica where the command runs:
$ dsrepl \
 initialize \
 --baseDN dc=example,dc=com \
 --toAllServers \
 --hostname localhost \
 --port 4444 \
 --bindDN uid=admin \
 --bindPassword password \
 --trustStorePath /path/to/opendj/config/keystore \
 --trustStorePassword:file /path/to/opendj/config/keystore.pin \
 --no-prompt
bash -
Initialize a single other replica, identified by its server ID, from the replica where the command runs:
$ dsrepl \
 initialize \
 --baseDN dc=example,dc=com \
 --toServer ds-1 \
 --hostname localhost \
 --port 4444 \
 --bindDN uid=admin \
 --bindPassword password \
 --trustStorePath /path/to/opendj/config/keystore \
 --trustStorePassword:file /path/to/opendj/config/keystore.pin \
 --no-prompt
bash
-
Initialize from LDIF
|
If you aim to return to a previous state of the data, or to initialize replicas with LDIF from a non-replicated environment, refer to Disaster recovery. |
Review Initialization Options before following these steps:
Initialize each replica with the same LDIF:
-
Stop the server.
-
If desired, enable data confidentiality.
For details, see Data encryption and Encrypt External Changelog Data.
-
Import the LDIF.
For details, see Import LDIF.
-
Start the server.
Initialize From backup
Review Initialization Options before following these steps:
-
Stop the replica.
-
Restore the backend from backup.
For details, see Restore.
-
Start the replica.
Replication replays changes from other replicas that have happened since the backup was created.
Replication status
The following command displays a snapshot of replication monitoring information:
$ dsrepl \
 status \
 --hostname localhost \
 --port 4444 \
 --bindDN uid=monitor \
 --bindPassword password \
 --trustStorePath /path/to/opendj/config/keystore \
 --trustStorePassword:file /path/to/opendj/config/keystore.pin \
 --no-prompt

Base DN            Status  Receive     Replay
                           delay (ms)  delay (ms)
-------------------------------------------------
dc=example,dc=com  OK               0           0
uid=monitor        OK               0           0
cn=schema OK 0 0The command connects to each known server to read status information. It will eventually time out if other servers cannot be contacted.
To get a balanced view of replication delays, monitor them over time.
You can do this with repeated use of the dsrepl status command,
or by reading the monitoring information over LDAP or HTTP.
For details, see Replication delay (Prometheus)
or Replication delay (LDAP).
Manual purge
Over time, DS servers purge any historical data and changelog data older than the replication purge delay. To remove stale historical data, you can optionally trigger a purge task manually:
$ dsrepl \
 purge-meta-data \
 --baseDN dc=example,dc=com \
 --hostname localhost \
 --port 4444 \
 --bindDN uid=admin \
 --bindPassword password \
 --trustStorePath /path/to/opendj/config/keystore \
 --trustStorePassword:file /path/to/opendj/config/keystore.pin \
--no-promptBy default, this task runs for a maximum of one hour.
If desired, set the maximum duration in seconds with the --maximumDuration option.
With earlier DS versions, you had to purge replicas from other servers' configurations after they were removed. DS servers do this automatically now. No administrative action is required.
Replication groups
Define replication groups so that replicas connect first to local replication servers, only going outside the group when no local replication servers are available.
For each group, set the appropriate group ID on the replication servers and the replicas. The following steps set up two replication groups, each with a replication server and a directory server. In a full-scale deployment, you would have multiple servers of each type in each group. The replicas and replication servers in the same location would belong to the same group:
-
Pick a group ID for each group.
The default group ID is
default. For mixed topologies with replicas running older DS versions that support only numeric group IDs, this is equivalent to1. -
Set the group ID for each group on the directory servers:
$ dsconfig \
 set-global-configuration-prop \
 --set group-id:US-East \
 --hostname ds.example.com \
 --port 4444 \
 --bindDN uid=admin \
 --bindPassword password \
 --usePkcs12TrustStore /path/to/opendj/config/keystore \
 --trustStorePassword:file /path/to/opendj/config/keystore.pin \
 --no-prompt

$ dsconfig \
 set-global-configuration-prop \
 --set group-id:US-West \
 --hostname replica.example.com \
 --port 4444 \
 --bindDN uid=admin \
 --bindPassword password \
 --usePkcs12TrustStore /path/to/opendj/config/keystore \
 --trustStorePassword:file /path/to/opendj/config/keystore.pin \
 --no-prompt
bash -
Set the group ID for each group on the replication servers:
$ dsconfig \
 set-global-configuration-prop \
 --set group-id:US-East \
 --hostname rs.example.com \
 --port 4444 \
 --bindDN uid=admin \
 --bindPassword password \
 --usePkcs12TrustStore /path/to/opendj/config/keystore \
 --trustStorePassword:file /path/to/opendj/config/keystore.pin \
 --no-prompt

$ dsconfig \
 set-global-configuration-prop \
 --set group-id:US-West \
 --hostname rs2.example.com \
 --port 4444 \
 --bindDN uid=admin \
 --bindPassword password \
 --usePkcs12TrustStore /path/to/opendj/config/keystore \
 --trustStorePassword:file /path/to/opendj/config/keystore.pin \
 --no-prompt
bash
Subtree replication
To configure subtree replication, split the data across multiple servers.
For example, use different servers for ou=People,dc=example,dc=com, and other dc=example,dc=com data.
Set up one set of servers with everything in dc=example,dc=com except ou=People,dc=example,dc=com.
Set up a separate set of servers for ou=People,dc=example,dc=com.
The former replicate dc=example,dc=com, the latter ou=People,dc=example,dc=com.
For details, see Split data.
Due to limitations described in Replication per base DN,
the same servers cannot replicate both dc=example,dc=com and ou=People,dc=example,dc=com separately.
Fractional replication
With fractional replication, you specify the attributes to include and to exclude
using fractional-include and fractional-exclude configuration properties.
Fractional replicas must respect LDAP schemas.
Attributes that are required by the relevant object classes are included whether you specify them or not.
Excluded attributes must be optional attributes of the relevant object classes.
Each attribute must remain on at least one replica. When you configure a replica to exclude an attribute, the replica checks that the attribute is never added to the replica as part of any LDAP operation. If you exclude the attribute everywhere, it can never be added anywhere.
When using fractional replication, initialize replication from LDIF. The import process imports only the data allowed by fractional replication. Be aware that you cannot create a replica with a full data set from a replica with only a subset of the data.
Replication servers filter objects for fractional replication. If you must prevent data from being replicated across a national boundary, for example, keep standalone replication servers in locations where you can store full entries and their changes. Outside that location, set up standalone replicas that receive the fractional entries.
The following example configures a fractional replica with a subset of inetOrgPerson attributes:
$ dsconfig \
 set-replication-domain-prop \
 --provider-name "Multimaster Synchronization" \
 --domain-name "dc=example,dc=com" \
 --set fractional-include:inetorgperson:cn,givenname,mail,mobile,sn,telephonenumber \
 --hostname replica.example.com \
 --port 4444 \
 --bindDN uid=admin \
 --bindPassword password \
 --usePkcs12TrustStore /path/to/opendj/config/keystore \
 --trustStorePassword:file /path/to/opendj/config/keystore.pin \
--no-promptThe following example excludes a custom attribute, sessionToken, on the replica:
$ dsconfig \
 set-replication-domain-prop \
 --provider-name "Multimaster Synchronization" \
 --domain-name "dc=example,dc=com" \
 --set fractional-exclude:*:sessionToken \
 --hostname replica.example.com \
 --port 4444 \
 --bindDN uid=admin \
 --bindPassword password \
 --usePkcs12TrustStore /path/to/opendj/config/keystore \
 --trustStorePassword:file /path/to/opendj/config/keystore.pin \
--no-promptThis example only applies if you have defined a sessionToken attribute in the LDAP schema.
Read-only replicas
By default, all directory servers in a replication topology are read-write.
The following command causes the replica to accept only replication updates, and to refuse updates from client applications:
$ dsconfig \
 set-global-configuration-prop \
 --set writability-mode:internal-only \
 --hostname replica.example.com \
 --port 4444 \
 --bindDN uid=admin \
 --bindPassword password \
 --usePkcs12TrustStore /path/to/opendj/config/keystore \
 --trustStorePassword:file /path/to/opendj/config/keystore.pin \
--no-promptThe following command resets the replica to the default behavior:
$ dsconfig \
 set-global-configuration-prop \
 --set writability-mode:enabled \
 --hostname replica.example.com \
 --port 4444 \
 --bindDN uid=admin \
 --bindPassword password \
 --usePkcs12TrustStore /path/to/opendj/config/keystore \
 --trustStorePassword:file /path/to/opendj/config/keystore.pin \
--no-promptTrusted replicas
By default, all directory servers in a replication topology trust all replicas. If a replica allows an update, then other servers relay and replay the update without further verification. This simplifies deployments where you control all the replicas.
In deployments where you do not control all the replicas, you can configure replication servers to accept updates only from trusted replicas. The trust depends on the certificate that a replica presents to the replication server when connecting. Specifically, replication servers can verify trust when:
-
Trusted certificates have the OID
1.3.6.1.4.1.36733.2.1.10.1in their extended key usage certificate extension.Use this policy when you control the CA signing the replicas' certificates, and can enforce that only authorized replicas have certificates with this setting.
-
They store fingerprints for all trusted certificates in their configurations.
Use this policy when you do not control the CA.
You choose the policy by setting the replication server advanced property, allow-updates-policy. It takes the following values:
all-
(Default) Trust all replicas.
verify-certificate-key-usage-
Only trust updates from replicas whose certificates'
ExtendedKeyUsageincludes1.3.6.1.4.1.36733.2.1.10.1. verify-certificate-fingerprint-
Only trust updates from replicas with certificate fingerprints in the advanced property, allow-updates-server-fingerprints.
If a replication server does not trust an update, it logs an error message explaining why. The update is not replicated, and therefore may cause replication to diverge on the untrusted replica. Configure the untrusted replicas you control to be read-only, as described in Read-only replicas.
Trust extended key usage
-
For each trusted DS server, get the certificate for replication signed with the appropriate extended key usage.
The following example demonstrates a certificate signing request with the appropriate extended key usage:
$ keytool \ -certreq \ -ext ExtendedKeyUsage:critical=clientAuth,serverAuth,1.3.6.1.4.1.36733.2.1.10.1 \ -alias ssl-key-pair \ -keystore /path/to/opendj/config/keystore \ -storepass:file /path/to/opendj/config/keystore.pin \ -file ssl-key-pair.csrbashThe full process for each server involves generating a certificate signing request, signing the certificate in the request with the CA signing certificate, and importing the CA-signed certificate on the server.
-
For each replication server, update the configuration to trust certificates with the appropriate extended key usage:
$ dsconfig \ set-replication-server-prop \ --provider-name "Multimaster Synchronization" \ --set allow-updates-policy:verify-certificate-key-usage \ --hostname localhost \ --port 4444 \ --bindDN uid=admin \ --bindPassword password \ --usePkcs12TrustStore /path/to/opendj/config/keystore \ --trustStorePassword:file /path/to/opendj/config/keystore.pin \ --no-promptbashAt this point, the replication server can trust the other server’s updates.
Trust fingerprints
-
For each trusted DS server, get the certificate fingerprint:
$ keytool \
 -list \
 -alias ssl-key-pair \
 -keystore /path/to/opendj/config/keystore \
 -storepass:file /path/to/opendj/config/keystore.pin \
ssl-key-pair, <date>, PrivateKeyEntry,
Certificate fingerprint (SHA-256): 05:55:BD:A5:E1:4C:35:A6:A5:4E:78:DD:3E:FD:EA:5A:66:5D:E0:DC:9C:C5:18:7E:E9:CA:A9:1E:CD:87:4B:78
bash -
For each replication server, update the configuration to trust replicas by their certificate fingerprints:
$ dsconfig \
 set-replication-server-prop \
 --provider-name "Multimaster Synchronization" \
 --set allow-updates-policy:verify-certificate-fingerprint \
 --hostname localhost \
 --port 4444 \
 --bindDN uid=admin \
 --bindPassword password \
 --usePkcs12TrustStore /path/to/opendj/config/keystore \
 --trustStorePassword:file /path/to/opendj/config/keystore.pin \
 --no-prompt
bash -
For each replication server, update the configuration to recognize each certificate fingerprint.
The following example demonstrates adding a trusted certificate fingerprint:
$ dsconfig \ set-replication-server-prop \ --provider-name "Multimaster Synchronization" \ --add allow-updates-server-fingerprints:\ "{SHA-256}05:55:BD:A5:E1:4C:35:A6:A5:4E:78:DD:3E:FD:EA:5A:66:5D:E0:DC:9C:C5:18:7E:E9:CA:A9:1E:CD:87:4B:78" \ --hostname localhost \ --port 4444 \ --bindDN uid=admin \ --bindPassword password \ --usePkcs12TrustStore /path/to/opendj/config/keystore \ --trustStorePassword:file /path/to/opendj/config/keystore.pin \ --no-promptbashAt this point, the replication server can trust the other server’s updates.
-
Repeat the relevant steps each time a trusted certificate changes.
Listen addresses
When configuring a server on a multi-homed system with multiple IP addresses, you can specify the listen addresses. By default, the replication server listens on all network interfaces.
The following example configures the server to listen only on 192.168.0.10 for all connections:
$ dsconfig \
 set-global-configuration-prop \
 --set advertised-listen-address:192.168.0.10 \
 --hostname localhost \
 --port 4444 \
 --bindDN uid=admin \
 --bindPassword password \
 --usePkcs12TrustStore /path/to/opendj/config/keystore \
 --trustStorePassword:file /path/to/opendj/config/keystore.pin \
--no-promptFor details, see advertised-listen-address.
Disk space thresholds
Replication servers record changes in changelog database files under the opendj/changelogDb directory.
|
Do not compress, tamper with, or otherwise alter changelog database files directly, unless specifically instructed to do so by a qualified ForgeRock technical support engineer. External changes to changelog database files can render them unusable by the server. |
Replication server configuration objects have changelog database properties,
disk-low-threshold, and disk-full-threshold:
-
When available disk space falls below
disk-low-threshold, the replication server triggers a warning alert notification to let you know to free disk space. -
When available disk space falls below
disk-full-threshold, the replication server triggers another warning alert notification, and disconnects from the replication topology.Connected directory servers fail over to another replication server until available disk space is above the
disk-full-thresholdagain.
Set the thresholds high enough to allow time to react after the initial alert.
The following example sets disk-low-threshold to 10 GB and disk-full-threshold to 5 GB:
$ dsconfig \
 set-replication-server-prop \
 --provider-name "Multimaster Synchronization" \
 --set "disk-low-threshold:10 GB" \
 --set "disk-full-threshold:5 GB" \
 --hostname localhost \
 --port 4444 \
 --bindDN uid=admin \
 --bindPassword password \
 --usePkcs12TrustStore /path/to/opendj/config/keystore \
 --trustStorePassword:file /path/to/opendj/config/keystore.pin \
--no-promptThe disk-low-threshold
and disk-full-threshold properties
are advanced properties. Examine their values with the dsconfig --advanced option.
Recover from user error
It is possible to restore accidentally deleted or changed data.
Changes to a replicated DS directory service are similar to those made with the Unix rm command,
but with a twist.
With the rm command, if you make a mistake you can restore your files from backup,
and lose only the work done since the last backup.
If you make a mistake with an update to the directory service, after you restore from backup,
replication efficiently replays your mistake over the data you restored.
There is more than one way to recover from user error. None of the ways are limited to changing DS settings. All involve manually fixing mistakes.
Consider these alternatives:
-
Encourage client applications to provide end users with undo capability.
In this case, client applications take responsibility for maintaining an undo history.
-
Maintain a record of each update to the service, so that you can manually "undo" mistakes.
You can use the external changelog. The external changelog is enabled with replication, and does not use additional space.
For instructions, see Changelog for notifications. In particular, see Include Unchanged Attributes on saving what is deleted as well as changed.
DS servers can write to a file-based audit log. The audit log does not help with a general solution in this case. The DS audit log records only changes to the data. When you delete an entry, the audit log does not record the entry before deletion. The following example shows audit log records for changes made to Barbara Jensen’s entry:
# <datestamp>; conn=<number>; op=<number> dn: uid=bjensen,ou=People,dc=example,dc=com changetype: modify replace: description description: This is the description I want. - replace: modifiersName modifiersName: uid=admin - replace: modifyTimestamp modifyTimestamp: <timestamp> # <datestamp>; conn=<number>; op=<number> dn: uid=bjensen,ou=People,dc=example,dc=com changetype: modify replace: description description: I never should have changed this! - replace: modifiersName modifiersName: uid=admin - replace: modifyTimestamp modifyTimestamp: <timestamp> # <datestamp>; conn=<number>; op=<number> dn: uid=bjensen,ou=People,dc=example,dc=com changetype: deleteldifYou can use these records to fix the mistaken update to the description. However, the audit log lacks the information needed to restore Barbara Jensen’s deleted entry.
-
For administrative errors that involve directory data, use the external changelog if possible.
If not, an alternative technique consists of restoring backup to a new server set up to not replicate. (Replication replays all updates, including mistakes.) Compare data on the separate restored server to the live replicas, and fix the mistakes manually.
A more drastic alternative is to rebuild the entire service from backup, as described in Disaster recovery. This alternative is only recommended in the case of a major error where you have a very fresh backup (taken immediately before the error), and no client applications are affected.
-
For administrative configuration errors that prevent servers from starting, know that DS servers keep snapshots of the main configuration file, including the
opendj/var/config.ldif.startokfile, and the files in theopendj/var/archived-configs/directory.Compare the current configuration with the earlier configurations, stop the server, and repair mistakes manually. Take care to avoid trailing white space at the end of LDIF lines.
Replication conflicts
Replication is eventually consistent by design to support basic write availability. Changes are applied locally and then replayed to remote replicas. This means it is possible to have conflicts. A replication conflict arises when incompatible changes are made concurrently to multiple read-write replicas.
Two types of conflicts happen: modify conflicts and naming conflicts. Modify conflicts involve concurrent modifications to the same entry. Naming conflicts involve other operations that affect the DN of the entry.
Replication resolves modify conflicts, and many naming conflicts by replaying the changes in the correct order.
To determine the relative order in which changes occurred, replicas retain historical information for each update.
This information is stored in the target entry’s ds-sync-hist operational attribute.
Replication resolves these conflicts automatically using the historical information to order changes correctly:
-
The attributes of a given entry are modified concurrently in different ways on different replicas.
-
An entry is renamed on one replica while being modified on another replica.
-
An entry is renamed on one replica while being renamed in a different way on another replica.
-
An entry is deleted on one replica while being modified on another replica.
-
An entry is deleted and another entry with the same DN added on one replica while the same entry is being modified on another replica.
Replication cannot resolve these particular naming conflicts. You must resolve them manually:
-
Different entries with the same DN are added concurrently on multiple replicas.
-
An entry on one replica is moved (renamed) to use the same DN as a new entry concurrently added on another replica.
-
A parent entry is deleted on one replica, while a child entry is added or renamed concurrently on another replica.
When replication cannot resolve naming conflicts automatically,
the server renames the conflicting entry using its entryUUID operational attribute.
The resulting conflicting entry has a DN with the following form:
entryuuid=entryUUID-value+original-RDN,original-parent-DN
For each conflicting entry named in this way, resolve the conflict manually:
-
Get the conflicting entry or entries, and the original entry if available.
The following example shows the result on one replica of a naming conflict when a
newuserentry was added concurrently on two replicas:$ ldapsearch \ --hostname localhost \ --port 1636 \ --useSsl \ --usePkcs12TrustStore /path/to/opendj/config/keystore \ --trustStorePassword:file /path/to/opendj/config/keystore.pin \ --bindDN uid=admin \ --bindPassword password \ --baseDN dc=example,dc=com \ "(uid=newuser)" dn: uid=newuser,ou=People,dc=example,dc=com objectClass: top objectClass: inetOrgPerson objectClass: organizationalPerson objectClass: person mail: newuser@example.com sn: User cn: New User ou: People description: Added on server 1 uid: newuser dn: entryuuid=2f1b58c3-4bee-4215-88bc-88202a7bcb9d+uid=newuser,ou=People,dc=example,dc=com objectClass: top objectClass: inetOrgPerson objectClass: organizationalPerson objectClass: person mail: newuser@example.com sn: User cn: New User ou: People description: Added on server 2 uid: newuserbash -
To preserve changes made on the conflicting entry or entries, apply the changes manually.
The following example shows a modification to preserve both description values:
$ ldapmodify \ --hostname localhost \ --port 1636 \ --useSsl \ --usePkcs12TrustStore /path/to/opendj/config/keystore \ --trustStorePassword:file /path/to/opendj/config/keystore.pin \ --bindDn uid=admin \ --bindPassword password << EOF dn: uid=newuser,ou=People,dc=example,dc=com changetype: modify add: description description: Added on server 2 EOFbashFor additional examples demonstrating how to apply changes to directory entries, see LDAP updates.
-
After making any necessary changes, manually delete the conflicting entry or entries.
The following example deletes the conflicting entry:
$ ldapdelete \ --hostname localhost \ --port 1636 \ --useSsl \ --usePkcs12TrustStore /path/to/opendj/config/keystore \ --trustStorePassword:file /path/to/opendj/config/keystore.pin \ --bindDN uid=admin \ --bindPassword password \ entryuuid=2f1b58c3-4bee-4215-88bc-88202a7bcb9d+uid=newuser,ou=People,dc=example,dc=combashFor additional examples, see Delete Entries.
Bootstrap replication servers
A bootstrap replication server is one of the replication servers in a deployment that a server should contact to discover all the other servers in the deployment.
Add a bootstrap replication server
After you add a replication server to a deployment, add it to the other servers' bootstrap-replication-server settings.
Apply these steps for each server whose configuration references the new replication server to add:
-
Add the bootstrap replication server to the server’s configuration:
$ dsconfig \
 set-synchronization-provider-prop \
 --provider-name "Multimaster Synchronization" \
 --add bootstrap-replication-server:new-rs.example.com:8989 \
 --hostname replica.example.com \
 --port 4444 \
 --bindDN uid=admin \
 --bindPassword password \
 --usePkcs12TrustStore /path/to/opendj/config/keystore \
 --trustStorePassword:file /path/to/opendj/config/keystore.pin \
 --no-prompt
bash -
If the server uses property value substitution to load the list of replication bootstrap servers from the environment, restart the server for the changes to take effect.
Remove a bootstrap replication server
After you remove a replication server from a deployment,
remove it from other servers' bootstrap-replication-server settings.
Apply these steps for each server whose configuration references the replication server that you removed:
-
Remove the bootstrap replication server from the server’s configuration:
$ dsconfig \
 set-synchronization-provider-prop \
 --provider-name "Multimaster Synchronization" \
 --remove bootstrap-replication-server:removed-rs.example.com:8989 \
 --hostname replica.example.com \
 --port 4444 \
 --bindDN uid=admin \
 --bindPassword password \
 --usePkcs12TrustStore /path/to/opendj/config/keystore \
 --trustStorePassword:file /path/to/opendj/config/keystore.pin \
 --no-prompt
bash -
If the server uses property value substitution to load the list of replication bootstrap servers from the environment, restart the server for the changes to take effect.
Disable replication
Disable replication temporarily
|
Do not allow modifications on the replica for which replication is temporarily stopped. No record of such changes is kept, and the changes cause replication to diverge. |
Follow these steps to disable replication temporarily for a replica and drop any changes that occur:
-
Prevent changes to the affected data.
For details, see Read-only replicas.
-
Disable the replication mechanism:
$ dsconfig \
 set-synchronization-provider-prop \
 --provider-name "Multimaster Synchronization" \
 --set enabled:false \
 --hostname replica.example.com \
 --port 4444 \
 --bindDN uid=admin \
 --bindPassword password \
 --usePkcs12TrustStore /path/to/opendj/config/keystore \
 --trustStorePassword:file /path/to/opendj/config/keystore.pin \
 --no-prompt
bash -
Perform whatever operations are required.
-
Enable the replication mechanism again:
$ dsconfig \
 set-synchronization-provider-prop \
 --provider-name "Multimaster Synchronization" \
 --set enabled:true \
 --hostname replica.example.com \
 --port 4444 \
 --bindDN uid=admin \
 --bindPassword password \
 --usePkcs12TrustStore /path/to/opendj/config/keystore \
 --trustStorePassword:file /path/to/opendj/config/keystore.pin \
 --no-prompt
bash -
Allow changes to the affected data.
For details, see Read-only replicas.
Before removing a server from a group of replicated servers, disable replication as described. When the server you remove is a bootstrap replication server, also remove it from the configuration on all other servers.
Stop replicating permanently
You might remove a server from a replication topology because:
-
The DS server is no longer needed.
For example, you are scaling a deployment down, or retiring an old server that you replaced with a newer one.
-
Someone configured replication between DS servers that should be independent.
For example, at setup time, replication was configured to include all six replicas in three data centers, but the expected configuration was three separate directory service deployments with two replicas in each data center.
In this case, you must permanently change which servers replicate with each other.
|
The steps that follow only apply to deployments of DS 7 and later servers. If you are upgrading from older servers and have a mix of DS 7 and earlier servers, see the Upgrade documentation instead. |
To remove a server that is no longer needed:
-
Uninstall the server.
For details, see Uninstallation.
-
If the server is referenced in other servers'
bootstrap-replication-serversettings, remove it.For details, see Remove a bootstrap replication server.
-
The automated purge process eventually removes historical data and changelog data for old servers.
You can optionally trigger a purge task manually, as described in Manual purge.
To change which servers replicate with each other:
-
Prevent changes to the affected data.
For details, see Read-only replicas.
-
Perform these steps in parallel on all affected servers:
-
Disable the replication mechanism.
For details, see Disable replication temporarily.
-
Adjust the
bootstrap-replication-serversettings to limit replication as desired. -
Enable the replication mechanism again.
-
Restart the server for the changes to take effect.
-
-
Allow changes to the affected data.
-
Delete entries that were erroneously replicated.
For details, see Delete Entries.
-
The automated purge process eventually removes historical data and changelog data for old servers.
You can optionally trigger a purge task manually, as described in Manual purge.