LDAP proxy
Directory Services proxy services let you build a single point of access to a directory service, with a uniform view of the underlying LDAPv3 user data. This hides implementation details from directory client applications, and promotes scalability and availability.
When you set up a directory proxy server, no user data is stored locally. The server acts purely as an LDAP proxy. The only local data is for the server configuration and LDAP schema. In addition, the server is set up to use global access control policies rather than global ACIs. Global access control policies provide coarse-grained access control suitable for use on proxy servers, where the lack of local access to directory data makes ACIs a poor fit.
Proxy services are provided by proxy backends. Proxy backends connect to remote directory servers using a dynamic and configurable discovery mechanism. They route requests to remote directory servers. The way they distribute requests is configurable. The way they handle failures depends on the response from the directory server.
LDAP schema definitions for user data must be aligned on the proxy server and on the remote directory servers.
ACIs are handled by the directory server where the target data is stored. In other words, global access control policies set on a proxy server do not change ACIs on the remote directory server. Set ACIs appropriately on the directory server independent of proxy settings.
Remote LDAP servers
When the target DN of an LDAP request is not in a local backend, an LDAP server can refuse to handle the request, or return a referral. An LDAP proxy can also forward the request to another directory server.
In Directory Services, the LDAP proxy is implemented as a proxy backend. Rather than store user data locally, the proxy backend forwards requests to remote directory servers.
For proxy backends, a service discovery mechanism identifies remote directory servers to forward LDAP requests to. A service discovery mechanism’s configuration specifies the keys used for secure communications, and how to contact the remote directory servers. It reads remote directory servers' configurations to discover their capabilities, including the naming contexts they serve, and so which target DNs they can handle. It periodically rereads their configurations in case they have been updated since the last service discovery operation.
When preparing to configure a service discovery mechanism, choose one of these alternatives:
- Replication service discovery mechanism
-
This mechanism contacts DS replication servers to discover remote LDAP servers. Each replication server maintains information about the replication topology that lets the proxy server discover directory server replicas.
This mechanism only works with replicated DS servers.
A replication service discovery mechanism configuration includes a bind DN and password to connect to replication servers. It uses this account to read configuration data. The account must have access and privileges to read the configuration data, and it must exist with the same credentials on all replication servers.
- Static service discovery mechanism
-
This mechanism maintains a static list of directory server
host:portcombinations. You must enumerate the remote LDAP servers.This mechanism is designed to work with all LDAPv3 directory servers that support proxied authorization.
When configuring a service discovery mechanism, make sure all the remote directory servers are replicas of each other, and that they have the same capabilities. A proxy backend expects all remote directory server replicas known to the mechanism to hold the same data. This allows the backend to treat the replicas as equivalent members of a pool. In the configuration, a pool of equivalent replicas is a shard.
In deployments where you must distribute data for horizontal write scalability, you can configure multiple service discovery mechanisms. The proxy backend can then distribute write requests across multiple shards.
The following example creates a replication service discovery mechanism that specifies two replication servers:
$ dsconfig \
 create-service-discovery-mechanism \
 --hostname localhost \
 --port 4444 \
 --bindDN uid=admin \
 --bindPassword password \
 --usePkcs12TrustStore /path/to/opendj/config/keystore \
 --trustStorePassword:file /path/to/opendj/config/keystore.pin \
 --mechanism-name "Replication Service Discovery Mechanism" \
 --type replication \
 --set bootstrap-replication-server:rs1.example.com:4444 \
 --set bootstrap-replication-server:rs2.example.com:4444 \
 --set ssl-cert-nickname:ssl-key-pair \
 --set key-manager-provider:PKCS12 \
 --set trust-manager-provider:PKCS12 \
 --set use-start-tls:true \
 --set use-sasl-external:true \
 --no-prompt
The example above assumes that the servers protect connections using keys generated with a deployment ID and password. If this is not the case, configure the security settings appropriately.
The following example creates a static service discovery mechanism that specifies four remote LDAP servers:
$ dsconfig \
 create-service-discovery-mechanism \
 --hostname localhost \
 --port 4444 \
 --bindDN uid=admin \
 --bindPassword password \
 --usePkcs12TrustStore /path/to/opendj/config/keystore \
 --trustStorePassword:file /path/to/opendj/config/keystore.pin \
 --mechanism-name "Static Service Discovery Mechanism" \
 --type static \
 --set primary-server:local1.example.com:636 \
 --set primary-server:local2.example.com:636 \
 --set secondary-server:remote1.example.com:636 \
 --set secondary-server:remote2.example.com:636 \
 --set ssl-cert-nickname:ssl-key-pair \
 --set key-manager-provider:PKCS12 \
 --set trust-manager-provider:"JVM Trust Manager" \
 --set use-ssl:true \
 --set use-sasl-external:true \
 --no-prompt
The example above assumes that the remote servers use certificates signed by well-known CAs, and so are recognized using the trust manager provided by the JVM. If this is not the case, configure the security settings appropriately.
If the proxy server must perform SSL mutual authentication when setting up secure connections with the remote servers, configure an appropriate key manager provider and SSL certificate nickname.
Supported service discovery mechanisms define a discovery-interval that specifies
how often to read the remote server configurations to discover changes.
Because the mechanism polls periodically for configuration changes, by default,
it can take up to one minute for the mechanism to see the changes.
If necessary, you can change this setting in the configuration.
Routing requests
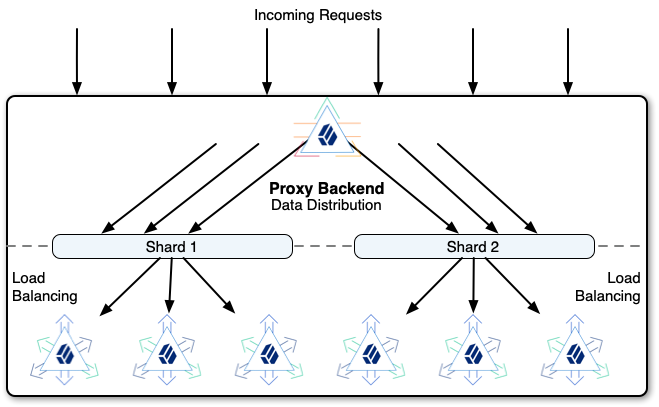
A proxy backend forwards requests according to their target DNs. The proxy backend matches target DNs to base DNs that you specify in the configuration. If you specify multiple shards for data distribution, the proxy also forwards requests to the appropriate shard.
When specifying base DNs, bear in mind the following points:
-
A server responds first with local data, such as the server’s own configuration or monitoring data. If a request target DN cannot be served from local data, the proxy backend can forward the request to a remote directory server.
The proxy backend will forward the request if its target DN is under one of the specified base DNs.
-
As an alternative to enumerating a list of base DNs to proxy, you can set the proxy backend property
route-all: true.When you activate this property, the proxy backend will attempt to forward all requests that can be served by public naming contexts of remote servers. If the request target DN is not in a naming context supported by any remote directory servers associated with the proxy backend, then the proxy will not forward the request.
-
The LDAP proxy capability is intended to proxy user data, not server-specific data.
A server with a proxy backend still responds directly to requests that target private naming contexts, such as
cn=config,cn=tasks, andcn=monitor. Local backends hold configuration and monitoring information that is specific to the server, and these naming contexts are not public.Make sure client applications for configuration and monitoring access servers directly for the server-specific data they need.
-
If you configure multiple proxy backends, each proxy backend must target distinct base DNs.
In deployments where you must distribute data for horizontal write scalability, you can configure multiple service discovery mechanisms for the same base DNs. Each service discovery mechanism targets its own distinct shard of directory data.
To enable write scalability beyond what is possible with a single shard of replicas, each shard must have its own independent replication configuration. Replication replays each update only within the shard.
The proxy backend distributes write requests across the shard, and balances the load within each shard:
Data distribution for horizontal scalability has the following properties:
-
The proxy backend always routes requests targeting an entry below the partition base DN to the same shard.
-
The proxy backend routes read requests targeting the partition base DN entry or above to any shard.
In other words, the proxy backend can route each request to a different shard. When you deploy data distribution, the proxy rejects writes to the partition base DN entry and above through the proxy backend. Instead, you must perform such write operations on a replica in each shard.
The best practice is therefore to update the partition base DN entry and above prior to deployment.
-
The proxy backend routes search requests to all shards unless the search scope is below the partition base DN.
For example, if the partition base DN is
ou=people,dc=example,dc=com, the proxy backend always routes a search with base DNuid=bjensen,ou=people,dc=example,dc=comordeviceid=12345,uid=bjensen,ou=people,dc=example,dc=comto the same shard. However, it routes a search with base DNou=people,dc=example,dc=comto all shards.
Load balancing
A directory proxy server balances the LDAP request load across the remote LDAP servers.
The proxy performs load balancing for the following purposes:
-
Data distribution: sharding data to scale out
-
Failover: routing requests to available directory servers
-
Affinity: consistently forwarding requests for the same entry to the same server
The proxy applies these load balancing capabilities in hierarchical order to route requests. Follow the paths of requests through the proxy backend to a directory server in this diagram:
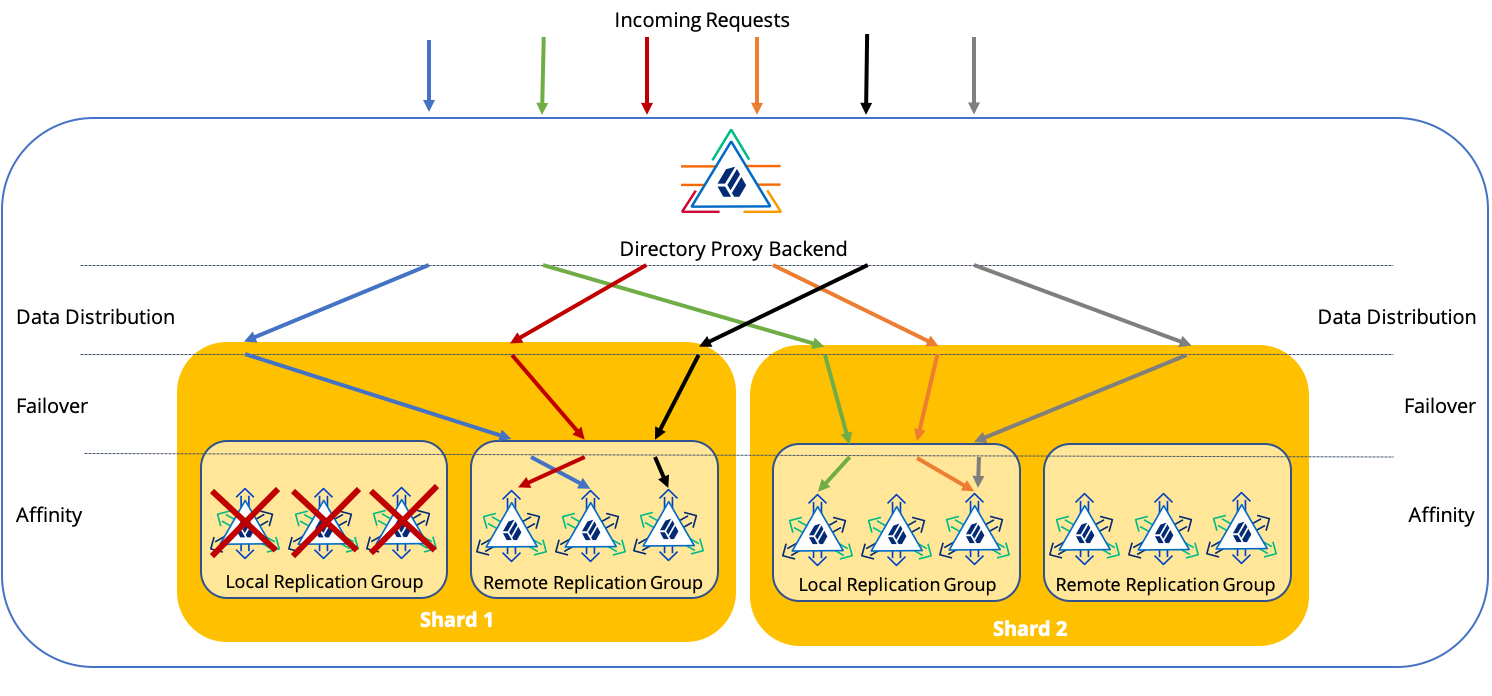
Notice in the diagram how the load balancing capabilities work together to route a request to a directory server:
-
Data distribution routes to the correct shard.
-
Failover routes around directory servers that are down, routing the request to available servers.
-
Affinity routes the operation to a specific server.
| Feature | Characteristics |
|---|---|
Data Distribution |
Routes requests with the same target DN below the partition base DN to the same shard. Data distribution helps to scale out the directory service horizontally. When to Use Use when you must scale out the directory service, and the deployment fits the constraints. A single DS directory service shard can process thousands of LDAP requests per second given the proper configuration and tuning. Furthermore, you can increase the search and read throughput simply by adding replicas. Configure data distribution for deployments when performance testing demonstrates that you cannot achieve write throughput requirements with properly configured and tuned replicas in a single replication topology. For example, use data distribution for a very high scale AM CTS deployment. Settings See Data distribution. |
Failover |
Routes LDAP requests to LDAP servers that are available and responding to health check probe requests. Failover prevents the proxy server from continuing to forward requests to unavailable servers. See also About failures. When to Use Use failover settings to route requests to local servers if they are available, and remote servers only when local servers are not available. Settings |
Affinity |
Routes LDAP requests with the same target DN to the same server. Affinity load balancing helps applications that update and then reread the same entry in quick succession. This is not a best practice, but is often seen in client applications. With an add or modify request on an entry that is quickly followed by a read of the entry, the requests to replicate the update can take longer than the read request, depending on network latency. Affinity load balancing forwards the read request to the same server that processed the update, ensuring that the client application obtains the expected result. Affinity routing depends on the values of the proxy backend property,
In terms of the CAP theorem, affinity load balancing provides consistency and availability, but not partition tolerance. As this algorithm lacks partition tolerance, configure it to load balance requests in environments where partitions are unlikely, such as a single data center with all directory servers on the same network. When to Use Use whenever possible, in combination with failover. Client application developers may be unaware of LDAP best practices. Settings Proxy backend properties: |
LDAP schema
Proxy services are designed to proxy user data rather than server configuration or monitoring data. A proxy server must expose the same LDAP schema for user data as the remote directory servers.
If the schema definitions for user data differ between the proxy server and the remote directory servers, you must update them to bring them into alignment.
For details on DS server schema, see LDAP schema.
If the remote servers are not DS servers, see the schema documentation for the remote servers. Schema formats are not identical across all LDAPv3 servers. You will need to translate the differences into native formats, and apply changes locally on each server.
Proxy backend
Create proxy backends only on servers set up as proxy servers (with setup --profile ds-proxy-server).
|
A directory proxy server connects using an account that must exist in the remote directory service. The directory proxy server binds with this service account, and then forwards LDAP requests on behalf of other users. For DS directory servers, use the proxied server setup profile if possible. For details, see Install DS for use with DS proxy. The service account must have the following on all remote directory servers:
The following listing shows an example service account that you could use with DS replicas. Adapt the account as necessary for your directory service: |
Forward for example.com
The following example creates a proxy backend that forwards LDAP requests when the target DN is in dc=example,dc=com:
$ dsconfig \
 create-backend \
 --hostname localhost \
 --port 4444 \
 --bindDN uid=admin \
 --bindPassword password \
 --usePkcs12TrustStore /path/to/opendj/config/keystore \
 --trustStorePassword:file /path/to/opendj/config/keystore.pin \
 --backend-name proxyExampleCom \
 --type proxy \
 --set enabled:true \
 --set base-dn:dc=example,dc=com \
 --set route-all:false \
 --set use-sasl-external:true \
 --set ssl-cert-nickname:ssl-key-pair \
 --set key-manager-provider:PKCS12 \
 --set partition-base-dn:ou=groups,dc=example,dc=com \
 --set partition-base-dn:ou=people,dc=example,dc=com \
 --set shard:"Replication Service Discovery Mechanism" \
 --no-prompt
This command fails if dc=example,dc=com is already served by local data.
The settings for checking remote server availability and keeping connections alive are not shown:
-
To check that the remote LDAP server is available, the proxy sends periodic availability-check requests.
-
To keep connections from appearing idle and being forcefully closed, the proxy sends periodic keep-alive requests to the remote server.
The request settings are configurable.
See the availability-check-* and keep-alive-* properties in Proxy Backend.
About failures describes in more detail how the proxy backend works with these requests.
Forward all requests
The following example creates a proxy backend that forwards LDAP requests targeting user data.
It does not specify base DNs explicitly, but uses the route-all property:
$ dsconfig \
 create-backend \
 --hostname localhost \
 --port 4444 \
 --bindDN uid=admin \
 --bindPassword password \
 --usePkcs12TrustStore /path/to/opendj/config/keystore \
 --trustStorePassword:file /path/to/opendj/config/keystore.pin \
 --backend-name proxyAll \
 --type proxy \
 --set enabled:true \
 --set route-all:true \
 --set use-sasl-external:true \
 --set ssl-cert-nickname:ssl-key-pair \
 --set key-manager-provider:PKCS12 \
 --set shard:"Static Service Discovery Mechanism" \
 --no-prompt
The example above assumes that the servers protect connections using keys generated with a deployment ID and password. If this is not the case, configure the security settings appropriately.
Proxy backends define a discovery-interval that specifies how often to
read the remote server configurations to discover changes.
Because the proxy polls periodically for configuration changes, by default,
it can take up to one minute to see the changes.
If necessary, you can change this setting in the configuration.
About failures
There are many specific ways that an LDAP request can fail. Not all failure result codes indicate a permanent failure, however. The following result codes from a remote directory server indicate a temporary failure:
-
51 (Busy) indicates that the server was too busy to process the request.
The request can safely be tried on another peer server.
-
52 (Unavailable) indicates that the server was missing at least one resource needed to process the request.
The request can safely be tried on another peer server.
When a forwarded request finishes with one of these return codes, the proxy backend retries the request on another server. In this case, the client does not receive the result from the remote directory server.
When a forwarded request finishes with a permanent server-side error return code, the proxy backend returns the result to the client application. In this case, the client must handle the error.
Connection failures can prevent the remote directory server from responding at all. The proxy backend handles connection failures differently, depending on whether it is inherently safe to replay the operation:
-
For operations that read directory data, including search and compare requests, the proxy backend retries the request if a connection failure occurs.
-
For operations that write directory data, including add, delete, modify, and modify DN requests, the proxy backend does not retry the request if a connection failure occurs.
When the connection fails during a write operation, it is not possible to determine whether the change was applied. It is not safe, therefore, to replay the request on another server.
The proxy returns an error to the client application.
-
Connection failures during bind operations cause the proxy to retry the bind.
In the unlucky event of repeated connection failures on successive bind attempts combined with a password policy configured to lock an account after a certain number of consecutive failures, it is possible that this behavior could lock an account.
A proxy backend protects against failed and stale connections with feedback from periodic availability-check and keep-alive requests to remote directory servers.
The requests serve these purposes:
-
Checks that the remote directory server is still available.
If the request fails, the proxy closes the unresponsive connection and connects to another remote directory server.
-
Determines whether an unresponsive server has recovered.
When the remote directory server responds again to requests, the proxy can begin forwarding client requests to it again.
-
Keeps the connection alive, preventing it from appearing idle and being forcefully closed.
If necessary, you can configure how often such requests are sent using the proxy backend configuration properties.
Access control and resource limits
When you deploy a directory proxy server, you limit the mechanisms for access control and resource limits. Such mechanisms cannot rely on ACIs in user data, resource limit settings on user entries, or group membership to determine what the server should allow. They can depend only on the server configuration and on the properties of the incoming request.
Global access control policies provide a mechanism suitable for directory proxy servers. For details, see Access control.
Resource limits set in the server configuration provide a way to prevent directory clients from using an unfair share of system resources. For details, see Resource limits, which covers how to update a server’s configuration.
High availability
Directory services are designed for basic availability. Directory data replication makes it possible to read and write directory data when the network is partitioned, where remote servers cannot effectively contact each other. This sort of availability assumes that client applications can handle temporary interruptions.
Some client applications can be configured to connect to a set of directory servers. Some of these clients are able to retry requests when a server is unavailable. Others expect a single point of entry to the directory service, or cannot continue promptly when a directory server is unavailable.
Individual directory servers can become unavailable for various reasons:
-
A network problem can make it impossible to reach the server.
-
The server can be temporarily down for maintenance (backup, upgrade, and other purposes).
-
The server can be removed from a replication topology and replaced with a different server.
-
A crash can bring the server down temporarily for a restart or permanently for a replacement.
All of these interruptions must be managed on the client side. Some could require reconfiguration of each client application.
A directory proxy server provides high availability to client applications by hiding these implementation details from client applications. The proxy presents client applications with a uniform view of the remote directory servers. It periodically rereads the remote servers' configurations and checks connections to route requests correctly despite changes in server configurations and availability.
Directory proxy servers are well-suited for applications that need a single entry point to the directory service.
Single point of access
Unlike directory servers with their potentially large sets of volatile user data, directory proxy servers manage only their configuration state. Proxy servers can start faster and require less disk and memory space. Each directory proxy server can effectively be a clone of every other, with a configuration that does not change after server startup. Each clone routes LDAP requests and handles problems in the same way.
When you configure all directory proxy servers as clones of each other, you have a number of identical directory access points. Each point provides the same view of the underlying directory service. The points differ from each other only by their connection coordinates (host, port, and potentially key material to establish secure connections).
To consolidate identical access points to a single access point, configure your network to use a virtual IP address for the proxy servers. You can restart or replace proxy servers at any time, in the worst case losing only the client connections that were established with the individual proxy server.
An alternative to a single, global access point for all applications is to repeat the same approach for each key application. The proxy server configuration is specific to each key application. Clones with that configuration provide a single directory access point for the key application. Other clones do the same other for other key applications. Be sure to provide a more generic access point for additional applications.
Data distribution
Data distribution through the proxy comes with the following constraints:
-
Data distribution is not elastic, and does not redistribute data if you add a shard. Once you deploy and use data distribution, you cannot change the number of shards.
Plan for peak load when using data distribution to scale out your deployment.
You can, however, add or change individual servers within a shard. For example, you could scale out by deploying many shards, and later upgrade to more powerful, faster underlying systems to scale up each shard.
-
You cannot import distributed data from LDIF. The
import-ldifcommand does not work with a proxy backend.If you must initialize distributed data, add the entries through the proxy server instead. You can use the
ldapmodifycommand, for example, setting the--numConnectionsoption to perform updates in parallel on multiple LDAP connections. You can also deploy as many proxy servers as necessary to perform the adds in parallel. -
Write requests for entries above the distributed data are not repeated on all shards. Instead, the proxy rejects such requests.
If you must make a change to entries above the distributed data, make the change behind the proxy to one directory server replica in each shard.
-
Subtree and one-level searches can be relatively expensive, as the proxy must potentially forward the search request to every shard to retrieve all search results.
To optimize searches, use a search base DN that points to a distributed entry.
-
Given the present constraints of both data distribution and replication, the best fit for data distribution occurs where the distributed data remains self-contained and logically independent from other data branches.
The example shown below distributes data for AM CTS tokens. The CTS data model fits DS data distribution well. AM stores all CTS token entries under the same DN. The entries above the distributed CTS tokens do not change during normal operation. CTS token entries do not have DN-value attributes that reference entries in another branch, nor are they members of LDAP groups stored in another branch.
The example that follows is intended for evaluation on a single computer. It involves installing five DS servers and one AM server:
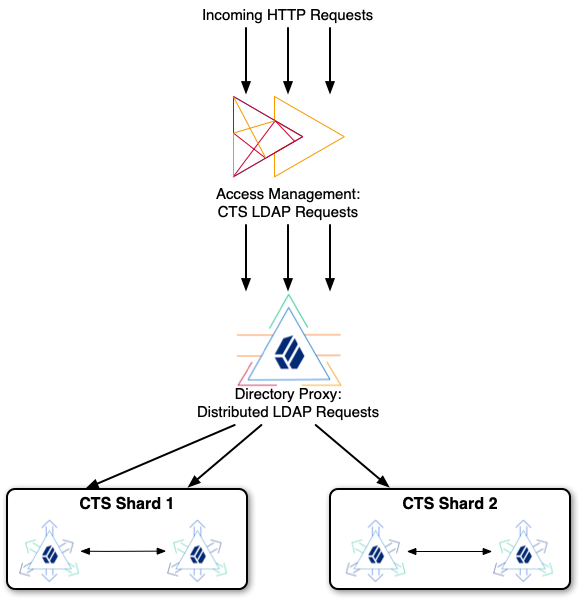
As you follow the example, notice the following characteristics:
-
The example is intended for evaluation only.
In production, deploy each server on a separate system, and use secure connections.
-
The AM server connects to the DS proxy for CTS LDAP requests.
-
The DS proxy distributes LDAP requests across two shards.
-
Each shard holds two DS replicas set up with the AM CTS profile.
DS servers replicate only within shards. Servers in different partitions never replicate to each other. If replication crosses a partition boundary, the data is replicated everywhere. Replicating data everywhere would defeat the purpose of data distribution.
Try the CTS example
-
Make sure you have the Bash shell installed so that you can run the scripts to install and configure DS servers.
-
Download the DS .zip delivery and keep track of where you saved it.
The scripts use the file name,
~/Downloads/DS-7.2.5.zip. -
Stop services that use the following ports. Servers in the example cannot start if these ports are in use:
-
1636 -
4444 -
5444 -
5636 -
5989 -
6444 -
6636 -
6989 -
8080 -
15444 -
15636 -
15989 -
16444 -
16636 -
16989
-
-
Set up the DS replicas:
-
Save a local copy of the script: setup-cts-replicas.sh.
View script
#!/usr/bin/env bash # # Copyright 2018-2020 ForgeRock AS. All Rights Reserved # # Use of this code requires a commercial software license with ForgeRock AS. # or with one of its affiliates. All use shall be exclusively subject # to such license between the licensee and ForgeRock AS. # ### # Set up directory server replicas for CTS in appropriate shards. # This is intended for evaluation on a single system. # # In deployment, each of these replicas would be on a separate host system. # # The proxy distributes data across two CTS shards, each with two replicas. # # Each shard is served by a pool of separate replicas. # In other words, each server replicates within one shard only. # # All servers have the same uid=Proxy service account. # The proxy binds with uid=Proxy and uses proxied authorization. # This script adds an ACI to allow the proxy service account # to perform proxied authorization under the CTS shards. # # All CTS shards have a CTS admin account, uid=openam_cts,ou=tokens. # To modify the account, for example to change the password, # you must modify it once for each shard, not through the proxy. # The proxy would distribute the change to only one shard. # # The shards have the following replication configurations, # with each server's (admin-port ldaps-port): # cts 1: (5444 5636) <==> (15444 15636) # cts 2: (6444 6636) <==> (16444 16636) ### ### # Adjust these variables to fit your circumstances: ZIP=~/Downloads/DS-7.2.5.zip BASE_DIR=/path/to FQDN=localhost DEPLOYMENT_ID=ADaMkVIXfryp4tZN3_0V4WoB3BZc9SQ5CBVN1bkVDE6OSY5Kl7pIibg DEPLOYMENT_PASSWORD=password ### CURRENT_DIR=$(pwd) # Install a single DS/RS with the CTS profile from the .zip distribution. # The AM CTS reaper will manage token expiration and deletion. # $1: instance number # $2: bootstrap server base install() { echo "### Installing ${BASE_DIR}/ds-rs-${1} ###" unzip -q "${ZIP}" mv opendj "ds-rs-${1}" "${BASE_DIR}/ds-rs-${1}/setup" \ --deploymentId "$DEPLOYMENT_ID" \ --deploymentIdPassword "$DEPLOYMENT_PASSWORD" \ --serverId "ds-rs-${1}" \ --adminConnectorPort "${1}444" \ --hostname "${FQDN}" \ --ldapsPort "${1}636" \ --enableStartTls \ --replicationPort "${1}989" \ --bootstrapReplicationServer "${FQDN}:${2}989" \ --bootstrapReplicationServer "${FQDN}:1${2}989" \ --rootUserDN uid=admin \ --rootUserPassword password \ --profile am-cts \ --set am-cts/amCtsAdminPassword:password \ --profile ds-proxied-server \ --set ds-proxied-server/baseDn:ou=tokens \ --acceptLicense echo "### Starting ds-rs-${1} ###" "${BASE_DIR}/ds-rs-${1}/bin/start-ds" --quiet } move_cts_admin() { echo "### Moving CTS admin account above the distributed data ###" "${BASE_DIR}/ds-rs-${1}/bin/ldapmodify" \ --hostname "${FQDN}" \ --port "${1}636" \ --useSsl \ --usePkcs12TrustStore "${BASE_DIR}/ds-rs-${1}/config/keystore" \ --trustStorePassword:file "${BASE_DIR}/ds-rs-${1}/config/keystore.pin" \ --bindDn uid=admin \ --bindPassword password << EOF dn: uid=openam_cts,ou=admins,ou=famrecords,ou=openam-session,ou=tokens changetype: moddn newrdn: uid=openam_cts deleteoldrdn: 0 newsuperior: ou=tokens EOF } add_aci() { echo "### Adding ACIs for moved CTS admin account on ds-rs-${1} ###" "${BASE_DIR}/ds-rs-${1}/bin/ldapmodify" \ --hostname "${FQDN}" \ --port "${1}636" \ --useSsl \ --usePkcs12TrustStore "${BASE_DIR}/ds-rs-${1}/config/keystore" \ --trustStorePassword:file "${BASE_DIR}/ds-rs-${1}/config/keystore.pin" \ --bindDn uid=admin \ --bindPassword password <<EOF dn: ou=tokens changetype: modify add: aci aci: (targetattr="*") (version 3.0; acl "Allow read access for debugging"; allow(read, search, compare) userdn = "ldap:///uid=openam_cts,ou=tokens";) dn: ou=famrecords,ou=openam-session,ou=tokens changetype: modify add: aci aci: (targetattr="*") (version 3.0; acl "Create, delete, update token entries"; allow(add, delete, write) userdn = "ldap:///uid=openam_cts,ou=tokens";) EOF } cd "${BASE_DIR}" || exit 1 for i in 5 6 do install ${i} ${i} install 1${i} ${i} done for i in 5 6 do move_cts_admin ${i} add_aci ${i} done # In this example, all replicas have the same data to start with. # If the data is not identical on each pair of replicas, initialize replication manually. cd "${CURRENT_DIR}" || exit -
If necessary, edit the script for use on your computer.
-
Run the script.
After the script finishes successfully, four DS replicas in two separate partitions are running on your computer.
-
-
Set up the DS proxy:
-
Save a local copy of the script: setup-cts-proxy.sh.
View script
#!/usr/bin/env bash # # Copyright 2018-2022 ForgeRock AS. All Rights Reserved # # Use of this code requires a commercial software license with ForgeRock AS. # or with one of its affiliates. All use shall be exclusively subject # to such license between the licensee and ForgeRock AS. # ### # Set up a directory proxy server listening on the typical ports. # This is intended for evaluation on a single system. # # In deployment, this would be a layer of identical proxy servers # to balance incoming requests. # # This server distributes data across two replication shards for CTS. # Each shard is served by two replicas. # Each DS directory server replicates within one shard only. ### ### # Adjust these variables to fit your circumstances: ZIP=~/Downloads/DS-7.2.5.zip BASE_DIR=/path/to FQDN=localhost DEPLOYMENT_ID=ADaMkVIXfryp4tZN3_0V4WoB3BZc9SQ5CBVN1bkVDE6OSY5Kl7pIibg DEPLOYMENT_PASSWORD=password ### CURRENT_DIR=$(pwd) # Install a single proxy from the .zip distribution. install() { echo "### Installing ${BASE_DIR}/proxy ###" unzip -q "${ZIP}" mv opendj proxy # The default proxyRoot is created at setup time, but removed later. ./proxy/setup \ --deploymentId "$DEPLOYMENT_ID" \ --deploymentIdPassword "$DEPLOYMENT_PASSWORD" \ --serverId proxy \ --rootUserDN uid=admin \ --rootUserPassword password \ --hostname "${FQDN}" \ --ldapsPort 1636 \ --adminConnectorPort 4444 \ --profile ds-proxy-server \ --set ds-proxy-server/bootstrapReplicationServer:"${FQDN}:5444" \ --set ds-proxy-server/rsConnectionSecurity:ssl \ --set ds-proxy-server/certNickname:ssl-key-pair \ --set ds-proxy-server/keyManagerProvider:PKCS12 \ --set ds-proxy-server/trustManagerProvider:PKCS12 \ --acceptLicense # Allow the CTS administrator to read and write directory data. ./proxy/bin/dsconfig \ create-global-access-control-policy \ --type generic \ --policy-name "CTS administrator access" \ --set allowed-attribute:"*" \ --set permission:read \ --set permission:write \ --set user-dn-equal-to:uid=openam_cts,ou=tokens \ --set request-target-dn-equal-to:ou=tokens \ --set request-target-dn-equal-to:**,ou=tokens \ --offline \ --no-prompt } # Configure distribution to multiple shards. configure() { echo "### Configuring distribution for CTS shards ###" ./proxy/bin/dsconfig \ create-service-discovery-mechanism \ --mechanism-name "CTS Shard 1" \ --type replication \ --set bootstrap-replication-server:"${FQDN}:5444" \ --set bootstrap-replication-server:"${FQDN}:15444" \ --set ssl-cert-nickname:ssl-key-pair \ --set key-manager-provider:PKCS12 \ --set trust-manager-provider:PKCS12 \ --set use-ssl:true \ --set use-sasl-external:true \ --offline \ --no-prompt ./proxy/bin/dsconfig \ create-service-discovery-mechanism \ --mechanism-name "CTS Shard 2" \ --type replication \ --set bootstrap-replication-server:"${FQDN}:6444" \ --set bootstrap-replication-server:"${FQDN}:16444" \ --set ssl-cert-nickname:ssl-key-pair \ --set key-manager-provider:PKCS12 \ --set trust-manager-provider:PKCS12 \ --set use-ssl:true \ --set use-sasl-external:true \ --offline \ --no-prompt ./proxy/bin/dsconfig \ create-backend \ --backend-name distributeCts \ --type proxy \ --set enabled:true \ --set partition-base-dn:ou=famrecords,ou=openam-session,ou=tokens \ --set shard:"CTS Shard 1" \ --set shard:"CTS Shard 2" \ --set use-sasl-external:true \ --set ssl-cert-nickname:ssl-key-pair \ --set key-manager-provider:PKCS12 \ --set route-all:true \ --offline \ --no-prompt } delete_unused_backend() { echo "### Removing unused proxyRoot backend ###" ./proxy/bin/dsconfig \ delete-backend \ --backend-name proxyRoot \ --offline \ --no-prompt } cd "${BASE_DIR}" || exit 1 install configure delete_unused_backend echo "### Starting proxy ###" ./proxy/bin/start-ds --quiet cd "${CURRENT_DIR}" || exit -
If necessary, edit the script for use on your computer.
-
Run the script.
After the script finishes successfully, the DS proxy server is configured to distribute requests to the two partitions running on your computer.
-
-
Install the AM server.
For details, see the AM Installation Guide.
You can use the default configuration options during installation.
-
Configure the AM server to use the directory proxy server.
For details, see Configuring CTS Token Stores.
This example has the following settings:
Connection string
localhost:1636AM must trust the DS
ssl-key-pairserver certificate to use this port.Root suffix
ou=famrecords,ou=openam-session,ou=tokensLogin ID
uid=openam_cts,ou=tokensPassword
passwordWhen you restart AM, it uses the distributed CTS store. As you perform operations in AM that use CTS, such as logging in as a regular user, you can see the token entries through the DS proxy server.
The following example shows two entries written by AM after logging in through the AM console as the
demouser:$ /path/to/proxy/bin/ldapsearch \ --hostname localhost \ --port 1636 \ --useSsl \ --usePkcs12TrustStore /path/to/proxy/config/keystore \ --trustStorePassword:file /path/to/proxy/config/keystore.pin \ --bindDn uid=openam_cts,ou=tokens \ --bindPassword password \ --baseDn ou=tokens \ "(coreTokenId=*)" \ coreTokenId dn: coreTokenId=id,ou=famrecords,ou=openam-session,ou=tokens coreTokenId: idAs AM performs CTS-related operations, you start to see the CTS tokens distributed across the two DS partitions. To examine the results, use LDAPS port
5636for CTS partition 1 and6636for partition 2. -
Install a second, identically configured AM server, and then test the system.
For details, see To Test Session High Availability.
-
After finishing the evaluation, stop the servers and remove the software you installed:
-
Uninstall the AM server(s).
-
Tear down the DS servers:
-
Save a local copy of the script: teardown-cts.sh,
View script
#!/usr/bin/env bash # # Copyright 2018-2022 ForgeRock AS. All Rights Reserved # # Use of this code requires a commercial software license with ForgeRock AS. # or with one of its affiliates. All use shall be exclusively subject # to such license between the licensee and ForgeRock AS. # ### # Stop and remove the proxy and replica servers. ### ### # Adjust this path if you changed it in other scripts: BASE_DIR=/path/to ### CURRENT_DIR=$(pwd) cd "${BASE_DIR}" || exit 1 ./proxy/bin/stop-ds rm -rf proxy for i in 5 15 6 16 do ./ds-rs-${i}/bin/stop-ds done rm -rf ds-rs-* cd "${CURRENT_DIR}" || exit -
If necessary, edit the script for use on your computer.
-
Run the script.
After the script finishes successfully, the DS software has been removed from your computer.
-
-